administration guide - fortideceptor 4.2.0 - aws
TRANSCRIPT
Administration GuideFortiDeceptor 4.2.0
FORTINET DOCUMENT LIBRARYhttps://docs.fortinet.com
FORTINET VIDEO GUIDEhttps://video.fortinet.com
FORTINET BLOGhttps://blog.fortinet.com
CUSTOMER SERVICE & SUPPORThttps://support.fortinet.com
FORTINET TRAINING & CERTIFICATION PROGRAMhttps://www.fortinet.com/training-certification
NSE INSTITUTEhttps://training.fortinet.com
FORTIGUARD CENTERhttps://www.fortiguard.com
END USER LICENSE AGREEMENThttps://www.fortinet.com/doc/legal/EULA.pdf
FEEDBACKEmail: [email protected]
June 29, 2022FortiDeceptor 4.2.0 Administration Guide50-420-801591-20220629
TABLE OF CONTENTS
Change Log 6Introduction 7Set up FortiDeceptor 8Connect to the GUI 8Connect to the CLI 9Change the system hostname 9Change the administrator password 10Configure the system time 10Upload license file to FortiDeceptor 10Default port information 10Central Management 11
Remote Client 12Configuring Central Management 13
Deploy Decoy VM 16Custom Decoy Image 16
Customize the deception base OS image 17Deception OS 39Deployment Network 40
Setting up the deployment network 41Deploy Decoy VMs with the Deployment Wizard 42
Lure Settings 44Deploy the FortiDeceptor token package 48Monitor Decoy Status 51Deployment Map 53
Discover & Deploy 54Asset Discovery 54Configure a Safe List 56Lure Resources 57
Uploading lure resources 57Importing users from LDAP 58
DMZMode 59Limitations of the DMZMode 60
Monitor Attacks 61Analysis 62
Table settings 63Viewing the incident details 65
Campaign 66Attack Map 68Incidents and Events Distribution 69Incidents and Events Count 70Top 10 Attackers by Events 70Top 10 Attackers by Incidents 70
FortiDeceptor 4.2.0 Administration Guide 3Fortinet Inc.
Top 10 IPS Attacks 71Incidents Distribution by Service 71
Supported services 71Global Attacker Distribution 72
Fabric 73Detection Devices 73
FortiSandbox 74Cuckoo Sandbox 74Virus Total 75
Quarantine Integration 75FortiDeceptor on FortiGate Security Fabric topology map 75FortiDeceptor integration for threat response mitigation 79Integrate Method settings 82
Quarantine Status 85IOC Export 86
System 88Administrators 88Admin Profiles 90Certificates 92LDAP Servers 94RADIUS Servers 95Mail Server 97SNMP 98FortiGuard 101FDC License 103Settings 104Login Disclaimer 104Table Customization 105
System Settings 106Dashboard 106
Customizing the dashboard 108System Information 109System Resources 110Decoy Distribution by OS 110Lure Distribution 111Top Critical Logs 112Disk Monitor 112
Basic System Settings 113Change the GUI idle timeout 113Microsoft Windows VM license activation 113Log out of the unit 113Update FortiDeceptor firmware 113Reboot or shut down the unit 114Back up or restore the system configuration 114
Network 115Interfaces 115
FortiDeceptor 4.2.0 Administration Guide 4Fortinet Inc.
DNS Configuration 116System Routing 117
System Log 118Logging Levels 118Raw logs 118Log Categories 120Log Servers 120
Deploying FortiDeceptor in offline or air-gapped networks 122Deception VM security 122
Applying the license in an offline or air-gapped network 122Importing deception VMs in an offline or air-gapped network 124Importing firmware in an offline or air-gapped network 126Importing an FDS package via FDC GUI in an offline or air-gapped network 126Importing FDS package and license file via FortiManager in an offline or air-gappednetwork 127
Appendix A - Deception deployment best practices 130Deception strategy 130
Deception strategy components 131Deception strategy goals 131Deception philosophy 131Deception light stack vs full stack 132
FortiDeceptor platform 132FortiDeceptor components 133FortiDeceptor Token Package 133FortiDeceptor decoys 134Decoy services details 135
Deploying deception 143Deception decoy best practices 144Deception token best practices 147AD integration best practices 148Deployment best practices checklist 149Network topology best practices 150
Attack vectors vs deception 154Compromised internal endpoint using lateral movement 154Lateral movement based on ADmapping 156Lateral movement based on Mimikatz / PTH 157
Deploying tokens using AD GPO logon script 158Configuring the GPO logon script 160
Configuring trunk ports on FortiDeceptor VM 163Configuring FortiDeceptor 167Configuring the vSwitch 170
How to setup and use LDAP/RADIUS servers 174
FortiDeceptor 4.2.0 Administration Guide 5Fortinet Inc.
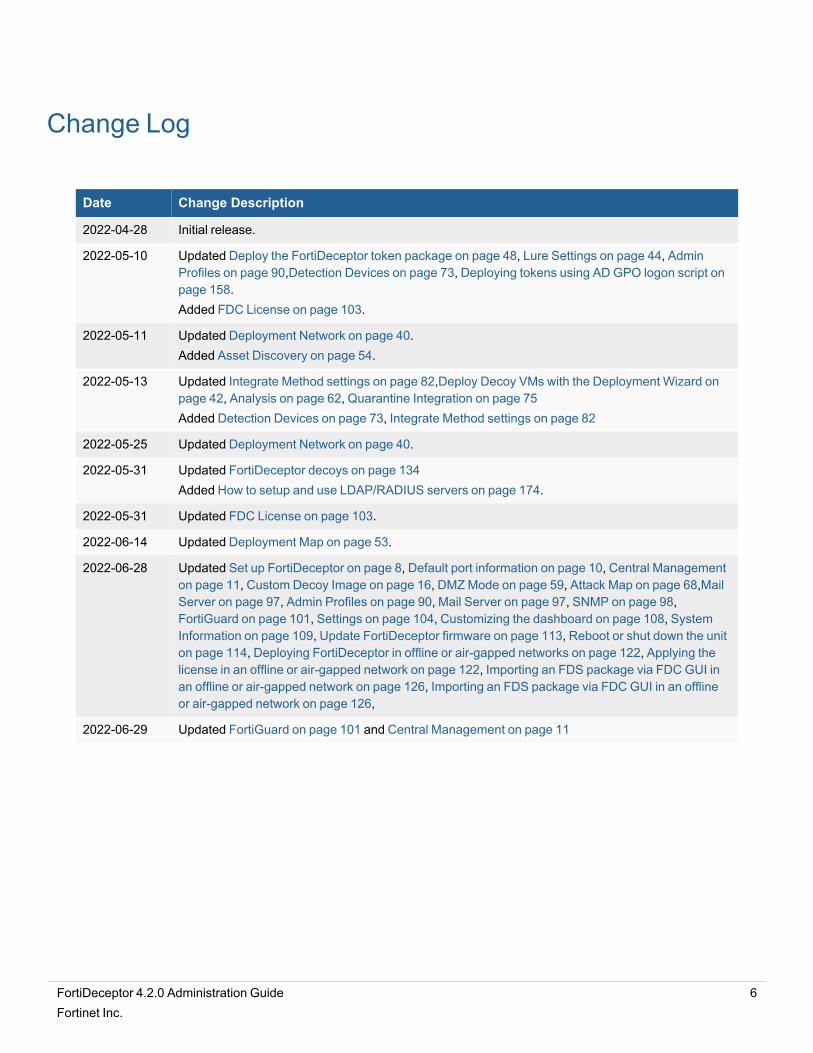
Change Log
Date Change Description
2022-04-28 Initial release.
2022-05-10 Updated Deploy the FortiDeceptor token package on page 48, Lure Settings on page 44, AdminProfiles on page 90,Detection Devices on page 73, Deploying tokens using AD GPO logon script onpage 158.Added FDC License on page 103.
2022-05-11 Updated Deployment Network on page 40.Added Asset Discovery on page 54.
2022-05-13 Updated Integrate Method settings on page 82,Deploy Decoy VMs with the Deployment Wizard onpage 42, Analysis on page 62, Quarantine Integration on page 75Added Detection Devices on page 73, Integrate Method settings on page 82
2022-05-25 Updated Deployment Network on page 40.
2022-05-31 Updated FortiDeceptor decoys on page 134Added How to setup and use LDAP/RADIUS servers on page 174.
2022-05-31 Updated FDC License on page 103.
2022-06-14 Updated Deployment Map on page 53.
2022-06-28 Updated Set up FortiDeceptor on page 8, Default port information on page 10, Central Managementon page 11, Custom Decoy Image on page 16, DMZMode on page 59, Attack Map on page 68,MailServer on page 97, Admin Profiles on page 90, Mail Server on page 97, SNMP on page 98,FortiGuard on page 101, Settings on page 104, Customizing the dashboard on page 108, SystemInformation on page 109, Update FortiDeceptor firmware on page 113, Reboot or shut down the uniton page 114, Deploying FortiDeceptor in offline or air-gapped networks on page 122, Applying thelicense in an offline or air-gapped network on page 122, Importing an FDS package via FDC GUI inan offline or air-gapped network on page 126, Importing an FDS package via FDC GUI in an offlineor air-gapped network on page 126,
2022-06-29 Updated FortiGuard on page 101 and Central Management on page 11
FortiDeceptor 4.2.0 Administration Guide 6Fortinet Inc.
Introduction
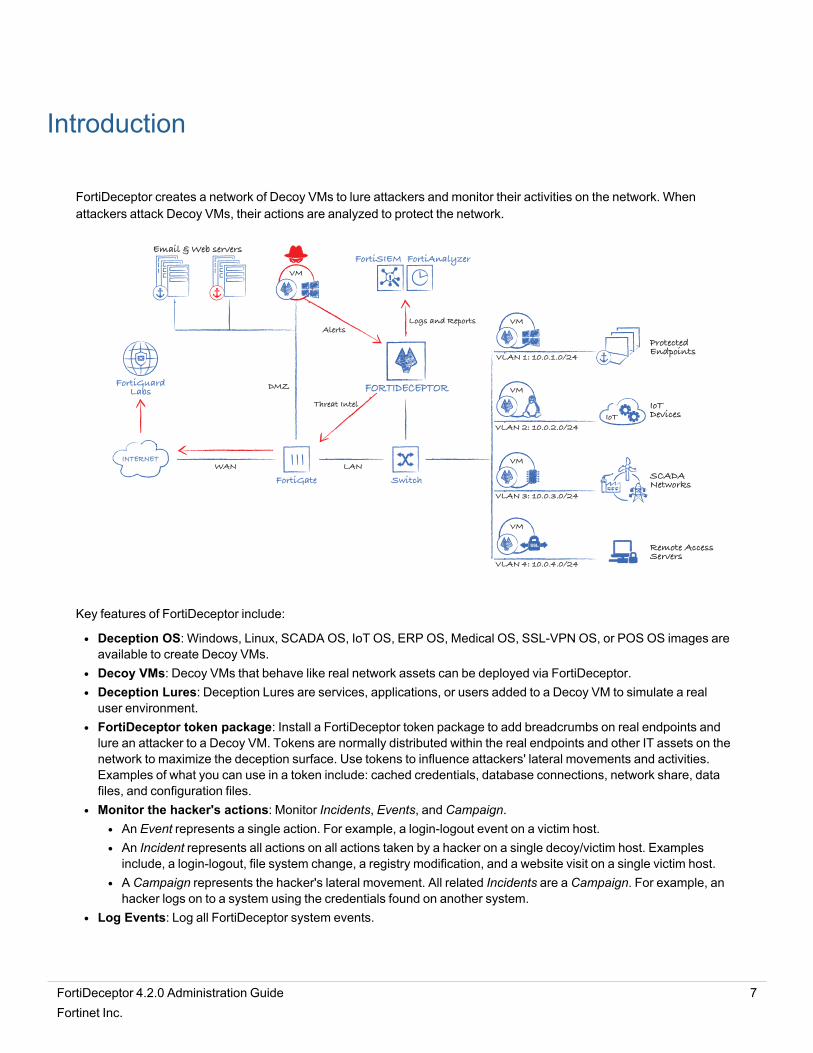
FortiDeceptor creates a network of Decoy VMs to lure attackers and monitor their activities on the network. Whenattackers attack Decoy VMs, their actions are analyzed to protect the network.
Logs and Reports
Key features of FortiDeceptor include:
l Deception OS: Windows, Linux, SCADA OS, IoT OS, ERP OS, Medical OS, SSL-VPN OS, or POS OS images areavailable to create Decoy VMs.
l Decoy VMs: Decoy VMs that behave like real network assets can be deployed via FortiDeceptor.l Deception Lures: Deception Lures are services, applications, or users added to a Decoy VM to simulate a realuser environment.
l FortiDeceptor token package: Install a FortiDeceptor token package to add breadcrumbs on real endpoints andlure an attacker to a Decoy VM. Tokens are normally distributed within the real endpoints and other IT assets on thenetwork to maximize the deception surface. Use tokens to influence attackers' lateral movements and activities.Examples of what you can use in a token include: cached credentials, database connections, network share, datafiles, and configuration files.
l Monitor the hacker's actions: Monitor Incidents, Events, and Campaign.l An Event represents a single action. For example, a login-logout event on a victim host.l An Incident represents all actions on all actions taken by a hacker on a single decoy/victim host. Examplesinclude, a login-logout, file system change, a registry modification, and a website visit on a single victim host.
l A Campaign represents the hacker's lateral movement. All related Incidents are a Campaign. For example, anhacker logs on to a system using the credentials found on another system.
l Log Events: Log all FortiDeceptor system events.
FortiDeceptor 4.2.0 Administration Guide 7Fortinet Inc.
Set up FortiDeceptor
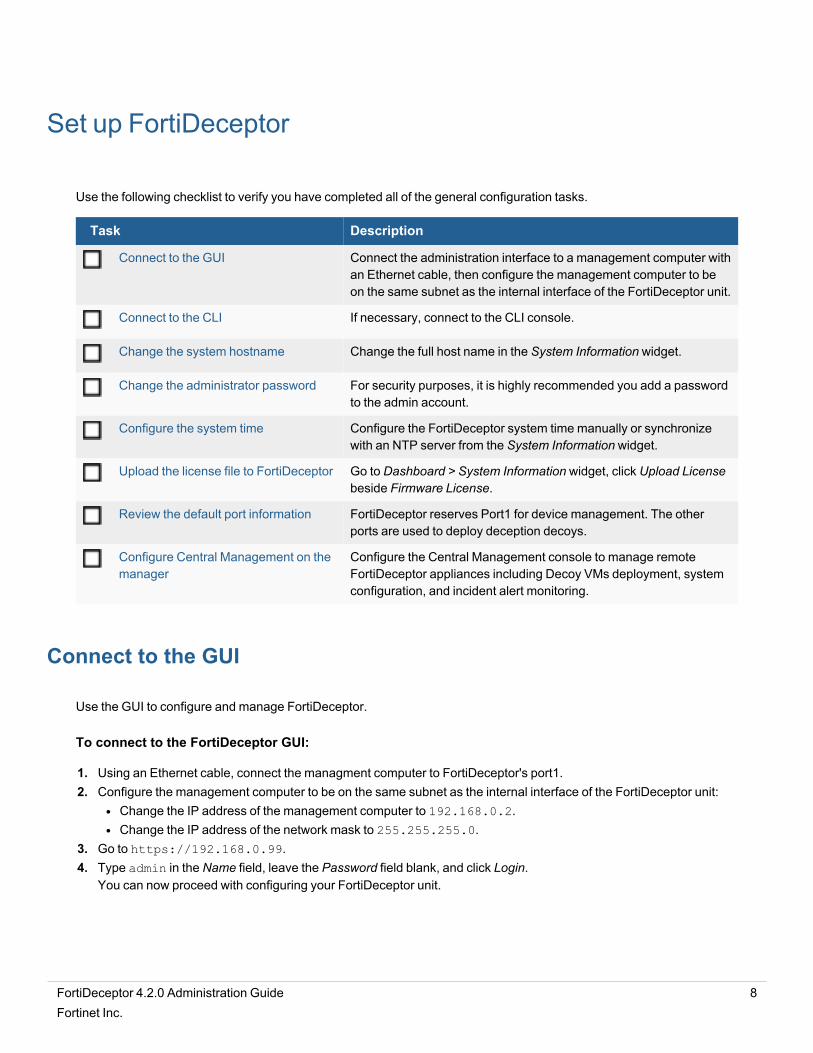
Use the following checklist to verify you have completed all of the general configuration tasks.
Task Description
Connect to the GUI Connect the administration interface to a management computer withan Ethernet cable, then configure the management computer to beon the same subnet as the internal interface of the FortiDeceptor unit.
Connect to the CLI If necessary, connect to the CLI console.
Change the system hostname Change the full host name in the System Information widget.
Change the administrator password For security purposes, it is highly recommended you add a passwordto the admin account.
Configure the system time Configure the FortiDeceptor system time manually or synchronizewith an NTP server from the System Information widget.
Upload the license file to FortiDeceptor Go to Dashboard > System Information widget, click Upload Licensebeside Firmware License.
Review the default port information FortiDeceptor reserves Port1 for device management. The otherports are used to deploy deception decoys.
Configure Central Management on themanager
Configure the Central Management console to manage remoteFortiDeceptor appliances including Decoy VMs deployment, systemconfiguration, and incident alert monitoring.
Connect to the GUI
Use the GUI to configure and manage FortiDeceptor.
To connect to the FortiDeceptor GUI:
1. Using an Ethernet cable, connect the managment computer to FortiDeceptor's port1.2. Configure the management computer to be on the same subnet as the internal interface of the FortiDeceptor unit:
l Change the IP address of the management computer to 192.168.0.2.l Change the IP address of the network mask to 255.255.255.0.
3. Go to https://192.168.0.99.4. Type admin in the Name field, leave the Password field blank, and click Login.
You can now proceed with configuring your FortiDeceptor unit.
FortiDeceptor 4.2.0 Administration Guide 8Fortinet Inc.
Set up FortiDeceptor
If the network interfaces have been configured differently during installation, the URL andadministrative access protocols might not be in their default state.
Connect to the CLI
You can use CLI commands to configure and manage FortiDeceptor.
To connect to the FortiDeceptor CLI:
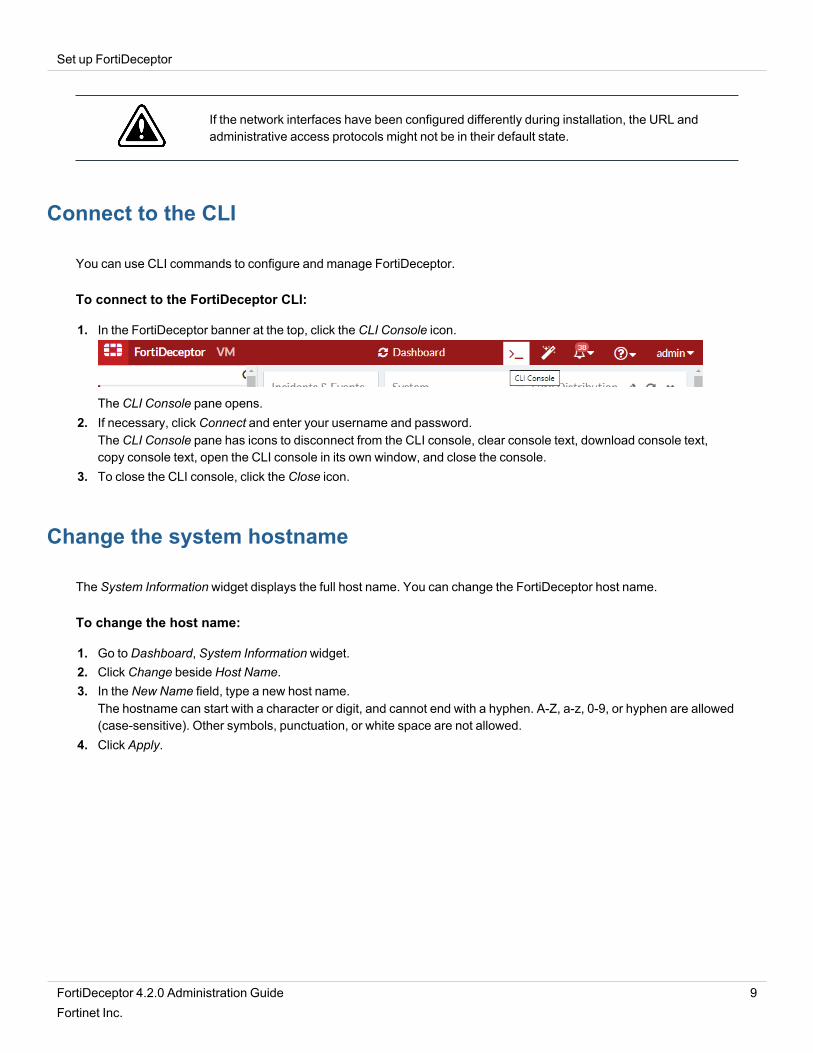
1. In the FortiDeceptor banner at the top, click the CLI Console icon.
The CLI Console pane opens.2. If necessary, click Connect and enter your username and password.
The CLI Console pane has icons to disconnect from the CLI console, clear console text, download console text,copy console text, open the CLI console in its own window, and close the console.
3. To close the CLI console, click the Close icon.
Change the system hostname
The System Information widget displays the full host name. You can change the FortiDeceptor host name.
To change the host name:
1. Go to Dashboard, System Information widget.2. Click Change beside Host Name.3. In the New Name field, type a new host name.
The hostname can start with a character or digit, and cannot end with a hyphen. A-Z, a-z, 0-9, or hyphen are allowed(case-sensitive). Other symbols, punctuation, or white space are not allowed.
4. Click Apply.
FortiDeceptor 4.2.0 Administration Guide 9Fortinet Inc.
Set up FortiDeceptor
Change the administrator password
By default, you can log in to the GUI using admin and no password. It is highly recommended that you add a password tothe admin account. For better security, regularly change the admin account password and the passwords for any otheradministrator accounts that you add.
To change the password of the logged in administrator:
1. In the FortiDeceptor banner at the top, click the username and select Change Password.2. Change the password and clickOK.
To change the administrator password in the Administrators page:
1. Go to System > Administrators.2. Select an administrator and click Edit.3. Change the password and clickOK.
Configure the system time
You can change the FortiDeceptor system time in the Dashboard. You can configure the FortiDeceptor system timemanually or synchronize with an NTP server.
To configure the system time:
1. Go to Dashboard > System Information widget and click Change beside System Time.2. Select the Time Zone and wait for the widget to refresh.3. Check that the System Time is correct. If necessary, click Set Time and manually set the time and date.4. Click Apply.
You might need to log in again.
If the time is not correct, we recommend configuring the NTP server for time synchronization.
Upload license file to FortiDeceptor
To upload the license to FortiDeceptor:
1. Go to Dashboard > System Information widget, click Upload License beside Firmware License.2. Locate the license and click Submit.
Default port information
FortiDeceptor treats Port1 as reserved for device management. The other ports are used to deploy deception decoys.
FortiDeceptor 4.2.0 Administration Guide 10Fortinet Inc.
Set up FortiDeceptor
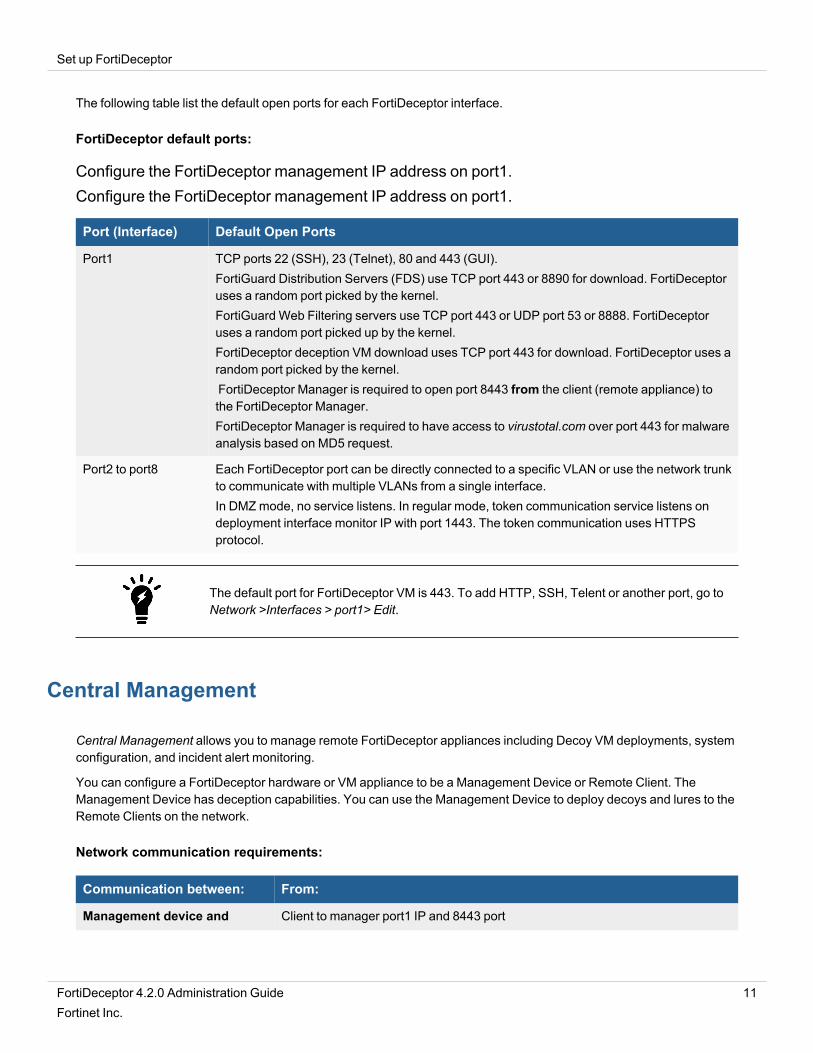
The following table list the default open ports for each FortiDeceptor interface.
FortiDeceptor default ports:
Configure the FortiDeceptor management IP address on port1.Configure the FortiDeceptor management IP address on port1.
Port (Interface) Default Open Ports
Port1 TCP ports 22 (SSH), 23 (Telnet), 80 and 443 (GUI).FortiGuard Distribution Servers (FDS) use TCP port 443 or 8890 for download. FortiDeceptoruses a random port picked by the kernel.FortiGuard Web Filtering servers use TCP port 443 or UDP port 53 or 8888. FortiDeceptoruses a random port picked up by the kernel.FortiDeceptor deception VM download uses TCP port 443 for download. FortiDeceptor uses arandom port picked by the kernel.FortiDeceptor Manager is required to open port 8443 from the client (remote appliance) tothe FortiDeceptor Manager.FortiDeceptor Manager is required to have access to virustotal.com over port 443 for malwareanalysis based on MD5 request.
Port2 to port8 Each FortiDeceptor port can be directly connected to a specific VLAN or use the network trunkto communicate with multiple VLANs from a single interface.In DMZmode, no service listens. In regular mode, token communication service listens ondeployment interface monitor IP with port 1443. The token communication uses HTTPSprotocol.
The default port for FortiDeceptor VM is 443. To add HTTP, SSH, Telent or another port, go toNetwork >Interfaces > port1> Edit.
Central Management
Central Management allows you to manage remote FortiDeceptor appliances including Decoy VM deployments, systemconfiguration, and incident alert monitoring.
You can configure a FortiDeceptor hardware or VM appliance to be a Management Device or Remote Client. TheManagement Device has deception capabilities. You can use the Management Device to deploy decoys and lures to theRemote Clients on the network.
Network communication requirements:
Communication between: From:
Management device and Client to manager port1 IP and 8443 port
FortiDeceptor 4.2.0 Administration Guide 11Fortinet Inc.
Set up FortiDeceptor
Communication between: From:
regular client appliance
Management device and cloudclient appliance
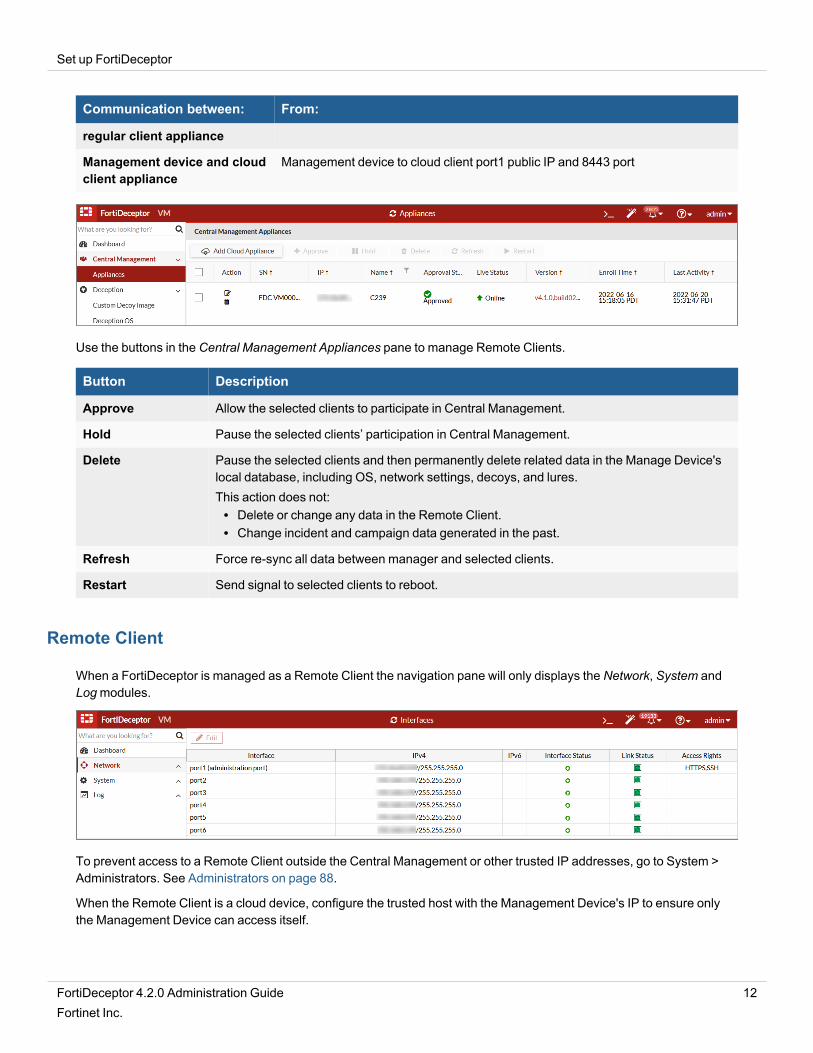
Management device to cloud client port1 public IP and 8443 port
Use the buttons in the Central Management Appliances pane to manage Remote Clients.
Button Description
Approve Allow the selected clients to participate in Central Management.
Hold Pause the selected clients’ participation in Central Management.
Delete Pause the selected clients and then permanently delete related data in the Manage Device'slocal database, including OS, network settings, decoys, and lures.This action does not:l Delete or change any data in the Remote Client.l Change incident and campaign data generated in the past.
Refresh Force re-sync all data between manager and selected clients.
Restart Send signal to selected clients to reboot.
Remote Client
When a FortiDeceptor is managed as a Remote Client the navigation pane will only displays the Network, System andLogmodules.
To prevent access to a Remote Client outside the Central Management or other trusted IP addresses, go to System >Administrators. See Administrators on page 88.
When the Remote Client is a cloud device, configure the trusted host with the Management Device's IP to ensure onlythe Management Device can access itself.
FortiDeceptor 4.2.0 Administration Guide 12Fortinet Inc.
Set up FortiDeceptor
On the Management Device, configure the trusted host with regular client IPs to ensure regular clients can accessManagement Device.
When you deploy a decoy or network, select the local or Remote Client name. Use the local configuration to deploydecoys and lures from the Management Device.
Configuring Central Management
To configure Central Management :
1. Enable Central Management on the Management Device.2. Enable Central Management the Remote Client.3. Approve the Remote Client on the Management Device.4. Configure the Remote Client with the Management Device.
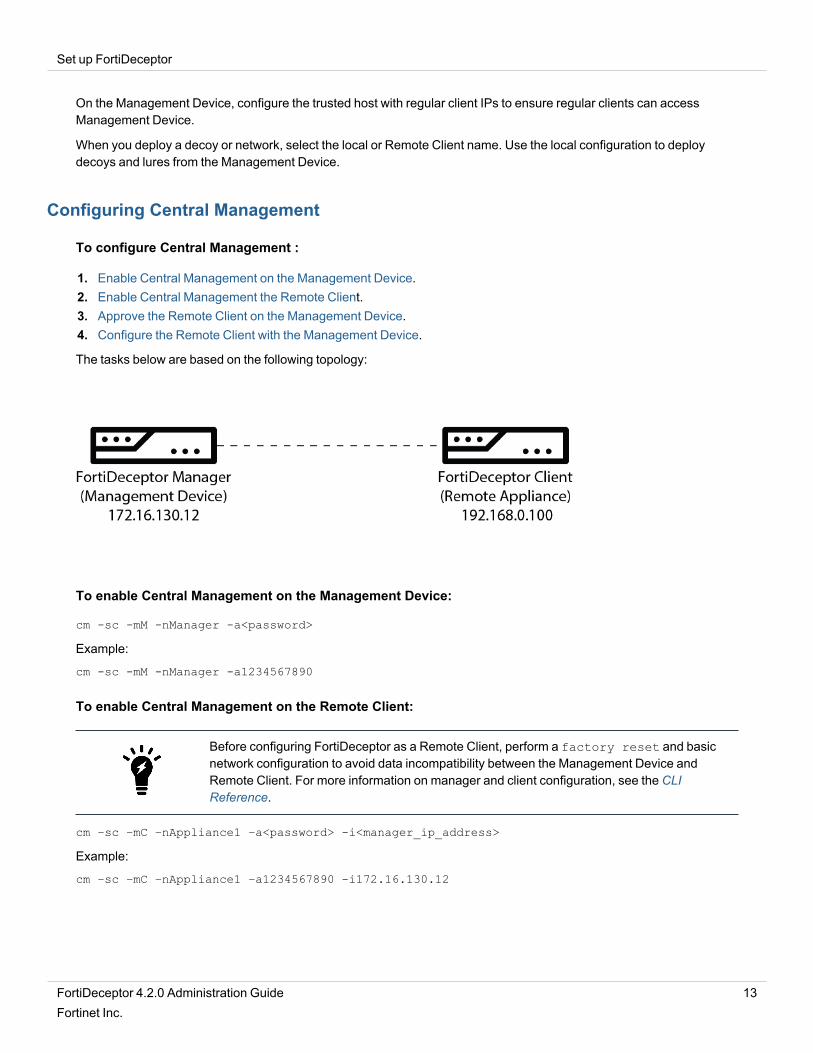
The tasks below are based on the following topology:
To enable Central Management on the Management Device:
cm -sc -mM -nManager -a<password>
Example:
cm -sc -mM -nManager -a1234567890
To enable Central Management on the Remote Client:
Before configuring FortiDeceptor as a Remote Client, perform a factory reset and basicnetwork configuration to avoid data incompatibility between the Management Device andRemote Client. For more information on manager and client configuration, see the CLIReference.
cm –sc –mC –nAppliance1 –a<password> -i<manager_ip_address>
Example:
cm –sc –mC –nAppliance1 –a1234567890 -i172.16.130.12
FortiDeceptor 4.2.0 Administration Guide 13Fortinet Inc.
Set up FortiDeceptor
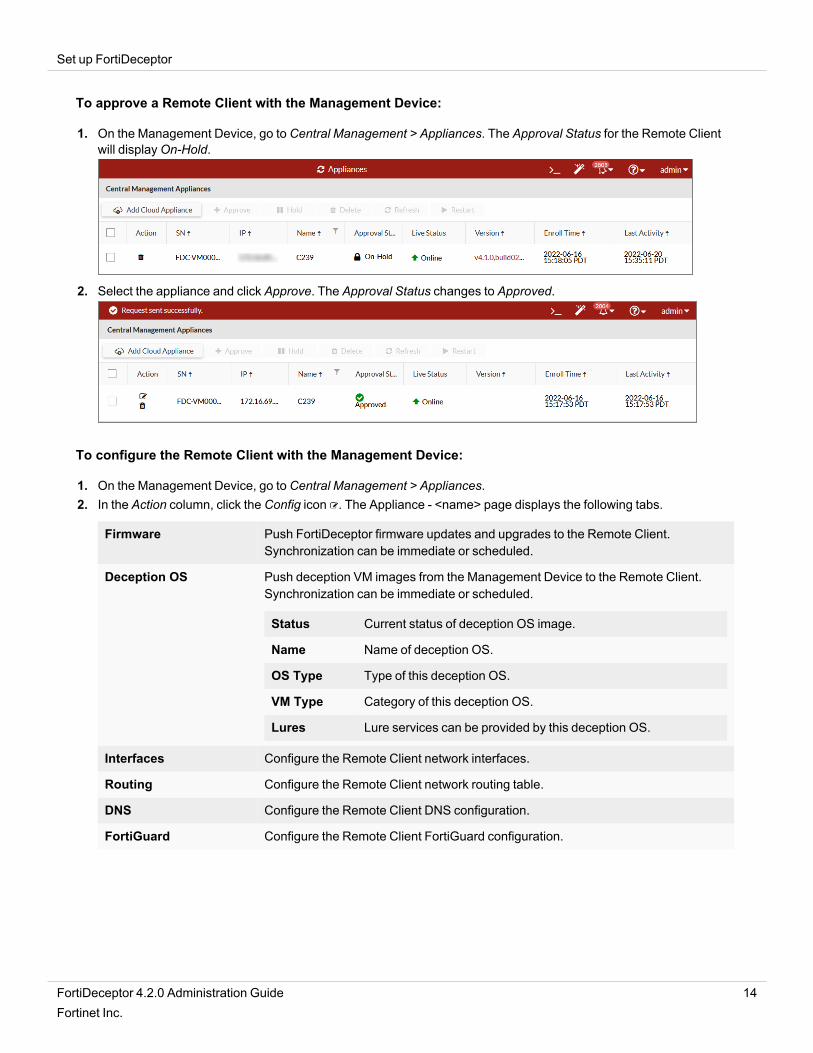
To approve a Remote Client with the Management Device:
1. On the Management Device, go to Central Management > Appliances. The Approval Status for the Remote Clientwill displayOn-Hold.
2. Select the appliance and click Approve. The Approval Status changes to Approved.
To configure the Remote Client with the Management Device:
1. On the Management Device, go to Central Management > Appliances.2. In the Action column, click the Config icon . The Appliance - <name> page displays the following tabs.
Firmware Push FortiDeceptor firmware updates and upgrades to the Remote Client.Synchronization can be immediate or scheduled.
Deception OS Push deception VM images from the Management Device to the Remote Client.Synchronization can be immediate or scheduled.
Status Current status of deception OS image.
Name Name of deception OS.
OS Type Type of this deception OS.
VM Type Category of this deception OS.
Lures Lure services can be provided by this deception OS.
Interfaces Configure the Remote Client network interfaces.
Routing Configure the Remote Client network routing table.
DNS Configure the Remote Client DNS configuration.
FortiGuard Configure the Remote Client FortiGuard configuration.
FortiDeceptor 4.2.0 Administration Guide 14Fortinet Inc.
Set up FortiDeceptor
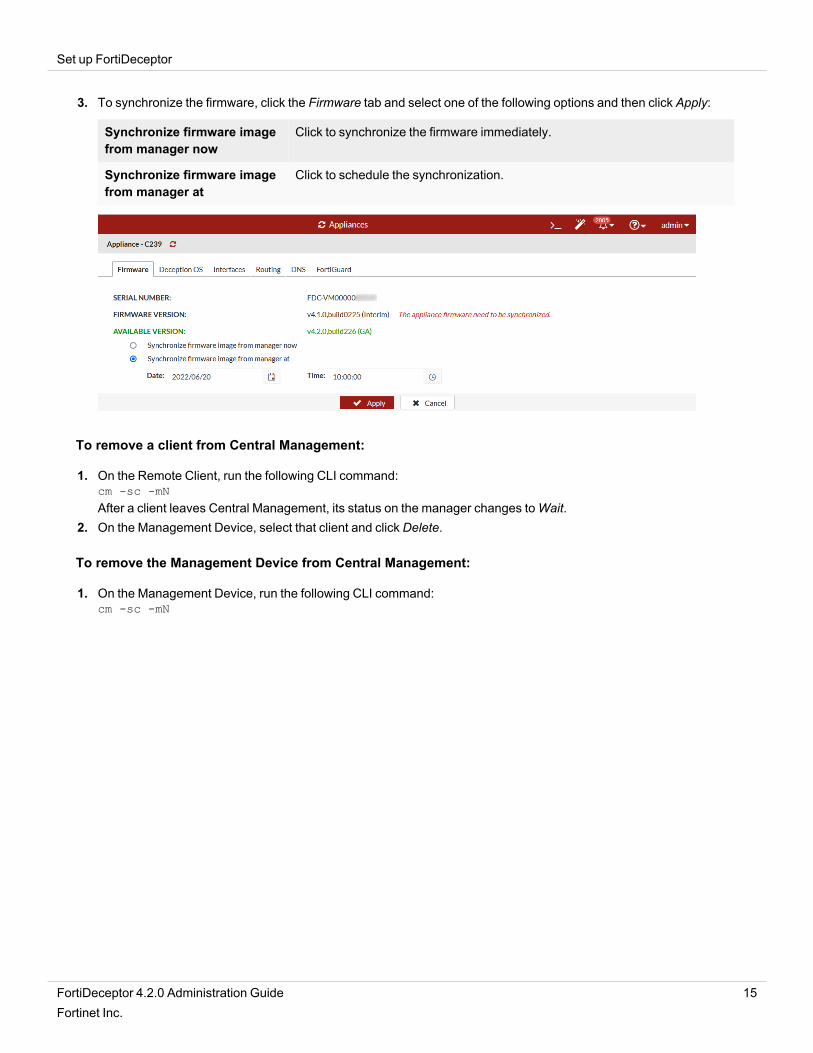
3. To synchronize the firmware, click the Firmware tab and select one of the following options and then click Apply:
Synchronize firmware imagefrom manager now
Click to synchronize the firmware immediately.
Synchronize firmware imagefrom manager at
Click to schedule the synchronization.
To remove a client from Central Management:
1. On the Remote Client, run the following CLI command:cm -sc -mN
After a client leaves Central Management, its status on the manager changes toWait.2. On the Management Device, select that client and click Delete.
To remove the Management Device from Central Management:
1. On the Management Device, run the following CLI command:cm -sc -mN
FortiDeceptor 4.2.0 Administration Guide 15Fortinet Inc.
Deploy Decoy VM
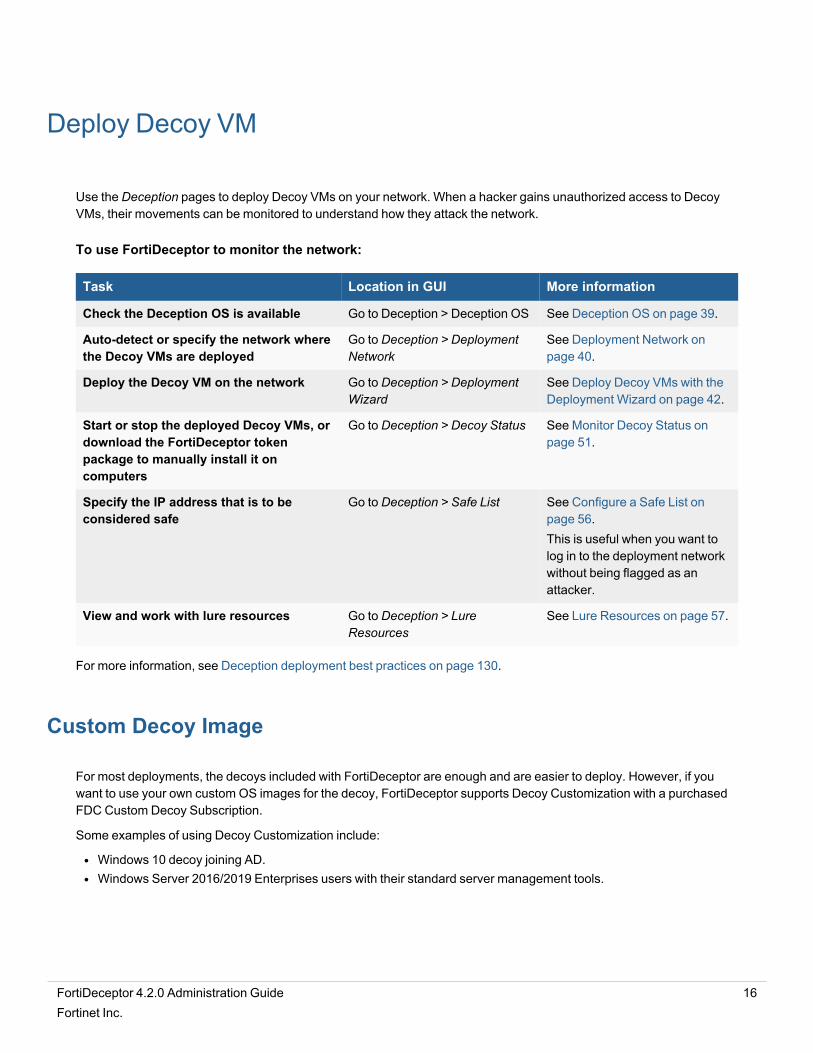
Use the Deception pages to deploy Decoy VMs on your network. When a hacker gains unauthorized access to DecoyVMs, their movements can be monitored to understand how they attack the network.
To use FortiDeceptor to monitor the network:
Task Location in GUI More information
Check the Deception OS is available Go to Deception > Deception OS See Deception OS on page 39.
Auto-detect or specify the network wherethe Decoy VMs are deployed
Go to Deception > DeploymentNetwork
See Deployment Network onpage 40.
Deploy the Decoy VM on the network Go to Deception > DeploymentWizard
See Deploy Decoy VMs with theDeployment Wizard on page 42.
Start or stop the deployed Decoy VMs, ordownload the FortiDeceptor tokenpackage to manually install it oncomputers
Go to Deception > Decoy Status See Monitor Decoy Status onpage 51.
Specify the IP address that is to beconsidered safe
Go to Deception > Safe List See Configure a Safe List onpage 56.This is useful when you want tolog in to the deployment networkwithout being flagged as anattacker.
View and work with lure resources Go to Deception > LureResources
See Lure Resources on page 57.
For more information, see Deception deployment best practices on page 130.
Custom Decoy Image
For most deployments, the decoys included with FortiDeceptor are enough and are easier to deploy. However, if youwant to use your own custom OS images for the decoy, FortiDeceptor supports Decoy Customization with a purchasedFDC Custom Decoy Subscription.
Some examples of using Decoy Customization include:
l Windows 10 decoy joining AD.l Windows Server 2016/2019 Enterprises users with their standard server management tools.
FortiDeceptor 4.2.0 Administration Guide 16Fortinet Inc.
Deploy Decoy VM
This version only supports Decoy Customization for Windows 10 andWindows Server2016/2019. Windows Server 2016/2019 supports customized MSSQL and IIS services.
Overview of implementing Decoy Customization:
1. Order the FDC Custom Decoy Subscription for FDC HW appliance only.The Decoy Customization subscription is for FortiDeceptor hardware appliances only. This subscription license isalready included in the FortiDeceptor VM bundle.
2. Install FortiDeceptor.After installing FortiDeceptor with the Decoy Customization subscription, the Helpmenu in the toolbar will display anoption for the Custom Decoy Image Cookbook.
3. Follow the instructions in the Customization Cookbook. The high-level instructions are:a. Upload an ISO image.b. Install ARAE engine on image.c. Use the Deployment Wizard to install the customized decoy.
Customize the deception base OS image
Overview of customizing the deception base OS image:
1. Import Windows ISO image.2. Customize VM image.3. Deploy custom image.
Import Windows ISO image
Before importing an ISO image into FortiDeceptor, ensure you have completed the following:
l Purchased a FDC Custom Decoy SubscriptionThe FDC Custom Decoy Subscription is for FortiDeceptor hardware appliances only. This subscription license isalready included in the FortiDeceptor VM bundle.
l Set up an ISO image with the licenses for your environment. For example, if you want to allow Active Domain (AD)accounts to access decoys, configure the settings on the AD servers, such as create dummy accounts, and so on.
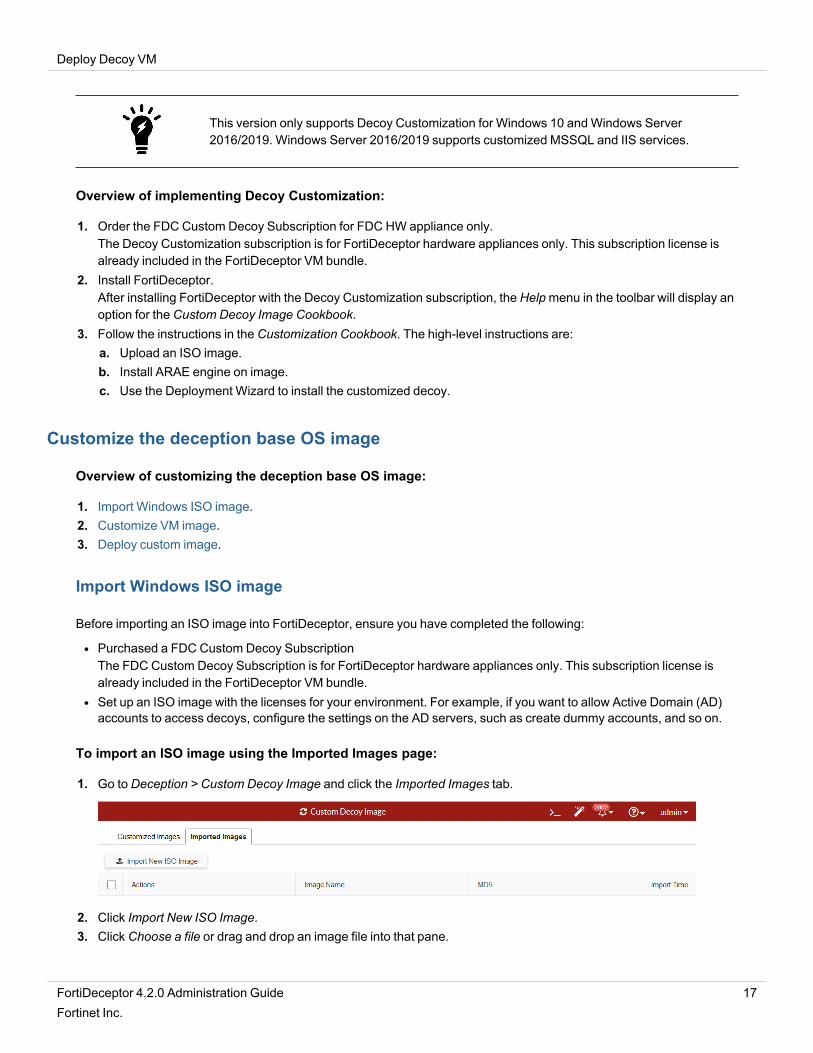
To import an ISO image using the Imported Images page:
1. Go to Deception > Custom Decoy Image and click the Imported Images tab.
2. Click Import New ISO Image.3. Click Choose a file or drag and drop an image file into that pane.
FortiDeceptor 4.2.0 Administration Guide 17Fortinet Inc.

Deploy Decoy VM
To import an ISO image using the Customized Images page:
1. Go to Deception > Custom Decoy Image and click the Customized Images tab.
2. Click Import Image and Customize.3. Click Choose a file or drag and drop an image file into that pane.
To delete an ISO image:
1. Go to Deception > Custom Decoy Image and click the Imported Images tab.2. Select one or more images and then click Delete.
Customize VM image
To initialize the VM instance:
1. Go to Deception > Custom Decoy Image and click the Customized Images tab.2. Click Import Image and Customize. The custom image wizard opens.3. In the Select an imported ISO image dropdown list, select an ISO image. Then click Next.4. In the Configuration step, specify the following and then click Next.
Name Upper and lowercase letters and numbers totaling under 48 characters.
CPU Cores 1–4 cores.
Memory 1024–8192 MB.
Storage 20–50 GB.
This configuration is applied to the VM instance for customizing the image, Thisconfiguration is not applied to decoys.
FortiDeceptor 4.2.0 Administration Guide 18Fortinet Inc.
Deploy Decoy VM
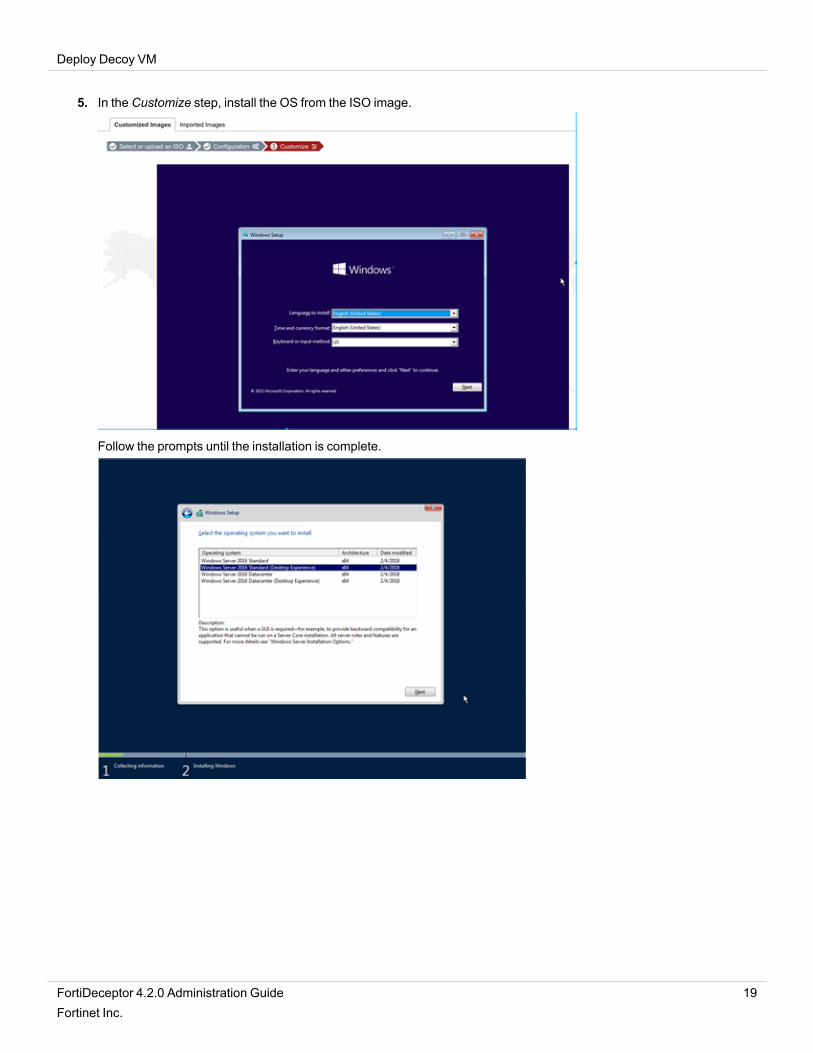
5. In the Customize step, install the OS from the ISO image.
Follow the prompts until the installation is complete.
FortiDeceptor 4.2.0 Administration Guide 19Fortinet Inc.

Deploy Decoy VM
To customize the VM:
1. Ensure the OS is installed and then log in with an admin account.2. In Windows Explorer, locate the FDC_Toolkit folder and read the instructions in toolkit_README.txt.
3. Configure the network using one of the following options.l Right-click set_network.bat and then click Run as Administrator.l Follow the instructions in net.json to configure the IP address, gateway, and DNS in Windows Control Panel >Network and Internet > Network Connections.
10.254.253.0/24 set by the script is the internal NAT IP address that is temporarilyused by the customization VM to allow downloading files and accessing other networkresources via the FortiDeceptor default route.
To customize the system for Windows 2016:
1. Ensure your license is activated.2. If you are using Windows 2016, enter the following commands in the PowerShell window to prevent lure
configuration failures in the Decoy Deployment wizard.secedit /export /cfg c:\secpol.cfg(gc C:\secpol.cfg).replace("PasswordComplexity = 1", "PasswordComplexity = 0") | Out-
File C:\secpol.cfgsecedit /configure /db c:\windows\security\local.sdb /cfg c:\secpol.cfg /areas
SECURITYPOLICYrm -force c:\secpol.cfg -confirm:$false
FortiDeceptor 4.2.0 Administration Guide 20Fortinet Inc.
Deploy Decoy VM
To customize the system for standalone Windows Server 2016:
1. Go to Server Manager > Tools > Local Security Policy. The Local Security Policy directory opens.2. In the Security Settings folder, open the Password Policy folder, and double-click Password must meet complexity
requirements.3. Select Disabled and then clickOK.4. Open a Command Prompt as an Administrator and type the following command to update the group policy:
gpupdate /force
You should get the following response:C:Users\Administrator>gpupdate /forceUpdating policy...Computer policy update has completed successfully.
To customize the system for Server 2016 Domain Controller :
1. In the Domain Controller, go to Server Manager > Tools > Group Policy Management.2. Right-click Default Domain Policy and click Edit. TheGroup Policy Management Editor opens.3. In the Computer Configuration folder, go to Policies > Windows Settings > Security Settings\Account Policies >
Password Policy > Password must meet complexity requirements.4. Select Disabled and clickOK.5. Open a Command Prompt as Administrator and type the following command to update the group policy:
gpupdate /force
Optional: install the Microsoft SQL Server
The following SQL Server versions are supported.
l SQL Server 2016. https://www.microsoft.com/en-us/download/details.aspx?id=56840l SQL Server 2017. https://www.microsoft.com/en-us/download/details.aspx?id=55994l SQL Server 2019. https://www.microsoft.com/en-us/sql-server/sql-server-downloadsl SQL Server Management Studio for SQL server management and customization. https://aka.ms/ssmsfullsetup
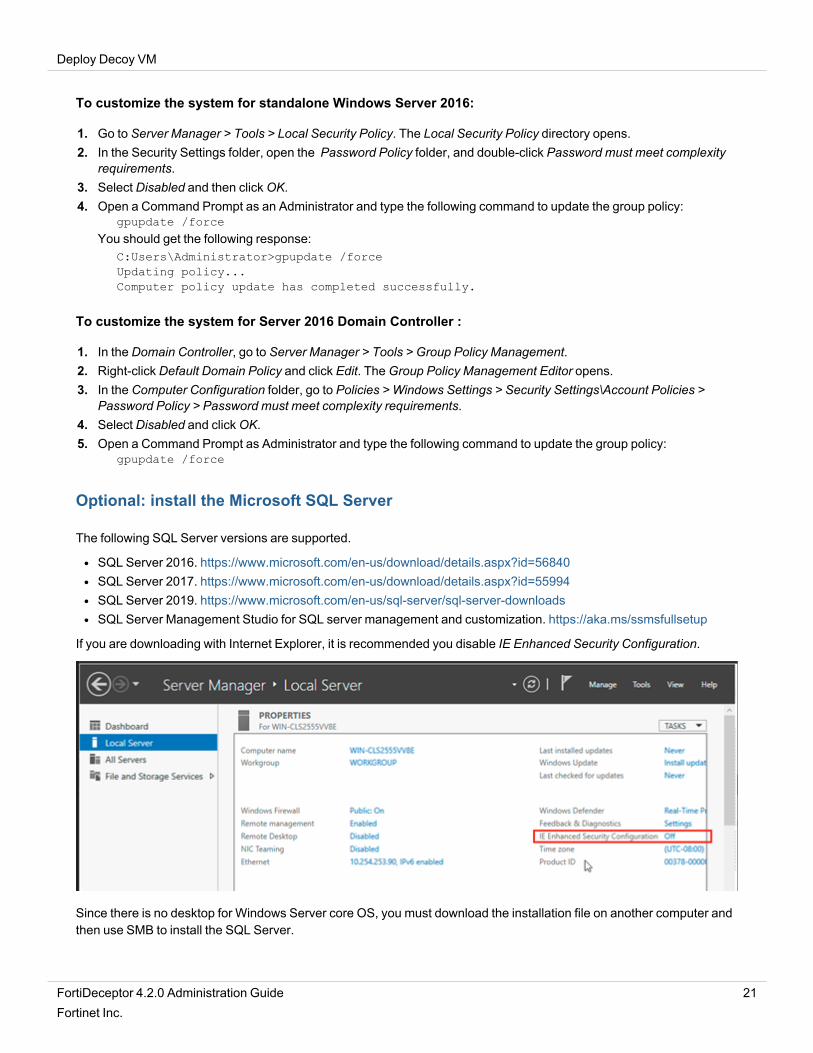
If you are downloading with Internet Explorer, it is recommended you disable IE Enhanced Security Configuration.
Since there is no desktop for Windows Server core OS, you must download the installation file on another computer andthen use SMB to install the SQL Server.
FortiDeceptor 4.2.0 Administration Guide 21Fortinet Inc.
Deploy Decoy VM
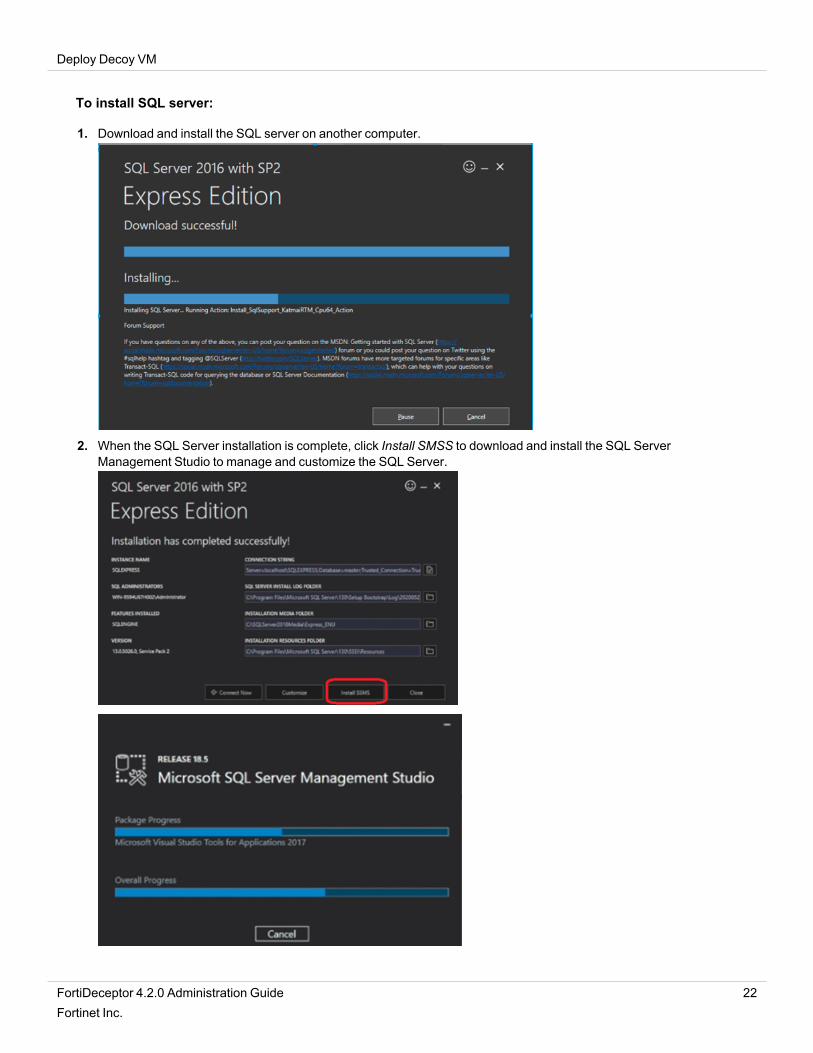
To install SQL server:
1. Download and install the SQL server on another computer.
2. When the SQL Server installation is complete, click Install SMSS to download and install the SQL ServerManagement Studio to manage and customize the SQL Server.
FortiDeceptor 4.2.0 Administration Guide 22Fortinet Inc.
Deploy Decoy VM
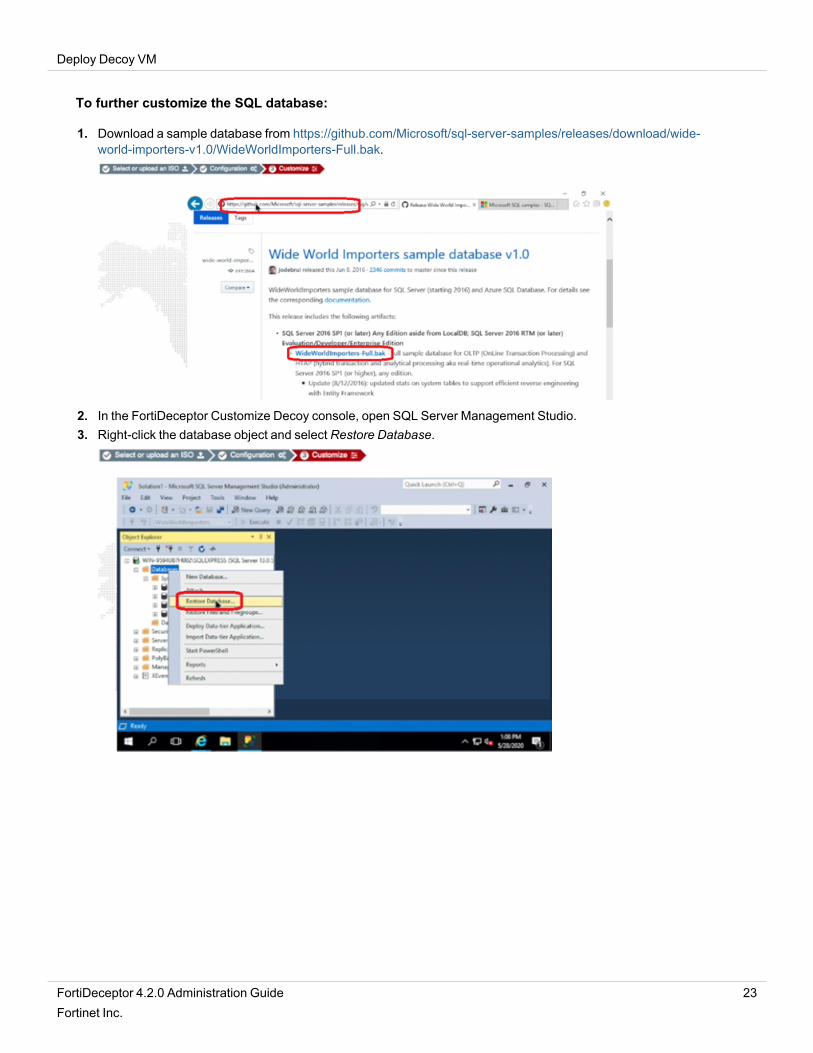
To further customize the SQL database:
1. Download a sample database from https://github.com/Microsoft/sql-server-samples/releases/download/wide-world-importers-v1.0/WideWorldImporters-Full.bak.
2. In the FortiDeceptor Customize Decoy console, open SQL Server Management Studio.3. Right-click the database object and select Restore Database.
FortiDeceptor 4.2.0 Administration Guide 23Fortinet Inc.

Deploy Decoy VM
4. Locate and add the sample DB you downloaded.
FortiDeceptor 4.2.0 Administration Guide 24Fortinet Inc.
Deploy Decoy VM
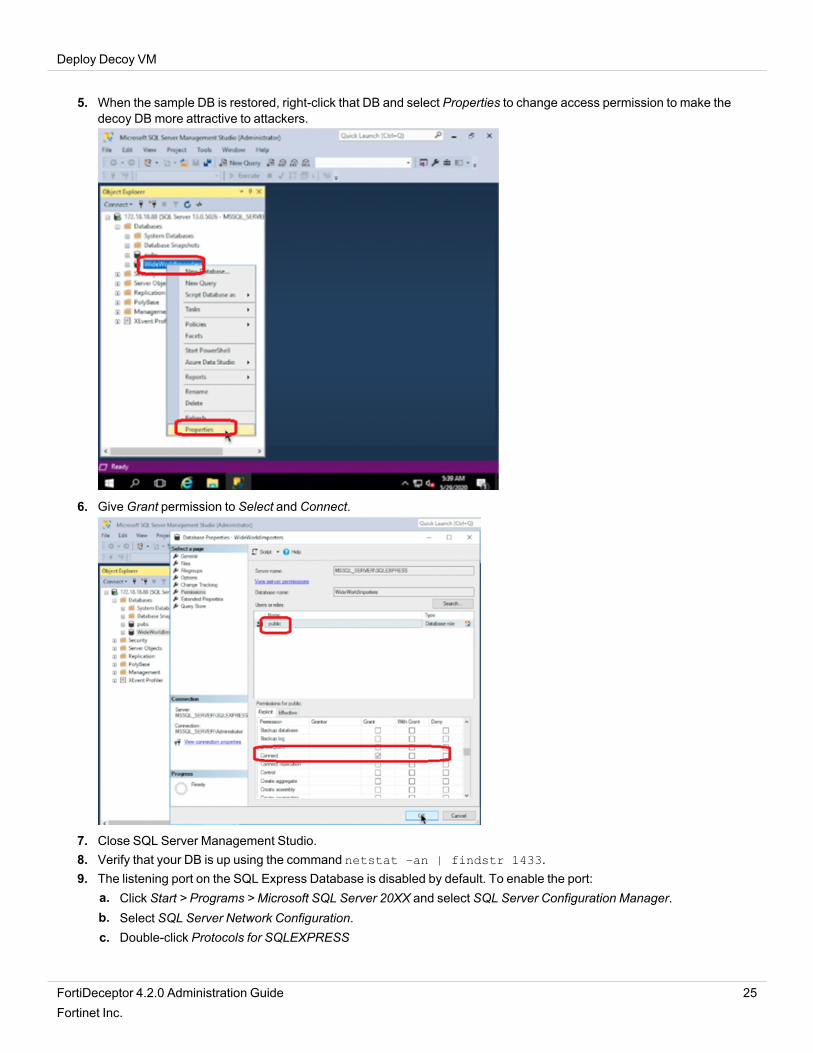
5. When the sample DB is restored, right-click that DB and select Properties to change access permission to make thedecoy DB more attractive to attackers.
6. GiveGrant permission to Select and Connect.
7. Close SQL Server Management Studio.8. Verify that your DB is up using the command netstat –an | findstr 1433.9. The listening port on the SQL Express Database is disabled by default. To enable the port:
a. Click Start > Programs > Microsoft SQL Server 20XX and select SQL Server Configuration Manager.b. Select SQL Server Network Configuration.c. Double-click Protocols for SQLEXPRESS
FortiDeceptor 4.2.0 Administration Guide 25Fortinet Inc.
Deploy Decoy VM
d. Right-click TCP/IP and select Properties. If necessary, first enable TCP/IP.e. Scroll down to IPAll and verify TCP Dynamic Ports is blank and that TCP Port is set to 1433.f. ClickOK.
Optional: install Internet Information Service (IIS)
IIS 10 is supported onWindows Server 2016/2019.
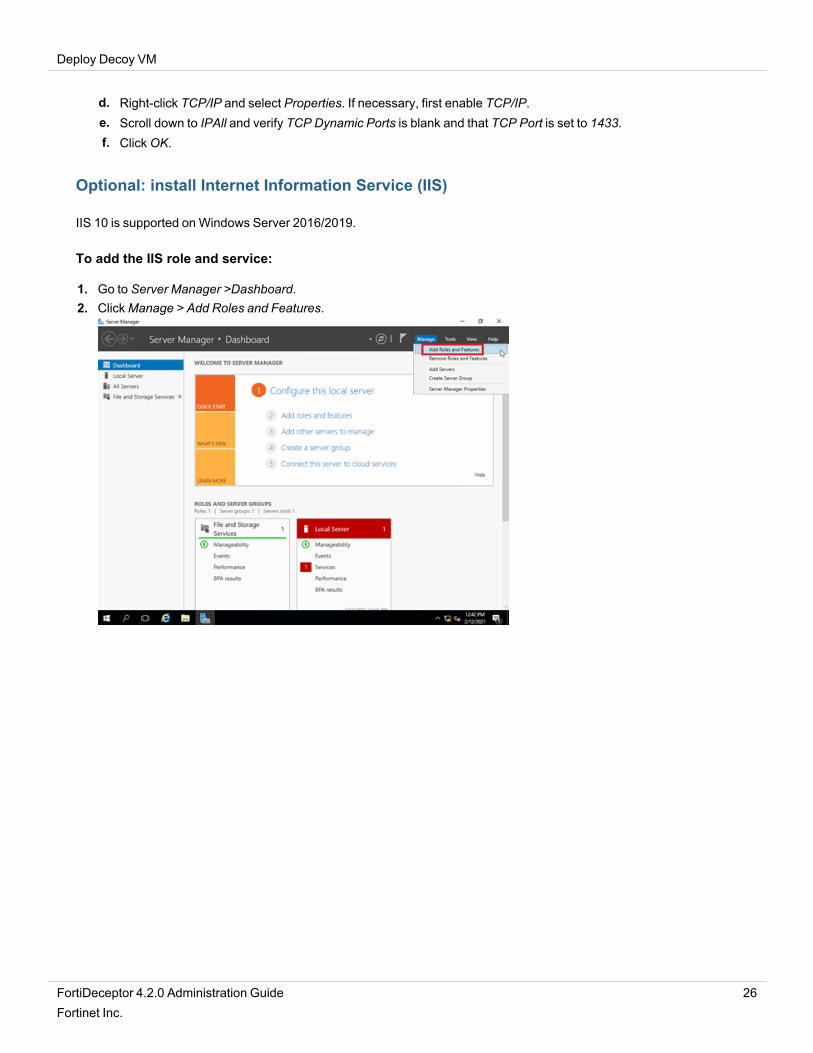
To add the IIS role and service:
1. Go to Server Manager >Dashboard.2. ClickManage > Add Roles and Features.
FortiDeceptor 4.2.0 Administration Guide 26Fortinet Inc.
Deploy Decoy VM
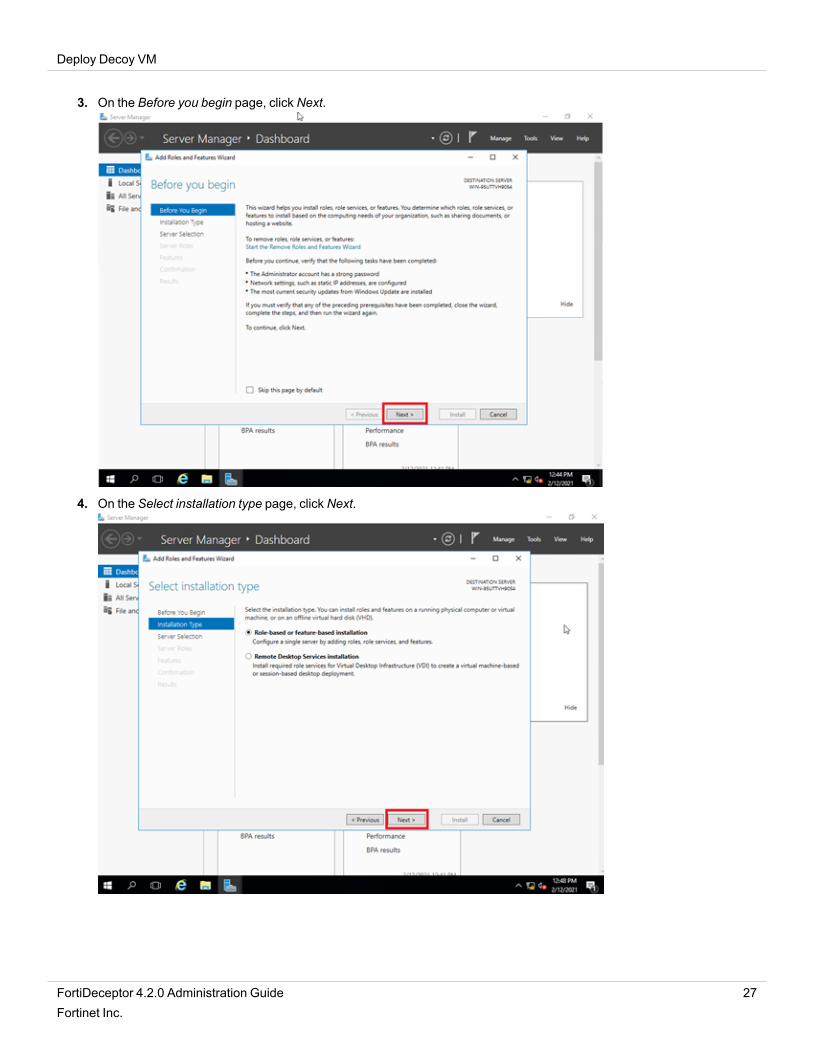
3. On the Before you begin page, click Next.
4. On the Select installation type page, click Next.
FortiDeceptor 4.2.0 Administration Guide 27Fortinet Inc.
Deploy Decoy VM
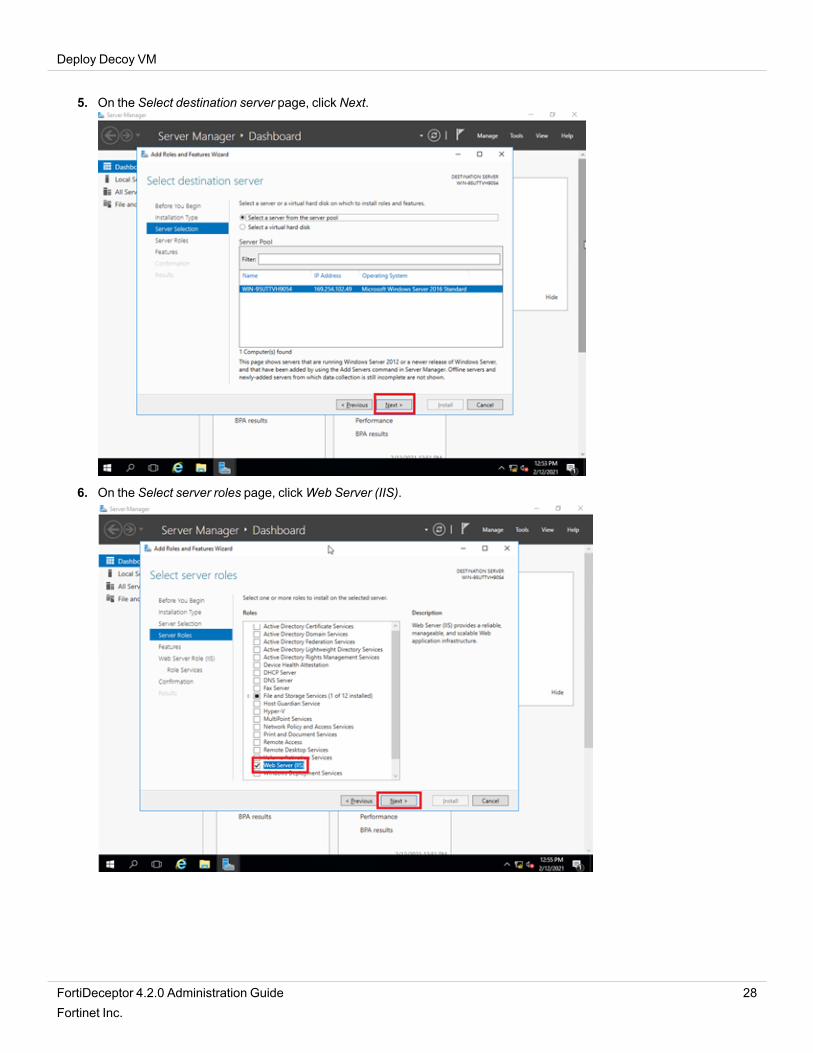
5. On the Select destination server page, click Next.
6. On the Select server roles page, clickWeb Server (IIS).
FortiDeceptor 4.2.0 Administration Guide 28Fortinet Inc.
Deploy Decoy VM
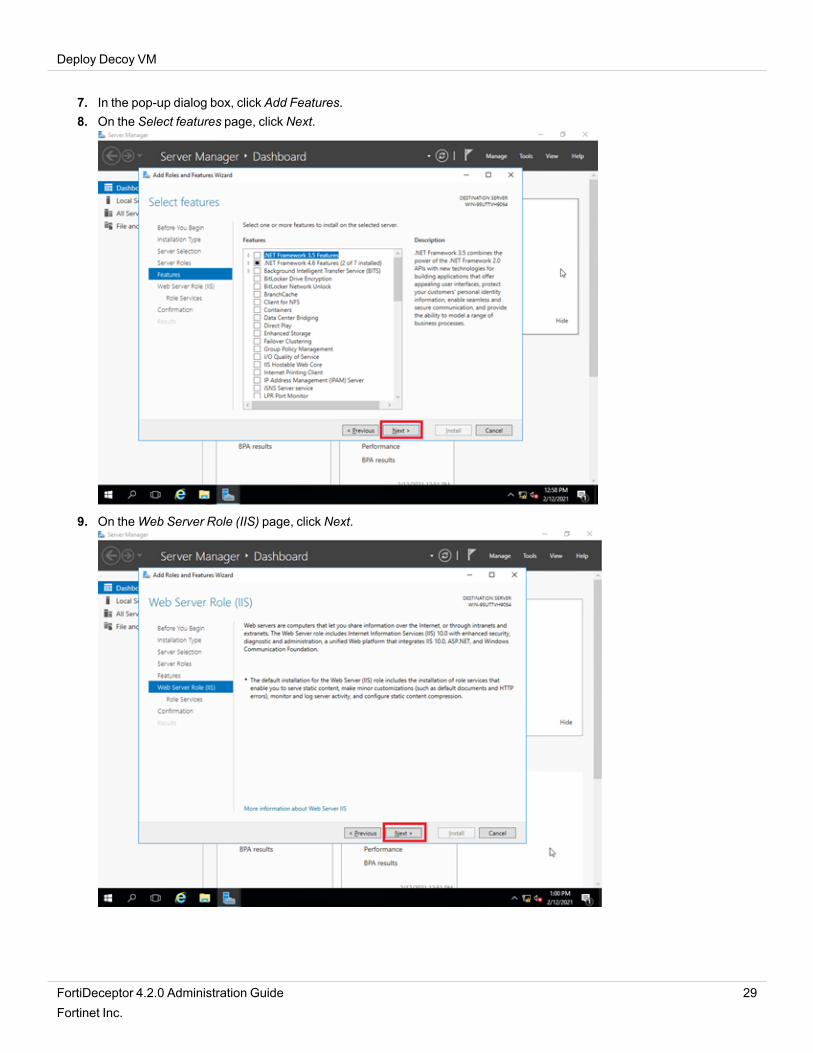
7. In the pop-up dialog box, click Add Features.8. On the Select features page, click Next.
9. On theWeb Server Role (IIS) page, click Next.
FortiDeceptor 4.2.0 Administration Guide 29Fortinet Inc.
Deploy Decoy VM
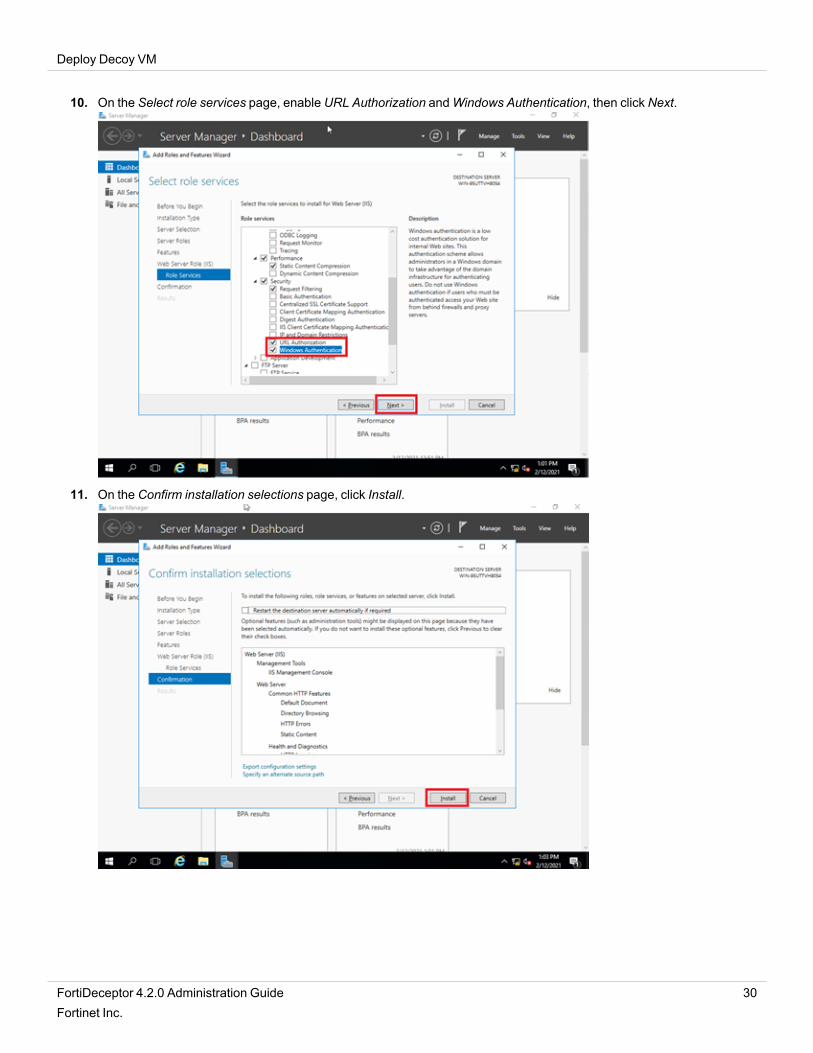
10. On the Select role services page, enable URL Authorization andWindows Authentication, then click Next.
11. On the Confirm installation selections page, click Install.
FortiDeceptor 4.2.0 Administration Guide 30Fortinet Inc.
Deploy Decoy VM
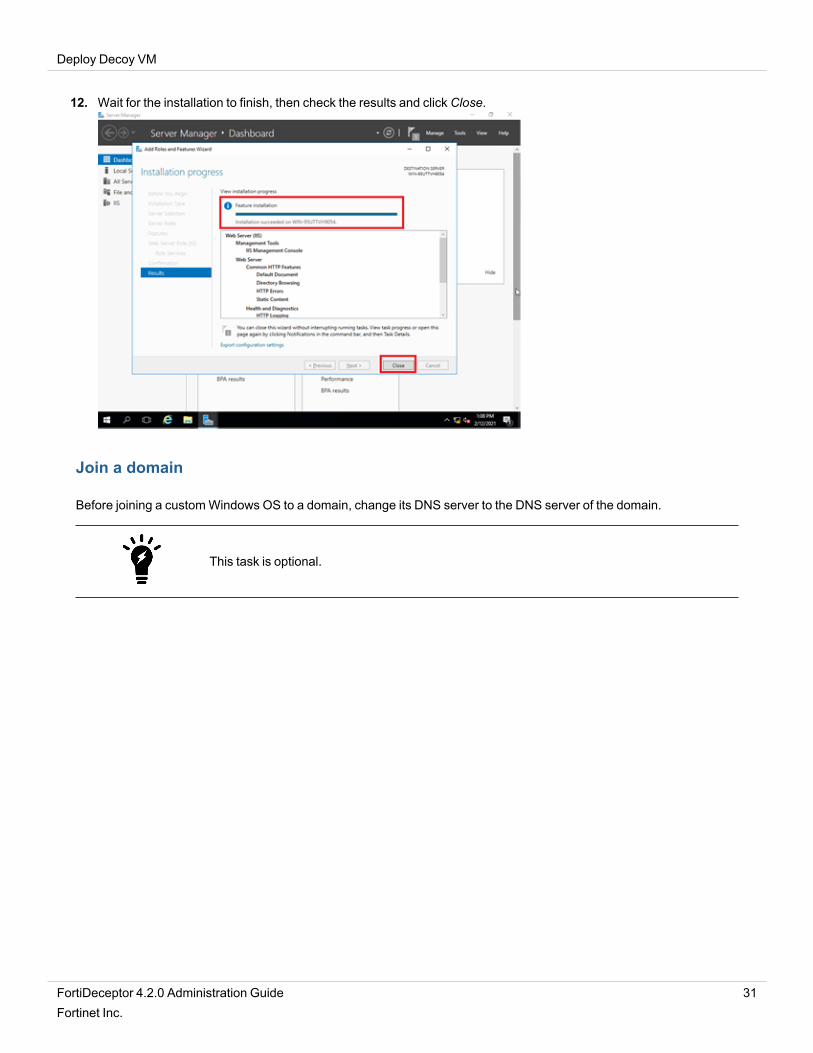
12. Wait for the installation to finish, then check the results and click Close.
Join a domain
Before joining a customWindows OS to a domain, change its DNS server to the DNS server of the domain.
This task is optional.
FortiDeceptor 4.2.0 Administration Guide 31Fortinet Inc.
Deploy Decoy VM
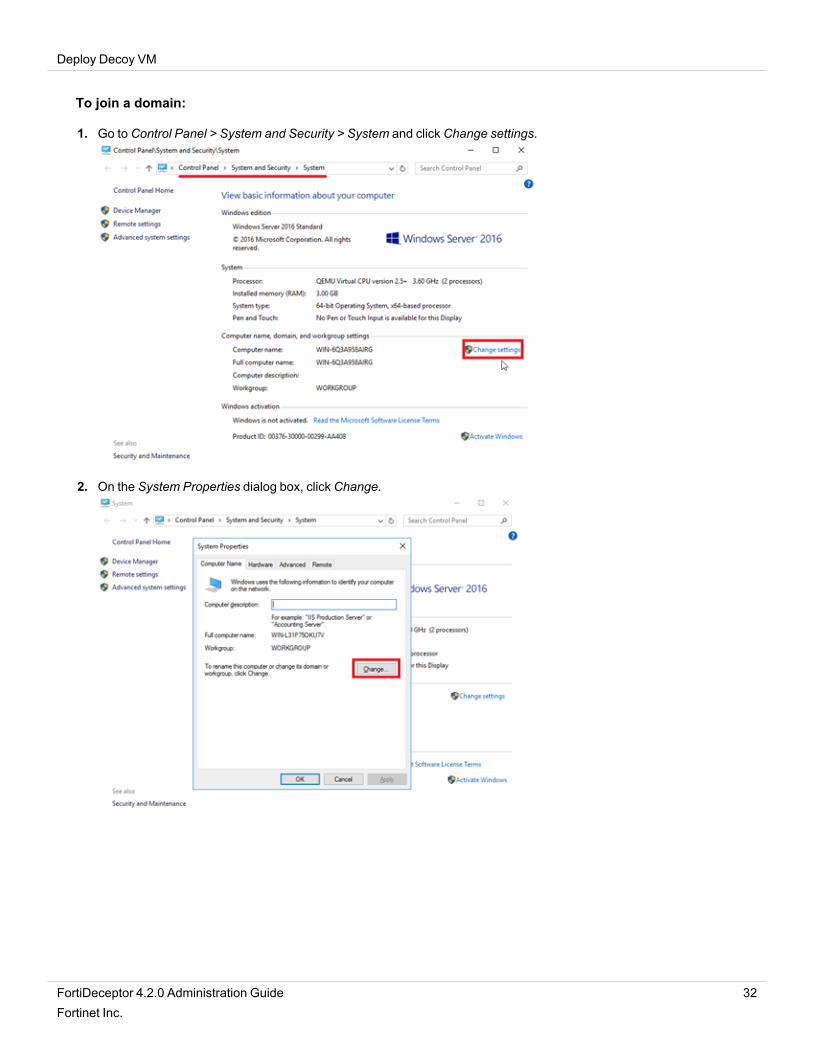
To join a domain:
1. Go to Control Panel > System and Security > System and click Change settings.
2. On the System Properties dialog box, click Change.
FortiDeceptor 4.2.0 Administration Guide 32Fortinet Inc.

Deploy Decoy VM
3. Enter the Domain and clickOK.
4. Click Close and restart the computer to join the domain.
Install the FortiDeceptor customization toolkit
When system customization is complete, right-click FDC_CUS_toolkit.exe and select Run as Administrator and wait forthe installation to finish.
Another option is to run the CLI command FDC_CUS_toolkit.exe as an administrator.
Save the custom image
When the customization status in the GUI displays Ready, click Start -> Power > Shut down to shut downWindows andthen click Save to save this image.
If the Windows Server is connected to a domain, there may not be a Power option in the GUI. In this case, run thecommand shutdown /s /t 1 /f as administrator.
It might take several minutes to save the entire image. When the image is saved, the page lists the image in CustomizedImages.
In Deception > Customization, the Customized Images tab lists the custom images.
The Actions column has icons for you to view logs, apply the image, or delete the image.
FortiDeceptor 4.2.0 Administration Guide 33Fortinet Inc.
Deploy Decoy VM
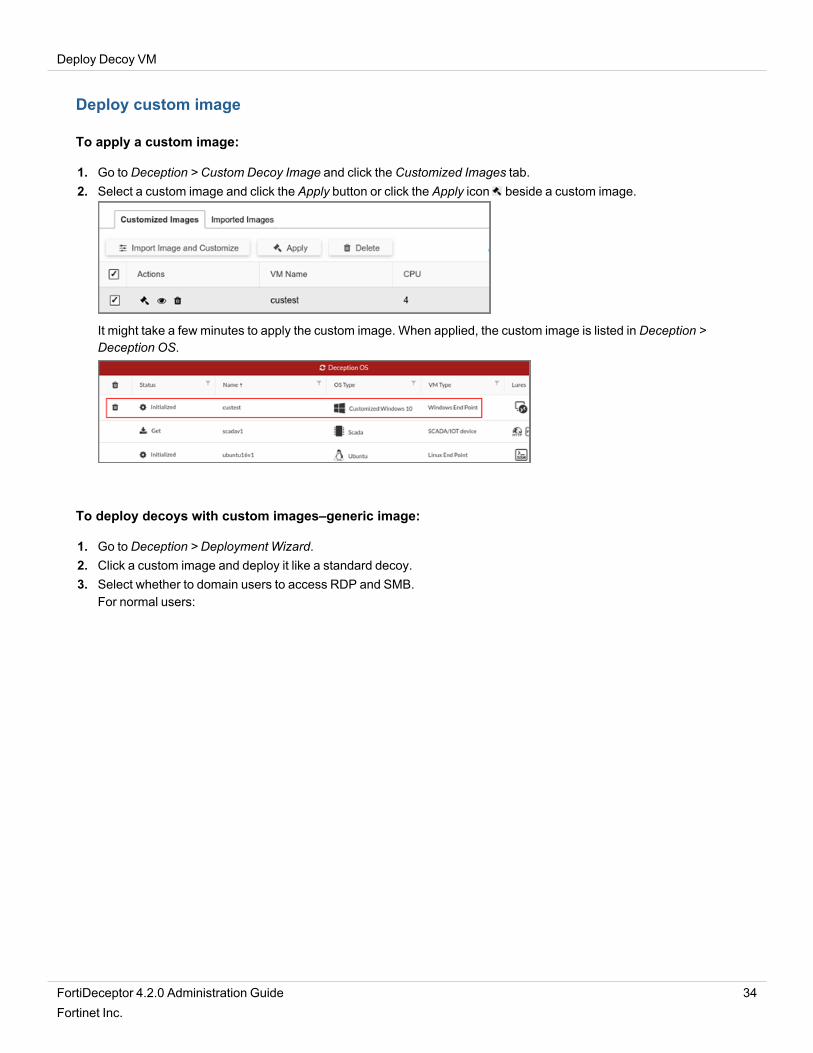
Deploy custom image
To apply a custom image:
1. Go to Deception > Custom Decoy Image and click the Customized Images tab.2. Select a custom image and click the Apply button or click the Apply icon beside a custom image.
It might take a few minutes to apply the custom image. When applied, the custom image is listed in Deception >Deception OS.
To deploy decoys with custom images–generic image:
1. Go to Deception > Deployment Wizard.2. Click a custom image and deploy it like a standard decoy.3. Select whether to domain users to access RDP and SMB.
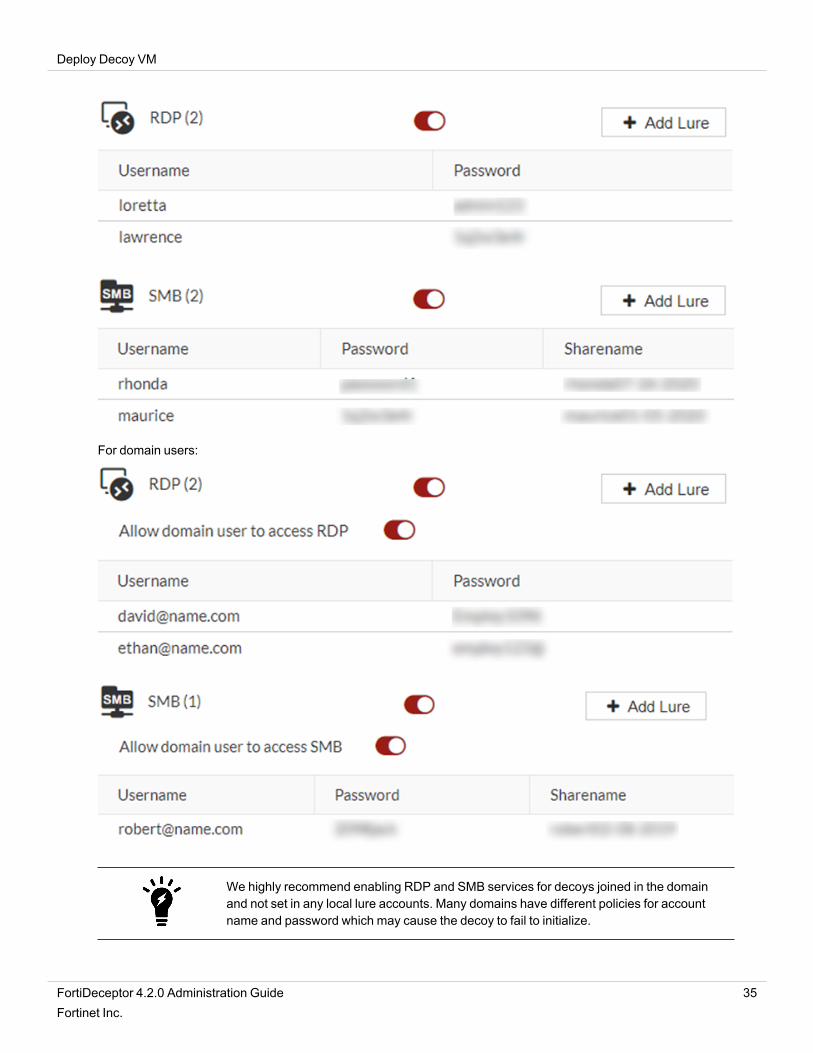
For normal users:
FortiDeceptor 4.2.0 Administration Guide 34Fortinet Inc.
Deploy Decoy VM
For domain users:
We highly recommend enabling RDP and SMB services for decoys joined in the domainand not set in any local lure accounts. Many domains have different policies for accountname and password which may cause the decoy to fail to initialize.
FortiDeceptor 4.2.0 Administration Guide 35Fortinet Inc.
Deploy Decoy VM
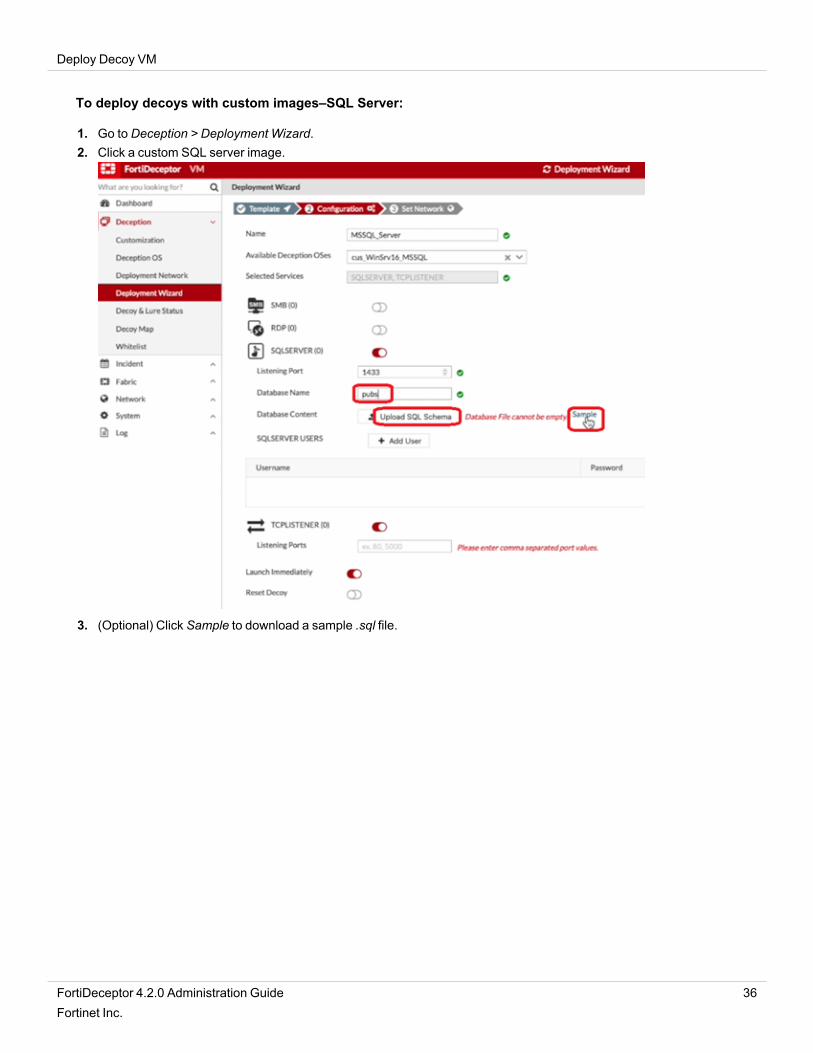
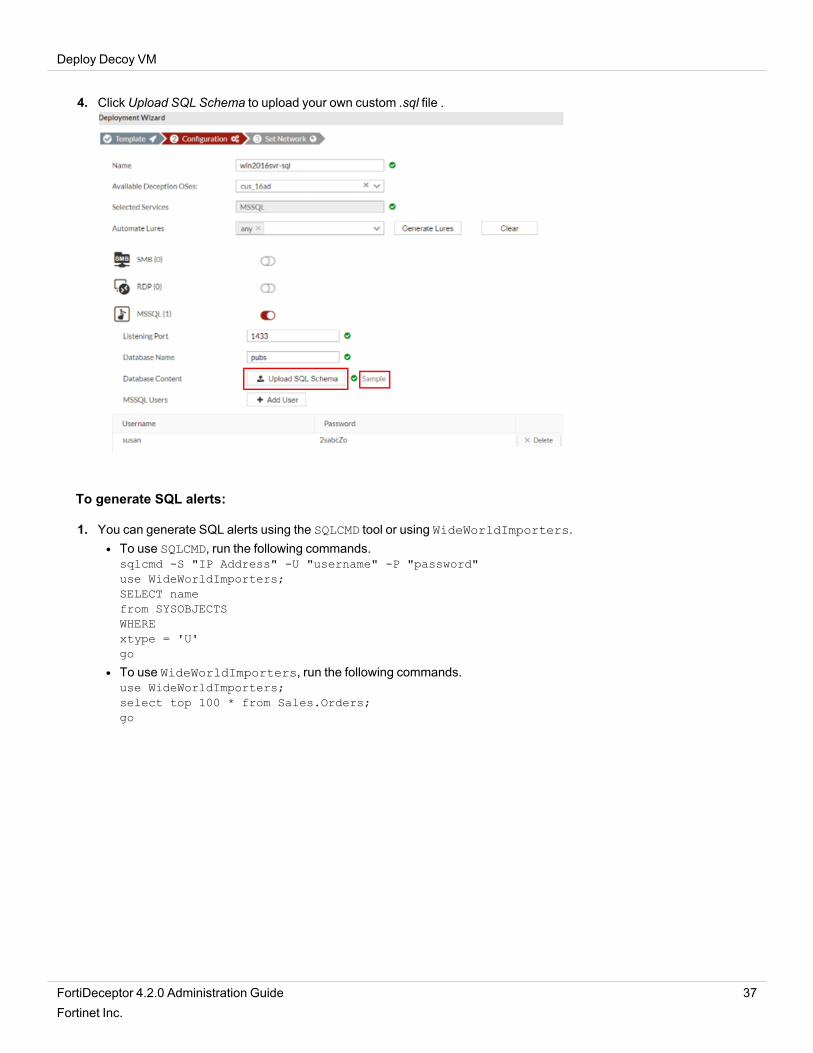
To deploy decoys with custom images–SQL Server:
1. Go to Deception > Deployment Wizard.2. Click a custom SQL server image.
3. (Optional) Click Sample to download a sample .sql file.
FortiDeceptor 4.2.0 Administration Guide 36Fortinet Inc.
Deploy Decoy VM
4. Click Upload SQL Schema to upload your own custom .sql file .
To generate SQL alerts:
1. You can generate SQL alerts using the SQLCMD tool or using WideWorldImporters.l To use SQLCMD, run the following commands.sqlcmd -S "IP Address" -U "username" -P "password"use WideWorldImporters;SELECT namefrom SYSOBJECTSWHERExtype = 'U'go
l To use WideWorldImporters, run the following commands.use WideWorldImporters;select top 100 * from Sales.Orders;go
FortiDeceptor 4.2.0 Administration Guide 37Fortinet Inc.

Deploy Decoy VM
The Incident > Analysis page displays the alerts for the SQL server attack.
To deploy decoys with custom images–IIS (HTTP/HTTPS):
1. Go to Deception > Deployment Wizard.2. Click a custom IIS image.
FortiDeceptor 4.2.0 Administration Guide 38Fortinet Inc.
Deploy Decoy VM
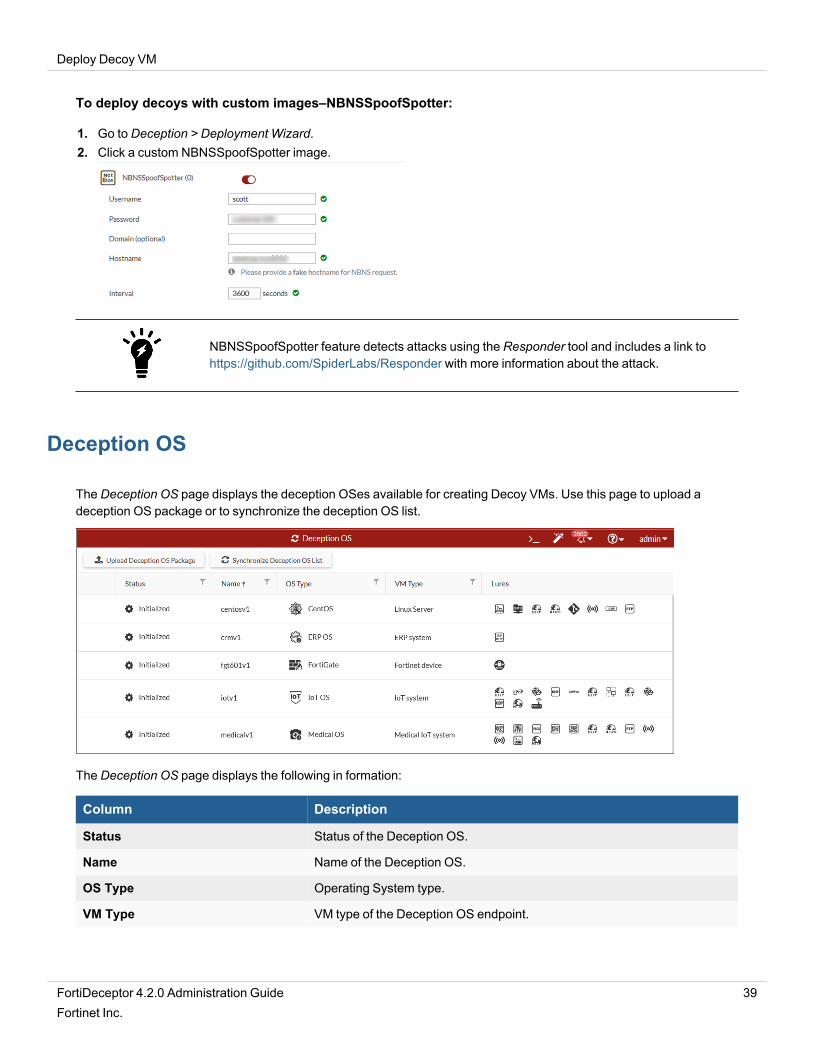
To deploy decoys with custom images–NBNSSpoofSpotter:
1. Go to Deception > Deployment Wizard.2. Click a custom NBNSSpoofSpotter image.
NBNSSpoofSpotter feature detects attacks using the Responder tool and includes a link tohttps://github.com/SpiderLabs/Responder with more information about the attack.
Deception OS
The Deception OS page displays the deception OSes available for creating Decoy VMs. Use this page to upload adeception OS package or to synchronize the deception OS list.
The Deception OS page displays the following in formation:
Column Description
Status Status of the Deception OS.
Name Name of the Deception OS.
OS Type Operating System type.
VM Type VM type of the Deception OS endpoint.
FortiDeceptor 4.2.0 Administration Guide 39Fortinet Inc.
Deploy Decoy VM
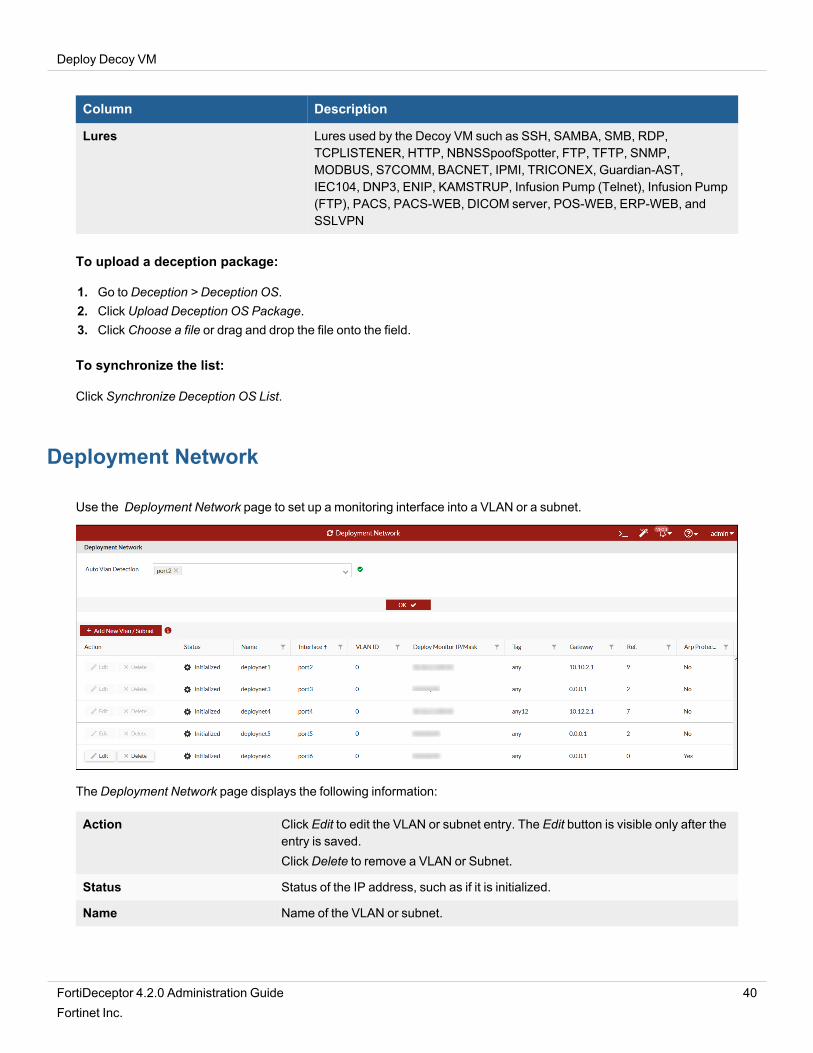
Column Description
Lures Lures used by the Decoy VM such as SSH, SAMBA, SMB, RDP,TCPLISTENER, HTTP, NBNSSpoofSpotter, FTP, TFTP, SNMP,MODBUS, S7COMM, BACNET, IPMI, TRICONEX, Guardian-AST,IEC104, DNP3, ENIP, KAMSTRUP, Infusion Pump (Telnet), Infusion Pump(FTP), PACS, PACS-WEB, DICOM server, POS-WEB, ERP-WEB, andSSLVPN
To upload a deception package:
1. Go to Deception > Deception OS.2. Click Upload Deception OS Package.3. Click Choose a file or drag and drop the file onto the field.
To synchronize the list:
Click Synchronize Deception OS List.
Deployment Network
Use the Deployment Network page to set up a monitoring interface into a VLAN or a subnet.
The Deployment Network page displays the following information:
Action Click Edit to edit the VLAN or subnet entry. The Edit button is visible only after theentry is saved.Click Delete to remove a VLAN or Subnet.
Status Status of the IP address, such as if it is initialized.
Name Name of the VLAN or subnet.
FortiDeceptor 4.2.0 Administration Guide 40Fortinet Inc.
Deploy Decoy VM
Interface The port that connects to the VLAN or subnet.
VLAN ID The VLAN's unique integer ID.
Deploy Monitor IP/Mask The IP address to monitor.
Tag The tag for the VLAN or subnet.
Gateway The gateway IP address of the deployment network.
ARP Protection Indicates ARP Protection is enabled (Yes) or disabled (No).
Setting up the deployment network
To add a VLAN or subnet to FortiDeceptor:
1. Go to Deception > Deployment Network.2. Enable Auto VLAN Detection to automatically detect the VLANs on your network.
Auto VLAN detection allows FortiDeceptor to detect the available VLANs on the deployment network interface anddisplay them in the GUI. You can select and add the VLANs for the deployment of Decoys later.
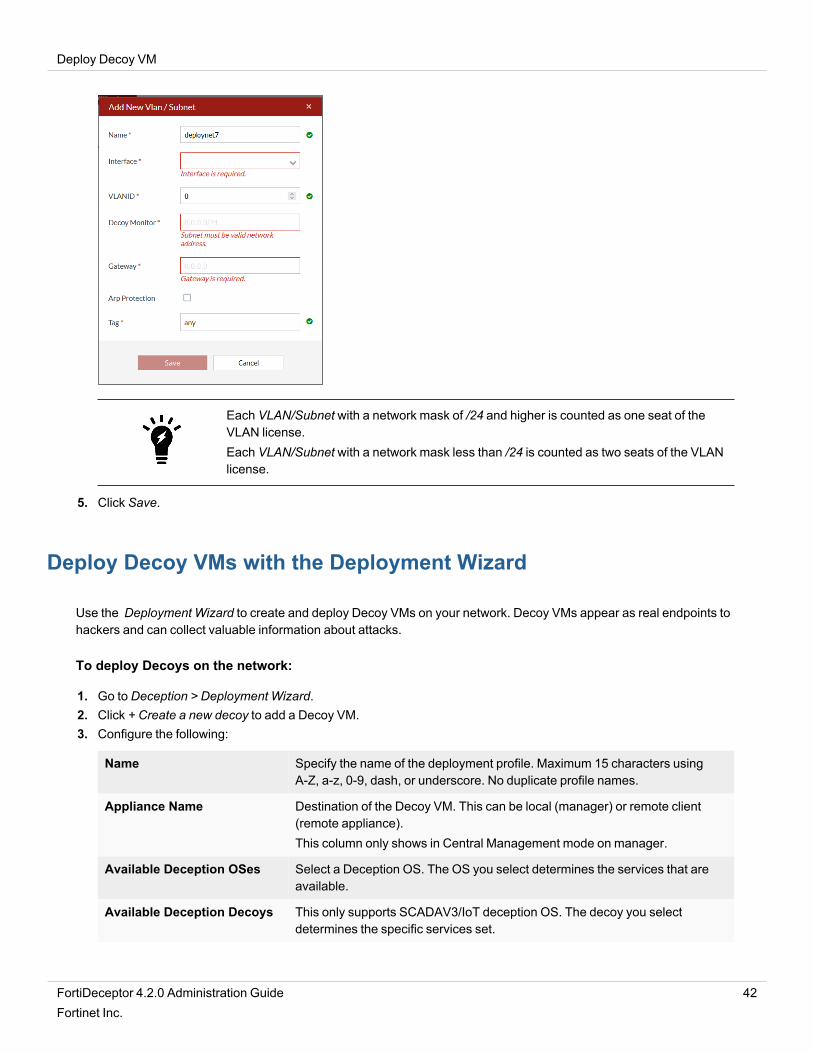
3. Select the Detection Interface and clickOK. You can select multiple ports.4. Click Add New VLAN/Subnet to manually add a VLAN or a subnet. Configure the following settings:
Name Name of the VLAN or subnet.
Interface The port that connects to the VLAN or subnet.
VLAN ID The VLAN's unique integer ID.
Deploy Monitor The IP address to monitor.
The deploy monitor IP/Mask must be an IP address and nota subnet.You must use the following guidelines to set the networkIP/mask:l Interface name and VLAN ID must be unique among allnetwork IP/masks.
l If VLAN ID is 0, the network IP/mask must be uniqueamong all the network IP/masks without VLAN and allsystem interfaces.
l If VLAN is not 0, the network IP/mask must be uniqueamong all subnets in the same VLAN.
Gateway The gateway IP address of the deployment network.
ARP Protection Select to enable ARP poisoning detection. ARP Protection is disabled bydefault. Upgrading FortiDeceptor will disable this setting.
Tag You can specify a tag for the VLAN or subnet.
Ref The number of objects referring to this object.
FortiDeceptor 4.2.0 Administration Guide 41Fortinet Inc.
Deploy Decoy VM
Each VLAN/Subnet with a network mask of /24 and higher is counted as one seat of theVLAN license.Each VLAN/Subnet with a network mask less than /24 is counted as two seats of the VLANlicense.
5. Click Save.
Deploy Decoy VMs with the Deployment Wizard
Use the Deployment Wizard to create and deploy Decoy VMs on your network. Decoy VMs appear as real endpoints tohackers and can collect valuable information about attacks.
To deploy Decoys on the network:
1. Go to Deception > Deployment Wizard.2. Click + Create a new decoy to add a Decoy VM.3. Configure the following:
Name Specify the name of the deployment profile. Maximum 15 characters usingA-Z, a-z, 0-9, dash, or underscore. No duplicate profile names.
Appliance Name Destination of the Decoy VM. This can be local (manager) or remote client(remote appliance).This column only shows in Central Management mode on manager.
Available Deception OSes Select a Deception OS. The OS you select determines the services that areavailable.
Available Deception Decoys This only supports SCADAV3/IoT deception OS. The decoy you selectdetermines the specific services set.
FortiDeceptor 4.2.0 Administration Guide 42Fortinet Inc.
Deploy Decoy VM
Selected Services Displays the services available for the Deception OS you selected.Services for Windows include RDP, SMB, NBNSSpoofSpotter (responder tooldetection), TCPLISTENER, ICMP, IIS(HTTP), and IIS(HTTPS).Services for SCADA include HTTP, FTP, TFTP, SNMP, MODBUS, S7COMM,BACNET, IPMI, TRICONEX, GUARDIAN-AST, ENIP, DNP3, KAMSTRUP,and IEC104.Services for Ubuntu include SSH, SAMBA, TCPLISTENER, HTTP, HTTPS,GIT, ICMP, FTP.Services for Medical OS include Infusion Pump (Telnet), Infusion Pump (FTP),PACS, PACS-WEB, and DICOM serverServices for POS OS include POS-WEB.Services for ERP OS include ERP-WEB.Services for FortiGate include SSLVPN.Services for Cisco Router include Telnet, HTTP, SNMP and CDP.Services for HP Printer include Jetdirect, Printer-WEB and SNMP.Services for SAP include SAP ROUTER, SAP DISPATCHER and SAPWEBServices for IoT include SNMP, Jetdirect, Printer-WEB, Telnet, HTTP, CDP,TP-LINKWEB, CWMP, IP Camera-WEB, UPnP and RTSP.Services for IP Camera include IP Camera-Web, UPnP, SNMP and RTSP.CentOS include SSH, SAMBA, TCPLISTENER, HTTP, HTTPS, GIT, ICMP,FTP.
Automate Lures Select one or more tag names to automate lure generation and to generaterelated contents. Selecting any and all generate random content.ClickGenerate Lures to automatically generate lures and list them in thepanes below.Click Clear to delete the lures on this page.
4. If applicable, clickGenerate lures or Add Lure for the service and configure the lure settings. See, Lure Settings onpage 44.
5. To launch the decoy VM immediately, scroll to the bottom of the page and enable Launch Immediately.6. To reset the decoy VM after it detects incidents, enable Reset Decoy and specify the Reset Interval value in
seconds.7. Click Next. The Set Network tab opens.8. Configure the network IP and Hostname. You can enter up to two DNS IP addresses.
DNS Enter the network IP address.You must set Domain DNS server IP to be the 1st DNS when customWindowsdecoys are in the domain(s).
DNS2 (Optional) Enter a second network IP address.Two DNS IP addresses are not supported in t FortiGate SSLVPN decoydeployments.
Hostname Enter the hostname for the network.
FortiDeceptor 4.2.0 Administration Guide 43Fortinet Inc.
Deploy Decoy VM
The Hostname can start with an English character or a digit, and must not endwith a hyphen. Maximum 15 characters using A-Z, a-z, 0-9, or hyphen (case-sensitive). Other symbols, punctuation, or white space are not supported.The Hostname cannot conflict with decoy names.
9. Click Deploy Into Network.10. Select the Deploy Interface. Set this to the VLAN or subnet added in Deployment Network on page 4011. Configure the following settings in the Add Interface for Decoy pane:
Addressing Mode Select Static or DHCP.Static allows you to configure the IP address for all the decoys.DHCP allows the decoys to receive IP address from the DHCP server. If you selectDHCP, IP Count is automatically set to 1 and all other fields are not applicable.
Network Mask This field is set automatically.
Gateway Specify the gateway.
MAC Address OUI The first three octets of the MAC address for the device vendor. Only the xx:xx:xxformat is supported.
IP Count Specify the number of IP addresses to be assigned, up to 24 ( for both STATIC andDHCP).
Min The minimum IP address in the IP range.
Max The maximum IP address in the IP range.
IP Ranges Specify the IP range betweenMin andMax.
12. Click Done.13. To deploy the decoys on the network, click Deploy.14. To save this as a template in Deception > Deployment Wizard, click Template.
For deception strategies and examples, see Deployment best practices checklist on page 149and Deception decoy best practices on page 144
Lure Settings
The lure settings will vary depending on the service. The character limits and requirements in FortiDeceptor may differfrom the requirements implemented in the service.
Character restrictions and guidelines
Lure setting Service Requirements
Client Number SAP DISPATCHER Alphanumeric characters (A-Z, a-z, 0-9), periods (.),commas (,), hyphens (-), underscores (_), and spaces aresupported.
FortiDeceptor 4.2.0 Administration Guide 44Fortinet Inc.
Deploy Decoy VM
Lure setting Service Requirements
DICOM ListeningPort
Medical Enter a value between 1-65535. Default is 4242.
DICOM ServerName
Medical Maximum of 16 characters.Name cannot begin with a digit.Alphanumeric characters (A-Z, a-z, 0-9), hyphens (-) andunderscores (_) are supported.
Domain (optional) Windows: NBNSSpoofSpotter Alphanumeric characters (A-Z, a-z, 0-9) and periods (.),are supported.
DSN Description Windows: ODBC lure Maximum of 256 characters.Alphanumeric characters (A-Z, a-z, 0-9), specialcharacters (.-_!@(~)?:|+;*/"') and spaces are supported.
DSN Name Windows: ODBC lure Maximum of 32 characters.Alphanumeric characters (A-Z, a-z, 0-9), periods (.),hyphens (-), underscores (_), and spaces are supported.
FTP Banner SCADAV3, Ubuntu, Centos Alphanumeric characters (A-Z, a-z, 0-9), hyphens (-),underscores (_), and spaces are supported.
Hostname Windows: NBNSSpoofSpotterSAP DISPATCHER
Maximum of 15 characters.Alphanumeric characters (A-Z, a-z, 0-9), hyphens (-) andunderscores (_) are supported.
HTTP ListeningPort
Ubuntu, Centos Enter a value between 1-65535.Default is 80.
HTTPS ListeningPort
Ubuntu, Centos Enter a value between 1-65535. Default is 443.
HTTPS SSLCertificate
Ubuntu, Centos Optional. Upload using default settings is supported.
Instance Name SAP DISPATCHER Alphanumeric characters (A-Z, a-z, 0-9), periods (.),commas (,), hyphens (-), underscores (_), and spaces aresupported.
Interval(sec) Windows: NBNSSpoofSpotter Enter a value between 60-3600.
Listening Port ERP (CRM), POS, SAP Router,SAP DISPATCHER, TP-LINK,CWMP
Enter a value between 1-65535.l ERP (CRM), POS, and TP-LINK: Default is 80.l SAP Router: Default is 3299l SAP DISPATCHER: Default is 3200l CWMP: Default is 7547
Listening Port OverHTTPS
SAPWEB Enter a value between 1-65535. Default is 443
Module type SCADAV3 Alphanumeric characters (A-Z, a-z, 0-9), hyphens (-),underscores (_), and spaces are supported.
FortiDeceptor 4.2.0 Administration Guide 45Fortinet Inc.
Deploy Decoy VM
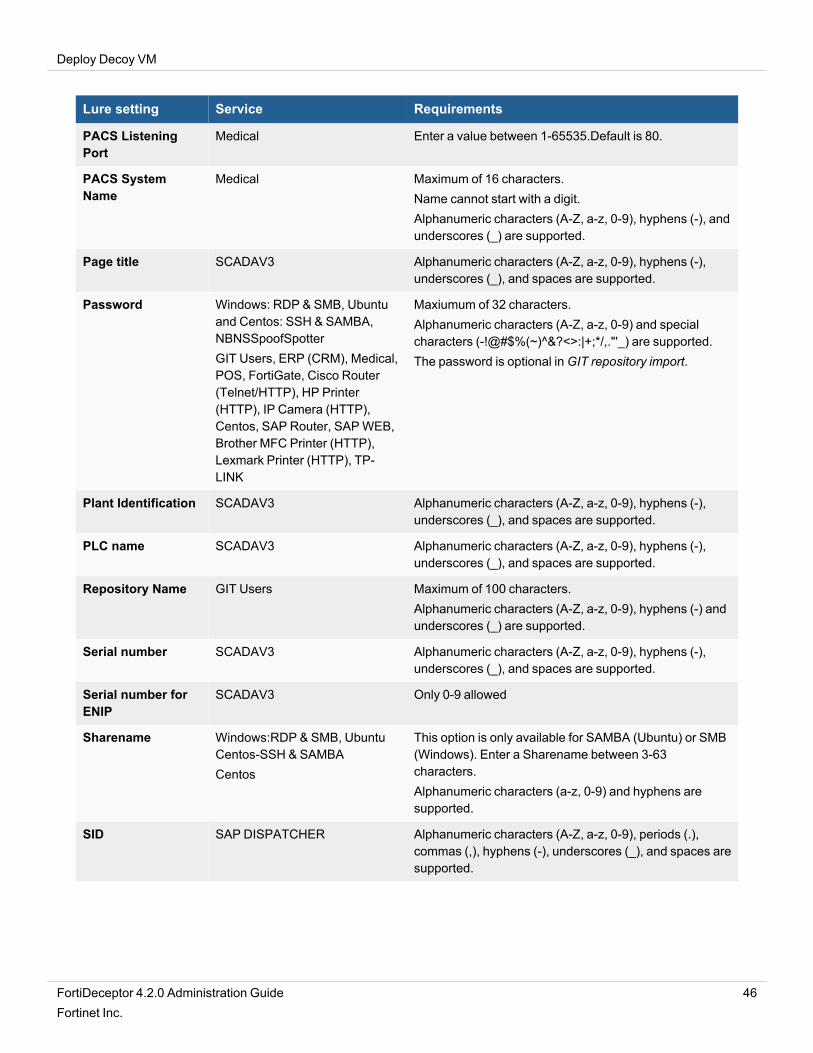
Lure setting Service Requirements
PACS ListeningPort
Medical Enter a value between 1-65535.Default is 80.
PACS SystemName
Medical Maximum of 16 characters.Name cannot start with a digit.Alphanumeric characters (A-Z, a-z, 0-9), hyphens (-), andunderscores (_) are supported.
Page title SCADAV3 Alphanumeric characters (A-Z, a-z, 0-9), hyphens (-),underscores (_), and spaces are supported.
Password Windows: RDP & SMB, Ubuntuand Centos: SSH & SAMBA,NBNSSpoofSpotterGIT Users, ERP (CRM), Medical,POS, FortiGate, Cisco Router(Telnet/HTTP), HP Printer(HTTP), IP Camera (HTTP),Centos, SAP Router, SAPWEB,Brother MFC Printer (HTTP),Lexmark Printer (HTTP), TP-LINK
Maxiumum of 32 characters.Alphanumeric characters (A-Z, a-z, 0-9) and specialcharacters (-!@#$%(~)^&?<>:|+;*/,."'_) are supported.The password is optional inGIT repository import.
Plant Identification SCADAV3 Alphanumeric characters (A-Z, a-z, 0-9), hyphens (-),underscores (_), and spaces are supported.
PLC name SCADAV3 Alphanumeric characters (A-Z, a-z, 0-9), hyphens (-),underscores (_), and spaces are supported.
Repository Name GIT Users Maximum of 100 characters.Alphanumeric characters (A-Z, a-z, 0-9), hyphens (-) andunderscores (_) are supported.
Serial number SCADAV3 Alphanumeric characters (A-Z, a-z, 0-9), hyphens (-),underscores (_), and spaces are supported.
Serial number forENIP
SCADAV3 Only 0-9 allowed
Sharename Windows:RDP & SMB, UbuntuCentos-SSH & SAMBACentos
This option is only available for SAMBA (Ubuntu) or SMB(Windows). Enter a Sharename between 3-63characters.Alphanumeric characters (a-z, 0-9) and hyphens aresupported.
SID SAP DISPATCHER Alphanumeric characters (A-Z, a-z, 0-9), periods (.),commas (,), hyphens (-), underscores (_), and spaces aresupported.
FortiDeceptor 4.2.0 Administration Guide 46Fortinet Inc.
Deploy Decoy VM
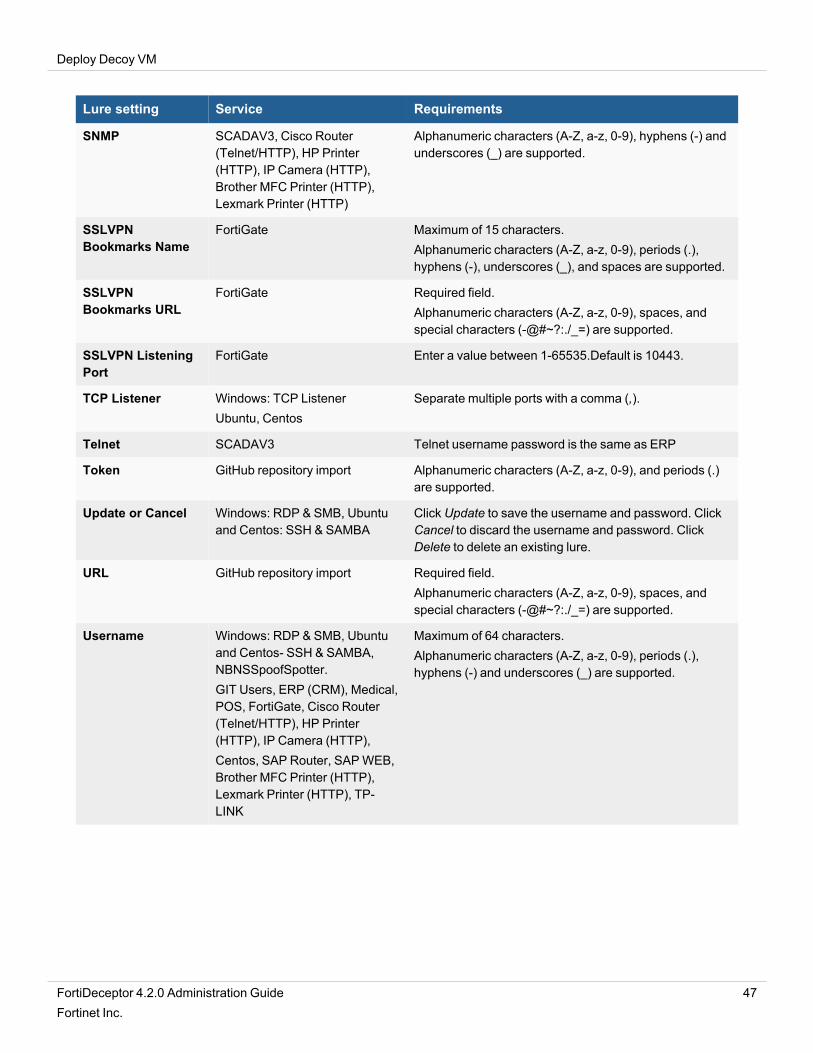
Lure setting Service Requirements
SNMP SCADAV3, Cisco Router(Telnet/HTTP), HP Printer(HTTP), IP Camera (HTTP),Brother MFC Printer (HTTP),Lexmark Printer (HTTP)
Alphanumeric characters (A-Z, a-z, 0-9), hyphens (-) andunderscores (_) are supported.
SSLVPNBookmarks Name
FortiGate Maximum of 15 characters.Alphanumeric characters (A-Z, a-z, 0-9), periods (.),hyphens (-), underscores (_), and spaces are supported.
SSLVPNBookmarks URL
FortiGate Required field.Alphanumeric characters (A-Z, a-z, 0-9), spaces, andspecial characters (-@#~?:./_=) are supported.
SSLVPN ListeningPort
FortiGate Enter a value between 1-65535.Default is 10443.
TCP Listener Windows: TCP ListenerUbuntu, Centos
Separate multiple ports with a comma (,).
Telnet SCADAV3 Telnet username password is the same as ERP
Token GitHub repository import Alphanumeric characters (A-Z, a-z, 0-9), and periods (.)are supported.
Update or Cancel Windows: RDP & SMB, Ubuntuand Centos: SSH & SAMBA
Click Update to save the username and password. ClickCancel to discard the username and password. ClickDelete to delete an existing lure.
URL GitHub repository import Required field.Alphanumeric characters (A-Z, a-z, 0-9), spaces, andspecial characters (-@#~?:./_=) are supported.
Username Windows: RDP & SMB, Ubuntuand Centos- SSH & SAMBA,NBNSSpoofSpotter.GIT Users, ERP (CRM), Medical,POS, FortiGate, Cisco Router(Telnet/HTTP), HP Printer(HTTP), IP Camera (HTTP),Centos, SAP Router, SAPWEB,Brother MFC Printer (HTTP),Lexmark Printer (HTTP), TP-LINK
Maximum of 64 characters.Alphanumeric characters (A-Z, a-z, 0-9), periods (.),hyphens (-) and underscores (_) are supported.
FortiDeceptor 4.2.0 Administration Guide 47Fortinet Inc.

Deploy Decoy VM
Deploy the FortiDeceptor token package
Use a FortiDeceptor token package to add breadcrumbs on real endpoints and lure an attacker to a Decoy VM. Tokensare normally distributed within real endpoints and other IT assets on the network to maximize the deception surface.
For information about using FortiDeceptor to generate a deception lure package based on the decoy serviceconfiguration, see Deploying tokens using AD GPO logon script on page 158.
The following token types are available:
Token type Description
SMB (hidden mapped network disk) Map the shared directory to a remote decoy that acts as file server while theshared disk is hidden. The username and password are saved in theWindows Vault (Credentials Manager).SMB remote folders are Windows folders.
SAMBA (hidden mapped networkdisk)
Same as SMB but for Linux SAMBA shares. SAMBA remote folders areLinux folders.
RDP (Remote Desktop) The username, password and the windows Decoy IP are saved in theWindows Vault (Credentials Manager).Additionally, it creates RDP shortcuts in %USERPROFILE%\Documents.The file name format is rdp_USERNAME_IP.rdp and created files arehidden.The RDP Lure username and password are saved in Windows Vault.
SSH (Secure Shell) Create a hidden Putty shortcut in %USERPROFILE%\Documents.If Putty (putty.exe) is not installed in the specified directory, no shortcut iscreated.
Credential Cache Lure In Domain environment, add a new credentials entry to the real desktop orserver process lsass.exe.
HoneyDocs Add fake files (Word & PDF) to Windows directories. The default is to themost recent folder. You can specify the location in the Windows directory.
ODBC The ODBC lure saves a DSN connection string using the TrustedConnection mechanism.To deploy an effective ODBC token, the following is required:l Deploy with domain DNS and SQL SERVER service based on acustom windows image joining a domain. See, Custom Decoy Imageon page 16 > To deploy decoys with custom images–SQL Server.
l Install ODBC lures into domain user accounts that are on the samedomain as the customWindows server.
SAP token Add fake SAP configuration files to Windows SAP installation path thatcontains decoy IP and other SAP related configuration data.
FortiDeceptor 4.2.0 Administration Guide 48Fortinet Inc.
Deploy Decoy VM
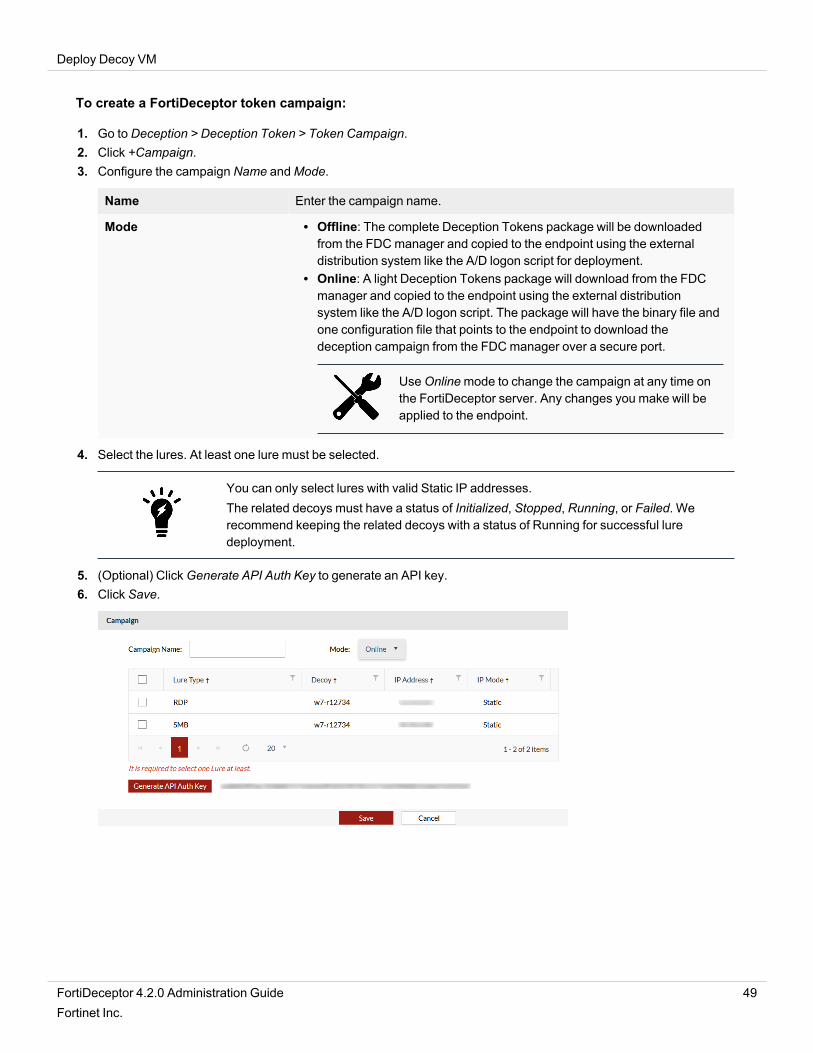
To create a FortiDeceptor token campaign:
1. Go to Deception > Deception Token > Token Campaign.2. Click +Campaign.3. Configure the campaign Name andMode.
Name Enter the campaign name.
Mode l Offline: The complete Deception Tokens package will be downloadedfrom the FDCmanager and copied to the endpoint using the externaldistribution system like the A/D logon script for deployment.
l Online: A light Deception Tokens package will download from the FDCmanager and copied to the endpoint using the external distributionsystem like the A/D logon script. The package will have the binary file andone configuration file that points to the endpoint to download thedeception campaign from the FDCmanager over a secure port.
UseOnlinemode to change the campaign at any time onthe FortiDeceptor server. Any changes you make will beapplied to the endpoint.
4. Select the lures. At least one lure must be selected.
You can only select lures with valid Static IP addresses.The related decoys must have a status of Initialized, Stopped, Running, or Failed. Werecommend keeping the related decoys with a status of Running for successful luredeployment.
5. (Optional) ClickGenerate API Auth Key to generate an API key.6. Click Save.
FortiDeceptor 4.2.0 Administration Guide 49Fortinet Inc.
Deploy Decoy VM
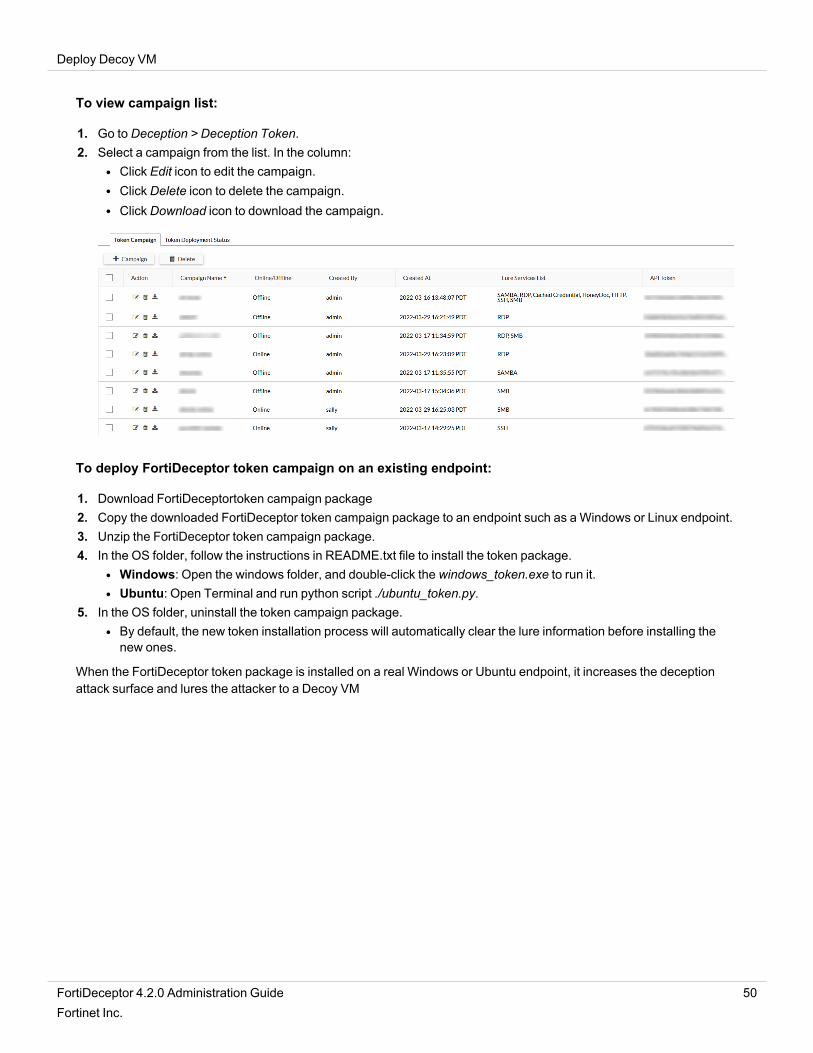
To view campaign list:
1. Go to Deception > Deception Token.2. Select a campaign from the list. In the column:
l Click Edit icon to edit the campaign.l Click Delete icon to delete the campaign.l Click Download icon to download the campaign.
To deploy FortiDeceptor token campaign on an existing endpoint:
1. Download FortiDeceptortoken campaign package2. Copy the downloaded FortiDeceptor token campaign package to an endpoint such as a Windows or Linux endpoint.3. Unzip the FortiDeceptor token campaign package.4. In the OS folder, follow the instructions in README.txt file to install the token package.
l Windows: Open the windows folder, and double-click the windows_token.exe to run it.l Ubuntu: Open Terminal and run python script ./ubuntu_token.py.
5. In the OS folder, uninstall the token campaign package.l By default, the new token installation process will automatically clear the lure information before installing thenew ones.
When the FortiDeceptor token package is installed on a real Windows or Ubuntu endpoint, it increases the deceptionattack surface and lures the attacker to a Decoy VM
FortiDeceptor 4.2.0 Administration Guide 50Fortinet Inc.
Deploy Decoy VM
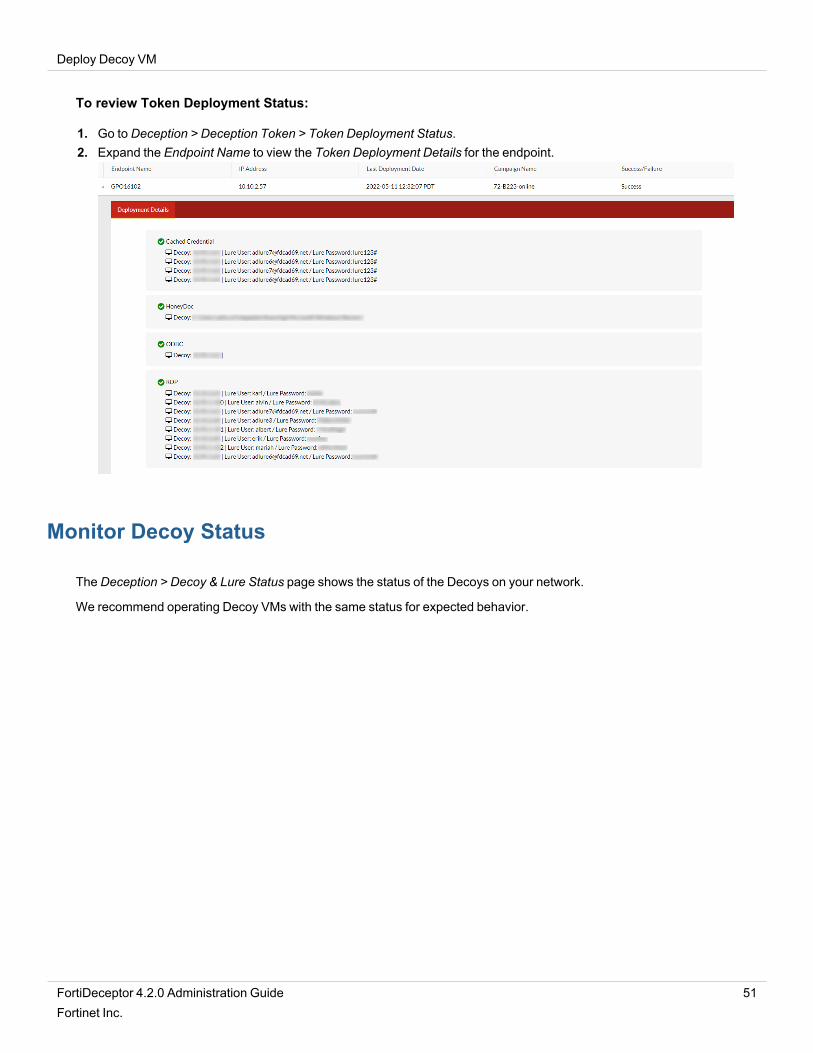
To review Token Deployment Status:
1. Go to Deception > Deception Token > Token Deployment Status.2. Expand the Endpoint Name to view the Token Deployment Details for the endpoint.
Monitor Decoy Status
The Deception > Decoy & Lure Status page shows the status of the Decoys on your network.
We recommend operating Decoy VMs with the same status for expected behavior.
FortiDeceptor 4.2.0 Administration Guide 51Fortinet Inc.
Deploy Decoy VM
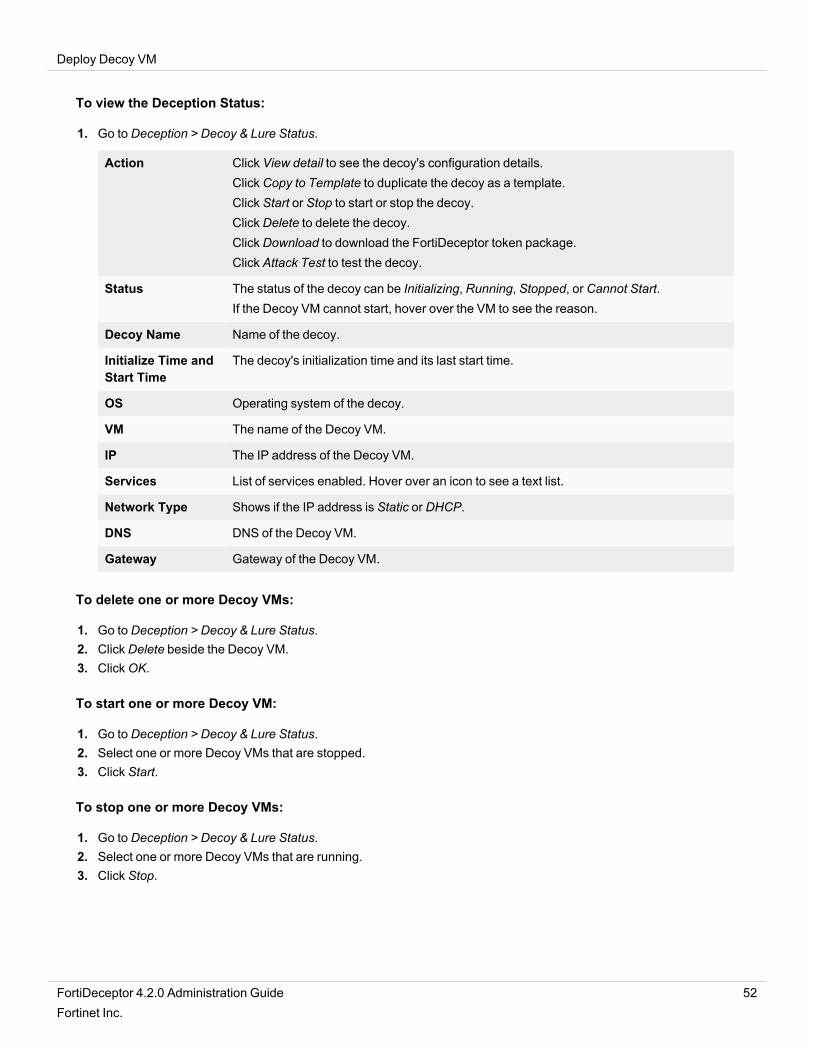
To view the Deception Status:
1. Go to Deception > Decoy & Lure Status.
Action Click View detail to see the decoy's configuration details.Click Copy to Template to duplicate the decoy as a template.Click Start or Stop to start or stop the decoy.Click Delete to delete the decoy.Click Download to download the FortiDeceptor token package.Click Attack Test to test the decoy.
Status The status of the decoy can be Initializing, Running, Stopped, or Cannot Start.If the Decoy VM cannot start, hover over the VM to see the reason.
Decoy Name Name of the decoy.
Initialize Time andStart Time
The decoy's initialization time and its last start time.
OS Operating system of the decoy.
VM The name of the Decoy VM.
IP The IP address of the Decoy VM.
Services List of services enabled. Hover over an icon to see a text list.
Network Type Shows if the IP address is Static or DHCP.
DNS DNS of the Decoy VM.
Gateway Gateway of the Decoy VM.
To delete one or more Decoy VMs:
1. Go to Deception > Decoy & Lure Status.2. Click Delete beside the Decoy VM.3. ClickOK.
To start one or more Decoy VM:
1. Go to Deception > Decoy & Lure Status.2. Select one or more Decoy VMs that are stopped.3. Click Start.
To stop one or more Decoy VMs:
1. Go to Deception > Decoy & Lure Status.2. Select one or more Decoy VMs that are running.3. Click Stop.
FortiDeceptor 4.2.0 Administration Guide 52Fortinet Inc.
Deploy Decoy VM
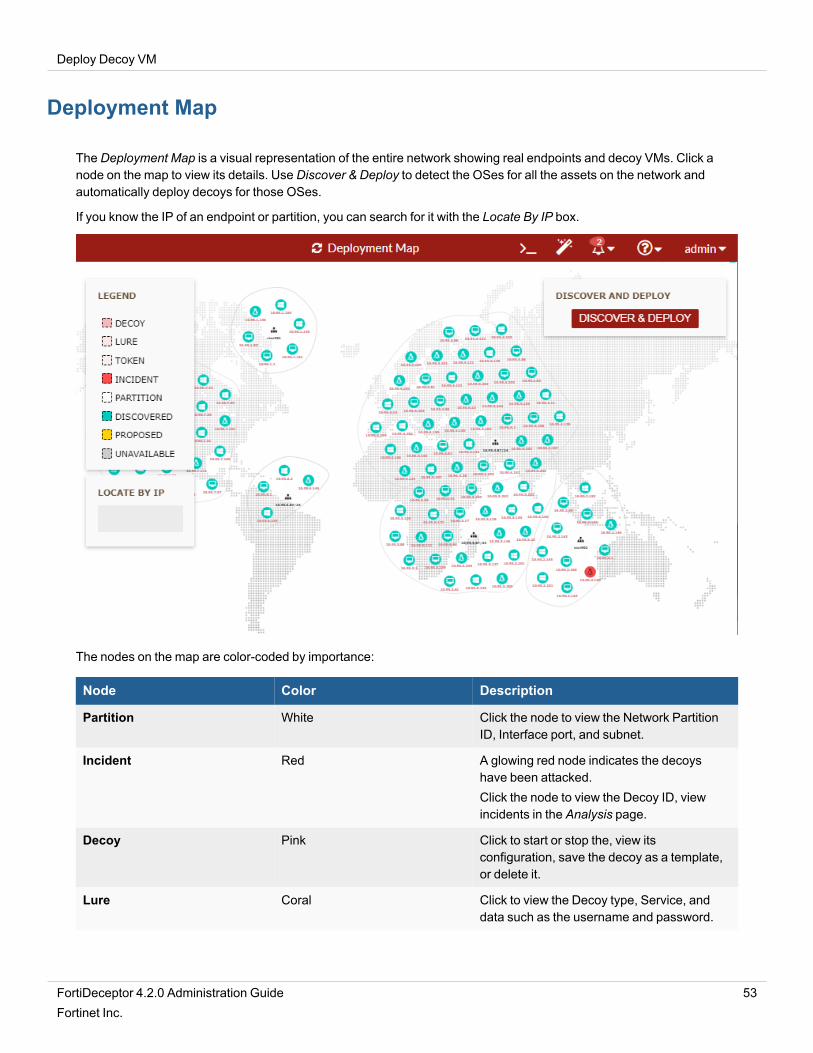
Deployment Map
The Deployment Map is a visual representation of the entire network showing real endpoints and decoy VMs. Click anode on the map to view its details. Use Discover & Deploy to detect the OSes for all the assets on the network andautomatically deploy decoys for those OSes.
If you know the IP of an endpoint or partition, you can search for it with the Locate By IP box.
The nodes on the map are color-coded by importance:
Node Color Description
Partition White Click the node to view the Network PartitionID, Interface port, and subnet.
Incident Red A glowing red node indicates the decoyshave been attacked.Click the node to view the Decoy ID, viewincidents in the Analysis page.
Decoy Pink Click to start or stop the, view itsconfiguration, save the decoy as a template,or delete it.
Lure Coral Click to view the Decoy type, Service, anddata such as the username and password.
FortiDeceptor 4.2.0 Administration Guide 53Fortinet Inc.
Deploy Decoy VM
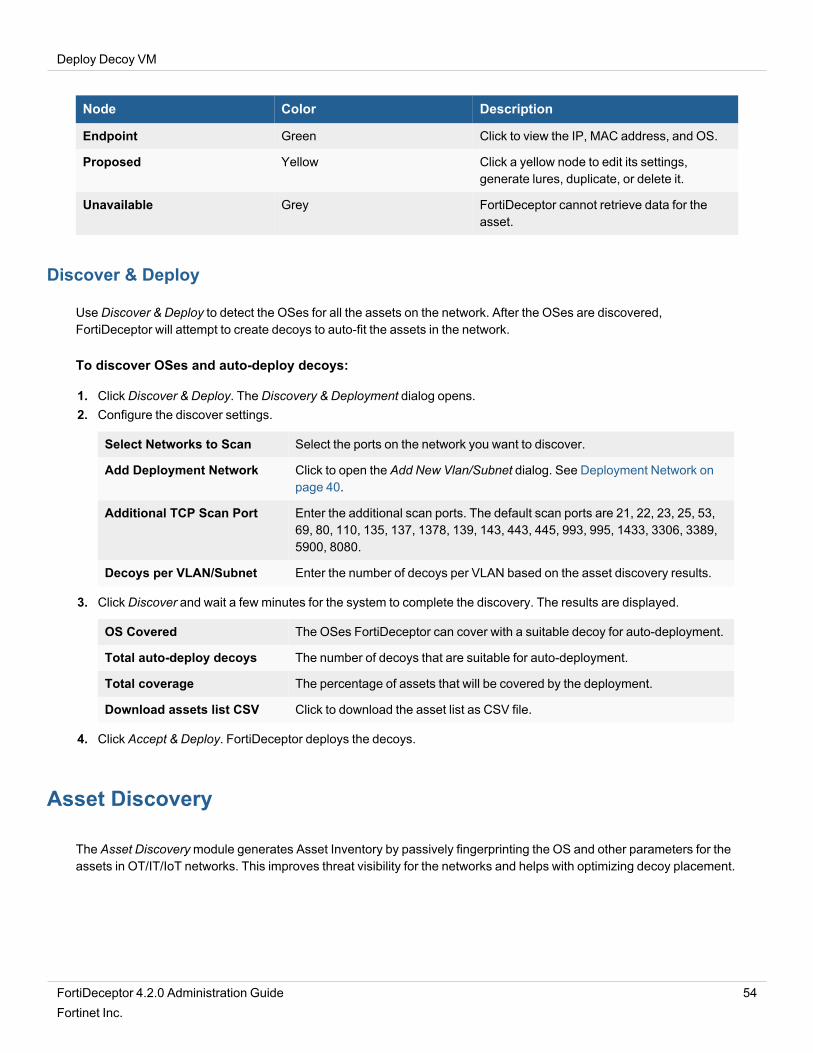
Node Color Description
Endpoint Green Click to view the IP, MAC address, and OS.
Proposed Yellow Click a yellow node to edit its settings,generate lures, duplicate, or delete it.
Unavailable Grey FortiDeceptor cannot retrieve data for theasset.
Discover & Deploy
Use Discover & Deploy to detect the OSes for all the assets on the network. After the OSes are discovered,FortiDeceptor will attempt to create decoys to auto-fit the assets in the network.
To discover OSes and auto-deploy decoys:
1. Click Discover & Deploy. The Discovery & Deployment dialog opens.2. Configure the discover settings.
Select Networks to Scan Select the ports on the network you want to discover.
Add Deployment Network Click to open the Add New Vlan/Subnet dialog. See Deployment Network onpage 40.
Additional TCP Scan Port Enter the additional scan ports. The default scan ports are 21, 22, 23, 25, 53,69, 80, 110, 135, 137, 1378, 139, 143, 443, 445, 993, 995, 1433, 3306, 3389,5900, 8080.
Decoys per VLAN/Subnet Enter the number of decoys per VLAN based on the asset discovery results.
3. Click Discover and wait a few minutes for the system to complete the discovery. The results are displayed.
OS Covered The OSes FortiDeceptor can cover with a suitable decoy for auto-deployment.
Total auto-deploy decoys The number of decoys that are suitable for auto-deployment.
Total coverage The percentage of assets that will be covered by the deployment.
Download assets list CSV Click to download the asset list as CSV file.
4. Click Accept & Deploy. FortiDeceptor deploys the decoys.
Asset Discovery
The Asset Discoverymodule generates Asset Inventory by passively fingerprinting the OS and other parameters for theassets in OT/IT/IoT networks. This improves threat visibility for the networks and helps with optimizing decoy placement.
FortiDeceptor 4.2.0 Administration Guide 54Fortinet Inc.
Deploy Decoy VM
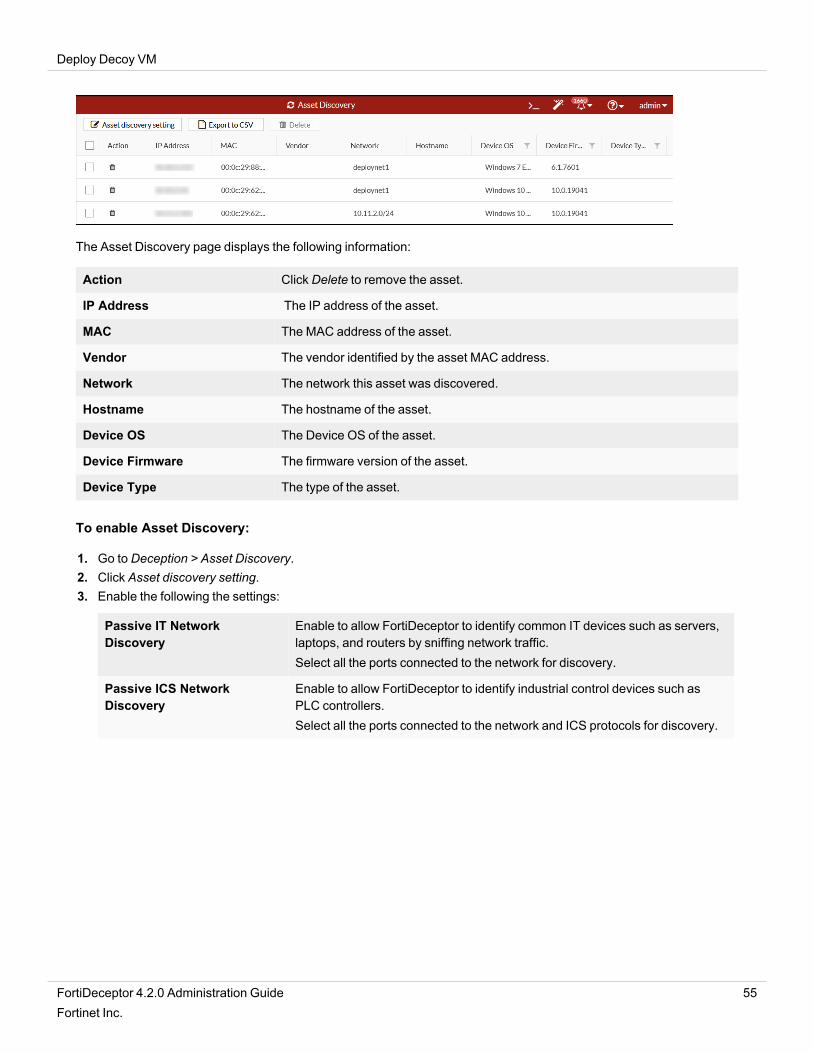
The Asset Discovery page displays the following information:
Action Click Delete to remove the asset.
IP Address The IP address of the asset.
MAC The MAC address of the asset.
Vendor The vendor identified by the asset MAC address.
Network The network this asset was discovered.
Hostname The hostname of the asset.
Device OS The Device OS of the asset.
Device Firmware The firmware version of the asset.
Device Type The type of the asset.
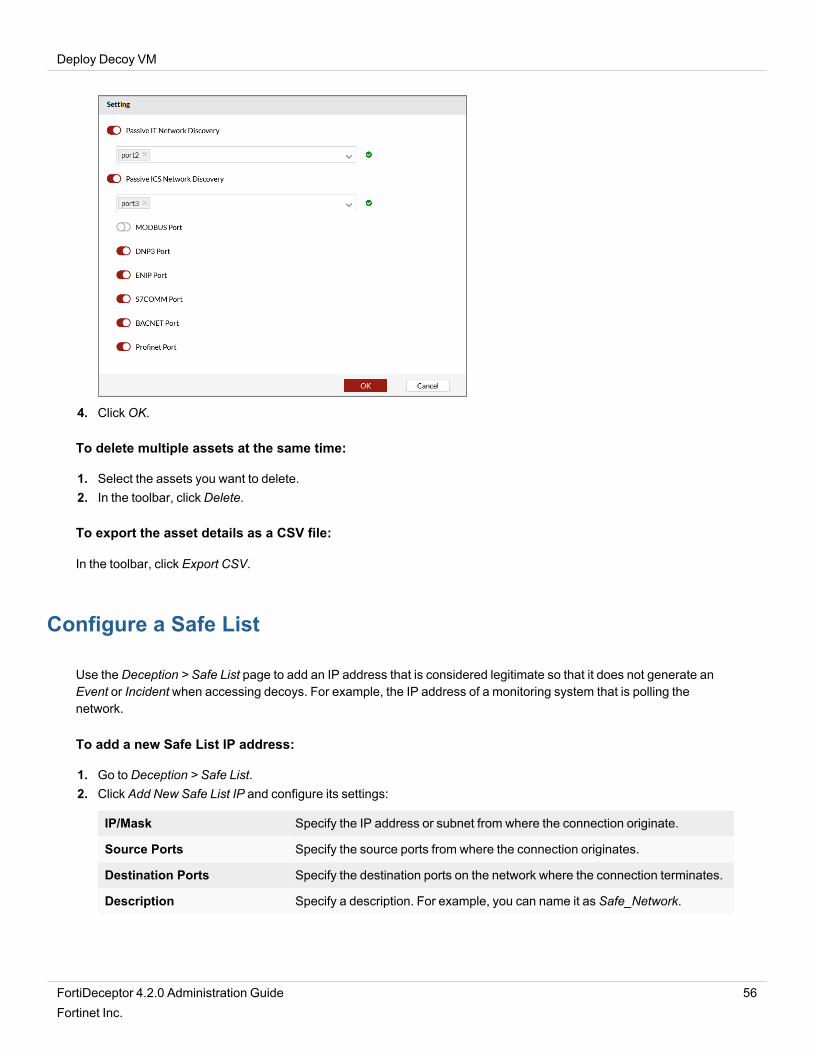
To enable Asset Discovery:
1. Go to Deception > Asset Discovery.2. Click Asset discovery setting.3. Enable the following the settings:
Passive IT NetworkDiscovery
Enable to allow FortiDeceptor to identify common IT devices such as servers,laptops, and routers by sniffing network traffic.Select all the ports connected to the network for discovery.
Passive ICS NetworkDiscovery
Enable to allow FortiDeceptor to identify industrial control devices such asPLC controllers.Select all the ports connected to the network and ICS protocols for discovery.
FortiDeceptor 4.2.0 Administration Guide 55Fortinet Inc.
Deploy Decoy VM
4. ClickOK.
To delete multiple assets at the same time:
1. Select the assets you want to delete.2. In the toolbar, click Delete.
To export the asset details as a CSV file:
In the toolbar, click Export CSV.
Configure a Safe List
Use the Deception > Safe List page to add an IP address that is considered legitimate so that it does not generate anEvent or Incident when accessing decoys. For example, the IP address of a monitoring system that is polling thenetwork.
To add a new Safe List IP address:
1. Go to Deception > Safe List.2. Click Add New Safe List IP and configure its settings:
IP/Mask Specify the IP address or subnet from where the connection originate.
Source Ports Specify the source ports from where the connection originates.
Destination Ports Specify the destination ports on the network where the connection terminates.
Description Specify a description. For example, you can name it as Safe_Network.
FortiDeceptor 4.2.0 Administration Guide 56Fortinet Inc.
Deploy Decoy VM
Services Select the name of the services used to connect to the network.
Status Select Enabled or Disabled.
Action Click Update or Cancel.
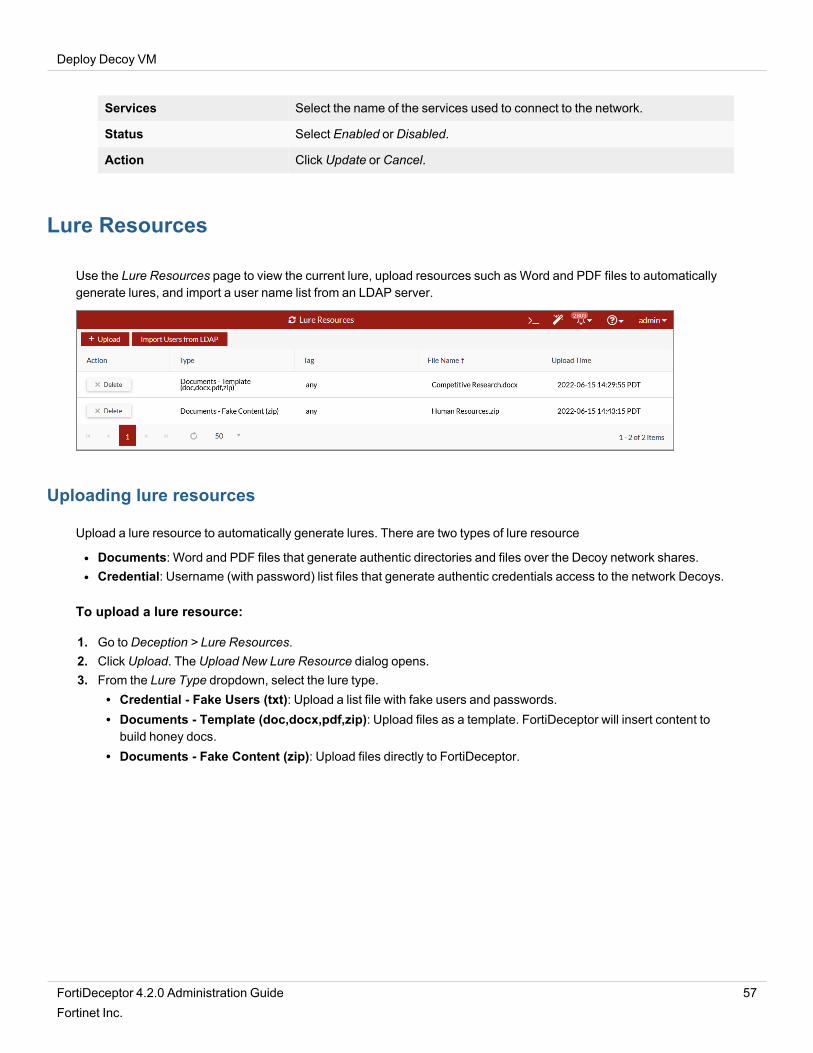
Lure Resources
Use the Lure Resources page to view the current lure, upload resources such as Word and PDF files to automaticallygenerate lures, and import a user name list from an LDAP server.
Uploading lure resources
Upload a lure resource to automatically generate lures. There are two types of lure resource
l Documents: Word and PDF files that generate authentic directories and files over the Decoy network shares.l Credential: Username (with password) list files that generate authentic credentials access to the network Decoys.
To upload a lure resource:
1. Go to Deception > Lure Resources.2. Click Upload. The Upload New Lure Resource dialog opens.3. From the Lure Type dropdown, select the lure type.
l Credential - Fake Users (txt): Upload a list file with fake users and passwords.l Documents - Template (doc,docx,pdf,zip): Upload files as a template. FortiDeceptor will insert content tobuild honey docs.
l Documents - Fake Content (zip): Upload files directly to FortiDeceptor.
FortiDeceptor 4.2.0 Administration Guide 57Fortinet Inc.
Deploy Decoy VM
The Credential - Fake Users (txt) and Documents - Template (doc,docx,pdf,zip) optionsinclude sample files to help you create a resource.
4. Enter an optional Tag, such as any.5. In the Resource File field, click Choose a file to upload the resource, or drag and drop it onto the field.6. Click Save.
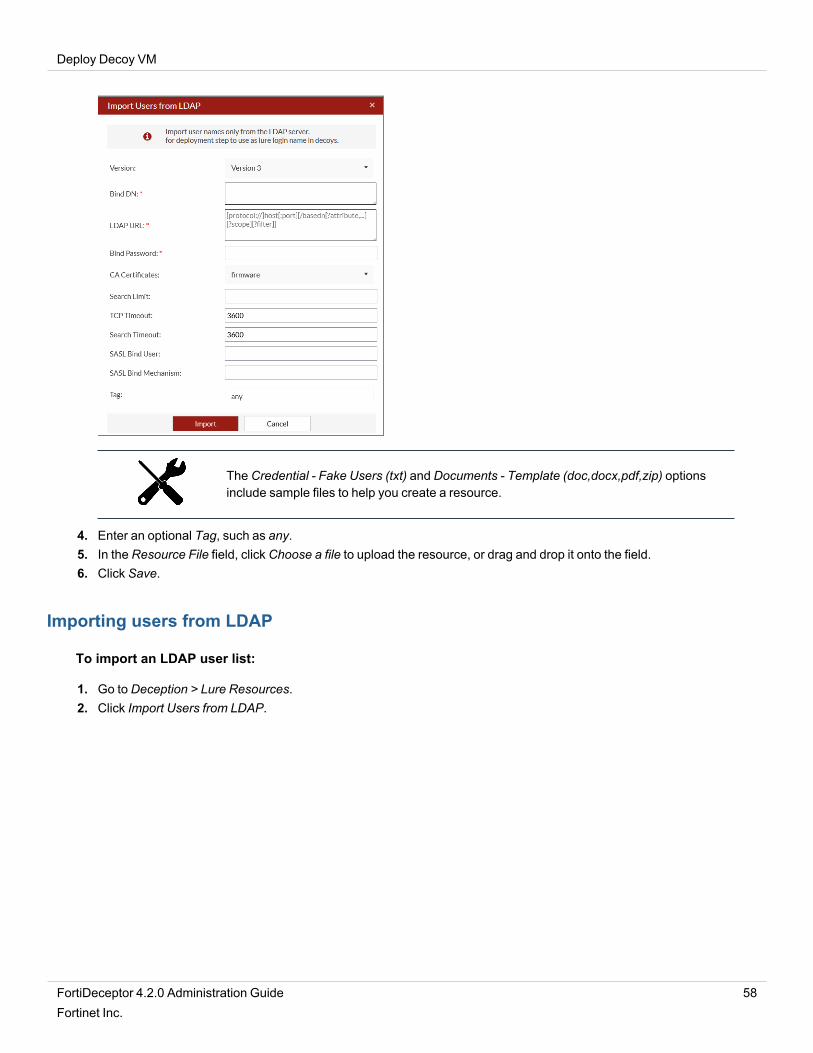
Importing users from LDAP
To import an LDAP user list:
1. Go to Deception > Lure Resources.2. Click Import Users from LDAP.
FortiDeceptor 4.2.0 Administration Guide 58Fortinet Inc.
Deploy Decoy VM
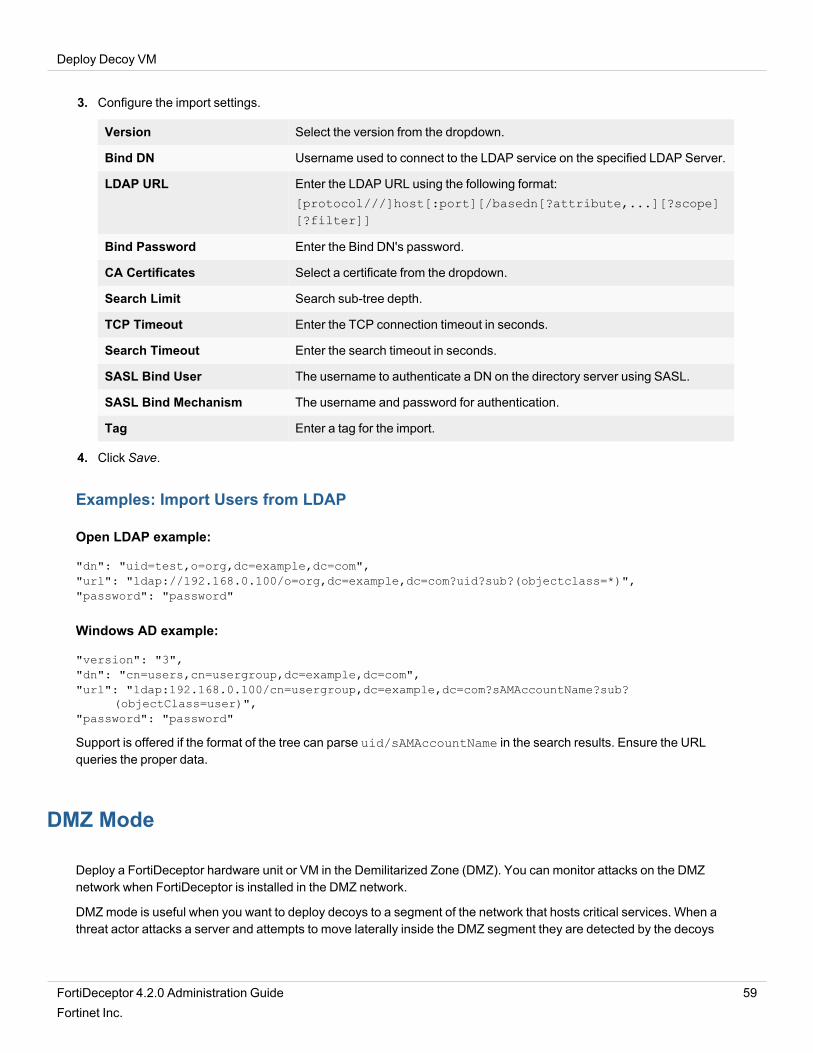
3. Configure the import settings.
Version Select the version from the dropdown.
Bind DN Username used to connect to the LDAP service on the specified LDAP Server.
LDAP URL Enter the LDAP URL using the following format:[protocol///]host[:port][/basedn[?attribute,...][?scope][?filter]]
Bind Password Enter the Bind DN's password.
CA Certificates Select a certificate from the dropdown.
Search Limit Search sub-tree depth.
TCP Timeout Enter the TCP connection timeout in seconds.
Search Timeout Enter the search timeout in seconds.
SASL Bind User The username to authenticate a DN on the directory server using SASL.
SASL Bind Mechanism The username and password for authentication.
Tag Enter a tag for the import.
4. Click Save.
Examples: Import Users from LDAP
Open LDAP example:
"dn": "uid=test,o=org,dc=example,dc=com","url": "ldap://192.168.0.100/o=org,dc=example,dc=com?uid?sub?(objectclass=*)","password": "password"
Windows AD example:
"version": "3","dn": "cn=users,cn=usergroup,dc=example,dc=com","url": "ldap:192.168.0.100/cn=usergroup,dc=example,dc=com?sAMAccountName?sub?
(objectClass=user)","password": "password"
Support is offered if the format of the tree can parse uid/sAMAccountName in the search results. Ensure the URLqueries the proper data.
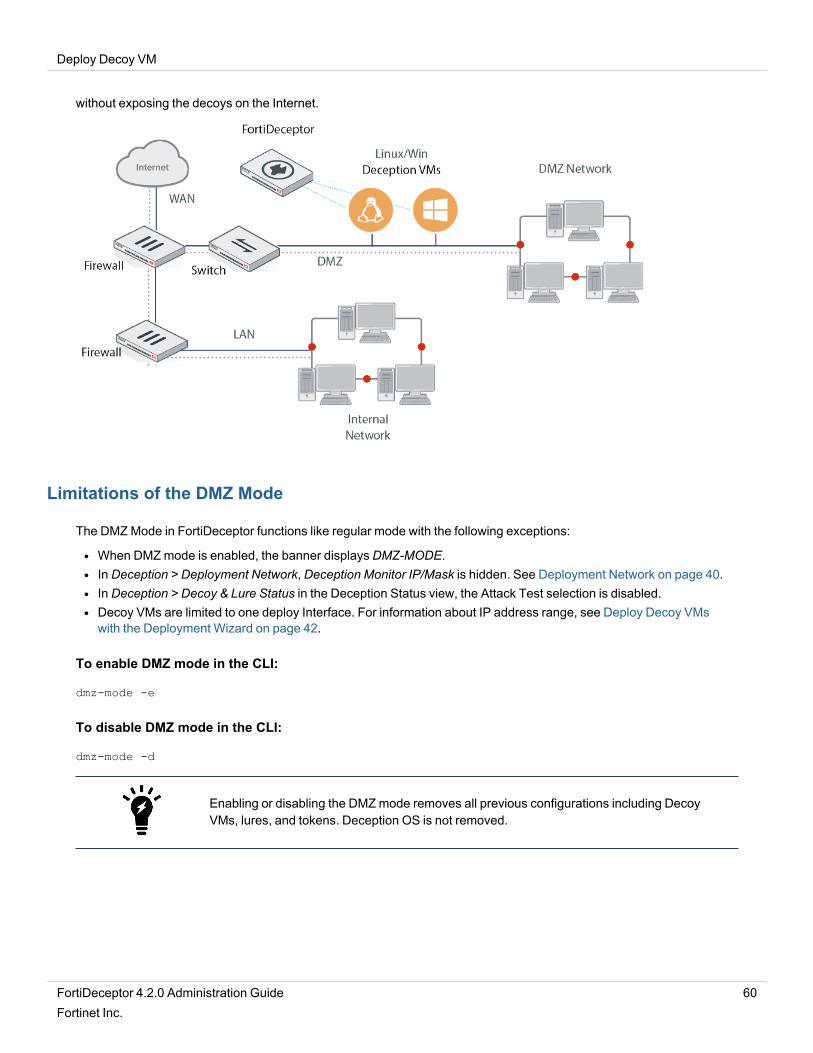
DMZ Mode
Deploy a FortiDeceptor hardware unit or VM in the Demilitarized Zone (DMZ). You can monitor attacks on the DMZnetwork when FortiDeceptor is installed in the DMZ network.
DMZmode is useful when you want to deploy decoys to a segment of the network that hosts critical services. When athreat actor attacks a server and attempts to move laterally inside the DMZ segment they are detected by the decoys
FortiDeceptor 4.2.0 Administration Guide 59Fortinet Inc.
Deploy Decoy VM
without exposing the decoys on the Internet.
Limitations of the DMZ Mode
The DMZMode in FortiDeceptor functions like regular mode with the following exceptions:
l When DMZmode is enabled, the banner displays DMZ-MODE.l In Deception > Deployment Network, Deception Monitor IP/Mask is hidden. See Deployment Network on page 40.l In Deception > Decoy & Lure Status in the Deception Status view, the Attack Test selection is disabled.l Decoy VMs are limited to one deploy Interface. For information about IP address range, see Deploy Decoy VMswith the Deployment Wizard on page 42.
To enable DMZ mode in the CLI:
dmz-mode -e
To disable DMZ mode in the CLI:
dmz-mode -d
Enabling or disabling the DMZmode removes all previous configurations including DecoyVMs, lures, and tokens. Deception OS is not removed.
FortiDeceptor 4.2.0 Administration Guide 60Fortinet Inc.
Monitor Attacks
Administrators can monitor attacks in two ways:
To monitor attacks using Incident pages:
l Incident > Analysis lists incidents and related events detected by FortiDeceptor. See Analysis on page 62.l Incident > Campaign lists attacks and related events detected by FortiDeceptor. See Campaign on page 66.l Incident > Attack Map shows attacks and related events detected by FortiDeceptor. See Attack Map on page 68.
To monitor attacks using Dashboard widgets:
l Use the Dashboard Incidents & Events Distribution widget. See Incidents and Events Distribution on page 69.l Use the Dashboard Incidents & Events Count widget. See Incidents and Events Count on page 70.
FortiDeceptor 4.2.0 Administration Guide 61Fortinet Inc.
Monitor Attacks
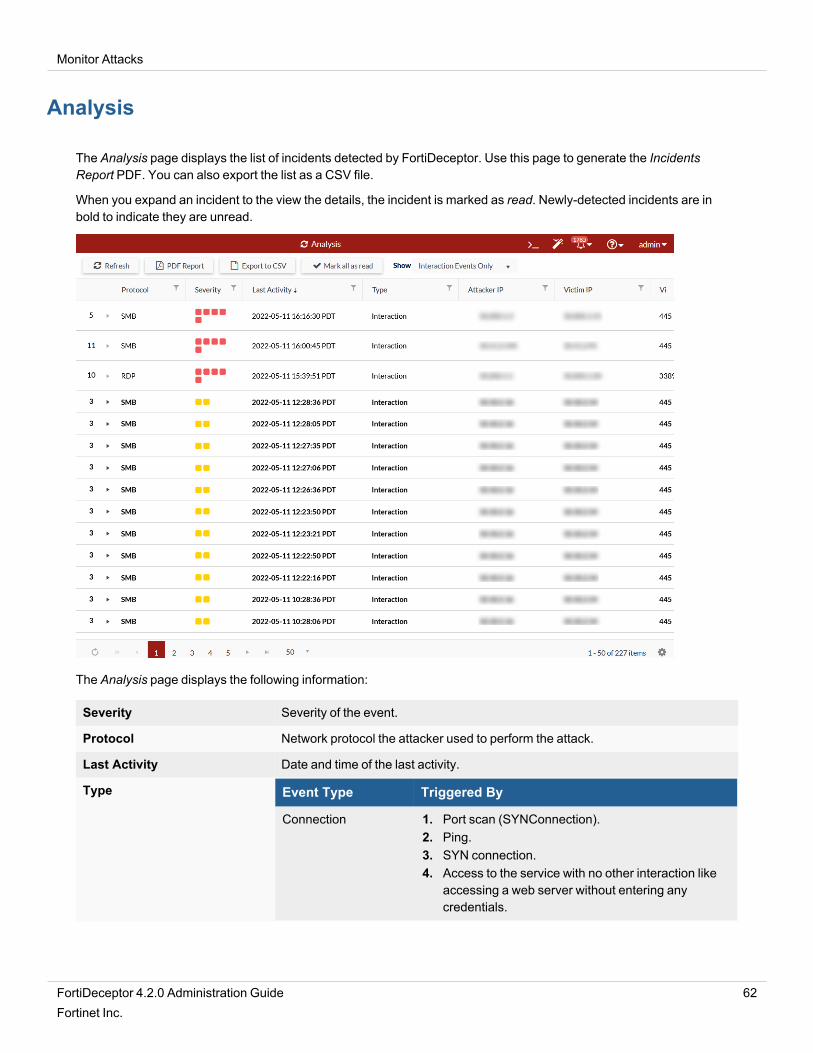
Analysis
The Analysis page displays the list of incidents detected by FortiDeceptor. Use this page to generate the IncidentsReport PDF. You can also export the list as a CSV file.
When you expand an incident to the view the details, the incident is marked as read. Newly-detected incidents are inbold to indicate they are unread.
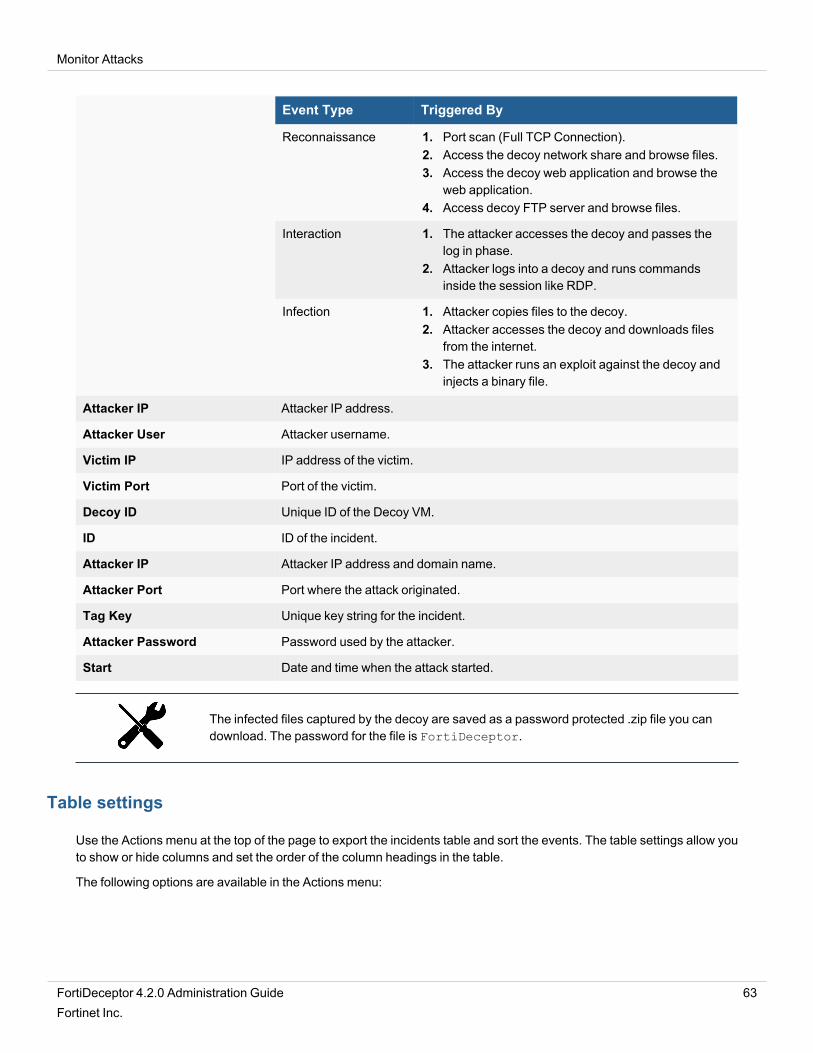
The Analysis page displays the following information:
Severity Severity of the event.
Protocol Network protocol the attacker used to perform the attack.
Last Activity Date and time of the last activity.
Type Event Type Triggered By
Connection 1. Port scan (SYNConnection).2. Ping.3. SYN connection.4. Access to the service with no other interaction like
accessing a web server without entering anycredentials.
FortiDeceptor 4.2.0 Administration Guide 62Fortinet Inc.
Monitor Attacks
Event Type Triggered By
Reconnaissance 1. Port scan (Full TCP Connection).2. Access the decoy network share and browse files.3. Access the decoy web application and browse the
web application.4. Access decoy FTP server and browse files.
Interaction 1. The attacker accesses the decoy and passes thelog in phase.
2. Attacker logs into a decoy and runs commandsinside the session like RDP.
Infection 1. Attacker copies files to the decoy.2. Attacker accesses the decoy and downloads files
from the internet.3. The attacker runs an exploit against the decoy and
injects a binary file.
Attacker IP Attacker IP address.
Attacker User Attacker username.
Victim IP IP address of the victim.
Victim Port Port of the victim.
Decoy ID Unique ID of the Decoy VM.
ID ID of the incident.
Attacker IP Attacker IP address and domain name.
Attacker Port Port where the attack originated.
Tag Key Unique key string for the incident.
Attacker Password Password used by the attacker.
Start Date and time when the attack started.
The infected files captured by the decoy are saved as a password protected .zip file you candownload. The password for the file is FortiDeceptor.
Table settings
Use the Actions menu at the top of the page to export the incidents table and sort the events. The table settings allow youto show or hide columns and set the order of the column headings in the table.
The following options are available in the Actions menu:
FortiDeceptor 4.2.0 Administration Guide 63Fortinet Inc.
Monitor Attacks
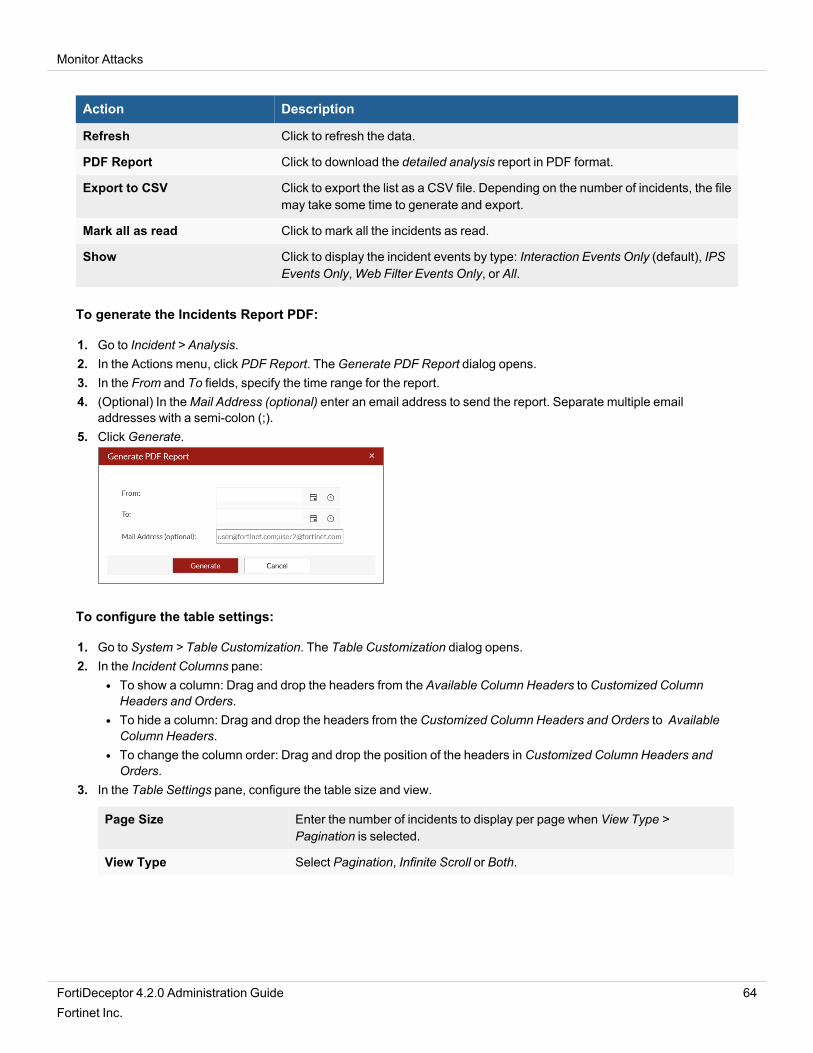
Action Description
Refresh Click to refresh the data.
PDF Report Click to download the detailed analysis report in PDF format.
Export to CSV Click to export the list as a CSV file. Depending on the number of incidents, the filemay take some time to generate and export.
Mark all as read Click to mark all the incidents as read.
Show Click to display the incident events by type: Interaction Events Only (default), IPSEvents Only,Web Filter Events Only, or All.
To generate the Incidents Report PDF:
1. Go to Incident > Analysis.2. In the Actions menu, click PDF Report. TheGenerate PDF Report dialog opens.3. In the From and To fields, specify the time range for the report.4. (Optional) In theMail Address (optional) enter an email address to send the report. Separate multiple email
addresses with a semi-colon (;).5. ClickGenerate.
To configure the table settings:
1. Go to System > Table Customization. The Table Customization dialog opens.2. In the Incident Columns pane:
l To show a column: Drag and drop the headers from the Available Column Headers to Customized ColumnHeaders and Orders.
l To hide a column: Drag and drop the headers from the Customized Column Headers and Orders to AvailableColumn Headers.
l To change the column order: Drag and drop the position of the headers in Customized Column Headers andOrders.
3. In the Table Settings pane, configure the table size and view.
Page Size Enter the number of incidents to display per page when View Type >Pagination is selected.
View Type Select Pagination, Infinite Scroll or Both.
FortiDeceptor 4.2.0 Administration Guide 64Fortinet Inc.
Monitor Attacks
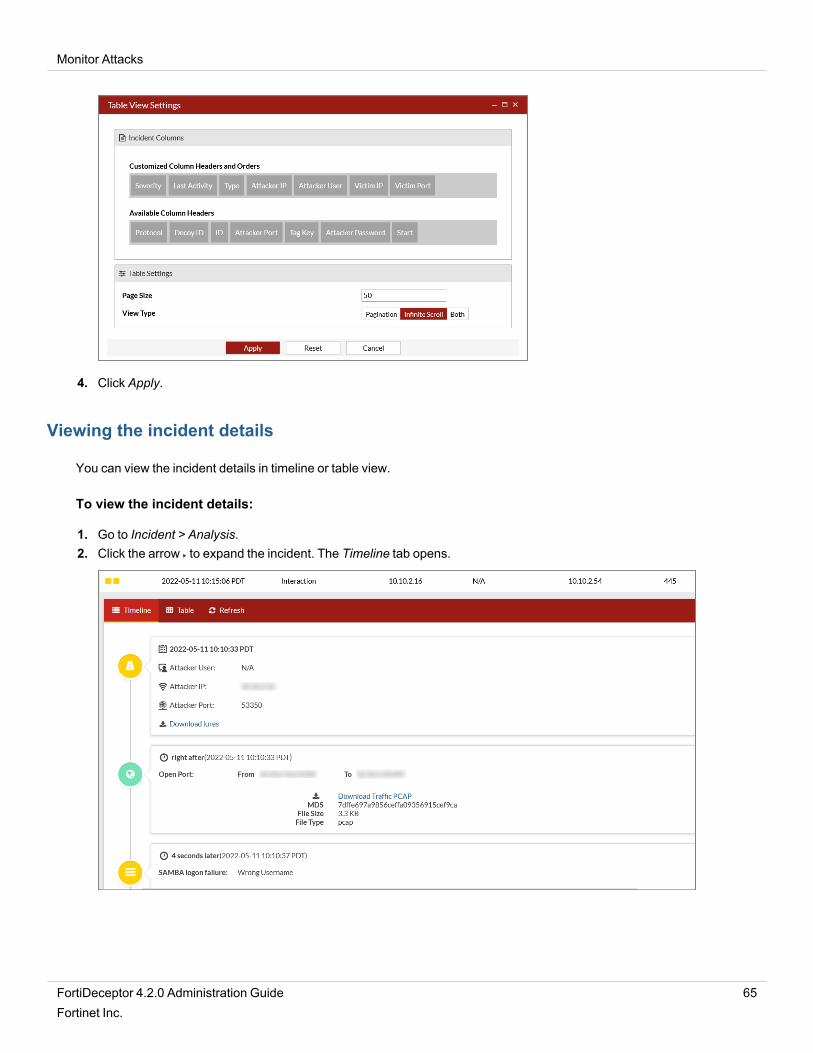
4. Click Apply.
Viewing the incident details
You can view the incident details in timeline or table view.
To view the incident details:
1. Go to Incident > Analysis.2. Click the arrow to expand the incident. The Timeline tab opens.
FortiDeceptor 4.2.0 Administration Guide 65Fortinet Inc.
Monitor Attacks
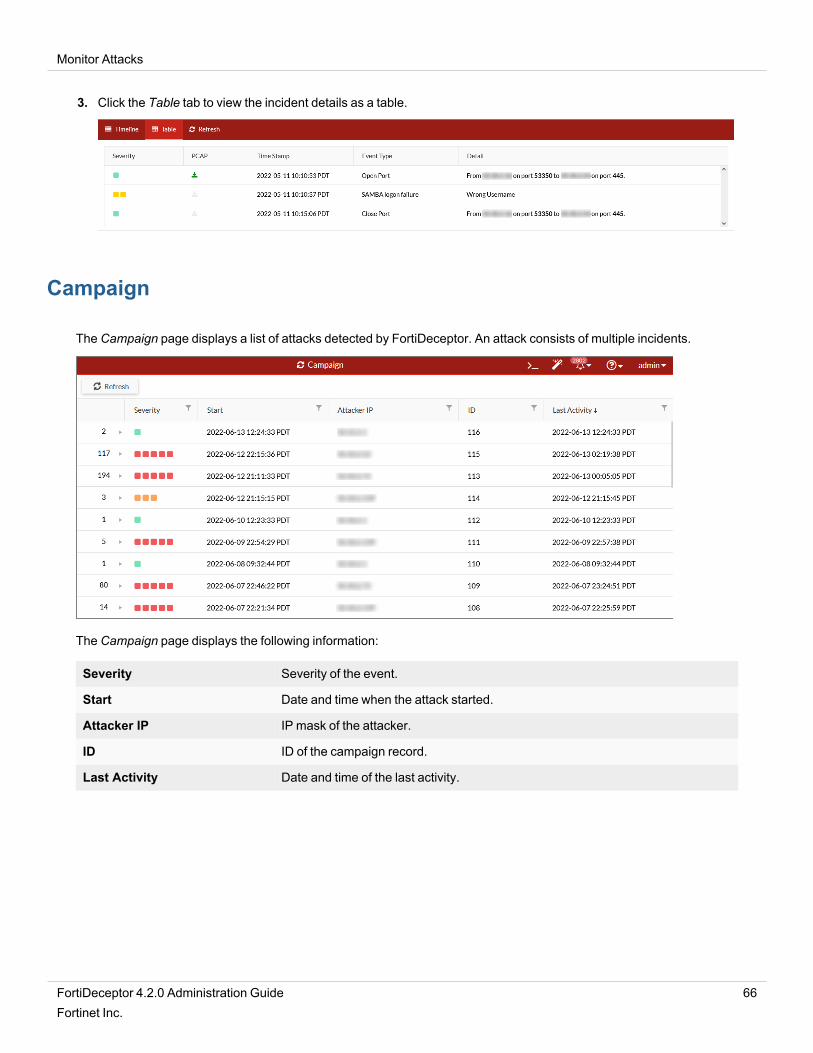
3. Click the Table tab to view the incident details as a table.
Campaign
The Campaign page displays a list of attacks detected by FortiDeceptor. An attack consists of multiple incidents.
The Campaign page displays the following information:
Severity Severity of the event.
Start Date and time when the attack started.
Attacker IP IP mask of the attacker.
ID ID of the campaign record.
Last Activity Date and time of the last activity.
FortiDeceptor 4.2.0 Administration Guide 66Fortinet Inc.
Monitor Attacks
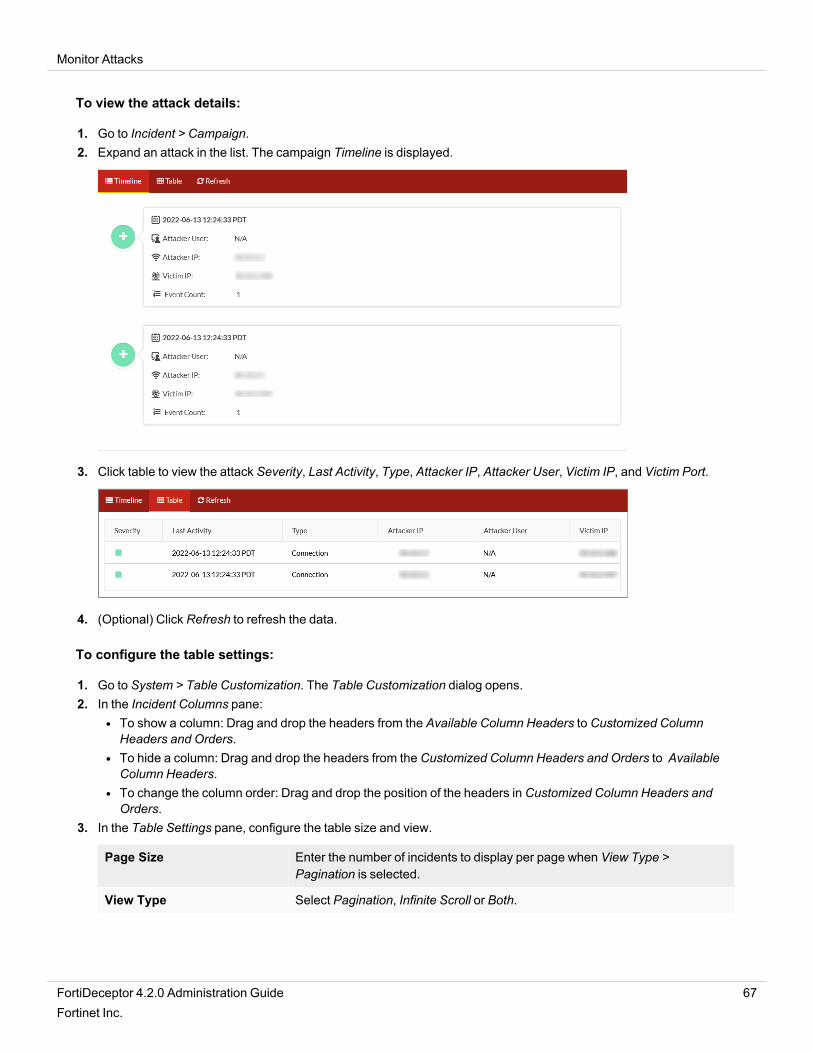
To view the attack details:
1. Go to Incident > Campaign.2. Expand an attack in the list. The campaign Timeline is displayed.
3. Click table to view the attack Severity, Last Activity, Type, Attacker IP, Attacker User, Victim IP, and Victim Port.
4. (Optional) Click Refresh to refresh the data.
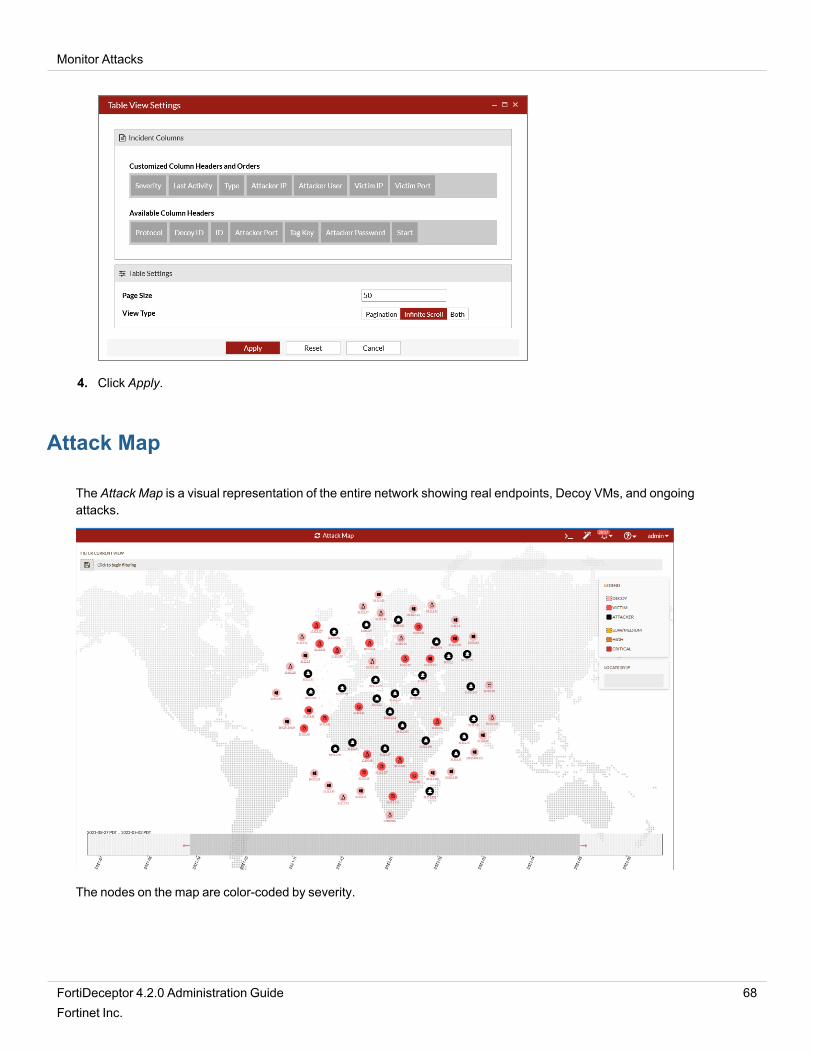
To configure the table settings:
1. Go to System > Table Customization. The Table Customization dialog opens.2. In the Incident Columns pane:
l To show a column: Drag and drop the headers from the Available Column Headers to Customized ColumnHeaders and Orders.
l To hide a column: Drag and drop the headers from the Customized Column Headers and Orders to AvailableColumn Headers.
l To change the column order: Drag and drop the position of the headers in Customized Column Headers andOrders.
3. In the Table Settings pane, configure the table size and view.
Page Size Enter the number of incidents to display per page when View Type >Pagination is selected.
View Type Select Pagination, Infinite Scroll or Both.
FortiDeceptor 4.2.0 Administration Guide 67Fortinet Inc.
Monitor Attacks
4. Click Apply.
Attack Map
The Attack Map is a visual representation of the entire network showing real endpoints, Decoy VMs, and ongoingattacks.
The nodes on the map are color-coded by severity.
FortiDeceptor 4.2.0 Administration Guide 68Fortinet Inc.
Monitor Attacks
Node Color Description
Decoy Pink Click to view the Name,MAC address, IP,DNS, and Gateway.
Victim Red Click to view the attack history includingAttacker, Start Time and Incident ID.When a node is both Victim and Attacker, thenode will appear as Attacker.
Attacker Black Click to view the attacker's history includingAttacker, Start Time and Incident ID.
To filter the Attack Map by IP:
1. Under Filter Current View, click in inside Click to begin filtering. The options menu is displayed.2. Select one of the following options:
l Attacker IPl Victim IPl Decoy IP
3. Enter the IP address. FortiDeceptor sorts the nodes on the map.
To save the current view of the map:
Under Filter Current View, click the Save View icon .
To filter the map by date:
Drag the red arrows at the bottom of the page to set the start and end dates.
To search for a node by IP:
In the Locate by IP box, enter the IP address.
Incidents and Events Distribution
This dashboard widget displays the number of incidents and events with the following risk level information and options.
Unknown Incident or Event where the risk level is unknown. Entries are in grey.
Low Risk Incident or Event where the risk level is low. Entries are in green.
Medium Risk Incident or Event where the risk level is medium. Entries are in yellow.
High Risk Incident or Event where the risk level is high. Entries are in orange.
Critical Incident or Event where the risk level is critical. Entries are in red.
FortiDeceptor 4.2.0 Administration Guide 69Fortinet Inc.
Monitor Attacks
Hover over the pie chart to see the number of Incidents or Events and their percentage.
To customize this widget:
1. Click the edit icon to make the following changes:l Enter a CustomizedWidget Title.l Change the Refresh Interval.l Select a Time Period: Last 24 Hours, Last 7 Days, or Last 4 Weeks.
Incidents and Events Count
This dashboard widget displays the number of Incidents and Events.
Event Click Event to show or hide the number of events in the time period. Events are in blue.
Incidents Click Incident to show or hide the number of incidents in the time period. Incidents are inorange.
Time/Date The time or date the Incident or Event occurred.
To customize this widget:
1. Click the edit icon to make the following changes:l Enter a CustomizedWidget Title.l Change the Refresh Interval.l Select a Time Period: Last 24 Hours, Last 7 Days, or Last 4 Weeks.
Top 10 Attackers by Events
This dashboard widget displays the top ten attackers by the number of events.
IP Address IP address of the attacker.
Number of Events Hover over an IP address to see the total number of Events.
Top 10 Attackers by Incidents
This dashboard widget displays the top ten attackers by the number of incidents.
IP Address IP address of the attacker.
Number of Incidents Hover over an IP address to see the total number of Incidents.
FortiDeceptor 4.2.0 Administration Guide 70Fortinet Inc.
Monitor Attacks
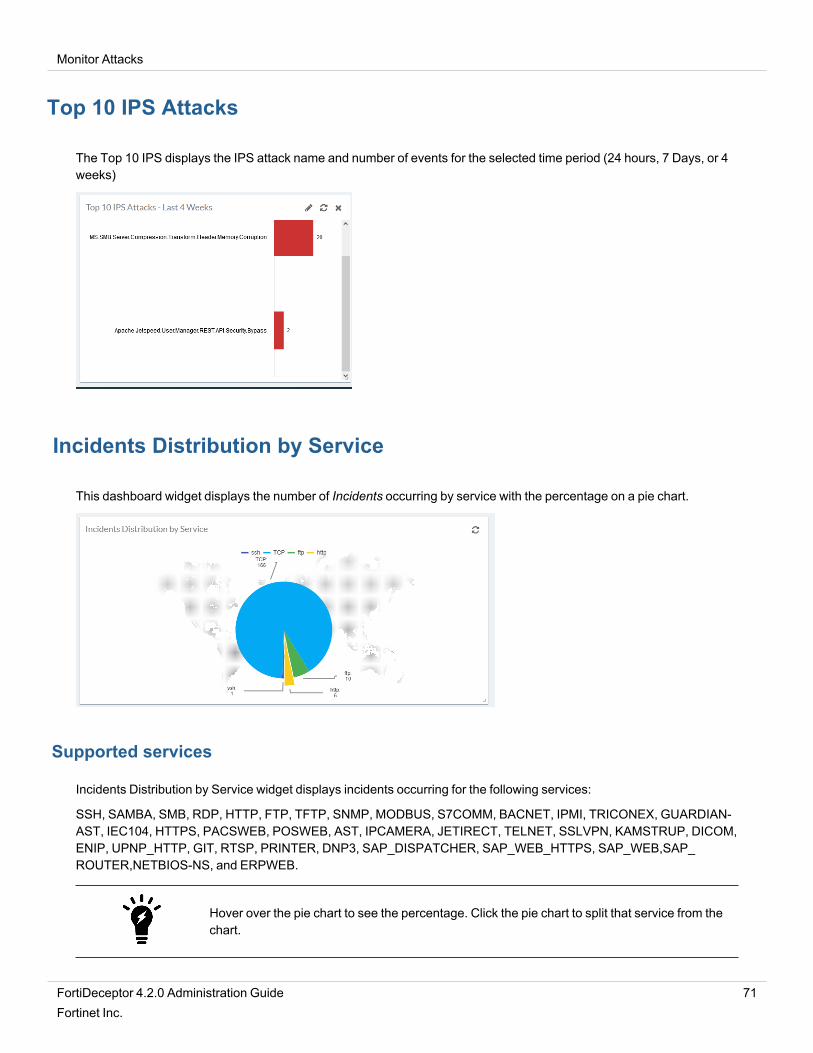
Top 10 IPS Attacks
The Top 10 IPS displays the IPS attack name and number of events for the selected time period (24 hours, 7 Days, or 4weeks)
Incidents Distribution by Service
This dashboard widget displays the number of Incidents occurring by service with the percentage on a pie chart.
Supported services
Incidents Distribution by Service widget displays incidents occurring for the following services:
SSH, SAMBA, SMB, RDP, HTTP, FTP, TFTP, SNMP, MODBUS, S7COMM, BACNET, IPMI, TRICONEX, GUARDIAN-AST, IEC104, HTTPS, PACSWEB, POSWEB, AST, IPCAMERA, JETIRECT, TELNET, SSLVPN, KAMSTRUP, DICOM,ENIP, UPNP_HTTP, GIT, RTSP, PRINTER, DNP3, SAP_DISPATCHER, SAP_WEB_HTTPS, SAP_WEB,SAP_ROUTER,NETBIOS-NS, and ERPWEB.
Hover over the pie chart to see the percentage. Click the pie chart to split that service from thechart.
FortiDeceptor 4.2.0 Administration Guide 71Fortinet Inc.

Monitor Attacks
Global Attacker Distribution
This widget displays the number of Attackers by country on a global map.
Hover over each country to see the number of Attackers from each country.
FortiDeceptor 4.2.0 Administration Guide 72Fortinet Inc.

Fabric
Use the Fabric pages to manage and configure FortiGate information for integration with FortiDeceptor. This includesblocking settings and Security Fabric status information. Blocking from FortiGate is an API call from FortiDeceptor whichallows instant quarantine from FortiGate once an incident is detected. The quarantined IP is under user quarantine in theFortiGate GUI.
Fabric provides access to the following pages:
Detection Devices Configure the third-party malware detection devices for FortiDeceptor integration.When FortiDeceptor detects a suspicious file transfer in an incident,FortiDeceptor will send raw files to those detection devices for malware inspectionand display the result along side the Incident.
Quarantine Integration Configure the quarantine devices for FortiDeceptor integration
Quarantine Status Status of blocked IP addresses.
IOC Export Export the IOC file in CSV format for a specified time period.
Detection Devices
The Detection Devices page allows you to configure integrations with FortiSandbox, Cuckoo Sandbox, and Virus Totaldevices.
FortiDeceptor 4.2.0 Administration Guide 73Fortinet Inc.
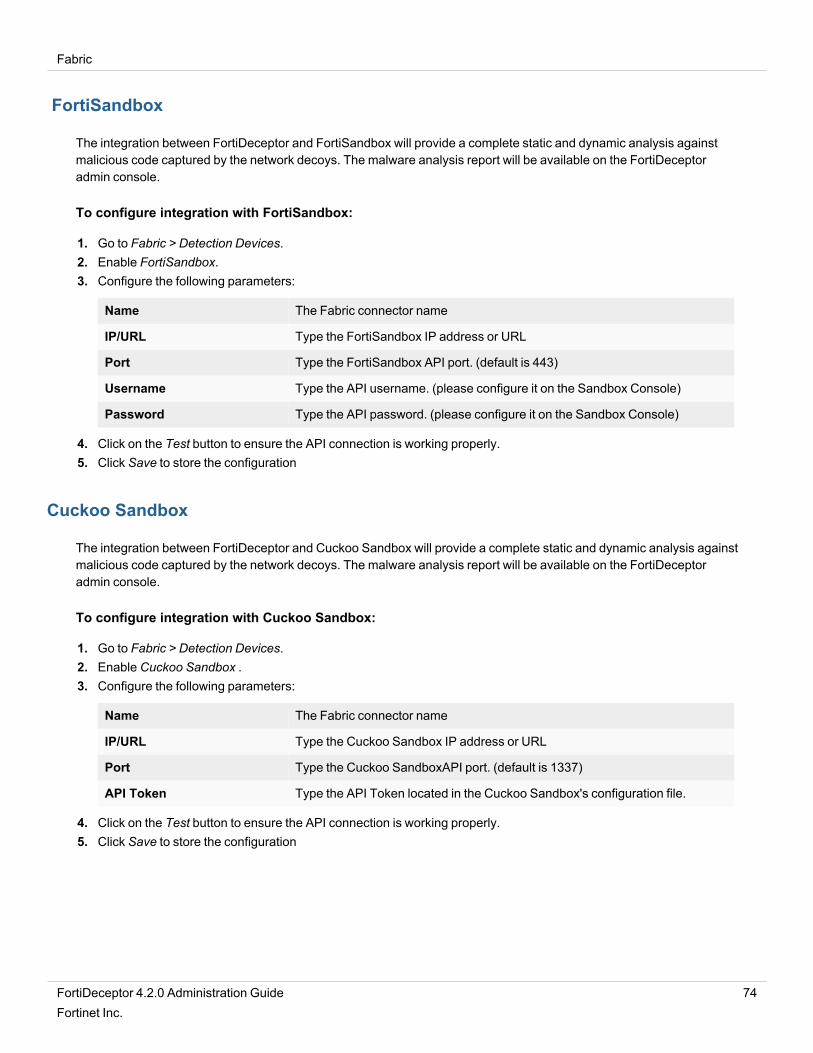
Fabric
FortiSandbox
The integration between FortiDeceptor and FortiSandbox will provide a complete static and dynamic analysis againstmalicious code captured by the network decoys. The malware analysis report will be available on the FortiDeceptoradmin console.
To configure integration with FortiSandbox:
1. Go to Fabric > Detection Devices.2. Enable FortiSandbox.3. Configure the following parameters:
Name The Fabric connector name
IP/URL Type the FortiSandbox IP address or URL
Port Type the FortiSandbox API port. (default is 443)
Username Type the API username. (please configure it on the Sandbox Console)
Password Type the API password. (please configure it on the Sandbox Console)
4. Click on the Test button to ensure the API connection is working properly.5. Click Save to store the configuration
Cuckoo Sandbox
The integration between FortiDeceptor and Cuckoo Sandbox will provide a complete static and dynamic analysis againstmalicious code captured by the network decoys. The malware analysis report will be available on the FortiDeceptoradmin console.
To configure integration with Cuckoo Sandbox:
1. Go to Fabric > Detection Devices.2. Enable Cuckoo Sandbox .3. Configure the following parameters:
Name The Fabric connector name
IP/URL Type the Cuckoo Sandbox IP address or URL
Port Type the Cuckoo SandboxAPI port. (default is 1337)
API Token Type the API Token located in the Cuckoo Sandbox's configuration file.
4. Click on the Test button to ensure the API connection is working properly.5. Click Save to store the configuration
FortiDeceptor 4.2.0 Administration Guide 74Fortinet Inc.
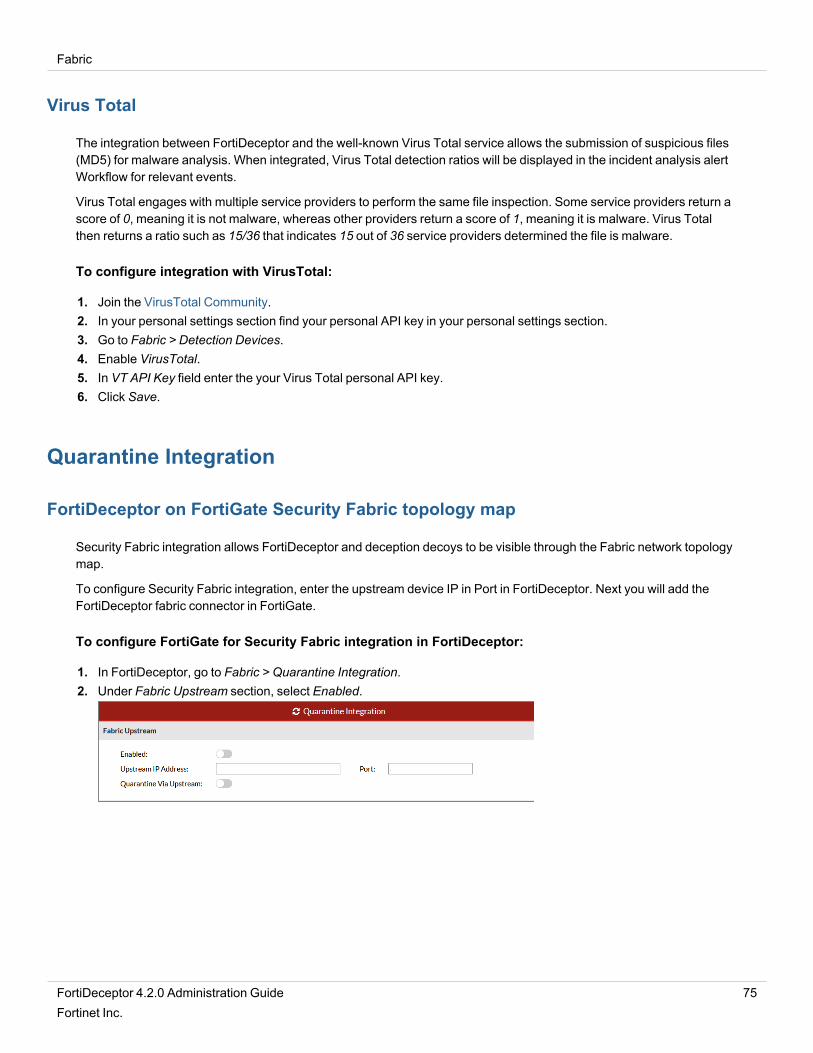
Fabric
Virus Total
The integration between FortiDeceptor and the well-known Virus Total service allows the submission of suspicious files(MD5) for malware analysis. When integrated, Virus Total detection ratios will be displayed in the incident analysis alertWorkflow for relevant events.
Virus Total engages with multiple service providers to perform the same file inspection. Some service providers return ascore of 0, meaning it is not malware, whereas other providers return a score of 1, meaning it is malware. Virus Totalthen returns a ratio such as 15/36 that indicates 15 out of 36 service providers determined the file is malware.
To configure integration with VirusTotal:
1. Join the VirusTotal Community.2. In your personal settings section find your personal API key in your personal settings section.3. Go to Fabric > Detection Devices.4. Enable VirusTotal.5. In VT API Key field enter the your Virus Total personal API key.6. Click Save.
Quarantine Integration
FortiDeceptor on FortiGate Security Fabric topology map
Security Fabric integration allows FortiDeceptor and deception decoys to be visible through the Fabric network topologymap.
To configure Security Fabric integration, enter the upstream device IP in Port in FortiDeceptor. Next you will add theFortiDeceptor fabric connector in FortiGate.
To configure FortiGate for Security Fabric integration in FortiDeceptor:
1. In FortiDeceptor, go to Fabric > Quarantine Integration.2. Under Fabric Upstream section, select Enabled.
FortiDeceptor 4.2.0 Administration Guide 75Fortinet Inc.
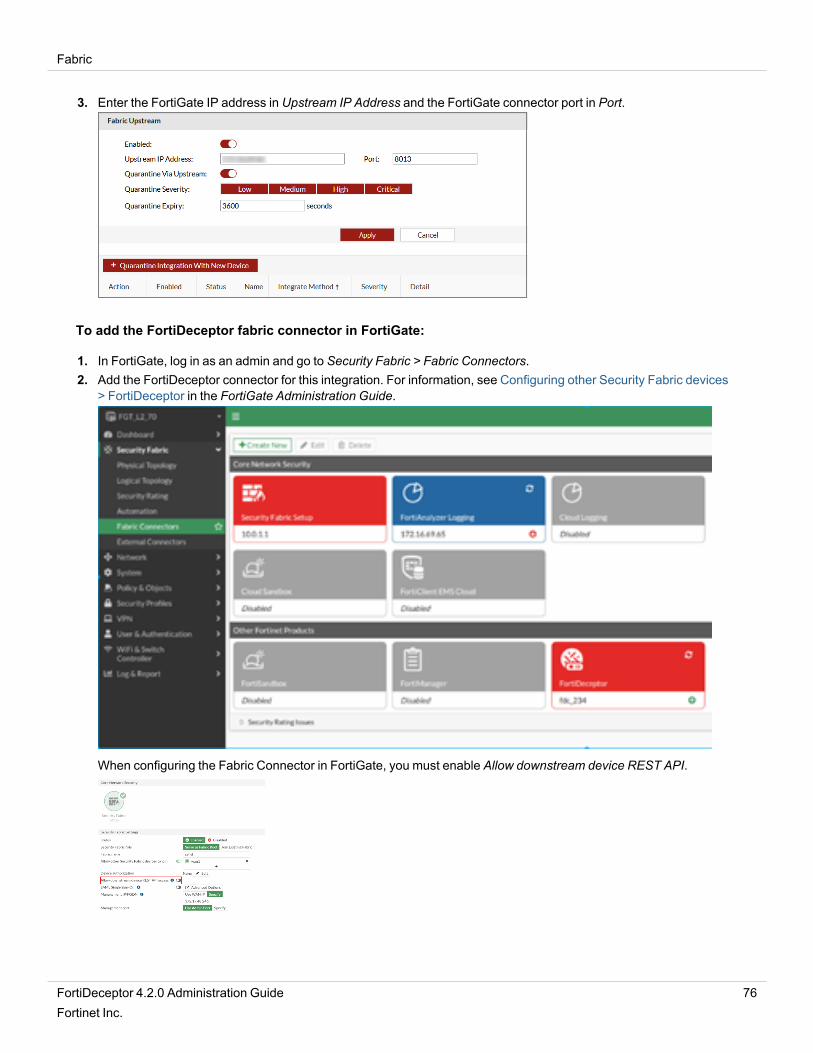
Fabric
3. Enter the FortiGate IP address in Upstream IP Address and the FortiGate connector port in Port.
To add the FortiDeceptor fabric connector in FortiGate:
1. In FortiGate, log in as an admin and go to Security Fabric > Fabric Connectors.2. Add the FortiDeceptor connector for this integration. For information, see Configuring other Security Fabric devices
> FortiDeceptor in the FortiGate Administration Guide.
When configuring the Fabric Connector in FortiGate, you must enable Allow downstream device REST API.
FortiDeceptor 4.2.0 Administration Guide 76Fortinet Inc.
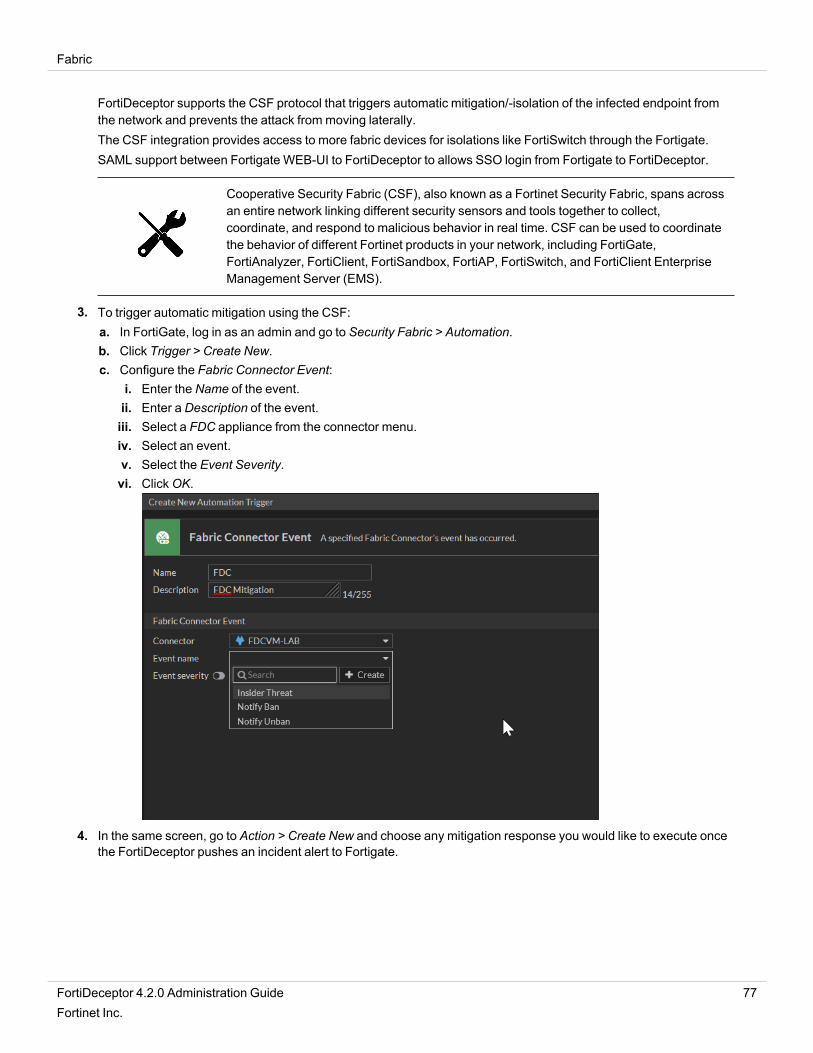
Fabric
FortiDeceptor supports the CSF protocol that triggers automatic mitigation/-isolation of the infected endpoint fromthe network and prevents the attack from moving laterally.The CSF integration provides access to more fabric devices for isolations like FortiSwitch through the Fortigate.SAML support between Fortigate WEB-UI to FortiDeceptor to allows SSO login from Fortigate to FortiDeceptor.
Cooperative Security Fabric (CSF), also known as a Fortinet Security Fabric, spans acrossan entire network linking different security sensors and tools together to collect,coordinate, and respond to malicious behavior in real time. CSF can be used to coordinatethe behavior of different Fortinet products in your network, including FortiGate,FortiAnalyzer, FortiClient, FortiSandbox, FortiAP, FortiSwitch, and FortiClient EnterpriseManagement Server (EMS).
3. To trigger automatic mitigation using the CSF:a. In FortiGate, log in as an admin and go to Security Fabric > Automation.b. Click Trigger > Create New.c. Configure the Fabric Connector Event:
i. Enter the Name of the event.ii. Enter a Description of the event.iii. Select a FDC appliance from the connector menu.iv. Select an event.v. Select the Event Severity.vi. ClickOK.
4. In the same screen, go to Action > Create New and choose any mitigation response you would like to execute oncethe FortiDeceptor pushes an incident alert to Fortigate.
FortiDeceptor 4.2.0 Administration Guide 77Fortinet Inc.
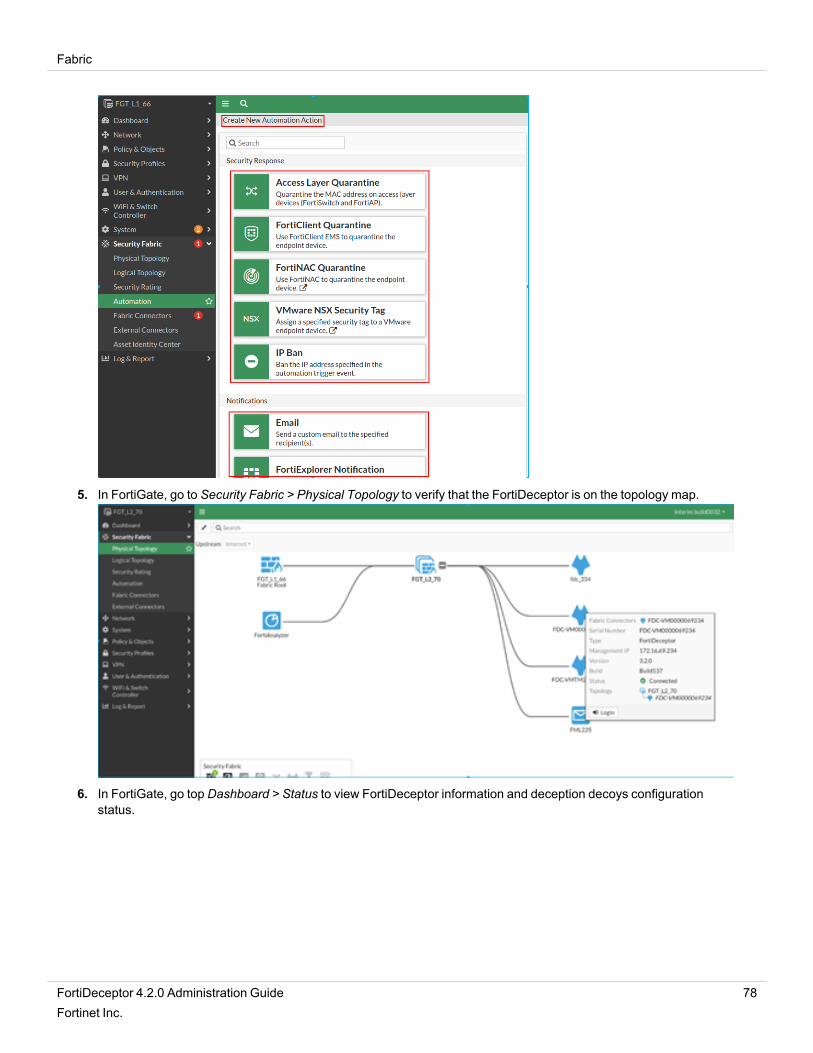
Fabric
5. In FortiGate, go to Security Fabric > Physical Topology to verify that the FortiDeceptor is on the topology map.
6. In FortiGate, go top Dashboard > Status to view FortiDeceptor information and deception decoys configurationstatus.
FortiDeceptor 4.2.0 Administration Guide 78Fortinet Inc.
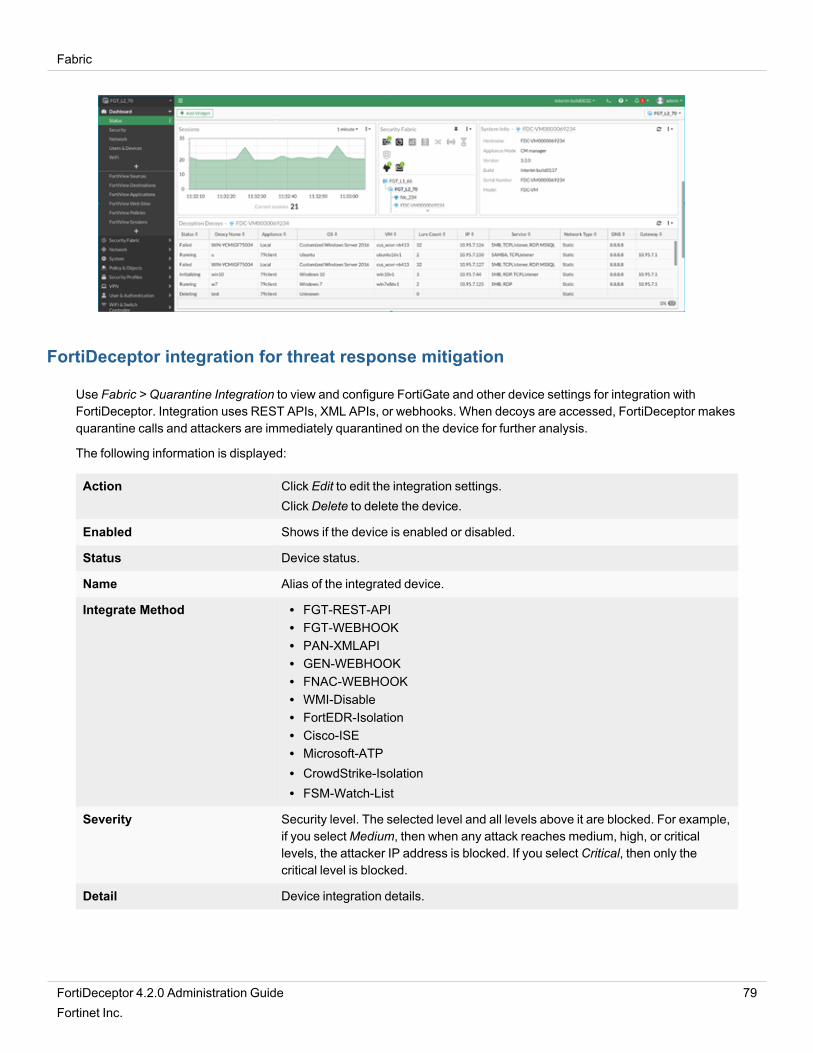
Fabric
FortiDeceptor integration for threat response mitigation
Use Fabric > Quarantine Integration to view and configure FortiGate and other device settings for integration withFortiDeceptor. Integration uses REST APIs, XML APIs, or webhooks. When decoys are accessed, FortiDeceptor makesquarantine calls and attackers are immediately quarantined on the device for further analysis.
The following information is displayed:
Action Click Edit to edit the integration settings.Click Delete to delete the device.
Enabled Shows if the device is enabled or disabled.
Status Device status.
Name Alias of the integrated device.
Integrate Method l FGT-REST-APIl FGT-WEBHOOKl PAN-XMLAPIl GEN-WEBHOOKl FNAC-WEBHOOKl WMI-Disablel FortEDR-Isolationl Cisco-ISEl Microsoft-ATPl CrowdStrike-Isolationl FSM-Watch-List
Severity Security level. The selected level and all levels above it are blocked. For example,if you selectMedium, then when any attack reaches medium, high, or criticallevels, the attacker IP address is blocked. If you select Critical, then only thecritical level is blocked.
Detail Device integration details.
FortiDeceptor 4.2.0 Administration Guide 79Fortinet Inc.

Fabric
To integrate a device:
1. Go to Fabric > Integration Devices.2. ClickQuarantine Integration With New Device.
FortiDeceptor 4.2.0 Administration Guide 80Fortinet Inc.
Fabric
3. Configure the device for integration. Then click Save.
Enabled Enable or disable this device.
Name Specify a name for this device.
Block Severity The selected level and all levels above it are blocked. For example, if youselectMedium, then when any attack reaches medium, high, or critical levels,the attacker IP address is blocked. If you select Critical, then only the criticallevel is blocked.
Appliance Option for Central Management manager device to integrate the incidentsfrom the specified appliances only.
Integrate Method The integration method of this device:l FGT-REST-API (Default)l FGT-WEBHOOKl PAN-XMLAPIl GEN-WEBHOOKl FNAC-WEBHOOKl WMI-Disablel FortEDR-Isolationl Cisco-ISEl Microsoft-ATPl CrowdStrike-Isolationl FSM-Watch-List
Different integration methods have different settings. To view the settings foreach integration type, see Integrate Method settings on page 82
IP or Device IP IP address of the integrated device.
Port Port number of the integrated device API service. Default is 8443.
Username and Password Username and password of the integrated device.
VDOM For FortiGate devices, the default access VDOM.
Verify SSL Enable to verify SSL.
Expiry Default blocking time in second. Default is 3600 seconds.
FortiDeceptor 4.2.0 Administration Guide 81Fortinet Inc.
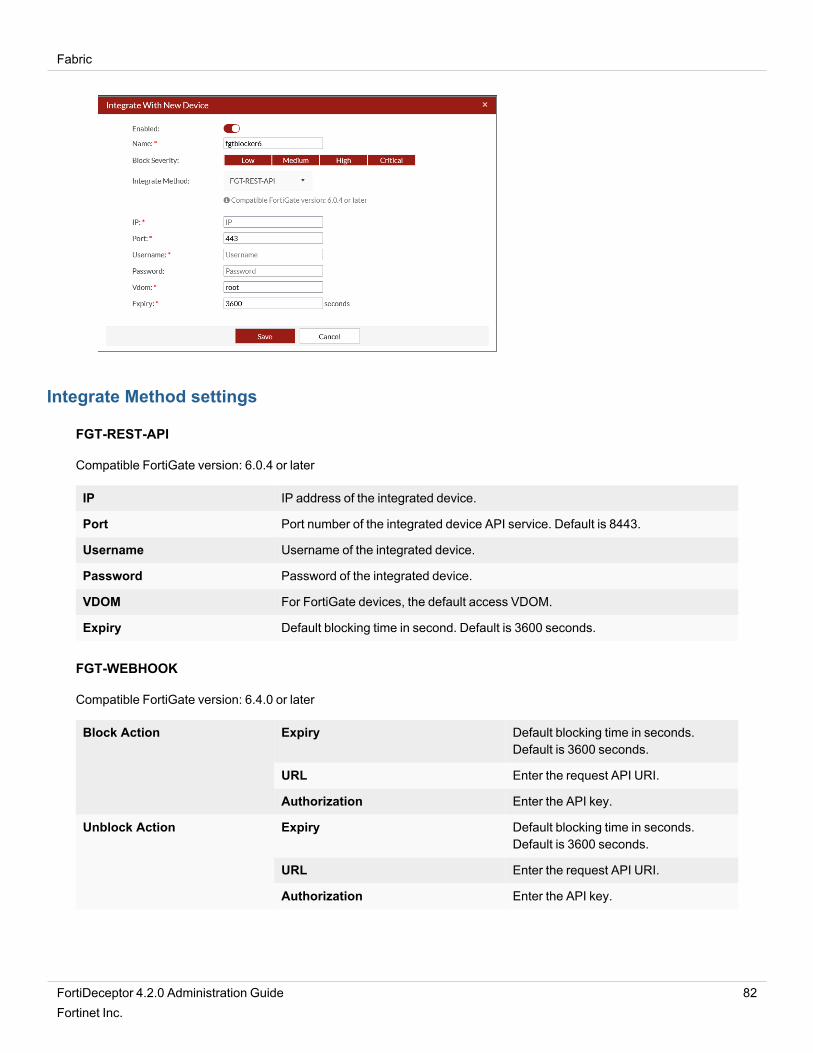
Fabric
Integrate Method settings
FGT-REST-API
Compatible FortiGate version: 6.0.4 or later
IP IP address of the integrated device.
Port Port number of the integrated device API service. Default is 8443.
Username Username of the integrated device.
Password Password of the integrated device.
VDOM For FortiGate devices, the default access VDOM.
Expiry Default blocking time in second. Default is 3600 seconds.
FGT-WEBHOOK
Compatible FortiGate version: 6.4.0 or later
Block Action Expiry Default blocking time in seconds.Default is 3600 seconds.
URL Enter the request API URI.
Authorization Enter the API key.
Unblock Action Expiry Default blocking time in seconds.Default is 3600 seconds.
URL Enter the request API URI.
Authorization Enter the API key.
FortiDeceptor 4.2.0 Administration Guide 82Fortinet Inc.
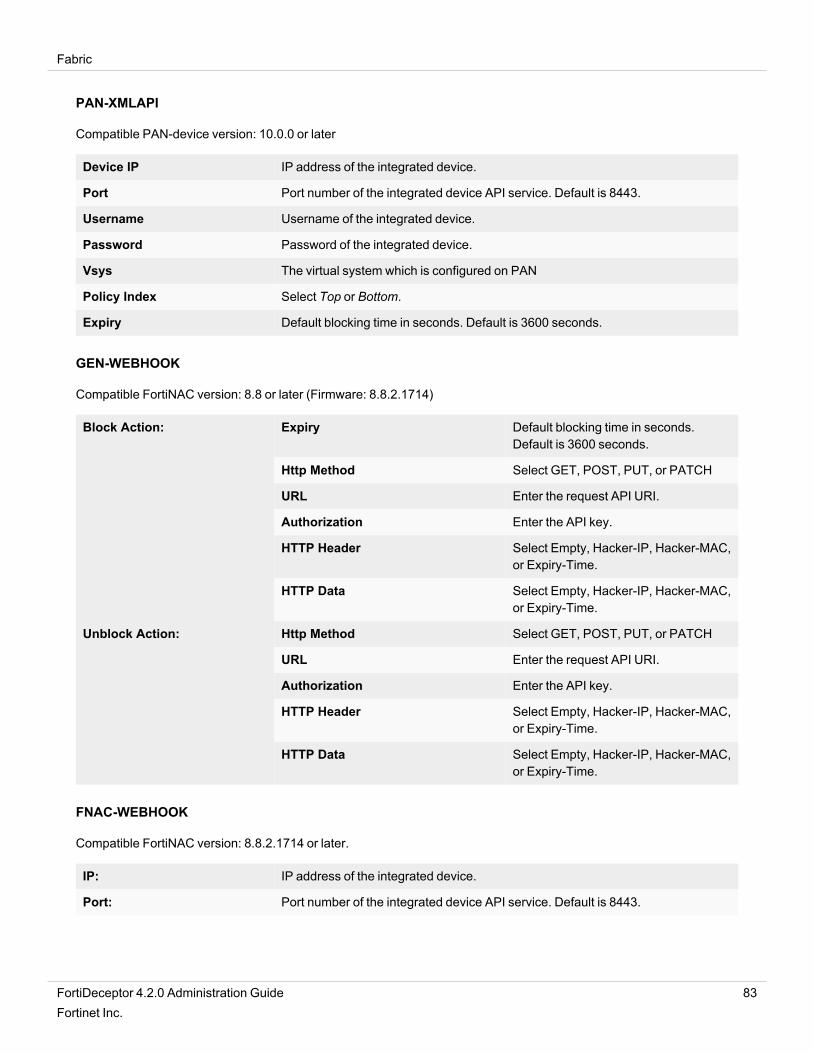
Fabric
PAN-XMLAPI
Compatible PAN-device version: 10.0.0 or later
Device IP IP address of the integrated device.
Port Port number of the integrated device API service. Default is 8443.
Username Username of the integrated device.
Password Password of the integrated device.
Vsys The virtual system which is configured on PAN
Policy Index Select Top or Bottom.
Expiry Default blocking time in seconds. Default is 3600 seconds.
GEN-WEBHOOK
Compatible FortiNAC version: 8.8 or later (Firmware: 8.8.2.1714)
Block Action: Expiry Default blocking time in seconds.Default is 3600 seconds.
Http Method Select GET, POST, PUT, or PATCH
URL Enter the request API URI.
Authorization Enter the API key.
HTTP Header Select Empty, Hacker-IP, Hacker-MAC,or Expiry-Time.
HTTP Data Select Empty, Hacker-IP, Hacker-MAC,or Expiry-Time.
Unblock Action: Http Method Select GET, POST, PUT, or PATCH
URL Enter the request API URI.
Authorization Enter the API key.
HTTP Header Select Empty, Hacker-IP, Hacker-MAC,or Expiry-Time.
HTTP Data Select Empty, Hacker-IP, Hacker-MAC,or Expiry-Time.
FNAC-WEBHOOK
Compatible FortiNAC version: 8.8.2.1714 or later.
IP: IP address of the integrated device.
Port: Port number of the integrated device API service. Default is 8443.
FortiDeceptor 4.2.0 Administration Guide 83Fortinet Inc.
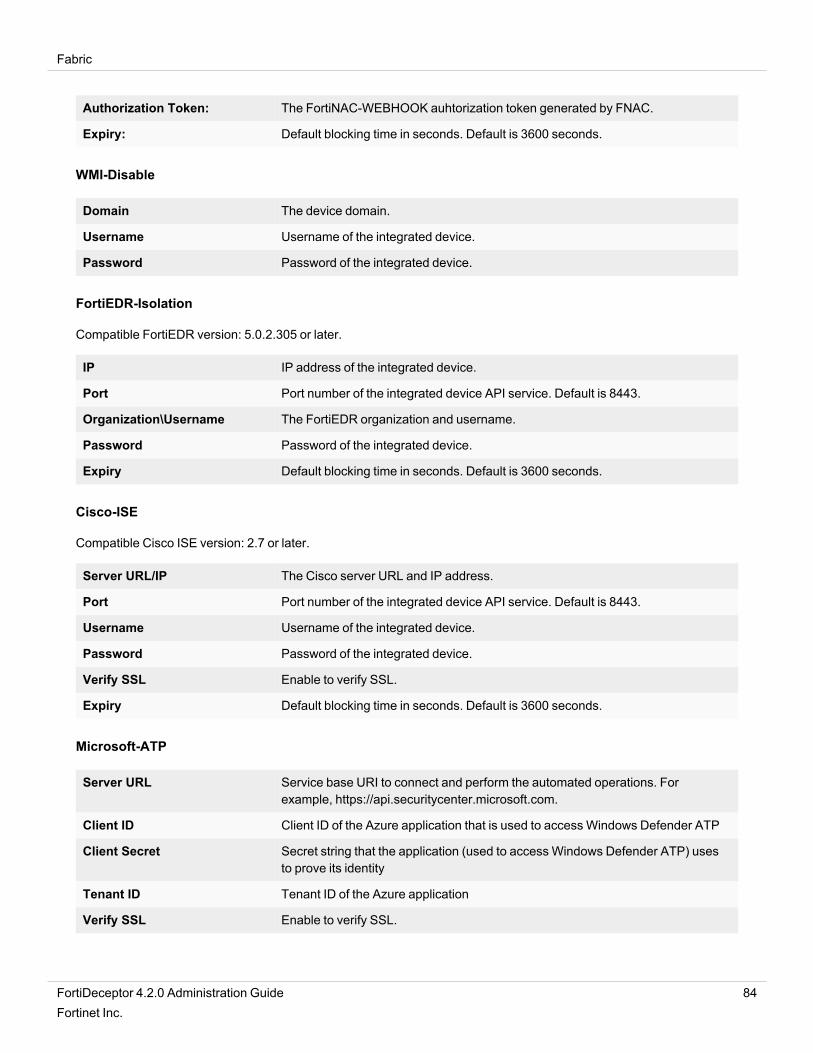
Fabric
Authorization Token: The FortiNAC-WEBHOOK auhtorization token generated by FNAC.
Expiry: Default blocking time in seconds. Default is 3600 seconds.
WMI-Disable
Domain The device domain.
Username Username of the integrated device.
Password Password of the integrated device.
FortiEDR-Isolation
Compatible FortiEDR version: 5.0.2.305 or later.
IP IP address of the integrated device.
Port Port number of the integrated device API service. Default is 8443.
Organization\Username The FortiEDR organization and username.
Password Password of the integrated device.
Expiry Default blocking time in seconds. Default is 3600 seconds.
Cisco-ISE
Compatible Cisco ISE version: 2.7 or later.
Server URL/IP The Cisco server URL and IP address.
Port Port number of the integrated device API service. Default is 8443.
Username Username of the integrated device.
Password Password of the integrated device.
Verify SSL Enable to verify SSL.
Expiry Default blocking time in seconds. Default is 3600 seconds.
Microsoft-ATP
Server URL Service base URI to connect and perform the automated operations. Forexample, https://api.securitycenter.microsoft.com.
Client ID Client ID of the Azure application that is used to access Windows Defender ATP
Client Secret Secret string that the application (used to access Windows Defender ATP) usesto prove its identity
Tenant ID Tenant ID of the Azure application
Verify SSL Enable to verify SSL.
FortiDeceptor 4.2.0 Administration Guide 84Fortinet Inc.
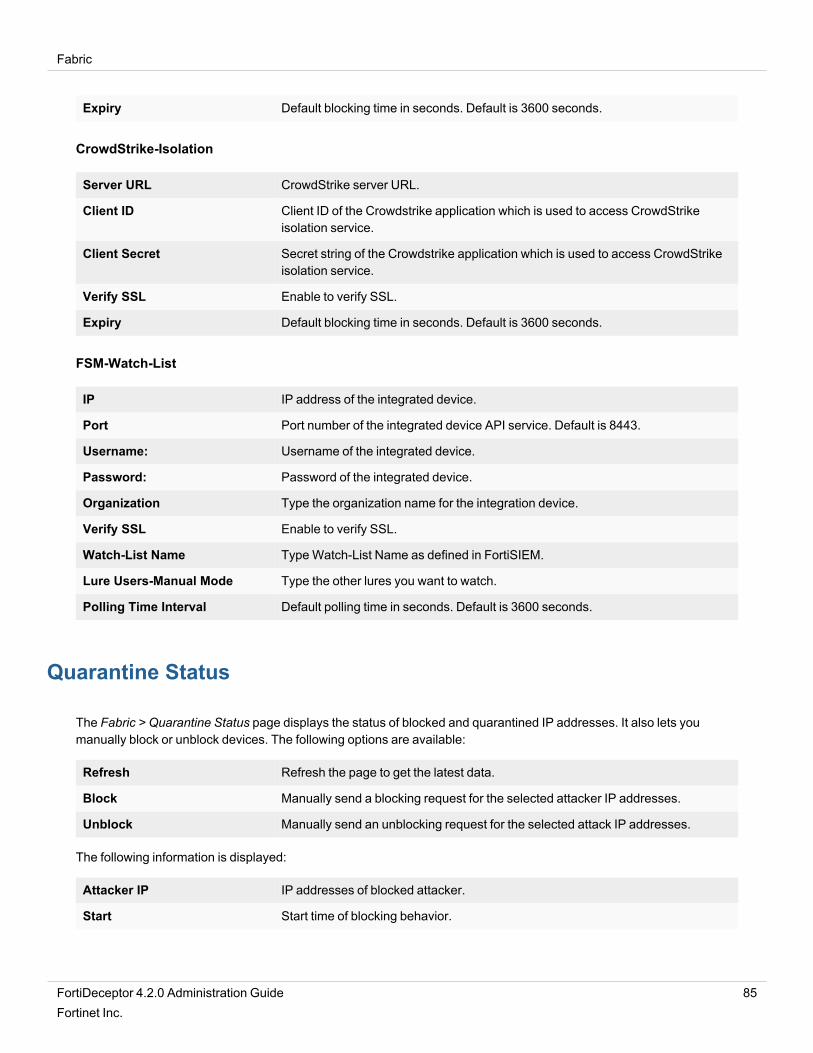
Fabric
Expiry Default blocking time in seconds. Default is 3600 seconds.
CrowdStrike-Isolation
Server URL CrowdStrike server URL.
Client ID Client ID of the Crowdstrike application which is used to access CrowdStrikeisolation service.
Client Secret Secret string of the Crowdstrike application which is used to access CrowdStrikeisolation service.
Verify SSL Enable to verify SSL.
Expiry Default blocking time in seconds. Default is 3600 seconds.
FSM-Watch-List
IP IP address of the integrated device.
Port Port number of the integrated device API service. Default is 8443.
Username: Username of the integrated device.
Password: Password of the integrated device.
Organization Type the organization name for the integration device.
Verify SSL Enable to verify SSL.
Watch-List Name TypeWatch-List Name as defined in FortiSIEM.
Lure Users-Manual Mode Type the other lures you want to watch.
Polling Time Interval Default polling time in seconds. Default is 3600 seconds.
Quarantine Status
The Fabric > Quarantine Status page displays the status of blocked and quarantined IP addresses. It also lets youmanually block or unblock devices. The following options are available:
Refresh Refresh the page to get the latest data.
Block Manually send a blocking request for the selected attacker IP addresses.
Unblock Manually send an unblocking request for the selected attack IP addresses.
The following information is displayed:
Attacker IP IP addresses of blocked attacker.
Start Start time of blocking behavior.
FortiDeceptor 4.2.0 Administration Guide 85Fortinet Inc.
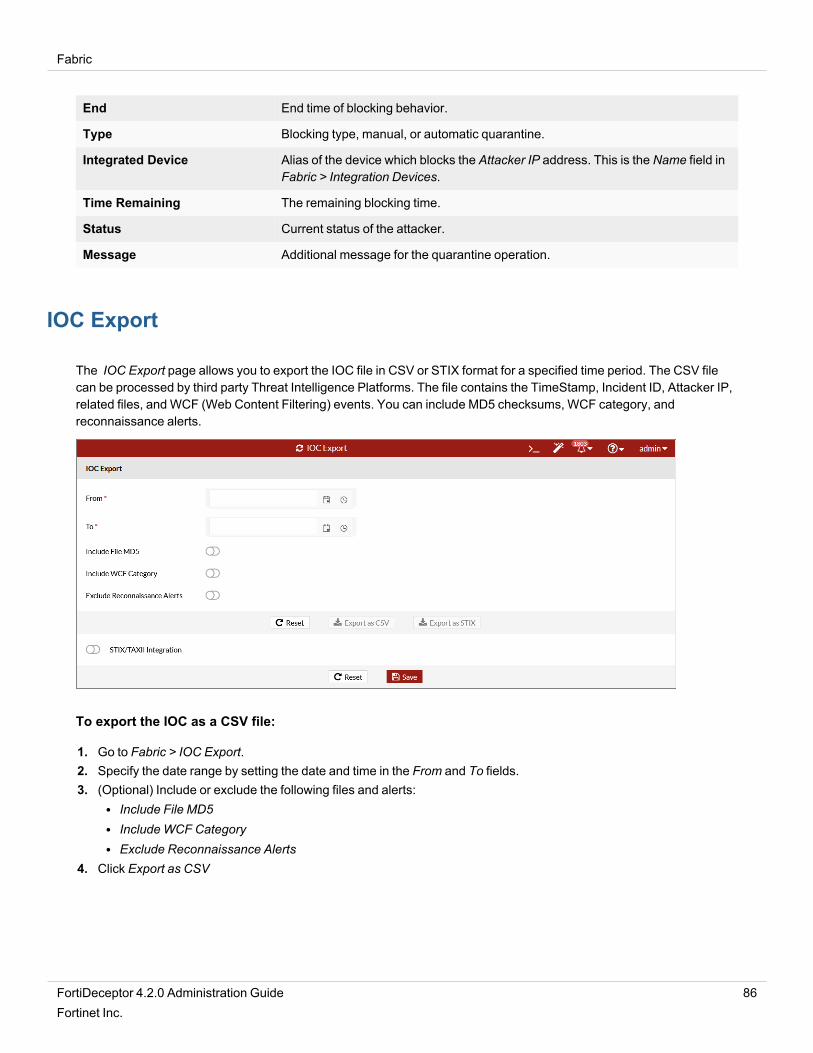
Fabric
End End time of blocking behavior.
Type Blocking type, manual, or automatic quarantine.
Integrated Device Alias of the device which blocks the Attacker IP address. This is the Name field inFabric > Integration Devices.
Time Remaining The remaining blocking time.
Status Current status of the attacker.
Message Additional message for the quarantine operation.
IOC Export
The IOC Export page allows you to export the IOC file in CSV or STIX format for a specified time period. The CSV filecan be processed by third party Threat Intelligence Platforms. The file contains the TimeStamp, Incident ID, Attacker IP,related files, and WCF (Web Content Filtering) events. You can include MD5 checksums, WCF category, andreconnaissance alerts.
To export the IOC as a CSV file:
1. Go to Fabric > IOC Export.2. Specify the date range by setting the date and time in the From and To fields.3. (Optional) Include or exclude the following files and alerts:
l Include File MD5l Include WCF Categoryl Exclude Reconnaissance Alerts
4. Click Export as CSV
FortiDeceptor 4.2.0 Administration Guide 86Fortinet Inc.
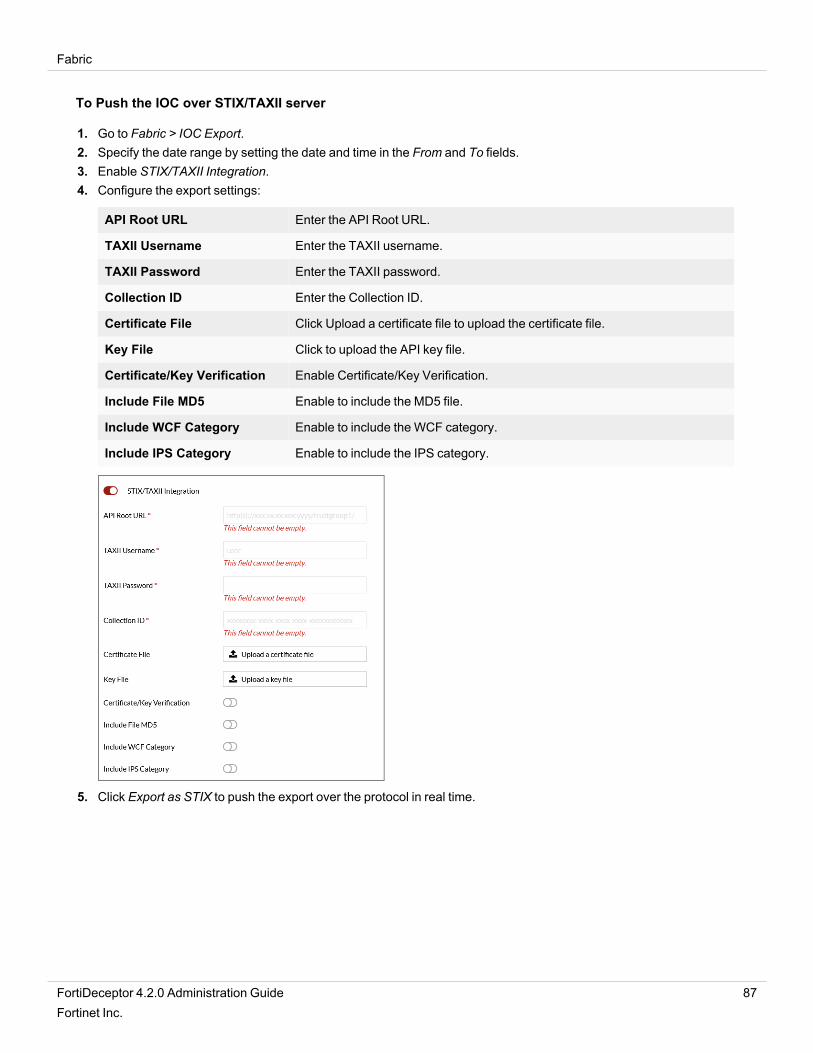
Fabric
To Push the IOC over STIX/TAXII server
1. Go to Fabric > IOC Export.2. Specify the date range by setting the date and time in the From and To fields.3. Enable STIX/TAXII Integration.4. Configure the export settings:
API Root URL Enter the API Root URL.
TAXII Username Enter the TAXII username.
TAXII Password Enter the TAXII password.
Collection ID Enter the Collection ID.
Certificate File Click Upload a certificate file to upload the certificate file.
Key File Click to upload the API key file.
Certificate/Key Verification Enable Certificate/Key Verification.
Include File MD5 Enable to include the MD5 file.
Include WCF Category Enable to include the WCF category.
Include IPS Category Enable to include the IPS category.
5. Click Export as STIX to push the export over the protocol in real time.
FortiDeceptor 4.2.0 Administration Guide 87Fortinet Inc.
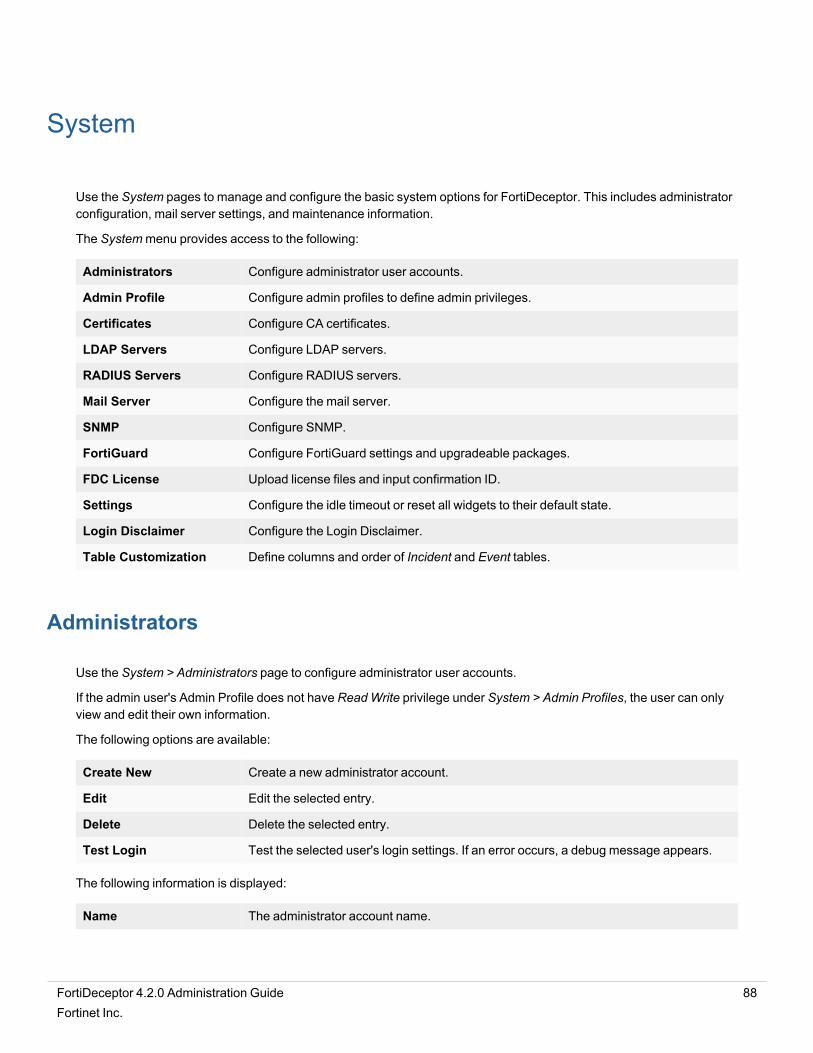
System
Use the System pages to manage and configure the basic system options for FortiDeceptor. This includes administratorconfiguration, mail server settings, and maintenance information.
The Systemmenu provides access to the following:
Administrators Configure administrator user accounts.
Admin Profile Configure admin profiles to define admin privileges.
Certificates Configure CA certificates.
LDAP Servers Configure LDAP servers.
RADIUS Servers Configure RADIUS servers.
Mail Server Configure the mail server.
SNMP Configure SNMP.
FortiGuard Configure FortiGuard settings and upgradeable packages.
FDC License Upload license files and input confirmation ID.
Settings Configure the idle timeout or reset all widgets to their default state.
Login Disclaimer Configure the Login Disclaimer.
Table Customization Define columns and order of Incident and Event tables.
Administrators
Use the System > Administrators page to configure administrator user accounts.
If the admin user's Admin Profile does not have ReadWrite privilege under System > Admin Profiles, the user can onlyview and edit their own information.
The following options are available:
Create New Create a new administrator account.
Edit Edit the selected entry.
Delete Delete the selected entry.
Test Login Test the selected user's login settings. If an error occurs, a debug message appears.
The following information is displayed:
Name The administrator account name.
FortiDeceptor 4.2.0 Administration Guide 88Fortinet Inc.
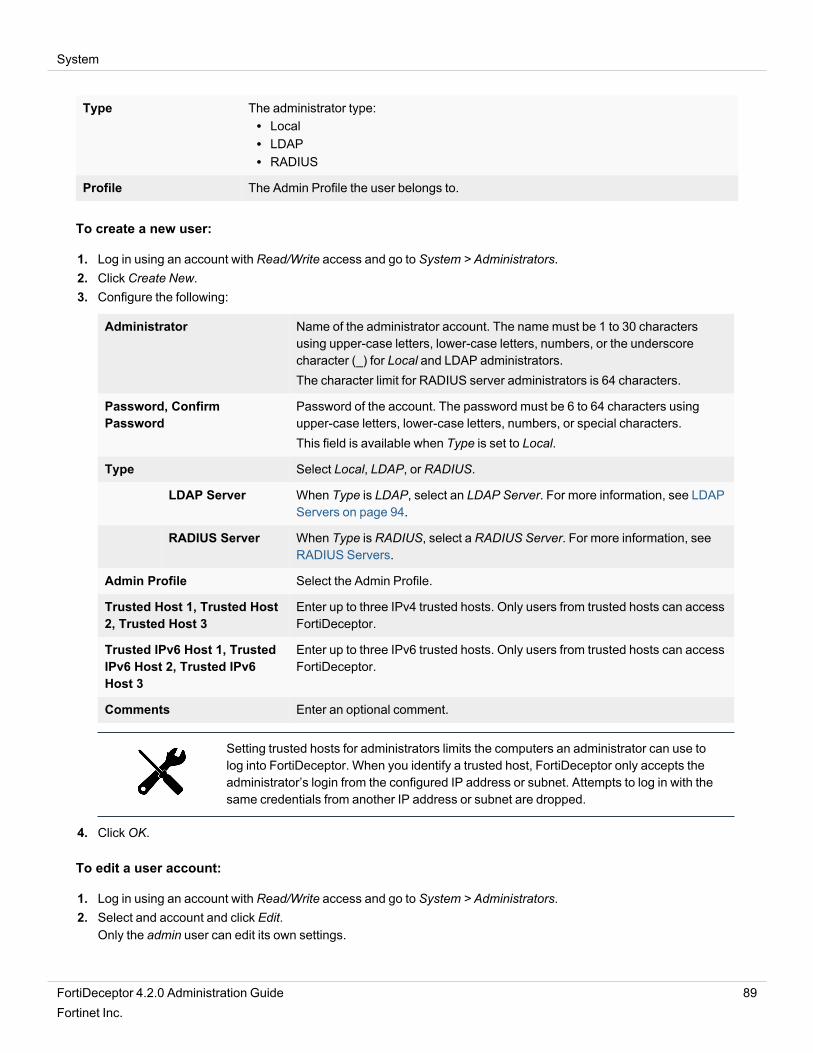
System
Type The administrator type:l Locall LDAPl RADIUS
Profile The Admin Profile the user belongs to.
To create a new user:
1. Log in using an account with Read/Write access and go to System > Administrators.2. Click Create New.3. Configure the following:
Administrator Name of the administrator account. The name must be 1 to 30 charactersusing upper-case letters, lower-case letters, numbers, or the underscorecharacter (_) for Local and LDAP administrators.The character limit for RADIUS server administrators is 64 characters.
Password, ConfirmPassword
Password of the account. The password must be 6 to 64 characters usingupper-case letters, lower-case letters, numbers, or special characters.This field is available when Type is set to Local.
Type Select Local, LDAP, or RADIUS.
LDAP Server When Type is LDAP, select an LDAP Server. For more information, see LDAPServers on page 94.
RADIUS Server When Type is RADIUS, select a RADIUS Server. For more information, seeRADIUS Servers.
Admin Profile Select the Admin Profile.
Trusted Host 1, Trusted Host2, Trusted Host 3
Enter up to three IPv4 trusted hosts. Only users from trusted hosts can accessFortiDeceptor.
Trusted IPv6 Host 1, TrustedIPv6 Host 2, Trusted IPv6Host 3
Enter up to three IPv6 trusted hosts. Only users from trusted hosts can accessFortiDeceptor.
Comments Enter an optional comment.
Setting trusted hosts for administrators limits the computers an administrator can use tolog into FortiDeceptor. When you identify a trusted host, FortiDeceptor only accepts theadministrator’s login from the configured IP address or subnet. Attempts to log in with thesame credentials from another IP address or subnet are dropped.
4. ClickOK.
To edit a user account:
1. Log in using an account with Read/Write access and go to System > Administrators.2. Select and account and click Edit.
Only the admin user can edit its own settings.
FortiDeceptor 4.2.0 Administration Guide 89Fortinet Inc.
System
You must enter the old password before you can set a new password.3. Edit the account and clickOK.
To delete one or more user accounts:
1. Log in using an account with Read/Write access and go to System > Administrators.2. Select the user account you want to delete.3. Click Delete and confirm that you want to delete the user.
To test LDAP or RADIUS logins:
1. Log in using an account with Read/Write access and go to System > Administrators.2. Select an LDAP or RADIUS user to test.3. Click Test Login.4. Enter the user password.5. ClickOK.
If an error occurs, a debug message appears.
When a remote RADIUS server is configured for two-factor authentication, RADIUS usersmust enter a FortiToken code or the code from email/SMS to complete login or to test login.
Admin Profiles
Use administrator profiles to control administrator access privileges to system features. When you create anadministrator account, you assign a profile to the account.
You cannot modify or delete the following predefined administrator profiles:
l ReadWrite has access to all functionality. This includes creating, editing, and deleting administrator profilesl Read only has read-only access.
TheMenu Access section has the following settings:
None User cannot view or make changes to that page.
Read Only User can view but not make any change to that page, except session-related user settingssuch as Table Customization, Dashboard, or Attack Map filter.
Read Write User can view and make changes to that page.
The CLI Commands section has the following settings:
None User cannot execute CLI commands.
Execute User can execute CLI commands.
FortiDeceptor 4.2.0 Administration Guide 90Fortinet Inc.
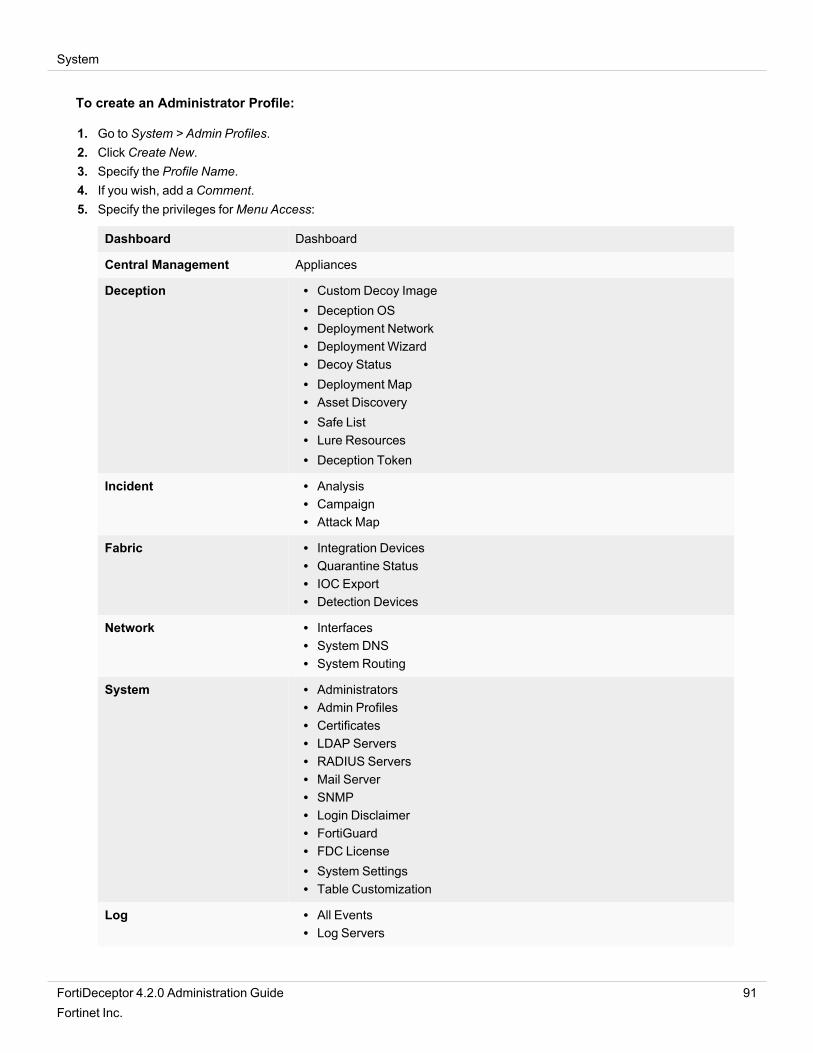
System
To create an Administrator Profile:
1. Go to System > Admin Profiles.2. Click Create New.3. Specify the Profile Name.4. If you wish, add a Comment.5. Specify the privileges forMenu Access:
Dashboard Dashboard
Central Management Appliances
Deception l Custom Decoy Imagel Deception OSl Deployment Networkl Deployment Wizardl Decoy Statusl Deployment Mapl Asset Discoveryl Safe Listl Lure Resourcesl Deception Token
Incident l Analysisl Campaignl Attack Map
Fabric l Integration Devicesl Quarantine Statusl IOC Exportl Detection Devices
Network l Interfacesl System DNSl System Routing
System l Administratorsl Admin Profilesl Certificatesl LDAP Serversl RADIUS Serversl Mail Serverl SNMPl Login Disclaimerl FortiGuardl FDC Licensel System Settingsl Table Customization
Log l All Eventsl Log Servers
FortiDeceptor 4.2.0 Administration Guide 91Fortinet Inc.
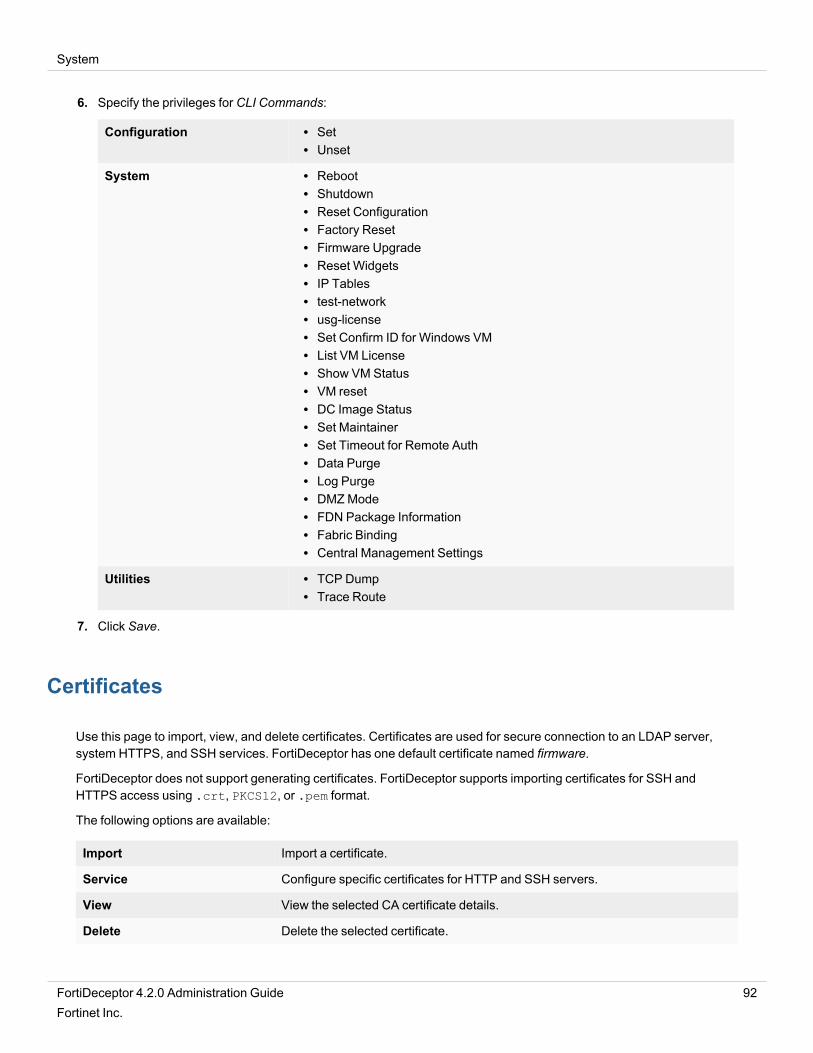
System
6. Specify the privileges for CLI Commands:
Configuration l Setl Unset
System l Rebootl Shutdownl Reset Configurationl Factory Resetl Firmware Upgradel Reset Widgetsl IP Tablesl test-networkl usg-licensel Set Confirm ID for Windows VMl List VM Licensel Show VM Statusl VM resetl DC Image Statusl Set Maintainerl Set Timeout for Remote Authl Data Purgel Log Purgel DMZModel FDN Package Informationl Fabric Bindingl Central Management Settings
Utilities l TCP Dumpl Trace Route
7. Click Save.
Certificates
Use this page to import, view, and delete certificates. Certificates are used for secure connection to an LDAP server,system HTTPS, and SSH services. FortiDeceptor has one default certificate named firmware.
FortiDeceptor does not support generating certificates. FortiDeceptor supports importing certificates for SSH andHTTPS access using .crt, PKCS12, or .pem format.
The following options are available:
Import Import a certificate.
Service Configure specific certificates for HTTP and SSH servers.
View View the selected CA certificate details.
Delete Delete the selected certificate.
FortiDeceptor 4.2.0 Administration Guide 92Fortinet Inc.
System
The following information is displayed:
Name Name of the certificate.
Subject Subject of the certificate.
Status The certificate status, active or expired.
Service HTTPS or SSH service that is using this certificate.
To import a certificate:
1. Go to System > Certificates.2. Click Import.3. Enter the Certificate Name.4. If you want to import a password protected PKCS12 certificate, select PKCS12 Format.5. Click Choose File and locate the certificate and key files on your management computer.6. ClickOK to import the certificate.
To view a certificate:
1. Go to System > Certificates.2. Select a certificate and click View.
The following information is available:
Certificate Name Name of the certificate.
Status Certificate status.
Serial number Certificate serial number.
Issuer Issuer of the certificate.
Subject Subject of the certificate.
Effective date Date and time that the certificate became effective.
Expiration date Date and time that the certificate expires.
To delete a CA certificate:
1. Go to System > Certificates.2. Select the certificate you want to delete.3. Click Delete and confirm you want to delete the certificate.
You cannot delete the firmware certificate.
FortiDeceptor 4.2.0 Administration Guide 93Fortinet Inc.
System
LDAP Servers
FortiDeceptor supports remote authentication of administrators using LDAP servers. To use this feature, configure theserver entries in FortiDeceptor for each authentication server in your network.
If you have configured LDAP support and require users to authenticate using an LDAP server, FortiDeceptor contactsthe LDAP server for authentication. To authenticate with FortiDeceptor, the user enters a user name and password.FortiDeceptor sends this user name and password to the LDAP server. If the LDAP server can authenticate the user,FortiDeceptor authenticates the user. If the LDAP server cannot authenticate the user, FortiDeceptor refuses theconnection.
The following options are available:
Create New Add an LDAP server.
Edit Edit the selected LDAP server.
Delete Delete the selected LDAP server.
The following information is displayed:
Name LDAP server name.
Address LDAP server address.
Common Name LDAP common name.
Distinguished Name LDAP distinguished name.
Bind Type LDAP bind type.
Connection Type LDAP connection type.
To create a new LDAP server:
1. Go to System > LDAP Servers.2. Click Create New.
FortiDeceptor 4.2.0 Administration Guide 94Fortinet Inc.
System
3. Configure the following settings:
Name A unique name to identify the LDAP server.
Server Name/IP IP address or FQDN of the LDAP server.
Port The port for LDAP traffic.The default port is 389.
Common Name Common name identifier of the LDAP server.Most LDAP servers use cn. Some servers use other common name identifierssuch as uid.
Distinguished Name Distinguished name used to look up entries on LDAP servers. Thedistinguished name reflects the hierarchy of LDAP database object classesabove the common name identifier.
Bind Type The type of binding for LDAP authentication:l Simplel Anonymousl Regular
Username When the Bind Type is set to Regular, enter the user name.
Password When the Bind Type is set to Regular, enter the password.
Enable Secure Connection Use a secure LDAP server connection for authentication.
Protocol When Enable Secure Connection is selected, select LDAPS or STARTTLS.
CA Certificate When Enable Secure Connection is selected, select a CA Certificate.
4. ClickOK.
RADIUS Servers
FortiDeceptor supports remote authentication of administrators using RADIUS servers. To use this feature, configure theserver entries in FortiDeceptor for each authentication server in your network.
If you have configured RADIUS support and require users to authenticate using a RADIUS server, FortiDeceptorcontacts the RADIUS server for authentication. To authenticate with FortiDeceptor, the user enters a user name andpassword. FortiDeceptor sends this user name and password to the RADIUS server. If the RADIUS server canauthenticate the user, FortiDeceptor authenticates the user. If the RADIUS server cannot authenticate the user,FortiDeceptor refuses the connection.
The following options are available:
Create New Add a RADIUS server.
Edit Edit the selected RADIUS server.
Delete Delete the selected RADIUS server.
FortiDeceptor 4.2.0 Administration Guide 95Fortinet Inc.
System
The following information is displayed:
Name RADIUS server name.
Primary Address Primary server IP address.
Secondary Address Secondary server IP address.
Port Port used for RADIUS traffic.The default port is 1812.
Auth Type The authentication type the RADIUS server requires.Select Any, PAP, CHAP, orMSv2. Anymeans FortiDeceptor tries allauthentication types.
To add a RADIUS server:
1. Go to System > RADIUS Servers.2. Click Create New.3. Configure the following settings:
Name A unique name to identify the RADIUS server.
Primary Server Name/IP IP address or FQDN of the primary RADIUS server.
Secondary Server Name/IP IP address or FQDN of the secondary RADIUS server.
Port Port for RADIUS traffic.The default port is 1812.
Auth Type Authentication type the RADIUS server requires.Select Any, PAP, CHAP, orMSv2. Anymeans FortiDeceptor tries allauthentication types.
Primary Secret Primary RADIUS server secret.
Secondary Secret Secondary RADIUS server secret.
NAS IP NAS IP address.
4. ClickOK.
FortiDeceptor 4.2.0 Administration Guide 96Fortinet Inc.
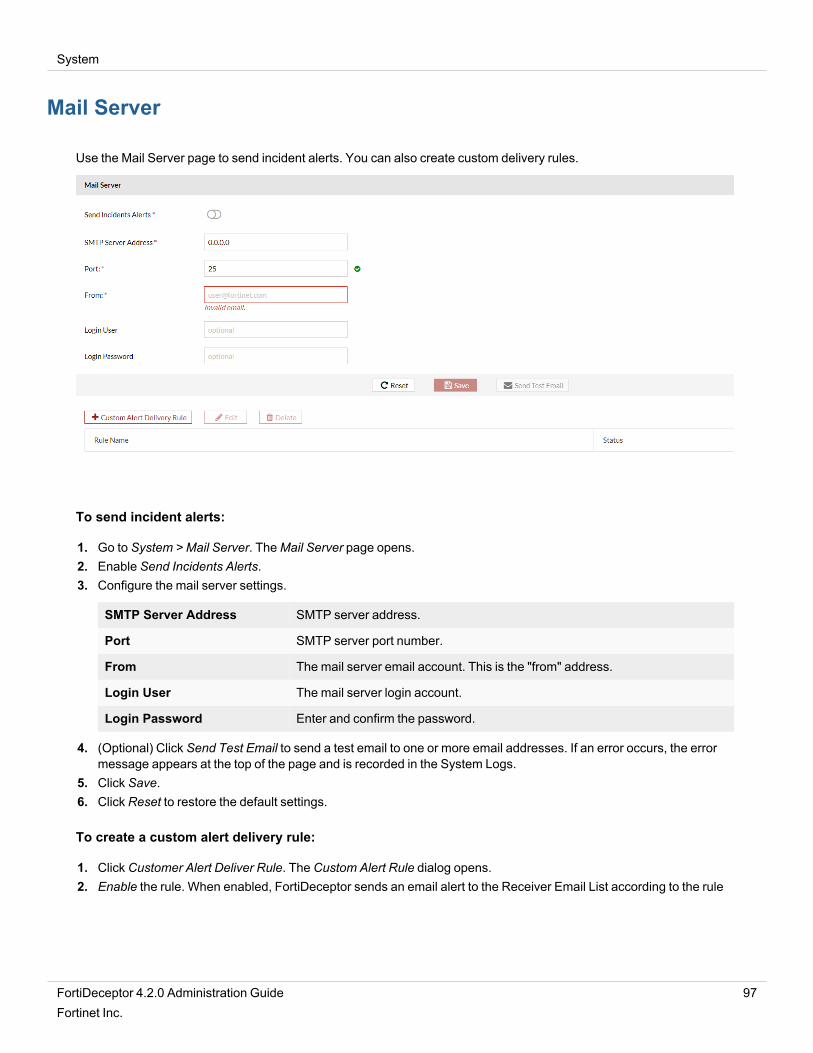
System
Mail Server
Use the Mail Server page to send incident alerts. You can also create custom delivery rules.
To send incident alerts:
1. Go to System > Mail Server. TheMail Server page opens.2. Enable Send Incidents Alerts.3. Configure the mail server settings.
SMTP Server Address SMTP server address.
Port SMTP server port number.
From The mail server email account. This is the "from" address.
Login User The mail server login account.
Login Password Enter and confirm the password.
4. (Optional) Click Send Test Email to send a test email to one or more email addresses. If an error occurs, the errormessage appears at the top of the page and is recorded in the System Logs.
5. Click Save.6. Click Reset to restore the default settings.
To create a custom alert delivery rule:
1. Click Customer Alert Deliver Rule. The Custom Alert Rule dialog opens.2. Enable the rule. When enabled, FortiDeceptor sends an email alert to the Receiver Email List according to the rule
FortiDeceptor 4.2.0 Administration Guide 97Fortinet Inc.
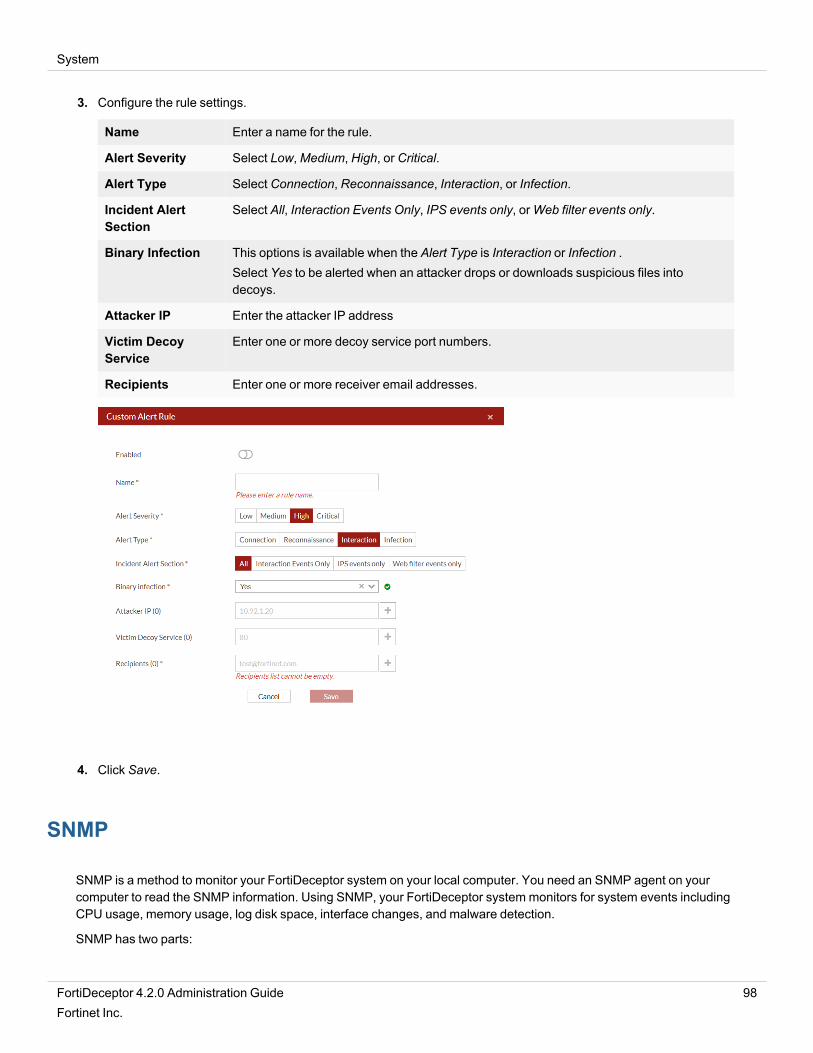
System
3. Configure the rule settings.
Name Enter a name for the rule.
Alert Severity Select Low,Medium, High, or Critical.
Alert Type Select Connection, Reconnaissance, Interaction, or Infection.
Incident AlertSection
Select All, Interaction Events Only, IPS events only, orWeb filter events only.
Binary Infection This options is available when the Alert Type is Interaction or Infection .Select Yes to be alerted when an attacker drops or downloads suspicious files intodecoys.
Attacker IP Enter the attacker IP address
Victim DecoyService
Enter one or more decoy service port numbers.
Recipients Enter one or more receiver email addresses.
4. Click Save.
SNMP
SNMP is a method to monitor your FortiDeceptor system on your local computer. You need an SNMP agent on yourcomputer to read the SNMP information. Using SNMP, your FortiDeceptor systemmonitors for system events includingCPU usage, memory usage, log disk space, interface changes, and malware detection.
SNMP has two parts:
FortiDeceptor 4.2.0 Administration Guide 98Fortinet Inc.
System
l The SNMP agent or the device that is sending traps.l The SNMPmanager that monitors those traps.
The SNMP communities on the monitored FortiDeceptorare configured in the SNMP page.
The FortiDeceptor SNMP implementation is read-only. SNMP v1, v2c, v3 compliant SNMPmanager applications, suchas those on your local computer, have read-only access to FortiDeceptorsystem information and can receiveFortiDeceptor system traps.
You can also download FortiDeceptor and Fortinet core MIB files.
Configure the SNMP agent
The SNMP agent sends SNMP traps that originate on FortiDeceptorto an external monitoring SNMPmanager defined inone of the FortiDeceptor SNMP communities. Typically, an SNMPmanager is an application on a local computer thatcan read the SNMP traps and then generate reports or graphs.
The SNMPmanager can monitor FortiDeceptor to determine if it is operating properly or if critical events are occurring.The description, location, and contact information for this FortiDeceptor system is part of the information an SNMPmanager collects. This information is useful if the SNMPmanager is monitoring many devices, and it enables a fasterresponse when FortiDeceptor requires attention.
To configure SNMP agents:
1. Go to System > SNMP.2. Configure the following settings:
SNMP Agent When enabled, the FortiDeceptor SNMP agent sends FortiDeceptor SNMPtraps.
Description Description of this FortiDeceptor to identify this unit.
Location Location of this FortiDeceptor if it requires attention.
Contact Contact information of the person in charge of this FortiDeceptor.
SNMP v1/v2c Create, edit, or delete SNMP v1 and v2c communities. You can enable ordisable communities in the edit page. Columns include: Community Name,Queries, Traps, Enable.
SNMP v3 Create, edit, or delete SNMP v3 entries. You can enable or disable queries inthe edit page. Columns include: Username, Security Level, Notification Host,andQueries.
To create an SNMP v1/v2c community:
1. Go to System > SNMP.2. In the SNMP v1/v2c section, click Create New.
FortiDeceptor 4.2.0 Administration Guide 99Fortinet Inc.
System
3. Configure the following settings:
Enable Enable the SNMP community.
Community Name The name that identifies the SNMP community.
Hosts The list of hosts that can use the settings in this SNMP community to monitorFortiDeceptor.
IP/Netmask IP address and netmask of the SNMP hosts.Click Add to add additional hosts.
Queries v1, Queries v2c Port number and if it is enabled.Enable queries for each SNMP version that FortiDeceptor uses.
Traps v1, Traps v2c Local port number, remote port number, and if it is enabled.Enable traps for each SNMP version that FortiDeceptor uses.
SNMP Events Events that cause FortiDeceptor to send SNMP traps to the community:l CPU usage is highl Memory is lowl Log disk space is lowl Incident is detected
4. ClickOK.
To create an SNMP v3 user:
1. Go to System > SNMP.2. In the SNMP v3 section, click Create New.
FortiDeceptor 4.2.0 Administration Guide 100Fortinet Inc.
System
3. Configure the following settings:
Username Name of the SNMPv3 user.
Security Level Security level of the user:l Nonel Authentication onlyl Encryption and authentication
Authentication Authentication is required when Security Level is either Authentication only orEncryption and authentication.
Method Authentication method: l MD5 (Message Digest 5 algorithm)l SHA1 (Secure Hash algorithm)
Password Authentication password of at least eight characters.
Encryption Encryption is required if Security Level is Encryption and authentication.
Method Encryption method:l DESl AES
Key Encryption key of at least eight characters.
Notification Hosts (Traps)
IP/Netmask IP address and netmask. Click Add to add more hosts.
Query
Port Port number and if it is enabled.
SNMP V3 Events SNMP events associated with that user:l CPU usage is highl Memory is lowl Log disk space is lowl Incident is detected
4. ClickOK.
To download MIB files:
1. Go to System > SNMP.2. Scroll down to FortiDeceptor SNMPMIB and click one of the following links:
l Download FortiDeceptor MIB Filel Download Fortinet Core MIB File
FortiGuard
The FortiGuard Distribution Network (FDN) provides FortiGuard services for your FortiDeceptor system. The FDN is aworldwide network of FortiGuard Distribution Servers (FDS), which update the FortiGuard services on your
FortiDeceptor 4.2.0 Administration Guide 101Fortinet Inc.
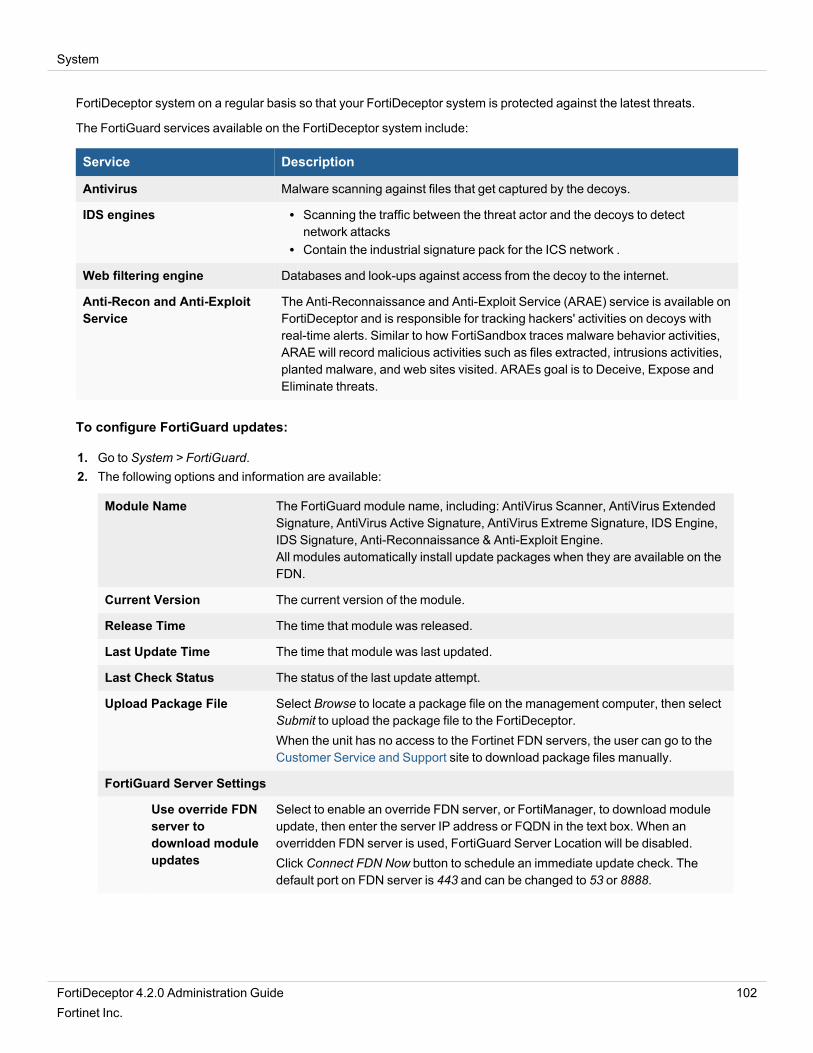
System
FortiDeceptor system on a regular basis so that your FortiDeceptor system is protected against the latest threats.
The FortiGuard services available on the FortiDeceptor system include:
Service Description
Antivirus Malware scanning against files that get captured by the decoys.
IDS engines l Scanning the traffic between the threat actor and the decoys to detectnetwork attacks
l Contain the industrial signature pack for the ICS network .
Web filtering engine Databases and look-ups against access from the decoy to the internet.
Anti-Recon and Anti-ExploitService
The Anti-Reconnaissance and Anti-Exploit Service (ARAE) service is available onFortiDeceptor and is responsible for tracking hackers' activities on decoys withreal-time alerts. Similar to how FortiSandbox traces malware behavior activities,ARAE will record malicious activities such as files extracted, intrusions activities,planted malware, and web sites visited. ARAEs goal is to Deceive, Expose andEliminate threats.
To configure FortiGuard updates:
1. Go to System > FortiGuard.2. The following options and information are available:
Module Name The FortiGuard module name, including: AntiVirus Scanner, AntiVirus ExtendedSignature, AntiVirus Active Signature, AntiVirus Extreme Signature, IDS Engine,IDS Signature, Anti-Reconnaissance & Anti-Exploit Engine.All modules automatically install update packages when they are available on theFDN.
Current Version The current version of the module.
Release Time The time that module was released.
Last Update Time The time that module was last updated.
Last Check Status The status of the last update attempt.
Upload Package File Select Browse to locate a package file on the management computer, then selectSubmit to upload the package file to the FortiDeceptor.When the unit has no access to the Fortinet FDN servers, the user can go to theCustomer Service and Support site to download package files manually.
FortiGuard Server Settings
Use override FDNserver todownload moduleupdates
Select to enable an override FDN server, or FortiManager, to download moduleupdate, then enter the server IP address or FQDN in the text box. When anoverridden FDN server is used, FortiGuard Server Location will be disabled.Click Connect FDN Now button to schedule an immediate update check. Thedefault port on FDN server is 443 and can be changed to 53 or 8888.
FortiDeceptor 4.2.0 Administration Guide 102Fortinet Inc.
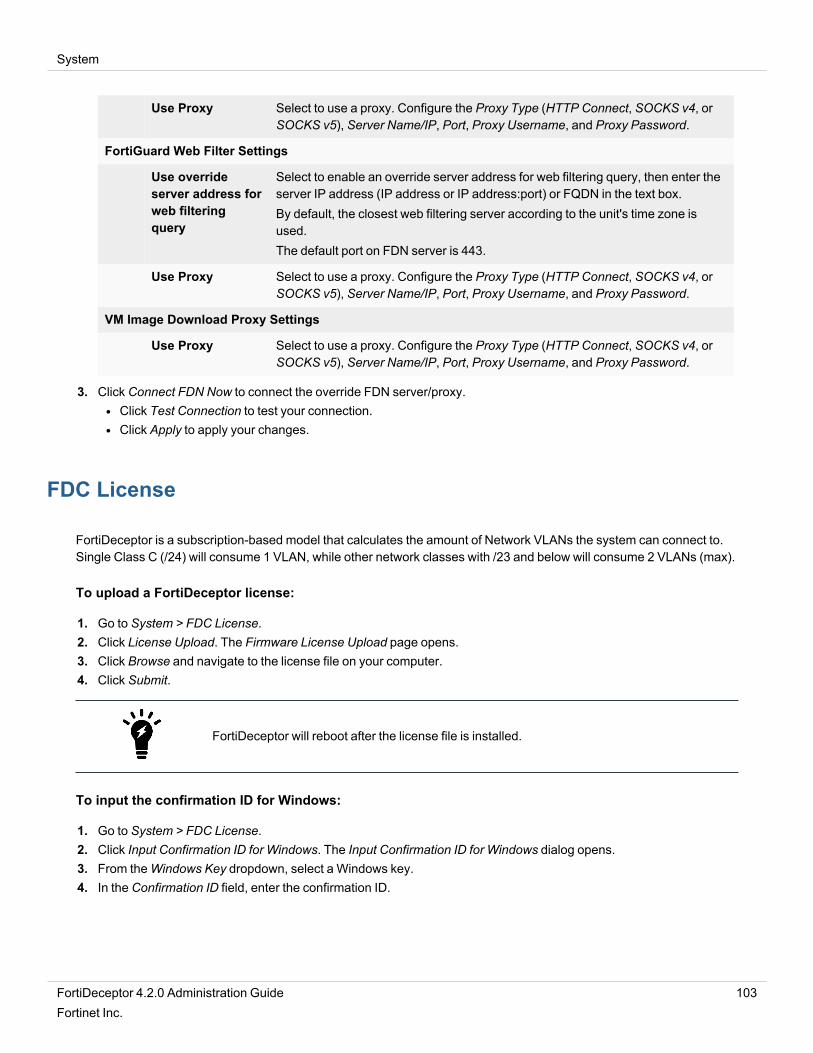
System
Use Proxy Select to use a proxy. Configure the Proxy Type (HTTP Connect, SOCKS v4, orSOCKS v5), Server Name/IP, Port, Proxy Username, and Proxy Password.
FortiGuard Web Filter Settings
Use overrideserver address forweb filteringquery
Select to enable an override server address for web filtering query, then enter theserver IP address (IP address or IP address:port) or FQDN in the text box.By default, the closest web filtering server according to the unit's time zone isused.The default port on FDN server is 443.
Use Proxy Select to use a proxy. Configure the Proxy Type (HTTP Connect, SOCKS v4, orSOCKS v5), Server Name/IP, Port, Proxy Username, and Proxy Password.
VM Image Download Proxy Settings
Use Proxy Select to use a proxy. Configure the Proxy Type (HTTP Connect, SOCKS v4, orSOCKS v5), Server Name/IP, Port, Proxy Username, and Proxy Password.
3. Click Connect FDN Now to connect the override FDN server/proxy.l Click Test Connection to test your connection.l Click Apply to apply your changes.
FDC License
FortiDeceptor is a subscription-based model that calculates the amount of Network VLANs the system can connect to.Single Class C (/24) will consume 1 VLAN, while other network classes with /23 and below will consume 2 VLANs (max).
To upload a FortiDeceptor license:
1. Go to System > FDC License.2. Click License Upload. The Firmware License Upload page opens.3. Click Browse and navigate to the license file on your computer.4. Click Submit.
FortiDeceptor will reboot after the license file is installed.
To input the confirmation ID for Windows:
1. Go to System > FDC License.2. Click Input Confirmation ID for Windows. The Input Confirmation ID for Windows dialog opens.3. From theWindows Key dropdown, select a Windows key.4. In the Confirmation ID field, enter the confirmation ID.
FortiDeceptor 4.2.0 Administration Guide 103Fortinet Inc.
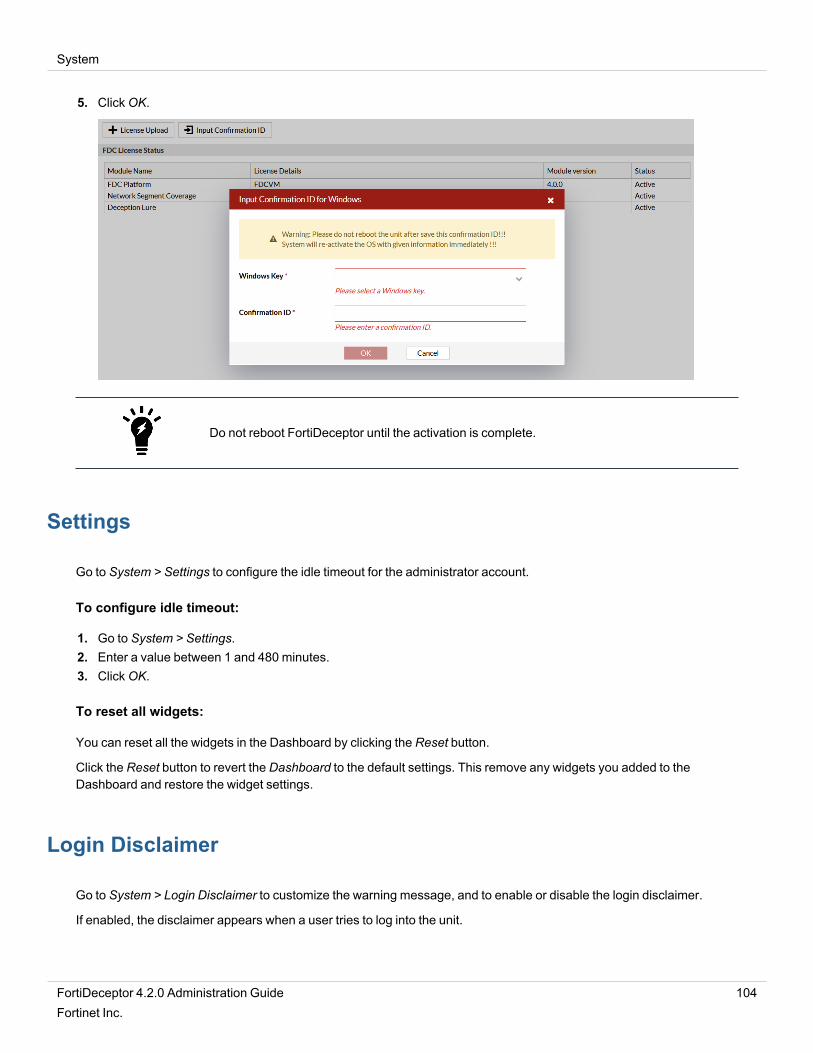
System
5. ClickOK.
Do not reboot FortiDeceptor until the activation is complete.
Settings
Go to System > Settings to configure the idle timeout for the administrator account.
To configure idle timeout:
1. Go to System > Settings.2. Enter a value between 1 and 480 minutes.3. ClickOK.
To reset all widgets:
You can reset all the widgets in the Dashboard by clicking the Reset button.
Click the Reset button to revert the Dashboard to the default settings. This remove any widgets you added to theDashboard and restore the widget settings.
Login Disclaimer
Go to System > Login Disclaimer to customize the warning message, and to enable or disable the login disclaimer.
If enabled, the disclaimer appears when a user tries to log into the unit.
FortiDeceptor 4.2.0 Administration Guide 104Fortinet Inc.
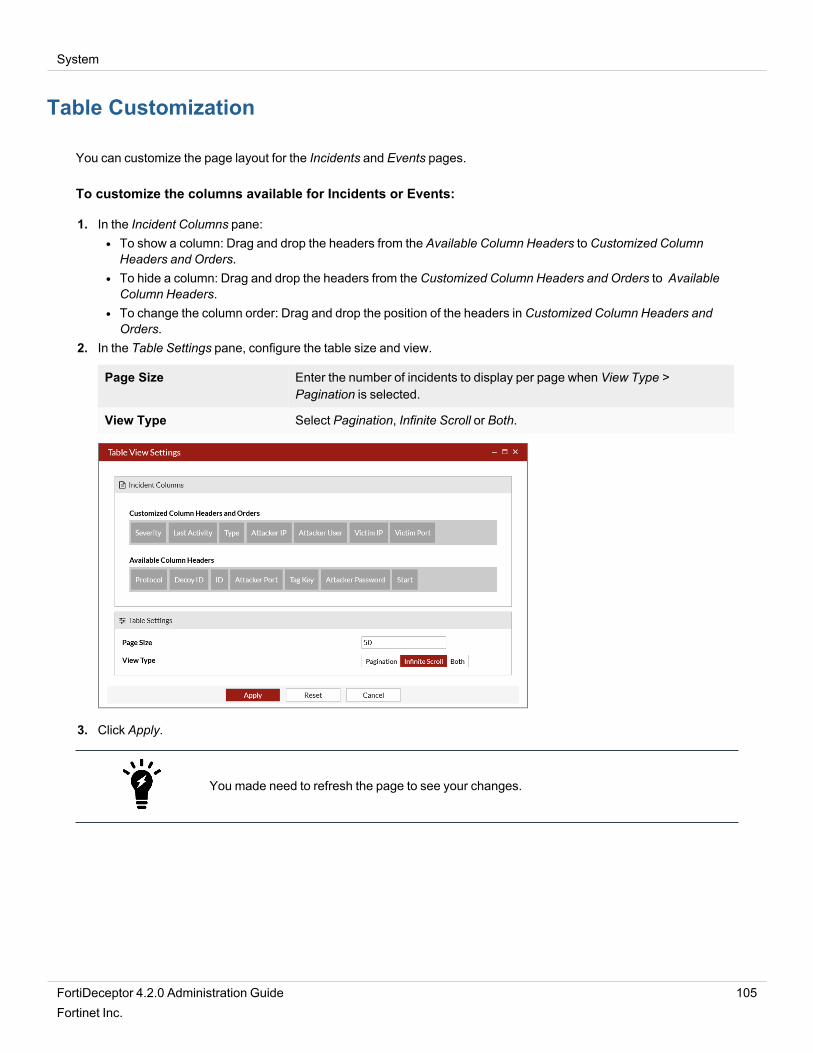
System
Table Customization
You can customize the page layout for the Incidents and Events pages.
To customize the columns available for Incidents or Events:
1. In the Incident Columns pane:l To show a column: Drag and drop the headers from the Available Column Headers to Customized ColumnHeaders and Orders.
l To hide a column: Drag and drop the headers from the Customized Column Headers and Orders to AvailableColumn Headers.
l To change the column order: Drag and drop the position of the headers in Customized Column Headers andOrders.
2. In the Table Settings pane, configure the table size and view.
Page Size Enter the number of incidents to display per page when View Type >Pagination is selected.
View Type Select Pagination, Infinite Scroll or Both.
3. Click Apply.
You made need to refresh the page to see your changes.
FortiDeceptor 4.2.0 Administration Guide 105Fortinet Inc.
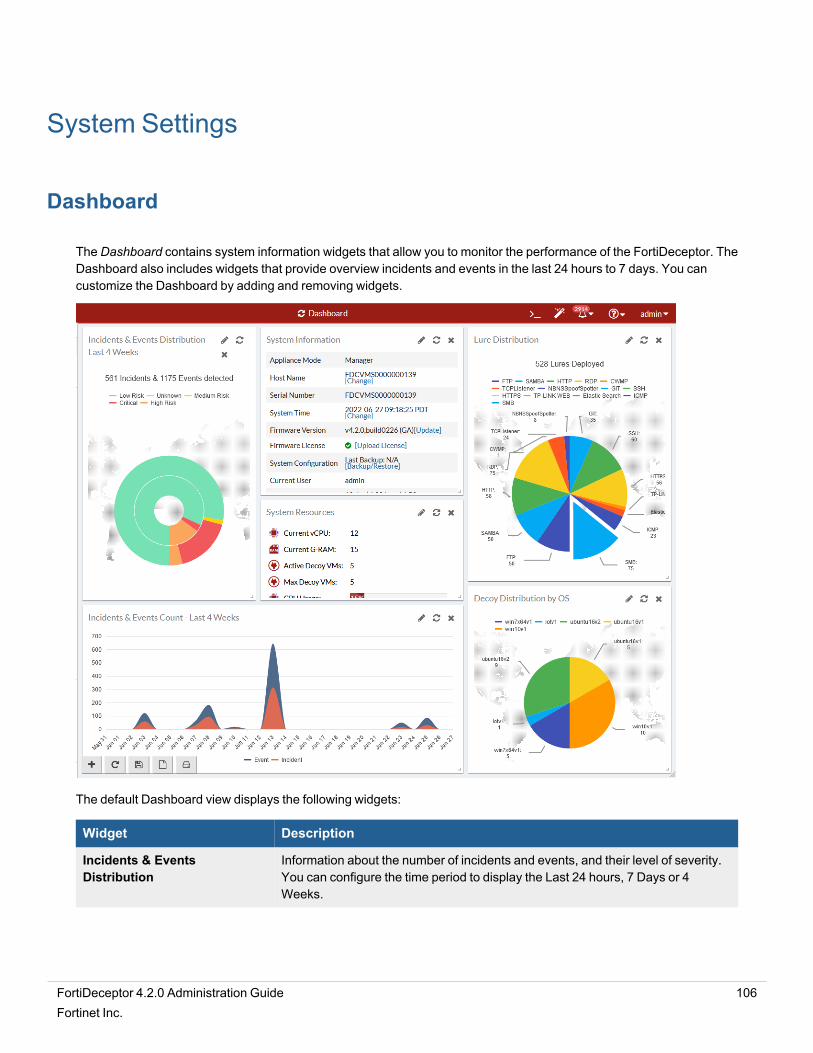
System Settings
Dashboard
The Dashboard contains system information widgets that allow you to monitor the performance of the FortiDeceptor. TheDashboard also includes widgets that provide overview incidents and events in the last 24 hours to 7 days. You cancustomize the Dashboard by adding and removing widgets.
The default Dashboard view displays the following widgets:
Widget Description
Incidents & EventsDistribution
Information about the number of incidents and events, and their level of severity.You can configure the time period to display the Last 24 hours, 7 Days or 4Weeks.
FortiDeceptor 4.2.0 Administration Guide 106Fortinet Inc.
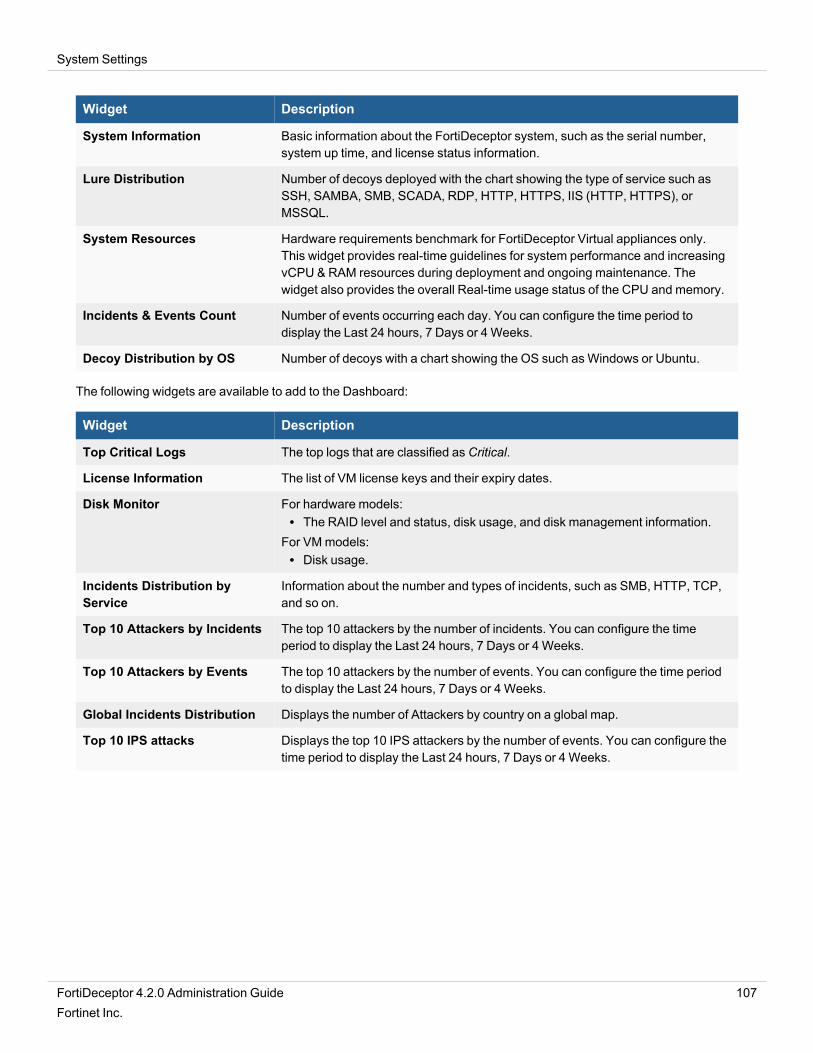
System Settings
Widget Description
System Information Basic information about the FortiDeceptor system, such as the serial number,system up time, and license status information.
Lure Distribution Number of decoys deployed with the chart showing the type of service such asSSH, SAMBA, SMB, SCADA, RDP, HTTP, HTTPS, IIS (HTTP, HTTPS), orMSSQL.
System Resources Hardware requirements benchmark for FortiDeceptor Virtual appliances only.This widget provides real-time guidelines for system performance and increasingvCPU & RAM resources during deployment and ongoing maintenance. Thewidget also provides the overall Real-time usage status of the CPU and memory.
Incidents & Events Count Number of events occurring each day. You can configure the time period todisplay the Last 24 hours, 7 Days or 4 Weeks.
Decoy Distribution by OS Number of decoys with a chart showing the OS such as Windows or Ubuntu.
The following widgets are available to add to the Dashboard:
Widget Description
Top Critical Logs The top logs that are classified as Critical.
License Information The list of VM license keys and their expiry dates.
Disk Monitor For hardware models:l The RAID level and status, disk usage, and disk management information.
For VMmodels:l Disk usage.
Incidents Distribution byService
Information about the number and types of incidents, such as SMB, HTTP, TCP,and so on.
Top 10 Attackers by Incidents The top 10 attackers by the number of incidents. You can configure the timeperiod to display the Last 24 hours, 7 Days or 4 Weeks.
Top 10 Attackers by Events The top 10 attackers by the number of events. You can configure the time periodto display the Last 24 hours, 7 Days or 4 Weeks.
Global Incidents Distribution Displays the number of Attackers by country on a global map.
Top 10 IPS attacks Displays the top 10 IPS attackers by the number of events. You can configure thetime period to display the Last 24 hours, 7 Days or 4 Weeks.
FortiDeceptor 4.2.0 Administration Guide 107Fortinet Inc.
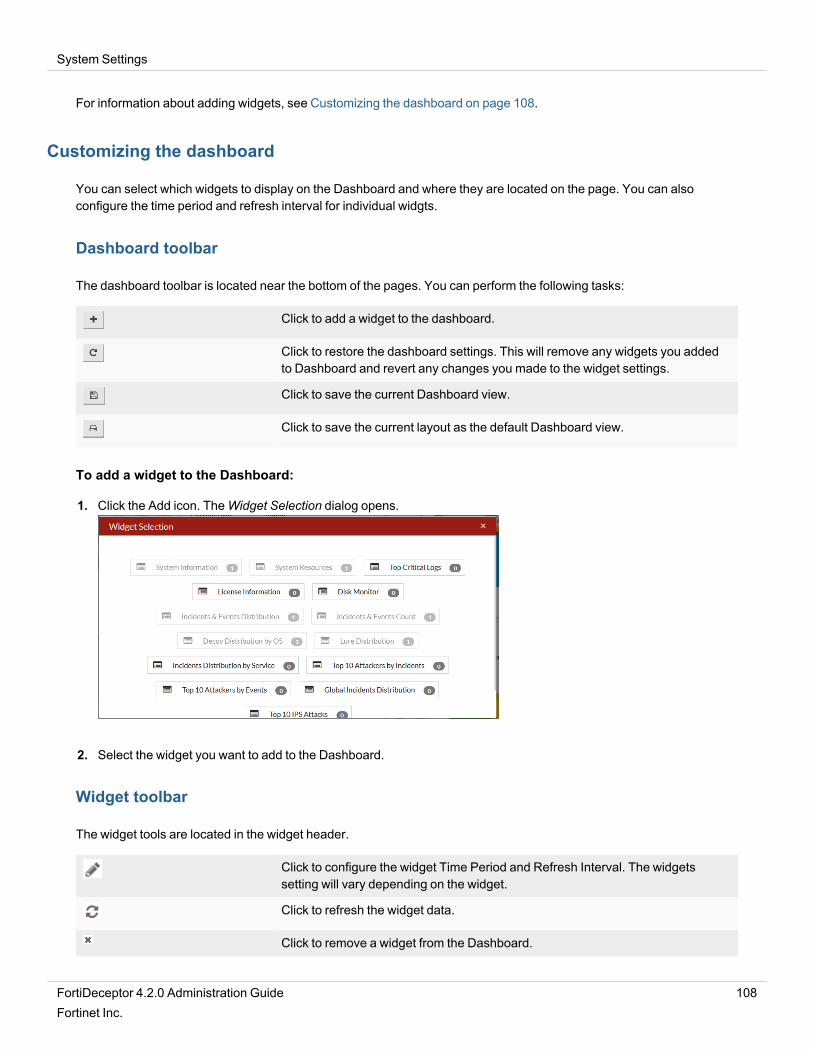
System Settings
For information about adding widgets, see Customizing the dashboard on page 108.
Customizing the dashboard
You can select which widgets to display on the Dashboard and where they are located on the page. You can alsoconfigure the time period and refresh interval for individual widgts.
Dashboard toolbar
The dashboard toolbar is located near the bottom of the pages. You can perform the following tasks:
Click to add a widget to the dashboard.
Click to restore the dashboard settings. This will remove any widgets you addedto Dashboard and revert any changes you made to the widget settings.
Click to save the current Dashboard view.
Click to save the current layout as the default Dashboard view.
To add a widget to the Dashboard:
1. Click the Add icon. TheWidget Selection dialog opens.
2. Select the widget you want to add to the Dashboard.
Widget toolbar
The widget tools are located in the widget header.
Click to configure the widget Time Period and Refresh Interval. The widgetssetting will vary depending on the widget.
Click to refresh the widget data.
Click to remove a widget from the Dashboard.
FortiDeceptor 4.2.0 Administration Guide 108Fortinet Inc.
System Settings
System Information
The System Information widget displays information about the FortiDeceptor device. Use this widget to quickly configurethe device host name, update the firmware version, upload a license or back up the system configuration.
This widget displays the following information and options.
Appliance Mode The mode of the appliance: Manager, Client, or standalone.
Appliance CM Status Optional for client appliance. Display the status in Central Management,
Appliance CM Live Time Optional for client appliance. The last live timestamp in Central Management.
Host Name The name assigned to this FortiDeceptor unit. Click Change to edit theFortiDeceptor host name.
Serial Number Serial number of this FortiDeceptor unit. The serial number is unique to theFortiDeceptor unit and does not change with firmware upgrades. The serialnumber is used for identification when connecting to the FortiGuard server.
System Time The current time on the FortiDeceptor internal clock or NTP server. Click Changeto configure the system time.
Firmware Version Version and build number of the firmware installed on the FortiDeceptor unit.To update the firmware, you must download the latest version from the FortinetCustomer Service & Support portal. Click Update or UPDATE AVAILABLE andselect the firmware image to load from the local hard disk or network volume.
Firmware License To load a firmware license, click Upload License and select a license file.
System Configuration Date and time of the last system configuration backup. Click Backup/Restore togo to the System Recovery page.
Current User The administrator that is currently logged into the system.
Uptime Duration that the FortiDeceptor unit has been running since it booted up.
Deception OS Deception OS license activation and initialization status.Displays a green check mark if the Deception OS is activated and initialized.Displays a Caution icon if the Deception OS is initializing or having issues. Hoverthe mouse pointer on the status icon to view detailed information. For moreinformation, see Log > All Events.To go to Deception > Deception OS to see the images available on FortiDeceptor,click Update or UPDATE AVAILABLE.After purchase, download the license file from the Fortinet Customer Service &Support portal. Then click Upload License to select the license file. The systemreboots and activates the newly-installed Deception OS.
FDN Download Server Shows if the FDN download server is accessible. When the FDN download serveris inaccessible, no update packages are downloaded.
Web Filtering Server Shows if the web filtering query server is accessible.
Antivirus DB Contract Brief information about this contract.
FortiDeceptor 4.2.0 Administration Guide 109Fortinet Inc.
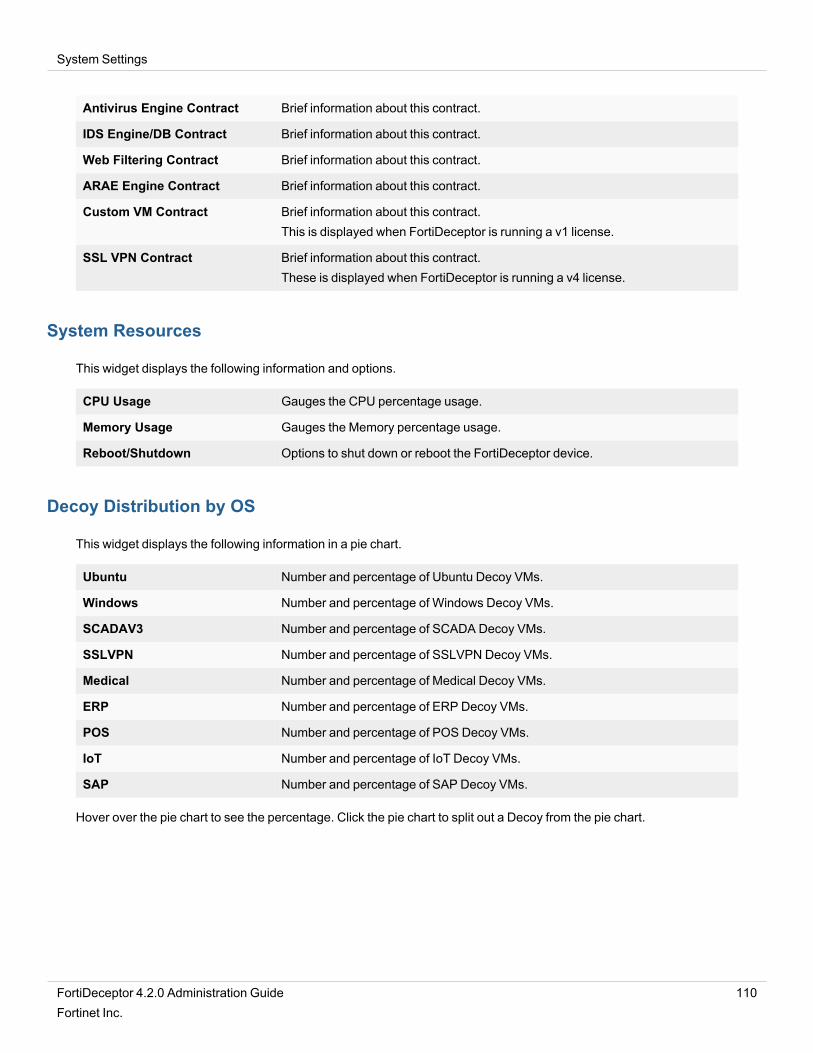
System Settings
Antivirus Engine Contract Brief information about this contract.
IDS Engine/DB Contract Brief information about this contract.
Web Filtering Contract Brief information about this contract.
ARAE Engine Contract Brief information about this contract.
Custom VM Contract Brief information about this contract.This is displayed when FortiDeceptor is running a v1 license.
SSL VPN Contract Brief information about this contract.These is displayed when FortiDeceptor is running a v4 license.
System Resources
This widget displays the following information and options.
CPU Usage Gauges the CPU percentage usage.
Memory Usage Gauges the Memory percentage usage.
Reboot/Shutdown Options to shut down or reboot the FortiDeceptor device.
Decoy Distribution by OS
This widget displays the following information in a pie chart.
Ubuntu Number and percentage of Ubuntu Decoy VMs.
Windows Number and percentage of Windows Decoy VMs.
SCADAV3 Number and percentage of SCADA Decoy VMs.
SSLVPN Number and percentage of SSLVPN Decoy VMs.
Medical Number and percentage of Medical Decoy VMs.
ERP Number and percentage of ERP Decoy VMs.
POS Number and percentage of POS Decoy VMs.
IoT Number and percentage of IoT Decoy VMs.
SAP Number and percentage of SAP Decoy VMs.
Hover over the pie chart to see the percentage. Click the pie chart to split out a Decoy from the pie chart.
FortiDeceptor 4.2.0 Administration Guide 110Fortinet Inc.
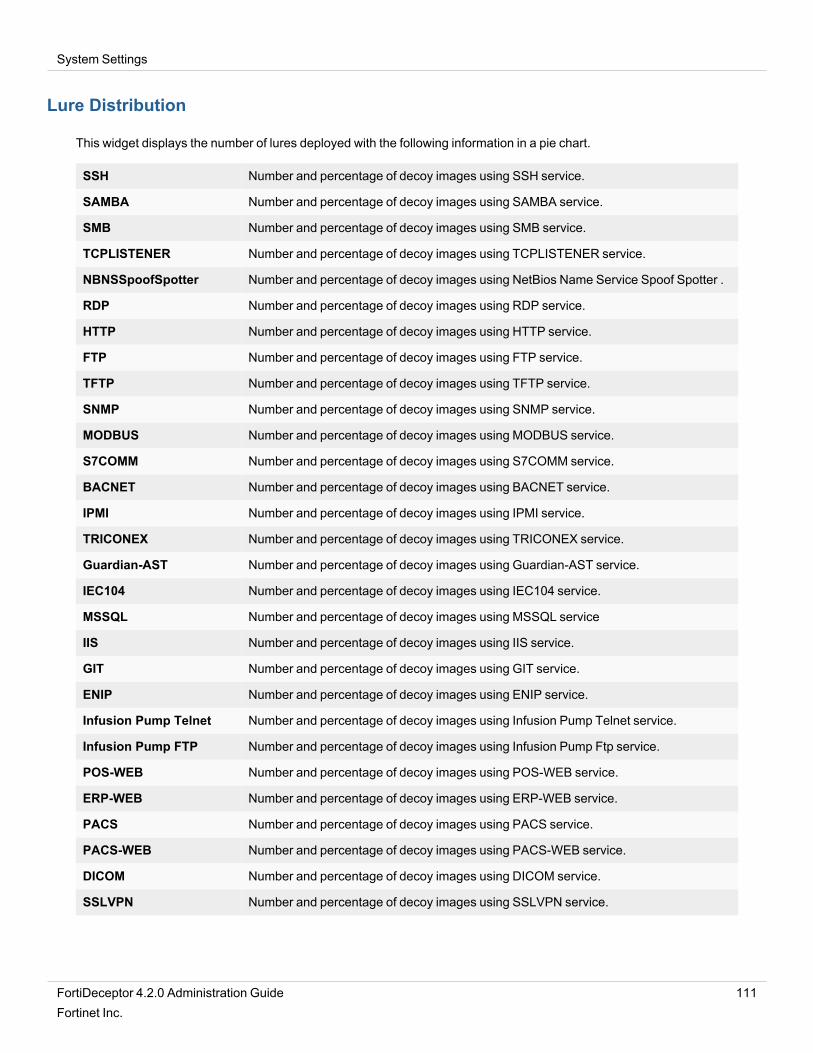
System Settings
Lure Distribution
This widget displays the number of lures deployed with the following information in a pie chart.
SSH Number and percentage of decoy images using SSH service.
SAMBA Number and percentage of decoy images using SAMBA service.
SMB Number and percentage of decoy images using SMB service.
TCPLISTENER Number and percentage of decoy images using TCPLISTENER service.
NBNSSpoofSpotter Number and percentage of decoy images using NetBios Name Service Spoof Spotter .
RDP Number and percentage of decoy images using RDP service.
HTTP Number and percentage of decoy images using HTTP service.
FTP Number and percentage of decoy images using FTP service.
TFTP Number and percentage of decoy images using TFTP service.
SNMP Number and percentage of decoy images using SNMP service.
MODBUS Number and percentage of decoy images using MODBUS service.
S7COMM Number and percentage of decoy images using S7COMM service.
BACNET Number and percentage of decoy images using BACNET service.
IPMI Number and percentage of decoy images using IPMI service.
TRICONEX Number and percentage of decoy images using TRICONEX service.
Guardian-AST Number and percentage of decoy images using Guardian-AST service.
IEC104 Number and percentage of decoy images using IEC104 service.
MSSQL Number and percentage of decoy images using MSSQL service
IIS Number and percentage of decoy images using IIS service.
GIT Number and percentage of decoy images using GIT service.
ENIP Number and percentage of decoy images using ENIP service.
Infusion Pump Telnet Number and percentage of decoy images using Infusion Pump Telnet service.
Infusion Pump FTP Number and percentage of decoy images using Infusion Pump Ftp service.
POS-WEB Number and percentage of decoy images using POS-WEB service.
ERP-WEB Number and percentage of decoy images using ERP-WEB service.
PACS Number and percentage of decoy images using PACS service.
PACS-WEB Number and percentage of decoy images using PACS-WEB service.
DICOM Number and percentage of decoy images using DICOM service.
SSLVPN Number and percentage of decoy images using SSLVPN service.
FortiDeceptor 4.2.0 Administration Guide 111Fortinet Inc.
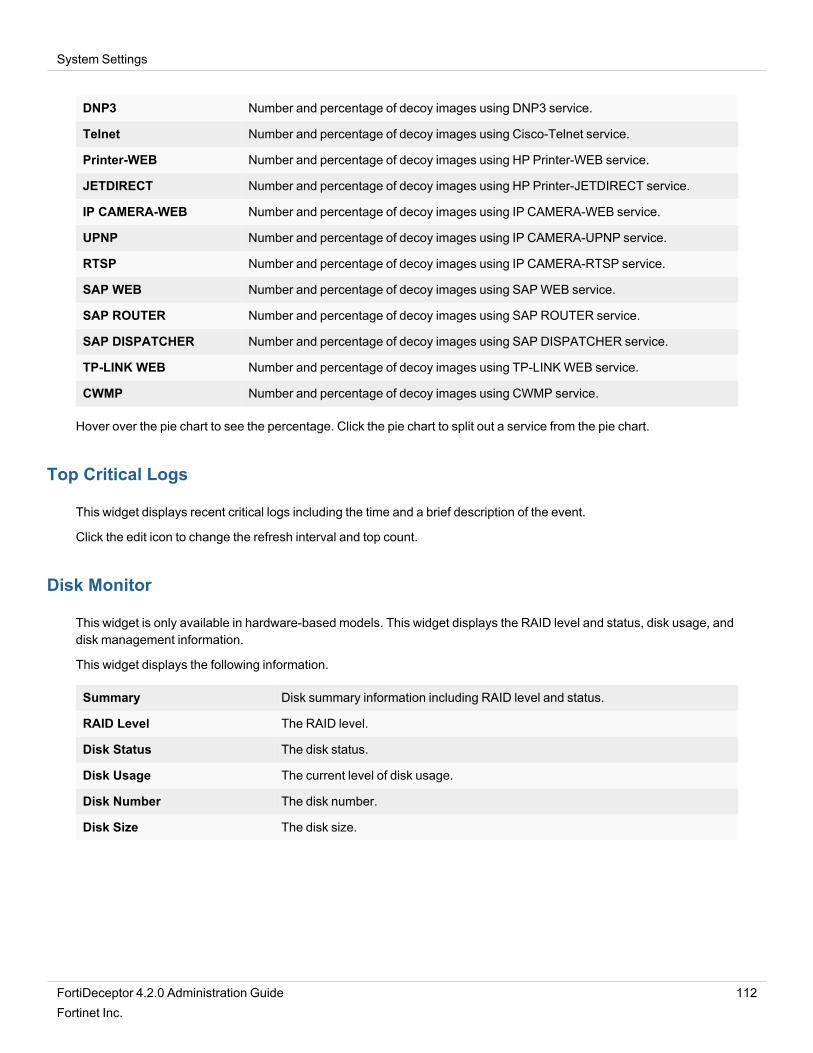
System Settings
DNP3 Number and percentage of decoy images using DNP3 service.
Telnet Number and percentage of decoy images using Cisco-Telnet service.
Printer-WEB Number and percentage of decoy images using HP Printer-WEB service.
JETDIRECT Number and percentage of decoy images using HP Printer-JETDIRECT service.
IP CAMERA-WEB Number and percentage of decoy images using IP CAMERA-WEB service.
UPNP Number and percentage of decoy images using IP CAMERA-UPNP service.
RTSP Number and percentage of decoy images using IP CAMERA-RTSP service.
SAP WEB Number and percentage of decoy images using SAPWEB service.
SAP ROUTER Number and percentage of decoy images using SAP ROUTER service.
SAP DISPATCHER Number and percentage of decoy images using SAP DISPATCHER service.
TP-LINK WEB Number and percentage of decoy images using TP-LINKWEB service.
CWMP Number and percentage of decoy images using CWMP service.
Hover over the pie chart to see the percentage. Click the pie chart to split out a service from the pie chart.
Top Critical Logs
This widget displays recent critical logs including the time and a brief description of the event.
Click the edit icon to change the refresh interval and top count.
Disk Monitor
This widget is only available in hardware-based models. This widget displays the RAID level and status, disk usage, anddisk management information.
This widget displays the following information.
Summary Disk summary information including RAID level and status.
RAID Level The RAID level.
Disk Status The disk status.
Disk Usage The current level of disk usage.
Disk Number The disk number.
Disk Size The disk size.
FortiDeceptor 4.2.0 Administration Guide 112Fortinet Inc.
System Settings
Basic System Settings
Change the GUI idle timeout
By default, the GUI disconnects administrative sessions if there is no activity for five minutes.
To change the idle timeout length:
1. Go to System > Settings.2. Change the Idle timeoutminutes (1 to 480 minutes).3. ClickOK.
The setting takes affect after you log out and log back in.
In this page you can also reset all widgets to their default settings.
Microsoft Windows VM license activation
When Fortinet ships FortiDeceptor, the default Windows guest VM image is activated. TheWindows VM license is in anunactivated state and requires activation.
If you purchase aWindows or Ubuntu VM upgrade package, put the downloaded license filehere using the Upload License link.
Log out of the unit
To log out of the unit:
1. In the FortiDeceptor banner at the top-right, click the user name and select Logout.
If you only close the browser or browse to another web site, you remain logged in until the idle timeout period elapses.
Update FortiDeceptor firmware
A best practice is to stay up-to-date on patch releases for currently deployed major release. Only update to a new majorrelease or version when you are looking for specific functionality in the new major release or version. For moreinformation, see the FortiDeceptor Release Notes or contact Technical Support.
Before any firmware update, complete the following:
l Download the FortiDeceptor firmware image and Release Notes document from the Fortinet Customer Service &Support portal. Review the Release Notes, including the special notices, upgrade information, product integrationand support, and resolved and known issues.
FortiDeceptor 4.2.0 Administration Guide 113Fortinet Inc.
System Settings
l Back up your configuration file. It is highly recommended that you create a system backup file and save it to yourmanagement computer. You can also schedule the system to back up system configurations to a remote server.See, Back up or restore the system configuration on page 114.
l Plan a maintenance window for the firmware update. If possible, consider setting up a test environment to checkthat the update does not negatively impact your network.
To update the FortiDeceptor firmware:
1. Go to Dashboard > System Information > Firmware Version.2. In the System Information widget beside Firmware Version, click Update or UPDATE AVAILABLE.3. Click Choose File and locate the previously downloaded firmware image on your management computer; then click
Submit to start the upgrade.Alternatively, in the AVAILABLE FIRMWARE pane Install column, click the download icon beside the firmwarerelease you want. The system upgrades and restarts automatically.
When the update is complete, test your FortiDeceptor device to ensure that the update was successful.
Reboot or shut down the unit
To avoid potential configuration or hardware problems, always use the GUI or CLI to reboot or shut down FortiDeceptor.
To reboot the FortiDeceptor unit:
1. Go to Dashboard > System Resources.2. Click Reboot.3. Enter a reason for the reboot in the Reason field.4. ClickOK.
After reboot, the FortiDeceptor VM initialization requires approximately 30 minutes. The Decoy VM icon in the SystemInformation widget shows a warning sign until the process completes.
When FortiDeceptor boots or reboots, the following critical event log message is normal:
The VM system is not running and might need more time to startup. Please check system logs for more details. Ifneeded, please reboot system.
After upgrading FortiDeceptor to a new firmware version, the systemmight clean up data and a Database is not readymessage displays. The clean up time depends on the size of historical data.
To shut down the FortiDeceptor unit:
1. Go to Dashboard > System Resources.2. Click Shutdown.3. Enter a reason for the shutdown in the Reason field.4. ClickOK.
Back up or restore the system configuration
We recommend that your regular maintenance includes system backups. Always backup before upgrading firmware ormaking major system configuration changes. Save configuration backups to a management computer in case you need
FortiDeceptor 4.2.0 Administration Guide 114Fortinet Inc.

System Settings
to restore the system after a network event.
The FortiDeceptor configuration file is in binary format and manual editing is not supported.
To back up the FortiDeceptor configuration to your local management computer:
1. Go to Dashboard > System Information > System Configuration.2. Click Backup/Restore.3. Click Click here to save your backup file.
To restore the FortiDeceptor configuration:
1. Go to Dashboard >System Information > System Configuration.2. Click Backup/Restore.3. Click Choose File and locate the backup file on your management computer.4. Click Restore to load the backup file.5. ClickOK.
When the system configuration restore process completes, the login page appears.
When you do a system restore, all configurations are replaced with the backup data. Thesystem reboots automatically to complete the restore. Only the backup configuration file fromthe previous or the current release is supported.
Network
The Network page provides interface, DNS, and routing management options.
Interfaces
To view and manage interfaces, go to Network > Interfaces.
This page displays the following information and options:
Interface The interface name and description.Failover IP is listed under this field with the descriptor: (cluster external port).
port1(administrationport)
Port1 is hard-coded as the administration interface. You can enable or disableHTTP, SSH, and Telnet access rights on port1. HTTPS is enabled by default andcannot be disabled. You can use port1 for Device mode although a different,dedicated port is recommended.
port2 Decoy VM deployment.
port3 Decoy VM deployment.
FortiDeceptor 4.2.0 Administration Guide 115Fortinet Inc.
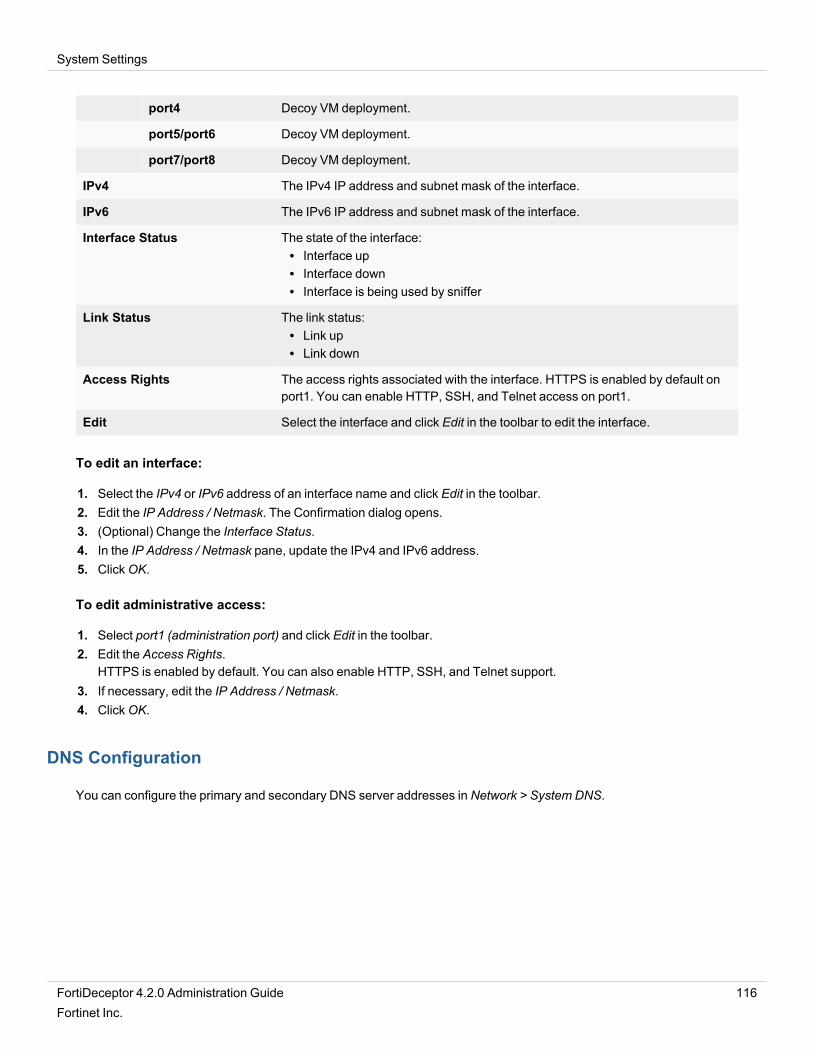
System Settings
port4 Decoy VM deployment.
port5/port6 Decoy VM deployment.
port7/port8 Decoy VM deployment.
IPv4 The IPv4 IP address and subnet mask of the interface.
IPv6 The IPv6 IP address and subnet mask of the interface.
Interface Status The state of the interface:l Interface upl Interface downl Interface is being used by sniffer
Link Status The link status:l Link upl Link down
Access Rights The access rights associated with the interface. HTTPS is enabled by default onport1. You can enable HTTP, SSH, and Telnet access on port1.
Edit Select the interface and click Edit in the toolbar to edit the interface.
To edit an interface:
1. Select the IPv4 or IPv6 address of an interface name and click Edit in the toolbar.2. Edit the IP Address / Netmask. The Confirmation dialog opens.3. (Optional) Change the Interface Status.4. In the IP Address / Netmask pane, update the IPv4 and IPv6 address.5. ClickOK.
To edit administrative access:
1. Select port1 (administration port) and click Edit in the toolbar.2. Edit the Access Rights.
HTTPS is enabled by default. You can also enable HTTP, SSH, and Telnet support.3. If necessary, edit the IP Address / Netmask.4. ClickOK.
DNS Configuration
You can configure the primary and secondary DNS server addresses in Network > System DNS.
FortiDeceptor 4.2.0 Administration Guide 116Fortinet Inc.
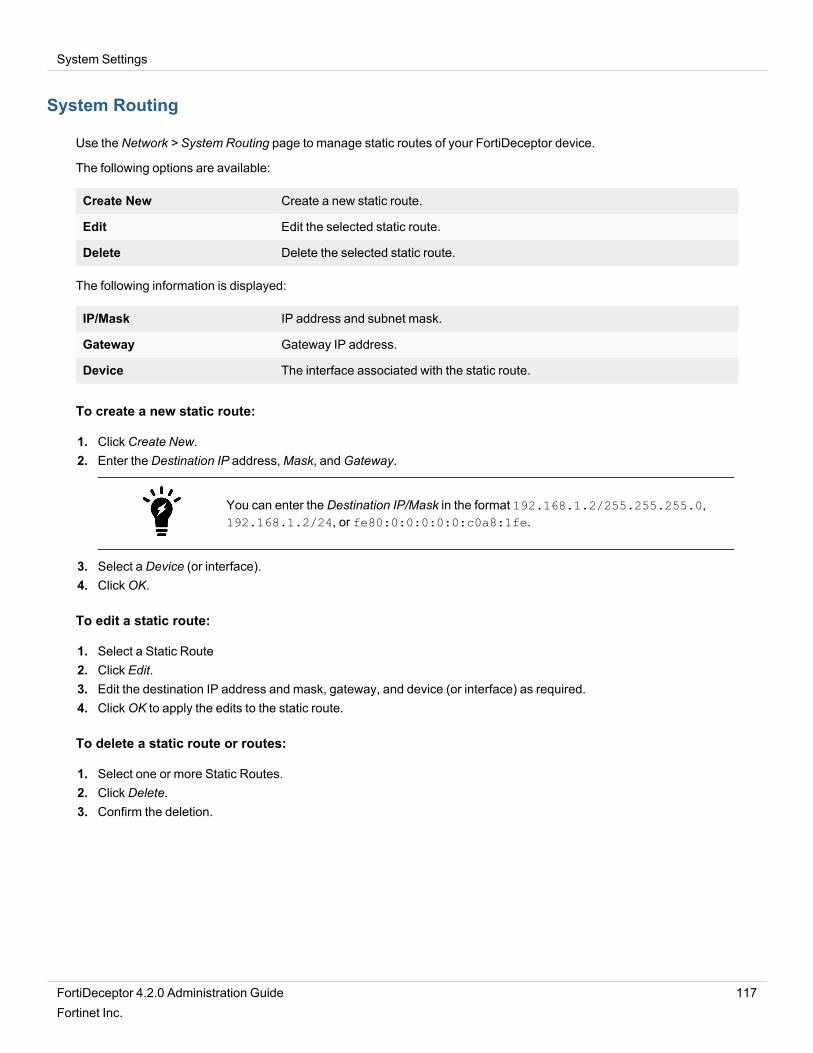
System Settings
System Routing
Use the Network > System Routing page to manage static routes of your FortiDeceptor device.
The following options are available:
Create New Create a new static route.
Edit Edit the selected static route.
Delete Delete the selected static route.
The following information is displayed:
IP/Mask IP address and subnet mask.
Gateway Gateway IP address.
Device The interface associated with the static route.
To create a new static route:
1. Click Create New.2. Enter the Destination IP address,Mask, andGateway.
You can enter the Destination IP/Mask in the format 192.168.1.2/255.255.255.0,192.168.1.2/24, or fe80:0:0:0:0:0:c0a8:1fe.
3. Select a Device (or interface).4. ClickOK.
To edit a static route:
1. Select a Static Route2. Click Edit.3. Edit the destination IP address and mask, gateway, and device (or interface) as required.4. ClickOK to apply the edits to the static route.
To delete a static route or routes:
1. Select one or more Static Routes.2. Click Delete.3. Confirm the deletion.
FortiDeceptor 4.2.0 Administration Guide 117Fortinet Inc.
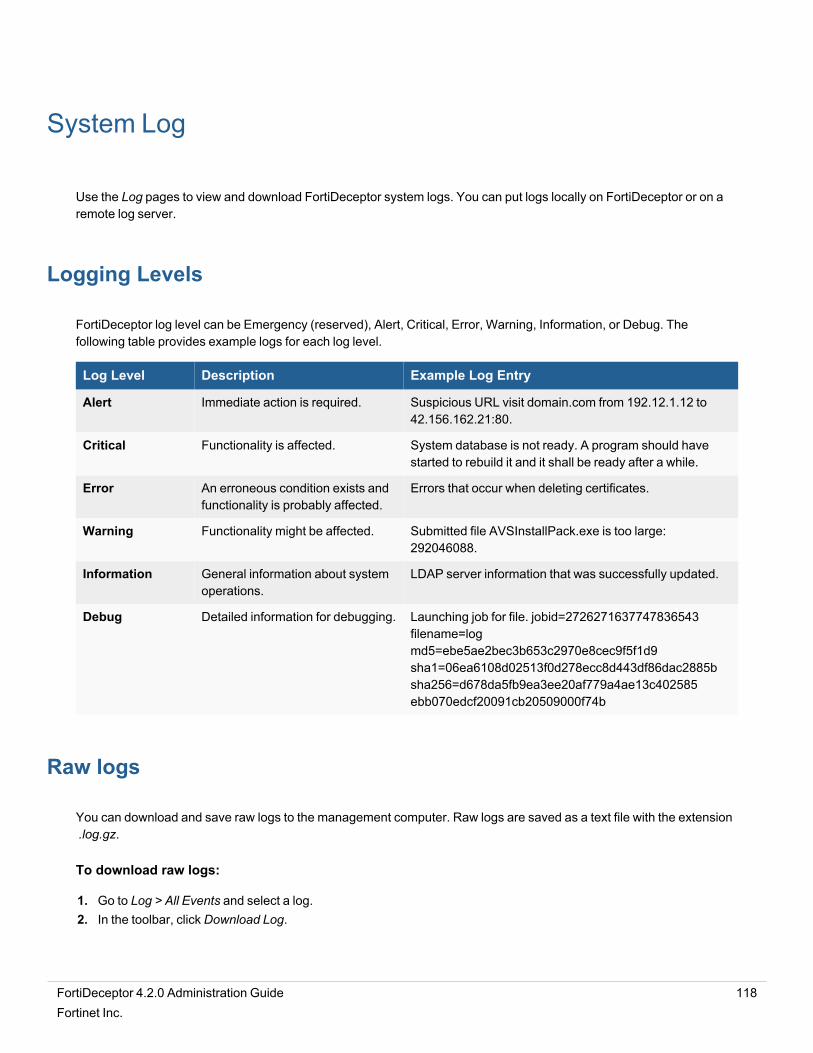
System Log
Use the Log pages to view and download FortiDeceptor system logs. You can put logs locally on FortiDeceptor or on aremote log server.
Logging Levels
FortiDeceptor log level can be Emergency (reserved), Alert, Critical, Error, Warning, Information, or Debug. Thefollowing table provides example logs for each log level.
Log Level Description Example Log Entry
Alert Immediate action is required. Suspicious URL visit domain.com from 192.12.1.12 to42.156.162.21:80.
Critical Functionality is affected. System database is not ready. A program should havestarted to rebuild it and it shall be ready after a while.
Error An erroneous condition exists andfunctionality is probably affected.
Errors that occur when deleting certificates.
Warning Functionality might be affected. Submitted file AVSInstallPack.exe is too large:292046088.
Information General information about systemoperations.
LDAP server information that was successfully updated.
Debug Detailed information for debugging. Launching job for file. jobid=2726271637747836543filename=logmd5=ebe5ae2bec3b653c2970e8cec9f5f1d9sha1=06ea6108d02513f0d278ecc8d443df86dac2885bsha256=d678da5fb9ea3ee20af779a4ae13c402585ebb070edcf20091cb20509000f74b
Raw logs
You can download and save raw logs to the management computer. Raw logs are saved as a text file with the extension.log.gz.
To download raw logs:
1. Go to Log > All Events and select a log.2. In the toolbar, click Download Log.
FortiDeceptor 4.2.0 Administration Guide 118Fortinet Inc.
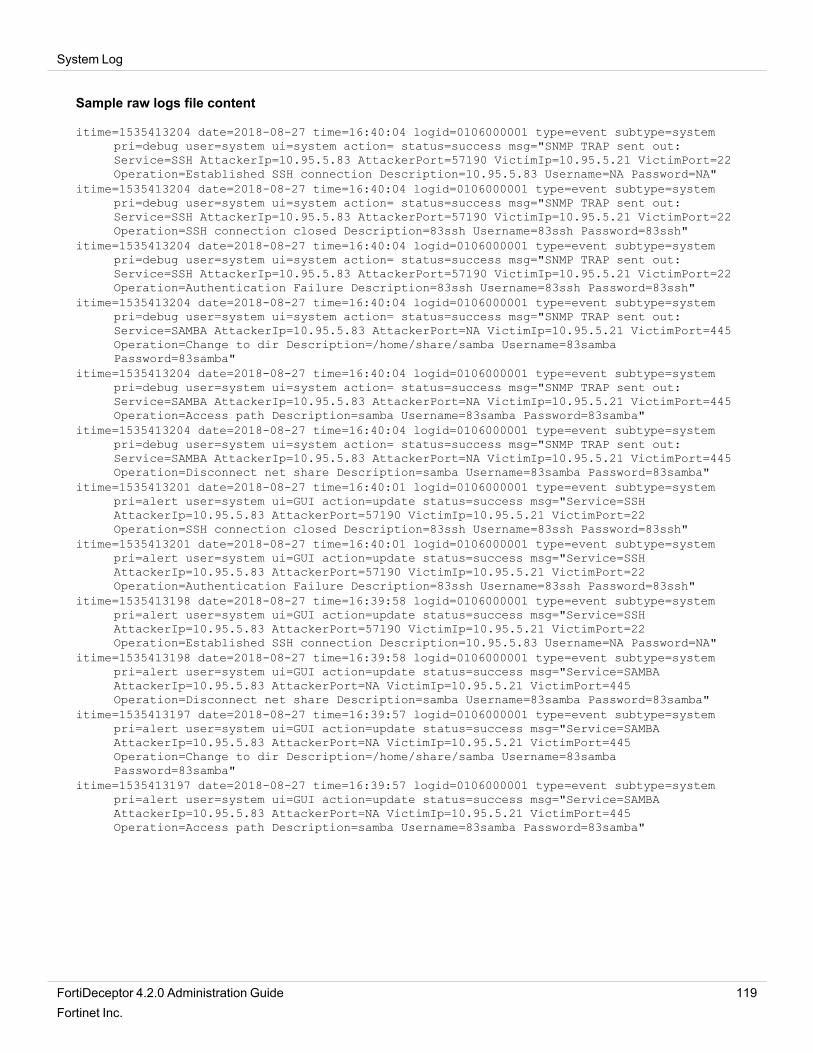
System Log
Sample raw logs file content
itime=1535413204 date=2018-08-27 time=16:40:04 logid=0106000001 type=event subtype=systempri=debug user=system ui=system action= status=success msg="SNMP TRAP sent out:Service=SSH AttackerIp=10.95.5.83 AttackerPort=57190 VictimIp=10.95.5.21 VictimPort=22Operation=Established SSH connection Description=10.95.5.83 Username=NA Password=NA"
itime=1535413204 date=2018-08-27 time=16:40:04 logid=0106000001 type=event subtype=systempri=debug user=system ui=system action= status=success msg="SNMP TRAP sent out:Service=SSH AttackerIp=10.95.5.83 AttackerPort=57190 VictimIp=10.95.5.21 VictimPort=22Operation=SSH connection closed Description=83ssh Username=83ssh Password=83ssh"
itime=1535413204 date=2018-08-27 time=16:40:04 logid=0106000001 type=event subtype=systempri=debug user=system ui=system action= status=success msg="SNMP TRAP sent out:Service=SSH AttackerIp=10.95.5.83 AttackerPort=57190 VictimIp=10.95.5.21 VictimPort=22Operation=Authentication Failure Description=83ssh Username=83ssh Password=83ssh"
itime=1535413204 date=2018-08-27 time=16:40:04 logid=0106000001 type=event subtype=systempri=debug user=system ui=system action= status=success msg="SNMP TRAP sent out:Service=SAMBA AttackerIp=10.95.5.83 AttackerPort=NA VictimIp=10.95.5.21 VictimPort=445Operation=Change to dir Description=/home/share/samba Username=83sambaPassword=83samba"
itime=1535413204 date=2018-08-27 time=16:40:04 logid=0106000001 type=event subtype=systempri=debug user=system ui=system action= status=success msg="SNMP TRAP sent out:Service=SAMBA AttackerIp=10.95.5.83 AttackerPort=NA VictimIp=10.95.5.21 VictimPort=445Operation=Access path Description=samba Username=83samba Password=83samba"
itime=1535413204 date=2018-08-27 time=16:40:04 logid=0106000001 type=event subtype=systempri=debug user=system ui=system action= status=success msg="SNMP TRAP sent out:Service=SAMBA AttackerIp=10.95.5.83 AttackerPort=NA VictimIp=10.95.5.21 VictimPort=445Operation=Disconnect net share Description=samba Username=83samba Password=83samba"
itime=1535413201 date=2018-08-27 time=16:40:01 logid=0106000001 type=event subtype=systempri=alert user=system ui=GUI action=update status=success msg="Service=SSHAttackerIp=10.95.5.83 AttackerPort=57190 VictimIp=10.95.5.21 VictimPort=22Operation=SSH connection closed Description=83ssh Username=83ssh Password=83ssh"
itime=1535413201 date=2018-08-27 time=16:40:01 logid=0106000001 type=event subtype=systempri=alert user=system ui=GUI action=update status=success msg="Service=SSHAttackerIp=10.95.5.83 AttackerPort=57190 VictimIp=10.95.5.21 VictimPort=22Operation=Authentication Failure Description=83ssh Username=83ssh Password=83ssh"
itime=1535413198 date=2018-08-27 time=16:39:58 logid=0106000001 type=event subtype=systempri=alert user=system ui=GUI action=update status=success msg="Service=SSHAttackerIp=10.95.5.83 AttackerPort=57190 VictimIp=10.95.5.21 VictimPort=22Operation=Established SSH connection Description=10.95.5.83 Username=NA Password=NA"
itime=1535413198 date=2018-08-27 time=16:39:58 logid=0106000001 type=event subtype=systempri=alert user=system ui=GUI action=update status=success msg="Service=SAMBAAttackerIp=10.95.5.83 AttackerPort=NA VictimIp=10.95.5.21 VictimPort=445Operation=Disconnect net share Description=samba Username=83samba Password=83samba"
itime=1535413197 date=2018-08-27 time=16:39:57 logid=0106000001 type=event subtype=systempri=alert user=system ui=GUI action=update status=success msg="Service=SAMBAAttackerIp=10.95.5.83 AttackerPort=NA VictimIp=10.95.5.21 VictimPort=445Operation=Change to dir Description=/home/share/samba Username=83sambaPassword=83samba"
itime=1535413197 date=2018-08-27 time=16:39:57 logid=0106000001 type=event subtype=systempri=alert user=system ui=GUI action=update status=success msg="Service=SAMBAAttackerIp=10.95.5.83 AttackerPort=NA VictimIp=10.95.5.21 VictimPort=445Operation=Access path Description=samba Username=83samba Password=83samba"
FortiDeceptor 4.2.0 Administration Guide 119Fortinet Inc.
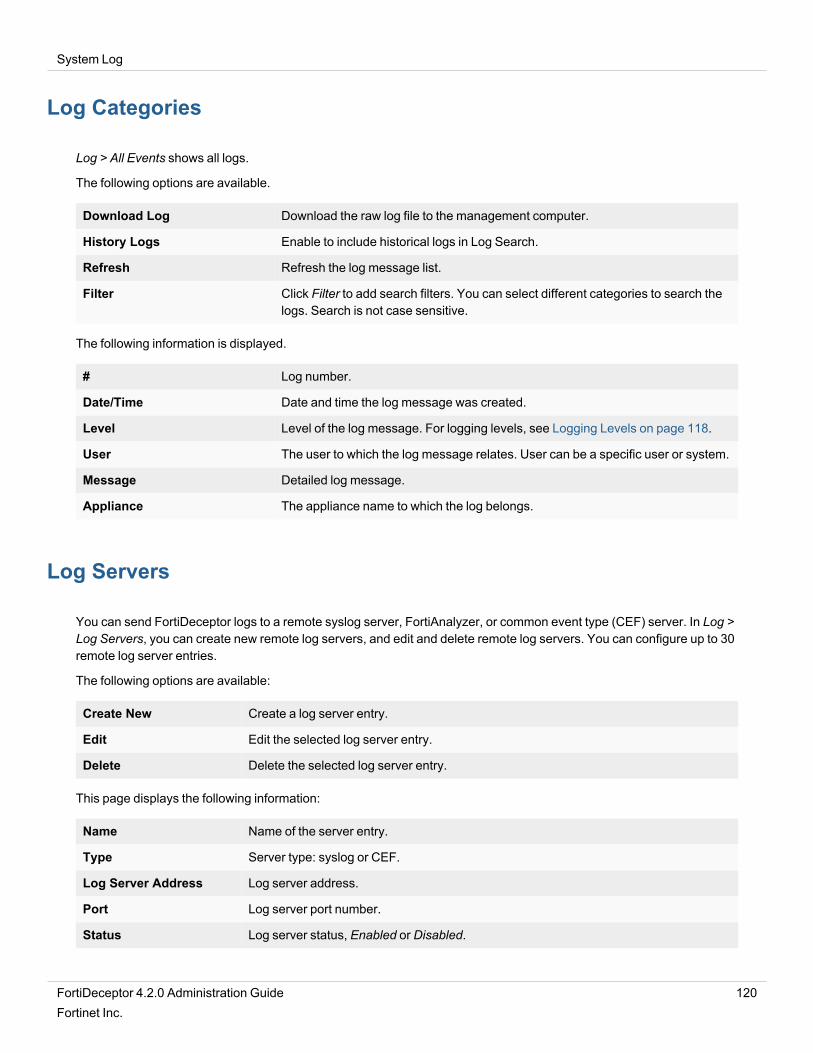
System Log
Log Categories
Log > All Events shows all logs.
The following options are available.
Download Log Download the raw log file to the management computer.
History Logs Enable to include historical logs in Log Search.
Refresh Refresh the log message list.
Filter Click Filter to add search filters. You can select different categories to search thelogs. Search is not case sensitive.
The following information is displayed.
# Log number.
Date/Time Date and time the log message was created.
Level Level of the log message. For logging levels, see Logging Levels on page 118.
User The user to which the log message relates. User can be a specific user or system.
Message Detailed log message.
Appliance The appliance name to which the log belongs.
Log Servers
You can send FortiDeceptor logs to a remote syslog server, FortiAnalyzer, or common event type (CEF) server. In Log >Log Servers, you can create new remote log servers, and edit and delete remote log servers. You can configure up to 30remote log server entries.
The following options are available:
Create New Create a log server entry.
Edit Edit the selected log server entry.
Delete Delete the selected log server entry.
This page displays the following information:
Name Name of the server entry.
Type Server type: syslog or CEF.
Log Server Address Log server address.
Port Log server port number.
Status Log server status, Enabled or Disabled.
FortiDeceptor 4.2.0 Administration Guide 120Fortinet Inc.
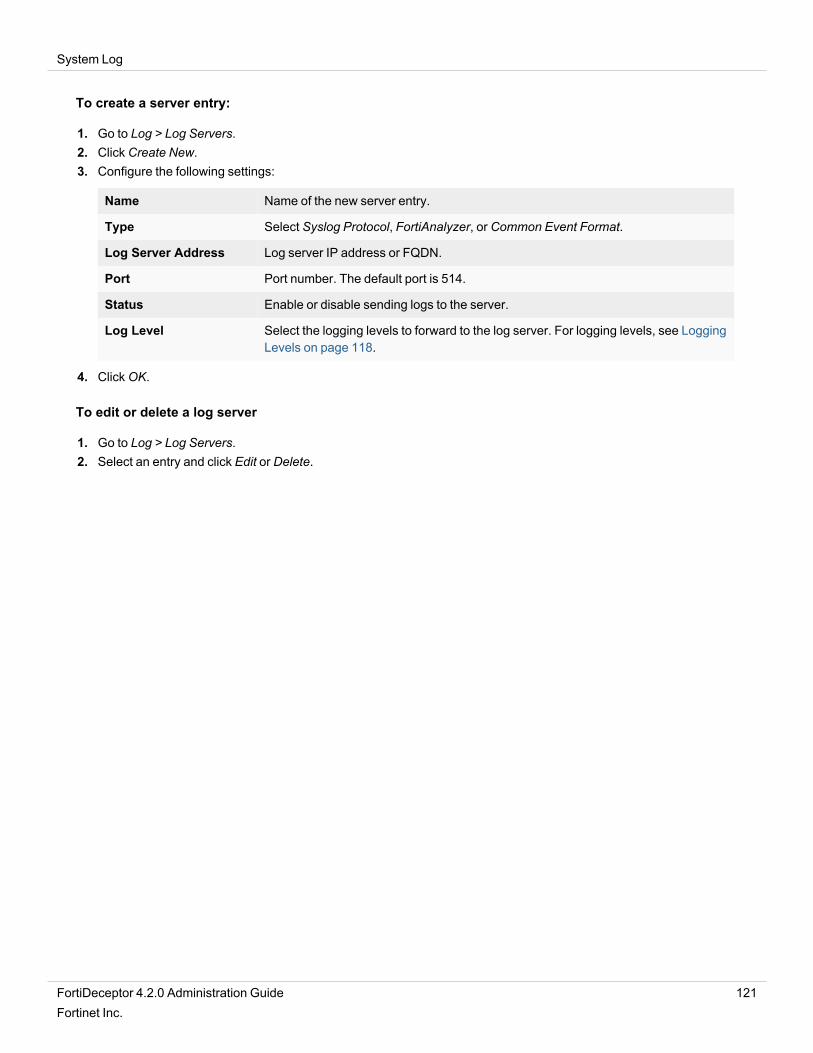
System Log
To create a server entry:
1. Go to Log > Log Servers.2. Click Create New.3. Configure the following settings:
Name Name of the new server entry.
Type Select Syslog Protocol, FortiAnalyzer, or Common Event Format.
Log Server Address Log server IP address or FQDN.
Port Port number. The default port is 514.
Status Enable or disable sending logs to the server.
Log Level Select the logging levels to forward to the log server. For logging levels, see LoggingLevels on page 118.
4. ClickOK.
To edit or delete a log server
1. Go to Log > Log Servers.2. Select an entry and click Edit or Delete.
FortiDeceptor 4.2.0 Administration Guide 121Fortinet Inc.
Deploying FortiDeceptor in offline or air-gapped networks
This section shows how to deploy FortiDeceptor in an offline or air-gapped network with no internet access, using thefollowing procedures.
l Applying the license in an offline or air-gapped network on page 122l Importing deception VMs in an offline or air-gapped network on page 124l Importing firmware in an offline or air-gapped network on page 126l Importing an FDS package via FDC GUI in an offline or air-gapped network on page 126l Importing FDS package and license file via FortiManager in an offline or air-gapped network on page 127
FortiDeceptor uses deception VMs to deploy decoys across the network. Deploying FortiDeceptor VMs in a closednetwork requires downloading the required images directly from the FortiDeceptor VM external repository and manuallyuploading the deception VMs. For information about downloading the deception VMs, see Importing deception VMs inan offline or air-gapped network on page 124
You can also use the Deception > Deception OS page or the fw-upgrade CLI command to download and importpackages.
Because FortiDeceptor also uses FDS services (IPS/AV/WEB) in offline and air-gapped networks, you must also importthese packages.
Deception VM security
You can download deception VMs via the HTTPS protocol. Each image is compressed, encrypted, and packed by theFDC tool separately. The metafile describes the MD5 of each VM image.
The security layers that protect deception images are:
l Download via HTTPS.l Deception VMs do not have any Fortinet propriety software.l We provide the file's MD5 so that you can confirm the MD5 checksum for the downloaded files.l FortiDeceptor always verifies the VM image by encryption and multiple layer checksum inside the package beforeinstalling it.
Applying the license in an offline or air-gapped network
To download the FortiDeceptor license file from the Fortinet support site:
1. Log into Customer Service and Support. The Asset Portal opens.2. Go toMy Assets and locate the device then click the Serial Number. The product details page opens.3. In the License & Key widget, clickGet The License File and save it to the local disk.
FortiDeceptor 4.2.0 Administration Guide 122Fortinet Inc.
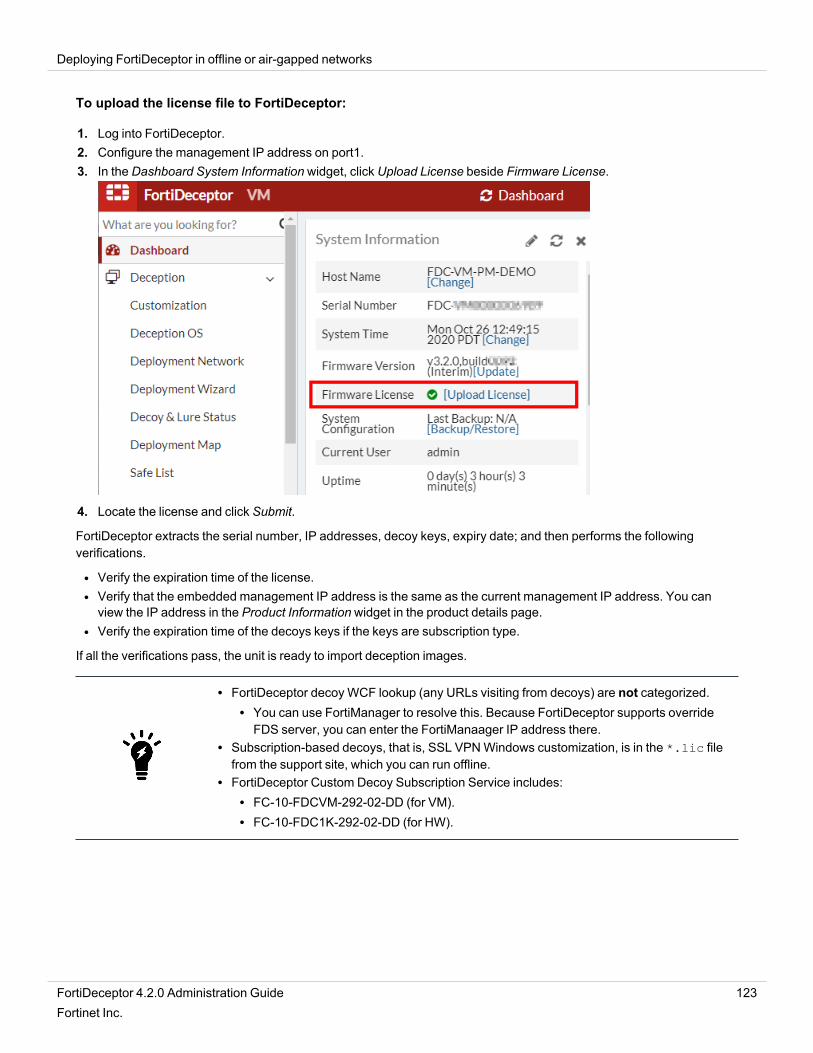
Deploying FortiDeceptor in offline or air-gapped networks
To upload the license file to FortiDeceptor:
1. Log into FortiDeceptor.2. Configure the management IP address on port1.3. In the Dashboard System Information widget, click Upload License beside Firmware License.
4. Locate the license and click Submit.
FortiDeceptor extracts the serial number, IP addresses, decoy keys, expiry date; and then performs the followingverifications.
l Verify the expiration time of the license.l Verify that the embedded management IP address is the same as the current management IP address. You canview the IP address in the Product Information widget in the product details page.
l Verify the expiration time of the decoys keys if the keys are subscription type.
If all the verifications pass, the unit is ready to import deception images.
l FortiDeceptor decoy WCF lookup (any URLs visiting from decoys) are not categorized.l You can use FortiManager to resolve this. Because FortiDeceptor supports overrideFDS server, you can enter the FortiManaager IP address there.
l Subscription-based decoys, that is, SSL VPNWindows customization, is in the *.lic filefrom the support site, which you can run offline.
l FortiDeceptor Custom Decoy Subscription Service includes:l FC-10-FDCVM-292-02-DD (for VM).l FC-10-FDC1K-292-02-DD (for HW).
FortiDeceptor 4.2.0 Administration Guide 123Fortinet Inc.

Deploying FortiDeceptor in offline or air-gapped networks
Importing deception VMs in an offline or air-gapped network
This topic shows how to download and import deception VMs in an offline or air-gapped network.
To download and import a deception VM:
1. Log into Customer Service and Support. The Asset Portal opens.2. In the banner, click Support > Downloads > Firmware Download.
3. In the Select Product dropdown list, select FortiDeceptor and then click Download.
FortiDeceptor 4.2.0 Administration Guide 124Fortinet Inc.
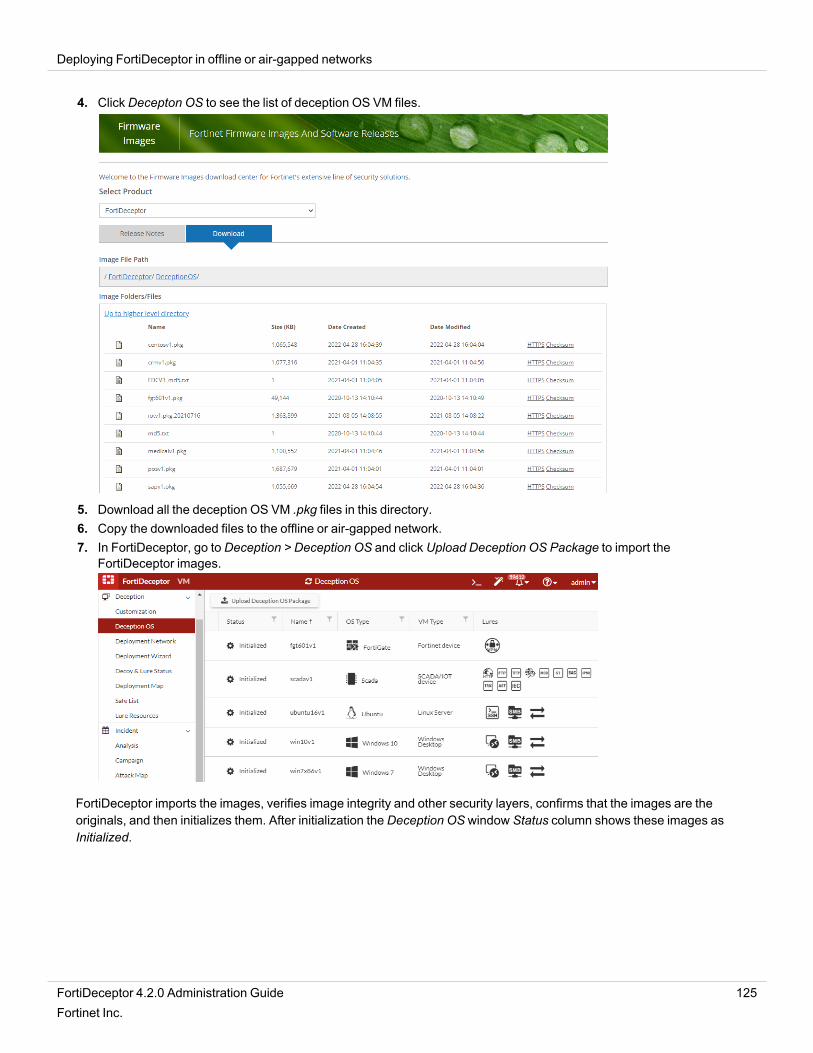
Deploying FortiDeceptor in offline or air-gapped networks
4. Click Decepton OS to see the list of deception OS VM files.
5. Download all the deception OS VM .pkg files in this directory.6. Copy the downloaded files to the offline or air-gapped network.7. In FortiDeceptor, go to Deception > Deception OS and click Upload Deception OS Package to import the
FortiDeceptor images.
FortiDeceptor imports the images, verifies image integrity and other security layers, confirms that the images are theoriginals, and then initializes them. After initialization the Deception OS window Status column shows these images asInitialized.
FortiDeceptor 4.2.0 Administration Guide 125Fortinet Inc.
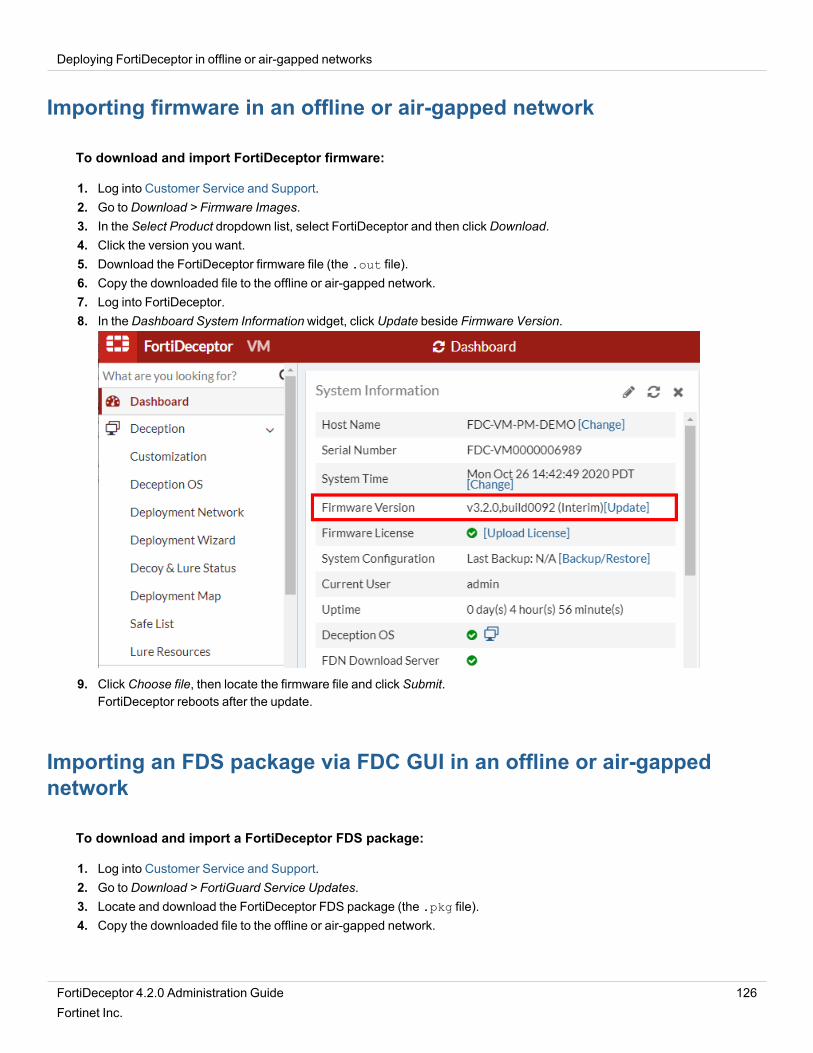
Deploying FortiDeceptor in offline or air-gapped networks
Importing firmware in an offline or air-gapped network
To download and import FortiDeceptor firmware:
1. Log into Customer Service and Support.2. Go to Download > Firmware Images.3. In the Select Product dropdown list, select FortiDeceptor and then click Download.4. Click the version you want.5. Download the FortiDeceptor firmware file (the .out file).6. Copy the downloaded file to the offline or air-gapped network.7. Log into FortiDeceptor.8. In the Dashboard System Information widget, click Update beside Firmware Version.
9. Click Choose file, then locate the firmware file and click Submit.FortiDeceptor reboots after the update.
Importing an FDS package via FDC GUI in an offline or air-gappednetwork
To download and import a FortiDeceptor FDS package:
1. Log into Customer Service and Support.2. Go to Download > FortiGuard Service Updates.3. Locate and download the FortiDeceptor FDS package (the .pkg file).4. Copy the downloaded file to the offline or air-gapped network.
FortiDeceptor 4.2.0 Administration Guide 126Fortinet Inc.
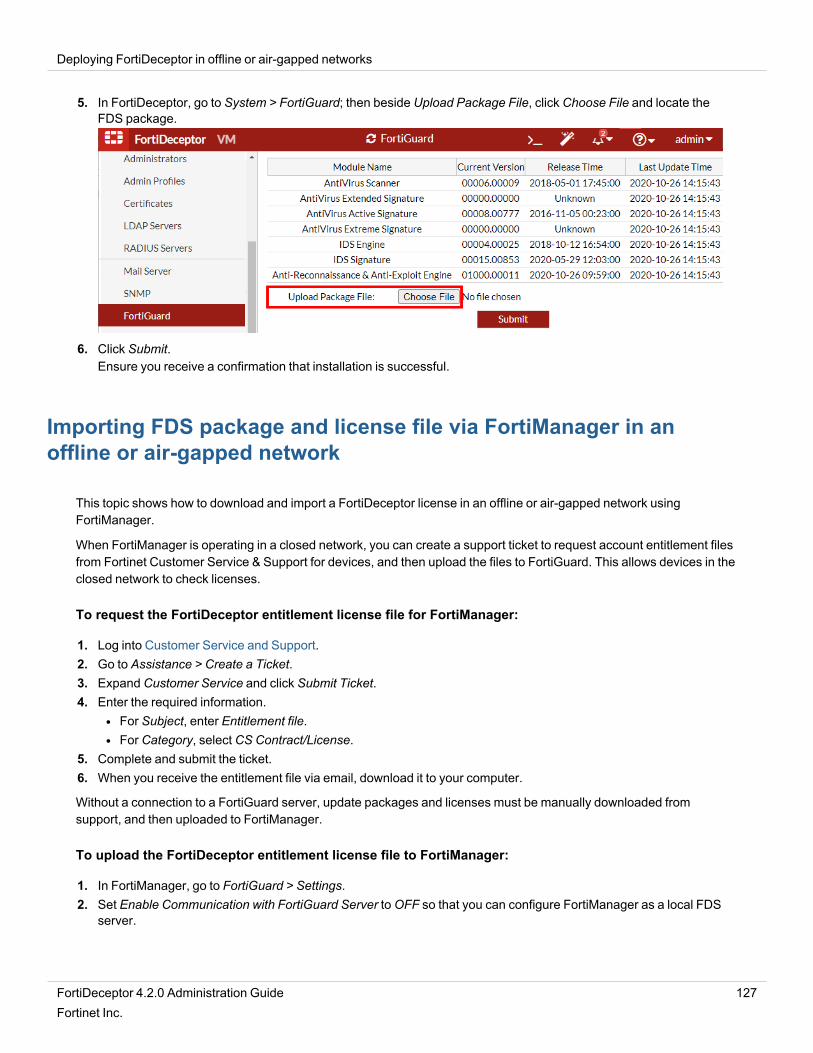
Deploying FortiDeceptor in offline or air-gapped networks
5. In FortiDeceptor, go to System > FortiGuard; then beside Upload Package File, click Choose File and locate theFDS package.
6. Click Submit.Ensure you receive a confirmation that installation is successful.
Importing FDS package and license file via FortiManager in anoffline or air-gapped network
This topic shows how to download and import a FortiDeceptor license in an offline or air-gapped network usingFortiManager.
When FortiManager is operating in a closed network, you can create a support ticket to request account entitlement filesfrom Fortinet Customer Service & Support for devices, and then upload the files to FortiGuard. This allows devices in theclosed network to check licenses.
To request the FortiDeceptor entitlement license file for FortiManager:
1. Log into Customer Service and Support.2. Go to Assistance > Create a Ticket.3. Expand Customer Service and click Submit Ticket.4. Enter the required information.
l For Subject, enter Entitlement file.l For Category, select CS Contract/License.
5. Complete and submit the ticket.6. When you receive the entitlement file via email, download it to your computer.
Without a connection to a FortiGuard server, update packages and licenses must be manually downloaded fromsupport, and then uploaded to FortiManager.
To upload the FortiDeceptor entitlement license file to FortiManager:
1. In FortiManager, go to FortiGuard > Settings.2. Set Enable Communication with FortiGuard Server toOFF so that you can configure FortiManager as a local FDS
server.
FortiDeceptor 4.2.0 Administration Guide 127Fortinet Inc.
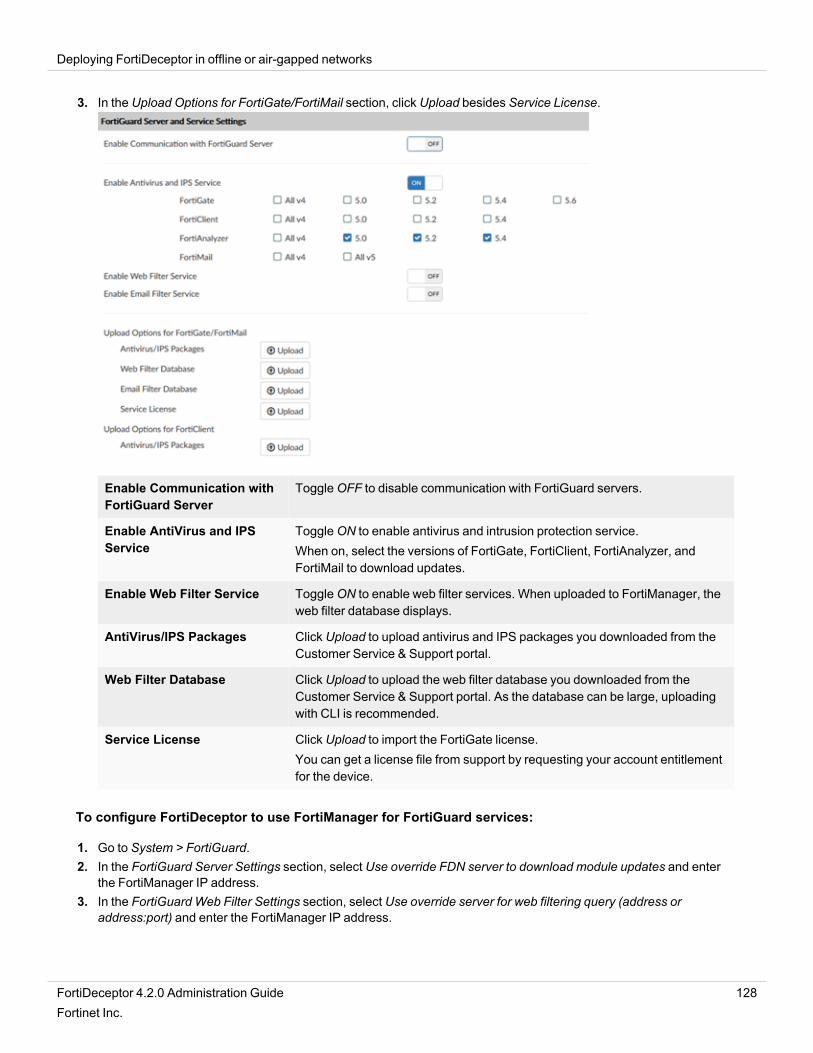
Deploying FortiDeceptor in offline or air-gapped networks
3. In the Upload Options for FortiGate/FortiMail section, click Upload besides Service License.
Enable Communication withFortiGuard Server
ToggleOFF to disable communication with FortiGuard servers.
Enable AntiVirus and IPSService
ToggleON to enable antivirus and intrusion protection service.When on, select the versions of FortiGate, FortiClient, FortiAnalyzer, andFortiMail to download updates.
Enable Web Filter Service ToggleON to enable web filter services. When uploaded to FortiManager, theweb filter database displays.
AntiVirus/IPS Packages Click Upload to upload antivirus and IPS packages you downloaded from theCustomer Service & Support portal.
Web Filter Database Click Upload to upload the web filter database you downloaded from theCustomer Service & Support portal. As the database can be large, uploadingwith CLI is recommended.
Service License Click Upload to import the FortiGate license.You can get a license file from support by requesting your account entitlementfor the device.
To configure FortiDeceptor to use FortiManager for FortiGuard services:
1. Go to System > FortiGuard.2. In the FortiGuard Server Settings section, select Use override FDN server to download module updates and enter
the FortiManager IP address.3. In the FortiGuard Web Filter Settings section, select Use override server for web filtering query (address or
address:port) and enter the FortiManager IP address.
FortiDeceptor 4.2.0 Administration Guide 128Fortinet Inc.
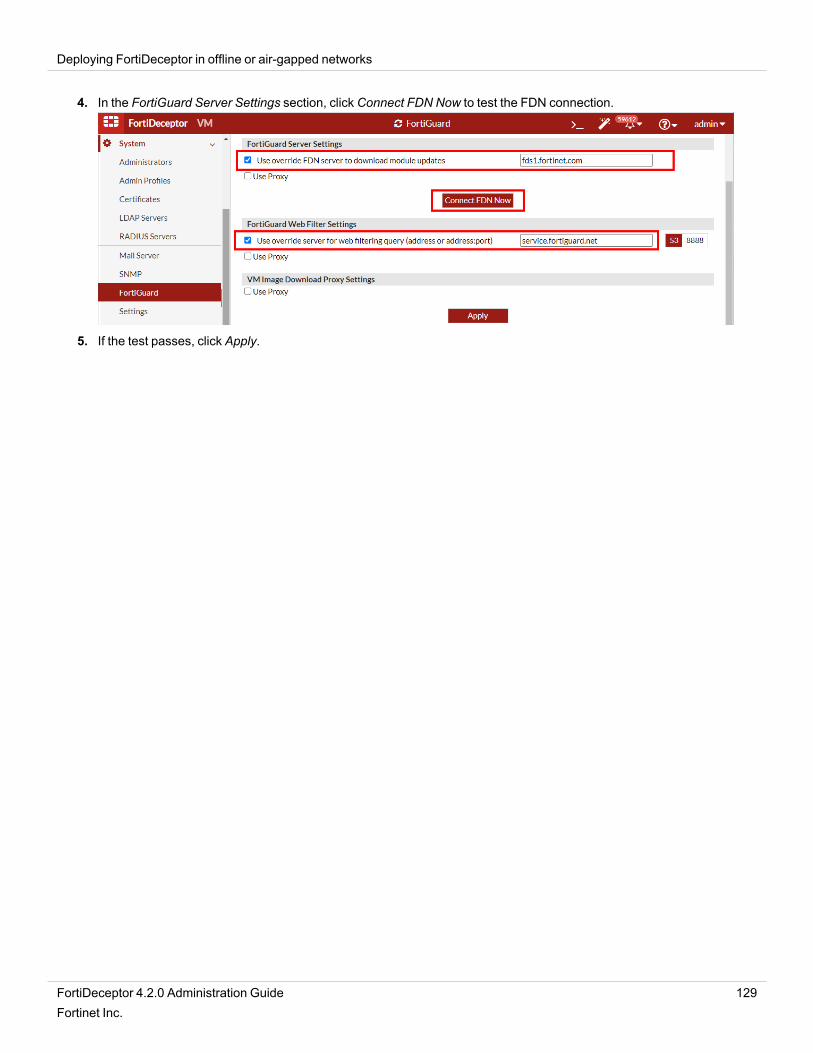
Deploying FortiDeceptor in offline or air-gapped networks
4. In the FortiGuard Server Settings section, click Connect FDN Now to test the FDN connection.
5. If the test passes, click Apply.
FortiDeceptor 4.2.0 Administration Guide 129Fortinet Inc.
Appendix A - Deception deployment best practices
This section provides best practices principles and use cases on how to deploy FortiDeceptor in different networktopologies.
The section covers the following topics:
Deception strategy on page 130
FortiDeceptor platform on page 132
Deploying deception on page 143
Attack vectors vs deception on page 154
Deploying tokens using AD GPO logon script on page 158
Configuring trunk ports on FortiDeceptor VM on page 163
Deception strategy
The ancient war strategies by Sun Tzu says: "Know thy self, know thy enemy. A thousand battles, a thousand victories.”
This means if you know the strengths and weaknesses of your enemy, and if you know the strengths and weaknesses inyour defense system, you can win any battle. To win against cyber attackers and hackers or users with maliciousintention, the cyber security team needs to understand the attacker’s techniques and tools, as well as shortfalls in theorganization's defense system.
To understand the attack techniques and hackers’ interests in your environment, we need to understand three tools thatcan help security professionals stop attackers before a data breach happens.
l Sandboxing: This technique allows the malware to install and run in an enclosed environment where the securityteam can monitor the malware's actions to identify potential risks and countermeasures.
l Honeypots: These are intentionally vulnerable systems that are meant to attract attackers. Honeypots enticeattackers to attempt to steal valuable data or further scope out the target network. Honeypots help you tounderstand the process and strategy of attackers.
l Deception technologies: These are more advanced honeypot and honeynet products that offer more automationfor both detection and implementation of defenses based on the data they gather.
Deception technology is like honeypots on steroids. It has more advanced capabilities like deception lure, deceptionautomation, threat analysis, threat hunting, and more.
The core technology behind deception is the decoy. In general, there are several kinds: low, medium, and high. To alignwith FortiDeceptor technology, let's focus on two types of decoys: Low Interaction and High Interaction.
l Low interaction honeypot: This decoy has limited capability of emulating enterprise applications and is used onlyto detect from where the attackers are coming and what they attempt to exploit. These are easy for attackers tofingerprint and bypass.
l High interaction honeypot: This decoy is identical to the enterprise systems and can run real operating systems,applications, and services with dummy data. They allow the attacker to log in and they respond to the attacker’s
FortiDeceptor 4.2.0 Administration Guide 130Fortinet Inc.

Appendix A - Deception deployment best practices
request. In this way, the decoy helps you understand the attacker's intentions, lures them for a long time to identifyhow command and control infrastructure is set up.
Deception technology systems are more advanced and have more components, breadcrumbs, baits, and lures.Deception systems are implemented alongside enterprise systems but still remain in an isolated environment.
Deception technology systems are used to interrupt the attacker's kill chain, prolong the attack either to exhaust theattacker’s resources or encourage attackers by providing obvious vulnerabilities to help identity the details of theirnetwork and arsenals.
Deception strategy components
Deployment of enterprise-scale deception includes the following components:
l Medium interaction decoy and high interaction decoy that are deployed everywhere.l Customizable decoys to match infrastructure and applications.l Create and deploy lures to redirect attackers toward decoys.l Create and deploy lures with trackable misinformation.l Threat analysis capabilities.l Integration with existing security infrastructure for mitigation and remediation (Security Fabric and third-party).
Deception strategy goals
Deployment of enterprise-scale deception should achieve the following cybersecurity requirements and goals:
l Generate actionable, high-fidelity alerts.l Reduce the “dwell time” of an initial compromise.l Confuse the attacker with false assets and misinformation.l Block the human attacker or Advanced Persistent Threat (APT).l Collect threat intelligence regarding tactics, techniques, and procedures.l Integrate with existing defense-in-depth architecture.
Deception philosophy
Deception philosophy is a straightforward concept. You deploy deception across the whole network infrastructure andlocation which generates a fake virtual network layer that masks the real assets with a fake one.
The networks today are fluid and dynamic, so we need to be sure that every network segment and location has thisdeception layer and capability.
For example:
l IT Endpoint segment—Requires deployment of lures and decoys.l IT Servers segment—Requires deployment of lures and decoys.l Network Devices—Requires deployment of decoys.l IoT Devices—Requires deployment of decoys.l OT Devices—Requires deployment of decoys.l Data Repository—Requires deployment of honey files and decoys.l Application segment—Requires deployment of lures and decoys.
FortiDeceptor 4.2.0 Administration Guide 131Fortinet Inc.
Appendix A - Deception deployment best practices
l Network Traffic—Require decoys that generates fake network traffic and lure that creates fake networkconnections and entries on the endpoint level.
l Public/Private Cloud—Requires deployment of decoys.
Deception light stack vs full stack
Deception light stack concept
The light deception concept uses a combination of endpoint lures with several high interaction decoys only asdestination targets.
Using the light deception concept against a sophisticated adversary has some significant drawbacks:
l Deception lures reside on the endpoint and if there is no in-depth customization, this can be fingerprinted.l A sophisticated adversary that controls several endpoints might fail once and learn the deception lure logic so thatthe adversary will not make the same mistake next time.
l A sophisticated adversary might not touch the deception lures if it can get high privilege at the beginning of theattack, and the probability of finding several decoys from several thousand assets is non-existent.
l Lack of visibility around unmanaged devices (IoT/OT) where an adversary has plenty of time and space to attackwithout detection.
l Simple malware spread vectors like pass the hash / single vulnerability attacks are not detected due to a lack ofdecoys in the network segment level. For example, the Wannacry malware will not get detected using thisdeployment stack.
Deception full stack concept
A simple explanation of the deception full stack concept is “do not let the sophisticated adversary / malware fingerprintyour fake story!”
The deception full stack addresses the drawback of the light deception concept using several deception layers’architectures:
l Server / endpoint lures are the first layer that engageswith the adversary / APT.l A large scale of decoys that creates a fake network surface on top of the real one offering false endpoints, servers,network devices, IoT/OT, database, files, applications, cloud, and more. This is the deception everywhere concept.
l Some of the decoys are generated from a customer “gold image” and are part of the network domain to increase theauthentic deception level.
The dynamic deception decoys module prevents the sophisticated adversary from fingerprinting the decoys by changingthe decoys' IP addresses and profile based on time or trigger.
The FortiDeceptor full stack deception concept runs deception lures with a large scale of decoys using a hybrid modeengine that provides medium and high-level interaction decoys against the adversary / APT malware.
FortiDeceptor platform
The FortiDeceptor platform includes the following:
l FortiDeceptor components on page 133l FortiDeceptor Token Package on page 133
FortiDeceptor 4.2.0 Administration Guide 132Fortinet Inc.
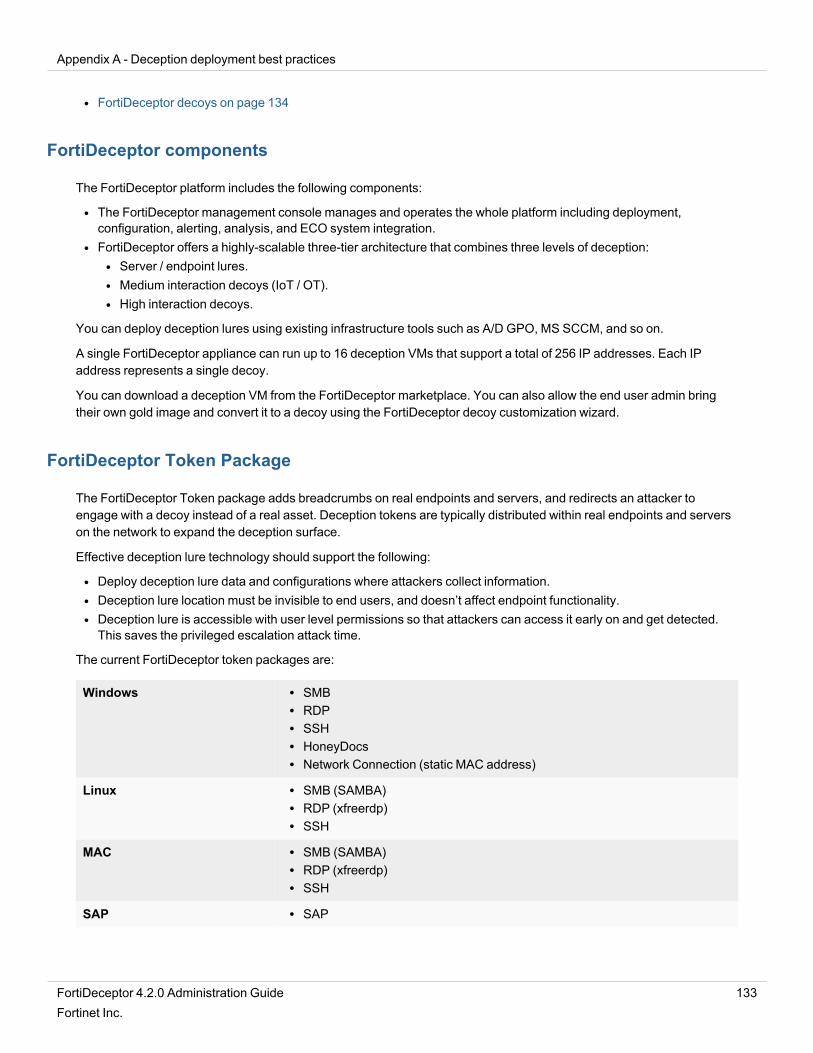
Appendix A - Deception deployment best practices
l FortiDeceptor decoys on page 134
FortiDeceptor components
The FortiDeceptor platform includes the following components:
l The FortiDeceptor management console manages and operates the whole platform including deployment,configuration, alerting, analysis, and ECO system integration.
l FortiDeceptor offers a highly-scalable three-tier architecture that combines three levels of deception:l Server / endpoint lures.l Medium interaction decoys (IoT / OT).l High interaction decoys.
You can deploy deception lures using existing infrastructure tools such as A/D GPO, MS SCCM, and so on.
A single FortiDeceptor appliance can run up to 16 deception VMs that support a total of 256 IP addresses. Each IPaddress represents a single decoy.
You can download a deception VM from the FortiDeceptor marketplace. You can also allow the end user admin bringtheir own gold image and convert it to a decoy using the FortiDeceptor decoy customization wizard.
FortiDeceptor Token Package
The FortiDeceptor Token package adds breadcrumbs on real endpoints and servers, and redirects an attacker toengage with a decoy instead of a real asset. Deception tokens are typically distributed within real endpoints and serverson the network to expand the deception surface.
Effective deception lure technology should support the following:
l Deploy deception lure data and configurations where attackers collect information.l Deception lure location must be invisible to end users, and doesn’t affect endpoint functionality.l Deception lure is accessible with user level permissions so that attackers can access it early on and get detected.This saves the privileged escalation attack time.
The current FortiDeceptor token packages are:
Windows l SMBl RDPl SSHl HoneyDocsl Network Connection (static MAC address)
Linux l SMB (SAMBA)l RDP (xfreerdp)l SSH
MAC l SMB (SAMBA)l RDP (xfreerdp)l SSH
SAP l SAP
FortiDeceptor 4.2.0 Administration Guide 133Fortinet Inc.

Appendix A - Deception deployment best practices
When the FortiDeceptor token package is installed on a real Windows, Linux, or MAC endpoint, it increases thedeception surface and redirects an attacker to engage with a decoy instead of a real asset.
FortiDeceptor decoys
FortiDeceptor creates a network of decoys to lure attackers and monitor their activities on the network. When a hackerattacks a decoy, an alert is generated and their malicious activities are captured and analyzed in real-time. This analysisgenerates a mitigation and remediation response that protects the network.
The current FortiDeceptor decoy OS are:
Windows Windows 7, Windows 10, Windows 2016 andWindows 2019
Linux Ubuntu Desktop, CentOS, ESXi and ELK
IoT/OT SCADA version 3, Medical OS, and IoT OS.
VPN Fortinet SSL-VPN (FG-60E, FG-100F, FG-1500D, FG-2000E, FG-3700D)
Customized Windows Windows 10, Windows Server 2016, Windows Sever 2019
The current FortiDeceptor application decoys are:
Application Decoys POS OS, ERP OS PACS and SAP
The current FortiDeceptor lure services are:
Windows RDP, SMB, TCPListener, NBNSSpoofSpotter, ICMP and FTP
Linux SSH, SAMBA, TCPListener, HTTP, HTTPS, GIT, ICMP and FTP
IoT/OT HTTP, FTP, TFTP, SNMP, MODBUS, S7COMM, BACNET, IPMI, TRICONEX,ENIP, Kamstrup, DNP3, Telnet, PACS-WEB, PACS, DICOM server, InfusionPump (TELNET), Infusion Pump (FTP), POS-WEB, ERP-WEP, GUARDIAN-AST, IEC104, Jetdirect, Printer-WEB, IP Camera-WEB, UPnP, RTSP, CDP, TP-link WEB, CWMP, SAP DISPATCHER and SAPWEB
SSL VPN HTTPS
Customized Windows RDP, SMB, NBNSSpoofSpotter, MSSQL, IIS (HTTP/HTTPS) and ICMP
The current FortiDeceptor IP address capacity are:
l A single EOL can host up to 16 deception VMs.l A single FDCIKG can host up to 20 deception VMs.l A single FDCVMS can host up to 20 deception VMs.l A single deception VM supports up to 24 IP addresses or decoys. Each IP represents a decoy.l A single FortiDeceptor appliance (HW/VM) can support up to 480 IP addresses.l A single FortiDeceptor appliance (HW/VM) can support up to 128 segments (VLANS).
FortiDeceptor 4.2.0 Administration Guide 134Fortinet Inc.
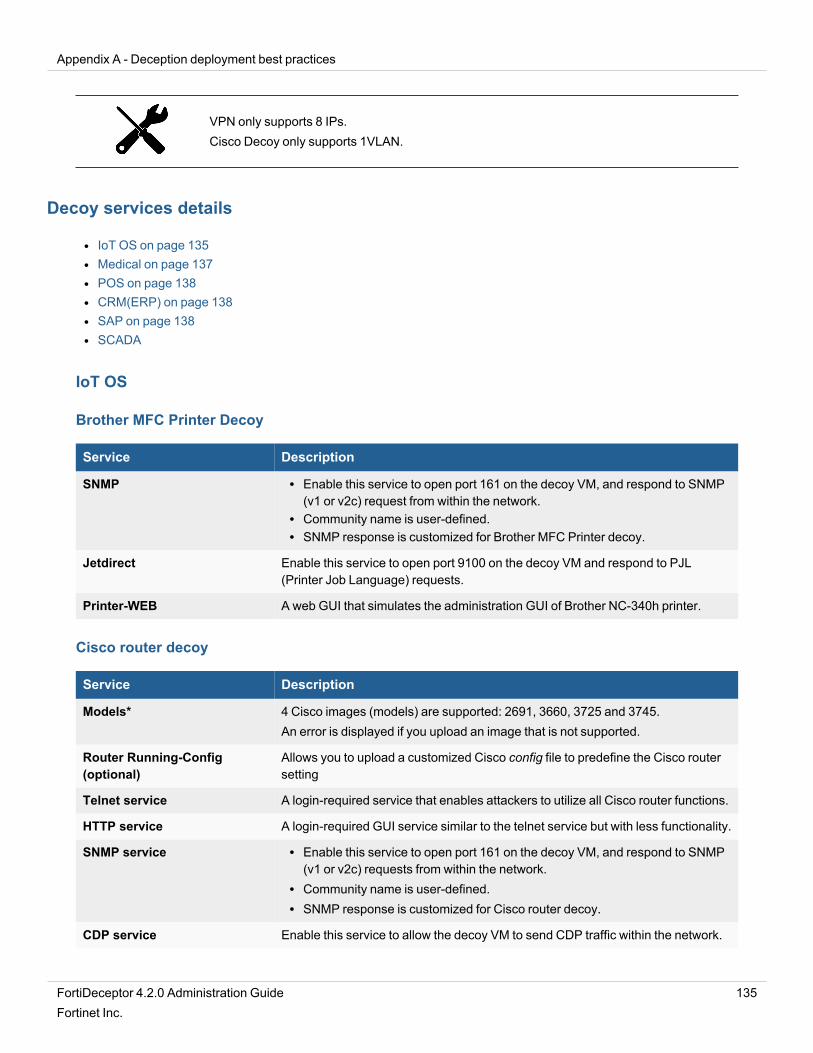
Appendix A - Deception deployment best practices
VPN only supports 8 IPs.Cisco Decoy only supports 1VLAN.
Decoy services details
l IoT OS on page 135l Medical on page 137l POS on page 138l CRM(ERP) on page 138l SAP on page 138l SCADA
IoT OS
Brother MFC Printer Decoy
Service Description
SNMP l Enable this service to open port 161 on the decoy VM, and respond to SNMP(v1 or v2c) request from within the network.
l Community name is user-defined.l SNMP response is customized for Brother MFC Printer decoy.
Jetdirect Enable this service to open port 9100 on the decoy VM and respond to PJL(Printer Job Language) requests.
Printer-WEB A web GUI that simulates the administration GUI of Brother NC-340h printer.
Cisco router decoy
Service Description
Models* 4 Cisco images (models) are supported: 2691, 3660, 3725 and 3745.An error is displayed if you upload an image that is not supported.
Router Running-Config(optional)
Allows you to upload a customized Cisco config file to predefine the Cisco routersetting
Telnet service A login-required service that enables attackers to utilize all Cisco router functions.
HTTP service A login-required GUI service similar to the telnet service but with less functionality.
SNMP service l Enable this service to open port 161 on the decoy VM, and respond to SNMP(v1 or v2c) requests from within the network.
l Community name is user-defined.l SNMP response is customized for Cisco router decoy.
CDP service Enable this service to allow the decoy VM to send CDP traffic within the network.
FortiDeceptor 4.2.0 Administration Guide 135Fortinet Inc.
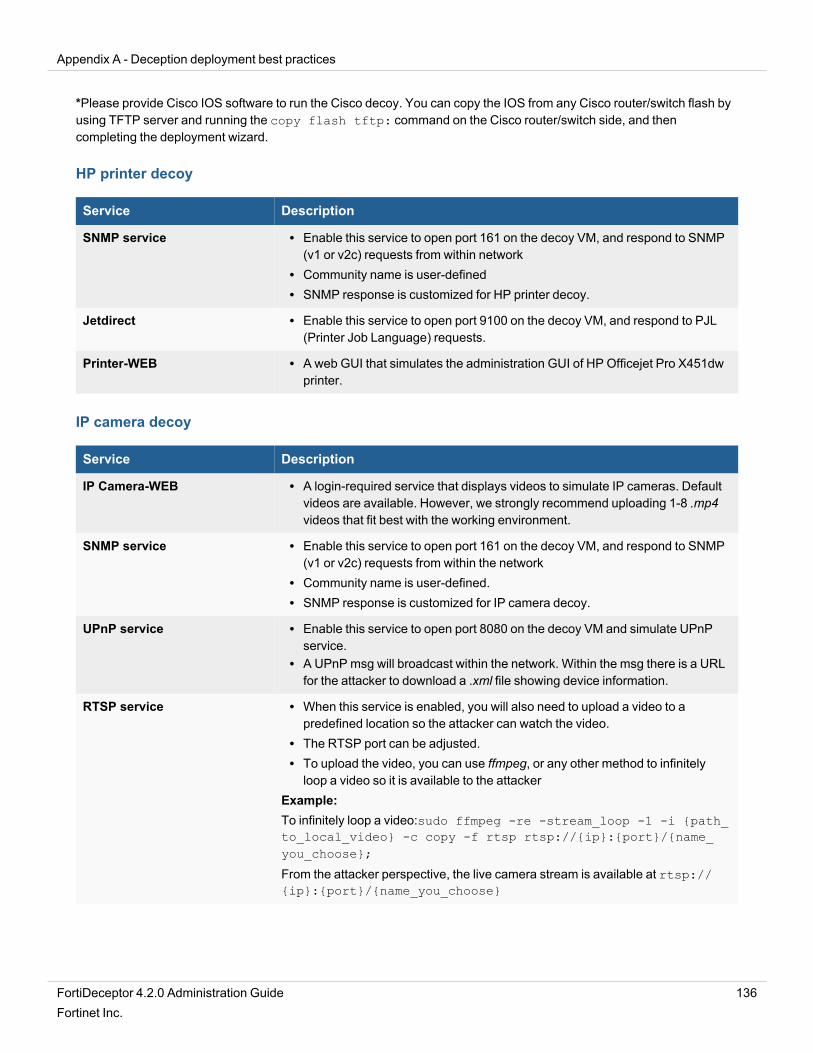
Appendix A - Deception deployment best practices
*Please provide Cisco IOS software to run the Cisco decoy. You can copy the IOS from any Cisco router/switch flash byusing TFTP server and running the copy flash tftp: command on the Cisco router/switch side, and thencompleting the deployment wizard.
HP printer decoy
Service Description
SNMP service l Enable this service to open port 161 on the decoy VM, and respond to SNMP(v1 or v2c) requests from within network
l Community name is user-definedl SNMP response is customized for HP printer decoy.
Jetdirect l Enable this service to open port 9100 on the decoy VM, and respond to PJL(Printer Job Language) requests.
Printer-WEB l A web GUI that simulates the administration GUI of HP Officejet Pro X451dwprinter.
IP camera decoy
Service Description
IP Camera-WEB l A login-required service that displays videos to simulate IP cameras. Defaultvideos are available. However, we strongly recommend uploading 1-8 .mp4videos that fit best with the working environment.
SNMP service l Enable this service to open port 161 on the decoy VM, and respond to SNMP(v1 or v2c) requests from within the network
l Community name is user-defined.l SNMP response is customized for IP camera decoy.
UPnP service l Enable this service to open port 8080 on the decoy VM and simulate UPnPservice.
l A UPnP msg will broadcast within the network. Within the msg there is a URLfor the attacker to download a .xml file showing device information.
RTSP service l When this service is enabled, you will also need to upload a video to apredefined location so the attacker can watch the video.
l The RTSP port can be adjusted.l To upload the video, you can use ffmpeg, or any other method to infinitelyloop a video so it is available to the attacker
Example:To infinitely loop a video:sudo ffmpeg -re -stream_loop -1 -i {path_to_local_video} -c copy -f rtsp rtsp://{ip}:{port}/{name_you_choose};
From the attacker perspective, the live camera stream is available at rtsp://{ip}:{port}/{name_you_choose}
FortiDeceptor 4.2.0 Administration Guide 136Fortinet Inc.
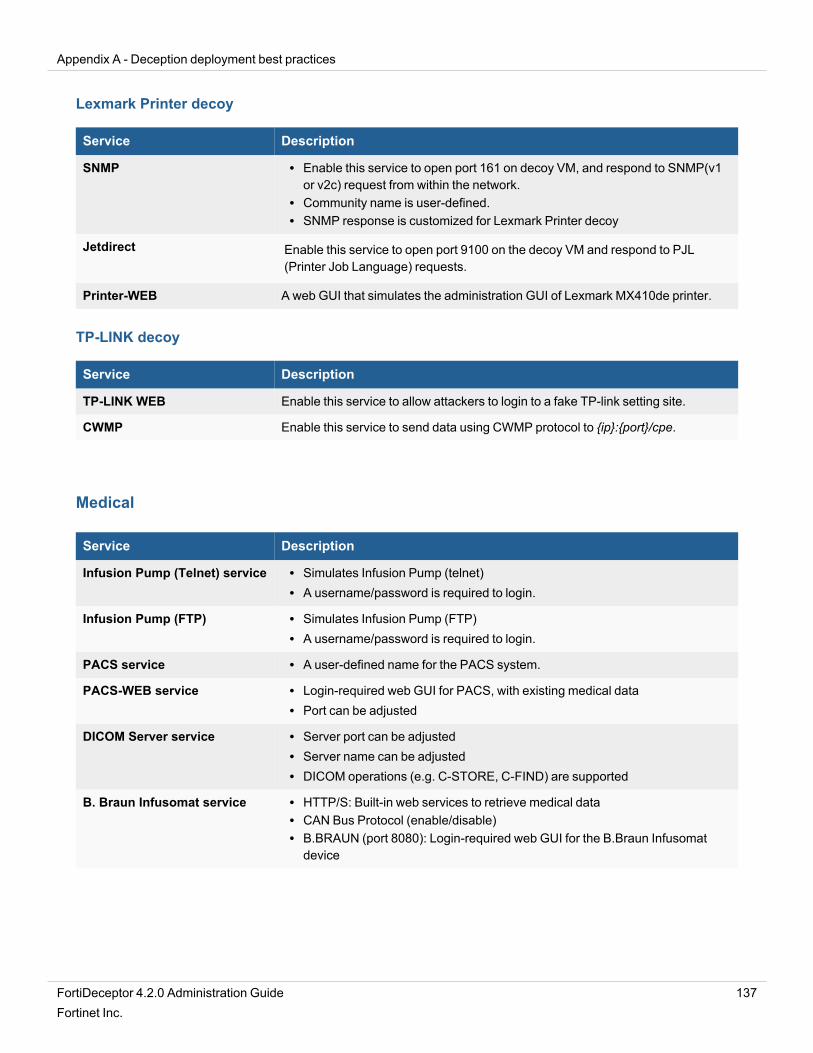
Appendix A - Deception deployment best practices
Lexmark Printer decoy
Service Description
SNMP l Enable this service to open port 161 on decoy VM, and respond to SNMP(v1or v2c) request from within the network.
l Community name is user-defined.l SNMP response is customized for Lexmark Printer decoy
Jetdirect Enable this service to open port 9100 on the decoy VM and respond to PJL(Printer Job Language) requests.
Printer-WEB A web GUI that simulates the administration GUI of Lexmark MX410de printer.
TP-LINK decoy
Service Description
TP-LINK WEB Enable this service to allow attackers to login to a fake TP-link setting site.
CWMP Enable this service to send data using CWMP protocol to {ip}:{port}/cpe.
Medical
Service Description
Infusion Pump (Telnet) service l Simulates Infusion Pump (telnet)l A username/password is required to login.
Infusion Pump (FTP) l Simulates Infusion Pump (FTP)l A username/password is required to login.
PACS service l A user-defined name for the PACS system.
PACS-WEB service l Login-required web GUI for PACS, with existing medical datal Port can be adjusted
DICOM Server service l Server port can be adjustedl Server name can be adjustedl DICOM operations (e.g. C-STORE, C-FIND) are supported
B. Braun Infusomat service l HTTP/S: Built-in web services to retrieve medical datal CAN Bus Protocol (enable/disable)l B.BRAUN (port 8080): Login-required web GUI for the B.Braun Infusomatdevice
FortiDeceptor 4.2.0 Administration Guide 137Fortinet Inc.
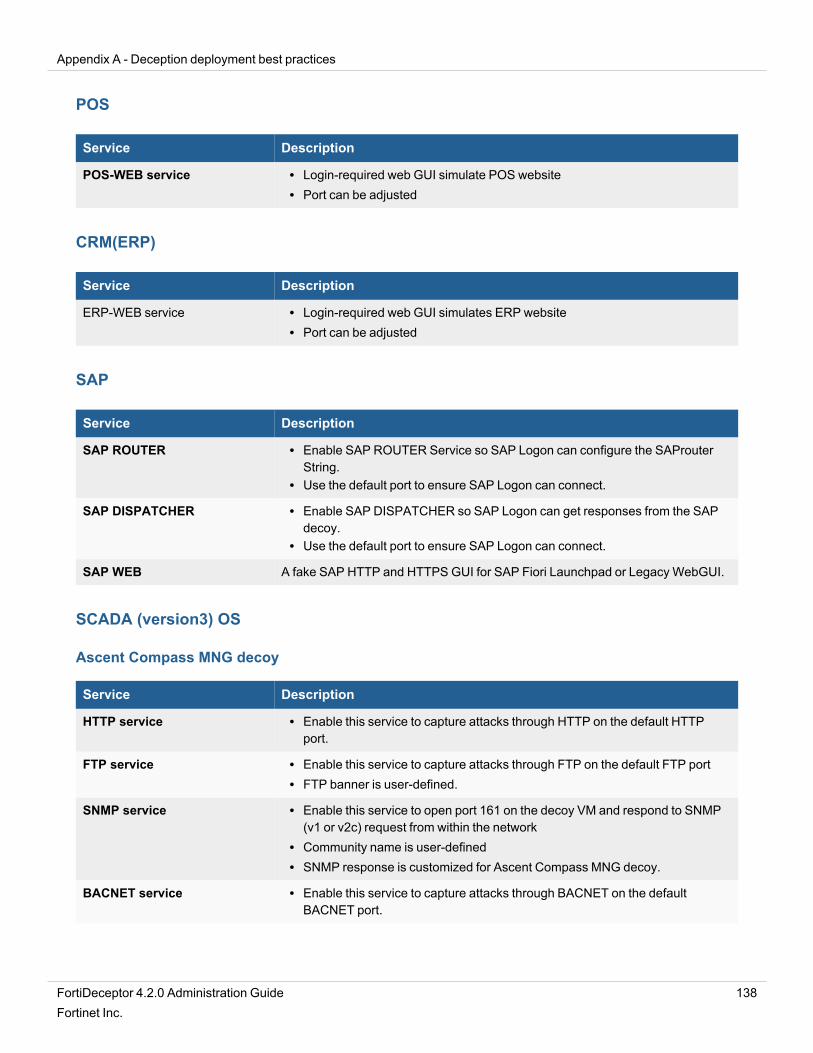
Appendix A - Deception deployment best practices
POS
Service Description
POS-WEB service l Login-required web GUI simulate POS websitel Port can be adjusted
CRM(ERP)
Service Description
ERP-WEB service l Login-required web GUI simulates ERP websitel Port can be adjusted
SAP
Service Description
SAP ROUTER l Enable SAP ROUTER Service so SAP Logon can configure the SAProuterString.
l Use the default port to ensure SAP Logon can connect.
SAP DISPATCHER l Enable SAP DISPATCHER so SAP Logon can get responses from the SAPdecoy.
l Use the default port to ensure SAP Logon can connect.
SAP WEB A fake SAP HTTP and HTTPS GUI for SAP Fiori Launchpad or Legacy WebGUI.
SCADA (version3) OS
Ascent Compass MNG decoy
Service Description
HTTP service l Enable this service to capture attacks through HTTP on the default HTTPport.
FTP service l Enable this service to capture attacks through FTP on the default FTP portl FTP banner is user-defined.
SNMP service l Enable this service to open port 161 on the decoy VM and respond to SNMP(v1 or v2c) request from within the network
l Community name is user-definedl SNMP response is customized for Ascent Compass MNG decoy.
BACNET service l Enable this service to capture attacks through BACNET on the defaultBACNET port.
FortiDeceptor 4.2.0 Administration Guide 138Fortinet Inc.
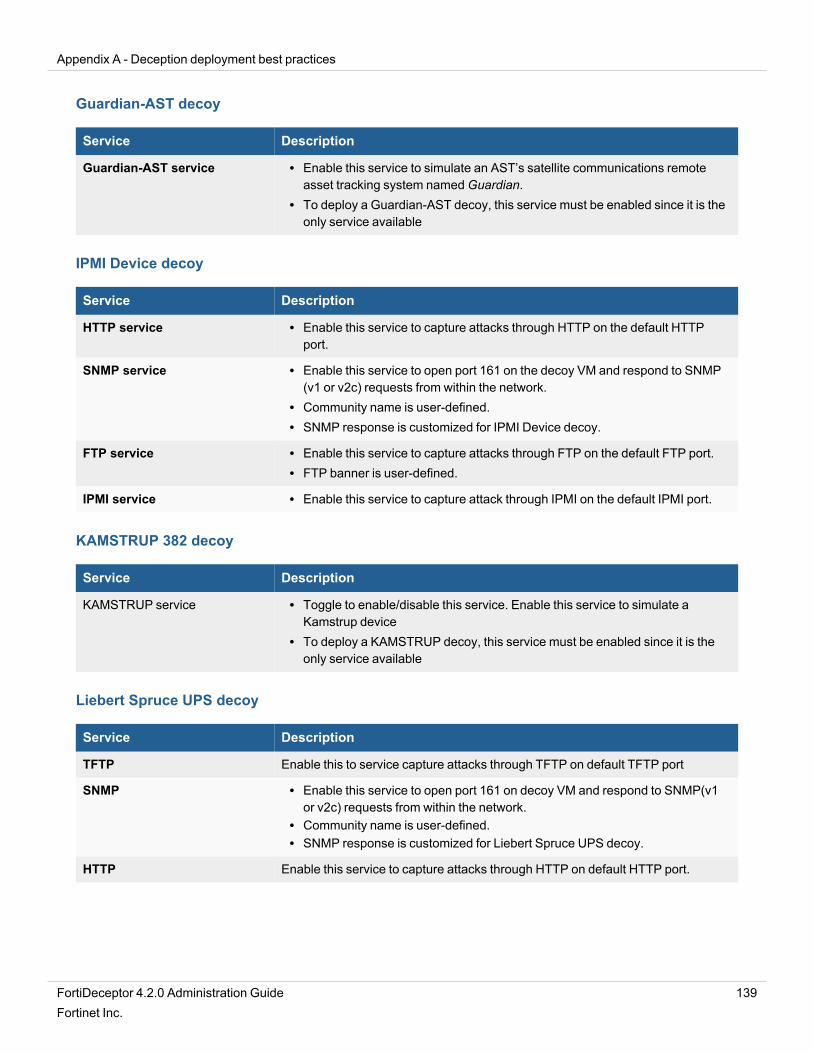
Appendix A - Deception deployment best practices
Guardian-AST decoy
Service Description
Guardian-AST service l Enable this service to simulate an AST’s satellite communications remoteasset tracking system namedGuardian.
l To deploy a Guardian-AST decoy, this service must be enabled since it is theonly service available
IPMI Device decoy
Service Description
HTTP service l Enable this service to capture attacks through HTTP on the default HTTPport.
SNMP service l Enable this service to open port 161 on the decoy VM and respond to SNMP(v1 or v2c) requests from within the network.
l Community name is user-defined.l SNMP response is customized for IPMI Device decoy.
FTP service l Enable this service to capture attacks through FTP on the default FTP port.l FTP banner is user-defined.
IPMI service l Enable this service to capture attack through IPMI on the default IPMI port.
KAMSTRUP 382 decoy
Service Description
KAMSTRUP service l Toggle to enable/disable this service. Enable this service to simulate aKamstrup device
l To deploy a KAMSTRUP decoy, this service must be enabled since it is theonly service available
Liebert Spruce UPS decoy
Service Description
TFTP Enable this to service capture attacks through TFTP on default TFTP port
SNMP l Enable this service to open port 161 on decoy VM and respond to SNMP(v1or v2c) requests from within the network.
l Community name is user-defined.l SNMP response is customized for Liebert Spruce UPS decoy.
HTTP Enable this service to capture attacks through HTTP on default HTTP port.
FortiDeceptor 4.2.0 Administration Guide 139Fortinet Inc.
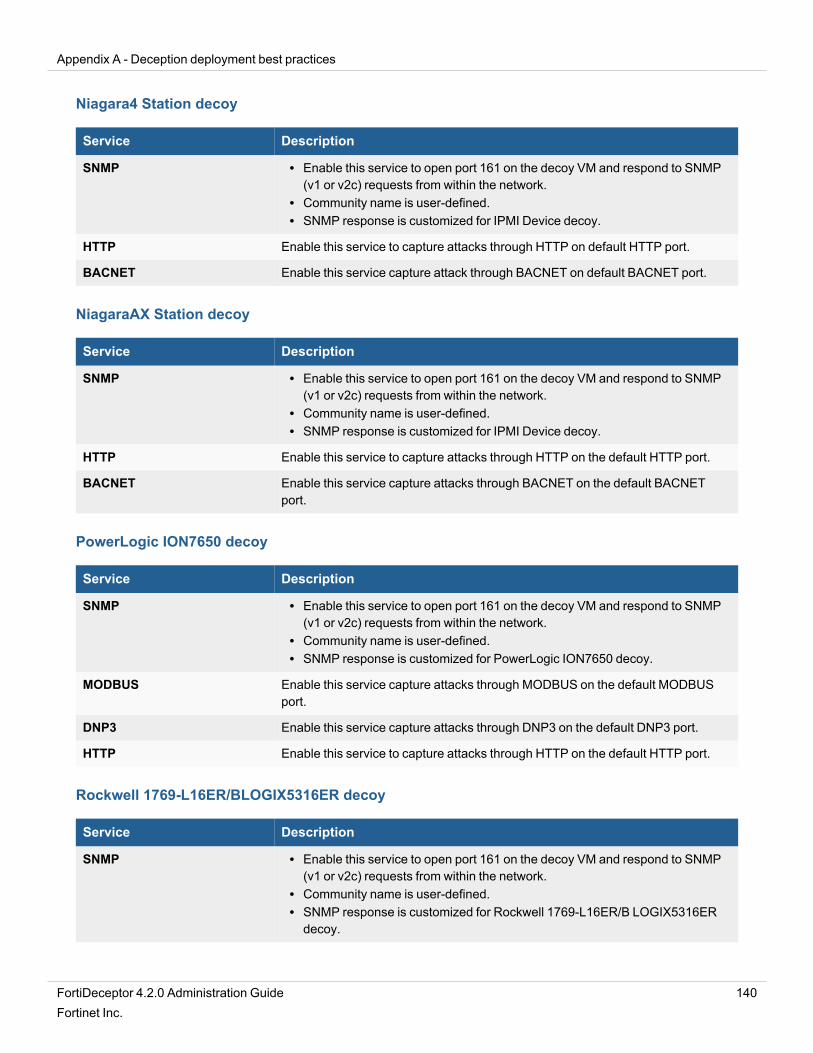
Appendix A - Deception deployment best practices
Niagara4 Station decoy
Service Description
SNMP l Enable this service to open port 161 on the decoy VM and respond to SNMP(v1 or v2c) requests from within the network.
l Community name is user-defined.l SNMP response is customized for IPMI Device decoy.
HTTP Enable this service to capture attacks through HTTP on default HTTP port.
BACNET Enable this service capture attack through BACNET on default BACNET port.
NiagaraAX Station decoy
Service Description
SNMP l Enable this service to open port 161 on the decoy VM and respond to SNMP(v1 or v2c) requests from within the network.
l Community name is user-defined.l SNMP response is customized for IPMI Device decoy.
HTTP Enable this service to capture attacks through HTTP on the default HTTP port.
BACNET Enable this service capture attacks through BACNET on the default BACNETport.
PowerLogic ION7650 decoy
Service Description
SNMP l Enable this service to open port 161 on the decoy VM and respond to SNMP(v1 or v2c) requests from within the network.
l Community name is user-defined.l SNMP response is customized for PowerLogic ION7650 decoy.
MODBUS Enable this service capture attacks through MODBUS on the default MODBUSport.
DNP3 Enable this service capture attacks through DNP3 on the default DNP3 port.
HTTP Enable this service to capture attacks through HTTP on the default HTTP port.
Rockwell 1769-L16ER/BLOGIX5316ER decoy
Service Description
SNMP l Enable this service to open port 161 on the decoy VM and respond to SNMP(v1 or v2c) requests from within the network.
l Community name is user-defined.l SNMP response is customized for Rockwell 1769-L16ER/B LOGIX5316ERdecoy.
FortiDeceptor 4.2.0 Administration Guide 140Fortinet Inc.
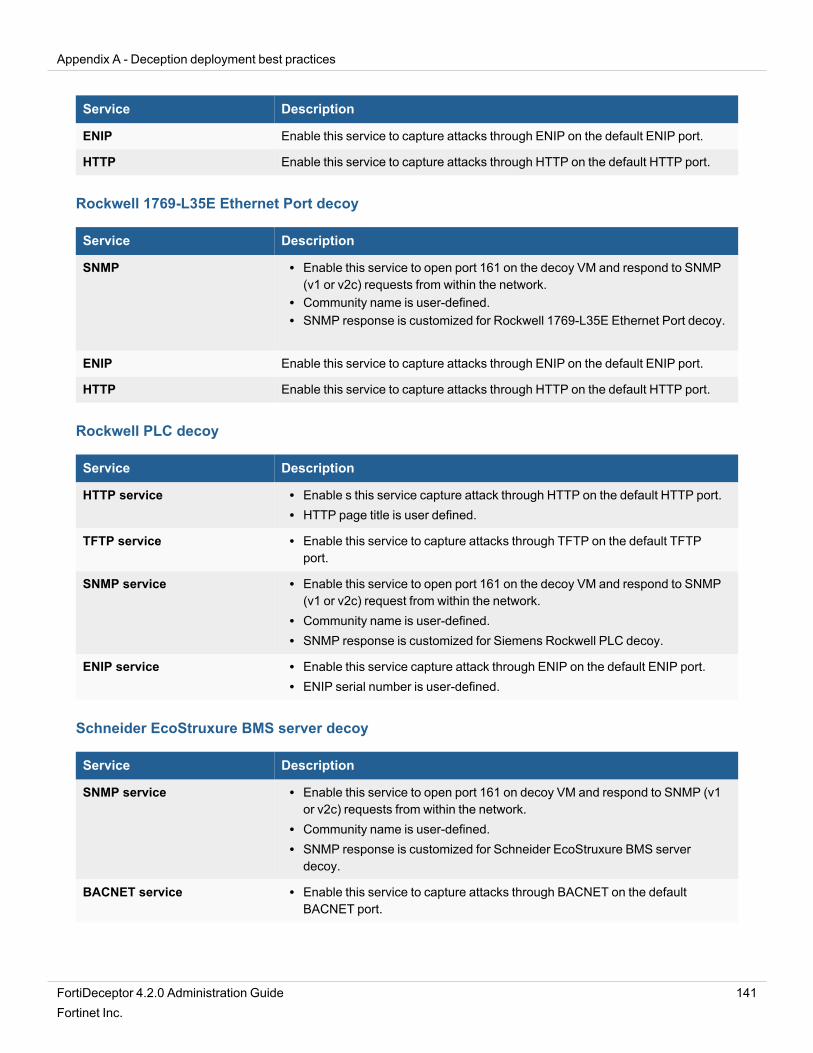
Appendix A - Deception deployment best practices
Service Description
ENIP Enable this service to capture attacks through ENIP on the default ENIP port.
HTTP Enable this service to capture attacks through HTTP on the default HTTP port.
Rockwell 1769-L35E Ethernet Port decoy
Service Description
SNMP l Enable this service to open port 161 on the decoy VM and respond to SNMP(v1 or v2c) requests from within the network.
l Community name is user-defined.l SNMP response is customized for Rockwell 1769-L35E Ethernet Port decoy.
ENIP Enable this service to capture attacks through ENIP on the default ENIP port.
HTTP Enable this service to capture attacks through HTTP on the default HTTP port.
Rockwell PLC decoy
Service Description
HTTP service l Enable s this service capture attack through HTTP on the default HTTP port.l HTTP page title is user defined.
TFTP service l Enable this service to capture attacks through TFTP on the default TFTPport.
SNMP service l Enable this service to open port 161 on the decoy VM and respond to SNMP(v1 or v2c) request from within the network.
l Community name is user-defined.l SNMP response is customized for Siemens Rockwell PLC decoy.
ENIP service l Enable this service capture attack through ENIP on the default ENIP port.l ENIP serial number is user-defined.
Schneider EcoStruxure BMS server decoy
Service Description
SNMP service l Enable this service to open port 161 on decoy VM and respond to SNMP (v1or v2c) requests from within the network.
l Community name is user-defined.l SNMP response is customized for Schneider EcoStruxure BMS serverdecoy.
BACNET service l Enable this service to capture attacks through BACNET on the defaultBACNET port.
FortiDeceptor 4.2.0 Administration Guide 141Fortinet Inc.
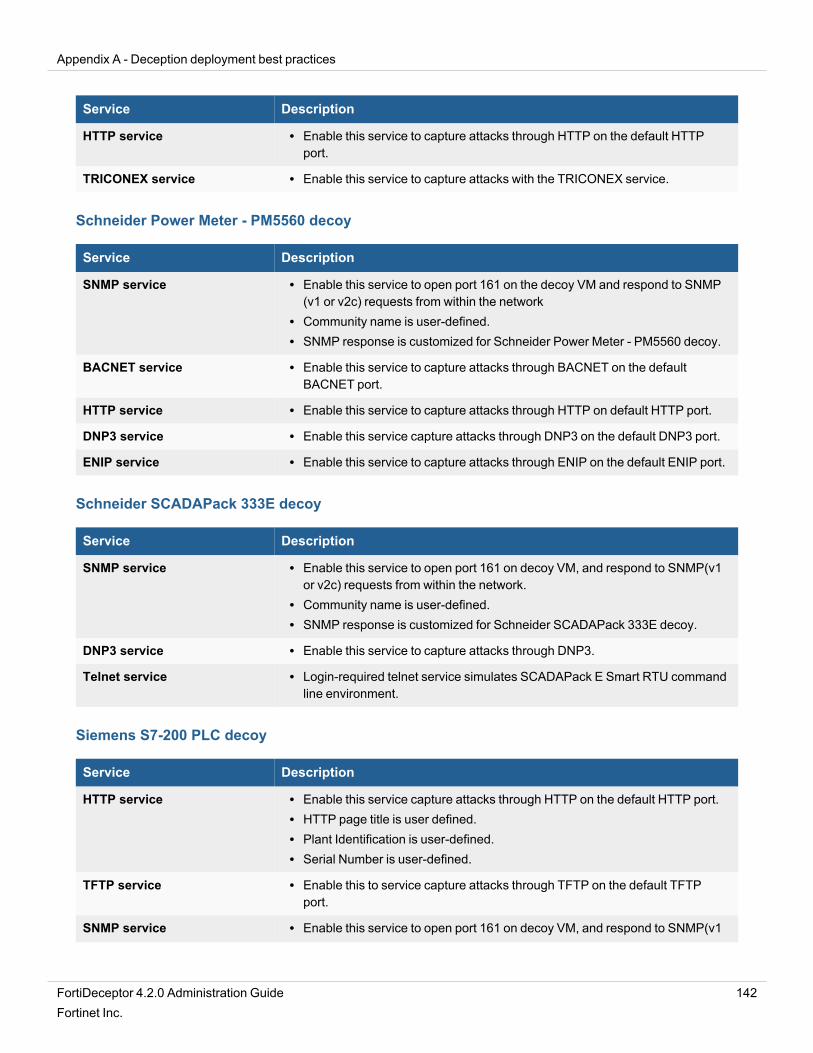
Appendix A - Deception deployment best practices
Service Description
HTTP service l Enable this service to capture attacks through HTTP on the default HTTPport.
TRICONEX service l Enable this service to capture attacks with the TRICONEX service.
Schneider Power Meter - PM5560 decoy
Service Description
SNMP service l Enable this service to open port 161 on the decoy VM and respond to SNMP(v1 or v2c) requests from within the network
l Community name is user-defined.l SNMP response is customized for Schneider Power Meter - PM5560 decoy.
BACNET service l Enable this service to capture attacks through BACNET on the defaultBACNET port.
HTTP service l Enable this service to capture attacks through HTTP on default HTTP port.
DNP3 service l Enable this service capture attacks through DNP3 on the default DNP3 port.
ENIP service l Enable this service to capture attacks through ENIP on the default ENIP port.
Schneider SCADAPack 333E decoy
Service Description
SNMP service l Enable this service to open port 161 on decoy VM, and respond to SNMP(v1or v2c) requests from within the network.
l Community name is user-defined.l SNMP response is customized for Schneider SCADAPack 333E decoy.
DNP3 service l Enable this service to capture attacks through DNP3.
Telnet service l Login-required telnet service simulates SCADAPack E Smart RTU commandline environment.
Siemens S7-200 PLC decoy
Service Description
HTTP service l Enable this service capture attacks through HTTP on the default HTTP port.l HTTP page title is user defined.l Plant Identification is user-defined.l Serial Number is user-defined.
TFTP service l Enable this to service capture attacks through TFTP on the default TFTPport.
SNMP service l Enable this service to open port 161 on decoy VM, and respond to SNMP(v1
FortiDeceptor 4.2.0 Administration Guide 142Fortinet Inc.
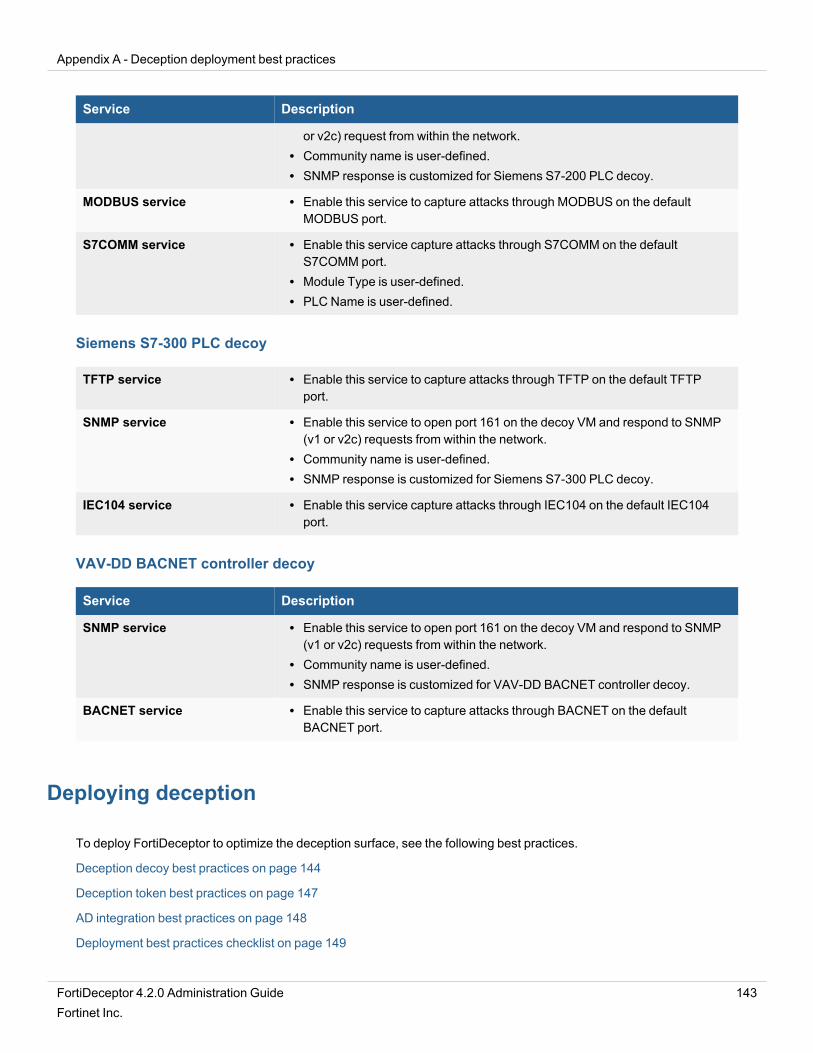
Appendix A - Deception deployment best practices
Service Description
or v2c) request from within the network.l Community name is user-defined.l SNMP response is customized for Siemens S7-200 PLC decoy.
MODBUS service l Enable this service to capture attacks through MODBUS on the defaultMODBUS port.
S7COMM service l Enable this service capture attacks through S7COMM on the defaultS7COMM port.
l Module Type is user-defined.l PLC Name is user-defined.
Siemens S7-300 PLC decoy
TFTP service l Enable this service to capture attacks through TFTP on the default TFTPport.
SNMP service l Enable this service to open port 161 on the decoy VM and respond to SNMP(v1 or v2c) requests from within the network.
l Community name is user-defined.l SNMP response is customized for Siemens S7-300 PLC decoy.
IEC104 service l Enable this service capture attacks through IEC104 on the default IEC104port.
VAV-DD BACNET controller decoy
Service Description
SNMP service l Enable this service to open port 161 on the decoy VM and respond to SNMP(v1 or v2c) requests from within the network.
l Community name is user-defined.l SNMP response is customized for VAV-DD BACNET controller decoy.
BACNET service l Enable this service to capture attacks through BACNET on the defaultBACNET port.
Deploying deception
To deploy FortiDeceptor to optimize the deception surface, see the following best practices.
Deception decoy best practices on page 144
Deception token best practices on page 147
AD integration best practices on page 148
Deployment best practices checklist on page 149
FortiDeceptor 4.2.0 Administration Guide 143Fortinet Inc.

Appendix A - Deception deployment best practices
Network topology best practices on page 150
Deception decoy best practices
Deception effectiveness requires deployment across all network segments and locations.
This topic provides deception deployment best practices for the decoy layer, including deployment guidelines for eachkind of network VLAN that can exist on an enterprise network.
Example of 5-8 decoys per data-center segment (VLAN)
OS
Deploy a matching decoy OS for each type of critical / sensitive IT system in this segment.
Services
Enable matching services for each type of critical / sensitive IT system in this segment and customize the services:
l Apply banner matching the network.l Apply user access rule such as fake user and password.l Upload fake data (SMB, FTP, HTTP).
If you do not have out-of-the-box matching services, you can use the custom TCP port listener.
Data
Upload fake data to the decoys to provide authentic engagement. If you do not have matching files, ask the customer toprovide a public files package that you can upload and generate fake data using the same structure.
Application
Enable a false matching application for each type of critical / sensitive IT system on this segment. If you do not have amatching application, enable high profile fake applications like ERP, POS, or PACS, and so on..
Hostname
Follow corporate standard server’s names for half the decoys and assign enticing names to the remaining half, such asJumpHost001, ERP-XXX, MNG-XXX, Net-Monitor, and so on. Remember that we need to configure these hostnameson the AD level as we use single deception VM across 16 IP address and we can have just one real hostname per OS.For the rest of the IP address, we should have it virtual on the DNS level.
Attackers also like to attack servers with a hostname that has names like “-test” or “-dev” as attackers assume that theseservers are less protected.
Gold Image
Ensure you use at least twoWindows servers as customer gold images that host critical applications and data. Toincrease authenticity, configure them to be part of the organization domain.
FortiDeceptor 4.2.0 Administration Guide 144Fortinet Inc.
Appendix A - Deception deployment best practices
STATIC / DHCP IP Address
For datacenter segment hosting servers that always use static IP addresses, also use static IP configuration for thedecoys.
Example of 2-4 decoys per endpoint segment (VLAN)
OS
Deploy a matching decoy OS and also an “old’ OS like Win7.
Services
Enable matching services for the endpoint on this segment.
If you do not have out-of-the-box matching services, you can use the custom TCP port listener.
Data
Upload fake data to the decoys to provide authentic engagement. If you do not have matching files, ask the customer toprovide a public files package that you can upload and generate fake data using the same structure.
Hostname
Follow corporate standard server’s names for half the decoys and assign enticing names to the remaining half, such asIT Admin, HelpDesk, DBA, Finance, and so on. Remember that we need to configure these hostnames on the AD levelas we use single deception VM across 16 IP address and we can have just one real hostname per OS. For the rest of theIP address, we should have it virtual on the DNS level.
Gold Image
Ensure you use at least 3–4 Windows servers as customer gold images. To increase authenticity, configure them to bepart of the organization domain.
STATIC / DHCP IP Address
For endpoints segment hosting desktops that always use DHCP IP addresses, also use the DHCP IP configuration forthe decoys. The DHCP configuration in FortiDeceptor 3.1 and 3.2 allows us to configure one IP per segment, so use thestatic configuration in this stage to have more decoys per segment.
Example of 7-10 decoys per OT segment (VLAN)
OS
Deploy a matching decoy SCADA OS.
Deploy a matching regular IT OS such as Win7, Win10, or Win2016.
FortiDeceptor 4.2.0 Administration Guide 145Fortinet Inc.
Appendix A - Deception deployment best practices
Services
Enable matching services for the OT assets on this segment and customize the services.
l Apply banner matching the network.l Apply access rule such as fake user and password.l Upload fake data (SMB, FTP, HTTP).
If you do not have out-of-the-box matching services, you can use the custom TCP port listener.
Data
Upload fake data to the decoys to provide authentic engagement. If you do not have matching files, ask the customer toprovide a public files package that you can upload and generate fake data using the same structure. You can also use asearch engine like SHODAN.IO to find this data on the Internet and use it to customize the decoys.
Hostname
Follow the OS SCADA names for half the decoys and assign enticing names to the remaining half, such as IT Admin,SCADA-MNG, PLC_ADMIN, HMI_SERVER, NET-MONITOR, and so on.
Application
Check if the customer is willing to provide you access to his OT software. Otherwise, use open-source OT software oruse the customize decoy option to generate this kind of decoy.
MAC ADDRESS
Ensure the OT decoy uses the appropriate MAC ADDRESS per vendor.
STATIC / DHCP IP Address
OT networks are mainly a static environment that does not has a DHCP server, so use static IP configuration as well forthe decoys.
Example of 8-10 decoys per cloud segment (VPC, VNET)
OS
Deploy a matching decoy OS for each type of critical / sensitive IT system in this segment.
Services
Enable matching services for each type of critical / sensitive IT system in this segment and customize the services:
l Apply banner matching the network.l Apply user access rule such as fake user and password.l Upload fake data (SMB, FTP, HTTP).
If you do not have out-of-the-box matching services, you can use the custom TCP port listener.
FortiDeceptor 4.2.0 Administration Guide 146Fortinet Inc.
Appendix A - Deception deployment best practices
Data
Upload fake data to the decoys to provide authentic engagement. If you do not have matching files, ask the customer toprovide a public files package that you can upload and generate fake data using the same structure.
Application
Enable a false matching application for each type of critical / sensitive IT system on this segment. If you do not have amatching application, enable high profile fake applications like ERP, POS, or PACS, and so on.
Hostname
Follow corporate standard server’s names for half the decoys and assign enticing names to the remaining half, such asJumpHost001, WEB-XXX, DB-XXX, Sec-Monitor, and so on. Remember that we need to configure these hostnames onthe AD level as we use single deception VM across 16 IP address and we can have just one real hostname per OS. Forthe rest of the IP address, we should have it virtual on the DNS level.
Attackers also like to attack servers with a hostname that has names like “-test” or “-dev” as attackers assume that theseservers are less protected.
Gold Image
Ensure you use at least twoWindows servers as customer gold images that host critical applications and data. Toincrease authenticity, configure them to be part of the organization domain.
STATIC / DHCP IP Address
Cloud environments mainly host servers that always use static IP addresses, so use static IPs configuration as well forthe decoys.
Deception token best practices
Deception effectiveness requires deployment across all managed endpoints and servers.
This topic provides deception deployment best practices for the deception token layer. For token deployment over ADlogon script, see appendix A.
Example of deception tokens on Windows, MAC, or Linux endpoint segment (VLAN)
RDP token
l Set up several Windows server decoys that support RDP access.l Set up appropriate decoy hostnames like Terminal-XX, VDI-XX, and so on. This increases the level of authenticitywhen you add the Windows server decoys to the company domain.
l Follow company username and password policy.l Generate 2-3 deception lures and deploy them over several different AD user groups.
SMB token
For Windows endpoints, use either SMB token or SAMBA token. Do not use both.
FortiDeceptor 4.2.0 Administration Guide 147Fortinet Inc.
Appendix A - Deception deployment best practices
l Set up at least twoWindows server decoys that support two fake network share access.l Generate at least two tokens with two different share names.l Use a share name similar to the company structure.l Set up appropriate hostnames like FileSRV-XX, File-Server, and so on. This increases the level of authenticitywhen you add the Windows server decoy to the company domain.
l Follow company username and password policy.l Generate a single deception token package and deploy it over all the network endpoints.
SAMBA token
For Windows endpoints, use either SMB lure or SAMBA token. Do not use both.
l Set up at least two Linux server decoys that support network share access.l Set up appropriate hostnames like Storage-XX, Backup-Server, and so on.l Generate at least two tokens with two different share names.l Use a share name similar to the company structure.l Follow company username and password policy.l Generate a single deception token package and deploy it over all the network endpoints.
SSH lure
l Set up several Linux server decoys that support SSH access.l Set up appropriate hostnames like JumpHost-XX, Control-XX, Cloud-XXX, and so on.l Use a complicated password. This gives the attacker the impression that this is a critical server.l Generate 2-3 deception tokens and deploy them over the IT endpoints group only. Attackers do not expect to seeSSH clients on a regular desktop.
AD integration best practices
Active Directory (AD) is Microsoft's proprietary directory service. It runs onWindows Server and allows administrators tomanage permissions and access to network resources. Active Directory stores data as objects. An object is a singleelement, such as a user, group, application; or device, such as a printer.
To detect AD attack using deception technology, use the following deception configuration example.
l Deploy customWindows decoys (Windows 10, 2016, 2019) and add them to the customer network domain.
Example of custom decoys in customer network domain
l Add several customWindows decoys to the customer network domain.l On the Windows domain, configure schedule task scripts to run using the fake users, such as the one from thecache credentials lure.
l Add to each domain decoy the maximum number of IP addresses and ensure they are static IP addresses.l On the network DNS server, configure a decoy DNS.
l Add DNS records to each decoy IP address.l Set up attractive hostnames for each decoy IP address. For more information, see Deception decoy bestpractices on page 144.
l Deploy the SMB lure front in a domain decoy to avoid detection by tools like HoneyBuster.
FortiDeceptor 4.2.0 Administration Guide 148Fortinet Inc.
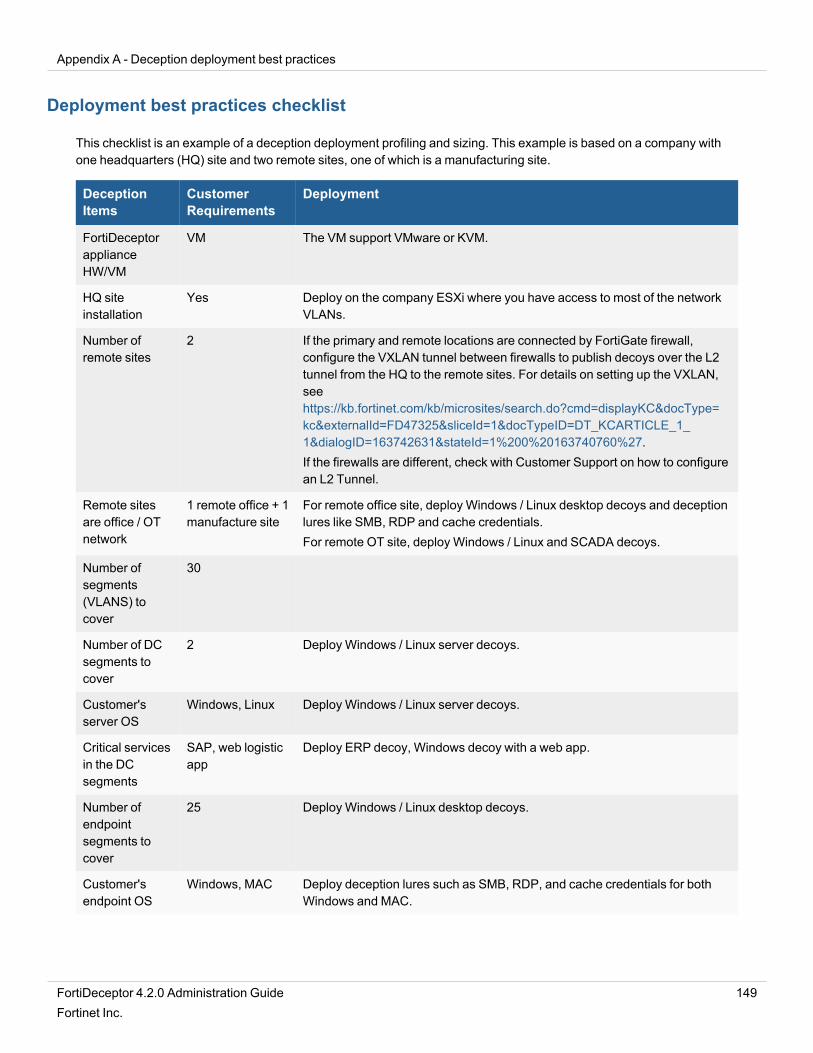
Appendix A - Deception deployment best practices
Deployment best practices checklist
This checklist is an example of a deception deployment profiling and sizing. This example is based on a company withone headquarters (HQ) site and two remote sites, one of which is a manufacturing site.
DeceptionItems
CustomerRequirements
Deployment
FortiDeceptorapplianceHW/VM
VM The VM support VMware or KVM.
HQ siteinstallation
Yes Deploy on the company ESXi where you have access to most of the networkVLANs.
Number ofremote sites
2 If the primary and remote locations are connected by FortiGate firewall,configure the VXLAN tunnel between firewalls to publish decoys over the L2tunnel from the HQ to the remote sites. For details on setting up the VXLAN,seehttps://kb.fortinet.com/kb/microsites/search.do?cmd=displayKC&docType=kc&externalId=FD47325&sliceId=1&docTypeID=DT_KCARTICLE_1_1&dialogID=163742631&stateId=1%200%20163740760%27.If the firewalls are different, check with Customer Support on how to configurean L2 Tunnel.
Remote sitesare office / OTnetwork
1 remote office + 1manufacture site
For remote office site, deploy Windows / Linux desktop decoys and deceptionlures like SMB, RDP and cache credentials.For remote OT site, deploy Windows / Linux and SCADA decoys.
Number ofsegments(VLANS) tocover
30
Number of DCsegments tocover
2 Deploy Windows / Linux server decoys.
Customer'sserver OS
Windows, Linux Deploy Windows / Linux server decoys.
Critical servicesin the DCsegments
SAP, web logisticapp
Deploy ERP decoy, Windows decoy with a web app.
Number ofendpointsegments tocover
25 Deploy Windows / Linux desktop decoys.
Customer'sendpoint OS
Windows, MAC Deploy deception lures such as SMB, RDP, and cache credentials for bothWindows and MAC.
FortiDeceptor 4.2.0 Administration Guide 149Fortinet Inc.
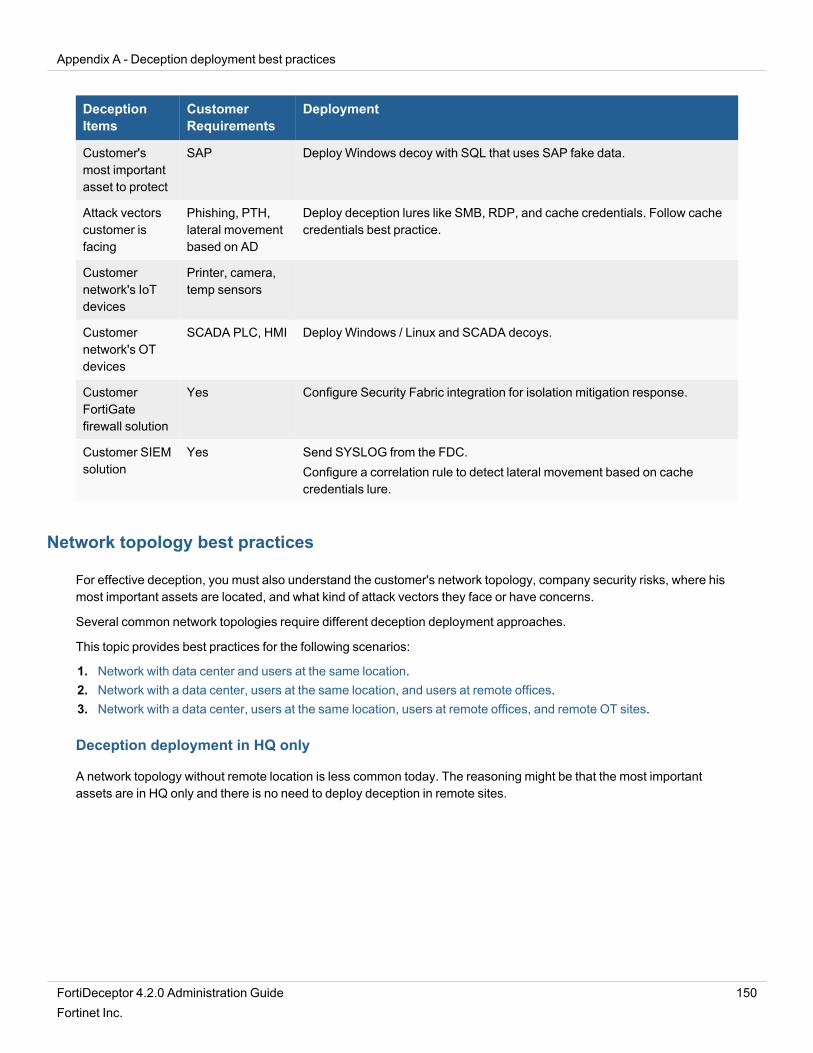
Appendix A - Deception deployment best practices
DeceptionItems
CustomerRequirements
Deployment
Customer'smost importantasset to protect
SAP Deploy Windows decoy with SQL that uses SAP fake data.
Attack vectorscustomer isfacing
Phishing, PTH,lateral movementbased on AD
Deploy deception lures like SMB, RDP, and cache credentials. Follow cachecredentials best practice.
Customernetwork's IoTdevices
Printer, camera,temp sensors
Customernetwork's OTdevices
SCADA PLC, HMI Deploy Windows / Linux and SCADA decoys.
CustomerFortiGatefirewall solution
Yes Configure Security Fabric integration for isolation mitigation response.
Customer SIEMsolution
Yes Send SYSLOG from the FDC.Configure a correlation rule to detect lateral movement based on cachecredentials lure.
Network topology best practices
For effective deception, you must also understand the customer's network topology, company security risks, where hismost important assets are located, and what kind of attack vectors they face or have concerns.
Several common network topologies require different deception deployment approaches.
This topic provides best practices for the following scenarios:
1. Network with data center and users at the same location.2. Network with a data center, users at the same location, and users at remote offices.3. Network with a data center, users at the same location, users at remote offices, and remote OT sites.
Deception deployment in HQ only
A network topology without remote location is less common today. The reasoning might be that the most importantassets are in HQ only and there is no need to deploy deception in remote sites.
FortiDeceptor 4.2.0 Administration Guide 150Fortinet Inc.
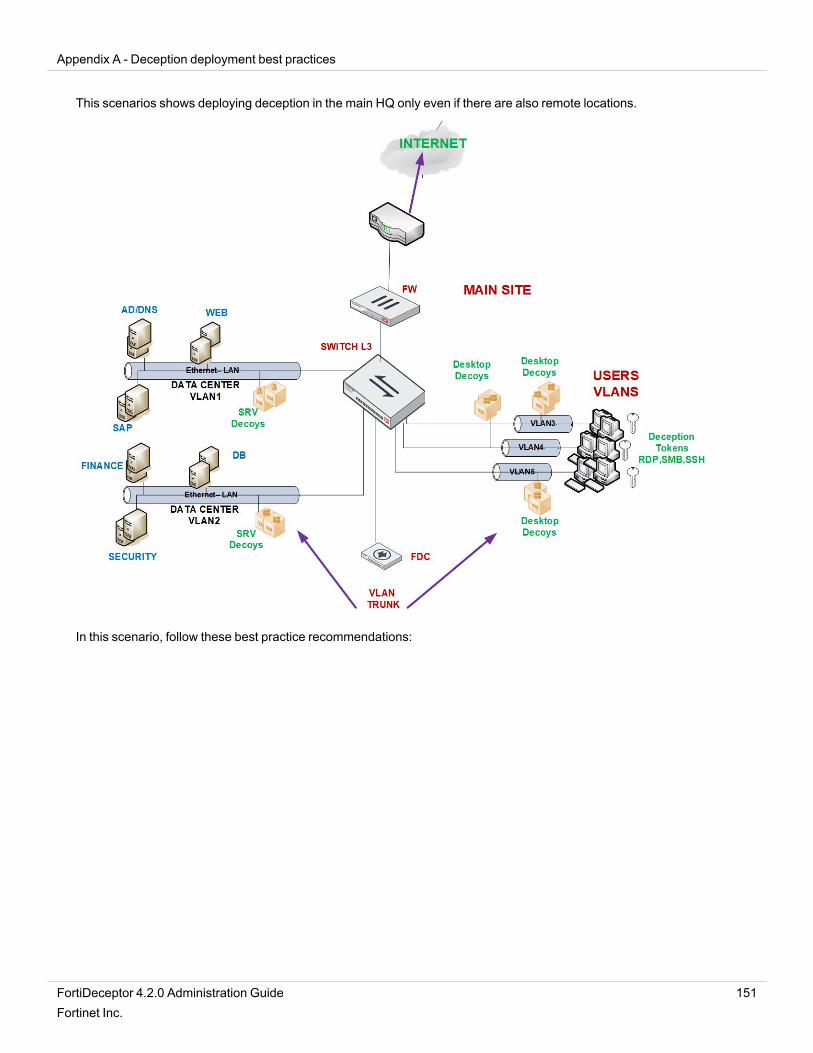
Appendix A - Deception deployment best practices
This scenarios shows deploying deception in the main HQ only even if there are also remote locations.
In this scenario, follow these best practice recommendations:
FortiDeceptor 4.2.0 Administration Guide 151Fortinet Inc.
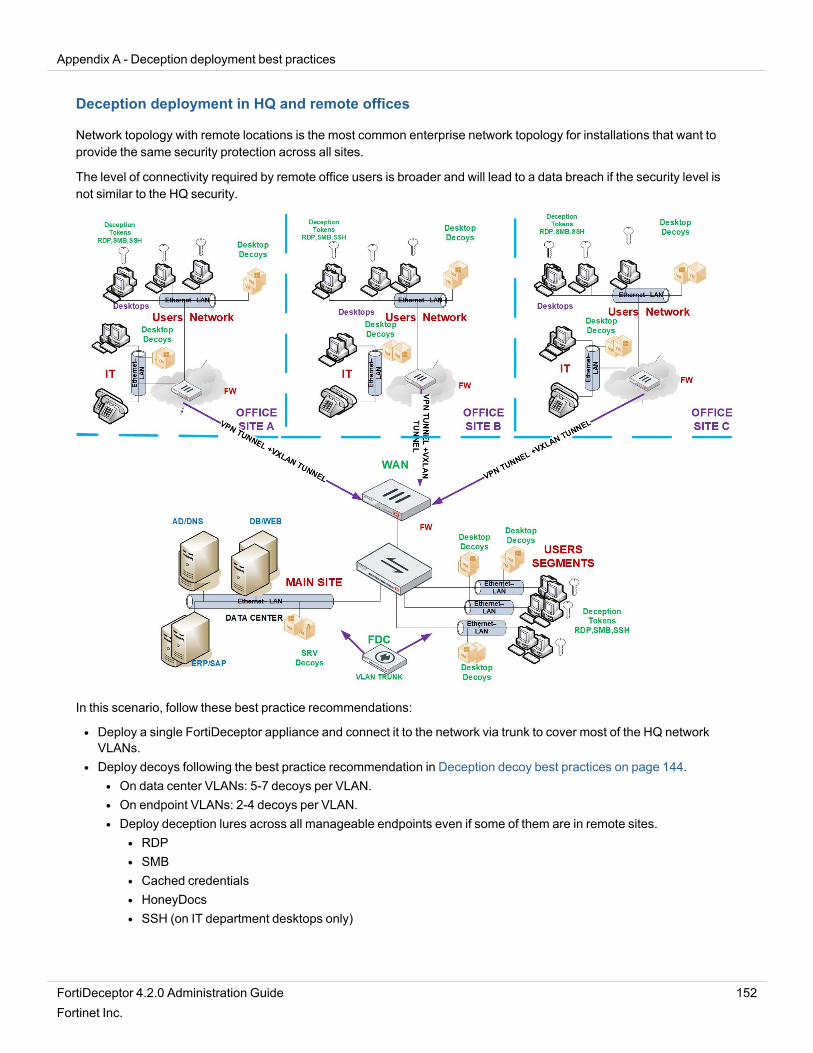
Appendix A - Deception deployment best practices
Deception deployment in HQ and remote offices
Network topology with remote locations is the most common enterprise network topology for installations that want toprovide the same security protection across all sites.
The level of connectivity required by remote office users is broader and will lead to a data breach if the security level isnot similar to the HQ security.
In this scenario, follow these best practice recommendations:
l Deploy a single FortiDeceptor appliance and connect it to the network via trunk to cover most of the HQ networkVLANs.
l Deploy decoys following the best practice recommendation in Deception decoy best practices on page 144. l On data center VLANs: 5-7 decoys per VLAN.l On endpoint VLANs: 2-4 decoys per VLAN.l Deploy deception lures across all manageable endpoints even if some of them are in remote sites.
l RDPl SMBl Cached credentialsl HoneyDocsl SSH (on IT department desktops only)
FortiDeceptor 4.2.0 Administration Guide 152Fortinet Inc.
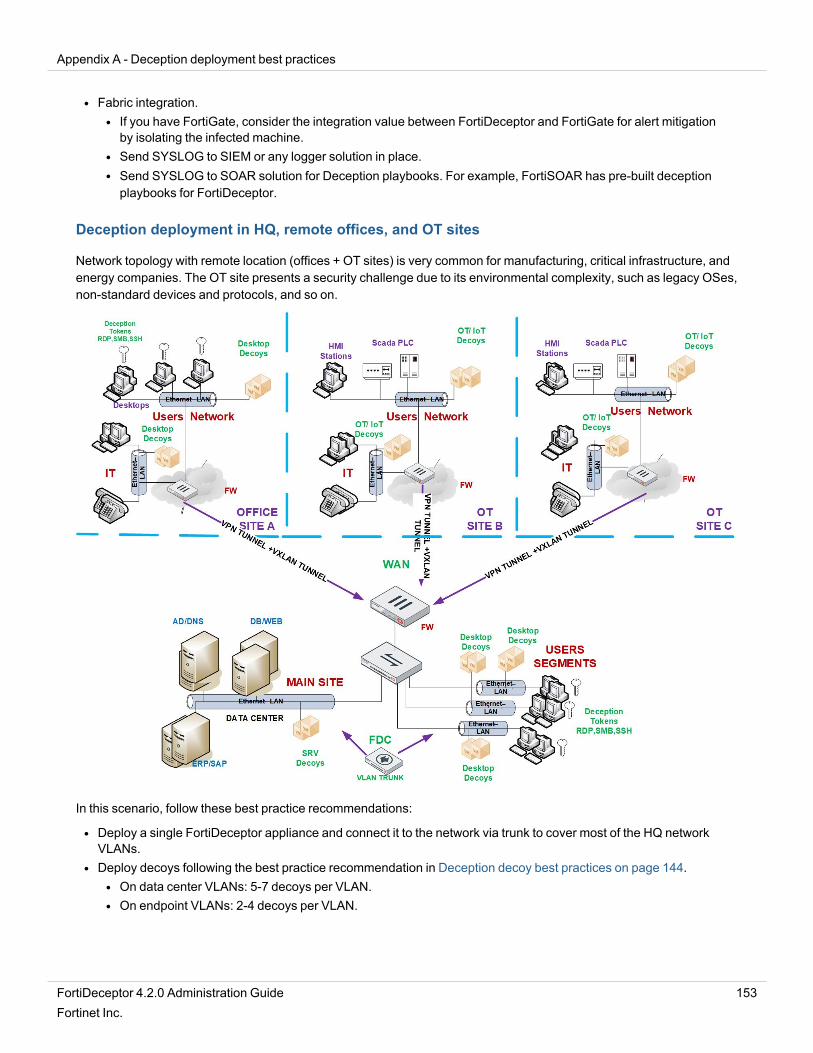
Appendix A - Deception deployment best practices
l Fabric integration.l If you have FortiGate, consider the integration value between FortiDeceptor and FortiGate for alert mitigationby isolating the infected machine.
l Send SYSLOG to SIEM or any logger solution in place.l Send SYSLOG to SOAR solution for Deception playbooks. For example, FortiSOAR has pre-built deceptionplaybooks for FortiDeceptor.
Deception deployment in HQ, remote offices, and OT sites
Network topology with remote location (offices + OT sites) is very common for manufacturing, critical infrastructure, andenergy companies. The OT site presents a security challenge due to its environmental complexity, such as legacy OSes,non-standard devices and protocols, and so on.
In this scenario, follow these best practice recommendations:
l Deploy a single FortiDeceptor appliance and connect it to the network via trunk to cover most of the HQ networkVLANs.
l Deploy decoys following the best practice recommendation in Deception decoy best practices on page 144. l On data center VLANs: 5-7 decoys per VLAN.l On endpoint VLANs: 2-4 decoys per VLAN.
FortiDeceptor 4.2.0 Administration Guide 153Fortinet Inc.
Appendix A - Deception deployment best practices
l Deploy deception lures across all manageable endpoints even if some of them are in remote sites.l RDPl SMBl Cached credentialsl HoneyDocsl SSH (on IT department desktops only)
l Fabric integration.l If you have FortiGate, consider the integration value between FortiDeceptor and FortiGate for alert mitigationby isolating the infected machine.
l Send SYSLOG to SIEM or any logger solution in place.l Send SYSLOG to SOAR solution for Deception playbooks. For example, FortiSOAR has pre-built deceptionplaybooks for FortiDeceptor.
Attack vectors vs deception
This section shows the best practices for attack vectors vs deception.
Compromised internal endpoint using lateral movement on page 154
Lateral movement based on ADmapping on page 156
Lateral movement based on Mimikatz / PTH on page 157
Compromised internal endpoint using lateral movement
This scenario shows a human attacker trying to compromise an internal endpoint using lateral movements.
Attack vector scenario
An attacker uses a phishing email to compromise the internal user and get access to an internal endpoint.
The attacker then explores the compromised endpoint and collect intelligence on the network before running anyprivileged escalation or lateral movement.
Attacker's possible first steps on the compromised endpoint:
l Use network commands to understand the network environment and the endpoint location, such as gettinginformation on critical servers and sensitive application locations.
l Access the local / network drive to find information like sensitive files, credentials, and more. The attacker is buildingthe lateral movement route.
l Extract / dump saved password fromWindows Credential Manager, browser, or memory, whether in clear text orhashed.
Deception layer
Use SMB deception lures that generate fake network drive fronts with a file server decoy with fake files. The fakenetwork drive configuration is hidden to avoid users from opening it and generating false alerts. Keep in mind that the
FortiDeceptor 4.2.0 Administration Guide 154Fortinet Inc.
Appendix A - Deception deployment best practices
SMB lure also inserts fake credentials to the Windows credentials manager as well.
Use RDP deception lures that store saved usernames and passwords in the Windows Credential Manager that providesaccess to a Windows / Linux server decoy.
Use Cached credentials lures that inject saved usernames and passwords in the Windows memory to detect attacksusing password dump like Mimikatz. Use a real domain user with IP restrictions.
Early breach detection
Since most users store data on the network drive, when an attacker finds that the compromised endpoint has a local diskand network drive, the attacker will likely access the fake network drive and generate alerts.
Attackers might use a tool like MIMIKATZ to extract clear-text password. An attacker engaging with a decoy using theextracted password generates alerts.
Alert details
The FortiDeceptor console presents the alert as a kill chain flow and presents a profile of the attacker. The alert dataincludes:
l Attacker username.l One of the most critical indicators that provide a quick answer regarding the attacker, attack stage, and phase.l A standard user means that the attacker / attack is in the early stage. Admin-level credentials means that theattacker / attack is in the privilege escalation phase or the attack was directed against high profile users fromthe IT department.
l Compromised IP address.l This is a critical indicator that points directly to the compromised host. Early detection prevents more persistentpoints by the attacker.
l Data that has been accessed by the attacker.l To see what data an attacker wants to access and steal, one way is to deploy interesting fake data thatresembles your organization's real data.
l Another way is to deploy a decoy file server with a structure that contains at least ten fake directories thatresemble your organization’s real server.
l You can monitor what data the attacker accesses or copies to assess the attacker's goal.l Malicious binary.
l For example, if the attacker engages with a decoy over RDP, the attacker will likely use malicious code to getmore persistent and privilege access. So having malicious binary as a piece of evidence with the full binaryanalysis helps IOC look across the network for more compromised endpoints. You can use an IOC scanner orAV/EDR API to find the indicators across network endpoints and servers.
ECO system flow:
l Send alerts to your SIEM solution.l Use your FortiGate Fabric integration to isolate the compromised endpoint from the network.l Deploy more decoys on the isolated segment to keep monitoring the compromised endpoint.
FortiDeceptor 4.2.0 Administration Guide 155Fortinet Inc.
Appendix A - Deception deployment best practices
Lateral movement based on AD mapping
This scenario shows a human attacker trying to compromise an internal endpoint using lateral movements based on ADmapping.
Attack vector scenario
An attacker uses a phishing email to compromise the internal user and get access to an internal endpoint.
The attacker uses the compromised user credentials to passively map the network and collect information withoutgenerating network noise.
The attacker uses the compromised user credentials to run LDAP queries against the AD to retrieve asset inventorysince all users have read-only access on AD objects.
Leveraging the AD asset inventory saves the attacker from running active port scan mapping that generates networknoise that can expose his malicious activity.
Attacker's toolkit for AD attack:
l PS script or LDAP query command tools to extract company endpoint and server assets.l Analyze the hostname to find assets where the hostname reflects their role or dev / test servers that might not beprotected like the rest of the network.
Deception layer
l Deploy Windows decoys and add them to the network Domainl Add DNS A record using attractive hostnames for all domain decoys' IP address. Each decoy supports up to 24 IPs.l Use SMB deception lures that generate a fake network drive share on the endpoint that mapped front a file serverdecoy with fake files. The fake network drive configuration is hidden to prevent users from opening it and generatingfalse alerts. Keep in mind that the SMB lure also inserts fake credentials to the Windows credentials manager aswell.
l Use RDP deception lures that store saved usernames and passwords in the Windows Credential Manager thatprovides access to a Windows / Linux server decoy.
l Use Cached credentials lures that inject saved usernames and passwords in the Windows memory to detectattacks using password dump like Mimikatz. Use a real domain user with IP restrictions.
Early breach detection
When the attacker retrieves asset inventory from the AD and starts probing the attractive servers based on theirhostname or the fake network connection, these activities generate alerts.
Alert details
The FortiDeceptor console presents the alert as a kill chain flow and presents a profile of the attacker. The alert dataincludes:
l Attacker username.l One of the most critical indicators that provide a quick answer regarding the attacker, attack stage, and phase.
FortiDeceptor 4.2.0 Administration Guide 156Fortinet Inc.
Appendix A - Deception deployment best practices
l A standard user means that the attacker / attack is in the early stage. Admin-level credentials means that theattacker / attack is in the privilege escalation phase or the attack was directed against high profile users fromthe IT department.
l Compromised IP address.l This is a critical indicator that points directly to the compromised host. Early detection prevents more persistentpoints by the attacker.
l Malicious binary.l For example, if the attacker engages with a decoy over RDP, the attacker will likely use malicious code to getmore persistent and privilege access. So having malicious binary as a piece of evidence with the full binaryanalysis helps IOC look across the network for more compromised endpoints. You can use an IOC scanner orAV/EDR API to find the indicators across network endpoints and servers.
ECO system flow:
l Send alerts to your SIEM solution.l Use your FortiGate Fabric integration to isolate the compromised endpoint from the network. FortiDeceptor offersmore fabric connectors for isolation.
l Deploy more decoys on the isolated segment to keep monitoring the compromised endpoint.
Lateral movement based on Mimikatz / PTH
This scenario shows a human attacker trying to compromise an internal endpoint using lateral movements based onMimikatz / PTH.
Attack vector scenario
An attacker uses a phishing email to compromise the internal user and get access to an internal endpoint.
The attacker looks for any powerful user in the compromised endpoint.
The attacker / APT uses an advanced tool like Mimikatz to run several attacks to extract clear text passwords frommemory or Windows Credential Manager, AD Kerberos tickets, Windows local hash, and so on.
The Mimikatz tool's goal is to get administrator-level permission and run in-depth lateral movement across the network.
Attacker's toolkit:
l Tools like Mimikatz, Meterpreter, password dump, and so on.l Leverage services like RDP, RPC, WMI, VNC, SSH, andWINRM for lateral movement.
Deception layer
l Deploy Windows decoys and add them to the network Domain.l Add DNS A record using attractive hostnames for all domain decoys' IP addresses. Each decoy supports up to 24IPs.
l Use SMB deception lures that generate a fake network drive share on the endpoint that mapped front a file serverdecoy with fake files. The fake network drive configuration is hidden to prevent users from opening it and generatingfalse alerts. Keep in mind that the SMB lure also inserts fake credentials to the Windows Credential Manager aswell.
FortiDeceptor 4.2.0 Administration Guide 157Fortinet Inc.
Appendix A - Deception deployment best practices
l Use RDP deception lures that store saved usernames and passwords in the Windows Credential Manager thatprovides access to a Windows / Linux server decoy.
l Use Cached credentials lures that inject saved usernames and passwords in the Windows memory to detectattacks using password dump like Mimikatz. Use a real domain user with IP restrictions.
Early breach detection
An attacker using fake credentials in the sRDP lure to engage with a decoy generates alerts.
An attacker engaging with a real asset using the fake username and password (in the cache credential lure) generate analert on the SIEM solution. This requires a SIEM correlation rule.
Alert details
The FortiDeceptor console presents the alert as a kill chain flow and presents a profile of the attacker. The alert dataincludes:
l Attacker username.l One of the most critical indicators that provide a quick answer regarding the attacker, attack stage, and phase.l A standard user means that the attacker / attack is in the early stage. Admin-level credentials means that theattacker / attack is in the privilege escalation phase or the attack was directed against high profile users fromthe IT department.
l Compromised IP address.l This is a critical indicator that points directly to the compromised host. Early detection prevents more persistentpoints by the attacker.
l Malicious binary.l For example, if the attacker engages with a decoy over RDP, the attacker will likely use malicious code to getmore persistent and privilege access. So having malicious binary as a piece of evidence with the full binaryanalysis helps IOC look across the network for more compromised endpoints. You can use an IOC scanner orAV/EDR API to find the indicators across network endpoints and servers.
ECO system flow:
l For SIEM:l Send alerts to your SIEM solution.l Create a correlation rule that creates an alert on using the fake username (cache credential lure.
l Use your FortiGate Fabric integration to isolate the compromised endpoint from the network. FortiDeceptor offersmore fabric connectors for isolation.
l Deploy more decoys on the isolated segment to keep monitoring the compromised endpoint.
Deploying tokens using AD GPO logon script
FortiDeceptor generates a deception lure package based on the decoy service configuration. For example, deploying aWindows server decoy with the services RDP and SMB, and Linux desktop decoy with the services SSH and SAMBAgenerates a deception lure package named FDC_TokenPKG_XXXXXXXXX that contains the deception lure files.
The deception lure package is a zip file that has three directories containing all the relevant data and configuration foreach OS.
FortiDeceptor 4.2.0 Administration Guide 158Fortinet Inc.
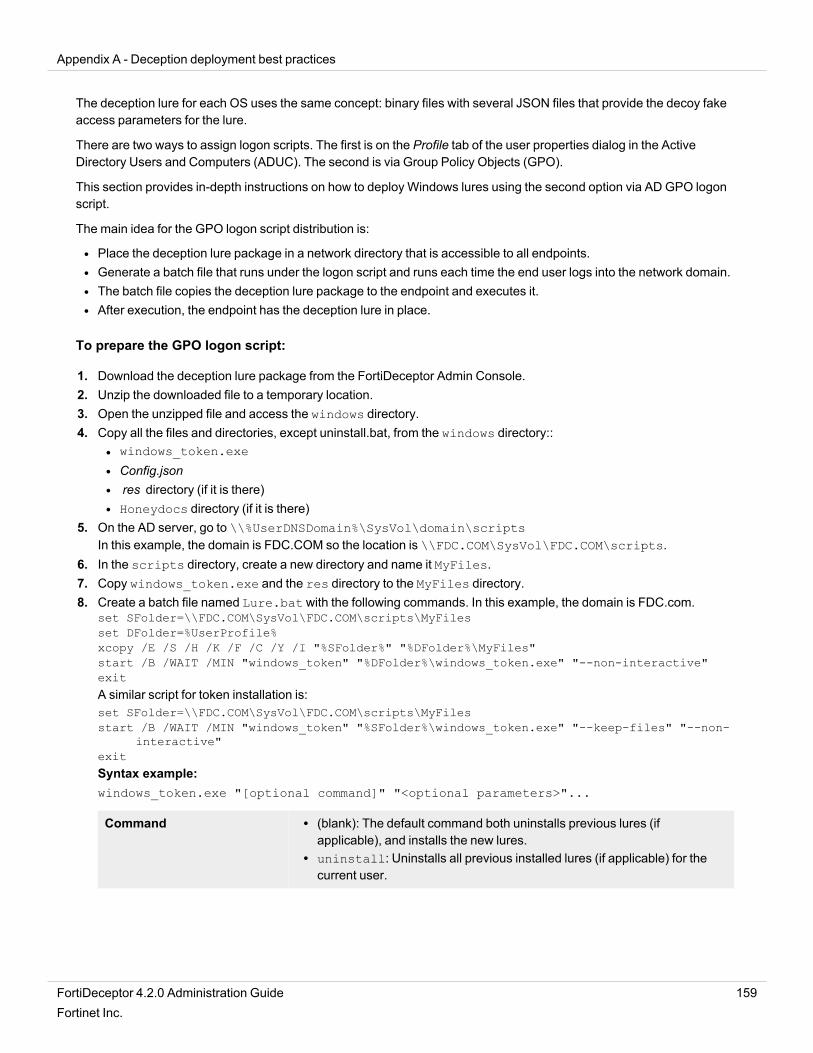
Appendix A - Deception deployment best practices
The deception lure for each OS uses the same concept: binary files with several JSON files that provide the decoy fakeaccess parameters for the lure.
There are two ways to assign logon scripts. The first is on the Profile tab of the user properties dialog in the ActiveDirectory Users and Computers (ADUC). The second is via Group Policy Objects (GPO).
This section provides in-depth instructions on how to deploy Windows lures using the second option via AD GPO logonscript.
The main idea for the GPO logon script distribution is:
l Place the deception lure package in a network directory that is accessible to all endpoints.l Generate a batch file that runs under the logon script and runs each time the end user logs into the network domain.l The batch file copies the deception lure package to the endpoint and executes it.l After execution, the endpoint has the deception lure in place.
To prepare the GPO logon script:
1. Download the deception lure package from the FortiDeceptor Admin Console.2. Unzip the downloaded file to a temporary location.3. Open the unzipped file and access the windows directory.4. Copy all the files and directories, except uninstall.bat, from the windows directory::
l windows_token.exe
l Config.jsonl res directory (if it is there)l Honeydocs directory (if it is there)
5. On the AD server, go to \\%UserDNSDomain%\SysVol\domain\scriptsIn this example, the domain is FDC.COM so the location is \\FDC.COM\SysVol\FDC.COM\scripts.
6. In the scripts directory, create a new directory and name it MyFiles.7. Copy windows_token.exe and the res directory to the MyFiles directory.8. Create a batch file named Lure.bat with the following commands. In this example, the domain is FDC.com.
set SFolder=\\FDC.COM\SysVol\FDC.COM\scripts\MyFilesset DFolder=%UserProfile%xcopy /E /S /H /K /F /C /Y /I "%SFolder%" "%DFolder%\MyFiles"start /B /WAIT /MIN "windows_token" "%DFolder%\windows_token.exe" "--non-interactive"exit
A similar script for token installation is:set SFolder=\\FDC.COM\SysVol\FDC.COM\scripts\MyFilesstart /B /WAIT /MIN "windows_token" "%SFolder%\windows_token.exe" "--keep-files" "--non-
interactive"exit
Syntax example:windows_token.exe "[optional command]" "<optional parameters>"...
Command l (blank): The default command both uninstalls previous lures (ifapplicable), and installs the new lures.
l uninstall: Uninstalls all previous installed lures (if applicable) for thecurrent user.
FortiDeceptor 4.2.0 Administration Guide 159Fortinet Inc.
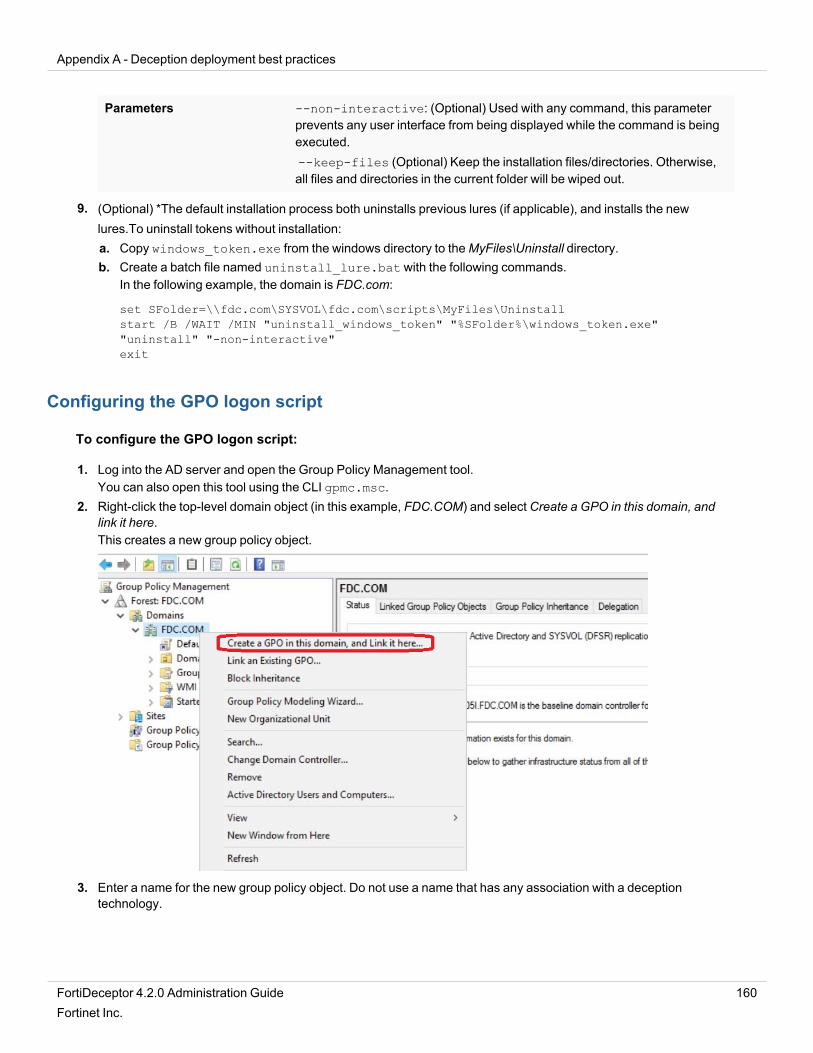
Appendix A - Deception deployment best practices
Parameters --non-interactive: (Optional) Used with any command, this parameterprevents any user interface from being displayed while the command is beingexecuted.--keep-files (Optional) Keep the installation files/directories. Otherwise,all files and directories in the current folder will be wiped out.
9. (Optional) *The default installation process both uninstalls previous lures (if applicable), and installs the newlures.To uninstall tokens without installation:a. Copy windows_token.exe from the windows directory to theMyFiles\Uninstall directory.b. Create a batch file named uninstall_lure.bat with the following commands.
In the following example, the domain is FDC.com:
set SFolder=\\fdc.com\SYSVOL\fdc.com\scripts\MyFiles\Uninstallstart /B /WAIT /MIN "uninstall_windows_token" "%SFolder%\windows_token.exe""uninstall" "-non-interactive"exit
Configuring the GPO logon script
To configure the GPO logon script:
1. Log into the AD server and open the Group Policy Management tool.You can also open this tool using the CLI gpmc.msc.
2. Right-click the top-level domain object (in this example, FDC.COM) and select Create a GPO in this domain, andlink it here.This creates a new group policy object.
3. Enter a name for the new group policy object. Do not use a name that has any association with a deceptiontechnology.
FortiDeceptor 4.2.0 Administration Guide 160Fortinet Inc.
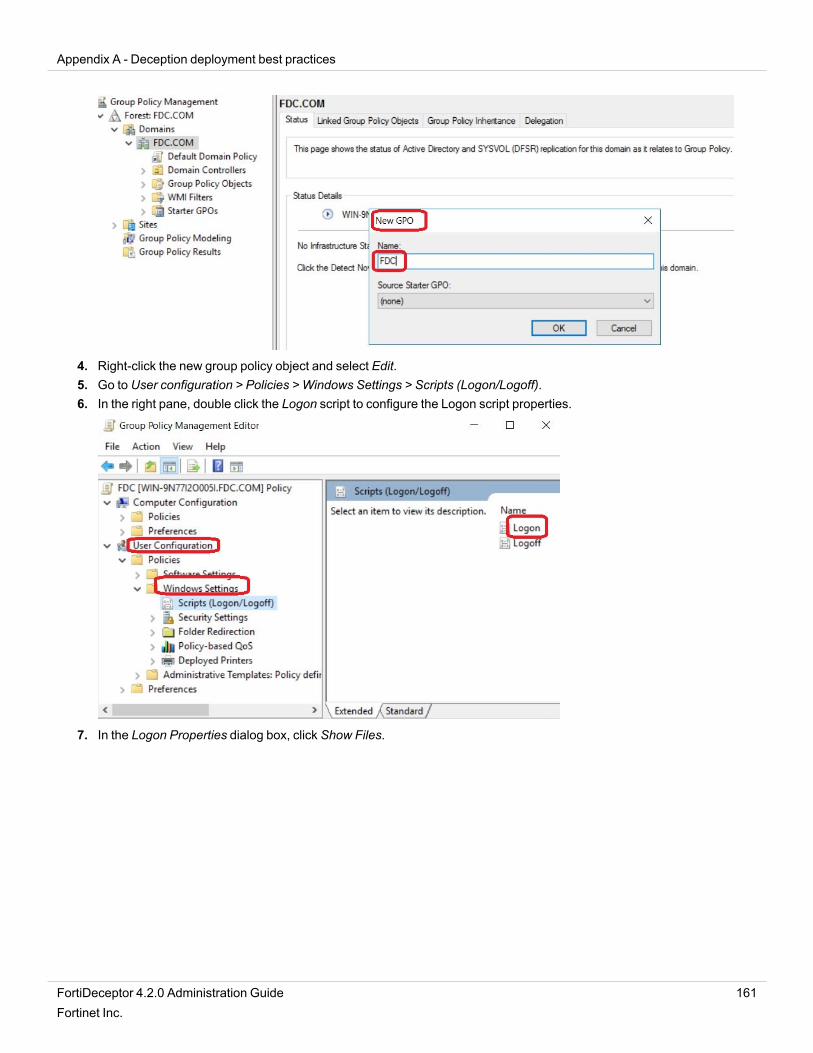
Appendix A - Deception deployment best practices
4. Right-click the new group policy object and select Edit.5. Go to User configuration > Policies > Windows Settings > Scripts (Logon/Logoff).6. In the right pane, double click the Logon script to configure the Logon script properties.
7. In the Logon Properties dialog box, click Show Files.
FortiDeceptor 4.2.0 Administration Guide 161Fortinet Inc.
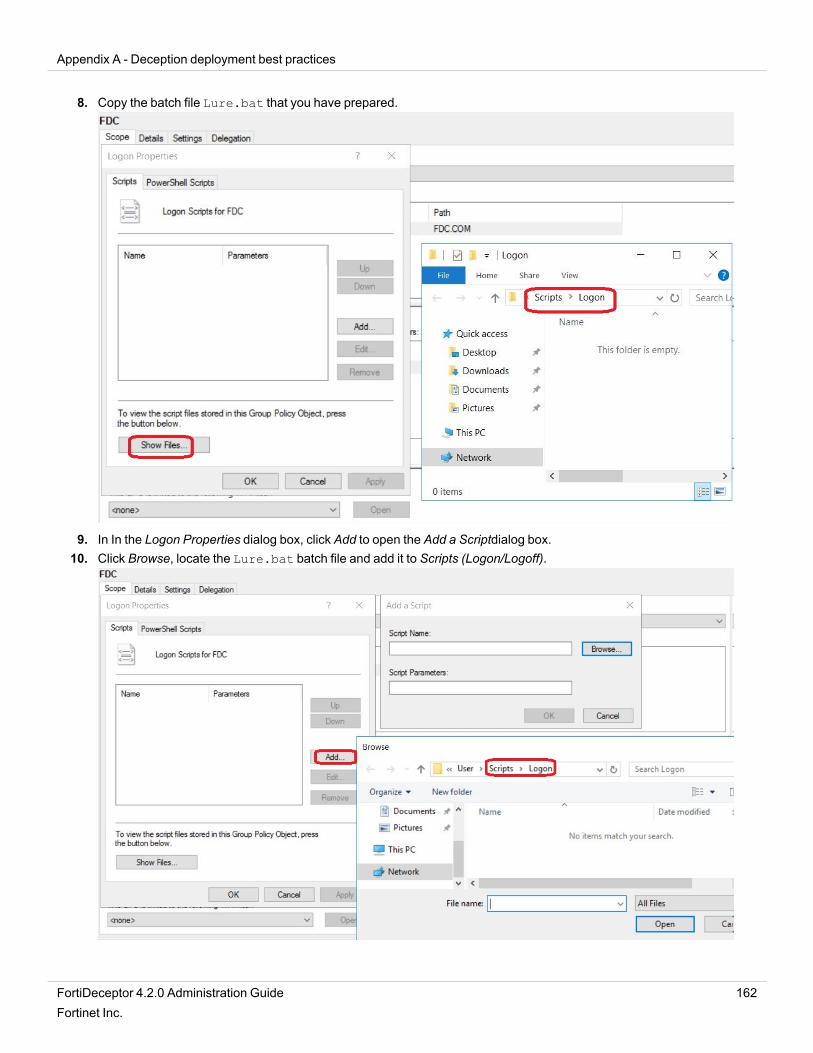
Appendix A - Deception deployment best practices
8. Copy the batch file Lure.bat that you have prepared.
9. In In the Logon Properties dialog box, click Add to open the Add a Scriptdialog box.10. Click Browse, locate the Lure.bat batch file and add it to Scripts (Logon/Logoff).
FortiDeceptor 4.2.0 Administration Guide 162Fortinet Inc.
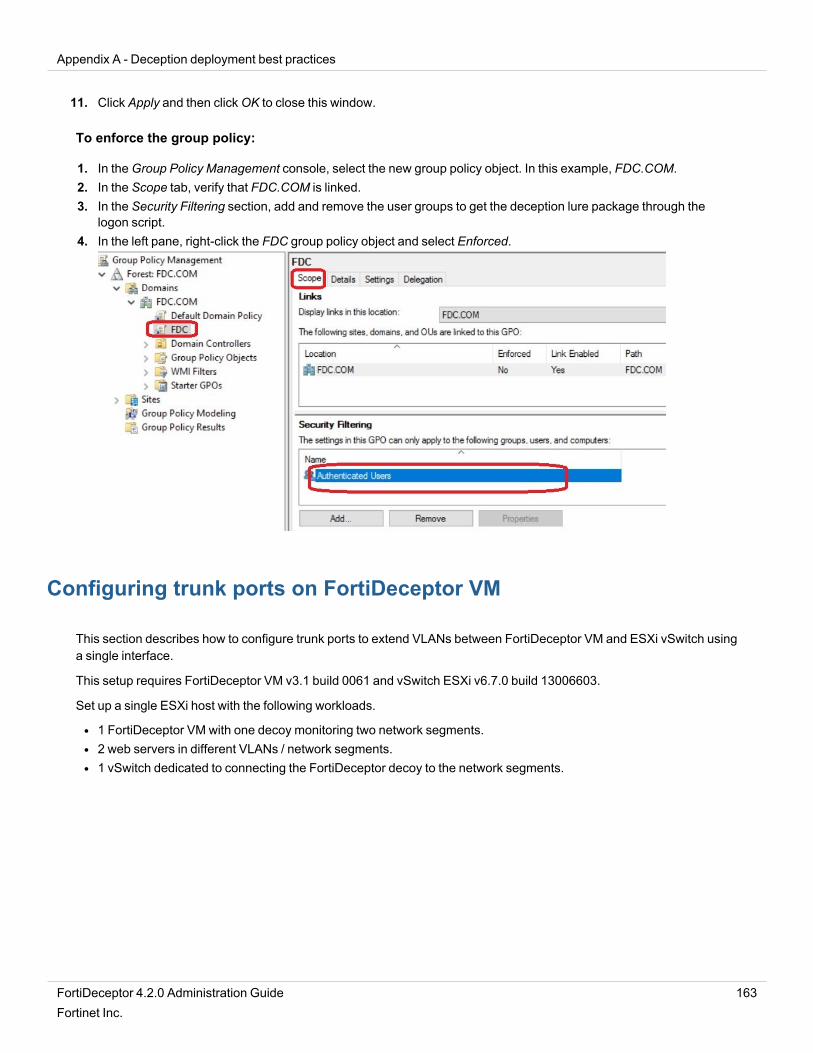
Appendix A - Deception deployment best practices
11. Click Apply and then clickOK to close this window.
To enforce the group policy:
1. In theGroup Policy Management console, select the new group policy object. In this example, FDC.COM.2. In the Scope tab, verify that FDC.COM is linked.3. In the Security Filtering section, add and remove the user groups to get the deception lure package through the
logon script.4. In the left pane, right-click the FDC group policy object and select Enforced.
Configuring trunk ports on FortiDeceptor VM
This section describes how to configure trunk ports to extend VLANs between FortiDeceptor VM and ESXi vSwitch usinga single interface.
This setup requires FortiDeceptor VM v3.1 build 0061 and vSwitch ESXi v6.7.0 build 13006603.
Set up a single ESXi host with the following workloads.
l 1 FortiDeceptor VM with one decoy monitoring two network segments.l 2 web servers in different VLANs / network segments.l 1 vSwitch dedicated to connecting the FortiDeceptor decoy to the network segments.
FortiDeceptor 4.2.0 Administration Guide 163Fortinet Inc.
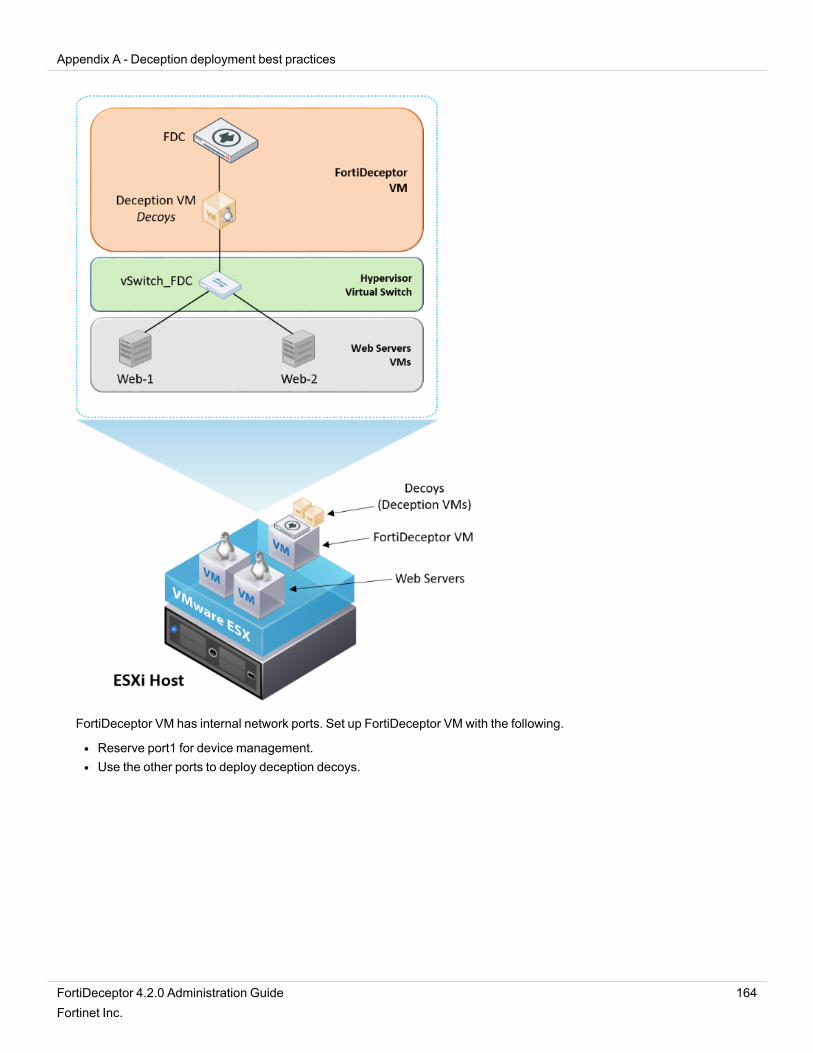
Appendix A - Deception deployment best practices
FortiDeceptor VM has internal network ports. Set up FortiDeceptor VM with the following.
l Reserve port1 for device management.l Use the other ports to deploy deception decoys.
FortiDeceptor 4.2.0 Administration Guide 164Fortinet Inc.

Appendix A - Deception deployment best practices
FortiDeceptor 4.2.0 Administration Guide 165Fortinet Inc.
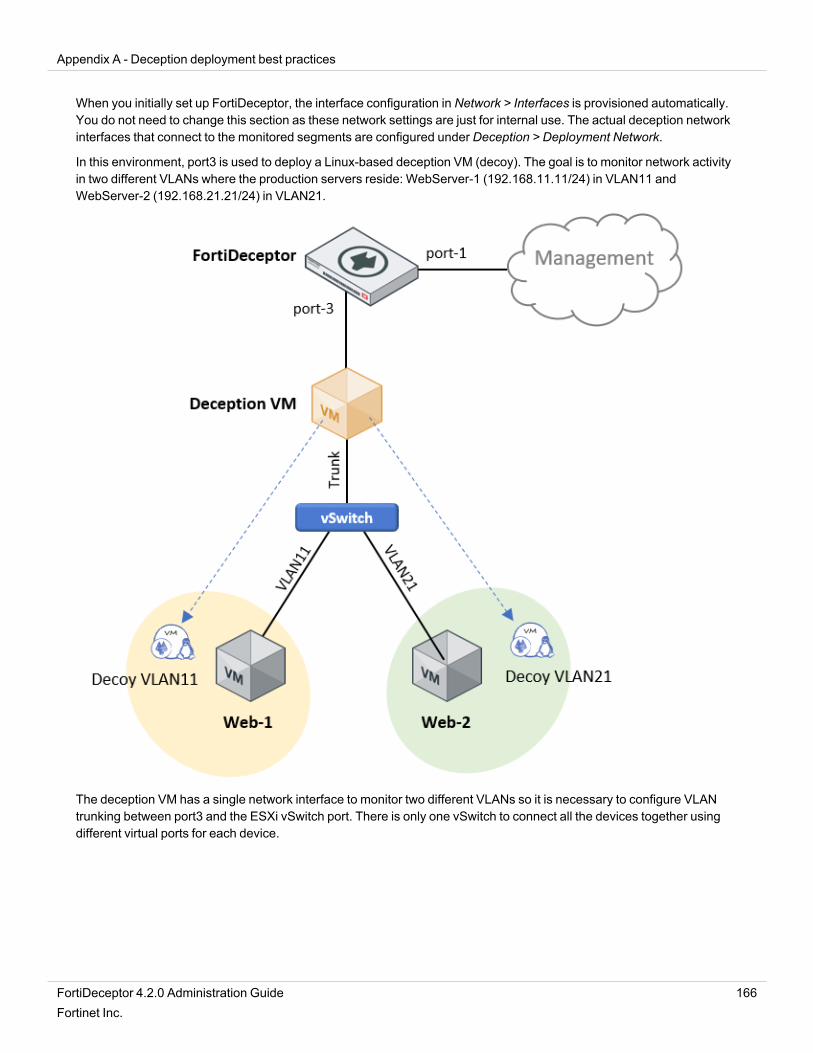
Appendix A - Deception deployment best practices
When you initially set up FortiDeceptor, the interface configuration in Network > Interfaces is provisioned automatically.You do not need to change this section as these network settings are just for internal use. The actual deception networkinterfaces that connect to the monitored segments are configured under Deception > Deployment Network.
In this environment, port3 is used to deploy a Linux-based deception VM (decoy). The goal is to monitor network activityin two different VLANs where the production servers reside: WebServer-1 (192.168.11.11/24) in VLAN11 andWebServer-2 (192.168.21.21/24) in VLAN21.
The deception VM has a single network interface to monitor two different VLANs so it is necessary to configure VLANtrunking between port3 and the ESXi vSwitch port. There is only one vSwitch to connect all the devices together usingdifferent virtual ports for each device.
FortiDeceptor 4.2.0 Administration Guide 166Fortinet Inc.

Appendix A - Deception deployment best practices
Configuring FortiDeceptor
Configure FortiDeceptor to monitor the subnet networks, one for each VLAN, using the same network port3.
To configure FortiDeceptor:
1. Go to Deception > Deployment Network and click Add New Vlan / Subnet to add the monitored segments.
2. Use the VLAN tag for each monitored subnet so that FortiDeceptor can differentiate the traffic between them.Verify that both VLANs use port3.
3. Specify the Deploy Network IP/Mask that the deception VM use to monitor its decoys on each segment.Ensure these IP addresses are unique and belong to the monitored subnets.
4. Go to Deception > Deployment Wizard to deploy the actual deception VM and attach the monitored segments.
5. Specify the network settings for the decoys.FortiDeceptor automates the creation of deception VMs and decoy services to lure and expose attackers; so decoyservices on each segment require dedicated IP addresses to interact with attackers.
FortiDeceptor 4.2.0 Administration Guide 167Fortinet Inc.
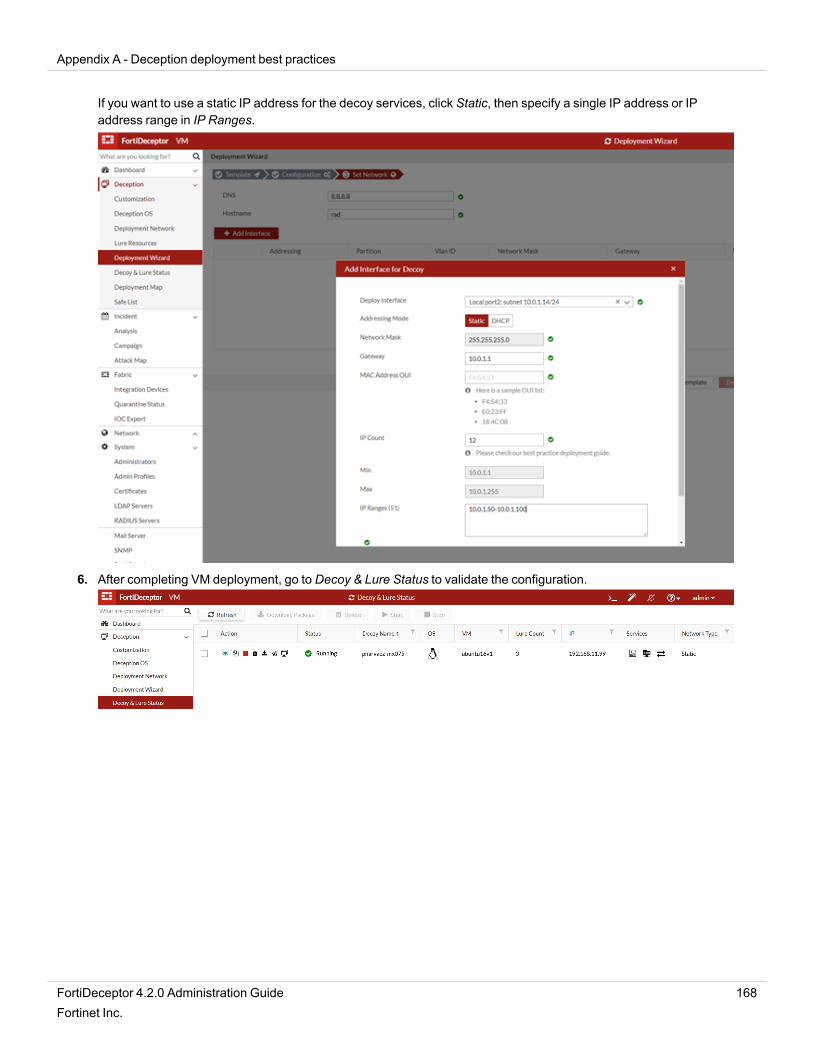
Appendix A - Deception deployment best practices
If you want to use a static IP address for the decoy services, click Static, then specify a single IP address or IPaddress range in IP Ranges.
6. After completing VM deployment, go to Decoy & Lure Status to validate the configuration.
FortiDeceptor 4.2.0 Administration Guide 168Fortinet Inc.
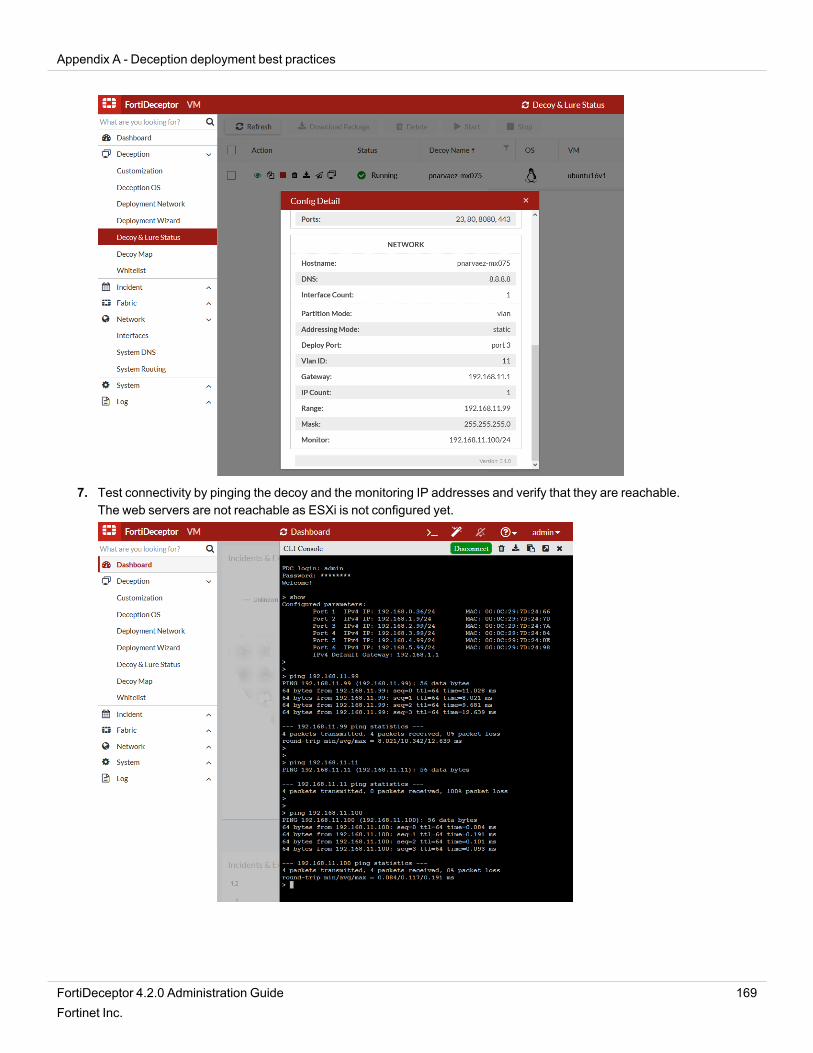
Appendix A - Deception deployment best practices
7. Test connectivity by pinging the decoy and the monitoring IP addresses and verify that they are reachable.The web servers are not reachable as ESXi is not configured yet.
FortiDeceptor 4.2.0 Administration Guide 169Fortinet Inc.
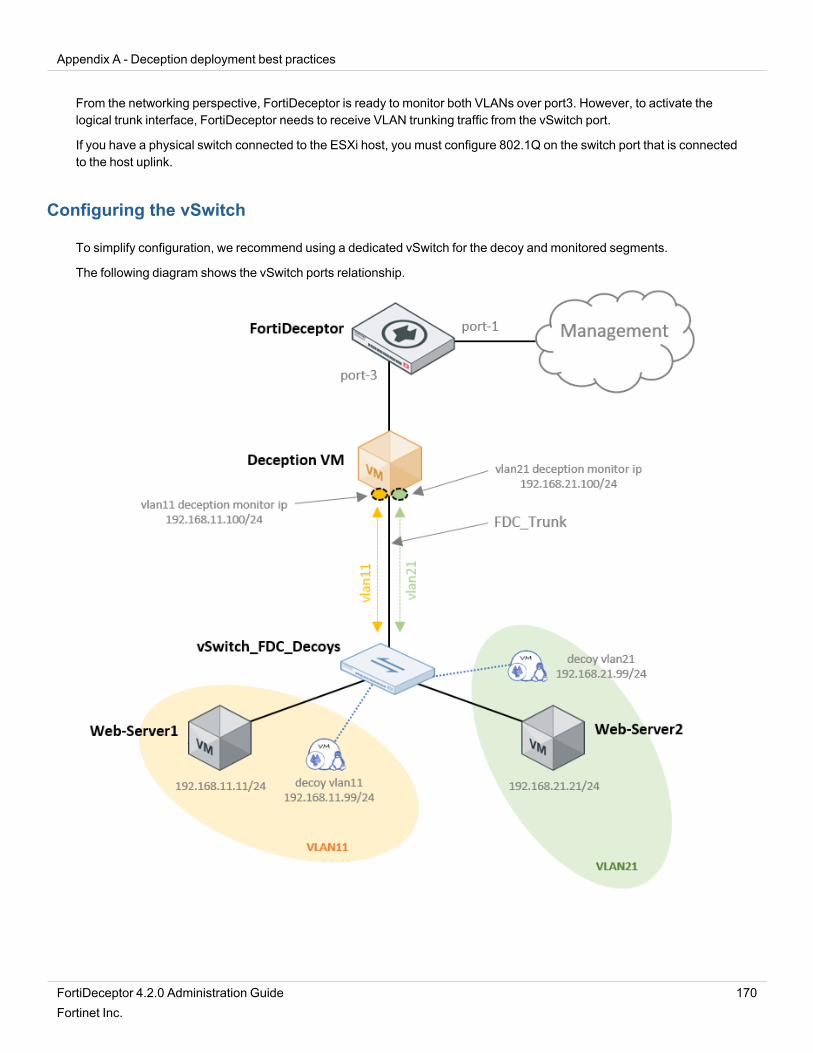
Appendix A - Deception deployment best practices
From the networking perspective, FortiDeceptor is ready to monitor both VLANs over port3. However, to activate thelogical trunk interface, FortiDeceptor needs to receive VLAN trunking traffic from the vSwitch port.
If you have a physical switch connected to the ESXi host, you must configure 802.1Q on the switch port that is connectedto the host uplink.
Configuring the vSwitch
To simplify configuration, we recommend using a dedicated vSwitch for the decoy and monitored segments.
The following diagram shows the vSwitch ports relationship.
FortiDeceptor 4.2.0 Administration Guide 170Fortinet Inc.
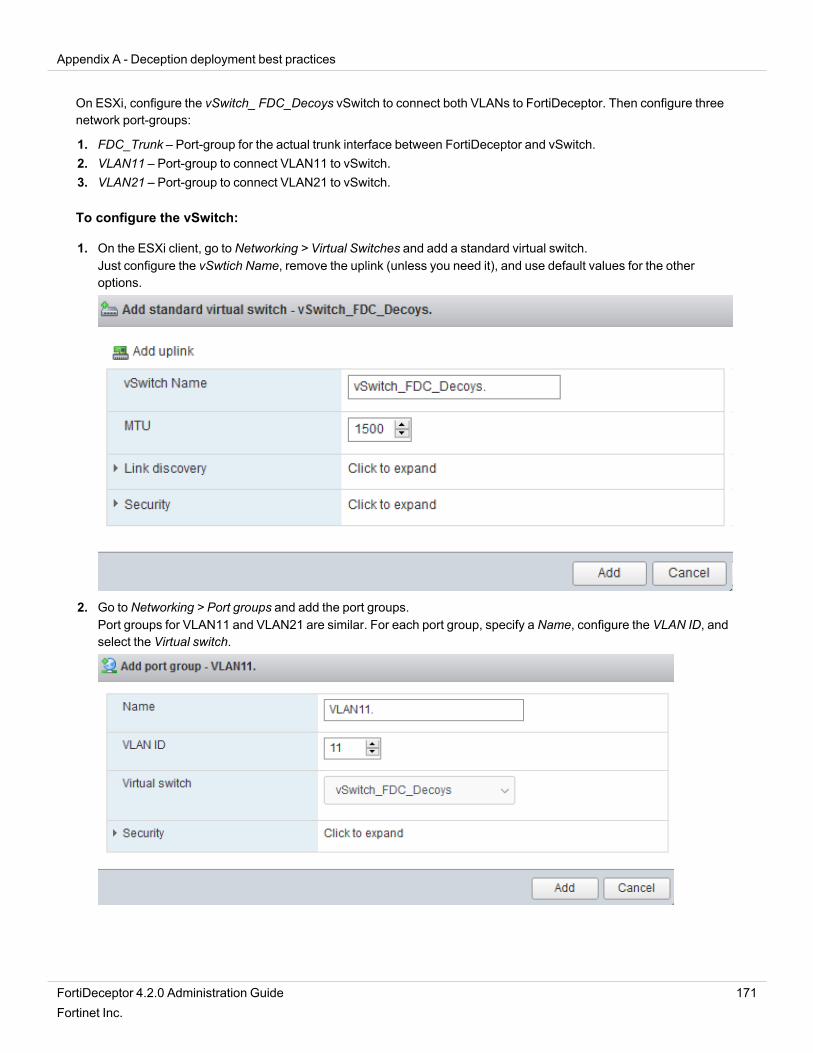
Appendix A - Deception deployment best practices
On ESXi, configure the vSwitch_ FDC_Decoys vSwitch to connect both VLANs to FortiDeceptor. Then configure threenetwork port-groups:
1. FDC_Trunk – Port-group for the actual trunk interface between FortiDeceptor and vSwitch.2. VLAN11 – Port-group to connect VLAN11 to vSwitch.3. VLAN21 – Port-group to connect VLAN21 to vSwitch.
To configure the vSwitch:
1. On the ESXi client, go to Networking > Virtual Switches and add a standard virtual switch.Just configure the vSwtich Name, remove the uplink (unless you need it), and use default values for the otheroptions.
2. Go to Networking > Port groups and add the port groups.Port groups for VLAN11 and VLAN21 are similar. For each port group, specify a Name, configure the VLAN ID, andselect the Virtual switch.
FortiDeceptor 4.2.0 Administration Guide 171Fortinet Inc.
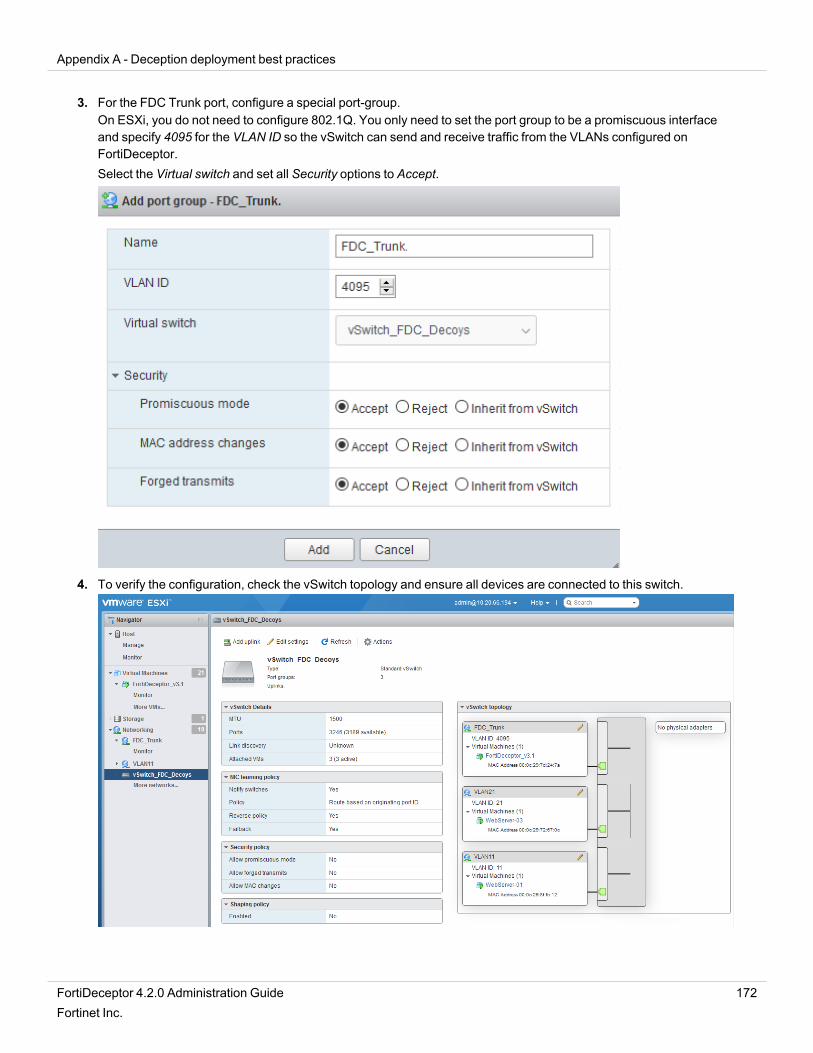
Appendix A - Deception deployment best practices
3. For the FDC Trunk port, configure a special port-group.On ESXi, you do not need to configure 802.1Q. You only need to set the port group to be a promiscuous interfaceand specify 4095 for the VLAN ID so the vSwitch can send and receive traffic from the VLANs configured onFortiDeceptor.Select the Virtual switch and set all Security options to Accept.
4. To verify the configuration, check the vSwitch topology and ensure all devices are connected to this switch.
FortiDeceptor 4.2.0 Administration Guide 172Fortinet Inc.
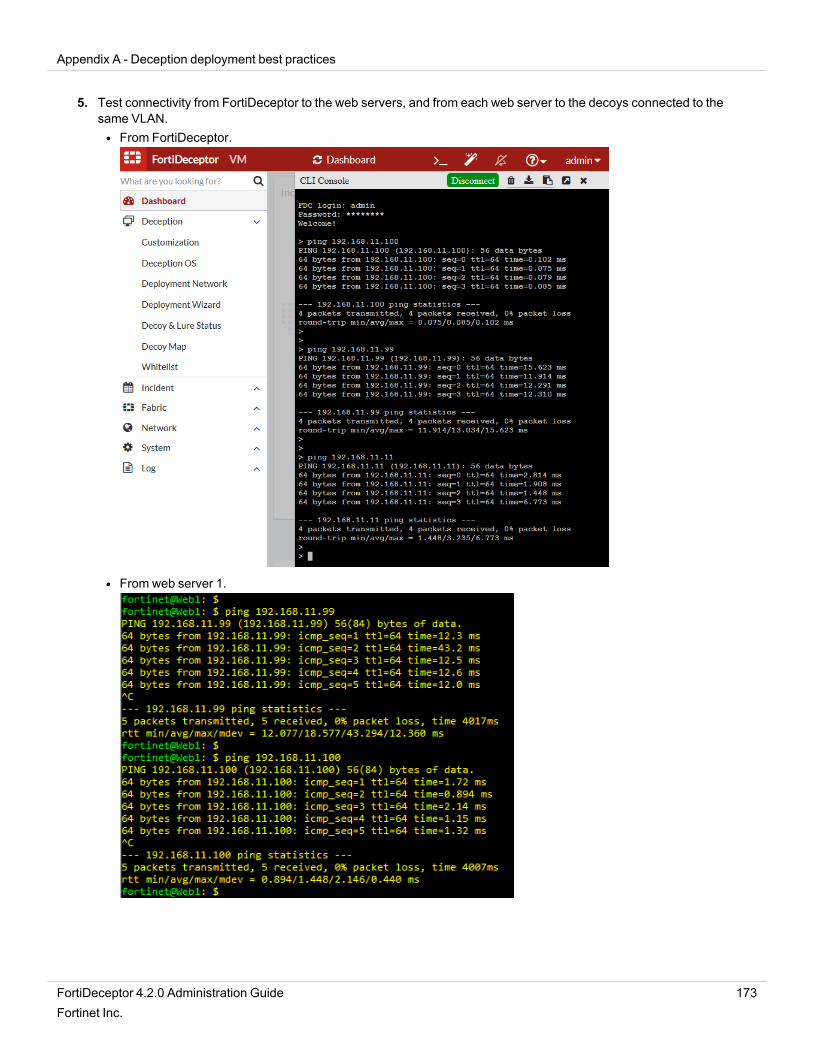
Appendix A - Deception deployment best practices
5. Test connectivity from FortiDeceptor to the web servers, and from each web server to the decoys connected to thesame VLAN.l From FortiDeceptor.
l From web server 1.
FortiDeceptor 4.2.0 Administration Guide 173Fortinet Inc.
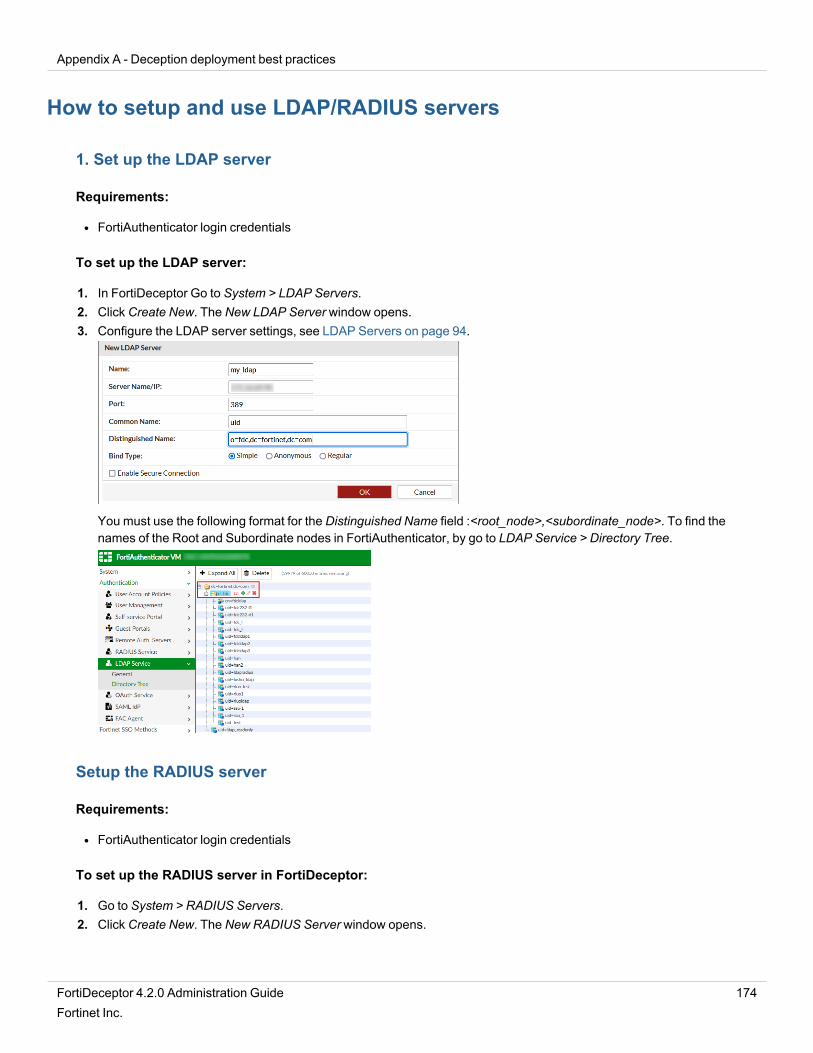
Appendix A - Deception deployment best practices
How to setup and use LDAP/RADIUS servers
1. Set up the LDAP server
Requirements:
l FortiAuthenticator login credentials
To set up the LDAP server:
1. In FortiDeceptor Go to System > LDAP Servers.2. Click Create New. The New LDAP Server window opens.3. Configure the LDAP server settings, see LDAP Servers on page 94.
You must use the following format for the Distinguished Name field :<root_node>,<subordinate_node>. To find thenames of the Root and Subordinate nodes in FortiAuthenticator, by go to LDAP Service > Directory Tree.
Setup the RADIUS server
Requirements:
l FortiAuthenticator login credentials
To set up the RADIUS server in FortiDeceptor:
1. Go to System > RADIUS Servers.2. Click Create New. The New RADIUS Server window opens.
FortiDeceptor 4.2.0 Administration Guide 174Fortinet Inc.
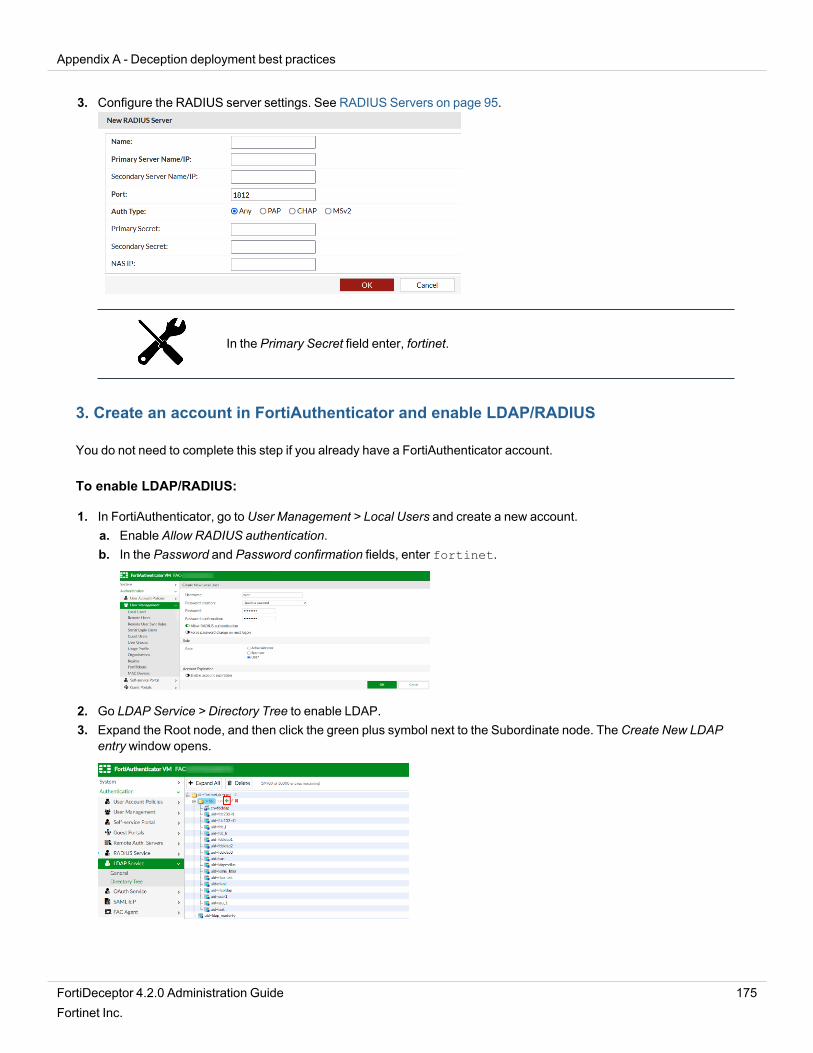
Appendix A - Deception deployment best practices
3. Configure the RADIUS server settings. See RADIUS Servers on page 95.
In the Primary Secret field enter, fortinet.
3. Create an account in FortiAuthenticator and enable LDAP/RADIUS
You do not need to complete this step if you already have a FortiAuthenticator account.
To enable LDAP/RADIUS:
1. In FortiAuthenticator, go to User Management > Local Users and create a new account.a. Enable Allow RADIUS authentication.b. In the Password and Password confirmation fields, enter fortinet.
2. Go LDAP Service > Directory Tree to enable LDAP.3. Expand the Root node, and then click the green plus symbol next to the Subordinate node. The Create New LDAP
entry window opens.
FortiDeceptor 4.2.0 Administration Guide 175Fortinet Inc.
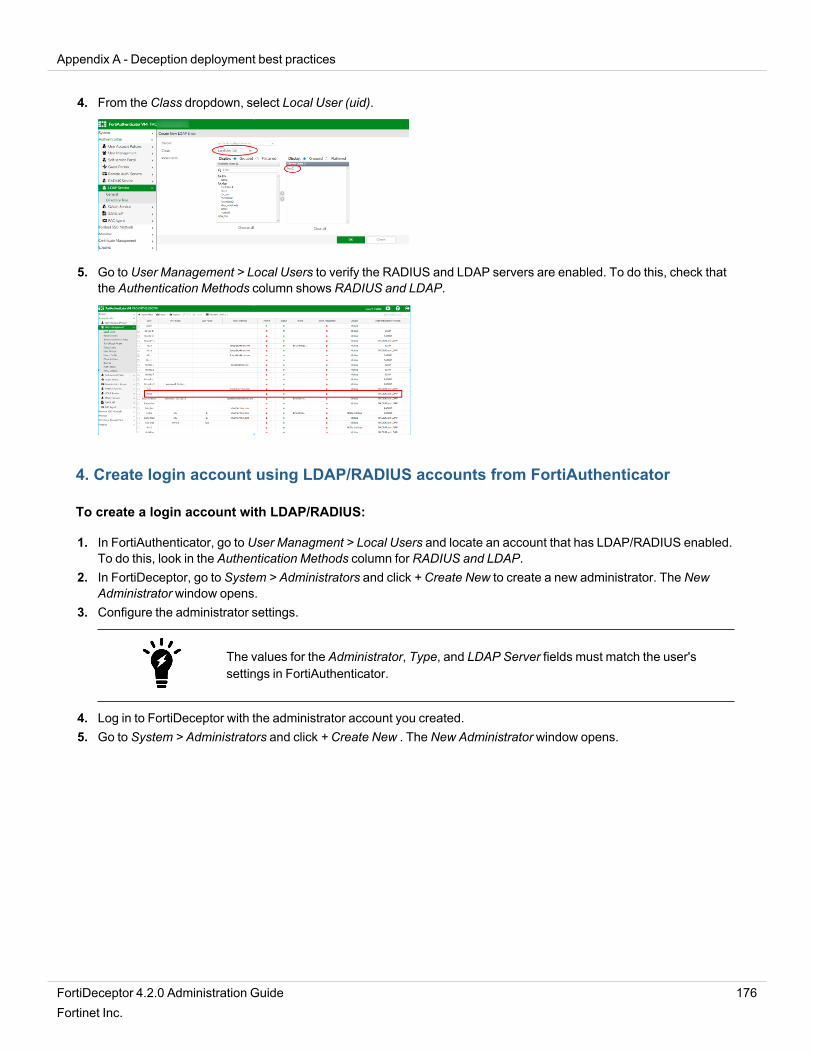
Appendix A - Deception deployment best practices
4. From the Class dropdown, select Local User (uid).
5. Go to User Management > Local Users to verify the RADIUS and LDAP servers are enabled. To do this, check thatthe Authentication Methods column shows RADIUS and LDAP.
4. Create login account using LDAP/RADIUS accounts from FortiAuthenticator
To create a login account with LDAP/RADIUS:
1. In FortiAuthenticator, go to User Managment > Local Users and locate an account that has LDAP/RADIUS enabled.To do this, look in the Authentication Methods column for RADIUS and LDAP.
2. In FortiDeceptor, go to System > Administrators and click + Create New to create a new administrator. The NewAdministrator window opens.
3. Configure the administrator settings.
The values for the Administrator, Type, and LDAP Server fields must match the user'ssettings in FortiAuthenticator.
4. Log in to FortiDeceptor with the administrator account you created.5. Go to System > Administrators and click + Create New . The New Administrator window opens.
FortiDeceptor 4.2.0 Administration Guide 176Fortinet Inc.
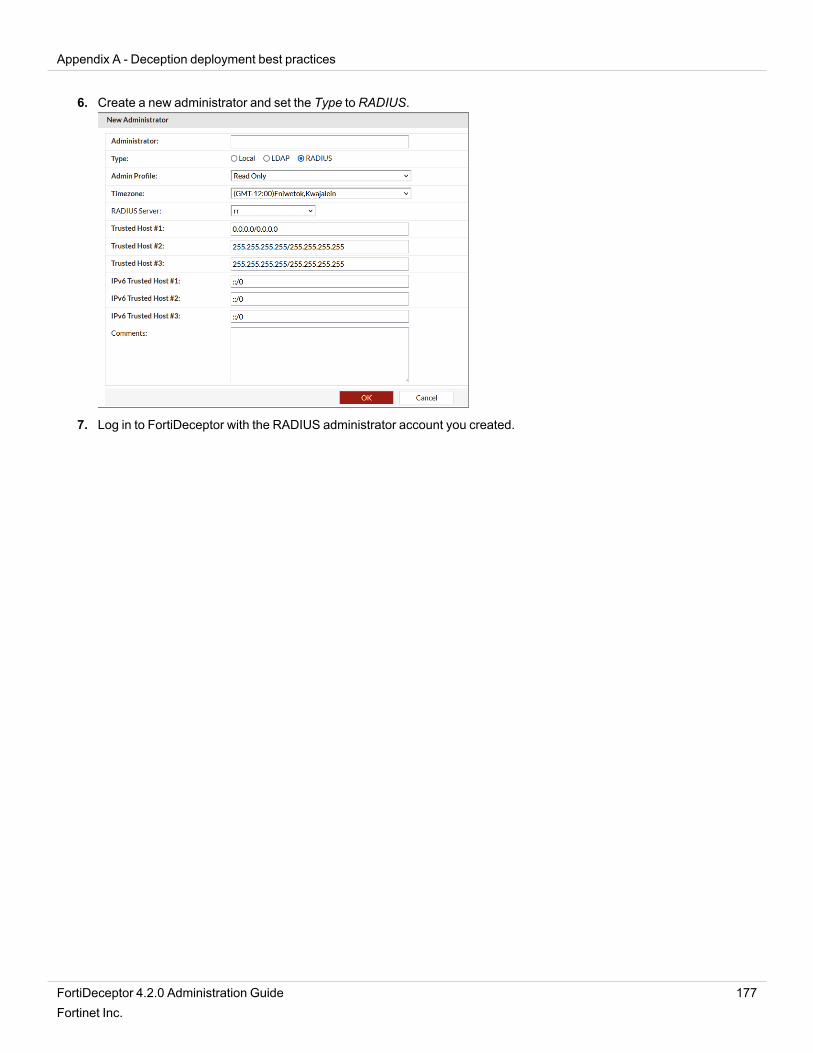
Appendix A - Deception deployment best practices
6. Create a new administrator and set the Type to RADIUS.
7. Log in to FortiDeceptor with the RADIUS administrator account you created.
FortiDeceptor 4.2.0 Administration Guide 177Fortinet Inc.

www.fortinet.com
Copyright© 2022 Fortinet, Inc. All rights reserved. Fortinet®, FortiGate®, FortiCare® and FortiGuard®, and certain other marks are registered trademarks of Fortinet, Inc., and other Fortinet names hereinmay also be registered and/or common law trademarks of Fortinet. All other product or company names may be trademarks of their respective owners. Performance and other metrics contained herein wereattained in internal lab tests under ideal conditions, and actual performance and other results may vary. Network variables, different network environments and other conditions may affect performanceresults. Nothing herein represents any binding commitment by Fortinet, and Fortinet disclaims all warranties, whether express or implied, except to the extent Fortinet enters a binding written contract,signed by Fortinet’s General Counsel, with a purchaser that expressly warrants that the identified product will perform according to certain expressly-identified performance metrics and, in such event, onlythe specific performance metrics expressly identified in such binding written contract shall be binding on Fortinet. For absolute clarity, any such warranty will be limited to performance in the same idealconditions as in Fortinet’s internal lab tests. Fortinet disclaims in full any covenants, representations, and guarantees pursuant hereto, whether express or implied. Fortinet reserves the right to change,modify, transfer, or otherwise revise this publication without notice, and the most current version of the publication shall be applicable.