2022 chevrolet camaro owner's manual - dealer e process
TRANSCRIPT
2022
2022
Owner’s Manual
Operating, servicing and maintaining a passenger vehicle or o�-highway motor vehicle can expose you to chemicals including engine exhaust, carbon monoxide, phthalates, and lead, which are known to the State of California to cause cancer and birth defects or other reproductive harm. To minimize exposure, avoid breathing exhaust, do not idle engine except as necessary, service your vehicle in a well-ventilated area and wear gloves or wash your hands frequently when servicing your vehicle. For more information go to www.P65Warnings.ca.gov/passenger-vehicle.
84716358 A
• Owner and Warranty Manuals • Connected Services • myChevrolet Mobile App • How To Videos• Vehicle Diagnostics • Schedule Maintenance • Vehicle Features• Many Additional Resources
Scan to Access
United States CanadaCustomer Assistance
1-800-222-1020Roadside Assistance
1-800-243-8872Roadside Assistance
1-800-268-6800
Customer Assistance1-800-263-3777
United States and CanadaConnected Services
1-888-4-ONSTAR
C
M
Y
CM
MY
CY
CMY
K
22_CHEV_Camaro_COV_en_US_84716358A_2021APR19.pdf 1 4/15/2021 9:48:37 AM
Chevrolet Camaro Owner Manual (GMNA-Localizing-U.S./Canada/Mexico-15516346) - 2022 - CRC - 4/9/21
Contents
Introduction . . . . . . . . . . . . . . . . . . . . . . . . . . . . . . 1
Keys, Doors, and Windows . . . . . . . . . . . . . . . 6
Seats and Restraints . . . . . . . . . . . . . . . . . . . . . 35
Storage . . . . . . . . . . . . . . . . . . . . . . . . . . . . . . . . . . 75
Instruments and Controls . . . . . . . . . . . . . . . . 77
Lighting . . . . . . . . . . . . . . . . . . . . . . . . . . . . . . . . 109
Infotainment System . . . . . . . . . . . . . . . . . . . 115
Climate Controls . . . . . . . . . . . . . . . . . . . . . . . . 173
Driving and Operating . . . . . . . . . . . . . . . . . . 181
Vehicle Care . . . . . . . . . . . . . . . . . . . . . . . . . . . . 235
Service and Maintenance . . . . . . . . . . . . . . 306
Technical Data . . . . . . . . . . . . . . . . . . . . . . . . . 320
Customer Information . . . . . . . . . . . . . . . . . . 326
Reporting Safety Defects . . . . . . . . . . . . . . . 334
OnStar . . . . . . . . . . . . . . . . . . . . . . . . . . . . . . . . . 337
Connected Services . . . . . . . . . . . . . . . . . . . . . 342
Index. . . . . . . . . . . . . . . . . . . . . . . . . . 345
Introduction
The names, logos, emblems, slogans, vehiclemodel names, and vehicle body designsappearing in this manual including, but notlimited to, GM, the GM logo, CHEVROLET,the CHEVROLET Emblem, CAMARO, and theCAMARO Emblem are trademarks and/orservice marks of General Motors LLC, itssubsidiaries, affiliates, or licensors.
For vehicles first sold in Canada, substitutethe name “General Motors of CanadaCompany” for Chevrolet Motor Divisionwherever it appears in this manual.
This manual describes features that may ormay not be on the vehicle because ofoptional equipment that was not purchasedon the vehicle, model variants, countryspecifications, features/applications that may
not be available in your region, or changessubsequent to the printing of this owner’smanual.
Refer to the purchase documentationrelating to your specific vehicle to confirmthe features.
Keep this manual in the vehicle for quickreference.
Canadian Vehicle OwnersA French language manual can be obtainedfrom your dealer, at www.helminc.com,or from:
Propriétaires Canadiens
On peut obtenir un exemplaire de ce guideen français auprès du concessionnaire ou àl'adresse suivante:
Helm, IncorporatedAttention: Customer Service47911 Halyard DrivePlymouth, MI 48170USA
Litho in U.S.A.Part No. 84716358 A First Printing ©2021 General Motors LLC. All Rights Reserved.

Chevrolet Camaro Owner Manual (GMNA-Localizing-U.S./Canada/Mexico-15516346) - 2022 - CRC - 4/9/21
2 Introduction
Using this ManualTo quickly locate information about thevehicle, use the Index in the back of themanual. It is an alphabetical list of what isin the manual and the page number whereit can be found.
Danger, Warning, and CautionWarning messages found on vehicle labelsand in this manual describe hazards andwhat to do to avoid or reduce them.
{ DangerDanger indicates a hazard with a highlevel of risk which will result in seriousinjury or death.
{ WarningWarning indicates a hazard that couldresult in injury or death.
CautionCaution indicates a hazard that couldresult in property or vehicle damage.
A circle with a slash through it is a safetysymbol which means “Do not,” “Do not dothis,” or “Do not let this happen.”
SymbolsThe vehicle has components and labels thatuse symbols instead of text. Symbols areshown along with the text describing theoperation or information relating to aspecific component, control, message, gauge,or indicator.
M : Shown when the owner’s manual hasadditional instructions or information.
* : Shown when the service manual hasadditional instructions or information.
0 : Shown when there is more informationon another page — “see page.”
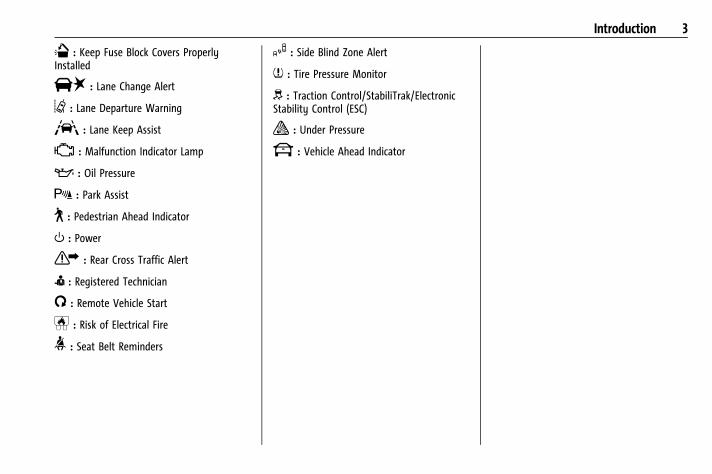
Vehicle Symbol Chart
Here are some additional symbols that maybe found on the vehicle and what theymean. See the features in this manual forinformation.
u : Air Conditioning System
G : Air Conditioning Refrigerant Oil
9 : Airbag Readiness Light
! : Antilock Brake System (ABS)
$ : Brake System Warning Light
9 : Dispose of Used Components Properly
P : Do Not Apply High Pressure Water
B : Engine Coolant Temperature
_ : Flame/Fire Prohibited
H : Flammable
[ : Forward Collision Alert
R : Fuse Block Cover Lock Location
+ : Fuses
j : ISOFIX/LATCH System Child Restraints
Chevrolet Camaro Owner Manual (GMNA-Localizing-U.S./Canada/Mexico-15516346) - 2022 - CRC - 4/9/21
Introduction 3
Q : Keep Fuse Block Covers ProperlyInstalled
| : Lane Change Alert
@ : Lane Departure Warning
A : Lane Keep Assist
* : Malfunction Indicator Lamp
: : Oil Pressure
X : Park Assist
~ : Pedestrian Ahead Indicator
O : Power
7 : Rear Cross Traffic Alert
I : Registered Technician
/ : Remote Vehicle Start
h : Risk of Electrical Fire
> : Seat Belt Reminders
I : Side Blind Zone Alert
7 : Tire Pressure Monitor
d : Traction Control/StabiliTrak/ElectronicStability Control (ESC)
a : Under Pressure
k : Vehicle Ahead Indicator
Chevrolet Camaro Owner Manual (GMNA-Localizing-U.S./Canada/Mexico-15516346) - 2022 - CRC - 4/9/21
4 Introduction
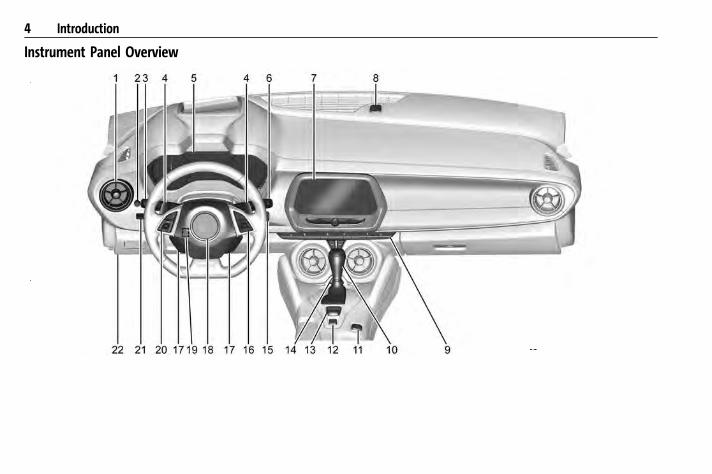
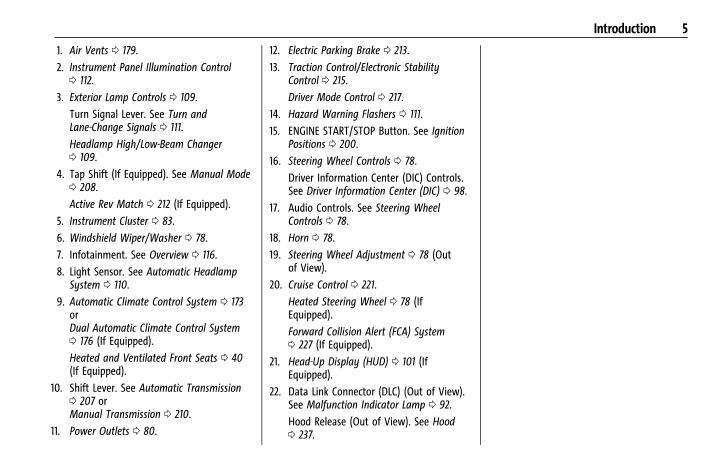
Instrument Panel Overview
Chevrolet Camaro Owner Manual (GMNA-Localizing-U.S./Canada/Mexico-15516346) - 2022 - CRC - 4/9/21
Introduction 5
1. Air Vents 0 179.
2. Instrument Panel Illumination Control0 112.
3. Exterior Lamp Controls 0 109.
Turn Signal Lever. See Turn andLane-Change Signals 0 111.
Headlamp High/Low-Beam Changer0 109.
4. Tap Shift (If Equipped). See Manual Mode0 208.
Active Rev Match 0 212 (If Equipped).
5. Instrument Cluster 0 83.
6. Windshield Wiper/Washer 0 78.
7. Infotainment. See Overview 0 116.
8. Light Sensor. See Automatic HeadlampSystem 0 110.
9. Automatic Climate Control System 0 173orDual Automatic Climate Control System0 176 (If Equipped).
Heated and Ventilated Front Seats 0 40(If Equipped).
10. Shift Lever. See Automatic Transmission0 207 orManual Transmission 0 210.
11. Power Outlets 0 80.
12. Electric Parking Brake 0 213.
13. Traction Control/Electronic StabilityControl 0 215.
Driver Mode Control 0 217.
14. Hazard Warning Flashers 0 111.
15. ENGINE START/STOP Button. See IgnitionPositions 0 200.
16. Steering Wheel Controls 0 78.
Driver Information Center (DIC) Controls.See Driver Information Center (DIC) 0 98.
17. Audio Controls. See Steering WheelControls 0 78.
18. Horn 0 78.
19. Steering Wheel Adjustment 0 78 (Outof View).
20. Cruise Control 0 221.
Heated Steering Wheel 0 78 (IfEquipped).
Forward Collision Alert (FCA) System0 227 (If Equipped).
21. Head-Up Display (HUD) 0 101 (IfEquipped).
22. Data Link Connector (DLC) (Out of View).See Malfunction Indicator Lamp 0 92.
Hood Release (Out of View). See Hood0 237.
Chevrolet Camaro Owner Manual (GMNA-Localizing-U.S./Canada/Mexico-15516346) - 2022 - CRC - 4/16/21
6 Keys, Doors, and Windows
Keys, Doors, andWindowsKeys and LocksKeys . . . . . . . . . . . . . . . . . . . . . . . . . . . . . . . . . . . . . 6Remote Keyless Entry (RKE) System . . . . . 7Remote Keyless Entry (RKE) SystemOperation . . . . . . . . . . . . . . . . . . . . . . . . . . . . . . 7
Remote Vehicle Start . . . . . . . . . . . . . . . . . . . 14Door Locks . . . . . . . . . . . . . . . . . . . . . . . . . . . . . . 15Power Door Locks . . . . . . . . . . . . . . . . . . . . . . . 17Delayed Locking . . . . . . . . . . . . . . . . . . . . . . . . 17Automatic Door Locks . . . . . . . . . . . . . . . . . . . 17Lockout Protection . . . . . . . . . . . . . . . . . . . . . . 18
DoorsTrunk . . . . . . . . . . . . . . . . . . . . . . . . . . . . . . . . . . . 18
Vehicle SecurityVehicle Security . . . . . . . . . . . . . . . . . . . . . . . . 20Vehicle Alarm System . . . . . . . . . . . . . . . . . . 20Immobilizer . . . . . . . . . . . . . . . . . . . . . . . . . . . . . 21Immobilizer Operation . . . . . . . . . . . . . . . . . . 22
Exterior MirrorsConvex Mirrors . . . . . . . . . . . . . . . . . . . . . . . . . 22Power Mirrors . . . . . . . . . . . . . . . . . . . . . . . . . . 23Heated Mirrors . . . . . . . . . . . . . . . . . . . . . . . . . 23Automatic Dimming Mirror . . . . . . . . . . . . . 23Reverse Tilt Mirrors . . . . . . . . . . . . . . . . . . . . . 23
Interior MirrorsInterior Rearview Mirrors . . . . . . . . . . . . . . . 23Manual Rearview Mirror . . . . . . . . . . . . . . . . 24Automatic Dimming Rearview Mirror . . . 24Rear Camera Mirror . . . . . . . . . . . . . . . . . . . . 24
WindowsWindows . . . . . . . . . . . . . . . . . . . . . . . . . . . . . . . 26Power Windows . . . . . . . . . . . . . . . . . . . . . . . . 26Sun Visors . . . . . . . . . . . . . . . . . . . . . . . . . . . . . . 28
RoofSunroof . . . . . . . . . . . . . . . . . . . . . . . . . . . . . . . . 29Convertible Top . . . . . . . . . . . . . . . . . . . . . . . . 29
Keys and LocksKeys
{ WarningLeaving children in a vehicle with aRemote Keyless Entry (RKE) transmitter isdangerous and children or others couldbe seriously injured or killed. They couldoperate the power windows or othercontrols or make the vehicle move. Thewindows will function with the RKEtransmitter in the vehicle, and children orothers could be caught in the path of aclosing window. Do not leave children ina vehicle with an RKE transmitter.
Chevrolet Camaro Owner Manual (GMNA-Localizing-U.S./Canada/Mexico-15516346) - 2022 - CRC - 4/16/21
Keys, Doors, and Windows 7
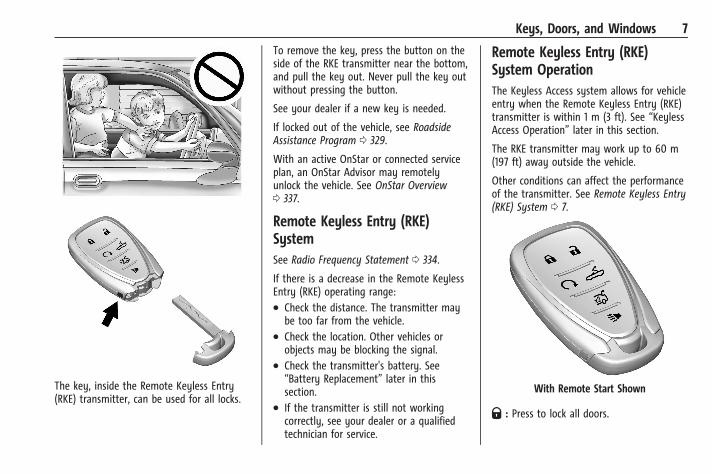
The key, inside the Remote Keyless Entry(RKE) transmitter, can be used for all locks.
To remove the key, press the button on theside of the RKE transmitter near the bottom,and pull the key out. Never pull the key outwithout pressing the button.
See your dealer if a new key is needed.
If locked out of the vehicle, see RoadsideAssistance Program 0 329.
With an active OnStar or connected serviceplan, an OnStar Advisor may remotelyunlock the vehicle. See OnStar Overview0 337.
Remote Keyless Entry (RKE)SystemSee Radio Frequency Statement 0 334.
If there is a decrease in the Remote KeylessEntry (RKE) operating range:. Check the distance. The transmitter may
be too far from the vehicle.. Check the location. Other vehicles or
objects may be blocking the signal.. Check the transmitter's battery. See
“Battery Replacement” later in thissection.
. If the transmitter is still not workingcorrectly, see your dealer or a qualifiedtechnician for service.
Remote Keyless Entry (RKE)System OperationThe Keyless Access system allows for vehicleentry when the Remote Keyless Entry (RKE)transmitter is within 1 m (3 ft). See “KeylessAccess Operation” later in this section.
The RKE transmitter may work up to 60 m(197 ft) away outside the vehicle.
Other conditions can affect the performanceof the transmitter. See Remote Keyless Entry(RKE) System 0 7.
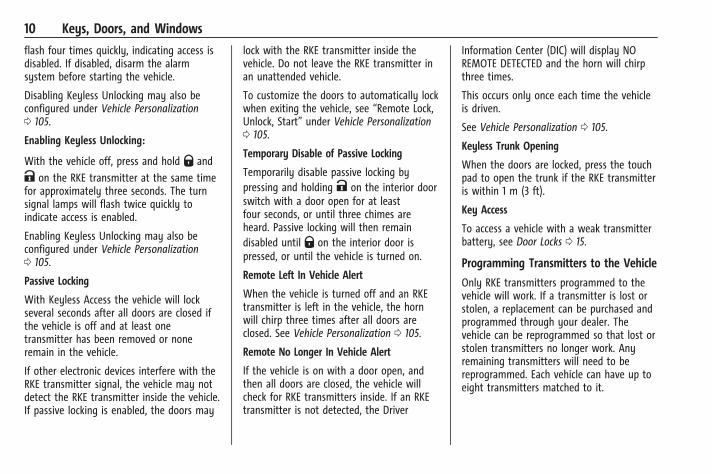
With Remote Start Shown
Q : Press to lock all doors.
Chevrolet Camaro Owner Manual (GMNA-Localizing-U.S./Canada/Mexico-15516346) - 2022 - CRC - 4/16/21
8 Keys, Doors, and Windows
The turn signal indicators may flash and/orthe horn may sound on the second press toindicate locking. See Vehicle Personalization0 105.
If the driver door is open when Q is pressedand Open Door Anti-Lockout is enabled, alldoors will lock and then the driver door willimmediately unlock. See VehiclePersonalization 0 105. If the passenger dooris open when Q is pressed, all doors lock.
Pressing Q may also arm the alarm system.See Vehicle Alarm System 0 20.
K : Press to unlock the driver door. Pressunlock again within five seconds to unlockall doors. The RKE transmitter can beprogrammed to unlock all doors on the firstbutton press. See Vehicle Personalization0 105.
The turn signal indicators may flash and/orthe horn may sound to indicate unlocking.See Vehicle Personalization 0 105.
Pressing K will disarm the alarm system.See Vehicle Alarm System 0 20.
If equipped, press and hold K on the RKEtransmitter to open the windows remotely,if enabled. See Vehicle Personalization 0 105.
/ : If equipped, press and release Q andthen immediately press and hold / for atleast four seconds to start the engine fromoutside the vehicle using the RKEtransmitter. See Remote Vehicle Start 0 14.
X : Press twice quickly to release thetrunk.
M : If equipped, press and release K,then immediately press and holdMcontinuously to open the convertible top allthe way. The vehicle must be off to operatethe convertible top with the RKE transmitter.The top will stop movement approximatelyone second afterM is released. To stopthe top immediately, press 7, K, or Q onthe RKE transmitter.M will only open theconvertible top.
The convertible top can also be openedusing a button in the overhead console. SeeConvertible Top 0 29.
7 : Press and release to initiate vehiclelocator. The exterior lamps flash and thehorn chirps three times.
Press and hold 7 for at least three secondsto sound the panic alarm. The horn soundsand the turn signals flash for 30 seconds,or until 7 is pressed again or the ignition isturned on.
Convertible Top. Do not try to start the vehicle while using
the RKE transmitter to open theconvertible top. ReleaseM on the RKEtransmitter and ENGINE START/STOP. Waita few seconds before starting the vehiclenormally.
. The passive door unlock feature may notoperate properly while using the RKEtransmitter to open the convertible top.
The convertible top can also be openedusing a button in the overhead console. SeeConvertible Top 0 29.
Keyless Access Operation
The Keyless Access system lets you lock andunlock the doors and access the trunkwithout removing the RKE transmitter fromyour pocket, purse, briefcase, etc. The RKEtransmitter should be within 1 m (3 ft) of thetrunk or door being opened. There will bebuttons on the outside door handles.

Chevrolet Camaro Owner Manual (GMNA-Localizing-U.S./Canada/Mexico-15516346) - 2022 - CRC - 4/16/21
Keys, Doors, and Windows 9
Keyless Access can be programmed tounlock all doors on the first lock/unlockpress from the driver door. Keyless Accesscan also be turned Off. See VehiclePersonalization 0 105.
If equipped with memory seats, RKEtransmitters 1 and 2 are linked to theseating positions of memory 1 or 2. SeeMemory Seats 0 37.
Keyless Unlocking/Locking from theDriver Door
When the doors are locked and the RKEtransmitter is within 1 m (3 ft) of the driverdoor handle, pressing the lock/unlock buttonon the driver door handle will unlock thedriver door. If the lock/unlock button ispressed again within five seconds, thepassenger door will unlock. Pull the doorhandle to unlatch the door.
Driver Side Shown, Passenger Side Similar
Pressing the lock/unlock button will causeall doors to lock if any of the followingoccur:. It has been more than five seconds since
the first lock/unlock button press.. Two lock/unlock button presses were
used to unlock all doors.. Any vehicle door has opened and all
doors are now closed.
Keyless Unlocking/Locking from thePassenger Door
When the doors are locked and the RKEtransmitter is within 1 m (3 ft) of thepassenger door handle, pressing the lock/unlock button on the passenger door handlewill unlock all doors.
Pressing the lock/unlock button will causeall doors to lock if any of the followingoccur:. The lock/unlock button was used to
unlock all doors.. Any vehicle door has opened and all
doors are now closed.
Disable/Enable Keyless Unlocking of ExteriorDoor Handles and Trunk
If equipped, keyless unlocking of the exteriordoor handles and trunk can be disabled andenabled.
Disabling Keyless Unlocking:
With the vehicle off, press and hold Q and
K on the RKE transmitter at the same timefor approximately three seconds. The turnsignal lamps will flash four times quickly toindicate access is disabled. Using anyexterior handle to unlock the doors or openthe trunk will cause the turn signal lamps to
Chevrolet Camaro Owner Manual (GMNA-Localizing-U.S./Canada/Mexico-15516346) - 2022 - CRC - 4/16/21
10 Keys, Doors, and Windows
flash four times quickly, indicating access isdisabled. If disabled, disarm the alarmsystem before starting the vehicle.
Disabling Keyless Unlocking may also beconfigured under Vehicle Personalization0 105.
Enabling Keyless Unlocking:
With the vehicle off, press and hold Q and
K on the RKE transmitter at the same timefor approximately three seconds. The turnsignal lamps will flash twice quickly toindicate access is enabled.
Enabling Keyless Unlocking may also beconfigured under Vehicle Personalization0 105.
Passive Locking
With Keyless Access the vehicle will lockseveral seconds after all doors are closed ifthe vehicle is off and at least onetransmitter has been removed or noneremain in the vehicle.
If other electronic devices interfere with theRKE transmitter signal, the vehicle may notdetect the RKE transmitter inside the vehicle.If passive locking is enabled, the doors may
lock with the RKE transmitter inside thevehicle. Do not leave the RKE transmitter inan unattended vehicle.
To customize the doors to automatically lockwhen exiting the vehicle, see “Remote Lock,Unlock, Start” under Vehicle Personalization0 105.
Temporary Disable of Passive Locking
Temporarily disable passive locking bypressing and holding K on the interior doorswitch with a door open for at leastfour seconds, or until three chimes areheard. Passive locking will then remaindisabled until Q on the interior door ispressed, or until the vehicle is turned on.
Remote Left In Vehicle Alert
When the vehicle is turned off and an RKEtransmitter is left in the vehicle, the hornwill chirp three times after all doors areclosed. See Vehicle Personalization 0 105.
Remote No Longer In Vehicle Alert
If the vehicle is on with a door open, andthen all doors are closed, the vehicle willcheck for RKE transmitters inside. If an RKEtransmitter is not detected, the Driver
Information Center (DIC) will display NOREMOTE DETECTED and the horn will chirpthree times.
This occurs only once each time the vehicleis driven.
See Vehicle Personalization 0 105.
Keyless Trunk Opening
When the doors are locked, press the touchpad to open the trunk if the RKE transmitteris within 1 m (3 ft).
Key Access
To access a vehicle with a weak transmitterbattery, see Door Locks 0 15.
Programming Transmitters to the Vehicle
Only RKE transmitters programmed to thevehicle will work. If a transmitter is lost orstolen, a replacement can be purchased andprogrammed through your dealer. Thevehicle can be reprogrammed so that lost orstolen transmitters no longer work. Anyremaining transmitters will need to bereprogrammed. Each vehicle can have up toeight transmitters matched to it.
Chevrolet Camaro Owner Manual (GMNA-Localizing-U.S./Canada/Mexico-15516346) - 2022 - CRC - 4/16/21
Keys, Doors, and Windows 11
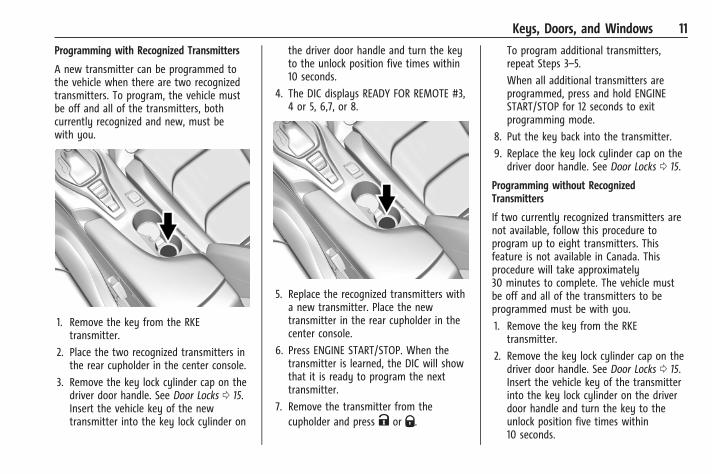
Programming with Recognized Transmitters
A new transmitter can be programmed tothe vehicle when there are two recognizedtransmitters. To program, the vehicle mustbe off and all of the transmitters, bothcurrently recognized and new, must bewith you.
1. Remove the key from the RKEtransmitter.
2. Place the two recognized transmitters inthe rear cupholder in the center console.
3. Remove the key lock cylinder cap on thedriver door handle. See Door Locks 0 15.Insert the vehicle key of the newtransmitter into the key lock cylinder on
the driver door handle and turn the keyto the unlock position five times within10 seconds.
4. The DIC displays READY FOR REMOTE #3,4 or 5, 6,7, or 8.
5. Replace the recognized transmitters witha new transmitter. Place the newtransmitter in the rear cupholder in thecenter console.
6. Press ENGINE START/STOP. When thetransmitter is learned, the DIC will showthat it is ready to program the nexttransmitter.
7. Remove the transmitter from thecupholder and press K or Q.
To program additional transmitters,repeat Steps 3–5.
When all additional transmitters areprogrammed, press and hold ENGINESTART/STOP for 12 seconds to exitprogramming mode.
8. Put the key back into the transmitter.
9. Replace the key lock cylinder cap on thedriver door handle. See Door Locks 0 15.
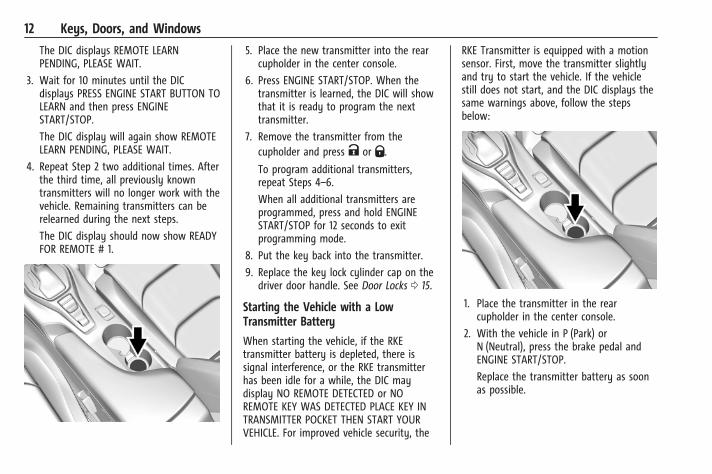
Programming without RecognizedTransmitters
If two currently recognized transmitters arenot available, follow this procedure toprogram up to eight transmitters. Thisfeature is not available in Canada. Thisprocedure will take approximately30 minutes to complete. The vehicle mustbe off and all of the transmitters to beprogrammed must be with you.
1. Remove the key from the RKEtransmitter.
2. Remove the key lock cylinder cap on thedriver door handle. See Door Locks 0 15.Insert the vehicle key of the transmitterinto the key lock cylinder on the driverdoor handle and turn the key to theunlock position five times within10 seconds.
Chevrolet Camaro Owner Manual (GMNA-Localizing-U.S./Canada/Mexico-15516346) - 2022 - CRC - 4/16/21
12 Keys, Doors, and Windows
The DIC displays REMOTE LEARNPENDING, PLEASE WAIT.
3. Wait for 10 minutes until the DICdisplays PRESS ENGINE START BUTTON TOLEARN and then press ENGINESTART/STOP.
The DIC display will again show REMOTELEARN PENDING, PLEASE WAIT.
4. Repeat Step 2 two additional times. Afterthe third time, all previously knowntransmitters will no longer work with thevehicle. Remaining transmitters can berelearned during the next steps.
The DIC display should now show READYFOR REMOTE # 1.
5. Place the new transmitter into the rearcupholder in the center console.
6. Press ENGINE START/STOP. When thetransmitter is learned, the DIC will showthat it is ready to program the nexttransmitter.
7. Remove the transmitter from thecupholder and press K or Q.
To program additional transmitters,repeat Steps 4–6.
When all additional transmitters areprogrammed, press and hold ENGINESTART/STOP for 12 seconds to exitprogramming mode.
8. Put the key back into the transmitter.
9. Replace the key lock cylinder cap on thedriver door handle. See Door Locks 0 15.
Starting the Vehicle with a LowTransmitter Battery
When starting the vehicle, if the RKEtransmitter battery is depleted, there issignal interference, or the RKE transmitterhas been idle for a while, the DIC maydisplay NO REMOTE DETECTED or NOREMOTE KEY WAS DETECTED PLACE KEY INTRANSMITTER POCKET THEN START YOURVEHICLE. For improved vehicle security, the
RKE Transmitter is equipped with a motionsensor. First, move the transmitter slightlyand try to start the vehicle. If the vehiclestill does not start, and the DIC displays thesame warnings above, follow the stepsbelow:
1. Place the transmitter in the rearcupholder in the center console.
2. With the vehicle in P (Park) orN (Neutral), press the brake pedal andENGINE START/STOP.
Replace the transmitter battery as soonas possible.
Chevrolet Camaro Owner Manual (GMNA-Localizing-U.S./Canada/Mexico-15516346) - 2022 - CRC - 4/16/21
Keys, Doors, and Windows 13
Battery Replacement
{ WarningNever allow children to play with the RKEtransmitter. The transmitter contains asmall battery, which can be a chokinghazard. If swallowed, internal burns canoccur, resulting in severe injury or death.Seek medical attention immediately if abattery is swallowed.
{ WarningTo avoid personal injury, do not touchmetal surfaces on the RKE transmitterwhen it has been exposed to extremeheat. These surfaces can be hot to thetouch at temperatures above 59 °C(138 °F).
CautionWhen replacing the battery, do not touchany of the circuitry on the transmitter.Static from your body could damage thetransmitter.
CautionAlways replace the battery with thecorrect type. Replacing the battery withan incorrect type could potentially createa risk of battery explosion. Dispose ofused batteries according to instructionsand local laws. Do not attempt to burn,crush, or cut the used battery, and avoidexposing the battery to environmentswith extremely low air pressures or hightemperatures.
CautionIf the RKE transmitter is not reassembledproperly, liquids could enter the housingand damage the circuitry, resulting in anRKE transmitter malfunction and/orfailure. To prevent damage, always followthe steps for RKE transmitter reassemblyin this manual to ensure the transmitteris sealed properly whenever the RKEtransmitter is opened.
Replace the battery if the REPLACE BATTERYIN REMOTE KEY message displays in the DIC.
The battery is not rechargeable. To replacethe battery:
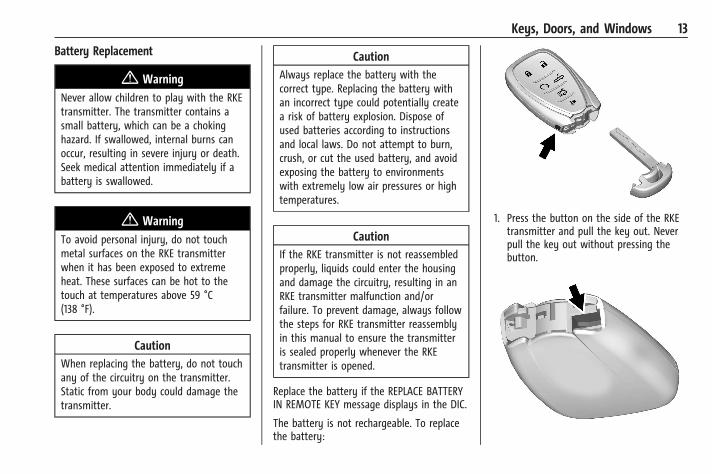
1. Press the button on the side of the RKEtransmitter and pull the key out. Neverpull the key out without pressing thebutton.
Chevrolet Camaro Owner Manual (GMNA-Localizing-U.S./Canada/Mexico-15516346) - 2022 - CRC - 4/16/21
14 Keys, Doors, and Windows
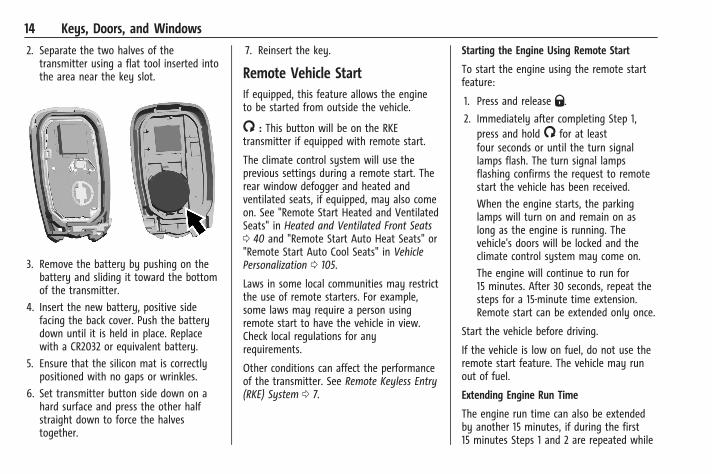
2. Separate the two halves of thetransmitter using a flat tool inserted intothe area near the key slot.
3. Remove the battery by pushing on thebattery and sliding it toward the bottomof the transmitter.
4. Insert the new battery, positive sidefacing the back cover. Push the batterydown until it is held in place. Replacewith a CR2032 or equivalent battery.
5. Ensure that the silicon mat is correctlypositioned with no gaps or wrinkles.
6. Set transmitter button side down on ahard surface and press the other halfstraight down to force the halvestogether.
7. Reinsert the key.
Remote Vehicle StartIf equipped, this feature allows the engineto be started from outside the vehicle.
/ : This button will be on the RKEtransmitter if equipped with remote start.
The climate control system will use theprevious settings during a remote start. Therear window defogger and heated andventilated seats, if equipped, may also comeon. See "Remote Start Heated and VentilatedSeats" in Heated and Ventilated Front Seats0 40 and "Remote Start Auto Heat Seats" or"Remote Start Auto Cool Seats" in VehiclePersonalization 0 105.
Laws in some local communities may restrictthe use of remote starters. For example,some laws may require a person usingremote start to have the vehicle in view.Check local regulations for anyrequirements.
Other conditions can affect the performanceof the transmitter. See Remote Keyless Entry(RKE) System 0 7.
Starting the Engine Using Remote Start
To start the engine using the remote startfeature:
1. Press and release Q.
2. Immediately after completing Step 1,press and hold / for at leastfour seconds or until the turn signallamps flash. The turn signal lampsflashing confirms the request to remotestart the vehicle has been received.
When the engine starts, the parkinglamps will turn on and remain on aslong as the engine is running. Thevehicle's doors will be locked and theclimate control system may come on.
The engine will continue to run for15 minutes. After 30 seconds, repeat thesteps for a 15-minute time extension.Remote start can be extended only once.
Start the vehicle before driving.
If the vehicle is low on fuel, do not use theremote start feature. The vehicle may runout of fuel.
Extending Engine Run Time
The engine run time can also be extendedby another 15 minutes, if during the first15 minutes Steps 1 and 2 are repeated while
Chevrolet Camaro Owner Manual (GMNA-Localizing-U.S./Canada/Mexico-15516346) - 2022 - CRC - 4/16/21
Keys, Doors, and Windows 15
the engine is still running. An extension canbe requested, 30 seconds after starting. Thisprovides a total of 30 minutes.
The remote start can only be extended once.
When the remote start is extended, thesecond 15-minute period is added on to thefirst 15 minutes for a total of 30 minutes.
A maximum of two remote starts, or aremote start with an extension, are allowedbetween ignition cycles.
The ignition must be turned on and then offbefore the remote start procedure can beused again.
Canceling a Remote Start
To cancel a remote start, do one of thefollowing:
. Press and hold / until the parking lampsturn off.
. Turn on the hazard warning flashers.
. Turn the vehicle on and then off.
Conditions in Which Remote Start WillNot Work
The remote start will not operate if:. The RKE transmitter is in the vehicle.. The vehicle is not off.
. The hood is not closed.
. The hazard warning flashers are on.
. There is an emission control systemmalfunction.
. The engine coolant temperature istoo high.
. The oil pressure is low.
. Two remote vehicle starts, or a singleremote start with an extension, havealready been used.
. The vehicle is not in P (Park).
Door Locks
{ WarningUnlocked doors can be dangerous.
. Passengers, especially children, caneasily open the doors and fall out of amoving vehicle. The doors can beunlocked and opened while the vehicleis moving. The chance of being thrownout of the vehicle in a crash isincreased if the doors are not locked.So, all passengers should wear seatbelts properly and the doors should belocked whenever the vehicle is driven.
(Continued)
Warning (Continued). Young children who get into unlocked
vehicles may be unable to get out.A child can be overcome by extremeheat and can suffer permanent injuriesor even death from heat stroke.Always lock the vehicle wheneverleaving it.
. Outsiders can easily enter through anunlocked door when you slow downor stop the vehicle. Locking the doorscan help prevent this from happening.
To lock or unlock the doors from outside thevehicle:
. Press Q or K on the Remote KeylessEntry (RKE) transmitter.
. Use Keyless Access. See Remote KeylessEntry (RKE) System Operation 0 7.
. Use the key in the driver door. The keycylinder is covered with a cap.
To lock or unlock the doors from inside thevehicle:
. Press Q or K on the power door lockswitch.
Chevrolet Camaro Owner Manual (GMNA-Localizing-U.S./Canada/Mexico-15516346) - 2022 - CRC - 4/16/21
16 Keys, Doors, and Windows. Pulling an interior door handle will unlock
the door. Pulling the door handle againunlatches it.
Keyless Access
The RKE transmitter must be within 1 m(3 ft) of the trunk or door being opened.Press the button on the door handle toopen. See “Keyless Access Operation” inRemote Keyless Entry (RKE) SystemOperation 0 7.
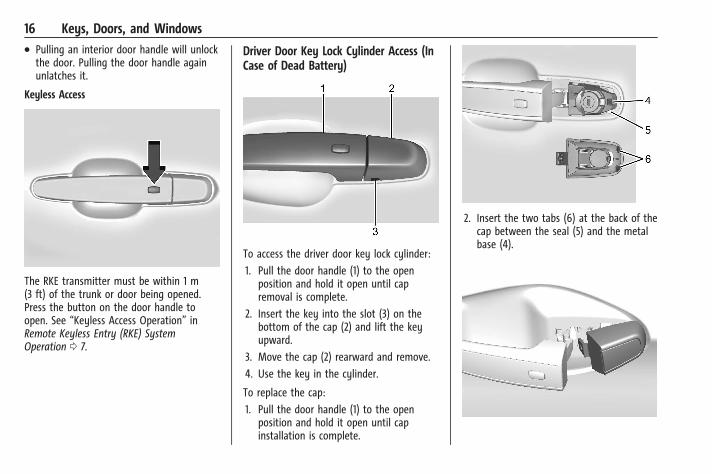
Driver Door Key Lock Cylinder Access (InCase of Dead Battery)
To access the driver door key lock cylinder:
1. Pull the door handle (1) to the openposition and hold it open until capremoval is complete.
2. Insert the key into the slot (3) on thebottom of the cap (2) and lift the keyupward.
3. Move the cap (2) rearward and remove.
4. Use the key in the cylinder.
To replace the cap:
1. Pull the door handle (1) to the openposition and hold it open until capinstallation is complete.
2. Insert the two tabs (6) at the back of thecap between the seal (5) and the metalbase (4).
Chevrolet Camaro Owner Manual (GMNA-Localizing-U.S./Canada/Mexico-15516346) - 2022 - CRC - 4/16/21
Keys, Doors, and Windows 17
3. Slide the cap forward and press theforward edge to install the cap in place.
4. Release the door handle.
5. Check that the cap is secure.
Free-Turning Locks
The door key lock cylinder turns freely wheneither the wrong key is used, or the correctkey is not fully inserted. The free-turningdoor lock feature prevents the lock frombeing forced open. To reset the lock, turn itto the vertical position with the correct keyfully inserted. Remove the key and insert itagain. If this does not reset the lock, turnthe key halfway around in the cylinder andrepeat the reset procedure.
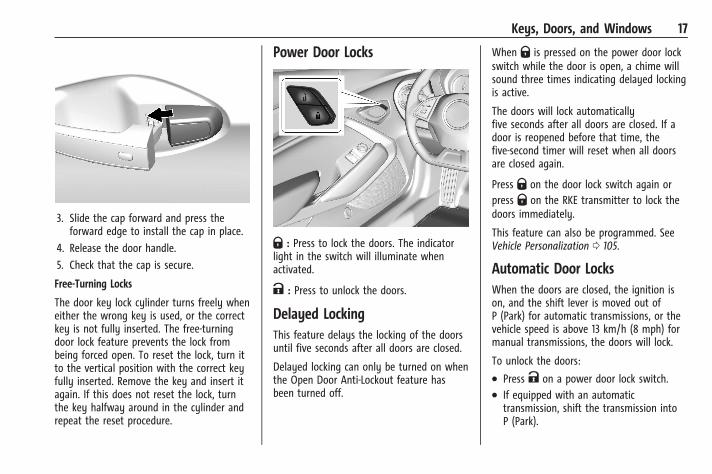
Power Door Locks
Q : Press to lock the doors. The indicatorlight in the switch will illuminate whenactivated.
K : Press to unlock the doors.
Delayed LockingThis feature delays the locking of the doorsuntil five seconds after all doors are closed.
Delayed locking can only be turned on whenthe Open Door Anti-Lockout feature hasbeen turned off.
When Q is pressed on the power door lockswitch while the door is open, a chime willsound three times indicating delayed lockingis active.
The doors will lock automaticallyfive seconds after all doors are closed. If adoor is reopened before that time, thefive-second timer will reset when all doorsare closed again.
Press Q on the door lock switch again orpress Q on the RKE transmitter to lock thedoors immediately.
This feature can also be programmed. SeeVehicle Personalization 0 105.
Automatic Door LocksWhen the doors are closed, the ignition ison, and the shift lever is moved out ofP (Park) for automatic transmissions, or thevehicle speed is above 13 km/h (8 mph) formanual transmissions, the doors will lock.
To unlock the doors:
. Press K on a power door lock switch.
. If equipped with an automatictransmission, shift the transmission intoP (Park).
Chevrolet Camaro Owner Manual (GMNA-Localizing-U.S./Canada/Mexico-15516346) - 2022 - CRC - 4/16/21
18 Keys, Doors, and Windows. If equipped with a manual transmission,
turn the vehicle off when parked.
Automatic door locking cannot be disabled.Automatic door unlocking can be enabledthrough vehicle personalization. See VehiclePersonalization 0 105.
Lockout ProtectionIf the vehicle is on or in ACC/ACCESSORYand the power door lock switch is pressedwith the driver door open, all the doors willlock and only the driver door will unlock.
If the vehicle is off and locking is requestedwhile a door is open, when all doors areclosed the vehicle will check for RKEtransmitters inside. If an RKE transmitter isdetected and the number of RKEtransmitters inside has not reduced, thedriver door will unlock and the horn willchirp three times.
Lockout Protection can be manuallyoverridden with the driver door open bypressing and holding Q on the power doorlock switch.
Open Door Anti-Lockout
If Open Door Anti-Lockout has been turnedon and the vehicle is off, the driver door isopen, and locking is requested, all the doors
will lock and the driver door will remainunlocked. The Open Door Anti-Lockoutfeature can be turned on or off. See VehiclePersonalization 0 105.
DoorsTrunk
{ WarningExhaust gases can enter the vehicle if itis driven with the liftgate, trunk/hatchopen, or with any objects that passthrough the seal between the body andthe trunk/hatch or liftgate. Engineexhaust contains carbon monoxide (CO)which cannot be seen or smelled. It cancause unconsciousness and even death.
If the vehicle must be driven with theliftgate, or trunk/hatch open:
. Close all of the windows.
. Fully open the air outlets on or underthe instrument panel.
(Continued)
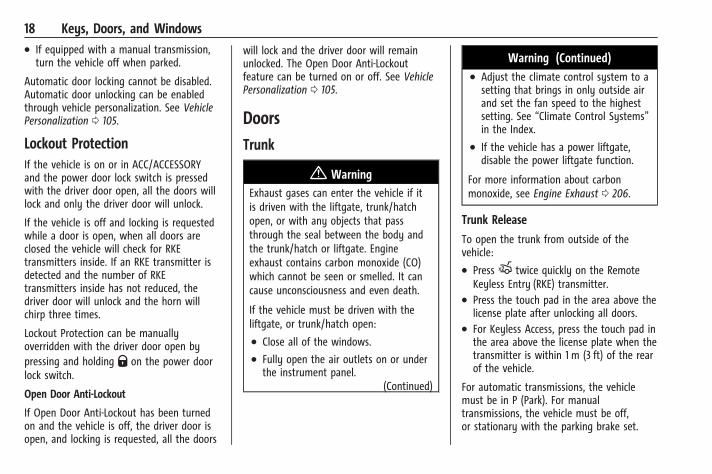
Warning (Continued). Adjust the climate control system to a
setting that brings in only outside airand set the fan speed to the highestsetting. See “Climate Control Systems”in the Index.
. If the vehicle has a power liftgate,disable the power liftgate function.
For more information about carbonmonoxide, see Engine Exhaust 0 206.
Trunk Release
To open the trunk from outside of thevehicle:
. PressX twice quickly on the RemoteKeyless Entry (RKE) transmitter.
. Press the touch pad in the area above thelicense plate after unlocking all doors.
. For Keyless Access, press the touch pad inthe area above the license plate when thetransmitter is within 1 m (3 ft) of the rearof the vehicle.
For automatic transmissions, the vehiclemust be in P (Park). For manualtransmissions, the vehicle must be off,or stationary with the parking brake set.
Chevrolet Camaro Owner Manual (GMNA-Localizing-U.S./Canada/Mexico-15516346) - 2022 - CRC - 4/16/21
Keys, Doors, and Windows 19
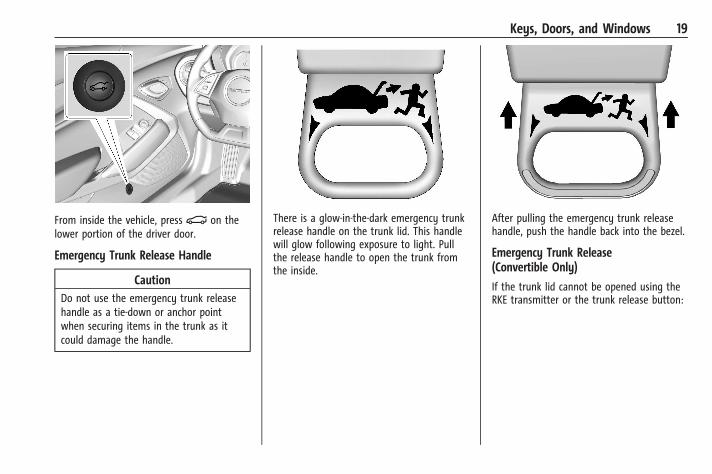
From inside the vehicle, press| on thelower portion of the driver door.
Emergency Trunk Release Handle
CautionDo not use the emergency trunk releasehandle as a tie-down or anchor pointwhen securing items in the trunk as itcould damage the handle.
There is a glow-in-the-dark emergency trunkrelease handle on the trunk lid. This handlewill glow following exposure to light. Pullthe release handle to open the trunk fromthe inside.
After pulling the emergency trunk releasehandle, push the handle back into the bezel.
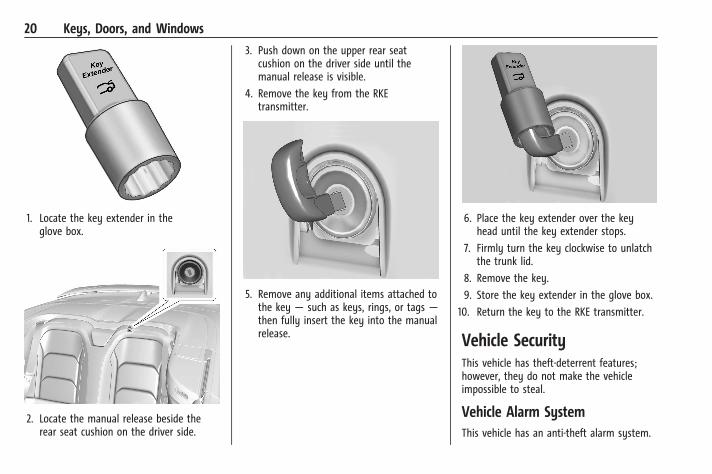
Emergency Trunk Release(Convertible Only)
If the trunk lid cannot be opened using theRKE transmitter or the trunk release button:
Chevrolet Camaro Owner Manual (GMNA-Localizing-U.S./Canada/Mexico-15516346) - 2022 - CRC - 4/16/21
20 Keys, Doors, and Windows
1. Locate the key extender in theglove box.
2. Locate the manual release beside therear seat cushion on the driver side.
3. Push down on the upper rear seatcushion on the driver side until themanual release is visible.
4. Remove the key from the RKEtransmitter.
5. Remove any additional items attached tothe key — such as keys, rings, or tags —then fully insert the key into the manualrelease.
6. Place the key extender over the keyhead until the key extender stops.
7. Firmly turn the key clockwise to unlatchthe trunk lid.
8. Remove the key.
9. Store the key extender in the glove box.
10. Return the key to the RKE transmitter.
Vehicle SecurityThis vehicle has theft-deterrent features;however, they do not make the vehicleimpossible to steal.
Vehicle Alarm SystemThis vehicle has an anti-theft alarm system.
Chevrolet Camaro Owner Manual (GMNA-Localizing-U.S./Canada/Mexico-15516346) - 2022 - CRC - 4/16/21
Keys, Doors, and Windows 21
The security light, on the instrument panelnear the windshield, indicates the status ofthe system:
Off : Alarm system is disarmed.
On Solid : Vehicle is secured during thedelay to arm the system.
Fast Flash : Vehicle is unsecured. A door, thehood, or the trunk is open.
Slow Flash : Alarm system is armed.
Arming the Alarm System1. Turn off the vehicle.
2. Lock the vehicle with one of thefollowing:. Use the RKE transmitter.
. With a door open, press theinside Q.
3. After 30 seconds the alarm system willarm, and the indicator light will begin toslowly flash indicating the alarm systemis operating. Pressing Q on the RKEtransmitter a second time will bypassthe 30-second delay and immediatelyarm the alarm system.
The vehicle alarm system will not arm if thedoors are locked with the key.
If the driver door is opened without firstunlocking with the RKE transmitter, the hornwill chirp and the lights will flash to indicatea pre-alarm. If the vehicle is not started,or the door is not unlocked by pressing Kon the RKE transmitter during the 10-secondpre-alarm, the alarm will be activated.
The alarm will also be activated if thepassenger door, the trunk, or the hood isopened without first disarming the system.When the alarm is activated, the turnsignals flash and the horn sounds for about30 seconds. The alarm system will thenre-arm to monitor for the next unauthorizedevent.
Disarming the System
To disarm the system or turn off the alarmif it has been activated, do one of thefollowing:
. Press K on the RKE transmitter.
. Start the vehicle.
To avoid setting off the alarm by accident:. Lock the vehicle with the RKE transmitter
after all occupants have left the vehicleand all doors are closed.
. Always unlock the vehicle with the RKEtransmitter. Unlocking the driver doorwith the key will not disarm the alarm.
How to Detect a Tamper Condition
If K is pressed on the RKE transmitter andthe horn chirps and the lights flash threetimes, a previous alarm occurred while thesystem was armed.
If the alarm has been activated, a messagewill appear on the Driver InformationCenter (DIC).
ImmobilizerSee Radio Frequency Statement 0 334.
Chevrolet Camaro Owner Manual (GMNA-Localizing-U.S./Canada/Mexico-15516346) - 2022 - CRC - 4/16/21
22 Keys, Doors, and Windows
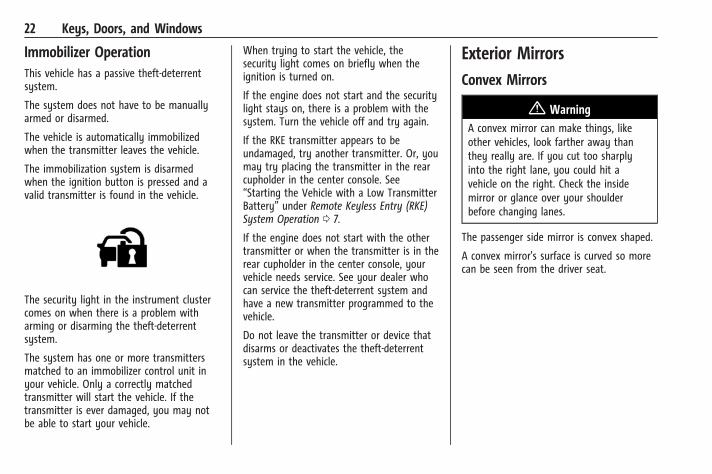
Immobilizer OperationThis vehicle has a passive theft-deterrentsystem.
The system does not have to be manuallyarmed or disarmed.
The vehicle is automatically immobilizedwhen the transmitter leaves the vehicle.
The immobilization system is disarmedwhen the ignition button is pressed and avalid transmitter is found in the vehicle.
The security light in the instrument clustercomes on when there is a problem witharming or disarming the theft-deterrentsystem.
The system has one or more transmittersmatched to an immobilizer control unit inyour vehicle. Only a correctly matchedtransmitter will start the vehicle. If thetransmitter is ever damaged, you may notbe able to start your vehicle.
When trying to start the vehicle, thesecurity light comes on briefly when theignition is turned on.
If the engine does not start and the securitylight stays on, there is a problem with thesystem. Turn the vehicle off and try again.
If the RKE transmitter appears to beundamaged, try another transmitter. Or, youmay try placing the transmitter in the rearcupholder in the center console. See“Starting the Vehicle with a Low TransmitterBattery” under Remote Keyless Entry (RKE)System Operation 0 7.
If the engine does not start with the othertransmitter or when the transmitter is in therear cupholder in the center console, yourvehicle needs service. See your dealer whocan service the theft-deterrent system andhave a new transmitter programmed to thevehicle.
Do not leave the transmitter or device thatdisarms or deactivates the theft-deterrentsystem in the vehicle.
Exterior MirrorsConvex Mirrors
{ WarningA convex mirror can make things, likeother vehicles, look farther away thanthey really are. If you cut too sharplyinto the right lane, you could hit avehicle on the right. Check the insidemirror or glance over your shoulderbefore changing lanes.
The passenger side mirror is convex shaped.
A convex mirror's surface is curved so morecan be seen from the driver seat.
Chevrolet Camaro Owner Manual (GMNA-Localizing-U.S./Canada/Mexico-15516346) - 2022 - CRC - 4/16/21
Keys, Doors, and Windows 23
Power Mirrors
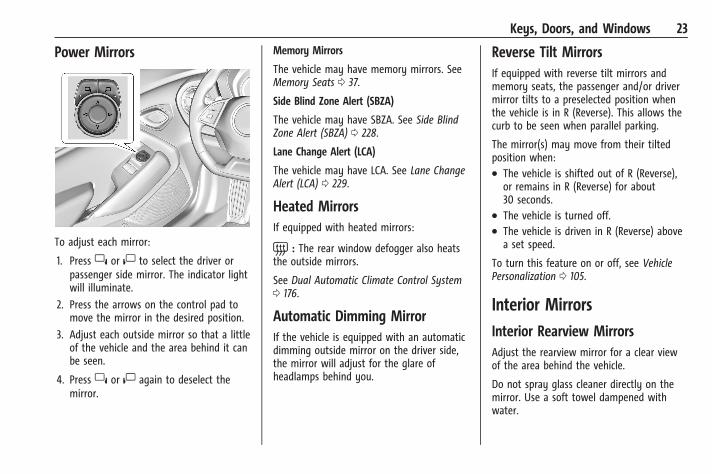
To adjust each mirror:
1. Press } or | to select the driver orpassenger side mirror. The indicator lightwill illuminate.
2. Press the arrows on the control pad tomove the mirror in the desired position.
3. Adjust each outside mirror so that a littleof the vehicle and the area behind it canbe seen.
4. Press } or | again to deselect themirror.
Memory Mirrors
The vehicle may have memory mirrors. SeeMemory Seats 0 37.
Side Blind Zone Alert (SBZA)
The vehicle may have SBZA. See Side BlindZone Alert (SBZA) 0 228.
Lane Change Alert (LCA)
The vehicle may have LCA. See Lane ChangeAlert (LCA) 0 229.
Heated MirrorsIf equipped with heated mirrors:
= : The rear window defogger also heatsthe outside mirrors.
See Dual Automatic Climate Control System0 176.
Automatic Dimming MirrorIf the vehicle is equipped with an automaticdimming outside mirror on the driver side,the mirror will adjust for the glare ofheadlamps behind you.
Reverse Tilt MirrorsIf equipped with reverse tilt mirrors andmemory seats, the passenger and/or drivermirror tilts to a preselected position whenthe vehicle is in R (Reverse). This allows thecurb to be seen when parallel parking.
The mirror(s) may move from their tiltedposition when:. The vehicle is shifted out of R (Reverse),
or remains in R (Reverse) for about30 seconds.
. The vehicle is turned off.
. The vehicle is driven in R (Reverse) abovea set speed.
To turn this feature on or off, see VehiclePersonalization 0 105.
Interior MirrorsInterior Rearview MirrorsAdjust the rearview mirror for a clear viewof the area behind the vehicle.
Do not spray glass cleaner directly on themirror. Use a soft towel dampened withwater.
Chevrolet Camaro Owner Manual (GMNA-Localizing-U.S./Canada/Mexico-15516346) - 2022 - CRC - 4/16/21
24 Keys, Doors, and Windows
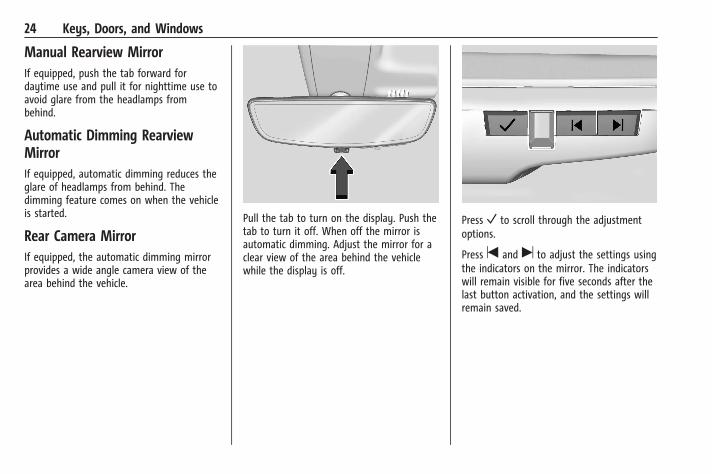
Manual Rearview MirrorIf equipped, push the tab forward fordaytime use and pull it for nighttime use toavoid glare from the headlamps frombehind.
Automatic Dimming RearviewMirrorIf equipped, automatic dimming reduces theglare of headlamps from behind. Thedimming feature comes on when the vehicleis started.
Rear Camera MirrorIf equipped, the automatic dimming mirrorprovides a wide angle camera view of thearea behind the vehicle.
Pull the tab to turn on the display. Push thetab to turn it off. When off the mirror isautomatic dimming. Adjust the mirror for aclear view of the area behind the vehiclewhile the display is off.
Press V to scroll through the adjustmentoptions.
Press t and u to adjust the settings usingthe indicators on the mirror. The indicatorswill remain visible for five seconds after thelast button activation, and the settings willremain saved.
Chevrolet Camaro Owner Manual (GMNA-Localizing-U.S./Canada/Mexico-15516346) - 2022 - CRC - 4/16/21
Keys, Doors, and Windows 25
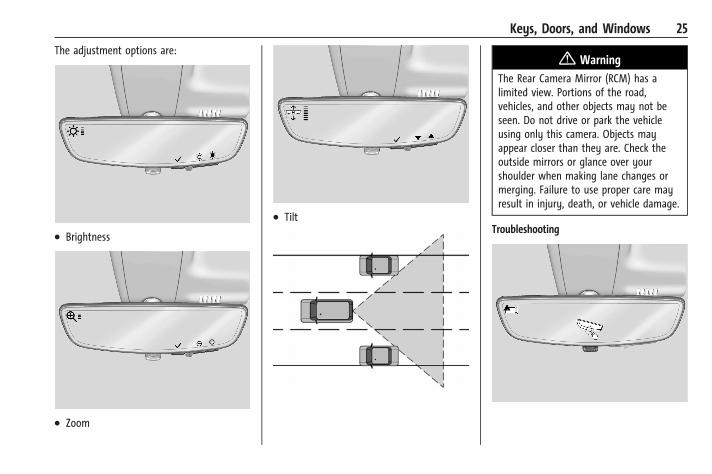
The adjustment options are:
. Brightness
. Zoom
. Tilt
{ WarningThe Rear Camera Mirror (RCM) has alimited view. Portions of the road,vehicles, and other objects may not beseen. Do not drive or park the vehicleusing only this camera. Objects mayappear closer than they are. Check theoutside mirrors or glance over yourshoulder when making lane changes ormerging. Failure to use proper care mayresult in injury, death, or vehicle damage.
Troubleshooting
Chevrolet Camaro Owner Manual (GMNA-Localizing-U.S./Canada/Mexico-15516346) - 2022 - CRC - 4/16/21
26 Keys, Doors, and Windows
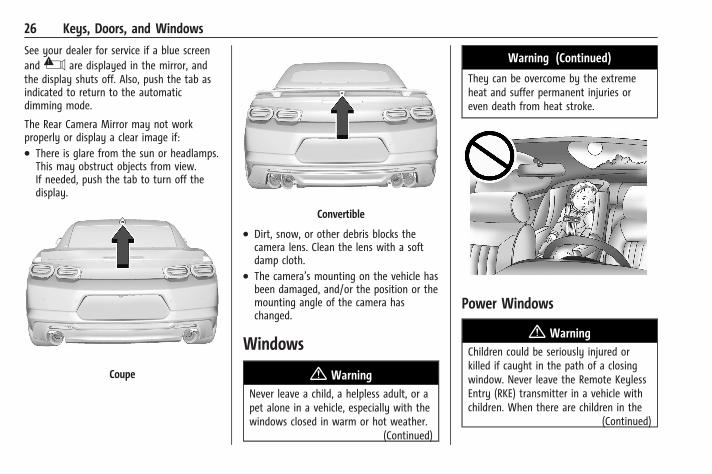
See your dealer for service if a blue screenand3 are displayed in the mirror, andthe display shuts off. Also, push the tab asindicated to return to the automaticdimming mode.
The Rear Camera Mirror may not workproperly or display a clear image if:. There is glare from the sun or headlamps.
This may obstruct objects from view.If needed, push the tab to turn off thedisplay.
Coupe
Convertible
. Dirt, snow, or other debris blocks thecamera lens. Clean the lens with a softdamp cloth.
. The camera’s mounting on the vehicle hasbeen damaged, and/or the position or themounting angle of the camera haschanged.
Windows
{ WarningNever leave a child, a helpless adult, or apet alone in a vehicle, especially with thewindows closed in warm or hot weather.
(Continued)
Warning (Continued)
They can be overcome by the extremeheat and suffer permanent injuries oreven death from heat stroke.
Power Windows
{ WarningChildren could be seriously injured orkilled if caught in the path of a closingwindow. Never leave the Remote KeylessEntry (RKE) transmitter in a vehicle withchildren. When there are children in the
(Continued)
Chevrolet Camaro Owner Manual (GMNA-Localizing-U.S./Canada/Mexico-15516346) - 2022 - CRC - 4/16/21
Keys, Doors, and Windows 27
Warning (Continued)
rear seat, use the window lockout switchto prevent operation of the windows. SeeKeys 0 6.
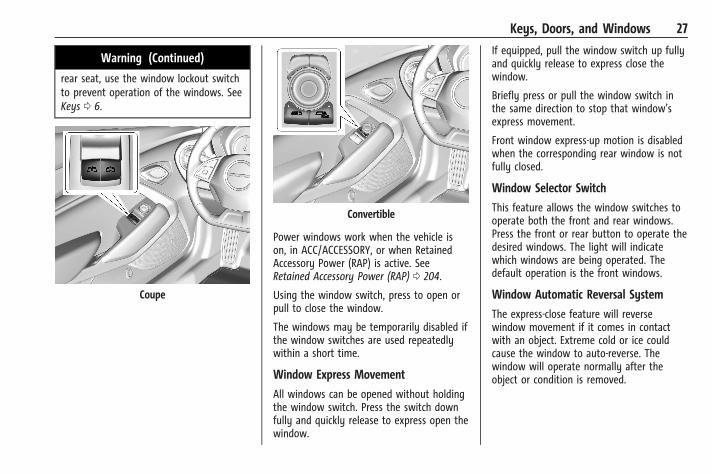
Coupe
Convertible
Power windows work when the vehicle ison, in ACC/ACCESSORY, or when RetainedAccessory Power (RAP) is active. SeeRetained Accessory Power (RAP) 0 204.
Using the window switch, press to open orpull to close the window.
The windows may be temporarily disabled ifthe window switches are used repeatedlywithin a short time.
Window Express Movement
All windows can be opened without holdingthe window switch. Press the switch downfully and quickly release to express open thewindow.
If equipped, pull the window switch up fullyand quickly release to express close thewindow.
Briefly press or pull the window switch inthe same direction to stop that window’sexpress movement.
Front window express-up motion is disabledwhen the corresponding rear window is notfully closed.
Window Selector Switch
This feature allows the window switches tooperate both the front and rear windows.Press the front or rear button to operate thedesired windows. The light will indicatewhich windows are being operated. Thedefault operation is the front windows.
Window Automatic Reversal System
The express-close feature will reversewindow movement if it comes in contactwith an object. Extreme cold or ice couldcause the window to auto-reverse. Thewindow will operate normally after theobject or condition is removed.

Chevrolet Camaro Owner Manual (GMNA-Localizing-U.S./Canada/Mexico-15516346) - 2022 - CRC - 4/16/21
28 Keys, Doors, and Windows
Automatic Reversal System Override
{ WarningIf automatic reversal system override isactive, the window will not reverseautomatically. You or others could beinjured and the window could bedamaged. Before using automatic reversalsystem override, make sure that allpeople and obstructions are clear of thewindow path.
When the engine is on, override theautomatic reversal system by pulling andholding the window switch if conditionsprevent it from closing.
Programming the Power Windows
Programming may be necessary if thevehicle's battery has been disconnected ordischarged. If the window is unable toexpress-close, program each express-closewindow:
1. Close all doors.
2. Turn the ignition on or to ACC/ACCESSORY.
3. Partially open the window to beprogrammed. Then close it and continueto pull the switch briefly after thewindow has fully closed.
4. Open the window and continue to pressthe switch briefly after the window hasfully opened.
Window Operation with Convertible Top
Windows will automatically lower fullywhen the convertible top is lowered orraised. See Convertible Top 0 29.
The rear windows should always be raisedbefore the front windows to ensure thebest seal.
Remote Window Operation
If equipped, this feature allows the windowsto be opened remotely.
If enabled, press and hold K on the RKEtransmitter. See Vehicle Personalization0 105.
Window Indexing
If the window freezes to the door:
1. Push the top of the window inwardwhile opening the door.
2. Clear all snow and ice from the door andglass.
3. Open the window completely and thenclose it.
4. Close the door.
When fully closed, indexing automaticallylowers the window a small amount whenthe door is opened. When the door isclosed, the window will raise to its previousposition. If either window does not indexproperly, it could be due to loss of power.Before seeing your dealer for service,program the power windows.
Sun Visors
Pull the sun visor down to block glare.Detach the sun visor from the center mountto pivot to the side window and,if equipped, extend along the rod.
Chevrolet Camaro Owner Manual (GMNA-Localizing-U.S./Canada/Mexico-15516346) - 2022 - CRC - 4/16/21
Keys, Doors, and Windows 29
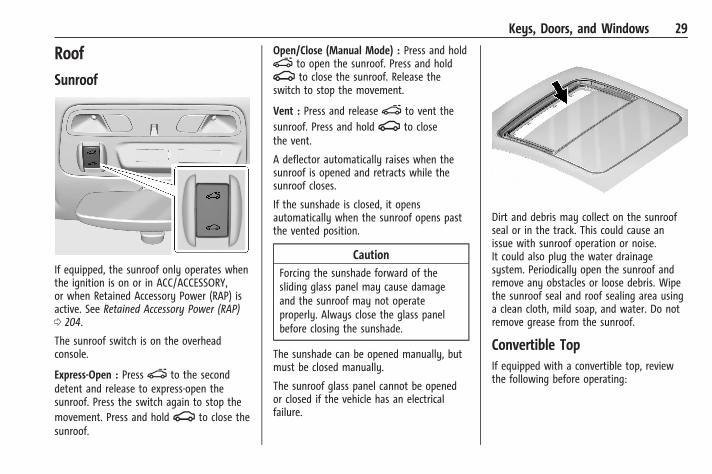
RoofSunroof
If equipped, the sunroof only operates whenthe ignition is on or in ACC/ACCESSORY,or when Retained Accessory Power (RAP) isactive. See Retained Accessory Power (RAP)0 204.
The sunroof switch is on the overheadconsole.
Express-Open : Presse to the seconddetent and release to express-open thesunroof. Press the switch again to stop themovement. Press and holdg to close thesunroof.
Open/Close (Manual Mode) : Press and holde to open the sunroof. Press and holdg to close the sunroof. Release theswitch to stop the movement.
Vent : Press and releasee to vent thesunroof. Press and holdg to closethe vent.
A deflector automatically raises when thesunroof is opened and retracts while thesunroof closes.
If the sunshade is closed, it opensautomatically when the sunroof opens pastthe vented position.
CautionForcing the sunshade forward of thesliding glass panel may cause damageand the sunroof may not operateproperly. Always close the glass panelbefore closing the sunshade.
The sunshade can be opened manually, butmust be closed manually.
The sunroof glass panel cannot be openedor closed if the vehicle has an electricalfailure.
Dirt and debris may collect on the sunroofseal or in the track. This could cause anissue with sunroof operation or noise.It could also plug the water drainagesystem. Periodically open the sunroof andremove any obstacles or loose debris. Wipethe sunroof seal and roof sealing area usinga clean cloth, mild soap, and water. Do notremove grease from the sunroof.
Convertible TopIf equipped with a convertible top, reviewthe following before operating:
Chevrolet Camaro Owner Manual (GMNA-Localizing-U.S./Canada/Mexico-15516346) - 2022 - CRC - 4/16/21
30 Keys, Doors, and Windows
{ WarningWhile opening or closing the convertibletop, people can be injured by the movingparts of the tonneau cover or convertibletop. Maintain visual contact with the topwhile it is being operated.
CautionFollow these guidelines when operatingthe convertible top or damage can occur:
. Remove all items from the roof, trunklid, or tonneau cover before operating.
. Remove all objects from the trunk thatmay contact the convertible top whenit is operated.
. Do not leave the vehicle with theconvertible top open.
. Do not exceed 50 km/h (31 mph) untilthe top has completely closed oropened.
. Do not open or close the top whiledriving in high wind conditions.
(Continued)
Caution (Continued). Do not operate the convertible top
multiple times in a short period oftime without starting the engine toavoid draining the vehicle battery.
. Do not open or store the convertibletop when it is dirty or wet. This couldresult in stains, mildew, or otherdamage.
. Only store the vehicle with the topfully closed.
CautionWhen the convertible top is open, thereare sliding covers next to the rear seat oneach side of the vehicle. Do not pressdown on or move these covers asdamage may occur to the covers or theconvertible top.
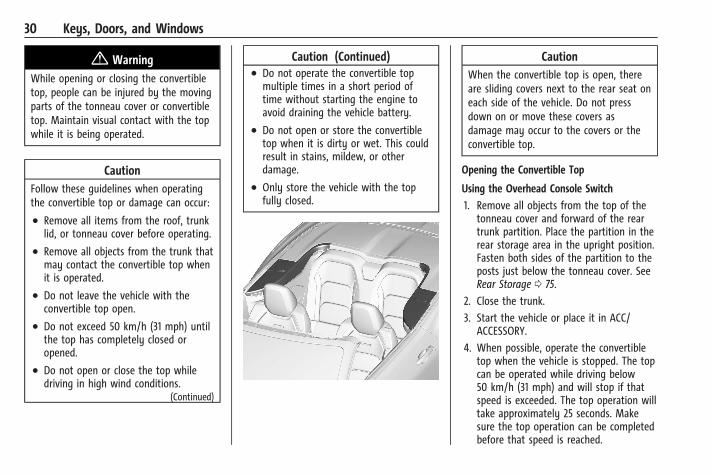
Opening the Convertible Top
Using the Overhead Console Switch
1. Remove all objects from the top of thetonneau cover and forward of the reartrunk partition. Place the partition in therear storage area in the upright position.Fasten both sides of the partition to theposts just below the tonneau cover. SeeRear Storage 0 75.
2. Close the trunk.
3. Start the vehicle or place it in ACC/ACCESSORY.
4. When possible, operate the convertibletop when the vehicle is stopped. The topcan be operated while driving below50 km/h (31 mph) and will stop if thatspeed is exceeded. The top operation willtake approximately 25 seconds. Makesure the top operation can be completedbefore that speed is reached.
Chevrolet Camaro Owner Manual (GMNA-Localizing-U.S./Canada/Mexico-15516346) - 2022 - CRC - 4/16/21
Keys, Doors, and Windows 31
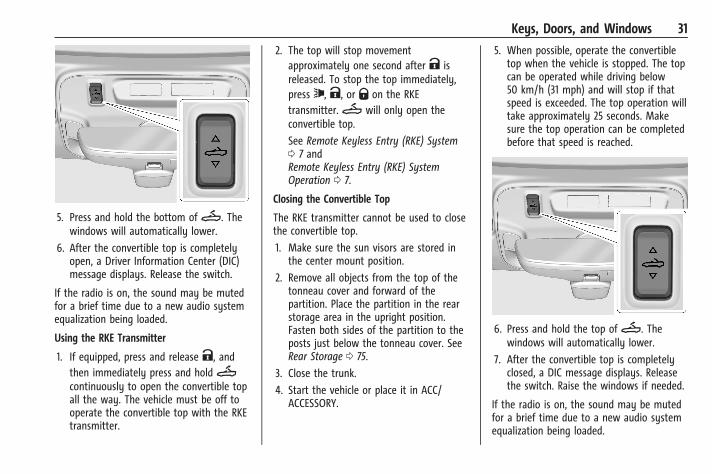
5. Press and hold the bottom ofM. Thewindows will automatically lower.
6. After the convertible top is completelyopen, a Driver Information Center (DIC)message displays. Release the switch.
If the radio is on, the sound may be mutedfor a brief time due to a new audio systemequalization being loaded.
Using the RKE Transmitter
1. If equipped, press and release K, andthen immediately press and holdMcontinuously to open the convertible topall the way. The vehicle must be off tooperate the convertible top with the RKEtransmitter.
2. The top will stop movementapproximately one second after K isreleased. To stop the top immediately,press 7, K, or Q on the RKEtransmitter.M will only open theconvertible top.
See Remote Keyless Entry (RKE) System0 7 andRemote Keyless Entry (RKE) SystemOperation 0 7.
Closing the Convertible Top
The RKE transmitter cannot be used to closethe convertible top.
1. Make sure the sun visors are stored inthe center mount position.
2. Remove all objects from the top of thetonneau cover and forward of thepartition. Place the partition in the rearstorage area in the upright position.Fasten both sides of the partition to theposts just below the tonneau cover. SeeRear Storage 0 75.
3. Close the trunk.
4. Start the vehicle or place it in ACC/ACCESSORY.
5. When possible, operate the convertibletop when the vehicle is stopped. The topcan be operated while driving below50 km/h (31 mph) and will stop if thatspeed is exceeded. The top operation willtake approximately 25 seconds. Makesure the top operation can be completedbefore that speed is reached.
6. Press and hold the top ofM. Thewindows will automatically lower.
7. After the convertible top is completelyclosed, a DIC message displays. Releasethe switch. Raise the windows if needed.
If the radio is on, the sound may be mutedfor a brief time due to a new audio systemequalization being loaded.
Chevrolet Camaro Owner Manual (GMNA-Localizing-U.S./Canada/Mexico-15516346) - 2022 - CRC - 4/16/21
32 Keys, Doors, and Windows
Troubleshooting
Check the following if the convertible topswitchM is not operating:. The ignition should be on or in ACC/
ACCESSORY, or Retained Accessory Power(RAP) should be active.
. The trunk lid should be closed and thetrunk partition in place. A DIC messagewill display.
. If the ONLY MANUAL OPERATION OF TOPPOSSIBLE message is displayed on theDIC, see “Manual Movement of Top” laterin this section.
. At cooler outside temperatures, theconvertible top may not open. It ispossible to close the top down totemperatures of about 0 °C (32 °F). A DICmessage will display if the top will notopen due to low temperature.If necessary, move the vehicle to a heatedindoor area to operate the top.
. If the top has recently been cycledrepeatedly or left in an intermediatestate, it will be temporarily disabled.A DIC message displays. Normal operationwill be restored within 10 minutes afterthe system has cooled.
. If the vehicle battery is low, the powertop operation may be disabled. Try tostart the vehicle. A DIC message displays.
. If the battery has recently beenreconnected or if the vehicle has beenjump started, the top may not operateuntil the power windows have beenindexed. Complete the power windowindexing procedure. See Power Windows0 26.
Other features may be affected whileoperating the convertible top:. The trunk can only be opened with the
key until the convertible top iscompletely opened or closed.
. The windows cannot close while the topis moving.
. When driving with the top not fullysecured, chimes can be heard above80 km/h (50 mph).
If the vehicle battery has been disconnectedand reconnected, the fuses were pulled orreplaced, or a jump start was performed, theTOP NOT SECURE message may display.Press and holdM to open/close the topuntil this message is cleared.
Partial Top Cycling
If the convertible top operation is stoppedbefore completion, the top will temporarilyhold its position. If the ignition is on or inACC/ACCESSORY, the top will be held for upto five minutes, then pulse down. If thevehicle is moving or off, the amount of timewill vary from a few seconds to about aminute.
Beeps and DIC messages will be displayedbefore the top will move. When this occurs,immediately finish the convertible topoperation by pressingM again until itcompletes.
If the top cannot be secured, keep clear ofthe top components. In some conditions thetop may move quickly.
Do not drive with the convertible top in anunsecured position. The top componentsmay move unexpectedly. In some cases thetop may not be able to be power operated.If this occurs, follow the DIC messagesdisplayed.
If the tonneau cover is not secured andlatched, and the vehicle is moving above10 km/h (6 mph), the tonneau cover mayautomatically move to a stable position.
Chevrolet Camaro Owner Manual (GMNA-Localizing-U.S./Canada/Mexico-15516346) - 2022 - CRC - 4/16/21
Keys, Doors, and Windows 33
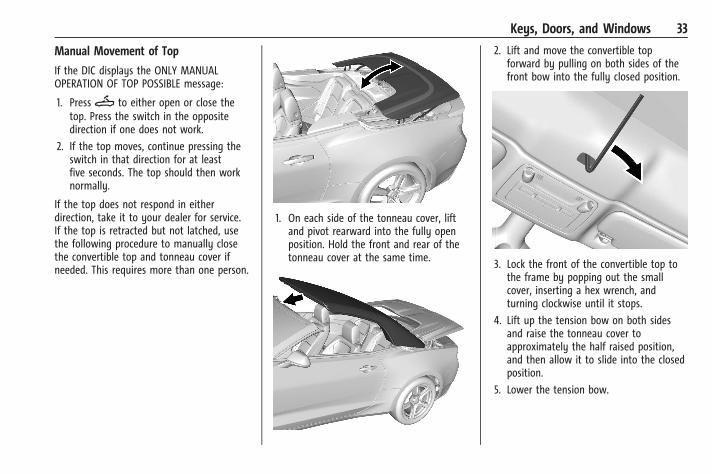
Manual Movement of Top
If the DIC displays the ONLY MANUALOPERATION OF TOP POSSIBLE message:
1. PressM to either open or close thetop. Press the switch in the oppositedirection if one does not work.
2. If the top moves, continue pressing theswitch in that direction for at leastfive seconds. The top should then worknormally.
If the top does not respond in eitherdirection, take it to your dealer for service.If the top is retracted but not latched, usethe following procedure to manually closethe convertible top and tonneau cover ifneeded. This requires more than one person.
1. On each side of the tonneau cover, liftand pivot rearward into the fully openposition. Hold the front and rear of thetonneau cover at the same time.
2. Lift and move the convertible topforward by pulling on both sides of thefront bow into the fully closed position.
3. Lock the front of the convertible top tothe frame by popping out the smallcover, inserting a hex wrench, andturning clockwise until it stops.
4. Lift up the tension bow on both sidesand raise the tonneau cover toapproximately the half raised position,and then allow it to slide into the closedposition.
5. Lower the tension bow.
Chevrolet Camaro Owner Manual (GMNA-Localizing-U.S./Canada/Mexico-15516346) - 2022 - CRC - 4/16/21
34 Keys, Doors, and Windows
The vehicle can now be driven to yourdealer for service. The convertible top willnot be completely waterproof and shouldnot be driven over 80 km/h (50 mph) in thisposition.
Cleaning the Convertible Top
The convertible top should be cleaned often.Do not use high-pressure car washes asthese may cause water to enter the vehicle.
Hand wash the convertible top in partialshade. Use mild soap, lukewarm water, anda soft sponge. A chamois or cloth may leavelint on the top, and a brush can chafe thethreads in the top fabric. Do not usedetergents, harsh cleaners, solvents,or bleaching agents.
Wet the entire top and let the soap remainon the fabric for a few minutes. Washevenly to avoid spots or rings. When thetop is very dirty, use a mild foam-typecleaner. Thoroughly rinse the entire vehicle,then let the top dry in direct sunlight.
To protect the convertible top:. Make sure the convertible top is
completely dry before lowering it.. Do not get any cleaner on the vehicle's
painted finish; it could leave streaks.
Chevrolet Camaro Owner Manual (GMNA-Localizing-U.S./Canada/Mexico-15516346) - 2022 - CRC - 4/9/21
Seats and Restraints 35
Seats and RestraintsHead RestraintsHead Restraints . . . . . . . . . . . . . . . . . . . . . . . . . 35
Front SeatsSeat Adjustment . . . . . . . . . . . . . . . . . . . . . . . 36Power Seat Adjustment . . . . . . . . . . . . . . . . 36Reclining Seatbacks . . . . . . . . . . . . . . . . . . . . . 37Memory Seats . . . . . . . . . . . . . . . . . . . . . . . . . . 37Seatback Latches . . . . . . . . . . . . . . . . . . . . . . . 40Heated and Ventilated Front Seats . . . . . 40
Rear SeatsRear Seats . . . . . . . . . . . . . . . . . . . . . . . . . . . . . . 41
Seat BeltsSeat Belts . . . . . . . . . . . . . . . . . . . . . . . . . . . . . . 42How to Wear Seat Belts Properly . . . . . . 43Lap-Shoulder Belt . . . . . . . . . . . . . . . . . . . . . . . 45Seat Belt Use During Pregnancy . . . . . . . . 47Seat Belt Extender . . . . . . . . . . . . . . . . . . . . . . 47Safety System Check . . . . . . . . . . . . . . . . . . . 47Seat Belt Care . . . . . . . . . . . . . . . . . . . . . . . . . . 47Replacing Seat Belt System Parts after aCrash . . . . . . . . . . . . . . . . . . . . . . . . . . . . . . . . . 48
Airbag SystemAirbag System . . . . . . . . . . . . . . . . . . . . . . . . . 48Where Are the Airbags? . . . . . . . . . . . . . . . . 50When Should an Airbag Inflate? . . . . . . . . 51
What Makes an Airbag Inflate? . . . . . . . . . 52How Does an Airbag Restrain? . . . . . . . . . . 52What Will You See after an AirbagInflates? . . . . . . . . . . . . . . . . . . . . . . . . . . . . . . 53
Passenger Sensing System . . . . . . . . . . . . . . 54Servicing the Airbag-EquippedVehicle . . . . . . . . . . . . . . . . . . . . . . . . . . . . . . . . 57
Adding Equipment to theAirbag-Equipped Vehicle . . . . . . . . . . . . . . 58
Airbag System Check . . . . . . . . . . . . . . . . . . . 58Replacing Airbag System Parts after aCrash . . . . . . . . . . . . . . . . . . . . . . . . . . . . . . . . . 59
Child RestraintsOlder Children . . . . . . . . . . . . . . . . . . . . . . . . . . 59Infants and Young Children . . . . . . . . . . . . 60Child Restraint Systems . . . . . . . . . . . . . . . . 62Where to Put the Restraint . . . . . . . . . . . . 64Lower Anchors and Tethers for Children(LATCH System) . . . . . . . . . . . . . . . . . . . . . . 65
Replacing LATCH System Parts After aCrash . . . . . . . . . . . . . . . . . . . . . . . . . . . . . . . . . 70
Securing Child Restraints (With the SeatBelt in the Rear Seat) . . . . . . . . . . . . . . . . . 70
Securing Child Restraints (With the SeatBelt in the Front Seat) . . . . . . . . . . . . . . . . 72
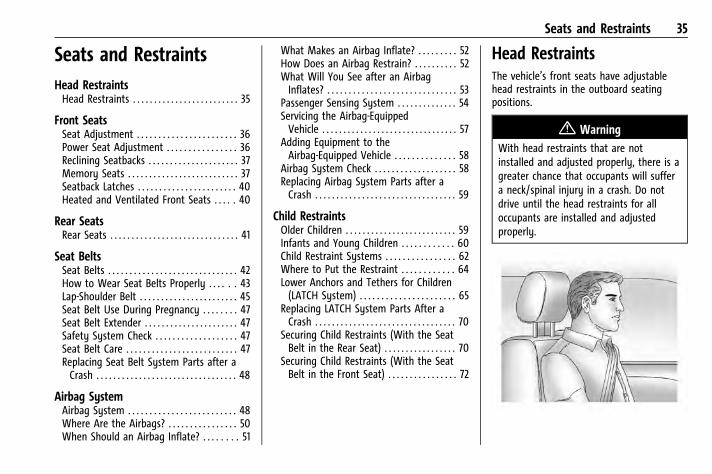
Head RestraintsThe vehicle’s front seats have adjustablehead restraints in the outboard seatingpositions.
{ WarningWith head restraints that are notinstalled and adjusted properly, there is agreater chance that occupants will suffera neck/spinal injury in a crash. Do notdrive until the head restraints for alloccupants are installed and adjustedproperly.
Chevrolet Camaro Owner Manual (GMNA-Localizing-U.S./Canada/Mexico-15516346) - 2022 - CRC - 4/9/21
36 Seats and Restraints
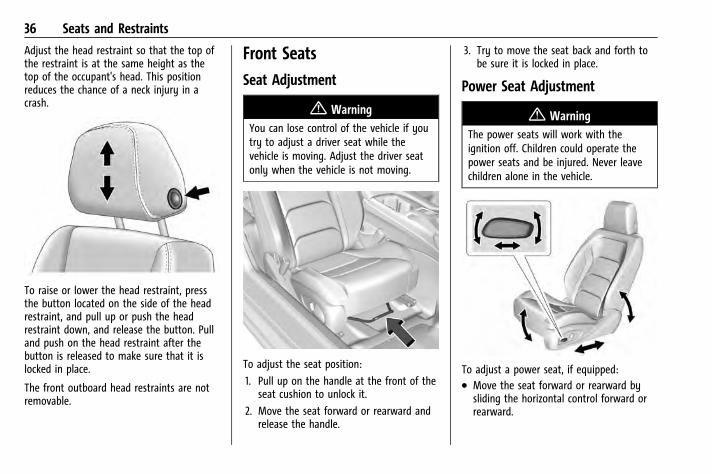
Adjust the head restraint so that the top ofthe restraint is at the same height as thetop of the occupant's head. This positionreduces the chance of a neck injury in acrash.
To raise or lower the head restraint, pressthe button located on the side of the headrestraint, and pull up or push the headrestraint down, and release the button. Pulland push on the head restraint after thebutton is released to make sure that it islocked in place.
The front outboard head restraints are notremovable.
Front SeatsSeat Adjustment
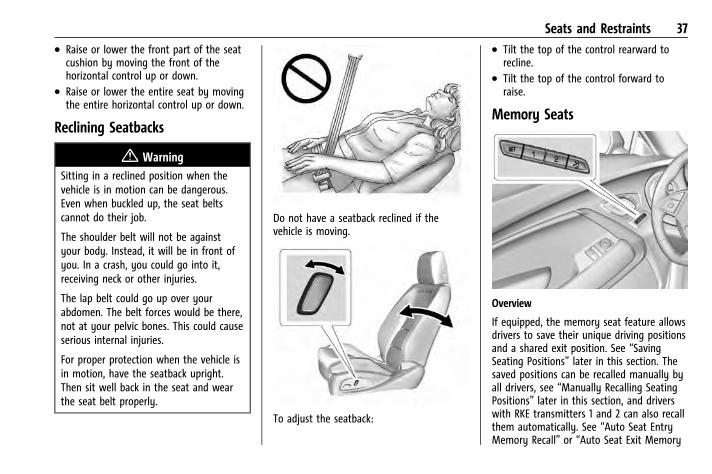
{ WarningYou can lose control of the vehicle if youtry to adjust a driver seat while thevehicle is moving. Adjust the driver seatonly when the vehicle is not moving.
To adjust the seat position:
1. Pull up on the handle at the front of theseat cushion to unlock it.
2. Move the seat forward or rearward andrelease the handle.
3. Try to move the seat back and forth tobe sure it is locked in place.
Power Seat Adjustment
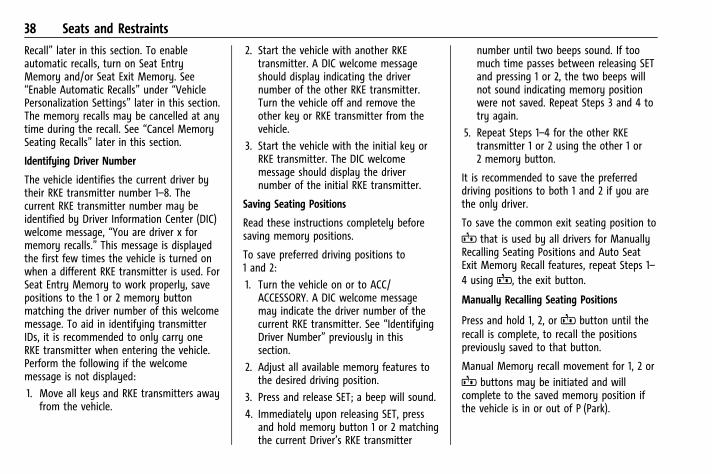
{ WarningThe power seats will work with theignition off. Children could operate thepower seats and be injured. Never leavechildren alone in the vehicle.
To adjust a power seat, if equipped:. Move the seat forward or rearward by
sliding the horizontal control forward orrearward.
Chevrolet Camaro Owner Manual (GMNA-Localizing-U.S./Canada/Mexico-15516346) - 2022 - CRC - 4/9/21
Seats and Restraints 37. Raise or lower the front part of the seat
cushion by moving the front of thehorizontal control up or down.
. Raise or lower the entire seat by movingthe entire horizontal control up or down.
Reclining Seatbacks
{ WarningSitting in a reclined position when thevehicle is in motion can be dangerous.Even when buckled up, the seat beltscannot do their job.
The shoulder belt will not be againstyour body. Instead, it will be in front ofyou. In a crash, you could go into it,receiving neck or other injuries.
The lap belt could go up over yourabdomen. The belt forces would be there,not at your pelvic bones. This could causeserious internal injuries.
For proper protection when the vehicle isin motion, have the seatback upright.Then sit well back in the seat and wearthe seat belt properly.
Do not have a seatback reclined if thevehicle is moving.
To adjust the seatback:
. Tilt the top of the control rearward torecline.
. Tilt the top of the control forward toraise.
Memory Seats
Overview
If equipped, the memory seat feature allowsdrivers to save their unique driving positionsand a shared exit position. See “SavingSeating Positions” later in this section. Thesaved positions can be recalled manually byall drivers, see “Manually Recalling SeatingPositions” later in this section, and driverswith RKE transmitters 1 and 2 can also recallthem automatically. See “Auto Seat EntryMemory Recall” or “Auto Seat Exit Memory
Chevrolet Camaro Owner Manual (GMNA-Localizing-U.S./Canada/Mexico-15516346) - 2022 - CRC - 4/9/21
38 Seats and Restraints
Recall” later in this section. To enableautomatic recalls, turn on Seat EntryMemory and/or Seat Exit Memory. See“Enable Automatic Recalls” under “VehiclePersonalization Settings” later in this section.The memory recalls may be cancelled at anytime during the recall. See “Cancel MemorySeating Recalls” later in this section.
Identifying Driver Number
The vehicle identifies the current driver bytheir RKE transmitter number 1–8. Thecurrent RKE transmitter number may beidentified by Driver Information Center (DIC)welcome message, “You are driver x formemory recalls.” This message is displayedthe first few times the vehicle is turned onwhen a different RKE transmitter is used. ForSeat Entry Memory to work properly, savepositions to the 1 or 2 memory buttonmatching the driver number of this welcomemessage. To aid in identifying transmitterIDs, it is recommended to only carry oneRKE transmitter when entering the vehicle.Perform the following if the welcomemessage is not displayed:
1. Move all keys and RKE transmitters awayfrom the vehicle.
2. Start the vehicle with another RKEtransmitter. A DIC welcome messageshould display indicating the drivernumber of the other RKE transmitter.Turn the vehicle off and remove theother key or RKE transmitter from thevehicle.
3. Start the vehicle with the initial key orRKE transmitter. The DIC welcomemessage should display the drivernumber of the initial RKE transmitter.
Saving Seating Positions
Read these instructions completely beforesaving memory positions.
To save preferred driving positions to1 and 2:
1. Turn the vehicle on or to ACC/ACCESSORY. A DIC welcome messagemay indicate the driver number of thecurrent RKE transmitter. See “IdentifyingDriver Number” previously in thissection.
2. Adjust all available memory features tothe desired driving position.
3. Press and release SET; a beep will sound.
4. Immediately upon releasing SET, pressand hold memory button 1 or 2 matchingthe current Driver’s RKE transmitter
number until two beeps sound. If toomuch time passes between releasing SETand pressing 1 or 2, the two beeps willnot sound indicating memory positionwere not saved. Repeat Steps 3 and 4 totry again.
5. Repeat Steps 1–4 for the other RKEtransmitter 1 or 2 using the other 1 or2 memory button.
It is recommended to save the preferreddriving positions to both 1 and 2 if you arethe only driver.
To save the common exit seating position toB that is used by all drivers for ManuallyRecalling Seating Positions and Auto SeatExit Memory Recall features, repeat Steps 1–4 usingB, the exit button.
Manually Recalling Seating Positions
Press and hold 1, 2, orB button until therecall is complete, to recall the positionspreviously saved to that button.
Manual Memory recall movement for 1, 2 orB buttons may be initiated and willcomplete to the saved memory position ifthe vehicle is in or out of P (Park).
Chevrolet Camaro Owner Manual (GMNA-Localizing-U.S./Canada/Mexico-15516346) - 2022 - CRC - 4/9/21
Seats and Restraints 39
If manual transmission equipped, ManualMemory recall movement for 1, 2, orBbuttons may be initiated and will completeto the saved memory position if the vehicleparking brake is set or released.
Enable Automatic Recalls under VehiclePersonalization Settings. For Seat Entry Memory that begins
movement to the preferred drivingposition of the 1 or 2 button when thevehicle is turned on, select the Settingsmenu, then Vehicle, then Seating Position,then Seat Entry Memory, and then SelectON or OFF. See “Auto Seat Entry MemoryRecall” later in this section.
. For Seat Exit Memory that beginsmovement to the preferred exit positionof theB button when the vehicle isturned off and the driver door is open oropened, select the Settings menu, thenVehicle, then Seating Position, then SeatExit Memory, and then Select ON or OFF.See “Auto Seat Exit Memory Recall” laterin this section.
. See Vehicle Personalization 0 105 foradditional setting information.
Auto Seat Entry Memory Recall
Seat Entry Memory will automatically beginmovement to the seating positions of the 1or 2 button corresponding to the driver’sRKE Transmitter number 1 or 2 detected bythe vehicle when:. The vehicle is turned ON.. Seating positions have been previously
saved to the same 1 or 2 button. See“Saving Seating Positions” previously inthis section.
. Seat Entry Memory is enabled. See“Enable Automatic Recalls” under “VehiclePersonalization Settings” previously in thissection.
. The shift lever is in P (Park).
. If manual transmission equipped, theparking brake must be set.
Seat Entry Memory Recall will continue ifthe vehicle is shifted out of P (Park) prior toreaching the saved memory position.
If manual transmission equipped, Seat EntryMemory Recall will continue if the parkingbrake is released prior to reaching the savedmemory position.
If the saved memory seat position does notautomatically recall, verify the recall isenabled. See “Enable Automatic Recalls”under “Vehicle Personalization Settings”previously in this section.
If the memory seat recalls to the wrongposition, the driver’s RKE transmitter number1 or 2 may not match the memory buttonnumber positions they were saved to. Trythe other RKE transmitter or try saving thepositions to the other 1 or 2 memorybutton. See “Saving Seating Positions”previously in this section.
Automatic Seat Entry Memory recalls areonly available for driver’s RKE Transmitternumbers 1 and 2. RKE transmitters 3–8 willnot provide Seat Entry Memory recalls.
Auto Seat Exit Memory Recall
Seat Exit Memory will begin movement tothe seating position of theBbutton when:. The vehicle is turned off and the driver
door is open or opened within ashort time.
. A seating position has been previouslybeen saved to theB memory button.See “Saving Seating Positions” previouslyin this section.
Chevrolet Camaro Owner Manual (GMNA-Localizing-U.S./Canada/Mexico-15516346) - 2022 - CRC - 4/9/21
40 Seats and Restraints. Seat Exit Memory is enabled. See “Enable
Automatic Recalls” under “VehiclePersonalization Settings” previously in thissection.
. The shift lever is in P (Park).
. If manual transmission equipped, theparking brake must be set.
Seat Exit Memory recall will continue if thevehicle is shifted out of P (Park) prior toreaching the saved memory position.
If manual transmission equipped, Seat ExitMemory will continue if the parking brake isreleased prior to reaching the save memoryposition.
Seat Exit Memory is not linked to thedriver’s RKE transmitter. The seating positionsaved toB is used for all drivers.
Cancel Memory Seating Recalls. During any memory recall:
Press a power seat control
Press SET memory button. During Manual memory recall:
Release 1, 2, orB memory button. During Auto Seat Entry Memory Recall:
Turn vehicle off
Press SET, 1, 2, orB memory buttons
. During Auto Seat Exit Memory Recall:
Press SET, 1, 2, orB memory buttons
Obstructions
If something has blocked the seat whilerecalling a memory position, the recall maystop. Remove the obstruction and try therecall again. If the memory position stilldoes not recall, see your dealer.
Seatback Latches
To access the rear seats, pull up on the latchon the top of the driver or front passengerseatback. Fold the seatback forward.
{ WarningIf either seatback is not locked, it couldmove forward in a sudden stop or crash.That could cause injury to the personsitting there. Always push and pull onthe seatbacks to be sure they are locked.
To return the seatback to the uprightposition, lift the seatback and manuallypush it rearward until it locks in place. Pushand pull on the seatback to make sure it islocked.
Do not use the power recline control on theoutboard side of the seat to raise theseatback. See Reclining Seatbacks 0 37.
Heated and Ventilated FrontSeats
{ WarningIf temperature change or pain to the skincannot be felt, the seat heater may causeburns. To reduce the risk of burns, usecare when using the seat heater,especially for long periods of time. Donot place anything on the seat that
(Continued)
Chevrolet Camaro Owner Manual (GMNA-Localizing-U.S./Canada/Mexico-15516346) - 2022 - CRC - 4/9/21
Seats and Restraints 41
Warning (Continued)
insulates against heat, such as a blanket,cushion, cover, or similar item. This maycause the seat heater to overheat. Anoverheated seat heater may cause a burnor may damage the seat.
If available, the engine must be running tooperate.
Press L or M to turn on the heated seat.A light indicates this feature is on.
Press the button once for the highestsetting. With each press of the button, theheated seat will change to the next lowersetting, and then the off setting. Threelights indicate the highest setting, and onelight indicates the lowest.
The passenger seat may take longer toheat up.
Press { or C to turn on the ventilatedseat. A light indicates this feature is on.
Press the button once for the highestsetting. With each press of the button, theventilated seat will change to the next lowersetting, and then the off setting. Threelights indicate the highest setting, and onelight indicates the lowest.
If the heated seats are on the highestsetting, the level will automatically lowerafter approximately 30 minutes.
Remote Start Heated and Ventilated Seats
If equipped, the heated seats will turn onautomatically during a remote start if it iscold outside and the ventilated seats willturn on automatically if it is hot outside.The heated and ventilated seat indicatorsmay not come on during this operation.
The heated and ventilated seats may cancelafter the ignition is turned on and theengine is running. These features can bemanually selected after the ignition isturned on.
The temperature performance of anunoccupied seat may be reduced. This isnormal.
The heated or ventilated seats may turn onduring a remote start unless they aredisabled in the vehicle personalization menu.See Remote Vehicle Start 0 14 andVehicle Personalization 0 105.
Rear SeatsIf equipped, the coupe seat can be foldedfor more cargo space. The rear seat has twodesignated seating positions. Fold the seatonly when the vehicle is parked.
To fold the seatback down:
Chevrolet Camaro Owner Manual (GMNA-Localizing-U.S./Canada/Mexico-15516346) - 2022 - CRC - 4/9/21
42 Seats and Restraints
1. Pull on the strap on the top of the rearseatback.
2. Fold the seatback down.
{ WarningA seat belt that is improperly routed, notproperly attached, or twisted will notprovide the protection needed in a crash.The person wearing the belt could beseriously injured. After raising the rearseatback, always check to be sure thatthe seat belts are properly routed andattached, and are not twisted.
Lift the seatback up to raise it, and push itback to lock it into place. Make sure theseat belt is not twisted or caught in theseatback.
Push and pull the top of the seatback to besure it is locked into position.
Seat BeltsThis section describes how to use seat beltsproperly, and some things not to do.
{ WarningDo not let anyone ride where a seat beltcannot be worn properly. In a crash,if you or your passenger(s) are notwearing seat belts, injuries can be muchworse than if you are wearing seat belts.You can be seriously injured or killed byhitting things inside the vehicle harder orby being ejected from the vehicle. Inaddition, anyone who is not buckled upcan strike other passengers in the vehicle.
It is extremely dangerous to ride in acargo area, inside or outside of a vehicle.In a collision, passengers riding in theseareas are more likely to be seriouslyinjured or killed. Do not allow passengersto ride in any area of the vehicle that isnot equipped with seats and seat belts.
Always wear a seat belt, and check thatall passenger(s) are restrainedproperly too.
This vehicle has indicators as a reminder tobuckle the seat belts. See Seat BeltReminders 0 90.
Why Seat Belts Work
When riding in a vehicle, you travel as fastas the vehicle does. If the vehicle stopssuddenly, you keep going until somethingstops you. It could be the windshield, theinstrument panel, or the seat belts!
When you wear a seat belt, you and thevehicle slow down together. There is moretime to stop because you stop over a longerdistance and, when worn properly, yourstrongest bones take the forces from theseat belts. That is why wearing seat beltsmakes such good sense.
Chevrolet Camaro Owner Manual (GMNA-Localizing-U.S./Canada/Mexico-15516346) - 2022 - CRC - 4/9/21
Seats and Restraints 43
Questions and Answers About Seat Belts
Q: Will I be trapped in the vehicle after acrash if I am wearing a seat belt?
A: You could be — whether you arewearing a seat belt or not. Your chanceof being conscious during and after acrash, so you can unbuckle and get out,is much greater if you are belted.
Q: If my vehicle has airbags, why should Ihave to wear seat belts?
A: Airbags are supplemental systems only.They work with seat belts — not insteadof them. Whether or not an airbag isprovided, all occupants still have tobuckle up to get the most protection.
Also, in nearly all states and in allCanadian provinces, the law requireswearing seat belts.
How to Wear Seat Belts ProperlyFollow these rules for everyone's protection.
There are additional things to know aboutseat belts and children, including smallerchildren and infants. If a child will be ridingin the vehicle, see Older Children 0 59 or
Infants and Young Children 0 60. Reviewand follow the rules for children in additionto the following rules.
It is very important for all occupants tobuckle up. Statistics show that unbeltedpeople are hurt more often in crashes thanthose who are wearing seat belts.
There are important things to know aboutwearing a seat belt properly.
. Sit up straight and always keep your feeton the floor in front of you (if possible).
. Wear the lap part of the belt low andsnug on the hips, just touching thethighs. In a crash, this applies force to thestrong pelvic bones and you would beless likely to slide under the lap belt.
If you slid under it, the belt would applyforce on your abdomen. This could causeserious or even fatal injuries.
. Wear the shoulder belt over the shoulderand across the chest. These parts of thebody are best able to take beltrestraining forces. The shoulder belt locksif there is a sudden stop or crash.
{ WarningYou can be seriously injured, or evenkilled, by not wearing your seat beltproperly.
Chevrolet Camaro Owner Manual (GMNA-Localizing-U.S./Canada/Mexico-15516346) - 2022 - CRC - 4/9/21
44 Seats and Restraints
Never allow the lap or shoulder belt tobecome loose or twisted.
Never wear the shoulder belt under botharms or behind your back.
Always use the correct buckle for yourseating position.
Never route the lap or shoulder belt over anarmrest.
{ WarningThe seat belt can be pinched if it isrouted under plastic trim on the seat,such as trim around the rear seatbackfolding handle or side airbag. In a crash,pinched seat belts might not provideadequate protection. Never allow seatbelts to be routed under plastic trimpieces.
Chevrolet Camaro Owner Manual (GMNA-Localizing-U.S./Canada/Mexico-15516346) - 2022 - CRC - 4/9/21
Seats and Restraints 45
{ WarningYou can be seriously injured or killed ifthe shoulder belt is worn behind yourback, under your legs, or wrapped aroundyour neck. The shoulder belt can tightenbut cannot be loosened if it is locked. Theshoulder belt locks when it is pulled allthe way out of the retractor. It unlockswhen the shoulder belt is allowed to goall the way back into the retractor, but itcannot do this if it is wrapped aroundyou. You may have to cut the seat belt ifit is locked and tightened around you.
Lap-Shoulder BeltAll seating positions in the vehicle have alap-shoulder belt.
The following instructions explain how towear a lap-shoulder belt properly.
1. Adjust the seat, if the seat is adjustable,so you can sit up straight. To see how,see “Seats” in the Index.
2. Pick up the latch plate and pull the beltacross you. Do not let it get twisted.
The lap-shoulder belt may lock if youpull the belt across you very quickly.If this happens, let the belt go backslightly to unlock it. Then pull the beltacross you more slowly.
If the shoulder portion of a passengerbelt is pulled out all the way, the childrestraint locking feature may beengaged. See Child Restraint Systems0 62. If this occurs, let the belt go backall the way and start again. If thelocking feature stays engaged afterletting the belt go back to stowed
position on the seat, move the seatrearward or recline the seat until theshoulder belt retractor lock releases.
Engaging the child restraint lockingfeature in the front outboard seatingposition may affect the passengersensing system. See Passenger SensingSystem 0 54.
On some models, if the shoulder portionof the driver belt is pulled out all theway, the shoulder belt retractor lockfeature may be engaged. If this happens,let the belt go back all the way and startagain. See the Camaro High Performancesupplement for more information.
Chevrolet Camaro Owner Manual (GMNA-Localizing-U.S./Canada/Mexico-15516346) - 2022 - CRC - 4/9/21
46 Seats and Restraints
3. Push the latch plate into the buckle untilit clicks.
Pull up on the latch plate to make sureit is secure. If the belt is not longenough, see Seat Belt Extender 0 47.
Position the release button on the buckleso that the seat belt could be quicklyunbuckled if necessary.
4. To make the lap part tight, pull up onthe shoulder belt.
To unlatch the belt, push the button on thebuckle. The belt should return to its stowedposition.
Always stow the seat belt slowly. If the seatbelt webbing returns quickly to the stowedposition, the retractor may lock and cannotbe pulled out. If this happens, pull the seatbelt straight out firmly to unlock thewebbing, and then release it. If the webbingis still locked in the retractor, see yourdealer.
Before a door is closed, be sure the seat beltis out of the way. If a door is slammedagainst a seat belt, damage can occur toboth the seat belt and the vehicle.
Seat Belt Pretensioners
This vehicle has seat belt pretensioners forthe front outboard occupants. Although theseat belt pretensioners cannot be seen, theyare part of the seat belt assembly. They canhelp tighten the seat belts during the earlystages of a moderate to severe frontal, nearfrontal, or rear crash if the thresholdconditions for pretensioner activation aremet. Seat belt pretensioners can also helptighten the seat belts in a side crash or arollover event.
Pretensioners work only once. If thepretensioners activate in a crash, thepretensioners and probably other parts ofthe vehicle's seat belt system will need tobe replaced. See Replacing Seat Belt SystemParts after a Crash 0 48.
Do not sit on the outboard seat belt whileentering or exiting the vehicle or at anytime while sitting in the seat. Sitting on theseat belt can damage the webbing andhardware.
Rear Seat Belt Comfort Guides
Rear seat belt comfort guides may provideadded seat belt comfort for older childrenwho have outgrown booster seats and for
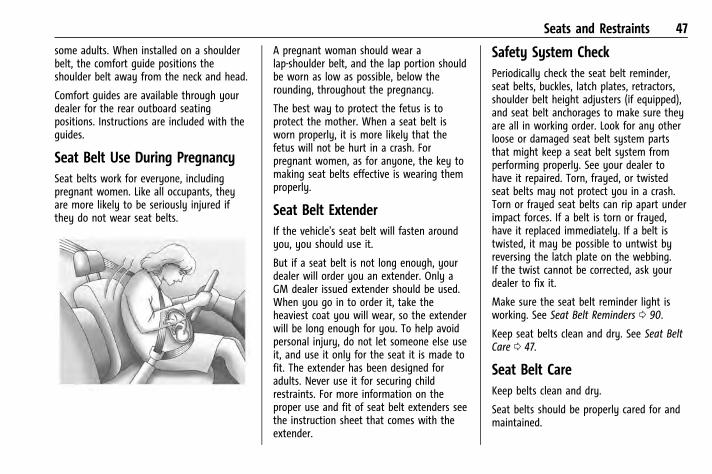
Chevrolet Camaro Owner Manual (GMNA-Localizing-U.S./Canada/Mexico-15516346) - 2022 - CRC - 4/9/21
Seats and Restraints 47
some adults. When installed on a shoulderbelt, the comfort guide positions theshoulder belt away from the neck and head.
Comfort guides are available through yourdealer for the rear outboard seatingpositions. Instructions are included with theguides.
Seat Belt Use During PregnancySeat belts work for everyone, includingpregnant women. Like all occupants, theyare more likely to be seriously injured ifthey do not wear seat belts.
A pregnant woman should wear alap-shoulder belt, and the lap portion shouldbe worn as low as possible, below therounding, throughout the pregnancy.
The best way to protect the fetus is toprotect the mother. When a seat belt isworn properly, it is more likely that thefetus will not be hurt in a crash. Forpregnant women, as for anyone, the key tomaking seat belts effective is wearing themproperly.
Seat Belt ExtenderIf the vehicle's seat belt will fasten aroundyou, you should use it.
But if a seat belt is not long enough, yourdealer will order you an extender. Only aGM dealer issued extender should be used.When you go in to order it, take theheaviest coat you will wear, so the extenderwill be long enough for you. To help avoidpersonal injury, do not let someone else useit, and use it only for the seat it is made tofit. The extender has been designed foradults. Never use it for securing childrestraints. For more information on theproper use and fit of seat belt extenders seethe instruction sheet that comes with theextender.
Safety System CheckPeriodically check the seat belt reminder,seat belts, buckles, latch plates, retractors,shoulder belt height adjusters (if equipped),and seat belt anchorages to make sure theyare all in working order. Look for any otherloose or damaged seat belt system partsthat might keep a seat belt system fromperforming properly. See your dealer tohave it repaired. Torn, frayed, or twistedseat belts may not protect you in a crash.Torn or frayed seat belts can rip apart underimpact forces. If a belt is torn or frayed,have it replaced immediately. If a belt istwisted, it may be possible to untwist byreversing the latch plate on the webbing.If the twist cannot be corrected, ask yourdealer to fix it.
Make sure the seat belt reminder light isworking. See Seat Belt Reminders 0 90.
Keep seat belts clean and dry. See Seat BeltCare 0 47.
Seat Belt CareKeep belts clean and dry.
Seat belts should be properly cared for andmaintained.
Chevrolet Camaro Owner Manual (GMNA-Localizing-U.S./Canada/Mexico-15516346) - 2022 - CRC - 4/9/21
48 Seats and Restraints
Seat belt hardware should be kept dry andfree of dust or debris. As necessary, exteriorhard surfaces and seat belt webbing may belightly cleaned with mild soap and water.Ensure there is not excessive dust or debrisin the mechanism. If dust or debris exists inthe system please see the dealer. Parts mayneed to be replaced to ensure properfunctionality of the system.
{ WarningDo not bleach or dye seat belt webbing.It may severely weaken the webbing. Ina crash, they might not be able toprovide adequate protection. Clean andrinse seat belt webbing only with mildsoap and lukewarm water. Allow thewebbing to dry.
Replacing Seat Belt System Partsafter a Crash
{ WarningA crash can damage the seat belt systemin the vehicle. A damaged seat beltsystem may not properly protect theperson using it, resulting in serious injury
(Continued)
Warning (Continued)
or even death in a crash. To help makesure the seat belt systems are workingproperly after a crash, have theminspected and any necessaryreplacements made as soon as possible.
After a minor crash, replacement of seatbelts may not be necessary. But the seatbelt assemblies that were used during anycrash may have been stressed or damaged.See your dealer to have the seat beltassemblies inspected or replaced.
New parts and repairs may be necessaryeven if the seat belt system was not beingused at the time of the crash.
Have the seat belt pretensioners checked ifthe vehicle has been in a crash, or if theairbag readiness light stays on after youstart the vehicle or while you are driving.See Airbag Readiness Light 0 91.
Airbag SystemThe vehicle has the following airbags:. A frontal airbag for the driver.. A frontal airbag for the front outboard
passenger.
. A knee airbag for the driver.
. A knee airbag for the front outboardpassenger.
. A seat-mounted side impact airbag for thedriver.
. A seat-mounted side impact airbag for thefront outboard passenger.
The vehicle may have the following airbags:. A roof-rail airbag for the driver and the
passenger seated directly behind thedriver.
. A roof-rail airbag for the front outboardpassenger and the passenger seateddirectly behind the front outboardpassenger.
All vehicle airbags have the word AIRBAG onthe trim or on a label near the deploymentopening.
For frontal airbags, the word AIRBAG is onthe center of the steering wheel for thedriver and on the instrument panel for thefront outboard passenger.
For knee airbags, the word AIRBAG is on thelower part of the instrument panel.
For seat-mounted side impact airbags, theword AIRBAG is on the side of the seatbackor side of the seat closest to the door.
Chevrolet Camaro Owner Manual (GMNA-Localizing-U.S./Canada/Mexico-15516346) - 2022 - CRC - 4/9/21
Seats and Restraints 49
For roof-rail airbags, the word AIRBAG is onthe ceiling or trim.
Airbags are designed to supplement theprotection provided by seat belts. Eventhough today's airbags are also designed tohelp reduce the risk of injury from the forceof an inflating bag, all airbags must inflatevery quickly to do their job.
Here are the most important things to knowabout the airbag system:
{ WarningYou can be severely injured or killed in acrash if you are not wearing your seatbelt, even with airbags. Airbags aredesigned to work with seat belts, notreplace them. Also, airbags are notdesigned to inflate in every crash. Insome crashes seat belts are the onlyrestraint. See When Should an AirbagInflate? 0 51.
Wearing your seat belt during a crashhelps reduce your chance of hittingthings inside the vehicle or being ejectedfrom it. Airbags are “supplementalrestraints” to the seat belts. Everyone in
(Continued)
Warning (Continued)
the vehicle should wear a seat beltproperly, whether or not there is anairbag for that person.
{ WarningBecause airbags inflate with great forceand faster than the blink of an eye,anyone who is up against, or very closeto, any airbag when it inflates can beseriously injured or killed. Do not situnnecessarily close to any airbag, as youwould be if sitting on the edge of theseat or leaning forward. Seat belts helpkeep you in position before and during acrash. Always wear a seat belt, even withairbags. The driver should sit as far backas possible while still maintaining controlof the vehicle. The seat belts and thefront outboard passenger airbags aremost effective when you are sitting wellback and upright in the seat with bothfeet on the floor.
(Continued)
Warning (Continued)
Occupants should not lean on or sleepagainst the door or side windows inseating positions with seat-mounted sideimpact airbags and/or roof-rail airbags.
{ WarningChildren who are up against, or veryclose to, any airbag when it inflates canbe seriously injured or killed. Alwayssecure children properly in the vehicle. Toread how, see Older Children 0 59 orInfants and Young Children 0 60.
There is an airbag readiness light on theinstrument cluster, which shows the airbagsymbol. The system checks the airbagelectrical system for malfunctions. The lighttells you if there is an electrical problem.See Airbag Readiness Light 0 91.

Chevrolet Camaro Owner Manual (GMNA-Localizing-U.S./Canada/Mexico-15516346) - 2022 - CRC - 4/9/21
50 Seats and Restraints
Where Are the Airbags?
The driver frontal airbag is in the center ofthe steering wheel.
The front outboard passenger frontal airbagis in the passenger side instrument panel.
The driver knee airbag is below the steeringcolumn. The front outboard passenger kneeairbag is below the glove box.
Coupe Models, Driver Side Shown, PassengerSide Similar
On coupe models, the driver and frontoutboard passenger seat-mounted sideimpact airbags are in the sides of theseatbacks closest to the door.
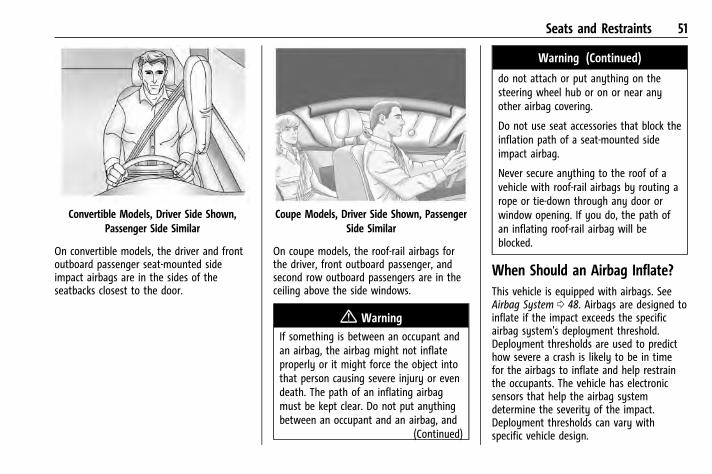
Chevrolet Camaro Owner Manual (GMNA-Localizing-U.S./Canada/Mexico-15516346) - 2022 - CRC - 4/9/21
Seats and Restraints 51
Convertible Models, Driver Side Shown,Passenger Side Similar
On convertible models, the driver and frontoutboard passenger seat-mounted sideimpact airbags are in the sides of theseatbacks closest to the door.
Coupe Models, Driver Side Shown, PassengerSide Similar
On coupe models, the roof-rail airbags forthe driver, front outboard passenger, andsecond row outboard passengers are in theceiling above the side windows.
{ WarningIf something is between an occupant andan airbag, the airbag might not inflateproperly or it might force the object intothat person causing severe injury or evendeath. The path of an inflating airbagmust be kept clear. Do not put anythingbetween an occupant and an airbag, and
(Continued)
Warning (Continued)
do not attach or put anything on thesteering wheel hub or on or near anyother airbag covering.
Do not use seat accessories that block theinflation path of a seat-mounted sideimpact airbag.
Never secure anything to the roof of avehicle with roof-rail airbags by routing arope or tie‐down through any door orwindow opening. If you do, the path ofan inflating roof-rail airbag will beblocked.
When Should an Airbag Inflate?This vehicle is equipped with airbags. SeeAirbag System 0 48. Airbags are designed toinflate if the impact exceeds the specificairbag system's deployment threshold.Deployment thresholds are used to predicthow severe a crash is likely to be in timefor the airbags to inflate and help restrainthe occupants. The vehicle has electronicsensors that help the airbag systemdetermine the severity of the impact.Deployment thresholds can vary withspecific vehicle design.
Chevrolet Camaro Owner Manual (GMNA-Localizing-U.S./Canada/Mexico-15516346) - 2022 - CRC - 4/9/21
52 Seats and Restraints
Frontal airbags are designed to inflate inmoderate to severe frontal or near frontalcrashes to help reduce the potential forsevere injuries, mainly to the driver's orfront outboard passenger's head and chest.
Whether the frontal airbags will or shouldinflate is not based primarily on how fastthe vehicle is traveling. It depends on whatis hit, the direction of the impact, and howquickly the vehicle slows down.
Frontal airbags may inflate at different crashspeeds depending on whether the vehiclehits an object straight on or at an angle,and whether the object is fixed or moving,rigid or deformable, narrow or wide.
Frontal airbags are not intended to inflateduring vehicle rollovers, rear impacts, or inmany side impacts.
In addition, the vehicle has advancedtechnology frontal airbags. Advancedtechnology frontal airbags adjust therestraint according to crash severity.
Knee airbags are designed to inflate inmoderate to severe frontal or near frontalimpacts. Knee airbags are not designed toinflate during vehicle rollovers, in rearimpacts, or in many side impacts.
The vehicle may have a seat position sensorthat enables the sensing system to monitorthe position of the front outboard passengerseat. If equipped, the passenger seatposition sensor and the passenger seat beltbuckle provide information that is used todetermine if the passenger knee airbagshould inflate.
Seat-mounted side impact airbags aredesigned to inflate in moderate to severeside crashes depending on the location ofthe impact. Seat-mounted side impactairbags are not designed to inflate in frontalimpacts, near frontal impacts, rollovers,or rear impacts. A seat-mounted side impactairbag is designed to inflate on the side ofthe vehicle that is struck.
Roof-rail airbags, if equipped, are designedto inflate in moderate to severe side crashesdepending on the location of the impact. Inaddition, these roof-rail airbags are designedto inflate during a rollover or in a severefrontal impact. Roof-rail airbags are notdesigned to inflate in rear impacts. Bothroof-rail airbags will inflate when either sideof the vehicle is struck, if the sensingsystem predicts that the vehicle is about toroll over on its side, or in a severe frontalimpact.
In any particular crash, no one can saywhether an airbag should have inflatedsimply because of the vehicle damage orrepair costs.
What Makes an Airbag Inflate?In a deployment event, the sensing systemsends an electrical signal triggering a releaseof gas from the inflator. Gas from theinflator fills the airbag causing the bag tobreak out of the cover. The inflator, theairbag, and related hardware are all part ofthe airbag module.
For airbag locations, see Where Are theAirbags? 0 50.
How Does an Airbag Restrain?In moderate to severe frontal or near frontalcollisions, even belted occupants can contactthe steering wheel or the instrument panel.In moderate to severe side collisions, evenbelted occupants can contact the inside ofthe vehicle.
Airbags supplement the protection providedby seat belts by distributing the force of theimpact more evenly over theoccupant's body.
Chevrolet Camaro Owner Manual (GMNA-Localizing-U.S./Canada/Mexico-15516346) - 2022 - CRC - 4/9/21
Seats and Restraints 53
Rollover capable roof-rail airbags,if equipped, are designed to help containthe head and chest of occupants in theoutboard seating positions in the first andsecond rows. The rollover capable roof-railairbags are designed to help reduce the riskof full or partial ejection in rollover events,although no system can prevent all suchejections.
But airbags would not help in many typesof collisions, primarily because theoccupant's motion is not toward thoseairbags. See When Should an Airbag Inflate?0 51.
Airbags should never be regarded asanything more than a supplement to seatbelts.
What Will You See after anAirbag Inflates?After frontal, knee, and seat-mounted sideimpact airbags inflate, they quickly deflate,so quickly that some people may not evenrealize the airbags inflated. Roof-rail airbagsmay still be at least partially inflated forsome time after they inflate. Somecomponents of the airbag module may behot for several minutes. For location of theairbags, see Where Are the Airbags? 0 50.
The parts of the airbag that come intocontact with you may be warm, but not toohot to touch. There may be some smokeand dust coming from the vents in thedeflated airbags. Airbag inflation does notprevent the driver from seeing out of thewindshield or being able to steer thevehicle, nor does it prevent people fromleaving the vehicle.
{ WarningWhen an airbag inflates, there may bedust in the air. This dust could causebreathing problems for people with ahistory of asthma or other breathingtrouble. To avoid this, everyone in thevehicle should get out as soon as it issafe to do so. If you have breathingproblems but cannot get out of thevehicle after an airbag inflates, then getfresh air by opening a window or a door.If you experience breathing problemsfollowing an airbag deployment, youshould seek medical attention.
The vehicle has a feature that mayautomatically unlock the doors, turn on theinterior lamps and hazard warning flashers,and shut off the fuel system after the
airbags inflate. The feature may alsoactivate, without airbag inflation, after anevent that exceeds a predeterminedthreshold. After turning the ignition off andthen on again, the fuel system will return tonormal operation; the doors can be locked,the interior lamps can be turned off, andthe hazard warning flashers can be turnedoff using the controls for those features.If any of these systems are damaged in thecrash they may not operate as normal.
{ WarningA crash severe enough to inflate theairbags may have also damagedimportant functions in the vehicle, suchas the fuel system, brake and steeringsystems, etc. Even if the vehicle appearsto be drivable after a moderate crash,there may be concealed damage thatcould make it difficult to safely operatethe vehicle.
Use caution if you should attempt torestart the engine after a crash hasoccurred.
Chevrolet Camaro Owner Manual (GMNA-Localizing-U.S./Canada/Mexico-15516346) - 2022 - CRC - 4/9/21
54 Seats and Restraints
In many crashes severe enough to inflatethe airbag, windshields are broken byvehicle deformation. Additional windshieldbreakage may also occur from the frontoutboard passenger airbag.. Airbags are designed to inflate only once.
After an airbag inflates, you will needsome new parts for the airbag system.If you do not get them, the airbagsystem will not be there to help protectyou in another crash. A new system willinclude airbag modules and possibly otherparts. The service manual for the vehiclecovers the need to replace other parts.
. The vehicle has a crash sensing anddiagnostic module which recordsinformation after a crash. See VehicleData Recording and Privacy 0 335 andEvent Data Recorders 0 336.
. Let only qualified technicians work on theairbag system. Improper service can meanthat an airbag system will not workproperly. See your dealer for service.
Passenger Sensing SystemThe vehicle has a passenger sensing systemfor the front outboard passenger position.The passenger airbag status indicator willlight on the overhead console when thevehicle is started.
United States
Canada and Mexico
The words ON and OFF, or the symbols foron and off, will be visible during the systemcheck. When the system check is complete,either the word ON or OFF, or the symbolfor on or off will be visible. See PassengerAirbag Status Indicator 0 91.
The passenger sensing system turns off thefront outboard passenger frontal airbag andknee airbag under certain conditions. Noother airbag is affected by the passengersensing system.
The passenger sensing system works withsensors that are part of the front outboardpassenger seat and seat belt. The sensorsare designed to detect the presence of aproperly seated occupant and determine ifthe front outboard passenger frontal airbagand knee airbag should be allowed to inflateor not.
According to accident statistics, children aresafer when properly secured in a rear seatin the correct child restraint for their weightand size.
Whenever possible, children aged 12 andunder should be secured in a rear seatingposition.
Never put a rear-facing child seat in thefront. This is because the risk to therear-facing child is so great, if the airbaginflates.
Chevrolet Camaro Owner Manual (GMNA-Localizing-U.S./Canada/Mexico-15516346) - 2022 - CRC - 4/9/21
Seats and Restraints 55
{ WarningA child in a rear-facing child restraint canbe seriously injured or killed if thepassenger frontal airbag inflates. This isbecause the back of the rear-facing childrestraint would be very close to theinflating airbag. A child in aforward-facing child restraint can beseriously injured or killed if the passengerfrontal airbag inflates and the passengerseat is in a forward position.
Even if the passenger sensing system hasturned off the front outboard passengerairbag(s), no system is fail-safe. No onecan guarantee that an airbag will notdeploy under some unusual circumstance,even though the airbag(s) are off.
Never put a rear-facing child restraint inthe front seat, even if the airbag is off.If securing a forward-facing child restraintin the front outboard passenger seat,always move the seat as far back as itwill go. It is better to secure childrestraints in the rear seat. Consider usinganother vehicle to transport the childwhen a rear seat is not available.
The passenger sensing system is designed toturn off the front outboard passengerfrontal airbag and knee airbag if:. The front outboard passenger seat is
unoccupied.. The system determines an infant is
present in a child restraint.. A front outboard passenger takes his/her
weight off of the seat for a periodof time.
. There is a critical problem with the airbagsystem or the passenger sensing system.
When the passenger sensing system hasturned off the front outboard passengerfrontal airbag and knee airbag, the OFFindicator will light and stay lit as a reminderthat the airbags are off. See PassengerAirbag Status Indicator 0 91.
The passenger sensing system is designed toturn on the front outboard passenger frontalairbag and knee airbag anytime the systemsenses that a person of adult size is sittingproperly in the front outboard passengerseat. When the passenger sensing systemhas allowed the airbags to be enabled, theON indicator will light and stay lit as areminder that the airbags are active.
For some children, including children in childrestraints, and for very small adults, thepassenger sensing system may or may notturn off the front outboard passengerfrontal airbag and knee airbag, dependingupon the person’s seating posture and bodybuild. Everyone in the vehicle who hasoutgrown child restraints should wear a seatbelt properly — whether or not there is anairbag for that person.
{ WarningIf the airbag readiness light ever comeson and stays on, it means thatsomething may be wrong with the airbagsystem. To help avoid injury to yourselfor others, have the vehicle serviced rightaway. See Airbag Readiness Light 0 91 formore information, including importantsafety information.
If the On Indicator Is Lit for a ChildRestraint
The passenger sensing system is designed toturn off the front outboard passengerfrontal airbag and knee airbag if the systemdetermines that an infant is present in achild restraint. If a child restraint has beeninstalled and the ON indicator is lit:
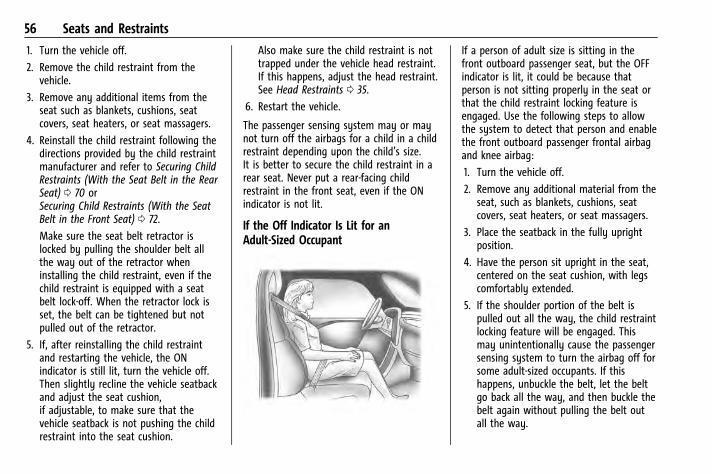
Chevrolet Camaro Owner Manual (GMNA-Localizing-U.S./Canada/Mexico-15516346) - 2022 - CRC - 4/9/21
56 Seats and Restraints
1. Turn the vehicle off.
2. Remove the child restraint from thevehicle.
3. Remove any additional items from theseat such as blankets, cushions, seatcovers, seat heaters, or seat massagers.
4. Reinstall the child restraint following thedirections provided by the child restraintmanufacturer and refer to Securing ChildRestraints (With the Seat Belt in the RearSeat) 0 70 orSecuring Child Restraints (With the SeatBelt in the Front Seat) 0 72.
Make sure the seat belt retractor islocked by pulling the shoulder belt allthe way out of the retractor wheninstalling the child restraint, even if thechild restraint is equipped with a seatbelt lock-off. When the retractor lock isset, the belt can be tightened but notpulled out of the retractor.
5. If, after reinstalling the child restraintand restarting the vehicle, the ONindicator is still lit, turn the vehicle off.Then slightly recline the vehicle seatbackand adjust the seat cushion,if adjustable, to make sure that thevehicle seatback is not pushing the childrestraint into the seat cushion.
Also make sure the child restraint is nottrapped under the vehicle head restraint.If this happens, adjust the head restraint.See Head Restraints 0 35.
6. Restart the vehicle.
The passenger sensing system may or maynot turn off the airbags for a child in a childrestraint depending upon the child’s size.It is better to secure the child restraint in arear seat. Never put a rear-facing childrestraint in the front seat, even if the ONindicator is not lit.
If the Off Indicator Is Lit for anAdult-Sized Occupant
If a person of adult size is sitting in thefront outboard passenger seat, but the OFFindicator is lit, it could be because thatperson is not sitting properly in the seat orthat the child restraint locking feature isengaged. Use the following steps to allowthe system to detect that person and enablethe front outboard passenger frontal airbagand knee airbag:
1. Turn the vehicle off.
2. Remove any additional material from theseat, such as blankets, cushions, seatcovers, seat heaters, or seat massagers.
3. Place the seatback in the fully uprightposition.
4. Have the person sit upright in the seat,centered on the seat cushion, with legscomfortably extended.
5. If the shoulder portion of the belt ispulled out all the way, the child restraintlocking feature will be engaged. Thismay unintentionally cause the passengersensing system to turn the airbag off forsome adult-sized occupants. If thishappens, unbuckle the belt, let the beltgo back all the way, and then buckle thebelt again without pulling the belt outall the way.
Chevrolet Camaro Owner Manual (GMNA-Localizing-U.S./Canada/Mexico-15516346) - 2022 - CRC - 4/9/21
Seats and Restraints 57
6. Restart the vehicle and have the personremain in this position for two tothree minutes after the ON indicatoris lit.
{ WarningIf the front outboard passenger airbag isturned off for an adult-sized occupant,the airbag will not be able to inflate andhelp protect that person in a crash,resulting in an increased risk of seriousinjury or even death. An adult-sizedoccupant should not ride in the frontoutboard passenger seat, if the passengerairbag OFF indicator is lit.
Additional Factors Affecting SystemOperation
Seat belts help keep the passenger inposition on the seat during vehiclemaneuvers and braking, which helps thepassenger sensing system maintain thepassenger airbag status. See “Seat Belts”and “Child Restraints” in the Index foradditional information about the importanceof proper restraint use.
A thick layer of additional material, such asa blanket or cushion, or aftermarketequipment such as seat covers, seat heaters,and seat massagers can affect how well thepassenger sensing system operates. Werecommend that you not use seat covers orother aftermarket equipment except whenapproved by GM for your specific vehicle.See Adding Equipment to theAirbag-Equipped Vehicle 0 58 for moreinformation about modifications that canaffect how the system operates.
The ON indicator may be lit if an object,such as a briefcase, handbag, grocery bag,laptop, or other electronic device, is put onan unoccupied seat. If this is not desired,remove the object from the seat.
{ WarningStowing articles under the passenger seator between the passenger seat cushionand seatback may interfere with theproper operation of the passengersensing system.
Servicing the Airbag-EquippedVehicleAirbags affect how the vehicle should beserviced. There are parts of the airbagsystem in several places around the vehicle.Your dealer and the service manual haveinformation about servicing the vehicle andthe airbag system. To purchase a servicemanual, see Publication OrderingInformation 0 333.
{ WarningFor up to 10 seconds after the vehicle isturned off and the battery isdisconnected, an airbag can still inflateduring improper service. You can beinjured if you are close to an airbagwhen it inflates. Avoid yellow connectors.They are probably part of the airbagsystem. Be sure to follow proper serviceprocedures, and make sure the personperforming work for you is qualified todo so.
Chevrolet Camaro Owner Manual (GMNA-Localizing-U.S./Canada/Mexico-15516346) - 2022 - CRC - 4/9/21
58 Seats and Restraints
Adding Equipment to theAirbag-Equipped VehicleAdding accessories that change the vehicle'sframe, bumper system, height, front end,or side sheet metal may keep the airbagsystem from working properly.
The operation of the airbag system can alsobe affected by changing, includingimproperly repairing or replacing, any partsof the following:. Airbag system, including airbag modules,
front or side impact sensors, sensing anddiagnostic module, or airbag wiring
. Front seats, including stitching, seams orzippers
. Seat belts
. Steering wheel, instrument panel,overhead console, ceiling trim, or pillargarnish trim
. Inner door seals, including speakers
Your dealer and the service manual haveinformation about the location of the airbagmodules and sensors, sensing and diagnosticmodule, and airbag wiring along with theproper replacement procedures.
In addition, the vehicle has a passengersensing system for the front outboardpassenger position, which includes sensorsthat are part of the passenger seat. Thepassenger sensing system may not operateproperly if the original seat trim is replacedwith non-GM covers, upholstery, or trim; orwith GM covers, upholstery, or trimdesigned for a different vehicle. Any object,such as an aftermarket seat heater or acomfort-enhancing pad or device, installedunder or on top of the seat fabric, couldalso interfere with the operation of thepassenger sensing system. This could eitherprevent proper deployment of the passengerairbag(s) or prevent the passenger sensingsystem from properly turning off thepassenger airbag(s). See Passenger SensingSystem 0 54.
If the vehicle has rollover roof-rail airbags,see Different Size Tires and Wheels 0 284 foradditional important information.
If the vehicle must be modified because youhave a disability and have questions aboutwhether the modifications will affect thevehicle's airbag system, or if you havequestions about whether the airbag system
will be affected if the vehicle is modified forany other reason, call Customer Assistance.See Customer Assistance Offices 0 328.
Airbag System CheckThe airbag system does not need regularlyscheduled maintenance or replacement.Make sure the airbag readiness light isworking. See Airbag Readiness Light 0 91.
CautionIf an airbag covering is damaged, opened,or broken, the airbag may not workproperly. Do not open or break the airbagcoverings. If there are any opened orbroken airbag coverings, have the airbagcovering and/or airbag module replaced.For the location of the airbags, see WhereAre the Airbags? 0 50. See your dealerfor service.
Chevrolet Camaro Owner Manual (GMNA-Localizing-U.S./Canada/Mexico-15516346) - 2022 - CRC - 4/9/21
Seats and Restraints 59
Replacing Airbag System Partsafter a Crash
{ WarningA crash can damage the airbag systemsin the vehicle. A damaged airbag systemmay not properly protect you and yourpassenger(s) in a crash, resulting inserious injury or even death. To helpmake sure the airbag systems areworking properly after a crash, havethem inspected and any necessaryreplacements made as soon as possible.
If an airbag inflates, you will need toreplace airbag system parts. See your dealerfor service.
If the airbag readiness light stays on afterthe vehicle is started or comes on when youare driving, the airbag system may not workproperly. Have the vehicle serviced rightaway. See Airbag Readiness Light 0 91.
Child RestraintsOlder Children
Older children who have outgrown boosterseats should wear the vehicle’s seat belts.
The manufacturer instructions that comewith the booster seat state the weight andheight limitations for that booster. Use abooster seat with a lap-shoulder belt untilthe child passes the fit test below:. Sit all the way back on the seat. Do the
knees bend at the seat edge? If yes,continue. If no, return to the booster seat.
. Buckle the lap-shoulder belt. Does theshoulder belt rest on the shoulder? If yes,continue. If no, try using the rear seat
belt comfort guide, if available. See “RearSeat Belt Comfort Guides” underLap-Shoulder Belt 0 45. If a comfort guideis not available, or if the shoulder beltstill does not rest on the shoulder, thenreturn to the booster seat.
. Does the lap belt fit low and snug on thehips, touching the thighs? If yes, continue.If no, return to the booster seat.
. Can proper seat belt fit be maintained forthe length of the trip? If yes, continue.If no, return to the booster seat.
Q: What is the proper way to wear seatbelts?
A: An older child should wear a lap-shoulderbelt and get the additional restraint ashoulder belt can provide. The shoulderbelt should not cross the face or neck.The lap belt should fit snugly below thehips, just touching the top of the thighs.This applies belt force to the child'spelvic bones in a crash. It should neverbe worn over the abdomen, which couldcause severe or even fatal internalinjuries in a crash.
Also see “Rear Seat Belt Comfort Guides”under Lap-Shoulder Belt 0 45.
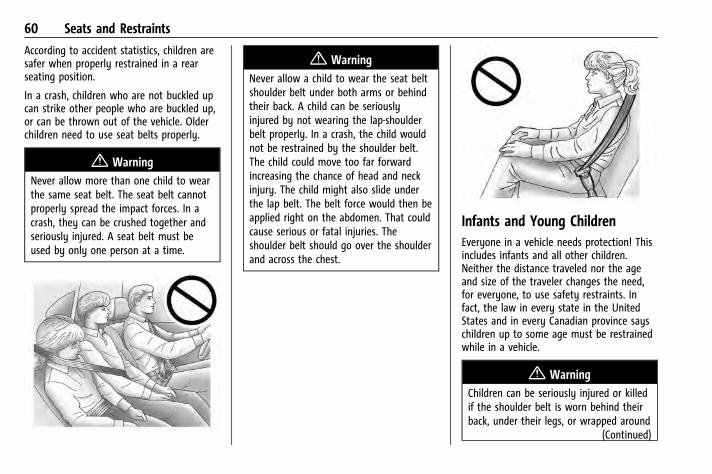
Chevrolet Camaro Owner Manual (GMNA-Localizing-U.S./Canada/Mexico-15516346) - 2022 - CRC - 4/9/21
60 Seats and Restraints
According to accident statistics, children aresafer when properly restrained in a rearseating position.
In a crash, children who are not buckled upcan strike other people who are buckled up,or can be thrown out of the vehicle. Olderchildren need to use seat belts properly.
{ WarningNever allow more than one child to wearthe same seat belt. The seat belt cannotproperly spread the impact forces. In acrash, they can be crushed together andseriously injured. A seat belt must beused by only one person at a time.
{ WarningNever allow a child to wear the seat beltshoulder belt under both arms or behindtheir back. A child can be seriouslyinjured by not wearing the lap-shoulderbelt properly. In a crash, the child wouldnot be restrained by the shoulder belt.The child could move too far forwardincreasing the chance of head and neckinjury. The child might also slide underthe lap belt. The belt force would then beapplied right on the abdomen. That couldcause serious or fatal injuries. Theshoulder belt should go over the shoulderand across the chest.
Infants and Young ChildrenEveryone in a vehicle needs protection! Thisincludes infants and all other children.Neither the distance traveled nor the ageand size of the traveler changes the need,for everyone, to use safety restraints. Infact, the law in every state in the UnitedStates and in every Canadian province sayschildren up to some age must be restrainedwhile in a vehicle.
{ WarningChildren can be seriously injured or killedif the shoulder belt is worn behind theirback, under their legs, or wrapped around
(Continued)
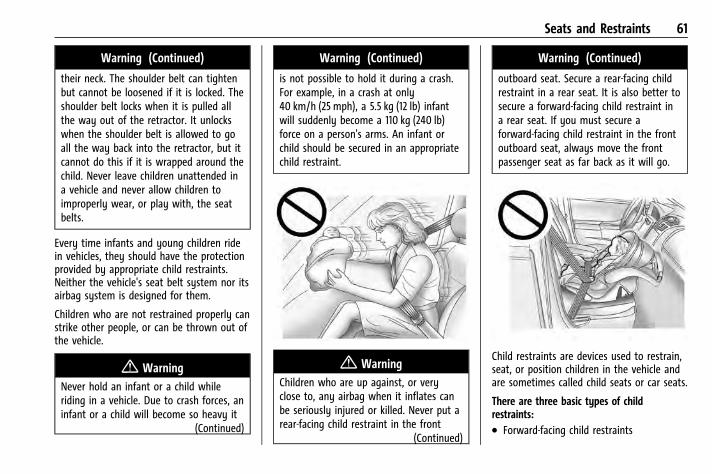
Chevrolet Camaro Owner Manual (GMNA-Localizing-U.S./Canada/Mexico-15516346) - 2022 - CRC - 4/9/21
Seats and Restraints 61
Warning (Continued)
their neck. The shoulder belt can tightenbut cannot be loosened if it is locked. Theshoulder belt locks when it is pulled allthe way out of the retractor. It unlockswhen the shoulder belt is allowed to goall the way back into the retractor, but itcannot do this if it is wrapped around thechild. Never leave children unattended ina vehicle and never allow children toimproperly wear, or play with, the seatbelts.
Every time infants and young children ridein vehicles, they should have the protectionprovided by appropriate child restraints.Neither the vehicle's seat belt system nor itsairbag system is designed for them.
Children who are not restrained properly canstrike other people, or can be thrown out ofthe vehicle.
{ WarningNever hold an infant or a child whileriding in a vehicle. Due to crash forces, aninfant or a child will become so heavy it
(Continued)
Warning (Continued)
is not possible to hold it during a crash.For example, in a crash at only40 km/h (25 mph), a 5.5 kg (12 lb) infantwill suddenly become a 110 kg (240 lb)force on a person's arms. An infant orchild should be secured in an appropriatechild restraint.
{ WarningChildren who are up against, or veryclose to, any airbag when it inflates canbe seriously injured or killed. Never put arear-facing child restraint in the front
(Continued)
Warning (Continued)
outboard seat. Secure a rear-facing childrestraint in a rear seat. It is also better tosecure a forward-facing child restraint ina rear seat. If you must secure aforward-facing child restraint in the frontoutboard seat, always move the frontpassenger seat as far back as it will go.
Child restraints are devices used to restrain,seat, or position children in the vehicle andare sometimes called child seats or car seats.
There are three basic types of childrestraints:. Forward-facing child restraints
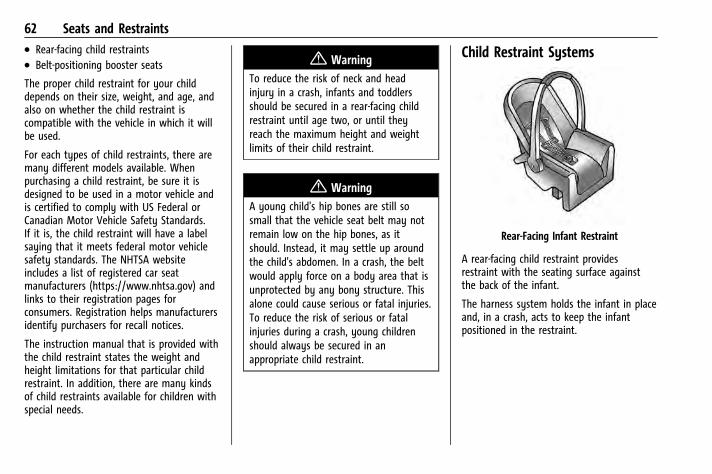
Chevrolet Camaro Owner Manual (GMNA-Localizing-U.S./Canada/Mexico-15516346) - 2022 - CRC - 4/9/21
62 Seats and Restraints. Rear-facing child restraints. Belt-positioning booster seats
The proper child restraint for your childdepends on their size, weight, and age, andalso on whether the child restraint iscompatible with the vehicle in which it willbe used.
For each types of child restraints, there aremany different models available. Whenpurchasing a child restraint, be sure it isdesigned to be used in a motor vehicle andis certified to comply with US Federal orCanadian Motor Vehicle Safety Standards.If it is, the child restraint will have a labelsaying that it meets federal motor vehiclesafety standards. The NHTSA websiteincludes a list of registered car seatmanufacturers (https://www.nhtsa.gov) andlinks to their registration pages forconsumers. Registration helps manufacturersidentify purchasers for recall notices.
The instruction manual that is provided withthe child restraint states the weight andheight limitations for that particular childrestraint. In addition, there are many kindsof child restraints available for children withspecial needs.
{ WarningTo reduce the risk of neck and headinjury in a crash, infants and toddlersshould be secured in a rear-facing childrestraint until age two, or until theyreach the maximum height and weightlimits of their child restraint.
{ WarningA young child's hip bones are still sosmall that the vehicle seat belt may notremain low on the hip bones, as itshould. Instead, it may settle up aroundthe child's abdomen. In a crash, the beltwould apply force on a body area that isunprotected by any bony structure. Thisalone could cause serious or fatal injuries.To reduce the risk of serious or fatalinjuries during a crash, young childrenshould always be secured in anappropriate child restraint.
Child Restraint Systems
Rear-Facing Infant Restraint
A rear-facing child restraint providesrestraint with the seating surface againstthe back of the infant.
The harness system holds the infant in placeand, in a crash, acts to keep the infantpositioned in the restraint.
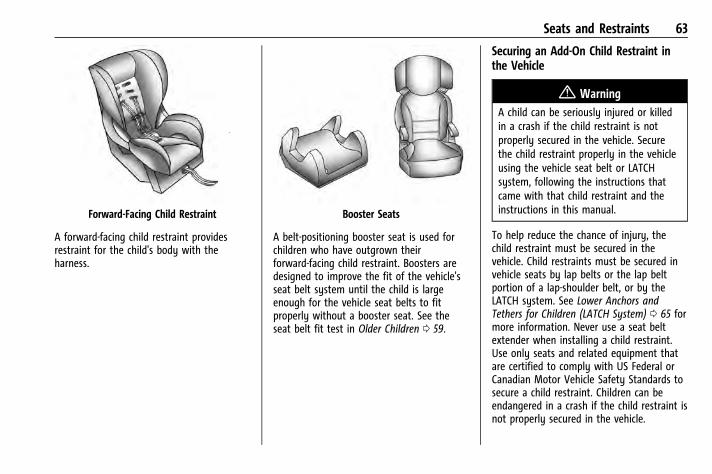
Chevrolet Camaro Owner Manual (GMNA-Localizing-U.S./Canada/Mexico-15516346) - 2022 - CRC - 4/9/21
Seats and Restraints 63
Forward-Facing Child Restraint
A forward-facing child restraint providesrestraint for the child's body with theharness.
Booster Seats
A belt-positioning booster seat is used forchildren who have outgrown theirforward-facing child restraint. Boosters aredesigned to improve the fit of the vehicle'sseat belt system until the child is largeenough for the vehicle seat belts to fitproperly without a booster seat. See theseat belt fit test in Older Children 0 59.
Securing an Add-On Child Restraint inthe Vehicle
{ WarningA child can be seriously injured or killedin a crash if the child restraint is notproperly secured in the vehicle. Securethe child restraint properly in the vehicleusing the vehicle seat belt or LATCHsystem, following the instructions thatcame with that child restraint and theinstructions in this manual.
To help reduce the chance of injury, thechild restraint must be secured in thevehicle. Child restraints must be secured invehicle seats by lap belts or the lap beltportion of a lap-shoulder belt, or by theLATCH system. See Lower Anchors andTethers for Children (LATCH System) 0 65 formore information. Never use a seat beltextender when installing a child restraint.Use only seats and related equipment thatare certified to comply with US Federal orCanadian Motor Vehicle Safety Standards tosecure a child restraint. Children can beendangered in a crash if the child restraint isnot properly secured in the vehicle.
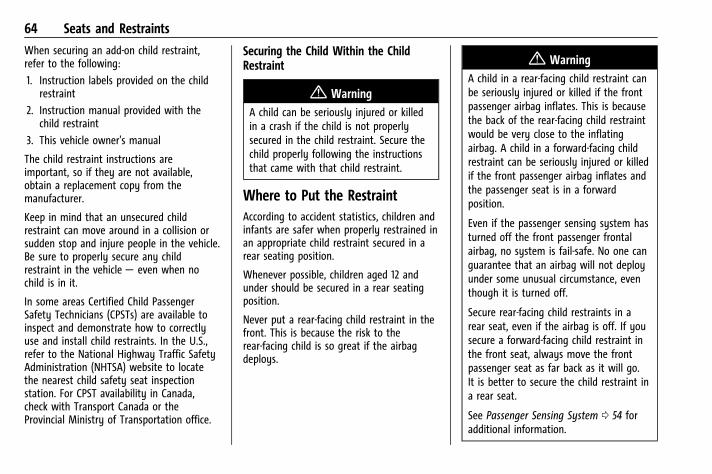
Chevrolet Camaro Owner Manual (GMNA-Localizing-U.S./Canada/Mexico-15516346) - 2022 - CRC - 4/9/21
64 Seats and Restraints
When securing an add-on child restraint,refer to the following:
1. Instruction labels provided on the childrestraint
2. Instruction manual provided with thechild restraint
3. This vehicle owner's manual
The child restraint instructions areimportant, so if they are not available,obtain a replacement copy from themanufacturer.
Keep in mind that an unsecured childrestraint can move around in a collision orsudden stop and injure people in the vehicle.Be sure to properly secure any childrestraint in the vehicle — even when nochild is in it.
In some areas Certified Child PassengerSafety Technicians (CPSTs) are available toinspect and demonstrate how to correctlyuse and install child restraints. In the U.S.,refer to the National Highway Traffic SafetyAdministration (NHTSA) website to locatethe nearest child safety seat inspectionstation. For CPST availability in Canada,check with Transport Canada or theProvincial Ministry of Transportation office.
Securing the Child Within the ChildRestraint
{ WarningA child can be seriously injured or killedin a crash if the child is not properlysecured in the child restraint. Secure thechild properly following the instructionsthat came with that child restraint.
Where to Put the RestraintAccording to accident statistics, children andinfants are safer when properly restrained inan appropriate child restraint secured in arear seating position.
Whenever possible, children aged 12 andunder should be secured in a rear seatingposition.
Never put a rear-facing child restraint in thefront. This is because the risk to therear-facing child is so great if the airbagdeploys.
{ WarningA child in a rear-facing child restraint canbe seriously injured or killed if the frontpassenger airbag inflates. This is becausethe back of the rear-facing child restraintwould be very close to the inflatingairbag. A child in a forward-facing childrestraint can be seriously injured or killedif the front passenger airbag inflates andthe passenger seat is in a forwardposition.
Even if the passenger sensing system hasturned off the front passenger frontalairbag, no system is fail-safe. No one canguarantee that an airbag will not deployunder some unusual circumstance, eventhough it is turned off.
Secure rear-facing child restraints in arear seat, even if the airbag is off. If yousecure a forward-facing child restraint inthe front seat, always move the frontpassenger seat as far back as it will go.It is better to secure the child restraint ina rear seat.
See Passenger Sensing System 0 54 foradditional information.
Chevrolet Camaro Owner Manual (GMNA-Localizing-U.S./Canada/Mexico-15516346) - 2022 - CRC - 4/9/21
Seats and Restraints 65
When securing a child restraint with theseat belts in a rear seat position, study theinstructions that came with the childrestraint to make sure it is compatible withthis vehicle.
Child restraints and booster seats varyconsiderably in size, and some may fit incertain seating positions better than others.Do not install a child restraint in any rearseating position where it cannot be installedsecurely.
Depending on where you place the childrestraint and the size of the child restraint,you may not be able to access adjacent seatbelts or LATCH anchors for additionalpassengers or child restraints. Adjacentseating positions should not be used if thechild restraint prevents access to orinterferes with the routing of the seat belt.
The seat in front of an installed childrestraint should be adjusted to ensureproper installation according to the childrestraint manual.
Wherever a child restraint is installed, besure to follow the instructions that camewith the child restraint and secure the childrestraint properly.
Keep in mind that an unsecured childrestraint can move around in a collision orsudden stop and injure people in the vehicle.Be sure to properly secure any childrestraint in the vehicle — even when nochild is in it.
Lower Anchors and Tethers forChildren (LATCH System)The LATCH system secures a child restraintduring driving or in a crash. LATCHattachments on the child restraint are usedto attach the child restraint to the anchorsin the vehicle. The LATCH system is designedto make installation of a child restrainteasier.
In order to use the LATCH system in yourvehicle, you need a child restraint that hasLATCH attachments. LATCH-compatiblerear-facing and forward-facing child seats canbe properly installed using either the LATCHanchors or the vehicle’s seat belts. Do notuse both the seat belts and the LATCHanchorage system to secure a rear-facing orforward-facing child seat.
Booster seats use the vehicle’s seat belts tosecure the child and the booster seat. If themanufacturer recommends that the boosterseat be secured with the LATCH system, this
can be done as long as the booster seat canbe positioned properly and there is nointerference with the proper positioning ofthe lap-shoulder belt on the child.
Make sure to follow the instructions thatcame with the child restraint, and also theinstructions in this manual.
When installing a child restraint with a toptether, you must also use either the loweranchors or the seat belts to properly securethe child restraint. A child restraint mustnever be installed using only the top tetherand anchor.
For a forward-facing 5-pt harness childrestraint where the combined weight of thechild and restraint are up to 29.5 kg (65 lb),use either the lower LATCH anchorages withthe top tether anchorage, or the seat beltwith the top tether anchorage. Where thecombined weight of the child and restraintare greater than 29.5 kg (65 lb), use the seatbelt with the top tether anchorage only.
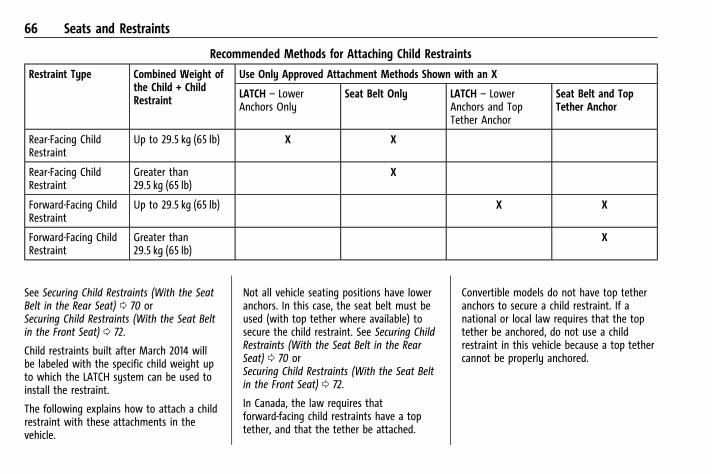
Chevrolet Camaro Owner Manual (GMNA-Localizing-U.S./Canada/Mexico-15516346) - 2022 - CRC - 4/9/21
66 Seats and Restraints
Recommended Methods for Attaching Child Restraints
Restraint Type Combined Weight ofthe Child + ChildRestraint
Use Only Approved Attachment Methods Shown with an X
LATCH – LowerAnchors Only
Seat Belt Only LATCH – LowerAnchors and TopTether Anchor
Seat Belt and TopTether Anchor
Rear-Facing ChildRestraint
Up to 29.5 kg (65 lb) X X
Rear-Facing ChildRestraint
Greater than29.5 kg (65 lb)
X
Forward-Facing ChildRestraint
Up to 29.5 kg (65 lb) X X
Forward-Facing ChildRestraint
Greater than29.5 kg (65 lb)
X
See Securing Child Restraints (With the SeatBelt in the Rear Seat) 0 70 orSecuring Child Restraints (With the Seat Beltin the Front Seat) 0 72.
Child restraints built after March 2014 willbe labeled with the specific child weight upto which the LATCH system can be used toinstall the restraint.
The following explains how to attach a childrestraint with these attachments in thevehicle.
Not all vehicle seating positions have loweranchors. In this case, the seat belt must beused (with top tether where available) tosecure the child restraint. See Securing ChildRestraints (With the Seat Belt in the RearSeat) 0 70 orSecuring Child Restraints (With the Seat Beltin the Front Seat) 0 72.
In Canada, the law requires thatforward-facing child restraints have a toptether, and that the tether be attached.
Convertible models do not have top tetheranchors to secure a child restraint. If anational or local law requires that the toptether be anchored, do not use a childrestraint in this vehicle because a top tethercannot be properly anchored.
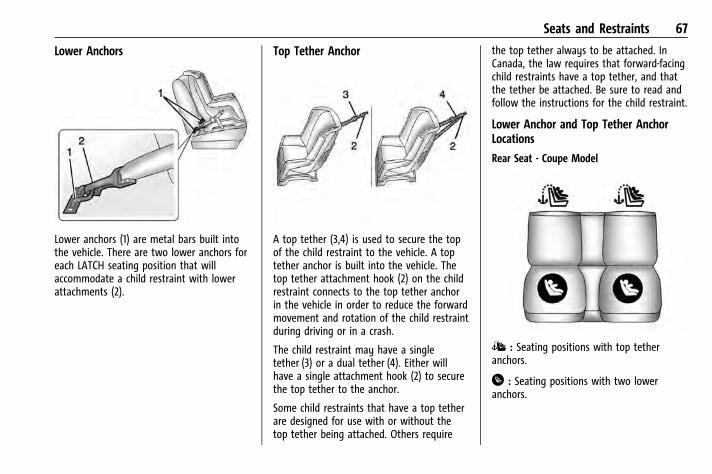
Chevrolet Camaro Owner Manual (GMNA-Localizing-U.S./Canada/Mexico-15516346) - 2022 - CRC - 4/9/21
Seats and Restraints 67
Lower Anchors
Lower anchors (1) are metal bars built intothe vehicle. There are two lower anchors foreach LATCH seating position that willaccommodate a child restraint with lowerattachments (2).
Top Tether Anchor
A top tether (3,4) is used to secure the topof the child restraint to the vehicle. A toptether anchor is built into the vehicle. Thetop tether attachment hook (2) on the childrestraint connects to the top tether anchorin the vehicle in order to reduce the forwardmovement and rotation of the child restraintduring driving or in a crash.
The child restraint may have a singletether (3) or a dual tether (4). Either willhave a single attachment hook (2) to securethe top tether to the anchor.
Some child restraints that have a top tetherare designed for use with or without thetop tether being attached. Others require
the top tether always to be attached. InCanada, the law requires that forward-facingchild restraints have a top tether, and thatthe tether be attached. Be sure to read andfollow the instructions for the child restraint.
Lower Anchor and Top Tether AnchorLocations
Rear Seat - Coupe Model
I : Seating positions with top tetheranchors.
H : Seating positions with two loweranchors.
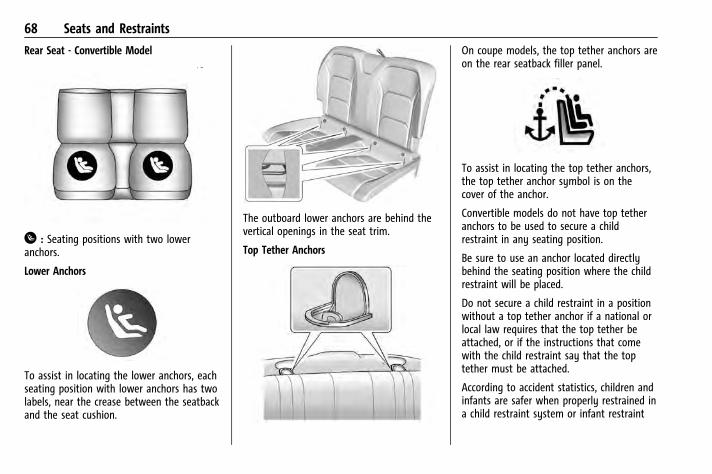
Chevrolet Camaro Owner Manual (GMNA-Localizing-U.S./Canada/Mexico-15516346) - 2022 - CRC - 4/9/21
68 Seats and Restraints
Rear Seat - Convertible Model
H : Seating positions with two loweranchors.
Lower Anchors
To assist in locating the lower anchors, eachseating position with lower anchors has twolabels, near the crease between the seatbackand the seat cushion.
The outboard lower anchors are behind thevertical openings in the seat trim.
Top Tether Anchors
On coupe models, the top tether anchors areon the rear seatback filler panel.
To assist in locating the top tether anchors,the top tether anchor symbol is on thecover of the anchor.
Convertible models do not have top tetheranchors to be used to secure a childrestraint in any seating position.
Be sure to use an anchor located directlybehind the seating position where the childrestraint will be placed.
Do not secure a child restraint in a positionwithout a top tether anchor if a national orlocal law requires that the top tether beattached, or if the instructions that comewith the child restraint say that the toptether must be attached.
According to accident statistics, children andinfants are safer when properly restrained ina child restraint system or infant restraint
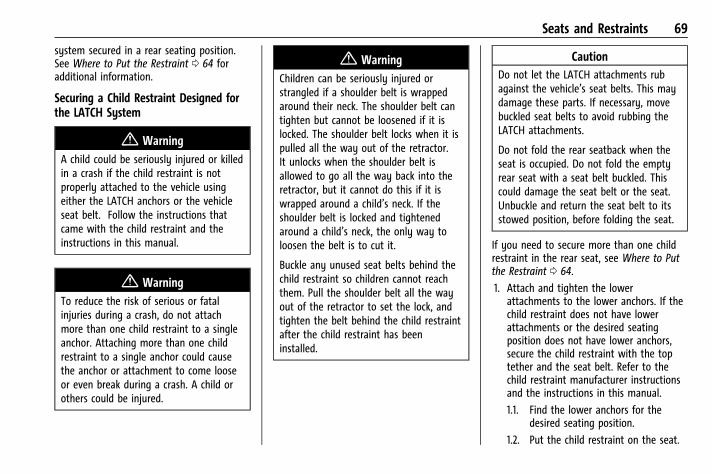
Chevrolet Camaro Owner Manual (GMNA-Localizing-U.S./Canada/Mexico-15516346) - 2022 - CRC - 4/9/21
Seats and Restraints 69
system secured in a rear seating position.See Where to Put the Restraint 0 64 foradditional information.
Securing a Child Restraint Designed forthe LATCH System
{ WarningA child could be seriously injured or killedin a crash if the child restraint is notproperly attached to the vehicle usingeither the LATCH anchors or the vehicleseat belt. Follow the instructions thatcame with the child restraint and theinstructions in this manual.
{ WarningTo reduce the risk of serious or fatalinjuries during a crash, do not attachmore than one child restraint to a singleanchor. Attaching more than one childrestraint to a single anchor could causethe anchor or attachment to come looseor even break during a crash. A child orothers could be injured.
{ WarningChildren can be seriously injured orstrangled if a shoulder belt is wrappedaround their neck. The shoulder belt cantighten but cannot be loosened if it islocked. The shoulder belt locks when it ispulled all the way out of the retractor.It unlocks when the shoulder belt isallowed to go all the way back into theretractor, but it cannot do this if it iswrapped around a child’s neck. If theshoulder belt is locked and tightenedaround a child’s neck, the only way toloosen the belt is to cut it.
Buckle any unused seat belts behind thechild restraint so children cannot reachthem. Pull the shoulder belt all the wayout of the retractor to set the lock, andtighten the belt behind the child restraintafter the child restraint has beeninstalled.
CautionDo not let the LATCH attachments rubagainst the vehicle’s seat belts. This maydamage these parts. If necessary, movebuckled seat belts to avoid rubbing theLATCH attachments.
Do not fold the rear seatback when theseat is occupied. Do not fold the emptyrear seat with a seat belt buckled. Thiscould damage the seat belt or the seat.Unbuckle and return the seat belt to itsstowed position, before folding the seat.
If you need to secure more than one childrestraint in the rear seat, see Where to Putthe Restraint 0 64.
1. Attach and tighten the lowerattachments to the lower anchors. If thechild restraint does not have lowerattachments or the desired seatingposition does not have lower anchors,secure the child restraint with the toptether and the seat belt. Refer to thechild restraint manufacturer instructionsand the instructions in this manual.
1.1. Find the lower anchors for thedesired seating position.
1.2. Put the child restraint on the seat.
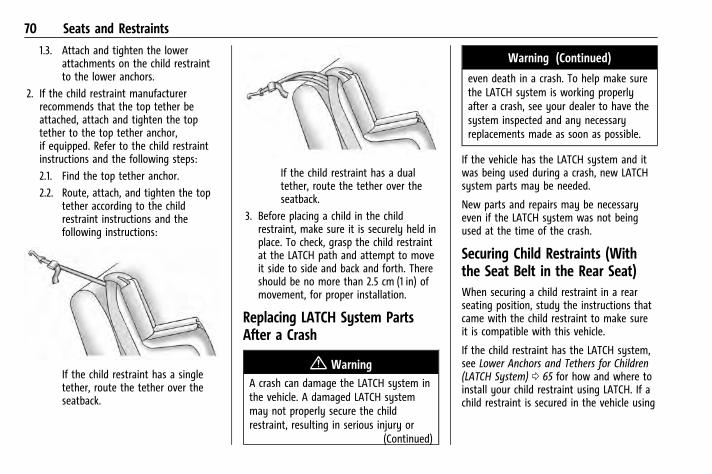
Chevrolet Camaro Owner Manual (GMNA-Localizing-U.S./Canada/Mexico-15516346) - 2022 - CRC - 4/9/21
70 Seats and Restraints
1.3. Attach and tighten the lowerattachments on the child restraintto the lower anchors.
2. If the child restraint manufacturerrecommends that the top tether beattached, attach and tighten the toptether to the top tether anchor,if equipped. Refer to the child restraintinstructions and the following steps:
2.1. Find the top tether anchor.
2.2. Route, attach, and tighten the toptether according to the childrestraint instructions and thefollowing instructions:
If the child restraint has a singletether, route the tether over theseatback.
If the child restraint has a dualtether, route the tether over theseatback.
3. Before placing a child in the childrestraint, make sure it is securely held inplace. To check, grasp the child restraintat the LATCH path and attempt to moveit side to side and back and forth. Thereshould be no more than 2.5 cm (1 in) ofmovement, for proper installation.
Replacing LATCH System PartsAfter a Crash
{ WarningA crash can damage the LATCH system inthe vehicle. A damaged LATCH systemmay not properly secure the childrestraint, resulting in serious injury or
(Continued)
Warning (Continued)
even death in a crash. To help make surethe LATCH system is working properlyafter a crash, see your dealer to have thesystem inspected and any necessaryreplacements made as soon as possible.
If the vehicle has the LATCH system and itwas being used during a crash, new LATCHsystem parts may be needed.
New parts and repairs may be necessaryeven if the LATCH system was not beingused at the time of the crash.
Securing Child Restraints (Withthe Seat Belt in the Rear Seat)When securing a child restraint in a rearseating position, study the instructions thatcame with the child restraint to make sureit is compatible with this vehicle.
If the child restraint has the LATCH system,see Lower Anchors and Tethers for Children(LATCH System) 0 65 for how and where toinstall your child restraint using LATCH. If achild restraint is secured in the vehicle using

Chevrolet Camaro Owner Manual (GMNA-Localizing-U.S./Canada/Mexico-15516346) - 2022 - CRC - 4/9/21
Seats and Restraints 71
a seat belt and it uses a top tether, seeLower Anchors and Tethers for Children(LATCH System) 0 65 for top tether anchorlocations.
Do not secure a child restraint in a positionwithout a top tether anchor if a national orlocal law requires that the top tether beanchored, or if the instructions that comewith the child restraint say that the toptether must be anchored.
In Canada, the law requires thatforward-facing child restraints have a toptether, and that the tether be attached.
If the child restraint or vehicle seat positiondoes not have the LATCH system, you willbe using the seat belt to secure the childrestraint. Be sure to follow the instructionsthat came with the child restraint.
If more than one child restraint needs to beinstalled in the rear seat, be sure to readWhere to Put the Restraint 0 64.
1. Put the child restraint on the seat.
2. Pick up the latch plate, and run the lapand shoulder portions of the vehicle seatbelt through or around the childrestraint. The child restraint instructionswill show you how.
3. Push the latch plate into the buckle untilit clicks.
Position the release button on thebuckle, away from the child restraint, sothat the seat belt could be quicklyunbuckled if necessary.
The push button used to release thelatch plate must be visible and notobscured by the child restraint. Theremust not be direct contact of the childrestraint to the push button.
4. Pull the shoulder belt all the way out ofthe retractor to set the lock. When theretractor lock is set, the belt can betightened but not pulled out of theretractor.
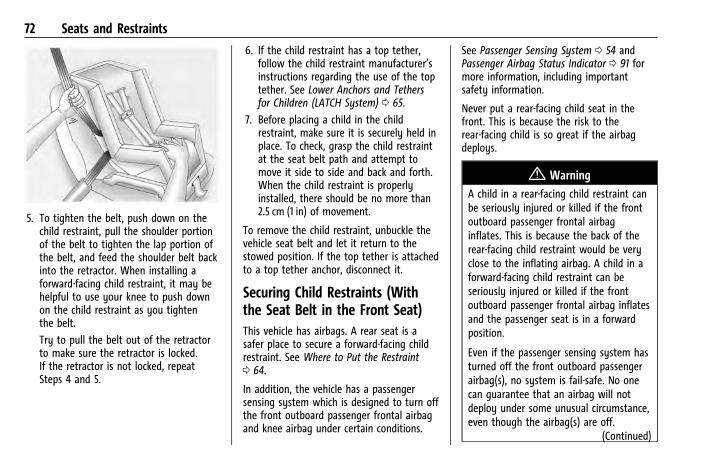
Chevrolet Camaro Owner Manual (GMNA-Localizing-U.S./Canada/Mexico-15516346) - 2022 - CRC - 4/9/21
72 Seats and Restraints
5. To tighten the belt, push down on thechild restraint, pull the shoulder portionof the belt to tighten the lap portion ofthe belt, and feed the shoulder belt backinto the retractor. When installing aforward-facing child restraint, it may behelpful to use your knee to push downon the child restraint as you tightenthe belt.
Try to pull the belt out of the retractorto make sure the retractor is locked.If the retractor is not locked, repeatSteps 4 and 5.
6. If the child restraint has a top tether,follow the child restraint manufacturer’sinstructions regarding the use of the toptether. See Lower Anchors and Tethersfor Children (LATCH System) 0 65.
7. Before placing a child in the childrestraint, make sure it is securely held inplace. To check, grasp the child restraintat the seat belt path and attempt tomove it side to side and back and forth.When the child restraint is properlyinstalled, there should be no more than2.5 cm (1 in) of movement.
To remove the child restraint, unbuckle thevehicle seat belt and let it return to thestowed position. If the top tether is attachedto a top tether anchor, disconnect it.
Securing Child Restraints (Withthe Seat Belt in the Front Seat)This vehicle has airbags. A rear seat is asafer place to secure a forward-facing childrestraint. See Where to Put the Restraint0 64.
In addition, the vehicle has a passengersensing system which is designed to turn offthe front outboard passenger frontal airbagand knee airbag under certain conditions.
See Passenger Sensing System 0 54 andPassenger Airbag Status Indicator 0 91 formore information, including importantsafety information.
Never put a rear-facing child seat in thefront. This is because the risk to therear-facing child is so great if the airbagdeploys.
{ WarningA child in a rear-facing child restraint canbe seriously injured or killed if the frontoutboard passenger frontal airbaginflates. This is because the back of therear-facing child restraint would be veryclose to the inflating airbag. A child in aforward-facing child restraint can beseriously injured or killed if the frontoutboard passenger frontal airbag inflatesand the passenger seat is in a forwardposition.
Even if the passenger sensing system hasturned off the front outboard passengerairbag(s), no system is fail-safe. No onecan guarantee that an airbag will notdeploy under some unusual circumstance,even though the airbag(s) are off.
(Continued)
Chevrolet Camaro Owner Manual (GMNA-Localizing-U.S./Canada/Mexico-15516346) - 2022 - CRC - 4/9/21
Seats and Restraints 73
Warning (Continued)
Secure rear-facing child restraints in arear seat, even if the airbag(s) are off.If you secure a forward-facing childrestraint in the front outboard passengerseat, always move the seat as far back asit will go. It is better to secure the childrestraint in a rear seat.
See Passenger Sensing System 0 54 foradditional information.
If the child restraint uses a top tether, seeLower Anchors and Tethers for Children(LATCH System) 0 65 for top tether anchorlocations.
Do not secure a child seat in a positionwithout a top tether anchor if a national orlocal law requires that the top tether beanchored, or if the instructions that comewith the child restraint say that the toptether must be anchored.
In Canada, the law requires thatforward-facing child restraints have a toptether, and that the tether be attached.
When using the lap-shoulder belt to securethe child restraint in this position, follow theinstructions that came with the childrestraint and the following instructions:
1. Move the seat as far back as it will gobefore securing the forward-facing childrestraint. Move the seat upward or theseatback to an upright position,if needed, to get a tight installation ofthe child restraint.
The push button used to release thelatch plate must be visible and notobscured by the child restraint. Theremust not be direct contact of the childrestraint to the push button.
When the passenger sensing system hasturned off the front outboard passengerfrontal airbag and knee airbag, the OFFindicator on the passenger airbag statusindicator should light and stay lit whenyou start the vehicle. See PassengerAirbag Status Indicator 0 91.
2. Put the child restraint on the seat.
3. Pick up the latch plate, and run the lapand shoulder portions of the vehicle seatbelt through or around the childrestraint. The child restraint instructionswill show you how.
4. Push the latch plate into the buckle untilit clicks.
Position the release button on thebuckle, away from the child restraint, sothat the seat belt could be quicklyunbuckled if necessary.
Chevrolet Camaro Owner Manual (GMNA-Localizing-U.S./Canada/Mexico-15516346) - 2022 - CRC - 4/9/21
74 Seats and Restraints
5. Pull the shoulder belt all the way out ofthe retractor to set the lock. When theretractor lock is set, the belt can betightened but not pulled out of theretractor.
6. To tighten the belt, push down on thechild restraint, pull the shoulder portionof the belt to tighten the lap portion ofthe belt, and feed the shoulder belt backinto the retractor. When installing aforward-facing child restraint, it may behelpful to use your knee to push downon the child restraint as you tightenthe belt.
Try to pull the belt out of the retractorto make sure the retractor is locked.If the retractor is not locked, repeatSteps 5 and 6.
7. Before placing a child in the childrestraint, make sure it is securely held inplace. To check, grasp the child restraintat the seat belt path and attempt to
move it side to side and back and forth.When the child restraint is properlyinstalled, there should be no more than2.5 cm (1 in) of movement.
If the airbags are off, the OFF indicator inthe passenger airbag status indicator willcome on and stay on when the vehicle isstarted.
If a child restraint has been installed andthe ON indicator is lit, see “If the OnIndicator Is Lit for a Child Restraint” underPassenger Sensing System 0 54.
To remove the child restraint, unbuckle thevehicle seat belt and let it return to thestowed position.
Chevrolet Camaro Owner Manual (GMNA-Localizing-U.S./Canada/Mexico-15516346) - 2022 - CRC - 4/9/21
Storage 75
StorageStorage CompartmentsStorage Compartments . . . . . . . . . . . . . . . . . 75Glove Box . . . . . . . . . . . . . . . . . . . . . . . . . . . . . . 75Rear Storage . . . . . . . . . . . . . . . . . . . . . . . . . . . . 75Center Console Storage . . . . . . . . . . . . . . . . . 76
Additional Storage FeaturesConvenience Net . . . . . . . . . . . . . . . . . . . . . . . 76
Storage Compartments
{ WarningDo not store heavy or sharp objects instorage compartments. In a crash, theseobjects may cause the cover to open andcould result in injury.
Glove BoxOpen the glove box by lifting up on thelever. Use the key to lock and unlock theglove box.
Rear Storage
Rear Seat Trunk Access (Coupe)
If equipped, there is access to the trunkfrom inside of the vehicle.
Pull the loop on the center of the rear seatback. The rear seat back will fold down.
Rear Trunk Partition
If equipped with a convertible top, there is atrunk partition to keep cargo from getting inthe way of the convertible top. The trunkpartition must be in place for theconvertible top to move. If the trunkpartition is not properly in place, a messagewill display and a chime sounds.
Chevrolet Camaro Owner Manual (GMNA-Localizing-U.S./Canada/Mexico-15516346) - 2022 - CRC - 4/9/21
76 Storage
The trunk partition can be attached ordetached to upper trunk brackets. With theconvertible top up, the trunk partition canbe unsnapped and laid flat.
Pull the partition up and snap it into placeon both sides and the bottom of the trunk.
Center Console Storage
Press to open. If equipped, there are twoUSB ports and an auxiliary jack inside. SeeUSB Port 0 125 andAuxiliary Jack 0 128.
Additional Storage FeaturesConvenience Net
For vehicles with a convenience net insidethe trunk, it can be used to secure looseitems.
Chevrolet Camaro Owner Manual (GMNA-Localizing-U.S./Canada/Mexico-15516346) - 2022 - CRC - 4/9/21
Instruments and Controls 77
Instruments and ControlsControlsSteering Wheel Adjustment . . . . . . . . . . . . 78Steering Wheel Controls . . . . . . . . . . . . . . . . 78Heated Steering Wheel . . . . . . . . . . . . . . . . . 78Horn . . . . . . . . . . . . . . . . . . . . . . . . . . . . . . . . . . . 78Windshield Wiper/Washer . . . . . . . . . . . . . . 78Compass . . . . . . . . . . . . . . . . . . . . . . . . . . . . . . . 79Clock . . . . . . . . . . . . . . . . . . . . . . . . . . . . . . . . . . . 79Power Outlets . . . . . . . . . . . . . . . . . . . . . . . . . . 80Wireless Charging . . . . . . . . . . . . . . . . . . . . . . 80
Warning Lights, Gauges, and IndicatorsWarning Lights, Gauges, andIndicators . . . . . . . . . . . . . . . . . . . . . . . . . . . . . 82
Instrument Cluster . . . . . . . . . . . . . . . . . . . . . 83Speedometer . . . . . . . . . . . . . . . . . . . . . . . . . . . 86Odometer . . . . . . . . . . . . . . . . . . . . . . . . . . . . . . 87Trip Odometer . . . . . . . . . . . . . . . . . . . . . . . . . . 87Tachometer . . . . . . . . . . . . . . . . . . . . . . . . . . . . . 87Fuel Gauge . . . . . . . . . . . . . . . . . . . . . . . . . . . . . 87Boost Gauge (Uplevel Cluster Only) . . . . 88Engine Oil Pressure Gauge (UplevelCluster Only) . . . . . . . . . . . . . . . . . . . . . . . . . 88
Engine Coolant Temperature Gauge . . . . 89Voltmeter Gauge (UplevelCluster Only) . . . . . . . . . . . . . . . . . . . . . . . . . 90
Seat Belt Reminders . . . . . . . . . . . . . . . . . . . . 90Airbag Readiness Light . . . . . . . . . . . . . . . . . . 91Passenger Airbag Status Indicator . . . . . . 91Charging System Light . . . . . . . . . . . . . . . . . 92Malfunction Indicator Lamp . . . . . . . . . . . . 92Brake System Warning Light . . . . . . . . . . . 94Electric Parking Brake Light . . . . . . . . . . . . . 94Service Electric Parking Brake Light . . . . . 94Antilock Brake System (ABS) WarningLight . . . . . . . . . . . . . . . . . . . . . . . . . . . . . . . . . . 95
Performance Shifting Light . . . . . . . . . . . . . 95Vehicle Ahead Indicator . . . . . . . . . . . . . . . . 95Traction Off Light . . . . . . . . . . . . . . . . . . . . . . 95StabiliTrak OFF Light . . . . . . . . . . . . . . . . . . . 96Traction Control System (TCS)/StabiliTrakLight . . . . . . . . . . . . . . . . . . . . . . . . . . . . . . . . . 96
Tire Pressure Light . . . . . . . . . . . . . . . . . . . . . 96Engine Oil Pressure Light . . . . . . . . . . . . . . . 97Low Fuel Warning Light . . . . . . . . . . . . . . . . 97Security Light . . . . . . . . . . . . . . . . . . . . . . . . . . 97High-Beam On Light . . . . . . . . . . . . . . . . . . . . 98Lamps On Reminder . . . . . . . . . . . . . . . . . . . . 98Cruise Control Light . . . . . . . . . . . . . . . . . . . . 98Door Ajar Light . . . . . . . . . . . . . . . . . . . . . . . . . 98
Information DisplaysDriver Information Center (DIC) . . . . . . . . 98Head-Up Display (HUD) . . . . . . . . . . . . . . . . 101
Vehicle MessagesVehicle Messages . . . . . . . . . . . . . . . . . . . . . . 104Engine Power Messages . . . . . . . . . . . . . . . 104Vehicle Speed Messages . . . . . . . . . . . . . . . 104
Vehicle PersonalizationVehicle Personalization . . . . . . . . . . . . . . . . 105
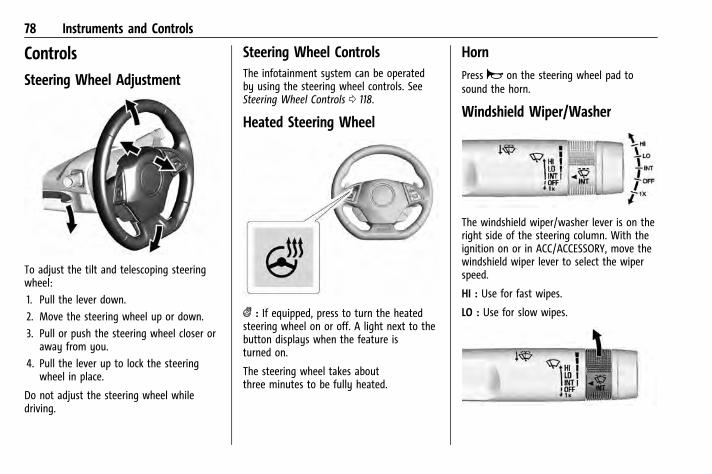
Chevrolet Camaro Owner Manual (GMNA-Localizing-U.S./Canada/Mexico-15516346) - 2022 - CRC - 4/9/21
78 Instruments and Controls
ControlsSteering Wheel Adjustment
To adjust the tilt and telescoping steeringwheel:
1. Pull the lever down.
2. Move the steering wheel up or down.
3. Pull or push the steering wheel closer oraway from you.
4. Pull the lever up to lock the steeringwheel in place.
Do not adjust the steering wheel whiledriving.
Steering Wheel ControlsThe infotainment system can be operatedby using the steering wheel controls. SeeSteering Wheel Controls 0 118.
Heated Steering Wheel
( : If equipped, press to turn the heatedsteering wheel on or off. A light next to thebutton displays when the feature isturned on.
The steering wheel takes aboutthree minutes to be fully heated.
HornPressa on the steering wheel pad tosound the horn.
Windshield Wiper/Washer
The windshield wiper/washer lever is on theright side of the steering column. With theignition on or in ACC/ACCESSORY, move thewindshield wiper lever to select the wiperspeed.
HI : Use for fast wipes.
LO : Use for slow wipes.
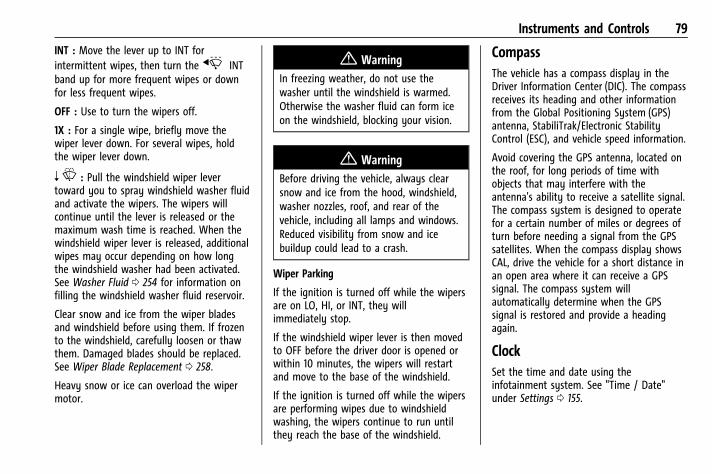
Chevrolet Camaro Owner Manual (GMNA-Localizing-U.S./Canada/Mexico-15516346) - 2022 - CRC - 4/9/21
Instruments and Controls 79
INT : Move the lever up to INT forintermittent wipes, then turn thex INTband up for more frequent wipes or downfor less frequent wipes.
OFF : Use to turn the wipers off.
1X : For a single wipe, briefly move thewiper lever down. For several wipes, holdthe wiper lever down.
nL : Pull the windshield wiper levertoward you to spray windshield washer fluidand activate the wipers. The wipers willcontinue until the lever is released or themaximum wash time is reached. When thewindshield wiper lever is released, additionalwipes may occur depending on how longthe windshield washer had been activated.See Washer Fluid 0 254 for information onfilling the windshield washer fluid reservoir.
Clear snow and ice from the wiper bladesand windshield before using them. If frozento the windshield, carefully loosen or thawthem. Damaged blades should be replaced.See Wiper Blade Replacement 0 258.
Heavy snow or ice can overload the wipermotor.
{ WarningIn freezing weather, do not use thewasher until the windshield is warmed.Otherwise the washer fluid can form iceon the windshield, blocking your vision.
{ WarningBefore driving the vehicle, always clearsnow and ice from the hood, windshield,washer nozzles, roof, and rear of thevehicle, including all lamps and windows.Reduced visibility from snow and icebuildup could lead to a crash.
Wiper Parking
If the ignition is turned off while the wipersare on LO, HI, or INT, they willimmediately stop.
If the windshield wiper lever is then movedto OFF before the driver door is opened orwithin 10 minutes, the wipers will restartand move to the base of the windshield.
If the ignition is turned off while the wipersare performing wipes due to windshieldwashing, the wipers continue to run untilthey reach the base of the windshield.
CompassThe vehicle has a compass display in theDriver Information Center (DIC). The compassreceives its heading and other informationfrom the Global Positioning System (GPS)antenna, StabiliTrak/Electronic StabilityControl (ESC), and vehicle speed information.
Avoid covering the GPS antenna, located onthe roof, for long periods of time withobjects that may interfere with theantenna's ability to receive a satellite signal.The compass system is designed to operatefor a certain number of miles or degrees ofturn before needing a signal from the GPSsatellites. When the compass display showsCAL, drive the vehicle for a short distance inan open area where it can receive a GPSsignal. The compass system willautomatically determine when the GPSsignal is restored and provide a headingagain.
ClockSet the time and date using theinfotainment system. See "Time / Date"under Settings 0 155.
Chevrolet Camaro Owner Manual (GMNA-Localizing-U.S./Canada/Mexico-15516346) - 2022 - CRC - 4/9/21
80 Instruments and Controls
Power OutletsThe vehicle has an accessory power outleton the center floor console in front of thecupholders. It can be used to plug inelectrical equipment, such as a cell phone oran MP3 player.
The accessory power outlet does not workwhen the ignition is turned off and thedriver door is opened. This helps to preservethe battery life of the vehicle.
Certain power accessory plugs may not becompatible with the accessory power outletand could overload vehicle and adapterfuses. If a problem is experienced, see yourdealer.
CautionAdding any electrical equipment to thevehicle may damage it or keep othercomponents from working as theyshould. The repairs would not be coveredby the vehicle warranty. Do not useequipment exceedingmaximum amperage rating of15 amperes. Check with your dealerbefore adding electrical equipment.
When adding electrical equipment, be sureto follow the proper installation instructionsincluded with the equipment. See Add-OnElectrical Equipment 0 234.
CautionHanging heavy equipment from thepower outlet can cause damage notcovered by the vehicle warranty. Thepower outlets are designed for accessorypower plugs only, such as cell phonecharge cords.
Wireless ChargingIf equipped, the vehicle has wirelesscharging in the storage bin at the back ofthe floor console. The system operates at145 kHz and wirelessly charges one Qicompatible smartphone. The power outputof the system is capable of charging at arate up to 1 amp (5W), as requested by thecompatible smartphone. See RadioFrequency Statement 0 334.
{ WarningWireless charging may affect theoperation of an implanted pacemaker orother medical devices. If you have one, itis recommended to consult with yourdoctor before using the wireless chargingsystem.
The vehicle must be on, in ACC/ACCESSORY,or Retained Accessory Power (RAP) must beactive. The wireless charging feature maynot correctly indicate charging when thevehicle is in RAP, during a Bluetooth phonecall, or when phone projection (e.g. AppleCarPlay / Android Auto) is active. SeeRetained Accessory Power (RAP) 0 204.
The operating temperature is −40 °C (−40 °F)to 85 °C (185 °F) for the charging system and0 °C (32 °F) to 35 °C (95 °F) for the phone.A charging stopped alert may be displayedon the infotainment screen, if the wirelesscharger or smartphone are outside ofnormal operating temperature. Charging willautomatically resume when a normaloperating temperature is reached.
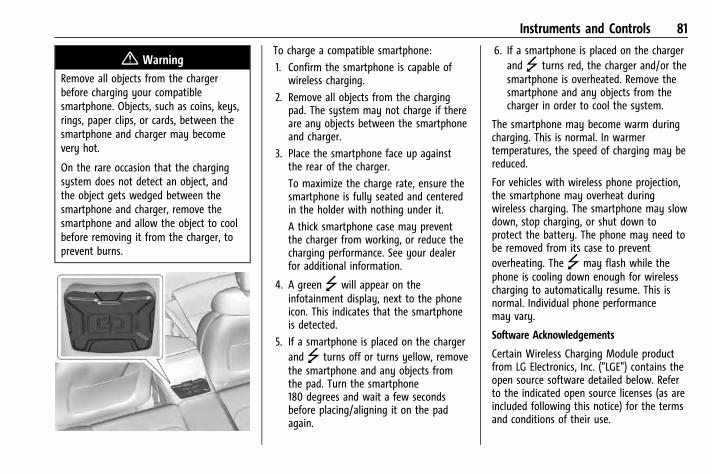
Chevrolet Camaro Owner Manual (GMNA-Localizing-U.S./Canada/Mexico-15516346) - 2022 - CRC - 4/9/21
Instruments and Controls 81
{ WarningRemove all objects from the chargerbefore charging your compatiblesmartphone. Objects, such as coins, keys,rings, paper clips, or cards, between thesmartphone and charger may becomevery hot.
On the rare occasion that the chargingsystem does not detect an object, andthe object gets wedged between thesmartphone and charger, remove thesmartphone and allow the object to coolbefore removing it from the charger, toprevent burns.
To charge a compatible smartphone:
1. Confirm the smartphone is capable ofwireless charging.
2. Remove all objects from the chargingpad. The system may not charge if thereare any objects between the smartphoneand charger.
3. Place the smartphone face up againstthe rear of the charger.
To maximize the charge rate, ensure thesmartphone is fully seated and centeredin the holder with nothing under it.
A thick smartphone case may preventthe charger from working, or reduce thecharging performance. See your dealerfor additional information.
4. A green ] will appear on theinfotainment display, next to the phoneicon. This indicates that the smartphoneis detected.
5. If a smartphone is placed on the chargerand ] turns off or turns yellow, removethe smartphone and any objects fromthe pad. Turn the smartphone180 degrees and wait a few secondsbefore placing/aligning it on the padagain.
6. If a smartphone is placed on the chargerand ] turns red, the charger and/or thesmartphone is overheated. Remove thesmartphone and any objects from thecharger in order to cool the system.
The smartphone may become warm duringcharging. This is normal. In warmertemperatures, the speed of charging may bereduced.
For vehicles with wireless phone projection,the smartphone may overheat duringwireless charging. The smartphone may slowdown, stop charging, or shut down toprotect the battery. The phone may need tobe removed from its case to preventoverheating. The ] may flash while thephone is cooling down enough for wirelesscharging to automatically resume. This isnormal. Individual phone performancemay vary.
Software Acknowledgements
Certain Wireless Charging Module productfrom LG Electronics, Inc. ("LGE") contains theopen source software detailed below. Referto the indicated open source licenses (as areincluded following this notice) for the termsand conditions of their use.
Chevrolet Camaro Owner Manual (GMNA-Localizing-U.S./Canada/Mexico-15516346) - 2022 - CRC - 4/9/21
82 Instruments and Controls
OSS Notice Information
To obtain the source code that is containedin this product, please visithttp://opensource.lge.com. In addition tothe source code, all referred license terms,warranty disclaimers and copyright noticesare available for download. LG Electronicswill also provide open source code to youon CD-ROM for a charge covering the cost ofperforming such distribution (such as thecost of media, shipping, and handling) uponemail request to [email protected]. Thisoffer is valid for three (3) years from thedate on which you purchased the product.
Freescale-WCT library
Copyright (c) 2012-2014 FreescaleSemiconductor, Inc.. All rights reserved.
Redistribution and use in source and binaryforms, with or without modification, arepermitted provided that the followingconditions are met:
1. Redistributions of source code mustretain the above copyright notice, thislist of conditions and the followingdisclaimer.
2. Redistributions in binary form mustreproduce the above copyright notice,this list of conditions and the following
disclaimer in the documentation and/orother materials provided with thedistribution.
3. Neither the name of the copyright holdernor the names of its contributors may beused to endorse or promote productsderived from this software withoutspecific prior written permission.
THIS SOFTWARE IS PROVIDED BY THECOPYRIGHT HOLDERS AND CONTRIBUTORS"AS IS" AND ANY EXPRESS OR IMPLIEDWARRANTIES, INCLUDING, BUT NOT LIMITEDTO, THE IMPLIED WARRANTIES OFMERCHANTABILITY AND FITNESS FOR APARTICULAR PURPOSE ARE DISCLAIMED. INNO EVENT SHALL THE COPYRIGHT HOLDEROR CONTRIBUTORS BE LIABLE FOR ANYDIRECT, INDIRECT, INCIDENTAL, SPECIAL,EXEMPLARY, OR CONSEQUENTIAL DAMAGES(INCLUDING, BUT NOT LIMITED TO,PROCUREMENT OF SUBSTITUTE GOODS ORSERVICES; LOSS OF USE, DATA, OR PROFITS;OR BUSINESS INTERRUPTION) HOWEVERCAUSED AND ON ANY THEORY OF LIABILITY,WHETHER IN CONTRACT, STRICT LIABILITY, ORTORT (INCLUDING NEGLIGENCE OROTHERWISE) ARISING IN ANY WAY OUT OFTHE USE OF THIS SOFTWARE, EVEN IFADVISED OF THE POSSIBILITY OF SUCHDAMAGE.
Warning Lights, Gauges, andIndicatorsWarning lights and gauges can signal thatsomething is wrong before it becomesserious enough to cause an expensive repairor replacement. Paying attention to thewarning lights and gauges could preventinjury.
Some warning lights come on briefly whenthe engine is started to indicate they areworking. When one of the warning lightscomes on and stays on while driving,or when one of the gauges shows theremay be a problem, check the section thatexplains what to do. Waiting to do repairscan be costly and even dangerous.
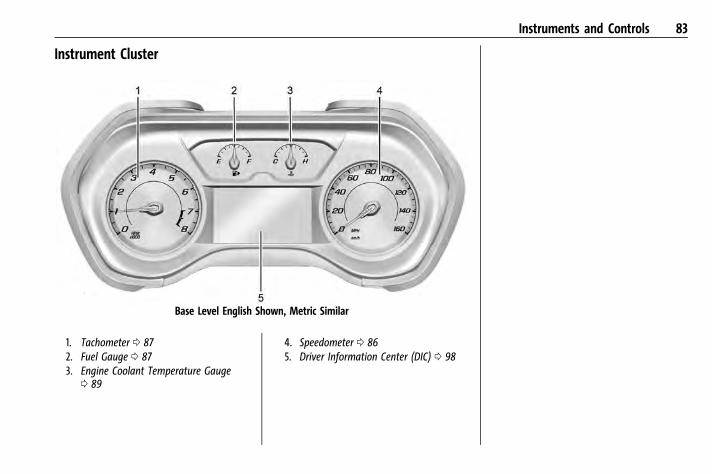
Chevrolet Camaro Owner Manual (GMNA-Localizing-U.S./Canada/Mexico-15516346) - 2022 - CRC - 4/9/21
Instruments and Controls 83
Instrument Cluster
Base Level English Shown, Metric Similar
1. Tachometer 0 872. Fuel Gauge 0 873. Engine Coolant Temperature Gauge
0 89
4. Speedometer 0 865. Driver Information Center (DIC) 0 98

Chevrolet Camaro Owner Manual (GMNA-Localizing-U.S./Canada/Mexico-15516346) - 2022 - CRC - 4/9/21
84 Instruments and Controls
Uplevel English Standard Theme Shown, Metric Similar
1. Tachometer 0 872. Engine Oil Pressure Gauge (Uplevel
Cluster Only) 0 883. Engine Coolant Temperature Gauge
0 894. Fuel Gauge 0 875. Boost Gauge (Uplevel Cluster Only)
0 88
Voltmeter Gauge (Uplevel Cluster Only)0 90
6. Speedometer 0 867. Driver Information Center (DIC) 0 98
See the Camaro High Performancesupplement for more information.
Reconfigurable Instrument Cluster
To change the theme for the uplevel cluster:
1. Find the Options page in one of theinteractive display zones on the cluster.
2. Press SEL to enter the Options menu.
3. Scroll down to highlight Display Theme,then press p to enter the DisplayTheme menu.
4. Press SEL to select the desired clusterconfiguration.
5. Exit the Display Theme menu bypressing o.
Cluster Menu
There is an interactive display area in thecenter of the instrument cluster.
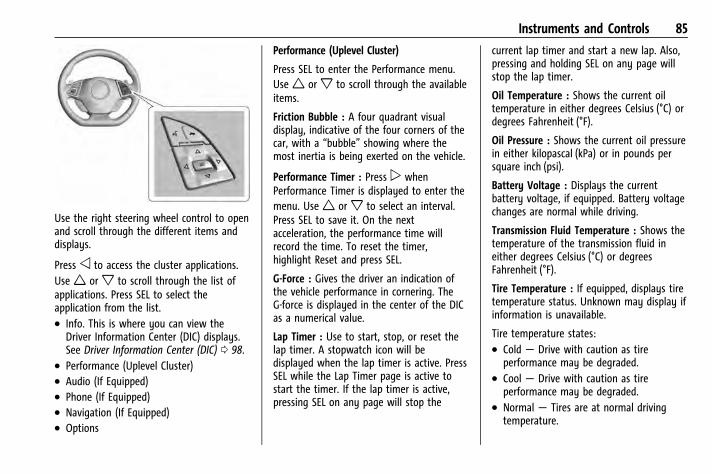
Chevrolet Camaro Owner Manual (GMNA-Localizing-U.S./Canada/Mexico-15516346) - 2022 - CRC - 4/9/21
Instruments and Controls 85
Use the right steering wheel control to openand scroll through the different items anddisplays.
Press o to access the cluster applications.Use w or x to scroll through the list ofapplications. Press SEL to select theapplication from the list.. Info. This is where you can view the
Driver Information Center (DIC) displays.See Driver Information Center (DIC) 0 98.
. Performance (Uplevel Cluster)
. Audio (If Equipped)
. Phone (If Equipped)
. Navigation (If Equipped)
. Options
Performance (Uplevel Cluster)
Press SEL to enter the Performance menu.Use w or x to scroll through the availableitems.
Friction Bubble : A four quadrant visualdisplay, indicative of the four corners of thecar, with a “bubble” showing where themost inertia is being exerted on the vehicle.
Performance Timer : Press p whenPerformance Timer is displayed to enter themenu. Use w or x to select an interval.Press SEL to save it. On the nextacceleration, the performance time willrecord the time. To reset the timer,highlight Reset and press SEL.
G-Force : Gives the driver an indication ofthe vehicle performance in cornering. TheG-force is displayed in the center of the DICas a numerical value.
Lap Timer : Use to start, stop, or reset thelap timer. A stopwatch icon will bedisplayed when the lap timer is active. PressSEL while the Lap Timer page is active tostart the timer. If the lap timer is active,pressing SEL on any page will stop the
current lap timer and start a new lap. Also,pressing and holding SEL on any page willstop the lap timer.
Oil Temperature : Shows the current oiltemperature in either degrees Celsius (°C) ordegrees Fahrenheit (°F).
Oil Pressure : Shows the current oil pressurein either kilopascal (kPa) or in pounds persquare inch (psi).
Battery Voltage : Displays the currentbattery voltage, if equipped. Battery voltagechanges are normal while driving.
Transmission Fluid Temperature : Shows thetemperature of the transmission fluid ineither degrees Celsius (°C) or degreesFahrenheit (°F).
Tire Temperature : If equipped, displays tiretemperature status. Unknown may display ifinformation is unavailable.
Tire temperature states:. Cold — Drive with caution as tire
performance may be degraded.. Cool — Drive with caution as tire
performance may be degraded.. Normal — Tires are at normal driving
temperature.
Chevrolet Camaro Owner Manual (GMNA-Localizing-U.S./Canada/Mexico-15516346) - 2022 - CRC - 4/9/21
86 Instruments and Controls. Warm — Tires are ready for aggressive
driving.. Overheated — Tire temperature may be
higher than optimal.
Audio
If equipped, while the audio app is open,use w or x to change the radio station orseek to the next or previous track,depending on the current audio source.Press p to enter the Audio menu. In theAudio menu browse for music, select fromthe favorites, or change the audio source.
Phone
If equipped, press p to enter the Phonemenu. In the Phone menu, if there is noactive phone call, view recent calls, or scrollthrough contacts. If there is an active call,mute or unmute the phone or switch tohandset or hands-free operation.
Navigation
If equipped, press p to enter theNavigation menu. If there is no active route,a compass will be displayed. If there is anactive route, press SEL to cancel routeguidance or turn the voice prompts on/off.
Options
Press SEL to enter the Options menu. Usew or x to scroll through items inthe menu.
Units : Press p while Units is displayed toenter the Units menu. Choose US or Metricunits by pressing SEL while the desired itemis highlighted.
Speed Warning : The Speed Warning displayallows the driver to set a speed that theydo not want to exceed. To set the SpeedWarning, press p when Speed Warning isdisplayed. Enable the speed warning andthen use w or x to adjust the value. PressSEL to set the speed. Once the speed is set,this feature can be turned off by pressingSEL while viewing this page. If the selectedspeed limit is exceeded, a pop-up warning isdisplayed with a chime.
Display Theme (Uplevel) : Press SEL whileDisplay Theme is highlighted to change theconfiguration of the uplevel cluster. See“Reconfigurable Instrument Cluster” earlierin this section.
Launch Control : If equipped, the LaunchControl display allows the driver to adjustthe parameters of the Launch ControlSystem. See Track Events and CompetitiveDriving 0 185.
Head-Up Display (HUD) Rotation :If equipped, this feature allows for adjustingthe angle of the HUD image. Press SEL onthe steering wheel controls while Head-UpDisplay Rotation is highlighted to enterAdjust Mode. Press w or x to highlightOK, then press SEL to save the setting.Cancel can also be selected to cancel thesetting. The vehicle must be on P (Park).
Info Pages : Press p while Info Pages ishighlighted to select the items to bedisplayed in the DIC info displays. See DriverInformation Center (DIC) 0 98.
Software Info : Displays open sourcesoftware information.
SpeedometerThe speedometer shows the vehicle's speedin either kilometers per hour (km/h) ormiles per hour (mph).
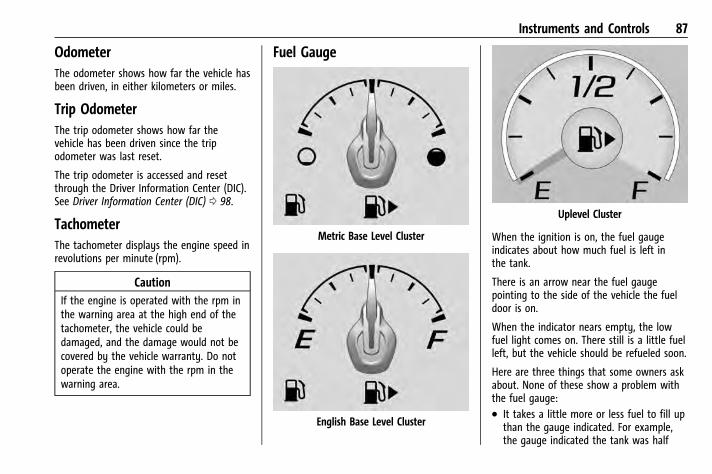
Chevrolet Camaro Owner Manual (GMNA-Localizing-U.S./Canada/Mexico-15516346) - 2022 - CRC - 4/9/21
Instruments and Controls 87
OdometerThe odometer shows how far the vehicle hasbeen driven, in either kilometers or miles.
Trip OdometerThe trip odometer shows how far thevehicle has been driven since the tripodometer was last reset.
The trip odometer is accessed and resetthrough the Driver Information Center (DIC).See Driver Information Center (DIC) 0 98.
TachometerThe tachometer displays the engine speed inrevolutions per minute (rpm).
CautionIf the engine is operated with the rpm inthe warning area at the high end of thetachometer, the vehicle could bedamaged, and the damage would not becovered by the vehicle warranty. Do notoperate the engine with the rpm in thewarning area.
Fuel Gauge
Metric Base Level Cluster
English Base Level Cluster
Uplevel Cluster
When the ignition is on, the fuel gaugeindicates about how much fuel is left inthe tank.
There is an arrow near the fuel gaugepointing to the side of the vehicle the fueldoor is on.
When the indicator nears empty, the lowfuel light comes on. There still is a little fuelleft, but the vehicle should be refueled soon.
Here are three things that some owners askabout. None of these show a problem withthe fuel gauge:. It takes a little more or less fuel to fill up
than the gauge indicated. For example,the gauge indicated the tank was half
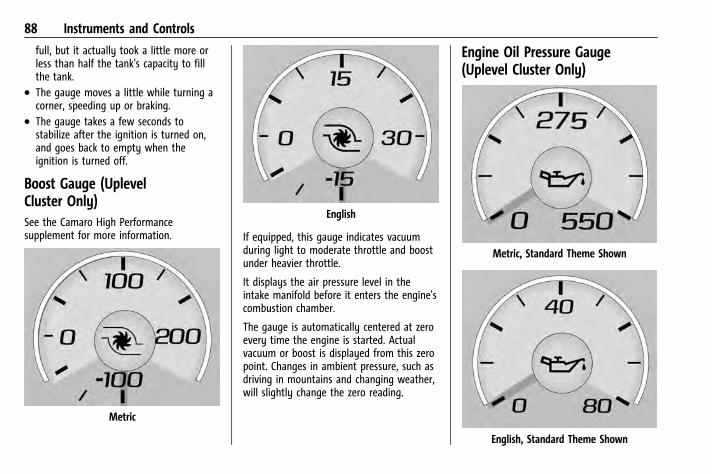
Chevrolet Camaro Owner Manual (GMNA-Localizing-U.S./Canada/Mexico-15516346) - 2022 - CRC - 4/9/21
88 Instruments and Controls
full, but it actually took a little more orless than half the tank's capacity to fillthe tank.
. The gauge moves a little while turning acorner, speeding up or braking.
. The gauge takes a few seconds tostabilize after the ignition is turned on,and goes back to empty when theignition is turned off.
Boost Gauge (UplevelCluster Only)See the Camaro High Performancesupplement for more information.
Metric
English
If equipped, this gauge indicates vacuumduring light to moderate throttle and boostunder heavier throttle.
It displays the air pressure level in theintake manifold before it enters the engine'scombustion chamber.
The gauge is automatically centered at zeroevery time the engine is started. Actualvacuum or boost is displayed from this zeropoint. Changes in ambient pressure, such asdriving in mountains and changing weather,will slightly change the zero reading.
Engine Oil Pressure Gauge(Uplevel Cluster Only)
Metric, Standard Theme Shown
English, Standard Theme Shown
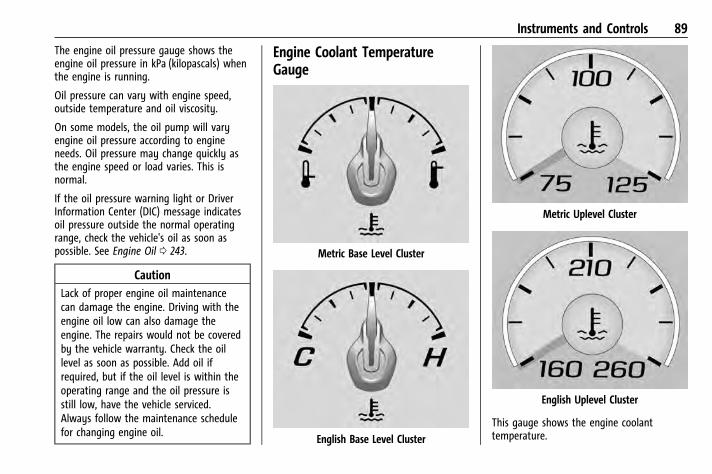
Chevrolet Camaro Owner Manual (GMNA-Localizing-U.S./Canada/Mexico-15516346) - 2022 - CRC - 4/9/21
Instruments and Controls 89
The engine oil pressure gauge shows theengine oil pressure in kPa (kilopascals) whenthe engine is running.
Oil pressure can vary with engine speed,outside temperature and oil viscosity.
On some models, the oil pump will varyengine oil pressure according to engineneeds. Oil pressure may change quickly asthe engine speed or load varies. This isnormal.
If the oil pressure warning light or DriverInformation Center (DIC) message indicatesoil pressure outside the normal operatingrange, check the vehicle's oil as soon aspossible. See Engine Oil 0 243.
CautionLack of proper engine oil maintenancecan damage the engine. Driving with theengine oil low can also damage theengine. The repairs would not be coveredby the vehicle warranty. Check the oillevel as soon as possible. Add oil ifrequired, but if the oil level is within theoperating range and the oil pressure isstill low, have the vehicle serviced.Always follow the maintenance schedulefor changing engine oil.
Engine Coolant TemperatureGauge
Metric Base Level Cluster
English Base Level Cluster
Metric Uplevel Cluster
English Uplevel Cluster
This gauge shows the engine coolanttemperature.
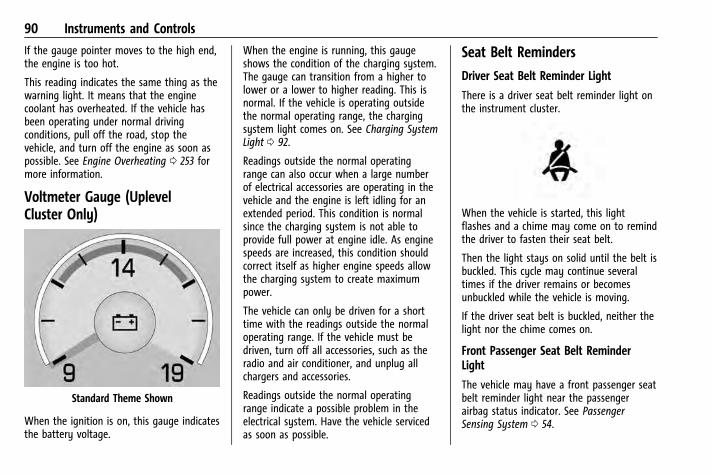
Chevrolet Camaro Owner Manual (GMNA-Localizing-U.S./Canada/Mexico-15516346) - 2022 - CRC - 4/9/21
90 Instruments and Controls
If the gauge pointer moves to the high end,the engine is too hot.
This reading indicates the same thing as thewarning light. It means that the enginecoolant has overheated. If the vehicle hasbeen operating under normal drivingconditions, pull off the road, stop thevehicle, and turn off the engine as soon aspossible. See Engine Overheating 0 253 formore information.
Voltmeter Gauge (UplevelCluster Only)
Standard Theme Shown
When the ignition is on, this gauge indicatesthe battery voltage.
When the engine is running, this gaugeshows the condition of the charging system.The gauge can transition from a higher tolower or a lower to higher reading. This isnormal. If the vehicle is operating outsidethe normal operating range, the chargingsystem light comes on. See Charging SystemLight 0 92.
Readings outside the normal operatingrange can also occur when a large numberof electrical accessories are operating in thevehicle and the engine is left idling for anextended period. This condition is normalsince the charging system is not able toprovide full power at engine idle. As enginespeeds are increased, this condition shouldcorrect itself as higher engine speeds allowthe charging system to create maximumpower.
The vehicle can only be driven for a shorttime with the readings outside the normaloperating range. If the vehicle must bedriven, turn off all accessories, such as theradio and air conditioner, and unplug allchargers and accessories.
Readings outside the normal operatingrange indicate a possible problem in theelectrical system. Have the vehicle servicedas soon as possible.
Seat Belt Reminders
Driver Seat Belt Reminder Light
There is a driver seat belt reminder light onthe instrument cluster.
When the vehicle is started, this lightflashes and a chime may come on to remindthe driver to fasten their seat belt.
Then the light stays on solid until the belt isbuckled. This cycle may continue severaltimes if the driver remains or becomesunbuckled while the vehicle is moving.
If the driver seat belt is buckled, neither thelight nor the chime comes on.
Front Passenger Seat Belt ReminderLight
The vehicle may have a front passenger seatbelt reminder light near the passengerairbag status indicator. See PassengerSensing System 0 54.
Chevrolet Camaro Owner Manual (GMNA-Localizing-U.S./Canada/Mexico-15516346) - 2022 - CRC - 4/9/21
Instruments and Controls 91
When the vehicle is started, this lightflashes and a chime may come on to remindpassengers to fasten their seat belt.
Then the light stays on solid until the belt isbuckled. This cycle continues several times ifthe front passenger remains or becomesunbuckled while the vehicle is moving.
If the front passenger seat belt is buckled,neither the chime nor the light comes on.
The front passenger seat belt reminder lightand chime may come on if an object is puton the seat such as a briefcase, handbag,grocery bag, laptop, or other electronicdevice. To turn off the reminder light and/orchime, remove the object from the seat orbuckle the seat belt.
Airbag Readiness LightThis light shows if there is an electricalproblem with the airbag system. It islocated in the instrument cluster. Thesystem check includes the airbag sensor(s),
the passenger sensing system, thepretensioners, the airbag modules, thewiring, and the crash sensing and diagnosticmodule. For more information on the airbagsystem, see Airbag System 0 48.
The airbag readiness light comes on forseveral seconds when the vehicle is started.If the light does not come on then, have itfixed immediately.
{ WarningIf the airbag readiness light stays onafter the vehicle is started or comes onwhile driving, it means the airbag systemmight not be working properly. Theairbags in the vehicle might not inflate ina crash, or they could even inflatewithout a crash. To help avoid injury,have the vehicle serviced right away.
If there is a problem with the airbagsystem, a Driver Information Center (DIC)message may also come on.
Passenger Airbag Status IndicatorThe vehicle has a passenger sensing system.See Passenger Sensing System 0 54 forimportant safety information. The overheadconsole has a passenger airbag statusindicator.
United States
Canada and Mexico
When the vehicle is started, the passengerairbag status indicator will light ON and OFF,or the symbols for on and off, for several
Chevrolet Camaro Owner Manual (GMNA-Localizing-U.S./Canada/Mexico-15516346) - 2022 - CRC - 4/9/21
92 Instruments and Controls
seconds as a system check. Then, afterseveral seconds, the status indicator willlight either ON or OFF, or either the on oroff symbol, to let you know the status ofthe front outboard passenger frontal airbagand knee airbag.
If the word ON or the on symbol is lit onthe passenger airbag status indicator, itmeans that the front outboard passengerfrontal airbag and knee airbag are allowedto inflate.
If the word OFF or the off symbol is lit onthe passenger airbag status indicator, itmeans that the passenger sensing systemhas turned off the front outboard passengerfrontal airbag and knee airbag.
If, after several seconds, both statusindicator lights remain on, or if there are nolights at all, there may be a problem withthe lights or the passenger sensing system.See your dealer for service.
{ WarningIf the airbag readiness light ever comeson and stays on, it means thatsomething may be wrong with the airbagsystem. To help avoid injury to yourself
(Continued)
Warning (Continued)
or others, have the vehicle serviced rightaway. See Airbag Readiness Light 0 91 formore information, including importantsafety information.
Charging System Light
The charging system light comes on brieflywhen the ignition is turned on, but theengine is not running, as a check to showthe light is working. It should go out whenthe engine is started.
If the light stays on, or comes on whiledriving, there may be a problem with theelectrical charging system. Have it checkedby your dealer. Driving while this light is oncould drain the battery.
When this light comes on, or is flashing, theDriver Information Center (DIC) also displaysa message.
If a short distance must be driven with thelight on, be sure to turn off all accessories,such as the radio and air conditioner. Find asafe place to stop the vehicle.
Malfunction Indicator LampThis light is part of the vehicle’s emissioncontrol on-board diagnostic system. If thislight is on while the engine is running, amalfunction has been detected and thevehicle may require service. The light shouldcome on to show that it is working whenthe ignition is in Service Mode. See IgnitionPositions 0 200.
Malfunctions are often indicated by thesystem before any problem is noticeable.Being aware of the light and seeking servicepromptly when it comes on may preventdamage.
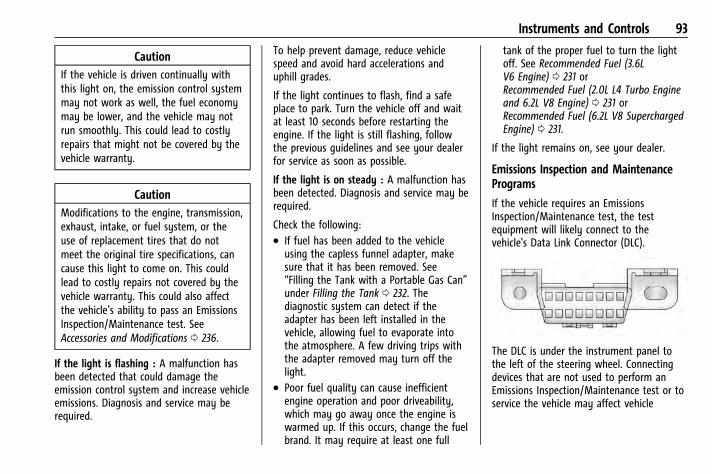
Chevrolet Camaro Owner Manual (GMNA-Localizing-U.S./Canada/Mexico-15516346) - 2022 - CRC - 4/9/21
Instruments and Controls 93
CautionIf the vehicle is driven continually withthis light on, the emission control systemmay not work as well, the fuel economymay be lower, and the vehicle may notrun smoothly. This could lead to costlyrepairs that might not be covered by thevehicle warranty.
CautionModifications to the engine, transmission,exhaust, intake, or fuel system, or theuse of replacement tires that do notmeet the original tire specifications, cancause this light to come on. This couldlead to costly repairs not covered by thevehicle warranty. This could also affectthe vehicle’s ability to pass an EmissionsInspection/Maintenance test. SeeAccessories and Modifications 0 236.
If the light is flashing : A malfunction hasbeen detected that could damage theemission control system and increase vehicleemissions. Diagnosis and service may berequired.
To help prevent damage, reduce vehiclespeed and avoid hard accelerations anduphill grades.
If the light continues to flash, find a safeplace to park. Turn the vehicle off and waitat least 10 seconds before restarting theengine. If the light is still flashing, followthe previous guidelines and see your dealerfor service as soon as possible.
If the light is on steady : A malfunction hasbeen detected. Diagnosis and service may berequired.
Check the following:. If fuel has been added to the vehicle
using the capless funnel adapter, makesure that it has been removed. See“Filling the Tank with a Portable Gas Can”under Filling the Tank 0 232. Thediagnostic system can detect if theadapter has been left installed in thevehicle, allowing fuel to evaporate intothe atmosphere. A few driving trips withthe adapter removed may turn off thelight.
. Poor fuel quality can cause inefficientengine operation and poor driveability,which may go away once the engine iswarmed up. If this occurs, change the fuelbrand. It may require at least one full
tank of the proper fuel to turn the lightoff. See Recommended Fuel (3.6LV6 Engine) 0 231 orRecommended Fuel (2.0L L4 Turbo Engineand 6.2L V8 Engine) 0 231 orRecommended Fuel (6.2L V8 SuperchargedEngine) 0 231.
If the light remains on, see your dealer.
Emissions Inspection and MaintenancePrograms
If the vehicle requires an EmissionsInspection/Maintenance test, the testequipment will likely connect to thevehicle's Data Link Connector (DLC).
The DLC is under the instrument panel tothe left of the steering wheel. Connectingdevices that are not used to perform anEmissions Inspection/Maintenance test or toservice the vehicle may affect vehicle
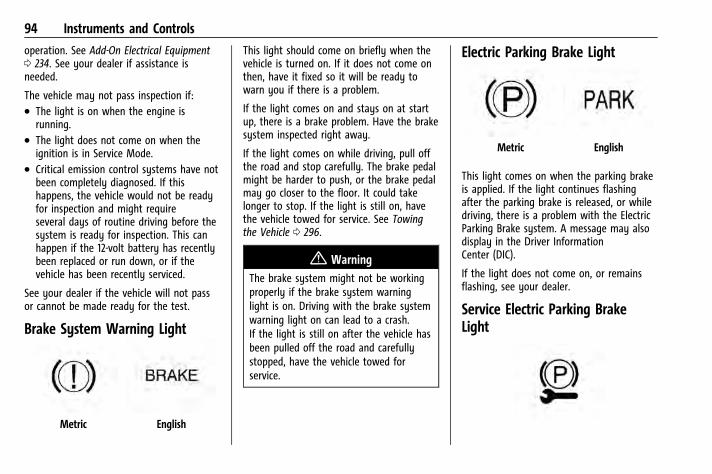
Chevrolet Camaro Owner Manual (GMNA-Localizing-U.S./Canada/Mexico-15516346) - 2022 - CRC - 4/9/21
94 Instruments and Controls
operation. See Add-On Electrical Equipment0 234. See your dealer if assistance isneeded.
The vehicle may not pass inspection if:. The light is on when the engine is
running.. The light does not come on when the
ignition is in Service Mode.. Critical emission control systems have not
been completely diagnosed. If thishappens, the vehicle would not be readyfor inspection and might requireseveral days of routine driving before thesystem is ready for inspection. This canhappen if the 12-volt battery has recentlybeen replaced or run down, or if thevehicle has been recently serviced.
See your dealer if the vehicle will not passor cannot be made ready for the test.
Brake System Warning Light
Metric English
This light should come on briefly when thevehicle is turned on. If it does not come onthen, have it fixed so it will be ready towarn you if there is a problem.
If the light comes on and stays on at startup, there is a brake problem. Have the brakesystem inspected right away.
If the light comes on while driving, pull offthe road and stop carefully. The brake pedalmight be harder to push, or the brake pedalmay go closer to the floor. It could takelonger to stop. If the light is still on, havethe vehicle towed for service. See Towingthe Vehicle 0 296.
{ WarningThe brake system might not be workingproperly if the brake system warninglight is on. Driving with the brake systemwarning light on can lead to a crash.If the light is still on after the vehicle hasbeen pulled off the road and carefullystopped, have the vehicle towed forservice.
Electric Parking Brake Light
Metric English
This light comes on when the parking brakeis applied. If the light continues flashingafter the parking brake is released, or whiledriving, there is a problem with the ElectricParking Brake system. A message may alsodisplay in the Driver InformationCenter (DIC).
If the light does not come on, or remainsflashing, see your dealer.
Service Electric Parking BrakeLight
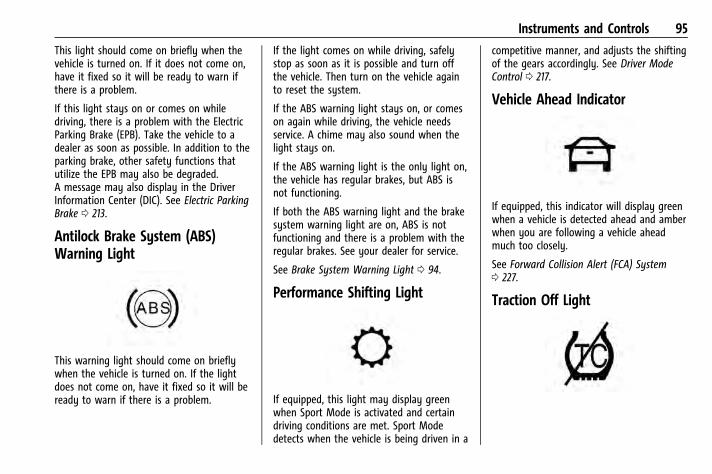
Chevrolet Camaro Owner Manual (GMNA-Localizing-U.S./Canada/Mexico-15516346) - 2022 - CRC - 4/9/21
Instruments and Controls 95
This light should come on briefly when thevehicle is turned on. If it does not come on,have it fixed so it will be ready to warn ifthere is a problem.
If this light stays on or comes on whiledriving, there is a problem with the ElectricParking Brake (EPB). Take the vehicle to adealer as soon as possible. In addition to theparking brake, other safety functions thatutilize the EPB may also be degraded.A message may also display in the DriverInformation Center (DIC). See Electric ParkingBrake 0 213.
Antilock Brake System (ABS)Warning Light
This warning light should come on brieflywhen the vehicle is turned on. If the lightdoes not come on, have it fixed so it will beready to warn if there is a problem.
If the light comes on while driving, safelystop as soon as it is possible and turn offthe vehicle. Then turn on the vehicle againto reset the system.
If the ABS warning light stays on, or comeson again while driving, the vehicle needsservice. A chime may also sound when thelight stays on.
If the ABS warning light is the only light on,the vehicle has regular brakes, but ABS isnot functioning.
If both the ABS warning light and the brakesystem warning light are on, ABS is notfunctioning and there is a problem with theregular brakes. See your dealer for service.
See Brake System Warning Light 0 94.
Performance Shifting Light
If equipped, this light may display greenwhen Sport Mode is activated and certaindriving conditions are met. Sport Modedetects when the vehicle is being driven in a
competitive manner, and adjusts the shiftingof the gears accordingly. See Driver ModeControl 0 217.
Vehicle Ahead Indicator
If equipped, this indicator will display greenwhen a vehicle is detected ahead and amberwhen you are following a vehicle aheadmuch too closely.
See Forward Collision Alert (FCA) System0 227.
Traction Off Light
Chevrolet Camaro Owner Manual (GMNA-Localizing-U.S./Canada/Mexico-15516346) - 2022 - CRC - 4/9/21
96 Instruments and Controls
This light comes on briefly when the vehicleis turned on. If it does not, have the vehicleserviced by your dealer. If the system isworking normally, the indicator light thenturns off.
The traction off light comes on when theTraction Control System (TCS) has beenturned off. If StabiliTrak/Electronic StabilityControl (ESC) is turned off, TCS is alsoturned off. To turn TCS and ESC off and on,see Traction Control/Electronic StabilityControl 0 215.
If TCS is off, wheel spin is not limited unlessnecessary to help protect the driveline fromdamage. Adjust driving accordingly.
StabiliTrak OFF Light
This light comes on briefly when the vehicleis turned on. If the light does not come on,have the vehicle serviced by your dealer.If the system is working normally, theindicator light then turns off.
This light comes on when the StabiliTrak/Electronic Stability Control (ESC) system isturned off. If StabiliTrak/ESC is off, theTraction Control System (TCS) is also off. Toturn ESC off and on, see Traction Control/Electronic Stability Control 0 215.
If ESC and TCS are off, the systems do notassist in controlling the vehicle. Adjustdriving accordingly.
Traction Control System (TCS)/StabiliTrak Light
This light comes on briefly when the vehicleis turned on.
If the light does not come on, have thevehicle serviced by your dealer. If thesystem is working normally, the indicatorlight turns off.
If the light is on and not flashing, the TCSand potentially the StabiliTrak/ESC systemare not fully operational and may not assistin maintaining control. Adjust driving
accordingly. If the condition persists, seeyour dealer as soon as possible. A DriverInformation Center (DIC) message maydisplay.
The light flashes when the TCS and/or theStabiliTrak/ESC system is actively working.
See Traction Control/Electronic StabilityControl 0 215.
Tire Pressure Light
For vehicles with the Tire Pressure MonitorSystem (TPMS), this light comes on brieflywhen the vehicle is started. It providesinformation about tire pressures andthe TPMS.
When the Light Is On Steady
This indicates that one or more of the tiresare significantly underinflated.
A Driver Information Center (DIC) tirepressure message may also display. Stop assoon as possible, and inflate the tires to the
Chevrolet Camaro Owner Manual (GMNA-Localizing-U.S./Canada/Mexico-15516346) - 2022 - CRC - 4/9/21
Instruments and Controls 97
pressure value shown on the Tire andLoading Information label. See Tire Pressure0 275.
When the Light Flashes First and Then Is OnSteady
If the light flashes for about a minute andthen stays on, there may be a problem withthe TPMS. If the problem is not corrected,the light will come on at every ignitioncycle. See Tire Pressure Monitor Operation0 278.
Engine Oil Pressure Light
CautionLack of proper engine oil maintenancecan damage the engine. Driving with theengine oil low can also damage theengine. The repairs would not be coveredby the vehicle warranty. Check the oillevel as soon as possible. Add oil ifrequired, but if the oil level is within theoperating range and the oil pressure isstill low, have the vehicle serviced.Always follow the maintenance schedulefor changing engine oil.
This light should come on briefly as theengine is started. If it does not come on,have the vehicle serviced by your dealer.
If the light comes on and stays on, it meansthat oil is not flowing through the engineproperly. The vehicle could be low on oiland might have some other systemproblem. See your dealer.
Low Fuel Warning Light
A Low Fuel Warning Light near the fuelgauge comes on briefly when the ignition isturned on as a check to show it is working.
It also comes on when the fuel gaugeindicator nears empty. The light turns offwhen fuel is added. If it does not, have thevehicle serviced.
Security Light
The security light should come on briefly asthe engine is started. If it does not come on,have the vehicle serviced by your dealer.If the system is working normally, theindicator light turns off.
If the light stays on and the engine doesnot start, there could be a problem with thetheft-deterrent system. See ImmobilizerOperation 0 22.
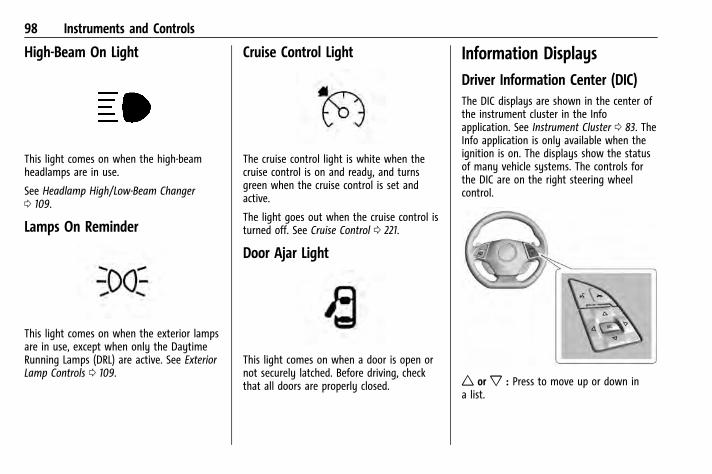
Chevrolet Camaro Owner Manual (GMNA-Localizing-U.S./Canada/Mexico-15516346) - 2022 - CRC - 4/9/21
98 Instruments and Controls
High-Beam On Light
This light comes on when the high-beamheadlamps are in use.
See Headlamp High/Low-Beam Changer0 109.
Lamps On Reminder
This light comes on when the exterior lampsare in use, except when only the DaytimeRunning Lamps (DRL) are active. See ExteriorLamp Controls 0 109.
Cruise Control Light
The cruise control light is white when thecruise control is on and ready, and turnsgreen when the cruise control is set andactive.
The light goes out when the cruise control isturned off. See Cruise Control 0 221.
Door Ajar Light
This light comes on when a door is open ornot securely latched. Before driving, checkthat all doors are properly closed.
Information DisplaysDriver Information Center (DIC)The DIC displays are shown in the center ofthe instrument cluster in the Infoapplication. See Instrument Cluster 0 83. TheInfo application is only available when theignition is on. The displays show the statusof many vehicle systems. The controls forthe DIC are on the right steering wheelcontrol.
w or x : Press to move up or down ina list.

Chevrolet Camaro Owner Manual (GMNA-Localizing-U.S./Canada/Mexico-15516346) - 2022 - CRC - 4/9/21
Instruments and Controls 99
o or p : Press o to open applicationmenus on the left. Press p to openinteraction menus on the right.
SEL : Press to select a menu item. Press andhold to reset values on certain screens.
DIC Info Pages
The following is the list of all possible DICinfo displays. Depending on the vehicle,some may not be available. Some itemsmay not be turned on by default but can beturned on through the Options app.
Current Speed : Displays the vehicle speedin either kilometers per hour (km/h) or milesper hour (mph).
Trip A or B/Average Fuel Economy : Tripdisplays the current distance traveled, ineither kilometers (km) or miles (mi), sincethe trip odometer was last reset. The tripodometer can be reset by pressing andholding SEL while this display is active.
Average Fuel Economy displays theapproximate average liters per100 kilometers (L/100 km) or miles pergallon (mpg). This number is calculatedbased on the number of L/100 km (mpg)recorded since the last time this menu itemwas reset. This number reflects only the
approximate average fuel economy that thevehicle has right now, and will change asdriving conditions change. The Average FuelEconomy can be reset by pressing andholding SEL while this display is active.
Average Speed: Displays the average speedof the vehicle in kilometers per hour (km/h)or miles per hour (mph). This average iscalculated based on the various vehiclespeeds recorded since the last reset of thisvalue. The average speed can be reset bypressing and holding SEL while this displayis active.
Fuel Range (Base Cluster) : Fuel Rangedisplays the approximate distance thevehicle can be driven without refueling. LOWwill be displayed when the vehicle is low onfuel. The fuel range estimate is based on anaverage of the vehicle's fuel economy overrecent driving history and the amount offuel remaining in the fuel tank.
Fuel Information (Base Cluster) or FuelRange/Instantaneous Fuel Economy (UplevelCluster) : Fuel Range displays theapproximate distance the vehicle can bedriven without refueling. LOW will bedisplayed when the vehicle is low on fuel.The fuel range estimate is based on an
average of the vehicle's fuel economy overrecent driving history and the amount offuel remaining in the fuel tank.
Instantaneous Fuel Economy displays thecurrent fuel economy in either liters per100 kilometers (L/100 km) or miles pergallon (mpg). This number reflects only theapproximate fuel economy that the vehiclehas right now and changes frequently asdriving conditions change.
This display may also show the number ofcylinders the vehicle is running on. SeeActive Fuel Management 0 205.
Fuel Economy Last XXX : Displays theaverage fuel economy over a set number ofkilometers or miles.
Average Speed : Displays the average speedof the vehicle in kilometers per hour (km/h)or miles per hour (mph). This average iscalculated based on the various vehiclespeeds recorded since the last reset of thisvalue. The average speed can be reset bypressing and holding SEL while this displayis active.
Timer : This display can be used as a timer.To start/stop the timer, press p while thisdisplay is active and then SEL to start/stopthe timer. The display will show the amount

Chevrolet Camaro Owner Manual (GMNA-Localizing-U.S./Canada/Mexico-15516346) - 2022 - CRC - 4/9/21
100 Instruments and Controls
of time that has passed since the timer waslast reset. To reset the timer to zero, pressand hold SEL or use p to access the menuwhile this display is active.
Oil Life : Displays an estimate of the oil'sremaining useful life. If REMAINING OIL LIFE99% is displayed, that means 99% of thecurrent oil life remains.
When the remaining oil life is low, theCHANGE ENGINE OIL SOON message willappear on the display. The oil should bechanged as soon as possible. See Engine Oil0 243. In addition to the engine oil lifesystem monitoring the oil life, additionalmaintenance is recommended. SeeMaintenance Schedule 0 307.
The Oil Life display must be reset after eachoil change. It will not reset itself. Do notreset the Oil Life display accidentally at anytime other than when the oil has just beenchanged. It cannot be reset accurately untilthe next oil change. To reset the engine oillife system, see Engine Oil Life System0 245.
Air Filter Life : If equipped, shows anestimate of the engine air filter’s remaininguseful life and the state of the system.Engine Air Filter Life 95% means 95% of the
current air filter life remains. Messages willdisplay based on the engine air filter lifeand the state of the system. When theREPLACE AT NEXT OIL CHANGE messagedisplays, the engine air filter should bereplaced at the time of the next oil change.When the REPLACE NOW message displays,the engine air filter should be replaced assoon as possible.
The Air Filter Life display must be reset afterthe engine air filter replacement. To reset,see Engine Air Filter Life System (2.0L LTGand 3.6L LGX Engines Only) 0 247.
Engine Hours : If equipped, shows the totalnumber of hours the engine has run.
Coolant Temperature : Displays the coolanttemperature in either degrees Celsius (°C) ordegrees Fahrenheit (°F).
Tire Pressure : Displays the approximatepressures of all four tires. Tire pressure isdisplayed in either kilopascal (kPa) or inpounds per square inch (psi). If the pressureis low, the value for that tire is shown inamber. See Tire Pressure Monitor System0 277 andTire Pressure Monitor Operation 0 278.
Battery Voltage : Displays the currentbattery voltage. The battery voltage canfluctuate while viewing this information onthe DIC. This is normal.
Speed Limit (Uplevel Cluster) : Displays signinformation, which comes from a roadwaydatabase in the onboard navigation.
Oil Temperature (Base Cluster) : Shows thecurrent oil temperature in either degreesCelsius (°C) or degrees Fahrenheit (°F). Thisdisplay is available in the Performance appon the uplevel cluster.
Oil Pressure (Base Cluster) : Shows thecurrent oil pressure in either kilopascal (kPa)or in pounds per square inch (psi). Thisdisplay is available in the Performance appon the uplevel cluster.
Performance Timer (Base Cluster) : Press pwhen Performance Timer is displayed toenter the menu. Press p while Set StartSpeed is highlighted then use w or x toenter the start speed. Press SEL to save it.Press p while Set End Speed is highlightedthen use w or x to enter the end speed.Press SEL to save it. After the start and endspeeds have been entered, press o to setthe Sport display to the set speeds and the
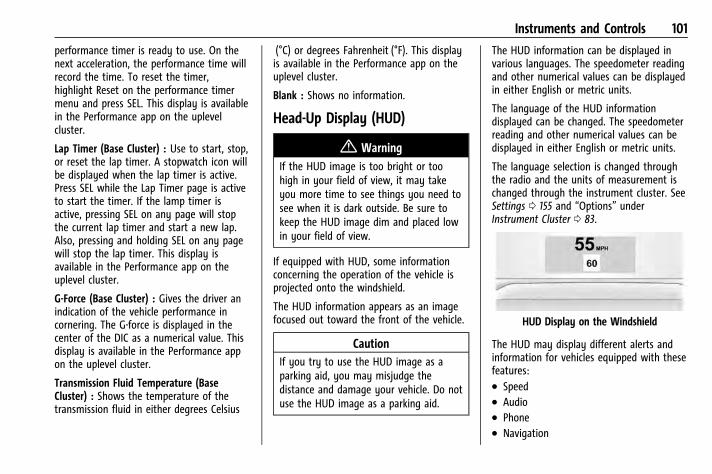
Chevrolet Camaro Owner Manual (GMNA-Localizing-U.S./Canada/Mexico-15516346) - 2022 - CRC - 4/9/21
Instruments and Controls 101
performance timer is ready to use. On thenext acceleration, the performance time willrecord the time. To reset the timer,highlight Reset on the performance timermenu and press SEL. This display is availablein the Performance app on the uplevelcluster.
Lap Timer (Base Cluster) : Use to start, stop,or reset the lap timer. A stopwatch icon willbe displayed when the lap timer is active.Press SEL while the Lap Timer page is activeto start the timer. If the lamp timer isactive, pressing SEL on any page will stopthe current lap timer and start a new lap.Also, pressing and holding SEL on any pagewill stop the lap timer. This display isavailable in the Performance app on theuplevel cluster.
G-Force (Base Cluster) : Gives the driver anindication of the vehicle performance incornering. The G-force is displayed in thecenter of the DIC as a numerical value. Thisdisplay is available in the Performance appon the uplevel cluster.
Transmission Fluid Temperature (BaseCluster) : Shows the temperature of thetransmission fluid in either degrees Celsius
(°C) or degrees Fahrenheit (°F). This displayis available in the Performance app on theuplevel cluster.
Blank : Shows no information.
Head-Up Display (HUD)
{ WarningIf the HUD image is too bright or toohigh in your field of view, it may takeyou more time to see things you need tosee when it is dark outside. Be sure tokeep the HUD image dim and placed lowin your field of view.
If equipped with HUD, some informationconcerning the operation of the vehicle isprojected onto the windshield.
The HUD information appears as an imagefocused out toward the front of the vehicle.
CautionIf you try to use the HUD image as aparking aid, you may misjudge thedistance and damage your vehicle. Do notuse the HUD image as a parking aid.
The HUD information can be displayed invarious languages. The speedometer readingand other numerical values can be displayedin either English or metric units.
The language of the HUD informationdisplayed can be changed. The speedometerreading and other numerical values can bedisplayed in either English or metric units.
The language selection is changed throughthe radio and the units of measurement ischanged through the instrument cluster. SeeSettings 0 155 and “Options” underInstrument Cluster 0 83.
HUD Display on the Windshield
The HUD may display different alerts andinformation for vehicles equipped with thesefeatures:. Speed. Audio. Phone. Navigation
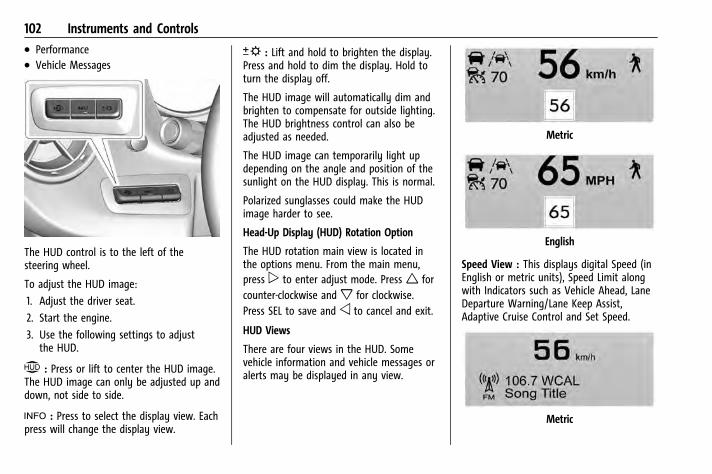
Chevrolet Camaro Owner Manual (GMNA-Localizing-U.S./Canada/Mexico-15516346) - 2022 - CRC - 4/9/21
102 Instruments and Controls. Performance. Vehicle Messages
The HUD control is to the left of thesteering wheel.
To adjust the HUD image:
1. Adjust the driver seat.
2. Start the engine.
3. Use the following settings to adjustthe HUD.
$ : Press or lift to center the HUD image.The HUD image can only be adjusted up anddown, not side to side.
! : Press to select the display view. Eachpress will change the display view.
D : Lift and hold to brighten the display.Press and hold to dim the display. Hold toturn the display off.
The HUD image will automatically dim andbrighten to compensate for outside lighting.The HUD brightness control can also beadjusted as needed.
The HUD image can temporarily light updepending on the angle and position of thesunlight on the HUD display. This is normal.
Polarized sunglasses could make the HUDimage harder to see.
Head-Up Display (HUD) Rotation Option
The HUD rotation main view is located inthe options menu. From the main menu,press p to enter adjust mode. Press w forcounter-clockwise and x for clockwise.Press SEL to save and o to cancel and exit.
HUD Views
There are four views in the HUD. Somevehicle information and vehicle messages oralerts may be displayed in any view.
Metric
English
Speed View : This displays digital Speed (inEnglish or metric units), Speed Limit alongwith Indicators such as Vehicle Ahead, LaneDeparture Warning/Lane Keep Assist,Adaptive Cruise Control and Set Speed.
Metric
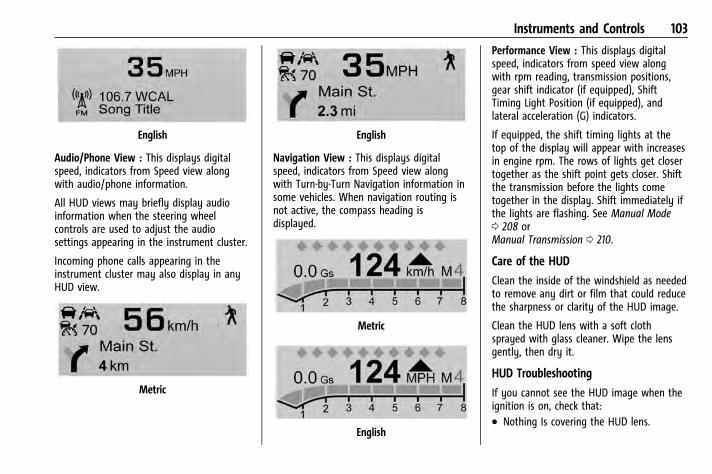
Chevrolet Camaro Owner Manual (GMNA-Localizing-U.S./Canada/Mexico-15516346) - 2022 - CRC - 4/9/21
Instruments and Controls 103
English
Audio/Phone View : This displays digitalspeed, indicators from Speed view alongwith audio/phone information.
All HUD views may briefly display audioinformation when the steering wheelcontrols are used to adjust the audiosettings appearing in the instrument cluster.
Incoming phone calls appearing in theinstrument cluster may also display in anyHUD view.
Metric
English
Navigation View : This displays digitalspeed, indicators from Speed view alongwith Turn-by-Turn Navigation information insome vehicles. When navigation routing isnot active, the compass heading isdisplayed.
Metric
English
Performance View : This displays digitalspeed, indicators from speed view alongwith rpm reading, transmission positions,gear shift indicator (if equipped), ShiftTiming Light Position (if equipped), andlateral acceleration (G) indicators.
If equipped, the shift timing lights at thetop of the display will appear with increasesin engine rpm. The rows of lights get closertogether as the shift point gets closer. Shiftthe transmission before the lights cometogether in the display. Shift immediately ifthe lights are flashing. See Manual Mode0 208 orManual Transmission 0 210.
Care of the HUD
Clean the inside of the windshield as neededto remove any dirt or film that could reducethe sharpness or clarity of the HUD image.
Clean the HUD lens with a soft clothsprayed with glass cleaner. Wipe the lensgently, then dry it.
HUD Troubleshooting
If you cannot see the HUD image when theignition is on, check that:. Nothing Is covering the HUD lens.
Chevrolet Camaro Owner Manual (GMNA-Localizing-U.S./Canada/Mexico-15516346) - 2022 - CRC - 4/9/21
104 Instruments and Controls. The HUD brightness is not too dim or too
bright.. The HUD is adjusted to the proper height.. Polarized sunglasses are not worn.. Windshield and HUD lens are clean.
If the HUD image is not correct, contactyour dealer.
The windshield is part of the HUD system.See Windshield Replacement 0 258.
Vehicle MessagesMessages displayed on the DIC indicate thestatus of the vehicle or some action thatmay be needed to correct a condition.Multiple messages may appear one afteranother.
The messages that do not requireimmediate action can be acknowledged andcleared by pressing SEL. The messages thatrequire immediate action cannot be cleareduntil that action is performed.
All messages should be taken seriously;clearing the message does not correct theproblem.
If a SERVICE message appears, see yourdealer.
Follow the instructions given in themessages. The system displays messagesregarding the following topics:. Service Messages. Fluid Levels. Vehicle Security. Brakes. Steering. Ride Control Systems. Driver Assistance Systems. Cruise Control. Lighting and Bulb Replacement. Wiper/Washer Systems. Doors and Windows. Seat Belts. Airbag Systems. Engine and Transmission. Tire Pressure. Engine Air Filter Life. Battery
Engine Power Messages
ENGINE POWER IS REDUCED
This message displays when the vehicle'spropulsion power is reduced. A reduction inpropulsion power can affect the vehicle's
ability to accelerate. If this message is on,but there is no observed reduction inperformance, proceed to your destination.Under certain conditions the performancemay be reduced the next time the vehicle isdriven. The vehicle may be driven while thismessage is on, but maximum accelerationand speed may be reduced. Anytime thismessage stays on, or displays repeatedly,the vehicle should be taken to your dealerfor service as soon as possible.
Under certain operating conditions,propulsion will be disabled. Try restartingafter the ignition has been off for30 seconds.
Vehicle Speed Messages
SPEED LIMITED TO XXX KM/H (MPH)
This message shows that the vehicle speedhas been limited to the speed displayed. Thelimited speed is a protection for variouspropulsion and vehicle systems, such aslubrication, thermal, brakes, suspension,Teen Driver if equipped, or tires.
Chevrolet Camaro Owner Manual (GMNA-Localizing-U.S./Canada/Mexico-15516346) - 2022 - CRC - 4/9/21
Instruments and Controls 105
Vehicle PersonalizationThe following are all possible vehiclepersonalization features. Depending on thevehicle, some may not be available.
For System, Apps, and Personal features andfunctions, see Settings 0 155.
To access the vehicle personalization menu:
1. Touch the Settings icon on the HomePage of the infotainment display.
2. Touch Vehicle to display a list ofavailable options.
3. Touch to select the desired featuresetting.
4. Touch9 or R to turn a feature off or on.
5. Touch z to go to the top level of theSettings menu.
The menu may contain the following:
Driving Mode
Touch and the following may display:. Engine Sound. Steering. Suspension
Engine Sound
Touch Engine Sound, then choose from theavailable options. See Driver Mode Control0 217.
Steering
Touch Steering, then choose from theavailable options. See Driver Mode Control0 217.
Suspension
Touch Suspension, then choose from theavailable options. See Driver Mode Control0 217.
Climate and Air Quality
Touch and the following may display:. Auto Fan Speed. Auto Cooled Seats. Auto Heated Seats. Auto Defog. Auto Rear Defog
Auto Fan Speed
This feature will set the auto fan speed.
Touch Low, Medium, or High.
Auto Cooled Seats
When enabled, this feature willautomatically activate the ventilated seatsat the level required by the interiortemperature. See Heated and VentilatedFront Seats 0 40.
Touch Off or On.
Auto Heated Seats
This setting automatically turns on andregulates the heated seats when the cabintemperature is cool. The auto heated seatscan be turned off by using the heated seatbuttons on the center stack. See Heated andVentilated Front Seats 0 40.
Touch Off or On.
Auto Defog
When turned on and high humidity isdetected, the climate control system mayadjust to outside air supply and turn on theair conditioner or the heater. The fan speedmay slightly increase to help preventfogging. When high humidity is no longerdetected, the system will return to its prioroperation.
Touch Off or On.
Chevrolet Camaro Owner Manual (GMNA-Localizing-U.S./Canada/Mexico-15516346) - 2022 - CRC - 4/9/21
106 Instruments and Controls
Auto Rear Defog
When on, this feature turns on the reardefogger at vehicle start when the interiortemperature is cold and fog is likely. Theauto rear defog function can be disabled bypressing1. When off, the feature can beturned on by pressing1. See “RearWindow Defogger” under Dual AutomaticClimate Control System 0 176.
Touch Off or On.
Collision/Detection Systems
Touch and the following may display:. Lane Change Alert. Park Assist. Rear Cross Traffic Alert
Lane Change Alert
This allows the Lane Change Alert feature tobe turned on or off. See Lane Change Alert(LCA) 0 229.
When Lane Change Alert is disabled, SideBlind Zone Alert is also disabled.
Touch Off or On.
Park Assist
If equipped, this feature can assist inbacking up and parking the vehicle. See ParkAssist 0 226.
Touch Off or On.
Rear Cross Traffic Alert
This allows the Rear Cross Traffic Alertfeature to be turned on or off. See “RearCross Traffic Alert” in Rear Cross Traffic Alert(RCTA) System 0 227.
Touch Off or On.
Comfort and Convenience
Touch and the following may display:. Chime Volume. Reverse Tilt Mirror
Chime Volume
This setting determines the chime volumelevel.
Touch the controls on the infotainmentdisplay to adjust the volume.
Reverse Tilt Mirror
When on, the driver, passenger, or bothdriver and passenger outside mirrors will tiltdownward when the vehicle is shifted into
R (Reverse) to improve visibility of theground near the rear wheels. They maymove from their tilted position when thevehicle is shifted out of R (Reverse) orturned off. See Reverse Tilt Mirrors 0 23.
Touch Off, On - Driver and Passenger, On -Driver, or On - Passenger.
Lighting
Touch and the following may display:. Ambient Lighting. Vehicle Locator Lights. Exit Lighting
Ambient Lighting
This setting allows the selection of availablecolors for the ambient lighting in thevehicle.
The Link to Drive Mode option will changethe ambient lighting to match the colorbeing used in the instrument cluster basedon the setting of the drive mode button.
This feature can be turned off or on.
Vehicle Locator Lights
This setting flashes the vehicle’s headlampswhen K is pressed on the Remote KeylessEntry (RKE) transmitter.
Chevrolet Camaro Owner Manual (GMNA-Localizing-U.S./Canada/Mexico-15516346) - 2022 - CRC - 4/9/21
Instruments and Controls 107
Touch Off or On.
Exit Lighting
This setting specifies how long theheadlamps stay on after the vehicle isturned off and exited.
Touch Off, 30 Seconds, 60 Seconds,or 120 Seconds.
Power Door Locks
Touch and the following may display:. Open Door Anti Lock Out. Auto Door Unlock. Delayed Door Lock
Open Door Anti Lock Out
This setting prevents the driver door fromlocking when the door is open. If thissetting is on, the Delayed Door Lock menuwill not be available.
Touch Off or On.
Auto Door Unlock
This allows selection of which of the doorswill automatically unlock when the vehicle isshifted into P (Park) with an automatictransmission or when the vehicle is turnedoff with a manual transmission.
Select Off, All Doors, or Driver Door.
Delayed Door Lock
When on, this feature will delay the lockingof the doors. To override the delay, pressthe power door lock switch on the door.
Touch Off or On.
Remote Lock, Unlock, and Start
Touch and the following may display:. Remote Unlock Light Feedback. Remote Lock Feedback. Remote Door Unlock. Remote Start Auto Cool Seats. Remote Start Auto Heat Seats. Remote Window Operation. Passive Door Unlock. Passive Door Lock. Remote Left in Vehicle Alert
Remote Unlock Light Feedback
This setting flashes the exterior lamps whenthe vehicle is unlocked with the RKEtransmitter.
Touch Off or Flash Lights.
Remote Lock Feedback
This setting specifies how the vehicleresponds when the vehicle is locked withthe RKE transmitter.
Touch Off, Lights and Horn, Lights Only,or Horn Only.
Remote Door Unlock
This setting specifies whether all doors,or just the driver door, unlock when pressingK on the RKE transmitter.
Touch All Doors or Driver Door.
Remote Start Auto Cool Seats
If equipped and turned on, this feature willturn the ventilated seats on when usingremote start on warm days.
Touch Off or On.
Remote Start Auto Heat Seats
This setting automatically turns on theheated seats when using the remote startfunction on cold days. See Heated andVentilated Front Seats 0 40 andRemote Vehicle Start 0 14.
Touch Off or On.
Chevrolet Camaro Owner Manual (GMNA-Localizing-U.S./Canada/Mexico-15516346) - 2022 - CRC - 4/9/21
108 Instruments and Controls
Remote Window Operation
If equipped, this feature enables remoteoperation of the windows with the RKEtransmitter. See Remote Keyless Entry (RKE)System Operation 0 7.
Touch Off or On.
Passive Door Unlock
This setting specifies which doors unlockwhen using the button on the driver doorhandle to unlock the vehicle.
Touch Off, All Doors, or Driver Door Only.
Passive Door Lock
This setting specifies if the vehicle willautomatically lock, or lock and provide analert after all the doors are closed, and youwalk away from the vehicle with the RKEtransmitter. See Remote Keyless Entry (RKE)System Operation 0 7.
Touch Off, On with Horn Chirp, or On.
Remote Left in Vehicle Alert
This feature sounds an alert when the RKEtransmitter is left in the vehicle. This menualso enables Remote No Longer in VehicleAlert.
Touch Off or On.
Seating Position
Touch and the following may display:. Seat Entry Memory. Seat Exit Memory
Seat Entry Memory
This feature automatically recalls thepreviously stored 1 or 2 button positionswhen the ignition is changed from off to onor ACC/ACCESSORY. See Memory Seats 0 37.
Touch Off or On.
Seat Exit Memory
This feature automatically recalls thepreviously stored exit button positions whenthe ignition is changed from on or ACC/ACCESSORY to off if the driver door is openor opened. See Memory Seats 0 37.
Touch Off or On.
Teen Driver
See Teen Driver 0 161.
Valet Mode
This will lock the infotainment system andsteering wheel controls. It may also limitaccess to vehicle storage locations,if equipped.
To enable valet mode:
1. Enter a four-digit code on the keypad.
2. Touch Enter to go to the confirmationscreen.
3. Re-enter the four-digit code.
Touch Lock or Unlock to lock or unlock thesystem. Touch Back to go back to theprevious menu.
Chevrolet Camaro Owner Manual (GMNA-Localizing-U.S./Canada/Mexico-15516346) - 2022 - CRC - 4/9/21
Lighting 109
LightingExterior LightingExterior Lamp Controls . . . . . . . . . . . . . . . . 109Headlamp High/Low-Beam Changer . . . 109Flash-to-Pass . . . . . . . . . . . . . . . . . . . . . . . . . . . 110Daytime Running Lamps (DRL) . . . . . . . . . 110Automatic Headlamp System . . . . . . . . . . 110Hazard Warning Flashers . . . . . . . . . . . . . . . 111Turn and Lane-Change Signals . . . . . . . . . . 111
Interior LightingInstrument Panel IlluminationControl . . . . . . . . . . . . . . . . . . . . . . . . . . . . . . . 112
Interior Lamps . . . . . . . . . . . . . . . . . . . . . . . . . 112Reading Lamps . . . . . . . . . . . . . . . . . . . . . . . . . 112
Lighting FeaturesEntry Lighting . . . . . . . . . . . . . . . . . . . . . . . . . . 112Exit Lighting . . . . . . . . . . . . . . . . . . . . . . . . . . . 113Theater Dimming . . . . . . . . . . . . . . . . . . . . . . 113Battery Load Management . . . . . . . . . . . . . 113Battery Power Protection . . . . . . . . . . . . . . 114Exterior Lighting Battery Saver . . . . . . . . . 114
Exterior LightingExterior Lamp Controls
The exterior lamp control is on the left sideof the steering wheel.
There are four positions:
P : Briefly turn to this position to turn theexterior lamps off and deactivate the AUTOmode. Turn again to reactivate the AUTOmode. When released, the control returns tothe AUTO position.
If equipped, the headlamps willautomatically reactivate when the vehicle isshifted out of P (Park).
AUTO : Automatically turns the exteriorlamps on and off, depending on outsidelighting.
AUTO also controls the Daytime RunningLamps (DRL). See Daytime Running Lamps(DRL) 0 110.
; : Turns on the parking lamps includingall lamps, except the headlamps.
5 : Turns on the headlamps together withthe parking lamps and instrument panellights.
A warning chime sounds if the driver door isopened when the vehicle is off and theheadlamps or parking lamps are on.
Headlamp High/Low-BeamChangerPush the turn signal lever away from youand release to turn the high beams on. Toreturn to low beams, push the lever againor pull it toward you and release.
This indicator light turns on in theinstrument cluster when the high-beamheadlamps are on.
Chevrolet Camaro Owner Manual (GMNA-Localizing-U.S./Canada/Mexico-15516346) - 2022 - CRC - 4/9/21
110 Lighting
Flash-to-PassThe flash-to-pass feature works with the lowbeams or Daytime Running Lamps (DRL) onor off.
To flash the high beams, pull the turn signallever all the way toward you, thenrelease it.
Daytime Running Lamps (DRL)DRL can make it easier for others to see thefront of your vehicle during the day. DRL arerequired on all vehicles first sold in Canada.
A light sensor on top of the instrumentpanel makes the DRL work, so be sure it isnot covered.
The dedicated DRL will come on when all ofthe following conditions are met:. The ignition is on.. The exterior lamps control is in AUTO,
or has been briefly turned toP to turnthe automatic light control on again.
. The light sensor determines it is daytime.
When the DRL are on, the headlamps,taillamps, sidemarker lamps, instrumentpanel lights, and other lamps will not be on.
The headlamps automatically change fromDRL to the regular headlamps depending onthe darkness of the surroundings. The otherlamps that come on with the headlamps willalso come on.
When it is bright enough outside, theheadlamps will go off and the DRL willcome on.
To turn the DRL off or on again, turn theexterior lamps control toP and thenrelease. For vehicles first sold in Canada, theDRL can only be turned off when the vehicleis parked.
The regular headlamp system should beturned on when needed.
Automatic Headlamp SystemWhen it is dark enough outside and theheadlamp switch is in AUTO, the automaticheadlamp system will turn on theheadlamps at the normal brightness alongwith other lamps such as the taillamps,sidemarker lamps, parking lamps, licenseplate lamps, and the instrument panellights. The radio lights will also be dim.
To turn off the automatic headlamp system,turn the exterior lamps switch to thePposition and then release. For vehicles first
sold in Canada, the transmission must be inP (Park), before the automatic headlampsystem can be turned off.
The vehicle has a light sensor on the top ofthe instrument panel. Do not cover thissensor, otherwise the system will come onwhenever the ignition is on.
The system may also turn on the headlampswhen driving through a parking garage,heavy overcast weather, or a tunnel. This isnormal.
There is a delay in the transition betweenthe daytime and nighttime operation of theDaytime Running Lamps (DRL) and theautomatic headlamp system so that drivingunder bridges or bright overhead streetlights does not affect the system. The DRLand automatic headlamp system will only
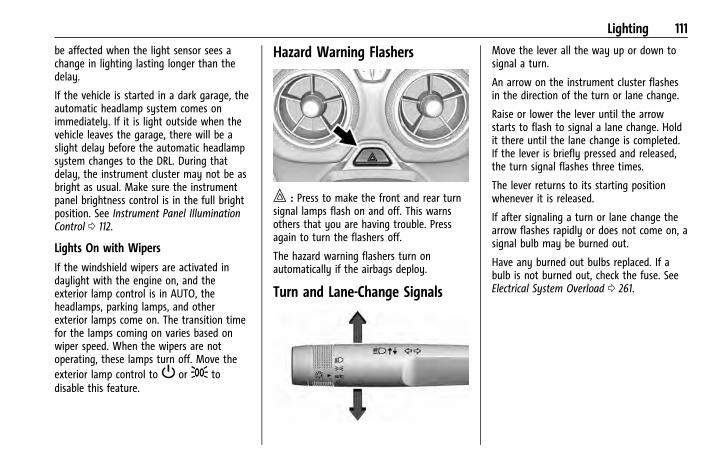
Chevrolet Camaro Owner Manual (GMNA-Localizing-U.S./Canada/Mexico-15516346) - 2022 - CRC - 4/9/21
Lighting 111
be affected when the light sensor sees achange in lighting lasting longer than thedelay.
If the vehicle is started in a dark garage, theautomatic headlamp system comes onimmediately. If it is light outside when thevehicle leaves the garage, there will be aslight delay before the automatic headlampsystem changes to the DRL. During thatdelay, the instrument cluster may not be asbright as usual. Make sure the instrumentpanel brightness control is in the full brightposition. See Instrument Panel IlluminationControl 0 112.
Lights On with Wipers
If the windshield wipers are activated indaylight with the engine on, and theexterior lamp control is in AUTO, theheadlamps, parking lamps, and otherexterior lamps come on. The transition timefor the lamps coming on varies based onwiper speed. When the wipers are notoperating, these lamps turn off. Move theexterior lamp control toP or; todisable this feature.
Hazard Warning Flashers
| : Press to make the front and rear turnsignal lamps flash on and off. This warnsothers that you are having trouble. Pressagain to turn the flashers off.
The hazard warning flashers turn onautomatically if the airbags deploy.
Turn and Lane-Change Signals
Move the lever all the way up or down tosignal a turn.
An arrow on the instrument cluster flashesin the direction of the turn or lane change.
Raise or lower the lever until the arrowstarts to flash to signal a lane change. Holdit there until the lane change is completed.If the lever is briefly pressed and released,the turn signal flashes three times.
The lever returns to its starting positionwhenever it is released.
If after signaling a turn or lane change thearrow flashes rapidly or does not come on, asignal bulb may be burned out.
Have any burned out bulbs replaced. If abulb is not burned out, check the fuse. SeeElectrical System Overload 0 261.
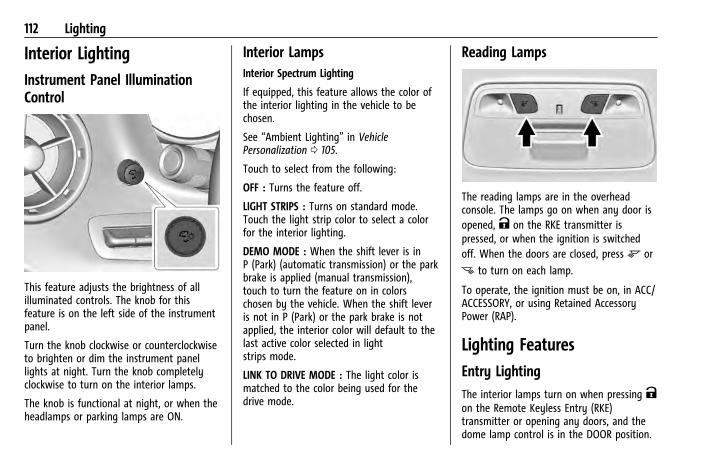
Chevrolet Camaro Owner Manual (GMNA-Localizing-U.S./Canada/Mexico-15516346) - 2022 - CRC - 4/9/21
112 Lighting
Interior LightingInstrument Panel IlluminationControl
This feature adjusts the brightness of allilluminated controls. The knob for thisfeature is on the left side of the instrumentpanel.
Turn the knob clockwise or counterclockwiseto brighten or dim the instrument panellights at night. Turn the knob completelyclockwise to turn on the interior lamps.
The knob is functional at night, or when theheadlamps or parking lamps are ON.
Interior LampsInterior Spectrum Lighting
If equipped, this feature allows the color ofthe interior lighting in the vehicle to bechosen.
See “Ambient Lighting” in VehiclePersonalization 0 105.
Touch to select from the following:
OFF : Turns the feature off.
LIGHT STRIPS : Turns on standard mode.Touch the light strip color to select a colorfor the interior lighting.
DEMO MODE : When the shift lever is inP (Park) (automatic transmission) or the parkbrake is applied (manual transmission),touch to turn the feature on in colorschosen by the vehicle. When the shift leveris not in P (Park) or the park brake is notapplied, the interior color will default to thelast active color selected in lightstrips mode.
LINK TO DRIVE MODE : The light color ismatched to the color being used for thedrive mode.
Reading Lamps
The reading lamps are in the overheadconsole. The lamps go on when any door isopened, K on the RKE transmitter ispressed, or when the ignition is switchedoff. When the doors are closed, press m or
n to turn on each lamp.
To operate, the ignition must be on, in ACC/ACCESSORY, or using Retained AccessoryPower (RAP).
Lighting FeaturesEntry LightingThe interior lamps turn on when pressing Kon the Remote Keyless Entry (RKE)transmitter or opening any doors, and thedome lamp control is in the DOOR position.
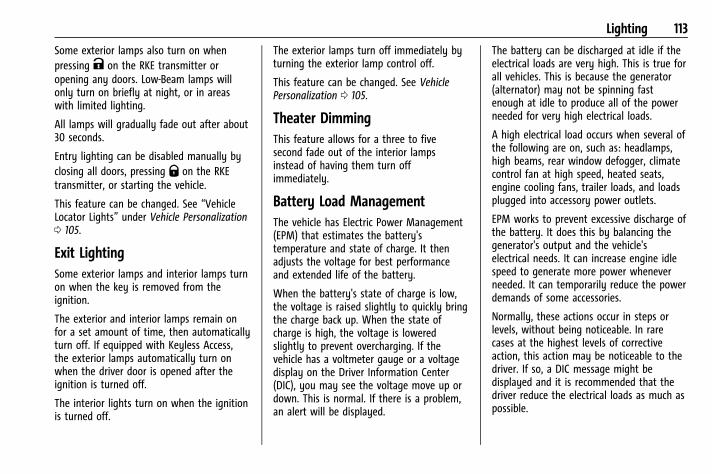
Chevrolet Camaro Owner Manual (GMNA-Localizing-U.S./Canada/Mexico-15516346) - 2022 - CRC - 4/9/21
Lighting 113
Some exterior lamps also turn on whenpressing K on the RKE transmitter oropening any doors. Low-Beam lamps willonly turn on briefly at night, or in areaswith limited lighting.
All lamps will gradually fade out after about30 seconds.
Entry lighting can be disabled manually byclosing all doors, pressing Q on the RKEtransmitter, or starting the vehicle.
This feature can be changed. See “VehicleLocator Lights” under Vehicle Personalization0 105.
Exit LightingSome exterior lamps and interior lamps turnon when the key is removed from theignition.
The exterior and interior lamps remain onfor a set amount of time, then automaticallyturn off. If equipped with Keyless Access,the exterior lamps automatically turn onwhen the driver door is opened after theignition is turned off.
The interior lights turn on when the ignitionis turned off.
The exterior lamps turn off immediately byturning the exterior lamp control off.
This feature can be changed. See VehiclePersonalization 0 105.
Theater DimmingThis feature allows for a three to fivesecond fade out of the interior lampsinstead of having them turn offimmediately.
Battery Load ManagementThe vehicle has Electric Power Management(EPM) that estimates the battery'stemperature and state of charge. It thenadjusts the voltage for best performanceand extended life of the battery.
When the battery's state of charge is low,the voltage is raised slightly to quickly bringthe charge back up. When the state ofcharge is high, the voltage is loweredslightly to prevent overcharging. If thevehicle has a voltmeter gauge or a voltagedisplay on the Driver Information Center(DIC), you may see the voltage move up ordown. This is normal. If there is a problem,an alert will be displayed.
The battery can be discharged at idle if theelectrical loads are very high. This is true forall vehicles. This is because the generator(alternator) may not be spinning fastenough at idle to produce all of the powerneeded for very high electrical loads.
A high electrical load occurs when several ofthe following are on, such as: headlamps,high beams, rear window defogger, climatecontrol fan at high speed, heated seats,engine cooling fans, trailer loads, and loadsplugged into accessory power outlets.
EPM works to prevent excessive discharge ofthe battery. It does this by balancing thegenerator's output and the vehicle'selectrical needs. It can increase engine idlespeed to generate more power wheneverneeded. It can temporarily reduce the powerdemands of some accessories.
Normally, these actions occur in steps orlevels, without being noticeable. In rarecases at the highest levels of correctiveaction, this action may be noticeable to thedriver. If so, a DIC message might bedisplayed and it is recommended that thedriver reduce the electrical loads as much aspossible.
Chevrolet Camaro Owner Manual (GMNA-Localizing-U.S./Canada/Mexico-15516346) - 2022 - CRC - 4/9/21
114 Lighting
Battery Power ProtectionThis feature helps prevent the battery frombeing drained, if the interior courtesy lampsor reading lamps are accidentally left on.If any of these lamps are left on, theyautomatically turn off after 10 minutes,if the ignition is off. The lamps will notcome back on again until one of thefollowing occurs:. The ignition is turned on.. The doors are closed and then re-opened.
Exterior Lighting Battery SaverThe exterior lamps turn off about 10 minutesafter the ignition is turned off, if the parkinglamps or headlamps have been manuallyleft on. This protects against draining thebattery. To restart the 10-minute timer, turnthe exterior lamp control to the O positionand then back to the; or2 position.
To keep the lamps on for more than10 minutes, the ignition must be on or inACC/ACCESSORY.
Chevrolet Camaro Owner Manual (GMNA-Localizing-U.S./Canada/Mexico-15516346) - 2022 - CRC - 4/9/21
Infotainment System 115
Infotainment SystemIntroductionIntroduction . . . . . . . . . . . . . . . . . . . . . . . . . . . . 115Overview . . . . . . . . . . . . . . . . . . . . . . . . . . . . . . 116Steering Wheel Controls . . . . . . . . . . . . . . . 118Using the System . . . . . . . . . . . . . . . . . . . . . . 118Software Updates . . . . . . . . . . . . . . . . . . . . . . 121
RadioAM-FM Radio . . . . . . . . . . . . . . . . . . . . . . . . . . 121HD Radio Technology . . . . . . . . . . . . . . . . . . 123Radio Data System (RDS) . . . . . . . . . . . . . . 124Satellite Radio . . . . . . . . . . . . . . . . . . . . . . . . . 124Radio Reception . . . . . . . . . . . . . . . . . . . . . . . 124Multi-Band Antenna . . . . . . . . . . . . . . . . . . . 125
Audio PlayersAvoiding Untrusted Media Devices . . . . . 125USB Port . . . . . . . . . . . . . . . . . . . . . . . . . . . . . . . 125Auxiliary Jack . . . . . . . . . . . . . . . . . . . . . . . . . . 128Bluetooth Audio . . . . . . . . . . . . . . . . . . . . . . . 128
NavigationUsing the Navigation System . . . . . . . . . . 129Maps . . . . . . . . . . . . . . . . . . . . . . . . . . . . . . . . . . . 131Navigation Symbols . . . . . . . . . . . . . . . . . . . . 132Destination . . . . . . . . . . . . . . . . . . . . . . . . . . . . 133Global Positioning System (GPS) . . . . . . . 138Vehicle Positioning . . . . . . . . . . . . . . . . . . . . 138Problems with Route Guidance . . . . . . . . 139
If the System Needs Service . . . . . . . . . . . 139Map Data Updates . . . . . . . . . . . . . . . . . . . . 139Database Coverage Explanations . . . . . . . 139
Voice RecognitionVoice Recognition . . . . . . . . . . . . . . . . . . . . . 140
Performance Data Recorder (PDR)Performance Data Recorder (PDR) . . . . . . 145
PhoneBluetooth (Overview) . . . . . . . . . . . . . . . . . . 149Bluetooth (Pairing and Using aPhone) . . . . . . . . . . . . . . . . . . . . . . . . . . . . . . . 150
Apple CarPlay and Android Auto . . . . . . . 154
SettingsSettings . . . . . . . . . . . . . . . . . . . . . . . . . . . . . . . . 155Teen Driver . . . . . . . . . . . . . . . . . . . . . . . . . . . . 161
Trademarks and License AgreementsTrademarks and LicenseAgreements . . . . . . . . . . . . . . . . . . . . . . . . . 164
IntroductionRead the following pages to become familiarwith the features.
{ WarningTaking your eyes off the road for toolong or too often while using anyinfotainment feature can cause a crash.You or others could be injured or killed.Do not give extended attention toinfotainment tasks while driving. Limityour glances at the vehicle displays andfocus your attention on driving. Use voicecommands whenever possible.
The infotainment system has built-infeatures intended to help avoid distractionby disabling some features when driving.These features may gray out when they areunavailable. Many infotainment features arealso available through the instrument clusterand steering wheel controls.
Before driving:. Become familiar with the operation,
center stack controls, steering wheelcontrols, and infotainment display.
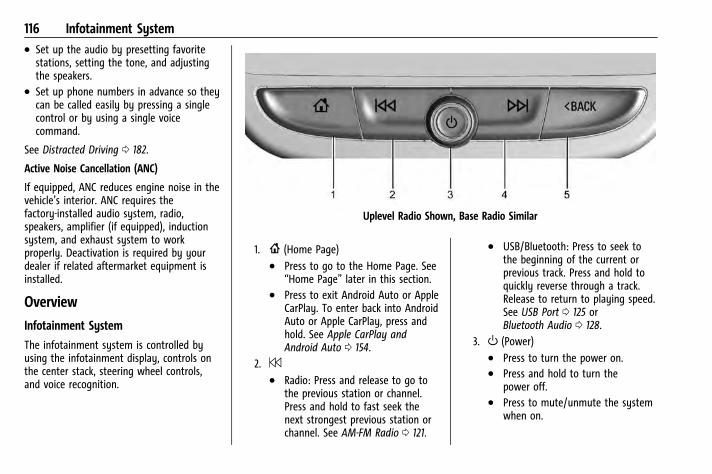
Chevrolet Camaro Owner Manual (GMNA-Localizing-U.S./Canada/Mexico-15516346) - 2022 - CRC - 4/9/21
116 Infotainment System. Set up the audio by presetting favorite
stations, setting the tone, and adjustingthe speakers.
. Set up phone numbers in advance so theycan be called easily by pressing a singlecontrol or by using a single voicecommand.
See Distracted Driving 0 182.
Active Noise Cancellation (ANC)
If equipped, ANC reduces engine noise in thevehicle’s interior. ANC requires thefactory-installed audio system, radio,speakers, amplifier (if equipped), inductionsystem, and exhaust system to workproperly. Deactivation is required by yourdealer if related aftermarket equipment isinstalled.
Overview
Infotainment System
The infotainment system is controlled byusing the infotainment display, controls onthe center stack, steering wheel controls,and voice recognition.
Uplevel Radio Shown, Base Radio Similar
1. { (Home Page). Press to go to the Home Page. See
“Home Page” later in this section.. Press to exit Android Auto or Apple
CarPlay. To enter back into AndroidAuto or Apple CarPlay, press andhold. See Apple CarPlay andAndroid Auto 0 154.
2. 7. Radio: Press and release to go to
the previous station or channel.Press and hold to fast seek thenext strongest previous station orchannel. See AM-FM Radio 0 121.
. USB/Bluetooth: Press to seek tothe beginning of the current orprevious track. Press and hold toquickly reverse through a track.Release to return to playing speed.See USB Port 0 125 orBluetooth Audio 0 128.
3. O (Power). Press to turn the power on.. Press and hold to turn the
power off.. Press to mute/unmute the system
when on.
Chevrolet Camaro Owner Manual (GMNA-Localizing-U.S./Canada/Mexico-15516346) - 2022 - CRC - 4/9/21
Infotainment System 117. When the power is on and the
system is not muted, a quickstatus pane will display when O ispressed. Pressing O will mute thesystem and trigger this pane toshow a long press is required toactually power down the system.
. Turn to decrease or increase thevolume.
4. 6. Radio: Press and release to go to
the next station or channel. Pressand hold to fast seek the nextstrongest station or channel.
. USB/Bluetooth: Press to seek thenext track. Press and hold to fastforward through a track. Release toreturn to playing speed. See USBPort 0 125 orBluetooth Audio 0 128.
5. S BACK or 5
. Press S BACK to return to theprevious display in a menu.
. Press and release 5 to access thephone display or answer anincoming call.
Home Page
The Home Page is where vehicle applicationicons are accessed. Some applications aredisabled when the vehicle is moving.
Swipe left or right across the display toaccess the pages of icons.
Managing Home Page Icons
1. Touch and hold any of the Home Pageicons to enter edit mode.
2. Continue holding the icon and drag it tothe desired position.
3. Release your finger to drop the icon inthe desired position.
4. To move an application to another page,drag the icon to the edge of the displaytoward the desired page.
5. Continue dragging and droppingapplication icons as desired.
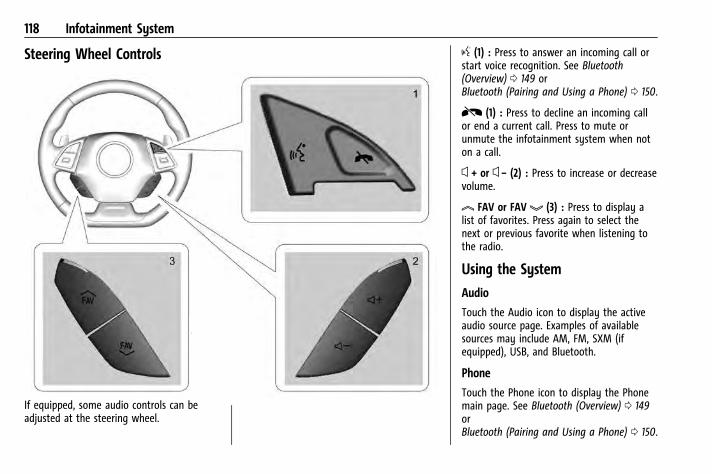
Chevrolet Camaro Owner Manual (GMNA-Localizing-U.S./Canada/Mexico-15516346) - 2022 - CRC - 4/9/21
118 Infotainment System
Steering Wheel Controls
If equipped, some audio controls can beadjusted at the steering wheel.
g (1) : Press to answer an incoming call orstart voice recognition. See Bluetooth(Overview) 0 149 orBluetooth (Pairing and Using a Phone) 0 150.
R (1) : Press to decline an incoming callor end a current call. Press to mute orunmute the infotainment system when noton a call.
x + or x − (2) : Press to increase or decreasevolume.
l FAV or FAVg (3) : Press to display alist of favorites. Press again to select thenext or previous favorite when listening tothe radio.
Using the System
Audio
Touch the Audio icon to display the activeaudio source page. Examples of availablesources may include AM, FM, SXM (ifequipped), USB, and Bluetooth.
Phone
Touch the Phone icon to display the Phonemain page. See Bluetooth (Overview) 0 149orBluetooth (Pairing and Using a Phone) 0 150.
Chevrolet Camaro Owner Manual (GMNA-Localizing-U.S./Canada/Mexico-15516346) - 2022 - CRC - 4/9/21
Infotainment System 119
Nav
Touch the Nav icon (if equipped) to displaythe navigation map. See Using theNavigation System 0 129.
Climate
Touch the Climate icon to display theClimate main page. See Dual AutomaticClimate Control System 0 176.
Wi-Fi Hotspot
Touch the Wi-Fi Hotspot icon to display theWi-Fi Hotspot information. See Settings0 155.
Users
If equipped, touch the Users icon to sign inor create a new user profile, and follow theon-screen instructions.
Only four user profiles can be active at onetime in the vehicle. It may be necessary toremove a profile from the menu beforecreating or signing into an existing profile.The removed profile can be logged into at alater time.
Settings
Touch the Settings icon to display theSettings menu. See Settings 0 155.
Apple CarPlay
Touch the Apple CarPlay icon to activateApple CarPlay (if equipped) after asupported device is connected. See AppleCarPlay and Android Auto 0 154.
Android Auto
Touch the Android Auto icon to activateAndroid Auto (if equipped) after a supporteddevice is connected. See Apple CarPlay andAndroid Auto 0 154.
Apps
If equipped, in-vehicle apps are available fordownload. Touch the Apps icon on theHome Page to begin.
Downloading and using in-vehicle appsrequires Internet connectivity which can beaccessed with a data plan through thevehicle’s built-in 4G LTE Wi-Fi hotspot,if equipped, or a compatible mobile devicehotspot. On most mobile devices, activationof the Wi-Fi hotspot is in the device’sSettings menu under Mobile NetworkSharing, Personal Hotspot, Mobile Hotspot,or similar.
Availability of apps and connectivity variesby vehicle, conditions, and location. Dataplan rates apply. Features are subject tochange. For more information, seewww.my.chevrolet.com/learn.
OnStar Services
If equipped, touch the OnStar Services iconto display the OnStar Services and Accountpages. See OnStar Overview 0 337.
Camera
If equipped, touch the Camera icon to accessthe camera application. See Rear VisionCamera (RVC) 0 225.
Shortcut Tray
The shortcut tray is near the bottom of thedisplay. It shows up to four applications.
Infotainment Display Features
Infotainment display features show on thedisplay when available. When a feature isunavailable, it may gray out. When afeature is touched, it may highlight.
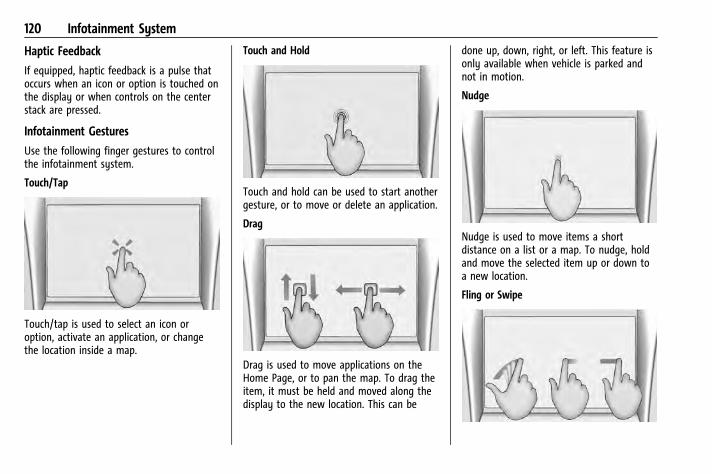
Chevrolet Camaro Owner Manual (GMNA-Localizing-U.S./Canada/Mexico-15516346) - 2022 - CRC - 4/9/21
120 Infotainment System
Haptic Feedback
If equipped, haptic feedback is a pulse thatoccurs when an icon or option is touched onthe display or when controls on the centerstack are pressed.
Infotainment Gestures
Use the following finger gestures to controlthe infotainment system.
Touch/Tap
Touch/tap is used to select an icon oroption, activate an application, or changethe location inside a map.
Touch and Hold
Touch and hold can be used to start anothergesture, or to move or delete an application.
Drag
Drag is used to move applications on theHome Page, or to pan the map. To drag theitem, it must be held and moved along thedisplay to the new location. This can be
done up, down, right, or left. This feature isonly available when vehicle is parked andnot in motion.
Nudge
Nudge is used to move items a shortdistance on a list or a map. To nudge, holdand move the selected item up or down toa new location.
Fling or Swipe

Chevrolet Camaro Owner Manual (GMNA-Localizing-U.S./Canada/Mexico-15516346) - 2022 - CRC - 4/9/21
Infotainment System 121
Fling or swipe is used to scroll through alist, pan the map, or change page views. Dothis by placing a finger on the display thenmoving it rapidly up and down or rightand left.
Spread
Spread is used to zoom in on a map, certainimages, or a web page. Place finger andthumb together on the display, then movethem apart.
Pinch
Pinch is used to zoom out on a map, certainimages, or a web page. Place finger andthumb apart on the display, then movethem together.
Cleaning High Gloss Surfaces and VehicleInformation and Radio Displays
For vehicles with high gloss surfaces orvehicle displays, use a microfiber cloth towipe surfaces. Before wiping the surfacewith the microfiber cloth, use a soft bristlebrush to remove dirt that could scratch thesurface. Then use the microfiber cloth bygently rubbing to clean. Never use windowcleaners or solvents. Periodically hand washthe microfiber cloth separately, using mildsoap. Do not use bleach or fabric softener.Rinse thoroughly and air dry beforenext use.
Software Updates
Over-the-Air Software Updates
If equipped, see “Updates” under Settings0 155 for details on software updates.
RadioAM-FM Radio
Playing the Radio
From the Home Page, touch the Audio iconto display the active audio source page.Choose from the three most recently usedsources listed at the left side of the displayor touch the More option to display a list ofavailable sources. Examples of availablesources may include AM, FM, SXM (ifequipped), MyMedia, USB, AUX, andBluetooth.
Infotainment System Sound Menu
From any of the audio source main pages,touch Sound to display the following:
Equalizer : Touch to adjust Bass, Midrange,Treble, and Surround (if equipped) using theoptions on the infotainment display.
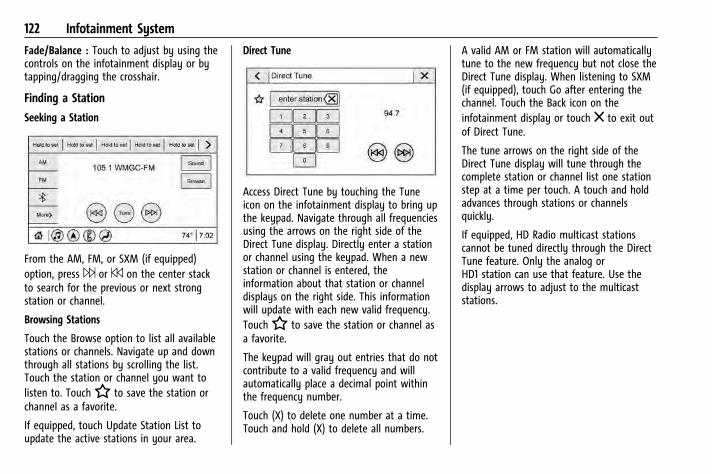
Chevrolet Camaro Owner Manual (GMNA-Localizing-U.S./Canada/Mexico-15516346) - 2022 - CRC - 4/9/21
122 Infotainment System
Fade/Balance : Touch to adjust by using thecontrols on the infotainment display or bytapping/dragging the crosshair.
Finding a Station
Seeking a Station
From the AM, FM, or SXM (if equipped)option, press 6 or 7 on the center stackto search for the previous or next strongstation or channel.
Browsing Stations
Touch the Browse option to list all availablestations or channels. Navigate up and downthrough all stations by scrolling the list.Touch the station or channel you want tolisten to. TouchH to save the station orchannel as a favorite.
If equipped, touch Update Station List toupdate the active stations in your area.
Direct Tune
Access Direct Tune by touching the Tuneicon on the infotainment display to bring upthe keypad. Navigate through all frequenciesusing the arrows on the right side of theDirect Tune display. Directly enter a stationor channel using the keypad. When a newstation or channel is entered, theinformation about that station or channeldisplays on the right side. This informationwill update with each new valid frequency.TouchH to save the station or channel asa favorite.
The keypad will gray out entries that do notcontribute to a valid frequency and willautomatically place a decimal point withinthe frequency number.
Touch (X) to delete one number at a time.Touch and hold (X) to delete all numbers.
A valid AM or FM station will automaticallytune to the new frequency but not close theDirect Tune display. When listening to SXM(if equipped), touch Go after entering thechannel. Touch the Back icon on theinfotainment display or touch z to exit outof Direct Tune.
The tune arrows on the right side of theDirect Tune display will tune through thecomplete station or channel list one stationstep at a time per touch. A touch and holdadvances through stations or channelsquickly.
If equipped, HD Radio multicast stationscannot be tuned directly through the DirectTune feature. Only the analog orHD1 station can use that feature. Use thedisplay arrows to adjust to the multicaststations.
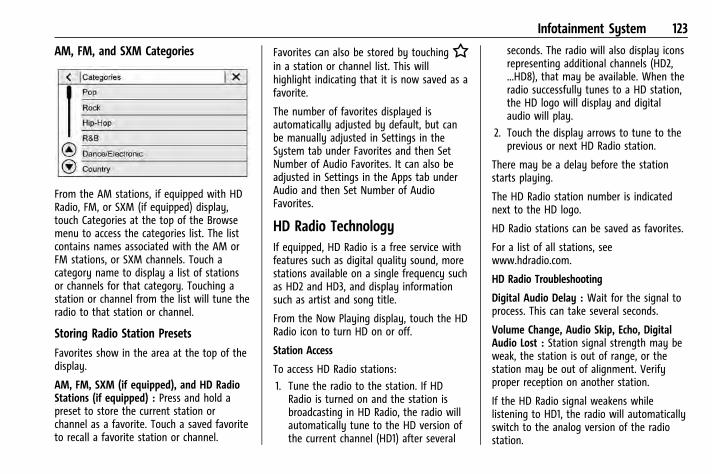
Chevrolet Camaro Owner Manual (GMNA-Localizing-U.S./Canada/Mexico-15516346) - 2022 - CRC - 4/9/21
Infotainment System 123
AM, FM, and SXM Categories
From the AM stations, if equipped with HDRadio, FM, or SXM (if equipped) display,touch Categories at the top of the Browsemenu to access the categories list. The listcontains names associated with the AM orFM stations, or SXM channels. Touch acategory name to display a list of stationsor channels for that category. Touching astation or channel from the list will tune theradio to that station or channel.
Storing Radio Station Presets
Favorites show in the area at the top of thedisplay.
AM, FM, SXM (if equipped), and HD RadioStations (if equipped) : Press and hold apreset to store the current station orchannel as a favorite. Touch a saved favoriteto recall a favorite station or channel.
Favorites can also be stored by touchingHin a station or channel list. This willhighlight indicating that it is now saved as afavorite.
The number of favorites displayed isautomatically adjusted by default, but canbe manually adjusted in Settings in theSystem tab under Favorites and then SetNumber of Audio Favorites. It can also beadjusted in Settings in the Apps tab underAudio and then Set Number of AudioFavorites.
HD Radio TechnologyIf equipped, HD Radio is a free service withfeatures such as digital quality sound, morestations available on a single frequency suchas HD2 and HD3, and display informationsuch as artist and song title.
From the Now Playing display, touch the HDRadio icon to turn HD on or off.
Station Access
To access HD Radio stations:
1. Tune the radio to the station. If HDRadio is turned on and the station isbroadcasting in HD Radio, the radio willautomatically tune to the HD version ofthe current channel (HD1) after several
seconds. The radio will also display iconsrepresenting additional channels (HD2,...HD8), that may be available. When theradio successfully tunes to a HD station,the HD logo will display and digitalaudio will play.
2. Touch the display arrows to tune to theprevious or next HD Radio station.
There may be a delay before the stationstarts playing.
The HD Radio station number is indicatednext to the HD logo.
HD Radio stations can be saved as favorites.
For a list of all stations, seewww.hdradio.com.
HD Radio Troubleshooting
Digital Audio Delay : Wait for the signal toprocess. This can take several seconds.
Volume Change, Audio Skip, Echo, DigitalAudio Lost : Station signal strength may beweak, the station is out of range, or thestation may be out of alignment. Verifyproper reception on another station.
If the HD Radio signal weakens whilelistening to HD1, the radio will automaticallyswitch to the analog version of the radiostation.
Chevrolet Camaro Owner Manual (GMNA-Localizing-U.S./Canada/Mexico-15516346) - 2022 - CRC - 4/9/21
124 Infotainment System
If the HD Radio signal loses reception whilelistening to stations HD2 to HD8, the radiomutes until the signal can be recovered oruntil the station is changed.
HD Radio can be disabled if driving in aweak signal area. Touch HD Radio On/Off totoggle HD Radio reception on and off.
Radio Data System (RDS)If equipped, RDS features are available foruse only on FM stations that broadcast RDSinformation. With RDS, the radio can:. Group stations by Category (i.e., Program
Type) such as Rock, Jazz, Classical, etc.. Display messages from radio stations.
This system relies on receiving specificinformation from these stations and onlyworks when the information is available.It is possible that a radio station couldbroadcast incorrect information that causesthe radio features to work improperly. If thishappens, contact the radio station.
When information is broadcast from a RDSstation, the station name or call lettersdisplay on the audio screen. Radio textsupporting the currently playing broadcastmay also appear.
Satellite Radio
SiriusXM Radio Service
If equipped, vehicles with a valid SiriusXMradio subscription can receive SiriusXMprogramming.
SiriusXM radio has a wide variety ofprogramming and commercial-free music,coast to coast, in digital-quality sound. Inthe U.S., see www.siriusxm.com or call1-888-601-6296. In Canada, seewww.siriusxm.ca or call 1-877-438-9677.
When SiriusXM is active, the channel name,number, song title, and artist appear on thedisplay.
SiriusXM with 360L
SiriusXM with 360L interface has enhancedin-vehicle listening experience forsubscribers. The experience now offers morecategories and system learnedrecommendations toward discovering morepersonalized content.
To use the full SiriusXM 360L program,including streaming content and listeningrecommendations, OnStar Connected Accessis required. Connected vehicle services vary
by model and require a complete workingelectrical system, cell reception, and GPSsignal. An active connected plan is required.
Reference the SiriusXM user guide for useand subscription information.
Radio ReceptionUnplug electronic devices from the accessorypower outlets if there is interference orstatic in the radio.
FM
FM signals only reach about 16 to 65 km (10to 40 mi). Although the radio has a built-inelectronic circuit that automatically works toreduce interference, some static can occur,especially around tall buildings or hills,causing the sound to fade in and out.
AM
The range for most AM stations is greaterthan for FM, especially at night. The longerrange can cause station frequencies tointerfere with each other. Static can alsooccur when things like storms and powerlines interfere with radio reception. Whenthis happens, try reducing the treble on theradio.
Chevrolet Camaro Owner Manual (GMNA-Localizing-U.S./Canada/Mexico-15516346) - 2022 - CRC - 4/9/21
Infotainment System 125
SiriusXM Satellite Radio Service
If equipped, SiriusXM Satellite Radio Serviceprovides digital radio reception. Tallbuildings or hills can interfere with satelliteradio signals, causing the sound to fade inand out. In addition, traveling or standingunder heavy foliage, bridges, garages,or tunnels may cause loss of the SiriusXMsignal for a period of time. Some cellularservices may interfere with SXM receptioncausing loss of signal.
Mobile Device Usage
Mobile device usage, such as making orreceiving calls, charging, or just having themobile device on may cause staticinterference in the radio. Unplug the mobiledevice or turn it off if this happens.
Multi-Band AntennaThe roof antenna is for AM, FM, SiriusXMSatellite Radio, OnStar, and GPS (GlobalPositioning System). Keep clear ofobstructions for clear reception. If thevehicle has a sunroof, and it is open,reception can also be affected.
Audio PlayersAvoiding Untrusted Media DevicesWhen using media devices such as SD cards,USB devices, and mobile devices, considerthe source. Untrusted media devices couldcontain files that affect system operation orperformance. Avoid use if the content ororigin cannot be trusted.
USB PortAudio stored on a USB device may belistened to.
The vehicle may be equipped with two USBports in the center console. These ports arefor data and charging.
CautionTo avoid vehicle damage, unplug allaccessories and disconnect all accessorycables from the vehicle when not in use.Accessory cables left plugged into thevehicle, unconnected to a device, could bedamaged or cause an electrical short ifthe unconnected end comes in contactwith liquids or another power source suchas the accessory power outlet.
Playing from a USB
A USB mass storage device can be connectedto the USB port.
Audio extensions supported by the USB mayinclude:. MP3. AAC. OGG. 3GP
Gracenote
When plugging in a USB device, Gracenoteservice builds voice tags for music. Voicetags allow artists, albums with hard topronounce names, and nicknames to be usedto play music through voice recognition,if equipped.
While indexing, infotainment features maybe available.
My Media Library
MyMedia is only available when more thanone indexed device is connected. It allowsaccess to content from all indexed mediasources. MyMedia will show as an availablesource in the Source page.
Chevrolet Camaro Owner Manual (GMNA-Localizing-U.S./Canada/Mexico-15516346) - 2022 - CRC - 4/9/21
126 Infotainment System
USB MP3 Player and USB Devices
The USB MP3 players and USB devicesconnected must comply with the USB MassStorage Class specification (USB MSC).
To play a USB device:
1. Connect the USB.
2. Touch Audio from the Home Page.
3. Touch the More option and then touchthe USB device.
Use the following when playing an activeUSB source:
p : Touch to play the current media source.
j : Touch to pause playback of the currentmedia source.
7 :. Touch to seek the beginning of the
current or previous track.. Touch and hold to reverse quickly
through playback. Release to return toplaying speed. Elapsed time displays.
6 :. Touch to seek the next track.. Touch and hold to advance quickly
through playback. Release to return toplaying speed. Elapsed time displays.
Shuffle : Touch the shuffle icon to playmusic in random order.
USB Sound Menu
See “Infotainment System Sound Menu”under AM-FM Radio 0 121.
USB Browse Menu
When a list of songs, albums, artists,or other types of media displays, the up anddown arrows and A-Z appear on the leftside. Select A-Z to view a display that willshow all letters of the alphabet and selectthe letter to go to.
Touch the up and down arrows to move thelist up and down.
Touch Browse and the following maydisplay:
Playlists:
1. Touch to view the playlists stored onthe USB.
2. Touch a playlist to view the list of allsongs in that playlist.
3. Touch a song from the list to beginplayback.
Supported playlist extensions are m3uand pls.
Artists:
1. Touch to view the list of artists storedon the USB.
2. Touch an artist name to view a list of allalbums by the artist.
3. To select a song, touch All Songs ortouch an album and then touch a songfrom the list.
Songs:
1. Touch to display a list of all songs onthe USB.
2. To begin playback, touch a song fromthe list.
Albums:
1. Touch to view the albums on the USB.
2. Touch the album to view a list of allsongs on the album.
3. Touch a song from the list to beginplayback.
Genres:
1. Touch to view the genres on the USB.
2. Touch a genre to view a list of artists.
3. Touch an artist to view albums by thatartist.
4. Touch an album to view songs on thealbum.
Chevrolet Camaro Owner Manual (GMNA-Localizing-U.S./Canada/Mexico-15516346) - 2022 - CRC - 4/9/21
Infotainment System 127
5. Touch a song to start playback.
Composers:
1. Touch to view the composers onthe USB.
2. Touch a Composer to view a list ofalbums by that composer.
3. Touch an album or All Songs to view alist of songs.
4. Touch a song from the list to beginplayback.
Folders:
1. Touch to view the directories onthe USB.
2. Touch a folder to view a list of all files.
3. Touch a file from the list to beginplayback.
Podcasts : Touch to view the podcasts onthe connected Apple device and get a list ofpodcast episodes.
Audiobooks:
1. Touch to view the audiobooks stored onthe Apple device.
2. Touch an audiobook to get a list ofchapters.
3. Touch the chapter from the list to beginplayback.
File System and Naming
File systems supported by the USB mayinclude:. FAT32. NTFS. HFS+
The songs, artists, albums, and genres aretaken from the file’s song information andare only displayed if present. The radiodisplays the file name as the track name ifthe song information is not available.
Supported Apple Devices
To view supported devices, seemy.chevrolet.com/learn.
Storing and Recalling Media Favorites
To store media favorites, touch Browse todisplay a list of media types.
Touch one of the following Browse optionsto save a favorite:
Playlists : TouchH next to any playlist tostore the playlist as a favorite. Touch asaved favorite to recall a favorite playlist.The first song in the playlist begins to play.
Artists : TouchH next to any artist tostore the artist as a favorite. Touch a savedfavorite to recall a favorite artist. The firstsong in the artist list begins to play.
Songs : TouchH next to any song to storethe song as a favorite. Touch a savedfavorite to recall a favorite song.
Albums : TouchH next to any album tostore the album as a favorite. Touch a savedfavorite to recall a favorite album. The firstsong in the album list begins to play.
Genres : TouchH next to any genre tostore the genre as a favorite. Touch a savedfavorite to recall a favorite genre. The firstsong of the genre begins to play.
Podcasts : TouchH next to any podcast tostore the podcast as a favorite. Touch asaved favorite to recall a favorite podcast.The podcast begins to play.
Audiobooks : TouchH next to anyaudiobook to store the audiobook as afavorite. Touch a saved favorite to recall afavorite audiobook. The first chapter in theaudiobook begins to play.
Chevrolet Camaro Owner Manual (GMNA-Localizing-U.S./Canada/Mexico-15516346) - 2022 - CRC - 4/9/21
128 Infotainment System
Media Playback and Mute
USB playback will be paused if the system ismuted. If the steering wheel mute control ispressed again, playback will resume.
If the source is changed while in mute,playback resumes and audio will unmute.
Auxiliary JackIf equipped, this vehicle has an auxiliaryinput jack in the center console. Possibleauxiliary audio sources include:. Laptop computer. Audio music player
This jack is not an audio output. Do notplug headphones into the auxiliary inputjack. Set up an auxiliary device while thevehicle is in P (Park).
Connect a 3.5 mm (1/8 in) cable from theauxiliary device to the auxiliary input jack.When a device is connected, the system canplay audio from the device over the vehiclespeakers.
If an auxiliary device has already beenconnected, but a different source is currentlyactive, touch More and then touch AUX tomake the source active.
Shuffle and Browse are not available in theAUX source menu.
Bluetooth AudioMusic may be played from a pairedBluetooth device. See Bluetooth (Overview)0 149 orBluetooth (Pairing and Using a Phone) 0 150for help pairing a device.
Volume and song selection may becontrolled by using the infotainmentcontrols or the mobile device. If Bluetooth isselected and no volume is present, check thevolume setting on the infotainment system.
Music can be launched by touchingBluetooth from the recent sources list onthe left of the display or by touching theMore option and then touching theBluetooth device.
To play music via Bluetooth:
1. Power on the device, and pair to connectthe device.
2. Once paired, touch Audio from the HomePage, then touch Bluetooth from therecent sources list on the left of thedisplay.
Bluetooth Sound Menu
See “Infotainment System Sound Menu”under AM-FM Radio 0 121.
Manage Bluetooth Devices
From the Home Page:
1. Touch Audio.
2. Touch More.
3. Touch Bluetooth.
4. Touch Devices to add or delete devices.
When touching Bluetooth, the radio maynot be able to launch the audio player onthe connected device to start playing. Whenthe vehicle is not moving, use the mobiledevice to begin playback.
All devices launch audio differently. Whenselecting Bluetooth as a source, the radiomay show as paused on the display. Pressplay on the device or touch p on thedisplay to begin playback.
Browse functionality will be provided wheresupported by the Bluetooth device. Thismedia content will not be part of theMyMedia source mode.
Some smartphones support sendingBluetooth music information to display onthe radio. When the radio receives this
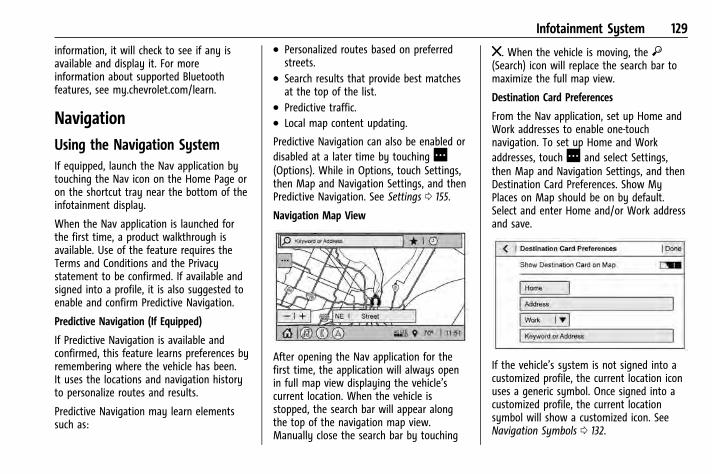
Chevrolet Camaro Owner Manual (GMNA-Localizing-U.S./Canada/Mexico-15516346) - 2022 - CRC - 4/9/21
Infotainment System 129
information, it will check to see if any isavailable and display it. For moreinformation about supported Bluetoothfeatures, see my.chevrolet.com/learn.
NavigationUsing the Navigation SystemIf equipped, launch the Nav application bytouching the Nav icon on the Home Page oron the shortcut tray near the bottom of theinfotainment display.
When the Nav application is launched forthe first time, a product walkthrough isavailable. Use of the feature requires theTerms and Conditions and the Privacystatement to be confirmed. If available andsigned into a profile, it is also suggested toenable and confirm Predictive Navigation.
Predictive Navigation (If Equipped)
If Predictive Navigation is available andconfirmed, this feature learns preferences byremembering where the vehicle has been.It uses the locations and navigation historyto personalize routes and results.
Predictive Navigation may learn elementssuch as:
. Personalized routes based on preferredstreets.
. Search results that provide best matchesat the top of the list.
. Predictive traffic.
. Local map content updating.
Predictive Navigation can also be enabled ordisabled at a later time by touchingA(Options). While in Options, touch Settings,then Map and Navigation Settings, and thenPredictive Navigation. See Settings 0 155.
Navigation Map View
After opening the Nav application for thefirst time, the application will always openin full map view displaying the vehicle’scurrent location. When the vehicle isstopped, the search bar will appear alongthe top of the navigation map view.Manually close the search bar by touching
z. When the vehicle is moving, the }(Search) icon will replace the search bar tomaximize the full map view.
Destination Card Preferences
From the Nav application, set up Home andWork addresses to enable one-touchnavigation. To set up Home and Workaddresses, touchA and select Settings,then Map and Navigation Settings, and thenDestination Card Preferences. Show MyPlaces on Map should be on by default.Select and enter Home and/or Work addressand save.
If the vehicle’s system is not signed into acustomized profile, the current location iconuses a generic symbol. Once signed into acustomized profile, the current locationsymbol will show a customized icon. SeeNavigation Symbols 0 132.
Chevrolet Camaro Owner Manual (GMNA-Localizing-U.S./Canada/Mexico-15516346) - 2022 - CRC - 4/9/21
130 Infotainment System
Map and Navigation Settings
TouchA while in the map view to displayoptions. The following may display:. 3D Heading Up, 2D Heading Up, 2D North. Show on Map. Traffic Events (available with OnStar
Connected Navigation). Settings. Edit Destination (if a route has been set). Avoid on Route (if a route has been set)
Touch Settings to view Map and NavigationSettings. The following may display:. Destination Card Preferences. Map Preferences. Route Preferences. Navigation Voice Control. Traffic Preferences. Alert Preferences. Fuel Grade Preferences. Manage History. Predictive Navigation: See “Predictive
Navigation (If Equipped)” previously inthis section.
. About
To exit a list, touch z in the top rightcorner to return to the main map view.
Make sure to set up preferences beforesetting a destination and starting activeguidance.
Map Preferences
Touch to choose between basic map featureconfigurations:
Map Colors. Auto – Touch to automatically change
modes based on lighting conditions.. Day (Light). Night (Dark)
3D Landmark (Default is On) : Touch On orOff. When turned on, the system willdisplay all 3D Landmarks on the mapdepending on the zoom level.
3D Building (Default is Off) : Touch On orOff. When turned on, the system willdisplay all of the possible 3D building shapeson the map depending on the zoom level.
Show Terrain in 3D (Default is Off) :If equipped, touch On or Off. When turnedon, the system will display terraininformation on the map in 3D view.
Auto-Zoom (Default is On) : Touch On orOff. When turned on, the system willautomatically adjust the zoom level whenthe vehicle is approaching a turn. After the
turn is completed, the system automaticallybrings the zoom back to the originally setlevel. If the vehicle is approaching a turnwith the next turn occurring shortly after,the Auto-Zoom will remain on until bothturns are completed.
Route Preferences
Touch to access the Route Preferences. Thechoices are:. Preferred Route – Choose from two
different route options: Fastest orEco-Friendly.
‐ Fastest would be the route with theshortest drive time.
‐ Eco-Friendly would be the mostfuel-efficient route.
. Avoid on Current Route – Choose any ofthe road features to avoid while on route:
‐ Highways
‐ Unpaved Roads
‐ Ferries
‐ Carpool Lanes
‐ Toll Roads
‐ Tunnels
‐ Country Borders
Chevrolet Camaro Owner Manual (GMNA-Localizing-U.S./Canada/Mexico-15516346) - 2022 - CRC - 4/9/21
Infotainment System 131
Navigation Voice Control
Touch to access the voice control settingdisplay.. Navigation Volume – To adjust the
volume level, touch the up and downarrows. If the voice guidance prompt isbeing heard, volume can also be adjustedusing the knob on the center stack or thevolume switch on the steering wheel.
. Navigation Voice Prompt Level during aCall. Options available are:
‐ Full Prompt (Selected by default)
‐ Tone Only
‐ None
Traffic Events (If Equipped)
This feature provides a list of events thatare on the route or nearby. TouchA andthen select Traffic Events. An OnStarconnected Navigation service plan isrequired.
Traffic Preferences (If Equipped)
While in Map View, touchA, then Settingsand then Map and Navigation Settings toaccess Traffic Preferences. When ShowTraffic on Map is turned on, the feature
provides an overview of the traffic flowusing different coded colors. The followingoptions are available for rerouting:. Auto Reroute to Better Route – The
system will automatically reroute if thesystem detects there is a traffic issueahead.
. Ask Before Rerouting (Default) – If thesystem detects there is a traffic issueahead, it will display a pop-up withdetails about the issue. Choose to rerouteor cancel the alert.
. Never Search for Better Route – Thesystem will not check for a better routeuntil one of the above options is selected.
Alert Preferences
Set alerts on or off during both inactive andactive guidance views. The following alertsmay be available:. Road Safety Alerts – Touch to display
upcoming School Zones.. Traffic Camera Alerts
Manage History
Touch Manage History to access the Historyoptions:
. Clear Recent Destinations – Touch\ toclear the recent destinations.
. Clear Search History – Touch\ to clearthe search history.
About
Touch to display software information,such as:. Telenav Terms and Conditions. Telenav Privacy Statement. Navigation Version
MapsThe Nav application requires a map databaseto run. It is stored on an SD card that isconnected to the infotainment system. If themap database is not available, a missing SDcard error message will be displayed.
SD Card Error Messages
The SD card only works for one uniquevehicle. The SD card must passauthentication verification to be used forthat specific vehicle. Do not remove SD cardwhile the ignition is on.
Potential error scenarios and messagesinclude:
Chevrolet Camaro Owner Manual (GMNA-Localizing-U.S./Canada/Mexico-15516346) - 2022 - CRC - 4/9/21
132 Infotainment System. The SD card has initialized for the first
time: “Once initialized, this SD card canonly be used for navigation in thisvehicle.” Make sure the SD card switch isin an upward position.
. The SD card is not working properly: “SDcard is not functioning properly.(Error Code).”
. The SD card is not paired with theexisting system: “This Nav SD card is notvalid in this vehicle for navigation. SeeOwner’s Manual for more detail or visityour dealer. (Error Code).”
. The SD card has been removed from theslot: “SD card has been removed. (ErrorCode).” Make sure the Nav SD card is inthe slot.
Touch Continue to resume after theinitialization error message. For the othermessages, touch OK to return to theHome Page.
If any errors continue, see your dealer.
Navigation SymbolsFollowing are the most common symbolsthat may appear in the Nav application.
This indicates the vehicle’s current locationand direction on the map.
This is the vehicle’s current location iconduring inactive guidance mode. Once a userprofile is created, the current location iconcan be customized.
This icon indicates the vehicle’s currentlocation and direction on the map.
The destination pin marks the location ofthe final destination. Touch the pin to viewthe destination address or to add it orremove it from the Favorites list. Hide theinformation by touching the pin one moretime. It will automatically time out if noaction is taken.
If equipped, smart Points of Interest (POIs)are places of interest for parking and gasstations.
The progress bar provides an overview ofthe route progress and may show traffic andincidents along the way. As the routeproceeds, the vehicle icon moves up the bar.
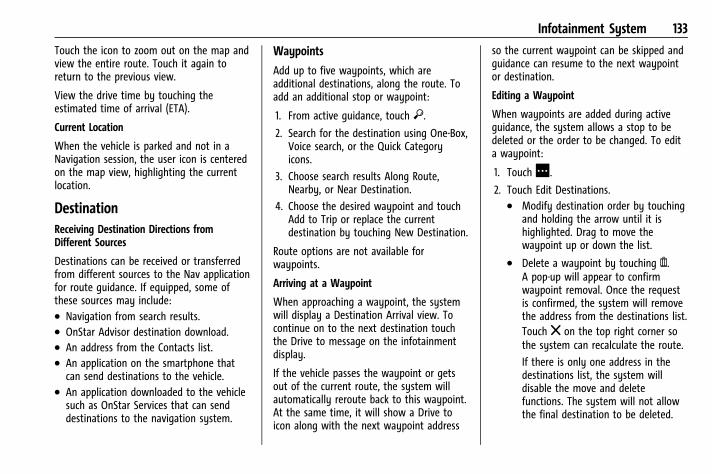
Chevrolet Camaro Owner Manual (GMNA-Localizing-U.S./Canada/Mexico-15516346) - 2022 - CRC - 4/9/21
Infotainment System 133
Touch the icon to zoom out on the map andview the entire route. Touch it again toreturn to the previous view.
View the drive time by touching theestimated time of arrival (ETA).
Current Location
When the vehicle is parked and not in aNavigation session, the user icon is centeredon the map view, highlighting the currentlocation.
DestinationReceiving Destination Directions fromDifferent Sources
Destinations can be received or transferredfrom different sources to the Nav applicationfor route guidance. If equipped, some ofthese sources may include:. Navigation from search results.. OnStar Advisor destination download.. An address from the Contacts list.. An application on the smartphone that
can send destinations to the vehicle.. An application downloaded to the vehicle
such as OnStar Services that can senddestinations to the navigation system.
Waypoints
Add up to five waypoints, which areadditional destinations, along the route. Toadd an additional stop or waypoint:
1. From active guidance, touch }.
2. Search for the destination using One-Box,Voice search, or the Quick Categoryicons.
3. Choose search results Along Route,Nearby, or Near Destination.
4. Choose the desired waypoint and touchAdd to Trip or replace the currentdestination by touching New Destination.
Route options are not available forwaypoints.
Arriving at a Waypoint
When approaching a waypoint, the systemwill display a Destination Arrival view. Tocontinue on to the next destination touchthe Drive to message on the infotainmentdisplay.
If the vehicle passes the waypoint or getsout of the current route, the system willautomatically reroute back to this waypoint.At the same time, it will show a Drive toicon along with the next waypoint address
so the current waypoint can be skipped andguidance can resume to the next waypointor destination.
Editing a Waypoint
When waypoints are added during activeguidance, the system allows a stop to bedeleted or the order to be changed. To edita waypoint:
1. TouchA.
2. Touch Edit Destinations.. Modify destination order by touching
and holding the arrow until it ishighlighted. Drag to move thewaypoint up or down the list.
. Delete a waypoint by touching Y.A pop-up will appear to confirmwaypoint removal. Once the requestis confirmed, the system will removethe address from the destinations list.Touch z on the top right corner sothe system can recalculate the route.
If there is only one address in thedestinations list, the system willdisable the move and deletefunctions. The system will not allowthe final destination to be deleted.
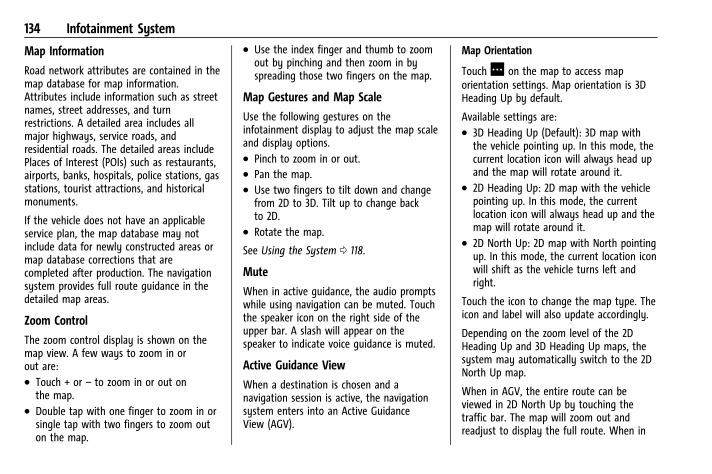
Chevrolet Camaro Owner Manual (GMNA-Localizing-U.S./Canada/Mexico-15516346) - 2022 - CRC - 4/9/21
134 Infotainment System
Map Information
Road network attributes are contained in themap database for map information.Attributes include information such as streetnames, street addresses, and turnrestrictions. A detailed area includes allmajor highways, service roads, andresidential roads. The detailed areas includePlaces of Interest (POIs) such as restaurants,airports, banks, hospitals, police stations, gasstations, tourist attractions, and historicalmonuments.
If the vehicle does not have an applicableservice plan, the map database may notinclude data for newly constructed areas ormap database corrections that arecompleted after production. The navigationsystem provides full route guidance in thedetailed map areas.
Zoom Control
The zoom control display is shown on themap view. A few ways to zoom in orout are:. Touch + or – to zoom in or out on
the map.. Double tap with one finger to zoom in or
single tap with two fingers to zoom outon the map.
. Use the index finger and thumb to zoomout by pinching and then zoom in byspreading those two fingers on the map.
Map Gestures and Map Scale
Use the following gestures on theinfotainment display to adjust the map scaleand display options.. Pinch to zoom in or out.. Pan the map.. Use two fingers to tilt down and change
from 2D to 3D. Tilt up to change backto 2D.
. Rotate the map.
See Using the System 0 118.
Mute
When in active guidance, the audio promptswhile using navigation can be muted. Touchthe speaker icon on the right side of theupper bar. A slash will appear on thespeaker to indicate voice guidance is muted.
Active Guidance View
When a destination is chosen and anavigation session is active, the navigationsystem enters into an Active GuidanceView (AGV).
Map Orientation
TouchA on the map to access maporientation settings. Map orientation is 3DHeading Up by default.
Available settings are:. 3D Heading Up (Default): 3D map with
the vehicle pointing up. In this mode, thecurrent location icon will always head upand the map will rotate around it.
. 2D Heading Up: 2D map with the vehiclepointing up. In this mode, the currentlocation icon will always head up and themap will rotate around it.
. 2D North Up: 2D map with North pointingup. In this mode, the current location iconwill shift as the vehicle turns left andright.
Touch the icon to change the map type. Theicon and label will also update accordingly.
Depending on the zoom level of the 2DHeading Up and 3D Heading Up maps, thesystem may automatically switch to the 2DNorth Up map.
When in AGV, the entire route can beviewed in 2D North Up by touching thetraffic bar. The map will zoom out andreadjust to display the full route. When in
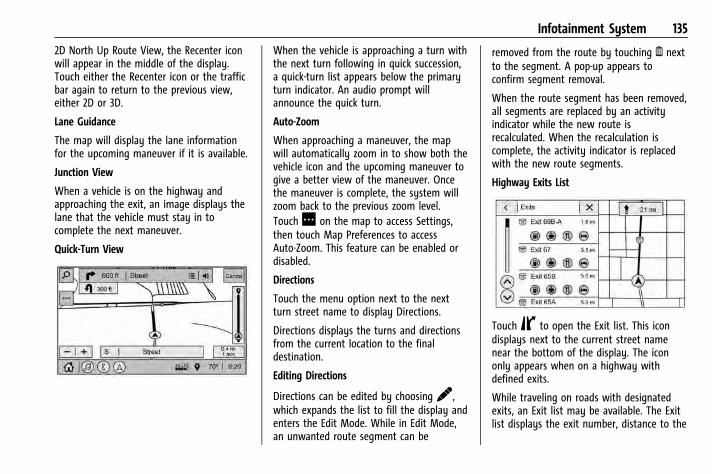
Chevrolet Camaro Owner Manual (GMNA-Localizing-U.S./Canada/Mexico-15516346) - 2022 - CRC - 4/9/21
Infotainment System 135
2D North Up Route View, the Recenter iconwill appear in the middle of the display.Touch either the Recenter icon or the trafficbar again to return to the previous view,either 2D or 3D.
Lane Guidance
The map will display the lane informationfor the upcoming maneuver if it is available.
Junction View
When a vehicle is on the highway andapproaching the exit, an image displays thelane that the vehicle must stay in tocomplete the next maneuver.
Quick-Turn View
When the vehicle is approaching a turn withthe next turn following in quick succession,a quick-turn list appears below the primaryturn indicator. An audio prompt willannounce the quick turn.
Auto-Zoom
When approaching a maneuver, the mapwill automatically zoom in to show both thevehicle icon and the upcoming maneuver togive a better view of the maneuver. Oncethe maneuver is complete, the system willzoom back to the previous zoom level.TouchA on the map to access Settings,then touch Map Preferences to accessAuto-Zoom. This feature can be enabled ordisabled.
Directions
Touch the menu option next to the nextturn street name to display Directions.
Directions displays the turns and directionsfrom the current location to the finaldestination.
Editing Directions
Directions can be edited by choosingy,which expands the list to fill the display andenters the Edit Mode. While in Edit Mode,an unwanted route segment can be
removed from the route by touching Y nextto the segment. A pop-up appears toconfirm segment removal.
When the route segment has been removed,all segments are replaced by an activityindicator while the new route isrecalculated. When the recalculation iscomplete, the activity indicator is replacedwith the new route segments.
Highway Exits List
TouchC to open the Exit list. This icondisplays next to the current street namenear the bottom of the display. The icononly appears when on a highway withdefined exits.
While traveling on roads with designatedexits, an Exit list may be available. The Exitlist displays the exit number, distance to the
Chevrolet Camaro Owner Manual (GMNA-Localizing-U.S./Canada/Mexico-15516346) - 2022 - CRC - 4/9/21
136 Infotainment System
exit from the current vehicle position, andconvenience stops that may be available,such as gas, coffee, food, and lodging.
Next Maneuver Menu
When in Active Guidance, the NextManeuver Turn Arrow, Street Name, andManeuver Distance are shown in the NextManeuver at the top of the displayoverlaying the map. ETA, Distance toDestination, and Traffic Indicator aredisplayed in a panel pinned on the right ofthe display.
Navigation Next Turn Maneuver Alert
If the Navigation application is not openwhen a near maneuver prompt is given, it isshown as an alert. Touch the alert to go tothe main navigation view or touch z todismiss the alert.
Repeat Voice Guidance
This symbol indicates the next guidancemaneuver. Touch it to repeat the lastspoken guidance instruction.
Incident Alert (If Equipped)
During active guidance, if the systemdetermines that there is an incident aheadbut there is not a better route, the systemwill play a tone and show a Quick Notice.This will only show once per incident.
Incident Reports (If Equipped)
Incident report icons, along with traffic flowdata, display on the map during both activeand inactive guidance.
End Route
Touch Cancel at the top right corner to endactive guidance and return to inactiveguidance. If active guidance is canceledbefore the destination has been reached, apop-up option to Resume Trip will appear.
Resume Trip
The trip can be resumed if it was canceledby touching the Resume Trip pop-up option.
If the system has determined that thedestination has been reached, either becausethe arrival view displayed or the destinationhas been passed, the Resume Trip optionwill not appear.
Favorites
The navigation favorites can have contacts,addresses, or POIs that have been savedthrough the favorite icon on thedetails view.
Accessing Favorites
In the Nav application, view the Favoriteslist by touchingH in the search bar alongthe top of the Nav map view. If the searchbar is closed, touch } and selectH.
Saving Favorites
Favorites can be added from a number ofthe system’s applications. Touch thefavorites icon to save content as a favorite.
Renaming Navigation Favorites
1. Touch the Settings icon on the HomePage and touch the System tab.
2. Touch Favorites to access the ManageFavorites option.
Chevrolet Camaro Owner Manual (GMNA-Localizing-U.S./Canada/Mexico-15516346) - 2022 - CRC - 4/9/21
Infotainment System 137
3. Touch a saved Navigation favorite toaccess the edit icon. Touch the edit iconto rename the favorite.
4. Touch Save to store the renamedfavorite.
Recents
Touch H to access a list of recentdestinations.
Recenter Position Icon
Touch the Recenter Position arrow in themiddle of the map view to reset the map tothe current location.
Last Parked Location
The Last Parked Location is the last locationthe vehicle engine was turned off. Thatlocation is displayed in the first row of theRecents list. Touching the last ParkedLocation shows the Address Details view toeither save the address or drive to it. TheLast Parked Location can be deleted byentering the Edit display. Once the LastParked Location is deleted, it no longerappears in the Recents list, unless thevehicle is started at that location again.
Show POI Icons
To see the POI categories, touch Options,then touch Show on Map. Up to eightcategories of icons can be selected.
Smart POI Icons on Map (If Equipped)
The smart POI icons such as fuel stationsand parking may appear based on time,location, driver search behavior, drivingconditions, and vehicle conditions.
Touch a smart POI icon to open thecorresponding details:. Left side: Name and address of the POI.. Right side:E + ETE (Estimated Time
Enroute.)
Smart Fuel Station Icons
Fuel station prices are shown if available fornearby stations when the vehicle is lowon fuel.
Smart Parking Icons
When reaching a densely populateddestination and the system determines thatparking may be limited, the system willattempt to display nearby parkingdestinations with pricing information,if available.
Report an Issue Using POI Details (IfEquipped)
In the POI details page, a POI issue can bereported if the data is not accurate or theaddress is incorrect. Touch Report an Issuenear the bottom of the display to access theissue selection page. Touch one of thepredefined issues on the selection page,then touch Send. The system will send theinformation for analysis.
Search
Touch Search on the infotainment display toopen the search display. It has a search fieldentry box, quick category icon shortcuts,recents icon, favorites icon, and keyboard.
Chevrolet Camaro Owner Manual (GMNA-Localizing-U.S./Canada/Mexico-15516346) - 2022 - CRC - 4/9/21
138 Infotainment System
Auto Complete
Enter a partial location in the field entry boxon the search display. Auto complete willattempt to complete the destination basedon what is being entered. Touch thesuggested item to search.
Search While in Motion with No Front SeatPassenger Present
The search display will not allow changes ortext input with the keyboard when thevehicle is in motion. As a result, a displayshowing three rows of the most commonlyused categories appears. Touching the searchbox will activate speech recognition.
Search While in Motion with Front SeatPassenger Present
If the system detects that the front seatpassenger is present with both driver andpassenger seat belts buckled, touching thesearch icon will display an alert messagethat allows the passenger to search for adestination as if the vehicle were stopped.
Connected Navigation
Connected Navigation is a subscriptionservice that enables certain capabilitieswithin the navigation system, such asTraffic, Smart Search/Routing, and Predictive
Navigation capabilities. The system willshow an alert when the subscription isexpiring and will ask to renew the plan.
Global Positioning System (GPS)If equipped, the position of the vehicle isdetermined by using satellite signals, variousvehicle signals, and map data.
At times, other interference such as thesatellite condition, road configuration,condition of the vehicle, and/or othercircumstances can affect the navigationsystem's ability to determine the accurateposition of the vehicle.
The GPS shows the current position of thevehicle using signals sent by GPS satellites.When the vehicle is not receiving signalsfrom the satellites, a symbol appears in thestatus bar.
This system might not be available orinterference can occur if any of thefollowing are true:. Signals are obstructed by tall buildings,
trees, large trucks, or a tunnel.. Satellites are being repaired or improved.
For more information if the GPS is notfunctioning properly, see Problems withRoute Guidance 0 139 andIf the System Needs Service 0 139.
Vehicle PositioningAt times, the position of the vehicle on themap could be inaccurate due to one or moreof the following reasons:. The road system has changed.. The vehicle is driving on slippery road
surfaces such as sand, gravel, or snow.. The vehicle is traveling on winding roads
or long, straight roads.. The vehicle is approaching a tall building
or a large vehicle.. The surface streets run parallel to a
freeway.. The vehicle has been transferred by a
vehicle carrier or a ferry.. The current position calibration is set
incorrectly.. The vehicle is traveling at high speed.. The vehicle changes directions more than
once, or the vehicle is turning on a turntable in a parking lot.
. The vehicle is entering and/or exiting aparking lot, garage, or a lot with a roof.
Chevrolet Camaro Owner Manual (GMNA-Localizing-U.S./Canada/Mexico-15516346) - 2022 - CRC - 4/9/21
Infotainment System 139. The GPS signal is not received.. A roof carrier is installed on the vehicle.. Tire chains are installed on the vehicle.. The tires are replaced or worn.. The tire pressure for the tires is incorrect.. This is the first navigation use after the
map data is updated.. The 12-volt battery has been disconnected
for several days.. The vehicle is driving in heavy traffic
where driving is at low speeds, and thevehicle is stopped and started repeatedly.
Problems with Route GuidanceInappropriate route guidance can occurunder one or more of the followingconditions:. The turn was not made on the road
indicated.. Route guidance might not be available
when using automatic rerouting for thenext right or left turn.
. The route might not be changed whenusing automatic rerouting.
. There is no route guidance when turningat an intersection.
. Plural names of places might beannounced occasionally.
. It could take a long time to operateautomatic rerouting during high-speeddriving.
. Automatic rerouting might display a routereturning to the set waypoint if headingfor a destination without passing througha set waypoint.
. The route prohibits the entry of a vehicledue to a regulation by time or season orany other regulation which may be given.
. Some routes might not be searched.
. The route to the destination might not beshown if there are new roads, if roadshave recently changed, or if certain roadsare not listed in the map data. See Maps0 131.
To recalibrate the vehicle's position on themap, park with the vehicle running for twoto five minutes, until the vehicle positionupdates. Make sure the vehicle is parked ina location that is safe and has a clear viewof the sky and away from largeobstructions.
If the System Needs ServiceIf the navigation system needs service, seeyour dealer.
Map Data UpdatesThe map data in the vehicle is the mostup-to-date information available when thevehicle was produced. The map data isupdated periodically, provided that the mapinformation has changed and the vehicle hasa relevant service plan.
See www.gmnavdisc.com for details onordering, purchasing, and installing a new orreplacement SD card. Features are subject tochange. For more information on thisfeature, see my.chevrolet.com/learn.
If the vehicle is equipped with ConnectedNavigation, which is a subscription servicethat enables certain features of thenavigation system, such as Traffic, SmartSearch/Routing, and Predictive Navigation,then the system will download the latestmap data from the cloud.
Database Coverage ExplanationsCoverage areas vary with respect to thelevel of map detail available for any givenarea. Some areas feature greater levels ofdetail than others. If this happens, it doesnot mean there is a problem with thesystem. As the map data is updated, more
Chevrolet Camaro Owner Manual (GMNA-Localizing-U.S./Canada/Mexico-15516346) - 2022 - CRC - 4/9/21
140 Infotainment System
detail can become available for areas thatpreviously had limited detail. See Map DataUpdates 0 139.
Voice RecognitionIf equipped, voice recognition allows forhands-free operation within the navigation,audio, phone, and weather applications. Thisfeature can be started by pressing g on thesteering wheel or touching g on theinfotainment display.
However, not all features within these areasare supported by voice commands.Generally, only complex tasks that requiremultiple manual interactions to completeare supported by voice commands.
For example, tasks that take more than oneor two touches, such as a song or artist toplay from a media device, would besupported by voice commands. Other tasks,like adjusting the volume or seeking up ordown, are audio features that are easilyperformed by touching one or two options,and are not supported by voice commands.
In general there are flexible ways to speakcommands for completing the tasks.
If your language supports it, try stating aone-shot command, such as “Directions toaddress <number, street, city, state/province>.” Do not include the ZIP codewhile stating the address during thecommand. Another example of a one-shotDestination Entry command is, “Directions toPlace of Interest at <hotel>.” If thesecommands do not work, try saying, “Takeme to Place of Interest” or “Find address”and the system will walk you through byasking additional questions.
Hybrid Speech Recognition
If equipped, this feature helps distinguishwords by using Internet-based informationalong with the system’s voice recognitiondatabase. This allows you to speak morenaturally when using voice recognition.
Using Voice Recognition
Voice recognition becomes available oncethe system has been initialized. This beginswhen the ignition is turned on. Initializationmay take a few moments.
1. Press g on the steering wheel controlsto activate voice recognition.
2. The audio system mutes and the systemplays a prompt.
3. Clearly speak one of the commandsdescribed in this section.
A voice recognition system prompt canbe interrupted while it is playing bypressing g again.
Once voice recognition is started, both theinfotainment display and instrument clustershow the selections and visual dialogcontent. These displays can be turned on oroff in the Tutorial Mode under Settings0 155.
There are three voice prompt modessupported:. Informative verbal prompts: This type of
prompt will provide more informationregarding the supported actions.
. Short prompts: This type of prompt willprovide simple instructions about whatcan be stated.
. Auto informative prompts: This type ofprompt plays during the first few speechsessions, then automatically switches tothe short prompt after some experiencehas been gained through using thesystem.
If a command is not spoken, the voicerecognition system says a help prompt.
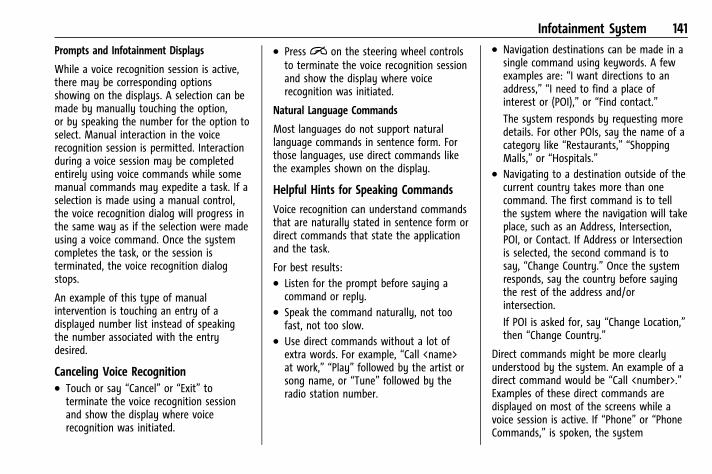
Chevrolet Camaro Owner Manual (GMNA-Localizing-U.S./Canada/Mexico-15516346) - 2022 - CRC - 4/9/21
Infotainment System 141
Prompts and Infotainment Displays
While a voice recognition session is active,there may be corresponding optionsshowing on the displays. A selection can bemade by manually touching the option,or by speaking the number for the option toselect. Manual interaction in the voicerecognition session is permitted. Interactionduring a voice session may be completedentirely using voice commands while somemanual commands may expedite a task. If aselection is made using a manual control,the voice recognition dialog will progress inthe same way as if the selection were madeusing a voice command. Once the systemcompletes the task, or the session isterminated, the voice recognition dialogstops.
An example of this type of manualintervention is touching an entry of adisplayed number list instead of speakingthe number associated with the entrydesired.
Canceling Voice Recognition. Touch or say “Cancel” or “Exit” to
terminate the voice recognition sessionand show the display where voicerecognition was initiated.
. Pressi on the steering wheel controlsto terminate the voice recognition sessionand show the display where voicerecognition was initiated.
Natural Language Commands
Most languages do not support naturallanguage commands in sentence form. Forthose languages, use direct commands likethe examples shown on the display.
Helpful Hints for Speaking Commands
Voice recognition can understand commandsthat are naturally stated in sentence form ordirect commands that state the applicationand the task.
For best results:. Listen for the prompt before saying a
command or reply.. Speak the command naturally, not too
fast, not too slow.. Use direct commands without a lot of
extra words. For example, “Call <name>at work,” “Play” followed by the artist orsong name, or “Tune” followed by theradio station number.
. Navigation destinations can be made in asingle command using keywords. A fewexamples are: “I want directions to anaddress,” “I need to find a place ofinterest or (POI),” or “Find contact.”
The system responds by requesting moredetails. For other POIs, say the name of acategory like “Restaurants,” “ShoppingMalls,” or “Hospitals.”
. Navigating to a destination outside of thecurrent country takes more than onecommand. The first command is to tellthe system where the navigation will takeplace, such as an Address, Intersection,POI, or Contact. If Address or Intersectionis selected, the second command is tosay, “Change Country.” Once the systemresponds, say the country before sayingthe rest of the address and/orintersection.
If POI is asked for, say “Change Location,”then “Change Country.”
Direct commands might be more clearlyunderstood by the system. An example of adirect command would be “Call <number>.”Examples of these direct commands aredisplayed on most of the screens while avoice session is active. If “Phone” or “PhoneCommands,” is spoken, the system
Chevrolet Camaro Owner Manual (GMNA-Localizing-U.S./Canada/Mexico-15516346) - 2022 - CRC - 4/9/21
142 Infotainment System
understands that a phone call is requestedand will respond with questions untilenough details are gathered to make a call.
If a cell phone number has been saved witha name and a place, the direct commandshould include both, for example “Call<name> at work.”
Using Voice Recognition for List Options
When a list is displayed, a voice prompt willask to confirm or select an option fromthat list.
When a display contains a list, there may beoptions that are available but not displayed.The list on a voice recognition screenfunctions the same as a list on otherdisplays. Scrolling or flinging can be used tohelp display other entries from the list.
Manually scrolling or paging the list on adisplay during a voice recognition sessionsuspends the current voice recognition eventand plays the prompt “Please selectmanually or touch the Back icon on theinfotainment display to try again.”
If manual selection takes more than15 seconds, the session terminates andprompts that it has timed out. The displayreturns to the display where voicerecognition was initiated.
The Back Command
Say “Back” or touch the Back icon on theinfotainment display to go to theprevious menu.
If in voice recognition, and “Back” is spokenall the way back to the starting display, andthen “Back” is spoken one more time, thevoice recognition session will cancel.
Help
Say “Help” on any voice recognition displayand the help prompt for the display isplayed.
Voice Recognition for the Radio
If browsing the audio sources when voice istouched, the voice recognition commandsfor AM, FM, and SiriusXM (if equipped) areavailable.
“Switch to AM” : Switch bands to AM andtune to the last AM radio station.
“Switch to FM” : Switch bands to FM andtune to the last FM radio station.
“Switch to SXM” : Switch bands to SiriusXMand tune to the last SiriusXM channel.
“Tune to <AM frequency> AM” : Tune tothe radio station whose frequency isidentified in the command (like “nine fifty”).
“Tune to <FM frequency> FM” : Tune to theradio station whose frequency is identifiedin the command (like “one oh onepoint one”).
“Tune to <AM frequency> AM HD” : Tuneto the HD Radio station (if equipped) whosefrequency is identified in the command.
“Tune to <FM frequency> FM HD” : Tune tothe HD Radio station (if equipped) whosefrequency is identified in the command.
“Tune to <FM frequency> FM HD <HDchannel number>” : Tune to the HD Radiostation (if equipped) whose frequency andHD channel are identified in the command.
“Tune to SXM <SXM channel number>” :Tune to the SiriusXM radio station whosechannel number is identified in thecommand.
“Tune to SXM <SXM channel name>” : Tuneto the SiriusXM radio station whose channelname is identified in the command.
Chevrolet Camaro Owner Manual (GMNA-Localizing-U.S./Canada/Mexico-15516346) - 2022 - CRC - 4/9/21
Infotainment System 143
Voice Recognition for Audio MyMedia
The available voice recognition commandsfor [browsing] MyMedia are:
“Play Artist” : Begin a dialog to enter aspecific artist name.
“Play Artist <artist name>” : Begin playbackof a specific artist.
“Play Album” : Begin a dialog to enter aspecific album name.
“Play Album <album name>” : Beginplayback of a specific album.
“Play Song” : Begin a dialog to enter aspecific song name.
“Play Song <song name>” : Begin playbackof a specific song, if available.
“Play Genre” : Begin a dialog to enter aspecific genre.
“Play Genre <genre name>” : Beginplayback of a specific genre.
“Play Playlist” : Begin a dialog to enter aspecific playlist name.
“Play Playlist <playlist name>” : Beginplayback of a specific playlist.
“Play <device name>” : Play music from aspecific device identified by name. Thedevice name is the name displayed on thedisplay when the device is first selected asan audio source.
“Play Chapter” : Begin a dialog to enter aspecific name.
“Play Chapter <chapter name>” : Beginplayback of a specific chapter.
“Play Audiobook” : Begin a dialog to entera specific audiobook.
“Play Audiobook <audiobook name>” :Begin playback of a specific audiobook.
“Play Episode” : Begin a dialog to enter aspecific name.
“Play Episode <episode name>” : Beginplayback of a specific episode.
“Play Podcast” : Begin a dialog to enter aspecific podcast.
“Play Podcast <podcast name>” : Beginplayback of a specific podcast.
“My Media” : Begin a dialog to enter thedesired media content.
Handling Large Amounts of Media Content
It is expected that large amounts of mediacontent will be brought into the vehicle.It may be necessary to handle largeamounts of media content in a differentway than smaller amounts of media. Thesystem may limit the options of voicerecognition by not allowing selection of filesby voice at the highest level if the numberof files exceeds the maximum limit.
Changes to voice commands due to mediacontent limits are:. Files including other individual files of all
media types such as songs, audiobookchapters, podcast episodes, and videos.
. Album type folders including types suchas albums and audiobooks.
There are no restrictions if the number offiles and albums is fewer than 12,000. Whenthe number of files connected to the systemis between 12,000 and 24,000, the contentcannot be accessed directly with onecommand like “Play <song name>.”
The restriction is that the command “PlaySong” must be spoken first; the system willthen ask for the song name. The replycommand would be to say the name of thesong to play.
Chevrolet Camaro Owner Manual (GMNA-Localizing-U.S./Canada/Mexico-15516346) - 2022 - CRC - 4/9/21
144 Infotainment System
Similar limits exist for album content.If there are more than 12,000 albums, butfewer than 24,000, the content cannot beaccessed directly with one command like,“Play <album name>.” The command “PlayAlbum” must first be spoken; the systemwill then ask for the album name. The replywould be to say the name of the albumto play.
Once the number of files has exceededapproximately 24,000, there is no supportfor accessing the songs directly throughvoice commands. There will still be access tothe media content by using commands forplaylists, artists, and genres.
The access commands for playlists, artists,and genres are prohibited after the numberof this type of media exceeds 12,000.
The system will provide feedback the firsttime voice recognition is initiated if it hasbecome apparent that any of these limitsare reached during a device initializingprocess.
Voice recognition performance will degradeto some extent based on many factors whenadding large amounts of data to recognize.If this is the case, perhaps accessing songsthrough playlists or artist name would workbetter.
Voice Recognition for Navigation (IfEquipped)
“Navigation” : Begin a dialog to enterspecific destination information.
“Navigation Commands” : Begin a dialog toenter specific destination information.
“Address” : Begin a dialog to enter aspecific destination address, which includesthe entire address consisting of the housenumber, street name, city, state/province,and country. Do not include the ZIP code.
“Place of Interest” : Begin a dialog to entera destination Place of Interest category ormajor brand name.
The name must be precisely spoken.Nicknames or short names for thebusinesses will not likely be found. Lesserknown businesses might have to be locatedby category, such as fast food, hotels,or banks.
“Navigate to Contact” : Begin a dialog toenter a specific destination contact name.
“Cancel Route” : End route guidance.
“Take Me Home” : Create a route to astored home location.
Voice Recognition for the Phone
“Call <contact name>” : Initiate a call to astored contact. The command may includelocation if the contact has location numbersstored.
“Call <contact> At Home,” “At Work,” “OnMobile,” or “On Other” : Initiate a call to astored contact and location at home, atwork, on mobile device, or on anotherphone.
“Call <cell phone number>” : Initiate a callto a cell phone number of seven digits, 10digits, or three digit emergency numbers.
“Pair Phone” : Begin the Bluetooth pairingprocess. Follow the instructions on theinfotainment display.
“Redial” : Initiate a call to the last dialednumber.
“Switch Phone” : Select a differentconnected cell phone for outgoing calls.
“Voice Keypad” : Begin a dialog to enterspecial numbers like international numbers.The numbers can be entered in groups ofdigits with each group of digits beingrepeated back by the system. If the groupof digits is not correct, the command“Delete” will remove the last group of digits
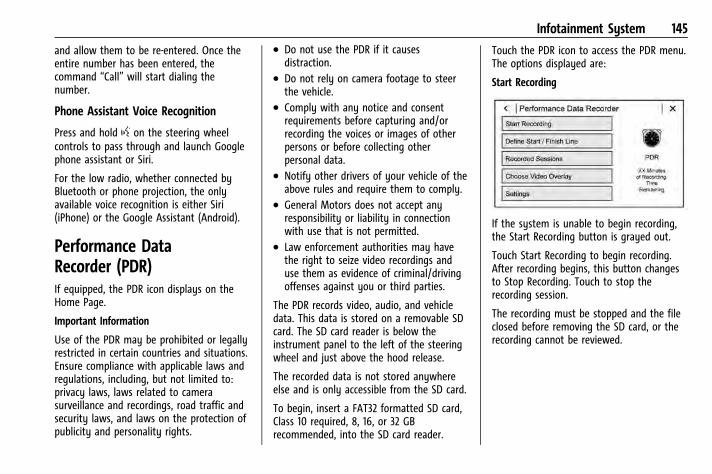
Chevrolet Camaro Owner Manual (GMNA-Localizing-U.S./Canada/Mexico-15516346) - 2022 - CRC - 4/9/21
Infotainment System 145
and allow them to be re-entered. Once theentire number has been entered, thecommand “Call” will start dialing thenumber.
Phone Assistant Voice Recognition
Press and hold g on the steering wheelcontrols to pass through and launch Googlephone assistant or Siri.
For the low radio, whether connected byBluetooth or phone projection, the onlyavailable voice recognition is either Siri(iPhone) or the Google Assistant (Android).
Performance DataRecorder (PDR)If equipped, the PDR icon displays on theHome Page.
Important Information
Use of the PDR may be prohibited or legallyrestricted in certain countries and situations.Ensure compliance with applicable laws andregulations, including, but not limited to:privacy laws, laws related to camerasurveillance and recordings, road traffic andsecurity laws, and laws on the protection ofpublicity and personality rights.
. Do not use the PDR if it causesdistraction.
. Do not rely on camera footage to steerthe vehicle.
. Comply with any notice and consentrequirements before capturing and/orrecording the voices or images of otherpersons or before collecting otherpersonal data.
. Notify other drivers of your vehicle of theabove rules and require them to comply.
. General Motors does not accept anyresponsibility or liability in connectionwith use that is not permitted.
. Law enforcement authorities may havethe right to seize video recordings anduse them as evidence of criminal/drivingoffenses against you or third parties.
The PDR records video, audio, and vehicledata. This data is stored on a removable SDcard. The SD card reader is below theinstrument panel to the left of the steeringwheel and just above the hood release.
The recorded data is not stored anywhereelse and is only accessible from the SD card.
To begin, insert a FAT32 formatted SD card,Class 10 required, 8, 16, or 32 GBrecommended, into the SD card reader.
Touch the PDR icon to access the PDR menu.The options displayed are:
Start Recording
If the system is unable to begin recording,the Start Recording button is grayed out.
Touch Start Recording to begin recording.After recording begins, this button changesto Stop Recording. Touch to stop therecording session.
The recording must be stopped and the fileclosed before removing the SD card, or therecording cannot be reviewed.
Chevrolet Camaro Owner Manual (GMNA-Localizing-U.S./Canada/Mexico-15516346) - 2022 - CRC - 4/9/21
146 Infotainment System
The elapsed time will show when recording.To define a finish line, see “Define FinishLine” later in this section.
If there is no available space on the SD card,a message displays. Delete or transferrecordings on the SD card or use another SDcard with free space.
To delete a recording, go to the RecordedSessions menu and touch V next to theitem. See “Recorded Sessions” later in thissection.
If no SD card is inserted, a message displays.
Define Finish Line
To track and record the vehicle’s lap times,the starting point of a lap must be set.Crossing this point activates the lap timerwhen recording.
To set the finish line, position the vehiclewith the front bumper at the start/finishpoint. From the PDR menu, touch DefineFinish Line and then touch Mark Finish Line.This can be done with the vehicle moving.
Recorded Sessions
To view recorded videos, touch RecordedSessions.
A list of recordings displays.
Select the recording to start playback.
Chevrolet Camaro Owner Manual (GMNA-Localizing-U.S./Canada/Mexico-15516346) - 2022 - CRC - 4/9/21
Infotainment System 147
Touch V next to an item to delete thatrecording. Touch Yes to delete or No tocancel on the confirmation screen.
Video playback is not allowed while thevehicle is in motion.
Tap the screen while the video is playing todisplay the video controls:
Video Scrubber : Changes the position andplayback. The length of the bar correspondsto the time of the video. Advance or rewindthe video by dragging along the bar.
Delete Recording : Touch to delete thevideo. A confirmation screen displays. TouchYes to delete or No to cancel.
Pause/Play : Touch to play or pause thevideo. The button will change when touched.
/ : Touch to display the previous screen.
Exit : Touch to exit the current display.
Choose Video Overlay
Touch Choose Video Overlay to displaythe menu.
Select one:. No Overlay. Sport. Track. Performance Timing
No Overlay:
No vehicle data displays on top of therecorded video. Vehicle data is still availablewith the video when accessed in the toolboxsoftware.
Sport:
Displays these vehicle metrics:. Vehicle Speed: Up to three digits are
displayed in km/h or MPH depending onvehicle settings.
. Engine Rotations Per Minute (RPMs): Thevertical line and triangle show currentRPMs. As the RPMs increase, the backfillfollows.
. Transmission State (Current Gear):Automatic and manual transmissionsdisplay 1, 2, etc.
. Lateral G-Force Graphic: Left and RightG-Forces are displayed. The graphic fills tothe left or the right depending on themeasure value. The measured G-Forcedisplays as a number at the top of thegraphic.
Chevrolet Camaro Owner Manual (GMNA-Localizing-U.S./Canada/Mexico-15516346) - 2022 - CRC - 4/9/21
148 Infotainment System. Event Odometer: This displays the
distance driven since the recording began.
Track:
Displays these vehicle metrics:. Vehicle Speed: Same as Sport.. GPS Tracking Map: Shows the vehicle’s
current position relative to a knownroute.
. Engine Rotations Per Minute (RPMs): Thevertical line and triangle indicate currentRPMs. As the RPMs increase, the backfillfollows.
. Transmission State (Current Gear): Sameas Sport.
. Friction Bubble Graphic: Lateral andlongitudinal G-Forces are displayed as adot within a bubble. A red dot displayswhen the vehicle starts braking and turns
green when the vehicle accelerates. Thedot is white when the vehicle is notmoving. A white dot is the default.
. Brake and Throttle Graphic: Displaysthe percentage value of brake andthrottle pedal position from 0–100%.
. Steering Angle: The graphic fills from thecenter to the left or right depending onthe direction of steering. The numericalsteering angle displays below the graphic.
. StabiliTrak/Electronic Stability Control(ESC) Active Indicator: The graphic onlydisplays if the active handling systemsare activated.
. Performance Traction Management (PTM)Mode: Displays the current PTM mode.The options are Wet, Dry, Sport 1, Sport 2,or Race.
. Current Lap Time: Displays the elapsedlap time if the finish line is defined andthe vehicle has crossed the defined finishline at least once.
. Event Odometer: Displays the distancedriven since the recording began.
. Drive Mode: Displays the vehicle’s currentdrive mode.
Performance Timing:
Displays these vehicle metrics:. Vehicle Speed: Same as Sport.. Engine Rotations Per Minute (RPMs):
Same as Sport.. Transmission State (Current Gear): Same
as Sport.. 0–100 km/h (0–60 mph), 0–200 km/h
(0–100 mph), 400 m (1/4 mi), and 0–200–0 km/h (0–100–0 mph): The timerstarts recording as soon as the vehicleaccelerates. As the vehicle passes eachspeed and distance milestone, it isdisplayed on the overlay.
. Throttle Position: Displays the percentageof throttle applied from 0–100%.
. StabiliTrak/ESC Active Indicator: Thegraphic only displays if the activehandling systems are activated.
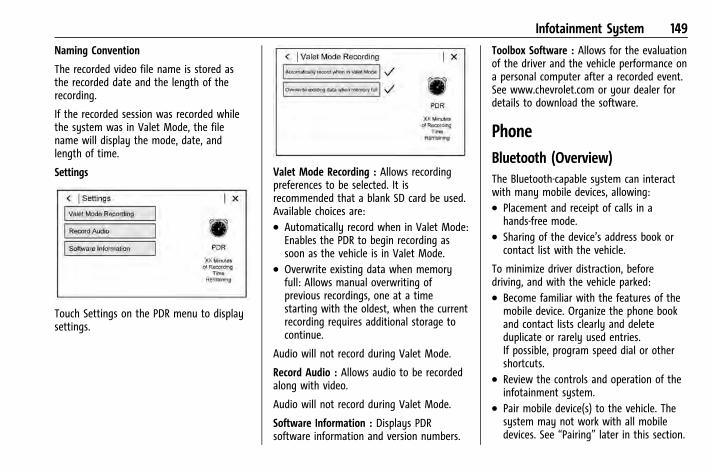
Chevrolet Camaro Owner Manual (GMNA-Localizing-U.S./Canada/Mexico-15516346) - 2022 - CRC - 4/9/21
Infotainment System 149
Naming Convention
The recorded video file name is stored asthe recorded date and the length of therecording.
If the recorded session was recorded whilethe system was in Valet Mode, the filename will display the mode, date, andlength of time.
Settings
Touch Settings on the PDR menu to displaysettings.
Valet Mode Recording : Allows recordingpreferences to be selected. It isrecommended that a blank SD card be used.Available choices are:. Automatically record when in Valet Mode:
Enables the PDR to begin recording assoon as the vehicle is in Valet Mode.
. Overwrite existing data when memoryfull: Allows manual overwriting ofprevious recordings, one at a timestarting with the oldest, when the currentrecording requires additional storage tocontinue.
Audio will not record during Valet Mode.
Record Audio : Allows audio to be recordedalong with video.
Audio will not record during Valet Mode.
Software Information : Displays PDRsoftware information and version numbers.
Toolbox Software : Allows for the evaluationof the driver and the vehicle performance ona personal computer after a recorded event.See www.chevrolet.com or your dealer fordetails to download the software.
PhoneBluetooth (Overview)The Bluetooth-capable system can interactwith many mobile devices, allowing:. Placement and receipt of calls in a
hands-free mode.. Sharing of the device’s address book or
contact list with the vehicle.
To minimize driver distraction, beforedriving, and with the vehicle parked:. Become familiar with the features of the
mobile device. Organize the phone bookand contact lists clearly and deleteduplicate or rarely used entries.If possible, program speed dial or othershortcuts.
. Review the controls and operation of theinfotainment system.
. Pair mobile device(s) to the vehicle. Thesystem may not work with all mobiledevices. See “Pairing” later in this section.
Chevrolet Camaro Owner Manual (GMNA-Localizing-U.S./Canada/Mexico-15516346) - 2022 - CRC - 4/9/21
150 Infotainment System
Vehicles with a Bluetooth system can use aBluetooth-capable mobile device with aHands-Free Profile to make and receivephone calls. The infotainment system andvoice recognition are used to control thesystem. The system can be used while theignition is on or in ACC/ACCESSORY. Therange of the Bluetooth system can be up to9.1 m (30 ft). Not all mobile devices supportall functions and not all mobile devices workwith the Bluetooth system. Seemy.chevrolet.com for more informationabout compatible mobile devices.
Controls
Use the controls on the center stack and thesteering wheel to operate the Bluetoothsystem.
Steering Wheel Controls
g : Press to answer incoming calls and startvoice recognition on your connectedBluetooth mobile device.
i : Press to end a call, decline a call,or cancel an operation. Press to mute orunmute the infotainment system when noton a call.
Infotainment System Controls
For information about how to navigate themenu system using the infotainmentcontrols, see Using the System 0 118.
Audio System
When using the Bluetooth mobile devicesystem, sound comes through the vehicle'sfront audio system speakers and overridesthe audio system. The volume level while ona mobile device call can be adjusted bypressing the steering wheel controls or thevolume control on the center stack. Theadjusted volume level remains in memoryfor later calls. The volume cannot belowered beyond a certain level.
Bluetooth (Pairing and Using aPhone)
Pairing
A Bluetooth-enabled mobile device must bepaired to the Bluetooth system and thenconnected to the vehicle before it can beused. See the mobile device manufacturer'suser guide for Bluetooth functions beforepairing the device.
Pairing Information. If no mobile device has been connected,
the Phone main page on the infotainmentdisplay will show the Connect Phoneoption. Touch this option to connect.Another way to connect is to touch thePhones tab at the top right of the displayand then touch Add Phone.
. A Bluetooth smartphone with musiccapability can be paired to the vehicle asa smartphone and a music player at thesame time.
. Up to 10 devices can be paired to theBluetooth system.
. The pairing process is disabled when thevehicle is moving.
. Pairing only needs to be completed once,unless the pairing information on the cellphone changes or the cell phone isdeleted from the system.
. If multiple paired cell phones are withinrange of the system, the system connectsto the paired cell phone that is set toFirst to Connect. If there is no cell phoneset to First to Connect, it will link to thecell phone which was used last. To link toa different paired cell phone, see “Linkingto a Different Phone” later in this section.
Chevrolet Camaro Owner Manual (GMNA-Localizing-U.S./Canada/Mexico-15516346) - 2022 - CRC - 4/9/21
Infotainment System 151
Pairing a Phone
1. Make sure Bluetooth has been enabledon the cell phone before the pairingprocess is started.
2. Touch the Phone icon on the Home Pageor the phone icon on the shortcut traynear the bottom of the display.
3. Touch Phones at the top of theinfotainment display. There is also aConnect Phones option in the middle ofthe Phone display which will shortcut tothe Phone List menu.
4. Touch Add Phone.
5. Select the vehicle name shown on theinfotainment display from your cellphone’s Bluetooth Settings list.
6. Follow the instructions on the cell phoneto confirm the six-digit code showing onthe infotainment display and touch Pair.The code on the cell phone andinfotainment display will need to beacknowledged for a successful pair.
7. Start the pairing process on the cellphone to be paired to the vehicle. Seethe cell phone manufacturer's user guidefor information on this process. Once thecell phone is paired, it will show underConnected.
8. If the vehicle name does not appear onyour cell phone, there are a few ways tostart the pairing process over:. Turn the cell phone off and then
back on.. Go back to the beginning of the
Phone menus on the infotainmentdisplay and restart the pairingprocess.
. Reset the cell phone, but this stepshould be done as a last effort.
9. If the cell phone prompts to acceptconnection or allow phone bookdownload, touch Always Accept andAllow. The phone book may not beavailable if not accepted.
10. Repeat Steps 1−8 to pair additional cellphones.
First to Connect Paired Phones
If multiple paired cell phones are withinrange of the system, the system connects tothe paired cell phone that is set as First toConnect. To enable a paired cell phone asthe First to Connect phone:
1. Make sure the cell phone is turned on.
2. Touch Settings, then touch System.
3. Touch Phones to access all paired and allconnected cell phones and mobiledevices.
4. Touch the information icon to the rightof the cell phone to open the cellphone’s settings menu.
5. Touch the First to Connect option, toenable the setting for that device.
Cell phones and mobile devices can beadded, removed, connected, anddisconnected. A sub-menu will displaywhenever a request is made to add ormanage cell phones and mobile devices.
Secondary Phone
A cell phone can be enabled as a SecondaryPhone by touching the information icon tothe right of the paired cell phone name toopen the phone settings menu. If a cellphone is enabled as a Secondary Phone, itcan connect simultaneously alongsideanother Bluetooth mobile device. In doingso, the Secondary Phone will be labeled asIncoming Calls. This means the mobiledevice can only receive calls. The AddressBook of a Secondary Phone will not beavailable and hands-free outgoing callscannot be placed using this cell phone.

Chevrolet Camaro Owner Manual (GMNA-Localizing-U.S./Canada/Mexico-15516346) - 2022 - CRC - 4/9/21
152 Infotainment System
If needed, touch the Secondary Phone whilein the Phones list to swap it into theOutgoing and Incoming role. This role makesit possible to place outgoing calls from theContacts and Recents list.
Listing All Paired and Connected Phones
1. Touch the Phone icon on the Home Pageor the phone icon on the shortcut traynear the bottom of the display.
2. Touch Phones.
Disconnecting a Connected Phone
1. Touch the Phone icon on the Home Page.
2. Touch Phones.
3. Touch the information icon next to theconnected cell phone or mobile device toshow the cell phone’s or mobile device’sinformation display.
4. Touch Disconnect.
Deleting a Paired Phone
1. Touch the Phone icon on the Home Pageor the phone icon on the shortcut traynear the bottom of the display.
2. Touch Phones.
3. Touch the information icon next to theconnected cell phone to display the cellphone’s or mobile device’s informationdisplay.
4. Touch Forget Device.
Linking to a Different Phone
To link to a different cell phone, the newcell phone must be in the vehicle and pairedto the Bluetooth system.
1. Touch the Phone icon on the Home Pageor the phone icon on the shortcut traynear the bottom of the display.
2. Touch Phones.
3. Touch the new cell phone to link to fromthe not connected phone list. See “Firstto Connect Paired Phones” and“Secondary Phone” previously in thissection.
Switching to Handset orHandsfree Mode
To switch between handset orhandsfree mode:. While the active call is hands-free, touch
the Handset option to switch to thehandset mode.
The mute icon will not be available orfunctional while Handset mode is active.
. While the active call is on the handset,touch the Handset option to switch to thehands-free mode.
Making a Call Using Contacts and RecentCalls
Calls can be made through the Bluetoothsystem using personal cell phone contactinformation for all cell phones that supportthe Phone Book feature. Become familiarwith the cell phone settings and operation.Verify the cell phone supports this feature.
The Contacts menu accesses the phone bookstored in the cell phone.
The Recents menu accesses the recents calllist from your cell phone.
To make a call using the Contacts menu:
1. Touch the Phone icon on the Home Page.
2. Touch Contacts.
3. The Contacts list can be searched byusing the first character. Touch A-Z onthe infotainment display to scrollthrough the list of names.
Touch the name to call.
4. Touch the desired contact number to call.
To make a call using the Recents menu:
1. Touch Phone on the Home Page.
Chevrolet Camaro Owner Manual (GMNA-Localizing-U.S./Canada/Mexico-15516346) - 2022 - CRC - 4/9/21
Infotainment System 153
2. Touch Recents.
3. Touch the name or number to call.
Making a Call Using the Keypad
To make a call by dialing the numbers:
1. Touch the Phone icon on the Home Page.
2. Touch Keypad and enter a phonenumber.
3. Touch # on the infotainment display tostart dialing the number.
Searching Contacts Using the Keypad
To search for contacts using the keypad:
1. Touch the Phone icon on the Home Page.
2. Touch Keypad and enter partial phonenumbers or contact names using thedigits on the keypad to search.
Results will show on the right side of thedisplay. Touch one to place a call.
Accepting or Declining a Call
When an incoming call is received, theinfotainment system mutes and a ring toneis heard in the vehicle.
Accepting a Call
There are two ways to accept a call:
. Press g on the steering wheel controls.
. Touch Answer on the infotainmentdisplay.
Declining a Call
There are two ways to decline a call:
. Pressi on the steering wheel controls.
. Touch Ignore on the infotainment display.
Call Waiting
Call waiting must be supported on theBluetooth cell phone and enabled by thewireless service carrier to work.
Accepting a Call
Press g to answer, then touch Switch onthe infotainment display.
Declining a Call
Pressi to decline, then touch Ignore onthe infotainment display
Switching Between Calls (Call WaitingCalls Only)
To switch between calls, touch Phone on theHome Page to display Call View. While inCall View, touch the call information of thecall on hold to change calls.
Three-Way Calling
Three-way calling must be supported on theBluetooth cell phone and enabled by thewireless service carrier to work.
To start a three-way call while in acurrent call:
1. In the Call View, touch Add Call to addanother call.
2. Initiate the second call by selecting fromRecents, Contacts, or Keypad.
3. When the second call is active, touch themerge icon to conference the three-waycall together.
Ending a Call. Pressi on the steering wheel controls.
. Touch # on the infotainment display,next to a call, to end only that call.
Dual Tone Multi-Frequency (DTMF) Tones
The in-vehicle Bluetooth system can sendnumbers during a call. This is used whencalling a menu-driven phone system. Use theKeypad to enter the number.
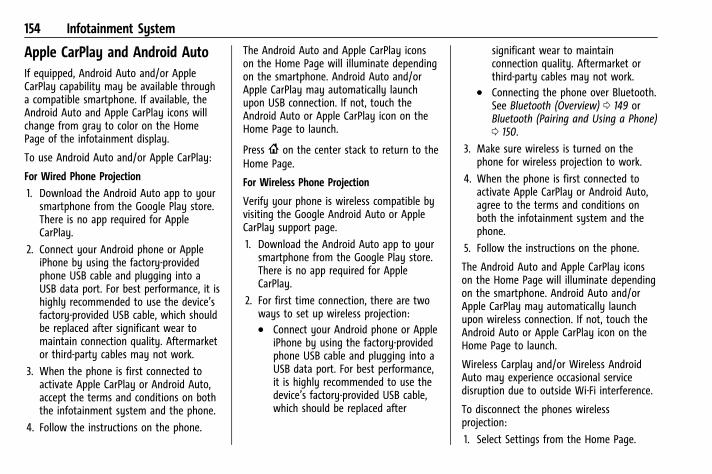
Chevrolet Camaro Owner Manual (GMNA-Localizing-U.S./Canada/Mexico-15516346) - 2022 - CRC - 4/9/21
154 Infotainment System
Apple CarPlay and Android AutoIf equipped, Android Auto and/or AppleCarPlay capability may be available througha compatible smartphone. If available, theAndroid Auto and Apple CarPlay icons willchange from gray to color on the HomePage of the infotainment display.
To use Android Auto and/or Apple CarPlay:
For Wired Phone Projection
1. Download the Android Auto app to yoursmartphone from the Google Play store.There is no app required for AppleCarPlay.
2. Connect your Android phone or AppleiPhone by using the factory-providedphone USB cable and plugging into aUSB data port. For best performance, it ishighly recommended to use the device’sfactory-provided USB cable, which shouldbe replaced after significant wear tomaintain connection quality. Aftermarketor third-party cables may not work.
3. When the phone is first connected toactivate Apple CarPlay or Android Auto,accept the terms and conditions on boththe infotainment system and the phone.
4. Follow the instructions on the phone.
The Android Auto and Apple CarPlay iconson the Home Page will illuminate dependingon the smartphone. Android Auto and/orApple CarPlay may automatically launchupon USB connection. If not, touch theAndroid Auto or Apple CarPlay icon on theHome Page to launch.
Press { on the center stack to return to theHome Page.
For Wireless Phone Projection
Verify your phone is wireless compatible byvisiting the Google Android Auto or AppleCarPlay support page.
1. Download the Android Auto app to yoursmartphone from the Google Play store.There is no app required for AppleCarPlay.
2. For first time connection, there are twoways to set up wireless projection:. Connect your Android phone or Apple
iPhone by using the factory-providedphone USB cable and plugging into aUSB data port. For best performance,it is highly recommended to use thedevice’s factory-provided USB cable,which should be replaced after
significant wear to maintainconnection quality. Aftermarket orthird-party cables may not work.
. Connecting the phone over Bluetooth.See Bluetooth (Overview) 0 149 orBluetooth (Pairing and Using a Phone)0 150.
3. Make sure wireless is turned on thephone for wireless projection to work.
4. When the phone is first connected toactivate Apple CarPlay or Android Auto,agree to the terms and conditions onboth the infotainment system and thephone.
5. Follow the instructions on the phone.
The Android Auto and Apple CarPlay iconson the Home Page will illuminate dependingon the smartphone. Android Auto and/orApple CarPlay may automatically launchupon wireless connection. If not, touch theAndroid Auto or Apple CarPlay icon on theHome Page to launch.
Wireless Carplay and/or Wireless AndroidAuto may experience occasional servicedisruption due to outside Wi-Fi interference.
To disconnect the phones wirelessprojection:
1. Select Settings from the Home Page.
Chevrolet Camaro Owner Manual (GMNA-Localizing-U.S./Canada/Mexico-15516346) - 2022 - CRC - 4/9/21
Infotainment System 155
2. Select Phones
3. Touch 4 next to the phone to bedisconnected.
4. Turn off Apple CarPlay or Android Auto.
Press { on the center stack to return to theHome Page.
Features are subject to change. For furtherinformation on how to set up Android Autoand Apple CarPlay in the vehicle, seemy.chevrolet.com.
Android Auto is provided by Google and issubject to Google’s terms and privacy policy.Apple CarPlay is provided by Apple and issubject to Apple’s terms and privacy policy.Data plan rates apply. For Android Autosupport and to see if your phone iscompatible, see https://support.google.com/androidauto. For Apple CarPlay support andto see if your phone is compatible, seewww.apple.com/ios/carplay/. Apple orGoogle may change or suspend availabilityat any time. Android Auto, Android, Google,Google Play, and other marks aretrademarks of Google Inc.; Apple CarPlay is atrademark of Apple Inc.
Press { on the center stack to exit AndroidAuto or Apple CarPlay. To enter back intoAndroid Auto or Apple CarPlay, press andhold { on the center stack.
Apple CarPlay and Android Auto can bedisabled from the infotainment system. Todo this, touch Home, Settings, and thentouch the Apps tab along the top of thedisplay. Use the On/Off toggled to turn offApple CarPlay or Android Auto.
SettingsCertain settings can be managed in theOwner Center sites when an account isestablished, and may be modified if otherusers have accessed the vehicle or createdaccounts. This may result in changes to thesecurity or functionality of the infotainmentsystem. Some settings may also betransferred to a new vehicle, if equipped. Forinstructions, in the U.S. seemy.chevrolet.com or in Canada seemychevrolet.ca or monchevrolet.ca.
Refer to the User Terms and PrivacyStatement for important details. To view,touch the Settings icon on the Home Pageof the infotainment display.
The settings menu may be organized intofour categories. Select the desired categoryby touching System, Apps, Vehicle,or Personal.
To access the personalization menus:
1. Touch Settings on the Home Page on theinfotainment display.
2. Touch the desired category to display alist of available options.
3. Touch to select the desired featuresetting.
4. Touch the options on the infotainmentdisplay to disable or enable a feature.
5. Touch z to go to the top level of theSettings menu.
System
The menu may contain the following:
Time / Date
Use the following features to set the clock:. Automatic Time and Date: Touch Off or
On to enable or disable automatic updateof the time and date. When this featureis on, the time and date cannot bemanually set.
Chevrolet Camaro Owner Manual (GMNA-Localizing-U.S./Canada/Mexico-15516346) - 2022 - CRC - 4/9/21
156 Infotainment System. Set Time: Touch to manually set the time
using the controls on the infotainmentdisplay.
. Set Date: Touch to manually set the dateusing the controls on the infotainmentdisplay.
. Automatic Time Zone (If Equipped): TouchOff or On to disable or enable automaticupdate of the time zone based on vehiclelocation. When this feature is on, thetime zone cannot be manually set.
. Select Time Zone: Touch to manually setthe time zone. Touch a time zone fromthe list.
. Use 24-hour Format: Touch to specify theclock format shown.
Touch Off or On to disable or enable.
Language
This will set the display language used onthe infotainment display. It may also usethe selected language for voice recognitionand audio feedback. Touch Language andtouch the appropriate language.
Phones
Touch to connect to a different cell phone ormobile device source, disconnect a cellphone or media device, or delete a cellphone or media device.
Wi-Fi Networks
This will show connected and available Wi-Finetworks.
If a 4G LTE data package is not active on thevehicle, the infotainment system can beconnected to an external protected Wi-Finetwork, such as a mobile device or homehotspot, to utilize connected services.
Wi-Fi Hotspot
Touch and the following may display:. Wi-Fi Services: This allows devices to use
the vehicle hotspot.
Touch the controls on the infotainmentdisplay to disable or enable.
. Wi-Fi Name: Touch to change the vehicleWi-Fi name.
. Wi-Fi Password: Touch to change thevehicle Wi-Fi password.
. Connected Devices: Touch to showconnected devices.
. Share Hotspot Data: Touch On to allowdevices to use the vehicle hotspot and itsdata, or touch Off to allow devices toonly use the vehicle hotspot but notits data.
Privacy
Touch and the following may display:. Location Services: This setting enables or
disables sharing of vehicle locationoutside the vehicle. Emergency serviceswill not be affected when Off is selected.
. Data Services: If equipped, this settingdetermines if data sharing can be used byfeatures including Wi-Fi, Hotspot, andapplications. Touch Off to disable dataservices. Emergency services and phonecalls, such as calls with OnStar Advisors orothers, will not be affected when Off isselected.
. Voice Recognition Sharing: This settingdetermines if voice commands can beshared with a cloud-based voicerecognition system. Touch Off to preventthe sharing and possible recording of yourvoice commands with this system. Thismay limit the system’s ability tounderstand your voice commands andmay disable some features.
Chevrolet Camaro Owner Manual (GMNA-Localizing-U.S./Canada/Mexico-15516346) - 2022 - CRC - 4/9/21
Infotainment System 157. Types: This setting lists all
Android-defined as dangerous permissionscurrently used by the infotainmentsystem, the number of applications thathave requested this permission, and thenumber of applications that are allowedto use this permission.
. Used By Applications: This setting lists allapplications that are requested or areusing Android-defined as dangerouspermissions. Only requested and activepermissions are shown.
Display
Touch and the following may display:. Mode: This adjusts the appearance of the
navigation map view and anydownloaded apps optimized for day ornight time conditions. Set to Auto for thedisplay to automatically adjust based onbright/dark conditions.
Touch Auto, Day, or Night to adjust thedisplay.
. Calibrate Touchscreen: Touch to calibratethe infotainment display and follow theprompts.
. Turn Display Off: Touch to turn thedisplay off. Touch anywhere on theinfotainment display or press anyinfotainment control on the center stackagain to turn the display on.
Sounds
Touch and the following may display:. Maximum Startup Volume: This feature
adjusts the maximum volume of theinfotainment system when you start yourvehicle. To set the maximum startupvolume, touch the controls on theinfotainment display to increase ordecrease.
. Audio Cues: This feature determines ifsounds play when the infotainmentsystem starts up and shuts down. Thisfeature can be turned off or on.
. Set Audio Cue Volume: This settingcontrols the volume of Audio Cues playedon startup and shut down. Touch thecontrols on the infotainment display toincrease or decrease.
. Audible Touch Feedback: This settingdetermines if a sound plays whentouching the infotainment display orradio controls. This feature can be turnedoff or on.
Voice
Touch and the following may display:. Confirm More/Less: This setting specifies
how often the voice recognition systemconfirms commands. Touch Confirm Moreto have the system check with you moreoften before acting on your commands.
. Prompt Length: This setting specifies theamount of detail the voice recognitionsystem provides when giving youfeedback. Touch Auto to have the systemautomatically adjust to your speechhabits. Touch Informative, Short, or Auto.
. Audio Feedback Speed: Touch Slow,Medium, or Fast to adjust how quicklythe voice recognition system speaks.
. Friendly Prompts: This setting adjusts theformality of voice prompts. Touch Off forshorter prompts. Touch On to hearprompts with more personality. TouchAuto to have the prompt match yourcommand style.
. Tutorial Mode: Touch Off or On toprovide tutorial feedback on the display.
. Allow Prompt Interruptions: This settingcontrols whether voice commands can bespoken before voice prompts finish. Turnthis on to speak commands withouthearing the full prompt. Speaking while
Chevrolet Camaro Owner Manual (GMNA-Localizing-U.S./Canada/Mexico-15516346) - 2022 - CRC - 4/9/21
158 Infotainment System
the prompt is still playing willimmediately stop playing the currentprompt and recognize your command.Background noise may cause accidentalinterruptions. Touch Off or On.
Favorites
Touch and the following may display:. Manage Favorites: Touch to display a list
of Audio, Phone, and Navigation favorites.
Favorites can be moved, renamed,or deleted.
To move, touch and hold the favorite, andthen drag up or down to rearrange theposition.
. Set Number of Audio Favorites: Touch toselect how many favorites pages can beviewed from the audio application. TheAuto setting will automatically adjust thisnumber based on the number of favoritesyou have saved. Touch Auto, 5, 10, 15, 20,25, 30, 35, or 40.
Updates
If equipped, the vehicle can download andinstall select software updates over awireless connection. The system will promptfor certain updates to be downloaded andinstalled. There is also an option to checkfor updates manually.
To manually check for updates, touchSettings on the Home Page and select theSystem tab. Go to the Vehicle Softwaresection and touch Updates. Follow theon-screen prompts. The steps to check for,download, and install updates may vary byvehicle.
The vehicle can be used normally during thesoftware download. Once the download iscomplete, there may be a prompt to acceptthe installation of the update upon the nextignition cycle or the next time the vehicle isshifted into P (Park). For most updates, thevehicle will be disabled and cannot be drivenduring the installation. The system willdeliver messages indicating success or errorduring and after the download andinstallation processes.
Downloading Over-the-Air vehicle softwareupdates requires Internet connectivity, whichcan be accessed through the vehicle’sbuilt-in 4G LTE connection, if equipped andactive. If required, data plans are providedby a third party. Optionally, a secure Wi-Fihotspot such as a compatible mobile devicehotspot, home hotspot, or public hotspotcan be used. Applicable data rates mayapply.
To connect the infotainment system to asecured mobile device hotspot, homehotspot, or public hotspot, touch Settings onthe Home Page, select the System tab,followed by Wi-Fi Networks. Select theappropriate Wi-Fi network, and follow theon-screen prompts. Download speedsmay vary.
On most compatible mobile devices,activation of the Wi-Fi hotspot is in theSettings menu under Mobile NetworkSharing, Personal Hotspot, Mobile Hotspot,or similar.
Availability of Over-the-Air software updatesvaries by vehicle and country. Features aresubject to change. For more information onthis feature, see my.chevrolet.com/learn.
Preferences
Touch the controls on the infotainmentdisplay to disable or enable the download ofnew updates in the background.
About
Touch to view the infotainment systemsoftware information.
Chevrolet Camaro Owner Manual (GMNA-Localizing-U.S./Canada/Mexico-15516346) - 2022 - CRC - 4/9/21
Infotainment System 159
Running Applications
Touch to see a complete list of applicationsthat are currently running on theinfotainment system.
Return to Factory Settings
Touch and the following may display:. Reset Vehicle Settings: Resets all vehicle
settings for the current user.
Touch Reset or Cancel.. Erase Settings and Personal Data: Erases
app data settings, user profiles, andpersonal data including navigation andmobile device data.
Touch Erase or Cancel.. Clear Default Applications: Resets
preferred applications that have been setto open when selecting a function. Noapplication data will be lost.
Touch Clear or Cancel.
Apps
The menu may contain the following:
Android Auto
This feature allows you to interact directlywith your mobile device on the infotainmentdisplay. See Apple CarPlay and Android Auto0 154.
Touch the controls on the infotainmentdisplay to disable or enable.
Apple CarPlay
This feature allows you to interact directlywith your mobile device on the infotainmentdisplay. See Apple CarPlay and Android Auto0 154.
Touch the controls on the infotainmentdisplay to disable or enable.
Apps
Touch and the following may display:. Update Apps Automatically: This allows
downloaded applications to be updatedautomatically.
Touch the controls on the infotainmentdisplay to disable or enable.
. About Apps: Touch to view the versionsof the shop software.
Audio
Depending on the current audio source,different options will be available.
Touch and the following may display:. Tone Settings: Touch to adjust Equalizer,
Fade/Balance, or Sound Mode. See“Infotainment System Sound Menu” inAM-FM Radio 0 121.
. Adaptive Volume: This feature adjusts thevolume based on the vehicle speed.
Touch Off, Low, Medium-Low, Medium,Medium-High, or High.
. Bose AudioPilot Noise CompensationTechnology (If Equipped): This featureadjusts the volume based on the noise inthe vehicle and the speed.
Touch Off or On.. Manage Favorites: Touch to display a list
of Audio, Mobile Devices, and Navigationfavorites.
Favorites can be moved, renamed,or deleted.
To move, touch and hold the favorite, andthen drag up or down to rearrange theposition.
. Set Number of Audio Favorites: Touch toselect how many favorites pages can beviewed from the audio application. TheAuto setting will automatically adjust thisnumber based on the number of favoritesyou have saved. Touch Auto, 5, 10, 15, 20,25, 30, 35, or 40.
. RDS: This allows the Radio Data System(RDS) to be turned on or off.
Touch the controls on the infotainmentdisplay to disable or enable.
Chevrolet Camaro Owner Manual (GMNA-Localizing-U.S./Canada/Mexico-15516346) - 2022 - CRC - 4/9/21
160 Infotainment System. HD Radio: This allows HD Radio reception
to be turned on or off.
Touch the controls on the infotainmentdisplay to disable or enable.
. Explicit Content Filter: This setting allowsaccess to explicit content SiriusXMchannels.
Touch Off or On.. Manage Phones: Select to connect to a
different phone source, disconnect aphone, or delete a phone.
. Reset Music Index: This allows the musicindex to be reset if you are havingdifficulty accessing all of the mediacontent on your device.
Touch Yes or No.
Climate
Touch and the following may display:. Auto Fan Speed: This setting specifies the
amount of airflow when the climatecontrol fan setting is Auto Fan.
Touch Low, Medium, or High.. Air Quality Sensor: This setting switches
the system into Recirculation Mode basedon the quality of the outside air.
Touch Off, Low Sensitivity, or HighSensitivity.
. Auto Cooled Seats: This settingautomatically turns on and regulates theventilated seats when the cabintemperature is warm.
Touch the controls on the infotainmentdisplay to disable or enable.
. Auto Heated Seats: This settingautomatically turns on and regulates theheated seats when the cabin temperatureis cool. The auto heated seats can beturned off by using the heated seatcontrols on the center stack.
Touch the controls on the infotainmentdisplay to disable or enable.
. Auto Defog: This setting automaticallyturns the front defogger on when thevehicle engine is started.
Touch the controls on the infotainmentdisplay to disable or enable.
. Auto Rear Defog: This settingautomatically turns the rear windowdefogger on when the vehicle engine isstarted.
Touch the controls on the infotainmentdisplay to disable or enable.
Navigation
Touch and the following may display:
. Destination Card Preferences
. Map Preferences
. Route Preferences
. Navigation Voice Control
. Traffic Preferences
. Alert Preferences
. Fuel Grade Preferences
. Manage History
. Predictive Navigation
. About
See Using the Navigation System 0 129.
Phone
Touch and the following may display:. My Number: Displays the cell phone
number of the Bluetooth connecteddevice.
. Active Call View: Shows active call displaywhen answering a call.
Touch the controls on the infotainmentdisplay to disable or enable.
. Privacy: Only show call alerts in theinstrument cluster.
Touch Off or On.. Sort Contacts: Touch to sort by first or
last name.. Re-sync Device Contacts:

Chevrolet Camaro Owner Manual (GMNA-Localizing-U.S./Canada/Mexico-15516346) - 2022 - CRC - 4/9/21
Infotainment System 161
This allows the device contacts to re-syncif you are having difficulty accessing all ofthe contacts on your cell phone.
. Delete All Vehicle Contacts: Touch todelete all vehicle stored contacts.
. OnStar Phone TTY Mode: This enablesOnStar cell phone TTY mode.
Touch Disable or Enable.
Vehicle
This menu allows adjustment of differentvehicle features. See Vehicle Personalization0 105.
Personal
If equipped, this menu allows adjustment ofdifferent user profile settings. See “Users” inUsing the System 0 118 for information onsetting up user profiles.
The menu may contain the following:
Name
Touch to edit your user name that will bedisplayed in the vehicle.
Vehicle Account Information
Touch to view the vehicle accountinformation and to change the accountpassword.
An “unverified user account” pop-up willdisplay until the account informationverification process has been completed onthe Internet. Check your registered e-mailaccount for an activation e-mail to completethe verification process.
Profile Picture
Touch to choose or change your profilepicture.
Profile Identifiers
Touch to have the vehicle recognize theidentifier you choose.
Touch Vehicle Key 1 and/or Vehicle Key 2.
If the Remote Keyless Entry (RKE)transmitter is lost or stolen, see your dealer.
Security
Touch to have your profile secured witha PIN.
Touch No or Yes.
Vehicle Name
Touch to edit your vehicle name.
Vehicle Account
Touch to view the vehicle accountinformation and to change the accountpassword.
Delete Profile
Touch to remove the profile from thevehicle.
Touch Remove or Cancel.
Teen DriverIf equipped, this allows multiple keys to beregistered for beginner drivers to encouragesafe driving habits. When the vehicle isstarted with a Teen Driver key, it willautomatically activate certain safetysystems, allow setting of some features, andlimit the use of others. The Report Card willrecord vehicle data about driving behaviorthat can be viewed later. When the vehicleis started with a registered key, the DriverInformation Center (DIC) displays a messagethat Teen Driver is active.
To access:
1. Touch Settings on the Home Page, thentouch Vehicle, and then Teen Driver.
2. Create a Personal Identification Number(PIN) by choosing a four-digit PIN.Re-enter the PIN to confirm. To changethe PIN, touch Change PIN.
The PIN is required to:. Register or unregister keys.
Chevrolet Camaro Owner Manual (GMNA-Localizing-U.S./Canada/Mexico-15516346) - 2022 - CRC - 4/9/21
162 Infotainment System. Change Teen Driver settings.. Change or clear the Teen Driver PIN.. Access or delete Report Card data.
Register keys to activate Teen Driver andassign restrictions to the key:
Any vehicle key can be registered, up to amaximum of eight keys. Label the key totell it apart from the other keys.
For a pushbutton start system:
1. Start the engine.
2. For automatic transmissions, the vehiclemust be in P (Park). For manualtransmissions, the vehicle must bestopped with the parking brake set.
3. From the Settings menu, touch Vehicleand then Teen Driver.
4. Enter the PIN.
5. Place the Remote Keyless Entry (RKE)transmitter key you wish to register inthe transmitter pocket. The key does notneed to be the one that started thevehicle. See Remote Keyless Entry (RKE)System Operation 0 7 for transmitterpocket location.
6. From the Teen Driver menu, touchSetup Keys.. If the transmitter key has not
previously been registered, the optionto add the key displays. Touch Addand a confirmation message displays.Teen Driver restrictions will beapplied whenever this key is used tooperate the vehicle.
. If the transmitter key has alreadybeen registered, the option toremove the key displays. If Remove istouched, the transmitter key is nolonger registered. A confirmationmessage displays, and Teen Driverrestrictions will not be applied if thistransmitter key is used to operatethe vehicle.
In vehicles with a pushbutton start system,if a Teen Driver and a non-Teen Driver keyare both present at start up, the vehicle willrecognize the non-Teen Driver key to startthe vehicle. The Teen Driver settings will notbe active.
For a keyed ignition system:
1. Start the engine.
2. For automatic transmissions, the vehiclemust be in P (Park). For manualtransmissions, the vehicle must bestopped with the parking brake set.
3. From the Settings menu, touch Vehicleand then Teen Driver.
4. Enter the PIN.
5. Touch Setup Keys. The system displaysinstructions for registering orunregistering a key. A confirmationmessage displays.
Manage Settings
Audio Volume Limit : Allows the audiovolume limit to be turned on or off. TouchSet Audio Volume Limit to choose themaximum allowable audio volume level.
Set Audio Volume Limit : Allows amaximum radio volume to be set. Use thearrows to choose the maximum allowablelevel for the audio volume.
Teen Driver Speed Limiter : Limits themaximum speed of the vehicle. When thespeed limiter is turned on and the vehicle isstarted with a Teen Driver key, the DICdisplays a message that the top speed islimited.
Chevrolet Camaro Owner Manual (GMNA-Localizing-U.S./Canada/Mexico-15516346) - 2022 - CRC - 4/9/21
Infotainment System 163
On certain vehicles, when the Speed Limiteris turned ON, the vehicle’s maximumacceleration will be limited. The DIC willdisplay a message that the acceleration islimited.
Teen Driver Speed Warning : Allows thespeed warning to be turned on or off. TouchSet Teen Driver Speed Warning to set thewarning speed.
Set Teen Driver Speed Warning : Displays awarning in the DIC when exceeding aselectable speed. Choose the desired speedwarning level. The speed warning does notlimit the speed of the vehicle.
SiriusXM Explicit Content Filter (ifequipped) : Allows the SiriusXM ExplicitContent Filter to be turned ON or OFF.When ON, the teen driver will not be ableto listen to SiriusXM stations that containexplicit content, and the Explicit ContentFilter selection in the Audio Settings will beunavailable for change.
When Teen Driver is Active:. If equipped with Buckle to Drive, shifting
out of P (Park) will be prevented if thedriver seat belt, and in some vehicles thefront passenger seat belt, is not buckled.
. The radio will mute when the driver seatbelt, and in some vehicles the frontpassenger seat belt, is not buckled. Theaudio from any device paired to thevehicle will also be muted.
. An object placed on the front passengerseat, such as a briefcase, handbag,grocery bag, laptop, or other electronicdevice, could cause the passenger sensingsystem to falsely sense an unbuckledfront passenger and mute the radio.If this happens, remove the object fromthe seat. See Passenger Sensing System0 54.
. Some safety systems, such as ForwardCollision Alert, if equipped, cannot beturned off.
. The gap setting for the Forward CollisionAlert and Adaptive Cruise Control,if equipped, cannot be changed.
. When trying to change a safety featurethat is not configurable in Teen Driver,the DIC displays a message indicatingthat Teen Driver is active and the actionis not available.
. Super Cruise, if equipped, is not available.
. Enhanced Low Fuel Warning (if equipped)– When the vehicle is low on fuel, thelow fuel light on the instrument clusterflashes and the DIC low fuel warningcannot be dismissed.
. Do not tow a trailer.
Report Card
The vehicle owner must secure the driver’sconsent to record certain vehicle data whenthe vehicle is driven with a registered TeenDriver key. There is one Report Card pervehicle. Data is only recorded when aregistered Teen Driver key is used tooperate the vehicle.
The Report Card data is collected from thetime Teen Driver is activated or the lasttime the Report Card was reset. Thefollowing items may be recorded:. Distance Driven – the total distance
driven.. Maximum Speed – the maximum vehicle
speed detected.. Overspeed Warnings – the number of
times the speed warning setting wasexceeded.
. Wide Open Throttle – the number oftimes the accelerator pedal was pressednearly all the way down.
Chevrolet Camaro Owner Manual (GMNA-Localizing-U.S./Canada/Mexico-15516346) - 2022 - CRC - 4/9/21
164 Infotainment System. Forward Collision Alerts – the number of
times the driver was notified whenapproaching a vehicle ahead too quicklyand at potential risk for a crash.
. Forward Automatic Braking, also calledAutomatic Emergency Braking (ifequipped) – the number of times thevehicle detected that a forward collisionwas imminent and applied the brakes.
. Reverse Automatic Braking (if equipped) –the number of times the vehicle detectedthat a rearward collision was imminentand applied the brakes.
. Traction Control – the number of timesthe Traction Control System activated toreduce wheel spin or loss of traction.
. Stability Control – the number of eventswhich required the use of electronicstability control.
. Antilock Braking System Active – Thenumber of Antilock Brake Systemactivations.
. Tailgating Alerts – the number of timesthe driver was alerted for following avehicle ahead too closely.
Report Card Data
Cumulative Data is saved for all trips untilthe Report Card is reset or until themaximum count is exceeded. If themaximum count is exceeded for a ReportCard line item, that item will no longer beupdated in the Report Card until it is reset.Each item will report a maximum of1,000 counts. The distance driven will reporta maximum of 64 374 km (40,000 mi).
To delete Report Card data, do one of thefollowing:. From the Report Card display, touch
Reset.. Touch Clear All Teen Keys and PIN from
the Teen Driver menu. This will alsounregister any Teen Driver keys anddelete the PIN.
Forgotten PIN
See your dealer to reset the PIN.
Trademarks and LicenseAgreementsFCC Information
See Radio Frequency Statement 0 334.
"Made for iPod," and "Made for iPhone,"mean that an electronic accessory has beendesigned to connect specifically to iPod oriPhone, respectively, and has been certifiedby the developer to meet Appleperformance standards. Apple is notresponsible for the operation of this deviceor its compliance with safety and regulatorystandards. Please note that the use of thisaccessory with iPod or iPhone may affectwireless performance. iPhone, iPod, iPodclassic, iPod nano, iPod shuffle, and iPodtouch are trademarks of Apple Inc.,registered in the U.S. and other countries.
Chevrolet Camaro Owner Manual (GMNA-Localizing-U.S./Canada/Mexico-15516346) - 2022 - CRC - 4/9/21
Infotainment System 165
If you decide to continue service after yourtrial, your selected subscription plan willautomatically renew thereafter. You will becharged at then-current rates. Fees and taxesapply. Please see the SiriusXM CustomerAgreement at siriusxm.com for completeterms and how to cancel, which includescalling SiriusXM at 1-866-635-2349. All feesand programming are subject to change.
Fees and Taxes: Subscription fee, taxes, onetime activation fee, and other fees mayapply. Subscription fee is consumer only. Allfees and programming subject to change.Subscriptions subject to CustomerAgreement available at www.siriusxm.com.SiriusXM service is only available in the48 contiguous United States and Canada.
In Canada: Some deterioration of servicemay occur in extreme northern latitudes.This is beyond the control of SiriusXMSatellite Radio.
Explicit Language Notice: Channels withfrequent explicit language are indicated withan “XL” preceding the channel name.Channel blocking is available for SiriusXMSatellite Radio receivers by notifyingSiriusXM:. USA Customers — See www.siriusxm.com
or call 1-888-601–6296.
. Canada Customers — Seewww.siriusxm.ca or call 1-877-438-9677.
It is prohibited to copy, decompile,disassemble, reverse engineer, hack,manipulate, or otherwise make available anytechnology or software incorporated inreceivers compatible with the SiriusXMSatellite Radio System or that support theSiriusXM website, the Online Service or anyof its content. Furthermore, the AMBER voicecompression software included in thisproduct is protected by intellectual propertyrights including patent rights, copyrights,and trade secrets of Digital VoiceSystems, Inc.
General Requirements:
1. A License Agreement from SiriusXM isrequired for any product thatincorporates SiriusXM Technology and/orfor use of any of the SiriusXM marks tobe manufactured, distributed,or marketed in the SiriusXMService Area.
2. For products to be distributed, marketed,and/or sold in Canada, a separateagreement is required with CanadianSatellite Radio Inc. (operating as SiriusXMCanada).
TouchSense Technology and TouchSenseSystem 1000 Series Licensed fromImmersion Corporation. TouchSense System1000 protected under one or more of theU.S. Patents at the following addresswww.immersion.com/patent-marking.htmland other patents pending.
Bose
Bose AudioPilot and Bose Centerpointsurround are registered trademarks of BoseCorporation in the U.S. and other countries.
HD Radio Technology
HD Radio Technology manufactured underlicense from iBiquity Digital Corporation. U.S.and Foreign Patents. For patents see

Chevrolet Camaro Owner Manual (GMNA-Localizing-U.S./Canada/Mexico-15516346) - 2022 - CRC - 4/9/21
166 Infotainment System
http://dts.com/patents. HD Radio and theHD, HD Radio, and “ARC” logos areregistered trademarks or trademarks ofiBiquity Digital Corporation in the UnitedStates and/or other countries.
Bluetooth
The Bluetooth word mark and logos areowned by the Bluetooth SIG, Inc. and anyuse of such marks by General Motors isunder license. Other trademarks and tradenames are those of their respective owners.
Java
Java is a registered trademark of Oracleand/or its affiliates.
Schedule I: Gracenote EULA
Music recognition technology and relateddata are provided by Gracenote. Gracenoteis the industry standard in music recognitiontechnology and related content delivery. Formore information see www.gracenote.com.
Music-related data from Gracenote, Inc.,copyright © 2000 to present Gracenote.Gracenote Software, copyright © 2000 topresent Gracenote. One or more patentsowned by Gracenote may apply to thisproduct and service. See the Gracenotewebsite for a non-exhaustive list ofapplicable Gracenote patents. Gracenote,CDDB, MusicID, MediaVOCS, the Gracenotelogo and logotype, and the "Powered byGracenote" logo are either registeredtrademarks or trademarks of Gracenote inthe United States and/or other countries.
Gracenote Terms of Use
This application or device contains softwarefrom Gracenote, Inc. of Emeryville, California("Gracenote"). The software from Gracenote(the "Gracenote Software") enables thisapplication to do disc or file identificationand obtain music-related information,including name, artist, track, and titleinformation ("Gracenote Data") from onlineservers or embedded databases (collectively,"Gracenote Servers") and to perform otherfunctions. You may use Gracenote Data onlyby means of the intended End-Userfunctions of this application or device.
This application or device may containcontent belonging to Gracenote’s providers.If so, all of the restrictions set forth hereinwith respect to Gracenote Data shall alsoapply to such content and such contentproviders shall be entitled to all of thebenefits and protections set forth hereinthat are available to Gracenote.
You agree that you will use Gracenote Data,the Gracenote Software, and GracenoteServers for your own personalnon-commercial use only. You agree not toassign, copy, transfer or transmit theGracenote Software or any Gracenote Datato any third party. YOU AGREE NOT TO USEOR EXPLOIT GRACENOTE DATA, THEGRACENOTE SOFTWARE, OR GRACENOTESERVERS, EXCEPT AS EXPRESSLY PERMITTEDHEREIN.
You agree that your non-exclusive license touse the Gracenote Data, the GracenoteSoftware, and Gracenote Servers willterminate if you violate these restrictions.If your license terminates, you agree tocease any and all use of the Gracenote Data,the Gracenote Software, and GracenoteServers. Gracenote reserves all rights inGracenote Data, the Gracenote Software,and the Gracenote Servers, including all
Chevrolet Camaro Owner Manual (GMNA-Localizing-U.S./Canada/Mexico-15516346) - 2022 - CRC - 4/9/21
Infotainment System 167
ownership rights. Under no circumstanceswill Gracenote become liable for anypayment to you for any information thatyou provide. You agree that Gracenote mayenforce its rights under this Agreementagainst you directly in its own name.
The Gracenote service uses a uniqueidentifier to track queries for statisticalpurposes. The purpose of a randomlyassigned numeric identifier is to allow theGracenote service to count queries withoutknowing anything about who you are. Formore information, see the web page for theGracenote Privacy Policy for the Gracenoteservice.
The Gracenote Software and each item ofGracenote Data are licensed to you "AS IS."Gracenote makes no representations orwarranties, express or implied, regarding theaccuracy of any Gracenote Data. Gracenotereserves the right to delete data from theGracenote Servers or to change datacategories for any cause that Gracenotedeems sufficient. No warranty is made thatthe Gracenote Software or Gracenote Serversare error-free or that functioning ofGracenote Software or Gracenote Serverswill be uninterrupted. Gracenote is notobligated to provide you with new enhanced
or additional data types or categories thatGracenote may provide in the future and isfree to discontinue its services at any time.
GRACENOTE DISCLAIMS ALL WARRANTIESEXPRESS OR IMPLIED, INCLUDING, BUT NOTLIMITED TO, IMPLIED WARRANTIES OFMERCHANTABILITY, FITNESS FOR APARTICULAR PURPOSE, TITLE, ANDNON-INFRINGEMENT. GRACENOTE DOES NOTWARRANT THE RESULTS THAT WILL BEOBTAINED BY YOUR USE OF THE GRACENOTESOFTWARE OR ANY GRACENOTE SERVER. INNO CASE WILL GRACENOTE BE LIABLE FORANY CONSEQUENTIAL OR INCIDENTALDAMAGES OR FOR ANY LOST PROFITS ORLOST REVENUES.
© 2014. Gracenote, Inc. All Rights Reserved.
MPEG4–AVC (H.264)
THIS PRODUCT IS LICENSED UNDER THE AVCPATENT PORTFOLIO LICENSE FOR THEPERSONAL AND NON-COMMERCIAL USE OF ACONSUMER TO (i) ENCODE VIDEO INCOMPLIANCE WITH THE AVC STANDARD(“AVC VIDEO”) AND/OR (ii) DECODE AVCVIDEO THAT WAS ENCODED BY ACONSUMER ENGAGED IN A PERSONAL ANDNON-COMMERCIAL ACTIVITY AND/OR WASOBTAINED FROM A VIDEO PROVIDERLICENSED TO PROVIDE AVC VIDEO. NO
LICENSE IS GRANTED OR SHALL BE IMPLIEDFOR ANY OTHER USE. ADDITIONALINFORMATION MAY BE OBTAINED FROMMPEG LA, LLC. SEEHTTP://WWW.MPEGLA.COM.
VC-1
THIS PRODUCT IS LICENSED UNDER THE VC-1PATENT PORTFOLIO LICENSE FOR THEPERSONAL AND NON-COMMERCIAL USE OF ACONSUMER TO (i) ENCODE VIDEO INCOMPLIANCE WITH THE VC-1 STANDARD(“VC-1 VIDEO”) AND/OR (ii) DECODE VC-1VIDEO THAT WAS ENCODED BY ACONSUMER ENGAGED IN A PERSONAL ANDNON-COMMERCIAL ACTIVITY AND/OR WASOBTAINED FROM A VIDEO PROVIDERLICENSED TO PROVIDE VC-1 VIDEO. NOLICENSE IS GRANTED OR SHALL BE IMPLIEDFOR ANY OTHER USE. ADDITIONALINFORMATION MAY BE OBTAINED FROMMPEG LA, LLC. SEEHTTP://WWW.MPEGLA.COM.
MPEG4–Visual
USE OF THIS PRODUCT IN ANY MANNERTHAT COMPLIES WITH THE MPEG-4 VISUALSTANDARD IS PROHIBITED, EXCEPT FOR USEBY A CONSUMER ENGAGING IN PERSONALAND NON-COMMERCIAL ACTIVITIES.
Chevrolet Camaro Owner Manual (GMNA-Localizing-U.S./Canada/Mexico-15516346) - 2022 - CRC - 4/9/21
168 Infotainment System
MP3
MPEG Layer-3 audio coding technologylicensed from Fraunhofer IIS and Thomson.
WMV/WMA
This product includes technology owned byMicrosoft Corporation and under a licensefrom Microsoft Licensing, GP. Use ordistribution of such technology outside ofthis product is prohibited without a licensefrom Microsoft Corporation and/or MicrosoftLicensing, GP as applicable.
Map End User License Agreement
END USER TERMS
The Map Data SD card (“Data”) is providedfor your personal, internal use only and notfor resale. It is protected by copyright, andis subject to the following terms (this “EndUser License Agreement”) and conditionswhich are agreed to by you, on the onehand, and HERE North America, LLC (“HERE”)and its licensors (including their licensorsand suppliers) on the other hand.
The Data for areas of Canada includesinformation taken with permission fromCanadian authorities, including: © Her
Majesty the Queen in Right of Canada, ©Queen's Printer for Ontario, © Canada PostCorporation, GeoBase®.
HERE holds a nonexclusive license from theUnited States Postal Service® to publish andsell ZIP+4® information.
© United States Postal Service 2013. Pricesare not established, controlled, or approvedby the United States Postal Service. Thefollowing trademarks and registrations areowned by the USPS: United States PostalService, USPS, and ZIP+4.
TERMS AND CONDITIONS
Personal Use Only: You agree to use thisData for the solely personal, noncommercialpurposes for which you were licensed, andnot for service bureau, timesharing or othersimilar purposes. Except as otherwise setforth herein, you agree not to otherwisereproduce, copy, modify, decompile,disassemble or reverse engineer any portionof this Data, and may not transfer ordistribute it in any form, for any purpose,except to the extent permitted bymandatory laws. You may transfer the Dataand all accompanying materials on apermanent basis if you retain no copies andthe recipient agrees to the terms of this EndUser License Agreement. Multi-disc sets may
only be transferred or sold as a completeset as provided to you and not as a subsetthereof.
Restrictions
Except where you have been specificallylicensed to do so by HERE and withoutlimiting the preceding paragraph, you maynot (a) use this Data with any products,systems, or applications installed orotherwise connected to or in communicationwith vehicles capable of vehicle navigation,positioning, dispatch, real time routeguidance, fleet management or similarapplications; or (b) with, or incommunication with, including withoutlimitation, cellular phones, palmtop andhandheld computers, pagers, and personaldigital assistants or PDAs.
Warning
This Data may contain inaccurate orincomplete information due to the passageof time, changing circumstances, sourcesused, and the nature of collectingcomprehensive geographic data, any ofwhich may lead to incorrect results.
Chevrolet Camaro Owner Manual (GMNA-Localizing-U.S./Canada/Mexico-15516346) - 2022 - CRC - 4/9/21
Infotainment System 169
No Warranty
This Data is provided to you “as is,” and youagree to use it at your own risk. HERE andits licensors (and their licensors andsuppliers) make no guarantees,representations, or warranties of any kind,express or implied, arising by law orotherwise, including but not limited to,content, quality, accuracy, completeness,effectiveness, reliability, fitness for aparticular purpose, usefulness, use or resultsto be obtained from this Data, or that theData or server will be uninterrupted orerror free.
Disclaimer of Warranty
THE DATABASE IS PROVIDED ON AN “AS IS”AND “WITH ALL FAULTS BASIS” ANDHARMAN (AND THEIR LICENSORS ANDSUPPLIERS) EXPRESSLY DISCLAIM ALL OTHERWARRANTIES, EXPRESS OR IMPLIED,INCLUDING BUT NOT LIMITED TO, THEIMPLIED WARRANTIES OFNON-INFRINGEMENT, MERCHANTABILITY,SATISFACTORY QUALITY, ACCURACY, TITLEAND FITNESS FOR A PARTICULAR PURPOSE.NO ORAL OR WRITTEN ADVICE ORINFORMATION PROVIDED BY HARMAN (ORANY OF THEIR LICENSORS, AGENTS,EMPLOYEES, OR THIRD PARTY PROVIDERS)
SHALL CREATE A WARRANTY, AND YOU ARENOT ENTITLED TO RELY ON ANY SUCHADVICE OR INFORMATION. THIS DISCLAIMEROF WARRANTIES IS AN ESSENTIAL CONDITIONOF THIS AGREEMENT.
Disclaimer of Liability
HERE AND ITS LICENSORS (INCLUDING THEIRLICENSORS AND SUPPLIERS) SHALL NOT BELIABLE TO YOU IN RESPECT OF ANY CLAIM,DEMAND OR ACTION, IRRESPECTIVE OF THENATURE OF THE CAUSE OF THE CLAIM,DEMAND OR ACTION ALLEGING ANY LOSS,INJURY OR DAMAGES, DIRECT OR INDIRECT,WHICH MAY RESULT FROM THE USE ORPOSSESSION OF THIS DATA; OR FOR ANYLOSS OF PROFIT, REVENUE, CONTRACTS ORSAVINGS, OR ANY OTHER DIRECT, INDIRECT,INCIDENTAL, SPECIAL OR CONSEQUENTIALDAMAGES ARISING OUT OF YOUR USE OF ORINABILITY TO USE THIS DATA, ANY DEFECT INTHIS DATA, OR THE BREACH OF THESETERMS OR CONDITIONS, WHETHER IN ANACTION IN CONTRACT OR TORT OR BASEDON A WARRANTY, EVEN IF HERE OR ITSLICENSORS HAVE BEEN ADVISED OF THEPOSSIBILITY OF SUCH DAMAGES. SomeStates, Territories, and Countries do not
allow certain liability exclusions or damageslimitations, so to that extent the above maynot apply to you.
Export Control
You agree not to export from anywhere anypart of the Data provided to you or anydirect product thereof except in compliancewith, and with all licenses and approvalsrequired under, applicable export laws, rulesand regulations. Entire Agreement: Theseterms and conditions constitute the entireagreement between HERE (and its licensors,including their licensors and suppliers) andyou pertaining to the subject matter hereof,and supersedes in their entirety any and allwritten or oral agreements previouslyexisting between us with respect to suchsubject matter.
Governing Law
The above terms and conditions shall begoverned by the laws of the State of Illinois,without giving effect to (i) its conflict oflaws provisions, or (ii) the United NationsConvention for Contracts for theInternational Sale of Goods, which isexplicitly excluded. You agree to submit tothe jurisdiction of the State of Illinois for
Chevrolet Camaro Owner Manual (GMNA-Localizing-U.S./Canada/Mexico-15516346) - 2022 - CRC - 4/9/21
170 Infotainment System
any and all disputes, claims, and actionsarising from or in connection with the Dataprovided to you hereunder.
Government End Users
If the Data is being acquired by or on behalfof the United States government or anyother entity seeking or applying rightssimilar to those customarily claimed by theUnited States government, this Data is a“commercial item” as that term is defined at48 C.F.R. (“FAR”) 2.101, is licensed inaccordance with this End User LicenseAgreement, and each copy of Data deliveredor otherwise furnished shall be marked andembedded as appropriate with the following“Notice of Use,” and be treated inaccordance with such Notice:
NOTICE OF USE
CONTRACTOR (MANUFACTURER/ SUPPLIER)
NAME:
HERE North America, LLC
CONTRACTOR (MANUFACTURER/SUPPLIER)
ADDRESS:
425 West Randolph Street, Chicago, IL60606.
This Data is a commercial item as defined inFAR 2.101 and is subject to the End UserLicense Agreement under which this Datawas provided.
© 2014 HERE North America, LLC. All rightsreserved.
If the Contracting Officer, federalgovernment agency, or any federal officialrefuses to use the legend provided herein,the Contracting Officer, federal governmentagency, or any federal official must notifyHERE prior to seeking additional oralternative rights in the Data.
Unicode
Copyright © 1991-2010 Unicode, Inc. Allrights reserved. Distributed under the Termsof Use in http://www.unicode.org/copyright.html.
Free Type Project
Portions of this software are copyright ©2010 The FreeType Project(http://www.freetype.org). All rightsreserved.
Open Source SW
Further information concerning the OSSlicenses is shown in the infotainmentdisplay.
QNX
Portions of this software are copyright ©2008-2011, QNX Software Systems. All rightsreserved.
Part C – EULA
Copyright © 2011, Software Systems GmbH& Co. KG. All Rights Reserved.
The product you have purchased ("Product")contains Software (Runtime ConfigurationNo. 505962; "Software") which is distributedby or on behalf of the Product manufacturer"Manufacturer") under license from SoftwareSystems Co. ("QSSC"). You may only use theSoftware in the Product and in compliancewith the license terms below.
Chevrolet Camaro Owner Manual (GMNA-Localizing-U.S./Canada/Mexico-15516346) - 2022 - CRC - 4/9/21
Infotainment System 171
Subject to the terms and conditions of thisLicense, QSSC hereby grants you a limited,non-exclusive, non-transferable license to usethe Software in the Product for the purposeintended by the Manufacturer. If permittedby the Manufacturer, or by applicable law,you may make one backup copy of theSoftware as part of the Product software.QSSC and its licensors reserve all license+C31rights not expressly granted herein, andretain all right, title and interest in and toall copies of the Software, including allintellectual property rights therein. Unlessrequired by applicable law you may notreproduce, distribute or transfer,or de-compile, disassemble or otherwiseattempt to unbundle, reverse engineer,modify or create derivative works of, theSoftware. You agree: (1) not to remove,cover or alter any proprietary notices, labelsor marks in or on the Software, and toensure that all copies bear any noticecontained on the original; and (2) not toexport the Product or the Software incontravention of applicable exportcontrol laws.
EXCEPT TO THE EXTENT OTHERWISEREQUIRED BY APPLICABLE LAW, QSSC ANDITS LICENSORS PROVIDE THE SOFTWARE ONAN "AS IS" BASIS, WITHOUT WARRANTIES OR
CONDITIONS OF ANY KIND, EITHER EXPRESSOR IMPLIED INCLUDING, WITHOUTLIMITATION, ANY WARRANTIES ORCONDITIONS OF TITLE, NON-INFRINGEMENT,MERCHANTABILITY OR FITNESS FOR APARTICULAR PURPOSE. ANY WARRANTIES OROTHER PROVISIONS OFFERED BY THEMANUFACTURER OR ITS DISTRIBUTOR(S)THAT DIFFER FROM THIS LICENSE AREOFFERED BY THE MANUFACTURER OR ITSDISTRIBUTOR(S) ALONE AND NOT BY QSSC,ITS AFFILIATES OR THEIR LICENSORS. YOUASSUME ANY RISKS ASSOCIATED WITH YOURUSE OF THE SOFTWARE UNDER THIS LICENSE.
EXCEPT TO THE EXTENT OTHERWISEREQUIRED BY APPLICABLE LAW (SUCH AS INTHE CASE OF DELIBERATE OR GROSSLYNEGLIGENT ACTS), IN NO EVENT SHALL QSSC,ITS AFFILIATES OR THEIR LICENSORS BELIABLE TO YOU UNDER ANY LEGAL THEORY,WHETHER IN TORT (INCLUDING NEGLIGENCE),CONTRACT OR OTHERWISE, FOR DAMAGES,INCLUDING ANY DIRECT, INDIRECT, SPECIAL,INCIDENTAL, OR CONSEQUENTIAL DAMAGESOF ANY CHARACTER ARISING AS A RESULT OFTHIS LICENSE OR OUT OF THE USE ORINABILITY TO USE THE PRODUCT (INCLUDINGBUT NOT LIMITED TO DAMAGES FOR LOSSOF GOODWILL, WORK STOPPAGE, PRODUCTFAILURE OR MALFUNCTION, OR ANY AND ALL
OTHER COMMERCIAL DAMAGES OR LOSSES),EVEN IF QSSC, ITS AFFILIATES OR THEIRLICENSORS HAVE BEEN ADVISED OF THEPOSSIBILITY OF SUCH DAMAGES.
WMA
This product is protected by certainintellectual property rights of Microsoft. Useor distribution of such technology outside ofthis product is prohibited without a licensefrom Microsoft.
For more information on the Software,including any open source software licenseterms (and available source code) as well ascopyright attributions applicable to theRuntime Configuration indicated above,please contact the Manufacturer or contactQSSC at 175 Terence Matthews Crescent,Kanata, Ontario, Canada K2M 1W8([email protected]).
Linotype
Helvetica is a trademark of Linotype Corp.registered in the U.S. Patent and TrademarkOffice and may be registered in certainother jurisdictions in the name of LinotypeCorp. or its licensee Linotype GmbH.
Usage in text form of each of the LicensedTrademarks is:
Chevrolet Camaro Owner Manual (GMNA-Localizing-U.S./Canada/Mexico-15516346) - 2022 - CRC - 4/9/21
172 Infotainment System
The trademark attribution requirements forthe Licensed Trademarks may be viewed athttp://www.linotype.com/2061-19414/trademarks.html.
END USER NOTICE
The marks of companies displayed by thisproduct to indicate business locations arethe marks of their respective owners. Theuse of such marks in this product does notimply any sponsorship, approval,or endorsement by such companies of thisproduct.
Chevrolet Camaro Owner Manual (GMNA-Localizing-U.S./Canada/Mexico-15516346) - 2022 - CRC - 4/9/21
Climate Controls 173
Climate ControlsClimate Control SystemsAutomatic Climate Control System . . . . . 173Dual Automatic Climate ControlSystem . . . . . . . . . . . . . . . . . . . . . . . . . . . . . . 176
Air VentsAir Vents . . . . . . . . . . . . . . . . . . . . . . . . . . . . . . 179
MaintenancePassenger Compartment Air Filter . . . . . 179Service . . . . . . . . . . . . . . . . . . . . . . . . . . . . . . . . 180
Climate Control Systems
Automatic Climate Control SystemThe heating, cooling, defrosting, and ventilation for the vehicle can be controlled with thissystem.
1. Temperature Control
2. Air Delivery Mode Controls
3. O (Power)
4. AUTO (Automatic Operation)
5. A/C (Air Conditioning)
6. Recirculation
7. Fan Control
8. Rear Window Defogger
9. Defrost
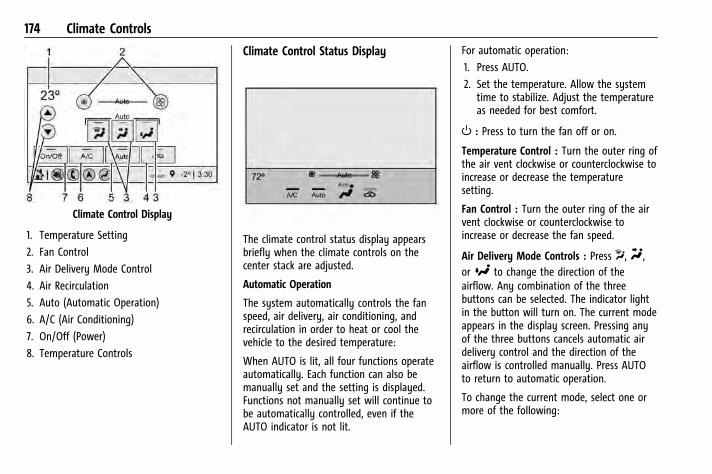
Chevrolet Camaro Owner Manual (GMNA-Localizing-U.S./Canada/Mexico-15516346) - 2022 - CRC - 4/9/21
174 Climate Controls
Climate Control Display
1. Temperature Setting
2. Fan Control
3. Air Delivery Mode Control
4. Air Recirculation
5. Auto (Automatic Operation)
6. A/C (Air Conditioning)
7. On/Off (Power)
8. Temperature Controls
Climate Control Status Display
The climate control status display appearsbriefly when the climate controls on thecenter stack are adjusted.
Automatic Operation
The system automatically controls the fanspeed, air delivery, air conditioning, andrecirculation in order to heat or cool thevehicle to the desired temperature:
When AUTO is lit, all four functions operateautomatically. Each function can also bemanually set and the setting is displayed.Functions not manually set will continue tobe automatically controlled, even if theAUTO indicator is not lit.
For automatic operation:
1. Press AUTO.
2. Set the temperature. Allow the systemtime to stabilize. Adjust the temperatureas needed for best comfort.
O : Press to turn the fan off or on.
Temperature Control : Turn the outer ring ofthe air vent clockwise or counterclockwise toincrease or decrease the temperaturesetting.
Fan Control : Turn the outer ring of the airvent clockwise or counterclockwise toincrease or decrease the fan speed.
Air Delivery Mode Controls : Press X, Y,or[ to change the direction of theairflow. Any combination of the threebuttons can be selected. The indicator lightin the button will turn on. The current modeappears in the display screen. Pressing anyof the three buttons cancels automatic airdelivery control and the direction of theairflow is controlled manually. Press AUTOto return to automatic operation.
To change the current mode, select one ormore of the following:
Chevrolet Camaro Owner Manual (GMNA-Localizing-U.S./Canada/Mexico-15516346) - 2022 - CRC - 4/9/21
Climate Controls 175
X : Clears the windows of fog or moisture.Air is directed to the windshield and sidewindow outlets.
Y : Air is directed to the instrument paneloutlets.
[ : Air is directed to the floor outlets.
0 : Clears the windshield of fog or frostmore quickly. Air is only directed to thewindshield and side window outlets. The airconditioning may turn on automatically toremove fog.
For best results, clear all snow and ice fromthe windshield before defrosting.
Do not drive the vehicle until all windowsare clear.
Air Conditioning
A/C : Press to turn the air conditioning onor off. An indicator light turns on. If the fanis turned off or the outside temperaturefalls below freezing, the air conditioning willnot run, but the indicator light will be lit.
The air conditioning might automaticallycome on when0 is selected.
@ : Press to turn on recirculation. Anindicator light comes on. Air is recirculatedinside the vehicle. It helps to quickly coolthe air inside the vehicle or reduce theoutside air and odors that may enter.
Operation in the recirculation mode whilethe air conditioner is off increases humidityand may cause the windows to fog.
Recirculation is not available in the defrostor defog modes.
To improve fuel efficiency and to cool thevehicle faster, recirculation may beautomatically selected in warm weather. Therecirculation light will not come on. Press@ to select recirculation; press it again toselect outside air.
Rear Window Defogger
1 : Press to turn the rear windowdefogger on or off. An indicator light on thebutton comes on to show that the rearwindow defogger is on. The defogger turnsoff if the ignition is turned off or to ACC/ACCESSORY.
The rear window defogger can be set toautomatic operation. See “Climate and AirQuality” under Vehicle Personalization 0 105.When Auto Rear Defog is selected, the rearwindow defogger turns on automaticallywhen the interior temperature is cold andthe outside temperature is about 7 °C (44 °F)and below.
The heated outside mirrors turn on whenthe rear window defogger button is on andhelp to clear fog or frost from the surface ofthe mirrors.
Do not drive the vehicle until all windowsare clear.
CautionDo not use a razor blade or sharp objectto clear the inside rear window. Do notadhere anything to the defogger gridlines in the rear glass. These actions maydamage the rear defogger. Repairs wouldnot be covered by the vehicle warranty.
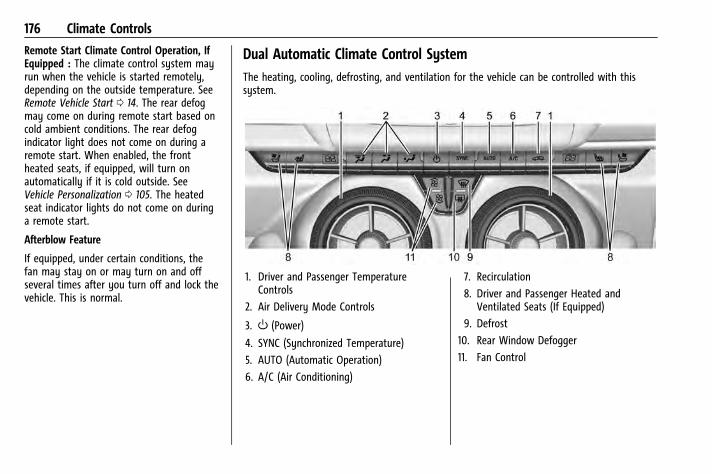
Chevrolet Camaro Owner Manual (GMNA-Localizing-U.S./Canada/Mexico-15516346) - 2022 - CRC - 4/9/21
176 Climate Controls
Remote Start Climate Control Operation, IfEquipped : The climate control system mayrun when the vehicle is started remotely,depending on the outside temperature. SeeRemote Vehicle Start 0 14. The rear defogmay come on during remote start based oncold ambient conditions. The rear defogindicator light does not come on during aremote start. When enabled, the frontheated seats, if equipped, will turn onautomatically if it is cold outside. SeeVehicle Personalization 0 105. The heatedseat indicator lights do not come on duringa remote start.
Afterblow Feature
If equipped, under certain conditions, thefan may stay on or may turn on and offseveral times after you turn off and lock thevehicle. This is normal.
Dual Automatic Climate Control SystemThe heating, cooling, defrosting, and ventilation for the vehicle can be controlled with thissystem.
1. Driver and Passenger TemperatureControls
2. Air Delivery Mode Controls
3. O (Power)
4. SYNC (Synchronized Temperature)
5. AUTO (Automatic Operation)
6. A/C (Air Conditioning)
7. Recirculation
8. Driver and Passenger Heated andVentilated Seats (If Equipped)
9. Defrost
10. Rear Window Defogger
11. Fan Control
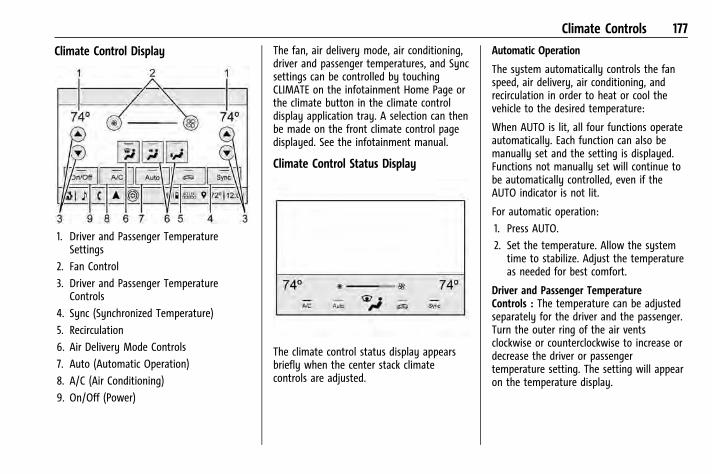
Chevrolet Camaro Owner Manual (GMNA-Localizing-U.S./Canada/Mexico-15516346) - 2022 - CRC - 4/9/21
Climate Controls 177
Climate Control Display
1. Driver and Passenger TemperatureSettings
2. Fan Control
3. Driver and Passenger TemperatureControls
4. Sync (Synchronized Temperature)
5. Recirculation
6. Air Delivery Mode Controls
7. Auto (Automatic Operation)
8. A/C (Air Conditioning)
9. On/Off (Power)
The fan, air delivery mode, air conditioning,driver and passenger temperatures, and Syncsettings can be controlled by touchingCLIMATE on the infotainment Home Page orthe climate button in the climate controldisplay application tray. A selection can thenbe made on the front climate control pagedisplayed. See the infotainment manual.
Climate Control Status Display
The climate control status display appearsbriefly when the center stack climatecontrols are adjusted.
Automatic Operation
The system automatically controls the fanspeed, air delivery, air conditioning, andrecirculation in order to heat or cool thevehicle to the desired temperature:
When AUTO is lit, all four functions operateautomatically. Each function can also bemanually set and the setting is displayed.Functions not manually set will continue tobe automatically controlled, even if theAUTO indicator is not lit.
For automatic operation:
1. Press AUTO.
2. Set the temperature. Allow the systemtime to stabilize. Adjust the temperatureas needed for best comfort.
Driver and Passenger TemperatureControls : The temperature can be adjustedseparately for the driver and the passenger.Turn the outer ring of the air ventsclockwise or counterclockwise to increase ordecrease the driver or passengertemperature setting. The setting will appearon the temperature display.

Chevrolet Camaro Owner Manual (GMNA-Localizing-U.S./Canada/Mexico-15516346) - 2022 - CRC - 4/9/21
178 Climate Controls
SYNC : Press to link the passenger climatetemperature settings to the driver setting.The SYNC indicator light will turn on. Whenthe passenger settings are adjusted, theSYNC indicator light turns off.
Manual Operation
O : Press to turn the fan off or on.
h or i : Press to increase or decrease thefan speed.
Air Delivery Mode Controls : Press X, Y,or[ to change the direction of theairflow. Any combination of the threebuttons can be selected. The indicator lightin the button will turn on. The current modeappears in the display screen. Pressing anyof the three buttons cancels automatic airdelivery control and the direction of theairflow is controlled manually. Press AUTOto return to automatic operation.
To change the current mode, select one ormore of the following:
X : Clears the windows of fog or moisture.Air is directed to the windshield and sidewindow outlets.
Y : Air is directed to the instrument paneloutlets.
[ : Air is directed to the floor outlets.
0 : Clears the windshield of fog or frostmore quickly. Air is only directed to thewindshield and side window outlets. The airconditioning may turn on automatically toremove fog.
For best results, clear all snow and ice fromthe windshield before defrosting.
Do not drive the vehicle until all windowsare clear.
Air Conditioning
A/C : Press to turn the air conditioning onor off. An indicator light turns on. If the fanis turned off or the outside temperaturefalls below freezing, the air conditioning willnot run, but the indicator light will be lit.
The air conditioning might automaticallycome on when0 is selected.
@ : Press to turn on recirculation. Anindicator light comes on. Air is recirculatedinside the vehicle. It helps to quickly coolthe air inside the vehicle or reduce theoutside air and odors that may enter.
Operation in the recirculation mode whilethe air conditioner is off increases humidityand may cause the windows to fog.
Recirculation is not available in the defrostor defog modes.
To improve fuel efficiency and to cool thevehicle faster, recirculation may beautomatically selected in warm weather. Therecirculation light will not come on. Press@ to select recirculation; press it again toselect outside air.
Rear Window Defogger
1 : Press to turn the rear windowdefogger on or off. An indicator light on thebutton comes on to show that the rearwindow defogger is on. The defogger turnsoff if the ignition is turned off or to ACC/ACCESSORY.
The rear window defogger can be set toautomatic operation. See “Climate and AirQuality” under Vehicle Personalization 0 105.When Auto Rear Defog is selected, the rearwindow defogger turns on automaticallywhen the interior temperature is cold andthe outside temperature is about 7 °C (44 °F)and below.
The heated outside mirrors turn on whenthe rear window defogger button is on andhelp to clear fog or frost from the surface ofthe mirrors.
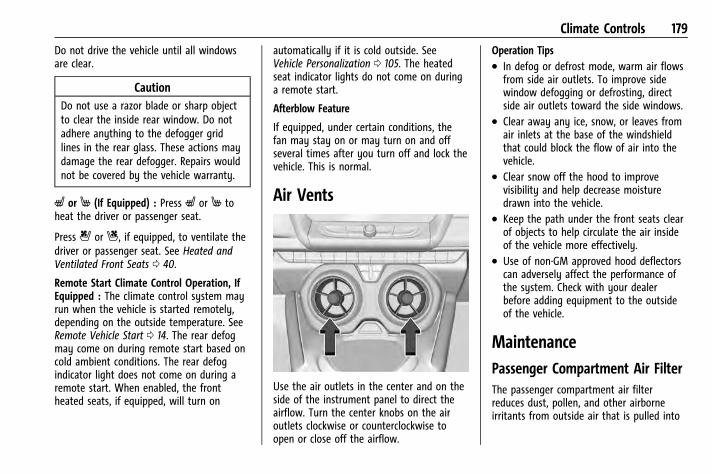
Chevrolet Camaro Owner Manual (GMNA-Localizing-U.S./Canada/Mexico-15516346) - 2022 - CRC - 4/9/21
Climate Controls 179
Do not drive the vehicle until all windowsare clear.
CautionDo not use a razor blade or sharp objectto clear the inside rear window. Do notadhere anything to the defogger gridlines in the rear glass. These actions maydamage the rear defogger. Repairs wouldnot be covered by the vehicle warranty.
L or M (If Equipped) : Press L or M toheat the driver or passenger seat.
Press { or C, if equipped, to ventilate thedriver or passenger seat. See Heated andVentilated Front Seats 0 40.
Remote Start Climate Control Operation, IfEquipped : The climate control system mayrun when the vehicle is started remotely,depending on the outside temperature. SeeRemote Vehicle Start 0 14. The rear defogmay come on during remote start based oncold ambient conditions. The rear defogindicator light does not come on during aremote start. When enabled, the frontheated seats, if equipped, will turn on
automatically if it is cold outside. SeeVehicle Personalization 0 105. The heatedseat indicator lights do not come on duringa remote start.
Afterblow Feature
If equipped, under certain conditions, thefan may stay on or may turn on and offseveral times after you turn off and lock thevehicle. This is normal.
Air Vents
Use the air outlets in the center and on theside of the instrument panel to direct theairflow. Turn the center knobs on the airoutlets clockwise or counterclockwise toopen or close off the airflow.
Operation Tips. In defog or defrost mode, warm air flows
from side air outlets. To improve sidewindow defogging or defrosting, directside air outlets toward the side windows.
. Clear away any ice, snow, or leaves fromair inlets at the base of the windshieldthat could block the flow of air into thevehicle.
. Clear snow off the hood to improvevisibility and help decrease moisturedrawn into the vehicle.
. Keep the path under the front seats clearof objects to help circulate the air insideof the vehicle more effectively.
. Use of non-GM approved hood deflectorscan adversely affect the performance ofthe system. Check with your dealerbefore adding equipment to the outsideof the vehicle.
MaintenancePassenger Compartment Air FilterThe passenger compartment air filterreduces dust, pollen, and other airborneirritants from outside air that is pulled into
Chevrolet Camaro Owner Manual (GMNA-Localizing-U.S./Canada/Mexico-15516346) - 2022 - CRC - 4/9/21
180 Climate Controls
the vehicle. The filter will need to bereplaced periodically. See MaintenanceSchedule 0 307.
Using the climate control system without anair filter installed is not recommended.Water or other debris could enter thesystem and result in leaks or noises. Alwaysinstall a new filter when removing the oldfilter.
For more information on filter replacement,see your dealer.
ServiceAll vehicles have a label underhood thatidentifies the refrigerant used in the vehicle.The refrigerant system should only beserviced by trained and certified technicians.The air conditioning evaporator should neverbe repaired or replaced by one from asalvage vehicle. It should only be replacedby a new evaporator to ensure proper andsafe operation.
During service, all refrigerants should bereclaimed with proper equipment. Ventingrefrigerants directly to the atmosphere isharmful to the environment and may alsocreate unsafe conditions based oninhalation, combustion, frostbite, or otherhealth-based concerns.
The air conditioning system requires periodicmaintenance. See Maintenance Schedule0 307.
Chevrolet Camaro Owner Manual (GMNA-Localizing-U.S./Canada/Mexico-15516346) - 2022 - CRC - 4/13/21
Driving and Operating 181
Driving and OperatingDriving InformationDriving for Better Fuel Economy . . . . . . . 182Distracted Driving . . . . . . . . . . . . . . . . . . . . . 182Defensive Driving . . . . . . . . . . . . . . . . . . . . . . 182Impaired Driving . . . . . . . . . . . . . . . . . . . . . . . 183Control of a Vehicle . . . . . . . . . . . . . . . . . . . 183Braking . . . . . . . . . . . . . . . . . . . . . . . . . . . . . . . . 183Steering . . . . . . . . . . . . . . . . . . . . . . . . . . . . . . . 183Off-Road Recovery . . . . . . . . . . . . . . . . . . . . . 184Loss of Control . . . . . . . . . . . . . . . . . . . . . . . . 184Track Events and CompetitiveDriving . . . . . . . . . . . . . . . . . . . . . . . . . . . . . . . 185
Driving on Wet Roads . . . . . . . . . . . . . . . . . 193Hill and Mountain Roads . . . . . . . . . . . . . . 194Winter Driving . . . . . . . . . . . . . . . . . . . . . . . . 194If the Vehicle Is Stuck . . . . . . . . . . . . . . . . . 195Vehicle Load Limits . . . . . . . . . . . . . . . . . . . . 196
Starting and OperatingNew Vehicle Break-In . . . . . . . . . . . . . . . . . . 199Ignition Positions . . . . . . . . . . . . . . . . . . . . . 200Starting the Engine . . . . . . . . . . . . . . . . . . . . 201Engine Heater . . . . . . . . . . . . . . . . . . . . . . . . . 202Retained Accessory Power (RAP) . . . . . . 204Shifting Into Park . . . . . . . . . . . . . . . . . . . . . 204Shifting out of Park . . . . . . . . . . . . . . . . . . . 205Parking (Manual Transmission) . . . . . . . . 205Parking over Things That Burn . . . . . . . . 205
Active Fuel Management . . . . . . . . . . . . . . 205Extended Parking . . . . . . . . . . . . . . . . . . . . . 206
Engine ExhaustEngine Exhaust . . . . . . . . . . . . . . . . . . . . . . . . 206Running the Vehicle While Parked . . . . 206
Automatic TransmissionAutomatic Transmission . . . . . . . . . . . . . . . 207Manual Mode . . . . . . . . . . . . . . . . . . . . . . . . . 208
Manual TransmissionManual Transmission . . . . . . . . . . . . . . . . . . 210Active Rev Match . . . . . . . . . . . . . . . . . . . . . . 212
BrakesAntilock Brake System (ABS) . . . . . . . . . . . 213Electric Parking Brake . . . . . . . . . . . . . . . . . . 213Brake Assist . . . . . . . . . . . . . . . . . . . . . . . . . . . 214Hill Start Assist (HSA) . . . . . . . . . . . . . . . . . . 215
Ride Control SystemsTraction Control/Electronic StabilityControl . . . . . . . . . . . . . . . . . . . . . . . . . . . . . . . 215
Driver Mode Control . . . . . . . . . . . . . . . . . . . 217Competitive Driving Mode (SS, ZL1 and1LE Models Only) . . . . . . . . . . . . . . . . . . . . 220
Limited-Slip Rear Axle . . . . . . . . . . . . . . . . . . 221
Cruise ControlCruise Control . . . . . . . . . . . . . . . . . . . . . . . . . . 221
Driver Assistance SystemsDriver Assistance Systems . . . . . . . . . . . . . 224Assistance Systems for Parking orBacking . . . . . . . . . . . . . . . . . . . . . . . . . . . . . . 225
Rear Vision Camera (RVC) . . . . . . . . . . . . . . 225Park Assist . . . . . . . . . . . . . . . . . . . . . . . . . . . . 226Rear Cross Traffic Alert (RCTA)System . . . . . . . . . . . . . . . . . . . . . . . . . . . . . . 227
Forward Collision Alert (FCA)System . . . . . . . . . . . . . . . . . . . . . . . . . . . . . . 227
Side Blind Zone Alert (SBZA) . . . . . . . . . . . 228Lane Change Alert (LCA) . . . . . . . . . . . . . . . 229
FuelTop Tier Fuel . . . . . . . . . . . . . . . . . . . . . . . . . . 230Recommended Fuel (3.6L V6 Engine) . . . 231Recommended Fuel (2.0L L4 TurboEngine and 6.2L V8 Engine) . . . . . . . . . . 231
Recommended Fuel (6.2L V8Supercharged Engine) . . . . . . . . . . . . . . . . 231
Prohibited Fuels . . . . . . . . . . . . . . . . . . . . . . . 232Fuels in Foreign Countries . . . . . . . . . . . . . 232Fuel Additives . . . . . . . . . . . . . . . . . . . . . . . . . 232Filling the Tank . . . . . . . . . . . . . . . . . . . . . . . . 232Filling a Portable Fuel Container . . . . . . . 234
Trailer TowingGeneral Towing Information . . . . . . . . . . . 234
Conversions and Add-OnsAdd-On Electrical Equipment . . . . . . . . . . . 234
Chevrolet Camaro Owner Manual (GMNA-Localizing-U.S./Canada/Mexico-15516346) - 2022 - CRC - 4/13/21
182 Driving and Operating
Driving InformationDriving for Better Fuel EconomyDriving habits can affect fuel mileage. Hereare some driving tips to get the best fueleconomy possible.. Set the climate controls to the desired
temperature after the engine is started,or turn them off when not required.
. Avoid fast starts and accelerate smoothly.
. Brake gradually and avoid abrupt stops.
. Avoid idling the engine for long periodsof time.
. When road and weather conditions areappropriate, use cruise control.
. Always follow posted speed limits ordrive more slowly when conditionsrequire.
. Keep vehicle tires properly inflated.
. Combine several trips into a single trip.
. Replace the vehicle's tires with the sameTPC Spec number molded into the tire'ssidewall near the size.
. Follow recommended scheduledmaintenance.
Distracted DrivingDistraction comes in many forms and cantake your focus from the task of driving.Exercise good judgment and do not let otheractivities divert your attention away fromthe road. Many local governments haveenacted laws regarding driver distraction.Become familiar with the local laws inyour area.
To avoid distracted driving, keep your eyeson the road, keep your hands on thesteering wheel, and focus your attention ondriving.. Do not use a phone in demanding driving
situations. Use a hands-free method toplace or receive necessary phone calls.
. Watch the road. Do not read, take notes,or look up information on phones orother electronic devices.
. Designate a front seat passenger tohandle potential distractions.
. Become familiar with vehicle featuresbefore driving, such as programmingfavorite radio stations and adjustingclimate control and seat settings. Programall trip information into any navigationdevice prior to driving.
. Wait until the vehicle is parked toretrieve items that have fallen to thefloor.
. Stop or park the vehicle to tend tochildren.
. Keep pets in an appropriate carrier orrestraint.
. Avoid stressful conversations whiledriving, whether with a passenger or on acell phone.
{ WarningTaking your eyes off the road too long ortoo often could cause a crash resulting ininjury or death. Focus your attention ondriving.
Refer to the infotainment section for moreinformation on using that system and thenavigation system, if equipped, includingpairing and using a cell phone.
Defensive DrivingDefensive driving means “always expect theunexpected.” The first step in drivingdefensively is to wear the seat belt. SeeSeat Belts 0 42.
Chevrolet Camaro Owner Manual (GMNA-Localizing-U.S./Canada/Mexico-15516346) - 2022 - CRC - 4/13/21
Driving and Operating 183. Assume that other road users
(pedestrians, bicyclists, and other drivers)are going to be careless and makemistakes. Anticipate what they may doand be ready.
. Allow enough following distance betweenyou and the driver in front of you.
. Focus on the task of driving.
Impaired DrivingDeath and injury associated with impaireddriving is a global tragedy.
{ WarningDrinking alcohol or taking drugs and thendriving is very dangerous. Your reflexes,perceptions, attentiveness, and judgmentcan be affected by even a small amountof alcohol or drugs. You can have aserious — or even fatal — collision if youdrive after drinking or taking drugs.
Do not drive while under the influence ofalcohol or drugs, or ride with a driverwho has been drinking or is impaired bydrugs. Find alternate transportationhome; or if you are with a group,designate a driver who will remain sober.
Control of a VehicleBraking, steering, and accelerating areimportant factors in helping to control avehicle while driving.
BrakingBraking action involves perception time andreaction time. Deciding to push the brakepedal is perception time. Actually doing it isreaction time.
Average driver reaction time is aboutthree-quarters of a second. In that time, avehicle moving at 100 km/h (60 mph) travels20 m (66 ft), which could be a lot ofdistance in an emergency.
Helpful braking tips to keep in mind include:. Keep enough distance between you and
the vehicle in front of you.. Avoid needless heavy braking.. Keep pace with traffic.
If the engine ever stops while the vehicle isbeing driven, brake normally but do notpump the brakes. Doing so could make thepedal harder to push down. If the enginestops, there will be some power brake assistbut it will be used when the brake is
applied. Once the power assist is used up, itcan take longer to stop and the brake pedalwill be harder to push.
Steering
CautionTo avoid damage to the steering system,do not drive over curbs, parking barriers,or similar objects at speeds greater than3 km/h (1 mph). Use care when drivingover other objects such as lane dividersand speed bumps. Damage caused bymisuse of the vehicle is not covered bythe vehicle warranty.
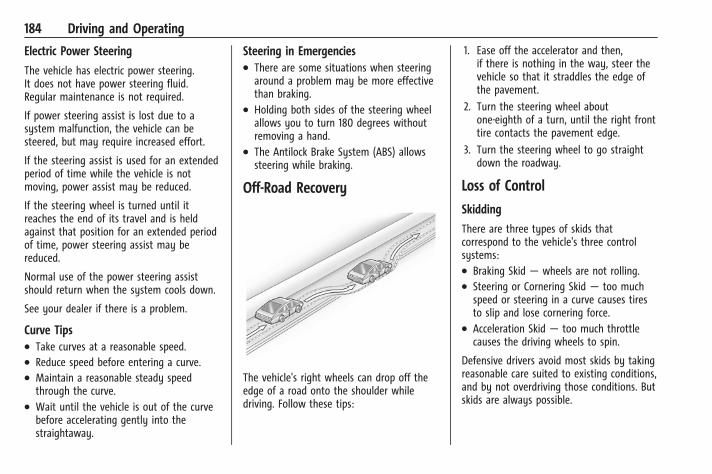
Chevrolet Camaro Owner Manual (GMNA-Localizing-U.S./Canada/Mexico-15516346) - 2022 - CRC - 4/13/21
184 Driving and Operating
Electric Power Steering
The vehicle has electric power steering.It does not have power steering fluid.Regular maintenance is not required.
If power steering assist is lost due to asystem malfunction, the vehicle can besteered, but may require increased effort.
If the steering assist is used for an extendedperiod of time while the vehicle is notmoving, power assist may be reduced.
If the steering wheel is turned until itreaches the end of its travel and is heldagainst that position for an extended periodof time, power steering assist may bereduced.
Normal use of the power steering assistshould return when the system cools down.
See your dealer if there is a problem.
Curve Tips. Take curves at a reasonable speed.. Reduce speed before entering a curve.. Maintain a reasonable steady speed
through the curve.. Wait until the vehicle is out of the curve
before accelerating gently into thestraightaway.
Steering in Emergencies. There are some situations when steering
around a problem may be more effectivethan braking.
. Holding both sides of the steering wheelallows you to turn 180 degrees withoutremoving a hand.
. The Antilock Brake System (ABS) allowssteering while braking.
Off-Road Recovery
The vehicle's right wheels can drop off theedge of a road onto the shoulder whiledriving. Follow these tips:
1. Ease off the accelerator and then,if there is nothing in the way, steer thevehicle so that it straddles the edge ofthe pavement.
2. Turn the steering wheel aboutone-eighth of a turn, until the right fronttire contacts the pavement edge.
3. Turn the steering wheel to go straightdown the roadway.
Loss of Control
Skidding
There are three types of skids thatcorrespond to the vehicle's three controlsystems:. Braking Skid — wheels are not rolling.. Steering or Cornering Skid — too much
speed or steering in a curve causes tiresto slip and lose cornering force.
. Acceleration Skid — too much throttlecauses the driving wheels to spin.
Defensive drivers avoid most skids by takingreasonable care suited to existing conditions,and by not overdriving those conditions. Butskids are always possible.
Chevrolet Camaro Owner Manual (GMNA-Localizing-U.S./Canada/Mexico-15516346) - 2022 - CRC - 4/13/21
Driving and Operating 185
If the vehicle starts to slide, follow thesesuggestions:. Ease your foot off the accelerator pedal
and steer the way you want the vehicleto go. The vehicle may straighten out. Beready for a second skid if it occurs.
. Slow down and adjust your drivingaccording to weather conditions. Stoppingdistance can be longer and vehicle controlcan be affected when traction is reducedby water, snow, ice, gravel, or othermaterial on the road. Learn to recognizewarning clues — such as enough water,ice, or packed snow on the road to makea mirrored surface — and slow downwhen you have any doubt.
. Try to avoid sudden steering, acceleration,or braking, including reducing vehiclespeed by shifting to a lower gear. Anysudden changes could cause the tires toslide.
Remember: Antilock brakes help avoid onlythe braking skid.
Track Events and CompetitiveDriving
{ DangerHigh-performance features are intendedfor use only on closed tracks byexperienced and qualified drivers andshould not be used on public roads.High-speed driving, aggressive cornering,hard braking, and other high-performancedriving can be dangerous. Improper driverinputs for the conditions may result inloss of control of the vehicle, which couldinjure or kill you or others. Always drivesafely.
If the vehicle is a Camaro High Performancemodel, see the additional items in theCamaro High Performance supplement.
Track events or competitive driving mayaffect the vehicle warranty. See thewarranty manual before using the vehiclefor racing or other competitive driving.
The Engine Sound Management setting (ifequipped) should not be set to Stealth Modeduring track events and competitive driving.See Driver Mode Control 0 217.
{ WarningPrior to each track event and againbefore returning to public roads, tightenthe wheel nuts with a torque wrench tothe proper torque specification. Wheelnuts that are improperly or incorrectlytightened can cause the wheels tobecome loose or come off, resulting in acrash. See Capacities and Specifications0 321 for wheel nut torque specifications.
Engine Oil
CautionIf you use the vehicle for racing or othercompetitive driving, the engine may usemore oil than it would with normal use.Low oil levels can damage the engine. Forinformation on how to add oil, seeEngine Oil 0 243.
Be sure to check the oil level often duringracing or other competitive driving andkeep the level at or near the upper markthat shows the proper operating range onthe engine oil dipstick.
Chevrolet Camaro Owner Manual (GMNA-Localizing-U.S./Canada/Mexico-15516346) - 2022 - CRC - 4/13/21
186 Driving and Operating
3.6L (LGX) V6 Engine
Change the engine oil to 0W-40 or 5W-40that meets the dexos2 specification. If thisoil is not available, the following oil can beused as an alternative: Valvoline SYNPOWERMST 5W-40.
For LS/LT 1LE, add 0.9 L (1.0 qt) of oil overthe nominal fill level for a track event. Afterthe competitive driving, remove the excessoil so that the level on the dipstick is notabove the upper mark that shows theproper operating range.
During track usage, do not follow the EngineOil Life System status. Change the engine oilafter four hours of accumulative track usage.
Fuel
Use premium unleaded gasoline with aposted octane rating of 93 at a track event.Unleaded gasoline with a posted octanerating of 91 may be used, but performancewill be degraded.
Automatic Transmission Fluid
Have the transmission fluid set to the trackspecific oil level prior to track usage.Transmission fluid should be changed after
every 15 hours of track usage. Anytransmission level set or change should beperformed at your dealer.
Manual Transmission Fluid
Manual transmission fluid should bechanged after every 15 hours of track usage.
Brake Fluid
Replace existing brake fluid with a qualifiedhigh performance DOT 4 brake fluid from asealed container. Brake fluid with a dryboiling point >310 °C (590 °F) is qualified.If high performance brake fluid is used,replace it with GM approved brake fluidbefore driving on public roads. If highperformance brake fluid is in the vehicle andthe age of the brake fluid is over a monthold or unknown, replace the brake fluidbefore track events and competitive driving.Do not use silicone or DOT 5 brake fluids.
Check the fluid level before each competitivedriving event.
Rear Axle Fluid
Axles must have 2 400 km (1,500 mi) beforebeing used in track driving.
The rear axle fluid temperatures may behigher than when driving in severeconditions. Drain and refill with new fluidafter the first racing or competitive drivingevent, and then after every 24 hours ofracing or competitive driving. SeeRecommended Fluids and Lubricants 0 316.
CautionDuring a first time track or racing event,high rear axle temperatures can occur.Damage could be caused to the rear axleand would not be covered by the vehiclewarranty. Do not drive as long or as fastthe first time the vehicle is driven on thetrack or raced.
Brake Fluid
For track events or competitive driving, it isrecommended that the brake fluid bereplaced with a high performance brake fluidthat has a dry boiling point greater than279 °C (534 °F). After conversion to the highperformance brake fluid, follow the brakefluid service recommendations outlined bythe fluid manufacturer. Do not use siliconeor DOT-5 brake fluids.
Chevrolet Camaro Owner Manual (GMNA-Localizing-U.S./Canada/Mexico-15516346) - 2022 - CRC - 4/13/21
Driving and Operating 187
Brake Burnishing
To prepare the Camaro brake systems fortrack events and racing, complete theappropriate high performance brakeburnishing procedure described below.
New brake pads must be burnished beforeracing or competitive driving.
CautionThese procedures are specific to theCamaro LT with Y4Q Heavy Duty CoolingSystem and J55 brakes, SS, ZL1, andmodels equipped with the 1LE trackpackage. This procedure should not berun on other Camaro models equippedwith JL9 or J55 brakes without Y4Q heavyduty cooling system as damage mayresult.
CautionThe new vehicle break-in period should becompleted before performing the brakeburnishing procedure or damage mayoccur to the powertrain/engine. See NewVehicle Break-In 0 199.
When performed as instructed, thisprocedure will not damage the brakes.During the burnishing procedure, the brakepads will smoke and produce an odor. Thebraking force and pedal travel may increase.After the procedure is complete, the brakepads may appear white at the rotor contact.
Run this procedure in a safe manner and incompliance with all local and stateordinances/laws regarding motor vehicleoperation. Run this procedure only on drypavement.
Racing/Track Brake Burnishing Procedure
CautionBrake fade will occur during this trackburnish procedure and can cause brakepedal travel and force to increase. Thiscould extend stopping distance until thebrakes are fully burnished.
1. Apply the brakes 25 times starting at100 km/h (60 mph) to 50 km/h (30 mph)while decelerating at 0.4 g. This is amedium brake application. Drive for atleast 1 km (0.6 mi) between applying thebrakes. This first step may be skipped ifthere are more than 320 km (200 mi) onthe brake pads.
2. Repeatedly apply the brakes from100 km/h (60 mph) to 25 km/h (15 mph)while decelerating at 0.8 g. This is a hardbrake application, without activating theAntilock Brake System (ABS). Drive for atleast 1 km (0.6 mi) between stops. Repeatuntil the brake pedal travel starts toincrease. Depending on conditions, thisshould take no longer than 25 brakeapplications.
3. Cool down: Drive at 100 km/h (60 mph)for approximately 15 km (10 mi) withoutusing the brakes.
4. Apply the brakes 25 times from100 km/h (60 mph) to 50 km/h (30 mph)while decelerating at 0.4 g. This is amedium brake application. Drive for atleast 1 km (0.6 mi) between applications.
Front Tire Deflectors, Lower Control ArmDeflectors, and Disc Splash Shields (SSexcept 1LE Only)
Before any racing event, remove the tiredeflectors in the front of the vehicle, andreplace the original deflector and splashshield with the tall deflector and smallsplash shield.
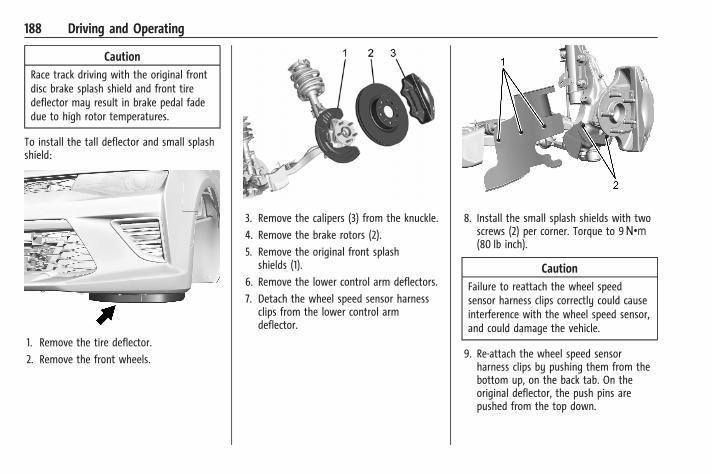
Chevrolet Camaro Owner Manual (GMNA-Localizing-U.S./Canada/Mexico-15516346) - 2022 - CRC - 4/13/21
188 Driving and Operating
CautionRace track driving with the original frontdisc brake splash shield and front tiredeflector may result in brake pedal fadedue to high rotor temperatures.
To install the tall deflector and small splashshield:
1. Remove the tire deflector.
2. Remove the front wheels.
3. Remove the calipers (3) from the knuckle.
4. Remove the brake rotors (2).
5. Remove the original front splashshields (1).
6. Remove the lower control arm deflectors.
7. Detach the wheel speed sensor harnessclips from the lower control armdeflector.
8. Install the small splash shields with twoscrews (2) per corner. Torque to 9Y(80 lb inch).
CautionFailure to reattach the wheel speedsensor harness clips correctly could causeinterference with the wheel speed sensor,and could damage the vehicle.
9. Re-attach the wheel speed sensorharness clips by pushing them from thebottom up, on the back tab. On theoriginal deflector, the push pins arepushed from the top down.

Chevrolet Camaro Owner Manual (GMNA-Localizing-U.S./Canada/Mexico-15516346) - 2022 - CRC - 4/13/21
Driving and Operating 189
10. Install the tall deflectors with threescrews (1) per corner. Torque to 3.3Y(29 lb inch).
When installing new control arms,torque the three screws to 4.5Y(40 lb inch).
11. Install the front rotors with one screwper corner. Torque to 9Y (80 lb inch).
12. Apply liquid thread adhesive to thecaliper bolts (GM Part No. 9985399 –Loctite 272 – Goodwrench 12345493).Install the calipers with two screws (1)per corner. Torque the caliper bolts to200Y (148 lb ft).
13. Reinstall the front wheels using thewheel nut torque. See Capacities andSpecifications 0 321.
CautionAfter a track event, remove the talldeflector and the small splash shield andreinstall the original deflector and splashshield. Failure to reinstall the originalparts may lead to corrosion, loss ofoutput, noise, premature brake pad androtor wear, reduced high-speed wetbraking, and damage to the tall deflector.
14. After a track event, repeat the steps toreinstall the original lower control armdeflectors and splash shields.
15. Reinstall the tire deflectors.
Custom Launch Control (If Equipped)
Custom Launch Control allows the followingparameters for Launch Control to bemodified:. Launch RPM. Slip Target (5%–15%). Surface Type
To adjust the Launch RPM, all of theseconditions must be met:. The vehicle must be in Track Mode. See
“Track Mode” under Driver Mode Control0 217.
. Performance Traction Management (PTM)Mode must be enabled. For convertibles,and SS equipped with 10-speed automatic,Competitive Driving Mode must beenabled. See Driver Mode Control 0 217.
. The steering wheel must be straight.
. The driver door must be closed.
. The transmission must be in a gear otherthan R (Reverse). It will work in P (Park)or N (Neutral).
. The parking brake must not be engaged.
For more information on Competitive DrivingMode, see Competitive Driving Mode (SS,ZL1 and 1LE Models Only) 0 220.
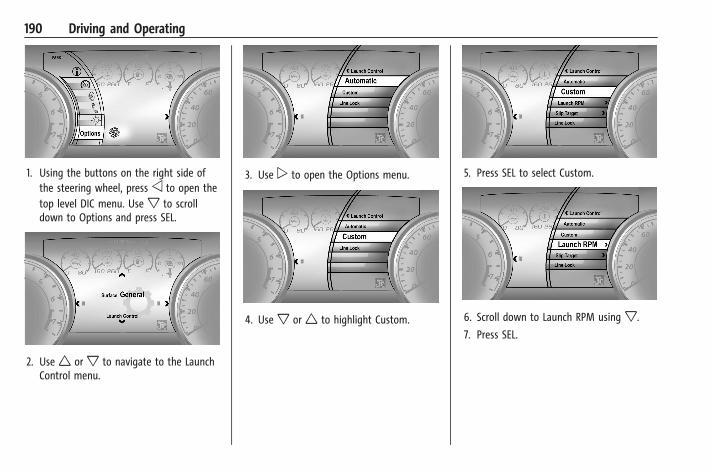
Chevrolet Camaro Owner Manual (GMNA-Localizing-U.S./Canada/Mexico-15516346) - 2022 - CRC - 4/13/21
190 Driving and Operating
1. Using the buttons on the right side ofthe steering wheel, press o to open thetop level DIC menu. Use x to scrolldown to Options and press SEL.
2. Use w or x to navigate to the LaunchControl menu.
3. Use p to open the Options menu.
4. Use x or w to highlight Custom.
5. Press SEL to select Custom.
6. Scroll down to Launch RPM using x.
7. Press SEL.
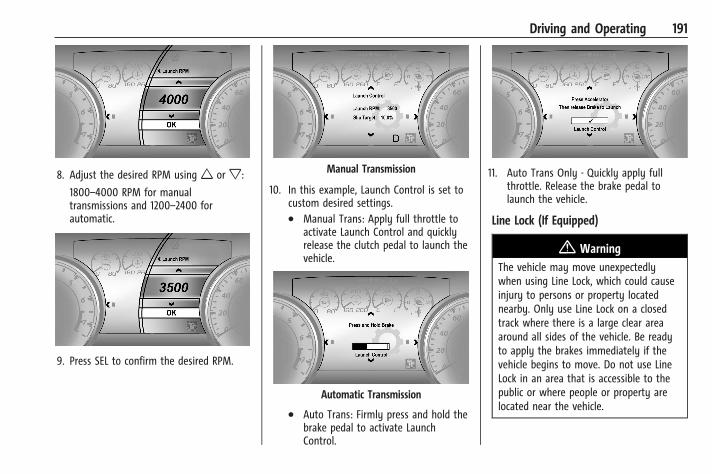
Chevrolet Camaro Owner Manual (GMNA-Localizing-U.S./Canada/Mexico-15516346) - 2022 - CRC - 4/13/21
Driving and Operating 191
8. Adjust the desired RPM using w or x:
1800–4000 RPM for manualtransmissions and 1200–2400 forautomatic.
9. Press SEL to confirm the desired RPM.
Manual Transmission
10. In this example, Launch Control is set tocustom desired settings.. Manual Trans: Apply full throttle to
activate Launch Control and quicklyrelease the clutch pedal to launch thevehicle.
Automatic Transmission
. Auto Trans: Firmly press and hold thebrake pedal to activate LaunchControl.
11. Auto Trans Only - Quickly apply fullthrottle. Release the brake pedal tolaunch the vehicle.
Line Lock (If Equipped)
{ WarningThe vehicle may move unexpectedlywhen using Line Lock, which could causeinjury to persons or property locatednearby. Only use Line Lock on a closedtrack where there is a large clear areaaround all sides of the vehicle. Be readyto apply the brakes immediately if thevehicle begins to move. Do not use LineLock in an area that is accessible to thepublic or where people or property arelocated near the vehicle.
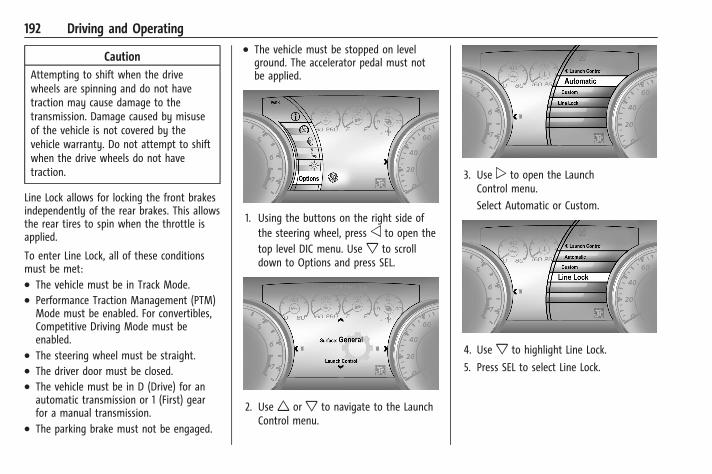
Chevrolet Camaro Owner Manual (GMNA-Localizing-U.S./Canada/Mexico-15516346) - 2022 - CRC - 4/13/21
192 Driving and Operating
CautionAttempting to shift when the drivewheels are spinning and do not havetraction may cause damage to thetransmission. Damage caused by misuseof the vehicle is not covered by thevehicle warranty. Do not attempt to shiftwhen the drive wheels do not havetraction.
Line Lock allows for locking the front brakesindependently of the rear brakes. This allowsthe rear tires to spin when the throttle isapplied.
To enter Line Lock, all of these conditionsmust be met:. The vehicle must be in Track Mode.. Performance Traction Management (PTM)
Mode must be enabled. For convertibles,Competitive Driving Mode must beenabled.
. The steering wheel must be straight.
. The driver door must be closed.
. The vehicle must be in D (Drive) for anautomatic transmission or 1 (First) gearfor a manual transmission.
. The parking brake must not be engaged.
. The vehicle must be stopped on levelground. The accelerator pedal must notbe applied.
1. Using the buttons on the right side ofthe steering wheel, press o to open thetop level DIC menu. Use x to scrolldown to Options and press SEL.
2. Use w or x to navigate to the LaunchControl menu.
3. Use p to open the LaunchControl menu.
Select Automatic or Custom.
4. Use x to highlight Line Lock.
5. Press SEL to select Line Lock.
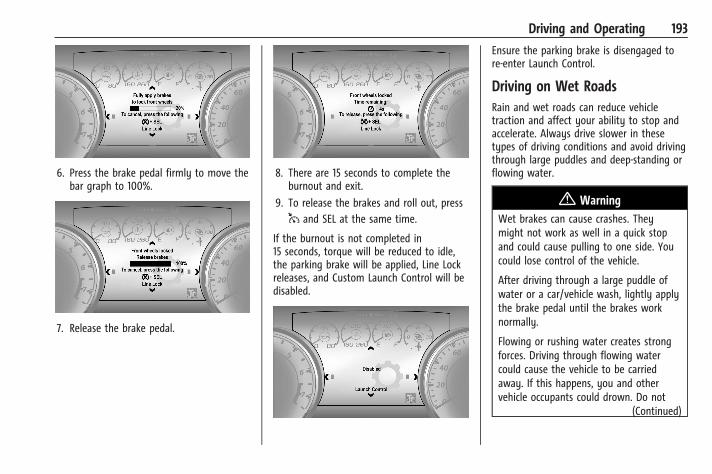
Chevrolet Camaro Owner Manual (GMNA-Localizing-U.S./Canada/Mexico-15516346) - 2022 - CRC - 4/13/21
Driving and Operating 193
6. Press the brake pedal firmly to move thebar graph to 100%.
7. Release the brake pedal.
8. There are 15 seconds to complete theburnout and exit.
9. To release the brakes and roll out, press1 and SEL at the same time.
If the burnout is not completed in15 seconds, torque will be reduced to idle,the parking brake will be applied, Line Lockreleases, and Custom Launch Control will bedisabled.
Ensure the parking brake is disengaged tore-enter Launch Control.
Driving on Wet RoadsRain and wet roads can reduce vehicletraction and affect your ability to stop andaccelerate. Always drive slower in thesetypes of driving conditions and avoid drivingthrough large puddles and deep-standing orflowing water.
{ WarningWet brakes can cause crashes. Theymight not work as well in a quick stopand could cause pulling to one side. Youcould lose control of the vehicle.
After driving through a large puddle ofwater or a car/vehicle wash, lightly applythe brake pedal until the brakes worknormally.
Flowing or rushing water creates strongforces. Driving through flowing watercould cause the vehicle to be carriedaway. If this happens, you and othervehicle occupants could drown. Do not
(Continued)
Chevrolet Camaro Owner Manual (GMNA-Localizing-U.S./Canada/Mexico-15516346) - 2022 - CRC - 4/13/21
194 Driving and Operating
Warning (Continued)
ignore police warnings and be verycautious about trying to drive throughflowing water.
Hydroplaning
Hydroplaning is dangerous. Water can buildup under the vehicle's tires so they actuallyride on the water. This can happen if theroad is wet enough and you are going fastenough. When the vehicle is hydroplaning, ithas little or no contact with the road.
There is no hard and fast rule abouthydroplaning. The best advice is to slowdown when the road is wet.
Other Rainy Weather Tips
Besides slowing down, other wet weatherdriving tips include:. Allow extra following distance.. Pass with caution.. Keep windshield wiping equipment in
good shape.. Keep the windshield washer fluid reservoir
filled.. Have good tires with proper tread depth.
See Tires 0 269.
. Turn off cruise control.
Hill and Mountain RoadsDriving on steep hills or through mountainsis different than driving on flat or rollingterrain. Tips include:. Keep the vehicle serviced and in good
shape.. Check all fluid levels and brakes, tires,
cooling system, and transmission.. Shift to a lower gear when going down
steep or long hills.
{ WarningUsing the brakes to slow the vehicle on along downhill slope can cause brakeoverheating, can reduce brakeperformance, and could result in a loss ofbraking. Shift the transmission to a lowergear to let the engine assist the brakeson a steep downhill slope.
{ WarningCoasting downhill in N (Neutral) or withthe ignition off is dangerous. This cancause overheating of the brakes and lossof steering assist. Always have the enginerunning and the vehicle in gear.
. Drive at speeds that keep the vehicle inits own lane. Do not swing wide or crossthe center line.
. Be alert on top of hills; something couldbe in your lane (e.g., stalled car, crash).
. Pay attention to special road signs (e.g.,falling rocks area, winding roads, longgrades, passing or no-passing zones) andtake appropriate action.
Winter Driving
Driving on Snow or Ice
CautionTo avoid damage to the wheels andbrake components, always clear snow andice from inside the wheels andunderneath the vehicle before driving.
Chevrolet Camaro Owner Manual (GMNA-Localizing-U.S./Canada/Mexico-15516346) - 2022 - CRC - 4/13/21
Driving and Operating 195
Snow or ice between the tires and the roadcreates less traction or grip, so drivecarefully. Wet ice can occur at about 0 °C(32 °F) when freezing rain begins to fall.Avoid driving on wet ice or in freezing rainuntil roads can be treated.
For Slippery Road Driving:. Accelerate gently. Accelerating too quickly
causes the wheels to spin and makes thesurface under the tires slick.
. Turn on Traction Control. See TractionControl/Electronic Stability Control 0 215.
. The Antilock Brake System (ABS) improvesvehicle stability during hard stops, butthe brakes should be applied sooner thanwhen on dry pavement. See AntilockBrake System (ABS) 0 213.
. Allow greater following distance andwatch for slippery spots. Icy patches canoccur on otherwise clear roads in shadedareas. The surface of a curve or anoverpass can remain icy when thesurrounding roads are clear. Avoid suddensteering maneuvers and braking whileon ice.
. Turn off cruise control.
Blizzard Conditions
Stop the vehicle in a safe place and signalfor help. Stay with the vehicle unless thereis help nearby. If possible, use RoadsideAssistance. See Roadside Assistance Program0 329. To get help and keep everyone in thevehicle safe:. Turn on the hazard warning flashers.. Tie a red cloth to an outside mirror.
{ WarningSnow can trap engine exhaust under thevehicle. This may cause exhaust gases toget inside. Engine exhaust containscarbon monoxide (CO), which cannot beseen or smelled. It can causeunconsciousness and even death.
If the vehicle is stuck in snow:
. Clear snow from the base of thevehicle, especially any blocking theexhaust pipe.
. Open a window about 5 cm (2 in) onthe vehicle side that is away from thewind, to bring in fresh air.
. Fully open the air outlets on or underthe instrument panel.
(Continued)
Warning (Continued). Adjust the climate control system to
circulate the air inside the vehicle andset the fan speed to the highestsetting. See “Climate Control Systems.”
For more information about CO, seeEngine Exhaust 0 206.
To save fuel, run the engine for shortperiods to warm the vehicle and then shutthe engine off and partially close thewindow. Moving about to keep warm alsohelps.
If it takes time for help to arrive, whenrunning the engine, push the acceleratorpedal slightly so the engine runs faster thanthe idle speed. This keeps the batterycharged to restart the vehicle and to signalfor help with the headlamps. Do this aslittle as possible, to save fuel.
If the Vehicle Is StuckSlowly and cautiously spin the wheels tofree the vehicle when stuck in sand, mud,ice, or snow.
Chevrolet Camaro Owner Manual (GMNA-Localizing-U.S./Canada/Mexico-15516346) - 2022 - CRC - 4/13/21
196 Driving and Operating
If stuck too severely for the traction systemto free the vehicle, turn the traction systemoff and use the rocking method. SeeTraction Control/Electronic Stability Control0 215.
{ WarningIf the vehicle's tires spin at high speed,they can explode, and you or otherscould be injured. The vehicle canoverheat, causing an engine compartmentfire or other damage. Spin the wheels aslittle as possible and avoid going above56 km/h (35 mph).
Rocking the Vehicle to Get it Out
Turn the steering wheel left and right toclear the area around the front wheels. Turnoff any traction system. Shift back and forthbetween R (Reverse) and a low forward gear,spinning the wheels as little as possible. Toprevent transmission wear, wait until thewheels stop spinning before shifting gears.Release the accelerator pedal while shifting,and press lightly on the accelerator pedalwhen the transmission is in gear. Slowlyspinning the wheels in the forward andreverse directions causes a rocking motionthat could free the vehicle. If that does not
get the vehicle out after a few tries, itmight need to be towed out. If the vehicledoes need to be towed out, see Towing theVehicle 0 296.
Vehicle Load LimitsIt is very important to know how muchweight the vehicle can carry. Thisweight is called the vehicle capacityweight and includes the weight of alloccupants, cargo, and allnonfactory-installed options. Two labelson the vehicle may show how muchweight it may properly carry: the Tireand Loading Information label and theCertification label.
{ Warning
Do not load the vehicle any heavierthan the Gross Vehicle Weight Rating(GVWR), or either the maximumfront or rear Gross Axle WeightRating (GAWR). This can causesystems to break and change theway the vehicle handles. This couldcause loss of control and a crash.
(Continued)
Warning (Continued)
Overloading can also reduce stoppingperformance, damage the tires, andshorten the life of the vehicle.
Tire and Loading Information Label
Label Example
A vehicle-specific Tire and LoadingInformation label is attached to thevehicle's center pillar (B-pillar). The Tireand Loading Information label showsthe number of occupant seating
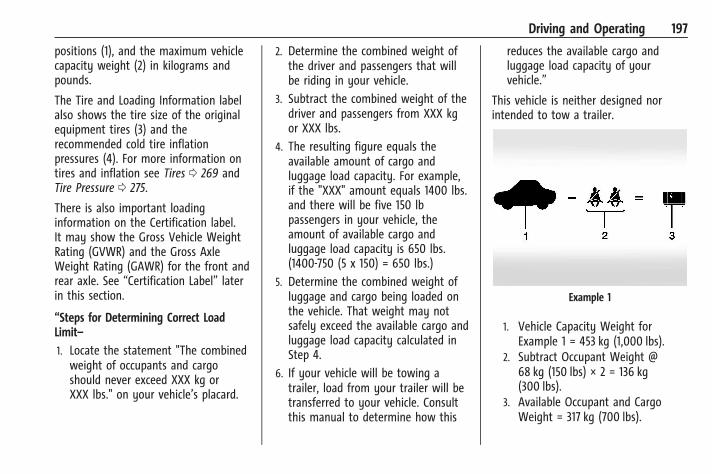
Chevrolet Camaro Owner Manual (GMNA-Localizing-U.S./Canada/Mexico-15516346) - 2022 - CRC - 4/13/21
Driving and Operating 197
positions (1), and the maximum vehiclecapacity weight (2) in kilograms andpounds.
The Tire and Loading Information labelalso shows the tire size of the originalequipment tires (3) and therecommended cold tire inflationpressures (4). For more information ontires and inflation see Tires 0 269 andTire Pressure 0 275.
There is also important loadinginformation on the Certification label.It may show the Gross Vehicle WeightRating (GVWR) and the Gross AxleWeight Rating (GAWR) for the front andrear axle. See “Certification Label” laterin this section.
“Steps for Determining Correct LoadLimit–1. Locate the statement "The combined
weight of occupants and cargoshould never exceed XXX kg orXXX lbs." on your vehicle’s placard.
2. Determine the combined weight ofthe driver and passengers that willbe riding in your vehicle.
3. Subtract the combined weight of thedriver and passengers from XXX kgor XXX lbs.
4. The resulting figure equals theavailable amount of cargo andluggage load capacity. For example,if the "XXX" amount equals 1400 lbs.and there will be five 150 lbpassengers in your vehicle, theamount of available cargo andluggage load capacity is 650 lbs.(1400-750 (5 x 150) = 650 lbs.)
5. Determine the combined weight ofluggage and cargo being loaded onthe vehicle. That weight may notsafely exceed the available cargo andluggage load capacity calculated inStep 4.
6. If your vehicle will be towing atrailer, load from your trailer will betransferred to your vehicle. Consultthis manual to determine how this
reduces the available cargo andluggage load capacity of yourvehicle.”
This vehicle is neither designed norintended to tow a trailer.
Example 1
1. Vehicle Capacity Weight forExample 1 = 453 kg (1,000 lbs).
2. Subtract Occupant Weight @68 kg (150 lbs) × 2 = 136 kg(300 lbs).
3. Available Occupant and CargoWeight = 317 kg (700 lbs).
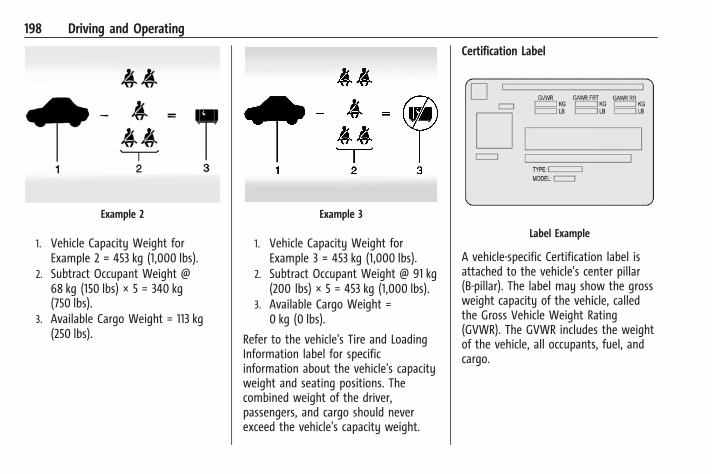
Chevrolet Camaro Owner Manual (GMNA-Localizing-U.S./Canada/Mexico-15516346) - 2022 - CRC - 4/13/21
198 Driving and Operating
Example 2
1. Vehicle Capacity Weight forExample 2 = 453 kg (1,000 lbs).
2. Subtract Occupant Weight @68 kg (150 lbs) × 5 = 340 kg(750 lbs).
3. Available Cargo Weight = 113 kg(250 lbs).
Example 3
1. Vehicle Capacity Weight forExample 3 = 453 kg (1,000 lbs).
2. Subtract Occupant Weight @ 91 kg(200 lbs) × 5 = 453 kg (1,000 lbs).
3. Available Cargo Weight =0 kg (0 lbs).
Refer to the vehicle's Tire and LoadingInformation label for specificinformation about the vehicle's capacityweight and seating positions. Thecombined weight of the driver,passengers, and cargo should neverexceed the vehicle's capacity weight.
Certification Label
Label Example
A vehicle-specific Certification label isattached to the vehicle's center pillar(B-pillar). The label may show the grossweight capacity of the vehicle, calledthe Gross Vehicle Weight Rating(GVWR). The GVWR includes the weightof the vehicle, all occupants, fuel, andcargo.
Chevrolet Camaro Owner Manual (GMNA-Localizing-U.S./Canada/Mexico-15516346) - 2022 - CRC - 4/13/21
Driving and Operating 199
{ Warning
Things inside the vehicle can strikeand injure people in a sudden stop orturn, or in a crash.. Put things in the cargo area of the
vehicle. In the cargo area, putthem as far forward as possible.Try to spread the weight evenly.
. Never stack heavier things, likesuitcases, inside the vehicle sothat some of them are above thetops of the seats.
. Do not leave an unsecured childrestraint in the vehicle.
. Secure loose items in the vehicle.
. Do not leave a seat folded downunless needed.
Starting and OperatingNew Vehicle Break-In
CautionFollow these recommended guidelinesduring the first 2 414 km (1,500 mi) ofdriving this vehicle. Parts have a break-inperiod and performance will be better inthe long run.
. Avoid full throttle starts and abruptstops.
. Do not exceed 4000 engine rpm.
. Avoid driving at any one constantspeed, fast or slow.
. Do not drive above129 km/h (80 mph).
. Avoid downshifting to brake or slowthe vehicle when the engine speedwill exceed 4000 rpm.
. Do not let the engine labor. Never lugthe engine in high gear at low speeds.With a manual transmission, shift tothe next lower gear. This rule appliesat all times, not just during thebreak-in period.
(Continued)
Caution (Continued). Do not participate in racing events,
sport driving schools, or similaractivities during this break-in period.
. Check engine oil with every refuelingand add if necessary. Oil and fuelconsumption may be higher thannormal during the first2 414 km (1,500 mi).
. To break in new tires, drive atmoderate speeds and avoid hardcornering for the first 322 km (200 mi).New tires do not have maximumtraction and may tend to slip.
. New brake linings also need a break-inperiod. Avoid making hard stopsduring the first 322 km (200 mi). Thisis recommended every time brakelinings are replaced.
. Should the vehicle be used for racingor competitive driving (after break-in),the rear axle lubricant must bereplaced beforehand.
See Track Events and Competitive Driving0 185.
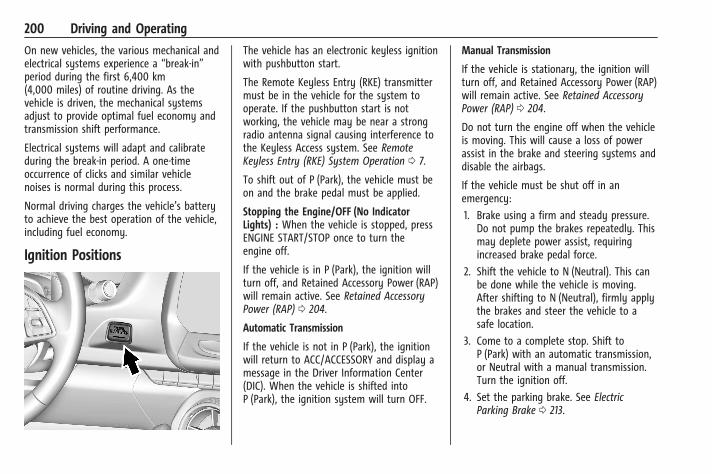
Chevrolet Camaro Owner Manual (GMNA-Localizing-U.S./Canada/Mexico-15516346) - 2022 - CRC - 4/13/21
200 Driving and Operating
On new vehicles, the various mechanical andelectrical systems experience a “break-in”period during the first 6,400 km(4,000 miles) of routine driving. As thevehicle is driven, the mechanical systemsadjust to provide optimal fuel economy andtransmission shift performance.
Electrical systems will adapt and calibrateduring the break-in period. A one-timeoccurrence of clicks and similar vehiclenoises is normal during this process.
Normal driving charges the vehicle’s batteryto achieve the best operation of the vehicle,including fuel economy.
Ignition Positions
The vehicle has an electronic keyless ignitionwith pushbutton start.
The Remote Keyless Entry (RKE) transmittermust be in the vehicle for the system tooperate. If the pushbutton start is notworking, the vehicle may be near a strongradio antenna signal causing interference tothe Keyless Access system. See RemoteKeyless Entry (RKE) System Operation 0 7.
To shift out of P (Park), the vehicle must beon and the brake pedal must be applied.
Stopping the Engine/OFF (No IndicatorLights) : When the vehicle is stopped, pressENGINE START/STOP once to turn theengine off.
If the vehicle is in P (Park), the ignition willturn off, and Retained Accessory Power (RAP)will remain active. See Retained AccessoryPower (RAP) 0 204.
Automatic Transmission
If the vehicle is not in P (Park), the ignitionwill return to ACC/ACCESSORY and display amessage in the Driver Information Center(DIC). When the vehicle is shifted intoP (Park), the ignition system will turn OFF.
Manual Transmission
If the vehicle is stationary, the ignition willturn off, and Retained Accessory Power (RAP)will remain active. See Retained AccessoryPower (RAP) 0 204.
Do not turn the engine off when the vehicleis moving. This will cause a loss of powerassist in the brake and steering systems anddisable the airbags.
If the vehicle must be shut off in anemergency:
1. Brake using a firm and steady pressure.Do not pump the brakes repeatedly. Thismay deplete power assist, requiringincreased brake pedal force.
2. Shift the vehicle to N (Neutral). This canbe done while the vehicle is moving.After shifting to N (Neutral), firmly applythe brakes and steer the vehicle to asafe location.
3. Come to a complete stop. Shift toP (Park) with an automatic transmission,or Neutral with a manual transmission.Turn the ignition off.
4. Set the parking brake. See ElectricParking Brake 0 213.
Chevrolet Camaro Owner Manual (GMNA-Localizing-U.S./Canada/Mexico-15516346) - 2022 - CRC - 4/13/21
Driving and Operating 201
{ WarningTurning off the vehicle while moving maycause loss of power assist in the brakeand steering systems and disable theairbags. While driving, only shut thevehicle off in an emergency.
If the vehicle cannot be pulled over, andmust be shut off while driving, press andhold ENGINE START/STOP for longer thantwo seconds, or press twice withinfive seconds.
ACC/ACCESSORY (Amber Indicator Light) :This mode allows the use of some electricalaccessories when the engine is off.
With the ignition off, pressing the buttonone time without the brake pedal appliedwill place the ignition system in ACC/ACCESSORY.
The ignition will switch from ACC/ACCESSORY to OFF after five minutes toprevent battery rundown.
ON/RUN/START (Green Indicator Light) : Thismode is for driving and starting. With theignition off, and the brake pedal applied,pressing the button once will place theignition system in ON/RUN/START. Once
engine cranking begins, release the button.Engine cranking will continue until theengine starts. See Starting the Engine 0 201.The ignition will then remain on.
Service Mode
This power mode is available for service anddiagnostics, and to verify the properoperation of the malfunction indicator lampas may be required for emission inspectionpurposes. With the vehicle off, and thebrake pedal not applied, pressing andholding ENGINE START/STOP for more thanfive seconds will place the vehicle in ServiceMode. The instruments and audio systemswill operate as they do in ON/RUN, but thevehicle will not be able to be driven. Theengine will not start in Service Mode. Pressthe button again to turn the vehicle off.
Starting the EnginePlace the transmission in the proper gear.
CautionIf you add electrical parts or accessories,you could change the way the engineoperates. Any resulting damage wouldnot be covered by the vehicle warranty.See Add-On Electrical Equipment 0 234.
Automatic Transmission
Move the shift lever to P (Park) orN (Neutral). To restart the vehicle when it isalready moving, use N (Neutral) only.
CautionDo not try to shift to P (Park) if thevehicle is moving. If you do, you coulddamage the transmission. Shift to P (Park)only when the vehicle is stopped.
Manual Transmission
The shift lever should be in Neutral and theparking brake engaged. Hold the clutchpedal down to the floor, press the brakepedal, and start the engine.
Starting the Vehicle
The RKE transmitter must be inside thevehicle for the ignition to work.
Cell phone chargers can interfere with theoperation of the Keyless Access system.Battery chargers should not be plugged inwhen starting or turning off the engine.
To start the vehicle:
1. For vehicles with an automatictransmission, press the brake pedal, thenpress ENGINE START/STOP on the
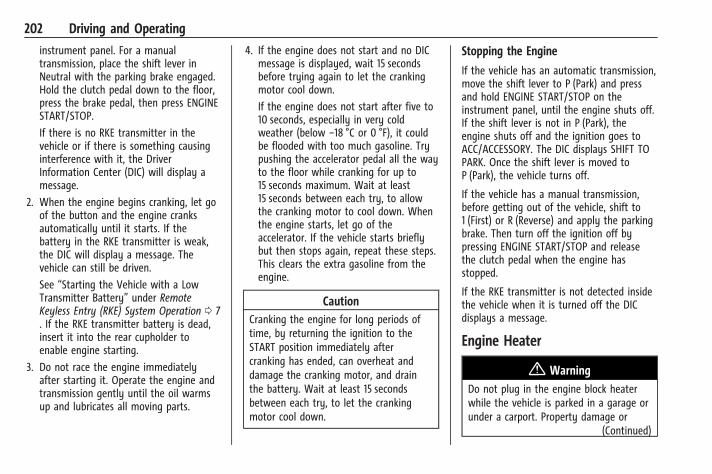
Chevrolet Camaro Owner Manual (GMNA-Localizing-U.S./Canada/Mexico-15516346) - 2022 - CRC - 4/13/21
202 Driving and Operating
instrument panel. For a manualtransmission, place the shift lever inNeutral with the parking brake engaged.Hold the clutch pedal down to the floor,press the brake pedal, then press ENGINESTART/STOP.
If there is no RKE transmitter in thevehicle or if there is something causinginterference with it, the DriverInformation Center (DIC) will display amessage.
2. When the engine begins cranking, let goof the button and the engine cranksautomatically until it starts. If thebattery in the RKE transmitter is weak,the DIC will display a message. Thevehicle can still be driven.
See “Starting the Vehicle with a LowTransmitter Battery” under RemoteKeyless Entry (RKE) System Operation 0 7. If the RKE transmitter battery is dead,insert it into the rear cupholder toenable engine starting.
3. Do not race the engine immediatelyafter starting it. Operate the engine andtransmission gently until the oil warmsup and lubricates all moving parts.
4. If the engine does not start and no DICmessage is displayed, wait 15 secondsbefore trying again to let the crankingmotor cool down.
If the engine does not start after five to10 seconds, especially in very coldweather (below −18 °C or 0 °F), it couldbe flooded with too much gasoline. Trypushing the accelerator pedal all the wayto the floor while cranking for up to15 seconds maximum. Wait at least15 seconds between each try, to allowthe cranking motor to cool down. Whenthe engine starts, let go of theaccelerator. If the vehicle starts brieflybut then stops again, repeat these steps.This clears the extra gasoline from theengine.
CautionCranking the engine for long periods oftime, by returning the ignition to theSTART position immediately aftercranking has ended, can overheat anddamage the cranking motor, and drainthe battery. Wait at least 15 secondsbetween each try, to let the crankingmotor cool down.
Stopping the Engine
If the vehicle has an automatic transmission,move the shift lever to P (Park) and pressand hold ENGINE START/STOP on theinstrument panel, until the engine shuts off.If the shift lever is not in P (Park), theengine shuts off and the ignition goes toACC/ACCESSORY. The DIC displays SHIFT TOPARK. Once the shift lever is moved toP (Park), the vehicle turns off.
If the vehicle has a manual transmission,before getting out of the vehicle, shift to1 (First) or R (Reverse) and apply the parkingbrake. Then turn off the ignition off bypressing ENGINE START/STOP and releasethe clutch pedal when the engine hasstopped.
If the RKE transmitter is not detected insidethe vehicle when it is turned off the DICdisplays a message.
Engine Heater
{ WarningDo not plug in the engine block heaterwhile the vehicle is parked in a garage orunder a carport. Property damage or
(Continued)
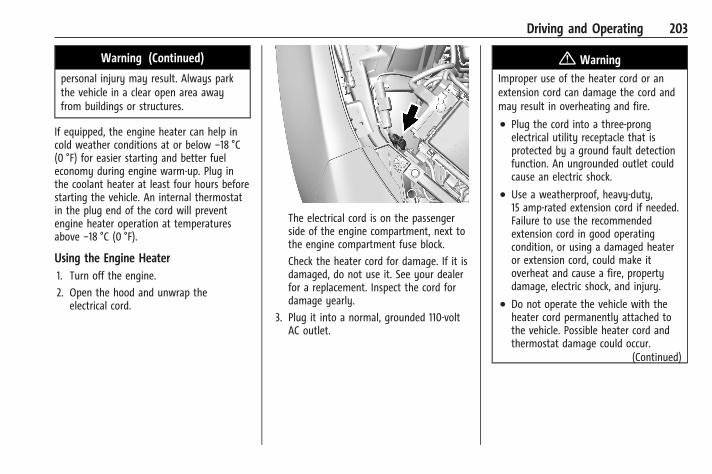
Chevrolet Camaro Owner Manual (GMNA-Localizing-U.S./Canada/Mexico-15516346) - 2022 - CRC - 4/13/21
Driving and Operating 203
Warning (Continued)
personal injury may result. Always parkthe vehicle in a clear open area awayfrom buildings or structures.
If equipped, the engine heater can help incold weather conditions at or below −18 °C(0 °F) for easier starting and better fueleconomy during engine warm-up. Plug inthe coolant heater at least four hours beforestarting the vehicle. An internal thermostatin the plug end of the cord will preventengine heater operation at temperaturesabove −18 °C (0 °F).
Using the Engine Heater1. Turn off the engine.
2. Open the hood and unwrap theelectrical cord.
The electrical cord is on the passengerside of the engine compartment, next tothe engine compartment fuse block.
Check the heater cord for damage. If it isdamaged, do not use it. See your dealerfor a replacement. Inspect the cord fordamage yearly.
3. Plug it into a normal, grounded 110-voltAC outlet.
{ WarningImproper use of the heater cord or anextension cord can damage the cord andmay result in overheating and fire.
. Plug the cord into a three-prongelectrical utility receptacle that isprotected by a ground fault detectionfunction. An ungrounded outlet couldcause an electric shock.
. Use a weatherproof, heavy-duty,15 amp-rated extension cord if needed.Failure to use the recommendedextension cord in good operatingcondition, or using a damaged heateror extension cord, could make itoverheat and cause a fire, propertydamage, electric shock, and injury.
. Do not operate the vehicle with theheater cord permanently attached tothe vehicle. Possible heater cord andthermostat damage could occur.
(Continued)
Chevrolet Camaro Owner Manual (GMNA-Localizing-U.S./Canada/Mexico-15516346) - 2022 - CRC - 4/13/21
204 Driving and Operating
Warning (Continued)
. While in use, do not let the heatercord touch vehicle parts or sharpedges. Never close the hood on theheater cord.
. Before starting the vehicle, unplug thecord, reattach the cover to the plug,and securely fasten the cord. Keep thecord away from any moving parts.
4. Before starting the engine, be sure tounplug and store the cord as it wasbefore to keep it away from movingengine parts. If you do not it could bedamaged.
The length of time the heater should remainplugged in depends on several factors. Ask adealer in the area where you will be parkingthe vehicle for the best advice on this.
Retained Accessory Power (RAP)When the ignition is turned from on to off,the following features (if equipped) willcontinue to function for up to 10 minutes,or until the driver door is opened. Thesefeatures will also work when the ignition isin RUN or ACC/ACCESSORY:
. Infotainment System
. Power Windows (during RAP thisfunctionality will be lost when any dooris opened)
. Sunroof (during RAP this functionality willbe lost when any door is opened)
. Auxiliary Power Outlet
. Audio System
. OnStar System
Shifting Into ParkTo shift into P (Park):
1. Hold the brake pedal down and set theparking brake.
See Electric Parking Brake 0 213.
2. Move the shift lever into P (Park) byholding in the button on the shift leverand pushing the shift lever all the waytoward the front of the vehicle.
3. Turn the ignition off.
Leaving the Vehicle with the EngineRunning
{ WarningIt can be dangerous to leave the vehiclewith the engine running. It couldoverheat and catch fire.
It is dangerous to get out of the vehicleif the shift lever is not fully in P (Park)with the parking brake firmly set. Thevehicle can roll.
Do not leave the vehicle when the engineis running. If you have left the enginerunning, the vehicle can move suddenly.You or others could be injured. To besure the vehicle will not move, evenwhen you are on fairly level ground,always set the parking brake and movethe shift lever to P (Park). See ShiftingInto Park 0 204.
If you have to leave the vehicle with theengine running, be sure the vehicle is inP (Park) and the parking brake is set beforeyou leave it. After you have moved the shiftlever into P (Park), hold the brake pedal
Chevrolet Camaro Owner Manual (GMNA-Localizing-U.S./Canada/Mexico-15516346) - 2022 - CRC - 4/13/21
Driving and Operating 205
down. Then, see if you can move the shiftlever away from P (Park) without firstpressing the button on the shift lever.
Release the button and check that the shiftlever cannot be moved out of P (Park).
Torque Lock
Torque lock is when the weight of thevehicle puts too much force on the parkingpawl in the transmission. This happens whenparking on a hill and shifting thetransmission into P (Park) is not doneproperly and then it is difficult to shift outof P (Park). To prevent torque lock, set theparking brake and then shift into P (Park). Tofind out how, see “Shifting Into Park”previously in this section.
If torque lock does occur, the vehicle mayneed to be pushed uphill by another vehicleto relieve the parking pawl pressure, so youcan shift out of P (Park).
Shifting out of ParkThis vehicle is equipped with an electronicshift lock release system. The shift lockrelease is designed to prevent movement ofthe shift lever out of P (Park), unless theignition is on and the brake pedal is applied.
The shift lock release is always functionalexcept in the case of an uncharged or lowvoltage (less than 9 volt) battery.
If the vehicle has an uncharged battery or abattery with low voltage, try charging orjump starting the battery. See Jump Starting- North America 0 294 for more information.
To shift out of P (Park):
1. Apply the brake pedal.
2. Release the parking brake. See ElectricParking Brake 0 213.
3. Press the shift lever button.
4. Move the shift lever.
If unable to shift out of P (Park):
1. Fully release the shift lever button.
2. While holding down the brake pedal,press the shift lever button again.
3. Move the shift lever.
If the shift lever will not move from P (Park),consult your dealer or a professional towingservice.
Parking (Manual Transmission)
{ WarningIf the vehicle has a manual transmission,never get out of the vehicle without firstmoving the shift lever into 1st orR (Reverse), setting the parking brake andturning the ignition off. The vehicle canroll, which could cause serious injury ordeath.
Parking over Things That Burn
{ WarningThings that can burn could touch hotexhaust parts under the vehicle andignite. Do not park over papers, leaves,dry grass, or other things that can burn.
Active Fuel ManagementVehicles with V6 and V8 engines and anautomatic transmission have Active FuelManagement. This system allows the engineto operate on either all or four of itscylinders, depending on the drivingconditions.
Chevrolet Camaro Owner Manual (GMNA-Localizing-U.S./Canada/Mexico-15516346) - 2022 - CRC - 4/13/21
206 Driving and Operating
When less power is required, such ascruising at a constant vehicle speed, thesystem will operate in four cylinder mode,allowing the vehicle to achieve better fueleconomy. When greater power demands arerequired, such as accelerating from a stop,passing, or merging onto a freeway, thesystem will maintain full-cylinder operation.
Extended ParkingIt is best not to park with the vehiclerunning. If the vehicle is left running, besure it will not move and there is adequateventilation. See Shifting Into Park 0 204 andEngine Exhaust 0 206.
If the vehicle is left parked and running withthe Remote Keyless Entry (RKE) transmitteroutside the vehicle, it will continue to runfor up to 15 minutes.
If the vehicle is left parked and running withthe RKE transmitter inside the vehicle, it willcontinue to run for up to 30 minutes.
The vehicle could turn off sooner if it isparked on a hill, due to lack ofavailable fuel.
Automatic Transmission
The timer will reset if the vehicle is takenout of P (Park) while it is running.
Manual Transmission
The timer will reset if vehicle speed exceeds4 km/h (2.5 mph).
Engine Exhaust
{ WarningEngine exhaust contains carbon monoxide(CO), which cannot be seen or smelled.Exposure to CO can causeunconsciousness and even death.
Exhaust may enter the vehicle if:
. The vehicle idles in areas with poorventilation (parking garages, tunnels,deep snow that may block underbodyairflow or tail pipes).
. The exhaust smells or sounds strangeor different.
. The exhaust system leaks due tocorrosion or damage.
. The vehicle exhaust system has beenmodified, damaged, or improperlyrepaired.
(Continued)
Warning (Continued). There are holes or openings in the
vehicle body from damage oraftermarket modifications that are notcompletely sealed.
If unusual fumes are detected or if it issuspected that exhaust is coming into thevehicle:
. Drive it only with the windowscompletely down.
. Have the vehicle repaired immediately.
Never park the vehicle with the enginerunning in an enclosed area such as agarage or a building that has no fresh airventilation.
Running the Vehicle While ParkedIt is better not to park with the enginerunning.
If the vehicle is left with the engine running,follow the proper steps to be sure thevehicle will not move. See Shifting Into Park0 204 andEngine Exhaust 0 206. If the vehicle has amanual transmission, see Parking (ManualTransmission) 0 205.
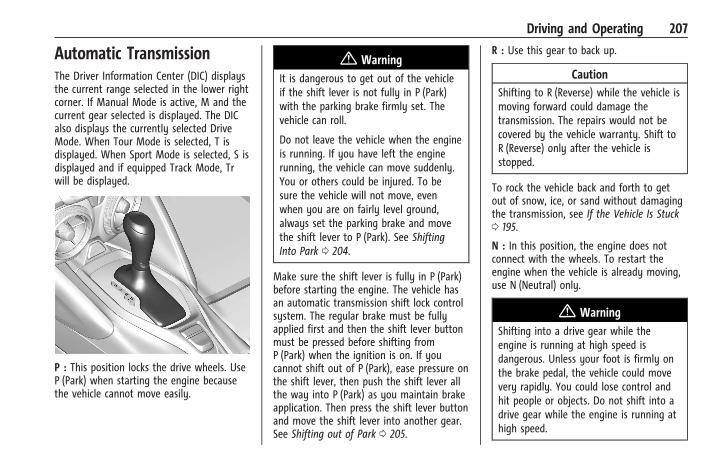
Chevrolet Camaro Owner Manual (GMNA-Localizing-U.S./Canada/Mexico-15516346) - 2022 - CRC - 4/13/21
Driving and Operating 207
Automatic TransmissionThe Driver Information Center (DIC) displaysthe current range selected in the lower rightcorner. If Manual Mode is active, M and thecurrent gear selected is displayed. The DICalso displays the currently selected DriveMode. When Tour Mode is selected, T isdisplayed. When Sport Mode is selected, S isdisplayed and if equipped Track Mode, Trwill be displayed.
P : This position locks the drive wheels. UseP (Park) when starting the engine becausethe vehicle cannot move easily.
{ WarningIt is dangerous to get out of the vehicleif the shift lever is not fully in P (Park)with the parking brake firmly set. Thevehicle can roll.
Do not leave the vehicle when the engineis running. If you have left the enginerunning, the vehicle can move suddenly.You or others could be injured. To besure the vehicle will not move, evenwhen you are on fairly level ground,always set the parking brake and movethe shift lever to P (Park). See ShiftingInto Park 0 204.
Make sure the shift lever is fully in P (Park)before starting the engine. The vehicle hasan automatic transmission shift lock controlsystem. The regular brake must be fullyapplied first and then the shift lever buttonmust be pressed before shifting fromP (Park) when the ignition is on. If youcannot shift out of P (Park), ease pressure onthe shift lever, then push the shift lever allthe way into P (Park) as you maintain brakeapplication. Then press the shift lever buttonand move the shift lever into another gear.See Shifting out of Park 0 205.
R : Use this gear to back up.
CautionShifting to R (Reverse) while the vehicle ismoving forward could damage thetransmission. The repairs would not becovered by the vehicle warranty. Shift toR (Reverse) only after the vehicle isstopped.
To rock the vehicle back and forth to getout of snow, ice, or sand without damagingthe transmission, see If the Vehicle Is Stuck0 195.
N : In this position, the engine does notconnect with the wheels. To restart theengine when the vehicle is already moving,use N (Neutral) only.
{ WarningShifting into a drive gear while theengine is running at high speed isdangerous. Unless your foot is firmly onthe brake pedal, the vehicle could movevery rapidly. You could lose control andhit people or objects. Do not shift into adrive gear while the engine is running athigh speed.
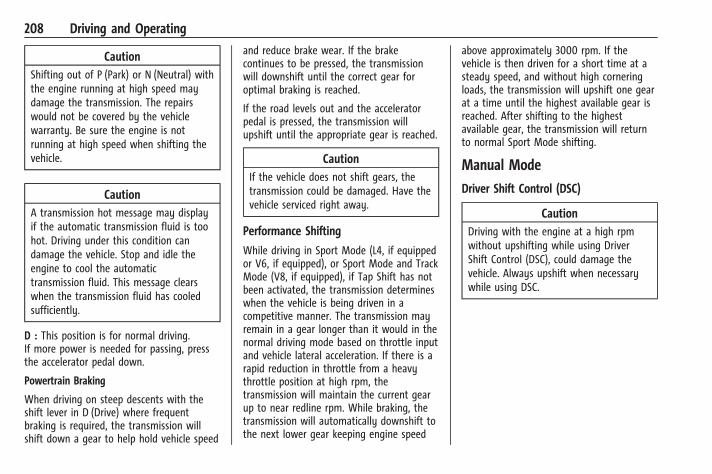
Chevrolet Camaro Owner Manual (GMNA-Localizing-U.S./Canada/Mexico-15516346) - 2022 - CRC - 4/13/21
208 Driving and Operating
CautionShifting out of P (Park) or N (Neutral) withthe engine running at high speed maydamage the transmission. The repairswould not be covered by the vehiclewarranty. Be sure the engine is notrunning at high speed when shifting thevehicle.
CautionA transmission hot message may displayif the automatic transmission fluid is toohot. Driving under this condition candamage the vehicle. Stop and idle theengine to cool the automatictransmission fluid. This message clearswhen the transmission fluid has cooledsufficiently.
D : This position is for normal driving.If more power is needed for passing, pressthe accelerator pedal down.
Powertrain Braking
When driving on steep descents with theshift lever in D (Drive) where frequentbraking is required, the transmission willshift down a gear to help hold vehicle speed
and reduce brake wear. If the brakecontinues to be pressed, the transmissionwill downshift until the correct gear foroptimal braking is reached.
If the road levels out and the acceleratorpedal is pressed, the transmission willupshift until the appropriate gear is reached.
CautionIf the vehicle does not shift gears, thetransmission could be damaged. Have thevehicle serviced right away.
Performance Shifting
While driving in Sport Mode (L4, if equippedor V6, if equipped), or Sport Mode and TrackMode (V8, if equipped), if Tap Shift has notbeen activated, the transmission determineswhen the vehicle is being driven in acompetitive manner. The transmission mayremain in a gear longer than it would in thenormal driving mode based on throttle inputand vehicle lateral acceleration. If there is arapid reduction in throttle from a heavythrottle position at high rpm, thetransmission will maintain the current gearup to near redline rpm. While braking, thetransmission will automatically downshift tothe next lower gear keeping engine speed
above approximately 3000 rpm. If thevehicle is then driven for a short time at asteady speed, and without high corneringloads, the transmission will upshift one gearat a time until the highest available gear isreached. After shifting to the highestavailable gear, the transmission will returnto normal Sport Mode shifting.
Manual Mode
Driver Shift Control (DSC)
CautionDriving with the engine at a high rpmwithout upshifting while using DriverShift Control (DSC), could damage thevehicle. Always upshift when necessarywhile using DSC.
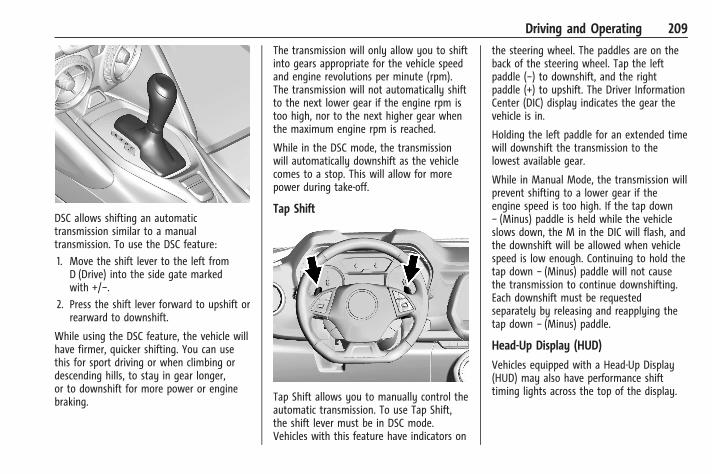
Chevrolet Camaro Owner Manual (GMNA-Localizing-U.S./Canada/Mexico-15516346) - 2022 - CRC - 4/13/21
Driving and Operating 209
DSC allows shifting an automatictransmission similar to a manualtransmission. To use the DSC feature:
1. Move the shift lever to the left fromD (Drive) into the side gate markedwith +/−.
2. Press the shift lever forward to upshift orrearward to downshift.
While using the DSC feature, the vehicle willhave firmer, quicker shifting. You can usethis for sport driving or when climbing ordescending hills, to stay in gear longer,or to downshift for more power or enginebraking.
The transmission will only allow you to shiftinto gears appropriate for the vehicle speedand engine revolutions per minute (rpm).The transmission will not automatically shiftto the next lower gear if the engine rpm istoo high, nor to the next higher gear whenthe maximum engine rpm is reached.
While in the DSC mode, the transmissionwill automatically downshift as the vehiclecomes to a stop. This will allow for morepower during take-off.
Tap Shift
Tap Shift allows you to manually control theautomatic transmission. To use Tap Shift,the shift lever must be in DSC mode.Vehicles with this feature have indicators on
the steering wheel. The paddles are on theback of the steering wheel. Tap the leftpaddle (−) to downshift, and the rightpaddle (+) to upshift. The Driver InformationCenter (DIC) display indicates the gear thevehicle is in.
Holding the left paddle for an extended timewill downshift the transmission to thelowest available gear.
While in Manual Mode, the transmission willprevent shifting to a lower gear if theengine speed is too high. If the tap down− (Minus) paddle is held while the vehicleslows down, the M in the DIC will flash, andthe downshift will be allowed when vehiclespeed is low enough. Continuing to hold thetap down − (Minus) paddle will not causethe transmission to continue downshifting.Each downshift must be requestedseparately by releasing and reapplying thetap down − (Minus) paddle.
Head-Up Display (HUD)
Vehicles equipped with a Head-Up Display(HUD) may also have performance shifttiming lights across the top of the display.
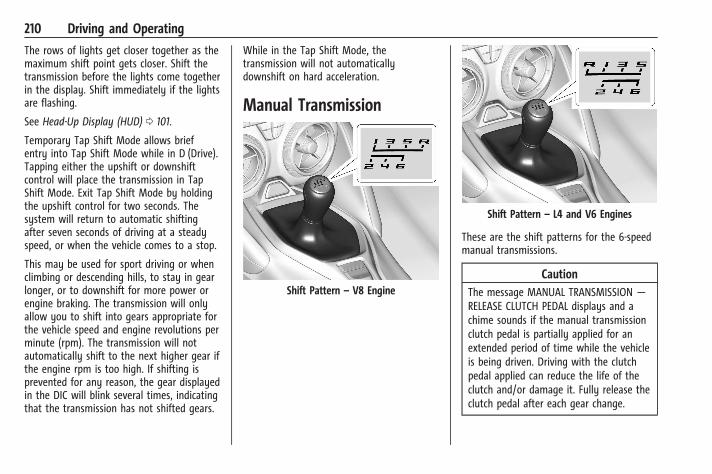
Chevrolet Camaro Owner Manual (GMNA-Localizing-U.S./Canada/Mexico-15516346) - 2022 - CRC - 4/13/21
210 Driving and Operating
The rows of lights get closer together as themaximum shift point gets closer. Shift thetransmission before the lights come togetherin the display. Shift immediately if the lightsare flashing.
See Head-Up Display (HUD) 0 101.
Temporary Tap Shift Mode allows briefentry into Tap Shift Mode while in D (Drive).Tapping either the upshift or downshiftcontrol will place the transmission in TapShift Mode. Exit Tap Shift Mode by holdingthe upshift control for two seconds. Thesystem will return to automatic shiftingafter seven seconds of driving at a steadyspeed, or when the vehicle comes to a stop.
This may be used for sport driving or whenclimbing or descending hills, to stay in gearlonger, or to downshift for more power orengine braking. The transmission will onlyallow you to shift into gears appropriate forthe vehicle speed and engine revolutions perminute (rpm). The transmission will notautomatically shift to the next higher gear ifthe engine rpm is too high. If shifting isprevented for any reason, the gear displayedin the DIC will blink several times, indicatingthat the transmission has not shifted gears.
While in the Tap Shift Mode, thetransmission will not automaticallydownshift on hard acceleration.
Manual Transmission
Shift Pattern – V8 Engine
Shift Pattern – L4 and V6 Engines
These are the shift patterns for the 6-speedmanual transmissions.
CautionThe message MANUAL TRANSMISSION —RELEASE CLUTCH PEDAL displays and achime sounds if the manual transmissionclutch pedal is partially applied for anextended period of time while the vehicleis being driven. Driving with the clutchpedal applied can reduce the life of theclutch and/or damage it. Fully release theclutch pedal after each gear change.
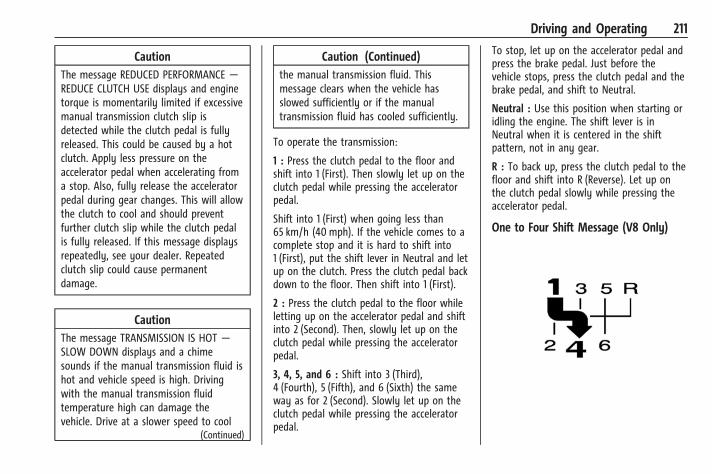
Chevrolet Camaro Owner Manual (GMNA-Localizing-U.S./Canada/Mexico-15516346) - 2022 - CRC - 4/13/21
Driving and Operating 211
CautionThe message REDUCED PERFORMANCE —REDUCE CLUTCH USE displays and enginetorque is momentarily limited if excessivemanual transmission clutch slip isdetected while the clutch pedal is fullyreleased. This could be caused by a hotclutch. Apply less pressure on theaccelerator pedal when accelerating froma stop. Also, fully release the acceleratorpedal during gear changes. This will allowthe clutch to cool and should preventfurther clutch slip while the clutch pedalis fully released. If this message displaysrepeatedly, see your dealer. Repeatedclutch slip could cause permanentdamage.
CautionThe message TRANSMISSION IS HOT —SLOW DOWN displays and a chimesounds if the manual transmission fluid ishot and vehicle speed is high. Drivingwith the manual transmission fluidtemperature high can damage thevehicle. Drive at a slower speed to cool
(Continued)
Caution (Continued)the manual transmission fluid. Thismessage clears when the vehicle hasslowed sufficiently or if the manualtransmission fluid has cooled sufficiently.
To operate the transmission:
1 : Press the clutch pedal to the floor andshift into 1 (First). Then slowly let up on theclutch pedal while pressing the acceleratorpedal.
Shift into 1 (First) when going less than65 km/h (40 mph). If the vehicle comes to acomplete stop and it is hard to shift into1 (First), put the shift lever in Neutral and letup on the clutch. Press the clutch pedal backdown to the floor. Then shift into 1 (First).
2 : Press the clutch pedal to the floor whileletting up on the accelerator pedal and shiftinto 2 (Second). Then, slowly let up on theclutch pedal while pressing the acceleratorpedal.
3, 4, 5, and 6 : Shift into 3 (Third),4 (Fourth), 5 (Fifth), and 6 (Sixth) the sameway as for 2 (Second). Slowly let up on theclutch pedal while pressing the acceleratorpedal.
To stop, let up on the accelerator pedal andpress the brake pedal. Just before thevehicle stops, press the clutch pedal and thebrake pedal, and shift to Neutral.
Neutral : Use this position when starting oridling the engine. The shift lever is inNeutral when it is centered in the shiftpattern, not in any gear.
R : To back up, press the clutch pedal to thefloor and shift into R (Reverse). Let up onthe clutch pedal slowly while pressing theaccelerator pedal.
One to Four Shift Message (V8 Only)
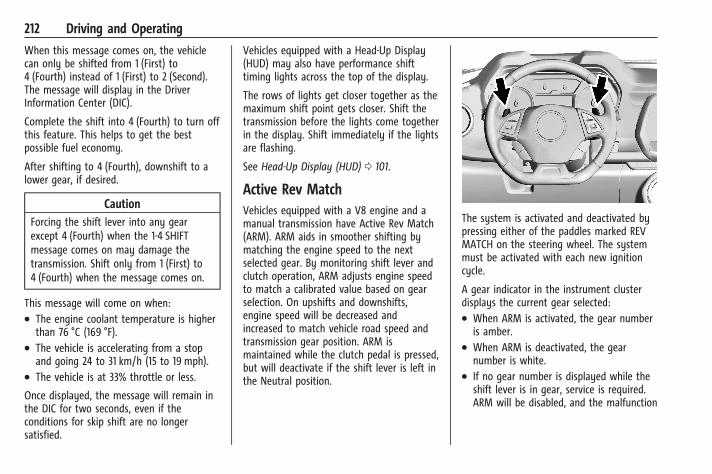
Chevrolet Camaro Owner Manual (GMNA-Localizing-U.S./Canada/Mexico-15516346) - 2022 - CRC - 4/13/21
212 Driving and Operating
When this message comes on, the vehiclecan only be shifted from 1 (First) to4 (Fourth) instead of 1 (First) to 2 (Second).The message will display in the DriverInformation Center (DIC).
Complete the shift into 4 (Fourth) to turn offthis feature. This helps to get the bestpossible fuel economy.
After shifting to 4 (Fourth), downshift to alower gear, if desired.
CautionForcing the shift lever into any gearexcept 4 (Fourth) when the 1-4 SHIFTmessage comes on may damage thetransmission. Shift only from 1 (First) to4 (Fourth) when the message comes on.
This message will come on when:. The engine coolant temperature is higher
than 76 °C (169 °F).. The vehicle is accelerating from a stop
and going 24 to 31 km/h (15 to 19 mph).. The vehicle is at 33% throttle or less.
Once displayed, the message will remain inthe DIC for two seconds, even if theconditions for skip shift are no longersatisfied.
Vehicles equipped with a Head-Up Display(HUD) may also have performance shifttiming lights across the top of the display.
The rows of lights get closer together as themaximum shift point gets closer. Shift thetransmission before the lights come togetherin the display. Shift immediately if the lightsare flashing.
See Head-Up Display (HUD) 0 101.
Active Rev MatchVehicles equipped with a V8 engine and amanual transmission have Active Rev Match(ARM). ARM aids in smoother shifting bymatching the engine speed to the nextselected gear. By monitoring shift lever andclutch operation, ARM adjusts engine speedto match a calibrated value based on gearselection. On upshifts and downshifts,engine speed will be decreased andincreased to match vehicle road speed andtransmission gear position. ARM ismaintained while the clutch pedal is pressed,but will deactivate if the shift lever is left inthe Neutral position.
The system is activated and deactivated bypressing either of the paddles marked REVMATCH on the steering wheel. The systemmust be activated with each new ignitioncycle.
A gear indicator in the instrument clusterdisplays the current gear selected:. When ARM is activated, the gear number
is amber.. When ARM is deactivated, the gear
number is white.. If no gear number is displayed while the
shift lever is in gear, service is required.ARM will be disabled, and the malfunction
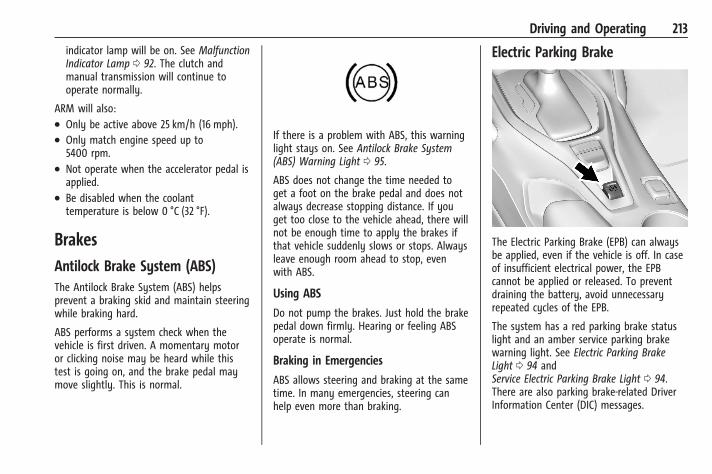
Chevrolet Camaro Owner Manual (GMNA-Localizing-U.S./Canada/Mexico-15516346) - 2022 - CRC - 4/13/21
Driving and Operating 213
indicator lamp will be on. See MalfunctionIndicator Lamp 0 92. The clutch andmanual transmission will continue tooperate normally.
ARM will also:. Only be active above 25 km/h (16 mph).. Only match engine speed up to
5400 rpm.. Not operate when the accelerator pedal is
applied.. Be disabled when the coolant
temperature is below 0 °C (32 °F).
BrakesAntilock Brake System (ABS)The Antilock Brake System (ABS) helpsprevent a braking skid and maintain steeringwhile braking hard.
ABS performs a system check when thevehicle is first driven. A momentary motoror clicking noise may be heard while thistest is going on, and the brake pedal maymove slightly. This is normal.
If there is a problem with ABS, this warninglight stays on. See Antilock Brake System(ABS) Warning Light 0 95.
ABS does not change the time needed toget a foot on the brake pedal and does notalways decrease stopping distance. If youget too close to the vehicle ahead, there willnot be enough time to apply the brakes ifthat vehicle suddenly slows or stops. Alwaysleave enough room ahead to stop, evenwith ABS.
Using ABS
Do not pump the brakes. Just hold the brakepedal down firmly. Hearing or feeling ABSoperate is normal.
Braking in Emergencies
ABS allows steering and braking at the sametime. In many emergencies, steering canhelp even more than braking.
Electric Parking Brake
The Electric Parking Brake (EPB) can alwaysbe applied, even if the vehicle is off. In caseof insufficient electrical power, the EPBcannot be applied or released. To preventdraining the battery, avoid unnecessaryrepeated cycles of the EPB.
The system has a red parking brake statuslight and an amber service parking brakewarning light. See Electric Parking BrakeLight 0 94 andService Electric Parking Brake Light 0 94.There are also parking brake-related DriverInformation Center (DIC) messages.
Chevrolet Camaro Owner Manual (GMNA-Localizing-U.S./Canada/Mexico-15516346) - 2022 - CRC - 4/13/21
214 Driving and Operating
Before leaving the vehicle, check the redparking brake status light to ensure that theparking brake is applied.
EPB Apply
To apply the EPB:
1. Be sure the vehicle is at a complete stop.
2. Pull the EPB switch momentarily.
The red parking brake status light will flashand then stay on once the EPB is fullyapplied. If the red parking brake status lightflashes continuously, the EPB is onlypartially applied or there is a problem withthe EPB. A DIC message will display. Releasethe EPB and try to apply it again. If thelight does not come on, or keeps flashing,have the vehicle serviced. Do not drive thevehicle if the red parking brake status lightis flashing. See your dealer.
If the amber service parking brake warninglight is on, pull the EPB switch. Continue tohold the switch until the red parking brakestatus light remains on. If the amber serviceparking brake warning light is on, see yourdealer.
If the EPB is applied while the vehicle ismoving, the vehicle will decelerate as longas the switch is pulled. If the switch ispulled until the vehicle comes to a stop, theEPB will remain applied.
The vehicle may automatically apply the EPBin some situations when the vehicle is notmoving. This is normal, and is done toperiodically check the correct operation ofthe EPB system, or at the request of othersafety functions that utilize the EPB.
If the EPB fails to apply, block the rearwheels to prevent vehicle movement.
EPB Release
To release the EPB:
1. Turn the ignition on or to ACC/ACCESSORY.
2. Apply and hold the brake pedal.
3. Press the EPB switch momentarily.
The EPB is released when the red parkingbrake status light is off.
If the amber service parking brake warninglight is on, release the EPB by pressing andholding the EPB switch. Continue to hold theswitch until the red parking brake statuslight is off. If either light stays on afterrelease is attempted, see your dealer.
CautionDriving with the parking brake on canoverheat the brake system and causepremature wear or damage to brakesystem parts. Make sure that the parkingbrake is fully released and the brakewarning light is off before driving.
Automatic EPB Release
The EPB will automatically release if thevehicle is running, placed into gear, and anattempt is made to drive away. Avoid rapidacceleration when the EPB is applied, topreserve parking brake lining life.
The EPB can also be used to prevent rollback for vehicles with a manual transmissiontaking off on a hill. When no roll back isdesired, an applied EPB will allow both feetto be used for the clutch and acceleratorpedals in preparation for starting the vehiclemoving in the intended direction. In thiscase, there is no need to press the switch torelease the EPB.]
Brake AssistBrake Assist detects rapid brake pedalapplications due to emergency brakingsituations and provides additional braking to
Chevrolet Camaro Owner Manual (GMNA-Localizing-U.S./Canada/Mexico-15516346) - 2022 - CRC - 4/13/21
Driving and Operating 215
activate the Antilock Brake System (ABS) ifthe brake pedal is not pushed hard enoughto activate ABS normally. Minor noise, brakepedal pulsation, and/or pedal movementduring this time may occur. Continue toapply the brake pedal as the drivingsituation dictates. Brake Assist disengageswhen the brake pedal is released.
Hill Start Assist (HSA)
{ WarningDo not rely on the HSA feature. HSA doesnot replace the need to pay attentionand drive safely. You may not hear orfeel alerts or warnings provided by thissystem. Failure to use proper care whendriving may result in injury, death,or vehicle damage. See Defensive Driving0 182.
When the vehicle is stopped on a grade, HillStart Assist (HSA) temporarily prevents thevehicle from rolling in an unintendeddirection during the transition from brakepedal release to accelerator pedal apply. Thebrakes release when the accelerator pedal isapplied or automatically release after a few
seconds. The brakes may also release underother conditions. Do not rely on HSA to holdthe vehicle.
HSA is available when the vehicle is facinguphill in a forward gear, or when facingdownhill in R (Reverse). The vehicle mustcome to a complete stop on a grade for HSAto activate.
Ride Control SystemsTraction Control/ElectronicStability Control
System Operation
The vehicle has a Traction Control System(TCS) and StabiliTrak/Electronic StabilityControl (ESC). These systems help limitwheel slip and assist the driver inmaintaining control, especially on slipperyroad conditions.
TCS activates if it senses that any of thedrive wheels are spinning or beginning tolose traction. When this happens, TCSapplies the brakes to the spinning wheelsand reduces engine power to limitwheel spin.
StabiliTrak/ESC activates when the vehiclesenses a difference between the intendedpath and the direction the vehicle is actuallytraveling. StabiliTrak/ESC selectively appliesbraking pressure to any one of the vehiclewheel brakes to assist the driver in keepingthe vehicle on the intended path.
If cruise control is being used and tractioncontrol or StabiliTrak/ESC begins to limitwheel spin, cruise control will disengage.Cruise control may be turned back on whenroad conditions allow.
Both systems come on automatically whenthe vehicle is started and begins to move.The systems may be heard or felt whilethey are operating or while performingdiagnostic checks. This is normal and doesnot mean there is a problem with thevehicle.
It is recommended to leave both systems onfor normal driving conditions, but it may benecessary to turn TCS off if the vehicle getsstuck in sand, mud, ice, or snow. See If theVehicle Is Stuck 0 195 and “Turning theSystems Off and On” later in this section.
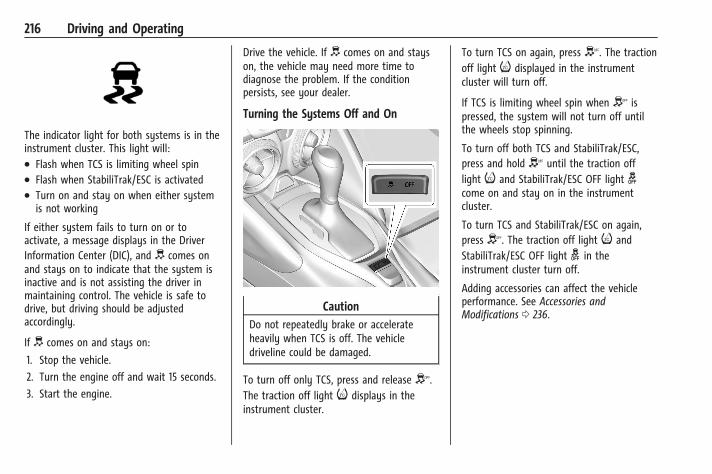
Chevrolet Camaro Owner Manual (GMNA-Localizing-U.S./Canada/Mexico-15516346) - 2022 - CRC - 4/13/21
216 Driving and Operating
The indicator light for both systems is in theinstrument cluster. This light will:. Flash when TCS is limiting wheel spin. Flash when StabiliTrak/ESC is activated. Turn on and stay on when either system
is not working
If either system fails to turn on or toactivate, a message displays in the DriverInformation Center (DIC), and d comes onand stays on to indicate that the system isinactive and is not assisting the driver inmaintaining control. The vehicle is safe todrive, but driving should be adjustedaccordingly.
If d comes on and stays on:
1. Stop the vehicle.
2. Turn the engine off and wait 15 seconds.
3. Start the engine.
Drive the vehicle. If d comes on and stayson, the vehicle may need more time todiagnose the problem. If the conditionpersists, see your dealer.
Turning the Systems Off and On
CautionDo not repeatedly brake or accelerateheavily when TCS is off. The vehicledriveline could be damaged.
To turn off only TCS, press and releaseY.The traction off light i displays in theinstrument cluster.
To turn TCS on again, pressY. The tractionoff light i displayed in the instrumentcluster will turn off.
If TCS is limiting wheel spin whenY ispressed, the system will not turn off untilthe wheels stop spinning.
To turn off both TCS and StabiliTrak/ESC,press and holdY until the traction offlight i and StabiliTrak/ESC OFF light gcome on and stay on in the instrumentcluster.
To turn TCS and StabiliTrak/ESC on again,pressY. The traction off light i andStabiliTrak/ESC OFF light g in theinstrument cluster turn off.
Adding accessories can affect the vehicleperformance. See Accessories andModifications 0 236.

Chevrolet Camaro Owner Manual (GMNA-Localizing-U.S./Canada/Mexico-15516346) - 2022 - CRC - 4/13/21
Driving and Operating 217
Engine Drag Control (EDC)
EDC improves vehicle stability by sensing ifthere is a difference in speed between thefree rolling front wheels and the rear drivewheels that often occurs when the drivertakes their foot off the accelerator pedal onslippery surfaces (snow, ice, etc.). When thisis detected, EDC sends more torque to therear wheels to make sure all four wheels arespinning at similar speeds, making thevehicle more stable.
Driver Mode ControlDriver Mode Control adds a sportier feel,provides a more comfortable ride, or assistsin different weather conditions or terrain.This system simultaneously changes thesoftware calibration of various sub-systemsto optimize driving performance. Dependingon the option package, available features,and mode selected, the exhaust, suspension,steering, and powertrain will changecalibrations to achieve the desired modecharacteristics. If the vehicle is equippedwith Magnetic Ride Control, selecting thevarious Driver Modes adjusts the ride of thevehicle to enhance the ride performance forthe road conditions and the selected mode.
While in the Sport and/or Track Modes, thevehicle monitors driving behavior andautomatically enables Performance ShiftFeatures in the automatic transmissionwhen spirited driving is detected. Thesefeatures maintain lower transmission gearsto increase available engine braking andimprove acceleration response. The vehiclewill exit these features and return to normaloperation after a short period when nospirited driving is detected.
Driver Mode Control Switch
The Driver Mode Control has three or fourmodes: Tour, Sport, Snow/Ice, and Track.Pressy or z on the MODE switch on thecenter console to make a mode selection.Pressing the switch will display the modingmenu in the instrument cluster with allavailable ride modes. Every switch press willselect and activate the next available mode.When Sport, Snow/Ice, or Track Mode isselected, a unique and persistent indicatorwill be displayed in the instrument cluster.
Tour Mode
Use for normal city and highway driving toprovide a smooth, soft ride. This settingprovides a balanced setting between comfortand handling. This is the standard mode.
Sport Mode
Use where road conditions or personalpreference demand a more controlledresponse.
Chevrolet Camaro Owner Manual (GMNA-Localizing-U.S./Canada/Mexico-15516346) - 2022 - CRC - 4/13/21
218 Driving and Operating
When Sport Mode is selected, thetransmission may downshift to a lower gearfor better performance. The transmissionwill continue to shift automatically but canhold a lower gear longer than it would inthe Tour Mode based on braking, throttleinput, and vehicle lateral acceleration. SeeAutomatic Transmission 0 207. The steeringwill change to provide more precise control.If the vehicle has Magnetic Ride Control, thesuspension will change to provide bettercornering performance. If the vehicle isequipped with Active Exhaust, the exhaustvalves will open earlier and more often.Competitive Driving Mode can be accessedthrough this mode by pressingY on theconsole twice.
This Competitive Driving Mode is only on SS,1LE, and ZL1 vehicles. For example, a vehiclewith a V6 engine and automatictransmission will have Sport Mode, but willnot be able to access CompetitiveDriving Mode.
Snow/Ice Mode
If equipped, use when more traction isneeded during slippery conditions. Theautomatic transmission will upshift normallywhen the vehicle is moving. The accelerationwill adjust to help provide a smootherlaunch. The automatic transmission will alsoshift differently to assist in maintainingtraction.
This feature is not intended for use whenthe vehicle is stuck in sand, mud, ice, snow,or gravel. If the vehicle becomes stuck, see Ifthe Vehicle Is Stuck 0 195.
Track Mode
If equipped, use when maximum vehiclehandling is desired.
When Track Mode is selected, thetransmission may downshift to a lower gearfor better performance. The automatictransmission and steering will functionsimilar to Sport Mode.
The accelerator pedal is adjusted to givemaximum control during the highest level ofspirited driving. The Magnetic Ride Controlwill be set to the optimum level for vehicleresponsiveness. If the vehicle is equippedwith Active Exhaust, the exhaust valves willopen. Performance Traction Management(PTM) can be accessed through this mode bypressingY on the console twice.
There are attributes that vary by modeshown below. Not all vehicles have allfeatures, depending on the vehicle options.
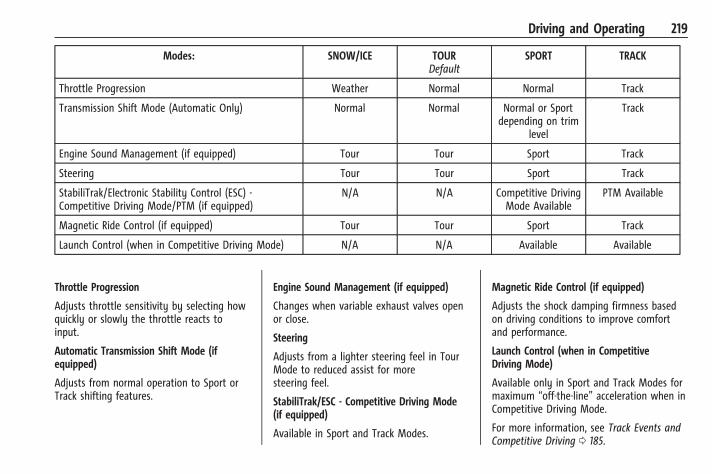
Chevrolet Camaro Owner Manual (GMNA-Localizing-U.S./Canada/Mexico-15516346) - 2022 - CRC - 4/13/21
Driving and Operating 219
Modes: SNOW/ICE TOURDefault
SPORT TRACK
Throttle Progression Weather Normal Normal Track
Transmission Shift Mode (Automatic Only) Normal Normal Normal or Sportdepending on trim
level
Track
Engine Sound Management (if equipped) Tour Tour Sport Track
Steering Tour Tour Sport Track
StabiliTrak/Electronic Stability Control (ESC) -Competitive Driving Mode/PTM (if equipped)
N/A N/A Competitive DrivingMode Available
PTM Available
Magnetic Ride Control (if equipped) Tour Tour Sport Track
Launch Control (when in Competitive Driving Mode) N/A N/A Available Available
Throttle Progression
Adjusts throttle sensitivity by selecting howquickly or slowly the throttle reacts toinput.
Automatic Transmission Shift Mode (ifequipped)
Adjusts from normal operation to Sport orTrack shifting features.
Engine Sound Management (if equipped)
Changes when variable exhaust valves openor close.
Steering
Adjusts from a lighter steering feel in TourMode to reduced assist for moresteering feel.
StabiliTrak/ESC - Competitive Driving Mode(if equipped)
Available in Sport and Track Modes.
Magnetic Ride Control (if equipped)
Adjusts the shock damping firmness basedon driving conditions to improve comfortand performance.
Launch Control (when in CompetitiveDriving Mode)
Available only in Sport and Track Modes formaximum “off-the-line” acceleration when inCompetitive Driving Mode.
For more information, see Track Events andCompetitive Driving 0 185.

Chevrolet Camaro Owner Manual (GMNA-Localizing-U.S./Canada/Mexico-15516346) - 2022 - CRC - 4/13/21
220 Driving and Operating
Competitive Driving Mode (SS,ZL1 and 1LE Models Only)Competitive Driving Mode and LaunchControl are systems designed to allowincreased performance while acceleratingand/or cornering. This is accomplished byregulating and optimizing the engine,brakes, and suspension performance. Thesemodes are for use at a closed course racetrack and are not intended for use on publicroads. They will not compensate for adriver’s inexperience or lack of familiaritywith the race track. Drivers who prefer toallow the system to have more control ofthe engine, brakes, and suspension areadvised to turn the normal TCS andStabiliTrak/Electronic Stability Control (ESC)systems on.
CautionAttempting to shift when the drivewheels are spinning and do not havetraction may cause damage to thetransmission. Damage caused by misuseof the vehicle is not covered by thevehicle warranty. Do not attempt to shiftwhen the drive wheels do not havetraction.
Competitive Driving Mode allows full enginepower while the StabiliTrak/ESC systemhelps maintain directional control of thevehicle by selective brake application. In thismode, TCS is off and Launch Control isavailable. Adjust your driving style toaccount for the available engine power. See“Launch Control” later in this section.
These lights are on when the vehicle is inthe Competitive Driving Mode.
This optional handling mode can be selectedby pressing the TCS/StabiliTrak/ESC buttonon the console two times. The appropriatemessage displays in the Driver InformationCenter (DIC).
When the TCS/StabiliTrak/ESC button ispressed again, the TCS and StabiliTrak/ESCsystems are on. The appropriate messagedisplays briefly in the DIC.
Launch Control
If the vehicle has the LT1 10 speedtransmission, see Track Events andCompetitive Driving 0 185 for custom launchcontrol information.
Chevrolet Camaro Owner Manual (GMNA-Localizing-U.S./Canada/Mexico-15516346) - 2022 - CRC - 4/13/21
Driving and Operating 221
A Launch Control feature is available, withinCompetitive Driving Mode, to allow thedriver to achieve high levels of vehicleacceleration in a straight line. LaunchControl is a form of traction control thatmanages tire spin while launching thevehicle. This feature is intended for useduring closed course race events whereconsistent zero to sixty and quarter miletimes are desirable.
Launch Control is only available when thefollowing criteria are met:. Competitive Driving Mode is selected.. The vehicle is not moving.. The steering wheel is pointing straight.
Manual Transmissions. The clutch is pressed to floor and the
vehicle is in 1 (First) gear.. The accelerator pedal is rapidly applied to
wide open throttle.
The Launch Control feature will initially limitengine speed as the driver rapidly appliesthe accelerator pedal to wide open throttle.Allow the engine rpm to stabilize. A smooth,quick release of the clutch, whilemaintaining the fully pressed accelerator
pedal, will manage wheel slip. Completeshifts are described in Manual Transmission0 210.
Automatic Transmissions. The brake pedal must be firmly pressed
to the floor, equivalent to a panic brakeevent.
. The accelerator pedal is rapidly applied towide open throttle. (If the vehicle rollsdue to wide open throttle, release thethrottle, press the brake pedal morefirmly, and re-apply the accelerator towide open throttle.)
After the vehicle is launched, the systemcontinues in Competitive Driving Mode.
Competitive Driving Mode and LaunchControl are systems designed for a closedcourse race track and not intended for useon public roads. The systems are notintended to compensate for lack of driverexperience or familiarity with the race track.
Limited-Slip Rear AxleVehicles with a limited-slip rear axle cangive more traction on snow, mud, ice, sand,or gravel. When traction is low, this featureallows the drive wheel with the mosttraction to move the vehicle. The limited-slip
rear axle also gives the driver enhancedcontrol when cornering hard or completing amaneuver, such as a lane change. Forvehicles with limited-slip differential, drivenunder severe conditions, the rear axle fluidshould be changed. See Competitive DrivingMode (SS, ZL1 and 1LE Models Only) 0 220andMaintenance Schedule 0 307.
Cruise ControlWhen using cruise control, the vehicle canmaintain a speed of about 40 km/h (25 mph)or more without keeping your foot on theaccelerator. Cruise control does not work atspeeds below 40 km/h (25 mph).
{ WarningCruise control can be dangerous whereyou cannot drive safely at a steadyspeed. Do not use cruise control onwinding roads or in heavy traffic.
Cruise control can be dangerous onslippery roads. On such roads, fastchanges in tire traction can cause
(Continued)
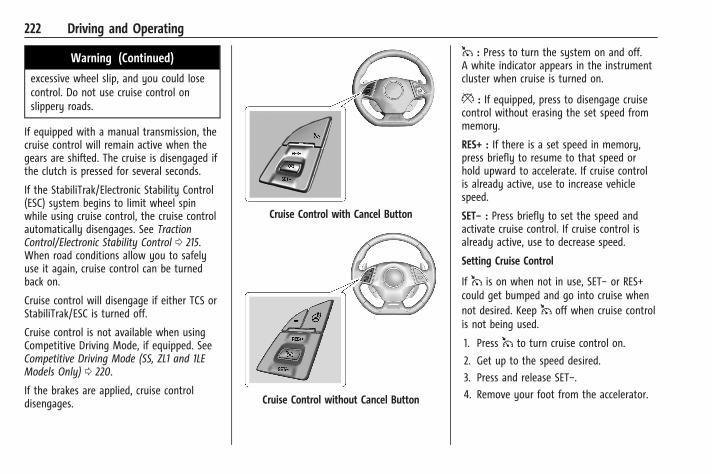
Chevrolet Camaro Owner Manual (GMNA-Localizing-U.S./Canada/Mexico-15516346) - 2022 - CRC - 4/13/21
222 Driving and Operating
Warning (Continued)
excessive wheel slip, and you could losecontrol. Do not use cruise control onslippery roads.
If equipped with a manual transmission, thecruise control will remain active when thegears are shifted. The cruise is disengaged ifthe clutch is pressed for several seconds.
If the StabiliTrak/Electronic Stability Control(ESC) system begins to limit wheel spinwhile using cruise control, the cruise controlautomatically disengages. See TractionControl/Electronic Stability Control 0 215.When road conditions allow you to safelyuse it again, cruise control can be turnedback on.
Cruise control will disengage if either TCS orStabiliTrak/ESC is turned off.
Cruise control is not available when usingCompetitive Driving Mode, if equipped. SeeCompetitive Driving Mode (SS, ZL1 and 1LEModels Only) 0 220.
If the brakes are applied, cruise controldisengages.
Cruise Control with Cancel Button
Cruise Control without Cancel Button
1 : Press to turn the system on and off.A white indicator appears in the instrumentcluster when cruise is turned on.
* : If equipped, press to disengage cruisecontrol without erasing the set speed frommemory.
RES+ : If there is a set speed in memory,press briefly to resume to that speed orhold upward to accelerate. If cruise controlis already active, use to increase vehiclespeed.
SET− : Press briefly to set the speed andactivate cruise control. If cruise control isalready active, use to decrease speed.
Setting Cruise Control
If 1 is on when not in use, SET− or RES+could get bumped and go into cruise whennot desired. Keep 1 off when cruise controlis not being used.
1. Press 1 to turn cruise control on.
2. Get up to the speed desired.
3. Press and release SET−.
4. Remove your foot from the accelerator.
Chevrolet Camaro Owner Manual (GMNA-Localizing-U.S./Canada/Mexico-15516346) - 2022 - CRC - 4/13/21
Driving and Operating 223
The cruise control indicator on theinstrument cluster turns green after cruisecontrol has been set to the desired speed.See Instrument Cluster 0 83.
Resuming a Set Speed
If the cruise control is set at a desired speedand then the brakes are applied or * ispressed, if equipped, the cruise control isdisengaged without erasing the set speedfrom memory.
Once the vehicle speed reaches about40 km/h (25 mph) or more, briefly press RES+. The vehicle returns to the previous setspeed.
Increasing Speed While Using Cruise Control
If the cruise control system is alreadyactivated:. Press and hold RES+ until the desired
speed is reached, and then release it.. To increase the vehicle speed in small
increments, briefly press RES+. For eachpress, the vehicle goes about 1 km/h(1 mph) faster.
The speedometer reading can be displayedin either English or metric units. See“Options” under Instrument Cluster 0 83.The increment value used depends on theunits displayed.
Reducing Speed While Using Cruise Control
If the cruise control system is alreadyactivated:. Press and hold SET− until the desired
lower speed is reached, then release it.. To decrease the vehicle speed in small
increments, briefly press SET−. For eachpress, the vehicle goes about 1 km/h(1 mph) slower.
The speedometer reading can be displayedin either English or metric units. See“Options” under Instrument Cluster 0 83.The increment value used depends on theunits displayed.
Passing Another Vehicle While Using CruiseControl
Use the accelerator pedal to increase thevehicle speed. When you take your foot offthe pedal, the vehicle slows down to thepreviously set cruise control speed. Whilepressing the accelerator pedal or shortlyfollowing the release to override cruise
control, briefly pressing SET– will result incruise control set to the current vehiclespeed.
Using Cruise Control on Hills
How well the cruise control works on hillsdepends upon the vehicle speed, load, andthe steepness of the hills. When going upsteep hills, you might have to step on theaccelerator pedal to maintain the vehiclespeed. When going downhill, you mighthave to brake or shift to a lower gear tokeep your speed down. If the brake pedal isapplied, cruise control will disengage.
Ending Cruise Control
There are five ways to end cruise control:. Step lightly on the brake pedal (manual
and automatic transmissions).. Press the clutch pedal for several seconds
or shift to Neutral (manual transmissions).. Shift to N (Neutral) (automatic
transmissions).
. Press *, if equipped.
. To turn off cruise control, press 1.
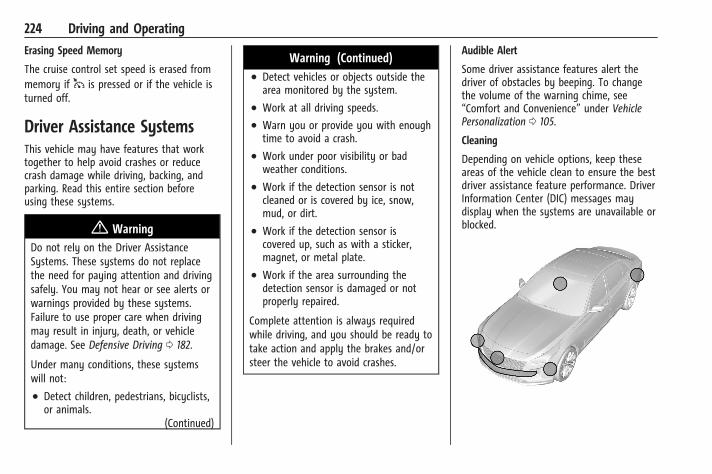
Chevrolet Camaro Owner Manual (GMNA-Localizing-U.S./Canada/Mexico-15516346) - 2022 - CRC - 4/13/21
224 Driving and Operating
Erasing Speed Memory
The cruise control set speed is erased frommemory if 1 is pressed or if the vehicle isturned off.
Driver Assistance SystemsThis vehicle may have features that worktogether to help avoid crashes or reducecrash damage while driving, backing, andparking. Read this entire section beforeusing these systems.
{ WarningDo not rely on the Driver AssistanceSystems. These systems do not replacethe need for paying attention and drivingsafely. You may not hear or see alerts orwarnings provided by these systems.Failure to use proper care when drivingmay result in injury, death, or vehicledamage. See Defensive Driving 0 182.
Under many conditions, these systemswill not:
. Detect children, pedestrians, bicyclists,or animals.
(Continued)
Warning (Continued). Detect vehicles or objects outside the
area monitored by the system.
. Work at all driving speeds.
. Warn you or provide you with enoughtime to avoid a crash.
. Work under poor visibility or badweather conditions.
. Work if the detection sensor is notcleaned or is covered by ice, snow,mud, or dirt.
. Work if the detection sensor iscovered up, such as with a sticker,magnet, or metal plate.
. Work if the area surrounding thedetection sensor is damaged or notproperly repaired.
Complete attention is always requiredwhile driving, and you should be ready totake action and apply the brakes and/orsteer the vehicle to avoid crashes.
Audible Alert
Some driver assistance features alert thedriver of obstacles by beeping. To changethe volume of the warning chime, see“Comfort and Convenience” under VehiclePersonalization 0 105.
Cleaning
Depending on vehicle options, keep theseareas of the vehicle clean to ensure the bestdriver assistance feature performance. DriverInformation Center (DIC) messages maydisplay when the systems are unavailable orblocked.
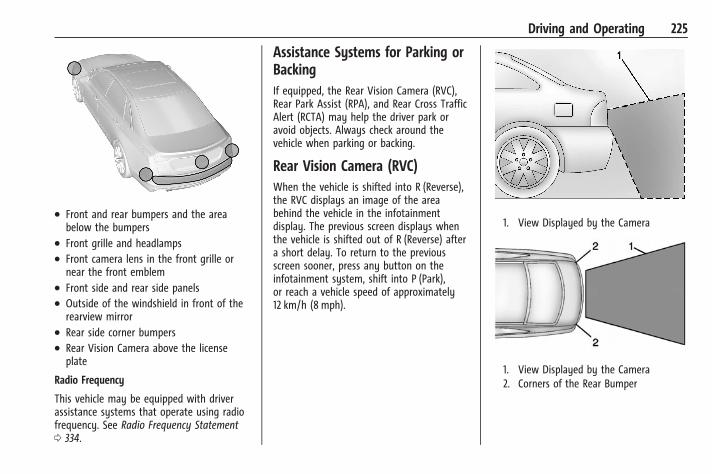
Chevrolet Camaro Owner Manual (GMNA-Localizing-U.S./Canada/Mexico-15516346) - 2022 - CRC - 4/13/21
Driving and Operating 225
. Front and rear bumpers and the areabelow the bumpers
. Front grille and headlamps
. Front camera lens in the front grille ornear the front emblem
. Front side and rear side panels
. Outside of the windshield in front of therearview mirror
. Rear side corner bumpers
. Rear Vision Camera above the licenseplate
Radio Frequency
This vehicle may be equipped with driverassistance systems that operate using radiofrequency. See Radio Frequency Statement0 334.
Assistance Systems for Parking orBackingIf equipped, the Rear Vision Camera (RVC),Rear Park Assist (RPA), and Rear Cross TrafficAlert (RCTA) may help the driver park oravoid objects. Always check around thevehicle when parking or backing.
Rear Vision Camera (RVC)When the vehicle is shifted into R (Reverse),the RVC displays an image of the areabehind the vehicle in the infotainmentdisplay. The previous screen displays whenthe vehicle is shifted out of R (Reverse) aftera short delay. To return to the previousscreen sooner, press any button on theinfotainment system, shift into P (Park),or reach a vehicle speed of approximately12 km/h (8 mph).
1. View Displayed by the Camera
1. View Displayed by the Camera2. Corners of the Rear Bumper

Chevrolet Camaro Owner Manual (GMNA-Localizing-U.S./Canada/Mexico-15516346) - 2022 - CRC - 4/13/21
226 Driving and Operating
Displayed images may be farther or closerthan they appear. The area displayed islimited and objects that are close to eithercorner of the bumper or under the bumperdo not display.
A warning triangle may display to showthat Rear Park Assist (RPA) or Rear CrossTraffic Alert (RCTA) has detected an object.This triangle changes from amber to red andincreases in size the closer the object.
{ WarningThe camera(s) do not display children,pedestrians, bicyclists, crossing traffic,animals, or any other object outside ofthe cameras’ field of view, below thebumper, or under the vehicle. Showndistances may be different from actualdistances. Do not drive or park thevehicle using only these camera(s).Always check behind and around thevehicle before driving. Failure to useproper care may result in injury, death,or vehicle damage.
Park AssistBlocked sensors will not detect objects andcan also cause false detections. Keep thesensors clean of mud, dirt, snow, ice, andslush; and clean sensors after a car wash infreezing temperatures.
With RPA, as the vehicle backs up at speedsof less than 8 km/h (5 mph), the sensors onthe rear bumper may detect objects up to2.5 m (8 ft) behind the vehicle within a zone25 cm (10 in) high off the ground and belowbumper level. These detection distances maybe shorter during warmer or humid weather.
{ WarningThe Park Assist system does not detectchildren, pedestrians, bicyclists, animals,or objects located below the bumper orthat are too close or too far from thevehicle. It is not available at speedsgreater than 8 km/h (5 mph). To preventinjury, death, or vehicle damage, evenwith Park Assist, always check the areaaround the vehicle and check all mirrorsbefore moving forward or backing.
The instrument cluster may have a ParkAssist display with bars that show “distanceto object” and object location informationfor RPA. As the object gets closer, more barslight up and the bars change color fromyellow to amber to red.
When an object is first detected in the rear,one beep will be heard from the rear. Whenan object is very close (<0.6 m (2 ft) in thevehicle rear), five beeps will sound fromthe rear.
Turning the Features On or Off
RPA can be turned on or off. See “Collision/Detection Systems” under VehiclePersonalization 0 105.
To turn the rear Park Assist symbols orguidance lines on or off, see “Rear Camera”under Vehicle Personalization 0 105.

Chevrolet Camaro Owner Manual (GMNA-Localizing-U.S./Canada/Mexico-15516346) - 2022 - CRC - 4/13/21
Driving and Operating 227
Rear Cross Traffic Alert (RCTA)SystemIf equipped, RCTA displays a red warningtriangle with a left or right pointing arrowto warn of traffic coming from the left orright. This system detects objects comingfrom up to 20 m (65 ft) from the left orright side of the vehicle. When an object isdetected, three beeps sound from the left orright, depending on the direction of thedetected vehicle.
Turning the Features On or Off
RCTA can be turned on or off. See “Collision/Detection Systems” under VehiclePersonalization 0 105.
Forward Collision Alert (FCA)SystemIf equipped, the FCA system may help toavoid or reduce the harm caused byfront-end crashes. When approaching avehicle ahead too quickly, FCA provides ared flashing alert on the windshield andrapidly beeps. FCA also lights an ambervisual alert if following another vehicle tooclosely.
FCA detects vehicles within a distance ofapproximately 60 m (197 ft) and operates atspeeds above 8 km/h (5 mph).
{ WarningFCA is a warning system and does notapply the brakes. When approaching aslower-moving or stopped vehicle aheadtoo rapidly, or when following a vehicletoo closely, FCA may not provide awarning with enough time to help avoida crash. It also may not provide anywarning at all. FCA does not warn ofpedestrians, animals, signs, guardrails,bridges, construction barrels, or otherobjects. Be ready to take action andapply the brakes. See Defensive Driving0 182.
FCA can be disabled with the FCA steeringwheel control.
Detecting the Vehicle Ahead
FCA warnings will not occur unless the FCAsystem detects a vehicle ahead. When avehicle is detected, the vehicle aheadindicator will display green. Vehicles maynot be detected on curves, highway exitramps, or hills, due to poor visibility; or if avehicle ahead is partially blocked bypedestrians or other objects. FCA will notdetect another vehicle ahead until it iscompletely in the driving lane.
{ WarningFCA does not provide a warning to helpavoid a crash, unless it detects a vehicle.FCA may not detect a vehicle ahead ifthe FCA sensor is blocked by dirt, snow,or ice, or if the windshield is damaged.It may also not detect a vehicle onwinding or hilly roads, or in conditionsthat can limit visibility such as fog, rain,
(Continued)
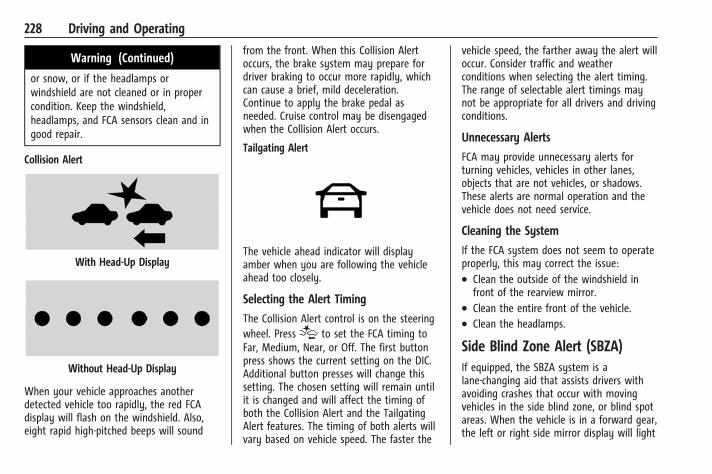
Chevrolet Camaro Owner Manual (GMNA-Localizing-U.S./Canada/Mexico-15516346) - 2022 - CRC - 4/13/21
228 Driving and Operating
Warning (Continued)
or snow, or if the headlamps orwindshield are not cleaned or in propercondition. Keep the windshield,headlamps, and FCA sensors clean and ingood repair.
Collision Alert
With Head-Up Display
Without Head-Up Display
When your vehicle approaches anotherdetected vehicle too rapidly, the red FCAdisplay will flash on the windshield. Also,eight rapid high-pitched beeps will sound
from the front. When this Collision Alertoccurs, the brake system may prepare fordriver braking to occur more rapidly, whichcan cause a brief, mild deceleration.Continue to apply the brake pedal asneeded. Cruise control may be disengagedwhen the Collision Alert occurs.
Tailgating Alert
The vehicle ahead indicator will displayamber when you are following the vehicleahead too closely.
Selecting the Alert Timing
The Collision Alert control is on the steeringwheel. Press[ to set the FCA timing toFar, Medium, Near, or Off. The first buttonpress shows the current setting on the DIC.Additional button presses will change thissetting. The chosen setting will remain untilit is changed and will affect the timing ofboth the Collision Alert and the TailgatingAlert features. The timing of both alerts willvary based on vehicle speed. The faster the
vehicle speed, the farther away the alert willoccur. Consider traffic and weatherconditions when selecting the alert timing.The range of selectable alert timings maynot be appropriate for all drivers and drivingconditions.
Unnecessary Alerts
FCA may provide unnecessary alerts forturning vehicles, vehicles in other lanes,objects that are not vehicles, or shadows.These alerts are normal operation and thevehicle does not need service.
Cleaning the System
If the FCA system does not seem to operateproperly, this may correct the issue:. Clean the outside of the windshield in
front of the rearview mirror.. Clean the entire front of the vehicle.. Clean the headlamps.
Side Blind Zone Alert (SBZA)If equipped, the SBZA system is alane-changing aid that assists drivers withavoiding crashes that occur with movingvehicles in the side blind zone, or blind spotareas. When the vehicle is in a forward gear,the left or right side mirror display will light
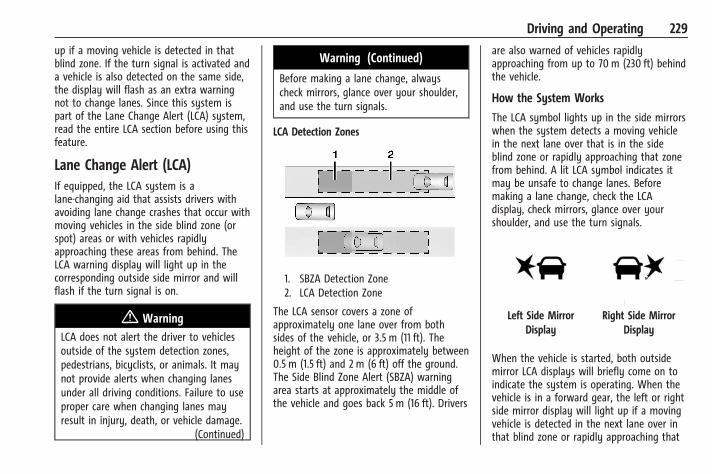
Chevrolet Camaro Owner Manual (GMNA-Localizing-U.S./Canada/Mexico-15516346) - 2022 - CRC - 4/13/21
Driving and Operating 229
up if a moving vehicle is detected in thatblind zone. If the turn signal is activated anda vehicle is also detected on the same side,the display will flash as an extra warningnot to change lanes. Since this system ispart of the Lane Change Alert (LCA) system,read the entire LCA section before using thisfeature.
Lane Change Alert (LCA)If equipped, the LCA system is alane-changing aid that assists drivers withavoiding lane change crashes that occur withmoving vehicles in the side blind zone (orspot) areas or with vehicles rapidlyapproaching these areas from behind. TheLCA warning display will light up in thecorresponding outside side mirror and willflash if the turn signal is on.
{ WarningLCA does not alert the driver to vehiclesoutside of the system detection zones,pedestrians, bicyclists, or animals. It maynot provide alerts when changing lanesunder all driving conditions. Failure to useproper care when changing lanes mayresult in injury, death, or vehicle damage.
(Continued)
Warning (Continued)
Before making a lane change, alwayscheck mirrors, glance over your shoulder,and use the turn signals.
LCA Detection Zones
1. SBZA Detection Zone2. LCA Detection Zone
The LCA sensor covers a zone ofapproximately one lane over from bothsides of the vehicle, or 3.5 m (11 ft). Theheight of the zone is approximately between0.5 m (1.5 ft) and 2 m (6 ft) off the ground.The Side Blind Zone Alert (SBZA) warningarea starts at approximately the middle ofthe vehicle and goes back 5 m (16 ft). Drivers
are also warned of vehicles rapidlyapproaching from up to 70 m (230 ft) behindthe vehicle.
How the System Works
The LCA symbol lights up in the side mirrorswhen the system detects a moving vehiclein the next lane over that is in the sideblind zone or rapidly approaching that zonefrom behind. A lit LCA symbol indicates itmay be unsafe to change lanes. Beforemaking a lane change, check the LCAdisplay, check mirrors, glance over yourshoulder, and use the turn signals.
Left Side MirrorDisplay
Right Side MirrorDisplay
When the vehicle is started, both outsidemirror LCA displays will briefly come on toindicate the system is operating. When thevehicle is in a forward gear, the left or rightside mirror display will light up if a movingvehicle is detected in the next lane over inthat blind zone or rapidly approaching that
Chevrolet Camaro Owner Manual (GMNA-Localizing-U.S./Canada/Mexico-15516346) - 2022 - CRC - 4/13/21
230 Driving and Operating
zone. If the turn signal is activated in thesame direction as a detected vehicle, thisdisplay will flash as an extra warning not tochange lanes.
LCA can be disabled through vehiclepersonalization. See “Collision/DetectionSystems” under Vehicle Personalization0 105. If LCA is disabled by the driver, theLCA mirror displays will not light up.
When the System Does Not Seem toWork Properly
The LCA system requires some driving forthe system to calibrate to maximumperformance. This calibration may occurmore quickly if the vehicle is driving on astraight highway road with traffic androadside objects (e.g., guardrails, barriers).
LCA displays may not come on whenpassing a vehicle quickly or for a stoppedvehicle. LCA may alert to objects attached tothe vehicle, such as a bicycle or objectextending out to either side of the vehicle.Attached objects may also interfere with thedetection of vehicles. This is normal systemoperation; the vehicle does not need service.
LCA may not always alert the driver tovehicles in the next lane over, especially inwet conditions or when driving on sharp
curves. The system does not need to beserviced. The system may light up due toguardrails, signs, trees, shrubs, and othernon-moving objects. This is normal systemoperation; the vehicle does not need service.
LCA may not operate when the LCA sensorsin the left or right corners of the rearbumper are covered with mud, dirt, snow,ice, or slush, or in heavy rainstorms. Forcleaning instructions, see "Washing theVehicle" under Exterior Care 0 297. If the DICstill displays the system unavailablemessage after cleaning both sides of thevehicle toward the rear corners of thevehicle, see your dealer.
If the LCA displays do not light up whenmoving vehicles are in the side blind zone orrapidly approaching this zone and thesystem is clean, the system may needservice. Take the vehicle to your dealer.
Radio Frequency Information
See Radio Frequency Statement 0 334.
FuelTop Tier FuelGM recommends the use of TOP TIERDetergent Gasoline to keep the engine clean,reduce engine deposits, and maintainoptimal vehicle performance. Look for theTOP TIER Logo or see www.toptiergas.comfor a list of TOP TIER Detergent Gasolinemarketers and applicable countries.
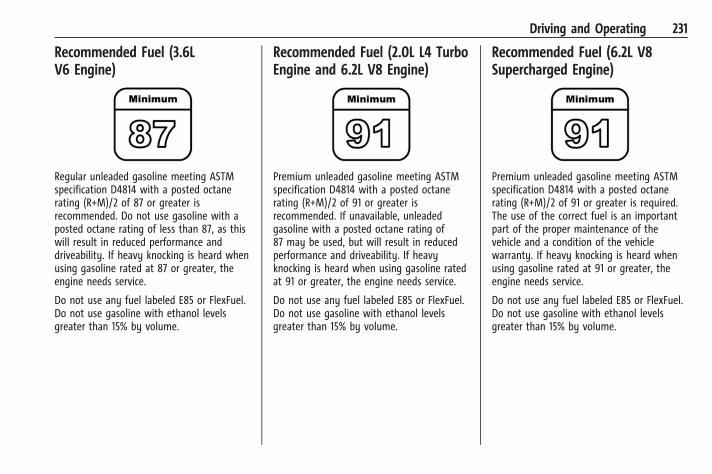
Chevrolet Camaro Owner Manual (GMNA-Localizing-U.S./Canada/Mexico-15516346) - 2022 - CRC - 4/13/21
Driving and Operating 231
Recommended Fuel (3.6LV6 Engine)
Regular unleaded gasoline meeting ASTMspecification D4814 with a posted octanerating (R+M)/2 of 87 or greater isrecommended. Do not use gasoline with aposted octane rating of less than 87, as thiswill result in reduced performance anddriveability. If heavy knocking is heard whenusing gasoline rated at 87 or greater, theengine needs service.
Do not use any fuel labeled E85 or FlexFuel.Do not use gasoline with ethanol levelsgreater than 15% by volume.
Recommended Fuel (2.0L L4 TurboEngine and 6.2L V8 Engine)
Premium unleaded gasoline meeting ASTMspecification D4814 with a posted octanerating (R+M)/2 of 91 or greater isrecommended. If unavailable, unleadedgasoline with a posted octane rating of87 may be used, but will result in reducedperformance and driveability. If heavyknocking is heard when using gasoline ratedat 91 or greater, the engine needs service.
Do not use any fuel labeled E85 or FlexFuel.Do not use gasoline with ethanol levelsgreater than 15% by volume.
Recommended Fuel (6.2L V8Supercharged Engine)
Premium unleaded gasoline meeting ASTMspecification D4814 with a posted octanerating (R+M)/2 of 91 or greater is required.The use of the correct fuel is an importantpart of the proper maintenance of thevehicle and a condition of the vehiclewarranty. If heavy knocking is heard whenusing gasoline rated at 91 or greater, theengine needs service.
Do not use any fuel labeled E85 or FlexFuel.Do not use gasoline with ethanol levelsgreater than 15% by volume.

Chevrolet Camaro Owner Manual (GMNA-Localizing-U.S./Canada/Mexico-15516346) - 2022 - CRC - 4/13/21
232 Driving and Operating
Prohibited Fuels
CautionDo not use fuels with any of thefollowing conditions; doing so maydamage the vehicle and void itswarranty:
. For vehicles that are not FlexFuel, fuellabeled greater than 15% ethanol byvolume, such as mid-level ethanolblends (16–50% ethanol), E85,or FlexFuel.
. Fuel with any amount of methanol,methylal, ferrocene, and aniline. Thesefuels can corrode metal fuel systemparts or damage plastic and rubberparts.
. Fuel containing metals such asmethylcyclopentadienyl manganesetricarbonyl (MMT), which can damagethe emissions control system andspark plugs.
. Fuel with a posted octane rating ofless than the recommended fuel. Usingthis fuel will lower fuel economy andperformance, and may decrease thelife of the emissions catalyst.
Fuels in Foreign CountriesThe U.S., Canada, and Mexico post fueloctane ratings in anti-knock index (AKI). Forfuel not to use in a foreign country, seeProhibited Fuels 0 232.
Fuel AdditivesTOP TIER Detergent Gasoline is highlyrecommended for use with your vehicle.If your country does not have TOP TIERDetergent Gasoline, add ACDelco FuelSystem Treatment Plus−Gasoline to thevehicle’s gasoline fuel tank at every oilchange or 15 000 km (9,000 mi), whicheveroccurs first. TOP TIER Detergent Gasoline andACDelco Fuel System Treatment Plus−Gasoline will help keep your vehicle’sengine fuel deposit free and performingoptimally.
Filling the TankAn arrow on the fuel gauge indicates whichside of the vehicle the fuel door is on. SeeFuel Gauge 0 87.
{ WarningFuel vapors and fuel fires burn violentlyand can cause injury or death.
Follow these guidelines to help avoidinjuries to you and others:
. Read and follow all the instructions onthe fuel pump island.
. Turn off the engine when refueling.
. Keep sparks, flames, and smokingmaterials away from fuel.
. Do not leave the fuel pumpunattended.
. Avoid using electronic devices whilerefueling.
. Do not re-enter the vehicle whilepumping fuel.
. Keep children away from the fuelpump and never let childrenpump fuel.
. Before touching the fill nozzle, touch ametallic object to discharge staticelectricity from your body.
(Continued)
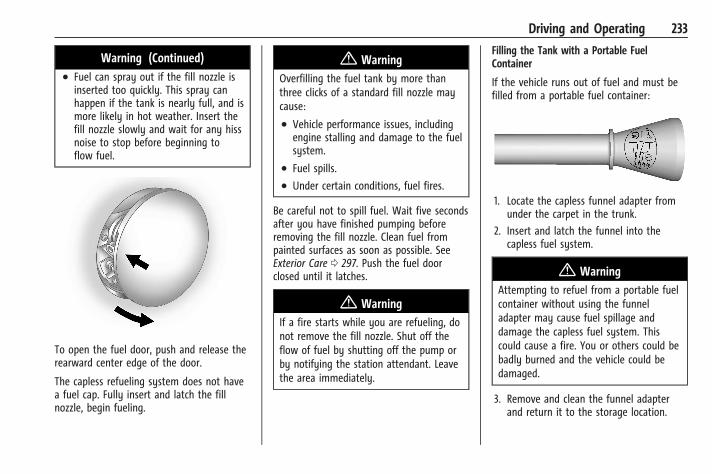
Chevrolet Camaro Owner Manual (GMNA-Localizing-U.S./Canada/Mexico-15516346) - 2022 - CRC - 4/13/21
Driving and Operating 233
Warning (Continued). Fuel can spray out if the fill nozzle is
inserted too quickly. This spray canhappen if the tank is nearly full, and ismore likely in hot weather. Insert thefill nozzle slowly and wait for any hissnoise to stop before beginning toflow fuel.
To open the fuel door, push and release therearward center edge of the door.
The capless refueling system does not havea fuel cap. Fully insert and latch the fillnozzle, begin fueling.
{ WarningOverfilling the fuel tank by more thanthree clicks of a standard fill nozzle maycause:
. Vehicle performance issues, includingengine stalling and damage to the fuelsystem.
. Fuel spills.
. Under certain conditions, fuel fires.
Be careful not to spill fuel. Wait five secondsafter you have finished pumping beforeremoving the fill nozzle. Clean fuel frompainted surfaces as soon as possible. SeeExterior Care 0 297. Push the fuel doorclosed until it latches.
{ WarningIf a fire starts while you are refueling, donot remove the fill nozzle. Shut off theflow of fuel by shutting off the pump orby notifying the station attendant. Leavethe area immediately.
Filling the Tank with a Portable FuelContainer
If the vehicle runs out of fuel and must befilled from a portable fuel container:
1. Locate the capless funnel adapter fromunder the carpet in the trunk.
2. Insert and latch the funnel into thecapless fuel system.
{ WarningAttempting to refuel from a portable fuelcontainer without using the funneladapter may cause fuel spillage anddamage the capless fuel system. Thiscould cause a fire. You or others could bebadly burned and the vehicle could bedamaged.
3. Remove and clean the funnel adapterand return it to the storage location.
Chevrolet Camaro Owner Manual (GMNA-Localizing-U.S./Canada/Mexico-15516346) - 2022 - CRC - 4/13/21
234 Driving and Operating
Filling a Portable Fuel Container
{ WarningNever fill a portable fuel container whileit is in the vehicle. Static electricitydischarge from the container can ignitethe fuel vapor. You or others could bebadly burned and the vehicle could bedamaged. To help avoid injury to youand others:
. Dispense fuel only into approvedcontainers.
. Do not fill a container while it isinside a vehicle, in a vehicle's trunk, ina pickup bed, or on any surface otherthan the ground.
. Bring the fill nozzle in contact withthe inside of the fill opening beforeoperating the nozzle. Maintain contactuntil filling is complete.
. Keep sparks, flames, and smokingmaterials away from fuel.
. Avoid using electronic devices whilepumping fuel.
Trailer TowingGeneral Towing Information
{ WarningNever tow a trailer with your vehicle.It was not designed or intended to tow atrailer.
Conversions and Add-OnsAdd-On Electrical Equipment
{ WarningThe Data Link Connector (DLC) is used forvehicle service and Emission Inspection/Maintenance testing. See MalfunctionIndicator Lamp 0 92. A device connectedto the DLC — such as an aftermarketfleet or driver-behavior tracking device —may interfere with vehicle systems. Thiscould affect vehicle operation and cause acrash. Such devices may also accessinformation stored in the vehicle’ssystems.
CautionSome electrical equipment can damagethe vehicle or cause components to notwork and would not be covered by thevehicle warranty. Always check with yourdealer before adding electrical equipment.
Add-on equipment can drain the vehicle's12-volt battery, even if the vehicle is notoperating.
The vehicle has an airbag system. Beforeattempting to add anything electrical to thevehicle, see Servicing the Airbag-EquippedVehicle 0 57 andAdding Equipment to the Airbag-EquippedVehicle 0 58.
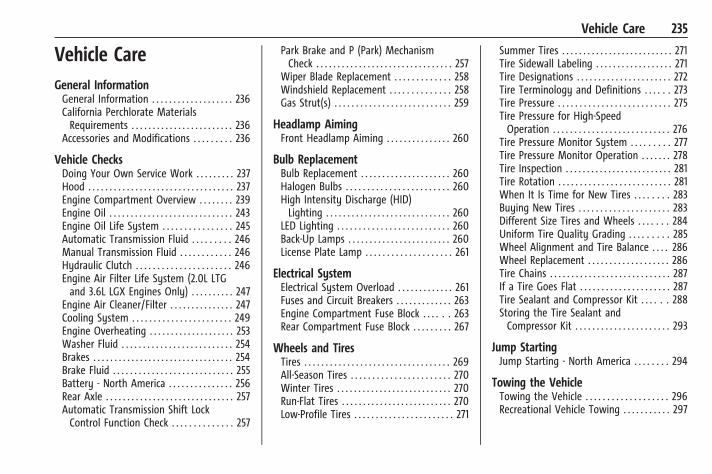
Chevrolet Camaro Owner Manual (GMNA-Localizing-U.S./Canada/Mexico-15516346) - 2022 - CRC - 4/9/21
Vehicle Care 235
Vehicle CareGeneral InformationGeneral Information . . . . . . . . . . . . . . . . . . . 236California Perchlorate MaterialsRequirements . . . . . . . . . . . . . . . . . . . . . . . . 236
Accessories and Modifications . . . . . . . . . 236
Vehicle ChecksDoing Your Own Service Work . . . . . . . . . 237Hood . . . . . . . . . . . . . . . . . . . . . . . . . . . . . . . . . . 237Engine Compartment Overview . . . . . . . . 239Engine Oil . . . . . . . . . . . . . . . . . . . . . . . . . . . . . 243Engine Oil Life System . . . . . . . . . . . . . . . . 245Automatic Transmission Fluid . . . . . . . . . 246Manual Transmission Fluid . . . . . . . . . . . . 246Hydraulic Clutch . . . . . . . . . . . . . . . . . . . . . . 246Engine Air Filter Life System (2.0L LTGand 3.6L LGX Engines Only) . . . . . . . . . . 247
Engine Air Cleaner/Filter . . . . . . . . . . . . . . . 247Cooling System . . . . . . . . . . . . . . . . . . . . . . . 249Engine Overheating . . . . . . . . . . . . . . . . . . . . 253Washer Fluid . . . . . . . . . . . . . . . . . . . . . . . . . . 254Brakes . . . . . . . . . . . . . . . . . . . . . . . . . . . . . . . . . 254Brake Fluid . . . . . . . . . . . . . . . . . . . . . . . . . . . . 255Battery - North America . . . . . . . . . . . . . . . 256Rear Axle . . . . . . . . . . . . . . . . . . . . . . . . . . . . . . 257Automatic Transmission Shift LockControl Function Check . . . . . . . . . . . . . . 257
Park Brake and P (Park) MechanismCheck . . . . . . . . . . . . . . . . . . . . . . . . . . . . . . . . 257
Wiper Blade Replacement . . . . . . . . . . . . . 258Windshield Replacement . . . . . . . . . . . . . . 258Gas Strut(s) . . . . . . . . . . . . . . . . . . . . . . . . . . . 259
Headlamp AimingFront Headlamp Aiming . . . . . . . . . . . . . . . 260
Bulb ReplacementBulb Replacement . . . . . . . . . . . . . . . . . . . . . 260Halogen Bulbs . . . . . . . . . . . . . . . . . . . . . . . . 260High Intensity Discharge (HID)Lighting . . . . . . . . . . . . . . . . . . . . . . . . . . . . . 260
LED Lighting . . . . . . . . . . . . . . . . . . . . . . . . . . 260Back-Up Lamps . . . . . . . . . . . . . . . . . . . . . . . . 260License Plate Lamp . . . . . . . . . . . . . . . . . . . . 261
Electrical SystemElectrical System Overload . . . . . . . . . . . . . 261Fuses and Circuit Breakers . . . . . . . . . . . . . 263Engine Compartment Fuse Block . . . . . . 263Rear Compartment Fuse Block . . . . . . . . . 267
Wheels and TiresTires . . . . . . . . . . . . . . . . . . . . . . . . . . . . . . . . . . 269All-Season Tires . . . . . . . . . . . . . . . . . . . . . . . 270Winter Tires . . . . . . . . . . . . . . . . . . . . . . . . . . . 270Run-Flat Tires . . . . . . . . . . . . . . . . . . . . . . . . . . 270Low-Profile Tires . . . . . . . . . . . . . . . . . . . . . . . 271
Summer Tires . . . . . . . . . . . . . . . . . . . . . . . . . . 271Tire Sidewall Labeling . . . . . . . . . . . . . . . . . . 271Tire Designations . . . . . . . . . . . . . . . . . . . . . . 272Tire Terminology and Definitions . . . . . . 273Tire Pressure . . . . . . . . . . . . . . . . . . . . . . . . . . 275Tire Pressure for High-SpeedOperation . . . . . . . . . . . . . . . . . . . . . . . . . . . 276
Tire Pressure Monitor System . . . . . . . . . 277Tire Pressure Monitor Operation . . . . . . . 278Tire Inspection . . . . . . . . . . . . . . . . . . . . . . . . . 281Tire Rotation . . . . . . . . . . . . . . . . . . . . . . . . . . 281When It Is Time for New Tires . . . . . . . . 283Buying New Tires . . . . . . . . . . . . . . . . . . . . . 283Different Size Tires and Wheels . . . . . . . 284Uniform Tire Quality Grading . . . . . . . . . 285Wheel Alignment and Tire Balance . . . . 286Wheel Replacement . . . . . . . . . . . . . . . . . . . 286Tire Chains . . . . . . . . . . . . . . . . . . . . . . . . . . . . 287If a Tire Goes Flat . . . . . . . . . . . . . . . . . . . . . 287Tire Sealant and Compressor Kit . . . . . . 288Storing the Tire Sealant andCompressor Kit . . . . . . . . . . . . . . . . . . . . . . 293
Jump StartingJump Starting - North America . . . . . . . . 294
Towing the VehicleTowing the Vehicle . . . . . . . . . . . . . . . . . . . 296Recreational Vehicle Towing . . . . . . . . . . . 297
Chevrolet Camaro Owner Manual (GMNA-Localizing-U.S./Canada/Mexico-15516346) - 2022 - CRC - 4/9/21
236 Vehicle Care
Appearance CareExterior Care . . . . . . . . . . . . . . . . . . . . . . . . . . 297Interior Care . . . . . . . . . . . . . . . . . . . . . . . . . . . 302Floor Mats . . . . . . . . . . . . . . . . . . . . . . . . . . . . 305
General InformationFor service and parts needs, visit yourdealer. You will receive genuine GM partsand GM-trained and supported servicepeople.
Genuine GM parts have one of these marks:
California Perchlorate MaterialsRequirementsCertain types of automotive applications,such as airbag initiators, seat beltpretensioners, and lithium batteriescontained in electronic keys, may containperchlorate materials. Perchlorate Material –
special handling may apply. Seewww.dtsc.ca.gov/hazardouswaste/perchlorate.
Accessories and ModificationsAdding non-dealer accessories or makingmodifications to the vehicle can affectvehicle performance and safety, includingsuch things as airbags, braking, stability,ride and handling, emissions systems,aerodynamics, durability, and electronicsystems like antilock brakes, traction control,and stability control. These accessories ormodifications could even cause malfunctionor damage not covered by the vehiclewarranty.
Damage to suspension components causedby modifying vehicle height outside offactory settings will not be covered by thevehicle warranty.
Damage to vehicle components resultingfrom modifications or the installation or useof non-GM certified parts, including controlmodule or software modifications, is notcovered under the terms of the vehiclewarranty and may affect remainingwarranty coverage for affected parts.
Chevrolet Camaro Owner Manual (GMNA-Localizing-U.S./Canada/Mexico-15516346) - 2022 - CRC - 4/9/21
Vehicle Care 237
GM Accessories are designed to complementand function with other systems on thevehicle. See your dealer to accessorize thevehicle using genuine GM Accessoriesinstalled by a dealer technician.
Also, see Adding Equipment to theAirbag-Equipped Vehicle 0 58.
Vehicle ChecksDoing Your Own Service Work
{ WarningIt can be dangerous to work on yourvehicle if you do not have the properknowledge, service manual, tools,or parts. Always follow owner’s manualprocedures and consult the servicemanual for your vehicle before doing anyservice work.
If doing some of your own service work, usethe proper service manual. It tells you muchmore about how to service the vehicle thanthis manual can. To order the proper servicemanual, see Publication OrderingInformation 0 333.
This vehicle has an airbag system. Beforeattempting to do your own service work,see Servicing the Airbag-Equipped Vehicle0 57.
If equipped with remote vehicle start, openthe hood before performing any servicework to prevent remote starting the vehicleaccidentally. See Remote Vehicle Start 0 14.
Keep a record with all parts receipts and listthe mileage and the date of any servicework performed. See Maintenance Records0 319.
CautionEven small amounts of contamination cancause damage to vehicle systems. Do notallow contaminants to contact the fluids,reservoir caps, or dipsticks.
Hood
{ WarningTurn the vehicle off before opening thehood. If the engine is running with thehood open, you or others could beinjured.
{ WarningComponents under the hood can get hotfrom running the engine. To help avoidthe risk of burning unprotected skin,never touch these components until theyhave cooled, and always use a glove ortowel to avoid direct skin contact.
Clear any snow from the hood beforeopening.
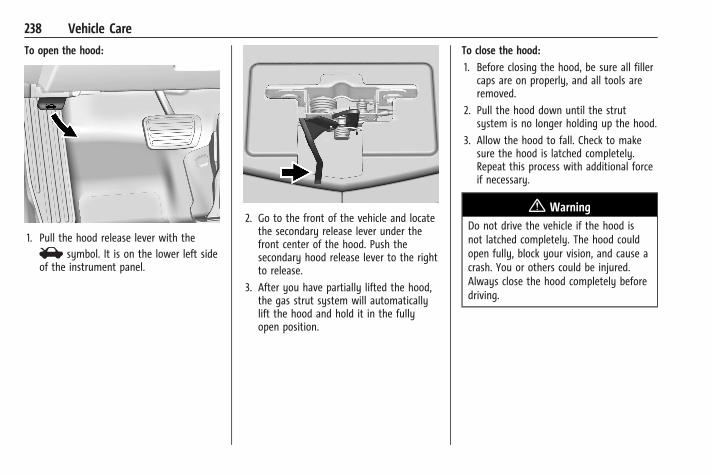
Chevrolet Camaro Owner Manual (GMNA-Localizing-U.S./Canada/Mexico-15516346) - 2022 - CRC - 4/9/21
238 Vehicle Care
To open the hood:
1. Pull the hood release lever with thei symbol. It is on the lower left sideof the instrument panel.
2. Go to the front of the vehicle and locatethe secondary release lever under thefront center of the hood. Push thesecondary hood release lever to the rightto release.
3. After you have partially lifted the hood,the gas strut system will automaticallylift the hood and hold it in the fullyopen position.
To close the hood:
1. Before closing the hood, be sure all fillercaps are on properly, and all tools areremoved.
2. Pull the hood down until the strutsystem is no longer holding up the hood.
3. Allow the hood to fall. Check to makesure the hood is latched completely.Repeat this process with additional forceif necessary.
{ WarningDo not drive the vehicle if the hood isnot latched completely. The hood couldopen fully, block your vision, and cause acrash. You or others could be injured.Always close the hood completely beforedriving.
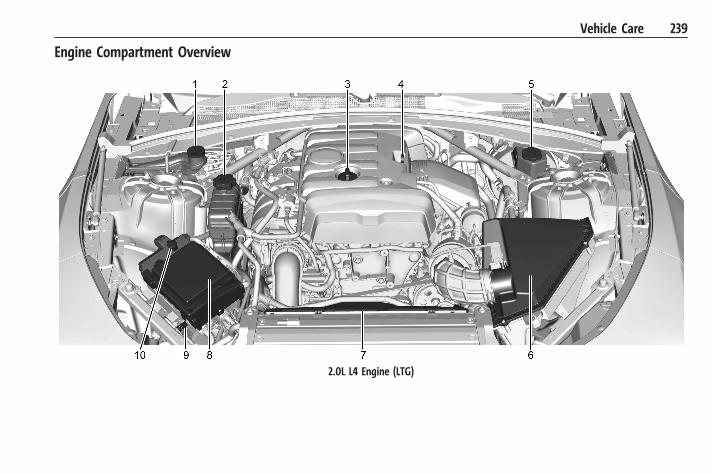
Chevrolet Camaro Owner Manual (GMNA-Localizing-U.S./Canada/Mexico-15516346) - 2022 - CRC - 4/9/21
Vehicle Care 239
Engine Compartment Overview
2.0L L4 Engine (LTG)
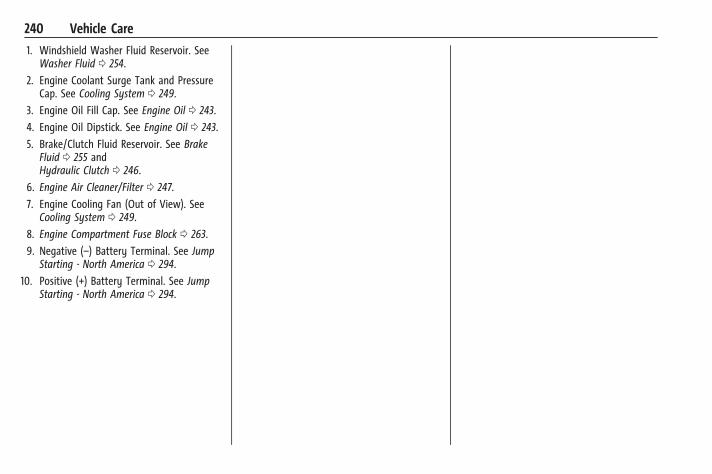
Chevrolet Camaro Owner Manual (GMNA-Localizing-U.S./Canada/Mexico-15516346) - 2022 - CRC - 4/9/21
240 Vehicle Care
1. Windshield Washer Fluid Reservoir. SeeWasher Fluid 0 254.
2. Engine Coolant Surge Tank and PressureCap. See Cooling System 0 249.
3. Engine Oil Fill Cap. See Engine Oil 0 243.
4. Engine Oil Dipstick. See Engine Oil 0 243.
5. Brake/Clutch Fluid Reservoir. See BrakeFluid 0 255 andHydraulic Clutch 0 246.
6. Engine Air Cleaner/Filter 0 247.
7. Engine Cooling Fan (Out of View). SeeCooling System 0 249.
8. Engine Compartment Fuse Block 0 263.
9. Negative (–) Battery Terminal. See JumpStarting - North America 0 294.
10. Positive (+) Battery Terminal. See JumpStarting - North America 0 294.
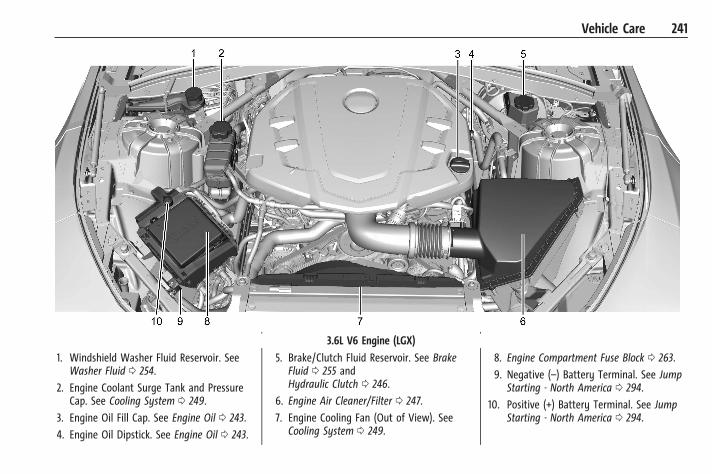
Chevrolet Camaro Owner Manual (GMNA-Localizing-U.S./Canada/Mexico-15516346) - 2022 - CRC - 4/9/21
Vehicle Care 241
3.6L V6 Engine (LGX)
1. Windshield Washer Fluid Reservoir. SeeWasher Fluid 0 254.
2. Engine Coolant Surge Tank and PressureCap. See Cooling System 0 249.
3. Engine Oil Fill Cap. See Engine Oil 0 243.
4. Engine Oil Dipstick. See Engine Oil 0 243.
5. Brake/Clutch Fluid Reservoir. See BrakeFluid 0 255 andHydraulic Clutch 0 246.
6. Engine Air Cleaner/Filter 0 247.
7. Engine Cooling Fan (Out of View). SeeCooling System 0 249.
8. Engine Compartment Fuse Block 0 263.
9. Negative (–) Battery Terminal. See JumpStarting - North America 0 294.
10. Positive (+) Battery Terminal. See JumpStarting - North America 0 294.
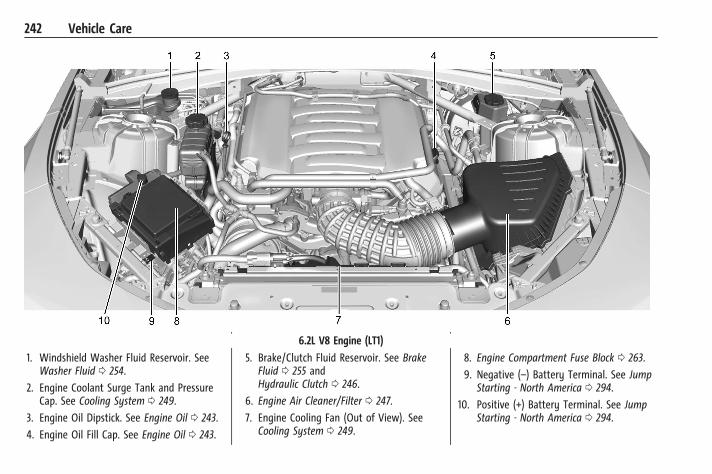
Chevrolet Camaro Owner Manual (GMNA-Localizing-U.S./Canada/Mexico-15516346) - 2022 - CRC - 4/9/21
242 Vehicle Care
6.2L V8 Engine (LT1)
1. Windshield Washer Fluid Reservoir. SeeWasher Fluid 0 254.
2. Engine Coolant Surge Tank and PressureCap. See Cooling System 0 249.
3. Engine Oil Dipstick. See Engine Oil 0 243.
4. Engine Oil Fill Cap. See Engine Oil 0 243.
5. Brake/Clutch Fluid Reservoir. See BrakeFluid 0 255 andHydraulic Clutch 0 246.
6. Engine Air Cleaner/Filter 0 247.
7. Engine Cooling Fan (Out of View). SeeCooling System 0 249.
8. Engine Compartment Fuse Block 0 263.
9. Negative (–) Battery Terminal. See JumpStarting - North America 0 294.
10. Positive (+) Battery Terminal. See JumpStarting - North America 0 294.
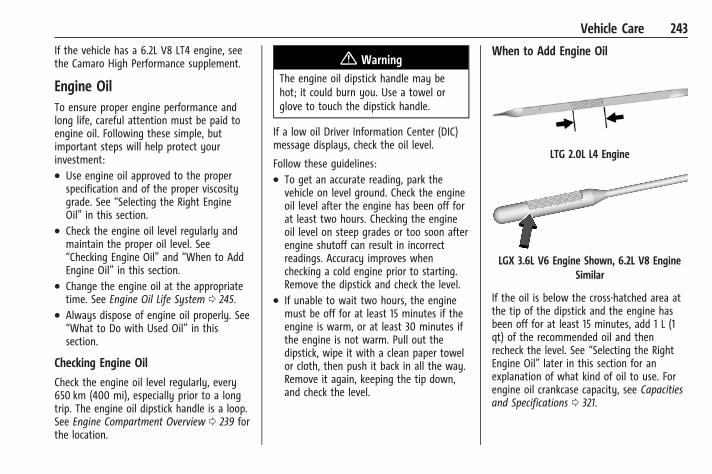
Chevrolet Camaro Owner Manual (GMNA-Localizing-U.S./Canada/Mexico-15516346) - 2022 - CRC - 4/9/21
Vehicle Care 243
If the vehicle has a 6.2L V8 LT4 engine, seethe Camaro High Performance supplement.
Engine OilTo ensure proper engine performance andlong life, careful attention must be paid toengine oil. Following these simple, butimportant steps will help protect yourinvestment:. Use engine oil approved to the proper
specification and of the proper viscositygrade. See “Selecting the Right EngineOil” in this section.
. Check the engine oil level regularly andmaintain the proper oil level. See“Checking Engine Oil” and “When to AddEngine Oil” in this section.
. Change the engine oil at the appropriatetime. See Engine Oil Life System 0 245.
. Always dispose of engine oil properly. See“What to Do with Used Oil” in thissection.
Checking Engine Oil
Check the engine oil level regularly, every650 km (400 mi), especially prior to a longtrip. The engine oil dipstick handle is a loop.See Engine Compartment Overview 0 239 forthe location.
{ WarningThe engine oil dipstick handle may behot; it could burn you. Use a towel orglove to touch the dipstick handle.
If a low oil Driver Information Center (DIC)message displays, check the oil level.
Follow these guidelines:. To get an accurate reading, park the
vehicle on level ground. Check the engineoil level after the engine has been off forat least two hours. Checking the engineoil level on steep grades or too soon afterengine shutoff can result in incorrectreadings. Accuracy improves whenchecking a cold engine prior to starting.Remove the dipstick and check the level.
. If unable to wait two hours, the enginemust be off for at least 15 minutes if theengine is warm, or at least 30 minutes ifthe engine is not warm. Pull out thedipstick, wipe it with a clean paper towelor cloth, then push it back in all the way.Remove it again, keeping the tip down,and check the level.
When to Add Engine Oil
LTG 2.0L L4 Engine
LGX 3.6L V6 Engine Shown, 6.2L V8 EngineSimilar
If the oil is below the cross-hatched area atthe tip of the dipstick and the engine hasbeen off for at least 15 minutes, add 1 L (1qt) of the recommended oil and thenrecheck the level. See “Selecting the RightEngine Oil” later in this section for anexplanation of what kind of oil to use. Forengine oil crankcase capacity, see Capacitiesand Specifications 0 321.
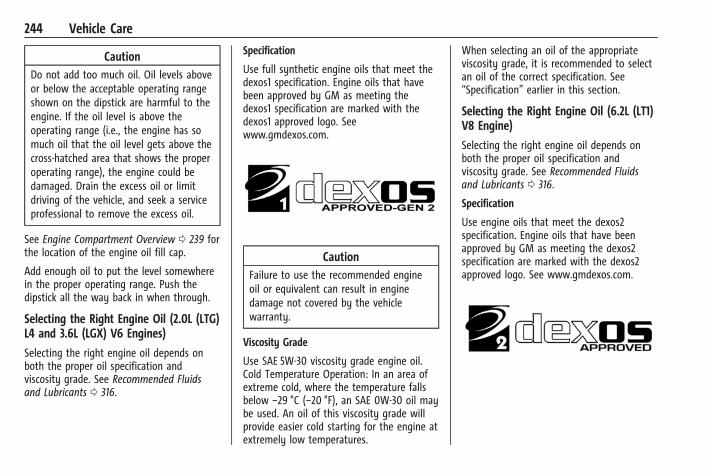
Chevrolet Camaro Owner Manual (GMNA-Localizing-U.S./Canada/Mexico-15516346) - 2022 - CRC - 4/9/21
244 Vehicle Care
CautionDo not add too much oil. Oil levels aboveor below the acceptable operating rangeshown on the dipstick are harmful to theengine. If the oil level is above theoperating range (i.e., the engine has somuch oil that the oil level gets above thecross-hatched area that shows the properoperating range), the engine could bedamaged. Drain the excess oil or limitdriving of the vehicle, and seek a serviceprofessional to remove the excess oil.
See Engine Compartment Overview 0 239 forthe location of the engine oil fill cap.
Add enough oil to put the level somewherein the proper operating range. Push thedipstick all the way back in when through.
Selecting the Right Engine Oil (2.0L (LTG)L4 and 3.6L (LGX) V6 Engines)
Selecting the right engine oil depends onboth the proper oil specification andviscosity grade. See Recommended Fluidsand Lubricants 0 316.
Specification
Use full synthetic engine oils that meet thedexos1 specification. Engine oils that havebeen approved by GM as meeting thedexos1 specification are marked with thedexos1 approved logo. Seewww.gmdexos.com.
CautionFailure to use the recommended engineoil or equivalent can result in enginedamage not covered by the vehiclewarranty.
Viscosity Grade
Use SAE 5W-30 viscosity grade engine oil.Cold Temperature Operation: In an area ofextreme cold, where the temperature fallsbelow −29 °C (−20 °F), an SAE 0W-30 oil maybe used. An oil of this viscosity grade willprovide easier cold starting for the engine atextremely low temperatures.
When selecting an oil of the appropriateviscosity grade, it is recommended to selectan oil of the correct specification. See“Specification” earlier in this section.
Selecting the Right Engine Oil (6.2L (LT1)V8 Engine)
Selecting the right engine oil depends onboth the proper oil specification andviscosity grade. See Recommended Fluidsand Lubricants 0 316.
Specification
Use engine oils that meet the dexos2specification. Engine oils that have beenapproved by GM as meeting the dexos2specification are marked with the dexos2approved logo. See www.gmdexos.com.
Chevrolet Camaro Owner Manual (GMNA-Localizing-U.S./Canada/Mexico-15516346) - 2022 - CRC - 4/9/21
Vehicle Care 245
CautionFailure to use the recommended engineoil or equivalent can result in enginedamage not covered by the vehiclewarranty.
Viscosity Grade
Use SAE 0W-40 viscosity grade engine oil.
When selecting an oil of the appropriateviscosity grade, it is recommended to selectan oil of the correct specification. See“Specification” earlier in this section.
If 0W-40 dexos2 oil is not available, SAE5W-30 dexos1 full synthetic engine oil maybe used for street use.
Engine Oil Additives/Engine Oil Flushes
Do not add anything to the oil. Therecommended oils meeting the dexosspecification are all that is needed for goodperformance and engine protection.
Engine oil system flushes are notrecommended and could cause enginedamage not covered by the vehiclewarranty.
What to Do with Used Oil
Used engine oil contains certain elementsthat can be unhealthy for your skin andcould even cause cancer. Do not let used oilstay on your skin for very long. Clean yourskin and nails with soap and water, or agood hand cleaner. Wash or properlydispose of clothing or rags containing usedengine oil. See the manufacturer's warningsabout the use and disposal of oil products.
Used oil can be a threat to the environment.If you change your own oil, be sure to drainall the oil from the filter before disposal.Never dispose of oil by putting it in thetrash or pouring it on the ground, intosewers, or into streams or bodies of water.Recycle it by taking it to a place thatcollects used oil.
Engine Oil Life System
When to Change Engine Oil
This vehicle has a computer system thatindicates when to change the engine oil andfilter. This is based on a combination offactors which include engine revolutions,engine temperature, and miles driven. Basedon driving conditions, the mileage at whichan oil change is indicated can vary
considerably. For the oil life system to workproperly, the system must be reset everytime the oil is changed.
When the system has calculated that oil lifehas been diminished, it indicates that an oilchange is necessary. A CHANGE ENGINE OILSOON message comes on. Change the oil assoon as possible within the next 1 000 km(600 mi). It is possible that, if driving underthe best conditions, the oil life systemmight indicate that an oil change is notnecessary for up to a year. The engine oiland filter must be changed at least once ayear and, at this time, the system must bereset. Your dealer has trained service peoplewho will perform this work and reset thesystem. It is also important to check the oilregularly over the course of an oil draininterval and keep it at the proper level.
If the system is ever reset accidentally, theoil must be changed at 5 000 km (3,000 mi)since the last oil change. Remember to resetthe oil life system whenever the oil ischanged.
Chevrolet Camaro Owner Manual (GMNA-Localizing-U.S./Canada/Mexico-15516346) - 2022 - CRC - 4/9/21
246 Vehicle Care
How to Reset the Engine Oil Life System
Reset the system whenever the engine oil ischanged so that the system can calculatethe next engine oil change. To reset thesystem:
1. Display the REMAINING OIL LIFE on theDIC. See Driver Information Center (DIC)0 98.
2. Press and hold SEL on the DIC while theOil Life display is active. The oil life willchange to 100%.
The oil life system can also be reset asfollows:
1. Display the REMAINING OIL LIFE on theDIC with the engine off. See DriverInformation Center (DIC) 0 98.
2. Fully press and release the acceleratorpedal three times within five seconds.
The system is reset when the CHANGEENGINE OIL SOON message goes off.
If the CHANGE ENGINE OIL SOON messagecomes back on when the vehicle is started,the engine oil life system has not beenreset. Repeat the procedure.
Automatic Transmission Fluid
How to Check Automatic TransmissionFluid
It is not necessary to check the transmissionfluid level. A transmission fluid leak is theonly reason for fluid loss. If a leak occurs,take the vehicle to your dealer and have itrepaired as soon as possible.
The vehicle is not equipped with atransmission fluid level dipstick. There is aspecial procedure for checking and changingthe transmission fluid. Because thisprocedure is difficult, this should be done atthe dealer. Contact the dealer for additionalinformation or the procedure can be foundin the service manual. To purchase a servicemanual, see Publication OrderingInformation 0 333.
CautionUse of the incorrect automatictransmission fluid may damage thevehicle, and the damage may not becovered by the vehicle warranty. Alwaysuse the correct automatic transmissionfluid. See Recommended Fluids andLubricants 0 316.
Change the fluid and filter at the intervalslisted in Maintenance Schedule 0 307, andbe sure to use the fluid listed inRecommended Fluids and Lubricants 0 316.
Manual Transmission FluidIt is not necessary to check the manualtransmission fluid level. A transmission fluidleak is the only reason for fluid loss. If aleak occurs, take the vehicle to your dealerand have it repaired as soon as possible. SeeRecommended Fluids and Lubricants 0 316for the proper fluid to use.
Hydraulic ClutchFor vehicles with a manual transmission, itis not necessary to regularly check brake/clutch fluid unless there is a leak suspected.Adding fluid will not correct a leak. A fluidloss in this system could indicate a problem.Have the system inspected and repaired.
When to Check and What to Use
Chevrolet Camaro Owner Manual (GMNA-Localizing-U.S./Canada/Mexico-15516346) - 2022 - CRC - 4/9/21
Vehicle Care 247
The brake/hydraulic clutch fluid reservoir caphas this symbol on it. See EngineCompartment Overview 0 239 for reservoirlocation. The common hydraulic clutch andbrake master cylinder fluid reservoir is filledwith brake fluid as indicated on the reservoircap. See Brake Fluid 0 255 for brake fluidto use.
How to Check and Add Fluid
Visually check the brake/clutch fluidreservoir to make sure the fluid level is atthe MIN (minimum) line on the side of thereservoir. The brake/hydraulic clutch fluidsystem should be closed and sealed.
Do not remove the cap to check the fluidlevel or to top-off the fluid level. Removethe cap only when necessary to add theproper fluid until the level reaches theMIN line.
Engine Air Filter Life System (2.0LLTG and 3.6L LGX Engines Only)If equipped, this feature provides the engineair filter’s remaining life and best timing fora change. The timing to change an engineair filter depends on driving andenvironmental conditions.
When to Change the Engine Air Filter
When the Driver Information Center (DIC)displays a message to replace the engine airfilter at the next oil change, follow thistiming.
When the DIC displays a message to replacethe engine air filter soon, replace the engineair filter at the earliest convenience.
The system must be reset after the engineair filter is changed.
If the DIC displays a message to check theengine air filter system, see your dealer.
How to Reset the Engine Air Filter LifeSystem
Reset the system whenever the engine airfilter is replaced so that the system cancalculate the next engine air filter change.
To reset:
1. Place the vehicle in P (Park).
2. Select Engine Air Filter Life on the DICmenu. See “Driver Information Center(DIC)” in the owner manual.
3. Press p to move to the Reset/Disabledisplay area. Select Reset then press SEL.Then press Yes to confirm the reset.
4. 100% Air Filter Life will be displayedwhen the Engine Air Filter Life System issuccessfully reset.
Engine Air Cleaner/FilterIf the vehicle has a 6.2L V8 LT4 engine, seethe Camaro High Performance supplement.
The engine air cleaner/filter is in the enginecompartment on the driver side of thevehicle. See Engine Compartment Overview0 239 for location.
When to Inspect the Engine Air Cleaner/Filter. For intervals on changing and inspecting
the engine air filter, see MaintenanceSchedule 0 307.
. If equipped with Engine Air Filter LifeSystem, see Engine Air Filter Life System(2.0L LTG and 3.6L LGX Engines Only)0 247.
. If driving in very dusty areas, follow theengine air filter inspecting and changingintervals, see Maintenance Schedule0 307.
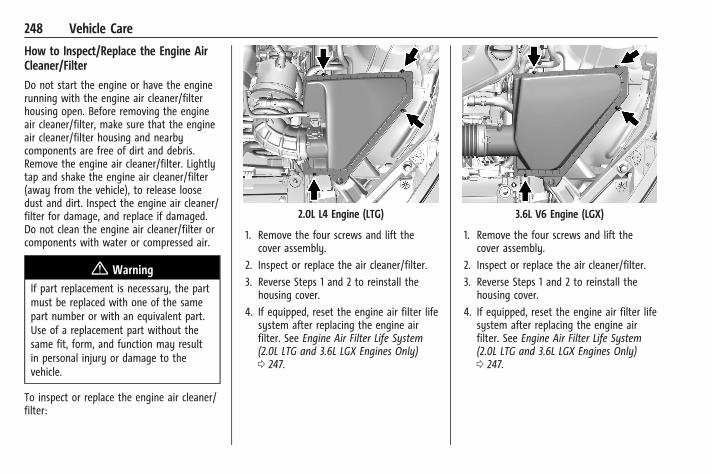
Chevrolet Camaro Owner Manual (GMNA-Localizing-U.S./Canada/Mexico-15516346) - 2022 - CRC - 4/9/21
248 Vehicle Care
How to Inspect/Replace the Engine AirCleaner/Filter
Do not start the engine or have the enginerunning with the engine air cleaner/filterhousing open. Before removing the engineair cleaner/filter, make sure that the engineair cleaner/filter housing and nearbycomponents are free of dirt and debris.Remove the engine air cleaner/filter. Lightlytap and shake the engine air cleaner/filter(away from the vehicle), to release loosedust and dirt. Inspect the engine air cleaner/filter for damage, and replace if damaged.Do not clean the engine air cleaner/filter orcomponents with water or compressed air.
{ WarningIf part replacement is necessary, the partmust be replaced with one of the samepart number or with an equivalent part.Use of a replacement part without thesame fit, form, and function may resultin personal injury or damage to thevehicle.
To inspect or replace the engine air cleaner/filter:
2.0L L4 Engine (LTG)
1. Remove the four screws and lift thecover assembly.
2. Inspect or replace the air cleaner/filter.
3. Reverse Steps 1 and 2 to reinstall thehousing cover.
4. If equipped, reset the engine air filter lifesystem after replacing the engine airfilter. See Engine Air Filter Life System(2.0L LTG and 3.6L LGX Engines Only)0 247.
3.6L V6 Engine (LGX)
1. Remove the four screws and lift thecover assembly.
2. Inspect or replace the air cleaner/filter.
3. Reverse Steps 1 and 2 to reinstall thehousing cover.
4. If equipped, reset the engine air filter lifesystem after replacing the engine airfilter. See Engine Air Filter Life System(2.0L LTG and 3.6L LGX Engines Only)0 247.
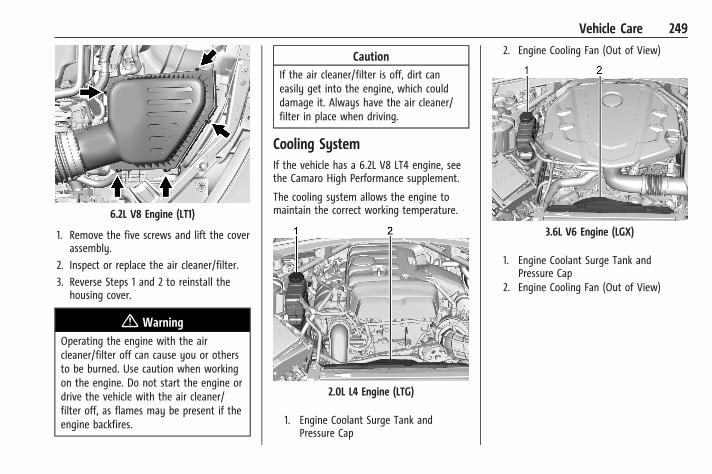
Chevrolet Camaro Owner Manual (GMNA-Localizing-U.S./Canada/Mexico-15516346) - 2022 - CRC - 4/9/21
Vehicle Care 249
6.2L V8 Engine (LT1)
1. Remove the five screws and lift the coverassembly.
2. Inspect or replace the air cleaner/filter.
3. Reverse Steps 1 and 2 to reinstall thehousing cover.
{ WarningOperating the engine with the aircleaner/filter off can cause you or othersto be burned. Use caution when workingon the engine. Do not start the engine ordrive the vehicle with the air cleaner/filter off, as flames may be present if theengine backfires.
CautionIf the air cleaner/filter is off, dirt caneasily get into the engine, which coulddamage it. Always have the air cleaner/filter in place when driving.
Cooling SystemIf the vehicle has a 6.2L V8 LT4 engine, seethe Camaro High Performance supplement.
The cooling system allows the engine tomaintain the correct working temperature.
2.0L L4 Engine (LTG)
1. Engine Coolant Surge Tank andPressure Cap
2. Engine Cooling Fan (Out of View)
3.6L V6 Engine (LGX)
1. Engine Coolant Surge Tank andPressure Cap
2. Engine Cooling Fan (Out of View)
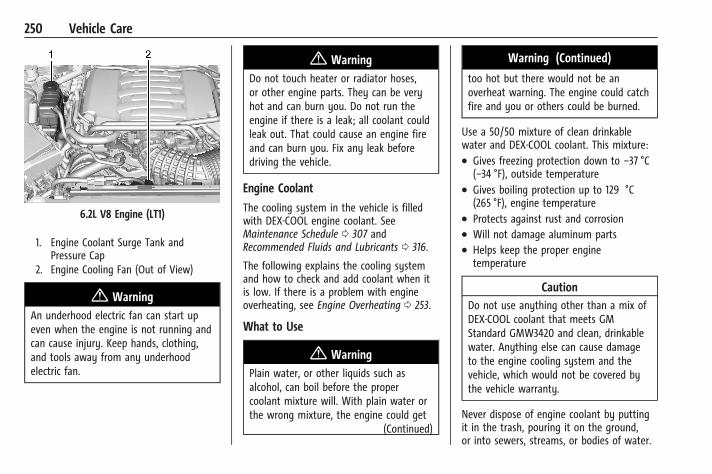
Chevrolet Camaro Owner Manual (GMNA-Localizing-U.S./Canada/Mexico-15516346) - 2022 - CRC - 4/9/21
250 Vehicle Care
6.2L V8 Engine (LT1)
1. Engine Coolant Surge Tank andPressure Cap
2. Engine Cooling Fan (Out of View)
{ WarningAn underhood electric fan can start upeven when the engine is not running andcan cause injury. Keep hands, clothing,and tools away from any underhoodelectric fan.
{ WarningDo not touch heater or radiator hoses,or other engine parts. They can be veryhot and can burn you. Do not run theengine if there is a leak; all coolant couldleak out. That could cause an engine fireand can burn you. Fix any leak beforedriving the vehicle.
Engine Coolant
The cooling system in the vehicle is filledwith DEX-COOL engine coolant. SeeMaintenance Schedule 0 307 andRecommended Fluids and Lubricants 0 316.
The following explains the cooling systemand how to check and add coolant when itis low. If there is a problem with engineoverheating, see Engine Overheating 0 253.
What to Use
{ WarningPlain water, or other liquids such asalcohol, can boil before the propercoolant mixture will. With plain water orthe wrong mixture, the engine could get
(Continued)
Warning (Continued)
too hot but there would not be anoverheat warning. The engine could catchfire and you or others could be burned.
Use a 50/50 mixture of clean drinkablewater and DEX-COOL coolant. This mixture:. Gives freezing protection down to −37 °C
(−34 °F), outside temperature. Gives boiling protection up to 129 °C
(265 °F), engine temperature. Protects against rust and corrosion. Will not damage aluminum parts. Helps keep the proper engine
temperature
CautionDo not use anything other than a mix ofDEX-COOL coolant that meets GMStandard GMW3420 and clean, drinkablewater. Anything else can cause damageto the engine cooling system and thevehicle, which would not be covered bythe vehicle warranty.
Never dispose of engine coolant by puttingit in the trash, pouring it on the ground,or into sewers, streams, or bodies of water.
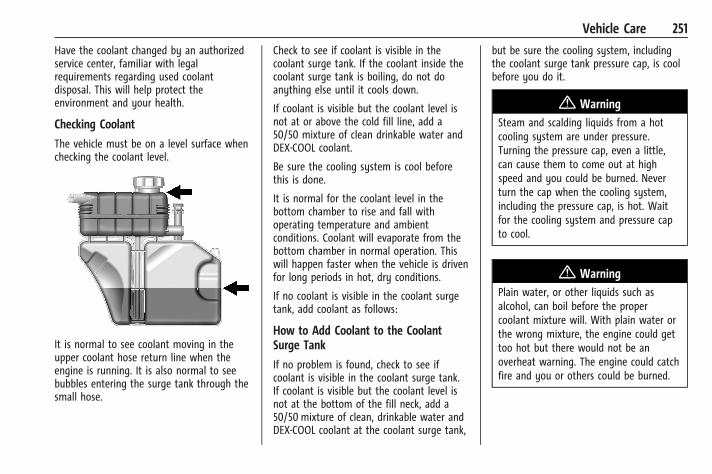
Chevrolet Camaro Owner Manual (GMNA-Localizing-U.S./Canada/Mexico-15516346) - 2022 - CRC - 4/9/21
Vehicle Care 251
Have the coolant changed by an authorizedservice center, familiar with legalrequirements regarding used coolantdisposal. This will help protect theenvironment and your health.
Checking Coolant
The vehicle must be on a level surface whenchecking the coolant level.
It is normal to see coolant moving in theupper coolant hose return line when theengine is running. It is also normal to seebubbles entering the surge tank through thesmall hose.
Check to see if coolant is visible in thecoolant surge tank. If the coolant inside thecoolant surge tank is boiling, do not doanything else until it cools down.
If coolant is visible but the coolant level isnot at or above the cold fill line, add a50/50 mixture of clean drinkable water andDEX-COOL coolant.
Be sure the cooling system is cool beforethis is done.
It is normal for the coolant level in thebottom chamber to rise and fall withoperating temperature and ambientconditions. Coolant will evaporate from thebottom chamber in normal operation. Thiswill happen faster when the vehicle is drivenfor long periods in hot, dry conditions.
If no coolant is visible in the coolant surgetank, add coolant as follows:
How to Add Coolant to the CoolantSurge Tank
If no problem is found, check to see ifcoolant is visible in the coolant surge tank.If coolant is visible but the coolant level isnot at the bottom of the fill neck, add a50/50 mixture of clean, drinkable water andDEX-COOL coolant at the coolant surge tank,
but be sure the cooling system, includingthe coolant surge tank pressure cap, is coolbefore you do it.
{ WarningSteam and scalding liquids from a hotcooling system are under pressure.Turning the pressure cap, even a little,can cause them to come out at highspeed and you could be burned. Neverturn the cap when the cooling system,including the pressure cap, is hot. Waitfor the cooling system and pressure capto cool.
{ WarningPlain water, or other liquids such asalcohol, can boil before the propercoolant mixture will. With plain water orthe wrong mixture, the engine could gettoo hot but there would not be anoverheat warning. The engine could catchfire and you or others could be burned.
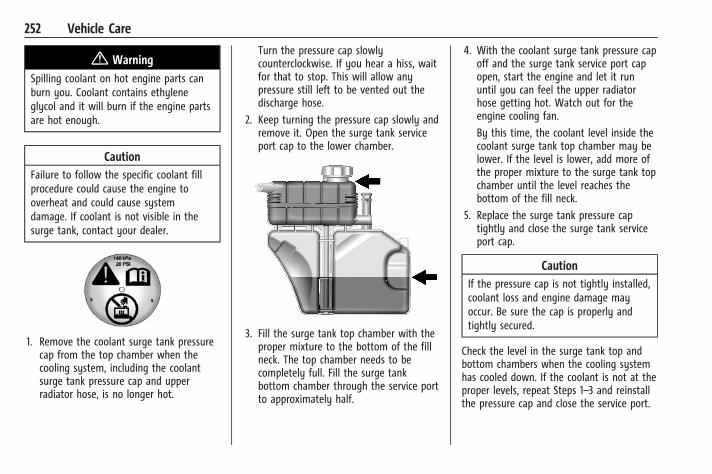
Chevrolet Camaro Owner Manual (GMNA-Localizing-U.S./Canada/Mexico-15516346) - 2022 - CRC - 4/9/21
252 Vehicle Care
{ WarningSpilling coolant on hot engine parts canburn you. Coolant contains ethyleneglycol and it will burn if the engine partsare hot enough.
CautionFailure to follow the specific coolant fillprocedure could cause the engine tooverheat and could cause systemdamage. If coolant is not visible in thesurge tank, contact your dealer.
1. Remove the coolant surge tank pressurecap from the top chamber when thecooling system, including the coolantsurge tank pressure cap and upperradiator hose, is no longer hot.
Turn the pressure cap slowlycounterclockwise. If you hear a hiss, waitfor that to stop. This will allow anypressure still left to be vented out thedischarge hose.
2. Keep turning the pressure cap slowly andremove it. Open the surge tank serviceport cap to the lower chamber.
3. Fill the surge tank top chamber with theproper mixture to the bottom of the fillneck. The top chamber needs to becompletely full. Fill the surge tankbottom chamber through the service portto approximately half.
4. With the coolant surge tank pressure capoff and the surge tank service port capopen, start the engine and let it rununtil you can feel the upper radiatorhose getting hot. Watch out for theengine cooling fan.
By this time, the coolant level inside thecoolant surge tank top chamber may belower. If the level is lower, add more ofthe proper mixture to the surge tank topchamber until the level reaches thebottom of the fill neck.
5. Replace the surge tank pressure captightly and close the surge tank serviceport cap.
CautionIf the pressure cap is not tightly installed,coolant loss and engine damage mayoccur. Be sure the cap is properly andtightly secured.
Check the level in the surge tank top andbottom chambers when the cooling systemhas cooled down. If the coolant is not at theproper levels, repeat Steps 1–3 and reinstallthe pressure cap and close the service port.
Chevrolet Camaro Owner Manual (GMNA-Localizing-U.S./Canada/Mexico-15516346) - 2022 - CRC - 4/9/21
Vehicle Care 253
If the coolant still is not at the proper levelswhen the system cools down again, seeyour dealer.
Engine OverheatingThe vehicle has several indicators to warn ofthe engine overheating.
There is an engine coolant temperaturegauge on the instrument cluster. See EngineCoolant Temperature Gauge 0 89. Thevehicle may also display a message on theDriver Information Center (DIC).
If the decision is made not to lift the hoodwhen this warning appears, get service helpright away. See Roadside Assistance Program0 329.
If the decision is made to lift the hood,make sure the vehicle is parked on a levelsurface.
Then check to see if the engine cooling fanis running. If the engine is overheating, thefan should be running. If it is not, do notcontinue to run the engine. Have the vehicleserviced.
CautionDo not run the engine if there is a leakin the engine cooling system. This cancause a loss of all coolant and candamage the system and vehicle. Haveany leaks fixed right away.
If Steam Is Coming from the EngineCompartment
{ WarningSteam and scalding liquids from a hotcooling system are under pressure.Turning the pressure cap, even a little,can cause them to come out at highspeed and you could be burned. Neverturn the cap when the cooling system,including the pressure cap, is hot. Waitfor the cooling system and pressure capto cool.
If Steam Is Coming from the EngineCompartment with no Overheat Warning
The hood extractor, if equipped, isfunctional. It will allow water from rain andcar washes to enter the enginecompartment and contact hot surfaces.
If steam is coming from the hood extractorwith no accompanying overheat warning, noservice is needed.
If No Steam Is Coming from the EngineCompartment
If an engine overheat warning is displayedbut no steam can be seen or heard, theproblem may not be too serious. Sometimesthe engine can get a little too hot when thevehicle:. Climbs a long hill on a hot day. Stops after high-speed driving. Idles for long periods in traffic
If the overheat warning is displayed with nosign of steam:
1. Turn the air conditioning off.
2. Turn the heater on to the highesttemperature and to the highest fanspeed. Open the windows as necessary.
3. When it is safe to do so, pull off theroad, shift to P (Park) or N (Neutral) foran automatic transmission or Neutral fora manual transmission, and let theengine idle.
If the engine coolant temperature gauge isno longer in the overheated area, thevehicle can be driven. Continue to drive the
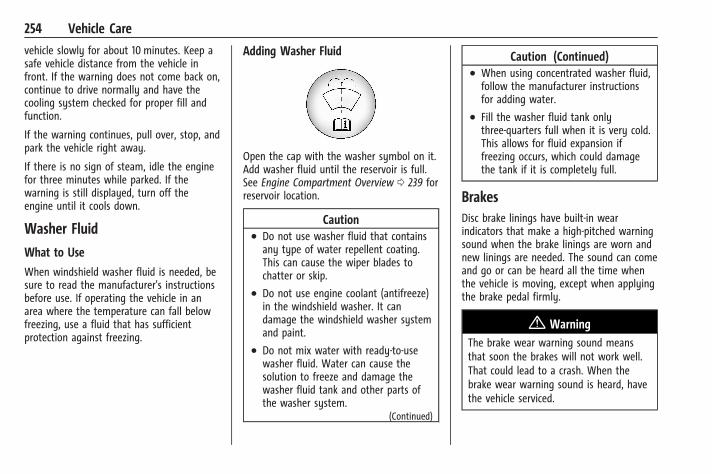
Chevrolet Camaro Owner Manual (GMNA-Localizing-U.S./Canada/Mexico-15516346) - 2022 - CRC - 4/9/21
254 Vehicle Care
vehicle slowly for about 10 minutes. Keep asafe vehicle distance from the vehicle infront. If the warning does not come back on,continue to drive normally and have thecooling system checked for proper fill andfunction.
If the warning continues, pull over, stop, andpark the vehicle right away.
If there is no sign of steam, idle the enginefor three minutes while parked. If thewarning is still displayed, turn off theengine until it cools down.
Washer Fluid
What to Use
When windshield washer fluid is needed, besure to read the manufacturer's instructionsbefore use. If operating the vehicle in anarea where the temperature can fall belowfreezing, use a fluid that has sufficientprotection against freezing.
Adding Washer Fluid
Open the cap with the washer symbol on it.Add washer fluid until the reservoir is full.See Engine Compartment Overview 0 239 forreservoir location.
Caution. Do not use washer fluid that contains
any type of water repellent coating.This can cause the wiper blades tochatter or skip.
. Do not use engine coolant (antifreeze)in the windshield washer. It candamage the windshield washer systemand paint.
. Do not mix water with ready-to-usewasher fluid. Water can cause thesolution to freeze and damage thewasher fluid tank and other parts ofthe washer system.
(Continued)
Caution (Continued). When using concentrated washer fluid,
follow the manufacturer instructionsfor adding water.
. Fill the washer fluid tank onlythree-quarters full when it is very cold.This allows for fluid expansion iffreezing occurs, which could damagethe tank if it is completely full.
BrakesDisc brake linings have built-in wearindicators that make a high-pitched warningsound when the brake linings are worn andnew linings are needed. The sound can comeand go or can be heard all the time whenthe vehicle is moving, except when applyingthe brake pedal firmly.
{ WarningThe brake wear warning sound meansthat soon the brakes will not work well.That could lead to a crash. When thebrake wear warning sound is heard, havethe vehicle serviced.

Chevrolet Camaro Owner Manual (GMNA-Localizing-U.S./Canada/Mexico-15516346) - 2022 - CRC - 4/9/21
Vehicle Care 255
CautionContinuing to drive with worn-out brakelinings could result in costly brakerepairs.
Some driving conditions or climates cancause a brake squeal when the brakes arefirst applied, clearing up following severalapplies. This does not mean something iswrong with the brakes.
If equipped with high performance brakelinings, there could be an increased build-upof brake dust as well as minor noises ascompared to standard brake linings.
Properly torqued wheel nuts are necessaryto help prevent brake pulsation. When tiresare rotated, inspect brake linings for wearand evenly tighten wheel nuts in the propersequence to torque specifications. SeeCapacities and Specifications 0 321.
Brake pads should be replaced as completeaxle sets.
Brake Pedal Travel
See your dealer if the brake pedal does notreturn to normal height, or if there is arapid increase in pedal travel. This could bea sign that brake service may be required.
Replacing Brake System Parts
Always replace brake system parts withnew, approved replacement parts. If this isnot done, the brakes may not workproperly. The braking performance canchange in many ways if the wrong brakeparts are installed or if parts are improperlyinstalled.
High Performance Brake Lining Car Washand Extended Parking Care
If equipped with high performance brakecomponents, binding or clunking may benoticeable after extended parking or in coldweather when the brakes have been wet,such as when driving in the rain or after acar wash. The clunking is normal for brakeswith high performance brake linings anddoes not affect the operation of the brakes.When driving, normal braking will allow forthe brakes to feel smooth and the clunkingto go away. If the vehicle is washed beforeovernight parking or long term storage,drive it and apply the brakes several timesto thoroughly dry the brakes.
Brake Fluid
The brake/clutch master cylinder reservoir isfilled with GM approved DOT 4 brake fluidas indicated on the reservoir cap. See EngineCompartment Overview 0 239 for thelocation of the reservoir.
Checking Brake Fluid
Place the vehicle in P (Park) or Neutral withthe parking brake applied if equipped with amanual transmission. On a level surface, thebrake fluid level should be between theminimum and maximum marks on the brakefluid reservoir.
There are only two reasons why the brakefluid level in the reservoir may go down:. Normal brake lining wear. When new
linings are installed, the fluid level goesback up.
Chevrolet Camaro Owner Manual (GMNA-Localizing-U.S./Canada/Mexico-15516346) - 2022 - CRC - 4/9/21
256 Vehicle Care. A fluid leak in the brake/clutch hydraulic
system. Have the brake/clutch hydraulicsystem fixed. With a leak, the brakes willnot work well.
Always clean the brake fluid reservoir capand the area around the cap beforeremoving it.
Do not top off the brake/clutch fluid. Addingfluid does not correct a leak. If fluid is addedwhen the linings are worn, there will be toomuch fluid when new brake linings areinstalled. Add or remove fluid, as necessary,only when work is done on the brake/clutchhydraulic system.
{ WarningIf too much brake fluid is added, it canspill on the engine and burn, if theengine is hot enough. You or others couldbe burned, and the vehicle could bedamaged. Add brake fluid only whenwork is done on the brake/clutchhydraulic system.
When the brake/clutch fluid falls to a lowlevel, the brake warning light comes on. SeeBrake System Warning Light 0 94.
Brake fluid absorbs water over time whichdegrades the effectiveness of the brake fluid.Replace brake fluid at the specified intervalsto prevent increased stopping distance. SeeMaintenance Schedule 0 307.
What to Add
Use only GM approved DOT 4 brake fluidfrom a clean, sealed container. SeeRecommended Fluids and Lubricants 0 316.
{ WarningThe wrong or contaminated brake fluidcould result in damage to the brakesystem. This could result in the loss ofbraking leading to a possible injury.Always use the proper GM approvedbrake fluid.
CautionIf brake fluid is spilled on the vehicle'spainted surfaces, the paint finish can bedamaged. Immediately wash off anypainted surface.
Battery - North AmericaThe original equipment battery ismaintenance free. Do not remove the capand do not add fluid.
The battery is in the trunk, behind the trimpanel, on the passenger side of the vehicle.Refer to the replacement number shown onthe original battery label when a newbattery is needed.
The vehicle has an Absorbed Glass Mat(AGM) 12-volt battery. Installation of astandard 12-volt battery will result inreduced 12-volt battery life. When using a12-volt battery charger on the 12-volt AGMbattery, some chargers have an AGMbattery setting on the charger. If available,use the AGM setting on the charger, to limitcharge voltage to 14.8 volts.
{ WarningWARNING: Battery posts, terminals andrelated accessories can expose you tochemicals including lead and leadcompounds, which are known to theState of California to cause cancer andbirth defects or other reproductive harm.
(Continued)
Chevrolet Camaro Owner Manual (GMNA-Localizing-U.S./Canada/Mexico-15516346) - 2022 - CRC - 4/9/21
Vehicle Care 257
Warning (Continued)
Wash hands after handling. For moreinformation go towww.P65Warnings.ca.gov.
See the warning on the back cover.
Vehicle Storage
{ WarningBatteries have acid that can burn you andgas that can explode. You can be badlyhurt if you are not careful. See JumpStarting - North America 0 294 for tipson working around a battery withoutgetting hurt.
Infrequent Usage: Remove the black,negative (−) cable from the battery to keepthe battery from running down.
Extended Storage: Remove the black,negative (−) cable from the battery or use abattery trickle charger.
Rear Axle
When to Check Lubricant
It is not necessary to regularly check therear axle fluid, unless a leak is suspected oran unusual noise is heard. A fluid loss couldindicate a problem. Have it inspected andrepaired by your dealer.
Automatic Transmission Shift LockControl Function Check
{ WarningWhen you are doing this inspection, thevehicle could move suddenly. If thevehicle moves, you or others could beinjured.
1. Before starting this check, be sure thereis enough room around the vehicle.It should be parked on a level surface.
2. Apply the parking brake. Be ready toapply the regular brake immediately ifthe vehicle begins to move.
3. With the engine off, turn the ignition on,but do not start the engine. Withoutapplying the regular brake, try to movethe shift lever out of P (Park) with
normal effort. If the shift lever movesout of P (Park), contact your dealer forservice.
Park Brake and P (Park)Mechanism Check
{ WarningWhen you are doing this check, thevehicle could begin to move. You orothers could be injured and propertycould be damaged. Make sure there isroom in front of the vehicle in case itbegins to roll. Be ready to apply theregular brake at once should the vehiclebegin to move.
Park on a fairly steep hill, with the vehiclefacing downhill. Keeping your foot on theregular brake, set the parking brake.. To check the parking brake's holding
ability: With the engine running and thetransmission in N (Neutral), slowly removefoot pressure from the regular brakepedal. Do this until the vehicle is held bythe parking brake only.
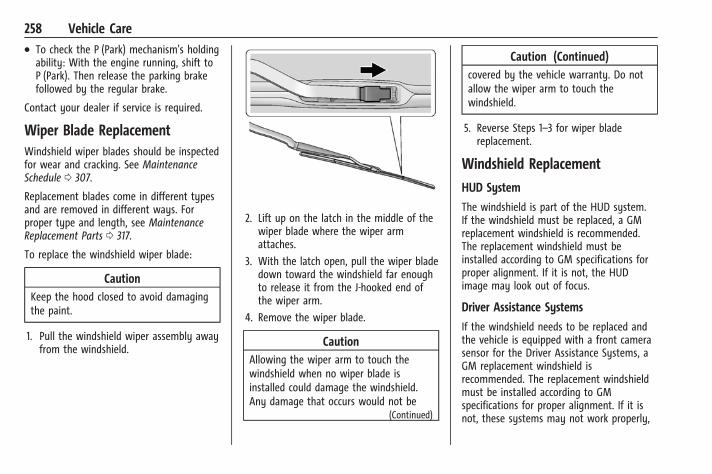
Chevrolet Camaro Owner Manual (GMNA-Localizing-U.S./Canada/Mexico-15516346) - 2022 - CRC - 4/9/21
258 Vehicle Care. To check the P (Park) mechanism's holding
ability: With the engine running, shift toP (Park). Then release the parking brakefollowed by the regular brake.
Contact your dealer if service is required.
Wiper Blade ReplacementWindshield wiper blades should be inspectedfor wear and cracking. See MaintenanceSchedule 0 307.
Replacement blades come in different typesand are removed in different ways. Forproper type and length, see MaintenanceReplacement Parts 0 317.
To replace the windshield wiper blade:
CautionKeep the hood closed to avoid damagingthe paint.
1. Pull the windshield wiper assembly awayfrom the windshield.
2. Lift up on the latch in the middle of thewiper blade where the wiper armattaches.
3. With the latch open, pull the wiper bladedown toward the windshield far enoughto release it from the J-hooked end ofthe wiper arm.
4. Remove the wiper blade.
CautionAllowing the wiper arm to touch thewindshield when no wiper blade isinstalled could damage the windshield.Any damage that occurs would not be
(Continued)
Caution (Continued)covered by the vehicle warranty. Do notallow the wiper arm to touch thewindshield.
5. Reverse Steps 1–3 for wiper bladereplacement.
Windshield Replacement
HUD System
The windshield is part of the HUD system.If the windshield must be replaced, a GMreplacement windshield is recommended.The replacement windshield must beinstalled according to GM specifications forproper alignment. If it is not, the HUDimage may look out of focus.
Driver Assistance Systems
If the windshield needs to be replaced andthe vehicle is equipped with a front camerasensor for the Driver Assistance Systems, aGM replacement windshield isrecommended. The replacement windshieldmust be installed according to GMspecifications for proper alignment. If it isnot, these systems may not work properly,
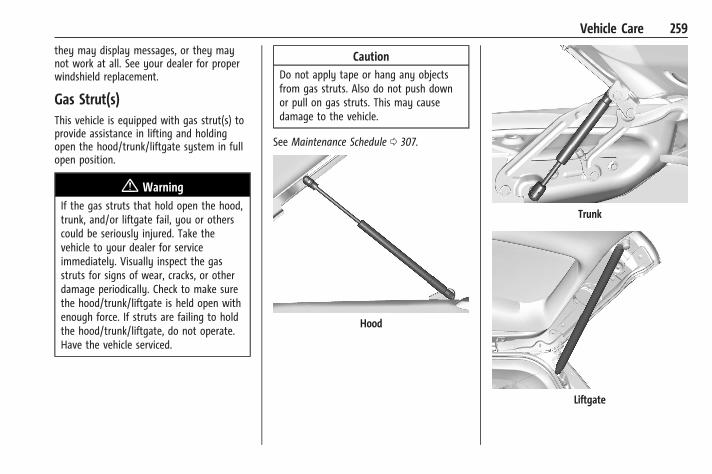
Chevrolet Camaro Owner Manual (GMNA-Localizing-U.S./Canada/Mexico-15516346) - 2022 - CRC - 4/9/21
Vehicle Care 259
they may display messages, or they maynot work at all. See your dealer for properwindshield replacement.
Gas Strut(s)This vehicle is equipped with gas strut(s) toprovide assistance in lifting and holdingopen the hood/trunk/liftgate system in fullopen position.
{ WarningIf the gas struts that hold open the hood,trunk, and/or liftgate fail, you or otherscould be seriously injured. Take thevehicle to your dealer for serviceimmediately. Visually inspect the gasstruts for signs of wear, cracks, or otherdamage periodically. Check to make surethe hood/trunk/liftgate is held open withenough force. If struts are failing to holdthe hood/trunk/liftgate, do not operate.Have the vehicle serviced.
CautionDo not apply tape or hang any objectsfrom gas struts. Also do not push downor pull on gas struts. This may causedamage to the vehicle.
See Maintenance Schedule 0 307.
Hood
Trunk
Liftgate
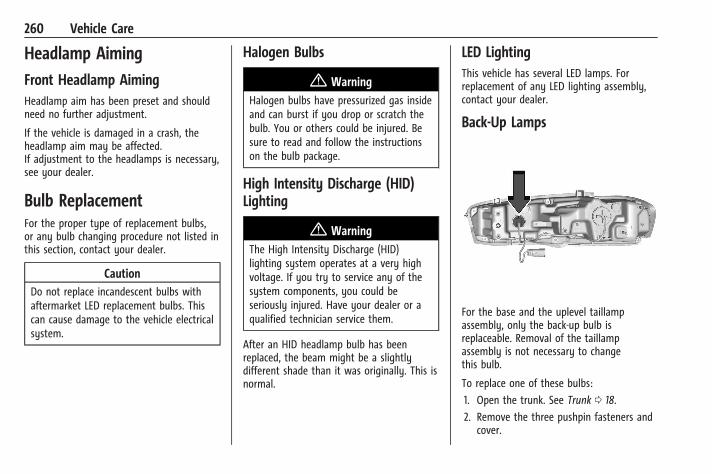
Chevrolet Camaro Owner Manual (GMNA-Localizing-U.S./Canada/Mexico-15516346) - 2022 - CRC - 4/9/21
260 Vehicle Care
Headlamp AimingFront Headlamp AimingHeadlamp aim has been preset and shouldneed no further adjustment.
If the vehicle is damaged in a crash, theheadlamp aim may be affected.If adjustment to the headlamps is necessary,see your dealer.
Bulb ReplacementFor the proper type of replacement bulbs,or any bulb changing procedure not listed inthis section, contact your dealer.
CautionDo not replace incandescent bulbs withaftermarket LED replacement bulbs. Thiscan cause damage to the vehicle electricalsystem.
Halogen Bulbs
{ WarningHalogen bulbs have pressurized gas insideand can burst if you drop or scratch thebulb. You or others could be injured. Besure to read and follow the instructionson the bulb package.
High Intensity Discharge (HID)Lighting
{ WarningThe High Intensity Discharge (HID)lighting system operates at a very highvoltage. If you try to service any of thesystem components, you could beseriously injured. Have your dealer or aqualified technician service them.
After an HID headlamp bulb has beenreplaced, the beam might be a slightlydifferent shade than it was originally. This isnormal.
LED LightingThis vehicle has several LED lamps. Forreplacement of any LED lighting assembly,contact your dealer.
Back-Up Lamps
For the base and the uplevel taillampassembly, only the back-up bulb isreplaceable. Removal of the taillampassembly is not necessary to changethis bulb.
To replace one of these bulbs:
1. Open the trunk. See Trunk 0 18.
2. Remove the three pushpin fasteners andcover.
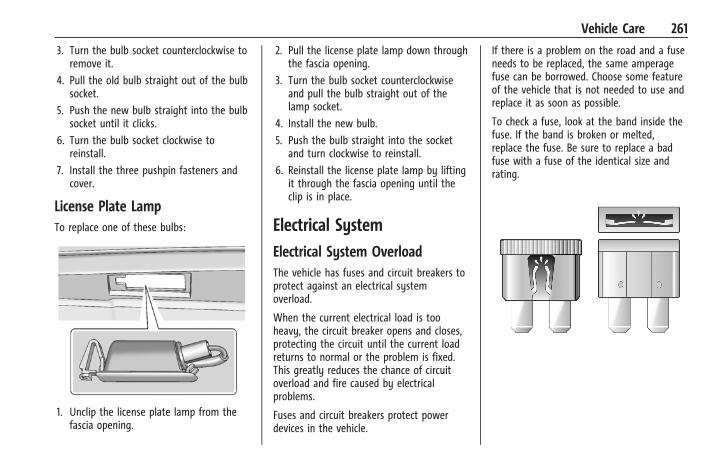
Chevrolet Camaro Owner Manual (GMNA-Localizing-U.S./Canada/Mexico-15516346) - 2022 - CRC - 4/9/21
Vehicle Care 261
3. Turn the bulb socket counterclockwise toremove it.
4. Pull the old bulb straight out of the bulbsocket.
5. Push the new bulb straight into the bulbsocket until it clicks.
6. Turn the bulb socket clockwise toreinstall.
7. Install the three pushpin fasteners andcover.
License Plate LampTo replace one of these bulbs:
1. Unclip the license plate lamp from thefascia opening.
2. Pull the license plate lamp down throughthe fascia opening.
3. Turn the bulb socket counterclockwiseand pull the bulb straight out of thelamp socket.
4. Install the new bulb.
5. Push the bulb straight into the socketand turn clockwise to reinstall.
6. Reinstall the license plate lamp by liftingit through the fascia opening until theclip is in place.
Electrical SystemElectrical System OverloadThe vehicle has fuses and circuit breakers toprotect against an electrical systemoverload.
When the current electrical load is tooheavy, the circuit breaker opens and closes,protecting the circuit until the current loadreturns to normal or the problem is fixed.This greatly reduces the chance of circuitoverload and fire caused by electricalproblems.
Fuses and circuit breakers protect powerdevices in the vehicle.
If there is a problem on the road and a fuseneeds to be replaced, the same amperagefuse can be borrowed. Choose some featureof the vehicle that is not needed to use andreplace it as soon as possible.
To check a fuse, look at the band inside thefuse. If the band is broken or melted,replace the fuse. Be sure to replace a badfuse with a fuse of the identical size andrating.
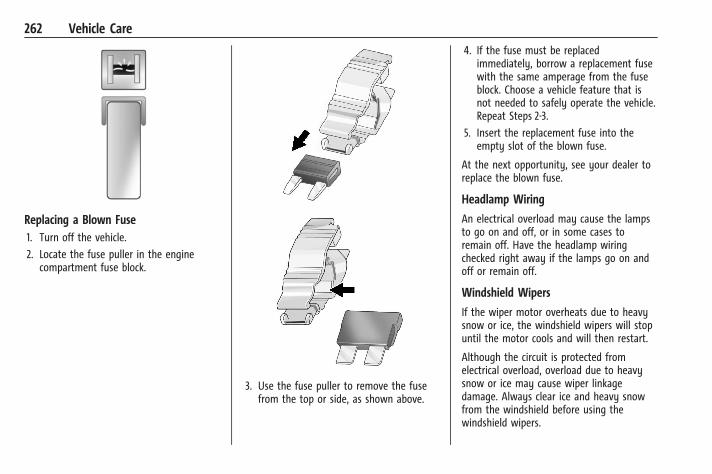
Chevrolet Camaro Owner Manual (GMNA-Localizing-U.S./Canada/Mexico-15516346) - 2022 - CRC - 4/9/21
262 Vehicle Care
Replacing a Blown Fuse1. Turn off the vehicle.
2. Locate the fuse puller in the enginecompartment fuse block.
3. Use the fuse puller to remove the fusefrom the top or side, as shown above.
4. If the fuse must be replacedimmediately, borrow a replacement fusewith the same amperage from the fuseblock. Choose a vehicle feature that isnot needed to safely operate the vehicle.Repeat Steps 2-3.
5. Insert the replacement fuse into theempty slot of the blown fuse.
At the next opportunity, see your dealer toreplace the blown fuse.
Headlamp Wiring
An electrical overload may cause the lampsto go on and off, or in some cases toremain off. Have the headlamp wiringchecked right away if the lamps go on andoff or remain off.
Windshield Wipers
If the wiper motor overheats due to heavysnow or ice, the windshield wipers will stopuntil the motor cools and will then restart.
Although the circuit is protected fromelectrical overload, overload due to heavysnow or ice may cause wiper linkagedamage. Always clear ice and heavy snowfrom the windshield before using thewindshield wipers.
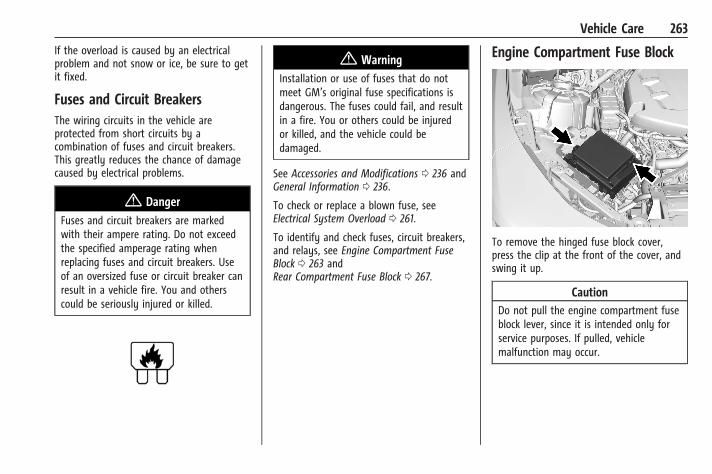
Chevrolet Camaro Owner Manual (GMNA-Localizing-U.S./Canada/Mexico-15516346) - 2022 - CRC - 4/9/21
Vehicle Care 263
If the overload is caused by an electricalproblem and not snow or ice, be sure to getit fixed.
Fuses and Circuit BreakersThe wiring circuits in the vehicle areprotected from short circuits by acombination of fuses and circuit breakers.This greatly reduces the chance of damagecaused by electrical problems.
{ DangerFuses and circuit breakers are markedwith their ampere rating. Do not exceedthe specified amperage rating whenreplacing fuses and circuit breakers. Useof an oversized fuse or circuit breaker canresult in a vehicle fire. You and otherscould be seriously injured or killed.
{ WarningInstallation or use of fuses that do notmeet GM’s original fuse specifications isdangerous. The fuses could fail, and resultin a fire. You or others could be injuredor killed, and the vehicle could bedamaged.
See Accessories and Modifications 0 236 andGeneral Information 0 236.
To check or replace a blown fuse, seeElectrical System Overload 0 261.
To identify and check fuses, circuit breakers,and relays, see Engine Compartment FuseBlock 0 263 andRear Compartment Fuse Block 0 267.
Engine Compartment Fuse Block
To remove the hinged fuse block cover,press the clip at the front of the cover, andswing it up.
CautionDo not pull the engine compartment fuseblock lever, since it is intended only forservice purposes. If pulled, vehiclemalfunction may occur.
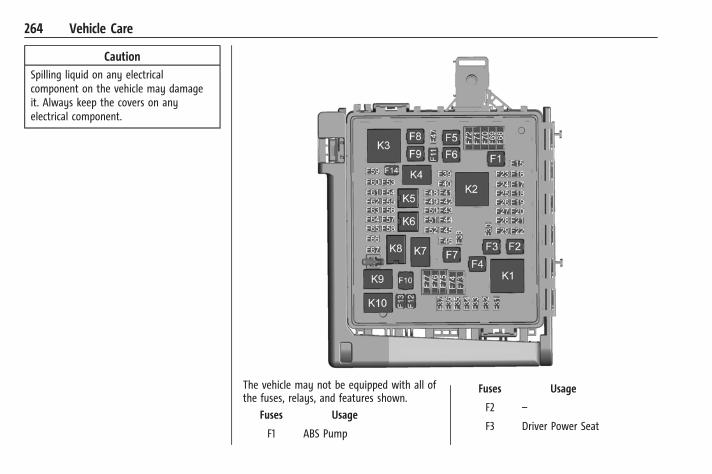
Chevrolet Camaro Owner Manual (GMNA-Localizing-U.S./Canada/Mexico-15516346) - 2022 - CRC - 4/9/21
264 Vehicle Care
CautionSpilling liquid on any electricalcomponent on the vehicle may damageit. Always keep the covers on anyelectrical component.
The vehicle may not be equipped with all ofthe fuses, relays, and features shown.
Fuses Usage
F1 ABS Pump
Fuses Usage
F2 –
F3 Driver Power Seat
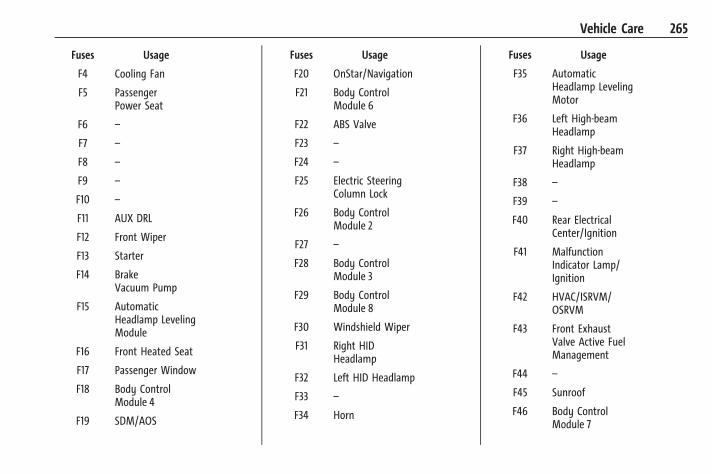
Chevrolet Camaro Owner Manual (GMNA-Localizing-U.S./Canada/Mexico-15516346) - 2022 - CRC - 4/9/21
Vehicle Care 265
Fuses Usage
F4 Cooling Fan
F5 PassengerPower Seat
F6 –
F7 –
F8 –
F9 –
F10 –
F11 AUX DRL
F12 Front Wiper
F13 Starter
F14 BrakeVacuum Pump
F15 AutomaticHeadlamp LevelingModule
F16 Front Heated Seat
F17 Passenger Window
F18 Body ControlModule 4
F19 SDM/AOS
Fuses Usage
F20 OnStar/Navigation
F21 Body ControlModule 6
F22 ABS Valve
F23 –
F24 –
F25 Electric SteeringColumn Lock
F26 Body ControlModule 2
F27 –
F28 Body ControlModule 3
F29 Body ControlModule 8
F30 Windshield Wiper
F31 Right HIDHeadlamp
F32 Left HID Headlamp
F33 –
F34 Horn
Fuses Usage
F35 AutomaticHeadlamp LevelingMotor
F36 Left High-beamHeadlamp
F37 Right High-beamHeadlamp
F38 –
F39 –
F40 Rear ElectricalCenter/Ignition
F41 MalfunctionIndicator Lamp/Ignition
F42 HVAC/ISRVM/OSRVM
F43 Front ExhaustValve Active FuelManagement
F44 –
F45 Sunroof
F46 Body ControlModule 7
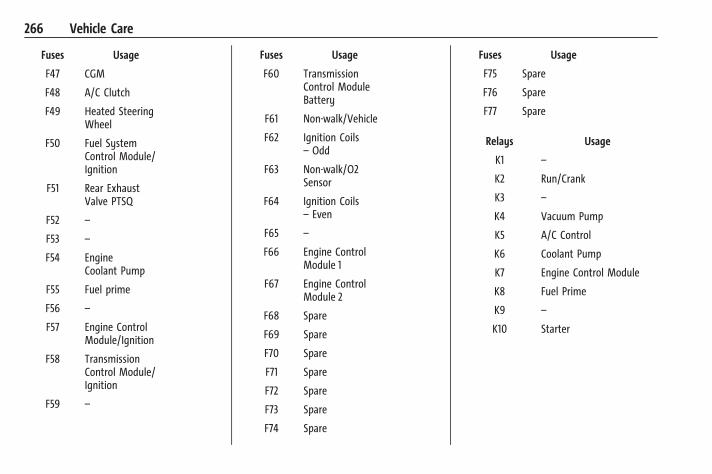
Chevrolet Camaro Owner Manual (GMNA-Localizing-U.S./Canada/Mexico-15516346) - 2022 - CRC - 4/9/21
266 Vehicle Care
Fuses Usage
F47 CGM
F48 A/C Clutch
F49 Heated SteeringWheel
F50 Fuel SystemControl Module/Ignition
F51 Rear ExhaustValve PTSQ
F52 –
F53 –
F54 EngineCoolant Pump
F55 Fuel prime
F56 –
F57 Engine ControlModule/Ignition
F58 TransmissionControl Module/Ignition
F59 –
Fuses Usage
F60 TransmissionControl ModuleBattery
F61 Non-walk/Vehicle
F62 Ignition Coils– Odd
F63 Non-walk/O2Sensor
F64 Ignition Coils– Even
F65 –
F66 Engine ControlModule 1
F67 Engine ControlModule 2
F68 Spare
F69 Spare
F70 Spare
F71 Spare
F72 Spare
F73 Spare
F74 Spare
Fuses Usage
F75 Spare
F76 Spare
F77 Spare
Relays Usage
K1 –
K2 Run/Crank
K3 –
K4 Vacuum Pump
K5 A/C Control
K6 Coolant Pump
K7 Engine Control Module
K8 Fuel Prime
K9 –
K10 Starter
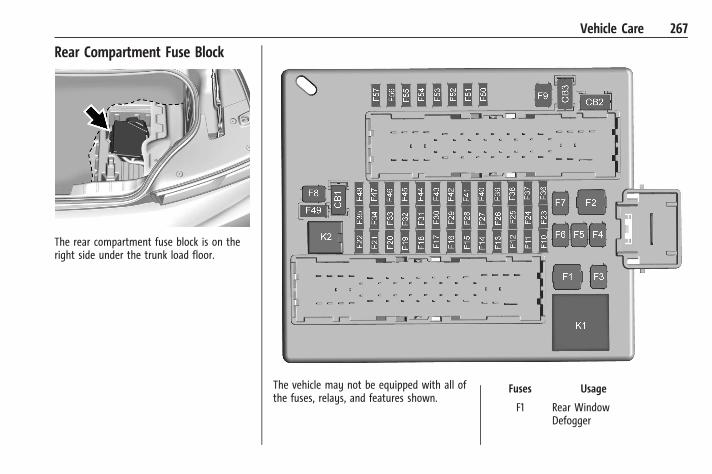
Chevrolet Camaro Owner Manual (GMNA-Localizing-U.S./Canada/Mexico-15516346) - 2022 - CRC - 4/9/21
Vehicle Care 267
Rear Compartment Fuse Block
The rear compartment fuse block is on theright side under the trunk load floor.
The vehicle may not be equipped with all ofthe fuses, relays, and features shown.
Fuses Usage
F1 Rear WindowDefogger
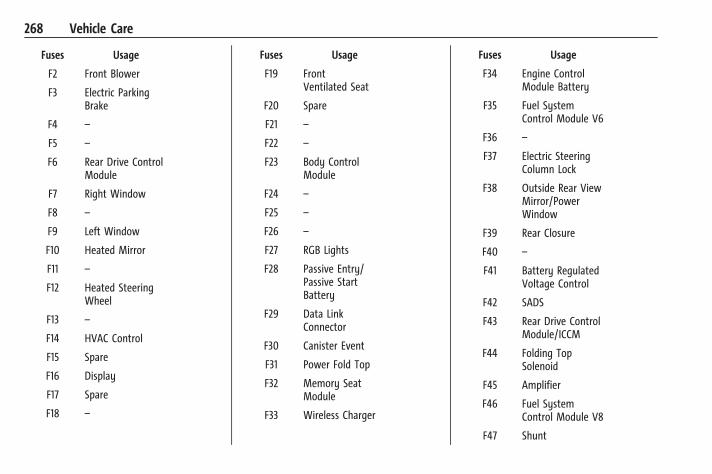
Chevrolet Camaro Owner Manual (GMNA-Localizing-U.S./Canada/Mexico-15516346) - 2022 - CRC - 4/9/21
268 Vehicle Care
Fuses Usage
F2 Front Blower
F3 Electric ParkingBrake
F4 –
F5 –
F6 Rear Drive ControlModule
F7 Right Window
F8 –
F9 Left Window
F10 Heated Mirror
F11 –
F12 Heated SteeringWheel
F13 –
F14 HVAC Control
F15 Spare
F16 Display
F17 Spare
F18 –
Fuses Usage
F19 FrontVentilated Seat
F20 Spare
F21 –
F22 –
F23 Body ControlModule
F24 –
F25 –
F26 –
F27 RGB Lights
F28 Passive Entry/Passive StartBattery
F29 Data LinkConnector
F30 Canister Event
F31 Power Fold Top
F32 Memory SeatModule
F33 Wireless Charger
Fuses Usage
F34 Engine ControlModule Battery
F35 Fuel SystemControl Module V6
F36 –
F37 Electric SteeringColumn Lock
F38 Outside Rear ViewMirror/PowerWindow
F39 Rear Closure
F40 –
F41 Battery RegulatedVoltage Control
F42 SADS
F43 Rear Drive ControlModule/ICCM
F44 Folding TopSolenoid
F45 Amplifier
F46 Fuel SystemControl Module V8
F47 Shunt
Chevrolet Camaro Owner Manual (GMNA-Localizing-U.S./Canada/Mexico-15516346) - 2022 - CRC - 4/9/21
Vehicle Care 269
Fuses Usage
F48 –
F49 Steering Wheel
F50 Front CameraModule
F51 Camera Module
F52 Ultrasonic Park Aid
F53 –
F54 Side Blind ZoneAlert
F55 Radio
F56 –
F57 –
Relays Usage
K1 Rear WindowDefogger
K2 Fuel SystemControl Module
CircuitBreakers Usage
CB1 –
CircuitBreakers Usage
CB2 Retained Accessory Power
CB3 –
Wheels and TiresTiresEvery new GM vehicle has high-qualitytires made by a leading tiremanufacturer. See the warranty manualfor information regarding the tirewarranty and where to get service. Foradditional information refer to the tiremanufacturer.
{ Warning. Poorly maintained and improperly
used tires are dangerous.. Overloading the tires can cause
overheating as a result of toomuch flexing. There could be ablowout and a serious crash. SeeVehicle Load Limits 0 196.
(Continued)
Warning (Continued). Underinflated tires pose the same
danger as overloaded tires. Theresulting crash could cause seriousinjury. Check all tires frequently tomaintain the recommendedpressure. Tire pressure should bechecked when the tires are cold.
. Overinflated tires are more likelyto be cut, punctured, or broken bya sudden impact — such as whenhitting a pothole. Keep tires at therecommended pressure.
. Worn or old tires can cause acrash. If the tread is badly worn,replace them.
. Replace any tires that have beendamaged by impacts withpotholes, curbs, etc.
. Improperly repaired tires can causea crash. Only your dealer or anauthorized tire service centershould repair, replace, dismount,and mount the tires.
(Continued)
Chevrolet Camaro Owner Manual (GMNA-Localizing-U.S./Canada/Mexico-15516346) - 2022 - CRC - 4/9/21
270 Vehicle Care
Warning (Continued). Do not spin the tires in excess of
56 km/h (35 mph) on slipperysurfaces such as snow, mud, ice,etc. Excessive spinning may causethe tires to explode.
See Tire Pressure for High-SpeedOperation 0 276 for inflation pressureadjustment for high-speed driving.
All-Season TiresThis vehicle may come with all-season tires.These tires are designed to provide goodoverall performance on most road surfacesand weather conditions. Original equipmenttires designed to GM's specific tireperformance criteria have a TPC specificationcode molded onto the sidewall. Originalequipment all-season tires can be identifiedby the last two characters of this TPC code,which will be “MS.”
Consider installing winter tires on thevehicle if frequent driving on snow orice-covered roads is expected. All-season tiresprovide adequate performance for mostwinter driving conditions, but they may not
offer the same level of traction orperformance as winter tires on snow orice-covered roads. See Winter Tires 0 270.
Winter TiresThis vehicle was not originally equippedwith winter tires. Winter tires are designedfor increased traction on snow andice-covered roads. Consider installing wintertires on the vehicle if frequent driving on iceor snow covered roads is expected. See yourdealer for details regarding winter tireavailability and proper tire selection. Also,see Buying New Tires 0 283.
With winter tires, there may be decreaseddry road traction, increased road noise, andshorter tread life. After changing to wintertires, be alert for changes in vehiclehandling and braking.
If using winter tires:. Use tires of the same brand and tread
type on all four wheel positions.. Use only radial ply tires of the same size,
load range, and speed rating as theoriginal equipment tires.
Winter tires with the same speed rating asthe original equipment tires may not beavailable for H, V, W, Y, and ZR speed rated
tires. If winter tires with a lower speedrating are chosen, never exceed the tire'smaximum speed capability.
Run-Flat TiresThis vehicle, when new, may have hadrun-flat tires. There is no spare tire, no tirechanging equipment, and no place to store atire in the vehicle.
{ WarningWhile driving with run-flat tires at areduced inflation pressure, avoid makingsudden stops or severe maneuvers as thehandling capabilities of the tires will bereduced. Driving too fast could cause lossof control and you or others could beinjured. Do not drive over 80 km/h(50 mph) with the tire operating at lowpressure. Drive cautiously and check thetire pressure as soon as possible.
Run-flat tires can be driven up to 80 km(50 mi) at speeds less than 80 km/h(50 mph) after a loss of inflation pressurehas occurred. There is no need to stop onthe side of the road to change the tire. Thepossible driving range after a pressure losswill vary based on the vehicle load and
Chevrolet Camaro Owner Manual (GMNA-Localizing-U.S./Canada/Mexico-15516346) - 2022 - CRC - 4/9/21
Vehicle Care 271
driving conditions. As soon as possible,contact the nearest authorized GM orrun-flat servicing facility for inspection andrepair or replacement.
When driving on a deflated run-flat tire,avoid potholes and other road hazards thatcould damage the tire and/or wheel beyondrepair. When a tire has been damaged, or ifdriven any distance while deflated, checkwith an authorized run-flat tire servicecenter to determine whether the tire can berepaired or should be replaced. To maintainthe run-flat feature, all replacement tiresmust be run-flat tires.
To locate the nearest GM or run-flatservicing facility, call Customer Assistance.
Low-Profile TiresSee the Camaro High Performancesupplement.
If the vehicle has 245/40R20,245/40ZR20 and 275/35ZR20, or285/30ZR20 and 305/30ZR20 size tires,they are classified as low-profile tires.
CautionLow-profile tires are more susceptible todamage from road hazards or curb impactthan standard profile tires. Tire and/orwheel assembly damage can occur whencoming into contact with road hazardslike potholes, or sharp edged objects,or when sliding into a curb. The warrantydoes not cover this type of damage. Keeptires set to the correct inflation pressureand when possible, avoid contact withcurbs, potholes, and other road hazards.
Summer TiresHigh Performance Summer Tires
See the Camaro High Performancesupplement.
This vehicle may come with 245/40ZR20 and275/35ZR20 or 285/30ZR20 and 305/30ZR20high performance summer tires. These tireshave a special tread and compound that areoptimized for maximum dry and wet roadperformance. This special tread andcompound will have decreased performancein cold climates, and on ice and snow. It isrecommended that winter tires be installedon the vehicle if frequent driving at
temperatures below approximately 5 °C(40 °F) or on ice or snow covered roads isexpected. See Winter Tires 0 270.
CautionHigh performance summer tires haverubber compounds that lose flexibilityand may develop surface cracks in thetread area at temperatures below −7 °C(20 °F). Always store high performancesummer tires indoors and attemperatures above −7 °C (20 °F) whennot in use. If the tires have beensubjected to −7 °C (20 °F) or less, let themwarm up in a heated space to at least5 °C (40 °F) for 24 hours or more beforebeing installed or driving a vehicle onwhich they are installed. Do not applyheat or blow heated air directly on thetires. Always inspect tires before use. SeeTire Inspection 0 281.
Tire Sidewall LabelingUseful information about a tire ismolded into its sidewall. The exampleshows a typical passenger tire sidewall.

Chevrolet Camaro Owner Manual (GMNA-Localizing-U.S./Canada/Mexico-15516346) - 2022 - CRC - 4/9/21
272 Vehicle Care
Passenger (P-Metric) Tire Example
(1) Tire Size : The tire size is acombination of letters and numbersused to define a particular tire's width,height, aspect ratio, construction type,and service description. See the “TireSize” illustration later in this section.
(2) TPC Spec (Tire Performance CriteriaSpecification) : Original equipment tiresdesigned to GM's specific tireperformance criteria have a TPCspecification code molded onto thesidewall. GM's TPC specifications meetor exceed all federal safety guidelines.
(3) DOT (Department ofTransportation) : The Department ofTransportation (DOT) code indicates thatthe tire is in compliance with the U.S.Department of Transportation MotorVehicle Safety Standards.
DOT Tire Date of Manufacture : The lastfour digits of the TIN indicate the tiremanufactured date. The first two digitsrepresent the week and the last twodigits, the year. For example, the thirdweek of the year 2020 would have a4-digit DOT date of 0320. Week 01 isthe first full week (Sunday throughSaturday) of each year.
(4) Tire Identification Number (TIN) :The letters and numbers following theDOT code are the Tire IdentificationNumber (TIN). The TIN shows themanufacturer and plant code, tire size,and date the tire was manufactured.The TIN is molded onto both sides ofthe tire, although only one side mayhave the date of manufacture.
(5) Tire Ply Material : The type of cordand number of plies in the sidewall andunder the tread.
(6) Uniform Tire Quality Grading(UTQG) : Tire manufacturers arerequired to grade tires based on threeperformance factors: treadwear,traction, and temperature resistance.For more information see Uniform TireQuality Grading 0 285.
(7) Maximum Cold Inflation LoadLimit : Maximum load that can becarried and the maximum pressureneeded to support that load.
Tire Designations
Tire Size
The example shows a typical passengervehicle tire size.
Passenger (P-Metric) Tire
Chevrolet Camaro Owner Manual (GMNA-Localizing-U.S./Canada/Mexico-15516346) - 2022 - CRC - 4/9/21
Vehicle Care 273
(1) Passenger (P-Metric) Tire : TheUnited States version of a metric tiresizing system. The letter "P" as the firstcharacter in the tire size means apassenger vehicle tire engineered tostandards set by the U.S. Tire and RimAssociation.
(2) Tire Width : The 3-digit numberindicates the tire section width inmillimeters from sidewall to sidewall.
(3) Aspect Ratio : A 2-digit number thatindicates the tire height-to-widthmeasurements. For example, if the tiresize aspect ratio is 75, as shown initem (3) of the illustration, it wouldmean that the tire's sidewall is75 percent as high as it is wide.
(4) Construction Code : A letter code isused to indicate the type of plyconstruction in the tire. The letter "R"means radial ply construction; the letter"D" means diagonal or bias plyconstruction.
(5) Rim Diameter : Diameter of thewheel in inches.
(6) Service Description : Thesecharacters represent the load index andspeed rating of the tire. The load indexrepresents the load carrying capacity atire is certified to carry. The speedrating is the maximum speed a tire iscertified to carry a load.
Tire Terminology and DefinitionsAir Pressure : The amount of air insidethe tire pressing outward on eachsquare inch of the tire. Air pressure isexpressed in kPa (kilopascal) or psi(pounds per square inch).
Accessory Weight : The combinedweight of optional accessories. Someexamples of optional accessories areautomatic transmission, powerwindows, power seats, and airconditioning.
Aspect Ratio : The relationship of atire's height to its width.
Belt : A rubber coated layer of cordsbetween the plies and the tread. Cordsmay be made from steel or otherreinforcing materials.
Bead : The tire bead contains steelwires wrapped by steel cords that holdthe tire onto the rim.
Bias Ply Tire : A pneumatic tire in whichthe plies are laid at alternate anglesless than 90 degrees to the centerlineof the tread.
Cold Tire Pressure : The amount of airpressure in a tire, measured in kPa(kilopascal) or psi (pounds per squareinch) before a tire has built up heatfrom driving. See Tire Pressure 0 275.
Curb Weight : The weight of a motorvehicle with standard and optionalequipment including the maximumcapacity of fuel, oil, and coolant, butwithout passengers and cargo.
DOT Markings : A code molded into thesidewall of a tire signifying that the tireis in compliance with the U.S.Department of Transportation (DOT)Motor Vehicle Safety Standards. TheDOT code includes the Tire IdentificationNumber (TIN), an alphanumeric
Chevrolet Camaro Owner Manual (GMNA-Localizing-U.S./Canada/Mexico-15516346) - 2022 - CRC - 4/9/21
274 Vehicle Care
designator which can also identify thetire manufacturer, production plant,brand, and date of production.
GVWR : Gross Vehicle Weight Rating.See Vehicle Load Limits 0 196.
GAWR FRT : Gross Axle Weight Ratingfor the front axle. See Vehicle LoadLimits 0 196.
GAWR RR : Gross Axle Weight Ratingfor the rear axle. See Vehicle LoadLimits 0 196.
Intended Outboard Sidewall : The sideof an asymmetrical tire that mustalways face outward when mounted ona vehicle.
Kilopascal (kPa) : The metric unit for airpressure.
Light Truck (LT-Metric) Tire : A tire usedon light duty trucks and somemultipurpose passenger vehicles.
Load Index : An assigned numberranging from 1 to 279 that correspondsto the load carrying capacity of a tire.
Maximum Inflation Pressure : Themaximum air pressure to which a coldtire can be inflated. The maximum airpressure is molded onto the sidewall.
Maximum Load Rating : The load ratingfor a tire at the maximum permissibleinflation pressure for that tire.
Maximum Loaded Vehicle Weight : Thesum of curb weight, accessory weight,vehicle capacity weight, and productionoptions weight.
Normal Occupant Weight : The numberof occupants a vehicle is designed toseat multiplied by 68 kg (150 lb). SeeVehicle Load Limits 0 196.
Occupant Distribution : Designatedseating positions.
Outward Facing Sidewall : The side ofan asymmetrical tire that has aparticular side that faces outward whenmounted on a vehicle. The side of thetire that contains a whitewall, bearswhite lettering, or bears manufacturer,brand, and/or model name molding
that is higher or deeper than the samemoldings on the other sidewall ofthe tire.
Passenger (P-Metric) Tire : A tire usedon passenger cars and some light dutytrucks and multipurpose vehicles.
Recommended Inflation Pressure :Vehicle manufacturer's recommendedtire inflation pressure as shown on thetire placard. See Tire Pressure 0 275 andVehicle Load Limits 0 196.
Radial Ply Tire : A pneumatic tire inwhich the ply cords that extend to thebeads are laid at 90 degrees to thecenterline of the tread.
Rim : A metal support for a tire andupon which the tire beads are seated.
Sidewall : The portion of a tire betweenthe tread and the bead.
Speed Rating : An alphanumeric codeassigned to a tire indicating themaximum speed at which a tire canoperate.
Chevrolet Camaro Owner Manual (GMNA-Localizing-U.S./Canada/Mexico-15516346) - 2022 - CRC - 4/9/21
Vehicle Care 275
Traction : The friction between the tireand the road surface. The amount ofgrip provided.
Tread : The portion of a tire that comesinto contact with the road.
Treadwear Indicators : Narrow bands,sometimes called wear bars, that showacross the tread of a tire when only1.6 mm (1/16 in) of tread remains. SeeWhen It Is Time for New Tires 0 283.
UTQGS (Uniform Tire Quality GradingStandards) : A tire information systemthat provides consumers with ratingsfor a tire's traction, temperature, andtreadwear. Ratings are determined bytire manufacturers using governmenttesting procedures. The ratings aremolded into the sidewall of the tire.See Uniform Tire Quality Grading 0 285.
Vehicle Capacity Weight : The numberof designated seating positionsmultiplied by 68 kg (150 lb) plus therated cargo load. See Vehicle LoadLimits 0 196.
Vehicle Maximum Load on the Tire :Load on an individual tire due to curbweight, accessory weight, occupantweight, and cargo weight.
Vehicle Placard : A label permanentlyattached to a vehicle showing thevehicle capacity weight and the originalequipment tire size and recommendedinflation pressure. See “Tire and LoadingInformation Label” under Vehicle LoadLimits 0 196.
Tire PressureTires need the correct amount of airpressure to operate effectively.
{ Warning
Neither tire underinflation noroverinflation is good. Underinflatedtires, or tires that do not haveenough air, can result in:. Tire overloading and overheating,
which could lead to a blowout.. Premature or irregular wear.. Poor handling.
(Continued)
Warning (Continued). Reduced fuel economy.
Overinflated tires, or tires that havetoo much air, can result in:. Unusual wear.. Poor handling.. Rough ride.. Needless damage from road
hazards.
The Tire and Loading Information labelon the vehicle indicates the originalequipment tires and the correct coldtire inflation pressures. Therecommended pressure is the minimumair pressure needed to support thevehicle's maximum load carryingcapacity. See Vehicle Load Limits 0 196.
How the vehicle is loaded affectsvehicle handling and ride comfort.Never load the vehicle with moreweight than it was designed to carry.
Chevrolet Camaro Owner Manual (GMNA-Localizing-U.S./Canada/Mexico-15516346) - 2022 - CRC - 4/9/21
276 Vehicle Care
When to Check
Check the pressure of the tires once amonth or more.
How to Check
Use a good quality pocket-type gaugeto check tire pressure. Proper tireinflation cannot be determined bylooking at the tire. Check the tireinflation pressure when the tires arecold, meaning the vehicle has not beendriven for at least three hours or nomore than 1.6 km (1 mi).
Remove the valve cap from the tirevalve stem. Press the tire gauge firmlyonto the valve to get a pressuremeasurement. If the cold tire inflationpressure matches the recommendedpressure on the Tire and LoadingInformation label, no further adjustmentis necessary. If the inflation pressure islow, add air until the recommendedpressure is reached. If the inflationpressure is high, press on the metalstem in the center of the tire valve torelease air.
Recheck the tire pressure with the tiregauge.
Put the valve caps back on the valvestems to keep out dirt and moisture.Use only valve caps designed for thevehicle by GM. TPMS sensors could bedamaged and would not be covered bythe vehicle warranty.
Tire Pressure for High-SpeedOperationSee the Camaro High Performancesupplement.
{ WarningDriving at high speeds, 160 km/h(100 mph) or higher, puts additionalstrain on tires. Sustained high-speeddriving causes excessive heat buildup andcan cause sudden tire failure. This couldcause a crash, and you or others could bekilled. Some high-speed rated tires requireinflation pressure adjustment forhigh-speed operation. When speed limitsand road conditions allow the vehicle tobe driven at high speeds, make sure the
(Continued)
Warning (Continued)
tires are rated for high-speed operation,are in excellent condition, and are set tothe correct cold tire inflation pressure forthe vehicle load.
Vehicles with tire sizes listed in the HighSpeed Operation Inflation Pressures tablerequire inflation pressure adjustment whendriving the vehicle at speeds of 160 km/h(100 mph) or higher. Set the cold tireinflation pressure to the corresponding valuein the table for the tire size on the vehicle.
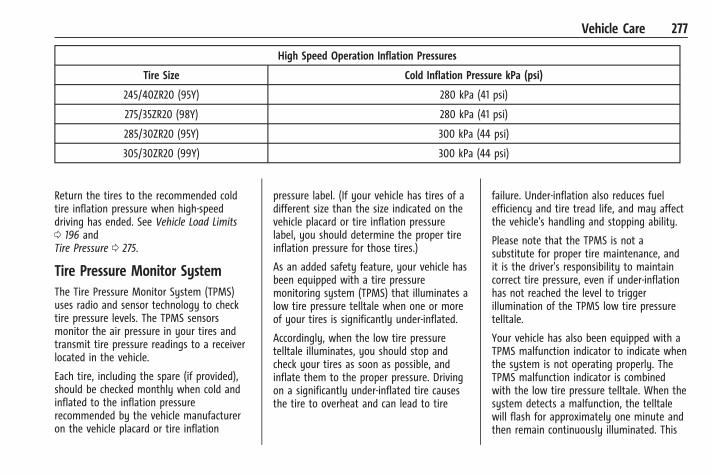
Chevrolet Camaro Owner Manual (GMNA-Localizing-U.S./Canada/Mexico-15516346) - 2022 - CRC - 4/9/21
Vehicle Care 277
High Speed Operation Inflation Pressures
Tire Size Cold Inflation Pressure kPa (psi)
245/40ZR20 (95Y) 280 kPa (41 psi)
275/35ZR20 (98Y) 280 kPa (41 psi)
285/30ZR20 (95Y) 300 kPa (44 psi)
305/30ZR20 (99Y) 300 kPa (44 psi)
Return the tires to the recommended coldtire inflation pressure when high-speeddriving has ended. See Vehicle Load Limits0 196 andTire Pressure 0 275.
Tire Pressure Monitor SystemThe Tire Pressure Monitor System (TPMS)uses radio and sensor technology to checktire pressure levels. The TPMS sensorsmonitor the air pressure in your tires andtransmit tire pressure readings to a receiverlocated in the vehicle.
Each tire, including the spare (if provided),should be checked monthly when cold andinflated to the inflation pressurerecommended by the vehicle manufactureron the vehicle placard or tire inflation
pressure label. (If your vehicle has tires of adifferent size than the size indicated on thevehicle placard or tire inflation pressurelabel, you should determine the proper tireinflation pressure for those tires.)
As an added safety feature, your vehicle hasbeen equipped with a tire pressuremonitoring system (TPMS) that illuminates alow tire pressure telltale when one or moreof your tires is significantly under-inflated.
Accordingly, when the low tire pressuretelltale illuminates, you should stop andcheck your tires as soon as possible, andinflate them to the proper pressure. Drivingon a significantly under-inflated tire causesthe tire to overheat and can lead to tire
failure. Under-inflation also reduces fuelefficiency and tire tread life, and may affectthe vehicle's handling and stopping ability.
Please note that the TPMS is not asubstitute for proper tire maintenance, andit is the driver's responsibility to maintaincorrect tire pressure, even if under-inflationhas not reached the level to triggerillumination of the TPMS low tire pressuretelltale.
Your vehicle has also been equipped with aTPMS malfunction indicator to indicate whenthe system is not operating properly. TheTPMS malfunction indicator is combinedwith the low tire pressure telltale. When thesystem detects a malfunction, the telltalewill flash for approximately one minute andthen remain continuously illuminated. This
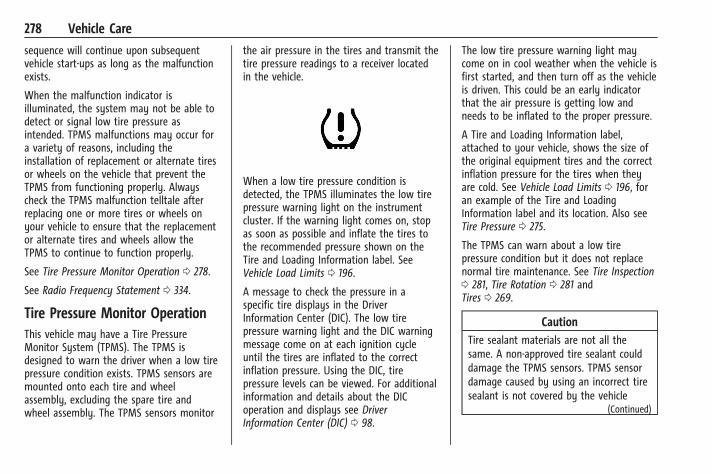
Chevrolet Camaro Owner Manual (GMNA-Localizing-U.S./Canada/Mexico-15516346) - 2022 - CRC - 4/9/21
278 Vehicle Care
sequence will continue upon subsequentvehicle start-ups as long as the malfunctionexists.
When the malfunction indicator isilluminated, the system may not be able todetect or signal low tire pressure asintended. TPMS malfunctions may occur fora variety of reasons, including theinstallation of replacement or alternate tiresor wheels on the vehicle that prevent theTPMS from functioning properly. Alwayscheck the TPMS malfunction telltale afterreplacing one or more tires or wheels onyour vehicle to ensure that the replacementor alternate tires and wheels allow theTPMS to continue to function properly.
See Tire Pressure Monitor Operation 0 278.
See Radio Frequency Statement 0 334.
Tire Pressure Monitor OperationThis vehicle may have a Tire PressureMonitor System (TPMS). The TPMS isdesigned to warn the driver when a low tirepressure condition exists. TPMS sensors aremounted onto each tire and wheelassembly, excluding the spare tire andwheel assembly. The TPMS sensors monitor
the air pressure in the tires and transmit thetire pressure readings to a receiver locatedin the vehicle.
When a low tire pressure condition isdetected, the TPMS illuminates the low tirepressure warning light on the instrumentcluster. If the warning light comes on, stopas soon as possible and inflate the tires tothe recommended pressure shown on theTire and Loading Information label. SeeVehicle Load Limits 0 196.
A message to check the pressure in aspecific tire displays in the DriverInformation Center (DIC). The low tirepressure warning light and the DIC warningmessage come on at each ignition cycleuntil the tires are inflated to the correctinflation pressure. Using the DIC, tirepressure levels can be viewed. For additionalinformation and details about the DICoperation and displays see DriverInformation Center (DIC) 0 98.
The low tire pressure warning light maycome on in cool weather when the vehicle isfirst started, and then turn off as the vehicleis driven. This could be an early indicatorthat the air pressure is getting low andneeds to be inflated to the proper pressure.
A Tire and Loading Information label,attached to your vehicle, shows the size ofthe original equipment tires and the correctinflation pressure for the tires when theyare cold. See Vehicle Load Limits 0 196, foran example of the Tire and LoadingInformation label and its location. Also seeTire Pressure 0 275.
The TPMS can warn about a low tirepressure condition but it does not replacenormal tire maintenance. See Tire Inspection0 281, Tire Rotation 0 281 andTires 0 269.
CautionTire sealant materials are not all thesame. A non-approved tire sealant coulddamage the TPMS sensors. TPMS sensordamage caused by using an incorrect tiresealant is not covered by the vehicle
(Continued)
Chevrolet Camaro Owner Manual (GMNA-Localizing-U.S./Canada/Mexico-15516346) - 2022 - CRC - 4/9/21
Vehicle Care 279
Caution (Continued)warranty. Always use only the GMapproved tire sealant available throughyour dealer or included in the vehicle.
Factory-installed Tire Inflator Kits use a GMapproved liquid tire sealant. Usingnon-approved tire sealants could damage theTPMS sensors. See Tire Sealant andCompressor Kit 0 288 for informationregarding the inflator kit materials andinstructions.
TPMS Malfunction Light and Message
The TPMS will not function properly if oneor more of the TPMS sensors are missing orinoperable. When the system detects amalfunction, the low tire pressure warninglight flashes for about one minute and thenstays on for the remainder of the ignitioncycle. A DIC warning message also displays.The malfunction light and DIC warningmessage come on at each ignition cycleuntil the problem is corrected. Some of theconditions that can cause these to comeon are:. One of the road tires has been replaced
with the spare tire. The spare tire doesnot have a TPMS sensor. The malfunction
light and DIC message should go off afterthe road tire is replaced and the sensormatching process is performedsuccessfully. See “TPMS Sensor MatchingProcess” later in this section.
. The TPMS sensor matching process wasnot done or not completed successfullyafter rotating the tires. The malfunctionlight and the DIC message should go offafter successfully completing the sensormatching process. See "TPMS SensorMatching Process" later in this section.
. One or more TPMS sensors are missing ordamaged. The malfunction light and theDIC message should go off when theTPMS sensors are installed and the sensormatching process is performedsuccessfully. See your dealer for service.
. Replacement tires or wheels do not matchthe original equipment tires or wheels.Tires and wheels other than thoserecommended could prevent the TPMSfrom functioning properly. See BuyingNew Tires 0 283.
. Operating electronic devices or being nearfacilities using radio wave frequenciessimilar to the TPMS could cause the TPMSsensors to malfunction.
If the TPMS is not functioning properly itcannot detect or signal a low tire pressurecondition. See your dealer for service if theTPMS malfunction light and DIC messagecomes on and stays on.
Tire Fill Alert (If Equipped)
This feature provides visual and audiblealerts outside the vehicle to help wheninflating an underinflated tire to therecommended cold tire pressure.
When the low tire pressure warning lightcomes on:
1. Park the vehicle in a safe, level place.
2. Set the parking brake firmly.
3. Place the vehicle in P (Park).
4. Add air to the tire that is underinflated.The turn signal lamp will flash.
5. When the recommended pressure isreached, the horn sounds once and theturn signal lamp will stop flashing andbriefly turn solid.
Repeat these steps for all underinflated tiresthat have illuminated the low tire pressurewarning light.
Chevrolet Camaro Owner Manual (GMNA-Localizing-U.S./Canada/Mexico-15516346) - 2022 - CRC - 4/9/21
280 Vehicle Care
{ WarningOverinflating a tire could cause the tireto rupture and you or others could beinjured. Do not exceed the maximumpressure listed on the tire sidewall. SeeTire Sidewall Labeling 0 271 andVehicle Load Limits 0 196.
If the tire is overinflated by more than35 kPa (5 psi), the horn will sound multipletimes and the turn signal lamp will continueto flash for several seconds after fillingstops. To release and correct the pressurewhile the turn signal lamp is still flashing,briefly press the center of the valve stem.When the recommended pressure is reached,the horn sounds once.
If the turn signal lamp does not flash within15 seconds after starting to inflate the tire,the tire fill alert has not been activated or isnot working.
If the hazard warning flashers are on, thetire fill alert visual feedback will not workproperly.
The TPMS will not activate the tire fill alertproperly under the following conditions:
. There is interference from an externaldevice or transmitter.
. The air pressure from the inflation deviceis not sufficient to inflate the tire.
. There is a malfunction in the TPMS.
. There is a malfunction in the horn or turnsignal lamps.
. The identification code of the TPMSsensor is not registered to the system.
. The battery of the TPMS sensor is low.
If the tire fill alert does not operate due toTPMS interference, move the vehicle about1 m (3 ft) back or forward and try again.If the tire fill alert feature is not working,use a tire pressure gauge.
TPMS Sensor Matching Process
Each TPMS sensor has a uniqueidentification code. The identification codeneeds to be matched to a new tire/wheelposition after rotating the vehicle’s tires orreplacing one or more of the TPMS sensors.The TPMS sensor matching process shouldalso be performed after replacing a sparetire with a road tire containing the TPMSsensor. The malfunction light and the DICmessage should go off at the next ignitioncycle. The sensors are matched to the tire/wheel positions, using a TPMS relearn tool,
in the following order: driver side front tire,passenger side front tire, passenger side reartire, and driver side rear. See your dealer forservice or to purchase a relearn tool.A TPMS relearn tool can also be purchased.See Tire Pressure Monitor Sensor ActivationTool at www.gmtoolsandequipment.com orcall 1-800-GM TOOLS (1-800-468-6657).
There are two minutes to match the firsttire/wheel position, and five minutes overallto match all four tire/wheel positions. If ittakes longer, the matching process stopsand must be restarted.
The TPMS sensor matching process is:
1. Set the parking brake.
2. Place the vehicle in Service Mode. SeeIgnition Positions 0 200.
3. Make sure the Tire Pressure info displayoption is turned on. The info displays onthe DIC can be turned on and offthrough the Options menu. See DriverInformation Center (DIC) 0 98.
4. Use the five-way DIC control on the rightside of the steering wheel to scroll tothe Tire Pressure screen under the DICinfo page. See Driver Information Center(DIC) 0 98.
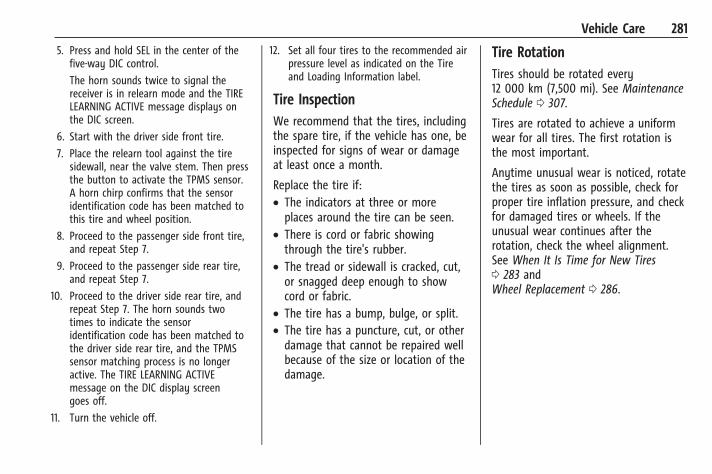
Chevrolet Camaro Owner Manual (GMNA-Localizing-U.S./Canada/Mexico-15516346) - 2022 - CRC - 4/9/21
Vehicle Care 281
5. Press and hold SEL in the center of thefive-way DIC control.
The horn sounds twice to signal thereceiver is in relearn mode and the TIRELEARNING ACTIVE message displays onthe DIC screen.
6. Start with the driver side front tire.
7. Place the relearn tool against the tiresidewall, near the valve stem. Then pressthe button to activate the TPMS sensor.A horn chirp confirms that the sensoridentification code has been matched tothis tire and wheel position.
8. Proceed to the passenger side front tire,and repeat Step 7.
9. Proceed to the passenger side rear tire,and repeat Step 7.
10. Proceed to the driver side rear tire, andrepeat Step 7. The horn sounds twotimes to indicate the sensoridentification code has been matched tothe driver side rear tire, and the TPMSsensor matching process is no longeractive. The TIRE LEARNING ACTIVEmessage on the DIC display screengoes off.
11. Turn the vehicle off.
12. Set all four tires to the recommended airpressure level as indicated on the Tireand Loading Information label.
Tire InspectionWe recommend that the tires, includingthe spare tire, if the vehicle has one, beinspected for signs of wear or damageat least once a month.
Replace the tire if:. The indicators at three or more
places around the tire can be seen.. There is cord or fabric showing
through the tire's rubber.. The tread or sidewall is cracked, cut,
or snagged deep enough to showcord or fabric.
. The tire has a bump, bulge, or split.
. The tire has a puncture, cut, or otherdamage that cannot be repaired wellbecause of the size or location of thedamage.
Tire RotationTires should be rotated every12 000 km (7,500 mi). See MaintenanceSchedule 0 307.
Tires are rotated to achieve a uniformwear for all tires. The first rotation isthe most important.
Anytime unusual wear is noticed, rotatethe tires as soon as possible, check forproper tire inflation pressure, and checkfor damaged tires or wheels. If theunusual wear continues after therotation, check the wheel alignment.See When It Is Time for New Tires0 283 andWheel Replacement 0 286.
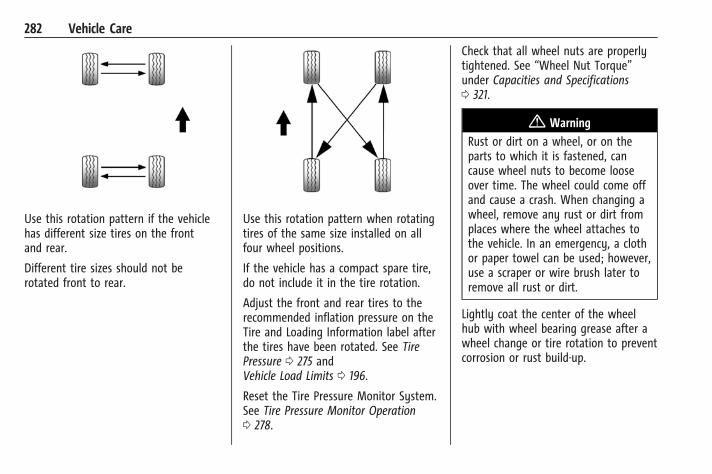
Chevrolet Camaro Owner Manual (GMNA-Localizing-U.S./Canada/Mexico-15516346) - 2022 - CRC - 4/9/21
282 Vehicle Care
Use this rotation pattern if the vehiclehas different size tires on the frontand rear.
Different tire sizes should not berotated front to rear.
Use this rotation pattern when rotatingtires of the same size installed on allfour wheel positions.
If the vehicle has a compact spare tire,do not include it in the tire rotation.
Adjust the front and rear tires to therecommended inflation pressure on theTire and Loading Information label afterthe tires have been rotated. See TirePressure 0 275 andVehicle Load Limits 0 196.
Reset the Tire Pressure Monitor System.See Tire Pressure Monitor Operation0 278.
Check that all wheel nuts are properlytightened. See “Wheel Nut Torque”under Capacities and Specifications0 321.
{ Warning
Rust or dirt on a wheel, or on theparts to which it is fastened, cancause wheel nuts to become looseover time. The wheel could come offand cause a crash. When changing awheel, remove any rust or dirt fromplaces where the wheel attaches tothe vehicle. In an emergency, a clothor paper towel can be used; however,use a scraper or wire brush later toremove all rust or dirt.
Lightly coat the center of the wheelhub with wheel bearing grease after awheel change or tire rotation to preventcorrosion or rust build-up.
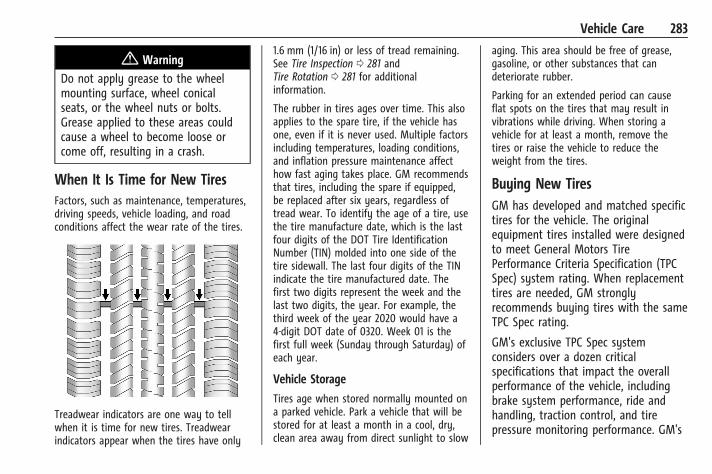
Chevrolet Camaro Owner Manual (GMNA-Localizing-U.S./Canada/Mexico-15516346) - 2022 - CRC - 4/9/21
Vehicle Care 283
{ Warning
Do not apply grease to the wheelmounting surface, wheel conicalseats, or the wheel nuts or bolts.Grease applied to these areas couldcause a wheel to become loose orcome off, resulting in a crash.
When It Is Time for New TiresFactors, such as maintenance, temperatures,driving speeds, vehicle loading, and roadconditions affect the wear rate of the tires.
Treadwear indicators are one way to tellwhen it is time for new tires. Treadwearindicators appear when the tires have only
1.6 mm (1/16 in) or less of tread remaining.See Tire Inspection 0 281 andTire Rotation 0 281 for additionalinformation.
The rubber in tires ages over time. This alsoapplies to the spare tire, if the vehicle hasone, even if it is never used. Multiple factorsincluding temperatures, loading conditions,and inflation pressure maintenance affecthow fast aging takes place. GM recommendsthat tires, including the spare if equipped,be replaced after six years, regardless oftread wear. To identify the age of a tire, usethe tire manufacture date, which is the lastfour digits of the DOT Tire IdentificationNumber (TIN) molded into one side of thetire sidewall. The last four digits of the TINindicate the tire manufactured date. Thefirst two digits represent the week and thelast two digits, the year. For example, thethird week of the year 2020 would have a4-digit DOT date of 0320. Week 01 is thefirst full week (Sunday through Saturday) ofeach year.
Vehicle Storage
Tires age when stored normally mounted ona parked vehicle. Park a vehicle that will bestored for at least a month in a cool, dry,clean area away from direct sunlight to slow
aging. This area should be free of grease,gasoline, or other substances that candeteriorate rubber.
Parking for an extended period can causeflat spots on the tires that may result invibrations while driving. When storing avehicle for at least a month, remove thetires or raise the vehicle to reduce theweight from the tires.
Buying New TiresGM has developed and matched specifictires for the vehicle. The originalequipment tires installed were designedto meet General Motors TirePerformance Criteria Specification (TPCSpec) system rating. When replacementtires are needed, GM stronglyrecommends buying tires with the sameTPC Spec rating.
GM's exclusive TPC Spec systemconsiders over a dozen criticalspecifications that impact the overallperformance of the vehicle, includingbrake system performance, ride andhandling, traction control, and tirepressure monitoring performance. GM's

Chevrolet Camaro Owner Manual (GMNA-Localizing-U.S./Canada/Mexico-15516346) - 2022 - CRC - 4/9/21
284 Vehicle Care
TPC Spec number is molded onto thetire's sidewall near the tire size. If thetires have an all-season tread design,the TPC Spec number will be followedby MS for mud and snow. See TireSidewall Labeling 0 271 for additionalinformation.
GM recommends replacing worn tires incomplete sets of four. Uniform treaddepth on all tires will help to maintainthe performance of the vehicle. Brakingand handling performance may beadversely affected if all the tires are notreplaced at the same time. If properrotation and maintenance have beendone, all four tires should wear out atabout the same time. However, if it isnecessary to replace only one axle setof worn tires, place the new tires onthe rear axle. See Tire Rotation 0 281.
{ Warning
Tires could explode during improperservice. Attempting to mount ordismount a tire could cause injury or
(Continued)
Warning (Continued)
death. Only your dealer or authorizedtire service center should mount ordismount the tires.
{ Warning
Mixing tires of different sizes (otherthan those originally installed on thevehicle), brands, tread patterns,or types may cause loss of vehiclecontrol, resulting in a crash or othervehicle damage. Use the correct size,brand, and type of tire on all wheels.
{ Warning
Using bias-ply tires on the vehiclemay cause the wheel rim flanges todevelop cracks after many miles ofdriving. A tire and/or wheel could failsuddenly and cause a crash. Use onlyradial-ply tires with the wheels onthe vehicle.
Winter tires with the same speed ratingas the original equipment tires may notbe available for H, V, W, Y and ZRspeed rated tires. Never exceed thewinter tires’ maximum speed capabilitywhen using winter tires with a lowerspeed rating.
If the vehicle tires must be replacedwith a tire that does not have a TPCSpec number, make sure they are thesame size, load range, speed rating, andconstruction (radial) as the originaltires.
The Tire and Loading Information labelindicates the original equipment tireson the vehicle. See Vehicle Load Limits0 196.
Different Size Tires and WheelsIf wheels or tires are installed that are adifferent size than the original equipmentwheels and tires, vehicle performance,including its braking, ride and handlingcharacteristics, stability, and resistance torollover may be affected. If the vehicle haselectronic systems such as antilock brakes,rollover airbags, traction control, electronic
Chevrolet Camaro Owner Manual (GMNA-Localizing-U.S./Canada/Mexico-15516346) - 2022 - CRC - 4/9/21
Vehicle Care 285
stability control, or All-Wheel Drive, theperformance of these systems can also beaffected.
{ WarningIf different sized wheels are used, theremay not be an acceptable level ofperformance and safety if tires notrecommended for those wheels areselected. This increases the chance of acrash and serious injury. Only use GMspecific wheel and tire systems developedfor the vehicle, and have them properlyinstalled by a GM certified technician.
See Buying New Tires 0 283 andAccessories and Modifications 0 236.
Uniform Tire Quality GradingThe following information relates to thesystem developed by the United StatesNational Highway Traffic SafetyAdministration (NHTSA), which gradestires by treadwear, traction, andtemperature performance. This appliesonly to vehicles sold in the UnitedStates. The grades are molded on thesidewalls of most passenger car tires.
The Uniform Tire Quality Grading(UTQG) system does not apply to deeptread, winter tires, compact spare tires,tires with nominal rim diameters of10 to 12 inches (25 to 30 cm), or to somelimited-production tires.
While the tires available on GeneralMotors passenger cars and light trucksmay vary with respect to these grades,they must also conform to federalsafety requirements and additionalGeneral Motors Tire PerformanceCriteria (TPC) standards.
Quality grades can be found whereapplicable on the tire sidewall betweentread shoulder and maximum sectionwidth. For example:
Treadwear 200 Traction AA Temperature A
All Passenger Car Tires Must Conform toFederal Safety Requirements In AdditionTo These Grades.
Treadwear
The treadwear grade is a comparativerating based on the wear rate of thetire when tested under controlled
conditions on a specified governmenttest course. For example, a tire graded150 would wear one and one-half (1½)times as well on the government courseas a tire graded 100. The relativeperformance of tires depends upon theactual conditions of their use, however,and may depart significantly from thenorm due to variations in driving habits,service practices and differences in roadcharacteristics and climate.
Traction
The traction grades, from highest tolowest, are AA, A, B, and C. Thosegrades represent the tire's ability tostop on wet pavement as measuredunder controlled conditions on specifiedgovernment test surfaces of asphalt andconcrete. A tire marked C may havepoor traction performance. Warning:The traction grade assigned to this tireis based on straight-ahead brakingtraction tests, and does not includeacceleration, cornering, hydroplaning,or peak traction characteristics.
Chevrolet Camaro Owner Manual (GMNA-Localizing-U.S./Canada/Mexico-15516346) - 2022 - CRC - 4/9/21
286 Vehicle Care
Temperature
The temperature grades are A (thehighest), B, and C, representing thetire's resistance to the generation ofheat and its ability to dissipate heatwhen tested under controlled conditionson a specified indoor laboratory testwheel. Sustained high temperature cancause the material of the tire todegenerate and reduce tire life, andexcessive temperature can lead tosudden tire failure. The grade Ccorresponds to a level of performancewhich all passenger car tires must meetunder the Federal Motor SafetyStandard No. 109. Grades B and Arepresent higher levels of performanceon the laboratory test wheel than theminimum required by law. Warning:The temperature grade for this tire isestablished for a tire that is properlyinflated and not overloaded. Excessivespeed, underinflation, or excessiveloading, either separately or incombination, can cause heat buildupand possible tire failure.
Wheel Alignment and TireBalanceThe tires and wheels were aligned andbalanced at the factory to provide thelongest tire life and best overallperformance. Adjustments to wheelalignment and tire balancing are notnecessary on a regular basis. Consider analignment check if there is unusual tire wearor the vehicle is significantly pulling to oneside or the other. Some slight pull to theleft or right, depending on the crown of theroad and/or other road surface variationssuch as troughs or ruts, is normal. If thevehicle is vibrating when driving on asmooth road, the tires and wheels mayneed to be rebalanced. See your dealer forproper diagnosis.
Wheel ReplacementReplace any wheel that is bent, cracked,or badly rusted or corroded. If wheel nutskeep coming loose, the wheel, wheel bolts,and wheel nuts should be replaced. If thewheel leaks air, replace it. Some aluminumwheels can be repaired. See your dealer ifany of these conditions exist.
Your dealer will know the kind of wheel thatis needed.
Each new wheel should have the sameload-carrying capacity, diameter, width,offset, and be mounted the same way asthe one it replaces.
Replace wheels, wheel bolts, wheel nuts,or Tire Pressure Monitor System (TPMS)sensors with new GM original equipmentparts.
{ WarningUsing the wrong replacement wheels,wheel bolts, or wheel nuts can bedangerous. It could affect the braking andhandling of the vehicle. Tires can lose airand cause loss of control, resulting in acrash. Always use the correct wheel,wheel bolts, and wheel nuts forreplacement.
Chevrolet Camaro Owner Manual (GMNA-Localizing-U.S./Canada/Mexico-15516346) - 2022 - CRC - 4/9/21
Vehicle Care 287
CautionThe wrong wheel can also causeproblems with bearing life, brake cooling,speedometer or odometer calibration,headlamp aim, bumper height, vehicleground clearance, and tire or tire chainclearance to the body and chassis.
Used Replacement Wheels
{ WarningReplacing a wheel with a used one isdangerous. How it has been used or howfar it has been driven may be unknown.It could fail suddenly and cause a crash.When replacing wheels, use a new GMoriginal equipment wheel.
Tire Chains
{ WarningDo not use tire chains. There is notenough clearance. Tire chains used on avehicle without the proper amount ofclearance can cause damage to thebrakes, suspension, or other vehicle parts.
(Continued)
Warning (Continued)
The area damaged by the tire chainscould cause loss of control and a crash.Use another type of traction device onlyif its manufacturer recommends it for thevehicle's tire size combination and roadconditions. Follow that manufacturer'sinstructions. To avoid vehicle damage,drive slowly and readjust or remove thetraction device if it contacts the vehicle.Do not spin the wheels. If tractiondevices are used, install them on the reartires.
If a Tire Goes FlatIt is unusual for a tire to blow out whiledriving, especially if the tires are maintainedproperly. See Tires 0 269. If air goes out ofa tire, it is much more likely to leak outslowly. But if there ever is a blowout, hereare a few tips about what to expect andwhat to do:
If a front tire fails, the flat tire creates adrag that pulls the vehicle toward that side.Take your foot off the accelerator pedal andgrip the steering wheel firmly. Steer to
maintain lane position, and then gentlybrake to a stop, well off the road,if possible.
A rear blowout, particularly on a curve, actsmuch like a skid and may require the samecorrection as used in a skid. Stop pressingthe accelerator pedal and steer to straightenthe vehicle. It may be very bumpy andnoisy. Gently brake to a stop, well off theroad, if possible.
The vehicle has no spare tire, no tirechanging equipment, and no place to storea tire.
If the vehicle has run-flat tires, there is noneed to stop on the side of the road tochange a flat tire. See Run-Flat Tires 0 270.
{ WarningDriving on a flat tire will causepermanent damage to the tire.Re-inflating a tire after it has been drivenon while severely underinflated or flatmay cause a blowout and a serious crash.Never attempt to re-inflate a tire that hasbeen driven on while severely
(Continued)
Chevrolet Camaro Owner Manual (GMNA-Localizing-U.S./Canada/Mexico-15516346) - 2022 - CRC - 4/9/21
288 Vehicle Care
Warning (Continued)
underinflated or flat. Have your dealer oran authorized tire service center repair orreplace the flat tire as soon as possible.
{ WarningSpecial tools and procedures are requiredto service a run-flat tire. If these specialtools and procedures are not used, injuryor vehicle damage may occur. Always besure the proper tools and procedures, asdescribed in the service manual, are used.
If a tire goes flat, avoid further tire andwheel damage by driving slowly to a levelplace, well off the road, if possible. Turn onthe hazard warning flashers. See HazardWarning Flashers 0 111.
This vehicle may come with a tire sealantand compressor kit. To use the tire sealantand compressor kit, see Tire Sealant andCompressor Kit 0 288.
Tire Sealant and Compressor Kit
{ WarningIdling a vehicle in an enclosed area withpoor ventilation is dangerous. Engineexhaust may enter the vehicle. Engineexhaust contains carbon monoxide (CO)which cannot be seen or smelled. It cancause unconsciousness and even death.Never run the engine in an enclosed areathat has no fresh air ventilation. For moreinformation, see Engine Exhaust 0 206.
{ WarningOverinflating a tire could cause the tireto rupture and you or others could beinjured. Be sure to read and follow thetire sealant and compressor kitinstructions and inflate the tire to itsrecommended pressure. Do not exceedthe recommended pressure.
{ WarningStoring the tire sealant and compressorkit or other equipment in the passengercompartment of the vehicle could causeinjury. In a sudden stop or collision, looseequipment could strike someone. Storethe tire sealant and compressor kit in itsoriginal location.
If this vehicle has a tire sealant andcompressor kit, there may not be a sparetire or tire changing equipment, and onsome vehicles there may not be a place tostore a tire.
The tire sealant and compressor can be usedto temporarily seal punctures up to 6 mm(0.25 in) in the tread area of the tire. It canalso be used to inflate an underinflated tire.
If the tire has been separated from thewheel, has damaged sidewalls, or has alarge puncture, the tire is too severelydamaged for the tire sealant andcompressor kit to be effective. See RoadsideAssistance Program 0 329.
Read and follow all of the tire sealant andcompressor kit instructions.
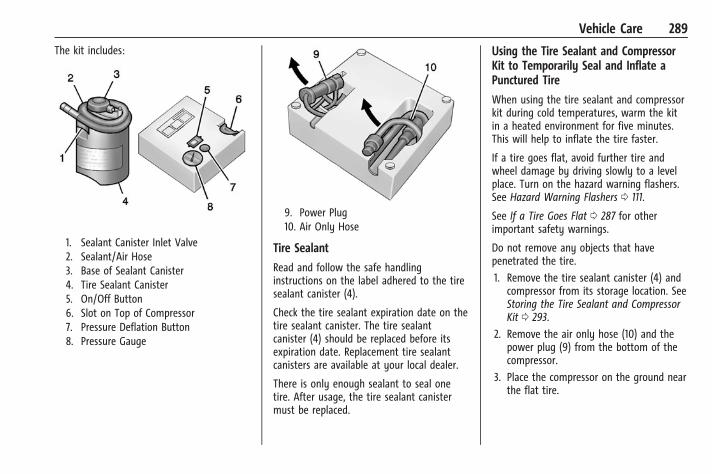
Chevrolet Camaro Owner Manual (GMNA-Localizing-U.S./Canada/Mexico-15516346) - 2022 - CRC - 4/9/21
Vehicle Care 289
The kit includes:
1. Sealant Canister Inlet Valve2. Sealant/Air Hose3. Base of Sealant Canister4. Tire Sealant Canister5. On/Off Button6. Slot on Top of Compressor7. Pressure Deflation Button8. Pressure Gauge
9. Power Plug10. Air Only Hose
Tire Sealant
Read and follow the safe handlinginstructions on the label adhered to the tiresealant canister (4).
Check the tire sealant expiration date on thetire sealant canister. The tire sealantcanister (4) should be replaced before itsexpiration date. Replacement tire sealantcanisters are available at your local dealer.
There is only enough sealant to seal onetire. After usage, the tire sealant canistermust be replaced.
Using the Tire Sealant and CompressorKit to Temporarily Seal and Inflate aPunctured Tire
When using the tire sealant and compressorkit during cold temperatures, warm the kitin a heated environment for five minutes.This will help to inflate the tire faster.
If a tire goes flat, avoid further tire andwheel damage by driving slowly to a levelplace. Turn on the hazard warning flashers.See Hazard Warning Flashers 0 111.
See If a Tire Goes Flat 0 287 for otherimportant safety warnings.
Do not remove any objects that havepenetrated the tire.
1. Remove the tire sealant canister (4) andcompressor from its storage location. SeeStoring the Tire Sealant and CompressorKit 0 293.
2. Remove the air only hose (10) and thepower plug (9) from the bottom of thecompressor.
3. Place the compressor on the ground nearthe flat tire.
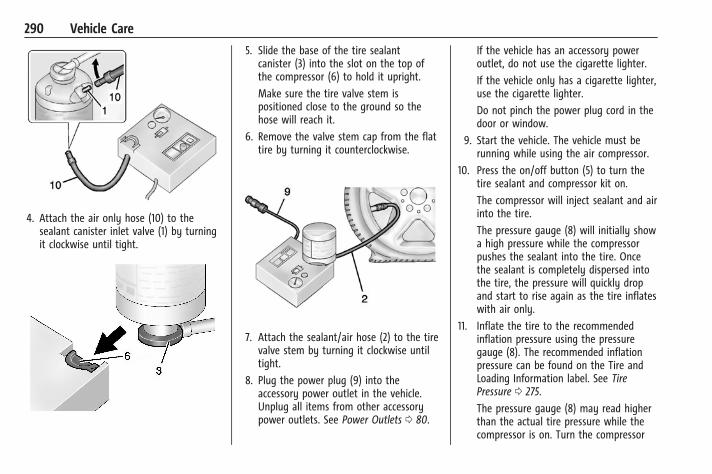
Chevrolet Camaro Owner Manual (GMNA-Localizing-U.S./Canada/Mexico-15516346) - 2022 - CRC - 4/9/21
290 Vehicle Care
4. Attach the air only hose (10) to thesealant canister inlet valve (1) by turningit clockwise until tight.
5. Slide the base of the tire sealantcanister (3) into the slot on the top ofthe compressor (6) to hold it upright.
Make sure the tire valve stem ispositioned close to the ground so thehose will reach it.
6. Remove the valve stem cap from the flattire by turning it counterclockwise.
7. Attach the sealant/air hose (2) to the tirevalve stem by turning it clockwise untiltight.
8. Plug the power plug (9) into theaccessory power outlet in the vehicle.Unplug all items from other accessorypower outlets. See Power Outlets 0 80.
If the vehicle has an accessory poweroutlet, do not use the cigarette lighter.
If the vehicle only has a cigarette lighter,use the cigarette lighter.
Do not pinch the power plug cord in thedoor or window.
9. Start the vehicle. The vehicle must berunning while using the air compressor.
10. Press the on/off button (5) to turn thetire sealant and compressor kit on.
The compressor will inject sealant and airinto the tire.
The pressure gauge (8) will initially showa high pressure while the compressorpushes the sealant into the tire. Oncethe sealant is completely dispersed intothe tire, the pressure will quickly dropand start to rise again as the tire inflateswith air only.
11. Inflate the tire to the recommendedinflation pressure using the pressuregauge (8). The recommended inflationpressure can be found on the Tire andLoading Information label. See TirePressure 0 275.
The pressure gauge (8) may read higherthan the actual tire pressure while thecompressor is on. Turn the compressor
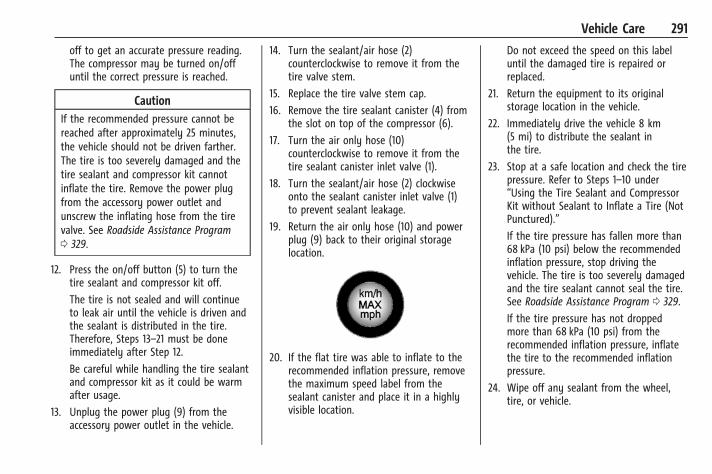
Chevrolet Camaro Owner Manual (GMNA-Localizing-U.S./Canada/Mexico-15516346) - 2022 - CRC - 4/9/21
Vehicle Care 291
off to get an accurate pressure reading.The compressor may be turned on/offuntil the correct pressure is reached.
CautionIf the recommended pressure cannot bereached after approximately 25 minutes,the vehicle should not be driven farther.The tire is too severely damaged and thetire sealant and compressor kit cannotinflate the tire. Remove the power plugfrom the accessory power outlet andunscrew the inflating hose from the tirevalve. See Roadside Assistance Program0 329.
12. Press the on/off button (5) to turn thetire sealant and compressor kit off.
The tire is not sealed and will continueto leak air until the vehicle is driven andthe sealant is distributed in the tire.Therefore, Steps 13–21 must be doneimmediately after Step 12.
Be careful while handling the tire sealantand compressor kit as it could be warmafter usage.
13. Unplug the power plug (9) from theaccessory power outlet in the vehicle.
14. Turn the sealant/air hose (2)counterclockwise to remove it from thetire valve stem.
15. Replace the tire valve stem cap.
16. Remove the tire sealant canister (4) fromthe slot on top of the compressor (6).
17. Turn the air only hose (10)counterclockwise to remove it from thetire sealant canister inlet valve (1).
18. Turn the sealant/air hose (2) clockwiseonto the sealant canister inlet valve (1)to prevent sealant leakage.
19. Return the air only hose (10) and powerplug (9) back to their original storagelocation.
20. If the flat tire was able to inflate to therecommended inflation pressure, removethe maximum speed label from thesealant canister and place it in a highlyvisible location.
Do not exceed the speed on this labeluntil the damaged tire is repaired orreplaced.
21. Return the equipment to its originalstorage location in the vehicle.
22. Immediately drive the vehicle 8 km(5 mi) to distribute the sealant inthe tire.
23. Stop at a safe location and check the tirepressure. Refer to Steps 1–10 under“Using the Tire Sealant and CompressorKit without Sealant to Inflate a Tire (NotPunctured).”
If the tire pressure has fallen more than68 kPa (10 psi) below the recommendedinflation pressure, stop driving thevehicle. The tire is too severely damagedand the tire sealant cannot seal the tire.See Roadside Assistance Program 0 329.
If the tire pressure has not droppedmore than 68 kPa (10 psi) from therecommended inflation pressure, inflatethe tire to the recommended inflationpressure.
24. Wipe off any sealant from the wheel,tire, or vehicle.
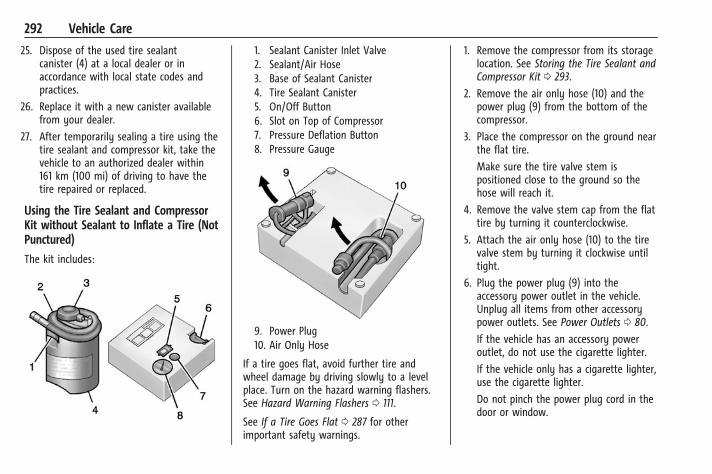
Chevrolet Camaro Owner Manual (GMNA-Localizing-U.S./Canada/Mexico-15516346) - 2022 - CRC - 4/9/21
292 Vehicle Care
25. Dispose of the used tire sealantcanister (4) at a local dealer or inaccordance with local state codes andpractices.
26. Replace it with a new canister availablefrom your dealer.
27. After temporarily sealing a tire using thetire sealant and compressor kit, take thevehicle to an authorized dealer within161 km (100 mi) of driving to have thetire repaired or replaced.
Using the Tire Sealant and CompressorKit without Sealant to Inflate a Tire (NotPunctured)
The kit includes:
1. Sealant Canister Inlet Valve2. Sealant/Air Hose3. Base of Sealant Canister4. Tire Sealant Canister5. On/Off Button6. Slot on Top of Compressor7. Pressure Deflation Button8. Pressure Gauge
9. Power Plug10. Air Only Hose
If a tire goes flat, avoid further tire andwheel damage by driving slowly to a levelplace. Turn on the hazard warning flashers.See Hazard Warning Flashers 0 111.
See If a Tire Goes Flat 0 287 for otherimportant safety warnings.
1. Remove the compressor from its storagelocation. See Storing the Tire Sealant andCompressor Kit 0 293.
2. Remove the air only hose (10) and thepower plug (9) from the bottom of thecompressor.
3. Place the compressor on the ground nearthe flat tire.
Make sure the tire valve stem ispositioned close to the ground so thehose will reach it.
4. Remove the valve stem cap from the flattire by turning it counterclockwise.
5. Attach the air only hose (10) to the tirevalve stem by turning it clockwise untiltight.
6. Plug the power plug (9) into theaccessory power outlet in the vehicle.Unplug all items from other accessorypower outlets. See Power Outlets 0 80.
If the vehicle has an accessory poweroutlet, do not use the cigarette lighter.
If the vehicle only has a cigarette lighter,use the cigarette lighter.
Do not pinch the power plug cord in thedoor or window.
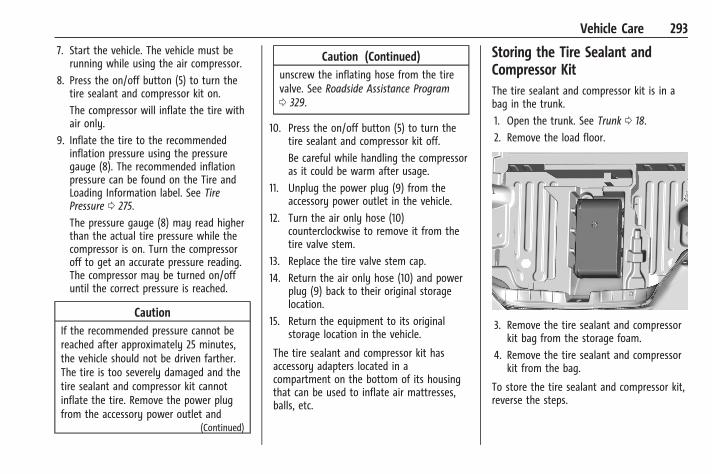
Chevrolet Camaro Owner Manual (GMNA-Localizing-U.S./Canada/Mexico-15516346) - 2022 - CRC - 4/9/21
Vehicle Care 293
7. Start the vehicle. The vehicle must berunning while using the air compressor.
8. Press the on/off button (5) to turn thetire sealant and compressor kit on.
The compressor will inflate the tire withair only.
9. Inflate the tire to the recommendedinflation pressure using the pressuregauge (8). The recommended inflationpressure can be found on the Tire andLoading Information label. See TirePressure 0 275.
The pressure gauge (8) may read higherthan the actual tire pressure while thecompressor is on. Turn the compressoroff to get an accurate pressure reading.The compressor may be turned on/offuntil the correct pressure is reached.
CautionIf the recommended pressure cannot bereached after approximately 25 minutes,the vehicle should not be driven farther.The tire is too severely damaged and thetire sealant and compressor kit cannotinflate the tire. Remove the power plugfrom the accessory power outlet and
(Continued)
Caution (Continued)unscrew the inflating hose from the tirevalve. See Roadside Assistance Program0 329.
10. Press the on/off button (5) to turn thetire sealant and compressor kit off.
Be careful while handling the compressoras it could be warm after usage.
11. Unplug the power plug (9) from theaccessory power outlet in the vehicle.
12. Turn the air only hose (10)counterclockwise to remove it from thetire valve stem.
13. Replace the tire valve stem cap.
14. Return the air only hose (10) and powerplug (9) back to their original storagelocation.
15. Return the equipment to its originalstorage location in the vehicle.
The tire sealant and compressor kit hasaccessory adapters located in acompartment on the bottom of its housingthat can be used to inflate air mattresses,balls, etc.
Storing the Tire Sealant andCompressor KitThe tire sealant and compressor kit is in abag in the trunk.
1. Open the trunk. See Trunk 0 18.
2. Remove the load floor.
3. Remove the tire sealant and compressorkit bag from the storage foam.
4. Remove the tire sealant and compressorkit from the bag.
To store the tire sealant and compressor kit,reverse the steps.
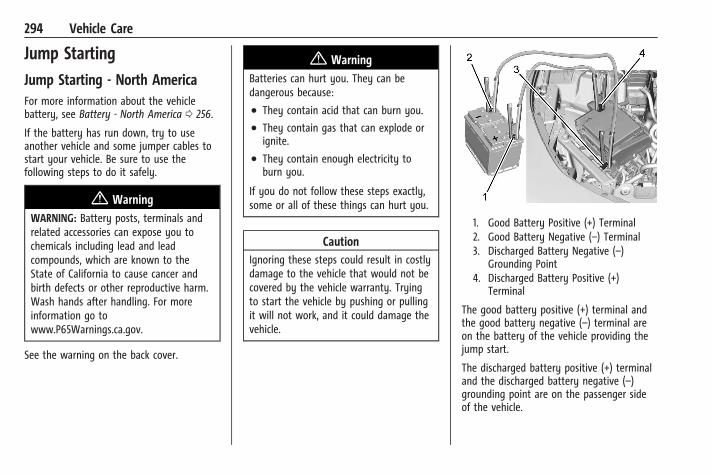
Chevrolet Camaro Owner Manual (GMNA-Localizing-U.S./Canada/Mexico-15516346) - 2022 - CRC - 4/9/21
294 Vehicle Care
Jump StartingJump Starting - North AmericaFor more information about the vehiclebattery, see Battery - North America 0 256.
If the battery has run down, try to useanother vehicle and some jumper cables tostart your vehicle. Be sure to use thefollowing steps to do it safely.
{ WarningWARNING: Battery posts, terminals andrelated accessories can expose you tochemicals including lead and leadcompounds, which are known to theState of California to cause cancer andbirth defects or other reproductive harm.Wash hands after handling. For moreinformation go towww.P65Warnings.ca.gov.
See the warning on the back cover.
{ WarningBatteries can hurt you. They can bedangerous because:
. They contain acid that can burn you.
. They contain gas that can explode orignite.
. They contain enough electricity toburn you.
If you do not follow these steps exactly,some or all of these things can hurt you.
CautionIgnoring these steps could result in costlydamage to the vehicle that would not becovered by the vehicle warranty. Tryingto start the vehicle by pushing or pullingit will not work, and it could damage thevehicle.
1. Good Battery Positive (+) Terminal2. Good Battery Negative (–) Terminal3. Discharged Battery Negative (–)
Grounding Point4. Discharged Battery Positive (+)
Terminal
The good battery positive (+) terminal andthe good battery negative (–) terminal areon the battery of the vehicle providing thejump start.
The discharged battery positive (+) terminaland the discharged battery negative (–)grounding point are on the passenger sideof the vehicle.
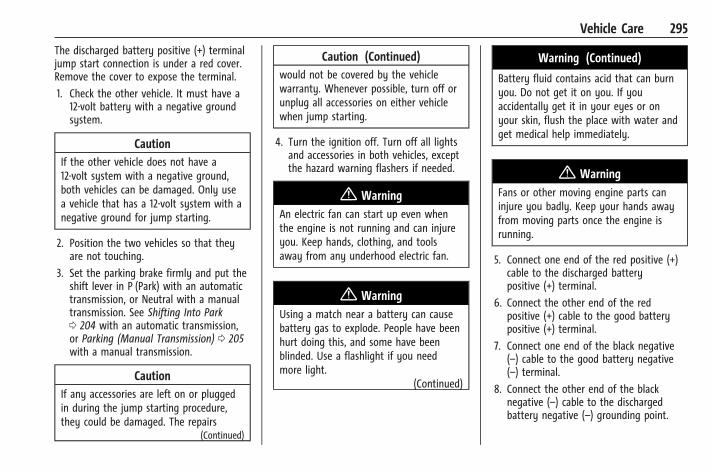
Chevrolet Camaro Owner Manual (GMNA-Localizing-U.S./Canada/Mexico-15516346) - 2022 - CRC - 4/9/21
Vehicle Care 295
The discharged battery positive (+) terminaljump start connection is under a red cover.Remove the cover to expose the terminal.
1. Check the other vehicle. It must have a12-volt battery with a negative groundsystem.
CautionIf the other vehicle does not have a12-volt system with a negative ground,both vehicles can be damaged. Only usea vehicle that has a 12-volt system with anegative ground for jump starting.
2. Position the two vehicles so that theyare not touching.
3. Set the parking brake firmly and put theshift lever in P (Park) with an automatictransmission, or Neutral with a manualtransmission. See Shifting Into Park0 204 with an automatic transmission,or Parking (Manual Transmission) 0 205with a manual transmission.
CautionIf any accessories are left on or pluggedin during the jump starting procedure,they could be damaged. The repairs
(Continued)
Caution (Continued)would not be covered by the vehiclewarranty. Whenever possible, turn off orunplug all accessories on either vehiclewhen jump starting.
4. Turn the ignition off. Turn off all lightsand accessories in both vehicles, exceptthe hazard warning flashers if needed.
{ WarningAn electric fan can start up even whenthe engine is not running and can injureyou. Keep hands, clothing, and toolsaway from any underhood electric fan.
{ WarningUsing a match near a battery can causebattery gas to explode. People have beenhurt doing this, and some have beenblinded. Use a flashlight if you needmore light.
(Continued)
Warning (Continued)
Battery fluid contains acid that can burnyou. Do not get it on you. If youaccidentally get it in your eyes or onyour skin, flush the place with water andget medical help immediately.
{ WarningFans or other moving engine parts caninjure you badly. Keep your hands awayfrom moving parts once the engine isrunning.
5. Connect one end of the red positive (+)cable to the discharged batterypositive (+) terminal.
6. Connect the other end of the redpositive (+) cable to the good batterypositive (+) terminal.
7. Connect one end of the black negative(–) cable to the good battery negative(–) terminal.
8. Connect the other end of the blacknegative (–) cable to the dischargedbattery negative (–) grounding point.
Chevrolet Camaro Owner Manual (GMNA-Localizing-U.S./Canada/Mexico-15516346) - 2022 - CRC - 4/9/21
296 Vehicle Care
9. Start the engine in the vehicle with thegood battery and run the engine at idlespeed for at least four minutes.
10. Try to start the vehicle that had thedead battery. If it will not start after afew tries, it probably needs service.
CautionIf the jumper cables are connected orremoved in the wrong order, electricalshorting may occur and damage thevehicle. The repairs would not be coveredby the vehicle warranty. Always connectand remove the jumper cables in thecorrect order, making sure that the cablesdo not touch each other or other metal.
Jumper Cable Removal
Reverse the sequence exactly whenremoving the jumper cables.
After starting the disabled vehicle andremoving the jumper cables, allow it to idlefor several minutes.
Towing the Vehicle
CautionIncorrectly transporting a disabled vehiclemay cause damage to the vehicle. Useproper tire straps to secure the vehicle tothe flatbed tow truck. Do not strap orhook to any frame, underbody,or suspension component not specifiedbelow. Do not move vehicles with driveaxle tires on the ground. Damage is notcovered by the vehicle warranty.
CautionThe vehicle may be equipped with anelectric parking brake and/or amechanical transmission range selectshifter. In the event of a loss of 12-voltbattery power, the electric parking brakecannot be released, and the vehiclecannot be shifted to N (Neutral). Tireskates or dollies must be used under thenon-rolling tires to prevent damage whileloading/unloading the vehicle. Draggingthe vehicle will cause damage notcovered by the vehicle warranty.
CautionThe vehicle may be equipped with a toweye. Improper use of the tow eye maycause damage to the vehicle and is notcovered by the vehicle warranty.If equipped, use the tow eye to load thevehicle onto a flatbed tow truck from aflat road surface, or to move the vehiclea very short distance at a walking pace.The tow eye is not designed for off-roadrecovery. The vehicle must be inN (Neutral) with the electric parkingbrake released when using the tow eye.
Contact a professional towing service if thedisabled vehicle must be transported. GMrecommends a flatbed tow truck totransport a disabled vehicle. Use ramps tohelp reduce approach angles, if necessary.
For Camaro High Performance models, seethe Camaro High Performance supplement.
If equipped, a tow eye may be located nearthe spare tire or emergency jack. Do not usethe tow eye to pull the vehicle from thesnow, mud, sand, or ditch. Tow eye threadsmay have right or left-hand threads. Usecaution when installing or removing thetow eye.
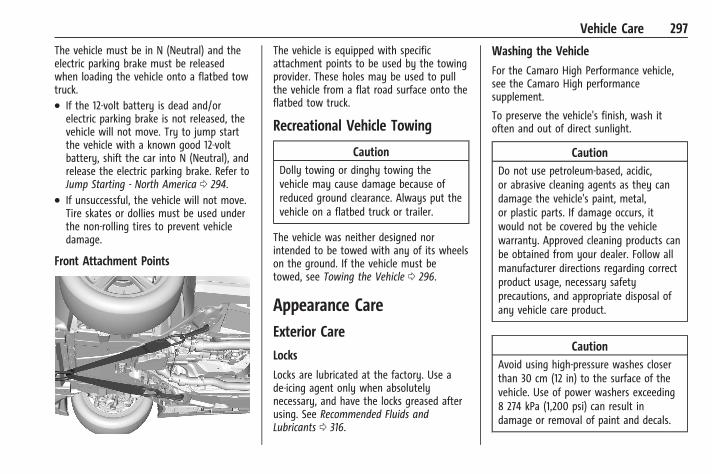
Chevrolet Camaro Owner Manual (GMNA-Localizing-U.S./Canada/Mexico-15516346) - 2022 - CRC - 4/9/21
Vehicle Care 297
The vehicle must be in N (Neutral) and theelectric parking brake must be releasedwhen loading the vehicle onto a flatbed towtruck.. If the 12-volt battery is dead and/or
electric parking brake is not released, thevehicle will not move. Try to jump startthe vehicle with a known good 12-voltbattery, shift the car into N (Neutral), andrelease the electric parking brake. Refer toJump Starting - North America 0 294.
. If unsuccessful, the vehicle will not move.Tire skates or dollies must be used underthe non-rolling tires to prevent vehicledamage.
Front Attachment Points
The vehicle is equipped with specificattachment points to be used by the towingprovider. These holes may be used to pullthe vehicle from a flat road surface onto theflatbed tow truck.
Recreational Vehicle Towing
CautionDolly towing or dinghy towing thevehicle may cause damage because ofreduced ground clearance. Always put thevehicle on a flatbed truck or trailer.
The vehicle was neither designed norintended to be towed with any of its wheelson the ground. If the vehicle must betowed, see Towing the Vehicle 0 296.
Appearance CareExterior Care
Locks
Locks are lubricated at the factory. Use ade-icing agent only when absolutelynecessary, and have the locks greased afterusing. See Recommended Fluids andLubricants 0 316.
Washing the Vehicle
For the Camaro High Performance vehicle,see the Camaro High performancesupplement.
To preserve the vehicle's finish, wash itoften and out of direct sunlight.
CautionDo not use petroleum-based, acidic,or abrasive cleaning agents as they candamage the vehicle's paint, metal,or plastic parts. If damage occurs, itwould not be covered by the vehiclewarranty. Approved cleaning products canbe obtained from your dealer. Follow allmanufacturer directions regarding correctproduct usage, necessary safetyprecautions, and appropriate disposal ofany vehicle care product.
CautionAvoid using high-pressure washes closerthan 30 cm (12 in) to the surface of thevehicle. Use of power washers exceeding8 274 kPa (1,200 psi) can result indamage or removal of paint and decals.
Chevrolet Camaro Owner Manual (GMNA-Localizing-U.S./Canada/Mexico-15516346) - 2022 - CRC - 4/9/21
298 Vehicle Care
CautionSome automatic car washes can causedamage to the vehicle, wheels andground effects. Automatic car washes arenot recommended, due to lack ofclearance for the undercarriage and/orwide rear tires and wheels.
If using an automatic car wash, comply withthe car wash instructions. The windshieldwiper and rear window wiper, if equipped,must be off. Remove any accessories thatmay be damaged or interfere with the carwash equipment.
Rinse the vehicle well, before washing andafter, to remove all cleaning agentscompletely. If they are allowed to dry onthe surface, they could stain.
Dry the finish with a soft, clean chamois oran all-cotton towel to avoid surfacescratches and water spotting.
Cleaning Underhood Components
CautionDo not power wash any componentunder the hood that has thisesymbol.
This could cause damage that would notbe covered by the vehicle warranty.
Solvents or aggressive cleaners may harmunderhood components. The usages of thesechemicals should be avoided.
Recommend water only.
A pressure washer may be used, but caremust be utilized. The following criteria mustbe followed:. Water pressure must be kept below
14 000 KPa (2,000 PSI).. Water temperature must be below 80 °C
(180 °F).. Spray nozzle with a 40 degree wide angle
spray pattern or wider must be used.. Nozzle must be kept at least 30 cm (1 ft)
away from all surfaces.
Finish Care
Application of aftermarket clearcoat sealant/wax materials is not recommended.If painted surfaces are damaged, see yourdealer to have the damage assessed andrepaired. Foreign materials such as calciumchloride and other salts, ice melting agents,road oil and tar, tree sap, bird droppings,chemicals from industrial chimneys, etc., candamage the vehicle's finish if they remainon painted surfaces. Wash the vehicle assoon as possible. If necessary, usenon-abrasive cleaners that are marked safefor painted surfaces to remove foreignmatter.
Occasional hand waxing or mild polishingshould be done to remove residue from thepaint finish. See your dealer for approvedcleaning products.
Do not apply waxes or polishes to uncoatedplastic, vinyl, rubber, decals, simulatedwood, or flat paint as damage can occur.
CautionMachine compounding or aggressivepolishing on a basecoat/clearcoat paintfinish may damage it. Use only
(Continued)
Chevrolet Camaro Owner Manual (GMNA-Localizing-U.S./Canada/Mexico-15516346) - 2022 - CRC - 4/9/21
Vehicle Care 299
Caution (Continued)non-abrasive waxes and polishes that aremade for a basecoat/clearcoat paint finishon the vehicle.
To keep the paint finish looking new, keepthe vehicle garaged or covered wheneverpossible.
Protecting Exterior Bright Metal Moldings
CautionFailure to clean and protect the brightmetal moldings can result in a hazywhite finish or pitting. This damagewould not be covered by the vehiclewarranty.
The bright metal moldings on the vehicleare aluminum, chrome or stainless steel. Toprevent damage always follow thesecleaning instructions:. Be sure the molding is cool to the touch
before applying any cleaning solution.. Use only approved cleaning solutions for
aluminum, chrome, or stainless steel.Some cleaners are highly acidic or containalkaline substances and can damage themoldings.
. Always dilute a concentrated cleaneraccording to the manufacturer’sinstructions.
. Do not use cleaners that are not intendedfor automotive use.
. Use a nonabrasive wax on the vehicleafter washing to protect and extend themolding finish.
Convertible Top Care
Frequently hand wash convertible tops withmild car wash soap. Never use a stiff brush,steam, bleach, or aggressive cleaners.If necessary, a soft brush can be used toremove dirt. When finished cleaning,thoroughly rinse the fabric. Avoid automaticcar washes with overhead brushes or veryhigh pressure sprays as they can causedamage and leaking.
Only lower the top when it is completelydry and avoid leaving the top lowered forextended periods of time to preventexcessive interior weathering.
Avoid leaving large amounts of snow on thetop for extended periods of time as damagemay also occur.
Hood Extractor
Hood Air Extractor
For the Camaro High Performance vehicle,see the Camaro High performancesupplement.
It is not recommended that the air extractoron the SS Performance Package be waxed,as it will change the gloss level of thesurface. In addition, care must be used whenwaxing around the air extractor. If a smallamount of wax is applied to the extractor itcan create an irregular appearance in thesurface of the panel.
The air extractor may have vent screens inthe openings. Keep leaves or other debrisout of the vent screens.
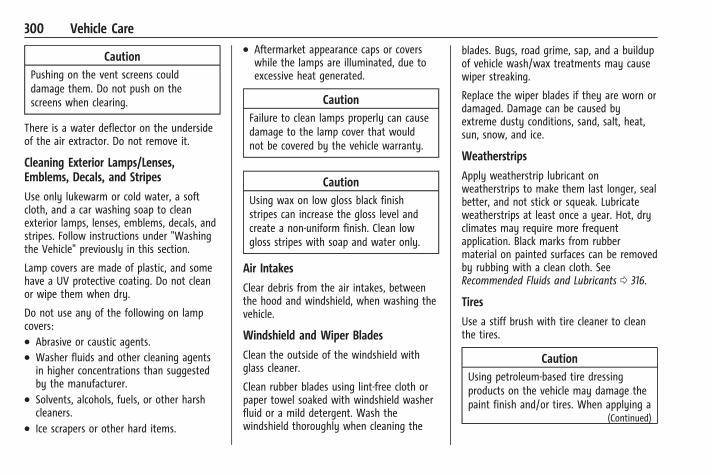
Chevrolet Camaro Owner Manual (GMNA-Localizing-U.S./Canada/Mexico-15516346) - 2022 - CRC - 4/9/21
300 Vehicle Care
CautionPushing on the vent screens coulddamage them. Do not push on thescreens when clearing.
There is a water deflector on the undersideof the air extractor. Do not remove it.
Cleaning Exterior Lamps/Lenses,Emblems, Decals, and Stripes
Use only lukewarm or cold water, a softcloth, and a car washing soap to cleanexterior lamps, lenses, emblems, decals, andstripes. Follow instructions under "Washingthe Vehicle" previously in this section.
Lamp covers are made of plastic, and somehave a UV protective coating. Do not cleanor wipe them when dry.
Do not use any of the following on lampcovers:. Abrasive or caustic agents.. Washer fluids and other cleaning agents
in higher concentrations than suggestedby the manufacturer.
. Solvents, alcohols, fuels, or other harshcleaners.
. Ice scrapers or other hard items.
. Aftermarket appearance caps or coverswhile the lamps are illuminated, due toexcessive heat generated.
CautionFailure to clean lamps properly can causedamage to the lamp cover that wouldnot be covered by the vehicle warranty.
CautionUsing wax on low gloss black finishstripes can increase the gloss level andcreate a non-uniform finish. Clean lowgloss stripes with soap and water only.
Air Intakes
Clear debris from the air intakes, betweenthe hood and windshield, when washing thevehicle.
Windshield and Wiper Blades
Clean the outside of the windshield withglass cleaner.
Clean rubber blades using lint-free cloth orpaper towel soaked with windshield washerfluid or a mild detergent. Wash thewindshield thoroughly when cleaning the
blades. Bugs, road grime, sap, and a buildupof vehicle wash/wax treatments may causewiper streaking.
Replace the wiper blades if they are worn ordamaged. Damage can be caused byextreme dusty conditions, sand, salt, heat,sun, snow, and ice.
Weatherstrips
Apply weatherstrip lubricant onweatherstrips to make them last longer, sealbetter, and not stick or squeak. Lubricateweatherstrips at least once a year. Hot, dryclimates may require more frequentapplication. Black marks from rubbermaterial on painted surfaces can be removedby rubbing with a clean cloth. SeeRecommended Fluids and Lubricants 0 316.
Tires
Use a stiff brush with tire cleaner to cleanthe tires.
CautionUsing petroleum-based tire dressingproducts on the vehicle may damage thepaint finish and/or tires. When applying a
(Continued)
Chevrolet Camaro Owner Manual (GMNA-Localizing-U.S./Canada/Mexico-15516346) - 2022 - CRC - 4/9/21
Vehicle Care 301
Caution (Continued)tire dressing, always wipe off anyoverspray from all painted surfaces onthe vehicle.
Wheels and Wheel Trim
Use a soft, clean cloth with mild soap andwater to clean the wheels. After rinsingthoroughly with clean water, dry with asoft, clean towel. A wax may then beapplied.
CautionChrome wheels and chrome wheel trimmay be damaged if the vehicle is notwashed after driving on roads that havebeen sprayed with magnesium chloride orcalcium chloride. These are used on roadsfor conditions such as dust and ice.Always wash the chrome with soap andwater after exposure.
CautionTo avoid surface damage on wheels andwheel trim, do not use strong soaps,chemicals, abrasive polishes, cleaners,
(Continued)
Caution (Continued)or brushes. Use only GM approvedcleaners. Do not drive the vehicle throughan automatic car wash that uses siliconcarbide tire/wheel cleaning brushes.Damage could occur and the repairswould not be covered by the vehiclewarranty.
Brake System
Visually inspect brake lines and hoses forproper hook-up, binding, leaks, cracks,chafing, etc. Inspect disc brake pads for wearand rotors for surface condition. Inspectdrum brake linings/shoes for wear or cracks.Inspect all other brake parts.
Steering, Suspension, and ChassisComponents
Visually inspect steering, suspension, andchassis components for damaged, loose,or missing parts or signs of wear at leastonce a year.
Inspect power steering for properattachment, connections, binding, leaks,cracks, chafing, etc.
Visually check constant velocity joint bootsand axle seals for leaks.
Body Component Lubrication
Lubricate all key lock cylinders, hood hinges,liftgate hinges, and steel fuel door hingeunless the components are plastic. Applyingsilicone grease on weatherstrips with a cleancloth will make them last longer, seal better,and not stick or squeak.
Underbody Maintenance
At least twice a year, spring and fall, useplain water to flush any corrosive materialsfrom the underbody. Take care tothoroughly clean any areas where mud andother debris can collect.
Do not directly power wash the rear axleoutput seals. High pressure water canovercome the seals and contaminate therear axle fluid. Contaminated fluid willdecrease the life of the axle and should bereplaced.
Sheet Metal Damage
If the vehicle is damaged and requires sheetmetal repair or replacement, make sure thebody repair shop applies anti-corrosionmaterial to parts repaired or replaced torestore corrosion protection.
Chevrolet Camaro Owner Manual (GMNA-Localizing-U.S./Canada/Mexico-15516346) - 2022 - CRC - 4/9/21
302 Vehicle Care
Original manufacturer replacement parts willprovide the corrosion protection whilemaintaining the vehicle warranty.
Finish Damage
Quickly repair minor chips and scratcheswith touch-up materials available from yourdealer to avoid corrosion. Larger areas offinish damage can be corrected in yourdealer's body and paint shop.
Chemical Paint Spotting
Airborne pollutants can fall upon and attackpainted vehicle surfaces causing blotchy,ring-shaped discolorations, and small,irregular dark spots etched into the paintsurface. See “Finish Care” previously in thissection.
Interior CareTo prevent dirt particle abrasions, regularlyclean the vehicle's interior. Before usingcleaners, read and follow all safetyinstructions on the label. While cleaning theinterior, open the doors and windows to getproper ventilation. Newspapers or darkgarments can transfer color to the vehicle’sinterior.
CautionImmediately remove cleaners, handlotions, sunscreen, and insect repellentfrom all interior surfaces or permanentdamage may result.
CautionUse cleaners specifically designed for thesurfaces being cleaned to preventpermanent damage to the vehicle. Applyall cleaners directly to a cleaning cloth.Do not spray cleaners on any switches orcontrols.
When using liquid soap cleaners, follow thedirections on the specific cleaner or soapsolution for dilution instructions.
CautionTo prevent damage:
. Never use a razor or any other sharpobject to remove soil from any interiorsurface
. Never use a brush with stiff bristles.(Continued)
Caution (Continued). Never rub any surface aggressively or
with too much pressure.
. Do not get any exposed electricalcomponents wet.
. Do not use laundry detergents ordishwashing soaps with degreasers. Donot use solutions that contain strongor caustic soap.
. Do not heavily saturate the upholsterywhen cleaning.
. Do not use solvents or cleanerscontaining solvents.
. Do not use disinfecting wipes that arescented or contain bleach. Do not usewipes or cleaners that show a colortransfer to the wipe or change theappearance of the interior surfacewhen used.
. Do not use scented or gel-type handsanitizers. If hand sanitizer comes incontact with interior surfaces of thevehicle, blot immediately and cleanwith a soft cloth dampened with amild soap and water solution.
Chevrolet Camaro Owner Manual (GMNA-Localizing-U.S./Canada/Mexico-15516346) - 2022 - CRC - 4/9/21
Vehicle Care 303
Interior Glass
To clean, use a microfiber cloth fabricdampened with water. Wipe droplets leftbehind with a clean dry cloth. If necessary,use a commercial glass cleaner aftercleaning with plain water.
CautionTo prevent scratching, never use abrasivecleaners on automotive glass. Abrasivecleaners or aggressive cleaning maydamage the rear window defogger.
Cleaning the windshield with water duringthe first three to six months of ownershipwill reduce tendency to fog.
Speaker Covers
Vacuum around a speaker cover gently, sothat the speaker will not be damaged. Cleanspots with water and mild soap.
Coated Moldings
Coated moldings should be cleaned.. When lightly soiled, wipe with a sponge
or soft, lint-free cloth dampened withwater.
. When heavily soiled, use warm soapywater.
Vinyl/Rubber
If equipped with vinyl floor and rubber floormats, use a soft cloth and/or brushdampened with water to remove dust andloose dirt. For more thorough cleaning, usea mild soap and water solution.
{ WarningDo not use cleaners that contain silicone,wax-based products, or cleaners thatincrease gloss on vinyl/rubber floor andmats. These cleaners can permanentlychange the appearance and feel of thevinyl/rubber and can make the floorslippery. Your foot could slip whileoperating the vehicle, and you could losecontrol, resulting in a crash. You orothers could be injured.
Fabric/Carpet/Suede
Start by vacuuming the surface using a softbrush attachment. If a rotating vacuumbrush attachment is being used, only use iton the floor carpet. Before cleaning, gentlyremove as much of the soil as possible:. Gently blot liquids with a paper towel.
Continue blotting until no more soil canbe removed.
. For solid soils, remove as much aspossible prior to vacuuming.
To clean:
1. Saturate a clean, lint-free colorfast clothwith water. Microfiber cloth isrecommended to prevent lint transfer tothe fabric or carpet.
2. Remove excess moisture by gentlywringing until water does not drip fromthe cleaning cloth.
3. Start on the outside edge of the soil andgently rub toward the center. Fold thecleaning cloth to a clean area frequentlyto prevent forcing the soil into thefabric.
4. Continue gently rubbing the soiled areauntil there is no longer any colortransfer from the soil to the cleaningcloth.
5. If the soil is not completely removed,use a mild soap solution followed onlyby plain water.
If the soil is not completely removed, it maybe necessary to use a commercial upholsterycleaner or spot lifter. Test a small hiddenarea for colorfastness before using a
Chevrolet Camaro Owner Manual (GMNA-Localizing-U.S./Canada/Mexico-15516346) - 2022 - CRC - 4/9/21
304 Vehicle Care
commercial upholstery cleaner or spot lifter.If ring formation occurs, clean the entirefabric or carpet.
After cleaning, use a paper towel to blotexcess moisture.
Cleaning High Gloss Surfaces and VehicleInformation and Radio Displays
Use a microfiber cloth on high gloss surfacesor vehicle displays. First, use a soft bristlebrush to remove dirt that can scratch thesurface. Then gently clean by rubbing with amicrofiber cloth. Never use window cleanersor solvents. Periodically hand wash themicrofiber cloth separately, using mild soap.Do not use bleach or fabric softener. Rinsethoroughly and air dry before next use.
CautionDo not attach a device with a suction cupto the display. This may cause damageand would not be covered by the vehiclewarranty.
Instrument Panel, Leather, Vinyl, OtherPlastic Surfaces, Low Gloss PaintSurfaces, and Natural Open Pore WoodSurfaces
Use a soft bristle brush to remove dust fromknobs and crevices on the instrumentcluster. Use a soft microfiber clothdampened with water to remove dust andloose dirt. For a more thorough cleaning,use a soft microfiber cloth dampened with amild soap and water solution.
CautionSoaking or saturating leather, especiallyperforated leather, as well as otherinterior surfaces, may cause permanentdamage. Wipe excess moisture fromthese surfaces after cleaning and allowthem to dry naturally. Never use heat,steam, or spot removers. Do not useliquids that contain alcohol or solvents onleather seats. Do not use cleaners thatcontain silicone or wax-based products.Cleaners containing these solvents canpermanently change the appearance andfeel of leather or soft trim, and are notrecommended.
Do not use cleaners that increase gloss,especially on the instrument panel. Reflectedglare can decrease visibility through thewindshield under certain conditions.
CautionUse of air fresheners may causepermanent damage to plastics andpainted surfaces. If an air freshenercomes in contact with any plastic orpainted surface in the vehicle, blotimmediately and clean with a soft clothdampened with a mild soap solution.Damage caused by air fresheners wouldnot be covered by the vehicle warranty.
Cargo Cover and Convenience Net
If equipped, wash with warm water andmild detergent. Do not use chlorine bleach.Rinse with cold water, and then drycompletely.
Care of Seat Belts
Keep belts clean and dry.
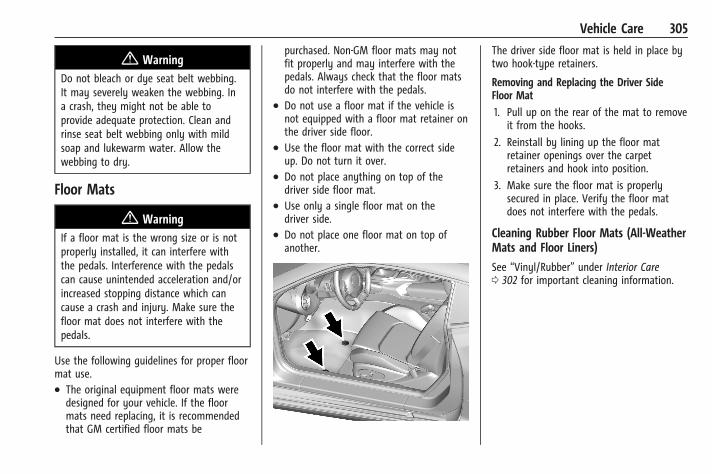
Chevrolet Camaro Owner Manual (GMNA-Localizing-U.S./Canada/Mexico-15516346) - 2022 - CRC - 4/9/21
Vehicle Care 305
{ WarningDo not bleach or dye seat belt webbing.It may severely weaken the webbing. Ina crash, they might not be able toprovide adequate protection. Clean andrinse seat belt webbing only with mildsoap and lukewarm water. Allow thewebbing to dry.
Floor Mats
{ WarningIf a floor mat is the wrong size or is notproperly installed, it can interfere withthe pedals. Interference with the pedalscan cause unintended acceleration and/orincreased stopping distance which cancause a crash and injury. Make sure thefloor mat does not interfere with thepedals.
Use the following guidelines for proper floormat use.. The original equipment floor mats were
designed for your vehicle. If the floormats need replacing, it is recommendedthat GM certified floor mats be
purchased. Non-GM floor mats may notfit properly and may interfere with thepedals. Always check that the floor matsdo not interfere with the pedals.
. Do not use a floor mat if the vehicle isnot equipped with a floor mat retainer onthe driver side floor.
. Use the floor mat with the correct sideup. Do not turn it over.
. Do not place anything on top of thedriver side floor mat.
. Use only a single floor mat on thedriver side.
. Do not place one floor mat on top ofanother.
The driver side floor mat is held in place bytwo hook-type retainers.
Removing and Replacing the Driver SideFloor Mat
1. Pull up on the rear of the mat to removeit from the hooks.
2. Reinstall by lining up the floor matretainer openings over the carpetretainers and hook into position.
3. Make sure the floor mat is properlysecured in place. Verify the floor matdoes not interfere with the pedals.
Cleaning Rubber Floor Mats (All-WeatherMats and Floor Liners)
See “Vinyl/Rubber” under Interior Care0 302 for important cleaning information.
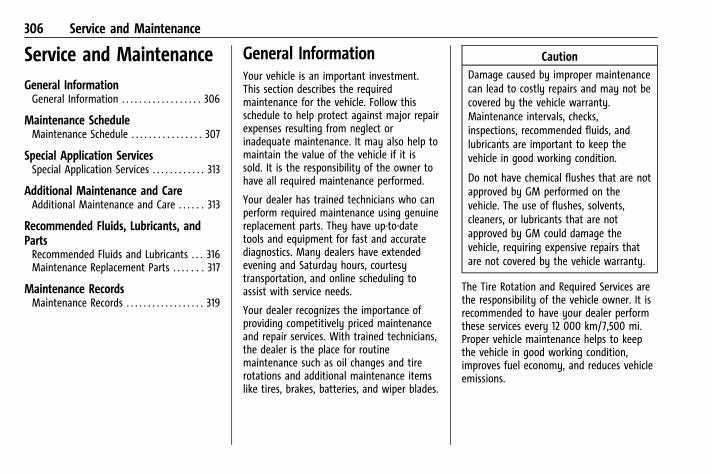
Chevrolet Camaro Owner Manual (GMNA-Localizing-U.S./Canada/Mexico-15516346) - 2022 - CRC - 4/9/21
306 Service and Maintenance
Service and MaintenanceGeneral InformationGeneral Information . . . . . . . . . . . . . . . . . . 306
Maintenance ScheduleMaintenance Schedule . . . . . . . . . . . . . . . . 307
Special Application ServicesSpecial Application Services . . . . . . . . . . . . 313
Additional Maintenance and CareAdditional Maintenance and Care . . . . . . 313
Recommended Fluids, Lubricants, andPartsRecommended Fluids and Lubricants . . . 316Maintenance Replacement Parts . . . . . . . 317
Maintenance RecordsMaintenance Records . . . . . . . . . . . . . . . . . . 319
General InformationYour vehicle is an important investment.This section describes the requiredmaintenance for the vehicle. Follow thisschedule to help protect against major repairexpenses resulting from neglect orinadequate maintenance. It may also help tomaintain the value of the vehicle if it issold. It is the responsibility of the owner tohave all required maintenance performed.
Your dealer has trained technicians who canperform required maintenance using genuinereplacement parts. They have up-to-datetools and equipment for fast and accuratediagnostics. Many dealers have extendedevening and Saturday hours, courtesytransportation, and online scheduling toassist with service needs.
Your dealer recognizes the importance ofproviding competitively priced maintenanceand repair services. With trained technicians,the dealer is the place for routinemaintenance such as oil changes and tirerotations and additional maintenance itemslike tires, brakes, batteries, and wiper blades.
CautionDamage caused by improper maintenancecan lead to costly repairs and may not becovered by the vehicle warranty.Maintenance intervals, checks,inspections, recommended fluids, andlubricants are important to keep thevehicle in good working condition.
Do not have chemical flushes that are notapproved by GM performed on thevehicle. The use of flushes, solvents,cleaners, or lubricants that are notapproved by GM could damage thevehicle, requiring expensive repairs thatare not covered by the vehicle warranty.
The Tire Rotation and Required Services arethe responsibility of the vehicle owner. It isrecommended to have your dealer performthese services every 12 000 km/7,500 mi.Proper vehicle maintenance helps to keepthe vehicle in good working condition,improves fuel economy, and reduces vehicleemissions.
Chevrolet Camaro Owner Manual (GMNA-Localizing-U.S./Canada/Mexico-15516346) - 2022 - CRC - 4/9/21
Service and Maintenance 307
Because of the way people use vehicles,maintenance needs vary. There may need tobe more frequent checks and services. TheAdditional Required Services - Normal are forvehicles that:. Carry passengers and cargo within
recommended limits on the Tire andLoading Information label. See VehicleLoad Limits 0 196.
. Are driven on reasonable road surfaceswithin legal driving limits.
. Use the recommended fuel.See Recommended Fuel (3.6L V6 Engine)0 231 orRecommended Fuel (2.0L L4 Turbo Engineand 6.2L V8 Engine) 0 231 orRecommended Fuel (6.2L V8 SuperchargedEngine) 0 231.
Refer to the information in the MaintenanceSchedule Additional Required Services -Normal chart.
The Additional Required Services - Severe arefor vehicles that are:. Mainly driven in heavy city traffic in hot
weather.
. Mainly driven in hilly or mountainousterrain.
. Frequently towing a trailer.
. Used for high speed or competitivedriving.
. Used for taxi, police, or delivery service.
Refer to the information in the MaintenanceSchedule Additional Required Services -Severe chart.
{ WarningPerforming maintenance work can bedangerous and can cause serious injury.Perform maintenance work only if therequired information, proper tools, andequipment are available. If they are not,see your dealer to have a trainedtechnician do the work. See Doing YourOwn Service Work 0 237.
Maintenance ScheduleOwner Checks and Services
Check the engine oil level. See Engine Oil0 243.
Once a Month. Check the tire inflation pressures. See Tire
Pressure 0 275.. Inspect the tires for wear. See Tire
Inspection 0 281.. Check the windshield washer fluid level.
See Washer Fluid 0 254.
Engine Oil Change
When the CHANGE ENGINE OIL SOONmessage displays, have the engine oil andfilter changed within the next 1 000 km/600 mi. If driven under the best conditions,the engine oil life system may not indicatethe need for vehicle service for up to a year.The engine oil and filter must be changed atleast once a year and the oil life systemmust be reset. Your trained dealer techniciancan perform this work. If the engine oil lifesystem is reset accidentally, service thevehicle within 5 000 km/3,000 mi since thelast service. Reset the oil life system whenthe oil is changed. See Engine Oil LifeSystem 0 245.
Chevrolet Camaro Owner Manual (GMNA-Localizing-U.S./Canada/Mexico-15516346) - 2022 - CRC - 4/9/21
308 Service and Maintenance
Engine Air Filter Change
When the REPLACE AT NEXT OIL CHANGEmessage displays, the engine air filtershould be replaced at the next engine oilchange. When the REPLACE ENGINE AIRFILTER SOON message displays, the engineair filter should be replaced at the earliestconvenience. Reset the engine air filter lifesystem after the engine air filter is replaced.See Engine Air Filter Life System (2.0L LTGand 3.6L LGX Engines Only) 0 247.
Air Conditioning Desiccant (Replace EverySeven Years)
The air conditioning system requiresmaintenance every seven years. This servicerequires replacement of the desiccant tohelp the longevity and efficient operation ofthe air conditioning system. This service canbe complex. See your dealer.
Tire Rotation and Required ServicesEvery 12 000 km/7,500 mi
Rotate the tires, if recommended for thevehicle, and perform the following services.See Tire Rotation 0 281.
. Check engine oil level and oillife percentage. If needed, change engineoil and filter, and reset oil life system.See Engine Oil 0 243 andEngine Oil Life System 0 245.
. If equipped with the engine air filter lifesystem, check the air filterlife percentage. If necessary, replace theengine air filter and reset the engine airfilter life system. See Engine Air Filter LifeSystem (2.0L LTG and 3.6L LGX EnginesOnly) 0 247. If the vehicle is not equippedwith the engine air filter life system,inspect the engine air cleaner filter. SeeEngine Air Cleaner/Filter 0 247.
. Check engine coolant level. See CoolingSystem 0 249.
. Check windshield washer fluid level. SeeWasher Fluid 0 254.
. Check tire inflation pressures. See TirePressure 0 275.
. Inspect tire wear. See Tire Inspection0 281.
. Visually check for fluid leaks.
. Inspect brake system. See Exterior Care0 297.
. Visually inspect steering, suspension, andchassis components for damage, includingcracks or tears in the rubber boots, looseor missing parts, or signs of wear at leastonce a year. See Exterior Care 0 297.
. Inspect power steering for properattachment, connections, binding, leaks,cracks, chafing, etc.
. Visually inspect halfshafts and driveshafts for excessive wear, lubricant leaks,and/or damage including: tube dents orcracks, constant velocity joint or universaljoint looseness, cracked or missing boots,loose or missing boot clamps, centerbearing excessive looseness, loose ormissing fasteners, and axle seal leaks.
. Check restraint system components. SeeSafety System Check 0 47.
. Visually inspect the fuel system includingthe evaporative (EVAP) system fordamage or leaks. Visually check all fuelpipes, vapor lines, and hoses for properattachment, connection, routing, andcondition.
. Visually inspect exhaust system andnearby heat shields for loose or damagedparts.
. Lubricate body components. See ExteriorCare 0 297.
Chevrolet Camaro Owner Manual (GMNA-Localizing-U.S./Canada/Mexico-15516346) - 2022 - CRC - 4/9/21
Service and Maintenance 309. Check automatic transmission shift lock
control function. See AutomaticTransmission Shift Lock Control FunctionCheck 0 257.
. Check parking brake and automatictransmission park mechanism. See ParkBrake and P (Park) Mechanism Check0 257.
. Check accelerator pedal for damage, higheffort, or binding. Replace if needed.
. Visually inspect gas strut for signs ofwear, cracks, or other damage. Check thehold open ability of the strut. If the holdopen is low, service the gas strut. See GasStrut(s) 0 259.
. Check tire sealant expiration date,if equipped. See Tire Sealant andCompressor Kit 0 288.
. Inspect sunroof track and seal,if equipped. See Sunroof 0 29.
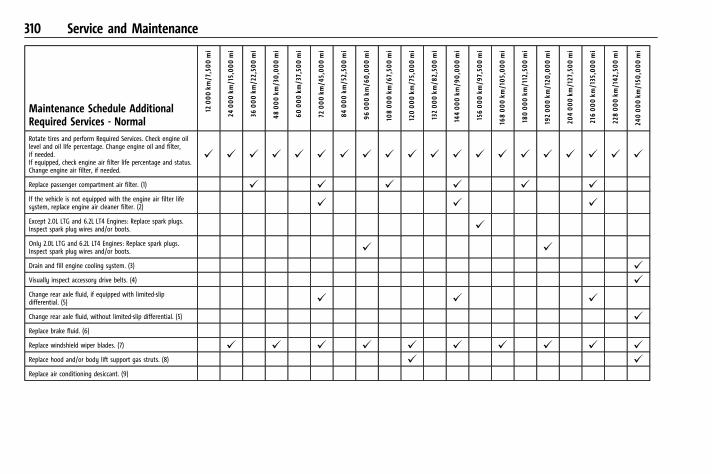
Chevrolet Camaro Owner Manual (GMNA-Localizing-U.S./Canada/Mexico-15516346) - 2022 - CRC - 4/9/21
310 Service and Maintenance
Maintenance Schedule AdditionalRequired Services - Normal
12000km
/7,500mi
24000km
/15,000mi
36000km
/22,50
0mi
48000km
/30,0
00mi
60000km
/37,50
0mi
72000km
/45,000mi
84000km
/52,50
0mi
96000km
/60,0
00mi
108000km
/67,50
0mi
120000km
/75,000mi
132000km
/82,50
0mi
144000km
/90,0
00mi
156000km
/97,50
0mi
168000km
/105,000mi
180000km
/112
,500mi
192000km
/120
,000mi
204000km
/127
,500mi
216000km
/135
,000mi
228000km
/142
,500mi
240000km
/150
,000mi
Rotate tires and perform Required Services. Check engine oillevel and oil life percentage. Change engine oil and filter,if needed.If equipped, check engine air filter life percentage and status.Change engine air filter, if needed.
@ @ @ @ @ @ @ @ @ @ @ @ @ @ @ @ @ @ @ @
Replace passenger compartment air filter. (1) @ @ @ @ @ @
If the vehicle is not equipped with the engine air filter lifesystem, replace engine air cleaner filter. (2) @ @ @
Except 2.0L LTG and 6.2L LT4 Engines: Replace spark plugs.Inspect spark plug wires and/or boots. @
Only 2.0L LTG and 6.2L LT4 Engines: Replace spark plugs.Inspect spark plug wires and/or boots. @ @
Drain and fill engine cooling system. (3) @
Visually inspect accessory drive belts. (4) @
Change rear axle fluid, if equipped with limited-slipdifferential. (5) @ @ @
Change rear axle fluid, without limited-slip differential. (5) @
Replace brake fluid. (6)
Replace windshield wiper blades. (7) @ @ @ @ @ @ @ @ @ @
Replace hood and/or body lift support gas struts. (8) @ @
Replace air conditioning desiccant. (9)
Chevrolet Camaro Owner Manual (GMNA-Localizing-U.S./Canada/Mexico-15516346) - 2022 - CRC - 4/9/21
Service and Maintenance 311
Footnotes — Maintenance ScheduleAdditional Required Services - Normal
(1) Or every two years, whichever comesfirst. More frequent passenger compartmentair filter replacement may be needed ifdriving in areas with heavy traffic, poor airquality, high dust levels, or environmentalallergens. Passenger compartment air filterreplacement may also be needed if there isreduced airflow, window fogging, or odors.Your GM dealer can help determine when toreplace the filter.
(2) Or every four years, whichever comesfirst. If driving in dusty conditions, inspectthe filter at each oil change or more oftenas needed. See Engine Air Cleaner/Filter0 247.
(3) Or every five years, whichever comesfirst. See Cooling System 0 249.
(4) Or every 10 years, whichever comes first.Inspect for fraying, excessive cracking,or damage; replace, if needed.
(5) Do not directly power wash the rear axleoutput seals. High pressure water canovercome the seals and contaminate therear axle fluid. Contaminated fluid willdecrease the life of the axle and should bereplaced.
(6) If equipped with an automatictransmission, replace brake fluid every fiveyears. If equipped with a manualtransmission, replace brake/clutch fluidevery three years. See Brake Fluid 0 255.
(7) Or every 12 months, whichever comesfirst. See Wiper Blade Replacement 0 258.
(8) Or every 10 years, whichever comes first.See Gas Strut(s) 0 259.
(9) Replace air conditioning desiccant everyseven years.
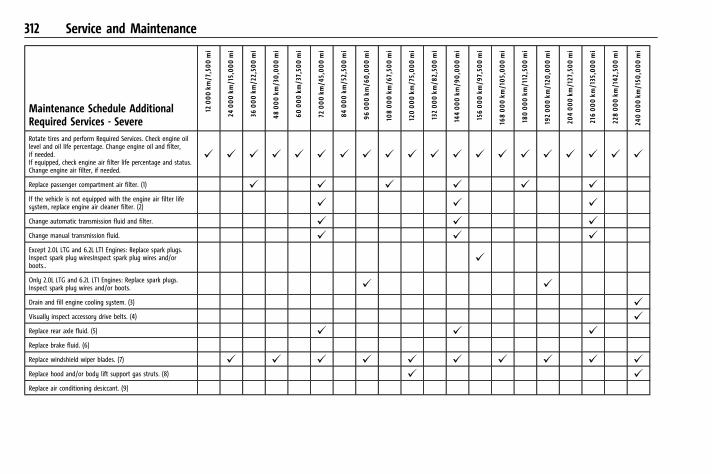
Chevrolet Camaro Owner Manual (GMNA-Localizing-U.S./Canada/Mexico-15516346) - 2022 - CRC - 4/9/21
312 Service and Maintenance
Maintenance Schedule AdditionalRequired Services - Severe
12000km
/7,500mi
24000km
/15,000mi
36000km
/22,50
0mi
48000km
/30,0
00mi
60000km
/37,50
0mi
72000km
/45,000mi
84000km
/52,50
0mi
96000km
/60,0
00mi
108000km
/67,50
0mi
120000km
/75,000mi
132000km
/82,50
0mi
144000km
/90,0
00mi
156000km
/97,50
0mi
168000km
/105,000mi
180000km
/112
,500mi
192000km
/120
,000mi
204000km
/127
,500mi
216000km
/135
,000mi
228000km
/142
,500mi
240000km
/150
,000mi
Rotate tires and perform Required Services. Check engine oillevel and oil life percentage. Change engine oil and filter,if needed.If equipped, check engine air filter life percentage and status.Change engine air filter, if needed.
@ @ @ @ @ @ @ @ @ @ @ @ @ @ @ @ @ @ @ @
Replace passenger compartment air filter. (1) @ @ @ @ @ @
If the vehicle is not equipped with the engine air filter lifesystem, replace engine air cleaner filter. (2) @ @ @
Change automatic transmission fluid and filter. @ @ @
Change manual transmission fluid. @ @ @
Except 2.0L LTG and 6.2L LT1 Engines: Replace spark plugs.Inspect spark plug wiresInspect spark plug wires and/orboots..
@
Only 2.0L LTG and 6.2L LT1 Engines: Replace spark plugs.Inspect spark plug wires and/or boots. @ @
Drain and fill engine cooling system. (3) @
Visually inspect accessory drive belts. (4) @
Replace rear axle fluid. (5) @ @ @
Replace brake fluid. (6)
Replace windshield wiper blades. (7) @ @ @ @ @ @ @ @ @ @
Replace hood and/or body lift support gas struts. (8) @ @
Replace air conditioning desiccant. (9)
Chevrolet Camaro Owner Manual (GMNA-Localizing-U.S./Canada/Mexico-15516346) - 2022 - CRC - 4/9/21
Service and Maintenance 313
Footnotes — Maintenance ScheduleAdditional Required Services - Severe
(1) Or every two years, whichever comesfirst. More frequent passenger compartmentair filter replacement may be needed ifdriving in areas with heavy traffic, poor airquality, high dust levels, or environmentalallergens. Passenger compartment air filterreplacement may also be needed if there isreduced airflow, window fogging, or odors.Your GM dealer can help determine when toreplace the filter.
(2) Or every four years, whichever comesfirst. If driving in dusty conditions, inspectthe filter at each oil change or more oftenas needed. See Engine Air Cleaner/Filter0 247.
(3) Or every five years, whichever comesfirst. See Cooling System 0 249.
(4) Or every 10 years, whichever comes first.Inspect for fraying, excessive cracking,or damage; replace, if needed.
(5) Do not directly power wash the rear axleoutput seals. High pressure water canovercome the seals and contaminate theaxle fluid. Contaminated fluid will decreasethe life of the axle and may drive the needfor repair or replacement.
(6) If equipped with an automatictransmission, replace brake fluid every fiveyears. If equipped with a manualtransmission, replace brake/clutch fluidevery three years. See Brake Fluid 0 255.
(7) Or every 12 months, whichever comesfirst. See Wiper Blade Replacement 0 258.
(8) Or every 10 years, whichever comes first.See Gas Strut(s) 0 259.
(9) Replace air conditioning desiccant everyseven years.
Special Application Services. Severe Commercial Use Vehicles Only:
Lubricate chassis components every oilchange.
. Have underbody flushing serviceperformed. See "Underbody Maintenance"in Exterior Care 0 297.
Additional Maintenanceand CareYour vehicle is an important investment andcaring for it properly may help to avoidfuture costly repairs. To maintain vehicleperformance, additional maintenanceservices may be required.
It is recommended that your dealer performthese services — their trained dealertechnicians know your vehicle best. Yourdealer can also perform a thoroughassessment with a multi-point inspection torecommend when your vehicle may needattention.
The following list is intended to explain theservices and conditions to look for that mayindicate services are required.
Battery
The 12-volt battery supplies power to startthe engine and operate any additionalelectrical accessories.. To avoid break-down or failure to start
the vehicle, maintain a battery with fullcranking power.
. Trained dealer technicians have thediagnostic equipment to test the batteryand ensure that the connections andcables are corrosion-free.
Belts. Belts may need replacing if they squeak
or show signs of cracking or splitting.. Trained dealer technicians have access to
tools and equipment to inspect the beltsand recommend adjustment orreplacement when necessary.
Chevrolet Camaro Owner Manual (GMNA-Localizing-U.S./Canada/Mexico-15516346) - 2022 - CRC - 4/9/21
314 Service and Maintenance
Brakes
Brakes stop the vehicle and are crucial tosafe driving.. Signs of brake wear may include chirping,
grinding, or squealing noises, or difficultystopping.
. Trained dealer technicians have access totools and equipment to inspect the brakesand recommend quality parts engineeredfor the vehicle.
Fluids
Proper fluid levels and approved fluidsprotect the vehicle’s systems andcomponents. See Recommended Fluids andLubricants 0 316 for GM approved fluids.. Engine oil and windshield washer fluid
levels should be checked at every fuel fill.. Instrument cluster lights may come on to
indicate that fluids may be low and needto be filled.
Hoses
Hoses transport fluids and should beregularly inspected to ensure that there areno cracks or leaks. With a multi-pointinspection, your dealer can inspect the hosesand advise if replacement is needed.
Lamps
Properly working headlamps, taillamps, andbrake lamps are important to see and beseen on the road.. Signs that the headlamps need attention
include dimming, failure to light, cracking,or damage. The brake lamps need to bechecked periodically to ensure that theylight when braking.
. With a multi-point inspection, your dealercan check the lamps and note anyconcerns.
Shocks and Struts
Shocks and struts help aid in control for asmoother ride.. Signs of wear may include steering wheel
vibration, bounce/sway while braking,longer stopping distance, or uneventire wear.
. As part of the multi-point inspection,trained dealer technicians can visuallyinspect the shocks and struts for signs ofleaking, blown seals, or damage, and canadvise when service is needed.
Tires
Tires need to be properly inflated, rotated,and balanced. Maintaining the tires can savemoney and fuel, and can reduce the risk oftire failure.. Signs that the tires need to be replaced
include three or more visible treadwearindicators; cord or fabric showing throughthe rubber; cracks or cuts in the tread orsidewall; or a bulge or split in the tire.
. Trained dealer technicians can inspect andrecommend the right tires. Your dealercan also provide tire/wheel balancingservices to ensure smooth vehicleoperation at all speeds. Your dealer sellsand services name brand tires.
Vehicle Care
To help keep the vehicle looking like new,vehicle care products are available from yourdealer. For information on how to clean andprotect the vehicle’s interior and exterior,see Interior Care 0 302 andExterior Care 0 297.
Chevrolet Camaro Owner Manual (GMNA-Localizing-U.S./Canada/Mexico-15516346) - 2022 - CRC - 4/9/21
Service and Maintenance 315
Wheel Alignment
Wheel alignment is critical for ensuring thatthe tires deliver optimal wear andperformance.. Signs that the alignment may need to be
adjusted include pulling, improper vehiclehandling, or unusual tire wear.
. Your dealer has the required equipmentto ensure proper wheel alignment.
Windshield
For safety, appearance, and the bestviewing, keep the windshield clean andclear.. Signs of damage include scratches, cracks,
and chips.. Trained dealer technicians can inspect the
windshield and recommend properreplacement if needed.
Wiper Blades
Wiper blades need to be cleaned and kept ingood condition to provide a clear view.. Signs of wear include streaking, skipping
across the windshield, and worn or splitrubber.
. Trained dealer technicians can check thewiper blades and replace them whenneeded.
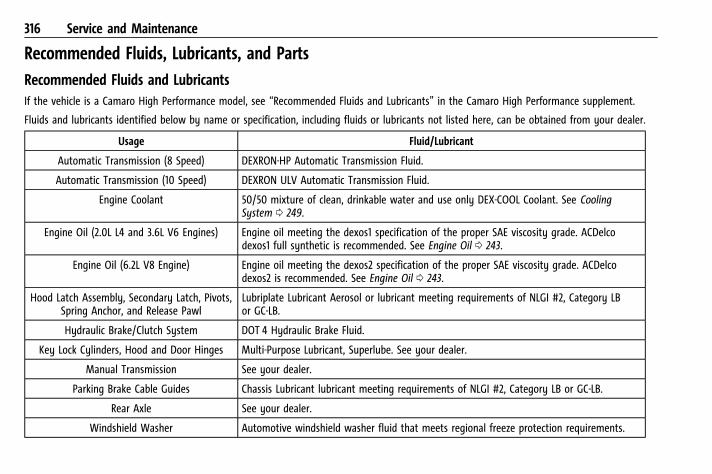
Chevrolet Camaro Owner Manual (GMNA-Localizing-U.S./Canada/Mexico-15516346) - 2022 - CRC - 4/9/21
316 Service and Maintenance
Recommended Fluids, Lubricants, and PartsRecommended Fluids and LubricantsIf the vehicle is a Camaro High Performance model, see “Recommended Fluids and Lubricants” in the Camaro High Performance supplement.
Fluids and lubricants identified below by name or specification, including fluids or lubricants not listed here, can be obtained from your dealer.
Usage Fluid/Lubricant
Automatic Transmission (8 Speed) DEXRON-HP Automatic Transmission Fluid.
Automatic Transmission (10 Speed) DEXRON ULV Automatic Transmission Fluid.
Engine Coolant 50/50 mixture of clean, drinkable water and use only DEX-COOL Coolant. See CoolingSystem 0 249.
Engine Oil (2.0L L4 and 3.6L V6 Engines) Engine oil meeting the dexos1 specification of the proper SAE viscosity grade. ACDelcodexos1 full synthetic is recommended. See Engine Oil 0 243.
Engine Oil (6.2L V8 Engine) Engine oil meeting the dexos2 specification of the proper SAE viscosity grade. ACDelcodexos2 is recommended. See Engine Oil 0 243.
Hood Latch Assembly, Secondary Latch, Pivots,Spring Anchor, and Release Pawl
Lubriplate Lubricant Aerosol or lubricant meeting requirements of NLGI #2, Category LBor GC-LB.
Hydraulic Brake/Clutch System DOT 4 Hydraulic Brake Fluid.
Key Lock Cylinders, Hood and Door Hinges Multi-Purpose Lubricant, Superlube. See your dealer.
Manual Transmission See your dealer.
Parking Brake Cable Guides Chassis Lubricant lubricant meeting requirements of NLGI #2, Category LB or GC-LB.
Rear Axle See your dealer.
Windshield Washer Automotive windshield washer fluid that meets regional freeze protection requirements.
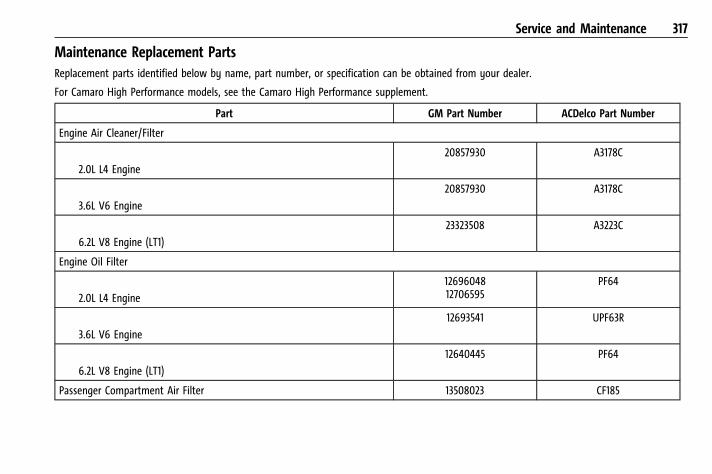
Chevrolet Camaro Owner Manual (GMNA-Localizing-U.S./Canada/Mexico-15516346) - 2022 - CRC - 4/9/21
Service and Maintenance 317
Maintenance Replacement PartsReplacement parts identified below by name, part number, or specification can be obtained from your dealer.
For Camaro High Performance models, see the Camaro High Performance supplement.
Part GM Part Number ACDelco Part Number
Engine Air Cleaner/Filter
I2.0L L4 Engine
20857930 A3178C
I3.6L V6 Engine
20857930 A3178C
I6.2L V8 Engine (LT1)
23323508 A3223C
Engine Oil Filter
I2.0L L4 Engine
1269604812706595
PF64
I3.6L V6 Engine
12693541 UPF63R
I6.2L V8 Engine (LT1)
12640445 PF64
Passenger Compartment Air Filter 13508023 CF185
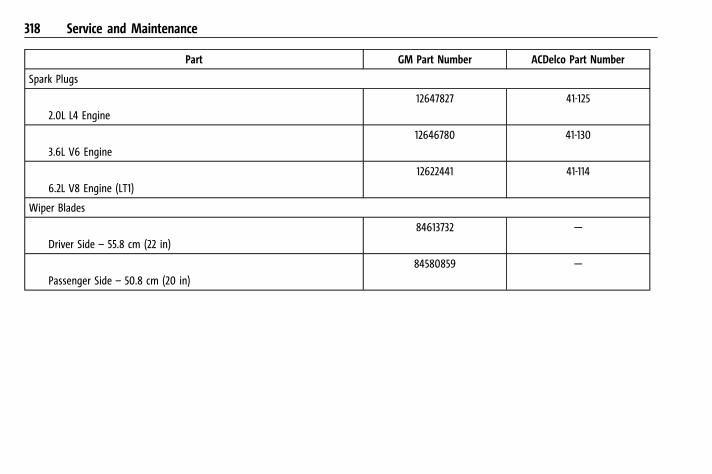
Chevrolet Camaro Owner Manual (GMNA-Localizing-U.S./Canada/Mexico-15516346) - 2022 - CRC - 4/9/21
318 Service and Maintenance
Part GM Part Number ACDelco Part Number
Spark Plugs
I2.0L L4 Engine
12647827 41-125
I3.6L V6 Engine
12646780 41-130
I6.2L V8 Engine (LT1)
12622441 41-114
Wiper Blades
IDriver Side – 55.8 cm (22 in)
84613732 —
IPassenger Side – 50.8 cm (20 in)
84580859 —
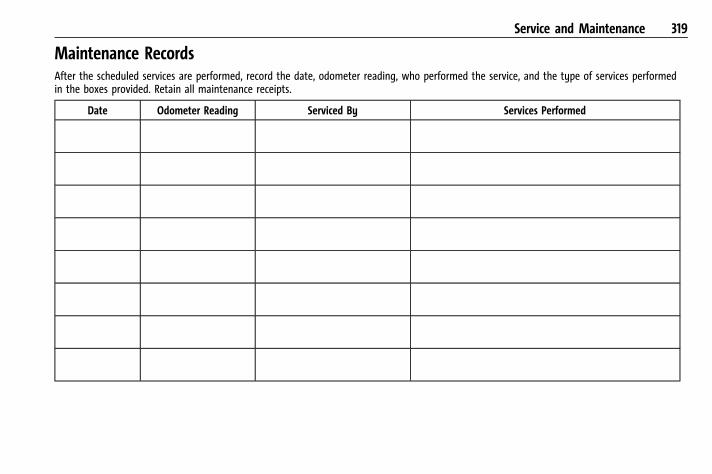
Chevrolet Camaro Owner Manual (GMNA-Localizing-U.S./Canada/Mexico-15516346) - 2022 - CRC - 4/9/21
Service and Maintenance 319
Maintenance RecordsAfter the scheduled services are performed, record the date, odometer reading, who performed the service, and the type of services performedin the boxes provided. Retain all maintenance receipts.
Date Odometer Reading Serviced By Services Performed
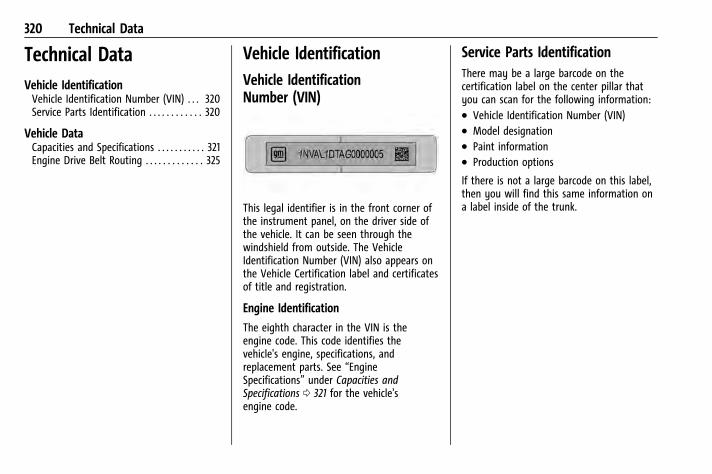
Chevrolet Camaro Owner Manual (GMNA-Localizing-U.S./Canada/Mexico-15516346) - 2022 - CRC - 4/9/21
320 Technical Data
Technical DataVehicle IdentificationVehicle Identification Number (VIN) . . . 320Service Parts Identification . . . . . . . . . . . . 320
Vehicle DataCapacities and Specifications . . . . . . . . . . . 321Engine Drive Belt Routing . . . . . . . . . . . . . 325
Vehicle IdentificationVehicle IdentificationNumber (VIN)
This legal identifier is in the front corner ofthe instrument panel, on the driver side ofthe vehicle. It can be seen through thewindshield from outside. The VehicleIdentification Number (VIN) also appears onthe Vehicle Certification label and certificatesof title and registration.
Engine Identification
The eighth character in the VIN is theengine code. This code identifies thevehicle's engine, specifications, andreplacement parts. See “EngineSpecifications” under Capacities andSpecifications 0 321 for the vehicle'sengine code.
Service Parts IdentificationThere may be a large barcode on thecertification label on the center pillar thatyou can scan for the following information:. Vehicle Identification Number (VIN). Model designation. Paint information. Production options
If there is not a large barcode on this label,then you will find this same information ona label inside of the trunk.
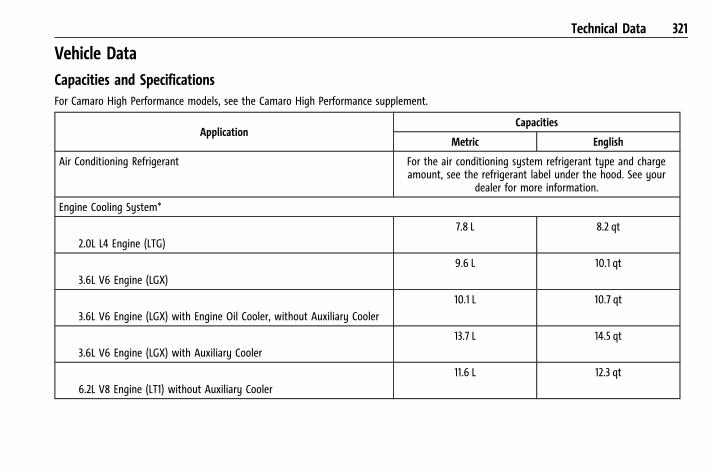
Chevrolet Camaro Owner Manual (GMNA-Localizing-U.S./Canada/Mexico-15516346) - 2022 - CRC - 4/9/21
Technical Data 321
Vehicle DataCapacities and SpecificationsFor Camaro High Performance models, see the Camaro High Performance supplement.
ApplicationCapacities
Metric English
Air Conditioning Refrigerant For the air conditioning system refrigerant type and chargeamount, see the refrigerant label under the hood. See your
dealer for more information.
Engine Cooling System*
I2.0L L4 Engine (LTG)
7.8 L 8.2 qt
I3.6L V6 Engine (LGX)
9.6 L 10.1 qt
I3.6L V6 Engine (LGX) with Engine Oil Cooler, without Auxiliary Cooler
10.1 L 10.7 qt
I3.6L V6 Engine (LGX) with Auxiliary Cooler
13.7 L 14.5 qt
I6.2L V8 Engine (LT1) without Auxiliary Cooler
11.6 L 12.3 qt
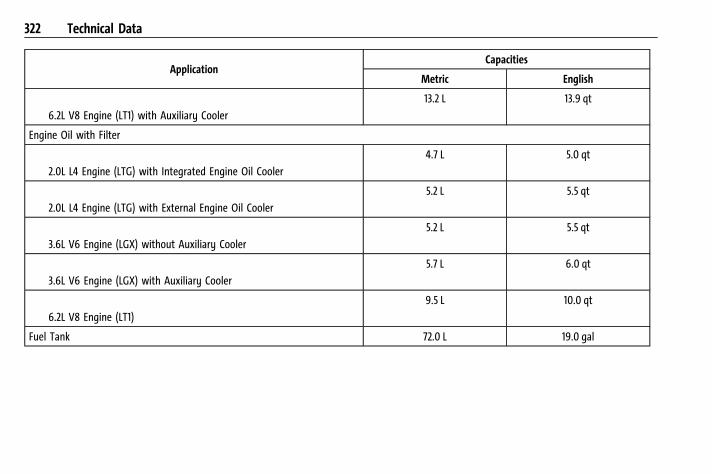
Chevrolet Camaro Owner Manual (GMNA-Localizing-U.S./Canada/Mexico-15516346) - 2022 - CRC - 4/9/21
322 Technical Data
ApplicationCapacities
Metric English
I6.2L V8 Engine (LT1) with Auxiliary Cooler
13.2 L 13.9 qt
Engine Oil with Filter
I2.0L L4 Engine (LTG) with Integrated Engine Oil Cooler
4.7 L 5.0 qt
I2.0L L4 Engine (LTG) with External Engine Oil Cooler
5.2 L 5.5 qt
I3.6L V6 Engine (LGX) without Auxiliary Cooler
5.2 L 5.5 qt
I3.6L V6 Engine (LGX) with Auxiliary Cooler
5.7 L 6.0 qt
I6.2L V8 Engine (LT1)
9.5 L 10.0 qt
Fuel Tank 72.0 L 19.0 gal
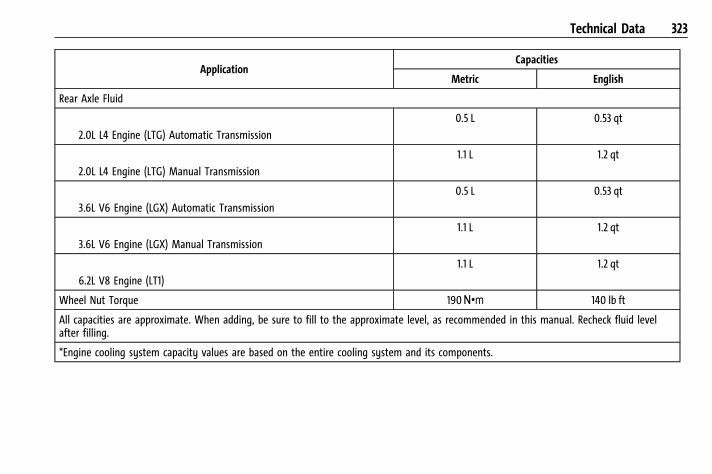
Chevrolet Camaro Owner Manual (GMNA-Localizing-U.S./Canada/Mexico-15516346) - 2022 - CRC - 4/9/21
Technical Data 323
ApplicationCapacities
Metric English
Rear Axle Fluid
I2.0L L4 Engine (LTG) Automatic Transmission
0.5 L 0.53 qt
I2.0L L4 Engine (LTG) Manual Transmission
1.1 L 1.2 qt
I3.6L V6 Engine (LGX) Automatic Transmission
0.5 L 0.53 qt
I3.6L V6 Engine (LGX) Manual Transmission
1.1 L 1.2 qt
I6.2L V8 Engine (LT1)
1.1 L 1.2 qt
Wheel Nut Torque 190Y 140 lb ft
All capacities are approximate. When adding, be sure to fill to the approximate level, as recommended in this manual. Recheck fluid levelafter filling.
*Engine cooling system capacity values are based on the entire cooling system and its components.
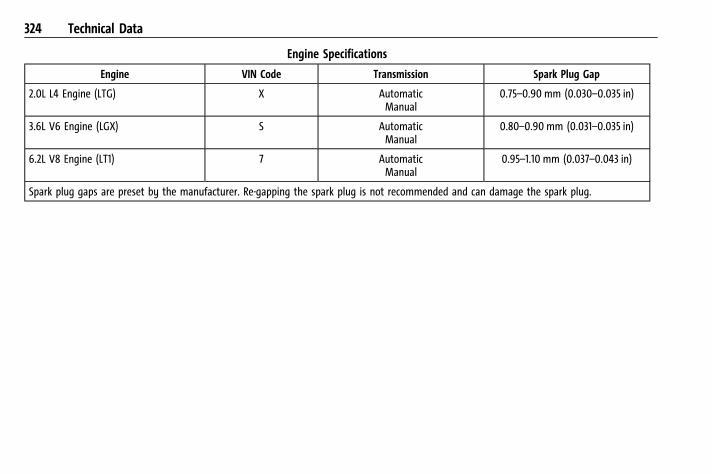
Chevrolet Camaro Owner Manual (GMNA-Localizing-U.S./Canada/Mexico-15516346) - 2022 - CRC - 4/9/21
324 Technical Data
Engine Specifications
Engine VIN Code Transmission Spark Plug Gap
2.0L L4 Engine (LTG) X AutomaticManual
0.75–0.90 mm (0.030–0.035 in)
3.6L V6 Engine (LGX) S AutomaticManual
0.80–0.90 mm (0.031–0.035 in)
6.2L V8 Engine (LT1) 7 AutomaticManual
0.95–1.10 mm (0.037–0.043 in)
Spark plug gaps are preset by the manufacturer. Re-gapping the spark plug is not recommended and can damage the spark plug.
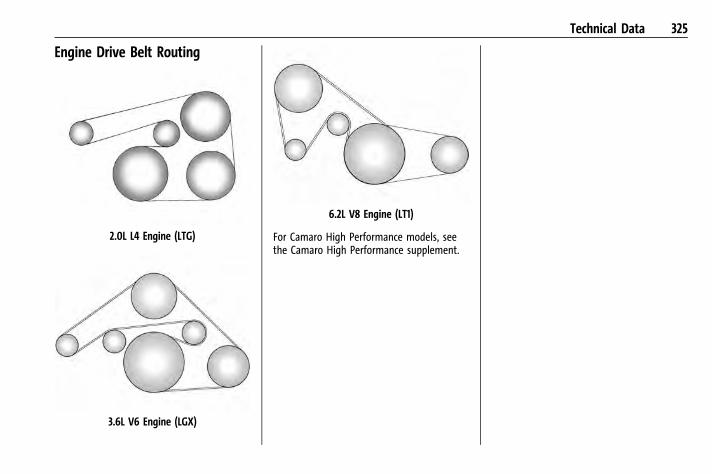
Chevrolet Camaro Owner Manual (GMNA-Localizing-U.S./Canada/Mexico-15516346) - 2022 - CRC - 4/9/21
Technical Data 325
Engine Drive Belt Routing
2.0L L4 Engine (LTG)
3.6L V6 Engine (LGX)
6.2L V8 Engine (LT1)
For Camaro High Performance models, seethe Camaro High Performance supplement.
Chevrolet Camaro Owner Manual (GMNA-Localizing-U.S./Canada/Mexico-15516346) - 2022 - CRC - 4/9/21
326 Customer Information
Customer InformationCustomer InformationCustomer Satisfaction Procedure . . . . . . 326Customer Assistance Offices . . . . . . . . . . . 328Customer Assistance for Text Telephone(TTY) Users . . . . . . . . . . . . . . . . . . . . . . . . . . 328
Online Owner Center . . . . . . . . . . . . . . . . . . 328GM Mobility ReimbursementProgram . . . . . . . . . . . . . . . . . . . . . . . . . . . . . 329
Roadside Assistance Program . . . . . . . . . . 329Scheduling Service Appointments . . . . . . 331Courtesy Transportation Program . . . . . . 331Collision Damage Repair . . . . . . . . . . . . . . . 332Publication Ordering Information . . . . . . 333Radio Frequency Statement . . . . . . . . . . . 334
Reporting Safety DefectsReporting Safety Defects to the UnitedStates Government . . . . . . . . . . . . . . . . . . 334
Reporting Safety Defects to theCanadian Government . . . . . . . . . . . . . . . 334
Reporting Safety Defects to GeneralMotors . . . . . . . . . . . . . . . . . . . . . . . . . . . . . . 335
Vehicle Data Recording and PrivacyVehicle Data Recording and Privacy . . . . 335Cybersecurity . . . . . . . . . . . . . . . . . . . . . . . . . . 335Event Data Recorders . . . . . . . . . . . . . . . . . . 336OnStar . . . . . . . . . . . . . . . . . . . . . . . . . . . . . . . . 336Infotainment System . . . . . . . . . . . . . . . . . . 336
Customer InformationCustomer Satisfaction ProcedureYour satisfaction and goodwill are importantto your dealer and to Chevrolet. Normally,any concerns with the sales transaction orthe operation of the vehicle will be resolvedby your dealer's sales or servicedepartments. Sometimes, however, despitethe best intentions of all concerned,misunderstandings can occur. If your concernhas not been resolved to your satisfaction,the following steps should be taken:
STEP ONE : Discuss your concern with amember of dealership management.Normally, concerns can be quickly resolvedat that level. If the matter has already beenreviewed with the sales, service, or partsmanager, contact the owner of yourdealership or the general manager.
STEP TWO : If after contacting a member ofdealership management, it appears yourconcern cannot be resolved by yourdealership without further help, in the U.S.,call the Chevrolet Customer AssistanceCenter at 1-800-222-1020. In Canada, callGeneral Motors of Canada Customer CareCentre at 1-800-263-3777 (English),or 1-800-263-7854 (French).
Chevrolet Camaro Owner Manual (GMNA-Localizing-U.S./Canada/Mexico-15516346) - 2022 - CRC - 4/9/21
Customer Information 327
We encourage you to call the toll-freenumber in order to give your inquiryprompt attention. Have the followinginformation available to give the CustomerAssistance representative:. Vehicle Identification Number (VIN). This is
available from the vehicle registration ortitle, or the plate at the top left of theinstrument panel and visible through thewindshield.
. Dealership name and location.
. Vehicle delivery date and present mileage.
When contacting Chevrolet, remember thatyour concern will likely be resolved at adealer's facility. That is why we suggestfollowing Step One first.
STEP THREE — U.S. Owners : Both GeneralMotors and your dealer are committed tomaking sure you are completely satisfiedwith your new vehicle. However, if youcontinue to remain unsatisfied afterfollowing the procedure outlined inSteps One and Two, you can file with theBetter Business Bureau (BBB) AUTO LINEProgram to enforce your rights.
The BBB AUTO LINE Program is anout-of-court program administered by BBBNational Programs, Inc. to settle automotive
disputes regarding vehicle repairs or theinterpretation of the New Vehicle LimitedWarranty. Although you may be required toresort to this informal dispute resolutionprogram prior to filing a court action, use ofthe program is free of charge and your casewill generally be heard within 40 days.If you do not agree with the decision givenin your case, you may reject it and proceedwith any other venue for relief availableto you.
You may contact the BBB AUTO LINEProgram using the toll-free telephonenumber or write them at the followingaddress:
BBB AUTO LINE a Division ofBBB National Programs, Inc.1676 International DriveSuite 550McLean, VA 22102
Telephone: 1-800-955-5100http://www.bbb.org/council/programs-services/dispute-handling-and-resolution/bbb-auto-line
This program is available in all 50 states andthe District of Columbia. Eligibility is limitedby vehicle age, mileage, and other factors.
General Motors reserves the right to changeeligibility limitations and/or discontinue itsparticipation in this program.
STEP THREE — Canadian Owners : In theevent that you do not feel your concernshave been addressed after following theprocedure outlined in Steps One and Two,General Motors of Canada Company wantsyou to be aware of its participation in ano-charge Mediation/Arbitration Program.General Motors of Canada Company hascommitted to binding arbitration of ownerdisputes involving factory-related vehicleservice claims. The program provides for thereview of the facts involved by an impartialthird party arbiter, and may include aninformal hearing before the arbiter. Theprogram is designed so that the entiredispute settlement process, from the timeyou file your complaint to the final decision,should be completed in about 70 days. Webelieve our impartial program offersadvantages over courts in most jurisdictionsbecause it is informal, quick, and free ofcharge.
For further information concerning eligibilityin the Canadian Motor Vehicle ArbitrationPlan (CAMVAP), call toll-free 1-800-207-0685,
Chevrolet Camaro Owner Manual (GMNA-Localizing-U.S./Canada/Mexico-15516346) - 2022 - CRC - 4/9/21
328 Customer Information
or call the General Motors Customer CareCentre, 1-800-263-3777 (English),1-800-263-7854 (French), or write to:
The Mediation/Arbitration Programc/o Customer Care CentreGeneral Motors of Canada CompanyMail Code: CA1-163-0051908 Colonel Sam DriveOshawa, Ontario L1H 8P7
Your inquiry should be accompanied by theVehicle Identification Number (VIN).
Customer Assistance OfficesChevrolet encourages customers to call thetoll-free number for assistance. However, if acustomer wishes to write or e-mailChevrolet, the letter should be addressed to:
United States and Puerto Rico
Chevrolet Motor DivisionChevrolet Customer Assistance CenterP.O. Box 33170Detroit, MI 48232-5170www.Chevrolet.com
1-800-222-10201-800-833-2438 (For Text Telephone Devices(TTYs))Roadside Assistance: 1-800-243-8872
From U.S. Virgin Islands:
1-800-496-9994
Canada
General Motors of Canada CompanyCustomer Care Centre, Mail Code:CA1-163-0051908 Colonel Sam DriveOshawa, Ontario L1H 8P7www.gm.ca
1-800-263-3777 (English)1-800-263-7854 (French)1-800-263-3830 (For Text Telephone devices(TTYs))Roadside Assistance: 1-800-268-6800
Overseas
Please contact the local General MotorsBusiness Unit.
Customer Assistance for TextTelephone (TTY) UsersTo assist customers who are deaf, hard ofhearing, or speech-impaired and who useText Telephones (TTYs), Chevrolet has TTYequipment available at its CustomerAssistance Center. Any TTY user in the U.S.
can communicate with Chevrolet by dialing:1-800-833-2438. TTY users in Canada can dial1-800-263-3830.
Online Owner Center
The Chevrolet Owner Center (U.S.)my.chevrolet.com
Learn more about your vehicle features,shop for and manage your connectedservices and OnStar plans, and accessdiagnostic information specific to yourvehicle.
Membership Benefits
E : Download owner’s manuals and viewvehicle-specific how-to videos.
G : View maintenance schedules, alerts, andVehicle Diagnostic Information. Scheduleservice appointments.
I : View service records from yourdealership and add your own.
D : Select a preferred dealer and viewlocations, maps, phone numbers, and hours.
r : Track your vehicle’s warrantyinformation.

Chevrolet Camaro Owner Manual (GMNA-Localizing-U.S./Canada/Mexico-15516346) - 2022 - CRC - 4/9/21
Customer Information 329
J : View active recalls by VehicleIdentification Number (VIN). See VehicleIdentification Number (VIN) 0 320.
H : Manage your profile and paymentinformation. View your GM Rewards Cardearnings and My Chevrolet Rewards points.
F : Chat with online help representatives.
Visit my.chevrolet.com and create anaccount today.
Chevrolet Owner Centre (Canada)mychevrolet.ca
Visit the Chevrolet Owner Centre atmychevrolet.ca (English) or my.chevrolet.ca(French) to access similar benefits to theU.S. site.
GM Mobility ReimbursementProgram
This program is available to qualifiedapplicants for cost reimbursement, up tocertain limits, of eligible aftermarketadaptive equipment required for the vehicle,such as hand controls or a wheelchair/scooter lift for the vehicle.
To learn about the GM Mobility program,see www.gmmobility.com or call the GMMobility Assistance Center at 1-800-323-9935.Text Telephone (TTY) users, call1-800-833-9935.
General Motors of Canada also has aMobility program. See www.gm.ca, or call1-800-GM-DRIVE (800-463-7483) for details.TTY users call 1-800-263-3830.
Roadside Assistance ProgramFor U.S.-purchased vehicles, call1-800-243-8872. (Text Telephone (TTY):1-888-889-2438.)
For Canadian-purchased vehicles, call1-800-268-6800.
Service is available 24 hours a day, 365 daysa year.
Calling for Assistance
When calling Roadside Assistance, have thefollowing information ready:
. Your name, home address, and hometelephone number
. Telephone number of your location
. Location of the vehicle
. Model, year, color, and license platenumber of the vehicle
. Odometer reading, Vehicle IdentificationNumber (VIN), and delivery date of thevehicle
. Description of the problem
Coverage
Services are provided for the duration of thevehicle’s powertrain warranty.
In the U.S., anyone driving the vehicle iscovered. In Canada, a person driving thevehicle without permission from the owneris not covered.
Roadside Assistance is not a part of the NewVehicle Limited Warranty. General MotorsNorth America and Chevrolet reserve theright to make any changes or discontinuethe Roadside Assistance program at anytime without notification.
Chevrolet Camaro Owner Manual (GMNA-Localizing-U.S./Canada/Mexico-15516346) - 2022 - CRC - 4/9/21
330 Customer Information
General Motors North America and Chevroletreserve the right to limit services orpayment to an owner or driver if theydecide the claims are made too often, or thesame type of claim is made many times.
Services Provided. Emergency Fuel Delivery: Delivery of
enough fuel for the vehicle to get to thenearest service station.
. Lock-Out Service: Service to unlock thevehicle if you are locked out. A remoteunlock may be available if you haveOnStar. For security reasons, the drivermust present identification before thisservice is given.
. Emergency Tow from a Public Road orHighway: Tow to the nearest Chevroletdealer for warranty service, or if thevehicle was in a crash and cannot bedriven. Assistance is not given when thevehicle is stuck in the sand, mud,or snow.
. Flat Tire Change: Service to change a flattire with the spare tire. The spare tire,if equipped, must be in good conditionand properly inflated. It is the owner'sresponsibility for the repair orreplacement of the tire if it is not coveredby the warranty.
. Battery Jump Start: Service to jump starta dead battery.
. Trip Interruption Benefits and Assistance:If your trip is interrupted due to awarranty event, incidental expenses maybe reimbursed within the Powertrainwarranty period. Items considered arereasonable and customary hotel, meals,rental car, or a vehicle being deliveredback to the customer, up to 500 miles.
Services Not Included in RoadsideAssistance. Impound towing caused by violation of
any laws. Legal fines. Mounting, dismounting, or changing of
snow tires, chains, or other tractiondevices
Service is not provided if a vehicle is in anarea that is not accessible to the servicevehicle or is not a regularly traveled ormaintained public road, which includes iceand winter roads. Off-road use is notcovered.
Services Specific to Canadian-PurchasedVehicles. Fuel Delivery: Reimbursement is up to
7 liters. Propane and other fuels are notprovided through this service.
. Lock-Out Service: Vehicle registration isrequired.
. Trip Interruption Benefits and Assistance:Must be over 150 km from where yourtrip was started to qualify.Pre-authorization, original detailedreceipts, and a copy of the repair ordersare required. Once authorization has beenreceived, the Roadside Assistance advisorwill help to make arrangements andexplain how to receive payment.
. Alternative Service: If assistance cannotbe provided right away, the RoadsideAssistance advisor may give permission toget local emergency road service. You willreceive payment, up to $100, aftersending the original receipt to RoadsideAssistance. Mechanical failures may becovered, however any cost for parts andlabor for repairs not covered by thewarranty are the owner responsibility.
Chevrolet Camaro Owner Manual (GMNA-Localizing-U.S./Canada/Mexico-15516346) - 2022 - CRC - 4/9/21
Customer Information 331
Scheduling Service AppointmentsWhen the vehicle requires warranty service,contact your dealer and request anappointment. By scheduling a serviceappointment and advising the serviceconsultant of your transportation needs,your dealer can help minimize yourinconvenience.
If the vehicle cannot be scheduled into theservice department immediately, keepdriving it until it can be scheduled forservice, unless, of course, the problem issafety related. If it is, please call yourdealership, let them know this, and ask forinstructions.
If your dealer requests you to bring thevehicle for service, you are urged to do soas early in the work day as possible toallow for same-day repair.
Courtesy Transportation ProgramTo enhance your ownership experience, weand our participating dealers are proud tooffer Courtesy Transportation, a customersupport program for vehicles with theBumper-to-Bumper (Base Warranty Coverage
period in Canada), Federal Emission,Extended Powertrain or Electric specificwarranties in both the U.S. and Canada.
Several Courtesy Transportation options areavailable to assist in reducing inconveniencewhen warranty repairs are required.
Courtesy Transportation is not a part of theNew Vehicle Limited Warranty. A separatemanual entitled “Limited Warranty andOwner Assistance Information” furnishedwith each new vehicle provides detailedwarranty coverage information.
Transportation Options
Warranty service can generally becompleted while you wait. However, if youare unable to do so, your dealer may offerthe following transportation options:
Shuttle Service
This includes one-way or round-trip shuttleservice within reasonable time and distanceparameters of your dealer's area.
Public Transportation or Fuel Reimbursement
If overnight warranty repairs are needed,and public transportation is used, theexpense must be supported by originalreceipts and within the maximum amountallowed by GM. If U.S. customers arrange
their own transportation, limitedreimbursement for reasonable fuel expensesmay be available. Claim amounts shouldreflect actual costs and be supported byoriginal receipts. See your dealer forinformation.
Courtesy Rental Vehicle
For an overnight warranty repair, the dealermay provide an available courtesy rentalvehicle or provide for reimbursement of arental vehicle. Reimbursement is limited andmust be supported by original receipts aswell as a signed and completed rentalagreement and meet state/provincial, local,and rental vehicle provider requirements.Requirements vary and may includeminimum age requirements, insurancecoverage, credit card, etc. Additional feessuch as fuel, rental vehicle insurance, taxes,levies, usage fees, excessive mileage,or rental usage beyond the completion ofthe repair are also your responsibility.
It may not be possible to provide a likevehicle as a courtesy rental.
Additional Program Information
All program options, such as shuttle service,may not be available at every dealer.Contact your dealer for specific availability.
Chevrolet Camaro Owner Manual (GMNA-Localizing-U.S./Canada/Mexico-15516346) - 2022 - CRC - 4/9/21
332 Customer Information
General Motors reserves the right tounilaterally modify, change, or discontinueCourtesy Transportation at any time and toresolve all questions of claim eligibilitypursuant to the terms and conditionsdescribed herein at its sole discretion.
Collision Damage RepairIf the vehicle is involved in a collision and itis damaged, have the damage repaired by aqualified technician using the properequipment and quality replacement parts.Poorly performed collision repairs diminishthe vehicle resale value, and safetyperformance can be compromised insubsequent collisions.
Collision Parts
Genuine GM Collision parts are new partsmade with the same materials andconstruction methods as the parts withwhich the vehicle was originally built.Genuine GM Collision parts are the bestchoice to ensure that the vehicle's designedappearance, durability, and safety arepreserved. The use of Genuine GM parts canhelp maintain the GM New Vehicle LimitedWarranty.
Recycled original equipment parts may alsobe used for repair. These parts are typicallyremoved from vehicles that were total lossesin prior crashes. In most cases, the partsbeing recycled are from undamaged sectionsof the vehicle. A recycled original equipmentGM part may be an acceptable choice tomaintain the vehicle's originally designedappearance and safety performance;however, the history of these parts is notknown. Such parts are not covered by theGM New Vehicle Limited Warranty, and anyrelated failures are not covered by thatwarranty.
Aftermarket collision parts are also available.These are made by companies other thanGM and may not have been tested for thevehicle. As a result, these parts may fitpoorly, exhibit premature durability/corrosion problems, and may not performproperly in subsequent collisions.Aftermarket parts are not covered by theGM New Vehicle Limited Warranty, and anyvehicle failure related to such parts is notcovered by that warranty.
Repair Facility
GM also recommends that you choose acollision repair facility that meets yourneeds before you ever need collision repairs.
Your dealer may have a collision repaircenter with GM-trained technicians andstate-of-the-art equipment, or be able torecommend a collision repair center that hasGM-trained technicians and comparableequipment.
Insuring the Vehicle
Protect your investment in the GM vehiclewith comprehensive and collision insurancecoverage. There are significant differences inthe quality of coverage afforded by variousinsurance policy terms. Many insurancepolicies provide reduced protection to theGM vehicle by limiting compensation fordamage repairs through the use ofaftermarket collision parts. Some insurancecompanies will not specify aftermarketcollision parts. When purchasing insurance,we recommend that you ensure that thevehicle will be repaired with GM originalequipment collision parts. If such insurancecoverage is not available from your currentinsurance carrier, consider switching toanother insurance carrier.
If the vehicle is leased, the leasing companymay require you to have insurance thatensures repairs with Genuine GM OriginalEquipment Manufacturer (OEM) parts orGenuine Manufacturer replacement parts.
Chevrolet Camaro Owner Manual (GMNA-Localizing-U.S./Canada/Mexico-15516346) - 2022 - CRC - 4/9/21
Customer Information 333
Read the lease carefully, as you may becharged at the end of the lease for poorquality repairs.
If a Crash Occurs
If there has been an injury, call emergencyservices for help. Do not leave the scene ofa crash until all matters have been takencare of. Move the vehicle only if its positionputs you in danger, or you are instructed tomove it by a police officer.
Give only the necessary information topolice and other parties involved in thecrash.
For emergency towing see RoadsideAssistance Program 0 329.
Gather the following information:. Driver name, address, and telephone
number. Driver license number. Owner name, address, and telephone
number. Vehicle license plate number. Vehicle make, model, and model year. Vehicle Identification Number (VIN). Insurance company and policy number
. General description of the damage to theother vehicle
Choose a reputable repair facility that usesquality replacement parts. See “CollisionParts” earlier in this section.
If the airbag has inflated, see What Will YouSee after an Airbag Inflates? 0 53.
Managing the Vehicle Damage RepairProcess
In the event that the vehicle requiresdamage repairs, GM recommends that youtake an active role in its repair. If you havea pre-determined repair facility of choice,take the vehicle there, or have it towedthere. Specify to the facility that anyrequired replacement collision parts beoriginal equipment parts, either newGenuine GM parts or recycled original GMparts. Remember, recycled parts will not becovered by the GM vehicle warranty.
Insurance pays the bill for the repair, butyou must live with the repair. Depending onyour policy limits, your insurance companymay initially value the repair usingaftermarket parts. Discuss this with therepair professional, and insist on GenuineGM parts. Remember, if the vehicle isleased, you may be obligated to have the
vehicle repaired with Genuine GM parts,even if your insurance coverage does notpay the full cost.
If another party's insurance company ispaying for the repairs, you are not obligatedto accept a repair valuation based on thatinsurance company's collision policy repairlimits, as you have no contractual limitswith that company. In such cases, you canhave control of the repair and parts choicesas long as the cost stays within reasonablelimits.
Publication Ordering Information
Service Manuals
Service manuals have the diagnosis andrepair information on the engine,transmission, axle, suspension, brakes,electrical system, steering system, body, etc.
Customer Literature
Owner’s manuals are written specifically forowners and are intended to provide basicoperational information about the vehicle.The owner’s manual includes theMaintenance Schedule for all models.
Chevrolet Camaro Owner Manual (GMNA-Localizing-U.S./Canada/Mexico-15516346) - 2022 - CRC - 4/9/21
334 Customer Information
Customer literature publications available forpurchase include owner’s manuals, warrantymanuals, and portfolios. Portfolios include anowner’s manual, warranty manual,if applicable, and zip lock bag or pouch.
Current and Past Models
Service manuals and customer literature areavailable for many current and past modelyear GM vehicles.
To order, call 1-800-551-4123 Monday–Friday,8:00 a.m.–6:00 p.m. eastern time
For credit card orders only (VISA,MasterCard, or Discover), see Helm, Inc. at:www.helminc.com.
To order by mail, write to:
Helm, IncorporatedAttention: Customer Service47911 Halyard DrivePlymouth, MI 48170
Make checks payable in U.S. funds.
Radio Frequency StatementThis vehicle uses license-exempt transmitters/ receivers / systems that operate on aradio frequency that complies with Part 15/Part 18 of the Federal CommunicationsCommission (FCC) rules and with Innovation,
Science and Economic Development (ISED)Canada's license-exempt RSS(s) / RSP-100 /ICES-GEN.
Operation is subject to the following twoconditions:
1. The device may not cause harmfulinterference.
2. The device must accept any interferencereceived, including interference that maycause undesired operation of the device.
Changes or modifications to any of thesesystems by other than an authorized servicefacility could void authorization to use thisequipment.
Reporting Safety DefectsReporting Safety Defects to theUnited States GovernmentIf you believe that your vehicle has adefect which could cause a crash orcould cause injury or death, you shouldimmediately inform the NationalHighway Traffic Safety Administration(NHTSA) in addition to notifying GeneralMotors.
If NHTSA receives similar complaints, itmay open an investigation, and if itfinds that a safety defect exists in agroup of vehicles, it may order a recalland remedy campaign. However, NHTSAcannot become involved in individualproblems between you, your dealer,or General Motors.
To contact NHTSA, you may call theVehicle Safety Hotline toll-free at1-888-327-4236 (TTY: 1-800-424-9153); goto http://www.safercar.gov; orwrite to:
Administrator, NHTSA1200 New Jersey Avenue, S.E.Washington, D.C. 20590
You can also obtain other informationabout motor vehicle safety fromhttp://www.safercar.gov.
Reporting Safety Defects to theCanadian GovernmentIf you live in Canada, and you believethat the vehicle has a safety defect,notify Transport Canada immediately,
Chevrolet Camaro Owner Manual (GMNA-Localizing-U.S./Canada/Mexico-15516346) - 2022 - CRC - 4/9/21
Customer Information 335
and notify General Motors of CanadaCompany. Call Transport Canada at1-800-333-0510; go to:
www.tc.gc.ca/recalls (English)
www.tc.gc.ca/rappels (French)
or write to:
Transport CanadaMotor Vehicle Safety DirectorateDefect Investigations and RecallsDivision80 Noel StreetGatineau, QC J8Z 0A1
Reporting Safety Defects toGeneral MotorsIn addition to notifying NHTSA (or TransportCanada) in a situation like this, notifyGeneral Motors.
In the U.S., call 1-800-222-1020, or write:
Chevrolet Motor DivisionChevrolet Customer Assistance CenterP.O. Box 33170Detroit, MI 48232-5170
In Canada, call 1-800-263-3777 (English) or1-800-263-7854 (French), or write:
General Motors of Canada CompanyCustomer Care Centre, Mail Code:CA1-163-0051908 Colonel Sam DriveOshawa, Ontario L1H 8P7
In Mexico, call 800-466-0811 or800-508-0000.
In other Central America and CaribbeanCountries, call 52-555-901-2369.
Vehicle Data Recording andPrivacyThe vehicle has a number of computers thatrecord information about the vehicle’sperformance and how it is driven or used.For example, the vehicle uses computermodules to monitor and control engine andtransmission performance, to monitor theconditions for airbag deployment anddeploy them in a crash, and, if equipped, toprovide antilock braking to help the drivercontrol the vehicle. These modules maystore data to help the dealer technicianservice the vehicle or to help GM improvesafety or features. Some modules may alsostore data about how the vehicle isoperated, such as rate of fuel consumption
or average speed. These modules may retainpersonal preferences, such as radio presets,seat positions, and temperature settings.
CybersecurityGM collects information about the use ofyour vehicle including operational and safetyrelated information. We collect thisinformation to provide, evaluate, improve,and troubleshoot our products and servicesand to develop new products and services.The protection of vehicle electronics systemsand customer data from unauthorizedoutside electronic access or control isimportant to GM. GM maintains appropriatesecurity standards, practices, guidelines andcontrols aimed at defending the vehicle andthe vehicle service ecosystem againstunauthorized electronic access, detectingpossible malicious activity in relatednetworks, and responding to suspectedcybersecurity incidents in a timely,coordinated and effective manner. Securityincidents could impact your safety orcompromise your private data. To minimizesecurity risks, please do not connect yourvehicle electronic systems to unauthorizeddevices or connect your vehicle to anyunknown or untrusted networks (such asBluetooth, WIFI or similar technology). In
Chevrolet Camaro Owner Manual (GMNA-Localizing-U.S./Canada/Mexico-15516346) - 2022 - CRC - 4/9/21
336 Customer Information
the event you suspect any security incidentimpacting your data or the safe operation ofyour vehicle, please stop operating yourvehicle and contact your dealer.
Event Data RecordersThis vehicle is equipped with an event datarecorder (EDR). The main purpose of an EDRis to record, in certain crash or nearcrash-like situations, such as an air bagdeployment or hitting a road obstacle, datathat will assist in understanding how avehicle’s systems performed. The EDR isdesigned to record data related to vehicledynamics and safety systems for a shortperiod of time, typically 30 seconds or less.The EDR in this vehicle is designed to recordsuch data as:. How various systems in your vehicle were
operating;. Whether or not the driver and passenger
safety belts were buckled/fastened;. How far (if at all) the driver was
depressing the accelerator and/or brakepedal; and,
. How fast the vehicle was traveling.
These data can help provide a betterunderstanding of the circumstances in whichcrashes and injuries occur.
NoteEDR data are recorded by your vehicle onlyif a non-trivial crash situation occurs; nodata are recorded by the EDR under normaldriving conditions and no personal data(e.g., name, gender, age, and crash location)are recorded. However, other parties, suchas law enforcement, could combine the EDRdata with the type of personally identifyingdata routinely acquired during a crashinvestigation.
To read data recorded by an EDR, specialequipment is required, and access to thevehicle or the EDR is needed. In addition tothe vehicle manufacturer, other parties, suchas law enforcement, that have the specialequipment, can read the information if theyhave access to the vehicle or the EDR.
GM will not access these data or share itwith others except: with the consent of thevehicle owner or, if the vehicle is leased,with the consent of the lessee; in responseto an official request by police or similargovernment office; as part of GM's defenseof litigation through the discovery process;or, as permitted by law. Data that GMcollects or receives may also be used for GMresearch needs or may be made available to
others for research purposes, where a needis shown and the data is not tied to aspecific vehicle or vehicle owner.
OnStarIf the vehicle is equipped with OnStar andhas an active service plan, additional datamay be collected and transmitted throughthe OnStar system. This includes informationabout the vehicle’s operation; collisionsinvolving the vehicle; the use of the vehicleand its features, including infotainment; andthe location and approximate GPS speed ofthe vehicle. Refer to the OnStar Terms andConditions and Privacy Statement on theOnStar website.
See OnStar Additional Information 0 339.
Infotainment SystemIf the vehicle is equipped with a navigationsystem as part of the infotainment system,use of the system may result in the storageof destinations, addresses, telephonenumbers, and other trip information. See theinfotainment section for information onstored data and for deletion instructions.
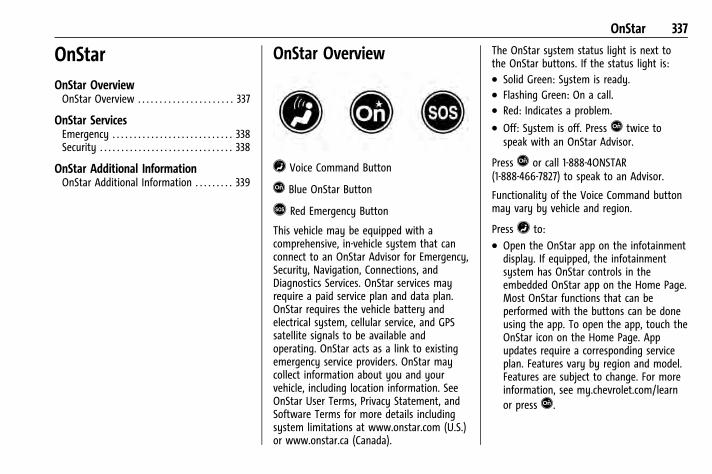
Chevrolet Camaro Owner Manual (GMNA-Localizing-U.S./Canada/Mexico-15516346) - 2022 - CRC - 4/9/21
OnStar 337
OnStarOnStar OverviewOnStar Overview . . . . . . . . . . . . . . . . . . . . . . 337
OnStar ServicesEmergency . . . . . . . . . . . . . . . . . . . . . . . . . . . . 338Security . . . . . . . . . . . . . . . . . . . . . . . . . . . . . . . 338
OnStar Additional InformationOnStar Additional Information . . . . . . . . . 339
OnStar Overview
= Voice Command Button
Q Blue OnStar Button
> Red Emergency Button
This vehicle may be equipped with acomprehensive, in-vehicle system that canconnect to an OnStar Advisor for Emergency,Security, Navigation, Connections, andDiagnostics Services. OnStar services mayrequire a paid service plan and data plan.OnStar requires the vehicle battery andelectrical system, cellular service, and GPSsatellite signals to be available andoperating. OnStar acts as a link to existingemergency service providers. OnStar maycollect information about you and yourvehicle, including location information. SeeOnStar User Terms, Privacy Statement, andSoftware Terms for more details includingsystem limitations at www.onstar.com (U.S.)or www.onstar.ca (Canada).
The OnStar system status light is next tothe OnStar buttons. If the status light is:. Solid Green: System is ready.. Flashing Green: On a call.. Red: Indicates a problem.. Off: System is off. Press Q twice to
speak with an OnStar Advisor.
Press Q or call 1-888-4ONSTAR(1-888-466-7827) to speak to an Advisor.
Functionality of the Voice Command buttonmay vary by vehicle and region.
Press= to:. Open the OnStar app on the infotainment
display. If equipped, the infotainmentsystem has OnStar controls in theembedded OnStar app on the Home Page.Most OnStar functions that can beperformed with the buttons can be doneusing the app. To open the app, touch theOnStar icon on the Home Page. Appupdates require a corresponding serviceplan. Features vary by region and model.Features are subject to change. For moreinformation, see my.chevrolet.com/learnor press Q.
Chevrolet Camaro Owner Manual (GMNA-Localizing-U.S./Canada/Mexico-15516346) - 2022 - CRC - 4/9/21
338 OnStar
Or. Give OnStar Turn-by-Turn Navigation voice
commands.. Obtain and customize the Wi-Fi hotspot
name or SSID and password, if equipped.
Press Q to connect to an Advisor to:. Verify account information or update
contact information.. Get driving directions.. Receive a Diagnostic check of the vehicle's
key operating systems.. Receive Roadside Assistance.. Manage Wi-Fi Settings, if equipped.
Press> to get a priority connection to anOnStar Advisor available 24/7 to:. Get help for an emergency.. Be a Good Samaritan or respond to an
AMBER Alert.. Get assistance in severe weather or other
crisis situations and find evacuationroutes.
OnStar ServicesEmergencyEmergency Services require an active safetyand security plan. With Automatic CrashResponse, built-in sensors can automaticallyalert a specially trained OnStar Advisor whois immediately connected in to the vehicleto help.
Press> for a priority connection to anOnStar Advisor who can contact emergencyservice providers, direct them to your exactlocation, and relay important information.
With OnStar Crisis Assist, specially trainedAdvisors are available 24 hours a day, 7 daysa week, to provide a central point ofcontact, assistance, and information during acrisis.
With Roadside Assistance, Advisors canlocate a nearby service provider to help witha flat tire, a battery jump, or an emptygas tank.
SecurityIf equipped, OnStar provides these services:. With Stolen Vehicle Assistance, OnStar
Advisors can use GPS to pinpoint thevehicle and help authorities quicklyrecover it.
. With Remote Ignition Block, if equipped,OnStar can block the engine from beingrestarted.
. With Stolen Vehicle Slowdown,if equipped, OnStar can work with lawenforcement to gradually slow thevehicle down.
Theft Alarm Notification
If equipped, if the doors are locked and thevehicle alarm sounds, a notification by text,e-mail, or phone call will be sent. If thevehicle is stolen, an OnStar Advisor can workwith authorities to recover the vehicle.
Chevrolet Camaro Owner Manual (GMNA-Localizing-U.S./Canada/Mexico-15516346) - 2022 - CRC - 4/9/21
OnStar 339
OnStar AdditionalInformationIn-Vehicle Audio Messages
Audio messages may play importantinformation at the following times:
. Prior to vehicle purchase. Press Q to setup an account.
. After change in ownership and at90 days.
Transferring Service
Press Q to request account transfereligibility information. The Advisor cancancel or change account information.
Selling/Transferring the Vehicle
Call 1-888-4ONSTAR (1-888-466-7827)immediately to terminate your OnStar orconnected services if the vehicle is disposedof, sold, transferred, or if the lease ends.
Reactivation for Subsequent Owners
Press Q and follow the prompts to speak toan Advisor as soon as possible. The Advisorwill update vehicle records and explainOnStar or connected service options.
How OnStar Service Works
Automatic Crash Response, EmergencyServices, Crisis Assist, Stolen VehicleAssistance, Remote Services, and RoadsideAssistance are available on most vehicles.Not all OnStar services are availableeverywhere or on all vehicles. For moreinformation, a full description of OnStarservices, system limitations, and OnStar UserTerms, Privacy Statement, and SoftwareTerms:. Call 1-888-4ONSTAR (1-888-466-7827).. See www.onstar.com (U.S.).. See www.onstar.ca (Canada).. Call TTY 1-877-248-2080.. Press Q to speak with an Advisor.
OnStar or connected services cannot workunless the vehicle is in a place where OnStarhas an agreement with a wireless serviceprovider for service in that area. Thewireless service provider must also havecoverage, network capacity, reception, andtechnology compatible with OnStar orconnected services. Service involving locationinformation about the vehicle cannot workunless GPS signals are available,unobstructed, and compatible with theOnStar hardware. OnStar or connected
services may not work if the OnStarequipment is not properly installed or it hasnot been properly maintained. If equipmentor software is added, connected,or modified, OnStar or connected servicesmay not work. Other problems beyond thecontrol of OnStar — such as hills, tallbuildings, tunnels, weather, electrical systemdesign and architecture of the vehicle,damage to the vehicle in a crash, or wirelessphone network congestion or jamming —may prevent service.
See Radio Frequency Statement 0 334.
Services for People with Disabilities
Advisors provide services to help withphysical disabilities and medical conditions.
Press Q to help:. Locate a gas station with an attendant to
pump gas.. Find a hotel, restaurant, etc., that meets
accessibility needs.. Provide directions to the closest hospital
or pharmacy in urgent situations.
Chevrolet Camaro Owner Manual (GMNA-Localizing-U.S./Canada/Mexico-15516346) - 2022 - CRC - 4/9/21
340 OnStar
TTY Users
OnStar has the ability to communicate todeaf, hard-of-hearing, or speech-impairedcustomers while in the vehicle. The availableTTY system can provide in-vehicle access toall OnStar services, except Virtual Advisorand OnStar Turn-by-Turn Navigation.
If equipped, TTY mode can be turned on oroff by touching Settings, then Apps, andthen Phone. When TTY mode is on, phonecalls can be made or received with OnStarusing the infotainment display.
OnStar Personal IdentificationNumber (PIN)
A PIN is needed to access some OnStarservices. The PIN will need to be changedthe first time when speaking with anAdvisor. To change the OnStar PIN, contactan OnStar Advisor by pressing Q or calling1-888-4ONSTAR.
Warranty
OnStar equipment may be warranted as partof the vehicle warranty.
Languages
The vehicle can be programmed to respondin multiple languages. Press Q and ask foran Advisor. Advisors are available in English,Spanish, and French. Available languagesmay vary by country.
Potential Issues
OnStar cannot perform Remote Door Unlockor Stolen Vehicle Assistance after the vehiclehas been off continuously for an extendedperiod of time without an ignition cycle. Tofind out the duration of time that appliesfor the vehicle, contact an OnStar Advisor bypressing Q or calling 1-888-4ONSTAR. If thevehicle has not been started for an extendedperiod of time, OnStar can contact RoadsideAssistance or a locksmith to help gain accessto the vehicle.
Global Positioning System (GPS). Obstruction of the GPS can occur in a
large city with tall buildings; in parkinggarages; around airports; in tunnels andunderpasses; or in an area with verydense trees. If GPS signals are notavailable, the OnStar system should still
operate to call OnStar. However, OnStarcould have difficulty identifying the exactlocation.
. In emergency situations, OnStar can usethe last stored GPS location to send toemergency responders.
A temporary loss of GPS can cause loss ofthe ability to send a Turn-by-TurnNavigation route. The Advisor may give averbal route or may ask for a call back afterthe vehicle is driven into an open area.
Cellular and GPS Antennas
Cellular reception is required for OnStar tosend remote signals to the vehicle. Do notplace items over or near the antenna toprevent blocking cellular and GPS signalreception.
Unable to Connect to OnStar Message
If there is limited cellular coverage or thecellular network has reached maximumcapacity, this message may come on. PressQ to try the call again or try again afterdriving a few miles into anothercellular area.
Chevrolet Camaro Owner Manual (GMNA-Localizing-U.S./Canada/Mexico-15516346) - 2022 - CRC - 4/9/21
OnStar 341
Vehicle and Power Issues
OnStar services require a vehicle electricalsystem, wireless service, and GPS satellitetechnologies to be available and operatingfor features to function properly. Thesesystems may not operate if the battery isdischarged or disconnected.
Add-on Electrical Equipment
The OnStar system is integrated into theelectrical architecture of the vehicle. Do notadd any electrical equipment. See Add-OnElectrical Equipment 0 234. Added electricalequipment may interfere with the operationof the OnStar system and cause it to notoperate.
Vehicle Software Updates
OnStar or GM may remotely deliversoftware updates or changes to the vehiclewithout further notice or consent. Theseupdates or changes may enhance ormaintain safety, security, or the operationof the vehicle or the vehicle systems.Software updates or changes may affect orerase data or settings that are stored in thevehicle, such as saved navigationdestinations or pre-set radio stations.Neither OnStar nor GM is responsible forany affected or erased data or settings.
These updates or changes may also collectpersonal information. Such collection isdescribed in the OnStar privacy statement orseparately disclosed at the time ofinstallation. These updates or changes mayalso cause a system to automaticallycommunicate with GM servers to collectinformation about vehicle system status,identify whether updates or changes areavailable, or deliver updates or changes. Anactive OnStar agreement constitutes consentto these software updates or changes andagreement that either OnStar or GM mayremotely deliver them to the vehicle.
Privacy
The complete OnStar Privacy Statement maybe found at www.onstar.com (U.S.),or www.onstar.ca (Canada). We recommendthat you review it. If you have anyquestions, call 1-888-4ONSTAR(1-888-466-7827) or press Q to speak withan Advisor. Users of wirelesscommunications are cautioned that theprivacy of any information sent via wirelesscellular communications cannot be assured.Third parties may unlawfully intercept oraccess transmissions and privatecommunications without consent.
OnStar - Software Acknowledgements
To obtain the source code under GPL, LGPL,MPL, and other open source licenses, that iscontained in this product, please visithttp://opensource.lge.com. In addition tothe source code, all referred license terms,warranty disclaimers, and copyright noticesare available for download. This offer is validfor a period of three years after our lastshipment of this product. This offer is validto anyone in receipt of this information.
*Provided through LG Electronics Inc., who issolely responsible for provisions of relatedOSS compliance.
Chevrolet Camaro Owner Manual (GMNA-Localizing-U.S./Canada/Mexico-15516346) - 2022 - CRC - 4/9/21
342 Connected Services
Connected ServicesConnected ServicesNavigation . . . . . . . . . . . . . . . . . . . . . . . . . . . . 342Connections . . . . . . . . . . . . . . . . . . . . . . . . . . . 342Diagnostics . . . . . . . . . . . . . . . . . . . . . . . . . . . . 344
Connected ServicesNavigationNavigation requires a specific OnStar orconnected service plan.
Press Q to receive Turn-by-Turn directionsor have them sent to the vehicle’snavigation screen, if equipped. SelectTurn-by-Turn Directions from the Servicestab of the OnStar app to call an Advisor orselect a recent or favorite destination. Touchthe navigation icons to select home, address,or place. A destination transfer from OnStarwill show the detail view of the destinationwhen it is transferred from OnStar to theNavigation application. See www.onstar.comfor a coverage map. Services vary by model.Map coverage is available in the UnitedStates and Canada.
Turn-by-Turn Navigation
1. Press Q to connect to an Advisor.
2. Request directions to be downloaded tothe vehicle.
3. Follow the voice-guided commands.
Using Voice Commands During aPlanned Route
Functionality of the Voice Command button,if equipped, may vary by vehicle and region.For some vehicles, press = to open theOnStar app on the infotainment display.
Send Destination to Vehicle
Directions can be sent to the vehicle’snavigation screen, if equipped.
Press Q, then ask the Advisor to downloaddirections to the vehicle’s navigation system,if equipped. After the call ends, thenavigation screen will provide prompts tobegin driving directions. Routes that are sentto the navigation screen can only becanceled through the navigation system.
See www.onstar.com (U.S.) or www.onstar.ca(Canada).
ConnectionsThe following services help with stayingconnected.
For coverage maps, see www.onstar.com(U.S.) or www.onstar.ca (Canada).
Chevrolet Camaro Owner Manual (GMNA-Localizing-U.S./Canada/Mexico-15516346) - 2022 - CRC - 4/9/21
Connected Services 343
Ensuring Security. Change the default passwords for the
Wi-Fi hotspot and myChevrolet mobileapplication. Make these passwordsdifferent from each other and use acombination of letters and numbers toincrease the security.
. Change the default name of the SSID(Service Set Identifier). This is yournetwork’s name that is visible to otherwireless devices. Choose a unique nameand avoid family names or vehicledescriptions.
Wi-Fi Hotspot (If Equipped)
The vehicle may have a built-in Wi-Fihotspot that provides access to the Internetand web content at 4G LTE speed. Up toseven mobile devices can be connected.A data plan is required. Use the in-vehiclecontrols only when it is safe to do so.
1. To retrieve Wi-Fi hotspot information,press= to open the OnStar app on theinfotainment display, then select Wi-FiHotspot. On some vehicles, touch Wi-Fior Wi-Fi Settings on the screen.
2. The Wi-Fi settings will display the Wi-Fihotspot name (SSID), password, and onsome vehicles, the connection type (noInternet connection, 3G, 4G, 4G LTE), andsignal quality (poor, good, excellent).
3. To change the SSID or password, pressQ or call 1-888-4ONSTAR to connectwith an Advisor. On some vehicles, theSSID and password can be changed inthe Wi-Fi Hotspot menu.
After initial set-up, your vehicle’s Wi-Fihotspot will connect automatically to yourmobile devices. Manage data usage byturning Wi-Fi on or off on your mobiledevice, using the myChevrolet mobile app,or by contacting an OnStar Advisor. Onsome vehicles, Wi-Fi can also be managedfrom the Wi-Fi Hotspot menu.
MyChevrolet Mobile App (If Available)
Download the myChevrolet mobile app tocompatible Apple and Android smartphones.Chevrolet users can access the followingservices from a smartphone:. Remotely start/stop the vehicle,
if factory-equipped.. Lock/unlock doors, if equipped with
automatic locks.. Activate the horn and lamps.
. Check the vehicle’s fuel level, oil life,or tire pressure, if factory-equipped withthe Tire Pressure Monitor System.
. Send destinations to the vehicle.
. Locate the vehicle on a map (U.S.market only).
. Turn the vehicle's Wi-Fi hotspot on/off,manage settings, and monitor dataconsumption, if equipped.
. Locate a dealer and schedule service.
. Request roadside assistance.
. Set a parking reminder with pin drop,take a photo, make a note, and set atimer.
. Connect with Chevrolet on social media.
Features are subject to change. FormyChevrolet mobile app informationand compatibility, see my.chevrolet.com.
An active OnStar or connected service planmay be required. A compatible device,factory-installed remote start, and powerlocks are required. Data rates apply. Seewww.onstar.com for details and systemlimitations.
Chevrolet Camaro Owner Manual (GMNA-Localizing-U.S./Canada/Mexico-15516346) - 2022 - CRC - 4/9/21
344 Connected Services
Remote Services
Contact an OnStar Advisor to unlock thedoors or sound the horn and flash thelamps.
Marketplace
OnStar Advisors can provide offers fromrestaurants and retailers on your route, helplocate hotels, or book a room. These servicesvary by market.
DiagnosticsBy monitoring and reporting on the vehicle'skey systems, OnStar Advanced Diagnostics,if equipped, provides a way to keep up onmaintenance. Capabilities vary by model.See www.onstar.com for details and systemlimitations. Features are subject to change.For updates on feature capabilities, seemy.chevrolet.com. Message and data ratesmay apply.
Chevrolet Camaro Owner Manual (GMNA-Localizing-U.S./Canada/Mexico-15516346) - 2022 - CRC - 4/9/21
Index 345
Index AAccessories and Modifications . . . . . . . . . . . 236Accessory Power . . . . . . . . . . . . . . . . . . . . . . . . . 204Active Fuel Management . . . . . . . . . . . . . . . . 205Active Rev Match . . . . . . . . . . . . . . . . . . . . . . . . .212Add-On Electrical Equipment . . . . . . . . . . . . . 234Additional InformationOnStar . . . . . . . . . . . . . . . . . . . . . . . . . . . . . . . . . 339
Additional Maintenance and Care . . . . . . . . .313AgreementsTrademarks and License . . . . . . . . . . . . . . . 164
Air Cleaner/Filter, Engine . . . . . . . . . . . . . . . . 247Air Conditioning . . . . . . . . . . . . . . . . . . . . . 173, 176Air FilterLife System . . . . . . . . . . . . . . . . . . . . . . . . . . . . 247
Air Filter, Passenger Compartment . . . . . . . 179Air Vents . . . . . . . . . . . . . . . . . . . . . . . . . . . . . . . . 179Airbag SystemCheck . . . . . . . . . . . . . . . . . . . . . . . . . . . . . . . . . . . 58How Does an Airbag Restrain? . . . . . . . . . . 52Passenger Sensing System . . . . . . . . . . . . . . 54What Makes an Airbag Inflate? . . . . . . . . . 52What Will You See after an AirbagInflates? . . . . . . . . . . . . . . . . . . . . . . . . . . . . . . 53
When Should an Airbag Inflate? . . . . . . . . . 51Where Are the Airbags? . . . . . . . . . . . . . . . . 50
AirbagsAdding Equipment to the Vehicle . . . . . . . 58
Airbags (cont'd)Passenger Status Indicator . . . . . . . . . . . . . . 91Readiness Light . . . . . . . . . . . . . . . . . . . . . . . . . 91Servicing Airbag-Equipped Vehicles . . . . . . 57System Check . . . . . . . . . . . . . . . . . . . . . . . . . . . 48
AlarmVehicle Security . . . . . . . . . . . . . . . . . . . . . . . . 20
AlertLane Change . . . . . . . . . . . . . . . . . . . . . . . . . . . 229Rear Cross Traffic . . . . . . . . . . . . . . . . . . . . . . 227Side Blind Zone (SBZA) . . . . . . . . . . . . . . . . . 228
All-Season Tires . . . . . . . . . . . . . . . . . . . . . . . . . . 270AM-FM Radio . . . . . . . . . . . . . . . . . . . . . . . . . . . . . 121AntennaMulti-band . . . . . . . . . . . . . . . . . . . . . . . . . . . . . 125
Antilock Brake System (ABS) . . . . . . . . . . . . . .213Warning Light . . . . . . . . . . . . . . . . . . . . . . . . . . 95
Appearance CareExterior . . . . . . . . . . . . . . . . . . . . . . . . . . . . . . . . 297Interior . . . . . . . . . . . . . . . . . . . . . . . . . . . . . . . . 302
Apple CarPlay and Android Auto . . . . . . . . . .154Assistance Program, Roadside . . . . . . . . . . . . 329Assistance Systems for Parking andBacking . . . . . . . . . . . . . . . . . . . . . . . . . . . . . . . . 225
AudioBluetooth . . . . . . . . . . . . . . . . . . . . . . . . . . . . . . 128
AutomaticClimate Control System . . . . . . . . . . . . . . . . . 173
Chevrolet Camaro Owner Manual (GMNA-Localizing-U.S./Canada/Mexico-15516346) - 2022 - CRC - 4/9/21
346 Index
Automatic (cont'd)Dimming Mirrors . . . . . . . . . . . . . . . . . . . . . . . 23Door Locks . . . . . . . . . . . . . . . . . . . . . . . . . . . . . . . 17Headlamp System . . . . . . . . . . . . . . . . . . . . . 110Transmission . . . . . . . . . . . . . . . . . . . . . . . . . . . 207Transmission Fluid . . . . . . . . . . . . . . . . . . . . . 246
Automatic TransmissionManual Mode . . . . . . . . . . . . . . . . . . . . . . . . . 208Shift Lock Control Function Check . . . . . . 257
Auxiliary Jack . . . . . . . . . . . . . . . . . . . . . . . . . . . . .128Avoiding Untrusted Media Devices . . . . . . . . 125Axle, Rear . . . . . . . . . . . . . . . . . . . . . . . . . . . . . . . . 257
BBatteryExterior Lighting Battery Saver . . . . . . . . . 114Load Management . . . . . . . . . . . . . . . . . . . . . . 113Power Protection . . . . . . . . . . . . . . . . . . . . . . . 114
Battery - North America . . . . . . . . . . . . 256, 294Blade Replacement, Wiper . . . . . . . . . . . . . . . 258BluetoothOverview . . . . . . . . . . . . . . . . . . . . . . . . . 149, 150
Bluetooth Audio . . . . . . . . . . . . . . . . . . . . . . . . . .128Boost Gauge . . . . . . . . . . . . . . . . . . . . . . . . . . . . . . 88BrakeParking, Electric . . . . . . . . . . . . . . . . . . . . . . . . 213System Warning Light . . . . . . . . . . . . . . . . . . 94
Brakes . . . . . . . . . . . . . . . . . . . . . . . . . . . . . . . . . . . 254
Brakes (cont'd)Antilock . . . . . . . . . . . . . . . . . . . . . . . . . . . . . . . . 213Assist . . . . . . . . . . . . . . . . . . . . . . . . . . . . . . . . . . 214Fluid . . . . . . . . . . . . . . . . . . . . . . . . . . . . . . . . . . . 255
Braking . . . . . . . . . . . . . . . . . . . . . . . . . . . . . . . . . . .183Break-In, New Vehicle . . . . . . . . . . . . . . . . . . . . 199Bulb ReplacementBack-up Lamps . . . . . . . . . . . . . . . . . . . . . . . . . 260Halogen Bulbs . . . . . . . . . . . . . . . . . . . . . . . . . 260Headlamp Aiming . . . . . . . . . . . . . . . . . . . . . . 260Headlamps . . . . . . . . . . . . . . . . . . . . . . . . . . . . 260High Intensity Discharge (HID)Lighting . . . . . . . . . . . . . . . . . . . . . . . . . . . . . . 260
License Plate Lamps . . . . . . . . . . . . . . . . . . . 261Buying New Tires . . . . . . . . . . . . . . . . . . . . . . . . 283
CCalibration . . . . . . . . . . . . . . . . . . . . . . . . . . . . . . . . 79CaliforniaPerchlorate MaterialsRequirements . . . . . . . . . . . . . . . . . . . . . . . . 236
California Proposition65 Warning . . . . . . . . . . . . . . . . . . . . . . .256, 294,
Back CoverCameraRear Vision (RVC) . . . . . . . . . . . . . . . . . . . . . . 225
Canadian Vehicle Owners . . . . . . . . . . . . . . . . . . . 1Capacities and Specifications . . . . . . . . . . . . . .321
Carbon MonoxideEngine Exhaust . . . . . . . . . . . . . . . . . . . . . . . . 206Trunk . . . . . . . . . . . . . . . . . . . . . . . . . . . . . . . . . . . 18Winter Driving . . . . . . . . . . . . . . . . . . . . . . . . . 194
Caution, Danger, and Warning . . . . . . . . . . . . . .2Center Console Storage . . . . . . . . . . . . . . . . . . . 76Chains, Tire . . . . . . . . . . . . . . . . . . . . . . . . . . . . . . 287ChargingWireless . . . . . . . . . . . . . . . . . . . . . . . . . . . . . . . . 80
Charging System Light . . . . . . . . . . . . . . . . . . . . 92CheckEngine Light (Malfunction Indicator) . . . . 92
Child RestraintsInfants and Young Children . . . . . . . . . . . . . 60Lower Anchors and Tethers forChildren . . . . . . . . . . . . . . . . . . . . . . . . . . . . . . . 65
Older Children . . . . . . . . . . . . . . . . . . . . . . . . . . 59Securing . . . . . . . . . . . . . . . . . . . . . . . . . . . . 70, 72Systems . . . . . . . . . . . . . . . . . . . . . . . . . . . . . . . . 62
Circuit Breakers . . . . . . . . . . . . . . . . . . . . . . . . . . 263CleaningExterior Care . . . . . . . . . . . . . . . . . . . . . . . . . . . 297Interior Care . . . . . . . . . . . . . . . . . . . . . . . . . . . 302
Climate Control SystemsAutomatic . . . . . . . . . . . . . . . . . . . . . . . . . . . . . . 173Dual Automatic . . . . . . . . . . . . . . . . . . . . . . . . 176
Clock . . . . . . . . . . . . . . . . . . . . . . . . . . . . . . . . . . . . . 79Cluster, Instrument . . . . . . . . . . . . . . . . . . . . . . . 83
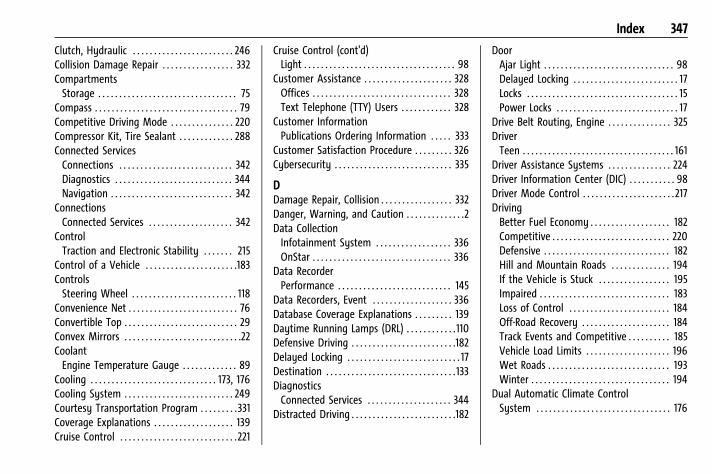
Chevrolet Camaro Owner Manual (GMNA-Localizing-U.S./Canada/Mexico-15516346) - 2022 - CRC - 4/9/21
Index 347
Clutch, Hydraulic . . . . . . . . . . . . . . . . . . . . . . . . 246Collision Damage Repair . . . . . . . . . . . . . . . . . 332CompartmentsStorage . . . . . . . . . . . . . . . . . . . . . . . . . . . . . . . . . 75
Compass . . . . . . . . . . . . . . . . . . . . . . . . . . . . . . . . . . 79Competitive Driving Mode . . . . . . . . . . . . . . . 220Compressor Kit, Tire Sealant . . . . . . . . . . . . . 288Connected ServicesConnections . . . . . . . . . . . . . . . . . . . . . . . . . . . 342Diagnostics . . . . . . . . . . . . . . . . . . . . . . . . . . . . 344Navigation . . . . . . . . . . . . . . . . . . . . . . . . . . . . . 342
ConnectionsConnected Services . . . . . . . . . . . . . . . . . . . . 342
ControlTraction and Electronic Stability . . . . . . . 215
Control of a Vehicle . . . . . . . . . . . . . . . . . . . . . .183ControlsSteering Wheel . . . . . . . . . . . . . . . . . . . . . . . . . 118
Convenience Net . . . . . . . . . . . . . . . . . . . . . . . . . . 76Convertible Top . . . . . . . . . . . . . . . . . . . . . . . . . . . 29Convex Mirrors . . . . . . . . . . . . . . . . . . . . . . . . . . . .22CoolantEngine Temperature Gauge . . . . . . . . . . . . . 89
Cooling . . . . . . . . . . . . . . . . . . . . . . . . . . . . . . 173, 176Cooling System . . . . . . . . . . . . . . . . . . . . . . . . . . 249Courtesy Transportation Program . . . . . . . . .331Coverage Explanations . . . . . . . . . . . . . . . . . . . 139Cruise Control . . . . . . . . . . . . . . . . . . . . . . . . . . . .221
Cruise Control (cont'd)Light . . . . . . . . . . . . . . . . . . . . . . . . . . . . . . . . . . . . 98
Customer Assistance . . . . . . . . . . . . . . . . . . . . . 328Offices . . . . . . . . . . . . . . . . . . . . . . . . . . . . . . . . . 328Text Telephone (TTY) Users . . . . . . . . . . . . 328
Customer InformationPublications Ordering Information . . . . . 333
Customer Satisfaction Procedure . . . . . . . . . 326Cybersecurity . . . . . . . . . . . . . . . . . . . . . . . . . . . . 335
DDamage Repair, Collision . . . . . . . . . . . . . . . . . 332Danger, Warning, and Caution . . . . . . . . . . . . . .2Data CollectionInfotainment System . . . . . . . . . . . . . . . . . . 336OnStar . . . . . . . . . . . . . . . . . . . . . . . . . . . . . . . . . 336
Data RecorderPerformance . . . . . . . . . . . . . . . . . . . . . . . . . . . 145
Data Recorders, Event . . . . . . . . . . . . . . . . . . . 336Database Coverage Explanations . . . . . . . . . 139Daytime Running Lamps (DRL) . . . . . . . . . . . .110Defensive Driving . . . . . . . . . . . . . . . . . . . . . . . . .182Delayed Locking . . . . . . . . . . . . . . . . . . . . . . . . . . . 17Destination . . . . . . . . . . . . . . . . . . . . . . . . . . . . . . . 133DiagnosticsConnected Services . . . . . . . . . . . . . . . . . . . . 344
Distracted Driving . . . . . . . . . . . . . . . . . . . . . . . . .182
DoorAjar Light . . . . . . . . . . . . . . . . . . . . . . . . . . . . . . . 98Delayed Locking . . . . . . . . . . . . . . . . . . . . . . . . . 17Locks . . . . . . . . . . . . . . . . . . . . . . . . . . . . . . . . . . . . 15Power Locks . . . . . . . . . . . . . . . . . . . . . . . . . . . . . 17
Drive Belt Routing, Engine . . . . . . . . . . . . . . . 325DriverTeen . . . . . . . . . . . . . . . . . . . . . . . . . . . . . . . . . . . . 161
Driver Assistance Systems . . . . . . . . . . . . . . . 224Driver Information Center (DIC) . . . . . . . . . . . 98Driver Mode Control . . . . . . . . . . . . . . . . . . . . . .217DrivingBetter Fuel Economy . . . . . . . . . . . . . . . . . . . 182Competitive . . . . . . . . . . . . . . . . . . . . . . . . . . . . 220Defensive . . . . . . . . . . . . . . . . . . . . . . . . . . . . . . 182Hill and Mountain Roads . . . . . . . . . . . . . . 194If the Vehicle is Stuck . . . . . . . . . . . . . . . . . 195Impaired . . . . . . . . . . . . . . . . . . . . . . . . . . . . . . . 183Loss of Control . . . . . . . . . . . . . . . . . . . . . . . . 184Off-Road Recovery . . . . . . . . . . . . . . . . . . . . . 184Track Events and Competitive . . . . . . . . . . 185Vehicle Load Limits . . . . . . . . . . . . . . . . . . . . 196Wet Roads . . . . . . . . . . . . . . . . . . . . . . . . . . . . . 193Winter . . . . . . . . . . . . . . . . . . . . . . . . . . . . . . . . . 194
Dual Automatic Climate ControlSystem . . . . . . . . . . . . . . . . . . . . . . . . . . . . . . . . 176
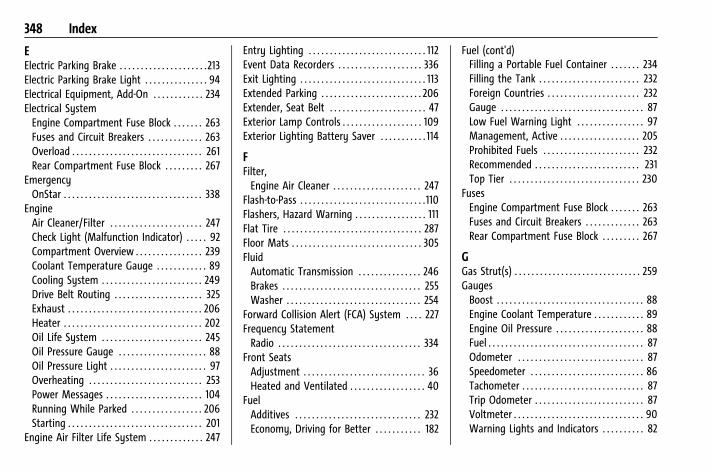
Chevrolet Camaro Owner Manual (GMNA-Localizing-U.S./Canada/Mexico-15516346) - 2022 - CRC - 4/9/21
348 Index
EElectric Parking Brake . . . . . . . . . . . . . . . . . . . . .213Electric Parking Brake Light . . . . . . . . . . . . . . . 94Electrical Equipment, Add-On . . . . . . . . . . . . 234Electrical SystemEngine Compartment Fuse Block . . . . . . . 263Fuses and Circuit Breakers . . . . . . . . . . . . . 263Overload . . . . . . . . . . . . . . . . . . . . . . . . . . . . . . . 261Rear Compartment Fuse Block . . . . . . . . . 267
EmergencyOnStar . . . . . . . . . . . . . . . . . . . . . . . . . . . . . . . . . 338
EngineAir Cleaner/Filter . . . . . . . . . . . . . . . . . . . . . . 247Check Light (Malfunction Indicator) . . . . . 92Compartment Overview . . . . . . . . . . . . . . . . 239Coolant Temperature Gauge . . . . . . . . . . . . 89Cooling System . . . . . . . . . . . . . . . . . . . . . . . . 249Drive Belt Routing . . . . . . . . . . . . . . . . . . . . . 325Exhaust . . . . . . . . . . . . . . . . . . . . . . . . . . . . . . . . 206Heater . . . . . . . . . . . . . . . . . . . . . . . . . . . . . . . . . 202Oil Life System . . . . . . . . . . . . . . . . . . . . . . . . 245Oil Pressure Gauge . . . . . . . . . . . . . . . . . . . . . 88Oil Pressure Light . . . . . . . . . . . . . . . . . . . . . . . 97Overheating . . . . . . . . . . . . . . . . . . . . . . . . . . . 253Power Messages . . . . . . . . . . . . . . . . . . . . . . . 104Running While Parked . . . . . . . . . . . . . . . . . 206Starting . . . . . . . . . . . . . . . . . . . . . . . . . . . . . . . . 201
Engine Air Filter Life System . . . . . . . . . . . . . 247
Entry Lighting . . . . . . . . . . . . . . . . . . . . . . . . . . . . 112Event Data Recorders . . . . . . . . . . . . . . . . . . . . 336Exit Lighting . . . . . . . . . . . . . . . . . . . . . . . . . . . . . . 113Extended Parking . . . . . . . . . . . . . . . . . . . . . . . . 206Extender, Seat Belt . . . . . . . . . . . . . . . . . . . . . . . 47Exterior Lamp Controls . . . . . . . . . . . . . . . . . . . 109Exterior Lighting Battery Saver . . . . . . . . . . . 114
FFilter,Engine Air Cleaner . . . . . . . . . . . . . . . . . . . . . 247
Flash-to-Pass . . . . . . . . . . . . . . . . . . . . . . . . . . . . . .110Flashers, Hazard Warning . . . . . . . . . . . . . . . . . 111Flat Tire . . . . . . . . . . . . . . . . . . . . . . . . . . . . . . . . . 287Floor Mats . . . . . . . . . . . . . . . . . . . . . . . . . . . . . . . 305FluidAutomatic Transmission . . . . . . . . . . . . . . . 246Brakes . . . . . . . . . . . . . . . . . . . . . . . . . . . . . . . . . 255Washer . . . . . . . . . . . . . . . . . . . . . . . . . . . . . . . . 254
Forward Collision Alert (FCA) System . . . . 227Frequency StatementRadio . . . . . . . . . . . . . . . . . . . . . . . . . . . . . . . . . . 334
Front SeatsAdjustment . . . . . . . . . . . . . . . . . . . . . . . . . . . . . 36Heated and Ventilated . . . . . . . . . . . . . . . . . . 40
FuelAdditives . . . . . . . . . . . . . . . . . . . . . . . . . . . . . . 232Economy, Driving for Better . . . . . . . . . . . 182
Fuel (cont'd)Filling a Portable Fuel Container . . . . . . . 234Filling the Tank . . . . . . . . . . . . . . . . . . . . . . . . 232Foreign Countries . . . . . . . . . . . . . . . . . . . . . . 232Gauge . . . . . . . . . . . . . . . . . . . . . . . . . . . . . . . . . . 87Low Fuel Warning Light . . . . . . . . . . . . . . . . 97Management, Active . . . . . . . . . . . . . . . . . . . 205Prohibited Fuels . . . . . . . . . . . . . . . . . . . . . . . 232Recommended . . . . . . . . . . . . . . . . . . . . . . . . . 231Top Tier . . . . . . . . . . . . . . . . . . . . . . . . . . . . . . . 230
FusesEngine Compartment Fuse Block . . . . . . . 263Fuses and Circuit Breakers . . . . . . . . . . . . . 263Rear Compartment Fuse Block . . . . . . . . . 267
GGas Strut(s) . . . . . . . . . . . . . . . . . . . . . . . . . . . . . . 259GaugesBoost . . . . . . . . . . . . . . . . . . . . . . . . . . . . . . . . . . . 88Engine Coolant Temperature . . . . . . . . . . . . 89Engine Oil Pressure . . . . . . . . . . . . . . . . . . . . . 88Fuel . . . . . . . . . . . . . . . . . . . . . . . . . . . . . . . . . . . . . 87Odometer . . . . . . . . . . . . . . . . . . . . . . . . . . . . . . 87Speedometer . . . . . . . . . . . . . . . . . . . . . . . . . . . 86Tachometer . . . . . . . . . . . . . . . . . . . . . . . . . . . . . 87Trip Odometer . . . . . . . . . . . . . . . . . . . . . . . . . . 87Voltmeter . . . . . . . . . . . . . . . . . . . . . . . . . . . . . . . 90Warning Lights and Indicators . . . . . . . . . . 82
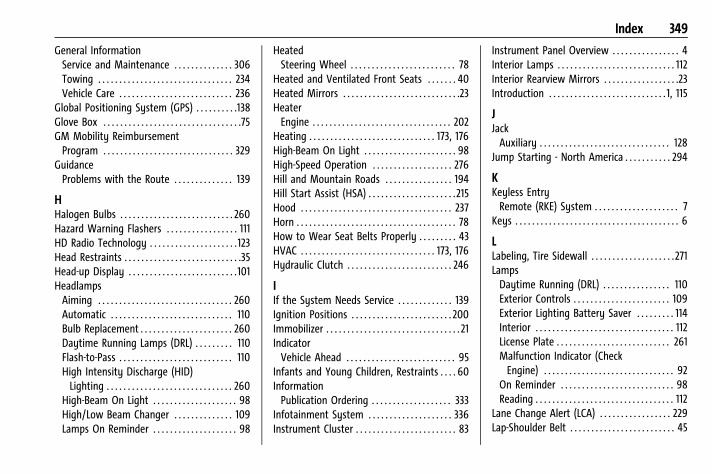
Chevrolet Camaro Owner Manual (GMNA-Localizing-U.S./Canada/Mexico-15516346) - 2022 - CRC - 4/9/21
Index 349
General InformationService and Maintenance . . . . . . . . . . . . . . 306Towing . . . . . . . . . . . . . . . . . . . . . . . . . . . . . . . . 234Vehicle Care . . . . . . . . . . . . . . . . . . . . . . . . . . . 236
Global Positioning System (GPS) . . . . . . . . . .138Glove Box . . . . . . . . . . . . . . . . . . . . . . . . . . . . . . . . .75GM Mobility ReimbursementProgram . . . . . . . . . . . . . . . . . . . . . . . . . . . . . . . 329
GuidanceProblems with the Route . . . . . . . . . . . . . . 139
HHalogen Bulbs . . . . . . . . . . . . . . . . . . . . . . . . . . . 260Hazard Warning Flashers . . . . . . . . . . . . . . . . . 111HD Radio Technology . . . . . . . . . . . . . . . . . . . . . 123Head Restraints . . . . . . . . . . . . . . . . . . . . . . . . . . . .35Head-up Display . . . . . . . . . . . . . . . . . . . . . . . . . .101HeadlampsAiming . . . . . . . . . . . . . . . . . . . . . . . . . . . . . . . . 260Automatic . . . . . . . . . . . . . . . . . . . . . . . . . . . . . 110Bulb Replacement . . . . . . . . . . . . . . . . . . . . . . 260Daytime Running Lamps (DRL) . . . . . . . . . 110Flash-to-Pass . . . . . . . . . . . . . . . . . . . . . . . . . . . 110High Intensity Discharge (HID)Lighting . . . . . . . . . . . . . . . . . . . . . . . . . . . . . . 260
High-Beam On Light . . . . . . . . . . . . . . . . . . . . 98High/Low Beam Changer . . . . . . . . . . . . . . 109Lamps On Reminder . . . . . . . . . . . . . . . . . . . . 98
HeatedSteering Wheel . . . . . . . . . . . . . . . . . . . . . . . . . 78
Heated and Ventilated Front Seats . . . . . . . 40Heated Mirrors . . . . . . . . . . . . . . . . . . . . . . . . . . . .23HeaterEngine . . . . . . . . . . . . . . . . . . . . . . . . . . . . . . . . . 202
Heating . . . . . . . . . . . . . . . . . . . . . . . . . . . . . . 173, 176High-Beam On Light . . . . . . . . . . . . . . . . . . . . . . 98High-Speed Operation . . . . . . . . . . . . . . . . . . . 276Hill and Mountain Roads . . . . . . . . . . . . . . . . 194Hill Start Assist (HSA) . . . . . . . . . . . . . . . . . . . . .215Hood . . . . . . . . . . . . . . . . . . . . . . . . . . . . . . . . . . . . 237Horn . . . . . . . . . . . . . . . . . . . . . . . . . . . . . . . . . . . . . . 78How to Wear Seat Belts Properly . . . . . . . . . 43HVAC . . . . . . . . . . . . . . . . . . . . . . . . . . . . . . . . 173, 176Hydraulic Clutch . . . . . . . . . . . . . . . . . . . . . . . . . 246
IIf the System Needs Service . . . . . . . . . . . . . 139Ignition Positions . . . . . . . . . . . . . . . . . . . . . . . . 200Immobilizer . . . . . . . . . . . . . . . . . . . . . . . . . . . . . . . . 21IndicatorVehicle Ahead . . . . . . . . . . . . . . . . . . . . . . . . . . 95
Infants and Young Children, Restraints . . . . 60InformationPublication Ordering . . . . . . . . . . . . . . . . . . . 333
Infotainment System . . . . . . . . . . . . . . . . . . . . 336Instrument Cluster . . . . . . . . . . . . . . . . . . . . . . . . 83
Instrument Panel Overview . . . . . . . . . . . . . . . . 4Interior Lamps . . . . . . . . . . . . . . . . . . . . . . . . . . . . 112Interior Rearview Mirrors . . . . . . . . . . . . . . . . . .23Introduction . . . . . . . . . . . . . . . . . . . . . . . . . . . . 1, 115
JJackAuxiliary . . . . . . . . . . . . . . . . . . . . . . . . . . . . . . . 128
Jump Starting - North America . . . . . . . . . . . 294
KKeyless EntryRemote (RKE) System . . . . . . . . . . . . . . . . . . . . 7
Keys . . . . . . . . . . . . . . . . . . . . . . . . . . . . . . . . . . . . . . . 6
LLabeling, Tire Sidewall . . . . . . . . . . . . . . . . . . . .271LampsDaytime Running (DRL) . . . . . . . . . . . . . . . . 110Exterior Controls . . . . . . . . . . . . . . . . . . . . . . . 109Exterior Lighting Battery Saver . . . . . . . . . 114Interior . . . . . . . . . . . . . . . . . . . . . . . . . . . . . . . . . 112License Plate . . . . . . . . . . . . . . . . . . . . . . . . . . . 261Malfunction Indicator (CheckEngine) . . . . . . . . . . . . . . . . . . . . . . . . . . . . . . . 92
On Reminder . . . . . . . . . . . . . . . . . . . . . . . . . . . 98Reading . . . . . . . . . . . . . . . . . . . . . . . . . . . . . . . . . 112
Lane Change Alert (LCA) . . . . . . . . . . . . . . . . . 229Lap-Shoulder Belt . . . . . . . . . . . . . . . . . . . . . . . . . 45
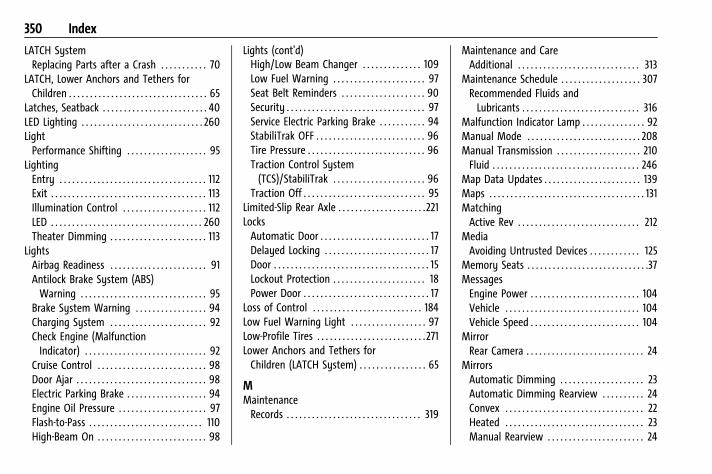
Chevrolet Camaro Owner Manual (GMNA-Localizing-U.S./Canada/Mexico-15516346) - 2022 - CRC - 4/9/21
350 Index
LATCH SystemReplacing Parts after a Crash . . . . . . . . . . . 70
LATCH, Lower Anchors and Tethers forChildren . . . . . . . . . . . . . . . . . . . . . . . . . . . . . . . . . 65
Latches, Seatback . . . . . . . . . . . . . . . . . . . . . . . . . 40LED Lighting . . . . . . . . . . . . . . . . . . . . . . . . . . . . . 260LightPerformance Shifting . . . . . . . . . . . . . . . . . . . 95
LightingEntry . . . . . . . . . . . . . . . . . . . . . . . . . . . . . . . . . . . 112Exit . . . . . . . . . . . . . . . . . . . . . . . . . . . . . . . . . . . . . 113Illumination Control . . . . . . . . . . . . . . . . . . . . 112LED . . . . . . . . . . . . . . . . . . . . . . . . . . . . . . . . . . . . 260Theater Dimming . . . . . . . . . . . . . . . . . . . . . . . 113
LightsAirbag Readiness . . . . . . . . . . . . . . . . . . . . . . . 91Antilock Brake System (ABS)Warning . . . . . . . . . . . . . . . . . . . . . . . . . . . . . . 95
Brake System Warning . . . . . . . . . . . . . . . . . 94Charging System . . . . . . . . . . . . . . . . . . . . . . . 92Check Engine (MalfunctionIndicator) . . . . . . . . . . . . . . . . . . . . . . . . . . . . . 92
Cruise Control . . . . . . . . . . . . . . . . . . . . . . . . . . 98Door Ajar . . . . . . . . . . . . . . . . . . . . . . . . . . . . . . . 98Electric Parking Brake . . . . . . . . . . . . . . . . . . . 94Engine Oil Pressure . . . . . . . . . . . . . . . . . . . . . 97Flash-to-Pass . . . . . . . . . . . . . . . . . . . . . . . . . . . 110High-Beam On . . . . . . . . . . . . . . . . . . . . . . . . . . 98
Lights (cont'd)High/Low Beam Changer . . . . . . . . . . . . . . 109Low Fuel Warning . . . . . . . . . . . . . . . . . . . . . . 97Seat Belt Reminders . . . . . . . . . . . . . . . . . . . . 90Security . . . . . . . . . . . . . . . . . . . . . . . . . . . . . . . . . 97Service Electric Parking Brake . . . . . . . . . . . 94StabiliTrak OFF . . . . . . . . . . . . . . . . . . . . . . . . . . 96Tire Pressure . . . . . . . . . . . . . . . . . . . . . . . . . . . . 96Traction Control System(TCS)/StabiliTrak . . . . . . . . . . . . . . . . . . . . . . 96
Traction Off . . . . . . . . . . . . . . . . . . . . . . . . . . . . . 95Limited-Slip Rear Axle . . . . . . . . . . . . . . . . . . . . .221LocksAutomatic Door . . . . . . . . . . . . . . . . . . . . . . . . . . 17Delayed Locking . . . . . . . . . . . . . . . . . . . . . . . . . 17Door . . . . . . . . . . . . . . . . . . . . . . . . . . . . . . . . . . . . . 15Lockout Protection . . . . . . . . . . . . . . . . . . . . . . 18Power Door . . . . . . . . . . . . . . . . . . . . . . . . . . . . . . 17
Loss of Control . . . . . . . . . . . . . . . . . . . . . . . . . . 184Low Fuel Warning Light . . . . . . . . . . . . . . . . . . 97Low-Profile Tires . . . . . . . . . . . . . . . . . . . . . . . . . .271Lower Anchors and Tethers forChildren (LATCH System) . . . . . . . . . . . . . . . . 65
MMaintenanceRecords . . . . . . . . . . . . . . . . . . . . . . . . . . . . . . . . 319
Maintenance and CareAdditional . . . . . . . . . . . . . . . . . . . . . . . . . . . . . 313
Maintenance Schedule . . . . . . . . . . . . . . . . . . . 307Recommended Fluids andLubricants . . . . . . . . . . . . . . . . . . . . . . . . . . . . 316
Malfunction Indicator Lamp . . . . . . . . . . . . . . . 92Manual Mode . . . . . . . . . . . . . . . . . . . . . . . . . . . 208Manual Transmission . . . . . . . . . . . . . . . . . . . . 210Fluid . . . . . . . . . . . . . . . . . . . . . . . . . . . . . . . . . . . 246
Map Data Updates . . . . . . . . . . . . . . . . . . . . . . . 139Maps . . . . . . . . . . . . . . . . . . . . . . . . . . . . . . . . . . . . . 131MatchingActive Rev . . . . . . . . . . . . . . . . . . . . . . . . . . . . . 212
MediaAvoiding Untrusted Devices . . . . . . . . . . . . 125
Memory Seats . . . . . . . . . . . . . . . . . . . . . . . . . . . . .37MessagesEngine Power . . . . . . . . . . . . . . . . . . . . . . . . . . 104Vehicle . . . . . . . . . . . . . . . . . . . . . . . . . . . . . . . . 104Vehicle Speed . . . . . . . . . . . . . . . . . . . . . . . . . . 104
MirrorRear Camera . . . . . . . . . . . . . . . . . . . . . . . . . . . . 24
MirrorsAutomatic Dimming . . . . . . . . . . . . . . . . . . . . 23Automatic Dimming Rearview . . . . . . . . . . 24Convex . . . . . . . . . . . . . . . . . . . . . . . . . . . . . . . . . 22Heated . . . . . . . . . . . . . . . . . . . . . . . . . . . . . . . . . 23Manual Rearview . . . . . . . . . . . . . . . . . . . . . . . 24
Chevrolet Camaro Owner Manual (GMNA-Localizing-U.S./Canada/Mexico-15516346) - 2022 - CRC - 4/9/21
Index 351
Mirrors (cont'd)Power . . . . . . . . . . . . . . . . . . . . . . . . . . . . . . . . . . 23Tilt in Reverse . . . . . . . . . . . . . . . . . . . . . . . . . . 23
Mirrors, Interior Rearview . . . . . . . . . . . . . . . . . .23Mode . . . . . . . . . . . . . . . . . . . . . . . . . . . . . . . . . . . . .217Driver Control . . . . . . . . . . . . . . . . . . . . . . . . . . 217
Monitor System, Tire Pressure . . . . . . . . . . . 277Multi-band Antenna . . . . . . . . . . . . . . . . . . . . . . 125
NNavigationConnected Services . . . . . . . . . . . . . . . . . . . . 342Destination . . . . . . . . . . . . . . . . . . . . . . . . . . . . 133Using the System . . . . . . . . . . . . . . . . . . . . . . 129
Navigation Symbols . . . . . . . . . . . . . . . . . . . . . . 132Net, Convenience . . . . . . . . . . . . . . . . . . . . . . . . . 76New Vehicle Break-In . . . . . . . . . . . . . . . . . . . . 199
OOdometer . . . . . . . . . . . . . . . . . . . . . . . . . . . . . . . . 87Trip . . . . . . . . . . . . . . . . . . . . . . . . . . . . . . . . . . . . . 87
Off-RoadRecovery . . . . . . . . . . . . . . . . . . . . . . . . . . . . . . . 184
OilEngine . . . . . . . . . . . . . . . . . . . . . . . . . . . . . . . . . 243Engine Oil Life System . . . . . . . . . . . . . . . . . 245Engine Oil Pressure Gauge . . . . . . . . . . . . . . 88Pressure Light . . . . . . . . . . . . . . . . . . . . . . . . . . 97
Older Children, Restraints . . . . . . . . . . . . . . . . . 59
Online Owner Center . . . . . . . . . . . . . . . . . . . . 328OnStar . . . . . . . . . . . . . . . . . . . . . . . . . . . . . . . . . . . 336OnStar Additional Information . . . . . . . . . . . 339OnStar Emergency . . . . . . . . . . . . . . . . . . . . . . . 338OnStar Overview . . . . . . . . . . . . . . . . . . . . . . . . . 337OnStar Security . . . . . . . . . . . . . . . . . . . . . . . . . . 338OutletsPower . . . . . . . . . . . . . . . . . . . . . . . . . . . . . . . . . . 80
Overheating, Engine . . . . . . . . . . . . . . . . . . . . . 253Overview . . . . . . . . . . . . . . . . . . . . . . . . . . . . . . . . . 116Instrument Panel . . . . . . . . . . . . . . . . . . . . . . . . 4
PParkShifting Into . . . . . . . . . . . . . . . . . . . . . . . . . . . 204Shifting Out of . . . . . . . . . . . . . . . . . . . . . . . . 205
Park Assist . . . . . . . . . . . . . . . . . . . . . . . . . . .225, 226Parking . . . . . . . . . . . . . . . . . . . . . . . . . . . . . . . . . . 205Brake and P (Park) MechanismCheck . . . . . . . . . . . . . . . . . . . . . . . . . . . . . . . . 257
Extended . . . . . . . . . . . . . . . . . . . . . . . . . . . . . . 206Over Things That Burn . . . . . . . . . . . . . . . . . 205
Parking or BackingAssistance Systems . . . . . . . . . . . . . . . . . . . . 225
Passenger Airbag Status Indicator . . . . . . . . . .91Passenger Compartment Air Filter . . . . . . . 179Passenger Sensing System . . . . . . . . . . . . . . . . 54
Perchlorate Materials Requirements,California . . . . . . . . . . . . . . . . . . . . . . . . . . . . . . 236
Performance Data Recorder (PDR) . . . . . . . . .145Performance Shifting Light . . . . . . . . . . . . . . . . 95PersonalizationVehicle . . . . . . . . . . . . . . . . . . . . . . . . . . . . . . . . 105
PhoneApple CarPlay and Android Auto . . . . . . . 154Bluetooth . . . . . . . . . . . . . . . . . . . . . . . . . 149, 150
PortUSB . . . . . . . . . . . . . . . . . . . . . . . . . . . . . . . . . . . . 125
PositioningVehicle . . . . . . . . . . . . . . . . . . . . . . . . . . . . . . . . 138
PowerDoor Locks . . . . . . . . . . . . . . . . . . . . . . . . . . . . . . . 17Mirrors . . . . . . . . . . . . . . . . . . . . . . . . . . . . . . . . . 23Outlets . . . . . . . . . . . . . . . . . . . . . . . . . . . . . . . . . 80Protection, Battery . . . . . . . . . . . . . . . . . . . . . . 114Retained Accessory (RAP) . . . . . . . . . . . . . . 204Seat Adjustment . . . . . . . . . . . . . . . . . . . . . . . . 36Windows . . . . . . . . . . . . . . . . . . . . . . . . . . . . . . . 26
Pregnancy, Using Seat Belts . . . . . . . . . . . . . . 47PrivacyVehicle Data Recording . . . . . . . . . . . . . . . . 335
Problems with Route Guidance . . . . . . . . . . 139ProgramCourtesy Transportation . . . . . . . . . . . . . . . 331
Prohibited Fuels . . . . . . . . . . . . . . . . . . . . . . . . . 232
Chevrolet Camaro Owner Manual (GMNA-Localizing-U.S./Canada/Mexico-15516346) - 2022 - CRC - 4/9/21
352 Index
Proposition 65 Warning,California . . . . . . . . . . . . . . . . . . . . . . . . .256, 294,
Back CoverPublication Ordering Information . . . . . . . . 333
RRadioHD Radio Technology . . . . . . . . . . . . . . . . . . 123
Radio Data System (RDS) . . . . . . . . . . . . . . . . .124Radio Frequency Statement . . . . . . . . . . . . . . 334Radio Reception . . . . . . . . . . . . . . . . . . . . . . . . . .124RadiosAM-FM Radio . . . . . . . . . . . . . . . . . . . . . . . . . . . 121Satellite . . . . . . . . . . . . . . . . . . . . . . . . . . . . . . . . 124
Reading Lamps . . . . . . . . . . . . . . . . . . . . . . . . . . . 112Rear Axle . . . . . . . . . . . . . . . . . . . . . . . . . . . . . . . . 257Limited-Slip . . . . . . . . . . . . . . . . . . . . . . . . . . . . 221
Rear Camera Mirror . . . . . . . . . . . . . . . . . . . . . . . 24Rear Cross Traffic Alert System . . . . . . . . . . 227Rear Seats . . . . . . . . . . . . . . . . . . . . . . . . . . . . . . . . .41Rear Storage . . . . . . . . . . . . . . . . . . . . . . . . . . . . . . .75Rear Vision Camera (RVC) . . . . . . . . . . . . . . . . 225Rearview Mirrors . . . . . . . . . . . . . . . . . . . . . . . . . 24Automatic Dimming . . . . . . . . . . . . . . . . . . . . 24
Reclining Seatbacks . . . . . . . . . . . . . . . . . . . . . . . .37RecognitionVoice . . . . . . . . . . . . . . . . . . . . . . . . . . . . . . . . . . 140
RecommendedFuel . . . . . . . . . . . . . . . . . . . . . . . . . . . . . . . . . . . . 231
Recommended Fluids and Lubricants . . . . . 316RecordsMaintenance . . . . . . . . . . . . . . . . . . . . . . . . . . . 319
Recreational Vehicle Towing . . . . . . . . . . . . . 297Reimbursement Program, GMMobility . . . . . . . . . . . . . . . . . . . . . . . . . . . . . . . 329
Remote Keyless Entry (RKE) System . . . . . . . .7Remote Vehicle Start . . . . . . . . . . . . . . . . . . . . . .14Replacement PartsAirbags . . . . . . . . . . . . . . . . . . . . . . . . . . . . . . . . . 59Maintenance . . . . . . . . . . . . . . . . . . . . . . . . . . . . 317
Replacing Airbag System . . . . . . . . . . . . . . . . . . 59Replacing LATCH System Parts after aCrash . . . . . . . . . . . . . . . . . . . . . . . . . . . . . . . . . . . 70
Replacing Seat Belt System Parts aftera Crash . . . . . . . . . . . . . . . . . . . . . . . . . . . . . . . . . 48
Reporting Safety DefectsCanadian Government . . . . . . . . . . . . . . . . . 334General Motors . . . . . . . . . . . . . . . . . . . . . . . . 335U.S. Government . . . . . . . . . . . . . . . . . . . . . . . 334
RestraintsWhere to Put . . . . . . . . . . . . . . . . . . . . . . . . . . . 64
Retained Accessory Power (RAP) . . . . . . . . . 204Reverse Tilt Mirrors . . . . . . . . . . . . . . . . . . . . . . . .23Ride Control SystemsLimited Slip Rear Axle . . . . . . . . . . . . . . . . . 221
RoadsDriving, Wet . . . . . . . . . . . . . . . . . . . . . . . . . . . 193
Roadside Assistance Program . . . . . . . . . . . . 329RoofSunroof . . . . . . . . . . . . . . . . . . . . . . . . . . . . . . . . . 29
Rotation, Tires . . . . . . . . . . . . . . . . . . . . . . . . . . . .281Routing, Engine Drive Belt . . . . . . . . . . . . . . . 325Run-Flat Tires . . . . . . . . . . . . . . . . . . . . . . . . . . . . 270Running the Vehicle While Parked . . . . . . . 206
SSafety Defects ReportingCanadian Government . . . . . . . . . . . . . . . . . 334General Motors . . . . . . . . . . . . . . . . . . . . . . . . 335U.S. Government . . . . . . . . . . . . . . . . . . . . . . . 334
Safety System Check . . . . . . . . . . . . . . . . . . . . . 47Satellite Radio . . . . . . . . . . . . . . . . . . . . . . . . . . . .124Scheduling Appointments . . . . . . . . . . . . . . . . .331Sealant Kit, Tire . . . . . . . . . . . . . . . . . . . . . . . . . . 288Seat Belts . . . . . . . . . . . . . . . . . . . . . . . . . . . . . . . . . 42Care . . . . . . . . . . . . . . . . . . . . . . . . . . . . . . . . . . . . 47Extender . . . . . . . . . . . . . . . . . . . . . . . . . . . . . . . . 47How to Wear Seat Belts Properly . . . . . . . 43Lap-Shoulder Belt . . . . . . . . . . . . . . . . . . . . . . . 45Reminders . . . . . . . . . . . . . . . . . . . . . . . . . . . . . . 90Replacing after a Crash . . . . . . . . . . . . . . . . . 48Use During Pregnancy . . . . . . . . . . . . . . . . . . 47
Seatback Latches . . . . . . . . . . . . . . . . . . . . . . . . . . 40
Chevrolet Camaro Owner Manual (GMNA-Localizing-U.S./Canada/Mexico-15516346) - 2022 - CRC - 4/9/21
Index 353
SeatsAdjustment, Front . . . . . . . . . . . . . . . . . . . . . . 36Head Restraints . . . . . . . . . . . . . . . . . . . . . . . . . 35Heated and Ventilated Front . . . . . . . . . . . . 40Memory . . . . . . . . . . . . . . . . . . . . . . . . . . . . . . . . 37Power Adjustment, Front . . . . . . . . . . . . . . . 36Rear . . . . . . . . . . . . . . . . . . . . . . . . . . . . . . . . . . . . 41Reclining Seatbacks . . . . . . . . . . . . . . . . . . . . . 37
Securing Child Restraints . . . . . . . . . . . . . . .70, 72SecurityLight . . . . . . . . . . . . . . . . . . . . . . . . . . . . . . . . . . . . 97OnStar . . . . . . . . . . . . . . . . . . . . . . . . . . . . . . . . . 338Vehicle . . . . . . . . . . . . . . . . . . . . . . . . . . . . . . . . . 20Vehicle Alarm . . . . . . . . . . . . . . . . . . . . . . . . . . . 20
Service . . . . . . . . . . . . . . . . . . . . . . . . . . . . . . . . . . . 180Accessories and Modifications . . . . . . . . . 236Doing Your Own Work . . . . . . . . . . . . . . . . . 237Maintenance Records . . . . . . . . . . . . . . . . . . 319Maintenance, General Information . . . . . 306Parts Identification . . . . . . . . . . . . . . . . . . . . . 320Scheduling Appointments . . . . . . . . . . . . . . 331
Service Electric Parking Brake Light . . . . . . . 94ServicesSpecial Application . . . . . . . . . . . . . . . . . . . . . 313
Servicing System . . . . . . . . . . . . . . . . . . . . . . . . 139Servicing the Airbag . . . . . . . . . . . . . . . . . . . . . . .57Settings . . . . . . . . . . . . . . . . . . . . . . . . . . . . . . . . . . . 155
Shift Lock Control Function Check,Automatic Transmission . . . . . . . . . . . . . . . . 257
ShiftingInto Park . . . . . . . . . . . . . . . . . . . . . . . . . . . . . . 204Out of Park . . . . . . . . . . . . . . . . . . . . . . . . . . . . 205
Side Blind Zone Alert (SBZA) . . . . . . . . . . . . . 228Signals, Turn and Lane-Change . . . . . . . . . . . . 111Software Updates . . . . . . . . . . . . . . . . . . . . . . . . . 121Special Application Services . . . . . . . . . . . . . . .313Specifications and Capacities . . . . . . . . . . . . . .321Speedometer . . . . . . . . . . . . . . . . . . . . . . . . . . . . . 86StabiliTrakOFF Light . . . . . . . . . . . . . . . . . . . . . . . . . . . . . . . 96
Start Assist, Hill . . . . . . . . . . . . . . . . . . . . . . . . . . .215Start Vehicle, Remote . . . . . . . . . . . . . . . . . . . . . .14Starting the Engine . . . . . . . . . . . . . . . . . . . . . . 201Steering . . . . . . . . . . . . . . . . . . . . . . . . . . . . . . . . . .183Heated Wheel . . . . . . . . . . . . . . . . . . . . . . . . . . 78Wheel Adjustment . . . . . . . . . . . . . . . . . . . . . . 78Wheel Controls . . . . . . . . . . . . . . . . . . . . . . . . . 78
Steering Wheel Controls . . . . . . . . . . . . . . . . . . 118StorageRear . . . . . . . . . . . . . . . . . . . . . . . . . . . . . . . . . . . . 75
Storage AreasCenter Console . . . . . . . . . . . . . . . . . . . . . . . . . 76Convenience Net . . . . . . . . . . . . . . . . . . . . . . . . 76Glove Box . . . . . . . . . . . . . . . . . . . . . . . . . . . . . . 75
Storage Compartments . . . . . . . . . . . . . . . . . . . .75
Storing the Tire Sealant andCompressor Kit . . . . . . . . . . . . . . . . . . . . . . . . . 293
StrutsGas . . . . . . . . . . . . . . . . . . . . . . . . . . . . . . . . . . . . 259
Stuck Vehicle . . . . . . . . . . . . . . . . . . . . . . . . . . . . 195Summer Tires . . . . . . . . . . . . . . . . . . . . . . . . . . . . .271Sun Visors . . . . . . . . . . . . . . . . . . . . . . . . . . . . . . . . 28Sunroof . . . . . . . . . . . . . . . . . . . . . . . . . . . . . . . . . . . 29Symbols . . . . . . . . . . . . . . . . . . . . . . . . . . . . . . . . . . . .2Navigation . . . . . . . . . . . . . . . . . . . . . . . . . . . . . 132
SystemEngine Air Filter Life . . . . . . . . . . . . . . . . . . . 247Forward Collision Alert (FCA) . . . . . . . . . . . 227Global Positioning . . . . . . . . . . . . . . . . . . . . . 138Infotainment . . . . . . . . . . . . . . . . . . . . . . . . . . . 336Rear Cross Traffic Alert . . . . . . . . . . . . . . . . 227
SystemsDriver Assistance . . . . . . . . . . . . . . . . . . . . . . 224
TTachometer . . . . . . . . . . . . . . . . . . . . . . . . . . . . . . . 87Teen Driver . . . . . . . . . . . . . . . . . . . . . . . . . . . . . . . 161Text Telephone (TTY) Users . . . . . . . . . . . . . . 328Theater Dimming . . . . . . . . . . . . . . . . . . . . . . . . . 113Theft-Deterrent Systems . . . . . . . . . . . . . . . . . . .22Immobilizer . . . . . . . . . . . . . . . . . . . . . . . . . . . . . . 21
Time . . . . . . . . . . . . . . . . . . . . . . . . . . . . . . . . . . . . . . 79Tires . . . . . . . . . . . . . . . . . . . . . . . . . . . . . . . . . . . . . 269
Chevrolet Camaro Owner Manual (GMNA-Localizing-U.S./Canada/Mexico-15516346) - 2022 - CRC - 4/9/21
354 Index
Tires (cont'd)All-Season . . . . . . . . . . . . . . . . . . . . . . . . . . . . . 270Buying New Tires . . . . . . . . . . . . . . . . . . . . . . 283Chains . . . . . . . . . . . . . . . . . . . . . . . . . . . . . . . . . 287Designations . . . . . . . . . . . . . . . . . . . . . . . . . . . 272Different Size . . . . . . . . . . . . . . . . . . . . . . . . . . 284If a Tire Goes Flat . . . . . . . . . . . . . . . . . . . . . 287Inspection . . . . . . . . . . . . . . . . . . . . . . . . . . . . . 281Low Profile . . . . . . . . . . . . . . . . . . . . . . . . . . . . . 271Pressure . . . . . . . . . . . . . . . . . . . . . . . . . . 275, 276Pressure Light . . . . . . . . . . . . . . . . . . . . . . . . . . 96Pressure Monitor Operation . . . . . . . . . . . 278Pressure Monitor System . . . . . . . . . . . . . . 277Rotation . . . . . . . . . . . . . . . . . . . . . . . . . . . . . . . 281Run-Flat . . . . . . . . . . . . . . . . . . . . . . . . . . . . . . . . 270Sealant and Compressor Kit . . . . . . . . . . . . 288Sealant and Compressor Kit,Storing . . . . . . . . . . . . . . . . . . . . . . . . . . . . . . . 293
Sidewall Labeling . . . . . . . . . . . . . . . . . . . . . . . 271Terminology and Definitions . . . . . . . . . . . 273Uniform Tire Quality Grading . . . . . . . . . . 285Wheel Alignment and Tire Balance . . . . 286Wheel Replacement . . . . . . . . . . . . . . . . . . . . 286When It Is Time for New Tires . . . . . . . . . 283Winter . . . . . . . . . . . . . . . . . . . . . . . . . . . . . . . . . 270
Top Tier Fuel . . . . . . . . . . . . . . . . . . . . . . . . . . . . 230TowingGeneral Information . . . . . . . . . . . . . . . . . . . 234
Towing (cont'd)Recreational Vehicle . . . . . . . . . . . . . . . . . . . 297Vehicle . . . . . . . . . . . . . . . . . . . . . . . . . . . . . . . . 296
Track Events and Competitive Driving . . . . .185TractionControl System (TCS)/StabiliTrakLight . . . . . . . . . . . . . . . . . . . . . . . . . . . . . . . . . . 96
Limited-Slip Rear Axle . . . . . . . . . . . . . . . . . . 221Off Light . . . . . . . . . . . . . . . . . . . . . . . . . . . . . . . . 95
Traction Control/Electronic StabilityControl . . . . . . . . . . . . . . . . . . . . . . . . . . . . . . . . . .215
Trademarks and License Agreements . . . . . 164TransmissionAutomatic . . . . . . . . . . . . . . . . . . . . . . . . . . . . . 207Fluid, Automatic . . . . . . . . . . . . . . . . . . . . . . . 246Fluid, Manual . . . . . . . . . . . . . . . . . . . . . . . . . . 246
Transportation Program, Courtesy . . . . . . . .331Trip Odometer . . . . . . . . . . . . . . . . . . . . . . . . . . . . 87Trunk . . . . . . . . . . . . . . . . . . . . . . . . . . . . . . . . . . . . . .18Turn and Lane-Change Signals . . . . . . . . . . . . 111
UUniform Tire Quality Grading . . . . . . . . . . . . 285UpdatesMap Data . . . . . . . . . . . . . . . . . . . . . . . . . . . . . . 139Software . . . . . . . . . . . . . . . . . . . . . . . . . . . . . . . . 121
USB Port . . . . . . . . . . . . . . . . . . . . . . . . . . . . . . . . . . 125Using the Navigation System . . . . . . . . . . . . 129
Using the System . . . . . . . . . . . . . . . . . . . . . . . . . 118Using This Manual . . . . . . . . . . . . . . . . . . . . . . . . . .2
VVehicleAlarm System . . . . . . . . . . . . . . . . . . . . . . . . . . 20Canadian Owners . . . . . . . . . . . . . . . . . . . . . . . . . 1Control . . . . . . . . . . . . . . . . . . . . . . . . . . . . . . . . 183Identification Number (VIN) . . . . . . . . . . . . 320Load Limits . . . . . . . . . . . . . . . . . . . . . . . . . . . . 196Messages . . . . . . . . . . . . . . . . . . . . . . . . . . . . . . 104Personalization . . . . . . . . . . . . . . . . . . . . . . . . 105Remote Start . . . . . . . . . . . . . . . . . . . . . . . . . . . 14Security . . . . . . . . . . . . . . . . . . . . . . . . . . . . . . . . . 20Speed Messages . . . . . . . . . . . . . . . . . . . . . . . 104Towing . . . . . . . . . . . . . . . . . . . . . . . . . . . . . . . . 296
Vehicle Ahead Indicator . . . . . . . . . . . . . . . . . . . 95Vehicle CareStoring the Tire Sealant andCompressor Kit . . . . . . . . . . . . . . . . . . . . . . . 293
Tire Pressure . . . . . . . . . . . . . . . . . . . . . . . . . . . 275Vehicle Data Recording and Privacy . . . . . . 335Vehicle Positioning . . . . . . . . . . . . . . . . . . . . . . .138Ventilation, Air . . . . . . . . . . . . . . . . . . . . . . . . . . 179Visors . . . . . . . . . . . . . . . . . . . . . . . . . . . . . . . . . . . . . 28Voice Recognition . . . . . . . . . . . . . . . . . . . . . . . . 140Voltmeter Gauge . . . . . . . . . . . . . . . . . . . . . . . . . 90
Chevrolet Camaro Owner Manual (GMNA-Localizing-U.S./Canada/Mexico-15516346) - 2022 - CRC - 4/9/21
Index 355
WWarningBrake System Light . . . . . . . . . . . . . . . . . . . . . 94Caution and Danger . . . . . . . . . . . . . . . . . . . . . 2
Warning Lights, Gauges, andIndicators . . . . . . . . . . . . . . . . . . . . . . . . . . . . . . . 82
WarningsHazard Flashers . . . . . . . . . . . . . . . . . . . . . . . . . 111
Washer Fluid . . . . . . . . . . . . . . . . . . . . . . . . . . . . 254WheelsAlignment and Tire Balance . . . . . . . . . . . . 286Different Size . . . . . . . . . . . . . . . . . . . . . . . . . . 284Replacement . . . . . . . . . . . . . . . . . . . . . . . . . . . 286
When It Is Time for New Tires . . . . . . . . . . . 283Where to Put the Restraint . . . . . . . . . . . . . . . 64Windows . . . . . . . . . . . . . . . . . . . . . . . . . . . . . . . . . 26Power . . . . . . . . . . . . . . . . . . . . . . . . . . . . . . . . . . 26
WindshieldReplacement . . . . . . . . . . . . . . . . . . . . . . . . . . . 258Wiper/Washer . . . . . . . . . . . . . . . . . . . . . . . . . . 78
WinterDriving . . . . . . . . . . . . . . . . . . . . . . . . . . . . . . . . 194
Winter Tires . . . . . . . . . . . . . . . . . . . . . . . . . . . . . 270Wiper Blade Replacement . . . . . . . . . . . . . . . . 258Wireless Charging . . . . . . . . . . . . . . . . . . . . . . . . 80
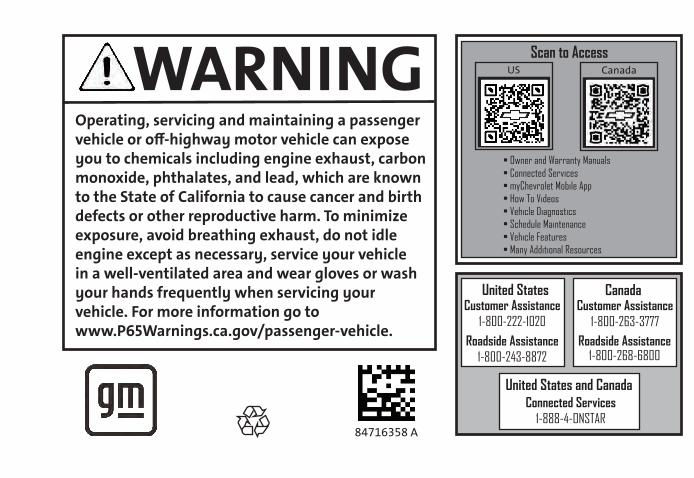
2022
2022
Owner’s Manual
Operating, servicing and maintaining a passenger vehicle or o�-highway motor vehicle can expose you to chemicals including engine exhaust, carbon monoxide, phthalates, and lead, which are known to the State of California to cause cancer and birth defects or other reproductive harm. To minimize exposure, avoid breathing exhaust, do not idle engine except as necessary, service your vehicle in a well-ventilated area and wear gloves or wash your hands frequently when servicing your vehicle. For more information go to www.P65Warnings.ca.gov/passenger-vehicle.
84716358 A
• Owner and Warranty Manuals • Connected Services • myChevrolet Mobile App • How To Videos• Vehicle Diagnostics • Schedule Maintenance • Vehicle Features• Many Additional Resources
Scan to Access
United States CanadaCustomer Assistance
1-800-222-1020Roadside Assistance
1-800-243-8872Roadside Assistance
1-800-268-6800
Customer Assistance1-800-263-3777
United States and CanadaConnected Services
1-888-4-ONSTAR
C
M
Y
CM
MY
CY
CMY
K
22_CHEV_Camaro_COV_en_US_84716358A_2021APR19.pdf 1 4/15/2021 9:48:37 AM