1995 civic coupe online reference owner's manual contents
TRANSCRIPT
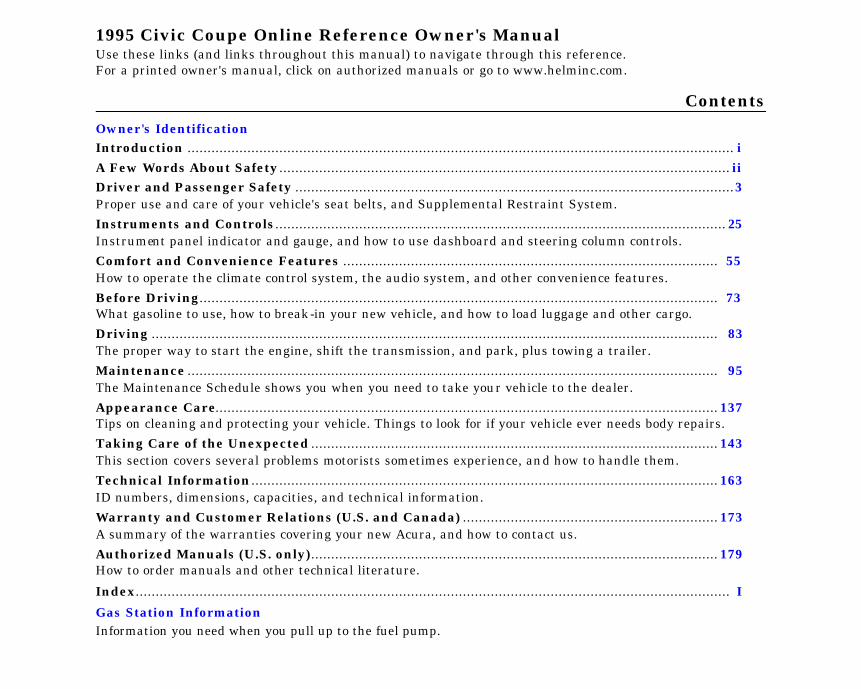
1995 Civic Coupe Online Reference Owner's Manual Use these links (and links throughout this manual) to navigate through this reference. For a printed owner's manual, click on authorized manuals or go to www.helminc.com.
Contents
Introduction ......................................................................................................................................... i A Few Words About Safety ................................................................................................................. ii Driver and Passenger Safety ..............................................................................................................3Proper use and care of your vehicle's seat belts, and Supplemental Restraint System. Instruments and Controls ................................................................................................................. 25Instrument panel indicator and gauge, and how to use dashboard and steering column controls. Comfort and Convenience Features .............................................................................................. 55How to operate the climate control system, the audio system, and other convenience features. Before Driving.................................................................................................................................. 73What gasoline to use, how to break-in your new vehicle, and how to load luggage and other cargo. Driving .............................................................................................................................................. 83The proper way to start the engine, shift the transmission, and park, plus towing a trailer. Maintenance ..................................................................................................................................... 95The Maintenance Schedule shows you when you need to take your vehicle to the dealer. Appearance Care.............................................................................................................................. 137Tips on cleaning and protecting your vehicle. Things to look for if your vehicle ever needs body repairs. Taking Care of the Unexpected ...................................................................................................... 143This section covers several problems motorists sometimes experience, and how to handle them. Technical Information..................................................................................................................... 163ID numbers, dimensions, capacities, and technical information. Warranty and Customer Relations (U.S. and Canada) ................................................................ 173A summary of the warranties covering your new Acura, and how to contact us. Authorized Manuals (U.S. only)...................................................................................................... 179How to order manuals and other technical literature.
Index..................................................................................................................................................... I
Information you need when you pull up to the fuel pump.Gas Station Information
Owner's Identification
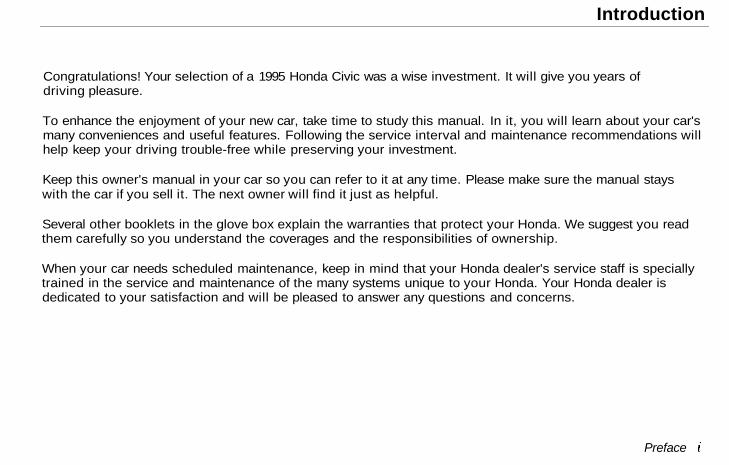
Introduction
Congratulations! Your selection of a 1995 Honda Civic was a wise investment. It will give you years ofdriving pleasure.
To enhance the enjoyment of your new car, take time to study this manual. In it, you will learn about your car'smany conveniences and useful features. Following the service interval and maintenance recommendations willhelp keep your driving trouble-free while preserving your investment.
Keep this owner's manual in your car so you can refer to it at any time. Please make sure the manual stayswith the car if you sell it. The next owner will find it just as helpful.
Several other booklets in the glove box explain the warranties that protect your Honda. We suggest you readthem carefully so you understand the coverages and the responsibilities of ownership.
When your car needs scheduled maintenance, keep in mind that your Honda dealer's service staff is speciallytrained in the service and maintenance of the many systems unique to your Honda. Your Honda dealer isdedicated to your satisfaction and will be pleased to answer any questions and concerns.
Preface
Main Menu ▲ ▼

Safety Messages
Your safety and the safety of others is very important. We have providedmany important safety messages in this manual and on the vehicle.Please read these messages carefully.
A safety message alerts you to potential hazards that could hurt you orothers. Each safety message is preceded by a safety alert symboland one of three words, DANGER, WARNING or CAUTION. These mean:
Each safety message tells you what the hazard is, what can happen andwhat you can do to avoid or reduce injury.
You will also see anotherimportant symbol:
Your Civic or otherproperty can be damagedif you don't followinstructions.
The purpose of thesemessages is to helpprevent damage to yourCivic, other property, orthe environment.
Preface
You WILL be KILLED orSERIOUSLY HURT if you don'tfollow instructions.
You CAN be KILLED orSERIOUSLY HURT if you don'tfollow instructions.
You CAN be HURT if you don'tfollow instructions.
NOTICE
Main Menu ▲ ▼
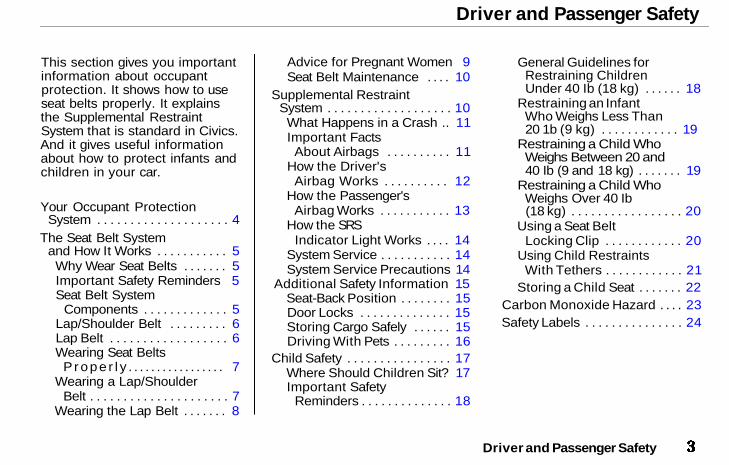
Driver and Passenger Safety
This section gives you importantinformation about occupantprotection. It shows how to useseat belts properly. It explainsthe Supplemental RestraintSystem that is standard in Civics.And it gives useful informationabout how to protect infants andchildren in your car.
Your Occupant ProtectionSystem . . . . . . . . . . . . . . . . . . . . 4
The Seat Belt Systemand How It Works . . . . . . . . . . . 5
Why Wear Seat Belts . . . . . . . 5Important Safety Reminders 5Seat Belt System
Components . . . . . . . . . . . . . 5Lap/Shoulder Belt . . . . . . . . . 6Lap Belt . . . . . . . . . . . . . . . . . . 6Wearing Seat Belts
P r o p e r l y . . . . . . . . . . . . . . . . . 7Wearing a Lap/Shoulder
Belt . . . . . . . . . . . . . . . . . . . . . 7Wearing the Lap Belt . . . . . . . 8
Advice for Pregnant Women 9Seat Belt Maintenance . . . . 10
Supplemental RestraintSystem . . . . . . . . . . . . . . . . . . . 10
What Happens in a Crash .. 11Important Facts
About Airbags . . . . . . . . . . 11How the Driver's
Airbag Works . . . . . . . . . . 12How the Passenger's
Airbag Works . . . . . . . . . . . 13How the SRS
Indicator Light Works . . . . 14System Service . . . . . . . . . . . 14System Service Precautions 14
Additional Safety Information 15Seat-Back Position . . . . . . . . 15Door Locks . . . . . . . . . . . . . . 15Storing Cargo Safely . . . . . . 15Driving With Pets . . . . . . . . . 16
Child Safety . . . . . . . . . . . . . . . . 17Where Should Children Sit? 17Important Safety
Reminders . . . . . . . . . . . . . . 18
General Guidelines forRestraining ChildrenUnder 40 Ib (18 kg) . . . . . . 18
Restraining an InfantWho Weighs Less Than20 1b (9 kg) . . . . . . . . . . . . 19
Restraining a Child WhoWeighs Between 20 and40 Ib (9 and 18 kg) . . . . . . . 19
Restraining a Child WhoWeighs Over 40 Ib(18 kg) . . . . . . . . . . . . . . . . . 20
Using a Seat BeltLocking Clip . . . . . . . . . . . . 20
Using Child RestraintsWith Tethers . . . . . . . . . . . . 21
Storing a Child Seat . . . . . . . 22Carbon Monoxide Hazard . . . . 23Safety Labels . . . . . . . . . . . . . . . 24
Driver and Passenger Safety
Main Menu ▲ ▼
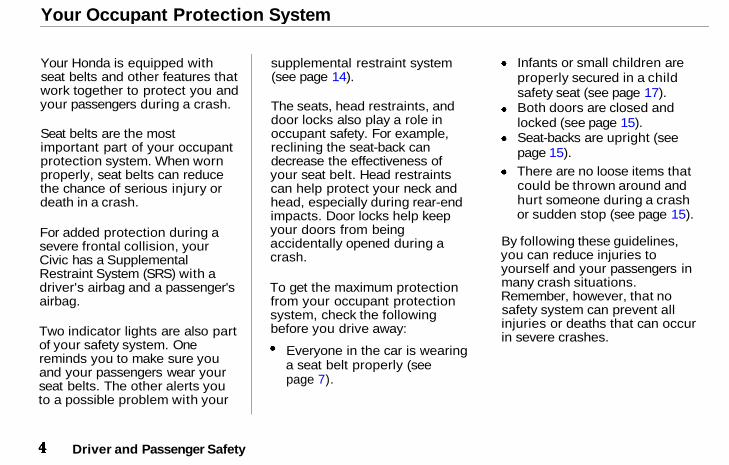
Your Occupant Protection System
Your Honda is equipped withseat belts and other features thatwork together to protect you andyour passengers during a crash.
Seat belts are the mostimportant part of your occupantprotection system. When wornproperly, seat belts can reducethe chance of serious injury ordeath in a crash.
For added protection during asevere frontal collision, yourCivic has a SupplementalRestraint System (SRS) with adriver's airbag and a passenger'sairbag.
Two indicator lights are also partof your safety system. Onereminds you to make sure youand your passengers wear yourseat belts. The other alerts youto a possible problem with your
supplemental restraint system(see page 14).
The seats, head restraints, anddoor locks also play a role inoccupant safety. For example,reclining the seat-back candecrease the effectiveness ofyour seat belt. Head restraintscan help protect your neck andhead, especially during rear-endimpacts. Door locks help keepyour doors from beingaccidentally opened during acrash.
To get the maximum protectionfrom your occupant protectionsystem, check the followingbefore you drive away:
Everyone in the car is wearinga seat belt properly (seepage 7).
Infants or small children areproperly secured in a childsafety seat (see page 17).Both doors are closed andlocked (see page 15).Seat-backs are upright (seepage 15).There are no loose items thatcould be thrown around andhurt someone during a crashor sudden stop (see page 15).
By following these guidelines,you can reduce injuries toyourself and your passengers inmany crash situations.Remember, however, that nosafety system can prevent allinjuries or deaths that can occurin severe crashes.
Driver and Passenger Safety
Main Menu Table of Contents ▲ ▼
The Seat Belt System and How It Works
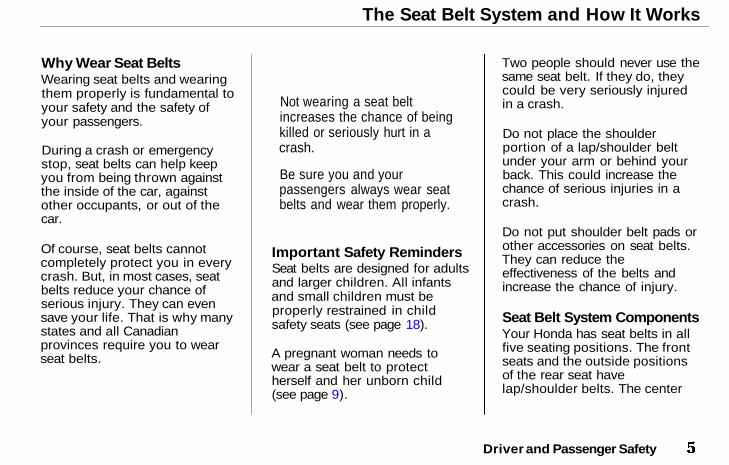
Why Wear Seat BeltsWearing seat belts and wearingthem properly is fundamental toyour safety and the safety ofyour passengers.
During a crash or emergencystop, seat belts can help keepyou from being thrown againstthe inside of the car, againstother occupants, or out of thecar.
Of course, seat belts cannotcompletely protect you in everycrash. But, in most cases, seatbelts reduce your chance ofserious injury. They can evensave your life. That is why manystates and all Canadianprovinces require you to wearseat belts.
Important Safety RemindersSeat belts are designed for adultsand larger children. All infantsand small children must beproperly restrained in childsafety seats (see page 18).
A pregnant woman needs towear a seat belt to protectherself and her unborn child(see page 9).
Two people should never use thesame seat belt. If they do, theycould be very seriously injuredin a crash.
Do not place the shoulderportion of a lap/shoulder beltunder your arm or behind yourback. This could increase thechance of serious injuries in acrash.
Do not put shoulder belt pads orother accessories on seat belts.They can reduce theeffectiveness of the belts andincrease the chance of injury.
Seat Belt System ComponentsYour Honda has seat belts in allfive seating positions. The frontseats and the outside positionsof the rear seat havelap/shoulder belts. The center
Driver and Passenger Safety
Not wearing a seat beltincreases the chance of beingkilled or seriously hurt in acrash.
Be sure you and yourpassengers always wear seatbelts and wear them properly.
Main Menu Table of Contents ▲ ▼
The Seat Belt System and How It Works
position of the rear seat has a lapbelt.
Your seat belt system alsoincludes a light on theinstrument panel to remind youto fasten your seat belt and tomake sure your passengersfasten theirs. This light comes onwhen you turn on the ignition ifyou have not fastened your seatbelt. A beeper also sounds forseveral seconds (see page 28).
The following pages cover moreabout the seat belt componentsand how they work.
Lap/Shoulder BeltThis style of seat belt has asingle belt that goes over yourshoulder, across your chest andacross your hips.
Each lap/shoulder belt has anemergency locking retractor. Innormal driving, the retractor letsyou move freely in your seatwhile it keeps some tension onthe belt. During a collision orsudden stop, the retractorautomatically locks the belt tohelp restrain your body.
Lap BeltThe lap belt has one manuallyadjusted belt that fits across thehips. It is similar to safety beltsused in airplanes.
Driver and Passenger Safety
SHOULDERPORTION
LATCHPLATE
BUCKLE
UPPERSEAT BELTANCHOR
ToRetractor
LAPPORTION
BUCKLE
LATCHPLATE
Main Menu Table of Contents ▲ ▼
The Seat Belt System and How It Works
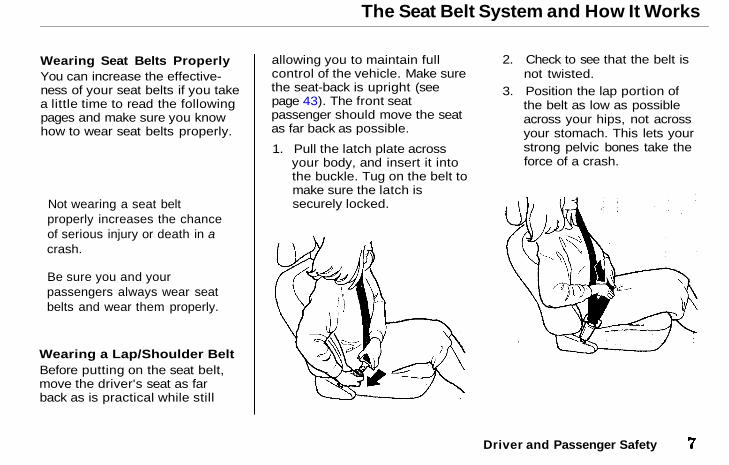
Wearing Seat Belts ProperlyYou can increase the effective-ness of your seat belts if you takea little time to read the followingpages and make sure you knowhow to wear seat belts properly.
Wearing a Lap/Shoulder BeltBefore putting on the seat belt,move the driver's seat as farback as is practical while still
allowing you to maintain fullcontrol of the vehicle. Make surethe seat-back is upright (seepage 43). The front seatpassenger should move the seatas far back as possible.
1. Pull the latch plate acrossyour body, and insert it intothe buckle. Tug on the belt tomake sure the latch issecurely locked.
2. Check to see that the belt isnot twisted.
3. Position the lap portion ofthe belt as low as possibleacross your hips, not acrossyour stomach. This lets yourstrong pelvic bones take theforce of a crash.
Driver and Passenger Safety
Not wearing a seat beltproperly increases the chanceof serious injury or death in acrash.
Be sure you and yourpassengers always wear seatbelts and wear them properly.
Main Menu Table of Contents ▲ ▼
The Seat Belt System and How It Works
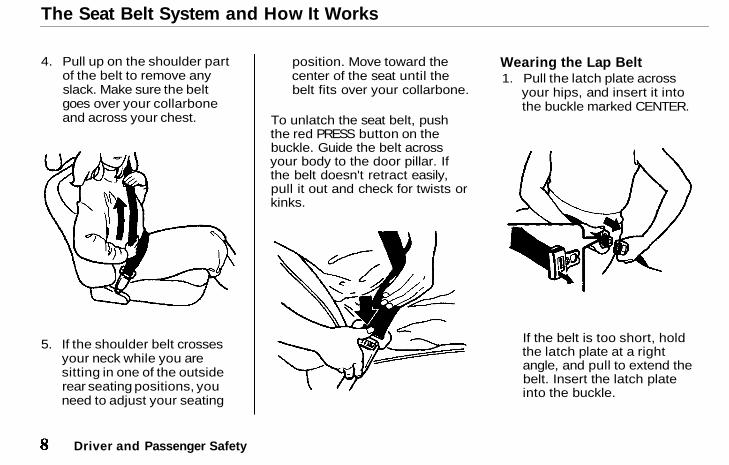
4. Pull up on the shoulder partof the belt to remove anyslack. Make sure the beltgoes over your collarboneand across your chest.
5. If the shoulder belt crossesyour neck while you aresitting in one of the outsiderear seating positions, youneed to adjust your seating
position. Move toward thecenter of the seat until thebelt fits over your collarbone.
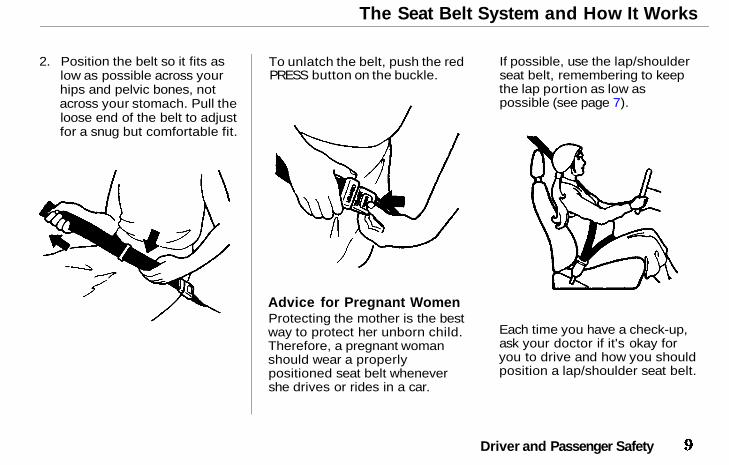
To unlatch the seat belt, pushthe red PRESS button on thebuckle. Guide the belt acrossyour body to the door pillar. Ifthe belt doesn't retract easily,pull it out and check for twists orkinks.
Wearing the Lap Belt1. Pull the latch plate across
your hips, and insert it intothe buckle marked CENTER.
If the belt is too short, holdthe latch plate at a rightangle, and pull to extend thebelt. Insert the latch plateinto the buckle.
Driver and Passenger Safety
Main Menu Table of Contents ▲ ▼
The Seat Belt System and How It Works
2. Position the belt so it fits aslow as possible across yourhips and pelvic bones, notacross your stomach. Pull theloose end of the belt to adjustfor a snug but comfortable fit.
To unlatch the belt, push the redPRESS button on the buckle.
Advice for Pregnant WomenProtecting the mother is the bestway to protect her unborn child.Therefore, a pregnant womanshould wear a properlypositioned seat belt whenevershe drives or rides in a car.
If possible, use the lap/shoulderseat belt, remembering to keepthe lap portion as low aspossible (see page 7).
Each time you have a check-up,ask your doctor if it's okay foryou to drive and how you shouldposition a lap/shoulder seat belt.
Driver and Passenger Safety
Main Menu Table of Contents ▲ ▼
The Seat Belt System and How It Works, Supplemental Restraint System
Seat Belt MaintenanceFor safety, you should check thecondition of your seat beltsregularly.
Pull out each belt fully and lookfor frays, cuts, burns and wear.Check to see that the latcheswork smoothly and thelap/shoulder belts retract easily.Any belt not in good condition ornot working properly should bereplaced.
If a seat belt is worn during acrash, have your dealer replacethe belt and check the anchorsfor damage.
For information on how to cleanyour seat belts, see page 140.
Supplemental Restraint SystemYour Civic is equipped with aSupplemental Restraint System
(SRS) to help protect the headand chest of the driver and frontseat passenger during a severefrontal collision.
This system does not replace yourseat belts. It supplements, oradds to, the protection offeredby the seat belts and otheroccupant protection features.
SRS ComponentsYour supplemental restraintsystem includes:
One airbag in the steeringwheel for the driver, andanother in the dashboard forthe passenger.Sensors that can detect asevere frontal collision.A sophisticated electronicsystem that continuallymonitors the sensors, controlunit, airbag activators, and allrelated wiring when theignition is ON (II).An indicator light on theinstrument panel to alert youto a possible problem with thesystem.Emergency backup power incase your car's electricalsystem is disconnected in acrash.
Driver and Passenger Safety
Not wearing a seat beltincreases the chance of seriousinjury or death in a crash, evenif you have airbags.
Be sure you and yourpassengers always wear seatbelts and wear them properly.
Main Menu Table of Contents ▲ ▼
Supplemental Restraint System
What Happens in a CrashIf you ever have a severe frontalcollision, the sensors will detectrapid deceleration and signal thecontrol unit to instantly inflatethe airbags.
During a crash, your seat beltswill help to restrain your lowerbody and torso. The airbags willprovide a cushion to absorbcrash energy and help keep thehead and chest of the driver andfront passenger from striking theinterior of the car.
After inflating, the airbags willimmediately deflate. The entireprocess, from detection todeflation, takes a fraction of asecond. This process occurs soquickly that you may not hearthe loud noise created by theairbag inflators or realize whathas happened.
After the crash, you may seewhat looks like smoke. This isactually powder from theairbag's surface. People withrespiratory problems mayexperience some temporarydiscomfort from the chemicalsused by the airbag's activators.
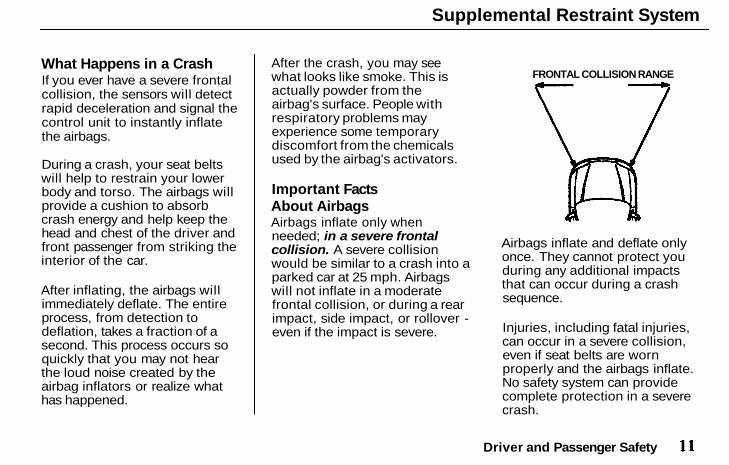
Important FactsAbout AirbagsAirbags inflate only whenneeded; in a severe frontalcollision. A severe collisionwould be similar to a crash into aparked car at 25 mph. Airbagswill not inflate in a moderatefrontal collision, or during a rearimpact, side impact, or rollover -even if the impact is severe.
Airbags inflate and deflate onlyonce. They cannot protect youduring any additional impactsthat can occur during a crashsequence.
Injuries, including fatal injuries,can occur in a severe collision,even if seat belts are wornproperly and the airbags inflate.No safety system can providecomplete protection in a severecrash.
Driver and Passenger Safety
FRONTAL COLLISION RANGE
Main Menu Table of Contents ▲ ▼
Supplemental Restraint System
Just from viewing the vehicledamage after a crash, it is verydifficult to accurately determineif the airbags should or shouldnot have inflated. In some caseswhere the airbag did not inflate,extensive visible damageindicated that the car absorbedmuch of the crash energy, andthe airbags were not needed. Inother cases, a severe jolt, suchas an impact to theundercarriage, may not causeextensive body damage butcause the airbags to inflate.
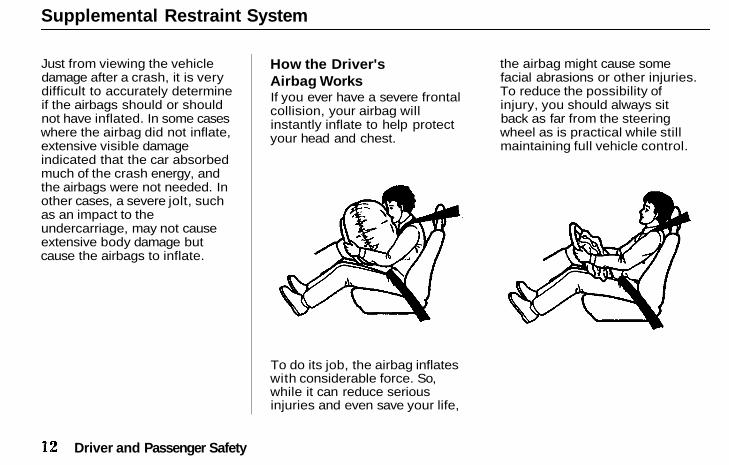
How the Driver'sAirbag WorksIf you ever have a severe frontalcollision, your airbag willinstantly inflate to help protectyour head and chest.
To do its job, the airbag inflateswith considerable force. So,while it can reduce seriousinjuries and even save your life,
the airbag might cause somefacial abrasions or other injuries.To reduce the possibility ofinjury, you should always sitback as far from the steeringwheel as is practical while stillmaintaining full vehicle control.
Driver and Passenger Safety
Main Menu Table of Contents ▲ ▼
Supplemental Restraint System
After the bag completely inflates,it immediately starts deflating soit won't interfere with yourvisibility, ability to steer orability to operate other controls.
The total time for inflating anddeflation takes a fraction of asecond. You may not even beaware that the airbag has beenfully inflated.
The airbag is stored in the centerof the steering wheel. For safety,do not attach any items to thesteering wheel. They couldinterfere with the proper opera-tion of the airbag. Or, if theairbag inflates, the items couldbe propelled inside the car andhurt someone.
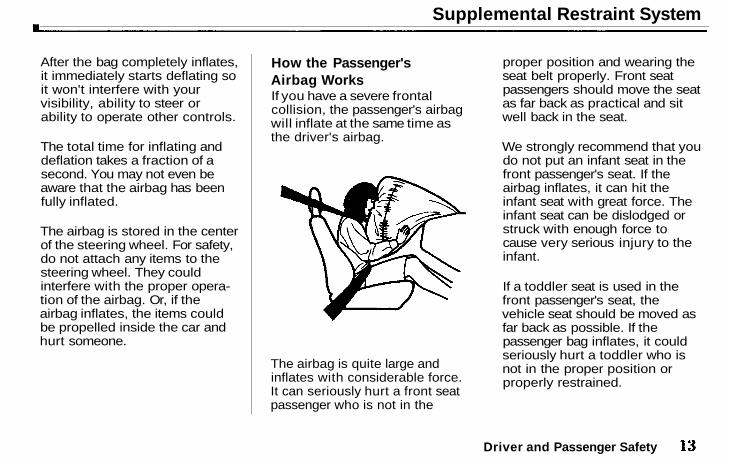
How the Passenger'sAirbag WorksIf you have a severe frontalcollision, the passenger's airbagwill inflate at the same time asthe driver's airbag.
The airbag is quite large andinflates with considerable force.It can seriously hurt a front seatpassenger who is not in the
proper position and wearing theseat belt properly. Front seatpassengers should move the seatas far back as practical and sitwell back in the seat.
We strongly recommend that youdo not put an infant seat in thefront passenger's seat. If theairbag inflates, it can hit theinfant seat with great force. Theinfant seat can be dislodged orstruck with enough force tocause very serious injury to theinfant.
If a toddler seat is used in thefront passenger's seat, thevehicle seat should be moved asfar back as possible. If thepassenger bag inflates, it couldseriously hurt a toddler who isnot in the proper position orproperly restrained.
Driver and Passenger Safety
Main Menu Table of Contents ▲ ▼
Supplemental Restraint System
The passenger's airbag is storednear the top of the dashboard,under a lid marked SRS. Do notplace any objects on top of thislid. If the airbag inflates, thoseobjects can be propelled insidethe car and possibly hurtsomeone.
How the SRS Indi-cator Light Works
The purpose of the SRS lighton your instrument panel isto alert you to a potentialproblem with your supplementalrestraint system.
Have the system checked if:
The light does not come onwhen you turn the ignitionON (II).
The light stays on after theengine starts.The light comes on or flasheswhile you are driving.
System ServiceYour supplemental restraintsystem is virtually maintenance-free. There are no parts you cansafely service.
You must have the systemserviced by an authorized Hondadealer:
If your airbags ever inflate. Theairbags and control unit mustbe replaced. Do not try toremove or discard the airbagsby yourself. This must bedone by a Honda dealer.If the SRS indicator light alertsyou of a problem. Have thesupplemental restraint systemchecked as soon as possible.Otherwise, your airbags might
not inflate when you needthem.When the car is 10 years old.Have the dealer inspect thesystem. The production dateis on the driver's doorjamb foryour convenience.
System Service PrecautionsDo not modify your steeringwheel or any other part of thesupplemental restraint system.Modifications could make thesystem ineffective.
Do not tamper with the systemcomponents or wiring. Thiscould cause the airbags to inflateinadvertently, possibly injuringsomeone very seriously.
Tell anyone who works on yourcar that you have a supplementalrestraint system. Failure tofollow the procedures and
Driver and Passenger Safety
S R S
Main Menu Table of Contents ▲ ▼
Supplemental Restraint System, Additional Safety Information
precautions in the official Hondaservice manual could result inpersonal injury or damage to thesystem.
Scrapping an entire car that hasuninflated airbags can bedangerous. Get assistance from aHonda dealer if your car must bescrapped.
If you sell your car, please besure to tell the new owner thatthe car has a supplementalrestraint system. Alert them tothe information and precautionsin this part of the Owner'sManual.
Additional Safety InformationThe seat belts and airbags areobviously important parts ofyour occupant protectionsystem.
In addition, you should knowthat sitting upright, locking thedoors, and stowing thingsproperly can also increase yoursafety and possibly even saveyour life.
Seat-Back PositionThe seat-backs should be in anupright position for you andyour passengers to get the mostprotection from the seat belts.
If you recline a seat-back, youreduce the protective capabilityof your seat belt. The farther aseat-back is reclined, the greaterthe risk that you will slide under
the belt in a severe crash and bevery seriously injured.
For information on how to adjustthe seat-back, see page 43.
Door LocksIt is not safe to leave your cardoors unlocked. A passenger,especially a child, could open adoor and accidentally fall out.Also, there is a greater chance ofbeing thrown out of the carduring a crash when the doorsare not locked.
Storing Cargo SafelyBefore you drive, make sure youfirst securely store or tie downany items that could be thrownaround the car and hurtsomeone or interfere with yourability to operate the controls.
Driver and Passenger Safety
Main Menu Table of Contents ▲ ▼
Additional Safety Information
Do not put any items on top ofthe rear shelf. They can blockyour view and they could bethrown about the car in a crash.
Be sure to keep compartmentdoors closed when the car ismoving. If a front passenger hitsthe door of an open glove box,for example, he could injure hisknees.
For information on LoadingCargo, see page 81.
Driving With PetsLoose pets can be a hazard whileyou are driving. An unrestrainedpet can interfere with yourability to drive the car. In a crashor sudden stop, loose pets orcages can be thrown aroundinside the car and hurt you oryour passengers. It is also for
their safety that pets should beproperly restrained in your car.
The recommended way torestrain a medium-sized or largerdog is with a special travelingharness. This harness can besecured to the rear seat with aseat belt. Travel harnesses areavailable at pet stores.
A small dog, cat, or other smallanimal will be safest in a petcarrier with rigid sides. Choose astyle that allows you to secure itto the car's seat by routing a seatbelt through the carrier's handle.
For further information, contactyour veterinarian or local animalprotection society.
Driver and Passenger Safety
Main Menu Table of Contents ▲ ▼
Child Safety
Children depend on adults toprotect them. To help make surewe do, every state and Canadianprovince has laws requiringinfants and young children to beproperly restrained wheneverthey ride in a car.
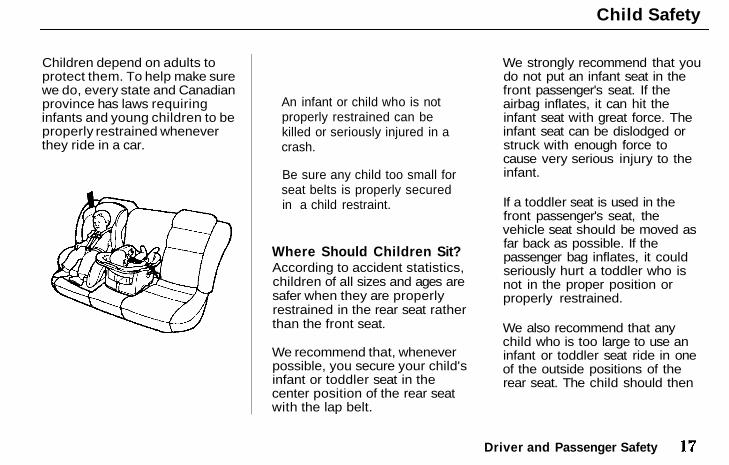
Where Should Children Sit?According to accident statistics,children of all sizes and ages aresafer when they are properlyrestrained in the rear seat ratherthan the front seat.
We recommend that, wheneverpossible, you secure your child'sinfant or toddler seat in thecenter position of the rear seatwith the lap belt.
We strongly recommend that youdo not put an infant seat in thefront passenger's seat. If theairbag inflates, it can hit theinfant seat with great force. Theinfant seat can be dislodged orstruck with enough force tocause very serious injury to theinfant.
If a toddler seat is used in thefront passenger's seat, thevehicle seat should be moved asfar back as possible. If thepassenger bag inflates, it couldseriously hurt a toddler who isnot in the proper position orproperly restrained.
We also recommend that anychild who is too large to use aninfant or toddler seat ride in oneof the outside positions of therear seat. The child should then
Driver and Passenger Safety
An infant or child who is notproperly restrained can bekilled or seriously injured in acrash.
Be sure any child too small forseat belts is properly securedin a child restraint.
Main Menu Table of Contents ▲ ▼
Child Safety
wear the lap/shoulder beltproperly for protection.
Important Safety RemindersNever hold a baby or child onyour lap when riding in a car. Ifyou are wearing your seat belt,the violent forces created duringa crash will tear the child fromyour arms. The child could beseriously hurt or killed.
If you are holding a child and notwearing a seat belt in a crash,you could crush the child againstthe car's interior.
Never put your seat belt overyourself and a child. During acrash, the belt could press deepinto the child causing seriousinternal injuries.
Two children should never usethe same seat belt. If they do,
they could be very seriouslyinjured in a crash.
For their safety, do not leavechildren alone in your carwithout adult supervision.
General Guidelines forRestraining Children Under40 Ib (18kg)Use an approved child seat. Theseat must meet Federal MotorVehicle Safety Standard 213(FMVSS-213) or Canadian MotorVehicle Safety Standards. Lookfor the manufacturer's statementof compliance on the box andseat.
Use a seat of the right size. Makesure the seat fits your child.Check the seat's instructions andlabels for height and weightlimits.
Secure the child seat to the car. Allapproved child seats aredesigned to be secured in the carseat by the lap belt or the lapbelt portion of a lap/shoulderbelt. A child whose seat is notproperly secured to the car canbe endangered in a crash.
To properly route a seat beltthrough a child seat, follow theseat-maker's instructions. If youuse a lap/shoulder belt, be sureyou install a locking clip on thebelt (see page 20).
Secure the child in the child seat.Make sure the infant or child isfirmly secured to the child seat.Use the straps provided, andcarefully follow themanufacturer's instructions.
Driver and Passenger Safety
Main Menu Table of Contents ▲ ▼
Child Safety
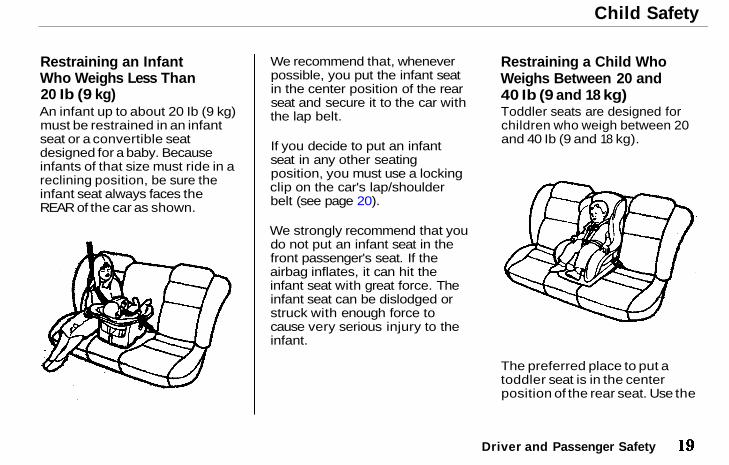
Restraining an InfantWho Weighs Less Than20 Ib (9 kg)An infant up to about 20 Ib (9 kg)must be restrained in an infantseat or a convertible seatdesigned for a baby. Becauseinfants of that size must ride in areclining position, be sure theinfant seat always faces theREAR of the car as shown.
We recommend that, wheneverpossible, you put the infant seatin the center position of the rearseat and secure it to the car withthe lap belt.
If you decide to put an infantseat in any other seatingposition, you must use a lockingclip on the car's lap/shoulderbelt (see page 20).
We strongly recommend that youdo not put an infant seat in thefront passenger's seat. If theairbag inflates, it can hit theinfant seat with great force. Theinfant seat can be dislodged orstruck with enough force tocause very serious injury to theinfant.
Restraining a Child WhoWeighs Between 20 and40 Ib (9 and 18 kg)Toddler seats are designed forchildren who weigh between 20and 40 Ib (9 and 18 kg).
The preferred place to put atoddler seat is in the centerposition of the rear seat. Use the
Driver and Passenger Safety
Main Menu Table of Contents ▲ ▼
Child Safety
car's lap belt to secure the seatto the car.
If you decide to put a toddlerseat in any other seatingposition, you must use a lockingclip on the car's lap/shoulderbelt (see page 20).
If you are using a toddler seat inthe front passenger's seat, movethe passenger's seat as far backas possible before installing thechild seat. If the passengerairbag inflates, it could seriouslyhurt a toddler who is not in theproper position or properlyrestrained.
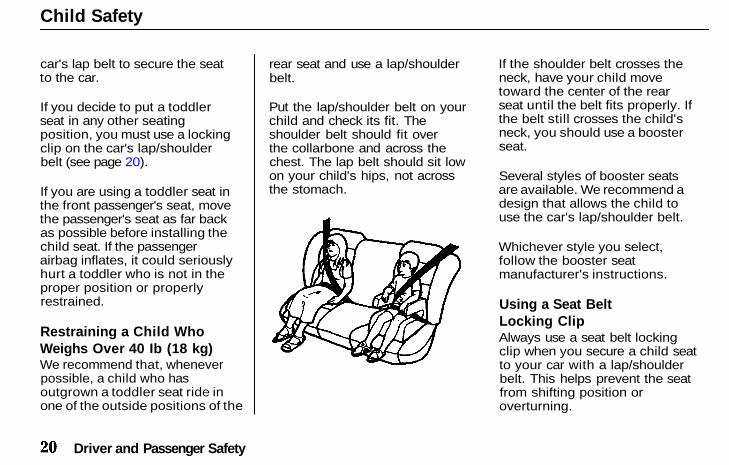
Restraining a Child WhoWeighs Over 40 Ib (18 kg)We recommend that, wheneverpossible, a child who hasoutgrown a toddler seat ride inone of the outside positions of the
rear seat and use a lap/shoulderbelt.
Put the lap/shoulder belt on yourchild and check its fit. Theshoulder belt should fit overthe collarbone and across thechest. The lap belt should sit lowon your child's hips, not acrossthe stomach.
If the shoulder belt crosses theneck, have your child movetoward the center of the rearseat until the belt fits properly. Ifthe belt still crosses the child'sneck, you should use a boosterseat.
Several styles of booster seatsare available. We recommend adesign that allows the child touse the car's lap/shoulder belt.
Whichever style you select,follow the booster seatmanufacturer's instructions.
Using a Seat BeltLocking ClipAlways use a seat belt lockingclip when you secure a child seatto your car with a lap/shoulderbelt. This helps prevent the seatfrom shifting position oroverturning.
Driver and Passenger Safety
Main Menu Table of Contents ▲ ▼
Child Safety
A locking clip is usually includedwith the child seat. If you need aclip, contact the seat'smanufacturer or a store that sellschild restraints.
To install a locking clip, do this:
1. Place the child restraint inthe desired position. Routethe lap/shoulder belt throughthe restraint according tothe seat manufacturer'sinstructions.
2. Insert the latch plate into thebuckle. Pull on the shoulderpart of the belt to make surethere is no slack in the lapportion.
3. Tightly grasp the belt nearthe latch plate. Pinch bothparts of the belt together sothey won't slip through thelatch plate. Unbuckle the seatbelt.
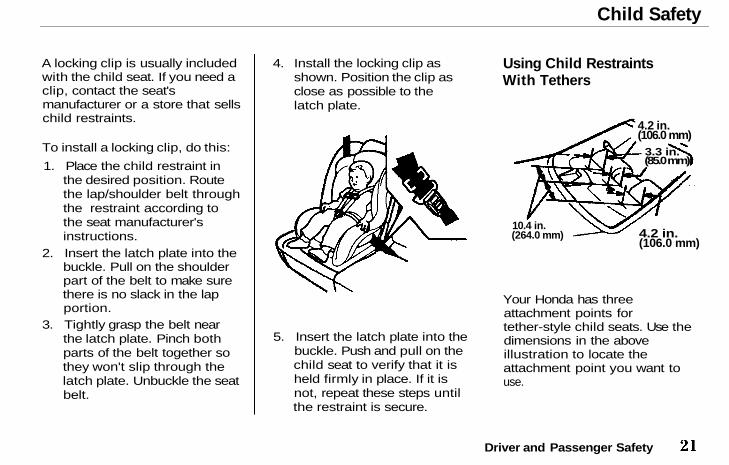
Using Child RestraintsWith Tethers
Driver and Passenger Safety
Your Honda has threeattachment points fortether-style child seats. Use thedimensions in the aboveillustration to locate theattachment point you want touse.
4.2 in.(106.0 mm)
4.2 in.(106.0 mm)
10.4 in.(264.0 mm)
5. Insert the latch plate into thebuckle. Push and pull on thechild seat to verify that it isheld firmly in place. If it isnot, repeat these steps untilthe restraint is secure.
4. Install the locking clip asshown. Position the clip asclose as possible to thelatch plate.
(85.0 mm)3.3 in.
Main Menu Table of Contents ▲ ▼
Child Safety
Cut a 1/2 inch (12.7 mm)diameter hole in the rear shelf,then install the tether hardwarethat came with the child seat.Tighten the bolt to: 16 Ib-ft (2.2kg-m, 22 N.m).
If you are not sure how to installthe bracket, have it installed byyour authorized Honda dealer.
If you need an anchor plate andmounting hardware, you canobtain them by writing to:
American Honda Motor Co., Inc.Consumer Affairs1919 Torrance Blvd.Torrance, CA 90501-2746
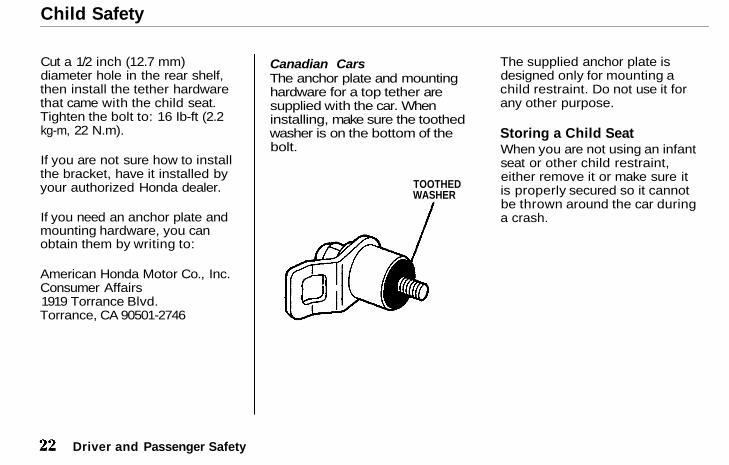
Canadian CarsThe anchor plate and mountinghardware for a top tether aresupplied with the car. Wheninstalling, make sure the toothedwasher is on the bottom of thebolt.
The supplied anchor plate isdesigned only for mounting achild restraint. Do not use it forany other purpose.
Storing a Child SeatWhen you are not using an infantseat or other child restraint,either remove it or make sure itis properly secured so it cannotbe thrown around the car duringa crash.
Driver and Passenger Safety
TOOTHEDWASHER
Main Menu Table of Contents ▲ ▼
Carbon Monoxide Hazard
Your car's exhaust containscarbon monoxide gas. Youshould have no problem withcarbon monoxide entering thecar in normal driving if youmaintain your car properly.Have the exhaust systeminspected for leaks whenever:
The car is raised for an oilchange.You notice a change in thesound of the exhaust.The car was in an accidentthat may have damaged theunderside.
High levels of carbon monoxidecan collect rapidly in enclosedareas, such as a garage. Do notrun the engine with the garagedoor closed. Even with the dooropen, run the engine only longenough to move the car out ofthe garage.
With the trunk lid open, air flowcan pull exhaust gas into thetrunk. This can get into yourcar's interior and create ahazardous condition. If you mustdrive with the trunk lid open,open all the windows and set theheating and cooling system asshown below.
If you must sit in your parkedcar, even in an unconfined area,with the engine running, adjustthe heating and cooling systemas follows:
1. Push the button.
2. Select the
3. Turn the fan on high speed.
4. Set the temperature controlto a comfortable setting.
Driver and Passenger Safety
Carbon monoxide gas is toxic.Breathing it can causeunconsciousness and can evenkill you.
Avoid any enclosed areas oractivities that expose you tocarbon monoxide.
mode.
Main Menu Table of Contents ▲ ▼
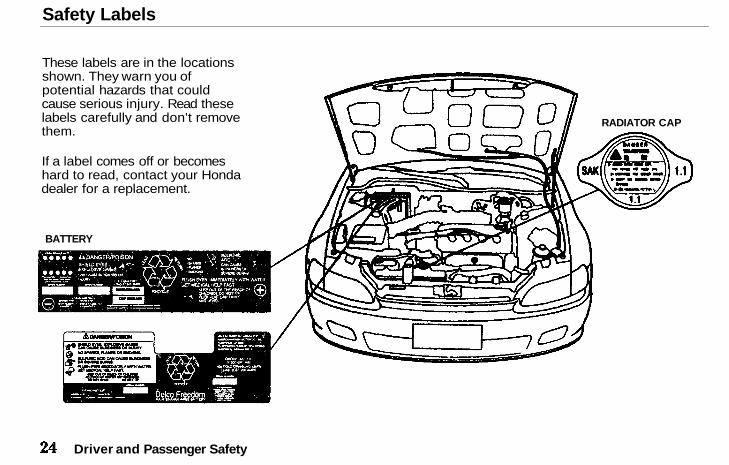
Safety Labels
These labels are in the locationsshown. They warn you ofpotential hazards that couldcause serious injury. Read theselabels carefully and don't removethem.
If a label comes off or becomeshard to read, contact your Hondadealer for a replacement.
RADIATOR CAP
Driver and Passenger Safety
BATTERY
Main Menu Table of Contents ▲ ▼
Instruments and Controls
This section gives informationabout the controls and displaysthat contribute to the dailyoperation of your Honda. All theessential controls are within easyreach.
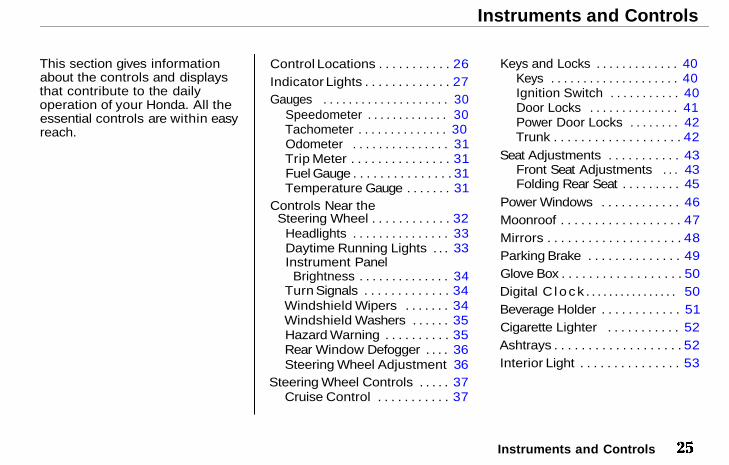
Control Locations . . . . . . . . . . . 26Indicator Lights . . . . . . . . . . . . . 27Gauges . . . . . . . . . . . . . . . . . . . . 30
Speedometer . . . . . . . . . . . . . 30Tachometer . . . . . . . . . . . . . . 30Odometer . . . . . . . . . . . . . . . 31Trip Meter . . . . . . . . . . . . . . . 31Fuel Gauge . . . . . . . . . . . . . . . 31Temperature Gauge . . . . . . . 31
Controls Near theSteering Wheel . . . . . . . . . . . . 32
Headlights . . . . . . . . . . . . . . . 33Daytime Running Lights . . . 33Instrument Panel
Brightness . . . . . . . . . . . . . . 34Turn Signals . . . . . . . . . . . . . 34Windshield Wipers . . . . . . . 34Windshield Washers . . . . . . 35Hazard Warning . . . . . . . . . . 35Rear Window Defogger . . . . 36Steering Wheel Adjustment 36
Steering Wheel Controls . . . . . 37Cruise Control . . . . . . . . . . . 37
Keys and Locks . . . . . . . . . . . . . 40Keys . . . . . . . . . . . . . . . . . . . . 40Ignition Switch . . . . . . . . . . . 40Door Locks . . . . . . . . . . . . . . 41Power Door Locks . . . . . . . . 42Trunk . . . . . . . . . . . . . . . . . . . 42
Seat Adjustments . . . . . . . . . . . 43Front Seat Adjustments . . . 43Folding Rear Seat . . . . . . . . . 45
Power Windows . . . . . . . . . . . . 46Moonroof . . . . . . . . . . . . . . . . . . 47Mirrors . . . . . . . . . . . . . . . . . . . . 48Parking Brake . . . . . . . . . . . . . . 49Glove Box . . . . . . . . . . . . . . . . . . 50Digital C l o c k . . . . . . . . . . . . . . . . 50Beverage Holder . . . . . . . . . . . . 51Cigarette Lighter . . . . . . . . . . . 52Ashtrays . . . . . . . . . . . . . . . . . . . 52Interior Light . . . . . . . . . . . . . . . 53
Instruments and Controls
Main Menu ▲ ▼
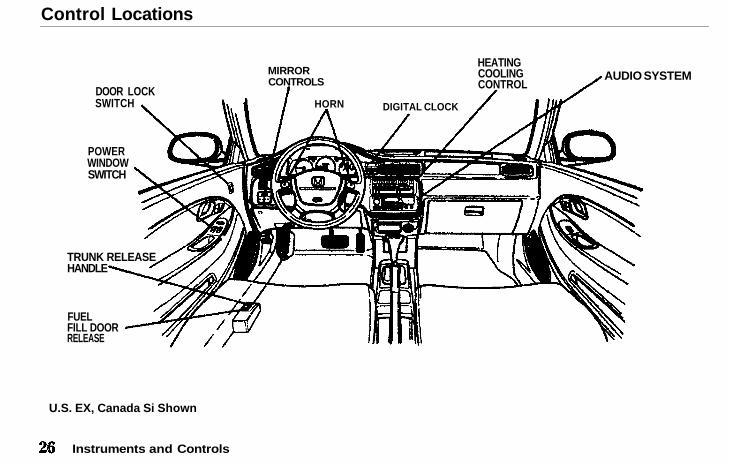
Control Locations
U.S. EX, Canada Si Shown
Instruments and Controls
POWERWINDOWSWITCH
DOOR LOCKSWITCH
HEATINGCOOLINGCONTROL
AUDIO SYSTEM
DIGITAL CLOCK
MIRRORCONTROLS
HORN
TRUNK RELEASEHANDLE
FUELFILL DOORRELEASE
Main Menu Table of Contents ▲ ▼

Indicator Lights
The instrument panel has manyindicators to give you importantinformation about your car.
Lamp CheckMany of the indicator lightscome on when you turn theignition switch ON (II), allowingyou to see that they areworking. If an indicator doesnot light during this test, itcannot alert you if that systemdevelops a problem. Have thedealer check your car forburned-out bulbs or otherproblems.
* The U.S. EX with ABS optioninstrument panel is shown.Differences for the Canadianmodel are noted in the text.
U.S. EX Automatic Transmission Shown
Instruments and Controls
HIGH BEAM INDICATOR
CHARGING SYSTEMINDICATOR
LOW OILPRESSUREINDICATOR
SUPPLEMENTAL RESTRAINTSYSTEM INDICATOR
MALFUNCTIONINDICATORLAMP TRUNK-OPEN
INDICATOR
SEAT BELT REMINDER LIGHT
PARKING BRAKE ANDBRAKE SYSTEM LIGHT*
ANTI-LOCK BRAKESYSTEM INDICATOR
CRUISE CONTROLINDICATOR
Main Menu Table of Contents ▲ ▼
Indicator Lights
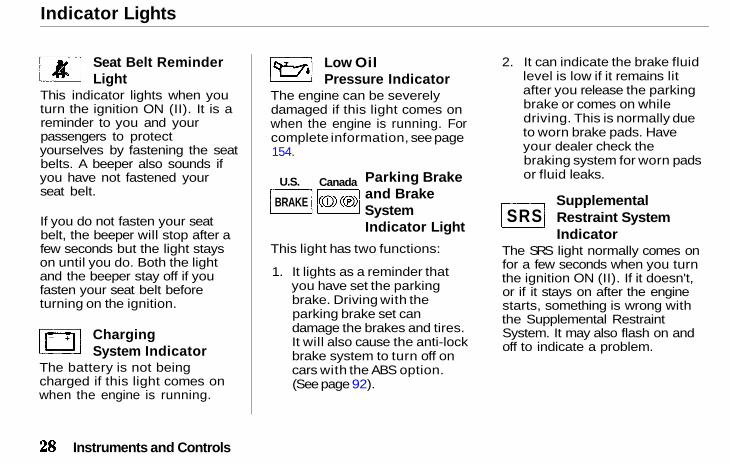
Seat Belt ReminderLight
This indicator lights when youturn the ignition ON (II). It is areminder to you and yourpassengers to protectyourselves by fastening the seatbelts. A beeper also sounds ifyou have not fastened yourseat belt.
If you do not fasten your seatbelt, the beeper will stop after afew seconds but the light stayson until you do. Both the lightand the beeper stay off if youfasten your seat belt beforeturning on the ignition.
ChargingSystem Indicator
The battery is not beingcharged if this light comes onwhen the engine is running.
Low OilPressure Indicator
The engine can be severelydamaged if this light comes onwhen the engine is running. Forcomplete information, see page154.
Parking Brakeand BrakeSystemIndicator Light
This light has two functions:
1. It lights as a reminder thatyou have set the parkingbrake. Driving with theparking brake set candamage the brakes and tires.It will also cause the anti-lockbrake system to turn off oncars with the ABS option.(See page 92).
2. It can indicate the brake fluidlevel is low if it remains litafter you release the parkingbrake or comes on whiledriving. This is normally dueto worn brake pads. Haveyour dealer check thebraking system for worn padsor fluid leaks.
SupplementalRestraint SystemIndicator
The SRS light normally comes onfor a few seconds when you turnthe ignition ON (II). If it doesn't,or if it stays on after the enginestarts, something is wrong withthe Supplemental RestraintSystem. It may also flash on andoff to indicate a problem.
Instruments and Controls
U.S. Canada
BRAKES R S
Main Menu Table of Contents ▲ ▼
Indicator Lights
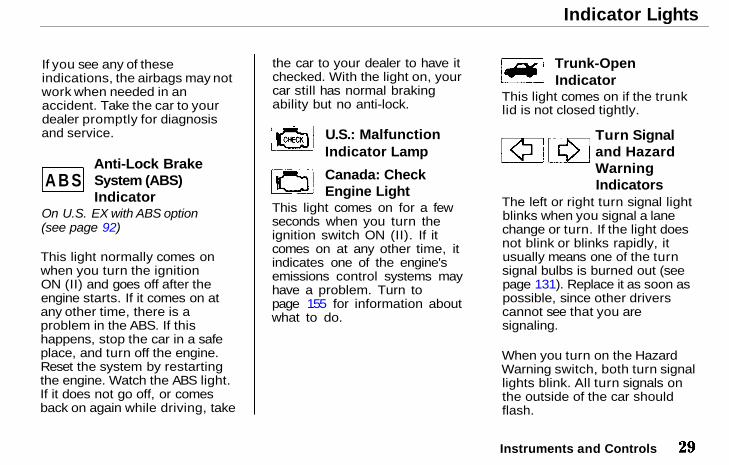
If you see any of theseindications, the airbags may notwork when needed in anaccident. Take the car to yourdealer promptly for diagnosisand service.
Anti-Lock BrakeSystem (ABS)Indicator
On U.S. EX with ABS option(see page 92)
This light normally comes onwhen you turn the ignitionON (II) and goes off after theengine starts. If it comes on atany other time, there is aproblem in the ABS. If thishappens, stop the car in a safeplace, and turn off the engine.Reset the system by restartingthe engine. Watch the ABS light.If it does not go off, or comesback on again while driving, take
the car to your dealer to have itchecked. With the light on, yourcar still has normal brakingability but no anti-lock.
U.S.: MalfunctionIndicator Lamp
Canada: CheckEngine Light
This light comes on for a fewseconds when you turn theignition switch ON (II). If itcomes on at any other time, itindicates one of the engine'semissions control systems mayhave a problem. Turn topage 155 for information aboutwhat to do.
Trunk-OpenIndicator
This light comes on if the trunklid is not closed tightly.
Turn Signaland HazardWarningIndicators
The left or right turn signal lightblinks when you signal a lanechange or turn. If the light doesnot blink or blinks rapidly, itusually means one of the turnsignal bulbs is burned out (seepage 131). Replace it as soon aspossible, since other driverscannot see that you aresignaling.
When you turn on the HazardWarning switch, both turn signallights blink. All turn signals onthe outside of the car shouldflash.
Instruments and Controls
A B S
Main Menu Table of Contents ▲ ▼
Indicator Lights, Gauges
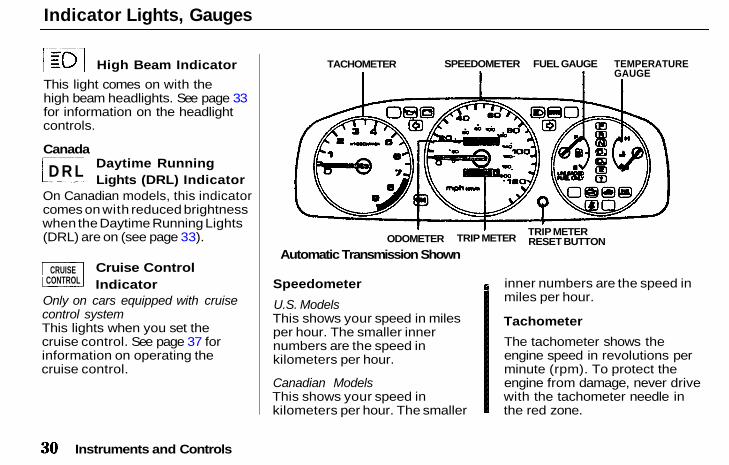
High Beam Indicator
This light comes on with thehigh beam headlights. See page 33for information on the headlightcontrols.
Daytime RunningLights (DRL) Indicator
On Canadian models, this indicatorcomes on with reduced brightnesswhen the Daytime Running Lights(DRL) are on (see page 33).
Cruise ControlIndicator
Only on cars equipped with cruisecontrol systemThis lights when you set thecruise control. See page 37 forinformation on operating thecruise control.
Speedometer
U.S. ModelsThis shows your speed in milesper hour. The smaller innernumbers are the speed inkilometers per hour.
Canadian ModelsThis shows your speed inkilometers per hour. The smaller
inner numbers are the speed inmiles per hour.
Tachometer
The tachometer shows theengine speed in revolutions perminute (rpm). To protect theengine from damage, never drivewith the tachometer needle inthe red zone.
Instruments and Controls
D R L
CRUISECONTROL
TACHOMETER SPEEDOMETER FUEL GAUGE TEMPERATUREGAUGE
ODOMETER TRIP METERTRIP METERRESET BUTTON
Automatic Transmission Shown
Canada
Main Menu Table of Contents ▲ ▼
Gauges
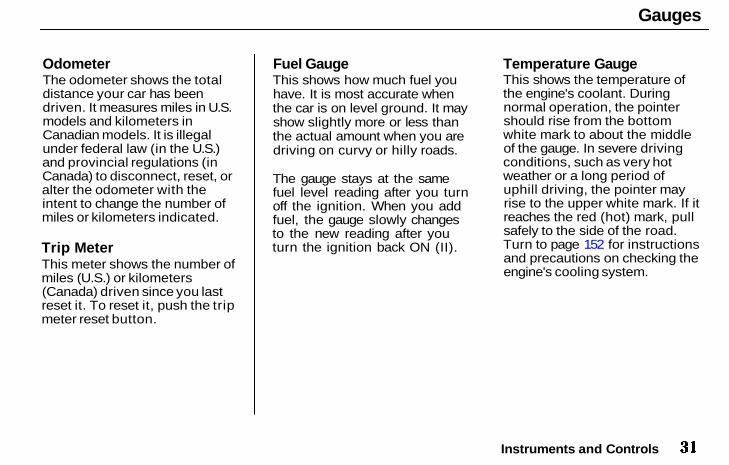
OdometerThe odometer shows the totaldistance your car has beendriven. It measures miles in U.S.models and kilometers inCanadian models. It is illegalunder federal law (in the U.S.)and provincial regulations (inCanada) to disconnect, reset, oralter the odometer with theintent to change the number ofmiles or kilometers indicated.
Trip MeterThis meter shows the number ofmiles (U.S.) or kilometers(Canada) driven since you lastreset it. To reset it, push the tripmeter reset button.
Fuel GaugeThis shows how much fuel youhave. It is most accurate whenthe car is on level ground. It mayshow slightly more or less thanthe actual amount when you aredriving on curvy or hilly roads.
The gauge stays at the samefuel level reading after you turnoff the ignition. When you addfuel, the gauge slowly changesto the new reading after youturn the ignition back ON (II).
Temperature GaugeThis shows the temperature ofthe engine's coolant. Duringnormal operation, the pointershould rise from the bottomwhite mark to about the middleof the gauge. In severe drivingconditions, such as very hotweather or a long period ofuphill driving, the pointer mayrise to the upper white mark. If itreaches the red (hot) mark, pullsafely to the side of the road.Turn to page 152 for instructionsand precautions on checking theengine's cooling system.
Instruments and Controls
Main Menu Table of Contents ▲ ▼
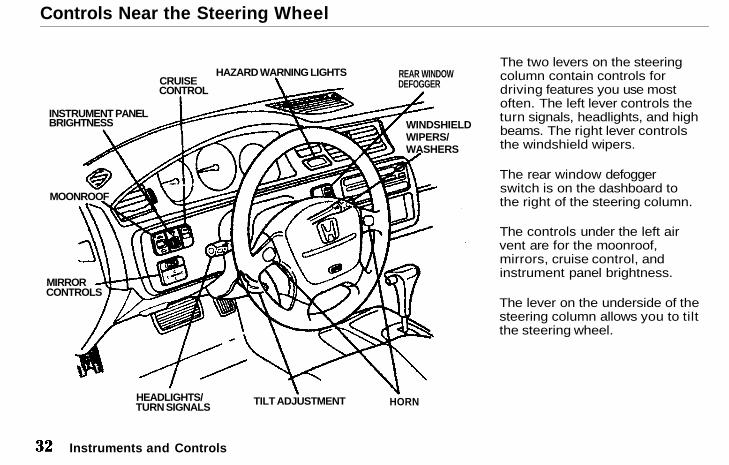
Controls Near the Steering Wheel
The two levers on the steeringcolumn contain controls fordriving features you use mostoften. The left lever controls theturn signals, headlights, and highbeams. The right lever controlsthe windshield wipers.
The rear window defoggerswitch is on the dashboard tothe right of the steering column.
The controls under the left airvent are for the moonroof,mirrors, cruise control, andinstrument panel brightness.
The lever on the underside of thesteering column allows you to tiltthe steering wheel.
Instruments and Controls
CRUISECONTROL
HAZARD WARNING LIGHTS REAR WINDOWDEFOGGER
INSTRUMENT PANELBRIGHTNESS WINDSHIELD
WIPERS/WASHERS
HORNTILT ADJUSTMENTHEADLIGHTS/TURN SIGNALS
MIRRORCONTROLS
MOONROOF
Main Menu Table of Contents ▲ ▼
Controls Near the Steering Wheel
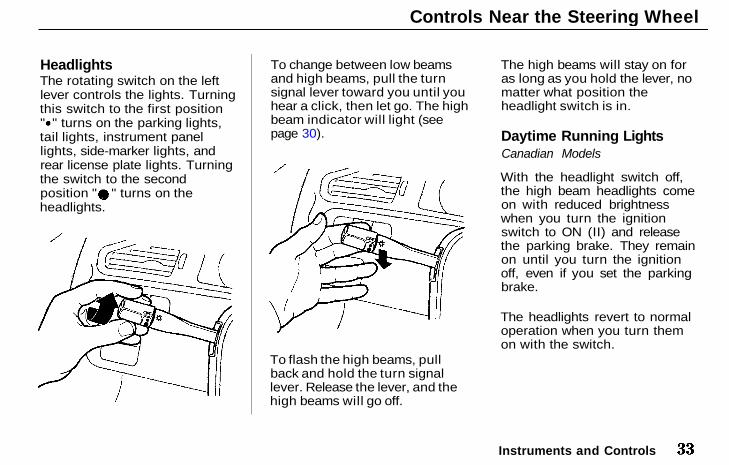
HeadlightsThe rotating switch on the leftlever controls the lights. Turningthis switch to the first position" " turns on the parking lights,tail lights, instrument panellights, side-marker lights, andrear license plate lights. Turningthe switch to the secondposition " " turns on theheadlights.
To change between low beamsand high beams, pull the turnsignal lever toward you until youhear a click, then let go. The highbeam indicator will light (seepage 30).
To flash the high beams, pullback and hold the turn signallever. Release the lever, and thehigh beams will go off.
The high beams will stay on foras long as you hold the lever, nomatter what position theheadlight switch is in.
Daytime Running LightsCanadian Models
With the headlight switch off,the high beam headlights comeon with reduced brightnesswhen you turn the ignitionswitch to ON (II) and releasethe parking brake. They remainon until you turn the ignitionoff, even if you set the parkingbrake.
The headlights revert to normaloperation when you turn themon with the switch.
Instruments and Controls
Main Menu Table of Contents ▲ ▼
Controls Near the Steering Wheel
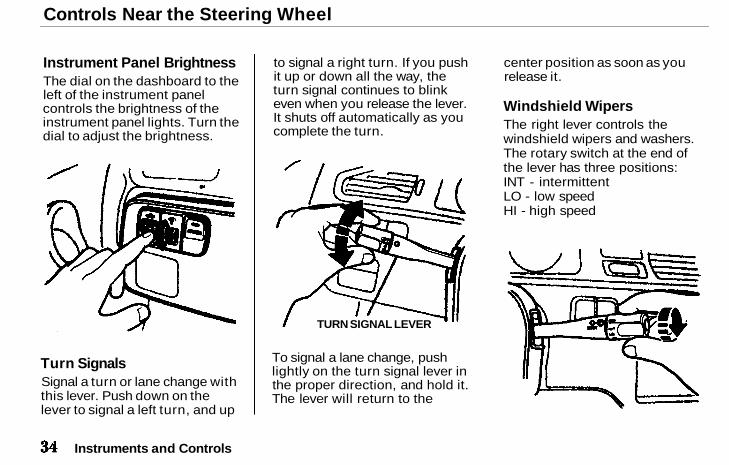
Instrument Panel BrightnessThe dial on the dashboard to theleft of the instrument panelcontrols the brightness of theinstrument panel lights. Turn thedial to adjust the brightness.
Turn SignalsSignal a turn or lane change withthis lever. Push down on thelever to signal a left turn, and up
to signal a right turn. If you pushit up or down all the way, theturn signal continues to blinkeven when you release the lever.It shuts off automatically as youcomplete the turn.
To signal a lane change, pushlightly on the turn signal lever inthe proper direction, and hold it.The lever will return to the
center position as soon as yourelease it.
Windshield WipersThe right lever controls thewindshield wipers and washers.The rotary switch at the end ofthe lever has three positions:INT - intermittentLO - low speedHI - high speed
Instruments and Controls
TURN SIGNAL LEVER
Main Menu Table of Contents ▲ ▼
Controls Near the Steering Wheel
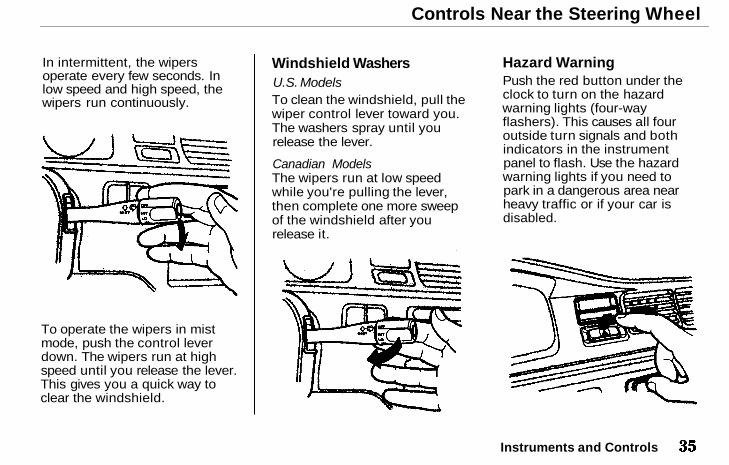
In intermittent, the wipersoperate every few seconds. Inlow speed and high speed, thewipers run continuously.
To operate the wipers in mistmode, push the control leverdown. The wipers run at highspeed until you release the lever.This gives you a quick way toclear the windshield.
Windshield WashersU.S. ModelsTo clean the windshield, pull thewiper control lever toward you.The washers spray until yourelease the lever.
Canadian ModelsThe wipers run at low speedwhile you're pulling the lever,then complete one more sweepof the windshield after yourelease it.
Hazard WarningPush the red button under theclock to turn on the hazardwarning lights (four-wayflashers). This causes all fouroutside turn signals and bothindicators in the instrumentpanel to flash. Use the hazardwarning lights if you need topark in a dangerous area nearheavy traffic or if your car isdisabled.
Instruments and Controls
Main Menu Table of Contents ▲ ▼

Controls Near the Steering Wheel
Rear Window DefoggerThe rear window defogger willclear fog, frost, and thin ice fromthe window. Push the defoggerbutton to turn it on and off. Thelight in the button lights to showthe defogger is on. If you do notturn it off, the defogger will shutitself off after about 25 minutes.It also shuts off when you turnoff the ignition. You have to turnit on again when you restart thecar.
Make sure the rear window isclear and you have goodvisibility before starting to drive.
The defogger wires on the insideof the rear window can beaccidentally damaged. Whencleaning the glass, always wipeside to side.
Steering Wheel AdjustmentYou can adjust the steeringwheel height to suit yourpreference. Do this before youbegin driving.
1. Adjust the seat so you are acomfortable distance fromthe pedals and can operatethem safely.
2. The lever to tilt the steeringwheel is under the steeringcolumn to the left. Push thislever all the way down.
3. Move the steering wheel upor down to the desired
Instruments and Controls
Adjusting the steering wheelposition while driving maycause you to lose control of thecar and be seriously injured in acrash.
Adjust the steering wheel whenthe car is stopped.
Main Menu Table of Contents ▲ ▼
Steering Wheel Controls
position. Position the wheelso you can see all theinstrument panel gauges andwarning lights. Push the leverup to lock the steering wheelin that position.
4. Make sure you have securelylocked the steering wheel inplace by trying to move it upand down.
Cruise ControlAvailable only on EX in the U.S.,and Si model in CanadaCruise control allows you tomaintain a set speed above25 mph (40 km/h) withoutkeeping your foot on theaccelerator pedal. It is forcruising on straight, openhighways. It is not recommendedfor conditions such as citydriving, winding roads, slipperyroads, heavy rain, or bad
weather. You should have fullcontrol of the car under thoseconditions.
The cruise control, as it operates,moves the accelerator pedal. Youcan damage your car's acceleratormechanism by resting your footunder the pedal and blocking themovement.
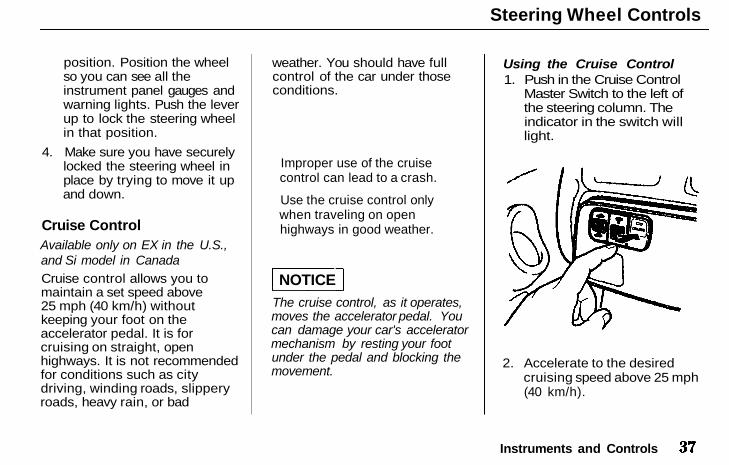
Using the Cruise Control1. Push in the Cruise Control
Master Switch to the left ofthe steering column. Theindicator in the switch willlight.
2. Accelerate to the desiredcruising speed above 25 mph(40 km/h).
Instruments and Controls
Improper use of the cruisecontrol can lead to a crash.
Use the cruise control onlywhen traveling on openhighways in good weather.
NOTICE
Main Menu Table of Contents ▲ ▼
Steering Wheel Controls
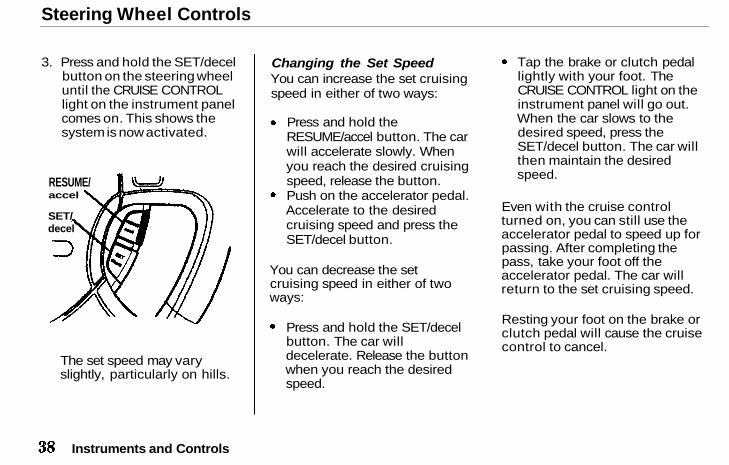
3. Press and hold the SET/decelbutton on the steering wheeluntil the CRUISE CONTROLlight on the instrument panelcomes on. This shows thesystem is now activated.
The set speed may varyslightly, particularly on hills.
Changing the Set SpeedYou can increase the set cruisingspeed in either of two ways:
Press and hold theRESUME/accel button. The carwill accelerate slowly. Whenyou reach the desired cruisingspeed, release the button.Push on the accelerator pedal.Accelerate to the desiredcruising speed and press theSET/decel button.
You can decrease the setcruising speed in either of twoways:
Press and hold the SET/decelbutton. The car willdecelerate. Release the buttonwhen you reach the desiredspeed.
Tap the brake or clutch pedallightly with your foot. TheCRUISE CONTROL light on theinstrument panel will go out.When the car slows to thedesired speed, press theSET/decel button. The car willthen maintain the desiredspeed.
Even with the cruise controlturned on, you can still use theaccelerator pedal to speed up forpassing. After completing thepass, take your foot off theaccelerator pedal. The car willreturn to the set cruising speed.
Resting your foot on the brake orclutch pedal will cause the cruisecontrol to cancel.
Instruments and Controls
RESUME/accel
SET/decel
Main Menu Table of Contents ▲ ▼
Steering Wheel Controls
Canceling the Cruise ControlYou can cancel the cruise controlin any of these ways:
Tap the brake or clutch pedal.Press the SET/decel andRESUME/accel buttons at thesame time.Press the Cruise ControlMaster Switch.
When you tap the brake orclutch pedal (manualtransmission cars) or press theSET and RESUME buttons at thesame time, the CRUISE CONTROLlight on the instrument panel willgo out and the car will begin toslow down. You can use theaccelerator pedal in the normalway.
If you use the brake or clutchpedal to cancel cruise control,the system retains the previouslyset cruising speed. To return tothat speed, accelerate to above25 mph (40 km/h), and press theRESUME/accel button until theCRUISE CONTROL light comeson. The car will accelerate to thesame cruising speed as before.
If you cancel cruise control bypressing the SET and RESUMEBUTTONS at the same time, thepreviously set cruising speed iserased. To use the cruise control,accelerate to the desiredcruising speed, and press theSET/decel button.
Pressing the Cruise ControlMaster Switch turns the systemcompletely off and erases theprevious cruising speed frommemory. To use the systemagain, refer to Using the CruiseControl.
Instruments and Controls
Main Menu Table of Contents ▲ ▼
Keys and Locks
KeysYour car comes with two kinds ofkeys: a master key and a valetkey. The master key fits all lockson your car:
IgnitionDoorsTrunkTrunk release handleRear seat trunk access
The valet key works only in theignition and the door locks. Youcan keep the glove box lockedwhen you leave your car andvalet key at a parking facility.
You should have received a keynumber plate with your set ofkeys. You will need this number ifyou have to get a lost keyreplaced. Keep the plate stored ina safe place. When replacing keys,use only Honda-approved keyblanks.
Ignition SwitchThe ignition switch is on theright side of the steering column.It has four positions:
LOCK (0)ACCESSORY (I)ON (II)START (HI)
LOCK (0) — You can insert orremove the key only in this
Instruments and Controls
KEYNUMBERPLATE
VALET KEY MASTER KEY
Main Menu Table of Contents ▲ ▼

Keys and Locks
position. When you turn thekey from LOCK to ACCESSORY,you may have to turn thesteering wheel to release theanti-theft lock. To switch fromACCESSORY to LOCK, you mustpush the key in slightly as youturn it. If your car has anautomatic transmission, it mustalso be in Park. The anti-theftlock will lock the steeringcolumn when you remove thekey.
ACCESSORY (I) — In thisposition, you can operate theaudio system and cigarettelighter.
ON (II) — This is the normalkey position when driving. Allfeatures and accessories on thecar are usable. Several of thelights on the instrument panelcome on as a test when youturn the ignition switch fromACCESSORY to ON (seepage 27).
START (III) — Use this positiononly to start the engine. Theswitch returns to ON when youlet go of the key.
You will hear a reminder beeperif you open either front doorwith the key in the LOCK orACCESSORY position. Removethe key to turn it off.
Door LocksEach door has a lock tab next tothe inside door handle. Push thetab forward to lock the door, andpull it backward to unlock.
To lock the passenger's doorwhen getting out of the car, pushthe lock tab forward, and closethe door. To lock the driver'sdoor, pull the outside door
Instruments and Controls
Removing the key from theignition switch while drivinglocks the steering. This cancause you to lose control.
Remove the key from theignition switch only whenparked.
Main Menu Table of Contents ▲ ▼
Keys and Locks
handle, and push the lock tabforward. Release the handle;then close the door.
Power Door LocksAvailable on U.S. EX model
This allows control of both doorlocks from the driver's door.Push the master door lockswitch down to lock both doorsand up to unlock them.
Both doors lock when you pushthe lock tab on the driver's door.Only the driver's door unlockswhen you use the key or locktab. To unlock the passenger'sdoor, use the master door lockswitch or the lock tab on eachdoor.
The doors can also be lockedand unlocked from the outsidewith the key.
TrunkYou can open the trunk in twoways:
Pull the trunk release handleto the left of the driver's seat.
Instruments and Controls
TRUNK RELEASE HANDLE
Main Menu Table of Contents ▲ ▼
Keys and Locks, Seat Adjustments
Use the master key to openthe trunk lock. The valet keydoes not work in this lock.
See page 81 for cargo loadingand weight-limit information.Keep the trunk lid closed at alltimes while driving to avoiddamaging the lid and gettingexhaust gas in the interior. SeeCarbon Monoxide Hazard onpage 23.
To protect items in the trunkwhen you need to give the key tosomeone else, lock the trunkrelease handle with the masterkey, and give the other personthe valet key.
Seat AdjustmentsAdjust the seat before you startdriving.
Front Seat AdjustmentsTo adjust the seat forward andbackward, pull up on the leverunder the seat cushion's frontedge. Move the seat to thedesired position, and release thelever. Try to move the seat tomake sure it is locked inposition.
Instruments and Controls
MASTER KEY
Main Menu Table of Contents ▲ ▼
Seat Adjustments
To change the angle of the seat-back, pull up on the lever on theoutside of the seat bottom. Movethe seat-back to the desiredposition, and release the lever.Let the seat-back latch in thenew position.
Rear Seat AccessOn the U.S. EX and Canada Si(Passenger side only)To get in or out of the rear seat,pull up on the lever at the side ofthe front passenger's seat. Theseat-back will fold down, and thefront passenger's seat will moveforward.
The seat will lock in place whenit is pushed back.
Instruments and Controls
Reclining the seat-back candecrease the protection you getfrom your seat belt in a crash.
You can slide under the seatbelt and be seriously injured.
Adjust the seat-back to anupright position, and sit wellback in the seat.
Main Menu Table of Contents ▲ ▼
Folding Rear Seat
Folding Rear SeatThe back of the rear seat foldsdown, giving you direct access tothe trunk. The seat-back can bereleased from inside the car orinside the trunk.
To fold down the seat-back frominside the car, insert the masterkey in the lock on the rear shelf.Turn the key clockwise, and pulldown the top of the seat-back;then release the key.
To release the seat-back frominside the trunk, pull the releaseloop under the rear shelf. Pushthe seat-back down; then let goof the loop.
To lock the seat-back upright,push it firmly against the rearshelf. Make sure it is latched inplace by pulling on the top of theseat.
Make sure all items in the trunk,or items extending through theopening into the back seat, aretied down. Loose items can flyforward and cause injury if youhave to brake hard. See LoadingCargo on page 81.
Never drive with the seat-backfolded down and the trunk lidopen. See Carbon MonoxideHazard on page 23.
Instruments and Controls
Main Menu Table of Contents ▲ ▼
Power Windows
On U.S. EX model
Your car's windows areelectrically powered. Turn theignition switch to ON (II) to raiseor lower a window.
Each door has a switch thatcontrols its window. To open thewindow, push the switch downand hold it. Release the switchwhen you want the window tostop. Close the window bypushing the switch up andholding it.
The driver's armrest has amaster power window controlpanel. To open the passenger'swindow, push down on theappropriate switch, and hold itdown until the window reachesthe desired position. To close thewindow, push up on the windowswitch. Release the switch when
the window gets to the positionyou want.
The master control panel alsocontains these extra features:
AUTO — To open the driver'swindow fully, push the windowswitch firmly down and releaseit. The window automaticallygoes all the way down. To stop
the window from going all theway down, push the windowswitch up briefly.
To open the driver's windowonly partially, push the windowswitch down lightly and hold it.The window will stop as soon asyou release the switch.
The AUTO function only worksto lower the driver's window. Toraise the window, you must pushthe window switch up and hold ituntil the window reaches thedesired position.
The MAIN switch controls powerto the passengers' windows.With this switch off, thepassengers' windows cannot beraised or lowered. The MAINswitch does not affect thedriver's window. Keep the MAINswitch off when you have
Instruments and Controls
MAIN SWITCH
DRIVER'S WINDOWSWITCH
Main Menu Table of Contents ▲ ▼
Power Windows, Moonroof
children in the car so they do notinjure themselves by operatingthe window unintentionally.
MoonroofOn EX in the U.S. and Si model inCanadaUse the switches on the dash-board under the left vent tooperate the moonroof. Theignition must be ON (II).
To lift the rear of the moonrooffor ventilation, push thebutton. To slide the moonroof
back, push the switch.Hold it until the moonroofreaches the desired position, andthen release the switch.
To close the moonroof, pressand hold the switch.
If you try to open the moonroof inbelow-freezing temperatures, orwhen it is covered with snow orice, you can damage themoonroof panel or motor.
Instruments and Controls
Closing a power window on achild's hands or fingers cancause serious injury.
Make sure children are awayfrom the windows beforeclosing them.
Closing the moonroof onsomeone's hands or fingers cancause serious injury.
Make sure passengers areclear of the moonroof beforeclosing it.
NOTICE
Main Menu Table of Contents ▲ ▼
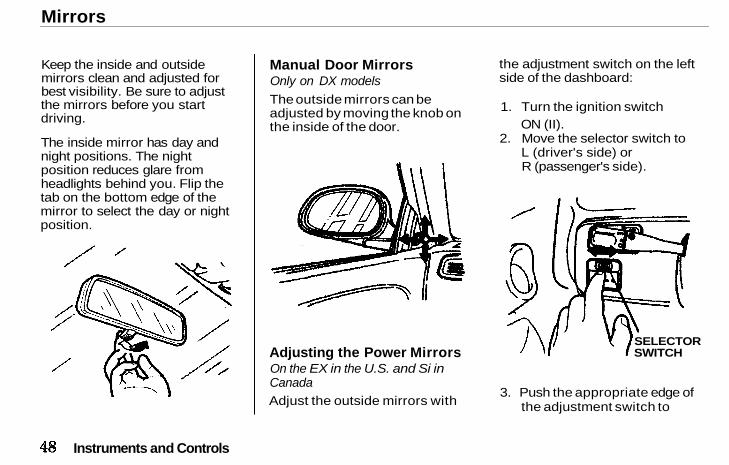
Mirrors
Keep the inside and outsidemirrors clean and adjusted forbest visibility. Be sure to adjustthe mirrors before you startdriving.
The inside mirror has day andnight positions. The nightposition reduces glare fromheadlights behind you. Flip thetab on the bottom edge of themirror to select the day or nightposition.
Manual Door MirrorsOnly on DX modelsThe outside mirrors can beadjusted by moving the knob onthe inside of the door.
Adjusting the Power MirrorsOn the EX in the U.S. and Si inCanadaAdjust the outside mirrors with
the adjustment switch on the leftside of the dashboard:
1. Turn the ignition switchON (II).
2. Move the selector switch toL (driver's side) orR (passenger's side).
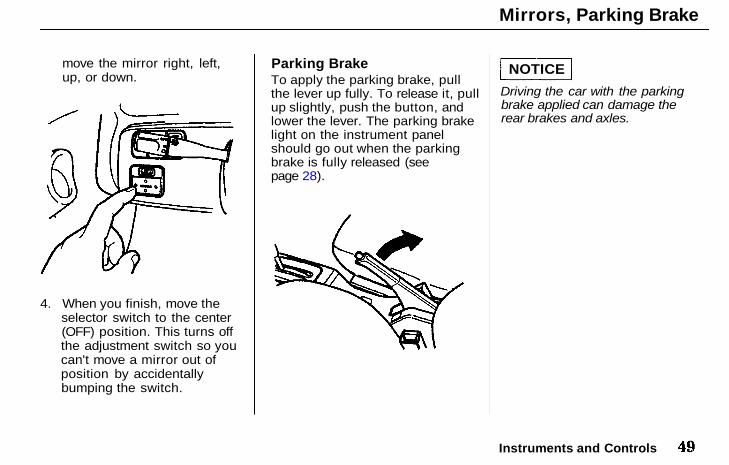
3. Push the appropriate edge ofthe adjustment switch to
Instruments and Controls
SELECTORSWITCH
Main Menu Table of Contents ▲ ▼
Mirrors, Parking Brake
move the mirror right, left,up, or down.
4. When you finish, move theselector switch to the center(OFF) position. This turns offthe adjustment switch so youcan't move a mirror out ofposition by accidentallybumping the switch.
Parking BrakeTo apply the parking brake, pullthe lever up fully. To release it, pullup slightly, push the button, andlower the lever. The parking brakelight on the instrument panelshould go out when the parkingbrake is fully released (seepage 28).
Driving the car with the parkingbrake applied can damage therear brakes and axles.
Instruments and Controls
NOTICE
Main Menu Table of Contents ▲ ▼
Glove Box, Digital Clock
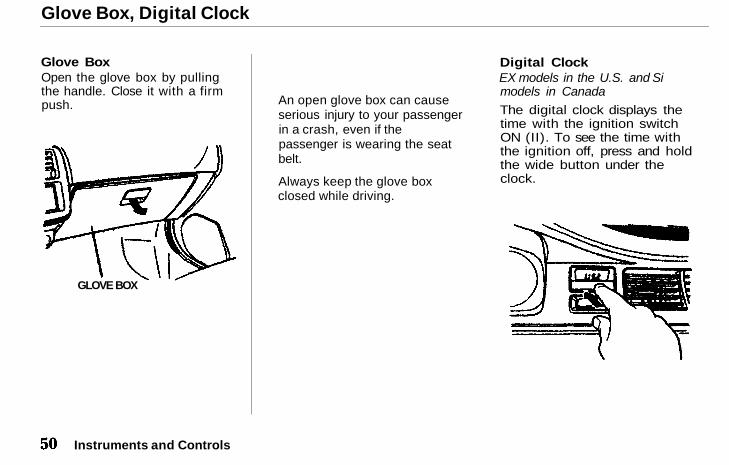
Glove BoxOpen the glove box by pullingthe handle. Close it with a firmpush.
Digital ClockEX models in the U.S. and Simodels in CanadaThe digital clock displays thetime with the ignition switchON (II). To see the time withthe ignition off, press and holdthe wide button under theclock.
Instruments and Controls
GLOVE BOX
An open glove box can causeserious injury to your passengerin a crash, even if thepassenger is wearing the seatbelt.
Always keep the glove boxclosed while driving.
Main Menu Table of Contents ▲ ▼
Digital Clock, Beverage Holder
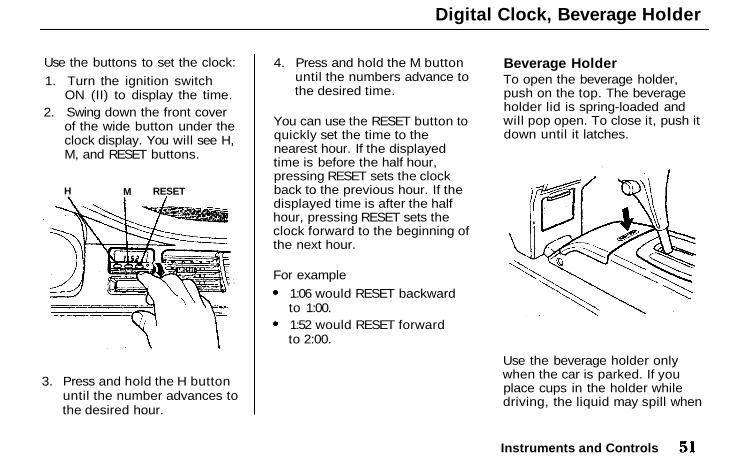
Use the buttons to set the clock:
1. Turn the ignition switchON (II) to display the time.
2. Swing down the front coverof the wide button under theclock display. You will see H,M, and RESET buttons.
3. Press and hold the H buttonuntil the number advances tothe desired hour.
4. Press and hold the M buttonuntil the numbers advance tothe desired time.
You can use the RESET button toquickly set the time to thenearest hour. If the displayedtime is before the half hour,pressing RESET sets the clockback to the previous hour. If thedisplayed time is after the halfhour, pressing RESET sets theclock forward to the beginning ofthe next hour.
For example
1:06 would RESET backwardto 1:00.1:52 would RESET forwardto 2:00.
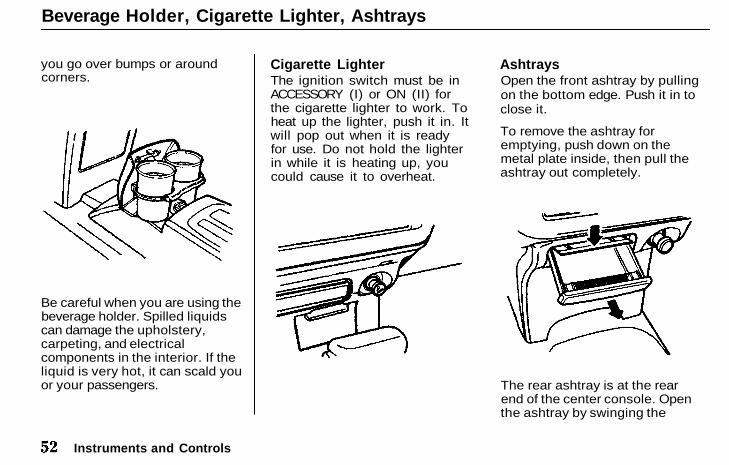
Beverage HolderTo open the beverage holder,push on the top. The beverageholder lid is spring-loaded andwill pop open. To close it, push itdown until it latches.
Use the beverage holder onlywhen the car is parked. If youplace cups in the holder whiledriving, the liquid may spill when
Instruments and Controls
RESETH M
Main Menu Table of Contents ▲ ▼
Beverage Holder, Cigarette Lighter, Ashtrays
you go over bumps or aroundcorners.
Be careful when you are using thebeverage holder. Spilled liquidscan damage the upholstery,carpeting, and electricalcomponents in the interior. If theliquid is very hot, it can scald youor your passengers.
Cigarette LighterThe ignition switch must be inACCESSORY (I) or ON (II) forthe cigarette lighter to work. Toheat up the lighter, push it in. Itwill pop out when it is readyfor use. Do not hold the lighterin while it is heating up, youcould cause it to overheat.
AshtraysOpen the front ashtray by pullingon the bottom edge. Push it in toclose it.
To remove the ashtray foremptying, push down on themetal plate inside, then pull theashtray out completely.
The rear ashtray is at the rearend of the center console. Openthe ashtray by swinging the
Instruments and Controls
Main Menu Table of Contents ▲ ▼
Ashtrays, Interior Light
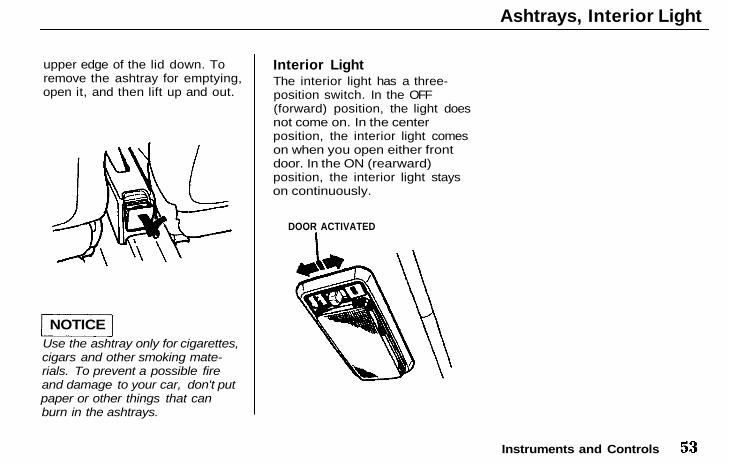
upper edge of the lid down. Toremove the ashtray for emptying,open it, and then lift up and out.
Use the ashtray only for cigarettes,cigars and other smoking mate-rials. To prevent a possible fireand damage to your car, don't putpaper or other things that canburn in the ashtrays.
Interior LightThe interior light has a three-position switch. In the OFF(forward) position, the light doesnot come on. In the centerposition, the interior light comeson when you open either frontdoor. In the ON (rearward)position, the interior light stayson continuously.
Instruments and Controls
NOTICE
DOOR ACTIVATED
Main Menu Table of Contents ▲ ▼
Comfort and Convenience Features
The heating/ventilation systemin your car, when combined withthe optional air conditioner,provides a comfortable drivingenvironment in all weatherconditions.
U.S. EX and Canada Si modelsThe standard audio system isvery versatile. To get the mostbenefit from this system, read itsdescription in this manual.
The anti-theft feature on yourradio disables the system. To getthe system working again youmust enter a code number asdescribed in this manual.
For other modelsRefer to the operatinginstructions that came with theoptional audio system youselected.
Heating and Cooling . . . . . . . . . 56What Each Control Does .. 58How to Use the System . . . . 58
Controlling AirFlow Direction . . . . . . . . 59
Ventilation . . . . . . . . . . . . 59To Cool With A/C . . . . . . . 59To Heat . . . . . . . . . . . . . . . 60To Heat and Dehumidify
With Air Conditioning . 60To Defog and Defrost . . . 60
To Turn Everything Off . . . . 61Audio System . . . . . . . . . . . . . . . 62
Operating the Radio . . . . . . 62Presetting Radio Stations .. 63Adjusting the Sound . . . . . . 64Radio Frequencies . . . . . . . . 65Operating the
Cassette Player . . . . . . . . . 65Caring for the
Cassette Player . . . . . . . . . 66Operating the
CD Player/Changer . . . . . . 67
Comfort and Convenience Features
Main Menu ▲ ▼
Heating and Cooling
This system has full heating,ventilation, and air conditioning(optional) capabilities. You canadjust the system controls to mixthese in various combinations.The air flows into the interior atthree possible levels that youcan select.
A Genuine Honda airconditioning system is availablefrom your dealer. It meetsHonda's high quality standardsand is designed to fit your car. Ifyou purchased your car withoutair conditioning, it can beinstalled at a later time. Pleasecontact your dealer for moreinformation.
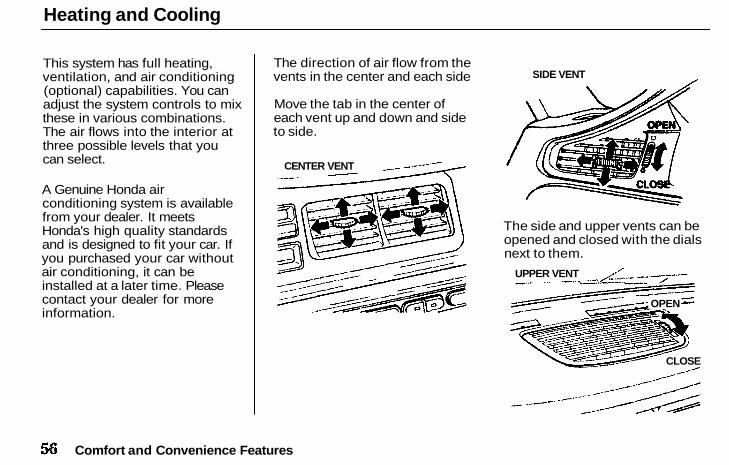
The direction of air flow from thevents in the center and each side
Move the tab in the center ofeach vent up and down and sideto side.
The side and upper vents can beopened and closed with the dialsnext to them.
Comfort and Convenience Features
CENTER VENT
UPPER VENT
CLOSE
OPEN
SIDE VENT
Main Menu Table of Contents ▲ ▼
Heating and Cooling
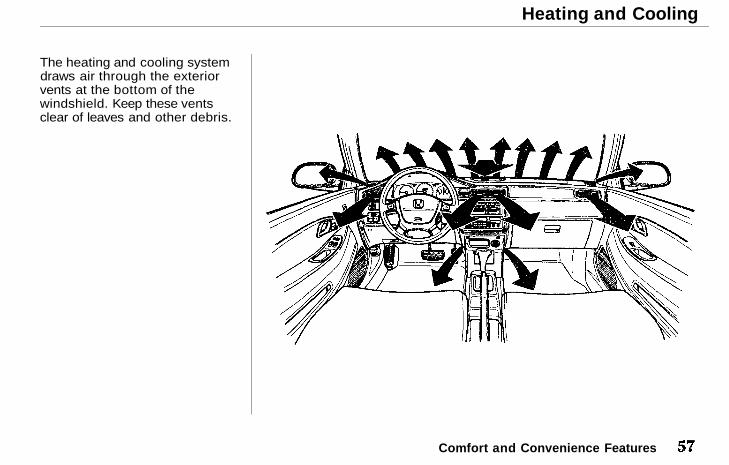
The heating and cooling systemdraws air through the exteriorvents at the bottom of thewindshield. Keep these ventsclear of leaves and other debris.
Comfort and Convenience Features
Main Menu Table of Contents ▲ ▼
Heating and Cooling
What Each Control Does
Fan Control LeverSliding this lever to the rightincreases the fan speed, whichIncreases air flow.
Temperature Control LeverSliding this lever to the rightincreases the temperature of airflowing through the system.
Mode ButtonsThese buttons control thedirection of air flow. Theindicator light shows whichbutton is controlling air flow.
Air Conditioning (A/C) Switch(Optional)This switch turns the airconditioner ON and OFF. Theindicator in the switch lightswhen the A/C is ON.
Fresh Air andRecirculation ButtonsThese two buttons control thesource of air going into thesystem. In Fresh Air mode, aircomes from outside the car. InRecirculation mode, the interiorair recycles through the system.
How to Use the SystemThis section covers the best wayto use the system for ventilation,cooling, dehumidifying,defrosting, and heating. In mostcases, the mode and air sourceselections are onlyrecommendations. You mayprefer different settings.
Comfort and Convenience Features
MODE BUTTONS RECIRCULATED AIR AIR CONDITIONINGON/OFF SWITCH
FRESH AIR
TEMPERATURECONTROL LEVER FAN CONTROL LEVER
Main Menu Table of Contents ▲ ▼

Heating and Cooling
Use mode to heat or coolthe interior more quickly, or tokeep out smoke and dust.Leaving the system inrecirculation mode with the airconditioning off can cause thewindows to fog up. Switch to
mode as soon as theinterior reaches a comfortabletemperature or the outsidesmoky, dusty condition clears.
The engine must be running forthe heater and air conditioningsystem to provide hot and coldair. The heater uses enginecoolant to warm the air. If theengine is cold, it will be severalminutes before you feel warm aircirculating.
Air conditioning does notdepend on engine temperature. Itcan produce cold air almostimmediately.
Controlling Air Flow DirectionAir flows into the interior atthree levels: Toward the floor
through the dash ventsand toward the windshield
and side windows Youselect the air flow level orcombination of levels with thefive mode buttons.
VentilationYour car has a flow-throughventilation system. Air enters thecar through vents in front of thewindshield. It circulates throughthe interior then exits throughvents near the rear window. Thissystem provides fresh air evenwhen the car is standing still. Tobring in outside air, press the
button. Set the fan at acomfortable speed.
To Cool With A/C (Optional)To operate the air conditioningsystem, press the airconditioning switch. Set the fanto the desired speed. You canalso use the mode buttonto direct air out of the dash andheater vents.
After your car has been sitting inthe sun, cool the interior downrapidly.
1. Start the engine.2. Turn on the A/C by pressing
the switch.3. Set the fan to maximum
speed.4. Open the windows partially.
5. Select and
When the interior reaches acomfortable temperature, close
Comfort and Convenience Features
Main Menu Table of Contents ▲ ▼
Heating and Cooling
the windows, and set the systemfor cooling as described above.
The air conditioning places anextra load on the engine. Watchthe coolant temperature gauge(see page 31) when using the A/Cin heavy traffic or driving uplong hills. If it moves near the redzone, turn off the airconditioning until the gaugereads normal.
To HeatTo warm the interior:
1. Start the engine.
2. Select and3. Switch the fan to the desired
speed.4. Adjust the warmth of the air
with the temperature controllever.
To Heat and DehumidifyWith Air ConditioningAir conditioning removesmoisture from the air as itoperates. When used incombination with the heater, itmakes the interior warm and dry.
1. Switch the fan on.2. Turn on the air conditioning.
3. Select and press anydesired mode button.
4. Adjust the temperaturecontrol lever so the mixtureof heated and cooled air feelscomfortable.
This setting is suitable for alldriving conditions whenever theoutside temperature is above32°F (0°C).
To Defog and DefrostTo remove fog from the inside ofthe windows:
1. Switch the fan on.2. Turn on the air conditioning.
3. Select and
4. Adjust the temperaturecontrol lever so the airflowfrom the defroster vents feelswarm.
5. Turn on the rear windowdefogger to help clear therear window.
To remove exterior frost or icefrom the windshield and sidewindows after the car has beensitting out in cold weather:
1. Start the engine.
2. Select and
Comfort and Convenience Features
Main Menu Table of Contents ▲ ▼
Heating and Cooling
3. Switch the fan andtemperature controls tomaximum.
To rapidly remove exterior frostor ice from the windshield (onvery cold days), first select
Once the windshield isclear, select to avoidfogging the windows.
These settings direct all the airflow to the defroster vents at thebase of the windshield and eachfront door window. The air flowwill get warmer and clear thewindows faster as the enginewarms up. You can close the sidevents with the dial beside eachvent. This will send more warmair to the windshield defrostervents.
For safety, make sure you have aclear view through all thewindows before driving away.
To Turn Everything OffTo shut off the systemtemporarily, slide the fan speedand temperature control leversall the way to the left.
You should only shut the systemcompletely off for the first fewminutes of driving in coldweather, until the engine coolantwarms up enough to operate theheater. Keep the fan on at allother times so stale air does notbuild up in the interior.
Comfort and Convenience Features
Main Menu Table of Contents ▲ ▼
Audio System
AM/FM/Cassette StereoAudio SystemU.S. EX and Canada Si ModelsYour Honda audio system is easyto use and will give clear AM/FMreception. The preset buttonsallow you to select six stations onAM and 12 stations on FM.
The anti-theft feature disablesthe system if it is disconnectedfrom the car's battery. To get thesystem working again, you mustenter a code number. See page71.
The cassette system usesDolby B* noise reduction to giveexcellent sound reproduction.The system also senses when ametal or a chromium dioxide(CrO2) tape is being played andadjusts accordingly.
*Dolby noise reduction manufac-tured under license from DolbyLaboratories Licensing Corpora-tion. "Dolby" and the symbolare trademarks of Dolby Labora-tories Licensing Corporation.
Operating the RadioThe ignition switch must be inACCESSORY (I) or ON (II) to
operate the audio system. Turnthe system on by turning theON/OFF/VOL knob clockwise.The radio comes on anddisplays the frequency of thestation it was last tuned to.
Adjust the volume by turning theON/OFF/VOL knob.
Comfort and Convenience Features
ON/OFF/VOLKNOB AM BUTTON
STEREOINDICATOR
TUNE/SEEK BAR PRESETBUTTONS
FM 1-2 BUTTON
Main Menu Table of Contents ▲ ▼
Audio System
Select the band you want tolisten to by pressing the AM orFM 1-2 button. You will see theselected band and the frequencyin the display.
ST will be displayed next to thefrequency if the station isbroadcasting in FM stereo. TheAM stereo feature is notavailable.
You can use any of threemethods to find radio stations onthe selected band: TUNE, SEEK,or the Preset buttons.
The TUNE function lets you finda desired frequency. Push theright side of the TUNE/SEEKbar to change to a higherfrequency, and push the left side
of the bar to change to alower frequency.
To change the frequency up ordown a single increment, pushand release the TUNE/SEEK bar.
The SEEK function searches theband for a station with a strongsignal. Depending on which wayyou push the TUNE/SEEK bar,the system searches up or downfrom the current frequency. Pushthe bar until you hear a beep,then release it. The systemsearches until it finds a stationwith a strong signal, then stops.
Presetting Radio StationsThe preset buttons allow you tostore radio frequencies for laterselection. Each button will storeone frequency on the AM bandand two on the FM band. Tostore a frequency do this:
1. Select the desired band, AMor FM. FM 1-2 allows you to
store two frequencies witheach Preset button.
2. Use the TUNE or SEEKfunction to tune the radio toa desired station.
3. Pick the Preset button youwant for that station. Pressthe button and hold it untilyou hear a beep. The light inthe indicator will come onand the station selected willshow in the display.
4. Repeat steps 1 through 3 tostore a total of six stations onAM and 12 on FM.
Once a station's frequency isstored, simply press and releasethe proper Preset button to tuneto it. If you want to change anyPreset button's selection, storeanother frequency as described.The frequencies you preset willbe lost if your car's battery goesdead or is disconnected.
Comfort and Convenience Features
Main Menu Table of Contents ▲ ▼
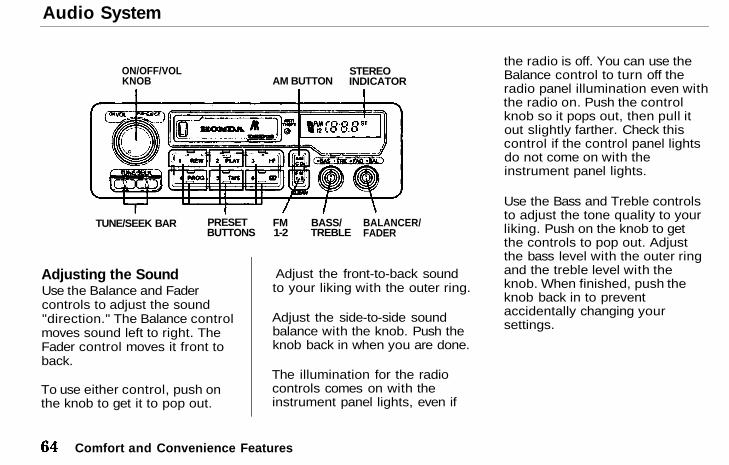
Audio System
Adjusting the SoundUse the Balance and Fadercontrols to adjust the sound"direction." The Balance controlmoves sound left to right. TheFader control moves it front toback.
To use either control, push onthe knob to get it to pop out.
Adjust the front-to-back soundto your liking with the outer ring.
Adjust the side-to-side soundbalance with the knob. Push theknob back in when you are done.
The illumination for the radiocontrols comes on with theinstrument panel lights, even if
the radio is off. You can use theBalance control to turn off theradio panel illumination even withthe radio on. Push the controlknob so it pops out, then pull itout slightly farther. Check thiscontrol if the control panel lightsdo not come on with theinstrument panel lights.
Use the Bass and Treble controlsto adjust the tone quality to yourliking. Push on the knob to getthe controls to pop out. Adjustthe bass level with the outer ringand the treble level with theknob. When finished, push theknob back in to preventaccidentally changing yoursettings.
Comfort and Convenience Features
ON/OFF/VOLKNOB AM BUTTON
STEREOINDICATOR
TUNE/SEEK BAR PRESETBUTTONS
FM1-2
BASS/TREBLE
BALANCER/FADER
Main Menu Table of Contents ▲ ▼
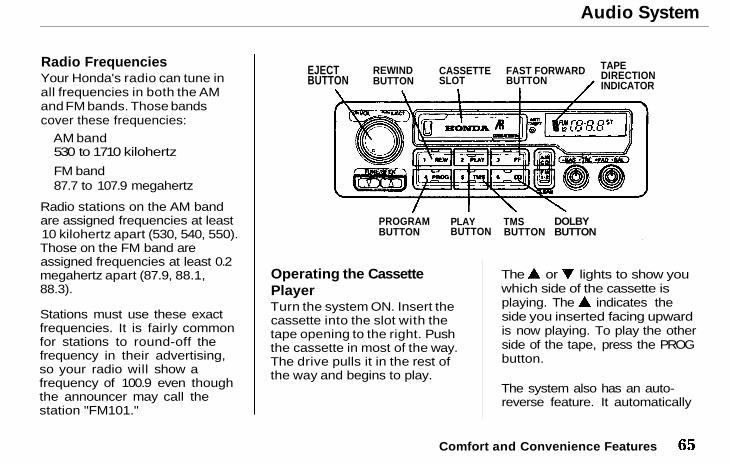
Audio System
Radio FrequenciesYour Honda's radio can tune inall frequencies in both the AMand FM bands. Those bandscover these frequencies:
AM band530 to 1710 kilohertz
FM band87.7 to 107.9 megahertz
Radio stations on the AM bandare assigned frequencies at least10 kilohertz apart (530, 540, 550).Those on the FM band areassigned frequencies at least 0.2megahertz apart (87.9, 88.1,88.3).
Stations must use these exactfrequencies. It is fairly commonfor stations to round-off thefrequency in their advertising,so your radio will show afrequency of 100.9 even thoughthe announcer may call thestation "FM101."
Operating the CassettePlayerTurn the system ON. Insert thecassette into the slot with thetape opening to the right. Pushthe cassette in most of the way.The drive pulls it in the rest ofthe way and begins to play.
The or lights to show youwhich side of the cassette isplaying. The indicates theside you inserted facing upwardis now playing. To play the otherside of the tape, press the PROGbutton.
The system also has an auto-reverse feature. It automatically
Comfort and Convenience Features
EJECTBUTTON
REWINDBUTTON
CASSETTESLOT
FAST FORWARDBUTTON
TAPEDIRECTIONINDICATOR
PROGRAMBUTTON
PLAYBUTTON
TMSBUTTON
DOLBYBUTTON
Main Menu Table of Contents ▲ ▼
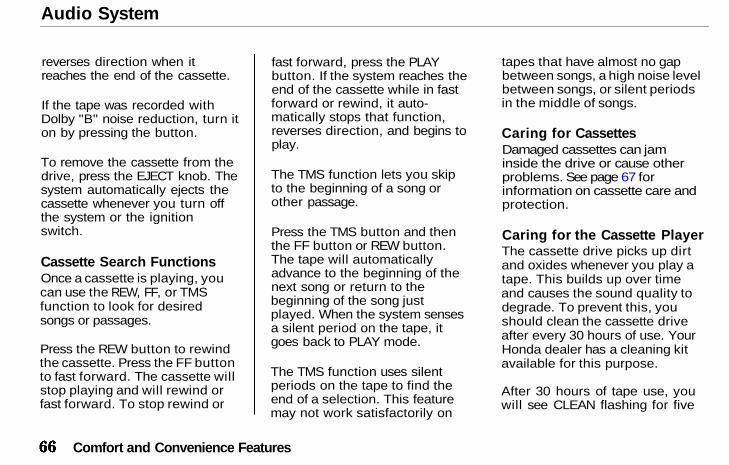
Audio System
reverses direction when itreaches the end of the cassette.
If the tape was recorded withDolby "B" noise reduction, turn iton by pressing the button.
To remove the cassette from thedrive, press the EJECT knob. Thesystem automatically ejects thecassette whenever you turn offthe system or the ignitionswitch.
Cassette Search FunctionsOnce a cassette is playing, youcan use the REW, FF, or TMSfunction to look for desiredsongs or passages.
Press the REW button to rewindthe cassette. Press the FF buttonto fast forward. The cassette willstop playing and will rewind orfast forward. To stop rewind or
fast forward, press the PLAYbutton. If the system reaches theend of the cassette while in fastforward or rewind, it auto-matically stops that function,reverses direction, and begins toplay.
The TMS function lets you skipto the beginning of a song orother passage.
Press the TMS button and thenthe FF button or REW button.The tape will automaticallyadvance to the beginning of thenext song or return to thebeginning of the song justplayed. When the system sensesa silent period on the tape, itgoes back to PLAY mode.
The TMS function uses silentperiods on the tape to find theend of a selection. This featuremay not work satisfactorily on
tapes that have almost no gapbetween songs, a high noise levelbetween songs, or silent periodsin the middle of songs.
Caring for CassettesDamaged cassettes can jaminside the drive or cause otherproblems. See page 67 forinformation on cassette care andprotection.
Caring for the Cassette PlayerThe cassette drive picks up dirtand oxides whenever you play atape. This builds up over timeand causes the sound quality todegrade. To prevent this, youshould clean the cassette driveafter every 30 hours of use. YourHonda dealer has a cleaning kitavailable for this purpose.
After 30 hours of tape use, youwill see CLEAN flashing for five
Comfort and Convenience Features
Main Menu Table of Contents ▲ ▼
Audio System
seconds in the display whenyou insert a tape into the tapeslot. If you are already regularlycleaning the tape drive at leastevery 30 hours, reset theindicator by pressing the FM1button while the system is inthe tape operation mode. Holdthe button until you hear abeep and the CLEAN indicatorgoes out.
If you do not clean the cassettedrive regularly, it may eventuallybecome impossible to removethe deposits with a normalcleaning kit.
The cassette playerautomatically ejects cassettesthat do not play normally. If itejects a cassette before it beginsto play, it is probably defectiveand should not be insertedagain. You may have a cassette
suddenly stop playing, reversedirections once or twice andthen eject. This is normally anindication the tape is woundunevenly. It should play normallyafter being manually rewound.
Use 100-minute or shortercassettes. Cassettes longer than100 minutes use thinner tapethat may break or jam the drive.
Look at a cassette before youinsert it. If the tape is loose,tighten it by turning one of thehubs with a pencil or your finger.
If the label is peeling off, do notput it in the player. It may causethe cassette to jam in the drivemechanism when you try toeject it.
Do not leave cassettes sittingwhere they are exposed to high
heat or humidity, such as on topof the dashboard or in theplayer. If a cassette is exposed toextreme heat or cold, let it reacha moderate temperature beforeputting it in the player.
Operating the CD Player/Changer (Optional)Your dealer has an in-dashHonda Compact Disc player or atrunk-mounted changer availablefor your car. The changer holdsup to six discs, providing severalhours of continuous program-ming. You operate the CD playerand the changer with the samecontrols used for the radio.
Loading the CD ChangerLoad the CDs in the magazineand load the magazine into thechanger according to theinstructions that came with thechanger unit.
Comfort and Convenience Features
Main Menu Table of Contents ▲ ▼
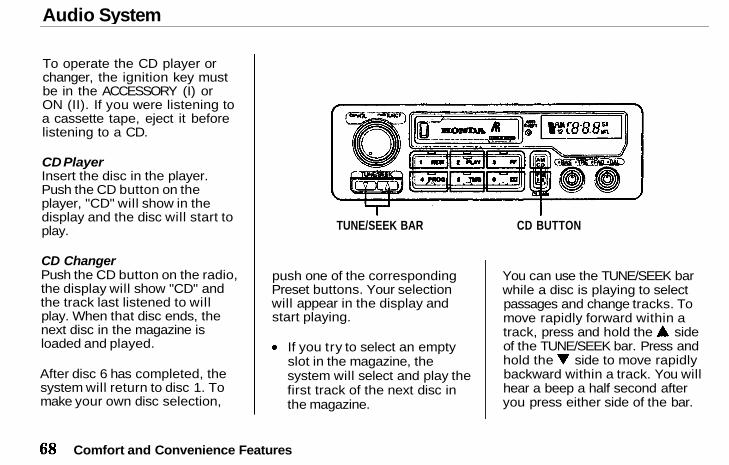
Audio System
To operate the CD player orchanger, the ignition key mustbe in the ACCESSORY (I) orON (II). If you were listening toa cassette tape, eject it beforelistening to a CD.
CD PlayerInsert the disc in the player.Push the CD button on theplayer, "CD" will show in thedisplay and the disc will start toplay.
CD ChangerPush the CD button on the radio,the display will show "CD" andthe track last listened to willplay. When that disc ends, thenext disc in the magazine isloaded and played.
After disc 6 has completed, thesystem will return to disc 1. Tomake your own disc selection,
push one of the correspondingPreset buttons. Your selectionwill appear in the display andstart playing.
If you try to select an emptyslot in the magazine, thesystem will select and play thefirst track of the next disc inthe magazine.
You can use the TUNE/SEEK barwhile a disc is playing to selectpassages and change tracks. Tomove rapidly forward within atrack, press and hold the sideof the TUNE/SEEK bar. Press andhold the side to move rapidlybackward within a track. You willhear a beep a half second afteryou press either side of the bar.
Comfort and Convenience Features
TUNE/SEEK BAR CD BUTTON
Main Menu Table of Contents ▲ ▼
Audio System
Keep pressing the bar until youthink the track has advanced orreturned to the desired position.The disc will start playing whenyou release the bar.
If you press the side andrelease it before you hear a beep,the system will skip forward tothe beginning of the next trackon the CD. It will skip backwardto the beginning of the currenttrack if you press the side andrelease it.
If you change modes to radioor tape while a CD is playing,then change back to CD mode,the same disc and track willplay.
If you turn off the systemwhile a CD is playing, eitherwith the ON/OFF/VOL knob orby turning off the ignition, thesystem will begin playing the
same disc and track when youturn it back on.
To return to the radio function,press the AM/FM button.
Comfort and Convenience Features
Main Menu Table of Contents ▲ ▼
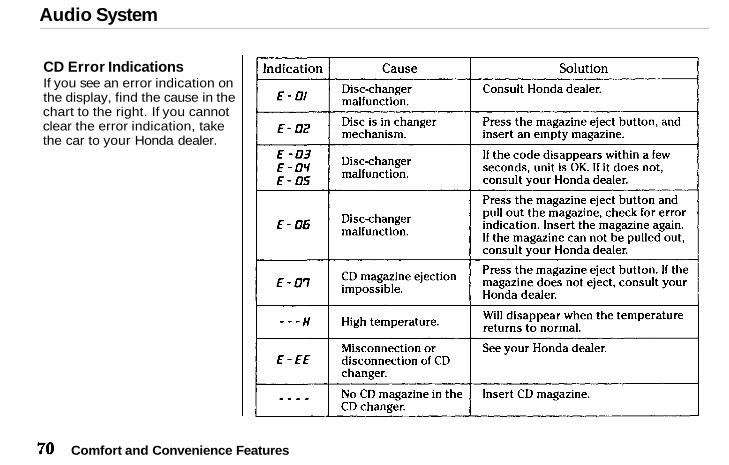
Audio System
CD Error IndicationsIf you see an error indication onthe display, find the cause in thechart to the right. If you cannotclear the error indication, takethe car to your Honda dealer.
Comfort and Convenience Features
Main Menu Table of Contents ▲ ▼
Audio System
On U.S. EX and Canada Si modelsYour car's audio system willdisable itself if it is disconnectedfrom electrical power for anyreason. To make it work again,the user must enter a specificfive-digit code in the Presetbuttons. Because there arehundreds of numbercombinations possible from fivedigits, making the system workwithout knowing the exact codeis nearly impossible.
You should have received a cardthat lists your audio system'scode number and serial number.Store the card in a safe place athome. In addition, you shouldwrite the audio system's serialnumber in this Owner's Manual.If you should happen to lose thecard, you must obtain the codenumber by having your Hondadealer contact American Honda.
To do this, he will need thesystem's serial number.
If your car's battery isdisconnected or goes dead, theaudio system will disable itself. Ifthis happens, you will see "Code"in the frequency display the nexttime you turn on the system. Usethe Preset buttons to enter thefive-digit code. If it is enteredcorrectly, the radio will startplaying.
If you make a mistake enteringthe code, do not start over or tryto correct your mistake.Complete the five-digit sequence,then enter the correct code. Youhave three tries to enter thecorrect code. If you areunsuccessful in three attempts,you must then leave the systemon for one hour before tryingagain.
You will have to store yourfavorite stations in the Presetbuttons after the system beginsworking. Your original settingswere lost when power wasdisconnected.
Comfort and Convenience Features
Main Menu Table of Contents ▲ ▼
Before Driving
Before you begin driving yourHonda, you should know whatgasoline to use and how to checkthe levels of important fluids.You also need to know how toproperly store luggage orpackages.
Break-in Period . . . . . . . . . . . . . 74Gasoline . . . . . . . . . . . . . . . . . . . 74
Oxygenated Fuels . . . . . . . . 74Driving in Foreign
Countries . . . . . . . . . . . . . . . 75Service Station Procedures .. 76
Filling the Fuel Tank . . . . . . 76Opening the Hood . . . . . . . . 77Oil Check . . . . . . . . . . . . . . . . 78Engine Coolant Check . . . . . 79
Fuel Economy . . . . . . . . . . . . . . 80Vehicle Condition . . . . . . . . . 80Driving Habits . . . . . . . . . . . . 80
Loading Cargo . . . . . . . . . . . . . 81
Before Driving
Main Menu ▲ ▼
Break-in Period, Gasoline
Break-in PeriodHelp assure your car's futurereliability and performance bypaying extra attention to howyou drive during the first 600miles (1,000 km). During thisperiod:
Avoid full-throttle starts andrapid acceleration.If you need to add oil, use theengine oil recommended inthis owner's manual.Avoid hard braking. Newbrakes need to be broken-inby moderate use for the first200 miles (300 km).
You should follow these samerecommendations with anoverhauled or exchanged engine,or when the brakes are replaced.
GasolineYour Honda is designed tooperate most effectively onunleaded gasoline. Use anunleaded gasoline with a pumpoctane number of 86 or higher.Use of a lower-octane gasolinecan cause a persistent, heavymetallic rapping noise in theengine that can lead tomechanical damage.
Gasolines containing detergentadditives designed to helpprevent fuel system and enginedeposits are recommended.Using gasoline containing leadwill damage your car's emissioncontrols. This contributes to airpollution and can void certainparts of your warranty.
Oxygenated FuelsSome conventional gasolines arebeing blended with alcohol or an
ether compound. Thesegasolines are collectivelyreferred to as oxygenated fuels.To meet clean air standards,some areas of the United Statesand Canada use oxygenated fuelsto help reduce emissions.
If you use an oxygenated fuel, besure it is unleaded and meets theminimum octane ratingrequirement.
Before using an oxygenated fuel,try to confirm the fuel'scontents. Some states/provincesrequire this information to beposted on the pump.
The following are theEPA-approved percentages ofoxygenates:
ETHANOL (ethyl or grainalcohol) — You may use gasolinecontaining up to 10% ethanol by
Before Driving
Main Menu Table of Contents ▲ ▼
Gasoline
volume. Gasoline containingethanol may be marketed underthe name "Gasohol."
MTBE (Methyl Tertiary ButylEther) — You may use gasolinecontaining up to 15% MTBE byvolume.
METHANOL (methyl or woodalcohol) — You may use gasolinecontaining up to 5% methanol byvolume as long as it alsocontains cosolvents andcorrosion inhibitors to protectthe fuel system. Gasolinecontaining more than 5%methanol by volume may causestarting and/or performanceproblems. It may also damagemetal, rubber, and plastic partsof your fuel system.
If you notice any undesirableoperating symptoms, try another
service station or switch toanother brand of gasoline.
Fuel system damage orperformance problems resultingfrom the use of an oxygenatedfuel containing more than theEPA approved percentages ofoxygenates are not coveredunder warranty.
Driving in Foreign CountriesUsing any type of leaded gasolinein your Honda will affectperformance and damage itsemissions controls. Unleadedgasoline may not be available inother countries. If you areplanning to take your car outsidethe U.S. or Canada, write toHonda at the address shown forinformation about anymodifications your car mayneed. Be sure to include the yearand model of your car.
U.S. Owners:American Honda Motor Co., Inc.Consumer Affairs1919 Torrance Blvd.Torrance, CA 90501-2746
Canadian Owners:Honda Canada Inc.715 Milner Ave.Scarborough, Ontario M1B 2K8
Before Driving
Main Menu Table of Contents ▲ ▼
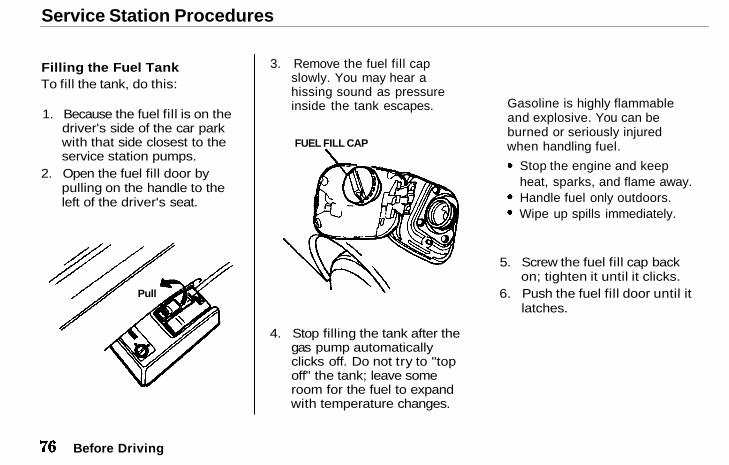
Service Station Procedures
Filling the Fuel TankTo fill the tank, do this:
1. Because the fuel fill is on thedriver's side of the car parkwith that side closest to theservice station pumps.
2. Open the fuel fill door bypulling on the handle to theleft of the driver's seat.
3. Remove the fuel fill capslowly. You may hear ahissing sound as pressureinside the tank escapes.
4. Stop filling the tank after thegas pump automaticallyclicks off. Do not try to "topoff" the tank; leave someroom for the fuel to expandwith temperature changes.
5. Screw the fuel fill cap backon; tighten it until it clicks.
6. Push the fuel fill door until itlatches.
Before Driving
Gasoline is highly flammableand explosive. You can beburned or seriously injuredwhen handling fuel.
Stop the engine and keepheat, sparks, and flame away.Handle fuel only outdoors.Wipe up spills immediately.
FUEL FILL CAP
Pull
Main Menu Table of Contents ▲ ▼
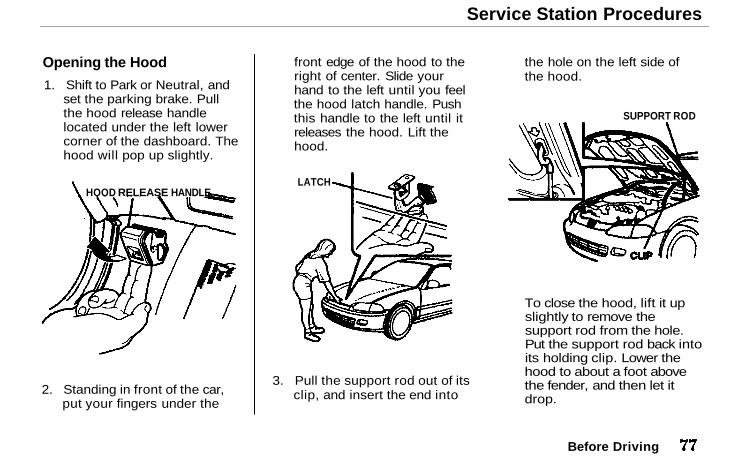
Service Station Procedures
Opening the Hood
1. Shift to Park or Neutral, andset the parking brake. Pullthe hood release handlelocated under the left lowercorner of the dashboard. Thehood will pop up slightly.
2. Standing in front of the car,put your fingers under the
front edge of the hood to theright of center. Slide yourhand to the left until you feelthe hood latch handle. Pushthis handle to the left until itreleases the hood. Lift thehood.
3. Pull the support rod out of itsclip, and insert the end into
the hole on the left side ofthe hood.
To close the hood, lift it upslightly to remove thesupport rod from the hole.Put the support rod back intoits holding clip. Lower thehood to about a foot abovethe fender, and then let itdrop.
Before Driving
SUPPORT ROD
LATCHHOOD RELEASE HANDLE
Main Menu Table of Contents ▲ ▼
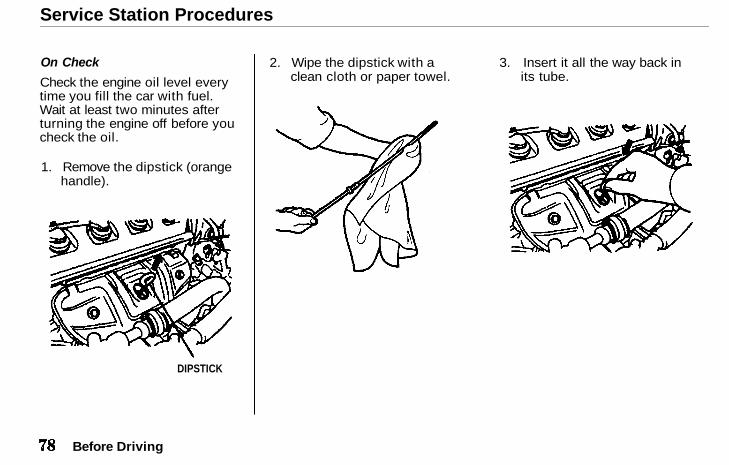
Service Station Procedures
On Check
Check the engine oil level everytime you fill the car with fuel.Wait at least two minutes afterturning the engine off before youcheck the oil.
1. Remove the dipstick (orangehandle).
2. Wipe the dipstick with aclean cloth or paper towel.
3. Insert it all the way back inits tube.
Before Driving
DIPSTICK
Main Menu Table of Contents ▲ ▼
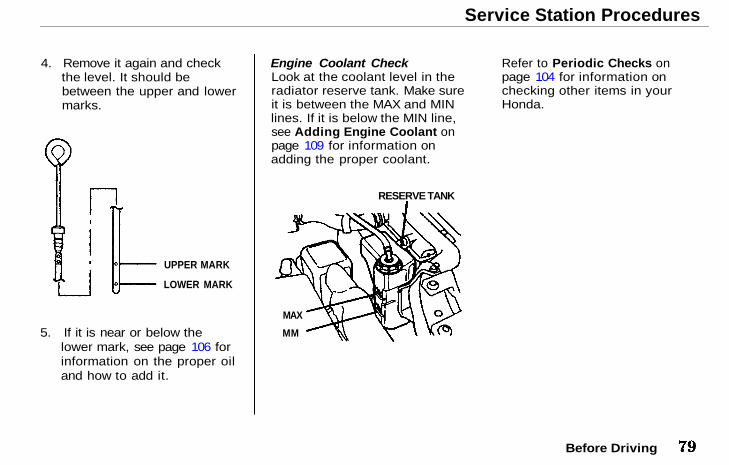
Service Station Procedures
4. Remove it again and checkthe level. It should bebetween the upper and lowermarks.
5. If it is near or below thelower mark, see page 106 forinformation on the proper oiland how to add it.
Engine Coolant CheckLook at the coolant level in theradiator reserve tank. Make sureit is between the MAX and MINlines. If it is below the MIN line,see Adding Engine Coolant onpage 109 for information onadding the proper coolant.
Refer to Periodic Checks onpage 104 for information onchecking other items in yourHonda.
Before Driving
UPPER MARK
LOWER MARK
RESERVE TANK
MAX
MM
Main Menu Table of Contents ▲ ▼
Fuel Economy
The condition of your car andyour driving habits are the twomost important things that affectthe fuel mileage you get.
Vehicle ConditionAlways maintain your caraccording to the maintenanceschedule. This will keep it in topoperating condition.
An important part of thatmaintenance is the PeriodicChecks (see page 104). Forexample, an underinflated tirecauses more "rolling resistance,"which uses fuel. It also wears outfaster, so check the tire pressureat least monthly.
In winter the build-up of snow onyour car's underside adds weightand rolling resistance. Frequentcleaning helps your fuel mileage
and reduces the chance ofcorrosion.
Driving HabitsYou can improve fuel economyby driving moderately. Rapidacceleration, cornering, and hardbraking use more fuel. Alwaysdrive in the highest gear thatallows the engine to run andaccelerate smoothly. Maintain aconstant speed while cruising,depending on traffic conditions.Every time you slow down andspeed up, your car uses extrafuel. Use the cruise control,when appropriate, to increasefuel economy.
A cold engine uses more fuelthan a warm engine. It is notnecessary to "warm-up" a coldengine by letting it idle for a longtime. You can drive away within30 seconds, no matter how cold
it is outside. The engine willwarm up faster, and you getbetter fuel economy. To cutdown on the number of "coldstarts," try to combine severalshort trips into one.
Air conditioning puts an extraload on the engine, which makesit use more fuel. Turn off the A/Cto cut down on air conditioninguse. Use the flow-throughventilation when the outside airtemperature is moderate.
Before Driving
Main Menu Table of Contents ▲ ▼
Loading Cargo
Loading CargoThe maximum load you cancarry in your Honda is 850 Ib(385 kg). It includes the totalweight of all passengers andtheir belongings, and anyaccessories. This 850 Ib (385 kg)figure is shown as the VehicleCapacity Weight on the tireinformation label attached to theinside of the glove box.
To figure out how much cargoyou can carry, do this:
Figure the total "occupantweight" you will betransporting. To do this,multiply the number of people(driver and all passengers) by150 lb (70 kg).Subtract this number from theVehicle Capacity Weight(850 lb/385 kg).
This final number is the totalweight of cargo you can load inor on the car. With fiveoccupants (driver and fourpassengers), the maximumrecommended weight for cargois 100 Ib (45 kg).
Where you store cargo and howwell you secure it are just asimportant as how much itweighs. Make sure you loadcargo so it will not shift whiledriving. Items stored in the trunkshould be placed as far forwardas possible. You could storeadditional items on the floorbehind the front seats. Make surethey cannot roll under the frontseat and interfere with thepedals.
If you must carry large objectsthat prevent you from closingthe trunk lid, be aware thatexhaust gas can enter theinterior. See Carbon MonoxideHazard on page 23.
Never place items on the shelfbehind the back seat. Thoseitems can fly forward and injureyou or your passengers if youbrake hard or are involved in acollision.
Before Driving
Main Menu Table of Contents ▲ ▼
Driving
This section gives you tips onstarting the engine under variousconditions and how to operatethe 5-speed manual andautomatic transmissions. It alsoincludes important informationon your car's braking system.
Preparing to Drive . . . . . . . . . . 84Starting the Engine . . . . . . . . . . 84
Starting in Cold Weather atHigh Altitude . . . . . . . . . . . 85
5-Speed ManualTransmission . . . . . . . . . . . . . 86Recommended Shift
Points . . . . . . . . . . . . . . . . . . 86Maximum Speeds . . . . . . . . . 87
Automatic Transmission . . . . . 87Shift Lever Positions . . . . . . 88Maximum Speeds . . . . . . . . . 90Shift Lock Release . . . . . . . . 90
The Braking System . . . . . . . . . 91Brake Wear Indicators . . . . 91Brake System Design . . . . . . 92Anti-Lock Brakes . . . . . . . . . 92
Towing a Trailer . . . . . . . . . . . . 93
Driving
Main Menu ▲ ▼
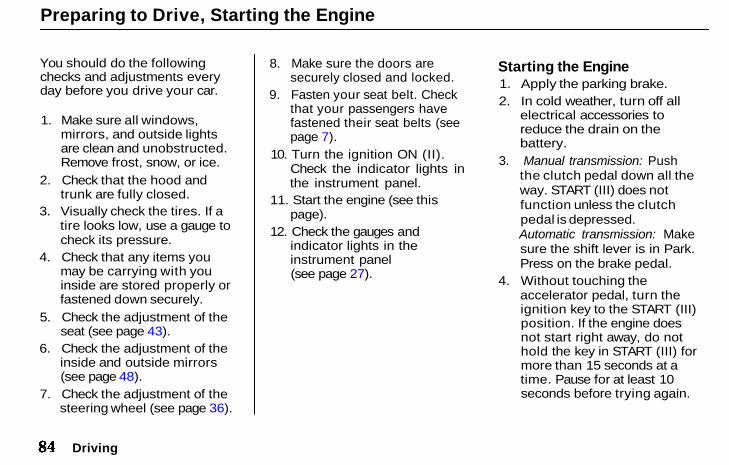
Preparing to Drive, Starting the Engine
You should do the followingchecks and adjustments everyday before you drive your car.
1. Make sure all windows,mirrors, and outside lightsare clean and unobstructed.Remove frost, snow, or ice.
2. Check that the hood andtrunk are fully closed.
3. Visually check the tires. If atire looks low, use a gauge tocheck its pressure.
4. Check that any items youmay be carrying with youinside are stored properly orfastened down securely.
5. Check the adjustment of theseat (see page 43).
6. Check the adjustment of theinside and outside mirrors(see page 48).
7. Check the adjustment of thesteering wheel (see page 36).
8. Make sure the doors aresecurely closed and locked.
9. Fasten your seat belt. Checkthat your passengers havefastened their seat belts (seepage 7).
10. Turn the ignition ON (II).Check the indicator lights inthe instrument panel.
11. Start the engine (see thispage).
12. Check the gauges andindicator lights in theinstrument panel(see page 27).
Starting the Engine1. Apply the parking brake.2. In cold weather, turn off all
electrical accessories toreduce the drain on thebattery.
3. Manual transmission: Pushthe clutch pedal down all theway. START (III) does notfunction unless the clutchpedal is depressed.Automatic transmission: Makesure the shift lever is in Park.Press on the brake pedal.
4. Without touching theaccelerator pedal, turn theignition key to the START (III)position. If the engine doesnot start right away, do nothold the key in START (III) formore than 15 seconds at atime. Pause for at least 10seconds before trying again.
Driving
Main Menu Table of Contents ▲ ▼
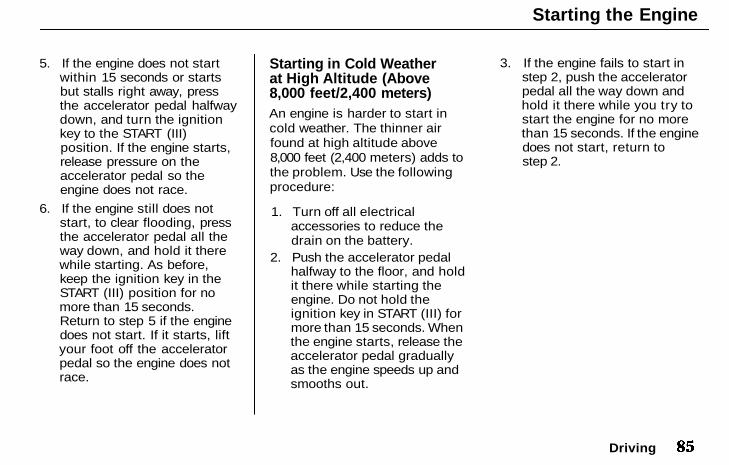
Starting the Engine
5. If the engine does not startwithin 15 seconds or startsbut stalls right away, pressthe accelerator pedal halfwaydown, and turn the ignitionkey to the START (III)position. If the engine starts,release pressure on theaccelerator pedal so theengine does not race.
6. If the engine still does notstart, to clear flooding, pressthe accelerator pedal all theway down, and hold it therewhile starting. As before,keep the ignition key in theSTART (III) position for nomore than 15 seconds.Return to step 5 if the enginedoes not start. If it starts, liftyour foot off the acceleratorpedal so the engine does notrace.
Starting in Cold Weatherat High Altitude (Above8,000 feet/2,400 meters)An engine is harder to start incold weather. The thinner airfound at high altitude above8,000 feet (2,400 meters) adds tothe problem. Use the followingprocedure:
1. Turn off all electricalaccessories to reduce thedrain on the battery.
2. Push the accelerator pedalhalfway to the floor, and holdit there while starting theengine. Do not hold theignition key in START (III) formore than 15 seconds. Whenthe engine starts, release theaccelerator pedal graduallyas the engine speeds up andsmooths out.
3. If the engine fails to start instep 2, push the acceleratorpedal all the way down andhold it there while you try tostart the engine for no morethan 15 seconds. If the enginedoes not start, return tostep 2.
Driving
Main Menu Table of Contents ▲ ▼
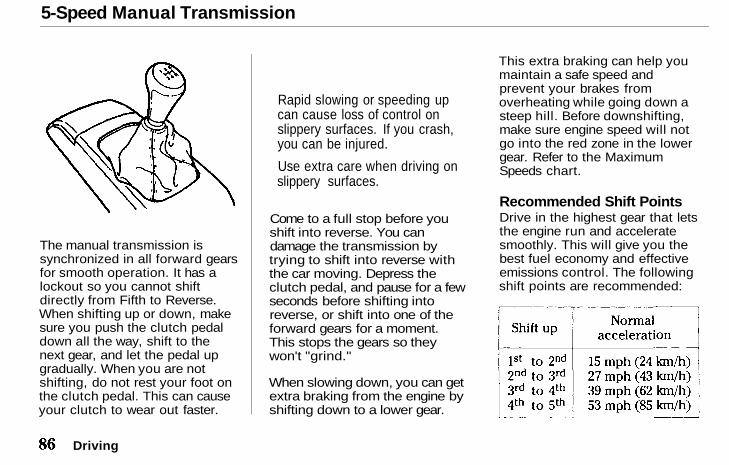
5-Speed Manual Transmission
The manual transmission issynchronized in all forward gearsfor smooth operation. It has alockout so you cannot shiftdirectly from Fifth to Reverse.When shifting up or down, makesure you push the clutch pedaldown all the way, shift to thenext gear, and let the pedal upgradually. When you are notshifting, do not rest your foot onthe clutch pedal. This can causeyour clutch to wear out faster.
Come to a full stop before youshift into reverse. You candamage the transmission bytrying to shift into reverse withthe car moving. Depress theclutch pedal, and pause for a fewseconds before shifting intoreverse, or shift into one of theforward gears for a moment.This stops the gears so theywon't "grind."
When slowing down, you can getextra braking from the engine byshifting down to a lower gear.
This extra braking can help youmaintain a safe speed andprevent your brakes fromoverheating while going down asteep hill. Before downshifting,make sure engine speed will notgo into the red zone in the lowergear. Refer to the MaximumSpeeds chart.
Recommended Shift PointsDrive in the highest gear that letsthe engine run and acceleratesmoothly. This will give you thebest fuel economy and effectiveemissions control. The followingshift points are recommended:
Driving
Rapid slowing or speeding upcan cause loss of control onslippery surfaces. If you crash,you can be injured.
Use extra care when driving onslippery surfaces.
Main Menu Table of Contents ▲ ▼
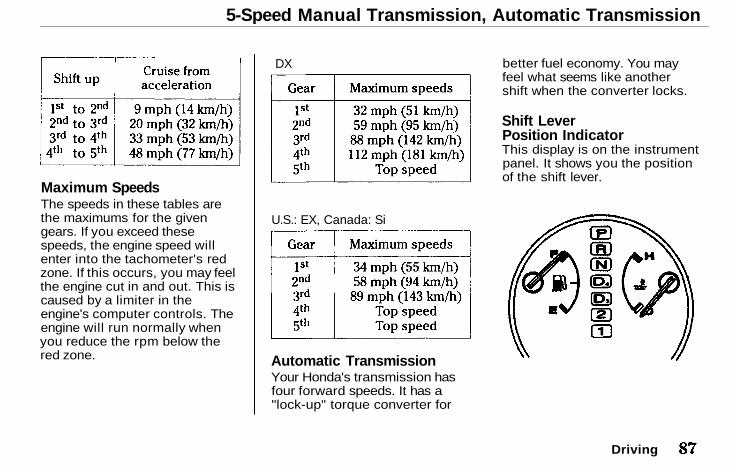
5-Speed Manual Transmission, Automatic Transmission
Maximum SpeedsThe speeds in these tables arethe maximums for the givengears. If you exceed thesespeeds, the engine speed willenter into the tachometer's redzone. If this occurs, you may feelthe engine cut in and out. This iscaused by a limiter in theengine's computer controls. Theengine will run normally whenyou reduce the rpm below thered zone.
DX
U.S.: EX, Canada: Si
Automatic TransmissionYour Honda's transmission hasfour forward speeds. It has a"lock-up" torque converter for
better fuel economy. You mayfeel what seems like anothershift when the converter locks.
Shift LeverPosition IndicatorThis display is on the instrumentpanel. It shows you the positionof the shift lever.
Driving
Main Menu Table of Contents ▲ ▼
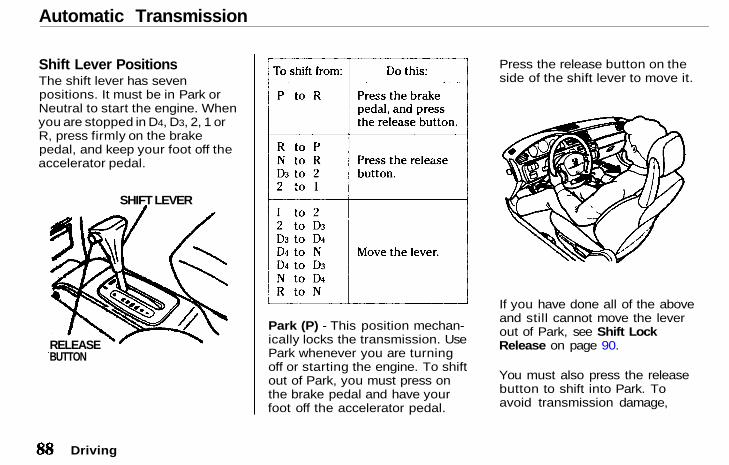
Automatic Transmission
Shift Lever PositionsThe shift lever has sevenpositions. It must be in Park orNeutral to start the engine. Whenyou are stopped in D4, D3, 2, 1 orR, press firmly on the brakepedal, and keep your foot off theaccelerator pedal.
Park (P) - This position mechan-ically locks the transmission. UsePark whenever you are turningoff or starting the engine. To shiftout of Park, you must press onthe brake pedal and have yourfoot off the accelerator pedal.
Press the release button on theside of the shift lever to move it.
If you have done all of the aboveand still cannot move the leverout of Park, see Shift LockRelease on page 90.
You must also press the releasebutton to shift into Park. Toavoid transmission damage,
Driving
SHIFT LEVER
RELEASEBUTTON
Main Menu Table of Contents ▲ ▼
Automatic Transmission
come to a complete stop beforeshifting into Park. The shift levermust be in Park before you canremove the key from the ignitionswitch.
Reverse (R) — To shift to Reversefrom Park, see the explanationunder Park. To shift to Reversefrom Neutral, come to acomplete stop and then shift.Press the release button beforeshifting into Reverse fromNeutral.
Neutral (N) — Use Neutral if youneed to restart a stalled engineor you need to stop briefly withthe engine idling. Shift to Parkposition if you need to leave thecar for any reason. Press on thebrake pedal when you aremoving the shift lever fromNeutral to another gear.
Drive (D4) — Use this position foryour normal driving. Thetransmission automaticallyselects a suitable gear for yourspeed and acceleration. You maynotice the transmission shiftingup at higher speeds when theengine is cold. This helps theengine warm up faster.
Drive (D3) — This position issimilar to D4, except only thefirst three gears may be selected.Use D3 to provide engine brakingwhen going down a steep hill. D3
keeps the transmission fromcycling between third and fourthgears in stop-and-go driving.
For faster acceleration when inD3 or D4, you can get thetransmission to automaticallydownshift by pushing theaccelerator pedal to the floor.The transmission will shift down
one or two gears, depending onyour speed.
Second (2) — To shift to Second,press the release button on theside of the shift lever. Thisposition locks the transmissionin second gear. It does notdownshift to first gear when youcome to a stop. Second gives youmore power when climbing, andincreased engine braking whengoing down steep hills. Usesecond gear when starting outon a slippery surface or in deepsnow. It will help reduce wheelspin.
Whenever you move the shiftlever to a lower gear, thetransmission downshifts only ifthe engine's redline will not beexceeded in the lower gear.
Driving
Main Menu Table of Contents ▲ ▼

Automatic Transmission
First (1) — To shift from Secondto First, press the release buttonon the side of the shift lever.With the lever in this position,the transmission locks in Firstgear. By upshifting anddownshifting through 1, 2, D3,and D4, you can operate thistransmission much like a manualtransmission without a clutchpedal.
Maximum SpeedsThe speeds in these tables arethe maximums for the givenposition. If you exceed thesespeeds, the engine speed willenter into the tachometer's redzone. If this occurs, you will feelthe engine cut in and out. This iscaused by a limiter in theengine's computer controls. Theengine will run normally whenyou reduce the rpm below thered zone.
DX
U.S.: EX, Canada: Si
Shift Lock ReleaseThis allows you to move the shiftlever out of Park if the normalmethod of pushing on the brakepedal and pressing the releasebutton does not work.
1. Set the Parking brake.
2. Remove the key from theignition switch.
3. Insert the key in the ShiftLock Release slot next to theshift lever.
4. Push down on the key whileyou press the release buttonand move the shift lever outof Park to Neutral.
Driving
RELEASE BUTTON
SHIFT LOCKRELEASE SLOT
Main Menu Table of Contents ▲ ▼

Automatic Transmission, The Braking System
5. Remove the key from the ShiftLock Release slot. Return thekey to the ignition switch,depress the brake pedal, andrestart the engine.
If you need to use the Shift LockRelease, it could mean your caris developing a problem. Havethe car checked by your Hondadealer.
The Braking SystemAll Civics are equipped withfront disc brakes. The brakes onthe rear wheels may be disc ordrum, depending on the model.The braking system is power-assisted to reduce the effortneeded on the brake pedal.
Put your foot on the brake pedalonly when you intend to brake.Resting your foot on the pedalkeeps the brakes applied lightly,causing them to build up heat.
Heat buildup can reduce howwell your brakes work. It alsokeeps your brake lights on all thetime, confusing drivers behindyou.
Constant application of thebrakes when going down a longhill builds up heat and reducestheir effectiveness. Use theengine to assist the brakes bydownshifting to a lower gear andtaking your foot off theaccelerator pedal.
Check your brakes after drivingthrough deep water. Apply thebrakes moderately to see if theyfeel normal. If not, apply themgently and frequently until theydo. Since a longer distance isneeded to stop with wet brakes,be extra cautious and alert inyour driving.
Brake Wear IndicatorsThe front disc brakes on all carshave audible brake wearindicators. They are also on therear brakes of cars with ABS.When the brake pads needreplacing, you will begin to heara distinctive metallic"screeching" sound when youapply the brakes. If you do nothave the brake pads replaced,they will screech all the time.
Your brakes may sometimessqueal or squeak when youapply them lightly. Do notconfuse this with the brake wearindicators. They make a veryaudible "screeching."
Driving
Main Menu Table of Contents ▲ ▼
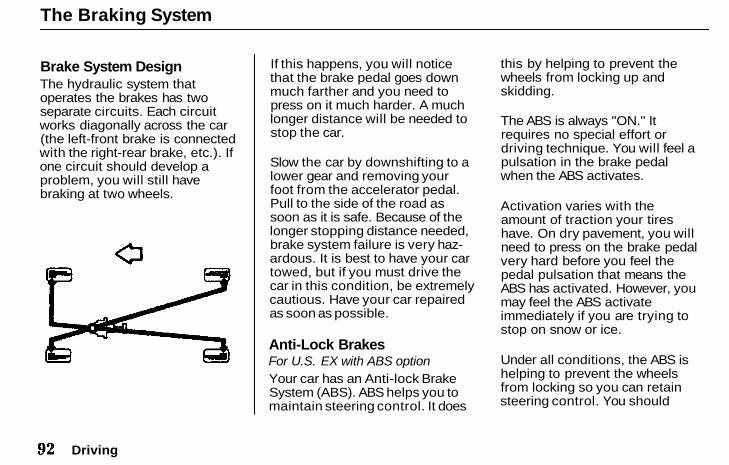
The Braking System
Brake System DesignThe hydraulic system thatoperates the brakes has twoseparate circuits. Each circuitworks diagonally across the car(the left-front brake is connectedwith the right-rear brake, etc.). Ifone circuit should develop aproblem, you will still havebraking at two wheels.
If this happens, you will noticethat the brake pedal goes downmuch farther and you need topress on it much harder. A muchlonger distance will be needed tostop the car.
Slow the car by downshifting to alower gear and removing yourfoot from the accelerator pedal.Pull to the side of the road assoon as it is safe. Because of thelonger stopping distance needed,brake system failure is very haz-ardous. It is best to have your cartowed, but if you must drive thecar in this condition, be extremelycautious. Have your car repairedas soon as possible.
Anti-Lock BrakesFor U.S. EX with ABS optionYour car has an Anti-lock BrakeSystem (ABS). ABS helps you tomaintain steering control. It does
this by helping to prevent thewheels from locking up andskidding.
The ABS is always "ON." Itrequires no special effort ordriving technique. You will feel apulsation in the brake pedalwhen the ABS activates.
Activation varies with theamount of traction your tireshave. On dry pavement, you willneed to press on the brake pedalvery hard before you feel thepedal pulsation that means theABS has activated. However, youmay feel the ABS activateimmediately if you are trying tostop on snow or ice.
Under all conditions, the ABS ishelping to prevent the wheelsfrom locking so you can retainsteering control. You should
Driving
Main Menu Table of Contents ▲ ▼
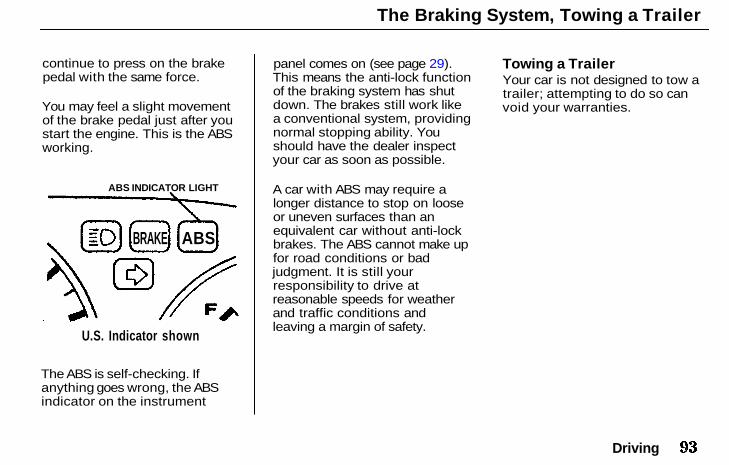
The Braking System, Towing a Trailer
continue to press on the brakepedal with the same force.
You may feel a slight movementof the brake pedal just after youstart the engine. This is the ABSworking.
The ABS is self-checking. Ifanything goes wrong, the ABSindicator on the instrument
panel comes on (see page 29).This means the anti-lock functionof the braking system has shutdown. The brakes still work likea conventional system, providingnormal stopping ability. Youshould have the dealer inspectyour car as soon as possible.
A car with ABS may require alonger distance to stop on looseor uneven surfaces than anequivalent car without anti-lockbrakes. The ABS cannot make upfor road conditions or badjudgment. It is still yourresponsibility to drive atreasonable speeds for weatherand traffic conditions andleaving a margin of safety.
Towing a TrailerYour car is not designed to tow atrailer; attempting to do so canvoid your warranties.
Driving
U.S. Indicator shown
ABS INDICATOR LIGHT
BRAKE A B S
Main Menu Table of Contents ▲ ▼
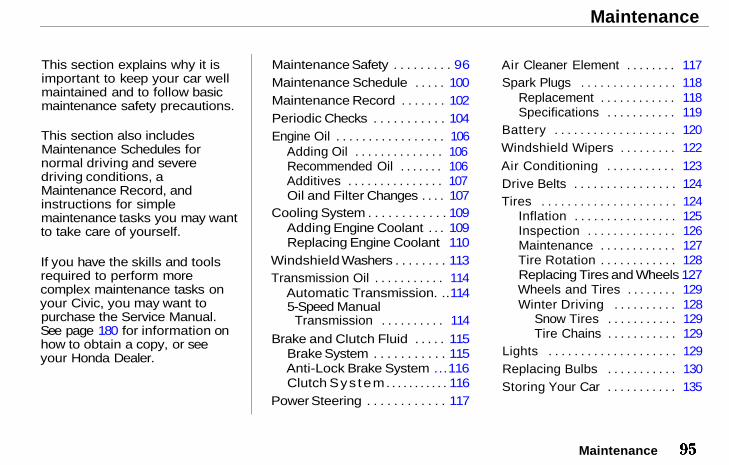
Maintenance
This section explains why it isimportant to keep your car wellmaintained and to follow basicmaintenance safety precautions.
This section also includesMaintenance Schedules fornormal driving and severedriving conditions, aMaintenance Record, andinstructions for simplemaintenance tasks you may wantto take care of yourself.
If you have the skills and toolsrequired to perform morecomplex maintenance tasks onyour Civic, you may want topurchase the Service Manual.See page 180 for information onhow to obtain a copy, or seeyour Honda Dealer.
Maintenance Safety . . . . . . . . . 96Maintenance Schedule . . . . . 100Maintenance Record . . . . . . . 102Periodic Checks . . . . . . . . . . . 104Engine Oil . . . . . . . . . . . . . . . . . 106
Adding Oil . . . . . . . . . . . . . . 106Recommended Oil . . . . . . . 106Additives . . . . . . . . . . . . . . . 107Oil and Filter Changes . . . . 107
Cooling System . . . . . . . . . . . . 109Adding Engine Coolant . . . 109Replacing Engine Coolant 110
Windshield Washers . . . . . . . . 113Transmission Oil . . . . . . . . . . . 114
Automatic Transmission. ..1145-Speed Manual
Transmission . . . . . . . . . . 114
Brake and Clutch Fluid . . . . . 115Brake System . . . . . . . . . . . 115Anti-Lock Brake System ...116Clutch S y s t e m . . . . . . . . . . . 116
Power Steering . . . . . . . . . . . . 117
Air Cleaner Element . . . . . . . . 117Spark Plugs . . . . . . . . . . . . . . . 118
Replacement . . . . . . . . . . . . 118Specifications . . . . . . . . . . . 119
Battery . . . . . . . . . . . . . . . . . . . 120Windshield Wipers . . . . . . . . . 122Air Conditioning . . . . . . . . . . . 123Drive Belts . . . . . . . . . . . . . . . . 124Tires . . . . . . . . . . . . . . . . . . . . . 124
Inflation . . . . . . . . . . . . . . . . 125Inspection . . . . . . . . . . . . . . 126Maintenance . . . . . . . . . . . . 127Tire Rotation . . . . . . . . . . . . 128Replacing Tires and Wheels 127Wheels and Tires . . . . . . . . 129Winter Driving . . . . . . . . . . 128
Snow Tires . . . . . . . . . . . 129Tire Chains . . . . . . . . . . . 129
Lights . . . . . . . . . . . . . . . . . . . . 129Replacing Bulbs . . . . . . . . . . . 130Storing Your Car . . . . . . . . . . . 135
Maintenance
Main Menu ▲ ▼

Maintenance Safety
Regularly maintaining your car isthe best way to protect yourinvestment. Proper maintenanceis essential to your safety andthe safety of your passengers. Itwill also reward you with moreeconomical, trouble-free drivingand help reduce air pollution.
This section includesinstructions for simplemaintenance tasks, such aschecking and adding oil. Anyservice items not detailed in thissection should be performed bya Honda technician or otherqualified mechanic.
Some of the most importantsafety precautions are givenbelow. However, we cannot warnyou of every conceivable hazardthat can arise in performingmaintenance. Only you candecide whether or not youshould perform a given task.
Maintenance
Improperly maintaining this caror failing to correct a problembefore driving can cause acrash in which you can beseriously hurt or killed.
Always follow the inspectionand maintenance recommen-dations and schedules in thisowner's manual.
Main Menu Table of Contents ▲ ▼
Maintenance Safety
Important Safety PrecautionsBefore you begin anymaintenance, make sure your caris parked on level ground andthat the parking brake is on.Also, be sure the engine is off.This will help to eliminateseveral potential hazards:
Carbon monoxide poisoningfrom engine exhaust. Be surethere is adequate ventilationwhenever you operate theengine.Burns from hot parts. Let theengine and exhaust systemcool before touching anyparts.Injury from moving parts. Donot run the engine unlessinstructed to do so.
Read the instructions before youbegin, and make sure you havethe tools and skills required.
To reduce the possibility of fireor explosion, be careful whenworking around gasoline orbatteries. Use a nonflammablesolvent, not gasoline, to cleanparts. Keep cigarettes, sparks,and flames away from thebattery and all fuel-related parts.You should wear eye protectionand protective clothing whenworking near the battery orwhen using compressed air.
Maintenance
Failure to properly followmaintenance instructions andprecautions can cause you tobe seriously hurt or killed.
Always follow the proceduresand precautions in this owner'smanual.
Main Menu Table of Contents ▲ ▼
Maintenance Schedule
Maintenance ScheduleThe Maintenance Schedulespecifies how often you shouldhave your car serviced and whatthings need attention. It isessential that you have your carserviced as scheduled to retainits high level of safety,dependability, and emissionscontrol performance.
The services and time ordistance intervals shown in themaintenance schedule assumeyou will use your car as normaltransportation. You should:
Avoid exceeding your car'sload limit. This puts excessstress on the engine, brakes,and many other parts of yourcar. The load limit is shown onthe label on the driver'sdoorjamb.Operate your car onreasonable roads within thelegal speed limit.Drive your car regularly over adistance of several miles(kilometers).Always use unleaded gasolinewith the proper octane rating(see page 74).
Which Schedule to FollowService your car according to thetime and mileage periods on oneof the Maintenance Schedules onthe following pages. Select theschedule for "Severe Conditions"if most of your driving is doneunder one or more of theconditions listed on that page.Otherwise, follow the schedulefor "Normal Conditions."
Maintenance
Main Menu Table of Contents ▲ ▼
Maintenance Schedule
Your authorized Honda dealerknows your car best and canprovide competent, efficientservice. However, service at adealer is not mandatory to keepyour warranties in effect.Maintenance may be done byany qualified service facility orperson who is skilled in this typeof automotive service. Keep allthe receipts as proof ofcompletion, and have the personwho does the work fill out theMaintenance Record. Check yourwarranty booklet for moreinformation.
We recommend the use ofGenuine Honda parts and fluidswhenever you have maintenancedone. These are manufactured tothe same high-quality standardsas the original components, soyou can be confident of theirperformance and durability.
U.S. Cars:Maintenance, replacement orrepair of emissions controldevices and systems may bedone by any automotive repairestablishment or individualusing parts that are "certified"to EPA standards.
According to state and federalregulations, failure to performmaintenance on the itemsmarked with an asterisk (*) willnot void your emissionswarranties. However, Hondarecommends that allmaintenance services beperformed at the recommendedtime or mileage period to ensurelong-term reliability.
Maintenance
Main Menu Table of Contents ▲ ▼
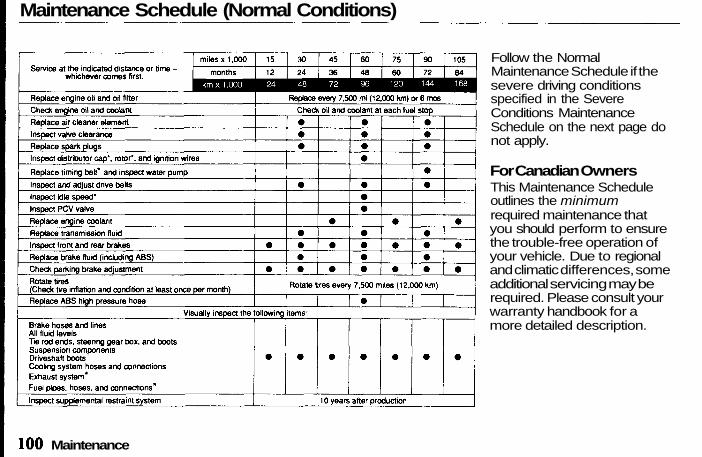
Maintenance Schedule (Normal Conditions)
Follow the NormalMaintenance Schedule if thesevere driving conditionsspecified in the SevereConditions MaintenanceSchedule on the next page donot apply.
For Canadian OwnersThis Maintenance Scheduleoutlines the minimumrequired maintenance thatyou should perform to ensurethe trouble-free operation ofyour vehicle. Due to regionaland climatic differences, someadditional servicing may berequired. Please consult yourwarranty handbook for amore detailed description.
Maintenance
Main Menu Table of Contents ▲ ▼

Maintenance Schedule (Severe Conditions)
Follow the Severe MaintenanceSchedule if you drive yourvehicle MAINLY under one ormore of the following conditions:
Driving less than 5 miles pertrip or, in freezingtemperatures, driving lessthan 10 miles per trip.Driving in extremely hot (over90°F) conditions.Extensive idling or longperiods of stop-and-godriving.Trailer towing, driving with acar-top carrier or driving inmountainous conditions.Driving on muddy, dusty, orde-iced roads.
NOTE: If you only OCCASION-ALLY drive under a "severe"condition, you should follow theNormal Conditions MaintenanceSchedule on the previous page.
Maintenance
Main Menu Table of Contents ▲ ▼
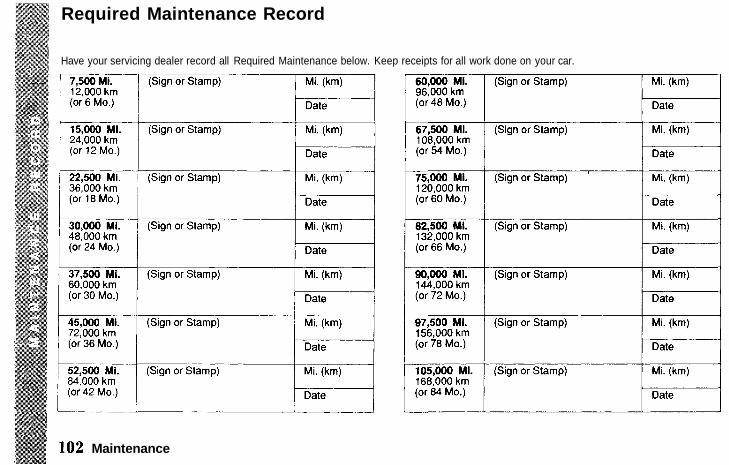
Required Maintenance Record
Have your servicing dealer record all Required Maintenance below. Keep receipts for all work done on your car.
Maintenance
Main Menu Table of Contents ▲ ▼
Non-Scheduled Maintenance Record
Record additional maintenance for severe driving conditions or non-scheduled maintenance on this page (see page 101).
Maintenance
Main Menu Table of Contents ▲ ▼
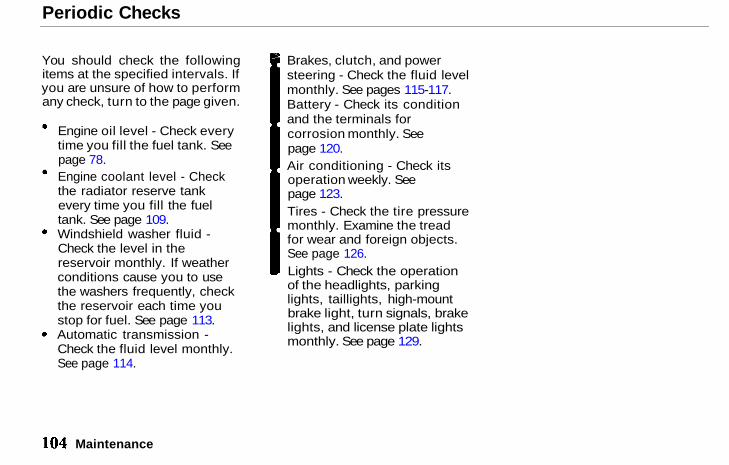
Periodic Checks
You should check the followingitems at the specified intervals. Ifyou are unsure of how to performany check, turn to the page given.
Engine oil level - Check everytime you fill the fuel tank. Seepage 78.Engine coolant level - Checkthe radiator reserve tankevery time you fill the fueltank. See page 109.Windshield washer fluid -Check the level in thereservoir monthly. If weatherconditions cause you to usethe washers frequently, checkthe reservoir each time youstop for fuel. See page 113.Automatic transmission -Check the fluid level monthly.See page 114.
Brakes, clutch, and powersteering - Check the fluid levelmonthly. See pages 115-117.Battery - Check its conditionand the terminals forcorrosion monthly. Seepage 120.Air conditioning - Check itsoperation weekly. Seepage 123.Tires - Check the tire pressuremonthly. Examine the treadfor wear and foreign objects.See page 126.Lights - Check the operationof the headlights, parkinglights, taillights, high-mountbrake light, turn signals, brakelights, and license plate lightsmonthly. See page 129.
Maintenance
Main Menu Table of Contents ▲ ▼
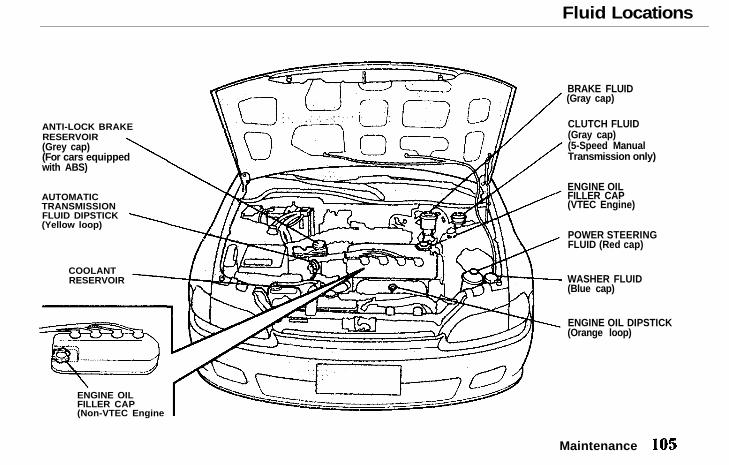
Fluid Locations
ANTI-LOCK BRAKERESERVOIR(Grey cap)(For cars equippedwith ABS)
AUTOMATICTRANSMISSIONFLUID DIPSTICK(Yellow loop)
COOLANTRESERVOIR
ENGINE OILFILLER CAP(Non-VTEC Engine
BRAKE FLUID(Gray cap)
ENGINE OILFILLER CAP(VTEC Engine)
POWER STEERINGFLUID (Red cap)
WASHER FLUID(Blue cap)
ENGINE OIL DIPSTICK(Orange loop)
Maintenance
CLUTCH FLUID(Gray cap)(5-Speed ManualTransmission only)
Main Menu Table of Contents ▲ ▼
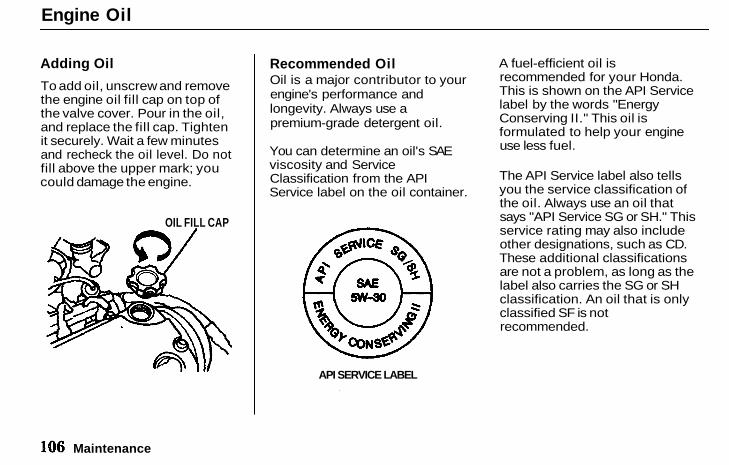
Engine Oil
Adding Oil
To add oil, unscrew and removethe engine oil fill cap on top ofthe valve cover. Pour in the oil,and replace the fill cap. Tightenit securely. Wait a few minutesand recheck the oil level. Do notfill above the upper mark; youcould damage the engine.
Recommended OilOil is a major contributor to yourengine's performance andlongevity. Always use apremium-grade detergent oil.
You can determine an oil's SAEviscosity and ServiceClassification from the APIService label on the oil container.
A fuel-efficient oil isrecommended for your Honda.This is shown on the API Servicelabel by the words "EnergyConserving II." This oil isformulated to help your engineuse less fuel.
The API Service label also tellsyou the service classification ofthe oil. Always use an oil thatsays "API Service SG or SH." Thisservice rating may also includeother designations, such as CD.These additional classificationsare not a problem, as long as thelabel also carries the SG or SHclassification. An oil that is onlyclassified SF is notrecommended.
Maintenance
OIL FILL CAP
API SERVICE LABEL
Main Menu Table of Contents ▲ ▼
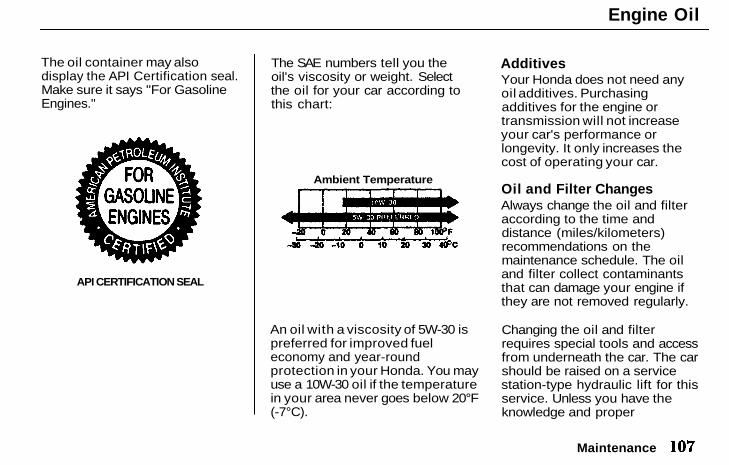
Engine Oil
The oil container may alsodisplay the API Certification seal.Make sure it says "For GasolineEngines."
API CERTIFICATION SEAL
The SAE numbers tell you theoil's viscosity or weight. Selectthe oil for your car according tothis chart:
An oil with a viscosity of 5W-30 ispreferred for improved fueleconomy and year-roundprotection in your Honda. You mayuse a 10W-30 oil if the temperaturein your area never goes below 20°F(-7°C).
AdditivesYour Honda does not need anyoil additives. Purchasingadditives for the engine ortransmission will not increaseyour car's performance orlongevity. It only increases thecost of operating your car.
Oil and Filter ChangesAlways change the oil and filteraccording to the time anddistance (miles/kilometers)recommendations on themaintenance schedule. The oiland filter collect contaminantsthat can damage your engine ifthey are not removed regularly.
Changing the oil and filterrequires special tools and accessfrom underneath the car. The carshould be raised on a servicestation-type hydraulic lift for thisservice. Unless you have theknowledge and proper
Maintenance
Ambient Temperature
Main Menu Table of Contents ▲ ▼
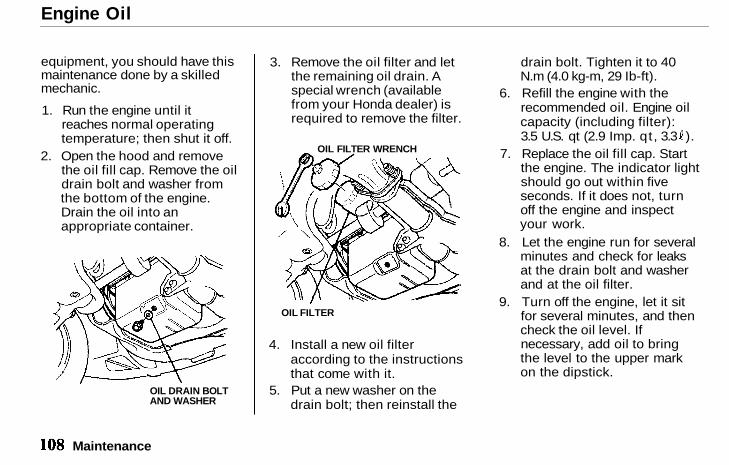
Engine Oil
equipment, you should have thismaintenance done by a skilledmechanic.
1. Run the engine until itreaches normal operatingtemperature; then shut it off.
2. Open the hood and removethe oil fill cap. Remove the oildrain bolt and washer fromthe bottom of the engine.Drain the oil into anappropriate container.
3. Remove the oil filter and letthe remaining oil drain. Aspecial wrench (availablefrom your Honda dealer) isrequired to remove the filter.
4. Install a new oil filteraccording to the instructionsthat come with it.
5. Put a new washer on thedrain bolt; then reinstall the
drain bolt. Tighten it to 40N.m (4.0 kg-m, 29 Ib-ft).
6. Refill the engine with therecommended oil. Engine oilcapacity (including filter):3.5 U.S. qt (2.9 Imp. q t , 3.3 ).
7. Replace the oil fill cap. Startthe engine. The indicator lightshould go out within fiveseconds. If it does not, turnoff the engine and inspectyour work.
8. Let the engine run for severalminutes and check for leaksat the drain bolt and washerand at the oil filter.
9. Turn off the engine, let it sitfor several minutes, and thencheck the oil level. Ifnecessary, add oil to bringthe level to the upper markon the dipstick.
Maintenance
OIL DRAIN BOLTAND WASHER
OIL FILTER WRENCH
OIL FILTER
Main Menu Table of Contents ▲ ▼
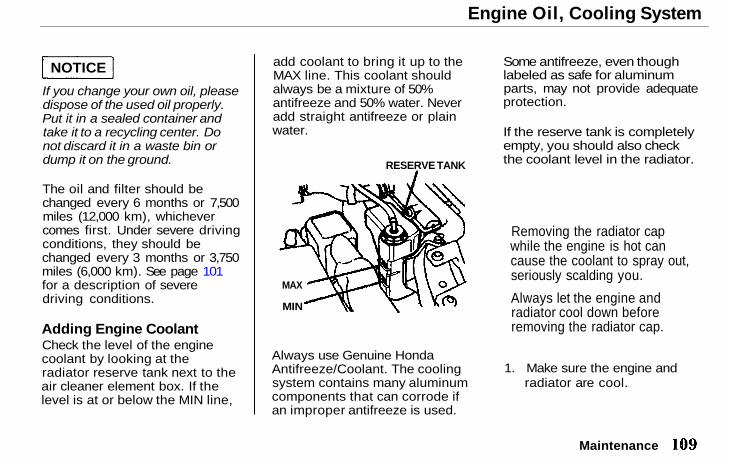
Engine Oil, Cooling System
If you change your own oil, pleasedispose of the used oil properly.Put it in a sealed container andtake it to a recycling center. Donot discard it in a waste bin ordump it on the ground.
The oil and filter should bechanged every 6 months or 7,500miles (12,000 km), whichevercomes first. Under severe drivingconditions, they should bechanged every 3 months or 3,750miles (6,000 km). See page 101for a description of severedriving conditions.
Adding Engine CoolantCheck the level of the enginecoolant by looking at theradiator reserve tank next to theair cleaner element box. If thelevel is at or below the MIN line,
add coolant to bring it up to theMAX line. This coolant shouldalways be a mixture of 50%antifreeze and 50% water. Neveradd straight antifreeze or plainwater.
Always use Genuine HondaAntifreeze/Coolant. The coolingsystem contains many aluminumcomponents that can corrode ifan improper antifreeze is used.
Some antifreeze, even thoughlabeled as safe for aluminumparts, may not provide adequateprotection.
If the reserve tank is completelyempty, you should also checkthe coolant level in the radiator.
1. Make sure the engine andradiator are cool.
Maintenance
NOTICE
RESERVE TANK
MAX
MIN
Removing the radiator capwhile the engine is hot cancause the coolant to spray out,seriously scalding you.
Always let the engine andradiator cool down beforeremoving the radiator cap.
Main Menu Table of Contents ▲ ▼
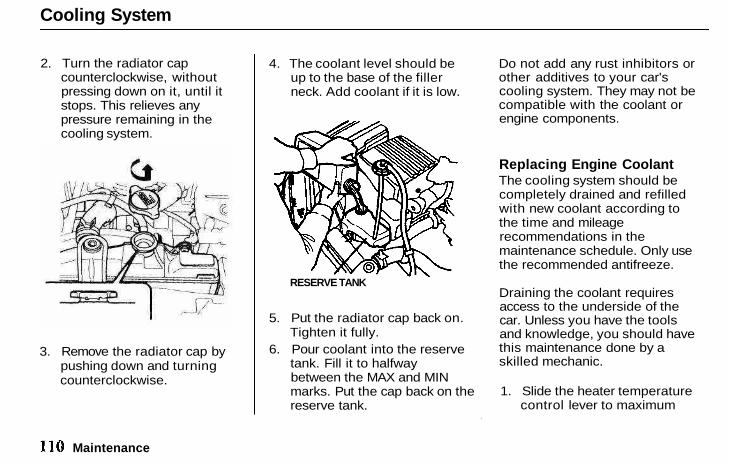
Cooling System
2. Turn the radiator capcounterclockwise, withoutpressing down on it, until itstops. This relieves anypressure remaining in thecooling system.
3. Remove the radiator cap bypushing down and turningcounterclockwise.
4. The coolant level should beup to the base of the fillerneck. Add coolant if it is low.
RESERVE TANK
5. Put the radiator cap back on.Tighten it fully.
6. Pour coolant into the reservetank. Fill it to halfwaybetween the MAX and MINmarks. Put the cap back on thereserve tank.
Do not add any rust inhibitors orother additives to your car'scooling system. They may not becompatible with the coolant orengine components.
Replacing Engine CoolantThe cooling system should becompletely drained and refilledwith new coolant according tothe time and mileagerecommendations in themaintenance schedule. Only usethe recommended antifreeze.
Draining the coolant requiresaccess to the underside of thecar. Unless you have the toolsand knowledge, you should havethis maintenance done by askilled mechanic.
1. Slide the heater temperaturecontrol lever to maximum
Maintenance
Main Menu Table of Contents ▲ ▼

Cooling System
heat. Open the hood. Makesure the engine and radiatorare cool to the touch.
2. Remove the radiator cap.
3. Loosen the drain plug in thebottom of the radiator. Thecoolant will drain through thesplash guard. Remove the
drain bolt from the engineblock.
4. Remove the reserve tankfrom its holder by pulling itstraight up. Drain thecoolant, then put the tankback in its holder.
RESERVE TANKRESERVETANK CAP
HOLDER
5. When the coolant stopsdraining, tighten the drainplug in the bottom of theradiator. Applynon-hardening sealant to the
Maintenance
Main Menu Table of Contents ▲ ▼

Cooling System
drain bolt threads andreinstall the bolt in theengine block. Tighten itsecurely.
6. Mix the recommendedantifreeze with an equalamount of purified ordistilled water in a cleancontainer. The coolingsystem capacity is:
With 5-speed manualtransmission:0.95 U.S. gal. (0.79 Imp. gal.,3.6 )
With automatic transmission:DX0.92 U.S. gal. (0.77 Imp. gal.,3.5 )
U.S.: EX, EX w/ABS option,Canada: Si1.00 U.S. gal. (0.84 Imp. gal.,3.8 )
7. Pour coolant into theradiator up to the base of thefiller neck.
8. Loosen the bleeder bolt ontop of the engine. Tighten itagain when coolant comesout in a steady stream withno bubbles.
9. Refill the radiator to the baseof the filler neck. Put the capon the radiator, only tightenit to the first stop. Start theengine and let it run until itwarms up (the radiatorcooling fan comes on at leasttwice).
10. Turn off the engine. Checkthe level in the radiator, add
Maintenance
Main Menu Table of Contents ▲ ▼
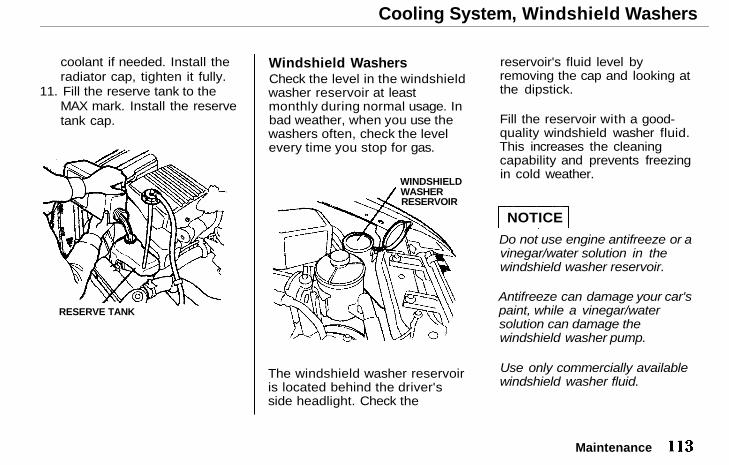
Cooling System, Windshield Washers
coolant if needed. Install theradiator cap, tighten it fully.
11. Fill the reserve tank to theMAX mark. Install the reservetank cap.
RESERVE TANK
Windshield WashersCheck the level in the windshieldwasher reservoir at leastmonthly during normal usage. Inbad weather, when you use thewashers often, check the levelevery time you stop for gas.
The windshield washer reservoiris located behind the driver'sside headlight. Check the
reservoir's fluid level byremoving the cap and looking atthe dipstick.
Fill the reservoir with a good-quality windshield washer fluid.This increases the cleaningcapability and prevents freezingin cold weather.
Do not use engine antifreeze or avinegar/water solution in thewindshield washer reservoir.
Antifreeze can damage your car'spaint, while a vinegar/watersolution can damage thewindshield washer pump.
Use only commercially availablewindshield washer fluid.
Maintenance
NOTICE
WINDSHIELDWASHERRESERVOIR
Main Menu Table of Contents ▲ ▼
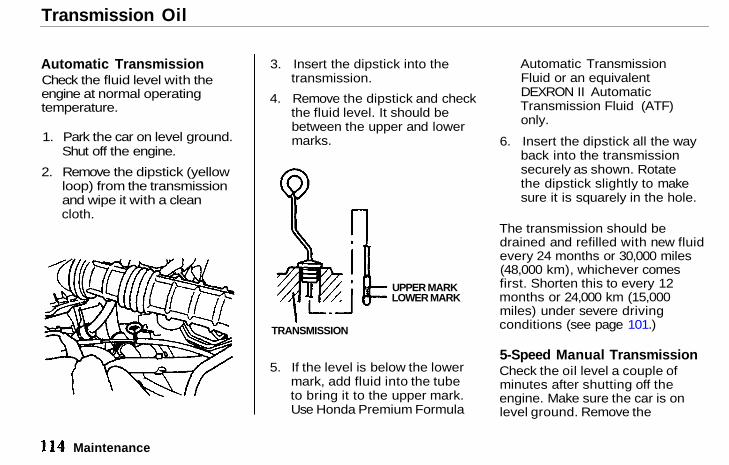
Transmission Oil
Automatic TransmissionCheck the fluid level with theengine at normal operatingtemperature.
1. Park the car on level ground.Shut off the engine.
2. Remove the dipstick (yellowloop) from the transmissionand wipe it with a cleancloth.
3. Insert the dipstick into thetransmission.
4. Remove the dipstick and checkthe fluid level. It should bebetween the upper and lowermarks.
UPPER MARKLOWER MARK
5. If the level is below the lowermark, add fluid into the tubeto bring it to the upper mark.Use Honda Premium Formula
Automatic TransmissionFluid or an equivalentDEXRON II AutomaticTransmission Fluid (ATF)only.
6. Insert the dipstick all the wayback into the transmissionsecurely as shown. Rotatethe dipstick slightly to makesure it is squarely in the hole.
The transmission should bedrained and refilled with new fluidevery 24 months or 30,000 miles(48,000 km), whichever comesfirst. Shorten this to every 12months or 24,000 km (15,000miles) under severe drivingconditions (see page 101.)
5-Speed Manual TransmissionCheck the oil level a couple ofminutes after shutting off theengine. Make sure the car is onlevel ground. Remove the
Maintenance
TRANSMISSION
Main Menu Table of Contents ▲ ▼
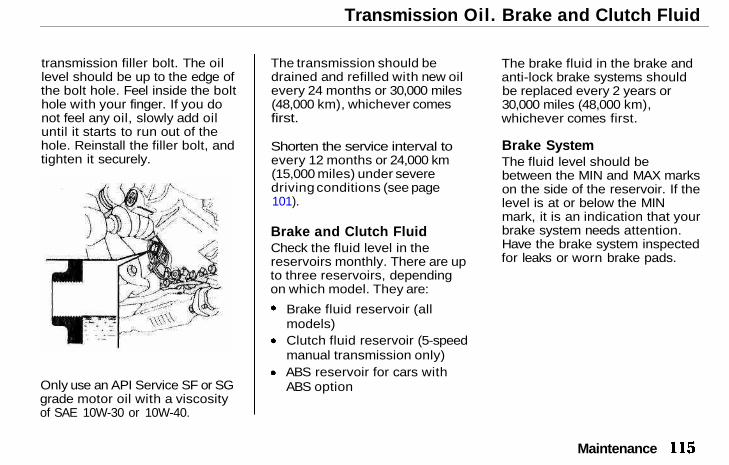
Transmission Oil. Brake and Clutch Fluid
transmission filler bolt. The oillevel should be up to the edge ofthe bolt hole. Feel inside the bolthole with your finger. If you donot feel any oil, slowly add oiluntil it starts to run out of thehole. Reinstall the filler bolt, andtighten it securely.
Only use an API Service SF or SGgrade motor oil with a viscosityof SAE 10W-30 or 10W-40.
The transmission should bedrained and refilled with new oilevery 24 months or 30,000 miles(48,000 km), whichever comesfirst.
Shorten the service interval toevery 12 months or 24,000 km(15,000 miles) under severedriving conditions (see page101).
Brake and Clutch FluidCheck the fluid level in thereservoirs monthly. There are upto three reservoirs, dependingon which model. They are:
Brake fluid reservoir (allmodels)Clutch fluid reservoir (5-speedmanual transmission only)ABS reservoir for cars withABS option
The brake fluid in the brake andanti-lock brake systems shouldbe replaced every 2 years or30,000 miles (48,000 km),whichever comes first.
Brake SystemThe fluid level should bebetween the MIN and MAX markson the side of the reservoir. If thelevel is at or below the MINmark, it is an indication that yourbrake system needs attention.Have the brake system inspectedfor leaks or worn brake pads.
Maintenance
Main Menu Table of Contents ▲ ▼
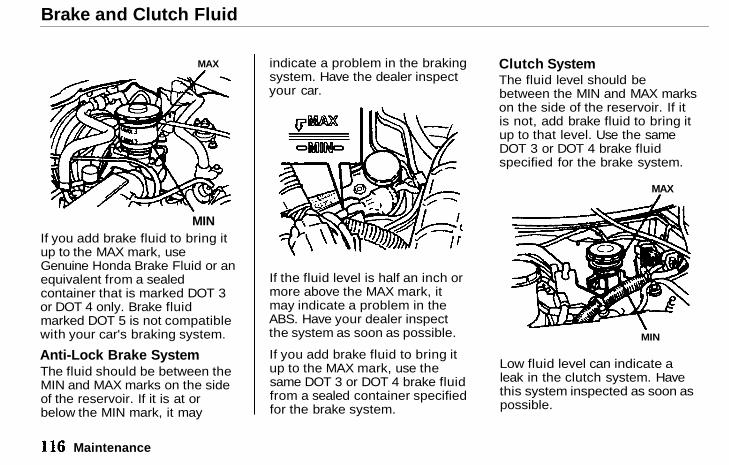
Brake and Clutch Fluid
MAX
If you add brake fluid to bring itup to the MAX mark, useGenuine Honda Brake Fluid or anequivalent from a sealedcontainer that is marked DOT 3or DOT 4 only. Brake fluidmarked DOT 5 is not compatiblewith your car's braking system.
Anti-Lock Brake SystemThe fluid should be between theMIN and MAX marks on the sideof the reservoir. If it is at orbelow the MIN mark, it may
indicate a problem in the brakingsystem. Have the dealer inspectyour car.
If the fluid level is half an inch ormore above the MAX mark, itmay indicate a problem in theABS. Have your dealer inspectthe system as soon as possible.
If you add brake fluid to bring itup to the MAX mark, use thesame DOT 3 or DOT 4 brake fluidfrom a sealed container specifiedfor the brake system.
Clutch SystemThe fluid level should bebetween the MIN and MAX markson the side of the reservoir. If itis not, add brake fluid to bring itup to that level. Use the sameDOT 3 or DOT 4 brake fluidspecified for the brake system.
Low fluid level can indicate aleak in the clutch system. Havethis system inspected as soon aspossible.
Maintenance
MIN
MAX
MIN
Main Menu Table of Contents ▲ ▼
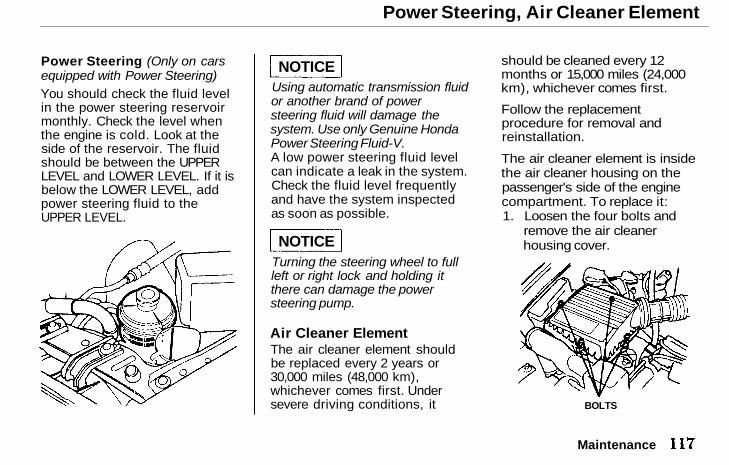
Power Steering, Air Cleaner Element
Power Steering (Only on carsequipped with Power Steering)You should check the fluid levelin the power steering reservoirmonthly. Check the level whenthe engine is cold. Look at theside of the reservoir. The fluidshould be between the UPPERLEVEL and LOWER LEVEL. If it isbelow the LOWER LEVEL, addpower steering fluid to theUPPER LEVEL.
Using automatic transmission fluidor another brand of powersteering fluid will damage thesystem. Use only Genuine HondaPower Steering Fluid-V.A low power steering fluid levelcan indicate a leak in the system.Check the fluid level frequentlyand have the system inspectedas soon as possible.
Turning the steering wheel to fullleft or right lock and holding itthere can damage the powersteering pump.
Air Cleaner ElementThe air cleaner element shouldbe replaced every 2 years or30,000 miles (48,000 km),whichever comes first. Undersevere driving conditions, it
should be cleaned every 12months or 15,000 miles (24,000km), whichever comes first.
Follow the replacementprocedure for removal andreinstallation.
The air cleaner element is insidethe air cleaner housing on thepassenger's side of the enginecompartment. To replace it:1. Loosen the four bolts and
remove the air cleanerhousing cover.
BOLTS
Maintenance
NOTICE
NOTICE
Main Menu Table of Contents ▲ ▼
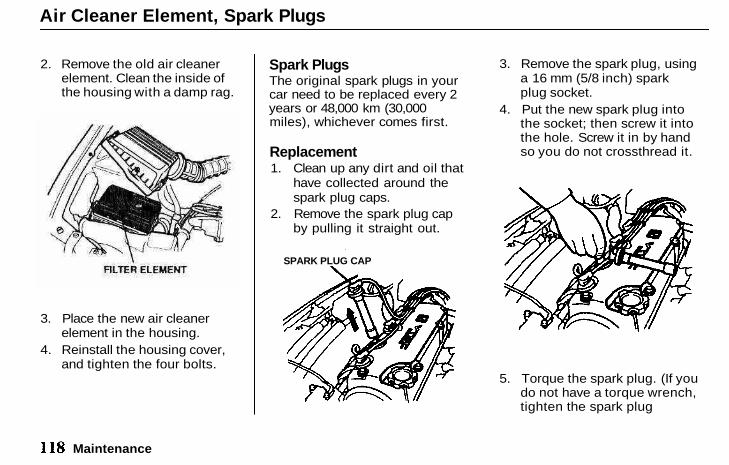
Air Cleaner Element, Spark Plugs
2. Remove the old air cleanerelement. Clean the inside ofthe housing with a damp rag.
3. Place the new air cleanerelement in the housing.
4. Reinstall the housing cover,and tighten the four bolts.
Spark PlugsThe original spark plugs in yourcar need to be replaced every 2years or 48,000 km (30,000miles), whichever comes first.
Replacement1. Clean up any dirt and oil that
have collected around thespark plug caps.
2. Remove the spark plug capby pulling it straight out.
3. Remove the spark plug, usinga 16 mm (5/8 inch) sparkplug socket.
4. Put the new spark plug intothe socket; then screw it intothe hole. Screw it in by handso you do not crossthread it.
5. Torque the spark plug. (If youdo not have a torque wrench,tighten the spark plug
Maintenance
SPARK PLUG CAP
Main Menu Table of Contents ▲ ▼
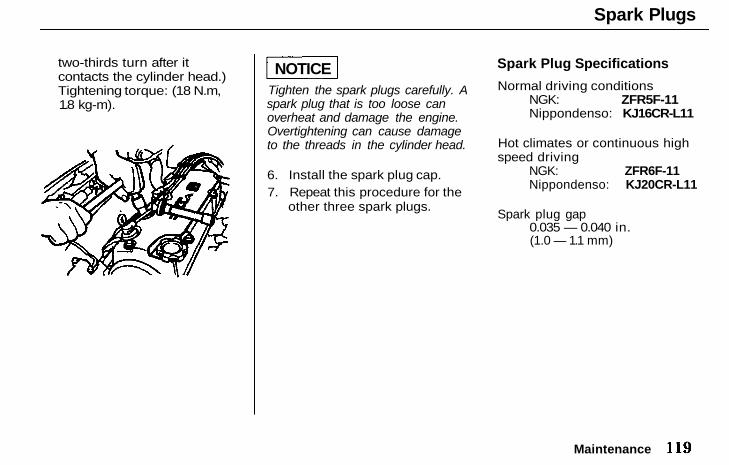
Spark Plugs
two-thirds turn after itcontacts the cylinder head.)Tightening torque: (18 N.m,1.8 kg-m).
Tighten the spark plugs carefully. Aspark plug that is too loose canoverheat and damage the engine.Overtightening can cause damageto the threads in the cylinder head.
6. Install the spark plug cap.7. Repeat this procedure for the
other three spark plugs.
Spark Plug Specifications
Normal driving conditionsNGK: ZFR5F-11Nippondenso: KJ16CR-L11
Hot climates or continuous highspeed driving
NGK: ZFR6F-11Nippondenso: KJ20CR-L11
Spark plug gap0.035 — 0.040 in.(1.0 — 1.1 mm)
Maintenance
NOTICE
Main Menu Table of Contents ▲ ▼
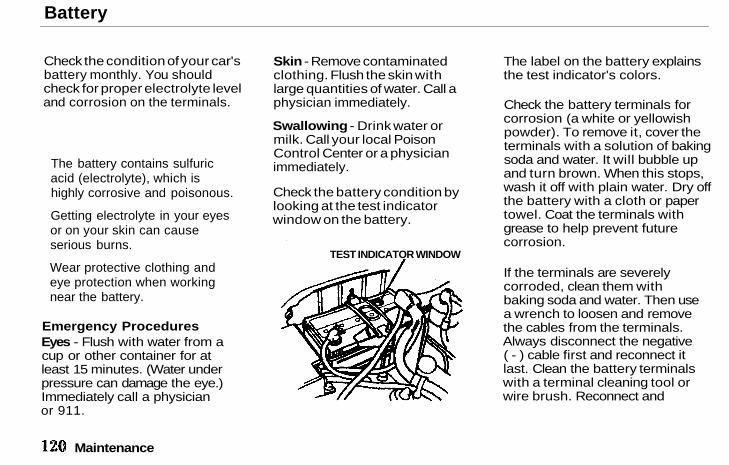
Battery
Check the condition of your car'sbattery monthly. You shouldcheck for proper electrolyte leveland corrosion on the terminals.
Emergency ProceduresEyes - Flush with water from acup or other container for atleast 15 minutes. (Water underpressure can damage the eye.)Immediately call a physicianor 911.
Skin - Remove contaminatedclothing. Flush the skin withlarge quantities of water. Call aphysician immediately.
Swallowing - Drink water ormilk. Call your local PoisonControl Center or a physicianimmediately.
Check the battery condition bylooking at the test indicatorwindow on the battery.
The label on the battery explainsthe test indicator's colors.
Check the battery terminals forcorrosion (a white or yellowishpowder). To remove it, cover theterminals with a solution of bakingsoda and water. It will bubble upand turn brown. When this stops,wash it off with plain water. Dry offthe battery with a cloth or papertowel. Coat the terminals withgrease to help prevent futurecorrosion.
If the terminals are severelycorroded, clean them withbaking soda and water. Then usea wrench to loosen and removethe cables from the terminals.Always disconnect the negative( - ) cable first and reconnect itlast. Clean the battery terminalswith a terminal cleaning tool orwire brush. Reconnect and
Maintenance
The battery contains sulfuricacid (electrolyte), which ishighly corrosive and poisonous.
Getting electrolyte in your eyesor on your skin can causeserious burns.
Wear protective clothing andeye protection when workingnear the battery.
TEST INDICATOR WINDOW
Main Menu Table of Contents ▲ ▼
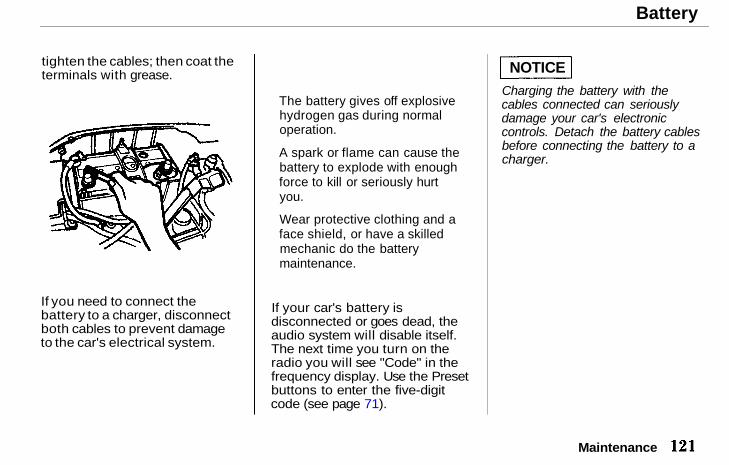
Battery
tighten the cables; then coat theterminals with grease.
If you need to connect thebattery to a charger, disconnectboth cables to prevent damageto the car's electrical system.
If your car's battery isdisconnected or goes dead, theaudio system will disable itself.The next time you turn on theradio you will see "Code" in thefrequency display. Use the Presetbuttons to enter the five-digitcode (see page 71).
Charging the battery with thecables connected can seriouslydamage your car's electroniccontrols. Detach the battery cablesbefore connecting the battery to acharger.
Maintenance
The battery gives off explosivehydrogen gas during normaloperation.
A spark or flame can cause thebattery to explode with enoughforce to kill or seriously hurtyou.
Wear protective clothing and aface shield, or have a skilledmechanic do the batterymaintenance.
NOTICE
Main Menu Table of Contents ▲ ▼
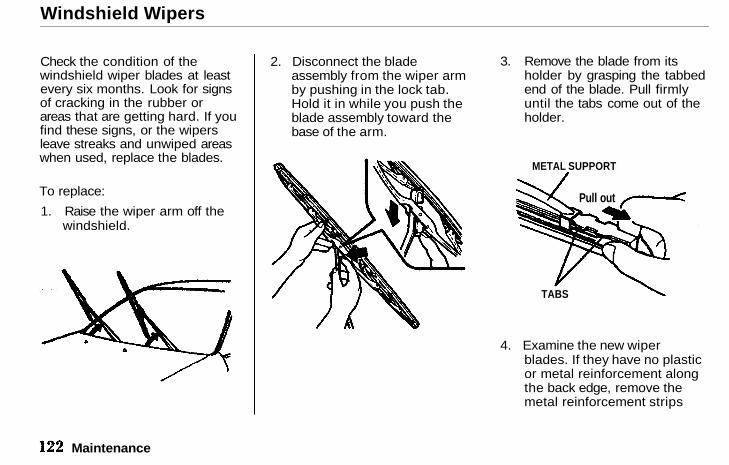
Windshield Wipers
Check the condition of thewindshield wiper blades at leastevery six months. Look for signsof cracking in the rubber orareas that are getting hard. If youfind these signs, or the wipersleave streaks and unwiped areaswhen used, replace the blades.
To replace:
1. Raise the wiper arm off thewindshield.
2. Disconnect the bladeassembly from the wiper armby pushing in the lock tab.Hold it in while you push theblade assembly toward thebase of the arm.
3. Remove the blade from itsholder by grasping the tabbedend of the blade. Pull firmlyuntil the tabs come out of theholder.
4. Examine the new wiperblades. If they have no plasticor metal reinforcement alongthe back edge, remove themetal reinforcement strips
Maintenance
METAL SUPPORT
Pull out
TABS
Main Menu Table of Contents ▲ ▼
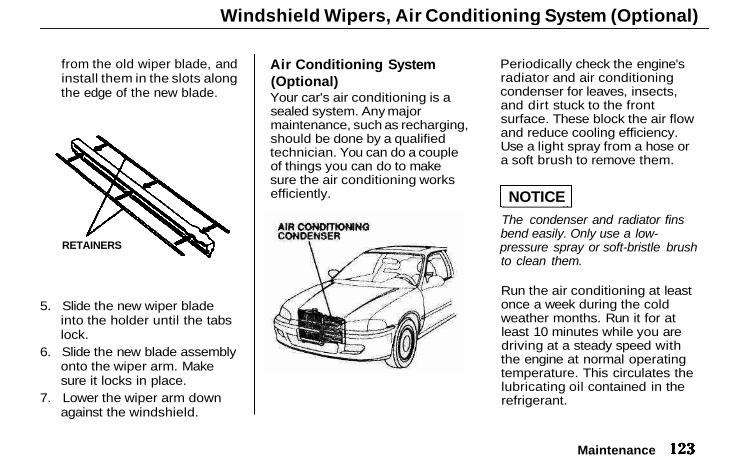
Windshield Wipers, Air Conditioning System (Optional)
from the old wiper blade, andinstall them in the slots alongthe edge of the new blade.
5. Slide the new wiper bladeinto the holder until the tabslock.
6. Slide the new blade assemblyonto the wiper arm. Makesure it locks in place.
7. Lower the wiper arm downagainst the windshield.
Air Conditioning System(Optional)Your car's air conditioning is asealed system. Any majormaintenance, such as recharging,should be done by a qualifiedtechnician. You can do a coupleof things you can do to makesure the air conditioning worksefficiently.
Periodically check the engine'sradiator and air conditioningcondenser for leaves, insects,and dirt stuck to the frontsurface. These block the air flowand reduce cooling efficiency.Use a light spray from a hose ora soft brush to remove them.
The condenser and radiator finsbend easily. Only use a low-pressure spray or soft-bristle brushto clean them.
Run the air conditioning at leastonce a week during the coldweather months. Run it for atleast 10 minutes while you aredriving at a steady speed withthe engine at normal operatingtemperature. This circulates thelubricating oil contained in therefrigerant.
Maintenance
NOTICE
RETAINERS
Main Menu Table of Contents ▲ ▼

Air Conditioning System (Optional), Drive Belts, Tires
If the air conditioning does notget as cold as before, have yourdealer check the system.Recharge the system withRefrigerant HFC-134a (R-134a).See Specifications on page 167.
Whenever you have the airconditioning system serviced,make sure the service facility usesa refrigerant recycling system.This system captures therefrigerant for reuse. Releasingrefrigerant into the atmospherecan damage the environment.
Drive BeltsCheck the condition of the twoengine belts. Examine the edgesof each belt for cracks or fraying.Check the tension of each belt bypushing on it with your thumbmidway between the pulleys.
The belts should have thefollowing "play" or deflection:
Alternator belt:0.28 — 0.41 in. (7.0 — 10.5 mm)Power steering belt:0.31 — 0.47 in. (8.0 — 12.0 mm)
If you see signs of wear orlooseness, have your dealeradjust or replace the belts.
TiresTo safely operate your car, yourtires must be the proper typeand size, in good condition withadequate tread, and correctlyinflated. The following pages givemore detailed information onhow and when to check airpressure, how to inspect yourtires for damage, and what to dowhen your tires need to bereplaced.
Maintenance
NOTICEALTERNATOR BELT
POWER STEERING BELT
Main Menu Table of Contents ▲ ▼
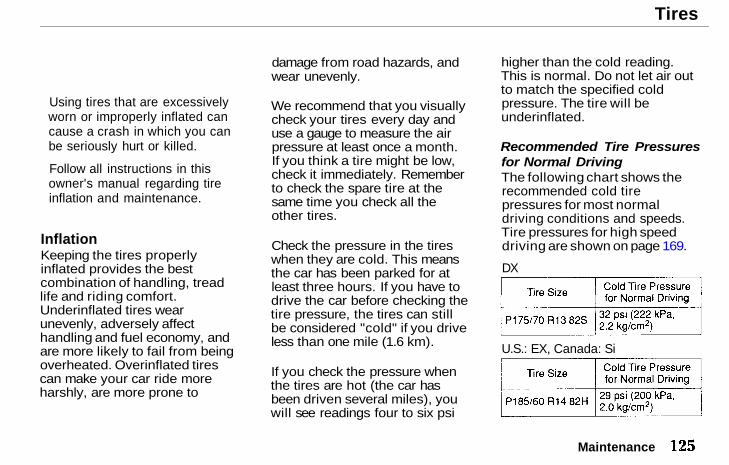
Tires
InflationKeeping the tires properlyinflated provides the bestcombination of handling, treadlife and riding comfort.Underinflated tires wearunevenly, adversely affecthandling and fuel economy, andare more likely to fail from beingoverheated. Overinflated tirescan make your car ride moreharshly, are more prone to
damage from road hazards, andwear unevenly.
We recommend that you visuallycheck your tires every day anduse a gauge to measure the airpressure at least once a month.If you think a tire might be low,check it immediately. Rememberto check the spare tire at thesame time you check all theother tires.
Check the pressure in the tireswhen they are cold. This meansthe car has been parked for atleast three hours. If you have todrive the car before checking thetire pressure, the tires can stillbe considered "cold" if you driveless than one mile (1.6 km).
If you check the pressure whenthe tires are hot (the car hasbeen driven several miles), youwill see readings four to six psi
higher than the cold reading.This is normal. Do not let air outto match the specified coldpressure. The tire will beunderinflated.
Recommended Tire Pressuresfor Normal DrivingThe following chart shows therecommended cold tirepressures for most normaldriving conditions and speeds.Tire pressures for high speeddriving are shown on page 169.
DX
U.S.: EX, Canada: Si
Maintenance
Using tires that are excessivelyworn or improperly inflated cancause a crash in which you canbe seriously hurt or killed.
Follow all instructions in thisowner's manual regarding tireinflation and maintenance.
Main Menu Table of Contents ▲ ▼
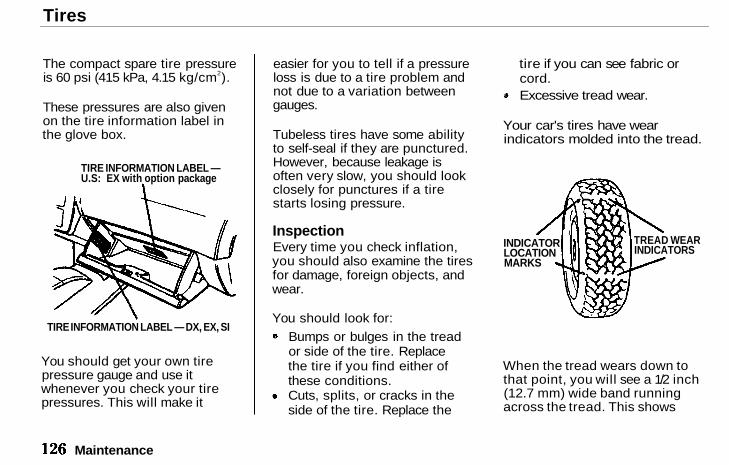
Tires
The compact spare tire pressureis 60 psi (415 kPa, 4.15 kg/cm2).
These pressures are also givenon the tire information label inthe glove box.
You should get your own tirepressure gauge and use itwhenever you check your tirepressures. This will make it
easier for you to tell if a pressureloss is due to a tire problem andnot due to a variation betweengauges.
Tubeless tires have some abilityto self-seal if they are punctured.However, because leakage isoften very slow, you should lookclosely for punctures if a tirestarts losing pressure.
InspectionEvery time you check inflation,you should also examine the tiresfor damage, foreign objects, andwear.
You should look for:Bumps or bulges in the treador side of the tire. Replacethe tire if you find either ofthese conditions.Cuts, splits, or cracks in theside of the tire. Replace the
tire if you can see fabric orcord.Excessive tread wear.
Your car's tires have wearindicators molded into the tread.
When the tread wears down tothat point, you will see a 1/2 inch(12.7 mm) wide band runningacross the tread. This shows
Maintenance
TIRE INFORMATION LABEL —U.S: EX with option package
TIRE INFORMATION LABEL — DX, EX, SI
INDICATORLOCATIONMARKS
TREAD WEARINDICATORS
Main Menu Table of Contents ▲ ▼
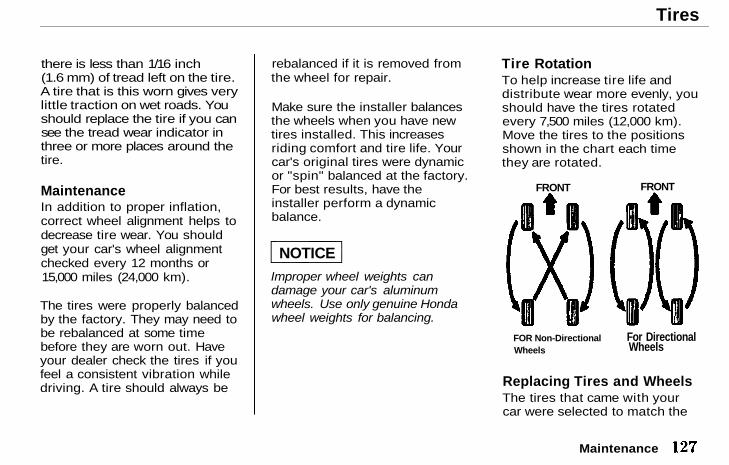
Tires
there is less than 1/16 inch(1.6 mm) of tread left on the tire.A tire that is this worn gives verylittle traction on wet roads. Youshould replace the tire if you cansee the tread wear indicator inthree or more places around thetire.
MaintenanceIn addition to proper inflation,correct wheel alignment helps todecrease tire wear. You shouldget your car's wheel alignmentchecked every 12 months or15,000 miles (24,000 km).
The tires were properly balancedby the factory. They may need tobe rebalanced at some timebefore they are worn out. Haveyour dealer check the tires if youfeel a consistent vibration whiledriving. A tire should always be
rebalanced if it is removed fromthe wheel for repair.
Make sure the installer balancesthe wheels when you have newtires installed. This increasesriding comfort and tire life. Yourcar's original tires were dynamicor "spin" balanced at the factory.For best results, have theinstaller perform a dynamicbalance.
Improper wheel weights candamage your car's aluminumwheels. Use only genuine Hondawheel weights for balancing.
Tire RotationTo help increase tire life anddistribute wear more evenly, youshould have the tires rotatedevery 7,500 miles (12,000 km).Move the tires to the positionsshown in the chart each timethey are rotated.
Replacing Tires and WheelsThe tires that came with yourcar were selected to match the
Maintenance
NOTICE
FRONT FRONT
FOR Non-DirectionalWheels
For DirectionalWheels
Main Menu Table of Contents ▲ ▼
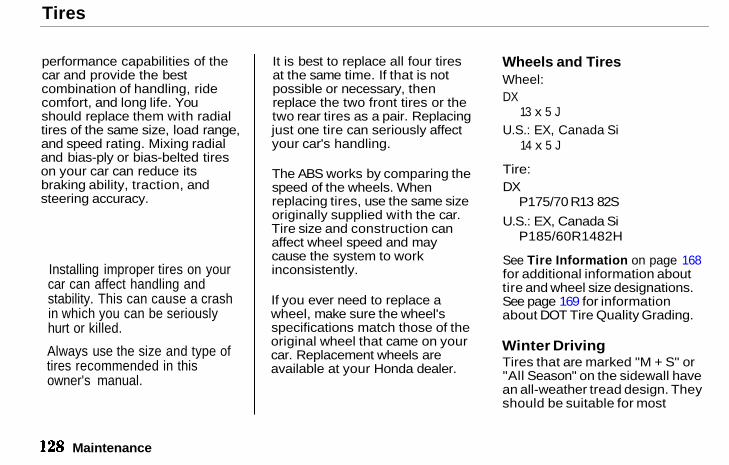
Tires
performance capabilities of thecar and provide the bestcombination of handling, ridecomfort, and long life. Youshould replace them with radialtires of the same size, load range,and speed rating. Mixing radialand bias-ply or bias-belted tireson your car can reduce itsbraking ability, traction, andsteering accuracy.
It is best to replace all four tiresat the same time. If that is notpossible or necessary, thenreplace the two front tires or thetwo rear tires as a pair. Replacingjust one tire can seriously affectyour car's handling.
The ABS works by comparing thespeed of the wheels. Whenreplacing tires, use the same sizeoriginally supplied with the car.Tire size and construction canaffect wheel speed and maycause the system to workinconsistently.
If you ever need to replace awheel, make sure the wheel'sspecifications match those of theoriginal wheel that came on yourcar. Replacement wheels areavailable at your Honda dealer.
Wheels and TiresWheel:DX
13 x 5 JU.S.: EX, Canada Si
14 x 5 J
Tire:DX
P175/70 R13 82S
U.S.: EX, Canada SiP185/60R1482H
See Tire Information on page 168for additional information abouttire and wheel size designations.See page 169 for informationabout DOT Tire Quality Grading.
Winter DrivingTires that are marked "M + S" or"All Season" on the sidewall havean all-weather tread design. Theyshould be suitable for most
Maintenance
Installing improper tires on yourcar can affect handling andstability. This can cause a crashin which you can be seriouslyhurt or killed.
Always use the size and type oftires recommended in thisowner's manual.
Main Menu Table of Contents ▲ ▼
Tires, Lights
winter driving conditions. Tireswithout these markings aredesigned for optimum traction indry conditions. They may notprovide adequate performancein winter driving. For the bestperformance in snowy or icyconditions, you should installsnow tires or tire chains. Theymay be required by local lawsunder certain conditions.
Snow TiresIf you mount snow tires on yourHonda, make sure they are radialtires of the same size and loadrange as the original tires. Mountsnow tires on all four wheels tobalance your car's handling inall weather conditions. Keep inmind the traction provided bysnow tires on dry roads may notbe as high as your car's originalequipment tires. You shoulddrive cautiously even when the
roads are clear. Check with thetire dealer for maximum speedrecommendations.
Tire ChainsMount snow chains on your carwhen warranted by drivingconditions or required by locallaws. Make sure the chains arethe correct size for your tires.Install them only on the fronttires. If metal chains are used,they must be SAE class "S."Cable-type traction devices canalso be used.
When installing chains, followthe manufacturer's instructionsand mount them as tightly as youcan. Drive slowly with chainsinstalled. If you hear the chainscontacting the body or chassis,stop and tighten them. If theystill make contact, slow downuntil it stops. Remove the chainsas soon as you begin driving oncleared roads.
Chains of the wrong size or thatare improperly installed candamage your car's brake lines,suspension, body, and wheels.Stop driving if you hear the chainshitting any part of the car.
LightsCheck the operation of your car'sexterior lights at least once amonth. A burned out bulb cancreate an unsafe condition byreducing your car's visibility andthe ability to signal yourintentions to other drivers.Check the following:
Headlights (low and highbeam)Parking lightsTaillightsBrake lights
Maintenance
NOTICE
Main Menu Table of Contents ▲ ▼
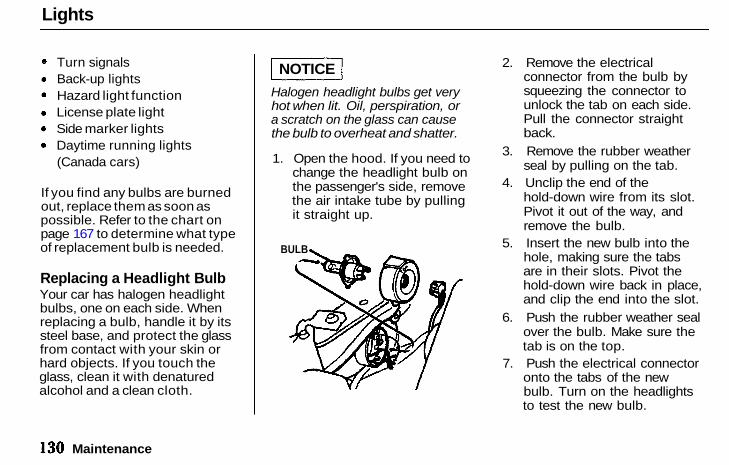
Lights
Turn signalsBack-up lightsHazard light functionLicense plate lightSide marker lightsDaytime running lights(Canada cars)
If you find any bulbs are burnedout, replace them as soon aspossible. Refer to the chart onpage 167 to determine what typeof replacement bulb is needed.
Replacing a Headlight BulbYour car has halogen headlightbulbs, one on each side. Whenreplacing a bulb, handle it by itssteel base, and protect the glassfrom contact with your skin orhard objects. If you touch theglass, clean it with denaturedalcohol and a clean cloth.
Halogen headlight bulbs get veryhot when lit. Oil, perspiration, ora scratch on the glass can causethe bulb to overheat and shatter.
1. Open the hood. If you need tochange the headlight bulb onthe passenger's side, removethe air intake tube by pullingit straight up.
2. Remove the electricalconnector from the bulb bysqueezing the connector tounlock the tab on each side.Pull the connector straightback.
3. Remove the rubber weatherseal by pulling on the tab.
4. Unclip the end of thehold-down wire from its slot.Pivot it out of the way, andremove the bulb.
5. Insert the new bulb into thehole, making sure the tabsare in their slots. Pivot thehold-down wire back in place,and clip the end into the slot.
6. Push the rubber weather sealover the bulb. Make sure thetab is on the top.
7. Push the electrical connectoronto the tabs of the newbulb. Turn on the headlightsto test the new bulb.
Maintenance
NOTICE
BULB
Main Menu Table of Contents ▲ ▼
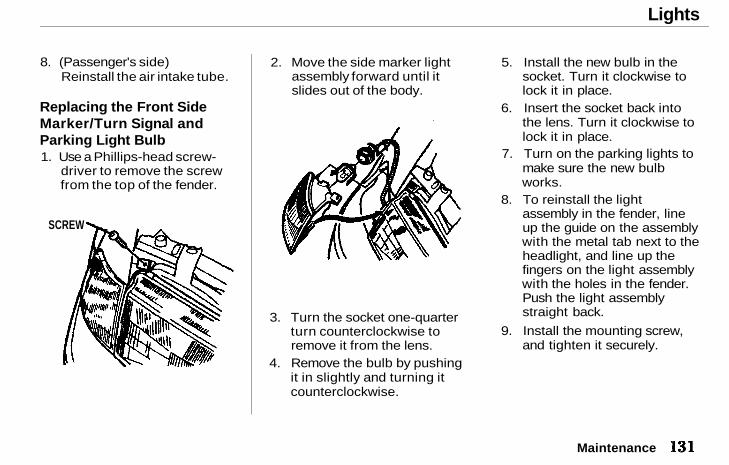
Lights
8. (Passenger's side)Reinstall the air intake tube.
Replacing the Front SideMarker/Turn Signal andParking Light Bulb1. Use a Phillips-head screw-
driver to remove the screwfrom the top of the fender.
2. Move the side marker lightassembly forward until itslides out of the body.
3. Turn the socket one-quarterturn counterclockwise toremove it from the lens.
4. Remove the bulb by pushingit in slightly and turning itcounterclockwise.
5. Install the new bulb in thesocket. Turn it clockwise tolock it in place.
6. Insert the socket back intothe lens. Turn it clockwise tolock it in place.
7. Turn on the parking lights tomake sure the new bulbworks.
8. To reinstall the lightassembly in the fender, lineup the guide on the assemblywith the metal tab next to theheadlight, and line up thefingers on the light assemblywith the holes in the fender.Push the light assemblystraight back.
9. Install the mounting screw,and tighten it securely.
Maintenance
SCREW
Main Menu Table of Contents ▲ ▼
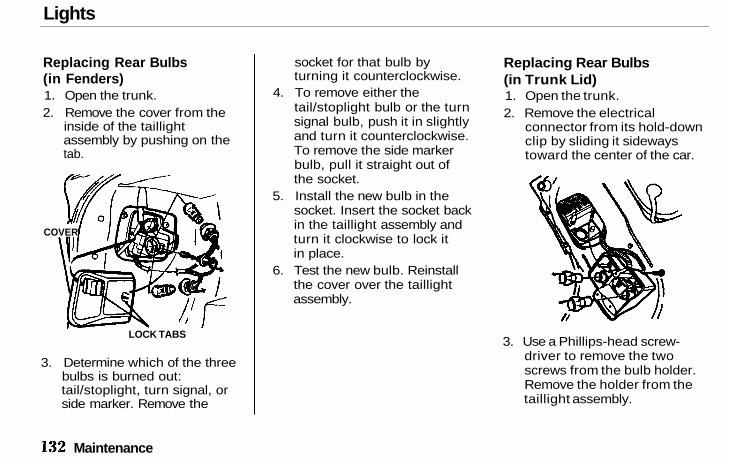
Lights
Replacing Rear Bulbs(in Fenders)1. Open the trunk.2. Remove the cover from the
inside of the taillightassembly by pushing on thetab.
3. Determine which of the threebulbs is burned out:tail/stoplight, turn signal, orside marker. Remove the
socket for that bulb byturning it counterclockwise.
4. To remove either thetail/stoplight bulb or the turnsignal bulb, push it in slightlyand turn it counterclockwise.To remove the side markerbulb, pull it straight out ofthe socket.
5. Install the new bulb in thesocket. Insert the socket backin the taillight assembly andturn it clockwise to lock itin place.
6. Test the new bulb. Reinstallthe cover over the taillightassembly.
Replacing Rear Bulbs(in Trunk Lid)1. Open the trunk.2. Remove the electrical
connector from its hold-downclip by sliding it sidewaystoward the center of the car.
3. Use a Phillips-head screw-driver to remove the twoscrews from the bulb holder.Remove the holder from thetaillight assembly.
Maintenance
LOCK TABS
COVER
Main Menu Table of Contents ▲ ▼
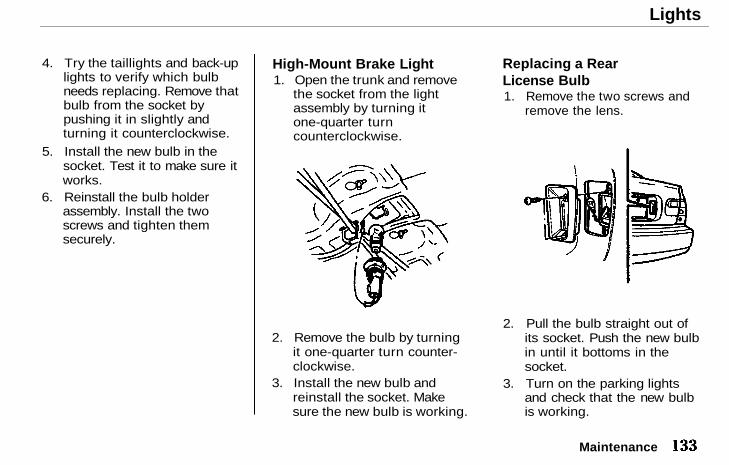
Lights
4. Try the taillights and back-uplights to verify which bulbneeds replacing. Remove thatbulb from the socket bypushing it in slightly andturning it counterclockwise.
5. Install the new bulb in thesocket. Test it to make sure itworks.
6. Reinstall the bulb holderassembly. Install the twoscrews and tighten themsecurely.
High-Mount Brake Light1. Open the trunk and remove
the socket from the lightassembly by turning itone-quarter turncounterclockwise.
2. Remove the bulb by turningit one-quarter turn counter-clockwise.
3. Install the new bulb andreinstall the socket. Makesure the new bulb is working.
Replacing a RearLicense Bulb1. Remove the two screws and
remove the lens.
2. Pull the bulb straight out ofits socket. Push the new bulbin until it bottoms in thesocket.
3. Turn on the parking lightsand check that the new bulbis working.
Maintenance
Main Menu Table of Contents ▲ ▼
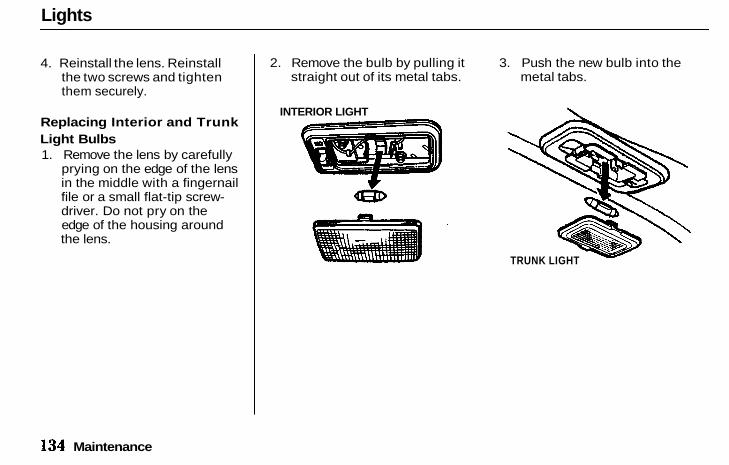
Lights
4. Reinstall the lens. Reinstallthe two screws and tightenthem securely.
Replacing Interior and TrunkLight Bulbs1. Remove the lens by carefully
prying on the edge of the lensin the middle with a fingernailfile or a small flat-tip screw-driver. Do not pry on theedge of the housing aroundthe lens.
2. Remove the bulb by pulling itstraight out of its metal tabs.
3. Push the new bulb into themetal tabs.
Maintenance
TRUNK LIGHT
INTERIOR LIGHT
Main Menu Table of Contents ▲ ▼
Storing Your Car
If you need to park your car foran extended period (more than1 month), there are severalthings you should do to prepareit for storage. Proper preparationhelps prevent deterioration andmakes it easier to get your carback on the road. If at allpossible, you should store yourcar indoors.
Fill the fuel tank.Change the engine oil andfilter (see page 107).Wash and dry the exteriorcompletely.Clean the interior. Make surethe carpeting, floor mats, etc.are completely dry.Leave the parking brake off.Put the transmission inReverse (5-speed manual) orPark (automatic).Block the rear wheels.
If the car is to be stored for alonger period, it should besupported on jackstands sothe tires are off the ground.Leave one window openslightly (if the car is beingstored indoors).Disconnect the battery.Cover the car with a"breathable" car cover, onemade from a porous materialsuch as cotton. Nonporousmaterials, such as plasticsheeting, trap moisture, whichcan damage the paint.If possible, periodically runthe engine for a while(preferably once a month).Support the front and rearwiper blade arms with afolded towel or rag so they donot touch the windshield.
To minimize the seal sticking,apply a silicone spraylubricant to all door and trunkseals. Also, apply a car bodywax to the painted surfacesthat mate with the door andtrunk seals.
If you store your car for 12months or longer, have yourHonda dealer perform theinspections called for in the 24months/30,000 miles (48,000 km)maintenance schedule as soon asyou take it out of storage (seepages 98 — 101). Thereplacements called for in themaintenance schedule are notneeded unless the car hasactually reached that time ormileage.
Maintenance
Main Menu Table of Contents ▲ ▼
Appearance Care
Regular cleaning and polishing ofyour Honda helps to keep it"new" looking. This section givesyou hints on how to clean yourcar and preserve its appearance:the paint, brightwork, wheels,and interior. Also included areseveral things you can do to helpprevent corrosion.
Exterior Care . . . . . . . . . . . . . . 138Washing . . . . . . . . . . . . . . . . 138Waxing . . . . . . . . . . . . . . . . . 138Touch-Up P a i n t . . . . . . . . . . 139
Interior Care . . . . . . . . . . . . . . 139Carpeting . . . . . . . . . . . . . . . 139Fabric . . . . . . . . . . . . . . . . . . 139Vinyl . . . . . . . . . . . . . . . . . . . 139Windows . . . . . . . . . . . . . . . 140Air Fresheners . . . . . . . . . . 140Seat Belts . . . . . . . . . . . . . . . 140
Corrosion Protection . . . . . . . 141Body Repairs . . . . . . . . . . . . . . 142
Appearance Care
Main Menu ▲ ▼
Exterior Care
WashingFrequent washing helps preserveyour car's beauty. Dirt and gritcan scratch the paint, while treesap and bird droppings canpermanently ruin the finish.
Wash your car in a shady area,not in direct sunlight. If the car isparked in the sun, move it intothe shade and let the exteriorcool down before you start.
Chemical solvents and strongcleaners can damage the paint,metal and plastic on your car.
Rinse the car thoroughly withcool water to remove loosedirt.Fill a bucket with cool water.Mix in a mild detergent, such
as dishwashing liquid or aproduct made especially forcar washing.Wash the car, using the waterand detergent solution and asoft-bristle brush, sponge, orsoft cloth. Start at the top andwork your way down. Rinsefrequently.Check the body for road tar,tree sap, etc. Remove thesestains with tar remover orturpentine. Rinse it offimmediately so it does notharm the finish. Remember torewax these areas, even if therest of the car does not needwaxing.
When you have washed andrinsed the whole exterior, dryit with a chamois or softtowel. Letting it air-dry willcause dulling and water spots.
As you dry the car, inspect it forchips and scratches that couldallow corrosion to start. Repairthem with touch-up paint (seepage 139).
WaxingAlways wash and dry the wholecar before waxing it. You shouldwax your car, including the metaltrim, whenever water sits on thesurface in large patches. Itshould form into beads ordroplets after waxing.
You should use a quality liquidor paste wax. Apply it accordingto the instructions on thecontainer. In general, there aretwo types of products:
Waxes - A wax coats the finishand protects it from damage byexposure to sunlight, airpollution, etc. You should use a
Appearance Care
NOTICE
Main Menu Table of Contents ▲ ▼
Exterior Care, Interior Care
wax on your Honda when it isnew.
Polishes - Polishes and cleaner/waxes can restore the shine topaint that has oxidized and lostsome of its shine. They normallycontain mild abrasives andsolvents that remove the toplayer of the finish. You shoulduse a polish on your Honda if thefinish does not have its originalshine after using a wax.
Cleaning tar, insects, etc. withremovers also takes off the wax.Remember to rewax those areas,even if the rest of the car doesnot need waxing.
Touch-Up PaintYour dealer has touch-up paintto match your car's color. Thecolor code is printed on a stickeron the driver's doorjamb. Take
this code to your dealer so youare sure to get the correct color.
Inspect your car for chips orscratches in the paint frequently.Repair them right away toprevent corrosion of the metalunderneath. Use touch-up paintonly on small chips andscratches. More extensive paintdamage should be repaired by aprofessional.
CarpetingVacuum the carpeting frequentlyto remove dirt. Ground-in dirtwill make the carpet wear outfaster. Periodically shampoo thecarpet to keep it looking new.Use one of the foam-type carpetcleaners on the market. Followthe instructions that come withthe cleaner, applying it with asponge or soft brush. Keep the
carpeting as dry as possible bynot adding water to the foam.
FabricVacuum dirt and dust out of thematerial frequently. For generalcleaning, use a solution of mildsoap and lukewarm water, lettingit air dry. To clean off stubbornspots, use a commerciallyavailable fabric cleaner. Test iton a hidden area of the fabricfirst, to make sure it does notbleach or stain the fabric. Followthe instructions that come withthe cleaner.
VinylRemove dirt and dust with avacuum cleaner. Wipe the vinylwith a soft cloth dampened in asolution of mild soap and water.Use the same solution with asoft-bristle brush on moredifficult spots. You can also use
Appearance Care
Main Menu Table of Contents ▲ ▼
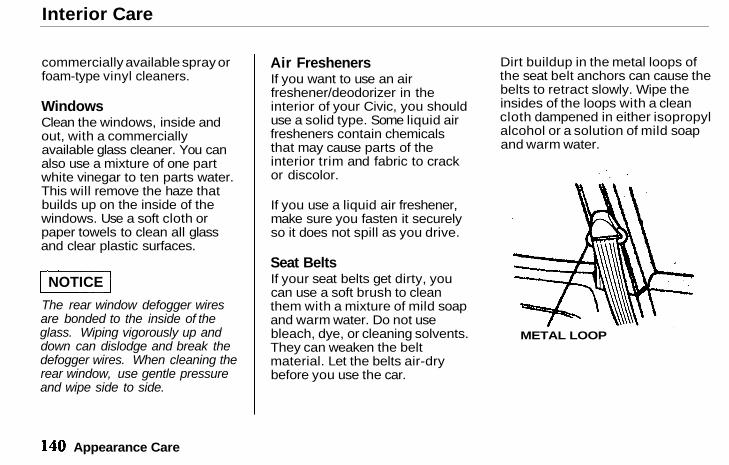
Interior Care
commercially available spray orfoam-type vinyl cleaners.
WindowsClean the windows, inside andout, with a commerciallyavailable glass cleaner. You canalso use a mixture of one partwhite vinegar to ten parts water.This will remove the haze thatbuilds up on the inside of thewindows. Use a soft cloth orpaper towels to clean all glassand clear plastic surfaces.
The rear window defogger wiresare bonded to the inside of theglass. Wiping vigorously up anddown can dislodge and break thedefogger wires. When cleaning therear window, use gentle pressureand wipe side to side.
Air FreshenersIf you want to use an airfreshener/deodorizer in theinterior of your Civic, you shoulduse a solid type. Some liquid airfresheners contain chemicalsthat may cause parts of theinterior trim and fabric to crackor discolor.
If you use a liquid air freshener,make sure you fasten it securelyso it does not spill as you drive.
Seat BeltsIf your seat belts get dirty, youcan use a soft brush to cleanthem with a mixture of mild soapand warm water. Do not usebleach, dye, or cleaning solvents.They can weaken the beltmaterial. Let the belts air-drybefore you use the car.
Dirt buildup in the metal loops ofthe seat belt anchors can cause thebelts to retract slowly. Wipe theinsides of the loops with a cleancloth dampened in either isopropylalcohol or a solution of mild soapand warm water.
Appearance Care
NOTICE
METAL LOOP
Main Menu Table of Contents ▲ ▼
Corrosion Protection
Corrosion ProtectionTwo factors normally contributeto causing corrosion in your car:
1. Moisture trapped in bodycavities. Dirt and road saltthat collects in hollows onthe underside of the car staysdamp, promoting corrosionin that area.
2. Removal of paint andprotective coatings from theexterior and underside of thecar.
Many corrosion-preventivemeasures are built into yourHonda. You can help keep yourcar from corroding byperforming some simple periodicmaintenance:
Repair chips and scratches inthe paint as soon as youdiscover them.
Inspect and clean out thedrain holes in the bottom ofthe doors and body.Check the floor coverings fordampness. Carpeting and floormats may remain damp for along time, especially in winter.This dampness can eventuallycause the floor panels tocorrode.
Use a high-pressure spray toclean the underside of yourcar. This is especiallyimportant in areas that useroad salt in winter. It is also agood idea in humid climatesand areas subject to salt air.Cars with ABS have a sensorand wiring at each wheel. Becareful not to damage them.Have the corrosion-preventivecoatings on the underside ofyour car inspected andrepaired periodically.
Appearance Care
Main Menu Table of Contents ▲ ▼
Body Repairs
Body RepairsBody repairs can affect your car'sresistance to corrosion. If your carneeds repairs after a collision, payclose attention to the parts usedin the repair and the quality of thework.
Make sure the repair facility usesgenuine Honda replacementbody parts. Some companiesmake sheet metal pieces thatseem to duplicate the originalHonda body parts, but areactually inferior in fit, finish, andcorrosion resistance. Onceinstalled, they do not give thesame high-quality appearance.
When reporting your collision tothe insurance company, tell themyou want genuine Honda partsused in the repair. Although mostinsurers recognize the quality oforiginal parts, some may try to
specify that the repairs be donewith other available parts. Youshould investigate this beforeany repairs are begun.
Take your car to your authorizedHonda dealer for inspection afterthe repairs are completed. Hecan make sure that qualitymaterials were used and thatcorrosion-preventive coatingswere applied to all repaired andreplaced parts.
Appearance Care
Main Menu Table of Contents ▲ ▼
Taking Care of the Unexpected
Compact Spare Tire . . . . . . . . 144Changing a Flat Tire . . . . . . . . 144If Your Engine Won't Start . . . 149
Nothing Happens . . . . . . . . 149The Starter Operates
Normally . . . . . . . . . . . . . . 150Jump Starting . . . . . . . . . . . 150
If Your Engine Overheats . . . . 152Low Oil Pressure Indicator .. 154Charging System Indicator .. 155Malfunction Indicator Lamp/
Check Engine Light . . . . . . . 155Closing the Moonroof . . . . . . 156Fuses . . . . . . . . . . . . . . . . . . . . . 157
Checking and Replacing .. 158Location . . . . . . . . . . . . . . . . 160
Towing . . . . . . . . . . . . . . . . . . . 162
Taking Care of the Unexpected
This section covers the morecommon problems thatmotorists experience with theircars. It gives you informationabout how to safely evaluate theproblem and what to do tocorrect it. If the problem hasstranded you on the side of theroad, you may be able to getgoing again. If not, you will alsofind instructions on getting yourcar towed.
Main Menu ▲ ▼
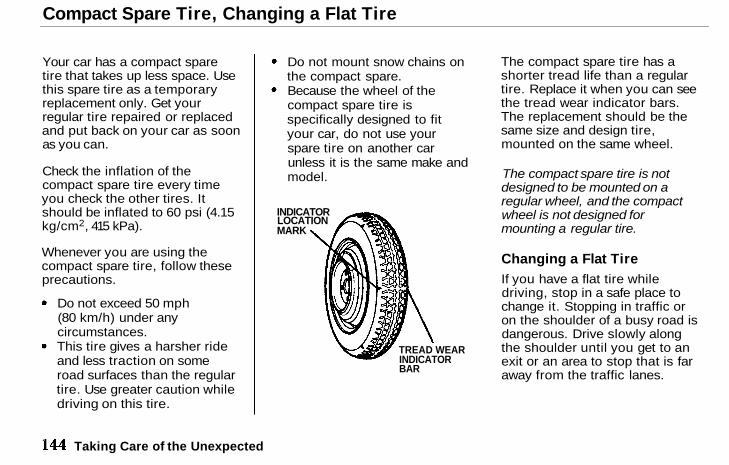
Compact Spare Tire, Changing a Flat Tire
Your car has a compact sparetire that takes up less space. Usethis spare tire as a temporaryreplacement only. Get yourregular tire repaired or replacedand put back on your car as soonas you can.
Check the inflation of thecompact spare tire every timeyou check the other tires. Itshould be inflated to 60 psi (4.15kg/cm2, 415 kPa).
Whenever you are using thecompact spare tire, follow theseprecautions.
Do not exceed 50 mph(80 km/h) under anycircumstances.This tire gives a harsher rideand less traction on someroad surfaces than the regulartire. Use greater caution whiledriving on this tire.
Do not mount snow chains onthe compact spare.Because the wheel of thecompact spare tire isspecifically designed to fityour car, do not use yourspare tire on another carunless it is the same make andmodel.
The compact spare tire has ashorter tread life than a regulartire. Replace it when you can seethe tread wear indicator bars.The replacement should be thesame size and design tire,mounted on the same wheel.
The compact spare tire is notdesigned to be mounted on aregular wheel, and the compactwheel is not designed formounting a regular tire.
Changing a Flat TireIf you have a flat tire whiledriving, stop in a safe place tochange it. Stopping in traffic oron the shoulder of a busy road isdangerous. Drive slowly alongthe shoulder until you get to anexit or an area to stop that is faraway from the traffic lanes.
Taking Care of the Unexpected
INDICATORLOCATIONMARK
TREAD WEARINDICATORBAR
Main Menu Table of Contents ▲ ▼
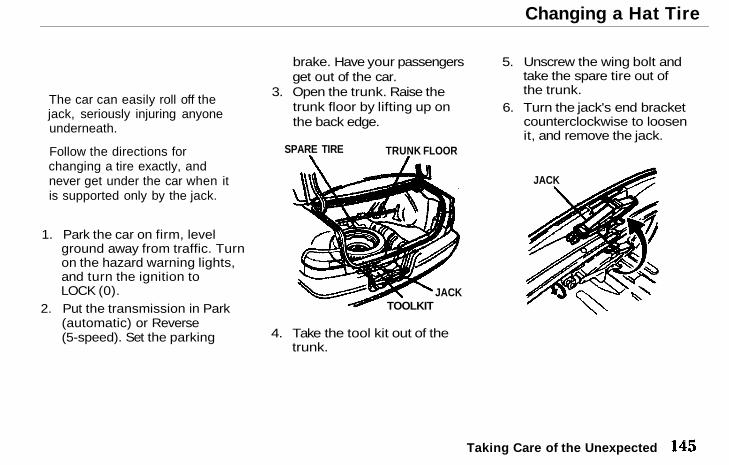
Changing a Hat Tire
1. Park the car on firm, levelground away from traffic. Turnon the hazard warning lights,and turn the ignition toLOCK (0).
2. Put the transmission in Park(automatic) or Reverse(5-speed). Set the parking
brake. Have your passengersget out of the car.
3. Open the trunk. Raise thetrunk floor by lifting up onthe back edge.
4. Take the tool kit out of thetrunk.
5. Unscrew the wing bolt andtake the spare tire out ofthe trunk.
6. Turn the jack's end bracketcounterclockwise to loosenit, and remove the jack.
Taking Care of the Unexpected
The car can easily roll off thejack, seriously injuring anyoneunderneath.
Follow the directions forchanging a tire exactly, andnever get under the car when itis supported only by the jack.
TRUNK FLOORSPARE TIRE
JACK
JACKTOOLKIT
Main Menu Table of Contents ▲ ▼
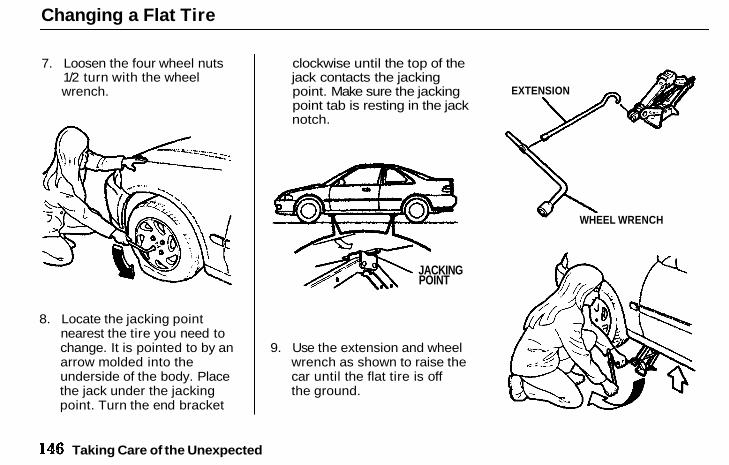
Changing a Flat Tire
7. Loosen the four wheel nuts1/2 turn with the wheelwrench.
8. Locate the jacking pointnearest the tire you need tochange. It is pointed to by anarrow molded into theunderside of the body. Placethe jack under the jackingpoint. Turn the end bracket
clockwise until the top of thejack contacts the jackingpoint. Make sure the jackingpoint tab is resting in the jacknotch.
9. Use the extension and wheelwrench as shown to raise thecar until the flat tire is offthe ground.
Taking Care of the Unexpected
JACKINGPOINT
EXTENSION
WHEEL WRENCH
Main Menu Table of Contents ▲ ▼
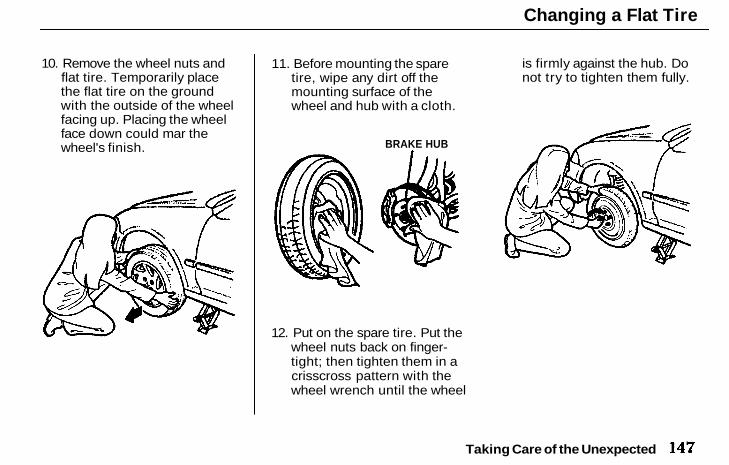
Changing a Flat Tire
10. Remove the wheel nuts andflat tire. Temporarily placethe flat tire on the groundwith the outside of the wheelfacing up. Placing the wheelface down could mar thewheel's finish.
11. Before mounting the sparetire, wipe any dirt off themounting surface of thewheel and hub with a cloth.
12. Put on the spare tire. Put thewheel nuts back on finger-tight; then tighten them in acrisscross pattern with thewheel wrench until the wheel
is firmly against the hub. Donot try to tighten them fully.
Taking Care of the Unexpected
BRAKE HUB
Main Menu Table of Contents ▲ ▼
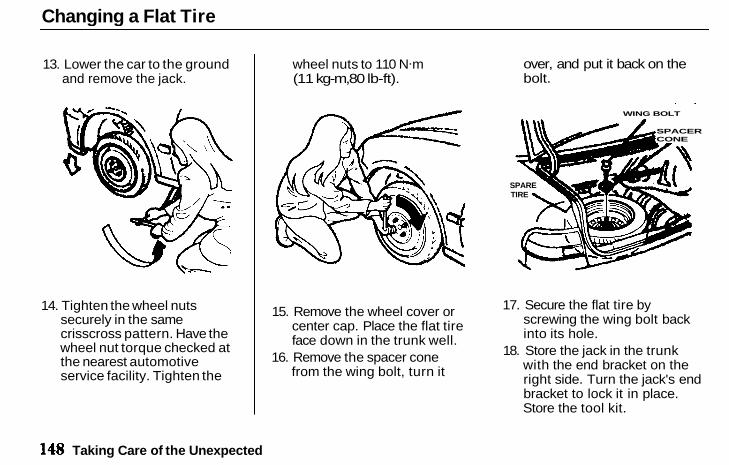
Changing a Flat Tire
13. Lower the car to the groundand remove the jack.
14. Tighten the wheel nutssecurely in the samecrisscross pattern. Have thewheel nut torque checked atthe nearest automotiveservice facility. Tighten the
wheel nuts to 110 N.m(11 kg-m,80 lb-ft).
15. Remove the wheel cover orcenter cap. Place the flat tireface down in the trunk well.
16. Remove the spacer conefrom the wing bolt, turn it
over, and put it back on thebolt.
17. Secure the flat tire byscrewing the wing bolt backinto its hole.
18. Store the jack in the trunkwith the end bracket on theright side. Turn the jack's endbracket to lock it in place.Store the tool kit.
Taking Care of the Unexpected
WING BOLT
SPACERCONE
SPARETIRE
Main Menu Table of Contents ▲ ▼
Changing a Flat Tire, If Your Engine Won't Start
19. Store the wheel cover orcenter cap in the trunk. Makesure it does not get scratchedor damaged.
If Your Engine Won't StartDiagnosing why your enginewon't start falls into two areas,depending on what you hearwhen you turn the key toSTART (III):
You hear nothing or almostnothing. The engine's startermotor does not operate at allor operates very slowly.You can hear the starter motoroperating normally, but theengine does not start up andrun.
Nothing Happens or theStarter Motor OperatesVery SlowlyWhen you turn the ignitionswitch to START (III), you donot hear the normal noise ofthe engine trying to start. Youmay hear a clicking sound orseries of clicks or nothing atall. Check these things:
Check the transmissioninterlock. If you have a5-speed, the clutch pedal mustbe pushed all the way to thefloor or the starter will notoperate. With an automatictransmission, it must be inPark or Neutral.Turn the ignition switch toON (II). Turn on theheadlights and check theirbrightness. If the headlightsare very dim or don't light atall, the battery is discharged.
See Jump Starting onpage 150.Turn the ignition switch toSTART (III). If the headlightsdo not dim, check thecondition of the fuses. If thefuses are OK, there is probablysomething wrong with theelectrical circuit for theignition switch or startermotor. You will need aqualified technician todetermine the problem. (SeeTowing on page 162.)
If the headlights dim noticeablyor go out when you try to startthe engine, either the battery isdischarged or the connectionsare corroded. Check thecondition of the battery andterminal connections (see page120). You can then try jumpstarting the car from a boosterbattery (see page 150).
Taking Care of the Unexpected
Main Menu Table of Contents ▲ ▼
If Your Engine Won't Start, Jump Starting
The Starter Operates NormallyIn this case, the starter motorsounds normal when you turnthe ignition switch to START(III), but the engine does notrun.
Are you using the properstarting procedure? Refer toStarting the Engine onpage 84.Do you have gas? Turn theignition switch to ON (II) fora minute, and watch the fuelgauge.There may be an electricalproblem, such as no power tothe fuel pump. Check all thefuses (see page 157).
If you find nothing wrong, youwill need a qualified technicianto find the problem. See Towingon page 162.
Jump StartingIf your car's battery has rundown, you may be able to startthe engine by using a boosterbattery. Although this seems likea simple procedure, you shouldtake several precautions. Followthese directions closely.
You cannot start a Honda with anautomatic transmission bypushing or pulling it.
To jump start your car, followthese directions closely.
1. Open the hood and check thecondition of the battery (seepage 120). In very coldweather, check the conditionof the electrolyte. If it seemsslushy or like ice, do not tryjump starting until it thaws.
If a battery sits in extremecold, the electrolyte inside canfreeze. Attempting to jumpstart with a frozen battery cancause it to rupture or explode.
2. Turn off all the electricalaccessories: heater, A/C,stereo system, lights, etc. Putthe transmission in Neutralor Park, and set the parkingbrake.
Taking Care of the Unexpected
NOTICEA battery can explode if you donot follow the correctprocedure, seriously injuringanyone nearby.
Keep all sparks, open flames,and smoking materials awayfrom the battery.
Main Menu Table of Contents ▲ ▼
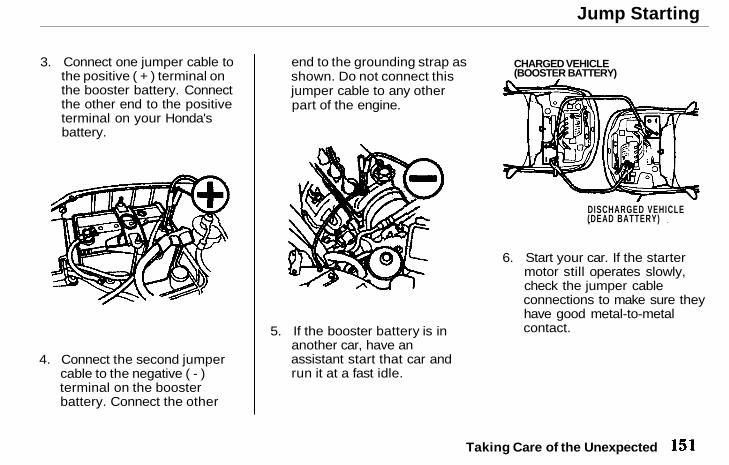
Jump Starting
3. Connect one jumper cable tothe positive ( + ) terminal onthe booster battery. Connectthe other end to the positiveterminal on your Honda'sbattery.
4. Connect the second jumpercable to the negative ( - )terminal on the boosterbattery. Connect the other
end to the grounding strap asshown. Do not connect thisjumper cable to any otherpart of the engine.
5. If the booster battery is inanother car, have anassistant start that car andrun it at a fast idle.
CHARGED VEHICLE(BOOSTER BATTERY)
6. Start your car. If the startermotor still operates slowly,check the jumper cableconnections to make sure theyhave good metal-to-metalcontact.
Taking Care of the Unexpected
DISCHARGED VEHICLE(DEAD BATTERY)
Main Menu Table of Contents ▲ ▼
Jump Starting, If Your Engine Overheats
7. Once your car is running,disconnect the negative cablefrom your car, and then fromthe booster battery. Disconnectthe positive cable from yourcar, then the booster battery.
If Your Engine OverheatsThe pointer of your car'stemperature gauge should stayin the midrange under mostconditions. It may go higher ifyou are driving up a long steephill on a very hot day. If it climbsto the red mark, you shoulddetermine the reason.
Driving with the temperature gaugepointer at the red mark can causeserious damage to your engine.
Your car can overheat for severalreasons, such as lack of coolantor a mechanical problem. The
only indication may be thetemperature gauge climbing toor above the red mark. Or youmay see steam or spray comingfrom under the hood. In eithercase, you should take immediateaction.
1. Safely pull to the side of theroad. Put the transmission inNeutral or Park and set theparking brake. Turn off theclimate control and all otheraccessories. Turn on thehazard warning indicators.
2. If you see steam and/or spraycoming from under the hood,turn off the engine.
3. If you do not see steam orspray, leave the enginerunning and watch thetemperature gauge. If thehigh heat is due tooverloading (climbing a long,steep hill on a hot day withthe A/C running, forexample), the engine shouldstart to cool down almostimmediately. If it does, waituntil the temperature gaugecomes down to the midpointthen continue driving.
4. If the temperature gaugestays at the red mark, turn offthe engine.
5. Wait until you see no moresigns of steam or spray, thenopen the hood.
Taking Care of the Unexpected
Steam and spray from anoverheated engine canseriously scald you.
Do not open the hood if steamis coming out.
NOTICE
Main Menu Table of Contents ▲ ▼
If Your Engine Overheats
6. Look for any obviouscoolant leaks, such as a splitradiator hose. Everything isstill extremely hot, so usecaution. If you find a leak, itmust be repaired before youcontinue driving (see Towingon page 162).
7. If you don't find an obviousleak, check the coolant levelin the radiator reserve tank(see page 79). If the level isbelow the MIN mark, addcoolant to halfway betweenthe MIN and MAX marks.
8. If you see no coolant in thereserve tank, you may alsohave to add coolant to theradiator.
Let the engine cool downuntil the pointer reaches themiddle of the temperaturegauge, or lower, beforechecking the radiator.
9. Using gloves or a large heavycloth, turn the radiator capcounterclockwise, withoutpushing down, to the firststop. This releases anyremaining pressure in thecooling system. After thepressure releases, push downon the cap, and turn it until itcomes off.
10. Start the engine and set theheater control lever to
maximum. Add coolant to theradiator up to the base of thefill neck. If you do not havethe proper coolant mixtureavailable, you can add plainwater. Remember to have thecooling system drained andrefilled with the propermixture as soon as you can.
11. Put the radiator cap back ontightly. Run the engine andwatch the temperaturegauge. If it goes back to thered mark, the engine needsrepair. (See Towing onpage 162.)
12. If the temperature staysnormal, check the coolantlevel in the radiator reservetank. If it has gone down, addcoolant to the MAX mark. Putthe cap back on tightly.
Taking Care of the Unexpected
Removing the radiator capwhile the engine is hot cancause the coolant to spray out,seriously scalding you.
Always let the engine andradiator cool down beforeremoving the radiator cap.
Main Menu Table of Contents ▲ ▼
Low Oil Pressure Indicator
Low Oil Pressure Indicator
This indicator lights when the oilpressure in the engine drops lowenough to cause damage. Itshould light when the ignition isON (II) and go out after theengine starts. If it comes onwhen the engine is running,serious engine damage couldhappen.
Running the engine with low oilpressure can cause seriousmechanical damage almostimmediately. Turn off the engineas soon as you can safely get thecar stopped.
1. Safely pull off the road andshut off the engine.
2. Let the car sit for a minute.Open the hood and check theoil level (see page 78).Although oil level and oilpressure are not directlyconnected, an engine that isvery low on oil can losepressure during corneringand other driving maneuvers.
3. If necessary, add oil to bringthe level back to the fullmark on the dipstick (seepage 106).
4. Start the engine and watch theoil pressure indicator. If theindicator does not go outwithin 10 seconds, turn off theengine. You need to have themechanical problem repairedbefore you can continuedriving. (See Towing on page162.)
Taking Care of the Unexpected
LOW OIL PRESSURE INDICATOR
NOTICE
Main Menu Table of Contents ▲ ▼
Charging System Indicator, Malfunction Indicator Lamp
Charging System Indicator
The U.S. instrument panel isshown. This light indicates thebattery is not being charged. Itshould come on when the igni-tion is ON (II) and go out afterthe engine starts. If it comes onbrightly with the engine running,the alternator is no longer charg-ing the battery.
Immediately turn off all electricalaccessories: radio, heater, A/C,rear defogger, cruise control, etc.Try not to use other electricallyoperated controls such as thepower windows. Keep the enginerunning and take extra care notto stall it. Starting the engine willdischarge the battery rapidly.
By eliminating as much of theelectrical load as possible, youcan drive several miles beforethe battery is too discharged tokeep the engine running. Drive toa service station or garage whereyou can get technical assistance.
U.S.: Malfunction IndicatorLampCanada: Check Engine Light
This indicator comes on for afew seconds when you turn theignition switch ON (II). If itcomes on at any other time, itindicates one of the engine'semissions control systems mayhave a problem. Even though
Taking Care of the Unexpected
CHARGING SYSTEM INDICATORMALFUNCTION INDICATOR LAMP
U.S. Car Shown
Main Menu Table of Contents ▲ ▼
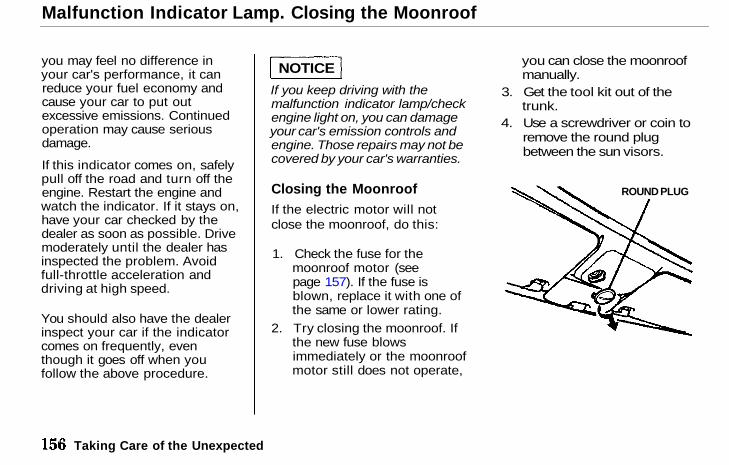
Malfunction Indicator Lamp. Closing the Moonroof
you may feel no difference inyour car's performance, it canreduce your fuel economy andcause your car to put outexcessive emissions. Continuedoperation may cause seriousdamage.
If this indicator comes on, safelypull off the road and turn off theengine. Restart the engine andwatch the indicator. If it stays on,have your car checked by thedealer as soon as possible. Drivemoderately until the dealer hasinspected the problem. Avoidfull-throttle acceleration anddriving at high speed.
You should also have the dealerinspect your car if the indicatorcomes on frequently, eventhough it goes off when youfollow the above procedure.
If you keep driving with themalfunction indicator lamp/checkengine light on, you can damageyour car's emission controls andengine. Those repairs may not becovered by your car's warranties.
Closing the MoonroofIf the electric motor will notclose the moonroof, do this:
1. Check the fuse for themoonroof motor (seepage 157). If the fuse isblown, replace it with one ofthe same or lower rating.
2. Try closing the moonroof. Ifthe new fuse blowsimmediately or the moonroofmotor still does not operate,
you can close the moonroofmanually.
3. Get the tool kit out of thetrunk.
4. Use a screwdriver or coin toremove the round plugbetween the sun visors.
Taking Care of the Unexpected
NOTICE
ROUND PLUG
Main Menu Table of Contents ▲ ▼
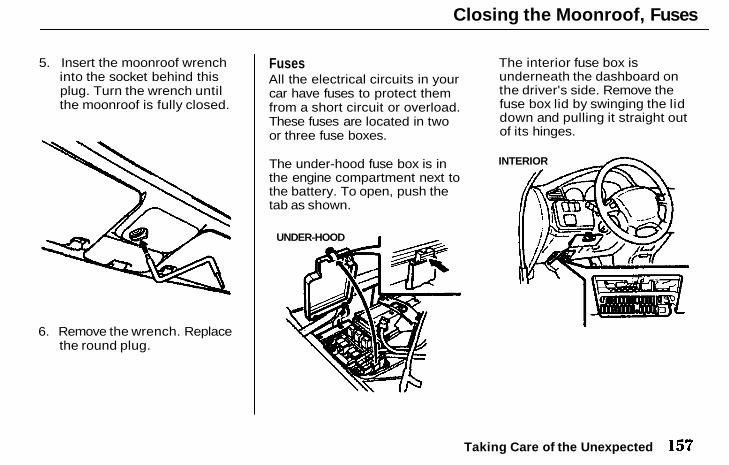
Closing the Moonroof, Fuses
5. Insert the moonroof wrenchinto the socket behind thisplug. Turn the wrench untilthe moonroof is fully closed.
6. Remove the wrench. Replacethe round plug.
FusesAll the electrical circuits in yourcar have fuses to protect themfrom a short circuit or overload.These fuses are located in twoor three fuse boxes.
The under-hood fuse box is inthe engine compartment next tothe battery. To open, push thetab as shown.
The interior fuse box isunderneath the dashboard onthe driver's side. Remove thefuse box lid by swinging the liddown and pulling it straight outof its hinges.
Taking Care of the Unexpected
UNDER-HOOD
INTERIOR
Main Menu Table of Contents ▲ ▼
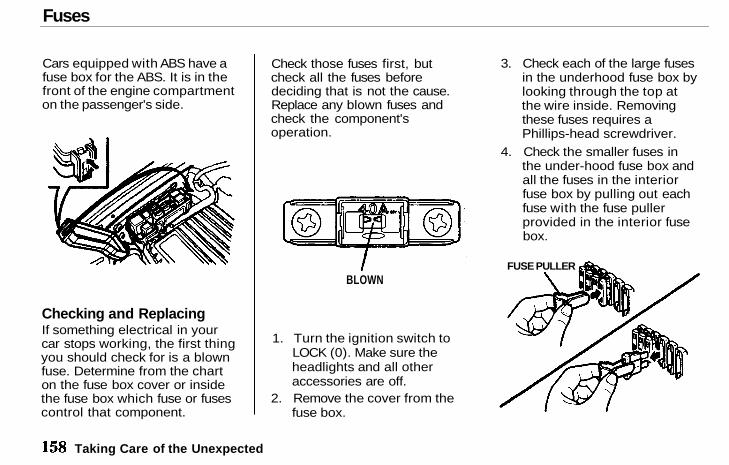
Fuses
Cars equipped with ABS have afuse box for the ABS. It is in thefront of the engine compartmenton the passenger's side.
Checking and ReplacingIf something electrical in yourcar stops working, the first thingyou should check for is a blownfuse. Determine from the charton the fuse box cover or insidethe fuse box which fuse or fusescontrol that component.
Check those fuses first, butcheck all the fuses beforedeciding that is not the cause.Replace any blown fuses andcheck the component'soperation.
1. Turn the ignition switch toLOCK (0). Make sure theheadlights and all otheraccessories are off.
2. Remove the cover from thefuse box.
3. Check each of the large fusesin the underhood fuse box bylooking through the top atthe wire inside. Removingthese fuses requires aPhillips-head screwdriver.
4. Check the smaller fuses inthe under-hood fuse box andall the fuses in the interiorfuse box by pulling out eachfuse with the fuse pullerprovided in the interior fusebox.
Taking Care of the Unexpected
BLOWNFUSE PULLER
Main Menu Table of Contents ▲ ▼
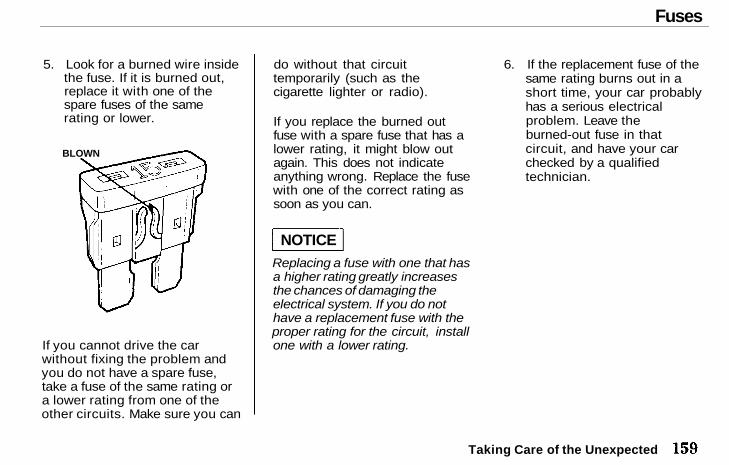
Fuses
5. Look for a burned wire insidethe fuse. If it is burned out,replace it with one of thespare fuses of the samerating or lower.
If you cannot drive the carwithout fixing the problem andyou do not have a spare fuse,take a fuse of the same rating ora lower rating from one of theother circuits. Make sure you can
do without that circuittemporarily (such as thecigarette lighter or radio).
If you replace the burned outfuse with a spare fuse that has alower rating, it might blow outagain. This does not indicateanything wrong. Replace the fusewith one of the correct rating assoon as you can.
Replacing a fuse with one that hasa higher rating greatly increasesthe chances of damaging theelectrical system. If you do nothave a replacement fuse with theproper rating for the circuit, installone with a lower rating.
6. If the replacement fuse of thesame rating burns out in ashort time, your car probablyhas a serious electricalproblem. Leave theburned-out fuse in thatcircuit, and have your carchecked by a qualifiedtechnician.
Taking Care of the Unexpected
BLOWN
NOTICE
Main Menu Table of Contents ▲ ▼
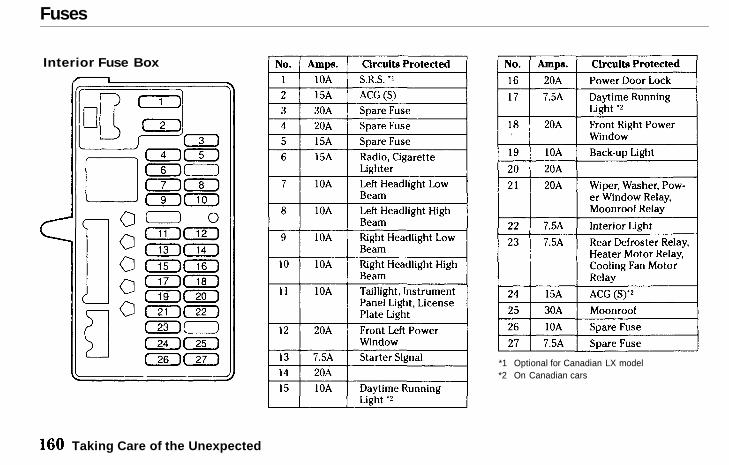
Fuses
Interior Fuse Box
*1 Optional for Canadian LX model*2 On Canadian cars
Taking Care of the Unexpected
Main Menu Table of Contents ▲ ▼
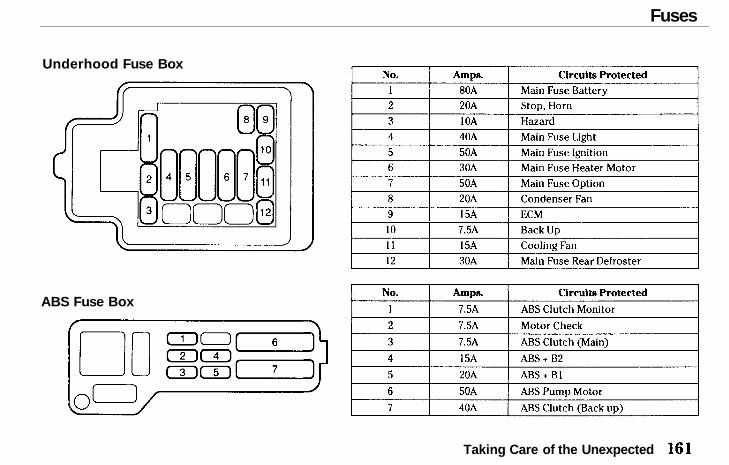
Fuses
Underhood Fuse Box
ABS Fuse Box
Taking Care of the Unexpected
Main Menu Table of Contents ▲ ▼
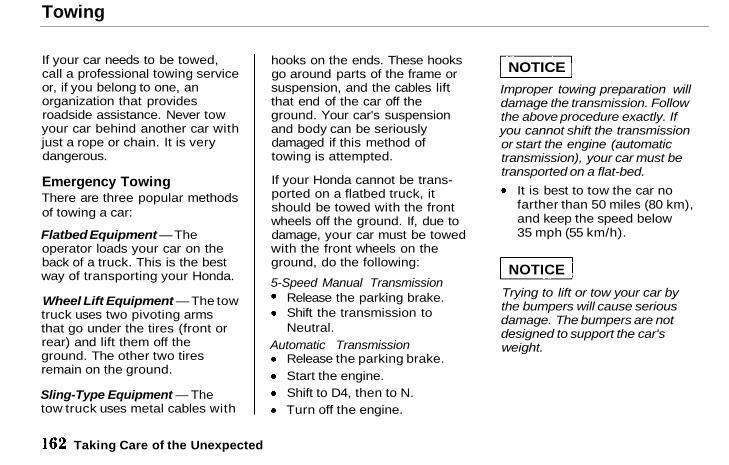
Towing
If your car needs to be towed,call a professional towing serviceor, if you belong to one, anorganization that providesroadside assistance. Never towyour car behind another car withjust a rope or chain. It is verydangerous.
Emergency TowingThere are three popular methodsof towing a car:
Flatbed Equipment — Theoperator loads your car on theback of a truck. This is the bestway of transporting your Honda.
Wheel Lift Equipment — The towtruck uses two pivoting armsthat go under the tires (front orrear) and lift them off theground. The other two tiresremain on the ground.
Sling-Type Equipment — Thetow truck uses metal cables with
hooks on the ends. These hooksgo around parts of the frame orsuspension, and the cables liftthat end of the car off theground. Your car's suspensionand body can be seriouslydamaged if this method oftowing is attempted.
If your Honda cannot be trans-ported on a flatbed truck, itshould be towed with the frontwheels off the ground. If, due todamage, your car must be towedwith the front wheels on theground, do the following:
5-Speed Manual TransmissionRelease the parking brake.Shift the transmission toNeutral.
Automatic TransmissionRelease the parking brake.Start the engine.Shift to D4, then to N.Turn off the engine.
Improper towing preparation willdamage the transmission. Followthe above procedure exactly. Ifyou cannot shift the transmissionor start the engine (automatictransmission), your car must betransported on a flat-bed.
It is best to tow the car nofarther than 50 miles (80 km),and keep the speed below35 mph (55 km/h).
Trying to lift or tow your car bythe bumpers will cause seriousdamage. The bumpers are notdesigned to support the car'sweight.
Taking Care of the Unexpected
NOTICE
NOTICE
Main Menu Table of Contents ▲ ▼
Technical Information
The diagrams in this section giveyou the dimensions andcapacities of your Honda and thelocations of the identificationnumbers. The explanations ofseveral electronic andmechanical systems on yourHonda are for the moretechnically oriented owner.
Identification Numbers . . . . . 164Specifications . . . . . . . . . . . . . 166Tire Information . . . . . . . . . . . 168
Tire Size Designation . . . . . 168Wheel Size Designation .. 168Tire Speed Ratings . . . . . . . 168Tire Pressure Adjustment
for High Speed Driving .. 169DOT Tire Quality Grading
(U.S. Cars) . . . . . . . . . . . . . 169Traction . . . . . . . . . . . . . 169Temperature . . . . . . . . . 170
Emissions Controls . . . . . . . . . 170The Clean Air Act . . . . . . . . 170Crankcase Emission
Control System . . . . . . . . 171Evaporative Emission
Control System . . . . . . . . 171
Exhaust EmissionControls . . . . . . . . . . . . . . . 171
PGM-FI System . . . . . . . . 171Ignition Timing
Control System . . . . . . 171Three-Way Catalytic
Converter . . . . . . . . . . . 171Replacement Parts . . . . 171
Three-Way CatalyticConverter . . . . . . . . . . . . . . . . 172
Technical Information
Main Menu ▲ ▼
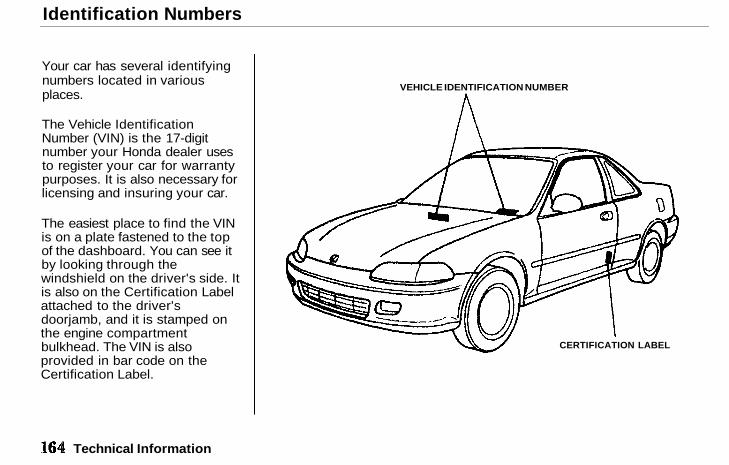
Identification Numbers
Your car has several identifyingnumbers located in variousplaces.
The Vehicle IdentificationNumber (VIN) is the 17-digitnumber your Honda dealer usesto register your car for warrantypurposes. It is also necessary forlicensing and insuring your car.
The easiest place to find the VINis on a plate fastened to the topof the dashboard. You can see itby looking through thewindshield on the driver's side. Itis also on the Certification Labelattached to the driver'sdoorjamb, and it is stamped onthe engine compartmentbulkhead. The VIN is alsoprovided in bar code on theCertification Label.
Technical Information
VEHICLE IDENTIFICATION NUMBER
CERTIFICATION LABEL
Main Menu Table of Contents ▲ ▼
Identification Numbers
The Engine Number is stampedinto the engine block.
The Transmission Number is ona label on top of thetransmission.
Technical Information
TRANSMISSION NUMBER(MANUAL)
TRANSMISSION NUMBER(AUTOMATIC)
ENGINE NUMBER
Main Menu Table of Contents ▲ ▼
Specifications
*1 DX*2 U.S.: EX, EX w/ABS option
Canada: Si
*1 Including the coolant in the reserve tank and that remaining in theengine. Reserve tank capacity: 0.4 (0.11 U.S. gal, 0.09 imp gal)
*2 DX*3 U.S.: EX, EX w/ABS option, Canada: Si*4 Excluding the oil remaining in the engine.
Technical Information
page 118.
Main Menu Table of Contents ▲ ▼
Specifications
*1 DX*2 U.S.: EX, EX w/ABS option, Canada: Si
Technical Information
Main Menu Table of Contents ▲ ▼
Tire Information
Tire Size DesignationA tire's sidewall is marked with atire size designation. You willneed this information whenselecting replacement tires foryour car. The following explainswhat the letters and numbers inthe tire size designation mean.
(Example tire size designation)P175/70R13 82S
P — Applicable vehicle type (tiresmarked with the prefix "P" areintended for use on passengercars; however, not all tires havethis marking).
175 — Tire width in millimeters.
70 — Aspect ratio. The tire'ssection height as a percentage ofits width.
R — Tire construction code(Radial).
13 — Rim diameter in inches.
82 — Load Index, a numericalcode associated with themaximum load the tire can carry.
S — Speed Rating Symbol. See thespeed rating chart in this sectionfor additional information.
Wheel Size DesignationWheels are also marked withimportant information that youneed if you ever have to replaceone. The following explains whatthe letters and numbers in thewheel size designation mean.
(Example wheel size designation)13 x 5J
13 — Rim diameter in inches.
5 — Rim width in inches.
J — Rim contour designation.
Tire Speed RatingsThe chart below shows many ofthe different speed ratingscurrently being used forpassenger car tires. The speedrating symbol is part of the tiresize designation on the sidewallof the tire. This symbolcorresponds to that tire'sdesigned maximum safeoperating speed.
Technical Information
Main Menu Table of Contents ▲ ▼

Tire Information
Tire Pressure Adjustment forHigh Speed DrivingHonda strongly recommendsthat you not drive faster thanposted speed limits andconditions allow. If you decide itis safe to drive at high speeds, besure to adjust the cold tirepressures as shown below. If youdo not adjust the tire pressure,excessive heat can build up andcause sudden tire failure.DX
U.S.: EX, Canada: Si
Be sure to readjust the pressurefor normal driving speeds. Youshould wait until the tires arecold before adjusting the tirepressure (see page 125).
DOT Tire Quality Grading(U.S. Cars)The tires on your car meet allU.S. Federal SafetyRequirements. All tires are alsograded for treadwear, traction,and temperature performanceaccording to Department ofTransportation (DOT) standards.The following explains thesegradings.
TreadwearThe treadwear grade is acomparative rating based on thewear rate of the tire when testedunder controlled conditions on aspecified government test course.For example, a tire graded 150
would wear one-and-one-half(1-1/2) times as well on thegovernment course as a tiregraded 100. The relativeperformance of tires dependsupon the actual conditions of theiruse, however, and may departsignificantly from the norm due tovariations in driving habits,service practices and differencesin road characteristics andclimate.
TractionThe traction grades, fromhighest to lowest, are A, B, andC, and they represent the tire'sability to stop on wet pavementas measured under controlledconditions on specifiedgovernment test surfaces ofasphalt and concrete. A tiremarked C may have poortraction performance.
Technical Information
Main Menu Table of Contents ▲ ▼
Tire Information, Emissions Controls
Warning: The traction gradeassigned to this tire is based onbraking (straight ahead) tractiontests and does not includecornering (turning) traction.
TemperatureThe temperature grades are A(the highest), B, and C,representing the tire's resistanceto the generation of heat and itsability to dissipate heat whentested under controlledconditions on a specified indoorlaboratory test wheel. Sustainedhigh temperature can cause thematerial of the tire to degenerateand reduce tire life, andexcessive temperature can leadto sudden tire failure. The gradeC corresponds to a level ofperformance which all passengercar tires must meet under theFederal Motor Vehicle SafetyStandard No. 109. Grades B and
A represent higher levels ofperformance on the laboratorytest wheel than the minimumrequired by law.
Warning: The temperature gradefor this tire is established for atire that is properly inflated andnot overloaded. Excessive speed,underinflation, or excessiveloading, either separately or incombination, can cause heatbuildup and possible tire failure.
Emissions ControlsThe burning of gasoline in yourcar's engine produces several by-products. Some of these arecarbon monoxide (CO), oxides ofnitrogen (NOx), andhydrocarbons (HC). Gasolineevaporating from the tank alsoproduces hydrocarbons.Controlling the production of CO,NOx, and HC is important to the
environment. Under certainconditions of sunlight andclimate, NOx and HC react toform photochemical "smog."Carbon monoxide does notcontribute to smog creation, butit is a poisonous gas.
The Clean Air ActThe Clean Air Act* setsstandards for automobileemissions. It also requires thatautomobile manufacturersexplain to owners how theiremissions controls work andwhat to do to maintain them.This section summarizes howthe emissions controls work.Scheduled maintenance is onpage 100 and 101.
* In Canada, Honda vehiclescomply with the Canadian MotorVehicle Safety Standards(CMVSS) for Emissions valid at
Technical Information
Main Menu Table of Contents ▲ ▼

Emissions Controls
the time the vehicles aremanufactured.
Crankcase EmissionControl SystemYour car has a PositiveCrankcase Ventilation (PCV)System. This keeps gasses thatbuild up in the engine'scrankcase from going into theatmosphere. The PCV valveroutes them from the crankcaseback to the intake manifold.They are then drawn into theengine and burned.
Evaporative EmissionControl SystemAs fuel evaporates in the fuel tank,an evaporative emission controlcanister filled with charcoaladsorbs the vapor. It is stored inthis canister while the engine is off.After the engine is started andwarmed up, the vapor is drawn
into the engine and burned duringdriving.
Exhaust Emission ControlsThe exhaust emission controlsinclude three systems: PGM-FI,Ignition Timing Control, andThree-Way Catalytic Converter.These three systems worktogether to control the engine'scombustion and minimize theamount of HC, CO, and NOx thatcomes out the tailpipe. Theexhaust emission control systemsare separate from the crankcaseand evaporative emission controlsystems.
PGM-FI SystemThe PGM-FI System uses asequential multiport fuelinjection. It has threesub-systems: Air Intake, EngineControl, and Fuel Control. TheEngine Control Module (ECM)
uses various sensors todetermine how much air is goinginto the engine. It then controlshow much fuel to inject under alloperating conditions.
Ignition Timing Control SystemThis system constantly adjuststhe ignition timing, reducing theamount of HC, CO, and NOxproduced.
Three-Way Catalytic ConverterThe Three-Way CatalyticConverter is in the exhaustsystem. Through chemicalreactions, it converts HC, CO,and NOx in the engine's exhaustto carbon dioxide (CO2),dinitrogen (N2), and water vapor.
Replacement PartsThe emissions control systemsare designed and certified to
Technical Information
Main Menu Table of Contents ▲ ▼
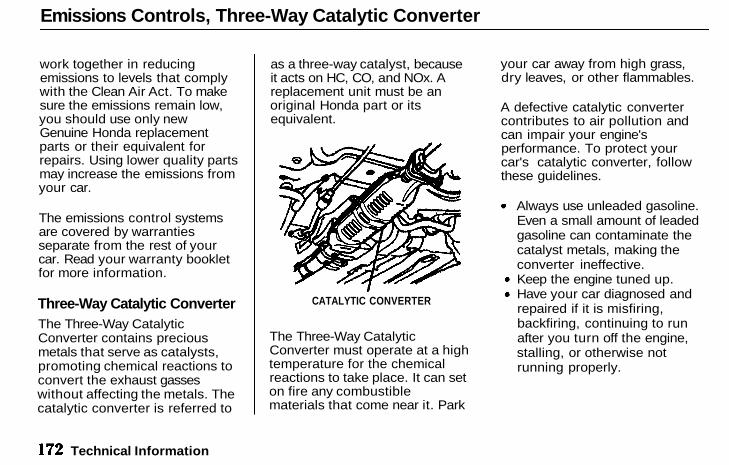
Emissions Controls, Three-Way Catalytic Converter
work together in reducingemissions to levels that complywith the Clean Air Act. To makesure the emissions remain low,you should use only newGenuine Honda replacementparts or their equivalent forrepairs. Using lower quality partsmay increase the emissions fromyour car.
The emissions control systemsare covered by warrantiesseparate from the rest of yourcar. Read your warranty bookletfor more information.
Three-Way Catalytic ConverterThe Three-Way CatalyticConverter contains preciousmetals that serve as catalysts,promoting chemical reactions toconvert the exhaust gasseswithout affecting the metals. Thecatalytic converter is referred to
as a three-way catalyst, becauseit acts on HC, CO, and NOx. Areplacement unit must be anoriginal Honda part or itsequivalent.
The Three-Way CatalyticConverter must operate at a hightemperature for the chemicalreactions to take place. It can seton fire any combustiblematerials that come near it. Park
your car away from high grass,dry leaves, or other flammables.
A defective catalytic convertercontributes to air pollution andcan impair your engine'sperformance. To protect yourcar's catalytic converter, followthese guidelines.
Always use unleaded gasoline.Even a small amount of leadedgasoline can contaminate thecatalyst metals, making theconverter ineffective.Keep the engine tuned up.Have your car diagnosed andrepaired if it is misfiring,backfiring, continuing to runafter you turn off the engine,stalling, or otherwise notrunning properly.
Technical Information
CATALYTIC CONVERTER
Main Menu Table of Contents ▲ ▼
Warranty and Customer Relations
Warranty Coverages . . . . . . . . 174
Customer RelationsInformation . . . . . . . . . . . . . . 175
Reporting Safety Defects . . . . 175U.S. Zone Office Map . . . . . . . 176Canada Zone Office Map . . . . 177Authorized Manuals . . . . . . . . 179
Warranty and Customer Relations
Main Menu ▲ ▼
Warranty Coverages
U.S. CarsYour new Honda is covered bythese warranties:
New Car Limited Warranty —Covers your new car, except forthe battery, emissions controlsystems and accessories, againstdefects in materials andworkmanship.
Emission Control SystemsDefects Warranty andEmissions PerformanceWarranty — These twowarranties cover your car'semission control systems. Time,mileage, and coverage areconditional. Please read thewarranty manual for exactinformation.
Original Equipment BatteryLimited Warranty — Thiswarranty gives up to 100% credittoward a replacement battery.
Seat Belt Limited Warranty —A seat belt that fails to functionproperly is covered for the usefullife of the car.
Rust Perforation LimitedWarranty — All exterior bodypanels are covered forrust-through from the inside forthe specified time period with nomileage limit.
Accessory Limited Warranty —Genuine Honda Accessories arecovered under this warranty.Time and mileage limits dependon the type of accessory andother factors. Please read yourwarranty manual for details.
Replacement Parts LimitedWarranty — Covers all GenuineHonda replacement parts againstdefects in materials andworkmanship.
Replacement Battery LimitedWarranty — Provides proratedcoverage for a replacementbattery purchased from a Hondadealer.
Replacement Muffler LifetimeLimited Warranty — Providescoverage for as long as thepurchaser of the muffler ownsthe car.
Restrictions and exclusionsapply to all these warranties.Please read the 1995 HondaWarranty booklet that came withyour car for precise informationon warranty coverages. YourHonda's original tires arecovered by their manufacturer.Tire warranty information is in aseparate booklet.
Canada CarsPlease refer to the 1995 Warrantyand Maintenance Guide thatcame with your car.
Warranty and Customer Relations
Main Menu Table of Contents ▲ ▼
Customer Relations Information, Reporting Safety Defects (U.S. Cars)
Customer RelationsInformationHonda dealership personnel aretrained professionals. Theyshould be able to answer all yourquestions. If you encounter aproblem that your dealershipdoes not solve to yoursatisfaction, please discuss itwith the dealership'smanagement. The ServiceManager or General Manager canhelp. Almost all problems aresolved in this way.
If you are dissatisfied with thedecision made by thedealership's management,contact your Honda CustomerRelations Zone Office. Refer tothe U.S. and Canada Zone Officemaps on the following pages.
When you call or write, pleasegive us this information:
Vehicle Identification Number(see page 164).Name and address of thedealer who services your car.Date of purchase.Mileage on your car.Your name, address, andtelephone number.A detailed description of theproblem.Name of the dealer who soldthe car to you.
Reporting Safety DefectsIf you believe that your vehiclehas a defect that could cause acrash or could cause injury ordeath, you should immediatelyinform the National HighwayTraffic Safety Administration(NHTSA) in addition to notifyingAmerican Honda Motor Co., Inc.
If NHTSA receives similarcomplaints, it may open aninvestigation, and if it finds thata safety defect exists in a groupof vehicles, it may order a recalland remedy campaign. However,NHTSA cannot become involvedin individual problems betweenyou, your dealer, or AmericanHonda Motor Co., Inc.
To contact NHTSA, you mayeither call the Auto SafetyHotline toll-free at (800) 424-9393(or (202) 366-0123 in WashingtonD.C. area), or write to: NHTSA,U.S. Department ofTransportation, Washington, D.C.20590. You can also obtain otherinformation about motor vehiclesafety from the Hotline.
Warranty and Customer Relations
Main Menu Table of Contents ▲ ▼
Index
ABS. See Anti-Lock Brakes
ACCESSORY,(Ignition Key Position) . . . . 41
AddingAutomatic Transmission
Fluid . . . . . . . . . . . . . . . . 114Brake Fluid . . . . . . . . . . . . 116Clutch Fluid . . . . . . . . . . . 116Engine Oil . . . . . . . . . . . . . 106Manual Transmission
Fluid . . . . . . . . . . . . . . . . 114Power Steering Fluid . . . 117Radiator Coolant . . . . . . 109Windshield Washer
F l u i d . . . . . . . . . . . . . . . . . 113
Additional SafetyInformation . . . . . . . . . . . . . 15
Door Locks . . . . . . . . . . . . 15Driving With Pets . . . . . . . 16Seat-Back Position . . . . . . 15Storing Cargo Safely . . . . 15
Additives, Engine Oil . . . . . 107
AdjustmentsMirrors . . . . . . . . . . . . . . . . 48Seats . . . . . . . . . . . . . . . . . . 43Steering Wheel . . . . . . 32, 36
Air Cleaner Element . . . . . . 117
Air ConditioningMaintenance . . . . . . . . . . 123Usage . . . . . . . . . . . . . . . . . 58
Air Filter.See Air Cleaner Element
Air Outlets (Vents) . . . . . . . . 56
Air Pressure, Tires . . . . . . . 167
Airbag (SRS) . . . . . . . . . . . . . 12
Alcohol in Gasoline . . . . . . . 74
Alternator Belt. See Drive Belts
Anchor Plate, Child Seat . . . 22
Anti-Theft SteeringColumn Lock . . . . . . . . . . . . 41
Anti-Lock BrakesIndicator Light . . . . . 29, 93Operation . . . . . . . . . . . . . 92
Antifreeze . . . . . . . . . . . . . . . 109
Appearance Care . . . . . . . . 137
Ashtrays . . . . . . . . . . . . . . . . . 52
Audio System . . . . . . . . . . . . 62
Automatic Cruise Control .. 37
Automatic Transmission . . . 87Capacity, Fluid . . . . . . . . 166Checking Fluid Level . . . 114Shift Lever Positions . . . . 88Shift Lock Release . . . . . . 90S h i f t i n g . . . . . . . . . . . . . . . . 88
Battery . . . . . . . . . . . . . . . . . 120Charging System
Indicator . . . . . . . . . . . . . 28
Main Menu ▲ ▼
Index
Jump Starting . . . . . . . . . 150Maintenance . . . . . . . . . . 120Specifications . . . . . . . . . 167
Before Driving . . . . . . . . . . . . 73
Belts, Seat . . . . . . . . . . . . . . . . 4
Beverage Holder . . . . . . . . . . 51
Body Repair . . . . . . . . . . . . . 142
BrakesAnti-Lock Brake System . 92Break-in . . . . . . . . . . . . . . . 74Fluid . . . . . . . . . . . . . . . . . 115Light, Burned out . . . . . 129P a r k i n g . . . . . . . . . . . . . . . . 49System Indicator . . . . . . . 28Wear Indicators . . . . . . . . 91
Braking System . . . . . . . . . . . 91
Break-in, New Car . . . . . . . . . 74
Brightness Control,Instruments . . . . . . . . . . . . . 34
Brights, Headlights . . . . . . . 33
Bulb ReplacementBack-up Lights . . . . . . . . 132Brake Lights . . . . . . . . . . 132Front Parking Lights . . . 131Front Side Marker
Lights . . . . . . . . . . . . . . . 131Headlights . . . . . . . . . . . . 130High-Mount Brake
L i g h t . . . . . . . . . . . . . . . . 133License Plate Lights . . . 133Rear Side Marker
Lights . . . . . . . . . . . . . . . 132Specifications . . . . . . . . . 167Turn Signal Lights . . . . . 131
Bulbs, Halogen . . . . . . . . . . 130
CD Player/Changer . . . . . . . . 67
Cables,Jump Starting With . . . . . 150
Capacities Chart . . . . . . . . . 166
Carbon Monoxide Hazard .. 23
Cargo, Loading . . . . . . . . . . . 81
Cassette PlayerCare . . . . . . . . . . . . . . . . . . 66Operation . . . . . . . . . . . . . 65
Catalytic Converter,Three-Way . . . . . . . . . . . . . 172
CAUTION, Explanation of . . . ii
Certification Label . . . . . . . 164
Chains, Tire . . . . . . . . . . . . . 129
Change Oil, How to . . . . . . 108
Changing a Flat Tire . . . . . . 144
Changing Engine Coolant . 110
Charging System Indicator . 28
Charging System Light . . . 155
Check Engine Light(Canada) . . . . . . . . . . . . . . . 29
Main Menu ▲ ▼
Index
CheckingAutomatic Transmission
Fluid . . . . . . . . . . . . . . . . 114Battery Condition . . . . . 120Brake Fluid . . . . . . . . . . . 115Clutch Fluid . . . . . . . . . . 115Drive Belts . . . . . . . . . . . 124Fuses . . . . . . . . . . . . . . . . 158Manual Transmission
Fluid . . . . . . . . . . . . . . . . 114Power Steering Fluid . . . 117Radiator Coolant . . . . . . 109Tire Pressure . . . . . . . . . 125Windshield Wipers . . . . 122
Checklist, Before Driving .. 84
Child Safety . . . . . . . . . . . . . . 17Guidelines for Restraining
Infants/Children . . . . . . 18Important Safety
Reminders . . . . . . . . . . . 18Where Should Children
Sit . . . . . . . . . . . . . . . . . . . 17
Cigarette Lighter . . . . . . . . . 52
CLEAN Indicator . . . . . . . . . . 66
Cleaner, Air . . . . . . . . . . . . . 117
CleaningExterior . . . . . . . . . . . . . . 138I n t e r i o r . . . . . . . . . . . . . . . 139Seat Belts . . . . . . . . . . . . 140
Vinyl . . . . . . . . . . . . . . . . . 139
Clock, Setting the . . . . . . . . . 50
Clutch Fluid . . . . . . . . . . . . . 116
CO in the Exhaus t . . . . . . . . 170
Cold Weather, Starting in .. 85
Compact Spare . . . . . . . . . . 144
Consumer Information . . . 175
Control Locations . . . . . . . . . 26Controls Near the Steering
Wheel . . . . . . . . . . . . . . . . . . 32Daytime Running Lights . 33Hazard Warning . . . . . . . . 35
Headlights . . . . . . . . . . . . . 33Instrument Panel
Brightness . . . . . . . . . . . 34Rear Window Defogger .. 36Steering Wheel
Adjustment . . . . . . . . . . . 36Turn Signals . . . . . . . . . . . 34Windshield Washers . . . . 35Windshield Wipers . . . . . 34
Controls, Instruments and . 25
CoolantAdding . . . . . . . . . . . . . . . 109Capacity . . . . . . . . . . . . . 166Proper Solution . . . . . . . 109Temperature Gauge . . . . 31
Corrosion Protection . . . . . 141
Crankcase EmissionControl System . . . . . . . . . 171
Cruise Control Operation .. 37
Cup Holder. See BeverageHolder
Main Menu ▲ ▼
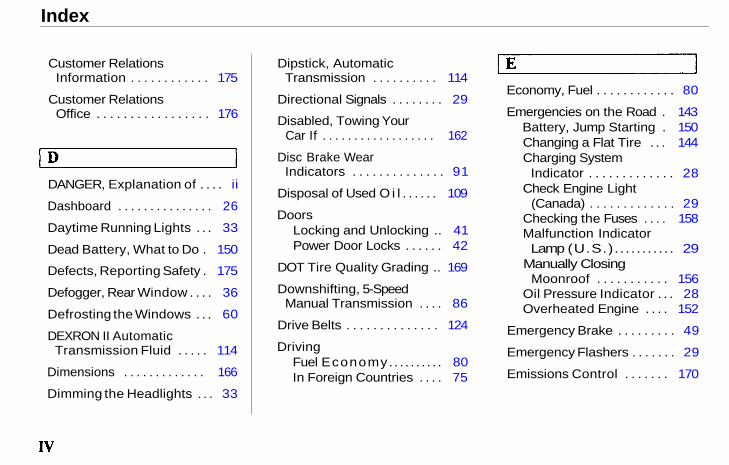
Index
Customer RelationsInformation . . . . . . . . . . . . 175
Customer RelationsOffice . . . . . . . . . . . . . . . . . 176
DANGER, Explanation of . . . . ii
Dashboard . . . . . . . . . . . . . . . 26
Daytime Running Lights . . . 33
Dead Battery, What to Do . 150
Defects, Reporting Safety . 175
Defogger, Rear Window . . . . 36
Defrosting the Windows . . . 60
DEXRON II AutomaticTransmission Fluid . . . . . 114
Dimensions . . . . . . . . . . . . . 166
Dimming the Headlights . . . 33
Dipstick, AutomaticTransmission . . . . . . . . . . 114
Directional Signals . . . . . . . . 29
Disabled, Towing YourCar If . . . . . . . . . . . . . . . . . . 162
Disc Brake WearIndicators . . . . . . . . . . . . . . 91
Disposal of Used O i l . . . . . . 109
DoorsLocking and Unlocking .. 41Power Door Locks . . . . . . 42
DOT Tire Quality Grading .. 169
Downshifting, 5-SpeedManual Transmission . . . . 86
Drive Belts . . . . . . . . . . . . . . 124
DrivingFuel Economy . . . . . . . . . . 80In Foreign Countries . . . . 75
Economy, Fuel . . . . . . . . . . . . 80
Emergencies on the Road . 143Battery, Jump Starting . 150Changing a Flat Tire . . . 144Charging System
Indicator . . . . . . . . . . . . . 28Check Engine Light
(Canada) . . . . . . . . . . . . . 29Checking the Fuses . . . . 158Malfunction IndicatorLamp (U.S.) . . . . . . . . . . . 29
Manually ClosingMoonroof . . . . . . . . . . . 156
Oil Pressure Indicator . . . 28Overheated Engine . . . . 152
Emergency Brake . . . . . . . . . 49
Emergency Flashers . . . . . . . 29
Emissions Control . . . . . . . 170
Main Menu ▲ ▼
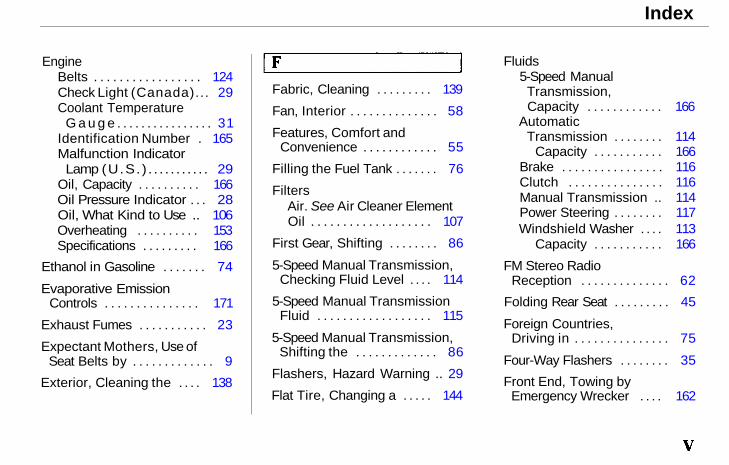
Index
EngineBelts . . . . . . . . . . . . . . . . . 124Check Light (Canada).. . 29Coolant Temperature
G a u g e . . . . . . . . . . . . . . . . 31Identification Number . 165Malfunction Indicator
Lamp (U .S . ) . . . . . . . . . . . 29Oil, Capacity . . . . . . . . . . 166Oil Pressure Indicator . . . 28Oil, What Kind to Use .. 106Overheating . . . . . . . . . . 153Specifications . . . . . . . . . 166
Ethanol in Gasoline . . . . . . . 74
Evaporative EmissionControls . . . . . . . . . . . . . . . 171
Exhaust Fumes . . . . . . . . . . . 23
Expectant Mothers, Use ofSeat Belts by . . . . . . . . . . . . . 9
Exterior, Cleaning the . . . . 138
Fabric, Cleaning . . . . . . . . . 139
Fan, Interior . . . . . . . . . . . . . . 58
Features, Comfort andConvenience . . . . . . . . . . . . 55
Filling the Fuel Tank . . . . . . . 76
FiltersAir. See Air Cleaner ElementOil . . . . . . . . . . . . . . . . . . . 107
First Gear, Shifting . . . . . . . . 86
5-Speed Manual Transmission,Checking Fluid Level . . . . 114
5-Speed Manual TransmissionFluid . . . . . . . . . . . . . . . . . . 115
5-Speed Manual Transmission,Shifting the . . . . . . . . . . . . . 86
Flashers, Hazard Warning .. 29
Flat Tire, Changing a . . . . . 144
Fluids5-Speed Manual
Transmission,Capacity . . . . . . . . . . . . 166
AutomaticTransmission . . . . . . . . 114
Capacity . . . . . . . . . . . 166Brake . . . . . . . . . . . . . . . . 116Clutch . . . . . . . . . . . . . . . 116Manual Transmission .. 114Power Steering . . . . . . . . 117Windshield Washer . . . . 113
Capacity . . . . . . . . . . . 166
FM Stereo RadioReception . . . . . . . . . . . . . . 62
Folding Rear Seat . . . . . . . . . 45
Foreign Countries,Driving in . . . . . . . . . . . . . . . 75
Four-Way Flashers . . . . . . . . 35
Front End, Towing byEmergency Wrecker . . . . 162
Main Menu ▲ ▼
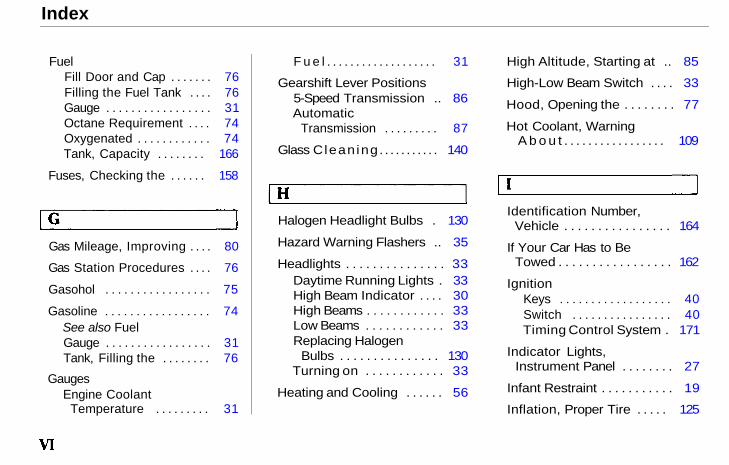
Index
FuelFill Door and Cap . . . . . . . 76Filling the Fuel Tank . . . . 76Gauge . . . . . . . . . . . . . . . . . 31Octane Requirement . . . . 74Oxygenated . . . . . . . . . . . . 74Tank, Capacity . . . . . . . . 166
Fuses, Checking the . . . . . . 158
Gas Mileage, Improving . . . . 80
Gas Station Procedures . . . . 76
Gasohol . . . . . . . . . . . . . . . . . 75
Gasoline . . . . . . . . . . . . . . . . . 74See also FuelGauge . . . . . . . . . . . . . . . . . 31Tank, Filling the . . . . . . . . 76
GaugesEngine Coolant
Temperature . . . . . . . . . 31
F u e l . . . . . . . . . . . . . . . . . . . 31
Gearshift Lever Positions5-Speed Transmission .. 86Automatic
Transmission . . . . . . . . . 87
Glass C lean ing . . . . . . . . . . . 140
Halogen Headlight Bulbs . 130
Hazard Warning Flashers .. 35
Headlights . . . . . . . . . . . . . . . 33Daytime Running Lights . 33High Beam Indicator . . . . 30High Beams . . . . . . . . . . . . 33Low Beams . . . . . . . . . . . . 33Replacing Halogen
Bulbs . . . . . . . . . . . . . . . 130Turning on . . . . . . . . . . . . 33
Heating and Cooling . . . . . . 56
High Altitude, Starting at .. 85
High-Low Beam Switch . . . . 33
Hood, Opening the . . . . . . . . 77
Hot Coolant, WarningA b o u t . . . . . . . . . . . . . . . . . 109
Identification Number,Vehicle . . . . . . . . . . . . . . . . 164
If Your Car Has to BeTowed . . . . . . . . . . . . . . . . . 162
IgnitionKeys . . . . . . . . . . . . . . . . . . 40Switch . . . . . . . . . . . . . . . . 40Timing Control System . 171
Indicator Lights,Instrument Panel . . . . . . . . 27
Infant Restraint . . . . . . . . . . . 19
Inflation, Proper Tire . . . . . 125
Main Menu ▲ ▼
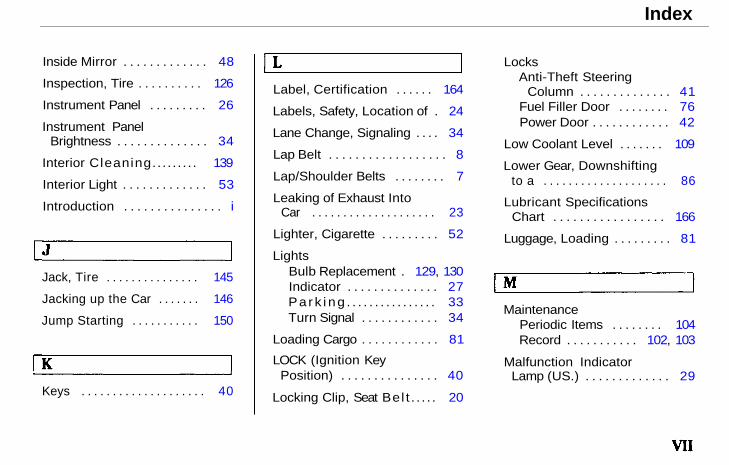
Index
Label, Certification . . . . . . 164
Labels, Safety, Location of . 24
Lane Change, Signaling . . . . 34
Lap Belt . . . . . . . . . . . . . . . . . . 8
Lap/Shoulder Belts . . . . . . . . 7
Leaking of Exhaust IntoCar . . . . . . . . . . . . . . . . . . . . 23
Lighter, Cigarette . . . . . . . . . 52
LightsBulb Replacement . 129, 130Indicator . . . . . . . . . . . . . . 27P a r k i n g . . . . . . . . . . . . . . . . 33Turn Signal . . . . . . . . . . . . 34
Loading Cargo . . . . . . . . . . . . 81
LOCK (Ignition KeyPosition) . . . . . . . . . . . . . . . 40
Locking Clip, Seat Be l t . . . . . 20
LocksAnti-Theft Steering
Column . . . . . . . . . . . . . . 41Fuel Filler Door . . . . . . . . 76Power Door . . . . . . . . . . . . 42
Low Coolant Level . . . . . . . 109
Lower Gear, Downshiftingto a . . . . . . . . . . . . . . . . . . . . 86
Lubricant SpecificationsChart . . . . . . . . . . . . . . . . . 166
Luggage, Loading . . . . . . . . . 81
MaintenancePeriodic Items . . . . . . . . 104Record . . . . . . . . . . . 102, 103
Malfunction IndicatorLamp (US.) . . . . . . . . . . . . . 29
Inside Mirror . . . . . . . . . . . . . 48
Inspection, Tire . . . . . . . . . . 126
Instrument Panel . . . . . . . . . 26
Instrument PanelBrightness . . . . . . . . . . . . . . 34
Interior C leaning. . . . . . . . . 139
Interior Light . . . . . . . . . . . . . 53
Introduction . . . . . . . . . . . . . . . i
Jack, Tire . . . . . . . . . . . . . . . 145
Jacking up the Car . . . . . . . 146
Jump Starting . . . . . . . . . . . 150
Keys . . . . . . . . . . . . . . . . . . . . 40
Main Menu ▲ ▼
Index
Manual TransmissionFluid . . . . . . . . . . . . . . . . . . 114
Manually ClosingMoonroof . . . . . . . . . . . . . . 156
Maximum Shift Speeds . . . . 87
Meters, Gauges . . . . . . . . . . . 30
Methanol in Gasoline . . . . . . 75
Mirrors, Adjusting . . . . . . . . 48
MoonroofClosing Manually . . . . . . 156Operation . . . . . . . . . . . . . 47
Neutral Gear Position . . . . . 89
New Vehicle Break-in . . . . . . 74
Normal Shift Speeds . . . . . . 86
NOTICE, Explanation of . . . . ii
Numbers, Identification .. 164
Occupant ProtectionSystem . . . . . . . . . . . . . . . . . . 4
Octane Requirement,Gasoline . . . . . . . . . . . . . . . . 74
Odometer . . . . . . . . . . . . . . . . 31
Odometer, Trip . . . . . . . . . . . 31
OilChange, How to . . . . . . . 108Pressure Indicator . . . . . . 28Selecting Proper
Viscosity Chart . . . . . . 107
ON (Ignition Key Position) . 41
Opening the Hood . . . . . . . . 77
Outside Mirrors . . . . . . . . . . 48
Overheating, Engine . . . . . 152
Panel Brightness Control .. 34
Park Gear Position . . . . . . . . 88
Parking Brake . . . . . . . . . . . . 49
Parking Brake and BrakeSystem Light . . . . . . . . . . . . 28
Parking Lights . . . . . . . . . . . . 33
Parking Over Things ThatBurn . . . . . . . . . . . . . . . . . . 172
PGM-FISystem . . . . . . . . . . 171
Polishing and Waxing . . . . 139
PowerDoor Locks . . . . . . . . . . . . 42Mirrors . . . . . . . . . . . . . . . . 48Steering . . . . . . . . . . . . . . 117Windows . . . . . . . . . . . . . . 46
Power Steering Belt. See DriveBelts
Pregnancy, Using Seat Belts . 9
Main Menu ▲ ▼
Index
Proper Seat Belt Usage . . . . . 7
Radiator Overheating . . . . 152
Radio/Cassette SoundSystem . . . . . . . . . . . . . . . . . 62
Rear End Towing . . . . . . . . 162
Rear Lights, BulbReplacement . . . . . . . . . . . 132
Rear Seat, Folding . . . . . . . . 45
Rear View Mirror . . . . . . . . . 48
Rear Window Defogger . . . . 36
Reclining the Seat-Back . 15, 44
Recommended ShiftSpeeds . . . . . . . . . . . . . . . . . 86
Replacement InformationAir Cleaner Element . . . 117Coolant . . . . . . . . . . . . . . 110
Engine Oil and Filter . . . 107Fuses . . . . . . . . . . . . . . . . 158Light Bulbs . . . . . . . . . . . 130Spark Plugs . . . . . . . . . . . 118Tires . . . . . . . . . . . . . . . . . 127Wiper Blades . . . . . . . . . 122
Replacing Seat BeltsAfter a Crash . . . . . . . . . . . . 10
Reporting Safety Defects . 175
Reserve Tank, Coolant . . . 109
Restraint, Child . . . . . . . . . . . 17
Reverse Gear Position . . . . . 89
Rotation, Tire . . . . . . . . . . . 127
Safety Belts . . . . . . . . . . . . . . . 5
Safety Defects, Reporting . 175
Safety Labels, Location o f . . 24
Safety Messages . . . . . . . . . . . ii
Seat Adjustments, FrontSeat Adjustments . . . . . . . . 43
Seat BeltsAdvice for Pregnant
Women . . . . . . . . . . . . . . . 9Child Seat Anchor Plate . 22C l e a n i n g . . . . . . . . . . . . . . 140Frayed or Torn . . . . . . . . . 10Locking Clip . . . . . . . . . . . 20Maintenance . . . . . . . . . . . 10Reminder Light . . . . . . . . 28Replacement . . . . . . . . . . . 10System Components . . . . . 5Tether Attachment
Points . . . . . . . . . . . . . . . 21Use During Pregnancy . . . 9Wearing a Lap/Shoulder
Belt . . . . . . . . . . . . . . . . . . . 7Wearing the Lap Be l t . . . . . 8
Seats, Adjusting the . . . . . . . 43
Serial Number . . . . . . . . . . . 164
Main Menu ▲ ▼
Index
Service Intervals . . . . . . 100, 101
Service Manual . . . . . . . . . . 179
Service StationProcedures . . . . . . . . . . . . . 76
Setting the Clock . . . . . . . . . 50
Shift Lever PositionIndicator . . . . . . . . . . . . . . . 87
ShiftingThe 5-Speed
Transmission . . . . . . . . . 86The Automatic
Transmission . . . . . . 87, 88
Side Marker Lights, BulbReplacement in . . . . . . . . 131
Signaling Turns . . . . . . . . . . . 34
Snow Chains . . . . . . . . . . . . 129
Snow Tires . . . . . . . . . . . . . . 129
Solvent-Type Cleaners . . . . 138
Sound System . . . . . . . . . . . . 62
Spare TireInflating . . . . . . . . . . . . . . 144Specifications . . . . . . . . . 167
Spark PlugsReplacing . . . . . . . . . . . . 118Specifications . . . . . . . . . 119
Speed Control . . . . . . . . . . . . 37
Speedometer . . . . . . . . . . . . . 30
START (Ignition KeyPosition) . . . . . . . . . . . . . . . 41
Starting the Engine . . . . . . . . 84In Cold Weather at High
Altitude . . . . . . . . . . . . . . 85With a Dead Battery . . . 150
Steam Coming FromEngine . . . . . . . . . . . . . . . . 152
Steering WheelAdjustment . . . . . . . . . . . . 36Anti-Theft Column Lock . 41
Steering Wheel Controls,Cruise Control . . . . . . . . . . 37
Stereo Sound System . . . . . . 62
Storing Your Car . . . . . . . . . 135
Supplemental RestraintSystem
Service Precautions . . . . 14Servicing . . . . . . . . . . . . . . 14SRS Indicator . . . . . . . 14, 28
Tachometer . . . . . . . . . . . . . . 30
Taillights, ChangingBulbs in . . . . . . . . . . . . . . . 132
Taking Care of theUnexpected . . . . . . . . . . . . 143
Tape Player . . . . . . . . . . . . . . 65
Main Menu ▲ ▼

Index
Technical DescriptionsEmission Control
Systems . . . . . . . . . . . . . 170Three-Way Catalytic
Converter . . . . . . . . . . . 172
Tire Information . . . . . . . 169
Temperature Gauge . . . . . . . 31
Tether Attachment Points . 21
Time, Setting the . . . . . . . . . 50Tire, How to Change a
Flat . . . . . . . . . . . . . . . . . . . 144
Tire Chains . . . . . . . . . . . . . 129
Tires . . . . . . . . . . . . . . . . . . . 124Checking Wear . . . . . . . . 126Compact Spare . . . . . . . . 144DOT Tire Quality
Grading . . . . . . . . . . . . . 169Inflation . . . . . . . . . . . . . . 125Inspection . . . . . . . . . . . . 126Replacing . . . . . . . . . . . . 127Rotating . . . . . . . . . . . . . . 127
S n o w . . . . . . . . . . . . . . . . . 129
Specifications . . . . . . . . . 167
Tools, Tire Changing . . . . . 145
Torn Seat Belts . . . . . . . . . . . 10
TowingA Trailer . . . . . . . . . . . . . . 93Emergency Wrecker (Tow
Truck) . . . . . . . . . . . . . . 162Transmission
Checking Fluid Level5-Speed Manual
Transmission . . . . . . 114Automatic
Transmission . . . . . . 114Fluid Selection . . . . . . . . 114Identification Number . 165Shifting the 5-Speed
M a n u a l . . . . . . . . . . . . . . . 86Shifting the Automatic .. 88
Tread Wear . . . . . . . . . . . . . 169
Trip Meter . . . . . . . . . . . . . . . 31
Trunk-Open IndicatorLight . . . . . . . . . . . . . . . . . . . 29
Turn Signals . . . . . . . . . . . . . . 34
Underside, Cleaning. . . . . . 138
Unexpected, TakingCare of the . . . . . . . . . . . . . 143
Uniform Tire QualityGrading . . . . . . . . . . . . . . . 169
Unleaded Gasoline . . . . . . . . 74
Upholstery Cleaning . . . . . 139
Used Oil, How toDispose of . . . . . . . . . . . . . 109
Main Menu ▲ ▼
Index
WARNING, Explanation of . . . ii
Warranty Coverages . . . . . 174
Washer, Windshield, FluidC a p a c i t y . . . . . . . . . . . . . . . 166
Washer, WindshieldChecking the Fluid
Level . . . . . . . . . . . . . . . 113
Operation . . . . . . . . . . . . . 35
Washing . . . . . . . . . . . . . . . . 138
Waxing and Polishing . . . . 138Wheels
Adjusting the Steering .. 36Alignment and Balance 127Compact Spare . . . . . . . . 144Wheel Wrench . . . . . . . . 146Wrench . . . . . . . . . . . . . . 146
WindowsC l e a n i n g . . . . . . . . . . . . . . 140Operating the Power . . . . 46Rear, Defogger . . . . . . . . . 36
WindshieldC l e a n i n g . . . . . . . . . . . . . . . 35Defroster . . . . . . . . . . . . . . 60
Wipers, WindshieldChanging Blades . . . . . . 122Operation . . . . . . . . . . . . . 34
Worn Tires . . . . . . . . . . . . . . 126
Wrecker, EmergencyTowing . . . . . . . . . . . . . . . . 162
Vehicle Capacity Load . . . . . 81
Vehicle Dimensions . . . . . . 166
Vehicle IdentificationNumber . . . . . . . . . . . . . . . 164
Vehicle Storage . . . . . . . . . . 135
Ventilation . . . . . . . . . . . . . . . 59
V I N . . . . . . . . . . . . . . . . . . . . . 164
Vinyl Cleaning . . . . . . . . . . . 139
Viscosity, Oil . . . . . . . . . . . . 106
Warning BeepersKey in Ignition . . . . . . . . . 41Seat Belts . . . . . . . . . . . . . 28
Warning Labels,Location of . . . . . . . . . . . . . 24
Main Menu ▲ ▼
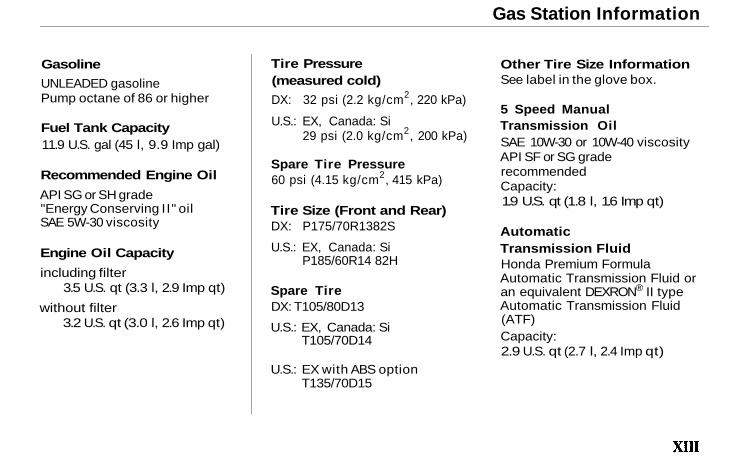
Gas Station Information
Gasoline
UNLEADED gasolinePump octane of 86 or higher
Fuel Tank Capacity11.9 U.S. gal (45 l, 9.9 Imp gal)
Recommended Engine Oil
API SG or SH grade"Energy Conserving I I" oilSAE 5W-30 viscosity
Engine Oil Capacity
including filter3.5 U.S. qt (3.3 l, 2.9 Imp qt)
without filter3.2 U.S. qt (3.0 l, 2.6 Imp qt)
Tire Pressure(measured cold)
DX: 32 psi (2.2 kg/cm2, 220 kPa)
U.S.: EX, Canada: Si29 psi (2.0 kg/cm2, 200 kPa)
Spare Tire Pressure60 psi (4.15 kg/cm2 , 415 kPa)
Tire Size (Front and Rear)DX: P175/70R1382S
U.S.: EX, Canada: SiP185/60R14 82H
Spare TireDX: T105/80D13
U.S.: EX, Canada: SiT105/70D14
U.S.: EX with ABS optionT135/70D15
Other Tire Size InformationSee label in the glove box.
5 Speed ManualTransmission OilSAE 10W-30 or 10W-40 viscosityAPI SF or SG graderecommendedCapacity:1.9 U.S. qt (1.8 l, 1.6 Imp qt)
AutomaticTransmission FluidHonda Premium FormulaAutomatic Transmission Fluid oran equivalent DEXRON® II typeAutomatic Transmission Fluid(ATF)Capacity:2.9 U.S. qt (2.7 l, 2.4 Imp qt)
Main Menu ▲ ▼