\ author - eric
TRANSCRIPT

ED 208 150
\ AUTHORTITLE
INSTITUTION
SPONS AGENCY
PUB DATE .
CONTRACTNOTE
EDES.PRICEDESCRIPTORS
-ABSTRACT
-DOCUMENT RESUME
CE 030 179
Ethridge, And Others`Core I Materials fo; Rural Agridultdial Programs.Units F-H.
.
Illinois Univ., Urbana. Dept.-of Vocational and'Technical Education.Illinois State Board of Education, Springfield. Dept.of. Adult, Vocational and Technical Education.Jun 81R-33-31-D-0542-388254.1 Not available in paper copy due to coloredpages. For related.documents see CE 030 177-178.
MF01 Plus Postage. PC'Not Available from ZDES;*Agricultural. Education; *Agricultural Engineering;*Agricultural $44..11§i _A9.;949114 Behaviora4,Objectives; Carpentry; Conservation (Environment);Equipment Utilization; Field Crops; Grade 9; Grade10; GuidelinesvHand Tools; *Horticulture:Instructional Materials; Job Skills; LearningActivities; Machine'Tools; Natural Resources;Ornamental Horticulture; *Rural Areas;juSafety;Secondary Education; *Soil Science; VeWationalEducation
These units of instructional materials and teachingaids are the final 'three of a series of eight designed for use inrural agriculture proirams foi students in grades 9 and 10,.; Coveredin'the unitOn soil science and conservation of natural resources are
soil samples and applying soil sample test results.Growing vegetables and beautifying the homestead are examined.Discussed next are such aspects of agiicultural mecaanics as -
identifying; fitting, and using hand tools; usingseiected powertools; developing safe work habits in agricult4rai mechanics; anddeveloping basic ca *pentry sk,iils. Each of these units cr problemarea packets includes some or all of the following components:suggestions to the teacher, a content outline, a teacher's gdide,information sheets, student worksheets or assignment sheets and keys,demonstrations, job.sheets, transparencies, a discussion.guide forthe transparencies, and sample test questions and a teacher's key.(The-remaining units are available separately--see note.) (MN)
.,
************************************************,*******i**************** Reproductions supplied by EDRS are the best that caabe made ** fromithe original document. *.***********************************************************************
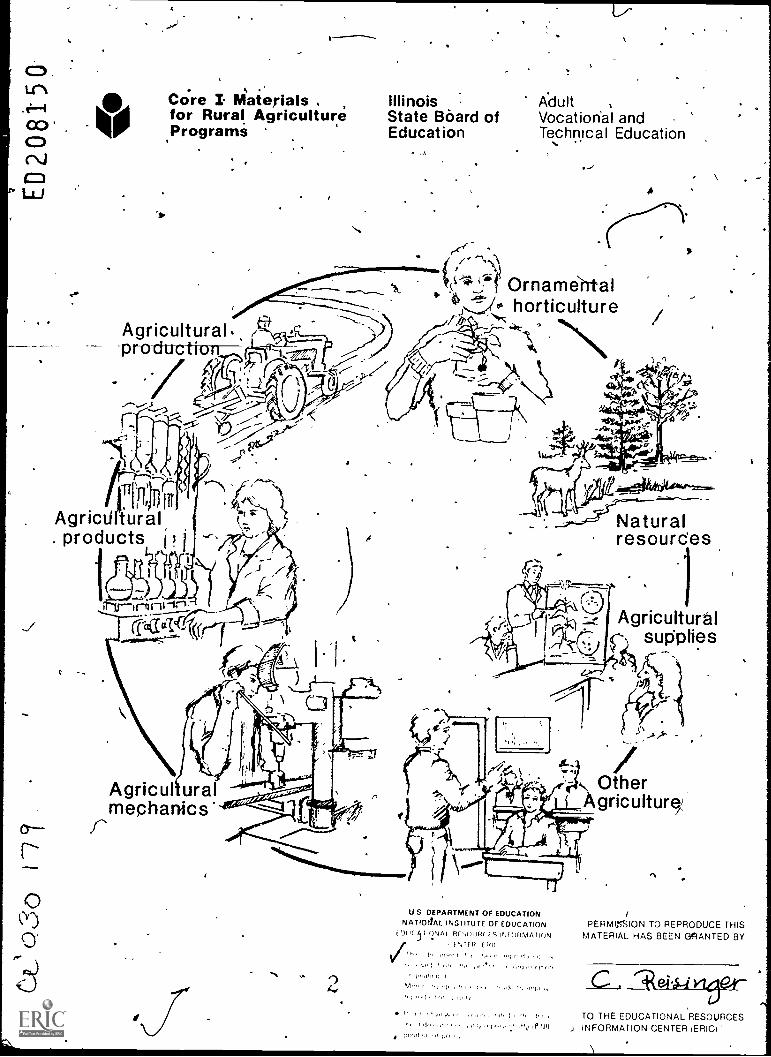
. , ..Core I. Materials s Illinois Adult ,for Rural Agriculture State BOard of Vocational andProgrami Education Technical Education.
Agricultural.-production
"ri
(t)4` Ornam&i-t-alhorticulture
.,./ .1 r.446.341,6
rITE:i1)iural
. products i
(ritamTateT
Naturalresources
Agriculturalsupplies
tz.,)Other
Agriculture)Agriculturalmechanics
Cr
U S DEPARTMENT OF EDUCATIONNATIO4AL INSTITUTE OF EDUCATION PERMISSION TO REPRODUCE THIS
RFF,I)I1Fir ES INFORMATION MATERIAL HAS BEEN 041ANTED BYEN TIP E F711
'""" "rrrrr1 rr ri
rr ir Ir r
r 1
Tr. 1 rro, r r , rr torpor,. ,,fr I P
,rrrr,r11,1 ,,r ,
TO THE EDUCATIONAL RESOURCESINFORMATION CENTER (ERICI'
I. .UNIT F: Soil Science and Conservation of Natural Resources ,
PROBLEM AREAS:
1 . Collecting soil sample's
. 2. Applying soil sample test results
%
UNIT F: SOIL StIENCE AND CONSERVATION OF NATURAL RESOURCES .
PROBLEM AREA: COLLECTING SOIL SAMPLES
?SUGGESTIONS TO THE TEACHER:
rr
This problem area is designed foi. use with ninth grade or beginning students enrolled in anagricultural occupations program. The recommended time for teaching this problem area is during4the fall semester before the soil freezes. The.e.stimated time 'for teaching this problem area is 1 to 3days depending on how much time the teacher wishes to spend on discussion and conducting thestAgested exercises. The materials in this pfoblem area were selected 'and written with thelollowingassumptions:
1. That all students need to understand the method of collecting a soil sample.
2. That each student will have the opportunity to collect a sample from his/her own S.O.E.P.
The Instructor is encouragedto conduct a local search to lbcate other supplementary materials.The items in this problem area are for reference or, modification as the teacher adapts these mate-rials to his/her local situation.
\s.
CREDIT SOURCES:
These materials were develLed through a funding agreement, R-33-21-D-0542-388 with theIllinois State Board of EduCation, Department of Adult, Vocational and Technical* Education,Research and Development Section, 100 North First Street, Springfield, Illinois 62777. Opinionsexpress6d in these materials do not reflect, nor should they be consVued as policy or opinion of theState Board of Education or its staff.
)The teacher's guide, worNheets, and sample test questions were developed by Jerry Pepple,
Department of Vocational and Technical Education, University of Illinois. The transparencymas-ters and transparency discussion guides were prepared by Vocational Agriculture Service, Universityof Illinois The information sheets "Soil Testing Services in Illinois," and the recommended pro-cedures presented are those proposed by fife Department cif Agronomy and the Cooperative Exten-sion Service of University of Illinois. Suggestions and guidance in the development ,o# these mate-vials were provided by the Rural Core Curriculum Pilot Test Teachers.
,
o
A
.l-F-11-1
1
i
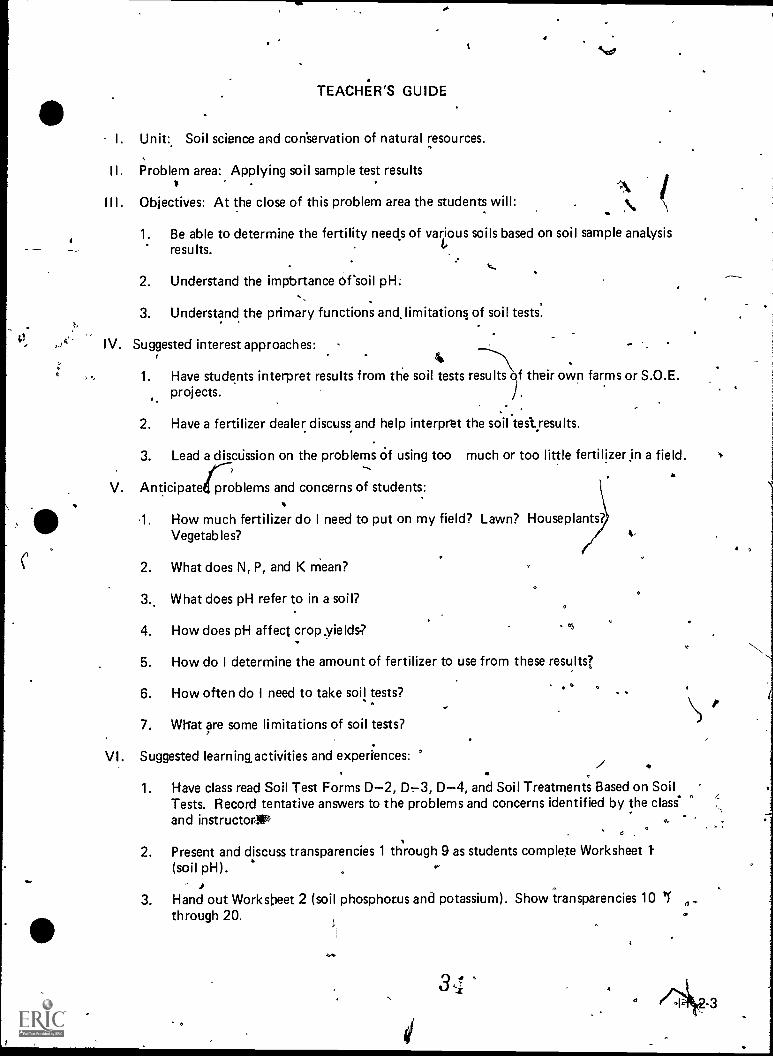
TEACHER'S GUIDE
I. Unit: Soil science and conservation of natural resources
II. Problem area: Collecting soil samples
III. Objectives: At the close of this problem c(rea students will: ,
1. Know the materials needed for sampling soil.
2. Understand the steps to follow in sampling soil.
U
3. Know the recommended number of samples to take in fields, lawns, gardens, and flowerbeds".
IV. Suggested interest approaches:
1. Lead a discussion on soil sampling by asking students if they have ever taken salts -moles.
2. Take the class on a field trip to a soil testing laboratory.-6
4,- Have a local fertilizer dealer as a guest speaker to discuss the importance of proper soilfertility.
V. Anticipated problems and concerns of students:
1. Why d6 we take a soil sample?
2. What factors influence the number of samples to be taken?
3. What is the procedure to follow in taking-a good soil sample?
4. How are the samples correctly prepared and packaged for testing or sending to a laboratory?.
5.t Why is information about past history and yield included with the samples?
.6. When-and how often should a soil sample e taken? ,
7. What are some things to avoid when taking a s it sample?
8. What soil testing services are locally available and is there a charge?
9. How do I take soil samples from greenhouse bench crops, nursery and greenhouse pottedcrops, and plants in the home?
VI. Suggested learning activities and experiences:
1. Have class read VAS Unit 4001 and record tentative answers to the problems and 'concernsidentified by the class and instructor.
.. ': 2. Distribute Soil Science Worksheet 1 and have students complete the blanks.444
.,
I-F-1-30
..
1
3. ow Fansparencies 1-11. A
.- .
Following instructions and sampling fools.b. Watching for unusual areas,c. Taking samples from each area.
4. Distribute soil test report forms.
5. Show transparencies 12-14.
a. Completing the information sheet.b. Follow test recommendations.
6. Distribute soil sample information sheet for lawns, gardens, an lower beds.
7. Discuss important facts concerning sksampling from lawns, gardens, and flower bedst
8. Discuss-h-ow-to-cd-mrefe-roifin-B7ustriTthe Samisre-F-orm as an example.
9. Take students on a field trip to collect soil samples or make this an out-of-class assign-ment. Use Job Sheet 1. .
VII. 'Application procedures:
1. Have each student take soil samples from his home, greenhouse, or houseplants for testing.
2. The interpretation of the soil tests will be emphasized in the problem area, "Applying Soil. Sample Test Results."
VIII. Evaluation:
1. Prepare and administer a Oeni and paper test using the Sample Test Questions as possibletest items.
2. Collect and grade Soil SLnce Worksheet 1.
3. Give credit for bringing soil samples from home for testing.
4. Have students demonstrate how to collect a soil sample and prepare it for testing.
IX. References and aids:
. 1. VAS Unit 4001, Vocational Agriculture Service, University of Illinois.
2. Soil Testing and Fertility Transparencies and Study Guide, Vocational Agriculture Service,University ofil Ilinois.
3. Soil Test Report Forms A and B, Vocational Agriculture Service, University of Illinois.
4. Soil Test Report Form B, Completed Example.4
5. Soil Test Procedu'res for lawns, gardens, flower beds, and greenhouse soils.
. 6. Soil Science Worksheet 1 and Job Sheet 1.
4
1
7. Hand out on.Soil Testing Services in Illinois.
8. Supplies and tools: .
)a. Supply of small paper sacks.b. Box of basket for carrying the samples.c. Pan or bucket for mixing the'samples.
. d. Trowel, spade, soil probe or auger to dig the samples
Samp le'Test Chiestions. .
r
.....
4
I
,
c
l
..,
t
-a
)
1i.
)
1
l
si
,
V.
*
Nt
.4. 4
4.1-F-1-5
/' I
Y
«
t
MIA
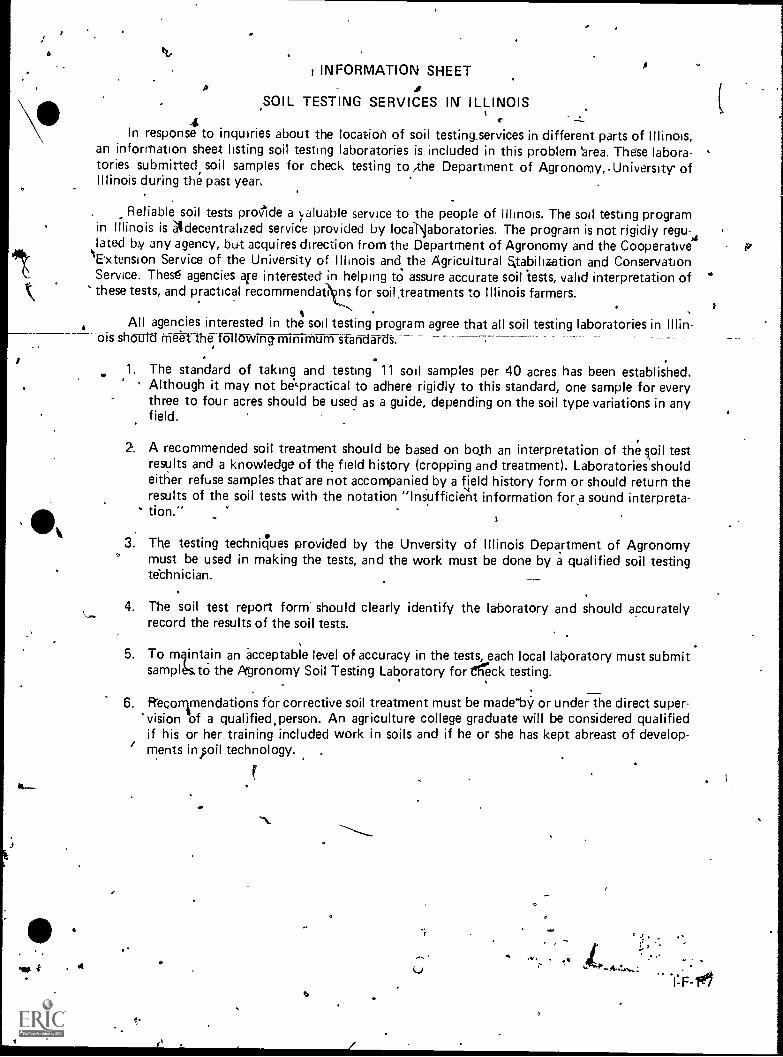
I INFORMATION SHEET
SOIL TESTING SERVICES IN' ILLINOIS
In response4
to inquiries about the location of soil testingservices in different parts of Illinois,an information sheet listing soil testing laboratories is included in this problem 'area. These labora-tories submitted soil samples for check testing to the Department of Agronomy, University. ofIllinois during the past year,
Reliable soil tests prociide a valuable service to the people of Illinois. The soil testing programin Illinois is Adecentralized service provided by localNaboratories. The program is not rigidly regu-3lated by any agency, but acquires direction from the Department of Agronomy and the CooperativeExtension Service of the University of Illinois and the Agricultural Stabilization and ConservationService. Thes>s agencies are interested in helping to assure accurate soil tests, valid interpretation of 'these tests, and practical recommendati ns for soil treatments to Illinois farmers.
All agencies interested in the soil testing program agree that all soil testing laboratories in Illin-ois should meet the fai owing minimum standards.
1. The standard of taking and testing 11 soil samples per 40 acres has been established.Although it may not bekpractical to adhere rigidly to this standard, one sample for everythree to four acres should be used as a guide, depending on the soil type variations in anyfield.
2. A recommended soil treatment should be based on both an interpretation of the foil testresults and a knowledge of the field history (cropping and treatment). Laboratories shouldeither refuse samples that are not accompanied by a field history form or should return theresults of the soil tests with the notation "Insufficient information for a sound interpreta-tion.
3. The testing techniques provided by the Unversity of Illinois Department of Agronomymust be used in making the tests, and the work must be done by a qualified soil testingtechnician.
4. The soil test report form' should clearly identify the laboratory and should accuratelyrecord the results of the soil tests.
5. To mqintain an *acceptable level of accuracy in the tests, each local laboratory must submitsamplkto* the Agronomy Soil Testing Laboratory for tileeck testing.
6. Reconrendations for corrective soil treatment must be made"by or under the direct super-vision of a qualified,person. An agriculture college graduate will be considered qualifiedif his or her training included work in soils and if he or she has kept abreast of develop-/ ments inisoil technology. .
.11F-111",
-JI
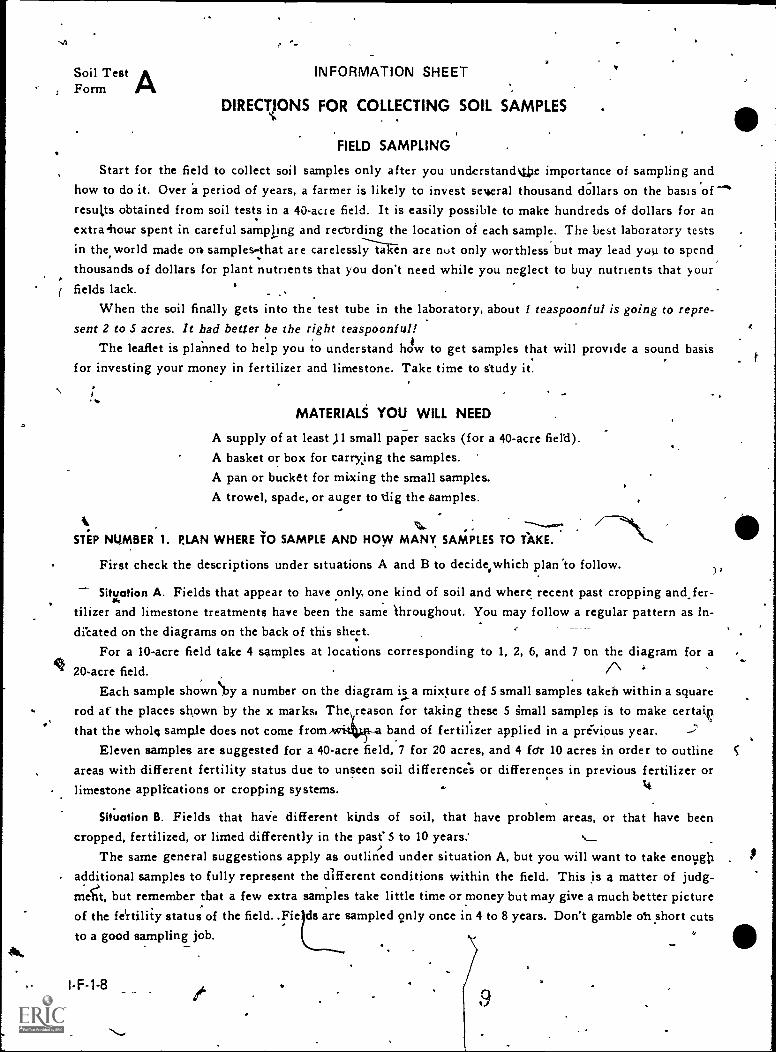
Soil TestForm
.INFORMATION SHEET
DIRECTIONS FOR COLLECTING SOIL SAMPLES
FIELD SAMPLING
r
Start for the field to collect soil samples only after you understandthe importance of sampling andhow to do it. Over a period of years, a farmer is likely to invest se\eeral thousand dollars on the basis ofresults obtained from soil tests in a 40-acre field. It is easily possible to make hundreds of dollars for anextra hour spent in careful sampling and recording the location of each sample. The best laboratory testsin the world made on samples -that are carelessly taken are not only worthless but may lead you to spendthousands of dollars for plant nutrients that you don't need while you neglect to buy nutrients that yourfields lack. . ..
.
When the soil finally gets into the test tube in the laboratory, about 1 teaspoonful is going to repre-sent 2 to 5 acres. It had better be the right teaspoonful!
The leaflet is planned to help you to understand ho1w to get samples that will provide a sound basisfor investing your money in fertilizer and limestone. Take time to study it.
; .
MATERIALS YOU WILL NEED
A supply of at least 11 small paper sacks (for a 40-acre field).A basket or box for carrying the samples.A pan or bucket for mixing the small samples.A trowel, spade, or auger to dig the samples.
STEP NUMBER 1. ELAN WHERE TO SAMPLE AND HOW MANY SAMPLES TO TAKE.
First check the descriptions under situations A and B to decide.which plan 'to follow. ),SituAation A. Fields that appear to have only. one kind of soil and where recent past cropping and.fer-
tilizer and limestone treatments have been the same Throughout. You may follow a regular pattern as In-.
Heated on the diagrams on the back of this sheet.For a 10-acre field take 4 samples at locations corresponding to 1, 2, 6, and 7 on the diagram for a
44' 20-acre field. /\ 'Each sample showAy a number on the diagram isa mixture of 5 small samples takeh within a square
rod of the places shown by the x marks, The reason for taking these 5 small samplep is to make certaiithat the whole sample does not come from band of fertilizer applied in a previous year. ....-
,
Eleven samples are suggested for a 40-acre field, 7 for 20 acres, and 4 far 10 acres in order to outline C
areas with different fertility status due to unseen soil difference's or differences in previous fertilizer orlimestone applications or cropping systems. - 4
e
. I'
Situation B. Fields that haie different kinds of soil, that have problem areas, or that have beencropped, fertilized, or limed differently in the past's to 10 years: ...._
The same general suggestions apply as outlined under situation A, but you will want to take enoughadditional samples to fully represent the different conditions within the field. This is a matter of judg-mgt, but remember that a few extra samples take little time or money but may give a much better pictureof the feirtiliiy status of the field..Fie s are sampled only once in 4 to 8 years. Don't gamble oh short cutsto a good sampling job.
I-F-1-8
0
4
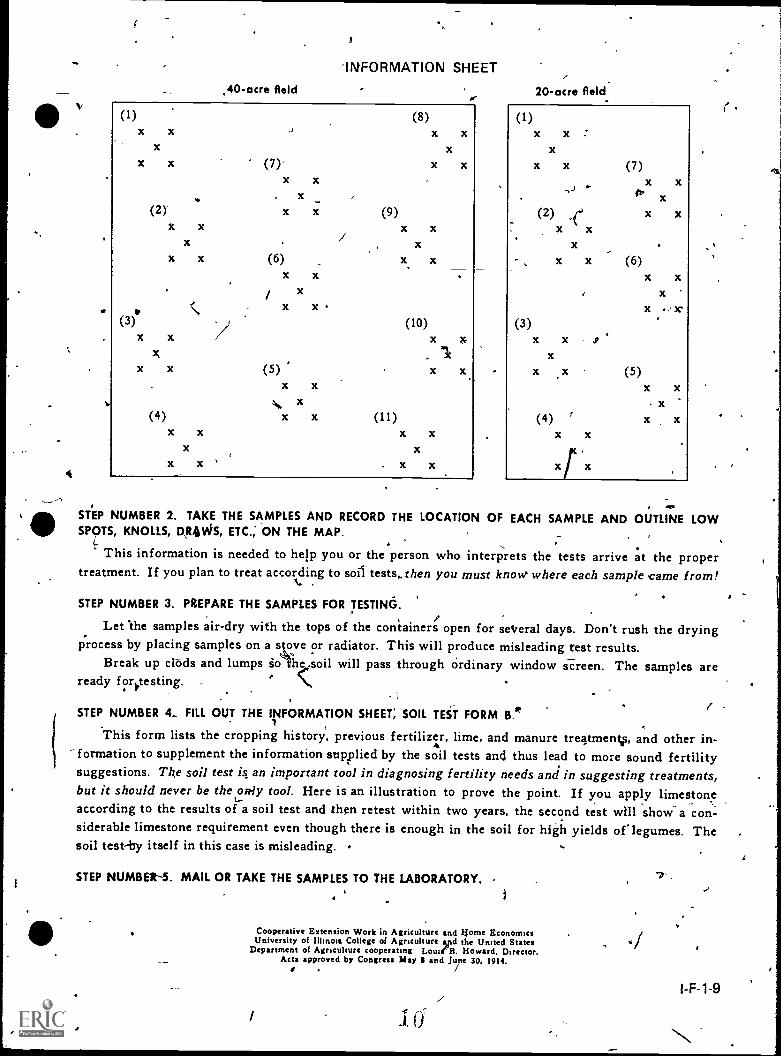
'INFORMATION SHEET.40-acre field
(1) (8)x x x x
x xx x (7)- x x
x xx
(2) x x (9)x x x x
x x (6) x xx x
x
x x
20-acre field
(1)x x
xx x (7)
x x
(3)x x is
x
x
x
se.STEP NUMBER 2. TAKE THE SAMPLES AND RECORD THE LOCATION OF EACH SAMPLE AND OUTLINE LOWSPOTS, KNOLLS, D,R4WS, ETC.; ON THE MAP.
This information is needed to help you or the person who interprets the tests arrive at the propertreatment. If you plan to treat according to soil-tests,. then you must know where each sample came from!
(
STEP NUMBER 3. PREPARE THE SAMPLES FOR TESTING.
Let The samples air-dry with the tops of the containers open for seiseral days. Don't rush the dryingprocess by placing samples on a stove or radiator. This will produce misleading rest results.
Break up clods and lumps so fhe.soil will pass through ordinary window screen. The samples areready f oye sting.
STEP NUMBER 4 FILL OUT THE INFORMATION SHEET; SOIL TEST FORM B.* (
This form lists the cropping history, previous fertilizer, lime, and manure treatments, and other in-formation to supplement the information supplied by the soil tests and thus lead to more sound fertilitysuggestions. The soil test is an important tool in diagnosing fertility needs and in suggesting treatments,but it should never be the
L.-oFrly tool. Here is an illustration to prove the point. If you apply limestone
according to the results of a soil test and then retest within two years, the second test will showa con-siderable limestone requirement even though there is enough in the soil for high yields of legumes. Thesoil test-by itself in this case is misleading.
STEP NUMBER-5. MAIL OR TAKE THE SAMPLES TO THE LABORATORY,
Cooperative Extension Work in Agriculture and Home EconomicsUniversity of Illinois College of Agriculture slid the United States
Department of Agriculture cooperating Lowell Howard. Director.Acts approved by Congress May and June 30, 1914.
. /
I-F-1-9
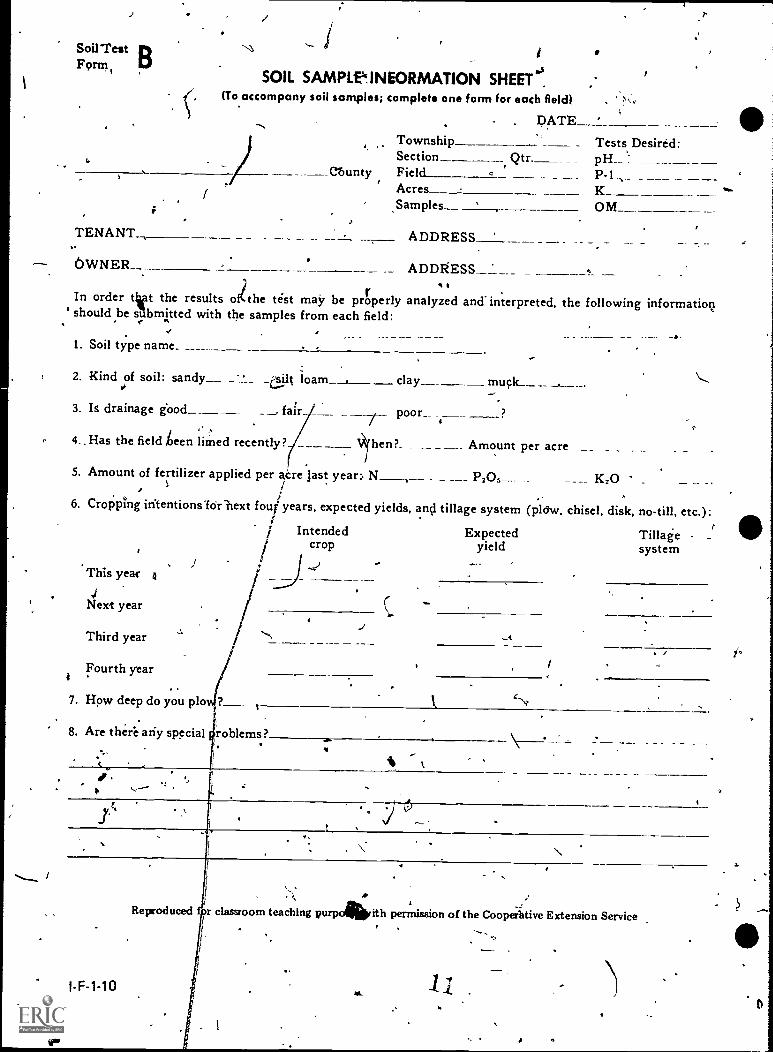
Soil Test DF9rtri
SOIL SAMPLeINEORMATION SHEET"$,(To accompany soil samples; complete one form for each fleldl ,
. DATE 'Township Tests, Desired:Section_ Qtr.
ebuntyAcres
,Samples OM
TENANT
OWNER
ADDRESS
_
In order let the results of?the test may be prto.perly analyzed and interpreted, the following informatioQI
' should be submitted with the samples from each field:
1. Soil type name
2. Kind of soil: sandy__: 2_ _c_dt loam_ clay__
3. It drainage good fair poor_
4.. Has the field been limed recently. hen ?_ _ _ ____ Amount per acre
5. Amount of fertilizer applied per are last year:, N/i6. Cropping ithentionsidrIext four years, expected yields,
)This year
Next year
IIntended
crop
.,.)j _:
Third year
K20 -
and tillage system (plCw. chisel, disk, no-till, etc.):rExpected
yieldTillage -
system
Fourth year
7. Hpw deep do you plo 4.-N
8. Are there any special roblems?4
.
il
I-F-1-10
1
I. ..
..../Reproduced ttr classroom teaching Rurpokith permission of the Cooperlitive Extension Service
I
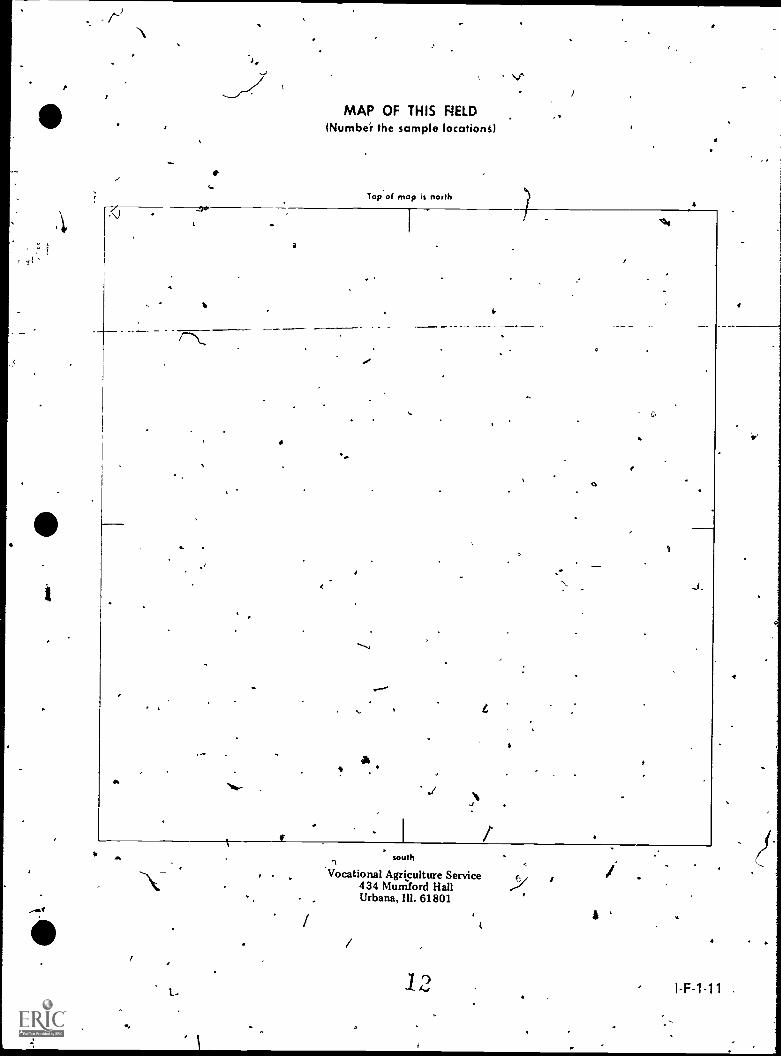
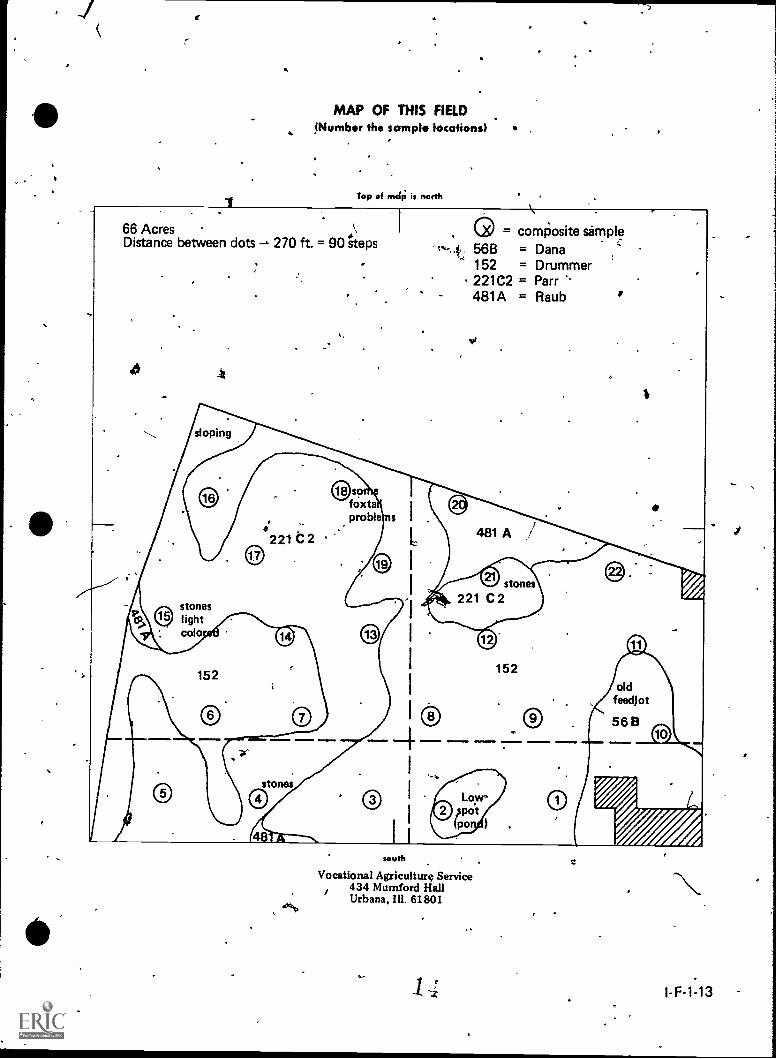
MAP OF THIS HELD(Numbei the sample locations)
Top of map is north
re.
A
./
a
J.
I
south
Vocational Agriculture Service434 Mumford HallUrbana, III. 61801
1
12 I-F-1-11
4
1
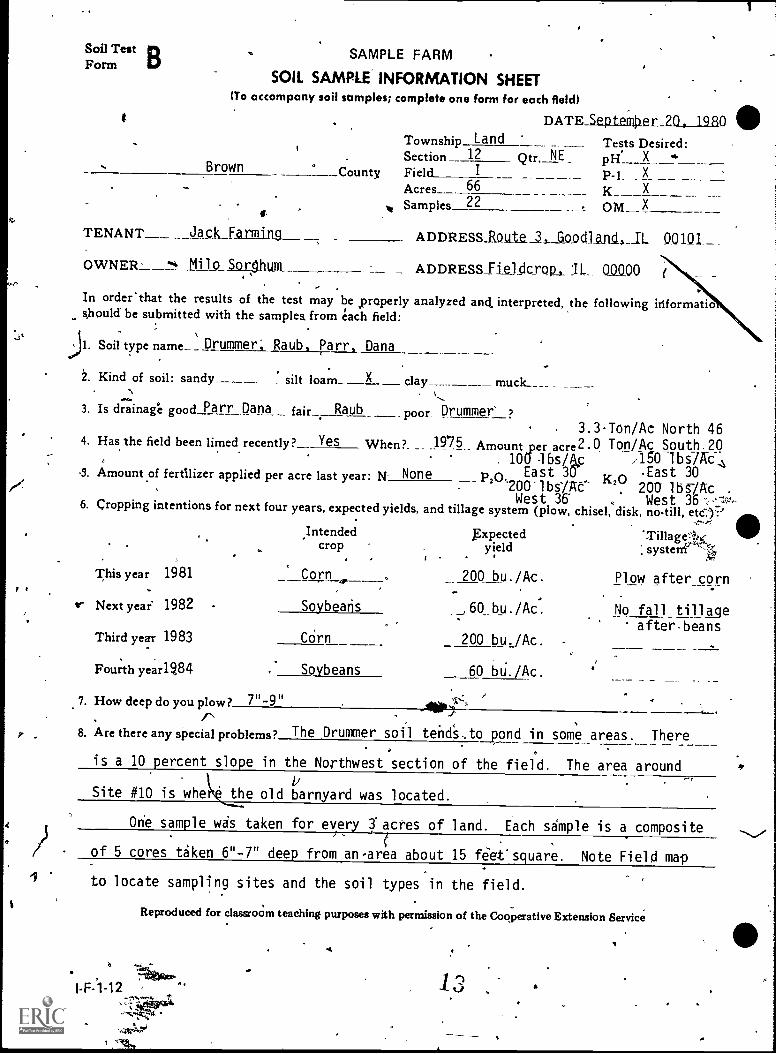
Soil Test B t. SAMPLE FARMForm
SOIL SAMPLE INFORMATION SHEET(To accompany soil samples; complete one form for each field)
R . DATE Stz.ptein Oer PO, 1980Township Land Tests Desired:
Brown .County
SFeiecltrt ion 12 Qtr. NE
P -1_ _X
Samples 22 ONT____X ---pH X *
- Acres 66 K X
, titw
TENANT__ __Jack Farming ADDRESS Routea,_ Go_odi_and,__IL 00101_
OWNER- ` Mil 0 .5_04.111111.. ADDRESS_Fieisicrop_, :U. 02100
In orderthat the results of the test may be properly analyzed and interpreted, the following irlformatioshould' be submitted with the samples from each field:
J1. Soil type name Drummer; Raub, Parr, Dana
. Kind of soil: sandy____ : silt loam_ X clay______ muck____
3. Is drainage good Parr Dana fair Raub poor Drummer_?3.3Ton/Ac North 46
4. Has the field been limed recently ? Yes When?, _ .197.5., Amount per cre2 -_0 Ton /Ac SOU th.20
None. 100 eirbashic ;150 1 bs7AC .4
5. Amount of fertilizer applied per acre last year: N- P2,0% Ix21/4F(-1 East 30" ,,,, East 30
. ZOO-lbs'/AC- , 200 lbs-/Ac .West 36" . West 36 ----lk,'-.6. Cropping intentions for next four years, expected yields, and tillage system (plow, chisel, disk, no-till, etc-.1?
,Intended gxpected .Tillage'l,K 111"A crop yield : system & '1,?
This year 1981 Corn , 200 bu./Ac. Plow after_corn
r Next year 1982 Soybeans ___,60_bu./Ac. No fall tillageafterbeans
Third year 1983 COrn 200 bujAc. _Fourth yea'084 Soybeans 60 bu. /Ac.
7. How deep do you plow? 7"-9"/8. Are there any special problems? The Droner soil tends:. to pond in some areas. There
is a 10 percent slope in the Northwest section of the field. The area around
Site #10 is whe the old barnyard was located.
One sample was taken for every 3' acres of land. Each sample is a composite
of 5 cores taken 6"-7" deep from an-area about 15 feet' square. Note Field map
to locate sampling sites and the soil types in the field.
Reproduced for classroom teaching purposes with permission of the Cooperative Extension Service
'Nitotto,I-F-1-12 °.
QtrkDi.,7844
MAP OF THIS FIELD(Number the :amok locations)
Top of nscip is north
66 AcresDistance between dots 270 ft. = 90 steps
sloping
kostones
lightcolo
152
;221 t 2
lJ I
$
foxtaproble s
stones
48
, = composite samplet---t 56B = Dana
152 = Drummer221C2 = Parr481A = Raub
/C@
481 A
152
1110
0/
oldfeedlot
56 B
south
Vocational Agriculture Service434 Mumford HallUrbana, Ill. 61801
14 I- F -1 -13
Information Sheet
SOIL TESTING LABORATORIES - ALPHABETICAL LISTING
January 12, 1979
List of laboratories submitting soil samples for check testing to theDepartthent of Agronomy, University of Illinois at Urbana-Champaign during 1978:
1. Agra Soil ServiceU.S. Hwy. 20Stockton, IL 61085 ,
JoDaviess County
2. Alvey Laboratoi-y
P.O. Box 261209 S. Clinton StreetCollinsville, IL, 62234 .<
Madison County
9. Eastern Illinois Soil Testing114 S. Chicago, Box 54Rossville, IL 60963Vermilion County
10. Edwards County Farm BureauSoil Testing Laboratory15 S. Fifth StreetAlbion, IL 62806
Edwards County
3. Belleville Area College 11.
Dust KickersSoil Testing2500 Carlyle RoadBelleville, IL 62221St. Clair County
4 'Brandt's Fertilizer Service,Co.P.O. Box 276Pleasant Plains, IL 62677Sangamon County
5. Bruck. Laboratory
Cyndy BruchBox 339, R.R. #16anville, IL 61326Putnam County
Edwards Soil Service601 N. Court StreetPontiac, IL 61764Livingston County
12. Effingham EquitySoil Testing LaboratoryP.O. Box 388Effingham, IL 62401 "'
Effingham County
13.
6, -Clark Co. Soil Testing Laboratory 14.R.R. #1 +4Marshall, IL 62441Clark County
7. Crop CheMical TestingR.R. #3, Box 147Apcola, IL 61910.
Coles County
wy.
15.
8. Cumberland Agri.. Laboratory 16.
P.O. Box 95Hazel Dell, IL 62430,Cumberland County
I- F -1 -14
4
Fayette County Farm BureauSoil Testing Laboratory112 N. Sixth StreetVandalia, IL 62471 .
Fayette County
Graymont Co-Op AssociationGraymont, IL 61743Livingston County
Greene County Farm BureauSoil Testing Laboratory319 W. Side of SquareCarrollton, IL. 62016Greene- County
Grundy County Farm BureauSoil Testing L4boratory116 E. WashingtonMorris, IL 60450Brundy County
.4
r
dr
17. Hamilton County SO'siTestingCourthouseMcLeansboro, IL 62859Hamilton County
18. Hancock Extension Soil LaboratoryP.O. Box 168Carthage, IL 62321Hancock County
19. Kaiser Chemical Co.
Soil Testing LaboratorySullivan, IL 61951Moultrie Couhty
20. Key Agricultural Services, Inc.114 Shady LaneMacomb, IL 61455McDonough County
11111111
21. LaSalle County_Fikrm BureauSoil Testing LaboratoryRt. 23 North, P.O. Box 8kOttawa, IL 61350LaSalle County
22. Macoupin County Farm BureauSoil Testing Laboratory210 N. BroadCarlinville, IL 62626MacOupin County
23. Marquise Farm Supply, Inc.Soil Testing LaboratoryBox 279Clinton, IL 61727DeWitt County
26. Midwest Soil Testing ServiceDaryforth, IL 60930Iroquois, County
27. Mississippi Valley Sill Testing1610 Keokuk, Box 96Hamilton, IL. 62341Hancock County
28.. Mowers Precision Crop CounselingService
107 N_FranklinToulon, IL .61483 ,
Stark County
29. Irwin- H. Parrill
Soil Te5.ting Laboratory'R.R. Bdx 159Edwardsville,'IL 62035Madison County
30. Pike County Farm BteauSoil Testing LaboratoryRoute 36 EastPittsfield, IL 62363Pike County
31. Randolph County Farm BureauSoil Testing LaboratorySouth St. Louis St., Box GSparta, Ib 62286Randolph County
321
1.
24. Meiners Farm Service, Inc. 33.
Soil Testing LaboratoryColfax, IL 61728McLean County
25. Mid-American, Pipeline Co. '(MAPC0) 34.Soil Testing LaboratoryR.J. #2Athens, IL 62613Menard County
4
Richardson Soil Testing LaboratoryR.R. #1
Centralia, IL 62001Marion County
Rich-Law Service Co.P.O. Box 403Olnipt 14 62450Richland County
Douglas H. Riley510,6. Euclid AvenuePrinceton, L .61356Bu'reau County
O
35. Scottland Soil LaboratoryScottland R. 4Chrisman, IL 61924 '
,Edgar County
36. Sharp's Soil Testing ServiceTyler ElevatorP.O. Box 337Elwood, IL 60421Will County
37. Max SlapeSoil Testing LaboratoryR.R. #1
Shelbyville, IL 62565Shelby County
38. Shields Soil ServiceR.R.
. Dewey, IL 6.1840
Champaign County
,39. Skiles Fertilizer ServiceSoil Testing LaboratoryP.O. Box 267Astoria, IL 61501
Fulton County
40. Southern Illinois Farm FoundationSoil,Testing LaboratoryP.O.Box 3354Vincea, IL 62995
Johnson County
.)
41. Sparks Soils Testing Laboratory122 S. McLean ,
Lincoln, IL 62656Logan County
42. Spoon River F.S. Inc.'Soil Testing LaboratoryEllisville, IL 61431
' Fulton Count*
43. Standard Laboratories'P.O. Box 1Z8Goodfield, IL 61742Woodford County
i-F-1-16
4
A4. Stringer's Soil ServiceR.R. #2
Assumption, IL 62510Christian County
45 Taylor Soil. Laboratory200 Meadow DriveMaCOmb, IL 61455McDonough County
46 Top Soil.Testing Service133' Maple Street
Frankfort, IL' .60423Will County
47 Twip County Service Co.Soil Testing Laboratory215 N. 12th StreetMurphysboro, IL 62966Jackson County
48 Vermilion County Farm BureauSoil Testing Laboratory431 N. VermilionDanville, IL. 61832Vermilion County
49. Warren County Farm BureauSoil Testitg Laboratory,1000 N. MatR StreetMonmouth, IL. 61462Warreounty:
50: White tounty Farm Bureau'Soil Testing Laboratory304 E. Robinson --4(-
Carmi, IL 62821White County
51. Whiteside County Farm BureauSoil Testing Laboratory100 East KnoxMorrison, IL 61270
WhitesideCodnty
52. The Zelle6,Laboratory2808 W. 4th StreetDixon, IL 61021Lee County
1 '7
INFORMATION SHEET
SUGGESTED INSTRUCJIONS FOR OBTAINING
SOIL SAMPLES.FROM LAWNS, GARDENS AND GROUND BEDS
1. Obtain at least one composite sample for each soil difference. Differences can be due to
texture_slope;color, drainage or past treatment. If a "probliM area" is sampled, keep' it
separate from the other composite samp es.
2. For a composite sample obtain 10-15 samples from each area. Samples from individual
ds should not be mixed. Take samples a depth of 6 inches in floWerbeds and gardenss
and 4 inches in lawns.
3. Mix the.soil for the composite sample and take out about on6.,pipt. Label each composite
sample with a number and name. Keep a record of the area from which,the samples came
and fill out the information sheet "B" as completely as possible. Also include thefollow-,
ing:
a. The size.of area (dimensions or number of square feet):
b. How many years has garden (or lawn or flowers) been in this spot?
e. Do you have manures, compost, leaves or other organic material available each year?
(Yes or No) If so, how much?
d. What particular difficulties do you have with plant growth in this area?
sr
1"I-F-1-17
INFORMATION SHEET
SUGGESTED PR6CEDURES FOR SAMPLING GREENHOUSE SOILS
A. Stockpiles of Soil Mixes
1. Take 10=15 samples from various locations in the stockpile and mix to obtain one..../
composite sample.
2. Do not sample the surface. (Salt content mpy be higher due to evaporation.)
3. Sample to a depth of 10-12 inches.
I
B. Potted Crops
1. Use 10-15 pots to make a cross-section of a composite sample..
.2. In large pots a probe can be used with minimum damage to the root system. In small
pots the root ball will need to be removed from the pots and a sample of soil removed
from the top of the bottom to_theroot ball where the roots are actively growing. The
//
I
I-F-1-18 ,
soil can be replaced by soil stock mix.
a'
e *
.

4
WORKSHEET 1
SOIL SAMPLING
1. List four reasonsor taking soil samples:
a.
b.
c.
d.
2. What does a soil test show?
a.
b.
c.
3. What other techniques are used to evaluate fertilizer responses?
a.
b.
d.
4. What factors influence the number of samples taken from an area or field?
e.
9.
a.
b.
c.
d.
e.. A
a
5. Describe some pitfalls to avoid in obtaining a good soil sample.
a. e.
. b. f.
c. 9.
d.
4.0
.
6. Describe the procedure to follow when collecting atoil sample..
a.
b.
c.
d.
e.
f.. a
g'
7. Why is information about past histo included with the sample?,
a.
b. 40'
8. When and how often should a soil samplt be taken?
a.
b.
9. What soil testing services are locey available?
a.
b.
c.
4,
10. What equipment isbeededdo take a soil sample?
-J-F-1-20
.a. ... c.
. e... a
1
41,
s I11. Place a small number where each coirnposie sample would be taken in the 20 acre plot below.
a'0
e-
A
-.-12. Sketch a diagram of how you would obtain one composite sample.,
O
22
.e
I
. ,
1-F-1-21.
011
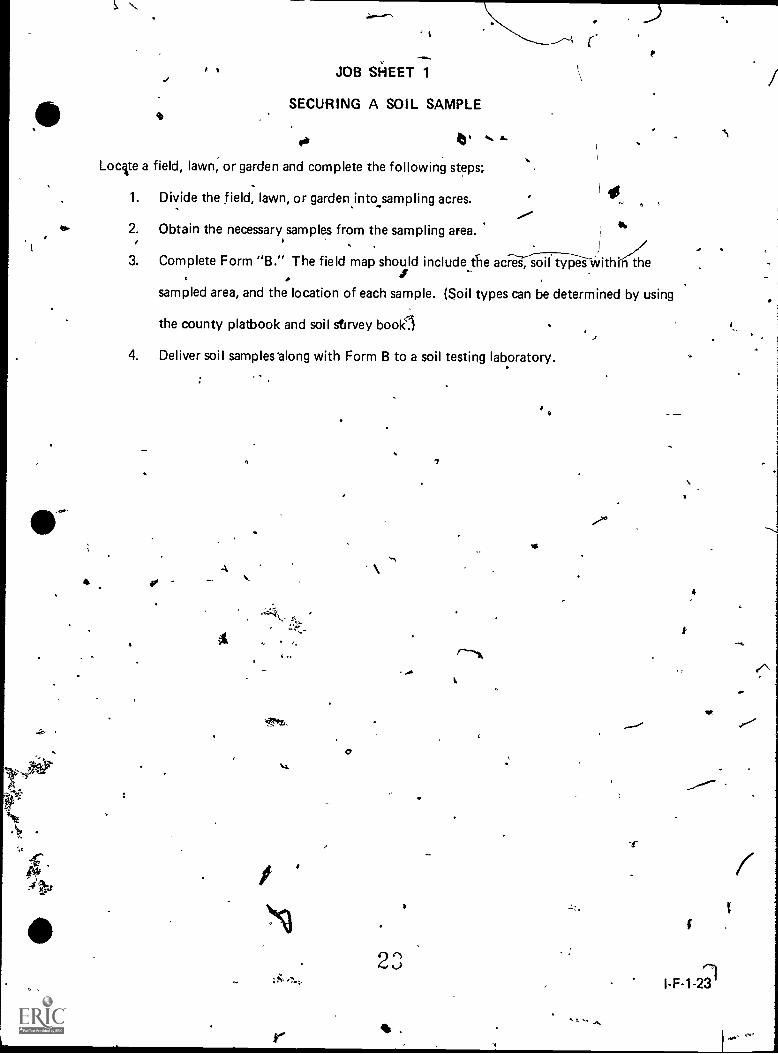
Locite a field, lawn, or garden and complete the following steps;
1. Divide the field, lawn, or garden into sampling acres.
JOB SWEET 1
SECURING A SOIL SAMPLE
2. Obtain the necessary samples from the sampling area.
Complete Form "B." The field map should include tie
1
sampled area, and the location of each sample. (Soil types can be determined by using
the county platbook and soil stirvey bookl
4. Deliver soil samples along with Form B to a soil testing laboratory.
4 y
A
r
2
,
-r
4
I
I-F-1-23
ON.
6
1 9
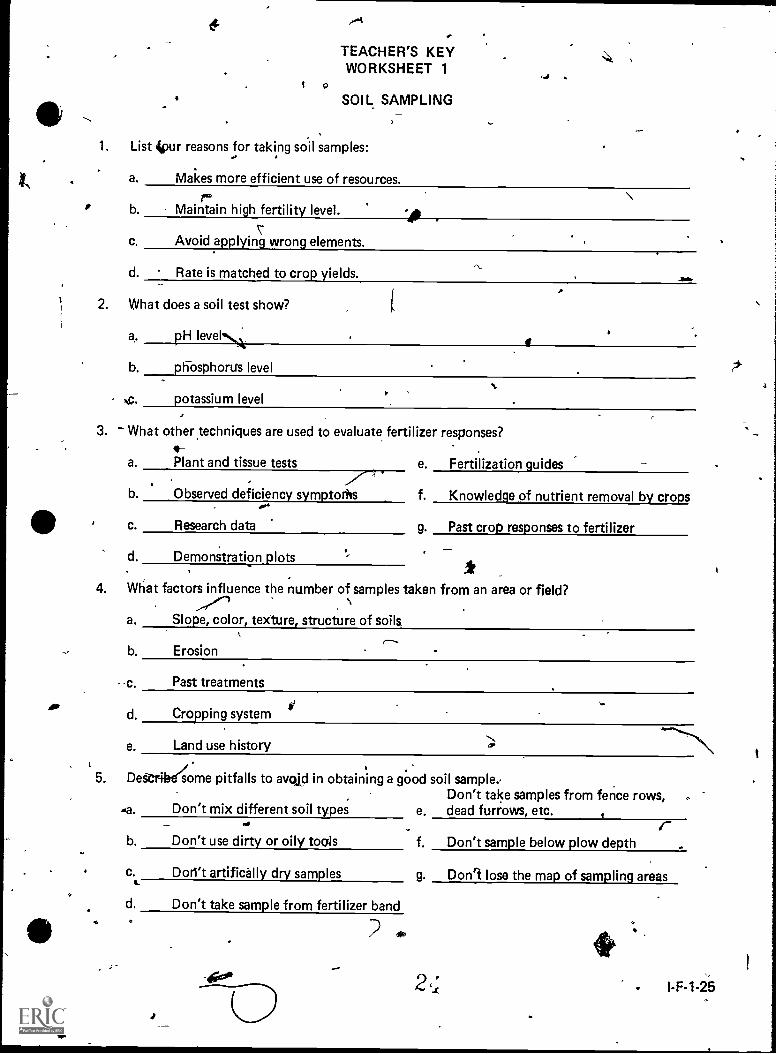
TEACHER'S KEYWORKSHEET 1
SOIL SAMPLING3
1. List 4pur reasons for taking soil samples:..
ii. . a. Makes more efficient use of resources.r0 b. Maintain high fertility level.
011
c. Avoid applying wrong elements.
-40
d. Rate is matched to crop yields.
2. What does a soil test show?
a. pH level
b. phosphorus level
L
c. potassium level
3. What other techniques are used to evaluate fertilizer responses?
a. Plant and tissue tests e. Fertilization guides
b. Observed deficiency symptoris f. Knowledge of nutrient removal by crops
c. Research data g. Past crop responses to fertilizer
d. Demonstration plots
4. What factors influence the number of samples taken from an area or field?
a. Slope, color, texture, structure of soils
b. Erosion
c. Past treatments
d. Cropping system
Land use history
5. Der-111,4ome pitfalls to avoid in obtaining a good soil sample.,Don't take samples from fence rows,
Don't mix different soil types e. dead furrows, etc.
b. Don't use dirty or oily 'rods f. Don't sample below plow depth
c. Don't artifically dry samples g. Don't lose the map of sampling areas4.
d. Don't take sample from fertilizer band
2so,
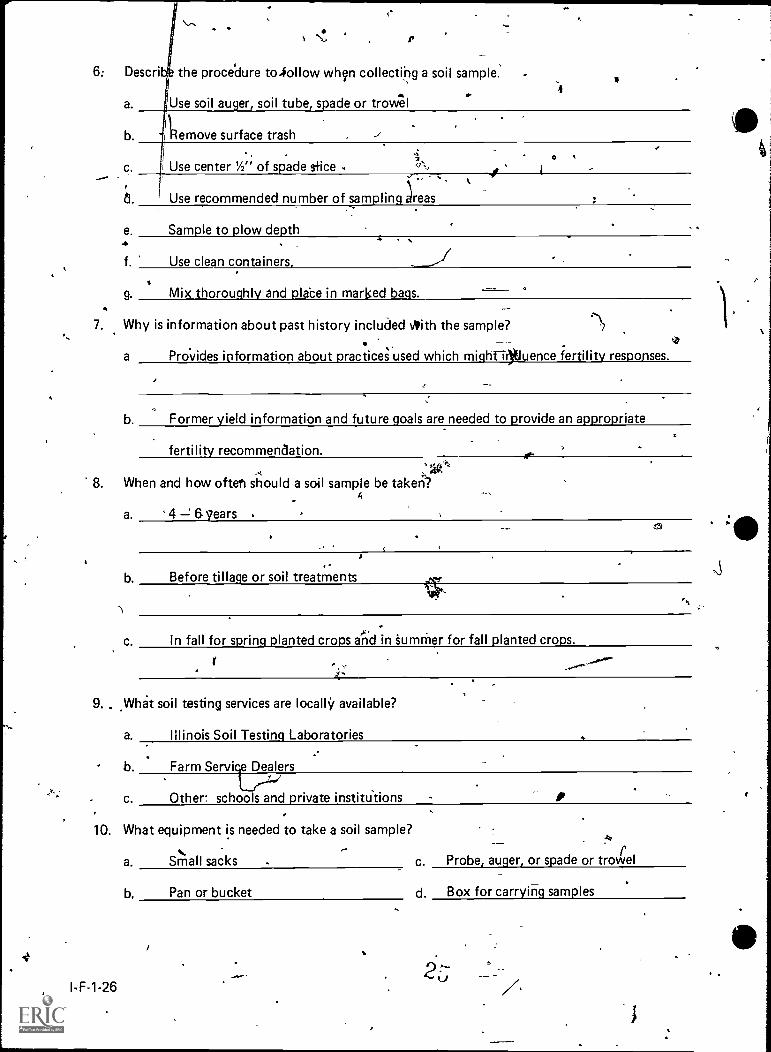
6: Descri the procedure to.#ollow wh9n collecting a soil sample.
a. Use soil auger, soil tube, spade or trowel
b. Lemove surface trash
c. Use center 1/2" of spade sfice
8. Use recommended number of sampling reas
e. Sample to plow depth
f. Use clean containers.
A
g. Mix thoroughly and plebe in marked bags.
7. Why is information about past history included with the sample?
a Prov ides information about practices used which migh-tirYaluence fertility responses.
b. Former yield information and future goals are needed to provide an appropriate
fertility recommendation..m
8. When and how often should a soil sample be taken?4
a. 4 -2 6 years Aik
b. Before tillage or soil treatments
c. In fall for spring planted crops and in 'summer for fall planted crops.
9.. What soil testing services are locally available?
a. Illinois Soil Testing Laboratories
b. Farm Service Dealers
c. Other: schools and private institutions
10. What equipment is needed to take a soil sample?
a. Small sacks c. Probe, auger, or spade or trowel
b. Pan or bucket
I-F-1-26
d. Box for carrying samples
_
/ tt
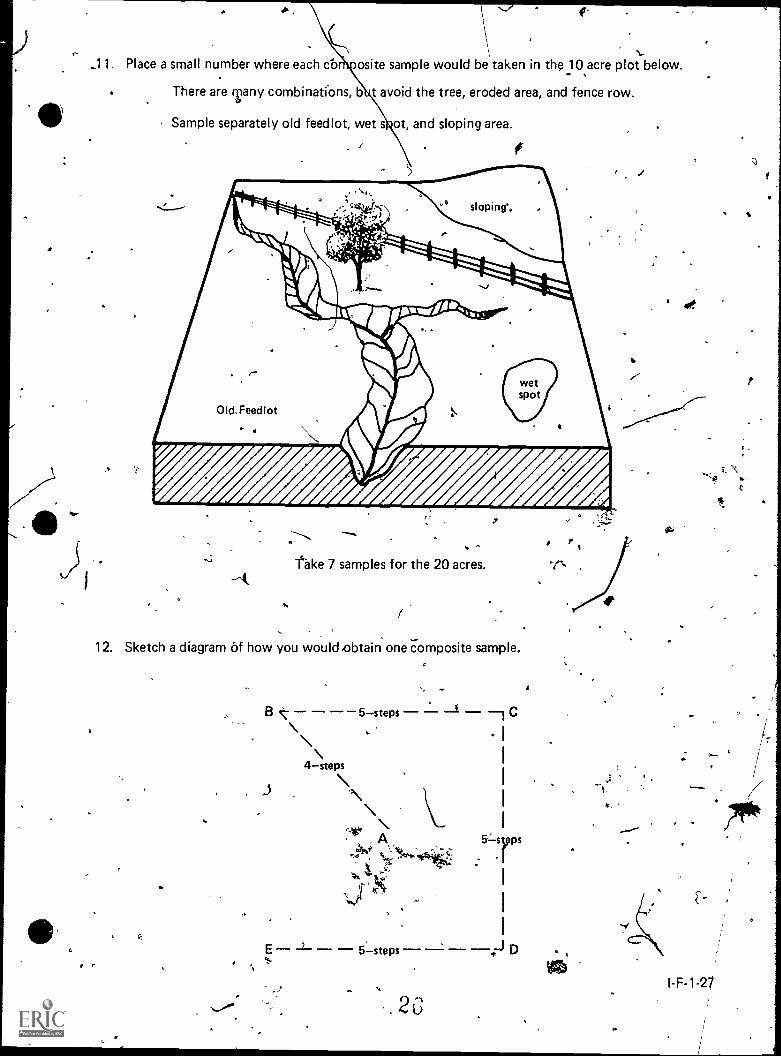
_11. Place a small number where each co osite sample would be taken in thp 10 acre plot below.
There are any y combinations, bit avoid the tree, eroded area, and fence row.
0 0
Sample separately old feedlot, wet s ot, and sloping area.
sloping',
. -'take 7 samples for the 20 acres.
12. Sketch a diagram of how you would obtain one composite sample.C
B 5steps C
4steps
A 5 -sups
0--
E 5steps D
. 2G

TRANSPARENCY DISCUSSION GUIDE
SOIL TESTING AND FERTILITY
(61.1 N.WHAT A SOIL TEST SHOWS
CNEM1C4L DETERMINATIONS ARE MADE FOR:
..J.,PH (SOIL REACTION)2. PHOSPHORUS
Pt TEST- avall. to plants
P2 TEST- total amt. In mala POTASSIUM
A GENERAL EVALUATION IS MADE OF:
I. SOIL TEXTURE2. SOIL COLOR3. ORGANIC MATTER CONTENT
TOOLS OR TECHNIQUES FOREVALUATING FERTILIZER
RESPONSES
I. Pan AND MUM TESTS
3. °SUMP DEVICIENCYSYMPTOMS
S. RISEARCN DATA
4. DEMONSTRATION PLOTS
S. FERTIL/ZAT/ON Gurus
6. anowuroor or arraign usrartaREMOVAL ST CROPS
7. PAST CROPPING NISTORT ANDRESPONSES TO Invinix
INFORMATION FOR COLLECTINGSOIL SAMPLES
KT 1111111OVI WITONIS algO IMINISLATION IMMO/ROO TOUR WOCIATIAML opawara6 MOCK COwimp* gompi ISAAC 1144. TIVIT MK, WWIIWOK PLANTOND
a
6
1. A soil test is a chemical test to determinethe amounts of various plant nutrients presentin the soil in forms that are available to plants.Soil testing can be done in a laboratory, orwith soil test kits in the field. Each type ofsoil test has its advantages and disadvantages.
.a. The soil test kits, commonly called"quick, .rapid, or indicator" tests, arefaster; and the testing can be done in thefield in a few minutes. These tests;however, are not as accu ate as a lab-oratory soil test.
b. The laboratory soil test takes moretime because it,is more precise.Representative good samples are es-sentiat to relivble soil tests.
j2. In addition to t elexperience of a farmer,there are a num of other tools or techniquesavailable for determining nutrient require-ments. Theee are listed on the transparencyand the advantages and disadvarpges of each-can be discussed
,4 r
0
3. An important item that must accompanythe soil sample is the information sheet. Thissheet, properly completed, aids in the inter-pretation of the soil test and in making fer-tilizer recommendations. The sheet should becompleted and sent with the soil samples. Thetime spent giving specific answers is well spent.
27I:F-1-29

DIRECTIONbFOR SAMPLING
DIVIDE YOUR FIELD INTO AREAS FOR SAMPLINGACCORDING TO THE DIFFERENT SOIL CONDITIONS
PRESENT
.111
MOM
11*ot/04
I awe
SAMPLING PRECAUTIONS
4. For fields that appear to have only onekind of soil or that have been'cropped, fer-tilized, or limed the same, you may collectsamples as shown by the diagram on thetransparency. If there are soil differenceor problem area, you -may waht to alsosample these areas. A few extra sampletake little time or money but may give a muchbetter picture of the fertility status of thefields. Fields are sampled only once in 4 to8 years.
5. Over a period of years, a farmerlikely to invest several thousand dollars on
AVOID SAMPLING FROM UNUSUAL AREAS, OR SAMPLE the.basis of results obtained from soil testsTHEM SEPARATELY in a 40-acre field. It is easily possible to
make 1-lundreds of dollars for an extra hourspent in careful sampling and recording thelocation of each sample. Avoid areas thatare not representative or that will give inac-curate results. The best laboratory test illkthe world made on samples that are carelesslytaken are not only worthless but may lead youto spend thousands of dollars for plant nutri-ents that you do not need while you neglect tobuy nutrients that your fieldsclack.
LIMED AREASDEAD FURROWS(
WIND BREAKSSNOW FENCES
MANURtO SPOTSWET SPOTS
ROADSNEAR TREES
ERODED AREASMUCK AREAS
LABEL CARTONS AND DRAW MAP
DIAGRAM YOUR FIELD THE WAY YOUSAMPLED IT BEING SURE
THE SAMPLED AREASARE LABELED THE SAME
AS THE SOIL SAMPLECARTONS
MAKING A COMPOSITE SAMPLE
C
. I-F-1-30
EACH INDIVIDUAL SAMPLE IS
A MIXTURE OF 5 SMALL,
SAMPLES TAKEN WTRIN A
SQUARE ROD.
6. Take the samples and record the locationof each and outline low spots, knolls, draws,etc., on the map. This information is neededto help you or the person who interprets thetest to arriveat the proper treatment. If youplan to treat according to soil tests,..then youmust know where each sample came from.
O
7. The reason for taking theSe five smallsamples is to 'make certain that the wholesampl6 does not come from within a band offertilizer applied in a previous year.
Eleven samples are suggested for a 40-acre field, seven for 20 acres, and four for10 acres. This number is needed iri order tooutline areas with different fertility status orto unseen soil differences in previous fer-tilizer or limestone applications or croppingsystems.
28
0,
SAVE A HANDFUL OF SAMPLE (.-\
PLACE A HAM RA.OF SOIL INTO A CARTON AND LABEL
WITH ITS SAMPLE NUMBER ANDOTHER INFORMATION CALLED FOR
FILL OUT INFORMATION SHEET
TILL OUT ?NC ISMANATION SHUT GIVING AS MAI-17nPACTS AS YOU OAS ABOUT
PREVIOUS CROPCROP TO SE GROWN
LAST LIMING DATE AND RATEWHETHER MANURE WILL SE USED
DEPTH OF PLOWINGSOIL TYPE
TYPE OF DRAINAGEWU/ GOAL
SPECIAL MUMS OR CONDITIONS
TOR LACK SAM /LC ARCA
SAMPLES SECURELY
WRAP SAMPLESSECURELY AND MAILTO THE SOIL TESTINGLABORATORY
. I-F-1-32
NSW
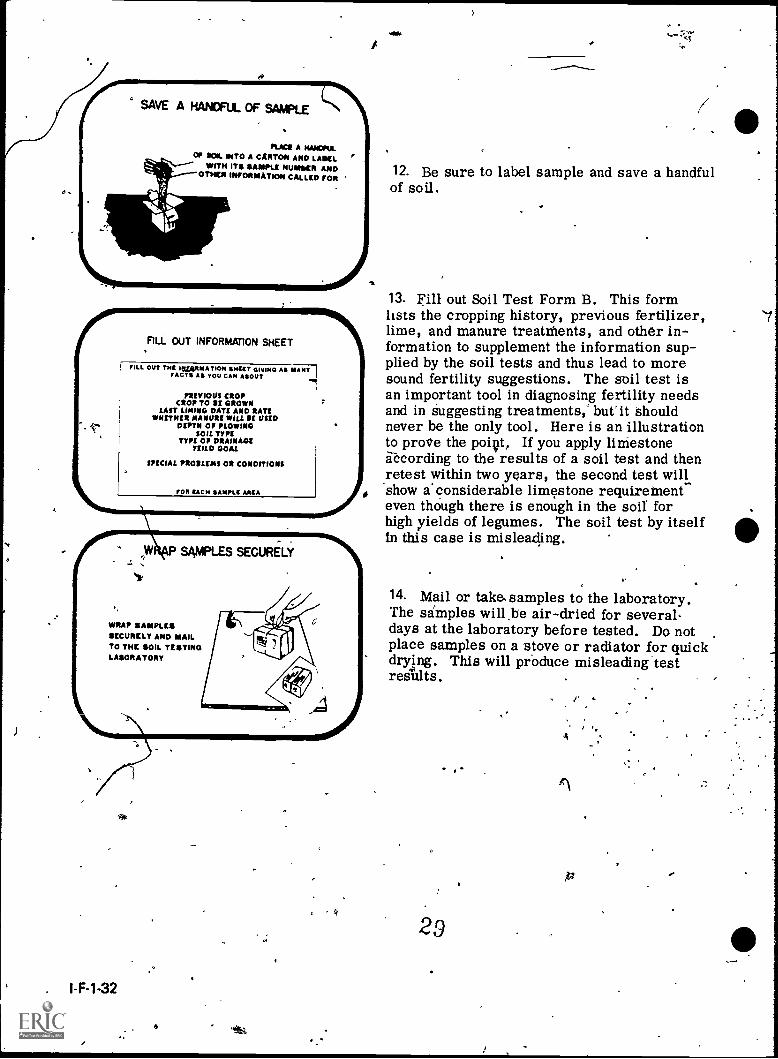
12. Be sure to label sample and save a handfulof soil.
13. Fill out Soil Test Form B. This formlists the cropping history, previous fertilizer,lime, and manure treatifients, and other in-formation to supplement the information sup-plied by the soil tests and thus lead to moresound fertility suggestions. The soil test isan important tool in diagnosing fertility needsand in suggesting treatments,' but'it Shouldnever be the only tool. Here is an illustrationto prove the poivt, If you apply limestoneaccording to the results of a soil test and thenretest within two years, the second test willshow a.considerable limestone requireinenteven though there is enough in the soil forhigh yields of legumes. The soil test by itselfIn this case is misleading.
14. Mail or take. samples to the laboratory.The samples will.be air-dried for several'days at the laboratory before tested. Do notplace samples on a stove or radiator for quickdrying. This will produce misleading testresults.
29
TEACHER'S KEYSAMPLE TESTQUESTIONS .
COLLECTING SOIL SAMPLES
1. Explain in writing two reason for testing soil.
a. More efficient use of resources.
b. Maintain high fertility.
c. Avoid applying wrong elements.
d. Rate is matched to crop yields..
2. Select from the list below, three major items forwhich soils are tested. Circle the correctanswer.
.a. Nitrogen e. Manganese
b.- Calcium 0 Phosphorus
G pH g. Iron
d. "Zinc hO. Potassium
3. Name four techniques, other than soil sampling, which are used to evaluate fertilizerresponses.
a. Plant and tissue tests Fertilization guides
b. Observed deficiency symptoms Knowledge of nutrient removal
c. Research data
d. Demonstration Plots
Past responses to fertilizer
.4. Place an "X", in the blank to select the correct procedure to follow for collecting a represent-
ative soil sample.
a. Ten samples should be taken in each field or area.
b. Samples should be taken from soil below eight inches in cropland and pasture land.
c. Approximately one quart of mixed 'Soil should be placed in a suitable container forsending to a soil testing laboratory.
,
X d. Take the samples and record to the location of each and outline low spots, knolls,draws, etc. on the map.
5. Select from the list below, the two areas from which soil samples shoulcPtibt be taken. Circlethe sites.
a. bottomland
fence rows
c. pasture land
sak upland
e. wet spots
f. acid soils
roads and lanes
3o I-F-1-33
J
6. Name two,items of information that should be submitted on the information sheet with thesoil samples.
4/a. Previous brop. Last liming date and rate
Crop tttbe grown Soil type If manure is usedb. Speciat'problems Yield goal Depth of plowing
70 Why is it not necessary to analyze soil every year?
It takes aberiod of years for the soil fertility levels to adjust. There is not notableyearly changes.
8. Why is proper identification of the soil samples important?
Different fertilizer rates may be recommended for different samples.
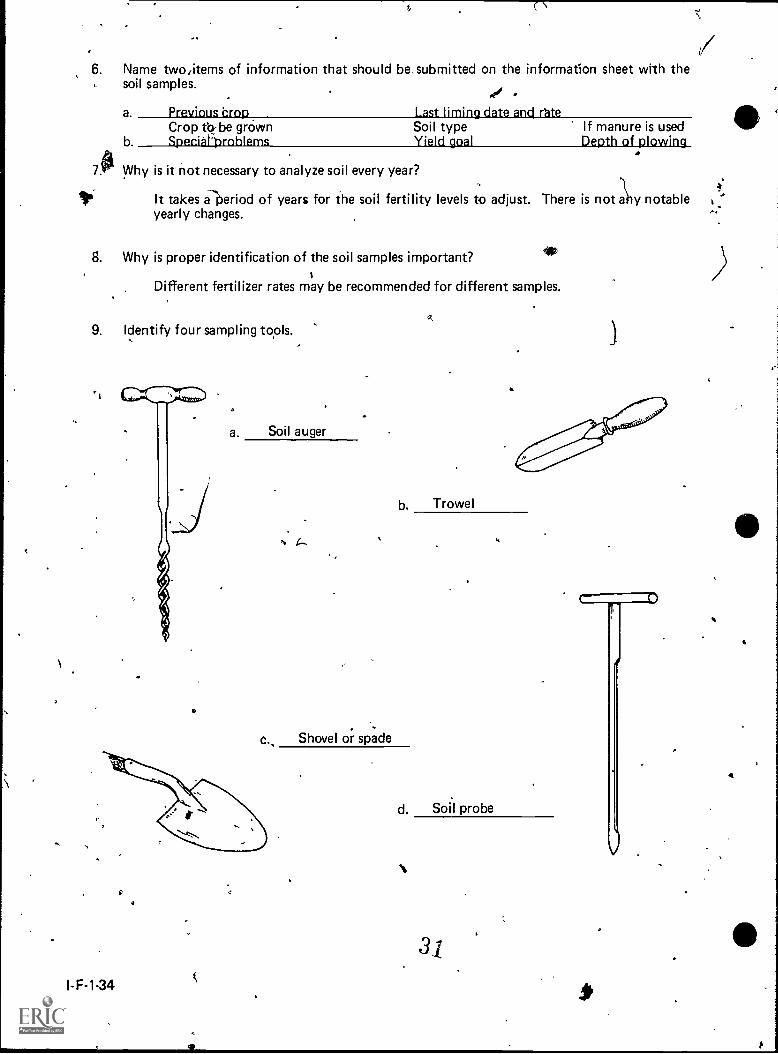
9. Identify four sampling tools.
a. Soil auger
c., Shovel or spade
I- F -1 -34
b. Trowel
d. Soil probe
c- 0
4

N
t_10. Name two locationsin _Illinois where soil samples canbe sent for testing.
a. Illinois Soil Testing Labt.
b. Farm Service Dealers
11, 6iftthe drawing below, complete the following tasks:,w.
:: a. Divide a field 'into sampling areas. The total field size is 80 acres.
b. Place a small number on each sampling ite in one o'the divided areas.
Area should be divided into 2-40 cr fields.Avoid eroded area.Sample old feedlot, low spot, and sloping area separatily.Use 11 sampling areas/40 acres.
,,
/
UNIT F: SOIL SCIENCE AND CONSERVATION OF NATURAL RESOURCES
PROBLEM AREA: APPLYJ.NG SOIL SAMPLE TEST RESULTS
SUGGESTIONS TO THE TEACHER:
This prbblem area is designed for use with ninth grade or beginning students enrolled in artagricultural occupations program. The recommended time for teaching this problem area is duringthe fall or early winter. The estimated time for teaching/his problem area is 3 to 5 days dependingon how much time the teacher wishes to spend on discussion and conducting the suggested exer-cises. The materials in this problem area were selected and written with the following assumptions:
1. That agriculture students should be able to interpret and explain soil sample tests results.
2. That agriculture students should be able to recommend fertilizer rates by using soil sampletest results. %
The instructor is encouraged to conduct a local search to locate other supplementary materials.
The items in this problem area are fOreference or modification as the teacher adapts these mate-
rials to his/her local situation.
CREDIT SOURCES:
These materials were developed through a funding agreement, R-33-21-D-0542-388 with the
Illinois State Board of Education, Department of Adult, Vocational and Technical Educatione"Research and Development Section, 100 North First Street, Springfield, Illinois 62777. OpkrOnsi'
expressed in these materials do not reflect, nor should they be construed as policy or opinion of th%
State Board of Education or its staff.
The teacher's guide, worksheets, and sample test questions were developed by Jerry Pep0e,
Department of Vocational and Technical Education, University of Illinois. The transparency mas-
ters and transparency discussion guides and soil test report forms were prepared by Vocational
Agriculture Service, University of Illinois. The information. sheets "Optimum pH Range for Vege-
table Crops" and "Soil Test Interpretation," were developed by Horticulture gepartment, Vege-table Crop Division, University of Illinois. Suggestions and guidance in the development of these
materials were provided by the Rural Core Curriculum Pilot Test Teachers.
a
I-F-2-1
Ave
TEACHER'S GUIDE
I. Unit: Soil science and conservation of natural resources.
II. Problem area: Applying soil sample test results
Ill. Objectives: At the close of this problem area the students will:
1. Be able to determine the fertility needs of various soils based on soil sample analysis4
results.
2. Understand the impbrtance Pfsoil pH.1
3. Understand the primary functions and, limitationi of soil tests. 1
IV. Suggested interest approaches:
1. Have students interpret results from the soil tests results of their own farms or S.O.E.projects.
2. Have a fertilizer dealer discuss and help interpret the soil test results.
3. Lead a discussion on the problems of using too much or too little fertilizer jn a field.
V. Anticipated problems and concerns of students:
1. How much fertilizer do I need to put on my field? Lawn? Houseplants?Vegetables?
2. What does N, P, and K mean?
3. What does pH refer to in a soil?
4. How does pH affect cropyields? .o
5. How do I determine the amount of fertilizer to use from these results?
6. How often do I need to take soil tests?
7. WITat are some limitations of soil tests?
VI. Suggested learning, activities and experiences:
1. Have class read Soil Test Forms D-2, D-4, and Soil Treatments Based on SoilTests. Record tentative answers to the problems and concerns identified by the class.and instructorSr.
°
2. Present and discuss transparencies 1 through 9 as students complete Worksheet 1(soil pH).
3. Hand out Worksheet 2 (soil phosphorus and potassium). Show transparencies 10 0.through 20:
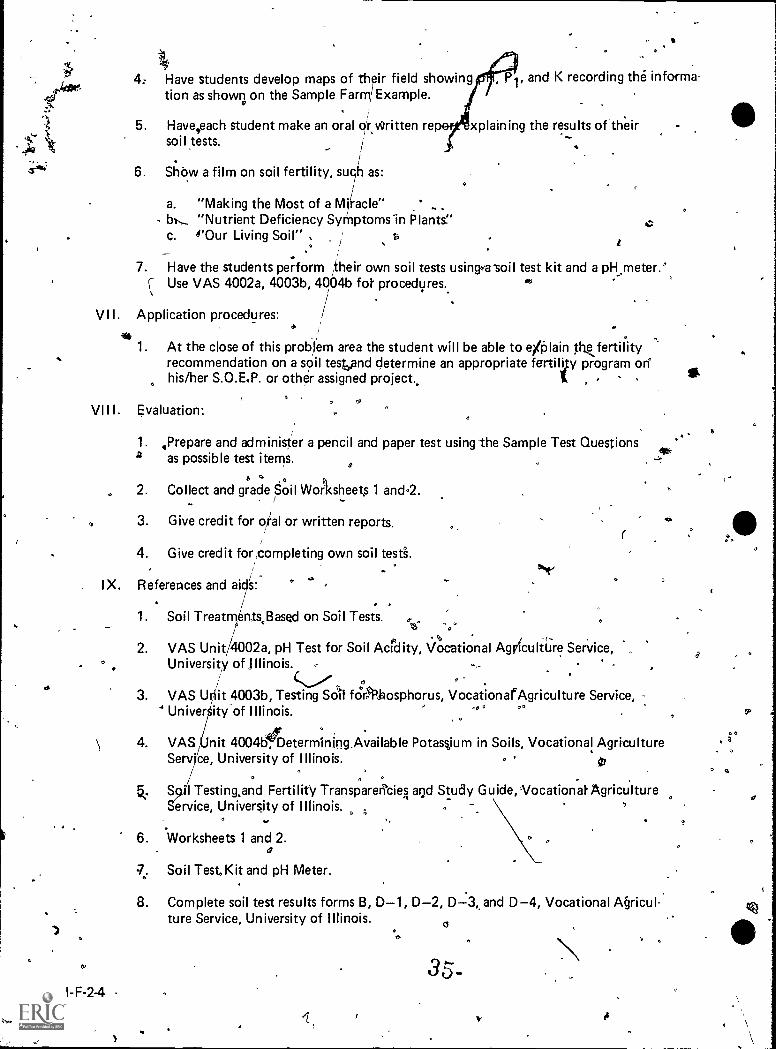
4:
5.
.4\1.";,7.3- 6.
7.
Have students develop maps of their field showing , P1, and K recording the informa-tion as show; on the Sample Farm l Example.
Have,each student make an oral orstkritten re xplaining the results of theirsoil tests. /
Shaw a film on soil fertility, such as:
a. "Making the Most of a Miiacle"- kw_ "Nutrient Deficiency Symptomsin Plants"
c. "Our Living Soil" ,
Have the students perform their own soil tests usinwa.soil test kit and a pH,meter.'C Use VAS 4002a, 4003b, 4004b fol. procedures. ""
VII. Application procedures:
1. At the close of this problem area the student will be able to e/Plain theiertilityrecommendation on a soil testand determine an appropriate fertility program onhis/her S.O.E.P. or other assigned project..
VIII. Evaluation:
1. ,Prepare and administer a pencil and paper test using the Sample Test Questionsa as possible test items.
2. Collect and grade Soil Worksheets 1 and-2.
3. Give credit for oral or written reports.
4. Give credit for,completing own soil tests.
IX. References and ai/s:
1. Soil Treatrr ents.Based on Soil Tests.Ta°
ct,
2. VAS Unit 4002a, pH Test for Soil Acidity, Vocational AgvicultUre Service,a University of J llinois.
°
3. VAS Urilit 4003b, Testing Soil fOAiosphorus, VocationafAgriculture Service,
Ne"
Univer ityof Illinois. 0
4. VAS Unit 4004b4)etermining.Available Potassium in Soils, Vocational AgricultureService, University of Illinois. ,
°
S 1 Testing,and Fertility Transparerkiel and Study Guide,VocationatAgricultureervice, University of Illinois.
6. *Worksheets 1 and 2.A
W. Soil Test Kit and pH Meter.
8. Complete soil test results forms B, D-1, D-2, D-3 and D-4, Vocational A§ricul-ture Service, University of Illinois.
I-F-24
0
a
e
.
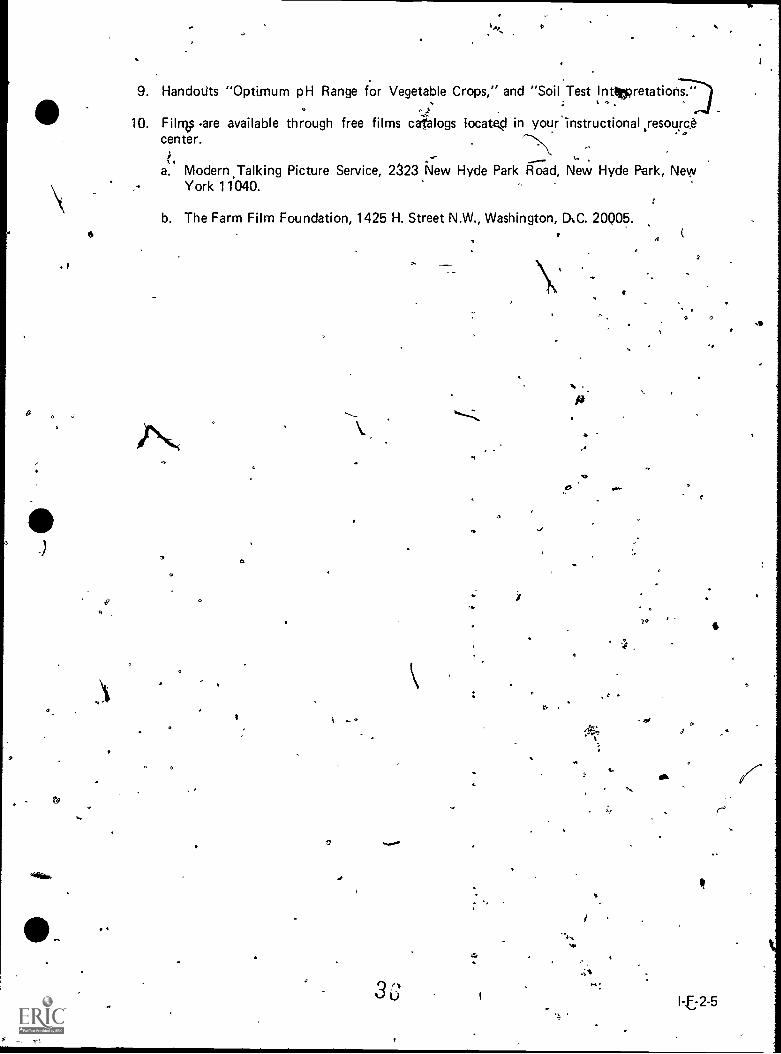
9. Handouts "Optimum pH Range for Vegetable Crops," and "Soil Test Inttepretations."
10. Films -are available through free films catalogs locatekd in your instructional .resourc.6center.
a. Modern ,Talking Picture Service, 2323 New Hyde Park Road, New Hyde Perk, NewYork 11040.
b. The Farm Film Foundation, 1425 H. Street N.W., Washington, D.C. 20Q05.
3
.4
4,
3
we.
.
3
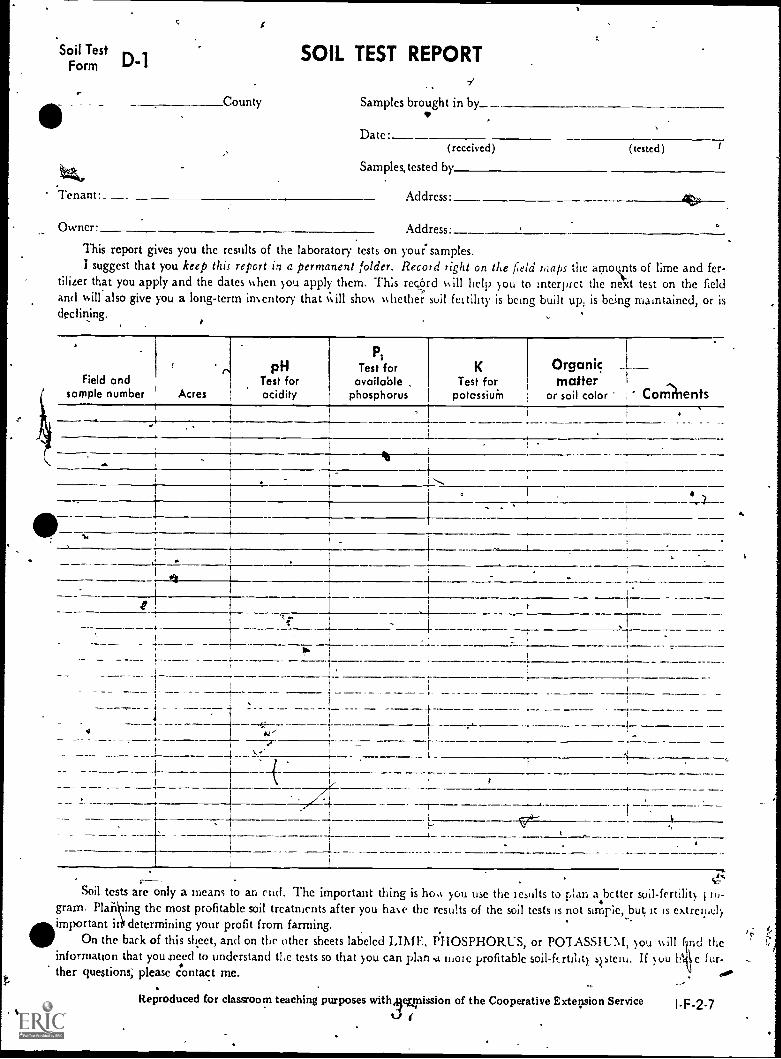
Soil Test r.%
Form Id- I
Tenant
c g
County
SOIL TEST REPORT1
Samples brought in by.
Date(received) (tested)
Samples, tested by
Address
Owner Address
This report gives you the results of the laboratory tests on your samples.I suggest that you keep this report in a permanent folder. Record right on the field maps the amounts of lime and fer-
tilizer that you apply and the dates hen you apply them. This record ill help you to interpret the next test on the fieldand will also give you a long-term inventory that Nill shcAN nether soil fertility is being built up, is being maintained, or isdeclining.
Field andsample number Acres
pHTest foracidity
P1
Test foravailable ,
phosphorus
KTest for
potassiuM
Organic _
matteror soil color ComIents
-11,
4--1---
1
1 i TT^r ...
1-r---
-I +--i !
1
4, I
4 1 *.vI
1.7-
i
it
Soil tests are only a means to an cud. The important thing is how you use the results to plan abetter soil-fertility } ro-
"'important it determining your profit from farming.gram. Plan ing the most profitable soil treatments after you haNc the results of the soil tests is not sirnrie, but it is extreipely
On the back of this sheet, and on the other sheets labeled LIME, PHOSPHORUS, or POTASSIUM, -you ill f nd theinformation that you.need to understand the tests so that you can plans more profitable soil- fertility ssteiii. If you h' e fur-
.fur -
ther questions; please contact me. V. .00t,
Reproduced for classroom teaching purposes withAiegnission of the Cooperative Extetpion Service
A(
I-F-2-7
SOIL TESTS ARE ONLY--PARTVF THE PICTURE
Soil tests are an inventory of the nutrients and acidity in your soil. You have to decide the kind and amotit,tand when to apply fertilizer and lime. Neither your local de-aler nor your extension adviser can give y ou thLanswer because only y ou know the amount of money that you have to invest and the alternative uses fur it thatyou have.
There are severalfinterrelated parts to y our crop and soil management programs besides the soil tests. lk ruare a few.
Cropping system. The fertility needs for Various crapping systems are--different. For example, a systemthat includes alfalfa and clover has a high requirement for lime, phosphorus, and potassium, but less need fornitrogen. Corn and soy beans have relatively lower requirements for lime and phosphorus, but corn requires ahigh level of nitrogen and both crops require a high level of potassium. Because corn returns most of the potas-sium to the soil in the stalks, the maintenance need for potassium with continuous corn is less than with uthercropping systems.
aLivestock and manure. If you feed livestock and conserve the manure; you can -return about 3/4 Of the
nitrogen, '4'5 of the_phosphorus, and 9,'10 of the potassium that is fed. In planning your fertilizer program, oumay credit manure 1% ith the following nutrients per ton of stable maniire if handled carefully to minimizenutrient losses. 10 pounds of nitrogen, 40 to 50 percent available in, the first year, 2 pound .uf phosphorus(5 pounds of P205), about 40 percent available in the Iyst year/and 8 pounds of potassium (10 ounds -uf K20).all available in the firs year. If the manure has been exposed to considerable leaching, the nit ogen and potas-sium levels will be much lower.
' Production potential of your soil. Through car ful study of soil-experiment field data and 2records,the. University of Illinois has developed estimates o the yield potentials for ?many Illinois soils. You can getthis information from your extension adviser or other sources in your county.
Good management practices. You will getost profitable returns from fertilizer only if y ou pli.,viv, fit, and 11/plant on time, cohtrol weeds, diseases, and insects, and choose the best crop varieties. As you set higher yieldgoals and apply more fertilizer, it comes increasingly important to do a good job bf farming in every way.
.,, What if the soirtest is varia e? 'Yoy may have a large variatio among tests on field and wonder what thereason is and, more important, what to do about it. First look at t e pattern of the tests over the field. Iftheieis a definite pattern of high tests in one part and low tests in anot er, check to see wl\eth there is a differencein soil type. cond, try to recall whether the field w s farme as separate fields at s me time in the past.Third, the youNsoil-test recordg for this field from pre ious tes s or, if y wave no records, try to rememberwhether e different areas were limed or fertilized differently at some time during the past 5 to 10 years.Whethe or not you fidd the lexplaiaation for large differences In tests, you can split the field, and apply basictreatments of lime and fertilizer according to indicated deficiencies.
If there is rib consistent pattern of high and low tests, then you will have to chooSe between using the.., \
lowest tests, or an average of the tests as a guide to the amount to apply. If you find no explanation for largedifferences in tests, you should consider taking a new set of samples from the field. \\
What to do about nitrogen? No test has been found to reliably indicate the amount of nitr\ogen that Illinoissoils will supply for a growing crop. You will want to check with pour county extension adviseor local ferti-lizer dealer for the latest suggestions on nitrogen rates.
I-F-2-8
Vocational Agriculture Service434 Mumford HallUrbana, Ill. 61801
4
3,,

\
Soil TestForm D-2 LIME MAP AND INTERPRETATION
The field map belt». shoys the pII for each sample. Figines on the t halts for limestone needed ate based on theseumptious'
1. \ 9-int li depth of plov..ing. For each inch less, the limestone tetitmement may be reduced by 10 pent nt.2. 1 wit al-fineness limestone 90 percent through 8-11,011. 60 pettent through 30 -mesh, 30 percent through 60-mesh.3 \ calcium carbonate equiYalcnt (total neutralizing poy.et of.90 pert ent. (See back of sheet for cxp anation.)If these assumptions do not apply to Now situation, adjust the limestone rate accordingly.
o
STEPS TQ FOLLOW
1. Use Chart I for grain systems and Chart II for alfalfa,. clover, or lespedeza
2. Decide which soil class fits your soil
A. Silty clays and silty clay towns (dark).
B. Silts clays and silty clay loans (light and medium) .
Silt and clay !owns (dark).
C. Silt and clay barns (light and medium). sand) loans(dark), loani$dark and medium)
.D. Loams (light), sandy foams (light and medium),sands.
E. Muck and peat.
CHART I
GRAIN FARMINGSYSTEMS
Tglq
TONS TO APPLY
pH65 60 5.5SLIGHTLY MODERATELY
ACID
SOIL-ACIDITY MAP
50STRONGLY
ACID
045 pH70 , 60 55
NEUTRAL SLIGHTLY MODERATELYACID ACID
3. Find Your soil's #1-1 along the bottom of the chart.
4 Follow up the vertical line until it intersekts the diagonalline A, B, C, D, dr E that fits your soil.
5. Read the suggested- tate of applicatiom along the rightside of the chart that you are using.
TON$ TO APPLY '
CHART II
CROPPING 'SYSTEMS WITHALFALFA, CLOVER ORLESPEDEZA
NONE NEEDED IFNATURALLY ,pH62OR ABOVE
APPLICATIONIS
OPTIONAL
I0
8
REMARKS
50STRONGLY
ACID
, 6
, 4144 2/3-XiLe
fr.* 6+ :ItiL 'I ,tk al-0 4- le-A-44/
I
045
1.1
1 of more information on liming, see the back of this sheet and also Circular 72
Reproduced for classroom teaching purposes with permission o
1thinicographed)
I-F-2-9t}ie Cooperative Extension Service.
INFORMATION TO HELP ,YOU PLAN A LIMING PROGRAM-
Reasons for Liming
laming ac id soils impel\ es most t loprbecause1 It win( es the solubility of manganese and aluminum that are pc sent in itaingly at id soils in ateounts largeanouell
to be toxi( . espet tally to alfalfa and close!. -Ns
2 It nulnuxes the oil for nut roolgarusius that speed the dei as of plant iesidues, thus isleasing. mole nitrogen notphosphorus for clop plants
3 It fasorsehe gio.t th of nodule-form bacteriaba tmia (those that take nitrogen from the air ,Ory alfalfa, elotei., and so),beans. 4
1 The best balance in as ailabilas of nunoi elements is found in suds that are neutral or only slightly acid.5 Phosphorus is more as adable id soils that arc near neutral m acidity than It is in strongly acid soils.
Suggested pH Goals
4For cropping systems tsith alfalfa and closer, maintain a pH of 6.5 or abose But if thC soils hasc,a pH of 6.2 or abuseonlibut eset hasing been limed, neutral soil is Just bekiss plotting depth and it still probably not be niseessaay to apply lime-stone-
Fm cash-grain ss stems 0,1 alfalfa or Hover), diaintain a pip of at least 6 0. If I test shoos that the pll is 60,apply Innestont tooKesent a drop beim\ 6U Farmers,kvay choose to raise the p still higher leyels . \t ter the initial in-t estment. it costs little more to maintain a NI of 6 3 than one of 60 The profit:mei' a 10-sear period still be affect&I secslittle one the increased raid still about offset the original cost of the (Au a limestone (2 or 3 ton per acre) plus interest.Raising the pH abuse 6 5 in cash -gram sssteins unnecessarils in( i ases the risk of nitrogen loss tl ough denarification.
The amount,. of soil organic matter that c orrespond to th«olor ti runs uu d in des( ribing soil lasses t excluding sands)on the other side of the shet are light"-- less than 21/2 pert ent. medium 2' to 41/2 percent, (lark' more than 41/2 ercent.
Liming Materials. ,
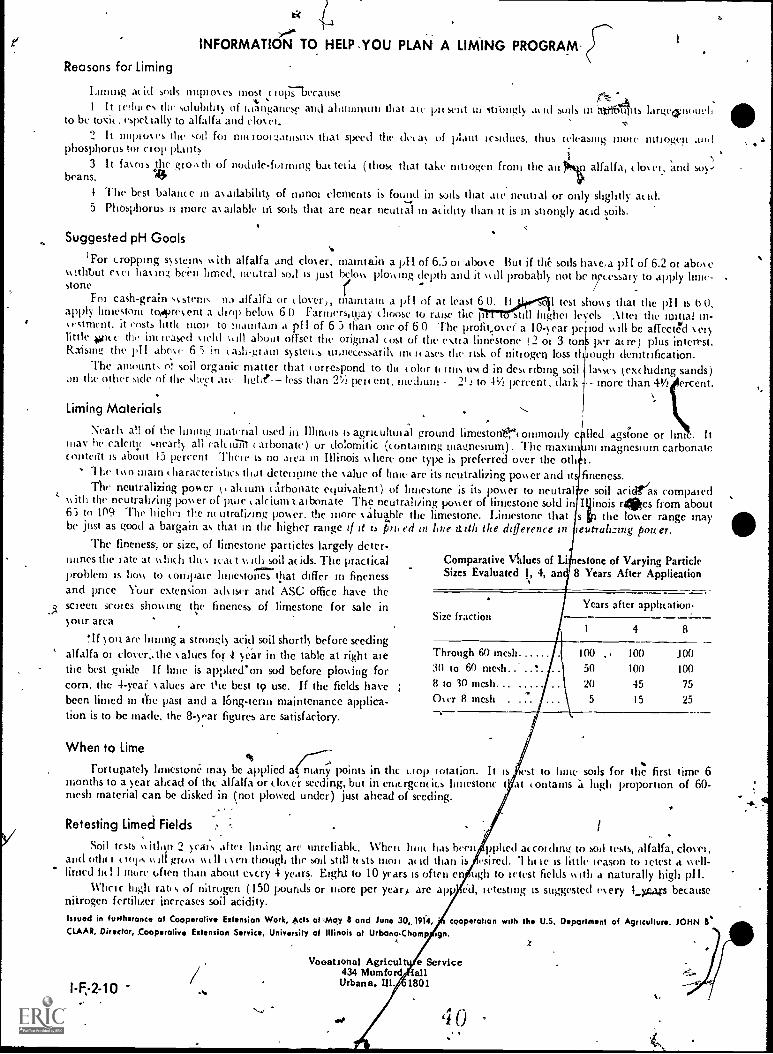
I
Vail\ all of the liming material used in Illinois is agricultui al ground limestonen ommonly c lled agsfone or Inn . Itmay he calcitic 4nearls all caleit.171 carbonate) ur dolomitic (containing magnesium). The maxim ni magnesium carbonatecontelit is about t3 percent Their, is no area in Illinois us here one type is preferred over the oth I.
' -I he too main t haracter istics that determine the salue of lime are its neutralizing poster and its fineness.The neutralizing poster t . alt ium c Arbonate equisalent) of limestone is its poster to neutral e soil acidt'as compared
smith the neutralizing poster of pule calcium tat bonate The neutralizing poster of limestone sold into
Illinois rues from about11165 109 The highei the nt utraliiing poster, the more saluele the limestone. Limestone that s the losser range maybe just as good a bargain as that in the higher range if it ii prked in line tizth the deference in ieutralrung power.
The fineness, or size, of limestone particles largely deter-;limes the late at %slid' the s Ica( t r, all soil ac ids. The practicalproblem is host to (onipaie limestones tliat differ in finenessand price Your extension ads iser and ASC office have the
o screen scores shooing the fineness of limestone for sale insour area
!If son, are Inning a strongly acid soil short!) before seedingalfalfa or closer;. the sallies ford sear in the table at right arethe best guide If line is applied'on sod before plotting forcorn, the 4-yeaf salves are time best t9 use. If the fields havebeen limed in the past and a Icing-term maintenance applica-tion is to be made, the 8 -smear figures are satisfaciory.
When to Limeas
rortupatels limestone. mas be applied a many points in the crop rotation. It is 'est to lime soils for the first time 6months to a scar ahead of the alfalfa or closer seeding, but in emergencies limestone that (ontains a high proportion of 60-mesh material can be disked in (not plowed under) just ahead of seeding.
Retesting Limed Fields
Comparative Values of Li estone of Varying ParticleSizes Evaluated 1, 4, ant 8 Years After Applieation
Size fraction
Through 60 mesh30 to 60 mesh..- .8 to 30 mesh...Os er 8 mesh . .:
Years after application,
1 4 8
100 , k 100 J0050 100 100
20 45 75
5 15 25
_
Soil tests tt alit), 2 scars dui liming are unreliable. When brut has been polled according to soil tests, alfalfa, closer,and oth(z t tops o ell pots still t ten though the sail still tests mon ac id than is 4 sired. .1 lit is is little reason to retest a well-limed he! I inure often than about es cry 4 years. Eight to 10 years is often en ugh to retest fields truth a naturally high pII.
Whim high rates of nitrogen (150 pounds or more per year). are app ed, retesting is suggested esery Ly.gars becausenitrogen fertilizer increases soil acidity.Issued in furtherance of Cooperative Extension Work, Acts of qAczy 8 and June 301918, cooperation with the U.S. Department of Agriculture. JOHN II'.CLAAR, Director, cooperative Extension Service. University of Illinois at UrbanaChamp ign.
Vocational Agricul e Service434 Mumford allUrbana, Ill. 1801
se
I
Soil Test. D-3Form
-t:
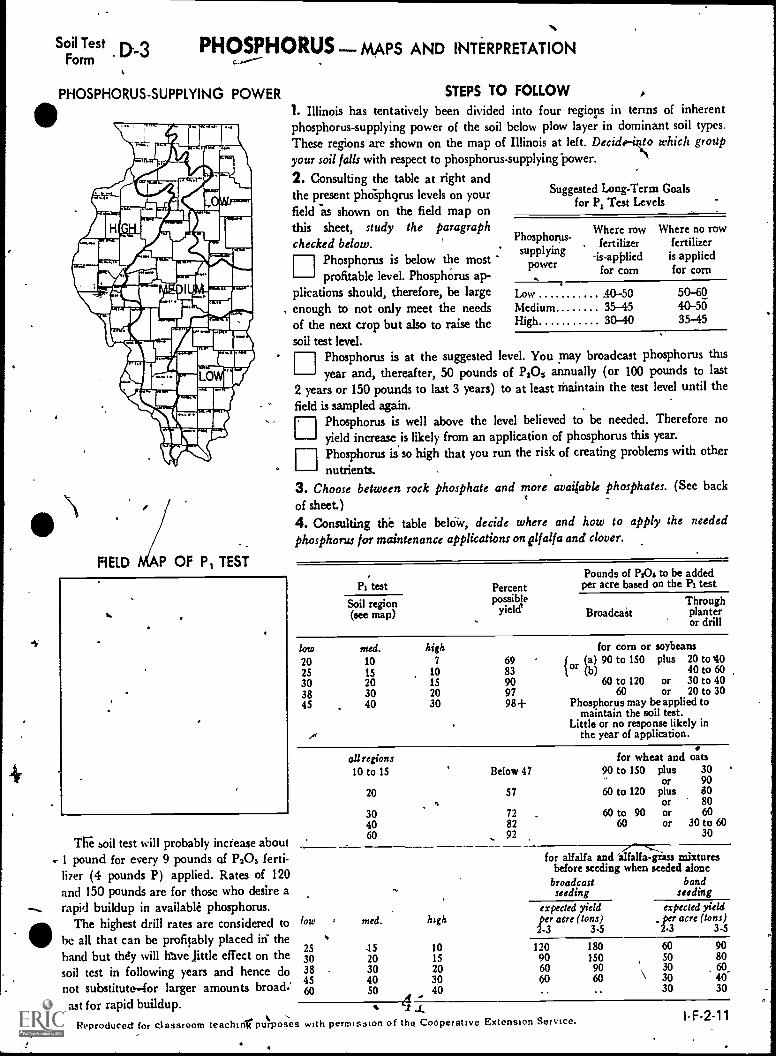
PHOSPHORUS -MAPS AND INTERPRETATION,----- .
PHOSPHORUS-SUPPLYING POWER
- .
FIELD P OF P 1 TEST
STEPS TO FOLLOW
1. Illinois has tentatively been divided into four regions in terms of inherentphosphorus-supplying power of the soil below plow layer in dominant soil types.These regions are shown on the map of Illinois at left. Decide -into which groupyour soil falls with respect to phosphorus-supplying power.
2. Consulting the table at right andthe present phosphgrus levels on yourfield as shown on the field map onthis sheet, studychecked below.
nPhosphorus isprofitable level.
the paragraph
below the mostPhosphorus ap-
Suggested Long-Term Goalsfor P, Test Levels
Phosphorus-Where row Where no rowfertilizer fertilizer
supplying-is-applied is applied
powerfor corn for corn
R._
plications should, therefore, be large Low A0-50 50-60, enough to not only meet the needs Medium 35-45 40-50
of the next crop but also to raise the High 30-40 35-45
soil test level.
i
The soil test will probably increase aboutt- 1 pound for every 9 pounds of P205 ferti-
li7er (4 pounds P) applied. Rates of 120and 150 pounds are for those who desire arapid buildup in available phosphorus.
The highest drill rates are considered tobe all that can be profitably placed in theband but they will have little effect on thesoil test in following years and hence donot substitutefor larger amounts broad:cast for rapid buildup.
0 Phosphorus is at the sux.ested level. You may broadcast phosphorus thisyear and, thereafter, 50 pounds of P205 annually (or 100 pounds to last
2 years or 150 pounds to last 3 years) to at least maintain the test level until the
field is sampled again. .
Phosphorus is well above the level believed to be needed. Therefore noyield increase is likely from an application of phosphorus this year.
[1 Phosphorus is. so high that you run the risk of creating problems with othernutrients. . .
3. Choose between rock phosphate and more available phosphates. (See backof sheet.)
t
4. Consulting the table belciiv, decide where and how to apply the neededphosphorus for maintenance applications on elf alf a and clover.
7"--
.Pi test
Soil region(see map)
Percentpossible
yield'
Pounds of PsOs to be addedper acre based on the P, test
BroadcaitThroughplanteror drill
low med. high20 10 7 6925 15 10 8330 20 15 9038 30 20 9745 40 30 98+
for corn or soybeansJ (a) 90 to 150 plus 20 to *101°1 (b) 40 to 60
60 to 120 or 30 to 4060 or 20 to 30
Phosphorus may be applied tomaintain the soil test.
Little or no response likely in.. the year of application.
all regions10 to 15
20e
304060
low med. high
25 45 1030 20 1538 30 2045 40 3060 50 40
i44..t..
Below 47
57
728292
for wheat and oats90 to 150 plus 30
Or 9060 to 120 plus 80
or 8060 to 90 or 60
60 or 30 to 6030
for alfalfa and 'alf.--alf-------grass mixturesbefore seeding when seeded alone
broadcast bandseeding seeding
expected yieldper acre (tons)2-3 3-5
120906000
180150
9060
expected yield. per acre (tons)
2-3 3-5
60 9050 8030 60,30 4030 30
Reproduced for classroom teachtnrPuiposes with permission of the Cooperative Extenston Servtce. I-F-2-11
0
'0
1
"%
"'INFORMATION TO HELP YOU PLAN A PHOSPHORUS PROGRAM
What Determines the Phosphorus-Supplying Power?
High phosphorus-supplying power means:
1. The amount of available phosphorus (P, test) in thesubsoil is relatively high.
-,... 2. The conditions are favorable for good root. penetrationand branching in the subsoil.
Low phosphorus- supplying power may be caused by oneor more of the following factors:
1. A low supply of available phosphorus in the subsoilbecause (a) the parent material was low in phosphorus;(b) phosphorus was lost in the soil-forming process; or (c) thephosphorus is made unavailable by high pH (calcareous)material. . .
2. Poor internal drainage that restricts root growth.3. A dense, compact layer that inhibits root penetration or
Suggested Annual Maintenance for Alfalfa, Grasses,and Alfalfa-Grass Mixtures
Phosphorus-supplyingpower rating
of soil
Yield expected or obtained(tons dry matter per acre)
5 7 10
Pounds P201 per acre
, Lowt 55 77 110Low to medium 44 62 88Medium 38 54 77Medium to high 33 46 66High to medium 28 38 55
spreading.4. $hallowness to bedrock, sand, or gravel.5. Drouthiness, strong acidity, or other conditions that restrict crop growth and reduce rooting depth.,
Annual vs. Infrequent Applications-..... N
Applying phosphorus every 2 or 3' years (up to 4 years for alfalfa) is as effective as applying smaller amounts each yearand it saves labor Mixing the fertilizer into the soil by plowing, disking, or chiseling will reduce the likelihood of it beingcarried off the field through erosion This may reduce excessive algae growth in lakes and reservoirs but it is probably not.. -,
important in Illinois streams.
Illinois Tests for PhOsphorus
Illinois laboratories make two tests for phosphorus, referred to as P, andP2. The PI test (interpreted on the front of this sheet) measures readilyavailable phosphorus. The P2 test uses a stronger extractint and, thereforemeasures both available phosphorus and phosphorus that has been built upwith rock phosphate but has not yet been converted to available form. The P,test is a better indication of the soil phosphorus supply for this year's cropand also for the next year or two.
The P3 test is used as a guide to:the application of rock phosphate (see ta-ble at right). The results of this test are necessary for ACP pra tice payments.' If the P2 test has been built to 50 or above through tapplica ns of soluble
phosphates, the rating of the P2 test in the table is .too 'Ow and the suggestedapplication is too high. A PI test is needed to show the status of available
, phosphorus.
Rock Phosphate or More Available Phosphate?
SuggsgaApplication of Rock PhosphateBased on the P2 Soil Test
0 P2 test Rock phosphatefor 8 to 10 years
.. lb. per acreBelow 20 1,50020 to 32 1,30033 to 53. .. 1,00054 to 75... . ....... .... 800
No build -up application,Above 75 but soluble phosphate is
needed for wheat
9
Rock phosphate contains about 30 percent total P20, of which about 1/10 is as available as that in other phosphorus -sup.'plying fertilizers Tie most economic use of rock phosphate is related to soil pH and to the amount of alfalfa or clo \er in.the cropping system'At pH 6.5 or above, rock phosphate is...alat likely to be as economical as other sources. At pH 6.0 to 6.5,rock phosphate and more readily mailable forms may be equally profitable if (a) alfalfa, cloyer. lespedeza,-or birdsfoot tre-foil is an important part of the cropping system, (b) the soil is inherently moderately acid, and (c) ACP cost-sharing assis-tance is available Below pH 6.0, there is enough soil acidity to efficiently release phosphorus from phosphate rock, so rock.May be used in a soil-buildup program.
To Convert P203 Figures to Amount of P Contained
Phosphorus fertilizers are added in order to suuly phosphorus. However, it, has long been the custom to show percentagesin termOof P205 content. To find the amount of P in P20s, multiply the P2Os figure by 0A4.
'll fIssued in furtherance of Cooperative Extension Work, Acts of May 8 and June 30, 1914, in cooperation with the U.S. Department of Agri-culture, John B Claar, Director, Cooperative Extension Service, University of Illinois at Urbana-Champaign.
IF-2-12
Vocational Agriculture Service434 Mumford Hall .
Urbana, Ill. 61861
4
4203
i
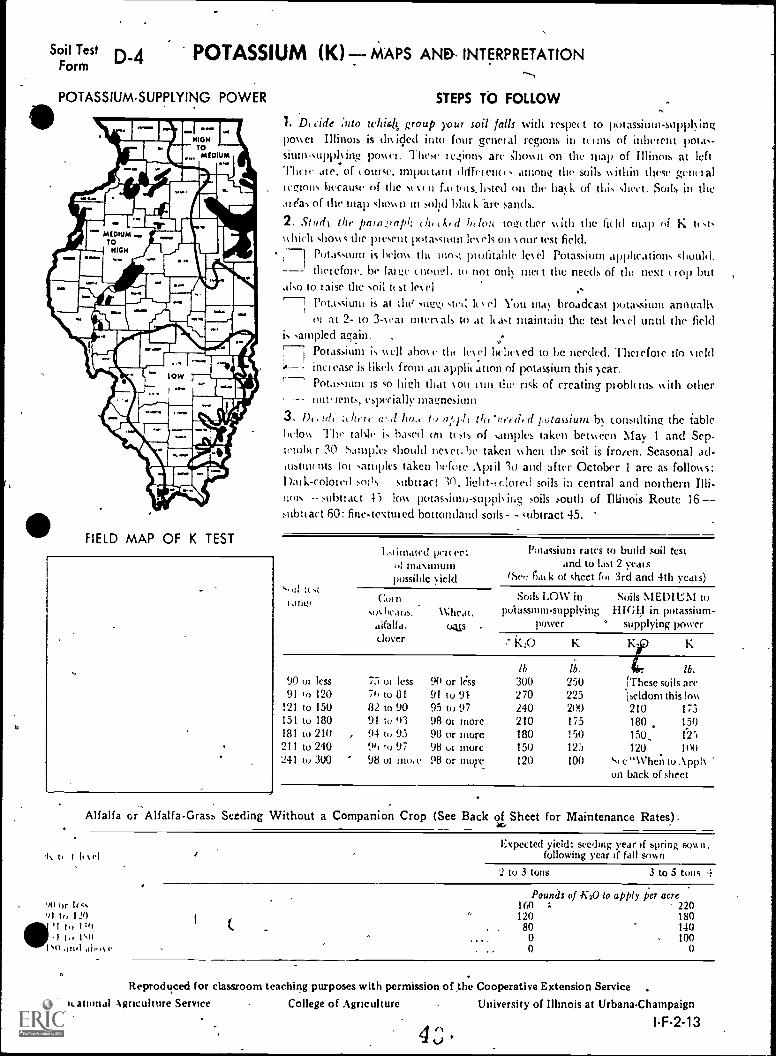
Soil Test D-4 POTASSIUM (10- MAPS AND INTERPRETATIONForm
POTASSIUM-SUPPLYING POWER
woo.
NIGHTO
MEDIUM
MEDIUM10
HIGH
FIELD MAP OF K TEST
STEPS TO FOLLOW
1. DI tide ;Tito whit/ group your soil falls with respect to potassium- supplingposse' Illinois is disiqed into four genrial regions in tt tins of inhetem pont,-siuni-suppls ing posse!. These legions arc ;Ilossii on the !nap of Illinois at leftTheir ale, of course, impoi tam di(feleiut ainonc the soils %skint] these grind allegions kiccause of the st st tr fat tins. listed on the bat k of this sheet. Soils in theatt-eas of the map slims!) III solid Ida( k are sands.
2. Stud the parr; :ra ph do .lo'd helot togt ther with the fitld map of K tt stshid' chose the pieseut ta,Cillitil les els on sour test field.
Potassium is helms tlit inns; piofitable !est! Potassium applications should,/ the' cloy% be late tnoili,h to not onh met t the needs of tht next c lop but
also to raise the soil ti st les el'n Potassium is at the stiggi stoil It t el You tads broadcast potassium annualls
to at 2- to 3-seal niters als to at least maintain the test lesel until the fieldis sampled again. .
Potassium is well ;those tilt !usel belies ed to be needed. The' dole tin sieldint-lease is likels from an applit atton of potassium this year.Potassium is co hig.h that sou inn the risk of creating ploblt ins with othernut, ients, especially magnesium
3. 1).' ale a here awl ha,' a,,f,li th, d potassium by consultinz the tableheloss The table is based cm tt sis of samples taken betsseen May 1 and Sep.tends( r 30 Samples should nes el. he taken s% hen the soil is froien. Seasonal ad-itistint its lot samples taken hefoie .Aptil 10 and after October 1 arc as follosss:Dal k-coloi soils subtract 30. lioit.,oloied soils in central and northern Illi-nois subti act 15 low potassitini-suppls lug soils south of Illinois Route 16sub:tact 60: fine -textuied bottoinlancl soils - - subtract 45.
oil st
tang(
1.stimates1 ),ricer:ut masamumpossible yield
Colnsus. beaus. Wheat,
alfalfa. uyisclover
Potassium rates to build soil testand to last 2 yea's
fiat k ot sheet lot 3rd and 4th years)
Soils LOW in Soils MEDIUM topotassium- supplying H1(;k1 in potassium-
power ° supplying power
k:o
lb lb. lb.90 to less 75 ot less 90 or lCss 300 250 (These soils arc91 to 120 7),tu81 91 tu 270 225 iseldom this loss
121 to 150 82 to 90 95 to 97 240 200 210 173151 to 180 91 to '43 98 01 more 210 175 180 150181 to 210 94 to 95 98 or more 180 150 150, I-23211 to 240 96 to 97 98 of inure 150 12;) 120 Ion241 to 300 98 of utu,c 08 or nickre 120 100 tit C"Whei.ltu . \ppls
un back of sheet
Alfalfa or Alfalfa-Grass Seeding Without a Companion Crop (See Back of Sheet for Maintenance Rates)
I It I It %el
Expected yield: seeding year if spring suss n.following year if fall sossn
2 to 3 tons 3 to 5 tons 4
Pounds of -K20 to apply per acreon or Icss 160 22001 to 1211t 120
80180140
0 100It SO and al,% 0 0
Reproduced for classroom teaching purposes with permission of the Cooperative Extension ServiceVosational Agriculture Service College of Agriculture University of Illinois at Urbana-Champaign
I-F-2-134"

Suggested Annual Potassium Maintenance Fertilization for Alfalfa, Grasses, and Alfalfa-Grass MixturesAfter Soil Tests Are Built to High Levels
Nutrient-supplying power Percent of nutrients to Yield expected or obtainedrating of soil be supplied.by fertilization (tons dry matter per acre)
(see map on front) 5 ''' 7 - 10
Pounds K20 per acreLow 100 250 350* 500'Low to medium 80 225' 315* 450'Medium , 70 200 280 400*Medium Lo high 60 175 245 350*High to medium 50 150 210 - 300High . 50 125 175 250
*Rates above 300 pounds K20 should be split and applied at two different dates to prevent plant injury.INFORMATION TO HELP YOU PLAN A POTASSIUM (K) PROGRAM
Why Soils Differ in Natural Supply of Potassium
Inherent potassium-sUpplying power dependimainly on:.
1. The amount of clay and organic matter. This influences the exchange capacity of the soil.2 The degree of weathering of the soil material. This affects the amount of potassium that has been leached out.3. The kind of clay mineral. se
4. Drainage and aeration. These influence the uptake of potassium.5. pH. Very high calcium and magnesium reduce potassium uptake.6. The parent material from which the soil formed. .7. Compactness or other conditions that influence root growth.
A soil test goal of 241 to 300 is suggested for all the reiions. Rates of potassium suggested in the buildup periodand for maintenance on soils that are classified low or medium/in potassium-supplying power are larger than those fortoils that are classified high.
Recent results show that a few soils respond to potassium applications even at tests above the suggested goal of241 to 300. Research to identify these soils is continuing. They are likely to be fine-textured, very dark, and imper-fectly drained.
Sandy soils are low in potassium-supplying power because they are low in exchange capacity and cannot holdmuch reserve K. In addition, minerals from which sandy soils develop are low in K.
The silt foams in the "low" area in' southern Illinois (claypans) are relatively older soils in terms of soil develop-ment and consequently much more of the potassium has been leached out of the root zone. Furtherinore, wetness anda platy structure in the upper subsoil may interfere with rooting and with K uptake early in the growing period eventhough roots are present.
Soils in northeastern Illinois that were formed from medium- to fine-textured till are quite high in potassium bysoil test, but restricted drainage may reduce potassium uptake during the early part of the growing season. As a result,those soils with wetness problems have only a medium rating in their ability to supply potassium to crops.
When to Apply Potassium in the Cropping ,stem
Corn, soybeans, and forage legumes are most sensitive to a potassium shortage. Applications should be timed tomeet their needs.
On soils that have a very .low potassium test, you may, apply the suggested initial applications (even up to 300pounds of K20 per acre) at one time or you may apply 2/3 the first year and 1/3 the second year. For the third andfourth years, or until the field is resampled, the following approximate maintenance amounts are suggested: 60 poundsof K20 per year or 120 pounds to last 2 years; double the amount on fields where silage or hay is removed and nomanure returned.
There is no hard-and-fast rule for dividing the potassium over a 4-year cropping period. Broadcast applicationsevery second or third year are as effective as smaller annual applications.
Safe Limits for Drill Applications
Since pOtassium salts are very soluble, large amounts cannot safely be placed near the seed. Nitrogen and potas.sium combined should not exceed about 40 pounds per acre for corn in 40-inch rows through a split boot. Largeramounts are safe through a plainer with side placement of the fertilizer away from the seed. Nomore than 12 pounds
`i should be applied as a pop-up fertilizer in contact with the seed.
Up to 40 pounds of K20 (33 Poy(d's of K) plus nitrogen is safe through the drill for small grain.
Soybeans are very sensitive to salt injury and no more than 40 pounds of K20 (33 pounds of K) is suggested for' side placement. Broadcast application of all potassium is preferred for soybean. Pop-up placement is discouraged.
I-F-2-1444
INFORMATION SHEET .
SOIL SAMPLE TEST RESULTS
ADDITIONAL INFORMATION FOR TEACHERS
RECOMMENDATIONS: All fertilizer recommendations are based on information in the 1979-80
SPECIAL NOTE:
PROCEDURE:
Handbook. As to the exact rates and zones of fertilizer application,
there is an elementof subjective interpretation which is based on experi-
ence, The student should use his/her own experience to modify the
recommendation to suit the individual operation.
The area around site 10, where the barnyard was, is sometimes given a
different recommendation than the field around it. The old barnyard
should be treated as a unit. Any part of the field south and east of
site 10 that was not part of the barnyard should be treated in the same
way as site 1, 9, and 11.
The students should be encouraged to develop a field map for each test,
plotting the recommendations at each sample site. This will aid the
student in visualizing the fertility recommendations for the field.
EXAMPLE: The sample farm is for class discussion and for an example as to how
the forms would be completed and the results analyz.ed. When discuss-
ing the results the students should have a copy of the handout, "Soil
Treatments Based on Soil Tests," and Illinois Soil Test Reports D-1,
D-2, D-3, and D-4.
C
ft.
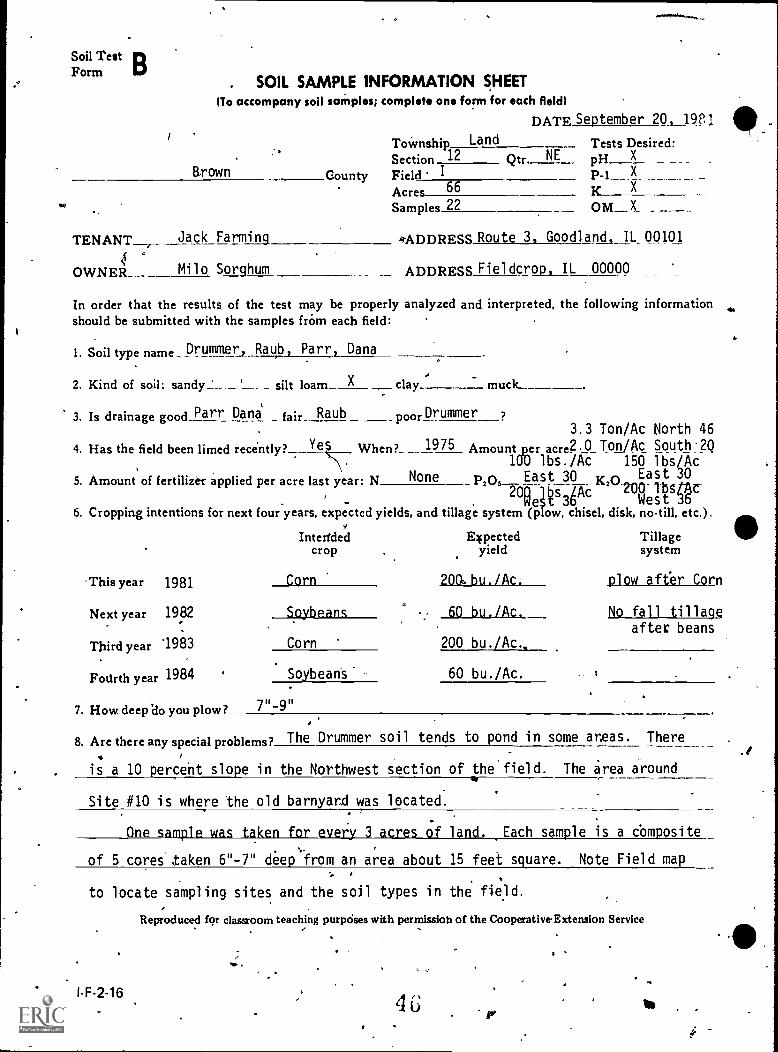
Soil Test BForm
. SOIL SAMPLE INFORMATION SHEET(To accompany soil samples; complete one form for each field)
DATE September 20,_1921
ToWnship Land Tests Desired:-Section 12 Qtr. NE pH X
Brown County Field_ I p -1 ___XAcres 66 K X
Samples 22 OM X_
TENANT Jack Farming 4ADDRESS Route 3, GoodlansL IL 00101
OWNER Milo Sorghum ADDRESS Fieldcrop, IL 00000
In order that the results of the test may be properly analyzed and interpreted, the following informationshould be submitted with the samples frrim each field:
1. Soil type name Drummer), Raub, Parr, Dana
2. Kind of soil: sandy ' silt loam X clay muck__
3. Is drainage good__Parr Dana fair Raub poorDrummer3.3 Ton/Ac North 46
4. Has the field been limed recently ?___ V When? 1975 Amount_p_er acre? 0 Ton/Ac South .2Q1010 lbs./Ac 150 lbs/Ac
5. Amount' of fertilizer applied per acre last year: N None p205 East 30 K 0 East 30
-
20aIsik 29eRgre
6. Cropping intentions for next four years, expected yields, and tillage system (plow, chisel, disk, no-till, etc.).
Intended Expected Tillagecrop yield system
-This year 1981 Corn 200. bu. /Ac. Wow after Corn
Next year 1982 Soybeans 60 bu./Ac. No fall tillageafter beans
Third year '1983 Corn 200 bu./Ac..
Fourth year 1984 Soybeans. 60 bu./Ac.
7h1 -9U7. How deep do you plow? ,i
S. Are there any special problems?
is a 10 percent slope in
The Drummer soil tends to pond in some areas. There
the Northwest section of the field. The area around
Site #10 is where the old barnyard was located.
One sample was taken for every 3 acres of land. Each sample is a composite.
of 5 cores taken 6"-7" deep from an area about 15 feet square. Note Field map
to locate sampling sites and the soil types in the field.
Reproduced for classroom teaching purposses with permission of the Cooperative-Extension Service
I.F-2-164
-
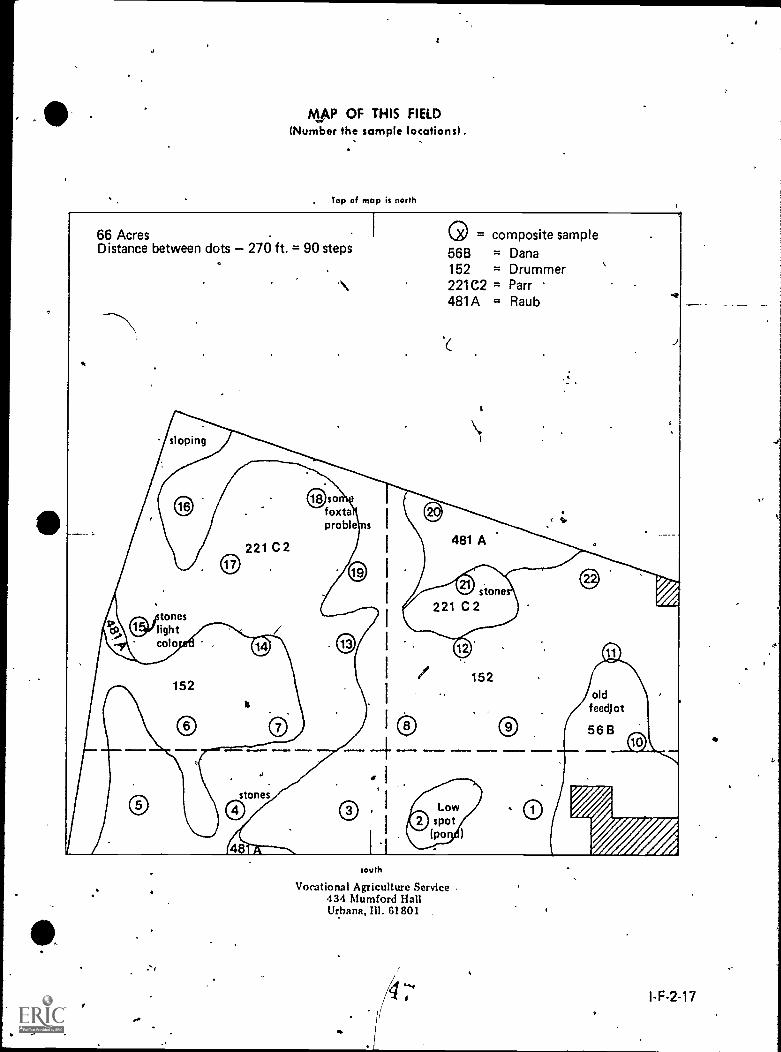
MAP OF THIS FIELD(Number the sample locations).
Top of map is north
66 AcresDistance between dots 270 ft. = 90 steps
sloping
Wtonesightcola
152
221 C2
Osofoxtaproble
stones
48
s 1
G. composite sample56B = Dana152 = Drummer221C2 = Parr481A = Raub
481 A
152
01111
Pp.
oldfeedlot
56 B(10)
south
Vocational Agriculture Service434 NIumford HallUrbana, Ill. 61801
41.
A
I-F-2-17
r
Soil TestLiF" IForm
Brown County
Tenant: Jack Farming
SOIL TEST REPORT
Owner Milo Sorghum
Samples brought in by Jack Farming
Date: September 23, 1981 .October 15, 1981(received) (tested)
Samples tested by J. Jones
Address: Route #3 Goodland, IL, 00101
Address: Fi el dcrop, IL 00000
This report gives you the results of the laboratory tests on your samples.I suggest that you keep this report in a permanent folder. Record right on the field maps the amounts of lime and fez:
tilizer that you apply and the dates when you apply them. This record will help you to interpret the next test on the fieldand will also give you a long-term inventory that will show %hether soil fertility is being built up, is bc'ng maintained, or isdeclining.
Field andsample'number Acres
pHTest foracidity
PI
Test foravailable
phosphorus
KTest for
potcrisium
Organicmatter
or soil color
,
Comments
Field I 66Sample #1 6.5 66 429 3.2 _j_
2 6.0 135 438 5.0
1_4 7.7 36 329 4.24 7.1 18 272 2.15 6.7 21 315 3.0
v 6 6.5 120 438 5.07 6.0 82 325 4.58 6.5 68 336 4.59 6.2 78 346 5.1 '
10 6.8 215 1590 6.0,,,e. 11 6.4 38 318 3.6
12 6.3 164 585 4.513 6.2 40 247 3.8 -
14 6.3 43 297 4.0' 15 6.8 26 311 2.6
16 6.0 54 332 4.317 -6.6 24 318 2.818 6.4 42 346 3.419 6.4 93 354 4.120 6.3 42 300 4.221 6.6 - 43 d53 2.722. 6.7 49 297 4.2
. -. 0 _
.Soil tests are only a means to an cnd. 1 he important thing is how you use the Yesults to plan a better soil-fertility pro-
gram. Planning the most profitable soil treatment.; after you ha%e retilts of the soil tests is not sitnFle, but it is extremelyimportant in determining your pp& from farming.
On the back of this sheet, and on the other sheets labeled LIME, PHOSPHORUS, or POTASSIUM, you will find theinformation'that you need to understand tlic tests so that you can plan a more profitable soil-fertility system. If you ha%c f ur-ther questions, please .contact me.
I-F-2.18 Reproduced for classroom teaching purposes with permission of the Cooperative Extension Servile
43
-;.
r
` a
FIELD 1 66 ACRES
pH values
North
t;.16 18 20
, 6.0 6.4 6.3
)17 - 19 216.6 6.4 6.6
15 14 136.8
56.7
126.3 6.2 6.3
....e
6 7 86.5 6.0 6.5 ,
ZONE II
47.1
Z NE I
pH 6.6 and above-sufficientno lime recommended
pH 6.0-6.5-- .
some lime recommended
226.7
1i*6.4 '
ALL'9 I .106.2
'.(1-1
6.8
3 I 2 1
7.7 1 6.0 6.5
I
1" = 360'
Range: 6.0-7.7
Median value: 6.4
RECOMMENDATION: Zone I Do not limeZone II Apply 2.5 VA limestone; dc; not lime barnya d
Assurtiptions: The quality of lime is such that 1) 95% will pass through 8 mesh scree40% will\Dass through 100 mesh screen, and 2) 90% CaCO3 equivalent.
$
a
4 ,r)I-F-2-19
A *1
0"
A
..
FIELD 1 66 ACRES
phosphorous testvalues given in lb/A
North
4
high P areas no P needed
adequate P maintenance only
low --buijdup plus Maintenance':
1526 lb.
16 ZONE I54 lb.
521 lb.
6 ,N
120
Range:' 18-215 lb/A
Median: 47 lb/A
RECOMMENDATION:
(
1724 lb.
18 2042 lb. 42 113-"
19 , 1 21\ 93 lb. \ Orb.\
14 13 1 12' \43 lb. 40 lb.( 164 lb.
1 ZONE
1 8 91
6Erib.. 78 lb.7
3 236 16.
For corn in 1981, 1983,Zone I 145 lb/A P205
4 1- .
Zone III 100 16/A P205 DO not fertilize the barnyard.
I
2249 lb.
ZONE 111
2 / 1
1351b. / 66 lb
.1
,,14.1'
Zone II No fertiliier
For soybeans in 1982, 1981, apply. Zone 1 115 lb/A P205
Zone 11 No Fertilizer-Zone III 75 lb/A P205 Do not fertilize the barnyard.
(1.1
Note: The fertility pattern seems to follow theterrain. The kn011s have exposed glacial till whichis low in phosphorous supplying abilitV. The low ground tends to be high in phosphorouslevels. It is not necessary to fertilize the low ground near site O'in Zone I.
.
I-F-2-20
50
I 4 I'll ti
North
IFIELD 1 66 ACRES
PbTAMUM TESTvalues given in lb/A
*,..high K areas no K needed
adequate K maintenance only
low K buildup plus maintenance N
a,
16 )8 203321b. 3461b. 3001b.
17 19 ,, 21 \ 22... .
318 lb. 354 lb./l 453 lb. 1 295 lb.
1
.....
I /15 % 14 13 1 12
3111b. 2971b.- 2471b.I1 5851b.,
/ZONE I ;d,,, \
6 7 8 1
438 lb. 325 lb. 336'lb. I
//
11
318 lb.
/ --W1 9 / 10Q46 lb.:. / 1590 lb.
ZONE II
'5 . 4 _,,-, 3 _ / 2 1
315 lb. 272 lb. 329 lb. / 438 lb. 429
i/429 lb.
Range: 247-1590 lb/A
- Median: 330 lb/A
...
1" = 360'
2
RECOMMENDATION: For corn 1981, 1983, applyZone 1 60 lb/a K2OZone II No fertilizer
For soybeans, 1982, 1984, applyZone I 80 lb/A K2OZone II No fertilizer
\Note: Soils are high in potassium-supplying ability. Soil test values are based on an ammonium
. , acetate extraction read on a flame emission spectrophotometer.
r.
51I-F-2-21
/
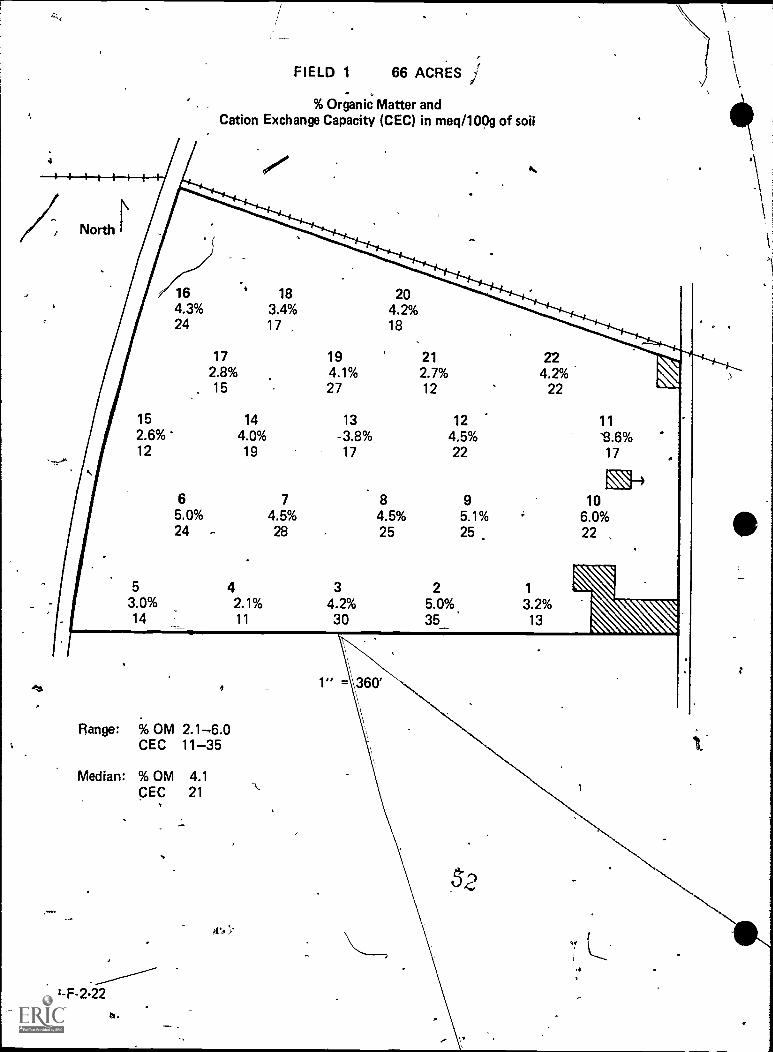
4
ft
IIIIIIII, North
FIELD 1,
66 ACRES j,
% Organic Matter andCation Exchange Capacity (CEC) in meq/100g of soil
k
16 ' 18 204.3% 3.4% 4.2%24 17 18
.
172.8%15
194.1%27
212.7%12
224.2%
,22
15 14 13 122.6% 4.0% -3.8% 4.5%12 19 17 22
11
-8.6%17
MI-)6 7 8 9 105.0% 4.5% 4.5% 5.1% 6.0%24 - 28 25 25 22
5 4 3 2 1
3.0% 2.1% 4.2% 5.0% 3.2%14 11 30 35_ 13
I
Range: % 2.1-6.0CEC 11-35
Median: % OM 4.1CEC 21
,
I-F-2:22
to.
-.
.4
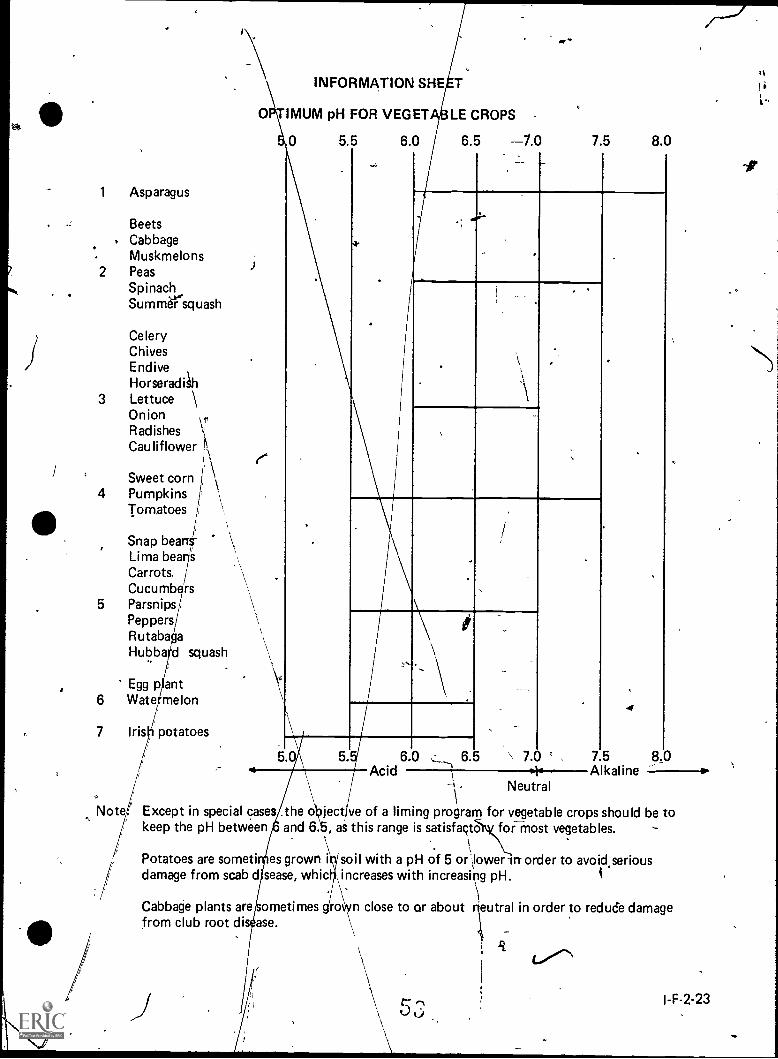
1 Asparagus
Beets. Cabbage
Muskmelons2 Peas
SpinachSumm6rsquash
CeleryChivesEndiveHorseradith
3 Lettuce \OnionRadishes \Cauliflower
Sweet corn4 Pumpkins
Tomatoes
Snap bearT
CarrotLima bey'Carrots.
s
Cucumb rs5 Parsnips
PeppersRutabaHubba d squash
INFORMATION SHE T
0 TIMUM pH FOR VEG ET LE CROPS
Egg plant6 Watermelon
7 Iris potatoes
0 5.5 6.0
6.0Acid
6.5 7.0 7.5 8.0
4
6.5 \ 7.0 7 5 8,0Alkaline
Neutral
Note. Except in special cases the objective of a liming program for vegetable crops should be tokeep the pH between and 6. , as this range is satisfacto for most vegetables.
f Potatoes are someti es grown i soil with a pH of 5 or ,lower yr order to avoid seriousdamage from scab d sease, whic increases with increasing pH.
Cabbage plants are ometimes g'roJvn close to or about neutral in order to reduce damagefrom club root disease.
I-F-2-23
-1$
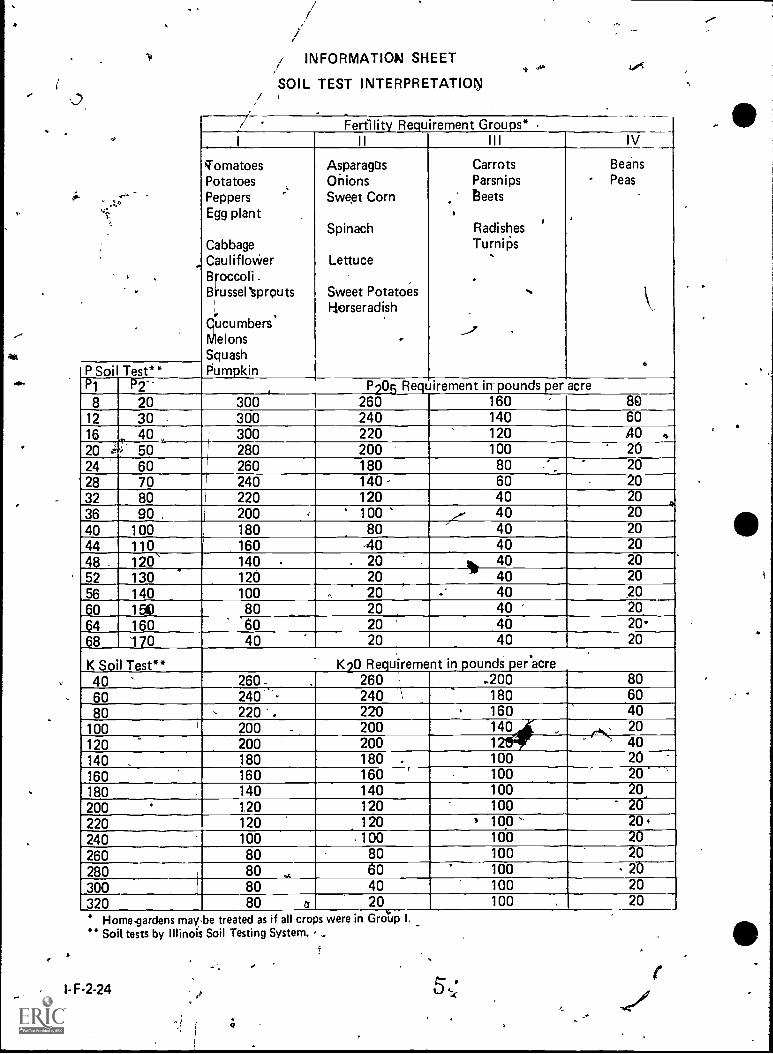
/ INFORMATION SHEET
SOIL TEST INTERPRETATION
.
...-:>
qi,
/ Fertility Requirement Groups*_.___J I I III IV
'TomatoesPotatoesPeppersEgg plant
CabbageCaulifloWerBroccoli _
Brussl'sproputs
iii.
icumberselonsquash
Pumpkin
AsparagusOnionsSweet Corn
Spinach
Lettuce
Sweet Potatoeshorseradish
.
CarrotsParsnipsbeets
Radishes iTurnips
. .
-,"
BeansPeas
..P Soi Test **P1 PZ' P905 Requirement impounds per acre
8 20 300 260 160 8012 30 300 240 140 6016 40 300 220 120 40 ..
20 50 I 280 200 100 2024 60 260 180 80 2028 70 I 240 140- 60 2032 80 220 120 40 20
36 90 200 100 r 40 20
40 100 1 180 80 40 20
44 110 160 -40 40 20
48 120 140 . 20Illt
40 20
52 130 120 20 40 20
56 140 100 20 a 40 2060 150 80 20 40 20
64 160 '60 20 40 2068 '170 40 20 40 20
K Soil Test**.
K20 Requirement in pounds per acre40 260- 260 , ..200 80
60 240 - 240 \ 180 6080 220 . 220 . 160 40
100 200 200 140 ,.. 20
120 200 200 1 40140 180 180 . 100 20
160 160 160 100 20`180 140 140 100 20200 120 120 100 2
220 120 120 , 100 ' 20 .
240 100 .100 100 202-6--260 80 80 100
280 80 60 100 20
300 80 40 100 20
320 80 a 20 100 20Home.gardens maybe treated as if all crops were in Group I.Soil tests by Illinois Soil Testing System.
I-F-2-24

WORKSHEET 1
SOIL pH
1. Name the three major elements necessary for plant growth.
a.
b.
c.
2. Why do soils become acid,or alkaline?
3. The most important single chemical characteristic of a soil is the degree of
or r
4.. The soil reaction' is indicated by .
0 5. A soil with a pH of 6.0 is considered' e4,
. Alkaline soils have a pH
gieater than (6. The most desirabgTH range-for farm crops is to
7. List four crops that grow best in the following pH ranges:4
pH 5.0-5.5
a.
b.
a,
b.
5.5-6.0 6.0-6.5
a. a.
b. b.
6.57-7.5
C. ii C. . C. C.
. 1.
d. d. d. d.
8. The best way to keep check on soil acidity levels is by
9. List the three most commonly used liming materials for neutralizing soils.
a.a
b.
c.
53,-

t`Y
WORKSHEET 2
PHOSPHORUS AND POTASSIUMt
1. Name nine common sources of phosphorus and the approximate percentage. of phosphorus.
Name
a.
b.
c.
d.
f.
g
h:
i.
2. List six sources of potassium and their approximate percentage.
Name . %
a.
b.
c.
d
e
3. The three forms of potassium in soil are: .
a.
I-F-2-26
c.
56
`J.
e
..,
.
,.r
4. What effect does pH have on 'the availability of phosphorus and potassium?
.
5. A survey of fields in Illinois showed about 16% were unrealistically high in their P1 test. Whatare some possible explanations for these results? .
4- V
6. What is the phosphorus supplying power of the soil in your region of Illinois?
7. To increase the P1 test one pound, you must apply pounds of P205 per acre.
8. What is the potassium supplying power of, the soil in your region of Illinois?
?
9. To increase the soil potassium test one pound, you must apply how many pounds of K20?
ei
5"-'
4
I-F-2,27
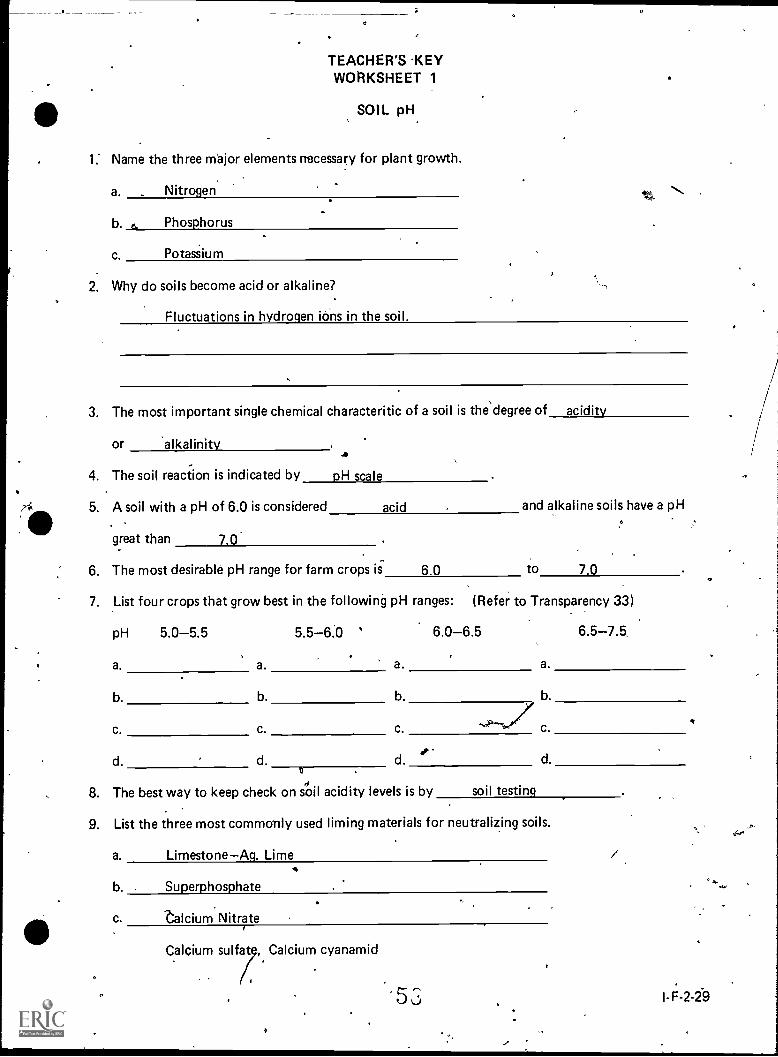
TEACHER'S -KEYWORKSHEET 1
SOIL pH
1: Name the three major elements necessary for plant growth.
a. Nitrogen
b. a Phosphorus
c. Potassium
2. Why do soils become add or alkaline?
Fluctuations in hydrogen ions in the soil.
3. The most important single chemical characteritic of a soil is the\ degree of acidity
or 'alkalinity
i4. The soil reaction is indicated by PH scale
5. A soil with a pH of 6.0 is considered
great than 7.0
acid and alkaline soils have a pH
6. The most desirable pH range for farm crops is 6.0 to 7.0
7. List four crops that grow best in the following pH ranges: (Refer to Transparency 33)
pH 5.0-5.5 5.5 -6.0 ' 6.0-6.5 6.5-7.5
a. a. a. a.
b. b. b. b.
c. c. c.
d. d. d.
8. The best way to keep check on soil acidity levels is by soil testing
c.
d.
9. List the three most commonly used liming materials for neutralizing soils.
a. LimestoneAg. Lime
b. Superphosphate
c. Zalcium Nitrate
Calcium sulfat Calcium cyanamid
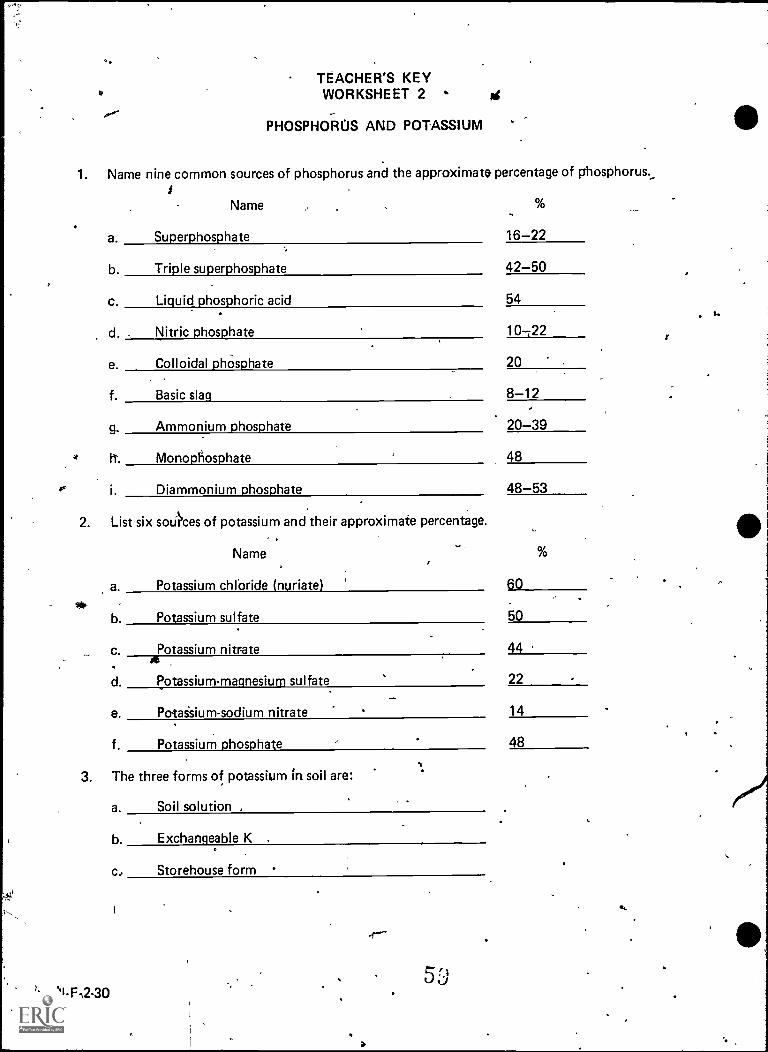
c.
TEACHER'S KEYWORKSHEET 2
PHOSPHORUS AND POTASSIUM
1.
2.
Name nine common sources of phosphorus and the approximate percentage of phosphorus.,
Name
a. Superphosphate 16-22
b. Triple superphosphate 42-50
c. Liquid phosphoric acid 54
d. , Nitric phosphate 10-22
e. Colloidal phOsphate 20
f. Basic slag 8-12
9 Ammonium phosphate 20-39
Monopliosphate 48
i. Diammonium phosphate 48-53
List six sources of potassium and their approximate percentage.
Name
a. Potassium chloride (nuriate) 60
b. Potassium sulfate 50
c. Potassium nitrate 44
d.
aPotassium-magnesium sulfate 22
e. Potaisium-sodium nitrate 14
f. Potassium phosphate 48
3. The three forms of potassium in soil are:
1-F12-30
a. Soil solution ,
b. Exchangeable K
c, Storehouse form
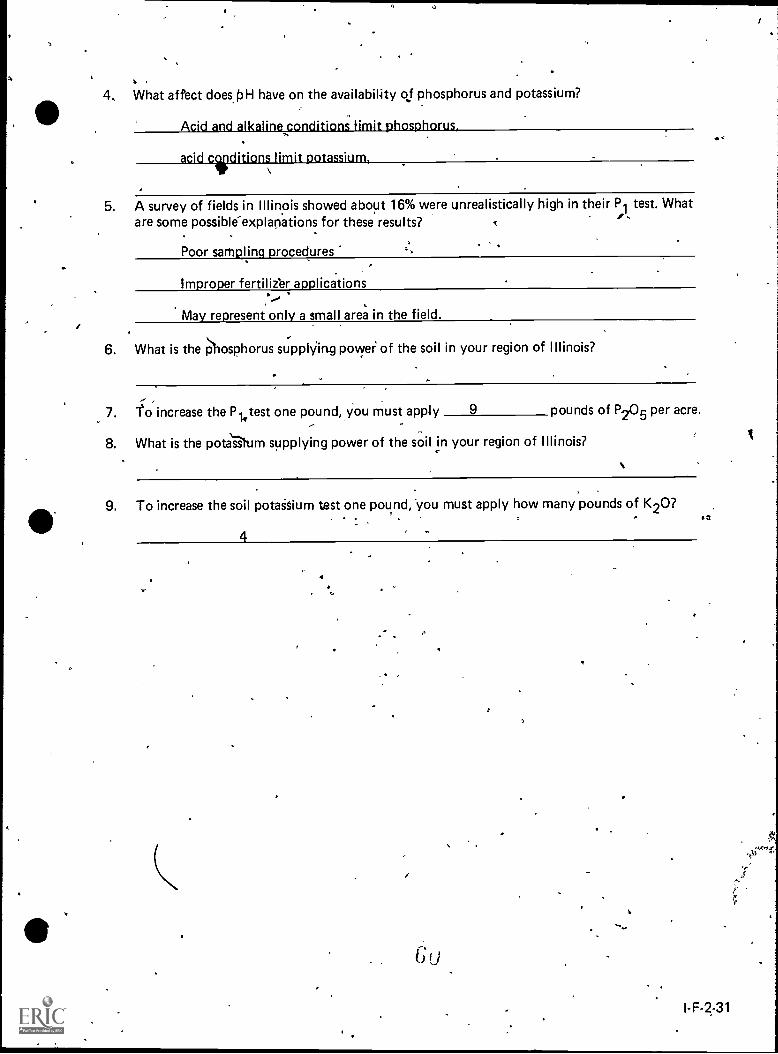
4. What affect does, OH have on the availability of phosphorus and potassium?
Acid and alkaline conditions limit phosphorus,
acid ciritions limit potassium,
5. A survey of fields in Illinois showed about 16% were unrealistically high in their P1 test. Whatare some possible-explanations for these results?
Poor sampling procedures
Improper fertilizer applications
May represent only a small area in the field.
6. What is the phosphorus supplying power of the soil in your region of Illinois?
7. lc increase the P test one pound, you must apply 9 pounds of P205 per acre.
8. What is the pota iltum supplying power of the soil in your region of Illinois?
9. To increase the soil potaisium test one pound, you must apply how many pounds of K20?se,
4
I-F-2-31
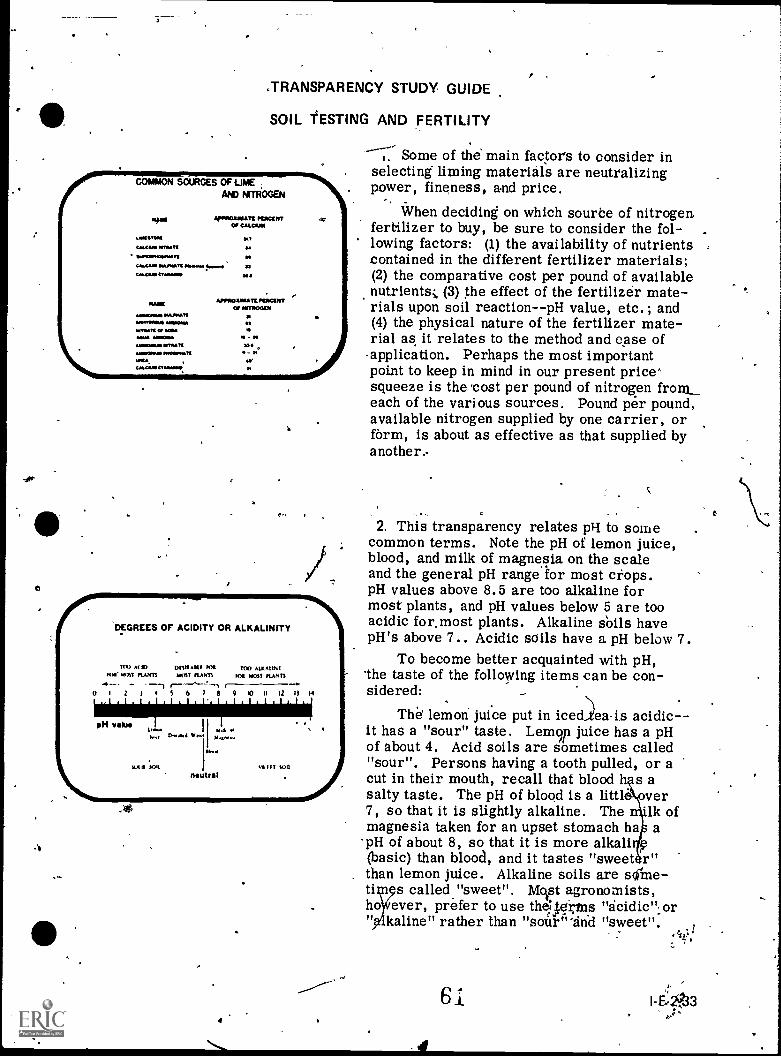
,TRANSPARENCY STUDY GUIDE
SOIL TESTING AND FERTILITY
COMMON SOURCES OF LIME ;AND NITROGEN
"MI APPOIOUSATt PCIKSPIITOf CALCIAI
LOSOONS 317
4sOlAil MOOTS SS
4.00.010NOTS so
WOWS ISOMOS 01.00 21"....1 ISMONO COONSIO OSA
MM[ APP1101111141TEPCIICIPIIT
0INIT11001,1yOSSOK.O SVISISSIS
40.1011101 ON1101Y
WW1 Of SOY-MOMS.luINIP0111.7.,11 noSYSIMOSO 0.0011MOS - S.
CUM. a *IMMO
DEGREES OF ACIDITY OR ALKALINITY
MIDSOW MOST MOOTS
0 1 2 1
DISMAU1MOH nAwn
--r1
TOO AMAIN!iOlt MOST PLAN11
S 6 7 8 9 10 12 11 14
pH valueMA
C.a.! Vert
301111 3011
IM,..
neutralSt 11 T 5011
Some of the main factors to consider inselecting liming materials are neutralizingpower, fineness, and price.
When deciding on which sourbe of nitrogenfertilizer to buy, be sure to consider the fol- .lowing factors: (1) the availability of nutrientscontained in the different fertilizer materials;(2) the comparative cost per pound of availablenutrients;. (3) the effect of the fertilizer mate-rials upon soil reaction--pH value, etc.; and(4) the physical nature of the fertilizer mate-rial as it relates to the method and ease of
-application. Perhaps the most importantpoint to keep in mind in our present price'squeeze is the 'cost per pound of nitrogen fromeach of the various sources. Pound per pound,available nitrogen supplied by one carrier, orform, is about as effective as that supplied byanother..
2. This transparency relates pH to somecommon terms. Note the pH of lemon juice,blood, and milk of magnesia on the scaleand the general pH range for most crops.pH values above 8.5 are too alkaline formost plants, and pH values below 5 are tooacidic for.most plants. Alkaline soils havepH's above 7.. Acidic soils have a pH below 7.
To become better acquainted with pH,'the taste of the following items can be con-sidered: -
The.' lemon juice put in iced/a-is acidic-it
.
has a "sour" taste. Lem9p juice has a pHof about 4. Acid soils are sometimes called"sour". Persons having a tooth pulled, or acut in their mouth, recall that blood s asalty taste. The pH of blood is a littl ver7, so that it is slightly alkaline. The 'lk ofmagnesia taken for an upset stomach ha apH of about 8, so that it is more alkali(basic) than blood, and it tastes "sweet r"than lemon juice. Alkaline soils are sciime-ti s called "sweet". Mist agronomists,ho ever, prefer to use the:t&cins "acidic".or" kaline" rather than "sou "'and "sweet".
61

04 SCALE SON SOIL REACTION
(01 Of 440)
SOIL pH atoll PLANT NUTRIENTS014 ,H8 4144 p117
cm=a==
114414ty .t Ptatal N.b4..t. t. hat. Mu**.44 04 W14014, aso Se,
t unn IF Ill M PM union
444 11New 40 moor ra sirs ammo es omit el Aurdemera...**
MENNEEIHNSIN=Nm4IMENIONm-IIIII NNWMEN Oka NE=
1.111 wm
RN.* Miro
MEM
.4=Mi
=ww=111MMIme MI EMI MN
=1=MI
1111...M.Man
ANINIMMORMIIMME=M
I-Ft2-34
Examples of the extreme ranges of thepH scale would be as follows: The pH of mostcommon dry drain cleaners is around 12.These products are alkaline. The battery -acid in a car battery has a pH value of about2. Battery acid is obviously acidic: Thedistilled or "bottled"- water for sale in storesis neutral--that is it is neither acidic nor al-kalinethis water'has a pH of 7.
3. The molt desirable pH range for farmcrops is - 7.0. Different kinds of plants,however, grow on soils with different pH values.For example, alfalfa does best on soils slightlyacid td lightly alkaline; whereas, potato willgrow Wirt strongly acid soils...
4. The availability of essential plant nutrientsis related to pH. Note the difference in the avail-ability of iron and calcium as pH changes.
5. This transparency illustrates nutrient'availability as influenced by pH. As the widthOf the nutrient line decreases, the availabilityof the nutrient decreases. Note how potas-sium is practically non-available at pH 4.5,but is little affected from pH 7-10. Noticehow pH affects the availability of nitrogen,phosphorus, iron, .and zinc in the soil pHrange of5-8.5,. Acidic conditions limit ordecrease the availability of nitrogen andphosphorus. Iron and zinc are little affectedunder slightly acidic conditions. However,notice the decreased availability of iron andzinc in the alkaline pH range of 7-8.5.
62
PH FERTIUTY STATUS
OF SAMPLED FIELDS
pH Percentof fields Evaluation
Blow 5 0 25 1-5.5 1156-6 0, 21
22
(52)7 1-7.5 . 11
7 5 3
(14)
6 1-6 56.6-7.0 ..
ManganesetalcrY a wc=gra E T below
1 crrl:lfa orrierXf-671Zi;htyworansoy .
Optimum pH.
Alkaline. Watch for manganese deficien-cies In soybeans and oats, and iron defi-ciencies In Wayne soybeans.
COMMON SOURCES OF PHOSPHORUSAND POTASSIUM
NAM 1140601.1172 /MINTOF 1.01161.01V6
Uoto+Fne.aft
KO,oveK(4.114.4Fot MIKawatiowel 11
T.
01011 1.1AC 1.16666
n nl,. 01.11.411,1
11...1. MN GYM KA "WI6111 011 roma,"1",11. V
I
6. Different kinds of plants have the ability'to grow and produce on soils with differentsoils pH values. Some grow only in acidsoils, while most crop plants do best onmoderately to slightly acid soils. Otherplants grow better on slightly acid to slightlyalkaliiie soils.
7. A 3-year survey of 1,706 fields in cornand soybeans in 74 counties was conductedby the University cif Illinois Agronomy De-partment. The results are shown in thistransparency and indicates that many liming"-programs are being short-changed on agrowing number of Illinois farms. The useof nitrogen fertilizer has rapidly increased,but the tonnage of limestone has not keptpace. It requires about four pounds of limeto neutralize the acidity of one pound ofnitrogen applied as ammonia or urea and asmuch as nine pounds of lime to neutralize tacidity resulting from one pound of nitrogas ammonium sulfate. A soil test every u..years is the best way to keep.check on soilacidity levels.
8. The availabi y bf inorganic phosphorusis largely deter fined by the following factors:(1) soil pH; (2) soluble iron, aluminum, andmanganese; (3) presence of iron-:,-, alumi-num--, and manganese--containing minerals;(4) available calcium and calcium minerals;(5) amount and decomposition of organicmatter; and (6) activities of microorganisms.The first four of these factors are inter-related bfcause their effects are largely -
. dependent upon soil pH.
The general trend by farmers is to,.use asoluble form of phosphorus fertilizers. Rockphosphate, which was earlier u,sqd, is notlikely to be as economical as other sourcesat soil pH 6.0 and above. The amount ofalfalfa or clover in the cropping system mayalso affect this -decision; but most farmersprefer fertilizer that is more readily avail-able td plants.
Cor)
I
I-F-2-35
LIME RECOMMENDATIONSFOR GRAIN FARMS
CHART /
GRAIN WNWSYSTEMS
%MINIUMANSX.M34
WMONX
TORS TO
AAI.41:1111AMU
AOOLY
6
5
2
0
ft
,H65 60 SS SO 45SLIGHTLY WiceaSELY STRONGLYXs Xs APO
LIME'RECOMMENDATIONS'FOR LEGUMES
T00 TO &PY
Potassium occurs in the soil in threemain forms: (1)1n the soil' solu n, (2) asexchangeable K, a e storehouseform. The K. in,,ffie soil solution is used byplants. The exchangeable K is held on theoutside of the clay minerals and the soilhumus; the storehouse form of K is held inthe interior of the clay. As K in the soilsolution is used`by plants, the exchangeubleK on the clay easily goes into the solutionand, in turn, the K from inside the clay(storehouse form) slowly moves to the out-side of the clay thus becoming exchangeable,DUring the time of the year when crops. arenot .growing, K continues to move from thestorehouse to build up the supply of exchange-able and soil solution K.
9. 1. Use Chart I for a grain farming system.2: Decide which soil class fits your soil- -
Silty clays and silty clay loams (dark).Silty clays and silty clay roams (lightand medium). Silt and clay loams(dark).
A.B.
C. Silt and clay lo ms (light and medium),sandy loams (dark), loims (dark andmedium).
D... Loams (light), sandy foams (light andmedium), sands.
E. Muck and peat.3. Find your soil's pH along the bottomlbf
the chart. '4. Follow up the vertical line until it inter-
sects the diagonal line A, B, C, D, or Ethat fits your soil.
5. Read the suggested rate of application'along the right side of the chart that youare using..
4
10. 1. Use Chart ,II for a cropping system withalfalfa, clever, or lespedeza.
2. Decide which soil class fits your soil- -Silty clays and silty clay loams (dark)."Silty clays and silty clay loams (light
nand medium). Silt and clay loams(dark).Silt and clay foams" (light and medium),sandy foam's (dark), loams (dark andmedium).Loams (light), sandy foams' (light andmedium), sands.Muck and peat.
04urfOPOPMG SySTEMS 1441.4al/K/A,CaCht
, LWII0tis
.111211 A.B.411511E1
.11:115111141E0511111
40W hefilD447404L, elJt
. eACM AlVel
""A41241111111111111111111
Miti1111111AE111111121 C.
D.
E.
,A5E11110W11lAllni1111211/1!..1i111115Ed11111i11111111U1111111
S000 SS A0 SS SO'COW lutotty OCCAO a S WW.
.CO CO ACO
I-F-2-36
I
Pt STATUS OF SAAPLED FIELDS
IN eatPercentof kids Evaluatke
&low 11 3 Low Sat ali crops and sods Buildup apph.11- 12 221-620 3
16 9 C100 Named
(32 3)Reasonable sods Sat corn and mbar..
31-40 13 2 depending somewhat on pbeepheetwaup-41-50 11 6
(6 wp.a yo.o.of d abe imed Se what.
31-100 25 1 =lab Mat:moans* &IMAMS or les.
101-2120 II 3 Unrealistically high No applicationAbove 203 3 needed.
(15 I)
4
PHOSPHORUS SUPPLYING POWER
65
3. Find your soil's pH along the bottom ofthe chart.
4. Follow up the vertical line until it inter-. sects the diagonal line A,' B, C. D, or E
that fits your soil.5. Read the suggested rate of application
along the right side of the chart that youare Using.
11. .A 3-year survey of 1,7.06 fields in cornand'soybeans in 74 counties showed the fol-lowing phosphorus fertility status. It wasconducted by the University of Illinois-Agron-omy Department.
About one-third of the fields (32.3 per-cent) are definitely low in-available phos--phorus, over one-fourth (26.8 percent) arenear suggested levels, 40.9 percent are abovesuggested levels and, of those, 15.8 percentare unrealistically high. Some of the veryhigh tests may represent only the small areain the field that was sampled rather than theentire field. Extremely high tests may becaused by an old manure pile or burning ofbrush or corncobs.
12. Illinois has been divided into four regionsin terms of inherent phosphorus-supplyingpower of the soil below the.plow layer indominant soil tykes.
High phosphorus-supplying power means:
a. The amount of available phosphorus(P1 test) in the, subsoil is relatively high.
b. The conditions 'are' favorable for goodroot pentration and branching in the subsoil,
Low phosphorus-supply power may becaused by one or more of the folloWing factors:
a. A loW supply of available phosphorusin the subsoil because (1) the parent materialwas low in phosphorus; (2) phosphorus waslost in the soil-forming process; or (3) thephosphorus is made unavailable by high pH(calcareous) material.
b. Poor4nternal drainage that restrictsroot growth.
-c. A dense, compact layer that inhibitsroot p&netration or spreading.
'd. Shallowness to bedrock, sand, orgravel.
e. Drouthiness, strong acidity, or otherconditions that restrict crop growth and re-duce rooting depth.
PHOSPHORUS FOR PORN .
AM SOYBEAN FIELDS 13. Broa cast applica ions at low P testlevels pro 'de for cons'derable -up.
applications do no . Where there is arange in the amou.nt'sug ested under theheading."Broadcast," the larger figure willgive a quick increase in test; the smalleffigure will give only a sma 1 increase.
1.7.4
rad
11
,e,w
Pa ** erre 4 .r*70%
7..**1*Or471
. 671, 777
n17 .1 17 wri,Ter 0.11
7.71 47.444.144.4.
7.4 mown
I I
arria *ow*NI
L.* **T 10
1%
7 4 7 410
47. 40.
m. 1)0;42 ,,er
.117141111Pm 70 fur
,7444444147 4.4,4 so 4674.
10
' PHOSPHORUS FOR WHEAT FIELDS
1 17444 711,0.7. 744.4 o4 744 en.t,_ - (4 1
11 r.
W,17 11
*o or 7*I PO. 24107 II
* 10 or
011*. rri* %
re 0.10 7411076
PHOSPHORUS RTES NEEDEDBEFORE SEEDING ALFALFA
Pt test Beoadcast seeding Band seeding
Soil regionsec map
Expected yieldper acre
Expected yieldper acre
2.3 tons 3.5 tons 2-3 tons 3.5 tons
tau2530384560
cord,
1520304050.
high1015203040
120906060
Pound: of P10 ply ant180 60ISO 5090 3060 ,p3303
90806040
7.4" 744744.. owo **or*or **.a.r,* rt. 4. 14;
I-F-2-3840
14. Note that the percent of possible yieldfor wheat is lower than for cor at the various.P test levels. Wheat requires large amountofreadily available phosphorus i the fall.Phosphorus stimulates early gro h, promoteswinter survival, and helps make t youngplant capable of high yield in the fo lowing _
year.If you do not have the results of P soil
test, apply 30 to 60 pounds of availabl Po 05(13 C0426 P) through the drill or broad srabout 60 to,120 pounds P
20
5(2 to 53 punds
P).
15, Apply all, phosphorus at seeding time obroadcast part of it with potassium. For bseeding reserve a minimum of 30 pounds ofP205, per acre. For broadcast seedip,g,broadcast all the phosphorus with potassiumpreferably after primary tillage and beforefinal seedbed, preparation.
16. Research has shown that it requires, asan average for Ilthiois soils, nine pounds ofP205 per acre to increase the P1 soil testone pound. Therefore, the recommendedrate of build-up phosphorus is equal to: thesoil test goal minus the actual soil test valuemultiplied by nine. The amount of phospho-,rus is equal to: the soil test goal minus theactual soil test value multiplied by nine. Theanioutlt of phos h rus recommended for build-up over a four- ar period for various soiltest levels is s wn in this transparency.
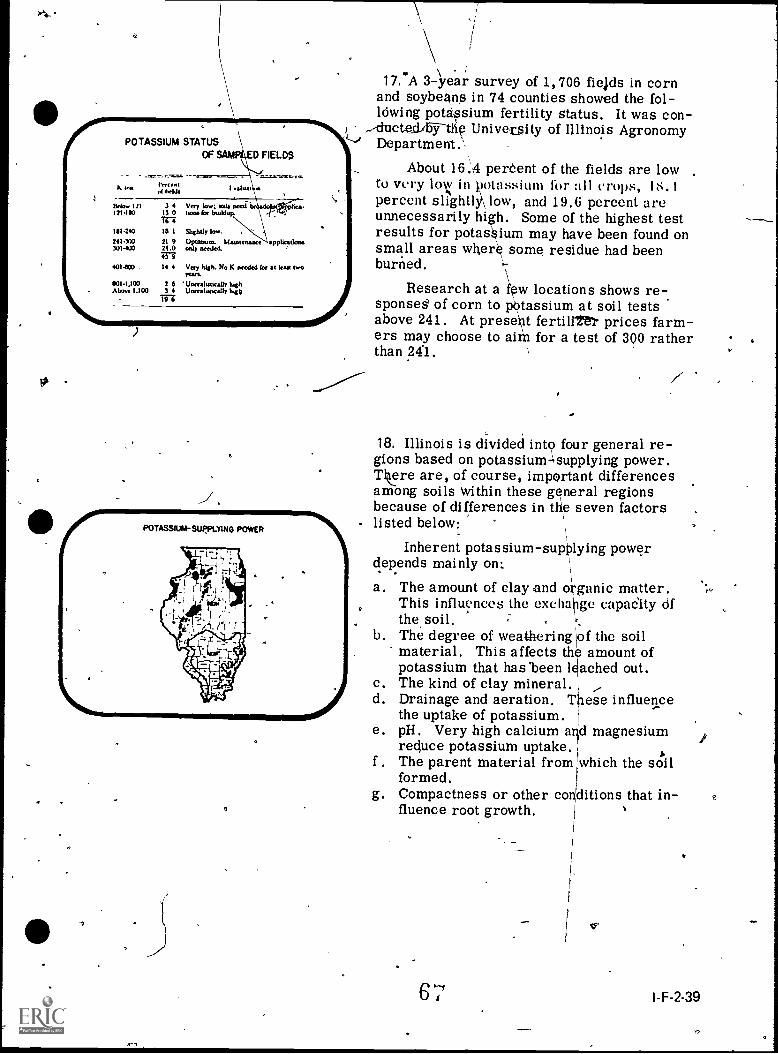
tio
17. A 3-year survey of 1,706 fie}ds in cornand soybeans in 74 counties showed the fol-lowing potassium fertility status. It was con-
.-duetecL,637-tlie University of Illinois AgronomyPOTASSIUM STATUS Department:
OP SAPA D FIELDS
About 16.4 percent of the fields are low.,...... ....---.. 0..,..A len of beide
Prrregili vaklai M1 to very 10%z in i?otassium for all crops, 18.1
percent slightly\ low, and 19.6 percent are121490 13 0
7.47now foe buildup. '1----. unnecessarily hi h. Some of the highest test
two. 1,/1 3 4 Very low; soda Deaf-
181.240 IS 1 Slightly 170, t results for potas ium may have been found on241.30) 21 9 en. Maintenance aPPIk71301.301-400 24,0 small areas wIier some residue had been0 9
401-1300 , 14 4 Very Migh. No K nettled foe at lean two burned.Team
901.1,1C0 28Above 1,100 3 4
'Uoreallsocally highUnrealistically htg0 Research at a few locations shows re-
vel...el above 241. At present fertiliTtr prices farm-we sponseg of corn to pbtassium at soil tests
) ers may choose to aim for a test of 300 ratherthan 241.
0
/
18. Illinois is divided into four general re-gions based on potassium - supplying power.There are, of course, important differencesamong soils within these general regionsbecause of differences in the seven factorslisted below:
Inherent potassium supplying powerdepends mainly on:
a. The amount of clay and organic matter.This influences the exchange capaCity dfthe soil. e.
b. The degree of weathering of the soilmaterial. This affects th amount ofpotassium that has been I ached out.
c. The kind of clay mineral.d. Drainage and aeration. T ese influence
the uptake of potassium.e. pH. Very high calcium and magnesium
reduce potassium uptake.f . The parent material from which the soil
formed.g. Compactness or other conditions that in-
fluence root growth.
6 1I-F-2-39
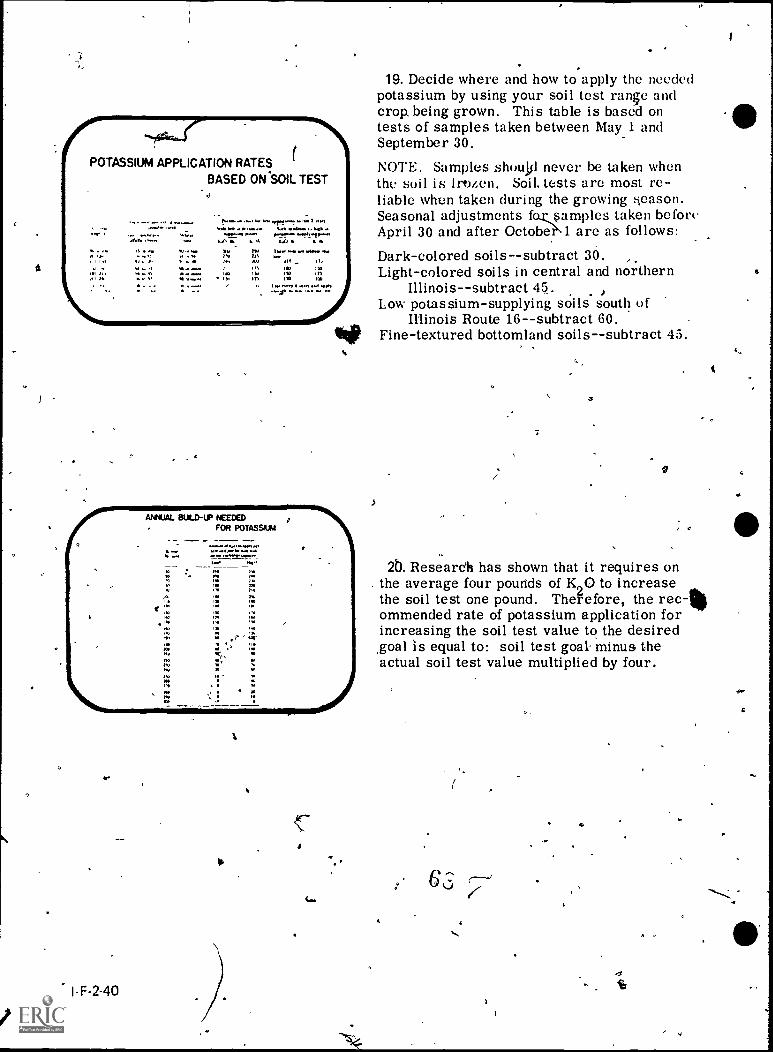
19. Decide where and how to apply the neededpotassium by using your soil test range andcrop, being grown. This table is based ontests of samples taken between May 1 andSeptember 30.
4
POTASSIUM APPLICATION RATES
BASED ON.SOIL TEST
-raw 1 .4.,
AO. 0 II. 'A It.0 It. 1101 T. Po *orA ISA 7.0 171 .
NJ I. II ,It, ISO 10
i 00 15u 110 11)II I ,,,, 101 110 100
0 . .... N.71" ....s. U. 0.. . I. N.
NOTE. Samples should never be taken whenthe soil is frozen. Soil, tests are most re-liable when taken during the growing .eason.Seasonal adjustments far,samples taken beforeApril 30 and after Octobel are as follows:Dark-colored soils -- subtract 30.Light-colored soils in central and northern
Illinois--subtract 45. . J
1
ANNUAL BUILD-UP NEEDEDFOR POTASS/UM- -0. ...v.
I-F-2-40
Low potassium-supplying soils south ofIllinois Route 16--subtract 60.
Fine-textured bottomland soils--subtract 45.
2b. Research has shown that it requires onthe average four pounds of K20 to increasethe soil test one pound. Therefore, the rec-14ommended rate of potassium application forincreasing the soil test value to the desired,goal is equal to: soil test goal minus theactual soil test value multiplied by four.
,
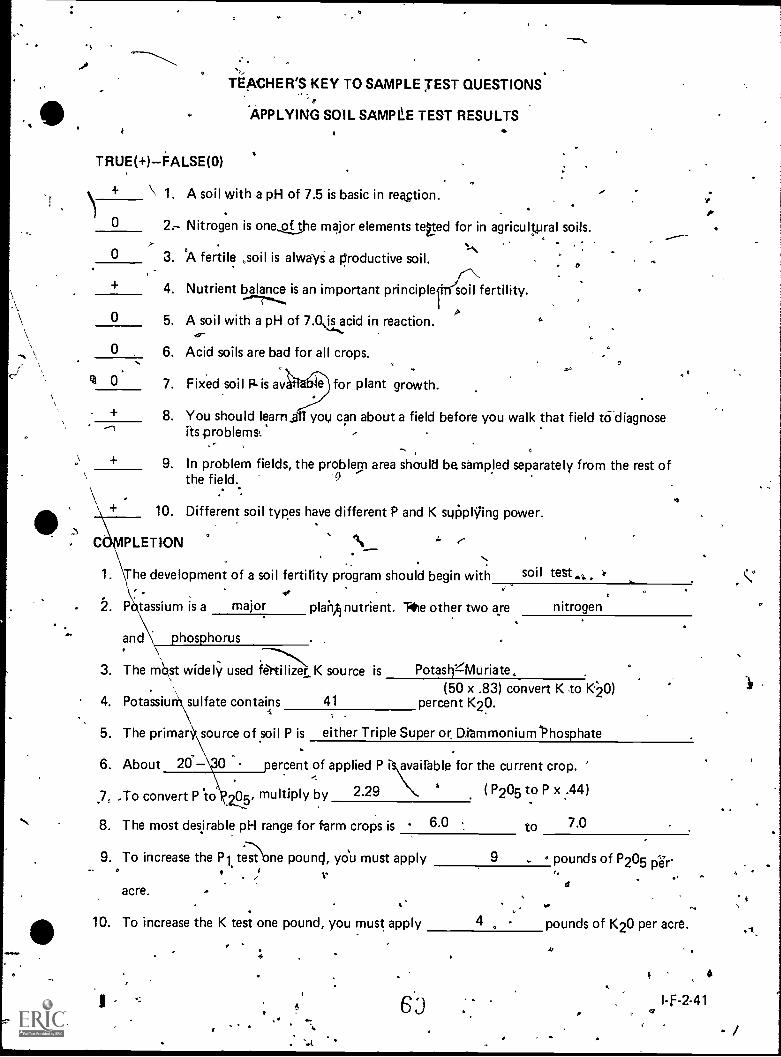
TEACHER'S KEY TO SAMPLE TEST QUESTIONS
'APPLYING SOIL SAMPLE TEST RESULTS
TRUENFALSE(0)
\ 1. A soil with a pH of 7.5 is basic in reaction.
Nitrogen is one,olthe major elements teed for in agricultural soils.0 2-
0 3. 8P4 fertile ,soil is always a firoductive soil.
4. Nutrient balance is an important principle soil fertility.
0 5.A
A soil with a pH of 7.0 is acid in reaction.tr"
0 6. Acid soils are bad for all crops.
qt 0 7. Fixed soil 14- is av for plant growth.
+ 8. You should learn_e you can about a field before you walk that field to diagnoseits problems:
+ 9. In problem fields, the problem area should be sampled separately from the rest ofthe field. -9
10. Different soil types have different P and K spiiplging power.
PLETION
The development of a soil fertility program should begin with
2. Potassium is a
soil test
major plakt)nutrient. T4ie other two are nitrogen
and phosphorus
3. The mast widely used f0-tilizer K source is PotastjZMuriate.(50 x .83) convert K K20)
4. Potassiu sulfate contains 41 percent K20..
5. The primar source of soil P is either Triple Super or aibmmonium 'Phosphate
6. About 20' 0 ercent of applied P ' available for the current crop.
7, To convert P to 29, multiply by 2.29 ( P205 to P x .44)
8. The most desirable pH range for farm crops is 6.0 to 7.0
9. To increase the P1 tesone pound, ydu must apply 9 , pounds of P205 ar
acre.
10. To increase the K test one pound, you must apply 4 pounds of K20 per acre.
4
t 6
l-F-2-410
The remaining questions pertain to the Soil Test Report.
11. How many samples were taken? 7
12. The resulis are based on expected yields per acre fOr what two crops?
corn and soybeani
13. The samples were tested by A. Adams
14. The % organic matter for sample 5 is 5.0
15. The soil texture contained in this sampled field is
16. The number of acres in this 'field is 20
silt loam
17. The yield goal for soybeans is 50
48. The field was limed in what year? 1974
19. Sample number 1 was taken in the old barnyard.
20. The pH for sample number 3 is 6.8
21. The two soil types contained in this field are Dana and Drummer
ESSAY QUESTIONS
Record the fertility recommendations for the following field,soil test results:
A. Recommendation-for Lime
Goal p"tfl 6.5 7.0 Apply about 2 ton/acre in Zone HDo not apply any in Zone I
B. Recommendation for Phosphorus
Med. supplying power40 50
Apply 100 120 lbs. P205/acre broadcast plus 20 lbs.through the planter. Avoid the feedlot andpond area.
C. Recommendation for Potassium
Med. to high supplyingpower
I-F-2-42
Apply 200 .2-20 lbs. of K20/acre in Zone IIand apply 60 lbs. of K20/acre in Zone I formaintenance.

Soil Test BForm
Blueboy
SOIL SAMPLE INFORMATION SHEET(To accompany soil samples; complete one form for each field)
TENANT Tom Test
OWNER Same
DATE 1
Township Flat Tests Desired:Section 2 Qtr. NW pH____,X.
County Field 1 p.i X
XAcres 20 # KSamples 7 OM X
ADDRESS
ADDRESS_
Testville IL
Same
In order that results of the test may be properly analyzed and interpreted, the following informationshould be submitted with the samples from each field:
1. Soil type name_ _DX:as_ Drummer
2. KIM of soil: sandy__ _ _ silt loam
3. Is drainage 'good. X_ fair
X clay__ muck__ ____.
poor_____________?
4. Has the field been limed When?_ 19.74__ Amount per acre 3 Ton
.5. Amount of fertilizer applied per acre last year: N 125 F205_ 100 K20 100
6. Cropping intentions for next four years, expected yields, and tillage system (plow, chisel, disk, no-till, etc.):Intended Expected ' Tillage
crop yield system
This year Soybeans 50 Chi set in fall
Corn 140_ _Fall_ploVrNext year
i
Third yiar Soybeaas___ 50._ Disk
Fourth year Wheat
7. How deep do you plow? /-,11_91;
40
8. Arediere any special problems? An old barnyard is lo6ted in the northwest corner of
the field.
The north 10 acres has received manure applications the last two years.
A pond is located in the southeast corner of the field.
e -Reproduced for classroom teaching purposes with permission of the Cooperative Extension Service
I-F-2-43

P
MAP OF THIS FIELD(Number the sample locations)
Top of map is north
568 = Dana'152 = Drummer20 acre field
I-F-2-44
south
Vocational Agriculture Service434 Mumford HallUrbana, Ill. 61801
72
1.
Soil Test INForm 1-1-
SOIL TEST REPORT
Bldeboy 'County Samples brought.in T
Tenant 4TOm Test
Owner: Sane_
J
m Test
Date(received) (tested)
Samples tested by A Adams
Address
Addrets Same
This report gives you the results ciljie laboratory tests on your samples.I suggest that you keep this report in a permanent folder. Record right on the ,field maps the amounts of lime and fer-
tilizer that you apply and the-dates uhen you apply them. This record help you to interprLt the next test on the fieldand `rill also give you a long-term inventory that «ill show Ndiether soil fertility is being built up, is be;ng maintained, or isdeclining.
Field andsample number Acres
pHTest foracidity
P,Test for
availablephosphorus
KTest for
potassium
Organic_ matteror soil color Comments
Field I 20
Sample #1 6.9 205 1250 5.8
2 7.0 18 275 4.8
3 6.8 24 315 4.5
4 5.8 15 130 4.2_____
5 5.7 . 140 310 5.0
6 6.1 '20 I 145 4.7I
I,-7 i 6.0- 17 137 4.5
i--.
. ,.
.
,
---r-
+-
1"
L.Soil tests are only a means to an ca The important thing is ho you use the results to plan a better soil - fertility proSgram. Planning the most profitable soil' treatments after you halve the results of the soil tests is rikt simFle, but it is extremely
important in determining your profit from farming.On the back of this sheet, and on the other sheets labeled LIME, PHOSPHORUS, or POTASSIUM, you \%ill find the
information that you deed to understand the tests so that you can plan a more profitable soil - fertility system. If you halve fur-ther questions, please contact me.
Reprluced for classroom teaching purposes with permission of the Cooperative Extension Service I-F-2-45
,;)
r
MAP OF THIS FIELD!Number the sample locations)
pH Results
Top of mop is north
11
II I
'5,
O6.9
1
®ZONE I 1\ 7,0
ZONE II
O6.0
ss.6.1
5,7
6.8
®5.8.
south
Vocational Agriculture Service434 Mumford HallUrbana, Iii. 61801
MAP OF THIS FIELD(Number the sample locations)
P1 Results
Top of mop is north
O205
20
18
south
Vocational Agriculture Service43eMurnford HallUrbana, Ill. 61801
73
4MAP OF THIS FIELD
(Number the sample locations)
, K Results
Q
A
Top of map is north *
@1250
ZONE I
ZONE II
. " CII 137
275
)
0'145
1
I,
013
5.
I-F-2-48. 4
south
Vocational Agriculture Service434 Mumford HallUrbana, Ill. 61801
G.

S
4 O5.8
®4.5
MAP OF THIS' FIELD(Number the sample locations)
Organic Matter Results
fop of map is north
.8
4.7
south
Vocational Agriculture Service434 Mumford HallUrbana, Ill. 61801
5t.
4
7
O4.5
04.2
a
l-F-2-49
2. Beautifying the homestead...
UNIT G: -HORTICULTURE
PROBLEM AREA: GROWING VEGETABLES
SUGGESTIONS TO THE TEACHER:
This problem area is designed for use with ninth grade or beginning students enrolled in anagricultural horticultural occupations program. The recommended time for teaching thi.s problemarea is late winter. The estimated time for teaching this problem area is 5 to 10 days depending onhow much time the teacher wishes to spend on discussion and conducting the suggested exercises.The materials in this problem area were selected and written with the following assumptions:
1.. Each student will have the opportunity to develop a SO.E. PrograM in vegetable garden-ing.
2. Where appropriate, school gardens or community gardens will be encouraged.
3. The Cooperative Extension Service, Park Districts, and Community College AgriculturePrograms will be contacted for local gardening programs.
The instructor is encouraged to condUct a local search to locate other supplementary mate-rials. The items in this proI21#rn area are for reference or modification as the teacher adapts thesematerials to his/her local situation...,
CREDIT SOURCES:
These materials were developed through a funding agreement, R-33-21-D-0542-388 with theIllinois State Board of Education, Department of Adult, Vocational and Technical Education,ResearCh and Development Section, 100 North First Street, Springfield, Illinois 62777. Opinionsexpressed in these materials do not reflect, nor should they be construed as policy or opinion ofthe State Board of Education or its,staff.
The teacher's guide, worksheets, information sheet and test questions were developed byRon Biondo, Department of Vocational and Technical Education, University of Illinois. Suggestionsand guidance in the development of these materials were provided by the Rural Core CurriculumPilot Test Teachers.
(
I-G-1-1
O
TEACHER'S GUIDE
I. Unit: Horticulture
I I. Problem area: Growing vegetables
III. Objectives: At the close of this problem area, students wilt
1. Understand the steps in planning a vegetable garden.
2. Know how to select and prepare a garden site.
3. Be familiar with the major vegetables grown in Illinois.
4. Know the factors to consider when selecting vegetable varieties and seed.
5. Know how and when to start seeds or transplants in a garden.
6. Know how to care for a vegetable garden.
IV. Suggested interest approaches:
1. Ask the class the following lead question: Did any of you have a Vegetable garden lastyear? What types of vegetables did you grow?
2. Ask the class to identify advantages of vegetable gardening at home.
3. Present figures to show the importance of gardening and the increased interest peoplehave in gardening.(A 1980 estimate for vegetables grown in a 25' x 30' garden was more than $500.)
4. Ask the class to identify the best gardener they know and have them describe thisperson's gardening program.
5. Ask the class to respond to the followihg questions:
a.- How many of you luld like to tart a garden project?
b. How many of you would be nterested in exhibiting vegetables at a fair?
c. How many of you would e to earn money from gardening?
6. Ask the students why tomat es are considered fruit and why carrots, roots and celery. petioles.
V. Anticipated problems and concerns of students:
Planning the garden
1. Why is it helpful to lay the garden out on paper?
2. At what time of the year should I begin to plant my garden?
3. How can trees and shrubs near the garden affect vegetable gioWth?
ai
SO0
6 421h.
I-G-1-3
A
4. Do all vegetables require full sunlight? 0
5. What are the major vegetables grown in Illinois?
6. What are the different plant structures that are eaten?
7. What is a variety?
8. What is meant by the term "hybrid"?
9. What does "germination rate" mean?
10. What is the meaning of disease resistance?
11. Why is spacing between the rows important?. *Preparing the garden i,
12. What is meant when referring to "good" soil?
13. Where can one have soil tested?
14. How can soil tilth be improved?4
15. How can I tell if the soik:s too wet to work?e
Planting the garden
16. What are the reasons for using Transplants?
17. Can vegetable seed be-saved and used the following year?"
18. How do freeze dates relate to the planting of vegetables? _
19. What benefits do transplants have over seed grown vegetables?
Caring for the garden
20. Why are chemical herbicides seldom used in vegetable gardening?
21. In ays do weeds compete with vegetables?.--
22. 'How often does a vegetable garden need to be watered?.4-
23. Can I use taTarn e insecticides used on farm crop in the vegetable garden?
.
... .24. Will my vegetables be harmed if I use black walnut leaves for a mulch?
,VI. Suggested learning activities and experiences:
,,1. Discuss the advantages of having a home vegetable garden.
I-G-1-4
2. Discuss why it helps to plan the vegetable garden in advance.
/I
,
3. Introduce thkstudents to terms commonly used when speaking about vegetable gardens.Have them coaplete Student Worksheet 1 on matching common terms.
81
4. Discuss the important factors in selecting a growing site for vegetables.
tf,5. Give an out -of -class exercise. Have the students make a sketch of their home
property, indicating the approximate locations of buildings, trees, fences, etc.'Then, ask them to select two sites they feel are suitable to locate, a garden.
6. Disctiss the improvement of soil tilth, soil testing, fertilization, and the prepara-tion of soil in the garden.
7. Have students collect soil in the school yard and prepare it for a soil test. Havethe soil tested, theldiscuss any treatment that would be needed to make it suitablefor a vegetable gorderi.
8. Identify the majorvegetab les grown in Illinois and discuss their edible par\.°
9. Have the students complete Student Worksheet 2 on garden vegetables. ,Jse VegetableGardening for Illinois as a reference.
10. Provide a list of major vegetables. Include figures on recommended spacing betweenrows and inches between plants after thinning or transplanting. Refer to Page 24ofVegetable Gardening for Illinois for information.
11.6 Explain the selection of vegetable varieties.
12. Discuss what Is important to look for when selecting seed or transplants.
13. Have the students order tomato seeds from a catalog. Plant the seed in class, and leteach student take home some plants.
14. Have The studefits complete a worksheet on the labeling of seed packets...,t
15. Explain how to sow seed and transplant vegetables. 'It °
16. Discuss frost free da-ys and freeze dates.in Illinois.'
1-117. Provide a andout on freeze dates, fps ree days in Wlinois, and planting dates for-1 -vegetable in°111inois gardens. Informati n on these topics may be found on Pages -.
21 and 23,in Vegetable Gardening for II ois.
18. Have the students plan a home vegetable garden Out of class, using the trident Work-sheet 3 for sketching the vegetable garden. The assignment should incl de the
selection of at least 12 different vegetables, spacing of the vegetables, rid the planting,date for each vegetable. An example garden plan may be found on Page 26 inVegetable Gardening for Illipoth
19. Provide Student Worksheet 4 for' planning a vegetable garden, and have thestudentsrecord information on 12 different vegetables. The information needed can be found _
in Vegetable G'ardening for Illinois.
20. Discuss the importance °tweed control in the vegetable garden. Also, discuss themethods used to control weeds.
21. Discuss when and how to water a vegetable garden.4111k
22.. Discuss how to control disease and insect pests in a vegetable garden.
°
/
.
I
23; Discuss the types o* hand and ,power tools used in vegetable gardens.
24. Distribute Fruit or Vegetable Production Record Book to students. Assign the ProblemFor Use With Fruit or Vegetable Production Record Book. .
VII. Application procedures:
1. Skills learned in this problem area should be used for home gardening purposes.
2. The skills learned Will be valuable fOr students who plan to-work in garden centers.
VIII. 'Evaluation:
1. Collect and evaluate worksheets.
al
.2, Evaluate students perfOrmance skill in planning and caring for a garden.
3. Administer and grade 'a test upon the completion of this problem area.
4. Evaluate' students ability to keep and use the record bobk problem.
0 9'IX'. References 4nd aids:
. 1: Vegetable Gardening fo'r Illinois
2. trocketts'. Victory Garden
-3. quitor Vegetable ProductionRecord Book
4. -Problem for Use with Fruit or',Vegetable Production Record Book
A e,
5. 4.upplementary materialp found in this packet:
J. S. Vandemark and J. W. CourterU. of 1.,Cooperati-te Extension ServiceCircular 1150
z
James Underwood Crockett, 1977WGBH Educational 5oundation, Inc.Published by Little, Brown & Co.
Vocational Agriculture Service434 Mumford HallUrbana, I L 61801
Vocational Agriculture Service434 Mumford HallUrbana, IL 61801
a. Student Worksheet on Matching Common Termsb. Student Workshdet on Garden Vegetablesc. Student Worksheet for Sketching the Vegetable Gardititd. Student fin- Planning a Vegetable Garden
'
° 60
Z.
I.
lb
4
)
Ar
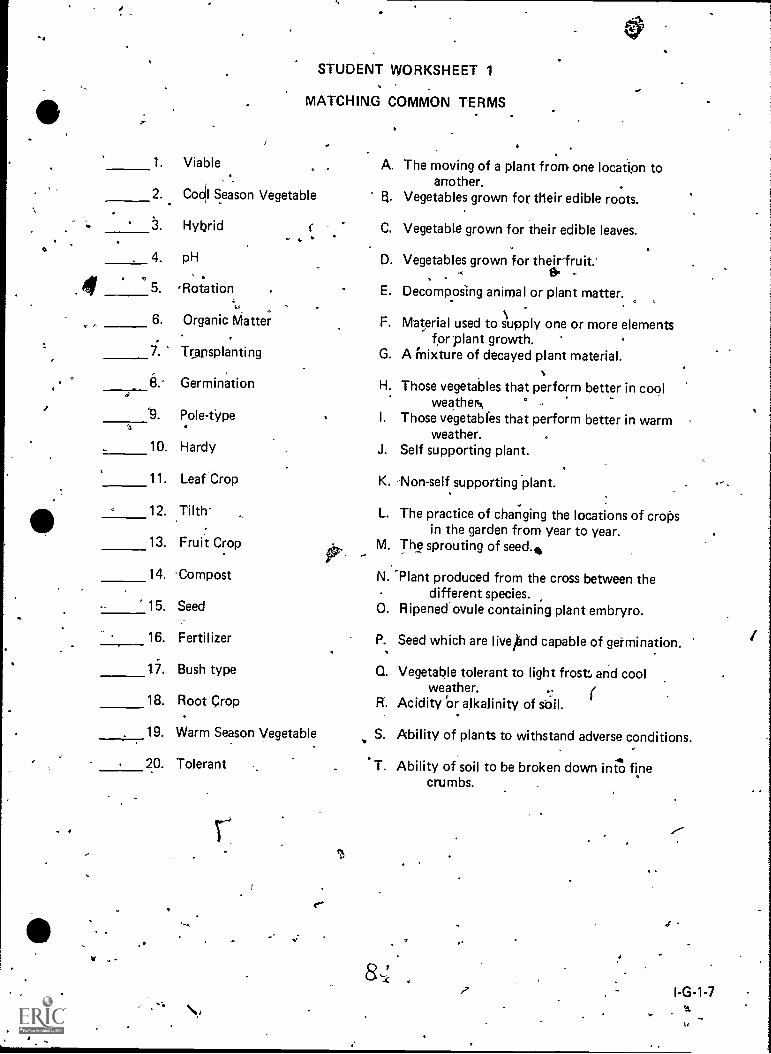
O
STUDENT WORKSHEET 1
MATCHING COMMON TERMS
1. Viable
2.. Col Season Vegetable
.3. Hybrid
0'
40,
A. The moving of a plant from one location toanother.
B. Vegetables grown for their edible roots.
C. Vegetable grown for their edible leaves.
4. pH D. Vegetables grown for theirfruit.'
4 . .0 , .5. 'Rotation
, .
E. Decomposing animal or plant matter..
16. Organic Matter F. Material used to supply one or more elementsc n. for plant growth.
7. Trapsplanting G. A Mixture of decayed plant material.
6. Germination H. Those vegetables that perform better in cool.:-
wweathers .'9. Pole -type I. Those vegetables that perform better in warm
oweather.
10. Hardy J. Self supporting plant.
11. Leaf Crop K. -Non-self supporting plant.
12. Tilth' L. The practice of changing the locations of cropsin the garden from year to year.
13. Fruit Crop M. The sprouting of seed.*
14. Compost N. 'Plant produced from the cross between thedifferent species.
15. Seed 0. Ripened ovule containing plant embryro.
16. Fertilizer P. Seed which are live1nd capable of germination.
17. Bush type Q. Vegetable tolerant to light frost and coolweather. (
18. Root crop Acidity or alkalinity of soil.
19. Warm Season Vegetable S. Ability of plants to withstand adverse conditions.
20. Tolerant T. Ability of soil to be broken down into finecrumbs.
.r
I-G-1-7
.
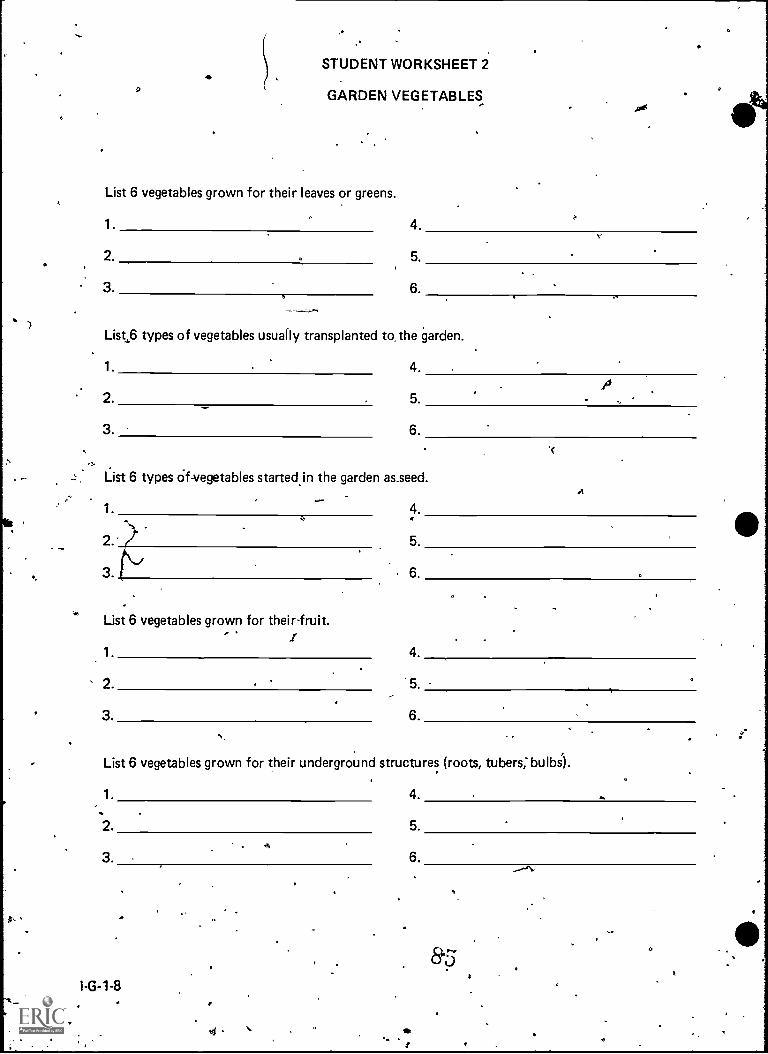
)
.
,0
STUDENT WORKSHEET 2
GARDEN VEGETABLESRe
List 6 vegetables grown for their leaves or greens.
1. 4.
2. . 5.
3. 6.
-...-.,...}1k
List6 types of vegetables usually transplanted to, the garden.
1. 4.
' 2. 5. -
3. 6.
44
List 6 types Of-vegetables started in the garden as_seed.A
,1. 4.
,,,--.. .
2.' / 5.
3. N . 6.
List 6 vegetables grown for their-fruit., . 1
1 4.
2. '5.
3. 6.
List 6 vegetables grown for their underground structures (roots, tubers; bulbs).
1. 4.
2. 5.
3. 6.
I-G-1-8e
4.
...---N.
8.5
i

1
STUDENT WORKSHEET 3
SKETCHING THE VEGETABLE,GARDENA
1. Select 12 different vegetables and locate them below as you would in your garden.
2. State the planting date and spacing requirements for each vegetable.
I"25'
t.,
\J
1
North
30'
e
1
.. .
..P.'
S_

STUDENT WORKSHEET 4
PLANNING A VEGETABLE GARDEN
F. Introduction: f".
The purpose of this exercise is to provide a means in which the student can efficiently
plan a vegetable garden.
II. Objective:.
At the conclusion of this exercise, students will haye gathered and organized the
information for planning a garden. From the plans developed, students will be-able to plant a
vegetable garden.
Ill. Procedure:
I-G-1-10
While referring to Vegetable Gardening for Illinois, record the following information for
12 vegetables: Name (including variety name), number of plants to be grown, the recom-
mended distances between rows and plants (page 24), the length of the row, expected
yields (page 3), dates of planting (page 23), type of planting (seed or transplant), and platnting
depth of seed (page 22).
0
O
8
4.
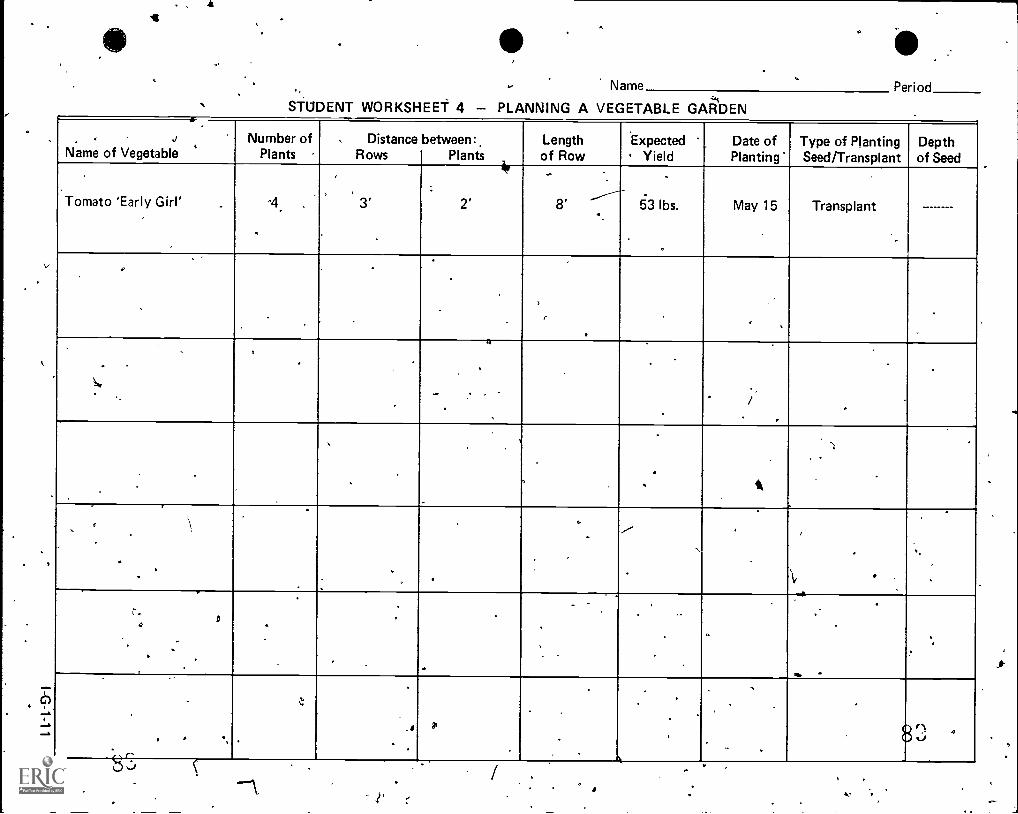
V
Name Period.STUDENT WORKSHEET 4 PLANNING A VEGETABLE GARDEN
. .I
Name of Vegetable
.
Number ofPlants
. DistanceRows
between:.Plants
Lengthof Row
.
ExpectedYield
Date ofPlanting'
Type of PlantingSeed/Transplant
Depthof Seed
Tomato 'Early Girl'
.
_
.
-4> ,
3' 2' ...----8'
.
53 lbs. May 15 Transplant
.
0
- . , . .
.
,
.
.
, e
.
.
...
A
.
. ,
.
'
.
.
. .
.
.
,
. . .1
,.
.
.
,
6
.
.
.
...
- ../'
\r
,
...
i -4
.
I..
'
.
..
. ..
,.
..
.
...
-:
.
.
.
. .,.
,
. .. ,
.
_
.
82
1 y.
r
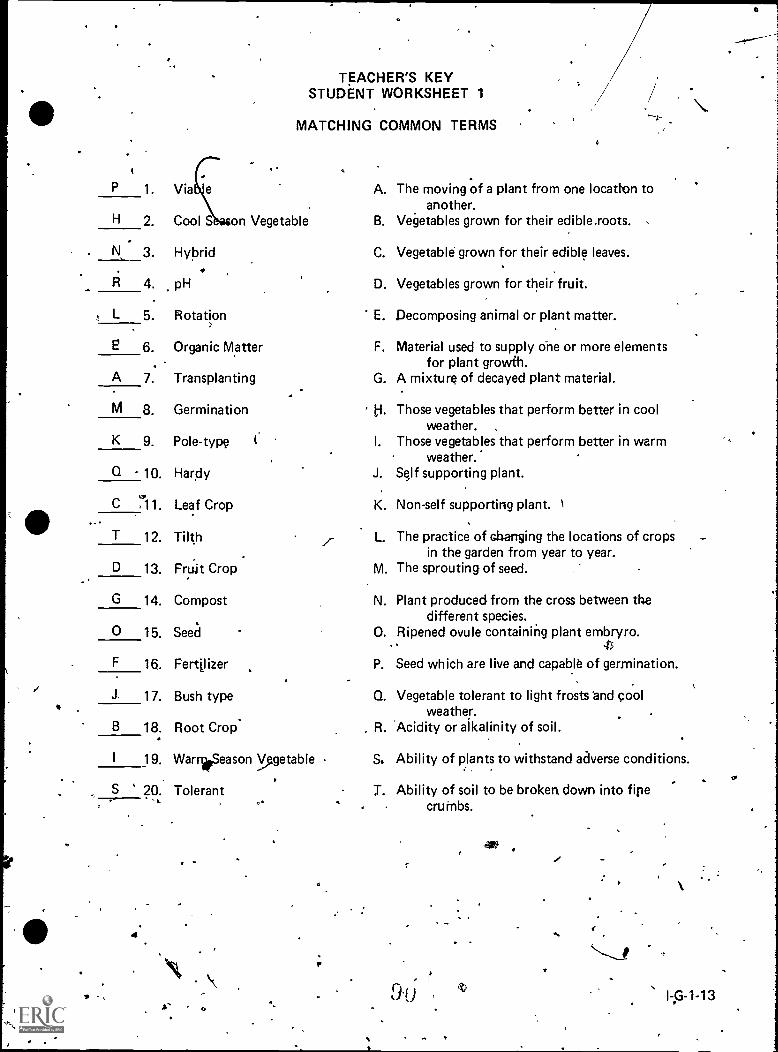
TEACHER'S KEYSTUDENT WORKSHEET 1
MATCHING COMMON TERMS
P 1. Via .e A. The moving of a plant from one locatton toanother.
H 2. Cool S on Vegetable B. Vegetables grown for their edible.roots.
3. Hybrid C. Vegetable grown for their edible leaves.
4. pH D. Vegetables grown for their fruit.
L 5. Rotation E. Decomposing animal or plant matter.
E 6. Organic Matter F. Material used to supply one or more elementsfor plant growth.
A 7. Transplanting G. A mixture of decayed plant material.
M 8. Germination
Pole-type I.
Those vegetables that perform better in coolweather. ,
Those vegetables that perform better in warmweather.
K g.
Q 10. Hardy J. Self supporting plant.
C 711. Leaf Crop K. Non-self supporting plant. 1
T 12. Tilth L. The practice of changing the locations of cropsin the garden from year to year.
D 13. Fruit Crop M. The sprouting of seed.
G 14. Compost N. Plant produced from the cross between thedifferent species.
0 15. Seed 0. Ripened ovule containing plant embryro.43
F 16. Fertilizer P. Seed which are live and capable of germination.
J. 17. Bush type Q. Vegetable tolerant to light frosts and poolweather.
B 18. Root Crop , R. Acidity or alkalinity of soil.
I 19. WarnoSeason getable S. Ability of plants to withstand adverse conditions.
S 20. Toleranto
T. Ability of soil to be broken, down into finecrurnbs.
4
O
\_1
1-p-1-13
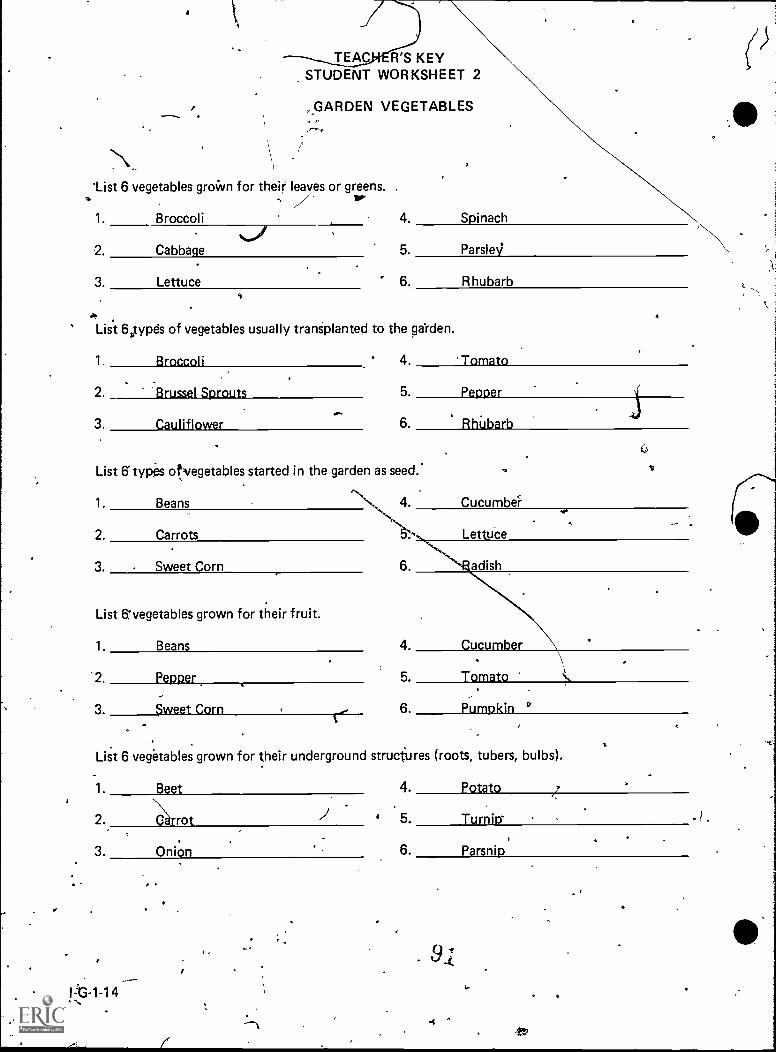
TEAC- R'S KEY"STUDENT WORKSHEET 2
GARDEN VEGETABLES,
'List 6 vegetables groivn for their leaves or greens.
IP'1. Broccoli 4. Spinach
...12. Cabbage 5.
3. Lettuce 6. Rhubarb
Parsley
i4List 6.types of vegetables usually transplanted to the garden.
1. Broccoli 4. 'Tomato
2. :BrusseLSprouts 5. Pepper.....
3. Cauliflower 6. RhUbarb
List 6 types started in the garden as seed.
1. Beans
2. Carrots
3. Sweet Corn
List evegetables grown for their fruit.
1. Beans
-2. Pepper
3. $weet Corn
6-,. v
r5. Tomato
6. Pumpkin '
List 6 vegetables grown for their underground structures (roots, tubers, bulbs).
1. Beet 4. Potato
2. Galrrot 1 5. Turnip
3. Onion 6. Parsnip
f
A
..,
4

TEACHER'S KEY
SAMPLE TEST QUESTIONS ON VEGETABLE GARDENING'
Completion Section
1. A plant that can iths-tand light frosts and cool temperatures is considered hardy
2. Young plant high are crowded should be thinned to allow plenty of room forgrowth.
3. Moying a plant rom one location to another is called transplanting
47/ Organic m tter may be added to soil to improve tilth.
/ 5. Dead leave , food scraps and grass clippings can be placed on 4 compost pile to dewy. .
// 6. Soil tests ell you the pH of the soil and content of
% organic matter phosphorus sand potassium
7. Whe watering the vegetable garden it is a good
8 inches.
nitrogen
to soak the soil to the depth of
8. eaves that remain wet for extended periods_of-time may be susceptible to disease
9. During'the drought periods watering may be necessary every 7 - 10' days.
10. Morning is the best time of the day to water a garden.
Listing Section
1. List 4 factors to'covsider when selecting a vegetable garden site.
1. Soil
2. Sunlight
3. Away from obstructions
4. Close to home
2. List 3types of mulches
1. Wood chips
2. Grass clippings
3. Straw
4. Peat moss
5. Black plastic
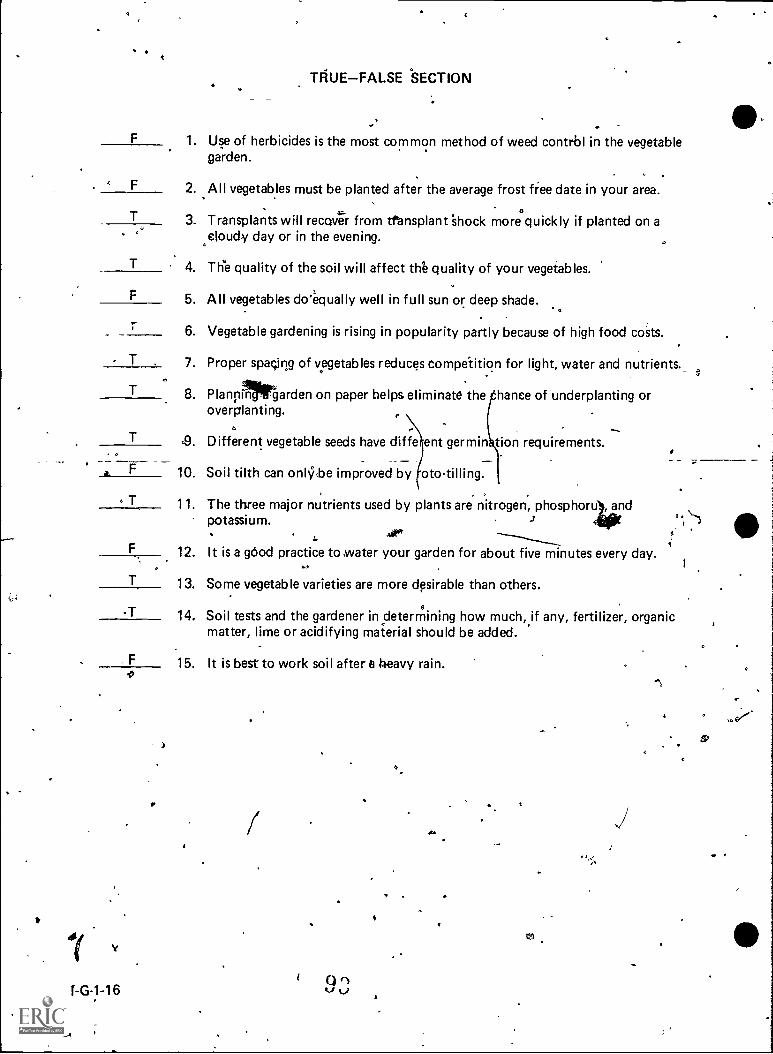
F 1.
F 2.
T 3.
T 4.
F 5.
6.
. T 7.
T 8.
T <9.
. F 10.
. T 11.
12.
13.
T 14.
F 15.
TRUE FALSE SECTION
Use of herbicides is the most common method of weed contrbl in the vegetablegarden.
All vegetables must be planted after the average frost free date in your area.
0
Transplants will recover from tfansplant 'shock ifcloudy day or in the evening.
more quickly planted on a
The quality of the soil will affect tq quality of your vegetables.
All vegetables do'equally well in full sun or deep shade.
Vegetable gardening is rising in popularity partly because of high food costs.
Proper spacing of vegetables reduces competition for light, water and nutrients._
Plannin .garden on paper helps eliminate the chance of underplanting oroverplanting. ,
Different vegetable seeds have different germin Lion requirements.
a Soil tilth can onIN;;be improved by °to-tilling.
f-G-1-16
The three major nutrients used by plants are nitrogen,potassium. .)
It is a g6od practice to .water your garden for about five minutes every day.
Some vegetable varieties are more dpsirable than others.
Soil tests and the gardener in determining how much, if any, fertilizer, organicmatter, lime or acidifying material should be added.
It is best to work soil after a heavy rain.
4
UNIT G:, HORTICULTURE
PROBLEM AREA: BEAUTIFY' G THE HOMESTEAD.
SUGGtSTIONS TO THE TEACHER:
This problem area is designed for use with ninth grade or beginning students enrolled in anagricultural occupations program. The recommened time for teaching this problem area is in thespring semester. the estimated time for teachinraiis problem area is 5 to 10 days depending onhow much time the teacher wishes to spend on discussion and conducting the suggested exercises.The materials in-this problem 'area were selected and written with the following assumptions:
1. Each student will have the opportunity to develop. a S.O.E. project usirig the homelandscape.,
Students have little or Vo backgrourein planting and caring for trees, shrubs and turfsgrass.
The instructor is encouraged to conduct dlocai search to Itcate other supplementary.mate- 4rials. The items in this problem area are for reference or modification as the teacher adapts thesematerials to his/herlocal situation.
CREDIT SOURCES:
These materials were developed thypilgii a funding agreement, R-33-21-D-0542-388 with theIllinois State Board of Education,. Departmgmt of Adult, Vocational and Technical Education,
* Research and Development'Section, 100 Nokth), First Street, Springfield, Illinois 62777. Opinionsexpressed in these materials do not reflect, nor should they be construed as policy or opinian ofthe State Board of Education or its staff.'
0
The teacher's guide, worksheets, information ,sheet and test questions were developed byRon Biondo, Department of Vocational and TechniCal Education, Univeisity of Illinois. Suggestionsand guidance in the development of these materials were provided by the Rural Core CurricuumPilot Test Teachers.,.
4
g.,db
0
I-G-2-1
I. Unit: Horticulture
.TEACHER'S GUIDES
III. Problem area: Beautifying the homestead
III. Objectives: At the close of this problem area students will:
1. Know how tokare for an established lawn..
2. Know the correct methods of pruning the various types of trees and shrubs.
3. Be qualified to plant balled and burlapped trees and shrubS correctly.
1V. Suggested interest approaches:
1. Ask the students to identify the best kept lawn and landscape in town.
2. Ask the students if their own landsclape could look better.If so, how?
3. Present a question: "What makes a home lancape attractive?"
4. Ask how many students would be interested in a career in landscaping:List occupations that students may consider and qualifications for each.
5. Ask the students to identify professional landscapers inthe area.What are some of their practices?
6. Have a prdiessional landscape contractor or golf course manager appear as a guestspeaker.
V. Anticipated problems and concerns of students:
6 ,. 6 4. t . V
t 4 r4. js 1Y:better to cinch gtass cliJipin9s or let them lie on the lawn? '''
.. .., ... 4 441 1 :f . t
. 8. Can insect, welearK1 disease 6rOblems be handlectwithotit using chemicals? i.0_ 4
.
1* ' '4.f
.. A
4' I ..
9. How can turf be grovNvin,s14dy situatAns? 1' *.' ," , 4 . A, , 1 I 1' .
,It . . '.)
'111) . 5. : '1, : (C. ; 14'* 4;4 ...4..
0 ..
¶Q, 'At what height should I moAtcpy lawn? ... p 0
% . de ' lib.. .....
' . o ,- fro . 1 . 4 .. ,. .,. .. IP
i - .*
,et . e, t. .4 ,4'4,-,,t,
, . .. -.. ''.... O. ',:,
1 +" I.. .I -G -2 -3
i \ 44 . 6 1., 1 .
A
a % , .40a.
1. What are the differences between organic and inorganic fertiliser ?.
2. How often should a lawn be fertilized?
3. How much fertilizer should be used?i
4. Why shouldn't you fertilize the lawn in August?. . ,
5. How often should a lawn be watered? ' '.-, . .
: I6. Houircarr you measure thesamNit of water# applied to a lawn?
2
*N11
11. What is top dressing, overseeding, andpoyver raking?
12. Why is pruning necessary?
.v0
13. Does pruning paint protect the tree injury from disease or iAeots?
14. When is the best time to prune?
15. What is renewal pruning?A
16. Why should hedges be Wider at the base?
L.
17. What is rejuvenation pruning?.
18. Why is a cut flush^with the trunk so important?
19. Why is it inadvisable ib remove
20. Do all trees andoshrubs sold for
1
e than a third of the trRe't crown at any onetime?
ng come with balleiand burlapped roots?
Suggested learning activities and experiences:
1. Discuss thedifferences between organic and inorganic fertilizers.What are the advantpges of each?
2. Discuss the best times to fertilize a lawn and liow fertilizing can be done."Toudh upon.'. the reasons for fertilizing. Have the'class fertilize a section of grass on theNschool - .._ .
`grounds using various types of fertilizer spreaders. . '.s . ., 0-1---' ' 0 , .
3. Excriain tIA factors that should be taken fnto account when wateeing a lawn. Usingcoffee cans, demonstrate how ihe''ambunt of water appliedtan be measured. '
ee;e g, e.,^. ,
4. Discuss the importance of timely mowitts, mowing to trip correct height,sand sharpnesstblades. . ,
.,, of mower blad r. ,. ' ; . .. .
A. 1 0O . 0. Al
th 5. Discuss the different methods of weed control in the lawn. ,in. - ,f .
, . ,- - .4; .46: ;Emphisizitht fact thdt weeds,diseasw and insect,j5rob1eii cats reduced by.good .44- ;:.
.''''f' : . 'maintenance or cultigalpractices.. ,' ', . : ,. 0 .,, ....v. . . . 1 1,P e ''' "'0 °" AO ..t. ,4 ii.:' Discuts how one, by ht -go about growing grass' in a sr4acjed 4rea-,. .3 .. . ;' . , . .... ., -,,,, 4 ; ' effil.j, 'V * ,.`- i v. Eti ..' ,
.4-- - e. 4:, , 40 :154: [Irina a- 6" 4.0'; 6"
,
section of turfAclass. Discuss the sort PAlationship,`the thatch. ., c0 4
' 1 0 1 0.
1.- ,' 4 layer and the 13 I a n t jist r y c t u re s - -.. . .. - .
61.....**' 0. /
- 9. Bring various pruning Auipment to class and discuss the use of each. ,,
tr.'- -'4'`
: 10-, Pr-esent the major reasons for pruning trees and shrubs. .. .'4 1.
I-G-2-4
'10. Discuss the besi time of the year to prune most trees. Also, dilcuss the pruning of.,flower, shrubs. f / .,
.,. .,:-
12. Describe the drop Crotch or 3 cut method of removing large limbs from trees....,r
13. DiscuO the correct way to prune or shear hedges.T.)-
9G
-7
4.
14. Discuss renewal pruning and rejuvenation pruning of shrubs.
15. Explain "how to prune pines and evergreens with scale like foliage.
16. Take a walk with tit class. Point out trees or shrubs is need of pruning. Discussthe methods of pruning in different situations.
17. Have the students complete Student Worksheet 1 on pruning.
18. Ask school officials for permission to prune a tree or shrubs on school grounds.Then let students do some pruning. Have them explain why they think certaincuts should be made before making them.
19. Discuss the factors to consider when selecting a planting location for trees or shrubs.
20. discuss the minimum dimensions for holes in which trees or §hrubg will be placed.
21. Discuss how poor soil may be improved and used as backfill.
22. f:scuss the level at which a root ball should be placed in a 'hole and the backfillprocedures.
23. Explain post planting care such as waterirt pruning, bracing and using tree wrap.
24. Have the students complete Student Worksheet 2 on transplanting trees andshrubs.
25. Plan a tree planting o2 Aib'or Day (last Friday in April) involving the class. Seekhelp from the city or '1501i'district and make it a community project. Have the classcarry out the entire plantio procedure.
26. Distribute Home and Farmstead Beautification Record Book and encouragestudents to keep records of their beautification activities.
VII. Application procedures:.
1. Thee skills learned in this problem area should be used in aring for the homelandscape..
2. The-ikills learned will be useful for students seeking careers in landscaping, golfcourse maintenance, and garden center management.
VIII Evaluation:
1., Collect and grade worksheets.
2. EAluate students ability toA
iNne and/or transplant trees and shrubs.
3. Administer and grade a written test upon the completion of this problem area.
4. Evaluate students record book on4iome and Farmttead Beautification.
9 "6t-G-2-5
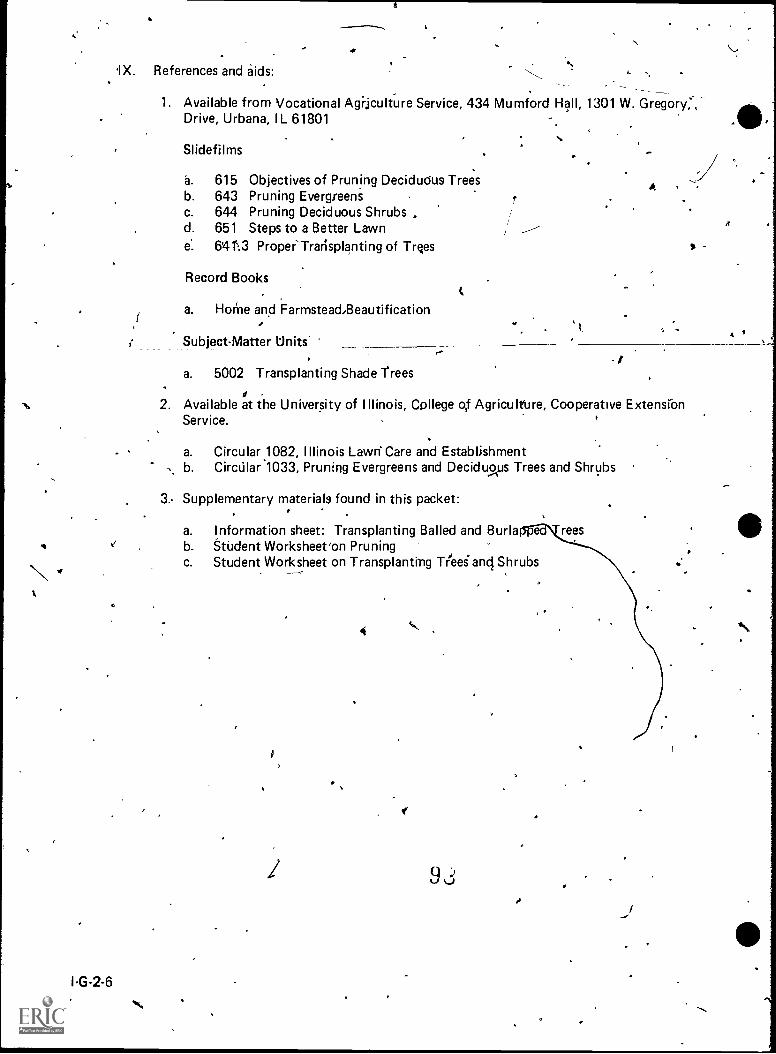
ti
I-G-2-6
.IX. References and aids: 4_ ..,
1. Available from Vocational Agi-jculture Service, 434 Mumford Hall, 1301 W. Gregory:,Drive, Urbana, IL 61801
Slidefilms
a. 615 Objectives of Pruning Decidudus Treesb. 643 Pruning Evergreensc. 644 Pruning Deciduous Shrubsd. 651 Steps to a Better Lawne: 641.3 Proper'Trarisplanting of Trees
Record Books
a. Horne and Farmstead,Beautification
Subject-Matter Units'
a. 5002 Transplanting Shade trees
A
-
2. Available at the University of Illinois, CDllege of Agriculture, Cooperative ExtensionService.
a. Circular 1082, Illinois Lawn Care and EstablishmentCirctilar*1033, Pruning Evergreens and Deciduoius Trees and Shrubs
3.- Supplementary materials found in this packet:
a. Information sheet: Transplanting Balled and Burlab. Student Worksheet'on Pruningc. Student Worksheet on Transplanting Trieeiand, Shrubs
2
4
f
rees
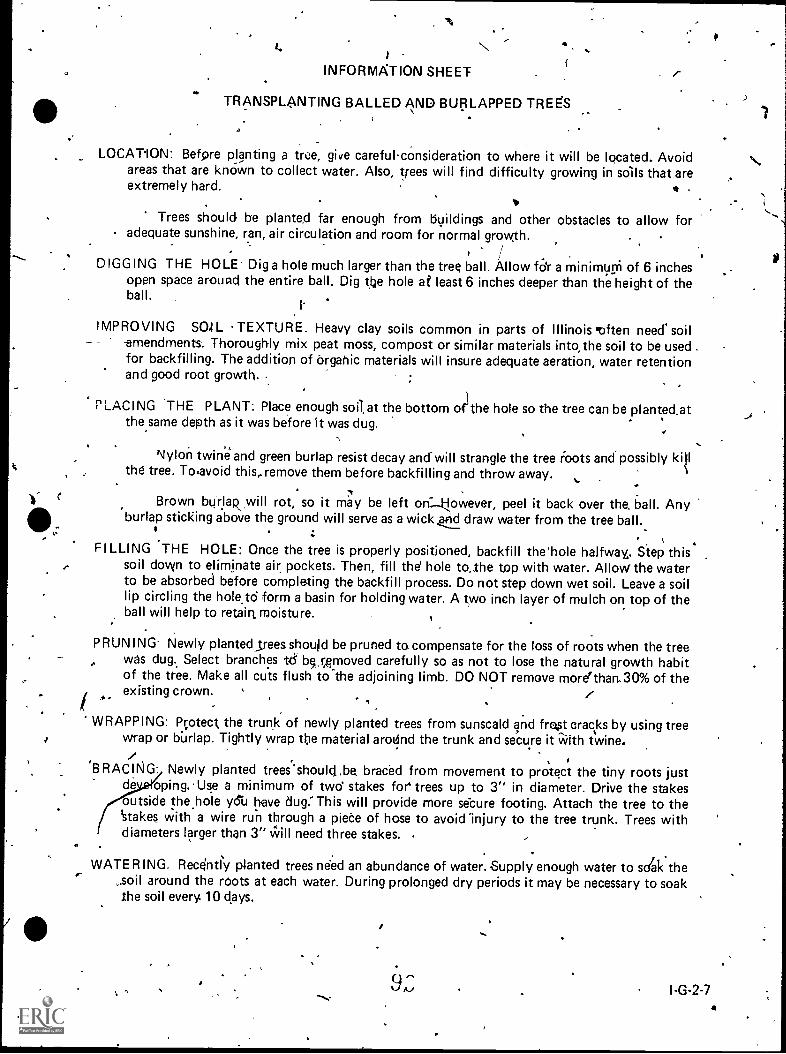
4
INFORMATION SHEET
TRANSPLANTING BALLED AND BURLAPPED TREES
LOCATION: Befpre planting a tree, give careful consideration to where it will be located. Avoidareas that are known to collect water. Also, trees will find difficulty growing in soils that areextremely hard. *
Trees should be planted far enough from buildings and other obstacles to allow foradequate sunshine, ran, air circulation and room for normal growth.
DIGGING THE HOLE Dig a hole much larger than the tree ball. Allow fdr a minimum of 6 inchesopen space around the entire ball. Dig tie hole at least 6 inches deeper than the height of theball.
IMPROVING SO4 L TEXTURE. Heavy clay soils common in parts of Illinois loften need' soil-amendments -. Thoroughly mix peat moss, compost or similar materials into, the soil to be usedfor backfilling. The addition of organic materials will insure adequate aeration, water retentionand good root growth.
PLACING THE PLANT: Place enough soil at the bottom o(the hole so the tree can be planted.atthe same depth as it was before it was dug.
Nylon twine and green burlap resist decay andwill strangle the tree roots and possibly kitlthe tree. Toavoid this, remove them before backfilling and throw away.
Brown burlap will rot, so it may be left ori.--owever, peel it back over the, ball. Anyburlap sticking above the ground will serve as a wicked draw water from the tree ball.
....
. .FILLING THE HOLE: Once the tree is properly positioned, backfill the'hole halfway,. Step this
soil down to eliminate air pockets. Then, fill the' hole to.the top with water. Allow the waterto be absorbed before completing the backfill process. Do not step down wet soil. Leave a soillip circling the holetO form a basin for holding water. A two inch layer of mulch on top of theball will help to retairt moisture. , I
PRUNING: Newly plantedlreesshoulld be pruned to compensate for the loss of roots when the tree, was dug.. Select branches td' bgsAmoved carefully so as not to lose the natural growth habit
of the tree. Make all cuts flush tothe adjoining limb. DO NOT remove morerthan.30% of theexisting crown. ,,..,- ,
WRAPPING: Protect the trunk of newly planted trees from sunscald and frost cracks by using treewrap or bi-lap. Tightly wrap the material arodnd the trunk and secure it with twine.
BRACING: Newly planted trees 'should,be, braced from movement to protect the tiny roots justde °ping.. Use a minimum of two stakes for trees up to 3" in diameter. Drive the stakesoutside the hole yciu have dug: This will provide more secure footing. Attach the tree to the'stakes with a wire run through a piete of hose to avoid 'injury to the tree trunk. Trees withdiameters larger than 3" Will need three stakes. .
WATERING. Recently planted trees need an abundance of water. Supply enough water to soak the,soil around the roots at each water. During prolonged dry periods it may be necessary to soakThe soil every 10 days.
I-G-2-7
it STUDENT WORKSVEET 1
PRUNING
1. Draw a diagrt am of the drop crotch or 3 cut method of pruning large limbs...0, .
....6%
,
'Nt .
...
II'
,
/
2. Sketch an end view of a properly pheared hedge and an improperly shdared hedge.
\3. State'when each of the following pieces of equipment should be used.in penning:
Ilt
hand pruners:
chain saw:
loppers:
pole saw:
hedge shears:
1 0 0
o
of
n
I.
,
. .1-G-2-9
t
r
.STUDENT WORKSHEET 26.
TRAN6LANTING TREES AND SHRUBS .,
)
I
1. Sketch% newly transplanted tree and label the important factors to consider when transplanting.
.. l
47;
2. Sketch aneyvly planted shrub.
1
: 1-d:2-10"
) // i
\... . /t...
._,
9
,,,
r
Y
,
. I 0
t
i, e
.4.
t
.
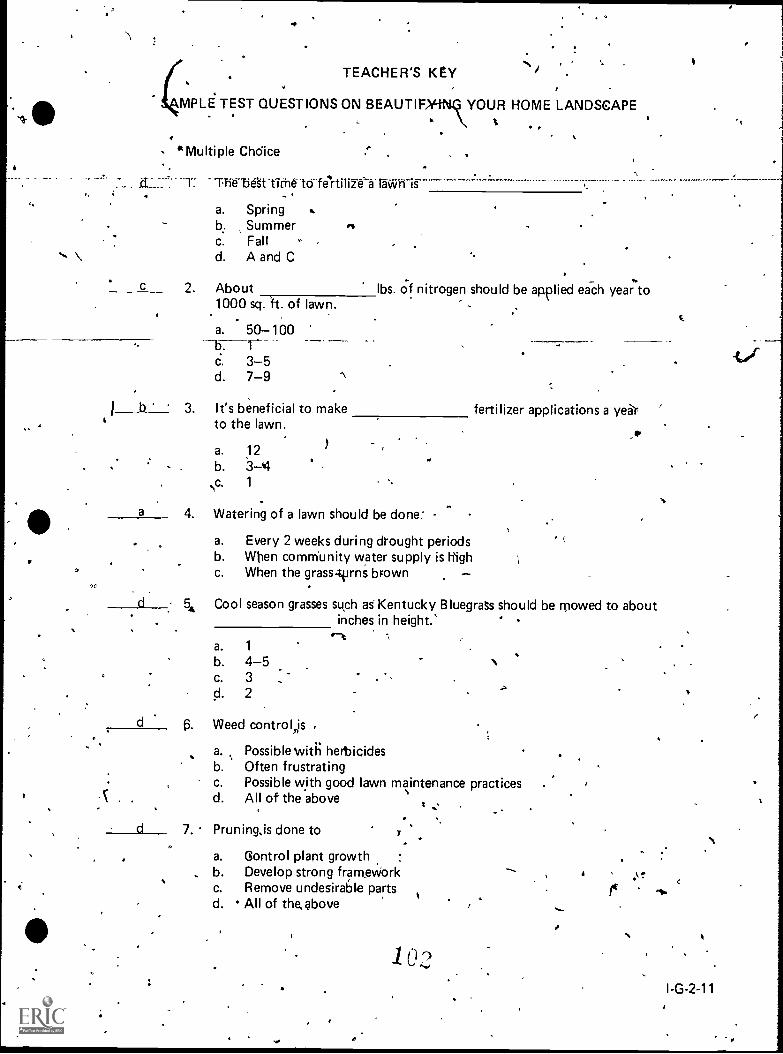
(MPLE TEST QUESTIONS ON BEAUTIFYN YOUR HOME LANDSCAPE
TEACHER'S KEY
`Multiple Chdice. .
Trielie'St-tithetofertilifea"raVvn is
a. Springb.. Summerc. Fall -
d. A and C
PS
c 2. About lbs. of nitrogen should be applied each year.
t o1000 sq. h. of lawn. .
,0
a. 50-100
C. 3-5d. 7-9
b 3. It's beneficial to make
a
to the lawn.
)
4. Watering of a lawn should be done:
a. Every 2 weeks during drought periodsb. When community water supply is highc. When the grassirrns bFown .
fertilizer applications a year
54 Cool season grasses such as Kentucky Bluegrats should be mowed to aboutinches in height.'
d
.--ta. 1
b. 4-5c. 3 ,cl. 2
Weed control ,js
a. Possible with herbicidesb. Often frustratingc. Possible with good lawn maintenance practicesd. All of the above
d 7. Pruning.is done to
a. Gontrol plant growth :
b. Develop strong frameWorkc. Remove undesirable partsd. All of the.above
a
14
1 0:2
I-G-2-11

r
c
------it'
8: Which is not a method of pruning?
a. Renewalb. Rejuvenationc. ReYentiond. Drop crotch , k
:S. -WHO iTa-cTeirliii-oTaiiirmportant consideration when locating a_site tor ,ac-__
.. tree? .
a.* Soilb. Drainagec. Burning 'ability
. d. Ropm to grow -.d
. 10. tree wrap ,.
a. ' Eliminatessprouts'alpng the trunk
c 1
.7
J
I-G-2712 '
b. Reduces damage from sun scaldc. Protects the thin bark from rodentscf. All of the above .
-N,
a
I
A
.-
c
/
. ,
4
)
1 -:
4
...., ..
. .i103
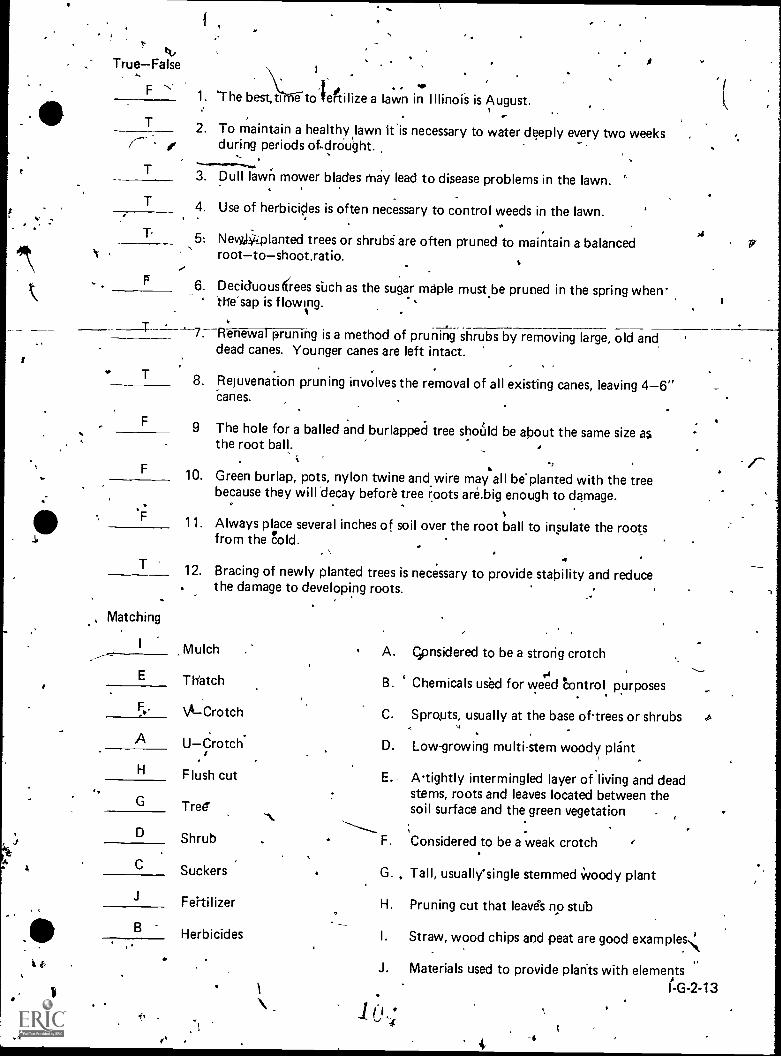
'
I
4,ATrueFalse i..
.
F 1. 'The best, tim to lertilize a lawn in Illinois is August.4 I '111.'
e l-
T
T,
2. To maintain a healthy lawn ifis necessary to water deeply every two weeksduring periods otdrought.
.
3. Dull lawn mower blades may lead to disease problems in the lawn.
4. Use of herbicides is often necessary to control weeds in the lawn..
5: Newli planted trees or shrubs are often pruned to maintain a balancedroottoshoot,ratio. .
6. Deciduous6ees such as the sugar maple must.be pruned in the spring when-thesap is Howling.T 7. Renewal pruning is a method of pruning shrubs by removing large, old anddead canes. Younger canes are left intact.I, ,
T
1
8. Rejuvenation pruning involves the removal of all existing canes, leaving 4-6"Canes.
F 9 The hole for a balled and burlapped tree shoUld be about the same size asthe root ball.
:F 10. Green burlap, pots, nylon twine and wire may all beplanted with the tree
because they will decay before tree roots are.big enough to damage.
F 11. Always place several inches of soil over the root ball to insulate the rootsfrom the Cold. .. \
..T 12. Bracing of newly planted trees is necessary to provide stability and reduce. the damage to developing roots.
, Matching
I,--/
E
F..
A
H
G
D
C
J
13
Mulch A. C.ipnsidered to be a strong crotch--
Thatch B. Chemicals used for weed Control purposes ..
\A Crotch C. Spro,uts, usually at the base oftrees or shrubs .4.
UCrotchI D. Low-growing multi-stem woody pl6nt
F lush cut E. A-tightly intermingled layer of living and deadstems, roots and leaves located between the
Tree' soil surface and the green vegetation-. --.........
Shrub - F. Considered to be a weak crotch ,
Suckers
Fertilizer
Herbicides
G. , Tall, usually'single stemmed Woody plant
H. Pruning cut that leave's no stub
I. Straw, wood chips and peat are good examples,
J. Materials used to provide plan'ts with elements
1 IG-2-13\ 1 0;c
4E,
a
N/1
UNIT Fl ' Agricultural MechanicsS.
PROBLEM AREAS
1.. Identifying, fitting and using hand tools
2. Using selected power tools
3. '') eve loping safe work habits in agricultural mechanics- .
4. Developing basic carpentry skills
q
1

.0
\
UNIT H: AGRICULTURAL MECHANICS
PROBLEM AREA: IDENTIFYING, FITTING AND USING HAND TOOLS
SUGGESTIONS TO THE TEACHER:
This problem ,area is designed for use with freshman or beginning students enrolled in an agri-cultural/horticultural occupations program. The recommended time for teaching this problem areais during the early winter. The estimated time for teaching this prOblem area is 3 to 5 days depend-ing on how much time the teacher wishes to spend on discussion and conducting the suggestedexercises. The materials in this problem area were selected and'written with the following assump-tions:
1. It is important)tir all agriculture students to be able to identify common hand tools.
2. It is important fOr students to receive instructioninlhe proper use and care of hand tools.
The materials included in this problem area include both urban and rural materials. The teach-er should adapt this material to his/her local situation.
CREDIT SOURCES:
These materials were developed through a funding agreement; R-33-21-D-1542-388 tivith, theIllinois State Board 9f .Education, Department jof Adult, Vocational and Technical Education,Research and Development Section, 100 North , irstStreet, Springfield, Illinois 62777. Opinionsexpressed in these materials do not reflect, nor should they be construed as policy or opinion of theState Board of Education pr its staff.
The teacher's guide, .workihees, transparency discussion guides were developed by PaulBenson, Jerry People, and Jim Ethridge, Department orVocational and Technical Education,University of Illinois. The ,transparehty masters and puggested fest questions were prepared byVocational Agriculture Service, University of Illinois..The student worksheet on "Sharpening aKnife" was adapted from the 'Horticultural task sheet "Sharpening a Knife" developed by theDepartment of Agricultural Education, The Pennsylvania State University, University Park, PA16802.
Suggestions and guidance ill the development of these materials were provided by the,pilottest teachers who worked with the Rural and the Urban Core Programs.
1
fir
r.
rI-H:1-1
*. \-1
TEACHER'S GUIDE
I. Unit: Agricultural mech nibs
II. Problem area: Identity g, fitting and using hand toOls
.1 Ill. Objectives: Atthe close of the problem area studenti will:. ,
1. Be able to identify commonlyused hand tools.
2. Be abl to sharpen or fit commonly used hand tools.
3. Be le to use hand tools in a prope'r and safe manner.
IV. Suggested interest approaches:
1. Have various hand tools displayed on a table and ask students to identify the tools byname and use.
2. Lead, into a_discussion of: hand tools by asking students what hand tools they have athome. r.
3. Asr the student to name safe practices and procedures to follow in using certain handtools.
4. Mk .the students if they have been involved in any accidents iihen using hand tools.
5. Ask the students if they know the approximate cost of each tool and then have themfigure a total value for their own tools.
. 6. Hand out hand tool puzz \sheet "I .Tool You So" and challenge students to provide theanswers.
V. Anticipated problems and concerns of students:
1. Why do I need to know the names of hand tools?
2. Why do I need to be able to sharpen hand tools?
3. Why do I need to weasafety glasses when using hand tools?.
4. How do you sharpen certain hand tools?t,
5.. How do l'hold a board when sawing with a hand saw?
ry Why do I need to be able to recognize hand to&s?
7. What hand tools are sharpened? How often?' 0
8. How are various hand tools used?
VI. Suggested learning activities and experienag.
1. Discuss problems and concerns identified by class or yrachet when first starting problemarea.
1O(
,r.
1
10
Take students into the shop area and identify available hand stbols. Use Job 'Sheet 1 andStudent Worksheet 2.
3. Discuss the safety considerations of each group of tools identified. Use Worksheet 6..
4. Visit a Ideal Machinery dealership and identify hand tools there.
5. Distribute Worksheet 1, Tool Identification, and have class 'dent' y tools.
6. Stiow transparencies. Identif\r various .carts of each tool and plain the correct prodq-dures for their use.
a. Hand Sawsb. Types of Hand Planesc. Parts oaf the Brace and Bit.,d. Selecting-NatilermWers
7. Have eachstudent demonstrate the proper use of one tool in the shop. For example, forthe hand saw and square, provide eaeh student with a board and have them saw one end,so it will be square.
8. Have class read VASUnit3005, "Sharpening Hand Tools."
Distribute Worksheet 4, "Sharpening Hand Tools's and have class fill out.
10. Demonstrate the actual ,sharpening of certain hand tools in the shop. Use Job Sheet 2and 3 and Student.Worksheet 3.,
u
11. Have each student bring in tools of each type to be sharpened.
12.AHave students make 3 by 5 identificiation cards by cutting out pictures of tools fromcatalogs. .
.1,
13. Schedule field trip for horticulture students to visit the I LCA (Illinois LandscapeContrac-tors' Association)field day in August and/or the I LCAwinter show to see jobbers displaytools available.
.VII. Evaluation:
1. Prepare and administer a pencil and paper test covering: identification' of hand tools,proper use of hand tools, and sharpening of hand tools.
2. Grade worksheets. -
3. Prepare and administer labOrator/ practical exam on identification, proper use,and sharp-ening of hand tools.
4. Administ er VAS safety test "Safe Practices in the Voca tional Agriculture Shop" (sectionon hand tools)(. f
V111. References and aids:
1. VAS Unit 3005, "Sharpening Hand Tools," Vocational Agriculture Service, University ofIllinois.
.
2. VAS Safety Test; "Student-Test on Hand Tools,"
-1
s
.
r
..
.
3. VAS Transparencies on Hand Tools. v
4. Student Worksheets 1-5.C
5: Phipps, Lloyd J., Mechanics in Agriculture, The Interstate Printers and Publishers, Dan-ville, Illinois:
.....-
6. Hand tool puzzle sheet "I Tool You So."I , ..
7. VAS Slide Set No, 633, "Identifying and Using Horticultural Hand Tools." (Available infall of 1981.)
,___,
8. Job Sheets 1, 2, and 3.
;
.
IC
,
r,
P
4
.
,
V.
10
,,. i
4
t
.
..
) . e
( f
4
to
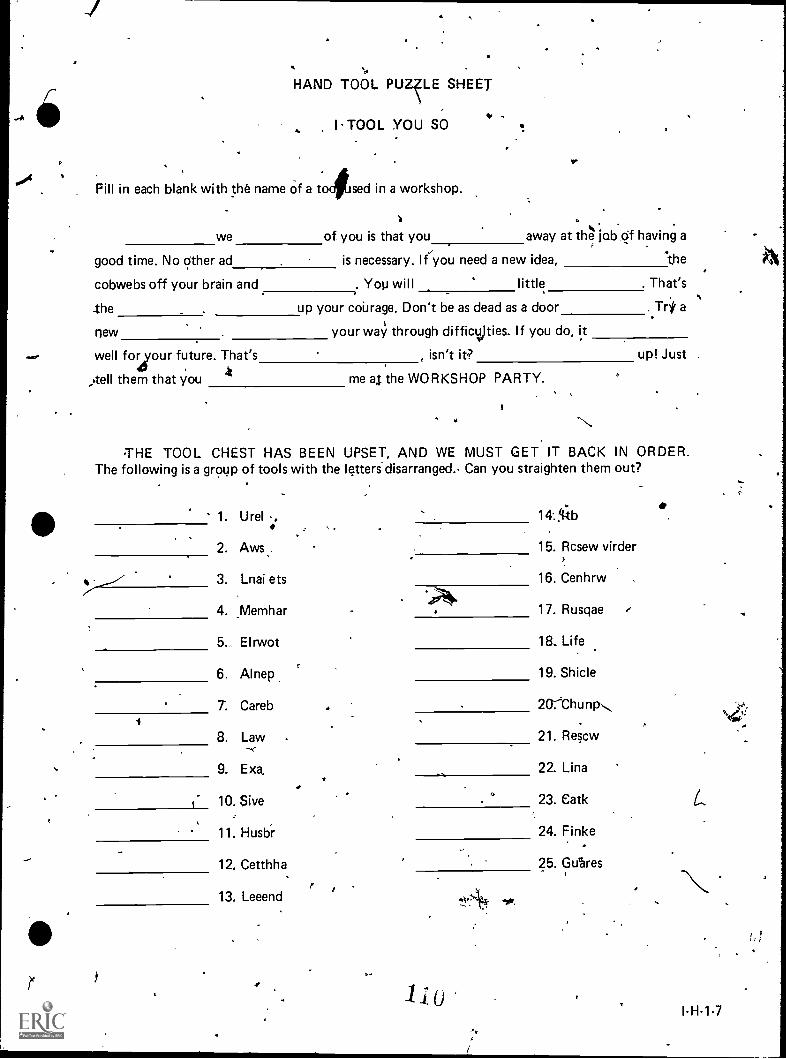
I
HAND TOOL PUZLE SHEET
TOOL YOU SO
Fill in each blank with the name of a to#sed in a workshop.
we of you is that you away at the jab of having a
is necessary. If y ou need a new idea, thegood time. No other ad
cobwebs off your brain and . You will-
little . That's
-the up your courage. Don't be as dead as a door . Tr* a
new your way through diffictpies. If you do, it
well for your future. That's , isn't it? up! Just4
them that you me al the WORKSHOP PARTY.
THE TOOL CHEST HAS BEEN UPSET, AND WE MUST GET IT BACK IN ORDER.The following is a group of tools with the le,tters'disarranged.- Can you straighten them out?
1. Urel -0. 14Stb
2. Aws, 15. Rcsew virder
_.--y" 3. Lnai ets 16. Cenhrw
a3=1.4. Memhar 17. Rusqae .
5. Elrwot 18. Life
6. Alnep 19. Shicle
7. Careb 20..-"Chunp.,
8. Law 21. Rescw
9. Exa. 22. Lina
I- 10. Sive 23. Catk
11. Husbr 24. Finke
12. Cetthha 25. Gubres
13. Leeend
I-H-1-7
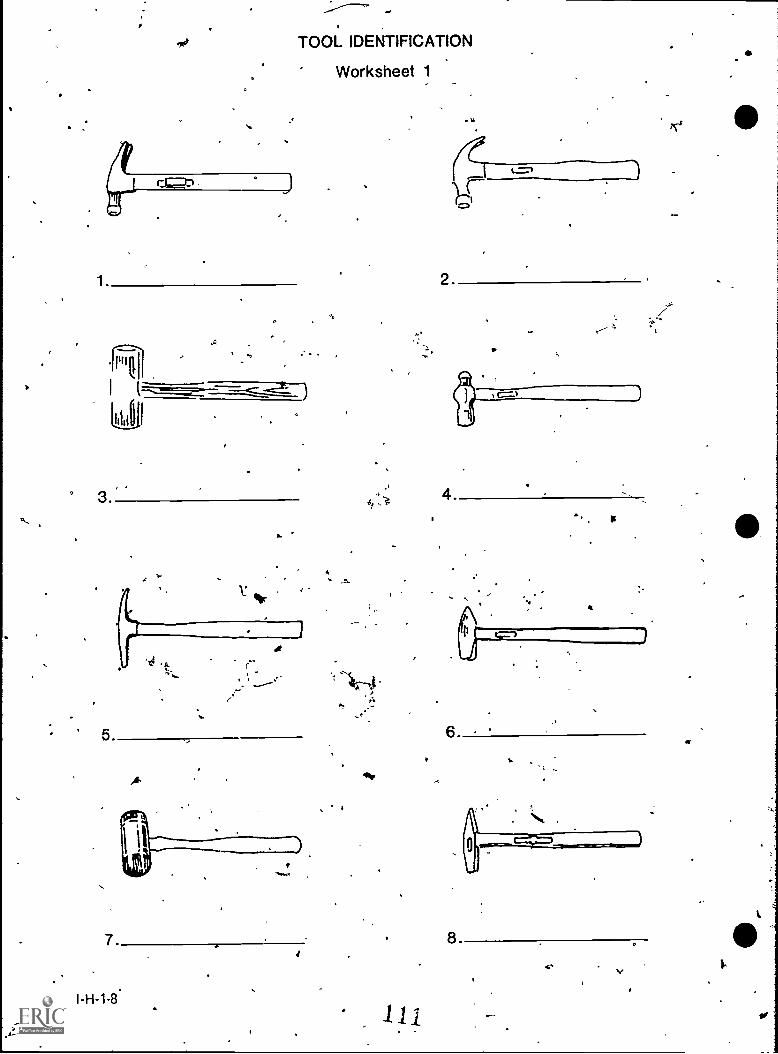
TOOL IDENTIFICATION
Worksheet 1
5.
7.4
I-H-1-8.
2
4.-0
111
p
6
8
ar
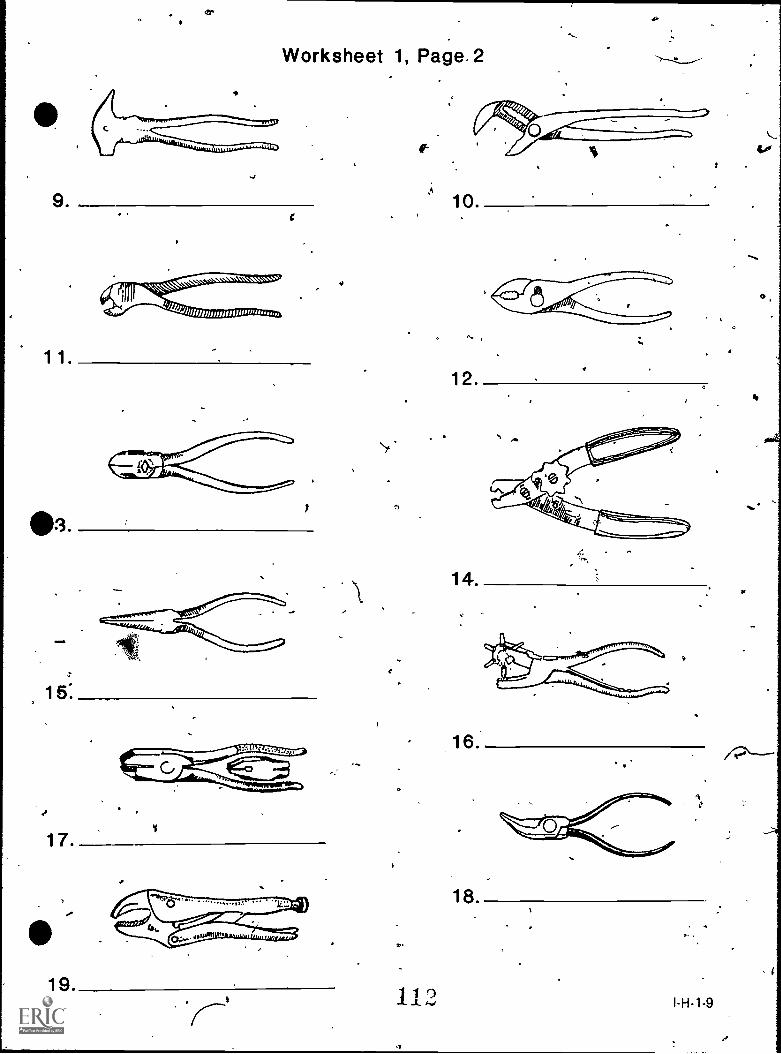
9.
4T
Worksheet 1, Page, 2
tiMIRWM :
1111/41111111ni 11f:saint ,,,,,,,,,
11.
3.
15:
17.
19.
fl
112
ti
10.
12.
14.
16
18.
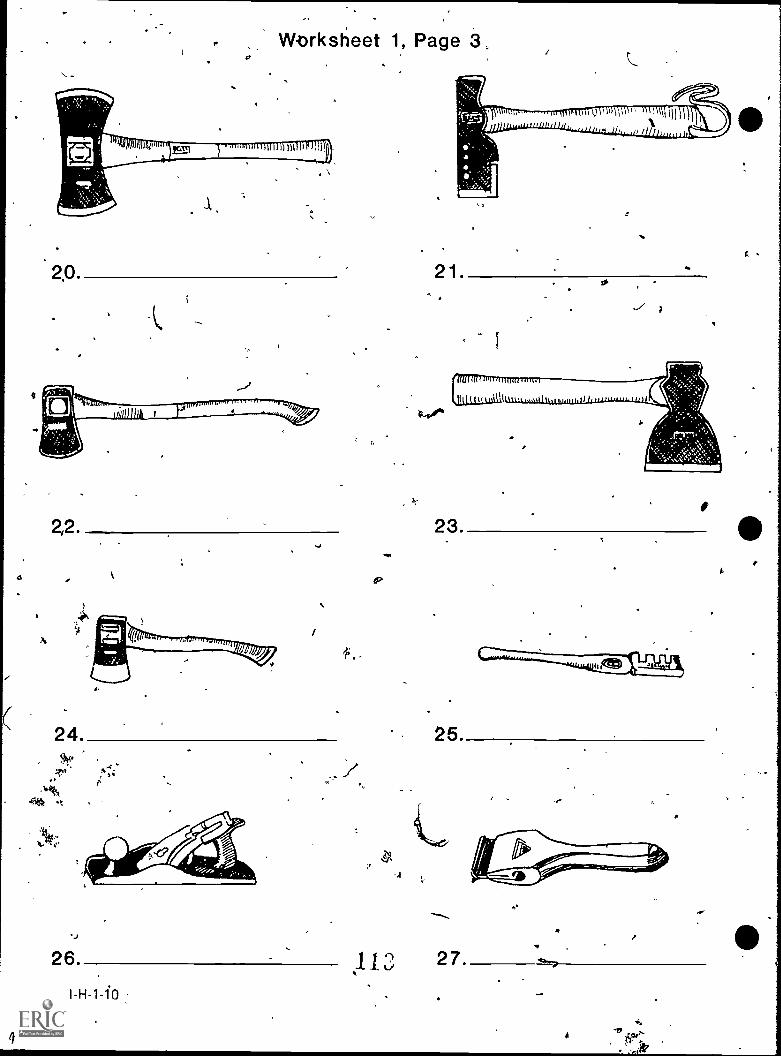
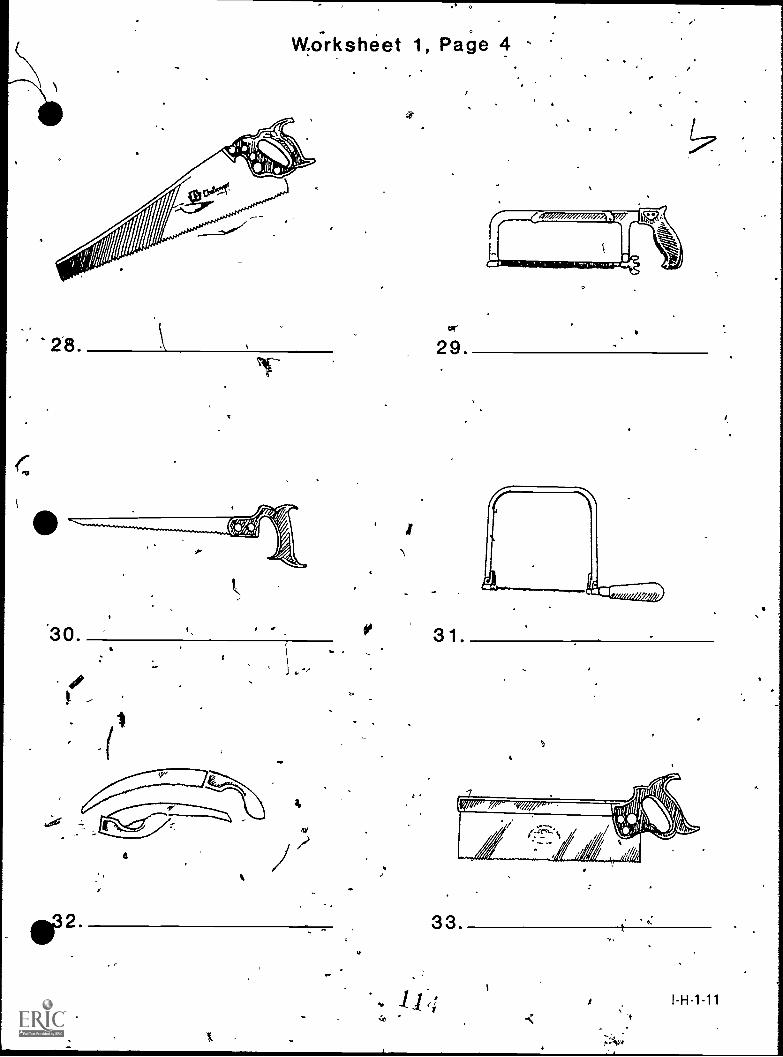
i
.. o
. .
Worksheet 1, Page 4
'28.
v
Iv
30. I
r L..,
32.
4
?le
.. .
x
Y.
...
c4-
I
cr
29
.1,
0 31.
t
33.
.. 1 1 e i
+3
, p
i I-H-1-11
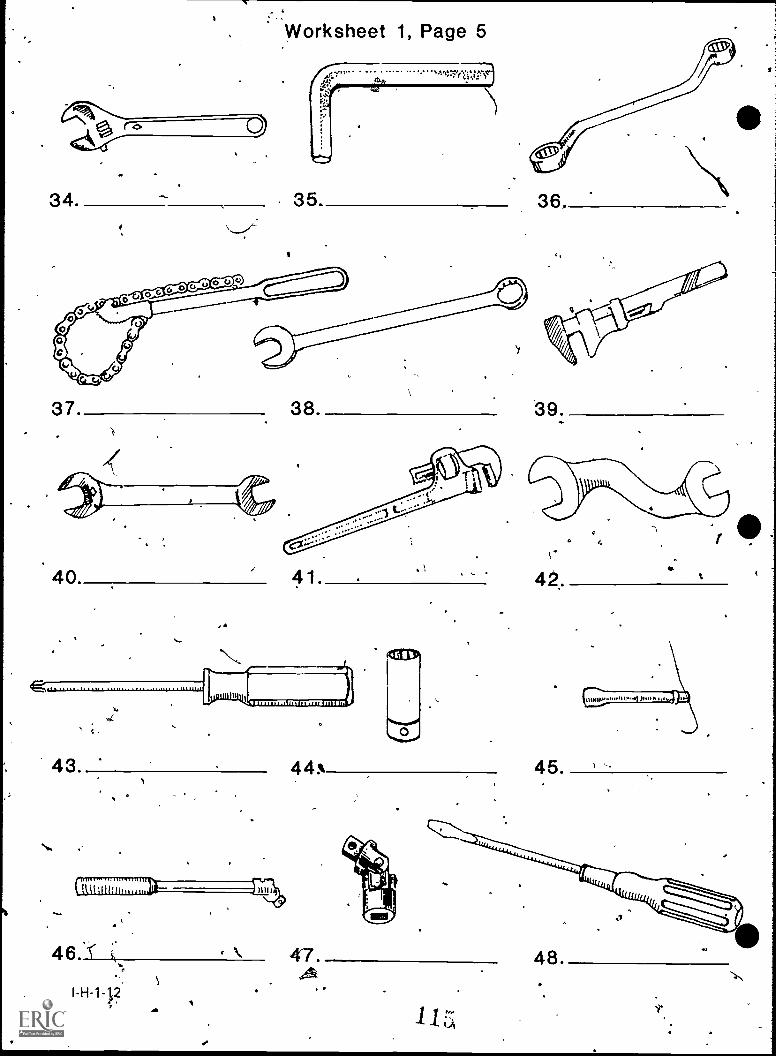
ol. '' i i.:.,:.'t
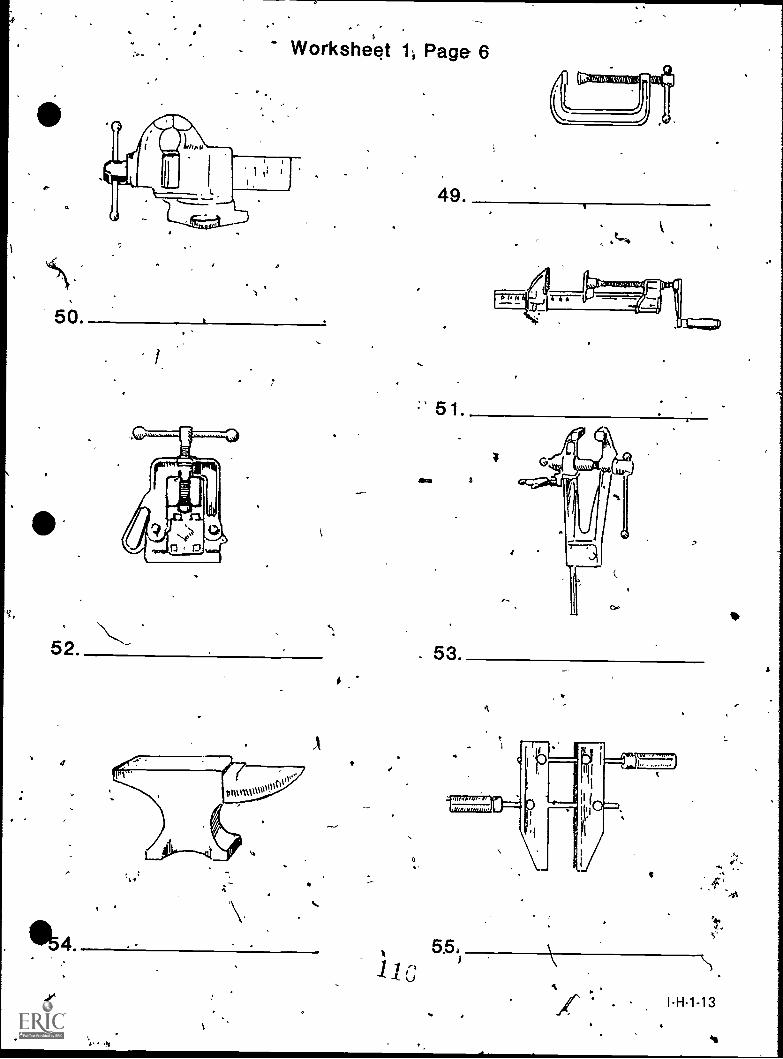
Worksheet 1; Page 6
50.
52.
4
A
Pt OW ,V1111
49
.,"'"
111
53
5.5,
I-H1-13
-44
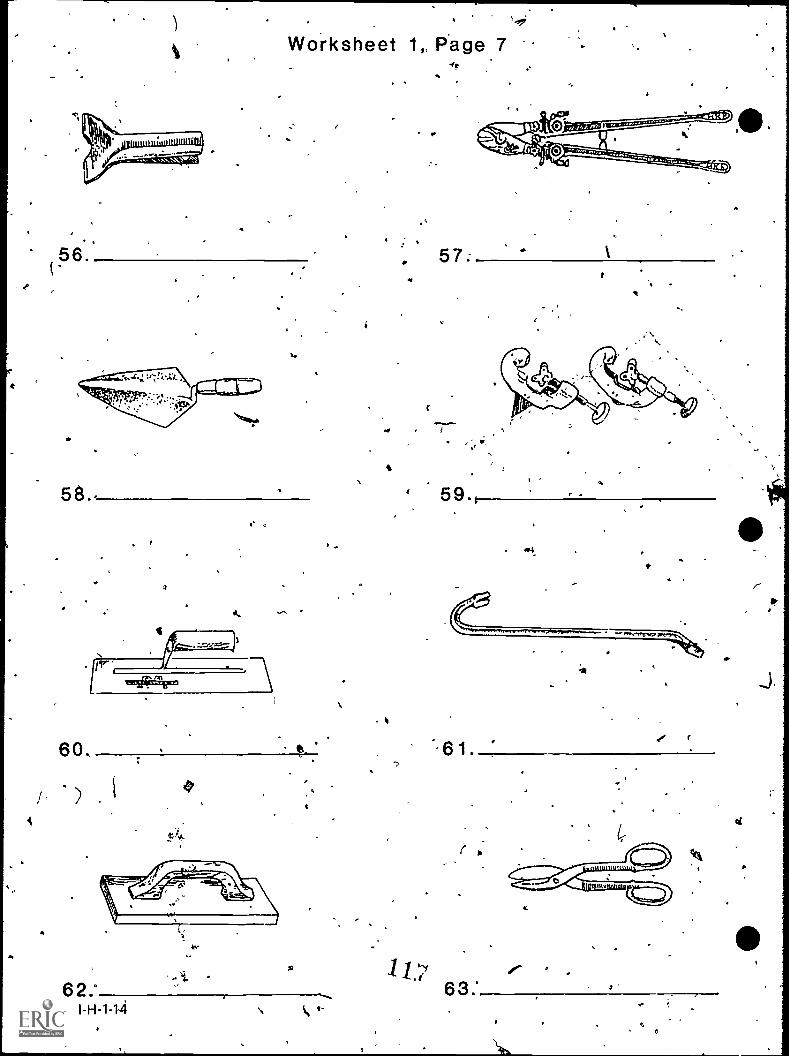
6
58.
Worksheet 1,, Page 7- ,
1.
e
60...
62.°1 H - 1 s
V
.
57:
A
59.
k
4.
eft
.6#
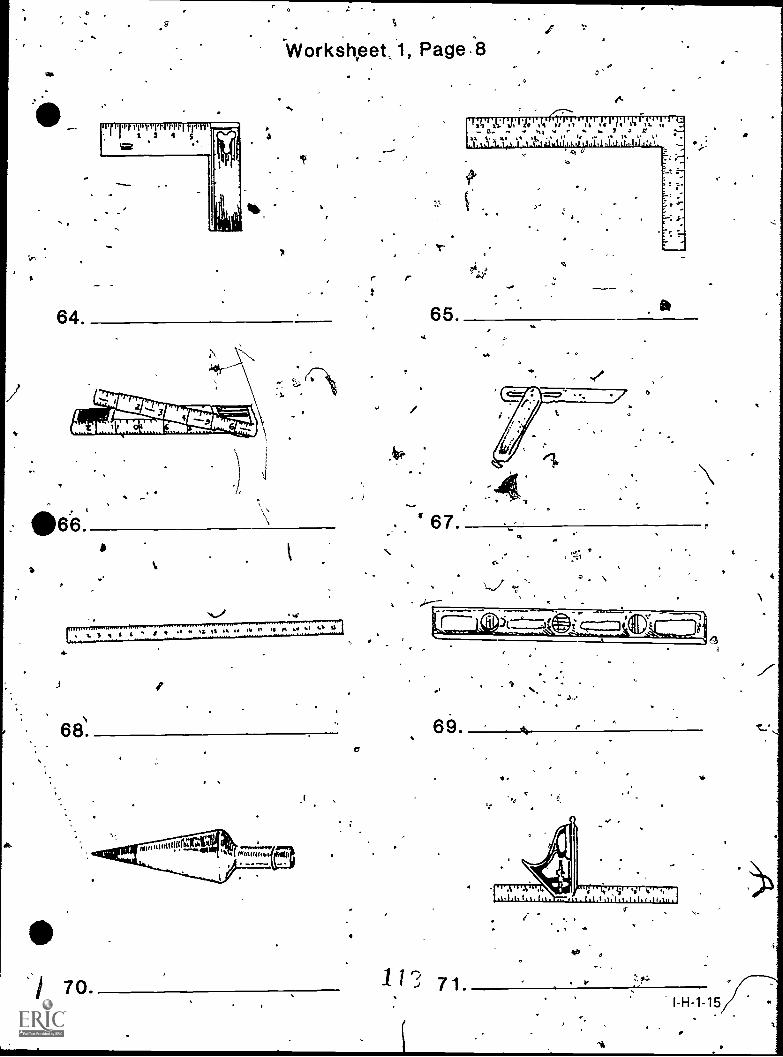
s
Worksheet, 1, Page :8
r r
64. 65.
66.I
`67
0
t4e
be
'
J f69
12
70.
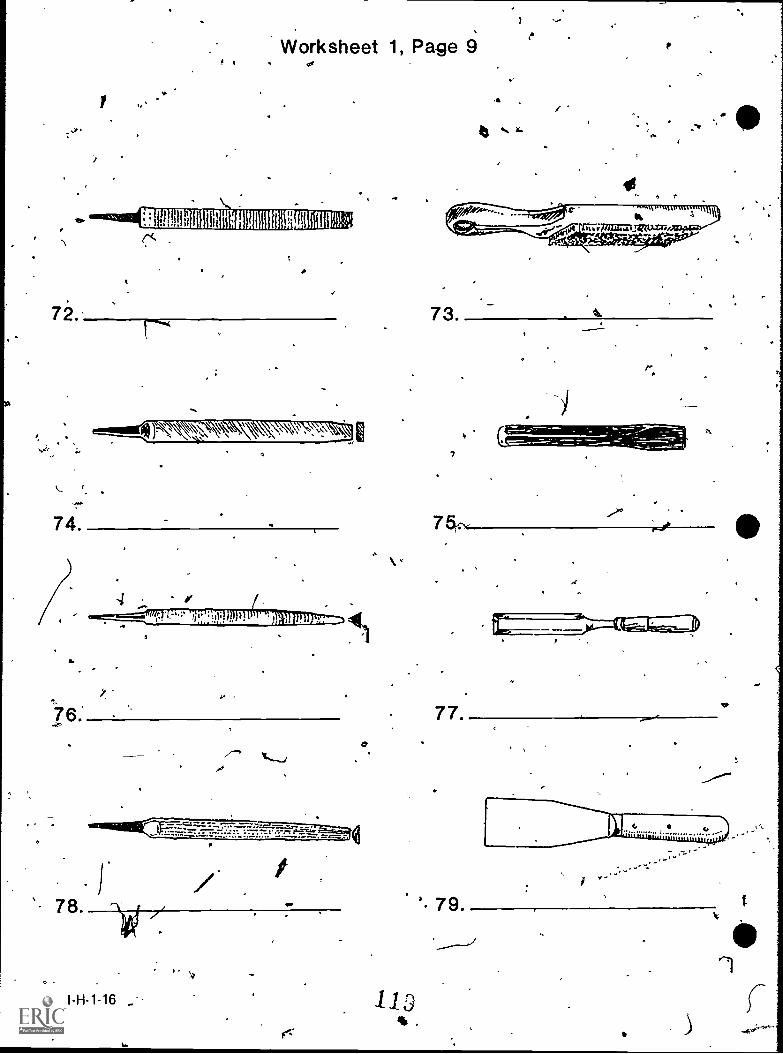
72.
1
1
Worksheet 1, Page 9
::1111:19;1 EMUS irgii
fl
\'
74.
Se
76. -
O
O
11.
73
77.
78. 79
1.
I-H-1-16
riz
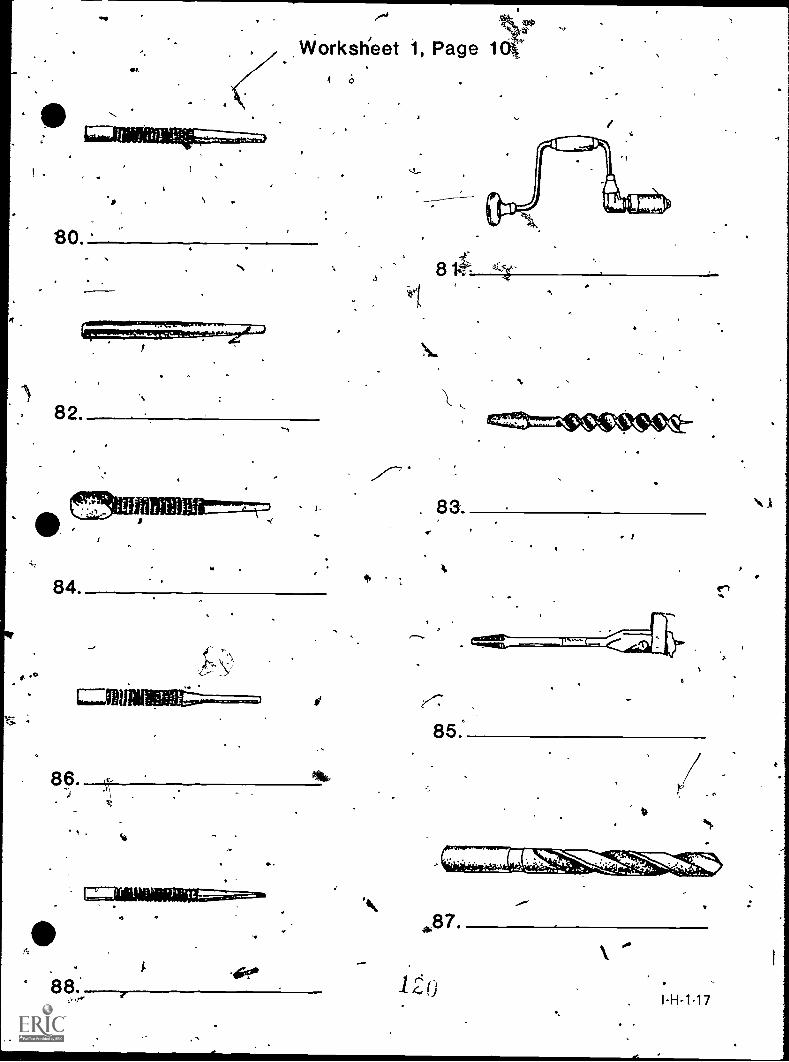
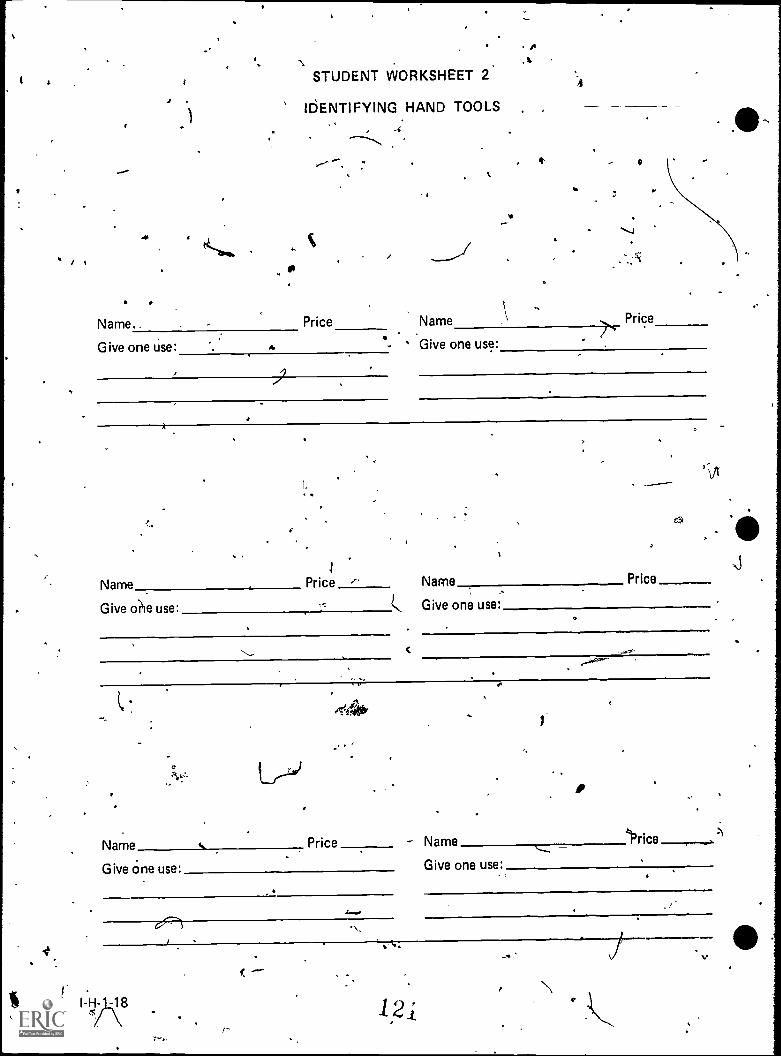
f1
STUDENT WORKSHEET 2
IDENTIFYING HAND TOOLS
Name.. Price Name
Give one use:Give one use:
a
Price
Name Price r Name Price
Give o?ie use: C Give one use:
4.
O
Name. Price Name trice
Give one use: Give one use'
4.001/011
I- -18;.s
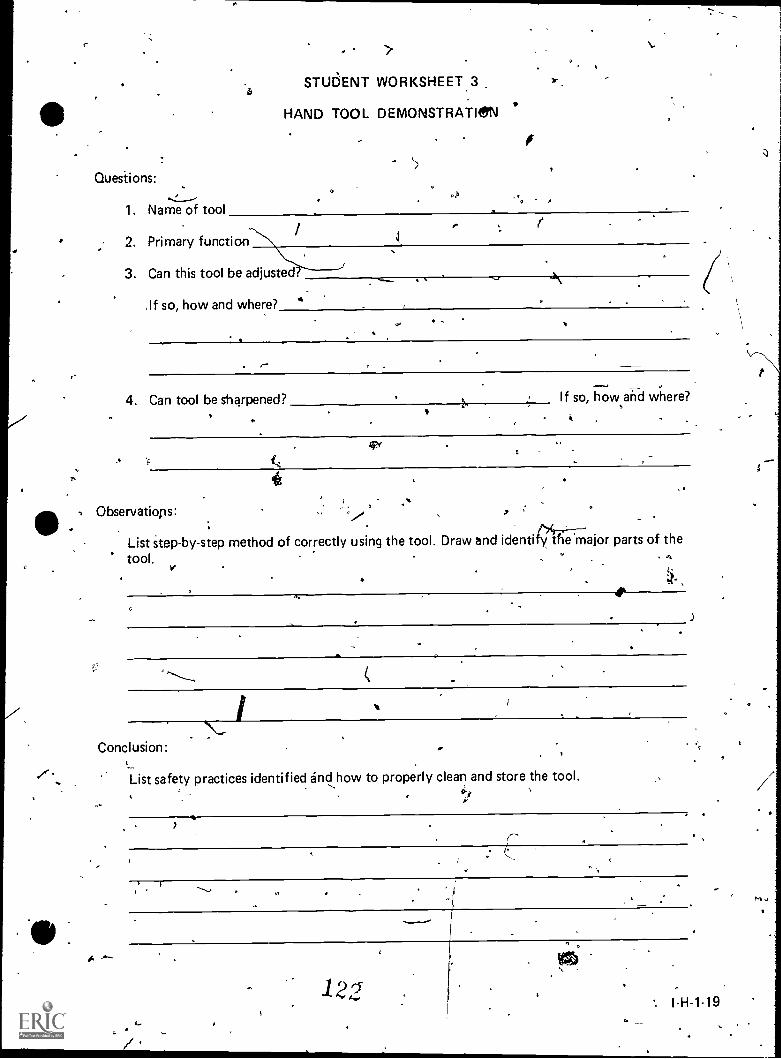
r
A
Questions:
1. Name of tool
STUliENT WORKSHEET 3
HAND TOOL DEMONSTRATION
2. Primary function
3. Can this tool be adjusted?
If so, how and where?
4\
r-
4. Can tool be sharpened?e
If so, how and where?
ifY
Observatiops:
List step-by-step method of correctly using the tool, Draw bnd identi-najor parts of the
tool.
Conclusion:
List safety practices identified and how to properly clean and store the tool.
r
C-
12 I-H-1.19

STUDENT WORKSHEET 4
SHARPENING HAND TOOLS 1
1, Why shouldn't a wood chisel be sharpened to a longer thinner bevel than what is recommended?
2. When sharpening a tool pn a grinder wheel, how should the tool to be sharpened be held?
3. What is meant by keeping a grinding wheel properly dressed?
4. What are three safety.precautions to take when using a grinding Wheel?
a.
'S'b.
c.
5. The standard angle of keenness for wood chisels is about degrees.
6. --The length of bevel of a wood chisel should be about twice the of the chiselblade.
7. The Cutting edge of a knife differs from a wood chisel in that e knife blade is ground on
- andusually with a longer
8. How do you joint an axeblade?
9. All sharpening of the auger bit is usually done with a
102 Describe the difference between rip-saw teeth anci...cioss-cut saw teeth.
1
11. What does "set of the saw" mean?
12. The standard angle of keenness for metal cutting tools, such as a cold chisel, is
13. What'does2itmean to fit a screwdriver?
L-H-1-20
degrees.
0
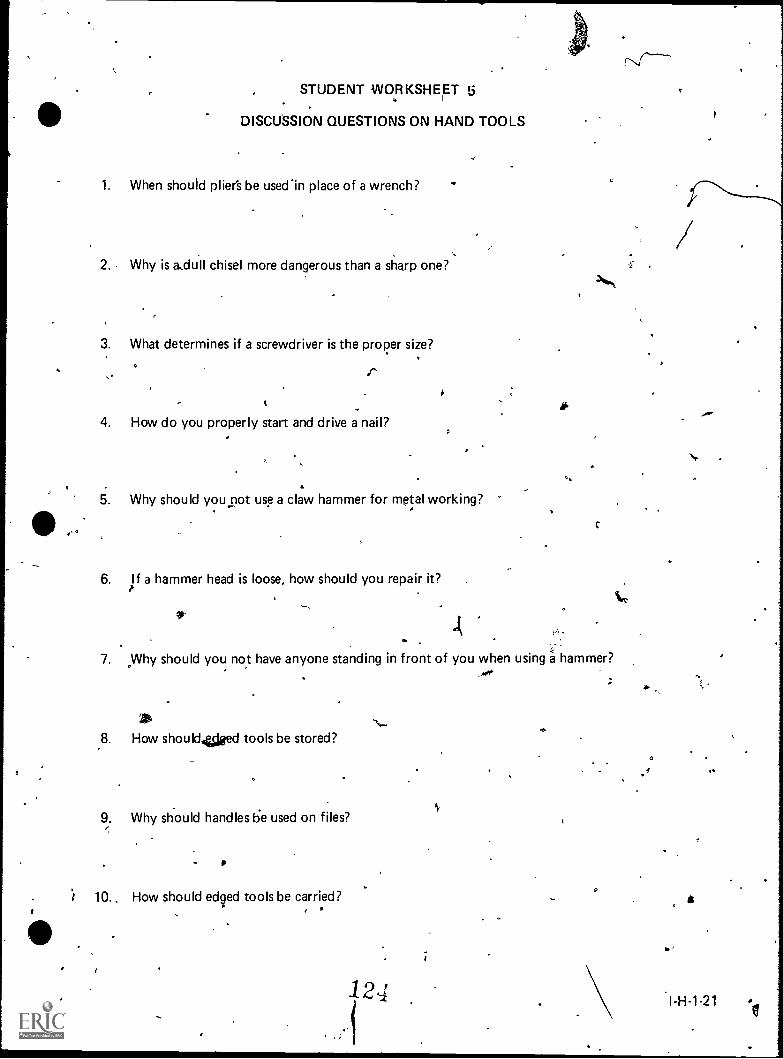
I
a °
STUDENT WORKSHEET 5
DISCUSSION QUESTIONS ON HAND TOOLS
1. When should pliers be used'in place of a wrench?
2. - Why is a.dull chisel more dangerous than a sharp one?
3. What determines if a screwdriver is the proper size?
rt
4. How do you properly start and drive a nail?
. .5. Why should you not use a claw hammer for metal working?
6. If a hammer head is loose, how should you repair it?
A
c
7. Why should you not have anyone standing in front of you when using a hammer?...o,
SR'
. How should4@ed tools be stored?
9. Why should handles tie used on files?
'I' 10.. How should edged tools be carried?,
124
.1.
,
iem
9
.

1
HAND TOOL PUZZLE SHEET
I TOOL YOU SO
Fill in each blank with the name of a tool used in a workshop.
.. Awl we axe of you is that you hammer away at the job of having a
good time. No other ad vise
file
ae
is necessary. If you need new 'idea, brush the
cobwebs off your brain and . You will needle little punch . That's
the;
rule . . Screw. up your courage. Don't be as dead as a door nail . Try a
new tack Knife your way through difficulties. If you do, it augers
well for your fture. That's plane , isn't it? Brace N. . up! Just
tell them that yoti saw me at the WORKSHOP PARTY.
THE TOOL CHEST HAS BEEN UPSET, AND WE MUST GET IT' BACK IN ORDER.The following is a group of tools with the letters disarranged. ,Can you straighten them out?
rule 1. Urel bit 14. ltb
saw 2. Aws screw driver 15. Rcsew virder
nailkset 3. Lnai ets wrench 16. Cenlyw
',hammer 4. Memhar squate 17. Rusqaea
5. Eirwot. 94 . - 18. Life
plane 6. Alnep chisel 19. Shicle
trowel (
brace 7. Careb punch 204' Chiihp
8.. Law screw 21. Rescw
9.. Exa nail ,. 22. Lina
vise 10. Sive tack 23. Catk44,
brush 11. Husbr knife . , 24. Finke
hatchet 12. Cetthha augers 25. Guares, ,ta
needle r- 13. Leeend
awl
125
I

.' TEACHER'S KEYSTUDENT WORKSHEET 1
1tiTOOL ADENTIFICATION KEY OR
1. aight Claw or Ripping Hammer 45. Extension Bar.
2. Cured clawillammer ' 46. Flex Handle
.3. Sledge Hammer 47. Universal Joint4. Ball Pein or Machinist's Hammer 48. Screw Driver
5. Tack Hammer 49. "C" Clamp6. Blacksmith's Hammer ta Machinist's Vise
7. Mallet or Soft Headed Hammer 61. Bar Clamp
8. Tinner's Hammer 52. Pipe Vise
9. Fence Pliers 53. Blacksmith's or Leg Vise
10. Water Pump Pliers 54. Anvil11. Battery Pliers 55. Hand Screw
12. Slip Joint Combination Pliers 56. Non-metallic Cable Ripper
13. Diagonal Pliers 57. Bolt Cutters
14. Wire Stripper 58. Brick Trowel o""
15. Long Nose Pliers 59. Tubing Cutter
16. Revolving or Leather Punch 60. Concrete Finishing Trowel
17. Lineman or Electricians Pliers 61. Wrecking, Ripping, or Pinch BaR),
18. Curved-needle nose Pliers 62) Concrete Float
19. Lever-Jawed Wrench or Locking Pliers 03. Tinner's Shears or Tin Snips
20. Qoubje Bit Axe , 64. Tri SqUare
21, Shingler's Hatchet 65. Carpenter's or Framing Square
22. Single Bit Axe 66. Folding Rule
'23. Broad Hatchet 67. Sliding "T" Bevel24. Hand Axe 68. Steel-Rule or Bench Rule"
25. Glass Cutter 69. Carpenter's Level
26. Jack Plane 70. Plumb Bob
27. Wood Scraper 71. Combination Square
28. Hand Saw 72. W6od Rasp
29. Hack Saw / 73. He Card30. Keyhole or Compass Saw 74. Single Cut File
31. Coping Saw 75. Cold Chisel
32." Pruning Saw 76. Taper or Triangular File
33. Back Saw 77. Wood Chisel
34. Adjustable or Crescent Wrench 78. Half Round File
35. Allen or Setscrew Wrench 79. Putty Knife36. Box End Wrench 20. Center Punch
37, Chain Wrench 81. Bit Brace
38. Combination End Wrench 82. Drift Punch
39. Monkey Wrench 83. Auger Bit
40. Open End Wrench 84. Nail Set
41. Pipe Wrench 85. Expansion Bit
42. Double Open nd S Wrench 86. Pin Punch
43. Phillips Screw river .97. Straight Shank Twist Drill
44. Deep Socket 88. Prick Punch
A
I-H-1.24
A
TEACHER'S KEYSTUDENT WORKSHEET 4
SHARPENING HAND TOOLS
1 Why shouldn't a wood chisel be sharpened to a longer thinner bevel than what is recommended?
It is likely to chip, break or dull.
2. When sharpening a tool on a grinder wheel, how should the tool to be sharpened be held?
Hold the P-strrn/heel turns toward the cutting edge.
3. What is meant by keeping a grinding wheel properly dressed?
Clean and sharpen the wheel4o keep clean particles of abrasive material' exposed.
4. What ar%three safety precautio'ns to take when using a grinding wheel?
a.
b
c.
wear goggles
use wheel guards
adjust tool rest so it is close to the wheel
5: The standard angle of keenness for wood chisels is about 25 30 degrees.
6. The length of bevel of a wood chisel should be about twice the thickness of the chiselblade.
The cutting edge of a knife differs ,from a wood chisel in that the knife blade is ground on
both sides and usually with a longer bevel
8. How do you joint an axe blade? Lay blade flop the tool rest with a light pressure
against the wheel. Move handle back and forth as blade is moved across the stone.
9. All §harpening of the auger bit is usually done with a file
10. Describe thetlifference between rip-saw teeth and cross-cut saw teeth.
Rip-saw teeth have flat cutting edges. Cross-cut teeth have sharp points.
(11. What does "set of the saw" mean?
Bending the teeth so the cutting points are wider than the blade.
12. The standard angle of keenness for metal cuttir4tools, such as a cold chisel, is 60 degrees.
13. What does it mean to fit a screwdriver?
Grind the tip so it is square and blunt with straight sides.
4
12 1-1-I-1-25
0
-JOB SHEET 1
IDENTIFYING AND USING HAND TOOLS
Objectives: Y
1. To become familiar with the names of hand tools in the school shop.
2. To know the correct uses of selected hand tools.
3. To become familiar with the cost of selected hand tools.
M.9terials:
1. Provide'student access,to the 0i-op-hand tools.
2. A supr4y of old hardware shop catalogs.
Protlure:
c
/
0
1. Give students a tour of the stibp pointing out the various hand tools and their location.
2. Have each studeht locate a picture of each selecte hand tooljn an old catalog, cut it out,tape the picture on the worksheet and complete, the }necessary information.
3. Duplicate additional worksheet pages according to the number of hand tools the studAtsare to identify. -
.1= -
.:.
1
1
...
I-H-1-27
C.
..
*
JOB SHEET. 2
HAND TOOL USE AND SAFETY
el 4/
Objeciivet: ,
1. To develop an interest in hand tools.
2. To develop the ability to correctly use hand tools.
3. To appreciate a satisfactory job of using hand tools.o
-.s. To develop ability to corrEfetly clean, adjust and store hand tools.
Ar-.
1
I
Materials:
1. Selected handltols.
2. Materials which can be used to demonstrate each hand tool (wood, metal, etc).
Procedures: ..
i-H-1-28
1. Demonstrate or have students demonstrate the use of selected hand tools.
I
4
2. Explain Proper m` -thods of using each tool.
3. Determine student knowledge of use and safety of each hand tool by asking students toidentify safety practices.
4. Have students complete attached sheet as each hand tool is. demonstrated.,
I'
$
129
I
t
.
JOB SHEET 3
SHARPENING A KNIFE
Objective:
.1Given a florist, nursery, or grafting knife, the student will sharpen the blade on an oil stone
and a leather strop to a razor cutting edge in a safe, careful manner. Performance is evaluated bythe teacher.
Introduction:o
A sharp knife is important in working with plant materials sd that all cuts are made in a clean'and smooth manner without crushing delicate plant parts. A dull knife is more likely to slip whilebeing used than a shardone, so injuries are more likely to
with
With a dull knive.
The knife blade is sharpened at the Original with all niciTse'arefully removed.4
Materials and Tools Needed:,
Florists, nursery, or grafting knifeOil sharpening stoneFilled oil can
t(o73
Wiping clothLeather razor s
Procedures:
AN.
1. Assemble all the needed materials: pocket knife, oil stone, filled oil can, wiping cloth.
2. Under the direct supervision of the instructor, carefully examine the blade to find any nicks inthe blade. If it is nicked, use the "coarse" side of the stone to remove Them. Put a few drops ofoil on the stone. Hold the blade against the stone near one end of the stone, at about a 20°angle, cutting edge in- the direction of m.otiort-Move it evenly and smoothly the f011 length ofthe'stone. Lift the blade and return it to the original position. Repeat 5 to 10 times. Turn theblade over in order to stroke the other side 5 to 10 times. Repeat alternately stroking echside of the blade until the nicks are all removed.
3. After the nicks are removed, (or do this at once if there are no nicks) turn the stone to the"fine" a and repeat the strokes as explained in Step 2.
4. Test the sharpness by attempting to cut 'a newspaper edge with the blade. Check the tip,middle, and sliank parts of the blade. Often only part of a blade may be sharp. Continue sharp-ening and testing until the entire cutting edge is sharp.
5. When the entire edge ispsharp, the next step is to finish (remove burrs) with a leather razorstrop,. No oil is used. The motions are exactly the same as for using stone, except that lb thiscase the back of the blade is in the direction o' the motion (otherwise, the strop will be cut!)This stropping results in a very fine edge.
6. Clean up all tools and equipment and store them.
Property used, a stone will last many 'years, a circular Motion in a small space of the stone will soon 1,
develop a narrow grove in the stone, ruining it.
.130
Yi
I-H=129
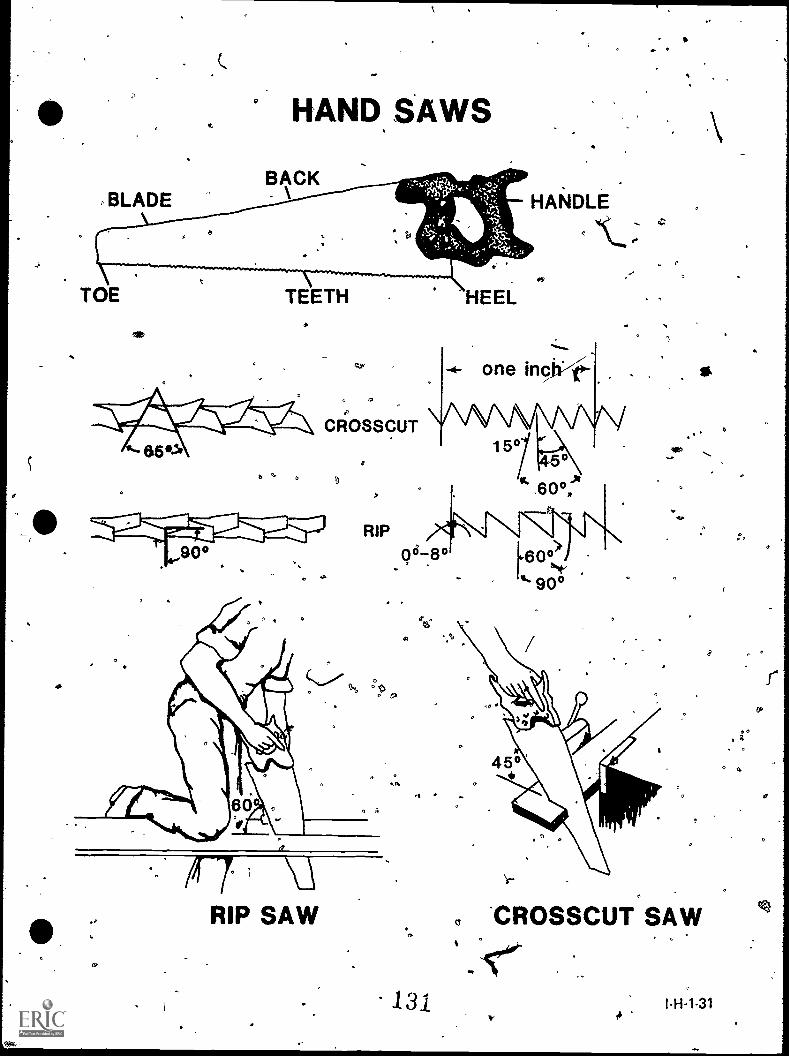
ar
HAND SAWS
s
0
65°.,
6 '4,
CROSSCUT
e .,
a
)
RIP
one inc
o
15°
60°'t
.0 780 1.60°N*- .
v 90°
i
\..\RIP SAW
el
.4
131
t
0
C
9
9
4
0
*
CROSSCUT SAW
v 0
s
s
I-H-1-31
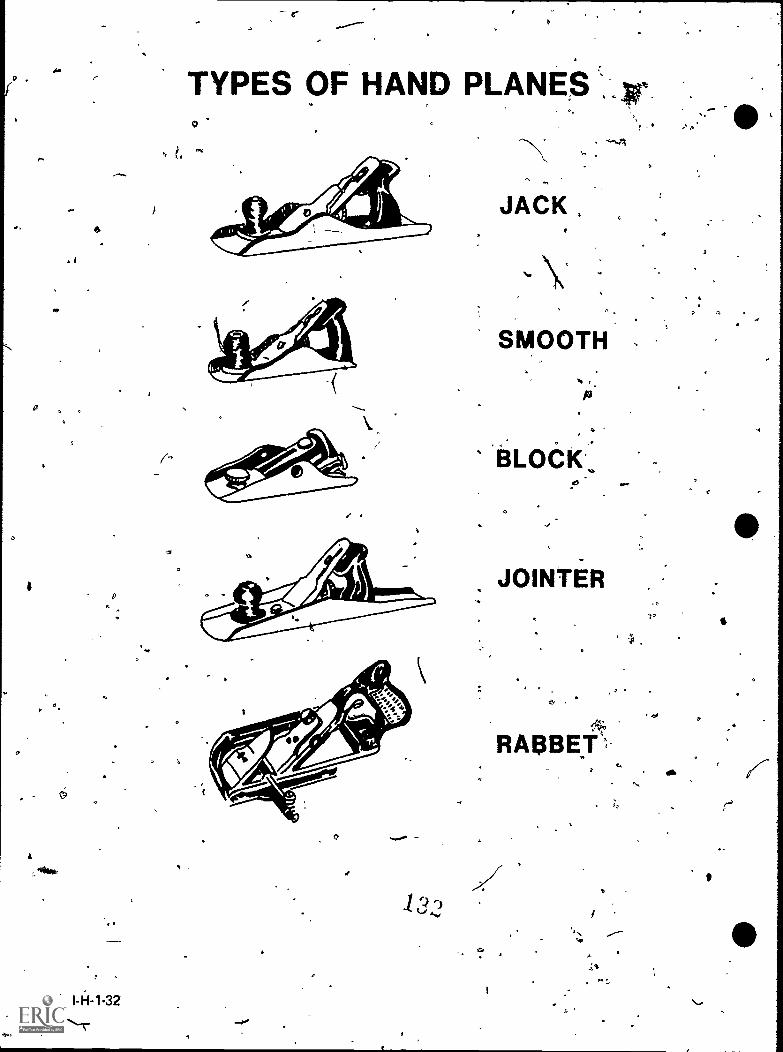
i 6.0.32\----
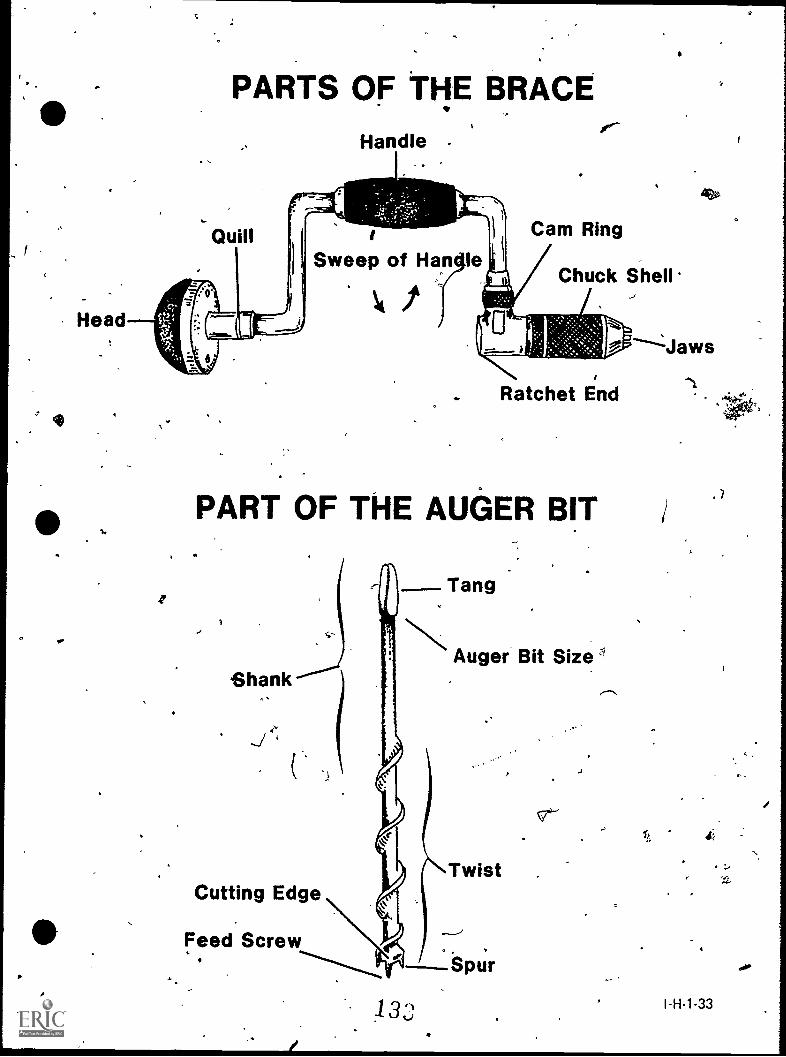
, PARTS OF THE BRACE
Head
Quill
Handle
ISweep of Han
4 i
Cam Ring
Chuck Shell
Ratchet End
,
Jaws
,PART OF THE AUGER BIT i
. ..
e
..,)
Shank
J°c
Cutting Edge
Tang
Auger Bit Size
Twist .
.. .
Spur
e.
10-
I-H-1-33
ei
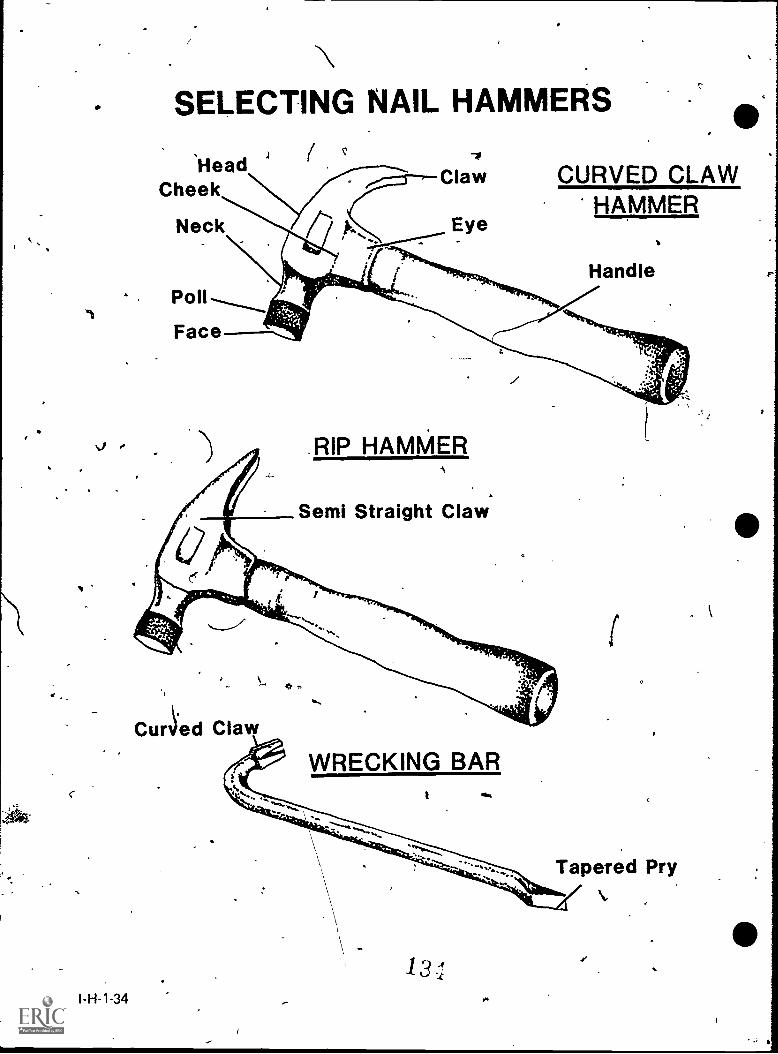
1
SELECTING NAIL HAMMERS
1
, 1 /Head
Cheek
Neck
Poll
Face
Claw CURVED CLAWHAMMER
Eye
Handle
RIP HAMMERi
Semi Straight Claw
Cured ClawVs ,
WRECKING BARC t
I-H-1-34
ve
I
Tapered Pry
,
13,1p.
l'
I
$
1.
DISCUSSION GUIDE FOR TRANSPARENCIES
HAND T9OLS
t 1, .
.I. Transparency: Crosscut and Rip Hand Saw .
A. Explain how hand saws are important to a well-equipped shop.
1. For small or confined work, hand saws are most.often better than4power tools.0.
2. Hand saws are often better for finish work than power saws.
3. Epctricity may not be available or safe in some locations.,0 .
4. Hand saws are often lighter and easier to handle than power tools.
5. Many times, a job can be completed quicker with a hand saw than with powersaws.
°
B. It is important to understand how saws differ so the correct saw can be selected and used.
1. Saws can have curved backs or straight backs.
,.2. Blade lengths, measured from heel to toe vary ft.= 8" 26" for commonly used
cross-cut saws and rip saws.
3. Most commonly used cross-cut saws have between 5 and 11 teeth per inch.Rip saws most commonly have between 4 and 7 teeth per inch.
. .4. Cross-cut saw teeth are shaped at different angles than rip saw teeth.)
5. Rip saw teeth are perpendicular to the blade and cut like a wood chisel. The frontangle can be from perpendicular to 8 degrees forward. The rear angle should bebetween 52 and 60 degrees.
6. Cross-cut saw teeth are angled about 65 degrees to the blade and shave the woodlike a plane. The front angle is about 15 degrees and the back angle is about 45degrees.
1
ft
L /
C. When purchasing hand saws specify: .1....414
1. rip or cross-cut
2. number of points to he inch, and
3. length of the saw
D. Correct use of hand saws:
Rip saw
1. Secure the material to be sawed..
'1
2. Use the thumb on the free hand as a guide when starting a cut. \
-H-1i'36
3. Hold the blade at 60 degrees to the surface of the work.
4. Place the saw on the waste side of the line. Draw the saw sack unfTI a groove is (2"
formed. Use lon, steady 'strokes with only light pressure on the down stroke.
cross-cut saws41. Use the same procedure as the rip saw except change the angle to 45 degrees.
II. Transparency: Types of Hand Planes
A. Jack Plane Most commonly used size is 14 inch length with a 2" blade.General purpose pier used for smoothing and jointing lumber.
B. Spooth Plane r9ost commonly used size is 8 inch length with a 1 3/4 inch blade.1.t se to smooth a airface after a larger plane has been used.It produces a smooth but not always a true surface.
C. Block Plate SmJlest of all the planes.Used to plane small pieces of wood.Bevels, camfers, and end grain held in one hand. .
D. Jointer Plane Largest of the planes. The length is 20 to 24 inches with blade 0,widths of 2 3/ 8 to 2 5/8 inches. -t ''Used on long boards and produces a straight true edge,Will perform the same wprk as a power jointer.
NE. Rabbit Plane Most commonly used size is 8 inch length and 1/2 inch blade.
A specialty plane which can be used to plane into corners.Primarily used as a finishing plane. .
i
F. All planes use the sarne principle for cutting. Their main difference is in the weight,length, width, and type of blade.
III. Transparency: Parts of the Brace and Parts of,the Auger Bit
Braces
A. Braces range in sizes from 6 to 14 inches with the 10-inch being the most common.
B. The size refers to the sweep of the handle.
. .C. Braces can be p4chased with or without ratchet. The ratchet brace willpermit the
drilling of holes in places where a full circle cannot be made with the handle.
Auger bit,
A. Used to bore holes in wood
B. Most common sizes are from 1/4 inch to one inch and are graduated in sixteenths.The number stamped on the tang is the numerator for the size of bit. A number 7bit will bore a 7/16 hole.
IH-1-36
13C
IV. Transparency: Selecting Nail Hammers, Parts of the Nail Hammer, Rip Hammer
A. Most commonly used hammer in agriculture is theurved claw hammer:' It is bestfor pulling nails and driving nails.
B. The'second most popular hammer is the rip or semi-straight claw hammer. It is befor taking apart structures and driving nails.
C. Hammers range in weight from 13 to 20 ounces. The 16 ounce is the most popularweight.
D. The face of hammers may be bell faced (reducing marking of wood) or flat-faced(easier driVing,of the nail).
E. The handles may be made of wood, nylon, or metal. The wood handle is the leastexpensive and will absorb the shock which redUces tiring of the hand and arm.
Wrecking Bar
. A. Most common size is 24 inch length.
B. Used to pry boards loose and pull nails.
C. The wrecking bar is better for pulling large nails and dismantling structures than clawhammers.
0. The wrecking bar is not a good crow bar. It is not good at prying machinery, beams,or large rocks.
13
16-
I-H-1.37
SAFETY RULES WITH HAND TOOLS
1. Use handles on files to avoid injuring your hands.
2. Be sure all machinery is stopped before adjusting.
3. Be sure wrenches fit securely to avoid slipping. ,
4. Replace broken handles; never repair them.
5. Always work away from your body when using chisels.
-6. Do not stand in front of someone using a hammer.
7. Be sure nails are.well started before using hard blows. .
4
8. Be,sure the hammer heads are tight on the handles before you use them.
e
9. Never use screwdrivers or files as pry-bars; select the proper tool for the job.
10. Keep edge tools sharp.
11. Use screwdrivers of thd proper size.
,12. Keep tool handles free from dirt, oil; and greaie..
13. Do not carry edged or pointed tools in your pockt.
14. Store tools properlytvhen you-finish using diem. ,-
C./
0
a
(-J
t,
et, I -H-1-39
4
9 ..
--,
SUGGESTIONS TO THE TEACHER REGARDING STUDENT TESTS ON
"SAFE PRACTICES IN THE VOdATIONAL AGRICULTURE SHOP"
..,
,
1. These tests have been prepared for individual power tools or areas of instruction with each test
on a single sheet.
2. Most of the test questions are TRUEFALSE types. Space haebeen left between q estions for
students to explain why the statement is true or false. It may be particularly desirable to
explain why a question was marked true or false, thus re-emphasizing correct procedure.
3, A set of correct answers to the test questions is'not provided. The correct answers to certain
questions depend upon the safety standards adopted by individual teachers.
4: Some teachers may wish to have the students sign the attached statements o safety training
and keep them on file.
5. Permission to duplicate any of this material is freely granted. Credit for the material used in
this unit is due to many individual teachers. Original drafts were submitted by A. W. Schmidt,
D. J. Witt, Loren Mills, and Charles Pearson, Teachers of Vocational Agriculture in Illinois.
/
(I
-,
90 1.../
I
I-H-1-41
TRUE or FALSE
IH-1-42
.,
STUDENT TESTON
HAND TOOLS
Name
Date
1. A dull eged tool may be more dangerous than a sharp one.
2. You should check the condition of any tool, as to its safety, before using it.
3. You should always cut toward yourself when using/9n edged tool to avoid dulling the
tool.
4. It is all right to use a hammer with a poor.handle, if that handle is fastened on tight.
5. It is all right to hammer on a wrench wittia ball-peen hammer, but not with a claw
hammer. k,
6. It is safer to use both hands on a screwdriver.
7. It is not safe to use files without handles.
8. In using adjustable end wrenches, have the jaws facing the direction of pull.
9. Yqu should keep your fingers flat against the board when.holding a nail for starting
with'a hammer.
't.10. If you discover a defective hammer handle in the shop, you should toss it aside and get..,
another hammer.
-
)k
At
S UNIT H: A3RICULTURAL MECHANICS
PROBLEM AREA: USING SELECTED POWER TOOLS
SUGGESTIONS TO THE TEACHER:
This problem area is designed for use with freshman or beginning students enrolled in an agri-
cultural /horticultural occupations program. The recommended time for teaching this problem area
is during the early winter. The estimated time for teaching this problem area is 3 to 10 days depend-
ing on Wow much time the teacher wishes to spend on discussion and conducting the suggesTed
exercises. The materials in this problem area were selected and written with the following assump-
tions:
1. It is important for all agriculture students to be able to identify common power toolsused in agriculture and their parts.
2. Students need instruction on the safe use and care of power tools at the freshman level.
The instructor is reminded that this problem area includes power tools used on the farm and
in urban areas. The items in thii problem, area are for reference or modification as the teacher
adapts this material to his/her local situation.
CREDIT SOURCES:
These materials were developed through a funding agreement, R-33-21-D-1542-388 with the
Illinois State Board of Education, Department of Adult, Vocational and Technical Education,Research' and Development Section, 100 North First Street, Springfield, Illinois 62777. Opinions
expressed in these materials do not reflect, nor should they be construed as policy or opinion of the
State Board ofAdu,cation or its staff.
The teacher's guide, worksheets1" transparency discussion guides were developep by Paul
Benson, Jerry Pepple, and Jim Ethridge, Department of Vocational and Technical /Education,University of Illinois. The transparency masters and suggested test questions were prepared bye
Vocational Agriculture Service, University of Illinois. Suggestions and guidance in the developmerft
of these materials were provided by the Rural and Metropolitan Core Curriculum Pilot Test
Teachers,.
-
I-H-2-1
r
TEACHER'S GUIDE
I. Unit: / Agricultural mechanics
II. Problem area: Using selected power tools
III. Objectives: At the close of the problem area, students will:
4
L
1. Be able to identify and list Oarts of selepted power tools.
2._ Be able to use proper procedures in the operation of selected power tools.
3. Understand the safety instructions for proper use of selected power tools.
IV. Suggested interest approaches:
.1. Collect an assortment 'of pciwer tools, and have students identify them.
2. Lead into a discussion by asking students what, power tools they have at home.
3. Ask students how they could get physically hurt with certain power tools.
4. Ask the students if they have been involved in any accidents when using power tools.
6. Ask students if they know the approximate cost of each power tool and then havethem figure a total value for their home power tools.
7. Have a display of boards or pieces of metal that have been cut or drilled with powertools.
8. Prepare a bulletin board display indicating varioud4kinds of power tools used in theagricultural service areas.
9. Discuss the issues involved inusing your own tools as compared to hiring the workdone or renting the tools.
10. Develop a list of power tools found at local businesses and ickintify the Common ones;then have the students learn how to operate these tools.
V. Anticipated problems and ponce' rns of students:
1. What power tools are we going to learn to operate?
2:"----lichv are each of theie tools used and operated?
3. What safety precautions should we use in operating these tools?
4. How should theie tools be maintained and stored?
5. What shop rules should I follow when using power tools?
6.. 'How do you change a blade on the power saw?
7. Additional problems and con cerns are included in Worksheets 1 5. Studentscould be referred to these worksheets to obtain additional problems and concerns.
142 F 'lb I-H-2-3
.44

\...._ ,""---..----
VI. Suggested learning activities and experiences:-
1. Discuss problems and concerns identified by class or teacher and develop appropriateanswers. Have class consider.questions on Worksheets 8, 9 and 10.
2. Have class read VAS Unit 3022 "Safety in the Agricultural Mechanics Shop,"Sections 7, 8, 11, 13, and 14.
3. Distribute Worksheet No. 1, "Safety lAstructions for Operating Power Tools," and haveclass fill out and discuss. Use Job Sheet 1 and Worksheet 2 to identify additional powertools.
4. Show 'transparencies. Identify various parts of each power tool and explain thecorrect procedures-for its use.
a. Table Circular Sawb. Table Saw Bladesc. Bench Model Drill Press
5. Show filmstrips: .,
VAS 461 "Drill Press"VAS 462 "Circular Saw"VAS 463 "Power Grinder"VAS 498 "Using Power Lawn Mowers Safely"VAS 633 "Identifying and Using Horticultural Hand,,Tools"
IA
6. Have each student demonstrate the proper and safe use for each power tool. Forexample, for the table saw, provide each student with a boardsa4d have them cutone end and one side so they are square. Use Job Sheet 2 and Worksheet 3.
7. Hand out.Worksheets 4, 5, 6, and 7. Have students go into the shop and fill out. Discusstheir results with the class.
8. Arrange for students to conduct an0rea survey of businesses using power tools ineach of the serv,:rce areas. Use the information gathered by the students in conductingyour instruction. Use Worksheets 11-19 for business survey,.
9. Use pictures, films, filmstrips, slides ancior actual power tools in demonstrating ordiscussing their sate and proper use. Identity occupational activities in which thestudents-Wtkuld use each power toot.
10. Ask students to demonstrate their ability to safely use and adjust certain power tools. r.(
VII. Application procedures:
1. The main purpose of this problem area is to learn to recognize and use power toolsin a proper and safe manner.
2. The students should apply their knowledge and understanding learned in the shjto their own power tools or to those in a place of employment. .
VIII. Evaluation:
IrH-2.4
1. Prepare and adrninister.a pencil and paper test covering the identificatibn of powertools and their parts and the proper use of power tools.
2. Grade worksheets
..,
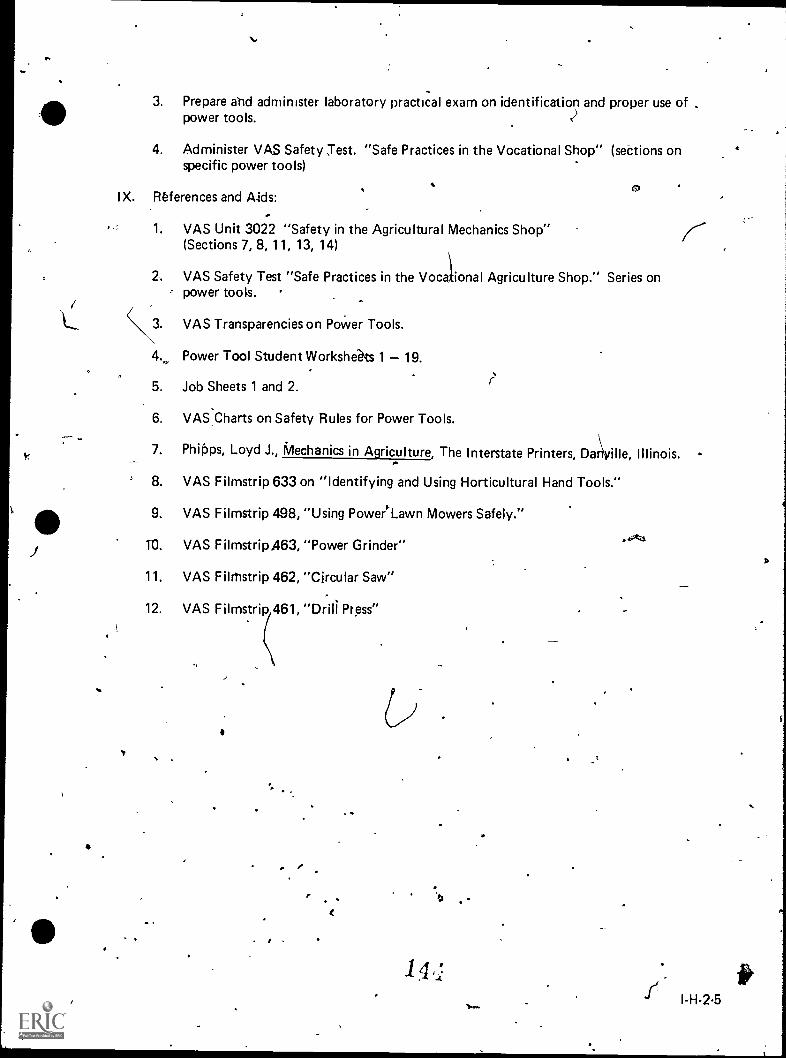
3. Prepare and administer laboratory practical exam on identification and proper use ofpower tools.
4. Administer VAS Safety Test. "Safe Practices in the Vocational Shop" (sections onspecific power tools)
IX. References and Aids:
1. VAS Unit 3022 "Safety in the Agricultural Mechanics Shop"(Sections 7, 8, 11, 13, 14)
2. VAS Safety Test "Safe Practices in the Vocational Agriculture Shop." Series onpower tools.
VAS Transparencies on Power Tools.
4. Power Tool Student Workshiats 1 19.
5. Job Sheets 1 and 2.
6. VAS Charts on Safety Rules for Power Tools.
7. Phipps, Loyd J., Mechanics in Agriculture, The Interstate Printers, Daville, Illinois.
8. VAS Filmstrip 633 on "Identifying and Using Horticultural Hand Tools."
9. VAS Filmstrip 498, "Using Poweritawn Mowers Safely."
1-0. VAS Filmstrip, 63, "Power Grinder"
11. VAS Filmstrip 462, "Circular Saw"
12. VAS Filmstrip 461, "Drill Press"
1
'fj- I-H-2.5

9
Prepare and administer laboraro-ry practical exam on identification and proper use ofpower tools.
4. Administer VAS Safety Test. "Safe Practices in the Vocational Shop" (sections onspecific power tools)
IX. References and Aids:
1. VAS Unit 3022 "Safety in the Agricultural Mechanics Shop"(Sections 7, 8, 11, 13, 14)
ti2, VAS Safety Test "Safe Practices in the VoCational Agriculture SIp." Series onpbwer tools.
3. VAS Transparencies on Rower Tools.
4. Power Tool Student Worksheets 1 19.
5. Job Sheets 1 and 2.
6. VAS Charts on Safety Rules for Power Tools.
7. Phipps, Loyd J., Mechanics in Agricultur<The Interstate Printers, Danville, Illinois.
8. VAS Filmstrip 633 on "Identifying and Using Horticultural Hand Tools."
9. VAS Filmstrip 498, "Using Power Lawn Mowers Safely."
10. VAS Filmstrip 463, "Power Grinder".
11. VAS Filmstrip 462, "Circular Saw"
12. VAS Filmstrip 461, "Drill-Press"'
145
4
STUDENT WORKSHEET 1
SAFETY INSTRUCTIONS FOR OPERATING POWER TOOLS
1. Blade height for a tilting arbor table saw should be just high enought to 'dear the work by
more than inches.2'
2. When can more than one person be inside the "safety zone"lines of the table saw?
-,,-. ,-,'"1.
.
3. What dress precautions should be taken when using the table saw?
4. When should a push stick be used with a table saw?
5. What are the three main types of sabre saw blades?. , 4,
a. ., .-
-
b.
c.
6. What should pu remember°?oxici-befOr'a adfustingtr repairing any power tool?
p ,s;
trF
7. To,stop a portable sander, you should tthe switch off. - ') ;
94 it It t
and then turn
8. You should have at least inches ofieverageb'efore holding any work td be drilled.
9. Check, an if necessary, adjust ts!; , before starting a gri,?id4"1
'-' 0 '-'41X g ,
10. A toql rest should be inches away trom the laceloi the wheel?,r ,.*- i
s - . t;
1
1-..........,..
11. Grind only on the of the wheel:-
0 .
12. Use I to hold small objects against the wheel.
.I-H-2-7

STUDENT WORKSHEET 2
IDENTIFYING POWER TOOLS
Name Price' , Name Price
Give one use: Give one use:
I, .Name _e-Price Name Price
Give sne use Give one use:
Nene Price Name Price.A
Give one use: Give one
\<
1t17
ite
i
Questions:
1. Name of tool
\- STUDENT WORKSHEET 3
POWER TOOL DEMONSTRATION
-t-
A
-2. Primary fusm o
3. Can t tool be adjusted?
If so, how and where?
1.
4. Can tool be sharpened? If so, how and where?
vObservations:
List step-by_-step method of correctly using the tool. Draw and identify the major parts of the
tool.
<11
Conclusion:
List-safety practices identified and how to properly clean and store the tool.
la. I-H-2-9
14 ..
Manufacturer's Name
STUDENT WORKSHEET 4
TILTING ARBORARBOR SAW INFORMATION SHEET
3
hat type of blade is in the saw?
':----,2. What is the-diameter of the saw blade?
.4....
3. What is the diameter of the arbor?
4. What othQr blades are available in the shop?
5. What is the deepest cut possible?$2
6. How is the blade raised and lowered?
..7. How is the arbor tilted?
-
B. How far will the arbor tilt?
Model Size
. .11..--
N.,
9. On what part are the saw guard and anti-kick-back fingers mounted?
10. How is the rip fence locked?
11. What is the use of the slot parallel.to the blade?
12. What is the speed of the blade in RPM?
o
13. What is the horsepower rating of the motor? .,
14. What type of switch turns the saw on and off?
1\15. How many volts are passing through this switch?
, 1 ,4 rl-0,- 1..,
,--I-H =2 -10
N
,1
4
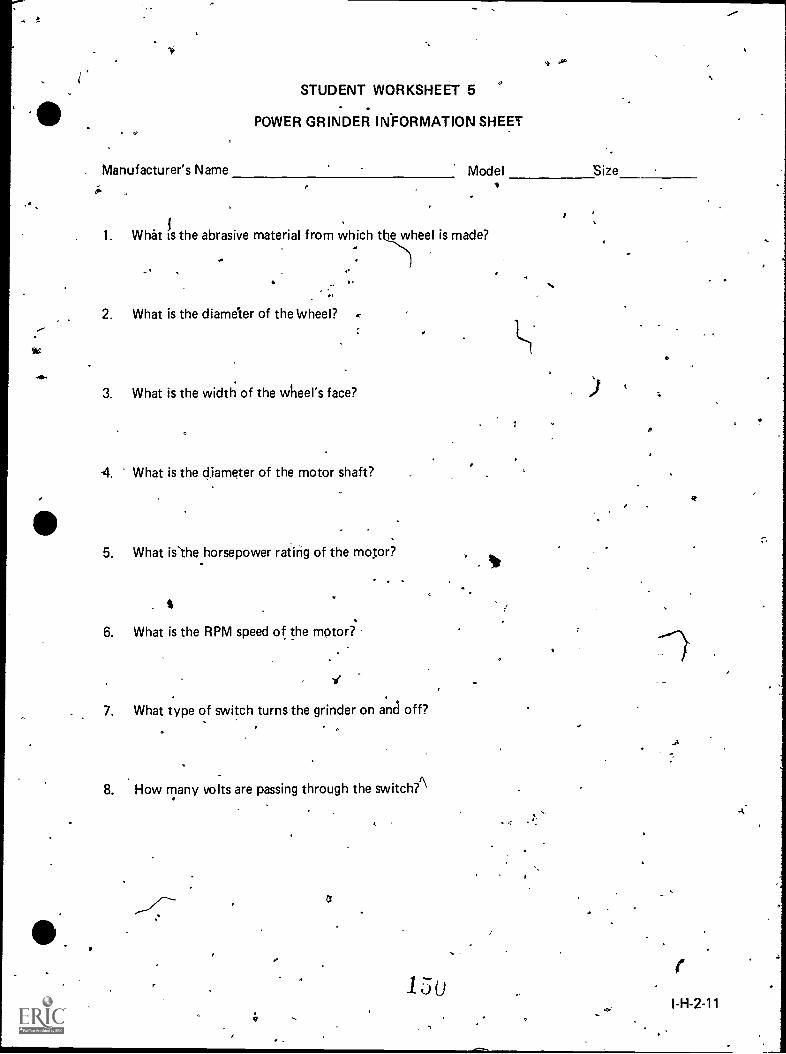
STUDENT WORKSHEET 5
POWER GRINDER INFORMATION SHEET
. Manufacturer's Name Model Size
1. What is the abrasive material from which the wheel is made?
2. What is the diameter of the Wheel?
3. What is the width of the wheel's face?
4. What is the diameter of the motor shaft?
5. What is'the horsepower rating of the motor?
6. What is the RPM speed of the motor?'
I7. What type of switch turns the grinder on and off?
8. How many volts are passing through the switch?'
a
15L
4
O
I-H-2-11
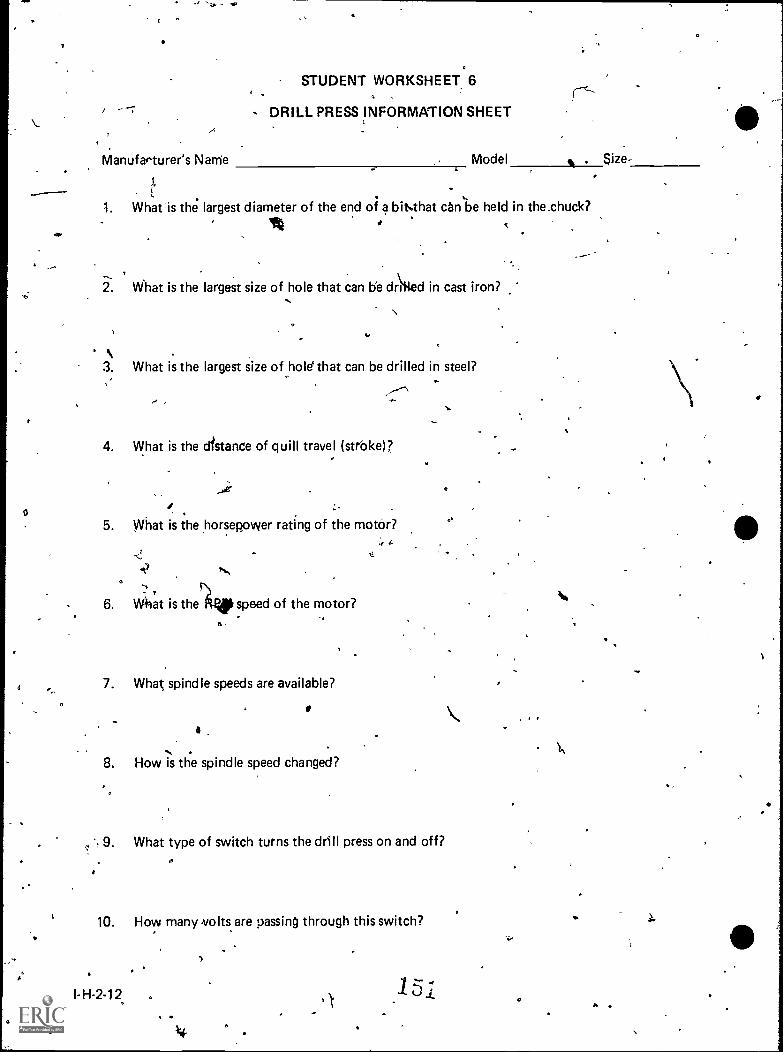
t
0
4
STUDENT WORKSHEET 6
DRILL PRESS INFORMATION SHEET
Manufacturer's Narrie Model . Size
1. What the largest diameter of the end of a bit'.that can .'be held in the.chuck?
2. What is the largest size of hole that can be drifted in cast iron?
3. What is the largest size of hole' that can be drilled in steel?
4. What is the distance of quill travel (stroke)?
5. What is the horsepower rating of the motor?
?
6. What is the speed of the motor?e -
1.
7. Whaj spindle speeds are available?
8. How is the spindle speed changed?
. What type of switch turns the drill press on and off?
10. How many volts are passing through this switch?
l- H-2-1 2,
444
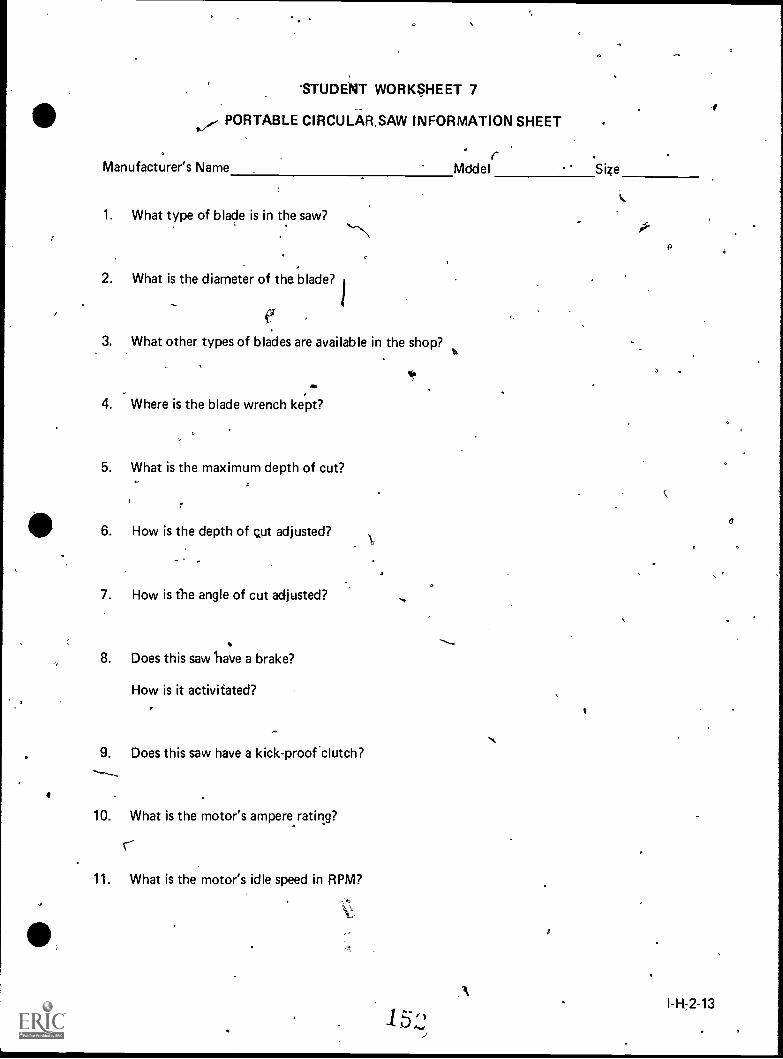
'STUDENT WORKSHEET 7
Manufacturer's
PORTABLE CIRCULAR. SAW INFORMATION SHEET
Name Mddel Site
1. What type of blade is in the saw?
2. What is the diameter of the blade?
3. What other types of blades are available in the shop?
if414
4. Where is the blade wrench kept?
5. What is the maximum depth of cut?
6. How is the depth of qut adjusted?
7. How is the angle of cut adjusted?
8. Does this saw 'have a brake?
How is it activitated?o
9. Does this saw have a kick-proof 'clutch?
10. What is the motor's ampere rating?
11. What is the motor's idle speed in RPM?
15:2
I
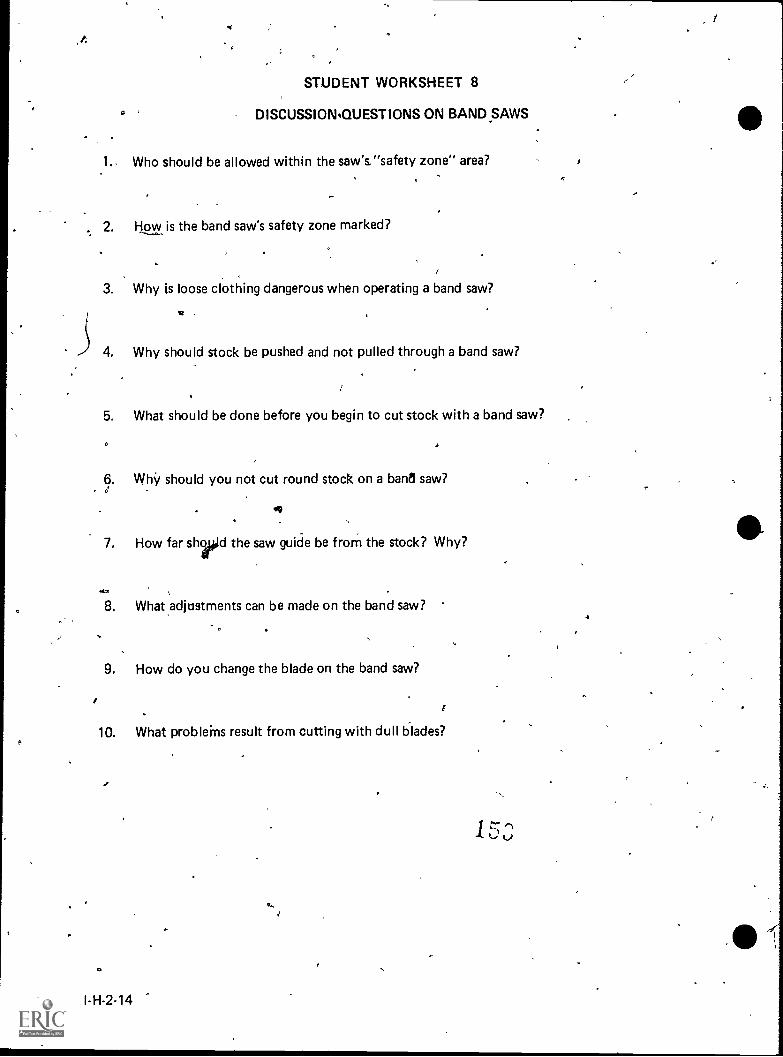
P
et
.
STUDENT WORKSHEET 8
DISCUSSION.QUESTIONS ON BAND SAWS
1. Who should be allowed within the saw's"safety zone" area?
2. How is the band saw's safety zone marked?
3. Why is loose clothing dangerous when operating a band saw?
R
4. Why should stock be pushed and not pulled through a band saw?
I
/
5. What should be done before you begin to cut stock with a band saw?
. WhY should you not cut round stock on a bane saw?
7. How far shoed the saw guide be from the stock? Why?
8. What adjustments can be made on the band saw?
9. How do you change the blade on the band saw?
I
10. What probleins result from cutting with dull blades?
,
I- H -2 -14
Q.
1 '-,t... U
4
I
.
STUDENT WORKSHEET 9r
DUSCUSSION QUESTIONS ON PORTABLE JIG SAWS
/.- clr
1. What checks should be made of the work area before you start to use the jig saw?
2. What are the three types of blades which can be used with jig saws?
3. What type of clothing should be worn when using the jig saw?
4. Describe the procedure for attaching the blade to the jig saw.
...
5. How should the jig saw be cleaned and lubricated?
6. Describe the procedure to follow when metal cutting with jig saws.
7. When should the rip fence be used with jig saws?
. What adjustments can be made onthe jig saw?
9. How can material be secured for cutting with a jig saw?
10. Describe how to make an inside cut with a jig saw.
ITh
. 1 ,
,
/
N
a,el.
STUDENT WORKSHEET to
DISCUSSION (rLECTR IC SANDERS
1. Can the motor be locked on for continuous sanding? If so, how?lt
2. Describe how to change the belt on a belt sander.
3. Describe how to adjust the "tracking" of the belt on a sander.
4. Why should the dust collector be kept clean?
,..i.:.
A ..fie
5. Describe how to properly clean a belt sander.
v
6. Why should you not start and stop the belt sander while it is resting on the stock?
7. Explain how to proOrl.y attach sanding paper to a disk sander.At
8. Describe how to properly secure and sand small stock.
,
. .
I-H-2-16 ,
r
STUDENT WORKSHEET 11
DISCUSSION QUESTIONS ON THE SOIL SHREDDER
S1. What will the soil shredder shred?
2. What is the proper clothing'to wear when shredding soil?..- .
3. How do I sharpen the hammer flails?
4. How many people does it take to operate a soil shredder?
5. How do I properly operate the soil shredder?
n 6. How do I properly maintain the soil tredder?
7. What materials should not be put through the soil shredder?
8. How should materials be prepared for shredding?
1 50
N
AM.
a
I-H-2-17
e
1.
2. ,
STUDENT ,WORKSHEET 12 4
DISCUSSION QUESTIONS ON THE WEED TRIMMER
What guards are provided on the electric weed trimmer?
What are the advantages of an automatic line feed trimmer?
3. What hazards are involved in operating a weed trimmer?
4. What is an extension cord connector?
1,- t.
5. At what angle should the electric trimmer be slanted for the most effective trimming?
6. In what direction should the weed trimmer be operated and why?
, .
7. What is the proper method of trimming along fences?
8. How do you rewind and install a nylon line and the disk?
9. What maintenance program should be followed on the weed trimmer?
I-H-2-18
STUDENT WORKSHEET 13
DISCUSSION QUESTIONS ON THE CONCRETE MIXER (SOIL MIXER)
1. What is the maximum cubic feet that a soil mixer will handle?
2. How do I operate a soil mixer?
3. Why is a concrete mixer used for mixing soil?
4. What maintenance program should be followed on a soil mixer?
5. What adjustments can.be made one soil mixer?
6. What hazards are involved in-operating a soil mixer?
7. Can the soil be over-mixed? What is done when the soil is over-mixed?
8. How many people should operate a soil mixer?
1 5 ;5I-H-2-19
STUDENT WORKSHEET 14
DISCUSSION QUESTIONS ON THE ROTARY TILLER
1. What is the correctprocedure to use in starting gasoline rotary tiller?
2. What is the recommended speed for rotary tilling?
3. How deep should the rotary tiller dig?
4. How do I force the r ciivy tiller into the ground?
5. How do I remove or add on addition'al cutting. blades?
PO
6. What is the drag bar on the rotary tiller?
7. What de the capabilities of an electric 'rotary tiller?
8. What are the hazards in operating a rotary, tiller?
9. How can the electric rotary tiller be adapted to operate as a de-thatcher? '
I-H-2-20'
STUDENT WORKSHEET 15%.
DISCUSSION QUESTIONS ON THE Spa. STERILIZER
1. How is soil media prepared for the soil sterilizer?
1 .
2. What precautions should be taken when operating an electric soil sterilizer?
3. What Unsafe actions should be avoided when operating a soil sterilizer?
.01
4. What temperatures are required to kill different organisms in a soil st rilizer?
5. How much time is req)Jired to sterilize soil?
6. Can a soil sterilizer -be filled, turned on, and then left unattended?
7. What hazards can occur if sterilized soil is removed before allowing it to cool?
8. What additional checks can be made to insure that the soil sterilizer is operatingcorrectly?
4
I-H-2-21
.3STUDENT WORKSHEET 16
DISCUSSION QUESTIONS ON THE CHAIN SAW
. What different sizes of chain saws are available?
2. What size of chain,saw should be used for what size of limbs or tree trunk?
C. What type of clothing shOdld be worn when operating p chain saw?
4: How does one prepare a tree for felling?
5. What precautions should be taken before starting-the chain saw?
6. How is the,chain of the saw lubricated and sharpened?
,
7. What special safety precautions should be observed when operating an electric chain saw?
. How is the thel mixed for chain saws?
-9. What safety prec utionstmust be taken when ).(sing a chain s 6 prune trees?_
l- H -2 -22
t4
P
SSTUDENT ,WORKSHEET 17
DISCUSSION QUESTIONS ON THE LAWN EDGER
1. Why must eye protection be used when using a lawn edger?
02. How can "outdoor" extension cords be identified?
-3. What is an extension cord retainer?
4. How 4o I attach a blade to a lawn edger?
d
How do I change the position of the cutti g head?
6. What chemicals will cause the blades to corrode? How do I prevent corrosion?
9
7. How do I clean and lubricate the lawn edgy?
8. What hazards ate involved in using a lawn edger?
1 C)
6
N
TH-2-23
I
STUDENT WORKSHEET 18
DISCUSSION QUESTIONS ON THE ELECTRIC AND GASOLINE LAWN MOWERS
1. What are the advantages of an electric and gagoline lawn mower?
7'ea
2. What is the proper dress when operating any lawn mower?'
3. I4ow do I sharpen a lawn mower blade?
4. What safety shield'should be on the lawn mower?
<5. How do I maintain the electric and gasoline lawn mowers?
6'. What are the hazards in using- each of the laviin molders?
7. How do I determine when my lawn mower blade needs sharpening?,
8. What is the proper method of mowing slopes?
9. How do I deterMine at what height my lawn should be mowed?
10. How do I adjust the height,of my lawn mower?
cy
1 6 P)
'4)
1/
STUDENT WORKSHEET 19
DISCUSSION QUESTIONS ON HEDGE TRIMMER
1. How often does a hedge trimmer need to be sharpened?
2. How should a hedge trimmer be sharpened?
3. How do I operate an energy pack for a hedge trimmer?
4. What should I do if I drop-an electric hedge trimmer?
5. How do I properly trim a hedge and operate the hedge trimmer?
6. How do I lubricate the hedge trimmer?
7. How do I clean the hedge trimmer after the work is completed?
8. What are the hazards in operating a hedge trimmer?
9. What is the proper dress for a person operating a hedge trimmer?1 .
10. How many people should it take to operate a hedge trimmer properly?
I-H-2-25
L TEACHER'S KEYSTUDENT WORKSHEET 1
SAFETY INSTRUCTIONS FOR OPERATING POWER TOOLS
1. Blade height for a tilting arbor table saw should be just high enought to clear the work by no
more than 1/4 winches. 2.
2. When can more than one person be inside the "safety zone , lines of the table saw?
Instructor has assigned a helper to assist the op
3. What dress precautions should be taken when using the table saw? #.
<7""
Do not wear gloves, long loose sleeves, neckties, or rings. Keep shirt tucked,in trousers.
4. When should a push stick bused with a table saw?
When board is to be ripped.
5. What are the three main types of sabre-saw blades?
a. woodcutting
b. metal caning
c. knife blade a4,
6. What should you remember to clpefore adjusting or repairing any power tool?
Disconnect the cord.
To stop a portable sander, you should lift it from the work and then turn
the switch off.
8. You should have at letht 12 inches of leverage before holding any work to be drilled.
9. Check, and if necessary, adjust tool rest before starting a grinder.
10. A tool rest should be 1/8,, inches way from the eel?
11. Grind only on the face of the wheel.
12. Use pliers
a
to hold small objects against the wheel.
tit
1
t 4
I-H-2-27

v
'N.
a1
JOB SHEET 1
IDENTIFYING AND USING POWER TOOLS
a .
Objectives:
1. To become familiar with the names of power tools in the school shop.
2. To know the correct uses of selected power tools.
3. To become familiar with the cost of selected poyver toots.
Materials:
1. Provide student access to the shop power tools.
2. A supply of old hardware shop catalogs.
Procedure:
1. Give students a tour of the shop pointing out the various power. tools and their location.. .
2. Have each student locate a picture of each selected power tool in an old catalog, cut itout, tape the picture on the worksheet and completenecessary information.
3. Duplicate additionalrworksheet pages according to the number of power tools the.. students are to identify.
4.-
i
1 n-u I
.1
. I-H-2-29
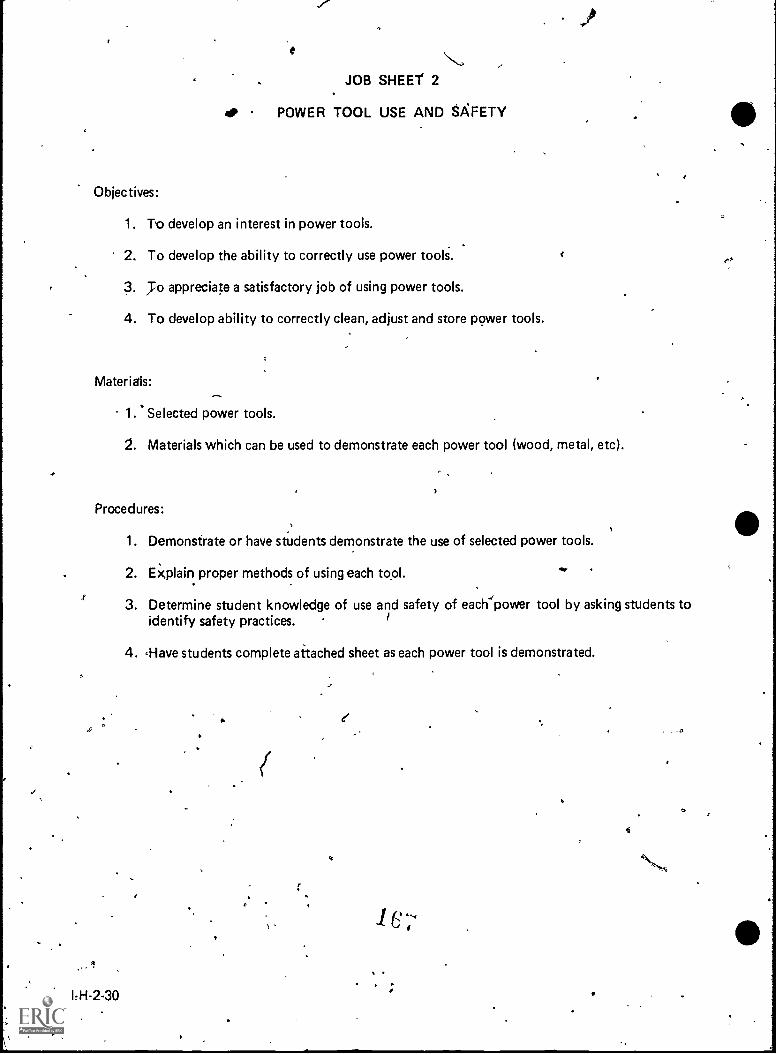
,JOB SHEET 2
POWER TOOL USE AND SAFETY
Objectives:
1. To develop an interest in power tools.
2. To develop the ability to correctly use power tools.
3. To appreciate a satisfactory job of using power tools.
4. To develop ability to correctly clean, adjust and store power tools.
Materials:
1. Selected power tools.
2. Materials which can be used to demonstrate each power tool (wood, metal, etc).
Procedures:
1. Demonstrate or have students demonstrate the use of selected power tools.
2. Ekplain proper methods of using each tool.
3. Determine student knowledge of use and safety of each power tool by asking students toidentify safety practices.
4. Have students complete attached sheet as each power tool is demonstrated.
I,H-2-30
(
;
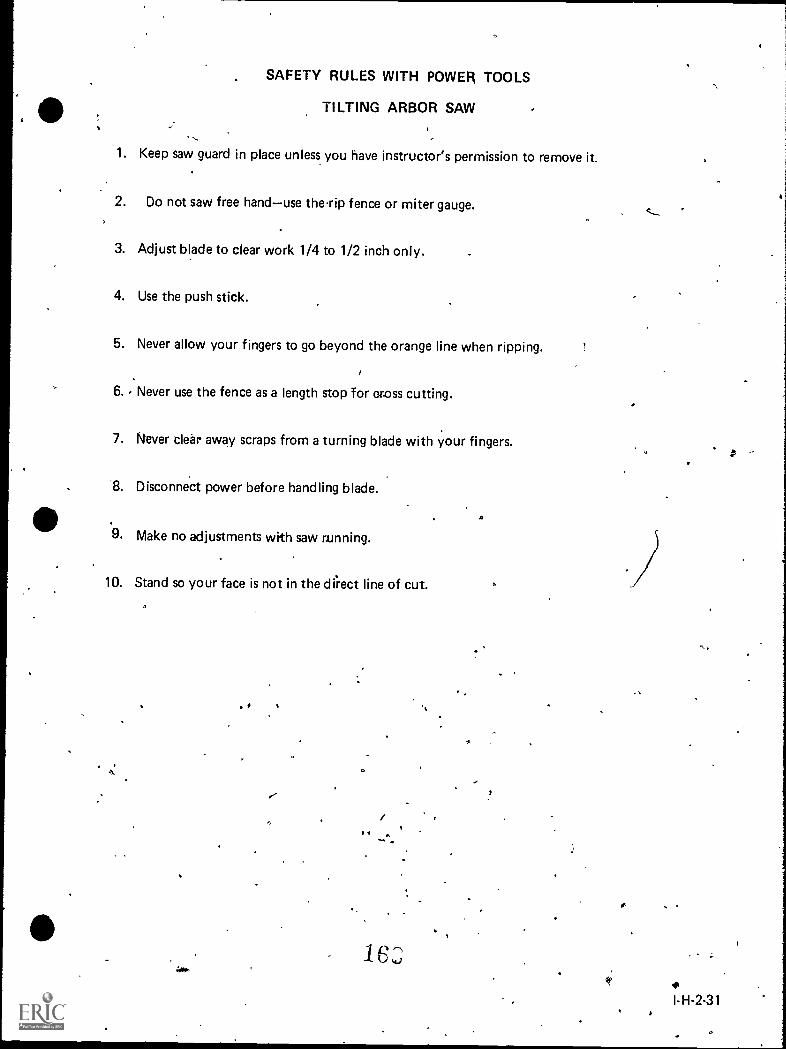
SAFETY RULES WITH POWER TOOLS
TILTING ARBOR SAW
1. Keep saw guard in place unless you have instructor's permission to remove it.
2. Do not saw free handuse therip fence or miter gauge.
3. Adjust blade to clear work 1/4 to 1/2 inch only.
4. Use the push stick.
5. Never allow your fingers to go beyond the orange line when ripping.
6. , Never use the fence as a length stop for cross cutting.
7. Never clear away scraps from a turning blade with your fingers.
8. Disconnect power before handling blade.
9. Make no adjustments with saw running.
10. Stand so your face is not in the di.rect line of cut.
1 6
I-H-2-31
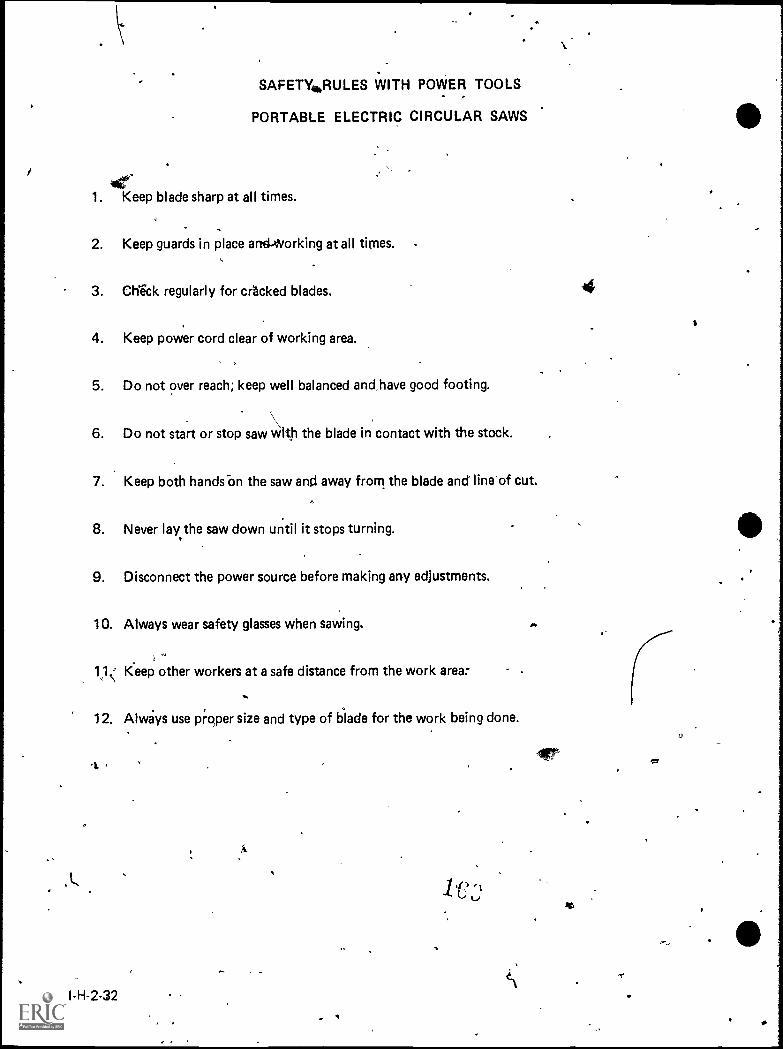
SAFETY RULES WITH POWER TOOLS
PORTABLE ELECTRIC CIRCULAR SAWS
1. Keep blade sharp at all times.
2. Keep guards in place and-Working at all times.
3. Check regularly for cricked blades.
4. Keep power cord clear of working area.
5. Do not over reach; keep well balanced and,have good footing.
6. Do not start or stop saw with the blade in contact with the stock.
7. Keep both handsbn the saw and away from the blade and line'of cut.
8. Never lay the saw down until it stops turning.
9. Disconnect the power source before making any adjustments.
10. Always wear safety glasses when sawing.
Ke11< ep other workers at a safe distance from the work area:
%Pa
12. Alwa'ys use proper size and type of blade for the work being done.
11P
4
I-H-2-32
47
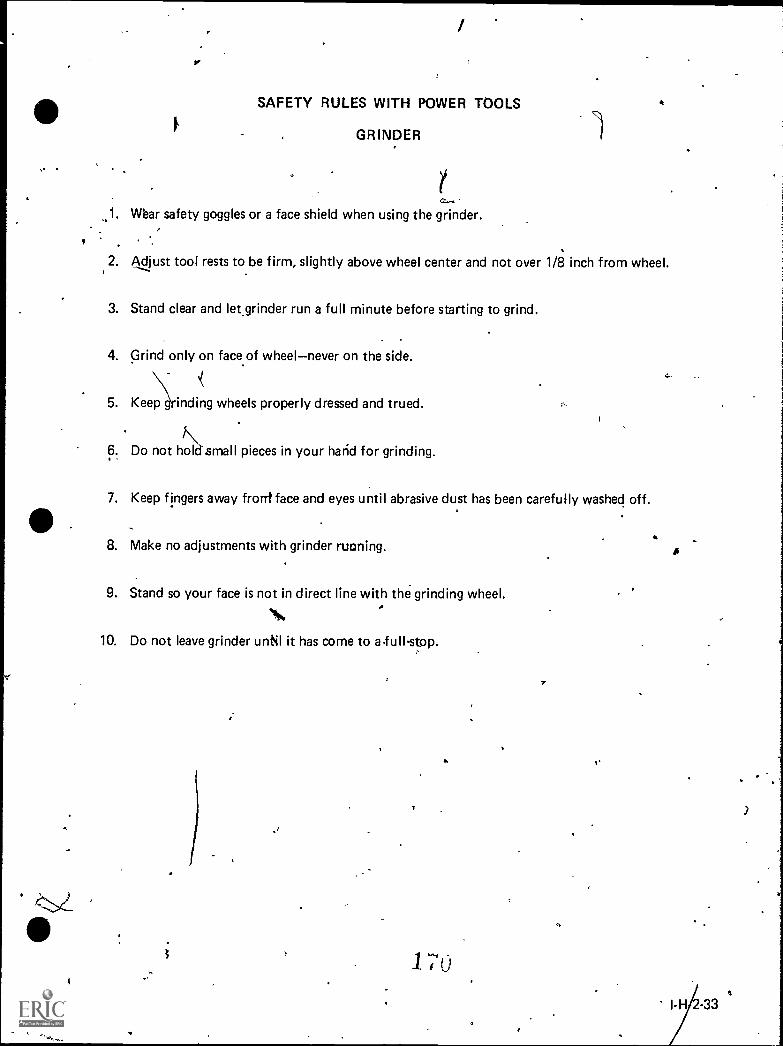
<2_
f
SAFETY RULES WITH POWER TOOLS
GRINDER
t.1. Wear safety goggles or a face shield when using the grinder.
. 't
2. Adjust tool rests to be firm, slightly above wheel center and not over 1/8 inch from wheel.
3. Stand clear and let_grinder run a full minute before starting to grind.
4. Grind only on face of wheelnever on the side.
5. Keep grinding wheels properly dressed and trued.
6 Do not hilsmall pieces in your harid for grinding.
7. Keep fingers away frorrt face and eyes until abrasive dust has been carefully washed off.
8. Make no adjustments with grinder ruining.
9. Stand so your face is not in direct line with the grinding wheel.
10. Do not leave grinder until it has come to afull-stop.
1
a .
1 70
.
A
l-H -33
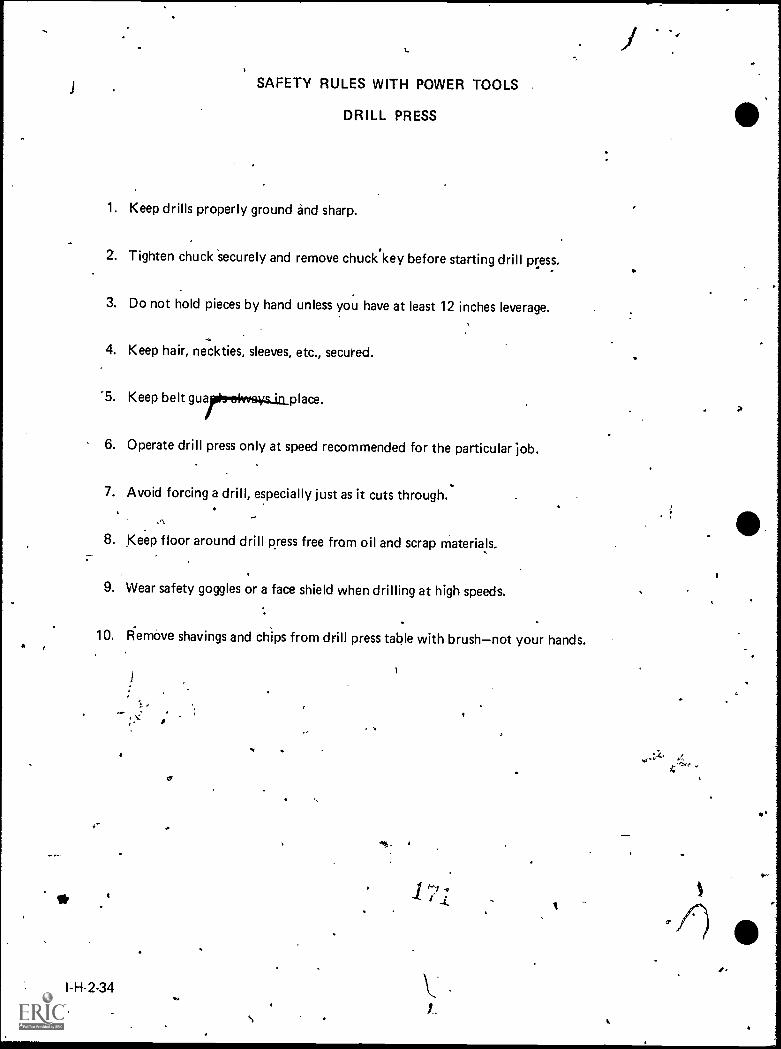
JSAFETY RULES WITH POWER TOOLS
DRILL PRESS
1. Keep drills properly ground and sharp.
2. Tighten chuck securely and remove chuck.key before starting drill press.
3. Do not hold pieces by hand unless you have at least 12 inches leverage.
4. Keep hair, neckties, sleeves, etc., secured.
-5. Keep belt gualirefrosvaiaplace.
6. Operate drill press only at speed recommended for the particular job.
7. Avoid forcing a drill, especially just as it cuts through.'
8. Keep floor around drill press free from oil and scrap materials.
9. Wear safety goggles or a face shield when drilling at high speeds.
10. Remove shavings and chips from drill press table with brushnot your hands.
110
I
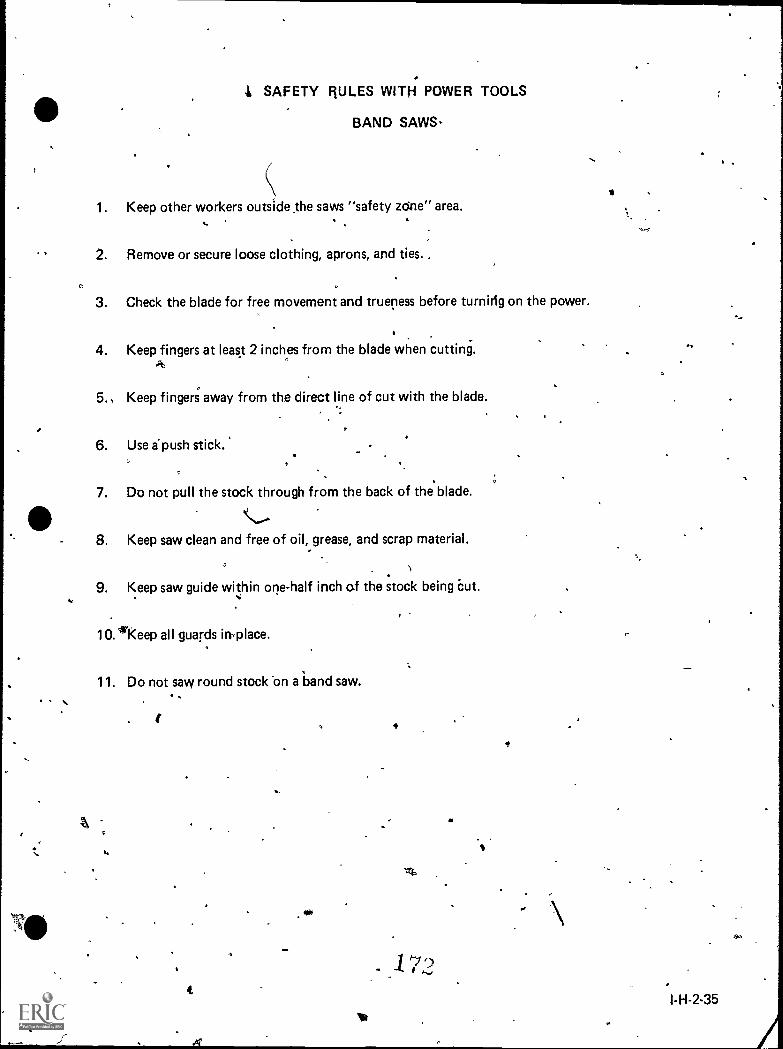
I SAFETY RULES WITH POWER TOOLS
BAND SAWS-
1. Keep other workers outside the saws "safety zone" area..
2. Remove or secure loose clothing, aprons, and ties..
3. Check the blade for free movement and trueness before turnidg on the power.
4. Keep fingers at least 2 inches from the blade when cutting.k
5., Keep finger4 away from the direct line of cut with the blade.
6. Use a push stick.
7. Do not pull the stock through from the back of the blade.
8. Keep saw clean and free of oil, grease, and scrap material.
9. Keep saw guide within one-half inch of the stock being cut.
10. keep all guards inplace.
11. Do not saw round stock bn a band saw.
4
1721-H-2-35
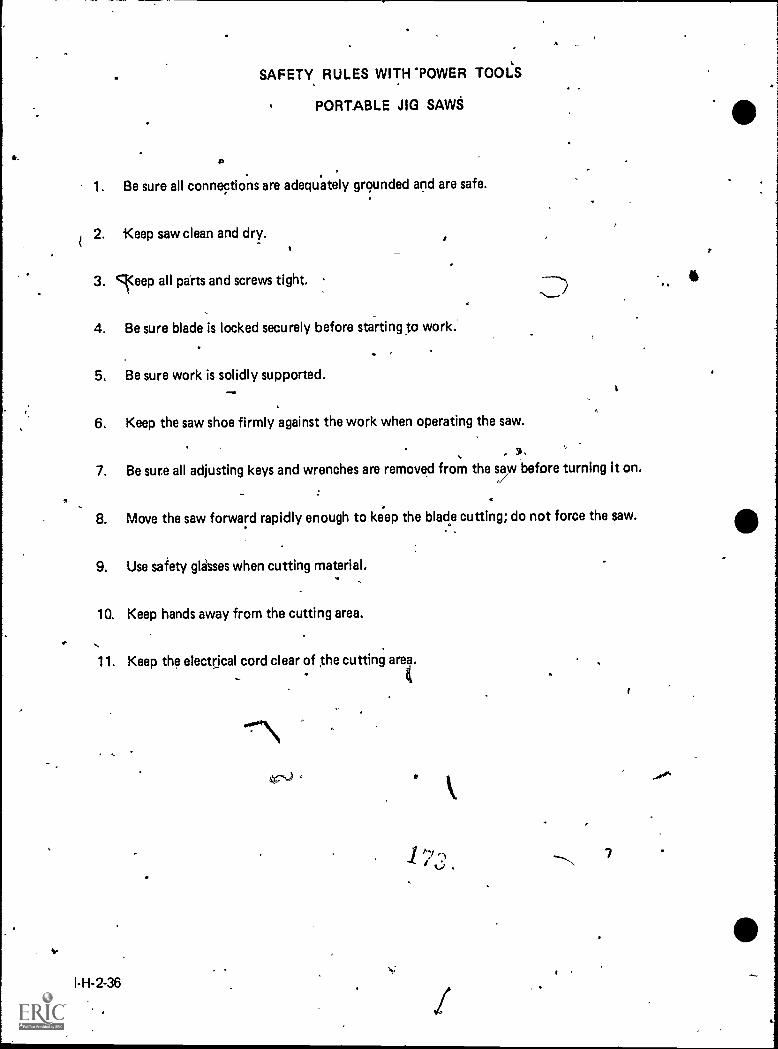
4.
S.
r
,Ir
.
SAFETY RULES WITH 'POWER TOOLS
PORTABLE JIG SAWS
. '1. Be sure all connections are adequately grounded and are safe.
2. Keep saw clean and dry.
3. Keep all parts and screws tight.
4. Be sure blade is locked securely before starting to work.
5. Be sure work is solidly supported.
6. Keep the saw shoe firmly against the work when operating the saw.
. ,7. Be sure all adjusting keys and wrenches are removed from the saw before turning it on./8. Move the saw forward rapidly enough to keep the blade cutting; do not force the saw.
. ,
9. Use safety glasses when cutting material.
10. Keep hands away from the cutting area.
11. Keep the electdcal cord clear of the cutting area. .
( .
I-H-2-36
,, 7
6
r
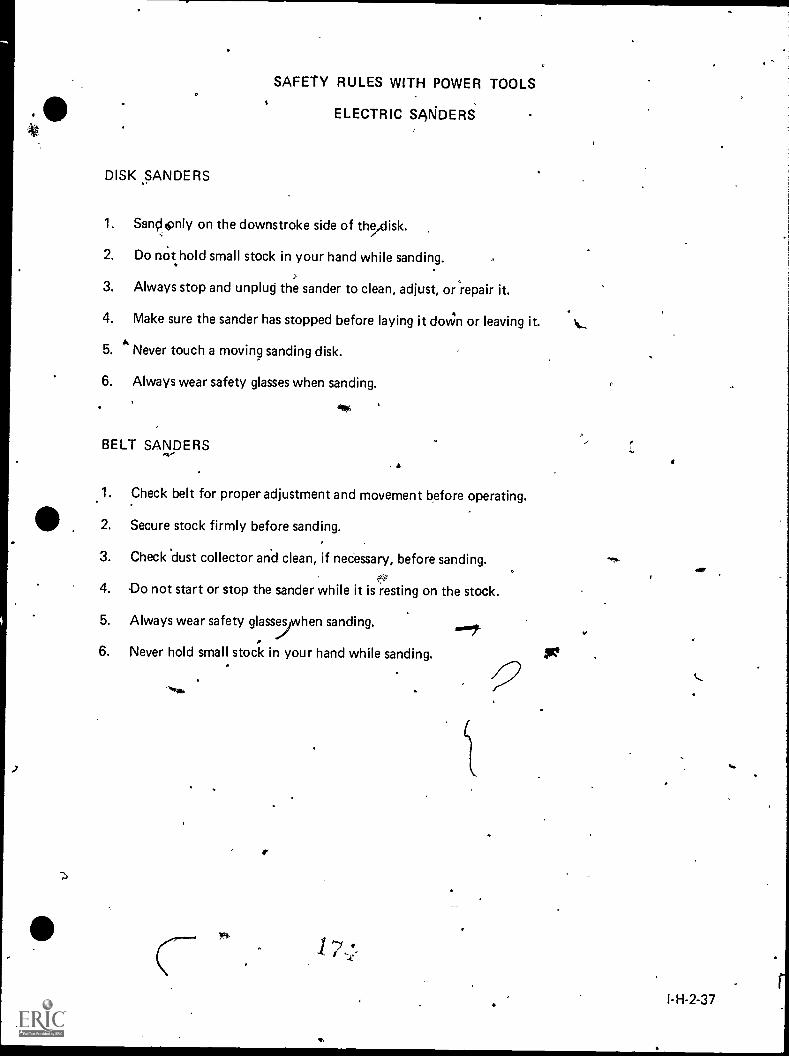
SAFETY RULES WITH POWER TOOLS
ELECTRIC SANDERS
DISK SANDERS
1. Sencitpnly on the downstroke side of th5Alisk.
2. Do not hold small stock in your hand while sanding.
3. Always stop and unplug the sander to clean, adjust, or repair it.
4. Make sure the sander has stopped before laying it doWn or leaving it.
5. Never touch a moving sanding disk.
6. Always wear safety glasses when sanding.
BELT SANDERS
1. Check belt for proper adjustment and movement before operating.
2. Secure stock firmly before sanding.
3. Check dust collector and clean, if necessary, before sanding.
4. -Do not start or stop the sander while it is resting on the stock.
5. Always wear safety glassesjwhen sanding.
6. Never hold small stock in your hand while sanding.
1
V
I-H-2-37
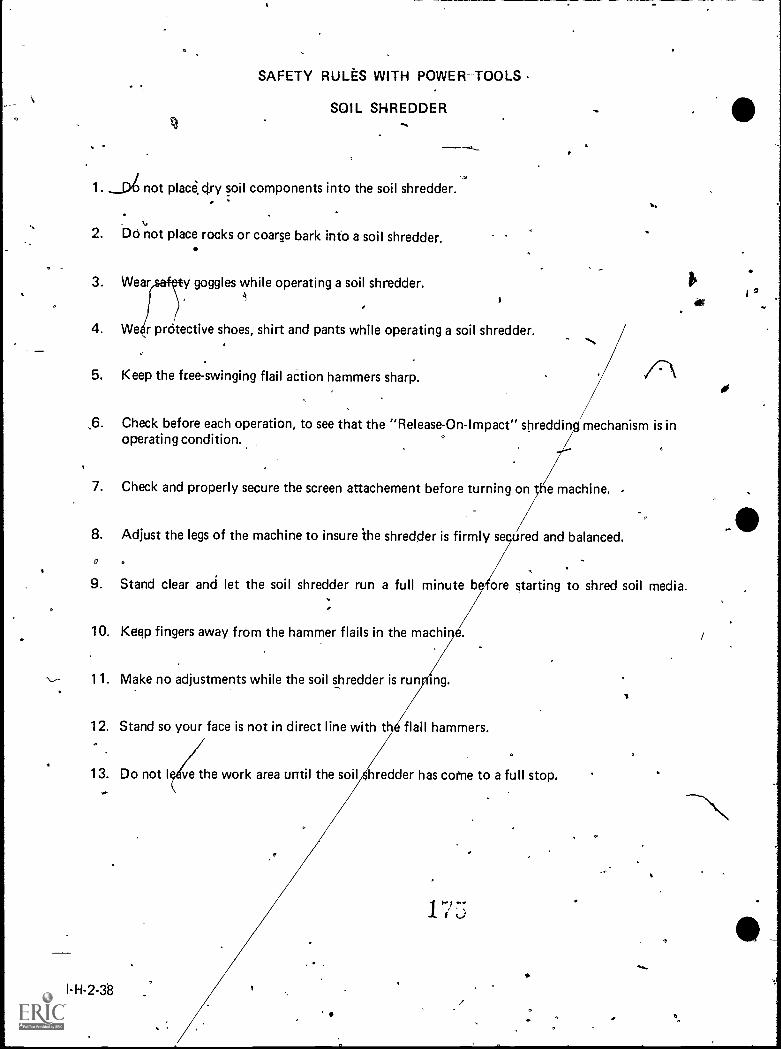
SAFETY RULES WITH POWER TOOLS
SOIL SHREDDER7t)
1. not placeAry soil components into the soil shredder.-
2. DO not place rocks or coarse bark into a soil shredder.
3. Wearsa#cty goggles while operating a soil shredder.
4. Weir prdtective shoes, shirt and pants while operating a soil shredder.
5. Keep the free-swinging flail action hammers sharp.
6. Check before each operation, to see that the "Release-On-Impact" shredding mechanism is inoperating condition.
7. Check and properly secure the screen attachement before turning on he machine.
8. Adjust the legs of the machine to insure the shredder is firmly secured and balanced.
O
9. Stand clear and let the soil shredder run a full minute before starting to shred soil media.
10. Keep fingers away from the hammer flails in the machi
1 1 . Make no adjustments while the soil shredder is run mg.
12. Stand so your face is not in direct line with t flail hammers.
13. Do not I ve the work area until the soil hredder has come to a full stop.
I-H-2-38
1
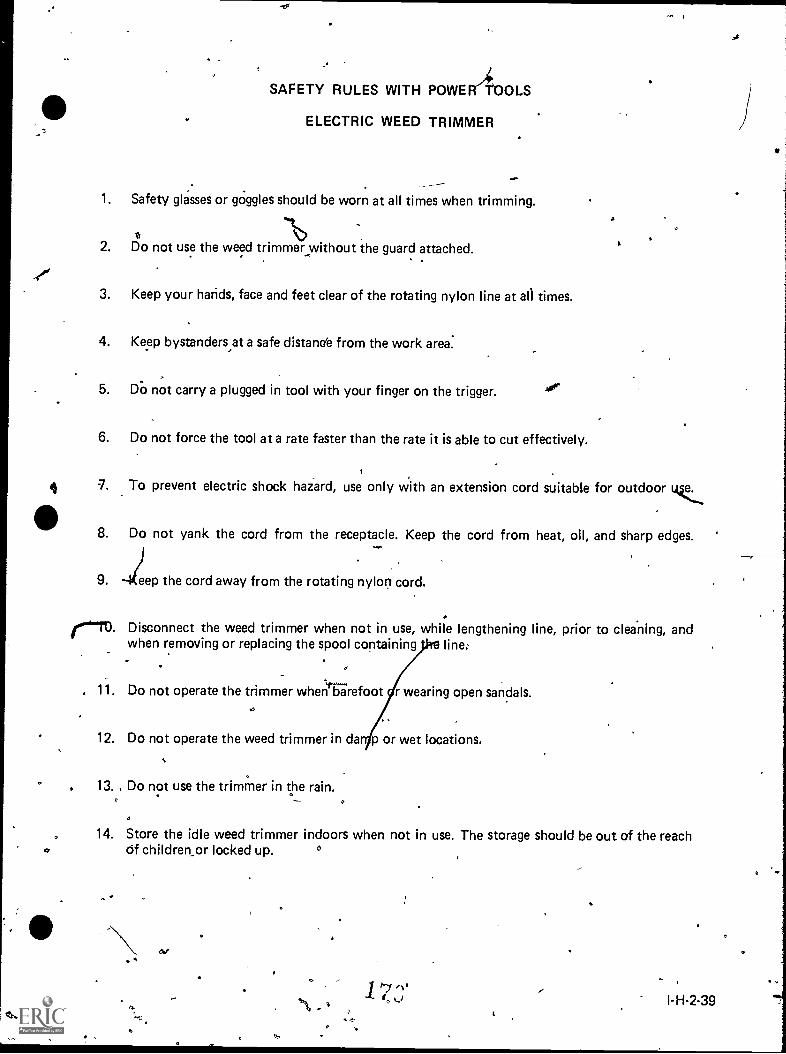
4,
4
SAFETY RULES WITH POWER4OOLS
ELECTRIC WEED TRIMMER
. --. .1. Safety glasses or goggles should be worn at all times when trimming.
t, ...t.
2. Do not use the weed trimmer without the guard attached..
3. Keep your harids, face and feet clear of the rotating nylon line at all times.
4. Keep bystanders at a safe distano'e from the work area.
5. Do not carry a plugged in tool with your finger on the trigger.
6. Do not force the tool at a rate faster than the rate it is able to cut effectively.
-7. To prevent electric shock hazard, use only with an extension cord suitable for outdoor tAke.....
8. Do not yank the cord from the receptacle. Keep the cord from heat, oil, and sharp edges.
14)9. eep the cord away from the rotating nylory cord.
10'M. Disconnect the weed trimmer when not in use, while lengthening line, prior to cleaning, andwhen removing or replacing the spool containing jute line:
. 11. Do not operate the trimmer when' barefoot Sfr wearing open sandals.
12. Do not operate the weed trimmer in da p or wet locations.
i13. , Do not use the trimmer n the rain.
14. Store the idle weed trimmer indoors when not in use. The storage should be out of the reachof children or locked up.
I- H -2 -39
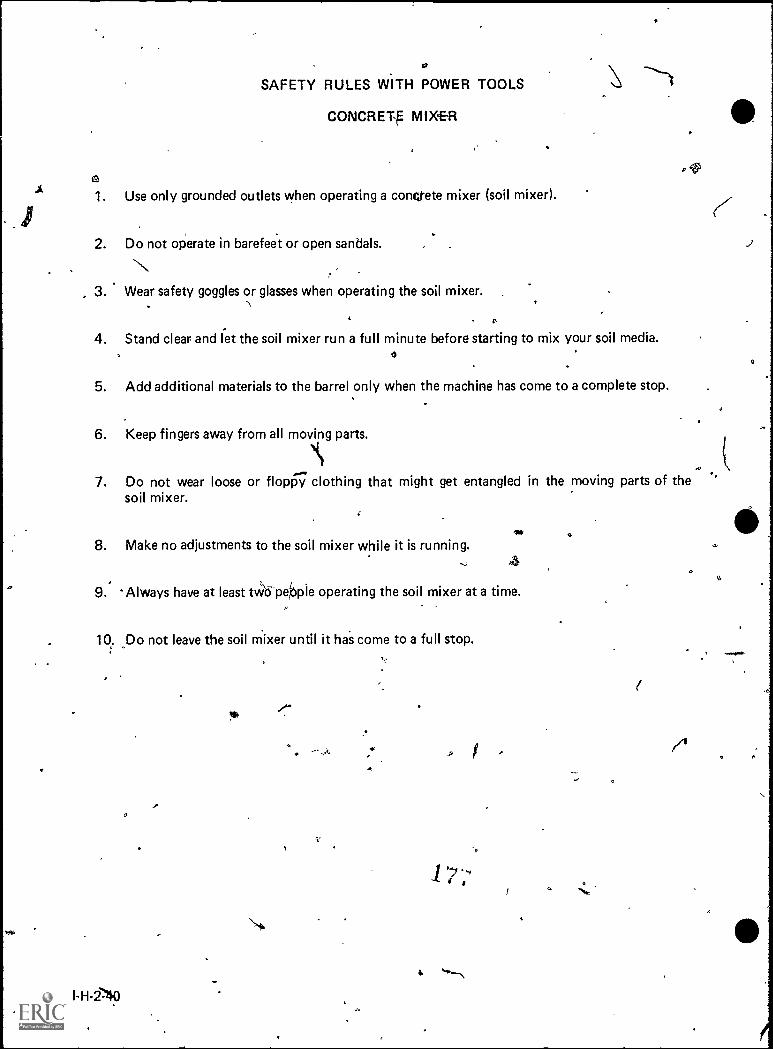
SAFETY RULES WITH POWER TOOLS
CONCRETtE MIXER
1. Use only grounded outlets when operating a conettete mixer (soil mixer).
2. Do not operate in barefeet or open sandals.
3. Wear safety goggles or glasses when operating the soil mixer.
.
4. Stand clear and let the soil mixer run a full minute before starting to mix your soil media.0
5. Add additional materials to the barrel only when the machine has come to a complete stop.
6. Keep fingers away from all moving parts.
7. Do not wear loose or floppy clothing that might get entangled in the moving parts of thesoil mixer.
8. Make no adjustments to the soil mixer while it is running.
9. 'Always have at least twi-pOpie operating the soil mixer at a time.
10. Do not leave the soil mixer until it his come to a full stop.
I
'7'"
/6
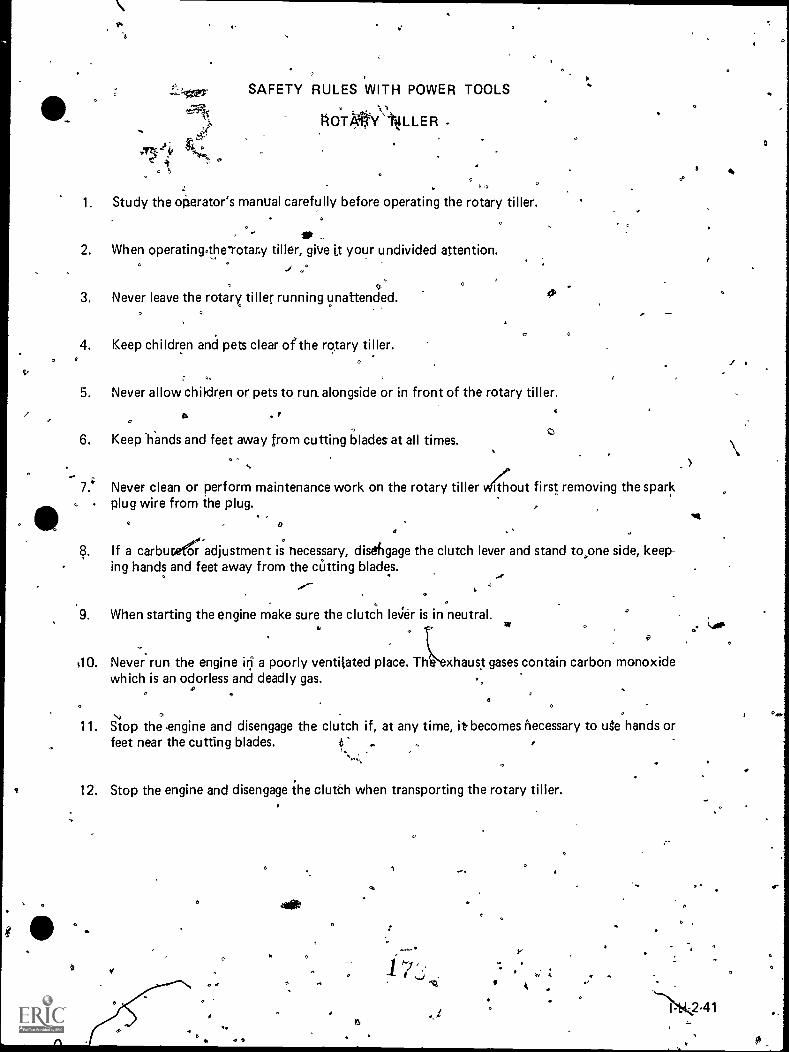
SAFETY RULES WITH POWER TOOLS
AOLWY\til.LLER
1 Study the operator's manual carefully before operating the rotary tiller.
IP2. When operating0therotary tiller, giVe it your undivided attention.
J 0°
3. Never leave the rotary tiller running unattended.,
4. Keep children and pets clear of' the rotary tiller./
5. Never allow children or pets to run. alongside or in front of the rotary tiller.
c.)
6. Keep hands and feet away from cutting blades at all times.
7. Never clean or perform maintenance work on the rotary tiller Without first removing the sparkplug wire from the plug.
Ah
8.
0
If a carbucettl adjustment is necessary, disefgage the clutch lever and stand to ,one side, keep-ing hands and feet away from the cutting blades.
ti
9. When starting the engine make sure the clutch lever is in neutral.
w10. Never run the engine in a poorly ventilated place. Th exhaust gases contain carbon monoxidewhich is an odorless and deadly gas. .0
.
11. Stop the engine and disengage the clutch if, at any time, it, becomes necessary to ute hands orfeet near the cutting blades. e' . s
...,
12. Stop the engine and disengage the clutch when transporting the rotary tiller.
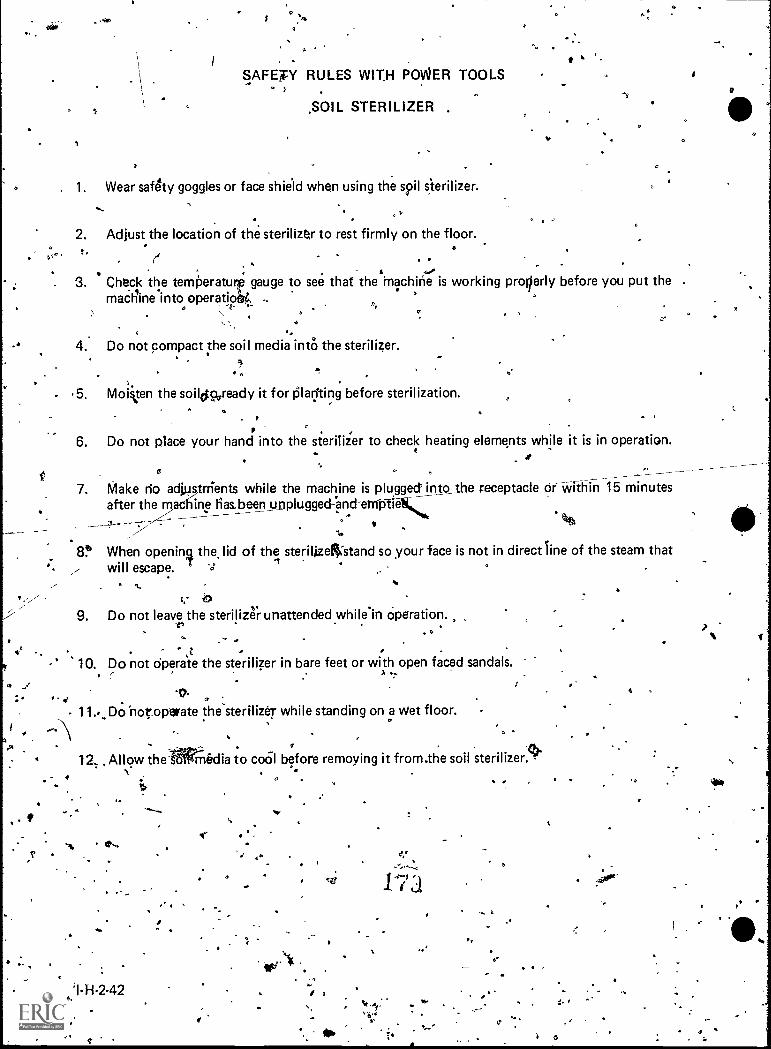
o ,
SAFEXY RULES WITH POWER TOOLS
.SOIL STERILIZER .
. 1. Wear saf4ty goggles or face shield when using the soil
2. Adjust the location of the sterilizer to rest firmly on the floor..
(I . .. . ,....
3. Check the temberaturf gauge to see that the Machine is working proilerly before you put themactline'into operatioia4. -. °
., , . .. .
4. Do not compact the soil media into the sterilizer.
.5. Moi%ten the soildweady it for planting before sterilization.
6. Do not place your hand into the sterilizer to check heating elements while it is in operation.
7. Make rio adjustments while the machine is plugged into_the receptacle or within 15 minutesafter the,crne Has,been unpluggedand-enidtierc-
8, When opening the, lid of the steriljzeWstand so your face is not in direct line of the steam that-I
will escape.*
7 C" 09. Do not leave the sterilizer unattended whileln Operation..
,t10. Do not dperate the sterilizer in bare feet or with open fac ed sandals.
: .
- M._ Do "notoperate the sterilizer while standing on a wet floor.
1 , Allow thet6lirmirdia to coil before remoying it from.the soil sterilizer.e1.
,
CP...
VI
A
401
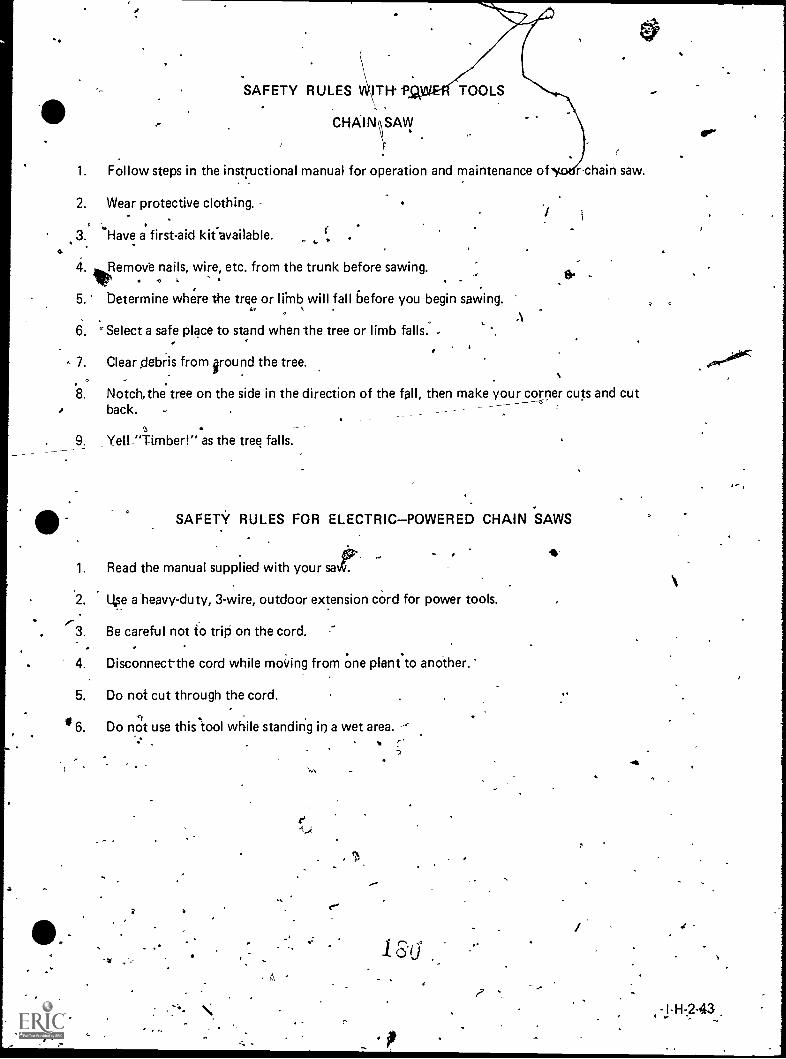
O
SAFETY RULES WITH` P TOOLS
CHAIN SAW
1. Follow steps in the instructional manual for oPeration and maintenance of chain saw.
2. Wear protective clothing.
3. Have a first-aid kifavailable.4.
4. Remove nails, wire, etc. from the trunk before sawing.lit5. Determine where the tree or li'mb will fall before you begin sawing.
6. Select a safe place to stand when the tree or limb falls.
7. Clear !debris from around the tree.
8. Notchthe tree on the side in the direction of the fall, then make your corner cuts and cutback.
o
. 9. Yell "Timber!" as the tree falls.
SAFETY RULES FOR ELECTRICPOWERED CHAIN SAWS
1. Read the manual supplied with your sal&
2. Use a'heavy-duty, 3-wire, outdoor extension cord for power tools.
3. Be careful not to trip on the cord.
4. Disconnect-the cord while moving from one plant to another.
5. Do not cut through the cord.
6. Do not use this tool while standing in a wet area.r'
-
a a
;',%
,
16
4 4
fr.
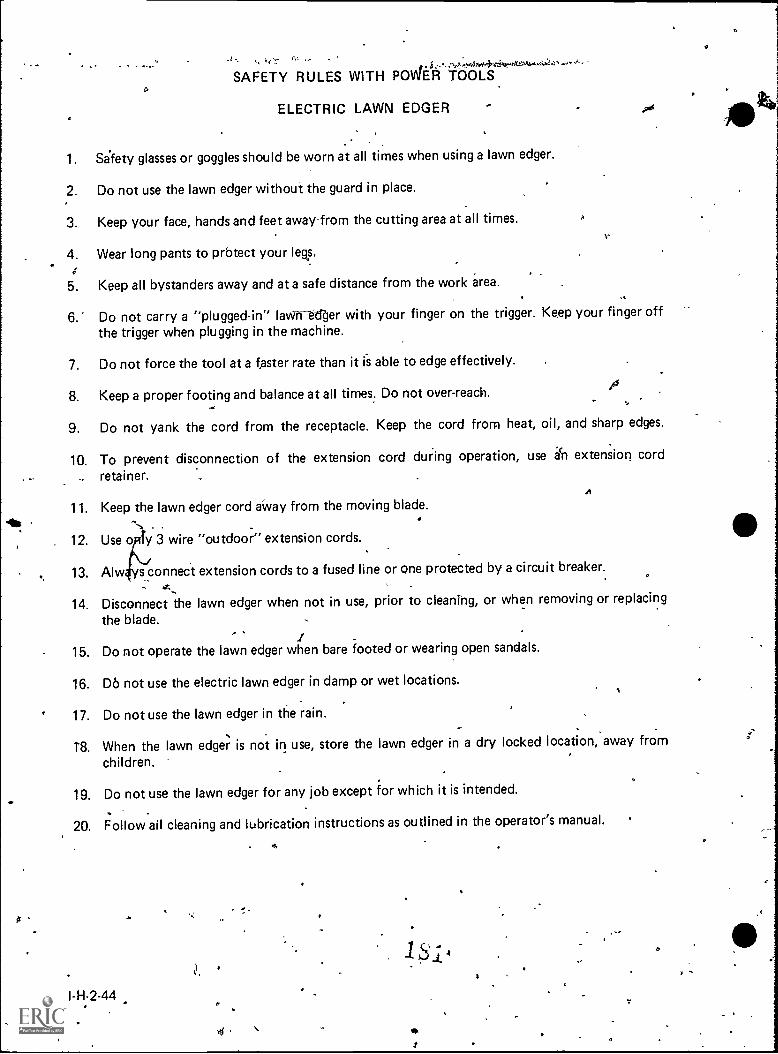
4- r'rA ,,,,41,114%-444.A4M1....i..# ,*+. -
SAFETY RULES WITH POWER TOOLS
ELECTRIC LAWN EDGER - A.6
1. Sifety glasses or goggles should be worn at all times when using a lawn edger.
2. Do not use the lawn edger without the guard in place.
3. Keep your face, hands and feet away from the cutting area at all times.
4. Wear long pants to prbtect your legs.
5. Keep all bystanders away and at a safe distance from the work
6." Do not carry a "plugged-in" lawne-trger with your finger on the trigger. Keep your finger offthe trigger when plugging in the machine.
7. Do not force the tool at a faster rate than it is able to edge effectively.
8. Keep a proper footing and balance at all times: Do not over-reach. , -
9. Do not yank the cord from the receptacle. Keep the cord from heat, oil, and sharp edges.
10. To prevent disconnection of the extension cord dur:ing operation, use ail extension cord
retainer.
11. Keep the lawn edger cord away from the moving blade.
11.12. Use oyrIy 3 wire "outdoor" extension cords.
13. Alw ys connect extension cords to a fused line or one protected by a circuit breaker.
14. Disconnect the lawn edger when not in use, prior to cleaning, or when removing or replacing
the blade., 1
15. Do not operate the lawn edger when bare footed or wearing open sandals.
16. D6 not use the electric lawn edger in damp or wet locations.
17. Do not use the lawn edger in the rain.
T8. When the lawn edger is not in use, store the lawn edger in a dry locked location, away from
children.
19. Do not use the lawn edger for any job except for which it is intended.
20. Follow all cleaning and lubrication instructions as outlined in the operator's manual.
I-H-2-44
I

L . .
SAFETY RULES WITH POWER TOOLS
LAWN MOWERS
1. Avoid dangerous environment. Do not use the electric lawnmower in damp or wet locations.
2. Keep children away. All visitors should be kept a safe distance from the mowing area.
3. Store idle tools indoors. When not in use, the electric lawn mower should be stored indoors ina dry, high or locked place and out of reach of children.
4. Do not force the tool. The el ctric lawn mower will do a better job and do it safer at the ratefor which it was designed.
5. Dress properly. D not wea loose clothing or jewelry. They can be caught in moving parts.Shoes must be worn .t all ti' es.
6. Never drag the electric mower by the electrical cord or yank, it to disconnect itlrom the recep-tacle. Keep.the cord from heat, oil, and sharp edges.
7. To prevent a shock hazard use only a drop cord suitable for outdoor use.
8. Do not use the electric lawn mower while it is raining.
9. Keep the proper fo9ting and balance at all time. Da not over-reach.
10. Keep the cutting edges sharp, and clean for the best and safest performance. OR
-. 11. Disconnect the electric lawn mower from the power source when nip in use, before servicing;and when changing blades. . .
,
12. To avoid accidental starting do not carry the lawn mower While it is plugged in and with yourfinger on the switch.
13. Keep all guards in place and in gbOd condition at all t1mes.
14. Keep hands and feet away from the cutting area.
15. The lawn should always be carefully examined and of all objects prior to each mowing.
:16. Never (perate the electric mower in a, gaseous or explosive atmosphere. Motors in electriclawn Mowers spark and these sparks might ignite fumes.
17. Safety glasses should be worn whenever,you are operating a lawn mower.
18. Mow across the face of slopes: never up and down. Exercise extreme caution when changingdirection on slopes. Do not mow excessively steep slopes.
A
18±
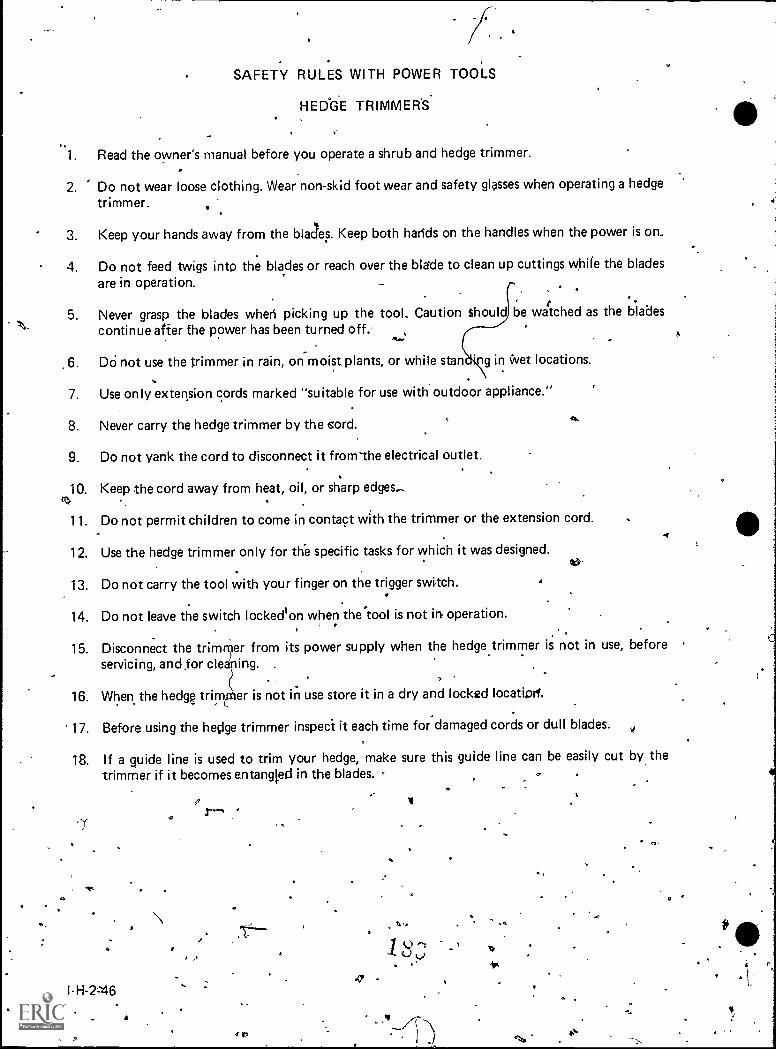
Is.
, SAFETY RULES WITH POWER TOOLS
HEDGE TRIMMERS.
1. Read the owner's manual before you operate a shrub and hedge trimmer.
2. Do not wear loose clothing. Wear non-skid foot wear and safety glasses when operating a hedgetrimmer. .
3. Keep your hands away from the blades. Keep both hadds on the handles when the power is on.
4. Do not feed twigs into the blades or reach over the blade to clean up cuttings while the blades
are in operation. _.
.t5. Never grasp the blades when picking up the tool. Caution should be watched as the blades
continue after the power has been turned off.
.6. DO not use the trimmer in rain, on moist plants, or while stan g in Net locations.
7. Use only extension cords marked "suitable for use with outdoor appliance."
8. Never carry the hedge trimmer by the fiord.
9. Do not yank the cord to disconnect it from-the electrical outlet.
10. Keep the cord away from heat, oil, or sharp edges(4.
A.
11. Do not permit children to come in contact with the trimmer or the extension cord.
12. Use the hedge trimmer only for the specific tasks for which it was designed.
13. Do not carry the tool with your finger on the trigger switch.
14. Do not leave the switch locked'on when the tool is not in- operation.
fe.
15. Disconnect the trim er from its power supply when the hedge trimmer is not in use, beforeservicing, and for clea ing. .
16. When the hedge trim er is not in use store it in a dry and locked locatioK.
17. Before using the hedge trimmer inspect it each time for damaged cords or dull blades. ii
18. If a guide line is used to trim your hedge, make sure this guide line can be easily cut by thetrimmer if it becomes entang'ed in the blades. . ..
'I "
v.1--"`
0 H
\ 6.
i t6
e 1d L.? ki
4'IH-2:46
4
9 4f,1 .1 ''O
0.---.;..
..
.
r.
it
,
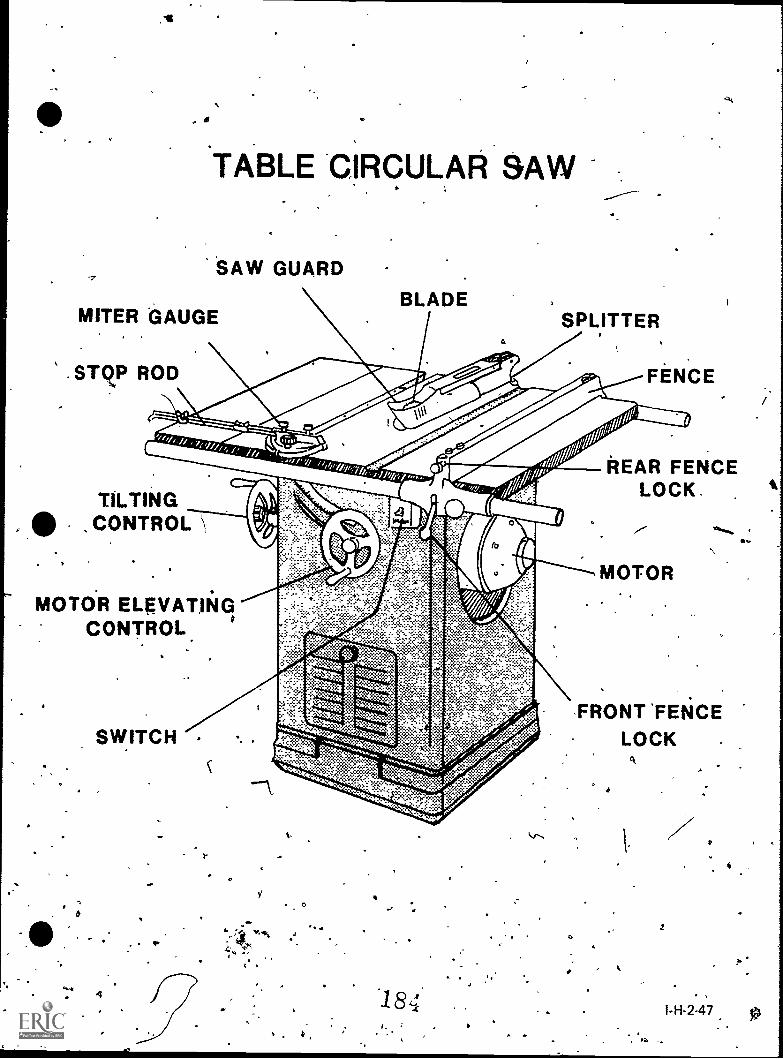
vs>
TABLE CIRCULAR SAW
SAW GUARD
MITER GAUGEBLADE
SPLITTER
FENCE
TILTING,CONTROL
REAR FENCELOCK.
MOTOR ELgVATII4G1CONTROL
a
4
41.
cc
FRONT 'FENCELOCK .
%.
4
18
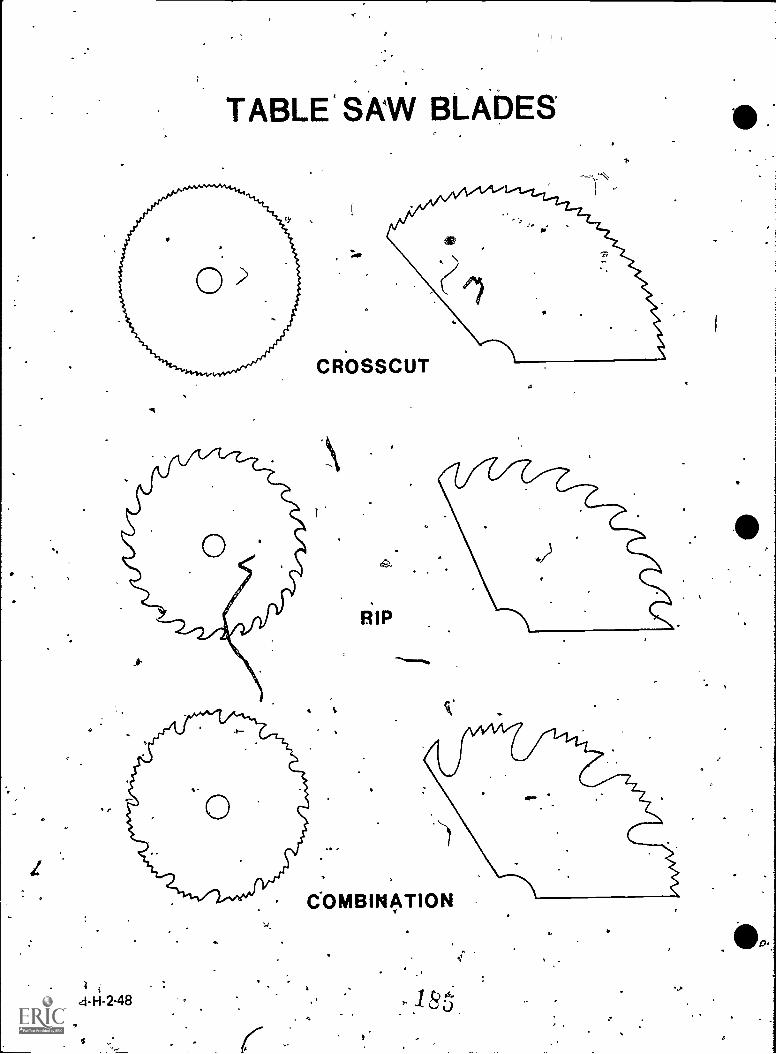
TABLE SAW BLADES
CROSSCUT
4- H-2-48
RIP
COMBINATION5,
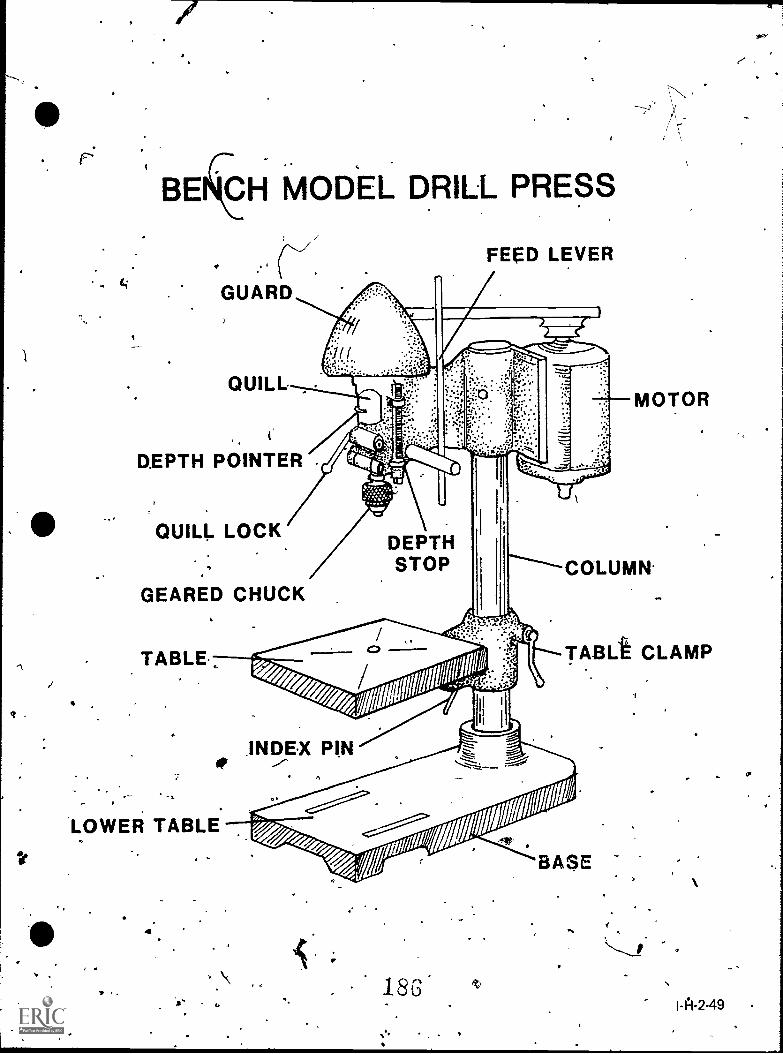
1
/
t
...
P'
. 4;
BELCH MODEL DRILL PRESS
*FEED LEVER
GUARD
QUILL
a
DEPTH POINTER
QUILL LOCK
GEARED CHUCK
TABLE.
MOTOR
COLUMN.
TABLt CLAMP
INDEX 13/141-.
LOWER TABLE
v -
4
18G*
BASE
tI-A-2-49
DISCUSSION GUIDE FOR TRANSPARENCIES
USING SELECTED POWER TOOLS
I. Transparency: Table Circular SaW
A. The table saw is used for many types of straight-edged cuts such as crosscutting, ripping,Chamfering, beveling, dadoing, mitering, and rabbeting.
B. Table saws are classified as:
1. Tilting arbor saw blade and arbor tilt. This is most commonly used in agricultureshops.
2. Tilting table saw table tilts for sawingangles. This type generally costs less thanthe tilting arbor saw.
C. Table saws are sized by the maximum diameter blade that will fit on the saw.
1. Blade determines the size of the circular saw. An 8 inch blade can square cut21/2 inches deep and 1 3/4 inches deep when.angled at 45 degrees.
2. Saw guard safety shield which surrounds the blade-. Floats on top of workbeing cut and has anti-kickback fingers for'operator protection.
D. Major parts of the table circular saw.
3. Splitter keeps cut boards apart and prevents binding of saw blade.
4. Fence used for ripping lumber. It is adjustable and should be removed from .
the table when using the miter gauge.
5. Rear and front fence locks used to secure aZ square the ripping fence.
6. Motor generally uses three belts-for driving the blade. A commonly usedmotor would be a 240 volt, 1 H.P. with a 3450 RPM capacitor-start with abuilt-in overload prptector.
,.,
T. Switch controls power to the motor. The switch should be operated onlyby the operator and not .15y-stander or assistant.
8. Motor elevating control .used to raise and lower.the saw blade.
9. Tilting control tilts the blade for cutting angles from 90 to 45 degrees. Theblade only tilts in one direction. "a,
4
10. Stop rod attaches to the miter gauge and allows stock to be cut to determined.'lengths:
t_ he
Miter gauge used for pushing and guiding stock when making crosscuts. It is,adjustable in both directions to enable crosscutting from 90 to 45'degrees;
(
I
4
/
If. Transparency: Table Saw Blades
A. Crosscut used to cut across the grain. The teeth are shaped like a crosscut hand saw.The teeth are smaller than those on the rip blade. The blade tends to get hot if usedfor ripping. et
B. Rip used to rip lumber. The teeth are shaped like those on a.hand-rip saw. It is notsuitable for crosscutting as it leaves a very rough finish.
C. Combination used for both crosscutting and ripping lumber. The teeth are slightlysmaller than those on the rip Wade and the back of the teeth are beveled. A series ofraker teeth are used on the blade which are pre ed by a deep groove. The blade pro-duces a smooth cut when crosscutting and ippi g.
III. Transparency: Bench Model Drill Press
A. There are two general types of drill presses t.,
1. bench press
2. floor press
B. The primary function is drilling holes; however, with proper attachments the press can beused for sanding, buffing, polishing, routing, shaping, grinding and cutting mortiseq andrabbets.
C. Common sizes of drill presses are 11 inch, 15 inch, and 17 inch. The size is determinedby the distance from the column to the center of the drill chuck.as. v
D. Speeds can vary from 400 to 8500 RPM and are changed by the belt-pulley ratio. Slowerspeeds are used for drilling metal and faster speeds are used for drilling wood.
E. Parts of the drill press:
1. Feed lever: moves the quill and spindle up and down for drilling. Generally, aspring keeps the quill in its highest position when not in use.
2. Motor Carvbe either 120 or 240 volt with 1/3 to 1/2 H.P.
3. Column Provides support for the heaeand table.
4. Table clamp fastens the table to the column. This allows the table to beadjusted up and down and sideways.
. .5. Base supports the drill presssome are mounted on benches and some rest on
the floor.
6. Lower table part of the base and serves the same purpose as the movable tablewhen drilling large stock.
-..
1. Index pin device used to tilt the table for drilling at angles.
B: Table adjustable support for securing stock for drilling or for other work.-
9. Geared. chuck used to attach twist drills and augers to the press. Generally... opens to a maximum of 1/2 inch.
.:.I-H-2-51
s,
t
a.
.
o
10. Depth St used todrill holes to a predetermined depth.
11. Quill lock locks the quill in various depth positions.
,.12, Depth pointer indicates depth of hole..
13. Quill the sleeve that supports the revolving spindle in a vertical position:
14. Guard protedtive cover over the pulleys and belt.-. . , .
A. e .
.
.4
I-H-2!52
v
,
.
I,
a
0
1
.
SUGGESTIONS TO THE TEACHER MEGA DING STUDENT TESTS ON
"SAFE PRACTICES IN THE VOCATION L AGRICULTURE SHOP"
Ya
These tests have been prepared for individual power tools or areas of instruction with each test
on a single sheet.
0
1/.6?1°
2. Most of the test questions are TRUE FALSE types. Space has been left between questions for
students to explain vihy 'the statement is true or false. It may be particularly desirable to
explain why a question was marked true of false, thus re-emphasizing correct procedure.
3. A set of correct answers to the test,questi_ons is not provided. The correct answers to certain
qbesttons depend ^upon the safety standards adopted by individual teachers.a
4. Some teachers may wish.to have the studerits sign the attached statements of safety. 44aining
and keep them on file.
5. .Permission to duplicate any of this material is freely granted. Credit for the material used in
this unit is due to many individual teachers. Original drafts Were submitted by A. W. Schmidt,
D. J. Witt, Loren Mills, and' Charles Pearson, -teachers of Vocational Agriculture in Illinois.
a
190
,
aI-H-2-53
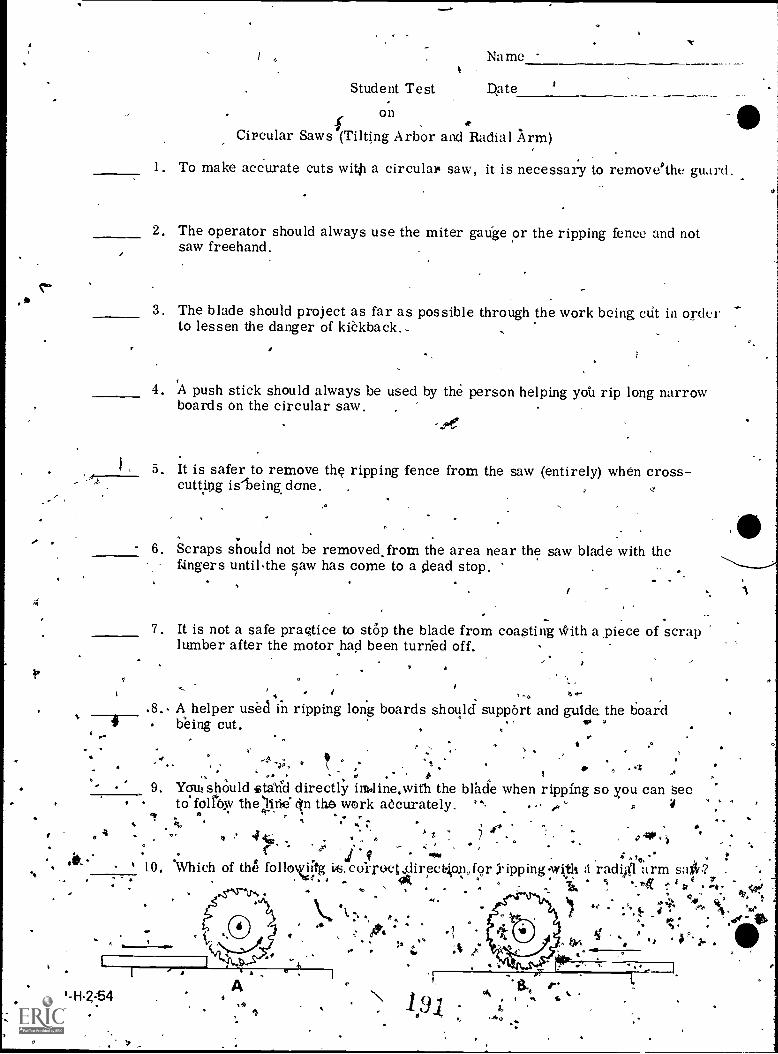
4, Name
Student Test Date
on
Circular Saws (Tilting Arbor and Radial Arm)
1. To make accurate cuts with a circular saw, it is necessary to remove°the guard.
2. The operator should always use the miter gauge or the ripping fence and notsaw freehand.
3. The blade should project as far as possible through the work being cut in orderto lessen the danger of kiekback.-
4. A push stick should always be used by the person helping yob rip long narrowboards On the circular saw.
5. It is safer to remove the ripping fence from the saw (entirely) when cross-cutting is-being done. .
6. Scraps should not be removed,from the area near the saw blade with thefingers untilthe saw has come to a dead stop.
7. It is not a safe pragtice to stop the blade from coaSinglOith a piece of scraplumber after the motor had been turned off.
,, , .. . I. ,, .-.
.
.8. A helper usecl in ripping long boards should support and guide the board% 4--- being cut. , . 40.
4.
-.
v , . - 0 #9. You; should staned directly imline,with the blade when ripping so you can 'sec
, ,.
to*folrOw thelirle' 44n the. work accurately. '*- ,, V9
*b * . Cr % . . V ,8. 4 .. ..". 4
) e I;41 * .. i . .
.'''. .
., i., AIP .
..'` i .\ ' . .
. At... . OW 4. 4 1,, . '
.
% 10. °Which of tht folloii..1"g i,.col-roct,iiirectipti,,for 'ipping-vvit.k A radiA arm safe'?"f3, 5 .- 14 ', I ° . 4 .
....,/,..,, . -,
_ ..,,, iii. Aecw ,D
". , ,* IS%% '' ' j . ) P 14 . IP' , i ia p
*". I
tO, 4.
,
a
; i . - . ; ,
6. C inding on the flat side of the wheel is permissabledy°, is out of shape. ' I ,
, .- ,:: . _. -
. I ,- . , , . ..,t,.
A i a 5
°'4Ne 4 --.4 . #,,,- . l '' 01.
.1. r.o.' '
1 * . .., 4 4 4 . %'l'',7 0 Y..o`u should ;iva hyour hands thorouggly t?.efote touching yotir face or ey*Ca,f l'o -afte;144tisingA,,t, inder. .,. . . 4 ;tt 7:
4. 4 ' 44, , .,,,, .* t
o * 4 711 '' to ... ,.. 'to..... ,
, 4 40 404 .t,oo _ 4 7 44
4
4 044 '*
4 i ' .91'.'
; . '' 0 .. ' SA. 4, - ...-.. - .
Student TeSt
on
Power GrinderIs
O.
Name
Date
.10
t a:'
fi
4. Always use a face shield or.gogglest.when operating a grinder,
°.
,.2. Tool rests should never be set as close as 1/8 inch from the wheel because
materials are likely to be caught between the restanti the wheel. *. 39
q
3. When grinding, you should stand directly in front of the wheel so you canhave better control Oiierthe piece you' are grinding.
4. Keep fingers Clear of the wheel when grinding.v
- .; '°
. x . .4. 4 °--
5 Iffer a new wheel haabee,n installed, you should stand to one side, turn it. ;on, and let it, run for at least a minute before starting to grind. , °,. ; ...
0:o ,,ix St, a
Po ' Z, .. t
nlte clgved surfacti,
14
44-
4
43 :SI, Start the gr d then ,°adjust,the tool rest so that it is slightly above the01 6. . ' center 'of the wheer.
k
e 1' I ..5..
4 9. You are responsible for the safety of others nearby wilen you areusing aportable grinder. I
10. If anything seems -Wrong with a grinder, turn it off, apd call your instructor.
192 - 1-H-2-55
, 49
44 '1"

Date
Student Test
on
Drill Press and PortablesDi-ill's
1. When using the drill press, clamp small work in a vise or clamp it to thedrill press table.
2. When drilling, remove the shavings from the work with a brush, not yourhand.
3. You should,increase the pressure on the drill slightly just as it starts tobreak through a piece Of steed in order to dut a clean hole.
4. Keep a light film of oil on the floor around the drill press so that chips willnot stick to it.
5. Be'sure the switch is "off" when making adjustments on the drill press.
8. Do not wear loose, floppy 'clothiing when operating a drill press.
I-H-2-56
8
7. The chuck key should always be left in the chuck after using a drill pressso it won't get 'lost.
8. Do not use a 1/2 inch portable electric drill in an "off balance" position.
9.' Never hold a piece of steel being dtilled in one hand and a portable drillin the other.
10. Always lock the switch "on" when a portable drill is held in your hands..
Student Test
on
Drill Press and Portable, Drill;
ti
1. When using the drill press, clamp small work in a vise or clamp it to thedrill press table.
2. When drilling, remove the shavings from the work with a brush, not yourhand.
3. You should,increase the pressure on the drill slightly just as it starts tobreak through a piece Of steel in order to cut a clean hole.
4. Keep a light film of oil on the floor around the drill press so that chips willnot stick to it.
5. Be'sure the switch is "off" when making adjustments on the drill press.
Q. Do not wear loose, floppy 'clothing when operating a drill press..
7. The chuck key should always be left in the chuck afthr using a drill pressso it won't get-lost.
I-H-2-56
\
8. Do not use a 1/2 inch portable electric drill in an "off balance" position.
9.' Never hold a piece of steel being dkilled in one hand and a portable drillin the other.
qr
10. Always lock the switch "on" when a portable drill is held in your hands.t
Name
Date
.0"
Student Test
on '-
Portable Electric Saw
1. When using a portable electric saw, us,e one hand to operate the saw and theother to hold the board securely.
2. It is not enough to just turn off the portable saw when you wish to changeblades, lubricate, .or make adjustments.
3. When you use a portable electric saw_for cross-cutting, start -the motorwith the saw teeth against the wood to prevent kickbacks.
4. 'The telescoping guard must be held out Of the way when starting a pocket cut.
5. It is not necessary to ground the frame of a portable electric saw, if theoperator is well grounded.
,1
.
6. The portable circular saw, is equipped with adjustments which'may bemade while the saw is ruting. I
7., When finishing a cut, you may safely reach around to catch the board toprevent it from falling down antd splintering.
8. Dull blades cut slower but are safer to use since they would not cut the .operator so severely if an accident occurred.
9. It is good practice to check the blade guard to see that it works freely andsprings back prom'ptly before using a portable ,electric saw.
10. Never lay a portable saw down until you have turned it off 'and the bladehas stopped turning.
19 4' I-H-2.57
1
I.
Student Test
on
The Band Saw
Name4
1. Before using the band saw, alw'ays check to see th-a.t the blade is centeredon the wheels by switching the potor on andoff Sieveral times.
2. It is-safest to keepboth hands on the same side of the blade when operatingthe band saw.
3. Use a push stick when your fingers Might otherwise come closer than 2 inchesto the band saw blade.
4. It is safest to back a band saw blade out of a blind cut while it is running atfull speed.
5. Narrow blades are best for cutting sharp curves.
6. It is consicleKed a safe practice to follow a line when sawing with the band saw.
e- .7. The band saw May be checked for trueness and free blade movement by turn-
.ing the saws a few revolutions by hand before starting.
(
8. Operating a saw with the blade caked with' dust, resin, or gum substances, )may cause breakage. -
9. Blade guards shbuld be removed only when changing band saw blades.
10. The upper blade guide support should be adjusted to clear the work by (A)no more than; (B) at least; one-half inch.
1-H-2-58
/
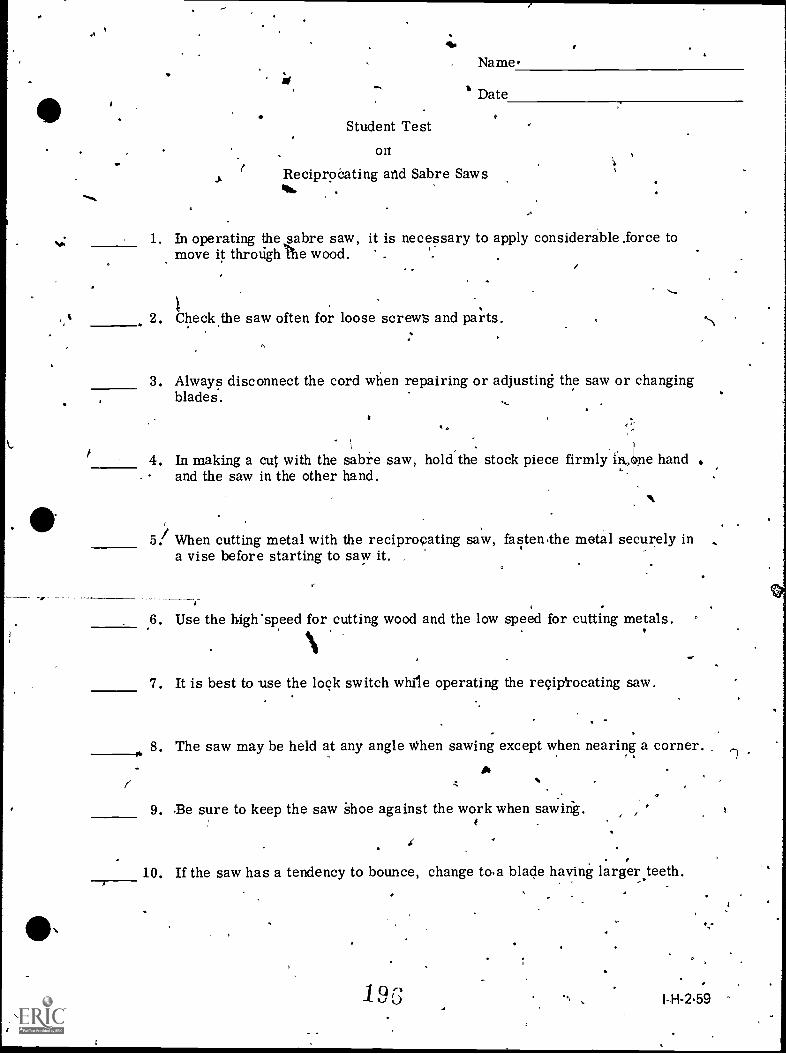
S
-
t
Name.
Date
Student Test
ort
Reciprocating and Sabre SawsAu.
1. In operating the sabre saw, it is necessary to apply considerable .force tomove it through the wood.
2. Checkthe saw often for loose screws and parts.
3. Always disconnect the cord when repairing or adjusting the saw or changingblades.
4. In making a cut with the sabre saw, hold the stock piece firmly 13,(!)ne handand the saw in the other hand.
5/ When cutting metal with the reciprocating saw, fasten the metal securely ina vise before starting to saw it.
6. Use the highspeed for cutting wood and the low speed for cutting metals.
7. It is best to use the lock switch while operating the reciprocating saw.
8. The saw may be held at any angle When sawing except when nearing a corner.A
(9. Be sure to keep the saw shoe against the work when sawing.
10. If the saw has a tendency to bounce, change toa blade having larger teeth.. -
19,"

4-
Student Test
on
Electric Sanders
Name
Date
7. 1. Portable disk sanders may be equipped for sanding masonry.
2. If the disk sander turns clockwise, you should hold the piece being sandedagainst the right=hand half of the disk.
3. It is safe to sand pieces that are too small to be-run over the jointer safely..
After the disk sander is turned off, you should either stand in front of ituntil it comes to a dead stop or jam a piece Of lumbei- up against the diskto stop it.
5. Yon should empty the dust collector on a portable belt sander each timethe sander is used, even if it is only half,full.
. 6. Plug in a portable sander and then check to be sure the switch is turned off.
7. It is safer to hold small pieces witheland ancrthe sander with the otherthan to hold small pieces in a vise and .1ce a chance on sanding the vise.
8. Always disconnect the sander from the power before changing the abrasivesheet.
1-H-2160.
9. It is all right to lay a sander down while it is still running if you lay it on itsside.
10. Stop the sander before making any adjustments.
197
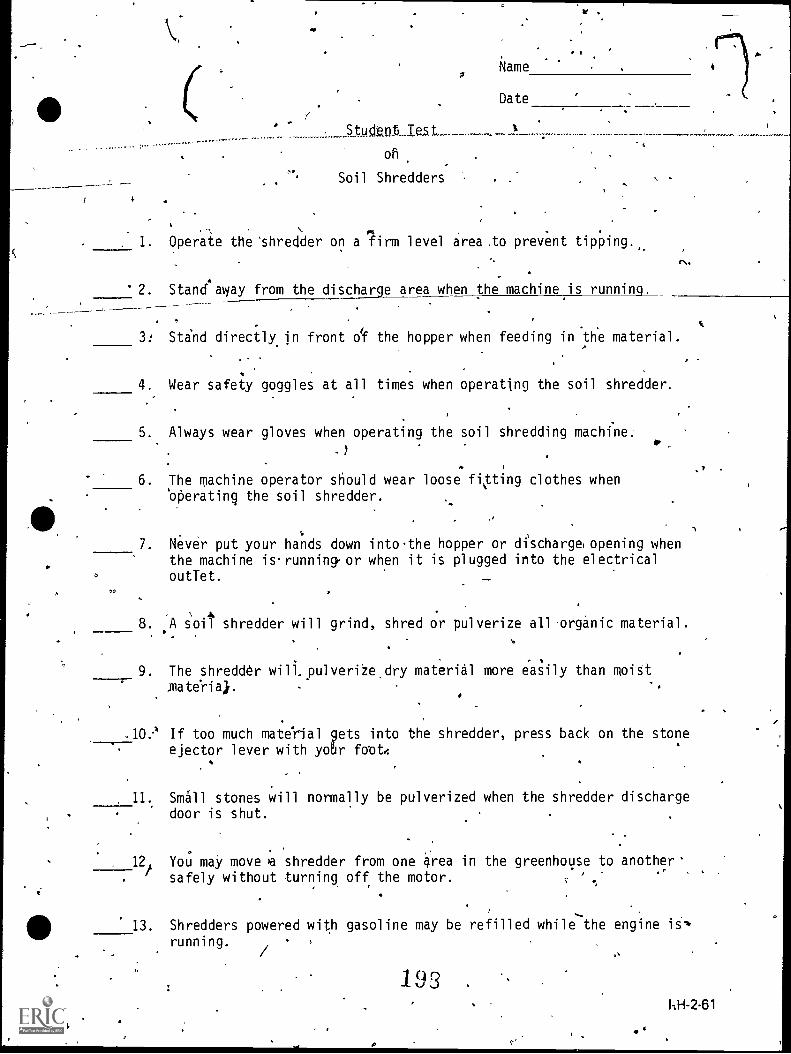
c
4
S tu T
on
Soil Shredders
1. Operate the 'shredder on a Tirm level area .to prevent tipping.
' 2. Stand' awayfroilthedischarge area when the machine is running.
r%.
3: Stind directly in front of the hopper when feeding in the material.
4. Wear safety goggles at all times when operating the soil shredder.
5. Always wear gloves when operating the soil shredding machine:
6. The machine operator should wear loose fitting clothes when`operating the soil shredder.
7. Never put your hands down into the hopper or discharge opening whenthe machine is. running,. or when it is plugged into the electrical
outlet.
8..4
S 01 1 shredder will grind, shred or pulverize all 'organic material.
9. The shredder wili.pulveri2e.dry material more easily than moist--r-materia),.
If too much mate'rial gets into the shredder, press back on the stoneejector lever with yob- foot.
11. Small stones will normally be pulverized when the shredder dischargedoor is shut.
12 You may move e shredder from one area in the greenhouse to another.safely without turning off the motor.
13. Shredders powered with gasoline may be refilled while the engine iS+
running.
1 93 .
1-.11-2-61
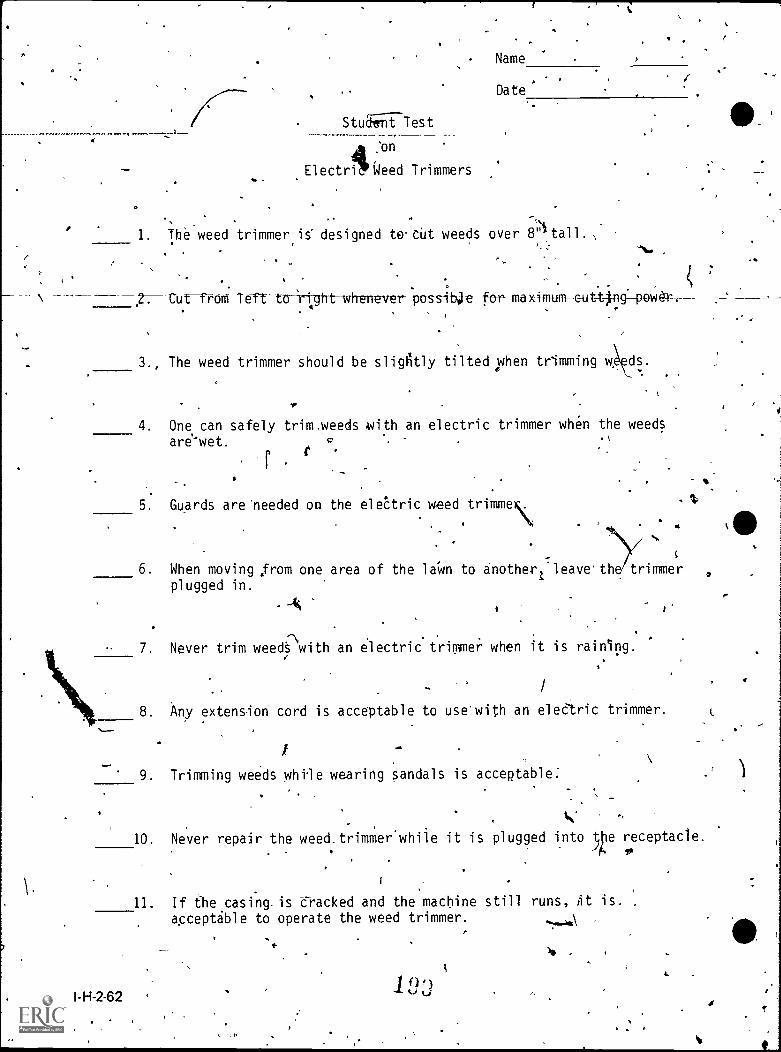
Name
Stuji;-iTest
on
Electri Weed Trimmers
Date
1. The weed trimmer is designed te.cut weeds over 8' tall. ,
Cuf from 7eft to right-wheneverpossiNe for makimumcut tpgpower,-----.
3., The weed trimmer should be slightly tilted when trimming w
4. One can safely trim.weeds with an electric trimmer when the weedsare'wet.
5. Guards are'needed on the eleCtric weed trimmess
-6. When moving from one area of the laWn to another; leave the trimmerplugged in.
7. Never trim weeds with an electric trimmer when it is raining.
a
. Any extension cord is acceptable to usewith an eledtric trimmer.
Ed*
9.. Trimming weeds while wearing sandals is acceptable:
I-H-2-62
4;
10. Never repair the weed.trimmer'while it is plugged into fthe receptacle.is "
11. If fhe.casing-is-d-racked and the machine still runs, ,it is,
acceptable to operate the weed trimmer.
I
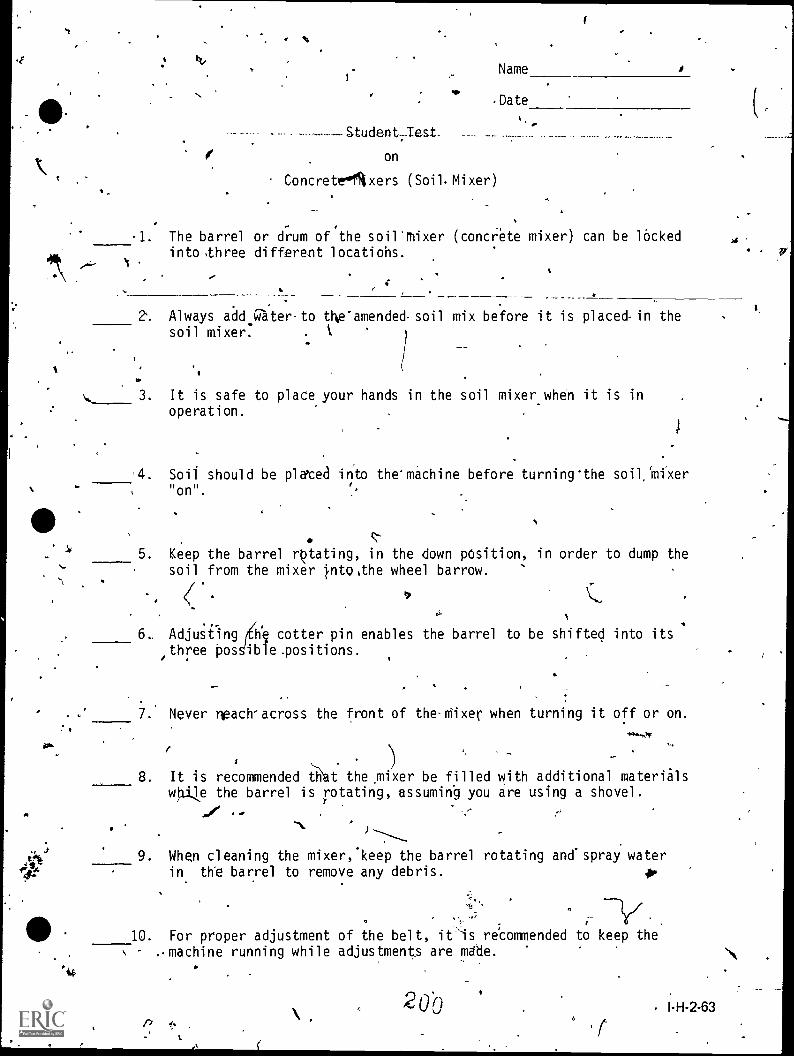
i, .
tx,
--Student:Jest.
on
ConcretrOixers (Soil. Mixer)
Name
Date
1. The barrel or drum of the soil'Mixer (concrete mixer) can be lockedinto three different locatiohs.
2'. Always add water -to tNe'amended soil mix before it is placedin thesoil mixer. . k
3. It is safe to place your hands in the soil mixer when it is inoperation.
-4. Soii should be plated into the'mOchine before turning 'the soil mixer"on".
5. Keep the barrel 'Voting, in the down pOsition, in order to dump thesoil from the mixer i.nto,the wheel barrow.
(.'af
6., Adjusting cotter pin enables the barrel to be shifted into itsthree 00S i le.positions.
7. Never mach-across the front of the mixer when turning it off or on.
,14r
. )
8. It is recommended that the mixer be filled with additional materialswile the barrel is rotating, assuming you are using a shovel.
9. When cleaning the mixer,keep the barrel rotating and'spray waterin the barrel to remove any debris.
10. For proper adjustment of the belt, iOs recommended to keep themachine running while adjustments are mane.
20OI
. I-H-2-63
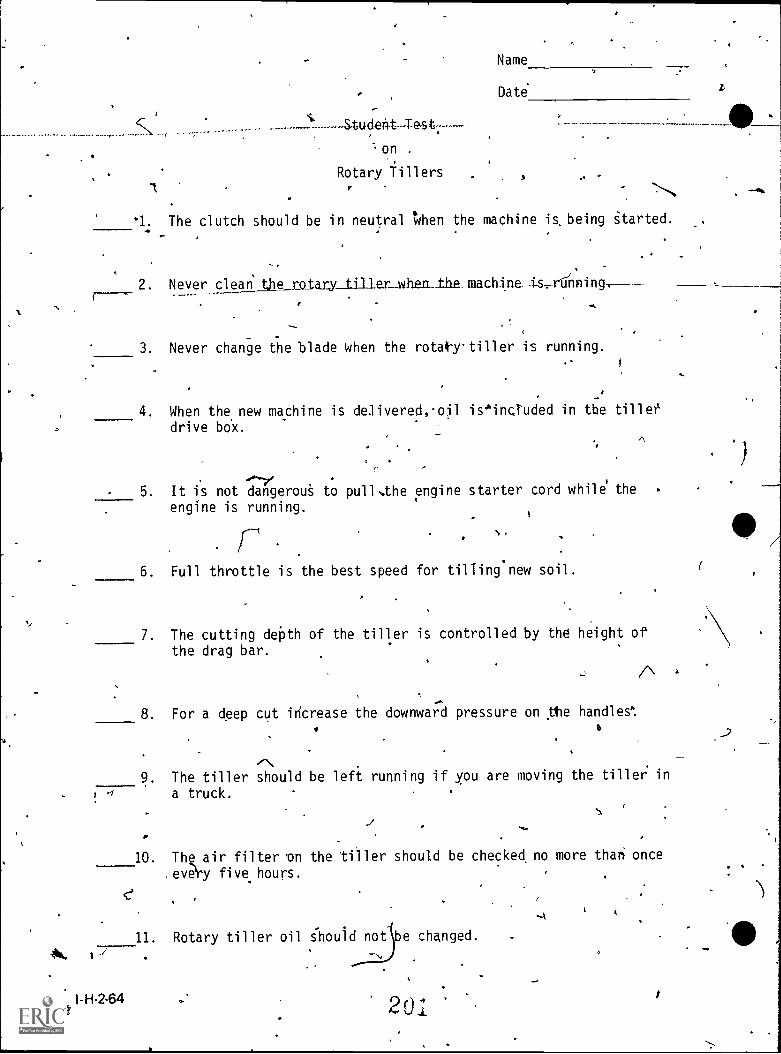
.1
on
Rotary Tillers1
Name
Date
3
'1. The clutch should be in neutral When the machine is, being started.
2. Never cltELthg ratary_tiller_when_the_mach_inei-srunning.
_ .
3. Never change the blade when the rota*-y-tiller is running.
4. When the new machine is delivered,01 is'%inauded in the tiller'drive box.
A
5. It is not dangerouS to pull.the engine starter cord while' the
engine is running.
. r6. Full throttle is the best speed for tillingnew soil.
7. The cutting depth of the tiller is controlled by the height of
the drag bar.
8. For a deep cut iricrease the downward pressure on tile handles':6
A
9. The tiller should be left running if you are moving the tiller in
a truck.
10. Th air filter 'on the tiller should be checked no more thati once
every five hours.
11. Rotary tiller oil should not e changed.
I-H-2-64 a 2 01
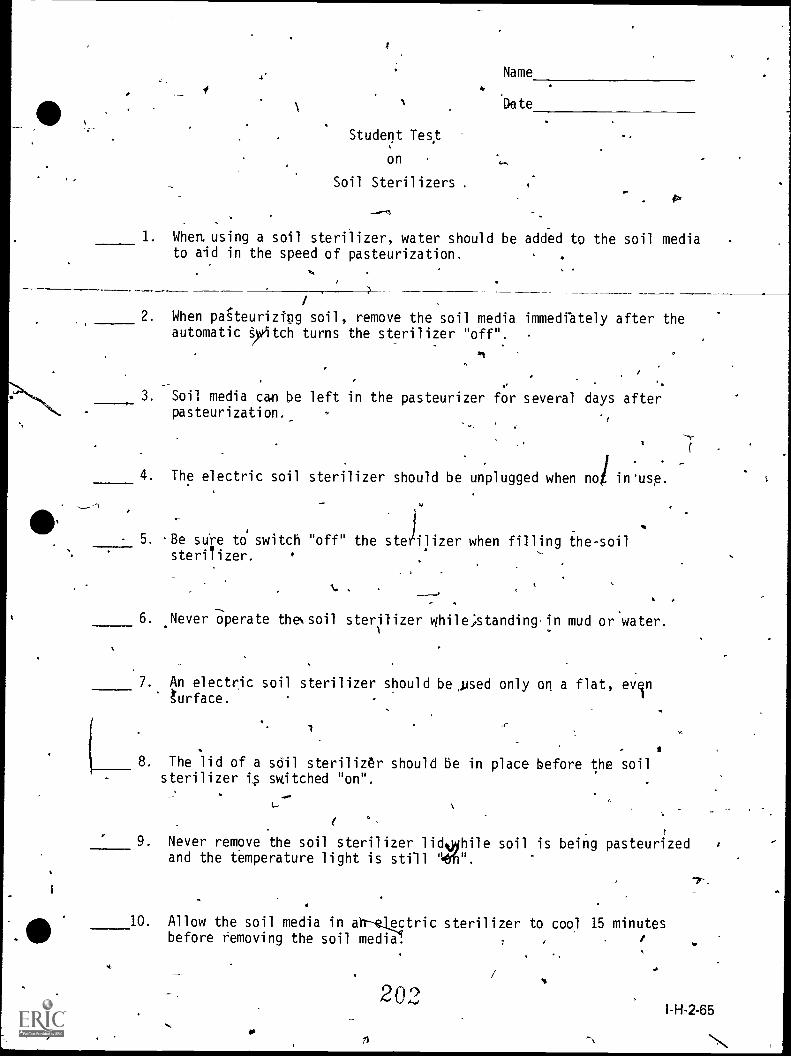
Name
bete
Student Test
on
Soil Sterilizers
1. Whem using a soil sterilizer, water should be added to the soil mediato aid in the speed of pasteurization.
2. When pateurizing soil, remove the soil media immediately after theautomatic ytch turns the sterilizer "off". -
. Soil media cm' be left in the pasteurizer for several days afterpasteurization._ 9
4. The electric soil sterilizer should be unplugged when no/ in'usg.
.
5. -Be sure to switch "off" the sterilizer when filling the-soilsterilizer.
6. Never operate thetsoil sterilizer while;,standingin mud or water.
7. An electric soil sterilizer should be ,psed only on a flat, eventurface.
8. The lid of a soil sterilizer should be in place before the soilsterilizer is switched "on".
L.
9. Never remove the soil sterilizer lid hile soil is being pasteurized ,
and the temperature light is still "
10. Allow the soil media in etelectric sterilizer to cool 15 minutesbefore removing the soil medial
202
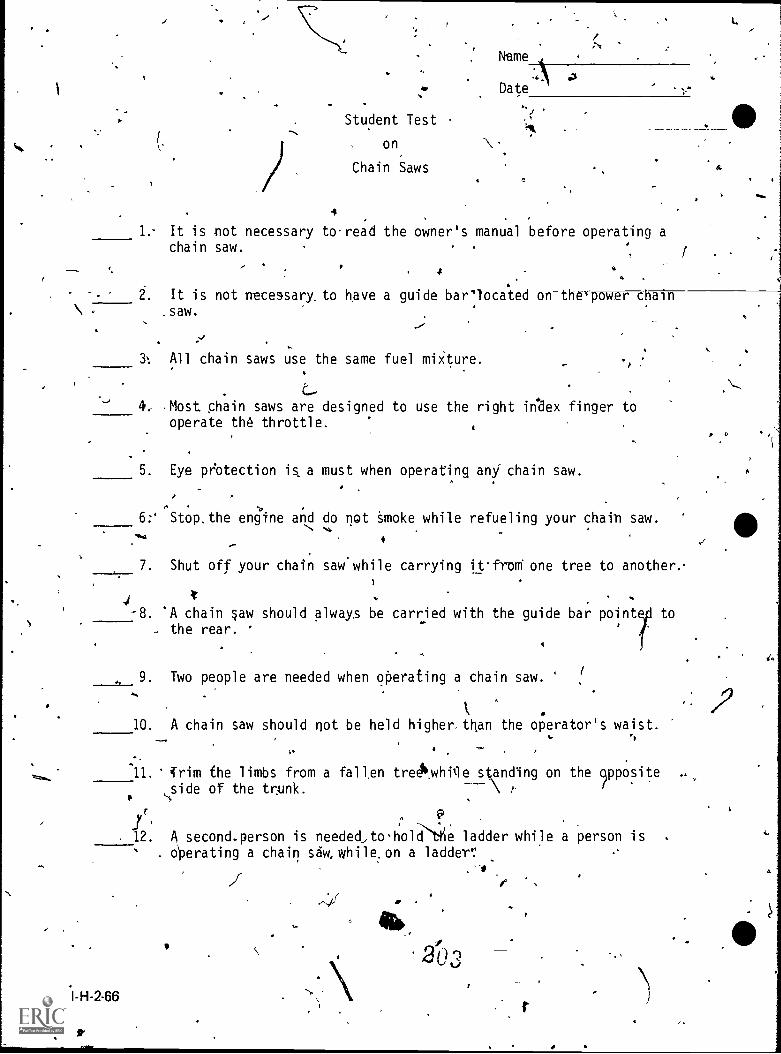
ti
Neme
Date
Student Test
on
Chain Saws
1.- It is not necessary toread the owner's manual before operating achain saw.
4
2. It is not necessary, to have a guide bar'located on thepower chain.
\ .saw.
3. All chain saws use the same fuel mixture.
4. . Most cha in saws are designed to use the right index finger tooperate the throttle.
5. Eye pr'otection is a must when operating any'chain saw..
6: Stop,the engine and do not 'smoke while refueling your chain saw.
4.44
4
7. Shut off your chain saw while carrying it From one tree to another.
-8. 'A chain gaw should always be carried with the guide bar point. the rear.
9. Two people are needed when operating a chain saw.1
10. A chain saw should not be held higher. than the op erator's waist.
t
© ,11. Trim the limbs from a fallen treAwhille standing on the crposite ..
side of the trAmik. \ /-
r PI '
.
.
12. A second person is needed,to'holhe ladder while a person is. operating a chain saw, while, on a ladder: ..
I-H-2-66
416
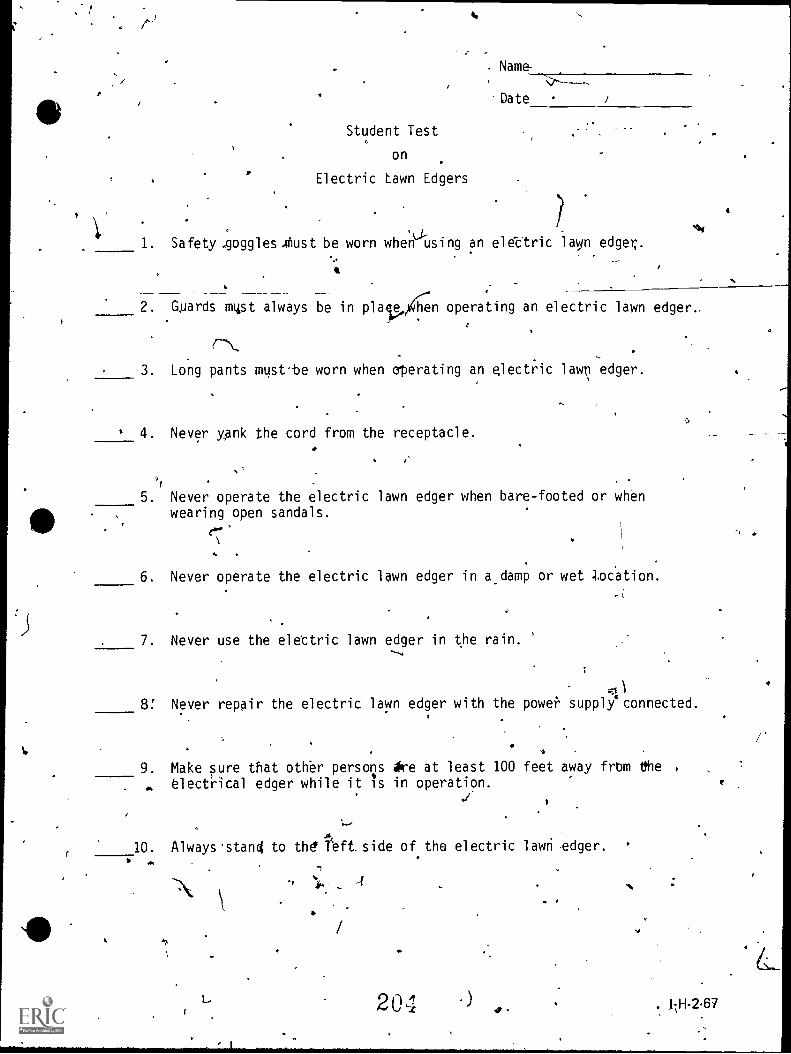
S
tit
Student Test
on
Electric Lawn Edgers
. Name-
'Date
1. Safety.gogglesdust be worn when sing an elettric layn edger;.
2. Guards mist always be in platen operating an electric lawn edger..
3. Long pants mustbe worn when operating an electric lainT edger.
4. Never yank the cord from the receptacle.
,1,
5. Never operate the electric lawn edger when bare-footed or Whenwearing open sandals.
6. Never operate the electric lawn edger in a_damp or wet qocation.
7. Never use the elettric lawn edger in the rain.
v.t\
8: Never repair the electric lawn edger with the powei' supply connected.
..
9. Make pure that othbr persons Are at least 100 feet away from the
,.. electrical edger while it is in operation../.
-a
10. Always .stand to the ?eft. side of the electric lawri edger.
, 4
AP'
20,1 ) 0. 17H-2-67
/
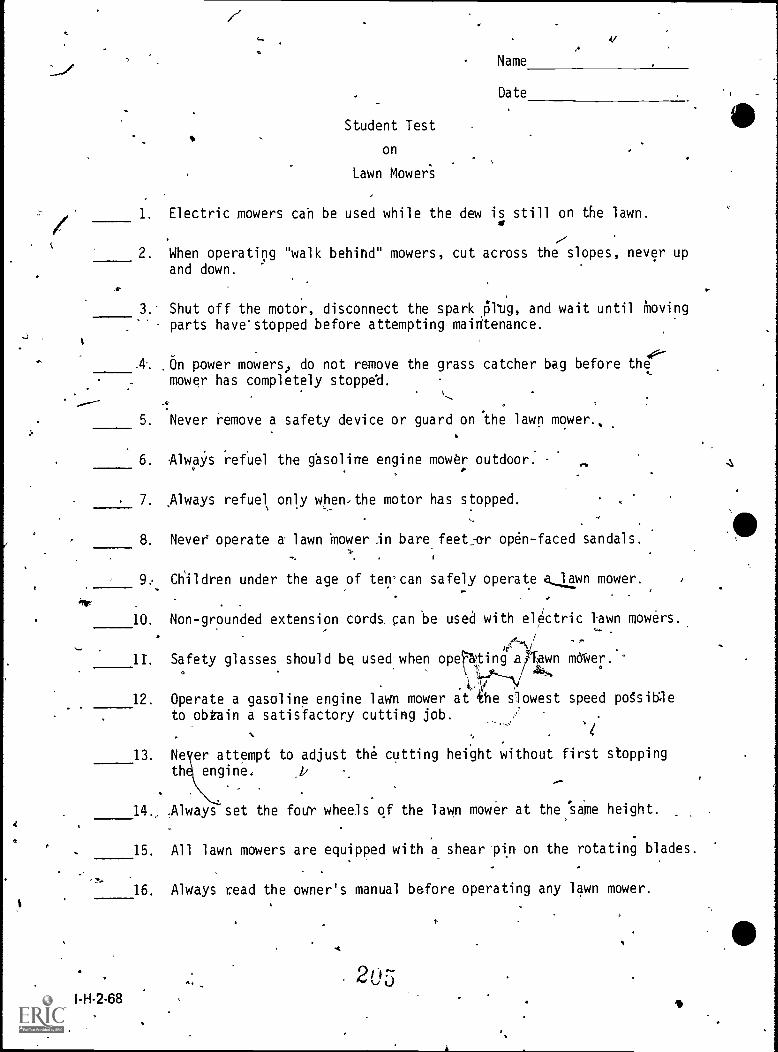
ti
O
Student Test
on
Lawn Mowers
Name
Date
4/
1. Electric mowers cab be used while the dew is still on the lawn.
2. When operating "walk behind" mowers, cut across the slopes, never upand down.
3. Shut off the motor, disconnect the spark Olug, and wait until Movingparts have-stopped before attempting maintenance.
.4. On power mowers, do not remove the grass catcher bag before the40%-
mower has completely stopped.
5. Never remove a safety device or guard on the lawn mower.,
. Always refuel the gasoline engine mower outdoor.
7. Always refuel only when. the motor has stopped.
P.%
8. Nevef operate a- lawn 'mower An bare feet:ar open-faced sandals.
9, Children under the age of ten.can safely operate <lawn mower.
10. Non-grounded extension cords, can be used with electric lawn mowers.
/V
11. Safety glasses should be used when opeMting .a 'dawn after.°
12. Operate a gasoline engine lawn mower at the slowest speed polsibAeto obkain a satisfactory cutting job.
1-H-2-68
'
13. Ne er attempt to adjust the cutting height without first stoppingth engine,
14.Always set the four wheels of the lawn mower at the salve height.
15. All lawn mowers are equipped with a shear OA on the rotating blades.
16. Always read the owner's manual before operating any lawn mower.
a.
1
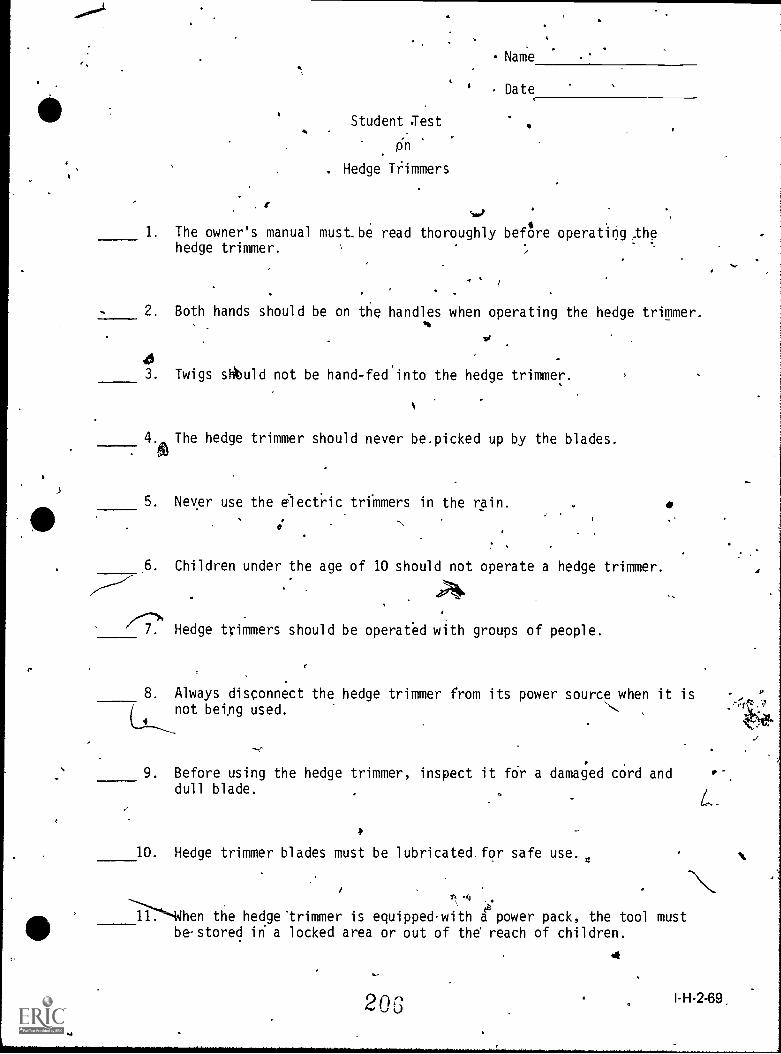
.."1
g
Student .Test
. Hedge Thmmers
Name
Date
1. The owner's manual must_be read thoroughly befOre operating7thehedge trimmer.
2. Both hands should be on 6e handles when operating the hedge trimmer.%
3. Twigs siibuld not be hand-fed'into the hedge trimmer.
4.,m
The hedge trimmer should never be.picked up by the blades.
5. Never use the electric trimmers in the rain.
.6. Children under the age of 10 should not operate a hedge trimmer.
,
Hedge trimmers should be operated with groups of people.
8. Always disconnect the hedge trimmer from its power source when it is . p
not beipg used.
/
9. Before using the hedge trimmer, inspect it fdr a damaged cord anddull blade.
10. Hedge trimmer blades must be lubricated.for safe use.
Yy,)
Ii.4"%When the hedge'trimmer is equipped d power pack, the tool mustbe-stored in a locked area or out of the' reach of children.
2 0 Gkto
4
I-H-2-69,
UNIT 1-1: AGRICULTURAL MECONICS
PROBLEM AAREA: DEVELOPING SAFE WORK HABITS IN AGRICULTURAL MECHANICS
SUGGESTIONS TO THE TEACHER:
This problem area is designed for use with freshman or beginning students enrolled in an agri-cUltural/horticultural occupations program. The recommended time for teaching this problem areais prior to the student's shop project work, The estimated time for teaching this problem area is 3 to5 days depending on how much, time the teacher wishes to spend on discussion and conductingthe suggested exercises.. The materials in this problem area were selected and written with thefollowing assumptions:
1. It is important for students to develop and practice a positive safe work attitude.
2. Students need instruction on the procedures to follow regarding first-aid.
Even though a separate problem area on safety has been included in these Core I materials,,teachers should not assume that safety should be taught solely as a separate-unit. Instruction insafety should bb included in all problemreas where applicable and handled as an integral part ofthe teaching program.
CREDIT SOURCES:
Theie materials were developed through a funding, agreement, R-33-21-D-1542-388 with theIllinois State Board of Education, Department of Adult, Vocational and Technical Education,Research and Development Section, 100 North First Street, Springfield, Illinois 62777. Opinionsexpressed in these materials do not reflect, nor should they be construed as policy or opinion of theState Board of Education or itsistaff.
The teacher's guide, worksheets, and transparency discussion guide were developed by PaulBenson, Jerry Pepple, and Jim Ethridge, Department of Vocational, and Technical Education,University of Illinois. The transparency masters, safety charts and suggested test, qbestions wereprepared by Vocational Agriculture Service, University of Illinois. Suggestions and guidance in thedevelopnient of these materials were provided bay the Rural and Metropolitan Core Curriculum PilotTest Teachers.
r
4
3
I-H-3-1

TEACHER'S GUIDE,.
I. Unit: Agricultural mechanics
II. Problem area: Developing safe work habits in agricultural mechanics -
III. Objectives: At the close of this problem area students will:
1. Understand the value of a positive safety attitude.
2. Understand the value and purposes of sound safety practices.
ft
3. Know and practice proper safety procedures inside and outside of the agrigultural mech-anics laboratory (shop) or greenhouse.
.
4. Know the proper steps to take-regarding accidents andlirsfaid.
IV. Suggested interst approaches: t1. Demonstrate the results of various hazards that may occur in the shop, and greenhouse,'
for Warn*:
a. Demonstrate the flammability of km-Ian hair by collecting some from each studentand igniting it at the front of the class.
b. Demonstrate the flammability and burning characteristics qf various types of cloth-ing, both old and new.
c. Demonstrate how a piece of metal in a drill press may catch on the bit and startspinning. ;
'd. Demonstrate cutting a board with a hand saw and fake a cut on the hand by using
red-dye. Yellout and then a§k the class what they should do 'for first aid.
Leacrimo a discussion of safety practices by asking students if they have been involvedin any accidents. Then ask them to describe what happened and also how these accidentscould have been avoided.
3. Shoyv color filmstrip that illustrates the results of proper and poor safety procedures.
4. Ta\-"Othe class into the laboratory and ask them to list, or point mkt, the potential hazards.
5. Ask the students to name as many safe operating procedures as thexcan and list them onthe board.
6. To insure student safety students mug demoltrate their knowledge of safety by passinga safety exam before being able to work in the shop.
7. Take the class to a ho'the shop to obferve safety procedures and potential hazards._
8. Develop student interest and motivation by asking the following lead questions:
a. What type of:fire extingdishers do you have at home?a
b. Were are the fire extinguishers in the_lab?
20 I-H-3-3
1
c. What is a fire blanket made of and how do you use it?
d. How could a dull power tool cause an accident?
e. How could safety glasses protect your eyes in the shop?
f. What are the OSHA'safety procedures that are required in a machine shop?
.g. Are safety glasses required by law in a school shop?
V. Anticipated problems and concerns of students:
1. Why should I practice good safety procedures?
2. What are good safety procedures?
3. What are the purposes of good safety procedures?
4. Why do I need to dress differently for the lab than for class?
5. Do I need to deonstrate all safety procedures before I will be allowed in the shop?
6. How will knowing safety practices be beneficial outside the shop?
7. Will knowing and following safety procedures count as a part of m .y grade? How much?
8. Where is the'first aid kit and what is in it?
9. Where is the fire extinguisher and how do you usg it?
10. What do.l.do if:
a. I get cut?b. I get burnt?
11. Do I have to wear safety glasses in the shop? Why? it
VI. Suggested learning activities and concerns:
I-H-34
1. Have class read VAS Unit 3022, Section 1, 2, and 3, ,Safety in the Agricultural MechanicsShop, and record tentative answers to the problems and concerns identified by the classor teacher when first starting problem area.
2. Distribute Worksheet 1, Safety in the Agricultural Mechanics Shop, and have studentsanswer questions.
3. Show the following transparencies:
a,. Safety Hazardsb. Types of Fire Extinguishersc. Shop Safety and Hand Tools
7
4. Distribute Worksheet 2, Checklist of Shop Hazards, and have class fill out in shop area.
5. Conduct orDave students conduct fire extinguisher demonsti'ation using Job Sheet 1.
'6. Show VAS filmstrip; "The Circular Saw and How to Use it Safely," and discuss.
203
17

7. Have class read VAS Unit-3044, A Color Code for Shop Safety.
8. Distribute Worksheet 3, Color Code for ShopiSafety, and have class fill out.
9. Hale class look at FFA record book on Safety and discuss the possibility of a studen't.S.O.E. program on safety.
10. Have students develop and conduct an F FA Chapter Safety Program.,
11. Show film on greenhouse fire hazards and flammability of pblyethelene and fiber glass.....--"'
VII. Application procedures:
1. The main purpose of this problem area is to develop a positive safety attitude and avoidbodily injury.
t2. The students should apply all safety procedures learned in the classroom to working in
th shop, at their homes, and at their place Of employment..
3. Ha students develop an S.O.E. safety project and submit records for sectional compet.tion. -.,
4. Have F FA chapter develop/ and conduct a safety campaign and submit for sectionalcompetition.
.
VII I.).valuation:
1. Prepare and administer a pencil and paper test covering safety procedures.
2. Grade worksheets.t
3. Prepare and administer laboratory pradtical examination on safety procedures.
4.jdminister VAS Safety Test "Safe Practices in the Vocational Agriculture Shop" (Section
bn g9neral shop safety).
I X. References and aids: .
1. VAS Unit 3022, "Safetyin the Agricultural Mechanics Shop."
2. VAS Unit 3044, "A Color-Code for Shop Safety."
40' 3. VAS Safety, Test,'"General Shop Safety" and "Safety Quiz Horticulture.
4., VAS Filmstrip, "The Circular Saw and How t6 Use it Safely."o)
t--VAS Transparencies on General Safety.
6. Student Worksheets 1, 2, and 3 and Teacher's Key.
"O7. Job Sheet 1, "Safe Use of Fire Extinguishers."4
kc--
8. VAS'Safety Charts
it 9. Phipps, Lloyd J., Mecpinics in Agriculture, The Interstate Printers and Publishers, Inc.,Danville, illinois
)
10. National FFA Chapter Safety Award Handbook.
'11. Illinois Foundation FFA Record Book qn Safety.
210 )
r , I-H-3-5
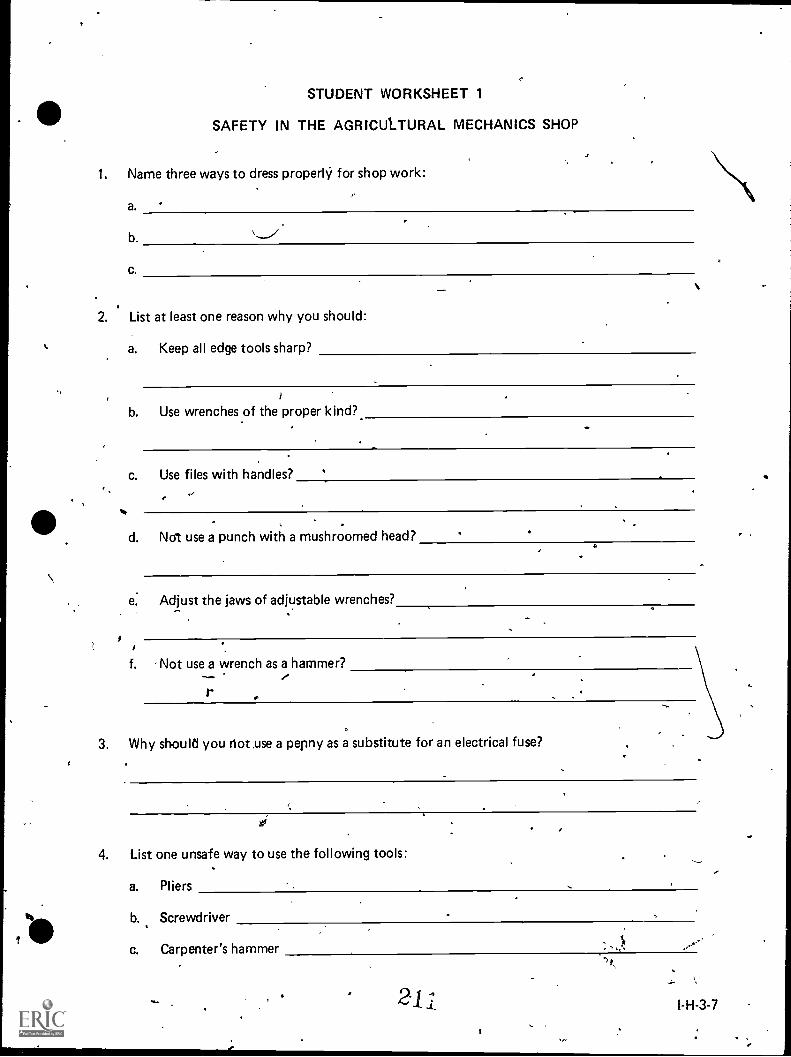
STUDENT WORKSHEET 1
SAFETY IN THE AGRICULTURAL MECHANICS SHOP
1. Name three ways to dress properly for shop work:
a.
b.
c.
N
2. List at least one reason why you should:
a. Keep all edge tools sharp?
)
b. Use wrenches of the proper kind?
c. Use files with handles? '..,
d. Not use a punch with a mushroomed head? .
e. Adjust the jaws of adjustable wrenches?
it 1
f. 'Not use a wrench as a hammer?
r
3. Why should you riot .use a penny as a substitute for an electrical fuse?
li
4. List one unsafe way to use the following tools:
a. Pliers .
b. Screwdriver
c. Carpenter's hammer ),
.,.
1-H-3-7

4
4
Oft
: o .
5. List fiv' e possible hazards while working with electricity in the shop?
9 -
a.
b.
c.
d.
'R.
6. What do you think are the most important safety rules for shop work?r
lb
b.
P
4
c.
d.
, I-H-3-(>
N . N
A
k
4.1
21
od
Y
N
N ,,'
.1
I
01
1
. It
ii.
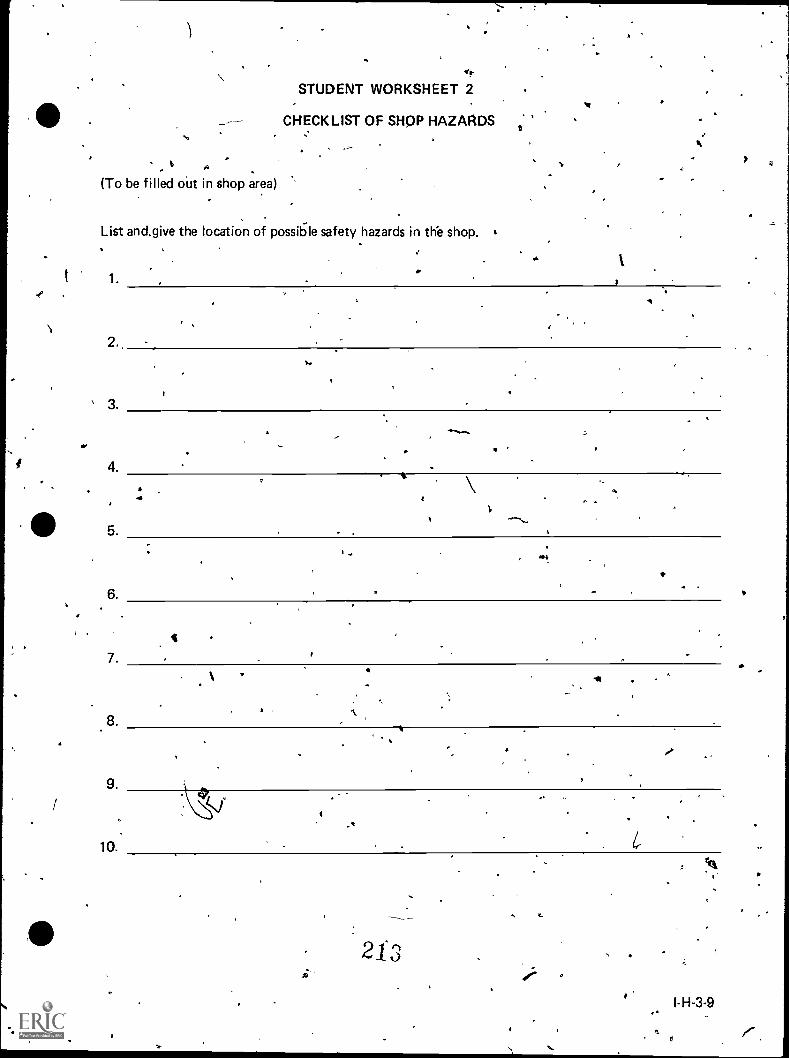
f
.e
r
)
\STUDENT WORKSHEET 2
CHECKLIST OF SHOP HAZARDS t:s.
- e ,(To be filled out in shop area)
List and.give the location of possible safety hazards in the shop.
e,
1.
2.
3.
c.
4.
L.
5.
,
4
6.
7.
I
8.
9.
44
,
.........
e
.."-.....
44
-44
r
.. .
213
C
l-H-3-9
... . /-.. ..
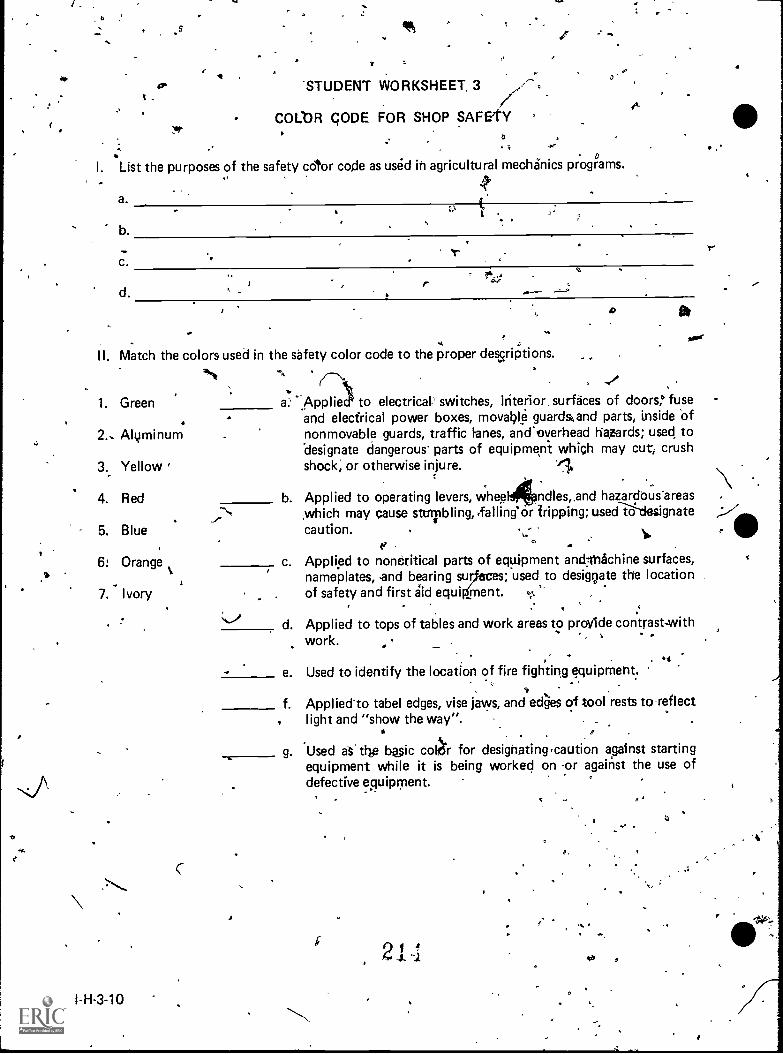
la
P 'STUDENT WORKSHEET, 3
COLOR CODE FOR SHOP SAFETYrr
0'
a
o
I. List the purposes of the safety cdtor code as used in agricultural mechanics programs.
a.
b.
c.
t
d.r
Se.
roe
II. Match the colors used in the safety color code to the proper dessriptions.
1. Green Applie) to electrical' switches, interior surfaces of doors,"fuseand electrical power boxes, moval?le guards and parts, inside of
2.. Alyminum nonmovable guards, traffic Manes, and'overhead hazards; used todesignate dangerous' parts of equipment which may cut crushshock; or otherwise injure.3.
4.
5.
6:
7.
Yellow
Red
.Blue
Orange
. ,Ivory
*N.....
I-H-3-10
b. Applied to operating levers, whee ndles,.and hazardous-areas,which may cause strpbling,,falling'or tripping; usedid-designatecaution. . . -
...
e ° -c Applied to noncritical parts of equipment andllnachine surfaces,
nameplates, and bearing su ; used to desiggate the locationof safety and first aid equi pent. .
,,
.
d. Applied to tops of tables and work areas to provide contrast-withwork.
.., ,.
..1t
e Used to identify the location of fire fighting equipment.
f. Applied'to tabel edges, vise jaws, and edges of tool rests to-reflectlight and "show the way".
g. Used a tbp basic colr for designating caution against startingequipment while it is being worked on or against the use ofdefective equipment.
I
B.
0
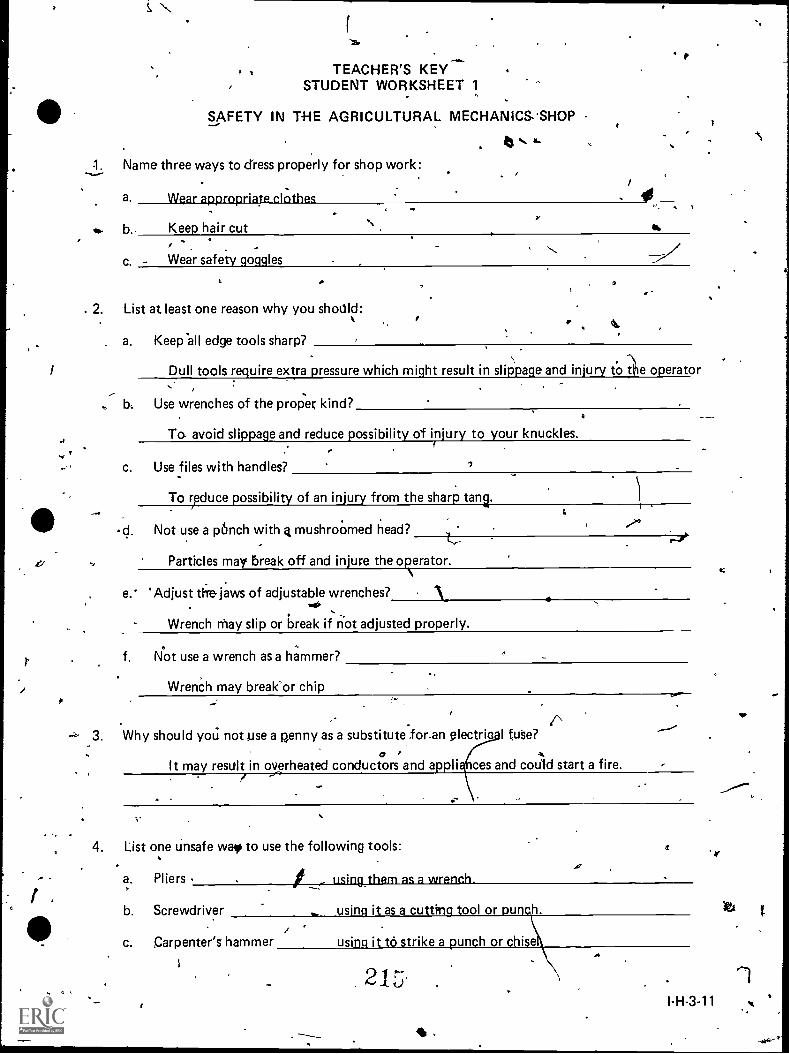
TEACHER'S KEYSTUDENT WORKSHEET 1
SAFETY IN THE AGRICULTURAL MECHANICS.SHOP
:1. Name three ways to dress properly for shop work:
e
a. Wear appropriate clothes
b.- Keep hair cut
c. Wear safety goggles
4.
2. List at least one reason why you should:
a. Keep'all edge tools sharp?
Dull tools require extra pressure which might result in slippage and injury tote operator
: b, Use wrenches of the proper kind?
To avoid slippage and reduce possibility of injury to your knuckles.
c. Use files with handles?
To ryduce possibility of an injury from the sharp tang.
I
d. Not use a ponch with 3 mushroomed head?
.e/ Particles may break off and injure the operator.
e.'Adjust thr jaws of adjustable wrenches? .V. ..e.,
Wrench may slip or break if not adjusted properly.
I
f. Not use a wrench as a hammer?
Wrench may break'or chip
3. Why should you not use a kenny as a substitute Jor.an electric I fuse?
0It may result in overheated conductors and appli ces and could start a fire.
4. List one unsafe Imo to use the following tools:
a. Pliers , using them as a wrench.
b. Screwdriver using it as a cutting tool or punch.
c. carpenter's hammer using it to strike a punch or chise
215
11)
ti

5. List five possible hazards while w9rkirpg,with electricity in the shop?
a. -Using tools with damaged cords or faulty plugs.
b. Using tools without a grbLinding condctor.
c. Overloading extension cords.
d. Handling electrical cords with wet hands.
e. Placing- extension cords in doorways.
6. What do you think'are the most important safet rules for shop work?
a. Do not engage in horseplay.
b. Wear safety goggles.
c. -Avoid "hurry".
d. Dres's properly.
e. Unplug tools before Cleaning or adjusting.4s,
4.
7AM.
1
,21
vit
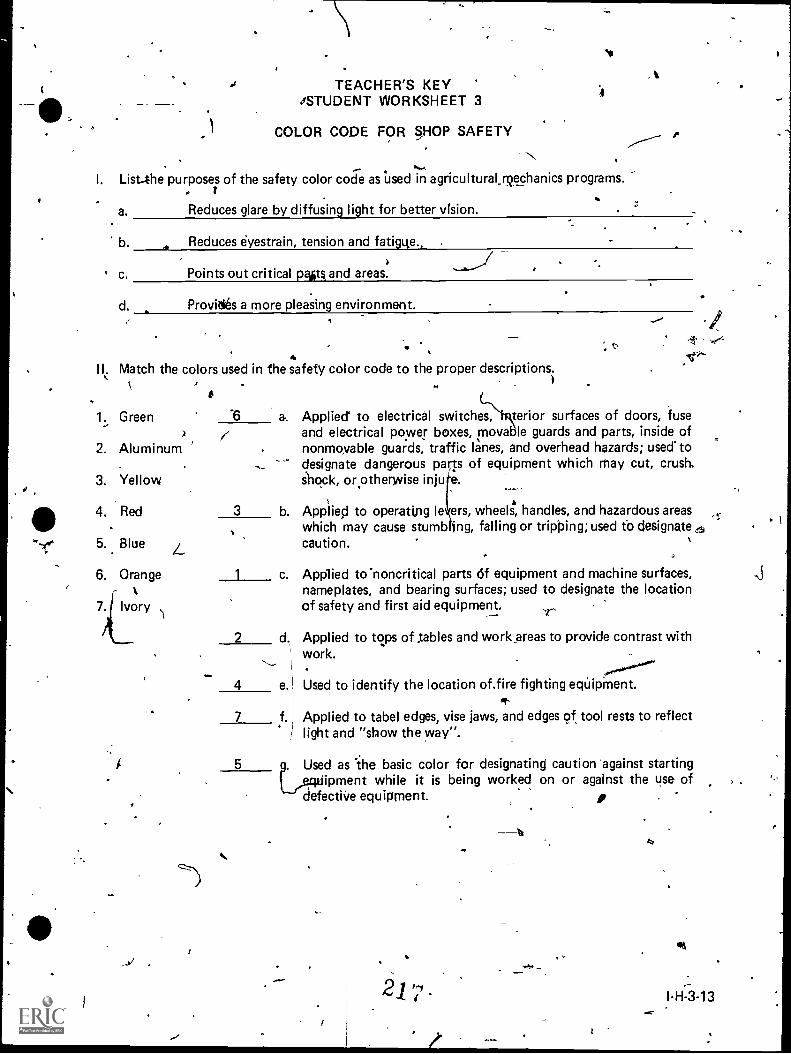
TEACHER'S KEY/STUDENT WORKSHEET 3
COLOR CODE FOR SHOP SAFETY
4
I. List-the purposes of the safety color code as used in agricultural_rQechanics programs.
a. Reduces glare by diffusing light for better vision.
' b. Reduces eyestrain, tension and fatig4e.
c. Points out critical pegs, and areas. .
d. Provides a more pleasing environment.
IL Match the colors used in the sa fety color code to the proper descriptions.
1. Green 6 a. Applied to electrical switches, terior surfaces of doors, fuseand electrical power boxes, move le guards and parts, inside of
2. Aluminum ' nonmovable guards, traffic lanes, and overhead hazards; used todesignate dangerous parts of equipment which may cut, crush.
3. Yellow shock, or otherwise injule..
4. Red 3
....
b. Applied to operating leers, whe4, handles, and hazardous areas ..,which may cause stumbjng, falling or tripping; used to designate a
5. Blue L caution. ,. .
6. Orange c. Applied to- noncritical parts df equipment and machine surfaces,
Ivorynameplates, and bearing surfaces; used to designate the location
7. of safety and first aid equipment. -r-
,-
2 d. Applied to tops of tables and work areas to provide contrast withwork. .
4 e. Used to identify the location of.fire fighting eqUipMent...f-
7 f. Applied to tabel edges, vise jaws, and edges of tool rests to reflectlight and "show the way".
5 . Used as the basic color for designating caution 'against startingipment while it is being worked on or against the use of
defectiiie equipment.
I-H-3-13
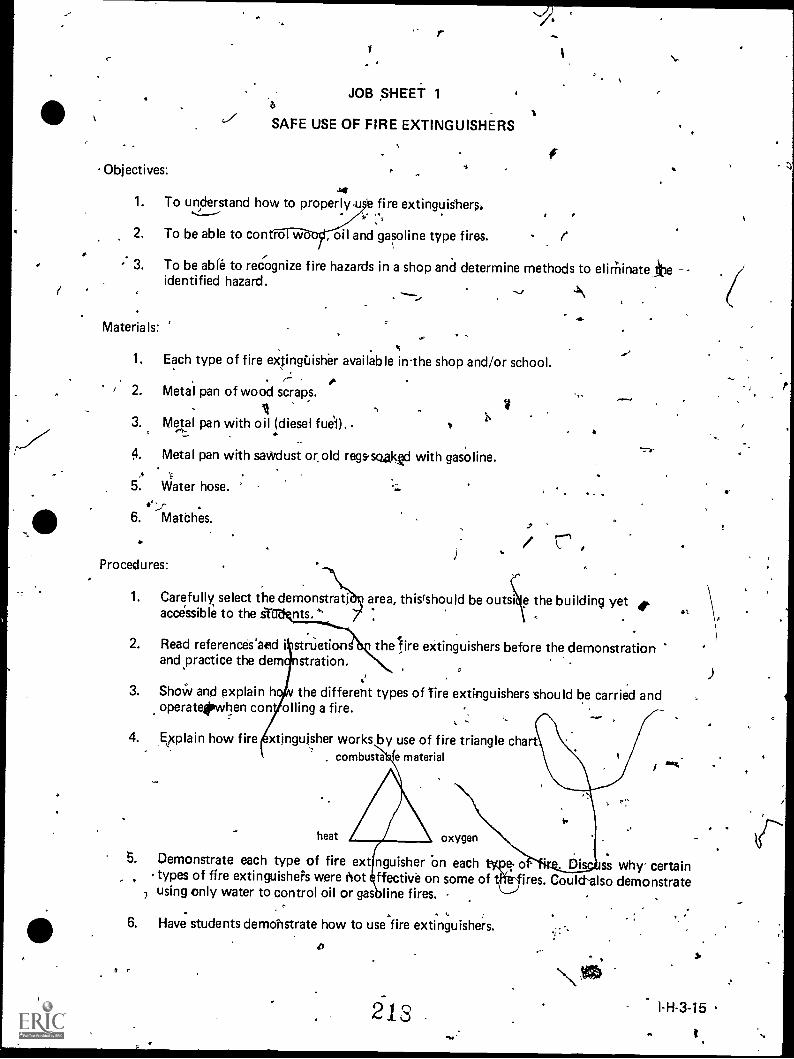
c./
Objectives:
1
JOB SHEET 11
SAFE USE OF FIRE EXTINGUISHERS
1. To understand how to properly u fire extinguishers.
, oil and gasoline type fires.2. To be able to con
N,
Or
3. To be able to recognize fire hazards in a shop and determine methods to elirninateibe --identified hazard.
Materials:
1. Each type of fire extinguisher available inthe shop and/or school.0.
2. Metal pan of wood scraps.
3. Metal pan with oil (diesel fuel}..
4. Metal pan with saWdust or, old regs.soal# with gasoline.
5. Water hose. . .
6. Matches.
co,
3'
)Procedures:
1. Carefully select the demonstratj area, thisishould be outst e the building yetaccessible to the nts.
2. Read references'aod struetionand practice the dem stration.
thelire extinguishers before the demonstration
3. ShoW and explain h the different types of Tire extinguishers' hould be carried andoperatepwhen con olling a fire.
4. Explain how fire extjngujsher works by use of fire triangle chart. combusta fe material
heat oxygen
MN%
tt
5. Demonstrate each type of fire ext nguisher on each Di ss why- certaintypes of fire extinguisheiS were not ffective on some of 'res. Could-also demonstrate
) using only water to control oil or gas line fires. -
6. Have students demohstrate how to use'fire extinguishers.
I-H-3-15
it
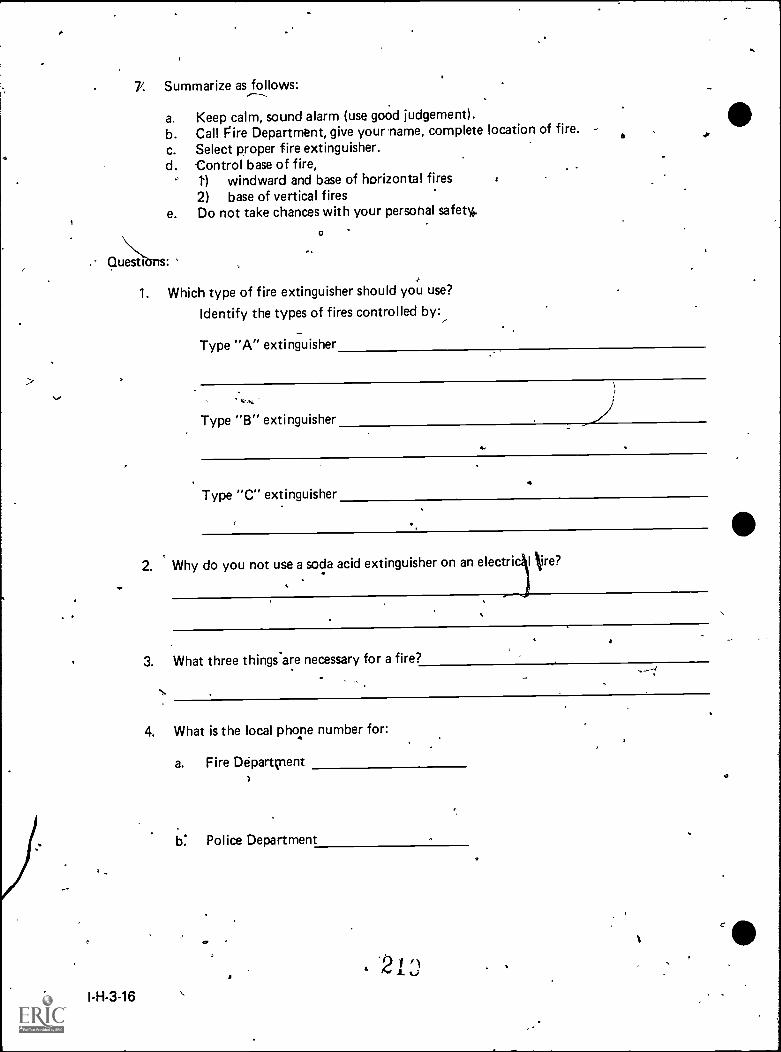
7. Summarize as follows:
a. Keep calm, sound alarm (use good judgement).b. Call Sire Department, give your name, complete location of fire.
c. Select proper fire extinguisher.d. Control base of fire,
1') windward and base of horizontal fires2) base of vertical fires
e. Do not take chances with your personal safety,o
I-H-3-16
1. Which type of fire extinguisher should you use?
Identify the types of fires controlled by:
Type "A" extinguisher
Type "B" extinguisher
Type "C" extinguisher
2. Why do you not use a soda acid extinguisher on an electri I ire?c
3. What three things-are necessary for a fire?
4. What is the local phone number for:
a. Fire Departcnent
b: Police Department
I '1tai
O

. ,
Observation.
Record the location and type of fire extinguisher in the shop and classroom. Also notelocation of fire alarms.
Conclusions:
Record the results of the fire extinguishers' demonstrations. Note what happens When each
type of extinguisher is used on each fire. bevelop a list of approved practices to follow inpreventing fires.
Am"
p
2 2
Ng.
1.
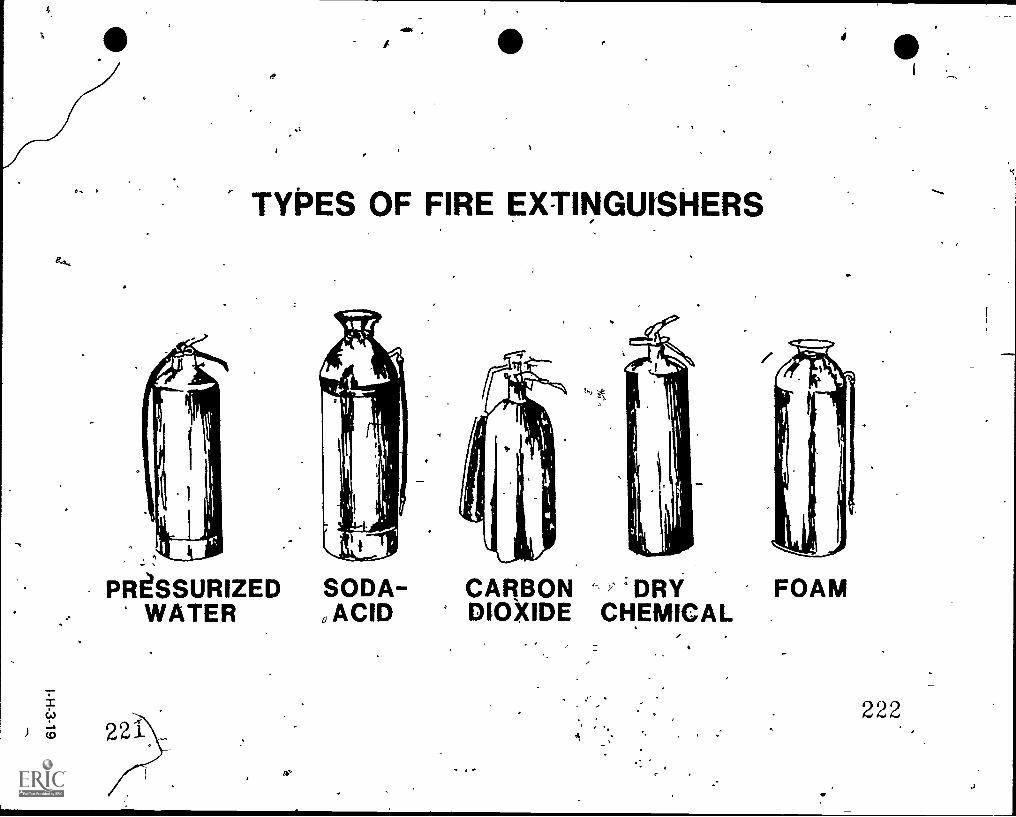
0.
.
i
B
,
TYPES OF FIRE EXTINGUISHERS
PRESSURIZED SODA-WATER °ACID
e. 4
) 8 221
.
CARBON °DRYDIOXIDE CHEMICAL
FOAM
222
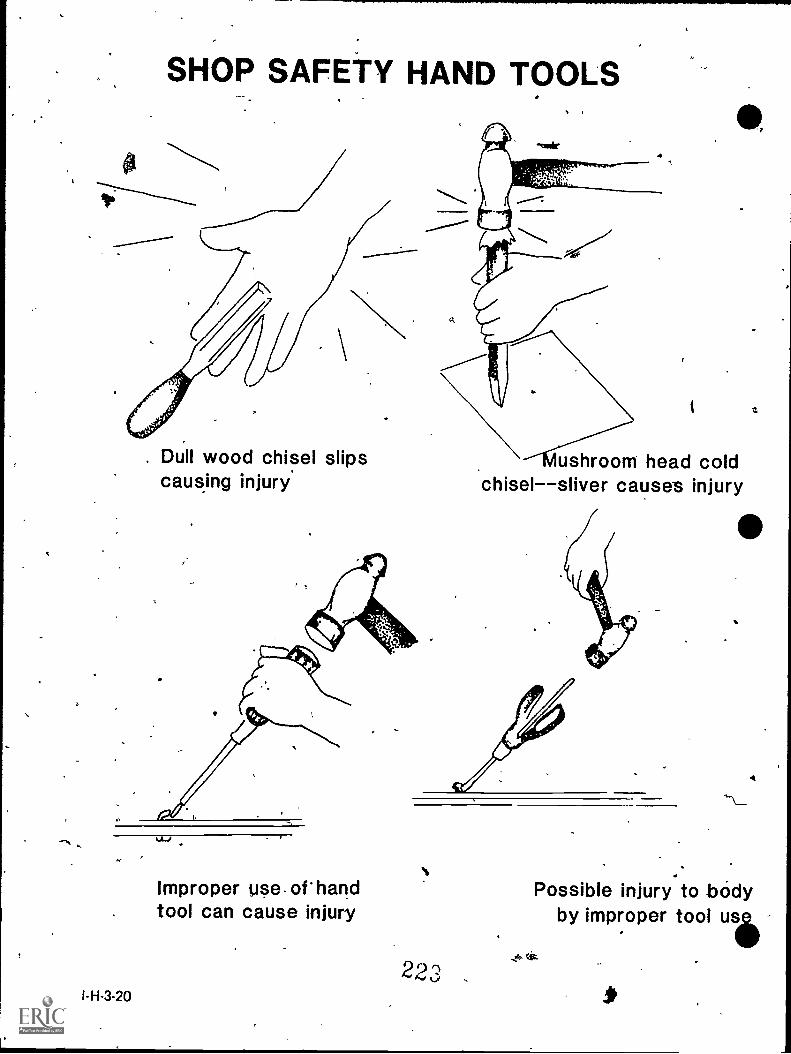
SHOP SAFETY HAND TOOLS
. Dull wood chisel slipscausing injury
Ll;rirooni head coldchisel--sliver causes injury
Improper use. of handtool can cause injury
I-H-3-20
S
223
Possible injury to bodyby improper tool us
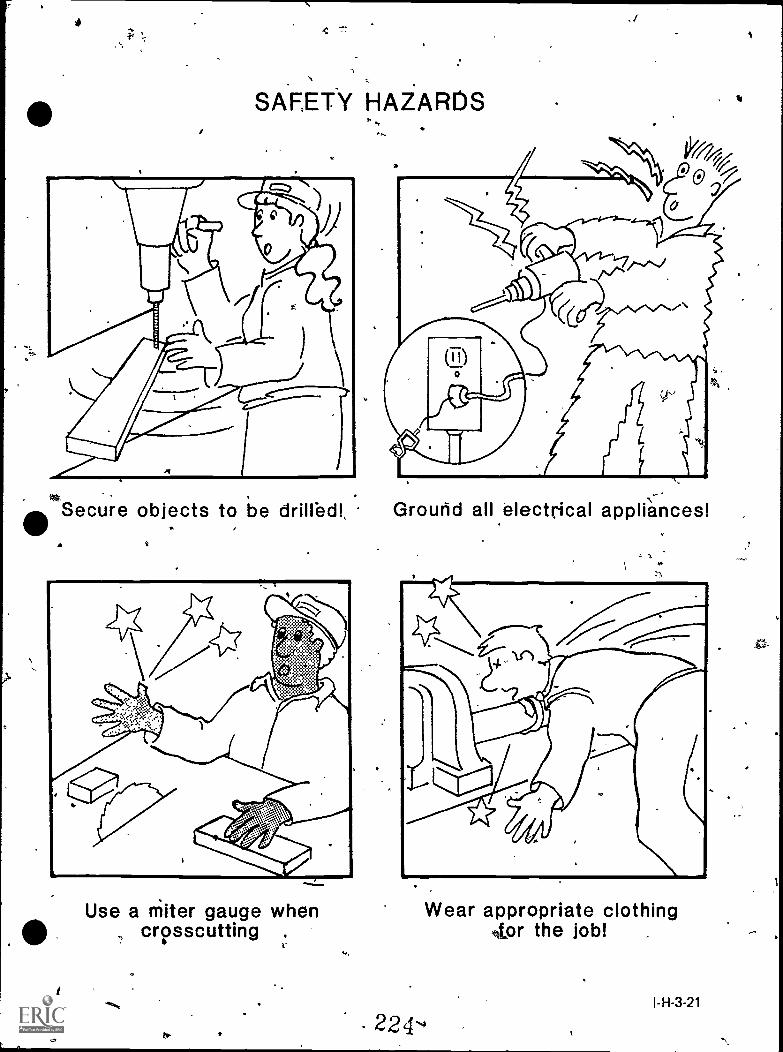
ML
I'
,
.1
SAFETY HAZARtS I,
-,--Secure objects to be drilled!, Ground allelectrical appliances!
. ,
Use a miter gauge whencrosscutting .
..
Wear appropriate clothingor the job!
224-4I-H-3-21
1
L
SUGGESTIONS TO. THE, TEACHER REGARDING STUDENT TESTS ON
"SAFE PRACTICES IN THE VOCATIONAL AGRICULTURE SHOP"
1. These tests have been prepared for individual power tools or areas of instruction with each test
on a single sheet.
2. Most of the test questions are TRUEFALSE types. Space has been left between questions for
students to explain why the statement is true or false. It may Ile particularly desirable to
explain why a question was marked true or false, thus re-emphasizing correct procedure.
3. A set of correct nswers to the test questions is not provided. The correct answers to certain
questions depend upon the safety standards adopted by individual teachers.
4. Some teachers may wish to have the students sign the attached statements of safety training
and keep them on file.
5. Permission to duplicate any of this material is -freely granted. Credit for the material used in
this unit is due to many individual teachers. Original drafts were submitted by A., W. Schmidt,
D. J. Witt, Loren Mills, and Charles Pearson, Teachers of Vocational Agriculture in Illinois.
$
225
I- H -3 -23
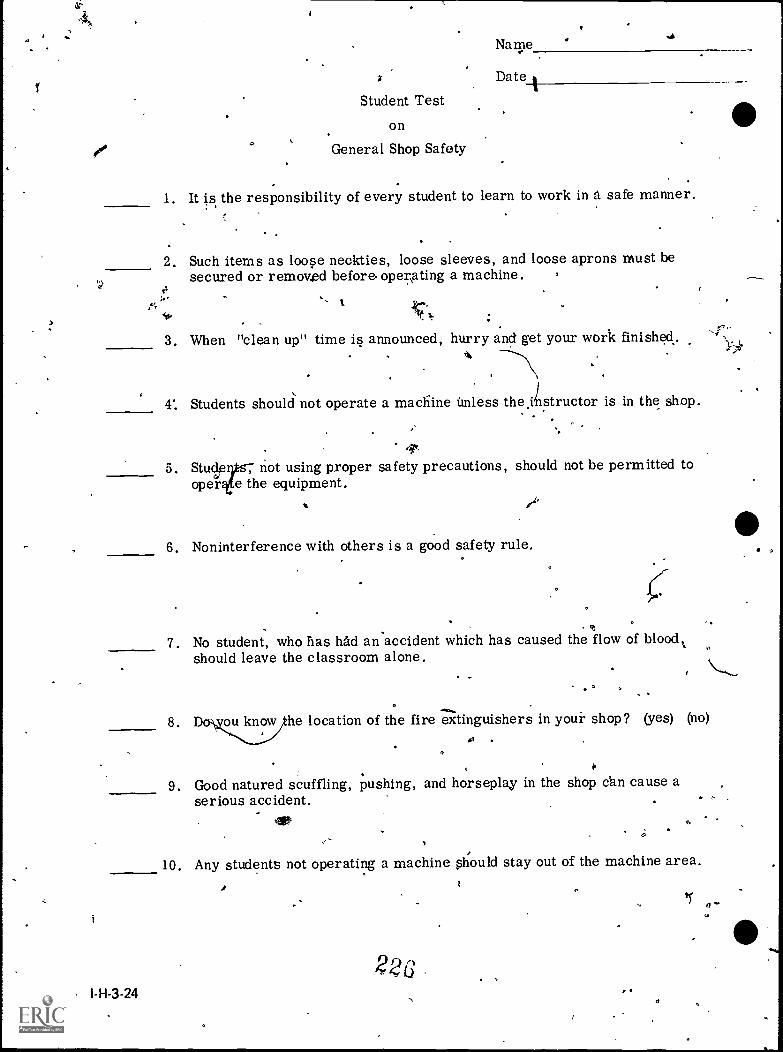
0,0
Name
Date
Student Test
on
General Shop Safety
1. It is the responsibility of every student to learn to work in a safe manner.
2. Such items as loose neckties, loose sleeves, and loose aprons must besecured or removed before. operating a machine.
1.1;Ss,
3. When "clean up" time is announced, hurry and get your work finished.
4". Students should not operate a machine unless the,ilistructor is in the shop.
5. Stucle s, not using proper safety precautions, should not be permitted tooper e the equipment.
I-H-3-24
6. Noninterference with others is a good safety rule.
7. No student, who has had an accident which has caused the flow of blood,should leave the classroom alone.
8. D ou know e location of the fire extinguishers in your shop? (yes) (no)
at
9. Good natured scuffling, pushing, and horseplay in the shop can cause aserious accident. 1,
10. Any students not operating a machine should stay out of the machine area.
2?6r
Ye
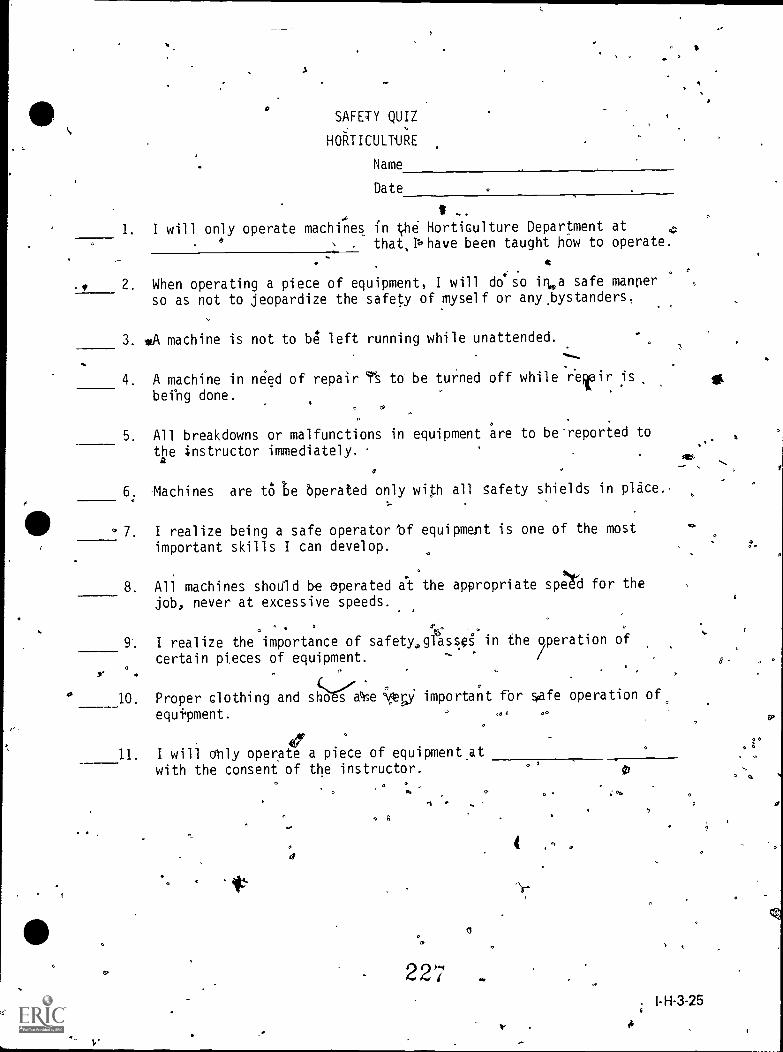
O
3
SAFETY QUIZ
HORTICULTURE
Name
Date
A1. will only operate machines in tehe Horticulture Department atonly
that,Ili,have been taught how to operate.
2. When operating a piece of equipment, I will doo in.a safe mannerso as not to jeopardize the safety of myself or any.bystanders.
3. *A machine is not to be left running while unattended.
4. A machine in need of repair to be turned off while r'eteir is
being done.
5. All breakdowns or malfunctions in equipment are to be-reported to
the instructor immediately.
6. -Machines are to be operated only with all safety shields in place.
7. I realize being a safe operator 'of equipment is one of the most
important skills I can develop.
r
V
8. All machines shoUld be operated at the appropriate sped for the
job, never at excessive speeds.
.
9. I realize the importance of safetmlasses in the operation ofcertain pieces of equipment.
10. Proper clothing and shoesale ;/je.0 important fbr $afe operation of,
equipment.
11. I will only operate a piece of equipment at
with the consent of the instructor.
0 ;
Ilk
227
0
0
1-H-3-25
UNIT H:''AGRICULTURAL MECHANICS0
ROBLEM AREA: DEVELOPING BASIC CARPENTRKILLS
SUGGESTIONS TO THE TEACHER:
Thi problem area is designed for tIsq. with freshman orproblem
student enrolled in an agri-cultural /horticultural occupations programThe recommended time for teaching this proble area
is during the early part of spring semester. The estimated time for teaching, is problem area is 10to 15 days depending on how much time the teacher wishes to spend on disc ion and conductingthe suggested exercises. The materials in this problem area were selected and written with thefollowing assumptions:
o
1. It is important for students to plan and construct a project to develop their shop skills.'
.0!
2. Students need to be involved in the "doing" phase of instruction to maximize r etention
of material learned.
The instructor is reminded that this problem area can be used in either a rural or urban setting.The items in this problem area are for reference or modification as, the teacher adapts this materialto his/her local situation. o
C
CREDIT SOURCES:
These materials were developed through a funding agreement, R-33-21-D-1542-388 with theIllinois State Board of Education, Department of Adult, Vocational and Technical Education,Resdarch and Development Section, 100 North First Street, Springfield, Illinois 62777. Opinionsexpressed in these materials do not reflect, nor should they be construed as policy or (Anion of theStater8oard of Education or its staff.
The teacher's guide, suggested content outline an suggested test questiOns were developed by
Paul Hemp, Department of Vocational and Technical ducation,, University of Illinois, The studentworksheets and suggested project plans were prepared by Vocatidnal Agriculture Service, Universityof Illinois. Suggestions and guidance in the development of these materials were provided b/ theRural and Metfopolitan Core Curriculum Pilot Test Teachers.
221.

TEACHER'S GUIDE
I. Unit: Agricultural mechanicso
II. Problem area:-7Developing basic carpentry skills
III. Objectives: At the close of this problem area, students will:
1. Be able to identify-and classify the following as softwood or hardwood: white pine, fir,cedar, poplar, oak, yellow pine, ash, elm, maple and hickory.
e able to list the characteristics and common uses of select, common and dimensionlumber.
,3. Be able to identify with 90% accuracy the following hardware items:
a. common nail g. stove boltsb. 'finishing nail h. machine bolts
(c. box nails . i. carriage bolts "),d. roofing nails j. toggle boltse. lag screws k. strap hinge
.
f. flat-headed wood screw I. T hinge
4. Be able td sketch a project showing the top, side and end view.
5. Be able to read a blueprint and calculate a bill of materials from the blueprint drawing. . ig
B. Be able to calculate board feet and running feet from a bill of materials supplied by theteacher.
*
7. Be able to perform the following skills to the satisfaction ofthe instruotor:
46. Measuring and marking a ten feet length of board within 1/8"b. Squaring a boardc. Sawing a boardd. Smoothing a rough cut on a boarde. Joining two boards with nailsf. Boring a hole in a 2" board
8. Be able to plan and construct a wood project which meets the following specifications:
a. Plan- meets the-approval of the teach& and parent.(19b. Bill of materials s judged to be'95% accurate by the teacher. .
c. Cutting list is judged to be 95%.accurate by the teacher. '-\d. Finished project is square, level and free of splits and hammer marks.
IV. Suggested interest approaches:
1. Obtain sample pieces of wood from a lumber yard.,Hold samples up to the class and ask them to identify the wood.
2. Ask class to identify a variety of nails and other hardware
3. Explain to the class that they will be building a carpentry project and that before theproject is started, basicilaforrnation and skills diust be learned.
I-H-4-3
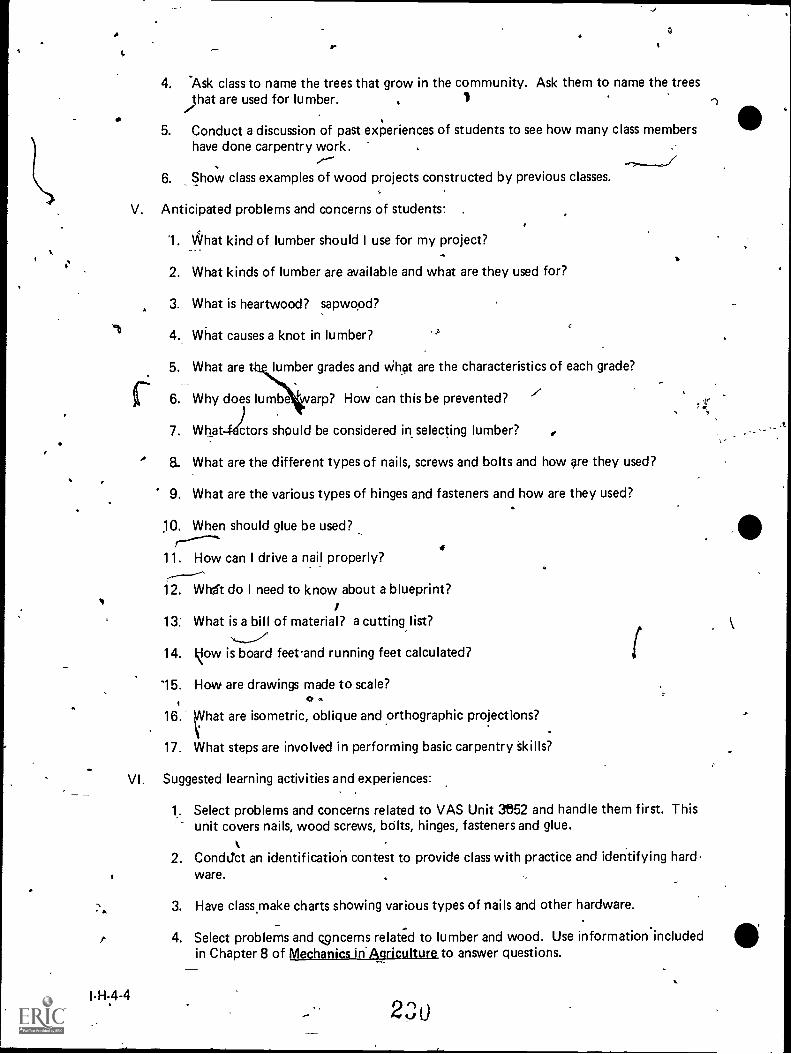
r
sa- I
a
4. 'Ask class to name the trees that grow in the community. Ask them to name the treesthat are used for lumber. . 1
.5. Conduct a discussion of past experiences of students to see how many class members
have done carpentry work... ---,----/6. Show class examples of wood projects constructed by previous classes.
V. Anticipated problems and concerns of students:
1. What kind of lumber should I use for my project?..._
2. What kinds of lumber are available and what are they used for?
3. What is heartwood? sapwood?
4. What causes a knot in lumber? .;..
5. What are t lumber grades and What are the characteristics of each grade?f 6. Why does lumbe arp? How can this be prevented?.
.
7. What-fictors should be considered in selecting lumber?
. 8. What are the different types of nails, screws and bolts and how ore they used?
9. What are the various types of hinges and fasteners and how are they used?
10. When should glue be used?r,..4
11. How can I drive a nail properly?r------12. Whit do I need to know about a blueprint?
r13: What is a bill of material? a cutting list?
,.....,.....-"
14. How is board feet-and running feet calculated?
15. How are drawings made to scale?o.
16. Ihat are isometric, oblique and orthographic projections?
17. What steps are involved in performing basic carpentry Skills?
VI. Suggested learning activities and experiences:
1.. Select problems and concerns related to VAS Unit 3e52 and handle them first. Thisunit covers nails, wood screws, bolts, hinges, fasteners and glue.
2. Condikt an identification contest to provide class with practice and identifying hard-ware.
3. Have class.make charts showing various types of nails and other hardware.
4. Select problems and concerns related to lumber and wood. Use informationincludedin Chapter 8 of Mechanics in'Agriculture to answer questions.
I-H-4-4
I1
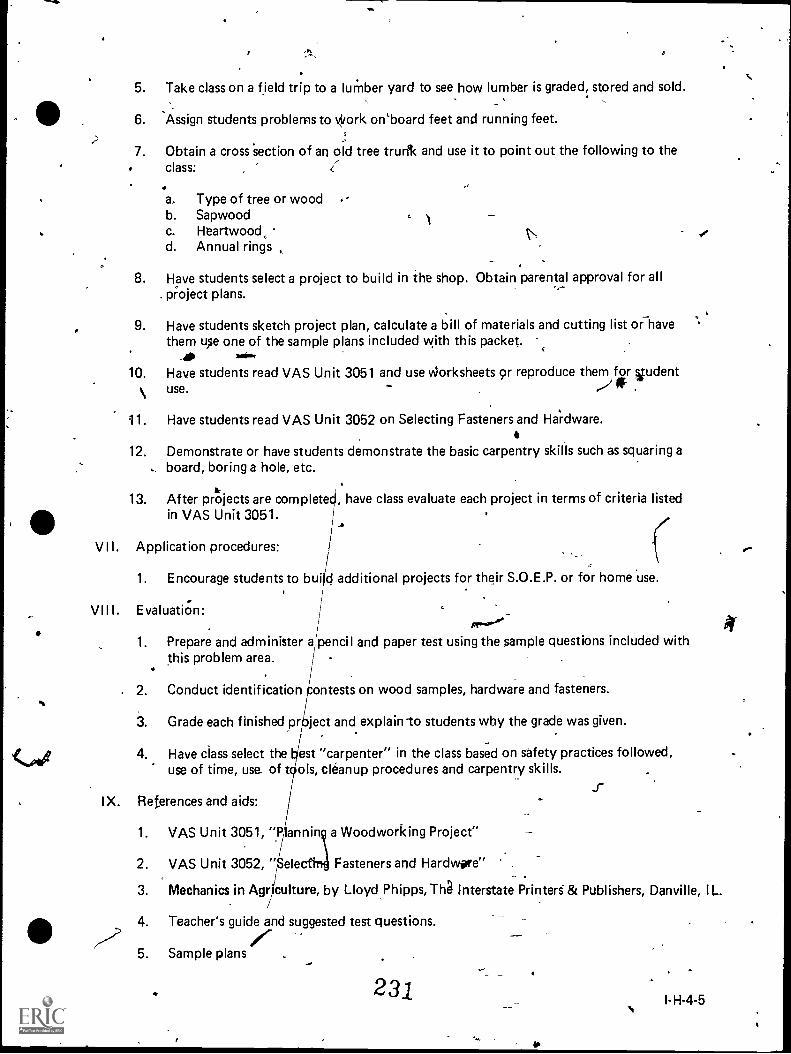
5. Take class on a field trip to a lumber yard to see how lumber is graded, stored and sold.
6. Assign students problems to Work on`board feet and running feet.
7. Obtain a cross section of an old tree trurfk and use it to point out the following to theclass:
a. Type of tree or woodb. Sapwoodc. Heartwoodd. Annual rings
8. Have students select a project to build in the shop. Obtain parental approval for allpr:oject plans.
9. Have students sketch project plan, calculate a bill of materials and cutting list or havethem use one of the sample plans included with this packet.
uNm.
10. Have students read VAS Unit 3051 and use Worksheets or reproduce them for 4udentuse. .
11. Have students read VAS Unit 3052 on Selecting Fasteners and Ha.rdware.
12. Demonstrate or have students demonstrate the basic carpentry skills such as squaring aboard, boring a hole, etc.
13. After proects are completed, have class evaluate each project in terms of criteria listedin VAS Unit 3051.
VII. Application procedures:
1. Encourage students to build additional projects for their S.O.E.P. or for home use.
VIII. EvaluatiOn:
1. Prepare and administer a pencil and paper test using the sample questions included withthis problem area.
2. Conduct identification contests on wood samples, hardware and fasteners.
3. Grade each finished project and explain-to students why the grade was given.
4. Have class select the est "carpenter" in the class based on safety practices followed,use of time, use of t ols, cleanup procedures and carpentry skills.
IX. References and aids:
1. VAS Unit 3051, "Pi annin a Woodworking Project"
2. VAS Unit 3052, " ele Fasteners and Hardware"
3. Mechanics in Agr culture, by LloydPhipps,Thg Interstate Printers- & Publishers, Danville, IL.
4. Teacher's guide and suggested test questions.
7'25. Sample plans
231I-H-4-5
4°
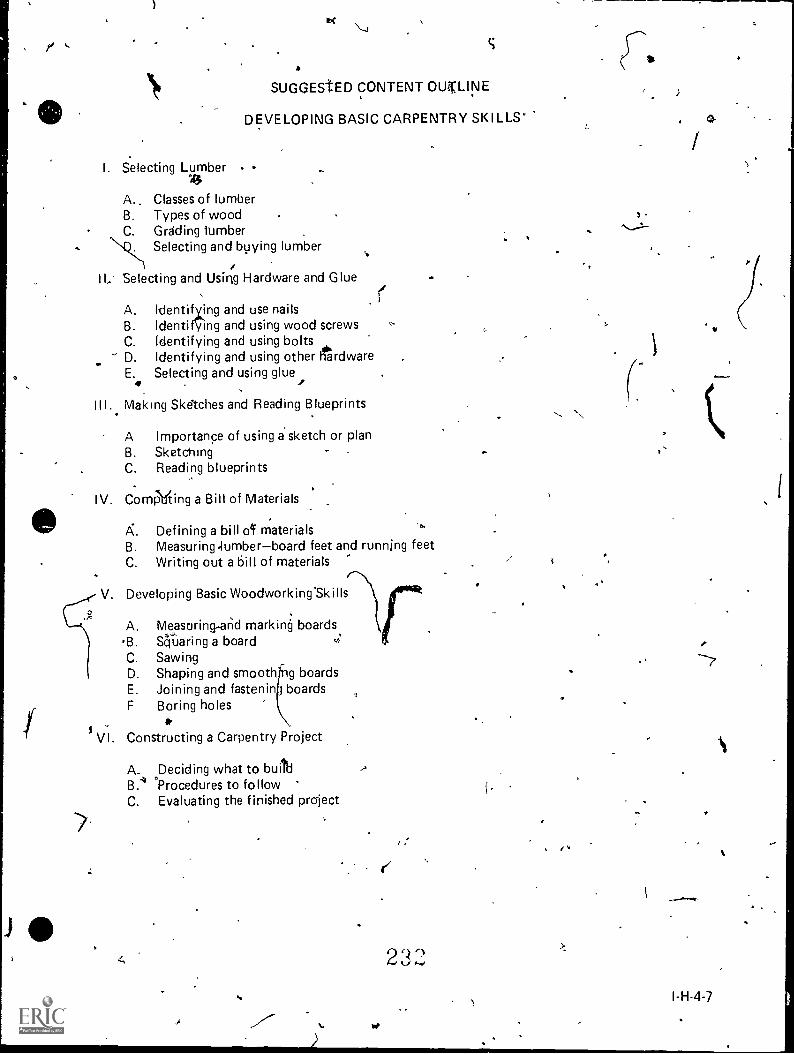
\-1
SUGGEStED CONTENT OUTLINE
DEVELOPING BASIC CARPENTRY SKILLS°
I. Selecting Lumber .1,t5
A.. Classes of lumberB. Types of woodC. Grading lumber
NI:k.\ Selecting and buying lumber
II, Selecting and Using Hardware and Glue
A. Identifying and use nailsB. Identifying and using wood screwsC. Identifying and using boltsD. Identifying and using other hardwareE. Selecting and using glue
III. Making Sketches and Reading Blueprints
A Importance of using a sketch or planB. SketchingC. Reading blueprints
IV. ComNting a Bill of Materials
A. Defining a bill oef materialsB. Measuring - lumber board feet and running feetC. Writing out a bill of materials
V. Developing Basic Woodworking' Skills
A. Measdring-and marking boardsB. Squaring a boardC. SawingD. Shaping and smooth g boardsE. Joining and fastenin boardsF Boring holes
tVI. Constructing a Carpentry Project
A. Deciding what to bulbB.' Procedures to followC. Evaluating the finished project
232>.
N
--7
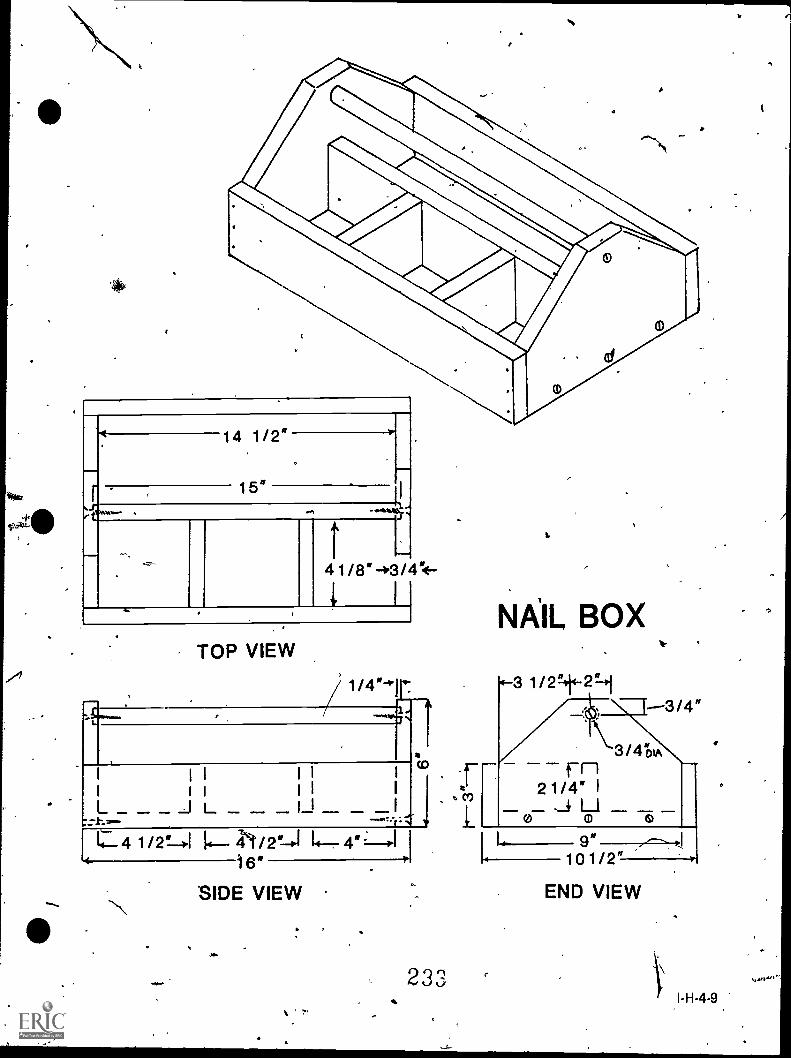
\q-
....
Jr
J141/2"
_15"
-,--
41/8"-+3/
i I..
TOP VIEW
1/4'1' r
I I I I
L _ _ _ I L. _ _ _ _I1/2"-)1 14- 471/2"-P.I
NAIL BOX
3 1/2414-01
--3/4"
3/4"DA
Fri21/4" I
_emu__.
i6" 101/2"
SIDE VIEW END VIEW
233I-H-4-9
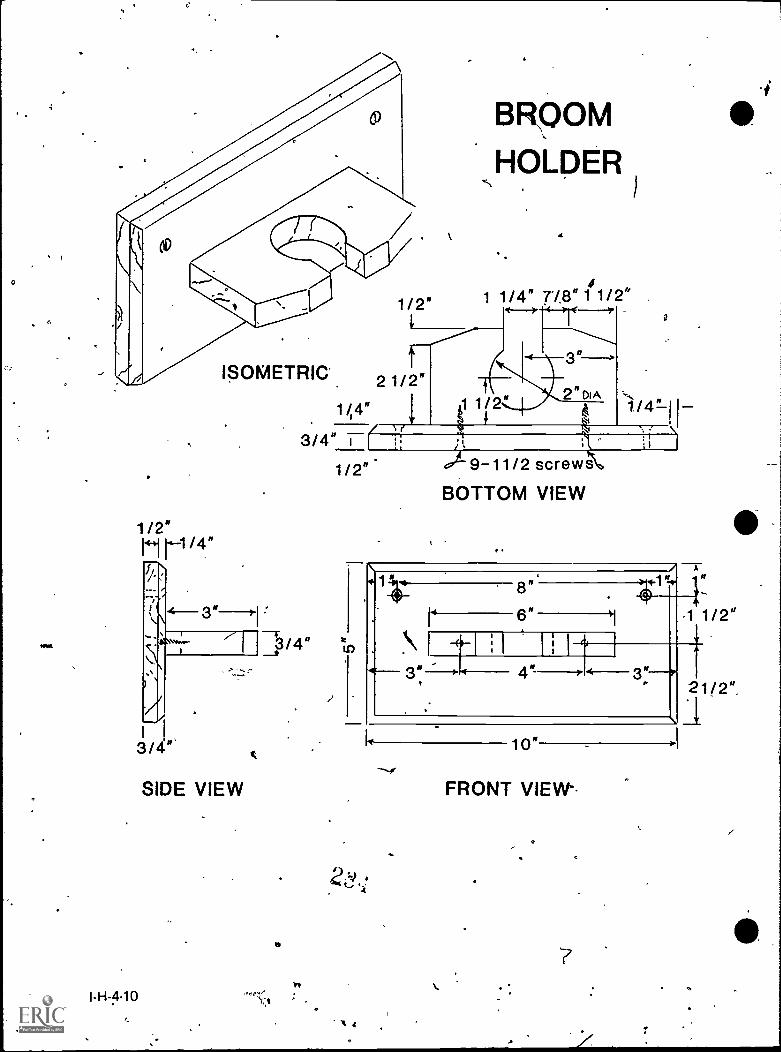
O
1/2"14114-1/4"
BROOM
HOLDER
401411V1/2"
1 1/4" 714f
,8" 1 1/2"
-4----\----"ISOMETRIC'
---).--.....s,,
21/2"33
i(/
2 n .,,,
kl4 1/411 I-144" 1 1/2:4
3/4" 1 1 iii )1/2 ".
3/4"'
SIDE VIEW
tl
ti 4
9-11/2 screws
BOTTOM VIEW
\ / A
47n II
6" 1
4"--P 4-- 3" '2
.in"
FRONT VIEW-
1/2"
/2".
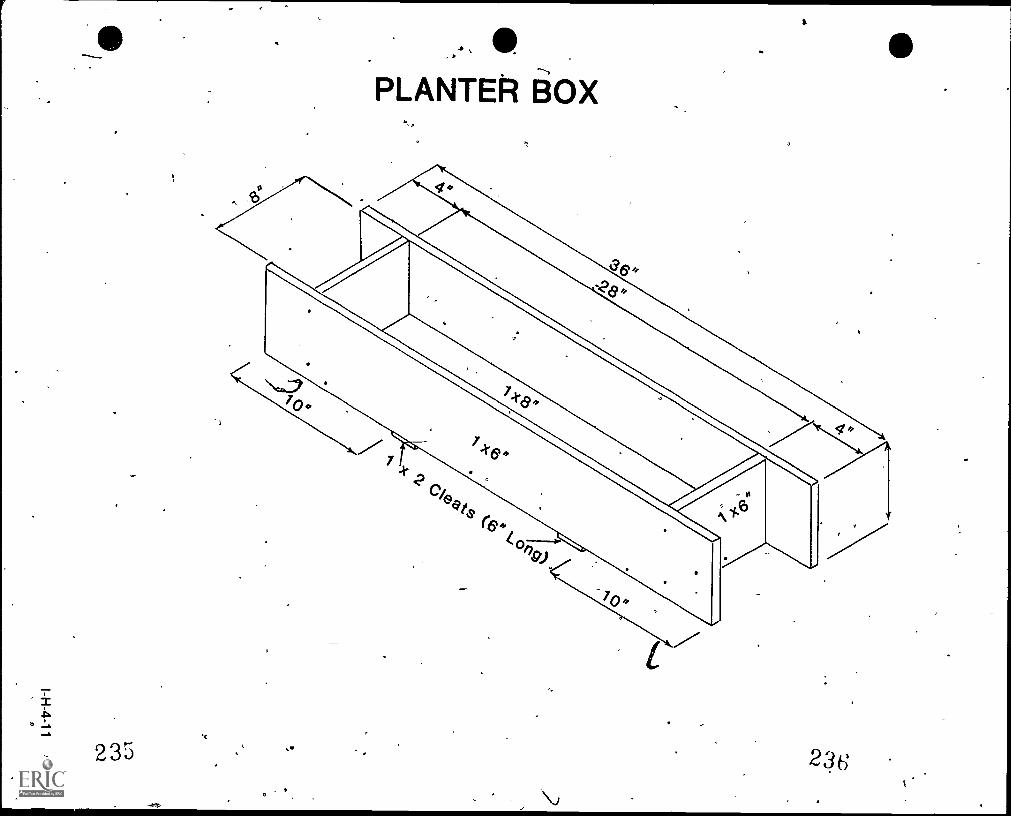
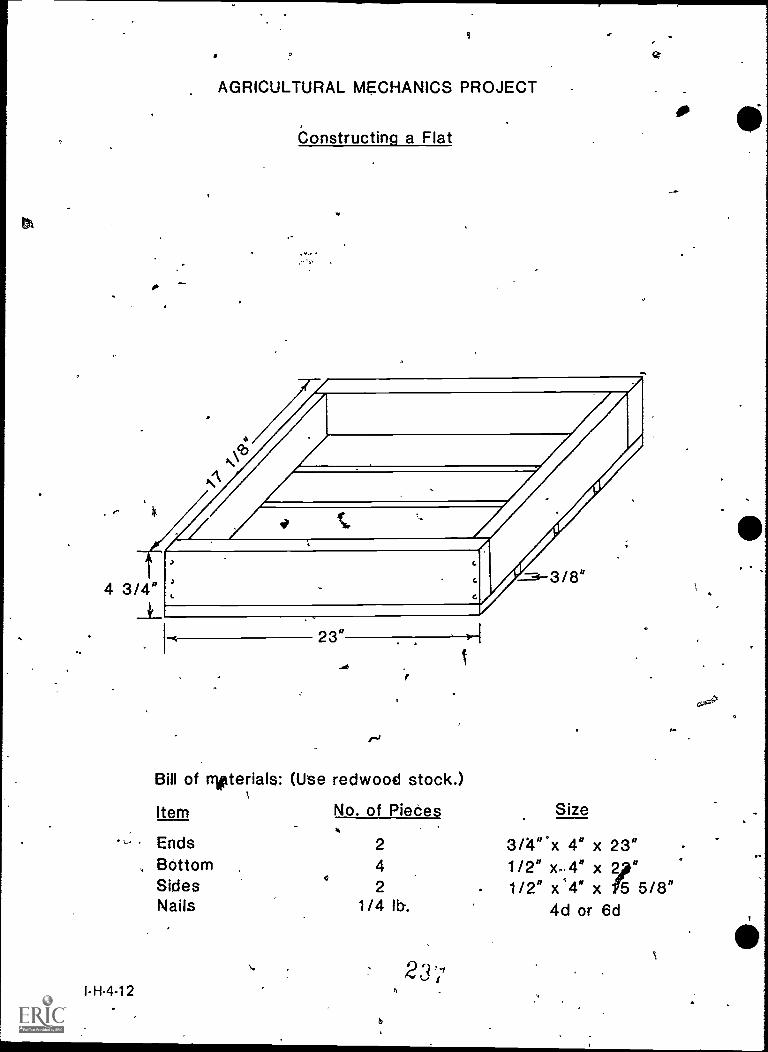
AGRICULTURAL MECHANICS PROJECT
Constructing a Flat
23"
-a*
Bill of rrotterials: (Use redwood stock.)
Item
EndsBottomSidesNails
No. of Pieces Size
2 3/4".x 4" x 23"4 1/2" x..4" x 2in2 1/2" x'4" x 5 5/8"
1/4 lb. 4d or 6d
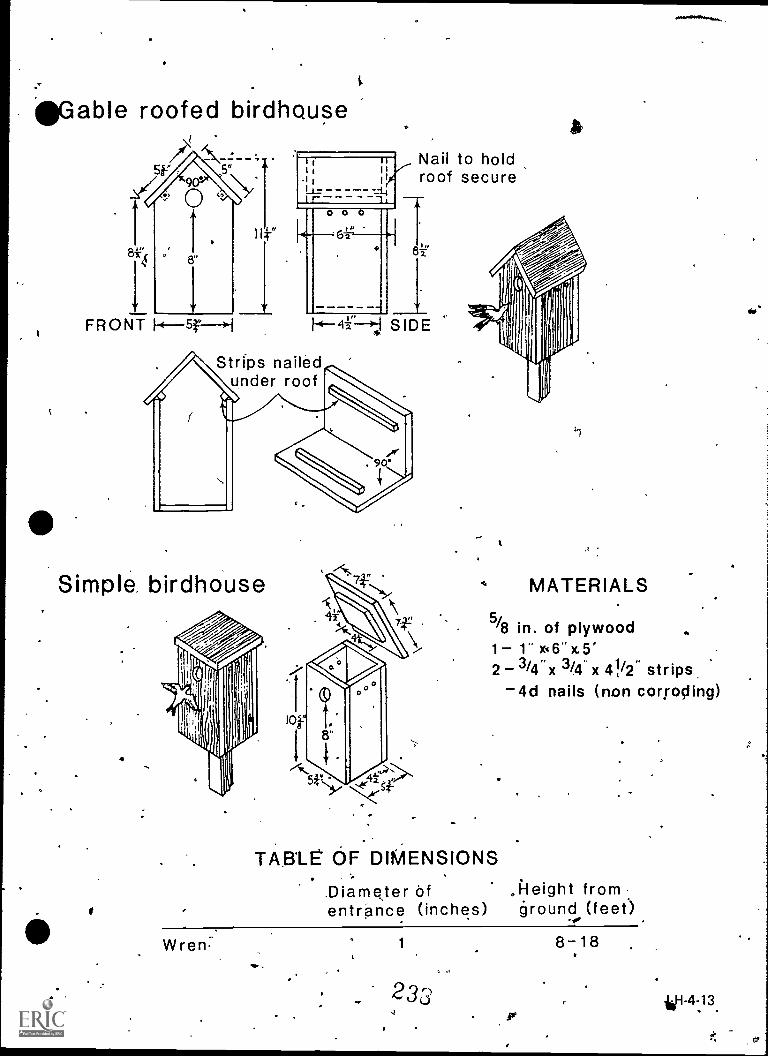
eGable roofed birdhQuse
FRONT 1-4-5f 0-I
iti 111-t it
r'--- -lt0 0 0
6122)
4
-------I
1
Nail to holdroof secure
1-4-4=0:-.I SIDE
Strips nailedunder roof
Simple birdhouse
V
4
105-
, .
MATERIALS
75/8 in. of plywood
411
2 3/4"x 3/4" x 41/2" strips_-4d nails (non corroding)
TAB5. OF DIMENSIONS. ...
.Diameter of ,Height fromentrance (inches) ground (feet
Wren: 1 8 -18
233
0
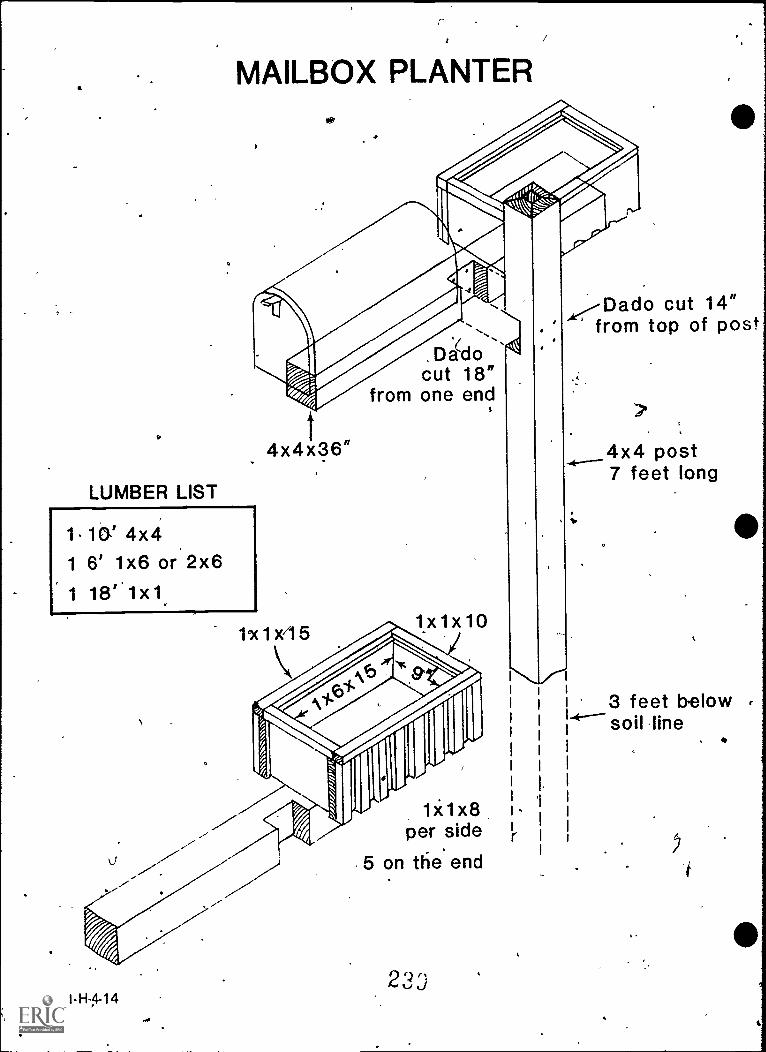
s.
LUMBER LIST
,
MAILBOX PLANTER
r
/
_DaC docut 18"
from one end
1.10! 4x41 6' 1x6 or 2x61 18'.1x1
)
t4x4x36°
tx1x/15
Dado cut 14"from top of post
4x4 post*------7 feet long
x x10
I-H14-14
to*
1i1x8per side
5 on the endr
3 feet below4---soil line
4
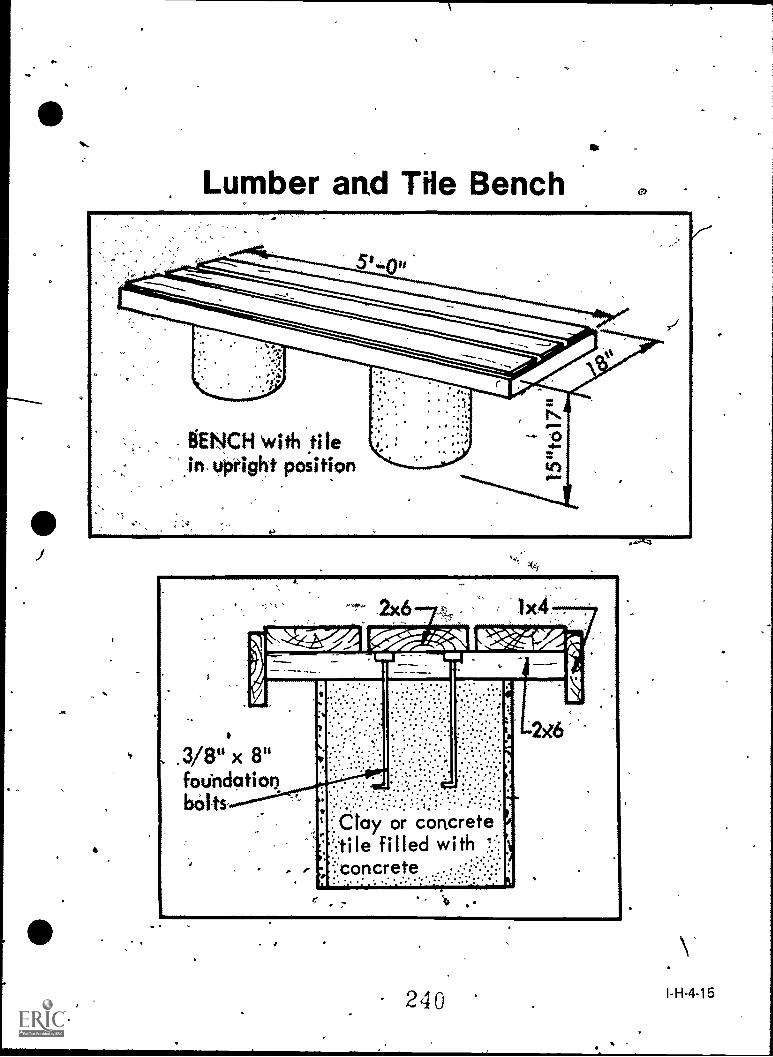
ge.
Lumber and Tile Bench
- WENCH with ti le',in uptight position
240 I-H-4-15
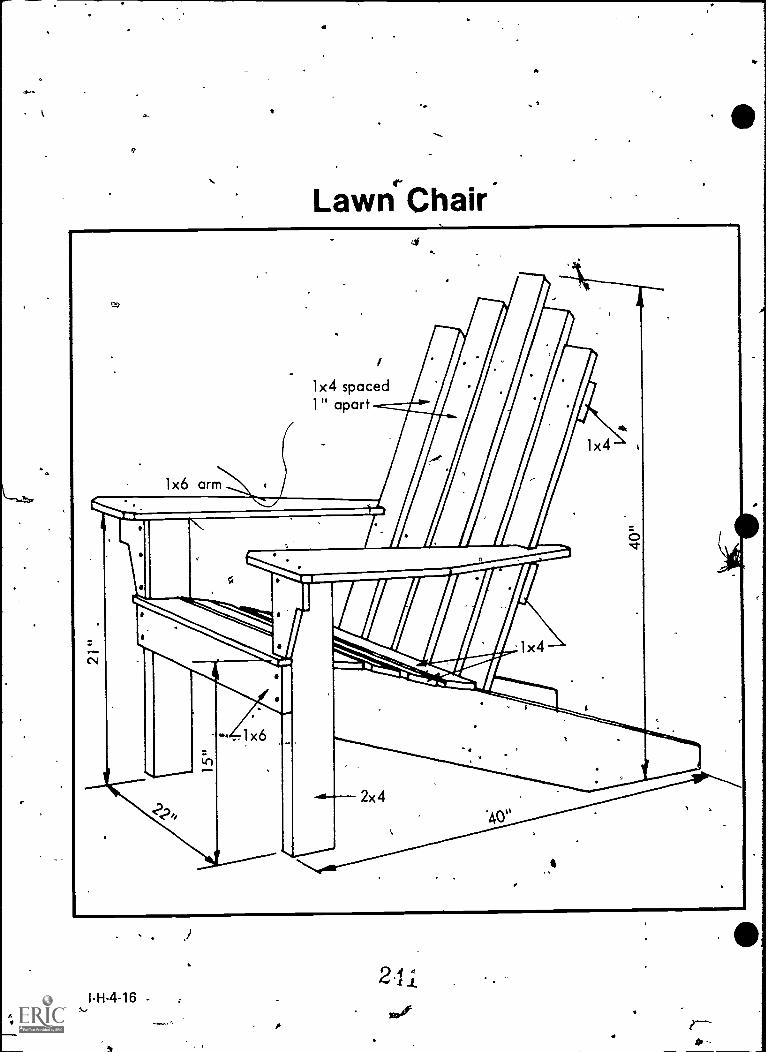
A
.
I
9
eLawn Chair
,
4
I-H-4-16 .
I
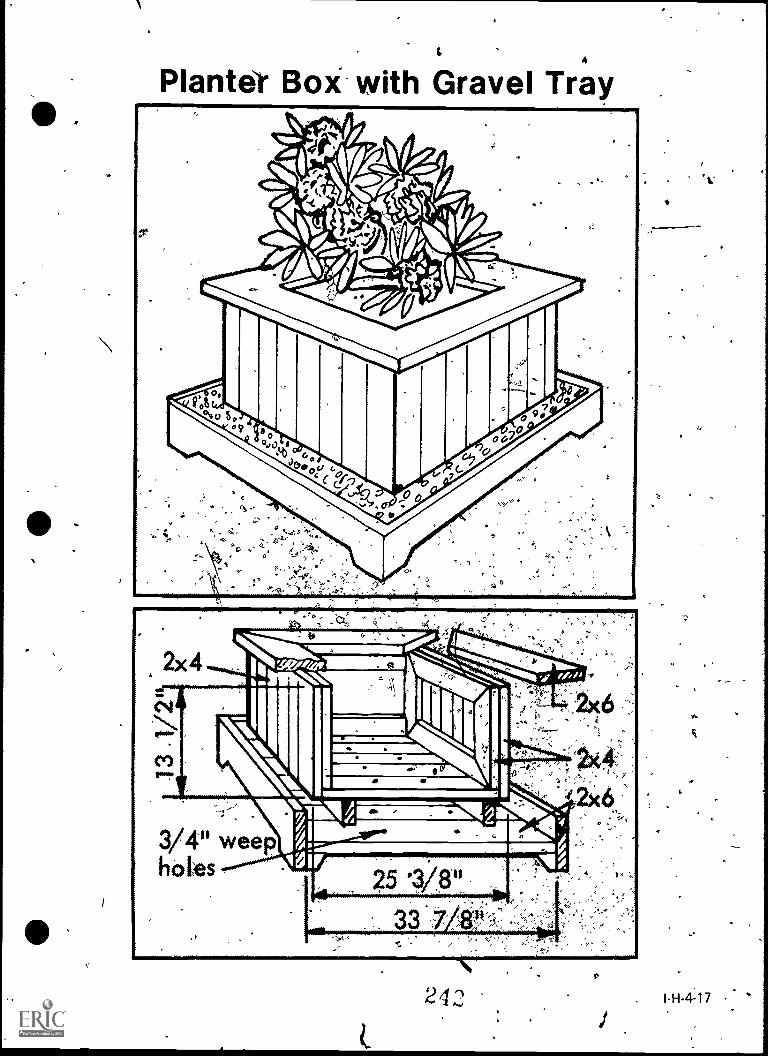
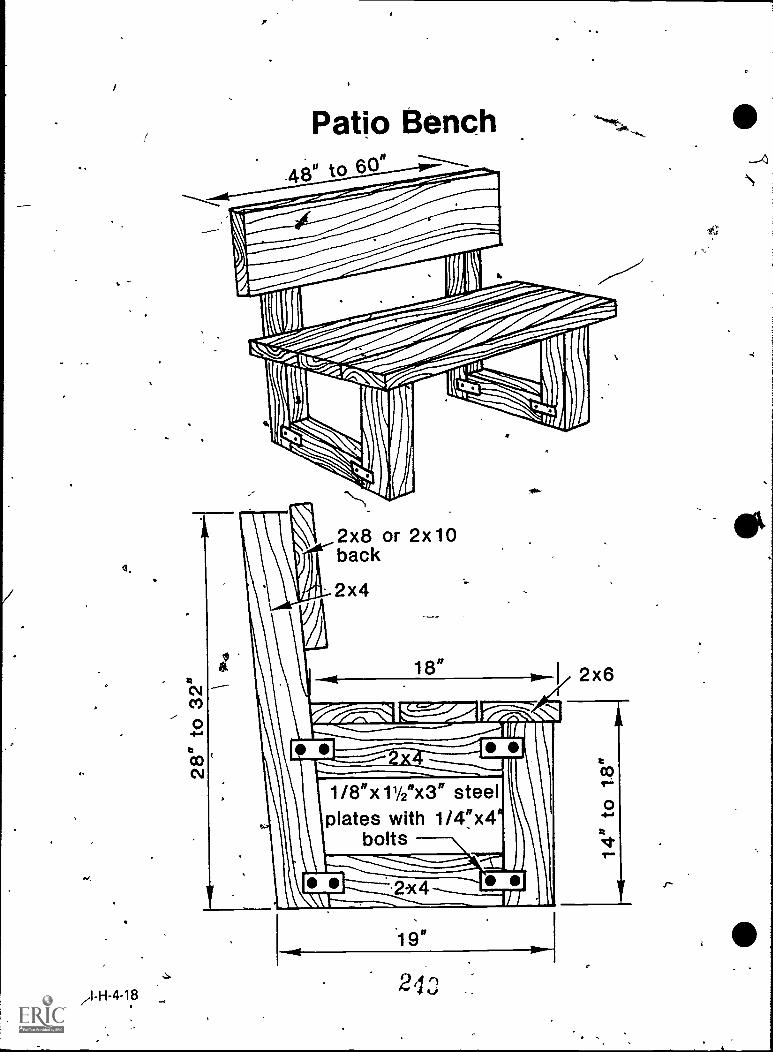
Patio Bench4 to 60" --------_
2x8 or 2x10back
2x4
18" 2x6
tco
2"Tt
.19"
2 13
J"`
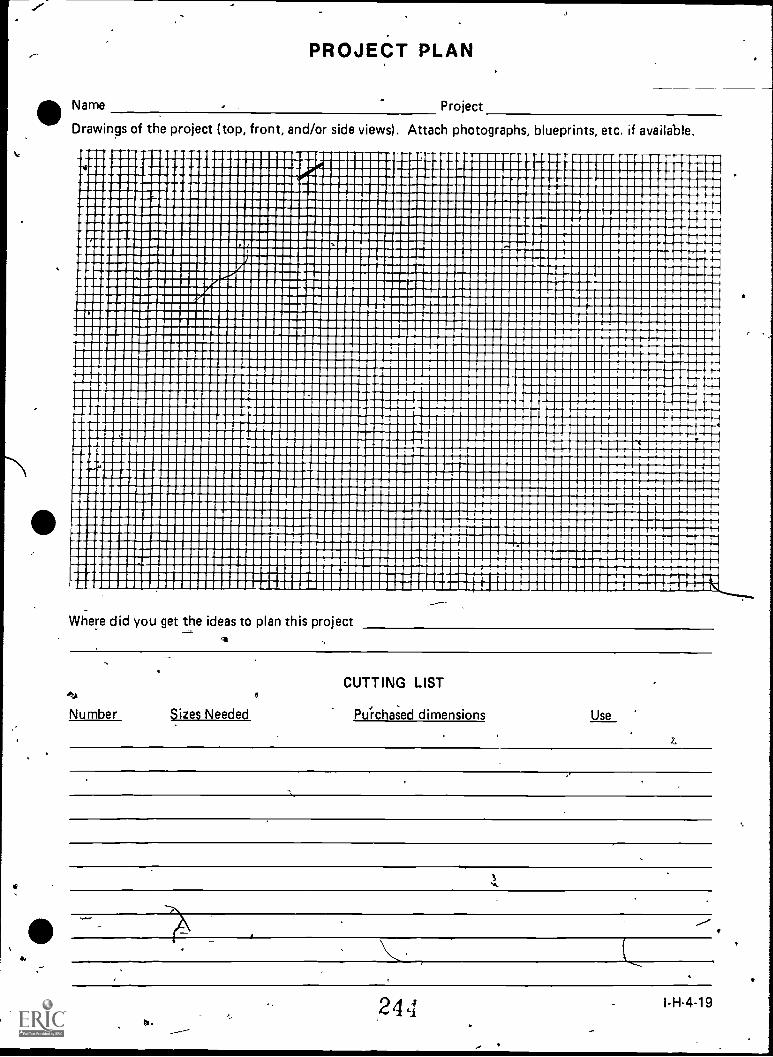
.
V
. . .
.
I .
o mmwmmpsmmmmmmmmmmmmmgwmmmmmmmmmmmmmmmmmmmmmmmmmmmmmmmsmmwmmsmmmmmwmms sammummommemmummommemmummaniummplimemmommummummommmummommumemmonsom will I mmumemuumammommommemmommommemommosommenummummommommummummomme go .mmumememmimusummessommossmommummummemmummommummommummsmassmssimmassrmsos Es mommummommomemmommemommumommoommommmummummimmommmommommummommmumms gm O UMMUMOUVOMMOOMOOMOOMMUMMOMOOMOMMEMEMIOMMOOMMWOOMMOOMOOMOOMOMMEMOOMMOOMOO MOM O NOONOMMEMOOMMOMMOMMEMOOMMOMMEMOOMOOMMEMOMMIOOMMEMOOMMOOMEMMENOMEMOOOME OEM ..wommemswommemmimmommosomummummismommilmmommommommummummumommommumm meg mmummummommommemimmimmummommommumummomommummonmemmulemmommommomm Emu OMUMWOWWMOEMEMMOOOOWNMEOWOOMOMOMOOMMIOMWNOMOEOOOMOMMOOOMOOUOMMMOMSOOEOO MOO immommommemmommommomummommmermsmossmemmommommenommommisommammommommm On MMOMMOMOOMMIO MRMOOMMOMORMOOMMOOMMOOMOMMEMOMOONEMOOMMOOONEOMOMOOMOOMMOOMMO OMM 00WOOMOUUMOMOMUMUMUNOOSMOOMMOOMMOOMMOMERROOMMOOMMOOOMMOROOMOOOMMOBEMOOMOI ONO NOMOMMOMMOMMOMMEOMOOMMOOMMOMOOMOMOOMOMMOOMOOMEMOOMOOOMMOOMMOOOMMOOMMOOOMM OMO MMOMMOMMOMMOONIOOMMOMENMEMEMMOOMMOMOMMOOMMOOMMOOMMOOMENOOMOONMOMOOMMOOMMOVOOM mMUUSOOMMOOMMOMOOMMOMMEMOOMNOMOOMOMOOMOOMMOOMEMOOOMOOMOOMOOMMOMOOOMMEMOISOMOMON OOMSOMMUMOOMMOOMMOOMMOMOMMOMMOMOMOMEMOOMMOOMEMOMMOOMEWOOMEMOOOMOOMEWOOMMOIr
=6OMMOSOMOOMMOSOMOMOOSOOMMOSOMMOMMOOMEMOOMMOOMMOOOMMOOMOMOOOMMOMOOMOM OM OMMEOMMOMMOOMMOOMMOMEMBOOMMEMOMOOMMEMOOSMOOMMEOOMOOOMMOOMOOMONOMMOMOMMOOMM MO
MOOMMOOMOOMOMMOMOOOMMEOMMOOMMOOMMENOMOOOMOOMMOOMMOOMOMMOOOMOOOMOROMO 11
MOMENOWEOMMOOMOMEMOOMOONEEMOMMOMMOOMMOOMMOMOOOMEMOOSOMMOOMMOOMM 8101
mammummumemmummommommommummommunumommusomommosimmesmommommeme ommassimmomosommemmummummommommimmommummommummeammammemummems MOM WIMMOMMEMENENUMOOMMONOMMOOMOOMOOMOMMOONOMOOMMOOMMOOMOOMOMMOS00 OOOMU ON MI MO OMMEMOOMOOMMOOMMOOSOOMOOMOOMOS MOM WOMOMMOONOMMEOMMOSOMMOMOSEMOOMORMOMMOMEMOOMOOMENEMOOMOOMEMOOMMOMMEM
OM gli IONEMEMOOMMIOOMEMOMMOMOMOOMOMONEWOMOSOOMOOMMOOMOOMOOMOOMOOMOOOOMMOOM0 OS SOMMOMOSOOOMMEMOOMMEMOOMMOONOMMOOMMOOOMOOMEMOMOMOSOMOODOEMOOMENMOUNOONO MOO MINUMMEMOOMMOMOOMMONOOMOOMMOOMOOMMOMENOOMOOMMEOMOMOOOMOOMOOMOOMOOMOOOMO0 SOO OMOUNIMUMUOMUOMMEROMMOOROMOOMOSOMMOMOUSOMMOOMMOSUMOMMUOMMOOMMOOMMOUROMOMOM OM f OM OMMOMOMMOOOMOOOSOMOOMOMMOOMOONOMOOOMOOMMOOMMEMEOMOOOMOOMOOMOOMMOOMEMMOOMO OM ommiummemommmummommummummemmemmummummormammemmemmommummommomm min ...mosammommosummommsommommommommummammommimmummummommiummossimm mms immemmommummommommimmemmommimmommommummomonsmommomernsmommemmorn Ens dommommemmommummmommomommummermemmummwomommimmomomommmmomm um
mommommummoommommimmemmommumwommommommuummommommemmommommommummilms mu MOMEMOOMMOOMMOMWOOMOOMMOOMOOOMMOOMOMMOOMMOMMOOOOMMOOMMOOMEMOKOMEMOONOOOMO Of MOMOMMUOMMOOMMOOMMOOMOMMOOMOMMOSOMOMOONOMMOOMEMOOOMMONOOMOOOMEMOMONOMOROOR0
us WMONOOMOOMOOMOOMMOMOOMOOSOMOKOOMMOOMOONO0 O OOMOOMMOOMOMOOMOMOOMOMOOMMOOOMMOOMEMOOOMOOMOOMECWOOOMOOMOOMMOOM OOMMOOMOOOMOMOMOMOOMOOMMOOMEMONOM Ol MOMOOPOOMOMOMOOMOOMOOOMOOOMOMOOMMOMOOMMOOMMOOMOOMEOPOOMNOMOMOOMOOMOOMOOMO O minummummommumminommimmummommommummummemommommommomommamommemmumemp
Of MOOMOOMMOOMOOOMMOOMOMMOMOMOOMBOOOONOMMOOMOOMCOOMOMOOMONUMWOOMOOOMMOOMOOOM OOMMOOONEMOOMOOOMOOOMOOMMOOMOONOWOOOMONEMOOMMOOMMOOMOOONOMOOMOOMOOOMOOMO OW lOWOOMMOOOMOOMMOOOMOOMOOOMMOOMOOMMOMOOMEOMMOOMMOMOOMMOOOMMOOMOOMOMMOOMO
U.S WOOMMOOMOSOMOOMOMOOMOMMOOMOOMOOMOOMOONOWOOMOOMMOOMEMOOMMOOMBOOOMOOOMMOOSO us
111 .1:19:11:::::::::1111:111111111::::11:11:11:11:1::::::::::::::::::::1111: 1 MOOD OMEMOOMOMOOOMMOMOW MOO OOMONO OOMONOMOOMOMOOMOOMOOOMOOMOOMOOmMOIOW
MOM O MEOW MOOMOOOMOOMOOMOMOI MOOOMMOOMOOPOOOOMMOOMOOMOOMOOMOOMOOMOOMOVOMO OM MO IONWOOMOMMOOOMOOPOOMOOOMOOR OMOOMMMOOPMMOOMMOOMMOOOPIOOMOOOMOOMOOOOMMOOMOOON O MOOVOMMOOMMOOMM MOMOMMOMMOMMUM giummemmummingemammommonsamomommummonsm mom mow 100MOSOOOMOOOMOOMOOOMOOMOOM OOMOOMOOMMOOPOOONOOMO/nagOOOOOOMMOOMOOOOOMOOOOM I
O 555 MO OM MO MOO NO MOMMOOMONOOMMOOOMOO SOON SONO 111 O
.. 5. I. : .
.
V . .
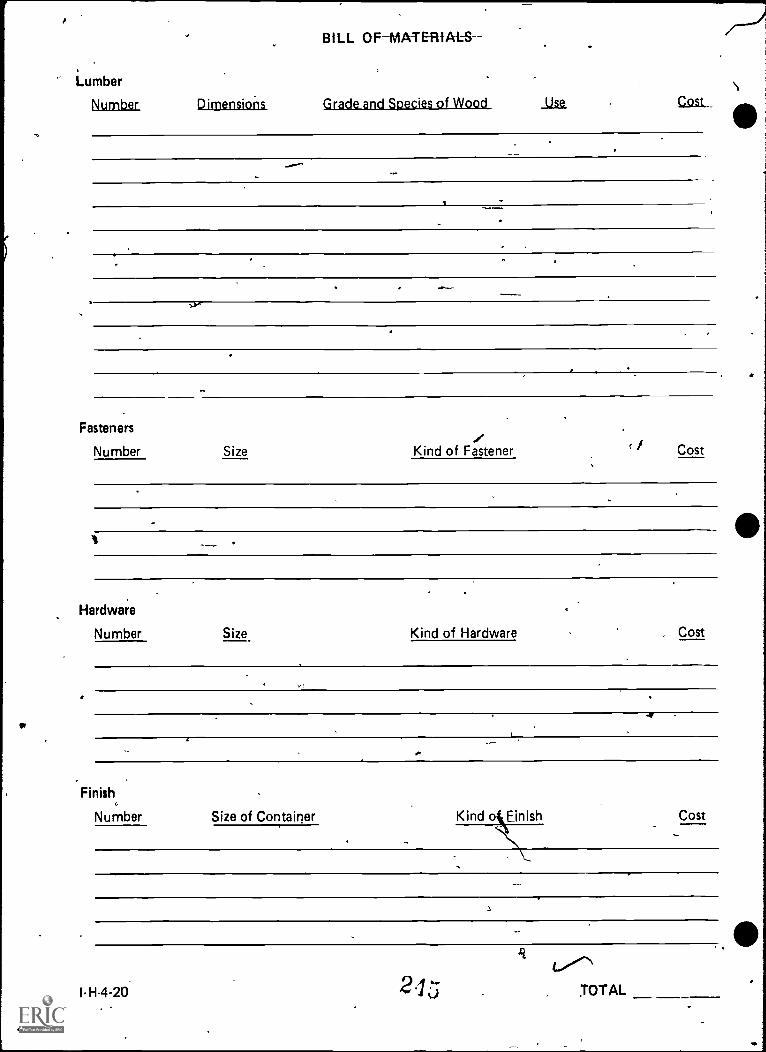
Lumber
Number
BIL L-0 F-MATERIALS
Dimensions Grade and Species of Wood Use Cost
'
Fasteners
Number Size Kind of Fastener Cost
Hardware
Number Size Kind of Hardware . Cost
41,
Finish
Number Size of Container Kind o Finish Cost
I-H4-20 TOTAL
e."
v
CONSTRUCTION PROCEDrE
(Steps in making the Project)
e
V -,_.,
1 JO
,:
. fi"--,t.
i.
4:
1
110
414
.,
..
f--
. . .
24G
ia .,
r"---- .
(- 1-H-4-21
AGRICULTURE MECHANICS DAILY PERFORMANCE REPORT
Name Date.
I. Problem Area (prOject)
A. Job skill performed today: Circle One
1, individual or group
2, individual or gro
3. individual or group
B. Difficulties encountered today:
1. unsolved or solved
2. unsolved or solved
3. unsolved or solved
Plans for tomorrow:
1.
2.
D. Today I feel I accomplished the following grade:
Circle one A B C D F
"1.
cutting line
Name
a.
AGRICULTURE MECHANICS 'DALLY PERFORMANCE REPORT
Date
I. Problem Area (project).
A. Job skill performed today: Circle One
1. individual or group
,2. individual or group4
3. individual or group
B. Difficulties encountered today:
1. unsolved or solved
2. unsolved or solved
3. unsolved or solved
C. Plans for tomorrow:
1.
2.
D. Today I feel I accomplished the following grade:
Circle one r A B C D F.
I-14-22 ° 2 1"
1'
STUDENT EVALUATION(To be filled out when project is bompleted)
Name Project
What do you like about your finished project?
How could you have done a better job?
What would you change if you, Were going to make another project like this oneo
What grade do you feel you deserve for this project?
INSTRUCTOR EVALUATION
Based on planning, use of time, and quality of workmanship)
well was project planned: (drawings, cutting fist, bill of materials, and contruction procedure)
Did the student make go'od use of shop time?
Does the finished project show quality workmanship? (Is it square? Is it level? etc.)
How could the project be improved?
243Project Grade
I-H-4-23

TEACHER'S KEYSUGGESTED TEST QUESTIONS
DEVELOPING BASIC CARPENTRY SKILLS
COmpletion Section
1. Two'main classes of trees are the
broadleaf or hardwood
needleleaf or softwood and tfie
2. Wood from the inner part of a limb or frunk of a tree is called heartwood
and wood from the outer portion is called sapwood
3. A defect in a board which is actually the,tross section of a linib is called a knot
4. o general grades Of softwoods are select and common
5. Four types of lumber commonly used in agricultural construction are dimension
lumber common boards finish lumber
and pattern lumber
6. Finish nails are used where4er you do not want nail heads showing in thewJ
completed project.
7. Nails.will be less likely to bend if you lubricate the point with soap,
wax o$Cil
8. To prevent marring project wood when pulling a bent nail, place a wood block
under the claws of the hammer.
9, A six penny nail (6d) is
10. Box nails are smaller
- two inche's long..
in diameter than common nails.
11. Three commonly shaped screw heads are oval flat
and round
12i Carriage bolts have a round head.
13. Stove bolts have a flat or round head:
14. ,A properly glued wood joint is stronger than the wood itself.
15. To hold twoboards together while the glue is drying, use clamps
. if possible.
a
24L°
TrueFalse Section
T 1. Driving a series of nails in a straight line parallel to the grain may cause splitting.
T,
F
2. Screws hold wood more securely than nails.
3. Strews are usually cheaper than nails.
T-2,..
4. If you buy a 2" x 4- finished piece at the lumber yard you will find that itMeasures about 1 5/8 x 3 1/2. ,
F 5. When drilling a hole for a wood screw, you should drill a hole equal to thediameter of the screw.
T 6. Cedar wood is resistant to decay.
F 7. Oak is very easy to work.
__T 8. A board 1" x 12' x 12' contains 144 board feet.
F 9. A 6d (six penny) nail is 6" long.
T 10. Stove bolts are threaded their full length.
Classification Item
1. Classify the following woods as hard or soft by checking the appropriate blank:
Wood
OakElmWhite PineCedarMapleRedwoodWalnut.AshDouglas FirCypressHickory
Hard
\XX
X
XX
X
a
Soft
XX
X
xx
Multiple-Choice Section
b 1 A board one inch thick, six inches wide, and sixteen feet long equals
a. four board feetb. eight board feetc. sixteen board feet
a 2 The symbol for'lumber st faced on one side is
I-H-4-26
a. SISb. S2Sc, S1 E
d. S2E
0 ..
25u
/

Multiple-Choice Section (cont.)
3, Machine bolts have
a. Square holesb. Hexagonal headsc. Round headsd. Square or hexagonal heads
b 4. Two pieces of wood glued together with a good glue form a bond that is
b
a. Weaker than When nailedb. Stronger than when nailedc. The same as a nailed bond
5. The length of an eight penny nail is
a. 8"b. 21/2''
c. 2"
251
I-H-4.27