docave content shield for sharepoint user guide 2010 docave: content shield getting started the...
TRANSCRIPT
1
DocAve: Content Shield
User Guide
For SharePoint 2010
DocAve® Content Shield
v2.2 for SharePoint
Revision A
Issued August 2012
2
DocAve: Content Shield
Table of Contents
Table of Contents .......................................................................................................................................... 2
About DocAve Content Shield for SharePoint .............................................................................................. 4
Complementary Products ......................................................................................................................... 4
Before You Begin ........................................................................................................................................... 5
Configuration ............................................................................................................................................ 5
Agents ................................................................................................................................................... 5
Installing Content Shield for SharePoint ................................................................................................... 6
Local Installation ................................................................................................................................... 6
Remote Installation On Web Front-end Servers ................................................................................... 7
Getting Started .............................................................................................................................................. 8
Accessing Content Shield for SharePoint .................................................................................................. 8
Licenses and Settings .................................................................................................................................... 9
Applying License to SharePoint Central Administration Server ................................................................ 9
Applying License(s) to Web Front-end Server(s) ...................................................................................... 9
Configuring a Database ........................................................................................................................... 10
Connecting to an existing database .................................................................................................... 10
Creating a new database .................................................................................................................... 11
Configuring Global Settings ..................................................................................................................... 11
Configuring E-mail Profile ....................................................................................................................... 12
Configuring E-mail Settings ..................................................................................................................... 13
Edit Mail Template .............................................................................................................................. 13
Using Content Shield ................................................................................................................................... 14
Filter Dictionaries .................................................................................................................................... 14
Creating a Content Dictionary ............................................................................................................. 14
Creating a File Type Dictionary ........................................................................................................... 15
Scan Engines ............................................................................................................................................ 16
Creating a Scan Engine ........................................................................................................................ 16
Policies .................................................................................................................................................... 17
Creating a Policy .................................................................................................................................. 17
3
DocAve: Content Shield
Filters....................................................................................................................................................... 22
Real-Time Filters ................................................................................................................................. 22
Scheduled Filters ................................................................................................................................. 24
Reports ........................................................................................................................................................ 27
Risk Reports ............................................................................................................................................ 28
Restoring and Deleting Files ....................................................................................................................... 29
Appendix A .................................................................................................................................................. 31
HIPAA Dictionaries .................................................................................................................................. 31
Business................................................................................................................................................... 31
Credit Card Number ................................................................................................................................ 31
Date ......................................................................................................................................................... 31
E-mail Address ........................................................................................................................................ 32
Fax Number ............................................................................................................................................. 33
General .................................................................................................................................................... 33
Government ............................................................................................................................................ 33
Healthcare ............................................................................................................................................... 33
IP Address ............................................................................................................................................... 33
Social Security Number ........................................................................................................................... 34
URL .......................................................................................................................................................... 34
US Address .............................................................................................................................................. 34
US Phone Number ................................................................................................................................... 35
Vehicle Identification Number ................................................................................................................ 35
Appendix B .................................................................................................................................................. 36
Document Risk ........................................................................................................................................ 36
Risk Summary .......................................................................................................................................... 37
Appendix D .................................................................................................................................................. 38
Index ............................................................................................................................................................ 40
Notices and Copyright Information ............................................................................................................ 43
4
DocAve: Content Shield
About DocAve Content Shield for SharePoint
DocAve Content Shield is a cost-effective and reliable solution for the prevention of non-business-
appropriate activity on WSSv3, SharePoint 2007, and SharePoint 2010 platforms. With both real-time
and scheduled content scanning, organizations can define exactly how and when content is vetted. Fully
customizable quarantine and e-mail notification options empower administrators to align DocAve
Content Shield’s powerful functionality with preferred business processes. With DocAve Content Shield,
organizations can establish a culture of proactive, preventative, automated compliance for their
Microsoft SharePoint 2007 and 2010 environments.
As with all AvePoint software, Content Shield for SharePoint leverages only fully supported Microsoft
methodologies and API’s.
Complementary Products
Many products and product suites on the DocAve 6 platform work in conjunction with DocAve Content
Shield for SharePoint. The following products are recommended for use with DocAve Content Shield for
SharePoint:
DocAve Content Manager – Rather than configuring a Content Shield Policy to block specific content, you may choose to only tag the content without blocking it from SharePoint. Once the content has been tagged, search for all content with that tag in Content Manager, and then move to the content to the desired location.
DocAve Replicator – Rather than configuring a Content Shield Policy to block specific content, you may choose to only tag the content without blocking it from SharePoint. Once the content has been tagged, search for all content with that tag in DocAve Replicator, and then configure the desired node to replicate the content to.
5
DocAve: Content Shield
Before You Begin
The DocAve Content Shield for SharePoint can perform real-time scans of uploaded SharePoint content
and of content already stored in SharePoint content databases based on pre-populated keyword
dictionaries and custom filters. It is fully integrated into SharePoint’s Central Administration, where you
can deploy and manage your filters on your SharePoint Web Front-end (WFE) servers quickly and easily.
Access to this tool is restricted to only the SharePoint farm administrator.
Refer to the Configuration section for system and farm requirements that must be in place prior to
installing and using DocAve Content Shield for SharePoint.
*Note: If you want to filter the files which created by Microsoft Office 2007 or above, the Microsoft
Office iFilter pack must be installed on the SharePoint FEWs. You can download this pack here.
Configuration
SharePoint WFE and SharePoint Central Administration Server must be running on:
Microsoft Office SharePoint Server 2010 or Microsoft Office SharePoint Foundation Server 2010
Windows Server 2008
*SQL Server 2005 SP1, SQL Server 2008, or SQL Server 2008 R2
.NET Framework v2 or higher
*Note: DocAve Content Shield for SharePoint cannot be installed on a stand-alone SharePoint server
with a built-in SQL Server. DocAve Content Shield for SharePoint requires an external SQL Server be
present in order to operate.
Agents
Like all DocAve products, DocAve Content Shield for SharePoint runs in a Manager/Agent configuration.
This configuration requires that the Manager be installed in the SharePoint Central Administration and
the Agents deployed to all SharePoint Web Front-ends (WFE) where users are able to create or upload
content. By ensuring that the Agents have been deployed to all WFEs you can provide full protection for
your farm.
6
DocAve: Content Shield
Installing Content Shield for SharePoint
Once you have downloaded the DocAve Content Shield for SharePoint.zip file, unzip the package on
your SharePoint Central Administration Server.
Before running the Installation Wizard for Content Shield for SharePoint, note the following crucial
requirements:
Any and all previous version of Antivirus or Content Shield must be uninstalled prior to proceeding with the installation of Content Shield v2.1 for SharePoint.
You must run the Installation Wizard on the SharePoint Central Administration server first. This will allow for remote installation of DocAve Content Shield for SharePoint onto other WFE servers.
*Note: When you have DocAve Content Shield for SharePoint and DocAve Antivirus for Microsoft
SharePoint installed in the SharePoint Central Administration, if you uninstall the DocAve Antivirus for
Microsoft SharePoint from the SharePoint Central Administration, DocAve Content Shield for SharePoint
will be uninstalled simultaneously.
When you are ready to install Content Shield for SharePoint, run the setup.exe file found in the unzipped
directory. There are two ways to install DocAve Content Shield for SharePoint. You may install directly
on each Web Front-end server, or install on the server running SharePoint Central Administration and
deploy to the Web Front-end servers.
Local Installation
For local installation, follow the instructions below:
1. Run the setup.exe file.
2. Enter your Name, Company Information, and for a Directory Location to install this software.
3. A dialog box will pop up with the following message:
The upload page file in SharePoint LAYOUTS folder is required to be replaced because of the DocAve Content Shield for SharePoint real-time feature. Are you sure you want to replace it?
a. Click Yes to replace the upload.aspx file in SharePoint with the one used by Content Shield’s Real-Time Filter. The upload.aspx file used by Content Shield provides your SharePoint users information when the file(s) they attempt to upload are blocked by Content Shield.
b. Click No to not replace the upload.aspx file in SharePoint. You will receive the following message:
7
DocAve: Content Shield
The installation will not be completed and it may impact the usability of DocAve Content Shield for SharePoint real time feature. Are you sure you want to continue the installation? Click OK to continue the rest of the installation without replacing the upload.aspx file in SharePoint or click Go Back to return to the previous interface. *Note: While you may finish the installation without replacing the upload.aspx file, you may encounter errors when attempting to edit non-compliant documents that were blocked by the Real-Time Filters with the option Include file in place with error message enabled.
*Note: If the upload.aspx file in a site is changed using SharePoint Designer or other custom upload.aspx files are used before installing DocAve Content Shield for SharePoint, you may encounter errors when attempting to edit non-compliant documents that were blocked by the Real-Time Filters with the option Include file in place with error message enabled.
*Note: The upload.aspx file will revert to the default SharePoint upload.aspx file when you uninstall DocAve Content Shield for SharePoint.
4. After installing the tool, you will be prompted to Restart IIS* in order to complete the installation. You can choose to reset IIS later by selecting No.
*Note: The IIS reset does not immediately restart the IIS service, but performs a “no-force” reset of the IIS processes. Any processes currently running will be allowed to finish before this reset takes place. If you choose to reset IIS at a later time, the installation will not be completed until it is reset.
Remote Installation On Web Front-end Servers
For remote installation, run the setup.exe file on the SharePoint Central Administration server. Once it
has been installed, go to Central Administration and navigate to DocAve Content Shield for SharePoint
> Front-end Settings. Select the Web Front-end server(s) you wish to install Content Shield on by
checking the corresponding checkbox(es) then click Deploy Now on the ribbon.
*Note: The Web Front-end server you wish to install Content Shield on using this method must be
connected to Central Administration and running.
8
DocAve: Content Shield
Getting Started
The DocAve Content Shield for SharePoint interface is accessed through Central Administration of
SharePoint. This user guide is specifically tailored to the Central Administration interface of SharePoint
2010. For instructions on using DocAve Content Shield for SharePoint specifically tailored to the Central
Administration interface of SharePoint 2007, see the DocAve Content Shield for SharePoint 2007 User
Guide.
Accessing Content Shield for SharePoint
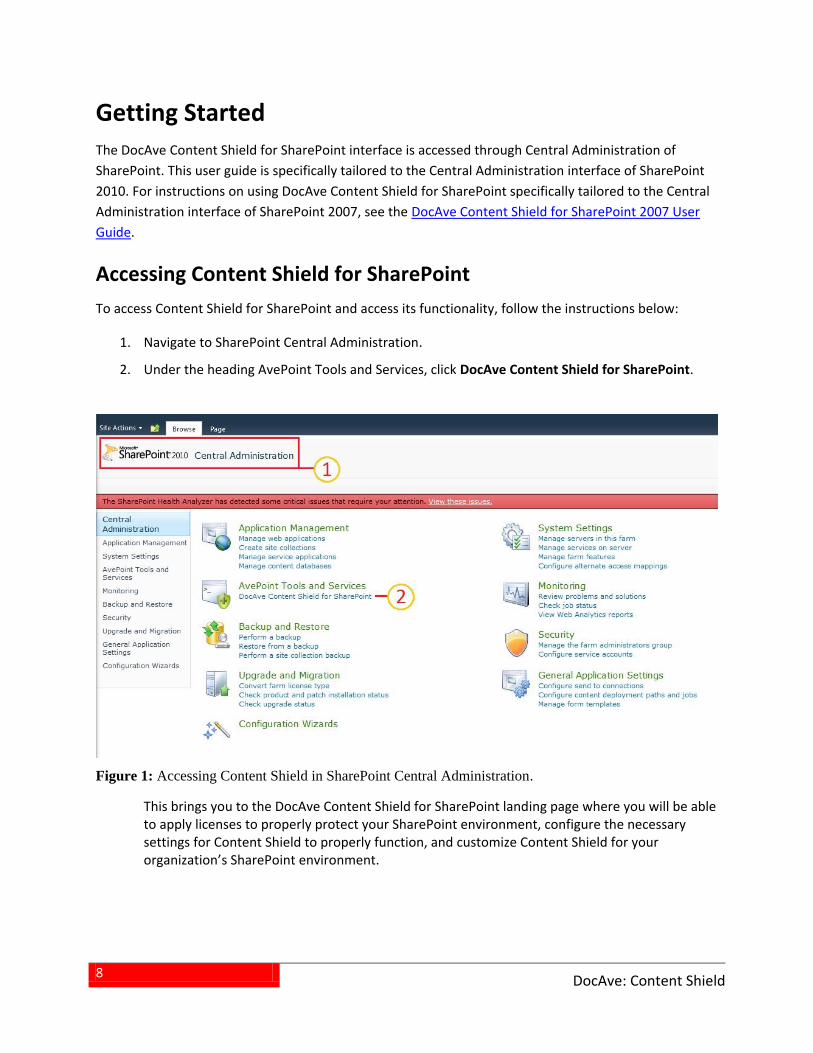
To access Content Shield for SharePoint and access its functionality, follow the instructions below:
1. Navigate to SharePoint Central Administration.
2. Under the heading AvePoint Tools and Services, click DocAve Content Shield for SharePoint.
Figure 1: Accessing Content Shield in SharePoint Central Administration.
This brings you to the DocAve Content Shield for SharePoint landing page where you will be able to apply licenses to properly protect your SharePoint environment, configure the necessary settings for Content Shield to properly function, and customize Content Shield for your organization’s SharePoint environment.
9
DocAve: Content Shield
Licenses and Settings
In order for Content Shield to properly protect your SharePoint environment, you must first configure
the following:
1. Apply the Content Shield license(s) you have purchased to your SharePoint Central Administration server and Web front-end servers.
2. Configure a database for Content Shield to connect to. DocAve Content Shield for SharePoint requires an application database to store its settings and configurations. We recommend that you use an application database that is deployed to the same instance as your SharePoint. However, it is possible to use an application database that is deployed to another SQL instance in your network’s domain.
3. Configure General Settings for performance and troubleshooting.
4. Configure E-mail Profiles which are used to notify the designated recipients when a Content Shield Filter finds violating content.
5. Configure E-mail templates to customize the notification messages.
Applying License to SharePoint Central Administration Server
To apply a license to the SharePoint Central Administration server, follow the instructions below:
1. On the DocAve Content Shield for SharePoint landing page, click Front-end Settings.
2. Click Browse in the License Management section to select the Content Shield license file from your local drive.
3. Click Apply. After applying the Content Shield license to the Central Administration server, license information including the license type, the license usage time, the expiration time, and the maximum number front-end web servers allowed by the license will be displayed under the License Management section.
Applying License(s) to Web Front-end Server(s)
To apply a license to a Web front-end server, follow the instructions below:
1. On the DocAve Content Shield for SharePoint landing page, click Front-end Settings.
2. Select the Web Front-end server you wish to apply a license to by checking the corresponding checkbox.
3. Click Apply License on the ribbon.
10
DocAve: Content Shield
Configuring a Database
Content Shield requires an application database for storing settings and configurations. You may
connect to an existing database, or create a new one. While you may configure the database for Content
Shield to your preference, we recommend the following:
Use an application database that is deployed to the same instance as your SharePoint. While it is possible to use an application database that is deployed to another SQL instance in your network’s domain, since Content Shield is integrated with SharePoint, using the same SQL instance as SharePoint can ensure the SharePoint farm administrator has the required permission to access the SQL instance.
Only choose to connect to an existing database if you have a database that was previously created by DocAve Content Shield for SharePoint.
If you are upgrading from DocAve Content Shield for SharePoint 1.3 to DocAve Content Shield for SharePoint 2.1, and wish to connect to the same database that was used by version 1.3, the database must first be upgraded. After you upgrade the database, the policy name displayed in version 2.1 will follow this format: policyname_enginename (The engine name will be appended to the policy name according to the filter plans configured in version 1.3.).
To configure the database for Content Shield, on the DocAve Content Shield for SharePoint landing
page, click Application Database. If a database has not been specified for Content Shield, a popup will
appear to prompt you to do so.
Connecting to an existing database
To connect an existing database, follow the instructions below:
1. In the Select Application Database Type section, select Connect to an existing database from the drop-down menu.
2. In the Database Name and Authentication section, configure the following settings:
Database Server – Enter the database server address of the database server you wish to connect to.
Database Name – Enter the name of the database you wish to connect to on this server.
Database Authentication – Select the authentication method to use. We recommend that you choose Windows authentication. If SQL authentication is selected, you must then enter the Account and Password to access the database with.
3. Click OK to create a new database.
11
DocAve: Content Shield
To configure the database for Content Shield, on the DocAve Content Shield for SharePoint landing
page, click Application Database. If a database has not been specified for Content Shield, a popup will
appear to prompt you to do so.
Creating a new database
To create a new database for Content Shield, follow the instructions below:
1. In the Select Application Database Type section, select Create a new database from the drop-down menu.
2. In the Database Name and Authentication section, configure the following settings:
Database Server – Enter the database server address of the database server you wish to create the new database on.
Database Name – Enter the name of the database you wish to create on this server.
Database Authentication ‒ Select the authentication method to use. We recommend that you choose Windows authentication. If SQL authentication is selected, you must then enter the Account and Password to access the database with.
3. Click OK to create a new database.
Configuring Global Settings
Global Settings affect the performance of Content Shield as well as the amount of storage it needs. Here
you can also configure log settings for Content Shield Filters and reports, and the DocAve Content Shield
for SharePoint System Log Settings. Logs contain crucial information that may be useful to our support
team when assisting you in troubleshooting any issue you may encounter when using DocAve Content
Shield for SharePoint. To configure these settings, on the DocAve Content Shield for SharePoint landing
page, click Global Settings. Configure the following settings:
Number of Threads – Specify the number of threads DocAve Content Shield for SharePoint will use when performing a scan. The more threads used the less time a scan takes, but may increase the performance load.
Content Filter Log and Report Settings – The Content Filter Log contains Content Shield job process information such as page redirect, filter job information, scanned file information and error messages. Configure the following settings for this log:
o Log Level – Select the Log Level for the Content Filter Log to display in the Event Viewer. Select Error, Warning, Info or Debug from the drop-down menu. If Error is selected, only the log at Error level will be displayed in the Event Viewer. If Warning is selected, the log of Warning level and Error level will be displayed in the Event Viewer. If Info is selected, the log of Info level, Warning level, and Error level will be displayed in the
12
DocAve: Content Shield
Event Viewer. If Debug is selected, the log of Debug level, Info level, Warning level, and Error level will be displayed in the Event Viewer.
o Maximum Storage Time – Select the amount of time to store a report before it is deleted.
DocAve Content Shield for SharePoint System Log Settings – Select the log level for Content Shield’s system log. Select Error, Warning, Info or Debug from the drop-down menu. If Error is selected, only the log at Error level will be displayed in the Event Viewer. If Warning is selected, the log of Warning level and Error level will be displayed in the Event Viewer. If Info is selected, the log of Info level, Warning level, and Error level will be displayed in the Event Viewer. If Debug is selected, the log of Debug level, Info level, Warning level, and Error level will be displayed in the Event Viewer.
When you are finished configuring these settings, click OK to save the settings and then click Cancel to
return to the DocAve Content Shield for SharePoint landing page.
*Note: If you are experiencing any issues with this product, we recommend that you set all log levels to
Debug before contacting AvePoint technical support.
Configuring E-mail Profile
E-mail Profiles are used to specify which user(s) to notify when a Content Shield scan job finds a
violation, or when a report is generated after a scan completes, depending on how the Content Shield
filter is configured.
To configure E-mail Profiles, on the DocAve Content Shield for SharePoint landing page, click E-mail
Profile. Any previously configured E-mail Profiles will be displayed here. You may change the number of
E-mail Profiles displayed, as well as the order they are displayed in. To change the number of E-mail
Profiles displayed, select the desired number from the Size drop-down menu in the upper right-hand
corner. To sort the E-mail Profiles, click on a column heading such as Profile Name or Sender.
To create a new E-mail Profile, click New Profile on the ribbon. To modify a previously configured E-mail
Profile, select the E-mail Profile then click Edit on the ribbon. In either the Create E-mail Profile interface
or the Edit E-mail Profile interface, configure the following settings:
E-mail Profile Name – Enter the desired name for this E-mail Profile.
SMTP Mail Server – Enter your Microsoft Exchange Outgoing Mail Server (SMTP) host or IP address, and specify the corresponding port for it. The default SMTP port number for most environments is 25. Check the E-mail Server Authentication if you have configured authentication for this mail server, and enter the appropriate User Name and Password.
Sender – Enter the e-mail address you wish the e-mail notifications to be sent from.
13
DocAve: Content Shield
Recipients – Enter the desired recipients of the e-mail notifications when this E-mail Profile is used. If entering multiple recipients, enter each recipient in a new line.
When you have finished configuring the E-mail Profile, click OK; This will test the configurations you have entered and save the E-mail Profile if all of the information entered is valid. A test e-mail will be sent to the e-mail address you have configured as the Recipients. Click Cancel to return to the E-mail Profile page without saving the configurations.
*Note: Please ensure that the account used to send e-mails is not in the profile’s recipients list. This will
cause an error in the messaging system.
Configuring E-mail Settings
E-mail Settings allow you to configure E-mail Templates for notifications tailored to each Content Shield
filter types so that you can customize what information is included when notifications are sent out.
The e-mail templates come pre-configured with default selections and messages. To configure E-mail
settings, on the DocAve Content Shield for SharePoint landing page, click E-mail Settings. There are two
e-mail templates that can be configured; Real-Time Filter Notification Settings and Scheduled Filter
notification settings. Click the Edit Mail Template hyperlink to edit the e-mail template for the
corresponding filter type.
Edit Mail Template
You can modify the following settings:
Subject – Enter the subject name of the e-mail notification for the e-mail template.
o Add Keywords – Select the keywords to include from the drop-down menu, and then click Add. The selections here will pull information from the report and include it in the subject.
Message Body – Customize the body of the e-mail notifications for this filter type.
o Add Keywords – Select the keywords you wish to include in the body of the e-mail from the drop-down menu, and then click Add. The selections here will pull information from the report and include them in the body of the e-mail.
When you have finished customizing the e-mail template, click OK to save, or click Cancel to return to the previous interface without saving any changes.
14
DocAve: Content Shield
Using Content Shield
DocAve Content Shield for SharePoint functions based on the following key elements:
Filter Dictionaries – Create customizable Filter Dictionaries used to define violating content.
Scan Engines – Create and customize Scan Engines with any combination of Filter Dictionaries so that they can each be used to target a specific set of violations.
Content Shield Policies – Create and customize Content Shield Policies which define the actions to take on violations found by a Scan Engine.
Filters (Real-Time or Scheduled) – Create and customize Filters which limits where in the SharePoint environment to apply a Policy to. The Scan Engine of that Policy will search the Scope selected in the Filter using the Filter Dictionaries of that Scan Engine.
Filter Dictionaries
In order for Content Shield to find violations, you must first define what your organization considers
violations to be. There are two types of Filter Dictionaries:
Content Dictionaries – A Content Dictionary is used to filter out items with content violations. You may define content violation with words, phrases and regular expressions.
File Type Dictionaries – A File Type Dictionary is used to filter out specific file types. You may define file type violation with the File Extension or the File Header.
To access Filter Dictionaries, on the DocAve Content Shield for SharePoint landing page, click Filter
Dictionaries. Any previously configured Filter Dictionaries will be displayed here. You may change the
number of Filter Dictionaries displayed, as well as the order they are displayed in. To change the number
of Filter Dictionary displayed, select the desired number from the Size drop-down menu in the upper
right-hand corner. To sort the Filter Dictionaries, click on a column heading such as Dictionary Name,
Category, Word Count or Dictionary Type.
To delete any Filter Dictionary(ies), check the corresponding checkbox(es) of the Filter Dictionary(ies)
and click Delete on the ribbon.
To see a list of basic keywords and regular expressions, refer to Appendix A.
Creating a Content Dictionary
To create a new Content Dictionary, click New on the ribbon then select Content Dictionary from the
drop-down menu. The Create Content Dictionary window will pop up where you can configure the
following settings for the new Content Dictionary:
Dictionary Name – Enter a name for the new Content Dictionary.
15
DocAve: Content Shield
Category – Enter the category this Content Dictionary falls under.
Dictionary Description – Enter an optional description for this Content Dictionary.
Risk Value – Enter a numeric value between 0 and 100 for the Risk Value. Each time a violation defined by this Content Dictionary is found in a document, the total Document Risk will increase by the Risk Value defined here.
Dictionary Keywords – Specify the keyword(s) for this Content Dictionary. A keyword can be a word, a phrase or a regular expression. Enter each Keyword in a new line.
When you have finished configuring the Content Dictionary, click OK to save, or click Cancel to return to
the previous interface without saving this Content Dictionary. To modify this Content Dictionary after it
has been created, click the Dictionary Name in the Filter Dictionary interface, or check its corresponding
checkbox then click Edit on the ribbon. In the Edit Content Dictionary interface, configure the Content
Dictionary according to the instructions above.
Creating a File Type Dictionary
To create a new File Type Dictionary, click New on the ribbon then select File Type Dictionary from the
drop-down menu. The Create File Type Dictionary window will pop up where you can configure the
following settings for the new File Type Dictionary:
Dictionary Name – Enter a name for the new File Type Dictionary.
Category – Enter the category this File Type Dictionary falls under.
Dictionary Description – Enter an optional description for this File Type Dictionary.
Risk Value – Enter a numeric value between 0 and 100 for the Risk Value. Each time a violation defined by this File Type Dictionary is found in a document, the total Document Risk will increase by the Risk Value defined here.
Blocked File Types – A list of File Types are displayed here. You may change the number of File Types displayed, as well as the order they are displayed in. To change the number of File Types displayed, select the desired number from the Size drop-down menu in the upper right-hand corner of this section. To sort the File Types, click the File Type column heading. To see more File Types, click the right arrow next to the 1-10. Use the left and right arrows to scroll between the pages of File Types. Select the File Type you wish to block by checking the corresponding checkbox in the File Extension column. By default, the File Header checkbox is selected so that for any File Extension you choose to block, Content Shield also scans the item properties for the actual File Type in case the File Extension has been changed. For any File Types not included in this list, check the Blocked File Types checkbox, and enter the File Type you wish to block, such as JPG, DOCX, EXE, etc. Enter each File Extension in a new line. Note that this field is not case sensitive.
16
DocAve: Content Shield
When you have finished configuring the File Type Dictionary, click OK to save, or click Cancel to return to
the previous interface without saving this File Type Dictionary. To modify this File Type Dictionary after it
has been created, click the Dictionary Name in the Filter Dictionary interface, or check its corresponding
checkbox then click Edit on the ribbon. In the Edit File Type Dictionary interface, configure the File Type
Dictionary according to the instructions above.
Scan Engines
A Scan Engine is what Content Shield Filters use to determine if an item in question contains violations.
A Scan Engine contains a combination of Filter Dictionaries as well as a file size limitation.
To access Scan Engines, on the DocAve Content Shield for SharePoint landing page, click . Any
previously configured Scan Engines will be displayed here. You may change the number of Scan Engines
displayed, as well as the order they are displayed in. To change the number of Scan Engines displayed,
select the desired number from the Size drop-down menu in the upper right-hand corner. To sort the
Scan Engines, click on a column heading Engine Name.
To delete any Scan Engine(s), check the corresponding checkbox(es) of the Scan Engine(s) and click
Delete on the ribbon.
Creating a Scan Engine
To create a new Scan Engine, click New on the ribbon. The Create Scan Engine window will pop up
where you can configure the following settings for the new Scan Engine:
Engine Name – Enter a name for the new Scan Engine.
Engine Description – Enter an optional description for this Scan Engine.
Engine Dictionaries – Choose whether or not to also filter consider file size when scanning content by configuring the File filter size then select the Filter Dictionaries for this Scan Engine to use in the Dictionary List:
o Check the File filter size checkbox to be able to specify the file size to include. If the option is checked, select Greater than, Between or Less than from the drop-down menu then configure the related file size by entering a number into the textbox and selecting KB, MB or GB from the drop-down menu. If Between is selected, you must configure both the lower and upper boundaries for the file size. For example, if you select Greater than, enter 1 into the textbox and select MB, all files over 1MB will be included in this filter. Files that are less than 1MB in size will be excluded by if the Content Shield Filter uses this Scan Engine.
o Dictionary List ‒ Any previously configured Filter Dictionaries will be displayed here. You may change the number of Filter Dictionaries displayed, as well as the order they are displayed in. To change the number of Filter Dictionaries displayed, select the desired number from the Size drop-down menu in the upper right-hand corner of the list. To
17
DocAve: Content Shield
sort the Filter Dictionaries, click on a column heading such as Dictionary Name or Dictionary Type. To see more Filter Dictionaries, click the right arrow next to the 1-10. Use the left and right arrows to scroll between the pages of Filter Dictionaries. Select the Filter Dictionaries you wish this Scan Engine to use by checking the corresponding checkbox.
When you have finished configuring the Scan Engine, click OK to save, or click Cancel to return to the
previous interface without saving this Scan Engine. To modify this Scan Engine after it has been created,
click the Engine Name in the Scan Engine interface, or check its corresponding checkbox then click Edit
on the ribbon. In the Edit Scan Engine interface, configure the Scan Engine according to the instructions
above.
Policies
A Content Shield Policy is what Content Shield Filters use to determine what actions to take on items
that the Scan Engine finds violations in.
To access Content Shield Policies, on the DocAve Content Shield for SharePoint landing page, click
Content Shield Policy. Any previously configured Content Shield Policies will be displayed here. You may
change the number of Content Shield Policies displayed, as well as the order they are displayed in. To
change the number of Content Shield Policies displayed, select the desired number from the Size drop-
down menu in the upper right-hand corner. To sort the Content Shield Policies, click on a column
heading such as Policy Name or Engine Name.
To delete any Content Shield Policy(ies), check the corresponding checkbox(es) of the Content Shield
Policy(ies) and click Delete on the ribbon.
Creating a Policy
To create a new Content Shield Policy, click New on the ribbon. The Create Content Shield Policy
window will pop up where you can configure the following settings for the new Content Shield Policy:
Policy Name – Enter a name for the new Content Shield Policy.
*Scan Engine – Select the Scan Engine that you wish this Content Shield Policy to use to determine violations.
File Filter – T This option allows you to configure exceptions or additions to the Filter Dictionaries used by the Scan Engine without having to modify the Filter Dictionaries themselves. This gives you flexibility without having to create multiple versions of a Filter Dictionary with slight modification, or create multiple versions of a Scan Engine with slight modifications. Note that File Filter can only be configured with File Types. Select Exclude from file filter or Include in file filter, and then enter the file type you wish to exclude or include. Enter each file type in a new line.
18
DocAve: Content Shield
Content Filter Action – Configure what actions Content Shield should take when violations are found based on the Scan Engine of this Content Shield Policy. While the same Content Shield Policy can be used by both Real-Time Filters and Scheduled Filters, the same Content Filter Action configurations causes different behaviors depending on which filter is using the Content Shield Policy. The following details the behavior of Real-Time Filters based on these configurations:
o Action – Choose whether or not to block content with violations by checking the Block the offending items from SharePoint when the risk is equal or greater than checkbox then enter the Risk Value in the textbox. A _BLOCK.txt file will be created in the location the blocked file was being uploaded to. If the checkbox is checked, you may also configure the following options:
Include file in-place with error message – Check this checkbox to have a dummy file appear where the blocked file was supposed to appear. Customize the Error Message to include in the dummy file or use the default message: Non-compliant content was found in this document.
Save offending file to quarantine folder – Check this checkbox to create a quarantine folder in the location where the blocked file was being uploaded to. The blocked file as well as all files blocked when uploading to this library will appear in the quarantine folder. If multiple files of the same name as the quarantined file are uploaded and they all contain violations, a numerical suffix will be added to each corresponding quarantined file. For example, if multiple testfile.doc are uploaded to the same location and they all contain violations, each subsequent file will be named testfile_0.doc, testfile_1.doc, testfile_2.doc, …
You can also specify the AD user(s)/AD group(s) who you want to notify when files with violations are quarantined to the quarantine folder. Note that this function only works if an E-mail profile has been configured in the filter using this policy. These users will also have permission to access to the quarantine folder as long as the users specified here have the appropriate permissions to access the SharePoint site. Otherwise they will not be able to access the quarantine folder. This function is only available for Scheduled Filters.
*Note: There will only be one _BLOCK.txt file in the location the blocked file was being uploaded to. The file is replaced by the new _BLOCK.txt file of the latest quarantined file. *Note: If Block the offending items from SharePoint when the risk is equal to or greater than checkbox is checked, offending files will be blocked regardless of Include file in-place with error message and/or Save offending file to quarantine folder being selected.
o Tag – Choose whether or not to tag the content with violations by checking the Tag checkbox then customize a Name and Description in the corresponding textboxes. A column will be added in SharePoint to display the Tag. The default Name is Block and the default Description is Non-compliant content was found in this document.
*Note: If you would like the File Name and the violation to be displayed in the error message, enter the Description as desired using %file name% and %invalid string% where you wish the File Name and violation to appear in the error message.
19
DocAve: Content Shield
o Report the error in DocAve Content Shield for SharePoint – Check this checkbox to list the item(s) with violations in the DocAve Content Shield for SharePoint in the Real-Time Filter Job Report.
o Discard check out – This option is only available for Scheduled Filters. Enabling this option has the following effects when the Scheduled Filter with this policy runs a scanning job:
If a file is checked out and the latest unchecked out version of the file contains violations, the checkout will be discarded and the latest version with the violations will be quarantined, disregarding any changes made in the checked out version.
If a file is checked out and the latest unchecked out version of the file does not contain a violation, the item will remain in its current state regardless of violations in the checked out version. When the file is checked back in, the Real Time Filter will scan for violations. Note that no other users will be able to see the edits containing violations until the file is checked back in.
If a file is uploaded and automatically checked out, and the Scheduled Filter finds violations in the checked out file, the file will be deleted.
o Enable risk report – Check this checkbox to generate a Risk Report including the scanned risk information and summary. Choose whether to Display only the first instance of a violation type within a file or Display all instances of a violation type within a file by selecting the corresponding radio button. Note that Risk Reports are only available for Scheduled Filters. For more information on Risk Reports, see the Risk Reports section of this guide.
o Send e-mail to the creator or modifier (This setting only affects Real-Time Filters) – Check this checkbox to send an e-mail notification to the creator or modifier of the non-compliant file.
o Set content type to: ‒ Check this checkbox if you wish change all files with violations to a specific content type. Enter the desired content type name into the textbox.
*Note: For SharePoint Report Library, if you select this option, you cannot view the processed files in the default view mode since the file content type has been changed to customized type, but you can find them in All reports and dashboards view mode.
o Identify the file name with an extension – Check this checkbox if you wish to add an extension to the file name of all files with violations. Enter the extension into the Extension textbox.
The following details the behavior of Scheduled Filters based on these configurations:
o Action – Choose whether or not to block content with violations by checking the Block the offending items from SharePoint when the risk is equal or greater than checkbox then enter the Risk Value in the textbox. *Note: For Scheduled Filters, blocked content will be deleted from SharePoint. A _BLOCK.txt file will be created in the location the blocked file was being uploaded to. If the checkbox is checked, you may also configure the following options:
20
DocAve: Content Shield
Include file in-place with error message – Check this checkbox to have a dummy file appear where the blocked file was supposed to appear. Customize the Error Message to include in the dummy file or use the default message: Non-compliant content was found in this document.
Save offending file to quarantine folder – Check this checkbox to create a quarantine folder in the location where the blocked file was being uploaded to. The blocked file will appear in the quarantine folder. If multiple files of the same name as the quarantined file are uploaded and they all contain violations, a numerical suffix will be added to each corresponding quarantined file. For example, if multiple testfile.doc are uploaded to the same location and they all contain violations, each subsequent file will be named testfile_0.doc, testfile_1.doc, testfile_2.doc, …
You can also specify the AD user(s)/AD group(s) who you want to notify when files with violations are quarantined to the quarantine folder. Note that this function only works if an E-mail profile has been configured in the filter using this policy. These users will also have permission to access to the quarantine folder as long as the users specified here have the appropriate permissions to access the SharePoint site. Otherwise they will not be able to access the quarantine folder. This function is only available for Scheduled Filters.
*Note: There will only be one _BLOCK.txt file in the location the blocked file was being uploaded to. The file is replaced by the new _BLOCK.txt file of the latest quarantined file. *Note: If Block the offending items from SharePoint when the risk is equal to or greater than checkbox is checked, the file will be blocked regardless of Include file in-place with error message and/or Save offending file to quarantine folder being selected.
o Tag – Choose whether or not to tag the content with violations by checking the Tag checkbox then customize a Name and Description in the corresponding textboxes. A column will be added in SharePoint to display the Tag. The default Name is Block and the default Description is Non-compliant content was found in this document.
*Note: If you would like the File Name and the violation to be displayed in the error message, enter the Description as desired using %file name% and %invalid string% where you wish the File Name and violation to appear in the error message.
o Report the error in DocAve Content Shield for SharePoint – Check this checkbox to list the item(s) with violations in the DocAve Content Shield for SharePoint in the Scheduled Filter Job Report.
o Discard check out – This option is only available for Scheduled Filters. Enabling this option has the following effects when the Scheduled Filter with this policy runs a scanning job:
If a file is checked out and the latest unchecked out version of the file contains violations, the checkout will be discarded and the latest version with the violations will be quarantined, disregarding any changes made in the checked out version.
21
DocAve: Content Shield
If a file is checked out and the latest unchecked out version of the file does not contain a violation, the item will remain in its current state regardless of violations in the checked out version. When the file is checked back in, the Real Time Filter will scan for violations. Note that no other users will be able to see the edits containing violations until the file is checked back in.
If a file is uploaded and automatically checked out, and the Scheduled Filter finds violations in the checked out file, the file will be deleted.
o Enable risk report – Check this checkbox to generate a Risk Report including the scanned risk information and summary. Choose whether to Display only the first instance of a violation type within a file or Display all instances of a violation type within a file by selecting the corresponding radio button. Note that Risk Reports are only available for Scheduled Filters. For more information on Risk Reports, see the Risk Reports section of this guide.
o Send e-mail to the creator or modifier (This setting only affects Real-Time Filters) – Check this checkbox to send an e-mail notification to the creator or modifier of the non-compliant file.
o Set content type to: ‒ Check this checkbox if you wish change all files with violations to a specific content type. Enter the desired content type name into the textbox.
*Note: For SharePoint Report Library, if you select this option, you cannot view the processed files in the default view mode since the file content type has been changed to customized type, but you can find them in All Reports and Dashboards view mode.
o Identify the file name with an extension – Check this checkbox if you wish to add an extension to the file name of all files with violations. Enter the extension into the Extension textbox.
Scan Strategy – Choose a scan strategy to optimize your filter policy:
o Stop scanning after one hit – Check the Stop scanning after one hit checkbox to stop scanning a file once a violation has been detected in it. Content Shield will take the actions configured in this Policy and move onto the next file instead of checking the rest of the file for violations. This option helps reduce the amount of time it takes to perform scans, however, if this option is selected not all violations in a file will be detected.
o Ignore restored files – Check this checkbox to ignore all restored files in future scans. Files that are restored after having been quarantined will not be quarantined in the future even if they do contain violating content.
When you have finished configuring the Content Shield Policy, click OK to save, or click Cancel to return
to the previous interface without saving this Content Shield Policy. To modify this Content Shield Policy
after it has been created, click the Policy Name in the Content Shield Policy interface, or check its
corresponding checkbox then click Edit on the ribbon. In the Edit Content Shield Policy interface,
configure the Content Shield Policy according to the instructions above.

22
DocAve: Content Shield
Filters
A Filter in DocAve Content Shield for SharePoint leverages a Content Shield Policy which you have
previously configured to find non-compliant content and blocks and/or tags the files containing the
violations depending on the Content Filter Action settings you have configured in the Content Shield
Policy. Content Shield has two types of filters:
Real-Time Filter – This type of filter scans the file(s) as they are uploaded into or edited in SharePoint so that all SharePoint objects configured in the Real-Time Filter will be scanned and acted upon based on the Content Shield Policy configured for the Real-Time Filter.
Scheduled Filter – This type of filter performs an on-demand scan of the file(s) that are already in the SharePoint objects you define based on the Start Time and interval you configure for the Scheduled Filter. The filter will scan and act upon files based on the Content Shield Policy configured for the Scheduled Filter.
Real-Time Filters
To access Real-Time Filters, on the DocAve Content Shield for SharePoint landing page, click Real-Time
Filter. Any previously configured Real-Time Filters will be displayed here. You may change the number of
Real-Time Filters displayed, as well as the order they are displayed in. To change the number of Real-
Time Filters displayed, select the desired number from the Size drop-down menu in the upper right-
hand corner. To sort the Real-Time Filters, click on a column heading such as Content Shield Policy or E-
mail Profile.
To delete any Real-Time Filter(s), check the corresponding checkbox(es) of the Real-Time Filter(s) and
click Delete on the ribbon.
Creating a Real-Time Filter
To create a new Real-Time Filter, click New on the ribbon. The Create Real-Time Filter window will pop
up where you can configure the following settings for the new Real-Time Filter:
Scope – Configure the locations in SharePoint to apply this filter to on the left side of this configuration interface. You may enter the URL of the Site Collection or Site you wish to apply this Real-Time Filter to then click Search icon. Check the corresponding checkbox in the data tree to select the object. Alternatively, click on the desired Farm to expand the data tree and access the objects within. Continue clicking on the objects to find the desired objects. Check the corresponding checkbox in the data tree to select the object(s). *Note: Click on the object icon of the corresponding SharePoint object to toggle whether or not to include new objects under the selected node. Object icons with a small yellow triangle on the bottom right corner means Include New is toggled on.
*Content Shield Policy – Select the desired Content Shield Policy to be used by this Real-Time Filter.
23
DocAve: Content Shield
E-mail Profile – Select the desired E-mail Profile to be used by this Real-Time Filter.
When you have finished configuring the Real-Time Filter, click Save to save, or click Cancel to return to
the previous interface without saving this Real-Time Filter. To modify this Real-Time Filter after it has
been created, click the corresponding hyperlink in the Mapping Content column in the Real-Time Filter
interface, or check its corresponding checkbox then click Edit on the ribbon. In the Edit Real-Time Filter
interface, configure the Real-Time Filter according to the instructions above.
*Note: When creating a new filter, select the desired node by checking the corresponding checkbox. If
the selected node has already been selected in an existing filter, a dialog box with the following message:
Some nodes for this web application already have a content shield policy applied, do you want to
override these policies?
Click OK to apply this new filter to the selected node. The previous filter associated with this node will
no longer include this node. Click Cancel to exclude the selected node from this new filter. The previous
filter will remain associated with this node.
Using Real-Time Filters
*Note: Before any Real-Time Filters can be applied and used, click Enable All Filters on the ribbon. If you
have already enabled all filters, newly created filters are enabled automatically, and will only need to be
applied before they become effective.
Once a Real-Time Filter has been created, it is not effective until it has been applied. To apply Real-Time
Filters, select the desired filter(s) by checking the corresponding checkbox in the Real-Time Filter
interface then click Apply Now on the ribbon. To have Real-Time Filters be automatically applied at
specific times, click Schedule on the ribbon and follow the instructions below:
1. Check the Enable Schedule checkbox to be able to configure a schedule for Real-Time Filters to be applied.
2. Configure the Start Time by clicking the calendar then selecting the date you wish to start applying Real-Time Filters. Select the time of day you wish to start applying Real-Time Filters by selecting the hour and minute from the two drop-down menus in the Start Time section.
3. By default, Only once is selected in the Interval section. Configure the Interval if you wish to apply Real-Time Filters on a set schedule after the first application at the Start Time. To have Real-Time Filters be applied on a repeating schedule after the first application indicated by the Start Time, enter a number into the Interval textbox, then select Minute(s), Hour(s), Day(s), Week(s) or Month(s) from the drop-down menu.
4. Click OK to save the schedule, or click Cancel to return to the previous interface without saving the schedule.
To avoid receiving an overwhelming number of e-mail notifications when Real-Time Filters detect
violations, you may set up a schedule for e-mail notifications as well. The e-mail sent based on the
24
DocAve: Content Shield
schedule will include all of the job reports between the time of the given e-mail and the time of the
previous e-mail. To set up a schedule for e-mail notifications, click E-mail Settings on the ribbon, then
follow the instructions below:
1. Check the Enable E-mail Schedule checkbox to be able to configure a schedule for e-mail notifications.
2. Configure the Start Time by clicking the calendar then selecting the date you wish to start receiving e-mail notifications. Select the time of day you wish to start receiving e-mail notifications by selecting the hour and minute from the two drop-down menus in the Start Time section.
3. Configure the Interval if you wish to receive e-mail notifications on a set schedule after the first one sent out at the Start Time. Enter a number into the Interval textbox, then select Minute(s), Hour(s), Day(s), Week(s) or Month(s) from the drop-down menu.
4. Click OK to save the schedule, or click Cancel to return to the previous interface without saving the schedule.
Enabling and Disabling Real-Time Filters
Before performing large backup jobs such as full platform backup with DocAve Platform Backup and
Restore or performing a major restructuring of your SharePoint environment with DocAve Content
Manager, you may wish to disable all Real-Time Filters so as to free up resources.
To disable all Real-Time Filters, click Disable All Filters on the ribbon. This will also terminate all scanning
immediately. Click Enable All Filters to re-enable all filters. Note that clicking Enable All Filters does not
resume scanning. For each Real-Time Filter you wish to have its scanning resume, you must select the
corresponding filter(s) and click Apply Now on the ribbon.
Scheduled Filters
To access Scheduled Filters, on the DocAve Content Shield for SharePoint landing page, click Scheduled
Filter. Any previously configured Scheduled Filters will be displayed here. You may change the number
of Scheduled Filters displayed, as well as the order they are displayed in. To change the number of
Scheduled Filters displayed, select the desired number from the Size drop-down menu in the upper
right-hand corner. To sort the Scheduled Filters, click on a column heading such as Plan Name, Content
Shield Policy or Last Run Time.
To delete any Scheduled Filter(s), check the corresponding checkbox(es) of the Scheduled Filter(s) and
click Delete on the ribbon.
Creating a Scheduled Filter
25
DocAve: Content Shield
To create a new Scheduled Filter, click New on the ribbon. The Create Plan window will pop up where
you can configure the following settings for the new Scheduled Filter:
Scope – Configure the locations in SharePoint to apply this filter to on the left side of this configuration interface. You may enter the URL of the Site Collection or Site you wish to apply this Scheduled Filter to then click Search icon. Check the corresponding checkbox in the data tree to select the object. Alternatively, click on the desired Farm to expand the data tree and access the objects within. Continue clicking on the objects to find the desired objects. Check the corresponding checkbox in the data tree to select the object(s).
Full Schedule – With this tab selected, check the Enable Full Schedule checkbox to run a scan of
all content in the location(s) specified by the Scope. Configure the Start Time by clicking the
calendar then selecting the date you wish to start the scan. Select the time of day you wish to
start the scan by selecting the hour and minute from the two drop-down menus in the Start
Time section. Enter an optional Description for reference.
Incremental Schedule – Select this tab to configure a schedule to perform scans of content that has been created or modified after the last previous job that ran. Check the Enable Incremental Schedule checkbox to configure the schedule. Configure the Start Time by clicking the calendar then selecting the date you wish to start the scan. Select the time of day you wish to start the scan by selecting the hour and minute from the two drop-down menus in the Start Time section. Configure the Interval if you wish to scan on a set schedule after the first scan at the Start Time. Enter a number into the Interval textbox, then select Minute(s), Hour(s), Day(s), Week(s) or Month(s) from the drop-down menu.
*Content Shield Policy – Select the desired Content Shield Policy to be used by this Real-Time Filter.
E-mail Profile – Select the desired E-mail Profile to be used by this Real-Time Filter.
When you have finished configuring the Scheduled Filter, click OK to save, or click Cancel to return to
the previous interface without saving this Scheduled Filter. To modify this Scheduled Filter after it has
been created, click the Plan Name in the Scheduled Filter interface, or check its corresponding checkbox
then click Edit on the ribbon. In the Edit Scheduled Filter interface, configure the Scheduled Filter
according to the instructions above.
*Note: When creating a new filter, select the desired node by checking the corresponding checkbox. If
the selected node has already been selected in an existing filter, a dialog box with the following message:
Some nodes for this web application already have a content shield policy applied, do you want to
override these policies?
26
DocAve: Content Shield
Click OK to apply this new filter to the selected node. The previous filter associated with this node will
no longer include this node. Click Cancel to exclude the selected node from this new filter. The previous
filter will remain associated with this node.
Using Scheduled Filters
Once a Schedule Filter has been created, it does not begin scanning the configured Scope until the Start
Time you have configured for that Scheduled Filter. If you wish to perform a scan using the filter
immediately, select the Scheduled Filter(s) by checking the corresponding checkbox(es) then click the
Run Now(Full) icon on the ribbon to start a full scan, or click Run Now(Full) on the ribbon to access the
drop-down menu for more options. Choose from Run Now(Full) or Run Now(Incremental) from the
drop-down menu.
27
DocAve: Content Shield
Reports
A report is generated for each filtering job run by DocAve Content Shield. To access job reports on the
DocAve Content Shield for SharePoint landing page, click Reports. There are three types of job reports:
Scheduled Filter Job Report – Contains information on the scan job of a scheduled filter.
Real-Time Filter Content Report – Contains information on the specific violation detected by the real-time filter.
Real-Time Filter Job Report – Contains information on the scan job of a real-time filter.
Select the type of content filter report you wish to view from the Select Content Filter Report Type
drop-down menu. The job list displays any jobs that are currently running or have run in the past. You
may change the number of job reports displayed and/or the order they are displayed in. To change the
number of job reports displayed, select the desired number from the Size drop-down menu in the upper
right-hand corner. To sort the job reports, click on a column heading such as Job ID, Plan Name, Job
Type, Start Time, End Time, Status, or Progress.
You can also use the buttons on the ribbon for each type of filter job to perform the actions specified in
the bulleted lists for each report below:
Scheduled Filter Job Report
Show Details ‒ Allows you to view detailed information of a selected scheduled filter job. You can choose to view the job statistics, violated content report, or the detailed settings of the plan by selecting the corresponding options.
Download ‒ Allows you to dowload a report of a selected scheduled filter job by selecting Download Selected Jobs from the drop-down list on the Download button on the ribbon, or download all of the job reports by selecting Download All Jobs.
Delete ‒ Allows you to delete a scheduled filter job report of a selected filter job by clicking, selecting from the drop-down list on the Delete button
Show Risk Report ‒ Allows you to view the risk report of a selected scheduled filter job by clicking Show Risk Report on the ribbon. For details on the risk report, refer to Risk Reports.
Stop ‒ Allows you to stop a running scheduled filter job. After it completes, you must restart this job if you want to continue it.
Pause ‒ Allows you to make a temporary pause on a running scheduled filter job. After it completes, you can continue this job smoothly.
Resume ‒ Allows you to continue a paused scheduled filter job, as if the job was run without any stops.
28
DocAve: Content Shield
Real-Time Filter Content Report
Download ‒ Allows you to dowload a real-time filter content report of the selected items/files with violated contents by selecting Download Selected Jobs from the drop-down list on the Download button on the ribbon, or download all of the job reports by clicking Download All Jobs.
Delete ‒ Allows you to delete a real-time filter content report of the items/files with violated contents by clicking Delete on the ribbon, or delete all of the job reports by clicking Delete All from the drop-down list on the Delete button.
Realt-Time Filter Job Report
Download ‒ Allows you to dowload a real-time filter report of a real-time filter job by selecting Download Selected Jobs from the drop-down list on the Download button on the ribbon, or download all of the job reports by clicking Download All Jobs.
Delete ‒ Allows you to delete a real-time filter job report of a real-time filter job by clicking Delete on the ribbon, or delete all of the job reports by clicking Delete All from the drop-down list on the Delete button.
Risk Reports
While a scheduled filter job report provides an overview of an entire scan job, DocAve Content Shield
also generates risk reports that contain detailed information about each specific violation in a scheduled
filter job.
To view the risk report for a scheduled filter job, click Reports on the DocAve Content Shield for
SharePoint landing page. Select Scheduled Filter Job Report from the Select Content Filter Report Type
drop-down menu. Select the scheduled filter scan job you want to view by checking the checkbox next
to the corresponding risk report, then clicking Show Risk Report. For more information on risk reports,
see Appendix B.
29
DocAve: Content Shield
Restoring and Deleting Files
Quarantined files may be restored or deleted by the Site Administrator or the specific AD users and
users in the AD groups specified in the policy. The AD users or users in AD groups whose permissions are
equal to or higher than Contribute (can view, add, update, and delete list items and documents) can
restore or delete the quarantined files.
To restore or delete quarantined files, complete the following steps:
1. Go to the SharePoint site that contains the quarantined items.
2. Navigate to Site Actions > Site Settings > AvePoint Tools and Services > DocAve Content Shield for SharePoint Restore Controller.
3. Click the site collection URL to expand the data tree on the left panel. Continue to expand the tree down to the list containing the quarantined items. *Note: The data tree on the left panel of the web part can only be expanded by the Site Administrator, specified AD users, or users in the specified AD groups.
4. Select the list by checking the corresponding checkbox. You may also enter the site URL in the URL Search to locate the corresponding site. The quarantined items under the selected list appear on the right panel. The list contains the following information for each quarantined item: Type, Name, Original Location, Modified, and Modified By.
5. Select the quarantined items you want to restore or delete by checking the corresponding checkbox(es).
6. Choose one of the following options:
Click View Content to view the quarantined item(s) and redirect to the Quarantine folder where the item(s) exists.
Click Restore Files to restore the selected quarantined items. When the pop-up window appears, select one of the following restore options: Append, Overwrite, or Not Overwrite. Choose whether to input a digital signature to mark this file as metadata by checking the Input the digital signature checkbox. Enter the signature as your preference, and click OK to start the restore.
Click Delete to delete the selected quarantined items.
7. Once the restore or delete job is complete, click View Report to see the job report.
8. To modify the number of quarantined items displayed in each page, click Size, then select the number of jobs you wish to display from the drop-down menu.
In cases where a new file with the same name as the quarantined file is uploaded to the same library,
you can choose from the following options when restoring the quarantined file to that library:
Overwrite – The legal file in the library will be overwritten by the quarantined file you restore.
30
DocAve: Content Shield
Append – A suffix of _1, _2, _3, ... will be added to the name of the quarantined file you restore. For example, if the name of the quarantined file and the file that was uploaded later to the same library are both named TestFile.docx, when the quarantined file is restored to the library, it will be named TestFile_1.docx.
Not Overwrite – The restore job will fail. The restore report contains the reason for the failed restore job.
*Note: No matter which option is selected, the _BLOCK.txt file will be deleted after the restore job.
31
DocAve: Content Shield
Appendix A
HIPAA Dictionaries
There are 14 pre-defined filter dictionaries for HIPAA that contain the definition of relevant personal
information and business information that should not be uploaded to SharePoint. It also supports risk
value for each dictionary, and the customers can determine what to do when it exceeds the specified
value. You can customize the pre-defined dictionaries or create new dictionaries if necessary.
Business
Business Dictionary provides the pre-defined keywords referring to information that should not be
uploaded to SharePoint for protecting business information and trade secrets.
Risk value – 1
Keywords – NDA, Non-Disclosure Agreement
Credit Card Number
The Credit Card Number Dictionary provides the regular expression that covers all credit card numbers
that should not be uploaded to SharePoint for protecting personal accounts. The following credit cards
are supported: Visa, Mastercard, Discover, and American Express.
Risk value – 5
Default Regular expression – (?<=^|\b)(((34|37)\d{2}[ \-]?\d{6}[ \-]?\d{5})|((4\d{3}|5[1-
4]\d{2}|6011)[ \-]?\d{4}[ \-]?\d{4}[ \-]?\d{4}))(?=$|\b)
The default regular expression only looks for number strings which follow the credit card number rules
of Visa, Mastercard, Discover and American Express.
Alternative Regular expression – (?<=^|\b)(?:\d[ -]*?){13,16}(?=$|\b)
The alternative regular expression looks for any 13 or 16 digit number strings which may not always be a
valid credit card number.
Date
Date Dictionary provides the regular expression that covers all date formats that should not be uploaded
to SharePoint.
Risk value – 5
32
DocAve: Content Shield
Regular expression – (?<=^|[^\d])(\d{4})\-((((0?[13578])|(1[02]))\-(([1-2][0-9])|(3[01])|(0?[1-
9])))|(((0?[469])|(11))\-(([1-2][0-9])|(30)|(0?[1-9])))|(0?2\-(([1-2][0-9])|(0?[1-9]))))(?=$|[^\d])
(?<=^|[^\d])(\d{4})\.((((0?[13578])|(1[02]))\.(([1-2][0-9])|(3[01])|(0?[1-9])))|(((0?[469])|(11))\.(([1-2][0-
9])|(30)|(0?[1-9])))|(0?2\.(([1-2][0-9])|(0?[1-9]))))(?=$|[^\d])
(?<=^|[^\d])(\d{4})\/((((0?[13578])|(1[02]))\/(([1-2][0-9])|(3[01])|(0?[1-9])))|(((0?[469])|(11))\/(([1-2][0-
9])|(30)|(0?[1-9])))|(0?2\/(([1-2][0-9])|(0?[1-9]))))(?=$|[^\d])
(?<=^|[^\d])((((0?[13578])|(1[02]))\-(((0?[1-9])|([1-2][0-9]))|(3[01])))|(((0?[469])|(11))\-(((0?[1-9])|([1-
2][0-9]))|(30)))|(0?2\-((0?[1-9])|([1-2][0-9]))))\-(\d{4})(?=$|[^\d])
(?<=^|[^\d])((((0?[13578])|(1[02]))\/(((0?[1-9])|([1-2][0-9]))|(3[01])))|(((0?[469])|(11))\/(((0?[1-9])|([1-
2][0-9]))|(30)))|(0?2\/((0?[1-9])|([1-2][0-9]))))\/(\d{4})(?=$|[^\d])
(?<=^|[^\d])(((((0?[1-9])|([1-2][0-9]))|(3[01]))\-((0?[13578])|(1[02])))|((((0?[1-9])|([1-2][0-9]))|(30))\-
((0?[469])|(11)))|(((0?[1-9])|([1-2][0-9]))\-0?2))\-(\d{4})(?=$|[^\d])
(?<=^|[^\d])(((((0?[1-9])|([1-2][0-9]))|(3[01]))\/((0?[13578])|(1[02])))|((((0?[1-9])|([1-2][0-
9]))|(30))\/((0?[469])|(11)))|(((0?[1-9])|([1-2][0-9]))\/0?2))\/(\d{4})(?=$|[^\d])
(?<=^|[^\d\w])((((Jan|January)|(Mar|March)|May|(Jul|July)|(Aug|August)|(Oct|October)|(Dec|Dece
mber))\s+(([0-
2]?((1(st)?)|(2(nd)?)|(3(rd)?)|([0456789](th)?)))|((30(th)?)|(31(st)?))))|(((Apr|April)|(Jun|June)|(Sep|Se
ptember)|(Nov|November))\s+(([0-
2]?((1(st)?)|(2(nd)?)|(3(rd)?)|([0456789](th)?)))|(30(th)?)))|((Feb|February)\s+[0-
2]?((1(st)?)|(2(nd)?)|(3(rd)?)|([0456789](th)?))))\s*[\,]\s*(\d{4})(?=$|[^\d])
(?<=^|[^\d\w])(((([0-
2]?((1(st)?)|(2(nd)?)|(3(rd)?)|([0456789](th)?)))|((30(th)?)|(31(st)?)))\s+((Jan|January)|(Mar|March)|M
ay|(Jul|July)|(Aug|August)|(Oct|October)|(Dec|December)))|((([0-
2]?((1(st)?)|(2(nd)?)|(3(rd)?)|([0456789](th)?)))|(30(th)?))\s+((Apr|April)|(Jun|June)|(Sep|September)|
(Nov|November)))|([0-
2]?((1(st)?)|(2(nd)?)|(3(rd)?)|([0456789](th)?))\s+(Feb|February)))\s*[\,]\s*(\d{4})(?=$|[^\d])
Example – Jan 1st, 2012
E-mail Address
E-mail Address Dictionary provides the regular expression that covers all kinds of e-mail addresses that
should not be uploaded to SharePoint for protecting personal information and business information.
Risk value – 1
Regular expression – (?<=^|\b)[a-zA-Z0-9!#$%*+/=?^_`{|}~-]+(?:\.[a-zA-Z0-9!#$%*+/=?^_`{|}~-
]+)*@(?:[a-zA-Z0-9](?:[a-zA-Z0-9-]*[a-zA-Z0-9])?\.)+[a-zA-Z0-9](?:[a-zA-Z0-9-]*[a-zA-Z0-9])?(?=$|\b)
33
DocAve: Content Shield
Example – [email protected]
Fax Number
Fax Number Dictionary provides the regular expression that can cover all the fax numbers that should
not be uploaded to SharePoint.
Risk value – 2
Regular expression – (?<=^|\b)([\(\+])?([0-9]{1,3}([\s])?)?([\+|\(|\-|\)|\s])?([0-9]{2,4})([\-
|\)|\.|\s]([\s])?)?([0-9]{2,4})?([\.|\-|\s])?([0-9]{4,8})(?=$|\b)
Example – (089)123-4567
General
General Dictionary provides the pre-defined keywords referring sensitive general information that
should not be uploaded to SharePoint.
Risk value – 1
Keywords – Do not distribute, Do not copy, Do not print, Do not scan, Do not photocopy, Restricted,
Sensitive Information, For Official Use Only, No Carbon Copy
Government
Government Dictionary provides the pre-defined keywords referring sensitive government information
that should not be uploaded to SharePoint.
Risk value – 1
Keywords – Top Secret, Confidential, Redact, Redacted, Eyes Only
Healthcare
Healthcare Dictionary provides the pre-defined keywords referring sensitive healthcare information that
should not be uploaded to SharePoint.
Risk value – 1
Keywords – Confidentiality, Patient Confidentiality, HIV, Human Immune Virus, AIDS, Auto Immune
Deficiency Syndrome, Hepatitis, Abortion, Drug Dependence, Alcohol Dependence
IP Address
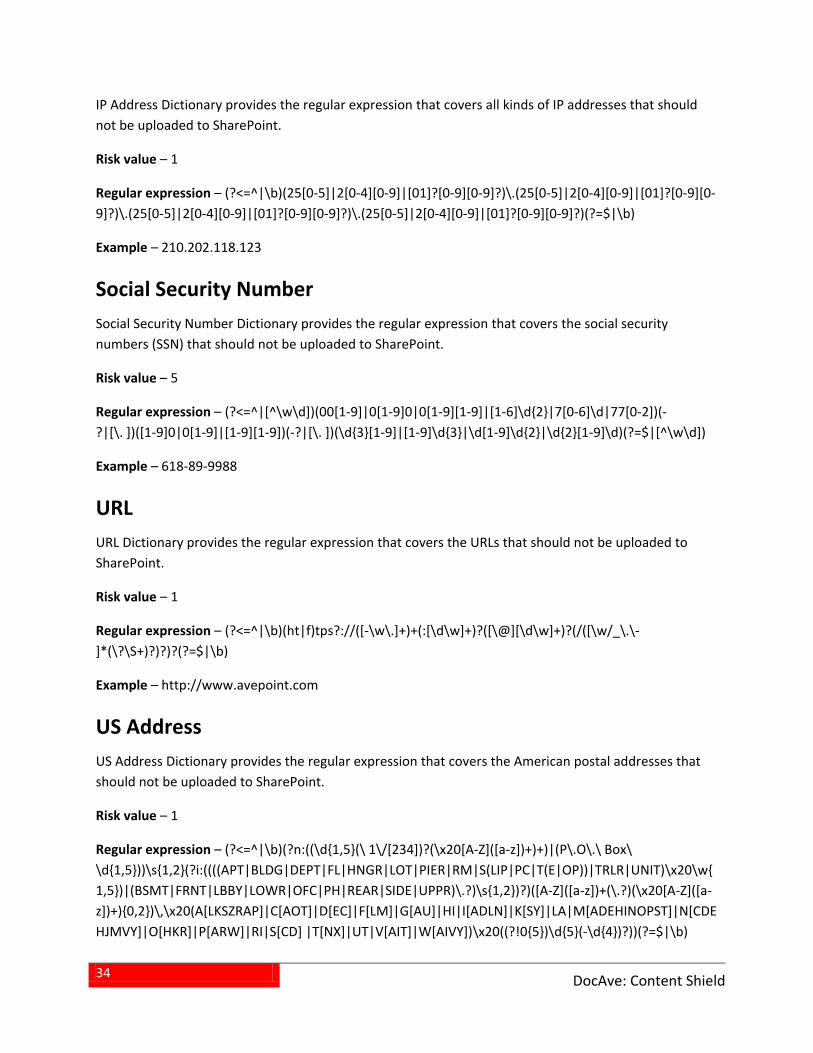
34
DocAve: Content Shield
IP Address Dictionary provides the regular expression that covers all kinds of IP addresses that should
not be uploaded to SharePoint.
Risk value – 1
Regular expression – (?<=^|\b)(25[0-5]|2[0-4][0-9]|[01]?[0-9][0-9]?)\.(25[0-5]|2[0-4][0-9]|[01]?[0-9][0-
9]?)\.(25[0-5]|2[0-4][0-9]|[01]?[0-9][0-9]?)\.(25[0-5]|2[0-4][0-9]|[01]?[0-9][0-9]?)(?=$|\b)
Example – 210.202.118.123
Social Security Number
Social Security Number Dictionary provides the regular expression that covers the social security
numbers (SSN) that should not be uploaded to SharePoint.
Risk value – 5
Regular expression – (?<=^|[^\w\d])(00[1-9]|0[1-9]0|0[1-9][1-9]|[1-6]\d{2}|7[0-6]\d|77[0-2])(-
?|[\. ])([1-9]0|0[1-9]|[1-9][1-9])(-?|[\. ])(\d{3}[1-9]|[1-9]\d{3}|\d[1-9]\d{2}|\d{2}[1-9]\d)(?=$|[^\w\d])
Example – 618-89-9988
URL
URL Dictionary provides the regular expression that covers the URLs that should not be uploaded to
SharePoint.
Risk value – 1
Regular expression – (?<=^|\b)(ht|f)tps?://([-\w\.]+)+(:[\d\w]+)?([\@][\d\w]+)?(/([\w/_\.\-
]*(\?\S+)?)?)?(?=$|\b)
Example – http://www.avepoint.com
US Address
US Address Dictionary provides the regular expression that covers the American postal addresses that
should not be uploaded to SharePoint.
Risk value – 1
Regular expression – (?<=^|\b)(?n:((\d{1,5}(\ 1\/[234])?(\x20[A-Z]([a-z])+)+)|(P\.O\.\ Box\
\d{1,5}))\s{1,2}(?i:((((APT|BLDG|DEPT|FL|HNGR|LOT|PIER|RM|S(LIP|PC|T(E|OP))|TRLR|UNIT)\x20\w{
1,5})|(BSMT|FRNT|LBBY|LOWR|OFC|PH|REAR|SIDE|UPPR)\.?)\s{1,2})?)([A-Z]([a-z])+(\.?)(\x20[A-Z]([a-
z])+){0,2})\,\x20(A[LKSZRAP]|C[AOT]|D[EC]|F[LM]|G[AU]|HI|I[ADLN]|K[SY]|LA|M[ADEHINOPST]|N[CDE
HJMVY]|O[HKR]|P[ARW]|RI|S[CD] |T[NX]|UT|V[AIT]|W[AIVY])\x20((?!0{5})\d{5}(-\d{4})?))(?=$|\b)

35
DocAve: Content Shield
Example – 123 Park Ave., Apt. 123, New York City, NY 10002
US Phone Number
US Phone Number Dictionary provides the regular expression that covers the American phone numbers
that should not be uploaded to SharePoint.
Risk value – 3
Regular expression – (?<=^|\b)(?:(?:\+?1\s*(?:[.-]\s*)?)?(?:\(\s*([2-9]1[02-9]|[2-9][02-8]1|[2-9][02-
8][02-9])\s*\)|([2-9]1[02-9]|[2-9][02-8]1|[2-9][02-8][02-9]))\s*(?:[.-]\s*)?)?([2-9]1[02-9]|[2-9][02-
9]1|[2-9][02-9]{2})\s*(?:[.-]\s*)?([0-9]{4})(?:\s*(?:#|x\.?|ext\.?|extension)\s*(\d+))?(?=$|\b)
(?<=^|\b)(?:\+?1\s*(?:[.-]\s*)?)?(?:\(\s*([2-9]1[02-9]|[2-9][02-8]1|[2-9][02-8][02-9])\s*\)|([2-9]1[02-
9]|[2-9][02-8]1|[2-9][02-8][02-9]))\s*(?:[.-]\s*)?([2-9a-z]1[02-9a-z]|[2-9a-z][02-9a-z]1|[2-9a-z][02-9a-
z]{2})([0-9a-z]{4})(?=$|\b)
(?<=^|\b)(?:\+?1\s*(?:[.-]\s*)?)?(?:\(\s*([2-9]1[02-9]|[2-9][02-8]1|[2-9][02-8][02-9])\s*\)|([2-9]1[02-
9]|[2-9][02-8]1|[2-9][02-8][02-9]))\s*(?:[.-]\s*)?([2-9a-z]1[02-9a-z]|[2-9a-z][02-9a-z]1|[2-9a-z][02-9a-
z]{2})([0-9a-z]{4})([0-9a-z]*)(?=$|\b)
Example – +1-(212)-800-5353
Vehicle Identification Number
Vehicle Identification Number is a unique serial number used by the automotive industry to identify
individual motor vehicles.
Vehicle Identification Number Dictionary provides the regular expression that covers the vehicle
identification number globally.
Risk value – 3
Regular expression – (?<=^|[^\w\d])([A-HJ-NPR-Z0-9]{3})[A-HJ-NPR-Z]{2}\d{2}([A-HJ-NPR-
Z]|\d)(\d|X)[A-HJ-NPR-Z\d]{2}\d{6}(?=$|[^\w\d])
Example – 1G1BL52P7TR115520
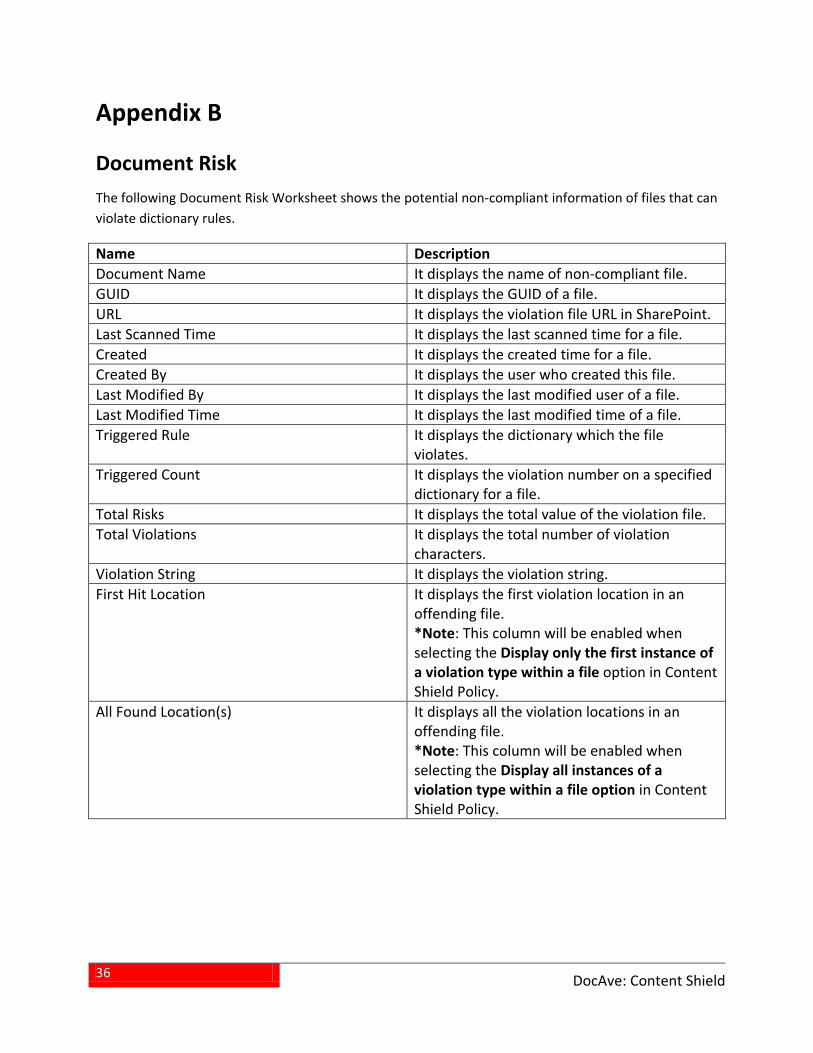
36
DocAve: Content Shield
Appendix B
Document Risk
The following Document Risk Worksheet shows the potential non-compliant information of files that can
violate dictionary rules.
Name Description
Document Name It displays the name of non-compliant file.
GUID It displays the GUID of a file.
URL It displays the violation file URL in SharePoint.
Last Scanned Time It displays the last scanned time for a file.
Created It displays the created time for a file.
Created By It displays the user who created this file.
Last Modified By It displays the last modified user of a file.
Last Modified Time It displays the last modified time of a file.
Triggered Rule It displays the dictionary which the file violates.
Triggered Count It displays the violation number on a specified dictionary for a file.
Total Risks It displays the total value of the violation file.
Total Violations It displays the total number of violation characters.
Violation String It displays the violation string.
First Hit Location It displays the first violation location in an offending file. *Note: This column will be enabled when selecting the Display only the first instance of a violation type within a file option in Content Shield Policy.
All Found Location(s) It displays all the violation locations in an offending file. *Note: This column will be enabled when selecting the Display all instances of a violation type within a file option in Content Shield Policy.
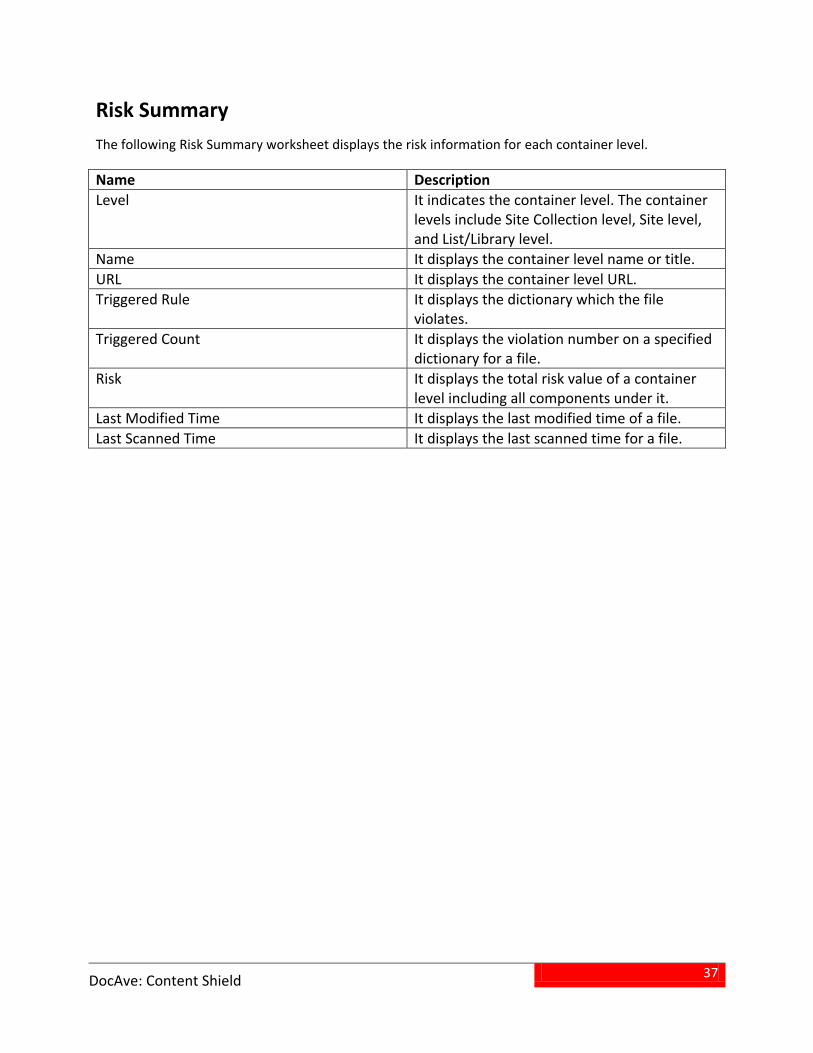
37
DocAve: Content Shield
Risk Summary
The following Risk Summary worksheet displays the risk information for each container level.
Name Description
Level It indicates the container level. The container levels include Site Collection level, Site level, and List/Library level.
Name It displays the container level name or title.
URL It displays the container level URL.
Triggered Rule It displays the dictionary which the file violates.
Triggered Count It displays the violation number on a specified dictionary for a file.
Risk It displays the total risk value of a container level including all components under it.
Last Modified Time It displays the last modified time of a file.
Last Scanned Time It displays the last scanned time for a file.
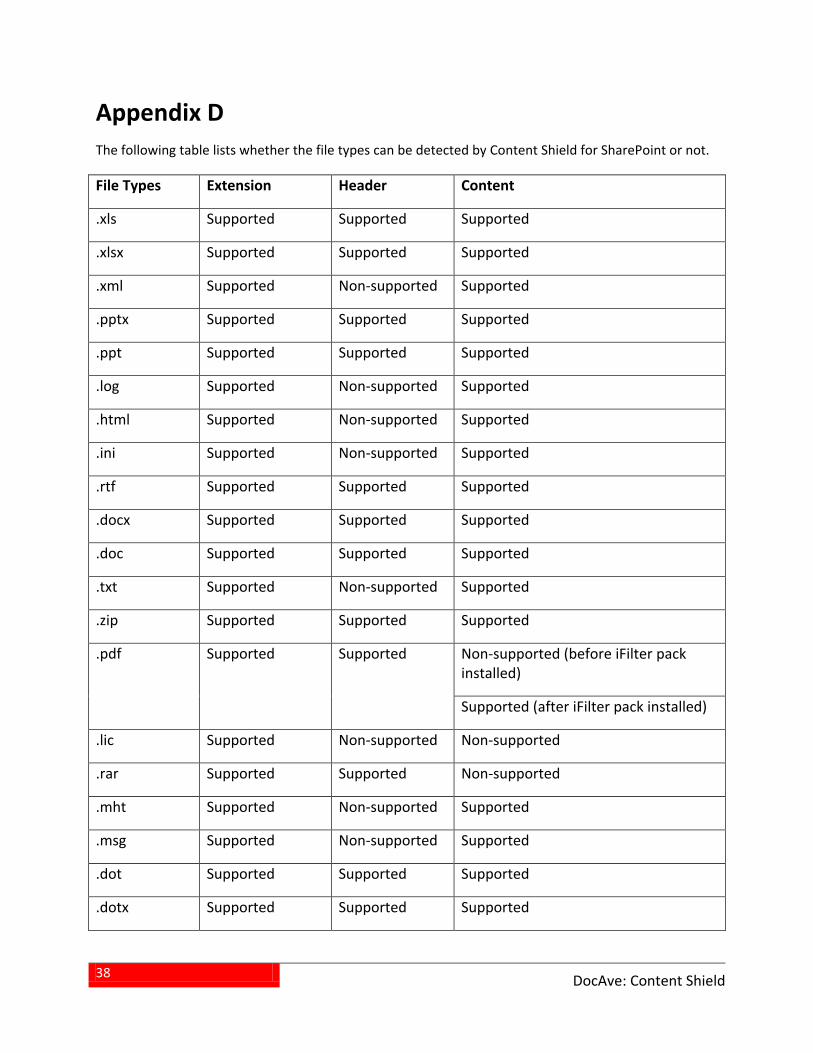
38
DocAve: Content Shield
Appendix D
The following table lists whether the file types can be detected by Content Shield for SharePoint or not.
File Types Extension Header Content
.xls Supported Supported Supported
.xlsx Supported Supported Supported
.xml Supported Non-supported Supported
.pptx Supported Supported Supported
.ppt Supported Supported Supported
.log Supported Non-supported Supported
.html Supported Non-supported Supported
.ini Supported Non-supported Supported
.rtf Supported Supported Supported
.docx Supported Supported Supported
.doc Supported Supported Supported
.txt Supported Non-supported Supported
.zip Supported Supported Supported
.pdf Supported Supported Non-supported (before iFilter pack installed)
Supported (after iFilter pack installed)
.lic Supported Non-supported Non-supported
.rar Supported Supported Non-supported
.mht Supported Non-supported Supported
.msg Supported Non-supported Supported
.dot Supported Supported Supported
.dotx Supported Supported Supported
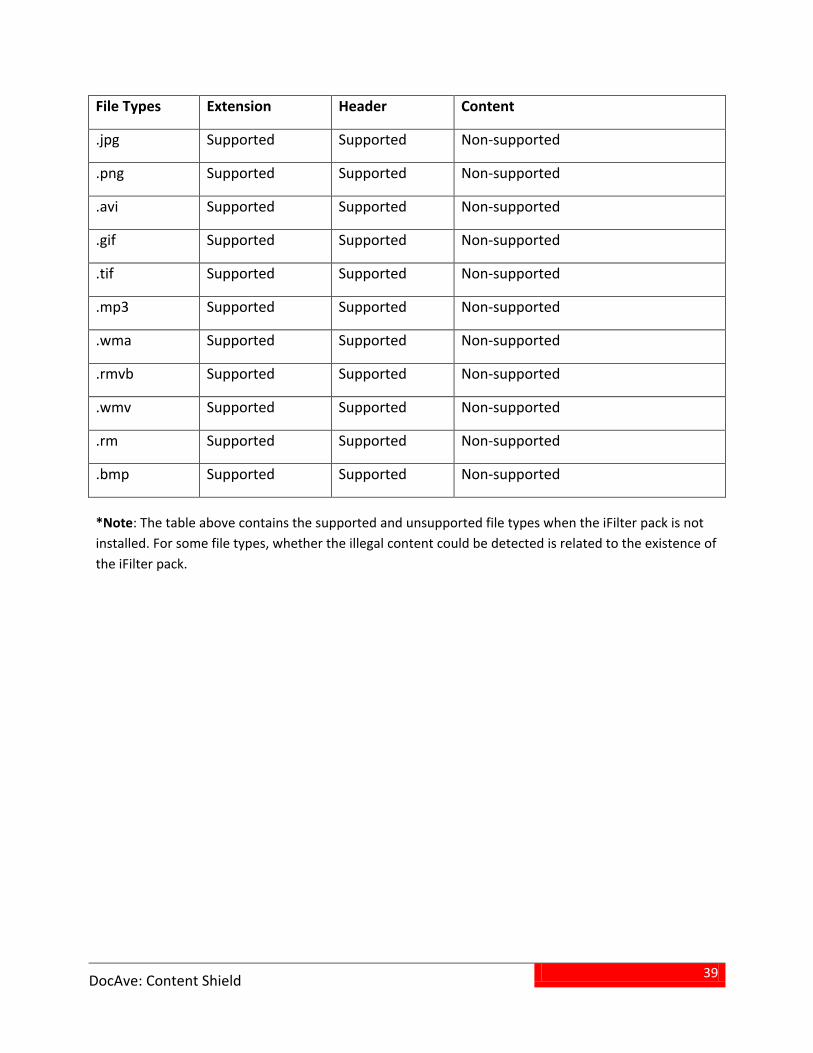
39
DocAve: Content Shield
File Types Extension Header Content
.jpg Supported Supported Non-supported
.png Supported Supported Non-supported
.avi Supported Supported Non-supported
.gif Supported Supported Non-supported
.tif Supported Supported Non-supported
.mp3 Supported Supported Non-supported
.wma Supported Supported Non-supported
.rmvb Supported Supported Non-supported
.wmv Supported Supported Non-supported
.rm Supported Supported Non-supported
.bmp Supported Supported Non-supported
*Note: The table above contains the supported and unsupported file types when the iFilter pack is not
installed. For some file types, whether the illegal content could be detected is related to the existence of
the iFilter pack.
40
DocAve: Content Shield
Index
*Content Shield Policy, 23, 26 *Scan Engine, 19 Account, 11 Add, 14 Append, 28 Application Database, 10 Apply, 9 Apply License, 9 Apply Now, 24 Between, 17 Block, 20 Block the offending items from SharePoint when the risk is equal or greater than, 19 Blocked File Types, 16 Browse, 9 Cancel, 12, 13, 14, 16, 17, 18, 22, 23, 24, 26 Category, 15, 16 Connect to an existing database, 10 Content Dictionary, 15 Content Shield Policy, 18, 22, 25 Create a new database, 11 Database Name, 10 Database Server, 10 Day(s), 24, 26 Debug, 12 Delete, 15, 17, 18, 23, 25, 28 Deploy Now, 7 Description, 20, 25 Dictionary Description, 16 Dictionary Keywords, 16 Dictionary Name, 15, 16, 18 Dictionary Type, 15, 18 Disable All Filters, 25 Display all instances of a violation type within a file, 20 Display only the first instance of a violation type within a file, 20 DocAve Content Shield for SharePoint, 7 DocAve Content Shield for SharePoint Restore Controller, 28 Edit, 13, 16, 17, 18, 22, 23, 26 Edit Mail Template, 13 E-mail Profile, 12, 22, 23, 26 E-mail Server Authentication, 13 E-mail Settings, 13, 24 Enable All Filters, 23 Enable E-mail Schedule, 24 Enable Full Schedule, 25 Enable Incremental Schedule, 26
41
DocAve: Content Shield
Enable risk report, 20 Enable Schedule, 24 End Time, 27 Engine Description, 17 Engine Dictionaries, 17 Engine Name, 17, 18 Error, 12 Error Message, 19 Exclude from file filter, 19 Extension, 20 File filter size, 17 File Header, 16 File Type, 16 File Type Dictionary, 16 Filter Dictionaries, 15 Front-end Settings, 7 Full Schedule, 25 GB, 17 Global Settings, 11 Greater than, 17 Hour(s), 24, 26 Identify the file name with an extension, 20 Include file in-place with error message, 19 Include in file filter, 19 Incremental Schedule, 26 Info, 12 Interval, 24 Job ID, 27 Job Type, 27 KB, 17 Last Run Time, 25 Less than, 17 Maximum Storage Time, 12 MB, 17 Message Body, 14 Minute(s), 24, 26 Month(s), 24, 26 Name, 20 New, 15, 16, 17, 18, 23, 25 New Profile, 13 Non-compliant content was found in this document, 19, 20 Not Overwrite, 28 Number of Threads, 11 OK, 11, 12, 13, 14, 16, 17, 18, 22, 23, 24, 26 Only once, 24 Overwrite, 28 Password, 11, 13 Plan Name, 25, 27
42
DocAve: Content Shield
Policy Name, 18 Profile Name, 12 Progress, 27 Real-Time Filter, 22 Recipients, 13 Report the error in DocAve Content Shield for SharePoint, 20 Reports, 27 Restore Files, 28 Risk Value, 16 Run Now(Full), 26 Run Now(Incremental), 26 Save, 23 Save offending file to quarantine folder, 19 Schedule, 24 Scheduled Filter, 25 Scheduled Filter Job Report, 27 Select Content Filter Report Type, 27 Send e-mail to the creator or modifier, 20 Sender, 12, 13 Set content type to, 20 Show Risk Report, 27 Site Actions, 28 Site Collection Administration, 28 Site Settings, 28 Size, 12, 15, 16, 17, 18, 22, 25, 27, 28 SQL authentication, 10, 11 Start Time, 24, 25, 26, 27 Status, 27 Stop scanning after one hit, 22 Subject, 13 Tag, 20 User Name, 13 Warning, 12 Week(s), 24, 26 Windows authentication, 10, 11 Word Count, 15
43
DocAve: Content Shield
Notices and Copyright Information
Notice
The materials contained in this publication are owned or provided by AvePoint, Inc. and are the property
of AvePoint or its licensors, and are protected by copyright, trademark and other intellectual property
laws. No trademark or copyright notice in this publication may be removed or altered in any way.
Copyright
Copyright © 2012 AvePoint, Inc. All rights reserved. All materials contained in this publication are
protected by United States copyright law and no part of this publication may be reproduced, modified,
displayed, stored in a retrieval system, or transmitted in any form or by any means, electronic,
mechanical, photocopying, recording or otherwise, without the prior written consent of AvePoint, 3
Second Street, Jersey City, NJ 07311, USA or, in the case of materials in this publication owned by third
parties, without such third party’s consent.
Trademarks
AvePoint®
, DocAve®
, the AvePoint logo, and the AvePoint Pyramid logo are registered trademarks of
AvePoint, Inc. with the United States Patent and Trademark Office. These registered trademarks, along
with all other trademarks of AvePoint used in this publication are the exclusive property of AvePoint and
may not be used without prior written consent.
Microsoft, MS-DOS, Internet Explorer, Microsoft Office SharePoint Servers 2007/2010, SharePoint Portal
Server 2003, Windows SharePoint Services, Windows SQL server, and Windows are either registered
trademarks or trademarks of Microsoft Corporation.
Adobe Acrobat and Acrobat Reader are trademarks of Adobe Systems, Inc.
All other trademarks contained in this publication are the property of their respective owners and may
not be used such party’s consent.
Changes
The material in this publication is for information purposes only and is subject to change without notice.
While reasonable efforts have been made in the preparation of this publication to ensure its accuracy,
AvePoint makes no representation or warranty, expressed or implied, as to its completeness, accuracy,
or suitability, and assumes no liability resulting from errors or omissions in this publication or from the
use of the information contained herein. AvePoint reserves the right to make changes in the Graphical
User Interface of the AvePoint software without reservation and without notification to its users.
AvePoint, Inc.
3 Second Street
Jersey City, NJ 07311
USA