docave 6 sql server data manager user guide · docave® 6 sql server data manager user guide ......
TRANSCRIPT

DocAve® 6 SQL Server
Data Manager User Guide
Service Pack 10, Cumulative Update 3
Issued July 2018
The Enterprise-Class Management Platform for SharePoint® Governance

DocAve®
6 SQL Server Data Manager 1
Table of Contents What’s New in this Guide ............................................................................................................................................. 3
About DocAve SQL Server Data Manager ............................................................................................................. 4
Complementary Products ............................................................................................................................................................ 4
Submitting Documentation Feedback to AvePoint ........................................................................................... 5
Before You Begin ............................................................................................................................................................. 6
AvePoint’s Testing Policy and Environment Support ........................................................................................................ 6
Supported Software Environments ..................................................................................................................................... 6
Supported Hardware ................................................................................................................................................................ 6
Supported Backup and Recovery ......................................................................................................................................... 7
Configuration .................................................................................................................................................................................... 7
Agents .................................................................................................................................................................................................. 7
Required Permissions .................................................................................................................................................................... 7
Supported SharePoint Versions ................................................................................................................................................. 9
Supported SQL Server Versions ................................................................................................................................................. 9
Health Analyzer ............................................................................................................................................................................. 10
Getting Started .............................................................................................................................................................. 11
Launching SQL Server Data Manager .................................................................................................................................. 11
Navigating DocAve ...................................................................................................................................................................... 12
User Interface Overview ............................................................................................................................................. 14
About the Staging Policy .......................................................................................................................................... 15
Staging Policy Configuration Interface ................................................................................................................................ 15
Managing Staging Policies ....................................................................................................................................................... 15
Configuring Staging Policies .................................................................................................................................................... 15
Configuring the Specify Location Interface .................................................................................................................. 17
About the Filter Policy ................................................................................................................................................ 18
Managing Filter Policies ............................................................................................................................................................. 18
Configuring Filter Policies ......................................................................................................................................................... 18
Analysis Builder ............................................................................................................................................................. 20
About InstaMount ........................................................................................................................................................ 23
Restore SQL Server Data ........................................................................................................................................... 24
Configuring a Restore Job ........................................................................................................................................................ 25
Site Collection Level Restore ................................................................................................................................... 32

DocAve®
6 SQL Server Data Manager 2
Restore Data From Database ................................................................................................................................... 33
Checking a Job Status ................................................................................................................................................ 40
Appendix A: SharePoint Object Security and Property .................................................................................. 41
Appendix B: Examples of Filter Policies ............................................................................................................... 42
Appendix C: Advanced Setting in the Configuration File ............................................................................. 48
Notices and Copyright Information ...................................................................................................................... 49

DocAve®
6 SQL Server Data Manager 3
What’s New in this Guide • General improvements for enhanced functionality.

DocAve®
6 SQL Server Data Manager 4
About DocAve SQL Server Data Manager SQL Server Data Manager is a recovery solution for Microsoft SharePoint. SQL Server Data
Manager provides full fidelity analysis and recovery of SharePoint content, from SQL backup
files, VHD/VHDX files, and content databases.
Complementary Products Many products and product suites on the DocAve 6 platform work in conjunction with one
another. The following products are recommended for use with SQL Server Data Manager:
• DocAve Granular Backup and Restore to back up all farm content and restore
content down to the item level
• DocAve Replicator for SharePoint for copying SharePoint content within the same
SharePoint farm or from one SharePoint farm to another
• DocAve Content Manager for SharePoint for restructuring or moving SharePoint
content
• DocAve Report Center for SharePoint to examine pain points in the SharePoint
infrastructure and report on SharePoint user behavior and changes
• DocAve Data Protection for setting backup and restore points prior to adjusting
SharePoint governance policies in this product

DocAve®
6 SQL Server Data Manager 5
Submitting Documentation Feedback to AvePoint AvePoint encourages customers to provide feedback regarding our product documentation. You
can Submit Your Feedback on our website.

DocAve®
6 SQL Server Data Manager 6
Before You Begin Refer to the sections below for system and farm requirements that must be in place prior to
installing and using DocAve SQL Server Data Manager.
AvePoint’s Testing Policy and Environment Support
Supported Software Environments
AvePoint is committed to testing against all major versions and service packs of SharePoint as
well as the latest versions of Windows Server and SQL Server, as Microsoft announces support
and compatibility.
*Note: AvePoint does not recommend or support installing DocAve on client operating systems.
Supported Hardware
AvePoint is committed to maintaining a hardware agnostic platform to ensure that DocAve
operates on common Windows file sharing and virtualization platforms. To ensure that DocAve
is hardware agnostic, AvePoint tests hardware that is intended to support SharePoint and
DocAve infrastructure, storage targets, and hardware-based backup and recovery solutions, as
supported by AvePoint’s partnerships. AvePoint directly integrates with the following platforms:
any Net Share, FTP, Amazon S3, AT&T Synaptic, Box, Caringo Storage, Cleversafe, DELL DX
Storage, Dropbox, EMC Atmos, EMC Centera, Google Drive, HDS Hitachi Content Platform, IBM
Spectrum Scale Object, IBM Storwize Family, Microsoft Azure Storage, NetApp Data ONTAP,
NFS, OneDrive, Rackspace Cloud Files, and TSM.
All other hardware platforms that support UNC addressable storage devices are supported.
*Note: AvePoint has ended the test and development for Caringo Storage and DELL DX Storage
in DocAve since DocAve 6 SP7 CU1, as the providers of these two platforms have stopped the
platform maintenance.
*Note: Due to changes in the IBM Tivoli Storage Manager API, DocAve 6 Service Pack 6 and
later versions require that TSM Client version 7.1.2 is installed on the Control Service and Media
Service servers.
*Note: Most of the hardware partnerships referenced in this guide are intended to make use of
advanced functionality (such as snapshot mirroring, BLOB snapshots, indexing, long-term
storage, WORM storage, etc.), and are not indications that any changes to the product are
required for basic support. In most cases, hardware can be supported with no change to the
product.

DocAve®
6 SQL Server Data Manager 7
Supported Backup and Recovery
DocAve supports BLOB backup storage according to the list of hardware platforms above. BLOB
snapshot function, however, is currently only supported on OEM versions and NetApp hardware.
DocAve supports SQL content and Application database backups via the SharePoint Volume
Shadow Copy Service (VSS) on all Windows and SQL server platforms listed above. DocAve also
supports snapshot-based SharePoint VSS on all hardware listed above where the hardware
partner has certified support with Microsoft.
DocAve supports application and configuration server backups for all the supported software
environments listed above. DocAve 6 SP5 or later supports VM backup via Hyper-V/VMWare for
the following operating systems: Windows Server 2008 R2, Windows Server 2012, Windows
Server 2012 R2, and Microsoft Hyper-V Server 2012 R2.
Configuration In order to use DocAve SQL Server Data Manager, the DocAve 6 platform must be installed and
configured properly on your farm. SQL Server Data Manager will not function without DocAve 6
present on the farm.
Agents DocAve Agents are responsible for running DocAve jobs and interacting with the SharePoint
object model. DocAve Agent must be installed on a SQL Server and at least one of the Web
front-end servers.
For instructions on installing the DocAve Platform, DocAve Manager, and DocAve Agents, refer
to the DocAve 6 Installation Guide.
Required Permissions To install and use SQL Server Data Manager properly, ensure that the Agent account has the
following permissions.
Agent accounts of DocAve Agent servers that are selected to run restore jobs require the
following permissions:
• Local System Permissions
Member of the Administrators group
• SharePoint Permissions
Member of the Farm Administrators group

DocAve®
6 SQL Server Data Manager 8
*Note: For both SharePoint 2013 and SharePoint 2016, SQL Server Data Manager
requires the Agent account to have Full Control permission to the Web
application where the destination node selected in a restore job resides.
• SQL Permissions
Database Role of db_owner for all the databases related with SharePoint,
including SharePoint Content Database, Configuration Database, and
Central Administration Database
Server Role of public for the SQL Server
Database Role of db_owner for the temporary databases that store the
analyzed data and the databases configured in the Restore Data from
Database jobs
*Note: To restore apps, the Agent account cannot be a system account.
Agent accounts configured on SQL Servers that are used in staging policies require the following
permissions:
• Local System Permissions
Member of the Administrators group
• SQL Permissions
*Note: If SQL authentication is used in staging policies, make sure the configured
accounts have the following permissions.
Server Role of public for the SQL Server
Server Role of processadmin for the SQL Server
SQL Instance Permission: Control Server
Server Role of dbcreator for the SQL Server
Database Role of db_owner for the temporary databases that store the
analyzed data
Server Role of sysadmin for the SQL Server
*Note: This permission is only required when analyzing VHD/VHDX files.
Agent accounts configured on SQL Servers where the restoring databases reside require the
following permissions:
*Note: These permissions are required when restoring data from database.
• Local System Permissions

DocAve®
6 SQL Server Data Manager 9
Member of the Administrators group
• SQL Permissions
Database Role of db_owner for the databases configured in the Restore
Data from Database jobs
Server Role of public for the SQL Server
Supported SharePoint Versions SQL Server Data Manager supports the following SharePoint versions for analyzing and
restoring data:
• SharePoint Server 2016 RTM
• SharePoint Server 2013 Service Pack 1
• SharePoint Server 2013 RTM
• SharePoint Foundation 2013 RTM
• SharePoint Foundation 2013 Service Pack 1
• SharePoint Server 2010 Service Pack 2
• SharePoint Server 2010 Service Pack 1
• SharePoint Foundation 2010 Service Pack 2
• SharePoint Foundation 2010 Service Pack 1
Supported SQL Server Versions SQL Server Data Manager supports the following SQL Server versions for analyzing and
restoring data:
• SQL Server 2017 Enterprise
• SQL Server 2017 Standard
• SQL Server 2016 Service Pack 2 Enterprise
• SQL Server 2016 Service Pack 2 Standard
• SQL Server 2016 Service Pack 1 Enterprise
• SQL Server 2016 Service Pack 1 Standard
• SQL Server 2016 Enterprise
• SQL Server 2016 Standard
• SQL Server 2014 Service Pack 1 Enterprise

DocAve®
6 SQL Server Data Manager 10
• SQL Server 2014 Business Intelligence
• SQL Server 2014 RTM Enterprise
• SQL Server 2012 Service Pack 3 Enterprise
• SQL Server 2012 Service Pack 2 Business Intelligence
• SQL Server 2012 Service Pack 2 Enterprise
• SQL Server 2012 Service Pack 2 Standard
• SQL Server 2012 Service Pack 1 Enterprise
• SQL Server 2008 R2 Service Pack 3 Enterprise
• SQL Server 2008 R2 Service Pack 3 Standard
• SQL Server 2008 Service Pack 4 Enterprise
• SQL Server 2005 Service Pack 4 Enterprise
Health Analyzer AvePoint recommends using Health Analyzer to verify that you meet the prerequisites necessary
to use DocAve SQL Server Data Manager.
*Note: Only users in the Administrators group can use Health Analyzer.
For more information about Health Analyzer, refer to DocAve 6 Installation Guide.
DocAve®
6 SQL Server Data Manager 11
Getting Started Refer to the sections below for important information on getting started with SQL Server Data
Manager.
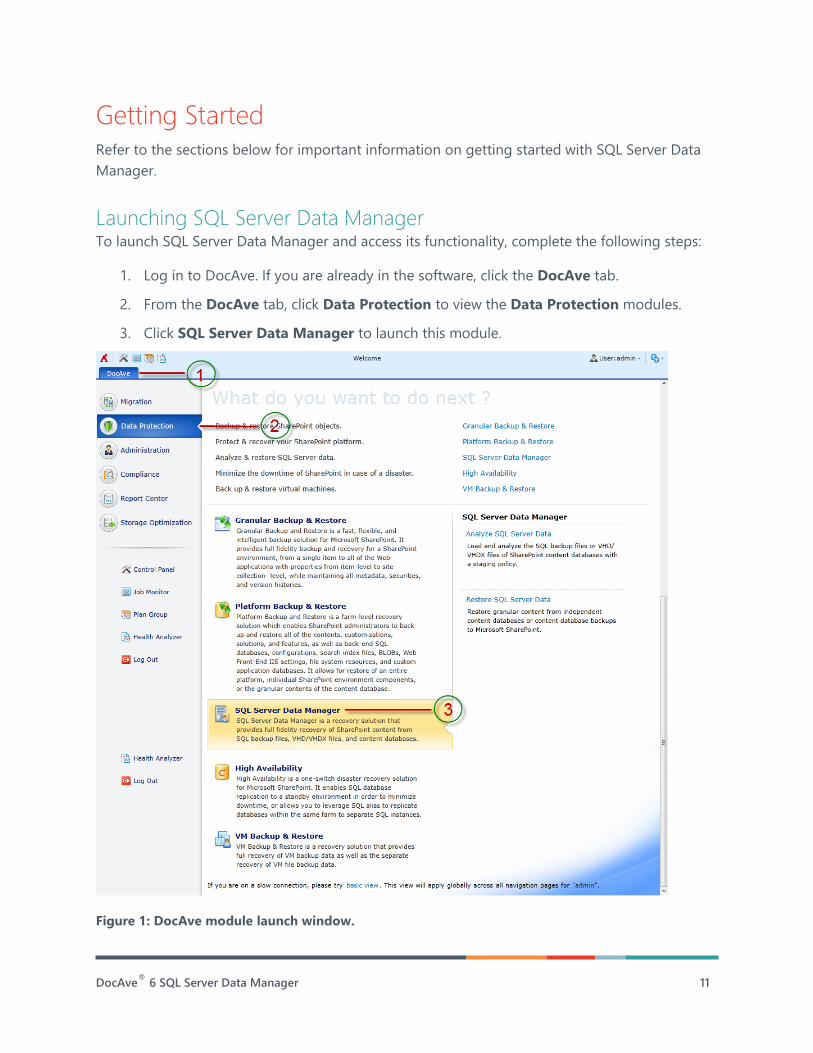
Launching SQL Server Data Manager To launch SQL Server Data Manager and access its functionality, complete the following steps:
1. Log in to DocAve. If you are already in the software, click the DocAve tab.
2. From the DocAve tab, click Data Protection to view the Data Protection modules.
3. Click SQL Server Data Manager to launch this module.
Figure 1: DocAve module launch window.

DocAve®
6 SQL Server Data Manager 12
Navigating DocAve DocAve mimics the look and feel of many Windows products, making for an intuitive and
familiar working environment. While there are many windows, pop-up displays, and messages
within DocAve products, they share similar features and are navigated in the same ways.
Below is a sample window in DocAve. It features a familiar, dynamic ribbon, and a searchable,
content list view.
Figure 2: Navigating DocAve.
1. Ribbon Tabs – Allows users to navigate to the DocAve Welcome page and within the
active module.
2. Ribbon Panes – Allows users to access the functionality of the active DocAve module.
3. Manage columns ( ) – Allows users to manage which columns are displayed in the table.
Click the manage columns ( ) button, and then select the checkbox next to the column
name in the drop-down list.
4. Hide the column ( ) – Allows users to hide the selected column.

DocAve®
6 SQL Server Data Manager 13
5. Filter the column ( ) – Allows users to filter the information in the List View. Click the
filter the column ( ) button next to the column and then select the checkbox next to the
column name.
6. Search – Allows users to search the List View pane for a keyword or phrase. You can
select Search all pages or Search current page to define the search scope.
*Note: The search function is not case sensitive.
7. Management Pane – Displays the actionable content of the DocAve module.

DocAve®
6 SQL Server Data Manager 14
User Interface Overview The SQL Server Data Manager interface launches with the Analyze tab active. This tab displays
the dashboard and allows for quick access to a list of the SQL Server Data Manager features.
Figure 3: SQL Server Data Manager user interface.
1. The ribbon shows the available actions for SQL Server Data Manager.
2. The workspace shows explanations and the content that is used during the
configuration of actions performed in SQL Server Data Manager.

DocAve®
6 SQL Server Data Manager 15
About the Staging Policy The staging policy determines where temporary databases generated during the analysis
process. Create a staging policy to specify a temporary database location and the SQL backup
files or VHD/VHDX files’ locations.
Staging Policy Configuration Interface To access Staging Policy Configuration for DocAve in the SQL Server Data Manager interface,
click Staging Policy in the Settings group on the Analyze tab. Click Close on the ribbon to
close the Staging Policy Configuration interface.
In the Staging Policy Configuration interface, you will see a list of configured staging policies.
Managing Staging Policies In the Staging Policy Configuration interface, you can create a new staging policy, edit a
staging policy, or delete staging policies. For details on creating or editing a staging policy, refer
to Configuring Staging Policies.
Select a staging policy from the list and click Edit on the ribbon to change its configurations. For
details on editing configurations for a staging policy, refer to Configuring Staging Policies.
To delete one or more staging policies for DocAve, select them from the list and then click
Delete on the ribbon. A confirmation window will pop up and ask if you are sure you want to
proceed with the deletion. Click OK to delete the selected staging policies, or click Cancel to
return without deleting them.
Configuring Staging Policies To configure a staging policy, complete the following steps:
1. Click Staging Policy in the Settings group on the Analyze tab. The Staging Policy
Configuration window appears.
2. Click Create in the Manage group. The Staging Policy > Create page appears.
Configure the following settings:
a. Staging Policy Name – Enter a staging policy name and an optional Description
for the staging policy.
b. Database Access Credentials – Choose the SQL Server that you want to use for
this staging policy and specify the credentials to access the SQL Server.
c. SQL agent name – All of the DocAve Agents that are installed on SQL Servers are
listed in the drop-down menu.

DocAve®
6 SQL Server Data Manager 16
SQL instance name – All of the instances in the SQL Agent selected
above are listed in the drop-down menu.
Database authentication (for accessing database within SharePoint)
▪ Windows authentication (recommended) (the default option) –
Use this method to confirm the user identity using Windows.
▪ SQL authentication – SQL Server confirms the user identity
according to the entered Account and Password.
*Note: Make sure the configured account has enough
permissions. For more information, refer to Required Permissions.
Click Validation Test to verify the access to the SQL Server.
d. Temporary Database Configuration – Set up the configuration of the
temporary database.
Minimum amount of free space to leave – Specify the minimum
amount of free space to leave for the database file location and log file
location. DocAve ensures that the entered amount of storage space exists
in the corresponding location before starting a job. If there is not enough
free space in the specified location before a job starts, the job will fail.
Additionally, if there is not enough space in the location after the
temporary database is stored there, the job will fail too.
Temporary database file location – Enter a local path on the SQL Server
to store the temporary database data file (.mdf). The default location is
the database data default location of SQL Server, for example, C:\Program
Files\Microsoft SQL Server\MSSQL10_50.MSSQLSERVER\MSSQL\Data.
Temporary log file location – Specify a local path on the SQL Server to
store the temporary database log file (.ldf). The default location is the
database log default location of SQL Server, for example, C:\Program
Files\Microsoft SQL Server\MSSQL10_50.MSSQLSERVER\MSSQL\Data.
Click Validation Test to verify the access to the SQL Server.
e. Source Data Location – Specify the location of the SQL backup files or
VHD/VHDX files.
Click Specify Location and the Specify Location interface appears. For more
information, refer to Configuring the Specify Location Interface.
f. Priority Settings – Select the action when the number of temporary databases
has met or exceeds the threshold.
Fail Current Job – The restore job of the backup files will fail immediately.
DocAve®
6 SQL Server Data Manager 17
Fail Other Jobs – The database of the oldest staging job will be deleted
before staging the new temporary database.
*Note: Make sure the xp_cmdshell function is enabled in the SQL instance selected in the
Staging Policy, or make sure the user that logs on the SQL instance service has Read and Write
permissions to the specified UNC path in the Staging Policy. To enable the xp_cmdshell
function, refer to xp_cmdshell Server Configuration Option.
Configuring the Specify Location Interface
Click Specify Location in the Source Data Location field of the Staging Policy > Create page
and the Specify Location interface appears. To specify the Source Path of the SQL backup files
or VHD/VHDX files, configure the following settings:
1. Enter the UNC Path.
2. Select an existing managed account profile from the drop-down menu or click New
Managed Account Profile to create a new one. For detailed information on creating a
new managed account profile, refer to DocAve 6 Control Panel Reference Guide.
3. Click Validation Test to verify the access to the UNC path.
4. Click Save.
DocAve®
6 SQL Server Data Manager 18
About the Filter Policy Filter Policies allow you to set up filter rules, so you can control what objects and data within any
file system level appear so that you can target content more precisely. By setting up and saving
filter policies, you can apply the same filter policies to different plans without having to recreate
them each time.
To access Filter Policy Configuration for DocAve in the SQL Server Data Manager interface,
click Filter Policy in the Settings group on the Analyze tab. Click Close on the ribbon to close
the Filter Policy Configuration interface.
In the Filter Policy Configuration interface, you will see a list of configured filter policies.
Managing Filter Policies In the Filter Policy Configuration interface, you can create a new filter policy, view details
about a filter policy, edit a filter policy, or delete filter policies. For details on creating or editing
a filter policy, refer to Configuring Filter Policies.
Select a filter policy from the list and click Edit on the ribbon to change its configurations. For
details on editing configurations for a filter policy, refer to Configuring Filter Policies.
To view a filter policy, select it from the list, and then click View Details on the ribbon. To delete
one or more filter policies for DocAve, select them from the list, and then click Delete on the
ribbon. A confirmation window will pop up and ask if you are sure with the deletion. Click OK to
delete the selected filter policies, or click Cancel to return without deleting them.
Configuring Filter Policies To create a new filter policy, click Create in the Manage group. To modify a configured filter
policy, select the filter policy, then click Edit on the ribbon. In the Filter Policy > Create or Filter
Policy > Edit page, configure the following settings:
1. Name and Description – Enter a Name for the filter policy. Then enter an optional
Description for future reference.
2. Criteria – Select specific objects or data within each file system level (file and folder).
Each level has a unique set of rules that can be applied to enhance configurations.
*Note: Refer to Appendix B: Examples of Filter Policies for examples of filter policies that
users can configure.
a. Click Add a Filter Level Group to add a new rule of the specified level and then
click Add a Criterion to add criteria for the new rule by completing the fields
below. Click the Delete ( ) button to delete the rule that is no longer needed.

DocAve®
6 SQL Server Data Manager 19
Rule – Select the rule you want to create from the drop-down list.
Condition – Select the condition for the rule.
Value – Enter a value in the text box for the rule.
b. To add more filters to the filter policy, repeat the previous step.
*Note: Depending on the filters you enter, you can change the logical
relationships between the filter rules. There are currently two logical relationships:
And and Or. By default, the logic is set to And. To change the logical
relationship, click on the logical relationship link. The And logical relationship
means that the content that meets all of the filter rules will be filtered and
included in the result. The Or logic means that the content that meets any one of
the filter rules will be filtered and included in the result.
3. Basic Filter Condition – View the logical relationship of the filter rules in this area.
For example, if the logical relationship is ((1 And 2) Or 3) in the Basic Filter Condition
area, the content that meets both the filter rule 1 and filter rule 2, or meets the filter rule
3, will be filtered and included in the result.
4. Click Save to save the configurations and return to the Filter Policy Configuration
interface, or click Cancel to return to the Filter Policy Configuration interface without
saving any changes.

DocAve®
6 SQL Server Data Manager 20
Analysis Builder Click Analysis Builder in the Manage group on the Analyze tab. The wizard mode page
appears. Configure the following settings:
1. Analysis Options – Choose a staging policy, a filter policy, and a method of analysis for
the job you are about to run.
• Staging Policy – Determines where temporary databases are generated during
the analysis process. Create a staging policy to specify a temporary database
location and to specify the SQL backup files’ or VHD/VHDX files’ location. You
may select a staging policy from the drop-down menu, or click New Staging
Policy to create a new one. For detailed information on configuring a staging
policy, refer to Configuring Staging Policies.
• Filter Policy – Controls what objects and data within any file system level are
analyzed so that you can target content more precisely. The default filter policy is
set to be none. You may select a filter policy from the drop-down menu, or click
New Filter Policy to create a new one. For detailed information on configuring a
filter policy, refer to Configuring Filter Policies.
• Source Data Format – Select a type for the source data that you want to analyze.
You can choose a SQL Backup File or VHD/VHDX File to analyze. Select SQL
Backup File to analyze the data in the content databases that are related to the
selected .bak file. Select VHD/VHDX File to analyze the data in the content
databases that are related to the .mdf file.
• Use InstaMount for Analysis – Select Yes or No for whether or not to use
InstaMount when analyzing the SQL backups of the content databases.
InstaMount uses a mapping file to record the relationship between the
InstaMount temporary database and the backup data. It makes the analyze job
more efficient and uses minimal disk space. For more information on InstaMount,
refer to About InstaMount.
*Note: If you select VHD/VHDX File in the Source Data Format field, the Yes
option is selected and cannot be edited. If you select SQL Backup File in the
Source Data Format field and the backup file is compressed backup, make sure
you select No in this field.
2. Data Selection – Select the SQL Server files where the data you want to analyze.
• If you select SQL Backup File in the Source Data Format field, follow the steps
below:
i. Click Find SQL Backup Files on the left pane of the interface, the Find
SQL Backup Files pop-up window appears.

DocAve®
6 SQL Server Data Manager 21
ii. On the left pane of the pop-up window, click the SQL Agent name to load
the tree structure.
iii. Click the desired tree node to load files on the right pane of the pop-up
window.
iv. Select the backup files that you want to analyze by selecting the
corresponding checkboxes. Only BAK files can be analyzed when you
select SQL Backup File in the Source Data Format field.
v. Click OK to save the selection.
vi. In the Analyze tab, the paths of the selected BAK files are displayed.
Select one BAK file at a time; the corresponding content databases of the
BAK file will load in the right pane of the pop-up window.
vii. Select the checkboxes next to the databases you’d like to analyze.
*Note: Make sure the selected content databases are not analyzed.
*Note: SQL Server Data Manager only supports analyzing the SQL backup file
whose backup type is Full.
• If you select VHD/VHDX File in the Source Data Format field, follow the steps
below:
i. Click Find VHD/VHDX Files on the left pane of the interface. The Find
VHD/VHDX Files pop-up window appears.
ii. On the left pane of the pop-up window, click the SQL Agent name to load
the tree structure.
iii. Click the desired tree node to load files on the right pane of the pop-up
window.
iv. Select VHD or VHDX files that you want to analyze by selecting the
corresponding checkboxes. Only VHD and VHDX files can be analyzed
when you select VHD/VHDX File in the Source Data Format field.
v. Click OK to save the selection.
vi. In the Analyze tab, the paths of the selected VHD or VHDX files are
displayed. Click the VHD or VHDX files to load the corresponding MDF
files.
vii. Select the desired MDF files by selecting the corresponding checkboxes.
The detailed information of the MDF files will be loaded in the right pane
of the pop-up window.

DocAve®
6 SQL Server Data Manager 22
viii. Click only one MDF file in the right pane at a time; the corresponding
content databases of the MDF file are displayed in the Database details
area.
If the file status is Not Found, click the Edit Path ( ) button to locate the
correct file path in the Locate Database File pop-up window.
*Note: Make sure the selected MDF file is not analyzed.
3. Schedule – Configure a schedule for this job.
• Notification – To inform specific users of the Backup Files Analysis job, configure
the Notification settings. Select a notification profile from the Select a profile
with address only drop-down list or choose to create a new e-mail notification
profile by clicking the New Notification Profile link. Click View to view the
detailed configuration of the selected notification profile.
• Schedule Selection – Choose whether to run the job immediately, or configure a
custom start time.
No schedule – Select this option to run the job immediately when you
finish the settings of this job.
Configure the schedule myself – Select this option and the Schedule
Settings section appears under the Schedule Selection section.
• Schedule Settings – Specify a start date and time to run this job.
*Note: The start time cannot be earlier than the current time.
• Description – Enter an optional description for this job.
4. Overview – Review and edit your configurations for this job.
5. Click Finish to run this job immediately or running this job at the time specified in the
Schedule Settings section.

DocAve®
6 SQL Server Data Manager 23
About InstaMount It is recommended that you enable the InstaMount function to restore smaller items. An
InstaMount temporary database is much smaller (and uses less space on SQL Server) than a
temporary database used during the data analysis. As a result, a SQL Server data analysis can be
much faster when using InstaMount.
The InstaMount function can be enabled in an analysis job. The InstaMount mapping file is
generated from backup data; it is used to generate the temporary files used by the InstaMount
function.
*Note: It is not recommended to uses InstaMount if you are analyzing large amounts of data. If
the read speed of your device is slow, using InstaMount may lead to a session timeout as well.

DocAve®
6 SQL Server Data Manager 24
Restore SQL Server Data To run a Restore Analyzed SQL Backup job, complete the following steps:
1. Select the Restore tab and click Restore SQL Server Data in the Manage group. The
Restore SQL Server Data tab appears.
2. Job Selection – Configure the options in the Filter By area to limit the scope of backup
data. The default filter rule is to filter the analysis jobs in the last seven days.
• Time Range – Filter analysis jobs by completion time range using the drop-down
list.
All jobs – Select this option to display all Finished/Finished with Exception
Backup Files Analysis jobs.
Analysis jobs start within – Select this option to specify a time period. All
of the Finished/Finished with Exception Backup Files Analysis jobs whose
start time is in the specified time period are displayed.
3. After selecting the filters, click the Filter button in the Filter By area or on the ribbon. All
analysis jobs that meet the selected filter rules are listed in the calendar. To clear all
filters and display all Finished/Finished with Exception analysis jobs, click Reset in the
Filter By area or click Reset on the ribbon.
4. Select the analysis job that you want to restore by clicking the job. Additional actions
that can be performed:
• Place the mouse cursor over an analysis job to display job information: Job ID,
Use InstaMount for Analysis, and Job Status. Click Day, Week, or Month to
change the view to see all the available jobs during that time period.
• Click the page turn ( ) button on the upper-left corner of the calendar to
turn the page.
5. Now that you’ve selected an analysis job containing data you want to restore, click Next
to continue with instructions on building the job.

DocAve®
6 SQL Server Data Manager 25
Configuring a Restore Job To configure a restore job, complete the following steps:
1. Refer to Restore SQL Server Data to begin building the job.
2. Data Selection – Select the database that includes the granular content to restore.
3. Click the Global Setting for Restoring Content, Property and Security link and
configure the Item Level Settings:
• Granular Content – Select the Restore granular content checkbox to restore
the granular content. If you do not select this checkbox, the tree in the Analyzed
Backup Data pane can only be expanded down to the site collection level and
you cannot select granular content. For more information, refer to Site Collection
Level Restore.
• Container Selection ─ Select the Global setting for container configuration
checkbox to enable the container’s global settings.
o Restore container – Restore the container and select the Security
checkbox if you want to restore the container’s security settings, and/or
select the Property checkbox if you want to restore the container’s
property settings. For more information, refer to Appendix A: SharePoint
Object Security and Property.
o Only restore security – Only restore the container’s security settings. You
can specify the Conflict resolution as Merge or Replace. Merge will add
the security of the container in the backup to the conflict container in the
destination. Replace will delete the security of the conflict container in
the destination first, and then add the security of the container in the
backup to the conflict container in the destination.
*Note: Once you select Only restore security option, the Container level
conflict resolution configuration field in the Restore Settings page will
be hidden from the interface and you will not be able to configure the
Container level conflict resolution though that page.
• Content Selection ─ Select the Global setting for restoring content checkbox
to enable the content’s global settings.
o Restore content – Restore the content. Additionally, select the Security
checkbox if you want to restore the content’s security settings along with.
For more information, refer to Appendix A: SharePoint Object Security
and Property.
o Only restore security – Only restore the content’s security settings. You
can specify the Conflict resolution as Merge or Replace. Merge will add

DocAve®
6 SQL Server Data Manager 26
the security settings of the content in the backup into the conflict content
in the destination. Replace will delete the security settings of the conflict
content in the destination first, and then add the security of the content in
the backup to the conflict content in the destination.
*Note: Make sure the content exists in the destination. If the content does
not exist in the destination, the content’s security settings will be skipped
restoring.
*Note: Once you select Only restore security option, the Content level
conflict resolution configuration field in the Restore Settings page will
be hidden from the interface and you will not be able to configure the
Content level conflict resolution though that page.
4. Expand the tree and locate the content you want to restore. The detailed information can
be viewed in the Item Browser pop-up window. Select the objects to be restored under
this node. You can also use the Advanced Search function to search the desired nodes
by the configured search criteria.
When finished, click Next. The Destination Settings page appears.
5. Destination Settings – Choose a destination to restore the data, specify an agent to
perform the restore job, select an action of how the data is restored, and configure the
mapping settings to update the metadata, securities, and language while storing to an
alternate location.
*Note: Make sure that the source node and the destination node are in the same version
of SharePoint. If the site within SharePoint 2013 is a SharePoint 2010 mode site, it can
only be restored to the same mode site.
a. Destination – Choose the destination for the restore job. You can either select an
existing node on the tree or select a manually-created node.
Use the Advanced Search function to search the desired nodes by the configured
search criteria. Click Advanced Search in the Search group of the Restore SQL
Server Data tab, the Advanced Search pop-up window appears. Optionally, you
can right-click a tree node and select the Advanced Search option from the
drop-down menu. You can use the Advanced Search function to search for Web
applications, site collections, sites, lists/libraries, or folders.
To create a node in the destination SharePoint manually, select a node with a
blank text box, and then enter the URL of the destination node into the text box
following the format displayed in the text box. If you are creating a new site
collection, you will be asked to select one existing managed path from the drop-
down list. Click Create Container beside the text box to create the node in the

DocAve®
6 SQL Server Data Manager 27
destination farm. Alternatively, click Create Container in the Manage group on
the Restore SQL Server Data tab to create the corresponding node.
b. Agent – Specify the Agent that will perform the restore job.
c. Action – Select how the SQL backup data will be restored to the destination.
Merge – Add the backup data to the destination node.
Attach – Restore the backup data as children beneath the selected node.
To see what the data tree of the destination node will look like after the job is
executed, click Preview. Only the unexpanded tree structure in the Data
Selection step can be previewed in the destination tree. Click Hide Preview to
hide the Preview area.
d. Mapping Settings (Optional) – Configure whether to specify the mapping
settings to map the user, domain, or language to the destination.
User mapping – If desired, configure the user mapping to map the
backed up user to the destination user. For specific instructions on setting
up the user mapping, refer to DocAve 6 Control Panel Reference Guide.
Domain mapping – If desired, configure the domain mapping to map the
backed up domain to the destination domain. For specific instructions on
setting up the domain mapping, refer to DocAve 6 Control Panel
Reference Guide.
Language mapping – If desired, configure the language mapping to
display a destination node in a different language than the language of
the backed-up data. For specific instructions on setting up the language
mapping, refer to DocAve 6 Control Panel Reference Guide.
Click Next when finished. The Restore Settings page appears.
6. Restore Settings – Configure how the content will be restored.
a. Conflict Resolution – Select one of the following options for resolving conflicts
at the container level and content level.
Container level conflict resolution – Set the conflict resolution on the
site collection, site, list, and folder level.
▪ Skip – Ignores the source container that is the same as the
destination one.
▪ Merge – Combines the settings and properties of the source and
destination container. If there is a conflict, the source overwrites
the destination.

DocAve®
6 SQL Server Data Manager 28
▪ Replace – Deletes the destination container and then restores the
source to the destination. If the selected container is a root site,
Replace function empties the root site instead of deleting it and
restores the source to the destination. This option can only be
used at folder/list/site/site collection level.
*Note: A discussion board item is considered a folder, so it is restored as
a container.
Content level conflict resolution – Sets the conflict resolution on the
item level.
▪ Skip – Ignores the source item/document that has the same item
ID/document name as the destination item/document. l
▪ Overwrite – Copies the source item/document to the destination
by overwriting the destination item/document with same item
ID/document name.
▪ Overwrite by Last Modified Time – Keeps the conflict
item/document which has the latest modified time and overwrites
the older one.
▪ Append an Item/Document Name with a Suffix – Keeps both of
the conflict items/documents, but the name of the restored source
document will be appended with a suffix (_1, _2, _3…), and the ID
of the restored source item will plus one.
▪ Append a New Version – Adds the conflict source
item/document to the destination as a new version of the conflict
destination item/document.
b. Apps Conflict Resolution – Select one of the following options for resolving
conflicts for apps:
Skip – No changes will be made; the destination app and AppData will
remain unchanged.
Update App Only – If the app in the source is a more recent version than
the destination, it will overwrite the destination app but not the AppData.
Replace App and AppData – The source app will always replace the
destination app and AppData.
c. Include Data in Recycle Bin – Choose whether to compare the data in the
backup with the data in the destination site collection’s recycle bin. If you select
Skip either at the Container level or Content level, or select Append an
Item/Document Name with a suffix or Append a New Version in Content
level, the Include Recycle Bin Data option is available to configure. If you select

DocAve®
6 SQL Server Data Manager 29
Yes in this field, and the selected content in the backup still exists in the recycle
bin of the destination site collection, then the selected content in the backup is
not restored.
d. Include Detailed Job Report for All Items – Selecting Yes generates a detailed
job report for all the items. Selecting No still generates a job report, but only for
list, site, or site collection level.
e. Workflow – Decide how the backed-up workflows are restored.
Include workflow definition – Only restores the definition of the
backed-up workflows.
Include workflow instance – Restores the state, history, and tasks for
each item.
*Note: All workflow instances whose status was In Progress when backed
up will be Cancelled when restored to the destination.
*Note: For the SharePoint designer workflow whose platform type is SharePoint
2013 Workflow, only the workflow definitions are supported to be restored for
SharePoint 2013 or SharePoint 2016. For SharePoint 2016, the SharePoint
designer workflow used to test is created by SharePoint Designer 2013.
f. Item Dependent Columns and Content Types – Choose whether to restore
item-dependent columns and content types.
*Note: If the dependent column or content type does not exist in the destination,
then that column or content type will not be restored. If this is the case, use this
option to restore them.
Restore the item-dependent columns and content types to maintain
item integrity – Whether the item is restored and the dependent column
or content type is created in the corresponding list or library are
dependent on the option selected below:
▪ Do not restore the columns and content types, or the
corresponding items – The columns, content types, and the
corresponding items will not be restored if the columns and
content types in the destination are in conflict with the backed up
columns and content types.
▪ Overwrite the columns and content types – The columns and
content types will overwrite the destination conflicted columns
and content types, and the corresponding items will be restored.
▪ Append the columns to the destination – The columns and
items will be restored to the destination if the columns and
DocAve®
6 SQL Server Data Manager 30
content types in the destination are in conflict with the backup up
columns and content types.
Do not restore item-dependent columns and content types – The item
dependent columns and dependent content types will not be restored.
When selecting this option, make sure the dependent columns and
content types exist in the destination. Otherwise, the item cannot be
restored.
g. Source Web Application URL – Enter the URL of the source Web application for
the content you want to restore.
*Note: This field will be hidden if the Restore granular content checkbox is not
selected in the Item Level Settings area.
h. Exclude User/Group Without Permission ─ If you select Yes, the users/groups
that have no permissions will not be restored. By default, No is selected.
i. Version Settings – Choose the Version Settings for the content being restored to
SharePoint. To improve performance, limit the versions restored. Restore all
versions restores all the versions of the backup data; while Restore the latest
versions only restores the latest several Major or Major and Minor versions of
the backup data as specified. The other versions are not restored.
*Note: The latest version does not take the current version into account.
j. Notification – Configure the email Notification settings. Select a notification
profile from the Select a profile with address only drop-down list. You can also
choose to create a new e-mail notification profile by clicking the New
Notification Profile link. Click View to view the detailed configuration of the
selected notification profile.
When finished configuring Restore Settings, click Next. The Schedule page appears.
7. Schedule – Choose whether or not to create the restore job based on a schedule. Select
Restore at the end of the wizard to run the job immediately after finishing the restore
wizard. To configure the schedule yourself, select Configure the schedule myself and
select a start date and time in Schedule Settings field. If desired, enter an optional
Description to distinguish the restore job from others.
When finished, click Next. The Overview page appears. The Settings and Preview tabs
are on the Overview page.

DocAve®
6 SQL Server Data Manager 31
8. Review and edit the job selections on the Settings tab. To make changes, click Edit in
the middle of the row. This links to the corresponding setting page allow you to edit the
configuration.
Review the action selection and edit the settings in the Destination Settings step on the
Preview tab. The selected action for the job and the preview tree are displayed in the
Preview tab. To make changes, click Edit in the middle of the row. This links to the
Destination Settings step, allowing you to edit the configuration.
9. Click Finish to save the job’s configuration. If the restore job does not have a schedule,
Finish runs the job immediately. If the restore job is set to run on a schedule, Finish
saves the restore job’s configuration without running it.

DocAve®
6 SQL Server Data Manager 32
Site Collection Level Restore This restore method can only be used for a granular restore that is performed at the site
collection level. If the whole site collection needs to be restored, enable the Site Collection Level
Restore feature by deselecting the Restore Granular Content checkbox. Deselecting the
Restore Granular Content checkbox disables granular content selection. In this case, the
restore will be similar to an STSADM site collection level restore. It is faster and can maintain
internal document IDs. The restored data and its data structure are much closer to the original
data and structure.
*Note: If you do not select Restore Granular Content the following occurs: the tree in the
Analyzed Backup Data/Content Database Data pane can only be expanded down to the site
collection level; granular content cannot be selected; and only Site Collection level is available
when using the Advanced Search functionality. Apps are not supported to be restored in site
collection level restore jobs.
For a granular restore performed at the site collection level, deselecting the Restore Granular
Content feature can be executed only when site collections in the destination do not have the
same URL or ID as the site collection selected in the backup data.

DocAve®
6 SQL Server Data Manager 33
Restore Data From Database Select the Restore tab and click Restore Data From Database in the Manage group, the
Restore Data Form Database tab appears. To run a Restore Data From Database job, complete
the following steps:
1. Database Selection – Select the SQL Server, database, and Agent for this job.
• Agent Selection – Select an Agent to browse the data in the specified database.
• SQL Instance – Specify the SQL instance and database where the data you want
to restore locate. Configure the following settings:
Configure Content Database – Enter a SQL instance name and a
Database name in the corresponding fields.
Authentication – Select the authentication mode for the specified
database. If you select SQL authentication, the necessary information
must be specified in the Account and Password fields. You can also
validate the SQL database account by clicking Validation Test.
2. Data Selection – Select the node that includes the granular content to restore.
*Note: You can right-click the content database node and click Refresh to reload the
content database node when it has been loaded.
3. Click the Global Setting for Restoring Content, Property and Security link and
configure the Item Level Settings:
Granular Content – Select the Restore granular content checkbox to restore the
granular content. If you do not select this checkbox, the tree in the Content Database
Data pane can only be expanded down to the site collection level and you cannot select
granular content. For more information, refer to Site Collection Level Restore.
• Container Selection ─ Select the Global setting for container configuration
checkbox to enable the container’s global settings.
o Restore container – Restore the container and select the Security
checkbox if you want to restore the container’s security settings, and/or
select the Property checkbox if you want to restore the container’s
property settings. For more information, refer to Appendix A: SharePoint
Object Security and Property.
o Only restore security – Only restore the container’s security settings. You
can specify the Conflict resolution as Merge or Replace. Merge will add
the security of the container in the backup to the conflict container in the
destination. Replace will delete the security of the conflict container in

DocAve®
6 SQL Server Data Manager 34
the destination first, and then add the security of the container in the
backup to the conflict container in the destination.
*Note: Once you select the Only restore security option, the Container
level conflict resolution configuration field in the Restore Settings page
will be hidden from the interface and you will not be able to configure the
Container level conflict resolution though that page.
• Content Selection ─ Select the Global setting for restoring content checkbox to
enable the content’s global settings.
o Restore content – Restore the content. Additionally, select the Security
checkbox if you want to restore the content’s security settings along with.
For more information, refer to Appendix A: SharePoint Object Security
and Property.
o Only restore security – Only restore the content’s security settings. You
can specify the Conflict Resolution as Merge or Replace. Merge will add
the security settings of the content in the backup into the conflict content
in the destination. Replace will delete the security settings of the conflict
content in the destination first, and then add the security of the content in
the backup to the conflict content in the destination.
*Note: Once you select Only restore security option, the Content level
conflict resolution configuration field in the Restore Settings page will
be hidden from the interface and you will not be able to configure the
Content level conflict resolution through that page.
4. Expand the tree and locate the content you want to restore. The detailed information can
be viewed in the Item Browser pop-up window. Select the objects to be restored under
this node.
You can also use the Advanced Search function to search the desired nodes by the
configured search criteria.
When finished, click Next. The Destination Settings page appears.
5. Destination Settings – Choose a destination to restore the data, specify an agent to
perform the restore job, select an action of how the data is restored, and configure the
mapping settings to update the metadata, securities, and language while storing to an
alternate location.
*Note: Make sure that the source node and the destination node are in the same version
of SharePoint. If the site within SharePoint 2013 is a SharePoint 2010 mode site, it can
only be restored to the same mode site.

DocAve®
6 SQL Server Data Manager 35
• Destination – Choose the destination for the restore job. You can either select an
existing node on the tree or select a manually-created node.
Use the Advanced Search function to search the desired nodes by the configured
search criteria. Click Advanced Search in the Search group of the Restore Data
From Database tab, the Advanced Search pop-up window appears. Optionally,
you can right-click a tree node and select the Advanced Search option from the
drop-down menu. You can use the Advanced Search function to search for Web
applications, site collections, sites, lists/libraries, or folders.
To create a node in the destination SharePoint manually, select a node with a
blank text box, and then enter the URL of the destination node into the text box
following the format displayed in the text box. If you are creating a new site
collection, you will be asked to select one existing managed path from the drop-
down list. Click Create Container beside the text box to create the node in the
destination farm. Alternatively, click Create Container in the Manage group on
the Restore Data From Database tab to create the corresponding node.
• Agent – Specify the Agent that will perform the restore job.
• Action – Select how the SQL backup data will be restored to the destination.
Attach will restore the contents as children beneath the selected node. Merge
will add the contents to the destination node. To see what the data tree of the
destination node will look like after the job is executed, click Preview. Only the
unfolded tree structure in the Data Selection step can be previewed in the
destination tree. Click Hide Preview to hide the Preview area. This field will be
hidden if the Restore granular content checkbox is not selected above.
• Mapping Settings – Choose whether or not use the following mappings: user
mapping, domain mapping, and language mapping. Select an existing mapping
or create a new one in the corresponding drop-down menu. This field will be
hidden if the Restore granular content checkbox is not selected above.
6. Restore Settings – Configure how the content will be restored.
*Note: If the Restore granular content checkbox is not selected above, only the
Conflict Resolution, Include Data in Recycle Bin, and Notification fields will be
available.
• Conflict Resolution – Select an option to dictate how to resolve conflicts at the
container level and content level.
Container level conflict resolution – Set the conflict resolution on the
site collection, site, list, and folder level.
▪ Skip – Ignores the source container that is the same as the
destination container.

DocAve®
6 SQL Server Data Manager 36
▪ Merge – Combines the settings and properties of the source and
destination container. If there is a conflict, the source overwrites
the destination.
▪ Replace – Deletes the destination container and then restores the
source to the destination. If the selected container is a root site,
the Replace function empties the root site instead of deleting it
and restores the source to the destination. This option can only be
used at the folder/list/site/site collection level.
*Note: As a discussion board item is considered a folder, it will restore as
a container.
Content level conflict resolution – Sets the conflict resolution on the
item level.
▪ Skip – Ignores the source item/document that has the same item
ID/document name as the destination item/document.
▪ Overwrite – Copies the source item/document to the destination
by overwriting the destination item/document with the same item
ID/document name.
▪ Overwrite by Last Modified Time – Keeps the conflict
item\document which has the latest modified time and overwrites
the older one.
▪ Append an Item/Document Name with a Suffix – Keeps both of
the conflict items/documents and adds a suffix (_1, _2, _3…) to the
name of the conflict source item/document.
▪ Append a New Version – Adds the conflict source
item/document to the destination as a new version of the conflict
destination item/document.
• Apps Conflict Resolution – Select an option to dictate how to resolve conflicts
for apps.
Skip – No changes will be made; the destination app and AppData will
remain unchanged.
Update App Only – If the app in the source is a more recent version than
the destination, it will overwrite the destination app but not the AppData.
Replace App and AppData – The source app will always replace the
destination app and AppData.
*Note: Only the definition of the source app will be restored to the
destination.

DocAve®
6 SQL Server Data Manager 37
• Include Data in Recycle Bin – Choose whether to compare the data in the
backup with the data in the destination site collection’s recycle bin. If you select
Skip either at the Container level or Content level, or select Append an
Item/Document Name with a suffix or Append a New Version at the Content
level, the Include Recycle Bin Data option is available to configure. If you select
Yes in this field and the selected content in the backup still exists in the recycle
bin of the destination site collection, the selected content in the backup will not
restore.
• Include Detailed Job Report for All Items – Selecting Yes generates a detailed
job report for all the items. Selecting No only generates a job report for list, site,
or site collection level.
• Workflow – Decide how the backed-up workflows are restored.
o Include workflow definition – Only restores the definition of the
backed-up workflows.
o Include workflow instance – Restores the state, history, and tasks for
each item.
*Note: All workflow instances whose status was In Progress when backed up will
be Cancelled when restored to the destination.
*Note: For the SharePoint designer workflow with the SharePoint 2013
Workflow platform type, only the workflow definitions are supported to be
restored for SharePoint 2013 or SharePoint 2016. For SharePoint 2016, the
SharePoint designer workflow used to test is created by SharePoint Designer
2013.
• Item Dependent Columns and Content Types – Choose whether to restore
item-dependent columns and content types.
*Note: If the dependent column or content type does not exist in the destination,
then that column or content type will not be restored. If this is the case, use this
option to restore them.
Restore the item-dependent columns and content types to maintain
item integrity – Whether the item is restored and the dependent column
or content type is created in the corresponding list and/or library is
dependent on the option selected below:
▪ Do not restore the columns and content types, or the
corresponding items – The columns, content types, and the
corresponding items will not be restored if the columns and
content types in the destination are conflicted with the backed up
columns and content types.

DocAve®
6 SQL Server Data Manager 38
▪ Overwrite the columns and content types – The columns and
content types will overwrite the destination conflicted columns
and content types, and the corresponding items will be restored.
▪ Append the columns to the destination – The columns and
items will be restored to the destination if the columns and
content types in the destination are conflicted with the backup up
columns and content types.
Do not restore item-dependent columns and content types – The item
dependent columns and dependent content types will not be restored.
When selecting this option, make sure the dependent columns and
content types exist in the destination. Otherwise, the item cannot be
restored.
• Source Web Application URL – Enter the URL of the source Web application to
specify the full URL of the content you want to restore.
*Note: This field will be hidden if the Restore granular content checkbox is not
selected in the Item Level Settings area.
• Exclude User/Group Without Permission ─ If you select Yes, the users and/or
groups that do not have permissions will not be restored. By default, No is
selected.
• Version Settings – Choose the Version Settings for the content being restored to
SharePoint. To improve performance, limit the versions restored. Restore all
versions restores all the versions of the backup data; while Restore the latest
versions only restores the latest several Major or Major and Minor versions of
the backup data as specified. The other versions are not restored.
*Note: The latest version does not take the current version into account.
• Notification – Configure the e-mail Notification settings. Select a previously-
configured notification profile from the Select a profile with address only drop-
down list. You can also choose to create a new e-mail notification profile by
clicking the New Notification Profile link. Click View to view the detailed
configuration of the selected notification profile.
When you have finished configuring Restore Settings, click Next. The Schedule page
appears.
7. Schedule – Choose whether to create the restore job based on a schedule. Select
Restore at the end of the wizard to run the job immediately after finishing the restore
wizard. To configure the schedule yourself, select Configure the schedule myself and
select a start date and time in the Schedule Settings field. If desired, enter an optional
Description to distinguish the restore job from other jobs.

DocAve®
6 SQL Server Data Manager 39
8. When finished, click Next. The Overview page appears. The Settings and Preview tabs
are on the Overview page.
9. Click Finish to save the job’s configuration. If the restore job does not have a schedule,
clicking Finish will run the job immediately. If the restore job is set to run on a schedule,
clicking Finish saves the restore job’s configuration without running it.

DocAve®
6 SQL Server Data Manager 40
Checking a Job Status SQL Server Data Manager contains a Job Monitor button where users can view the status of
jobs. This is useful for monitoring jobs or troubleshooting for errors.
Refer to the DocAve 6 Job Monitor Reference Guide for more information.

DocAve®
6 SQL Server Data Manager 41
Appendix A: SharePoint Object Security and Property Refer to the table below for the detailed information of security and property of each SharePoint
object.
Type SharePoint
Object
Attributes of the SharePoint Object Belonging to the
Specified Type
Security
Site Collection Users and groups of the site collection
Site Mappings of the users and their permissions, permission
levels, groups, users
List Mappings of the users and their permissions, users, groups
Folder/Item/File Mappings of the users and their permissions, users, groups
Property
Site Collection Basic information used to create the site collection, other
information of the site collection, site features
Site Basic information used to create the site, other information
of the site, site columns, site content types, navigation, site
features, triggers for the users’ actions in the site
List Basic information used to create the List, other information
of the list, list columns, list content types, triggers for the
users’ actions in the list, alert
Folder/Item/File Properties of the folder/item/file, alert

DocAve®
6 SQL Server Data Manager 42
Appendix B: Examples of Filter Policies *Note: The Equals condition is not case sensitive.
Hierarchy
Level
Rule Condition Value Result
File Name Contains test The file whose name contains test will
be filtered and included in the results.
Does Not
Contain
test The file whose name does not contain
test will be filtered and included in the
results.
Equals test The file whose name is test will be
filtered and included in the results.
Does Not
Equal
test The file whose name is not test will be
filtered and included in the results.
Matches te*t The file whose name begins with te and
ends with t will be filtered and included
in the results. For example, teABct will
be filtered and included in the results.
te?t The file whose name is the same as te?t
except character ? will be filtered and
included in the results. For example, test
will be filtered and included in the
results.
Does Not
Match
te*t All files except those whose names
begin with te and end with t will be
filtered and included in the results. For
example, DocAve will be filtered and
included in the results.
te?t All files except those whose names are
the same as te?t except character ? will
be filtered and included in the results.

DocAve®
6 SQL Server Data Manager 43
Hierarchy
Level
Rule Condition Value Result
For example, DocAve will be filtered and
included in the results.
Size >= 1MB The file whose size is not smaller than
1MB will be filtered and included in the
result. For example, a 2MB file will be
filtered and included in the result.
<= 1MB The file whose size is not bigger than
1MB will be filtered and included in the
result. For example, a 500KB file will be
filtered and included in the result.
Modified
Time
Before 2015-01-01
12:15:50
The file which is modified before
12:15:50 01/01/2015 will be filtered and
included in the result.
After 2015-01-01
12:15:50
The file which is modified after 12:15:50
01/01/2015 will be filtered and included
in the result.
On 2015-01-01
12:15:50
The file which is modified on 12:15:50
01/01/2015 will be filtered and included
in the result.
Within 5 Days The file which is modified in last 5 days
will be filtered and included in the
result.
Older Than 5 Days The file which is modified 5 days ago
will be filtered and included in the
result.
Created
Time
Before 2015-01-01
12:15:50
The file which is created before 12:15:50
01/01/2015 will be filtered and included
in the result.

DocAve®
6 SQL Server Data Manager 44
Hierarchy
Level
Rule Condition Value Result
After 2015-01-01
12:15:50
The file which is created after 12:15:50
01/01/2015 will be filtered and included
in the result.
On 2015-01-01
12:15:50
The file which is created on 12:15:50
01/01/2015 will be filtered and included
in the result.
Within 5 Days The file which is created in last 5 days
will be filtered and included in the
result.
Older Than 5 Days The file which is created 5 days ago will
be filtered and included in the result.
Last
Accessed
Time
Before 2015-01-01
12:15:50
The file whose last accessed time is
before 12:15:50 01/01/2015 will be
filtered and included in the result.
After 2015-01-01
12:15:50
The file whose last accessed time is after
12:15:50 01/01/2015 will be filtered and
included in the result.
On 2015-01-01
12:15:50
The file whose last accessed time is on
12:15:50 01/01/2015 will be filtered and
included in the result.
Within 5 Days The file whose last accessed time is in
last 5 days will be filtered and included
in the result.
Older Than 5 Days The file whose last accessed time is 5
days ago will be filtered and included in
the result.
Folder Name Contains test The folder whose name contains test
will be filtered and included in the
results.
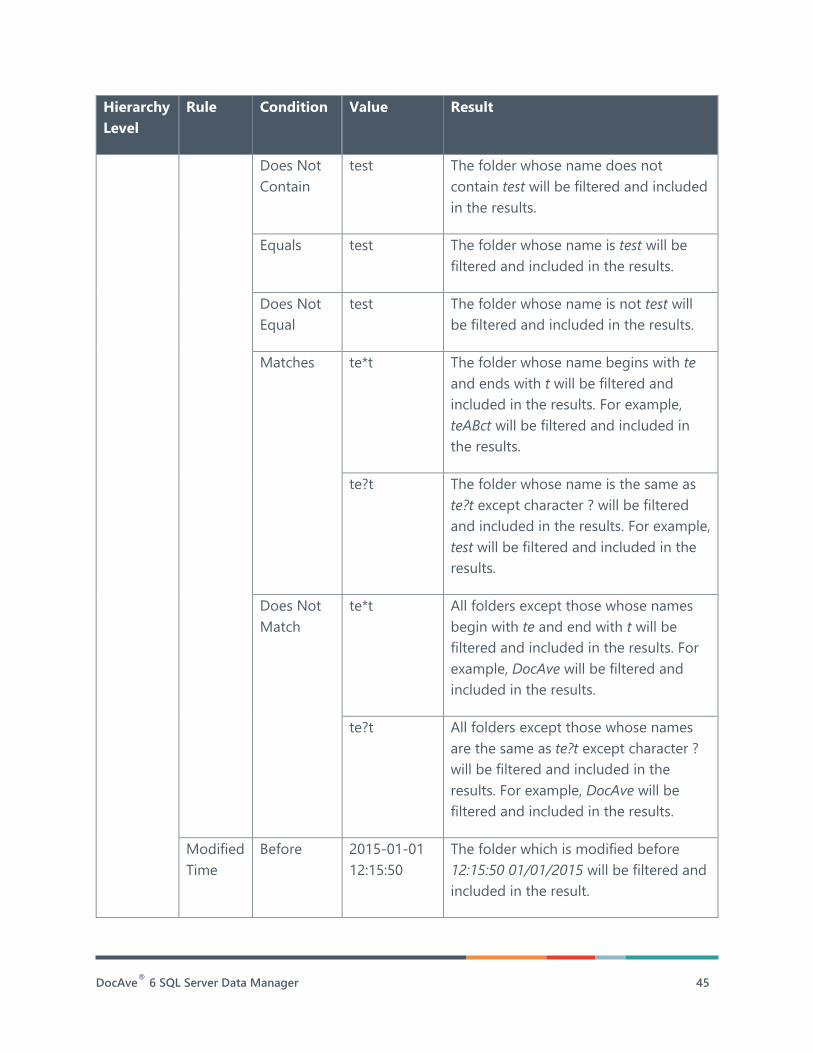
DocAve®
6 SQL Server Data Manager 45
Hierarchy
Level
Rule Condition Value Result
Does Not
Contain
test The folder whose name does not
contain test will be filtered and included
in the results.
Equals test The folder whose name is test will be
filtered and included in the results.
Does Not
Equal
test The folder whose name is not test will
be filtered and included in the results.
Matches te*t The folder whose name begins with te
and ends with t will be filtered and
included in the results. For example,
teABct will be filtered and included in
the results.
te?t The folder whose name is the same as
te?t except character ? will be filtered
and included in the results. For example,
test will be filtered and included in the
results.
Does Not
Match
te*t All folders except those whose names
begin with te and end with t will be
filtered and included in the results. For
example, DocAve will be filtered and
included in the results.
te?t All folders except those whose names
are the same as te?t except character ?
will be filtered and included in the
results. For example, DocAve will be
filtered and included in the results.
Modified
Time
Before 2015-01-01
12:15:50
The folder which is modified before
12:15:50 01/01/2015 will be filtered and
included in the result.

DocAve®
6 SQL Server Data Manager 46
Hierarchy
Level
Rule Condition Value Result
After 2015-01-01
12:15:50
The folder which is modified after
12:15:50 01/01/2015 will be filtered and
included in the result.
On 2015-01-01
12:15:50
The folder which is modified on
12:15:50 01/01/2015 will be filtered and
included in the result.
Within 5 Days The folder which is modified in last 5
days will be filtered and included in the
result.
Older Than 5 Days The folder which is modified 5 days ago
will be filtered and included in the
result.
Created
Time
Before 2015-01-01
12:15:50
The folder which is created before
12:15:50 01/01/2015 will be filtered and
included in the result.
After 2015-01-01
12:15:50
The folder which is created after
12:15:50 01/01/2015 will be filtered and
included in the result.
On 2015-01-01
12:15:50
The folder which is created on 12:15:50
01/01/2015 will be filtered and included
in the result.
Within 5 Days The folder which is created in last 5 days
will be filtered and included in the
result.
Older Than 5 Days The folder which is created 5 days ago
will be filtered and included in the
result.

DocAve®
6 SQL Server Data Manager 47
Hierarchy
Level
Rule Condition Value Result
Last
Accessed
Time
Before 2015-01-01
12:15:50
The folder whose last accessed time is
before 12:15:50 01/01/2015 will be
filtered and included in the result.
After 2015-01-01
12:15:50
The folder whose last accessed time is
after 12:15:50 01/01/2015 will be
filtered and included in the result.
On 2015-01-01
12:15:50
The folder whose last accessed time is
on 12:15:50 01/01/2015 will be filtered
and included in the result.
Within 5 Days The folder whose last accessed time is
in last 5 days will be filtered and
included in the result.
Older Than 5 Days The folder whose last accessed time is 5
days ago will be filtered and included in
the result.

DocAve®
6 SQL Server Data Manager 48
Appendix C: Advanced Setting in the Configuration File Configure the SP2010PlatformConfiguration.xml file to specify the maximum number of the
temporary databases can be created.
1. Go to the machine where the installed DocAve Agent is selected in the staging policy
and open the …\AvePoint\DocAve6\Agent\data\SP2010\Platform directory to find the
SP2010PlatformConfiguration.xml file.
2. Open the SP2010PlatformConfiguration.xml file with Notepad.
3. Find the <SDMConfig> node.
For detailed information, refer to the screenshot below:
Figure 4: Finding the <SDMConfig> node in the SP2010PlatformConfiguration.xml file.
<SDMAnalyzeConfig tempDBCount=" " /> – Specify the maximum number of
temporary databases. The default value is 5. When the number of temporary databases
is larger than 5, the action will be taken according to the settings in the Priority Settings
section. For more information on Priority Settings section, see the Configuring Staging
Policies section of this guide.
4. Save changes to this file and close it.
5. When running the analysis job using the staging policy, the configuration in the
SP2010PlatformConfiguration.xml file will take effect.

DocAve®
6 SQL Server Data Manager 49
Notices and Copyright Information Notice
The materials contained in this publication are owned or provided by AvePoint, Inc. and are the property
of AvePoint or its licensors, and are protected by copyright, trademark and other intellectual property
laws. No trademark or copyright notice in this publication may be removed or altered in any way.
Copyright
Copyright © 2012-2018 AvePoint, Inc. All rights reserved. All materials contained in this publication are
protected by United States and international copyright laws and no part of this publication may be
reproduced, modified, displayed, stored in a retrieval system, or transmitted in any form or by any means,
electronic, mechanical, photocopying, recording or otherwise, without the prior written consent of
AvePoint, 525 Washington Blvd, Suite 1400, Jersey City, NJ 07310, USA or, in the case of materials in this
publication owned by third parties, without such third party’s consent. Notwithstanding the foregoing, to
the extent any AvePoint material in this publication is reproduced or modified in any way (including
derivative works and transformative works), by you or on your behalf, then such reproduced or modified
materials shall be automatically assigned to AvePoint without any further act and you agree on behalf of
yourself and your successors, assigns, heirs, beneficiaries, and executors, to promptly do all things and
sign all documents to confirm the transfer of such reproduced or modified materials to AvePoint.
Trademarks
AvePoint®, DocAve®, the AvePoint logo, and the AvePoint Pyramid logo are registered trademarks of
AvePoint, Inc. with the United States Patent and Trademark Office. These registered trademarks, along
with all other trademarks of AvePoint used in this publication are the exclusive property of AvePoint and
may not be used without prior written consent.
Microsoft, MS-DOS, Internet Explorer, Office, Office 365, SharePoint, Windows PowerShell, SQL Server,
Outlook, Windows Server, Active Directory, and Dynamics CRM 2013 are either registered trademarks or
trademarks of Microsoft Corporation in the United States and/or other countries.
Adobe Acrobat and Acrobat Reader are trademarks of Adobe Systems, Inc.
All other trademarks contained in this publication are the property of their respective owners and may not
be used without such party’s consent.
Changes
The material in this publication is for information purposes only and is subject to change without notice.
While reasonable efforts have been made in the preparation of this publication to ensure its accuracy,
AvePoint makes no representation or warranty, expressed or implied, as to its completeness, accuracy, or
suitability, and assumes no liability resulting from errors or omissions in this publication or from the use of
the information contained herein. AvePoint reserves the right to make changes in the Graphical User
Interface of the AvePoint software without reservation and without notification to its users.
AvePoint, Inc.
525 Washington Blvd
Suite 1400
Jersey City, New Jersey 07310
USA