doc-0319 revision c-1 software version 1.0
TRANSCRIPT

PAX Maintenance Console
(PMC)
Software Manual
DOC-0319 Revision C-1
Software Version 1.0.1
2400 Trade Centre Avenue
Longmont, CO 80503 USA
DOC-0319 Rev C-1 © 2018 DROPLET MEASUREMENT TECHNOLOGIES LLC.
2
In no event will Droplet Measurement Technologies, LLC (DMT) be liable for direct, indirect, special,
incidental or consequential damages resulting from any defect or omissions in this manual.
DMT reserves the right to make changes to this manual and the products it describes at any time,
without
notice or obligation. Revised editions are found on the manufacturer’s website.
All DMT product names and the Droplet Measurement Technologies Logo are trademarks of Droplet
Measurement Technologies, LLC.
All other brand and product names are trademarks, or registered trademarks, of their respective
owners.
Software License
DMT licenses its software only upon the condition that you accept all of the terms contained in this
license agreement.
This software is provided by DMT “as is” and any express or implied warranties, including, but not
limited to, the implied warranties of merchantability and fitness for a particular purpose are disclaimed.
Under no circumstances and under no legal theory, whether in tort, contract, or otherwise, shall DMT
or its developers be liable for any direct, indirect, incidental, special, exemplary, or consequential
damages (including damages for work stoppage; computer failure or malfunction; loss of goodwill;
loss of use, data or profits; or for any and all other damages and losses). Some states do not allow
the limitation or exclusion of implied warranties and you may be entitled to additional rights in those
states.
Warranty
The seller warrants that the equipment supplied will be free from defects in material and workmanship
for a period of eighteen months from date of shipment or 12 months from the date of either installation
or first use whichever comes first. When returning the equipment to DMT for warranty or service
procedures, the equipment owner will pay for shipping to DMT, while DMT will pay the return shipping
expense. Consumable components, such as tubing, filters, pump diaphragms, and Nafion humidifiers
and dehumidifiers are not covered by this warranty.

PAX Maintenance Console (PMC) Software Manual
DOC-0319 Rev C-1 3 © 2018 DROPLET MEASUREMENT TECHNOLOGIES LLC
CONTENTS
Software License ................................................................................. 2
Warranty ........................................................................................... 2
1.0 Introduction ............................................................................. 6
2.0 Installation............................................................................... 6
3.0 Basic Operation ......................................................................... 6
3.1 Opening the PMC and Connecting to a PAX .................................................. 6
3.1.1 Disconnecting / Connecting to a New PAX ............................................... 7
3.2 Closing the PMC .................................................................................. 8
4.0 Program Tabs ........................................................................... 8
4.1 Instruments Tab .................................................................................. 8
4.1.1 Instruments Table: Address and Description Parameters ............................. 8
4.1.2 Serial Port Parameters ..................................................................... 8
4.2 File Transfer Tab ................................................................................. 9
4.2.1 Transferring PAX Data Files to the Local Computer................................... 10
4.2.2 Deleting Data Files ......................................................................... 10
4.2.3 “Extract Results from Selected File” Button ........................................... 11
4.2.4 Transferring Configuration and Log Files ............................................... 11
4.2.5 Deleting Configuration and Log Files .................................................... 11
4.2.6 Aborting File Transfers .................................................................... 11
4.3 Data Display Tab: Displaying all Output Channels ......................................... 12
4.3.1 Loading Data for Viewing .................................................................. 12
4.3.2 Loading Config File for Viewing .......................................................... 13
4.3.3 Time-Series Graph .......................................................................... 13
4.3.4 “Extract Results Channels” Button ...................................................... 15
4.3.5 Data Table ................................................................................... 15
4.4 Results Tab: Displaying Channels of Scientific Interest ................................... 15
4.4.1 What are Results?........................................................................... 16
4.4.2 Why am I Not Seeing Results? ............................................................. 17
4.4.3 Managing Results Files ..................................................................... 17
4.4.4 Averaging Channels......................................................................... 18
4.5 Log File Tab ...................................................................................... 18
4.6 Utilities Tab ..................................................................................... 19
4.6.1 Changing PAX Parameters via the PMC .................................................. 19
5.0 Program Menus ........................................................................ 20
5.1 File Menu ......................................................................................... 20
5.2 Connection Menu ................................................................................ 20
5.3 About Menu ...................................................................................... 20

DOC-0319 Rev C-1 © 2018 DROPLET MEASUREMENT TECHNOLOGIES LLC.
4
6.0 Troubleshooting ....................................................................... 20
Appendix A: Installing the PMC ............................................................... 21
Appendix B: Revisions to Manual ............................................................ 22
PAX Maintenance Console (PMC) Software Manual
DOC-0319 Rev C-1 5 © 2018 DROPLET MEASUREMENT TECHNOLOGIES LLC
Figures
Figure 1: PMC Software Icon ................................................................... 6
Figure 2: Typing IP Addresses into the Instruments Table .............................. 7
Figure 3: The File Transfer Tab ............................................................... 9
Figure 4: Data Display Tab .................................................................... 12
Figure 5: File Loading Button ................................................................ 12
Figure 6: Changing the Displayed Channel Using Arrows ............................... 13
Figure 7: Selecting a Display Channel using the Drop-down List ...................... 14
Figure 8: Start and End Sliders for Setting Time Scale .................................. 14
Figure 9: Results Tab ........................................................................... 15
Figure 10: The Log File Tab .................................................................. 18
Figure 11: Utilities Tab ........................................................................ 19
Figure 12: Installing the PMC ................................................................. 21
Figure 13: Approving the Destination Directory .......................................... 22

DOC-0319 Rev C-1 © 2018 DROPLET MEASUREMENT TECHNOLOGIES LLC.
6
1.0 Introduction
The PAX Maintenance Console (PMC) is a LabVIEW-based program that allows users to perform the following
tasks:
1. Transfer PAX data to another computer using FTP (through the PAX Ethernet port)
2. Display data file contents in a time-series chart
3. Manipulate data for post-processing analysis
4. Examine real-time data (through the PAX serial or Ethernet port)
The PMC can connect to multiple PAX instruments, although connections are done sequentially rather than
concurrently—that is, users must disconnect from one PAX before connecting to another.
The PMC has a tab-based structure. PMC menu items and tabs are described below.
Because file transfers can be time-consuming, the PMC has separate processing loops for file transfers and for
data and results display. This enables the user to perform other tasks while files are transferring. This manual
describes version 1.0.1 of the PMC software.
2.0 Installation
To install the PMC, insert the USB drive included with your PAX into a USB port on the computer where you
would like to view files. Navigate to the PMC/Installer directory and click on Setup.exe. Accept all licensing
agreements. The installer should place a PMC icon on the desktop.
For the PMC Ethernet-based functions to work, the PAX instrument needs to be connected to a network and
have a static IP address. This connection must be done through the PAX Ethernet port. A trained IT professional
should be consulted when putting the PAX on the network.
3.0 Basic Operation
3.1 Opening the PMC and Connecting to a PAX
To open the PMC, click on the PMC icon on the local computer desktop:
Figure 1: PMC Software Icon
PAX Maintenance Console (PMC) Software Manual
DOC-0319 Rev C-1 7 © 2018 DROPLET MEASUREMENT TECHNOLOGIES LLC
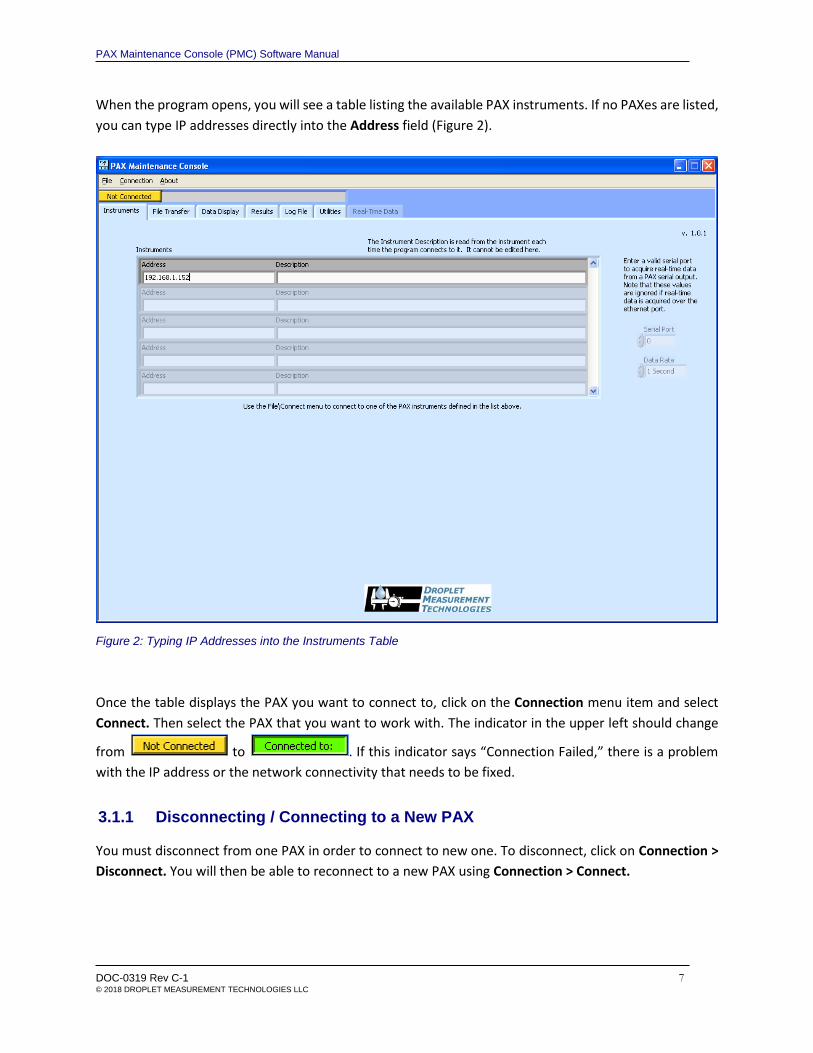
When the program opens, you will see a table listing the available PAX instruments. If no PAXes are listed,
you can type IP addresses directly into the Address field (Figure 2).
Figure 2: Typing IP Addresses into the Instruments Table
Once the table displays the PAX you want to connect to, click on the Connection menu item and select
Connect. Then select the PAX that you want to work with. The indicator in the upper left should change
from to . If this indicator says “Connection Failed,” there is a problem
with the IP address or the network connectivity that needs to be fixed.
3.1.1 Disconnecting / Connecting to a New PAX
You must disconnect from one PAX in order to connect to new one. To disconnect, click on Connection >
Disconnect. You will then be able to reconnect to a new PAX using Connection > Connect.

DOC-0319 Rev C-1 © 2018 DROPLET MEASUREMENT TECHNOLOGIES LLC.
8
3.2 Closing the PMC
To exit the program, click on the File menu item and select Exit.
4.0 Program Tabs
4.1 Instruments Tab
The Instruments tab (Figure 2) displays all the PAX instruments available for connection via the PMC. To
connect to an instrument, follow the instructions in section 3.1.
PAX instruments are displayed in a table. If you only have one PAX, only one instrument will appear in the
table. If you have many PAXes, you can view them all using the scrollbar on the right side of the table.
If the PMC is connected to a PAX, it will display an ID window in the bottom half of the Instruments tab.
This window provides additional information about the currently connected PAX.
4.1.1 Instruments Table: Address and Description Parameters
The Address parameter displays the PAX IP address.
The Description parameter describes each PAX. This field is read from the instrument each time the PMC
connects to it. The description includes the PAX station ID, serial number, and IP address. You cannot
change the serial number, but you can modify the station ID and IP address from the PAX touch screen
Setup page.
4.1.2 Serial Port Parameters
Serial port parameters are not currently enabled. In the future, they will be used to specify real-time data
parameters.

PAX Maintenance Console (PMC) Software Manual
DOC-0319 Rev C-1 9 © 2018 DROPLET MEASUREMENT TECHNOLOGIES LLC
4.2 File Transfer Tab
The File Transfer tab (Figure 3) allows you to transfer data from the PAX computer to your local computer.
It is essentially an easy-to-use FTP program.
The top panel of the window allows you to manage Data files, while the bottom panel allows you to
manage Configuration and Log files.
If files are created or deleted on either computer by processes outside of the PMC program—
e.g., by the PAX software or through Windows Explorer on your local machine—the file lists can become
outdated and not reflect the current contents of the computers. If you suspect that this has happened,
click on Refresh File Lists to update the file display for both the PAX and the local computer.
Figure 3: The File Transfer Tab

DOC-0319 Rev C-1 © 2018 DROPLET MEASUREMENT TECHNOLOGIES LLC.
1 0
4.2.1 Transferring PAX Data Files to the Local Computer
To move PAX data files to the local computer, first select the desired directory on the local computer
where files should be stored. You can do this by typing the directory name (e.g., C:\DMT\PMC Data) into
the Local Path field. You can also click on the folder icon , select the desired folder, and click on
Current Folder. The default root destination for the PMC program is C:\DMT\PMC Data.
There are several ways to move PAX data files into the Local Path directory:
1.) For single files: Double-click on the file name in the PAX Data Files window.
2.) For single or multiple files: Select the desired files using the mouse. Then click on Transfer All
Selected Data Files to Local Computer. (A range of files can be selected by clicking on the first file
and then shift-clicking on the last. A selection of non-consecutive files can be selected by control-
clicking on each file.)
3.) To transfer only new files: Click on Transfer All Data Files Not Already On Local Computer.
4.) To transfer all files, regardless of whether they are new or not: Click on Transfer All PAX Data Files
To Local Computer. Warning: Any file that is transferred that already exists on the local computer
will be overwritten.
While the files are transferring, the PMC will display a status indicator in the window header:
4.2.2 Deleting Data Files
To delete data files from the PAX, select the data files you want to delete in the PAX Data Files window.
Then click on Delete All Selected Files from PAX. Warning: you are responsible for ensuring that data
and configuration files are properly archived in another location before deleting files on the PAX.
Caution: Do not delete the current day’s data file from the PAX. Doing so will stop data recording. If you
accidentally delete this file, you will need to turn off the PAX, wait two minutes, and then turn on the PAX
again. This will restart recording.
To delete data files from the local computer, click on Open Data Folder in Windows Explorer. This will
open a Windows Explorer window that shows the contents of the specified local path. You can then delete
files using normal Microsoft windows mechanisms. After deleting files, you will need to click the Refresh
File Lists button for the Local Data Files window to reflect the changes that were made outside of the
PMC program.

PAX Maintenance Console (PMC) Software Manual
DOC-0319 Rev C-1 1 1 © 2018 DROPLET MEASUREMENT TECHNOLOGIES LLC
4.2.3 “Extract Results from Selected File” Button
Pressing this button extracts results from the data file selected in Local Data Files list. For more
information, see sections 4.4.1 and 0.
4.2.4 Transferring Configuration and Log Files
Transferring configuration and log files works very similarly to transferring data files. These file transfers
are performed using the buttons in the lower part of the File Transfer tab.
The PMC transfers files from the PAX to the Local Path.
You have four options for transferring configuration and log files:
1.) For single files: Double-click on the file name in the PAX Configuration Files window.
2.) For single or multiple files: Select the desired files using the mouse. (A range of files can be
selected by clicking on the first file and then shift-clicking on the last. A selection of non-
consecutive files can be selected by control-clicking on each file.) Then click on Transfer All
Selected Config Files to Local Computer.
3.) To transfer only new files: Click on Transfer All Config Files Not Already On Local Computer.
4.) To transfer all files, regardless of whether they are new or not: Click on Transfer All Config PAX
Files To Local Computer. Warning: Any file that is transferred that already exists on the local
computer will be overwritten.
While the files are transferring, the PMC will display a status indicator in the window header:
4.2.5 Deleting Configuration and Log Files
To delete configuration and log files from the PAX, select the files you want to delete in the PAX
Configuration Files window. Then click on Delete All Selected Config Files from PAX. Warning: you are
responsible for ensuring that files are properly archived in another location before deleting files on the
PAX.
To delete configuration and log files from the local computer, click on Open Data Folder in Windows
Explorer. This will open a Windows Explorer window that shows the contents of the specified data
directory. You can then delete files using normal Microsoft windows mechanisms. After deleting files, you
will need to click the Refresh File Lists button for the Local Data Files window to reflect the changes that
were made outside of the PMC program.
4.2.6 Aborting File Transfers
To abort the transfer of all files, click on the File menu and select Disconnect.

DOC-0319 Rev C-1 © 2018 DROPLET MEASUREMENT TECHNOLOGIES LLC.
1 2
4.3 Data Display Tab: Displaying all Output Channels
The Data Display tab displays information from the file listed in the Data File field. The tab has a time-
series graph that displays two user-selectable data channels. In addition, a table in the bottom of the tab
displays tabular data for all channels during all sampling intervals. For definitions of these channels,
consult DOC-0301, the PAX Operator Manual.
Figure 4: Data Display Tab
4.3.1 Loading Data for Viewing
To select a data set to display, you have several options:
• Type in the data file path and name in the Data File field
• Click on the folder icon and select the desired file
• On the File Transfer tab, double click on the file name in the Local Data Files list
Note that PAX data files can be quite large and can take some time to load, depending on file size and the
speed of your computer. While a data file is loading, a yellow warning appears in the upper left corner of
the PMC window indicating that the file is being loaded:
Figure 5: File Loading Button

PAX Maintenance Console (PMC) Software Manual
DOC-0319 Rev C-1 1 3 © 2018 DROPLET MEASUREMENT TECHNOLOGIES LLC
4.3.2 Loading Config File for Viewing
You can also load a Config file for display. To load a config file, you have two options:
• Click on the folder icon , navigate to the desired directory, and click on a .csv file
• Click on the File Transfer tab and double-click on the config file in the Local Configuration Files
list
Warning: Do not try to Extract Results from a config file. Extracting Results is for data files only.
4.3.3 Time-Series Graph
The top part of the Data Display tab displays two-user selectable data channels in a time-series graph.
The channel shown in the upper left is displayed in green, while the channel in the upper right is displayed
in blue.
4.3.3.1 Changing the Displayed Channels
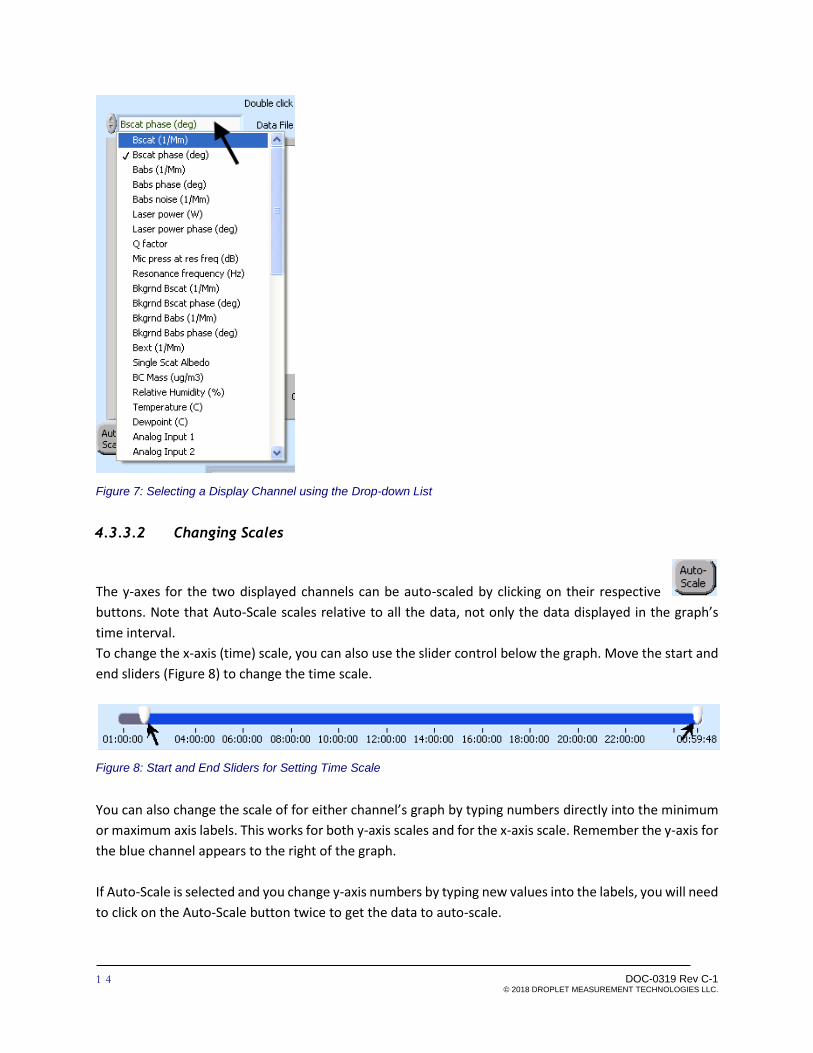
To change the channel being displayed, you have two options. You can use the arrows to the left of the
channel name to select available channels.
Figure 6: Changing the Displayed Channel Using Arrows
Alternatively, you can click on the field (Figure 7) to bring up a drop-down list of available channels, from
which you can select the one you want displayed.
DOC-0319 Rev C-1 © 2018 DROPLET MEASUREMENT TECHNOLOGIES LLC.
1 4
Figure 7: Selecting a Display Channel using the Drop-down List
4.3.3.2 Changing Scales
The y-axes for the two displayed channels can be auto-scaled by clicking on their respective
buttons. Note that Auto-Scale scales relative to all the data, not only the data displayed in the graph’s
time interval.
To change the x-axis (time) scale, you can also use the slider control below the graph. Move the start and
end sliders (Figure 8) to change the time scale.
Figure 8: Start and End Sliders for Setting Time Scale
You can also change the scale of for either channel’s graph by typing numbers directly into the minimum
or maximum axis labels. This works for both y-axis scales and for the x-axis scale. Remember the y-axis for
the blue channel appears to the right of the graph.
If Auto-Scale is selected and you change y-axis numbers by typing new values into the labels, you will need
to click on the Auto-Scale button twice to get the data to auto-scale.

PAX Maintenance Console (PMC) Software Manual
DOC-0319 Rev C-1 1 5 © 2018 DROPLET MEASUREMENT TECHNOLOGIES LLC
4.3.3.3 Filtering Data
The Filter control allows you to filter the graph data to remove readings taken when the PAX is in zero,
flush or acoustic calibration mode. If you select “Measurement Data,” the graph will only display data
acquired when the PAX was in measure mode. If you select “All Data,” the graph will display all data,
regardless of the PAX mode.
4.3.4 “Extract Results Channels” Button
Pressing this button extracts Result channels from the current data file. For more information, see sections
4.4.1 and 0. This button only appears when data have not yet been extracted.
4.3.5 Data Table
To navigate around this table, use the scroll bars on the bottom and right sides. Channel names are
displayed in the first row.
4.4 Results Tab: Displaying Channels of Scientific Interest
The Results tab is shown below.
Figure 9: Results Tab

DOC-0319 Rev C-1 © 2018 DROPLET MEASUREMENT TECHNOLOGIES LLC.
1 6
4.4.1 What are Results?
“Results” are channels of scientific interest:
• Babs (1/Mm)
• Bscat (1/Mm)
• Bext (1/Mm)
• Sing Scat Albedo
• BC Mass (ug/m3)
• # of Points
The first five channels are PAX output channels. The PMC calculates # of Points. This channel currently
always has the value of 1, but in the future it will store data related to the averaging function.
Note that all Results data are filtered. When you extract Results, the PMC removes readings taken when
the PAX was in zero, flush, or acoustic calibration mode. Only readings taken during measure mode are
retained.

PAX Maintenance Console (PMC) Software Manual
DOC-0319 Rev C-1 1 7 © 2018 DROPLET MEASUREMENT TECHNOLOGIES LLC
4.4.2 Why am I Not Seeing Results?
Results must be extracted before you can view them. By extracting results, you can view these channels
without the distraction of housekeeping channels. In addition, Results channels can be averaged over time
and written to a Results file, and Results from multiple PAX instruments can be viewed together.
There are two ways to extract results:
1.) On the File Transfer tab, select the data file from which you wish to extract results. This file will
be listed under Local Data Files (not PAX Data Files). Then click on Extract Results from Selected
File.
2.) On the Data Display Screen, select and load the Data file from which you want to extract results.
You can load the file by clicking on the folder icon and double-clicking on the file name. After
the file is loaded, click on the Extract Results Channels button.
While results are being extracted, you will see a status indicator in the PMC program header:
Note that extracting results may take several minutes, depending on file size and the speed of your
computer. Once results have finished loading, they are displayed in the Results tab.
The Results tab time-series graph is similar to the Data Display graph, except different channels are
available for display. For information on selecting channels to display and changing the graph’s scales, see
section 4.3.3.
4.4.3 Managing Results Files
Extracting results does not automatically save these results to a file. To save results on the local computer,
click on Save Data Set to a New File. This will create a .csv file of Results channels. This file is stored in the
Local Path (as defined on the File Transfer tab.) The default file name is the PAX data file name with
“Results” appended to it.
The Results tab displays information from all data files from which the user has extracted results during
the current PMC session. To clear out results from a data file, select that file in the Results Data Set field
and then click on Remove Data Set from Memory.
To delete, move or copy Results files stored on the local computer, click on Open Data Folder in Windows
Explorer. You can then manage the Results files according to normal Windows mechanisms.

DOC-0319 Rev C-1 © 2018 DROPLET MEASUREMENT TECHNOLOGIES LLC.
1 8
4.4.4 Averaging Channels
The averaging function is not currently functional.
4.5 Log File Tab
The Log File tab allows you to view PAX log files. To view a file, load it in one of the following ways:
• Type its name in the Log File field
• Click on the folder icon and navigate to the desired log file
• On the File Transfer tab, double-click on the log file in the Local Data Files list (not the PAX System
Files list)
After the file is loaded, it will be displayed in the Log File window (Figure 10).
Figure 10: The Log File Tab
To view later log entries, use the scroll bar to scroll down.

PAX Maintenance Console (PMC) Software Manual
DOC-0319 Rev C-1 1 9 © 2018 DROPLET MEASUREMENT TECHNOLOGIES LLC
4.6 Utilities Tab
The Utilities tab (Figure 11) allows you to control the PAX via the PMC. For instance, you can instruct the
PAX to begin a zero calibration, or you could reset its laser power. This is done by resetting the values of
PAX parameters. You will need a password, or “lock,” in order to use this feature. Any changes made on
the Utilities tab apply to the currently connected PAX only.
Figure 11: Utilities Tab
Modifying PAX parameters from the PMC rather than from the PAX is useful if you have numerous changes
to make. The PAX touch screen interface is slower than the PMC’s interface, so updates take longer. In
the future, the Utilities tab will be modified to further facilitate parameter changes.
4.6.1 Changing PAX Parameters via the PMC
To change PAX parameter values, follow the steps below.
1.) Click on Get Lock.
2.) In the pop-up window that appears, type in the PAX password.
3.) Click OK.

DOC-0319 Rev C-1 © 2018 DROPLET MEASUREMENT TECHNOLOGIES LLC.
2 0
4.) For each parameter you want to change, enter a value in the New Value field. You can use the
scrollbar to access all the available parameters. Any parameters with the value NaN (Not-a-
Number) will be ignored and the PAX will retain its current value for those parameters.
5.) Click on Send Param.
6.) Click on Release Lock.
5.0 Program Menus
5.1 File Menu
The File menu offers two options:
• Save Screen to jpg saves the current screen to a .jpg file. By default, images are saved in the “PAX
Data” sub-folder of the Local Path (specified on the File Transfer screen). By default, file names
are PAX1.jpg, PAX2.jpg, etc. You can change the destination directory and the file name in the
pop-up window that appears when you select Save Screen to jpg.
• Exit allows you to quit the PMC program.
5.2 Connection Menu
• Connect allows you to select a PAX for the PMC to connect to. Note you will not be able to connect
to a new PAX until you have disconnected from the current one.
• Disconnect disconnects from the currently connected PAX. This option can be used to abort file
transfers or deletions.
• Delete allows you to delete particular PAXes from the instruments available for connection. Once
a PAX has been deleted, it will no longer be displayed on the PMC Instruments tab. If you
accidentally delete a PAX from the PMC, you can type in its IP address to restore it.
• Real Time Data is not currently functional. In the future, this option will allow you to specify how
the system receives real-time data.
5.3 About Menu
If you click on the About menu, a window appears that gives information about the PMC version number
and copyright date. You can close this window by clicking anywhere inside it.
6.0 Troubleshooting
The PAX doesn’t seem to be recording data.

PAX Maintenance Console (PMC) Software Manual
DOC-0319 Rev C-1 2 1 © 2018 DROPLET MEASUREMENT TECHNOLOGIES LLC
One possibility is that you have deleted the current day’s data file. If this happens, turn off power to the
instrument, wait two minutes, and turn the PAX on again. Data recording will resume.
My data has problems—I’m getting big spikes in the channels Babs and Bscat, with values so high they
can’t be correct. How can I fix this?
One possibility is that you need to filter the data so it includes measurement data only. On the Dta Display tab,
make sure the Filter control is set to “Measurement Data.”
The time axis on my graph is showing strange values—I’m getting some dates back as far as the year 1904.
What could be causing this?
The data file could have incomplete lines in it, due to minor corruptions when the instrument was started or
stopped. Another possibility is that the time stamps could be irregular if the PAX clock was reset during data
acquisition. In either case, if you have saved your original data file, revert to this file and delete the current one.
Appendix A: Installing the PMC
To install the PMC on a local computer, insert the USB stick with the PMC installer. Navigate to the
Setup.exe program. Double-click on the file name.
Figure 12: Installing the PMC

DOC-0319 Rev C-1 © 2018 DROPLET MEASUREMENT TECHNOLOGIES LLC.
2 2
A window will appear asking you to select the Destination Directory. Click on Next.
Figure 13: Approving the Destination Directory
Accept all license agreements. The PMC will install on your computer.
Appendix B: Revisions to Manual
Rev. Date Rev. No. Summary Section
11/7/11 B Updated manual to reflect new menu and File Transfer Tab
1.1, 1.1.1, 2.1, 2.2, 3
4/23/12 C Added Installation section 2.0
7/27/12 C-1 Added caution that PAX stops recording data if the current day’s data file is deleted.
4.2.2, 6.0