diy command center - kreg tool
TRANSCRIPT

DIY Command Center
This is a very convenient command center. It would be great next to a door, in the garage, or in an office or classroom. It is a
pretty straight forward build, that requires pretty basic tools and supplies. It measures 28" wide by 40 1/2" tall.
Difficulty
Easy
Page 1 of 18

Page 2 of 18

ToolsKreg Tools
Accu-Cut™
Wood Project Clamp - 6"
Kreg Pocket-Hole Jig® 720
Other Tools
Circular Saw (corded)
Miter Saw
Tape Measure
Drill (cordless)
Sander
MaterialsWood Products
Board , 1x3 , 96"1
Board , 1x3 , 72"1
Board , 1x4 , 72"1
Board , 1x6 , 36"1
Plywood , 1/4" Thick , Quarter Sheet1
Hardware & Supplies
1 1/4" Pocket Hole Screws50
Hooks (Use As Many As You'd Like)7
Wood Glue1
Chalkboard Paint1
Small Nails8
Page 3 of 18

Cut List & PartsFrame Piece , 28" 1x31
Frame Piece , 32 1/2" 1x32
Frame Piece , 23" 1x31
Frame Piece , 9 1/2" 1x31
Shelf Piece , 11 1/4" 1x41
Shelf Piece , 14" 1x41
Shelf Pieces , 12 1/2" 1x43
Bottom Frame Piece , 28" 1x61
Backing Pieces , 9 1/2" X 10 1/2" (1/4" Plywood)2
File Holder Fronts , 14" X 6 1/2" (1/4" Plywood)2
Chalkboard , 22 1/2" X 24" (1/4" Plywood Chalkboard)1
Page 4 of 18

DirectionsBuild FrameCut Two (30 1/2") 1x3 boards. Drill pocket holes in both ends.
Cut one (28") 1x3 board.
Cut one (28") 1x6 board.
Using wood glue and 1 1/4" pocket hole screws, assemble a frame, with the 1x6 on the bottom.
1
Page 5 of 18

Add Cross SupportsCut one (23") 1x3 board. Drill pocket holes in both ends.
Cut one (9 1/2") 1x3 board. Drill pocket holes in both ends.
Using wood glue and 1 1/4" pocket hole screws, attach the 23" board horizontally, at 9 1/2" from the bottom.
Using wood glue and 1 1/4" pocket hole screws, attach the 9 1/2" board vertically, centered on the 1x6.
2
Page 6 of 18

Start Building Shelving UnitCut two (11 1/4") 1x4 boards. Drill pocket holes in one end of each board, and across the left side of the first board, and the
right side of the second board.
The pocket holes along the sides (length) of the board will be used to connect the entire shelving unit to the frame later.
3
Page 7 of 18

Attach Shelf BottomCut one (14") 1x4 board. Using wood glue and 1 1/4" pocket hole screws, attach the boards together. The 14" board will be the
shelf bottom.
Add Shelf FrontCut one (12 1/2") 1x4 board. Drill pocket holes in both ends. Using wood glue and 1 1/4" pocket hole screws, attach this board
horizontally, across the front side of the vertical support boards.
4
5
Page 8 of 18

Add ShelvesCut two (12 1/2") 1x4 boards. Drill pocket holes in each end. Using wood glue and 1 1/4" pocket hole screws, attach the shelves.
The top shelf should be even with the bottom of the of the front you just attached. You can place the middle shelf wherever
you want it.
6
Page 9 of 18

Attach Shelving UnitUse wood glue and 1 1/4" pocket holes to attach the shelving unit to the frame. You will use the pocket holes on the sides of
the vertical shelf supports to attach.
7
Page 10 of 18

Cut Triangle SupportsUsing a 1x3, you will cut FOUR triangle supports for the file holders.
Drill pocket holes along the long side of the triangles.
See plans for the diagram.
8
Page 11 of 18

Attach Triangle SupportsUsing wood glue and 1 1/4" pocket hole screws, attach the triangle supports to the vertical pieces of the frame.
These pieces should be flush up against the outside of the frame, and against the shelving unit you already attached.
9
Page 12 of 18

Add File Holder FrontsCut two (14" x 6 1/2") 1/4" plywood pieces.
Using wood glue, attach to the fronts of the triangle supports. You can secure with a brad nail or staple, if you'd like, to add
support until the wood glue dries.
10
Page 13 of 18

Attach ChalkboardCut a piece of chalkboard at 22" x 24". Most home improvement stores sell 1/4" thick chalkboard. Or you can paint a 1/4"
plywood sheet with chalkboard paint or chalkboard spray paint.
Attach to the back of the frame with wood glue and either brad nails, staples, or short screws.
(Note: You may find it easier to paint or stain before adding the chalkboard.)
11
Page 14 of 18
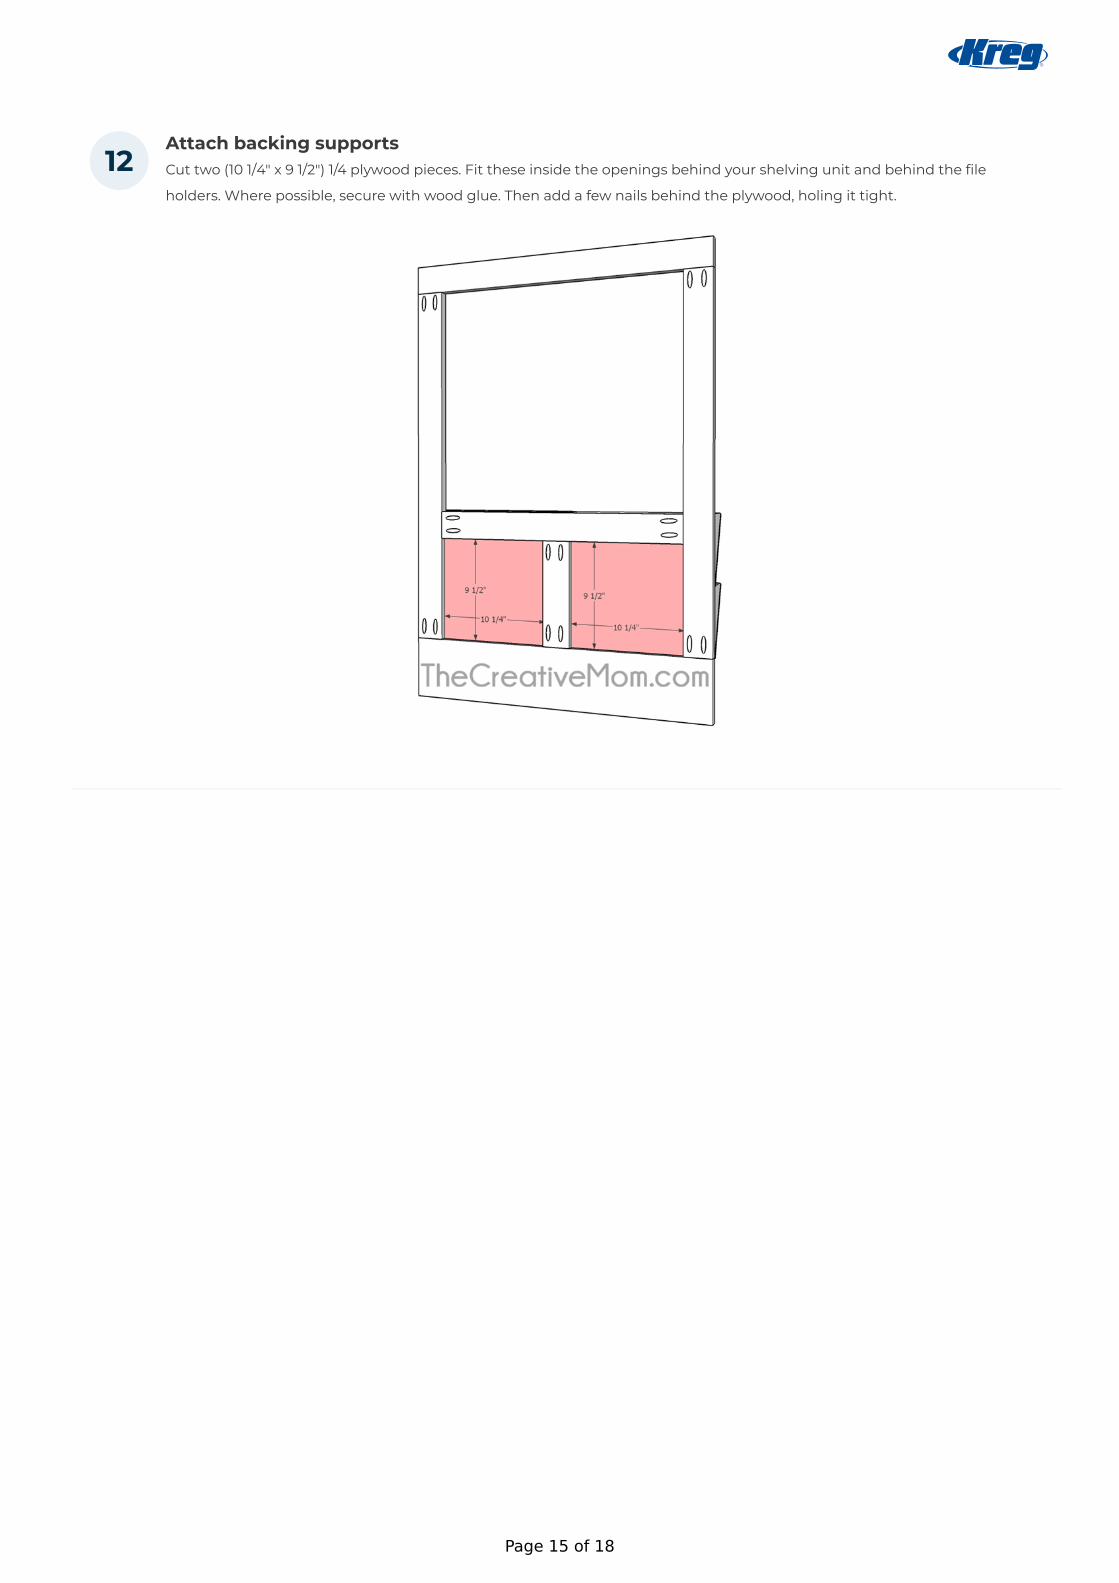
Attach backing supportsCut two (10 1/4" x 9 1/2") 1/4 plywood pieces. Fit these inside the openings behind your shelving unit and behind the file
holders. Where possible, secure with wood glue. Then add a few nails behind the plywood, holing it tight.
12
Page 15 of 18
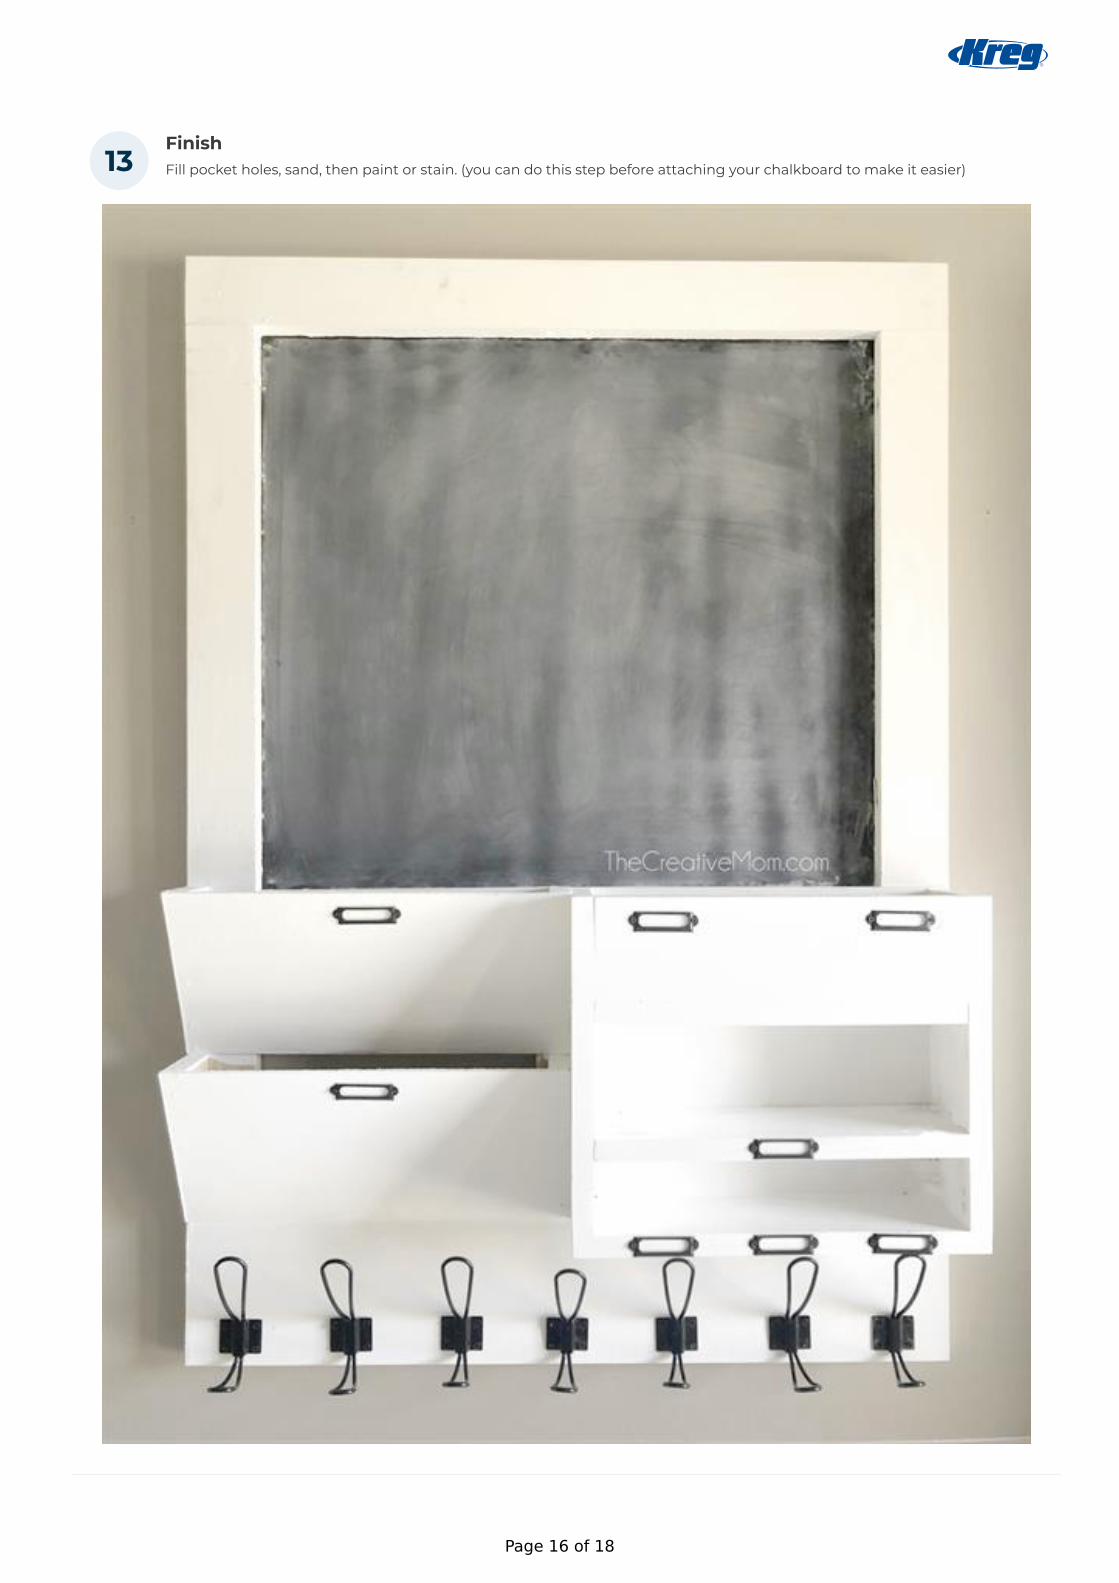
FinishFill pocket holes, sand, then paint or stain. (you can do this step before attaching your chalkboard to make it easier)13
Page 16 of 18

Add HooksAdd as many hooks as you'd like to the bottom. I used 7.
If you use 7 hooks, you will mark on center, then every 4 inches out from that mark, leaving the side marks 2 inches from the
edges.
The Amazon links for the hooks, as well as the metal label plates are linked in the "extras" section of these plans.
14
Page 17 of 18

HangThe way you hang your command center depends on where you hang it, and how you intend to use it.
If you intend to hang backpacks, bags, purses, and other heavy items from the command center, make sure to properly
secure it to the wall. It is a heavy piece, and can fall if not secured properly.
The best way to hang is to drill a 4 inch wood screw through the top and bottom frame pieces into a stud in the wall-
anchored in 4 places.
15
Page 18 of 18