dittyroo embellishing tutorial - studiokatdesigns.com · of our dittyroo pattern 1) ... since...
TRANSCRIPT

Free-Form Embellishing An embellishment technique
demonstrated on the ‘Roo’ Pouch
of our DittyRoo pattern
1) So if you've got all your supplies, let's get started embellishing this bag! We’ll be embellishing the ‘Roo” Pouch for this DittyRoo, so the best thing to do first, is to trace a fresh copy of this pattern piece.
*
*
*
*
*
*
*
*
*
*
*
*
*
*
*
*
*
*
*
*
*
*
*
*
*
*
*
*
*
*
*
*
*
*
*
1 2) Since we’re doing a diagonal drape on this em-bellishment, I want to measure the distance from outside bottom corner to top inside corner of the Roo Pouch (in this case, ~16”). (This will be the longest piece we will need, but or convenience sake, we’ll cut them ALL this length.) AND, since the Roo Pouch is a really small piece, it will be best enhanced by relatively small strips. This piece was done with strips that were 1.75” wide. So, with that in mind, use your roller blade to cut at least 22 strips (in various colors) that are 16" X 1.75".
3) For this Roo Pouch, let’s shave a “graduated 1/2” off each side of each strip. Begin by aligning the side edge of your cutting ruler with the bottom right corner of your strip. Now, while anchoring your ruler in this corner, tilt the top edge of your ruler to the left, so that it crosses the top edge of your strip, 1/2” away from the top right corner. (see photo at right.) Carefully trim away this wedge of fabric, which is a point at the bottom and 1/2" wide
at the top.
4) As was done in step 3, place your ruler diagonally across your fabric so that the left edge is even with the bot-tom left corner, AND crosses the top edge of your fabric 1/2" from the top left corner. Hold your ruler done firmly and cut this wedge of fabric away. (see photo at left)
5) Repeat this procedure with your remaining strips. You'll need about twenty-four of these fabric wedges to cover your Roo Pouch exte-rior. Please do not obcess about making these all exactly the same size. It really doesn't mat-ter, and i swear no one will notice. Actually, I think slight variations add a bit to the charm of the overall look.
6) Once you've got your pieces all cut, you can begin sewing them together along the side edges with a 1/4" seam. (see photo at right) Place a mark on the fabric edge to indicate where you want the center of your Roo Pouch to be.
7) I press all my seams open as I go.
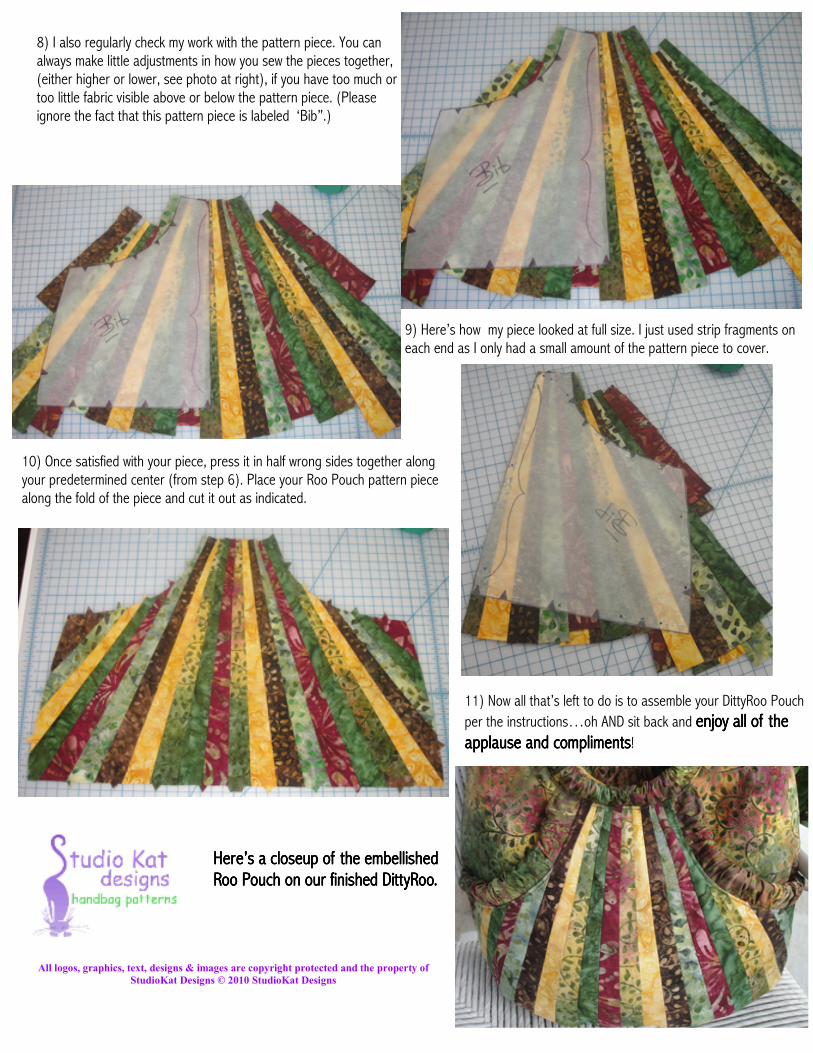
8) I also regularly check my work with the pattern piece. You can always make little adjustments in how you sew the pieces together, (either higher or lower, see photo at right), if you have too much or too little fabric visible above or below the pattern piece. (Please ignore the fact that this pattern piece is labeled ‘Bib”.)
9) Here’s how my piece looked at full size. I just used strip fragments on each end as I only had a small amount of the pattern piece to cover.
10) Once satisfied with your piece, press it in half wrong sides together along your predetermined center (from step 6). Place your Roo Pouch pattern piece along the fold of the piece and cut it out as indicated.
11) Now all that’s left to do is to assemble your DittyRoo Pouch
per the instructions…oh AND sit back and enjoy all of the enjoy all of the enjoy all of the enjoy all of the applause and complimentsapplause and complimentsapplause and complimentsapplause and compliments!
Here’s a closeup of the embellished Here’s a closeup of the embellished Here’s a closeup of the embellished Here’s a closeup of the embellished Roo Pouch on our finished DittyRoo. Roo Pouch on our finished DittyRoo. Roo Pouch on our finished DittyRoo. Roo Pouch on our finished DittyRoo.
All logos, graphics, text, designs & images are copyright protected and the property of
StudioKat Designs © 2010 StudioKat Designs