disinfection and sterilization - pphsn index · 2012-01-27 · powder sprinkled directly on blood...
TRANSCRIPT

Section VII: Disinfection and Sterilization
97
ANTISEPTICS ANDDISINFECTANTS
ANTISEPTICS
Antiseptics are designed to be used for reducing or destroying micro-organisms on the skin ormucous membranes without damaging these tissues.
Uses of Antiseptics
Antiseptics are used for:
Skin, cervical, or vaginal preparation before a clinical procedure
Surgical scrub
Handwashing in high-risk situations, such as before an invasive procedure or contact witha patient at high-risk of infection, (e.g. a newborn or immuno-suppressed patient) (see Table 7).
Antiseptics are not meant to be used on inanimate objects, such as instruments and surfaces. They usually do not have the same killing power as chemicals used for disinfection of inanimate objects.
Section VII: Disinfection and Sterilization
98
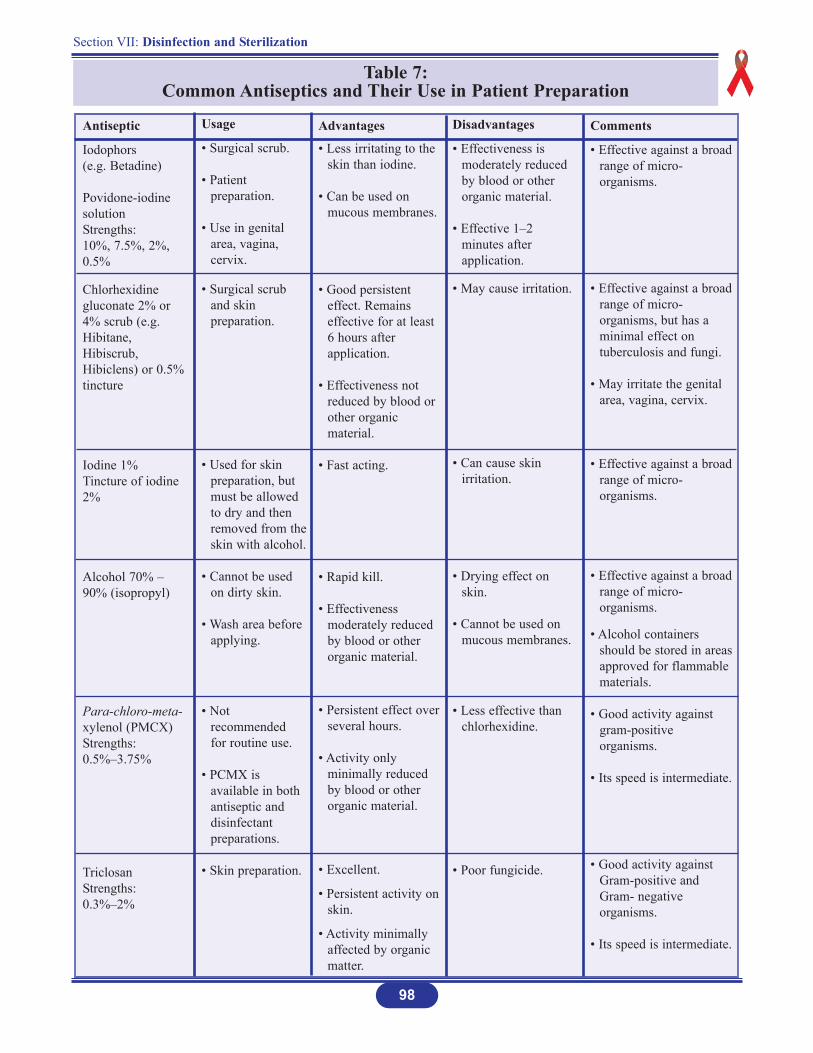
Table 7: Common Antiseptics and Their Use in Patient Preparation
Antiseptic
Iodophors(e.g. Betadine)
Povidone-iodinesolutionStrengths:10%, 7.5%, 2%,0.5%
Chlorhexidinegluconate 2% or4% scrub (e.g.Hibitane,Hibiscrub,Hibiclens) or 0.5%tincture
Iodine 1% Tincture of iodine2%
Alcohol 70% –90% (isopropyl)
Para-chloro-meta-xylenol (PMCX) Strengths:0.5%–3.75%
TriclosanStrengths:0.3%–2%
Usage
• Surgical scrub.
• Patient preparation.
• Use in genital area, vagina, cervix.
• Surgical scrub and skin preparation.
• Used for skin preparation, but must be allowed to dry and then removed from theskin with alcohol.
• Cannot be used on dirty skin.
• Wash area before applying.
• Not recommended for routine use.
• PCMX is available in both antiseptic and disinfectant preparations.
• Skin preparation.
Disadvantages
• Effectiveness is moderately reduced by blood or other organic material.
• Effective 1–2 minutes after application.
• May cause irritation.
• Can cause skin irritation.
• Drying effect on skin.
• Cannot be used on mucous membranes.
• Less effective than chlorhexidine.
• Poor fungicide.
Comments
• Effective against a broadrange of micro-organisms.
• Effective against a broadrange of micro-organisms, but has a minimal effect on tuberculosis and fungi.
• May irritate the genital area, vagina, cervix.
• Effective against a broadrange of micro-organisms.
• Effective against a broadrange of micro-organisms.
• Alcohol containers should be stored in areasapproved for flammable materials.
• Good activity against gram-positive organisms.
• Its speed is intermediate.
• Good activity against Gram-positive and Gram- negative organisms.
• Its speed is intermediate.
Advantages
• Less irritating to the skin than iodine.
• Can be used on mucous membranes.
• Good persistent effect. Remains effective for at least 6 hours after application.
• Effectiveness not reduced by blood or other organic material.
• Fast acting.
• Rapid kill.
• Effectiveness moderately reduced by blood or other organic material.
• Persistent effect over several hours.
• Activity only minimally reduced by blood or other organic material.
• Excellent.
• Persistent activity on skin.
• Activity minimally affected by organic matter.
99
Section VII: Disinfection and Sterilization
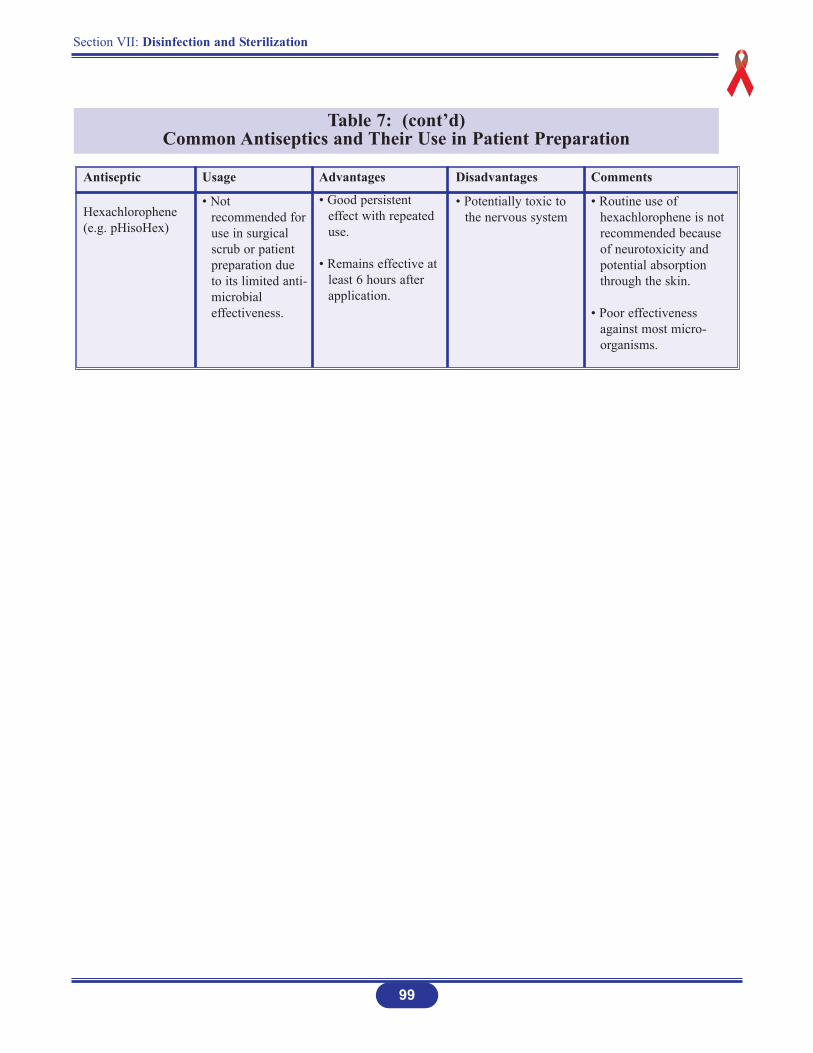
Table 7: (cont’d)Common Antiseptics and Their Use in Patient Preparation
Antiseptic
Hexachlorophene(e.g. pHisoHex)
Usage
• Not recommended foruse in surgical scrub or patient preparation due to its limited anti-microbial effectiveness.
Disadvantages
• Potentially toxic to the nervous system
Comments
• Routine use of hexachlorophene is not recommended because of neurotoxicity and potential absorption through the skin.
• Poor effectiveness against most micro-organisms.
Advantages
• Good persistent effect with repeated use.
• Remains effective at least 6 hours after application.

Section VII: Disinfection and Sterilization
100
DISINFECTANTS
Purpose of Disinfectants
Disinfectants are chemicals used to kill micro-organisms on infected instruments. Disinfectantsare not meant to be used on the skin or mucous membranes.
Types of Disinfectants
There are three types of disinfectants (see Table 8):
1. High-level disinfectants
Kill bacteria, viruses, fungi, Mycobacterium tuberculosis and some, but not necessarily all bacterial endospores. Some high-level disinfectants are also chemicalsterilants and, given sufficient time, will destroy bacterial endospores.
Are used for processing instruments and other items that are semi-critical.
2. Intermediate-level disinfectants
Kill mycobacteria, most viruses, and bacteria.
Recommended for use on blood and other potentially infectious materials.
Small, non-lipid viruses, (e.g. enteroviruses) may be resistant.
Used for some non-critical items, or devices, or environmental surfaces.
3. Low-level disinfectants
Kill some bacteria and some viruses and fungi, but do not kill tuberculosis-causing micro-organisms and bacterial endospores.
Are used for cleaning surfaces, such as floors and counter tops.
They should not be used for processing instruments and other items.
Section VII: Disinfection and Sterilization
101
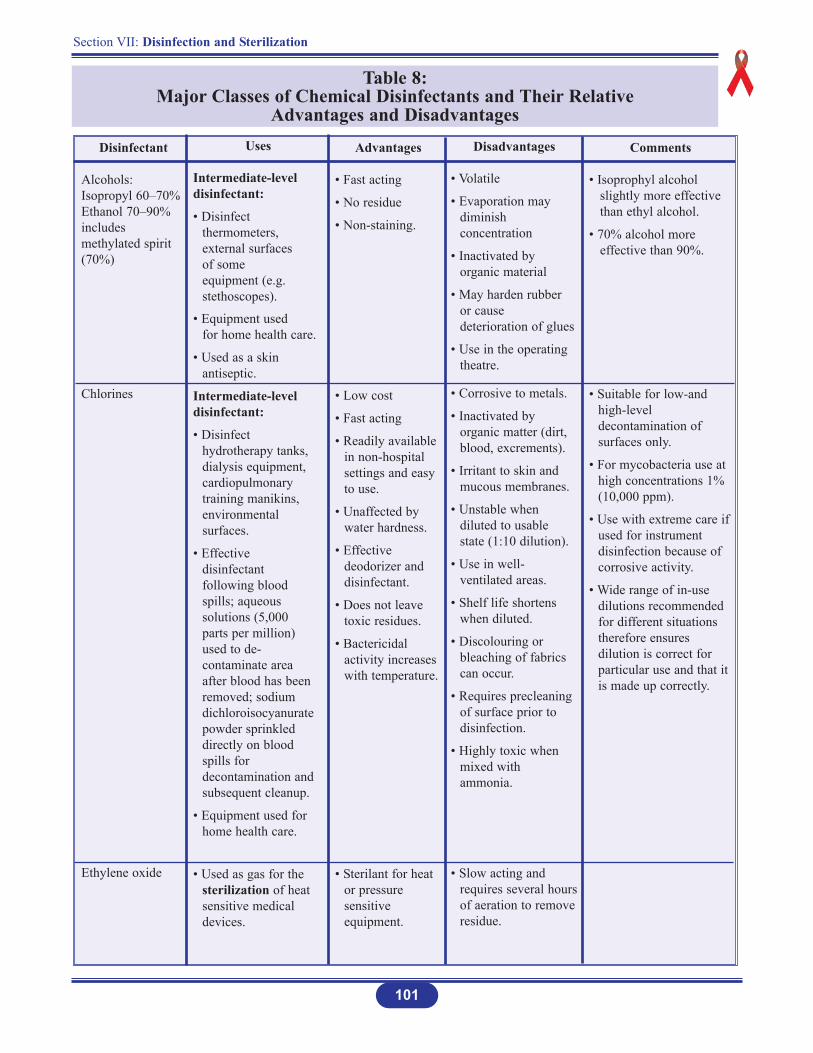
Table 8: Major Classes of Chemical Disinfectants and Their Relative
Advantages and Disadvantages
Disinfectant
Alcohols:Isopropyl 60–70%Ethanol 70–90%includesmethylated spirit(70%)
Chlorines
Ethylene oxide
Uses
Intermediate-leveldisinfectant:
• Disinfect thermometers, external surfaces of some equipment (e.g. stethoscopes).
• Equipment used for home health care.
• Used as a skin antiseptic.
Intermediate-leveldisinfectant:
• Disinfect hydrotherapy tanks, dialysis equipment, cardiopulmonary training manikins, environmental surfaces.
• Effective disinfectant following blood spills; aqueous solutions (5,000 parts per million) used to de-contaminate area after blood has been removed; sodium dichloroisocyanurate powder sprinkled directly on blood spills for decontamination and subsequent cleanup.
• Equipment used for home health care.
• Used as gas for the sterilization of heat sensitive medical devices.
Advantages
• Fast acting
• No residue
• Non-staining.
• Low cost
• Fast acting
• Readily available in non-hospital settings and easy to use.
• Unaffected by water hardness.
• Effective deodorizer and disinfectant.
• Does not leave toxic residues.
• Bactericidal activity increases with temperature.
• Sterilant for heat or pressure sensitive equipment.
Disadvantages
• Volatile
• Evaporation may diminish concentration
• Inactivated by organic material
• May harden rubber or cause deterioration of glues
• Use in the operating theatre.
• Corrosive to metals.
• Inactivated by organic matter (dirt, blood, excrements).
• Irritant to skin and mucous membranes.
• Unstable when diluted to usable state (1:10 dilution).
• Use in well-ventilated areas.
• Shelf life shortens when diluted.
• Discolouring or bleaching of fabrics can occur.
• Requires precleaning of surface prior to disinfection.
• Highly toxic when mixed with ammonia.
• Slow acting and requires several hoursof aeration to removeresidue.
Comments
• Isoprophyl alcohol slightly more effective than ethyl alcohol.
• 70% alcohol more effective than 90%.
• Suitable for low-and high-level decontamination of surfaces only.
• For mycobacteria use at high concentrations 1% (10,000 ppm).
• Use with extreme care ifused for instrument disinfection because of corrosive activity.
• Wide range of in-use dilutions recommended for different situations therefore ensures dilution is correct for particular use and that it is made up correctly.
Section VII: Disinfection and Sterilization
102
Table 8: (cont’d)Major Classes of Chemical Disinfectants and Their Relative
Advantages and DisadvantagesDisinfectant
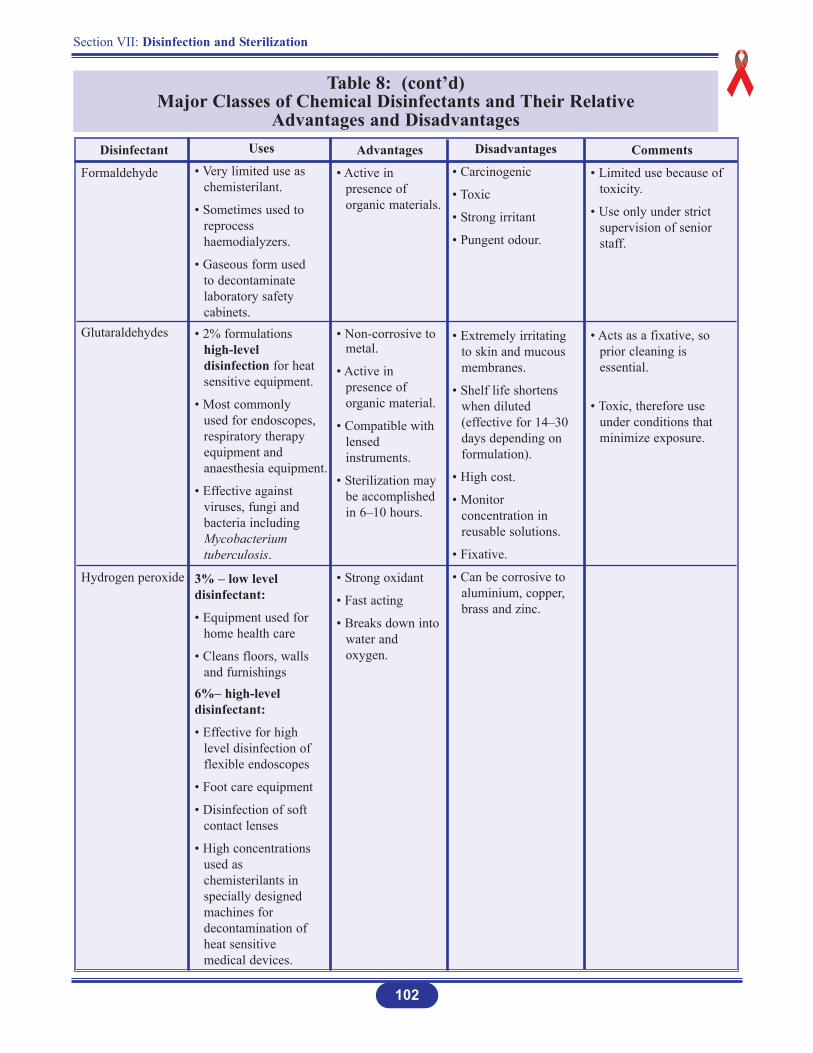
Formaldehyde
Glutaraldehydes
Hydrogen peroxide
Uses
• Very limited use as chemisterilant.
• Sometimes used to reprocess haemodialyzers.
• Gaseous form used to decontaminate laboratory safety cabinets.
• 2% formulations high-level disinfection for heat sensitive equipment.
• Most commonly used for endoscopes, respiratory therapy equipment and anaesthesia equipment.
• Effective against viruses, fungi and bacteria including Mycobacterium tuberculosis.
3% – low level disinfectant:
• Equipment used for home health care
• Cleans floors, walls and furnishings
6%– high-level disinfectant:
• Effective for high level disinfection of flexible endoscopes
• Foot care equipment
• Disinfection of soft contact lenses
• High concentrations used as chemisterilants in specially designed machines for decontamination of heat sensitive medical devices.
Advantages
• Active in presence of organic materials.
• Non-corrosive to metal.
• Active in presence of organic material.
• Compatible with lensed instruments.
• Sterilization may be accomplished in 6–10 hours.
• Strong oxidant
• Fast acting
• Breaks down into water and oxygen.
Disadvantages
• Carcinogenic
• Toxic
• Strong irritant
• Pungent odour.
• Extremely irritating to skin and mucous membranes.
• Shelf life shortens when diluted (effective for 14–30 days depending on formulation).
• High cost.
• Monitor concentration in reusable solutions.
• Fixative.
• Can be corrosive to aluminium, copper, brass and zinc.
Comments
• Limited use because of toxicity.
• Use only under strict supervision of senior staff.
• Acts as a fixative, so prior cleaning is essential.
• Toxic, therefore use under conditions that minimize exposure.
Section VII: Disinfection and Sterilization
103
Table 8: (cont’d)Major Classes of Chemical Disinfectants and Their Relative
Advantages and DisadvantagesDisinfectant
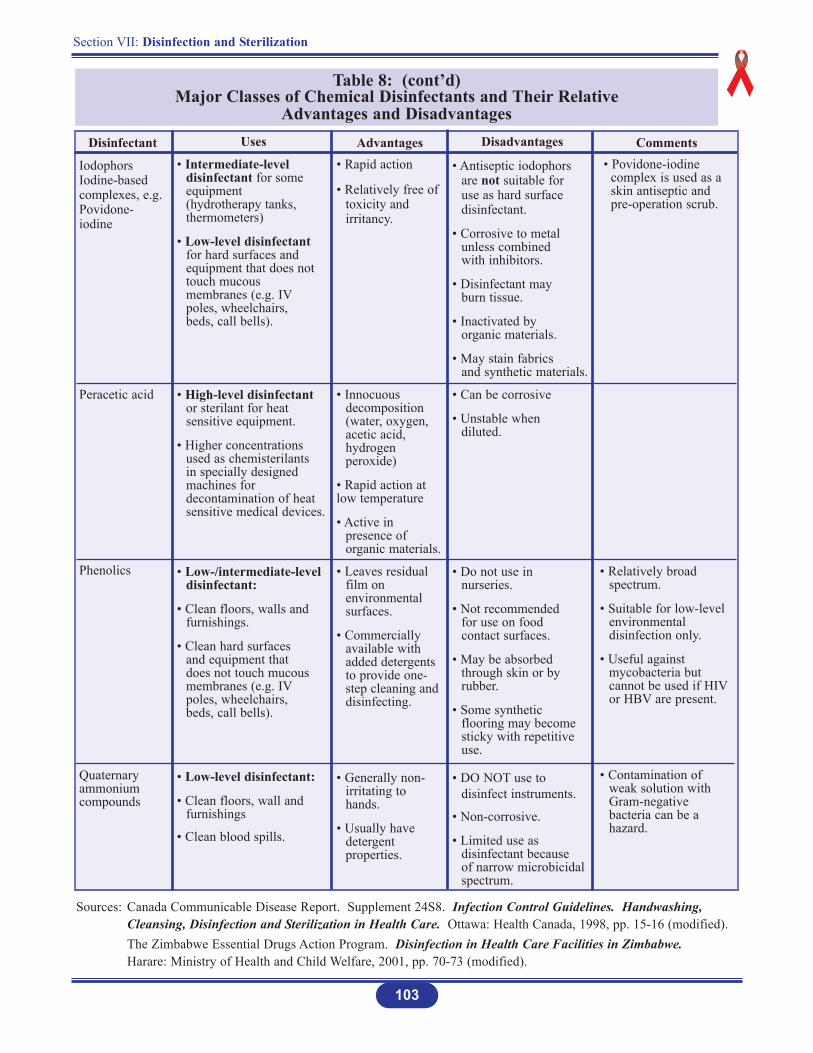
IodophorsIodine-basedcomplexes, e.g.Povidone-iodine
Peracetic acid
Phenolics
Quaternaryammoniumcompounds
Uses
• Intermediate-level disinfectant for some equipment (hydrotherapy tanks, thermometers)
• Low-level disinfectant for hard surfaces and equipment that does not touch mucous membranes (e.g. IVpoles, wheelchairs, beds, call bells).
• High-level disinfectant or sterilant for heat sensitive equipment.
• Higher concentrations used as chemisterilants in specially designed machines for decontamination of heat sensitive medical devices.
• Low-/intermediate-level disinfectant:
• Clean floors, walls and furnishings.
• Clean hard surfaces and equipment that does not touch mucous membranes (e.g. IVpoles, wheelchairs, beds, call bells).
• Low-level disinfectant:
• Clean floors, wall and furnishings
• Clean blood spills.
Advantages• Rapid action
• Relatively free of toxicity and irritancy.
• Innocuous decomposition (water, oxygen, acetic acid, hydrogen peroxide)
• Rapid action at low temperature
• Active in presence of organic materials.
• Leaves residual film on environmental surfaces.
• Commercially available with added detergents to provide one-step cleaning and disinfecting.
• Generally non-irritating to hands.
• Usually have detergent properties.
Disadvantages
• Antiseptic iodophors are not suitable for use as hard surface disinfectant.
• Corrosive to metal unless combined with inhibitors.
• Disinfectant may burn tissue.
• Inactivated by organic materials.
• May stain fabrics and synthetic materials.
• Can be corrosive
• Unstable when diluted.
• Do not use in nurseries.
• Not recommended for use on food contact surfaces.
• May be absorbed through skin or by rubber.
• Some synthetic flooring may become sticky with repetitive use.
• DO NOT use to disinfect instruments.
• Non-corrosive.
• Limited use as disinfectant because of narrow microbicidal spectrum.
Comments• Povidone-iodine
complex is used as a skin antiseptic and pre-operation scrub.
• Relatively broad spectrum.
• Suitable for low-level environmental disinfection only.
• Useful against mycobacteria but cannot be used if HIVor HBV are present.
• Contamination of weak solution with Gram-negative bacteria can be a hazard.
Sources: Canada Communicable Disease Report. Supplement 24S8. Infection Control Guidelines. Handwashing, Cleansing, Disinfection and Sterilization in Health Care. Ottawa: Health Canada, 1998, pp. 15-16 (modified).The Zimbabwe Essential Drugs Action Program. Disinfection in Health Care Facilities in Zimbabwe.Harare: Ministry of Health and Child Welfare, 2001, pp. 70-73 (modified).
Section VII: Disinfection and Sterilization
104
The Effectiveness of Disinfectants
To be effective, the chosen disinfectant must:
1. Kill or inhibit the growth of the undesirable micro-organisms.
2. Not be harmful to the instrument/equipment on which it is used.
3. Be used only on clean, rinsed and dried instruments/equipment. Protein material, detergent and soap will inhibit some disinfectants.
4. Be used in the proper concentration.
5. Be used within the stipulated lifetime after dilution.
Factors Affecting Disinfection
1. Nature of the item to be disinfected
The rougher the surface, the longer the contact time required for disinfection (crevices,hinges, lumen).
2. Number of micro-organisms present
The number of micro-organisms present will lengthen the time for effective disinfection to take place. In general, higher bioburden requires more time for disinfection.
3. Resistance of micro-organisms
Some micro-organisms are more resistant to disinfection than others. The generally accepted order from the most resistant to the least resistant is: bacterial spores, mycobacteria, hydrophilic viruses, fungi, vegetative bacteria, lipid viruses.
Disinfecting a spill with a small concentration of bacterial spores will require longer disinfection time than a large concentration of lipid viruses.
Certain organisms, which flourish in a health care facility environment (such as Pseudomonas auruginosa and other antibiotic-resistant micro-organisms), have an inherent resistance to certain disinfectants, while other organisms may develop resistance as a result of environmental selection.
Section VII: Disinfection and Sterilization
105
4. Type and concentration of disinfectant used
Resistance of micro-organisms depends on the type of disinfectant used. A particularmicro-organism may be more resistant to one type of disinfectant than another. For instance, alcohol (isopropyl or ethyl) is effective against vegetative bacteria and mostlipophilic viruses, but is not effective against bacterial spores or most hydrophilic viruses.
Many disinfectants are broad spectrum; that is, effective against all or most forms ofmicrobial life.
Some broad spectrum disinfectants include glutaraldehyde, sodium hypochlorite (bleach), and hydrogen peroxide.
Non-broad spectrum disinfectants include phenolics and quaternary ammonium compounds.
Alcohols lie somewhere in between these two.
5. Presence of organic material
The presence of organic soiling matter will compromise disinfection.
Blood, blood products, body fluids, and faeces contain significant amounts of proteins,and protein will bind and inactivate some disinfectants or slow their action. Therefore,in the presence of large amounts of protein, a higher concentration of disinfectant andlonger contact time will be necessary to achieve maximal disinfection.
6. Duration of exposure and temperature
Duration of exposure and temperature influences the disinfection process. The longerthe duration of exposure, the higher the degree of disinfection achieved.
Some disinfectants require a longer contact time to achieve killing, and some micro-organisms need longer exposures to be killed. Higher temperatures increase the killing power of most disinfectants, whereas lower temperatures may slow the killing power of most disinfectants.
Choice of Disinfection Methods
1. When compatible with other requirements, disinfectants used should be bacteriocidal rather than bacteriostatic; active against a wide range of micro-organisms and should not be readilyinactivated.
2. Disinfectants are used under a variety of conditions, therefore the one chosen should be considered in terms of acceptability, availability, cost, as well as antibacterial activity. Stability, toxicity, corrosiveness and cleaning properties should be assessed before use. It is essential to monitor their effectiveness, i.e., by regular “in-use” tests under actual conditionsof use on the wards/units.
3. The main problem in choosing the wrong disinfectant or using them incorrectly is that they may allow the survival and multiplication of bacteria. These bacteria then spread by spillage,as aerosols, or by being carried over on mops or other equipment that is being supposedly disinfected.
Guide to the Use of Disinfectants*
The following should be adhered to:
1. Follow manufacturer’s instructions AND ensure that the correct (optimum) dilution is used.
2. Check expiry date of the solution. The date should be clearly marked on the container.
3. Disinfectant containers must be thoroughly cleaned or sterilized before refill between uses. NEVER TOP UP!!.
4. Disinfectants must not be used to sterilize instruments or equipment (unless specified in thedisinfectant policy, e.g. endoscopes).
5. Disinfectants should be supplied, preferably ready for use from the pharmacy (new stocks tobe supplied on receipt of empty containers). Do not discard empty containers or use them tostore other solutions. Chemicals can be harmful when used in the wrong situations.
6. Open containers of disinfectant should not be tolerated in any health care facility environment. There is a serious risk of contamination with multiple antibiotic-resistant bacteria such as Pseudomonas spp and spores.
7. Where disinfectants are indicated for use on surfaces, WIPE! Do not wash, bathe or flood-wash.
8. Always thoroughly decontaminate, then clean articles before disinfection, i.e., remove any substance such as dirt and biological materials.
106
Section VII: Disinfection and Sterilization
9. The health care facility pharmacy should ensure that:
The containers are thoroughly cleaned, washed and dried.
The containers are clearly labelled with the type of contents, the in-use dilution and the expiry date.
None of the disinfectants are exposed to inactivating substances, i.e. cork, rubber caps or incompatible detergents.
10. The disinfectants are diluted by knowledgeable personnel in manageable quantities, e.g. 5 litres or less. This will reduce waste and that partially filled containers will not be left on thewards (prevent hoarding)*.
Calculation of Concentrations
Many active chlorine compounds are available at various strengths; however, the most widely used for chemical disinfection is sodium hypochlorite. Household bleach or laundry bleach is a solution of 5.25% or 52,500 parts per million (ppm) of sodium hypochlorite.
Note that a 10% or 1:10 dilution of bleach will result in a 0.525% or 5250 ppm solution of chlorine. Rounded off, 0.5% is 5,000 ppm solution of chlorine.
Thus, 100 ppm available chlorine means 100 out of every million parts of chlorine in the solution are available to produce a disinfectant effect.
The following calculations are included to assist in the preparation of chlorine solutions (see Tables 9-10A) .
107
Section VII: Disinfection and Sterilization
Source: * Castle, D., Moosdeen, F. (1998). Use of Disinfectants: Recommendations, and Guide to Sterilization and Disinfection. University Hospital of the West Indies, Kingston, Jamaica.
Section VII: Disinfection and Sterilization
108
Using Liquid BleachExample IChlorine in liquid bleach comes in different concentrations. Any concentration can be used to make a dilutechlorine solution by applying the following formula:
% chlorine in liquid bleach – 1 = Total parts of water for each part bleach†% chlorine desired
Example: To make a 0.5% chlorine solution from 3.5%‡ bleach:3.5% – 1 = [7] – = 6 parts water for each part bleach0.5%
Therefore, you must add 1 part bleach to 6 parts water to make a 0.5% chlorine solution.† “Parts” can be used for any unit of measure (e.g. ounce, litre or gallon) or any container used for measuring, such as
a pitcher.‡ In countries where French products are available, the amount of active chlorine is usually expressed in degrees
chlorum. One degree chlorum is equivalent to 0.3% active chlorine.
Using Bleach PowderIf using bleach powder, † calculate the ratio of bleach to water by using the following formula:
% chlorine desired x 1,000 = Number of grams of powder for each litre of water% chlorine in bleach powder
Example: To make a 0.5% chlorine solution from calcium hypochlorite powder containing 35% activechlorine:
0.5% x 1,000 = 0.0143 x 1,000 = 14.335%
Therefore, you must dissolve 14.3 grams of calcium hypochlorite powder in each litre of water used to makea 0.5% chlorine solution.
† When bleach powder is used; the resulting chlorine solution is likely to be cloudy (milky).
1. Preparing a Dilute Chlorine Solution*
[ ]
[ ]
[ ]
[ ]
Source: * AVSC International (1999). Infection Prevention Curriculum. Teacher’s Manual. New York, p.267.
109
Section VII: Disinfection and Sterilization
Example IIFormula for Making a Dilute Solution from a Concentrated Solution*
Total Parts (TP) (H2O) = % Concentrate - 1% Dilute
Example: To make a dilute solution (0.1%) from 5% concentrated solution.
1. Calculate TP (H2O) = 5.0% - 1 = 50-1 = 490.1%
2. Take 1 part concentrated solution and add to 49 parts boiled (filtered if necessary) water.
Formula for Making a Chlorine-Releasing Solution from a Dry Powder
Grams/Liter = % Dilute x 1000% Concentrate
Example: To make a dilute chlorine-releasing solution (0.5%) from a concentrated powder (35%).
1. Calculate Grams/litre = 0.5% x 1000 = 14.2 g/l35%
2. Add 14.2 grams (approximately 14 g) to 1 litre of water.
[ ]
[ ]
[ ]
[ ]
Source: * Infection Prevention. http://www.reproline.jhu.edu/english/6read/6multi/pg/ip2.htm
Section VII: Disinfection and Sterilization
110
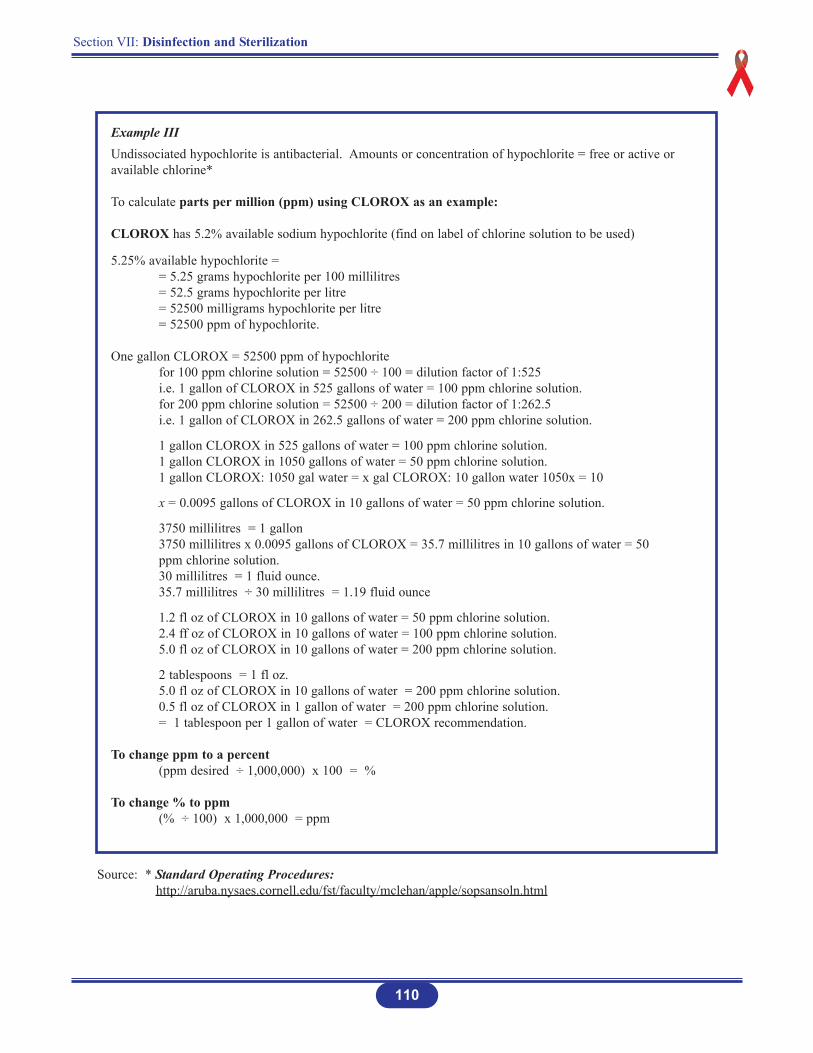
Example IIIUndissociated hypochlorite is antibacterial. Amounts or concentration of hypochlorite = free or active oravailable chlorine*
To calculate parts per million (ppm) using CLOROX as an example:
CLOROX has 5.2% available sodium hypochlorite (find on label of chlorine solution to be used)
5.25% available hypochlorite == 5.25 grams hypochlorite per 100 millilitres= 52.5 grams hypochlorite per litre= 52500 milligrams hypochlorite per litre= 52500 ppm of hypochlorite.
One gallon CLOROX = 52500 ppm of hypochloritefor 100 ppm chlorine solution = 52500 ÷ 100 = dilution factor of 1:525i.e. 1 gallon of CLOROX in 525 gallons of water = 100 ppm chlorine solution.for 200 ppm chlorine solution = 52500 ÷ 200 = dilution factor of 1:262.5i.e. 1 gallon of CLOROX in 262.5 gallons of water = 200 ppm chlorine solution.
1 gallon CLOROX in 525 gallons of water = 100 ppm chlorine solution.1 gallon CLOROX in 1050 gallons of water = 50 ppm chlorine solution.1 gallon CLOROX: 1050 gal water = x gal CLOROX: 10 gallon water 1050x = 10
x = 0.0095 gallons of CLOROX in 10 gallons of water = 50 ppm chlorine solution.
3750 millilitres = 1 gallon3750 millilitres x 0.0095 gallons of CLOROX = 35.7 millilitres in 10 gallons of water = 50 ppm chlorine solution.30 millilitres = 1 fluid ounce.35.7 millilitres ÷ 30 millilitres = 1.19 fluid ounce
1.2 fl oz of CLOROX in 10 gallons of water = 50 ppm chlorine solution.2.4 ff oz of CLOROX in 10 gallons of water = 100 ppm chlorine solution.5.0 fl oz of CLOROX in 10 gallons of water = 200 ppm chlorine solution.
2 tablespoons = 1 fl oz.5.0 fl oz of CLOROX in 10 gallons of water = 200 ppm chlorine solution.0.5 fl oz of CLOROX in 1 gallon of water = 200 ppm chlorine solution.= 1 tablespoon per 1 gallon of water = CLOROX recommendation.
To change ppm to a percent(ppm desired ÷ 1,000,000) x 100 = %
To change % to ppm(% ÷ 100) x 1,000,000 = ppm
Source: * Standard Operating Procedures:http://aruba.nysaes.cornell.edu/fst/faculty/mclehan/apple/sopsansoln.html
Section VII: Disinfection and Sterilization
111
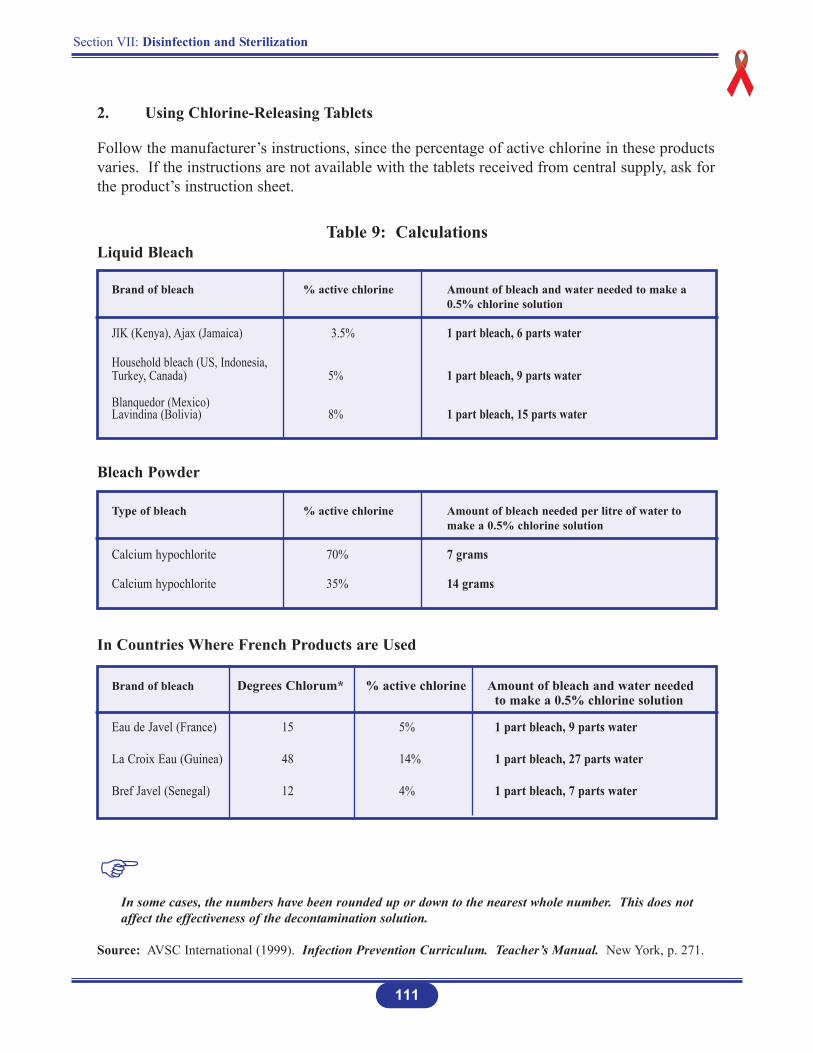
2. Using Chlorine-Releasing Tablets
Follow the manufacturer’s instructions, since the percentage of active chlorine in these productsvaries. If the instructions are not available with the tablets received from central supply, ask forthe product’s instruction sheet.
Brand of bleach % active chlorine Amount of bleach and water needed to make a 0.5% chlorine solution
JIK (Kenya), Ajax (Jamaica) 3.5% 1 part bleach, 6 parts water
Household bleach (US, Indonesia, Turkey, Canada) 5% 1 part bleach, 9 parts water
Blanquedor (Mexico)Lavindina (Bolivia) 8% 1 part bleach, 15 parts water
Table 9: CalculationsLiquid Bleach
Brand of bleach Degrees Chlorum* % active chlorine Amount of bleach and water needed to make a 0.5% chlorine solution
Eau de Javel (France) 15 5% 1 part bleach, 9 parts water
La Croix Eau (Guinea) 48 14% 1 part bleach, 27 parts water
Bref Javel (Senegal) 12 4% 1 part bleach, 7 parts water
Type of bleach % active chlorine Amount of bleach needed per litre of water to make a 0.5% chlorine solution
Calcium hypochlorite 70% 7 grams
Calcium hypochlorite 35% 14 grams
Bleach Powder
In Countries Where French Products are Used
In some cases, the numbers have been rounded up or down to the nearest whole number. This does not affect the effectiveness of the decontamination solution.
Source: AVSC International (1999). Infection Prevention Curriculum. Teacher’s Manual. New York, p. 271.
Section VII: Disinfection and Sterilization
112
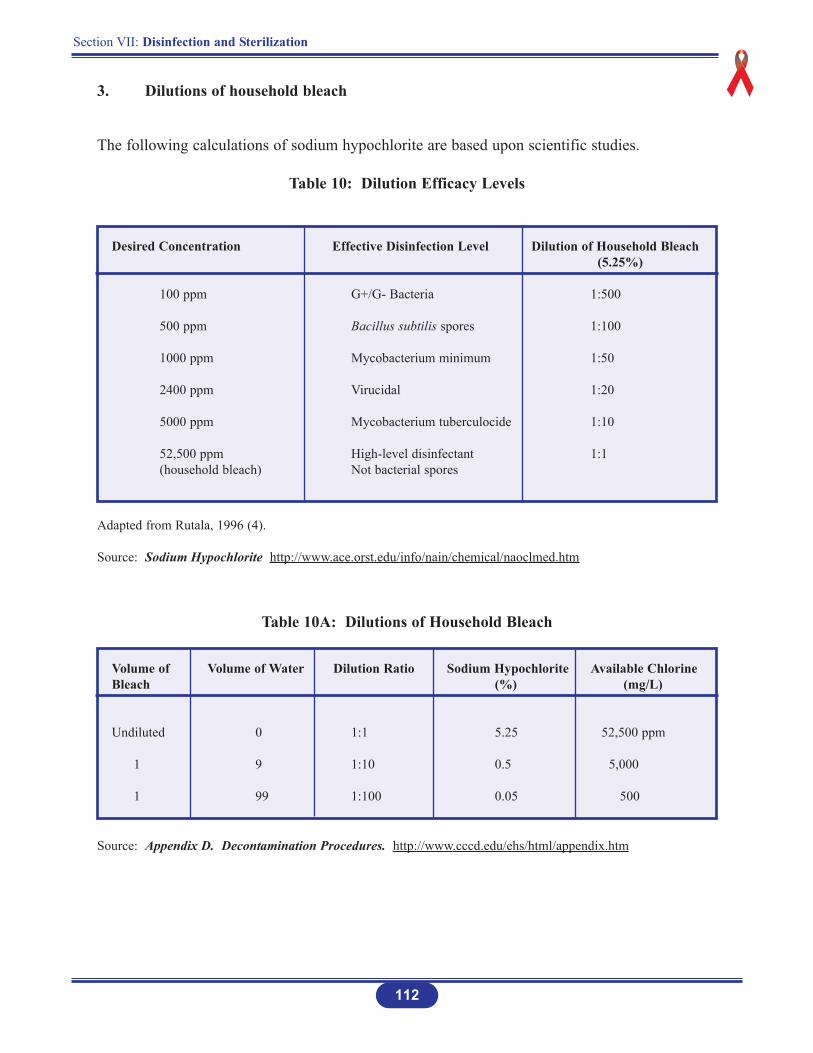
Desired Concentration Effective Disinfection Level Dilution of Household Bleach(5.25%)
100 ppm G+/G- Bacteria 1:500
500 ppm Bacillus subtilis spores 1:100
1000 ppm Mycobacterium minimum 1:50
2400 ppm Virucidal 1:20
5000 ppm Mycobacterium tuberculocide 1:10
52,500 ppm High-level disinfectant 1:1(household bleach) Not bacterial spores
Volume of Volume of Water Dilution Ratio Sodium Hypochlorite Available ChlorineBleach (%) (mg/L)
Undiluted 0 1:1 5.25 52,500 ppm
1 9 1:10 0.5 5,000
1 99 1:100 0.05 500
3. Dilutions of household bleach
The following calculations of sodium hypochlorite are based upon scientific studies.
Table 10: Dilution Efficacy Levels
Adapted from Rutala, 1996 (4).
Source: Sodium Hypochlorite http://www.ace.orst.edu/info/nain/chemical/naoclmed.htm
Source: Appendix D. Decontamination Procedures. http://www.cccd.edu/ehs/html/appendix.htm
Table 10A: Dilutions of Household Bleach

113
Section VII: Disinfection and Sterilization
PROCESSING
INTRODUCTION
Appropriate decontamination, cleaning, disinfection and sterilization of patient careequipment are important in limiting and/or preventing the transmission of micro-organisms
related to reusable patient care equipment.
The reprocessing method required for a specific item will depend on the item’s intended use, riskof infection to the patient, and the amount of soiling.
Decontamination and cleaning are always essential prior to disinfection or sterilization. An itemthat has not been decontaminated and cleaned cannot be assuredly disinfected or sterilized.
The rationale for the methods of decontamination, cleaning, disinfection and/or sterilizationprocess used for surgical instruments and equipment depends on many factors including the levelof potential risk of infection to the patient.
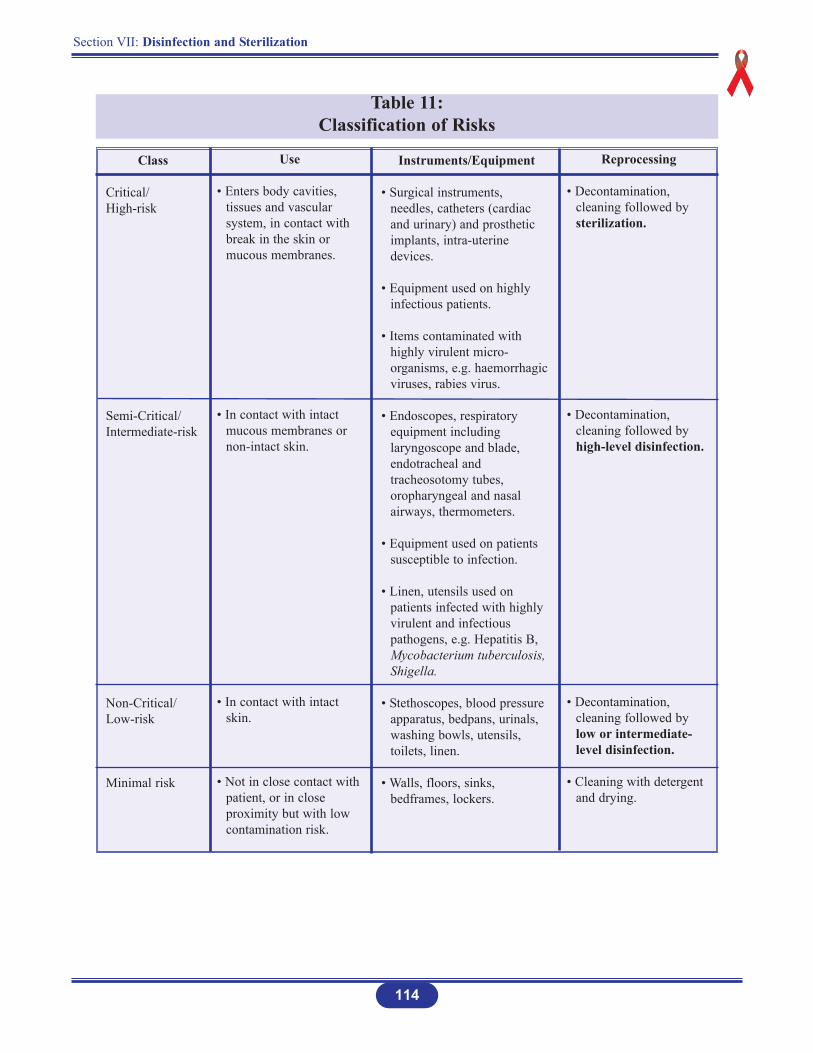
The level of risks determines the reprocessing of surgical instruments and equipment. See Table 11.
Section VII: Disinfection and Sterilization
114
Table 11: Classification of Risks
Class
Critical/High-risk
Semi-Critical/Intermediate-risk
Non-Critical/Low-risk
Minimal risk
Use
• Enters body cavities, tissues and vascular system, in contact with break in the skin or mucous membranes.
• In contact with intact mucous membranes or non-intact skin.
• In contact with intact skin.
• Not in close contact withpatient, or in close proximity but with low contamination risk.
Instruments/Equipment
• Surgical instruments, needles, catheters (cardiac and urinary) and prosthetic implants, intra-uterine devices.
• Equipment used on highly infectious patients.
• Items contaminated with highly virulent micro-organisms, e.g. haemorrhagic viruses, rabies virus.
• Endoscopes, respiratory equipment including laryngoscope and blade, endotracheal and tracheosotomy tubes, oropharyngeal and nasal airways, thermometers.
• Equipment used on patients susceptible to infection.
• Linen, utensils used on patients infected with highly virulent and infectious pathogens, e.g. Hepatitis B, Mycobacterium tuberculosis, Shigella.
• Stethoscopes, blood pressure apparatus, bedpans, urinals, washing bowls, utensils, toilets, linen.
• Walls, floors, sinks, bedframes, lockers.
Reprocessing
• Decontamination, cleaning followed by sterilization.
• Decontamination, cleaning followed by high-level disinfection.
• Decontamination, cleaning followed by low or intermediate-level disinfection.
• Cleaning with detergent and drying.
Section VII: Disinfection and Sterilization
115
Risk Categories in the Environment
Units or areas within a unit should be classified into risk categories and catered for accordingly(see Section VIII: Housekeeping).
High Risk Areas Low Risk AreasOperating Theatre PharmacyLabour and Delivery Rooms PhysiotherapyICU X-ray DepartmentDressing Room OfficesLaboratories Kitchen.Dental UnitNeonatal UnitIsolation Room.
THE STEPS OF PROCESSING
Proper processing involves several steps that reduce the risk of transmitting infections from usedinstruments and other items to health care workers and patients. For proper processing, it isessential to perform the steps in the correct order. Figure 26 outlines the steps in processing.
Figure 26: Processing
Source: AVSC International. Infection Prevention Curriculum. Teacher’s Manual. New York, 1999, p. 263 (modified).
Step 1. Decontamination
Decontamination is the first step inreprocessing instruments and other items forreuse. It makes soiled instruments and otheritems safe to handle by health care workersbefore cleaning.
Decontamination Procedure
Decontamination is done beforeleaving the treatment or procedure room.
Immediately after a procedure and before the removal of gloves, place items in 0.5% chlorine solution.
Allow to soak for 10 minutes. This step rapidly inactivates HBV and HIV.
Dip gloved hands in the chlorine solution before removing the gloves. Remove gloves by inverting them.
Deposit gloves into the hazardous waste container for disposal.
After 10 minutes of soaking in 0.5% chlorine solution remove instruments. Do not soakmore than 10 minutes.
Rinse immediately or place instruments immediately in soapy water for cleaning.
116
Section VII: Disinfection and Sterilization
Figure 26a

Step 2. Cleaning of Instruments and Equipment
Cleaning instruments and equipment is thenext important step in processing and refersto scrubbing items with a brush, detergent,and water to remove blood, other body fluids,organic material, tissue and dirt. In addition,cleaning greatly reduces the number ofmicro-organisms (including bacterialendospores) on items and is a crucial step inprocessing. If items have not first beencleaned, further processing might not beeffective because:
Micro-organisms trapped in organic material may be protected and survive further processing.
Organic material and dirt can make the chemicals used in some processing techniques less effective.
Cleaning Procedure
Cleaning that follows decontamination can remove up to 90% of micro-organisms (bacteria, viruses, fungi and parasites) and is the best way to reduce the number of endospores, which cause tetanus and gangrene.
Neither sterilization nor high-level disinfection procedures are effective without prior decontamination and cleaning using detergent, water and brushes.
Cleaning should be done under the surface of the water, using liquid soap and friction toremove all organic material from instruments.
After cleaning, rinse items in clean water until no detergent remains.
Air-dry items whenever possible.
Use heavy-duty gloves for cleaning instruments.
Wash hands after removing gloves.
Section VII: Disinfection and Sterilization
117
Figure 26b
Section VII: Disinfection and Sterilization
118
Care of All Instruments
Those with moving parts should be lubricated after drying.
Avoid oils that may protect bacteria during autoclaving; a water soluble lubricant is recommended.
Never use steel wool or abrasive powders on stainless steel instruments. Their use may seriously damage the corrosion resistant film of the instrument.
Never label surgical instruments by impact marking. Striking any hardened instruments can cause stress and severe damage may result at a later date.
Staining and spotting can be caused by condensation of water droplets on the surface, leaving slight mineral deposits.
General dullness of the surface finish may arise from water softening systems.
When instruments do stain in spite of all good care taken they can be cleaned by using acommercially available rust and stain remover.
New Instruments
All new instruments are supplied without lubrication. It is recommended that all be carefully washed and dried and any moving part lubricated.
Whenever cleaning, regardless of method, keep ratchets unlocked and box joints open.
When instruments are no longer new, avoid as far a possible contact between stainless steel instruments and any of the following substances: barium chloride, aluminium chloride, bromide and iodine containing compounds.
Manual Cleaning of Soiled Instruments and Equipment
Routine cleaning of soiled instruments is done immediately after the procedure.
When an operation is in progress do not drop instruments into a holding solution of disinfectant. If the instruments are not cleaned first, disinfectants such as glutaraldehydeor alcohol act as fixatives of any organic material present, making it difficult to remove.
Instruments should not be soaked in saline, as they will become pitted.
Dilute detergent properly as per supplier’s direction.
Completely dismantle all items and leave instruments open.
Use warm water, detergent and hard brush to completely remove the blood, tissue, food and other residue, paying special attention to small teeth of instruments and joints.
Finally rinse with clean water to remove traces of detergent.
Dry properly. Failure to remove water from trapped areas will cause corrosion.
For sterilization wrap the instruments properly to prevent contact corrosion.
1. There is no substitute for proper cleaning. Whether steam sterilization, ethylene oxide or disinfectants are used they cannot penetrate debris. These processes will not work when instruments are not cleanedproperly.
2. Always keep soiled items separated from clean and disinfected/sterile areas to prevent cross contamination.
3. Consider the item contaminated when packaging is torn, damaged, wet, dropped on the floor and when the expiry date has passed.
4. Never let a clean item stand in liquid. DRY! Keep all instruments open.
119
Section VII: Disinfection and Sterilization

Step 3. High-level Disinfection (HLD)
HLD is the process that eliminates all micro-organisms (including bacteria, viruses, fungiand parasites), but does not reliably kill allbacterial endospores, which cause diseasessuch as tetanus and gas gangrene. HLD issuitable for instruments and items that comein contact with broken skin or intact mucousmembranes.
Because sterilization kills all micro-organisms, including bacterial endospores, itis preferable to HLD for instruments and other items that will come in contact with thebloodstream or tissues under the skin. If sterilization is not available, HLD is the only acceptablealternative. HLD can be performed by: Boiling; Soaking in Chemicals, Steaming.
A. HLD by Boiling
Step 1
Decontaminate and clean all items to be boiled.
Open all hinged items and disassemble those with sliding or multiple parts.
Completely submerge all items in the water in the pot or boiler.
Place any bowls and containers upright, not upside-down, and fill with water.
Step 2
Cover the pot or close the lid on the boiler and bring the water to a gentle, rolling boil.
Step 3
When the water comes to a rolling boil, start timing for 20 minutes. Use a timer to make sure to record the time that boiling begins. From this point on, do not add or remove any water and do not add any items to the pot or boiler.
Step 4
Lower the heat to keep the water at a gentle, rolling boil.
120
Section VII: Disinfection and Sterilization
Figure 26c
Section VII: Disinfection and Sterilization
121
If the water boils too vigorously, it will evaporate, and the items may become damagedif they bounce around the container and hit the sidewalls and other items being boiled.Lower heat also saves fuel or electricity.
Step 5
After 20 minutes, remove the items using dry, HLD pickups (lifters, cheatle forceps). Place the items on an HLD tray or in an HLD container away from insects and dust.
An HLD tray or container can be prepared by boiling it for 20 minutes or by filling it with a 0.5% chlorine solution and letting it soak for 20 minutes, then draining the chlorine solution and rinsing thoroughly with sterile water
Step 6
Allow to air-dry before use or storage.
Step 7
Use items immediately or keep them in a covered, sterile or HLD container for up to one week.
Never leave boiled items in water that has stopped boiling; they can become contaminated as the water cools down.
Tips for HLD by Boiling
• Items must be completely covered with water. Open all hinged instruments and disassemble items with sliding or multiple parts.
• Always boil for 20 minutes. Start timing when the water reaches a rolling boil. If you forget to start timingthe procedure, start timing at the point at which you realize this.
• Do not add anything to or remove anything from the boiler once boiling begins.
122
Section VII: Disinfection and Sterilization
B. HLD by Chemicals
Step 1
Decontaminate, clean, and thoroughly dry all instruments and other items to be processed. Water from wet items will dilute the chemical solution, thereby reducing its effectiveness.
Step 2
When using a glutaraldehyde solution: Prepare the solution according to the manufacturer’s instructions. Ideally, an indicator strip should be used each time the solution is used to determine if the solution is still effective. After preparing the solution, place in a clean container with a lid. Mark the container with the date the solution was prepared and the date it expires.
When using a chlorine solution: Prepare the 0.5% chlorine solution as described. Fresh solution should be made each day, or more often if the solution becomes cloudy. Put the solution in a clean container with a lid.
Step 3
Open all hinged items and disassemble those with sliding or multiple parts. The solution must contact all surfaces in order for HLD to be achieved. Completely submerge all items in the solution. All parts of the items should be under the surface of the solution. Place any bowls and containers upright, not upside-down, and fill with the solution.
Step 4
Cover the container, and allow the items to soak for 20 minutes. Do not add or remove any instruments or other items once timing has begun.
Step 5
Remove the items from the solution using dry, HLD pickups (lifters, cheatle forceps).
Step 6
Rinse thoroughly with sterile water to remove the residue that chemical sterilants leave on items. This residue is toxic to skin and tissue.

Step 7
Place the items on an HLD tray or in an HLD container and allow to air-dry before use or storage. Use items immediately or keep in a covered, dry HLD container and use within one week.
An HLD tray or container can be prepared by boiling it for 20 minutes or by filling it with a 0.5% chlorine solution and letting it soak for 20 minutes, then draining the chlorine solution and rinsing thoroughly with boiled water.
123
Section VII: Disinfection and Sterilization
Tips for Chemical HLD
• Items must be completely covered with solution.
• Open all hinged instruments and disassemble items with sliding or multiple parts.
• Soak for 20 minutes. If you forget to start timing, start at the point at which you remember.
• Do not add or remove anything once timing begins.
• Rinse items thoroughly with boiled water.
Antiseptics should never be used for HLD.
Section VII: Disinfection and Sterilization
124
Desirable Properties of Chemical Disinfectants
Broad spectrum of activity
Rapid activity
Stable when in contact with organic matter, soaps, detergents, hard water, plastic, etc.
Non-toxic
Non-corrosive
Non-damaging to equipment/substances treated
Cost-effective and available.
Step 4: Sterilization
Sterilization protects patients by eliminatingall micro-organisms (bacteria, viruses, fungi,and parasites), including bacterialendospores, from instruments and otheritems. Sterilization is recommended forinstruments and other items that will comein contact with the bloodstream or tissuesunder the skin, as well as on draped andsome surgical attire.Sterilization can be performed using:
High pressure steam (autoclaving)
Dry heat (oven)
Soaking in chemicals (cold sterilization)
Heat (autoclaving/steam and dry heat) is the most effective method of sterilization and reliable ifmonitored carefully. It is also cheaper than chemical methods. It should be considered first for allmedical equipment that can withstand heat.
Chemical is the alternative where heat cannot be used, e.g. ethylene oxide and glutaraldehyde.
Figure 26d
Section VII: Disinfection and Sterilization
125
Sterilization by Heat
A. Dry HeatTime/Temperature : 1 hour at 170 degrees C (340 degrees F)
2 hours at 160 degrees C (320 degrees F)2½ hours at 150 degrees C (300 degrees F)3 hours at 140 degrees C (285 degrees F)
B. Steam HeatTime : 20 minutes (or 30 minutes if wrapped)Temperature : 121 degrees C (250 degrees F)Pressure : 106 KPA (15 lbs/sq inch)
The units of pressure marked on an autoclave’s pressure gauge may vary from one autoclave to another.
C. Sterilization by Chemicals
Chemical sterilization method is used for instruments and other items that are heat-sensitive orwhen heat sterilization is not available.
Step 1
Decontaminate, clean, and thoroughly dry all instruments and other items to be sterilized. Water from wet instruments and other items dilutes the chemical solution, thereby reducing its effectiveness.
Step 2
Prepare the glutaraldehyde or other chemical solution by following the manufacturer’s instructions or use a solution that was prepared previously, as long as it is clear (not cloudy) and has not expired. After preparing the solution, put it in a clean container with a lid. Always mark the container with the date the solution was prepared and the date it expires.
Section VII: Disinfection and Sterilization
126
Step 3
Open all hinged instruments and other items and disassemble those with sliding or multiple parts; the solution must contact all surfaces in order for sterilization to be achieved. Completely submerge all instruments and other items in the solution; all partsof the instruments and other items should be under the surface of the solution. Place any bowls and containers upright, not upside-down, and fill with the solution.
Step 4
Follow the manufacturer’s instructions regarding the time necessary for sterilization to be achieved. In general, if the solution contains glutaraldehyde, cover the container, andallow the instruments and other items to soak for 8 to 10 hours. Do not add or remove any instruments or other items once time has begun.
Step 5
Remove the instruments and other items from the solution using large, sterile pickups (lifters, cheatle forceps).
Step 6
Rinse thoroughly with sterile water to remove the residue that chemical sterilants leave on instruments and other items; this residue is toxic to skin and tissues.
Boiled water is not sterile; because boiling does not guarantee that bacterial endosporeshave been killed. Therefore, rinsing with boiled water can contaminate sterilized instruments and other items.
Step 7
Storage: Place the instruments and other items on a sterile tray or in a sterile container and allow to air-dry before use or storage. Use the instruments and other items immediately or keep in a covered, dry, sterile container and use within one week.

Step 5: Use or Storage
After processing, items should be usedimmediately or stored in such a way so thatthey do not become contaminated. Properstorage is as important as proper processing.
SUMMARY
It is important to perform the steps in the appropriate order for several reasons:
1. Decontamination should always be done first to make items safer to handle.
2. Cleaning should always be done before sterilization or HLD to remove material that can interfere with these processes.
3. Sterilization or HLD should be done before use or storage to minimize the risk of infectionsto patients during procedures. Table 12 summarizes the processing of instruments and equipment.
4. Items should be used or properly stored immediately after sterilization or HLD so that they do not become contaminated.
Sterilization is preferred over HLD for items that will come in contact with the bloodstream or tissues under the skin. In settings where tetanus is common, all attempts should be made to sterilize these items.
127
Section VII: Disinfection and Sterilization
Sterilization or Disinfection – When to Choose• The choice depends on the use of equipment or instruments (see Table 11 for definition of risk categories).
• Remember that heat is the preferred method of sterilization. Disinfectants are used only when the instruments or equipment cannot tolerate heat treatment, or disinfection only is required.
• Boiling “sterilizers” as used in the past do not sterilize and should be removed from health care facilities where “pressure type steam sterilizers” are available. If no sterilizer is present, disinfection is the procedureto use.
Figure 26e
Section VII: Disinfection and Sterilization
128
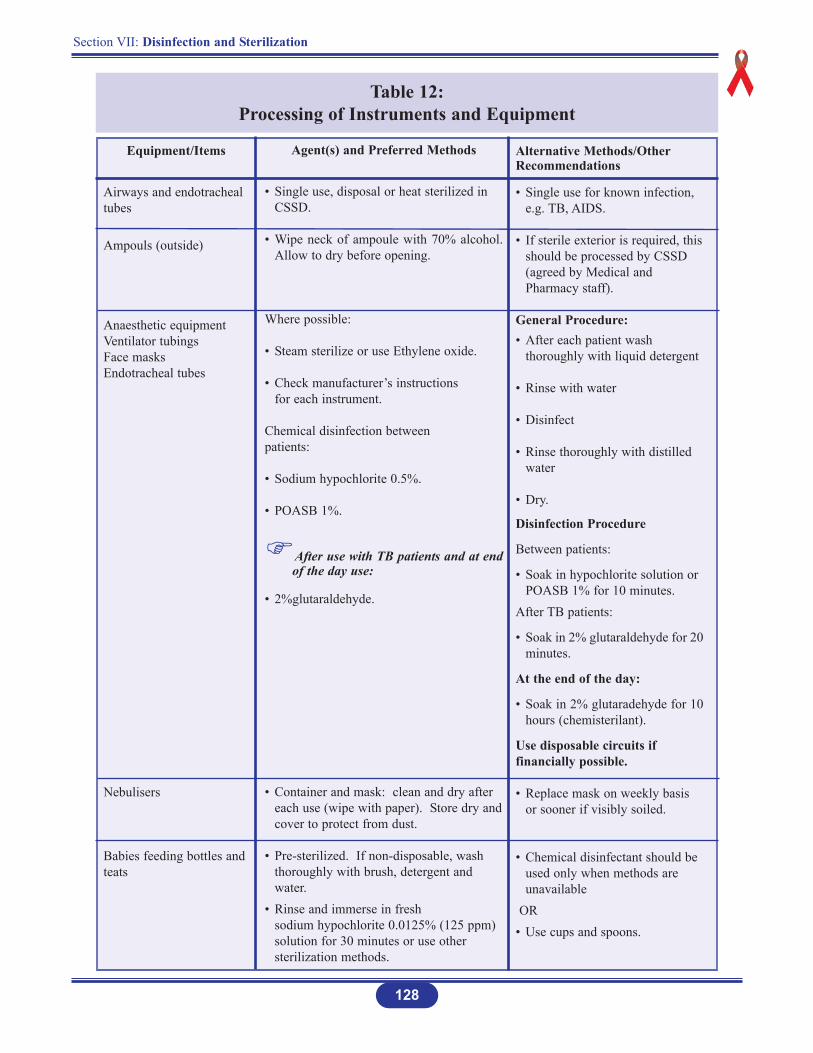
Table 12: Processing of Instruments and Equipment
Equipment/Items
Airways and endotrachealtubes
Ampouls (outside)
Anaesthetic equipmentVentilator tubingsFace masksEndotracheal tubes
Nebulisers
Babies feeding bottles andteats
Agent(s) and Preferred Methods
• Single use, disposal or heat sterilized in CSSD.
• Wipe neck of ampoule with 70% alcohol.Allow to dry before opening.
Where possible:
• Steam sterilize or use Ethylene oxide.
• Check manufacturer’s instructions for each instrument.
Chemical disinfection between patients:
• Sodium hypochlorite 0.5%.
• POASB 1%.
After use with TB patients and at endof the day use:
• 2%glutaraldehyde.
• Container and mask: clean and dry after each use (wipe with paper). Store dry andcover to protect from dust.
• Pre-sterilized. If non-disposable, wash thoroughly with brush, detergent and water.
• Rinse and immerse in fresh sodium hypochlorite 0.0125% (125 ppm) solution for 30 minutes or use other sterilization methods.
Alternative Methods/OtherRecommendations
• Single use for known infection, e.g. TB, AIDS.
• If sterile exterior is required, thisshould be processed by CSSD (agreed by Medical and Pharmacy staff).
General Procedure:• After each patient wash
thoroughly with liquid detergent
• Rinse with water
• Disinfect
• Rinse thoroughly with distilled water
• Dry.
Disinfection Procedure
Between patients:
• Soak in hypochlorite solution or POASB 1% for 10 minutes.
After TB patients:
• Soak in 2% glutaraldehyde for 20minutes.
At the end of the day:
• Soak in 2% glutaradehyde for 10hours (chemisterilant).
Use disposable circuits iffinancially possible.
• Replace mask on weekly basis or sooner if visibly soiled.
• Chemical disinfectant should be used only when methods are unavailable
OR• Use cups and spoons.
Section VII: Disinfection and Sterilization
129
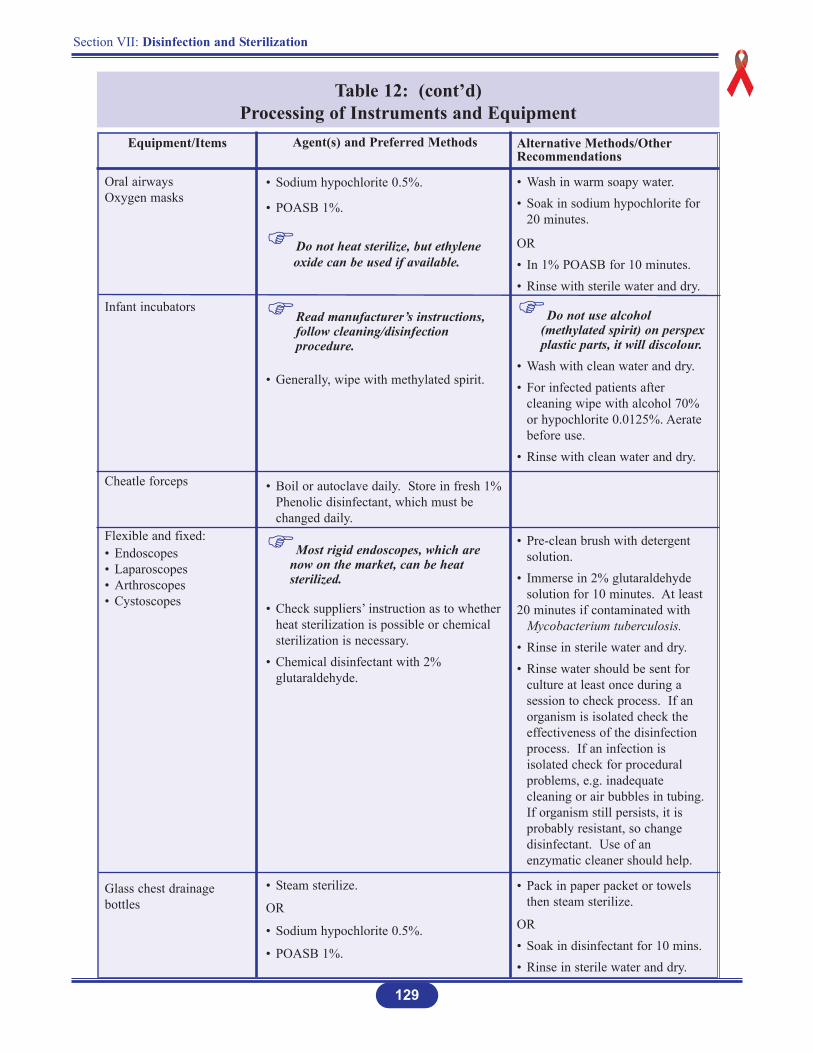
Table 12: (cont’d)Processing of Instruments and Equipment
Equipment/Items
Oral airwaysOxygen masks
Infant incubators
Cheatle forceps
Flexible and fixed:• Endoscopes• Laparoscopes• Arthroscopes• Cystoscopes
Glass chest drainagebottles
Agent(s) and Preferred Methods
• Sodium hypochlorite 0.5%.
• POASB 1%.
Do not heat sterilize, but ethylene oxide can be used if available.
Read manufacturer’s instructions, follow cleaning/disinfection procedure.
• Generally, wipe with methylated spirit.
• Boil or autoclave daily. Store in fresh 1%Phenolic disinfectant, which must be changed daily.
Most rigid endoscopes, which are now on the market, can be heat sterilized.
• Check suppliers’ instruction as to whetherheat sterilization is possible or chemical sterilization is necessary.
• Chemical disinfectant with 2% glutaraldehyde.
• Steam sterilize.
OR
• Sodium hypochlorite 0.5%.
• POASB 1%.
Alternative Methods/OtherRecommendations
• Wash in warm soapy water.• Soak in sodium hypochlorite for
20 minutes.
OR• In 1% POASB for 10 minutes.• Rinse with sterile water and dry.
Do not use alcohol (methylated spirit) on perspexplastic parts, it will discolour.
• Wash with clean water and dry.• For infected patients after
cleaning wipe with alcohol 70% or hypochlorite 0.0125%. Aerate before use.
• Rinse with clean water and dry.
• Pre-clean brush with detergent solution.
• Immerse in 2% glutaraldehyde solution for 10 minutes. At least
20 minutes if contaminated with Mycobacterium tuberculosis.
• Rinse in sterile water and dry.• Rinse water should be sent for
culture at least once during a session to check process. If an organism is isolated check the effectiveness of the disinfection process. If an infection is isolated check for procedural problems, e.g. inadequate cleaning or air bubbles in tubing.If organism still persists, it is probably resistant, so change disinfectant. Use of an enzymatic cleaner should help.
• Pack in paper packet or towels then steam sterilize.
OR• Soak in disinfectant for 10 mins.• Rinse in sterile water and dry.
Section VII: Disinfection and Sterilization
130
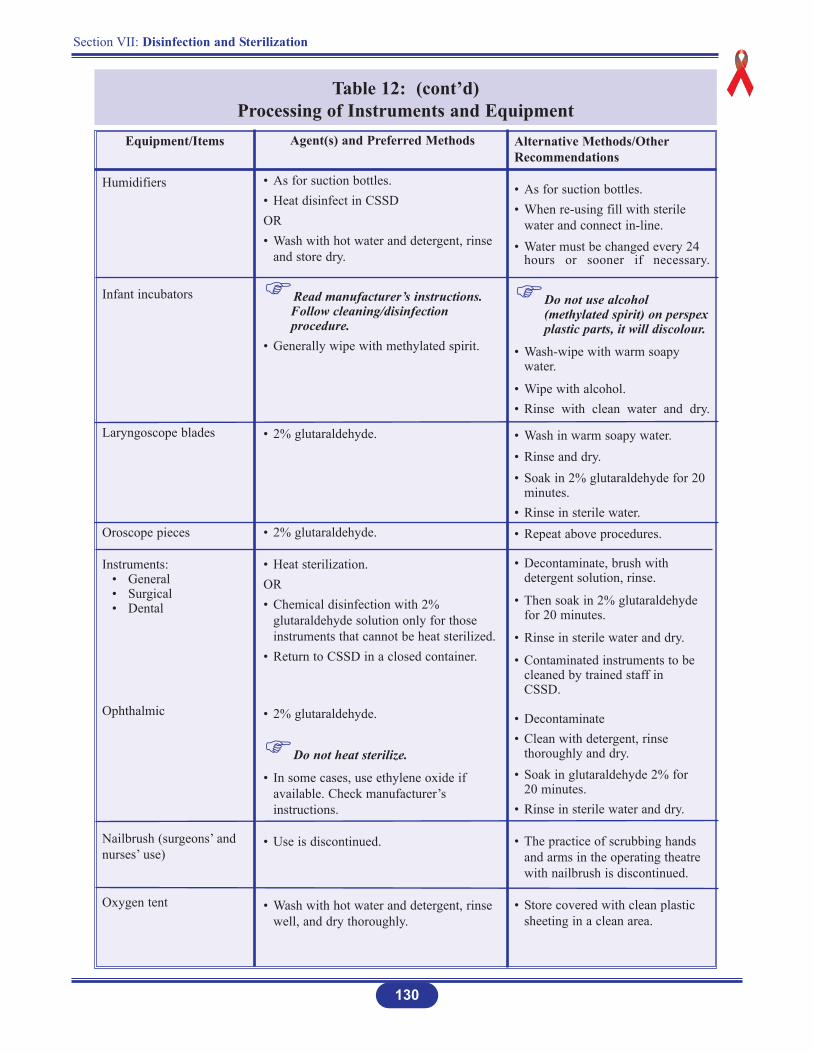
Table 12: (cont’d)Processing of Instruments and Equipment
Equipment/Items
Humidifiers
Infant incubators
Laryngoscope blades
Oroscope pieces
Instruments:• General• Surgical• Dental
Ophthalmic
Nailbrush (surgeons’ andnurses’ use)
Oxygen tent
Agent(s) and Preferred Methods
• As for suction bottles.• Heat disinfect in CSSD OR• Wash with hot water and detergent, rinse
and store dry.
Read manufacturer’s instructions. Follow cleaning/disinfection procedure.
• Generally wipe with methylated spirit.
• 2% glutaraldehyde.
• 2% glutaraldehyde.
• Heat sterilization.OR• Chemical disinfection with 2%
glutaraldehyde solution only for those instruments that cannot be heat sterilized.
• Return to CSSD in a closed container.
• 2% glutaraldehyde.
Do not heat sterilize.
• In some cases, use ethylene oxide if available. Check manufacturer’s instructions.
• Use is discontinued.
• Wash with hot water and detergent, rinse well, and dry thoroughly.
Alternative Methods/OtherRecommendations
• As for suction bottles.• When re-using fill with sterile
water and connect in-line.• Water must be changed every 24
hours or sooner if necessary.
Do not use alcohol (methylated spirit) on perspexplastic parts, it will discolour.
• Wash-wipe with warm soapy water.
• Wipe with alcohol.• Rinse with clean water and dry.
• Wash in warm soapy water.• Rinse and dry.• Soak in 2% glutaraldehyde for 20
minutes.• Rinse in sterile water.• Repeat above procedures.
• Decontaminate, brush with detergent solution, rinse.
• Then soak in 2% glutaraldehyde for 20 minutes.
• Rinse in sterile water and dry.
• Contaminated instruments to be cleaned by trained staff in CSSD.
• Decontaminate • Clean with detergent, rinse
thoroughly and dry.• Soak in glutaraldehyde 2% for
20 minutes.• Rinse in sterile water and dry.
• The practice of scrubbing hands and arms in the operating theatre with nailbrush is discontinued.
• Store covered with clean plastic sheeting in a clean area.

Section VII: Disinfection and Sterilization
131
Table 12: (cont’d)Processing of Instruments and Equipment
Alternative Methods/OtherRecommendations
• Discard disposables after each use in puncture-resistant containers.
• Damp dust exterior of equipmentwith methylated spirit.
• Flush lines thoroughly with sterile distilled water.
• Distilled water should be used in1% POASB or 0.5% sodium hypochlorite.
• Flush lines with formaldehyde.
• Rinse thoroughly with sterile distilled water. Check for residual formaldehyde with Clin-Test tablets.
Regardless of patient’s status ofinfection:
• Empty suction bottle, wash with soapy water.
• Add disinfectant power (POASB/NDCC) OR 0.25% sodium hypochlorite solution into bottle,mix, leave for 5 minutes, empty.
• Fill with prepared disinfectant solution, leave for 20 minutes.
• Rinse with clean water and dry.
• Each ward should have enough thermometers available to serve individual patient.
Before and after use:
• Wash with cold soapy water.
• Wipe with cotton wool soaked inmethylated spirit.
• Store thermometers dry.
Equipment/Items
Razors• Safety• Open• Electric
Renal dialysis machines
Suction bottles, chestdrainage bottles
ThermometersArmpitOralRectal (generallydiscouraged)
Agent(s) and Preferred Methods
• Ideally individual shaving equipment is disposable.
• Detach head, clean thoroughly and immerse in 70% alcohol for 10 minutes.
• Allow to dry between each patient.
• Methylated spirit.
• Formaldehyde.
• Sterile distilled water.
• POASB 1%.
• Sodium hypochlorite 0.5%.
Do not heat sterilize.
• In some cases, ethylene oxide sterilizationmight be the correct treatment. Check manufacturer’s instructions.
• Detergent and water.
Pre-disinfect to render safe:
• POASB 1% OR NaDCC powder
OR• Sodium hypochlorite 0.25% (2500 ppm)
Disinfect with:
• Sodium hypochlorite.
• POASB 1%.
Pour bottled contents carefully into sluice,then flush.
Rinse jar, then wash with hot water anddetergent.
• Methylated spirit.
Section VII: Disinfection and Sterilization
132
Table 12: (cont’d)Processing of Instruments and Equipment
Equipment/Items
Disposables:• Endotracheal tubes• Foleys catheters• Feeding tubes• Suction tubes• Stomach tubes• Laboratory waste• Syringes• Scalpel blades• Dressings, etc.• Gloves• Masks
Agent(s) and Preferred Methods
• Discard.
Only in the case that disposables expire before use, repeat sterilization with ethylene oxide, if available can be considered.
Source: The Zimbabwe Essential Drugs Action Program. Disinfection in Health Care Facilities in Zimbabwe, Harare: Ministry of Health and Child Welfare, 2001, pp. 28-33 (modified).
Alternative Methods/OtherRecommendations
• The very nature of disposables isthat they are to be disposed of after use.
• Handle with care!
• All sharps should go in the sharpscontainers.
• Other materials collect in the refuse bag recommended.
• Full sharps puncture-resistant containers and plastic bags should be incinerated (see Section IV: Standard Precautions).
Section VII: Disinfection and Sterilization
133
SUMMARY
Decontaminating, cleaning, disinfecting, and sterilizing patient care equipment.
All objects to be high-level disinfected or sterilized should first be thoroughly decontaminated and cleaned to remove all organic matter (e.g. blood, tissue) and other residue.
A. STERILIZATION*
Critical items that will enter tissue or vascular system or blood will flow through them.
Procedure:
Heat sterilization
Chemisterilant
• 2% glutaraldehyde
• 6% hydrogen peroxide
• 1% peracetic acid
• 0.1% (1000 ppm) sodium hypochlorite
Exposure time: In hours, manufacturer’s recommendations.
B. HIGH-LEVEL DISINFECTANT (HLD)
Semi-critical items (except dental) that will come in contact with mucous membrane or non-intactskin.
Procedure:
HLD/Chemisterilant
• 2% glutaraldehyde
• 6% hydrogen peroxide
• 1% peracetic acid
• 0.1% (1000 ppm) sodium hypochlorite
Exposure time: 20 minutes
C. DISINFECTION
1. Intermediate-Level
Semi-critical items and non-critical items.
Procedure: Disinfection
Sodium hypochlorite 0.1% (1000 ppm)
70%-90% ethyl or isopropyl alcohol
Phenolic germicidal detergent solution
Iodophor germicidal detergent
Exposure time: 10 minutes
2. Low-LevelNon-critical items
Procedure: Disinfection
Ethyl or isopropyl alcohol 70%-90%
Sodium hypochlorite 0.01% (100 ppm)
Phenolic germicidal detergent solution
Iodophor germicidal detergent solution
Quaternary ammonium germicidal detergent
Exposure time: 10 minutes.
Source: * APIC Guidelines for Selection and Use of Disinfectants. APIC, Vol. 24, No. 4, p. 317.
Section VII: Disinfection and Sterilization
134

D. RECOMMENDATIONS FROM CENTERS FOR DISEASE CONTROL (CDC)*
Sodium hypochlorite solution (household bleach) prepared daily.
Concentrations ranging from approximately 500 ppm (1:100 dilution) (0.05%) sodium hypochlorite to 5,000 ppm (1:10 dilution) (0.5%) of household bleach are effective depending on the amount of organic material, (e.g. blood, mucus) present on the surface to be cleaned.
135
Section VII: Disinfection and Sterilization
Source: * Use of Bleach in Prevention of Transmission of HIV in Health Care Settings. http://www.cdc.gov/od/ohs/biosfty/bleachiv.htm