directv standard professional installation · pdf fileinstallation of one or more directv...
TRANSCRIPT

DIRECTV Standard Professional Installation Guidelines
Updated March 30, 2006 Retail Version 2

The basic DIRECTV residential installation includes the following:
1. Confirmation of installation appointment. DIRECTV recommends that at a minimum, each customer should receive two (2) pre-calls from the retailer’s installation company prior to any work being performed and one (1) post-call after work has been performed. Contact the customer:
Two (2) to three (3) days in advance of their scheduled installation to confirm
both the appointment window and work to be performed. Installer or dispatcher should phone the customer on the day of the scheduled
appointment to confirm when they will arrive to begin the job. In the event that the agreed upon timeframe is in jeopardy, the customer should be contacted and notified of any changes.
Contact the customer within two (2) weeks post installation to confirm
customer satisfaction.
2. Arrival at customer's residence within the designated window of time preferably wearing proper ID and uniform.
3. Completion of a site survey and planning the installation with the customer (Cable
routing, antenna location, connection of devices). Refer to the DIRECTV Installation Manual.
4. Verification of services ordered and work to be performed with customer. Any
non-standard/custom work with incremental costs associated must be communicated and agreed to in writing prior to commencement of installation.
5. Routing and properly attaching approved RG-6 cable through external and
internal walls as needed. Routing of cable through attics and/or crawlspaces is considered standard. Refer to the DIRECTV Installation Manual.
6. Use of DIRECTV approved drop materials is required.
7. Grounding to meet Local / NEC requirements. Refer to the DIRECTV
Installation Manual.
8. Properly mounting to customer’s home, aligning and peaking satellite antenna for maximum signal strength. Standard mounting includes, but is not limited to the roof, eave, outside wall, balcony, deck and chimney. Refer to the DIRECTV Installation Manual.
9. A Pole Mount is considered standard on KAKU ODU’s
Copyright © 2006 DIRECTV. Unpublished work. All rights reserved. Page iii Revised 3/30/06 Version 1

10. A Monopole support mount must be installed on all wall and roof mounted KAKU ODU’s.
11. In any market where local channels are delivered from the 101 110 or 119 orbital
slots or on HD installs or upgrades, a TripleSat ODU is required on all installations.
12. A KAKU ODU is required in any market where High Definition local channels
are delivered from the 99 or 103 orbital slots or on HD installs or upgrades.
13. Dual or Quad cable run is recommended from the ODU to the ground block or Multiswitch on single sat or triple sat installs.
14. Quad cable run is recommended from the ODU to the ground block or
Multiswitch on all KAKU High Definition installs.
15. A “B band” converter must be installed to the “SAT IN” on all H20 IRD’s
16. Dual cable must be run to all DIRECTV DVRs.
17. Installation of one or more DIRECTV System IRDs as indicated on the customer’s work order.
18. All IRDs must be connected to a land based telephone line. Refer to the
DIRECTV Installation Manual.
19. Connection of existing off-air antenna or active cable drop (enabling TV to function as it had prior to DIRECTV installation).
20. Connection of existing co-located devices (VCR, functioning surround sound,
DVD, video games, etc.) and programming the DIRECTV Universal Remote Control to operate all applicable devices.
21. Completion of a system test verifying signal strength, access card match and
telephone connectivity. Refer to the DIRECTV Installation manual
22. Activation of DIRECTV service with the customer on the phone.
23. Cleaning up any mess made during installation and removing debris from the customer's residence. This includes removal of empty equipment boxes at customer’s request.
24. Customer education (min. 20 min) on system operation including soft and hard
resets. and features (min. 20 minutes). Refer to the DIRECTV Installation Manual
Copyright © 2006 DIRECTV. Unpublished work. All rights reserved. Page iv Revised 3/30/06 Version 1

25. Completion of all applicable forms (eg. Work order, Customer Installation Checklist, Certificate Program documents, etc) and obtaining customer's signature certifying the job was completed to their satisfaction.
26. Leaving installation company name and toll free telephone number if applicable
with the customer enabling them to contact the Installation Company directly if there are any problems with the installation.
27. If, after arriving at a job the installation cannot be completed and is cancelled, the
installer must explain to the customer in detail why they were not able to complete the job.
DIRECTV RECOMMENDED RATES FOR REQUESTED SERVICES BEYOND WHAT IS PROVIDED IN A STANDARD PROFESSIONAL INSTALLATION The following list contains DIRECTV’s recommended rates for additional services, applicable nation-wide. These rates were established after reviewing rates from multiple sources for similar services. We believe these rates are reasonably competitive. Of course, these rates are merely recommended rates and retailers are free to charge reasonable fees based upon the actual work to be rendered by them. ADDITIONAL CHARGES TO BE PAID TO THE RETAILER OR INSTALLATION COMPANY UPON COMPLETION OF INSTALLATION: Not to Exceed WALL FISH $60.00 per POLE MOUNT REMOVAL DIG $65.00 POLE MOUNT REMOVAL CUT $20.00 POLE MOUNT/ PER CUSTOMERS REQUEST $75.00 SIDEWALK BORE $35.00 MIRROR OUTLET $45.00 ADDITIONAL OUTLETS WITHOUT RECEIVERS $45.00 ADDITIONAL OUTLETS WITH RECEIVERS $45.00 SEPARATE TRIP ADDITIONAL OUTLETS $85.00 NON -PENETRATING/ SLED MOUNT $65.00 BALCONY MOUNT/BRACKETS $30.00 FLAT CABLE JUMPER $ 5.00 BURY CABLE/ OUTLET $30.00 LINE AMPS $15.00 DIPLEXERS (2) $15.00 WIRELESS PHONE JACK $75.00 RELOCATE DISH (CUSTOMER REQUEST) $97.50
Copyright © 2006 DIRECTV. Unpublished work. All rights reserved. Page v Revised 3/30/06 Version 1

DIRECTV INSTALLATION MANUAL – TABLE OF CONTENTS 1. Introduction . . . . . . . . . . . . . . . . . . . . . . . . . . . . . . . . . . . . . . . . . . . . . . . . . . . . . . . . 1
1.1 Pre-Call 1.2 Identification 1.3 Verification 1.4 Pre-Installation Process
2. Site Survey . . . . . . . . . . . . . . . . . . . . . . . . . . . . . . . . . . . . . . . . . . . . . . . . . . . . . . . . . 2
2.1 Preliminary Evaluation 2.2 Unobstructed Line of Sight 2.3 Ground Source 2.4 Access to Phone 2.5 Distribution Location 2.6 TV Set Location 2.7 Customer Concerns 2.8 Customer Walk Through 2.9 Installation Overview – Standard Installation 2.10 Non-Standard Installation 2.11 Safety Considerations 2.12 Working on Roof or Wall Mounts 2.13 Ground Mounts 2.14 Know Your Limitations!
3. Dish Antenna Installation . . . . . . . . . . . . . . . . . . . . . . . . . . . . . . . . . . . . . . . . . . . . . 9 3.1 Antenna Assembly 3.2 Wall Mounting – Wood 3.3 Brick Mount 3.4 Roof Mount Assembly 3.5 Positioning 3.6 Pole Mount – Hole Size and Location 3.7 Concrete 3.8 Trench/Drop Bury 3.9 Cable Run 3.10 Dish Antenna Assembly
4. Grounding and Bounding . . . . . . . . . . . . . . . . . . . . . . . . . . . . . . . . . . . . . . . . . . . . . . 12 4.1 Ground Block 4.2 Suitable Ground Sources 4.3 #4 or #6 Ground Wire to Electrode 4.4 Electrical Ground Rod 4.5 Panel Box Lug or Meter Base 4.6 Metallic Service Raceway 4.7 Grounded Metal Structure (Mobile Home) 4.8 Sprinkler System – Commercial Buildings 4.9 Metal Underground Water Pipe
Copyright © 2006 DIRECTV. Unpublished work. All rights reserved. Page vi Revised 3/30/06 Version 1

4.10 Supplemental Electrode Bonding Ground Rod 4.11 Summary of Grounding
5. Cable Routing . . . . . . . . . . . . . . . . . . . . . . . . . . . . . . . . . . . . . . . . . . . . . . . . . . . . . . 17 5.1 Conventional Foundation 5.2 Slab Foundation 5.3 Cable Considerations
6. Telephone Line Installation and Troubleshooting . . . . . . . . . . . . . . . . . . . . . . . . . . . 19 6.1 Installation 6.2 Troubleshooting Phone Lines 6.3 Valid Reasons for Non-Impulse DIRECTV Receivers
7. Access Cards . . . . . . . . . . . . . . . . . . . . . . . . . . . . . . . . . . . . . . . . . . . . . . . . . . . . . . . 22
8. Integration With The Customer’s Equipment . . . . . . . . . . . . . . . . . . . . . . . . . . . . . . 22 8.1 Tuning VCRs 8.2 Stereo/Surround Sound 8.3 Picture-in-Picture (PIP) 8.4 High Definition TV (HDTV)
9. Dish Antenna Alignment and Peaking . . . . . . . . . . . . . . . . . . . . . . . . . . . . . . . . . . . . 25 9.1 General 9.2 Signal Strength Meter – Alignment 9.3 DIRECTV Receiver Signal Meter – Alignment 9.4 Peaking a Multi-Satellite Dish Antenna 9.5 Peaking a Multi-Satellite Dish Antenna with DIRECTV Receiver Signal Meter
10. Customer Education . . . . . . . . . . . . . . . . . . . . . . . . . . . . . . . . . . . . . . . . . . . . . . . . . 29 10.1 Remote Control 10.2 Operating the VCR with DIRECTV 10.3 Explain How to Record DIRECTV Programming 10.4 Explain How to Record Off Air and Cable Programming 10.5 Stereo Connection 10.6 Menus 10.7 Additional Customer Information
11. Multiswitches . . . . . . . . . . . . . . . . . . . . . . . . . . . . . . . . . . . . . . . . . . . . . . . . . . . . . . 31 11.1 Purpose 11.2 Types of Multiswitches 11.3 Multiswitch Functions
12. Independent Contractors . . . . . . . . . . . . . . . . . . . . . . . . . . . . . . . . . . . . . . . . . . . . . 32 12.1 Installation Contractors
Copyright © 2006 DIRECTV. Unpublished work. All rights reserved. Page vii Revised 3/30/06 Version 1

13. Installation Tips/Common Installation Problems . . . . . . . . . . . . . . . . . . . . . . . . . . 33 13.1 Premature Rain Fade 13.2 Useful Equipment for Troubleshooting 13.3 Locate DIRECTV Receiver’s Main Menu and Perform “Systems Test” 13.4 Signal Strength 13.5 Additional Troubleshooting Tips
14. Troubleshooting Steps . . . . . . . . . . . . . . . . . . . . . . . . . . . . . . . . . . . . . . . . . . . . . . . 34 15. Risk Management . . . . . . . . . . . . . . . . . . . . . . . . . . . . . . . . . . . . . . . . . . . . . . . . . . 34
15.1 Property Damage 15.2 Irate Customers 15.3 Customer Not Home 15.4 Late for Appointment 15.5 Technician Responsibility 15.6 Clean Up After Installation
16. WorldDirect™ Installation and Upgrade . . . . . . . . . . . . . . . . . . . . . . . . . . . . . . . . . 37 16.1 WorldDirect™ Installation Overview 16.2 Satellite Dish Pointing Coordinates 16.3 Multiswitches
17. 72.5° WL Installation and Upgrade . . . . . . . . . . . . . . . . . . . . . . . . . . . . . . . . . . . . . 40 17.1 Installation Overview 17.2 Satellite Dish Pointing Coordinates 17.3 Multiswitches
18. KaKu (5 LNB Multi Satellite Dish, MPEG4 & KaKu Compatible) Installation and Upgrade . . . . . . . . . . . . . . . . . . . . . . . . . . . . . . . . . . . . . . . . . . . . . . . . . . . . . . . . . . . . . 43
18.1 KaKu Installation Overview 18.2 KaKu Pointing Coordinates 18.3 Multiswitch
Copyright © 2006 DIRECTV. Unpublished work. All rights reserved. Page viii Revised 3/30/06 Version 1

1 INTRODUCTION All employees, contractors or agents, working for a DIRECTV dealer/retailer/sales agent, are required to follow the practices, procedures and standards found in this manual. Any variation from these standards requires prior written approval from DIRECTV technical operations. It is imperative each person representing DIRECTV provide the best products, prompt responses to problems and courtesy to all DIRECTV customers. The installation technician is often the only person associated with DIRECTV to have direct and personal contact with our customer. The installer’s efficiency, appearance and demeanor determine the customer's first impression of DIRECTV. It is therefore essential that the installer make a positive first impression that reflects well on him, his company and DIRECTV. It is the goal of DIRECTV for each customer contact to be exciting and friendly for the customer. This manual will:
Provide the information to ensure every installation is performed in an acceptable and professional manner.
Ensure the installation standards are followed and maintained in accordance with DIRECTV requirements.
1.1 Pre-Call
At a minimum, each customer should receive two (2) pre-calls from the retailer or Installation Company prior to any work being performed.
Contact the customer two (2) to three (3) days in advance of their scheduled installation to confirm both the appointment window and work to be performed.
Installer or dispatcher should phone the customer on the day of the scheduled appointment to confirm when they will arrive to begin the job. In the event that the agreed upon timeframe is in jeopardy, the customer should be contacted and notified of any changes.
Contact the customer within two (2) weeks post installation to confirm customer satisfaction.
1.2 Identification
The credibility of the installer and DIRECTV hinge on the first impression made with the customer.
The installer must look and be professional in his or her actions, appearance and the appearance of his or her vehicle.
All vehicles should be appropriate for installation work, undamaged and have proper identifiable signage.
Upon arrival the installer should knock or ring the bell and step away from the door so he can be identified.
While greeting the customer the installer should smile and introduce himself. The installer should show the customer proper identification.
Copyright © 2006 DIRECTV. Unpublished work. All rights reserved. Page 1 Revised 03/30/06 Version 1

The installer must remain polite and courteous at all times. A picture ID card identifying the installer as a representative of the retailer should
be plain view or, at a minimum, carried and displayed at the initial introduction and upon request.
1.3 Verification The installer will:
Verify services ordered and work to be performed with customer. Any non-standard / custom work with incremental costs associated must be communicated and agreed to in writing prior to commencement of installation.
Ask if there are any known restrictions on satellite antennas in the area or if permission is required from a homeowner's association or landlord. If the customer does not own the property, the installer should receive a copy of the Landlord permission prior to beginning work.
1.4 Pre-Installation Process The installer will:
Involve the customer in selecting the best possible location for their DIRECTV antenna and the routing and placement of equipment.
Explain the different types of mount options and advantages / disadvantages and ask the customer for their location preference. (Having photos of other installations will greatly enhance this presentation and ensure the customer understands the differences.)
Always attempt to place the antenna and route the cable as inconspicuously as possible. (In locations where snow is common, an antenna placed on a high roof can be difficult or impossible to clean off.)
Confirm that the customer or a representative for the customer, who is at least 18 years old and authorized to sign for work performed, must be home during the entire installation. It should be noted on the Work Order if the customer plans to have someone represent them.
2 SITE SURVEY 2.1 Preliminary Evaluation As you approach the work site, be aware of the following:
1) Trees, bare trees that will produce foliage in the future and landscaping 2) Any large obstructions or potential problems such as:
a. Fences b. Fence gates c. Water or gas wells d. Any young trees that may grow into the line of sight e. Construction in progress or potential new construction (new housing
development, commercial complex) f. Gardens and flower beds g. Animals such as dogs or horses that may damage the equipment
Copyright © 2006 DIRECTV. Unpublished work. All rights reserved. Page 2 Revised 03/30/06 Version 1

NOTE: Once inside, ask the customer of any planned future projects that may affect placement of the DIRECTV dish antenna such as additions or pools. 3) Note terrain: hilly, flat, wooded or clear 4) Type of neighborhood 5) Rural - vs.- urban 6) Residential - vs.- commercial 7) Generally zoned - vs.- Covenant-Restricted neighborhoods are more likely to
have association restrictions 8) Location of house on property 9) Front or rear 10) North, South, East or West facing 11) Type of house 12) Style: ranch, raised ranch, colonial, split-level, etc. 13) Roof material type, condition and pitch 14) Type of siding: brick, wood, slate, etc. 15) Other structures to be aware of are: 16) Swimming pool or spa 17) Sidewalks or patio – especially in winter when they may be covered with
snow 18) Deck 19) Other potential mounting structures such as garage, shed, barn or carport 20) Where electric and telephone service enter the home
2.2 Unobstructed Line of Sight
Use a compass and inclinometer to locate a site with an unobstructed view to the desired satellite(s).
Ensure that you have a 10-degree window around the charted location for the satellites. Remember the optimum window is for clear LINE OF SIGHT (LOS) from 10˚ left of the 101˚ satellite to 10˚ right of the 119˚ satellite. This is ~ a 40˚ window. If you only require LOS to the 101˚ satellite and the window will not allow the full 40˚clearance, it is acceptable to proceed with the installation. Take into consideration future growth of trees that may impede the signal. If you cannot get a clear LOS, call your supervisor.
2.3 Ground Source It is very important to access and bond the system to the best possible ground source (preferably the power ground). When looking for a site, the location of the ground is of utmost importance. The dish location should be coordinated with the ground source (keeping the ground as short as possible). If the house is not grounded, notify the customer and have them contact a Licensed Electrician. Contact your supervisor. 2.4 Access to Phone Is a phone line behind the TV or will you have to install one? Will the phone line be run with the cable or by itself? Remember multiple DIRECTV Receivers must dial out on
Copyright © 2006 DIRECTV. Unpublished work. All rights reserved. Page 3 Revised 03/30/06 Version 1

the same phone number. Check each phone jack to insure you are using the same number for all DIRECTV Receivers. Any install without a phone line requires the approval of your supervisor. 2.5 Distribution Location Is there a location in the basement by the furnace or a utility closet that may be suitable for present or future multiswitches? A location indoors is always better than routing several cables around the exterior of the home. 2.6 TV Set Location Is the TV located on an interior or exterior wall? What cable routing is best to the TV set location? 2.7 Customer Concerns
Always discuss the installation procedure, cable routing and antenna placement in detail with the customer before any work is performed.
If cable must be routed on the outside of the house, does the customer agree with your planned cable or phone wire route? (Always route cable through a basement, attic or crawl space before placing it on or around the exterior of the house).
Is your chosen antenna location going to be located where it would interfere with normal family activities or yard work?
Is the aesthetics of the installation in keeping with the structure and neighborhood?
Note: The account can only be activated by the person listed on the account
2.8 Customer Walk Through: Walk Through the Installation in Detail Cover the services to be installed as noted on the Work Order and amount due. Provide the customer with an estimated completion time. Discuss location of the dish antenna. Discuss routing and entry of the cable and phone wire and note any holes that
need to be drilled. Confirm location of the DIRECTV Receiver. ("This is where I would like to place
the DIRECTV Receiver. Is it OK with you?") Discuss routing of cable or wire through the basement, crawl space or through the
walls of the home plus any wires on the outside of the home. Question the customer as to options, i.e. "Is it OK to bring the cable up through
the floor by the TV?"
Note: Inspect all areas where you will be working for existing damage that you could be blamed for later. If you should find damage, bring it to the attention of the customer and have them acknowledge it in writing before performing any work in that area.
Check the customer’s TV, VCR and any audio system that is connected prior to doing any work. Do not assume that they are in proper working order. Always check the reception quality of all off air signals.
Copyright © 2006 DIRECTV. Unpublished work. All rights reserved. Page 4 Revised 03/30/06 Version 1

Note: Ask the customer (adult) to turn the TV set, VCR, etc. on and show you the channels they receive and how their system works. If you turn the set on and it does not work or has a problem, the customer may claim that you are responsible for the problem.
Point out any TV set problems to the customer immediately and confirm if
problems are new or existing. Explain that DIRECTV System installation will not correct TV set related problems. They should receive better quality signals but a DIRECTV System will not correct a TV set problem.
Verify that the customer still wants a DIRECTV System installed. If so, make a note on a work order referencing the TV problem and proceed with the installation.
Follow established procedures regarding collection of any payment due. If payment is required, try to collect prior to installation. Always verify the amount and ask if payment will be by check or cash. This can alleviate potential problems; (e.g.) “My husband has the checkbook.”
Other General Considerations: • Do you have a clear view to the satellite? • Has permission been granted if customer is not the owner of the property?
Note: It is the customer’s responsibility to obtain landlord permission for installation. Check for other restrictions: e.g., building permit required (depends on location –
the burden is on the customer to obtain any such permits.) Refer to the zoning issues below.
Have the customer remove objects from the top of or around the television set and anything in any work area which could sustain damage while you are working.
Do not unplug anything for any reason without customer permission beforehand.
ZONING ISSUES (A BRIEF REVIEW) Installation location on property may mean special local zoning laws apply. Zoning varies widely by community. Covenants exist in some subdivisions. These are important but different from zoning laws.
Use good common sense!
Copyright © 2006 DIRECTV. Unpublished work. All rights reserved. Page 5 Revised 03/30/06 Version 1

2.9 Installation Overview - Standard Installation 1. Confirmation of installation appointment. DIRECTV recommends that at a minimum, each customer should receive two (2) pre-calls from the retailer’s installation company prior to any work being performed and one (1) post-call after work has been performed. Contact the customer:
Two (2) to three (3) days in advance of their scheduled installation to confirm both the appointment window and work to be performed.
Installer or dispatcher should phone the customer on the day of the scheduled
appointment to confirm when they will arrive to begin the job. In the event that the agreed upon timeframe is in jeopardy, the customer should be contacted and notified of any changes.
Contact the customer within two (2) weeks post installation to confirm customer
satisfaction. 2. Arrival at customer's residence within the designated window of time preferably wearing proper ID and uniform. 3. Completion of a site survey and planning the installation with the customer (Cable routing, antenna location, connection of devices). Refer to the DIRECTV Installation Manual. 4. Verification of services ordered and work to be performed with customer. Any non-standard/custom work with incremental costs associated must be communicated and agreed to in writing prior to commencement of installation. 5. Routing and proper attachment of approved RG-6 cable through external and internal walls as needed. Routing of cable through attics and/or crawlspaces is considered standard. Refer to the DIRECTV Installation Manual. 6. Grounding to meet local/NEC requirements. Refer to the DIRECTV Installation Manual. 7. Proper mounting to customer’s home of satellite dish antenna and aligning and peaking antenna for maximum signal strength. Standard mounting includes, but is not limited to the roof, eave, outside wall, balcony, deck and chimney. Refer to the DIRECTV Installation Manual.
To receive programming from the 110° West Longitude (WL) or 119° WL orbital location (i.e. local channels programming, HD programming or DIRECTV PARA TODOS™ programming), a multi-satellite dish antenna is required.
Copyright © 2006 DIRECTV. Unpublished work. All rights reserved. Page 6 Revised 03/30/06 Version 1

To receive programming from the 72.5° WL orbital location (i.e. local channels programming in certain markets), a second satellite dish antenna is required to receive local channels programming.
To receive programming from the 95° WL orbital location (i.e. WorldDirect™
services), a 36-inch satellite dish antenna is required. 8. Dual cable run is recommended from the dish antenna to the ground block on all installs. 9. Dual cable must be run to all DIRECTV® DVR Receivers. 10. Installation of one or more DIRECTV® Receivers, as indicated on the customer’s work order. 11. All DIRECTV Receivers must be connected to a land based telephone line. Refer to the DIRECTV Installation Manual. 12. Connection of existing off-air antenna or active cable drop (enabling TV to function as it had prior to DIRECTV installation). 13. Connection of existing co-located devices (VCR, functioning surround sound, DVD, video games, etc.) and programming of the DIRECTV Universal Remote Control to operate all applicable devices. 14. Completion of a system test verifying signal strength, access card match and telephone connectivity. Refer to the DIRECTV Installation Manual. 15. Activation of DIRECTV® service with the customer on the phone. 16. Clean up of any mess made during installation and removal of debris from the customer's residence. This includes removal of empty equipment boxes at customer’s request. 17. Customer education (min. 20 minutes) on system operation and features, including soft resets and hard resets. Refer to the DIRECTV Installation Manual. 18. Completion of all applicable forms and obtaining customer's signature certifying the job was completed to their satisfaction. 19. Leaving retailer or installation company name and telephone number with the customer so that customer can contact the retailer or installation company directly if there are any problems with the installation. 20. If after arriving at a job the installation cannot be completed and is cancelled, the installer must explain to the customer in detail why the job could not be completed.
Copyright © 2006 DIRECTV. Unpublished work. All rights reserved. Page 7 Revised 03/30/06 Version 1

If you encounter any trouble with the install, contact your supervisor immediately. REMEMBER: It is the small things that make a great install and a great customer experience. 2.10 Non-Standard Installation The following are considered non-standard installation services. Address added cost and prices with the customer prior to beginning the install:
Yard or ground pole mount if requested by customer but not required for LOS Interior / Exterior wall fishes Mirror outlets (additional outlets) Line amplifiers or other accessories not included in the standard installation work
order Sidewalk bore Any other situations that may incur additional incremental charges to customer
2.11 Safety Considerations OSHA approved training is required for all contractors by DIRECTV and OSHA. 2.12 Working on Roof or Wall Mounts
Look for obstacles that might hinder movement of a ladder. Look for overhead electrical, telephone or CATV wires. Look for tree branches or clothes lines. Use proper OSHA approved safety equipment like fiberglass ladders, lanyard and
body harness. 2.13 Ground Mounts Before you dig:
Locate and identify underground electric or gas utilities. Locate and identify underground fuel oil or propane lines. Locate and identify water lines, sprinkler or sewage system.
Note: Always ask the customer about any underground systems! 2.14 Know Your Limitations!
Do not attempt any procedure that you are not comfortable performing. Call your supervisor for assistance. Keep the customer informed of any problems. Never attempt to conceal a
problem Do not attempt or perform unauthorized work. You should only handle DIRECTV-related work and not any other unrelated
services (i.e., electrical, plumbing, etc.).
Copyright © 2006 DIRECTV. Unpublished work. All rights reserved. Page 8 Revised 03/30/06 Version 1
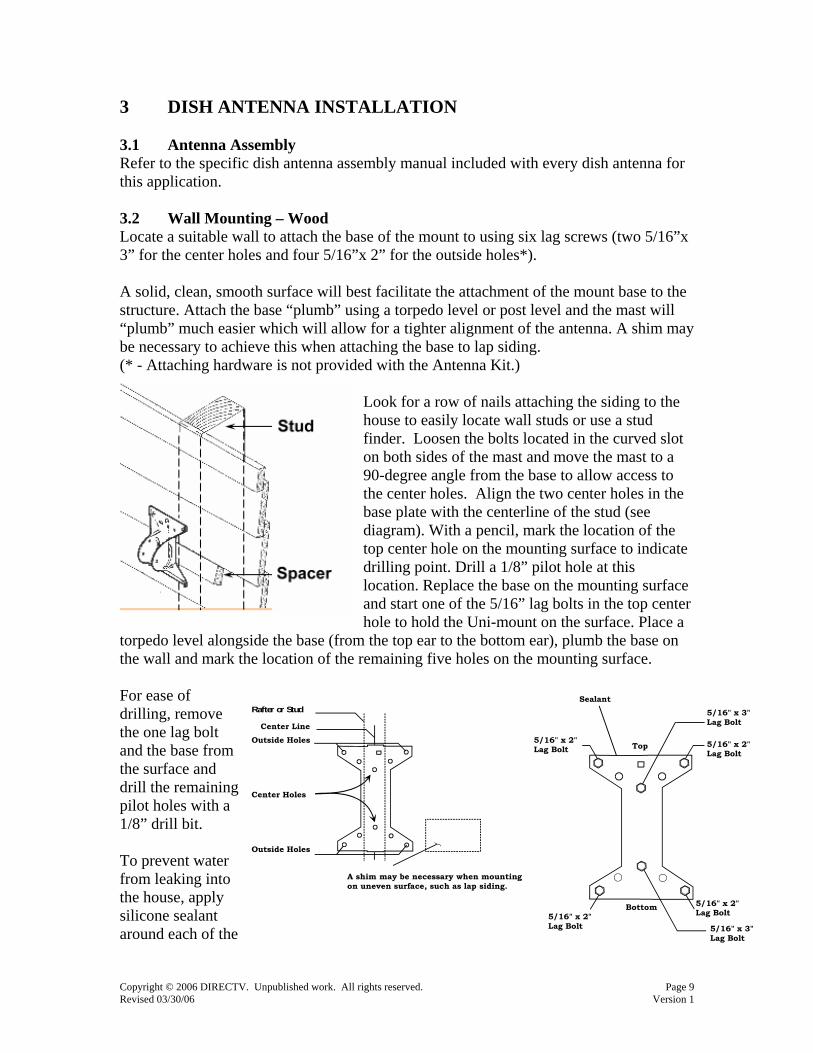
3 DISH ANTENNA INSTALLATION 3.1 Antenna Assembly Refer to the specific dish antenna assembly manual included with every dish antenna for this application. 3.2 Wall Mounting – Wood Locate a suitable wall to attach the base of the mount to using six lag screws (two 5/16”x 3” for the center holes and four 5/16”x 2” for the outside holes*). A solid, clean, smooth surface will best facilitate the attachment of the mount base to the structure. Attach the base “plumb” using a torpedo level or post level and the mast will “plumb” much easier which will allow for a tighter alignment of the antenna. A shim may be necessary to achieve this when attaching the base to lap siding. (* - Attaching hardware is not provided with the Antenna Kit.)
Look for a row of nails attaching the siding to the house to easily locate wall studs or use a stud finder. Loosen the bolts located in the curved slot on both sides of the mast and move the mast to a 90-degree angle from the base to allow access to the center holes. Align the two center holes in the base plate with the centerline of the stud (see diagram). With a pencil, mark the location of the top center hole on the mounting surface to indicate drilling point. Drill a 1/8” pilot hole at this location. Replace the base on the mounting surface and start one of the 5/16” lag bolts in the top center hole to hold the Uni-mount on the surface. Place a
torpedo level alongside the base (from the top ear to the bottom ear), plumb the base on the wall and mark the location of the remaining five holes on the mounting surface. For ease of drilling, remove the one lag bolt and the base from the surface and drill the rpilot holes with a1/8” drill bit.
Rafter or Stud
Center LineOutside Holes
Center Holes
Outside Holes
A shim may be necessary when mountingon uneven surface, such as lap siding.
5/16" x 2"Lag Bolt
Sealant5/16" x 3"Lag Bolt
5/16" x 2"Lag Bolt
5/16" x 2"Lag Bolt5/16" x 2"
Lag Bolt 5/16" x 3"Lag Bolt
Top
Bottom
emaining
o prevent water
e
Tfrom leaking into the house, apply silicone sealant around each of th
Copyright © 2006 DIRECTV. Unpublished work. All rights reserved. Page 9 Revised 03/30/06 Version 1

six pilot holes. Replace the base on the mounting surface and install the two 5/16”x 3” lag bolts with flat washers in the center holes. Next install the four 5/16”x 2” lag boltswith flat washers in the outside holes. Torque the six lag bolts.
3.3 Brick Mount
Locate a solid brick, concrete or block load-bearing wall, and make certain there are no protrusions preventing the Uni-mount from a flush attachment. When attaching the mount to a brick or concrete wall, you will need four 5/8”x 2” lead anchors and four 5/16”x 2” lag bolts with flat washers. Place the base of the mount against the mounting surface with a torpedo level alongside the base as described above. Be certain that all four outside holes are located on a brick surface and not mortar. Mark the location of the four outside holes with a pencil. Remove mount assembly from wall and pilot drill
the four marked locations with ¼” diameter x 2 ½” deep holes. Drill the pilot holes out to 5/8” diameter x 2 ½” deep and clean out holes. Install the four lead anchors flush with the surface of the brick. Seal with a silicone sealant. 3.4 Roof Mount Assembly Use the mounting assembly for a roof application. Generally, this mount may be used only on asphalt shingled roofs. Normally the maximum pitch should not exceed 35 degrees but the universal mount can be installed on roofs with a pitch as high as 53 degrees with the proper safety considerations. Do not install on roofs with wood, slate or tiled shingles.
Copyright © 2006 DIRECTV. Unpublished work. All rights reserved. Page 10 Revised 03/30/06 Version 1

3.5 Positioning Locate the rafters on the roof that faces southward and determine where the rafters are by using a tapping / listening method or reference point. To use the tapping method, you will need a hammer to tap across the roof area locating the center of the rafter. There will also be information for locating rafters in the manual that accompanies the dish antenna. Attach the Universal Mounting Assembly using 5/16” x 3” lag bolts and sealing it with Bishops tape or tar patch. This mount can only be used on roofs and walls with a S, SE or SW facing surface and a clear unobstructed line of sight to the satellite. Roof mount procedures are the same as for the Wall with the exception of repositioning the mast foot. All unused holes will be sealed with silicon sealant. For further details, see manuals in each mount package. 3.6 Pole Mount - Hole Size and Location Typically, the hole will be approximately 36” deep by 8” wide. The hole must be slightly wider at the bottom to prevent frost heave from displacing the pole during inclement weather. Place the flattened end of the pipe in the concrete to prevent rotation and attach the required ground wire to the punched hole. The pipe should extend at least 30” into the concrete pier. The use of “tall” poles is not an option. 3.7 Concrete The use of Fast Set concrete is a must if the installation is being done the same day as the pole is being cemented. It is acceptable to mix regular concrete and Fast Set 50 / 50 prior to pouring concrete into the posthole. If regular concrete is being used, it must be left to cure 24 hours prior to installing the antenna on the pole. Install Tip: Dig the hole and set the pole prior to digging the trench, cabling, grounding, etc. This way there will be more time for the concrete to set prior to placing the dish antenna on the post. 3.8 Trench / Drop Bury
Bury the drop cable to a minimum 6-inch depth or to a depth required by local codes. The buried RG-6 cable must be a minimum of 12” from buried electrical services (NEC 810.18 A). All direct buried cables must be rated for underground use.
Prior to digging the trench, ensure that there are no utilities in the proposed path. Mobile home parks and MDU projects can have many more obstructions.
The trench should be prepared in such a way as to eliminate sharp bends in the cable and minimize the impact on the environment. Remember that less than a 6” minimum bend diameter may damage the cable. Under extreme rocky conditions, conduit may be required to protect the cable from damage.
A service loop should be made at the dish antenna and be tie-wrapped near the antenna to protect it from damage and to conceal the cable.
Copyright © 2006 DIRECTV. Unpublished work. All rights reserved. Page 11 Revised 03/30/06 Version 1

Note: Any cable that is direct buried must be flooded underground rated cable. 3.9 Cable Run
The cable must be run at right angles and follow the lines of the structure. Do not attach the cable to the roof of the structure with clips, nails or screws that
could later cause leaks. Cable can NOT be attached to electrical entrance cables or electrical conduit. Cable must be kept 4" away from electrical wires on the exterior of the home and
2" away on the interior. Cable should be fastened every 18” on a horizontal run. Remember NO staples
allowed. Drip loops and a feed through bushing are required at all entry points to prevent
water migration into the home. 3.10 Dish Antenna Assembly
Attach the AZ / EL to the dish antenna and torque to 4 PSF. Insert and seat the feed support into the bottom of the antenna and torque the
assembly to 6 PSF. Mount the antenna assembly to the pole and align it to a southerly heading. Route the cable up into the AZ / EL cap, leaving extra cable for subsequent
maintenance. (One loop will be sufficient.) The wire is then routed through the support ARM to the LNB. For further details, see manuals in each antenna package
4 GROUNDING & BONDING Pay close attention to this section. It is absolutely necessary for the DIRECTV System to be grounded to the electrical ground of the house. Our equipment should not be on a different ground potential than the house electrical system. If the grounding rules and guidelines are followed, proper grounding will be assured as will customer safety. The NEC (National Electric Code) states that an outside antenna metal support structure must be bonded to the electrical ground of the house. Ground the RG-6 messenger wire to the foot of the Universal Assembly Mount. There are several locations that the ground may be attached using the nut, washer and bolt provided. If the foot of the mast is not used, you may attach the messenger wire to the pole with an approved ground lug. These are the only acceptable ground options at the dish antenna. Never use the face of the dish antenna or adjusting bolts to ground the system.
Copyright © 2006 DIRECTV. Unpublished work. All rights reserved. Page 12 Revised 03/30/06 Version 1

The ground screw MUST never be used for any purpose other than for grounding. Never attach to adjustment bolt that may be loosened at any point.
4.1 Ground Block The length of the #10 wire from the ground block to the house ground should be as short as possible and in as straight a line as possible. Whenever possible it should also be shorter than the distance of the cable from the ground block to the DIRECTV Receiver. The maximum length of the #10 from the ground block to the house ground is 20 feet. (NEC 820.40 subsection 4) Use only Green jacketed wire as approved. Attach the #17 wire from the dish antenna foot to the #10 wire with a #8H split bolt or connector that is NEC approved to accommodate more than one conductor. See the dual screw ground block information below. The dual screw ground block is the preferred method for this connection
4.2 Suitable Ground Sources When attaching the ground wire from the ground block (#10) to the house electrical ground system, several options are available depending on how the grounding system was originally installed. Below is a list of options currently allowed by DIRECTV, based on NEC requirements:
Copyright © 2006 DIRECTV. Unpublished work. All rights reserved. Page 13 Revised 03/30/06 Version 1

The #4 or #6 Ground electrode (wire) from the meter base to the electrical service
ground rod The house ground rod (Separate Attachment) The panel box or breaker box ground lug stud The metallic service entrance raceway (metal conduit) attached from the meter
base (customer side of the meter) to the first main disconnect (breaker box or cut off switch)
The grounded metal FRAME of the building (commercial or trailer) Sprinkler system of a commercial building A grounded interior metal cold water pipe within five feet of the point of entry to
earth 4.3 #4 or #6 Ground Wire to Electrode This bonding source is preferred. It is easy to attach and usually easy to access. Remember to take sandpaper or something similar and scrape off any paint or corrosion that might have built up on the wire. This is required to make a good connection. Never do anything that would damage or weaken any ground wire. Use a split bolt to attach the #10 from ground block to the ground electrode wire. Wrench tighten the connection. 4.4 Electrical Ground Rod The primary ground source of the house electrical system, (usually a ground rod) provides the best ground source. A proper and separate clamp (rated for burial) must be used in attaching the DIRECTV bonding wire to an electrical power ground rod. You may have to dig down a little to expose a rod. If so, it may be necessary to do some cleaning at the point of attachment to ensure a good connection. Note: Never attach the DIRECTV bonding wire to the existing clamp and never loosen any clamp when attaching the ground. This can be very dangerous as the electrical ground wire can have voltage and high current and this will sacrifice the integrity of the existing ground. 4.5 Panel Box Lug or Meter Base On some meter bases and panel boxes (breaker boxes), there is a stud, usually at the bottom, where a lug can be attached to provide a grounding point for DIRECTV. If the box or panel does not have this stud, a corner clamp will allow you to attach the bond wire to the back corner of the box. This clamp must be attached at the rear of the meter pan. Some power companies will allow this, but you will need to be sure. Contact your local power provider to verify. It is imperative that this clamp can in no way impede or restrict removal of the electric meter cover.
Copyright © 2006 DIRECTV. Unpublished work. All rights reserved. Page 14 Revised 03/30/06 Version 1

Note: Use this clamp only as a last resort. 4.6 Metallic Service Raceway This option may be used if there is no electrical ground conductor available to attach to, or if it is further away than the metallic conduit. It is preferable to utilize this option when the metallic conduit is the service entrance conduit and is continuously unbroken between the meter panel and the first main disconnect panel. This type of connection will need to be made with an approved galvanized grounding strap (Sachs); 6-inch or 12 inch, depending on the diameter of the metallic conduit. The surface of the metallic conduit will need to be cleaned with sandpaper to provide a clean connection. 4.7 Grounded Metal Structure (Mobile Home) The metal structure of a commercial building or a mobile home by NEC is a ground source and can be used only under the situations outlined in the below diagram. Use an approved beam clamp and take care to clean the metal where the attachment will be made to ensure a good connection. Also, take care to check that the structure is indeed bonded to the electrical ground. This may be done with a continuity check (using a VOM). It is best to connect to the I-beam, which is directly grounded to the breaker box. Connection to breaker box must be verified – on doublewide mobile homes, the jumper between the two frames must be present. When using this attachment, the meter pole must be more than 30 feet from the trailer. 4.8 Sprinkler System – Commercial Buildings When cabling a commercial complex, another ground source can be the fire sprinkler system. This option will offer a ground source, but use it only as a last resort. Remember to scrape off any paint, coating or corrosion on the pipe to be sure it is clean and a good connection is made. 4.9 Metal Underground Water Pipe Water pipes should not be used for grounding if the point of connection is more then 5’ from the point the pipe enters earth. See section 250.52 of the NEC below. Section 250.52 of the NEC states: A metal underground water pipe in direct contact with the earth for 3.0 m (10 ft) or more (including any metal well casing effectively bonded to the pipe) and electrically continuous (or made electrically continuous by bonding around insulating joints or insulating pipe) to the points of connection of the grounding electrode conductor and the bonding conductors. Interior metal water piping located more than 1.52 m (5 ft) from the point of entrance to the building shall not be used as a part of the
Copyright © 2006 DIRECTV. Unpublished work. All rights reserved. Page 15 Revised 03/30/06 Version 1

grounding electrode system or as a conductor to interconnect electrodes that are part of the grounding electrode system. 4.10 Supplemental Electrode Bonding Ground Rod In most cases, careful planning of the installation will eliminate the need for supplemental electrode bonding. Changes in the 2002 NEC code have reduced the maximum length of the #10 ground wire to 20 feet. In order to minimize the cable loss, this alternate bonding method may be required. When the electrical ground is over 20 feet from the ground block, the following method for bonding will enable you to complete the installation by NEC requirements. (NEC 820.40 subsection 4) The list below provides a step-by-step grounding process. Keep in mind this is a last resort for a ground source. 1) Once a suitable position is found for the dish antenna and the ground block, a
ground rod will need to be driven into the earth within 20 wire feet of the location of the ground block.
2) The type of ground rod to be used is an 8 ft copper coated steel rod. The rod is required to be driven 8 ft into virgin soil. Dig a small hole a couple of inches down. Drive the ground rod except for the last 6 inches.
3) Once attachments are made, drive rod in below ground. This requires digging out around the clamp area so the clamp will not be disturbed when rod is set below ground level.
4) Use a ground rod clamp to attach the #6 to the ground rod. The #10 from the ground block may be attached to the #6 with a split bolt connector. The other end of the #6 must be connected to the electrical service ground conductor, (wire) or the electric service ground rod.
5) The #6 will be run to the house ground either underneath the house or buried if the house is built on a slab.
6) At the house electrical ground, the #6 can be bonded either to the house ground electrode with a split bolt rated for two wire connection or to the electrical ground rod with a separate ground rod clamp approved for burial. There are several things to keep in mind when using this method:
Only one wire may be attached to each ground rod clamp
Copyright © 2006 DIRECTV. Unpublished work. All rights reserved. Page 16 Revised 03/30/06 Version 1

This is a good option when the placement of the dish antenna is restricted by the landscape, the location of trees in the yard or the location of the house ground. Some ground sources are located on a pole far away from the house.
This method can also be used to wrap a #6 wire around a row of apartments or
condos where the electrical service and meters are at one end of the building. The ground rod should be placed at the opposite end from the electrical with the #6 between and the #10 attached to the #6 at each residence for bonding.
4.11 Summary of Grounding This is an extremely important step in the installation of a DIRECTV System. If done correctly, it will provide protection against electrical shock for the customer. To ensure the continuing integrity of the grounding system you have set up at the customer’s house, it is essential to attach a green ground warning tag at the connection to the house ground. This will tell the customer or any service technician to contact DIRECTV if the need arises to disconnect our ground from the grounding system of the house. Remember when configuring the ground run, the length of the ground wire must be as short as possible. “DANGER: Never disconnect the house ground connection in attempts to connect your wire to the house grounding wire.”
Note: Changes in the 2002 NEC code have reduced the maximum length of the #10 ground wire to 20 feet. NEC code. (NEC 820.40 subsection 4) Always comply with Local Electrical Code Requirements. For example the green ground warning tag may not be required when using #10 green coated ground wire.
5 CABLE ROUTING After deciding the location of the DIRECTV Receiver(s), plan the routing of the cable. Several things should be considered:
What type of house is it? Is it one or two story? Is the foundation conventional or slab? What type of siding is used?
When choosing a location for the ground block, choose one that is as close as possible to the house electrical ground to promote a short ground run. If feasible, also place it close to the point of entry for the cable run into the house. Once these are determined, it will be a matter of finding the shortest / best route to the TVs.
Copyright © 2006 DIRECTV. Unpublished work. All rights reserved. Page 17 Revised 03/30/06 Version 1

5.1 Conventional Foundation If the house is on a conventional foundation (basement or crawl space), the cable
should be routed underneath the house for aesthetics. If this is the method chosen, make sure that the cable is not left lying on the ground.
Attach cables up to the underside of the house by using dual clips or drive rings. If the cable route is through a basement, the cable should be through or attached to the joist but should not be attached to the bottom of a joist. If the cable is to be routed through the attic, use a feed through bushing sealed with a silicone sealant at the point of entry. The cable shall be sealed with a silicone sealant to the bushing.
Take care to place the cable out of the way of traffic or away from anything that might damage it. Always fasten cable up out of the way to protect it. Preferred method is over ductwork and piping. Use caution around hot water pipes and hot water heat pipes. Cable lying on a hot water pipe can be damaged. Cable must have a 2-inch clearance from internal electrical wire.
5.2 Slab Foundation If the house is on a slab foundation:
It is preferable to route the cable through the attic for aesthetic reasons. The less showing on the outside, the better. If this is not possible, run the cable
along the lines of the house, up either along the eave of the house or along the bottom where it will be easy to hide behind the shrubbery.
When tacking the cable along the outside of a house, space the clips evenly so they are uniform and the cable maintains a straight line, not sagging. Recommended spacing for clips is 3’ vertical and 12 to 18” horizontal.
Use caution not to crush or compress the cable when installing cable clips. When running cable around corners, take care not to kink it in any way. Keep the
bend radius (5-inch minimum diameter) in mind. 5.3 Cable Considerations The proper type of cable must be used for each type of situation. All cables must be Series RG-6, sweep tested to 2050 MHz with a loop resistance of 2 ohms or less and solid copper center conductor. In addition, cable must be UL approved and meet CL2 and CMX ratings.
Cable running from the dish antenna to the house shall be Series RG-6 Dual cable with #17 copper clad steel ground wire attached for bonding. This cable should never be spliced. No underground splices are permitted. Any cut cable must be entirely replaced.
The run from the ground block should normally be non-flooded cable. It may be necessary to run flooded if part of the run will need to be buried. In these instances the cable must be converted back to non-flooded cable before it enters the living area of the home in another house box (on the outside) or behind the wall plate on an outside wall. If the cable enters the basement, a ground block may be used as a transition device.
Copyright © 2006 DIRECTV. Unpublished work. All rights reserved. Page 18 Revised 03/30/06 Version 1

If a trailer is being installed, avoid bringing cables inside through the wall; instead always bring cables up through the floor. If this is not possible (outside wall), then drilling through the wall may be the only option. Care must be taken to avoid electrical wiring. At the point of entry, use a feed through bushing with silicone sealant.
When bringing the cable in through a wall or down a wall from the attic, use a wall plate to bring the cable into the room. As a standard install, you can always use a 24-inch drill bit to drill down through the wall from the standard electrical outlet height down through the sill plate in the basement or crawl space. (This should be considered normal installation and NOT a wall fish).
When the cable is brought up through a non-carpeted floor and the hole is larger than the cable, use a feed through bushing to seal the entry point. (e.g., 5/8” hole for dual RG-6 cable)
o When the floor is carpeted, it is necessary to properly prepare the carpet for drilling. The recommended method is using a carpet punch. At a minimum, the carpet must be pulled back or out of the path of the drill bit.
o Be sure the customer understands you will be placing the cable through the carpet. Do not try to drill through the carpeting as this may cause the carpeting strands to get caught on the drill bit and will snag the carpet and cause damage.
The ground block should be located outside whenever possible. When bringing cable inside a structure, into the basement or attic, the method of
drilling may differ. Always drill at an angle so that the outside hole is lower than the inside hole to prevent moisture from entering the wall space.
o If drilling into the basement, it may be best to drill from the outside in.
o If drilling into the room where the DIRECTV Receiver will be, it is usually best to drill from the inside out for hole placement.
o Any time the cable runs down an outside wall or entering from above the hole into the house put a drip loop at the hole to prevent water from entering the wall. The loop in the cable must be at least a 4" diameter.
6 TELEPHONE LINE INSTALLATION AND TROUBLE-SHOOTING Connection of the receiver to a telephone line is required. Every effort should be made to connect the receiver to the customer’s telephone line. If the telephone outlet is within 25 feet of the requested location of the DIRECTV receiver, you should connect the receiver to the phone line. In the event that a customer doesn’t have a telephone, DIRECTV does have the ability to authorize the unit in a “non-impulse” mode. However, programming packages available to the customer may be limited as not all services can be provided to a receiver not connected to a telephone line. Pay per view purchases must be made by calling customer service and are therefore more expensive than standard impulse
Copyright © 2006 DIRECTV. Unpublished work. All rights reserved. Page 19 Revised 03/30/06 Version 1

purchases when no telephone is connected to the DIRECTV Receiver. This information should be communicated clearly to the customer prior to beginning the install. The telephone connection gives the customer the ability of purchasing PPV events by using the remote control (impulse PPV). It also gives DIRECTV access to DIRECTV Receiver information, such as signal quality and the signal history for trouble-shooting. At times, customers will not want the line connected to their DIRECTV Receiver or they will not have telephone service. 6.1 Installation The preferred method is to home run the telephone line directly from the DIRECTV Receiver to the demarcation point outside the house if a modular jack is not available.
Always check to see if an existing modular telephone jack is close to the DIRECTV Receiver. This requires a duplex telephone jack so the customer has telephone access at the jack. If the jack is not in close proximity to the DIRECTV Receiver, then make sure any jumper you install will not be in the way of any door or walking path.
Installation must be completed with approved telephone station wire. Install a biscuit jack or combination wall plate behind the TV and use a modular telephone jumper to connect the jack to the DIRECTV Receiver.
In some cases, it may be necessary to attach the station wire to an existing outlet. This is allowed when a home run is not practical; however, under no circumstances should the customer’s wire be cut. The wire must be connected to an appropriate connection in the existing outlet.
When connecting the telephone line to the terminals in the outside box, always observe correct polarity (red and green).
Be careful not to disturb existing telephone connections. If the telephone line is installed underneath the house, be careful not to let the
wire lay on the ground. It will need to be tacked up along the underside of the house to prevent possible damage
If the phone line is attached along the outside of the house, run it along the lines of the house. Always try to keep it as well as the coax concealed as much as possible. It is sometimes feasible to run the telephone line underneath the coax thereby concealing it completely. The feed through bushing has a notch in it for routing of the telephone line with the coax. This will eliminate the need for an extra hole to be drilled.
Biscuit-type telephone jacks can be attached with double-stick foam tape that comes with them or attached directly to the wall with screws.
Another type of wall jack available has both the telephone and coaxial connection mounted on a wall plate. This device is attractive because it does not require a separate wall outlet for the phone connection; in most cases it requires installing a low voltage bracket in the wall.
Make sure the customer understands the telephone line should be connected to the DIRECTV Receiver at all times to assure trouble-free service.
Never splice a telephone line
Copyright © 2006 DIRECTV. Unpublished work. All rights reserved. Page 20 Revised 03/30/06 Version 1

Never bury a telephone line that is not rated for direct burial. This type of wire has a thick black insulator type jacket and a flooding compound. Under no circumstances is the station wire to be plugged directly into the receiver by attaching an RJ-11 modular connector directly to the station wire. Modular connectors are designed specifically for satin modular phone line.
When attaching the wires to the screws in the jack or the house telephone box, never wrap the wire all the way around the screw post overlapping it back onto itself. This can cause the wire to be cut when the screw is tightened. After installation, always check every phone line in the customer’s home to ensure all lines are working.
6.2 Trouble-shooting Phone Lines Many things can affect the operation of the telephone circuit connected to the DIRECTV System. Use the following trouble-shooting steps. If all trouble-shooting fails and no corrective action is found you may be forced to install the DIRECTV Receiver as non-impulse.
1) Check to make sure the phone line is connected to the receiver. 2) Run a system test. If phone line “not okay,” connect a telephone in phone jack
and check for dial tone. 3) If there is a dial tone, replace DIRECTV Receiver with a different receiver
and run system test. 4) Check on hook voltage to be sure it is greater than 17 V DC. Typical voltage
is ~50 V DC. This is done by reading across the red and green, tip & ring, of the phone line with a multi meter on DC volts.
5) Check off hook voltage by taking a phone off hook and reading the voltage the same as above. Off hook voltage must be less than 11 V DC. Typical off hook voltage is ~5 VDC.
6) If there is not a dial tone, contact local telephone company. 6.3 Valid Reasons for Non-Impulse DIRECTV Receivers
No phone service, however, a phone line should still be run and connected to the phone demarcation point
Customer objection only after explanation of the benefits and drawbacks for non-impulse. Customer MUST sign off.
Phone line not available or not practical to run. If not practical to run, must be approved by supervisor and specific reasons noted on the Work Order. Wireless phone systems are not an option for all advanced product (e.g. TiVo, Ultimate TV) installations.
DIRECTV Receiver failed the phone test and problem cannot be corrected. Details as to why phone test failed and specific trouble-shooting steps noted with voltages.
Party line with operator intervention 800 block on customer’s line
7 ACCESS CARDS
Copyright © 2006 DIRECTV. Unpublished work. All rights reserved. Page 21 Revised 03/30/06 Version 1

An access card is included in the purchase of a DIRECTV System and authorizes the programming for the customer’s system. Once the customer has completed their DIRECTV System installation, the access card is added to the customer’s account and services are authorized. Access cards are non-transferable. They cannot be transferred from one customer or dealer account to another. 8 INTEGRATION WITH THE CUSTOMER'S EQUIPMENT Key Points:
The coaxial RF output used to connect the DIRECTV Receiver to the customer’s TV does not provide an MTS stereo signal. If the customer has a stereo light or indicator on their TV, it will not indicate stereo even though the TV is receiving stereo. Connection preference order: Component, S-Video, Composite, RF.
The L-R audio outputs (RCA Connectors) will provide stereo signal to the TV / VCR and the output level is fixed at 1 V P / P. Volume is controlled by the customers TV or audio system if applicable.
To use the DIRECTV Receiver's composite video and audio outputs to the TV, the TV must be capable of receiving this type of input and it must be set to the correct Video Input mode.
Note: This generally means that the stereo indicator on the TV will not light up even though the TV is receiving true stereo. The only time this light works is when the MTS stereo signal is being decoded by the TV from another source (i.e. off air antenna or cable).
As above, if the VCR is connected to the DIRECTV Receiver using the audio and video jacks and the customer wishes to record in stereo, then the VCR will need to be set to the correct input. This input is usually labeled as Line1 or Line 2, VIDEO or AUX., depending on the number of inputs the particular VCR has as well as its make and model.
The DIRECTV Receiver’s S-Video output provides the best picture quality but the TV and / or VCR must be equipped with an S-Video jack. This requires a special cable that is not provided with all DIRECTV receivers. The S-Video output does not provide any audio output so the L-R audio jacks must be used in conjunction with the S-Video jack. Again, the TV and / or VCR must be set to the correct input mode to accommodate this hookup.
The RF antenna input will only accommodate a 75-ohm cable. If the customer’s antenna line is the 300-ohm type, (flat cable) then a 300-75 ohm transformer will be necessary.
Set the channel selector switch located on the back of the DIRECTV Receiver, to the same channel as the TV and VCR. These outputs have a fixed output level to facilitate proper use with VCR and stereo hookups. Some DIRECTV Receivers
Copyright © 2006 DIRECTV. Unpublished work. All rights reserved. Page 22 Revised 03/30/06 Version 1

have a programmable output that is changeable through the DIRECTV Receiver installation and set-up menu.
8.1 Tuning VCRs It is important that all new customers understand that recording procedures require that their VCR be tuned to the same channel the output on the DIRECTV Receiver is set for. Set the DIRECTV Receiver RF output for whichever channel, (either 3 or 4), that is not used for local programming. To check for proper tuning – with the TV and DIRECTV Receiver on, turn the VCR on and set the channel display on the VCR to the same channel the output of the DIRECTV Receiver is set for (Channel 3 or 4). Press the TV / VCR button on the VCR. If the picture flicks but you do not see any significant change, then the VCR is properly set. If the picture goes to snow, blue screen or junk, then you need to tune the VCR with the VCR tuner.
e.g. IRD = Ch 4 VCR = Ch 4 TV = Ch 4 Remember the VCR can also record from one of the Line inputs for better quality recording. 8.2 Stereo / Surround Sound Most customers now have television sets equipped for stereo sound. Some will have a stereo audio system in addition to a stereo TV. It is essential that this equipment also be connected. Note: The customer must have a stereo receiver that is capable of processing the surround signal in Dolby Digital format. This does not mean that they can't enjoy the stereo signal that most receivers can process. Note: Never connect an audio wire when the equipment is on! Always check the following for proper stereo hookup:
Verify that the customer’s stereo receiver has available inputs for the DIRECTV Receiver audio output. Most will have inputs labeled ‘aux. input’ or, if that is not available; you may use an input such as ‘CD input’ or ‘tape input’ if it is not being used.
Note: Under no circumstances should you ever connect the DIRECTV Receiver audio to the PHONO input of a customer's amplifier. This usually causes severe damage to the amp and / or speakers.
Depending on which input is used, the stereo receiver will need to be set to the correct input selection to receive the audio signal from the DIRECTV Receiver.
Copyright © 2006 DIRECTV. Unpublished work. All rights reserved. Page 23 Revised 03/30/06 Version 1

When connecting the DIRECTV Receiver to the stereo, the L&R audio outputs will be used.
These closely match most VCR's audio output levels and all volume control is done with the customer’s stereo system.
Not all movies are encoded with the Dolby Digital & Surround Sound format. Make sure the customer understands this to avoid unnecessary service calls.
If the customer has a hi-fi VCR, it is usually best if you connect the audio output from the DIRECTV Receiver through the VCR’s audio in and then out of the VCR to the TV or stereo receiver. This will allow the customer to have surround and / or stereo sound from both DIRECTV and their VCR.
If the customer has a TV or Sound system that has multiple inputs and outputs for audio and video, these usually act as a control center and all in / outputs should be connected through this device.
True digital stereo sound can still be enjoyed even if the customer does not have a surround sound receiver. Again, whenever possible connect the DIRECTV Receiver to the customer’s stereo equipment. Detailed quality instruction should also be given to the customer on the system operations. 8.3 Picture-in-Picture (PIP) Many television sets now come equipped with the PIP feature (watching two or more programs at the same time). Most TVs with PIP require the additional input signals be supplied as base band audio / video signals. This signal can be provided by a variety of sources (e.g., DVD, Laser Disc or a VCR). Newer high end TV / Monitors now allow multiple RF inputs as well as multiple A/V, composite and component inputs. Television sets that offer PIP differ in how each picture is displayed. With this in mind, the customer may need to consult the owner’s manual on PIP operations. Unless the customer requests otherwise, set up DIRECTV as the primary signal since it is usually the main video source. This also helps a great deal when trouble-shooting over the phone. Note: Even if a customer has picture in picture, they will only be able to receive 1 DIRECTV signal at a time unless they have an advanced product DIRECTV Receiver or two (2) DIRECTV Receivers connected to the PIP TV. 8.4 High Definition TV (HDTV) In order to receive HDTV signals, you must have an HDTV receiver as well as an HDTV television / monitor. The connection between the HDTV DIRECTV Receiver and the HDTV must be made with the best available connection (listed in descending order of preference): 1. DVI
Copyright © 2006 DIRECTV. Unpublished work. All rights reserved. Page 24 Revised 03/30/06 Version 1

connectors, 2. RGB connectors or 3. Component connectors. The channel 3 / 4 connection should always be made for trouble-shooting purposes. A multi-sat dish antenna must be installed in order to access HDTV programming on the 110 / 119˚ satellites. If an older dish antenna is in place, make sure the c- kit is installed for the 110 feed.
9 DISH ANTENNA ALIGNMENT AND PEAKING 9.1 General The dish antenna can be peaked by using a satellite signal strength meter (preferred) or the built in signal strength meter in the DIRECTV Receiver. Prior to attempting alignment and peaking, the following must be established:
1. Clear line of sight 2. Antenna and mount installed and pole plumb 3. System connected to DIRECTV Receiver with DIRECTV Receiver plugged into
active electrical outlet. Access internal installation and set-up menu to determine appropriate azimuth and elevation settings.
Copyright © 2006 DIRECTV. Unpublished work. All rights reserved. Page 25 Revised 03/30/06 Version 1

4. Dish antenna type has been selected in the DIRECTV Receiver installation and set-up menu
9.2 Signal Strength Meter – Alignment
1) Connect the signal meter between the LNB and the receiver. Use a temporary jumper ~ 3’ long from the LNB to the meter.
2) In order to supply power to the meter and LNB the receiver must be installed and connected to a live electrical outlet or use a battery pack. The meter will pass power through to the LNB.
3) Set the elevation adjustment to ~ 4 degrees below the recommended setting for your area.
4) The dish antenna should be moved to the approximate azimuth for the zip code that you are installing in and then panned slowly to the left or right approximately 5 degrees. The meter should be set up to monitor signal strength at this point.
5) Pan the dish antenna in the direction of the expected azimuth angle slowly and monitor the meter for signal. If the dish antenna is moved 5-8 degrees past the expected azimuth and there is no signal, the elevation should be increased two (2) degrees and the sweep repeated. If signal is not acquired, the dish antenna elevation should be lowered an additional two (2) degrees and the sweep repeated. If acquisition is still unsuccessful, the dish antenna elevation should be raised two (2) more degrees and the sweep repeated. If no signal is found by this point the elevation should be reset to the expected degree and the process should be restarted.
6) If there is no signal after repeating this entire procedure, consider checking the plumb of the pole, meter settings, connections, LNB power / functionality and, field of view. Note that the farther you get from your expected settings the more likely you are to acquire an incorrect satellite. Remember to call your supervisor if you need help.
7) Once the satellite signal is identified, the fine peaking process begins. 8) The azimuth should be peaked first by moving the dish antenna left or right
slightly to maximize the signal on the meter. When performing this step, the dish antenna should be moved past the peak signal and then reversed to the
Copyright © 2006 DIRECTV. Unpublished work. All rights reserved. Page 26 Revised 03/30/06 Version 1

maximum reading. The dish antenna azimuth bolts should be tightened at this point enough that the dish antenna will not easily swing left or right.
9) The elevation is set by adjusting the dish antenna up or down past the peak signal and then back to the peak signal setting. The elevation bolts should be tightened enough at this point to hold the elevation setting temporarily.
10) The final step to ensure peak signal strength has been achieved is to lightly push and pull the top of the dish antenna. If the elevation is maximized, the signal will go down. If it does not, the elevation bolts should be slightly loosened and re-peaked vertically.
11) The same test is performed to the left and right and should give the same results. Again if it does not, the azimuth bolts need to be loosened slightly and re-peaked in this plane.
12) Once you are confident the dish antenna is properly peaked, tighten the left and right pivot bolts in alternate sequence, making sure that the voltage or signal strength does not drop.
13) Torque to specifications noted in dish antenna manual and recheck signal to ensure that it has not dropped.
14) Remove the meter and connect the cable to the LNB. 15) Return to the receiver and check signal quality to ensure it is within
specifications for your area. Re-peak if signal is not >80 or consistent with your area.
16) Use a permanent marker to place a vertical reference alignment mark on the AZ / EL cap to the pole. Never scratch the paint, as this will cause the pole to rust.
9.3 DIRECTV Receiver Signal Meter - Alignment Exact steps to selecting the signal strength meter varies by manufacturer, however the general procedure is the same.
1) Use the DIRECTV Receiver menu to access the installation menu screen. 2) Select the signal strength meter option. 3) As you have not yet peaked the dish antenna, the signal strength meter is
probably reading 0. 4) Refer to section 10.2, step 3 above and follow the same procedure as peaking
with a signal strength meter for actual dish antenna alignment steps. 9.4 Peaking a Multi-Sat Dish Antenna
1) Go into the DIRECTV Receiver installation & set-up menu and select the appropriate Dish Antenna type. Remember that the azimuth and elevation settings provided are for the 110 slot. You must calculate accordingly to determine the settings for the 101˚and 119˚coordinates (+/- 9˚).
2) The multi-sat dish antenna requires that the azimuth, elevation and tilt be set for both the A (101) slot and the B (119) slot. When these are peaked, the C (110) LNB (if applicable) is automatically peaked due to the construction of the dish antenna.
3) The azimuth of the Multi-sat dish antenna should be peaked first by panning the dish antenna left or right slightly to maximize the signal on the meter. The
Copyright © 2006 DIRECTV. Unpublished work. All rights reserved. Page 27 Revised 03/30/06 Version 1

22 KHz tone should be turned off at this point to peak the A (101) LNB. When performing this step, the dish antenna should be moved past the peak signal and then reversed to the maximum reading. The 22 KHz tone should be turned on and the step repeated for the B (119) LNB. The meter should be switched back and forth from A to B and back until both LNB's signals are maximized. The dish antenna’s azimuth bolts should be tightened enough at this point that the dish antenna will not easily swing left or right.
4) The elevation of the Multi-sat is set by adjusting the dish antenna up or down past the peak signal (and then back to the peak signal reading). The 22 KHz tone should be turned off. When performing this step, the dish antenna should be moved past the peak signal and then reversed to the maximum reading. The 22 KHz tone should then be turned on and the step repeated for the B (119) LNB. The meter should be switched back and forth from A to B and back until both LNB's signals are maximized. The elevation bolts should be tightened enough at this point to hold the elevation setting temporarily.
5) The tilt of the Multi-sat dish antenna must also be peaked (with the 22 KHz tone turned off). As in previous steps, rotate the dish antenna clockwise or counterclockwise while passing peak signal and then back to the peak signal setting. The 22 KHz tone should then be turned on and the step repeated for the B 119 LNB. The meter should be switched back and forth from A to B and back until both LNB's signals are maximized.
6) The final step to ensure peak signal strength has been achieved is to lightly push and pull the top of the dish antenna. If the elevation is maximized, the signal will go down. Turn on the 22 KHz tone and repeat for the B LNB. If the signal doesn’t go down, the elevation bolts should be slightly loosened and the dish antenna re-peaked vertically.
7) The same test is performed horizontally and rotationally. All tests should give the same results. If it does not, the bolts need to be loosened slightly and re-peaked in the plane which needs improvement.
8) After performing these final steps, all dish antenna hardware should be tightened while monitoring the meter to make sure the signal remains at its maximum level.
9) Remove the meter connections, reattach the LNB if it was disconnected and continue with the rest of the installation.
10) Verify signal strength on all satellites by utilizing the installation screen on the DIRECTV receiver.
Verify the 101˚ satellite by checking channels 490 (odd transponders) and 491 (even transponders)
Verify the 110˚ satellite by checking channel 494 Verify the 119˚ satellite by checking channels 492 (odd
transponders) and 493 (even transponders) Verify the 72.5˚ satellite by checking channel 496 (even
transponders) Verify the 95˚ satellite by checking channel 497
11) Use a permanent marker to place a vertical reference alignment mark on the AZ / EL cap. Never scratch the paint, as this will cause the pole to rust.
Copyright © 2006 DIRECTV. Unpublished work. All rights reserved. Page 28 Revised 03/30/06 Version 1

12) Document the signal strength on the work order and in the customer’s DIRECTV Receiver owner's manual.
9.5 Peaking a Multi-Sat Dish Antenna with DIRECTV Receiver signal meter
1) Follow manufacturer’s instructions to enter signal strength measurement menu.
2) Preset elevation and tilt / skew. 3) Sweep Az and lock on Sat A. 4) Maximize Sat A signal and mark Az and El on mast. 5) Switch to Satellite B, maximize Satellite B signal and mark Az and El on
mast. 6) Split the difference and set Az and El (Signal levels should be approximately
equal.) 7) Fine tune tilt / skew and elevation if necessary. (If fine tuning performed, you
must repeat the above procedure.)
A minimum of 80 should be obtained on each satellite to be used. 10 CUSTOMER EDUCATION The following topics should be explained to every customer: 10.1 Remote Control
Basic operation of the Remote control. Refer to owner's manual for each specific manufacturer.
The installer should program the remote control to work with the customer’s TV, VCR and all applicable devices.
Explain the DIRECTV Menus and On Screen Guide. Familiarize the customer with the remote control functions.
10.2 Operating the VCR with DIRECTV
TV must be on and set to channel 3 or 4 or select A/V inputs. VCR must be on and set to channel 3 or 4 or select A/V inputs. Be prepared to refer the customer to their owner’s manual if they have any
questions regarding use of their own television, VCR, etc. 10.3 Explain How to Record DIRECTV Programming
The DIRECTV Receiver must be on and the channel you wish to record must be selected.
The VCR must be set to record either channel 3 or 4 (depending on 3/4 output switch on DIRECTV) or select A/V inputs.
If customer wants to watch what they are recording, the TV channel should match the VCR recording channel (Channel 3 or 4).
Copyright © 2006 DIRECTV. Unpublished work. All rights reserved. Page 29 Revised 03/30/06 Version 1

Recording with audio / video - Connect A/V cables to VCR and select A/V input on VCR. RF cable should always be connected so the customer has these options. This will reduce service calls.
10.4 Explain How to Record Off Air & Cable Programming
The DIRECTV must be set to TV mode using the SAT / TV button. Powering the DIRECTV Receiver off will also default to TV mode.
VCR must be tuned to the off-air / cable channel you wish to record. If customer wants to watch while recording, the TV and VCR must be tuned to
the same channel. 10.5 Stereo Connection
Explain the normal stereo operation – provide a quick overview for the customer. Explain / demonstrate to them which stereo input DIRECTV is connected to (e.g.)
AUX / CD / etc. Other options - if the stereo is connected to the volume controlled audio out of the
TV, DIRECTV, off air and VCR signals will pass to the stereo and be controlled by the TV.
Explain any other reconfigured home electronics components you may have interfaced into the system (e.g., laser disk player etc.).
10.6 Menus – Refer to Owner's Manual for Each Specific DIRECTV Receiver
Menu preferences – Allows customer to change style of displays. Purchase History and Status – Enables customer to monitor PPV activity and
phone status. Rating and Channel Lockout – Controls the rating of programs allowed to be
viewed. Explain rating codes – G, PG, PG-13, R, NR-MATURE & NC-17. Favorite Channel Lists – Enables quick access to channels most often watched. Program Times - Programs are similar to a VCR and should be explained along
with the VCR. Daylight savings time changes are automatically set. Messages – DIRECTV notification of sun outages or upcoming events. Receiver status – Explain in detail so the customer can assist with future trouble-
shooting. Signal Quality – Explain how customer would use this information for trouble-
shooting with Technical Support personnel. Set or Change Password – This menu item needs to be discussed in detail to
ensure proper instruction of previous menu items. Explain that the password is blank on new or reset units. Once set, it can only be
reset by the customer once their password has been entered. Refer to manual for password reset instructions.
The customer should know to call DIRECTV if they have a problem with the password.
10.7 Additional Customer Information
Sun Outages:
Copyright © 2006 DIRECTV. Unpublished work. All rights reserved. Page 30 Revised 03/30/06 Version 1

Occur in spring and fall (March & October) due to the position of the sun in relation to the satellite. (The sun passes directly behind and in line with the satellite, interfering with the incoming signal for a few minutes a day during a two (2)-week period – this happens with all satellites.)
Rain Fade / Snow & Ice in Dish Antenna. Occurs during periods of inclement weather – remember that it does not have to
be raining, as moisture in clouds may have the same effect. Explain that snow or ice in the dish antenna can cause loss of picture. This is most evident with “searching for satellite” message during or after inclement weather. During winter months, removing snow from dish antenna may clear this problem.
11 MULTISWITCHES 11.1 Purpose Multiswitches can be used when the required number of outlets exceeds the available number of DIRECTV Receiver inputs from the dish antenna. A multiswitch is needed for three (3) or more DIRECTV Receiver inputs when using an 18” dish antenna and 5 or more inputs when using a Multi-Sat dish antenna. A second 4-way multiswitch or an 8-way is required for 5 or more DIRECTV Receiver inputs. 11.2 Types of Multiswitches It is important to determine the correct switch for your application. Deciding factors:
Number of DIRECTV Receiver inputs required Cable length and amplification Multiswitch may require AC power Integration of local channel source
Several companies manufacture multiswitches ranging from two (2) to 32 outlets (depending on configuration), both with and without antenna input ports for off- air integration. Always use DIRECTV approved products. Note: A multiswitch cannot be used with a single output LNB. 11.3 Multiswitch Functions The multiswitch controls the selection of left and right hand polarized inputs from the LNB by sensing voltage from the DIRECTV Receiver. Thirteen (13) VDC causes the multiswitch to switch to a right hand polarized signal. Eighteen (18) VDC causes the multiswitch to switch to a left-hand polarized signal. In multi-sat applications, the multiswitch also selects the LNB. A 22 KHz tone generated from the DIRECTV Receiver triggers the LNB selection. All multiswitches pass power to the LNB. Some have external power supplies.
Copyright © 2006 DIRECTV. Unpublished work. All rights reserved. Page 31 Revised 03/30/06 Version 1

When diplexing / combining the off-air / cable signal with DIRECTV another separate diplexer will be needed. This is required to separate the off-air / cable signal from the DIRECTV signal.
All powered
Multiswitches polarity lock the LNBs
The LNB is always locked in the 13V (right hand polarity) or 18V (left hand polarity)
Note: DIRECTV Receiver powered Multiswitches can sometimes cause micro blocking or momentary loss of picture. This may occur when all DIRECTV Receivers are tuned to a right hand polarity channel (13V) and then one DIRECTV Receiver is changed to a left hand polarity channel. This can be difficult to trouble-
shoot. 12 INDEPENDENT CONTRACTORS 12.1 Installation Contractors To ensure consistent and positive customer experience, a retailer should implement the following when using installation contractors to perform DIRECTV System installations on your behalf.
The contractor should be fully licensed, insured, bonded, and in compliance with the laws of each state in which it operates.
Retailer should ensure that the installation contractors follow these guidelines. The retailer shall require the contractor to maintain, at a minimum, the same
insurance coverage, in the same amounts, as the retailer is required to carry under its agreement with DIRECTV. The contractor’s insurance policies shall name DIRECTV as an additional insured.
Retailer shall ensure that installation contractor does not take any adverse action against the customers (e.g., such as threatening or placing any liens on customer’s home or property).
. Please note that DIRECTV will expect the retailer to be responsible and liable for any acts or omissions on the part of the installation contractors. As such, the retailer shall
Copyright © 2006 DIRECTV. Unpublished work. All rights reserved. Page 32 Revised 03/30/06 Version 1

indemnify and hold DIRECTV harmless from and against any and all claims, suits, liabilities, actions, liens and expenses (including reasonable attorneys’ fees) arising out of or in connection with any acts or omissions of installation contractors utilized by retailer. 13 INSTALLATION TIPS / Common Installation Problems 13.1 Premature Rain Fade This problem may be caused by the following:
dish antenna not properly peaked Long drop with no line amp Bad piece of cable or non approved cable Corroded F connectors or water in ground block Several outlets with high insertion loss through splitters. (Signal quality may be
good under blue skies) Electrical impulse noise from arcing insulator on High Voltage power lines Leaves of a tree drooping down when wet Obstruction in line of sight Water or insects in the feed horn / LNB Dish antenna under eave of home where water runs off roof on dish antenna
13.2 Useful Equipment for Trouble-shooting
Satellite signal strength meter Digital VOM Spare DIRECTV Receiver (any model) Telephone test set Telephone polarity tester Extra phone cord. (10 to 25 feet) 100’ RG-6 test cable (with connectors) Power strip
13.3 Locate DIRECTV Receiver’s Main Menu and Perform “Systems Test”
1) Assess the situation by looking at overall configuration of installation. Note the number of outlets, length of drop, clear line of sight, etc.
2) Determine scope of problem. 3) Check signal quality to verify that it is greater than 80. 4) If signal quality is lower than expected, visually inspect the condition of the
LNB. 5) Check dish antenna alignment, re-peak dish antenna, if necessary. 6) Run a temporary cable to the LNB to see if this corrects the problem. If this
does correct the problem, move the temporary connection back to the ground block to further isolate the problem. This will allow you to determine which section of the cable may be bad.
7) If you suspect the LNB is bad, replace with a known good unit.
Copyright © 2006 DIRECTV. Unpublished work. All rights reserved. Page 33 Revised 03/30/06 Version 1

13.4 Signal Strength Remember the key items:
Every device has an insertion loss Signal loss occurs at a rate of approximately 8.5 dBm to every 100 feet of series 6
cable @ 1450 MHz Larger diameter cable has less attenuation Optimum signal required at the DIRECTV Receiver is between -25 and -65 dBm Typically, an 18” dish antenna has a -40 dBm output at the LNB
Some other helpful hints:
Find a distribution point to amplify and distribute signal. Install an amplifier / power inserter to power the LNB prior to installing your
splitters. Splitters should all be Diode protected and dual power passing.
13.5 Additional Trouble-shooting Tips
Check for wireless phone jacks that may be plugged into the same electrical outlets with fluorescent lighting, halogen lamps or other devices that may cause surges in power. Never use wireless phone jacks with advanced products.
Look for overloaded power strips. Check for loose telephone jacks with exposed or faulty wiring. Look for possible overheated DIRECTV Receiver (may be located in enclosed
cabinet with other electronic equipment). Check DIRECTV Receiver cable connection.
14 TROUBLE-SHOOTING STEPS For Retail assistance contact the Retail Services Department (800-323-1994). For Customer Service assistance contact the Customer Service Department (800-531-5000). Soft Boot – On most receivers, a Soft Boot is performed by simultaneously depressing the Down Arrow and the Power Button for twenty to thirty seconds. Release the buttons and the receiver will begin set-up. Cancel out of the set-up and check to see if the problem has been resolved. Hard Boot – Unplug receiver and let sit for 10 minutes. Plug back in and power up. Check to see if problem is corrected. 15 RISK MANAGEMENT 15.1 Property Damage
Copyright © 2006 DIRECTV. Unpublished work. All rights reserved. Page 34 Revised 03/30/06 Version 1

Every technician is responsible to take appropriate precautions to avoid damage to a customer’s property or belongings. In most cases damage and accidents happen when we:
Lose concentration and skip necessary steps Get frustrated with a problem Lack of knowledge regarding general construction or proper installation
techniques If damage occurs, immediately notify your supervisor and have a note entered in the account. The customer must always be informed. A minor problem can escalate if not addressed immediately. Immediate response to customer's claims of damage is required. Potentially harmful situations shall be resolved and repaired with the highest priority. If the response time of the service provider is not satisfactory or if the situation warrants, the customer may have the problem repaired and the cost of the repair may be deducted from the invoice payment. 15.2 Irate Customers At times, irate customers need to release their frustrations, especially when they feel they have been mistreated or their problems ignored. Listening to and addressing their frustration immediately can minimize problems and demonstrate to our customer that we value their business. Never argue with a customer! Under no circumstances should a technician continue to work in a situation where physical threats have been made. The technician should leave the job site and contact their supervisor. 15.3 Customer Not Home When the technician arrives and a customer is not home, review the following items:
Am I early? Call the customer or have your dispatcher call them Review paperwork for accuracy Look around to see if customer is outdoors
Note: Under no circumstances should a private dwelling or apartment be entered without the customer, a representative of the customer or the homeowner being present. If the customer is not home, leave a door hanger and contact your office and supervisor immediately. The dispatcher should note the account with a description of the home and time. 15.4 Late For Appointment - Greater than two (2) hours past the START of a
window
Copyright © 2006 DIRECTV. Unpublished work. All rights reserved. Page 35 Revised 03/30/06 Version 1

If you are going to be late for an appointment, always call the customer and notify your office. Dispatch should note the account. 15.5 Technician Responsibility The last person at a home is responsible for all compliance with DIRECTV standards. This includes but is not limited to NEC grounding and workmanship. 15.6 Clean Up After Installation ~ Small things make a big difference The customer’s house, yard and any work area shall be left CLEAN of any installation debris, including empty boxes, tie wraps, drilling dust, dirt, etc. Vacuum or sweep up any debris created by your installation.
ALWAYS SHOW PRIDE IN YOUR WORK
SHOW RESPECT FOR THE CUSTOMER’S TIME AND HOME
Copyright © 2006 DIRECTV. Unpublished work. All rights reserved. Page 36 Revised 03/30/06 Version 1

16 WORLDDIRECT™ INSTALLATION/UPGRADE 16.1 WorldDirect™ Installation Overview 1. Perform and review site survey with customer. Remember, the customer’s programming selections will determine which orbital locations need to be visible.
From 95° WL: WorldDirect™ From 101° WL: core DIRECTV programming From 110° WL: High Definition From 119° WL: selected local channels markets, HD and DIRECTV PARA
TODOS™ programming From 72.5° WL: selected local channels markets
2. Identify dish antenna location(s) and line of site(s) needed for customer’s programming selections. 3. Assemble and mount dish antenna(s). Standard mounting includes, but is not limited to the roof, eave, outside wall, balcony, deck and chimney. 4. Ground dish antenna(s) to meet NEC requirements. 5. Connect DIRECTV Receiver(s) to television(s). 6. Connect cables from dish antenna to multiswitch. 7. Connect cables from multiswitch to DIRECTV Receiver(s). 8. Run “auto configuration” from set up menu on each DIRECTV Receiver. 9. Check signal strength in the DIRECTV Receiver for 95° WL, 101° WL, 110° WL, 119° WL and/or 72.5° WL, depending on the customer’s programming selections and market location. 10. Check test channels for satellite confirmation.
For 95° WL – Channel 497 For 101° WL – Channel 490 (odd) and Channel 491 (even) For 110° WL – Channel 494 For 119° WL – Channel 492 (odd) and Channel 493 (even) For 72.5° WL –Channel 496 (even) For Macrovision- Channel 498
11. Provide customer education.
Copyright © 2006 DIRECTV. Unpublished work. All rights reserved. Page 37 Revised 03/30/06 Version 1

16.2 Satellite Dish Pointing Coordinates
Copyright © 2006 DIRECTV. Unpublished work. All rights reserved. Page 38 Revised 03/30/06 Version 1

16.3 Multiswitches When combining signal from the 72.5° WL and the 101° WL orbital locations,
you must always use a 4x4 or 4x8 multiswitch. o Both coax cables from the 101° WL LNB must be connected to the Sat A
13V and 18V side. o Both coax cables from the 72.5° WL LNB must be connected to the Sat B
13V and 18V side. When combining signal form the 72.5° WL, 101° WL, 110° WL and 119° WL
orbital locations, you must always use a 6x8 multiswitch. o All four coax cables coming from the multi-satellite dish antenna must be
connected to the first four ports on the 6x8 multiswitch. o One coax cable from the 72.5 LNB must be connected to the Flex Port 1
on the 6x8 multiswitch. You only need one cable because each flex port supports both 13v and 18v.
Copyright © 2006 DIRECTV. Unpublished work. All rights reserved. Page 39 Revised 03/30/06 Version 1

17 72.5° WL INSTALLATION AND UPGRADE 17.1 72.5 Local channel Overview 1. Perform and review site survey with customer. Remember, the customer’s programming selections will determine which orbital locations need to be visible.
From 72.5° WL: selected local channels markets From 101° WL: core DIRECTV programming From 110° WL: High Definition From 119° WL: selected local channels markets, HD and DIRECTV PARA
TODOS™ programming From 95° WL: WorldDirect™
2. Identify dish antenna location(s) and line of site(s) needed for customer’s programming selections. 3. Assemble and mount dish antenna(s). Standard mounting includes, but is not limited to the roof, eave, outside wall, balcony, deck and chimney. 4. Ground dish antenna(s) to meet NEC requirements. 5. Connect DIRECTV Receiver(s) to television(s). 6. Connect cables from dish antenna to multiswitch. 7. Connect cables from multiswitch to DIRECTV Receiver(s). 8. Run “auto configuration” from set up menu on each DIRECTV Receiver. 9. Check signal strength in the DIRECTV Receiver for 72.5° WL, 101° WL, 110° WL, 119° WL and/or 95° WL, depending on the customer’s programming selections and market location. 10. Check test channels for satellite confirmation.
For 72.5° WL –Channel 496 (even) For 101° WL – Channel 490 (odd) and Channel 491 (even) For 110° WL – Channel 494 For 119° WL – Channel 492 (odd) and Channel 493 (even) For 95° WL – Channel 497 For Macrovision- Channel 498
11. Provide customer education.
Copyright © 2006 DIRECTV. Unpublished work. All rights reserved. Page 40 Revised 03/30/06 Version 1

17.2 Satellite Dish Pointing Coordinates
DMA Zip Code
72.5 AZ mag
72.5 EL
101 AZ mag 101 EL Multi-
sat AZ Multi-sat EL
Multi-sat Tilt
Boise, ID 83702 110 23 143 37 165 39 96
Burlington, VT-Plattsburgh, NY 05401 194 39 242 27 244 27 58
Cedar Rapids-Waterloo, IA 52401 151 38 242 27 206 38 71
Champaign, IL 62701 158 40 211 39 210 40 67
Chattanooga, TN 37402 161 47 207 46 220 42 60
Columbia-Jefferson City, MO 65205 148 40 193 45 206 42 69
Davenport, IA 52801 154 38 196 40 209 37 70
Evansville, IN 47708 158 43 203 44 215 40 65
Fort Smith, AR 72901 141 43 188 48 202 46 69
Fort Wayne, IN 46808 166 40 209 40 220 36 64
Lincoln-Hastings, NE 68508 140 37 180 43 193 41 76
Sioux Falls, SD 57103 142 34 182 40 195 38 76
Springfield, MO 65802 145 41 190 46 204 43 70
Traverse City, MI 49684 167 37 207 36 218 33 68
Tri-Cities 37605 169 47 216 44 227 39 58
Waco-Temple-Bryan, TX 76702 133 44 184 53 200 50 70
Johnstown-Altoona, PA 15901 179 43 222 39 232 34 59
Toledo, OH 43604 170 40 211 39 223 35 64
Syracuse, NY 13202 187 40 227 35 237 30 59
Youngstown, OH 44512 176 41 218 38 229 34 61
Greenville, NC 27835 180 48 227 41 237 36 53
Charleston, SC 29401 173 50 222 46 234 40 52
Peoria-Bloomington, IL 61602 155 40 199 41 211 38 68
Wausau-Rhinelander, WI 54403 157 35 197 37 209 34 71
Copyright © 2006 DIRECTV. Unpublished work. All rights reserved. Page 41 Revised 03/30/06 Version 1

17.3 Multiswitches
When combining signal from the 72.5° WL and the 101° WL orbital locations, you must always use a 4x4 or 4x8 multiswitch.
o Both coax cables from the 101° WL LNB must be connected to the Sat A 13V and 18V side.
o Both coax cables from the 72.5° WL LNB must be connected to the Sat B 13V and 18V side.
When combining signal form the 72.5° WL, 101° WL, 110° WL and 119° WL orbital locations, you must always use a 6x8 multiswitch.
o All four coax cables coming from the multi-satellite dish antenna must be connected to the first four ports on the 6x8 multiswitch.
o One coax cable from the 72.5 LNB must be connected to the Flex Port 1 on the 6x8 multiswitch. You only need one cable because each flex port supports both 13v and 18v.
Copyright © 2006 DIRECTV. Unpublished work. All rights reserved. Page 42 Revised 03/30/06 Version 1

5 LNB Multi Satellite Dish, MPEG4 & KaKu Compatible Installation and Upgrade 18 KaKu INSTALLATION AND UPGRADE 18.1 KaKu Installation Overview 1. Perform and review site survey with customer. Remember, the customer’s programming selections will determine which orbital locations need to be visible.
From 72.5° WL: selected local channels markets From 99° WL Selected High Definition Local Channels From 101° WL: core DIRECTV programming From 103° WL Selected High Definition Local Channels From 110° WL: High Definition From 119° WL: selected local channels markets, HD and DIRECTV PARA
TODOS™ programming From 95° WL: WorldDirect™
2. Identify dish antenna location(s) and line of site(s) needed for customer’s programming selections. 3. Assemble and mount dish antenna(s). Standard mounting includes, but is not limited to the roof, eave, outside wall, balcony, deck and chimney. A Pole Mount is considered standard. 4. A Monopole support mount must be used on all wall and roof installations. 5. Ground dish antenna(s) to meet NEC requirements. 6. Connect DIRECTV Receiver(s) to television(s). 7. Connect ”B Band” Converter (BBC) to all H20 IRD’s. 8. Connect cables from dish antenna to multiswitch. 9. Connect cables from multiswitch to DIRECTV Receiver(s). 10. Check signal strength in the DIRECTV Receiver for 72.5° WL, 99° WL , 101° WL, 103°, WL 110° WL, 119° WL and/or 95° WL, depending on the customer’s programming selections and market location. 10. Check applicable test channels for satellite confirmation.
For 72.5° WL –Channel 496 (even) For 101° WL – Channel 490 (odd) and Channel 491 (even) For 110° WL – Channel 494 For 119° WL – Channel 492 (odd) and Channel 493 (even) For 95° WL – Channel 497 For Macrovision- Channel 498
11. Provide customer education.
Copyright © 2006 DIRECTV. Unpublished work. All rights reserved. Page 43 Revised 03/30/06 Version 1

18.2 KaKu Pointing Coordinates
DMA Representative Zip Code Lat / Long Ka/Ku Azimuth Ka/Ku
Elevation Ka/Ku Tilt
Detroit 48304 42.6 / 83.2 212.9 37.6 71.6
New York 07458 41.1 / 74.1 231 35 62.6
Los Angeles 92307 34.6 / 117.1 140.0 46.3 111.9
Chicago 60467 41.6 / 87.8 203.8 40.1 75.6
Philadelphia 19145 39.9 / 75.2 228.5 36.7 62.5
San Francisco 94954 38.2 / 122.6 131.7 40.3 115.1
Boston 01460 42.5 / 71.5 234.8 32.6 61.7
Dallas-Fort Worth 75212 32.8 / 96.9 184.6 51.6 83.7
Washington, DC 20117 39.0 / 77.7 224.0 38.8 64.0
Atlanta 30341 33.9 / 84.3 212.2 46.7 113.2
Houston 77024 29.8 / 95.5 188.1 54.7 80.5
Tampa 33567 27.9 / 82.1 219.8 51.3 58.5
Seattle 98272 47.9 / 121.9 133.6 31.4 107.9
Minneapolis 55340 45.1 / 93.6 191.7 37.5 82.7
Miami 33196 25.6 / 80.7 224.7 52.5 54.1
Sacramento 95682 38.6 / 121.0 133.8 40.7 113.2
Pittsburgh 15221 40.4 / 79.9 219.6 38.5 67.1
Baltimore 21234 39.4 / 76.5 226.2 37.8 63.2
San Diego 92065 33.1 / 116.9 139.9 47.9 112.8
Hartford 06033 41.7 / 72.5 233.1 33.8 61.8
Charlotte 28206 35.3 / 80.8 218.9 43.7 64.0
Nashville 37204 36.1 / 86.8 206.4 45.5 71.4
West Palm B 33478 26.9 / 80.2 224.6 51.0 55.0
Birmingham 35214 33.6 / 86.9 206.7 48.1 69.9
Phoenix (Kaibeto)
85017 86053
33.5 / 112.136.5 / 111.3
150.1 152.6
49.3 46.3
106.2 103.6
Cleveland 44281 41.1 / 81.7 216.0 38.5 69.2
Denver 80112 39.6 / 104.9 166.9 44 94.7
Orlando 32707 28.7 / 81.3 220.9 50.1 58.4
St Louis 63105 38.6 / 90.3 198.7 43.9 76.9
Copyright © 2006 DIRECTV. Unpublished work. All rights reserved. Page 44 Revised 03/30/06 Version 1

18.2 KaKu Pointing Coordinates (cont.)
DMA Representative Zip Code Lat / Long Ka/Ku Azimuth Ka/Ku
Elevation Ka/Ku Tilt
Indianapolis 46220 39.9 / 86.1 207.3 41.3 72.9
Raleigh 27520 35.6 / 78.5 223.4 42.3 61.9
Kansas City 64056 39.1 / 94.3 190.1 44.2 81.8
Milwaukee 53089 43.1 / 88.2 202.9 38.6 76.7
Columbus 43004 40.0 / 82.8 214.0 40.1 69.6
Salt Lake (Aneth)
84119 84510
40.7 / 111.937.1 / 109.4
152.1 156.8
41.6 46.1
102.4 100.9
Fresno 93657 36.8 / 119.4 136.0 43.1 112.9
18.3 Multiswitch
When combining signal form the 72.5° WL, 95° WL, 99° WL ,101° WL, 103° WL 110° WL and 119° WL orbital locations, you must always use a wideband 6x8 multiswitch.
o All four coax cables coming from the KaKu multi-satellite dish antenna must be connected to the first four ports on the wideband 6x8 multiswitch.
o One coax cable from the 72.5 LNB must be connected to the Flex Port 1 on the 6x8 multiswitch.
o One coax cable from the 95 LNB must be connected to the Flex Port 2 on the wideband 6x8 multiswitch.
Copyright © 2006 DIRECTV. Unpublished work. All rights reserved. Page 45 Revised 03/30/06 Version 1