dimensions in physics - society of physics students · dimensions in physics table of contents ......
TRANSCRIPT

Dimensions in Physics
Table of Contents Section 1: Getting to Know Your SOCK
About SOCKs Special Thanks
SOCK Buyer’s Guide Setting Up Events Event Preparation
Section 2: Demonstration Ideas
Presenting Polyhedra Movie Madness
Giant Mobius Band The Big Blue Sky
One Moon, Two Tides The Birth of a Solar System
Section 3: Workshop Activities
Pondering Polyhedra A Leg to Stand On Rainbow Reversal Taming the Tides Marbles in Orbit
1

The topics highlighted in the “Dimensions in Physics” SOCK are all loosely connected by a theme of geometry and its applications to physics, astronomy and pedagogy. We provide not only a demonstration for each topic, but a workshop idea as well. The following chart outlines which workshop ideas and SOCK components correspond to each demonstration. In addition, some reference materials that were instructive to us as we constructed the SOCK are listed.
Polyhedra
Scaling Laws
Surface Fun
Optical Geometry
Astronomical Phenomena
Related Demo:
Presenting Polyhedra
Movie Madness
Giant Mobius Band
The Big Blue Sky (Coffee Creamer Demo about why sky is blue and sunsets, red)
One Moon, Two Tides
The Birth of a Solar System
Related
Workshop:
Pondering Polyhedra
A Leg to Stand On
Shape of the
Spandex
Rainbow Reversal
Spandex Orbital Study
Reference Materials:
Feynman, Leighton, Sands:
The Feynman
Lectures on Physic1,
Volume II (Chapter 30)
A.B. Arons: Teaching
Introductory Physics2
G. D. White, M. Walker: The shape
of “the Spandex” and orbits upon its surface, included
Halliday, Resnick, Krane:
Physics3; also, for natural
rainbows, Conceptual
Physical Science, Hewitt, et al.
Michael Henle: A Combinatorial Introduction to Topology; also aforementioned Spandex article,
included
What to Use from
SOCK:
Wood shapes,
Foam shapes
Wood blocks, SOCK grid
paper
Yellow tag, Spandex and hoop
Diffraction grating glasses
Marbles, spandex (need to acquire larger piece of
Spandex for most effective demos)
1Feynman’s text gives a very helpful and fascinating introduction to the role of crystals in nature. 2This is the definitive source for the science of physics pedagogy; everyone who teaches physics should have this text. 3In general, most introductory physics texts deal with diffraction gratings, but we found that this
one does a particularly good job of explaining the concepts.
2

Getting to Know Your SOCK
About SOCKsSpecial Thanks
SOCK Buyer’s GuideSetting Up EventsEvent Preparation
About SOCKs
The SOCK program is part of the outreach effort started by the Society of Physics Students (SPS) in 2001. It is partially supported by its associated physics honor society, Sigma Pi Sigma (). Both SPS and are affiliated with the American Institute of Physics (AIP).
For more information about any aspect of the program, please email us at [email protected] (please mention SOCKs in the subject line) or call the SPS office at 301-209-3007.
3

Special Thanks
Special thanks to the following people/organizations for their efforts in developing this year’s SOCK:
-Russ Wood and the University of Maryland Physics Department
-SPS and AIP Education staff
-Students, faculty, and parents from Angelus Academy, Springfield, VA
-Northwestern State University SPS chapter, particularly KristenRussell and Marcie Kimball, authors of the first polyhedronexercise as a winning Marsh White proposal. They helped test-drive the first versions of the geometry and spandex exercises.
SOCK Buyer’s GuideThe materials provided represent a sampling of what you can use to perform the activities outlined in this guide. In the event that you need to replenish materials, below is a list of the names of the vendors used.
Product Qty Vendor
Fun noodle shape 1 Target (www.target.com)
Foam shape 1 JoAnn Fabrics (www.joann.com)
Wood shape 5 Home Depot (www.homedepot.com), Smoot’s Lumber (local to Alexandria, VA)
Craft blocks 1 bag Lara’s Crafts (www.larascrafts.com)
Pipe cylinders 3 Home Depot (www.homdepot.com)
Diffraction glasses 10 Rainbow Symphony (818-708-8400)
Spandex sheet 1 JoAnn Fabrics (www.joann.com)
Marbles 30 The Dollar Tree
Quilting hoop 1 Schrock’s International (330-874-3700)
4

Setting Up Events1. To locate a school open to volunteers, ask staff from your community
service office or education department for recommendations. The more specific the contact information, the better.
2. If attempts to make contact with someone from the outreach site fail, try contacting a guidance counselor or administrator who can connect you to teachers who are actively seeking volunteers.
3. Your schedule may not always fit with the school’s schedule. Try a Saturday event instead of a classroom event or scale-down your outreach ideas so smaller numbers of SPS members can do the event successfully.
4. To maximize learning, coordinate your outreach event with the teacher’s lesson plans. This way the students are getting reinforcement and the teacher feels like the time is spent on something worthwhile.
Event Preparation
Preparing for the big event? Here are a few things to remember.
1. Plan activities ahead of time. Teach from a lesson plan that not only details the planned lesson but also includes notes from outside resources to supplement the knowledge you already have.
2. Prepare materials in advance. Find out the audience size and whether or not a computer is provided in advance so that you can prepare accordingly.
3. Practice. Certainly the workshop will take on a life of its own, but your lesson plan will be most effective if you practice. This will also help you to think about questions that might be asked ahead of time.
5
Demonstrations spark the interest of an audience. The following demonstrations explore “Dimensions in Physics” while setting the foundation for deeper exploration into
presented topics through workshops.
Demonstration Ideas
Demonstration IdeasPresenting Polyhedra
To introduce students to polyhedra, show a large box (like a refrigerator box) and point out faces, edges, and corners. You might
Movie Madness
Let’s face it: the movie industry often uses bad physics. By showing a clip of the bad physics, you can start the students thinking about related topics. Then you can lead them to a correct perspective on what should have been shown on the big screen.
want to use symbols to help the students remember. For instance, you could draw a giant smiley face on one of the box faces as you name it.
From Men In Black, Columbia Pictures, 1997
6

Demonstration Ideas (cont’d)
Giant Mobius BandBefore directing students to make their own small Mobius strips out of paper and tape, first get their help in making a GIANT Mobius band. To make a demonstration mobius band, connect seven or eight sheets of poster board with duct tape, edge to edge, to make a single long strip. Bring the ends together, giving a single twist to one end before you fasten them together with tape. Ask the audience for their ideas on what will happen as you trace, starting from any point on the strip, and then cut around the middle. You can also experiment with different numbers of twists and crossed mobius bands. For more information on the math behind the demo, see Michael Henle’s A Combinatorial Introduction to Topology (Dover Pub., 1979).
Demonstration Ideas (cont’d)
Because of its popularity in last year’s SOCK and its relevance to the theme of Dimensions, here is a demonstration from SOCK #1.
The Big Blue Sky (or Why the sky is blue and a sunset, red.)
Materials: directional white light source, water tank, non-dairy coffee creamer or powdered milk, white paper, a dark room
Procedure: 1. Set up a plain water tank with a flashlight on one end (see image, right).
2. As students look through the water at the light source, begin to slowly poor the creamer throughout the water, simulating molecules in the atmosphere. If you put in too much, the light source will be completely blocked.
7

Demonstration Ideas: The Big Blue Sky (cont’d)
3. Look at the beam from the side of the tank and then from the end of the tank. (You may want to project the light onto a white card at the end of the tank.) From the side, the beam looks bluish-white; from the end, it looks yellow-orange. If you have added enough creamer to the water, you will be able to see the color of the beam change from blue-white to yellow-orange along the length of the beam.
Water Tank
White light source This side should appear more red
This side should appear dimmer and bluish
Demonstration Ideas:The Big Blue Sky (cont’d)
Blue light scattering off of molecules
A brief explanation: A clear cloudless day-time sky is blue because molecules in the atmosphere scatter blue light from the sun at larger angles than they scatter red light. At sunset
we see red and orange colorsbecause the blue light has been scattered at right angles, away
from the line of sight toward the sun.
Daytime
Sunset
8

Demonstration Ideas (cont’d)
Here is another favorite from last year’s SOCK.
The Rainbow Room
Materials: a dark room, diffraction glasses, multiple light sources*
Bring students into the dark room individually or in groups and have them put on their rainbow glasses. It can be a time for free exploration, group discussions or even a more formal lesson such as Spectral Scavenger Hunt. It is also a time in which they can get to know spectra: the orientation of the colors, brightness, continuity, etc.
*LIGHT SOURCE IDEAS: laser, glow sticks, glow-in-the-dark ball, mini-flashlight, black lights, vapor tubes, incandescent bulbs, fluorescent lamps, fluorescent liquids, spark generators
Demonstration Ideas (cont’d)
One Moon, Two TidesThis is an excellent way to explain why there are two tides. The tidal bulge on the earth that points toward (approximately) the moon is easy to motivate from gravitational considerations. To help understand the second bulge opposite the moon, choose two audience participants of noticeably different sizes with long hair (if you cannot find long-haired participants, choose two participants who have shirts tied around their waists- anything that will fly out). Have the participants model the earth-moon system by joining hands and spinning around each other, like roller-skaters sometimes do. Their hair will fly out as they orbit each other, just like the earth’s water on the side opposite the moon protrudes, making a second tidal bulge. In reality, the earth’s tides are complicated by the sun’s effects (roughly ½ that of the moon) and the earth’s rotation, which causes the tidal bulges to lead the moon by almost 90 degrees. (See A Dynamical Picture of the Oceanic Tides, Eugene I. Butikov, AJP, October 2002)
9

Demonstration Ideas (cont’d)
The Birth of a Solar SystemMaterials: large spandex sheet, marbles
To demonstrate one theory on solar system origins, have the class gather around the spandex. Choose several people to hold up the spandex and others to roll marbles onto the spandex. As the marbles roll around, some will collect in the center while others begin to orbit the central mass. This is one model used to describe the origins of our solar system and other planetary bodies orbited by moons.
10

1
Workshop ActivitiesThis section contains lesson plans and worksheets that you
can use together to form your own workshops. Sample lessons give an overview of what to during the workshop and the
worksheets give an in-depth look at a given topic. You can easily adjust the fine details of each workshop for a
particular age group. Above all, we hope that our ideas inspire more ideas on how to use the equipment or present a topic in
a way that utilizes good science to spark imaginations.
Pondering Polyhedra
Overview: The study of crystals is essential to understanding the molecular composition of solids- from salt crystals to superconductors. This workshop involves the exploration of simple crystal models to systematically discover general properties including Euler’s formula for polyhedra.
Demo Idea: Presenting Polyhedra
Exploration leads to discovery
11
2
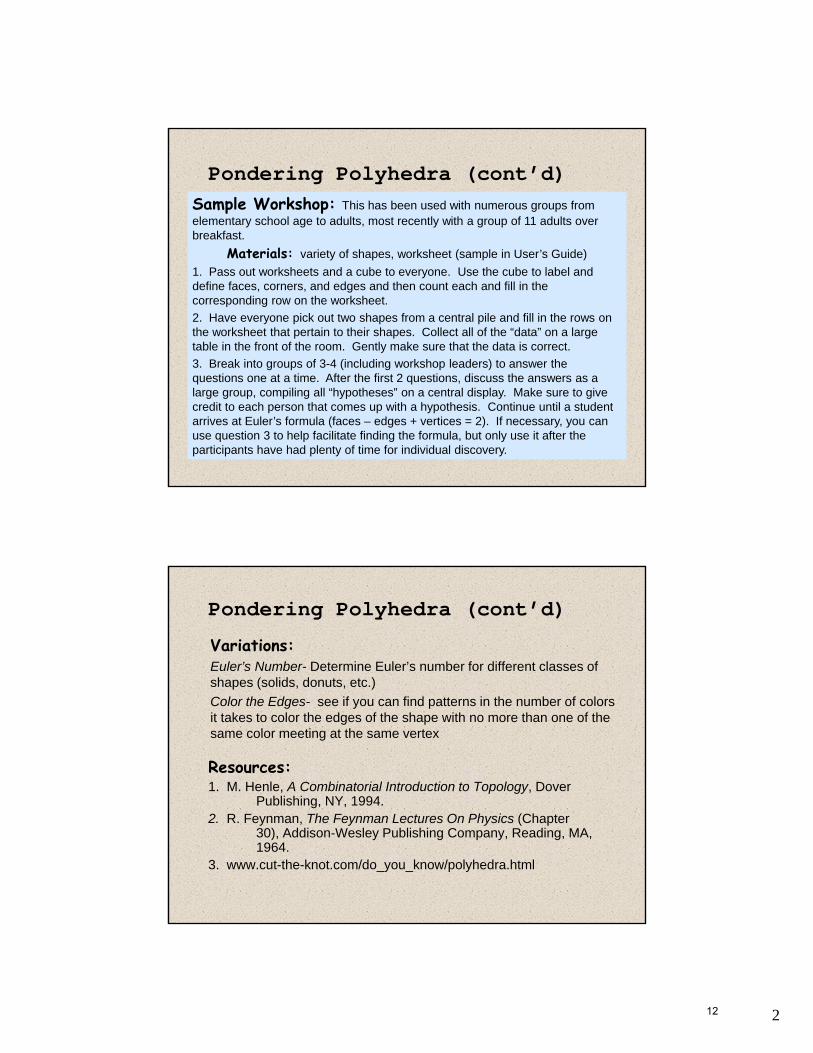
Pondering Polyhedra (cont’d)Sample Workshop: This has been used with numerous groups from elementary school age to adults, most recently with a group of 11 adults over breakfast.
Materials: variety of shapes, worksheet (sample in User’s Guide)
1. Pass out worksheets and a cube to everyone. Use the cube to label and define faces, corners, and edges and then count each and fill in the corresponding row on the worksheet.
2. Have everyone pick out two shapes from a central pile and fill in the rows on the worksheet that pertain to their shapes. Collect all of the “data” on a large table in the front of the room. Gently make sure that the data is correct.
3. Break into groups of 3-4 (including workshop leaders) to answer the questions one at a time. After the first 2 questions, discuss the answers as a large group, compiling all “hypotheses” on a central display. Make sure to give credit to each person that comes up with a hypothesis. Continue until a student arrives at Euler’s formula (faces – edges + vertices = 2). If necessary, you can use question 3 to help facilitate finding the formula, but only use it after the participants have had plenty of time for individual discovery.
Pondering Polyhedra (cont’d)
Variations:Euler’s Number- Determine Euler’s number for different classes of shapes (solids, donuts, etc.)
Color the Edges- see if you can find patterns in the number of colors it takes to color the edges of the shape with no more than one of the same color meeting at the same vertex
Resources:1. M. Henle, A Combinatorial Introduction to Topology, Dover
Publishing, NY, 1994.2. R. Feynman, The Feynman Lectures On Physics (Chapter
30), Addison-Wesley Publishing Company, Reading, MA, 1964.
3. www.cut-the-knot.com/do_you_know/polyhedra.html
12

3
Pondering Polyhedra (cont’d)What we learned when we did this lesson:
-It is a good idea to provide pencils and stickers to mark shapes while counting.
-Kids gravitate towards the foam shapes because of their larger size.
-Complex shapes are hard for anyone to deal with. Allow plenty of time for counting.
-Make sure that the table in the front of the classroom is correct.
A Leg to Stand On
Overview: In Teaching Introductory Physics, Arnold Arons spends the first chapter detailing a number of mathematical problems that hinder students from grasping major concepts in physics. Among the problems mentioned are confusion of area and volume as well as problems understanding ratios and
Related Demo: Movie Madness (we used a scene from the end of Men In Black I)
Developing scaling reasoning through models
scaling. This workshop cannot fix such problems, but we hope that it provides a sound approach to work on such problems that plague students of all ages.
13

4
A Leg to Stand On (cont’d)Sample Workshop: This was used as part of a 90-minute physics session
for 12 4th-8th graders.
Materials: movie, TV/VCR, craft blocks, graph paper, scissors, tape, prepared models, worksheet (see sample)
1. Show clip of roach scene from MIB.a. Question: What would happen to the bug if it were that big?b. We can use physics to find out what would happen to the bug
2. To do this, we are going to use models. A model is a small representation of something that is usually bigger, like this model of a robot (show decorated robot model). To make it bigger we multiply the length of each side by a number that makes it the correct size in the end.
3. Our first models are little boxes. (Hand out worksheets.)a. Build and measure the small and medium boxes in small groups.b. Record all measurements for the small and medium boxes.
4. Build big box as a class. Find all measurements for it and record.5. Build robots in small groups (just add blocks to make legs for the medium box,
double all leg dimensions for the big box). Measure and record.6. Discuss the operational definition of support from the worksheet.7. Finish worksheet. Discuss as small groups then as a class.
A Leg to Stand On (cont’d)Variations:
Resources:1. Arnold B. Arons, Teaching Introductory Physics, John Wiley and
Sons, Inc, New York, 1997.2. Lillian C. McDermott, Physics By Inquiry, Vol. I, John Wiley and
Sons, Inc., New York, 1996.
Pipe Fillers- Seal off ends of scaled pipe and investigate the scaling properties of cylindrical shapes.
Practice Problems- Arnold Arons (see below for bibliography) provides a number of useful practice problems in chapter one of his book, Teaching Introductory Physics.
“Properties of Matter”- This is the first section of labs contained in Lillian C. McDermott’s Physics By Inquiry. Many of the labs in the section deal directly with understanding fundamentals of physics, including area and mass.
14

5
A Leg to Stand On (cont’d)
What we learned when we did this lesson:-You will need to watch as the students draw the outlines of their
boxes on the graph paper. Some students may get frustrated when trying to move from 2-D to 3-D in their heads.
-The more blocks that you can provide, the more fun the kids have.-You can substitute big blocks for known numbers of little blocks to
speed the counting/filling process. This also gives the students more of a chance to develop an intuition of how many little blocks fill a larger block/box.
Rainbow ReversalOverview: The math necessary for understanding both diffraction gratings and prisms is nothing more than basic geometry: it is a matter of understanding
Demo Idea: The Big Blue Sky, Rainbow Room
which color of light will be deflect at the greatest angle and which will be deflected at the smallest angle. In this way major concepts in optics can be easily explained.
The physics behind gratings and prisms
15

6
Rainbow Reversal (cont’d)
Sample WorkshopMaterials: rainbow glasses, light sources, worksheet (see sample)1. Pass out diffraction glasses and worksheets. Ask audience to close eyes.2. “Part I: Learning About Light”a. Ask each audience member to picture a day at the beach. Each watches the
waves as they come to shore. It is peaceful, but their scientific natures get the best of them and they decide to start measuring different properties of the waves.
b. Have them open their eyes and look at Figure 1. Point out the different properties of waves on an overhead.
c. Do Part I, Bullet 1.d. Follow worksheet discussions of ocean waves vs. light waves and white light.3. Do “Part II: Diffraction Gratings” in small groups.4. Do “Part III: Prisms” in small groups.5. Do “Part IV: Conclusions” as a class.
Rainbow Reversal (cont’d)
Variations:Gratings Explained- Go into detail about how images are produced by the diffraction glasses.
Prisms in Practice- Do “Why the Sky is Blue” using different shaped containers. Apply knowledge of prisms to predict and explain color patterns.
Resources:1. Hans C. Ohanian, Physics 2nd Edition, Expanded, Norton, New
York, 1989.
16

7
Taming the Tides
Demo Idea: One Moon, Two Tides
Tidal bulges, the Roche limit, and planetary rings
Overview: Grasping the concept of tidal bulges leads to the introduction of the Roche limit and planetary rings. Using spandex, a light bulb, and marbles, students can see first hand the effects of gravity.
Taming the Tides (cont’d)
• You’ll need to make a Spandex about a meter across.• Place about 10 marbles onto the Spandex and then press
the palm of your hand deep into the Spandex, moving in a circular pattern. With practice you can get the group of marbles to orbit your hand. (Instead of your palm you can also use the round surface of a light bulb pressed deep into the Spandex, with your fingers grasping the socket part.)
• Closely watch the orbiting marbles. You should be able to see the group of marbles form a pattern, elongating toward your hand (or the bulb). If you make the orbit get tighter and tighter, this effect should become more pronounced.
17

8
Taming the Tides (cont’d)• Eventually as the orbits get tighter, the marble satellite
“breaks up” just as a satellite would if it orbited within the Roche limit. (The individual marbles don’t break…the group of marbles which started out as roughly round blob of marbles then deformed to an oval of marbles pointing toward the deepest part of the Spandex, then a line, finally separates into individually orbiting marbles). This is the essential effect that produces planetary rings, and the “string of pearls” effect that astronomers observed as Comet Schoemaker-Levy crashed into Jupiter
Resources:
1. Gary White, Tony Mondragon, David Slaughter, and Dorothy Coates, “Modeling Tidal Effects,” American Journal of Physics, April, 1993.
Marbles in Orbit
Demo Idea: Birth of a Solar System
Overview: This experiment is described in detail in the article included in the pocket of the User’s Guide entitled, “The shape of ‘the Spandex’ and orbits upon its surface.” Using a piece of spandex and marbles, students can explore an incorrect model of orbital systems. By making comparisons between their system and Kepler’s observations of our solar system, they can form a correct models of astronomical systems.
An incorrect model helps develop a correct mental model of the solar system
18

9
Marbles in Orbit (cont’d)Sample Workshop: This workshop was tested in multiple settings with
students ranging from upper middle school age to college age.
Materials: spandex, marbles, stopwatch, worksheet, graph paper1. Pass out worksheets.2. Review Kepler data.
a. Kepler used tables of astronomical data to look for connections.b. He wanted to connect period (T) and radius of orbit (R).
-Define T and R.c. Present planetary data and look for patterns.
3. Observe Spandex orbital system in groups.a. Practice putting marbles in orbit and timing the period.b. Decide on a way to measure the radius of orbit (or know before hand average radius of orbit)c. Collect data while varying the mass pulling down the Spandex.
-Have a designated recorder put data into a chart on worksheet.d. Look for patterns in the data.
4. Using the data.a. Graph the data T versus R for both Kepler and Spandex data.b. Analyze the shapes of each graph. Discuss differences.c. How does error affect Spandex data?
Marbles in Orbit (cont’d)
Resources:
1. Edwin F. Taylor and John Archibald Taylor, Exploring Black Holes: An Introduction to Relativity, Addison Wesley, Longman, Inc., San Francisco, 2000.
2. Gary White and Michael Walker, “The shape of ‘the Spandex’ and orbits upon its surface,” American Journal of Physics, 2002.
Variations:Geometry of Space- Use the Spandex and chalk to explore basic principles of hyperbolic geometry, the geometry used to describe black holes. You can explore the nature of a straight line, parallel lines, and triangles. For lesson ideas, see www.sff.net/people/Geoffrey.Landis/blackhole_models/paper_blackholes.html.
19

Pondering Polyhedra- Sample Worksheet
Shape # of Faces # of Corners # of Edges Group A: PRISMS
Group B: PYRAMIDS
Group C: STACKED PYRAMIDS
1. Sarah, Ryan, and Cody formed a group to discuss their shapes. They each observed a pattern in their shapes.
Sarah’s hypothesis: There are always more edges than faces or corners. Is this true? Ryan’s hypothesis: There are always more faces than corners. Is this true? Cody’s hypothesis: The numbers of faces, corners, and edges are always even numbers for group A, the prisms. Is this true?
2. Cody’s hypothesis states a pattern for a group of shapes. Do you observe any patterns for groups of shapes? Sarah’s hypothesis states a pattern for all of the shapes. Do you observe any patterns that work for all of the shapes? 3. If you add the number of faces to the number of corners is the answer less than, equal to, or more than the number of edges? Or is there no pattern at all?
20

A Leg to Stand On- Sample Worksheet
The first models we will make are little boxes. 1. Decide the length around the box so that you can draw the bottom of the box
on your graph paper. The small box will have a 1 line long side and a 2 lines long side. The dark rectangle in the picture shows a sample drawing.
2. Calculate (by counting the squares) how big the surface is that you drew and record on Table 1. This will be the foot surface that the weight of the box rests on.
3. Draw the walls of the box. For the small box they should all be one line high (see picture for help).
4. Cut the whole thing out (be sure to keep the walls attached to the bottom). 5. Fold the walls in and tape the loose edges together. 6. Fill the box with the little blocks. Each block is one block of weight. Record
the number of blocks of weight in Table 1. 7. Repeat these steps for a medium box that has two times the length, height, and
width of the small box. 8. As a class you will build a big box that has four times the length, height, and
width of the small box. Table 1: Small box, medium box Small box Medium box The medium box has two times the
length, height, and width of the small box.
Length around The medium box has ____ times the length around of the small box.
Foot surface The medium box has ____ times the foot surface of the small box.
Weight The medium box has ____ times the weight of the small box.
Table 2: Small box, big box Small box Big box The big box has four times the length,
height, and width of the small box. Length around The big box has ____ times the length
around of the small box. Foot surface The big box has ____ times the foot
surface of the small box. Weight The big box has ____ times the weight
of the small box.
21

A Leg to Stand On- Sample Worksheet
Table 3: Medium box, big box Medium box Big box The big box has two times the length,
height, and width of the medium box. Length around The big box has ____ times the
length around of the medium box. Foot surface The big box has ____ times the foot
surface of the medium box. Weight The big box has ____ times the
weight of the medium box. Question 1: Using the data in your tables, circle the one that gets bigger faster as you move from a small box to a big box:
a.) length around or weight b.) foot surface or length around c.) weight or foot surface
If we add legs to our boxes, they look like little robot models. You can put two small blocks under the medium box to make a medium robot. If you double all of the dimensions the small robot to make the big robot, then you will have to put two 2x2x2 cubes (eight small blocks total) under the big box to make the second robot. Table 4: Small robot, big robot Medium robot Big robot The big robot is two times bigger than
the medium robot. Foot surface The big robot has ____ times the foot
surface of the medium robot. Weight The big robot has ____ times the
weight of the medium robot. Some physicists define support as the comparison of foot surface to weight. In order to see which of our models has the best support we can make a table of our data. The model with the amount of foot space closest to the amount of weight has the most support. Table 5: Support Foot surface Weight Medium box Big box Medium robot Big robot Question 2: Which model has the best support according to Table 5? How would the small box compare?
22

A Leg to Stand On- Sample Worksheet
Question 3: Below are photos of an elephant and a flamingo.
How do the elephant’s legs and feet seem suited for his size? How are the flamingo’s legs and feet different from the elephant’s legs and feet? What would happen if the flamingo was as big as an elephant? Question 4: Now think about the roach in MIB. What would happen if a roach grew to be that size? Besides its legs and feet, do you think that the large size would affect any other parts of its body?
23

24
1
1
ReversalA lesson in the geometry of rainbows
2
Rainbow Glasses•Put on rainbow glasses•Observe the sources around you
-What colors do you see?-Which color is closest to the source?-Which color is farthest from the source?
25

2
3
Learning About Light
•Light waves: amplitude ~ brightness, wavelength ~ color•Physicists use wavelength to define color of visible light
•Sometimes light contains more than one wavelength•2 ways to separate the colors: gratings and prisms
4
Diffraction Gratings•Lenses of the glasses are diffraction gratings•Typical grating: parallel scratches/slits cause scattering, produce rainbow pattern
•Our gratings: crossed scratches-scratches are about
4200 nm apart
26

3
5
Diffraction Gratings (Spacing = 4200 nm)
CONSIDER…Alice’s HYPOTHESIS: For diffraction gratings, longer wavelengths scatter at greater angles.Bob’s HYPOTHESIS: For diffraction gratings, shorter wavelengths scatter at greater angles.
Test the HypothesesColor, wavelength
Red ~ 680nm
Orange ~ 610nm
Yellow ~ 580nm
Green ~540nm
Blue ~ 480nm
Using this image taken through the glasses, who do you agree with?
6
Now consider Prisms
•No scratches•Light bounces off of atoms in prism
27
4
7
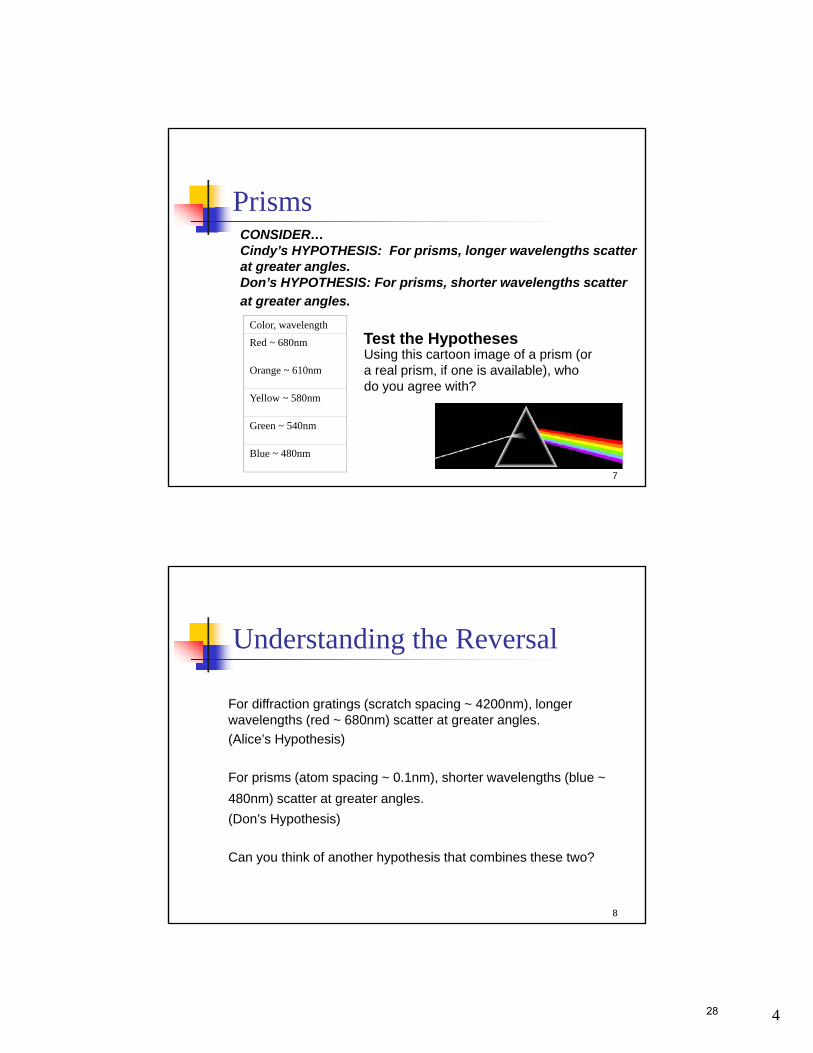
PrismsCONSIDER…Cindy’s HYPOTHESIS: For prisms, longer wavelengths scatter at greater angles.Don’s HYPOTHESIS: For prisms, shorter wavelengths scatter at greater angles.
Test the HypothesesColor, wavelength
Red ~ 680nm
Orange ~ 610nm
Yellow ~ 580nm
Green ~ 540nm
Blue ~ 480nm
Using this cartoon image of a prism (or a real prism, if one is available), who do you agree with?
8
Understanding the Reversal
For diffraction gratings (scratch spacing ~ 4200nm), longer wavelengths (red ~ 680nm) scatter at greater angles.
(Alice’s Hypothesis)
For prisms (atom spacing ~ 0.1nm), shorter wavelengths (blue ~
480nm) scatter at greater angles.
(Don’s Hypothesis)
Can you think of another hypothesis that combines these two?
28

5
9
Understanding the Reversal
Lauren’s Hypothesis (Do you agree?):The wavelength closest to the size of the object the light scatters from experiences the largest angle of scattering.**Note that this is consistent with the “Coffee Creamer Demo” which shows why the sky is blue and sunsets are red. What about natural rainbows like the one shown on the title page of this lesson?---which kind do you think they are, like the diffraction grating kind or the prism kind? For more details about natural rainbows see, for example, page 292 of Conceptual Physical Science, 2nd ed. by Hewitt, Suchocki, and Hewitt.
29

1
1
Shape of the Spandex
What kind of mathematical function describes the profile of the Spandex when a weight is suspended from the middle? Digital photography is an easy way to record the shape of the Spandex profile and match it to various math functions.
What shape would it have to have to be like the gravitational potential well of the sun?
2
Non-Euclidean Surfaces with the Spandex
While the Spandex is a tactile version of the textbook “rubber-sheet geometry” drawings, there is usually much vagueness about what is meant by this analogy. We would say that the Spandex models “potential wells” adequately, but have not really used it as a model for space-time geometry. The Spandex caneasily be used to demonstrate what is meant by two dimensional non-Euclidean surfaces or curved space (as opposed to space-time) and the resulting discussions are fun. For example, hanging a mass from the center results in hyperbolic surface geometry. Discussions of the definition of straight lines, geodesics, light paths vs. marble paths, how many degrees in a triangle, and the expansion of space become more concrete when using the Spandex.
30

2
3
Some other things to do with the Spandex
Astronomy demonstrations• Tidal effects, comet break-ups,
planetary rings• Modelling origin of solar system• Precession of orbits• Escape velocity• Exploring orbits in
binary systems by hanging two weightsSee Modelling Tidal Effects, AJP, April 1993.
4
Some Spandex Results*(Spandex not pre-stretched)
The time of orbit cubed is roughly proportional to the radius of orbit squared (reversing the exponents in Kepler’s 3rd Law for planets)
Weight needed to deform Spandex goes roughly as cube of vertical displacement---so to get twice the displacement need 8 times the weight
Far from the mass, the profile of the Spandex goes as r2/3
*from ‘The shape of the Spandex and orbits upon its surface’, AJP, January, 2002, included in SOCK User’s Guide
31

3
5
A workshop-laboratory on The Spandex
Spandex Orbital Study Hang a mass from the Spandex* Roll marbles in circular orbits Measure period and radius of orbit Make tables of data and look for curiosities, like
Kepler’s 3rd Law (see next page) Can use known Spandex profile to obtain
theoretical result for comparison in large orbit limit (see Spandex article)
*It is probably necessary to use a large Spandex (~1 sq. meter) than the one included in your SOCK for this; mount it on circular frame (a hula hoop works, better is a 1m circle cut out of 4x8 plyboard-we cut ours into two 2x8 pieces and hinged it for ease in transporting)
6
Re-visiting Kepler’s 3rd Law (see previous page)
planets period, T radius from sun, R T-squared R-squared T-cubed R-cubed(in years) (in earth-sun distances)
Mercury 0.241 0.387 0.0580 0.150 0.0140 0.058Venus 0.616 0.723 0.379 0.523 0.2338 0.378Earth 1 1 1 1 1.0000 1.000Mars 1.88 1.52 3.54 2.321 6.65 3.54Jupiter 11.9 5.20 141.6 27.1 1685.16 140.8Saturn 29.5 9.54 870.3 91.0 25672.38 867.9
Notice anything interesting when comparing the columns? Kepler doubted that the similarities in the T-squared and R-cubed columns could be a coincidence; similar curiosities occur when studying orbits on the Spandex.
32