dimâge scan dual windows v2.1 - derrybryson.com scan...your scanner has been packaged with the ds...
TRANSCRIPT

Windows Version

Thank you for purchasing the Minolta Dimâge Scan Dual. The Dimâge Scan Dual is a dualformat film scanner capable of scanning 35mm and, with the optional AD-10 APS Adapter,Advanced Photo System film.
This manual has been designed to help you understand the operation of your scanner. Torealize all the benefits of your scanner, please read this manual thoroughly.
Your scanner has been packaged with the DS Dual twain driver software for AdobePhotoshop™/ Adobe PhotoDeluxe™. Before using the Minolta Dimâge Scan Dual, werecommend you have a working knowledge of the PC and its operating conventions.Familiarity with the mouse and Windows® menus and commands is necessary beforeoperating the Minolta Dimâge Scan Dual driver software.
This manual does not instruct in the basic use of the PC, the Windows® 95, Windows® 98, orWindows NT® operating systems, Adobe Photoshop™ , or Adobe PhotoDeluxe™.
This mark certifies that this product meets the requirements of the EU (EuropeanUnion) concerning interference causing equipment regulations. CE stands forConformité Européenne.
This Class B digital apparatus meets all the requirements of the Canadian Interference-Causing Equipment Regulations.Cet appareil numérique de la classe B respecte toutes les exigences du Règlement sur lematériel brouilleur du Canada.
• Changes or modifications not approved by the party responsible for compliance could void the user’s authority tooperate the equipment.
• This manual may not be copied in part or whole without prior written permission from Minolta Co., Ltd. ©1997Minolta Co., Ltd.
• Every necessary caution has been taken to ensure the accuracy of this instruction manual. Please contact us ifyou have any questions, find any errors, or notice missing information.
• Minolta is not responsible for loss, damage, or other results occurring during the operation of this product.
MS, MS-DOS, Microsoft, Windows®, Windows® 95, Windows 98®, and Windows NT® areregistered trademarks of the Microsoft Corporation.Adobe®, Photoshop™, and Adobe PhotoDeluxe™ are registered trademarks of Adobe Systems Inc.Corel Draw™ is a trademark of the Corel Corporation.Other corporate and product names are the trademarks and registered trademarks of theirrespective companies.
Tested by the Minolta Corporation101 Williams DriveRamsey, New Jersey 07446USA
This device complies with Part 15 of the FCC Rules. Operation issubject to the following conditions: (1) This device may not causeharmful interference, and (2) this device must accept anyinterference received, including interference that may causeundesired operation.To meet FCC regulations, the SCSI cables used with this scannermust be equipped with ferrite cores.

Dimâge Scan Dual 1
FOR PROPER AND SAFE USE
Please read and understand each caution before using this product.
To avoid fire or electric shock:• Only use the voltage specified for this unit.• Do not expose this unit to liquids.• Do not insert metal objects into this unit.• Do not touch the cord or plug if your hands are wet.• Unplug this unit when it is not in use.
Improper use of the power cord may result in fire or electric shock.• Insert the plug securely into an electrical outlet.• Do not pull on the cord. Grasp the plug when removing the power cord from an
outlet.• Do not scratch, twist, modify, heat, or place a heavy object on the power cord.• Do not connect the ground to a gas pipe, telephone ground, or a water pipe.
Improper grounding can result in electric shock.
This product must have sufficient ventilation while in use. Blocked ventilationducts may cause the unit to overheat, increasing the risk of fire.• Do not use or store this product in dusty or very humid areas.
If there is smoke, a strange smell, or any other unusual conditions, shut downand unplug the unit, then contact a Minolta Service Facility.
CAUTION
Unexpected damage may occur if this unit is left unattended near youngchildren.
Do not attempt to disassemble this product. It contains high-voltagecircuits. Take the product to a Minolta Service facility for repairs.
2
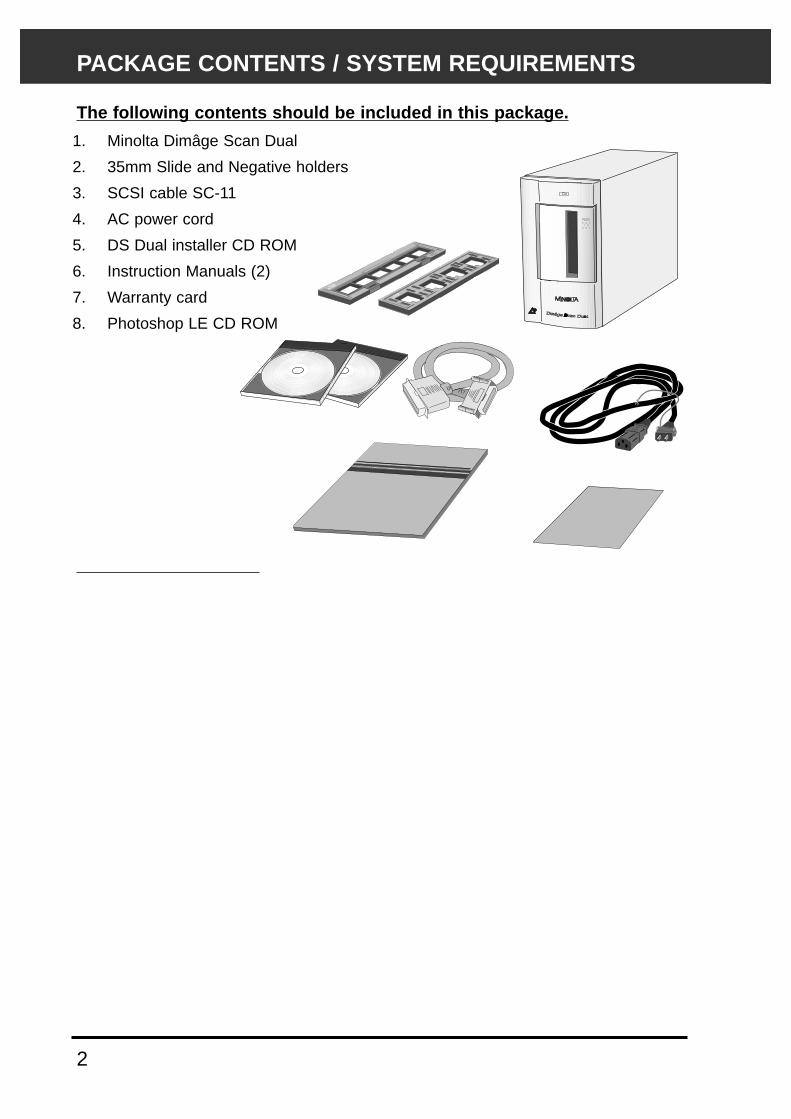
1. Minolta Dimâge Scan Dual
2. 35mm Slide and Negative holders
3. SCSI cable SC-11
4. AC power cord
5. DS Dual installer CD ROM
6. Instruction Manuals (2)
7. Warranty card
8. Photoshop LE CD ROM
PACKAGE CONTENTS / SYSTEM REQUIREMENTS
The following contents should be included in this package.

Dimâge Scan Dual 3
TABLE OF CONTENTS
FOR PROPER AND SAFE USE . . . . . . . . . . . . . . . . . . . . . . . . . . . . . . . . . . . . . . . . . . . . .1PACKAGE CONTENTS . . . . . . . . . . . . . . . . . . . . . . . . . . . . . . . . . . . . . . . . . . . . . . . . . . . .2SYSTEM REQUIREMENTS . . . . . . . . . . . . . . . . . . . . . . . . . . . . . . . . . . . . . . . . . . . . . . . . .2TABLE OF CONTENTS . . . . . . . . . . . . . . . . . . . . . . . . . . . . . . . . . . . . . . . . . . . . . . . . . . . .3NAMES OF PARTS . . . . . . . . . . . . . . . . . . . . . . . . . . . . . . . . . . . . . . . . . . . . . . . . . . . . . . .4
SCANNER SETUPSetting the SCSI ID . . . . . . . . . . . . . . . . . . . . . . . . . . . . . . . . . . . . . . . . . . . . . . . . . . . . . . . . . . .6Connecting the Hardware . . . . . . . . . . . . . . . . . . . . . . . . . . . . . . . . . . . . . . . . . . . . . . . . . . . . . .7Installing the Software . . . . . . . . . . . . . . . . . . . . . . . . . . . . . . . . . . . . . . . . . . . . . . . . . . . . . . . .10
STANDARD OPERATIONLaunching the Software . . . . . . . . . . . . . . . . . . . . . . . . . . . . . . . . . . . . . . . . . . . . . . . . . . . . . . .16
Standard Control Window - Names of Parts . . . . . . . . . . . . . . . . . . . . . . . . . . . . . . . . . . . . .18Preview Window - Names of Parts . . . . . . . . . . . . . . . . . . . . . . . . . . . . . . . . . . . . . . . . . . . .19Preferences Dialog Box - Names of Parts . . . . . . . . . . . . . . . . . . . . . . . . . . . . . . . . . . . . . . .20
Setting the Preferences . . . . . . . . . . . . . . . . . . . . . . . . . . . . . . . . . . . . . . . . . . . . . . . . . . . . . . .21Loading the Film Holder . . . . . . . . . . . . . . . . . . . . . . . . . . . . . . . . . . . . . . . . . . . . . . . . . . . . . .23Inserting the Film Holder into the Scanner . . . . . . . . . . . . . . . . . . . . . . . . . . . . . . . . . . . . . . . . .25Setting the Film Type . . . . . . . . . . . . . . . . . . . . . . . . . . . . . . . . . . . . . . . . . . . . . . . . . . . . . . . .26Prescan . . . . . . . . . . . . . . . . . . . . . . . . . . . . . . . . . . . . . . . . . . . . . . . . . . . . . . . . . . . . . . . . . .26Selecting the Usage Mode . . . . . . . . . . . . . . . . . . . . . . . . . . . . . . . . . . . . . . . . . . . . . . . . . . . .27Orienting the Image . . . . . . . . . . . . . . . . . . . . . . . . . . . . . . . . . . . . . . . . . . . . . . . . . . . . . . . . .29
Variation Dialog Box - Names of Parts . . . . . . . . . . . . . . . . . . . . . . . . . . . . . . . . . . . . . . . . .32Image Correction - Variation . . . . . . . . . . . . . . . . . . . . . . . . . . . . . . . . . . . . . . . . . . . . . . . . . . .33Scanning and Saving the Image . . . . . . . . . . . . . . . . . . . . . . . . . . . . . . . . . . . . . . . . . . . . . . . .34
PRECISION OPERATIONPrecission Operation - Startup . . . . . . . . . . . . . . . . . . . . . . . . . . . . . . . . . . . . . . . . . . . . . . . . . .36
Precision Control Window - Names of Parts . . . . . . . . . . . . . . . . . . . . . . . . . . . . . . . . . . . . .37Loading and Prescan . . . . . . . . . . . . . . . . . . . . . . . . . . . . . . . . . . . . . . . . . . . . . . . . . . . . . . . .38Orienting the Image . . . . . . . . . . . . . . . . . . . . . . . . . . . . . . . . . . . . . . . . . . . . . . . . . . . . . . . . .39Setting the Resolution . . . . . . . . . . . . . . . . . . . . . . . . . . . . . . . . . . . . . . . . . . . . . . . . . . . . . . . .40Resolution Notes . . . . . . . . . . . . . . . . . . . . . . . . . . . . . . . . . . . . . . . . . . . . . . . . . . . . . . . . . . . .41Scan Settings - Save and Load . . . . . . . . . . . . . . . . . . . . . . . . . . . . . . . . . . . . . . . . . . . . . . . . .42
Histogram Dialog Box - Names of Parts . . . . . . . . . . . . . . . . . . . . . . . . . . . . . . . . . . . . . . . .43Image Correction - Histogram . . . . . . . . . . . . . . . . . . . . . . . . . . . . . . . . . . . . . . . . . . . . . . . . . .44
Tone Curve Dialog Box - Names of Parts . . . . . . . . . . . . . . . . . . . . . . . . . . . . . . . . . . . . . . .48Image Correction - Tone Curve . . . . . . . . . . . . . . . . . . . . . . . . . . . . . . . . . . . . . . . . . . . . . . . . .49Scanning and Saving the Image . . . . . . . . . . . . . . . . . . . . . . . . . . . . . . . . . . . . . . . . . . . . . . . .52
SCANNING APS FILMLaunching the Software . . . . . . . . . . . . . . . . . . . . . . . . . . . . . . . . . . . . . . . . . . . . . . . . . . . . . . .54Setting the Film Type . . . . . . . . . . . . . . . . . . . . . . . . . . . . . . . . . . . . . . . . . . . . . . . . . . . . . . . .55Setting the APS Preferences . . . . . . . . . . . . . . . . . . . . . . . . . . . . . . . . . . . . . . . . . . . . . . . . . . .56
APS Adapter - Names of Parts . . . . . . . . . . . . . . . . . . . . . . . . . . . . . . . . . . . . . . . . . . . . . . .57Loading the APS Adapter . . . . . . . . . . . . . . . . . . . . . . . . . . . . . . . . . . . . . . . . . . . . . . . . . . . . .57Inserting the APS Adapter into the Scanner . . . . . . . . . . . . . . . . . . . . . . . . . . . . . . . . . . . . . . . .58Index Scan . . . . . . . . . . . . . . . . . . . . . . . . . . . . . . . . . . . . . . . . . . . . . . . . . . . . . . . . . . . . . . . .59Prescan and Image Correction . . . . . . . . . . . . . . . . . . . . . . . . . . . . . . . . . . . . . . . . . . . . . . . . .60Scanning the Image . . . . . . . . . . . . . . . . . . . . . . . . . . . . . . . . . . . . . . . . . . . . . . . . . . . . . . . . .61Quitting the APS Window . . . . . . . . . . . . . . . . . . . . . . . . . . . . . . . . . . . . . . . . . . . . . . . . . . . . .62
APPENDIXTrouble-Shooting . . . . . . . . . . . . . . . . . . . . . . . . . . . . . . . . . . . . . . . . . . . . . . . . . . . . . . . . . . . .64User Technical Support . . . . . . . . . . . . . . . . . . . . . . . . . . . . . . . . . . . . . . . . . . . . . . . . . . . . . . .65Installing Adobe PhotoDeluxe . . . . . . . . . . . . . . . . . . . . . . . . . . . . . . . . . . . . . . . . . . . . . . . . . .66

4
SCANNER - NAMES OF PARTS
1. Indicator lamp
2. Film slot
3. Film door
4. Power switch
5. SCSI port - DB25
6. Terminator power switch
7. SCSI ID switches
8. SCSI port - SCSI-1
9. AC socket

S C A N N E R S E T U P

Turn off the PC and all the devices in the SCSI chain downbefore changing SCSI IDs, connecting, or disconnecting SCSIcables. Hardware damage may occur if this precaution is notfollowed.
6
SETTING THE SCSI ID
A SCSI ID is a unique address you assign to each SCSI device connected to your PC. TheSCSI ID range of your PC is from 0 to 7. Do not use a SCSI ID for more than one SCSIdevice.
1. Turn off the PC and all connected SCSI devices.
Setting the SCSI ID
SCSI ID Dip Switch Settings
3. Using a pointed object, set the switches to anunused SCSI ID.
• The Dimâge Scan Dual’s SCSI ID is factory preset to 5. If 5 is notoccupied, there is no need to change the SCSI ID.
• Two operating SCSI devices in the same SCSI chain cannot share aSCSI ID.
2. Determine which SCSI IDs are not being used.

Dimâge Scan Dual 7
CONNECTING THE HARDWARE
3. Plug the other end of the SCSI cable) into theback of the scanner.
• Either SCSI port can be used, there is no dedicated in or out port.
1. Place the scanner on a level surface.
2. Plug the SCSI cable SC-11 into the SCSI port onthe rear of the PC.
Connecting the SCSI CableThe SCSI cable SC-11 (DB25-to-SCSI-1) has been packaged with the Dimâge Scan Dual. Seeyour dealer if you require a different SCSI cable.
• To meet FCC regulations, the SCSI cables used with this scanner must be equipped with ferrite cores.
BEFORE YOU BEGIN…TURN THE COMPUTER AND ALL CONNECTEDDEVICES OFF.

8
CONNECTING THE HARDWARE
4. Plug the SCSI cable from the next device in yourSCSI chain into the open port on the back of thescanner.
If there are other devices in your SCSI chain…
5. Plug the power cord into the scanner’s AC socket,then plug it into a grounded outlet.

Terminating the SCSI chain helpsto suppress electronic noise inthe SCSI chain.Not terminating the SCSI chaincan cause slowdowns, dataerrors, crashes, and otherunpredictable errors.
Dimâge Scan Dual 9
5. Plug the power cord into the scanner’s ACsocket, then plug it into a grounded outlet.
4. Turn the terminator power switch (switch 4) to ON.• An external terminator is not necessary with this scanner.
If the Dimâge Scan Dual is the last oronly device in your SCSI chain…
CONNECTING THE HARDWARE

10
INSTALLING THE SOFTWARE
1. Turn on the Dimâge Scan Dual, then turn onyour PC.
2. Start Windows.
Dimâge Scan Dual for Windows Setup installs the Twain and Twain_32 driver software into thedrive and folder you select.Photoshop, PhotoDeluxe, Corel DRAW, or Corel PhotoPaint should be installed before youlaunch this installer.
• The appearance and/or wording of some dialog boxes may vary depending on the version of Windows running onyour machine.
• The install instructions assume drive D is the CD ROM drive.
• The Device Wizard dialog box will appear.
This step varies with your specific operating software...
Windows 95 Windows 95 Release 2 (OSR2)and Windows 98
• The New Hardware Found dialog box will appear.
3. Click on Cancel.• This dialog box may appear several times.
Repeat step 3 until the dialog box no longerappears.
3. Click on Next until the UnknownDevice window appears…
then click on Finish.• This dialog box may appear several times.
Repeat step 3 until the dialog box no longerappears.
Windows NT
3. Select Start > Settings > Control Panel, then double-click on the SCSIAdapters icon. Confirm that Minolta #2882 appears as a connecteddevice for your SCSI board.
• If Minolta #2884 does not appear, turn the system off and check all the connections. Repeat theprocedure.

Dimâge Scan Dual 11
INSTALLING THE SOFTWARE
Continued on the following page.
5. Select Run from the Start menu.
The Run dialog box will appear.
6. Select D:\ENGLISH\Setup.exe from the Opendrop-down list, then click on .
• If your CD-ROM drive is not the D drive, replace the D with the appropriatedesignation for your CD-ROM drive.
The installer flash will appear.
4. Insert the Dimâge Scan Speed CD-ROM into theCD-ROM drive.
7. Click on .

INSTALLING THE SOFTWARE
12
9. After reading the agreement, click on .• If you do not agree to the conditions stated in the End-User License
Agreement, click on No and the software will not be installed.
The Software License Agreement will appear.
8. Click on .
The Welcome dialog box will appear.

INSTALLING THE SOFTWARE
Dimâge Scan Dual 13
Continued on the following page.
10. Select the desired option, then click on .
The Setup Options dialog box will appear.
The Select Program Folder dialog box will appear.
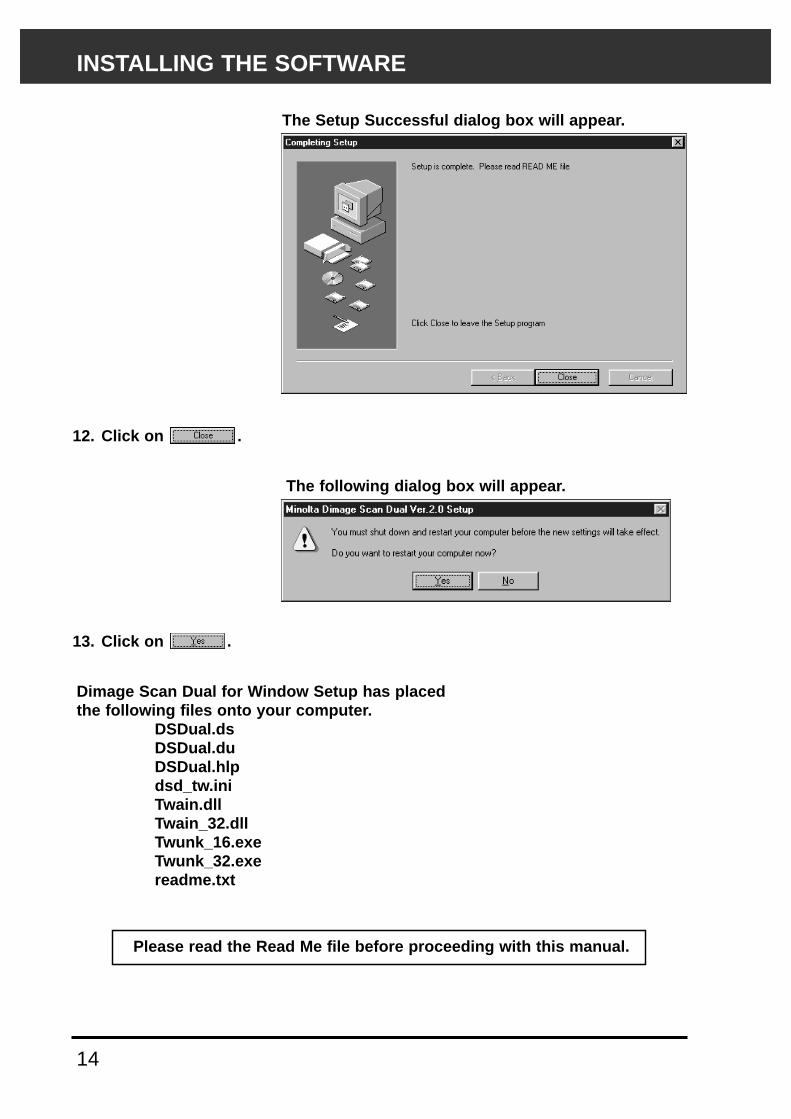
11.Click on .• Setup will begin.
INSTALLING THE SOFTWARE
14
Dimage Scan Dual for Window Setup has placedthe following files onto your computer.
DSDual.dsDSDual.duDSDual.hlpdsd_tw.iniTwain.dllTwain_32.dllTwunk_16.exeTwunk_32.exereadme.txt
13. Click on .
Please read the Read Me file before proceeding with this manual.
The following dialog box will appear.
The Setup Successful dialog box will appear.
12. Click on .

S T A N D A R D O P E R A T I O NS C A N F L O W
Set the Preferences
Launch the Software
Load the Film Holder
Insert the Film Holder
Specify the Film Type
Prescan
Select the Output Mode
Orient the Image
Correct the Brightness,Contrast, and Colour
Save
Scan

16
LAUNCHING THE SOFTWARE
1. Turn on the Minolta Dimâge Scan Dual, then turnon your PC.
2. Launch Adobe Photoshop.
3. Select File > Import > SelectTwain_32 Source
4. Select DS_dual, then click on Select
The Select Source dialog box appears.
The following instructions detail the import procedure for Adobe Photoshop. Refer to the onlinemanual to import images into Adobe PhotoDeluxe.
5. Select File > Import > Twain–32

The setup screen will appear.
LAUNCHING THE SOFTWARE
Dimâge Scan Dual 17
The Dimâge Scan Dual’s standard control and previewwindows appear after initialization is complete (approx. 2 min.).

18
STANDARD CONTROL WINDOW – NAMES OF PARTS
1. Image use option buttons
2. Image orientation option buttons
3. File size
4. Saving drive storage capacity
5. Preference button
6. Help button
7. Status window
8. Exit button
9. Scan button
10. Prescan button
11. Reset button
12. Relative image size option buttons
13. Image /Paper size list box
14. Film type list box

Dimâge Scan Dual 19
PREVIEW WINDOW – NAMES OF PARTS
1. Grab button
2. Enlarge button
3. Flip vertical
4. Rotate 90° right
5. Rotate 90° left
6. Flip horizontal
7. Reduce button
8. RGB values under cursor
9. Full-screen display button
10. Revert to prescan settings button
11. Histogram button
12. Curves button
13. Variations button
14. Cropping frame dimensions
15. Cropping frame
16. Preview window

20
PREFERENCES DIALOG BOX – NAMES OF PARTS
1. Scanner control option buttons
2. Close driver after scan checkbox
3. Auto expose positive film checkbox
4. Background colour modify button
5. Preview window size list box
6. Scratch disk list box
1. Click on .
The Preferences dialog box will appear.
7. Unit list box
8. Output resolution list box
9. Input resolution list box
10. Help button
11. Cancel changes button
12. OK Button

Dimâge Scan Dual 21
SETTING THE PREFERENCES
2. Click on the Standard optionbutton.
3. Click on this checkbox if youwant to use the auto-exposuresystem when scanning slides.
• You will obtain better scans fromunderexposed slide film when thischeckbox is selected.
Continued on the following page.
4. Select the desired preview window size fromthe drop-down list.
5. Select the saving directory.• The number of options depends on the
number of drives connected to your system.
6. Click on the “Close driver after scanning”checkbox to automatically shut down the driversoftware after scanning.

22
SETTING THE PREFERENCES
9. Click on to accept the new preferencesettings.
8. Click on the desired backgroundcolour, then click on .
1. Click on Define Custom Colours to openthe colour field.2. Click on and drag the pointer to select acustom colour.3. Click on and drag the brightness slider tolighten or darken the colour.4. Click on Add to Custom Colours to add thenew colour to the custom colours options.
7. Click on to change the background colourof the full screen display.
• The colour chip displays the background colour currently selected.
Defining Custom Colours
The Colour Palette dialog box will appear.

2. Place the film in the film holderemulsion side down.
• The film holder will accept filmstrips up to 6 frames long.
• Brush dust off the film beforeplacing it into the film holder.
Dimâge Scan Dual 23
LOADING THE FILM HOLDER
Using the included 35mm negative and slide holders, the Minolta Dimâge Scan Dual can scanmounted or unmounted…
• 35mm colour negatives • 35mm colour slides• 35mm black & white negatives • 35mm black & white positives
Advanced Photo System negatives and slides can also be scanned using the optional AD-10APS Adapter. See page 57.
1. Open the film holder.
3. Align the frames within the scanning windows.
4. Snap the film holder closed.
Loading the Negative Holder
The frame numbers andtext are backwards whenthe film’s emulsion side isup.

Insert slides into the slide holder emulsionside down.
• Brush dust off the the slide before placing it into the film holder.• Slide mounts must be thicker than 1 mm and thinner than 2 mm
to fit into the slide holder.• Orient the slides horizontally, not vertically.
LOADING THE FILM HOLDER
24
Loading the Slide Holder
Do not scan glass mountedslides. Glass mounts bendthe light from the linescanner, producing badresults.

The white markshould be upright.
INSERTING THE FILM HOLDER INTO THE SCANNER
Dimâge Scan Dual 25
The notches in the film and slide holders identify the position of the scanning windows. Pushthe holder in all the way in to scan the last frame on that side of the film holder. Remove, flip,then reinsert the film holder to scan the frames on the other side of the holder.
Remove, flip, then reinsert the negative holder toscan frames 4, 5, or 6.
• Frames 3 or 4 with the slide holder.• The blue mark should be upright
Insert the negative holder into the scanner’s filmslot to scan frames 1, 2, or 3.
• Frames 1 or 2 with the slide holder.

Click on to preview the image.• The indicator lamp blinks
slowly (0.5 Hz) duringprescan.
26
Setting the type of film you are scanning is necessary to accurately reproduce the image.When 35mm film is being scanned, select colour negative, colour positive, black & whitenegative, or black & white positive. Refer to pages 54-62 when you are scanning AdvancedPhoto System film.
Select the type of film you arescanning from the film type drop-down list.
• The selected film type will be displayed in the filmtype window.
• Refer to pages 54-62 if you are scanning an APSfilm type.
SETTING THE FILM TYPE / PRESCAN
The prescanned image will appear in preview window.
• The Preview and Control windows can be moved to any convenientlocation on the screen. Grab the title bar to move the preview or controlwindows.
Prescan
Press the option keywhen clicking on to improve the colouraccuracy of the prescanimage.• The film will be prescannedtwice. The first scan will setthe exposure. The secondprescans the image.

2. Select the desired image size fromthe image size drop-down list.
• When selected, your image will be scanned at a 96 dpiresolution.
1. Click on the option button forthe desired usage mode.
Dimâge Scan Dual 27
SELECTING THE USAGE MODE
Screen
Standard mode has three image usage options to simplify operation of the Dimâge Scan Dualfor beginners.
Screen – Image will be viewed on a monitor (image data base or home page).Paste – Image will be imported into a word processing document.Print – Image will be printed or modified using Photoshop or PhotoDeluxe.
The table below lists the display size for each imagesize in the drop-down list for monitors with a screenresolution of 72 dpi.
Image Size (pixels) Approx. File Size
384 x 256 263K
640 x 480 907K
768 x 512 1.2MB
800 x 600 1.4MB
1024 x 768 2.3MB
1280 x 1024 3.9MB
3504 x 2336 24.2MB
Approx. Screen Image Size
4.83 x 3.56 in.
8.89 x 6.67 in.
10.67 x 7.11 in.
11.11 x 8.33 in.
14.22 x 10.67 in.
17.78 x 14.22 in.
48.67 x 32.44 in.
Continued on the following page.

4. Click on the desired image size option button.• The actual size of the image depends on the paper size selected in
step 2.• The image will be scanned at a resolution of 180 dpi.
28
SELECTING THE USAGE MODE
Paste
2. Select the word processingdocument’s paper size from thepaper size drop-down list.
2. Select a paper size from the paper size drop-down list.
• Image orientation only affects the orientation of the prescan andscanned images. Set the correct paper orientation in your printer driver.
4. Click on the desired image size option button.• The actual size of the image depends on the paper size selected in
step 2.• The image will be scanned at a resolution of 96 dpi.• The page orientation icon changes according to the image size
selected.
3. Click on the landscape (horizontal) or portrait(vertical) print orientation option button.
• Image orientation only affects the orientation of the prescan andscanned images. Set the correct paper orientation in your printer driverand word processing application.
3. Click on the landscape (horizontal) or portrait(vertical) print orientation option button.