digital camera operating steps and reference...
TRANSCRIPT


2
Digital Camera Operating Steps and Reference GuidesYour camera includes two manuals: the “EOS D30 Camera User’s Guide” and the “SoftwareStarter Guide.”
EOS D30 Camera User’s Guide (This Document)
1 Prepare your camerafor use
2 Start taking pictures
3 Check your pictures
Software Starter Guide Help
1 Install the softwarefrom the
Canon Digital CameraSolution Disk
2 Connect your camerato a computer
3 Load your images ontothe computer
4 Process the imageswith the software

Introduction
The Canon EOS D30 is a high-quality, high-precision, digital single-lens reflex camera with aCMOS sensor that has a total pixel count of 3.25 million pixels.This camera provides a full range of imaging options and functions ideal for everyphotographic use, from easy, fully automatic shots for first-time users to applications forexperienced photographers.A CompactFlash card* (CF card Type 1, 2) is used as the recording media.
Before you use your EOS D30, be sure to read this user’s guide with your camera on hand.This will help you become more familiar with your camera, and learn how to operate it properly.
* We strongly recommend that you use a Canon CF card.
Test Shots and Warranty of Photographic ImagesBefore taking important pictures, we would strongly recommend that you first shoot several trialimages to make sure you are operating the camera correctly. Please note that the manufactureris not liable for any consequential damages arising from any malfunction of the EOS D30camera or recording media (CF card) that results in the failure of an image to be recorded ortransferred to a computer.
Warning Against Copyright InfringementPlease note that your Canon EOS D30 camera is intended for personal use and should neverbe used in a way that infringes upon or contravenes international or domestic copyright lawsand regulations. Please be advised that photographing performances, exhibitions, orcommercial properties may contravene copyright or other legal rights, even if the photographwas taken for personal use.
● Canon and EOS are trademarks of Canon, Inc.● Adobe and Photoshop are trademarks of Adobe Systems Incorporated.● CompactFlash is a trademark of SanDisk Corporation.● IBM PC/AT series computers are trademarks or registered trademarks of International
Business Machines Corporation (IBM) in the U.S.A.● Macintosh is a trademark of Apple Computers (U.S.A.), registered in the U.S.A. and other
countries.● Other corporate and product names used in this document are registered trademarks or
trademarks of their respective corporations.
3
Thank you for purchasing this Canon product

4
Before using your camera, make sure you have all the accessories shown on this and thefollowing page. If any are missing, contact the store where you purchased your camera.
Check Your Accessories
q EOS D30 Camera w Strap (with eyepiece cover)
e Battery Pack BP-511 r Compact Power AdapterCA-PS400
t DC Coupler DR-400 y CompactFlash Card FC-16M

!1 Software Starter Guide !2 Warranty
Introduction
5
Check Your Accessories
u Interface Cable IFC-200 PCU
i Video Cable VC-100
English EditionINSTRUCTIONS
Camera User’s Guide
o Canon Digital CameraSolution Disk, AdobePhotoshop LE Disk
!0 EOS D30 Camera User’s Guide (this document)
IntroductionDigital Camera Operating Steps and
Reference Guides .......................................2Check Your Accessories.................................4Precautions for Handling ..............................12Quick Guide ..................................................14Nomenclature................................................16Conventions Used in This Manual ................22
1 Before You Begin .....................23Replacing the Backup Battery......................24Charging the Battery Pack............................25Inserting and Removing the Battery Pack ...27
Inserting the Battery Pack ........................27Removing the Battery Pack ......................28Using a Household Power Supply............29
Mounting and Detaching a Lens ..................30Mounting a Lens .......................................30Detaching a Lens......................................30
Inserting a CF Card ......................................31Removing a CF Card ................................31
File Numbering System ........................32Basic Operation ............................................33
Main Switch...............................................33Shutter Button ...........................................33Using the Electronic Dials.........................34About the LCD Monitor .............................35Menu Functions and Settings ...................36
Setting the Date and Time....................38Dioptric Adjustment in the Viewfinder...........40Holding the Camera......................................40
2 Simple Picture Taking..............41Fully Automatic Picture Taking................42
Automatic Built-in Flash ............................43AF-Assist Light ..........................................43
Check the Image Immediately......................44Check the Image in PLAY Mode .........44
Checking the Image After it is Taken..45Time Images Are Displayed
for Checking..............................................46Erasing a Recorded Image
(Single Image Erase) ................................47Portrait Mode ...........................................48Landscape Mode ....................................49Close-Up Mode .......................................50
6
ContentsSports Mode ............................................51Night Scene Mode...................................52
3 Advanced Operations ..............53Quality Selection...................................54About ISO Speed .................................55Selecting Parameters ...........................56
Parameters................................................57AF Mode Selection ..................................58
One-Shot AF for Still Subjects ..................59AI Servo AF for Moving Subjects..............60AI Focus AF ..............................................60
Focusing Point Selection .......................61Focusing On an Off-Center Subject .............62Problem Subjects for Autofocusing ..............63
Manual Focus....................................63INFO. Checking Camera Settings .................64
Selecting a Metering Mode ....................65Metering Modes ............................................66Selecting a Drive Mode ................................67
Setting the White Balance ......................68White Balance Settings.................................69
Custom White Balance Setting.............70Program AE..............................................72Shutter Speed-Priority AE ........................74Aperture-Priority AE .................................76
Checking the Depth of Field .........................77Manual Exposure .....................................78Automatic Depth-of-Field AE .................80
Setting Exposure Compensation ..................81Autoexposure Bracketing.....................82
AE Lock ...................................................84Self-timer Operation .................................85Using the Eyepiece Cover ........................86
Bulb Exposures.............................................87Mirror Lockup................................................88
4 Flash Photography ..................89Using the Built-in Flash .................................90
Using the Built-in Flash in the Easy Shooting Zone........................90Using the Built-in Flash in the Creative Zone..................................90Built-in Flash Range..................................91Flash Sync Shutter Speed and Aperture Settings ......................................91
Red-eye Reduction ..........................93
FE Lock .....................................................94Flash Exposure Compensation...........95
Flash Photography with the EOS-Dedicated 550EX Speedlite .............96Full Auto Flash ..........................................97Taking Flash Pictures in Each Shooting Mode ...........................................97High-Speed Sync (FP Flash) ....................98FEB (Flash Exposure Bracketing).............98FE Lock .....................................................99
Flash Exposure Compensation...........99Modeling Flash..........................................99Wireless Multi-Light/E-TTL Autoflash Photography..............................99
Using Non-Canon Flash Units ....................100
5 Playing and Erasing Recorded Images ....101Viewing Recorded Images..........................102
Viewing a Single Image.....................102Viewing the Index .............................102Viewing Enlarged Images.................103
JUMP Jumping to Another Image...........103INFO. Turning the Information Display On and Off ..............................................104
Automated Playback of Recorded Images (Auto playback) ........105
Rotating an Image..........................106Protecting an Image ...........................107
Erasing Images (All Image Erase) ........108Formatting the CF Card......................109Print Order ..........................................110
Selecting Images for Printing..................111Print Type ................................................113Specifying Date Printing .........................114Specifying File Number Printing .............115
Connecting to a TV .....................................116Cleaning the CMOS Imaging Element ..117
6 Menu Function Settings ........119List of Menu Functions .......................120
Custom Function Settings.......................124
7 Reference ................................130Basic Terminology for Digital Cameras
and Digital Photography .........................130Function Availability Table...........................134
7
Contents
1
2
3
4
5
6
7
AF Modes and Drive Modes.......................134Exposure Warnings .....................................135AE Lock Effects for Combinations of
Focusing Point Selection and Metering Method.....................................135
Program Line...............................................136Shutter Speed and
Aperture Value Readouts........................137Troubleshooting...........................................138Major Accessories (Sold Separately) .........140Major Specifications....................................142Message List...............................................145System Map ................................................146Index ...........................................................147

8
This digital apparatus does not exceed the Class B limits for radio noise emissions fromdigital apparatus as set out in the interference-causing equipment standard entitled“Digital Apparatus”, ICES-003 of the Industry Canada.
Cet appareil numérique respecte les limites de bruits radioélectriques applicables auxappareils numériques de Classe B prescrites dans la norme sur le matériel brouilleur:“Appareils Numériques”, NMB-003 édictée par l’Industrie Canada.
The Mark is a directive conformity mark ofthe European Community (EC).
This mark indicates that the product complieswith Australia’s EMC regulations.
EOS D30This device complies with Part 15 of the FCC Rules. Operation is subject to the followingtwo conditions: (1) This device may not cause harmful interference, and (2) this devicemust accept any interference received, including interference that may cause undesiredoperation.
Note:This equipment has been tested and found to comply with the limits for class Bdigital devices, pursuant to Part 15 of the FCC Rules. These limits are designed toprovide reasonable protection against harmful interference in a residentialinstallation. This equipment generates, uses and can radiate radio frequencyenergy and, if not installed and used in accordance with the instructions, may causeharmful interference to radio communications. However, there is no guarantee thatinterference will not occur in a particular installation. If this equipment does causeharmful interference to radio or television reception, which can be determined byturning the equipment off and on, the user is encouraged to try to correct theinterference by one or more of the following measures:— Reorient or relocate the receiving antenna.— Increase the separation between the equipment and receiver.— Connect the equipment into an outlet on a circuit different from that to which the
receiver is connected.— Consult the dealer or an experienced radio/TV technician for help.
Use of shielded cable is required to comply with class B limits in Subpart B of Part 15 ofFCC Rules.
Do not make any changes or modifications to the equipment unless otherwise specifiedin the manual. If such changes or modifications should be made, you could be requiredto stop operation of the equipment.
Canon U.S.A. Inc.One Canon Plaza, Lake Success, NY 11042, U.S.A.Tel No. (516)328-5600
Bij dit produkt zijn batterijengeleverd. Wanneer deze leeg
zijn, moet u ze niet weggoolenmaar inleveren als KCA
Introduction
9
SAFETY PRECAUTIONS• Before using the camera, please ensure that you have read and understood the safety
precautions described below. Always ensure that the camera is operated correctly.• The safety precautions noted on the following pages are intended to instruct you in the
safe and correct operation of the camera and its accessories to prevent injuries ordamage to yourself, other persons and equipment.
• In the next few pages, the term “equipment” refers primarily to the camera and its powersupply accessories.
WARNINGS• Do not aim the camera directly into the sun or at other intense light sources that could
injure your eyesight.• Do not trigger the flash in close proximity to human or animal eyes. Exposure to the
intense light produced by the flash may injure eyesight. In particular, remain at least onemeter (39 inches) away from infants when using the flash.
• Store this equipment out of the reach of children and infants. Accidental damage to thecamera or batteries by a child could result in serious injury. In addition, placement of thewrist strap around a child’s neck could result in asphyxiation.
• Be particularly careful to keep the button batteries (CR2025 lithium) used in the cameraout of the reach of children. Seek medical assistance immediately if a child swallows abattery.
• Do not attempt to disassemble or alter any part of the equipment that is not expresslydescribed in this guide. Disassembly or alteration may result in high-voltage electricalshock. Internal inspections, alterations and repairs should be conducted by qualified servicepersonnel authorized by your camera distributor or a Canon Customer Support Help Desk.
• To avoid the risk of high-voltage electrical shock, do not touch the flash portion of thecamera if it has been damaged. Similarly, never touch internal portions of the equipmentthat become exposed as a result of damage. There is a risk of high-voltage electricalshock. Please take the first opportunity to consult your camera distributor or a CanonCustomer Support Help Desk.
• Stop operating the equipment immediately if it should emit smoke or noxious fumes.Failure to do so may result in fire or electrical shock. Set the camera’s main switch to theOff position and remove the camera battery or unplug the power cord from the electricaloutlet immediately. Confirm that smoke or fume emissions cease. Please consult yourcamera distributor or the closest Canon Customer Support Help Desk.
• Stop operating the equipment if it is dropped or the casing is damaged. Failure to do somay result in fire or electrical shock. Set the camera’s main switch to the Off position andremove the camera battery or unplug the power cord from the electrical outlet immediately.Please consult your camera distributor of the closest Canon Customer Support Help Desk.
• Prevent the equipment from contact with, or immersion in, water and other liquids. Do notallow liquids to enter the interior. The camera has not been waterproofed. If the exteriorcomes into contact with liquids or salt air, wipe it dry with a soft, absorbent cloth. In theevent that water or other foreign substances enter the interior, immediately set thecamera’s main switch to the Off position and remove the camera battery or unplug thepower cord from the electrical outlet immediately. Continued use of the equipment mayresult in fire or electrical shock. Please consult your camera distributor or the closestCanon Customer Support Help Desk.

10
• Do not use substances containing alcohol, benzene, thinners or other flammablesubstances to clean or maintain the equipment. The use of these substances may lead tofire.
• Do not cut, damage, alter or place heavy items on the power adapter cord. Any of theseactions may cause an electrical short circuit, which may lead to fire or electrical shock.Replace a broken or damaged power adapter cord.
• Do not handle the power cord if your hands are wet. Handling it with wet hands may leadto electrical shock. When unplugging the cord, ensure that you hold the rigid portion ofthe plug. Pulling the flexible portion of the cord may damage or expose the wire andinsulation, creating the potential for fires or electrical shocks.
• Use of power sources not expressly recommended for this equipment may lead tooverheating, distortion of the equipment, fire, electrical shock or other hazards. Use onlythe recommended power accessories.
• Power down the computer and unplug the power cord before attempting to connect theinterface cable, to avoid the risk of electrical shock.
• Do not place the batteries near a heat source or expose them to direct flame or heat.Neither should you immerse them in water. Such exposure may damage the batteries andlead to the leakage of corrosive liquids, fire, electrical shock, explosion or serious injury.
• Do not attempt to disassemble, alter, or apply heat to the batteries. There is serious riskof injury due to an explosion. Immediately flush with water any area of the body, includingthe eyes and mouth, or clothing, that comes into contact with the inner contents of abattery. If the eyes or mouth contact these substances, immediately flush with water andseek medical assistance.
• Avoid dropping or subjecting the batteries to severe impacts that could damage thecasings. This could lead to leakage and injury.
• Do not short-circuit the battery terminals with metallic objects, such as key holders. Thiscould lead to overheating, burns and other injuries. Use the supplied battery case totransport or store the battery pack.
• Before you discard a battery, cover the terminals with tape or other insulators to preventdirect contact with other objects. Contact with the metallic components of other materialsin waste containers may lead to fire or explosions. Discard batteries in specialized wastefacilities if available in your area.
• Use of batteries not expressly recommended for this equipment may cause explosions orleaks, resulting in fire, injury and damage to the surroundings. Use only recommendedbatteries and accessories.
• Use only the recommended compact power adapter to charge the Battery Pack BP-511rechargeable batteries. Use of chargers not expressly recommended may result inoverheating, distortion, fire or electrical shock.
• Disconnect the compact power adapter from both the camera and electrical outlet afterrecharging and when the camera is not in use to avoid fires and other hazards.
• The camera terminal of the compact power cord is designed for exclusive use with theEOS D30. Do not use it with other products or batteries. There is a risk of fire and otherhazards.

Introduction
11
CAUTIONS• Avoid using, placing or storing the equipment in places subject to strong sunlight or high
temperatures, such as the dashboard or trunk (boot) of a car. Exposure to intense sunlightand heat may cause the batteries to leak, overheat or explode, resulting in fire, burns orother injuries. High temperatures may also cause deformation of the casing. Ensure thatthere is good ventilation when using the compact power adapter to charge the batterypack or power the camera.
• Do not store the equipment in humid or dusty areas. Storage in these areas could lead tofire, electrical shock or other damage.
• Be careful not to bang the camera or subject it to strong impacts or shocks that could leadto injury or damage the equipment when wearing or holding it by the wrist strap.
• Be careful not to cover the flash with your fingers when shooting. In addition, do not touchthe surface of the flash after taking several pictures in rapid succession. Either actioncould result in burns.
Preventing MalfunctionsAvoid Strong Magnetic FieldsNever place the camera in close proximity to electric motors or other equipment generatingstrong electromagnetic fields. Exposure to strong magnetic fields may cause malfunctionsor corrupt image data.Avoid Condensation Related ProblemsMoving the equipment rapidly between hot and cold temperatures may cause condensation(water droplets) to form on its external and internal surfaces. You can avoid this by placingthe equipment in an airtight, resealable plastic bag and letting it adjust to temperaturechanges slowly before removing it from the bag.If Condensation Forms Inside the CameraStop using the camera immediately if you detect condensation. Continued use may damagethe equipment. Remove the CF card and battery or power cord (if connected) from thecamera and wait until the moisture evaporates completely before resuming use.Extended StorageWhen not using the camera for extended periods of time, remove the battery (except theCR2025 lithium button battery) and store the equipment in a safe place. Storing the camerafor extended periods with a battery installed will run down the battery and may damage thecamera.
Important Safety Functions and Preventive Measures• When the CF Card Access Lamp is blinking, do not remove the CF card from the camera.
Since the card is reading and writing data when the lamp is blinking, removal of the CFcard at this time will damage the card.
• Do not use any cable other than that supplied with the camera. Use the supplied interfacecable to connect the camera to a computer. Use of any other cable may lead to amalfunction.
12
Precautions for HandlingThe Camera(1) This camera is a precision instrument. Do not drop it or expose it to physical shock.(2) The camera is not waterproof and should not be used in wet conditions or underwater. If
the camera gets wet, take it to your nearest Canon dealer as soon as possible. If smallamounts of water splash onto the camera, wipe it with a clean dry cloth. If the camera isexposed to salty air, wipe it thoroughly with a slightly damp cloth.
(3) Never leave the camera close to devices that generate strong magnetic fields, such asmagnets or electric motors. Do not operate or leave the camera in areas where strongelectromagnetic signals are generated, such as near electronic transmission towers.Exposing the camera to strong electromagnetic signals can cause it to malfunction anddestroy recorded image data.
(4) Do not leave the camera in hot locations, such as in a car sitting in direct sunlight. Hightemperatures can damage the camera.
(5) The camera contains precision circuits. Never attempt to disassemble the camera orservice it yourself.
(6) Use a commercially available blower brush to remove any dust that accumulates on thecamera lens, viewfinder, mirror, or focusing screen. Do not use cleaners that containorganic solvents to wipe off the camera body or lens. If the camera is very soiled, consultyour nearest Canon dealer.
(7) Do not touch the camera’s electrical contacts with your hands. Doing so could corrodethe contacts and interfere with the camera’s normal operation.
(8) If you take the camera quickly from a cold location into a warm one, condensation canform on the outside and inside of the camera. To prevent this, place the camera in anairtight, resealable plastic bag until it warms up to the ambient temperature.
(9) Do not use the camera if condensation forms on it, or you could damage it. If this occurs,remove the CF card and battery from the camera, and wait until the condensation hasevaporated before using the camera.
(10) If the camera will not be used for an extended period, remove its battery and store thecamera in a cool, dry, well-ventilated location. While the camera is in storage, operate itsshutter periodically to make sure that it is working.
(11) Avoid storing the camera in locations where potentially corrosive chemicals are used,such as in a laboratory.
(12) If the camera has been in storage for an extended period, check its components beforeusing it. If you have not used the camera for some time or are planning to take shots youwill not want to lose (overseas vacation, etc.), have the camera checked by your Canondealer beforehand, or check for yourself that the camera components are working properly.
LCD Panel and LCD Monitor(1) LCD displays are manufactured using high-precision technology. Even so, very small
black, red, or green dots can occasionally appear on a display. This is within the normal99.98% range for valid picture elements (pixels), and does not indicate a fault. Suchaberrations on the display also do not affect recorded images.
(2) Do not press hard on an LCD display or subject it to impacts, as this can cause displayflaws and damage.
(3) If an LCD display becomes soiled, clean it with a commercially available blower brush, orwipe it with a soft cloth, taking care not to scratch the screen. If an LCD display becomesextremely soiled, consult your nearest Canon dealer.

Introduction
13
Precautions for Handling
(4) By their nature, LCD displays react more slowly at low temperatures, and may appeardark at high temperatures. The display will return to normal at room temperature.
Lithium Backup Battery(1) Store lithium batteries out of reach of small children. The chemicals in these batteries are
very dangerous if the battery is accidentally swallowed. If this happens, seek medicalattention at once.
(2) Do not use metal instruments such as pliers to hold the battery, or you could cause a shortcircuit.
(3) Do not disassemble or heat the battery, or you could rupture it.
CF Card(1) The CF card is a precision device. Do not drop CF cards or expose them to vibrations.
Doing so could lose the images recorded on them.(2) Do not store or use CF cards near objects that generate magnetic fields, such as TVs,
speakers, or magnets, or in locations affected by static electricity. Doing so could lose theimages recorded on the CF card.
(3) Do not place CF cards in direct sunlight or close to heating appliances. Doing so candistort the cards and make them unusable.
(4) Do not spill liquids onto CF cards.(5) Always store your CF cards in a case or cabinet to protect the data stored on them.(6) Use only CF cards specified by Canon. Otherwise, you may be unable to record or play
back images.(7) Do not bend CF cards, or subject them to strong impacts.(8) Do not store CF cards in hot, dusty, or humid locations, or in locations exposed to static
electricity or magnetic fields.
Lens Electrical ContactsAfter removing a lens from the EOS D30, set the lens with itsmounting side facing up, and attach the dust cap to preventdamage to the electrical contacts and lens surface.
Electrical Contacts
14
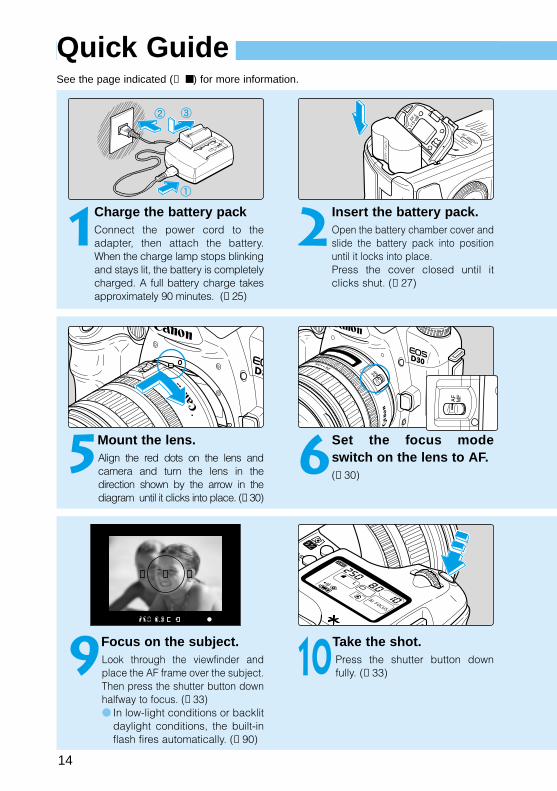
Quick GuideSee the page indicated (→ ■) for more information.
1Charge the battery packConnect the power cord to theadapter, then attach the battery.When the charge lamp stops blinkingand stays lit, the battery is completelycharged. A full battery charge takesapproximately 90 minutes. (→25)
2 Insert the battery pack.Open the battery chamber cover andslide the battery pack into positionuntil it locks into place.Press the cover closed until itclicks shut. (→27)
5Mount the lens.Align the red dots on the lens andcamera and turn the lens in thedirection shown by the arrow in thediagram until it clicks into place. (→30)
6Set the focus modeswitch on the lens to AF.(→30)
9Focus on the subject.Look through the viewfinder andplace the AF frame over the subject.Then press the shutter button downhalfway to focus. (→33)● In low-light conditions or backlit
daylight conditions, the built-inflash fires automatically. (→90)
10Take the shot.Press the shutter button downfully. (→33)

Introduction
15
Quick Guide
3Open the CF card slot cover.Slide the cover in the directionshown by the arrow, then open it.(→31)
4Insert the CF card.Insert the CF card, then close thecover. (→31)
8Set the Mode Dial to ⟨ ⟩(Full Auto).(→42)
7 Set the Main Switch to⟨ON⟩.(→33)
11 Check the image.The image is displayed forapproximately 2 seconds after theshot. (→44)
● To check other images youhave taken, see “Check theImage Immediately” (→44)and “Viewing RecordedImages” (→102).
● To erase images you havetaken, see “Erasing aRecorded Image (SingleImage Erase)” (→47).

16
Nomenclature⟨ ⟩ AF mode/WB button (→58, 70)AF
WB
Lens mount index (→30)
Built-in flash (→90)
Hot shoe (→96)
⟨ ⟩ Flash button (→90)
Mode dial (→20)
Strap eyelet (→23)
Expansion electronics cover
(→116)
Lens release button(→30)
Remote controlterminal
PC terminal (→100)
Depth-of-field preview button (→77, 99)
Lens mount
Electrical contacts (→13)Reflex mirror (→88, 117)
Red-eye reduction lamp(→93)AF-assist light emitter (→43) Self-timer operating display (→85)
Grip (Batterychamber)
Shutter button(→33)
⟨ ⟩ Main dial(→34)
⟨ ⟩ Metering mode button/Flash exposure compensationbutton (→65, 95)LCD panel (→18)
⟨DRIVE⟩ Drive mode button (→67)
Inside the expansion electronics cover
DIGITAL terminal(refer to Software Starter Guide)
VIDEO OUT terminal (→116)
See the page indicated (→■) for more information.
DC coupler cordchannel (→29)
Locking pins
Introduction
17
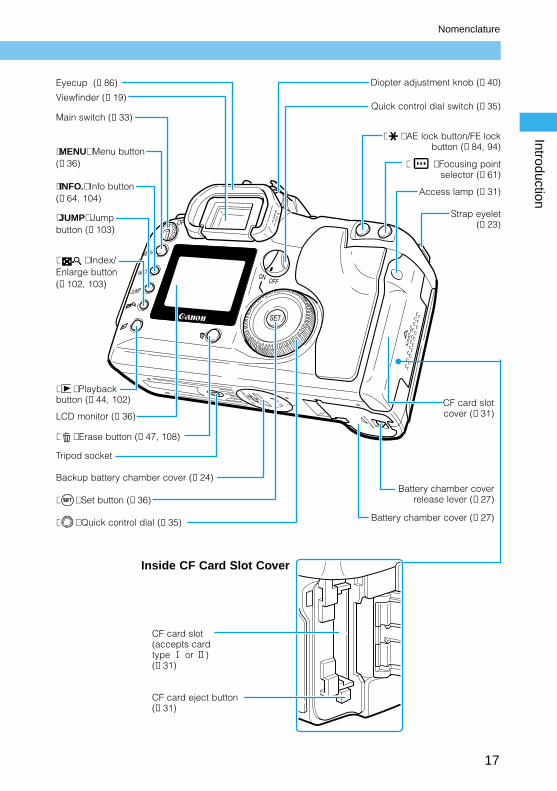
Nomenclature
Quick control dial switch (→35)
Diopter adjustment knob (→40)
⟨ ⟩ AE lock button/FE lockbutton (→84, 94)
⟨ ⟩ Focusing pointselector (→61)
Access lamp (→31)
Strap eyelet(→23)
CF card slotcover (→31)
Battery chamber coverrelease lever (→27)
Battery chamber cover (→27)⟨ ⟩ Quick control dial (→35)
⟨ ⟩ Set button (→36)
Backup battery chamber cover (→24)
Tripod socket
⟨ ⟩ Erase button (→47, 108)
LCD monitor (→36)
⟨ ⟩ Index/Enlarge button (→102, 103)
⟨JUMP⟩ Jumpbutton (→103)
⟨INFO.⟩ Info button(→64, 104)
⟨MENU⟩ Menu button(→36)
Main switch (→33)
Viewfinder (→19)
Eyecup (→86)
Inside CF Card Slot Cover
CF card slot (accepts cardtype 1 or 2)(→31)
CF card eject button(→31)
⟨ ⟩ Playbackbutton (→44, 102)
18
Nomenclature
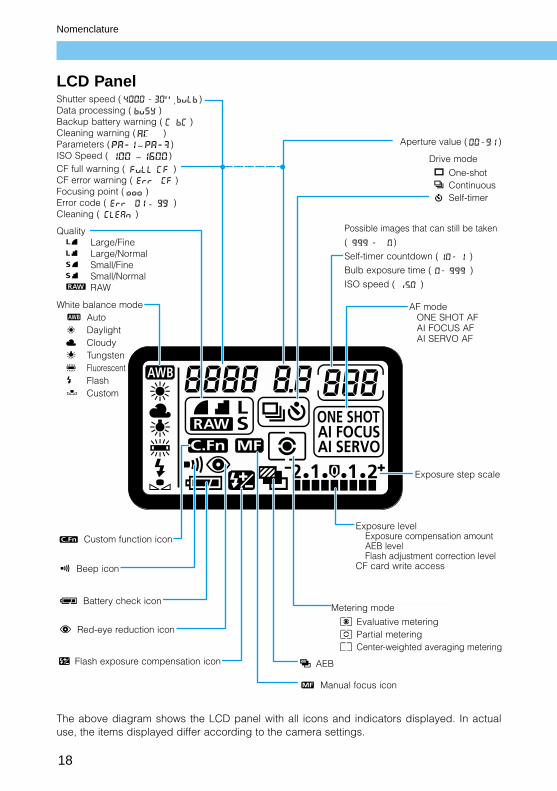
LCD Panel
Aperture value ( - )
Drive modeOne-shotContinuousSelf-timer
Possible images that can still be taken
( - )
Self-timer countdown ( - )
Bulb exposure time ( - )
ISO speed ( )
AF modeONE SHOT AFAI FOCUS AFAI SERVO AF
Exposure step scale
Exposure levelExposure compensation amountAEB levelFlash adjustment correction level
CF card write access
Metering mode
Evaluative meteringPartial meteringCenter-weighted averaging metering
AEB
Manual focus icon
Flash exposure compensation icon
Red-eye reduction icon
Battery check icon
Beep icon
Custom function icon
White balance modeAutoDaylightCloudyTungstenFluorescentFlash Custom
CF full warning ( )CF error warning ( )Focusing point ( )Error code ( - )Cleaning ( )
Shutter speed ( - , )Data processing ( )Backup battery warning ( )Cleaning warning ( )Parameters ( ~ )ISO Speed ( ~ )
The above diagram shows the LCD panel with all icons and indicators displayed. In actualuse, the items displayed differ according to the camera settings.
QualityLarge/FineLarge/NormalSmall/FineSmall/NormalRAW
Introduction
19
Nomenclature
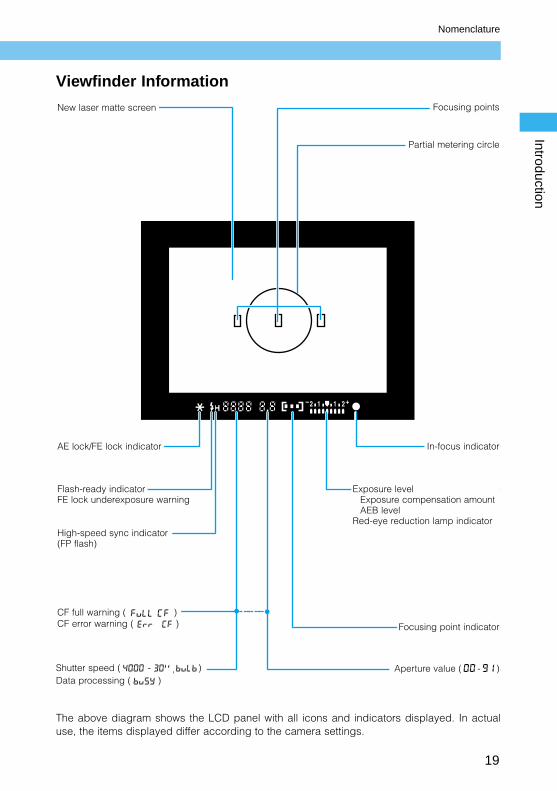
Viewfinder Information
Focusing points
Partial metering circle
In-focus indicator
Exposure levelExposure compensation amountAEB level
Red-eye reduction lamp indicator
Focusing point indicator
Aperture value ( - )Shutter speed ( - , )Data processing ( )
CF full warning ( )CF error warning ( )
High-speed sync indicator(FP flash)
Flash-ready indicatorFE lock underexposure warning
AE lock/FE lock indicator
New laser matte screen
The above diagram shows the LCD panel with all icons and indicators displayed. In actualuse, the items displayed differ according to the camera settings.
20
Nomenclature
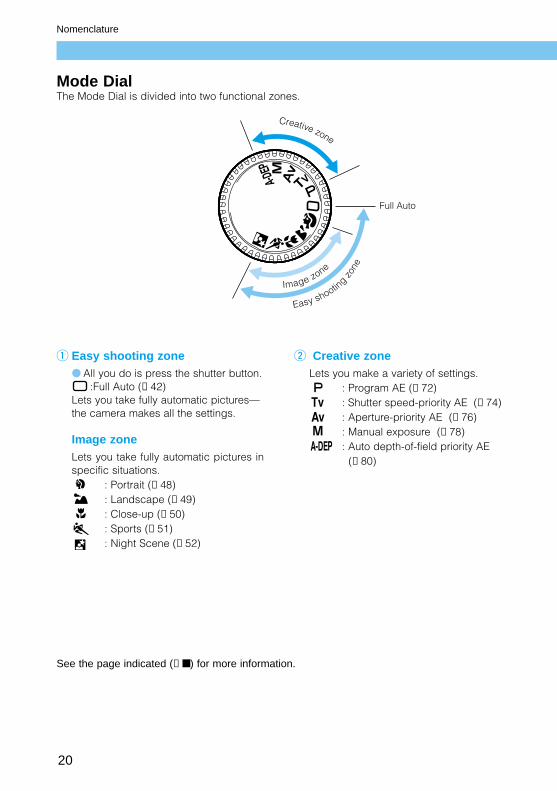
Mode DialThe Mode Dial is divided into two functional zones.
Image zone
Easy shooting
zone
Creative zone
Full Auto
q Easy shooting zone● All you do is press the shutter button.
:Full Auto (→42)Lets you take fully automatic pictures—the camera makes all the settings.
Image zoneLets you take fully automatic pictures inspecific situations.
: Portrait (→48): Landscape (→49): Close-up (→50): Sports (→51): Night Scene (→52)
w Creative zoneLets you make a variety of settings.
: Program AE (→72): Shutter speed-priority AE (→74): Aperture-priority AE (→76): Manual exposure (→78): Auto depth-of-field priority AE
(→80)
See the page indicated (→■) for more information.

Introduction
21
Nomenclature
Compact Power Adapter CA-PS400
Battery pack connectors(→25)
Attach battery packsfor charging.
Charge lamp (→25)
DC coupler socket (→29)Plug in cord for DC couplerhere.
Power cord (→25, 29)
Power cord socket (→25, 29)Plug in power cord here.
Back
DC coupler plug (→29)Plug into DC coupler socket of compactpower adapter.
DC CouplerDR-400
DC coupler cord (→29)

22
Conventions Used in This Manual● All descriptions in this manual assume that the Main Switch is already set to ⟨ON⟩. Set it to
⟨ON⟩ before proceeding with any operation.
● In this manual, the ⟨ ⟩ icon indicates the Main Dial.
● In this manual the ⟨ ⟩ icon indicates the Quick Control Dial.
● In this manual the ⟨ ⟩ icon indicates the SET button, used toset menu functions and custom functions.
● In this manual, the [C.Fn] symbol indicates a brief explanationof the respective custom function. For details, refer to “CustomFunction Settings ”(→124).
● The camera control icons and markings in this booklet correspond to the icons andmarkings on the camera. See "Nomenclature" on page 16.
● Reference page numbers are shown in parentheses (→■ ). ● The procedures in this user’s guide use a Canon EF 24-85mm F3.5-4.5 USM lens for
reference.● The descriptions also assume that the menu functions and custom functions are set to the
default settings.
● The icons ( ), ( ), and ( ) indicate that the function operates on a timer, and
remains in effect after the button is released. The icons represent 4, 6, or 16 seconds
respectively.● In general, the illustrations used for explaining procedures are taken with a single-lens
reflex camera using 35 mm film.
■ This user’s guide uses the following symbols as described:
1664
: Indicates precautions about potential problems with photographing.
: Indicates additional information you may find helpful.
: Indicates useful pointers for better camera operation or better photographs.

1Before You Begin
This chapter describes preparations and settings you need to makebefore you begin shooting, as well as how the shutter buttonoperates.
Attaching the StrapPass the end of the strap through thestrap eyelet from beneath, then back inand out of the strap clasp as shown. Pullthe strap to make sure it does not slipout of the clasp.
● The eyepiece cover is attached to thestrap. (→86)
Eyepiece cover
24
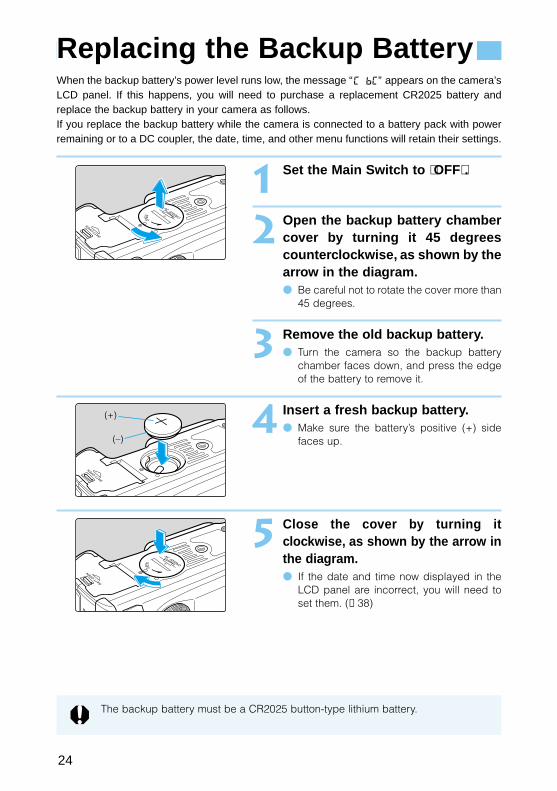
Replacing the Backup BatteryWhen the backup battery’s power level runs low, the message “ ” appears on the camera’sLCD panel. If this happens, you will need to purchase a replacement CR2025 battery andreplace the backup battery in your camera as follows.If you replace the backup battery while the camera is connected to a battery pack with powerremaining or to a DC coupler, the date, time, and other menu functions will retain their settings.
1 Set the Main Switch to ⟨OFF⟩.
2 Open the backup battery chambercover by turning it 45 degreescounterclockwise, as shown by thearrow in the diagram.● Be careful not to rotate the cover more than
45 degrees.
3 Remove the old backup battery.● Turn the camera so the backup battery
chamber faces down, and press the edgeof the battery to remove it.
4 Insert a fresh backup battery.● Make sure the battery’s positive (+) side
faces up.
5 Close the cover by turning itclockwise, as shown by the arrow inthe diagram.● If the date and time now displayed in the
LCD panel are incorrect, you will need toset them. (→38)
The backup battery must be a CR2025 button-type lithium battery.
(+)
(–)
25
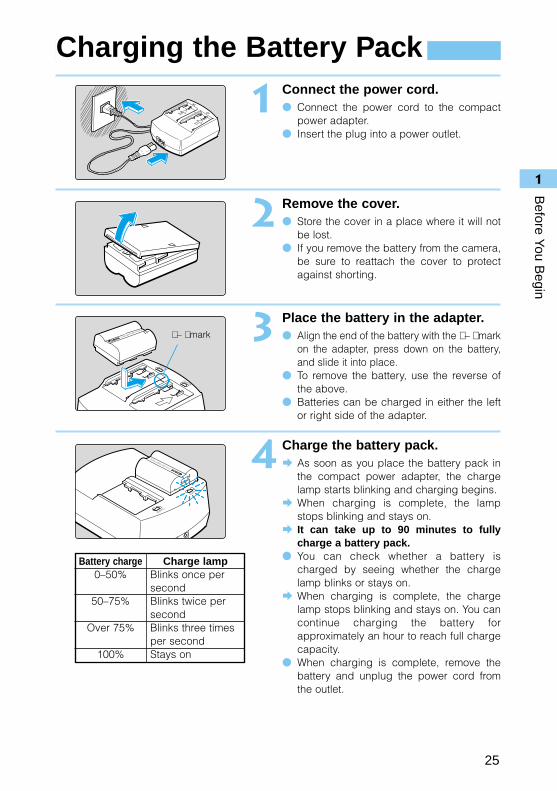
Charging the Battery Pack
1
Before You B
egin
1 Connect the power cord.● Connect the power cord to the compact
power adapter.● Insert the plug into a power outlet.
2 Remove the cover.● Store the cover in a place where it will not
be lost.● If you remove the battery from the camera,
be sure to reattach the cover to protectagainst shorting.
3 Place the battery in the adapter.● Align the end of the battery with the ⟨ – ⟩ mark
on the adapter, press down on the battery,and slide it into place.
● To remove the battery, use the reverse ofthe above.
● Batteries can be charged in either the leftor right side of the adapter.
4 Charge the battery pack.As soon as you place the battery pack inthe compact power adapter, the chargelamp starts blinking and charging begins.When charging is complete, the lampstops blinking and stays on.It can take up to 90 minutes to fullycharge a battery pack.
● You can check whether a battery ischarged by seeing whether the chargelamp blinks or stays on.When charging is complete, the chargelamp stops blinking and stays on. You cancontinue charging the battery forapproximately an hour to reach full chargecapacity.
● When charging is complete, remove thebattery and unplug the power cord fromthe outlet.
Battery charge0–50%
50–75%
Over 75%
100%
Charge lampBlinks once persecondBlinks twice persecondBlinks three timesper secondStays on
⟨ – ⟩ mark

26
Charging the Battery Pack
● When the DC coupler is connected to the compact power adapter, the adaptercannot be used to charge battery packs.
● Do not charge any battery packs other than model BP-511.● When the battery pack is in the camera, it discharges slightly over time even
when the camera is not used. This reduces the battery pack’s operating time.When not using the camera, remove the battery pack and store it with itsprotective cover attached. Always be sure to charge the battery pack beforeusing it again.
● To protect battery packs and prevent loss of capacity, do not charge themcontinuously for more than 24 hours.
● If operating time is sharply reduced even after charging normally, the batterypack may have exceeded its useful life. Replace it with a new battery pack.
● The adapter can hold and charge two battery packs. Charging starts with thefirst battery pack attached. After that battery pack is charged, the charge lampgoes on and the adapter starts charging the second battery pack.After charging of both battery packs is completed (both charge lamps are on),leave both battery packs in the charger for two more hours (one hour per batterypack) to reach a full charge.
● Charging time depends on the ambient temperature, and the level to which thebattery pack is already charged.
● When battery power is low, the ⟨ ⟩ icon on the LCD panel blinks. Removethe battery pack from the camera and charge it.
● The battery pack can operate in temperatures from 0°C to 40°C (32°F to 104°F),however for full operating performance, use between 10°C (50°F) and 30°C(86°F) is recommended. In cold locations such as ski areas, battery performanceis temporarily decreased and operating time may be reduced.

Inserting the Battery PackLoad a fully charged BP-511 battery pack into the camera.
1 Open the battery chamber cover.● Slide the lever in the direction shown by the
arrow in the diagram, and open the coveras shown.
2 Load the battery into the camera.● Make sure the battery pack is facing the
right way, and insert it into the batterychamber.
● Insert the battery pack until it locks intoplace.
3 Close the cover.● Press the cover closed until it clicks shut.
Battery Charge Remaining IconsThe level of charge remaining is shown in three stages when the Main Switch is set to ⟨ ON ⟩.(→33)
: Charge is sufficient.
: Charge is low.
: Battery pack must be charged.
27
Inserting and Removing the Battery Pack
1
Before You B
egin
If the level of charge remaining runs out when you are using the menu screen orplaying back an image, a no battery warning appears on the LCD monitor. Whenthis occurs, remove the battery and charge it.

28
Inserting and Removing the Battery Pack
Number of Available Shots
Temperature
Normal (20°C/68°F)Low (0°C/32°F)
No flash useApprox. 680Approx. 480
50% flash useApprox. 540Approx. 400
Shooting conditions
● The above figures were obtained under Canon test conditions (fully charged battery, EF 50mmF1.4 USM lens, Review function [On], Review Time [2 sec.], Quality [Large ]).
● Playback on the LCD monitor is available for approximately 140 minutes at normaltemperature (continuous auto playback).
● The number of available shots may be less than indicated in some cases, due todifferences in operating conditions.
● The number of available shots is reduced by frequent use of the LCD monitor.● Holding the shutter button halfway down for long periods to use the AF function
without taking a shot can reduce the number of available shots.● In low temperature conditions (0°C/32°F), the number of available shots may be
less than indicated.● For the number of available shots when using the Battery Grip BG-ED3, see the
BG-ED3 User’s Manual.
Removing the Battery Pack
1 Open the battery cover.● Slide the lever in the direction shown by the
arrow in the diagram, and open the coveras shown.
2 Remove the battery pack.● Slide the battery lock lever in the direction
shown by the arrow, and remove thebattery.
3 Close the battery cover.● Press the cover closed until it clicks shut.

29
Inserting and Removing the Battery Pack
1
Before You B
egin
Using a Household Power SupplyYou can operate the EOS D30 from a household power outlet by using the DC coupler. Thisenables you to use the camera as long as you like without a battery.
1 Connect the DC coupler.● Plug the DC coupler into the compact
power adapter.
2 Place the cord in the groove.● Carefully insert the cord into the groove.
3 Insert the DC coupler into the camera.● Open the cover (→27) and lower the
covering on the cord channel.● Insert the DC coupler and fit the cord into
the cord channel.● Check that the cord is placed tightly in the
cord channel, and slide the DC couplerinto the chamber until it locks into place.
● Close the cover so that it clicks into place.
4 Connect the power cord.● Connect the power cord to the compact
power adapter.● Plug the cord into a power outlet.● When you are finished, remove the plug
from the power outlet.
● Do not use any DC coupler other than the one provided with your EOS D30camera.
● Do not use the DC coupler provided with your EOS D30 with any other camera.

30
Mounting and Detaching a LensMounting a Lens
1 Remove the caps.● Remove the rear lens cap and the body
cap by turning them as shown by thearrows in the diagram.
2 Attach the lens.● Align the red dots on the lens and camera
and turn the lens as shown by the arrow inthe diagram until it clicks in place.
3 Set the focus mode switch on thelens to ⟨AF⟩.● If the focus mode switch is set to ⟨MF⟩ (or
⟨M⟩ on older lenses), the autofocus will notoperate and ⟨ ⟩ will be displayed on theLCD panel.
4 Remove the front lens cap.
Detaching a LensPress and hold the lens releasebutton, and turn the lens as shownby the arrow in the diagram.● Turn the lens until the index mark is at the
top, then remove it.
Lens mount index
● Because the EOS D30 has a smaller sensor area thanthat of a 35mm-format camera, the angle of view of allEF lenses is changed. The effective focal length of alllenses is increased by a factor of 1.6, eg a 50mm lenshas approximately the same angle of view as an 80mmlens.
● AF stands for autofocus.● MF or M stands for manual focus.● Be careful not to lose the lens caps or body cap.
EOS D30 image field (22.7 × 15.1 mm /0.89 × 0.59 in)
35 mm image field (36 × 24 mm / 1.42 × 0.94 in)

31
Inserting a CF Card
1
Before You B
egin
The EOS D30 stores pictures on a CompactFlash (CF) card. The camera can use either Type 1 or Type 2 CF cards.
1 Open the cover.● Slide the cover in the direction shown by
the arrow, and open it as shown in thediagram.
2 Insert the CF card.● With the CF card label side (the side with
the printed mark) facing toward the rearof the camera, slide the card in thedirection of the mark, into the slot.The Eject button pops out.
3 Close the cover.● Close the cover and slide it in the direction
shown by the arrow until it clicks shut.
Removing a CF Card
1 Open the cover.● Set the Main Switch to ⟨OFF⟩.● Check that the “ ” message is not
shown on the LCD panel.● Make sure the access lamp is off (→17), and open the cover.
2 Remove the CF card.● Press the Eject button.
The CF card is ejected.● Close the cover.
● Never do any of the following while the access lamp is blinking (the “ ” and“ ” messages are shown on the LCD panel and in the viewfinder), or yourisk destroying image data or even damaging the camera itself.• Never shake the camera or subject it to impact.• Never open the CF card slot cover. • Never remove the CF card.• Never open the battery cover. • Never remove the battery.
● You cannot use the menu function or playback images while image data is beingwritten onto the CF card (the access lamp is blinking (→17)). If you press ⟨MENU⟩or the ⟨ ⟩ button, the warning message of “Busy.” (→137) will appear on theLCD panel.
● If you insert a CF card that is unformatted or contains corrupt data, the LCDpanel will display the message “ ”. If this happens, refer to “Formattinga CF Card” (→109) for instructions.
mark
Eject button Label side

The pictures you take are automatically assigned file numbers from 0001 to 9900 and storedin folders of 100 images each. Each folder on the CF card is numbered from 100 to 998.Automatic file numbering can be either by continuous numbering or auto reset numbering (thedefault setting is continuous numbering):
(1) Continuous: Numbering is continuousbetween cards, so that the firstfile number assigned on a newCF card is one more than the lastfile number assigned on theprevious CF card.
(2) Auto reset: Each time you insert a new CFcard, the file number resets to itsdefault value (100-0001). If thecard already contains files, thenext available number isassigned.
1 From the menu, select [Filenumbering].● Press the ⟨MENU⟩ button.● Turn the ⟨ ⟩ dial to select [File
Numbering], then press the ⟨ ⟩ button.
2 Select the setting you want.● Turn the ⟨ ⟩ dial to select [Continuous] or
[Auto reset], then press the ⟨ ⟩ button.The selection is entered, and the displayreturns to the menu.
● Press the ⟨MENU⟩ button to clear thescreen and exit the menu.
3 images are recorded on the CF card
100-0001
100-0002
100-0003
100
Continuous numbering
100-0004
100
Auto reset numbering
When you change the CF card and take a picture
100-0001
100
32
File Numbering System
● File numbers are used the same way as frame numbers in a film camera.● For details about file numbers, see “Basic Terminology for Digital Cameras and
Digital Photography” (→131).● Because pictures taken using continuous shooting must be stored in the same
folder, there may in some cases be more than 101 images in a folder.
Because continuous numbering avoids duplication of image file numbers, thissetting is convenient for processing images on computers.

Shutter ButtonThe shutter button has two stages. You can press it down halfway or fully. The two levels ofshutter button operation are as follows:
(1) Half press ( )Pressing the shutter button down halfway activates autofocusing(AF) and focuses the camera, and also activates the automaticexposure mechanism and sets the shutter speed and aperturevalue. The exposure (the combination of shutter speed and aperturevalue) appears on the LCD panel and in the viewfinder.
(2) Full pressThis releases the shutter and takes the picture.
4
Main SwitchThe camera operates only after the Main Switch is set to ⟨ON⟩.
⟨ON⟩: Set to this position when the camera is in use.⟨OFF⟩ : The camera does not operate.
Set to this position when not using the camera.
33
Basic Operation
1
Before You B
egin
● To save battery power, the camera automatically turns off if you do not operate itfor approximately one minute (Auto power off function). To use the camera again,press the shutter button down halfway, or set the Main Switch to ⟨OFF⟩ and thenset it to ⟨ON⟩ again. You can use the Menu functions to set the Auto power offfunction to 1, 2, 4, 8, 15, or 30 minutes, or Off. (→121)
● If you set the Main Switch to ⟨OFF⟩ immediately you take a picture, the accesslamp may blink for a few seconds so that the image is recorded onto the CF card.The access lamp will go off when the image has been recorded onto the CF cardand the camera will turn off automatically.
● This camera has been designed so that taking pictures is given priority overother operations. Unless the internal memory is full, you will always be able totake pictures immediately by pressing the shutter button down.
● Regardless of the camera status (playback in progress, menu selection inprogress, image recording in progress, etc.), you can return to shooting modeimmediately by pressing the shutter button down halfway.

34
Using the Electronic DialsBasic Operations with the ⟨ ⟩ DialThe ⟨ ⟩ dial is used to make settings only when taking pictures.It can be used in two ways.
(1) Press a button and turn the ⟨ ⟩ dial.When you press a button, its function remains active while a timer ( ) runs. During thistime you can turn the ⟨ ⟩ dial and view the settings on the LCD panel. When the timerruns out or you press the shutter button down halfway, the camera is ready to take apicture.
(2) Just turn the ⟨ ⟩ dial.Turn the ⟨ ⟩ dial while watching the LCD panel.
6
Basic Operation
w Turn the ⟨ ⟩ dial
q After a button is pressed
Use the dial this way to set the shutter speed and aperture value.
Use the dial this way to set the AF mode, focusing point, metering mode or drivemode.

35
1
Before You B
eginBasic Operation
Basic Operations with the ⟨ ⟩ dial.You can only use the ⟨ ⟩ dial when the Quick Control Dialswitch is set to ⟨ON⟩. Use the dial to select and set shootingmode operations and menu functions from the LCD monitor.When using the ⟨ ⟩ dial to carry out basic operations, you canuse it in two ways.
(1) Press a button and turn the ⟨ ⟩ dial.When you press a button, its function remains activewhile a timer ( ) runs. During this time you canturn the ⟨ ⟩ dial and view settings on the LCDpanel. The timer function and return to shooting mode arethe same as for the ⟨ ⟩ dial.
(2) Just turn the ⟨ ⟩ dial.When you are taking pictures, turn the ⟨ ⟩ dialwhile watching the viewfinder display or LCD panel.When you are making selections and settings fromthe LCD monitor, turn the dial while watching theLCD monitor.
About the LCD MonitorYou can use the LCD monitor on the back of thecamera to review and select images, as well asselect and set menu functions.
6
Use the dial this way to select and set the white balance, drive mode and flashexposure compensation.
● When you are taking pictures, use the dial to set the exposure compensation andmanual aperture value.
● When using the LCD monitor, use the dial to review and select the recordedimage and select menu functions.
You can use the ⟨ ⟩ dial when you are using the LCD monitor, regardless ofwhether the Quick Control Dial Switch is set to ⟨OFF⟩.
You cannot use the LCD monitor as a viewfinder while taking pictures.

36
Basic Operation
Menu Functions and SettingsThe Canon EOS D30 uses menu functions to set functions such as the quality, the date andtime, and Custom Function settings. To use the menu functions, look at the LCD monitor anduse the ⟨MENU⟩ button, ⟨ ⟩ dial and ⟨ ⟩ button as shown below.
⟨MENU⟩ button
⟨ ⟩ dialLCD monitor
⟨ ⟩ button
● When the menu is displayed, you can take pictures immediately by pressing theshutter button down.
● You can finish making a setting by pressing the shutter button down halfway.● You can cycle through menu items and options lists.● You can select the display language from three other languages besides English. (→122)● If you press the ⟨JUMP⟩ button while the menu screen is displayed, you can
move to the top item in the recording, playback and setup sub-menus in thatorder, each time you press this button.
1. Display the menu.Press the ⟨MENU⟩ button to display the menu. Press the buttonagain to clear the screen.
2. Select the menu item.Turn the ⟨ ⟩ dial to select the desired item.
3. Display the options for the item and make your selection.Press the ⟨ ⟩ button to display the options list, then turn the ⟨ ⟩dial to select the desired option.
4. Make the setting.Press the ⟨ ⟩ button.
5. Exit the menu.Press the ⟨MENU⟩ button to exit the menu.
move the frame up
move the frame down

Small
400
4 min.30 min.
On (Info)
yy/mm/dd
LargeRAWOff
2001600Off
Set 1Set 3
2 min.15 min.
On4 sec.HoldBrightdd/mm/yyAuto resetDeutschJapanesePAL
37
Basic Operation
1
Before You B
egin
Menu Selections and Default SettingsOn the Menu screen, items and settings are shown in different colors according to thefunctions they control. Selected items are enclosed in a frame.
ColorRed
Blue
Yellow
Setting typeRecording
Playback
Setup
DescriptionMenu items related totaking pictures.Menu items related to playingback recorded images.Menu items related to basiccamera functions.
Menu item Setting indicated by color
Options list
Menu itemQuality *2
Red-eye on/off *3
AEB *2
ISO speed
BeepCustom WB *2
Parameters *1 *2
ProtectRotatePrint orderAuto playbackAuto power off
ReviewReview time
LCD BrightnessDate/TimeFile numberingLanguage
Video systemFormatC.Fn *2
LargeSmallOn
100800On
StandardSet 2
1 min.8 min.OffOff2 sec.8 sec.Normalmm/dd/yyContinuousEnglishFrançaisNTSC
Ref. page54
9382
55
1207056
107106110105121
4546
1223832122
123109124
Available settings
Protect recorded imageRotate recorded imageOrder print of recorded imageAutomatic playback of recorded image
*1: Does not appear in the menu if it is not set or registered.*2: Does not appear in the menu when the Easy Shooting zone (→20) is selected.*3: Does not appear in the menu in ⟨ ⟩ and ⟨ ⟩ modes.
: Default setting
Reco
rdin
g (R
ed)
Playb
ack (Blu
e)S
etup
(Yellow
)
Set custom white balance
Format CF cardCustom Function settings

38
Setting the Date and TimeSet the date and time as shown. The date and time are recorded with the image data for eachphotographed image.
1 From the Menu, select [Date/Time].● Press the ⟨MENU⟩ button.● Turn the ⟨ ⟩ dial to select [Date/Time].
2 Press the ⟨ ⟩ button.The Date/Time setting screen appears.
3 Set the date and time.● Turn the ⟨ ⟩ dial to adjust the date and
time values, then press the ⟨ ⟩ button.● After entering the setting, go to the next
item.
4 Select the order for the display.● Use the ⟨ ⟩ dial to select the order, then
press the ⟨ ⟩ button.
● Turn the ⟨ ⟩ dial to cycle through the
selections in the order shown.
yy/mm/dd
mm/dd/yy
dd/mm/yy

39
Setting the Date and Time
1
Before You B
egin
● Each photographed image is recorded with the date and time it was taken. If thedate and time are not set, they cannot be recorded correctly. Make sure you setthe date and time correctly.
● The date and time are stored using the backup battery.
5 Press the ⟨ ⟩ button.The date and time are set, and the displayreturns to the menu.
● Press the ⟨MENU⟩ button to clear thescreen and exit the menu.

40
Dioptric Adjustment in the ViewfinderUse the dioptric adjustment in the viewfinder to best suit your vision. This adjustment canenable eyeglass wearers to see through the viewfinder clearly, even without their eyeglasses.The camera’s adjustable dioptric range is –3 to +1 dpt.
Turn the Dioptric Adjustment Knob● Turn the knob right or left until the focusing point
or the center spot metering circle appearssharply defined in the viewfinder.
● The diagram shows the knob set at the standarddiopter (–1 dpt).
If the viewfinder image still does not look sharp after adjusting the diopteradjustment knob, try one of the E-series dioptric adjustment lenses (soldseparately). (→140)
Holding the CameraTo get sharp pictures, hold the camera as still as possible.
● Grasp the camera grip firmly with your right hand, and hold your right elbow lightly againstyour body.
● Hold the lens at the bottom with your left hand.● Hold the camera to your face and look through the viewfinder.● To maintain a stable stance, place one foot slightly in front of the other.
Landscape position Portrait position
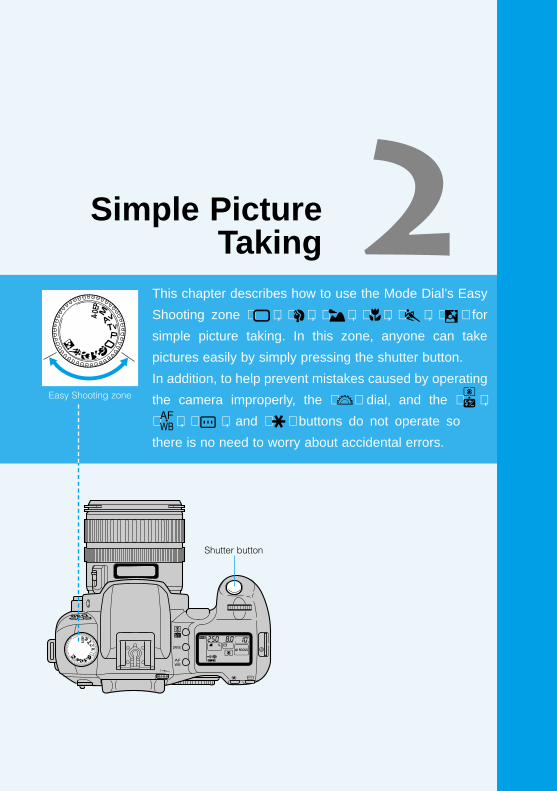
2Simple PictureTaking
This chapter describes how to use the Mode Dial’s Easy
Shooting zone ⟨ ⟩ , ⟨ ⟩ , ⟨ ⟩ , ⟨ ⟩ , ⟨ ⟩ , ⟨ ⟩ for
simple picture taking. In this zone, anyone can take
pictures easily by simply pressing the shutter button.
In addition, to help prevent mistakes caused by operating
the camera improperly, the ⟨ ⟩ dial, and the ⟨ ⟩ , ⟨ ⟩ , ⟨ ⟩ , and ⟨ ⟩ buttons do not operate so
there is no need to worry about accidental errors.
Easy Shooting zone
Shutter button

42
Fully Automatic Picture TakingYou can easily and confidently take pictures of any subject, with no need to do anything butpress the shutter button. The Canon EOS D30 can capture subjects at any of three focusingpoints, so that anybody can take great pictures easily.
1 Set the Mode Dial to ⟨ ⟩ .The AF mode is automatically set to ⟨AIFocus⟩ (→60), the metering mode is set to⟨ ⟩ and the drive mode to ⟨ ⟩ (Singleshot).
The Quality setting is automatically set toLarge/Fine (2160 × 1440).
2 Place one of the focusing pointson the subject.● The camera determines the subject
position and uses the most appropriatefocusing point.
● To focus on a subject that is not at any ofthe three focusing points, see “FocusingOn an Off-Center Subject” (→62).
3 Set the focus.● Press the shutter button down halfway to
set the focus.The camera beeps when the shot is infocus, and the in-focus indicator ⟨● ⟩ lightsin the viewfinder at the focusing point thecamera is using.
4 Check the display.The camera determines the shutter speed andaperture value automatically, and displaysthem in the viewfinder and on the LCD panel.
5 Take the picture.● Compose the shot and press the shutter
button down fully.The image is shown for approximately 2seconds on the LCD monitor.
Focusing point

2
Sim
ple Picture Taking
43
Fully Automatic Picture Taking
● The focus and exposure are locked when AF focusing is complete.● The camera automatically focuses on the focusing point that is on the subject
closest to the camera.● You can set the beep that indicates the subject is in focus or the beep that
indicates the self-timer is operating to On or Off. (→37, 120)
● If anything blocks the flash so that it cannot pop up automatically, the error code“ ” (→137) appears on the LCD panel. When this occurs, set the MainSwitch to ⟨OFF⟩ and then set it to ⟨ON⟩ again.
● For precautions and information about using the built-in flash, see “FlashPhotography” (→90).
● If the CF card becomes full, the CF Full message “ ” appears on the LCDpanel and in the viewfinder, and the camera will not take any more pictures.Replace the CF card with another CF card that has capacity available.
● When the in-focus indicator ⟨● ⟩ is blinking, the camera will not take pictures.(→63, 139)
● To take pictures in an area where flash photography is prohibited or using indoorlighting, the ⟨ ⟩ (Program) (→72) mode setting is recommended.
● When taking flash pictures of people at night or in dark interiors, we recommendusing “Red-eye reduction” (→93).
Automatic Built-in FlashIn the Easy Shooting zone (other than ⟨ ⟩ and ⟨ ⟩ ), the flash pops up automatically andfires in low-light conditions or backlit daylight conditions. Press the flash back down when youare finished using it.
AF-Assist Light● In dark locations, pressing the shutter button
down halfway causes the AF-assist light emitterto light. The AF-assist light helps the AF functionfocus the shot.
● The effective range of the AF-assist light in focusing is approximately 3.8 m/12.5 ft.● When using an EX-series Speedlite for the EOS camera (sold separately), the AF-
assist light built into the camera or the flash operates, depending on shootingconditions.

44
Check the Image ImmediatelyYou can view the images you take immediately, on the LCD monitor on the back of the camera.
1 Take the picture.After the picture is taken, the image as itwas shot appears on the LCD monitor.
● The image is shown for approximately 2 seconds.
You can also view the images you have taken in index form (→102) or enlarged form(→103).
● You can turn the Review function on or off, as well as display the imageinformation display. (→45)
● You can change the length of time the image is displayed. (→46)● You can change the brightness of the LCD monitor. (→122)● While a picture is being displayed, you can press the ⟨ ⟩ button to delete that
image. (→47) This will erase the image shown on the LCD monitor before it is written to the CFcard.
Check the Image in PLAY Mode
1 View the image.● Press the ⟨ ⟩ button.
The most recently recorded image appears.
● Press the ⟨ ⟩ button again to remove theimage from the LCD monitor and exit PLAYmode.
2 Change the displayed image.● Turn the ⟨ ⟩ dial counterclockwise to move
back through the images you have taken,from newest to oldest.
● Turn the ⟨ ⟩ dial clockwise to movethrough the images from oldest to newest.
You cannot use the menu function or playback images while image data is beingwritten onto the CF card (the access lamp is blinking (→17)). If you press ⟨MENU⟩or the ⟨ ⟩ button, the warning message of “Busy.” (→137) will appear on the LCDpanel.
2
Sim
ple Picture Taking
45
Check the Image Immediately
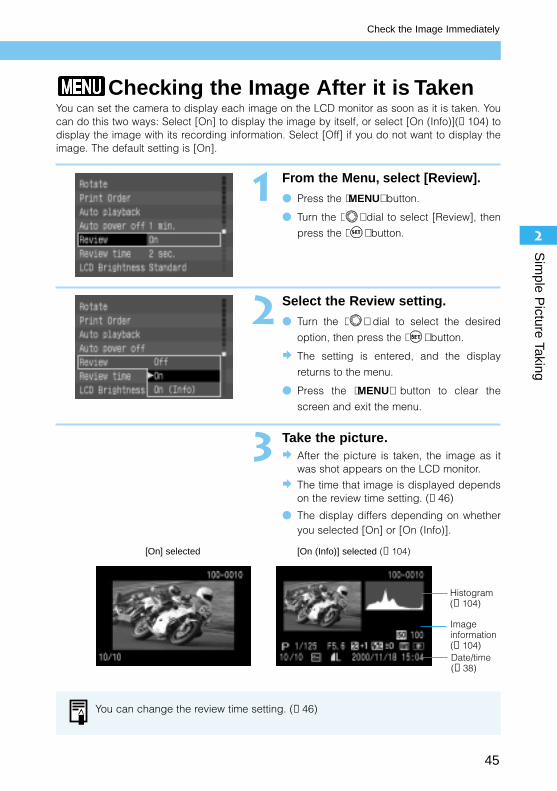
Checking the Image After it is TakenYou can set the camera to display each image on the LCD monitor as soon as it is taken. Youcan do this two ways: Select [On] to display the image by itself, or select [On (Info)](→104) todisplay the image with its recording information. Select [Off] if you do not want to display theimage. The default setting is [On].
1 From the Menu, select [Review].● Press the ⟨MENU⟩ button.
● Turn the ⟨ ⟩ dial to select [Review], then
press the ⟨ ⟩ button.
2 Select the Review setting.● Turn the ⟨ ⟩ dial to select the desired
option, then press the ⟨ ⟩ button.
The setting is entered, and the display
returns to the menu.
● Press the ⟨MENU⟩ button to clear the
screen and exit the menu.
3 Take the picture.After the picture is taken, the image as itwas shot appears on the LCD monitor.
The time that image is displayed dependson the review time setting. (→46)
● The display differs depending on whetheryou selected [On] or [On (Info)].
You can change the review time setting. (→46)
[On] selected [On (Info)] selected (→104)
Histogram (→104)
Date/time (→38)
Imageinformation (→104)

46
Check the Image Immediately
Time Images Are Displayed for CheckingYou can control how long images are displayed by setting the review time to [2 sec.], [4 sec.], [8 sec.], or [Hold] which keeps the image on the monitor screen. The default setting is [2 sec.].
1 From the Menu, select [Reviewtime].● Press the ⟨MENU⟩ button.
● Turn the ⟨ ⟩ dial to select [Review time],
then press the ⟨ ⟩ button.
2 Set the review time.● Turn the ⟨ ⟩ dial to select the review time
you want, then press the ⟨ ⟩ button.
The setting is entered, and the displayreturns to the menu.
● Press the ⟨MENU⟩ button to clear thescreen and exit the menu.
● When this function is set to [Hold], the image is displayed until you press theshutter button down halfway. Note however that the camera power will turn offautomatically when the Auto power off time setting is reached (→33, 121).
● The [Review time] setting is valid when the [Review] feature is set to [On] or [On (Info)].

2
Sim
ple Picture Taking
47
Erasing a Recorded Image (Single Image Erase)
1 Set the camera to Play mode.● Press the ⟨ ⟩ button to enter Play mode.
The most recent image appears.
2 Select the image you want toerase.● Turn the ⟨ ⟩ dial to select the image you
want to erase.
3 Open the Erase menu.● Press the ⟨ ⟩ button.
The Erase menu appears at the bottom ofthe LCD monitor.
4 Erase the image.● Turn the ⟨ ⟩ dial to select [Erase], then
press the ⟨ ⟩ button.
The access lamp blinks and the image iserased.
You cannot recover an image once you have erased it. Make sure you no longerwant an image before erasing it.
● You can protect images (→107) to prevent them from being erased accidentally.● To erase all images recorded on the CF card, see “Erasing Images (All Image
Erase) ” (→108).

48
Portrait ModeThis mode blurs the background to make the subjectstand out.
Set the Mode Dial to ⟨ ⟩ .● The way you take pictures is the same as in ⟨ ⟩
(Full Auto) mode. (→42)The AF mode is automatically set to ⟨ONESHOT⟩ , the drive mode to ⟨ ⟩ , and themetering mode to ⟨ ⟩ .The Quality setting is automatically set toLarge/Fine (2160 × 1440).
● Head-and-shoulder shots give the best background blur effect. Also, the fartherthe subject is from the background, the more blurred the background will appear.
● Use a telephoto lens to blur the background even more. If you use a zoom lens,its longest focal length is the most effective (for example, a 24-85mm lens set to85 mm).

2
Sim
ple Picture Taking
49
Landscape ModeThis mode is for sweeping scenery, sunsets, etc.
Set the Mode Dial to ⟨ ⟩ .● The way you take pictures is the same as in ⟨ ⟩
(Full Auto) mode. (→42)The AF mode is automatically set to ⟨ONESHOT⟩, the drive mode to ⟨ ⟩ (Single shot),and the metering mode to ⟨ ⟩ .The Quality setting is automatically set toLarge/Fine (2160 × 1440).
If the shutter speed indicator blinks, the shutter speed may be too slow to keep thepicture from being blurred by camera shake. We recommend you use a tripod whentaking landscape pictures. (The shutter speed indicator still blinks if you use a tripod, but camera shake will not be a problem.)
The built-in flash does not fire in Landscape mode, even if it is raised.
A wide-angle lens provides the greatest depth from foreground to background, aswell as a wider image. If you use a zoom lens, its shortest focal length is the mosteffective (for example, a 24-85mm lens set to 24 mm).

50
Close-Up ModeThis mode is for taking close-up shots of flowers,insects, or other small subjects.
Set the Mode Dial to ⟨ ⟩ .● The way you take pictures is the same as in ⟨ ⟩
(Full Auto) mode. (→42)The AF mode is automatically set to (ONESHOT), the drive mode to ⟨ ⟩ (Single shot),and the metering mode to ⟨ ⟩ .The Quality setting is automatically set toLarge/Fine (2160 × 1440).
● Close-up mode is most effective when the subject is at the minimum focusingdistance of the lens.
● If you use a zoom lens, use its longest focal length to get a higher magnification.● For better close-ups, we recommend using an EOS-dedicated macro lens and
the Macro Ring Lite MR-14EX.

2
Sim
ple Picture Taking
51
Sports Mode
The built-in flash does not fire in Sports mode, even if it is raised.
If the shutter speed indicator blinks, the shutter speed may be too slow to keep thepicture from being blurred by camera shake. Be careful to hold the camera steadyand press the shutter button smoothly, or use a tripod. (The shutter speed indicatorstill blinks if you use a tripod, but camera shake will not be a problem.)
● For best results in Sports mode, use a film speed setting of ISO 400 or faster.(→55, 120)
● For sports photography we recommend using a telephoto lens of 200-300 mm.
This mode is used for sports photography andcapturing fast-moving subjects.
Set the Mode Dial to ⟨ ⟩ .● The way you take pictures is the same as in ⟨ ⟩
(Full Auto) mode. (→42)The AF mode is automatically set to (AI Servo),the drive mode to ⟨ ⟩ , and the metering modeto ⟨ ⟩ .The Quality setting is automatically set toLarge/Fine (2160 × 1440).

52
Night Scene Mode
● If you are taking images of scenery only (and not people), use Landscape ⟨ ⟩ mode.
● Tell your subjects not to move for a few seconds after the flash fires.● You can also use Night Scene ⟨ ⟩ mode with an EX-series Speedlite.
● In daylight, Night Scene ⟨ ⟩ mode operates the same as ⟨ ⟩ (Full Auto)mode.
For best results in Night Scene mode, use a film speed setting of ISO 400 or faster.(→55, 120)
This mode is for taking pictures of people at sunset or at night. It uses flash to illuminate thesubject and a slow shutter speed to expose the background, resulting in a natural-lookingexposure.
Set the Mode Dial to ⟨ ⟩ .● The way you take pictures is the same as in ⟨ ⟩
(Full Auto) mode. (→42)The AF mode is automatically set to ⟨ONESHOT⟩, the drive mode to ⟨ ⟩ (Single shot),and the metering mode to ⟨ ⟩ .The Quality setting is automatically set toLarge/Fine (2160 × 1440).
● To prevent camera shake, always use a tripod.● When the shutter speed has been automatically set to 1-2 seconds, it will take
one second from when the shutter button is pressed down fully until the pictureis taken. Continue pressing the shutter button until the picture is taken.

3AdvancedOperationsThe Creative zone features shooting modes that letyou select the shutter speed or aperture value andchange the exposure yourself, providing you withmore flexibility to set up the camera for a variety ofshooting styles. This chapter describes how to makeeffective use of each of these functions.
● The ⟨ ⟩ icon represents the Main Dial, and the ⟨ ⟩ iconrepresents the Quick Control Dial.
● Press the shutter button down halfway and release, and a timerwill show the exposure setting for approximately 4 seconds onthe LCD panel and viewfinder.
● The AE lock, exposure compensation, AEB, bulb, and depth-of-field check functions operate only in Creative zone modes.
● The Menu function Quality, AEB, Custom WB, Parameters, andC.Fn settings are used only in the Creative zone.
Creative zone

54
Quality Selection
● You cannot adjust the Quality setting while in the Easy Shooting zone (→20).● Opening images on a computer that have been recorded in RAW format require
the dedicated computer driver provided with the camera. For details, refer to theSoftware Starter Guide.
1 From the menu, select [Quality].● Press the ⟨MENU⟩ button.
● Turn the ⟨ ⟩ dial to select [Quality], then
press the ⟨ ⟩ button.
2 Set the quality.● Turn the ⟨ ⟩ dial to select the Quality you
want, then press the ⟨ ⟩ button.
The selected Quality setting is entered,and the screen returns to the menu.
● Press the ⟨MENU⟩ button to clear thescreen and exit the menu.
You can set the Quality by pressing the ⟨ ⟩ button and turning the ⟨ ⟩ or ⟨ ⟩dial as you look at the LCD panel. (C.Fn-12-1 →128)
Size of oneimage
1.3 Mbyte0.7 Mbyte0.7 Mbyte0.4 Mbyte3.4 Mbyte
Quality
Large/FineLarge/NormalSmall/FineSmall/NormalRAW
Icon Recordingsize
2160 × 1440
1440 × 960
2160 × 1440
Recordingmethod
JPEG
RAW
CompressionratioLowHighLowHigh
–
Recordingcapacity
Approx. 10 shots Approx. 21 shotsApprox. 22 shotsApprox. 40 shotsApprox. 3 shots
Use the Menu function to choose from five Quality settings:
● Based on Canon testing standards (ISO 100 setting).● Recording capacity is the number of shots that can be stored on the CF card/FC-16M provided
with the EOS D30 camera.● The number of images that can be recorded depends on the subject and modes used.

3
Advanced O
perations
55
ISO speed is an index number representing the photosensitivity of silver-halide film. Digitalcameras do not use film, but their photosensitivity is commonly described in terms of “ISOequivalent” speed settings. (→132)The higher the number, the greater the sensitivity. Higher speeds are better for taking picturesof moving subjects or in dim light, but the pictures will also contain more noise and so will beless sharp. Conversely, lower speeds are less suited to moving subjects or dim conditions, butproduce sharper, more detailed images.The Canon EOS D30 provides ISO-equivalent speed settings from ISO 100 to ISO 1600, inone-step increments.
1 Select [ISO Speed].● Press the ⟨MENU⟩ button.● Turn the ⟨ ⟩ dial to select [ISO Speed],
then press the ⟨ ⟩ button.
2 Set the ISO speed.● Turn the ⟨ ⟩ dial to select the desired ISO
speed, then press the ⟨ ⟩ button.
The selected ISO speed is entered, andthe screen returns to the Menu.
● Press the ⟨MENU⟩ button to clear thescreen and exit the Menu.
You can set the ISO speed by pressing the ⟨ ⟩ button and turning the ⟨ ⟩ or ⟨ ⟩ dial as you look at the LCD panel. (C.Fn-12-2 →128)
About ISO Speed
56
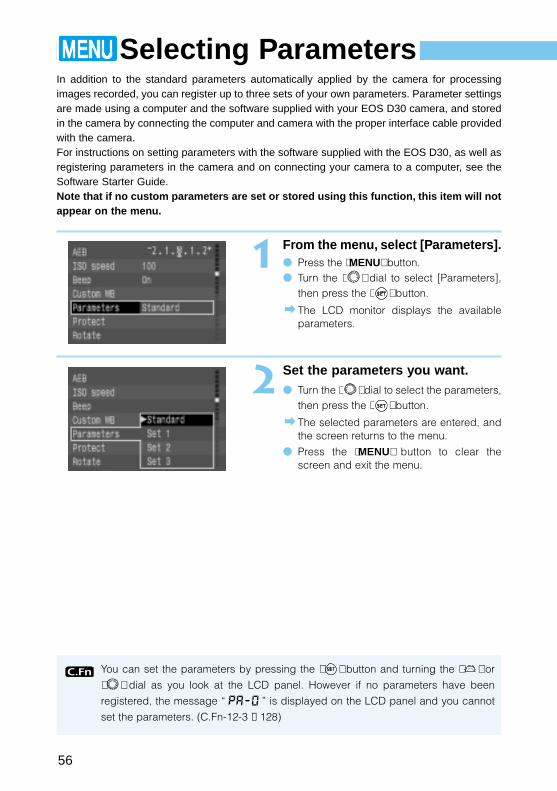
Selecting ParametersIn addition to the standard parameters automatically applied by the camera for processingimages recorded, you can register up to three sets of your own parameters. Parameter settingsare made using a computer and the software supplied with your EOS D30 camera, and storedin the camera by connecting the computer and camera with the proper interface cable providedwith the camera.For instructions on setting parameters with the software supplied with the EOS D30, as well asregistering parameters in the camera and on connecting your camera to a computer, see theSoftware Starter Guide.Note that if no custom parameters are set or stored using this function, this item will notappear on the menu.
You can set the parameters by pressing the ⟨ ⟩ button and turning the ⟨ ⟩ or
⟨ ⟩ dial as you look at the LCD panel. However if no parameters have been
registered, the message “ ” is displayed on the LCD panel and you cannot
set the parameters. (C.Fn-12-3 →128)
1 From the menu, select [Parameters].● Press the ⟨MENU⟩ button.● Turn the ⟨ ⟩ dial to select [Parameters],
then press the ⟨ ⟩ button.
The LCD monitor displays the availableparameters.
2 Set the parameters you want.● Turn the ⟨ ⟩ dial to select the parameters,
then press the ⟨ ⟩ button.
The selected parameters are entered, andthe screen returns to the menu.
● Press the ⟨MENU⟩ button to clear thescreen and exit the menu.

3
Advanced O
perations
57
Selecting Parameters
ParametersThe camera can store up to three sets of parameters, each a combination of settings forContrast, Sharpness, and Color Saturation. For details, see the Software Starter Guide.
Parameter
Contrast
Sharpness
Color Saturation
Setting
Adjusts the contrast
Adjusts thesharpness
Adjusts the color saturation
Level
Low
Normal
High
Low
Normal
High
Low
Normal
High
Effect
Takes pictures with lower contrast.
Takes pictures with normal contrast.
Takes pictures with higher contrast.
Takes pictures with lower sharpness.
Takes pictures with normal sharpness.
Takes pictures with higher sharpness.
Takes pictures with muted colors.
Takes pictures with normal color saturation.
Takes pictures with intense colors.
Up to 3 sets of parameters can be stored.
Set the contrast in three levels.
Set the sharpness in three levels.
Set the color saturation in three levels.
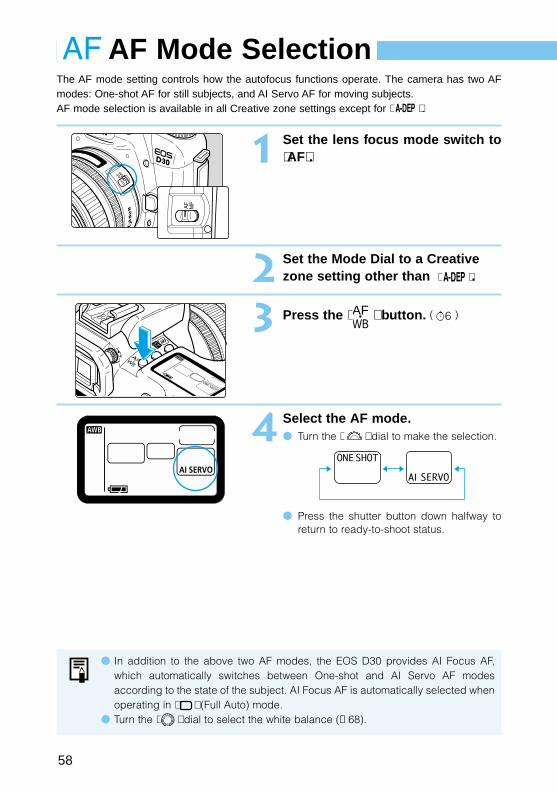
58
AF Mode SelectionThe AF mode setting controls how the autofocus functions operate. The camera has two AFmodes: One-shot AF for still subjects, and AI Servo AF for moving subjects. AF mode selection is available in all Creative zone settings except for ⟨ ⟩ .
1 Set the lens focus mode switch to⟨AF⟩.
2 Set the Mode Dial to a Creativezone setting other than ⟨ ⟩ .
3 Press the ⟨ ⟩ button. ( )
4 Select the AF mode.● Turn the ⟨ ⟩ dial to make the selection.
● Press the shutter button down halfway toreturn to ready-to-shoot status.
6AFWB
● In addition to the above two AF modes, the EOS D30 provides AI Focus AF,which automatically switches between One-shot and AI Servo AF modesaccording to the state of the subject. AI Focus AF is automatically selected whenoperating in ⟨ ⟩ (Full Auto) mode.
● Turn the ⟨ ⟩ dial to select the white balance (→68).
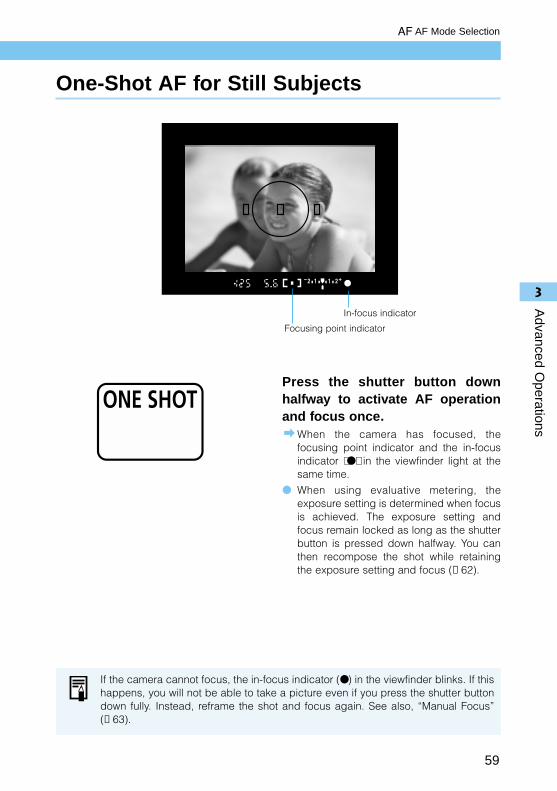
3
Advanced O
perations
59
AF Mode Selection
One-Shot AF for Still Subjects
Press the shutter button downhalfway to activate AF operationand focus once.
When the camera has focused, thefocusing point indicator and the in-focusindicator ⟨● ⟩ in the viewfinder light at thesame time.
● When using evaluative metering, theexposure setting is determined when focusis achieved. The exposure setting andfocus remain locked as long as the shutterbutton is pressed down halfway. You canthen recompose the shot while retainingthe exposure setting and focus (→62).
If the camera cannot focus, the in-focus indicator (● ) in the viewfinder blinks. If thishappens, you will not be able to take a picture even if you press the shutter buttondown fully. Instead, reframe the shot and focus again. See also, “Manual Focus”(→63).
In-focus indicator
Focusing point indicator

60
AF Mode Selection
AI Servo AF for Moving SubjectsPress and hold the shutter buttondown halfway, and the camerafocuses continuously.● This mode is suited for moving subjects
when the focusing distance keepschanging.
● With its predictive AF function, the cameracan also track a subject that is steadilyapproaching or retreating from the camera.
● The exposure settings are determinedimmediately before the picture is taken.
If the in-focus indicator ⟨● ⟩ in the viewfinder blinks, the camera has not focused.
You can set the camera so that during AI Servo AF operation, you can press the ⟨ ⟩ button and the focus will momentarily lock as long as the button is held down.(C. Fn-2-2→124)
About Predictive AFWhen a subject is approaching or retreating from the camera at a constant rate, the focusingfunction can track the subject and predict the focusing distance immediately before thepicture is taken so that the shot will be in focus at the moment of exposure.● When the focusing point is selected automatically, the camera uses one of three focusing
points to focus on the subject. Tracking and predictive focusing is carried out using theselected focusing point.
● When the focusing point is selected manually (→61), the selected focusing point tracks thesubject.
AI Focus AFAI Focus AF is set automatically in ⟨ ⟩ (Full Auto) mode. At the time of the shot, the cameraautomatically selects One-shot AF and AI Servo AF according to the state of the subject.If the subject is focused in One-shot AF and the subject then begins to move continuously, thecamera detects the movement, automatically switches to AI Servo AF, and focusescontinuously as it tracks the subject.

3
Advanced O
perations
61
Focusing Point SelectionThe focusing point is the frame in which the subject is focused. The focusing point can beselected automatically or manually. In the Easy Shooting zone and in ⟨ ⟩ mode, theselection is automatic, but in ⟨ ⟩ , ⟨ ⟩ , ⟨ ⟩ , and ⟨ ⟩ modes you can switch betweenautomatic and manual focusing point selection.
Automatic selection AF: The camera selects the focusing point automatically according toconditions.
Manual selection AF: You can select any of the three focusing points manually. This is bestwhen you want to be sure to focus on a particular subject, or to usethe speed of the AF focusing function to help you compose aparticular shot quickly.
1 Press the ⟨ ⟩ button. ( )
2 Select the focusing point.Look at the LCD panel or the viewfinderdisplay as you turn the ⟨ ⟩ or ⟨ ⟩ dial.
● Press the shutter button down halfway toreturn to ready-to-shoot mode.
6
Automatic selection
Manual selection

62
Focusing On an Off-Center SubjectTo focus on a subject not covered by one of the three focusing points, follow the procedurebelow. This technique is called Focus Lock. Focus lock is valid when the AF mode is set to One-shot AF.
1 Select a focusing point.(→61)
2 Focus on the subject.● Place the focusing point over the subject
and press the shutter button down halfway.
3 Hold the shutter button downhalfway and recompose thepicture.
4 Take the picture.
For best results, use the combination of One-shot AF with AE lock applied on thefocusing point where focus is achieved, and evaluative metering.
You can also use the Focus lock function in the Easy Shooting zone (except for⟨ ⟩ mode), starting from step 2.

3
Advanced O
perations
63
Problem Subjects for AutofocusingThe EOS D30 has a precision AF system that can focus on most subjects. However, it may notbe able to focus on subjects (in-focus indicator ⟨● ⟩ blinks) in particular conditions such as thefollowing:
Difficult-to-Focus Subjects● Very low-contrast subjects, such as a blue sky or single-color wall● Subjects in very dark locations● Extremely backlit or reflective subjects, such as a shiny new car● Overlapping nearby and distant objects, such as cage bars and the animal inside the cage
In such cases, use one of the following procedures:(1) Focus on an object that is at the same distance as the desired subject, apply Focus Lock,
then recompose the picture.(2) Set the lens focus mode switch to MF (or M on older lenses), and focus manually.
Manual Focus
1 Set the lens focus mode switch to⟨MF⟩ (or ⟨M⟩ on older lenses).
The ⟨ ⟩ icon appears on the LCD panel.
2 Focus on the subject.● Turn the manual focusing ring on the lens
until the subject appears sharp in theviewfinder.
If you press and hold the shutter button down halfway as you focus manually, youwill see the focusing point where the subject is focused, and the in-focus indicator⟨● ⟩ will light.

64
INFO. Checking Camera SettingsWhen the camera is ready to shoot, press the ⟨INFO.⟩ button to view the current camerasettings on the LCD monitor.
Camera Setting InformationThe following information is shown on the LCD monitor:
● Parameters are shown only if settings have been entered.● For viewing image information during playback, see “Turning the Information
Display On and Off” (→104).
Auto power off time (→33, 121)
ISO speed (→55)
AEB (→82)
Possible images thatcan still be taken
C.Fn (custom function) number(s)(→124)
Parameters (→56) (not displayedunless parameters have been stored)
Review (→45),Review time (→46)
1 Display the camera settings.● Press the ⟨INFO.⟩ button.
The current camera settings appear on theLCD monitor.
● Press the ⟨INFO.⟩ button again to clear theLCD monitor.
Flash exposure compensation (→95)
CF card capacityremaining (→18, 54)

3
Advanced O
perations
65
Selecting a Metering Mode
1 Press the ⟨ ⟩ button. ( )
2 Select a metering mode.Look at the LCD panel as you turn the ⟨ ⟩dial.
● Press the shutter button down halfway toreturn to ready-to-shoot mode.
6
Turn the ⟨ ⟩ dial to set the flash exposure compensation for the built-in/optionalflash (→95).
:Evaluative
:Partial
:Center-weighted averaging

66
Metering ModesThe EOS D30 uses three methods for metering: evaluative, partial, and center-weightedaveraging. The Easy Shooting zone uses evaluative metering. In the Creative zone, any of the threemodes can be selected.
: Evaluative MeteringThis is an all-around metering mode suited even forbacklit subjects. The viewfinder field is divided into35 metering zones to which the three focusingpoints are linked for evaluative metering. Thecamera determines the main subject’s size,position, brightness, background, front and backlighting, etc., so that it can select the properexposure for the subject at all times.
● When using manual focusing, evaluativemetering is based on the center focusing point.
: Partial MeteringThis is particularly effective when the background ismuch brighter than the subject due to backlighting,etc. This method uses a center area ofapproximately 9.5% of the screen.
● The area covered by partial metering is shownon the left.
: Center-weighted Averaging MeteringThis method meters the average exposure of theentire viewfinder screen, and gives extra weight tothe center.

3
Advanced O
perations
67
You can set the EOS D30’s drive mode to single-image shooting, continuous shooting or self-timer operation.Single-image shooting ⟨ ⟩ : Press the shutter button to take one image.Continuous shooting ⟨ ⟩ : You can use the continuous shooting mode by pressing and
holding the shutter button. The maximum number of images thatcan be taken for each quality setting is shown in the table below.
Self-timer operation: You can set the self-timer to take a picture after 10 seconds. (→85)
● Based on Canon testing standards (shutter speed of 1/250 second or faster, at ISO 100).● The number of frames that can be recorded depends on the subject and modes used.
1 Press the ⟨DRIVE⟩ button. ( )
2 Select the drive mode.● Look at the LCD panel as you turn the
⟨ ⟩ or ⟨ ⟩ dial.
● Press the shutter button down halfway toreturn to ready-to-shoot mode.
6
ONE SHOT AI SERVO81717303
Selecting a Drive Mode
:Single-frame shooting
:Continuous shooting
:Self-Timer Operation
Size/Quality
Large/FineLarge/NormalSmall/FineSmall/NormalRAW
ONE SHOT
3
AI SERVO
2.5
Maximum number of images(Approx. images/sec.)
Maximum number of images(Approx. images)
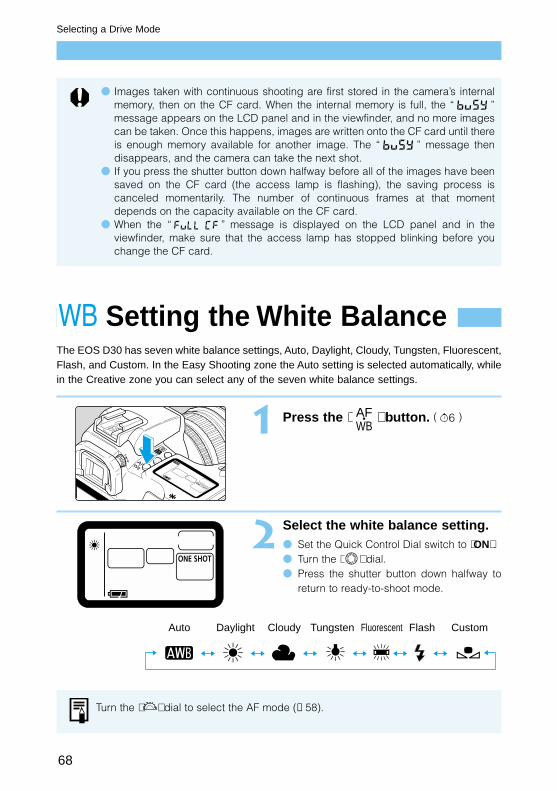
68
Selecting a Drive Mode
The EOS D30 has seven white balance settings, Auto, Daylight, Cloudy, Tungsten, Fluorescent,Flash, and Custom. In the Easy Shooting zone the Auto setting is selected automatically, whilein the Creative zone you can select any of the seven white balance settings.
1 Press the ⟨ ⟩ button. ( )
2 Select the white balance setting.● Set the Quick Control Dial switch to ⟨ON⟩.● Turn the ⟨ ⟩ dial.● Press the shutter button down halfway to
return to ready-to-shoot mode.
6AFWB
Turn the ⟨ ⟩ dial to select the AF mode (→58).
Auto Daylight Cloudy Tungsten Fluorescent Flash Custom
● Images taken with continuous shooting are first stored in the camera’s internalmemory, then on the CF card. When the internal memory is full, the “ ”message appears on the LCD panel and in the viewfinder, and no more imagescan be taken. Once this happens, images are written onto the CF card until thereis enough memory available for another image. The “ ” message thendisappears, and the camera can take the next shot.
● If you press the shutter button down halfway before all of the images have beensaved on the CF card (the access lamp is flashing), the saving process iscanceled momentarily. The number of continuous frames at that momentdepends on the capacity available on the CF card.
● When the “ ” message is displayed on the LCD panel and in theviewfinder, make sure that the access lamp has stopped blinking before youchange the CF card.
Setting the White Balance

3
Advanced O
perations
69
White Balance SettingsIn light from any source, the proportion of the primary colors (red, green, blue) in the light variesaccording to the color temperature. Higher color temperatures contain a greater proportion ofblue, and lower color temperatures contain a greater proportion of red. Moving from low to high,the progression is red → orange → yellow → white → blue-white. For example, a given subjectwill appear reddish if taken under tungsten (incandescent) lighting, or greenish if taken underfluorescent lighting.The human eye automatically adapts to changes in light so that white subjects appear whiteeven under different lighting conditions. Cameras that use film have to adjust for thesedifferences by using color-correcting filters or switching to different film types. Digital camerasrely on software to correct the color temperature by determining white as the basis for the colorsin the subject, then correcting the other colors to achieve a natural color range.⟨ ⟩ mode automatically selects the white balance according to the light source where youare shooting. If this does not produce pictures with satisfactory coloring, you can select a modeother than ⟨ ⟩ .
Icon Conditions Color temperature K (Kelvin)
Camera selects the setting automatically. approx. 3000 -7000
For bright outdoor daylight. approx. 5500
For cloudy conditions at twilight or evening. approx. 6000
For indoor incandescent lighting. approx. 3200
For indoor white fluorescent lighting. approx. 4000
For flash pictures. approx. 6000
To photograph a white subject to use as a base color, then load that white balance approx. 2000-10000data to set the ideal white balance for that shooting location (→70).
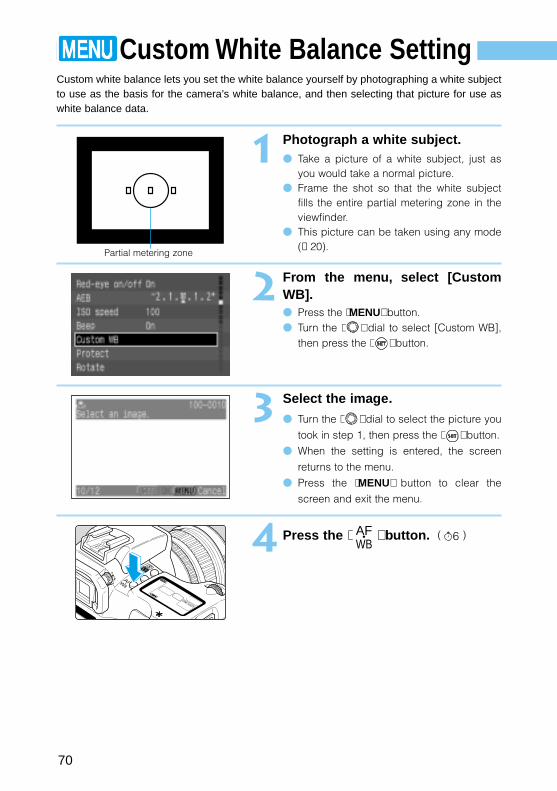
70
Custom white balance lets you set the white balance yourself by photographing a white subjectto use as the basis for the camera’s white balance, and then selecting that picture for use aswhite balance data.
1 Photograph a white subject.● Take a picture of a white subject, just as
you would take a normal picture.● Frame the shot so that the white subject
fills the entire partial metering zone in theviewfinder.
● This picture can be taken using any mode(→20).
2 From the menu, select [CustomWB].● Press the ⟨MENU⟩ button.● Turn the ⟨ ⟩ dial to select [Custom WB],
then press the ⟨ ⟩ button.
3 Select the image.● Turn the ⟨ ⟩ dial to select the picture you
took in step 1, then press the ⟨ ⟩ button.
● When the setting is entered, the screen
returns to the menu.
● Press the ⟨MENU⟩ button to clear the
screen and exit the menu.
4 Press the ⟨ ⟩ button. ( )6AFWB
Custom White Balance Setting
Partial metering zone
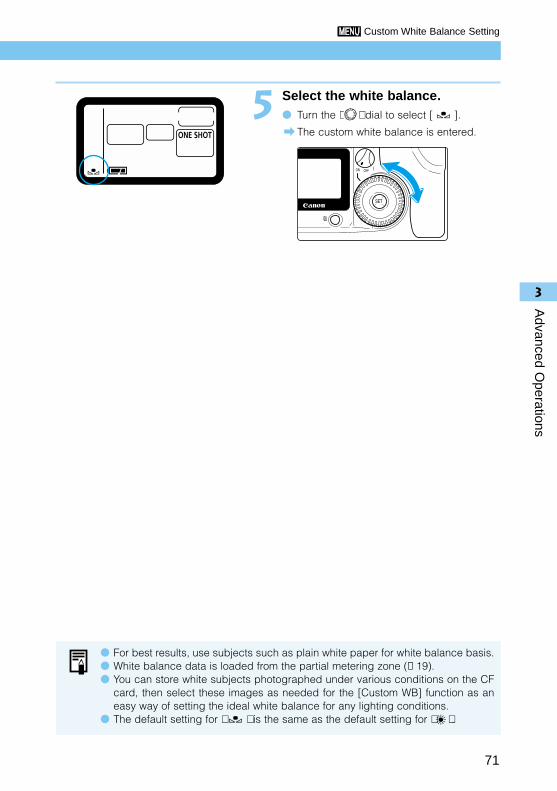
3
Advanced O
perations
71
Custom White Balance Setting
5 Select the white balance.● Turn the ⟨ ⟩ dial to select [ ].
The custom white balance is entered.
● For best results, use subjects such as plain white paper for white balance basis.● White balance data is loaded from the partial metering zone (→19).● You can store white subjects photographed under various conditions on the CF
card, then select these images as needed for the [Custom WB] function as aneasy way of setting the ideal white balance for any lighting conditions.
● The default setting for ⟨ ⟩ is the same as the default setting for ⟨ ⟩ .

72
Program AELike ⟨ ⟩ (Full Auto) mode, this is a general-purposepicture-taking mode. The camera automatically setsthe shutter speed and aperture value to suit thescene’s brightness. This is called Program AE.
* stands for Program
*AE stands for Auto Exposure
1 Set the Mode Dial to ⟨ ⟩ .
2 Focus on the subject.● Press the shutter button down halfway.
When the camera has focused, thefocusing point indicator and the in-focusindicator in the viewfinder light at the sametime.
3 Check the display.The shutter speed and aperture value aredetermined automatically, and displayed inthe viewfinder and on the LCD panel.
● If the shutter speed and aperture valuesare not blinking, the exposure is correct.
● If either is blinking, see “ExposureWarnings” (→134).
4 Take the picture.● Compose the picture, then press the
shutter button down fully.

3
Advanced O
perations
73
Program AE
Differences Between Program AE Mode ⟨ ⟩ and Full AutoMode ⟨ ⟩● ⟨ ⟩ (Program AE) and ⟨ ⟩ (Full Auto) mode are alike in that both automatically determine
the shutter speed and aperture values. ● The following functions can be used in ⟨ ⟩ mode but not in ⟨ ⟩ mode.
● Manual focusing point selection ● Built-in flash firing manually/firing prohibited● Metering mode selection ● Flash exposure compensation● Drive mode selection ● Special features with EX-series Speedlites● Program shift - High-speed sync (FP Flash) with● AE lock with ⟨ ⟩ button selected EX-series Speedlites● Exposure compensation - FE lock● Autoexposure bracketing (AEB) - Fill flash control● Custom functions - FEB
- 2nd-curtain sync- Modeling flash- E-TTL wireless autoflash
Shifting the ProgramIn Program AE mode, you can freely change the shutter speed and aperture valuecombination (program) set by the camera while maintaining the same exposure value. This iscalled shifting the program.To do this, press the shutter button down halfway, then turn the ⟨ ⟩ dial until the shutter speedor aperture value you want is displayed.● Once you take a picture with the shifted program, the shifted program is canceled
automatically and the original program is restored.● If you are using a flash, you cannot shift the program.

74
Shutter Speed-Priority AEIn this mode, you set the shutter speed, and the camera automatically sets the aperture valueto suit the brightness of the subject. This is called Shutter Speed-Priority AE.A fast shutter speed can freeze the motion of a fast-moving subject, and a slow shutter speedcan blur the subject to give the impression of motion.
* stands for “time value.”
1 Set the Mode Dial to ⟨ ⟩ .
2 Set the shutter speed.● Turn the ⟨ ⟩ dial.
3 Focus on the subject.● Press the shutter button down halfway.
The aperture value is determined automatically.
4 Check the display, then take thepicture.● If the aperture value is not blinking, the
exposure is correct.● Compose the picture, then press the
shutter button down fully.
Fast shutter speed Slow shutter speed

3
Advanced O
perations
75
Shutter Speed Priority AE
● At shutter speeds slower than one second, the release time lag (between thetime the shutter button is pressed completely and the start of the exposure) isapproximately 1 second. The release time will be a little longer when the drivemode is continuous shooting, even if the shutter speed is faster than one second.In this case, hold the shutter button down until the pictures have been taken.
● If the smallest aperture value (the maximumopen aperture) for the lens you are usingblinks, the scene is too dark. Turn the ⟨ ⟩dial to a slower shutter speed until theaperture value stops blinking.
● If the largest aperture value (the minimumaperture) for the lens you are using blinks, thescene is too bright. Turn the ⟨ ⟩ dial to afaster shutter speed until the aperture valuestops blinking.
Shutter Speed DisplayYou can set the shutter speed in half-stop increments as shown below. The shutterspeeds from 4000 to 4 indicate the denominator of the fractional shutter speed, sothat—for example—125 is 1/125 second. For slow speeds, 0”7 is 0.7 seconds, and15” is 15 seconds.4000 3000 2000 1500 1000 750 500 350 250 180 125 90 60 45 30 20 15 10 8 6 4 0”3 0”5 0”7 1” 1”5 2” 3” 4” 6” 8” 10” 15” 20” 30”
The ideal shutter speed for capturing a clear image from a TV screen is 1/15second. We recommend using a tripod.
You can also set the camera so that you can set the shutter speed in 1/3-stopincrements. (C.Fn-4 →124)

76
Aperture-Priority AEIn this mode, you set the aperture value, and the camera automatically sets the shutter speedto suit the brightness of the scene. This is called Aperture-Priority AE.By setting a smaller aperture value (larger aperture), you can blur the background to make thesubject stand out as in a portrait. Or, by setting a larger aperture value (smaller aperture), youcan increase the depth of field to make both the foreground and background look sharp.
* stands for “aperture value.”
1 Set the Mode Dial to ⟨ ⟩ .
2 Select the aperture value.● Turn the ⟨ ⟩ dial.
3 Focus on the subject.● Press the shutter button down halfway.
The shutter speed is determined automatically.
4 Check the display, then take thepicture.● If the shutter speed is not blinking, the
exposure is correct.● Compose the picture, then press the
shutter button down fully.
Small aperture value Large aperture value

3
Advanced O
perations
77
Aperture-Priority AE
Aperture Value DisplayYou can set the aperture in half stops as shown below. The higher the aperturevalue, the smaller the aperture opening. The range of aperture settings displayeddepends on the lens mounted on the camera.1.0 1.2 1.4 1.8 2.0 2.5 2.8 3.5 4.0 4.5 5.6 6.7 8.0 9.5 11 13 16 19 22 2732 38 45 54 64 76 91If no lens is mounted on the camera, the aperture setting is displayed as 00.
Checking the Depth of FieldYou can press the Depth-of-Field Preview buttonto close the aperture to the current aperturesetting, and then verify the range of focus in theviewfinder.
● This feature can be used in the Creative zone.● In ⟨ ⟩ mode, this feature operates when the shutter button is pressed down
halfway.● The exposure is locked (AE lock) while the Depth-of-Field Preview button is
pressed.
● If the 30” shutter speed blinks, the scene istoo dark. Turn the ⟨ ⟩ dial to reduce theaperture value (larger aperture).
● If the 4000 shutter speed blinks, the scene istoo bright. Turn the ⟨ ⟩ dial to increase theaperture value (smaller aperture).
● You can also set the camera so that you can set the aperture value in 1/3-stopincrements. (C.Fn-4 →124)
● You can fix the shutter speed at 1/200 second for shooting with a flash. (C.Fn-6-1 →126)

78
Manual ExposureIn this mode you set the shutter speed andaperture value yourself. The camera makes nosettings automatically. You can determine thecorrect combination of shutter speed andaperture value by checking the exposure leveldisplayed in the camera.
* stands for manual.
1 Set the Mode Dial to ⟨ ⟩ .
2 Set the shutter speed.● Turn the ⟨ ⟩ dial.
3 Set the aperture value.● Set the Quick Control Dial switch to ⟨ON⟩,
then turn the ⟨ ⟩ dial.
4 Focus on the subject.● Press the shutter button down halfway.
( )The exposure level indicator appears in theviewfinder and on the LCD panel.
● The exposure level icon ⟨ ⟩ lets you seehow far you are from the standardexposure level.
4

3
Advanced O
perations
79
5 Determine the exposure.● Set the shutter speed or aperture value
manually.
● If the exposure level indicator ⟨ ⟩ isflashing at the ⟨2+⟩ or ⟨–2⟩ position, theexposure is over- or under-exposed bymore than two stops.
6 Take the picture.● Compose the picture, then press the
shutter button down fully.
You can set the camera so that you can set the shutter speed or aperture value in1/3-stop increments. (C.Fn-4 →124)
Standard exposure : This is the standard reference point for a correctexposure.
Underexposure : Decrease the shutter speed or reduce the aperturevalue.
Overexposure : Increase the shutter speed or increase the aperturevalue.
Manual Exposure
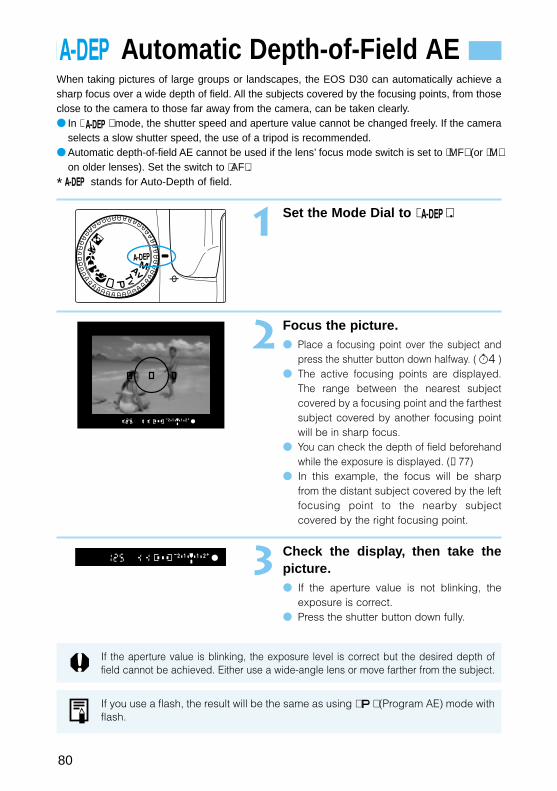
80
Automatic Depth-of-Field AEWhen taking pictures of large groups or landscapes, the EOS D30 can automatically achieve asharp focus over a wide depth of field. All the subjects covered by the focusing points, from thoseclose to the camera to those far away from the camera, can be taken clearly.● In ⟨ ⟩ mode, the shutter speed and aperture value cannot be changed freely. If the camera
selects a slow shutter speed, the use of a tripod is recommended. ● Automatic depth-of-field AE cannot be used if the lens’ focus mode switch is set to ⟨MF⟩ (or ⟨M⟩
on older lenses). Set the switch to ⟨AF⟩.* stands for Auto-Depth of field.
1 Set the Mode Dial to ⟨ ⟩ .
2 Focus the picture.● Place a focusing point over the subject and
press the shutter button down halfway. ( )● The active focusing points are displayed.
The range between the nearest subjectcovered by a focusing point and the farthestsubject covered by another focusing pointwill be in sharp focus.
● You can check the depth of field beforehandwhile the exposure is displayed. (→77)
● In this example, the focus will be sharpfrom the distant subject covered by the leftfocusing point to the nearby subjectcovered by the right focusing point.
3 Check the display, then take thepicture.● If the aperture value is not blinking, the
exposure is correct.● Press the shutter button down fully.
4
If you use a flash, the result will be the same as using ⟨ ⟩ (Program AE) mode withflash.
If the aperture value is blinking, the exposure level is correct but the desired depth offield cannot be achieved. Either use a wide-angle lens or move farther from the subject.

3
Advanced O
perations
81
Setting Exposure CompensationExposure compensation is used to alter the camera’s standard exposure setting to make thepicture brighter (overexposure) or darker (underexposure). Exposure compensation can be setup to ±2 stops, in 1/2-stop increments.
1 Set the Quick Control Dial switchto ⟨ON⟩.
2 Focus on the subject, then checkthe exposure level.● Press the shutter button down halfway and
check the display. ( )
3 Select the exposure.● Turn the ⟨ ⟩ dial.
● Turn the ⟨ ⟩ dial while pressing the shutter
button down halfway, or within ( )
seconds of pressing the shutter button
down halfway.● Positions on the [+] side indicate
overexposure, and positions on the [-] sideindicate underexposure.
● Once set, the exposure compensationremains in memory after the Main Switch isset to ⟨OFF⟩.
● To cancel exposure compensation, returnthe compensation setting to the standardexposure position ⟨ ⟩ .
4 Take the picture.
4
4
● To prevent the ⟨ ⟩ dial from turning inadvertently and changing the exposurecompensation, enter the setting and then set the Quick Control Dial switch to ⟨OFF⟩.
● In ⟨M⟩ (Manual) mode, because you determine the exposure (thecombination of shutter speed and aperture) yourself, the exposure compensationfunction does not operate.
You can set the camera so that you can set the exposure compensation amount in1/3-stop increments. (C.Fn-4 →124)
Underexposure Overexposure
82
Autoexposure BracketingWhen using autoexposure bracketing, the camera automatically changes the exposure levelwithin the set range (up to ±2 stops in 1/2-stop increments) for three successive frames. This iscalled AEB (Auto Exposure Bracketing). The three bracketed shots are exposed in the selecteddrive mode (→67) in the following order: correct exposure, underexposure, and overexposure.
1 From the menu, select [AEB].● Press the ⟨MENU⟩ button.
● Turn the ⟨ ⟩ dial to select [AEB], then
press the ⟨ ⟩ button.
2 Set the AEB level.● Turn the ⟨ ⟩ dial to set the AEB level you
want, then press the ⟨ ⟩ button.● The AEB setting is entered, and the display
returns to the Menu.● Press the ⟨MENU⟩ button to clear the
screen and exit the menu.
3 Take the picture.● When using continuous shooting, press
and hold the shutter button down fully totake all three bracketed shots continuously,and then stop automatically.
● When using AEB with the self-timer, thecamera takes the three bracketed shots insuccession after the 10-second timer delay.
Canceling AEB
● Follow steps 1 and 2 to set the AEB level to⟨ ⟩ .
● AEB will be automatically cancelled whenthe Main Switch is set to ⟨OFF⟩, the lens ischanged, the flash is charged, the batterypack or the CF card is replaced.
:Correct exposure
:Underexposure
:Overexposure
Correct exposure (0) Underexposure (-1.0) Overexposure (+1.0)

3
Advanced O
perations
83
Autoexposure Bracketing
● To indicate that AEB is in progress, the ⟨ ⟩ AEB icon on the LCD panel and the⟨ ⟩ indicator in the viewfinder blink until all three bracketed shots have beentaken.
● During continuous shooting, no viewfinder information is displayed.● In manual exposure mode, AEB is applied by changing the shutter speed.● You can use AEB in combination with exposure compensation. In this case, if
exposure compensation causes the exposure to fall outside the indicatedexposure level, the display looks as follows. In all cases the exposures are takenaccording to the settings.
In ⟨ ⟩ , ⟨ ⟩ , ⟨ ⟩ and ⟨ ⟩ modes
: AEB set to ±1 stop.
: With exposure compensation of –1 stop
: With exposure compensation of –1.5 stops
: With exposure compensation of –2 stops
In ⟨ ⟩ mode
: Center exposure –2 stops from correct exposure
: Center exposure more than –2 stops from correct exposure
● Neither flash nor bulb exposures can be used in AEB mode.● If you set mirror lockup with C.Fn-3-1 and then use AEB, single-frame shooting
takes effect even if the drive mode is set to continuous shooting.
● You can change the AEB settings in 1/3-stop increments. (C.Fn-4 →124)In this case, the AEB indicator on the LCD panel looks like this.
AEB settings in 1/3-stop increments
: -1/3 :+1/3
AEB settings in 2/3-stop increments
: -2/3 :+2/3
● You can change the sequence to underexposure, correct exposure, oroverexposure. (C.Fn-7 →126)

84
AE LockAE lock enables you to lock the exposure at a place other than the point of focus. After lockingthe exposure, you can recompose the shot while maintaining the exposure level. This featureis useful for backlit and spotlighted subjects.● The effects of the AE lock depend on the focusing point and metering method selected.
(→135)
1 Focus on the point on which youwant to lock the exposure reading.
The exposure value is displayed in theviewfinder.
2 Press the ⟨ ⟩ button.● The ⟨ ⟩ icon lights in the viewfinder to
indicate that the exposure setting islocked. ( )
● Each time you press the ⟨ ⟩ button, thecurrent exposure setting is locked.
3 Compose the shot and take thepicture.
4
You can apply AE lock by pressing the shutter button (instead of the ⟨ ⟩ button)down halfway, and focus with the ⟨ ⟩ button. (C.Fn-2-1 →124)

3
Advanced O
perations
85
Self-timer OperationThe self-timer is convenient for group photographs. You can use it in any Easy Shooting modeor Creative mode. We recommend using a tripod when you use the self-timer.
1 Select the self-timer.● Press the ⟨DRIVE⟩ button ( ), and turn
the ⟨ ⟩ dial to select ⟨ ⟩ .
2 Focus on the subject.● Make sure the in-focus indicator ⟨● ⟩ and
the exposure setting are displayed.
3 Take the picture.● Press the shutter button down fully.
The beep sounds as the red-eye reductionlamp operates, and the picture is takenafter 10 seconds.
First 8 seconds: Slow beeps and the lamp blinks slowly.
Last 2 seconds: Faster beeps and the lamp stays on.
While the self-timer is operating, the LCDpanel shows the number of secondsremaining until the picture is taken.
● To cancel the self-timer, press the ⟨DRIVE⟩button.
6
● You can set the beep that indicates the subject is in focus and the beep thatindicates the self-timer is operating to On or Off. (→120)
● When using the self-timer to photograph only yourself, lock the focus (→62) onan object at about the same distance as where you will be.
● You can use the Remote Switch RS-80N3 (sold separately) or Timer RemoteController TC-80N3 (sold separately) to take a picture when you are away fromthe camera.
Do not stand in front of the camera when you press the shutter button to start theself-timer. Doing so prevents the camera from focusing on the subject.

86
Self-timer Operation
Using the Eyepiece CoverIf you take a picture using the self-timer or remote switch (sold separately) without lookingthrough the viewfinder, stray light can enter the eyepiece and affect the exposure. To preventthis, attach the eyepiece cover to the viewfinder eyepiece before taking the picture.
1 Remove the eyecup.● Grasp both sides of the eyecup and lift it
up and away from the camera.
2 Slip the eyepiece cover over theeyepiece.● The eyepiece cover is attached to the
camera strap.
In a bulb exposure, the shutter remains open as long as you hold the shutter button down, andcloses when you release it. Bulb exposures are useful for the long exposures required for nightscenes, fireworks, etc.
1 Set the Mode Dial to ⟨ ⟩ .
2 Set the shutter speed to [ ].● Look at the LCD panel and turn the ⟨ ⟩
dial to select [ ].● The next setting after [ ] is [ ].
3 Set the aperture value.● Turn the ⟨ ⟩ dial.
4 Take the picture.● Press and hold the shutter button down fully.
During the bulb exposure, the elapsedexposure time is displayed on the LCD panel(1 to 999 seconds).
● Exposure continues as long as you holddown the shutter button.
3
Advanced O
perations
87
Bulb Exposures
The Remote Switch RS-80N3 (sold separately), or Timer Remote Controller TC-80N3(sold separately) can be used to eliminate the need to hold down the shutter button.
In long exposures, some degree of noise can enter the exposed image. You can usethe Long exposure noise reduction function to reduce the noise. (C.Fn-1→124)
● The elapsed exposure time displayed on the LCD panel is only counted up to999 seconds. For accurate exposure time, check the information display for theexposed image. (→104)
● Long exposures exceeding 1 second result in increased noise introduced intothe image, and reduce the quality of the image.

88
Mirror LockupMirror lock is enabled with C.Fn-3-1 (→124). This function raises the mirror and exposes thepicture, in separate operations. It is useful for close-up shots or when using a super telephotolens, where the mirror shock could affect the picture.● When using mirror lockup, we recommend you use the Remote Switch RS-80N3 (sold
separately).
1 Press the shutter button downfully.
The mirror is raised.
● The mirror automatically returns to thedown position approximately 30 secondsafter it is raised. Be sure to take the picturewithin 30 seconds.
2 Press the shutter button downfully again.● The picture is taken, and the mirror goes
back down.● To take the picture again, repeat the
procedure from step 1.
● During mirror lockup, the drive mode (→67) is single-frame shooting regardlessof the current setting.
● If you use mirror lockup with the self-timer, pressing the shutter button down fullythe first time raises and locks the mirror, then releases the shutter 2 seconds later.
● During mirror lockup, do not point the camera at the sun. The sun’s heat canscorch and damage the shutter curtains.
● If you use mirror lockup with the self-timer for a bulb exposure, there will be ashutter release sound when you release the shutter button during self-timeroperation. This is not the sound of the shutter release.
The EOS D30 can take easy, natural-looking flash pictures with correctsubject illumination using E-TTL autoflash (preflash evaluative metering inmemory) and either the camera’s built-in flash or any EOS-dedicated EX-series Speedlite. The procedure is as easy as a normal AE shot.
This chapter describes how to take flash pictures with the built-in flash, withthe EOS-dedicated 550EX Speedlite, or other types of external flash.
4FlashPhotography

90
Using the Built-in FlashThe built-in flash lets you take the following kinds of flash pictures with the ease of a normal AEshot.
● E-TTL autoflashE-TTL autoflash (preflash evaluative metering in memory) supplies the correct level of flash forthe subject in the focusing point selected by AF.
● FE (Flash Exposure) lock (→94)FE (flash exposure) lock sets the correct flash exposure for a selected part of the subject. TheFE lock functions as an AE lock with flash.
● Flash exposure compensation (→95)This function corrects the flash level in much the same way as the Exposure compensationfunction. The level of compensation can be up to ±2 stops in 1/2-stop increments.
Using the Built-in Flash in the EasyShooting ZoneIn the Easy Shooting zone (except in ⟨ ⟩ and ⟨ ⟩ modes), the built-in flash pops up andfires automatically in low-light or backlit conditions.
Using the Built-in Flash in the Creative ZoneIn the Creative zone, you can take flash pictures by simply pressing the < > button to popup the built-in flash at any time, regardless of lighting conditions.
: Select ⟨ ⟩ mode for full autoflash. The shutter speed and aperture value are determined automatically, just as in ⟨ ⟩(Full Auto) mode.
: Select ⟨ ⟩ mode to manually set a shutter speed slower than 1/200 second. The camera then automatically sets the flash aperture value to provide the properexposure for your shutter speed.
: Select ⟨ ⟩ mode to manually set the aperture value.In low-light conditions against a background such as a night sky, you can useautomatic slow-sync settings to properly expose the main subject and thebackground. The main subject is captured by the flash, and the background iscaptured by time exposure using a slow shutter speed.● Because automatic slow-sync photography uses a slow shutter speed, always use
a tripod.
: Select ⟨ ⟩ mode to set the shutter speed and the aperture value manually. The main subject is exposed properly by the flash. The background exposure variesaccording to the shutter speed and aperture settings.
: The effect is the same as using flash in ⟨ ⟩ mode.
Built-in Flash Range(using EF24-85mm F3.5-4.5 USM lens)
ISO Speed Wide-angle: 24 mm Telephoto: 85 mm
100 Approx. 1-3.4 m (3.3-11.2 ft) Approx. 1-2.6 m (3.3-8.5 ft)
200 Approx. 1-4.8 m (3.3-15.7 ft) Approx. 1-3.7 m (3.3-12.1 ft)
400 Approx. 1-6.8 m (3.3-22.3 ft) Approx. 1-5.3 m (3.3-17.4 ft)
800 Approx. 1-9.6 m (3.3-31.5 ft) Approx. 1-7.5 m (3.3-24.6 ft)
1600 Approx. 1-13.7 m (3.3-44.9 ft) Approx. 1-10.6 m (3.3-34.8 ft)
Flash P
hotography
4
91
Using the Built-in Flash
Flash Sync Shutter Speed and ApertureSettings
Mode Sync shutter speed
Automatically set from 1/200 to 1/60
second.
Manually set to speeds slower than
1/200 second.
Automatically set (1/200 to 30 sec.)
for the metered brightness, according
to the aperture value.
Manually set to speeds slower than
1/200 second.
Aperture Value
Automatically set by the E-TTL
program.
Automatically set for the metered
brightness, according to the shutter
speed setting.
Manually set as desired.

92
● The ‘E’ in E-TTL stands for ‘Evaluative.’● To retract the built-in flash, press it back down into the camera.● You cannot use the built-in flash to set high-speed sync (FP flash).● In ⟨ ⟩ or ⟨ ⟩ mode, if you set the shutter speed faster than 1/200 second, the
camera will automatically reset it to 1/200 unless the EX-series Speedlite hasbeen set for high-speed sync.
● AF flash exposure is always based on the aperture value at the time the shot istaken, and controlled by E-TTL automatic flash compensation linked to the activefocusing point and weighted for the main subject.
● The built-in flash and external flash cannot be used at the same time.● For subjects that are difficult to focus, the AF-assist light (→43) automatically
projects a beam of light at the subject.
● When using an EX-series Speedlite (→96), press the built-in flash back into thecamera before mounting the external flash.
● When using the built-in flash, keep at least 1 m/3.3 ft away from the subject.Otherwise the lens barrel may partially obstruct the flash and cause part of thephoto to look dark.
● When using the built-in flash, detach any hood from the lens to keep it fromobstructing flash coverage.
● Using the built-in flash with any of the following lenses can partially obstruct theflash coverage. Instead, use an EOS-dedicated external flash.Large-aperture lenses, including the EF17-35mm F2.8L USM, EF28-70mm F2.8L USM.Super-telephoto lenses, including the EF300mm F2.8L IS USM and EF600mm F4L IS USM.
● The built-in flash can cover the picture area for lenses with focal lengths as shortas 18 mm. If you use a lens shorter than 18 mm, the photo will be dark aroundthe edges.
Using the Built-in Flash
You can set the Shutter curtain sync to 2nd-curtain sync. (C.Fn-8-1→126)

Flash P
hotography
4
93
Red-eye ReductionWhen you use flash in low-light conditions, it can reflect off your subject’s pupils and make their eyes look red in the photograph. This effect is called “red-eye,” and is caused by the light of theflash reflecting off the retina of the eye. The Red-eye reduction function uses the camera’s red-eye reduction lamp, which gently shines into the subject’s eyes to constrict the pupils andthereby reduces the likelihood that red-eye will occur. You can use red-eye reduction in anypicture-taking mode except ⟨ ⟩ and ⟨ ⟩ modes.
1 From the menu, select [Red-eyeon/off].● Press the ⟨MENU⟩ button.
● Turn the ⟨ ⟩ dial to select [Red-eye
on/off], then press the ⟨ ⟩ button.
2 Set the Red-eye reduction function.● Turn the ⟨ ⟩ dial to select [On], then
press the ⟨ ⟩ button.
The red-eye reduction function is turned
On, and the display returns to the Menu.
● Press the ⟨MENU⟩ button to clear the
screen and exit the menu.
● When you press the shutter button down halfway, the red-eye reduction lamp indicator appears in the viewfinder.
● Red-eye reduction is effective only when the subject islooking at the red-eye reduction lamp. Be sure to tell yoursubjects to look at the lamp.
● To increase the effectiveness of red-eye reduction, pressthe shutter button down fully approximately 1.5 secondsafter the red-eye reduction lamp indicator goes off.
● You can take a picture anytime by pressing the shutterbutton down fully, even if the red-eye reduction lamp is on.
● Red-eye reduction also operates when you use an EOS-dedicated Speedlite.
● The effectiveness of red-eye reduction varies from subjectto subject.
Red-eye reduction is more effective in bright interior locations, with the cameraclose to the subject.
Red-eye reductionlamp indicator
Using the Built-in Flash

94
FE LockFE (flash exposure) Lock obtains and locks the correct flash exposure reading for any part ofa subject. FE Lock is a function in the Creative zone.
1 Make sure the ⟨ ⟩ icon in theviewfinder is on.● In the Creative zone, press the ⟨ ⟩ button
to pop up the built-in flash.
2 Focus on the subject.● Focus on the subject you want to lock the
flash exposure on.
3 Place the center focusing point overthe subject, and press the ⟨ ⟩button. ( )
The ⟨ ⟩ icon lights in the viewfinder.
The Speedlite fires a preflash and recordsthe required flash output for this subject inmemory.
In the viewfinder, the display appears asshown in 1 for 0.5 seconds, then changesto 2.
● Each time you press the ⟨ ⟩ button thepreflash fires, and the FE lock is applied atthe required exposure level.
4 Take the picture.● Compose the shot and take the picture.
16
If the subject is far enough away to cause underexposure, the ⟨ ⟩ icon will blink inthe viewfinder. Move closer to the subject and repeat steps 2 – 4.
q
w
Using the Built-in Flash
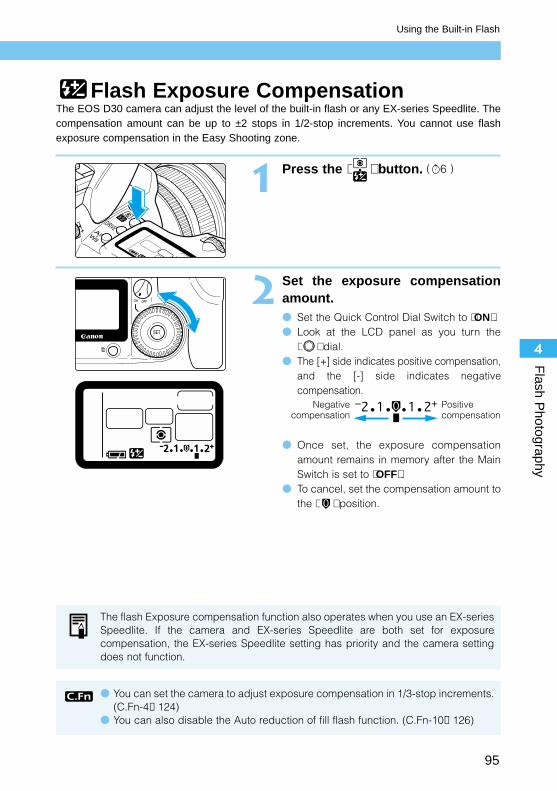
Flash P
hotography
4
95
Flash Exposure CompensationThe EOS D30 camera can adjust the level of the built-in flash or any EX-series Speedlite. Thecompensation amount can be up to ±2 stops in 1/2-stop increments. You cannot use flashexposure compensation in the Easy Shooting zone.
1 Press the ⟨ ⟩ button. ( )
2 Set the exposure compensationamount.● Set the Quick Control Dial Switch to ⟨ON⟩.● Look at the LCD panel as you turn the
⟨ ⟩ dial.● The [+] side indicates positive compensation,
and the [-] side indicates negativecompensation.
● Once set, the exposure compensationamount remains in memory after the MainSwitch is set to ⟨OFF⟩.
● To cancel, set the compensation amount tothe ⟨ ⟩ position.
6
Negative compensation
Positive compensation
● You can set the camera to adjust exposure compensation in 1/3-stop increments.(C.Fn-4→124)
● You can also disable the Auto reduction of fill flash function. (C.Fn-10→126)
The flash Exposure compensation function also operates when you use an EX-seriesSpeedlite. If the camera and EX-series Speedlite are both set for exposurecompensation, the EX-series Speedlite setting has priority and the camera settingdoes not function.
Using the Built-in Flash

96
Flash Photography with the EOS-Dedicated 550EX SpeedliteThe Canon 550EX Speedlite allows you to take high-quality flash pictures easily, in the sameway as you would with a built-in flash.
● E-TTL AutoflashE-TTL autoflash (preflash evaluative metering in memory) supplies the correct level of flash forthe subject in the focusing point selected by AF. In dark locations, you can set the camera toaperture-priority AE for automatic slow-sync operation, for a natural-looking exposurebalanced between the subject and background.
● High-Speed Sync (FP Flash) (→98)High-speed sync (FP or focal-plane flash) enables flash synchronization at all shutter speedsfrom 30 sec. to 1/4000 sec.
● FE (Flash Exposure) Lock (→99)FE lock obtains and locks the correct flash exposure for any part of the subject. This is the flashequivalent of AE lock.
● Flash Exposure Compensation (→99)As with normal exposure compensation, you can use flash exposure compensation to adjustthe flash output within a range of ±2 stops, in 1/2-stop increments.
● FEB (Flash Exposure Bracketing) (→98)The FEB function is like AEB (autoexposure bracketing) with flash. You can bracket flashexposures by up to ±3 stops, in 1/2-stop increments.
● Modeling Flash (→99)Modeling flash allows you to check shadows and the light balance produced by multi-lightsettings.
● Wireless Multi-Light E-TTL Autoflash (→99)You can implement wireless multi-light E-TTL autoflash, using any or all of the features listedabove. This provides the freedom to set up sophisticated lighting effects with no connectioncords required.
● You can also use the Canon 420EX and 220EX Speedlites. Refer to theirrespective user’s guides for a list of functions that can be used with them.
● In difficult focusing conditions, the AF-assist light is emitted from the550EX Speedlite, and automatically linked to the active focusing point.
Autoflash functions are not available with EZ, E, EG, ML, or TL-series Speedlites.

Flash P
hotography
4
97
Flash Photography with the EOS-Dedicated 550EX Speedlite
Full Auto FlashThis section describes how to use Full Auto E-TTL flash with ⟨ ⟩ (Program AE) mode. Forinstructions for operating the 550EX Speedlite, see the 550EX User’s Guide.
1 Set the Mode Dial to ⟨ ⟩ .
2 Make sure the 550EX Speedlite’spilot lamp is on.
3 Focus the subject, and take thepicture.● Make sure the flash-ready indicator ⟨ ⟩ is
on, and check the shutter speed andaperture value before taking the picture.
Taking Flash Pictures in Each ShootingModeEven in ⟨ ⟩ , ⟨ ⟩ , and ⟨ ⟩ modes, E-TTL autoflash is as easy as normal picture-taking without flash.
(1) Press the shutter button down halfway to have the camera automatically set the shutterspeed or aperture value, just as in normal picture-taking without flash.
(2) Press the shutter button down fully for E-TTL autoflash, using preflash evaluative meteringbased on the aperture value set in (1).
(3) The background exposure is determined by the shutter speed and aperture value.
MODE SELEC
PILOT H
Mode
(Shutter-priority AE)
(Aperture-priority AE)
(Manual exposure)
Shutter speed setting
Manual (30 to 1/200 sec.)
Auto (30 to 1/200 sec.)
Manual (30 to 1/200 sec.)
Aperture (flash aperture) setting
Auto
Manual
Manual
You can set the camera to apply a fixed shutter speed of 1/200 for flashphotography in aperture-priority AE mode. (C.Fn-6 →126)
● Flash photography in ⟨ ⟩ mode operates the same as in ⟨ ⟩ mode.● In the Easy Shooting zone (→20), the 550EX Speedlite operates in Full Auto
mode, with the same functions as the built-in flash.

98
You can set the camera to change FEB settings in 1/3-stop increments. (C.Fn-4 →124)
Flash Photography with the EOS-Dedicated 550EX Speedlite
High-Speed Sync (FP Flash)When the 550EX Speedlite is set to high-speed sync ⟨ ⟩ mode, it can automaticallysynchronize at any shutter speed of 1/200 second or faster, thus providing high-speed sync(FP) flash operation. When high-speed sync is On, the ⟨ ⟩ icon appears in the viewfinder.High-speed sync is effective for portrait photography in the following situations:(1) When you want to use daylight sync flash for a portrait, and widen the aperture (reduce
the aperture value) to blur the background.(2) When you want to produce a catchlight in the subject’s eyes.(3) When you want to use fill flash to eliminate shadows.
FEB (Flash Exposure Bracketing)With the 550EX Speedlite, FEB (flash exposure bracketing) automatically shoots three flashshots, bracketing the exposure by as much as ±3 stops in 1/2-stop increments, withoutchanging the background exposure.● FEB is applied from the 550EX Speedlite. For details, see the User’s Guide for your
Speedlite.● For best results use ⟨ ⟩ (single-image shooting) drive mode. (→67)

Flash P
hotography
4
99
Flash Photography with the EOS-Dedicated 550EX Speedlite
FE LockTaking FE Lock pictures with the 550EX Speedlite is the same as described in “FE Lock” (→94)for the built-in flash. In step 1, be sure the 550EX Speedlite pilot lamp is on.The flash mode may be either normal flash or high-speed sync. The FE lock operates witheither mode.
Flash Exposure CompensationFor flash pictures with flash exposure compensation, see “Flash Exposure Compensation” forthe built-in flash. (→95)
Modeling FlashModeling flash allows you to see shadows, light balance, and other effects produced by multi-light settings.
1 Check that the camera andSpeedlite are properly set for flashphotography.
2 Press the camera’s depth-of-fieldpreview button.● The Speedlite fires at 70Hz for approximately
one second.
Wireless Multi-Light/E-TTL AutoflashPhotographyThe 550EX Speedlite can be operated as a slave light from a master (550EX or ST-E2) for easywireless multi-light/E-TTL autoflash photography. The slave 550EX is placed to supplement themaster flash, which provides the primary flash for the subject.
● This is a Type-A camera. For details, refer to the user’s guide for your Speedlite.

100
Using Non-Canon Flash UnitsSync SpeedThe EOS D30 can synchronize with compact, non-Canon flash units at shutter speeds of 1/200second or slower. With larger studio flash units, the flash speed is 1/60 second or slower. Besure to test the flash you are using beforehand, to make sure it synchronizes properly with thecamera.
PC TerminalWe recommend you use a flash with sync cable connected to the PC contacts. The PCterminal has a locking thread to prevent accidental disconnection. Only the X-sync terminal isused for synchronization at 1/200 second or slower.
● You can use a flash unit attached to the camera's hot shoe and another flash unitconnected to the PC terminal at the same time.
● We recommend Canon EX-series Speedlites for use with this camera.
● If you use the EOS D30 with a flash unit or flash accessory built for another brandof camera, the EOS D30 may not operate properly.
● Some large studio flash units have a synccord polarity that is the opposite of the EOSD30’s PC terminal. Such flash units will notwork with the EOS D30 unless you changethe polarity of the sync cord. Consult themanufacturer of the flash unit, or purchase acommercially-available polarity conversioncord. The camera’s PC terminal polarity isshown in the figure on the right.
+ (plus)
- (minus)

This section explains how to view the images you have recorded with theEOS D30, how to erase images, and how to make settings for Digital PrintOrder Format (DPOF) digital printers or photo lab printing services.This section also describes how to connect the EOS D30 to a television andhow to set the date and time.
5Playing andErasing
Recorded Images
About Image Data Taken or Recorded by Other DevicesThe EOS D30 may in some cases be unable to accurately display images taken withother cameras, or taken with the EOS D30 but subsequently had image data or filenames modified by computer or other means.
About DPOFDPOF (Digital Print Order Format) is a standard used to record (on the CF card orother recording media) the image number, number of prints, etc. of images taken bydigital camera.● You can simply insert the CF card into a DPOF-compatible digital printer to make
prints as specified.● You will not need to fill out the desired numbers and quantities of prints when
ordering prints from a photo printing job.
* This camera is compatible with DPOF Version 1.00.

102
Viewing Recorded ImagesThe EOS D30 can display recorded images on its LCD monitor. You can view these images insingle-image format, index format, or enlarged format. Press the ⟨ ⟩ button to switch formats.
Viewing a Single Image
1 Check the image.● Press the ⟨ ⟩ button.
The most recent single image taken by thecamera appears.
● Press the ⟨ ⟩ button again to clear theLCD monitor and exit PLAY.
2 Change the displayed image.● Turn the ⟨ ⟩ dial counterclockwise to view
images in order from newest to oldest.● Turn the ⟨ ⟩ dial clockwise to view
images in order from oldest to newest.
Viewing the IndexThis mode displays 9 images simultaneously on a single screen.
1 Press the ⟨ ⟩ button.The most recent single image taken by thecamera appears.
2 Display the index.● Press the ⟨ ⟩ button.
The images are displayed in index format.
3 Change the image selection.The selected image is surrounded by agreen border.
● Turn the ⟨ ⟩ dial counterclockwise toselect images in order from newest tooldest.
● Turn the ⟨ ⟩ dial clockwise to selectimages in order from oldest to newest.
● Press the ⟨ ⟩ button to enlarge theselected image. To return to single-imagedisplay, press the ⟨ ⟩ button again.
● When you finish viewing, press the ⟨ ⟩button.
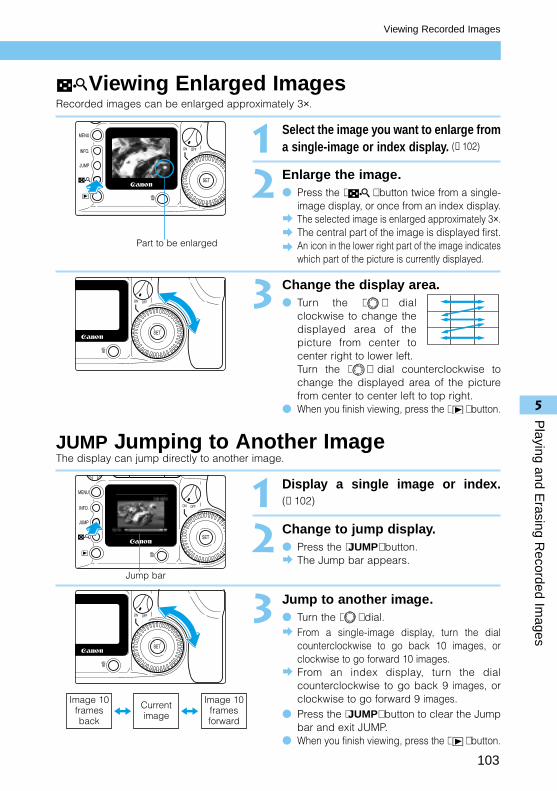
5
Playing and E
rasing Recorded Im
ages
103
Viewing Recorded Images
Viewing Enlarged ImagesRecorded images can be enlarged approximately 3×.
1 Select the image you want to enlarge froma single-image or index display. (→102)
2 Enlarge the image.● Press the ⟨ ⟩ button twice from a single-
image display, or once from an index display.The selected image is enlarged approximately 3×.The central part of the image is displayed first.An icon in the lower right part of the image indicateswhich part of the picture is currently displayed.
3 Change the display area.● Turn the ⟨ ⟩ dial
clockwise to change thedisplayed area of thepicture from center tocenter right to lower left.Turn the ⟨ ⟩ dial counterclockwise tochange the displayed area of the picturefrom center to center left to top right.
● When you finish viewing, press the ⟨ ⟩ button.
JUMP Jumping to Another ImageThe display can jump directly to another image.
1 Display a single image or index.(→102)
2 Change to jump display.● Press the ⟨JUMP⟩ button.
The Jump bar appears.
3 Jump to another image.● Turn the ⟨ ⟩ dial.
From a single-image display, turn the dialcounterclockwise to go back 10 images, orclockwise to go forward 10 images.From an index display, turn the dialcounterclockwise to go back 9 images, orclockwise to go forward 9 images.
● Press the ⟨JUMP⟩ button to clear the Jumpbar and exit JUMP.
● When you finish viewing, press the ⟨ ⟩ button.
Image 10framesback
Image 10framesforward
Currentimage
Jump bar
Part to be enlarged

104
Viewing Recorded Images
INFO. Turning the Information Display On and OffWhen an image is displayed on the LCD monitor, you can press the ⟨INFO.⟩ button to viewinformation about that image. Image information is available only for single-image displays.
Image Information Displayed During PLAYThe following information is displayed:
Press the ⟨INFO.⟩ buttonPressing the button repeatedly switches the LCDmonitor information display On and Off.
● You can change the displayed image using the⟨ ⟩ dial, just as for a single-image display.
Aperture value (→130, 136)Shutter speed (→132, 136)Camera mode (→20)Image number/total imagesrecorded
● For settings displayed while preparing to shoot, see “Checking Camera Settings” (→64).● You can switch the information display On and Off by pressing the ⟨INFO.⟩
button, even during automated playback (Auto playback) (→105), or whilerotating (→106), or protecting images (→107).
HistogramsThe histogram is a graph showing brightness levels on the horizontal axis, and the number ofpixels at each level of brightness on the vertical axis. Darker pixels are towards the left side ofthe graph, and brighter pixels towards the right. By looking at a histogram you can determinethe brightness of a picture after it is recorded.If the histogram is higher towards the dark end, set the exposure compensation (→81) towardsthe plus end. If the histogram is highertowards the light end, set the exposurecompensation towards the minus end,then take the picture again.
High Brightness WarningWhen exposure information is displayed for a picture that will be overexposed, the relatedsettings will blink. For better results check the histogram and adjust the exposurecompensation towards the minus end (→81), then take the picture again.
Sample Histograms
Darker image Normal brightness Lighter image
Image (→44)
File number (→32)Histogram
ISO speed (→55)
White balance (→68)Metering mode (→66)
Time (→38)
Exposure compensation (→95)Flash exposure compensation(→95) (not displayed whenflash not in use)
Date (→38)Image protect (→107)
Quality (→54)
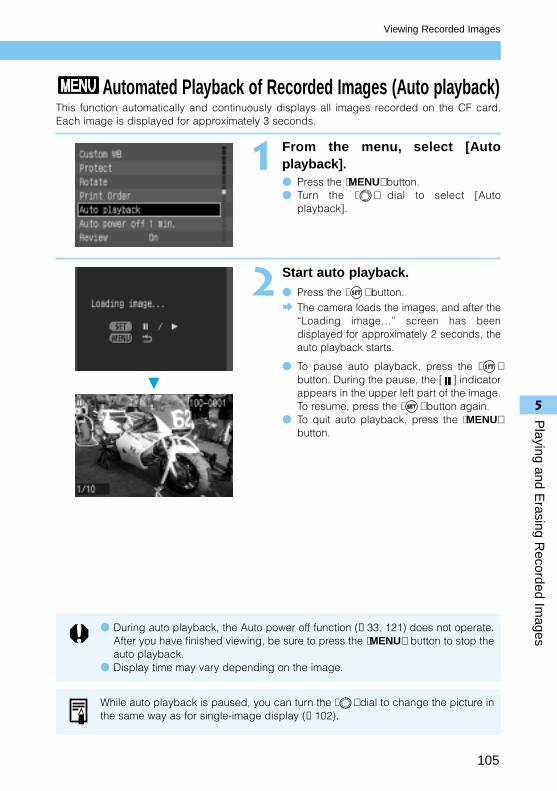
5
Playing and E
rasing Recorded Im
ages
105
Viewing Recorded Images
Automated Playback of Recorded Images (Auto playback)This function automatically and continuously displays all images recorded on the CF card.Each image is displayed for approximately 3 seconds.
1 From the menu, select [Autoplayback].● Press the ⟨MENU⟩ button.● Turn the ⟨ ⟩ dial to select [Auto
playback].
2 Start auto playback.● Press the ⟨ ⟩ button.
The camera loads the images, and after the“Loading image…” screen has beendisplayed for approximately 2 seconds, theauto playback starts.
● To pause auto playback, press the ⟨ ⟩button. During the pause, the [ ] indicatorappears in the upper left part of the image.To resume, press the ⟨ ⟩ button again.
● To quit auto playback, press the ⟨MENU⟩button.
While auto playback is paused, you can turn the ⟨ ⟩ dial to change the picture inthe same way as for single-image display (→102).
● During auto playback, the Auto power off function (→33, 121) does not operate.After you have finished viewing, be sure to press the ⟨MENU⟩ button to stop theauto playback.
● Display time may vary depending on the image.

106
Viewing Recorded Images
Rotating an ImageThe Rotate function can rotate a picture 90° clockwise or counterclockwise. This allows you toplay images with the correct orientation.
1 From the menu, select [Rotate].● Press the ⟨MENU⟩ button.● Turn the ⟨ ⟩ dial to select [Rotate].
2 Go to Rotate mode.● Press the ⟨ ⟩ button.
The display goes to Rotate mode.
3 Rotate the image.● Turn the ⟨ ⟩ dial to display the image you
want to rotate, then press the ⟨ ⟩ button.
Press the ⟨ ⟩ button repeatedly to cyclethrough the rotation: 90° clockwise → 90°counterclockwise → 0°.
● If you have other images to be rotated,repeat the above steps.
● Press the ⟨MENU⟩ button to exit Rotatemode.
Rotate pictures taken with the cameragrip on the bottom 90° clockwise
● Rotating images in the display has no effect on the recorded image data.● Some software for loading images may not display a rotated image with the
correct orientation on a computer screen.
Pictures taken with the camera grip on the bottom should be rotated 90° clockwiseto be displayed correctly. Pictures taken with the camera grip on the top should berotated 90° counterclockwise to be displayed correctly.
Rotate pictures taken with the cameragrip on the top 90° counterclockwise

5
Playing and E
rasing Recorded Im
ages
107
Protecting an ImageThis function lets you protect an image file to keep it from being accidentally deleted from theCF card. You can press the ⟨ ⟩ button to switch between single-image and index display in order toprotect individual pictures.
1 From the menu, select [Protect].● Press the ⟨MENU⟩ button.● Turn the ⟨ ⟩ dial to select [Protect].
2 Open the Protect Settings screen.● Press the ⟨ ⟩ button.
The display goes to the Protect Settingsscreen.
● Press the ⟨ ⟩ button to show theProtect Settings screen on an indexdisplay, then press the ⟨ ⟩ button againto show the Protect Settings screen on asingle image display.
3 Protect the image.● Turn the ⟨ ⟩ dial to select the image you
want to protect, then press the ⟨ ⟩ button.
Protected images are identified with a ⟨ ⟩ icon.
● Press the ⟨ ⟩ button again to cancelprotection and delete the ⟨ ⟩ icon.
● If you have other images to be protected,repeat the above steps.
● Press the ⟨MENU⟩ button to exit Protect mode.
The ⟨ ⟩ icon
Once an image is protected, it cannot be removed by the camera’s Erase function.To erase a protected image, you must first remove the protection.
If you protect the images you need and erase all the images at once (→108), allnon-protected images will be erased. This is handy when you want to erase all theimages you do not need at once.
Formatting a CF card will erase all information on the card, including protectedimages. Be sure to carefully review the contents of a CF card before formatting.

108
Erasing Images (All Image Erase)You can erase images one image at a time, or you can erase all images on the CF card at once.This section describes how to erase all the images recorded on a CF card in one operation. Toerase images one at a time, see “Erasing a Recorded Image (Single Image Erase)”. (→47)
1 Set the camera to PLAY. (→102)
● Press the ⟨ ⟩ button.The latest picture taken will be displayed.
2 Press the ⟨ ⟩ button.The Erase menu appears.
3 Turn the ⟨ ⟩ dial to select [All…],then press the ⟨ ⟩ button.
The Erase Confirmation message appears.
4 Turn the ⟨ ⟩ dial to select [OK],then press the ⟨ ⟩ button.
The camera erases all unprotectedimages.
● Once an image is protected, it cannot be removed by the camera’s Erase function.To erase a protected image, you must first remove the protection.(→107).
● Once an image is erased, it cannot be recovered. Make sure you no longer needthe image before erasing it.
If you protect the images you need (→107) and erase all the images at once, allnon-protected images will be erased. This is handy when you want to erase all theimages you do not need at once.

5
Playing and E
rasing Recorded Im
ages
109
Formatting the CF CardThe CF card must be formatted before it is used in the EOS D30 camera. Also, if you see themessage “ ” (CF card error) on the LCD panel when you load a CF card, the CF cardmay need to be formatted before it can be used.
1 From the Menu, select [Format].● Press the ⟨MENU⟩ button.● Turn the ⟨ ⟩ dial to select [Format].
2 Press the ⟨ ⟩ button.A message will appear asking you toconfirm that you want to format the CF card.
3 Turn the ⟨ ⟩ dial to select [OK],then press the ⟨ ⟩ button.
The CF card will be formatted.
● If a CF card from another manufacturer does not operate correctly, it may beusable after formatting.
● CF cards formatted on other cameras or computers or peripheral devices maynot operate correctly with the EOS D30. In this case, format the card in your EOSD30 camera.
Formatting a CF card will erase all information on the card, including protectedimages. Be sure to carefully review the contents of a CF card before formatting.

110
Print OrderYou can mark the images on a CF card for printing, as well as specify the number of prints, printtype, and the image data (date and file no.). The print specifications for the Canon EOS D30camera conform to the Digital Print Order Format (DPOF) standard.
DPOFDPOF (Digital Print Order Format) is a standard used to record (on the CF card or otherrecording media) the image number, number of prints, etc. of images taken by digital cameras.● You can simply insert the CF card into a DPOF-compatible digital printer to make prints as
specified.● You will not need to fill out the desired numbers and quantities of prints when ordering prints
from a photo printing lab.
1 Order the prints from thecamera.
2 Insert the CF card into a digitalprinter for easy printing.
Digital printer
2 Take the CF card to a photoprinting service for easy ordering.
Precautions for Printing from DPOF-compatible DevicesPlease note the following when printing from a DPOF-compatible device.● The EOS D30 cannot change print order information set by another DPOF-compatible
device. Any such changes should be made by the device on which the print order wasentered.
● If the CF card contains image data with print order information from another device, enteringnew print order information from the EOS D30 may erase the previous print orderinformation.
● Some DPOF-compatible devices or photo printing services may not use all the recordedprint order information. Check the user’s guide for the device you are using, or with the photoprinting service.
* The print specifications while [ ] is appearing on the LCD panel will cancel all the formerspecifications.

5
Playing and E
rasing Recorded Im
ages
111
Print Order
Selecting Images for PrintingThere are two ways to select images for printing. You can select images one at a time, or selectall images.
Selecting a Single Image
1 From the menu, select [Print Order].● Press the ⟨MENU⟩ button.● Turn the ⟨ ⟩ dial to select [Print Order].
2 Press the ⟨ ⟩ button.The Print Order screen appears.
[Order] is selected.
3 Press the ⟨ ⟩ button.The Select Image screen appears.
● If you press the ⟨ ⟩ button, 3 imagesare displayed on the “Select Image”screen. Press the ⟨ ⟩ button again toenlarge the “Select Image” screen.
4 Select the images.● Turn the ⟨ ⟩ dial to select an image, then
press the ⟨ ⟩ button.
If the Print Type (→113) selection isStandard or Both, the Print Quantity screenappears.If the Print Type (→113) selection is [Index],a check mark ⟨ ⟩ appears at the upper left.
● Images in RAW format cannot be markedfor printing.
● If you selected [Index], you can press the⟨ ⟩ button again to delete the ⟨ ⟩ markand cancel the selection.

112
Print Order
5 Select the print quantity.● If the Print Type (→113) is [Index], you do
not need to specify the print quantity.● Turn the ⟨ ⟩ dial to select the quantity,
then press the ⟨ ⟩ button.The quantity appears next to the ⟨ ⟩ icon.
● To cancel the selection, set the quantity to [0].● To select another image, repeat steps 4
and 5.● Press the ⟨MENU⟩ button to return to the
Select Image screen.
Selecting All ImagesYou can select all images on a CF card at once, except those in RAW format.
1 Follow steps 1 and 2 of the Selecting aSingle Image procedure (→111), todisplay the Print Order screen.
2 Turn the ⟨ ⟩ dial to select [All],then press the ⟨ ⟩ button.
The Select All Images menu appears.
3 Select [Mark all].● Turn the ⟨ ⟩ dial to select [Mark All], then
press the ⟨ ⟩ button.This orders all the images and the displaythen returns to the Print Order screen.
● At this point you can select [Clear all] todelete all images you have ordered.
● Select [Cancel] to return to the Print Orderscreen.
Number of prints of the selected image
● Images are printed in order from oldest to newest.● You can order up to 998 images.● If you select images using the Mark All method, one copy of each will be printed.
To specify quantities, use the Selecting a Single Image method. (→111)

5
Playing and E
rasing Recorded Im
ages
113
Print Order
Print TypeYou can specify the following print types.Standard: Prints one image to each page.Index: Prints an index of the images in reduced size, on one page.Both: Prints the individual images and an index sheet.
1 Follow steps 1 and 2 of the Selecting aSingle Image procedure (→111), todisplay the Print Order screen.
2 Turn the ⟨ ⟩ dial to select [Setup], then press the ⟨ ⟩ button.
The Print Order Setting screen appears.
3 Turn the ⟨ ⟩ dial to select [PrintType], then press the ⟨ ⟩ button.
4 Select the print type.● Turn the ⟨ ⟩ dial to select the print type,
then press the ⟨ ⟩ button.
● Press the ⟨MENU⟩ button to return to thePrint Order screen.

114
Print Order
Specifying Date PrintingYou can specify printing of the date and time on each image.
1 Follow steps 1 and 2 of the Selecting aSingle Image procedure (→111), todisplay the Print Order screen.
2 Turn the ⟨ ⟩ dial to select [Setup], then press the ⟨ ⟩ button.
The Print Order Setting screen appears.
3 Turn the ⟨ ⟩ dial to select [Date],then press the ⟨ ⟩ button.
4 Specify date printing.● Turn the ⟨ ⟩ dial to select [On] or [Off],
then press the ⟨ ⟩ button.
● Press the ⟨MENU⟩ button to return to thePrint Order screen.
● If the print type is [Index], you cannot specify both date and file number. Specifyone or the other.
● The date will be printed in the date style set from the menu in the Date/Timefunction. (→38)

5
Playing and E
rasing Recorded Im
ages
115
Print Order
Specifying File Number PrintingYou can specify printing of file number information on each image.
1 Follow steps 1 and 2 of the Selectinga Single Image procedure (→111), todisplay the Print Order screen.
2 Turn the ⟨ ⟩ dial to select [Setup], then press the ⟨ ⟩ button.
The Print Order Setting screen appears.
3 Turn the ⟨ ⟩ dial to select [FileNo.], then press the ⟨ ⟩ button.
4 Specify file number printing.● Turn the ⟨ ⟩ dial to select [On] or [Off],
then press the ⟨ ⟩ button.
● Press the ⟨MENU⟩ button to return to thePrint Order screen.
If the print type is [Index], you cannot specify both date and file number. Specifyone or the other.
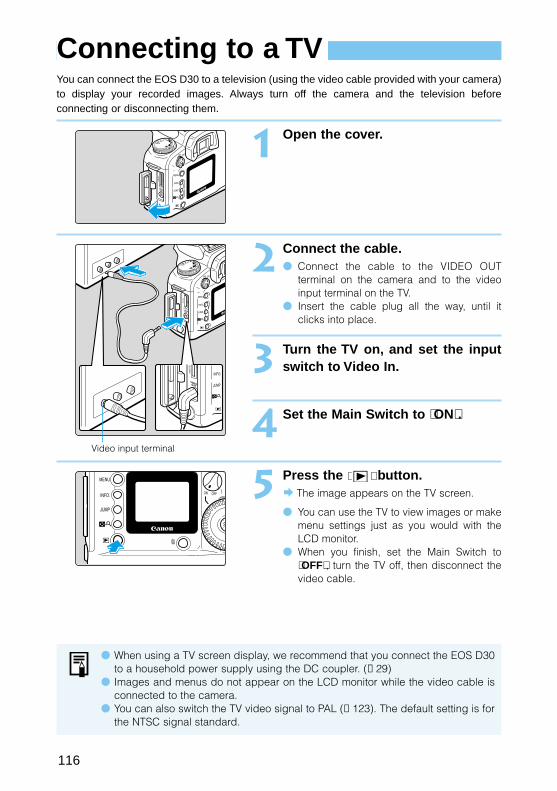
116
Connecting to a TVYou can connect the EOS D30 to a television (using the video cable provided with your camera)to display your recorded images. Always turn off the camera and the television beforeconnecting or disconnecting them.
1 Open the cover.
2 Connect the cable.● Connect the cable to the VIDEO OUT
terminal on the camera and to the videoinput terminal on the TV.
● Insert the cable plug all the way, until itclicks into place.
3 Turn the TV on, and set the inputswitch to Video In.
4 Set the Main Switch to ⟨ON⟩.
5 Press the ⟨ ⟩ button.The image appears on the TV screen.
● You can use the TV to view images or makemenu settings just as you would with theLCD monitor.
● When you finish, set the Main Switch to⟨OFF⟩, turn the TV off, then disconnect thevideo cable.
● When using a TV screen display, we recommend that you connect the EOS D30to a household power supply using the DC coupler. (→29)
● Images and menus do not appear on the LCD monitor while the video cable isconnected to the camera.
● You can also switch the TV video signal to PAL (→123). The default setting is forthe NTSC signal standard.
Video input terminal

5
Playing and E
rasing Recorded Im
ages
117
Cleaning the CMOS Imaging ElementThe imaging element corresponds to the film in a film camera. If dirt or foreign matter gets onthis imaging element, black spots may be recorded on the corresponding part of the image. Ifthis happens, use the procedure below to clean the imaging element.Because the imaging element is very sensitive, we strongly recommend that you have thecleaning done by Canon service representatives.When cleaning the imaging element, always connect the EOS D30 camera to a householdpower outlet using the DC coupler. If you try to clean the imaging element while the battery packis installed in the camera, the cleaning warning message “ ” will blink on the LCD panel andyou will not be able to clean the imaging element.
Before you start cleaning, remove the lens (→30), attach the DC coupler (→29), and set theMain Switch to ⟨ON⟩.
1 Insert the DC coupler (→29) and setthe Main Switch to ⟨ON⟩. (→31)
2 From the menu, select [C.Fn].● Press the ⟨MENU⟩ button.● Turn the ⟨ ⟩ dial to select [C.Fn].
3 Press the ⟨ ⟩ button.The Custom Function Setting screenappears.
4 Select [C.Fn-13].● Turn the ⟨ ⟩ dial to select C.Fn-13
[Sensor cleaning], then press the ⟨ ⟩button.

118
Cleaning the CMOS Imaging Element
5 Select [1: Enable].● Turn the ⟨ ⟩ dial to select [1: Enable],
then press the ⟨ ⟩ button.
The message “ ” appears on theLCD panel.
● If “ ” is blinking on the LCD panel, setthe Main Switch to ⟨OFF⟩ and remove thebattery pack. Then repeat the procedurefrom Step1.
6 Press the shutter button downfully.● The reflex mirror of the camera then flips
up, and the shutter opens.
7 Clean the imaging element.● Carefully blow any dust off the imaging
element using a commercially availableblower.
8 Finish cleaning.● Set the Main Switch to ⟨OFF⟩.
The camera power turns off, the shuttercloses and the mirror is lowered.
● Set the Main Switch to ⟨ON⟩ again, and thecamera will be ready to shoot picturesnormally.
● Never disconnect the camera power during cleaning. If the power is cut off, theshutter will close and possibly damage the shutter curtain.
● Use a blower without a brush attached. Using a brush to remove dust from theimage element can damage the element.
● Do not insert a dust blower into the camera beyond the lens mount. If the powershuts off and the shutter closes, this may damage the shutter curtains.
● Never use cleaning sprays or blower sprays. The pressure and freezing actionof the spray gas may damage the surface of the imaging element.

You can make a variety of settings from the EOS D30’s menu. The menuincludes special settings called Custom Functions that are related tocamera operation. This booklet indicates these settings with the mark, and provides basic descriptions.This chapter lists the EOS D30’s menu functions and describes the use ofthe Custom Function settings. For Menu operations and default settings,see “Menu Functions and Settings” (→36, 37).
6Menu FunctionSettings

120
List of Menu FunctionsItem
Quality
Red-eyereductionfunction
AEB toautomaticallychangeexposure level
ISO speed
Beep
Custom WB
Screen DescriptionSets the size in pixels of thepicture as recorded on the CFcard, as well as the compressionratio. Select Large ⟨ ⟩ , Large⟨ ⟩ , Small ⟨ ⟩ , Small ⟨ ⟩ , orRAW.
Turns on/off a function forreducing the “red-eye” lookcaused by using a flash tophotograph people at night orin dark settings.
Sets the increment steps forunderexposure andoverexposure in AEB shots.
Sets the ISO speed. Select ISO100, 200, 400, 800, or 1600.
Turns on/off the electronic beepthat sounds when the image isin focus. Can also be set tofunction as the beep thatindicates the self timer isoperating. Select On or Off.
Selects the image to use as thebasis for custom white balanceadjustments.
See page54
93
82
55
4385
70
Menu F
unction Settings
121
List of Menu Functions
6
ItemParameters
Protect
Rotate
Print Order
Auto playback
Auto power off
Screen DescriptionAllows the user to set up tothree sets of parameters withthe included software forprocessing recorded images, inaddition to the standardparameters automatically storedin the camera.
Allows the user to protect imagefiles against accidental erasure.
Rotates the image display 90°clockwise or counterclockwise.
Lets you order prints of yourphotos for printing on DPOF-compatible devices.
Automatically plays imagessequentially on the LCDmonitor.
To conserve battery power, setsthe Auto power off function thatautomatically switches offpower if there is no operationfor a given time. Select 1, 2, 4,8, 15, or 30 minutes, or Off.
See page56
107
106
110
105
33

122
List of Menu Functions
ItemReview
Review time
LCD brightness
Date/Time
File numbering
Language
Screen DescriptionDetermines whether imagesappear on the LCD monitorafter they are taken. Select On,On (Info), or Off. The displaytime is set by the Review timesetting (below).
When the Review function hasbeen set to On or On (Info), thisdetermines the time that imagesare displayed. Select 2, 4, or 8seconds, or Hold.
Sets the LCD brightness. Selectnormal or bright.
Sets the date and time, and theorder of display for year, month,and day.
Sets the pattern forautomatically assigning filenumbers to each image. Selectcontinuous or auto reset.
Sets the language used for theMenu screen. Select English,Deutsch, Français, orJapanese.
See page45
46
–
38
32
–

Menu F
unction Settings
123
6
List of Menu Functions
ItemVideo system
Format CF card
Customfunctions
Screen DescriptionDetermines the video systemformat. Select NTSC or PAL.
Formats the CF card in thecamera.
Sets custom functions that canadjust many of the camerafunctions to meet individualrequirements.
See page116
109
124
124
List of Menu Functions
Select no.
01
0
1
2
3
0
1
01
01
Item
Longexposurenoisereduction
Shutterbutton/AE lockbutton
Mirrorlockup
Tv, Av,andexposurelevel
AF-assistlight
Func. No.
01
02
03
04
05
Setting or change
OffOn
Press the shutter button downhalfway: AE, AF⟨ ⟩ button: AE lock⟨ ⟩ button: AE, AFPress the shutter button downhalfway: AE lockPress the shutter button downhalfway: AE, AF⟨ ⟩ button: AF lock (no AE lock)⟨ ⟩ button: AE, AF (no AE lock)Press the shutter button downhalfway: AE
Disable (normal photography)
Enable
1/2-stop increments1/3-stop increments
On (auto)Off
Screen
Custom Function SettingsYou can adjust many of the Canon EOS D30’s functions to meet your particular requirementsusing the Custom Function settings. To change Custom Functions, select [C.Fn] from the menu.
Menu F
unction Settings
125
List of Menu Functions
6
Effects, remarks
Effective for reducing noise occurring in time exposure or bulb shots longer thanone second. However, this requires processing time after the shot approximately equivalent tothe exposure time. During processing, the message “ ” appears on theLCD panel and in the viewfinder, and no exposures can be made.
Effective for determining focus and exposure separately.
In AI Servo AF mode, if an object passes between the camera and the subject, youcan press the ⟨ ⟩ button to pause AF operation and keep the camera fromfocusing on the obstruction. Exposure is determined when you take the picture.This is useful when photographing subjects that move and stop repeatedly. In AIServo AF mode you can press the ⟨ ⟩ button to start or stop AI Servo AFoperation. Exposure is determined when you take the picture. The optimum focusand exposure are thus always ready for the decisive moment.
Effective for preventing the effects of camera vibration caused by mirror action inclose-up and ultra-telephoto shots.
Effective in conditions that require more precise exposure settings.(The exposure indications may not change even if you change exposure settings.However, exposure control will be done according to your setting.)
Effective in conditions where the AF-assist light may not be desirable.
See Page
87
84
60
88
136
43
126
List of Menu Functions
Select no.
01
0
1
2
30
1
01
2
01
Item
Shutterspeed inAv modewith flash
AEBsequence/autocancellatonwhen MainSwitch isOff
Shuttercurtainsync
Lens AFstopbuttonFn.Switch
Autoreductionof fill flash
Func. No.
06
07
08
09
10
Setting or change
Automatic settingFixed at 1/200 second (when using flash)
0 → – → +/Enabled
0 → – → +/Disabled
– → 0 → +/Enabled
– → 0 → +/Disabled1st-curtain sync.Flash fires immediately after theshutter reaches full-open position.
2nd-curtain sync.Flash fires immediately before2nd curtain closes.
Stop AF while button is pressedOperate AF while button ispressedPress button to start exposuretimer and lock AE
EnableDisable
Screen

Menu F
unction Settings
127
List of Menu Functions
6
Effects, remarks
Effective for using flash at night or in dark locations.
Effective when you continue to take AEB shots with the first frame set at thecorrect exposure.
Lets you take AEB shots from the lowest exposure first.
Effective when you continue to take AEB shots from the lowest exposure first.
Effective at filling in shadows at slow shutter speeds.
Camera AF does not operate while this button is pressed.
Effective for determining focus and exposure separately.
Produces natural daylight sync imaging.Prevents underexposure of people photographed against strong backlightingsuch as sunsets.
See Page
7797
83
83
83
92
95

128
List of Menu Functions
Select no.
0
1
2
0
1
2
301
Item
Menubuttonreturnposition
SETbuttonfunc.whenshooting
Sensorcleaning
Func. No.
11
12
13
Setting or change
Always show first menu item.
Show the most recently setmenu item. (Set the Main Switchto Off to cancel, or On to showthe first menu item.)
Show the most recently set menuitem. (Retain in memory whenthe main switch is Set to Off.)Not assigned.
Change quality.
Change ISO speed.
Select parameters.DisableEnable
Screen
* Settings you set with C.Fn-11 will be effective even in the Easy shooting zone.
Menu F
unction Settings
129
List of Menu Functions
6
Effects, remarks
Enables prompt menu selection for items that are frequently changed.
Enables prompt menu selection for items that are frequently changed.Convenient when you want to retain function settings, regardless of whether thepower is On or Off.
Lets you change quality quickly when you are taking photographs.
Lets you change ISO speed quickly when you are taking photographs.
Lets you change parameters quickly when you are taking photographs.
Used when cleaning the imaging element. Effective when dust or small blackspots appear on pictures.
See Page
54
55
56
117
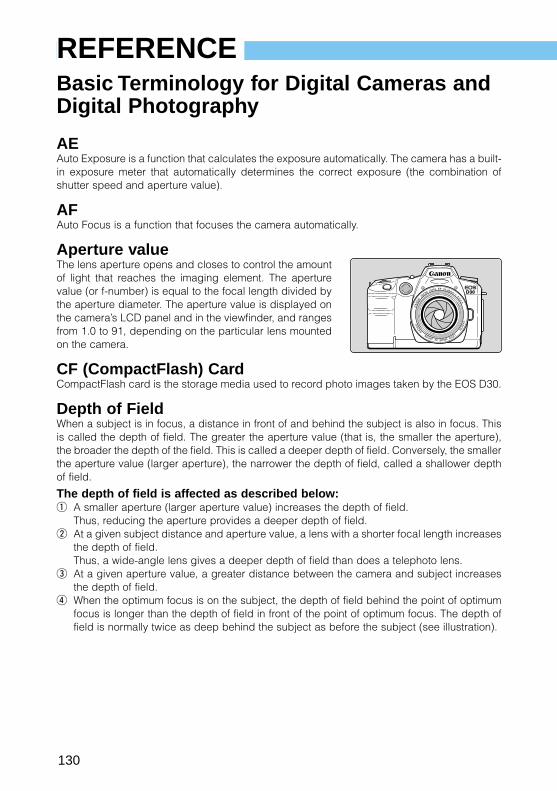
130
REFERENCEBasic Terminology for Digital Cameras andDigital Photography
AEAuto Exposure is a function that calculates the exposure automatically. The camera has a built-in exposure meter that automatically determines the correct exposure (the combination ofshutter speed and aperture value).
AFAuto Focus is a function that focuses the camera automatically.
Aperture valueThe lens aperture opens and closes to control the amountof light that reaches the imaging element. The aperturevalue (or f-number) is equal to the focal length divided bythe aperture diameter. The aperture value is displayed onthe camera’s LCD panel and in the viewfinder, and rangesfrom 1.0 to 91, depending on the particular lens mountedon the camera.
CF (CompactFlash) CardCompactFlash card is the storage media used to record photo images taken by the EOS D30.
Depth of FieldWhen a subject is in focus, a distance in front of and behind the subject is also in focus. Thisis called the depth of field. The greater the aperture value (that is, the smaller the aperture),the broader the depth of the field. This is called a deeper depth of field. Conversely, the smallerthe aperture value (larger aperture), the narrower the depth of field, called a shallower depthof field.
The depth of field is affected as described below:q A smaller aperture (larger aperture value) increases the depth of field.
Thus, reducing the aperture provides a deeper depth of field.w At a given subject distance and aperture value, a lens with a shorter focal length increases
the depth of field. Thus, a wide-angle lens gives a deeper depth of field than does a telephoto lens.
e At a given aperture value, a greater distance between the camera and subject increasesthe depth of field.
r When the optimum focus is on the subject, the depth of field behind the point of optimumfocus is longer than the depth of field in front of the point of optimum focus. The depth offield is normally twice as deep behind the subject as before the subject (see illustration).

7
RE
FE
RE
NC
E
131
REFERENCE
DPOFDigital Print Order Format is a standard format for ordering prints of digital camera imagesfrom photo lab printing services, as well as printing from household printers. The Canon EOSD30 is DPOF-compatible. You can specify printing from the camera itself and store the orderinformation on the CF card. Photo printing services or household printers using the DPOFformat can then produce prints easily using that information.
ExposureExposure refers to the amount of light striking the imaging element to produce a photograph.The amount of light appropriate for the ISO speed is called the correct exposure. The correctexposure is adjusted by changing the combination of the shutter speed and aperture value.
File Numbering and FoldersThe pictures you take are automatically assigned file numbers from 0001-9900 and stored in foldersof 100 images each. Each folder is numbered from 100 to 998 and recorded on the CF card.Because pictures taken using continuous shooting mustbe stored in the same folder, there may in some cases bemore than 101 images in a folder. Folders with 99 as theirlast two digits are not created. Images stored in formats other than RAW format have thefile name Img_ and the extension ‘jpg’, and images storedin RAW format have the file name CRW_ and the extension‘crw’. Images with the extension ‘thm’ are thumbnailimages for index display.
Example: Img_0001.jpg
1 2
Depth of field
Point of optimum focus
Aperture value set to f/22 Aperture value set to f/2
0001100 0002 0099 0100
~
~
~
~
0101101 0102 0199 0200
9801198 9802 9899 9900
0001200 0002 0099 0100
•••
File name
File number
Extension

132
REFERENCE
FormatFormatting a CF card is the process of preparing the CF card to store image data. Be carefulwhen formatting a CF card, because the formatting process erases all data stored on the card.
ISO SpeedAn index number representing the photosensitivity of silver-halide photo film. This sensitivitystandard is determined by the International Standards Organization (ISO), and is normallywritten as “ISO 100”, etc. The higher the ISO speed, the greater the sensitivity to light. Digitalcameras use ISO speeds based on silver-halide photography.
JPEGJoint Photographic Experts Group is a file format for compressing and storing color images.The compression ratio can vary, but higher compression results in greater image degradationwhen the file is expanded (restored).
Red-eye PhenomenonIn a relatively dark room, where subjects’ pupils are dilated, the light from a camera flashpasses through the pupil, is reflected by the retina, and causes the subjects’ pupils to appearred. Red-eye is particularly prevalent when the flash is close to the optical axis of the lens. Usethe following procedure to minimize red-eye:q Shoot with the Red-eye reduction function turned on. (The red-eye reduction lamp lights
before the picture is taken, causing the pupils to contract and thus minimizing red-eye.)w Shoot with an EX-series Speedlite. (The light reflected from the flash will not be directed
along the optical axis of the lens, thus minimizing red-eye.)e Shoot from as close as possible (same effect as w).
Shutter SpeedThe camera’s shutter opens for a variable length of time to control the amount of light thatreaches the imaging element. This length of time is called the shutter speed.

7
RE
FE
RE
NC
E
133
AF Modes and Drive Modes
REFERENCE
Function Availability Table : Automatic setting
: Selection possible
Mode DialBuilt-in flash White balance Image size Compression
Auto ManualRed-eye
Auto Manual Large Small RAWreduction
Drive mode
Single
Continuous
ONE SHOT AFShutter cannot be released until focusis achieved. When focus is achieved,AF is locked. In evaluative meteringmode, the exposure (set just beforethe picture is taken) is also locked.The above conditions apply duringcontinuous shooting. (in Large format, approximately 3 images persecond to a maximum of 8 images.)
AI Servo AFAutofocus tracks themoving subject, and theexposure is set when thepicture is taken.
The above conditions applyduring continuous shooting.(in Large format,approximately 2.5 imagesper second, up to amaximum of 8 images.)
AI Focus AFAutomaticallyswitches betweenONE SHOT AF andAI Servo AFaccording to thesubject.
Mode DialAF Focusing point Drive Metering modeselection
ONE SHOT AI SERVO AI FOCUS Auto Manual Single Continuous Evaluative PartialCenter-
weighted averaging

134
REFERENCE
Mode Blinking warning DescriptionSubject is too dark.
Subject is too bright.
Picture will be underexposed.
Picture will be overexposed.
Picture will be underexposed.
Picture will be overexposed.
The desired depth of fieldcannot be obtained.
Subject is too dark.
Subject is too bright.
RemarksUse flash.
Use a neutral density filter.
Turn the ⟨ ⟩ dial to aslower shutter speed.
Turn the ⟨ ⟩ dial to afaster shutter speed.
Turn the ⟨ ⟩ dial to asmaller aperture value.
Turn the ⟨ ⟩ dial to alarger aperture value.
1) Move farther from thesubject and try again.
2) If using a zoom lens, usethe shortest focal length.
Use a flash (the result willbe the same as usingProgram AE ⟨ ⟩ ).Use a neutral density filter.
Exposure Warnings
The warnings shown are examples using a lens with a minimum aperture value off/3.5, and a maximum aperture value of f/22. Actual maximum and minimumaperture values will depend on the particular lens you use.
AE Lock Effects for Combinations of FocusingPoint Selection and Metering Method
Focusing point selection
Metering method
Evaluative metering
Partial meteringCenter-weighted averaging
Auto selection AF
AE lock applied to themetered value at the activefocusing point.
Manual selection AF
AE lock applied to themetered value at theselected focusing point.
AE lock applied to the metered value at the center focusingpoint.
(when using a mode in the Creative zone)

7
RE
FE
RE
NC
E
135
REFERENCE
Program Line⟨ ⟩ The following program line applies when the camera is in Program AE ⟨ ⟩ mode.
–1
–2
–3
–41.4
–5
30 15 8 4 2 1 2 4 8 15 30 60 125 250 500 1000 2000 40001.0
2
2.8
4
5.6
8
11
16
22
326 7 8 9 10 11 12 13 14 15 16 17 18 19
ISO 1
00
200
400
800
1600
EF24–85mm F3.5–4.5 USM WIDE24mmEF24–85mm F3.5–4.5 USM TELE85mm
2120 22
4
3
2
1
0
EV
5
EF50mm F1.4 USMLens
Ap
erture value (f-no.)
Shutter speed
Program Line DescriptionThe lower horizontal axis represents the shutter speed, and the right-hand vertical axisrepresents the aperture value. The combinations of shutter speed and aperture valueautomatically determined by Program AE are shown as colored lines with respect to thesubject brightness (Exposure Value) gradations on the left and top edges of the graph.
Example: Using an EF50 F1.4 USM lens with a subject brightness of EV12, the point wherethe diagonal line from EV12 (on the top edge) intersects the Program AE linerepresents the corresponding shutter speed (1/350 second) and aperture value(f/3.5) that the program sets automatically.The diagonal arrowed lines at the upper left indicate the metering range for theindicated ISO speed.

136
1/2-stop increments 1/3-stop incrementsShutter speed Shutter speedAperture value Aperture value
REFERENCE
Shutter Speed and Aperture Value ReadoutsShutter speed readoutThe shutter speed is normally displayed in 1/2-stop increments. Numbers from 4000 to 4denote the denominator of the shutter speed fraction: for example, 125 is 1/125 seconds. Inaddition, 0"3 is 0.3 seconds, and 15" is 15 seconds.
Aperture value readoutThe aperture value is normally displayed in 1/2-stop increments. The larger the number, thesmaller the aperture opening. The range of aperture values (f-numbers) displayed depends onthe lens used.
The shutter speed and aperture value can be set in 1/3-stop increments. (C.Fn-4→124)
7
RE
FE
RE
NC
E
137
Error CodesWhen a camera error occurs, an error code (Err xx) appears on the LCD panel. When thishappens, set the Main Switch to ⟨OFF⟩ and then set it to ⟨ON⟩ again.
If an error code is displayed frequently, this indicates that a malfunction has occurred.Make a note of the error code and contact your nearest Canon Service Center (see backcover).
If an error code is displayed after you take a picture, the picture may not have beenrecorded. Press the play button and review the image.
Message ListThe following messages are displayed on the LCD monitor.
Busy. A picture is being stored on the CF card, or the camera is loading arecorded image.
No CF card Attempted to take a picture or play an image with no CF card in thecamera.
CF card error. There is a problem with the CF card.
CF card full. No more print orders can be stored.
Naming error! A file already exists with the file name that the camera is attemptingto create. Or the file numbers have already reached the maximumvalue and no new file numbers can be created. Transfer thenecessary number of images to a computer, then use the computerto format the CF card. Note that formatting will erase all images andinformation on the CF card.
No Image. No images are recorded on the CF card.
Image too large. Attempted to play an image having a size larger than 3200 × 2400pixels.
Incompatible JPEG format. Attempted to play an image having a JPEG format that is notcompatible with the camera.
Corrupted data. Attempted to play an image containing corrupted data.
Cannot rotate Attempted to rotate an image recorded by another camera or inanother format, or processed by a computer.
Unidentified Image Attempted to play an image taken in a special format (such as aformat unique to a camera from another manufacturer).
Protected! Attempted to erase a protected image.
Too many marks. Attempted to enter a print order quantity that is too high. Enter alower quantity.
Cannot complete! Print order or slide show setting could not be stored.
CCDRAW You attempted to replay a CCDRAW image.
Unable to chargebattery pack.
Main switch doesnot turn the camera⟨ON⟩.
Access lamp blinkseven when the MainSwitch is ⟨OFF⟩.
Battery loses powerquickly
Camera switches offby itself
Only the ⟨ ⟩ iconblinks on the LCDpanel
138
REFERENCE
TroubleshootingIf you have a problem with your camera, first refer to this Troubleshooting Guide as you checkthe camera.
PowerAn incorrect battery pack is being used.
Use a Canon BP-511 battery pack. (→4)
Battery pack is not correctly attached to the compact power adapter.Attach the battery pack correctly. (→25)
The DC coupler is connected to the compact power adapter.Remove the DC coupler plug from the compact power adapter.(→26)
The battery pack is out of power.Charge the battery pack. (→25)
Battery pack is not inserted correctly.Insert the battery pack correctly. (→27)
Battery chamber cover is not closed.Close the battery chamber cover tightly. (→27)
CF card slot cover is not closed.Insert the CF card firmly until the CF card eject button pops out,then close the CF card slot cover tightly. (→31)
If the Main Switch is set to ⟨OFF⟩ immediately after taking a picture,the access lamp continues flashing for a few seconds until theimage is stored on the CF card.
After the image has been stored on the CF card the access lampwill go out and the camera will turn off automatically.
Battery pack is not sufficiently charged.Charge the battery pack fully. (→25)
Battery pack is beyond its useful life.Obtain a new battery pack. (→140)
Auto power off function is operating.Switch the camera on again with the main switch, or turn off theAuto power off function. (→121)
Battery pack level is very low.Charge the battery pack. (→25)
Camera is not operating properly.Press the shutter button down halfway to reset the camera tonormal. (→33)* If the ⟨ ⟩ icon still appears, the camera needs repair. Take it
to a Canon Service Center. (→back cover)

Unable to shoot orrecord images
LCD monitordisplays and imagesare hard to see
Images are blurred
Unable to use theCF card
The message“ ” appears onthe LCD panel 7
RE
FE
RE
NC
E
139
REFERENCE
CF card is not loaded correctly.Load the CF card correctly. (→31)
CF card is full.Change to a new CF card, or erase unwanted images. (→31, 47, 108)
The battery pack is out of power.Charge the battery pack. (→25)
Image out of focus (In-focus light in the viewfinder blinks).Press the shutter button down halfway to focus again. If this fails,focus manually. (→33, 63)
Dust or foreign matter on the monitor.Clean the monitor with a soft eyeglass cloth.
LCD monitor is worn out.Consult the store where you bought your camera, or a CanonService Center. (→12, back cover)
Lens focusing mode switch set to ⟨MF⟩ (or ⟨M⟩).Set the focusing mode switch to ⟨AF⟩. (→30)
Hand movement when the shutter button is pressed.Press the shutter button carefully so that the camera does notmove. (→33, 40)
CF card data is corrupted.Format the CF card. (→109)
Use the specified type of CF card. (→3, 141)
The backup battery is out of power.Replace the backup battery. (→24)
Shooting
Checking and Handling Images
Cannot erase images
Incorrect date andtime displayed
No image appearson the TV screen
Images may be protected.Remove image protection. (→107)
Date/Time setting may be incorrect.Set date/time correctly. (→38)
Video cable plugs are not inserted fully.Insert the video cable plugs firmly all the way. (→116)

140
REFERENCE
Major Accessories (Sold Separately)Battery Pack BP-511This is a powerful lithium ion secondary battery pack. Therated voltage is 7.4V. You can use the Compact PowerAdapter CA-PS400 to charge the BP-511 battery pack, andwhen fully charged it has enough power for you to takeapproximately 540 pictures (Normal, with 50% flash use).Charging takes about 90 minutes.
Battery Grip BG-ED3This is a battery grip that holds two BP-511 battery packs. Itprovides a shutter button, electronic dials, AE lock/FE lockbutton, and focusing point selection button for use in takingportrait (vertical) shots. (Can also use the DC coupler)
E-series Dioptric Adjustment LensesOne of ten E-series dioptric adjustment lenses (-4 to +3diopters) with eyecup can be attached to the camera’seyepiece to further expand the dioptric correction range.
EOS-Dedicated EX-Series Speedlites550EX, 420EX, 220EXThree EOS-dedicated E-TTL autoflash Speedlites areavailable: the high-output zoom flash 550EX, the affordable420EX, and the compact 220EX.The respective guide numbers of these (ISO 100 in meters)are 55, 42, and 22. All three Speedlites enable E-TTLautoflash, high-speed sync (FP flash), and FE lock. Inaddition, the 550EX can operate in an easy-to-use wireless,multi-Speedlite system.
Macro Ring Lite MR-14EXThis is an EOS-dedicated macro ring flash featuring twinflash tubes, guide no. 14 (ISO 100 in meters), and E-TTLautoflash. You can fire one or both flash tubes and controlthe flash ratio to easily obtain sophisticated lighting effectswith E-TTL autoflash. Features include high-speed sync (FPflash) and FE lock. The MR-14EX can operate in a wireless,multi-Speedlite system with a 550EX Speedlite as a slave toprovide a variety of macro flash effects.
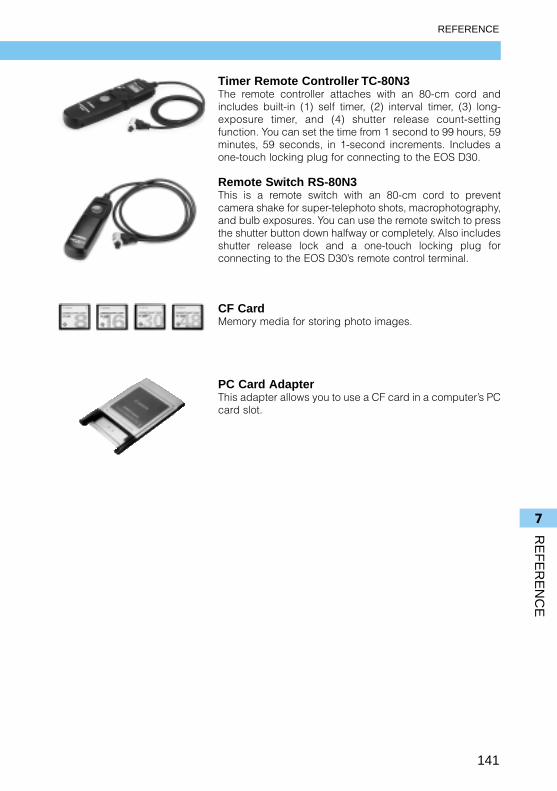
7
RE
FE
RE
NC
E
141
REFERENCE
Timer Remote Controller TC-80N3The remote controller attaches with an 80-cm cord andincludes built-in (1) self timer, (2) interval timer, (3) long-exposure timer, and (4) shutter release count-settingfunction. You can set the time from 1 second to 99 hours, 59minutes, 59 seconds, in 1-second increments. Includes aone-touch locking plug for connecting to the EOS D30.
Remote Switch RS-80N3This is a remote switch with an 80-cm cord to preventcamera shake for super-telephoto shots, macrophotography,and bulb exposures. You can use the remote switch to pressthe shutter button down halfway or completely. Also includesshutter release lock and a one-touch locking plug forconnecting to the EOS D30’s remote control terminal.
CF CardMemory media for storing photo images.
PC Card AdapterThis adapter allows you to use a CF card in a computer’s PCcard slot.
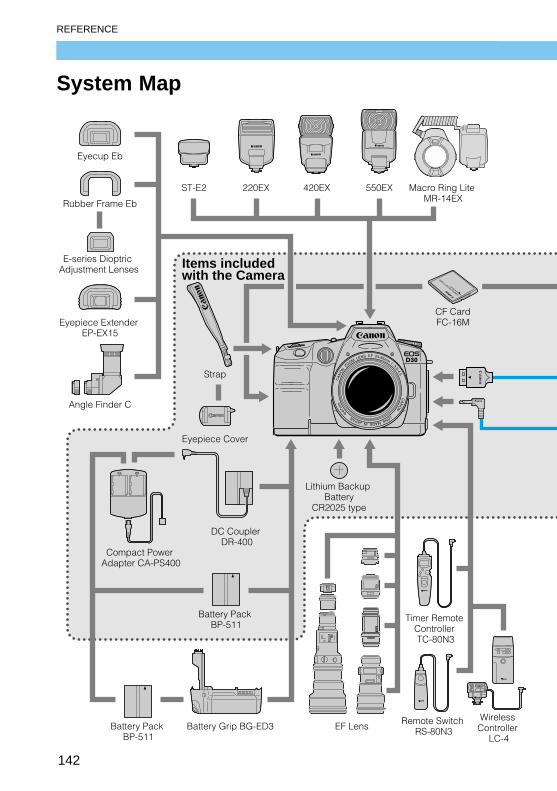
142
REFERENCE
System Map
EF Lens
Battery Pack BP-511
Lithium Backup Battery
CR2025 type
Timer Remote Controller TC-80N3
Remote Switch RS-80N3
Wireless Controller
LC-4
Strap
CF CardFC-16M
Eyecup Eb
Rubber Frame Eb
Eyepiece Extender EP-EX15
Angle Finder C
Battery Grip BG-ED3Battery Pack BP-511
Compact Power Adapter CA-PS400
DC Coupler DR-400
E-series Dioptric Adjustment Lenses
220EXST-E2 420EX 550EX Macro Ring Lite MR-14EX
Eyepiece Cover
Items included with the Camera

7
RE
FE
RE
NC
E
143
REFERENCE
PC Card Slot
CF Cards
CF Card Reader
TV/Video
MacintoshComputer
PC/AT CompatibleComputer
PC Card Adapter• Canon Digital CameraSolution Disk
• Adobe Photoshop LE Disk
Interface CableIFC-200 PCU
Video Cable VC-100
Printer or Modem PortDIN-8 Pin Connector
USB Port
USB Port
PC Card Slot
Parallel Port

144
REFERENCE
Major SpecificationsTypeType ....................................Single-lens reflex AE-AF digital camera with built-in flash and
focal plane shutter (vertical travel), 36-bit full color (RGB each12-bit), single-shot CMOS direct imaging sensor
Picture size..........................22.7 × 15.1 mm (0.89 × 0.59 in)Compatible lenses ..............Canon EF lens groupLens mount .........................Canon EF mountLens focal length ................Approx. 1.6× indicated lens focal length
Imaging elementType ....................................High-sensitivity, high-resolution, large single-plate CMOS sensor.Effective sensor size ...........22.7 × 15.1 mm (0.89 × 0.59 in) (Advanced Photo System C
print type equivalent)Pixel count ..........................Total: approx. 3.25 million pixels (2226 × 1460)
Effective: approx. 3.11 million pixels (2160 × 1440)Aspect ratio.........................2 : 3Color filter method ..............Primary color filterLow-pass filter.....................Positioned on front surface of imaging element, non-removable
LCD MonitorType ....................................TFT-type color LCD monitorPicture size..........................1.8-inchPixel count ..........................Approx. 114,000 pixelsBrightness adjustment ........2 levels: Standard or Bright (select by menu function)
Recording MethodRecording media ................CF card (Type 1 or 2)Recording format type ........Design rule for Camera File SystemRecording formats ..............JPEG, RAWRecording capacity.............q Large/Fine:10, w Large/Normal:21, e Small/Fine:22,
r Small/Normal:40, RAW:3 (with 16-Mbyte CF card)Parameters..........................Standard parameters plus three types of custom parameters
selected by the user.
Auto FocusAF Type...............................multi-BASIS TTL-CT-SIR type (TTL secondary image registration)Focusing points ..................3-point (| + |)AF working range................EV2 to EV18 (ISO 100)Focusing point selection.....q Automatic selection by camera, w Manual 1-point selection
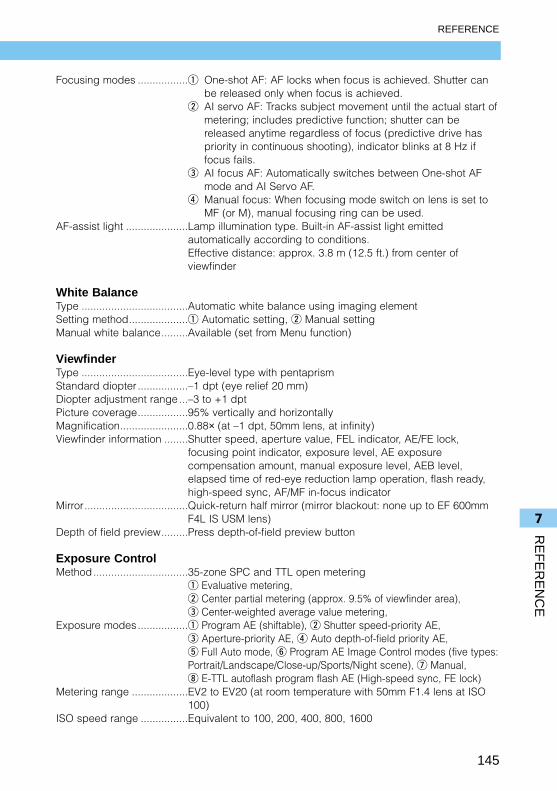
7
RE
FE
RE
NC
E
145
REFERENCE
Focusing modes .................q One-shot AF: AF locks when focus is achieved. Shutter canbe released only when focus is achieved.
w AI servo AF: Tracks subject movement until the actual start ofmetering; includes predictive function; shutter can bereleased anytime regardless of focus (predictive drive haspriority in continuous shooting), indicator blinks at 8 Hz iffocus fails.
e AI focus AF: Automatically switches between One-shot AFmode and AI Servo AF.
r Manual focus: When focusing mode switch on lens is set toMF (or M), manual focusing ring can be used.
AF-assist light .....................Lamp illumination type. Built-in AF-assist light emittedautomatically according to conditions.Effective distance: approx. 3.8 m (12.5 ft.) from center ofviewfinder
White BalanceType ....................................Automatic white balance using imaging elementSetting method....................q Automatic setting, w Manual settingManual white balance.........Available (set from Menu function)
ViewfinderType ....................................Eye-level type with pentaprismStandard diopter .................–1 dpt (eye relief 20 mm)Diopter adjustment range...–3 to +1 dptPicture coverage.................95% vertically and horizontallyMagnification.......................0.88× (at –1 dpt, 50mm lens, at infinity)Viewfinder information ........Shutter speed, aperture value, FEL indicator, AE/FE lock,
focusing point indicator, exposure level, AE exposurecompensation amount, manual exposure level, AEB level,elapsed time of red-eye reduction lamp operation, flash ready,high-speed sync, AF/MF in-focus indicator
Mirror...................................Quick-return half mirror (mirror blackout: none up to EF 600mmF4L IS USM lens)
Depth of field preview.........Press depth-of-field preview button
Exposure ControlMethod................................35-zone SPC and TTL open metering
q Evaluative metering, w Center partial metering (approx. 9.5% of viewfinder area), e Center-weighted average value metering,
Exposure modes.................q Program AE (shiftable), w Shutter speed-priority AE, e Aperture-priority AE, r Auto depth-of-field priority AE, t Full Auto mode, y Program AE Image Control modes (five types:Portrait/Landscape/Close-up/Sports/Night scene), u Manual, i E-TTL autoflash program flash AE (High-speed sync, FE lock)
Metering range ...................EV2 to EV20 (at room temperature with 50mm F1.4 lens at ISO100)
ISO speed range ................Equivalent to 100, 200, 400, 800, 1600
146
REFERENCE
Exposure compensation .....q AEB: ±2 stops in 1/2- or 1/3-stop increments, Correctexposure, underexposure, overexposure
w Manual compensation: ±2 stops in 1/2- or 1/3-stop incrementsAE Lock...............................q Auto AE lock, w Press AE Lock button: Center partial
metering and AE lock
ShutterType ....................................Vertical-travel focal-plane shutter with all speeds controlled
electronically Shutter speeds....................1/4000 to 30 sec., bulb, and X-sync at 1/200 sec.Shutter release....................Soft-touch electromagnetic releaseSelf-timer .............................Electronically controlled, 10-second delay
DriveDrive modes........................q Single-shot, w Continuous, e Self-timer (10 sec.)Number of continuous images ...Approximately 3 images/second, to a maximum of 8 images
(ONE SHOT, in Large/Fine format).
Built-in flashType ....................................Retractable E-TTL autoflash and auto pop-up flashGuide No.............................12/39 (at ISO 100, m/ft.)Recycling time ....................Approx. 3 sec.Flash ready indicator ..........Flash ready icon lights in viewfinderFlash coverage ...................Covers field equivalent to a focal length of 18mm Flash adjustment.................E-TTL autoflash (preflash for metering and focus)Flash level control ...............Automatic reduction in backlit conditions or for fill flashExposure compensation .....±2 stops in 1/2- or 1/3-stop increments
Playback and Erase FunctionsPlayback modes .................q Single image, w Index display, e Enlargement,
r Auto playbackErase ...................................q Single image, w All (except protected images)
Power SupplyBattery.................................Operates from one BP-511 Battery Pack (lithium ion battery)Number of images that
can be taken.....................680 (No flash, normal temperature)(with a fully-charged 480 (No flash, low temperature)battery) 540 (50% flash, normal temperature)
400 (50% flash, low temperature)Battery check......................3-stage battery check icon on LCD panelPower-saving functions.......Set by menu functionBackup battery ...................One CR2025 lithium button battery (stores settings for menu
functions)Backup battery warning .....Change message displayed on LCD panel.
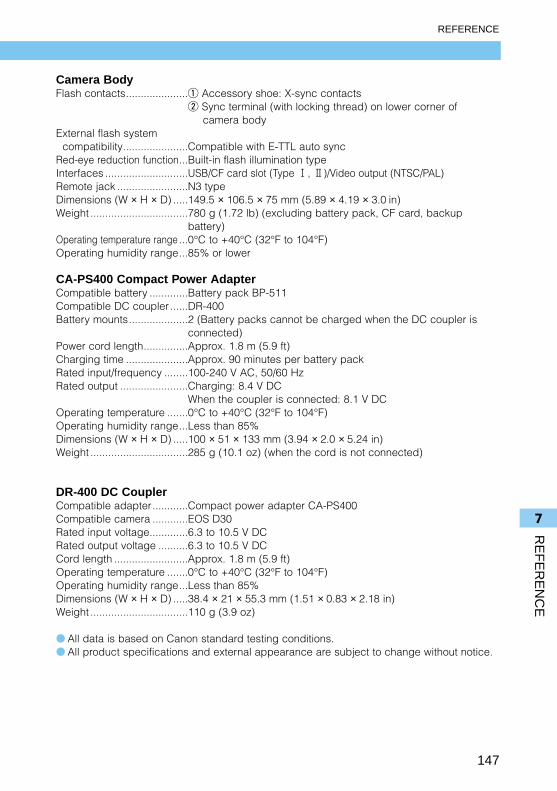
7
RE
FE
RE
NC
E
147
REFERENCE
Camera BodyFlash contacts.....................q Accessory shoe: X-sync contacts
w Sync terminal (with locking thread) on lower corner of camera body
External flash system compatibility......................Compatible with E-TTL auto sync
Red-eye reduction function...Built-in flash illumination typeInterfaces ............................USB/CF card slot (Type 1, 2)/Video output (NTSC/PAL)Remote jack ........................N3 typeDimensions (W × H × D) .....149.5 × 106.5 × 75 mm (5.89 × 4.19 × 3.0 in)Weight .................................780 g (1.72 lb) (excluding battery pack, CF card, backup
battery)Operating temperature range ...0°C to +40°C (32°F to 104°F)Operating humidity range...85% or lower
CA-PS400 Compact Power AdapterCompatible battery .............Battery pack BP-511Compatible DC coupler ......DR-400Battery mounts....................2 (Battery packs cannot be charged when the DC coupler is
connected)Power cord length...............Approx. 1.8 m (5.9 ft)Charging time .....................Approx. 90 minutes per battery packRated input/frequency ........100-240 V AC, 50/60 HzRated output .......................Charging: 8.4 V DC
When the coupler is connected: 8.1 V DCOperating temperature .......0°C to +40°C (32°F to 104°F)Operating humidity range...Less than 85%Dimensions (W × H × D) .....100 × 51 × 133 mm (3.94 × 2.0 × 5.24 in)Weight .................................285 g (10.1 oz) (when the cord is not connected)
DR-400 DC CouplerCompatible adapter............Compact power adapter CA-PS400Compatible camera ............EOS D30Rated input voltage.............6.3 to 10.5 V DCRated output voltage ..........6.3 to 10.5 V DCCord length .........................Approx. 1.8 m (5.9 ft)Operating temperature .......0°C to +40°C (32°F to 104°F)Operating humidity range...Less than 85%Dimensions (W × H × D) .....38.4 × 21 × 55.3 mm (1.51 × 0.83 × 2.18 in)Weight .................................110 g (3.9 oz)
● All data is based on Canon standard testing conditions.● All product specifications and external appearance are subject to change without notice.

148
Index4-second timer function ................................226-second timer function ................................2216-second timer function ..............................22
A
Accessories ............................................4, 140AE................................................................130AEB (Autoexposure bracketing) ...................82
Canceling AEB..........................................82AE lock ..........................................................84AF..........................................................30, 130
Problem subjects ......................................63AF Assist-light ...............................................43AF Mode........................................................58AI Focus AF...................................................60AI Servo AF for moving subjects ..................60Aperture-Priority AE ......................................76Aperture value.............................................131Aperture value readout ...............................137Automatic Depth-of-Field AE ........................80Auto power off function.........................33, 121Auto reset ......................................................32
B
Backup battery replacement ........................24Basic terminology .......................................130Battery Grip.................................................140Battery pack......................................4, 25, 140
Battery charge ..........................................25Charge checking ......................................27Charging ...................................................25Charging time ...........................................25Inserting ....................................................27
Beep............................................................120Built-in flash use............................................90
Creative zone shooting .............................90Easy zone shooting...................................90Flash Exposure compensation ...........95, 99Flash range ...............................................91Flash sync shutter speed,
aperture value.........................................91Red-eye reduction ....................................93
Bulb exposures .............................................87
C
Canon Service Centers...................Back coverCF (CompactFlash) card....3, 4, 13, 31, 130, 141
Formatting.......................................109, 131Inserting ....................................................31Removing ..................................................31
Charge lamp ...........................................21, 25Close-up mode .............................................50CMOS.......................................................3,117Color temperature .........................................69Compact power adapter.....................4, 21, 25Compression ratio .........................................54Continuous numbering..................................32Copyright.........................................................3Creative zone ..........................................20, 90Custom functions ................................123, 124Custom White Balance..................................70
D
Date printing specification ..........................114DC coupler..........................................4, 21, 29Depth of field ........................................77, 132Dioptric adjustment.......................................40Dioptric Correction Lens .............................140DPOF (Digital Print Order Format)
................................................101, 110, 130Drive Mode....................................................67
E
Easy shooting zone...........................20, 31, 90EOS D30 Camera User’s Guide .................2, 5EOS-dedicated 550EX
Speedlite flash photography.....................96EOS-dedicated EX-Series Speedlites......96, 140Erasing ..................................................47, 108Exposure .....................................................133Exposure compensation setting ...................81Exposure warnings .....................................135Eyepiece cover ......................................23, 86
7
RE
FE
RE
NC
E
149
Index
F
FEB (Flash Exposure Bracketing) .................98FE lock ....................................................94, 99File numbers .......................................115, 131Flash exposure compensation................95, 99Flash photography..................................43, 89
Automatic flash .........................................43Built-in flash ........................................89, 90EX-series Speedlite.............................89, 95
Flash shooting in each mode........................97Focusing point ..............................................61
AE lock effects for focusing and metering combinations..................135
Focusing on an off-center subject ............62Selecting ...................................................61
Formatting ...........................................109, 131FP flash (high-speed sync)...........................98Full auto flash................................................97Fully automatic shooting ...............................42Fully press the shutter button .......................33Function Availability Table...........................134
H
Half press the shutter button ........................33Handling precautions....................................12
Camera .....................................................12CF card .....................................................13LCD panel and LCD monitor ....................12Lens electrical contacts............................13Lithium backup battery .............................13
High-speed sync...........................................98Holding the camera ......................................40Household power supply ..............................29
I
Image information .................................45, 104Image zone ...................................................20Imaging element .....................................3, 117Index printing ..............................................113In-focus indicator ..........................................19Interface cable ................................................5ISO speed.....................................55, 120, 130
J
JPEG .....................................................54, 131
L
Landscape Mode..........................................49Landscape position ......................................40Language....................................................122LCD brightness ...........................................122LCD panel ...............................................12, 18Lens...............................................................30
Detaching..................................................30Effective field angle...................................30Mounting ...................................................30
M
Macro Ring Lite...........................................140Main Dial .................................................22, 34Manual exposure ..........................................78Manual focus.................................................63Main switch .............................................22, 33Message List...............................................145Menu functions......................................36, 120
Default settings .........................................37Functions...................................................36Items .........................................................37Settings .....................................................36
Metering Modes ............................................65Types.........................................................66
MF (Manual Focus) .................................30, 63Mirror lockup .........................................88, 124Mode dial ......................................................20Modeling flash...............................................99
N
Night Scene Mode ........................................52Non-Canon flash unit use ...........................100Number of available shots ............................28
O
One-shot AF ..................................................59

150
Index
P
Parameter selection ......................................56Partial metering .............................................66PC Card Adapter ........................................141PC terminal..................................................100Portrait Mode.................................................48Portrait position .....................................40, 106Print order selection ....................................110
Date printing ...........................................114File number printing................................115Print type .................................................113Selecting all images................................112Selecting a single image ........................111
Program AE...................................................72Program line................................................136Program shifting............................................73Protection ....................................................107
Q
Quick Control Dial ...................................22, 35Quick Control Dial Switch .............................35
R
Recording capacity.......................................54Recording size ..............................................54Red-eye phenomenon ................................131Red-eye reduction ........................................93Remote Switch ............................................141
S
Self-timer .......................................................85Service centers ...............................Back coverSettings checking .........................................64Shooting modes ............................................20Shutter button................................................33Shutter speed..............................................131Shutter Speed-Priority AE .............................74Shutter speed readout ................................137Specifications..............................................142Software Starter Guide....................................5Sports Mode..................................................51Standard......................................................111Strap..........................................................4, 23
Sync shutter speed...............................91, 100System Map ................................................146
T
Television connection..................................116Test shots ........................................................3Timer Remote Controller .............................141Trademarks .....................................................3
V
Video cable .............................................5, 116Video system...............................................123Viewfinder......................................................19Viewing the image ................................44, 102
Auto playback .........................................105Enlarged image viewing .........................103Erasing images
Single....................................................47All ........................................................108
Jumping between images ......................103Protecting images ...................................107Rotating images......................................106Viewing a single image...........................102Viewing the index....................................102
W
Warranty ..........................................................5White balance .........................................68, 69
Custom setting ..........................................70Types.........................................................69
Wireless multi-light photography ..................99

7
RE
FE
RE
NC
E
151
Memo