dfm autocad plug-in installation guide autocad...dfm autocad plug-in installation guide 5 audience...
TRANSCRIPT
INSTALLATION GUIDE
DFM AutoCAD Plug-In
Authored by:
Adenium Systems Customer Engineering Department

Document History
Initial Release: Thursday, December 21, 2006
Latest Release: Thursday, December 21, 2006
Release Number: 1
Printed: Thursday, January 25, 2007 © 2006 Adenium Systems Inc. All rights reserved. The information contained in this document represents the current view of Adenium Systems on the issues discussed as of the date of publication. Because Adenium Systems must respond to changing market conditions, it should not be interpreted to be a commitment on the part of Adenium Systems, and Adenium Systems cannot guarantee the accuracy of any information presented after the date of publication. This document is for informational purposes only. Adenium Systems MAKES NO WARRANTIES, EXPRESS OR IMPLIED, IN THIS DOCUMENT. Adenium Systems is the registered trademarks or trademarks of Adenium Systems in the United States and/or other countries. Other product and company names mentioned herein may be the trademarks of their respective owners. Adenium Systems • 34103 Lakeshore Blvd • Cleveland, OH 44095• USA

CONTENTS
AUDIENCE....................................................................................................................5
INSTALL AUTOCAD......................................................................................................6
INSTALL THE DFM AUTOCAD PLUG-IN.......................................................................7
ADD THE PLOT DEVICE USED TO MAKE PRINTABLE FILES ......................................8
CONFIGURE THE PLOT DEVICE USED TO MAKE VIEWABLE FILES.........................13
CONFIGURING THE PLUG-IN.....................................................................................16
CONCLUSION.............................................................................................................20


DFM AutoCAD Plug-In Installation Guide 5
AUDIENCE This document shows how to install and configure the DFM AutoCAD Plug-in for use.
The plug-in works with full versions is AutoCAD from 2000 to 2007.
The plug-in also works with any of the vertical AutoCAD products, such as Architectural Desktop and Land Desktop.
The plug-in does NOT work with any LT versions of AutoCAD.
This installation should be presented with a full functional demonstration of DFM for AutoCAD. The Installation guide is not meant to be a replacement for personal interaction.

DFM AutoCAD Plug-In Installation Guide 6
INSTALL AUTOCAD Install one of the following products:
AutoCAD 2000
AutoCAD 2002
AutoCAD 2004
AutoCAD 2005
AutoCAD 2006
AutoCAD 2007
Any vertical products based on the versions above:
Autodesk Architectural Desktop
Autodesk Land Desktop
Autodesk Building Systems
Autodesk Map 3D
Autodesk Civil 3D
AutoCAD Mechanical
AutoCAD Electrical

DFM AutoCAD Plug-In Installation Guide 7
INSTALL THE DFM AUTOCAD PLUG-IN Choose the correct installation of AutoCAD, as shows below. Then click Install.
Close the application.
DFM AutoCAD Plug-In Installation Guide 8
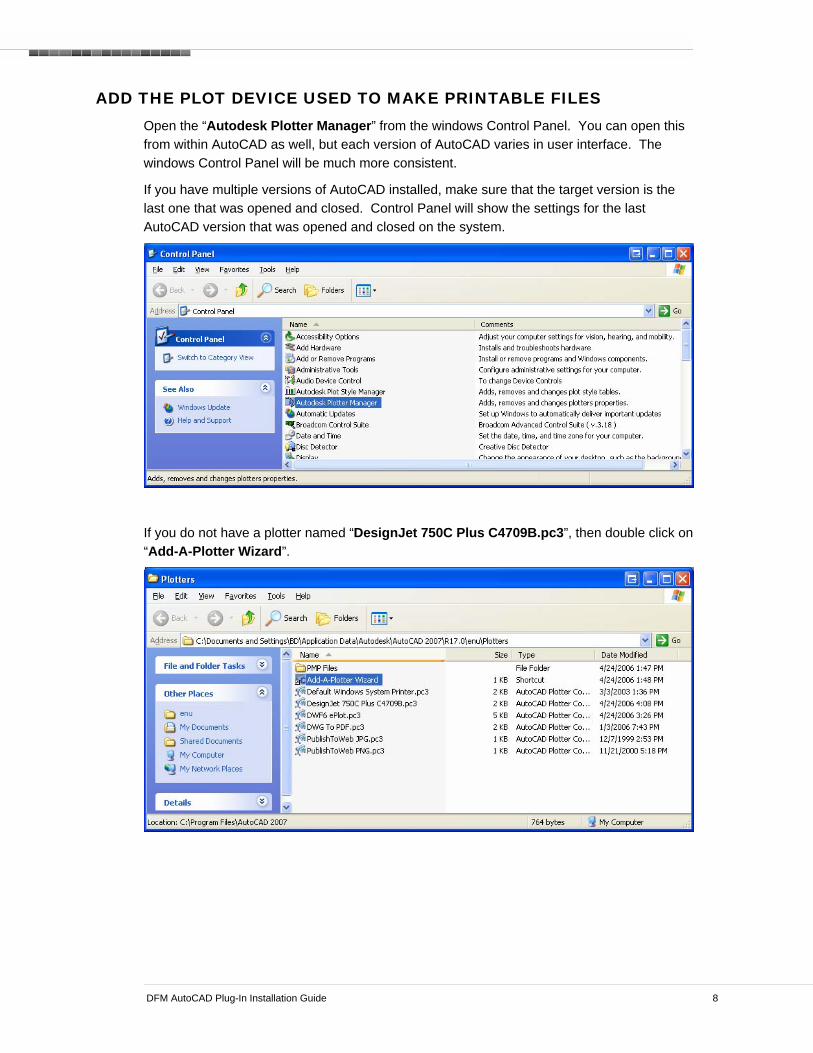
ADD THE PLOT DEVICE USED TO MAKE PRINTABLE FILES Open the “Autodesk Plotter Manager” from the windows Control Panel. You can open this from within AutoCAD as well, but each version of AutoCAD varies in user interface. The windows Control Panel will be much more consistent.
If you have multiple versions of AutoCAD installed, make sure that the target version is the last one that was opened and closed. Control Panel will show the settings for the last AutoCAD version that was opened and closed on the system.
If you do not have a plotter named “DesignJet 750C Plus C4709B.pc3”, then double click on “Add-A-Plotter Wizard”.

DFM AutoCAD Plug-In Installation Guide 9
Choose “My Computer”, and then click Next.
Select the following Manufacturer and Model, and then click Next.

DFM AutoCAD Plug-In Installation Guide 10
Click Continue.
Click Next.

DFM AutoCAD Plug-In Installation Guide 11
Choose “Plot to File”, and then click Next.
Click Next. Make sure you do not change this name if you are planning on using the Adenium sample demo files. This will save you some work later.

DFM AutoCAD Plug-In Installation Guide 12
Click Finish.
DFM AutoCAD Plug-In Installation Guide 13
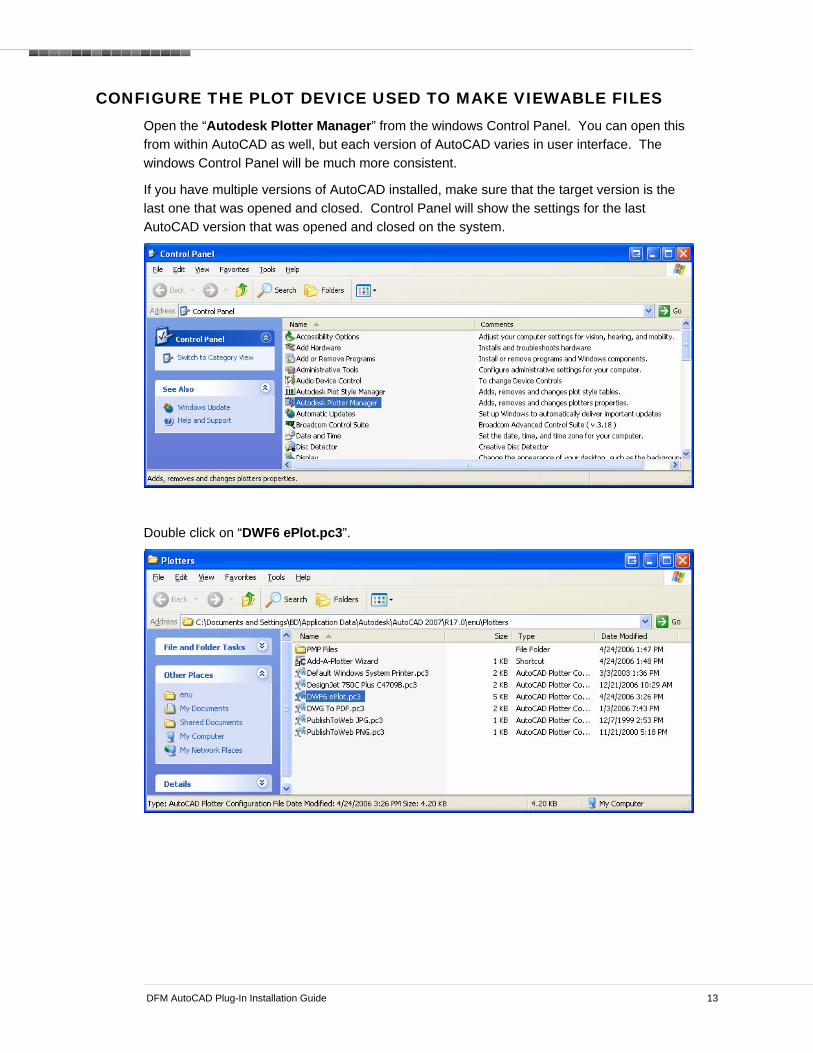
CONFIGURE THE PLOT DEVICE USED TO MAKE VIEWABLE FILES Open the “Autodesk Plotter Manager” from the windows Control Panel. You can open this from within AutoCAD as well, but each version of AutoCAD varies in user interface. The windows Control Panel will be much more consistent.
If you have multiple versions of AutoCAD installed, make sure that the target version is the last one that was opened and closed. Control Panel will show the settings for the last AutoCAD version that was opened and closed on the system.
Double click on “DWF6 ePlot.pc3”.

DFM AutoCAD Plug-In Installation Guide 14
Change to the “Device and Document Settings” tab.
Select “Custom Properties” from the list.
Click on the “Custom Properties…” button.

DFM AutoCAD Plug-In Installation Guide 15
Select “Capture all”.
Select “Include layer information”.
Select “Save preview in DWF”.
Click OK twice.
Close any remaining windows.

DFM AutoCAD Plug-In Installation Guide 16
CONFIGURING THE PLUG-IN The following section assumes that you have already installed and configured DFM File Sharing to connect to your DFM system.
If you have not configured DFM File Sharing to connect to your DFM system, then you will have to add the Gateway connection information under “DFP”, then “Manage”, then “Environment Settings”.
Select the following from the menus in AutoCAD: “DFP”, then “Manage”, then “Design Tool Defaults.
DFM AutoCAD Plug-In Installation Guide 17
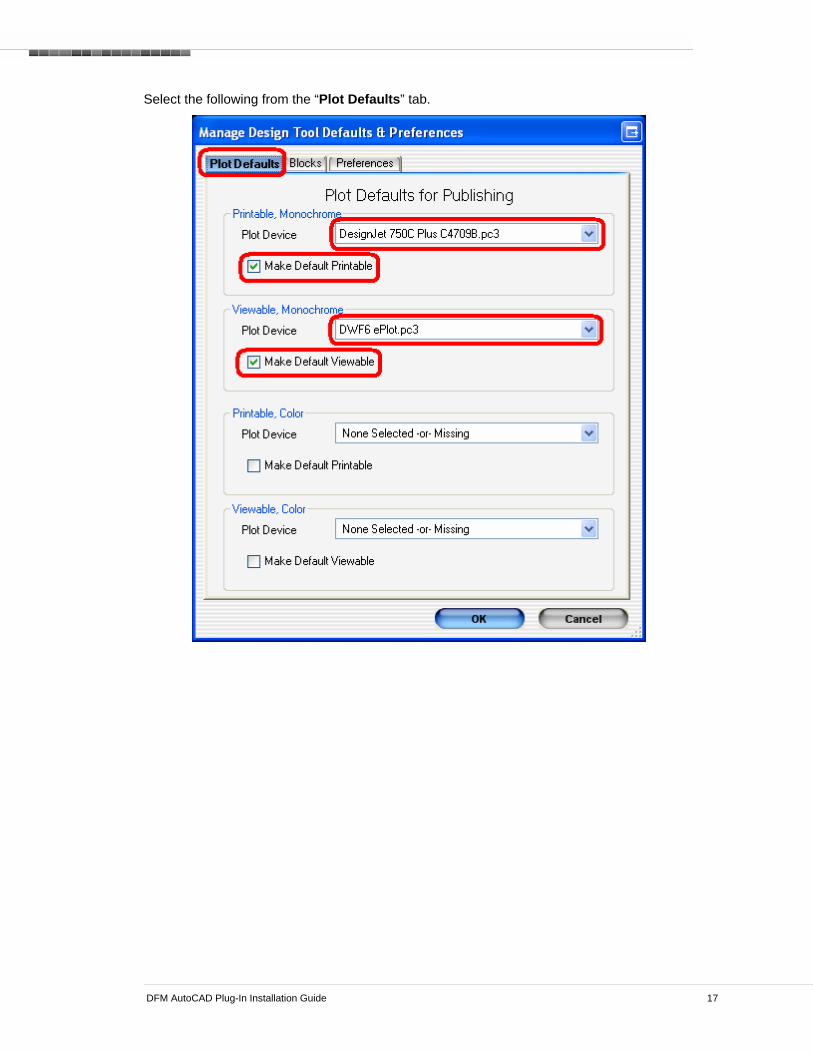
Select the following from the “Plot Defaults” tab.

DFM AutoCAD Plug-In Installation Guide 18
If you plan to use the Adenium AutoCAD sample files, then click the add button shown below.
Type in “TITLE_BORD”, and then click OK.

DFM AutoCAD Plug-In Installation Guide 19
Select the following from the “Preferences” tab.
Click OK.
You can select “Show preview on Publish” if you like. Leaving it deselected will make for a more streamlined demo.

DFM AutoCAD Plug-In Installation Guide 20
CONCLUSION Now you are ready to follow the training videos below.
The videos should be viewed in order of appearance. They will show you how to demo both DFM File Sharing and the DFM AutoCAD Plug-in.
It is highly recommended that you give careful consideration about which document type you plan to use during your AutoCAD demo. If you are not going to demonstrate something useful with Document Type, Attributes, and Status, then you should configure your DFM system to not prompt the user for any of the information. The demo should either be very efficient, or show that the extra clicks are well worth the time.