device tester step by step v2 - delcan technologies
TRANSCRIPT
4411 Suwanee Dam Road, Suite 510 Suwanee, GA 30024 T: (770) 831-3370 [email protected]
Copyright 2011, Intelligent Devices, Inc. All Rights Reserved
Intelligent Devices
DeviceTester Step by Step

Device Tester Step by Step Intelligent Devices, Inc
Page 2 of 17
Table of Contents
Introduction ........................................................................................................................ 2 Overview ............................................................................................................................. 3 How to Add a Device ........................................................................................................... 4 How to Use Easy Test .......................................................................................................... 7 How to Add and Manage Scripts ........................................................................................ 8 How to Transfer Device Type Master Tables .................................................................... 14 How to Add a Device Type ................................................................................................ 15 Object Model .................................................................................................................... 17
Introduction Device Tester for NTCIP (National Transportation Communications for ITS Protocol) is
the easy and fast way to test your NTCIP central or field device. The software allows
automatic configurable testing of devices that conform to the NTCIP suite of standards.
Device Tester has an easy‐to‐use interface, a powerful object model and database
structure, combined with NTCIP ActiveX control for communications, resulting in a
product that is great for:
Debugging new applications and products.
Fault‐finding during System Integration and Acceptance testing.
Verifying product conformance.
Right out of the box, Device Tester comes with a set of device templates, all using the
NTCIP standard. Device Tester can utilize a number of communication methods
including Ethernet (both UDP and TCP are supported), dial up, and Direct Connect Multi‐
drop. Device Tester also ships with a standard list of scripts that are useful for testing a
device’s communications or for performing basic functions such as placing a message on
a sign. For many customers, the standard devices and scripts are sufficient; however,
Device Tester Step by Step Intelligent Devices, Inc
Page 3 of 17
this guide will also explain in step‐by‐step detail how to configure and add devices and
scripts to suit individual needs.
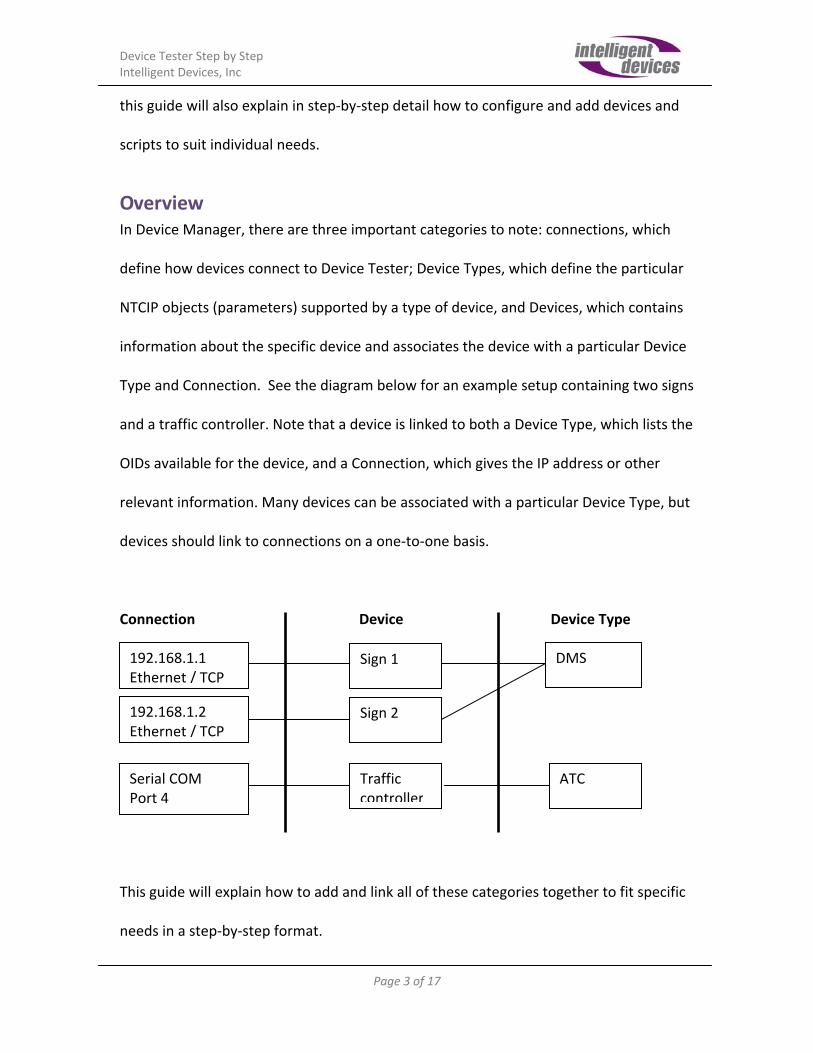
Overview In Device Manager, there are three important categories to note: connections, which
define how devices connect to Device Tester; Device Types, which define the particular
NTCIP objects (parameters) supported by a type of device, and Devices, which contains
information about the specific device and associates the device with a particular Device
Type and Connection. See the diagram below for an example setup containing two signs
and a traffic controller. Note that a device is linked to both a Device Type, which lists the
OIDs available for the device, and a Connection, which gives the IP address or other
relevant information. Many devices can be associated with a particular Device Type, but
devices should link to connections on a one‐to‐one basis.
Connection Device Device Type
This guide will explain how to add and link all of these categories together to fit specific
needs in a step‐by‐step format.
192.168.1.1 Ethernet / TCP
Sign 1 DMS
192.168.1.2 Ethernet / TCP
Sign 2
Serial COM Port 4
Traffic controller
ATC
Device Tester Step by Step Intelligent Devices, Inc
Page 4 of 17
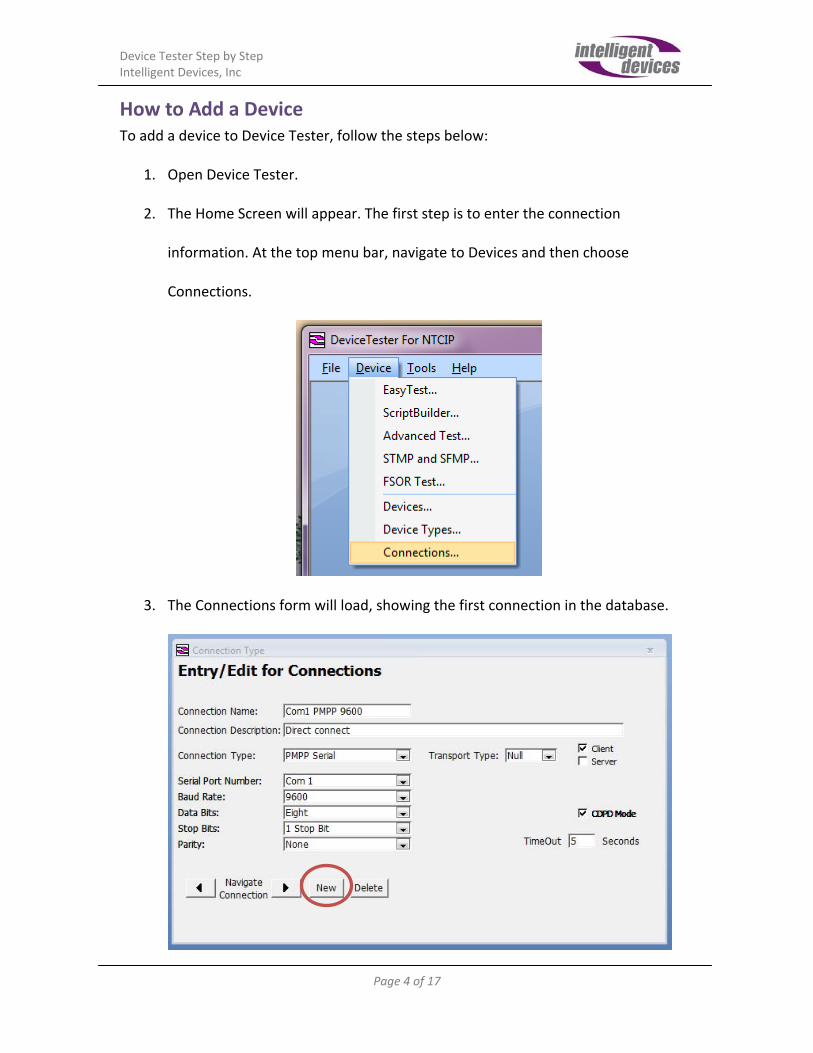
How to Add a Device To add a device to Device Tester, follow the steps below:
1. Open Device Tester.
2. The Home Screen will appear. The first step is to enter the connection
information. At the top menu bar, navigate to Devices and then choose
Connections.
3. The Connections form will load, showing the first connection in the database.
Device Tester Step by Step Intelligent Devices, Inc
Page 5 of 17
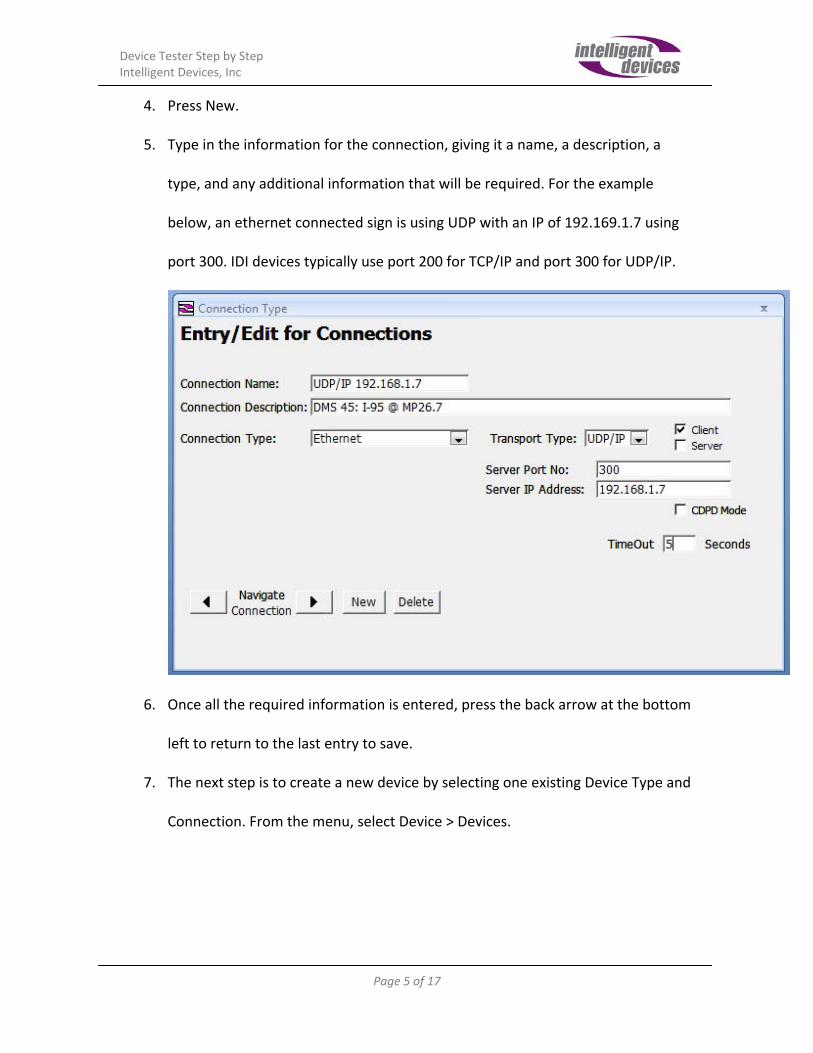
4. Press New.
5. Type in the information for the connection, giving it a name, a description, a
type, and any additional information that will be required. For the example
below, an ethernet connected sign is using UDP with an IP of 192.169.1.7 using
port 300. IDI devices typically use port 200 for TCP/IP and port 300 for UDP/IP.
6. Once all the required information is entered, press the back arrow at the bottom
left to return to the last entry to save.
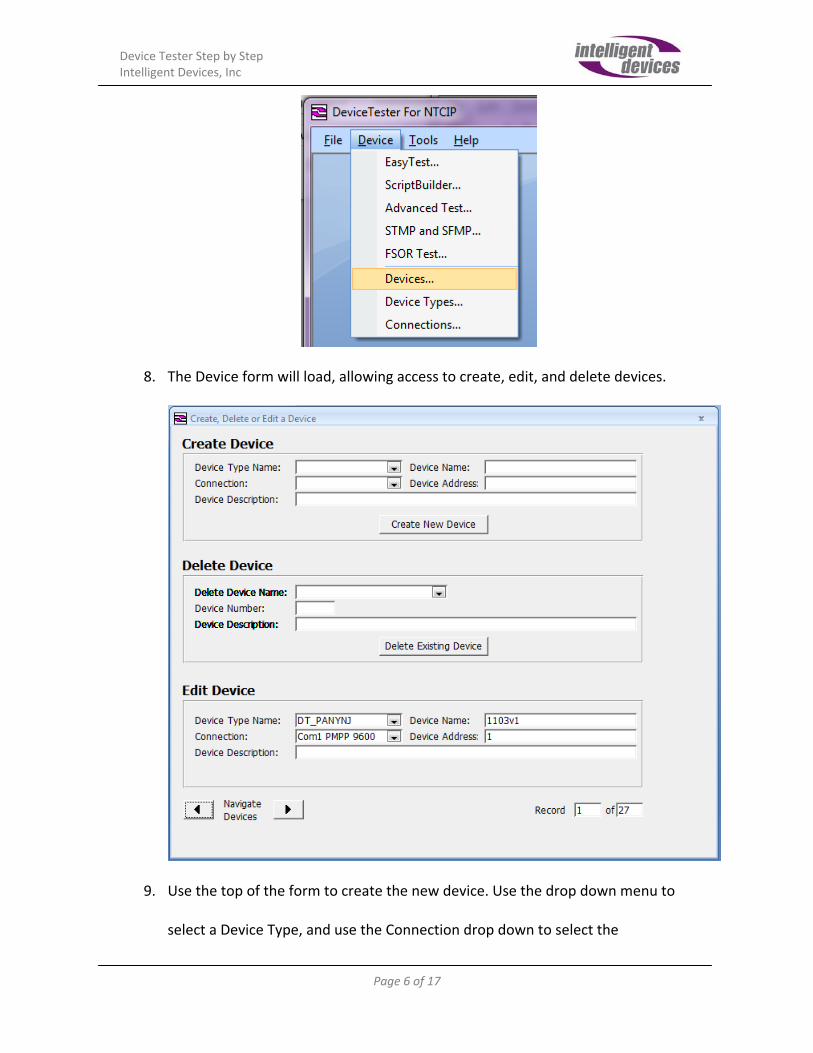
7. The next step is to create a new device by selecting one existing Device Type and
Connection. From the menu, select Device > Devices.
Device Tester Step by Step Intelligent Devices, Inc
Page 6 of 17
8. The Device form will load, allowing access to create, edit, and delete devices.
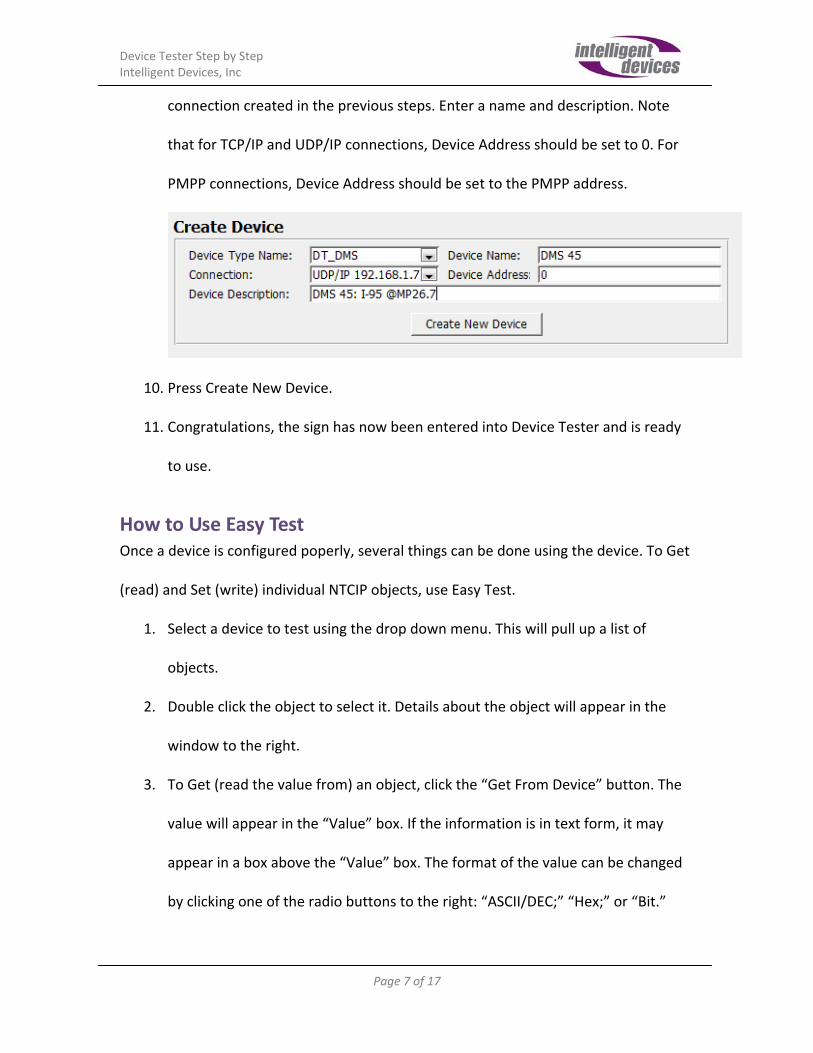
9. Use the top of the form to create the new device. Use the drop down menu to
select a Device Type, and use the Connection drop down to select the
Device Tester Step by Step Intelligent Devices, Inc
Page 7 of 17
connection created in the previous steps. Enter a name and description. Note
that for TCP/IP and UDP/IP connections, Device Address should be set to 0. For
PMPP connections, Device Address should be set to the PMPP address.
10. Press Create New Device.
11. Congratulations, the sign has now been entered into Device Tester and is ready
to use.
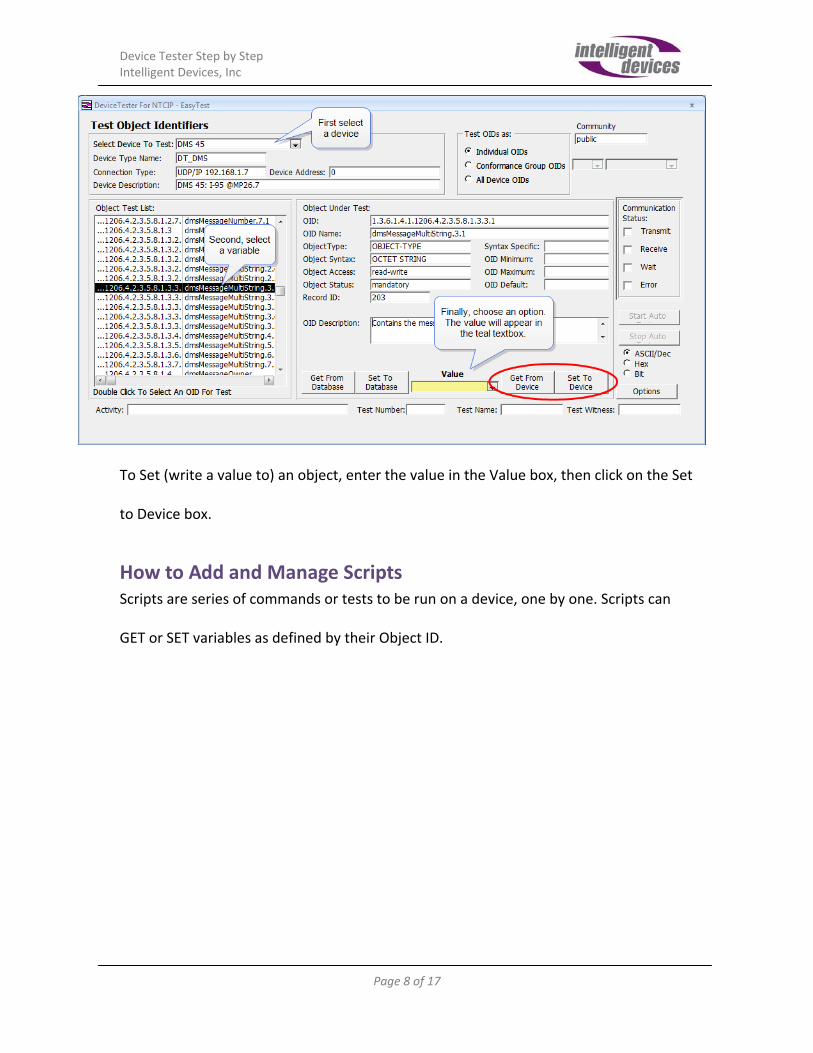
How to Use Easy Test Once a device is configured poperly, several things can be done using the device. To Get
(read) and Set (write) individual NTCIP objects, use Easy Test.
1. Select a device to test using the drop down menu. This will pull up a list of
objects.
2. Double click the object to select it. Details about the object will appear in the
window to the right.
3. To Get (read the value from) an object, click the “Get From Device” button. The
value will appear in the “Value” box. If the information is in text form, it may
appear in a box above the “Value” box. The format of the value can be changed
by clicking one of the radio buttons to the right: “ASCII/DEC;” “Hex;” or “Bit.”
Device Tester Step by Step Intelligent Devices, Inc
Page 8 of 17
To Set (write a value to) an object, enter the value in the Value box, then click on the Set
to Device box.
How to Add and Manage Scripts Scripts are series of commands or tests to be run on a device, one by one. Scripts can
GET or SET variables as defined by their Object ID.
Device Tester Step by Step Intelligent Devices, Inc
Page 9 of 17
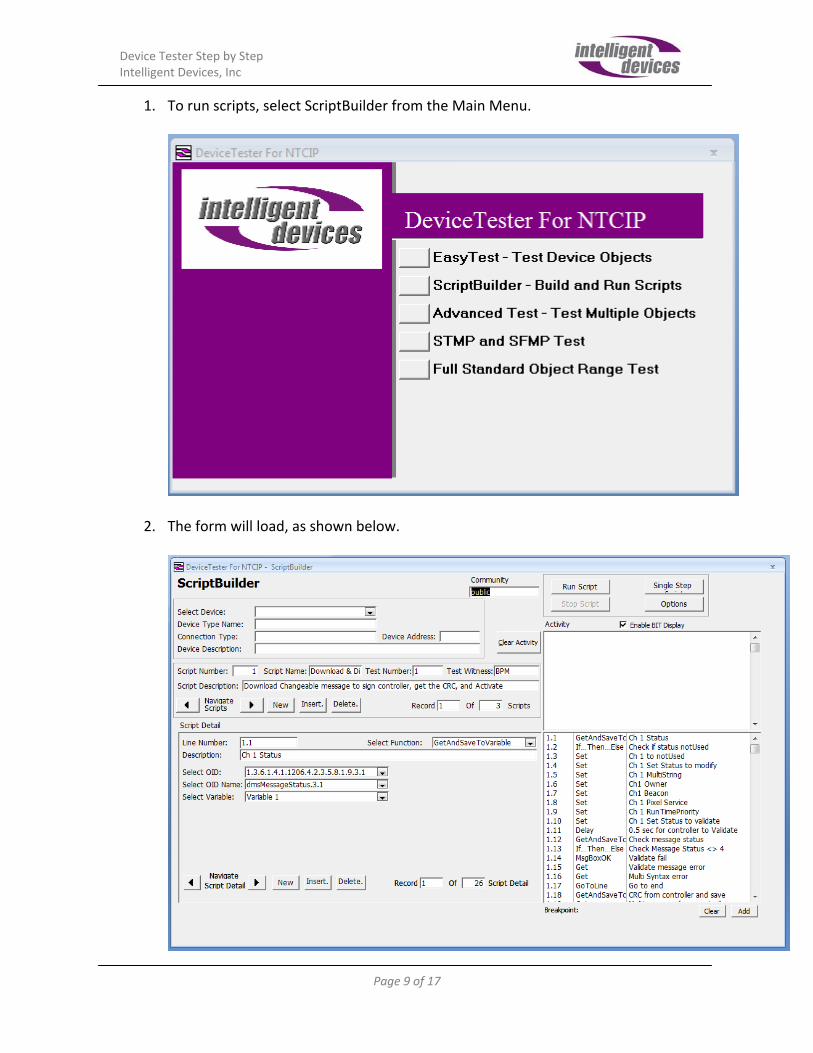
1. To run scripts, select ScriptBuilder from the Main Menu.
2. The form will load, as shown below.
Device Tester Step by Step Intelligent Devices, Inc
Page 10 of 17
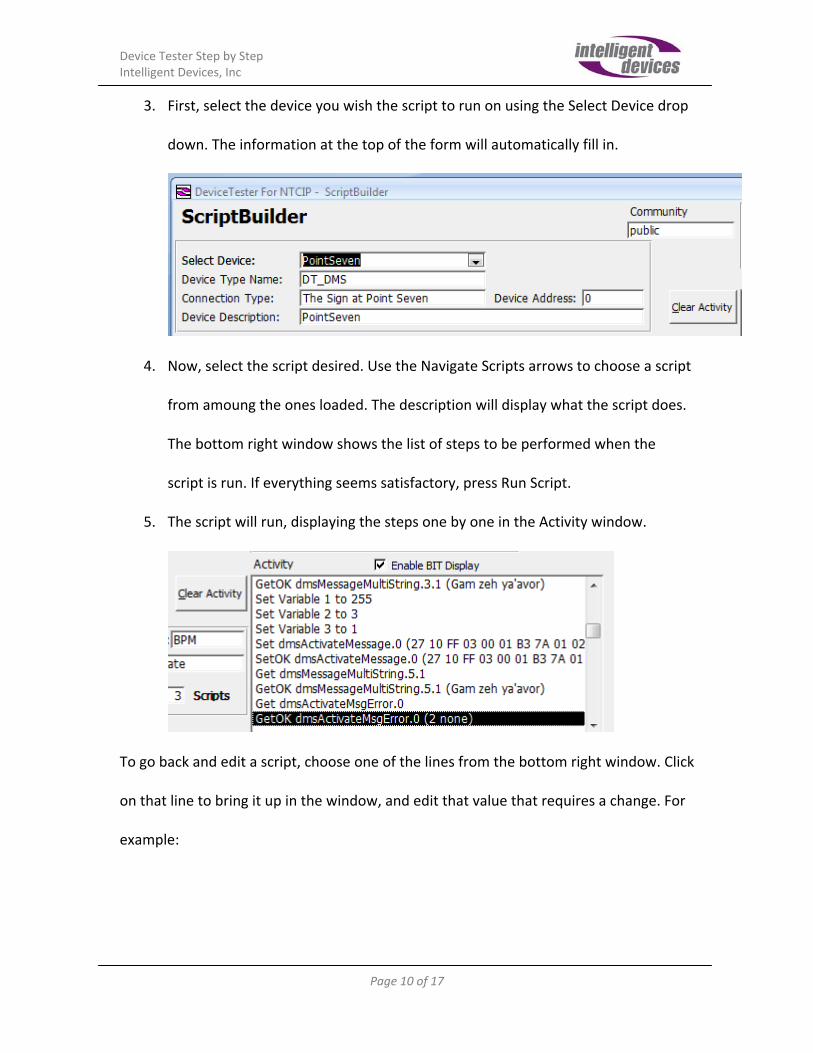
3. First, select the device you wish the script to run on using the Select Device drop
down. The information at the top of the form will automatically fill in.
4. Now, select the script desired. Use the Navigate Scripts arrows to choose a script
from amoung the ones loaded. The description will display what the script does.
The bottom right window shows the list of steps to be performed when the
script is run. If everything seems satisfactory, press Run Script.
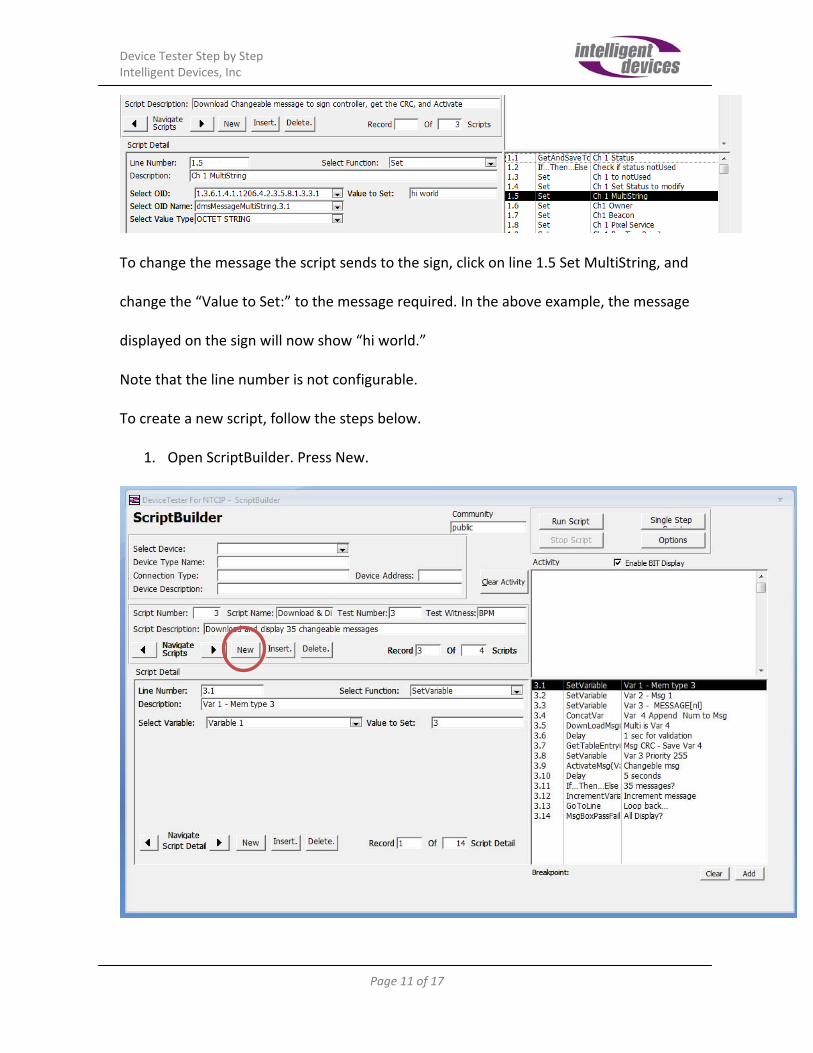
5. The script will run, displaying the steps one by one in the Activity window.
To go back and edit a script, choose one of the lines from the bottom right window. Click
on that line to bring it up in the window, and edit that value that requires a change. For
example:
Device Tester Step by Step Intelligent Devices, Inc
Page 11 of 17
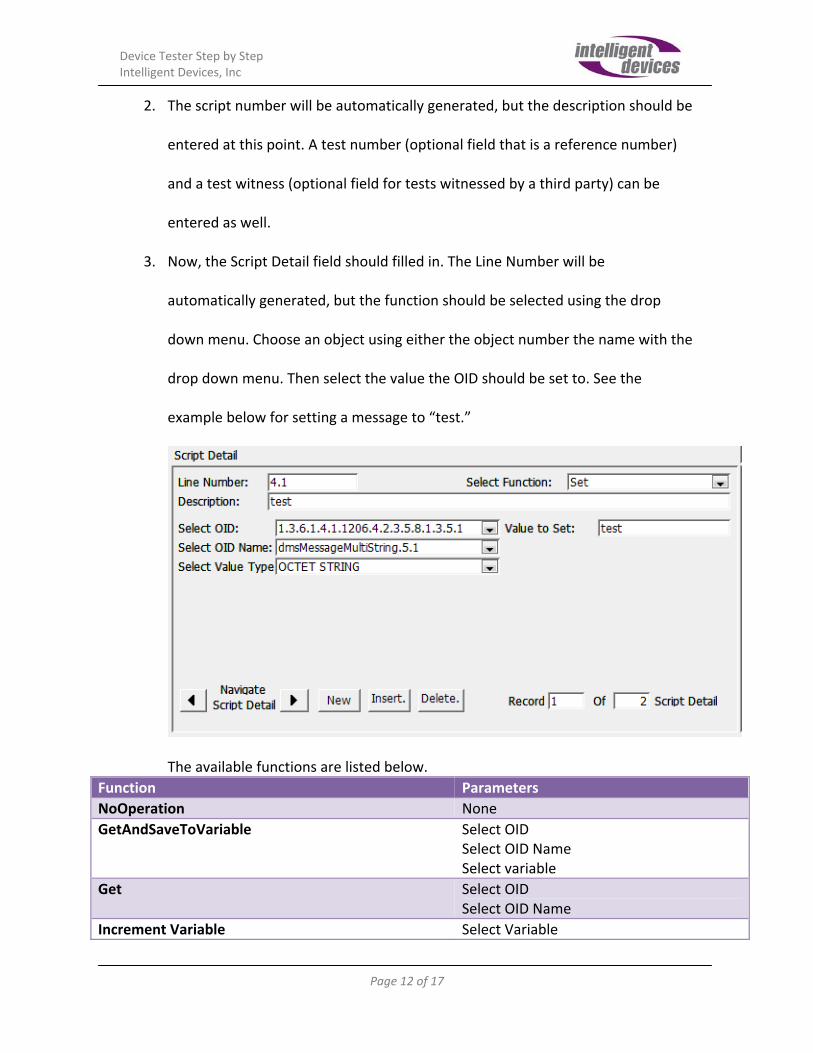
To change the message the script sends to the sign, click on line 1.5 Set MultiString, and
change the “Value to Set:” to the message required. In the above example, the message
displayed on the sign will now show “hi world.”
Note that the line number is not configurable.
To create a new script, follow the steps below.
1. Open ScriptBuilder. Press New.
Device Tester Step by Step Intelligent Devices, Inc
Page 12 of 17
2. The script number will be automatically generated, but the description should be
entered at this point. A test number (optional field that is a reference number)
and a test witness (optional field for tests witnessed by a third party) can be
entered as well.
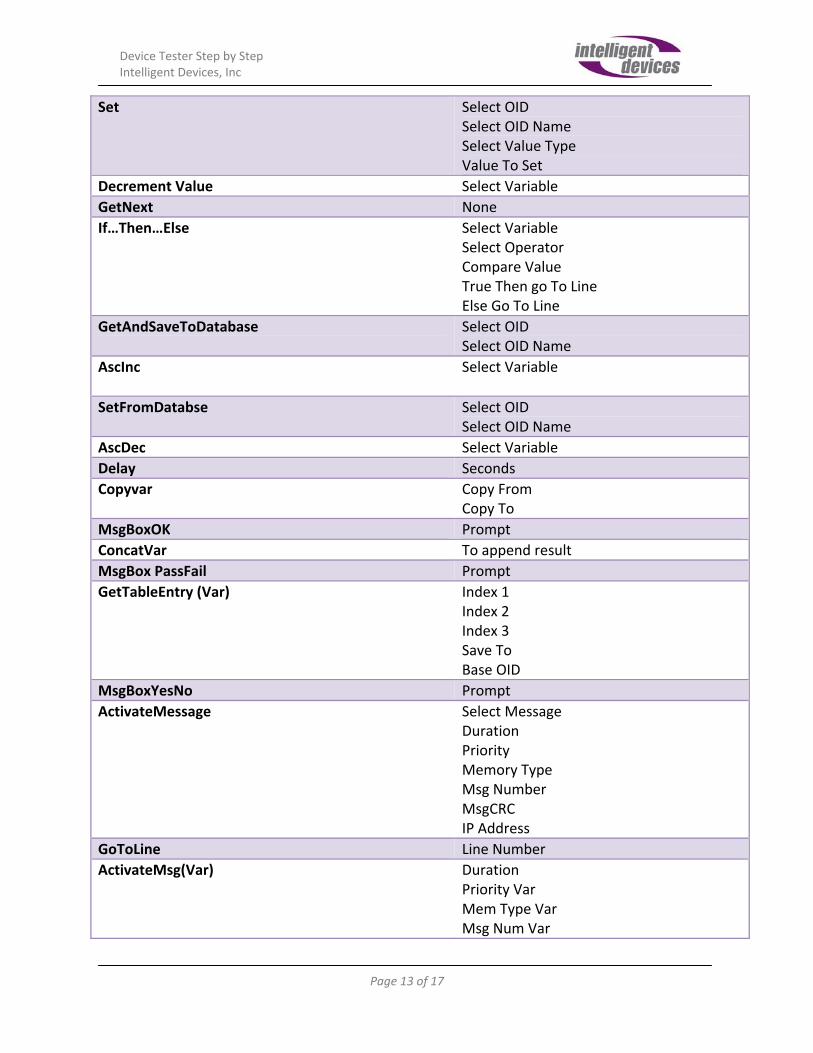
3. Now, the Script Detail field should filled in. The Line Number will be
automatically generated, but the function should be selected using the drop
down menu. Choose an object using either the object number the name with the
drop down menu. Then select the value the OID should be set to. See the
example below for setting a message to “test.”
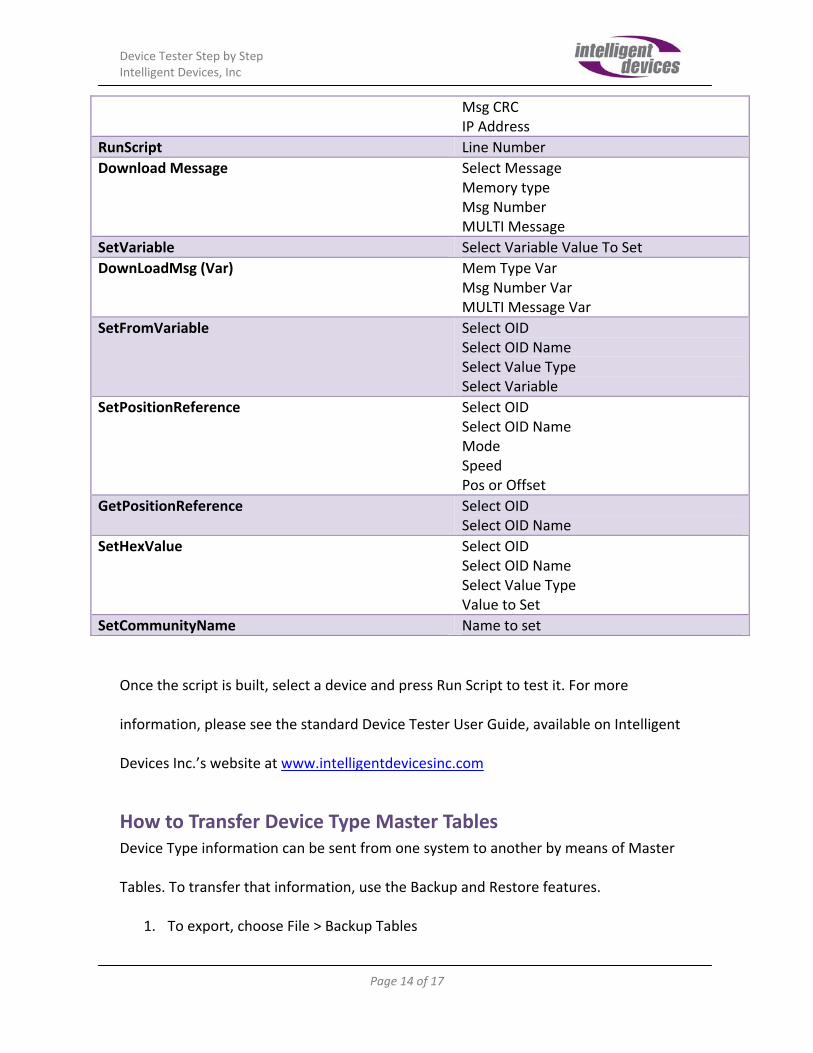
The available functions are listed below.
Function Parameters
NoOperation None
GetAndSaveToVariable
Select OID Select OID Name Select variable
Get Select OID Select OID Name
Increment Variable Select Variable
Device Tester Step by Step Intelligent Devices, Inc
Page 13 of 17
Set Select OID Select OID Name Select Value Type Value To Set
Decrement Value Select Variable
GetNext None
If…Then…Else Select Variable Select Operator Compare Value True Then go To Line Else Go To Line
GetAndSaveToDatabase Select OID Select OID Name
AscInc Select Variable
SetFromDatabse Select OID Select OID Name
AscDec Select Variable
Delay Seconds
Copyvar Copy From Copy To
MsgBoxOK Prompt
ConcatVar To append result
MsgBox PassFail Prompt
GetTableEntry (Var) Index 1 Index 2 Index 3 Save To Base OID
MsgBoxYesNo Prompt
ActivateMessage Select Message Duration Priority Memory Type Msg Number MsgCRC IP Address
GoToLine Line Number
ActivateMsg(Var) Duration Priority Var Mem Type Var Msg Num Var
Device Tester Step by Step Intelligent Devices, Inc
Page 14 of 17
Once the script is built, select a device and press Run Script to test it. For more
information, please see the standard Device Tester User Guide, available on Intelligent
Devices Inc.’s website at www.intelligentdevicesinc.com
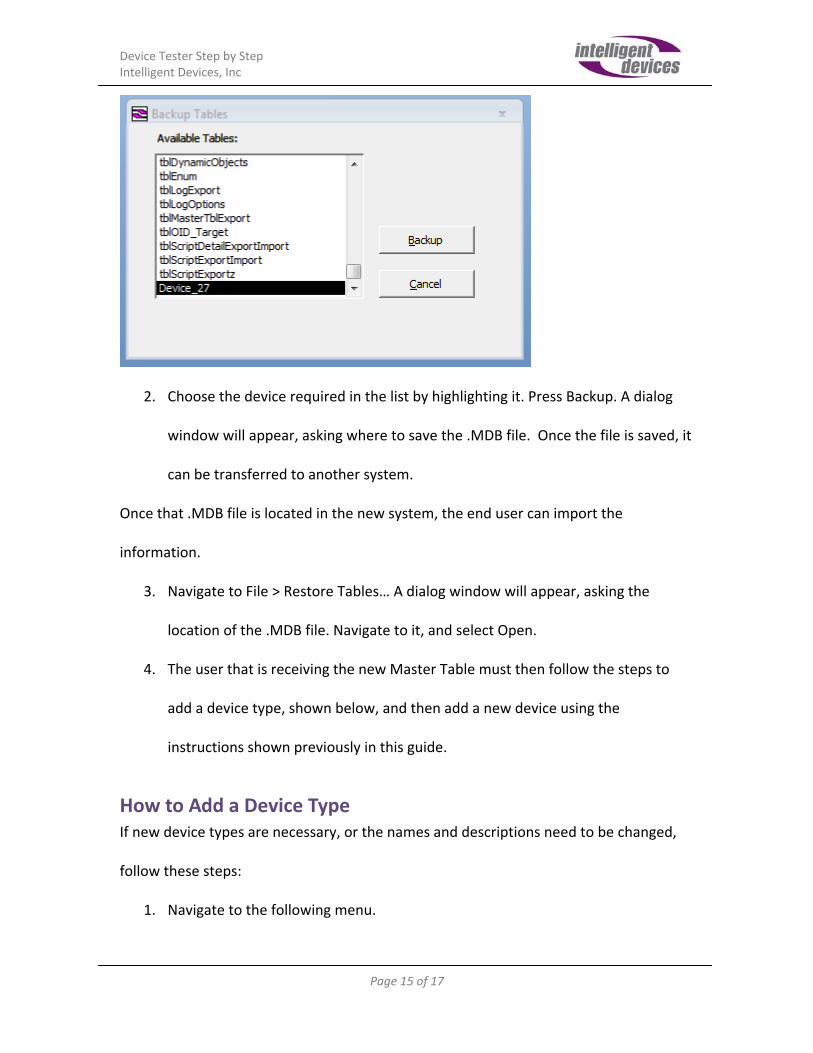
How to Transfer Device Type Master Tables Device Type information can be sent from one system to another by means of Master
Tables. To transfer that information, use the Backup and Restore features.
1. To export, choose File > Backup Tables
Msg CRC IP Address
RunScript Line Number
Download Message Select Message Memory type Msg Number MULTI Message
SetVariable Select Variable Value To Set
DownLoadMsg (Var) Mem Type Var Msg Number Var MULTI Message Var
SetFromVariable Select OID Select OID Name Select Value Type Select Variable
SetPositionReference Select OID Select OID Name Mode Speed Pos or Offset
GetPositionReference Select OID Select OID Name
SetHexValue Select OID Select OID Name Select Value Type Value to Set
SetCommunityName Name to set
Device Tester Step by Step Intelligent Devices, Inc
Page 15 of 17
2. Choose the device required in the list by highlighting it. Press Backup. A dialog
window will appear, asking where to save the .MDB file. Once the file is saved, it
can be transferred to another system.
Once that .MDB file is located in the new system, the end user can import the
information.
3. Navigate to File > Restore Tables… A dialog window will appear, asking the
location of the .MDB file. Navigate to it, and select Open.
4. The user that is receiving the new Master Table must then follow the steps to
add a device type, shown below, and then add a new device using the
instructions shown previously in this guide.
How to Add a Device Type If new device types are necessary, or the names and descriptions need to be changed,
follow these steps:
1. Navigate to the following menu.

Device Tester Step by Step Intelligent Devices, Inc
Page 16 of 17
2. The Device Type form will load, allowing access to current device types. If any
changes are made, be sure to navigate using the arrows at the bottom left to
save changes. To add a new device type, press New.
3. This will add a new record. Fill in the information and choose the master table.
The master table is a database table that is composed of all the available objects
that descibe a particular device. If a new master table is required, check the
standard Device Manager User Guide for instructions.
Device Tester Step by Step Intelligent Devices, Inc
Page 17 of 17
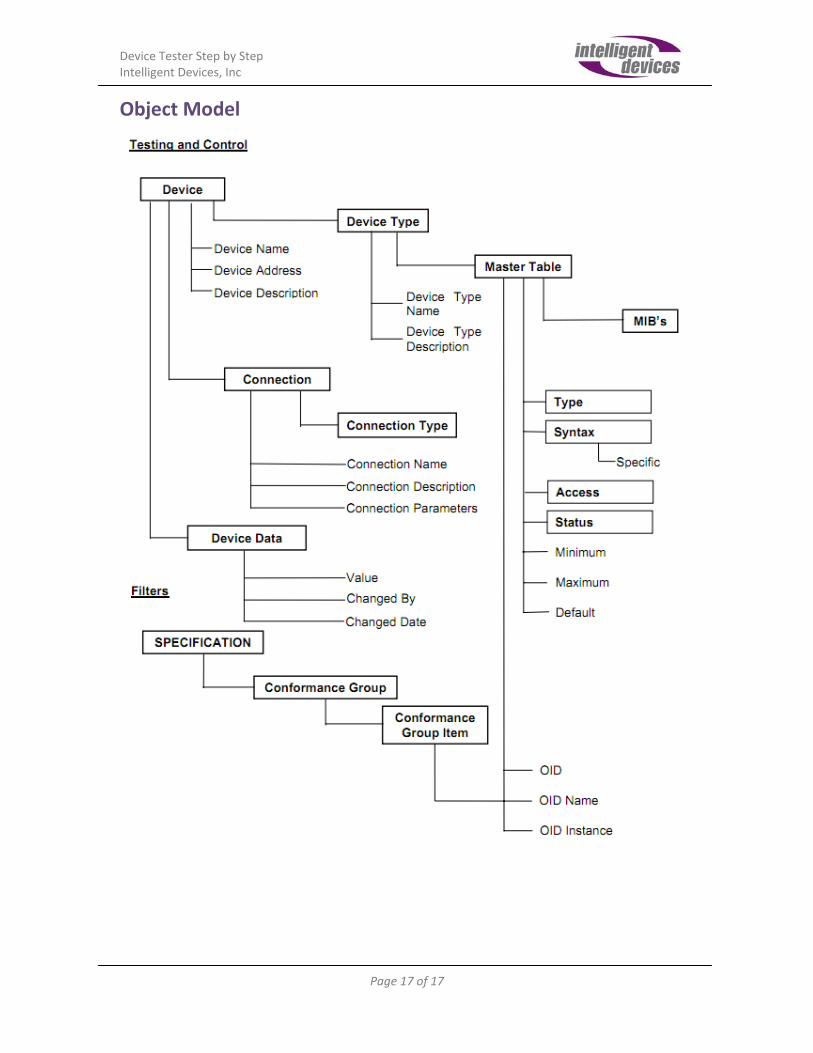
Object Model