deployment guide - suse enterprise storage 5.5 …...and support of suse. suse enterprise storage...
TRANSCRIPT

Deployment Guide
SUSE Enterprise Storage 5.5 (SES 5 & SES 5.5)

Deployment GuideSUSE Enterprise Storage 5.5 (SES 5 & SES 5.5)by Tomáš Bažant, Jana Haláčková, and Sven Seeberg
Publication Date: 02/24/2020
SUSE LLC10 Canal Park DriveSuite 200Cambridge MA 02141USA
https://www.suse.com/documentation
Copyright © 2020 SUSE LLC
Copyright © 2016, RedHat, Inc, and contributors.
The text of and illustrations in this document are licensed under a Creative Commons Attribution-Share Alike 4.0
International ("CC-BY-SA"). An explanation of CC-BY-SA is available at http://creativecommons.org/licenses/by-
sa/4.0/legalcode . In accordance with CC-BY-SA, if you distribute this document or an adaptation of it, you must
provide the URL for the original version.
Red Hat, Red Hat Enterprise Linux, the Shadowman logo, JBoss, MetaMatrix, Fedora, the Infinity Logo, and RHCE
are trademarks of Red Hat, Inc., registered in the United States and other countries. Linux® is the registered
trademark of Linus Torvalds in the United States and other countries. Java® is a registered trademark of Oracle
and/or its affiliates. XFS® is a trademark of Silicon Graphics International Corp. or its subsidiaries in the United
States and/or other countries. All other trademarks are the property of their respective owners.

For SUSE trademarks, see http://www.suse.com/company/legal/ . All other third-party trademarks are the prop-
erty of their respective owners. Trademark symbols (®, ™ etc.) denote trademarks of SUSE and its affiliates.
Asterisks (*) denote third-party trademarks.
All information found in this book has been compiled with utmost attention to detail. However, this does not
guarantee complete accuracy. Neither SUSE LLC, its affiliates, the authors nor the translators shall be held liable
for possible errors or the consequences thereof.

Contents
About This Guide ix
I SUSE ENTERPRISE STORAGE 1
1 SUSE Enterprise Storage 5.5 and Ceph 21.1 Ceph Features 2
1.2 Core Components 3
RADOS 3 • CRUSH 4 • Ceph Nodes and Daemons 5
1.3 User Privileges and Command Prompts 6
Salt/DeepSea Related Commands 6 • Ceph Related
Commands 6 • General Linux Commands 7 • Additional
Information 7
1.4 Storage Structure 8
Pool 8 • Placement Group 8 • Example 8
1.5 BlueStore 10
1.6 Additional Information 11
2 Hardware Requirements and Recommendations 12
2.1 Object Storage Nodes 12
Minimum Requirements 12 • Minimum Disk Size 13 • Recommended
Size for the BlueStore's WAL and DB Device 13 • Using SSD for OSD
Journals 14 • Maximum Recommended Number of Disks 15
2.2 Monitor Nodes 15
2.3 Object Gateway Nodes 16
2.4 Metadata Server Nodes 16
2.5 Salt Master 16
iv Deployment Guide

2.6 iSCSI Nodes 16
2.7 Network Recommendations 16
Adding a Private Network to a Running Cluster 17 • Monitor Nodes on
Different Subnets 18
2.8 Naming Limitations 19
2.9 OSD and Monitor Sharing One Server 19
2.10 Minimum Cluster Configuration 19
2.11 Recommended Production Cluster Configuration 20
2.12 SUSE Enterprise Storage 5.5 and Other SUSE Products 21
SUSE Manager 21
3 Ceph Admin Node HA Setup 22
3.1 Outline of the HA Cluster for Ceph Admin Node 22
3.2 Building HA Cluster with Ceph Admin Node 23
II CLUSTER DEPLOYMENT AND UPGRADE 25
4 Deploying with DeepSea/Salt 264.1 Read the Release Notes 27
4.2 Introduction to DeepSea 27
Organization and Important Locations 29 • Targeting the Minions 29
4.3 Cluster Deployment 32
4.4 DeepSea CLI 40
DeepSea CLI: Monitor Mode 40 • DeepSea CLI: Stand-alone Mode 41
4.5 Configuration and Customization 43
The policy.cfg File 43 • Adjusting ceph.conf with Custom Settings 52
5 Upgrading from Previous Releases 53
5.1 Read the Release Notes 53
5.2 General Upgrade Procedure 53
v Deployment Guide

5.3 Encrypting OSDs during Upgrade 55
5.4 Upgrade from SUSE Enterprise Storage 4 (DeepSea Deployment) to5 57
OSD Migration to BlueStore 63 • Details on the salt targetceph.maintenance.upgrade Command 66
5.5 Upgrade from SUSE Enterprise Storage 4 (ceph-deploy Deployment) to5 67
5.6 Upgrade from SUSE Enterprise Storage 4 (Crowbar Deployment) to5 73
5.7 Upgrade from SUSE Enterprise Storage 3 to 5 79
6 Backing Up the Cluster Configuration 80
6.1 Back Up Ceph COnfiguration 80
6.2 Back Up Salt Configuration 80
6.3 Back Up DeepSea Configuration 80
7 Customizing the Default Configuration 82
7.1 Using Customized Configuration Files 82
Disabling a Deployment Step 82 • Replacing a Deployment
Step 83 • Modifying a Deployment Step 84 • Modifying a Deployment
Stage 85 • Updates and Reboots during Stage 0 87
7.2 Modifying Discovered Configuration 88
III INSTALLATION OF ADDITIONAL SERVICES 91
8 Installation of Services to Access your Data 92
9 Ceph Object Gateway 93
9.1 Object Gateway Manual Installation 93
Object Gateway Configuration 94
vi Deployment Guide

10 Installation of iSCSI Gateway 100
10.1 iSCSI Block Storage 100
The Linux Kernel iSCSI Target 101 • iSCSI Initiators 101
10.2 General Information about lrbd 102
10.3 Deployment Considerations 103
10.4 Installation and Configuration 104
Deploy the iSCSI Gateway to a Ceph Cluster 104 • Create RBD
Images 104 • Export RBD Images via iSCSI 105 • Authentication and
Access Control 108 • Optional Settings 111 • Advanced Settings 112
10.5 Exporting RADOS Block Device Images using tcmu-runner 117
Installation 118 • Configuration and Deployment 118 • Usage 119
11 Installation of CephFS 121
11.1 Supported CephFS Scenarios and Guidance 121
11.2 Ceph Metadata Server 122
Adding a Metadata Server 122 • Configuring a Metadata Server 122
11.3 CephFS 123
Creating CephFS 123 • MDS Cluster Size 124 • MDS Cluster and
Updates 125
12 Installation of NFS Ganesha 127
12.1 Preparation 127
General Information 127 • Summary of Requirements 128
12.2 Example Installation 128
12.3 High Availability Active-Passive Configuration 129
Basic Installation 129 • Clean Up Resources 132 • Setting Up Ping
Resource 132 • Setting Up PortBlock Resource 133 • NFS Ganesha HA and
DeepSea 135
12.4 More Information 136
vii Deployment Guide

13 Exporting Ceph Data via Samba 137
13.1 Export CephFS via Samba Share 137
Samba Related Packages Installation 137 • Single Gateway
Example 137 • High Availability Configuration 140
A Documentation Updates 145A.1 The Latest Documentation Update 145
A.2 October, 2018 (Documentation Maintenance Update) 146
A.3 November, 2017 (Maintenance Update) 149
A.4 October, 2017 (Release of SUSE Enterprise Storage 5) 150
viii Deployment Guide

About This Guide
SUSE Enterprise Storage 5.5 is an extension to SUSE Linux Enterprise Server 12 SP3. It combinesthe capabilities of the Ceph (http://ceph.com/ ) storage project with the enterprise engineeringand support of SUSE. SUSE Enterprise Storage 5.5 provides IT organizations with the abilityto deploy a distributed storage architecture that can support a number of use cases using com-modity hardware platforms.
This guide helps you understand the concept of the SUSE Enterprise Storage 5.5 with the mainfocus on managing and administrating the Ceph infrastructure. It also demonstrates how to useCeph with other related solutions, such as OpenStack or KVM.
Many chapters in this manual contain links to additional documentation resources. These includeadditional documentation that is available on the system as well as documentation availableon the Internet.
For an overview of the documentation available for your product and the latest documentationupdates, refer to https://documentation.suse.com .
1 Available Documentation
The following manuals are available for this product:
Book “Administration Guide”
The guide describes various administration tasks that are typically performed after theinstallation. The guide also introduces steps to integrate Ceph with virtualization solutionssuch as libvirt , Xen, or KVM, and ways to access objects stored in the cluster via iSCSIand RADOS gateways.
Deployment Guide
Guides you through the installation steps of the Ceph cluster and all services related toCeph. The guide also illustrates a basic Ceph cluster structure and provides you with relatedterminology.
HTML versions of the product manuals can be found in the installed system under /usr/share/doc/manual . Find the latest documentation updates at https://documentation.suse.com whereyou can download the manuals for your product in multiple formats.
ix Available Documentation SES 5.5 (SES 5 & SES …

2 FeedbackSeveral feedback channels are available:
Bugs and Enhancement Requests
For services and support options available for your product, refer to http://www.suse.com/
support/ .To report bugs for a product component, log in to the Novell Customer Center from http://
www.suse.com/support/ and select My Support Service Request.
User Comments
We want to hear your comments and suggestions for this manual and the other documen-tation included with this product. If you have questions, suggestions, or corrections, con-tact [email protected], or you can also click the Report Documentation Bug link be-side each chapter or section heading.
For feedback on the documentation of this product, you can also send a mail to [email protected] . Make sure to include the document title, the product version, and thepublication date of the documentation. To report errors or suggest enhancements, providea concise description of the problem and refer to the respective section number and page(or URL).
3 Documentation ConventionsThe following typographical conventions are used in this manual:
/etc/passwd : directory names and le names
placeholder : replace placeholder with the actual value
PATH : the environment variable PATH
ls , --help : commands, options, and parameters
user : users or groups
Alt , Alt – F1 : a key to press or a key combination; keys are shown in uppercase as ona keyboard
x Feedback SES 5.5 (SES 5 & SES …

File, File Save As: menu items, buttons
Dancing Penguins (Chapter Penguins, ↑Another Manual): This is a reference to a chapter inanother manual.
4 About the Making of This ManualThis book is written in GeekoDoc, a subset of DocBook (see http://www.docbook.org ). TheXML source les were validated by xmllint , processed by xsltproc , and converted into XSL-FO using a customized version of Norman Walsh's stylesheets. The final PDF can be formattedthrough FOP from Apache or through XEP from RenderX. The authoring and publishing toolsused to produce this manual are available in the package daps . The DocBook Authoring andPublishing Suite (DAPS) is developed as open source software. For more information, see http://
daps.sf.net/ .
5 Ceph ContributorsThe Ceph project and its documentation is a result of hundreds of contributors and organizations.See https://ceph.com/contributors/ for more details.
xi About the Making of This Manual SES 5.5 (SES 5 & SES …

I SUSE Enterprise Storage
1 SUSE Enterprise Storage 5.5 and Ceph 2
2 Hardware Requirements and Recommendations 12
3 Ceph Admin Node HA Setup 22

1 SUSE Enterprise Storage 5.5 and Ceph
SUSE Enterprise Storage 5.5 is a distributed storage system designed for scalability, reliabilityand performance which is based on the Ceph technology. A Ceph cluster can be run on com-modity servers in a common network like Ethernet. The cluster scales up well to thousands ofservers (later on referred to as nodes) and into the petabyte range. As opposed to conventionalsystems which have allocation tables to store and fetch data, Ceph uses a deterministic algorithmto allocate storage for data and has no centralized information structure. Ceph assumes that instorage clusters the addition or removal of hardware is the rule, not the exception. The Cephcluster automates management tasks such as data distribution and redistribution, data replica-tion, failure detection and recovery. Ceph is both self-healing and self-managing which resultsin a reduction of administrative and budget overhead.
This chapter provides a high level overview of SUSE Enterprise Storage 5.5 and briey describesthe most important components.
TipSince SUSE Enterprise Storage 5.5, the only cluster deployment method is DeepSea. Referto Chapter 4, Deploying with DeepSea/Salt for details about the deployment process.
1.1 Ceph Features
The Ceph environment has the following features:
Scalability
Ceph can scale to thousands of nodes and manage storage in the range of petabytes.
Commodity Hardware
No special hardware is required to run a Ceph cluster. For details, see Chapter 2, Hardware
Requirements and Recommendations
Self-managing
The Ceph cluster is self-managing. When nodes are added, removed or fail, the clusterautomatically redistributes the data. It is also aware of overloaded disks.
2 Ceph Features SES 5.5 (SES 5 & SES …

No Single Point of Failure
No node in a cluster stores important information alone. The number of redundancies canbe configured.
Open Source Software
Ceph is an open source software solution and independent of specific hardware or vendors.
1.2 Core Components
To make full use of Ceph's power, it is necessary to understand some of the basic components andconcepts. This section introduces some parts of Ceph that are often referenced in other chapters.
1.2.1 RADOS
The basic component of Ceph is called RADOS (Reliable Autonomic Distributed Object Store). It isresponsible for managing the data stored in the cluster. Data in Ceph is usually stored as objects.Each object consists of an identifier and the data.
RADOS provides the following access methods to the stored objects that cover many use cases:
Object Gateway
Object Gateway is an HTTP REST gateway for the RADOS object store. It enables directaccess to objects stored in the Ceph cluster.
RADOS Block Device
RADOS Block Devices (RBD) can be accessed like any other block device. These can beused for example in combination with libvirt for virtualization purposes.
CephFS
The Ceph File System is a POSIX-compliant le system.
librados
librados is a library that can be used with many programming languages to create anapplication capable of directly interacting with the storage cluster.
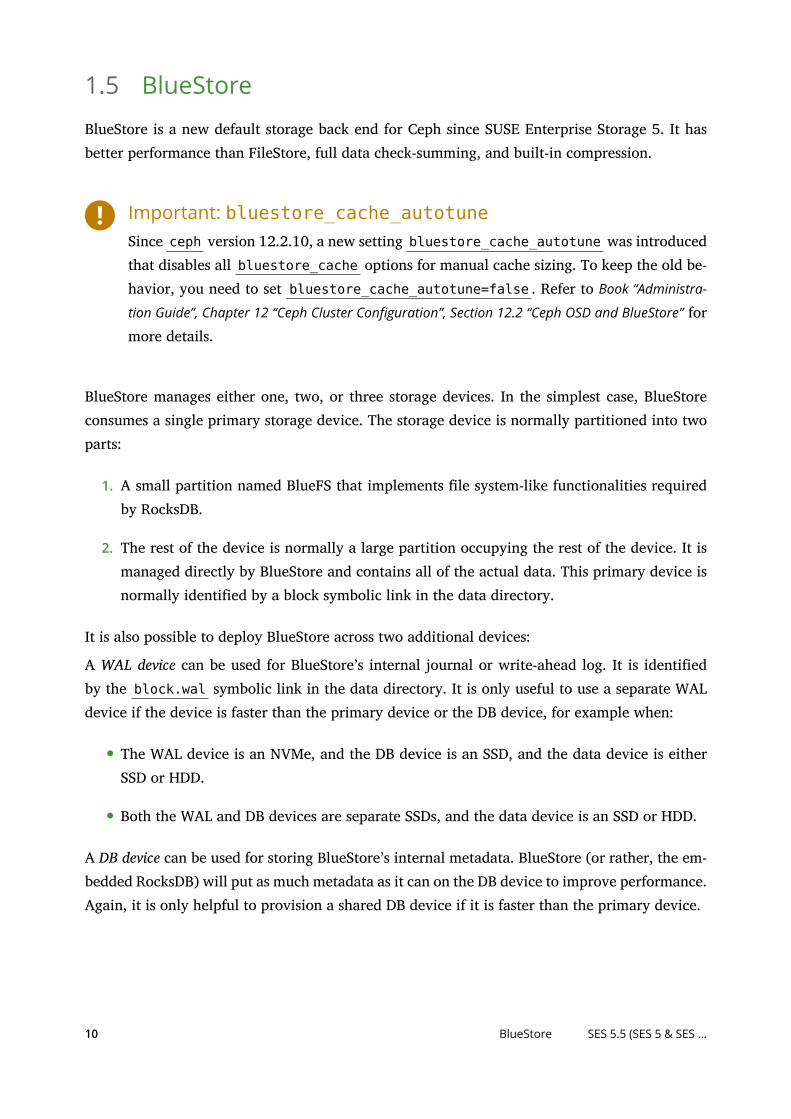
librados is used by Object Gateway and RBD while CephFS directly interfaces with RADOSFigure 1.1, “Interfaces to the Ceph Object Store”.
3 Core Components SES 5.5 (SES 5 & SES …

librados
RADOSRADOS
RADOSGW RBD Ceph FS
App App VM /Host Client
FIGURE 1.1: INTERFACES TO THE CEPH OBJECT STORE
1.2.2 CRUSH
At the core of a Ceph cluster is the CRUSH algorithm. CRUSH is the acronym for ControlledReplication Under Scalable Hashing. CRUSH is a function that handles the storage allocation andneeds comparably few parameters. That means only a small amount of information is necessaryto calculate the storage position of an object. The parameters are a current map of the clusterincluding the health state, some administrator-defined placement rules and the name of theobject that needs to be stored or retrieved. With this information, all nodes in the Ceph clusterare able to calculate where an object and its replicas are stored. This makes writing or readingdata very efficient. CRUSH tries to evenly distribute data over all nodes in the cluster.
The CRUSH map contains all storage nodes and administrator-defined placement rules for storingobjects in the cluster. It defines a hierarchical structure that usually corresponds to the physicalstructure of the cluster. For example, the data-containing disks are in hosts, hosts are in racks,racks in rows and rows in data centers. This structure can be used to define failure domains. Cephthen ensures that replications are stored on different branches of a specific failure domain.
If the failure domain is set to rack, replications of objects are distributed over different racks.This can mitigate outages caused by a failed switch in a rack. If one power distribution unitsupplies a row of racks, the failure domain can be set to row. When the power distribution unitfails, the replicated data is still available on other rows.
4 CRUSH SES 5.5 (SES 5 & SES …

1.2.3 Ceph Nodes and Daemons
In Ceph, nodes are servers working for the cluster. They can run several different types of dae-mons. It is recommended to run only one type of daemon on each node, except for MGR dae-mons which can be collocated with MONs. Each cluster requires at least MON, MGR and OSDdaemons:
Ceph Monitor
Ceph Monitor (often abbreviated as MON) nodes maintain information about the clusterhealth state, a map of all nodes and data distribution rules (see Section 1.2.2, “CRUSH”).If failures or conflicts occur, the Ceph Monitor nodes in the cluster decide by majoritywhich information is correct. To form a qualified majority, it is recommended to have anodd number of Ceph Monitor nodes, and at least three of them.If more than one site is used, the Ceph Monitor nodes should be distributed over an oddnumber of sites. The number of Ceph Monitor nodes per site should be such that more than50% of the Ceph Monitor nodes remain functional if one site fails.
Ceph Manager
The Ceph manager (MGR) collects the state information from the whole cluster. The Cephmanager daemon runs alongside the monitor daemons. It provides additional monitoring,and interfaces the external monitoring and management systems.The Ceph manager requires no additional configuration, beyond ensuring it is running.You can deploy it as a separate role using DeepSea.
Ceph OSD
A Ceph OSD is a daemon handling Object Storage Devices which are a physical or logicalstorage units (hard disks or partitions). Object Storage Devices can be physical disks/par-titions or logical volumes. The daemon additionally takes care of data replication and re-balancing in case of added or removed nodes.Ceph OSD daemons communicate with monitor daemons and provide them with the stateof the other OSD daemons.
To use CephFS, Object Gateway, NFS Ganesha, or iSCSI Gateway, additional nodes are required:
Metadata Server (MDS)
The metadata servers store metadata for the CephFS. By using an MDS you can executebasic le system commands such as ls without overloading the cluster.
5 Ceph Nodes and Daemons SES 5.5 (SES 5 & SES …

Object Gateway
The Ceph Object Gateway provided by Object Gateway is an HTTP REST gateway for theRADOS object store. It is compatible with OpenStack Swift and Amazon S3 and has itsown user management.
NFS Ganesha
NFS Ganesha provides an NFS access to either the Object Gateway or the CephFS. It runsin the user instead of the kernel space and directly interacts with the Object Gateway orCephFS.
iSCSI Gateway
iSCSI is a storage network protocol that allows clients to send SCSI commands to SCSIstorage devices (targets) on remote servers.
1.3 User Privileges and Command PromptsAs a Ceph cluster administrator, you will be configuring and adjusting the cluster behavior byrunning specific commands. There are several types of commands you will need:
1.3.1 Salt/DeepSea Related Commands
These commands help you to deploy or upgrade the Ceph cluster, run commands on several (orall) cluster nodes at the same time, or assist you when adding or removing cluster nodes. Themost frequently used are salt , salt-run , and deepsea . You need to run Salt commands onthe Salt master node (refer to Section 4.2, “Introduction to DeepSea” for details) as root . Thesecommands are introduced with the following prompt:
root@master #
For example:
root@master # salt '*.example.net' test.ping
1.3.2 Ceph Related Commands
These are lower level commands to configure and ne tune all aspects of the cluster and itsgateways on the command line. ceph , rbd , radosgw-admin , or crushtool to name someof them.
6 User Privileges and Command Prompts SES 5.5 (SES 5 & SES …

To run Ceph related commands, you need to have read access to a Ceph key. The key's capabil-ities then define your privileges within the Ceph environment. One option is to run Ceph com-mands as root (or via sudo ) and use the unrestricted default keyring 'ceph.client.admin.key'.
Safer and recommended option is to create a more restrictive individual key for each adminis-trator user and put it in a directory where the users can read it, for example:
~/.ceph/ceph.client.USERNAME.keyring
Tip: Path to Ceph KeysTo use a custom admin user and keyring, you need to specify the user name and path tothe key each time you run the ceph command using the -n client.USER_NAME and --keyring PATH/TO/KEYRING options.
To avoid this, include these options in the CEPH_ARGS variable in the individual users'~/.bashrc les.
Although you can run Ceph related commands on any cluster node, we recommend runningthem on the node with the 'admin' role (see Section 4.5.1.2, “Role Assignment” for details). Thisdocumentation uses the cephadm user to run the commands, therefore they are introduced withthe following prompt:
cephadm >
For example:
cephadm > ceph auth list
1.3.3 General Linux Commands
Linux commands not related to Ceph or DeepSea, such as mount , cat , or openssl , are intro-duced either with the cephadm > or root # prompts, depending on which privileges therelated command requires.
1.3.4 Additional Information
For more information on Ceph key management, refer to Book “Administration Guide”, Chapter 6
“Authentication with cephx”, Section 6.2 “Key Management”.
7 General Linux Commands SES 5.5 (SES 5 & SES …

1.4 Storage Structure
1.4.1 Pool
Objects that are stored in a Ceph cluster are put into pools. Pools represent logical partitionsof the cluster to the outside world. For each pool a set of rules can be defined, for example,how many replications of each object must exist. The standard configuration of pools is calledreplicated pool.
Pools usually contain objects but can also be configured to act similar to a RAID 5. In this con-figuration, objects are stored in chunks along with additional coding chunks. The coding chunkscontain the redundant information. The number of data and coding chunks can be defined bythe administrator. In this configuration, pools are referred to as erasure coded pools.
1.4.2 Placement Group
Placement Groups (PGs) are used for the distribution of data within a pool. When creating a pool,a certain number of placement groups is set. The placement groups are used internally to groupobjects and are an important factor for the performance of a Ceph cluster. The PG for an objectis determined by the object's name.
1.4.3 Example
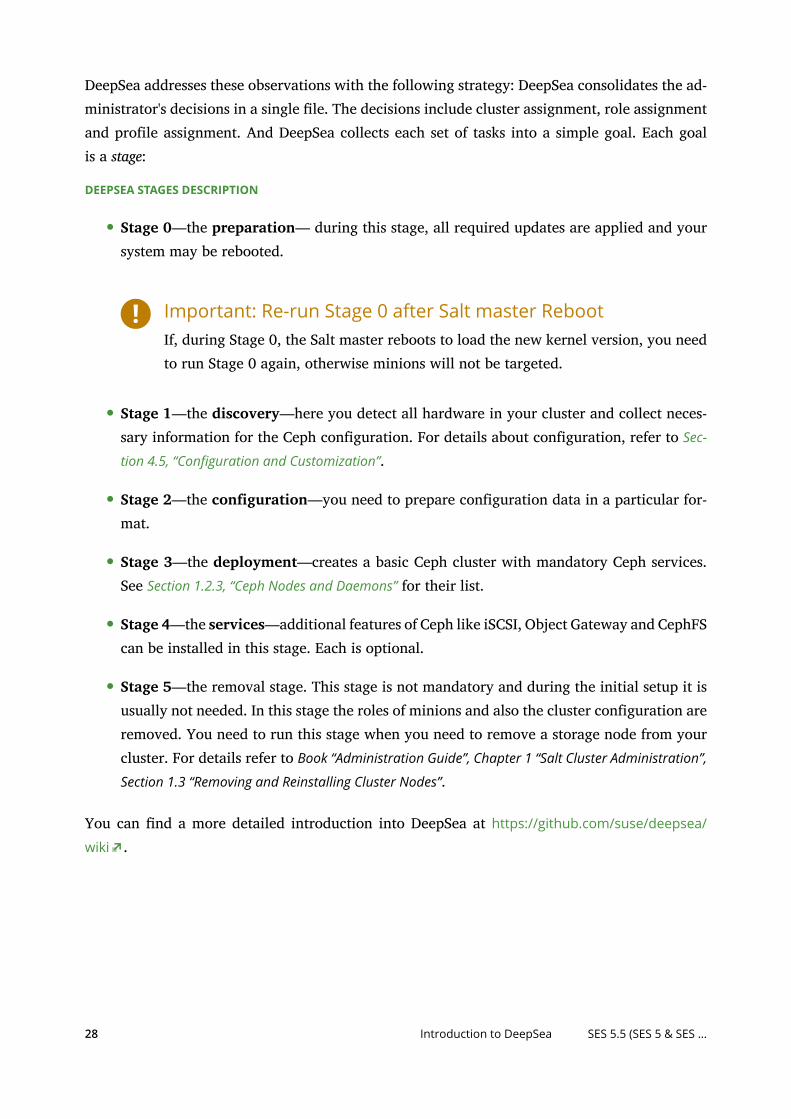
This section provides a simplified example of how Ceph manages data (see Figure 1.2, “Small
Scale Ceph Example”). This example does not represent a recommended configuration for a Cephcluster. The hardware setup consists of three storage nodes or Ceph OSDs ( Host 1 , Host 2 ,Host 3 ). Each node has three hard disks which are used as OSDs ( osd.1 to osd.9 ). The CephMonitor nodes are neglected in this example.
Note: Difference between Ceph OSD and OSDWhile Ceph OSD or Ceph OSD daemon refers to a daemon that is run on a node, the wordOSD refers to the logical disk that the daemon interacts with.
The cluster has two pools, Pool A and Pool B . While Pool A replicates objects only two times,resilience for Pool B is more important and it has three replications for each object.
8 Storage Structure SES 5.5 (SES 5 & SES …

When an application puts an object into a pool, for example via the REST API, a PlacementGroup ( PG1 to PG4 ) is selected based on the pool and the object name. The CRUSH algorithmthen calculates on which OSDs the object is stored, based on the Placement Group that containsthe object.
In this example the failure domain is set to host. This ensures that replications of objects arestored on different hosts. Depending on the replication level set for a pool, the object is storedon two or three OSDs that are used by the Placement Group.
An application that writes an object only interacts with one Ceph OSD, the primary Ceph OSD.The primary Ceph OSD takes care of replication and confirms the completion of the write processafter all other OSDs have stored the object.
If osd.5 fails, all object in PG1 are still available on osd.1 . As soon as the cluster recognizesthat an OSD has failed, another OSD takes over. In this example osd.4 is used as a replacementfor osd.5 . The objects stored on osd.1 are then replicated to osd.4 to restore the replicationlevel.
Pool A(2 replications, 2 Placement Groups)
CRUSH algorithm
Host 1
osd.1 osd.2 osd.3
Host 2
osd.4 osd.5 osd.6
Host 3
osd.7 osd.8 osd.9
PG1osd.1osd.5 (failed)osd.4 (substitute)
PG2osd.3osd.8
Pool B(3 replications, 2 Placement Groups)
PG3osd.2osd.6osd.7
PG4osd.3osd.4osd.9
replicates data
Logical Structure
Hardware
Objects Objects
(failed)
FIGURE 1.2: SMALL SCALE CEPH EXAMPLE
If a new node with new OSDs is added to the cluster, the cluster map is going to change. TheCRUSH function then returns different locations for objects. Objects that receive new locationswill be relocated. This process results in a balanced usage of all OSDs.
9 Example SES 5.5 (SES 5 & SES …
1.5 BlueStore
BlueStore is a new default storage back end for Ceph since SUSE Enterprise Storage 5. It hasbetter performance than FileStore, full data check-summing, and built-in compression.
Important: bluestore_cache_autotuneSince ceph version 12.2.10, a new setting bluestore_cache_autotune was introducedthat disables all bluestore_cache options for manual cache sizing. To keep the old be-havior, you need to set bluestore_cache_autotune=false . Refer to Book “Administra-
tion Guide”, Chapter 12 “Ceph Cluster Configuration”, Section 12.2 “Ceph OSD and BlueStore” formore details.
BlueStore manages either one, two, or three storage devices. In the simplest case, BlueStoreconsumes a single primary storage device. The storage device is normally partitioned into twoparts:
1. A small partition named BlueFS that implements le system-like functionalities requiredby RocksDB.
2. The rest of the device is normally a large partition occupying the rest of the device. It ismanaged directly by BlueStore and contains all of the actual data. This primary device isnormally identified by a block symbolic link in the data directory.
It is also possible to deploy BlueStore across two additional devices:
A WAL device can be used for BlueStore’s internal journal or write-ahead log. It is identifiedby the block.wal symbolic link in the data directory. It is only useful to use a separate WALdevice if the device is faster than the primary device or the DB device, for example when:
The WAL device is an NVMe, and the DB device is an SSD, and the data device is eitherSSD or HDD.
Both the WAL and DB devices are separate SSDs, and the data device is an SSD or HDD.
A DB device can be used for storing BlueStore’s internal metadata. BlueStore (or rather, the em-bedded RocksDB) will put as much metadata as it can on the DB device to improve performance.Again, it is only helpful to provision a shared DB device if it is faster than the primary device.
10 BlueStore SES 5.5 (SES 5 & SES …

Tip: Plan for the DB SizePlan thoroughly for the sufficient size of the DB device. If the DB device lls up, metadatawill be spilling over to the primary device which badly degrades the OSD's performance.
You can check if a WAL/DB partition is getting full and spilling over with the cephdaemon osd.ID perf dump command. The slow_used_bytes value shows the amountof data being spilled out:
cephadm > ceph daemon osd.ID perf dump | jq '.bluefs'"db_total_bytes": 1073741824,"db_used_bytes": 33554432,"wal_total_bytes": 0,"wal_used_bytes": 0,"slow_total_bytes": 554432,"slow_used_bytes": 554432,
1.6 Additional Information
Ceph as a community project has its own extensive online documentation. For topics notfound in this manual, refer to http://docs.ceph.com/docs/master/ .
The original publication CRUSH: Controlled, Scalable, Decentralized Placement of ReplicatedData by S.A. Weil, S.A. Brandt, E.L. Miller, C. Maltzahn provides helpful insight into theinner workings of Ceph. Especially when deploying large scale clusters it is a recommendedreading. The publication can be found at http://www.ssrc.ucsc.edu/papers/weil-sc06.pdf .
SUSE Enterprise Storage can be used with non-SUSE OpenStack distributions. The Cephclients need to be at a level that is compatible with SUSE Enterprise Storage.
NoteSUSE supports the server component of the Ceph deployment and the client is sup-ported by the OpenStack distribution vendor.
11 Additional Information SES 5.5 (SES 5 & SES …

2 Hardware Requirements and Recommendations
The hardware requirements of Ceph are heavily dependent on the IO workload. The followinghardware requirements and recommendations should be considered as a starting point for de-tailed planning.
In general, the recommendations given in this section are on a per-process basis. If severalprocesses are located on the same machine, the CPU, RAM, disk and network requirements needto be added up.
2.1 Object Storage Nodes
2.1.1 Minimum Requirements
At least 4 OSD nodes, with 8 OSD disks each, are required.
For OSDs that do not use BlueStore, 1 GB of RAM per terabyte of raw OSD capacity isminimally required for each OSD storage node. 1.5 GB of RAM per terabyte of raw OSDcapacity is recommended. During recovery, 2 GB of RAM per terabyte of raw OSD capacitymay be optimal.For OSDs that use BlueStore, rst calculate the size of RAM that is recommended for OSDsthat do not use BlueStore, then calculate 2 GB plus the size of the BlueStore cache of RAMis recommended for each OSD process, and choose the bigger value of RAM of the tworesults. Note that the default BlueStore cache is 1 GB for HDD and 3 GB for SSD drives bydefault. In summary, pick the greater of:
[1GB * OSD count * OSD size]
or
[(2 + BS cache) * OSD count]
1.5 GHz of a logical CPU core per OSD is minimally required for each OSD daemon process.2 GHz per OSD daemon process is recommended. Note that Ceph runs one OSD daemonprocess per storage disk; do not count disks reserved solely for use as OSD journals, WALjournals, omap metadata, or any combination of these three cases.
10 Gb Ethernet (two network interfaces bonded to multiple switches).
12 Object Storage Nodes SES 5.5 (SES 5 & SES …

OSD disks in JBOD configurations.
OSD disks should be exclusively used by SUSE Enterprise Storage 5.5.
Dedicated disk/SSD for the operating system, preferably in a RAID 1 configuration.
If this OSD host will host part of a cache pool used for cache tiering, allocate at least anadditional 4 GB of RAM.
For disk performance reasons, we recommend using bare metal for OSD nodes and notvirtual machines.
2.1.2 Minimum Disk Size
There are two types of disk space needed to run on OSD: the space for the disk journal (forFileStore) or WAL/DB device (for BlueStore), and the primary space for the stored data. Theminimum (and default) value for the journal/WAL/DB is 6 GB. The minimum space for data is5 GB, as partitions smaller than 5 GB are automatically assigned the weight of 0.
So although the minimum disk space for an OSD is 11 GB, we do not recommend a disk smallerthan 20 GB, even for testing purposes.
2.1.3 Recommended Size for the BlueStore's WAL and DB Device
Tip: More InformationRefer to Section 1.5, “BlueStore” for more information on BlueStore.
Following are several rules for WAL/DB device sizing. When using DeepSea to deploy OSDswith BlueStore, it applies the recommended rules automatically and notifies the administratorabout the fact.
10GB of the DB device for each Terabyte of the OSD capacity (1/100th of the OSD).
Between 500MB and 2GB for the WAL device. The WAL size depends on the data trafficand workload, not on the OSD size. If you know that an OSD is physically able to handlesmall writes and overwrites at a very high throughput, more WAL is preferred rather thanless WAL. 1GB WAL device is a good compromise that fulfills most deployments.
13 Minimum Disk Size SES 5.5 (SES 5 & SES …

If you intend to put the WAL and DB device on the same disk, then we recommend usinga single partition for both devices, rather than having a separate partition for each. Thisallows Ceph to use the DB device for the WAL operation as well. Management of the diskspace is therefore more effective as Ceph uses the DB partition for the WAL only if thereis a need for it. Another advantage is that the probability that the WAL partition gets fullis very small, and when it is not entirely used then its space is not wasted but used forDB operation.To share the DB device with the WAL, do not specify the WAL device, and specify onlythe DB device:
bluestore_block_db_path = "/path/to/db/device"bluestore_block_db_size = 10737418240bluestore_block_wal_path = ""bluestore_block_wal_size = 0
Alternatively, you can put the WAL on its own separate device. In such case, we recommendthe fastest device for the WAL operation.
2.1.4 Using SSD for OSD Journals
Solid-state drives (SSD) have no moving parts. This reduces random access time and read latencywhile accelerating data throughput. Because their price per 1MB is significantly higher than theprice of spinning hard disks, SSDs are only suitable for smaller storage.
OSDs may see a significant performance improvement by storing their journal on an SSD andthe object data on a separate hard disk.
Tip: Sharing an SSD for Multiple JournalsAs journal data occupies relatively little space, you can mount several journal directoriesto a single SSD disk. Keep in mind that with each shared journal, the performance of theSSD disk degrades. We do not recommend sharing more than six journals on the sameSSD disk and 12 on NVMe disks.
14 Using SSD for OSD Journals SES 5.5 (SES 5 & SES …

2.1.5 Maximum Recommended Number of Disks
You can have as many disks in one server as it allows. There are a few things to consider whenplanning the number of disks per server:
Network bandwidth. The more disks you have in a server, the more data must be transferredvia the network card(s) for the disk write operations.
Memory. For optimum performance, reserve at least 2 GB of RAM per terabyte of diskspace installed.
Fault tolerance. If the complete server fails, the more disks it has, the more OSDs the clustertemporarily loses. Moreover, to keep the replication rules running, you need to copy allthe data from the failed server among the other nodes in the cluster.
2.2 Monitor Nodes
At least three Ceph Monitor nodes are required. The number of monitors should alwaysbe odd (1+2n).
4 GB of RAM.
Processor with four logical cores.
An SSD or other sufficiently fast storage type is highly recommended for monitors, specifi-cally for the /var/lib/ceph path on each monitor node, as quorum may be unstable withhigh disk latencies. Two disks in RAID 1 configuration is recommended for redundancy.It is recommended that separate disks or at least separate disk partitions are used for themonitor processes to protect the monitor's available disk space from things like log lecreep.
There must only be one monitor process per node.
Mixing OSD, monitor, or Object Gateway nodes is only supported if sufficient hardwareresources are available. That means that the requirements for all services need to be addedup.
Two network interfaces bonded to multiple switches.
15 Maximum Recommended Number of Disks SES 5.5 (SES 5 & SES …

2.3 Object Gateway Nodes
Object Gateway nodes should have six to eight CPU cores and 32 GB of RAM (64 GB recom-mended). When other processes are co-located on the same machine, their requirements needto be added up.
2.4 Metadata Server Nodes
Proper sizing of the Metadata Server nodes depends on the specific use case. Generally, the moreopen les the Metadata Server is to handle, the more CPU and RAM it needs. Following are theminimal requirements:
3G of RAM per one Metadata Server daemon.
Bonded network interface.
2.5 GHz CPU with at least 2 cores.
2.5 Salt Master
At least 4 GB of RAM and a quad-core CPU are required. This is includes running openATTICon the Salt master. For large clusters with hundreds of nodes, 6 GB of RAM is suggested.
2.6 iSCSI Nodes
iSCSI nodes should have six to eight CPU cores and 16 GB of RAM.
2.7 Network Recommendations
The network environment where you intend to run Ceph should ideally be a bonded set of atleast two network interfaces that is logically split into a public part and a trusted internal partusing VLANs. The bonding mode is recommended to be 802.3ad if possible to provide maximumbandwidth and resiliency.
16 Object Gateway Nodes SES 5.5 (SES 5 & SES …

The public VLAN serves to provide the service to the customers, while the internal part providesfor the authenticated Ceph network communication. The main reason for this is that althoughCeph provides authentication and protection against attacks once secret keys are in place, themessages used to configure these keys may be transferred openly and are vulnerable.
Important: Administration Network not SupportedAdditional administration network setup—that enables for example separating SSH, Salt,or DNS networking—is neither tested nor supported.
Tip: Nodes Configured via DHCPIf your storage nodes are configured via DHCP, the default timeouts may not be sufficientfor the network to be configured correctly before the various Ceph daemons start. Ifthis happens, the Ceph MONs and OSDs will not start correctly (running systemctlstatus ceph\* will result in "unable to bind" errors) To avoid this issue, we recommendincreasing the DHCP client timeout to at least 30 seconds on each node in your storagecluster. This can be done by changing the following settings on each node:
In /etc/sysconfig/network/dhcp , set
DHCLIENT_WAIT_AT_BOOT="30"
In /etc/sysconfig/network/config , set
WAIT_FOR_INTERFACES="60"
2.7.1 Adding a Private Network to a Running Cluster
If you do not specify a cluster network during Ceph deployment, it assumes a single publicnetwork environment. While Ceph operates ne with a public network, its performance andsecurity improves when you set a second private cluster network. To support two networks,each Ceph node needs to have at least two network cards.
You need to apply the following changes to each Ceph node. It is relatively quick to do for asmall cluster, but can be very time consuming if you have a cluster consisting of hundreds orthousands of nodes.
17 Adding a Private Network to a Running Cluster SES 5.5 (SES 5 & SES …

1. Stop Ceph related services on each cluster node.Add a line to /etc/ceph/ceph.conf to define the cluster network, for example:
cluster network = 10.0.0.0/24
If you need to specifically assign static IP addresses or override cluster network settings,you can do so with the optional cluster addr .
2. Check that the private cluster network works as expected on the OS level.
3. Start Ceph related services on each cluster node.
root # systemctl start ceph.target
2.7.2 Monitor Nodes on Different Subnets
If the monitor nodes are on multiple subnets, for example they are located in different rooms andserved by different switches, you need to adjust the ceph.conf le accordingly. For exampleif the nodes have IP addresses 192.168.123.12, 1.2.3.4, and 242.12.33.12, add the followinglines to its global section:
[global][...]mon host = 192.168.123.12, 1.2.3.4, 242.12.33.12mon initial members = MON1, MON2, MON3[...]
Additionally, if you need to specify a per-monitor public address or network, you need to adda [mon.X] section per each monitor:
[mon.MON1]public network = 192.168.123.0/24
[mon.MON2]public network = 1.2.3.0/24
[mon.MON3]public network = 242.12.33.12/0
18 Monitor Nodes on Different Subnets SES 5.5 (SES 5 & SES …

2.8 Naming LimitationsCeph does not generally support non-ASCII characters in configuration les, pool names, usernames and so forth. When configuring a Ceph cluster we recommend using only simple alphanu-meric characters (A-Z, a-z, 0-9) and minimal punctuation ('.', '-', '_') in all Ceph object/configu-ration names.
2.9 OSD and Monitor Sharing One ServerAlthough it is technically possible to run Ceph OSDs and Monitors on the same server in testenvironments, we strongly recommend having a separate server for each monitor node in pro-duction. The main reason is performance—the more OSDs the cluster has, the more I/O oper-ations the monitor nodes need to perform. And when one server is shared between a monitornode and OSD(s), the OSD I/O operations are a limiting factor for the monitor node.
Another consideration is whether to share disks between an OSD, a monitor node, and theoperating system on the server. The answer is simple: if possible, dedicate a separate disk toOSD, and a separate server to a monitor node.
Although Ceph supports directory-based OSDs, an OSD should always have a dedicated diskother than the operating system one.
TipIf it is really necessary to run OSD and monitor node on the same server, run the monitoron a separate disk by mounting the disk to the /var/lib/ceph/mon directory for slightlybetter performance.
2.10 Minimum Cluster Configuration
Four Object Storage Nodes
10 Gb Ethernet (two networks bonded to multiple switches)
32 OSDs per storage cluster
OSD journal can reside on OSD disk
19 Naming Limitations SES 5.5 (SES 5 & SES …

Dedicated OS disk for each Object Storage Node
1 GB of RAM per TB of raw OSD capacity for each Object Storage Node
1.5 GHz per OSD for each Object Storage Node
Ceph Monitors, gateway and Metadata Servers can reside on Object Storage Nodes
Three Ceph Monitor nodes (requires SSD for dedicated OS drive)
Ceph Monitors, Object Gateways and Metadata Servers nodes require redundantdeployment
iSCSI Gateways, Object Gateways and Metadata Servers require incremental 4GB RAM and four cores
Separate management node with 4 GB RAM, four cores, 1 TB capacity
2.11 Recommended Production ClusterConfiguration
Seven Object Storage Nodes
No single node exceeds ~15% of total storage
10 Gb Ethernet (four physical networks bonded to multiple switches)
56+ OSDs per storage cluster
RAID 1 OS disks for each OSD storage node
SSDs for Journal with 6:1 ratio SSD journal to OSD
1.5 GB of RAM per TB of raw OSD capacity for each Object Storage Node
2 GHz per OSD for each Object Storage Node
Dedicated physical infrastructure nodes
20 Recommended Production Cluster Configuration SES 5.5 (SES 5 & SES …

Three Ceph Monitor nodes: 4 GB RAM, 4 core processor, RAID 1 SSDs for disk
One SES management node: 4 GB RAM, 4 core processor, RAID 1 SSDs for disk
Redundant physical deployment of gateway or Metadata Server nodes:
Object Gateway nodes: 32 GB RAM, 8 core processor, RAID 1 SSDs for disk
iSCSI Gateway nodes: 16 GB RAM, 4 core processor, RAID 1 SSDs for disk
Metadata Server nodes (one active/one hot standby): 32 GB RAM, 8 core proces-sor, RAID 1 SSDs for disk
2.12 SUSE Enterprise Storage 5.5 and Other SUSEProductsThis section contains important information about integrating SUSE Enterprise Storage 5.5 withother SUSE products.
2.12.1 SUSE Manager
SUSE Manager and SUSE Enterprise Storage are not integrated, therefore SUSE Manager cannotcurrently manage a SUSE Enterprise Storage 5.5 cluster.
21 SUSE Enterprise Storage 5.5 and Other SUSE Products SES 5.5 (SES 5 & SES …

3 Ceph Admin Node HA Setup
Ceph admin node is a Ceph cluster node where the Salt master service is running. The admin nodeis a central point of the Ceph cluster because it manages the rest of the cluster nodes by queryingand instructing their Salt minion services. It usually includes other services as well, for examplethe openATTIC Web UI with the Grafana dashboard backed by the Prometheus monitoring toolkit.
In case of the Ceph admin node failure, you usually need to provide a new working hardwarefor the node and restore the complete cluster configuration stack from a recent backup. Suchmethod is time consuming and causes cluster outage.
To prevent the Ceph cluster performance downtime caused by the admin node failure, we rec-ommend to make use of the High Availability (HA) cluster for the Ceph admin node.
3.1 Outline of the HA Cluster for Ceph Admin Node
The idea of an HA cluster is that in case of one cluster node failure, the other node automaticallytakes over its role including the virtualized Ceph admin node. This way other Ceph cluster nodesdo not notice that the Ceph admin node failed.
The minimal HA solution for the Ceph admin node requires the following hardware:
Two bare metal servers able to run SUSE Linux Enterprise with the High Availability ex-tension and virtualize the Ceph admin node.
Two or more redundant network communication paths, for example via Network DeviceBonding.
Shared storage to host the disk image(s) of the Ceph admin node virtual machine. Theshared storage needs to be accessible form both servers. It can be for example an NFSexport, a Samba share, or iSCSI target.
Find more details on the cluster requirements at https://documentation.suse.com/sle-ha/12-SP5/
single-html/SLE-HA-install-quick/#sec-ha-inst-quick-req .
22 Outline of the HA Cluster for Ceph Admin Node SES 5.5 (SES 5 & SES …

FIGURE 3.1: 2-NODE HA CLUSTER FOR CEPH ADMIN NODE
3.2 Building HA Cluster with Ceph Admin Node
The following procedure summarizes the most important steps of building the HA cluster forvirtualizing the Ceph admin node. For details, refer to the indicated links.
1. Set up a basic 2-node HA cluster with shared storage as described in https://documenta-
tion.suse.com/sle-ha/12-SP5/single-html/SLE-HA-install-quick/#art-sleha-install-quick .
2. On both cluster nodes, install all packages required for running the KVM hypervisorand the libvirt toolkit as described in https://documentation.suse.com/sles/12-SP5/sin-
gle-html/SLES-virtualization/#sec-vt-installation-kvm .
3. On the rst cluster node, create a new KVM virtual machine (VM) making use of lib-virt as described in https://documentation.suse.com/sles/12-SP5/single-html/SLES-virtual-
ization/#sec-libvirt-inst-virt-install . Use the preconfigured shared storage to store the diskimages of the VM.
4. After the VM setup is complete, export its configuration to an XML le on the sharedstorage. Use the following syntax:
root # virsh dumpxml VM_NAME > /path/to/shared/vm_name.xml
23 Building HA Cluster with Ceph Admin Node SES 5.5 (SES 5 & SES …

5. Create a resource for the Admin Node VM. Refer to https://documentation.suse.com/sle-
ha/12-SP5/single-html/SLE-HA-guide/#cha-conf-hawk2 for general info on creating HA re-sources. Detailed info on creating resource for a KVM virtual machine is described in http://
www.linux-ha.org/wiki/VirtualDomain_%28resource_agent%29 .
6. On the newly created VM guest, deploy the Ceph admin node including the additionalservices you need there. Follow relevant steps in Section 4.3, “Cluster Deployment”. At thesame time, deploy the remaining Ceph cluster nodes on the non-HA cluster servers.
24 Building HA Cluster with Ceph Admin Node SES 5.5 (SES 5 & SES …

II Cluster Deployment and Upgrade
4 Deploying with DeepSea/Salt 26
5 Upgrading from Previous Releases 53
6 Backing Up the Cluster Configuration 80
7 Customizing the Default Configuration 82

4 Deploying with DeepSea/Salt
Note: ceph-deploy Removed in SUSE Enterprise Storage 5.5The ceph-deploy cluster deployment tool was deprecated in SUSE Enterprise Storage 4and is completely removed in favor of DeepSea as of SUSE Enterprise Storage 5.
Salt along with DeepSea is a stack of components that help you deploy and manage serverinfrastructure. It is very scalable, fast, and relatively easy to get running. Read the followingconsiderations before you start deploying the cluster with Salt:
Salt minions are the nodes controlled by a dedicated node called Salt master. Salt minionshave roles, for example Ceph OSD, Ceph Monitor, Ceph Manager, Object Gateway, iSCSIGateway, or NFS Ganesha.
A Salt master runs its own Salt minion. It is required for running privileged tasks—forexample creating, authorizing, and copying keys to minions—so that remote minions neverneed to run privileged tasks.
Tip: Sharing Multiple Roles per ServerYou will get the best performance from your Ceph cluster when each role is deployedon a separate node. But real deployments sometimes require sharing one node formultiple roles. To avoid troubles with performance and upgrade procedure, do notdeploy the Ceph OSD, Metadata Server, or Ceph Monitor role to the Salt master.
Salt minions need to correctly resolve the Salt master's host name over the network. Bydefault, they look for the salt host name, but you can specify any other network-reach-able host name in the /etc/salt/minion le, see Section 4.3, “Cluster Deployment”.
26 SES 5.5 (SES 5 & SES …

4.1 Read the Release Notes
In the release notes you can nd additional information on changes since the previous releaseof SUSE Enterprise Storage. Check the release notes to see whether:
your hardware needs special considerations.
any used software packages have changed significantly.
special precautions are necessary for your installation.
The release notes also provide information that could not make it into the manual on time. Theyalso contain notes about known issues.
After having installed the package release-notes-ses , nd the release notes locally in thedirectory /usr/share/doc/release-notes or online at https://www.suse.com/releasenotes/ .
4.2 Introduction to DeepSea
The goal of DeepSea is to save the administrator time and confidently perform complex opera-tions on a Ceph cluster.
Ceph is a very configurable software solution. It increases both the freedom and responsibilityof system administrators.
The minimal Ceph setup is good for demonstration purposes, but does not show interestingfeatures of Ceph that you can see with a big number of nodes.
DeepSea collects and stores data about individual servers, such as addresses and device names.For a distributed storage system such as Ceph, there can be hundreds of such items to collectand store. Collecting the information and entering the data manually into a configuration man-agement tool is exhausting and error prone.
The steps necessary to prepare the servers, collect the configuration, and configure and deployCeph are mostly the same. However, this does not address managing the separate functions. Forday to day operations, the ability to trivially add hardware to a given function and remove itgracefully is a requirement.
27 Read the Release Notes SES 5.5 (SES 5 & SES …
DeepSea addresses these observations with the following strategy: DeepSea consolidates the ad-ministrator's decisions in a single le. The decisions include cluster assignment, role assignmentand profile assignment. And DeepSea collects each set of tasks into a simple goal. Each goalis a stage:
DEEPSEA STAGES DESCRIPTION
Stage 0—the preparation— during this stage, all required updates are applied and yoursystem may be rebooted.
Important: Re-run Stage 0 after Salt master RebootIf, during Stage 0, the Salt master reboots to load the new kernel version, you needto run Stage 0 again, otherwise minions will not be targeted.
Stage 1—the discovery—here you detect all hardware in your cluster and collect neces-sary information for the Ceph configuration. For details about configuration, refer to Sec-
tion 4.5, “Configuration and Customization”.
Stage 2—the configuration—you need to prepare configuration data in a particular for-mat.
Stage 3—the deployment—creates a basic Ceph cluster with mandatory Ceph services.See Section 1.2.3, “Ceph Nodes and Daemons” for their list.
Stage 4—the services—additional features of Ceph like iSCSI, Object Gateway and CephFScan be installed in this stage. Each is optional.
Stage 5—the removal stage. This stage is not mandatory and during the initial setup it isusually not needed. In this stage the roles of minions and also the cluster configuration areremoved. You need to run this stage when you need to remove a storage node from yourcluster. For details refer to Book “Administration Guide”, Chapter 1 “Salt Cluster Administration”,
Section 1.3 “Removing and Reinstalling Cluster Nodes”.
You can nd a more detailed introduction into DeepSea at https://github.com/suse/deepsea/
wiki .
28 Introduction to DeepSea SES 5.5 (SES 5 & SES …

4.2.1 Organization and Important Locations
Salt has several standard locations and several naming conventions used on your master node:
/srv/pillar
The directory stores configuration data for your cluster minions. Pillar is an interface forproviding global configuration values to all your cluster minions.
/srv/salt/
The directory stores Salt state les (also called sls les). State les are formatted descrip-tions of states in which the cluster should be. For more information, refer to the Salt doc-
umentation (https://docs.saltstack.com/en/latest/topics/tutorials/starting_states.html) .
/srv/module/runners
The directory stores Python scripts known as runners. Runners are executed on the masternode.
/srv/salt/_modules
The directory stores Python scripts that are called modules. The modules are applied toall minions in your cluster.
/srv/pillar/ceph
The directory is used by DeepSea. Collected configuration data are stored here.
/srv/salt/ceph
A directory used by DeepSea. It stores sls les that can be in different formats, but eachsubdirectory contains sls les. Each subdirectory contains only one type of sls le. Forexample, /srv/salt/ceph/stage contains orchestration les that are executed by salt-run state.orchestrate .
4.2.2 Targeting the Minions
DeepSea commands are executed via the Salt infrastructure. When using the salt command,you need to specify a set of Salt minions that the command will affect. We describe the set of theminions as a target for the salt command. The following sections describe possible methodsto target the minions.
29 Organization and Important Locations SES 5.5 (SES 5 & SES …

4.2.2.1 Matching the Minion Name
You can target a minion or a group of minions by matching their names. A minion's name isusually the short host name of the node where the minion runs. This is a general Salt targetingmethod, not related to DeepSea. You can use globbing, regular expressions, or lists to limit therange of minion names. The general syntax follows:
root@master # salt target example.module
Tip: Ceph-only ClusterIf all Salt minions in your environment belong to your Ceph cluster, you can safely sub-stitute target with '*' to include all registered minions.
Match all minions in the example.net domain (assuming the minion names are identical to their"full" host names):
root@master # salt '*.example.net' test.ping
Match the 'web1' to 'web5' minions:
root@master # salt 'web[1-5]' test.ping
Match both 'web1-prod' and 'web1-devel' minions using a regular expression:
root@master # salt -E 'web1-(prod|devel)' test.ping
Match a simple list of minions:
root@master # salt -L 'web1,web2,web3' test.ping
Match all minions in the cluster:
root@master # salt '*' test.ping
4.2.2.2 Targeting with a 'deepsea' Grain
In a heterogeneous Salt-managed environment where SUSE Enterprise Storage 5.5 is deployedon a subset of nodes alongside other cluster solution(s), it is a good idea to 'mark' the relevantminions by applying a 'deepsea' grain to them. This way you can easily target DeepSea minionsin environments where matching by the minion name is problematic.
30 Targeting the Minions SES 5.5 (SES 5 & SES …

To apply the 'deepsea' grain to a group of minions, run:
root@master # salt target grains.append deepsea default
To remove the 'deepsea' grain from a group of minions, run:
root@master # salt target grains.delval deepsea destructive=True
After applying the 'deepsea' grain to the relevant minions, you can target them as follows:
root@master # salt -G 'deepsea:*' test.ping
The following command is an equivalent:
root@master # salt -C 'G@deepsea:*' test.ping
4.2.2.3 Set the deepsea_minions Option
Setting the deepsea_minions option's target is a requirement for DeepSea deployments. Deep-Sea uses it to instruct minions during stages execution (refer to DeepSea Stages Description fordetails.
To set or change the deepsea_minions option, edit the /srv/pillar/ceph/deepsea_minion-s.sls le on the Salt master and add or replace the following line:
deepsea_minions: target
Tip: deepsea_minions TargetAs the target for the deepsea_minions option, you can use any targeting method: bothMatching the Minion Name and Targeting with a 'deepsea' Grain.
Match all Salt minions in the cluster:
deepsea_minions: '*'
Match all minions with the 'deepsea' grain:
deepsea_minions: 'G@deepsea:*'
31 Targeting the Minions SES 5.5 (SES 5 & SES …

4.2.2.4 For More Information
You can use more advanced ways to target minions using the Salt infrastructure. Refer to https://
docs.saltstack.com/en/latest/topics/targeting/ for a description of all targeting techniques.
Also, the 'deepsea-minions' manual page gives you more detail about DeepSea targeting ( man7 deepsea_minions ).
4.3 Cluster Deployment
The cluster deployment process has several phases. First, you need to prepare all nodes of thecluster by configuring Salt and then deploy and configure Ceph.
Tip: Deploying Monitor Nodes without Defining OSD ProfilesIf you need to skip defining OSD profiles and deploy the monitor nodes rst, you can doso by setting the DEV_ENV variable. It allows deploying monitors without the presence ofthe profile/ directory, as well as deploying a cluster with at least one storage, monitor,and manager node.
To set the environment variable, either enable it globally by setting it in the /srv/pil-lar/ceph/stack/global.yml le, or set it for the current shell session only:
root@master # export DEV_ENV=true
The following procedure describes the cluster preparation in detail.
1. Install and register SUSE Linux Enterprise Server 12 SP3 together with SUSE EnterpriseStorage 5.5 extension on each node of the cluster.
Important: SUSE Linux Enterprise Server 12 SP4 NotSupportedSUSE Linux Enterprise Server 12 SP4 is not a supported base operating system forSUSE Enterprise Storage 5.5.
32 Cluster Deployment SES 5.5 (SES 5 & SES …

2. Verify that proper products are installed and registered by listing existing software repos-itories. The list will be similar to this output:
root # zypper lr -E# | Alias | Name | Enabled | GPG Check | Refresh---+---------+-----------------------------------+---------+-----------+-------- 4 | [...] | SUSE-Enterprise-Storage-5-Pool | Yes | (r ) Yes | No 6 | [...] | SUSE-Enterprise-Storage-5-Updates | Yes | (r ) Yes | Yes 9 | [...] | SLES12-SP3-Pool | Yes | (r ) Yes | No11 | [...] | SLES12-SP3-Updates | Yes | (r ) Yes | Yes
3. Configure network settings including proper DNS name resolution on each node. The Saltmaster and all the Salt minions need to resolve each other by their host names. For more in-formation on configuring a network, see https://documentation.suse.com/sles/12-SP5/sin-
gle-html/SLES-admin/#sec-basicnet-yast For more information on configuring a DNS serv-er, see https://documentation.suse.com/sles/12-SP5/single-html/SLES-admin/#cha-dns .
4. Select one or more time servers/pools, and synchronize the local time against them. Verifythat the time synchronization service is enabled on each system start-up. You can use theyast ntp-client command found in a yast2-ntp-client package to configure timesynchronization.
TipVirtual machines are not reliable NTP sources.
Find more information on setting up NTP in https://documentation.suse.com/sles/12-SP5/
single-html/SLES-admin/#sec-ntp-yast .
5. Install the salt-master and salt-minion packages on the Salt master node:
root@master # zypper in salt-master salt-minion
Check that the salt-master service is enabled and started, and enable and start it ifneeded:
root@master # systemctl enable salt-master.serviceroot@master # systemctl start salt-master.service
33 Cluster Deployment SES 5.5 (SES 5 & SES …

6. If you intend to use firewall, verify that the Salt master node has ports 4505 and 4506open to all Salt minion nodes. If the ports are closed, you can open them using the yast2firewall command by allowing the SaltStack service.
Warning: DeepSea Stages Fail with FirewallDeepSea deployment stages fail when firewall is active (and even configured). Topass the stages correctly, you need to either turn the firewall o by running
root # systemctl stop SuSEfirewall2.service
or set the FAIL_ON_WARNING option to 'False' in /srv/pillar/ceph/stack/glob-al.yml :
FAIL_ON_WARNING: False
7. Install the package salt-minion on all minion nodes.
root # zypper in salt-minion
Make sure that the fully qualified domain name of each node can be resolved to the publicnetwork IP address by all other nodes.
8. Configure all minions (including the master minion) to connect to the master. If your Saltmaster is not reachable by the host name salt , edit the le /etc/salt/minion or createa new le /etc/salt/minion.d/master.conf with the following content:
master: host_name_of_salt_master
If you performed any changes to the configuration les mentioned above, restart the Saltservice on all Salt minions:
root@minion > systemctl restart salt-minion.service
9. Check that the salt-minion service is enabled and started on all nodes. Enable and startit if needed:
root # systemctl enable salt-minion.serviceroot # systemctl start salt-minion.service
34 Cluster Deployment SES 5.5 (SES 5 & SES …

10. Verify each Salt minion's fingerprint and accept all salt keys on the Salt master if thefingerprints match.View each minion's fingerprint:
root@minion > salt-call --local key.fingerlocal:3f:a3:2f:3f:b4:d3:d9:24:49:ca:6b:2c:e1:6c:3f:c3:83:37:f0:aa:87:42:e8:ff...
After gathering fingerprints of all the Salt minions, list fingerprints of all unaccepted min-ion keys on the Salt master:
root@master # salt-key -F[...]Unaccepted Keys:minion1:3f:a3:2f:3f:b4:d3:d9:24:49:ca:6b:2c:e1:6c:3f:c3:83:37:f0:aa:87:42:e8:ff...
If the minions' fingerprint match, accept them:
root@master # salt-key --accept-all
11. Verify that the keys have been accepted:
root@master # salt-key --list-all
12. Prior to deploying SUSE Enterprise Storage 5.5, manually zap all the disks. Remember toreplace 'X' with the correct disk letter:
a. Stop all processes that are using the specific disk.
b. Verify whether any partition on the disk is mounted, and unmount if needed.
c. If the disk is managed by LVM, deactivate and delete the whole LVM infrastructure.Refer to https://documentation.suse.com/sles/12-SP5/single-html/SLES-storage/#cha-
lvm for more details.
d. If the disk is part of MD RAID, deactivate the RAID. Refer to https://documen-
tation.suse.com/sles/12-SP5/single-html/SLES-storage/#part-software-raid for moredetails.
35 Cluster Deployment SES 5.5 (SES 5 & SES …

e. Tip: Rebooting the ServerIf you get error messages such as 'partition in use' or 'kernel can not be updatedwith the new partition table' during the following steps, reboot the server.
Wipe the beginning of each partition (as root ):
for partition in /dev/sdX[0-9]*do dd if=/dev/zero of=$partition bs=4096 count=1 oflag=directdone
f. Wipe the beginning of the drive:
root # dd if=/dev/zero of=/dev/sdX bs=512 count=34 oflag=direct
g. Wipe the end of the drive:
root # dd if=/dev/zero of=/dev/sdX bs=512 count=33 \ seek=$((`blockdev --getsz /dev/sdX` - 33)) oflag=direct
h. Create a new GPT partition table:
root # sgdisk -Z --clear -g /dev/sdX
i. Verify the result with:
root # parted -s /dev/sdX print free
or
root # dd if=/dev/sdX bs=512 count=34 | hexdump -Croot # dd if=/dev/sdX bs=512 count=33 \ skip=$((`blockdev --getsz /dev/sdX` - 33)) | hexdump -C
13. Optionally, if you need to preconfigure the cluster's network settings before the deepseapackage is installed, create /srv/pillar/ceph/stack/ceph/cluster.yml manually andset the cluster_network: and public_network: options. Note that the le will not beoverwritten after you install deepsea .
36 Cluster Deployment SES 5.5 (SES 5 & SES …

14. Install DeepSea on the Salt master node:
root@master # zypper in deepsea
15. Check that the le /srv/pillar/ceph/master_minion.sls on the Salt master points toyour Salt master. If your Salt master is reachable via more host names, use the one suitablefor the storage cluster. If you used the default host name for your Salt master—salt—inthe ses domain, then the le looks as follows:
master_minion: salt.ses
Now you deploy and configure Ceph. Unless specified otherwise, all steps are mandatory.
Note: Salt Command ConventionsThere are two possible ways how to run salt-run state.orch—one is withstage.<stage number> , the other is with the name of the stage. Both notations havethe same impact and it is fully your preference which command you use.
PROCEDURE 4.1: RUNNING DEPLOYMENT STAGES
1. Include the Salt minions belonging to the Ceph cluster that you are currently deploying.Refer to Section 4.2.2.1, “Matching the Minion Name” for more information on targeting theminions.
2. Prepare your cluster. Refer to DeepSea Stages Description for more details.
root@master # salt-run state.orch ceph.stage.0
or
root@master # salt-run state.orch ceph.stage.prep
Note: Run or Monitor Stages using DeepSea CLIUsing the DeepSea CLI, you can follow the stage execution progress in real-time,either by running the DeepSea CLI in the monitoring mode, or by running the stagedirectly through DeepSea CLI. For details refer to Section 4.4, “DeepSea CLI”.
37 Cluster Deployment SES 5.5 (SES 5 & SES …

3. Optional: create Btrfs sub-volumes for /var/lib/ceph/ . This step should only be executedbefore the next stages of DeepSea have been executed. To migrate existing directories orfor more details, see Book “Administration Guide”, Chapter 20 “Hints and Tips”, Section 20.6 “Btrfs
Sub-volume for /var/lib/ceph”.
root@master # salt-run state.orch ceph.migrate.subvolume
4. The discovery stage collects data from all minions and creates configuration fragmentsthat are stored in the directory /srv/pillar/ceph/proposals . The data are stored inthe YAML format in *.sls or *.yml les.
root@master # salt-run state.orch ceph.stage.1
or
root@master # salt-run state.orch ceph.stage.discovery
5. After the previous command finishes successfully, create a policy.cfg le in /srv/pillar/ceph/proposals . For details refer to Section 4.5.1, “The policy.cfg File”.
TipIf you need to change the cluster's network setting, edit /srv/pillar/ceph/stack/ceph/cluster.yml and adjust the lines starting with cluster_network:and public_network: .
6. The configuration stage parses the policy.cfg le and merges the included les intotheir final form. Cluster and role related content are placed in /srv/pillar/ceph/clus-ter , while Ceph specific content is placed in /srv/pillar/ceph/stack/default .Run the following command to trigger the configuration stage:
root@master # salt-run state.orch ceph.stage.2
or
root@master # salt-run state.orch ceph.stage.configure
38 Cluster Deployment SES 5.5 (SES 5 & SES …

The configuration step may take several seconds. After the command finishes, you canview the pillar data for the specified minions (for example, named ceph_minion1 ,ceph_minion2 , etc.) by running:
root@master # salt 'ceph_minion*' pillar.items
Note: Overwriting DefaultsAs soon as the command finishes, you can view the default configuration andchange it to suit your needs. For details refer to Chapter 7, Customizing the Default
Configuration.
7. Now you run the deployment stage. In this stage, the pillar is validated, and monitors andODS daemons are started on the storage nodes. Run the following to start the stage:
root@master # salt-run state.orch ceph.stage.3
or
root@master # salt-run state.orch ceph.stage.deploy
The command may take several minutes. If it fails, you need to x the issue and run theprevious stages again. After the command succeeds, run the following to check the status:
cephadm > ceph -s
8. The last step of the Ceph cluster deployment is the services stage. Here you instantiate anyof the currently supported services: iSCSI Gateway, CephFS, Object Gateway, openATTIC,and NFS Ganesha. In this stage, the necessary pools, authorizing keyrings, and startingservices are created. To start the stage, run the following:
root@master # salt-run state.orch ceph.stage.4
or
root@master # salt-run state.orch ceph.stage.services
Depending on the setup, the command may run for several minutes.
39 Cluster Deployment SES 5.5 (SES 5 & SES …

4.4 DeepSea CLIDeepSea also provides a CLI tool that allows the user to monitor or run stages while visualizingthe execution progress in real-time.
Two modes are supported for visualizing a stage's execution progress:
DEEPSEA CLI MODES
Monitoring mode: visualizes the execution progress of a DeepSea stage triggered by thesalt-run command issued in another terminal session.
Stand-alone mode: runs a DeepSea stage while providing real-time visualization of itscomponent steps as they are executed.
Important: DeepSea CLI CommandsThe DeepSea CLI commands can only be run on the Salt master node with the rootprivileges.
4.4.1 DeepSea CLI: Monitor Mode
The progress monitor provides a detailed, real-time visualization of what is happening duringexecution of stages using salt-run state.orch commands in other terminal sessions.
Tip: Start Monitor in a New Terminal SessionYou need to start the monitor in a new terminal window before running any salt-runstate.orch so that the monitor can detect the start of the stage's execution.
If you start the monitor after issuing the salt-run state.orch command, then no executionprogress will be shown.
You can start the monitor mode by running the following command:
root@master # deepsea monitor
For more information about the available command line options of the deepsea monitor com-mand check its manual page:
cephadm > man deepsea-monitor
40 DeepSea CLI SES 5.5 (SES 5 & SES …

4.4.2 DeepSea CLI: Stand-alone Mode
In the stand-alone mode, DeepSea CLI can be used to run a DeepSea stage, showing its executionin real-time.
The command to run a DeepSea stage from the DeepSea CLI has the following form:
root@master # deepsea stage run stage-name
where stage-name corresponds to the way Salt orchestration state les are referenced. Forexample, stage deploy, which corresponds to the directory located in /srv/salt/ceph/stage/deploy , is referenced as ceph.stage.deploy.
This command is an alternative to the Salt-based commands for running DeepSea stages (or anyDeepSea orchestration state le).
The command deepsea stage run ceph.stage.0 is equivalent to salt-run state.orchceph.stage.0 .
For more information about the available command line options accepted by the deepsea stagerun command check its manual page:
root@master # man deepsea-stage run
41 DeepSea CLI: Stand-alone Mode SES 5.5 (SES 5 & SES …

In the following figure shows an example of the output of the DeepSea CLI when running Stage 2:
FIGURE 4.1: DEEPSEA CLI STAGE EXECUTION PROGRESS OUTPUT
4.4.2.1 DeepSea CLI stage run Alias
For advanced users of Salt, we also support an alias for running a DeepSea stage that takesthe Salt command used to run a stage, for example, salt-run state.orch stage-name , asa command of the DeepSea CLI.
Example:
root@master # deepsea salt-run state.orch stage-name
42 DeepSea CLI: Stand-alone Mode SES 5.5 (SES 5 & SES …

4.5 Configuration and Customization
4.5.1 The policy.cfg File
The /srv/pillar/ceph/proposals/policy.cfg configuration le is used to determine rolesof individual cluster nodes. For example, which node acts as an OSD or which as a monitornode. Edit policy.cfg in order to reflect your desired cluster setup. The order of the sectionsis arbitrary, but the content of included lines overwrites matching keys from the content ofprevious lines.
Tip: Examples of policy.cfgYou can nd several examples of complete policy les in the /usr/share/doc/pack-ages/deepsea/examples/ directory.
4.5.1.1 Cluster Assignment
In the cluster section you select minions for your cluster. You can select all minions, or you canblacklist or whitelist minions. Examples for a cluster called ceph follow.
To include all minions, add the following lines:
cluster-ceph/cluster/*.sls
To whitelist a particular minion:
cluster-ceph/cluster/abc.domain.sls
or a group of minions—you can shell glob matching:
cluster-ceph/cluster/mon*.sls
To blacklist minions, set the them to unassigned :
cluster-unassigned/cluster/client*.sls
43 Configuration and Customization SES 5.5 (SES 5 & SES …

4.5.1.2 Role Assignment
This section provides you with details on assigning 'roles' to your cluster nodes. A 'role' in thiscontext means the service you need to run on the node, such as Ceph Monitor, Object Gateway,iSCSI Gateway, or openATTIC. No role is assigned automatically, only roles added to poli-cy.cfg will be deployed.
The assignment follows this pattern:
role-ROLE_NAME/PATH/FILES_TO_INCLUDE
Where the items have the following meaning and values:
ROLE_NAME is any of the following: 'master', 'admin', 'mon', 'mgr', 'mds', 'igw', 'rgw', 'gane-sha', or 'openattic'.
PATH is a relative directory path to .sls or .yml les. In case of .sls les, it usually iscluster , while .yml les are located at stack/default/ceph/minions .
FILES_TO_INCLUDE are the Salt state les or YAML configuration les. They normallyconsist of Salt minions host names, for example ses5min2.yml . Shell globbing can beused for more specific matching.
An example for each role follows:
master - the node has admin keyrings to all Ceph clusters. Currently, only a single Cephcluster is supported. As the master role is mandatory, always add a similar line to thefollowing:
role-master/cluster/master*.sls
admin - the minion will have an admin keyring. You define the role as follows:
role-admin/cluster/abc*.sls
mon - the minion will provide the monitoring service to the Ceph cluster. This role requiresaddresses of the assigned minions. As of SUSE Enterprise Storage 5.5, the public addressare calculated dynamically and are no longer needed in the Salt pillar.
role-mon/cluster/mon*.sls
The example assigns the monitoring role to a group of minions.
44 The policy.cfg File SES 5.5 (SES 5 & SES …

mgr - the Ceph manager daemon which collects all the state information from the wholecluster. Deploy it on all minions where you plan to deploy the Ceph monitor role.
role-mgr/cluster/mgr*.sls
mds - the minion will provide the metadata service to support CephFS.
role-mds/cluster/mds*.sls
igw - the minion will act as an iSCSI Gateway. This role requires addresses of the assignedminions, thus you need to also include the les from the stack directory:
role-igw/cluster/*.sls
rgw - the minion will act as an Object Gateway:
role-rgw/cluster/rgw*.sls
openattic - the minion will act as an openATTIC server:
role-openattic/cluster/openattic*.sls
For more information, see Book “Administration Guide”, Chapter 17 “openATTIC”.
ganesha - the minion will act as an NFS Ganesha server. The 'ganesha' role requires eitheran 'rgw' or 'mds' role in cluster, otherwise the validation will fail in Stage 3.To successfully install NFS Ganesha, additional configuration is required. If you want touse NFS Ganesha, read Chapter 12, Installation of NFS Ganesha before executing stages 2 and4. However, it is possible to install NFS Ganesha later.In some cases it can be useful to define custom roles for NFS Ganesha nodes. For details,see Book “Administration Guide”, Chapter 16 “NFS Ganesha: Export Ceph Data via NFS”, Section 16.3
“Custom NFS Ganesha Roles”.
Note: Multiple Roles of Cluster NodesYou can assign several roles to a single node. For example, you can assign the mds rolesto the monitor nodes:
role-mds/cluster/mon[1,2]*.sls
45 The policy.cfg File SES 5.5 (SES 5 & SES …

4.5.1.3 Common Configuration
The common configuration section includes configuration les generated during the discovery(Stage 1). These configuration les store parameters like fsid or public_network . To includethe required Ceph common configuration, add the following lines:
config/stack/default/global.ymlconfig/stack/default/ceph/cluster.yml
4.5.1.4 Profile Assignment
In Ceph, a single storage role would be insufficient to describe the many disk configurationsavailable with the same hardware. DeepSea stage 1 will generate a default storage profile pro-posal. By default this proposal will be a bluestore profile and will try to propose the highestperforming configuration for the given hardware setup. For example, external journals will bepreferred over a single disk containing objects and metadata. Solid state storage will be priori-tized over spinning disks. Profiles are assigned in the policy.cfg similar to roles.
The default proposal can be found in the profile-default directory tree. To include this add thefollowing two lines to your policy.cfg .
profile-default/cluster/*.slsprofile-default/stack/default/ceph/minions/*.yml
You can also create a customized storage profile to your liking by using the proposal runner.This runner offers three methods: help, peek, and populate.
salt-run proposal.help prints the runner help text about the various arguments it accepts.
salt-run proposal.peek shows the generated proposal according to the arguments passed.
salt-run proposal.populate writes the proposal to the /srv/pillar/ceph/proposals sub-directory. Pass name=myprofile to name the storage profile. This will result in a profile-mypro-file subdirectory.
For all other arguments, consult the output of salt-run proposal.help .
46 The policy.cfg File SES 5.5 (SES 5 & SES …

4.5.1.5 Overriding Default Search for Disk Devices
If you have a Salt minion with multiple disk devices assigned and the device names do not seemto be consistent or persistent, you can override the default search behavior by editing /srv/pillar/ceph/stack/global.yml :
1. Edit global.yml and make the necessary changes:To override the default match expression of -name ata* -o -name scsi* -o -namenvme* for the find command with for example -name wwn* , add the following:
ceph: modules: cephdisks: device: match: '-name wwn*'
To override the default pathname of /dev/disk/by-id with for example /dev/disk/by-label , add the following:
ceph: modules: cephdisks: device: pathname: '/dev/disk/by-label'
2. Refresh the Pillar:
root@master # salt 'DEEPSEA_MINIONS' saltutil.pillar_refresh
3. Try a query for a device that was previously wrongly assigned:
root@master # salt 'SPECIFIC_MINION' cephdisks.device PATH_TO_DEVICE
If the command returns 'module not found', be sure to synchronize:
root@master # salt '*' saltutil.sync_all
4.5.1.6 Deploying Encrypted OSDs
Since SUSE Enterprise Storage 5.5, OSDs are by default deployed using BlueStore instead ofFileStore. Although BlueStore supports encryption, Ceph OSDs are deployed unencrypted bydefault. The following procedure describes steps to encrypt OSDs during the upgrade process.
47 The policy.cfg File SES 5.5 (SES 5 & SES …

Let us assume that both data and WAL/DB disks to be used for OSD deployment are clean withno partitions. If the disk were previously used, wipe them following the procedure describedin Step 12.
To use encrypted OSDs for your new deployment, rst wipe the disks following the proceduredescribed in Step 12, then use the proposal.populate runner with the encryption=dmcryptargument:
root@master # salt-run proposal.populate encryption=dmcrypt
Important: Slow BootsEncrypted OSDs require longer boot and activation times compared to the default unen-crypted ones.
1. Determine the bluestore block db size and bluestore block wal size val-ues for your deployment and add them to the /srv/salt/ceph/configuration/files/ceph.conf.d/global.conf le on the Salt master. The values need to be specified inbytes.
[global]bluestore block db size = 48318382080bluestore block wal size = 2147483648
For more information on customizing the ceph.conf le, refer to Book “Administration
Guide”, Chapter 1 “Salt Cluster Administration”, Section 1.12 “Adjusting ceph.conf with Custom
Settings”.
2. Run DeepSea Stage 3 to distribute the changes:
root@master # salt-run state.orch ceph.stage.3
3. Verify that the ceph.conf le is updated on the relevant OSD nodes:
root@minion > cat /etc/ceph/ceph.conf
4. Edit the *.yml les in the /srv/pillar/ceph/proposals/profile-default/stack/de-fault/ceph/minions directory that are relevant to the OSDs you are encrypting. Doublecheck their path with the one defined in the /srv/pillar/ceph/proposals/policy.cfgle to ensure that you modify the correct *.yml les.
48 The policy.cfg File SES 5.5 (SES 5 & SES …

Important: Long Disk IdentifiersWhen identifying OSD disks in the /srv/pillar/ceph/proposals/profile-de-fault/stack/default/ceph/minions/*.yml les, use long disk identifiers.
An example of an OSD configuration follows. Note that because we need encryption, thedb_size and wal_size options are removed:
ceph: storage: osds: /dev/disk/by-id/scsi-SDELL_PERC_H730_Mini_007027b1065faa972100d34d7aa06d86: format: bluestore encryption: dmcrypt db: /dev/disk/by-id/nvme-INTEL_SSDPEDMD020T4D_HHHL_NVMe_2000GB_PHFT642400HV2P0EGN wal: /dev/disk/by-id/nvme-INTEL_SSDPEDMD020T4D_HHHL_NVMe_2000GB_PHFT642400HV2P0EGN /dev/disk/by-id/scsi-SDELL_PERC_H730_Mini_00d146b1065faa972100d34d7aa06d86: format: bluestore encryption: dmcrypt db: /dev/disk/by-id/nvme-INTEL_SSDPEDMD020T4D_HHHL_NVMe_2000GB_PHFT642400HV2P0EGN wal: /dev/disk/by-id/nvme-INTEL_SSDPEDMD020T4D_HHHL_NVMe_2000GB_PHFT642400HV2P0EGN
5. Deploy the new Block Storage OSDs with encryption by running DeepSea Stages 2 and 3:
root@master # salt-run state.orch ceph.stage.2root@master # salt-run state.orch ceph.stage.3
You can watch the progress with ceph -s or ceph osd tree . It is critical that you letthe cluster rebalance before repeating the process on the next OSD node.
49 The policy.cfg File SES 5.5 (SES 5 & SES …

4.5.1.7 Item Filtering
Sometimes it is not practical to include all les from a given directory with *.sls globbing. Thepolicy.cfg le parser understands the following filters:
Warning: Advanced TechniquesThis section describes filtering techniques for advanced users. When not used correctly,filtering can cause problems for example in case your node numbering changes.
slice=[start:end]
Use the slice filter to include only items start through end-1. Note that items in the givendirectory are sorted alphanumerically. The following line includes the third to fth lesfrom the role-mon/cluster/ subdirectory:
role-mon/cluster/*.sls slice[3:6]
re=regexp
Use the regular expression filter to include only items matching the given expressions. Forexample:
role-mon/cluster/mon*.sls re=.*1[135]\.subdomainX\.sls$
4.5.1.8 Example policy.cfg File
Following is an example of a basic policy.cfg le:
## Cluster Assignmentcluster-ceph/cluster/*.sls 1
## Roles# ADMINrole-master/cluster/examplesesadmin.sls 2
role-admin/cluster/sesclient*.sls 3
# MONrole-mon/cluster/ses-example-[123].sls 4
# MGRrole-mgr/cluster/ses-example-[123].sls 5
50 The policy.cfg File SES 5.5 (SES 5 & SES …

# MDSrole-mds/cluster/ses-example-4.sls 6
# IGWrole-igw/cluster/ses-example-4.sls 7
# RGWrole-rgw/cluster/ses-example-4.sls 8
# openATTICrole-openattic/cluster/openattic*.sls 9
# COMMONconfig/stack/default/global.yml 10
config/stack/default/ceph/cluster.yml 11
## Profilesprofile-default/cluster/*.sls 12
profile-default/stack/default/ceph/minions/*.yml 13
1 Indicates that all minions are included in the Ceph cluster. If you have minions you do notwant to include in the Ceph cluster, use:
cluster-unassigned/cluster/*.slscluster-ceph/cluster/ses-example-*.sls
The rst line marks all minions as unassigned. The second line overrides minions matching'ses-example-*.sls', and assigns them to the Ceph cluster.
2 The minion called 'examplesesadmin' has the 'master' role. This, by the way, means it willget admin keys to the cluster.
3 All minions matching 'sesclient*' will get admin keys as well.
4 All minions matching 'ses-example-[123]' (presumably three minions: ses-example-1, ses-example-2, and ses-example-3) will be set up as MON nodes.
5 All minions matching 'ses-example-[123]' (all MON nodes in the example) will be set upas MGR nodes.
6 Minion 'ses-example-4' will have the MDS role.
7 Minion 'ses-example-4' will have the IGW role.
8 Minion 'ses-example-4' will have the RGW role.
9 Specifies to deploy the openATTIC user interface to administer the Ceph cluster. See Book
“Administration Guide”, Chapter 17 “openATTIC” for more details.
51 The policy.cfg File SES 5.5 (SES 5 & SES …

10 Means that we accept the default values for common configuration parameters such asfsid and public_network .
11 Means that we accept the default values for common configuration parameters such asfsid and public_network .
12 We are telling DeepSea to use the default hardware profile for each minion. Choosing thedefault hardware profile means that we want all additional disks (other than the root disk)as OSDs.
13 We are telling DeepSea to use the default hardware profile for each minion. Choosing thedefault hardware profile means that we want all additional disks (other than the root disk)as OSDs.
4.5.2 Adjusting ceph.conf with Custom Settings
If you need to put custom settings into the ceph.conf configuration le, see Book “Administration
Guide”, Chapter 1 “Salt Cluster Administration”, Section 1.12 “Adjusting ceph.conf with Custom Settings”
for more details.
52 Adjusting ceph.conf with Custom Settings SES 5.5 (SES 5 & SES …

5 Upgrading from Previous Releases
This chapter introduces steps to upgrade SUSE Enterprise Storage from the previous release(s)to version 5.5.
5.1 Read the Release NotesIn the release notes you can nd additional information on changes since the previous releaseof SUSE Enterprise Storage. Check the release notes to see whether:
your hardware needs special considerations.
any used software packages have changed significantly.
special precautions are necessary for your installation.
The release notes also provide information that could not make it into the manual on time. Theyalso contain notes about known issues.
After having installed the package release-notes-ses , nd the release notes locally in thedirectory /usr/share/doc/release-notes or online at https://www.suse.com/releasenotes/ .
5.2 General Upgrade ProcedureConsider the following items before starting the upgrade procedure:
Upgrade Order
Before upgrading the Ceph cluster, you need to have both the underlying SUSE LinuxEnterprise Server and SUSE Enterprise Storage correctly registered against SCC or SMT.You can upgrade daemons in your cluster while the cluster is online and in service. Certaintypes of daemons depend upon others. For example Ceph Object Gateways depend uponCeph monitors and Ceph OSD daemons. We recommend upgrading in this order:
1. Ceph Monitors
2. Ceph Managers
3. Ceph OSDs
53 Read the Release Notes SES 5.5 (SES 5 & SES …

4. Metadata Servers
5. Object Gateways
6. iSCSI Gateways
7. NFS Ganesha
Delete Unnecessary Operating System Snapshots
Remove not needed le system snapshots on the operating system partitions of nodes. Thisensures that there is enough free disk space during the upgrade.
Check Cluster Health
We recommend to check the cluster health before starting the upgrade procedure.
Upgrade One by One
We recommend upgrading all the daemons of a specific type—for example all monitordaemons or all OSD daemons—one by one to ensure that they are all on the same release.We also recommend that you upgrade all the daemons in your cluster before you try toexercise new functionality in a release.After all the daemons of a specific type are upgraded, check their status.Ensure each monitor has rejoined the quorum after all monitors are upgraded:
cephadm > ceph mon stat
Ensure each Ceph OSD daemon has rejoined the cluster after all OSDs are upgraded:
cephadm > ceph osd stat
Set require-osd-release luminous Flag
When the last OSD is upgraded to SUSE Enterprise Storage 5.5, the monitor nodes willdetect that all OSDs are running the 'luminous' version of Ceph and they may complainthat the require-osd-release luminous osdmap ag is not set. In that case, you needto set this ag manually to acknowledge that—now that the cluster has been upgradedto 'luminous'—it cannot be downgraded back to Ceph 'jewel'. Set the ag by running thefollowing command:
cephadm > ceph osd require-osd-release luminous
After the command completes, the warning disappears.On fresh installs of SUSE Enterprise Storage 5.5, this ag is set automatically when theCeph monitors create the initial osdmap, so no end user action is needed.
54 General Upgrade Procedure SES 5.5 (SES 5 & SES …

5.3 Encrypting OSDs during UpgradeSince SUSE Enterprise Storage 5.5, OSDs are by default deployed using BlueStore instead ofFileStore. Although BlueStore supports encryption, Ceph OSDs are deployed unencrypted bydefault. The following procedure describes steps to encrypt OSDs during the upgrade process.Let us assume that both data and WAL/DB disks to be used for OSD deployment are clean withno partitions. If the disk were previously used, wipe them following the procedure describedin Step 12.
Important: One OSD at a TimeYou need to deploy encrypted OSDs one by one, not simultaneously. The reason is thatOSD's data is drained, and the cluster goes through several iterations of rebalancing.
1. Determine the bluestore block db size and bluestore block wal size val-ues for your deployment and add them to the /srv/salt/ceph/configuration/files/ceph.conf.d/global.conf le on the Salt master. The values need to be specified inbytes.
[global]bluestore block db size = 48318382080bluestore block wal size = 2147483648
For more information on customizing the ceph.conf le, refer to Book “Administration
Guide”, Chapter 1 “Salt Cluster Administration”, Section 1.12 “Adjusting ceph.conf with Custom
Settings”.
2. Run DeepSea Stage 3 to distribute the changes:
root@master # salt-run state.orch ceph.stage.3
3. Verify that the ceph.conf le is updated on the relevant OSD nodes:
root@minion > cat /etc/ceph/ceph.conf
4. Edit the *.yml les in the /srv/pillar/ceph/proposals/profile-default/stack/de-fault/ceph/minions directory that are relevant to the OSDs you are encrypting. Doublecheck their path with the one defined in the /srv/pillar/ceph/proposals/policy.cfgle to ensure that you modify the correct *.yml les.
55 Encrypting OSDs during Upgrade SES 5.5 (SES 5 & SES …

Important: Long Disk IdentifiersWhen identifying OSD disks in the /srv/pillar/ceph/proposals/profile-de-fault/stack/default/ceph/minions/*.yml les, use long disk identifiers.
An example of an OSD configuration follows. Note that because we need encryption, thedb_size and wal_size options are removed:
ceph: storage: osds: /dev/disk/by-id/scsi-SDELL_PERC_H730_Mini_007027b1065faa972100d34d7aa06d86: format: bluestore encryption: dmcrypt db: /dev/disk/by-id/nvme-INTEL_SSDPEDMD020T4D_HHHL_NVMe_2000GB_PHFT642400HV2P0EGN wal: /dev/disk/by-id/nvme-INTEL_SSDPEDMD020T4D_HHHL_NVMe_2000GB_PHFT642400HV2P0EGN /dev/disk/by-id/scsi-SDELL_PERC_H730_Mini_00d146b1065faa972100d34d7aa06d86: format: bluestore encryption: dmcrypt db: /dev/disk/by-id/nvme-INTEL_SSDPEDMD020T4D_HHHL_NVMe_2000GB_PHFT642400HV2P0EGN wal: /dev/disk/by-id/nvme-INTEL_SSDPEDMD020T4D_HHHL_NVMe_2000GB_PHFT642400HV2P0EGN
5. Deploy the new Block Storage OSDs with encryption by running DeepSea Stages 2 and 3:
root@master # salt-run state.orch ceph.stage.2root@master # salt-run state.orch ceph.stage.3
You can watch the progress with ceph -s or ceph osd tree . It is critical that you letthe cluster rebalance before repeating the process on the next OSD node.
56 Encrypting OSDs during Upgrade SES 5.5 (SES 5 & SES …

5.4 Upgrade from SUSE Enterprise Storage 4(DeepSea Deployment) to 5
Important: Software RequirementsYou need to have the following software installed and updated to the latest packageversions on all the Ceph nodes you want to upgrade before you can start with the upgradeprocedure:
SUSE Linux Enterprise Server 12 SP2
SUSE Enterprise Storage 4
Warning: Points to Consider before the Upgrade
Although the cluster is fully functional during the upgrade, DeepSea sets the 'noout'ag which prevents Ceph from rebalancing data during downtime and thereforeavoids unnecessary data transfers.
To optimize the upgrade process, DeepSea upgrades your nodes in the order, basedon their assigned role as recommended by Ceph upstream: MONs, MGRs, OSDs,MDS, RGW, IGW, and NFS Ganesha.Note that DeepSea cannot prevent the prescribed order from being violated if a noderuns multiple services.
Although the Ceph cluster is operational during the upgrade, nodes may get reboot-ed in order to apply, for example, new kernel versions. To reduce waiting I/O oper-ations, we recommend declining incoming requests for the duration of the upgradeprocess.
The cluster upgrade may take a very long time—approximately the time it takes toupgrade one machine multiplied by the number of cluster nodes.
57
Upgrade from SUSE Enterprise Storage 4 (DeepSea Deployment) to 5 SES 5.5 (SES 5 & SES
…

Since Ceph Luminous, the osd crush location configuration option is no longersupported. Update your DeepSea configuration les to use crush location beforeupgrading.
There are two ways to obtain SUSE Linux Enterprise Server and SUSE EnterpriseStorage 5.5 update repositories:
If your cluster nodes are registered with SUSEConnect and use SCC/SMT, youwill use the zypper migration method and the update repositories will beassigned automatically.
If you are not using SCC/SMT but a Media-ISO or other package source, youwill use the zypper dup method. In this case, you need to add the followingrepositories to all cluster nodes manually: SLE12-SP3 Base, SLE12-SP3 Update,SES5 Base, and SES5 Update. You can do so using the zypper command. Firstremove all existing software repositories, then add the required new ones, andfinally refresh the repositories sources:
root # zypper sd {0..99}root # zypper ar \ http://REPO_SERVER/repo/SUSE/Products/Storage/5/x86_64/product/ SES5-POOLroot # zypper ar \ http://REPO_SERVER/repo/SUSE/Updates/Storage/5/x86_64/update/ SES5-UPDATESroot # zypper ar \ http://REPO_SERVER/repo/SUSE/Products/SLE-SERVER/12-SP3/x86_64/product/ SLES12-SP3-POOLroot # zypper ar \ http://REPO_SERVER/repo/SUSE/Updates/SLE-SERVER/12-SP3/x86_64/update/ SLES12-SP3-UPDATESroot # zypper ref
To upgrade the SUSE Enterprise Storage 4 cluster to version 5, follow these steps:
1. Upgrade the Salt master node to SUSE Linux Enterprise Server 12 SP3 and SUSE Enter-prise Storage 5.5. Depending on your upgrade method, use either zypper migration orzypper dup .
58
Upgrade from SUSE Enterprise Storage 4 (DeepSea Deployment) to 5 SES 5.5 (SES 5 & SES
…

Using rpm -q deepsea , verify that the version of the DeepSea package on the Salt masternode starts with at least 0.7 . For example:
root # rpm -q deepseadeepsea-0.7.27+git.0.274c55d-5.1
If the DeepSea package version number starts with 0.6, double check whether you suc-cessfully migrated the Salt master node to SUSE Linux Enterprise Server 12 SP3 and SUSEEnterprise Storage 5.5.
2. Set the new internal object sort order, run:
cephadm > ceph osd set sortbitwise
TipTo verify that the command was successful, we recommend running
cephadm > ceph osd dump --format json-pretty | grep sortbitwise "flags": "sortbitwise,recovery_deletes,purged_snapdirs",
3. If your cluster nodes are not registered with SUSEConnect and do not use SCC/SMT, youwill use the zypper dup method. Change your Pillar data in order to use the differentstrategy. Edit
/srv/pillar/ceph/stack/name_of_cluster/cluster.yml
and add the following line:
upgrade_init: zypper-dup
4. Update your Pillar:
root@master # salt target saltutil.sync_all
See Section 4.2.2, “Targeting the Minions” for details about Salt minions targeting.
5. Verify that you successfully wrote to the Pillar:
root@master # salt target pillar.get upgrade_init
The command's output should mirror the entry you added.
59
Upgrade from SUSE Enterprise Storage 4 (DeepSea Deployment) to 5 SES 5.5 (SES 5 & SES
…

6. Upgrade Salt minions:
root@master # salt target state.apply ceph.updates.salt
7. Verify that all Salt minions are upgraded:
root@master # salt target test.version
8. Include the cluster's Salt minions. Refer to Section 4.2.2, “Targeting the Minions” of Proce-
dure 4.1, “Running Deployment Stages” for more details.
9. Start the upgrade of SUSE Linux Enterprise Server and Ceph:
root@master # salt-run state.orch ceph.maintenance.upgrade
Refer to Section 5.4.2, “Details on the salt target ceph.maintenance.upgrade Command”
for more information.
Tip: Re-run on RebootIf the process results in a reboot of the Salt master, re-run the command to start theupgrade process for the Salt minions again.
10. After the upgrade, the Ceph Managers are not installed yet. To reach a healthy clusterstate, do the following:
a. Run Stage 0 to enable the Salt REST API:
root@master # salt-run state.orch ceph.stage.0
b. Run Stage 1 to create the role-mgr/ subdirectory:
root@master # salt-run state.orch ceph.stage.1
c. Edit policy.cfg as described in Section 4.5.1, “The policy.cfg File” and add a CephManager role to the nodes where Ceph Monitors are deployed, or uncomment the'role-mgr' lines if you followed the steps of Section 5.5, “Upgrade from SUSE Enterprise
Storage 4 (ceph-deploy Deployment) to 5” until here. Also, add the openATTIC role toone of the cluster nodes. Refer to Book “Administration Guide”, Chapter 17 “openATTIC”
for more details.
60
Upgrade from SUSE Enterprise Storage 4 (DeepSea Deployment) to 5 SES 5.5 (SES 5 & SES
…

d. Run Stage 2 to update the Pillar:
root@master # salt-run state.orch ceph.stage.2
e. DeepSea uses a different approach to generate the ceph.conf configuration lenow, refer to Book “Administration Guide”, Chapter 1 “Salt Cluster Administration”, Sec-
tion 1.12 “Adjusting ceph.conf with Custom Settings” for more details.
f. Set any of the three AppArmor states to all DeepSea minions. For example to disablethem, run
root@master # salt 'TARGET' state.apply ceph.apparmor.default-disable
For more information, refer to Book “Administration Guide”, Chapter 1 “Salt Cluster Ad-
ministration”, Section 1.13 “Enabling AppArmor Profiles”.
g. Run Stage 3 to deploy Ceph Managers:
root@master # salt-run state.orch ceph.stage.3
h. Run Stage 4 to configure openATTIC properly:
root@master # salt-run state.orch ceph.stage.4
61
Upgrade from SUSE Enterprise Storage 4 (DeepSea Deployment) to 5 SES 5.5 (SES 5 & SES
…

Note: Ceph Key Caps MismatchIf ceph.stage.3 fails with "Error EINVAL: entity client.bootstrap-osd exists butcaps do not match", it means the key capabilities (caps) for the existing cluster'sclient.bootstrap.osd key do not match the caps that DeepSea is trying to set.Above the error message, in red text, you can see a dump of the ceph auth com-mand that failed. Look at this command to check the key ID and le being used. Inthe case of client.bootstrap-osd , the command will be
cephadm > ceph auth add client.bootstrap-osd \ -i /srv/salt/ceph/osd/cache/bootstrap.keyring
To x mismatched key caps, check the content of the keyring le DeepSea is tryingto deploy, for example:
cephadm > cat /srv/salt/ceph/osd/cache/bootstrap.keyring[client.bootstrap-osd] key = AQD6BpVZgqVwHBAAQerW3atANeQhia8m5xaigw== caps mgr = "allow r" caps mon = "allow profile bootstrap-osd"
Compare this with the output of ceph auth get client.bootstrap-osd :
cephadm > ceph auth get client.bootstrap-osdexported keyring for client.bootstrap-osd[client.bootstrap-osd] key = AQD6BpVZgqVwHBAAQerW3atANeQhia8m5xaigw== caps mon = "allow profile bootstrap-osd"
Note how the latter key is missing caps mgr = "allow r" . To x this, run:
cephadm > ceph auth caps client.bootstrap-osd mgr \ "allow r" mon "allow profile bootstrap-osd"
Running ceph.stage.3 should now succeed.
The same issue can occur with other daemon and gateway keyrings when runningceph.stage.3 and ceph.stage.4 . The same procedure as above applies: checkthe command that failed, the keyring le being deployed, and the capabilities ofthe existing key. Then run ceph auth caps to update the existing key capabilities
62
Upgrade from SUSE Enterprise Storage 4 (DeepSea Deployment) to 5 SES 5.5 (SES 5 & SES
…

to match to what is being deployed by DeepSea. The keyring les that DeepSeatries to deploy are typically placed under the /srv/salt/ceph/DAEMON_OR_GATE-WAY_NAME/cache directory.
Important: Upgrade FailureIf the cluster is in 'HEALTH_ERR' state for more than 300 seconds, or one of the servicesfor each assigned role is down for more than 900 seconds, the upgrade failed. In thatcase, try to nd the problem, resolve it, and re-run the upgrade procedure. Note that invirtualized environments, the timeouts are shorter.
Important: Rebooting OSDsAfter upgrading to SUSE Enterprise Storage 5.5, FileStore OSDs need approximately veminutes longer to start as the OSD will do a one-o conversion of its on-disk les.
Tip: Check for the Version of Cluster Components/NodesWhen you need to nd out the versions of individual cluster components and nodes—for example to nd out if all your nodes are actually on the same patch level after theupgrade—you can run
root@master # salt-run status.report
The command goes through the connected Salt minions and scans for the version numbersof Ceph, Salt, and SUSE Linux Enterprise Server, and gives you a report displaying theversion that the majority of nodes have and showing nodes whose version is differentfrom the majority.
5.4.1 OSD Migration to BlueStore
OSD BlueStore is a new back end for the OSD daemons. It is the default option since SUSE En-terprise Storage 5.5. Compared to FileStore, which stores objects as les in an XFS le system,BlueStore can deliver increased performance because it stores objects directly on the underlyingblock device. BlueStore also enables other features, such as built-in compression and EC over-writes, that are unavailable with FileStore.
63 OSD Migration to BlueStore SES 5.5 (SES 5 & SES …

Specifically for BlueStore, an OSD has a 'wal' (Write Ahead Log) device and a 'db' (RocksDBdatabase) device. The RocksDB database holds the metadata for a BlueStore OSD. These twodevices will reside on the same device as an OSD by default, but either can be placed on faster/different media.
In SES5, both FileStore and BlueStore are supported and it is possible for FileStore and BlueS-tore OSDs to co-exist in a single cluster. During the SUSE Enterprise Storage upgrade procedure,FileStore OSDs are not automatically converted to BlueStore. Be aware that the BlueStore-spe-cific features will not be available on OSDs that have not been migrated to BlueStore.
Before converting to BlueStore, the OSDs need to be running SUSE Enterprise Storage 5.5. Theconversion is a slow process as all data gets re-written twice. Though the migration process cantake a long time to complete, there is no cluster outage and all clients can continue accessingthe cluster during this period. However, do expect lower performance for the duration of themigration. This is caused by rebalancing and backfilling of cluster data.
Use the following procedure to migrate FileStore OSDs to BlueStore:
Tip: Turn Off Safety MeasuresSalt commands needed for running the migration are blocked by safety measures. In orderto turn these precautions o, run the following command:
root@master # salt-run disengage.safety
1. Migrate hardware profiles:
root@master # salt-run state.orch ceph.migrate.policy
This runner migrates any hardware profiles currently in use by the policy.cfg le. Itprocesses policy.cfg , nds any hardware profile using the original data structure, andconverts it to the new data structure. The result is a new hardware profile named 'migrat-ed- original_name '. policy.cfg is updated as well.If the original configuration had separate journals, the BlueStore configuration will usethe same device for the 'wal' and 'db' for that OSD.
2. DeepSea migrates OSDs by setting their weight to 0 which 'vacuums' the data until theOSD is empty. You can either migrate OSDs one by one, or all OSDs at once. In eithercase, when the OSD is empty, the orchestration removes it and then re-creates it with thenew configuration.
64 OSD Migration to BlueStore SES 5.5 (SES 5 & SES …

Tip: Recommended MethodUse ceph.migrate.nodes if you have a large number of physical storage nodesor almost no data. If one node represents less than 10% of your capacity, then theceph.migrate.nodes may be marginally faster moving all the data from thoseOSDs in parallel.
If you are not sure about which method to use, or the site has few storage nodes (forexample each node has more than 10% of the cluster data), then select ceph.mi-grate.osds .
a. To migrate OSDs one at a time, run:
root@master # salt-run state.orch ceph.migrate.osds
b. To migrate all OSDs on each node in parallel, run:
root@master # salt-run state.orch ceph.migrate.nodes
TipAs the orchestration gives no feedback about the migration progress, use
cephadm > ceph osd tree
to see which OSDs have a weight of zero periodically.
After the migration to BlueStore, the object count will remain the same and disk usage will benearly the same.
65 OSD Migration to BlueStore SES 5.5 (SES 5 & SES …

5.4.2 Details on the salt target ceph.maintenance.upgradeCommand
During an upgrade via salt targetceph.maintenance.upgrade , DeepSea applies all availableupdates/patches on all servers in the cluster in parallel without rebooting them. After theseupdates/patches are applied, the actual upgrade begins:
1. The admin node is upgraded to SUSE Linux Enterprise Server 12 SP3. This also upgradesthe salt-master and deepsea packages.
2. All Salt minions are upgraded to a version that corresponds to the Salt master.
3. The migration is performed sequentially on all cluster nodes in the recommended order(the Ceph Monitors rst, see Upgrade Order) using the preferred method. As a consequence,the ceph package is upgraded.
4. After updating all Ceph Monitors, their services are restarted but the nodes are not re-booted. This way we ensure that all running Ceph Monitors have identical version.
Important: Do Not Reboot Monitor NodesIf the cluster monitor nodes host OSDs, do not reboot the nodes during this stagebecause the shared OSDs will not join the cluster after the reboot.
5. All the remaining cluster nodes are updated and rebooted in the recommended order.
6. After all nodes are on the same patch-level, the following command is run:
ceph require osd release RELEASE
In case this process is interrupted by an accident or intentionally by the administrator, neverreboot the nodes manually because after rebooting the rst OSD node and OSD daemon, it willnot be able to join the cluster anymore.
66 Details on the salt target ceph.maintenance.upgrade Command SES 5.5 (SES 5 & SES …

5.5 Upgrade from SUSE Enterprise Storage 4 (ceph-deploy Deployment) to 5
Important: Software RequirementsYou need to have the following software installed and updated to the latest packageversions on all the Ceph nodes you want to upgrade before you can start with the upgradeprocedure:
SUSE Linux Enterprise Server 12 SP2
SUSE Enterprise Storage 4
Choose the Salt master for your cluster. If your cluster has Calamari deployed, then theCalamari node already is the Salt master. Alternatively, the admin node from which youran the ceph-deploy command will become the Salt master.
Before starting the procedure below, you need to upgrade the Salt master node to SUSELinux Enterprise Server 12 SP3 and SUSE Enterprise Storage 5.5 by running zypper mi-gration (or your preferred way of upgrading).
To upgrade the SUSE Enterprise Storage 4 cluster which was deployed with ceph-deploy toversion 5, follow these steps:
PROCEDURE 5.1: STEPS TO APPLY TO ALL CLUSTER NODES (INCLUDING THE CALAMARI NODE)
1. Install the salt package from SLE-12-SP2/SES4:
root # zypper install salt
2. Install the salt-minion package from SLE-12-SP2/SES4, then enable and start the relatedservice:
root # zypper install salt-minionroot # systemctl enable salt-minionroot # systemctl start salt-minion
67
Upgrade from SUSE Enterprise Storage 4 (ceph-deploy Deployment) to 5 SES 5.5 (SES 5 &
SES …

3. Ensure that the host name 'salt' resolves to the IP address of the Salt master node. If yourSalt master is not reachable by the host name salt , edit the le /etc/salt/minion orcreate a new le /etc/salt/minion.d/master.conf with the following content:
master: host_name_of_salt_master
TipThe existing Salt minions have the master: option already set in /etc/salt/minion.d/calamari.conf . The configuration le name does not matter, the /etc/salt/minion.d/ directory is important.
If you performed any changes to the configuration les mentioned above, restart the Saltservice on all Salt minions:
root@minion > systemctl restart salt-minion.service
4. a. If you registered your systems with SUSEConnect and use SCC/SMT, no further ac-tions need to be taken.
b. If you are not using SCC/SMT but a Media-ISO or other package source, add the fol-lowing repositories manually: SLE12-SP3 Base, SLE12-SP3 Update, SES5 Base, andSES5 Update. You can do so using the zypper command. First remove all existingsoftware repositories, then add the required new ones, and finally refresh the repos-itories sources:
root # zypper sd {0..99}root # zypper ar \ http://172.17.2.210:82/repo/SUSE/Products/Storage/5/x86_64/product/ SES5-POOLroot # zypper ar \ http://172.17.2.210:82/repo/SUSE/Updates/Storage/5/x86_64/update/ SES5-UPDATESroot # zypper ar \ http://172.17.2.210:82/repo/SUSE/Products/SLE-SERVER/12-SP3/x86_64/product/ SLES12-SP3-POOLroot # zypper ar \ http://172.17.2.210:82/repo/SUSE/Updates/SLE-SERVER/12-SP3/x86_64/update/ SLES12-SP3-UPDATESroot # zypper ref
68
Upgrade from SUSE Enterprise Storage 4 (ceph-deploy Deployment) to 5 SES 5.5 (SES 5 &
SES …

PROCEDURE 5.2: STEPS TO APPLY TO THE SALT MASTER NODE
1. Set the new internal object sort order, run:
cephadm > ceph osd set sortbitwise
TipTo verify that the command was successful, we recommend running
cephadm > ;ceph osd dump --format json-pretty | grep sortbitwise "flags": "sortbitwise,recovery_deletes,purged_snapdirs",
2. Upgrade the Salt master node to SUSE Linux Enterprise Server 12 SP3 and SUSE Enter-prise Storage 5.5. For SCC-registered systems, use zypper migration . If you provide therequired software repositories manually, use zypper dup . After the upgrade, ensure thatonly repositories for SUSE Linux Enterprise Server 12 SP3 and SUSE Enterprise Storage5.5 are active (and refreshed) on the Salt master node before proceeding.
3. If not already present, install the salt-master package, then enable and start the relatedservice:
root@master # zypper install salt-masterroot@master # systemctl enable salt-masterroot@master # systemctl start salt-master
4. Verify the presence of all Salt minions by listing their keys:
root@master # salt-key -L
5. Add all Salt minions keys to Salt master including the minion master:
root@master # salt-key -A -y
6. Ensure that all Salt minions' keys were accepted:
root@master # salt-key -L
7. Make sure that the software on your Salt master node is up to date:
root@master # zypper migration
69
Upgrade from SUSE Enterprise Storage 4 (ceph-deploy Deployment) to 5 SES 5.5 (SES 5 &
SES …

8. Install the deepsea package:
root@master # zypper install deepsea
9. Include the cluster's Salt minions. Refer to Section 4.2.2, “Targeting the Minions” of Proce-
dure 4.1, “Running Deployment Stages” for more details.
10. Import the existing ceph-deploy installed cluster:
root@master # salt-run populate.engulf_existing_cluster
The command will do the following:
Distribute all the required Salt and DeepSea modules to all the Salt minions.
Inspect the running Ceph cluster and populate /srv/pillar/ceph/proposals witha layout of the cluster./srv/pillar/ceph/proposals/policy.cfg will be created with roles match-ing all detected running Ceph services. If no ceph-mgr daemons are detect-ed a 'role-mgr' is added for every node with 'role-mon'. View this le to veri-fy that each of your existing MON, OSD, RGW and MDS nodes have the appro-priate roles. OSD nodes will be imported into the profile-import/ subdirecto-ry, so you can examine the les in /srv/pillar/ceph/proposals/profile-im-port/cluster/ and /srv/pillar/ceph/proposals/profile-import/stack/de-fault/ceph/minions/ to confirm that the OSDs were correctly picked up.
NoteThe generated policy.cfg will only apply roles for detected Ceph services'role-mon', 'role-mds', 'role-rgw', 'role-admin', and 'role-master' for the Saltmaster node. Any other desired roles will need to be added to the le manu-ally (see Section 4.5.1.2, “Role Assignment”).
The existing cluster's ceph.conf will be saved to /srv/salt/ceph/configura-tion/files/ceph.conf.import .
70
Upgrade from SUSE Enterprise Storage 4 (ceph-deploy Deployment) to 5 SES 5.5 (SES 5 &
SES …

/srv/pillar/ceph/proposals/config/stack/default/ceph/cluster.yml willinclude the cluster's fsid, cluster and public networks, and also specifies the config-uration_init: default-import option, which makes DeepSea use the ceph.con-f.import configuration le mentioned previously, rather than using DeepSea's de-fault /srv/salt/ceph/configuration/files/ceph.conf.j2 template.
Note: Custom Settings in ceph.confIf you need to integrate the ceph.conf le with custom changes, wait un-til the engulf/upgrade process successfully finishes. Then edit the /srv/pil-lar/ceph/proposals/config/stack/default/ceph/cluster.yml le andcomment the following line:
configuration_init: default-import
Save the le and follow the information in Book “Administration Guide”, Chap-
ter 1 “Salt Cluster Administration”, Section 1.12 “Adjusting ceph.conf with Custom
Settings”.
The cluster's various keyrings will be saved to the following directories:
/srv/salt/ceph/admin/cache//srv/salt/ceph/mon/cache//srv/salt/ceph/osd/cache//srv/salt/ceph/mds/cache//srv/salt/ceph/rgw/cache/
Verify that the keyring les exist, and that there is no keyring le in the followingdirectory (the Ceph Manager did not exist before SUSE Enterprise Storage 5.5):
/srv/salt/ceph/mgr/cache/
11. If the salt-run populate.engulf_existing_cluster command cannot detect ceph-mgr daemons, the policy.cfg le will contain a 'mgr' role for each node that has the 'role-mon' assigned. This will deploy ceph-mgr daemons together with the monitor daemonsin a later step. Since there are no ceph-mgr daemons running at this time, please edit /srv/pillar/ceph/proposals/policy.cfg and comment out all lines starting with 'role-mgr' by prepending a '#' character.
71
Upgrade from SUSE Enterprise Storage 4 (ceph-deploy Deployment) to 5 SES 5.5 (SES 5 &
SES …

12. The salt-run populate.engulf_existing_cluster command does not handle import-ing the openATTIC configuration. You need to manually edit the policy.cfg le andadd a role-openattic line. Refer to Section 4.5.1, “The policy.cfg File” for more details.
13. The salt-run populate.engulf_existing_cluster command does not handle import-ing the iSCSI Gateways configurations. If your cluster includes iSCSI Gateways, importtheir configurations manually:
a. On one of iSCSI Gateway nodes, export the current lrbd.conf and copy it to theSalt master node:
root@minion > lrbd -o >/tmp/lrbd.confroot@minion > scp /tmp/lrbd.conf admin:/srv/salt/ceph/igw/cache/lrbd.conf
b. On the Salt master node, add the default iSCSI Gateway configuration to the DeepSeasetup:
root@master # mkdir -p /srv/pillar/ceph/stack/ceph/root@master # echo 'igw_config: default-ui' >> /srv/pillar/ceph/stack/ceph/cluster.ymlroot@master # chown salt:salt /srv/pillar/ceph/stack/ceph/cluster.yml
c. Add the iSCSI Gateway roles to policy.cfg and save the le:
role-igw/stack/default/ceph/minions/ses-1.ses.suse.ymlrole-igw/cluster/ses-1.ses.suse.sls[...]
14. Run Stages 0 and 1 to update packages and create all possible roles:
root@master # salt-run state.orch ceph.stage.0root@master # salt-run state.orch ceph.stage.1
15. Generate required subdirectories under /srv/pillar/ceph/stack :
root@master # salt-run push.proposal
16. Verify that there is a working DeepSea-managed cluster with correctly assigned roles:
root@master # salt target pillar.get roles
Compare the output with the actual layout of the cluster.
72
Upgrade from SUSE Enterprise Storage 4 (ceph-deploy Deployment) to 5 SES 5.5 (SES 5 &
SES …

17. Calamari leaves a scheduled Salt job running to check the cluster status. Remove the job:
root@master # salt target schedule.delete ceph.heartbeat
18. From this point on, follow the procedure described in Section 5.4, “Upgrade from SUSE Enter-
prise Storage 4 (DeepSea Deployment) to 5”.
5.6 Upgrade from SUSE Enterprise Storage 4(Crowbar Deployment) to 5
Important: Software RequirementsYou need to have the following software installed and updated to the latest packageversions on all the Ceph nodes you want to upgrade before you can start with the upgradeprocedure:
SUSE Linux Enterprise Server 12 SP2
SUSE Enterprise Storage 4
To upgrade SUSE Enterprise Storage 4 deployed using Crowbar to version 5, follow these steps:
1. For each Ceph node (including the Calamari node), stop and disable all Crowbar-relatedservices :
root@minion > systemctl stop chef-clientroot@minion > systemctl disable chef-clientroot@minion > systemctl disable crowbar_joinroot@minion > systemctl disable crowbar_notify_shutdown
2. For each Ceph node (including the Calamari node), verify that the software repositoriespoint to SUSE Enterprise Storage 5.5 and SUSE Linux Enterprise Server 12 SP3 products.If repositories pointing to older product versions are still present, disable them.
3. For each Ceph node (including the Calamari node), verify that the salt-minion is in-stalled. If not, install it:
root@minion > zypper in salt salt-minion
73
Upgrade from SUSE Enterprise Storage 4 (Crowbar Deployment) to 5 SES 5.5 (SES 5 & SES
…

4. For the Ceph nodes that did not have the salt-minion package installed, create the le /etc/salt/minion.d/master.conf with the master option pointing to the full Calamarinode host name:
master: full_calamari_hostname
TipThe existing Salt minions have the master: option already set in /etc/salt/minion.d/calamari.conf . The configuration le name does not matter, the /etc/salt/minion.d/ directory is important.
Enable and start the salt-minion service:
root@minion > systemctl enable salt-minionroot@minion > systemctl start salt-minion
5. On the Calamari node, accept any remaining salt minion keys:
root@master # salt-key -L[...]Unaccepted Keys:d52-54-00-16-45-0a.example.comd52-54-00-70-ac-30.example.com[...]
root@master # salt-key -AThe following keys are going to be accepted:Unaccepted Keys:d52-54-00-16-45-0a.example.comd52-54-00-70-ac-30.example.comProceed? [n/Y] yKey for minion d52-54-00-16-45-0a.example.com accepted.Key for minion d52-54-00-70-ac-30.example.com accepted.
6. If Ceph was deployed on the public network and no VLAN interface is present, add a VLANinterface on Crowbar's public network to the Calamari node.
7. Upgrade the Calamari node to SUSE Linux Enterprise Server 12 SP3 and SUSE EnterpriseStorage 5.5, either by using zypper migration or your favorite method. From hereonward, the Calamari node becomes the Salt master. After the upgrade, reboot the Saltmaster.
74
Upgrade from SUSE Enterprise Storage 4 (Crowbar Deployment) to 5 SES 5.5 (SES 5 & SES
…

8. Install DeepSea on the Salt master:
root@master # zypper in deepsea
9. Specify the deepsea_minions option to include the correct group of Salt minions into de-ployment stages. Refer to Section 4.2.2.3, “Set the deepsea_minions Option” for more details.
10. DeepSea expects all Ceph nodes to have an identical /etc/ceph/ceph.conf . Crowbardeploys a slightly different ceph.conf to each node, so you need to consolidate them:
Remove the osd crush location hook option, it was included by Calamari.
Remove the public addr option from the [mon] section.
Remove the port numbers from the mon host option.
11. If you were running the Object Gateway, Crowbar deployed a separate /etc/ceph/ceph.conf.radosgw le to keep the keystone secrets separated from the regularceph.conf le. Crowbar also added a custom /etc/systemd/system/[email protected] le. Because DeepSea does not support it, you need to remove it:
Append all [client.rgw....] sections from the ceph.conf.radosgw le to /etc/ceph/ceph.conf on all nodes.
On the Object Gateway node, run the following:
root@minion > rm /etc/systemd/system/[email protected] reenable [email protected].$hostname
12. Double check that ceph status works when run from the Salt master:
root@master # ceph statuscluster a705580c-a7ae-4fae-815c-5cb9c1ded6c2health HEALTH_OK[...]
13. Import the existing cluster:
root@master # salt-run populate.engulf_existing_clusterroot@master # salt-run state.orch ceph.stage.1root@master # salt-run push.proposal
75
Upgrade from SUSE Enterprise Storage 4 (Crowbar Deployment) to 5 SES 5.5 (SES 5 & SES
…

14. The salt-run populate.engulf_existing_cluster command does not handle import-ing the iSCSI Gateways configurations. If your cluster includes iSCSI Gateways, importtheir configurations manually:
a. On one of iSCSI Gateway nodes, export the current lrbd.conf and copy it to theSalt master node:
root@minion > lrbd -o > /tmp/lrbd.confroot@minion > scp /tmp/lrbd.conf admin:/srv/salt/ceph/igw/cache/lrbd.conf
b. On the Salt master node, add the default iSCSI Gateway configuration to the DeepSeasetup:
root@master # mkdir -p /srv/pillar/ceph/stack/ceph/root@master # echo 'igw_config: default-ui' >> /srv/pillar/ceph/stack/ceph/cluster.ymlroot@master # chown salt:salt /srv/pillar/ceph/stack/ceph/cluster.yml
c. Add the iSCSI Gateway roles to policy.cfg and save the le:
role-igw/stack/default/ceph/minions/ses-1.ses.suse.ymlrole-igw/cluster/ses-1.ses.suse.sls[...]
15. a. If you registered your systems with SUSEConnect and use SCC/SMT, no further ac-tions need to be taken.
b. If you are not using SCC/SMT but a Media-ISO or other package source, add the fol-lowing repositories manually: SLE12-SP3 Base, SLE12-SP3 Update, SES5 Base, andSES5 Update. You can do so using the zypper command. First remove all existingsoftware repositories, then add the required new ones, and finally refresh the repos-itories sources:
root # zypper sd {0..99}root # zypper ar \ http://172.17.2.210:82/repo/SUSE/Products/Storage/5/x86_64/product/ SES5-POOLroot # zypper ar \ http://172.17.2.210:82/repo/SUSE/Updates/Storage/5/x86_64/update/ SES5-UPDATESroot # zypper ar \ http://172.17.2.210:82/repo/SUSE/Products/SLE-SERVER/12-SP3/x86_64/product/ SLES12-SP3-POOLroot # zypper ar \
76
Upgrade from SUSE Enterprise Storage 4 (Crowbar Deployment) to 5 SES 5.5 (SES 5 & SES
…

http://172.17.2.210:82/repo/SUSE/Updates/SLE-SERVER/12-SP3/x86_64/update/ SLES12-SP3-UPDATESroot # zypper ref
Then change your Pillar data in order to use a different strategy. Edit
/srv/pillar/ceph/stack/name_of_cluster/cluster.yml
and add the following line:
upgrade_init: zypper-dup
TipThe zypper-dup strategy requires you to manually add the latest softwarerepositories, while the default zypper-migration relies on the repositoriesprovided by SCC/SMT.
16. Fix host grains to make DeepSea use short host names on the public network for the Cephdaemon instance IDs. For each node, you need to run grains.set with the new (short)host name. Before running grains.set , verify the current monitor instances by runningceph status . A before and after example follows:
root@master # salt target grains.get hostd52-54-00-16-45-0a.example.com: d52-54-00-16-45-0ad52-54-00-49-17-2a.example.com: d52-54-00-49-17-2ad52-54-00-76-21-bc.example.com: d52-54-00-76-21-bcd52-54-00-70-ac-30.example.com: d52-54-00-70-ac-30
root@master # salt d52-54-00-16-45-0a.example.com grains.set \ host public.d52-54-00-16-45-0aroot@master # salt d52-54-00-49-17-2a.example.com grains.set \ host public.d52-54-00-49-17-2aroot@master # salt d52-54-00-76-21-bc.example.com grains.set \ host public.d52-54-00-76-21-bcroot@master # salt d52-54-00-70-ac-30.example.com grains.set \ host public.d52-54-00-70-ac-30
root@master # salt target grains.get host
77
Upgrade from SUSE Enterprise Storage 4 (Crowbar Deployment) to 5 SES 5.5 (SES 5 & SES
…

d52-54-00-76-21-bc.example.com: public.d52-54-00-76-21-bcd52-54-00-16-45-0a.example.com: public.d52-54-00-16-45-0ad52-54-00-49-17-2a.example.com: public.d52-54-00-49-17-2ad52-54-00-70-ac-30.example.com: public.d52-54-00-70-ac-30
17. Run the upgrade:
root@master # salt target state.apply ceph.updatesroot@master # salt target test.versionroot@master # salt-run state.orch ceph.maintenance.upgrade
Every node will reboot. The cluster will come back up complaining that there is no activeCeph Manager instance. This is normal. Calamari should not be installed/running anymoreat this point.
18. Run all the required deployment stages to get the cluster to a healthy state:
root@master # salt-run state.orch ceph.stage.0root@master # salt-run state.orch ceph.stage.1root@master # salt-run state.orch ceph.stage.2root@master # salt-run state.orch ceph.stage.3
19. To deploy openATTIC (see Book “Administration Guide”, Chapter 17 “openATTIC”), add anappropriate role-openattic (see Section 4.5.1.2, “Role Assignment”) line to /srv/pil-lar/ceph/proposals/policy.cfg , then run:
root@master # salt-run state.orch ceph.stage.2root@master # salt-run state.orch ceph.stage.4
20. During the upgrade, you may receive "Error EINVAL: entity [...] exists but caps do notmatch" errors. To x them, refer to Section 5.4, “Upgrade from SUSE Enterprise Storage 4 (Deep-
Sea Deployment) to 5”.
78
Upgrade from SUSE Enterprise Storage 4 (Crowbar Deployment) to 5 SES 5.5 (SES 5 & SES
…

21. Do the remaining cleanup:
Crowbar creates entries in /etc/fstab for each OSD. They are not necessary, sodelete them.
Calamari leaves a scheduled Salt job running to check the cluster status. Removethe job:
root@master # salt target schedule.delete ceph.heartbeat
There are still some unnecessary packages installed, mostly ruby gems, and chefrelated. Their removal is not required but you may want to delete them by runningzypper rm pkg_name .
5.7 Upgrade from SUSE Enterprise Storage 3 to 5
Important: Software RequirementsYou need to have the following software installed and updated to the latest packageversions on all the Ceph nodes you want to upgrade before you can start with the upgradeprocedure:
SUSE Linux Enterprise Server 12 SP1
SUSE Enterprise Storage 3
To upgrade the SUSE Enterprise Storage 3 cluster to version 5, follow the steps described inProcedure 5.1, “Steps to Apply to All Cluster Nodes (including the Calamari Node)” and then Procedure 5.2,
“Steps to Apply to the Salt master Node”.
79 Upgrade from SUSE Enterprise Storage 3 to 5 SES 5.5 (SES 5 & SES …

6 Backing Up the Cluster Configuration
This chapter explains which les on the admin node should be backed up. As soon as you arefinished with your cluster deployment or migration, create a backup of these directories.
6.1 Back Up Ceph COnfiguration
Back up the /etc/ceph directory. It contains crucial cluster configuration. You will need thebackup of /etc/ceph for example when you need to replace the Admin Node.
6.2 Back Up Salt Configuration
You need to back up the /etc/salt/ directory. It contains the Salt configuration les, forexample the Salt master key and accepted client keys.
The Salt les are not strictly required for backing up the admin node, but make redeploying theSalt cluster easier. If there is no backup of these les, the Salt minions need to be registeredagain at the new admin node.
Note: Security of the Salt Master Private KeyMake sure that the backup of the Salt master private key is stored in a safe location. TheSalt master key can be used to manipulate all cluster nodes.
After restoring the /etc/salt directory from a backup, restart the Salt services:
root@master # systemctl restart salt-masterroot@master # systemctl restart salt-minion
6.3 Back Up DeepSea Configuration
All les required by DeepSea are stored in /srv/pillar/ , /srv/salt/ and /etc/salt/mas-ter.d .
80 Back Up Ceph COnfiguration SES 5.5 (SES 5 & SES …

If you need to redeploy the admin node, install the DeepSea package on the new node andmove the backed up data back into the directories. DeepSea can then be used again without anyfurther changes being required. Before using DeepSea again, make sure that all Salt minions arecorrectly registered on the admin node.
81 Back Up DeepSea Configuration SES 5.5 (SES 5 & SES …

7 Customizing the Default Configuration
You can change the default cluster configuration generated in Stage 2 (refer to DeepSea Stages
Description). For example, you may need to change network settings, or software that is installedon the Salt master by default installed. You can perform the former by modifying the pillarupdated after Stage 2, while the latter is usually done by creating a custom sls le and addingit to the pillar. Details are described in following sections.
7.1 Using Customized Configuration FilesThis section lists several tasks that require adding/changing your own sls les. Such a proce-dure is typically used when you need to change the default deployment process.
Tip: Prefix Custom .sls FilesYour custom .sls les belong to the same subdirectory as DeepSea's .sls les. To preventoverwriting your .sls les with the possibly newly added ones from the DeepSea package,prefix their name with the custom- string.
7.1.1 Disabling a Deployment Step
If you address a specific task outside of the DeepSea deployment process and therefore need toskip it, create a 'no-operation' le following this example:
PROCEDURE 7.1: DISABLING TIME SYNCHRONIZATION
1. Create /srv/salt/ceph/time/disabled.sls with the following content and save it:
disable time setting:test.nop
2. Edit /srv/pillar/ceph/stack/global.yml , add the following line, and save it:
time_init: disabled
3. Verify by refreshing the pillar and running the step:
root@master # salt target saltutil.pillar_refreshroot@master # salt 'admin.ceph' state.apply ceph.time
82 Using Customized Configuration Files SES 5.5 (SES 5 & SES …

admin.ceph: Name: disable time setting - Function: test.nop - Result: Clean
Summary for admin.ceph------------Succeeded: 1Failed: 0------------Total states run: 1
Note: Unique IDThe task ID 'disable time setting' may be any message unique within an sls le.Prevent ID collisions by specifying unique descriptions.
7.1.2 Replacing a Deployment Step
If you need to replace the default behavior of a specific step with a custom one, create a customsls le with replacement content.
By default /srv/salt/ceph/pool/default.sls creates an rbd image called 'demo'. In ourexample, we do not want this image to be created, but we need two images: 'archive1' and'archive2'.
PROCEDURE 7.2: REPLACING THE DEMO RBD IMAGE WITH TWO CUSTOM RBD IMAGES
1. Create /srv/salt/ceph/pool/custom.sls with the following content and save it:
wait: module.run: - name: wait.out - kwargs: 'status': "HEALTH_ERR" 1
- fire_event: True
archive1: cmd.run: - name: "rbd -p rbd create archive1 --size=1024" 2
- unless: "rbd -p rbd ls | grep -q archive1$" - fire_event: True
archive2: cmd.run:
83 Replacing a Deployment Step SES 5.5 (SES 5 & SES …

- name: "rbd -p rbd create archive2 --size=768" - unless: "rbd -p rbd ls | grep -q archive2$" - fire_event: True
1 The wait module will pause until the Ceph cluster does not have a status ofHEALTH_ERR . In fresh installations, a Ceph cluster may have this status until a suffi-cient number of OSDs become available and the creation of pools has completed.
2 The rbd command is not idempotent. If the same creation command is re-run afterthe image exists, the Salt state will fail. The unless statement prevents this.
2. To call the newly created custom le instead of the default, you need to edit /srv/pil-lar/ceph/stack/ceph/cluster.yml , add the following line, and save it:
pool_init: custom
3. Verify by refreshing the pillar and running the step:
root@master # salt target saltutil.pillar_refreshroot@master # salt 'admin.ceph' state.apply ceph.pool
Note: AuthorizationThe creation of pools or images requires sufficient authorization. The admin.ceph min-ion has an admin keyring.
Tip: Alternative WayAnother option is to change the variable in /srv/pillar/ceph/stack/ceph/roles/master.yml instead. Using this le will reduce the clutter of pillar data for other minions.
7.1.3 Modifying a Deployment Step
Sometimes you may need a specific step to do some additional tasks. We do not recommendmodifying the related state le as it may complicate a future upgrade. Instead, create a separatele to carry out the additional tasks identical to what was described in Section 7.1.2, “Replacing
a Deployment Step”.
Name the new sls le descriptively. For example, if you need to create two rbd images inaddition to the demo image, name the le archive.sls .
84 Modifying a Deployment Step SES 5.5 (SES 5 & SES …

PROCEDURE 7.3: CREATING TWO ADDITIONAL RBD IMAGES
1. Create /srv/salt/ceph/pool/custom.sls with the following content and save it:
include: - .archive - .default
Tip: Include PrecedenceIn this example, Salt will create the archive images and then create the demo image.The order does not matter in this example. To change the order, reverse the linesafter the include: directive.
You can add the include line directly to archive.sls and all the images willget created as well. However, regardless of where the include line is placed, Saltprocesses the steps in the included le rst. Although this behavior can be over-ridden with requires and order statements, a separate le that includes the othersguarantees the order and reduces the chances of confusion.
2. Edit /srv/pillar/ceph/stack/ceph/cluster.yml , add the following line, and save it:
pool_init: custom
3. Verify by refreshing the pillar and running the step:
root@master # salt target saltutil.pillar_refreshroot@master # salt 'admin.ceph' state.apply ceph.pool
7.1.4 Modifying a Deployment Stage
If you need to add a completely separate deployment step, create three new les—an sls lethat performs the command, an orchestration le, and a custom le which aligns the new stepwith the original deployment steps.
For example, if you need to run logrotate on all minions as part of the preparation stage:
First create an sls le and include the logrotate command.
PROCEDURE 7.4: RUNNING logrotate ON ALL SALT MINIONS
1. Create a directory such as /srv/salt/ceph/logrotate .
85 Modifying a Deployment Stage SES 5.5 (SES 5 & SES …

2. Create /srv/salt/ceph/logrotate/init.sls with the following content and save it:
rotate logs: cmd.run: - name: "/usr/sbin/logrotate /etc/logrotate.conf"
3. Verify that the command works on a minion:
root@master # salt 'admin.ceph' state.apply ceph.logrotate
Because the orchestration le needs to run before all other preparation steps, add it to the Prepstage 0:
1. Create /srv/salt/ceph/stage/prep/logrotate.sls with the following content andsave it:
logrotate: salt.state: - tgt: '*' - sls: ceph.logrotate
2. Verify that the orchestration le works:
root@master # salt-run state.orch ceph.stage.prep.logrotate
The last le is the custom one which includes the additional step with the original steps:
1. Create /srv/salt/ceph/stage/prep/custom.sls with the following content and saveit:
include: - .logrotate - .master - .minion
2. Override the default behavior. Edit /srv/pillar/ceph/stack/global.yml , add the fol-lowing line, and save the le:
stage_prep: custom
3. Verify that Stage 0 works:
root@master # salt-run state.orch ceph.stage.0
86 Modifying a Deployment Stage SES 5.5 (SES 5 & SES …

Note: Why global.yml?The global.yml le is chosen over the cluster.yml because during the prep stage, nominion belongs to the Ceph cluster and has no access to any settings in cluster.yml .
7.1.5 Updates and Reboots during Stage 0
During Stage 0 (refer to DeepSea Stages Description for more information on DeepSea stages),the Salt master and Salt minions may optionally reboot because newly updated packages, forexample kernel , require rebooting the system.
The default behavior is to install available new updates and not reboot the nodes even in caseof kernel updates.
You can change the default update/reboot behavior of DeepSea Stage 0 by adding/chang-ing the stage_prep_master and stage_prep_minion options in the /srv/pillar/ceph/stack/global.yml le. stage_prep_master sets the behavior of the Salt master, andstage_prep_minion sets the behavior of all minions. All available parameters are:
default
Install updates without rebooting.
default-update-reboot
Install updates and reboot after updating.
default-no-update-reboot
Reboots without installing updates.
default-no-update-no-reboot
Do not install updates or reboot.
For example, to prevent the cluster nodes from installing updates and rebooting, edit /srv/pillar/ceph/stack/global.yml and add the following lines:
stage_prep_master: default-no-update-no-rebootstage_prep_minion: default-no-update-no-reboot
87 Updates and Reboots during Stage 0 SES 5.5 (SES 5 & SES …

Tip: Values and Corresponding FilesThe values of stage_prep_master correspond to le names located in /srv/salt/ceph/stage/0/master , while values of stage_prep_minion correspond to les in /srv/salt/ceph/stage/0/minion :
cephadm > ls -l /srv/salt/ceph/stage/0/masterdefault-no-update-no-reboot.slsdefault-no-update-reboot.slsdefault-update-reboot.sls[...]
cephadm > ls -l /srv/salt/ceph/stage/0/miniondefault-no-update-no-reboot.slsdefault-no-update-reboot.slsdefault-update-reboot.sls[...]
7.2 Modifying Discovered ConfigurationAfter you completed Stage 2, you may want to change the discovered configuration. To viewthe current settings, run:
root@master # salt target pillar.items
The output of the default configuration for a single minion is usually similar to the following:
---------- available_roles: - admin - mon - storage - mds - igw - rgw - client-cephfs - client-radosgw - client-iscsi - mds-nfs - rgw-nfs - master
88 Modifying Discovered Configuration SES 5.5 (SES 5 & SES …

cluster: ceph cluster_network: 172.16.22.0/24 fsid: e08ec63c-8268-3f04-bcdb-614921e94342 master_minion: admin.ceph mon_host: - 172.16.21.13 - 172.16.21.11 - 172.16.21.12 mon_initial_members: - mon3 - mon1 - mon2 public_address: 172.16.21.11 public_network: 172.16.21.0/24 roles: - admin - mon - mds time_server: admin.ceph time_service: ntp
The above mentioned settings are distributed across several configuration les. The directorystructure with these les is defined in the /srv/pillar/ceph/stack/stack.cfg directory.The following les usually describe your cluster:
/srv/pillar/ceph/stack/global.yml - the le affects all minions in the Salt cluster.
/srv/pillar/ceph/stack/ceph/cluster.yml - the le affects all minions in the Cephcluster called ceph .
/srv/pillar/ceph/stack/ceph/roles/role.yml - affects all minions that are assignedthe specific role in the ceph cluster.
/srv/pillar/ceph/stack/cephminions/minion ID/yml - affects the individual minion.
89 Modifying Discovered Configuration SES 5.5 (SES 5 & SES …

Note: Overwriting Directories with Default ValuesThere is a parallel directory tree that stores the default configuration setup in /srv/pillar/ceph/stack/default . Do not change values here, as they are overwritten.
The typical procedure for changing the collected configuration is the following:
1. Find the location of the configuration item you need to change. For example, if you needto change cluster related setting such as cluster network, edit the le /srv/pillar/ceph/stack/ceph/cluster.yml .
2. Save the le.
3. Verify the changes by running:
root@master # salt target saltutil.pillar_refresh
and then
root@master # salt target pillar.items
90 Modifying Discovered Configuration SES 5.5 (SES 5 & SES …

III Installation of Additional Services
8 Installation of Services to Access your Data 92
9 Ceph Object Gateway 93
10 Installation of iSCSI Gateway 100
11 Installation of CephFS 121
12 Installation of NFS Ganesha 127
13 Exporting Ceph Data via Samba 137

8 Installation of Services to Access your Data
After you deploy your SUSE Enterprise Storage 5.5 cluster you may need to install additionalsoftware for accessing your data, such as the Object Gateway or the iSCSI Gateway, or youcan deploy a clustered le system on top of the Ceph cluster. This chapter mainly focuses onmanual installation. If you have a cluster deployed using Salt, refer to Chapter 4, Deploying with
DeepSea/Salt for a procedure on installing particular gateways or the CephFS.
92 SES 5.5 (SES 5 & SES …

9 Ceph Object Gateway
Ceph Object Gateway is an object storage interface built on top of librgw to provide applica-tions with a RESTful gateway to Ceph clusters. It supports two interfaces:
S3-compatible: Provides object storage functionality with an interface that is compatiblewith a large subset of the Amazon S3 RESTful API.
Swift-compatible: Provides object storage functionality with an interface that is compatiblewith a large subset of the OpenStack Swift API.
The Object Gateway daemon uses an embedded HTTP server (CivetWeb) for interacting withthe Ceph cluster. Since it provides interfaces compatible with OpenStack Swift and Amazon S3,the Object Gateway has its own user management. Object Gateway can store data in the samecluster that is used to store data from CephFS clients or RADOS Block Device clients. The S3and Swift APIs share a common name space, so you may write data with one API and retrieveit with the other.
Important: Object Gateway Deployed by DeepSeaSince SUSE Enterprise Storage 5.5, the Object Gateway is installed as a DeepSea role,therefore you do not need to install it manually.
To install the Object Gateway during the cluster deployment, see Section 4.3, “Cluster De-
ployment”.
To add a new node with Object Gateway to the cluster, see Book “Administration Guide”,
Chapter 1 “Salt Cluster Administration”, Section 1.2 “Adding New Roles to Nodes”.
9.1 Object Gateway Manual Installation
1. Install Object Gateway on a node that is not using port 80. For example a node alreadyrunning openATTIC is already using port 80. The following command installs all requiredcomponents:
root # zypper ref && zypper in ceph-radosgw
93 Object Gateway Manual Installation SES 5.5 (SES 5 & SES …

2. If the Apache server from the previous Object Gateway instance is running, stop it anddisable the relevant service:
root # systemctl stop disable apache2.service
3. Edit /etc/ceph/ceph.conf and add the following lines:
[client.rgw.gateway_host] rgw frontends = "civetweb port=80"
TipIf you want to configure Object Gateway/CivetWeb for use with SSL encryption,modify the line accordingly:
rgw frontends = civetweb port=7480s ssl_certificate=path_to_certificate.pem
4. Restart the Object Gateway service.
root # systemctl restart [email protected]_host
9.1.1 Object Gateway Configuration
Several steps are required to configure an Object Gateway.
9.1.1.1 Basic Configuration
Configuring a Ceph Object Gateway requires a running Ceph Storage Cluster. The Ceph ObjectGateway is a client of the Ceph Storage Cluster. As a Ceph Storage Cluster client, it requires:
A host name for the gateway instance, for example gateway .
A storage cluster user name with appropriate permissions and a keyring.
Pools to store its data.
A data directory for the gateway instance.
An instance entry in the Ceph configuration le.
94 Object Gateway Configuration SES 5.5 (SES 5 & SES …

Each instance must have a user name and key to communicate with a Ceph storage cluster. Inthe following steps, we use a monitor node to create a bootstrap keyring, then create the ObjectGateway instance user keyring based on the bootstrap one. Then, we create a client user nameand key. Next, we add the key to the Ceph Storage Cluster. Finally, we distribute the keyringto the node containing the gateway instance.
1. Create a keyring for the gateway:
root # ceph-authtool --create-keyring /etc/ceph/ceph.client.rgw.keyringroot # chmod +r /etc/ceph/ceph.client.rgw.keyring
2. Generate a Ceph Object Gateway user name and key for each instance. As an example, wewill use the name gateway after client.radosgw :
root # ceph-authtool /etc/ceph/ceph.client.rgw.keyring \ -n client.rgw.gateway --gen-key
3. Add capabilities to the key:
root # ceph-authtool -n client.rgw.gateway --cap osd 'allow rwx' \ --cap mon 'allow rwx' /etc/ceph/ceph.client.rgw.keyring
4. Once you have created a keyring and key to enable the Ceph Object Gateway with accessto the Ceph Storage Cluster, add the key to your Ceph Storage Cluster. For example:
root # ceph -k /etc/ceph/ceph.client.admin.keyring auth add client.rgw.gateway \ -i /etc/ceph/ceph.client.rgw.keyring
5. Distribute the keyring to the node with the gateway instance:
root # scp /etc/ceph/ceph.client.rgw.keyring ceph@hostname:/home/cephcephadm > ssh hostnameroot # mv ceph.client.rgw.keyring /etc/ceph/ceph.client.rgw.keyring
Tip: Use Bootstrap KeyringAn alternative way is to create the Object Gateway bootstrap keyring, and then createthe Object Gateway keyring from it:
1. Create an Object Gateway bootstrap keyring on one of the monitor nodes:
root # ceph \ auth get-or-create client.bootstrap-rgw mon 'allow profile bootstrap-rgw' \
95 Object Gateway Configuration SES 5.5 (SES 5 & SES …

--connect-timeout=25 \ --cluster=ceph \ --name mon. \ --keyring=/var/lib/ceph/mon/ceph-node_host/keyring \ -o /var/lib/ceph/bootstrap-rgw/keyring
2. Create the /var/lib/ceph/radosgw/ceph-rgw_name directory for storing thebootstrap keyring:
root # mkdir \/var/lib/ceph/radosgw/ceph-rgw_name
3. Create an Object Gateway keyring from the newly created bootstrap keyring:
root # ceph \ auth get-or-create client.rgw.rgw_name osd 'allow rwx' mon 'allow rw' \ --connect-timeout=25 \ --cluster=ceph \ --name client.bootstrap-rgw \ --keyring=/var/lib/ceph/bootstrap-rgw/keyring \ -o /var/lib/ceph/radosgw/ceph-rgw_name/keyring
4. Copy the Object Gateway keyring to the Object Gateway host:
root # scp \/var/lib/ceph/radosgw/ceph-rgw_name/keyring \rgw_host:/var/lib/ceph/radosgw/ceph-rgw_name/keyring
9.1.1.2 Create Pools (Optional)
Ceph Object Gateways require Ceph Storage Cluster pools to store specific gateway data. Ifthe user you created has proper permissions, the gateway will create the pools automatically.However, ensure that you have set an appropriate default number of placement groups per poolin the Ceph configuration le.
The pool names follow the ZONE_NAME.POOL_NAME syntax. When configuring a gateway withthe default region and zone, the default zone name is 'default' as in our example:
.rgw.rootdefault.rgw.controldefault.rgw.metadefault.rgw.log
96 Object Gateway Configuration SES 5.5 (SES 5 & SES …

default.rgw.buckets.indexdefault.rgw.buckets.data
To create the pools manually, see Book “Administration Guide”, Chapter 8 “Managing Storage Pools”,
Section 8.2.2 “Create a Pool”.
Important: Object Gateway and Erasure-coded PoolsOnly the default.rgw.buckets.data pool can be erasure-coded. All other pools needto be replicated, otherwise the gateway is not accessible.
9.1.1.3 Adding Gateway Configuration to Ceph
Add the Ceph Object Gateway configuration to the Ceph Configuration le. The Ceph ObjectGateway configuration requires you to identify the Ceph Object Gateway instance. Then, specifythe host name where you installed the Ceph Object Gateway daemon, a keyring (for use withcephx), and optionally a log le. For example:
[client.rgw.instance-name]host = hostnamekeyring = /etc/ceph/ceph.client.rgw.keyring
Tip: Object Gateway Log FileTo override the default Object Gateway log le, include the following:
log file = /var/log/radosgw/client.rgw.instance-name.log
The [client.rgw.*] portion of the gateway instance identifies this portion of the Ceph con-figuration le as configuring a Ceph Storage Cluster client where the client type is a Ceph ObjectGateway (radosgw). The instance name follows. For example:
[client.rgw.gateway]host = ceph-gatewaykeyring = /etc/ceph/ceph.client.rgw.keyring
NoteThe host must be your machine host name, excluding the domain name.
97 Object Gateway Configuration SES 5.5 (SES 5 & SES …

Then turn o print continue . If you have it set to true, you may encounter problems withPUT operations:
rgw print continue = false
To use a Ceph Object Gateway with subdomain S3 calls (for example http://bucket-
name.hostname ), you must add the Ceph Object Gateway DNS name under the [client.rg-w.gateway] section of the Ceph configuration le:
[client.rgw.gateway]...rgw dns name = hostname
You should also consider installing a DNS server such as Dnsmasq on your client machine(s)when using the http://bucketname.hostname syntax. The dnsmasq.conf le should includethe following settings:
address=/hostname/host-ip-addresslisten-address=client-loopback-ip
Then, add the client-loopback-ip IP address as the rst DNS server on the client machine(s).
9.1.1.4 Create Data Directory
Deployment scripts may not create the default Ceph Object Gateway data directory. Create datadirectories for each instance of a radosgw daemon if not already done. The host variables inthe Ceph configuration le determine which host runs each instance of a radosgw daemon. Thetypical form specifies the radosgw daemon, the cluster name, and the daemon ID.
root # mkdir -p /var/lib/ceph/radosgw/cluster-id
Using the example ceph.conf settings above, you would execute the following:
root # mkdir -p /var/lib/ceph/radosgw/ceph-radosgw.gateway
9.1.1.5 Restart Services and Start the Gateway
To ensure that all components have reloaded their configurations, we recommend restartingyour Ceph Storage Cluster service. Then, start up the radosgw service. For more information,see Book “Administration Guide”, Chapter 2 “Introduction” and Book “Administration Guide”, Chapter 13
“Ceph Object Gateway”, Section 13.3 “Operating the Object Gateway Service”.
98 Object Gateway Configuration SES 5.5 (SES 5 & SES …

When the service is up and running, you can make an anonymous GET request to see if thegateway returns a response. A simple HTTP request to the domain name should return thefollowing:
<ListAllMyBucketsResult> <Owner> <ID>anonymous</ID> <DisplayName/> </Owner> <Buckets/></ListAllMyBucketsResult>
99 Object Gateway Configuration SES 5.5 (SES 5 & SES …

10 Installation of iSCSI Gateway
iSCSI is a storage area network (SAN) protocol that allows clients (called initiators) to sendSCSI commands to SCSI storage devices (targets) on remote servers. SUSE Enterprise Storage5.5 includes a facility that opens Ceph storage management to heterogeneous clients, such asMicrosoft Windows* and VMware* vSphere, through the iSCSI protocol. Multipath iSCSI accessenables availability and scalability for these clients, and the standardized iSCSI protocol alsoprovides an additional layer of security isolation between clients and the SUSE Enterprise Stor-age 5.5 cluster. The configuration facility is named lrbd . Using lrbd , Ceph storage adminis-trators can define thin-provisioned, replicated, highly-available volumes supporting read-onlysnapshots, read-write clones, and automatic resizing with Ceph RADOS Block Device (RBD).Administrators can then export volumes either via a single lrbd gateway host, or via multiplegateway hosts supporting multipath failover. Linux, Microsoft Windows, and VMware hosts canconnect to volumes using the iSCSI protocol, which makes them available like any other SCSIblock device. This means SUSE Enterprise Storage 5.5 customers can effectively run a completeblock-storage infrastructure subsystem on Ceph that provides all the features and benefits of aconventional SAN, enabling future growth.
This chapter introduces detailed information to set up a Ceph cluster infrastructure togetherwith an iSCSI gateway so that the client hosts can use remotely stored data as local storagedevices using the iSCSI protocol.
10.1 iSCSI Block Storage
iSCSI is an implementation of the Small Computer System Interface (SCSI) command set usingthe Internet Protocol (IP), specified in RFC 3720. iSCSI is implemented as a service where aclient (the initiator) talks to a server (the target) via a session on TCP port 3260. An iSCSI target'sIP address and port are called an iSCSI portal, where a target can be exposed through one ormore portals. The combination of a target and one or more portals is called the target portalgroup (TPG).
The underlying data link layer protocol for iSCSI is commonly Ethernet. More specifically, mod-ern iSCSI infrastructures use 10 Gigabit Ethernet or faster networks for optimal throughput.10 Gigabit Ethernet connectivity between the iSCSI gateway and the back-end Ceph cluster isstrongly recommended.
100 iSCSI Block Storage SES 5.5 (SES 5 & SES …

10.1.1 The Linux Kernel iSCSI Target
The Linux kernel iSCSI target was originally named LIO for linux-iscsi.org, the project's originaldomain and Web site. For some time, no fewer than four competing iSCSI target implementa-tions were available for the Linux platform, but LIO ultimately prevailed as the single iSCSIreference target. The mainline kernel code for LIO uses the simple, but somewhat ambiguousname "target", distinguishing between "target core" and a variety of front-end and back-end tar-get modules.
The most commonly used front-end module is arguably iSCSI. However, LIO also supports FibreChannel (FC), Fibre Channel over Ethernet (FCoE) and several other front-end protocols. At thistime, only the iSCSI protocol is supported by SUSE Enterprise Storage.
The most frequently used target back-end module is one that is capable of simply re-exportingany available block device on the target host. This module is named iblock. However, LIO al-so has an RBD-specific back-end module supporting parallelized multipath I/O access to RBDimages.
10.1.2 iSCSI Initiators
This section introduces brief information on iSCSI initiators used on Linux, Microsoft Windows,and VMware platforms.
10.1.2.1 Linux
The standard initiator for the Linux platform is open-iscsi . open-iscsi launches a daemon,iscsid , which the user can then use to discover iSCSI targets on any given portal, log in totargets, and map iSCSI volumes. iscsid communicates with the SCSI mid layer to create in-kernel block devices that the kernel can then treat like any other SCSI block device on the system.The open-iscsi initiator can be deployed in conjunction with the Device Mapper Multipath( dm-multipath ) facility to provide a highly available iSCSI block device.
10.1.2.2 Microsoft Windows and Hyper-V
The default iSCSI initiator for the Microsoft Windows operating system is the Microsoft iSCSIinitiator. The iSCSI service can be configured via a graphical user interface (GUI), and supportsmultipath I/O for high availability.
101 The Linux Kernel iSCSI Target SES 5.5 (SES 5 & SES …

10.1.2.3 VMware
The default iSCSI initiator for VMware vSphere and ESX is the VMware ESX software iSCSIinitiator, vmkiscsi . When enabled, it can be configured either from the vSphere client, or usingthe vmkiscsi-tool command. You can then format storage volumes connected through thevSphere iSCSI storage adapter with VMFS, and use them like any other VM storage device. TheVMware initiator also supports multipath I/O for high availability.
10.2 General Information about lrbd
lrbd combines the benefits of RADOS Block Devices with the ubiquitous versatility of iSCSI.By employing lrbd on an iSCSI target host (known as the lrbd gateway), any application thatneeds to make use of block storage can benefit from Ceph, even if it does not speak any Cephclient protocol. Instead, users can use iSCSI or any other target front-end protocol to connect toan LIO target, which translates all target I/O to RBD storage operations.
FIGURE 10.1: CEPH CLUSTER WITH A SINGLE ISCSI GATEWAY
lrbd is inherently highly-available and supports multipath operations. Thus, downstream ini-tiator hosts can use multiple iSCSI gateways for both high availability and scalability. Whencommunicating with an iSCSI configuration with more than one gateway, initiators may load-balance iSCSI requests across multiple gateways. In the event of a gateway failing, being tem-porarily unreachable, or being disabled for maintenance, I/O will transparently continue viaanother gateway.
102 General Information about lrbd SES 5.5 (SES 5 & SES …

FIGURE 10.2: CEPH CLUSTER WITH MULTIPLE ISCSI GATEWAYS
10.3 Deployment Considerations
A minimum configuration of SUSE Enterprise Storage 5.5 with lrbd consists of the followingcomponents:
A Ceph storage cluster. The Ceph cluster consists of a minimum of four physical servershosting at least eight object storage daemons (OSDs) each. In such a configuration, threeOSD nodes also double as a monitor (MON) host.
An iSCSI target server running the LIO iSCSI target, configured via lrbd .
An iSCSI initiator host, running open-iscsi (Linux), the Microsoft iSCSI Initiator (Mi-crosoft Windows), or any other compatible iSCSI initiator implementation.
103 Deployment Considerations SES 5.5 (SES 5 & SES …

A recommended production configuration of SUSE Enterprise Storage 5.5 with lrbd consists of:
A Ceph storage cluster. A production Ceph cluster consists of any number of (typicallymore than 10) OSD nodes, each typically running 10-12 object storage daemons (OSDs),with no fewer than three dedicated MON hosts.
Several iSCSI target servers running the LIO iSCSI target, configured via lrbd . ForiSCSI fail-over and load-balancing, these servers must run a kernel supporting the tar-get_core_rbd module. Update packages are available from the SUSE Linux EnterpriseServer maintenance channel.
Any number of iSCSI initiator hosts, running open-iscsi (Linux), the Microsoft iSCSIInitiator (Microsoft Windows), or any other compatible iSCSI initiator implementation.
10.4 Installation and ConfigurationThis section describes steps to install and configure an iSCSI Gateway on top of SUSE EnterpriseStorage.
10.4.1 Deploy the iSCSI Gateway to a Ceph Cluster
You can deploy the iSCSI Gateway either during Ceph cluster deployment process, or add it toan existing cluster using DeepSea.
To include the iSCSI Gateway during the cluster deployment process, refer to Section 4.5.1.2, “Role
Assignment”.
To add the iSCSI Gateway to an existing cluster, refer to Book “Administration Guide”, Chapter 1
“Salt Cluster Administration”, Section 1.2 “Adding New Roles to Nodes”.
10.4.2 Create RBD Images
RBD images are created in the Ceph store and subsequently exported to iSCSI. We recommendthat you use a dedicated RADOS pool for this purpose. You can create a volume from any hostthat is able to connect to your storage cluster using the Ceph rbd command line utility. Thisrequires the client to have at least a minimal ceph.conf configuration le, and appropriate CephXauthentication credentials.
104 Installation and Configuration SES 5.5 (SES 5 & SES …

To create a new volume for subsequent export via iSCSI, use the rbd create command, spec-ifying the volume size in megabytes. For example, in order to create a 100 GB volume namedtestvol in the pool named iscsi , run:
cephadm > rbd --pool iscsi create --size=102400 testvol
The above command creates an RBD volume in the default format 2.
NoteSince SUSE Enterprise Storage 3, the default volume format is 2, and format 1 is dep-recated. However, you can still create the deprecated format 1 volumes with the --im-age-format 1 option.
10.4.3 Export RBD Images via iSCSI
To export RBD images via iSCSI, use the lrbd utility. lrbd allows you to create, review, andmodify the iSCSI target configuration, which uses a JSON format.
Tip: Import Changes into openATTICAny changes made to the iSCSI Gateway configuration using the lrbd command are notvisible to DeepSea and openATTIC. To import your manual changes, you need to exportthe iSCSI Gateway configuration to a le:
root@minion > lrbd -o /tmp/lrbd.conf
Then copy it to the Salt master so that DeepSea and openATTIC can see it:
root@minion > scp /tmp/lrbd.conf ses5master:/srv/salt/ceph/igw/cache/lrbd.conf
Finally, edit /srv/pillar/ceph/stack/global.yml and set:
igw_config: default-ui
In order to edit the configuration, use lrbd -e or lrbd --edit . This command will invoke thedefault editor, as defined by the EDITOR environment variable. You may override this behaviorby setting the -E option in addition to -e .
105 Export RBD Images via iSCSI SES 5.5 (SES 5 & SES …

Below is an example configuration for
two iSCSI gateway hosts named iscsi1.example.com and iscsi2.example.com ,
defining a single iSCSI target with an iSCSI Qualified Name (IQN) ofiqn.2003-01.org.linux-iscsi.iscsi.x86:testvol ,
with a single iSCSI Logical Unit (LU),
backed by an RBD image named testvol in the RADOS pool rbd ,
and exporting the target via two portals named "east" and "west":
{ "auth": [ { "target": "iqn.2003-01.org.linux-iscsi.iscsi.x86:testvol", "authentication": "none" } ], "targets": [ { "target": "iqn.2003-01.org.linux-iscsi.iscsi.x86:testvol", "hosts": [ { "host": "iscsi1.example.com", "portal": "east" }, { "host": "iscsi2.example.com", "portal": "west" } ] } ], "portals": [ { "name": "east", "addresses": [ "192.168.124.104" ] }, { "name": "west", "addresses": [ "192.168.124.105"
106 Export RBD Images via iSCSI SES 5.5 (SES 5 & SES …

] } ], "pools": [ { "pool": "rbd", "gateways": [ { "target": "iqn.2003-01.org.linux-iscsi.iscsi.x86:testvol", "tpg": [ { "image": "testvol" } ] } ] } ] }
Note that whenever you refer to a host name in the configuration, this host name must matchthe iSCSI gateway's uname -n command output.
The edited JSON is stored in the extended attributes (xattrs) of a single RADOS object per pool.This object is available to the gateway hosts where the JSON is edited, as well as to all gatewayhosts connected to the same Ceph cluster. No configuration information is stored locally on thelrbd gateway.
To activate the configuration, store it in the Ceph cluster, and do one of the following things(as root ):
Run the lrbd command (without additional options) from the command line,
or
Restart the lrbd service with service lrbd restart .
The lrbd "service" does not operate any background daemon. Instead, it simply invokes thelrbd command. This type of service is known as a "one-shot" service.
You should also enable lrbd to auto-configure on system start-up. To do so, run the systemctlenable lrbd command.
107 Export RBD Images via iSCSI SES 5.5 (SES 5 & SES …

The configuration above reflects a simple, one-gateway setup. lrbd configuration can be muchmore complex and powerful. The lrbd RPM package comes with an extensive set of configura-tion examples, which you may refer to by checking the content of the /usr/share/doc/pack-ages/lrbd/samples directory after installation. The samples are also available from https://
github.com/SUSE/lrbd/tree/master/samples .
10.4.4 Authentication and Access Control
iSCSI authentication is flexible and covers many possibilities. The ve possible top level settingsare none , tpg , acls , tpg+identified and identified .
10.4.4.1 No Authentication
'No authentication' means that no initiator will require a user name and password to access anyLUNs for a specified host or target. 'No authentication' can be set explicitly or implicitly. Specifya value of 'none' for authentication to be set explicitly:
{ "host": "igw1", "authentication": none}
Removing the entire auth section from the configuration will use no authentication implicitly.
10.4.4.2 TPG Authentication
For common credentials or a shared user name/password, set authentication to tpg . This settingwill apply to all initiators for the associated host or target. In the following example, the sameuser name and password are used for the redundant target and a target local to igw1 :
{ "target": "iqn.2003-01.org.linux-iscsi.igw.x86:sn.redundant", "authentication": tpg, "tpg": { "userid": "common1", "password": "pass1" }},{
108 Authentication and Access Control SES 5.5 (SES 5 & SES …

"host": "igw1", "authentication": tpg, "tpg": { "userid": "common1", "password": "pass1" }}
Redundant configurations will have the same credentials across gateways but are independentof other configurations. In other words, LUNs configured specifically for a host and multipleredundant configurations can have a unique user name and password for each.
One caveat is that any initiator setting will be ignored when using tpg authentication. Usingcommon credentials does not restrict which initiators may connect. This configuration may besuitable in isolated network environments.
10.4.4.3 ACLs Authentication
For unique credentials for each initiator, set authentication to acls . Additionally, only definedinitiators are allowed to connect.
{ "host": "igw1", "authentication": acls, "acls": [ { "initiator": "iqn.1996-04.de.suse:01:e6ca28cc9f20", "userid": "initiator1", "password": "pass1", } ]},
10.4.4.4 TPG+identified Authentication
The previous two authentication settings pair two independent features: TPG pairs commoncredentials with unidentified initiators, while ACLs pair unique credentials with identified ini-tiators.
Setting authentication to tpg+identified pairs common credentials with identified initiators.Although you can imitate the same behavior choosing acls and repeating the same credentialswith each initiator, the configuration would grow huge and harder to maintain.
109 Authentication and Access Control SES 5.5 (SES 5 & SES …

The following configuration uses the tpg configuration with only the authentication keywordchanging.
{ "target": "iqn.2003-01.org.linux-iscsi.igw.x86:sn.redundant", "authentication": tpg+identified, "tpg": { "userid": "common1", "password": "pass1" }},{ "host": "igw1", "authentication": tpg+identified, "tpg": { "userid": "common1", "password": "pass1" }}
The list of initiators is gathered from those defined in the pools for the given hosts and targetsin the authentication section.
10.4.4.5 Identified Authentication
This type of authentication does not use any credentials. In secure environments where onlyassignment of initiators is needed, set the authentication to identified . All initiators willconnect but only have access to the images listed in the pools section.
{ "target": "iqn.2003-01.org.linux-iscsi:igw.x86:sn.redundant", "authentication": "identified",},{ "host": "igw1", "authentication": "identified",}
10.4.4.6 Discovery and Mutual Authentication
Discovery authentication is independent of the previous authentication methods. It requires cre-dentials for browsing.
110 Authentication and Access Control SES 5.5 (SES 5 & SES …

Authentication of type tpg , tpg+identified , acls , and discovery support mutual authen-tication. Specifying the mutual settings requires that the target authenticates against the initia-tor.
Discovery and mutual authentications are optional. These options can be present, but disabledallowing experimentation with a particular configuration. After you decide, you can remove thedisabled entries without breaking the configuration.
Refer to the examples in /usr/share/doc/packages/lrbd/samples . You can combine ex-cerpts from one le with others to create unique configurations.
10.4.5 Optional Settings
The following settings may be useful for some environments. For images, there are uuid , lun ,retries , sleep , and retry_errors attributes. The rst two— uuid and lun—allow hard-coding of the 'uuid' or 'lun' for a specific image. You can specify either of them for an image.The retries , sleep and retry_errors affect attempts to map an rbd image.
TipIf a site needs statically assigned LUNs, then assign numbers to each LUN.
"pools": [ { "pool": "rbd", "gateways": [ { "host": "igw1", "tpg": [ { "image": "archive", "uuid": "12345678-abcd-9012-efab-345678901234", "lun": "2", "retries": "3", "sleep": "4", "retry_errors": [ 95 ], [...] } ] } ] }
111 Optional Settings SES 5.5 (SES 5 & SES …

]
10.4.6 Advanced Settings
lrbd can be configured with advanced parameters which are subsequently passed on to theLIO I/O target. The parameters are divided up into iSCSI and backing store components, whichcan then be specified in the "targets" and "tpg" sections, respectively, of the lrbd configuration.
WarningUnless otherwise noted, changing these parameters from the default setting is not recom-mended.
"targets": [ { [...] "tpg_default_cmdsn_depth": "64", "tpg_default_erl": "0", "tpg_login_timeout": "10", "tpg_netif_timeout": "2", "tpg_prod_mode_write_protect": "0", }]
A description of the options follows:
tpg_default_cmdsn_depth
Default CmdSN (Command Sequence Number) depth. Limits the amount of requests thatan iSCSI initiator can have outstanding at any moment.
tpg_default_erl
Default error recovery level.
tpg_login_timeout
Login timeout value in seconds.
tpg_netif_timeout
NIC failure timeout in seconds.
tpg_prod_mode_write_protect
If set to 1, prevents writes to LUNs.
112 Advanced Settings SES 5.5 (SES 5 & SES …

"pools": [ { "pool": "rbd", "gateways": [ { "host": "igw1", "tpg": [ { "image": "archive", "backstore_block_size": "512", "backstore_emulate_3pc": "1", "backstore_emulate_caw": "1", "backstore_emulate_dpo": "0", "backstore_emulate_fua_read": "0", "backstore_emulate_fua_write": "1", "backstore_emulate_model_alias": "0", "backstore_emulate_pr": "1", "backstore_emulate_rest_reord": "0", "backstore_emulate_tas": "1", "backstore_emulate_tpu": "0", "backstore_emulate_tpws": "0", "backstore_emulate_ua_intlck_ctrl": "0", "backstore_emulate_write_cache": "0", "backstore_enforce_pr_isids": "1", "backstore_fabric_max_sectors": "8192", "backstore_hw_block_size": "512", "backstore_hw_max_sectors": "8192", "backstore_hw_pi_prot_type": "0", "backstore_hw_queue_depth": "128", "backstore_is_nonrot": "1", "backstore_max_unmap_block_desc_count": "1", "backstore_max_unmap_lba_count": "8192", "backstore_max_write_same_len": "65535", "backstore_optimal_sectors": "8192", "backstore_pi_prot_format": "0", "backstore_pi_prot_type": "0", "backstore_queue_depth": "128", "backstore_unmap_granularity": "8192", "backstore_unmap_granularity_alignment": "4194304" } ] } ] }]
113 Advanced Settings SES 5.5 (SES 5 & SES …

A description of the options follows:
backstore_block_size
Block size of the underlying device.
backstore_emulate_3pc
If set to 1, enables Third Party Copy.
backstore_emulate_caw
If set to 1, enables Compare and Write.
backstore_emulate_dpo
If set to 1, turns on Disable Page Out.
backstore_emulate_fua_read
If set to 1, enables Force Unit Access read.
backstore_emulate_fua_write
If set to 1, enables Force Unit Access write.
backstore_emulate_model_alias
If set to 1, uses the back-end device name for the model alias.
backstore_emulate_pr
If set to 0, support for SCSI Reservations, including Persistent Group Reservations, is dis-abled. While disabled, the SES iSCSI Gateway can ignore reservation state, resulting inimproved request latency.
TipSetting backstore_emulate_pr to 0 is recommended if iSCSI initiators do not requireSCSI Reservation support.
backstore_emulate_rest_reord
If set to 0, the Queue Algorithm Modifier has Restricted Reordering.
backstore_emulate_tas
If set to 1, enables Task Aborted Status.
backstore_emulate_tpu
If set to 1, enables Thin Provisioning Unmap.
114 Advanced Settings SES 5.5 (SES 5 & SES …

backstore_emulate_tpws
If set to 1, enables Thin Provisioning Write Same.
backstore_emulate_ua_intlck_ctrl
If set to 1, enables Unit Attention Interlock.
backstore_emulate_write_cache
If set to 1, turns on Write Cache Enable.
backstore_enforce_pr_isids
If set to 1, enforces persistent reservation ISIDs.
backstore_fabric_max_sectors
Maximum number of sectors the fabric can transfer at once.
backstore_hw_block_size
Hardware block size in bytes.
backstore_hw_max_sectors
Maximum number of sectors the hardware can transfer at once.
backstore_hw_pi_prot_type
If non-zero, DIF protection is enabled on the underlying hardware.
backstore_hw_queue_depth
Hardware queue depth.
backstore_is_nonrot
If set to 1, the backstore is a non-rotational device.
backstore_max_unmap_block_desc_count
Maximum number of block descriptors for UNMAP.
backstore_max_unmap_lba_count:
Maximum number of LBAs for UNMAP.
backstore_max_write_same_len
Maximum length for WRITE_SAME.
backstore_optimal_sectors
Optimal request size in sectors.
backstore_pi_prot_format
DIF protection format.
115 Advanced Settings SES 5.5 (SES 5 & SES …

backstore_pi_prot_type
DIF protection type.
backstore_queue_depth
Queue depth.
backstore_unmap_granularity
UNMAP granularity.
backstore_unmap_granularity_alignment
UNMAP granularity alignment.
For targets, the tpg attributes allow tuning of kernel parameters. Use with caution.
"targets": [{ "host": "igw1", "target": "iqn.2003-01.org.linux-iscsi.generic.x86:sn.abcdefghijk", "tpg_default_cmdsn_depth": "64", "tpg_default_erl": "0", "tpg_login_timeout": "10", "tpg_netif_timeout": "2", "tpg_prod_mode_write_protect": "0", "tpg_t10_pi": "0"}
For initiators, the attrib and param settings allow the tuning of kernel parameters. Use withcaution. These are set in the authentication section. If the authentication is tpg+identifiedor identified , then the subsection is identified.
"auth": [ { "authentication": "tpg+identified", "identified": [ { "initiator": "iqn.1996-04.de.suse:01:e6ca28cc9f20", "attrib_dataout_timeout": "3", "attrib_dataout_timeout_retries": "5", "attrib_default_erl": "0", "attrib_nopin_response_timeout": "30", "attrib_nopin_timeout": "15", "attrib_random_datain_pdu_offsets": "0", "attrib_random_datain_seq_offsets": "0", "attrib_random_r2t_offsets": "0", "param_DataPDUInOrder": "1",
116 Advanced Settings SES 5.5 (SES 5 & SES …

"param_DataSequenceInOrder": "1", "param_DefaultTime2Retain": "0", "param_DefaultTime2Wait": "2", "param_ErrorRecoveryLevel": "0", "param_FirstBurstLength": "65536", "param_ImmediateData": "1", "param_InitialR2T": "1", "param_MaxBurstLength": "262144", "param_MaxConnections": "1", "param_MaxOutstandingR2T": "1" } ] }]
If the authentication is acls , then the settings are included in the acls subsection. One caveatis that settings are only applied for active initiators. If an initiator is absent from the poolssection, the acl entry is not created and settings cannot be applied.
10.5 Exporting RADOS Block Device Images usingtcmu-runnerSince version 5, SUSE Enterprise Storage ships a user space RBD back-end for tcmu-runner(see man 8 tcmu-runner for details).
Warning: Technology Previewtcmu-runner based iSCSI Gateway deployments are currently a technology preview.See Chapter 10, Installation of iSCSI Gateway for instructions on kernel-based iSCSI Gatewaydeployment with lrbd .
Unlike kernel-based lrbd iSCSI Gateway deployments, tcmu-runner based iSCSI Gateways donot offer support for multipath I/O or SCSI Persistent Reservations.
As DeepSea and openATTIC do not currently support tcmu-runner deployments, you need tomanage the installation, deployment, and monitoring manually.
117 Exporting RADOS Block Device Images using tcmu-runner SES 5.5 (SES 5 & SES …

10.5.1 Installation
On your iSCSI Gateway node, install the tcmu-runner-handler-rbd package from the SUSEEnterprise Storage 5 media, together with the libtcmu1 and tcmu-runner package depen-dencies. Install the targetcli-fb package for configuration purposes. Note that the target-cli-fb package is incompatible with the 'non-fb' version of the targetcli package.
Confirm that the tcmu-runner systemd service is running:
root # systemctl enable tcmu-runnertcmu-gw:~ # systemctl status tcmu-runner● tcmu-runner.service - LIO Userspace-passthrough daemon Loaded: loaded (/usr/lib/systemd/system/tcmu-runner.service; static; vendor preset: disabled) Active: active (running) since ...
10.5.2 Configuration and Deployment
Create a RADOS Block Device image on your existing Ceph cluster. In the following example,we will use a 10G image called 'tcmu-lu' located in the 'rbd' pool.
Following RADOS Block Device image creation, run targetcli , and ensure that the tcmu-run-ner RBD handler (plug-in) is available:
root # targetclitargetcli shell version 2.1.fb46Copyright 2011-2013 by Datera, Inc and others.For help on commands, type 'help'.
/> lso- / ................................... [...] o- backstores ........................ [...]... | o- user:rbd ......... [Storage Objects: 0]
Create a backstore configuration entry for the RBD image:
/> cd backstores/user:rbd/backstores/user:rbd> create tcmu-lu 10G /rbd/tcmu-luCreated user-backed storage object tcmu-lu size 10737418240.
118 Installation SES 5.5 (SES 5 & SES …

Create an iSCSI transport configuration entry. In the following example, the target IQN"iqn.2003-01.org.linux-iscsi.tcmu-gw.x8664:sn.cb3d2a3a" is automatically generated by tar-getcli for use as a unique iSCSI target identifier:
/backstores/user:rbd> cd /iscsi/iscsi> createCreated target iqn.2003-01.org.linux-iscsi.tcmu-gw.x8664:sn.cb3d2a3a.Created TPG 1.Global pref auto_add_default_portal=trueCreated default portal listening on all IPs (0.0.0.0), port 3260.
Create an ACL entry for the iSCSI initiator(s) that you want to connect to the target. In thefollowing example, an initiator IQN of "iqn.1998-01.com.vmware:esxi-872c4888" is used:
/iscsi> cdiqn.2003-01.org.linux-iscsi.tcmu-gw.x8664:sn.cb3d2a3a/tpg1/acls//iscsi/iqn.20...a3a/tpg1/acls> create iqn.1998-01.com.vmware:esxi-872c4888
Finally, link the previously created RBD backstore configuration to the iSCSI target:
/iscsi/iqn.20...a3a/tpg1/acls> cd ../luns/iscsi/iqn.20...a3a/tpg1/luns> create /backstores/user:rbd/tcmu-luCreated LUN 0.Created LUN 0->0 mapping in node ACL iqn.1998-01.com.vmware:esxi-872c4888
Exit the shell to save the existing configuration:
/iscsi/iqn.20...a3a/tpg1/luns> exitGlobal pref auto_save_on_exit=trueLast 10 configs saved in /etc/target/backup.Configuration saved to /etc/target/saveconfig.json
10.5.3 Usage
From your iSCSI initiator (client) node, connect to your newly provisioned iSCSI target usingthe IQN and host name configured above.
"auth": [ { "host": "igw1", "authentication": "acls", "acls": [ {
119 Usage SES 5.5 (SES 5 & SES …

"initiator": "iqn.1996-04.de.suse:01:e6ca28cc9f20", "userid": "initiator1", "password": "pass1", "attrib_dataout_timeout": "3", "attrib_dataout_timeout_retries": "5", "attrib_default_erl": "0", "attrib_nopin_response_timeout": "30", "attrib_nopin_timeout": "15", "attrib_random_datain_pdu_offsets": "0", "attrib_random_datain_seq_offsets": "0", "attrib_random_r2t_offsets": "0", "param_DataPDUInOrder": "1", "param_DataSequenceInOrder": "1", "param_DefaultTime2Retain": "0", "param_DefaultTime2Wait": "2", "param_ErrorRecoveryLevel": "0", "param_FirstBurstLength": "65536", "param_ImmediateData": "1", "param_InitialR2T": "1", "param_MaxBurstLength": "262144", "param_MaxConnections": "1", "param_MaxOutstandingR2T": "1" } ] },]
120 Usage SES 5.5 (SES 5 & SES …

11 Installation of CephFS
The Ceph le system (CephFS) is a POSIX-compliant le system that uses a Ceph storage clusterto store its data. CephFS uses the same cluster system as Ceph block devices, Ceph object storagewith its S3 and Swift APIs, or native bindings ( librados ).
To use CephFS, you need to have a running Ceph storage cluster, and at least one running Cephmetadata server.
11.1 Supported CephFS Scenarios and Guidance
With SUSE Enterprise Storage, SUSE introduces official support for many scenarios in whichthe scale-out and distributed component CephFS is used. This entry describes hard limits andprovides guidance for the suggested use cases.
A supported CephFS deployment must meet these requirements:
A minimum of one Metadata Server. SUSE recommends to deploy several nodes with theMDS role. Only one will be 'active' and the rest will be 'passive'. Remember to mention allthe MON nodes in the mount command when mounting the CephFS from a client.
CephFS snapshots are disabled (default) and not supported in this version.
Clients are SUSE Linux Enterprise Server 12 SP2 or SP3 based, using the cephfs kernelmodule driver. The FUSE module is not supported.
CephFS quotas are not supported in SUSE Enterprise Storage, as support for quotas isimplemented in the FUSE client only.
CephFS supports le layout changes as documented in http://docs.ceph.com/docs/jew-
el/cephfs/file-layouts/ . However, while the le system is mounted by any client, new datapools may not be added to an existing CephFS le system ( ceph mds add_data_pool ).They may only be added while the le system is unmounted.
121 Supported CephFS Scenarios and Guidance SES 5.5 (SES 5 & SES …

11.2 Ceph Metadata ServerCeph metadata server (MDS) stores metadata for the CephFS. Ceph block devices and Cephobject storage do not use MDS. MDSs make it possible for POSIX le system users to execute basiccommands—such as ls or find—without placing an enormous burden on the Ceph storagecluster.
11.2.1 Adding a Metadata Server
You can deploy MDS either during the initial cluster deployment process as described in Sec-
tion 4.3, “Cluster Deployment”, or add it to an already deployed cluster as described in Book “Ad-
ministration Guide”, Chapter 1 “Salt Cluster Administration”, Section 1.1 “Adding New Cluster Nodes”.
After you deploy your MDS, allow the Ceph OSD/MDS service in the firewall setting of the serverwhere MDS is deployed: Start yast , navigate to Security and Users Firewall Allowed Servicesand in the Service to Allow drop–down menu select Ceph OSD/MDS. If the Ceph MDS node isnot allowed full traffic, mounting of a le system fails, even though other operations may workproperly.
11.2.2 Configuring a Metadata Server
You can ne-tune the MDS behavior by inserting relevant options in the ceph.conf configu-ration le.
MDS CACHE SIZE
mds cache memory limit
The soft memory limit (in bytes) that the MDS will enforce for its cache. Administratorsshould use this instead of the old mds cache size setting. Defaults to 1GB.
mds cache reservation
The cache reservation (memory or inodes) for the MDS cache to maintain. When the MDSbegins touching its reservation, it will recall client state until its cache size shrinks torestore the reservation. Defaults to 0.05.
For a detailed list of MDS related configuration options, see http://docs.ceph.com/docs/mas-
ter/cephfs/mds-config-ref/ .
For a detailed list of MDS journaler configuration options, see http://docs.ceph.com/docs/mas-
ter/cephfs/journaler/ .
122 Ceph Metadata Server SES 5.5 (SES 5 & SES …

11.3 CephFSWhen you have a healthy Ceph storage cluster with at least one Ceph metadata server, you cancreate and mount your Ceph le system. Ensure that your client has network connectivity anda proper authentication keyring.
11.3.1 Creating CephFS
A CephFS requires at least two RADOS pools: one for data and one for metadata. When config-uring these pools, you might consider:
Using a higher replication level for the metadata pool, as any data loss in this pool canrender the whole le system inaccessible.
Using lower-latency storage such as SSDs for the metadata pool, as this will improve theobserved latency of le system operations on clients.
When assigning a role-mds in the policy.cfg , the required pools are automatically created.You can manually create the pools cephfs_data and cephfs_metadata for manual perfor-mance tuning before setting up the Metadata Server. DeepSea will not create these pools if theyalready exist.
For more information on managing pools, see Book “Administration Guide”, Chapter 8 “Managing
Storage Pools”.
To create the two required pools—for example, 'cephfs_data' and 'cephfs_metadata'—with defaultsettings for use with CephFS, run the following commands:
cephadm > ceph osd pool create cephfs_data pg_numcephadm > ceph osd pool create cephfs_metadata pg_num
It is possible to use EC pools instead of replicated pools. We recommend to only use EC poolsfor low performance requirements and infrequent random access, for example cold storage,backups, archiving. CephFS on EC pools requires BlueStore to be enabled and the pool musthave the allow_ec_overwrite option set. This option can be set by running ceph osd poolset ec_pool allow_ec_overwrites true .
Erasure coding adds significant overhead to le system operations, especially small updates.This overhead is inherent to using erasure coding as a fault tolerance mechanism. This penaltyis the trade o for significantly reduced storage space overhead.
123 CephFS SES 5.5 (SES 5 & SES …

When the pools are created, you may enable the le system with the ceph fs new command:
cephadm > ceph fs new fs_name metadata_pool_name data_pool_name
For example:
cephadm > ceph fs new cephfs cephfs_metadata cephfs_data
You can check that the le system was created by listing all available CephFSs:
cephadm > ceph fs ls name: cephfs, metadata pool: cephfs_metadata, data pools: [cephfs_data ]
When the le system has been created, your MDS will be able to enter an active state. Forexample, in a single MDS system:
cephadm > ceph mds state5: 1/1/1 up
Tip: More TopicsYou can nd more information of specific tasks—for example mounting, unmounting, andadvanced CephFS setup—in Book “Administration Guide”, Chapter 15 “Clustered File System”.
11.3.2 MDS Cluster Size
A CephFS instance can be served by multiple active MDS daemons. All active MDS daemonsthat are assigned to a CephFS instance will distribute the le system's directory tree betweenthemselves, and thus spread the load of concurrent clients. In order to add an active MDS daemonto a CephFS instance, a spare standby is needed. Either start an additional daemon or use anexisting standby instance.
The following command will display the current number of active and passive MDS daemons.
cephadm > ceph mds stat
The following command sets the number of active MDS's to two in a le system instance.
cephadm > ceph fs set fs_name max_mds 2
In order to shrink the MDS cluster prior to an update, two steps are necessary. First set max_mdsso that only one instance remains:
cephadm > ceph fs set fs_name max_mds 1
124 MDS Cluster Size SES 5.5 (SES 5 & SES …

and after that explicitly deactivate the other active MDS daemons:
cephadm > ceph mds deactivate fs_name:rank
where rank is the number of an active MDS daemon of a le system instance, ranging from0 to max_mds -1. See http://docs.ceph.com/docs/luminous/cephfs/multimds/ for additional in-formation.
11.3.3 MDS Cluster and Updates
During Ceph updates, the feature ags on a le system instance may change (usually by addingnew features). Incompatible daemons (such as the older versions) are not able to function withan incompatible feature set and will refuse to start. This means that updating and restarting onedaemon can cause all other not yet updated daemons to stop and refuse to start. For this reasonwe, recommend shrinking the active MDS cluster to size one and stopping all standby daemonsbefore updating Ceph. The manual steps for this update procedure are as follows:
1. Update the Ceph related packages using zypper .
2. Shrink the active MDS cluster as described above to 1 instance and stop all standby MDSdaemons using their systemd units on all other nodes:
root # systemctl stop ceph-mds\*.service ceph-mds.target
3. Only then restart the single remaining MDS daemon, causing it to restart using the updatedbinary.
root # systemctl restart ceph-mds\*.service ceph-mds.target
4. Restart all other MDS daemons and re-set the desired max_mds setting.
root # systemctl start ceph-mds.target
If you use DeepSea, it will follow this procedure in case the ceph package was updated duringStages 0 and 4. It is possible to perform this procedure while clients have the CephFS instancemounted and I/O is ongoing. Note however that there will be a very brief I/O pause while theactive MDS restarts. Clients will recover automatically.
125 MDS Cluster and Updates SES 5.5 (SES 5 & SES …

It is good practice to reduce the I/O load as much as possible before updating an MDS cluster. Anidle MDS cluster will go through this update procedure quicker. Conversely, on a heavily loadedcluster with multiple MDS daemons it is essential to reduce the load in advance to prevent asingle MDS daemon from being overwhelmed by ongoing I/O.
126 MDS Cluster and Updates SES 5.5 (SES 5 & SES …

12 Installation of NFS Ganesha
NFS Ganesha provides NFS access to either the Object Gateway or the CephFS. In SUSE Enter-prise Storage 5.5, NFS versions 3 and 4 are supported. NFS Ganesha runs in the user space in-stead of the kernel space and directly interacts with the Object Gateway or CephFS.
Warning: Cross Protocol AccessNative CephFS and NFS clients are not restricted by le locks obtained via Samba, andvice-versa. Applications that rely on cross protocol le locking may experience data cor-ruption if CephFS backed Samba share paths are accessed via other means.
12.1 Preparation
12.1.1 General Information
To successfully deploy NFS Ganesha, you need to add a role-ganesha to your /srv/pil-lar/ceph/proposals/policy.cfg . For details, see Section 4.5.1, “The policy.cfg File”. NFSGanesha also needs either a role-rgw or a role-mds present in the policy.cfg .
Although it is possible to install and run the NFS Ganesha server on an already existing Cephnode, we recommend running it on a dedicated host with access to the Ceph cluster. The clienthosts are typically not part of the cluster, but they need to have network access to the NFSGanesha server.
To enable the NFS Ganesha server at any point after the initial installation, add the role-gane-sha to the policy.cfg and re-run at least DeepSea stages 2 and 4. For details, see Section 4.3,
“Cluster Deployment”.
NFS Ganesha is configured via the le /etc/ganesha/ganesha.conf that exists on the NFSGanesha node. However, this le is overwritten each time DeepSea stage 4 is executed. There-fore we recommend to edit the template used by Salt, which is the le /srv/salt/ceph/gane-sha/files/ganesha.conf.j2 on the Salt master. For details about the configuration le, seeBook “Administration Guide”, Chapter 16 “NFS Ganesha: Export Ceph Data via NFS”, Section 16.2 “Config-
uration”.
127 Preparation SES 5.5 (SES 5 & SES …

12.1.2 Summary of Requirements
The following requirements need to be met before DeepSea stages 2 and 4 can be executed toinstall NFS Ganesha:
At least one node needs to be assigned the role-ganesha .
You can define only one role-ganesha per minion.
NFS Ganesha needs either an Object Gateway or CephFS to work.
If NFS Ganesha is supposed to use the Object Gateway to interface with the cluster, the /srv/pillar/ceph/rgw.sls on the Salt master needs to be populated.
The kernel based NFS needs to be disabled on minions with the role-ganesha role.
12.2 Example InstallationThis procedure provides an example installation that uses both the Object Gateway and CephFSFile System Abstraction Layers (FSAL) of NFS Ganesha.
1. If you have not done so, execute DeepSea stages 0 and 1 before continuing with thisprocedure.
root@master # salt-run state.orch ceph.stage.0root@master # salt-run state.orch ceph.stage.1
2. After having executed stage 1 of DeepSea, edit the /srv/pillar/ceph/proposals/pol-icy.cfg and add the line
role-ganesha/cluster/NODENAME
Replace NODENAME with the name of a node in your cluster.Also make sure that a role-mds and a role-rgw are assigned.
3. Create a le with '.yml' extension in the /srv/salt/ceph/rgw/users/users.d directoryand insert the following content:
- { uid: "demo", name: "Demo", email: "[email protected]" }- { uid: "demo1", name: "Demo1", email: "[email protected]" }
128 Summary of Requirements SES 5.5 (SES 5 & SES …

These users are later created as Object Gateway users, and API keys are generated. On theObject Gateway node, you can later run radosgw-admin user list to list all createdusers and radosgw-admin user info --uid=demo to obtain details about single users.DeepSea makes sure that Object Gateway and NFS Ganesha both receive the credentialsof all users listed in the rgw section of the rgw.sls .The exported NFS uses these user names on the rst level of the le system, in this examplethe paths /demo and /demo1 would be exported.
4. Execute at least stages 2 and 4 of DeepSea. Running stage 3 in between is recommended.
root@master # salt-run state.orch ceph.stage.2root@master # salt-run state.orch ceph.stage.3 # optional but recommendedroot@master # salt-run state.orch ceph.stage.4
5. Verify that NFS Ganesha is working by mounting the NFS share from a client node:
root # mount -o sync -t nfs GANESHA_NODE:/ /mntroot # ls /mntcephfs demo demo1
/mnt should contain all exported paths. Directories for CephFS and both Object Gatewayusers should exist. For each bucket a user owns, a path /mnt/USERNAME/BUCKETNAMEwould be exported.
12.3 High Availability Active-Passive Configuration
This section provides an example of how to set up a two-node active-passive configuration ofNFS Ganesha servers. The setup requires the SUSE Linux Enterprise High Availability Extension.The two nodes are called earth and mars .
For details about SUSE Linux Enterprise High Availability Extension, see https://documenta-
tion.suse.com/sle-ha/12-SP5/ .
12.3.1 Basic Installation
In this setup earth has the IP address 192.168.1.1 and mars has the address 192.168.1.2 .
129 High Availability Active-Passive Configuration SES 5.5 (SES 5 & SES …

Additionally, two floating virtual IP addresses are used, allowing clients to connect to the serviceindependent of which physical node it is running on. 192.168.1.10 is used for cluster admin-istration with Hawk2 and 192.168.2.1 is used exclusively for the NFS exports. This makes iteasier to apply security restrictions later.
The following procedure describes the example installation. More details can be found at https://
documentation.suse.com/sle-ha/12-SP5/single-html/SLE-HA-install-quick/ .
1. Prepare the NFS Ganesha nodes on the Salt master:
a. Run DeepSea stages 0 and 1.
root@master # salt-run state.orch ceph.stage.0root@master # salt-run state.orch ceph.stage.1
b. Assign the nodes earth and mars the role-ganesha in the /srv/pillar/ceph/proposals/policy.cfg :
role-ganesha/cluster/earth*.slsrole-ganesha/cluster/mars*.sls
c. Run DeepSea stages 2 to 4.
root@master # salt-run state.orch ceph.stage.2root@master # salt-run state.orch ceph.stage.3root@master # salt-run state.orch ceph.stage.4
2. Register the SUSE Linux Enterprise High Availability Extension on earth and mars .
root # SUSEConnect -r ACTIVATION_CODE -e E_MAIL
3. Install ha-cluster-bootstrap on both nodes:
root # zypper in ha-cluster-bootstrap
4. a. Initialize the cluster on earth :
root@earth # ha-cluster-init
b. Let mars join the cluster:
root@mars # ha-cluster-join -c earth
130 Basic Installation SES 5.5 (SES 5 & SES …

5. Check the status of the cluster. You should see two nodes added to the cluster:
root@earth # crm status
6. On both nodes, disable the automatic start of the NFS Ganesha service at boot time:
root # systemctl disable nfs-ganesha
7. Start the crm shell on earth :
root@earth # crm configure
The next commands are executed in the crm shell.
8. On earth , run the crm shell to execute the following commands to configure the resourcefor NFS Ganesha daemons as clone of systemd resource type:
crm(live)configure# primitive nfs-ganesha-server systemd:nfs-ganesha \op monitor interval=30scrm(live)configure# clone nfs-ganesha-clone nfs-ganesha-server meta interleave=truecrm(live)configure# commitcrm(live)configure# status 2 nodes configured 2 resources configured
Online: [ earth mars ]
Full list of resources: Clone Set: nfs-ganesha-clone [nfs-ganesha-server] Started: [ earth mars ]
9. Create a primitive IPAddr2 with the crm shell:
crm(live)configure# primitive ganesha-ip IPaddr2 \params ip=192.168.2.1 cidr_netmask=24 nic=eth0 \op monitor interval=10 timeout=20
crm(live)# statusOnline: [ earth mars ]Full list of resources: Clone Set: nfs-ganesha-clone [nfs-ganesha-server] Started: [ earth mars ] ganesha-ip (ocf::heartbeat:IPaddr2): Started earth
131 Basic Installation SES 5.5 (SES 5 & SES …

10. To set up a relationship between the NFS Ganesha server and the floating Virtual IP, weuse collocation and ordering.
crm(live)configure# colocation ganesha-ip-with-nfs-ganesha-server inf: ganesha-ip nfs-ganesha-clonecrm(live)configure# order ganesha-ip-after-nfs-ganesha-server Mandatory: nfs-ganesha-clone ganesha-ip
11. Use the mount command from the client to ensure that cluster setup is complete:
root # mount -t nfs -v -o sync,nfsvers=4 192.168.2.1:/ /mnt
12.3.2 Clean Up Resources
In the event of an NFS Ganesha failure at one of the node, for example earth , x the issue andclean up the resource. Only after the resource is cleaned up can the resource fail back to earthin case NFS Ganesha fails at mars .
To clean up the resource:
root@earth # crm resource cleanup nfs-ganesha-clone earthroot@earth # crm resource cleanup ganesha-ip earth
12.3.3 Setting Up Ping Resource
It may happen that the server is unable to reach the client because of a network issue. A pingresource can detect and mitigate this problem. Configuring this resource is optional.
1. Define the ping resource:
crm(live)configure# primitive ganesha-ping ocf:pacemaker:ping \ params name=ping dampen=3s multiplier=100 host_list="CLIENT1 CLIENT2" \ op monitor interval=60 timeout=60 \ op start interval=0 timeout=60 \ op stop interval=0 timeout=60
host_list is a list of IP addresses separated by space characters. The IP addresses willbe pinged regularly to check for network outages. If a client must always have access tothe NFS server, add it to host_list .
132 Clean Up Resources SES 5.5 (SES 5 & SES …

2. Create a clone:
crm(live)configure# clone ganesha-ping-clone ganesha-ping \ meta interleave=true
3. The following command creates a constraint for the NFS Ganesha service. It forces theservice to move to another node when host_list is unreachable.
crm(live)configure# location nfs-ganesha-server-with-ganesha-ping nfs-ganesha-clone \ rule -inf: not_defined ping or ping lte 0
12.3.4 Setting Up PortBlock Resource
When a service goes down, the TCP connection that is in use by NFS Ganesha is required tobe closed otherwise it continues to run until a system-specific timeout occurs. This timeout cantake upwards of 3 minutes.
To shorten the timeout time, the TCP connection needs to be reset. We recommend configuringportblock to reset stale TCP connections.
You can choose to use portblock with or without the tickle_dir parameters that could unblockand reconnect clients to the new service faster. We recommend to have tickle_dir as theshared CephFS mount between two HA nodes (where NFS Ganesha services are running).
NoteConfiguring the following resource is optional.
1. On earth , run the crm shell to execute the following commands to configure the resourcefor NFS Ganesha daemons:
root@earth # crm configure
2. Configure the block action for portblock and omit the tickle_dir option if you havenot configured a shared directory:
crm(live)configure# primitive nfs-ganesha-block ocf:portblock protocol=tcp portno=2049 action=blockip=192.168.2.1 op monitor depth="0" timeout="10" interval="10" tickle_dir="/tmp/ganesha/tickle/"
133 Setting Up PortBlock Resource SES 5.5 (SES 5 & SES …

3. Configure the unblock action for portblock and omit the reset_local_on_un-
block_stop option if you have not configured a shared directory:
crm(live)configure# colocationganesha-portblock inf: ganesha-ip nfs-ganesha-block nfs-ganesha-unblockcrm(live)configure# edit ganesha-ip-after-nfs-ganesha-server
4. Configure the IPAddr2 resource with portblock :
crm(live)configure# colocationganesha-portblock inf: ganesha-ip nfs-ganesha-block nfs-ganesha-unblockcrm(live)configure# editganesha-ip-after-nfs-ganesha-server order ganesha-ip-after-nfs-ganesha-serverMandatory: nfs-ganesha-block nfs-ganesha-clone ganesha-ip nfs-ganesha-unblock
5. Save your changes:
crm(live)configure# commit
6. Your configuration should look like this:
crm(live)configure# show
"node 1084782956: nfs1node 1084783048: nfs2primitive ganesha-ip IPaddr2 \ params ip=192.168.2.1 cidr_netmask=24 nic=eth0 \ op monitor interval=10 timeout=20primitive nfs-ganesha-block portblock \ params protocol=tcp portno=2049 action=block ip=192.168.2.1 \ tickle_dir="/tmp/ganesha/tickle/" op monitor timeout=10 interval=10 depth=0primitive nfs-ganesha-server systemd:nfs-ganesha \ op monitor interval=30sprimitive nfs-ganesha-unblock portblock \ params protocol=tcp portno=2049 action=unblock ip=192.168.2.1 \ reset_local_on_unblock_stop=true tickle_dir="/tmp/ganesha/tickle/" \ op monitor timeout=10 interval=10 depth=0clone nfs-ganesha-clone nfs-ganesha-server \ meta interleave=truelocation cli-prefer-ganesha-ip ganesha-ip role=Started inf: nfs1order ganesha-ip-after-nfs-ganesha-server Mandatory: nfs-ganesha-block nfs-ganesha-clone ganesha-ip nfs-ganesha-unblockcolocation ganesha-ip-with-nfs-ganesha-server inf: ganesha-ip nfs-ganesha-clonecolocation ganesha-portblock inf: ganesha-ip nfs-ganesha-block nfs-ganesha-unblockproperty cib-bootstrap-options: \
134 Setting Up PortBlock Resource SES 5.5 (SES 5 & SES …

have-watchdog=false \ dc-version=1.1.16-6.5.1-77ea74d \ cluster-infrastructure=corosync \ cluster-name=hacluster \ stonith-enabled=false \ placement-strategy=balanced \ last-lrm-refresh=1544793779rsc_defaults rsc-options: \ resource-stickiness=1 \ migration-threshold=3op_defaults op-options: \ timeout=600 \ record-pending=true"
In this example /tmp/ganesha/ is the CephFS mount on both nodes (nfs1 and nfs2):
172.16.1.11:6789:/ganesha on /tmp/ganesha type ceph (rw,relatime,name=admin,secret=...hidden...,acl,wsize=16777216)
The tickle directory has been initially created.
12.3.5 NFS Ganesha HA and DeepSea
DeepSea does not support configuring NFS Ganesha HA. To prevent DeepSea from failing afterNFS Ganesha HA was configured, exclude starting and stopping the NFS Ganesha service fromDeepSea Stage 4:
1. Copy /srv/salt/ceph/ganesha/default.sls to /srv/salt/ceph/ganesha/ha.sls .
2. Remove the .service entry from /srv/salt/ceph/ganesha/ha.sls so that it looks asfollows:
include:- .keyring- .install- .configure
3. Add the following line to /srv/pillar/ceph/stack/global.yml :
ganesha_init: ha
135 NFS Ganesha HA and DeepSea SES 5.5 (SES 5 & SES …

12.4 More InformationMore information can be found in Book “Administration Guide”, Chapter 16 “NFS Ganesha: Export
Ceph Data via NFS”.
136 More Information SES 5.5 (SES 5 & SES …

13 Exporting Ceph Data via Samba
This chapter describes how to export data stored in a Ceph cluster via a Samba/CIFS share sothat you can easily access them from Windows* client machines. It also includes informationthat will help you configure a Ceph Samba gateway to join Active Directory in the Windows*domain to authenticate and authorize users.
Note: Samba Gateway PerformanceBecause of increased protocol overhead and additional latency caused by extra networkhops between the client and the storage, accessing CephFS via a Samba Gateway maysignificantly reduce application performance when compared to native Ceph clients.
13.1 Export CephFS via Samba Share
Warning: Cross Protocol AccessNative CephFS and NFS clients are not restricted by le locks obtained via Samba, and viceversa. Applications that rely on cross protocol le locking may experience data corruptionif CephFS backed Samba share paths are accessed via other means.
13.1.1 Samba Related Packages Installation
To configure and export a Samba share, the following packages need to be installed: sam-ba-ceph and samba-winbind . If these packages are not installed, install them:
cephadm@smb > zypper install samba-ceph samba-winbind
13.1.2 Single Gateway Example
In preparation for exporting a Samba share, choose an appropriate node to act as a SambaGateway. The node needs to have access to the Ceph client network, as well as sufficient CPU,memory, and networking resources.
137 Export CephFS via Samba Share SES 5.5 (SES 5 & SES …

Failover functionality can be provided with CTDB and the SUSE Linux Enterprise High Avail-ability Extension. Refer to Section 13.1.3, “High Availability Configuration” for more information onHA setup.
1. Make sure that a working CephFS already exists in your cluster. For details, see Chapter 11,
Installation of CephFS.
2. Create a Samba Gateway specific keyring on the Ceph admin node and copy it to bothSamba Gateway nodes:
cephadm > ceph auth get-or-create client.samba.gw mon 'allow r' \ osd 'allow *' mds 'allow *' -o ceph.client.samba.gw.keyringcephadm > scp ceph.client.samba.gw.keyring SAMBA_NODE:/etc/ceph/
Replace SAMBA_NODE with the name of the Samba gateway node.
3. The following steps are executed on the Samba Gateway node. Install Samba together withthe Ceph integration package:
cephadm@smb > sudo zypper in samba samba-ceph
4. Replace the default contents of the /etc/samba/smb.conf le with the following:
[global] netbios name = SAMBA-GW clustering = no idmap config * : backend = tdb2 passdb backend = tdbsam # disable print server load printers = no smbd: backgroundqueue = no
[SHARE_NAME] path = / vfs objects = ceph ceph: config_file = /etc/ceph/ceph.conf ceph: user_id = samba.gw read only = no oplocks = no kernel share modes = no
138 Single Gateway Example SES 5.5 (SES 5 & SES …

Tip: Oplocks and Share Modesoplocks (also known as SMB2+ leases) allow for improved performance throughaggressive client caching, but are currently unsafe when Samba is deployed togetherwith other CephFS clients, such as kernel mount.cephfs , FUSE, or NFS Ganesha.
If all CephFS le system path access is exclusively handled by Samba, then theoplocks parameter can be safely enabled.
Currently kernel share modes needs to be disabled in a share running with theCephFS vfs module for le serving to work properly.
Important: Permitting AccessSince vfs_ceph does not require a le system mount, the share path is interpretedas an absolute path within the Ceph le system on the attached Ceph cluster. Forsuccessful share I/O, the path's access control list (ACL) needs to permit access fromthe mapped user for the given Samba client. You can modify the ACL by temporarilymounting via the CephFS kernel client and using the chmod , chown , or setfaclutilities against the share path. For example, to permit access for all users, run:
root # chmod 777 MOUNTED_SHARE_PATH
5. Start and enable the Samba daemon:
cephadm@smb > sudo systemctl start smb.servicecephadm@smb > sudo systemctl enable smb.servicecephadm@smb > sudo systemctl start nmb.servicecephadm@smb > sudo systemctl enable nmb.service
139 Single Gateway Example SES 5.5 (SES 5 & SES …

13.1.3 High Availability Configuration
Important: Transparent Failover Not SupportedAlthough a multi-node Samba + CTDB deployment is more highly available comparedto the single node (see Chapter 13, Exporting Ceph Data via Samba), client-side transparentfailover is not supported. Applications will likely experience a short outage on SambaGateway node failure.
This section provides an example of how to set up a two-node high availability configuration ofSamba servers. The setup requires the SUSE Linux Enterprise High Availability Extension. Thetwo nodes are called earth ( 192.168.1.1 ) and mars ( 192.168.1.2 ).
For details about SUSE Linux Enterprise High Availability Extension, see https://documenta-
tion.suse.com/sle-ha/12-SP5/ .
Additionally, two floating virtual IP addresses allow clients to connect to the service no matterwhich physical node it is running on. 192.168.1.10 is used for cluster administration withHawk2 and 192.168.2.1 is used exclusively for the CIFS exports. This makes it easier to applysecurity restrictions later.
The following procedure describes the example installation. More details can be found at https://
documentation.suse.com/sle-ha/12-SP5/single-html/SLE-HA-install-quick/ .
1. Create a Samba Gateway specific keyring on the Admin Node and copy it to both nodes:
cephadm > ceph auth get-or-create client.samba.gw mon 'allow r' \ osd 'allow *' mds 'allow *' -o ceph.client.samba.gw.keyringcephadm > scp ceph.client.samba.gw.keyring earth:/etc/ceph/cephadm > scp ceph.client.samba.gw.keyring mars:/etc/ceph/
2. SLE-HA setup requires a fencing device to avoid a split brain situation when active clus-ter nodes become unsynchronized. For this purpose, you can use a Ceph RBD imagewith Stonith Block Device (SBD). Refer to https://documentation.suse.com/sle-ha/12-SP5/
single-html/SLE-HA-guide/#sec-ha-storage-protect-fencing-setup for more details.If it does not yet exist, create an RBD pool called rbd (see Book “Administration Guide”,
Chapter 8 “Managing Storage Pools”, Section 8.2.2 “Create a Pool”) and associate it with rbd(see Book “Administration Guide”, Chapter 8 “Managing Storage Pools”, Section 8.1 “Associate Pools
with an Application”). Then create a related RBD image called sbd01 :
cephadm > ceph osd pool create rbd PG_NUM PGP_NUM replicated
140 High Availability Configuration SES 5.5 (SES 5 & SES …

cephadm > ceph osd pool application enable rbd rbdcephadm > rbd -p rbd create sbd01 --size 64M --image-shared
3. Prepare earth and mars to host the Samba service:
a. Make sure the following packages are installed before you proceed: ctdb , tdb-tools , and samba (needed for smb.service and nmb.service ).
cephadm@smb > zypper in ctdb tdb-tools samba samba-ceph
b. Make sure the services ctdb , smb , and nmb are stopped and disabled:
cephadm@smb > sudo systemctl disable ctdbcephadm@smb > sudo systemctl disable smbcephadm@smb > sudo systemctl disable nmbcephadm@smb > sudo systemctl stop smbcephadm@smb > sudo systemctl stop nmb
c. Open port 4379 of your firewall on all nodes. This is needed for CTDB to commu-nicate with other cluster nodes.
4. On earth , create the configuration les for Samba. They will later automatically syn-chronize to mars .
a. Insert a list of private IP addresses of Samba Gateway nodes in the /etc/ctdb/nodesle. Find more details in the ctdb manual page ( man 7 ctdb ).
192.168.1.1192.168.1.2
b. Configure Samba. Add the following lines in the [global] section of /etc/sam-ba/smb.conf . Use the host name of your choice in place of CTDB-SERVER (all nodesin the cluster will appear as one big node with this name). Add a share definition aswell, consider SHARE_NAME as an example:
[global] netbios name = SAMBA-HA-GW clustering = yes idmap config * : backend = tdb2 passdb backend = tdbsam ctdbd socket = /var/lib/ctdb/ctdb.socket # disable print server load printers = no smbd: backgroundqueue = no
141 High Availability Configuration SES 5.5 (SES 5 & SES …

[SHARE_NAME] path = / vfs objects = ceph ceph: config_file = /etc/ceph/ceph.conf ceph: user_id = samba.gw read only = no oplocks = no kernel share modes = no
Note that the /etc/ctdb/nodes and /etc/samba/smb.conf les need to matchon all Samba Gateway nodes.
5. Install and bootstrap the SUSE Linux Enterprise High Availability cluster.
a. Register the SUSE Linux Enterprise High Availability Extension on earth and mars :
root@earth # SUSEConnect -r ACTIVATION_CODE -e E_MAIL
root@mars # SUSEConnect -r ACTIVATION_CODE -e E_MAIL
b. Install ha-cluster-bootstrap on both nodes:
root@earth # zypper in ha-cluster-bootstrap
root@mars # zypper in ha-cluster-bootstrap
c. Map the RBD image sbd01 on both Samba Gateways via rbdmap.service .Edit /etc/ceph/rbdmap and add an entry for the SBD image:
rbd/sbd01 id=samba.gw,keyring=/etc/ceph/ceph.client.samba.gw.keyring
Enable and start rbdmap.service :
root@earth # systemctl enable rbdmap.service && systemctl start rbdmap.serviceroot@mars # systemctl enable rbdmap.service && systemctl start rbdmap.service
The /dev/rbd/rbd/sbd01 device should be available on both Samba Gateways.
d. Initialize the cluster on earth and let mars join it.
root@earth # ha-cluster-init
root@mars # ha-cluster-join -c earth
142 High Availability Configuration SES 5.5 (SES 5 & SES …

ImportantDuring the process of initialization and joining the cluster, you will be inter-actively asked whether to use SBD. Confirm with y and then specify /dev/rbd/rbd/sbd01 as a path to the storage device.
6. Check the status of the cluster. You should see two nodes added in the cluster:
root@earth # crm status2 nodes configured1 resource configured
Online: [ earth mars ]
Full list of resources:
admin-ip (ocf::heartbeat:IPaddr2): Started earth
7. Execute the following commands on earth to configure the CTDB resource:
root@earth # crm configurecrm(live)configure# primitive ctdb ocf:heartbeat:CTDB params \ ctdb_manages_winbind="false" \ ctdb_manages_samba="false" \ ctdb_recovery_lock="!/usr/lib64/ctdb/ctdb_mutex_ceph_rados_helper ceph client.samba.gw cephfs_metadata ctdb-mutex" ctdb_socket="/var/lib/ctdb/ctdb.socket" \ op monitor interval="10" timeout="20" \ op start interval="0" timeout="200" \ op stop interval="0" timeout="100"crm(live)configure# primitive nmb systemd:nmb \ op start timeout="100" interval="0" \ op stop timeout="100" interval="0" \ op monitor interval="60" timeout="100"crm(live)configure# primitive smb systemd:smb \ op start timeout="100" interval="0" \ op stop timeout="100" interval="0" \ op monitor interval="60" timeout="100"crm(live)configure# group g-ctdb ctdb nmb smbcrm(live)configure# clone cl-ctdb g-ctdb meta interleave="true"crm(live)configure# commit
143 High Availability Configuration SES 5.5 (SES 5 & SES …

The binary /usr/lib64/ctdb/ctdb_mutex_ceph_rados_helper in the configura-tion option ctdb_recovery_lock has the parameters CLUSTER_NAME , CEPHX_USER ,RADOS_POOL , and RADOS_OBJECT , in this order.An extra lock-timeout parameter can be appended to override the default value used (10seconds). A higher value will increase the CTDB recovery master failover time, whereasa lower value may result in the recovery master being incorrectly detected as down, trig-gering flapping failovers.
8. Add a clustered IP address:
crm(live)configure# primitive ip ocf:heartbeat:IPaddr2 params ip=192.168.2.1 \ unique_clone_address="true" \ op monitor interval="60" \ meta resource-stickiness="0"crm(live)configure# clone cl-ip ip \ meta interleave="true" clone-node-max="2" globally-unique="true"crm(live)configure# colocation col-with-ctdb 0: cl-ip cl-ctdbcrm(live)configure# order o-with-ctdb 0: cl-ip cl-ctdbcrm(live)configure# commit
If unique_clone_address is set to true , the IPaddr2 resource agent adds a clone IDto the specified address, leading to three different IP addresses. These are usually notneeded, but help with load balancing. For further information about this topic, see https://
documentation.suse.com/sle-ha/15-SP1/single-html/SLE-HA-guide/#cha-ha-lb .
9. Check the result:
root@earth # crm statusClone Set: base-clone [dlm] Started: [ factory-1 ] Stopped: [ factory-0 ] Clone Set: cl-ctdb [g-ctdb] Started: [ factory-1 ] Started: [ factory-0 ] Clone Set: cl-ip [ip] (unique) ip:0 (ocf:heartbeat:IPaddr2): Started factory-0 ip:1 (ocf:heartbeat:IPaddr2): Started factory-1
10. Test from a client machine. On a Linux client, run the following command to see if youcan copy les from and to the system:
root # smbclient //192.168.2.1/myshare
144 High Availability Configuration SES 5.5 (SES 5 & SES …

A Documentation Updates
This chapter lists content changes for this document since the initial release of SUSE EnterpriseStorage 4. You can nd changes related to the cluster deployment that apply to previous versionsin https://documentation.suse.com/ses/5.5/single-html/ses-deployment/#ap-deploy-docupdate .
The document was updated on the following dates:
Section A.1, “The Latest Documentation Update”
Section A.2, “October, 2018 (Documentation Maintenance Update)”
Section A.3, “November, 2017 (Maintenance Update)”
Section A.4, “October, 2017 (Release of SUSE Enterprise Storage 5)”
A.1 The Latest Documentation UpdateBUGFIXES
Added an important box stating that encrypted OSDs boot longer than unencrypt-ed in Section 4.5.1.6, “Deploying Encrypted OSDs” (https://bugzilla.suse.com/show_bug.c-
gi?id=1124813 ).
Added a step to disable AppArmor profiles in Important: Software Requirements (https://
bugzilla.suse.com/show_bug.cgi?id=1127297 ).
Added Section 10.4.4, “Authentication and Access Control” and extended Section 10.4.6, “Advanced
Settings” (https://bugzilla.suse.com/show_bug.cgi?id=1114705 ).
Added DeepSea stage 2 to the deployment process in Procedure 12.0, “” (https://bugzil-
la.suse.com/show_bug.cgi?id=1119167 ).
Added Section 1.3, “User Privileges and Command Prompts” (https://bugzil-
la.suse.com/show_bug.cgi?id=1116537 ).
Added Section 5.4.2, “Details on the salt target ceph.maintenance.upgrade Command”
(https://bugzilla.suse.com/show_bug.cgi?id=1104794 ).
145 The Latest Documentation Update SES 5.5 (SES 5 & SES …

A.2 October, 2018 (Documentation MaintenanceUpdate)GENERAL UPDATES
Added Chapter 3, Ceph Admin Node HA Setup (Fate#325622).
Encrypted OSDs during deployment and upgrade in Section 4.5.1.6, “Deploying Encrypted
OSDs” and Section 5.3, “Encrypting OSDs during Upgrade” (Fate#321665).
BUGFIXES
Cleaned the update repository sections in Section 5.4, “Upgrade from SUSE Enterprise Storage
4 (DeepSea Deployment) to 5” (https://bugzilla.suse.com/show_bug.cgi?id=1109377 ).
Added Section 4.5.1.5, “Overriding Default Search for Disk Devices” (https://bugzil-
la.suse.com/show_bug.cgi?id=1105967 ).
Prepended DeepSea Stage 0 execution in Procedure 5.2, “Steps to Apply to the Salt master Node”
(https://bugzilla.suse.com/show_bug.cgi?id=1110440 ).
Fixed creation of demo users in Section 12.2, “Example Installation” (https://bugzil-
la.suse.com/show_bug.cgi?id=1105739 ).
Removed the default stage_prep_master and stage_prep_minion values in Sec-
tion 7.1.5, “Updates and Reboots during Stage 0” (https://bugzilla.suse.com/show_bug.c-
gi?id=1103242 ).
Updated various parts of Chapter 13, Exporting Ceph Data via Samba (https://bugzil-
la.suse.com/show_bug.cgi?id=1101478 ).
Added information on preconfiguring network settings by a custom cluster.yml in Sec-
tion 4.3, “Cluster Deployment” (https://bugzilla.suse.com/show_bug.cgi?id=1099448 ).
Removed spare role-igw definitions (https://bugzilla.suse.com/show_bug.c-
gi?id=1099687 ).
Added a tip on running a second terminal session for the monitor mode in Section 4.4.1,
“DeepSea CLI: Monitor Mode” (https://bugzilla.suse.com/show_bug.cgi?id=1099453 ).
Non-data Object Gateway pools need to be replicated in Section 9.1.1.2, “Create Pools (Op-
tional)” (https://bugzilla.suse.com/show_bug.cgi?id=1095743 ).
146 October, 2018 (Documentation Maintenance Update) SES 5.5 (SES 5 & SES …

FQDN of all nodes must be resolvable to the public network IP. See Section 4.3, “Cluster
Deployment” (https://bugzilla.suse.com/show_bug.cgi?id=1067113 ).
Added a tip on sharing multiple roles in Chapter 4, Deploying with DeepSea/Salt (https://bugzil-
la.suse.com/show_bug.cgi?id=1093824 ).
Added Section 2.4, “Metadata Server Nodes” (https://bugzilla.suse.com/show_bug.c-
gi?id=1047230 ).
Manually edit policy.cfg for openATTIC (https://bugzilla.suse.com/show_bug.c-
gi?id=1073331 ).
Recommended /var/lib/ceph on SSD in Section 2.2, “Monitor Nodes” (https://bugzil-
la.suse.com/show_bug.cgi?id=1056322 ).
Added Section 1.5, “BlueStore” and Section 2.1.3, “Recommended Size for the BlueStore's WAL and
DB Device” (https://bugzilla.suse.com/show_bug.cgi?id=1072502 ).
Extended the deployment of encrypted OSDs in Section 4.5.1.6, “Deploying Encrypted OSDs”
(https://bugzilla.suse.com/show_bug.cgi?id=1093003 ).
Increased the number of bytes to erase to 4M in Step 12 (https://bugzil-
la.suse.com/show_bug.cgi?id=1093331 ).
Firewall breaks DeepSea stages, in Section 4.3, “Cluster Deployment” (https://bugzil-
la.suse.com/show_bug.cgi?id=1090683 ).
Added the list of repositories in Section 4.3, “Cluster Deployment” (https://bugzil-
la.suse.com/show_bug.cgi?id=1088170 ).
Added instructions to manually add repositories using zypper Section 5.4, “Upgrade from
SUSE Enterprise Storage 4 (DeepSea Deployment) to 5”, Section 5.5, “Upgrade from SUSE Enterprise
Storage 4 (ceph-deploy Deployment) to 5”, and Section 5.6, “Upgrade from SUSE Enterprise Stor-
age 4 (Crowbar Deployment) to 5” (https://bugzilla.suse.com/show_bug.cgi?id=1073308 ).
Added a list of upgrade repositories + brief explanation of the DeepSea's upgrade_initoption in Section 5.4, “Upgrade from SUSE Enterprise Storage 4 (DeepSea Deployment) to 5”
(https://bugzilla.suse.com/show_bug.cgi?id=1073372 ).
Added Section 7.1.5, “Updates and Reboots during Stage 0” (https://bugzil-
la.suse.com/show_bug.cgi?id=1081524 ).
147 October, 2018 (Documentation Maintenance Update) SES 5.5 (SES 5 & SES …

Fixed prompts in Procedure 5.2, “Steps to Apply to the Salt master Node” (https://bugzil-
la.suse.com/show_bug.cgi?id=1084307 ).
Added Section 2.12, “SUSE Enterprise Storage 5.5 and Other SUSE Products” (https://bugzil-
la.suse.com/show_bug.cgi?id=1089717 ).
Added a note on the Object Gateway configuration sections in Book “Administration Guide”,
Chapter 1 “Salt Cluster Administration”, Section 1.12 “Adjusting ceph.conf with Custom Settings”
(https://bugzilla.suse.com/show_bug.cgi?id=1089300 ).
Added WAL/DB snippets to Section 2.1.2, “Minimum Disk Size” (https://bugzil-
la.suse.com/show_bug.cgi?id=1057797 ).
MONs' public addresses are calculated dynamically (https://bugzilla.suse.com/show_bug.c-
gi?id=1089151 ).
Fixed keyrings location in Section 5.5, “Upgrade from SUSE Enterprise Storage 4 (ceph-deployDeployment) to 5” (https://bugzilla.suse.com/show_bug.cgi?id=1073368 ).
Provided several helper snippets in Section 4.5.1.2, “Role Assignment” (https://bugzil-
la.suse.com/show_bug.cgi?id=1061629 ).
Engulfing custom ceph.conf in Procedure 5.2, “Steps to Apply to the Salt master Node” (https://
bugzilla.suse.com/show_bug.cgi?id=1085443 ).
Updated RAM value recommended for BlueStore deployment in Section 2.1.1, “Minimum
Requirements” (https://bugzilla.suse.com/show_bug.cgi?id=1076385) ).
Added manual steps to upgrade the iSCSI Gateways after the engulf command in Sec-
tion 5.5, “Upgrade from SUSE Enterprise Storage 4 (ceph-deploy Deployment) to 5” and Sec-
tion 5.6, “Upgrade from SUSE Enterprise Storage 4 (Crowbar Deployment) to 5” (https://bugzil-
la.suse.com/show_bug.cgi?id=1073327) ).
The iSCSI Gateway deployment updated to the DeepSea way in Section 10.4, “Installation and
Configuration” (https://bugzilla.suse.com/show_bug.cgi?id=1073327 ).
CephFS quotas are not supported. See Section 11.1, “Supported CephFS Scenarios and
Guidance” (https://bugzilla.suse.com/show_bug.cgi?id=1077269 ). CephFS quotas are notsupported. See Section 11.1, “Supported CephFS Scenarios and Guidance”. (https://bugzil-
la.suse.com/show_bug.cgi?id=1077269) )
Include partitions with higher numbers than 9 in zeroing step, see Step 12. (https://bugzil-
la.suse.com/show_bug.cgi?id=1050230 ).
148 October, 2018 (Documentation Maintenance Update) SES 5.5 (SES 5 & SES …

A.3 November, 2017 (Maintenance Update)GENERAL UPDATES
Added Section 11.3.2, “MDS Cluster Size” and Section 11.3.3, “MDS Cluster and Updates”.
BUGFIXES
Enhanced the disk wiping strategy in Step 12 of Section 4.3, “Cluster Deployment” (https://
bugzilla.suse.com/show_bug.cgi?id=1073897 ).
Added tip on disengaging safety measures in Section 5.4.1, “OSD Migration to BlueStore”
(https://bugzilla.suse.com/show_bug.cgi?id=1073720 ).
Referred to Section 4.2.2.1, “Matching the Minion Name” in Procedure 4.1, “Running De-
ployment Stages” and Book “Administration Guide”, Chapter 1 “Salt Cluster Administration”,
Section 1.1 “Adding New Cluster Nodes” to unify the information source (https://bugzil-
la.suse.com/show_bug.cgi?id=1073374 ).
In Section 5.2, “General Upgrade Procedure” only update Salt master and minion andnot all packages. Therefore replace salt target state.apply ceph.updates withsalt target state.apply ceph.updates.salt (https://bugzilla.suse.com/show_bug.c-
gi?id=1073373 ).
Added Section 5.6, “Upgrade from SUSE Enterprise Storage 4 (Crowbar Deployment) to 5” (https://
bugzilla.suse.com/show_bug.cgi?id=1073317 and https://bugzilla.suse.com/show_bug.c-
gi?id=1073701 ).
Replaced '*' with target and extended the targeting introduction in Section 4.2.2, “Targeting
the Minions” (https://bugzilla.suse.com/show_bug.cgi?id=1068956 ).
Added verification of Salt minions' fingerprints in Section 4.3, “Cluster Deployment” (https://
bugzilla.suse.com/show_bug.cgi?id=1064045 ).
Removed advice to copy the example refactor.conf le in Book “Administration Guide”, Chap-
ter 1 “Salt Cluster Administration”, Section 1.9 “Automated Installation via Salt” (https://bugzil-
la.suse.com/show_bug.cgi?id=1065926 ).
Fixed path to network configuration YAML le in Procedure 4.1, “Running Deployment Stages”
(https://bugzilla.suse.com/show_bug.cgi?id=1067730 ).
Verify the cluster layout in Procedure 5.2, “Steps to Apply to the Salt master Node” (https://
bugzilla.suse.com/show_bug.cgi?id=1067189 ).
149 November, 2017 (Maintenance Update) SES 5.5 (SES 5 & SES …

Added ceph osd set sortbitwise to Section 5.4, “Upgrade from SUSE Enterprise Storage 4
(DeepSea Deployment) to 5” and Procedure 5.2, “Steps to Apply to the Salt master Node” (https://
bugzilla.suse.com/show_bug.cgi?id=1067146 ).
osd crush location is gone, ceph.conf is customized differently in Important: Software
Requirements (https://bugzilla.suse.com/show_bug.cgi?id=1067381 ).
Fixed 'role-admin' from 'role-master' in Section 4.5.1.2, “Role Assignment” (https://bugzil-
la.suse.com/show_bug.cgi?id=1064056 ).
Fixed path to cluster.yml in Procedure 4.1, “Running Deployment Stages” (https://bugzil-
la.suse.com/show_bug.cgi?id=1066711 ).
Added Section 12.3.5, “NFS Ganesha HA and DeepSea” (https://bugzilla.suse.com/show_bug.c-
gi?id=1058313 ).
Re-added Section 2.7.2, “Monitor Nodes on Different Subnets” (https://bugzil-
la.suse.com/show_bug.cgi?id=1050115 ).
The le deepsea_minions.sls must contain only one deepsea_minions entry.See Procedure 4.1, “Running Deployment Stages”. (https://bugzilla.suse.com/show_bug.c-
gi?id=1065403 )
Changed order of steps in rst procedure of Section 4.3, “Cluster Deployment”. (https://bugzil-
la.suse.com/show_bug.cgi?id=1064770 )
Clarified Section 5.4.1, “OSD Migration to BlueStore”. (https://bugzilla.suse.com/show_bug.c-
gi?id=1063250 )
A.4 October, 2017 (Release of SUSE EnterpriseStorage 5)GENERAL UPDATES
Added Section 5.7, “Upgrade from SUSE Enterprise Storage 3 to 5” (Fate #323072).
Removed the obsolete Crowbar installation tool in favor of DeepSea.
Removed the obsolete ceph-deploy tool in favor of DeepSea.
150 October, 2017 (Release of SUSE Enterprise Storage 5) SES 5.5 (SES 5 & SES …

Updated Chapter 2, Hardware Requirements and Recommendations (https://
bugzilla.suse.com/show_bug.cgi?id=1029544 and https://bugzilla.suse.com/show_bug.c-
gi?id=1042283 ).
Updated Chapter 12, Installation of NFS Ganesha (https://bugzilla.suse.com/show_bug.c-
gi?id=1036495 , https://bugzilla.suse.com/show_bug.cgi?id=1031444 , FATE#322464).
DeepSea naming schema of profiles changed. See Section 4.5.1.4, “Profile Assignment” (https://
bugzilla.suse.com/show_bug.cgi?id=1046108 ).
CephFS can be used on EC pools, see Section 11.3.1, “Creating CephFS” (FATE#321617).
BUGFIXES
Added Section 10.5, “Exporting RADOS Block Device Images using tcmu-runner” (https://bugzil-
la.suse.com/show_bug.cgi?id=1064467 ).
Improved the upgrade procedure to include the openATTIC role in Section 5.4, “Upgrade from
SUSE Enterprise Storage 4 (DeepSea Deployment) to 5” (https://bugzilla.suse.com/show_bug.c-
gi?id=1064621 ).
Added a reference to Procedure 4.1, “Running Deployment Stages” in Step 4 (https://bugzil-
la.suse.com/show_bug.cgi?id=1064276 ).
Modified the upgrade procedure in Procedure 5.2, “Steps to Apply to the Salt
master Node” (https://bugzilla.suse.com/show_bug.cgi?id=1061608 and https://bugzil-
la.suse.com/show_bug.cgi?id=1048959 ).
Added rgw.conf in Book “Administration Guide”, Chapter 1 “Salt Cluster Administration”, Sec-
tion 1.12 “Adjusting ceph.conf with Custom Settings” (https://bugzilla.suse.com/show_bug.c-
gi?id=1062109 ).
Moved DeepSea installation to the very end in Section 4.3, “Cluster Deployment” (https://
bugzilla.suse.com/show_bug.cgi?id=1056292 ).
Added Section 4.5.1.6, “Deploying Encrypted OSDs” (https://bugzilla.suse.com/show_bug.c-
gi?id=1061751 ).
Updated and simplified the upgrade procedure in Section 5.4, “Upgrade from SUSE Enterprise
Storage 4 (DeepSea Deployment) to 5” (https://bugzilla.suse.com/show_bug.cgi?id=1059362 ).
Check for DeepSea version before upgrade in Important: Software Requirements (https://
bugzilla.suse.com/show_bug.cgi?id=1059331 ).
151 October, 2017 (Release of SUSE Enterprise Storage 5) SES 5.5 (SES 5 & SES …

Prefixing custom .sls les with custom- in Section 7.1, “Using Customized Configuration Files”
(https://bugzilla.suse.com/show_bug.cgi?id=1048568 ).
Added a note about key caps mismatch in Section 5.4, “Upgrade from SUSE Enterprise Storage
4 (DeepSea Deployment) to 5” (https://bugzilla.suse.com/show_bug.cgi?id=1054186 ).
Merged redundant list items in Section 4.3, “Cluster Deployment” (https://bugzil-
la.suse.com/show_bug.cgi?id=1055140 ).
Added a note about the long time the cluster upgrade may take in Section 5.4, “Upgrade from
SUSE Enterprise Storage 4 (DeepSea Deployment) to 5” (https://bugzilla.suse.com/show_bug.c-
gi?id=1054079 ).
Salt minions targeting with deepsea_minions: is mandatory (https://bugzil-
la.suse.com/show_bug.cgi?id=1054229 ).
Inserted Stage 1 after engulfing in Procedure 5.2, “Steps to Apply to the Salt master Node”
(https://bugzilla.suse.com/show_bug.cgi?id=1054155 ).
Added Book “Administration Guide”, Chapter 1 “Salt Cluster Administration”, Section 1.12 “Adjusting
ceph.conf with Custom Settings” (https://bugzilla.suse.com/show_bug.cgi?id=1052806 ).
Added missing steps in Section 5.4, “Upgrade from SUSE Enterprise Storage 4 (DeepSea Deploy-
ment) to 5” (https://bugzilla.suse.com/show_bug.cgi?id=1052597 ).
Fixed radosgw-admin command syntax in Section 12.2, “Example Installation” (https://bugzil-
la.suse.com/show_bug.cgi?id=1052698 ).
'salt' is not the required host name of the Salt master during the upgrade in Proce-
dure 5.1, “Steps to Apply to All Cluster Nodes (including the Calamari Node)” (https://bugzil-
la.suse.com/show_bug.cgi?id=1052907 ).
Better wording and text ow in the 'important' section of Section 5.4, “Upgrade from
SUSE Enterprise Storage 4 (DeepSea Deployment) to 5” (https://bugzilla.suse.com/show_bug.c-
gi?id=1052147 ).
Added a note about manual role assignment during engulfment in Procedure 5.2, “Steps to
Apply to the Salt master Node” (https://bugzilla.suse.com/show_bug.cgi?id=1050554 ).
Added Section 5.4.1, “OSD Migration to BlueStore” (https://bugzilla.suse.com/show_bug.c-
gi?id=1052210 ).
152 October, 2017 (Release of SUSE Enterprise Storage 5) SES 5.5 (SES 5 & SES …

Explained salt-run populate.engulf_existing_cluster in detail in Proce-
dure 5.2, “Steps to Apply to the Salt master Node” (https://bugzilla.suse.com/show_bug.c-
gi?id=1051258 ).
Added openATTIC role in Section 4.5.1.8, “Example policy.cfg File” (https://bugzil-
la.suse.com/show_bug.cgi?id=1052076 ).
Fixed profile-default paths in Section 4.5.1.8, “Example policy.cfg File” (https://bugzil-
la.suse.com/show_bug.cgi?id=1051760 ).
Detached previous section into a new chapter Chapter 7, Customizing the Default Configuration
(https://bugzilla.suse.com/show_bug.cgi?id=1050238 ).
Referencing to Section 1.2.3, “Ceph Nodes and Daemons” from DeepSea Stages Descrip-
tion to keep the list of Ceph services up-to-date (https://bugzilla.suse.com/show_bug.c-
gi?id=1050221 ).
Improved Salt master description and wording in Chapter 4, Deploying with DeepSea/Salt
(https://bugzilla.suse.com/show_bug.cgi?id=1050214 ).
Added optional node roles description in Section 1.2.3, “Ceph Nodes and Daemons” (https://
bugzilla.suse.com/show_bug.cgi?id=1050085 ).
Updated the upgrade procedure in general (https://bugzilla.suse.com/show_bug.c-
gi?id=1048436 , https://bugzilla.suse.com/show_bug.cgi?id=1048959 , and https://bugzil-
la.suse.com/show_bug.cgi?id=104i7085 ).
Added a new DeepSea role Ceph Manager (https://bugzilla.suse.com/show_bug.c-
gi?id=1047472 ).
Added Section 5.5, “Upgrade from SUSE Enterprise Storage 4 (ceph-deploy Deployment) to 5”
(https://bugzilla.suse.com/show_bug.cgi?id=1048436 ).
Made Stage 0 fully optional in DeepSea Stages Description (https://bugzil-
la.suse.com/show_bug.cgi?id=1045845 ).
Updated the list of default pools in Section 9.1.1, “Object Gateway Configuration” (https://bugzil-
la.suse.com/show_bug.cgi?id=1034039 ).
Added an 'important' snippet about Object Gateway being deployed by DeepSea now inChapter 9, Ceph Object Gateway (https://bugzilla.suse.com/show_bug.cgi?id=1044928 ).
Fixed shell script in Section 4.3, “Cluster Deployment” (https://bugzilla.suse.com/show_bug.c-
gi?id=1044684 ).
153 October, 2017 (Release of SUSE Enterprise Storage 5) SES 5.5 (SES 5 & SES …

Added "Set require-osd-release luminous Flag" to Section 5.2, “General Upgrade Proce-
dure” (https://bugzilla.suse.com/show_bug.cgi?id=1040750 ).
Added annotation to the example policy.cfg in Section 4.5.1.8, “Example policy.cfg File”
(https://bugzilla.suse.com/show_bug.cgi?id=1042691 ).
Improved commands for OSD disk zapping in Section 4.3, “Cluster Deployment” (https://bugzil-
la.suse.com/show_bug.cgi?id=1042074 ).
Removed advice to install salt-minion on Salt master in Section 4.3, “Cluster Deployment”
(https://bugzilla.suse.com/show_bug.cgi?id=1041590 ).
Added firewall recommendation to Section 4.3, “Cluster Deployment” (https://bugzil-
la.suse.com/show_bug.cgi?id=1039344 ).
Removed XML-RPC references from openATTIC systemd command lines in Section 7.1, “Us-
ing Customized Configuration Files” (https://bugzilla.suse.com/show_bug.cgi?id=1037371 ).
Fixed YAML syntax in Section 4.3, “Cluster Deployment” (https://bugzilla.suse.com/show_bug.c-
gi?id=1035498 ).
Added the 'ganesha' role explanation in Section 4.5.1.2, “Role Assignment” (https://bugzil-
la.suse.com/show_bug.cgi?id=1037365 ).
Clarified and improved text ow in Section 4.5.1, “The policy.cfg File” (https://bugzil-
la.suse.com/show_bug.cgi?id=1037360 ).
Added the SUSE Enterprise Storage 4 to 5 upgrade procedure in Section 5.4, “Upgrade from
SUSE Enterprise Storage 4 (DeepSea Deployment) to 5” (https://bugzilla.suse.com/show_bug.c-
gi?id=1036266 ).
Replaced the term 'provisioning' with 'preparation' in Section 4.3, “Cluster
Deployment” (https://bugzilla.suse.com/show_bug.cgi?id=1036400 and https://bugzil-
la.suse.com/show_bug.cgi?id=1036492 ).
Added warning about advanced techniques in Section 4.5.1.7, “Item Filtering” (https://bugzil-
la.suse.com/show_bug.cgi?id=1036278 ).
Replaced redundant role-admin assignment in Section 4.5.1.8, “Example policy.cfg File”
(https://bugzilla.suse.com/show_bug.cgi?id=1036506 ).
Improved DeepSea Stages Description and Section 4.3, “Cluster Deployment” (https://bugzil-
la.suse.com/show_bug.cgi?id=1036278 ).
154 October, 2017 (Release of SUSE Enterprise Storage 5) SES 5.5 (SES 5 & SES …

Added deployment steps modifications in Section 7.1, “Using Customized Configuration Files”
(https://bugzilla.suse.com/show_bug.cgi?id=1026782 ).
Clarified and enhanced Chapter 4, Deploying with DeepSea/Salt as suggested by (https://bugzil-
la.suse.com/show_bug.cgi?id=1020920 ).
Recommended enabling custom openATTIC services in Section 7.1, “Using Customized Config-
uration Files” (https://bugzilla.suse.com/show_bug.cgi?id=989349 ).
Moved network recommendations to Chapter 2, Hardware Requirements and Recommenda-
tions and included Section 2.7.1, “Adding a Private Network to a Running Cluster” (https://bugzil-
la.suse.com/show_bug.cgi?id=1026569 ).
155 October, 2017 (Release of SUSE Enterprise Storage 5) SES 5.5 (SES 5 & SES …