deployment guide deploying infoblox vnios for microsoft azure · pdf filedeployment guide...
TRANSCRIPT

© 2018 Infoblox Inc. All rights reserved. Infoblox vNIOS for Azure Deployment Guide April 2018 Page 1 of 60
DEPLOYMENT GUIDE
Deploying Infoblox vNIOS for Microsoft Azure

© 2018 Infoblox Inc. All rights reserved. Infoblox vNIOS for Azure Deployment Guide April 2018 Page 2 of 60
Contents
Introduction....................................................................................................................................... 5
Prerequisites .................................................................................................................................... 5
Limitations ........................................................................................................................................ 5
Concepts .......................................................................................................................................... 5
Basic Workflow .......................................................................................................................... 5
Best Practices ............................................................................................................................ 6
Introduction to Microsoft Azure .................................................................................................. 6
Microsoft Azure Objects ...................................................................................................... 6
Infoblox vNIOS for Azure Use Cases ........................................................................................ 7
The DNS and RPZ Services Use Case .............................................................................. 7
The Fault Tolerance and Disaster Recovery Use Case ..................................................... 7
The Maximum Availability Use Case .................................................................................. 7
High Availability in Azure: Availability Sets and Infoblox Server Placement ............................. 7
Deploying Infoblox vNIOS for Azure ................................................................................................ 9
Microsoft Azure Portal ............................................................................................................... 9
Logging into the Microsoft Azure Portal for the first time .................................................... 9
Azure Portal ...................................................................................................................... 12
Microsoft Azure Subscription ............................................................................................ 12
Microsoft Azure Marketplace ............................................................................................ 14
Deploying Infoblox vNIOS in the Azure Marketplace .............................................................. 14
Create the Infoblox vNIOS for Azure Virtual Machine ...................................................... 14
Monitoring the deployment ................................................................................................ 20
Verify the IP addresses for your Infoblox vNIOS for Azure appliance .............................. 22
Connecting to and using the Infoblox vNIOS for Azure appliance ................................................. 24
Remote Console Access (SSH) .............................................................................................. 24
Grid Manager GUI (Web Access) ............................................................................................ 25
Help ......................................................................................................................................... 26
Tooltips .............................................................................................................................. 26
Help Panel ......................................................................................................................... 26
NIOS Administrators Guide ............................................................................................... 27
DNS Operations ............................................................................................................................. 28
Azure DNS Settings ................................................................................................................. 28
Enable Infoblox DNS in the Azure network settings for clients deployed in Azure ........... 28

© 2018 Infoblox Inc. All rights reserved. Infoblox vNIOS for Azure Deployment Guide April 2018 Page 3 of 60
Infoblox DNS ............................................................................................................................ 29
Start the DNS Service ....................................................................................................... 29
Enable Recursion .............................................................................................................. 30
Enable DNS response and RPZ Logging ......................................................................... 31
Create a DNS zone ........................................................................................................... 32
Infoblox DNS Firewall (RPZ) ............................................................................................. 32
Restart Services ................................................................................................................ 36
Testing DNS ...................................................................................................................... 37
Infoblox vDiscovery ........................................................................................................................ 40
Overview .................................................................................................................................. 40
Introduction ....................................................................................................................... 40
Cloud Network Automation Overview ............................................................................... 40
Enabling vDiscovery in Azure .................................................................................................. 42
Create the Azure Active Directory App registration .......................................................... 42
Obtain the Client ID ........................................................................................................... 44
Add required Azure permissions ....................................................................................... 45
Generate the Client Secret (key) ...................................................................................... 47
Obtain the Service Endpoint Address ............................................................................... 48
Attach API Permissions to App Registration ..................................................................... 49
Infoblox vDiscovery Task ......................................................................................................... 51
Create a vDiscovery Task ................................................................................................. 51
Run the vDiscovery Task .................................................................................................. 53
vDiscovery Data – With Cloud Network Automation (CNA) .............................................. 54
vDiscovery Data – IPAM Only (No CNA) .......................................................................... 55

© 2018 Infoblox Inc. All rights reserved. Infoblox vNIOS for Azure Deployment Guide April 2018 Page 4 of 60
.......................................................................................................................................... 55
Infoblox Azure for vNIOS Appliance ........................................................................................ 56
Stopping your Infoblox Azure for vNIOS Appliance .......................................................... 56
Starting your Infoblox Azure for vNIOS Appliance ............................................................ 57
Delete (terminate) your Infoblox vNIOS for Azure appliance ............................................ 58
Delete your Azure Subscription (account) ........................................................................ 59

© 2018 Infoblox Inc. All rights reserved. Infoblox vNIOS for Azure Deployment Guide April 2018 Page 5 of 60
Introduction
Infoblox vNIOS for Azure is a virtualized Infoblox appliance designed for deployment as a VM (virtual
machine) in Microsoft Azure, a collection of integrated cloud services in the Microsoft Cloud.
Infoblox vNIOS for Azure enables you to deploy robust, manageable, and cost effective Infoblox
appliances in the Microsoft Cloud. Infoblox NIOS is the underlying software running on Infoblox
appliances and provides core network services and a framework for integrating all the components of the
modular Infoblox solution. It provides integrated, secure, and easy-to-manage DNS (Domain Name
System), IPAM (IP address management) and other services.
Prerequisites
The following are prerequisites for deploying an Infoblox vNIOS for Azure appliance:
• Valid subscription in Microsoft Azure.
• Appropriate permissions in Microsoft Azure to create a new VM instance.
Limitations
The following general limitations apply for Infoblox vNIOS for Azure appliances:
• Only provides the LAN1 and MGMT interfaces.
• No HA (High Availability) support.
• No support for Anycast.
• DHCP is not supported in the Azure cloud.
• No serial console access (SSH is enabled by default).
Concepts
Basic Workflow
The following bullet points outline the basic steps that can be followed for an administrators first time
connecting into Microsoft Azure and creating an Infoblox VM:
• Sign in to the Azure Portal (https://portal.azure.com/).
• Create a new Subscription.
• Navigate to the Azure Marketplace.
• Search for Infoblox in the marketplace.
• Select Infoblox NIOS for Azure (BYOL).
o Note: This will be your Infoblox vNIOS for Azure appliance. This may also be referred
to as an Infoblox server or VM (Virtual Machine).
• Follow the steps to create the Infoblox vNIOS for Azure appliance.
• Once the Infoblox vNIOS for Azure appliance has successfully deployed, verify its IP
configuration.
• Connect to the Infoblox vNIOS for Azure appliance and begin using it.

© 2018 Infoblox Inc. All rights reserved. Infoblox vNIOS for Azure Deployment Guide April 2018 Page 6 of 60
Best Practices
To get the most from your Infoblox vNIOS for Azure appliance(s), Infoblox recommends the following best
practices:
• In larger setups where two or more appliances are being deployed, assign them to a single
Availability Set as this helps ensure maximum availability of those servers.
• The model of Infoblox vNIOS for Azure appliance should be sized appropriately for the environment,
factoring in the workload that can be expected during peak usage, including for any administrative
activity (such as API calls). Refer to the Infoblox appliance data sheets for performance information.
• Use the boot diagnostics to help diagnose any issues should access to the server be lost.
Introduction to Microsoft Azure
Microsoft Azure Objects
Before implementing Infoblox vNIOS for Azure, an administrator must understand common terms or
objects available in Azure related to the implementation of vNIOS. The following are common objects and
terms:
• Azure Subscription: An account which is used to access Azure services and through which
billing is managed.
• Azure Resource Manager (ARM): Introduced in 2014, this is the deployment model (engine)
which is used to manage resources in Azure. ARM is replacing the classic portal, which was
inefficient and complex to use, though may still be used in limited fashion.
• Azure Marketplace: An online storefront where applications and other services (including virtual
machines) can be hosted or purchased.
• vNet: A virtual network where individual subnets and other network settings (such as security
groups) are applied.
• vNet Peering: Connects one or more (non-overlapping) vNets together.
• Network Security Group: The configuration where port access can be allowed or blocked
(firewall).
• Availability Set: Maintain maximum availability of servers/applications by placing more than one
in an availability set.
• Storage Account: Holds the image files for the OS or boot diagnostics for a VM.
• Resource Group: A container which holds objects such as VM’s and their related resources and
can be used to simplify management of all objects within that resource group.
• Express Route: A direct connection between an ISP and the Azure Cloud which is used to
provide faster and more secure connections.
• Virtual Network Gateway: The connection point that is used as part of a VPN gateway and
enables connectivity between different vNets or VPN tunnels.

© 2018 Infoblox Inc. All rights reserved. Infoblox vNIOS for Azure Deployment Guide April 2018 Page 7 of 60
Infoblox vNIOS for Azure Use Cases
The following are common use cases for using the Infoblox vNIOS for Azure appliance:
a. Providing DNS and RPZ/DNS Firewall services from within the Azure cloud for Azure, on-prem,
and public clients.
b. Expanding services to the Azure cloud for additional fault tolerance and disaster recovery (DR)
purposes.
c. Providing services with maximum availability and across multiple vNets.
The DNS and RPZ Services Use Case
In this use case, DNS and RPZ services are hosted in the Azure cloud. This enables you to distribute
enterprise DNS services for clients operating in the Azure cloud, on-prem, and across the Internet. One or
more Infoblox vNIOS for Azure appliances are deployed in Azure, assigning as many as possible to an
Availability Set. These appliances can also be integrated with an existing Grid. Clients are then updated
to use your Infoblox vNIOS for Azure appliance(s) for DNS resolution, providing them with your enterprise
DNS and RPZ services.
The Fault Tolerance and Disaster Recovery Use Case
This use case is for Fault Tolerance and Disaster Recovery. In case of failure in the Primary Datacenter
(power outage, network outage, or other critical failure) an Infoblox vNIOS for Azure appliance enabled as
a Grid Master Candidate (GMC) can be promoted to the Grid Master role so that Grid services can
continue to operate. DNS services can also be redirected to servers operating in the Azure cloud,
possibly without even requiring any manual intervention and helping ensure the business can continue to
operate.
The Maximum Availability Use Case
In many cases, it can be a challenge to implement services in a way that maximizes availability across a
distributed environment in a secure manner and without deploying more resources than are required. One
method for accomplishing this may be by leveraging ‘management’ or ‘transit’ vNets where critical
services, including your Infoblox servers, operate from. vNet peering can be used to connect other vNets
to the management vNet. This allows for seamless communications between those vNets and the
management vNet, without allowing connectivity between the other subnets. Traditional routing and/or
VPN’s can also be used to allow connectivity into the management vNet for vNets which cannot leverage
vNet peering or even for networks from outside of Azure.
High Availability in Azure: Availability Sets and Infoblox Server Placement
The Infoblox High Availability (HA) feature provides redundancy and fault tolerance in an easy to manage
and implement configuration, ideally suited for local/on-premise networks (both physical and virtual). In
public cloud environments, this is generally not supported.
In Microsoft Azure divides hardware resources into hardware clusters and when deploying applications
and instances in Azure, it is possible for them to be hosted in a single hardware cluster, introducing a
single point of failure. To give a level of control over this, instances and applications can be assigned to
an Availability Set. Availability Sets help minimize disruption in case of an outage, such as during planned
maintenance or unplanned hardware failure.

© 2018 Infoblox Inc. All rights reserved. Infoblox vNIOS for Azure Deployment Guide April 2018 Page 8 of 60
An Availability Set utilizes Fault Domains and Update Domains. When using the Azure Resource
Manager, three Fault Domains and five Update Domains are associated with an Availability Set by
default. Fault Domains control which hardware cluster an instance is deployed in and limit disruptions that
can be seen due to unplanned events, while with Update Domains, only instances in one Update Domain
can be rebooted at a time during planned maintenance. Update Domains are rebooted sequentially but
may happen in any order. Instances are assigned sequentially to Fault Domains and Update Domains in
the order that they are created.
When designing your Infoblox Grid for the cloud, important considerations include:
• Peak load expected to be processed by the servers (for DNS and any other services provided by
the servers). The number of servers deployed should be able to handle expected peak load.
Elastic scaling can also be leveraged so that only the number of servers required for standard
operations are deployed and additional servers can be deployed during periods of higher loads.
• Accessibility: Servers can be deployed locally for clients in isolated networks or where
connectivity may be limited.
• Fault tolerance and redundancy: Servers should be deployed in a manner which minimizes
disruptions should any outages occur within a region or Availability Set. To qualify for Azure’s
SLA, a minimum of two servers must be deployed in an Availability Set.

© 2018 Infoblox Inc. All rights reserved. Infoblox vNIOS for Azure Deployment Guide April 2018 Page 9 of 60
Deploying Infoblox vNIOS for Azure
Microsoft Azure Portal
Logging into the Microsoft Azure Portal for the first time
Microsoft Azure is managed through the Azure Portal.
1. To access the Azure Portal, visit https://portal.azure.com/ using your web browser.

© 2018 Infoblox Inc. All rights reserved. Infoblox vNIOS for Azure Deployment Guide April 2018 Page 10 of 60
2. For both new and existing Microsoft Azure users: enter the email address that you want to
use for your Microsoft Azure subscription.
3. Press Enter or click in the Password box after typing in your email address.
Note: If you have a valid SSO (single sign-on) email address for your organization/company and your
domain is integrated with Microsoft Azure, you will automatically be redirected to your SSO portal once
you enter your SSO enabled email address. Complete the sign-on process as prompted.
a. If your email address is not recognized, you may be redirected to the main sign in page.

© 2018 Infoblox Inc. All rights reserved. Infoblox vNIOS for Azure Deployment Guide April 2018 Page 11 of 60
b. Click Sign up now to create a new Microsoft account, which will be used for your login to
the Microsoft Azure Portal, along with other Microsoft services. Complete the steps for
creating the new account.
c. If you are not redirected to a new page but the email address was not recognized (isn’t
in our system) and you wish to create a new account, click get a new Microsoft
account and proceed with the steps for creating a new account. Otherwise, try using a
different email address.

© 2018 Infoblox Inc. All rights reserved. Infoblox vNIOS for Azure Deployment Guide April 2018 Page 12 of 60
Azure Portal
Once logged into the Azure Portal, the menu and Dashboard will load.
Note: The Dashboard can be customized extensively. The display of the blades and other menu items
can also be moved around and/or re-ordered to help make the data easier to navigate and use.
Another important note- Microsoft does make frequent changes and updates to the Azure Portal. Any
steps, examples or images provided in this guide are subject to change without notice.
Microsoft Azure Subscription
When getting started with the Azure Portal, you may need to first create a Subscription. The subscription
is how all billing information is tracked and is required before you will be able to start using any paid
features in Azure. Credit card and other information will be collected; however, new users to Microsoft
Azure are provided with a $200 credit. A $1 fee will be charged to your credit card as part of the
verification process.
Note: Operating a vNIOS for Azure appliance will cost starting at approximately $10 a day with minimal
activity. Usage can be tracked by clicking on Billing in the menu on the left-hand side of the page (click
if the menu is collapsed).
To create the Subscription:
1. Click All services in the menu bar on the left hand side of the page (click if the menu is
collapsed).

© 2018 Infoblox Inc. All rights reserved. Infoblox vNIOS for Azure Deployment Guide April 2018 Page 13 of 60
2. In the Filter box, type Subscriptions. Locate and click on Subscriptions in the services list.
3. Click Add.
4. A new window will open (check your pop-up blocker if it fails to open).
5. Click Free Trial.
6. Enter your contact information (About you). Click Next.
7. Enter your phone details. Click either Send text message or Call me (phone must support text
messaging if that option is used).
8. Enter the code provided to you. Click Verify code.
9. Enter your credit card and related billing information. A $1 fee will be applied as part of the
verification process (as noted previously). Click Next.
10. In step 4, enable the check box to agree to the subscription agreement. Click Sign up.
11. Your subscription is now being created and may take a few minutes to complete. Click Start
managing my service once it is reported that your subscription is ready for you.
© 2018 Infoblox Inc. All rights reserved. Infoblox vNIOS for Azure Deployment Guide April 2018 Page 14 of 60
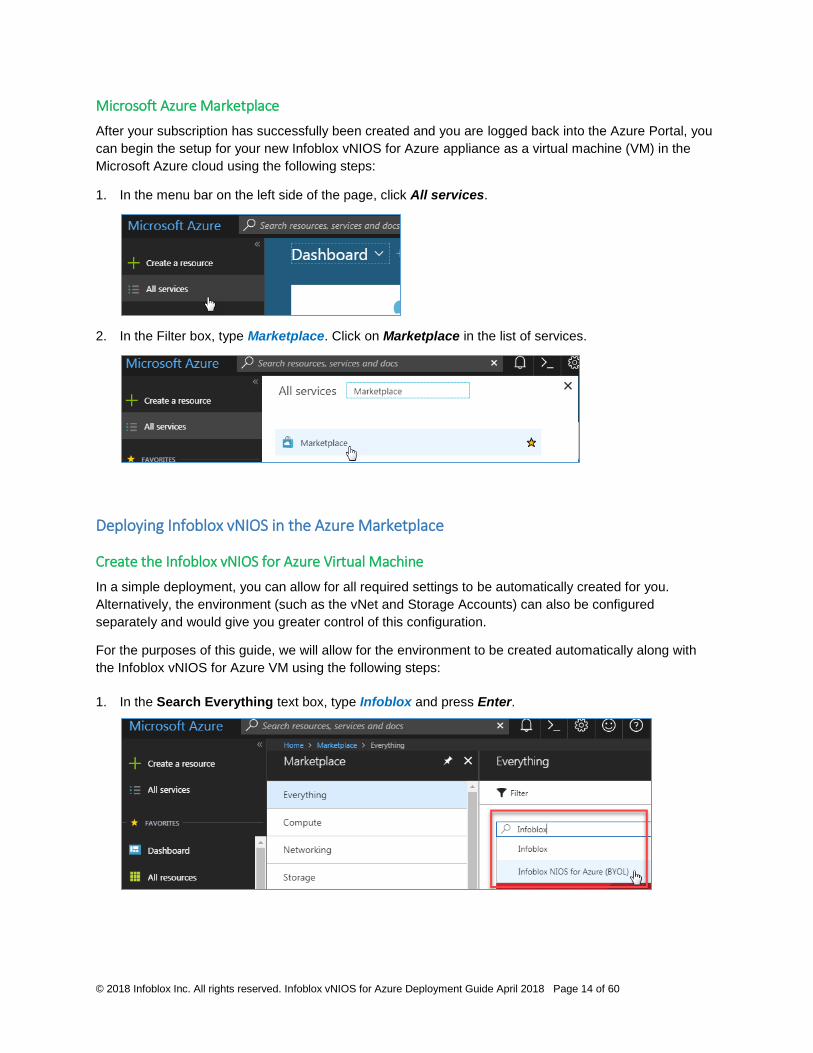
Microsoft Azure Marketplace
After your subscription has successfully been created and you are logged back into the Azure Portal, you
can begin the setup for your new Infoblox vNIOS for Azure appliance as a virtual machine (VM) in the
Microsoft Azure cloud using the following steps:
1. In the menu bar on the left side of the page, click All services.
2. In the Filter box, type Marketplace. Click on Marketplace in the list of services.
Deploying Infoblox vNIOS in the Azure Marketplace
Create the Infoblox vNIOS for Azure Virtual Machine
In a simple deployment, you can allow for all required settings to be automatically created for you.
Alternatively, the environment (such as the vNet and Storage Accounts) can also be configured
separately and would give you greater control of this configuration.
For the purposes of this guide, we will allow for the environment to be created automatically along with
the Infoblox vNIOS for Azure VM using the following steps:
1. In the Search Everything text box, type Infoblox and press Enter.

© 2018 Infoblox Inc. All rights reserved. Infoblox vNIOS for Azure Deployment Guide April 2018 Page 15 of 60
2. In the search results, click Infoblox NIOS for Azure (BYOL).
3. Review the product details and Useful links, then click Create.
4. In the Basics panel, expand the NIOS model menu and select the model appliance to be created.
5. Type a name to be used for your Infoblox vNIOS for Azure appliance.
6. Enter and confirm the password which will be used for the admin account (the default Infoblox
password is not used on Infoblox vNIOS for Azure appliances).
Note:
7. Select the Subscription to use.
© 2018 Infoblox Inc. All rights reserved. Infoblox vNIOS for Azure Deployment Guide April 2018 Page 16 of 60
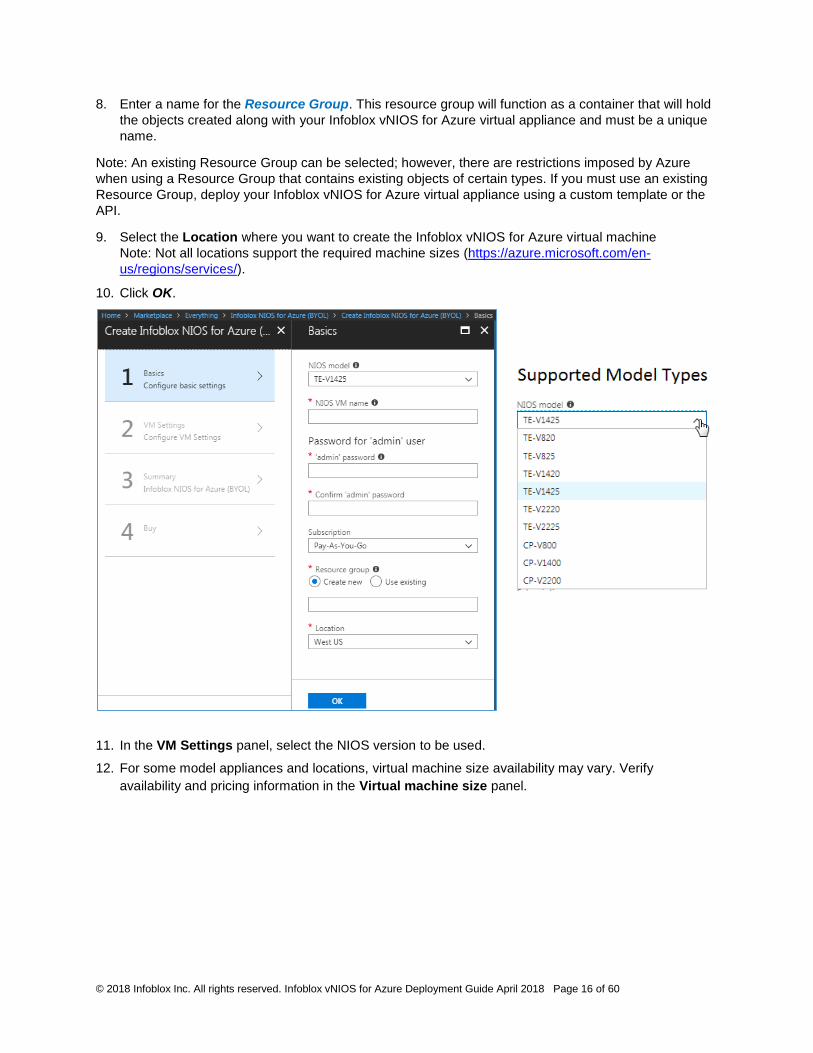
8. Enter a name for the Resource Group. This resource group will function as a container that will hold
the objects created along with your Infoblox vNIOS for Azure virtual appliance and must be a unique
name.
Note: An existing Resource Group can be selected; however, there are restrictions imposed by Azure
when using a Resource Group that contains existing objects of certain types. If you must use an existing
Resource Group, deploy your Infoblox vNIOS for Azure virtual appliance using a custom template or the
API.
9. Select the Location where you want to create the Infoblox vNIOS for Azure virtual machine
Note: Not all locations support the required machine sizes (https://azure.microsoft.com/en-
us/regions/services/).
10. Click OK.
11. In the VM Settings panel, select the NIOS version to be used.
12. For some model appliances and locations, virtual machine size availability may vary. Verify
availability and pricing information in the Virtual machine size panel.

© 2018 Infoblox Inc. All rights reserved. Infoblox vNIOS for Azure Deployment Guide April 2018 Page 17 of 60
13. Select or create a Storage account to be used. This must be a premium type storage account and
will be used for the OS disk.
14. For Storage account for BootDiagnostics, select or create a standard type storage account.

© 2018 Infoblox Inc. All rights reserved. Infoblox vNIOS for Azure Deployment Guide April 2018 Page 18 of 60
15. For Virtual network, select or create a vNet. This vNet must contain at least two subnets.
16. In the Subnets panel, assign or create the subnets to be used. The Infoblox vNIOS for Azure
appliance requires two separate subnets to support the LAN1 and MGMT interfaces. The MGMT
interface is not enabled in NIOS by default.

© 2018 Infoblox Inc. All rights reserved. Infoblox vNIOS for Azure Deployment Guide April 2018 Page 19 of 60
17. Confirm the Public IP address configuration. Create a new Public IP address or allocate an existing
(and available) IP address if required. This guide assumes that a public IP address is used.
18. If a Public IP address was assigned, type a Public DNS name. Note the following requirements:
19. The value for 'Public DNS name' must match the regular expression '^$|^[a-z][a-z0-9-]{1,61}[a-z0-9]$'
20. Select yes to Install temporary licenses (the default option).
21. Click OK once all VM settings have been configured.
22. Review the Summary screen, verifying that everything is correct. Note the Download template and
parameters option. If a custom template is required (useful when deploying Infoblox vNIOS for Azure
appliances in a single Resource Group), download this template and use this as the foundation for
your own custom template.
23. Click OK.

© 2018 Infoblox Inc. All rights reserved. Infoblox vNIOS for Azure Deployment Guide April 2018 Page 20 of 60
24. On the Buy panel, review the Terms of use and privacy policy information. Click Create to begin
deployment of your Infoblox vNIOS for Azure appliance.
Monitoring the deployment
On the Azure Portal Dashboard, you will see a new tile appear for the virtual machine that you just
created. This and the notification bell can be used to monitor the status for the deployment for your new
Infoblox vNIOS for Azure VM.
1. Click on the notification bell at the top right-hand corner of the window to expand it.
2. Monitor this for new updates as the launch progresses.
3. The duration of the deployment takes about 10-20 minutes to complete. Once completed
successfully, a new Resources tile will be added to your Dashboard.

© 2018 Infoblox Inc. All rights reserved. Infoblox vNIOS for Azure Deployment Guide April 2018 Page 21 of 60
4. If the deployment fails, the operation will be rolled back and you will see a notification and tile on
the Dashboard reflecting this. Click on the Deployment failed link in the notification to easily
access the event details.
5. Click on the Failed status bar to view the error log.

© 2018 Infoblox Inc. All rights reserved. Infoblox vNIOS for Azure Deployment Guide April 2018 Page 22 of 60
6. Review the error message in the ERROR DETAILS panel. This is circled in red in the example
provided here.
7. One of the most common causes for a deployment failure is resource contention where an
existing object in the resource group shares the same name as an object being created for the
new Infoblox vNIOS for Azure appliance. Take any corrective actions necessary to correct for the
error and retry the deployment.
Verify the IP addresses for your Infoblox vNIOS for Azure appliance
Before being able to connect to your new Infoblox vNIOS for Azure virtual machine, you will first need to
verify its IP address configuration. While there are multiple ways to identify the IP address, the following
steps demonstrate one way to do this through the Azure Portal.
1. Login to the Microsoft Azure Portal (https://portal.azure.com/).
2. Open All services and select Virtual machines.
3. Click on the name for your Infoblox vNIOS for Azure appliance.
© 2018 Infoblox Inc. All rights reserved. Infoblox vNIOS for Azure Deployment Guide April 2018 Page 23 of 60
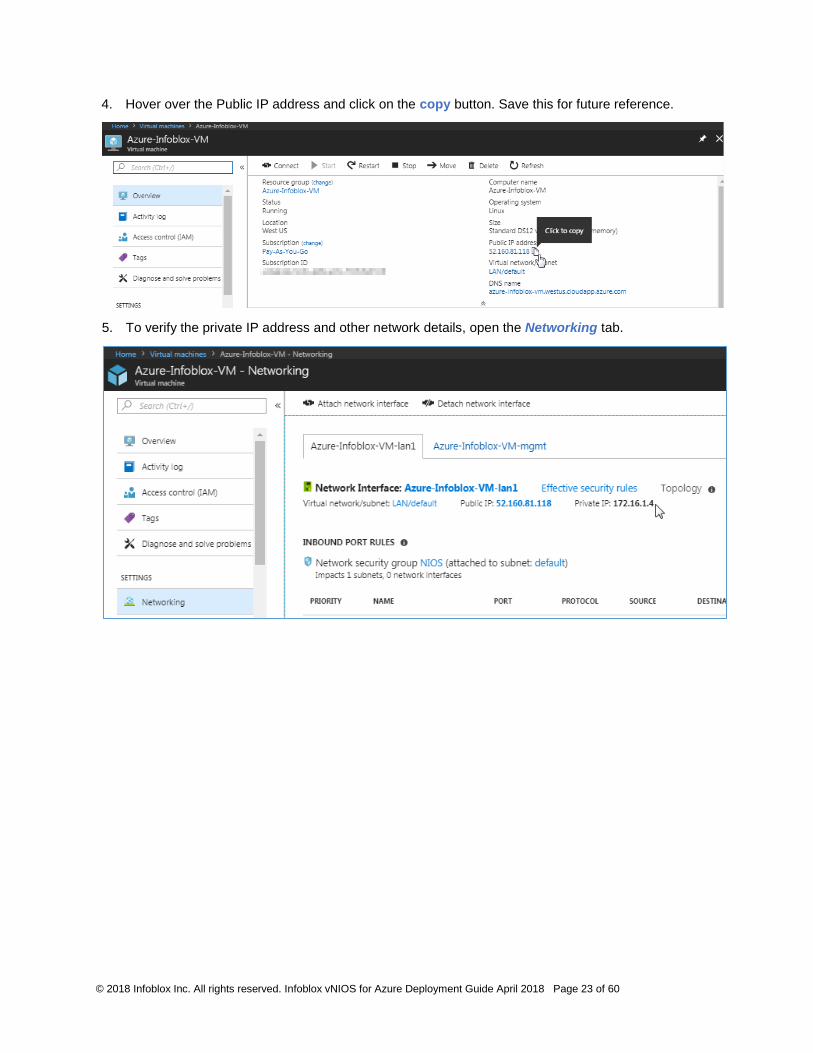
4. Hover over the Public IP address and click on the copy button. Save this for future reference.
5. To verify the private IP address and other network details, open the Networking tab.

© 2018 Infoblox Inc. All rights reserved. Infoblox vNIOS for Azure Deployment Guide April 2018 Page 24 of 60
Connecting to and using the Infoblox vNIOS for Azure appliance
Remote Console Access (SSH)
Remote Console Access (SSH) is enabled by default to aid with management of the server.
1. Open an SSH client and connect to the public IP address for your Azure vNIOS VM.
2. When prompted for a username and password, enter the username of admin and the password that
you used in step 1 while creating the VM.
3. Run the following commands and
describe their output:
• Show version
• Show status
• Show license
• Show network
• Show remote_console

© 2018 Infoblox Inc. All rights reserved. Infoblox vNIOS for Azure Deployment Guide April 2018 Page 25 of 60
Grid Manager GUI (Web Access)
1. Open a web browser.
2. Connect to the IP address for your Azure vNIOS VM, prefixing its public IP address with https://
Note: NIOS uses a self-signed certificate. Warnings about the connection being insecure are to be
expected and might require that you add an exception before being able to connect.
3. Log in with the user name “admin” and the password that you specified when deploying your
Infoblox vNIOS for Azure appliance.
4. Accept the Infoblox End-User License Agreement.
5. Close the Grid Setup Wizard.
6. Verify that your server has successfully started. The status is reported under both the
Dashboards -> Status and Grid -> Grid Manager -> Members tabs.

© 2018 Infoblox Inc. All rights reserved. Infoblox vNIOS for Azure Deployment Guide April 2018 Page 26 of 60
Help
Infoblox appliances provide many different features, services and configuration options. Help resources
are provided in different forms, including directly in the Grid Manager GUI, the Infoblox Support Portal
(https://support.infoblox.com/) and the Infoblox Community site (https://community.infoblox.com/).
Tooltips
Tooltips display the function of each button. Hover your mouse over a button or icon to
display its label.
Help Panel
The Help panel provides the following types of Help:
• Help: Expand this section to view information about the window
currently displayed.
• Documentation: Expand this section to download the latest
versions of the Infoblox documentation, including the NIOS
Administrators Guide and Infoblox API Documentation.
• Support: Expand this section to view links to the Infoblox web
site and Technical Support site.
• About: Expand this section to view information about the NIOS
software version.

© 2018 Infoblox Inc. All rights reserved. Infoblox vNIOS for Azure Deployment Guide April 2018 Page 27 of 60
The (inline) Help panel can also be expanded in editor and dialogue windows to display help information
specific for the active window. Where available, click on the icon to expand the Help panel.
NIOS Administrators Guide
For step by step instructions and other information, the NIOS Administrators Guide can also be a helpful
reference. The NIOS Administrators Guide (and other guides) can be found through the main Help panel,
or on the Infoblox Support site (https://support.infoblox.com/).

© 2018 Infoblox Inc. All rights reserved. Infoblox vNIOS for Azure Deployment Guide April 2018 Page 28 of 60
DNS Operations
Azure DNS Settings
Enable Infoblox DNS in the Azure network settings for clients deployed in Azure
Once your Infoblox vNIOS for Azure server has been deployed, you may want to update your settings in
Azure so that any clients deployed will use your Infoblox server for DNS.
1. In the Azure Portal, open All services.
2. In the Filter text box, type Virtual networks and click on Virtual networks in the search results.
3. Click on the name for your Virtual network.
4. Open the DNS servers tab.
5. Toggle the DNS servers option to Custom.

© 2018 Infoblox Inc. All rights reserved. Infoblox vNIOS for Azure Deployment Guide April 2018 Page 29 of 60
6. In the Add DNS server text box, type the IP address for your Infoblox vNIOS for Azure virtual
appliance. Modify any existing DNS servers as necessary.
7. Click Save.
8. Close the Virtual networks panels once done making any changes.
Infoblox DNS
Start the DNS Service
Before any DNS queries sent to your Infoblox vNIOS for Azure appliance will work, the DNS service must
be started.
1. In the Infoblox Grid Manager GUI, navigate to Data Management -> DNS -> Members/Servers.
2. Enable the checkbox for your server.
3. In the Toolbar on the right-hand side of the page, click Start.
4. Click Yes at the confirmation prompt.

© 2018 Infoblox Inc. All rights reserved. Infoblox vNIOS for Azure Deployment Guide April 2018 Page 30 of 60
Note: If refreshing the status of this page while the service is starting (or restarting), the status may show
Error. This is normal and should change to Running once the service finishes starting.
Enable Recursion
Before testing recursive queries (such as for data across the Internet), recursion must be allowed.
Note: Services must be restarted before any changes will take effect. To simplify the process here, the
steps for completing the service restart will be provided later in this guide once all changes being made
have been completed; however, this can be done at any stage in these steps without issue.
1. In your NIOS GUI, navigate to the Data Management -> DNS -> Members tab.
2. Click Grid DNS Properties in the toolbar on the right-hand side of the page.
3. Change to the Queries panel.
4. Enable the checkbox for Allow Recursion.
5. Click Save & Close.

© 2018 Infoblox Inc. All rights reserved. Infoblox vNIOS for Azure Deployment Guide April 2018 Page 31 of 60
Enable DNS response and RPZ Logging
To assist with testing or monitoring of RPZ activity, it is useful to enable logging for RPZ activity:
1. In your Grid manager GUI, navigate to Data Management -> DNS -> Members/Servers.
2. Click Grid DNS Properties in the toolbar on the right-hand side of the page.
3. Click Toggle Advanced Mode.
4. Open the Logging tab.
5. Under the Basic tab, enable the check boxes for both responses and rpz.
Note: Enabling the responses option will give you both the query and response data in your logs. The
options for both queries and responses should never be enabled at the same time as this can lead to
performance issues.
6. Click Save & Close.

© 2018 Infoblox Inc. All rights reserved. Infoblox vNIOS for Azure Deployment Guide April 2018 Page 32 of 60
Create a DNS zone
To be able to test authoritative queries (data served locally on the server), an authoritative forward
mapping zone must be added and one or more records added.
1. Switch to the Data Management -> DNS -> Zones tab.
2. Click on the (Add) button (Select Authoritative Zone if clicking on the dropdown arrow).
3. Verify that Add an authoritative forward-mapping zone is selected and click Next.
4. Type a name for your zone (example.com) and click Next.
5. Toggle the radio button to Use this set of name servers.
6. Click the (Add) button (select Grid Primary if clicking on the dropdown arrow).
7. Click Select (your Infoblox vNIOS for Azure appliance will be automatically selected).
Note: In a Grid with more than one Grid member, a pop-up window will appear to enable you to select the
Grid member that you want to assign for this role.
8. Click Add.
9. Click Save & Close.
Infoblox DNS Firewall (RPZ)
Infoblox DNS Firewall, or more commonly referred to as RPZ (Response Policy Zones), gives you rule
based control over DNS resolution. This is commonly used to block or redirect known malicious or
unauthorized hostnames from being able to resolve, helping protect your clients and network. Rules can
be built using a feed, or in a local policy.
Note: In this guide, only the steps for configuring a local policy will be provided. The configuration of feeds is similar
and documented in the NIOS Administrators Guide.

© 2018 Infoblox Inc. All rights reserved. Infoblox vNIOS for Azure Deployment Guide April 2018 Page 33 of 60
RPZ License
To test RPZ, you will first need to install the RPZ license (if this has not already been done):
1. Connect to the remote console (SSH) for your Infoblox vNIOS for Azure appliance.
2. Login using your admin credentials.
3. Type the command: set temp_license
4. Type the number for Add Response Policy Zones license and press Enter.
5. Type y and press Enter at the confirmation prompts.
Note: Any active sessions in the Grid Manager GUI will be ended. Administrators will need to log back in
after making this change.
Create a Local RPZ Policy
1. In your Grid manager GUI, navigate to Data Management -> DNS -> Response Policy Zones.
2. Click + (Add). If the + Add menu is expanded, select Zone -> Response Policy Zone.

© 2018 Infoblox Inc. All rights reserved. Infoblox vNIOS for Azure Deployment Guide April 2018 Page 34 of 60
3. Select Add Local Response Policy Zone, click Next.
4. Type a descriptive name, click Next.
5. Select Use this set of name servers.
6. Click (Grid Primary).
7. Click Select.
8. Click Add.
9. Click Save & Close.

© 2018 Infoblox Inc. All rights reserved. Infoblox vNIOS for Azure Deployment Guide April 2018 Page 35 of 60
Add RPZ Ruleset
There are different rulesets which can be configured:
• Passthru : ‘Whitelist’ the hostname.
• Block : Return either a nxdomain (No Such Domain) or no answer (No Data).
• Substitute : Redirect the domain name or record using an alias record (CNAME).
For this exercise, we will create a rule to block an invalid domain name.
1. Click on the hyperlinked name for the local policy which you created.
2. Click on the drop-down arrow next to the + (Add) button (1). Expand Block (No Such Domain)
Rule (2) and select Block Domain Name (No Such Domain) Rule (3).

© 2018 Infoblox Inc. All rights reserved. Infoblox vNIOS for Azure Deployment Guide April 2018 Page 36 of 60
3. In the Name field, type bogus.domain. Click Save & Close.
4. Repeat step # 2: Click on the drop-down arrow next to the + (Add) button. Expand Block (No
Such Domain) Rule and select Block Domain Name (No Such Domain) Rule.
5. In the Name field, type *.bogus.domain. Click Save & Close.
Note: Additions or changes to individual rulesets do not require a service restart as they take effect
immediately. However, before the rulesets within this policy will work, services still need to be restarted
here to account for the local policy that was added in the previous step.
Restart Services
After making a configuration change, a restart of the affected service(s) may be required. Generally, a
yellow banner will appear at the top of the page when this occurs.
To restart services:
1. Click on the Restart button in the banner at the top of the page, or the Restart Services button in
the toolbar on the right-hand side of the page.
2. Click on the (Poll Members) to verify the service(s) that will be affected by the restart.
3. Switch to the View Pending Changes tab to view the action(s) which triggered the service
restart.
4. Click Restart.

© 2018 Infoblox Inc. All rights reserved. Infoblox vNIOS for Azure Deployment Guide April 2018 Page 37 of 60
Testing DNS
Using the Infoblox CLI (Command Line Interface):
1. Open an SSH client or terminal window.
2. Connect to your Infoblox vNIOS for Azure appliance.
3. Login using your admin credentials.
4. To test authoritative resolution, run the command: dig example.com soa
Note: replace example.com in the above example with the name used for the authoritative forward
mapping zone that you created if a different name was used.
5. Verify that the answer in the response is correct.

© 2018 Infoblox Inc. All rights reserved. Infoblox vNIOS for Azure Deployment Guide April 2018 Page 38 of 60
6. To test recursive queries, run the command: dig www.infoblox.com
7. Verify that the answer in the response is correct.
Testing DNS using the Infoblox Dashboard: Dig Request widget
DNS queries can also be tested using the Dig Request widget on your Dashboard in your Grid Manager
GUI. To use the Dig Request Dashboard widget:
1. In your Infoblox Grid Manager GUI, navigate to the Dashboards -> Status tab.
2. Locate the Dig Request widget (found near the bottom left hand side of the page by default).
3. In the Domain Name to Query text box, type: example.com

© 2018 Infoblox Inc. All rights reserved. Infoblox vNIOS for Azure Deployment Guide April 2018 Page 39 of 60
4. Click Perform Dig.
5. Verify that the DNS query completes successfully.
Testing RPZ
RPZ is designed so that any queries with a source IP address belonging to the Infoblox server (or any
other server in the Grid) are not processed. The intention behind this is so that queries are only
processed once and then forwarded on, avoiding unnecessary delays that would very likely result in the
query timing out.
With this in mind, you would need to be able to query the server from a computer which has network
connectivity to the Infoblox server in order to test RPZ. This can be done from any computer across the
Internet if your Infoblox vNIOS for Azure appliance has a public IP address, or from another computer
which has connectivity to the vNet that your Infoblox vNIOS for Azure appliance resides in.
For Windows based computers which are able to query your Infoblox vNIOS for Azure appliance:
1. Verify the IP address that you will be connecting to for your Infoblox vNIOS for Azure appliance.
Note: In the commands below, we reference this as <IP address>. Wherever <IP address> is
referenced, replace that value with the actual IP address for your Infoblox vNIOS for Azure appliance.
2. Open a command prompt.
3. Type the following commands:
• nslookup
• server <IP address>
• www.bogus.com.
4. Verify that you received a Non-existent domain (nxdomain) response.

© 2018 Infoblox Inc. All rights reserved. Infoblox vNIOS for Azure Deployment Guide April 2018 Page 40 of 60
For ‘extra credit’: Referring back to the Add RPZ Ruleset steps, add rules for additional domain names to
test with. Be sure to use both the block and redirect policy actions and see how each works.
Note: For Linux and MAC based computers, the steps are similar but use the dig command in a terminal
window instead. Example: dig @<IP address> www.bogus.com.
Infoblox vDiscovery
Overview
Introduction
The Infoblox vDiscovery feature is very useful for detecting and obtaining information about
Subscriptions, vNets, Subnets and Virtual Machines (VM’s) operating in your cloud environments. This
can include Microsoft Azure, Amazon Web Services (AWS), Openstack and VMware.
Many organizations operate multiple Subscriptions (accounts) and cloud environments tend to be very
dynamic, with things such as VM’s being created and terminated on a frequent basis. This makes it
difficult to keep track of everything and with Infoblox vDiscovery, tasks can be configured to run
automatically and thereby allowing your Infoblox vNIOS appliance to keep track of your cloud
environments, storing this data in IPAM. In conjunction with the Cloud Network Automation (CNA) feature,
you will gain enhanced visibility into your cloud environments, all within a ‘single pane of glass’.
Cloud Network Automation Overview
Under the Cloud tab (displayed when the Cloud Network Automation (CNA) license is installed), you
will see multiple sub tabs:
• Tenants: This provides you with details for each of your Subscriptions (accounts).
• VPCs: Displays your vNets for Azure, or VPCs (Virtual Private Clouds) for other cloud platforms.

© 2018 Infoblox Inc. All rights reserved. Infoblox vNIOS for Azure Deployment Guide April 2018 Page 41 of 60
• Networks: A global view of all subnets that have been discovered.
• VMs: A global view of all Virtual Machines that have been discovered.
• Cloud Platform Members: Displays any Cloud Platform (CP) appliances that have been
configured in your Grid.

© 2018 Infoblox Inc. All rights reserved. Infoblox vNIOS for Azure Deployment Guide April 2018 Page 42 of 60
Detailed metadata is also collected for discovered objects. Here is an example showing the data collected
for an Infoblox vNIOS for Azure appliance:
Enabling vDiscovery in Azure
Enabling vDiscovery for Microsoft Azure requires several steps, including:
1. Create an App registration in Azure Active Directory.
2. Obtain the Client ID.
3. Add the required Azure permissions.
4. Create the authentication key.
5. Save the OAUTH 2.0 token endpoint.
6. Associate the app registration to an IAM user account.
7. Create the vDiscovery task in NIOS.
Create the Azure Active Directory App registration
The first step in enabling vDiscovery for Microsoft Azure involves creating an app registration in Azure
Active Directory (AD). To create the AD app registration:
1. Using your web browser, connect to https://portal.azure.com/.
2. Login using your Azure or SSO credentials.
3. Close any popups that may appear upon your first login.

© 2018 Infoblox Inc. All rights reserved. Infoblox vNIOS for Azure Deployment Guide April 2018 Page 43 of 60
4. Expand the ALL services menu and select Azure Active Directory.
5. Click App registrations.

© 2018 Infoblox Inc. All rights reserved. Infoblox vNIOS for Azure Deployment Guide April 2018 Page 44 of 60
6. Click + New application registration.
7. Type a descriptive name for your app registration.
8. Set Application type to Web app / API.
9. Type a URL for the app registration.
Note: This URL is not used by vDiscovery. The URL for your Grid Manager GUI can be used here.
10. Click Create.
Obtain the Client ID
1. Navigate to Azure Active Directory -> App registrations.
2. Select your newly created application.
3. Hover your mouse pointer over the value for Application ID and click on the Copy button.

© 2018 Infoblox Inc. All rights reserved. Infoblox vNIOS for Azure Deployment Guide April 2018 Page 45 of 60
4. Save this to a text file for future reference. This value will be used for the Client ID in the
vDiscovery configuration.
Add required Azure permissions
1. Still on the details panel for your application, click on the Settings button.
2. Under API ACCESS, click on Required permissions.

© 2018 Infoblox Inc. All rights reserved. Infoblox vNIOS for Azure Deployment Guide April 2018 Page 46 of 60
3. Click + Add.
4. Click Select an API.
5. In API list, click on Windows Azure Service Management API and then the Select button.

© 2018 Infoblox Inc. All rights reserved. Infoblox vNIOS for Azure Deployment Guide April 2018 Page 47 of 60
6. On the Select permissions tab, enable the checkbox for DELEGATED PERMISSIONS and click
Select.
7. Verify that the Windows Azure Service Management API permission has been added
successfully. Click Done.
Generate the Client Secret (key)
1. On the Settings panel for your application, open the Keys panel.

© 2018 Infoblox Inc. All rights reserved. Infoblox vNIOS for Azure Deployment Guide April 2018 Page 48 of 60
2. In the Description text box, type a descriptive name for the key.
3. In the Expires dropdown menu, select an expiration duration. Click Save.
4. Highlight and copy the key value, saving this to a text file for future reference.
Note: If the key value is not saved or is lost, a new one must be created. Creating additional keys will not
affect any services that uses an existing key, assuming the existing key is not deleted.
Obtain the Service Endpoint Address
1. Navigate to All services -> Azure Active Directory -> App registrations.
2. Above the list of App registrations, click on the Endpoints button.
3. Click on the copy button for OAUTH 2.0 TOKEN ENDPOINT. Save this to a text file for future
reference.

© 2018 Infoblox Inc. All rights reserved. Infoblox vNIOS for Azure Deployment Guide April 2018 Page 49 of 60
4. Close the App Endpoints window.
Attach API Permissions to App Registration
1. Login to https://portal.azure.com/.
2. Navigate to More services -> Subscriptions (type ‘subscriptions’ in the filter box to reduce the
list of available services).
3. Click on the name for your subscription.

© 2018 Infoblox Inc. All rights reserved. Infoblox vNIOS for Azure Deployment Guide April 2018 Page 50 of 60
4. Click Access control (IAM).
5. Click Add.
6. Expand the Role dropdown menu and select Reader.
7. In the Select box, type the name for your registered app, or locate and select it in the Selected
members list.
8. Click Save.

© 2018 Infoblox Inc. All rights reserved. Infoblox vNIOS for Azure Deployment Guide April 2018 Page 51 of 60
Infoblox vDiscovery Task
Once you have setup the app registration in Azure and collected the required Service Endpoint address,
Client (Application) ID and Client Secret (key), you are ready to create a vDiscovery task.
Note: vDiscovery tasks can be enabled with or without the Cloud Network Automation (CNA)
feature/license installed. In this guide, we demonstrate vDiscovery with CNA enabled; however, the
vDiscovery data is limited to the IPAM view. The Cloud tab is not visible when CNA is not installed.
Create a vDiscovery Task
1. Login to the Infoblox Grid Manager GUI.
2. Switch to the Cloud tab.
3. Expand the vDiscovery menu and select Discovery Manager.
4. Click on the + (Add) button.

© 2018 Infoblox Inc. All rights reserved. Infoblox vNIOS for Azure Deployment Guide April 2018 Page 52 of 60
5. Enter a descriptive name.
6. Click Select to assign your Infoblox vNIOS for Azure appliance.
7. Click Next.
8. In the Server Type* menu, select Azure.
9. For Service Endpoint, paste in the value for OAUTH 2.0 TOKEN ENDPOINT.
10. Enter the value for Client ID.
11. For Client Secret, enter the key that was generated earlier.
12. Click Next.
13. Review the configuration for Network Views. Click Next to proceed to Step 4 of 5.
14. Enable the check box for the option “For every newly discovered IP address, create”.

© 2018 Infoblox Inc. All rights reserved. Infoblox vNIOS for Azure Deployment Guide April 2018 Page 53 of 60
15. Expand the Help panel.:
16. Describe the available formulas (macros), which are used to control how the names for DNS
records are generated.
17. In the text box, type: ${vm_name}.example.com
18. Enable the checkboxes to select DNS views, selecting the desired DNS view. For this guide, we
select the default DNS view for both options.
19. Click Next.
20. Describe the scheduling options – what is the shortest/most frequent schedule that can be
configured here?
Note: The RESTful API provides additional flexibility for running vDiscovery tasks.
21. Click Save & Close.
Run the vDiscovery Task
1. In the vDiscovery Job Manager, click on the gear wheel and select Start.

© 2018 Infoblox Inc. All rights reserved. Infoblox vNIOS for Azure Deployment Guide April 2018 Page 54 of 60
2. Click Yes to start the vDiscovery job.
3. Click the Refresh button until the Status shows Job completed (with warnings).
4. Click Close.
vDiscovery Data – With Cloud Network Automation (CNA)
1. Review each of sub-tabs under the Cloud tab and describe the available data.
Note: The following example demonstrates a Grid which has been configured for multiple cloud platforms.
2. Edit the properties for each of the objects under each tab (Tenants, VPCs, Networks, and VMs).
3. Describe the properties available for the objects under each tab.
4. Note: you may see a licensing error when editing the properties for VPCs. Close any warnings
that are displayed and proceed to the next tab.

© 2018 Infoblox Inc. All rights reserved. Infoblox vNIOS for Azure Deployment Guide April 2018 Page 55 of 60
vDiscovery Data – IPAM Only (No CNA)
When CNA is not installed, vDiscovery data is limited to IPAM only data and found under the Data Management tab.
To view this data:
1. Navigate to Data Management -> IPAM.
2. Locate a network which has been created by vDiscovery. Use filters to easily locate these, as
demonstrated in the following example:
3. Open the network container (if present) and then the desired network.
4. Review the available IP address information.

© 2018 Infoblox Inc. All rights reserved. Infoblox vNIOS for Azure Deployment Guide April 2018 Page 56 of 60
Cleanup
Infoblox Azure for vNIOS Appliance
Stopping your Infoblox Azure for vNIOS Appliance
If you are using your Infoblox Azure for vNIOS appliance for testing purposes, you may want to shut it
down in order to avoid incurring unnecessary costs but not delete (terminate) it. If using a public IP
address, the IP address may change when you start your Infoblox vNIOS for Azure appliance again.
Note: Charges will still be incurred for storage usage, though these should be minimal
(https://azure.microsoft.com/en-us/pricing/details/storage/blobs/).
1. Login to the Grid Manager GUI.
2. Navigate to the Grid -> Grid Manager -> Members tab.
3. Enable the checkbox for your server.
4. Click on the dropdown arrow next to Control and select Shutdown.
5. Click OK.

© 2018 Infoblox Inc. All rights reserved. Infoblox vNIOS for Azure Deployment Guide April 2018 Page 57 of 60
6. Click Yes.
12. In the Azure Portal, open All services.
7. In the Filter box, type Virtual machines.
8. Click Virtual machines in the search results.
9. Click on the name for your Infoblox vNIOS for Azure appliance.
10. Click Stop.
11. Click Yes.
Starting your Infoblox Azure for vNIOS Appliance
1. In the Azure Portal, open All services.
2. In the Filter box, type Virtual machines.

© 2018 Infoblox Inc. All rights reserved. Infoblox vNIOS for Azure Deployment Guide April 2018 Page 58 of 60
3. Click Virtual machines in the search results.
4. Click on the name for your Infoblox vNIOS for Azure appliance.
5. Click Start.
Delete (terminate) your Infoblox vNIOS for Azure appliance
To terminate (permanently delete) your Infoblox vNIOS for Azure appliance:
1. In the Azure Portal, open All services.
2. In the Filter box, type Virtual machines.
3. Click Virtual machines in the search results.
4. Click on the name for your Infoblox vNIOS for Azure appliance.
5. Click Delete.

© 2018 Infoblox Inc. All rights reserved. Infoblox vNIOS for Azure Deployment Guide April 2018 Page 59 of 60
6. Click Yes.
Delete your Azure Subscription (account)
If you no longer wish to use the Microsoft Azure cloud platform and want to permanently delete your
Azure subscription, including your billing (credit card) information and all other data, you will need to
cancel your subscription. This process is not reversible and all data will be lost; however, your Microsoft
account used to login will not be affected. To cancel your subscription:
1. In the Azure Portal, open All services.
2. In the Filter box, type Subscriptions.
3. Click Subscriptions in the search results.
4. Click on the name for your Subscription.
5. Click Cancel Subscription.

© 2018 Infoblox Inc. All rights reserved. Infoblox vNIOS for Azure Deployment Guide April 2018 Page 60 of 60
6. Proceed through any prompts that are displayed. Confirm your Subscription name, specify a
reason for the cancellation and click the Cancel Sub button at the bottom of the window.
Note: This process can take approximately 10 minutes to complete. Any pending billing operations
will stop effective immediately.