department of interior design - jim dawkinsjimdawkins.weebly.com/uploads/6/4/2/1/6421708/13... ·...
TRANSCRIPT

graphic techniques i IND 2300
Florida State University
Department of Interior Design
Fall 2013
Professor Jim Dawkins

IND 2300 Graphic Techniques I
2
IND 2300 – GRAPHIC TECHNIQUES I
Department of Interior Design The Florida State University Instructor: Prof. Jim Dawkins, DCA, IDEC, NEWH Office: 1016 William Johnston Building Office Hours: By semester, posted outside of office and on Blackboard Phone: 644-1436 (Main Office) Email: [email protected] Teaching Assistants: Katie Timmerman Austin Gauley Office: 1081 William Johnston Building 1081 William Johnston Building Office Hours: By appointment only By appointment only Phone: 644-1436 (Main Office) 644-1436 (Main Office) Email: [email protected] [email protected] Section 01 Section 02 Course Time and Place M/W 11:45a – 2:00p T/Th 11:45a – 2:00p
WJB 1061 WJB 1061 Course Description and Purpose An introduction to achromatic media used in sketching and design drawing, with an emphasis on quick sketch techniques and graphic ideation applied to conceptual, schematic, and design development problem solving. Course Goals (Also refer to the goals and objectives listed later in this syllabus) Upon completion of this course, you will be able to:
Sharpen hand/eye coordination for drawing actual and imagined spaces or objects.
Utilize various graphic techniques for problem solving in the conceptual, schematic, and design development phases.
Understand the potentials within the art marker medium and be able to apply the medium to value rendering of plans, elevations, and sections.
Utilize 1-point, 2-point, grid, and “eyeball” perspective methods.
Have fun and do good work……….why not? Prerequisites/Co-requisites
None

IND 2300 Graphic Techniques I
3
DEPARTMENT POLICIES
Attendance Policy Each student is allowed two unexcused absences without penalty. Each additional unexcused absence will result in a 1/3 letter grade deduction from the final course grade. (For example, a student with an A- in a class and 2 unexcused absences beyond the 2 allowed will receive a 2/3 of a letter grade reduction, which would result in a final grade of B.) Excused absences are defined by the university to include documented illness, deaths in the family and other documented emergencies, call to active military duty or jury duty, religious holy days, and official university activities. Official documentation required to clear an absence must be presented within one week of the absence. Students arriving more than 15 minutes late are considered absent. Late Assignment Policy Assignments are due at the start of class on the day they are due. If an assignment is turned in late, a 10% reduction (one full letter grade) will be applied for each day late, including weekends. An assignment is considered 1 day late if it is turned in 1 minute to 24 hours late; an assignment is two days late if it is turned in 24 hours and 1 minute to 48 hours late; and so on. If a student is unable to give a late assignment directly to the instructor she/he should find a faculty member, teaching assistant, or staff member to document the time the project was turned in by marking the date and time on a note attached to the project--otherwise it will be assumed the project was turned in when it was found in the teacher’s box, office, etc. If a student misses an exam/test/quiz, she/he must have an excused absence to make it up. All make-up tests must be completed within two weeks of the absence unless otherwise specified by the instructor. Minimum Course Grades Effective January 2013 all interior design students must earn a C- or higher in ALL classes in the major. Failure to do so will require taking the class again or leaving the program. (Courses in which a student earns a grade below a C- may be repeated once. If a student does not earn a C- or higher after the second attempt in a class, they must petition the full-time faculty for the opportunity to take the class a third time.) Technology, CAD, and Printing Policy Executing any or part of a course project using the computer involves certain responsibilities. No computer-related excuses of any kind will be accepted if a student fails to meet course deadlines or requirements in any class in the interior design department. Save your work often and be sure that you always have a copy of your files in several different locations! It will be unfortunate if you have computer problems, lose work, have files damaged or lost in the “cloud”, etc., but there will be no extensions granted for projects under any circumstances. The interior design department makes every effort to keep the computer lab and print room in working order. However, keep in mind that equipment does malfunction, ink will occasionally run out, and students may not always be able to print in our print room. When many projects are due at once, students are advised to plan way in advance to ensure they will have time to print. A line at the department printer or at Kinkos/Target will not be accepted as an excuse for a late project. Please keep in mind that the equipment and ink used in the printers is funded by department materials fees. Students who are not in the interior design major should not use our computer or print rooms. Students who are allowed to use these spaces have swipe card access to these rooms—so please do not allow others into these rooms.

IND 2300 Graphic Techniques I
4
After Hours Access Policy The William Johnston Building is set up to allow 24/7 access to the building for interior design students. However, with that after-hours access comes quite a bit of responsibility. The safety of our students is a big concern, so please come and go with other students—safety in numbers is the goal. Keep an eye out for one another when you are in the building and please do not let students you don’t know into the building at night or on the weekends. Please do not prop doors open on the outside or inside of the building. If you ever feel you are in great danger, you should call the FSU police. Please do this only for emergencies—not just for personal inconveniences. They can be reached at 644-1234. Students should show respect for the building and the equipment, furniture, and spaces in which they work. Food should be consumed in the dining areas rather than in the classrooms and labs. When working on the weekends, please bring food trash to outside trash receptacles when you leave the building so we can avoid all the negative consequences that comes when food trash piles up (smells, bugs, rats, etc.). Please be respectful of floors and table surfaces and use spray paint or spray mount, Xacto knives, and other things that might damage surfaces in an appropriate way (spraying outside or protecting surfaces when cutting). Students found abusing the building or ignoring the after-hours policies will lose their swipe card privileges to the building. Remember, this building needs to serve our students for many years to come! Computer Lab Rules Due to the sensitive nature of computers, absolutely no food, drink, pets, or smoking will be allowed in the computer lab or print room (yes, we really have had people bring pets). The only exception to the food and drink rule is a drink in a bottle or other closed container is allowed. We love children (we even have children!), but please do not bring your children to class or into the lab while you work. This is disruptive to other students as well as a liability for the university. Students who ignore these rules will lose their swipe card access to these facilities. Policy For Retaining Student Work As you may know, the department is NASAD (National Association of Schools of Art and Design) and CIDA (Council for Interior Design Accreditation) accredited, and this process makes it necessary to retain examples of student work. Therefore, the department has the right to retain student work for these or for teaching or research purposes for a period of time. We urge you (always) to obtain digital photographs or scans of your work for your portfolio immediately after its completion. The Department also retains the right to photodocument and show your work to others for these purposes. Interior Design Department Main Office Hours 1038 WJB: 8:00 AM – 5:00 PM Monday-Friday (644-1436)
NO SMOKING, FOOD, DRINK (except water), DIP, CHEW, DRUGS, CHILDREN, OR PETS IN OR NEAR THE STUDIOS OR CLASSROOMS!

IND 2300 Graphic Techniques I
5
UNIVERSITY POLICIES University Attendance Policy Excused absences include documented illness, deaths in the family and other documented crises, call to active military duty or jury duty, religious holy days, and official University activities. These absences will be accommodated in a way that does not arbitrarily penalize students who have a valid excuse. Consideration will also be given to students whose dependent children experience serious illness. University Academic Honor Policy The Florida State University Academic Honor Policy outlines the University’s expectations for the integrity of students’ academic work, the procedures for resolving alleged violations of those expectations, and the rights and responsibilities of students and faculty members throughout the process. Students are responsible for reading the Academic Honor Policy and for living up to their pledge to “. . . be honest and truthful and . . . [to] strive for personal and institutional integrity at Florida State University.” (Florida State University Academic Honor Policy, found at http://fda.fsu.edu/Academics/Academic-Honor-Policy.) Americans With Disabilities Act Students with disabilities needing academic accommodation should: (1) register with and provide documentation to the Student Disability Resource Center; and (2) bring a letter to the instructor indicating the need for accommodation and what type. This should be done during the first week of class.
This syllabus and other class materials are available in alternative format upon request.
For more information about services available to FSU students with disabilities, contact the:
Student Disability Resource Center 874 Traditions Way 108 Student Services Building (850) 644-9566 (voice) (850) 644-8504 (TDD) [email protected] http://www.disabilitycenter.fsu.edu/
Syllabus Change Policy Except for changes that substantially affect implementation of the evaluation (grading) statement, this syllabus is a guide for the course and is subject to change with advance notice.

IND 2300 Graphic Techniques I
6
GRAPHIC TECHNIQUES I POLICIES THIS IS AN IN-STUDIO INTENSIVE CLASS. Minimum expectations are that you will be completely prepared to work in class for the full session unless the instructor informs you otherwise. Working in class is an important part of a studio class experience. Ideas exchanged and questions raised by one student benefit all students. Exercises and projects will span longevities of a few days to several weeks, followed by a class critique or presentation, as suitable to the exercise or project. It is your responsibility to listen to schedule discussions in class, review the class schedule before each class, check in with Blackboard, and read any emails sent out emails PRIOR TO EACH AND EVERY CLASS SESSION. You are responsible for printing out all Warm-Up, Skills, and Project Exercise requirements and bring those materials to class. ATTENDANCE IS REQUIRED IN ALL STUDIO SESSIONS unless otherwise specified by the instructor. Students are expected to report to class PREPARED. Any student attending class without completing previous assignments or without the necessary working materials may be counted absent for the class and/or asked to leave. Attendance at project critiques and presentations is required even if they are held outside of the usual class meeting times (with at least one week notice.) Information missed due to tardiness or absence is your responsibility. Class will start promptly on time. Necessary lecture and assignment submittals will occur at the start of class. No information will be repeated as there is insufficient time to bring late-arriving students ‘up to speed’ on content. The professor’s office hours ARE NOT substitutes for in-class instruction. Communication FSU email is the University preferred method of communication between faculty and students. Additionally, Blackboard will be utilized throughout the semester. It is your responsibility to regularly check your FSU account(s) for any class updates or comments. Plagiarism Definition: To take and use as one’s own the concepts, ideas or writings of another. Although all designers are inspired and influenced by the work of other artists and designers, their ideas, concepts, and images MUST NOT be directly or recognizably utilized in student work without written or verbal attribution. Penalties for plagiarism range from failing the course to dismissal from the program and/or the University. Cell Phones You are NOT given permission to use your cell phone in class. Cell phones are to be turned off or to the vibrate position and placed in the bin provided by the instructor. If you are expecting a call that cannot be accommodated at any other time, it is your responsibility to notify the instructor(s) ahead of time so that you may take the call. If you are found surfing the web, emailing, Facebooking, texting, tweeting, etc., you will be counted absent for the day and/or asked to leave. This is a matter of showing respect for the subject matter, your fellow students, and your instructor(s). Textbooks (REQUIRED) None
Reference Books, Websites, etc. (HIGHLY RECOMMENDED) While not required, these references are HIGHLY RECOMMENDED for exploring graphic techniques. These materials will be referenced throughout the session in one form or another. The developing interior

IND 2300 Graphic Techniques I
7
design student should begin to include these books in a personal collection of graphic references that will help form a lifelong library of materials relative to interior design. Design Process: Hand Sketching for Interiors by Rick Bartholomew Architectural Graphics by Francis D.K. Ching, 5th Edition. Drawing Shortcuts by Jim Leggitt, 2nd Edition. The Complete Sketch by Robert S. Oliver. (Rare, out of print – you’ll have to search Google, Amazon, etc.) Interior Design Illustrated by Francis D.K. Ching, 2nd Edition. Drawing and Designing with Confidence, by Mike W. Lin. http://beloose.com (Mike Lin’s website) http://sketchaway.wordpress.com Required Materials and Equipment (Most, if not all, supplies can be obtained locally at Bill’s Bookstore, Utrecht, Michael’s and/or Hobby Lobby)
Sketchbook - approximately 9” x 11”.
Basic drafting equipment such as 30/60 and 45° triangles, scale (US, not metric), a metal or durable plastic straightedge, a T-square that will fit the departmental drafting tables.
Tracing paper (referred to by the instructor as “trash”) – white, 12” and 18” wide rolls.
Pilot Precise V5 and V7 black pens.
Sharpies (Black) – Fine Point common marker (Not Super or Chisel), Fine, and Ultra Fine.
Black pen set such as the Micron six pack with sizes 005 to 08, Prismacolor 5-piece or 7-piece Fine Line Marker set, and/or Faber-Castell PITT Artist’s Pen set. Ink should be non-smearing and/or archival quality. Refillable ink pens such as Rapidograph and Rotring technical pens are NOT recommended.
Markers in gray values: 10, 20, 30, 40, 50, 60, 70, 80, 90%, and black. All markers should be either cool, warm, or French gray and all the same brand - your choice. It is recommended that you buy one or two of each type of gray (cool, warm, or French) and determine your favorite prior to purchasing a full pack of grays.
Colored pencils in gray values and white. Gray values should be cool or warm to correspond with marker choice.
Colored pencils in red, green, yellow, and blue
Roll of ½” masking tape or tape dots.
Unlined 5” x 8” white index cards.
Notebook or file folder for collecting and organizing sketch and reference materials.

IND 2300 Graphic Techniques I
8
Grading Standards and Evaluation Criteria The final grade will be determined on the basis of 1) successful completion of assigned projects, 2) satisfactory completion of warm-up and skills exercises, 3) performance on design charette(s) and/or quizzes (if any), 4) sketch book utilization, and 5) attendance, positive utilization of class time, attitude, and respect for yourself, your classmates, and your instructor(s). Unsatisfactory class attendance and punctuality can have a negative impact on the final course grade. The specific requirements and objectives for each exercise, project, or charette will be defined in the assignment handouts and in the corresponding lecture (if any).
It is important to note that the minimum passing grade in this interior design class is C-. A grade below this mark will result in waiting a year before being able to retake this course (as courses are offered only once per year). Department Grading Scale 95-100 A 90-94.99 A- 87-89.99 B+ 83-86.99 B 80-82.99 B- 77-79.99 C+ 73-76.99 C 70-72.99 C- 67-69.99 D+ 63-66.99 D 60-62.99 D- Below 59.99 F
It is helpful to keep in mind the following letter grade descriptors. A = Outstanding A- = Very good B = Good C = Satisfactory D = Weak F = Unacceptable
Submittal of Work All ‘Work’ (exercises, project drawings, sketchbooks, charette drawings, and any other documents required by the instructor(s) to be submitted for review or grading purposes) are due at the beginning of the class designated as a due date in the course schedule or as directed by your instructor(s) in class. Any Work submitted after the instructor(s) has requested its submittal in class will be considered late and is subject to departmental policies regarding late work. Presentations of Work You will be expected to pin up your Work, even if it is incomplete, and discuss your experience with it so that learning from each other can take place. All Work must be submitted on or ahead of time in order to be graded. Attendance at project critiques and presentations is required even if they are held outside of the usual class meeting times (with at least one week notice.)

IND 2300 Graphic Techniques I
9
Overview of Class Requirements
Activity Description Grade weight
Sketchbook, Warm-up and Skills Exercises
General notes and graphic interpretations of lecture information. In-class guided/demonstrated exercises. Warm-up and Skills Exercises graded pass/fail - drawn or placed in sketchbook.
20%
Project Exercises
P1 One and Two-Point Perspectives: The Basics
10%
P2 From Basics to Details: Adding Life to Perspective
Sketches
20%
P3 Presentation Level Sketch Perspectives 30%
Design Charrette/Competition
All-Department design charrette/competition 10%
AAAP
Attendance/Attention/Attitude/Professionalism The design student is on time and prepared for class and project presentations each and every day; participates fully and enthusiastically in class activities and critiques; exhibits honesty in one’s work and openness about one’s abilities; possesses a great attitude and demonstrates RESPECT for oneself, one’s classmates, and the instructor(s) – the 3-R’s.
10%
Interesting Note: 30% of your grade is based on your being in class and doing the work, and then Doing It Again.
Grading Rubric General Descriptions of Grade Assignments for Presentation Projects
The following are general descriptions of an example project that would receive a grade of A, B, C, or D. Each project you will complete will have its own specific set of requirements. Every student’s project and in fact, every student’s situation, is, of course, different as well. Therefore, chances are good that your project and actions will not exactly correspond to any of the following descriptions—they are not supposed to. Instead, the following descriptions are offered to you as a general documentation of an imaginary project’s successes and failures and the grade resulting from it.

IND 2300 Graphic Techniques I
10
In GENERAL, a project receiving an A for a grade might possess the following characteristics: Student successfully communicates (visually) a uniquely creative and functional project solution and fully takes into consideration program requirements through excellent graphic techniques. Graphic conventions are effectively manipulated to produce an easily understood interior solution, either in blackline or with color/tone as required. Text is easily readable and accurate in content and hierarchy. Color palette, if utilized, and tone/shade/shadow are balanced and realistic; focus and contrast is demonstrated in the case of either line quality and shade/shadow. Student took initiative to exceed the required minimum guidelines through extra drawings, sketches, or other means. Presentation is consistent and in keeping with the approach of the solution. All required elements are included. The oral presentation is obviously rehearsed and the student, while perhaps nervous, is knowledgeable in the project solution and can justify decisions made utilizing the graphics presented. Student has consistently attended and interacted in class and has taken constructive criticism into account. Exercises and/or projects are handed in on time or ahead of due date. The graphic techniques employed represent the student exceedingly well in a portfolio and would likely be assessed as the work of a beginning professional by a client or design employer.
In GENERAL, a project receiving a B for a grade might possess the following characteristics: Student has a clear grasp of subject matter parameters and other impacting elements. Resulting graphics indicate this knowledge, with a few minor flaws in some areas. Solutions requiring graphic communications express creative and inventive techniques. Graphic conventions are sound, but lack fine-tuned refinement. Small notations may be missing, inadequate, or incorrect. Graphics, in their final presentation forms, show clear thinking as they evolved into final project solutions for studio projects, but may possess small flaws that are distracting in minor ways to the overall design communication. The oral presentation supports a competency in using graphic techniques to communicate design ideas and solutions. The presentation may suffer from a short, incomplete, or disorganized explanation of the project through graphics that shows little rehearsal. Student has consistently attended class and interacted with others. Project is handed in on time. The employment and execution of graphic techniques to illustrate design intent represents the student fairly well in a portfolio and would likely be assessed as competent and adequate student work by clients and design employers. In GENERAL, a project receiving a C for a grade might possess the following characteristics: Student has been attentive in class to lecture, but lacks a definitive grasp of graphic techniques and/or drawing requirements. Graphics for exercises and projects are not overly creative in their use. Elements of graphic guidelines and drawing conventions, while not missing, may be misunderstood or underestimated. View composition components such as scale and proportion are not accurately described. Fair to poor scene selection and view composition presents problems to the exercise’s or project’s overall success. Drawings and sketches may appear ordinary or even boring through repetitive use of the same ideas, line weight or lack of value variety. Some lines may appear to have been ‘free-handed’ inappropriately. Text is inconsistent and distracting. Tone, shade, shadow, material, and texture are inconsistent, poorly scaled, or left out completely. Graphic presentation lacks consistency and rendering shows lack of time investment. Oral presentation is marked with stammering or presentation is missed altogether. Exercise or project is handed in on time. Failure to employ and execute appropriate graphic techniques to illustrate design does not represent the student particularly well in a portfolio and would likely be assessed as beginning student work by clients and design employers.

IND 2300 Graphic Techniques I
11
In GENERAL, a project receiving a D for a grade might possess the following characteristics: Through absences from class or aversion to reading, listening, studying and doing, the student has not grasped the goals and objectives of graphic techniques. The work clearly lacks an understanding of the graphic techniques taught, discussed, reviewed, and executed. Graphics are inconsistent. Requirements are largely ignored or incorrectly applied. Some of the drawings, through poor use of time, appear to ignore the conventions of hand produced design documents. Text is inconsistent or entirely unreadable. Elements of the work are missing. Prior constructive criticism is either received with hostility or ignored. The oral presentation is obviously assembled with little or no prior rehearsal. Class attendance is spotty and missed handouts are frequently requested of fellow students. Project is handed in late, resulting in a lowered grade. The graphics work does not represent the student well in a portfolio and should not be included as an indicator of their work.

IND 2300 Graphic Techniques I
12
SEMESTER SCHEDULE OVERVIEW – GOALS AND OBJECTIVES THE BASICS Goals
1. Continue to develop basic drawing skills learned in DF1/2 required which will form solid sketch drawing foundations.
2. Develop expertise in specific drawing media: black ink-based pens, bond paper, tracing paper, and vellum paper.
3. Develop a clear, concise, and complete comprehension of one and two-point perspective drawing basic skills.
Objectives
1. Create easily readable, clearly organized, and carefully crafted sketch drawings that demonstrate a clear understanding of drawing media, perspective “rules”, quick sketch techniques, drawing organization, and graphic design presentation methods.
2. Utilize graphic techniques supporting the Studio I work. 3. Create perspective sketch drawing(s) of Studio I project(s).
Foundations
Course Introduction
Warm-up Exercises
Introduction(s): Drawing and Media Basics – The notion of FREEHAND drawing (why, when, where)
o Pens Types
Inks – rollerball, felt tip, mechanical pens
Pen Tips (construction of the pen)
Holding the pen (ergonomics); pen pressure o Usage
Line weights Line construction Using lines to sketch rather than sketching lines - FREEHAND
o Paper Types
Bond and sketch pad
Trash
Vellum
Putting The Drawing Media Together o Freehand quick sketching - not finished renderings; we are imitating professional ‘client and/or
project team meeting’ drawings, not final presentation drawings. NOTE: Client meeting drawings, in most cases, will suffice as presentation drawings for collegiate work.
o Brainstorming, ideation, conceptual ideas o Communication of ideas: presenting your ideas in drawing form o Organizing While Drawing
Page layouts, storyboarding, lettering, elements and principles of design

IND 2300 Graphic Techniques I
13
Early Development Defining and Understanding Perspective through Skills Exercises (Deconstructing the perspective – discovering the components via drawings and photographs)
Examining good perspective drawings – why are they “good”?
Discuss perspective view composition Perspective “Rules” and Construction Basics
Elements of correct and successful 3-dimensional freehand idea communication – horizon line, scale figure, vertical measure, vanishing points
One-point perspective
Two-point perspective Other Communication Graphic Techniques
Bubble diagrams as design process “tools”, means of communication, etc.; not drawn for their own sake
The notion of ‘graphic facilitation’ FROM BASICS TO DETAILS: ADDING LIFE TO PERSPECTIVE DRAWINGS Goals
1. Reinforce basic skills while developing more detailed graphic techniques to enhance design idea communication.
2. Finely tune the use of ‘most-favored’ drawing media: black ink-based pens, bond paper, tracing paper, and vellum paper.
3. Develop shade/shadow/tone/texture skills with the addition of gray/black design markers and white wax-type pencils.
4. Continue to develop a clear, concise, and complete comprehension of one and two-point perspective drawing skills linked to project, client, and situation appropriate presentation methods.
Objectives
1. Create easily readable, clearly organized, and carefully crafted sketch drawings for the Studio I project that demonstrate a clear understanding of drawing media, perspective “rules”, quick sketch techniques, drawing organization, and graphic design presentation methods.
2. Contribute well-executed and graphically informative sketch drawings to a design competition. Continued Development
Growth through more complex Skills Exercises emphasizing individual stylistic development without abandoning professional, industry-utilized graphic standards. The use of entourage - creating drawing ‘life’ and believability. Light – Using shade, shadow, tone, texture and materials to describe design intent. Introduction of more intricate graphic skills into Studio I projects.

IND 2300 Graphic Techniques I
14
PRESENTATION LEVEL SKETCH PERSPECTIVES Goals
1. Combine a semester’s worth of freehand sketch perspective instruction into a personalized and unique method of drawing.
2. Utilize various graphic techniques for problem solving in the conceptual, schematic, and design development phases of a project.
3. Explore color as a means to highlight sketch drawings (NOT COLOR RENDERING). Objectives
1. Create easily readable, clearly organized, and carefully crafted professional presentation level sketch drawings for Studio I projects that demonstrate a clear understanding of drawing media, perspective “rules”, quick sketch techniques, drawing organization, and graphic design presentation methods.
Graphic Technique Refinements Final technique-honing Skills Exercises. High Tech and High Touch: InDesign, Photoshop, and SketchUp and how they influence hand-drawing (and vice-versa). Exploring the digital influences in sketch perspectives. Practical applications of graphic techniques in Studio I project perspective sketch drawings while creating ‘final’ presentation information. Develop the ability to self-assess individual work.

IND 2300 Graphic Techniques I
15
Graphic Techniques I - ScheduleIND 2300 – Fall 2011
Subject to change at any time and for any reason
Mtg.
No.
Proj.
Clas
sDa
y
Mth. Date Agenda Activities
1 1 M Aug 29
Tu 30
2 2 W 31
Th Sep 1
3 3 M 5 LABOR DAY
Tu 6
4 4 W 7
Th 8
5 5 M 12
Tu 13
6 6 W 14
Th 15
7 1 M 19
Tu 20
8 2 W 21
Th 22
9 3 M 26
Tu 27
10 4 W 28
Th 29
11 5 M Oct 3
Tu 4
12 6 W 5
Th 6
13 7 M 10
Tu 11
14 8 W 12
Th 13
F 14 ALL-DAY CHARETTE
15 1 M 17
Tu 18
16 2 W 19
Th 20
17 3 M 24
Tu 25
18 4 W 26
Th 27
19 5 M 31
Tu Nov 1
20 6 W 2
Th 3
21 1 M 7
Tu 8
22 2 W 9
Th 10
F 11 VETERAN'S DAY
Loving your country and its soldiers – being glad you are in
college and not stuck on some mountain outpost in
Afghanistan
23 3 M 14
Tu 15
24 4 W 16
Th 17
25 5 M 21
Tu 22
26 W 23
Th 24
27 6 M 28
Tu 29
28 7 W 30
Th Dec 1
29 8 M 5 All Day Presentations: 10:45am - 4:00pm
Tu 6 All Day Presentations: 8:00am - 12:45pm
30 9 W 7
Th 8
F 9 LAST DAY OF CLASSES
M 12
Tu 13
W 14 Study, Engage, Pass
Th 15
F 16
Universal Design Discovery
Center Project (GT1 P2) Due
SPIRITUAL SHRINE/RETREAT PROJECT (GT1 P3)
VISUAL NOTATION PROJECT
THANKSGIVING BREAK Eating, resting, enjoying family and friends, watching football
Presentation Level Sketch
Perspectives
Pin-up: Critical review of drawings and exercises from
UnivDesign project
Draw like your grade depends
on it
Avoid frustration by paying
attention
Draw…and then draw some
more
From Basics to Details -
Adding Life to Perspective
Drawings
Introduce GT1 P2 Project; SE7 Bubble Process (Keonig); discuss
Universal Design Discovery Center project requirements
Review tone, shade, shadow, texture per Koenig Ch's. 1 & 9;
SE's 8 and 9 in classListen, Discuss, Learn
Students hand in SE4 DIA for AAAP grade; Work Session
EXAM WEEK
Introduce GT1 P3 Project; Discuss Spiritual Shrine/Retreat
Project; discuss Composition (Studies); SE11 Entourage
Review and select SE 12 in class; concentrate on bubble
flow process for SS/R Project
Spiritual Shrine/Retreat
(GT1 P3) Presentations
Work Session
Work Session
Plan, Elevation and Section graphics; SE 13 in class
Review of SE13 in class; Color - Instructor led quick-color
demo with design development sketches
Instructor led demos and work session with computer
models, marker, pencil, pen
Semester Review; portfolio completion
The notion of color….
computer aided sketching - let's
have an open mind….
CHARETTE BOARDS DUE; Instructor led shadowcasting per
Koenig Ch. 3; SE10 in class and DIA as homework
Students hand in SE10 for AAAP grade; DIA DAY with SE4
and t/s/s/t; general work session
Studio I SRO Project
(GT1 P1) DuePin-up: Critical review of drawings from SRO project
UNIVERSAL DESIGN DISCOVERY CENTER PROJECT (GT1 P2)
lines, details, view composition
(depth, floor, walls, ceiling)
Participate
Draw…and then draw some
more
Listen, Obey, Draw and DIA
Model photography (snapshots) as a means to perspective
drawing
Work Session - Review of any/all WUP's and SE's
WUP 7 in class; Studio I VisNote work session
Studio I VisNote Project Due
SE4 in class; Perspective Q&A and Troubleshooting table-by-
table
Instructor led SE's 5/6 - ; students hand in SE's 5/6 for
AAAP grade; Quick-Sketch Scenario
Instructor led SE3; students hand in SE3 for AAAP grade;
Discuss SRO requirements
Introduce GT1 P1 Project; SE2a one-point review/deconstruction
in class; One-point perspective instruction (Keonig)
SE2b two-point review/deconstruction in class; two-point
perspective instruction (Koenig)
Review VisNote comments; SE1 in class; Perspective
Overview - various methods
One and Two-Point
Perspectives: The Basics
COLLEGE STUDENT SRO PROJECT (GT1 P1)
Course IntroductionOrientation, texts, references, tools/materials, Blackboard,
expectations, RRR, AAAP, DIA, InDesign
Discuss Koenig Ch's 1-2 including "Loosen Up" and "Line
Control" exercises, WUP's 1-3 in classListen, Obey, Draw and DIA
Discuss Koenig pp. 55-58, Ch. 5, pp. 91-97, WUP's 4-6 in
class
Discuss Koenig; DIA: Everything so far; check-up on AAAP
grade
Participate
No
InD1
InD2
InD3
InD4
InD5
InD6
InD7
InD
IN-HOUSE DESIGN COMPETITION This semester the ID Department is organizing an in-house design competition that will occur Wednesday, October 16 to Monday, October 21. Students in Studio 1, 2, 4, and Creative Problem Solving will be required to participate. If you are not in these classes you may voluntarily participate. You are required to attend your classes during this time, but studio work is being suspended and assignment/test dates have been massaged to allow students to focus on the design competition. It is critical that you plan your schedule accordingly in advance to be able to fully participate in the design competition with your team members for the duration, including the weekend dates of October 18 - 20. A significant portion of your individual grade will be based upon your level of participation with your team members and contribution to the design outcome.

IND 2300 Graphic Techniques I
16
WARM-UPS and
SKILLS EXERCISES

IND 2300 Graphic Techniques I
17
These Warm-up (WUP) and Skills Exercises (SE) will help you learn and apply skills discussed and demonstrated in class and will help you complete your studio projects. Your instructor will review all exercises. Note that exercises must be thoroughly completed in order to achieve a satisfactory grade. “Thoroughly completed” is at the discretion of the instructor. Exercises are to be repeated as many times as necessary, during the corresponding timeframe noted in the schedule, until a pass is achieved. If you have doubts as to the quality of your work, DO IT AGAIN.

IND 2300 Graphic Techniques I
18
WARM-UP EXERCISES The following “warm-up” exercises will help you develop skills that provide important credibility to your work. Clients and project teams are constantly exposed to ‘process’ drawings as a project moves along. These drawings, while often quickly drawn, must possess a certain presence to convince your client and/or project team that you are capable of producing a quality solution. To derive the greatest benefit these exercises play in the development of your graphic technique(s), they should be practiced and employed in all your work DAILY. Goals and Objectives
1. Develop and/or improve hand-lettering skills. 2. Develop an understanding of and appreciation for the value of line weights and construction in
drawings. 3. Develop beginning familiarity with adding supportive sketch people to drawings in order to
determine accurate and appropriate scale and proportion. 4. Develop sketch note-taking skills. 5. Create storyboards that assist in the communication/presentation of design ideas.
Exercises
WUP 1 Hand Lettering
WUP 2 Sketch People/Scale Figures
WUP 3 Line Weight Variation/Profiling
WUP 4 Utilizing Bubble Diagrams and Sketching Symbols
WUP 4 Idea Communication Submittal Complete your exercises in your sketch book or on tracing paper (mounted in your sketch book). All work should be easily and cleanly removable from any fixed binding for assignments required to be handed in. Each page should include the exercise title, your name, and date, all in architectural hand lettering with close attention paid to font size, font accuracy, pen weight selection, and spelling. Page composition elements such as borders are recommended to bring clarity to your work. Grading Criteria
Completeness of each exercise and quality of the graphic presentation.
Evidence of effort and beginning evolution of your technique and style.
Ability to adhere to submittal requirements including titling, page size, name and assembly details.
Cleanliness of submittal - elements are logically composed and organized, imagery is clean (no finger smudges, candy stains, coffee or soda marks, etc.), and final product is worthy of showing to your client.
IND 2300 Graphic Techniques I
19
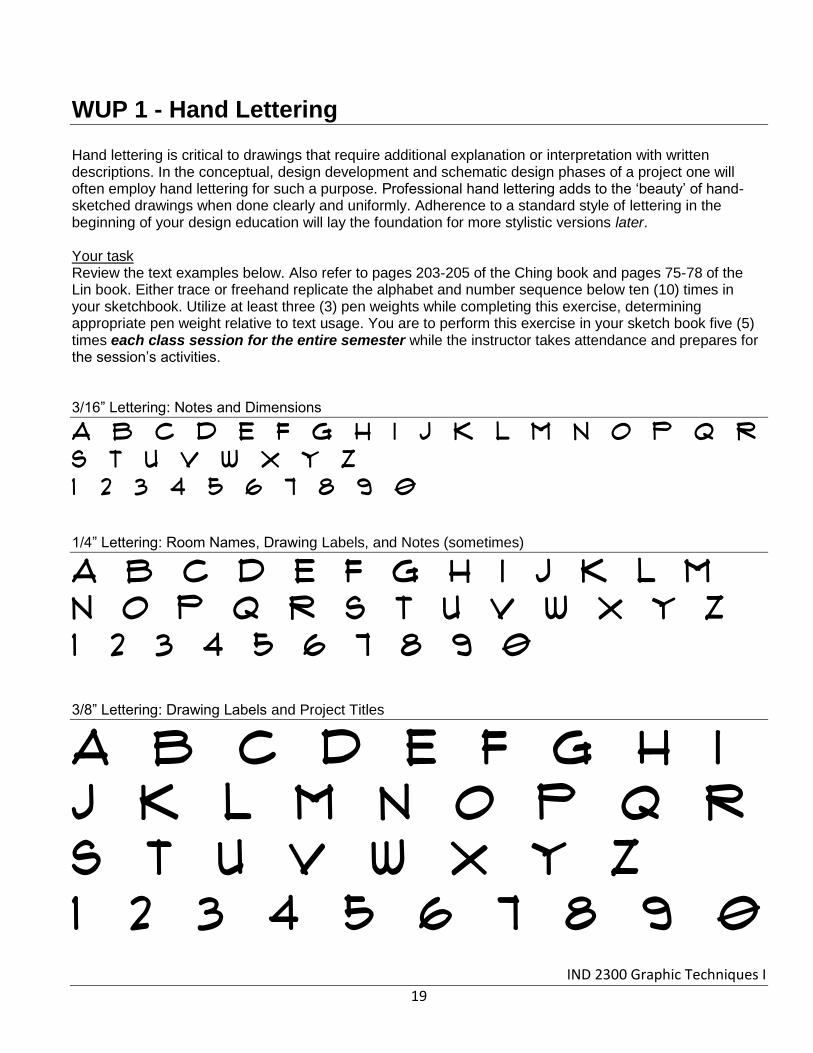
WUP 1 - Hand Lettering Hand lettering is critical to drawings that require additional explanation or interpretation with written descriptions. In the conceptual, design development and schematic design phases of a project one will often employ hand lettering for such a purpose. Professional hand lettering adds to the ‘beauty’ of hand-sketched drawings when done clearly and uniformly. Adherence to a standard style of lettering in the beginning of your design education will lay the foundation for more stylistic versions later. Your task Review the text examples below. Also refer to pages 203-205 of the Ching book and pages 75-78 of the Lin book. Either trace or freehand replicate the alphabet and number sequence below ten (10) times in your sketchbook. Utilize at least three (3) pen weights while completing this exercise, determining appropriate pen weight relative to text usage. You are to perform this exercise in your sketch book five (5) times each class session for the entire semester while the instructor takes attendance and prepares for the session’s activities. 3/16” Lettering: Notes and Dimensions
A B C D E F G H I J K L M N O P Q R S T U V W X Y Z 1 2 3 4 5 6 7 8 9 0 1/4” Lettering: Room Names, Drawing Labels, and Notes (sometimes)
A B C D E F G H I J K L M N O P Q R S T U V W X Y Z 1 2 3 4 5 6 7 8 9 0 3/8” Lettering: Drawing Labels and Project Titles
A B C D E F G H I J K L M N O P Q R S T U V W X Y Z 1 2 3 4 5 6 7 8 9 0

IND 2300 Graphic Techniques I
20
WUP 1 - Hand Lettering (continued) 1/2” Lettering: Project Titles and Lettering as Graphics (Artwork)
A B C D E F G H I J K L M N O P Q R S T U V W X Y Z 1 2 3 4 5 6 7 8 9 0

IND 2300 Graphic Techniques I
21
WUP 2 - Sketch People/Scale Figures Sketch people, at the correct scale, add variety, context, and life to a drawing. Creatively drawn they become enhancements, visual cues, and ‘human’ reasons for the perspective viewer to participate in a drawing. Your task Review the images below. Also refer to pages 79 – 83 of the Lin book and pages 180 – 184 of the Ching book. Trace the following figures and add only as much detail as necessary to generate a believable person or group of people. Utilize at least three (3) pen weights while completing this exercise, determining appropriate pen weight relative to scale figure scale and usage. You are to draw one page of sketch figures at multiple scales, sizes, and orientations in your sketch book each class session for the entire semester while the instructor takes attendance and prepares for the session’s activities.

IND 2300 Graphic Techniques I
22
WUP 3 - Line Weight Variation/Profiling Good drawings rely on great lines; well-drawn, expertly crafted, and carefully and logically placed. Your task Place a layer of sketch paper over the drawing below and FREEHAND trace it with correct line construction emphasizing the three basic line weights: 1) “look past” edges (outlines - heavy); 2) inside corners/lines (receding, internal - medium); 3) outside corners/lines/edges (leading, external - fine). Utilize at least three (3) pen weights while completing this exercise, determining appropriate pen weight relative to the purpose of each line in the drawing. You are to complete this exercise each class session for the entire semester while the instructor takes attendance and prepares for the session’s activities.

IND 2300 Graphic Techniques I
23
WUP 4 - Utilizing Bubble Diagrams and Sketching Symbols Objective Part of a designer’s responsibility is to use the design process to arrive at a solution for a client. Beginning stages of this process often require small, sketch-like drawings using a handful of simple graphic symbols to express merging ideas. This exercise will provide you practice in getting comfortable with this ‘vocabulary’ of lines, arrows, and special symbols.
‘Bubble’ Graphics The ‘bubbling’ process is often a series of loose sketches you generate by yourself to help you work through your ideas. Sometimes, though, you want to share your emerging ideas with others (like in your presentations), showing ideas that still look preliminary but more easy to understand. Additionally, you will begin analyzing factors that affect the design and layout of a space such as the flow of circulation, space adjacencies, various hierarchies of space type and usage, furniture, fixtures and equipment/accessories (FF&E), access to views and environmental considerations among others. Below are some examples that show how you can quickly develop symbolic drawings with relevant graphic symbols and techniques. You should decide when to use each for your own way of doing things.
Images below retrieved from http://www.sciencedirect.com/science/article/pii/S0950705105000705
Loose & fast. Uses one or two pen weights and is put
down on paper very quickly.
Preliminary client presentation. Still ‘preliminary’ in feel, but easier for others to understand because different lineweights and/or tone/shadow help items ‘pop’ off the page. Arrows may be more carefully drawn.

IND 2300 Graphic Techniques I
24
Your task Recall the most recent doctor’s or dentist’s office you visited for treatment. Create two bubble diagrams that describe how the original designer most likely laid out the space, as if the building were still in the very early stages of concept design and planning:
1. A loose and fast version of the plan layout, and then
2. A preliminary client presentation version, Define the general layout, circulation hierarchies and size relationships (proportional) and any other feature that you deem important. Refine the bubble diagrams with the symbol vocabulary illustrated below. Experiment with the graphic ideas discussed in your Studio 1 class on your most current project.

IND 2300 Graphic Techniques I
25
Basic Symbol Vocabulary You only need to use a few symbols and a handful of simple graphic techniques to produce clear and strong diagrams. Only three types of basic symbols are necessary to produce concept diagrams:
Bubbles to define areas
Lines with arrows to indicate circulation
Special symbols to represent special spots or events. Next, you need ways to differentiate among same type symbols to convey hierarchy. This is accomplished by
varying the size of the symbol,
the line weight of its outline, and/or,
the texture you use inside the symbol.

IND 2300 Graphic Techniques I
26
WUP 5 – Idea Communication
During all phases of the design process you will need to communicate your work at various but regular intervals. This may be for your client, your in-house team, or the larger project team consisting of design consultants, purchasing agents, contractors and the like. One of the quickest and simplest ways to convey design ideas is to literally take notes through drawing - a real-time physical notation linking the mind’s eye to a reproducible medium through a (set of) recording instrument(s). This is simply drawing while thinking.
(images retrieved from www.lizsteel.com.)
Graphic records of your design process (and developing design solutions) can be linear, non-linear, or even ‘frenzied’ as so often happens with creative actions. Free-thought scribbles, sketches, and doodles are intrinsically simple, and for designers their power is typically realized (initially) only in a potential energy state. As such, it needs to be converted into a corresponding kinetic energy in order for it to be transformative. A design is only as good as its understanding by those interpreting your
objectives. You are responsible for communicating ideas in an organized manner that clearly, concisely, and completely describes your design intent. An effective method of describing design intent is through graphic facilitation.
Graphic facilitation (retrieved from http://en.wikipedia.org/wiki/Graphic_facilitation)
Graphic Facilitation is the use of large scale imagery to lead groups and individuals towards a goal. The method is used in various processes such as meetings, seminars, workshops and conferences. This visual process is conducted by a Graphic Facilitator. The early field of Graphic Facilitation was named “Explicit Group Memory” by Facilitator Geoff Ball, who “discovered” that a shared picture supported group learning or more importantly – a lasting memory in the group.

IND 2300 Graphic Techniques I
27
A Graphic Facilitation Retrospective by Graphic Facilitator David Sibbet tells the story of these early pioneers in the field who were inspired by architects (with understanding of large imagery), designers, computer engineers (who started to cluster information in a new way), art and psychology. He describes
that what at a glance “just” looked like graphics was so much more: “It was also a dance, and storytelling, since the facilitator was constantly in physical motion, miming the group and its communication with movement, as well as commenting on the displays.”
One successful method for designers to illustrate their ideas is to storyboard them prior to preparing the final document. Creating a storyboard will help you plan your presentation drawing-by-drawing, title by title, note by note. You can make changes to your storyboard before preliminary and final presentations rather than going through the headache (and
anxiety) of changing your mind later and forcing a restart late in your process. Storyboarding will also allow you to get immediate feedback on your ideas, discuss your presentation techniques, and prepare for confident verbal and graphic delivery.
Your Task Create an 18” x 24” storyboard presentation illustrating your first 2 weeks in class utilizing WUP’s 1-4.

IND 2300 Graphic Techniques I
28
SKILLS EXERCISES

IND 2300 Graphic Techniques I
29
SE 1- Photo Perspective Exercise Objective Observe and diagram perspective components as we see them in the “real world” via photos. Understand and accept that the concepts of vanishing points, vanishing lines, and horizon lines are very real constructs for visually analyzing the matrix of our environment. Your task
1. Locate two photographs of a building interior that show large spaces in one and two point perspective. (Do not use the one below). Cut the original out or get a photocopy of the image. If necessary, use a printer to reduce the photo down to approximately 4” x 4”. Predetermine if the photo’s perspective is vertical or horizontal and then adhere the photo to a page in your sketch book in either a portrait or landscape direction. Using colored pencils, draw on top of the photo, showing the horizon line (light blue) and the vanishing points (left vanishing point green, right vanishing point red). Draw lines that vanish to the left vanishing point in green. Draw lines that vanish to the right vanishing point in red. In some cases, the vanishing points may be too far out to draw. In these cases, draw lines out to the edge of the paper and explain that the vanishing point is further out. Draw lines that extend from walls or objects to show how you located the vanishing points.
2. Place a sheet of trace paper over the image and tape it down at the top. Redraw the basic components of the scene into simple boxes showing how they respect these vanishing points.
Label your sheet of paper as “Skills Exercise 1: Photo Perspective Exercise” and include your name.
1.
2.

IND 2300 Graphic Techniques I
30
SE 2 - Composition Studies/View Analysis Objective Composition is an important part of an effective perspective sketch. Too much or little balance affects a perspective sketch’s success. Layering objects in front of one another reinforces depth in a scene, and locating objects or planes in back, mid and foreground areas often completes a scene and makes a viewer feel a part of it. Lastly, having one or more focal points gives a perspective sketch logic and makes it interesting to observe. Doing quick composition studies prior to an image perspective or final perspective drawing allows you to plan for these goals in advance. Your task Thinking about your SRO project, create at least four (4) composition studies on 5” x 8” index cards of anticipated views or scenes. Be sure to include people in your sketches because they affect composition. Two views (2) should be portrait orientation and the other two (2) landscape orientation. Circle the major and minor focal points and show a heavy dotted line that explains where you would crop the scene. Using the criteria above, decide which one is your favorite. On the back of each index card, in two or three sentences, justify your choice incorporating the “language” of composition studies relative to the elements and principles of design.

IND 2300 Graphic Techniques I
31
SE 3 - Perspective Sketching: Just draw A BUNCH of stuff….. Objective Create believable perspective sketches that rely on accurate perspective construction, the perception of depth, great linework, and cues from people for scale. Your task Review your notes on perspective drawing from the class instruction and the other reference materials. Using the six (6) perspective grids you created in class, do the following: A. One point perspective grids: Sketch a window in a side wall that is at least 5 feet wide and 5 feet tall and straddles the horizon line in the sketch. Draw items that you can see out the window. Draw a person standing in the room. Note that their eyes should be located at the horizon line. The rest of their body should be sufficiently long so that they make proportional sense where you place them in the room. Draw several other people at varying depths in the room. Sketch an array (10 or more) of cubes, cones, cylinders, rectangular boxes, and pyramids above the horizon line, at the horizon line, and below the horizon line, all at varying depths in the perspective. B. Two point perspective grids. Sketch an open door in a side wall that is at least 3 feet wide and 7 feet tall and straddles the horizon line in the sketch. Draw items that you can see out the door. Draw a person standing in the room. Note that their eyes should be located at the horizon line. The rest of their body should be sufficiently long so that they make proportional sense where you place them in the room. Draw several other people at varying depths in the room. Sketch an array (10 or more) of cubes, cones, cylinders, rectangular boxes, and pyramids above the horizon line, at the horizon line, and below the horizon line, all at varying depths in the perspective.

IND 2300 Graphic Techniques I
32
SE 4 - Advanced Perspective Analysis Objective In order to become familiar with constructing perspectives of complex spaces, it is helpful to ‘reverse engineer’ a drawing, deconstructing it to see what basic shapes and forms have been created, and where the vanishing point(s) and horizon line are located.
SE4a – One-Point Perspective Deconstruction and Analysis Your task Examine the perspectives below and on the next page and complete the following:
1. With a blue colored pencil and straightedge, examine the walls and then locate and draw the horizon line. Identify the vanishing point with a yellow pencil.
2. Shade all walls that vanish (and are parallel to) the vanishing point with a red colored pencil. 3. Shade all walls that are perpendicular to the vanishing point with a green colored pencil. Do these
vanish? 4. Utilizing the horizon line and vanishing point in the drawings, draw a 2’x2’x2’ box on each table.
Draw a 3’x3’x3’ square matte centered under both objects. What is unique about the table in the first drawing?
Taken from Ching’s Interior Design Illustrated, 2nd
Edition, p. 126.

IND 2300 Graphic Techniques I
33
Taken from Ching’s Interior Design Illustrated, 2nd
Edition, p. 96.

IND 2300 Graphic Techniques I
34
SE4b – Two-Point Perspective Deconstruction and Analysis Your task Examine the perspectives below and on the next page and complete the following:
1. With a blue colored pencil and straightedge, examine the walls and then locate and draw the horizon line. Identify the left vanishing point with a green pencil and the right vanishing point with a red pencil.
2. Shade all walls that use the right vanishing point with a red colored pencil. 3. Shade all walls that use the left vanishing point with a green colored pencil. 4. In the second perspective drawing, shade the two oddly angled walls with a yellow pencil. These
two walls use a third vanishing point. Can you find it? 5. In the second perspective, utilize the horizon line and vanishing points in the drawing to draw a box
that would contain a loveseat sofa. Draw a box next to it that would contain an end table. Finally, draw a square area rug underneath both objects.
http://hiattconstruction.com/pics_drawings/island_cad.jpg

IND 2300 Graphic Techniques I
35
Adapted from Montague, J. Basic Perspective Drawing: A Visual Approach. NY: VNR.

IND 2300 Graphic Techniques I
36
SE 5 - Volume Perspective Doodles Interior space can take many different shapes with different types of details, and it is important to become familiar with how to sketch them quickly and confidently. Here are 24 rooms provided in plan, reflected ceiling plan or elevation view. Sketch each room in one point perspective in your sketchbook. Place the vanishing point wherever you would like on the back wall. Be sure to label your pages as “Skills Exercise 3: Volume Perspective Doodles.” Write the number of the doodle in the box under each perspective sketch.
“100 AFF” means the ceiling is 10 feet above the finished floor.
RCP means the drawing is a reflected ceiling plan, as if a mirror were on the floor reflecting the ceiling plane onto it.
Here is an example.
10o AFF

IND 2300 Graphic Techniques I
37

IND 2300 Graphic Techniques I
38

IND 2300 Graphic Techniques I
39

IND 2300 Graphic Techniques I
40

IND 2300 Graphic Techniques I
41
SE6 - One-Point Eyeball Grid with Chair and Window Objective Create a one-point eyeball grid to quickly generate a perspective view of furniture and architectural items within an interior space. Construct a drawing where scale and proportion support the accuracy and believability of depth in a perspective view. Your task
1. Review notes from your classroom exercises in one-point grid construction. 2. Construct a 1-point interior grid:
10 foot tall ceiling 12 foot wide back wall 10 foot of depth from back wall to foreground Place the VP at 5’-0” AFF and 4 feet from the left back corner on the back wall.
Next, draw Le Corbusier’s LC2 chair in the room:
3. Create a 36”x36”x36” box to place the chair (32”x32”x32”). Place this box in the front half of the room. You will draw it so the seat cushion is facing the viewer. The majority of the chair should be to the left or right of the vanishing point. Use the nearest wall’s grid to determine the height of this box.
4. Draw two or more scale figures at different room depths to confirm the chair’s scale. 5. Thinking of the chair’s front as an elevation for a moment, translate the major divisions of the chair
(its bottom edge, the seat cushion’s top) to the front of the box. 6. Translate the side elevation to the box like you did the front. 7. Finally, carve away the seat opening, leaving the arms.
Add a window of your choice in one of the side walls showing the full thickness (+/-5”) of the wall.

IND 2300 Graphic Techniques I
42
SE7 - Two-Point Eyeball Grid with Chair and Door Objective Create a two-point eyeball grid to quickly generate a perspective view of furniture and architectural items within an interior space. Construct a drawing where scale and proportion support the accuracy and believability of depth in a perspective view. Your task
1. Review notes from your classroom exercises in two-point grid construction. 2. Construct a 2-point interior grid:
12 foot tall ceiling Place the VP at 5’-0” AFF.
Next, draw Le Corbusier’s LC2 chair in the room:
3. Create a 36”x36”x36” box to place the chair (32”x32”x32”). Place this box in the front half of the room. You will draw it so the seat cushion is facing toward the viewer angled toward the right. Use the nearest wall’s grid to determine the height of this box.
4. Draw two or more scale figures at different room depths to confirm the box’s scale. 5. Thinking of the chair’s front as an elevation for a moment, translate the major divisions of the chair
(its bottom edge, the seat cushion’s top) to the right front of the box. 6. Translate the side elevation to the box’s left side like you did the front. 7. Finally, carve away the seat opening, leaving the arms.
Add a door opening of your choice of style in one of the walls. The door opening should show the full thickness (+/-5”) of the wall and should be a minimum of 3 feet wide and 7 feet tall.

IND 2300 Graphic Techniques I
43
SE8 - Sketch Perspective Construction Objective Begin visualizing unbuilt spaces and employ graphic techniques to clearly, concisely and accurately depict a scene or multiple scenes within that space. Your task Utilizing the plan, section, and elevation drawings below, create a two-point sketch perspective of the space. Utilize your perspective analysis, deconstruction, and construction methods. Pay attention to objects in the foreground, mid-ground, and background. Be conscious of an object’s three-dimensional quality. Utilize line weights to define the room’s depth from the foreground to the background. Be conscious of view composition when selecting your station point.
S
E

IND 2300 Graphic Techniques I
44
SE9- Tone, Shadow, and Light Objective Understand why light plays a large part in how interior spaces appear. Recognize that light falls differently across various parts of walls, floors and ceilings, which, properly sketched, can bring credibility to your perspective drawings. Learn how lighting effects can enliven walls, floors and ceilings and bring focus to a drawing. Your task Using the single line blowups on the next page, decide from which direction a single, overall ambient lighting source will affect the scenes. Using your grayscale markers, slowly build up areas of tone on the walls starting with the lightest values first. Add darker values to reinforce the depth of the scene and add ellipses of light on the back wall to provide a focal point. Provide shadows under the person and the overhang of the reception desk.

IND 2300 Graphic Techniques I
45
SE9 - Tone, Shadow, and Light (cont.)

IND 2300 Graphic Techniques I
46
SE10 – Texture and Material Objective Understand why texture and material can play a large part in how interior spaces “feel”. Learn to describe objects’ surfaces with realistic or graphically generic textures in order to add a level of believability to your perspective sketches. Textures and materials begin to describe a perspective in greater detail, and their proper use can enliven spaces and bring focus to the entire drawing or highlighted portions of a drawing. Your task Using the single line blowups on the next page, define all surfaces with textures and/or materials. First explore the top drawing with generic textures (regardless of actual or perceived materials) and then try your hand at mimicking real materials on the bottom drawing. Remember that textures, scaled appropriately and taking advantage of vanishing directions, can reinforce depth in a perspective drawing.

IND 2300 Graphic Techniques I
47
SE10 – Texture and Material (cont.)

IND 2300 Graphic Techniques I
48
SE11 - Shadowcasting Objective Understand how perspective sketches can seem more believable and realistic when they include cast shadow, whether it is from the sun or other sources. Including shadows does not need to be a geometry-intensive ordeal. The ‘flagpole’ approach can produce believable effects in a sketch. Your task Place trash paper over the sketch on the next page.
1. Using light coming through the window and door at a 30* altitude, create a sketch that shows the right triangles that help you locate the shadows and areas of light on the ground. Utilize textures and linework to convey shade and shadow.
2. On a second piece of trash paper, use your grayscale markers to add shadows to the line drawing. 3. Also add marker lines that suggest glass within the window opening. 4. When the instructor is satisfied with your explorations, add shade, shadow, tone and texture to a
new piece of trash or the original copy of the sketch. 5. Repeat the exercise with the light source generating light from position A and then from position B.

IND 2300 Graphic Techniques I
49
SE11 - Shadowcasting (cont.)

IND 2300 Graphic Techniques I
50
SE12– Entourage – Adding “Stuff” to Your Drawings Objective Understand the importance of providing cues in your drawings that ‘humanize’ the space(s) so that the view is convincing and makes a connection to your client. Details like art and plants and accessories such as books and other table items make a space look inhabited. The trick with entourage is to provide an abstracted idea of these items so they don’t take attention away from the drawing’s main intent. Your task Gather some photos of plants, art and accessories (books, candles, framed photos, lighting fixtures, etc.). Using the starter sketch on this next page, add detail and entourage to complete the scene. Add vegetation in the container on the left and add items to the coffee table on the right. Provide abstract, subtle detail to the wall frame. Don’t forget baseboards where the wall meets the floor.

IND 2300 Graphic Techniques I
51
SE13 - Plan, Elevation, and Section View Sketch Graphics Readable plans (floor and reflected ceiling plans, finish plans, reference plans), elevations, and sections (details) are the basic lines of defense against misinterpretation and misappropriation of your design intent. Line weight variation defines materials, systems, and proportions of building elements. Line weights help clients, consultants, and contractors alike determine depth of objects, location of elements (above, in plane, or below the imaginary plan, elevation, and section cut lines), relativity of one object to another, types and sizes of materials, and other items necessary for clearly, concisely, and completely constructing the design. Objective Learn how quick graphics that include line, shade, shadow and texture are essential additions to orthographic drawings such as plans, elevations and sections. These details allow furniture, millwork, casework, built-ins, etc. to appear three-dimensional, provide clients more cues about finishes, and very often make these drawings easier to read. Line enhancements, shade, shadow and texture need not be overly time-consuming. This exercise provides you practice and strategies for adding quick enhancements to your 2D drawings.
Alison Rainey, FSU 2011
Pelli & Associates (Bradford Fiske, delineator), The Long Gallery House (plan, section, elevation)
Retrieved from: http://www.alexhogrefe.com/blog/2012/9/23/building-section.html
Retrieved from: http://www.intiaz.com/2012/12/42-northside-condominium/

IND 2300 Graphic Techniques I
52
SE13 - Plan, Elevation, and Section View Sketch Graphics
Dark poche walls, gradient shadows Dark poche walls compliment the overall light value of the floor material. Concrete floor: 2-way stroke grey marker, white and dark grey pencil scoring for pattern. Area rug: 2-way stroke grey marker, 80% grey color pencil texture pointillism. Note profiling of exterior edges of furnishings for ‘pop’ off the floor. Medium poche walls, marker
drop shadow Medium poche walls works well when floor values vary throughout the plan. Wood plank floor: 1-way stroke 20% grey marker, .005 pen or grey pencil for pattern. (should be subtle). Area rug: 2-way stroke 40% grey marker, 60% grey marker pointillism. Note profiling of exterior edges of furnishings for ‘pop’ off the floor.
No-poche walls, marker drop shadow No-poche walls works well when floor values are relatively dark. Ceramic tile floor: 2-way stroke 40% grey marker, 50% grey and white pencil for tile pattern. A whiteout pen can also be used for tile divisions if it doesn’t create too much contrast/distraction.

IND 2300 Graphic Techniques I
53
SE13 - Plan, Elevation, and Section View Sketch Graphics Your task: PLAN GRAPHICS Using pen and gray-scale markers, create a variety of floor surfaces within areas of the plan below. Try out a wall poche and shadow style choices as well. Two floor plans are provided so you can experiment.
Used with permission of Slifer Designs.

IND 2300 Graphic Techniques I
54
Used with permission of Slifer Designs.

IND 2300 Graphic Techniques I
55
SE13 - Plan, Elevation, and Section View Sketch Graphics Your task: ELEVATION GRAPHICS Using pens and gray-scale markers, concentrate on line weights for depth, material textures, and shadow styles on the elevations below.
Re
trie
ve
d f
rom
In
terio
r D
esig
n V
isu
al P
rese
nta
tio
n,
Mitto
n, 3
rd E
ditio
n.

IND 2300 Graphic Techniques I
56
Re
trie
ve
d f
rom
In
terio
r D
esig
n V
isu
al P
rese
nta
tio
n,
Mitto
n, 3
rd E
ditio
n.

IND 2300 Graphic Techniques I
57
Your task: BUILDING SECTION GRAPHICS Using pens and gray-scale markers, concentrate on line weights for depth, material textures, and shadow styles on the building sections below.
Re
trie
ve
d f
rom
In
terio
r D
esig
n V
isu
al P
rese
nta
tio
n,
Mitto
n, 3
rd E
ditio
n.

IND 2300 Graphic Techniques I
58
Retrieved from Interior Design Visual Presentation, Mitton, 3rd Edition.

IND 2300 Graphic Techniques I
59
PROJECT EXERCISES

IND 2300 Graphic Techniques I
60
Project Exercise 1: One and Two-Point Perspectives - The Basics
Image Perspectives Objectives
Demonstrate your ability to create image perspectives depicting preliminary views of a design solution.
Explore the power of quick, thumbnail volumetric sketch doodles to inform project design, scene selection and composition, and presentation appropriateness.
Use the eyeball grid or grid method to create one and two-point perspective scenes.
Employ line profiling to enhance the readability of a perspective view.
Explore marker value and its potential for perspective scene readability. Submittal You are to create and submit two (2) 8.5” x 11.0” image perspective scenes of your choice from your Studio I College Student SRO project that illustrate your ‘way cool feature’ in more detail. You are to base your drawings off of the rough doodle diagrams required as part of your SRO project deliverables. Perspectives are to be completed on trash paper. Affix white paper beneath the trash paper for readability. Drawings are to be mounted on a 12”x 24” cardboard. Note that image perspectives are loose, but accurate. You are not to use straightedges to draw lines. Full bleed or vignette perspective scenes should be considered. Deliverables
o One (1) one-point perspective of your ‘way cool feature’ in its SRO context. o One (1) two-point perspective of your ‘way cool feature’ in its SRO context. o Explore gray marker value on at least one (1) of the views. o All scenes should have multiple (greater than two) scale figures in them. o At least three widths of lines should be used as taught in this class. o Drawing titles should be well executed but subtle. Place your name below the title.
Craft expectations. Note that craft matters- assembly should not distract the viewer from the content of the perspective scenes. Drawings should be cut cleanly and straight. Some options for adhering your trash paper to presentation boards or white backing paper (if used) include spray glue, drafting dots, or other dry-style adhesives. Double-stick tape may be used if done cleanly.

IND 2300 Graphic Techniques I
61
Grading criteria a. Composition of the perspective scene b. Sketch quality (perspective accuracy) c. Use of pen and marker media (profiling, use of multiple line weights, application of marker
value) d. Quality of the overall submittal (craft)

IND 2300 Graphic Techniques I
62
Project Exercise 2: From Basics to Details - Adding Life to Sketch Perspectives
Objectives
Develop a perspective scene from a composition study.
Depict an interior scene with further detail than explored previously.
Explore an interior environment from multiple station points.
Apply tone, shade, shadow, and texture/materials to define depth.
Apply entourage items to enhance the space’s believability. Submittals
1. Using the drawing information provided by the instructor, create four quick, sketch image perspective drawings of the space, two (2) being full bleed drawings and two (2) being vignette views, each drawing fitting a 6” x 9” frame. These will function as composition studies for further analysis of each scene. On or around the sketches, provide a written analysis of each view highlighting the pro’s and con’s relative to being appropriate view compositions.
2. Choose two (2) of the image perspective studies to pursue further. Create FREEHAND single line
sketches of each. These FREEHAND sketches should be created with a V5 or 01 maximum line weight. Use one weight for all lines in these two drawings. Photocopy each drawing onto bond paper.
Drawings should evidence the grid construction methods taught in class.
Use good line quality: free-hand line style lines are required. These sketches will be utilized as view and composition studies and will require extra detail and entourage to make the view more realistic. Note that these drawings are still studies, which implies speed and looseness all the while maintaining accuracy. 3. On trash paper, create a line weight study overlay for each of the (2) perspectives.
Use a minimum of three (3) line weights to describe look past edges, inside edges (receding), and outside edges (leading).
4. On trash paper, create a tone/shade/shadow study overlay for each of the (2) perspectives.
Use a full range of values in a composition supportive of the single line drawing.
Explore one or more light sources that create cast shadows and light patterns.

IND 2300 Graphic Techniques I
63
5. On trash paper, create a texture/materials study overlay for each of the (2) perspectives.
Show textures so that they support a sense of depth in the scene (that is, less detail as the scene recedes into the background).
Submittal
Attach a copy of the line drawing (base drawing) to a piece of sturdy board (see overlay mounting suggestion above). Attach each of the three (3) overlays (see Overlay Order above) on top of the single line drawing by tucking a ½” edge behind the top of the chipboard or matboard piece and affixing with single-sided tape on the back. Make sure overlay paper is cut evenly and cleanly and is easily pulled up from the base drawing.
Attach all four single line blowup drawings and the overlay combinations to a cleanly and evenly cut white matboard or chipboard measuring 15” x 21”. This will leave 1” of space around all sides of two sets of two 9” wide x 6” scenes. DO NOT mix and match portrait and landscape layouts. Choose either all portrait or all landscape.
Affix the single line blowup drawings to the board, making sure that all edges are secured.
Write your name on the back of the board. Keep in mind that craft of assembly is critically important. Grading Criteria For each study:
Composition
Line
Quality
Light, Tone and Shadow
Texture & Materials
Use of entourage
Craft and assembly of the project board
Originals of the single line drawings (line weight to be no thicker than a V5 or 01) mounted to the board
Overlay Order Top: Texture, material study
Middle: Tone, shade, shadow study
Bottom: Line weight study
Base Drawing: Photocopy or scanned print of the single line drawing
Piece of chipboard or matboard
Example shown in landscape format (portrait format is acceptable)
Overlay mounting suggestion

IND 2300 Graphic Techniques I
64
Project 3: Presentation Level Sketch Perspectives
Objectives
Use compositional studies to help make decisions for your perspective drawing.
Add tone/shadow and texture to both the perspective drawing and plan view drawing.
Include appropriate entourage and stylized people to a perspective scene.
Apply all the knowledge learned in this graphics class to the entire drawing package required by and supporting your Studio I class presentation.
Overview (minimum requirements)
Work through 6-8 compositional studies on 5”x8” notecards studying your interior space. Discuss these studies with your instructor/TA and create two (2) interior perspectives of the Studio I Spiritual Shrine/Retreat project. You should choose views that capture significant and meaningful portions of the space(s). Use marker and pen to describe tone, shade, shadow and texture. You will apply the overlay elements of tone, shade, shadow and texture to the scene, this time combining them into one physical sheet of paper. You will include more enhanced entourage in these larger scenes.
Render the plan view of the Spiritual Shrine/Retreat utilizing marker and pen to describe tone, shade, shadow and texture. Apply labels to identify functional zones within the space. Annotation is required for objects that are not otherwise obvious.
Render any and all other elevation and section views of the Spiritual Shrine/Retreat utilizing marker and pen to describe tone, shade, shadow and texture. Annotation is required for objects that are not otherwise obvious.
Deliverables
Your interior perspective views should be approximately 11” x 17” in size - your choice of full bleed or vignette style. Affix the loose sheets to stiff backings of a size and material suitable to your Studio I project presentation requirements. Write your name on the back of the boards.
The plan view rendering should conform to the size/scale requirements of your Studio I project.
Submit the perspective composition studies you completed on a 5”x 8” index card. This should show all changes you make to the scenes as you develop the perspectives.

IND 2300 Graphic Techniques I
65
Submit a file folder that contains the photos (of entourage, etc.) that helped you develop your perspective scenes. Be sure to place your name on the tab of the file folder. Locate photographs that show:
o People in the context of your scene o Other relevant entourage, such as scenes outside windows, floor treatments, window
treatments, desk accessories, etc.
Examine your studio project floor plan. Using the quick eyeball method, develop 6-8 perspective composition studies. These should be index card size. This is so you can make decisions:
o Will your scenes be portrait or landscape? o Will they be full bleed or vignette? o Where will light come from in the scenes? o What finishes will you be including? o How will you suggest depth (overlapping of items)? o Horizon line height o Placement of the vanishing point(s) o Positive-negative space o Foreground-midground-background development o How do you plan to zoom in and/or crop the scenes?
Choose two composition studies and then generate single line blowups on tracing paper at an approximate size of 11” x 17”. Use the quick eyeball or grid eyeball perspective method. Here you will show cleaned-up line detail and profiling lines on a second generation trace. Rely heavily here on the style and detail of objects in your Studio I project.
On a piece of trash paper laid on top of each of your single line blowups do several shade, shadow and tone studies. Experiment with light coming into the scenes from several directions.
On a piece of trash paper laid on top of each of your single line blowups do several texture studies. Most of your elements in the scenes should have texture in these studies, though you may not apply all these textures to your final submitted copies.
When you are satisfied with your tone, texture, shade and shadow studies, start fresh with your final presentation level drawings.
Grading Criteria Composition Focal point Positive/negative space Fore/mid/background development Perspective construction Line quality Profiling Line consistency Light, Tone & Shadow Tonal variation across planes Cast shadow Texture & Materials Supports foreground/background Supports but does not overwhelm the scene Detail and entourage People lend context and scale cues and are well placed Other included details