department of industrial relations department of industrial relations . user guide for electronic...
TRANSCRIPT

1
Department of Industrial Relations
User Guide for Electronic Certified Payroll Reporting via XML Upload
July 2016
Version 1.6

2
Contents 1. Introduction ................................................................................................................................. 3
2. Release Notes .............................................................................................................................. 3
3. System Requirements .................................................................................................................. 4
4. How to Submit Certified Payroll Records via XML ...................................................................... 4
4.1 How to Submit Corrections ................................................................................................. 14
5. How to Create an XML File ........................................................................................................ 15
5.1 XML File Validation .............................................................................................................. 15
5.11 Software Installation ..................................................................................................... 15
5.12 How to Validate an XML file against the eCPR Schema File Using XML Notepad ........ 17
5.2. Create an XML File Using CPRSample.xml as a Template .................................................. 23
5.3. XML File Naming Convention for eCPR .............................................................................. 33

3
1. Introduction This manual will help you:
• Submit a certified payroll record via XML. (For more details, see Section 4 of this user guide.)
• Create an XML file using the schema template or vendor software. (For more details, see Section 5 of this user guide.)
2. Release Notes • (Release 2.6, August 2016) Contractors will not need to make any adjustments to how
they enter data, but the final data display screen for contractor, project, and payroll information has undergone minor layout changes.
• (Release 1.5, January 2016) New element in the XML schema 1. <CPR:ProjectInfo> element now contains <CPR:contractAgencyID> element to
distinguish multiple contractors under a single project. The Contract Agency ID serves as a placeholder only, and the value must be empty. For example: <CPR:projectInfo> <CPR:awardingBody></CPR:awardingBody> <CPR:contractAgencyID></CPR:contractAgencyID> <CPR:contractAgency>CA-DIR</CPR:contractAgency> <CPR:projectName></CPR:projectName> <CPR:projectID>9</CPR:projectID> <CPR:awardingBodyID></CPR:awardingBodyID> <CPR:projectNum></CPR:projectNum> <CPR:contractID></CPR:contractID> <CPR:projectLocation> <CPR:description></CPR:description> <CPR:street></CPR:street> <CPR:city></CPR:city> <CPR:county></CPR:county> <CPR:state></CPR:state> <CPR:zip></CPR:zip> </CPR:projectLocation>

4
3. System Requirements • For submitting an XML file: The electronic reporting application supports Internet
Explorer 9, 10, and the latest versions of Chrome, Firefox, and Safari.
• For creating an XML file: XML files can be created and edited with any standard text editor such as Notepad (PC) or Textedit (Mac). We highly recommend Notepad++ or XML Notepad for editing and validating XML files against a schema file.
4. How to Submit Certified Payroll Records via XML To get started, go to the following website: http://www.dir.ca.gov/Public-Works/Certified-Payroll-Reporting.html.
1. The XML format must strictly follow the guidelines provided in Section 5 of this user
guide. 2. To import the XML file:
a. Select the “Submit Payroll in XML File” button.

5
b. Select “Browse” to select the XML file you want to upload and then click the
“Upload” button.
3. The uploaded XML file will be validated. 4. If the validation is successful, the “eCPR XML Validation Success” page will appear.
Click on the blue link in Step 1 to load the XML into the Online Form. Before doing so, read through the instructions outlined in Steps 2–6, which explain what to do to complete the process of submitting your payroll record. (These instructions are also explained here in this user guide.)

6
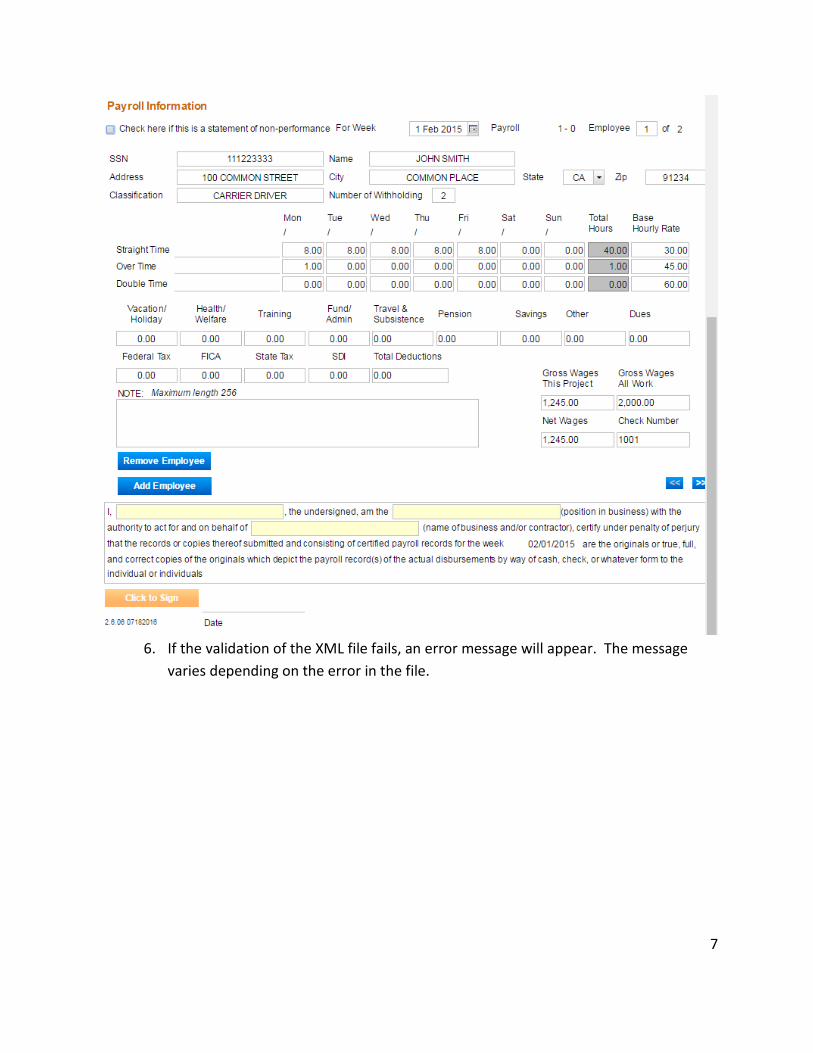
5. If you have already submitted payroll records in the system, all Contractor, Project and Payroll information should display in the format of the Online Form.
(screenshot continues on next page)
7
6. If the validation of the XML file fails, an error message will appear. The message
varies depending on the error in the file.

8
• There are two options to correct the data and submit it again for validation: a. Correct the data in the import XML file and upload it again. b. Load the data directly into the Online Form, by clicking on the blue link in the
error message box, (“load the xml into the Online eCPR form”). In the Online Form, correct the problem areas highlighted in brick red. Please note that hitting the “Enter” key while typing in the Notes field will lead to an error for that field.

9
7. If you are a new contractor, select “Add New Contractor.”
8. If the project doesn’t yet exist in the eCPR database, select “Add New Project.”

10
9. If the system recognizes the project, it will ask you to select the entity that hired you for the project. Select it from the “Contract With” field. If you are the prime contractor, select the awarding body. If you are the subcontractor, select the contractor with whom you have a contract for the project. Once you’ve chosen the contractor, select “Go” to proceed.
The “Contract With” drop-down list may contain any of the following:
• The awarding body • The prime contractor and any subcontractors listed for this project number (DIR
Project ID, also known as the “PWC-100 number”) in the PWC-100 database. • Contractors who have previously submitted certified payroll records on this
project.
10. If you do not find the name of the contractor with whom you have a contract for the project, type that name into the “Contract With” field. It is critical to enter the name exactly as it appears in the PWC-100 form or on the contract (for subcontractors not on the PWC-100 form). This name drives the payroll number (and amendment number) for the payroll reporting system. If the name is even slightly off (different spacing, punctuation, capitalization style or spelling), the system will create a new branch of payroll for the certified payroll records you are submitting.

11
11. If this is your first time entering payroll for this project, you will need to create an association linking the project, the awarding body or contractor with whom you have a contract for this project, and your entity. Click on the blue button, “Connect To Project,” to create this association. You only need to do this the first time you enter payroll information for this project.
12. The Payroll Information will auto fill with the information from your XML files.
Complete the “Certification” section below the Payroll Information section, and select “Click to Sign.” Be sure to review all the records carefully before you click on the “Click to sign” button, since you will not be able to make any edits to them afterwards.

12
13. To finish the process, select the “Submit” button that will appear.
13
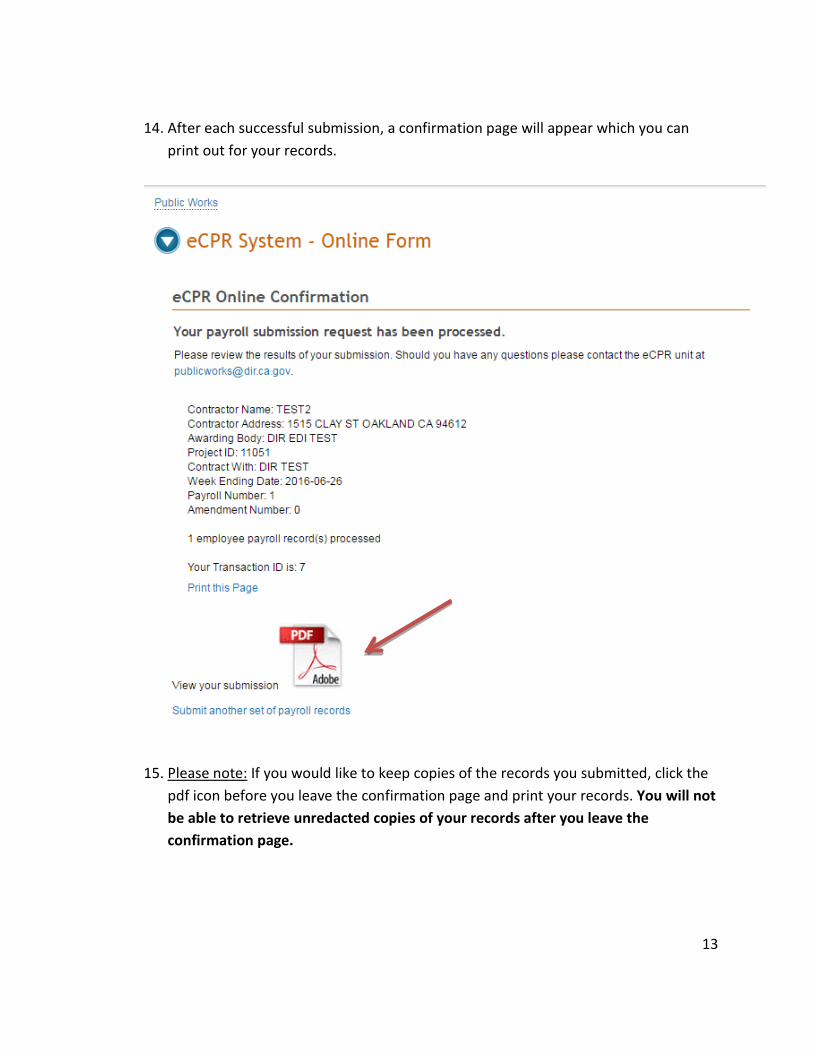
14. After each successful submission, a confirmation page will appear which you can
print out for your records.
15. Please note: If you would like to keep copies of the records you submitted, click the
pdf icon before you leave the confirmation page and print your records. You will not be able to retrieve unredacted copies of your records after you leave the confirmation page.

14
4.1 How to Submit Corrections After you have submitted a payroll record by uploading XML files, you can still make corrections to the submitted record, even though the system does not allow you to retrieve and change the record you have submitted.
1. To do so, you must correct the information in the xml file and resubmit it by uploading the corrected xml file.
2. The following fields in the payroll you are correcting must match the original payroll exactly as first entered in order for your corrected report to replace the first version:
• Contractor’s SSN (or the FEIN)
• DIR Project ID (also known as the “PWC-100 number”)
• Contract agency name (the awarding body, prime contractor, or other hiring contractor indicated in the “Contract With” field)
• Week ending date
• Craft
• Base Hourly Rate
Please note: If the error that you need to correct is in one of the fields listed above, your payroll record will be considered a new payroll report. In that case, you should explain the situation in the Notes field.
3. The confirmation page includes key information about the payroll records submitted, including the Amendment Number. This number refers to the corrected version of records already submitted. “Amendment Number 1” refers to the first resubmission/correction of a payroll record; if you need to correct it a second time, the subsequent correction would be named “Amendment 2.”

15
5. How to Create an XML File
5.1 XML File Validation
5.11 Software Installation
• There are several freeware, and commercial products to validate XML files against a schema. The following software is a free XML editor from Microsoft:
1. XML Notepad
• To download:
1. Go to this Webpage: http://www.microsoft.com/en-us/download/details.aspx?id=7973
2. Click “Download”.
3. After the download is done, Click “Run” to start the installation process.

16
4. Go through the installation wizard and click “Install” to complete the installation.
5. A web page with additional links to XML appears after a successful installation:

17
5.12 How to Validate an XML file against the eCPR Schema File Using XML Notepad
• The following files are available to help you follow eCPR XML guideline:
1. CPRSample.xml (XML with sample data)
2. CPR.xsd (eCPR Schema)
• To save the CPRSample.xml and CPR.xsd files to a local drive:
1. Go to eCPR Home Page.
2. Right-click on the “eCPR schema CPR.xsd” link and choose “Save target as.” Change the file extension to .xsd and save as type “XSD File” or “All Files(*.*)” to a local drive.
3. Right-click on the “CPRSample.xml” and choose “Save target as.” Change the file extension to .xml and save as type “XML File” or “All Files(*.*)” to a local drive.

18
• To validate XML files against the eCPR Schema:
1. Launch XML Notepad
2. Click “File” from the menu bar, and select “Open” and browse to CPRSample.XML location to open the file. The file will open with a vertically split window of “Tree View” on the left and the texts of values on the right.

19
3. After the CPRSample.xml is open in the XML Notepad, Click “View” from the menu bar and select “Schemas”.

20
4. The XML Schemas dialog box will pop up. If there are any schemas listed in the XML schemas dialog box, click “Clear”. This will erase any schemas that have been previously loaded.
5. Click “Add schemas” and browse to the location of saved CPR.xsd (eCPR schema). Click “Ok” to load the schema.
6. After the CPR.xsd is loaded, any errors that occur while editing the XML file will show up in the “Error List tab”, at the bottom of the XML Notepad.

21
7. When you double click on the error, the record with the error will be opened on the right side with the value enclosed in a box.
8. Select or hover over the corresponding element to display the xsd: annotations.
22
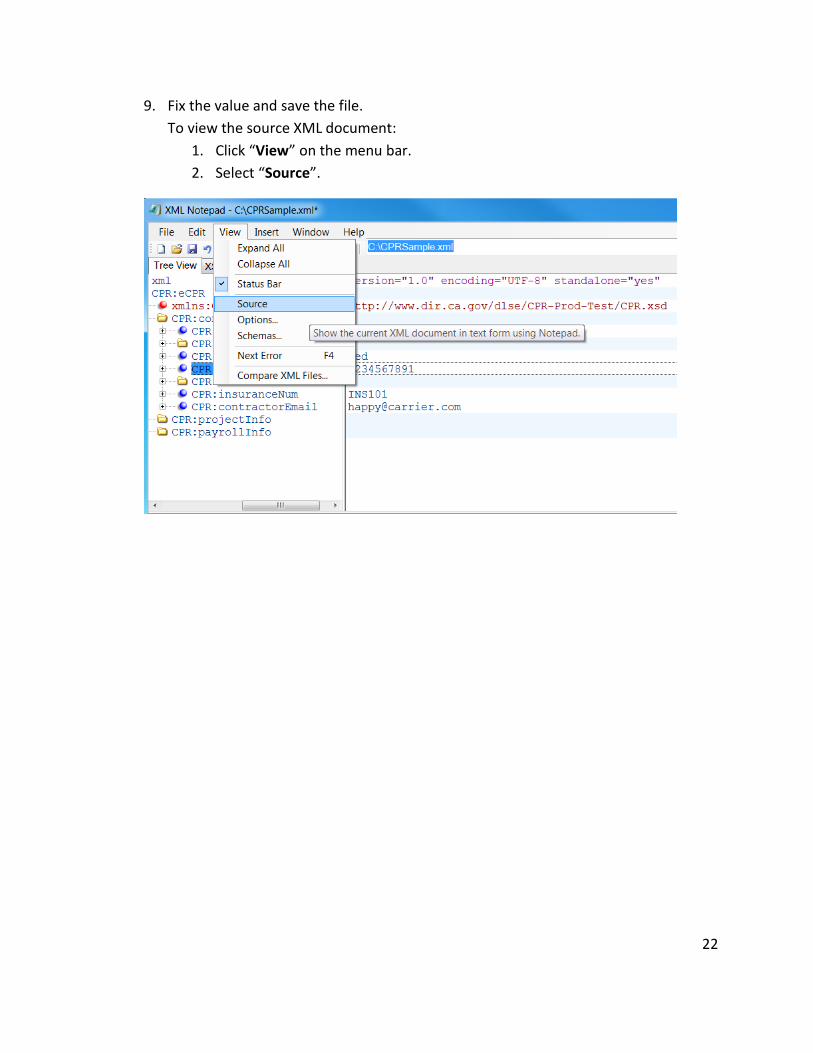
9. Fix the value and save the file. To view the source XML document:
1. Click “View” on the menu bar. 2. Select “Source”.

23
5.2. Create an XML File Using CPRSample.xml as a Template
• The following files are available to help you follow eCPR XML guideline:
1. CPRSample.xml (XML with sample data)
2. CPR.xsd (eCPR Schema)
• Save the CPRSample.xml and CPR.xsd files to a local or network drive.
• Open CPR.xsd with any standard text editor or XML editor. The file will open and display the existing code.
• Review the CPR.xsd file, and know the acceptable values of each element.

24
• Open CPRSample.xml with any standard text editor or XML editor.
• Edit the file:
1. Enter the appropriate values for all fields under <CPR:contractorInfo> element:

25
2. For the “License Type” field, enter “CSLB”, “PL”, or “OTHER”.
3. For the “PWCR” field, enter “NA” if you have not registered for the PWCR. If you wish to apply for PWCR, please follow this link: https://efiling.dir.ca.gov/PWCR/

26
4. Under <CPR: ProjectInfo> element, the mandatory fields to be filled out are Contract Agency, and Project ID.
If you need to look up Project ID, please follow this link: https://www.dir.ca.gov/pwc100ext/ExternalLookup.aspx
5. All other fields must be empty under <CPR: ProjectInfo> element.

27
6. Enter the appropriate values for the all fields under <CPR: payrollInfo> element:
7. If the submitting payroll week isn’t a statement of non-peformance, enter “false” for <statementOfNP> element. The values for <CPR:payrollNum> and <CPR:amendmentNum> elements are automactically assigned by the eCPR system and must be empty.

28
8. For the <CPR:forWeekEnding> element, enter the ending date of payroll week in following date format: yyyy-mm-dd.
9. Each worker’s information is enclosed in each <CPR:employee> element. To add new workers to the Payroll Information, add <CPR: employee> elements contained within the parent element < CPR: employees>.
10. If you are using XML Notepad, right click the “CPR:employee” and click “Copy” to copy the node. Select “CPR:employees” and click “Paste” to add a new employee.

29
11. Each employee <CPR:name> element needs to have an “id” attribute that contains the SSN::Name of the employee. The “Name” must be all upper-case.
In XML Notepad
30
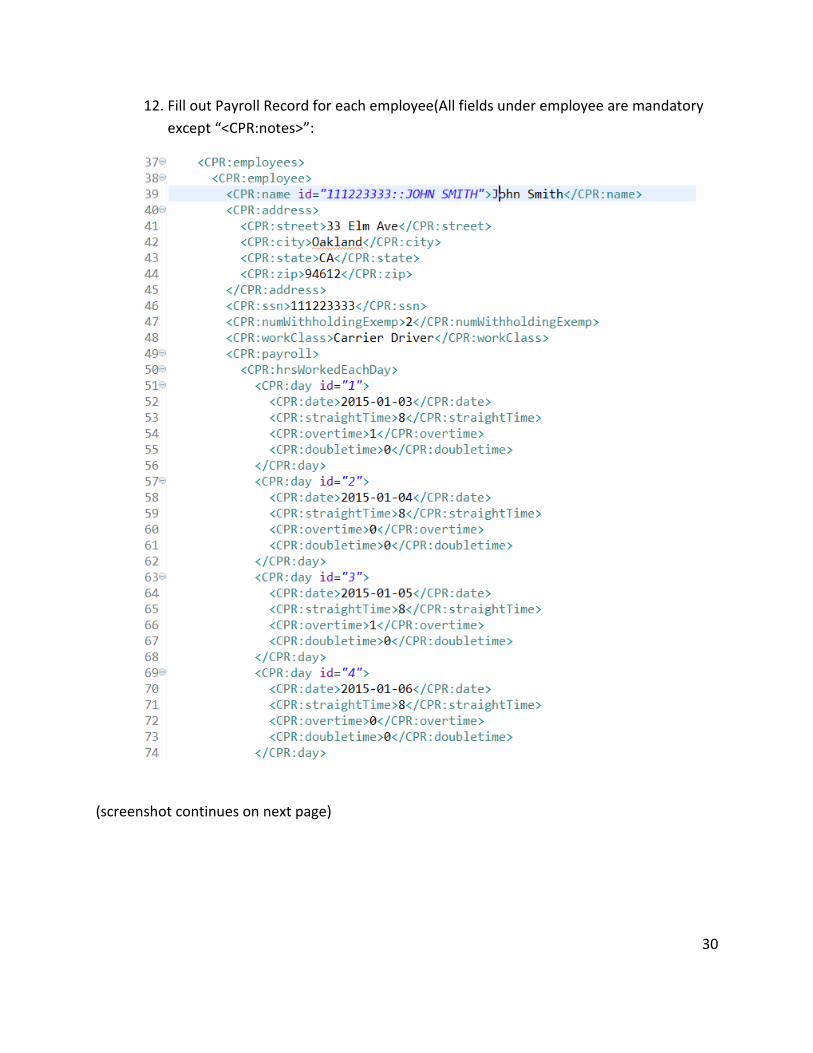
12. Fill out Payroll Record for each employee(All fields under employee are mandatory except “<CPR:notes>”:
(screenshot continues on next page)

31

32
13. <CPR:notes> element can be used to add a free form supplemental descriptive information for each employee’s payroll, but it isn’t mandatory and can be left blank.
14. If the submitting payroll week is a statement of non-peformance, enter “true” for <statementOfNP> element. All <CPR:employee> elements contained within the <CPR: employees> element aren’t included.
• Review and save your XML file.

33
5.3. XML File Naming Convention for eCPR
• Please follow the example given below when naming XML files for submission:
1. 6789_DIR001_010915.xml
• This naming convention can be broken down into following sections: [last 4 digits of FEIN number]_[Project ID]_[week ending date].xml
1. 6789 = last 4 digits of FEIN number
2. DIR001 = Project ID
3. 010915 = Week ending date
• The xml file must end with the extension “.xml”.