dell™ powervault™ rd1000 - cc.cnetcontent.com · dell-installed powervault rd1000 internal...
TRANSCRIPT

Dell™ PowerVault™ RD1000
User's Guide

NOTE: A NOTE indicates important information that helps you make better use of your computer.
CAUTION: A CAUTION indicates potential damage to hardware or loss of data if instructions are not
followed.
WARNING: A WARNING indicates a potential for property damage, personal injury, or death.
Copyright © 2015 Dell Inc. All rights reserved. This product is protected by U.S. and international copyright and
intellectual property laws. Dell™ and the Dell logo are trademarks of Dell Inc. in the United States and/or other
jurisdictions. All other marks and names mentioned herein may be trademarks of their respective companies.
2015-03 Rev. A00

Index
Introduction
Quick Start Installation
Using the Drive
Using the Removable Disk Utility
Troubleshooting
Specifications
Regulatory
Appendix: Using the Linux Operating System
Information in this document is subject to change without notice.
Export Regulations
Customer acknowledges that these Products, which may include technology and software, are subject to the customs and export control laws and regulations of the United States (U.S.) and may also be subject to the customs and export laws and regulations of the country in which the Products are manufactured and/or received. Customer agrees to abide by those laws and regulations. Further,
under U.S. law, the Products may not be sold, leased or otherwise transferred to, or utilized by an end-user engaged in activities related to weapons of mass destruction, including without limitation, activities related to the design, development, production or use of nuclear weapons, materials, or facilities, missiles or the support of missile projects, and chemical or biological weapons.
Initial Release: March 2015

Introduction
Overview
The Dell PowerVault RD1000 is a removable, robust, hard disk drive system. It features backup application compatibility, high speed transfer rate for fast backups, portable cartridges and high level of data reliability. The RD1000 is available as an internal SATA device (see Figure 1) or external USB device (see Figure 2).
Figure 1. RD1000 Internal Drives
3.5-inch Internal SATA Drive 5.25-inch Internal SATA Drive
Figure 2. RD1000 External Drive
External USB Drive

Capacity and Transfer Rates
The capacity and transfer rate of the RD1000 data storage system are dependent upon the inserted RD1000 media. Capacity and transfer rate will vary depending on the RD1000 cartridge type. The average transfer rates are listed in the table below.
Table 1. RD1000 Specifications
Characteristic Storage capacity varies by individual cartridge capacity
Transfer Rate Dependent on system configuration (see below)
Configuration Theoretical Transfer Rate
Maximum Burst Transfer Rate
Typical Transfer Rate
RD1000 USB 2.0 USB 2.0 Host USB 2.0 Cable
480 Mbps (60 MB/s) 35 MB/s 25 MB/s
RD1000 USB 3.0 USB 2.0 Host USB 3.0 Cable
480 Mbps (60 MB/s) 35 MB/s 30 MB/s
RD1000 USB 3.0 USB 3.0 Host USB 3.0 Cable
5 Gbps (625 MB/s) 230 MB/s 80 MB/s
SATA 1.5 Gbps (187.5 MB/s) 45 MB/s 35 MB/s
Average access time (msec) 15
Function Removable disk drive
Logical block size 512 bytes
Supported file system ext2, ext3, FAT32 and NTFS*
*NTFS is the default file system on the cartridge. If you are using Linux then the cartridge that comes
with your system will need to be re-formatted to support a file system that is compatible with a Linux based operating system (see section "RD1000 Cartridge File System Considerations" in the appendix).
Supported Media
The RD1000 hard drive system supports any Dell RD1000 cartridge. RD1000 cartridges are available in different capacity configurations depending on your storage requirements.

Operating System Requirements
The RD1000 hard drive system is supported on the following operating systems:
Windows 2003 Service Pack 1 or later Windows 2008 R2 Service Pack 1 or later Windows 7 Windows 8 / 8.1 Windows Server 2012 / 2012 R2 Linux (see "Linux Compatibility" section for more details)
Software
Backup Software
The RD1000 device works with industry backup applications that support removable disk media. See your backup software manual for instructions on backing up data.
Windows Software
The RD1000 Utility provides essential Windows® software for use with the RD1000 unit. The RD1000 Utility Software can be downloaded at www.Dell.com/support. The RD1000 Utility software for Windows installs:
A removable disk utility that provides basic diagnostic tests capabilities An application update that enables the eject button to operate correctly under the Windows
operating system An application that allows the right-click eject to operate in user-mode under the Windows
operating system An application that automatically sets the SATA connection to DMA mode for improved
performance
See "Installing Unit Software for Windows" and "Using the Removable Disk Utility" sections for more information on these applications.
Linux Software
There is no special software necessary when running Linux operating system. See "Using the Linux Operating System" appendix for more information on using the RD1000 with Linux.

Front Panel Features
The front of the RD1000 unit has the following features and indicators:
1. Cartridge Indicator (located on cartridge) 2. Emergency Eject Hole 3. Eject Button/Power Indicator
Figure 3. Front Panel Features
Table 2. Power Indicator
The eject button is illuminated by a power indicator. Table 2 describes the operation of this indicator:
Indicator Status Meaning Description
OFF
No Power / Low
Power Mode
Unit is in Low Power Mode (see below), or unit does not have power
Steady GREEN Ready Power is on and the RD1000 unit is working properly

Blinking GREEN Ejecting Unit is ejecting the cartridge
Steady AMBER Fault RD1000 unit has detected a fault condition. For more information, run a diagnostic application (see section "Using the Removable Disk Utility").
Blinking AMBER Prevent Host computer is accessing the media, and the user has pressed the eject
button. The unit will blink amber for a few seconds then return to a steady green. The unit will eject the cartridge after the host access completes.
Table 3. Cartridge Indicator
The cartridge indicator displays the current status of the cartridge. Table 3 describes the operation of this indicator:
Indicator Status Meaning Description
OFF Not
Ready Cartridge is not inserted properly, the unit is in Low Power Mode, or the unit
has no power
Steady GREEN Ready Cartridge is ready
Blinking GREEN Activity Reading, writing, seeking
Steady AMBER Fault RD1000 unit has detected a cartridge fault condition. For more information, run a diagnostic application (see section "Using the Removable Disk Utility").
Low Power Mode [RD1000 USB 3.0 External only]
If the USB cable is unplugged from the USB 3.0 External dock, or the system that the dock is connected to is turned off or in standby mode, the dock will enter Low Power Mode and the
dock Power Indicator will turn OFF. If the media is inserted in the dock while in Low Power Mode the cartridge indicator will also
be turned off. To eject a cartridge from the dock when it is in Low Power Mode, push and hold the Eject
button for approximately 10 seconds. The cartridge will be ejected, and the dock will go back into Low Power Mode.
The dock will resume normal operation once the USB cable is reconnected to the computer.

Quick Start Installation
CAUTION: Before performing any of the procedures in this section, read and follow the
safety instruction in your Product Information Guide.
Dell-Installed PowerVault RD1000 Internal Drive
Dell performs the installation of a RD1000 Internal drive that is shipped as part of a system. If you are
running Windows® you will need to install the software included on the RD1000 User's Guide and Utilities DVD, which includes essential Windows software for use with the RD1000 unit. In this case, installation instructions are provided below in the "Installing Unit Software for Windows" section. If you are using the Linux operating system see the appendix "Using the Linux Operating System".
Store the software DVD/diskette that came with your system in a safe place in case you ever need to reinstall the software. If the software is misplaced it can be downloaded from www.Dell.com/support.
User-Installed PowerVault RD1000 Internal Drive (Customer Kit)
This section describes how a user can install the PowerVault RD1000 Internal drive, in case it did not come pre-installed by Dell.
Before You Begin
The RD1000 unit ships ready to install in a standard 3.5-inch or 5.25-inch half-high drive bay
depending on the configuration you order.
Depending on your computer you may need a standard (flat-blade) or Philips screwdriver to remove the computer cover and install the drive in your computer.
Important Information on Electro-Static Damage
To protect your computer and drive from electro-static damage (ESD), follow these guidelines:
Before you open your computer or remove the RD1000 unit from its antistatic bag, ground
yourself by touching the metal chassis of your computer or some other grounded object. For optimal protection, use an electrostatic grounding strap.
NOTE: Your computer must be plugged into a grounded electrical outlet to be properly
grounded.
Do not touch any printed circuit boards or electronic chips on your RD1000 device or in your computer.
Turn your computer and any peripheral devices off before installing the RD1000 unit.

Installation Instructions
1. Carefully unpack the unit and accessories. 2. Turn off the computer. 3. Open the computer cover, using a screwdriver if necessary. 4. Mount the unit. Slide the RD1000 unit into an unused drive bay until the bezel is flush with the
front of the computer. Secure the unit using mounting screws, being careful not to over-tighten the screws (see Figure 1 below).
5. Attach the power cable to the power connector (see Figure 1 below). 6. Connect the SATA data cable to the SATA data connector (see Figure 1 below). 7. Check all cables in your computer system. Before you reinstall your computer cover ensure
that all cables are correctly routed so that they will not bind or become crimped. Also, make sure that no cables have loosened during the installation.
8. Replace your computer cover. 9. Turn on the computer. 10. During power-up press F2 key, or other hot key, to enter BIOS set up mode. Enable the SATA
port connected to your RD1000 unit. Save changes and exit from BIOS. 11. If running Windows install the RD1000 software (see "Installing Unit Software for Windows").
12. If you are using the Linux operating system see the appendix "Using the Linux Operating System".
NOTE: If you choose to install a new operating system on your computer with an RD1000 unit attached, make sure the cartridge is removed. This prevents the operating system from confusing the removable drive with the system drive.
Figure 1. RD1000 Internal SATA Connectors
3.5-inch Internal SATA Drive 5.25-inch Internal SATA Drive
1 Mounting Screws
2 Power Adapter Cable
3 Mounting Holes
4 SATA Data Cable

Installing the Dell PowerVault RD1000 External Drive
1. Carefully unpack the unit and accessories. 2. Attach the USB cable to USB port on the back of the RD1000 unit and connect it to an available
USB 2.0 port on the computer (see Figure 2 below). 3. Attach the power cable to the power connector (see Figure 2 below) and plug it into an outlet. 4. Select a convenient location for the PowerVault RD1000 External drive that is flat, sturdy, level
and close to the host server. The drive can be oriented horizontally or vertically. 5. If running Windows install the RD1000 software (see "Installing Unit Software for Windows").
6. If you are using the Linux operating system see appendix "Using the Linux Operating System".
Figure 2. RD1000 External USB Connectors
1 AC Power Adapter
2 USB 2.0 Connector (black)
3 USB 3.0 Connector (blue)
USB Cables
The USB2 device will only accept USB 2.0 cables and is not compatible with a USB 3.0 cable (see “connector detail” in Figure 2).
The USB3 device will accept both USB 2.0 and USB 3.0 cables.
Note: Using a USB 2.0 cable with a USB3 device will not optimize the performance of the USB3 device (see the section on “Unit Performance Seems Slow”)

Installing Unit Software for Windows
The RD1000 Utility provides essential Windows® software for use with the RD1000 unit. The RD1000
Utility Software can be downloaded at www.Dell.com/support. The RD1000 Utility software for Windows installs:
A removable disk utility that provides basic diagnostic tests capabilities An application update that enables the eject button to operate correctly under the Windows
operating system An application that allows the right-click eject to operate in user-mode under the Windows
operating system An application that automatically sets the SATA connection to DMA mode for improved
performance
NOTE: If the RD1000 software is not installed the eject button and right-click eject method may not work properly.
To install the software (Microsoft® Windows Server 2003 / 2008 / 2012, Windows 7 / 8):
NOTE: You must be logged in as the Administrator or have administrator privileges to install the software.
1. Go to www.Dell.com/support to download the RD1000 Utility.
2. Click on the executable setup file to install and follow the instructions.
3. Re-start the computer.
Your new Dell™ PowerVault™ RD1000 is ready for use. See your backup software manual for instructions on backing up data.

Using the Drive
Operating the RD1000 Unit
This section describes typical activities involved in operating and maintaining the RD1000 unit. For instructions on using your backup software, see the manual that came with your software.
Handling the RD1000 Cartridges
Although RD1000 cartridges are robust, the best practice is to handle them with extra care. This will ensure data integrity and long life. Observe the following precautions:
Store cartridges in their protective cases when you are not using them.
Do not stack RD1000 cartridges.
Keep cartridges away from dust, dirt and moisture.
Avoid direct sunlight, heat sources and temperature extremes or rapid changes in
temperature.
Never try to force the cartridge into the unit. If it is difficult to insert, check the orientation and insure correct alignment using keyed corner as a guide.
Loading and Unloading Cartridges
The front of your unit has an opening for inserting RD1000 cartridges. A protective door covers the opening. Below and to the right of the door is the power indicator that doubles as a cartridge-eject button.
To Load a Cartridge
Insert the cartridge in the unit with the keyed corner facing the upper left corner of the unit and the write-protect tab on the back right (see Figure 1). The cartridge only fits in one orientation. Push the cartridge gently into the unit until it is locked in place with a clicking sound.

Figure 1. Loading the Cartridge
1 Keyed Corner
2 Write Protect Tab
To Unload a Cartridge
To unload a cartridge using the mouse right-click method (Windows only):
1. While running Windows® Explorer locate the drive letter for the device. 2. Right-click on the device and select Eject. 3. When the cartridge has been ejected by the unit, grasp the exposed sides of the cartridge and
pull the cartridge straight out (see Figure 2).
To unload a cartridge using the eject button:
1. Push the eject button. 2. When the cartridge has been ejected by the unit, grasp the exposed sides of the cartridge and
pull the cartridge straight out (see Figure 2).
To unload a cartridge when the unit is in Low Power Mode [RD1000 USB 3.0 External only]:
1. Push and hold the eject button for approximately 10 seconds.

2. The cartridge will eject, and the dock will return to Low Power Mode.
NOTE: If the RD1000 software is not installed the eject button and right-click eject method may not work properly (see section "Installing Unit Software for Windows").
NOTE: Under proper operation, the drive bay will make an audible noise during the ejection
process. If the cartridge does not eject see the "Troubleshooting" section for more details.
Figure 2. Unloading the Cartridge
1 Cartridge Indicator (located on cartridge)
2 Emergency Eject Hole
3 Eject Button/Power Indicator
To Eject a Cartridge in Emergency
NOTE: Do not emergency eject a RD1000 cartridge while the cartridge activity indicator is flashing.
If the cartridge does not eject, using either the eject button or the right-click eject methods then use the following emergency eject hole method to recover the cartridge:
1. If using the RD1000 Internal device, turn off your computer. If using the RD1000 External device, unplug the power cable.

2. Insert a large straightened paper clip (or similar object) into the Emergency Eject Hole (see
Figure 2). Do not insert the object in the hole at an angle. Keep the object straight and apply some force to eject the cartridge.
3. When the cartridge has been ejected by the unit, grasp the exposed sides of the cartridge and
pull the cartridge straight out (see Figure 2). 4. Re-start your computer to reset the RD1000 unit. If using the RD1000 External device, re-plug
in the power cable for the unit and then re-start your computer.
Copying Files
The RD1000 device operates just like other disk drives attached to your computer. As a result, you can use file browsers such as Windows Explorer to drag and drop files to the RD1000 cartridge.
To Copy Files to an RD1000 Cartridge (Windows only):
1. Insert a cartridge into the RD1000 device. 2. Double-click on My Computer to see the list of devices attached to your computer. 3. Double-click on the removable disk drive to view the files on the RD1000 cartridge. 4. Drag and drop files into the browser window to copy files to the cartridge.

Using the Removable Disk Utility
Overview
The RD1000 Utility is a Windows® application that allows you to diagnose problems with your RD1000 device. With the utility, you can:
Identify RD1000 devices attached to your computer.
Retrieve device and cartridge status information.
Test the unit and the cartridge.
Using Removable Disk Utility
To run the RD1000 Utility for Windows:
Click Start All Programs RD1000 RD1000 Utility.
For instructions on using removable disk utility, click Help (see Figure 1 below).
Figure 1. RD1000 Utility
If the software is not installed on your computer, see the section "Installing Unit Software for Windows" for installation instructions.

Troubleshooting
The Power Indicator is OFF
RD1000 Internal Drive
If the power indicator is off, the RD1000 Internal unit does not have power. Follow these steps to verify the cable connections in the rear of the unit:
1. Turn off the computer.
2. Check the SATA power and SATA data cable connections in the rear of the unit. 3. Turn on the computer.
RD1000 External Drive
If the power indicator is off, the RD1000 External unit does not have power, or the unit is in Low Power Mode. Follow these steps to verify the cable connections in the rear of the unit:
1. Check power connection at the back of the unit. 2. Check that the power adapter is plugged into an outlet.
3. If plugged into an outlet strip make sure that it is turned on. 4. [RD1000 USB 3.0 External only] If all of the above are OK, the unit may be in Low Power
Mode. Check the USB connection between the unit and the computer. If the USB cable is not connected to the computer, or the computer is OFF, the unit will be in Low Power Mode.
The Power Indicator is Steady AMBER
If the power indicator is a steady amber, the RD1000 unit is not working properly. The error is due to one of the following conditions:
The unit cannot eject the cartridge due to an obstruction.
The internal electronics are damaged or malfunctioning.
Follow these steps to remove a stuck cartridge:
1. If using the RD1000 Internal device, turn off your computer. If using the RD1000 External device, unplug the power cable.
2. Insert a large straightened paper clip (or similar object) into the Emergency Eject Hole (see Figure 2 in the "Using the Drive: Loading and Unloading Cartridges" section). Do not insert the object in the hole at an angle. Keep the object straight and apply some force to eject the cartridge.
3. When the cartridge has been ejected by the unit, grasp the exposed sides of the cartridge and pull the cartridge straight out.
4. Re-start your computer to reset the RD1000 unit. If using the RD1000 External device, re-plug in the power cable for the unit and then re-start your computer.

The Power Indicator is Blinking AMBER, and the Cartridge Does Not Eject
If the power indicator is blinking amber after you press the eject button, the Host computer is accessing the media. The RD1000 unit will eject the cartridge after the Host access completes.
If the cartridge does not eject after the Host computer access completes, you may not be running the correct unit software. See the "Installing Unit Software for Windows" section for instructions on installing the software.
If the cartridge still does not eject, use Windows Explorer to eject the cartridge. In Windows® Explorer, right-click on the drive letter for the RD1000 unit (i.e. F:), and select Eject.
The Cartridge Indicator is Steady AMBER
The cartridge indicator is located on the front of the cartridge. If this indicator is amber, the cartridge is not working properly. The error is due to one of the following conditions:
The cartridge is not compatible with the RD1000 unit.
The cartridge has been severely damaged.
The cartridge has not been fully inserted.
Run the removable disk utility to obtain more information about the failure. See section "Using the Removable Disk Utility".
The Cartridge Does Not Eject
If the cartridge does not eject, verify that you have installed the unit software. For instructions on installing the software, see the "Installing Unit Software for Windows" section.
[RD1000 USB 3.0 External only] If the unit is in Low Power Mode (power connected, computer
OFF/standby, or USB cable not connected), press and hold the Eject button for approximately 10 seconds. The cartridge will be ejected and the unit will return to Low Power Mode
Follow these steps to remove a stuck cartridge:
1. If using the RD1000 Internal device, turn off your computer. If using the RD1000 External
device, unplug the power cable. 2. Insert a large straightened paper clip (or similar object) into the Emergency Eject Hole (see
Figure 2 in the Using the Drive: Loading and Unloading Cartridges section). Do not insert the object in the hole at an angle. Keep the object straight and apply some force to eject the cartridge.
3. When the cartridge has been ejected by the unit, grasp the exposed sides of the cartridge and pull the cartridge straight out.
4. Re-start your computer to reset the RD1000 unit. If using the RD1000 External device, re-plug in the power cable for the unit and then re-start your computer.
NOTE: When the emergency eject is used the computer's operating system will lose recognition of the RD1000 media. Therefore, one of the following options can be preformed to restore recognition.
1. Re-start the computer (recommended).
2. Follow steps 1-4 in "The Unit does Not Appear in the Device Manager (Windows)" section if re-starting the computer is not desired.
The Unit Does Not Appear in the Device Manager (Windows)
If the unit does not appear in the Windows Device Manager and the power indicator is green, follow these steps to rescan the hardware:
1. Bring up the Device Manager:
1. Right-click on My Computer 2. Select Manage 3. Select Device Manager
2. Right-click on the top folder (this should be your computer’s name).
3. Select Scan for Hardware Changes. 4. You should see your RD1000 device listed under Disk drives. If the device does not appear,
re-start the computer.
Unit Performance Seems Slow
RD1000 Internal Drive
Some system SATA ports do not by default operate in DMA mode for the RD1000 Internal device. This
results in slower performance and weaker data protection. Reinstall the unit software for Windows to set the SATA ports to the correct mode. Refer to "Installing Unit Software for Windows" section.
RD1000 External Drive
The RD1000 External device may appear slow based on the type of USB port the device is attached to.
a) If your RD1000 drive supports USB 3.0 make sure your unit is connected to a USB 3.0 port instead
of a USB 2.0 port. For best performance, connect directly to a USB 3.0 root hub on the PC and not an external hub.
NOTE: If your host system does not support USB 3.0, then a host adapter card supporting USB 3.0 may be required for your PC.

b) Make sure your unit is connected to a USB 2.0 port instead of a USB 1.1 port. For best performance, connect directly to a USB 2.0 root hub on the PC and not an external hub.
1 AC Power Adapter
2 USB 2.0 Connector (black)
3 USB 3.0 Connector (blue)
The USB bus shares bandwidth between all USB devices connected to the systems, including the
RD1000 External unit. The use of cameras, flash memory devices, etc. on the USB bus may decrease performance of the device. Remove extra devices if they are not necessary.
If running Windows 2000 see section "Slow Performance with RD1000 External and Windows 2000" for additional information.
Linux Users
Systems running Linux may see reduced performance when doing backups on RD1000 cartridges configured for FAT32. For best performance, configure the file system on the RD1000 cartridges for ext2 or ext3. See section "RD1000 Cartridge File System Considerations" in the appendix.
Write Error
If the backup application reports a write error, follow these steps:
1. Verify that the write protect switch on the cartridge is set to the “unlock” position.
2. Check the cartridge indicator on the front of the cartridge. If this indicator is amber, the cartridge is not working properly. This may be due to severe damage to the cartridge. Run the RD1000 utility software to obtain more information about the failure.
3. Replace the cartridge if the error persists.

Firmware Download Fails with Windows Server 2003
If the firmware download fails with error invalid parameter and you are using Windows Server
2003, check to ensure you have at least Service Pack 1 installed.
Windows 2000 Cannot Eject Cartridge
When attempting to eject a cartridge while connected to the Windows 2000 operating system, ensure that any open Explorer windows are not selecting the removable device. Windows 2000 will not allow the cartridge to be ejected when the removable drive is selected. When using the eject button, the button will flash amber and the cartridge will not eject. When using the right-click eject function of Explorer, an error message will be displayed indicating that the drive is in use.
If the cartridge will not eject from either the front panel button or the right-click eject function of Explorer try closing all open Explorer windows and retry.
Slow Performance with RD1000 External and Windows 2000
USB 2.0 Drivers are not installed for any USB 2.0 controllers by default with a Windows 2000
installation. The device will operate at a slower USB 1.1 speed until the USB 2.0 drivers are installed. To install the USB 2.0 drivers, follow the steps below:
1. Right click on the My Computer icon and select Manage
2. Select Device Manager 3. Right click on the Universal Serial Bus Controller listed in the “other devices” section 4. Select Properties 5. Select Update Driver and follow the instructions to update USB 2.0 drivers.
System Will Not Complete Boot Process with RD1000 External
Some versions of BIOS do not handle large USB removable media correctly. If your system will not complete the boot process with the RD1000 External device attached, follow the steps below:
1. Make sure you are using the latest BIOS for your system by checking www.support.dell.com.
2. Disable USB boot in the BIOS and retry.
3. Attempt to eject the cartridge and retry boot, or boot with the RD1000 device disconnected. 4. If using a FAT32 formatted cartridge, reformatting to another file system may fix the problem.

Specifications
General
Manufacturer Dell Inc.
Model Names PowerVault RD1000
Interface Type Internal SATA, Internal USB (USB 2.0 or USB 3.0), or External USB (USB 2.0 or USB 3.0)
Performance
Characteristic Storage capacity varies by individual cartridge capacity
Transfer Rate Dependent on system configuration (see below)
Configuration Theoretical Transfer Rate
Maximum Burst Transfer Rate
Typical Transfer Rate
RD1000 USB 2.0
USB 2.0 Host
USB 2.0 Cable
480 Mbps (60 MB/s) 35 MB/s 25 MB/s
RD1000 USB 3.0
USB 2.0 Host
USB 3.0 Cable
480 Mbps (60 MB/s) 35 MB/s 30 MB/s
RD1000 USB 3.0
USB 3.0 Host
USB 3.0 Cable
5 Gbps (625 MB/s) 230 MB/s 80 MB/s
SATA 1.5 Gbps (187.5 MB/s) 45 MB/s 35 MB/s
Average access time (msec) 15
Function Removable disk drive
Logical block size 512 bytes
Supported file system ext2, ext3, FAT32 and NTFS*
Capacity and transfer rate will vary depending on the RD1000 cartridge type used.
*NTFS is the default file system on the cartridge.

Reliability
Unrecoverable error rate 1 error per 1014 bits read
MTBF 550,000 hours
Physical
RD1000 Internal Devices RD1000 External Device
RD1000 Media
Form Factor
3.5 inch internal 5.25 inch half-height internal
External Removable Cartridge
Height 41.4 mm (1.63 inch) 41.4 mm (1.63 inch) 51.8 mm (2.04 inch) 23.68 mm (0.93
inch)
Width 101.6 mm (4.00 inch) 146.0 mm (5.75 inch) 109.8 mm (4.32 inch) 86.6 mm (3.4 inch)
Depth 159.4 mm (6.28 inch) including bezel
171.9 mm (6.77 inch) including bezel
177.5 mm (7.00 inch) including bezel
119.18 mm (4.69 inch)
Weight 408 g (0.90 lbs) 635 g (1.40 lbs) 610 g (1.34 lbs) 173 g (0.38 lbs)
Power
Internal RD1000 Devices External RD1000 Device
Voltage Tolerance +5VDC ±5%, +12VDC ±10%
+12VDC ±10%
Power Consumption (Low Power Mode/Typical/Peak)
N/A / 7.5W / 20W 0.25W / 6.6W / 13W
AC Adapter N/A Universal Adapter 100-240 VAC, 50-60Hz input
Environmental
RD1000 Unit Operational Non-Operational
Temperature 5 to 40°C -40 to 65°C
Thermal Gradient 10°C/hour 20°C/hour
Relative Humidity 20 to 80%, non-condensing 10 to 90%, non-condensing
Maximum Wet Bulb Temperature 29°C, non-condensing 38°C, non-condensing
Altitude -50 ft to 10,000 ft -50 ft to 35,000 ft
Vibration sine vib 0.25G peak, 3-200 Hz random vib 1.54G RMS
Shock half sine 31G @ 2.6ms half sine 71G @ 2 ms

Regulatory
For additional regulatory information, please see the product user documentation which accompanied your product and refer to the link below.
http://www.dell.com/content/topics/global.aspx/about_dell/values/regulatory_compliance/emc_reg_notice?~ck=ln&c=us&l=en&lnki=0&s=corp
Internal Drive Model Number: RDX-Internal-A
External Drive Model Number: RDx-External-A
Appendix: Using the Linux Operating System
Overview
This document describes the use of RD1000 removable disk drives on Linux operating systems. There are two models of the RD1000 device: an internal SATA version and an external USB version. Both SATA and USB models support Linux.
Linux Compatibility
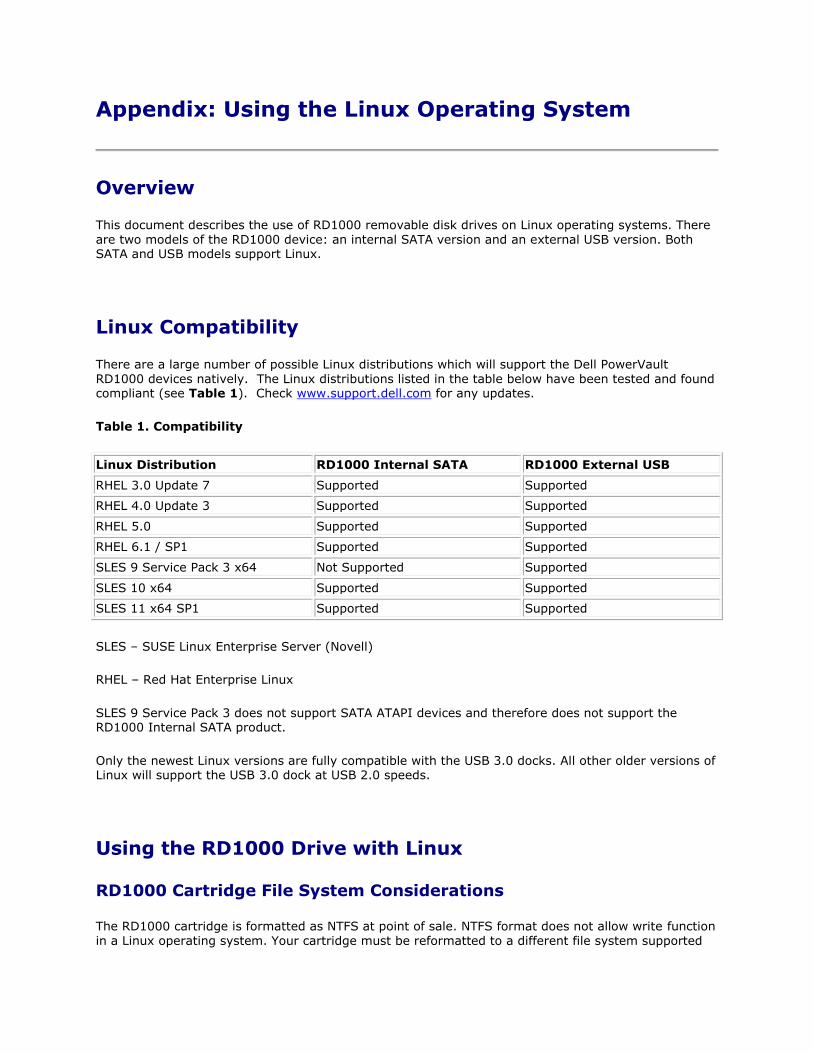
There are a large number of possible Linux distributions which will support the Dell PowerVault RD1000 devices natively. The Linux distributions listed in the table below have been tested and found compliant (see Table 1). Check www.support.dell.com for any updates.
Table 1. Compatibility
Linux Distribution RD1000 Internal SATA RD1000 External USB
RHEL 3.0 Update 7 Supported Supported
RHEL 4.0 Update 3 Supported Supported
RHEL 5.0 Supported Supported
RHEL 6.1 / SP1 Supported Supported
SLES 9 Service Pack 3 x64 Not Supported Supported
SLES 10 x64 Supported Supported
SLES 11 x64 SP1 Supported Supported
SLES – SUSE Linux Enterprise Server (Novell)
RHEL – Red Hat Enterprise Linux
SLES 9 Service Pack 3 does not support SATA ATAPI devices and therefore does not support the RD1000 Internal SATA product.
Only the newest Linux versions are fully compatible with the USB 3.0 docks. All other older versions of Linux will support the USB 3.0 dock at USB 2.0 speeds.
Using the RD1000 Drive with Linux
RD1000 Cartridge File System Considerations
The RD1000 cartridge is formatted as NTFS at point of sale. NTFS format does not allow write function in a Linux operating system. Your cartridge must be reformatted to a different file system supported

by Linux, such as FAT32, ext2, and ext3, etc. Refer to the man pages for fdisk and mkfs for detailed
instructions on how to manipulate partition table and create file systems on Linux. If creating multiple partitions on a cartridge, see topic "Eject" below.
The choice of the file system also has significant impact on backup performance. Ext3 typically
gives the best overall performance.
The FAT32 file system has a 4GB file size limit which can limit archive sizes when using tar.
Some system BIOS do not handle FAT32 formatted disk volumes correctly and may hang on
boot. This typically occurs when USB boot is enabled in the BIOS. See "System Will Not Complete Boot Process with RD1000 External" section in "Troubleshooting" for more information.
NOTE: Although mkfs will allow format of un-partitioned media, we recommend always using fdisk to create partitioned media before formatting. Issues exist with the 2.4 kernel and umount when using un-partitioned media.
Automount
A cartridge must be mounted to be accessible by the backup application. Some Linux distributions
include pre-configured automount for removable disks, others may require user configuration. Please refer to the man pages for automount for more information.
Eject
If the cartridge is mounted, the eject button on the RD1000 drive will not work properly. Use the eject command to un-mount and eject the cartridge.
NOTE: The eject command cannot properly handle un-mount if multiple partitions are present on a removable disk. Each mounted partition must be un-mounted manually or the eject command will fail.
Backup With tar
The tar command works with RD1000 drives by writing the archive to a file on the cartridge. Use the tar -M option to create archives which span multiple cartridges on the RD1000 drive. For spanning
removable disk cartridges use the tar -M -L size option (where size is the cartridge capacity in
kilobytes) when creating multiple-volume backups. For more information refer to the man page for tar.
Troubleshooting
SCSI Device Status
To find out whether the RD1000 drive is recognized by the system, issue the following command:
cat /proc/scsi/scsi

This will print out a list of all the SCSI devices in the system. The list should include any RD1000
drives recognized by the system. If the RD1000 drive is not listed, check cable connections and power supplies (and BIOS settings for the SATA product.)
e2fsck File System Check Fails
If the e2fsck program is unable to successfully complete the file check of an ext2/ext3 cartridge, check to make sure you have the latest version of e2fsprogs installed. Under certain circumstances, earlier versions (pre 1.35) of e2fsck included with some distribution are unable to complete the file systems check.