dell emc avamar for sql server user guide · dell emc avamar for sql server version 18.1 user guide...
TRANSCRIPT

Dell EMC Avamar for SQL ServerVersion 18.1
User Guide302-004-684
REV 01

Copyright © 2001-2018 Dell Inc. or its subsidiaries. All rights reserved.
Published July 2018
Dell believes the information in this publication is accurate as of its publication date. The information is subject to change without notice.
THE INFORMATION IN THIS PUBLICATION IS PROVIDED “AS-IS.“ DELL MAKES NO REPRESENTATIONS OR WARRANTIES OF ANY KIND
WITH RESPECT TO THE INFORMATION IN THIS PUBLICATION, AND SPECIFICALLY DISCLAIMS IMPLIED WARRANTIES OF
MERCHANTABILITY OR FITNESS FOR A PARTICULAR PURPOSE. USE, COPYING, AND DISTRIBUTION OF ANY DELL SOFTWARE DESCRIBED
IN THIS PUBLICATION REQUIRES AN APPLICABLE SOFTWARE LICENSE.
Dell, EMC, and other trademarks are trademarks of Dell Inc. or its subsidiaries. Other trademarks may be the property of their respective owners.
Published in the USA.
Dell EMCHopkinton, Massachusetts 01748-91031-508-435-1000 In North America 1-866-464-7381www.DellEMC.com
2 Avamar for SQL Server 18.1 User Guide

9
Introduction 13Architecture................................................................................................ 14
Avamar components.......................................................................14How Avamar connects to SQL Server............................................ 15Failover Cluster Instances.............................................................. 15AlwaysOn availability groups.......................................................... 18Database mirroring........................................................................ 23Data Domain system support......................................................... 23Server virtualization.......................................................................24
Backup....................................................................................................... 24Backup types................................................................................. 24Backups in AlwaysOn availability groups........................................ 27Mixed backup storage....................................................................27Multi-streaming............................................................................. 28Database log truncation.................................................................28Backups with other tools............................................................... 29
Restore.......................................................................................................29Restore to the original location......................................................29Restore to a new database in the original instance........................ 30Restore to a different instance on the original server.................... 30Restore to an instance on a different server..................................30Restore to a file............................................................................. 30Restore to an AlwaysOn availability group......................................31Restore of a database with an intact log file.................................. 33Restore of system databases.........................................................33Tail-log backup.............................................................................. 34Point-in-time restore..................................................................... 34SQL Server recovery operations....................................................35
Table level recovery....................................................................................36Disaster recovery....................................................................................... 36
Installation 37Preparing to install the SQL Server plug-in.................................................38
System requirements.....................................................................38Preparing a stand-alone server...................................................... 44Preparing a cluster........................................................................ 44Downloading the software............................................................. 45Verifying the environment............................................................. 46
Configure the group policy......................................................................... 47PREFACE................................................................................................... 48Backup options........................................................................................... 51SQL plug-in backup options........................................................................58Backup problems and solutions...................................................................62Restore only on primary replica.................................................................. 64Add an advanced group policy.................................................................... 64
Preface
Chapter 1
Chapter 2
CONTENTS
Avamar for SQL Server 18.1 User Guide 3
Configure the SQL server group policy.......................................................65Installing the Avamar Plug-in for SQL Server............................................. 66Perform an on-demand SQL backup by using AUI ..................................... 67Performing an on-demand backup by using the Avamar Administrator.......68Prerequisites.............................................................................................. 70Restore a SQL Server backup client by using AUI.......................................70Installing the Avamar client software.......................................................... 72
Installation road maps.................................................................... 72Installing the Avamar Client for Windows.......................................73Installing the Avamar Plug-in for SQL Server.................................74Silent installation of Itempoint for SQL.......................................... 75Registering the client.....................................................................75Configuring the cluster client in a failover cluster.......................... 76Configuring the cluster client for an AlwaysOn availability group... 77Configuring the cluster client for an AlwaysOn availability group onAmazon Web Services and Azure...................................................79
Upgrading the Avamar client software........................................................82Upgrading on a stand-alone server................................................ 82Upgrading in a cluster....................................................................83
Uninstalling the Avamar client software......................................................83Uninstall road map......................................................................... 84Uninstalling the cluster client in a failover cluster.......................... 84Uninstalling the cluster client for an AlwaysOn availability group...85
Backup 87Perform an on-demand SQL backup by using AUI ..................................... 88Performing an on-demand backup by using the Avamar Administrator.......88Scheduling backups.................................................................................... 91
Creating a dataset..........................................................................91Creating a group............................................................................94Enabling scheduled backups.......................................................... 95
Setting backup options...............................................................................96Backup label option....................................................................... 98Backup type options...................................................................... 98Copy-only backup........................................................................ 100AlwaysOn availability group option............................................... 100Enhanced data deduplication option............................................. 101Enable consistency check option..................................................102Truncate database log option....................................................... 102Simple recovery model databases option..................................... 103Skip log gap detection..................................................................103Enable debugging messages.........................................................104Data Domain system options........................................................ 104Multi-streaming options............................................................... 105Authentication options.................................................................. 111
Monitoring backups.................................................................................... 111Verifying backups...................................................................................... 112Canceling backups..................................................................................... 113
Application consistent SQL virtual machine image backup byusing AUI 115Managing advanced policies for SQL......................................................... 116Prerequisites..............................................................................................116Add an advanced group policy................................................................... 116
Chapter 3
Chapter 4
CONTENTS
4 Avamar for SQL Server 18.1 User Guide

Configure a source........................................................................ 117Configure the SQL server group policy......................................... 117Configure members...................................................................... 118Configure a proxy for the image backup....................................... 119
Remove an advanced group policy............................................................ 120Edit an advanced group policy...................................................................120View advanced group policy details........................................................... 120Migrate existing Backup Policy or Group to Advanced Policy....................120View logs................................................................................................... 121
Restore 123Restore requirements................................................................................124
Software requirements for restore............................................... 124Tail-log backup and point-in-time restore requirements............... 125Requirements to restore secondary database files....................... 126Requirements to restore the Report Server database.................. 126SQL Server write permission requirements.................................. 126
Restore a SQL Server backup client by using AUI..................................... 126Finding a backup....................................................................................... 128
Finding a backup by date..............................................................129Finding a backup by content......................................................... 131
Determine the restore size for an SQL server database............................ 134Determine the space required to restore the system database.....134Determine the space required to restore a single SQL serverdatabase.......................................................................................134Determine the space required to restore multiple SQL serverdatabases..................................................................................... 135
Restoring to the original location.............................................................. 135Restoring to a new database in the original instance................................. 137Restoring to a different instance...............................................................139Restoring to a file...................................................................................... 141
Restoring to a file with the SQL Server plug-in............................. 141Restoring to a file with the Windows File System plug-in............. 143Restoring a database with SQL Server tools................................ 144
Restoring system databases..................................................................... 149Restoring system databases automatically to the original location....149Restoring system databases manually to the original location.......151Restoring system databases to a different instance..................... 154
Restoring to an AlwaysOn availability group..............................................156Restoring to the original availability group....................................156Restoring to a new database in the original availability group....... 157Restoring to a different availability group.....................................158Restoring to a SQL Server instance without availability groups....158Restoring to operating system files.............................................. 159
Restoring a database with an intact log file...............................................159Setting restore options............................................................................. 160
General restore options................................................................ 161Recovery operation options..........................................................164System database restore options................................................. 166Redirected restore options...........................................................166Authentication options................................................................. 167Point-in-time recovery options.....................................................167
Performing table level recovery................................................................ 168Monitoring restores...................................................................................170
Chapter 5
CONTENTS
Avamar for SQL Server 18.1 User Guide 5

Canceling restores.................................................................................... 170
Disaster Recovery 171Preparing for disaster recovery................................................................. 172Performing disaster recovery.................................................................... 172
SQL Plug-in Options 173How to set plug-in options........................................................................ 174SQL plug-in backup options.......................................................................174SQL plug-in restore options...................................................................... 179SQL TLR plug-in options........................................................................... 183
SQL TLR plug-in browse options.................................................. 183SQL TLR plug-in restore options.................................................. 184
Command Line Interface 185Overview of the SQL Server plug-in CLI................................................... 186Command reference..................................................................................186
Synopsis.......................................................................................186Operations................................................................................... 186Options........................................................................................ 188
Specifying command line options............................................................. 205Password encoding.................................................................................. 206Performing command line operations in a failover cluster.........................206Performing command line operations in an AlwaysOn environment.......... 206CLI examples............................................................................................ 207
Example browse commands.........................................................207Example backup commands.........................................................208Example restore commands.......................................................... 211
avsqltlr command reference...................................................................... 217avsqltlr synopsis........................................................................... 217avsqltlr options............................................................................. 217
Monitoring CLI activities........................................................................... 218
Troubleshooting 219Backup problems and solutions.................................................................220Restore problems and solutions.................................................................221Upgrade problems and solutions................................................................221
Cluster Configuration Tool CLI 223Cluster Configuration Tool CLI Overview..................................................224Plugins......................................................................................................224Operations................................................................................................225
SQL plugin configure options.......................................................225SQL plugin remove options.......................................................... 227SQLAlwayson plugin configure options........................................ 227SQLAlwayson plugin remove options........................................... 228
Cluster Configuration Tool CLI examples..................................................229
ItemPoint for Microsoft SQL Server Notes 231Supported environments for ItemPoint for Microsoft SQL Server............232Limitations for ItemPoint for Microsoft SQL Server................................. 233
Chapter 6
Appendix A
Appendix B
Appendix C
Appendix D
Appendix E
CONTENTS
6 Avamar for SQL Server 18.1 User Guide

235Glossary
CONTENTS
Avamar for SQL Server 18.1 User Guide 7

CONTENTS
8 Avamar for SQL Server 18.1 User Guide

PREFACE
As part of an effort to improve the product lines, revisions of the software andhardware are periodically released. Therefore, some functions that are described inthis document might not be supported by all versions of the software or hardwarecurrently in use. The product release notes provide the most up-to-date informationon product features.
Contact the technical support professional when a product does not function correctlyor does not function as described in this document.
Note
This document was accurate at publication time. To find the latest version of thisdocument, go to Online Support (https://support.EMC.com).
PurposeThis guide describes how to install Avamar in a Microsoft SQL Server databaseenvironment, and how to back up and restore SQL Server databases.
AudienceThe information in this guide is primarily intended for:
l System administrators who are responsible for installing software and maintainingservers and clients on a network
l Microsoft SQL Server administrators who are responsible for backing up andmaintaining Microsoft SQL Servers
Persons using this guide should have current practical experience with the followingtopics:
l Operating system shell commands on the SQL Server platform (root permissionrequired)
l The specific version of Microsoft SQL Server currently deployed at the site
Revision historyThe following table presents the revision history of this document.
Revision Date Description
01 July 7, 2018 GA release of Avamar 18.1
Related documentationThe following publications provide additional information:
l Avamar Compatibility and Interoperability Matrix
l Avamar Release Notes
l Avamar Administration Guide
l Avamar for Windows Server User Guide
l Avamar and Data Domain System Integration Guide
l Avamar Operational Best Practices Guide
l Avamar for Hyper-V VSS User Guide
Avamar for SQL Server 18.1 User Guide 9

l Avamar for VMware User Guide
Special notice conventions used in this documentThese conventions are used for special notices.
DANGER
Indicates a hazardous situation which, if not avoided, results in death or seriousinjury.
WARNING
Indicates a hazardous situation which, if not avoided, could result in death orserious injury.
CAUTION
Indicates a hazardous situation which, if not avoided, could result in minor ormoderate injury.
NOTICE
Addresses practices that are not related to personal injury.
Note
Presents information that is important, but not hazard-related.
Typographical conventionsThese type style conventions are used in this document.
Table 1 Typographical conventions
Bold Used for names of interface elements, such as names of windows,dialog boxes, buttons, fields, tab names, key names, and menu paths(what the user specifically selects or clicks)
Italic Used for full titles of publications that are referenced in text
Monospace Used for:
l System code
l System output, such as an error message or script
l Pathnames, filenames, prompts, and syntax
l Commands and options
Monospace italic Used for variables
Monospace bold Used for user input
[ ] Square brackets enclose optional values
| Vertical bar indicates alternate selections - the bar means “or”
{ } Braces enclose content that the user must specify, such as x or y orz
... Ellipses indicate nonessential information that is omitted from theexample
PREFACE
10 Avamar for SQL Server 18.1 User Guide

Where to get helpThe Avamar support page provides access to licensing information, productdocumentation, advisories, and downloads, as well as how-to and troubleshootinginformation. This information may resolve a product issue before contacting CustomerSupport.
To access the Avamar support page:
1. Go to https://support.EMC.com/products.
2. Type a product name in the Find a Product by Name box.
3. Select the product from the list that appears.
4. Click the arrow next to the Find a Product by Name box.
5. (Optional) Add the product to the My Products list by clicking Add to My SavedProducts in the upper right corner of the Support by Product page.
DocumentationThe Avamar product documentation provides a comprehensive set of featureoverview, operational task, and technical reference information. To supplement theinformation in product administration and user guides, review the followingdocuments:
l Release notes provide an overview of new features and known limitations for arelease.
l Technical notes provide technical details about specific product features, includingstep-by-step tasks, where necessary.
l White papers provide an in-depth technical perspective of a product or productsas applied to critical business issues or requirements.
KnowledgebaseThe Knowledgebase contains applicable solutions that you can search for either bysolution number (for example, esgxxxxxx) or by keyword.
To search the Knowledgebase:
1. Click Search at the top of the page.
2. Type either the solution number or keywords in the search box.
3. (Optional) Limit the search to specific products by typing a product name in theScope by product box and then selecting the product from the list that appears.
4. Select Knowledgebase from the Scope by resource list.
5. (Optional) Specify advanced options by clicking Advanced options and specifyingvalues in the available fields.
6. Click Search.
Online communitiesGo to Community Network at http://community.EMC.com for peer contacts,conversations, and content on product support and solutions. Interactively engageonline with customers, partners, and certified professionals for all products.
Live chatTo engage Customer Support by using live interactive chat, click Join Live Chat onthe Service Center panel of the Avamar support page.
Service RequestsFor in-depth help from Customer Support, submit a service request by clicking CreateService Requests on the Service Center panel of the Avamar support page.
PREFACE
Avamar for SQL Server 18.1 User Guide 11

Note
To open a service request, you must have a valid support agreement. Contact a salesrepresentative for details about obtaining a valid support agreement or with questionsabout an account.
To review an open service request, click the Service Center link on the ServiceCenter panel, and then click View and manage service requests.
Enhancing supportIt is recommended to enable ConnectEMC and Email Home on all Avamar systems:
l ConnectEMC automatically generates service requests for high priority events.
l Email Home sends configuration, capacity, and general system information toCustomer Support.
Comments and suggestionsComments and suggestions help to continue to improve the accuracy, organization,and overall quality of the user publications. Send comments and suggestions aboutthis document to [email protected].
Please include the following information:
l Product name and version
l Document name, part number, and revision (for example, 01)
l Page numbers
l Other details to help address documentation issues
PREFACE
12 Avamar for SQL Server 18.1 User Guide

CHAPTER 1
Introduction
This chapter includes the following topics:
l Architecture....................................................................................................... 14l Backup............................................................................................................... 24l Restore.............................................................................................................. 29l Table level recovery........................................................................................... 36l Disaster recovery............................................................................................... 36
Introduction 13

ArchitectureYou can use Avamar to back up and restore data in a variety of Microsoft SQL Serverenvironments.
Avamar componentsRequired Avamar software components in a SQL Server environment include theAvamar Client for Windows, the Avamar Plug-in for SQL Server, and AvamarAdministrator.
The following figure illustrates a basic system architecture, including required Avamarsoftware components, when you use Avamar to back up a SQL Server environment.
Figure 1 Avamar architecture with SQL Server
Install the Avamar Client for Windows and the Avamar Plug-in for SQL Server on thecomputer that is running SQL Server. Install Avamar Administrator on either thecomputer that is running SQL Server or on a separate computer, as shown in thefigure.
Avamar Client for WindowsThe Avamar Client for Windows installation includes the Avamar Plug-in for WindowsFile System and the Avamar agent, which is required for the Avamar Plug-in for SQLServer. You can use the Windows File System plug-in to back up operating system andSQL Server binary files, which are required for disaster recovery.
Avamar Plug-in for SQL ServerThe SQL Server plug-in enables you to back up and restore SQL Server instances anddatabases.
Avamar AdministratorAvamar Administrator is a graphical management console software application forremote administration of an Avamar system from a supported Windows or Linux clientcomputer. You can configure, perform, monitor, and manage backups and restoresusing Avamar Administrator. The Avamar Administration Guide provides completeinstructions for installing and using Avamar Administrator.
Introduction
14 Avamar for SQL Server 18.1 User Guide

How Avamar connects to SQL ServerThe Avamar Plug-in for SQL Server uses the SQL Server virtual device interface (VDI)to back up and restore databases and transaction logs.
Backup process overview
1. The SQL Server plug-in creates one or more VDI devices, and then executes thenecessary SQL commands to back up the database to the VDI devices.The number of VDI devices that the SQL Server plug-in creates depends on thenumber of data streams that you configure for a backup. Each data streamcorresponds to a VDI device.
2. The Avamar avtar program is spawned in a standard input/output (stdio) mode.
3. The SQL Server plug-in reads data read from the VDI device and writes data toavtar standard input.
4. The avtar program reads and sends the data to either the Avamar server or aconfigured Data Domain system.
Restore process overviewDuring a restore, the SQL Server plug-in reads data from standard output and writesthe data to the VDI device, which communicates with SQL Server to restore thedatabases.
AuthenticationAvamar connects to SQL Server for backup or restore by using either Windowsauthentication or SQL Server authentication.
With Windows authentication, Avamar connects to SQL Server by using the Windowssystem service account (NT AUTHORITY\SYSTEM), which has privileges in SQLServer. The account must have the sysadmin server-level role.
With SQL Server authentication, Avamar connects to SQL Server by using a SQLServer login account. The account must have the sysadmin server-level role. You mustselect the mixed authentication mode for the Database Engine when you configureSQL Server.
If you do not specify an authentication method, then the SQL Server plug-in uses NTauthentication and logs in with the Windows system service account. This account hasthe public and sysadmin server-level roles in SQL Server by default in SQL Server2008 and 2008 R2. In SQL Server 2012, 2014, and 2016, you must add the account tothe SQL Server administrators group.
Adding sysadmin server-level role in SQL Server Management Studio on page 37provides more instructions on adding sysadmin server-level role in SQL ServerManagement Studio.
Failover Cluster InstancesYou can install SQL Server in a Windows Server Failover Clustering (WSFC) clusterwith two or more nodes.
With Failover Cluster Instances (FCIs), SQL Server databases and log files are onstorage that is shared between the nodes. If one of the nodes fails, then theapplications fail over to and run on another node. When the failed node comes backonline, you can fail back the applications from the other node.
Introduction
How Avamar connects to SQL Server 15
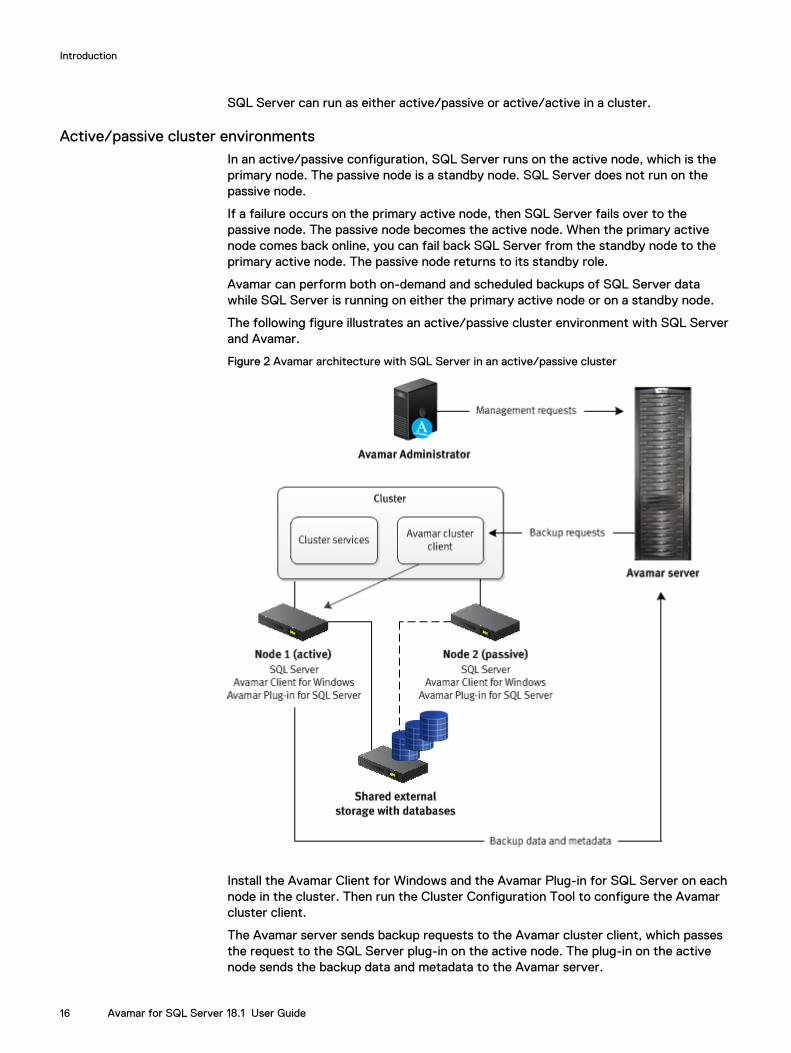
SQL Server can run as either active/passive or active/active in a cluster.
Active/passive cluster environmentsIn an active/passive configuration, SQL Server runs on the active node, which is theprimary node. The passive node is a standby node. SQL Server does not run on thepassive node.
If a failure occurs on the primary active node, then SQL Server fails over to thepassive node. The passive node becomes the active node. When the primary activenode comes back online, you can fail back SQL Server from the standby node to theprimary active node. The passive node returns to its standby role.
Avamar can perform both on-demand and scheduled backups of SQL Server datawhile SQL Server is running on either the primary active node or on a standby node.
The following figure illustrates an active/passive cluster environment with SQL Serverand Avamar.
Figure 2 Avamar architecture with SQL Server in an active/passive cluster
Install the Avamar Client for Windows and the Avamar Plug-in for SQL Server on eachnode in the cluster. Then run the Cluster Configuration Tool to configure the Avamarcluster client.
The Avamar server sends backup requests to the Avamar cluster client, which passesthe request to the SQL Server plug-in on the active node. The plug-in on the activenode sends the backup data and metadata to the Avamar server.
Introduction
16 Avamar for SQL Server 18.1 User Guide

On Windows Server 2012 R2, the Avamar Plug-in for SQL Server supports storage ofSQL Server databases and log files in an active/passive cluster on shared disks,clustered shared volumes (CSVs), and shared virtual hard disk (VHDX) files. SharedVHDX files must be on either a CSV or on a Server Message Block (SMB) 3.0 fileshare.
Active/active cluster environmentsIn an active/active configuration, SQL Server runs on both nodes. The SQL Serverinstallation on each node manages its own separate databases.
If a failure occurs on one of the nodes, then the SQL Server installation on the othernode assumes responsibility for managing the databases for both nodes. When thefailed node comes back online, you can return the management responsibility for thedatabases to the original SQL Server installation on each node.
Avamar can perform both on-demand and scheduled backups of SQL Server dataregardless of which active node is managing the data at the time of the backup.
The following figure illustrates an active/active cluster environment with SQL Serverand Avamar.
Figure 3 Avamar architecture with SQL Server in an active/active cluster
You install the Avamar Client for Windows and the Avamar Plug-in for SQL Server oneach node in the cluster. Then you run the Cluster Configuration Tool to configure theAvamar cluster client. When you perform a backup or restore, you select the clusterclient as the client to back up or the target client for the restore.
Introduction
Failover Cluster Instances 17

The Avamar server sends backup requests to the Avamar cluster client, which passesthe request to the SQL Server plug-in on both active nodes. The plug-ins on the activenodes back up the SQL Server data that they are managing to the Avamar server.
AlwaysOn availability groupsYou can configure high availability of groups of databases by using AlwaysOnavailability groups (AGs) in SQL Server 2012, 2014, and 2016.
With AGs, SQL Server is installed in a WSFC cluster, but the data is not stored on ashared drive. Instead, the data is stored on each node, and SQL Server synchronizesthe data from the primary version of the database to any secondary versions on othernodes.
You can group user databases together in an availability group. Databases in anavailability group must use the full recovery model. All databases in an availabilitygroup fail over together from one node to another.
A SQL Server instance on a cluster node that hosts an availability group is called anavailability replica. Each availability replica of an availability group must reside on adifferent node of the same cluster. There are two types of availability replicas: oneprimary replica and one or more secondary replicas. The primary replica handles read/write activity from clients and sends transaction log updates to the secondaryreplicas. Each secondary replica applies the transaction log updates to its databases.
During failover of an AG, the target secondary replica assumes the primary role andbecomes the new primary replica. The target secondary replica brings its databasesonline as the primary databases, and client applications can connect to them. Whenthe former primary replica is available, it assumes the secondary role and becomes asecondary replica.
NOTICE
The Avamar Plug-in for SQL Server does not support backups of AlwaysOn availabilitygroups on an availability replica that is hosted by a SQL Server Failover ClusterInstance (FCI). To back up databases in such an environment, you must install theAvamar client software on the node with the primary replica as a stand-alone client,and then perform backups on only that node.
Architecture and workflow of backups in AlwaysOn availability groupsAvamar can perform both on-demand and scheduled backups of databases in eitherthe primary replica or a secondary replica for an availability group.
Install the Avamar Client for Windows and the Avamar Plug-in for SQL Server on eachnode in the cluster. Then run the Cluster Configuration Tool to configure the Avamarcluster client for the availability group listener. When you perform a backup or restore,select the cluster client for the availability group listener as the client to back up or thetarget client for the restore.
Backups on the primary replica
The following figure illustrates the data workflow of SQL Server plug-in backups onthe primary replica.
Introduction
18 Avamar for SQL Server 18.1 User Guide

Figure 4 Backup workflow on a primary replica in an AlwaysOn environment
The Avamar server sends a backup request to the Avamar cluster client for theavailability group listener, which passes the request to the primary replica. The SQLServer plug-in on the node with the primary replica performs the backup and sendsthe backup data and metadata to the Avamar server.
Backups on the secondary replica
The following figure illustrates the data workflow of SQL Server plug-in backups on asecondary replica.
Introduction
AlwaysOn availability groups 19

Figure 5 Backup workflow on a secondary replica in an AlwaysOn environment
The Avamar server sends a backup request to the Avamar cluster client for theavailability group listener, which passes the request to the primary replica. The SQLServer plug-in on the node with the primary replica determines the secondary replicaon which to perform the backup, and forwards the backup request to the SQL Serverplug-in on the node with the secondary replica. The plug-in on the node with thesecondary replica performs the backup and then sends the backup data to the Avamarserver. The plug-in on the secondary replica then sends the metadata to the Avamarserver and notifies the plug-in on the primary replica whether the backup completedsuccessfully. The primary replica sends the final summary to the Avamar server.
Architecture and workflow of restores in AlwaysOn availability groupsYou can use the backup from either the primary replica or a secondary replica torestore the databases in an AlwaysOn availability group. You can restore to only theprimary replica, or restore to both the primary and secondary replicas.
Restore to only the primary replica
The following figure illustrates the process to restore to only the primary replica in anAlwaysOn availability group.
Introduction
20 Avamar for SQL Server 18.1 User Guide
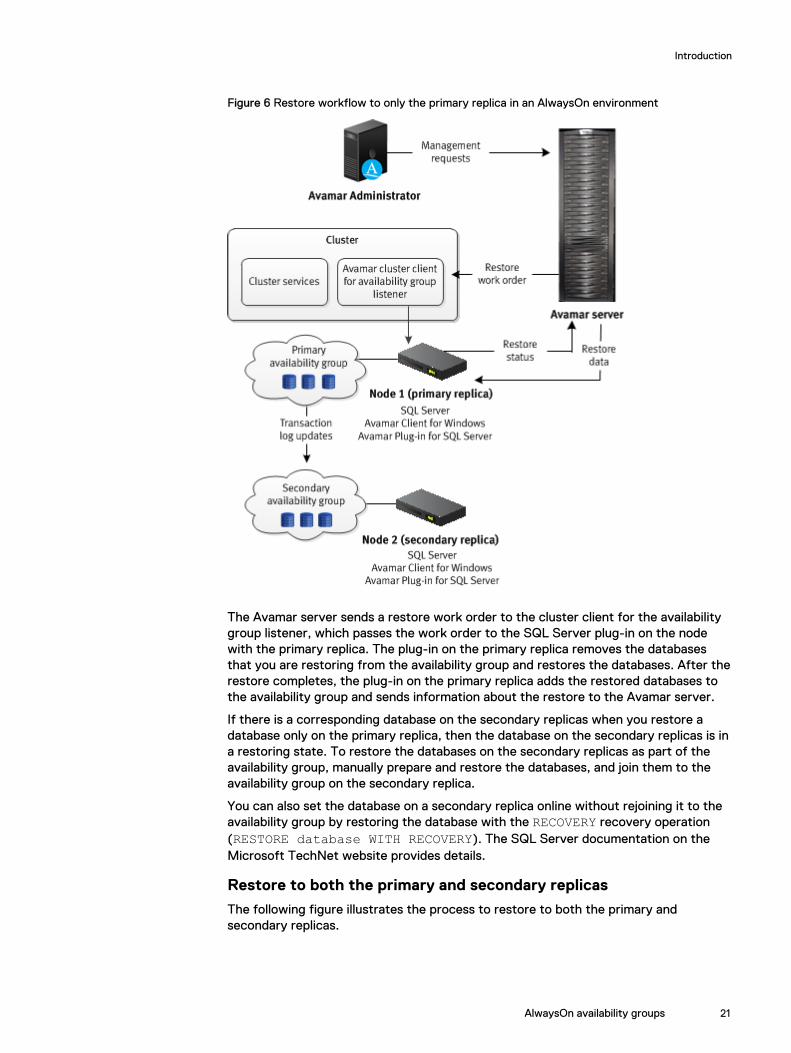
Figure 6 Restore workflow to only the primary replica in an AlwaysOn environment
The Avamar server sends a restore work order to the cluster client for the availabilitygroup listener, which passes the work order to the SQL Server plug-in on the nodewith the primary replica. The plug-in on the primary replica removes the databasesthat you are restoring from the availability group and restores the databases. After therestore completes, the plug-in on the primary replica adds the restored databases tothe availability group and sends information about the restore to the Avamar server.
If there is a corresponding database on the secondary replicas when you restore adatabase only on the primary replica, then the database on the secondary replicas is ina restoring state. To restore the databases on the secondary replicas as part of theavailability group, manually prepare and restore the databases, and join them to theavailability group on the secondary replica.
You can also set the database on a secondary replica online without rejoining it to theavailability group by restoring the database with the RECOVERY recovery operation(RESTORE database WITH RECOVERY). The SQL Server documentation on theMicrosoft TechNet website provides details.
Restore to both the primary and secondary replicas
The following figure illustrates the process to restore to both the primary andsecondary replicas.
Introduction
AlwaysOn availability groups 21

Figure 7 Restore workflow to the primary and secondary replicas in an AlwaysOn environment
During the restore, the Avamar server sends a restore work order to the SQL Serverplug-in on the node with the primary replica. The plug-in on the node with the primaryreplica then sends the restore work order to the plug-in on the nodes with thesecondary replicas. The plug-ins on the primary and secondary replicas remove thedatabases that you are restoring from the availability group and restore the databases.
After the restore completes, the plug-in on the node with the primary replica adds therestored databases to the availability group. Then the plug-ins on the nodes with thesecondary replicas join the restored databases to the availability groups. When theentire restore process completes on all replicas, the plug-in on the node with theprimary replica sends information about the restore to the Avamar server.
Hybrid IT environments with AlwaysOn availability groups and Microsoft AzureThe Avamar Plug-in for SQL Server can perform both on-demand and scheduledbackups of databases in AlwaysOn availability groups in hybrid IT environments withMicrosoft Azure.
The backup can occur on either the primary replica or the secondary replica of theavailability group, but the replica on which the backup occurs must be on-premise.Avamar cannot back up databases on a replica on a Microsoft Azure virtual machine.
The Avamar installation process is the same in a hybrid IT environment as in atraditional AlwaysOn availability group environment. Install the Avamar Client for
Introduction
22 Avamar for SQL Server 18.1 User Guide
Windows and the Avamar Plug-in for SQL Server on each node in the cluster, includingthe Microsoft Azure nodes. Then run the Cluster Configuration Tool to configure theAvamar cluster client for the availability group listener.
When you perform a backup or restore, select the availability group listener as theclient to back up or the target client for the restore. Ensure that backups occur on anon-premise replica by using SQL Server and Avamar settings.
If the primary replica is on-premise, restore data to only the primary replica. Do notattempt to restore to both the primary and secondary replicas. If there is acorresponding database on the secondary replicas when you restore a database onlyon the primary replica, then the database on the secondary replicas is in a restoringstate. To restore the databases on the secondary replicas as part of the availabilitygroup, manually prepare and restore the databases, and join them to the availabilitygroup on the secondary replica.
If the primary replica is on a Microsoft Azure virtual machine, then restore thedatabase to operating system files and then use SQL Server tools to restore thedatabase to the availability group.
Database mirroringDatabase mirroring maintains multiple copies of a single database that must reside ondifferent SQL Server instances. Typically, these server instances reside on computersin different locations.
The principal server serves the database to clients, while the mirror servers serve asstandby servers.
Implement mirroring settings individually for each database.
Mirroring works only with databases that use the full recovery model. The simple andbulk-logged recovery models do not support database mirroring, and you cannotmirror the master, msdb, tempdb, or model databases.
You can use the Avamar Plug-in for SQL Server to back up mirrored SQL Serverdatabases. However, several conditions apply:
l The SQL Server version must be 2008 or greater.
l Perform backups of only the principal database, not the mirrors.
l Use only the Avamar Plug-in for SQL Server to perform backups. If you use otherbackup products in addition to the Avamar Plug-in for SQL Server, then log chainbreaks may occur.
l Backup and database administrators must use extra care. Some mirror operationscause log chain breaks that cannot be detected.
l When database mirroring is established, either initially or as the result of failoverand failback, then you must manually perform a new full backup. Otherwise,incremental and differential backups that occur after the establishment ofdatabase mirroring are not valid for restore. After you perform the full backup inthis case, you cannot perform point-in-time recoveries to a point in time beforethe full backup.
l To restore a database, you must break the SQL mirror.
Data Domain system supportYou can store backups on either the Avamar server or a Data Domain® system.Backup metadata is stored on the Avamar server.
Before you can store backups on a Data Domain system, add the Data Domain systemto the Avamar configuration by using Avamar Administrator. Then select the Data
Introduction
Database mirroring 23
Domain system in the plug-in options when you perform an on-demand backup orwhen you create a dataset for a scheduled backup. You can also use the command lineinterface (CLI) to perform backups to a Data Domain system.
The steps to restore backups are the same whether you restore from the Avamarserver or a Data Domain system. The restore process determines the location of thebackup and restores the backup.
Beginning with Avamar 7.4, Data Domain Cloud Tier is also supported. DD Cloud Tiermoves data from Data Domain to the cloud. From the Avamar Administrator, you canconfigure cloud tiering to move Avamar backups from Data Domain to the cloud, andperform seamless recovery of these backups.
The Avamar and Data Domain System Integration Guide provides more information aboutData Domain systems in an Avamar environment, including detailed steps to add aData Domain system to the Avamar configuration.
Server virtualizationYou can install SQL Server in a server virtualization environment such as VMware orMicrosoft Hyper-V. There are multiple ways that you can install and use Avamar toback up and restore SQL Server data in a server virtualization environment.
The Avamar for Hyper-V VSS User Guide and Avamar for VMware User Guide providedetails on additional system requirements, as well as installation and configurationprocedures.
BackupWhen you perform a backup with the Avamar Plug-in for SQL Server, you can back upeither all SQL Server data on a specific server, one or more instances, or one or moredatabases.
You cannot use the Avamar Plug-in for SQL Server to back up individual filegroups,files, or tables. To back up individual files, use the Avamar Client for Windows.
The SQL Server plug-in can back up both user databases and system databases suchas the master, msdb, and model databases. Backup of system databases in a SQLServer replication environment, such as the publication, distribution, and subscriptiondatabases, is also supported.
The SQL Server plug-in does not support backup of either the Resource or tempdbdatabase because Microsoft SQL Server does not support backup and restore ofthose system databases.
Avamar can back up databases that use any of the three recovery models: simple, full,or bulk-logged. However, the recovery model may determine the type of backup thatyou can perform of the database.
Backup typesThe Avamar Plug-in for SQL Server supports full, differential, transaction log(incremental), and copy-only database backups.
The following figure illustrates the different types of data that are included in each ofthe backup types.
Introduction
24 Avamar for SQL Server 18.1 User Guide

Figure 8 Types of database backups
Full backupsFull backups include the entire database, including all objects, system tables, and data.As the backup operation progresses, it copies the transaction logs. The timing of thetransaction log backup ensures that you can recover the complete database to thestate it was in when the backup finished.
Differential backupsDifferential backups include data that changed after the last full backup. The backupoperation also copies relevant portions of the transaction logs.
When you select a differential backup to restore a database, the restore processrestores the last full backup, followed by the differential backups performed after thefull backup. Because a differential backup only saves changes to data, the backup issmaller and faster than a full backup. Therefore, you can perform a differential backupmore often than a full backup.
Differential backups are used primarily in heavily utilized systems where you mustbring a failed database back online as quickly as possible. Differential backups aresmaller than full backups, and so have less effect on the system where they run.
Transaction log (incremental) backupsBy default, transaction log backups only back up the transaction logs. Transaction logsare serial records of all database modifications.
The logs are used in recovery operations to update the database with completetransactions and roll back incomplete transactions. When you back up a transactionlog, the backup stores all changes after the last transaction log backup. Transactionlog backups record the state of the transaction log at the start of the backup (unlikefull and differential backups, which record the state of the data at the end of thebackup).
Introduction
Backup types 25

When a transaction log backup is complete, the log truncates to remove anytransactions that are committed to the database. When restoring the database,restore the data to the state it was in at the end of the last full or differential backup,and then sequentially restore the transaction log backups in order.
To fully restore data from a transaction log backup, at least one full backup must exist.To ensure data integrity, the Avamar Plug-in for SQL Server software always checksfor the presence of a full backup on the server. If there is a full backup, thetransaction log backup proceeds (that is, the backup includes only transaction logs). Ifthere is no full backup and you select the Force full backup option (the defaultsetting), then the Avamar Plug-in for SQL Server software forces a full backup toensure data integrity.
Copy-only backupsCopy-only backups are special-purpose full backups that are created independently ofthe sequence of full, differential, and transaction log backups. After you perform acopy-only backup, the next differential or transaction log backup is based on the lastfull backup, not the new copy-only backup.
Copy-only backups are supported for all recovery models, and for performing backupsat the database, instance and stripe levels. Restoring from a copy-only backup is thesame as restoring from a full backup.
Copy-only backups cannot be used as a base for differential backups and do nottruncate the transaction log. If you perform a copy-only backup on a database withouta current full backup, the Avamar Plug-in for SQL Server software promotes the nextdifferential or transaction log backup to a full backup. Promotion to full is indicated inthe Activity Window of the Avamar Administrator with the status Completed withPromotion. When only some of the databases in the backup are promoted to full, thestatus will still be indicated as Completed with Promotion.
Previous versions of Avamar identify copy-only backups as type Unknown.
Supported backup types for different recovery modelsThe type of database backup that you can perform depends on the recovery model ofthe database.
You can perform full backups of all databases, regardless of the recovery model(simple, full, or bulk-logged).
If the database uses the simple recovery model, then you cannot perform atransaction log backup of the database. Databases with the simple recovery model donot support transaction log backups. System databases such as the master and msdbdatabases typically use the simple recovery model.
Microsoft SQL Server also does not allow differential backups of the master database.You can only create full backups of the master database.
If a transaction log backup includes databases with the simple recovery model anddatabases with other recovery models, then you can select how Avamar handles thedatabases with the simple recovery model. You can exclude the databases with thesimple recovery model and log either a warning or an error message in the log, or youcan automatically perform a full backup of the databases. When you perform thebackup, the For simple recovery model databases option controls this behavior.
Databases in AlwaysOn availability groups must use the full recovery model.
If you change the recovery model of a database, perform a full backup before you tryto perform a differential or transaction log backup.
Introduction
26 Avamar for SQL Server 18.1 User Guide

Backups in AlwaysOn availability groupsAvamar can perform both on-demand and scheduled backups of databases in eitherthe primary replica or a secondary replica for an availability group. You can increaseperformance of the primary replica when you perform backups on a secondary replica.
Settings in SQL Server and in Avamar enable you to specify a preference for thereplica on which the backup occurs:
l Always on the primary replica
l Always on a secondary replica
l On a secondary replica if possible, otherwise on the primary replica
l No preference defined
In a hybrid IT environment with Microsoft Azure and AlwaysOn availability groups, usethese settings to ensure that the backup occurs on an on-premise replica. Avamarcannot back up databases on a replica on a Microsoft Azure virtual machine.
If you do not specify a preference, then other factors contribute to the selection ofthe replica for backup, including the backup priority, operational status, andconnection status of each replica.
If you perform the backup on a secondary replica, then the replica must meet thefollowing requirements:
l The replica must be in a synchronized state.
l The replica role setting in SQL Server must allow either read-only connections orall connections.
l If there are multiple secondary replicas, then set the priority for which secondaryreplica to use for the backup.
If you select the option to perform the backup only on a secondary replica and nosecondary replicas that meet the requirements are available, then the backup failswith an error.
You can perform full, differential, and transaction log backups on the primary replica.You can perform only full and transaction log backups on a secondary replica. If youtry to perform a differential backup on a secondary replica, then the backup fails withan error message.
SQL Server does not support system databases in an availability group. To back upsystem databases with Avamar, you must perform a separate backup. During thebackup, select the server name of the physical node as the client to back up, and thenselect the system databases.
Mixed backup storageYou can store backups on either the Avamar server or a Data Domain system.However, the full backup for a client and all subsequent transaction log (incremental)and differential backups must be stored on either the Avamar server or a single DataDomain system.
Avamar does not support the following scenarios:
l Full backup on a Data Domain system, and transaction log or differential backupson the Avamar server
l Full backup on the Avamar server, and transaction log or differential backups on aData Domain system
Introduction
Backups in AlwaysOn availability groups 27

l Full backup on one Data Domain system, and transaction log or differentialbackups on another Data Domain system
NOTICE
An exception to this restriction is if you perform a tail-log backup during a restore. Thetail-log backup is stored on the Avamar server even if the other backups for the clientare stored on a Data Domain system.
As a result, if you change the server on which backups for a client are stored, then youmust perform a full backup before any further transaction log or differential backups.
If you change the backup storage from one Data Domain system to another DataDomain system, you can restore to a point in time between the two full backups.
Multi-streamingMulti-streaming enables you to improve backup and restore performance by backingup and restoring SQL Server data by using multiple parallel data streams.
You can either back up multiple databases in parallel with one stream per database, orback up a single database with multiple parallel streams.
If you use multiple data streams to send backup data for a single database to theAvamar server or Data Domain system, then the backup for the database is stored asmultiple files. As a result, the restore uses the same number of streams that you usefor the backup.
You can specify a maximum of 10 streams for each backup, and the minimum size of astream.
Multi-streaming options on page 105 provides details on how multi-streaming worksand how to set multi-streaming options to maximize performance.
Database log truncationThe Avamar Plug-in for SQL Server truncates the database transaction log after anincremental (transaction log) backup of the database.
You can truncate the database transaction log by performing an incremental backupautomatically after a full backup in SQL Server 2008 and later.
You also can prevent truncation of database transaction logs after backups.
The Truncate database log option controls whether truncation occurs. Toautomatically perform an incremental backup after a full backup, select the Forceincremental backup after full backup option.
When the backup process successfully truncates the log file, LOG_BACKUP appears inthe header of the database.
Note
Truncation does not reduce the physical size of a log file. To reduce the physical sizeof a log file, shrink the log file. The Microsoft TechNet website provides informationon log shrinking in SQL Server.
Introduction
28 Avamar for SQL Server 18.1 User Guide

Backups with other toolsIssues can occur when you perform backups with other tools in addition to backupswith the Avamar Plug-in for SQL Server.
Backups with multiple tools can break the backup chain for all of the tools, especially ifthe backups are truncating the database transaction log. Consider the followingscenario:
1. You perform a transaction log backup of a database with the SQL Server plug-in.The backup process truncates the log.
2. The next day you perform transaction log backup with SQL Server managementtools. The backup process truncates the log.
3. The next time that a transaction log backup with the SQL Server plug-in occurs,the backup is missing the transactions from the last Avamar backup through theSQL Server backup.
Exclusive backups with the Avamar Plug-in for SQL Server are recommended to avoidbreaks in the backup chain.
RestoreThe Avamar Plug-in for SQL Server supports a variety of restore options toaccommodate a wide range of data recovery needs.
NOTICE
The SQL Server plug-in performs only offline restores of SQL Server data. Onlinerestore is not supported.
Restore to the original locationThere are two options when you use the Avamar Plug-in for SQL Server to restore aSQL Server instance, database, or filegroup to its original location:
l Perform a standard restore with a tail-log backup and recovery.
l Use the SQL Server REPLACE option to completely overwrite the database.
A standard restore with a tail-log backup is perhaps the most common restoreprocedure. During this procedure, a tail-log backup is created to capture transactionsthat are not in a backup. Then Avamar restores the database from the most recent fullbackup and any differential or transaction log backups.
You may need to use the SQL Server REPLACE option for a restore, for example, if aprevious database restore exited with the following SQL Server error in the AvamarSQL restore log:
One or more devices or files already exist.Reissue the statement using the WITH REPLACEoption to overwrite these files and devices.
Introduction
Backups with other tools 29
NOTICE
When you use the Avamar plug-in option for the SQL Server REPLACE option, it addsan SQL WITH REPLACE clause statement to the restore Transact-SQL command.Use of this statement overrides a SQL Server safety check to prevent you fromaccidentally overwriting a different database or file. The Microsoft Transact-SQLReference Manual provides more information about the safety check in the RESTOREcommand section.
Restore to a new database in the original instanceYou can use the Avamar Plug-in for SQL Server to restore a backup of a database toits original instance, but with a new name that creates a database in the instance.
When you restore to a new database in the original instance, you can perform a tail-logbackup and recovery to recover transactions that were not in the backup. You also canspecify the path for the database and log files.
If the database uses the full recovery model, then you can restore to either a specificdate and time or to a named mark in the transaction log.
Restore to a different instance on the original serverYou can use the Avamar Plug-in for SQL Server to restore an instance, database,filegroup, or file to a different instance on the original server.
When you restore to a different instance on the original server, you cannot perform atail-log backup. However, you can specify the path for the database and log files.
If you are restoring a database, you can leave the original database name or restorethe database with a new name. You can also restore to either a specific date and timeor to a named mark in the transaction log.
Restore to an instance on a different serverYou can use the Avamar Plug-in for SQL Server to restore an instance, database,filegroup, or file to an instance on a different server.
When you restore to an instance on a different server, you cannot perform a tail-logbackup. However, you can specify the path for the database and log files.
If you are restoring a database, you can leave the original database name or restorethe database with a new name. You also can restore to either a specific date and timeor to a named mark in the transaction log.
Restore to a fileIf the Avamar Plug-in for SQL Server is not installed on the target server, or you wantto use the standard SQL Server restore tools for other features, then you can restoreuser or system databases to operating system files. You can then use SQL Servertools, such as SQL Server Management Studio, a Transact-SQL RESTORE command,or the Microsoft SQL Server sqlcmd utility, to restore the databases.
The SQL Server plug-in restores the backup as one or more files to the specifieddestination in the following path:
destination\client\instance\database\file
where:
Introduction
30 Avamar for SQL Server 18.1 User Guide

l destination is the destination for the files that you specified in the Set Destinationdialog box.
l client is the name of the computer on which SQL Server is installed.
l instance is the name of the SQL Server instance from the backup.
l database is the name of the database from the backup.
l file is the name of the file.
A single backup may include multiple files, depending on the number of streams inthe backup. The file name for each file is composed of the backup type and thestream number:
n f-0 indicates a full backup.
n d-n indicates a differential backup.
n i-n indicates a transaction log (incremental) backup.
where n is the sequential number of the differential or incremental backup afterthe preceding full backup.
For example, a full backup with two streams results in two files: f-0.stream0 andf-0.stream1.
Restore to an AlwaysOn availability groupWhen you back up a database in an AlwaysOn availability group, you can restore thedatabase to the following locations:
l To the original availability group
l To a new database in the original availability group
l To a different availability group
l To a different instance that does not use availability groups
l To a file
You can restore an entire database, a filegroup, or a file. You also can perform point-in-time restore of databases that use the full recovery model.
These restore options are available regardless of whether the backup was on theprimary replica or a secondary replica.
Restore to the original availability groupWhen you restore to the original availability group, the restore process canautomatically restore the databases on both the primary replica and the secondaryreplicas.
You can also restore databases only on the primary replica. When you restore adatabase only on the primary replica, the corresponding database on the secondaryreplicas is in a restoring state. To restore the databases on the secondary replicas aspart of the availability group, manually prepare and restore the databases, and jointhem to the availability group on the secondary replicas.
You can also set the databases on a secondary replica online without rejoining them tothe availability group by restoring the databases with the RECOVERY recoveryoperation. The SQL Server documentation on the Microsoft TechNet website providesdetails.
Introduction
Restore to an AlwaysOn availability group 31

Restore to a new database in the original availability groupYou can restore a database to the original AlwaysOn availability group, but with a newname that creates database in the availability group.
When you restore to a new database in the original instance, the restore processrestores the database to only the primary replica. You must then join the new databaseto the availability group.
To restore the database on the secondary replicas as part of the availability group,manually restore the database and join the database to the availability group on eachsecondary replica.
Restore to a different availability groupWhen you restore a database to an availability group on a different server, the restoreprocess restores the database to only the primary replica.
To restore the database on the secondary replicas as part of the availability group,manually restore the database and join the database to the availability group on eachsecondary replica.
NOTICE
You cannot restore a database to a different availability group in the same cluster.Restore fails with an error message that indicates the existence of the database.
Restore to a different instance that does not use availability groupsYou can restore a database to a different SQL Server instance that does not useAlwaysOn availability groups. The steps are the same whether you restore from abackup of databases on a stand-alone server, in a cluster, or in an availability group.
Restore of a database from an availability group to a fileYou can restore a database from a backup of an availability group to operating systemfiles. This type of restore may be necessary if the Avamar Plug-in for SQL Server isnot installed on the target server, or you want to use the standard SQL Server restoretools for other features. The steps are the same whether you restore from a backup ofdatabases on a stand-alone server, in a cluster, or in an availability group.
Restore to hybrid IT environments with Microsoft AzureIn a hybrid IT environment with AlwaysOn availability groups and Microsoft Azure, thesteps to restore a database depend on the location of the primary replica.
If the primary replica is on-premise, restore data to only the primary replica. Do notattempt to restore to both the primary and secondary replicas. If there is acorresponding database on the secondary replicas when you restore a database onlyon the primary replica, then the database on the secondary replicas is in a restoringstate. To restore the databases on the secondary replicas as part of the availabilitygroup, manually prepare and restore the databases, and join them to the availabilitygroup on the secondary replica.
If the primary replica is on a Microsoft Azure virtual machine, then restore thedatabase to operating system files and then use SQL Server tools to restore thedatabase to the availability group.
Introduction
32 Avamar for SQL Server 18.1 User Guide
Restore of a database with an intact log fileIf a database becomes corrupt or is otherwise lost but an intact database log file isavailable, you can restore the database and use the log file to recover transactionsafter the most recent Avamar backup.
To restore the database, perform a transaction log backup by using a Transact-SQLcommand. Then, restore the database from the most recent Avamar backup by usingAvamar Administrator. Finally, restore the transaction log backup by using Transact-SQL commands.
Restore of system databasesRestore of only system databases is rare but may be necessary if one or more systemdatabases are damaged. It is more likely that you must restore system databases whenyou restore user databases. When you select both system and user databases forrestore, the system databases restore first.
When you restore system databases, the Avamar Plug-in for SQL Server canautomatically restore the databases in the correct order and manage SQL Serverservices. However, you can also restore individual system databases and manuallymanage the services.
NOTICE
The Avamar Plug-in for SQL Server can back up and restore system databases in aSQL Server replication environment, including the publication, distribution, andsubscription databases. The SQL Server plug-in can automatically restore thereplication system databases in the correct order and manage SQL Server services.The "Back Up and Restore Replicated Databases" topic in the SQL Serverdocumentation on the MSDN website provides details on backup strategies and thesteps to manually restore databases in different types of replication environments.
Automatic restore of system databasesWhen you restore multiple system databases, Avamar automatically restores thedatabases in the correct order: master, msdb, and model.
Avamar can also automatically manage the stop and restart of the necessary SQLServer services during the restore. For example:
l When you restore the master database, Avamar can automatically stop the SQLServer instance, including dependent services such as the SQL Server agentservice and the Analysis Service, and restart the instance in single-user modebefore the restore. After the restore, Avamar automatically restarts the instance.
l When you restore the msdb database, Avamar can automatically stop the SQLServer agent service, and then restart it when the restore is complete.
Manual restore of system databasesWhen you restore system databases manually, you must manage the services andrestore the databases in the correct order.
1. Shut down the SQL Server instance and then restart the instance in single-usermode.
2. Restore the master database.
Introduction
Restore of a database with an intact log file 33
3. Restart the SQL Server service.
4. Stop the SQL Server Agent service.
5. Restore the msdb and model databases.
6. Restart the SQL Server Agent service.
Tail-log backupWith a tail-log backup, Avamar backs up the tail of the transaction log during therestore process to capture the log records that are not in a backup. After the databaserestore, Avamar uses the tail-log backup to recover the transactions that were not inthe backup.
To perform a tail-log backup, the database must be online and using either the full orbulk-logged recovery model. As a result, you cannot perform a tail-log backup ofsystem databases such as the master and msdb databases because those databasesuse the simple recovery model.
When you are restoring a user-defined filegroup or secondary data file and youperform a tail-log backup, you must select the most recent backup as the backup fromwhich to restore. Otherwise, the restore fails and an error message is written to thelog file.
You can perform a tail-log backup when you are restoring an instance, database,filegroup, or file to its original location without the SQL WITH REPLACE option.
You can also perform a tail-log backup when you are restoring a database to theoriginal instance but with a new database name.
If you are performing a point-in-time restore and the point in time that you arerestoring to is after the most recent transaction log backup, then you must perform atail-log backup.
A tail-log backup is also necessary if you restore a file from a user-defined filegroup toits original location.
Do not perform a tail-log backup if you are performing a redirected restore to adifferent SQL Server instance.
NOTICE
If the tail-log backup fails to complete, then the restore cannot take place. Review thelog file to determine the cause of the failure. Correct the problem, and then restartthe restore. Keep in mind that if you clear the Tail-log backup checkbox to preventthe tail-log backup from occurring, then the restore includes only the transactions upto the selected backup. Any transactions in the tail of the log are lost.
Point-in-time restoreYou can restore a database with the full recovery model to a specific date and time orto a named mark in the transaction log.
You cannot perform a point-in-time restore of system databases such as the masterand msdb databases because those databases use the simple recovery model.
To restore to a specific point in time, you must provide the transaction date and timeor named mark to which to recover. This information is available in the SQL Servertransaction log. The SQL Server documentation on the Microsoft TechNet websiteprovides details on how to access transaction log information.
The point in time to which you are restoring must be after the finish time for the mostrecent full backup. In addition, if the point in time is before the start time of the most
Introduction
34 Avamar for SQL Server 18.1 User Guide
recent transaction log (incremental) backup, then a tail-log backup is not necessary.However, a tail-log backup is required if the point in time is after the most recenttransaction log backup.
When you specify the point in time for restore, do not specify the start time of theselected transaction log backup if it is not the last backup in the backup sequence.Otherwise, the restore fails, and a tail-log backup does not occur even if you selectthe Tail-log backup checkbox.
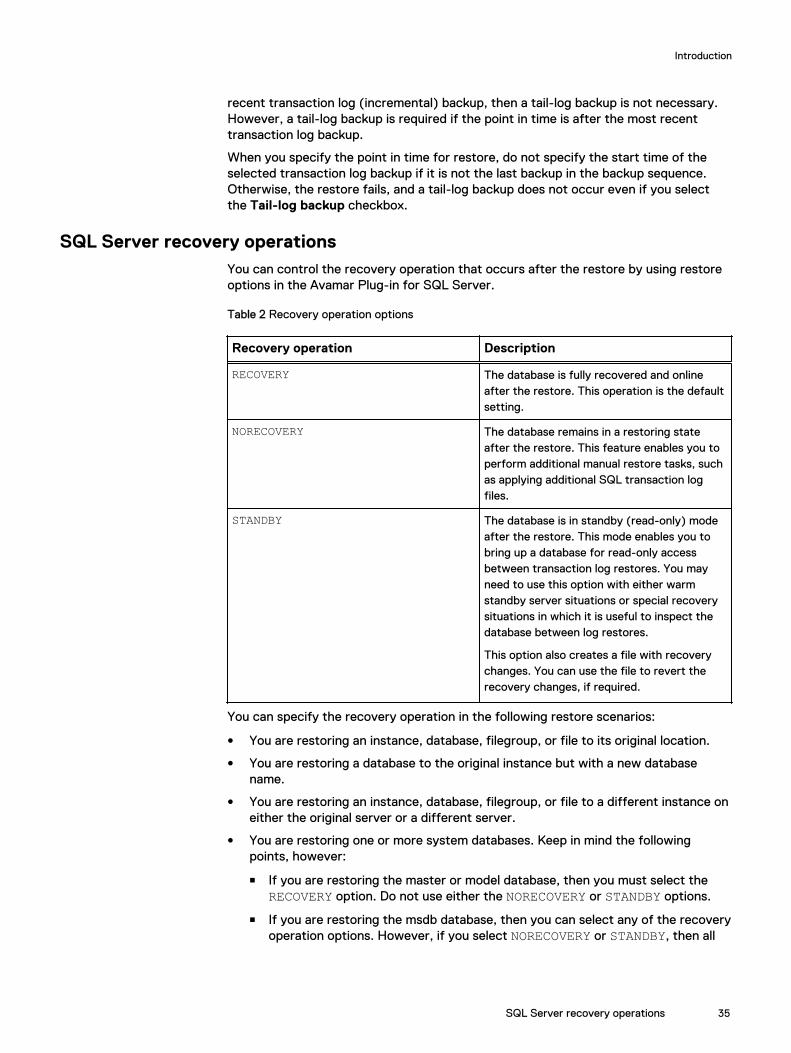
SQL Server recovery operationsYou can control the recovery operation that occurs after the restore by using restoreoptions in the Avamar Plug-in for SQL Server.
Table 2 Recovery operation options
Recovery operation Description
RECOVERY The database is fully recovered and onlineafter the restore. This operation is the defaultsetting.
NORECOVERY The database remains in a restoring stateafter the restore. This feature enables you toperform additional manual restore tasks, suchas applying additional SQL transaction logfiles.
STANDBY The database is in standby (read-only) modeafter the restore. This mode enables you tobring up a database for read-only accessbetween transaction log restores. You mayneed to use this option with either warmstandby server situations or special recoverysituations in which it is useful to inspect thedatabase between log restores.
This option also creates a file with recoverychanges. You can use the file to revert therecovery changes, if required.
You can specify the recovery operation in the following restore scenarios:
l You are restoring an instance, database, filegroup, or file to its original location.
l You are restoring a database to the original instance but with a new databasename.
l You are restoring an instance, database, filegroup, or file to a different instance oneither the original server or a different server.
l You are restoring one or more system databases. Keep in mind the followingpoints, however:
n If you are restoring the master or model database, then you must select theRECOVERY option. Do not use either the NORECOVERY or STANDBY options.
n If you are restoring the msdb database, then you can select any of the recoveryoperation options. However, if you select NORECOVERY or STANDBY, then all
Introduction
SQL Server recovery operations 35

databases become inaccessible until the restore of the msdb database iscomplete.
n If you are restoring the system databases, then you must select the RECOVERYoption. Do not use either the NORECOVERY or STANDBY options.
Table level recoveryYou can restore individual tables from a backup of an SQL database by performing atable level recovery.
Table level recovery (TLR) from an SQL database uses the Avamar Plug-in for SQLTLR with ItemPoint for Microsoft SQL Server, which is installed during installation ofthe Avamar Plug-in for SQL TLR. Single-stream as well as multiple streams aresupported.
During a recovery operation when the Avamar Plug-in for SQL TLR is selected, theselected database backup is mounted as a virtual mounted drive. Once the databasebackup is mounted, ItemPoint for Microsoft SQL Server is used to perform the tablelevel recovery.
Disaster recoveryTo ensure sufficient preparation for disaster recovery of a SQL Server environment,you must perform ongoing backups of the Windows server and all system and userdatabases. Disaster Recovery on page 171 provides high-level procedures forpreparing for and performing disaster recovery.
Introduction
36 Avamar for SQL Server 18.1 User Guide

CHAPTER 2
Installation
This chapter includes the following topics:
l Preparing to install the SQL Server plug-in........................................................ 38l Configure the group policy................................................................................. 47l PREFACE...........................................................................................................48l Backup options................................................................................................... 51l SQL plug-in backup options............................................................................... 58l Backup problems and solutions.......................................................................... 62l Restore only on primary replica..........................................................................64l Add an advanced group policy............................................................................64l Configure the SQL server group policy.............................................................. 65l Installing the Avamar Plug-in for SQL Server.....................................................66l Perform an on-demand SQL backup by using AUI ............................................. 67l Performing an on-demand backup by using the Avamar Administrator.............. 68l Prerequisites...................................................................................................... 70l Restore a SQL Server backup client by using AUI.............................................. 70l Installing the Avamar client software..................................................................72l Upgrading the Avamar client software............................................................... 82l Uninstalling the Avamar client software............................................................. 83
Installation 37
Preparing to install the SQL Server plug-inReview the system requirements for the Avamar Plug-in for SQL Server, and ensurethat the environment meets the requirements before you install Avamar clientsoftware. The Avamar Config Checker for Microsoft Windows provides an additionalautomated verification of the environment. You also must download the Avamar Clientfor Windows and the Avamar Plug-in for SQL Server installation packages from theAvamar server.
System requirementsThe environment must meet client compatibility requirements before you installAvamar client software.
See the compatibility guide on Online Support (http://compatibilityguide.emc.com:8080/CompGuideApp) for client compatibility requirements and supported operatingsystems and application versions.
The Avamar file system client and the plug-ins that you install on the host must havethe same version number.
Installation of SQL Server 2008 or SQL Server 2008 R2 in a Windows Server 2012cluster requires SQL Server 2008 SP3 or later, or SQL Server 2008 R2 SP1.
On Windows Server 2012, the Avamar Plug-in for SQL Server does not supportbackup and restore of SQL Server data on Server Message Block (SMB) 3.0 fileshares. However, on Windows Server 2012 R2, the SQL Server plug-in supportsstorage of SQL Server databases and log files in an active/passive cluster on sharedvirtual hard disk (VHDX) files on an SMB 3.0 file share.
The Avamar Plug-in for SQL Server does not support backup and restore of theWindows Internal Database, which is also referred to as SQL Server EmbeddedEdition.
The environment must also meet other requirements, including hardwarerequirements, security requirements, and SQL Server feature and configurationrequirements.
Hardware requirements
The following table lists the hardware requirements for the Avamar Plug-in for SQLServer.
Table 3 Minimum and recommended hardware requirements
Requirement Minimum and recommended
RAM 512 MB (2 GB recommended).
Hard drive space 2 GB permanent hard drive space for softwareinstallation.
The Avamar Plug-in for SQL Server softwarealso requires an additional 12 MB ofpermanent hard drive space for each 64 MBof physical RAM. This space is necessary forlocal cache files.
Installation
38 Avamar for SQL Server 18.1 User Guide

Table 3 Minimum and recommended hardware requirements (continued)
Requirement Minimum and recommended
Network interface 10BaseT minimum; 100BaseT or higherrecommended, configured with the latestdrivers for the environment.
Security requirementsWhen Avamar connects to SQL Server for backup or restore, you can use eitherWindows (NT) authentication or SQL Server authentication.
With Windows authentication, Avamar connects to SQL Server by using the Windowssystem service account (NT AUTHORITY\SYSTEM), which has privileges in SQLServer. The account must have the sysadmin server-level role.
Note
To use the Windows authentication method, select NT authentication in the plug-inoptions for the Avamar Plug-in for SQL Server.
With SQL Server authentication, Avamar connects to SQL Server by using a SQLServer login account. The account must have the sysadmin server-level role. You mustselect the mixed authentication mode for the Database Engine when you configureSQL Server.
If you do not specify an authentication method, then the SQL Server plug-in uses NTauthentication and logs in with the Windows system service account. This account hasthe public and sysadmin server-level roles in SQL Server by default in SQL Server2008 and 2008 R2. In SQL Server 2012, 2014, and 2016, you must add the account tothe SQL Server administrators group.
Adding sysadmin server-level role in SQL Server ManagementStudio
Procedure
1. In SQL Server Management Studio, expand the Security node and then theLogins node for the instance in the Object Explorer.
2. Right-click the user to whom you want to assign the sysadmin server role andselect Properties.
The Login Properties dialog box appears.
Note
For Windows authentication, select the NT AUTHORITY\SYSTEM useraccount.
3. Select the Server Roles page from the list in the left pane.
4. In the right pane, select the checkbox next to the sysadmin server role.
5. Click OK.
Installation
System requirements 39

SQL Server requirementsThe SQL Server installation and environment must meet the requirements for theAvamar Plug-in for SQL Server.
SQL Server feature installation requirements
The Avamar Plug-in for SQL Server requires installation of SQL Server ManagementObjects (SMO). To install SMO, install the Client Tools SDK when you install SQLServer. Alternatively, install SMO from the SQL Server feature pack.
You also must install Management Tools and the SQL Client Connectivity SDK whenyou install SQL Server.
Database name requirements
Use only valid file name characters in database names. Avoid any of the followingcharacters, which are known to interfere with proper operation of the SQL Serverplug-in: asterisk (*), forward slash (/), backward slash (\), colon (:), semicolon (;),question mark (?), right angle bracket (>), left angle bracket (<), vertical bar (|), ornumber (#).
Do not end the database name with a period (.). If you end a database name with aperiod and then you restore the database, you receive an access violation when youtry to open the folder for the restored database.
Transaction log marking requirements
The Avamar Plug-in for SQL Server cannot successfully back up and restoredatabases in which database transaction log marks contain leading or trailing whitespace.
System database requirements
The SQL Server plug-in can back up both user databases and system databases suchas the master, msdb, and model databases.
The SQL Server Resource database is a read-only database that contains copies of allsystem objects that ship with SQL Server. The Avamar Plug-in for SQL Server cannotback up the Resource database, mssqlsystemresource.mdf, or its log file,mssqlsystemresource.ldf, because SQL Server cannot back up the Resourcedatabase. To back up Resource database files, use the Avamar Client for Windows.
The tempdb database is a temporary system database that is re-created every timeyou restart a SQL Server instance. The SQL Server plug-in cannot back up thetempdb system database because SQL Server does not support backup of the tempdbdatabase.
The Avamar Plug-in for SQL Server can back up and restore system databases in aSQL Server replication environment, including the publication, distribution, andsubscription databases. The SQL Server plug-in can automatically restore thereplication system databases in the correct order and manage SQL Server services.The "Back Up and Restore Replicated Databases" topic in the SQL Serverdocumentation on the MSDN website provides details on backup strategies and thesteps to manually restore databases in different types of replication environments.
Alias requirements
A SQL Server alias is a name that you configure on the client computer that points toa server, instance, or database on either the local server or on a different computer.
Installation
40 Avamar for SQL Server 18.1 User Guide

You can use an alias to connect with a certain network protocol, such as TCP/IP,Named Pipes, or Shared Memory.
An alias can improve the convenience and speed of connecting to SQL Server.However, improper use of an alias can result in connectivity issues that are difficult toisolate and troubleshoot.
If you plan to use a SQL Server alias, review the requirements and configuration stepson the Microsoft website for setting up an alias. Also, review best practices for usingand troubleshooting aliases. These best practices are available in the blogs andSupport knowledgebase articles on the Microsoft website.
AlwaysOn availability group requirements
In a SQL Server AlwaysOn environment, you can back up databases on either theprimary or secondary replica for an availability group. There must be an availabilitygroup listener for each availability group. The following sections list additionalrequirements in an AlwaysOn environment.
Requirements for backups on a secondary replicaIf you perform the backup on a secondary replica, then the replica must meet thefollowing requirements:
l The replica must be in a synchronized state.
l The replica role setting in SQL Server must allow either read-only connections orall connections:
n When you create a replica in SQL Server Management Studio, select eitherRead-intent only or Yes from the Readable secondary list on the Replicastab in the Add Replica Wizard.
n When you edit the configuration for an availability group in SQL ServerManagement Studio, select either Read-intent only or Yes from the Readablesecondary list on the Availability Replica Properties dialog box.
n Specify either READ_ONLY or ALL for the SECONDARY_ROLE option when youissue the CREATE AVAILABILITY GROUP or ALTER AVAILABILITYGROUP Transact-SQL command.
l If there are multiple secondary replicas, then set the priority for which secondaryreplica to use for the backup:
n When you create a replica in SQL Server Management Studio, specify a valuebetween 1 and 100 in the Backup Priority field in the Add Replica Wizard.
n When you edit the configuration for an availability group in SQL ServerManagement Studio, specify a value between 1 and 100 in the Backup Priorityfield on the Availability Replica Properties dialog box.
n Specify a numeric value for the BACKUP_PRIORITY option when you issue theCREATE AVAILABILITY GROUP or ALTER AVAILABILITY GROUPTransact-SQL command.
A value of 1 indicates the lowest priority, and a value of 100 indicates the highestpriority.
System databases in an availability groupSQL Server does not support system databases in an availability group. To back upsystem databases with Avamar, you must perform a separate backup. During thebackup, select the server name of the physical node as the client to back up, and thenselect the system databases.
Installation
System requirements 41

Requirements for the var directoryThe var directory for the SQL AlwaysOn Cluster Plug-in must meet the followingrequirements:
l Must have greater than 2 GB of available space.
l For a local directory, the local full path to the var directory must be the same on allnodes in the cluster where the Availability group is selected.
l For a shared location:
n The full path to the shared location must be available on all nodes in the clusterwhere the Availability group is selected.
n During registration, the shared \var folder must be specified as a UNC path.
n Mounted shared locations which are available only to the primary replica arenot supported.
n The account running the avagent service must have modify permission level(including read/write access) to the shared var folder.
Hybrid IT environments with Microsoft Azure and AlwaysOn availability groupsIn a hybrid IT environment with Microsoft Azure and AlwaysOn availability groups,ensure that the backup occurs on an on-premise replica. Avamar cannot back updatabases on a replica on a Microsoft Azure virtual machine.
AlwaysOn availability groups and FCIsThe Avamar Plug-in for SQL Server does not support backups of AlwaysOn availabilitygroups on an availability replica that is hosted by a SQL Server Failover ClusterInstance (FCI). To back up databases in such an environment, you must install theAvamar client software on the node with the primary replica as a stand-alone client,and then perform backups on only that node.
Database mirroring requirements
You can use the Avamar Plug-in for SQL Server to back up SQL Server databases thatare mirrored.
The following conditions apply when you use the SQL Server plug-in in an environmentwith database mirroring:
l The SQL Server version must be 2008 or greater.
l Perform backups of only the principal database, not the mirrors.
l Use only the Avamar Plug-in for SQL Server to perform backups. If you use otherbackup products in addition to the Avamar Plug-in for SQL Server, then log chainbreaks may occur.
l Backup and database administrators must use extra care. Some mirror operationscause log chain breaks that cannot be detected.
l When database mirroring is established, either initially or as the result of failoverand failback, then you must manually perform a new full backup. Otherwise,incremental and differential backups that occur after the establishment ofdatabase mirroring are not valid for restore. After you perform the full backup inthis case, you cannot perform point-in-time recoveries to a point in time beforethe full backup.
l To restore a database, you must break the SQL mirror.
Installation
42 Avamar for SQL Server 18.1 User Guide
Transparent Data Encryption requirements
When you protect Avamar backups of SQL Server 2008 or later databases withTransparent Data Encryption (TDE), the backups intentionally do not include theDatabase Encryption Key (DEK).
Including the DEK defeats one of the primary reasons for using TDE, which is toencrypt exported data such as backups.
When you perform an Avamar backup of TDE-protected databases, manually back upthe DEK. The article “Understanding Transparent Data Encryption (TDE),” availableon the Microsoft TechNet website, provides additional details.
FILESTREAM requirements
The SQL Server FILESTREAM feature enables you to configure a database to storebinary large object (BLOB) data as files on the file system instead of in the database.The Avamar Plug-in for SQL Server supports backups of SQL Server databases withFILESTREAM data for SQL Server 2008 and later.
Backing up and restoring a database with FILESTREAM data by using either AvamarAdministrator or the avsql command line interface (CLI) are the same as backing upand restoring other databases.
Known issues with FILESTREAM supportYou might encounter the following issues when you back up or restore a SQL Serverdatabase with FILESTREAM data.
FILESTREAM data restores to the database folder during redirected restoreFILESTREAM data restores to the folder with the database files, even if theFILESTREAM data was originally in a different folder than the database files, when thefollowing conditions are true:
l You are restoring the database to a different location than the original location atthe time of the backup.
l You specify the new location by using the Alternate database location box on theRestore Command Line Options dialog box.
To avoid this issue, specify the restore location for both the database files and theFILESTREAM data in the Set Destination dialog box.
Restore fails when the folder with FILESTREAM data is openRestore of a database with FILESTREAM data fails when the folder with FILESTREAMdata is open in a program such as Windows Explorer.
To avoid this issue, close the program that is accessing the folder with theFILESTREAM before you perform the restore. However, if the FILESTREAM folder isopen and the restore fails, then perform the restore again and select the WITHREPLACE option to force the restore and bring the database online.
FILESTREAM datafiles appear as Rows Data in Avamar AdministratorFILESTREAM datafiles appear with a description of Rows Data on the Restore tab ofthe Backup, Restore and Manage window in Avamar Administrator. The descriptionin Avamar Administrator is different than the Filestream data description thatappears in SQL Server Management Studio.
SQL Server Analysis Service (SSAS) requirements
The Avamar Plug-in for SQL Server cannot back up SSAS databases. However, youcan back up the SSAS databases by using SQL Server Management Studio (SSMS) or
Installation
System requirements 43

the XMLA Query Editor. Then use the Avamar Client for Windows to back up the flatfile that results from the SSMS or XMLA query backup.
The Microsoft website provides instructions on using SSMS or an XMLA query to backup SSAS databases.
Considerations for the number of databases
The Avamar Management Console Server (MCS) may not be able to display alldatabases when you browse for data to back up or restore on a SQL Serverinstallation with many databases.
When this issue occurs, a Browse Timeout message appears and enables you to eitherset a new time limit in seconds or to view partial results. If you view partial results, noentries appear. The Avamar Plug-in for SQL Server does not support this option.
Preparing a stand-alone serverYou must perform SQL Server installation and configuration steps before you installAvamar client software on a stand-alone server.
Procedure
1. Install and configure Microsoft SQL Server.
2. Install Microsoft .NET Framework 4. This software is required to install theAvamar Plug-in for SQL Server. Search the Microsoft Download Center for“Microsoft .NET Framework 4" to find downloads and additional information.
3. If you are using Microsoft SQL Server 2012, 2014, or 2016, then add theWindows system service account to the SQL Server administrators group. Adding sysadmin server-level role in SQL Server Management Studio on page39 provides instructions.
Preparing a clusterYou must perform SQL Server installation and configuration steps before you installAvamar client software in a cluster.
Procedure
1. Install and prepare the cluster.
2. If you are installing SQL Server 2008 or SQL Server 2008 R2 in a WindowsServer 2012 cluster, enable the COM-based MsClust.dll library on eachnode.
If you do not enable this library on the cluster node, then the SQL Server setupon the node fails with an error that cluster service verification failed.
To enable the library, enable the Failover Cluster Automation Server feature byusing one of the following methods on each node in the cluster:
l In Server Manager, expand Remote Server Administration Tools > FeatureAdministration Tools > Failover Clustering Tools, and then select theFailover Cluster Automation Server checkbox.
l Run the following Windows PowerShell cmdlet from an elevated commandprompt:
add-windowsfeature RSAT-Clustering-AutomationServer
Installation
44 Avamar for SQL Server 18.1 User Guide

3. If you are installing SQL Server 2008 or SQL Server 2008 R2 in a WindowsServer 2012 cluster, install SQL Server 2008 SP3 or later, or SQL Server 2008R2 SP1 or later.
Otherwise, a “Windows Server 2003 FILESTREAM Hotfix Check” error appearswhen you install and configure SQL Server in the cluster.
To ensure that you are installing the service pack version of SQL Server, youmay need to perform one of the following steps:
l Download the correct service pack package, and run the service pack setupon each of the cluster nodes to pre-patch the nodes with setup binaries.
The setup process closes automatically after you install setup support files.You must reopen the setup wizard to perform the SQL Server installation.
NOTICE
If the SQL Support Files from SQL Server 2008 or SQL Server 2008 R2 arecurrently installed on the node, uninstall SQL Server before you run theservice pack setup to install latest SQL Support Files.
l Create a slipstream package that includes the service pack, and use that toinstall the service pack version of SQL Server on each node. Microsoftknowledgebase article 955392, “How to update or slipstream an installationof SQL Server 2008,” which is available on the Microsoft website, providesinstructions on creating a slipstream package.
4. Install and configure Microsoft SQL Server on each node.
5. Install Microsoft .NET Framework 4 on each node. This software is required toinstall the Avamar Plug-in for SQL Server. Search the Microsoft DownloadCenter for “Microsoft .NET Framework 4" to find downloads and additionalinformation.
Microsoft .NET Framework 4 is pre-installed on Windows Server 2012.
6. If you are using Microsoft SQL Server 2012, 2014, or 2016, then add theWindows system service account to the SQL Server administrators group. Adding sysadmin server-level role in SQL Server Management Studio on page39 provides instructions.
Downloading the softwareDownload the installation packages for the Avamar Client for Windows, the AvamarPlug-in for SQL Server, and the Avamar Config Checker from the Avamar server.Then save the installation packages to a temporary folder.
Procedure
1. Log in to the computer that is running SQL Server as an administrator.
2. Log in to the application_name server as an administrator.
3. Open a web browser and type the following URL:
https://Avamar_server/dtlt/home.htmlwhere Avamar_server is the DNS name or IP address of the Avamar server.
The Avamar Web Restore page appears.
4. Click Downloads.
The Downloads list appears.
Installation
Downloading the software 45
5. Click + next to the operating system headings until the applicable softwareinstallation packages appear.
6. Click the Avamar Client for Windows installation package, AvamarClient-windows-x86_64-version.msiwhere version is the Avamar client version.
7. Click the link for the SQL Server plug-in installation package, AvamarSQL-windows-x86_64-version.exe.
where version is the SQL Server plug-in version.
NOTICE
Ensure that you select the correct installation package for the operatingsystem.
8. Save the SQL Server plug-in installation package to a temporary folder.
9. Click the Avamar Config Checker installation package,Avamar_ConfigChecker_win_x64.zip.
Verifying the environmentUse the Avamar Config Checker for Microsoft Windows to verify that you correctlyconfigured the Windows environment for Avamar backup and recovery. The ConfigChecker checks the configuration for problems that can lead to installation, backup, orrecovery failures. These failures can affect the operating system for the applicationhost or the application itself.
You can run the Avamar Config Checker either before or after you install Avamarsoftware on the client computer.
The Config Checker supports only English language operating systems.
Procedure
1. Unzip the Avamar Config Checker installation package. To install the software,run the setup program.
2. Start the Config Checker:
a. Open the Start screen.
b. Select Avamar Config Checker.
3. Click Next on the welcome page.
The Avamar Application and User Settings page appears.
4. Select the version number from the Avamar version list.
5. In the application list, select the checkbox next to the applications on the clientcomputer. Specify credentials, if required.
6. Click Next.
7. Review the summary information.
8. Click Run Tests.
When the verification completes, the Config Check Results window appears.
9. Save or open the results in HTML format.
Installation
46 Avamar for SQL Server 18.1 User Guide

NOTICE
The Config Checker does not automatically save the results. If you do not savethe results, you must rerun the Config Checker to view them.
10. Click Finish to exit the Config Checker.
11. Review the HTML result file, and correct all failed checks.
12. Rerun the Config Checker to ensure that all the checks are successful.
The Avamar Config Checker for Microsoft Windows Technical Note, available onOnline Support at https://support.EMC.com, provides troubleshootinginformation and details about the results that appear for each application.
Configure the group policyA group policy contains all the information necessary to perform backups of groups ofinstances.
Group policy objects contain three child objects:
l Schedule—A policy that controls the frequency and the start and end time eachday for backups of clients in a group. A schedule is a persistent and reusableAvamar policy that can be named and attached to multiple groups.
l Retention—A policy that defines how long the backup is stored in the backupappliance.
l Dataset—A policy that defines a set of files, directories, and file systems for eachsupported platform that are included or excluded in backups across a group ofclients. A dataset is a persistent and reusable Avamar policy that can be namedand attached to multiple groups.
Procedure
1. On the Advanced Policy Builder page, click Type.
2. In the Advanced Policy Type field, select SQL Server.
3. In the Advanced Policy Type field, select Oracle Server.
4. To add a backup group, click , and then select a backup group type from thelist.
5. In the Schedule column, select a schedule for each backup group.
To ensure that backups occur on an ongoing basis, scheduled backups runautomatically. You can schedule backups to run daily, weekly, or monthly.
Alternatively, you can add a schedule by selecting Create in the drop-down list.The Create Schedule wizard appears and opens to the Basic Configurationpage. For detailed instructions, see Add a schedule.
6. In the Dataset column, select a dataset for each backup group.
A dataset specifies the data to include in a scheduled backup and the options touse for the backup. Create at least one dataset for scheduled backups on aclient or group of clients. Create multiple datasets to segregate client data.
Alternatively, you can add a dataset by selecting Create in the drop-down list.The Create DataSet wizard appears. For detailed instructions, see Add adataset.
Installation
Configure the group policy 47

7. In the Retention column, select a retention policy for each backup group.
Retention is the time setting to automatically delete backups on an Avamarserver. Retention can be set to permanent for backups that should not bedeleted from an Avamar server.
Alternatively, you can add a retention policy by selecting Create in the drop-down list. The Add Retention Policy wizard appears. For detailed instructions,see Add a retention policy.
PREFACEAs part of an effort to improve the product lines, revisions of the software andhardware are periodically released. Therefore, some functions that are described inthis document might not be supported by all versions of the software or hardwarecurrently in use. The product release notes provide the most up-to-date informationon product features.
Contact the technical support professional when a product does not function correctlyor does not function as described in this document.
Note
This document was accurate at publication time. To find the latest version of thisdocument, go to Online Support (https://support.EMC.com).
PurposeThis guide describes how to install Avamar in a Microsoft SQL Server databaseenvironment, and how to back up and restore SQL Server databases.
AudienceThe information in this guide is primarily intended for:
l System administrators who are responsible for installing software and maintainingservers and clients on a network
l Microsoft SQL Server administrators who are responsible for backing up andmaintaining Microsoft SQL Servers
Persons using this guide should have current practical experience with the followingtopics:
l Operating system shell commands on the SQL Server platform (root permissionrequired)
l The specific version of Microsoft SQL Server currently deployed at the site
Revision historyThe following table presents the revision history of this document.
Revision Date Description
01 July 7, 2018 GA release of Avamar 18.1
Related documentationThe following publications provide additional information:
l Avamar Compatibility and Interoperability Matrix
l Avamar Release Notes
Installation
48 Avamar for SQL Server 18.1 User Guide
l Avamar Administration Guide
l Avamar for Windows Server User Guide
l Avamar and Data Domain System Integration Guide
l Avamar Operational Best Practices Guide
l Avamar for Hyper-V VSS User Guide
l Avamar for VMware User Guide
Special notice conventions used in this documentThese conventions are used for special notices.
DANGER
Indicates a hazardous situation which, if not avoided, results in death or seriousinjury.
WARNING
Indicates a hazardous situation which, if not avoided, could result in death orserious injury.
CAUTION
Indicates a hazardous situation which, if not avoided, could result in minor ormoderate injury.
NOTICE
Addresses practices that are not related to personal injury.
Note
Presents information that is important, but not hazard-related.
Typographical conventionsThese type style conventions are used in this document.
Table 4 Typographical conventions
Bold Used for names of interface elements, such as names of windows,dialog boxes, buttons, fields, tab names, key names, and menu paths(what the user specifically selects or clicks)
Italic Used for full titles of publications that are referenced in text
Monospace Used for:
l System code
l System output, such as an error message or script
l Pathnames, filenames, prompts, and syntax
l Commands and options
Monospace italic Used for variables
Monospace bold Used for user input
[ ] Square brackets enclose optional values
Installation
PREFACE 49

Table 4 Typographical conventions (continued)
| Vertical bar indicates alternate selections - the bar means “or”
{ } Braces enclose content that the user must specify, such as x or y orz
... Ellipses indicate nonessential information that is omitted from theexample
Where to get helpThe Avamar support page provides access to licensing information, productdocumentation, advisories, and downloads, as well as how-to and troubleshootinginformation. This information may resolve a product issue before contacting CustomerSupport.
To access the Avamar support page:
1. Go to https://support.EMC.com/products.
2. Type a product name in the Find a Product by Name box.
3. Select the product from the list that appears.
4. Click the arrow next to the Find a Product by Name box.
5. (Optional) Add the product to the My Products list by clicking Add to My SavedProducts in the upper right corner of the Support by Product page.
DocumentationThe Avamar product documentation provides a comprehensive set of featureoverview, operational task, and technical reference information. To supplement theinformation in product administration and user guides, review the followingdocuments:
l Release notes provide an overview of new features and known limitations for arelease.
l Technical notes provide technical details about specific product features, includingstep-by-step tasks, where necessary.
l White papers provide an in-depth technical perspective of a product or productsas applied to critical business issues or requirements.
KnowledgebaseThe Knowledgebase contains applicable solutions that you can search for either bysolution number (for example, esgxxxxxx) or by keyword.
To search the Knowledgebase:
1. Click Search at the top of the page.
2. Type either the solution number or keywords in the search box.
3. (Optional) Limit the search to specific products by typing a product name in theScope by product box and then selecting the product from the list that appears.
4. Select Knowledgebase from the Scope by resource list.
5. (Optional) Specify advanced options by clicking Advanced options and specifyingvalues in the available fields.
6. Click Search.
Installation
50 Avamar for SQL Server 18.1 User Guide
Online communitiesGo to Community Network at http://community.EMC.com for peer contacts,conversations, and content on product support and solutions. Interactively engageonline with customers, partners, and certified professionals for all products.
Live chatTo engage Customer Support by using live interactive chat, click Join Live Chat onthe Service Center panel of the Avamar support page.
Service RequestsFor in-depth help from Customer Support, submit a service request by clicking CreateService Requests on the Service Center panel of the Avamar support page.
Note
To open a service request, you must have a valid support agreement. Contact a salesrepresentative for details about obtaining a valid support agreement or with questionsabout an account.
To review an open service request, click the Service Center link on the ServiceCenter panel, and then click View and manage service requests.
Enhancing supportIt is recommended to enable ConnectEMC and Email Home on all Avamar systems:
l ConnectEMC automatically generates service requests for high priority events.
l Email Home sends configuration, capacity, and general system information toCustomer Support.
Comments and suggestionsComments and suggestions help to continue to improve the accuracy, organization,and overall quality of the user publications. Send comments and suggestions aboutthis document to [email protected].
Please include the following information:
l Product name and version
l Document name, part number, and revision (for example, 01)
l Page numbers
l Other details to help address documentation issues
Backup optionsBackup options for the avsql command enable you to control backup behavior. Manyof these options are the same as the plug-in options that you specify in AvamarAdministrator when you perform an on-demand backup or create a dataset forscheduled backups.
The following avsql options are available for the backup operation.
Table 5 Backup options for the avsql command
Option Description
--clusternode=HOSTNAME(IP) Statically defines the node's IP address in a multi-NICenvironment when backups are failing due to a
Installation
Backup options 51
Table 5 Backup options for the avsql command (continued)
Option Description
resolution error. HOSTNAME is the node's hostnameand IP is the node's network address.
Note
Include the parentheses around the IP address.
--consistency-check={true| extendedlogicalchecks |physicalonly}
Instructs the SQL plugin to perform a consistencycheck of the database before performing a backup.
l true enables consistency checks using the default
behavior.
l extendedlogicalchecks performs an extended
logical consistency check, which includes checkson indexed view, as well as XML and spatialindexes.
l physicalonly performs a physical-only
consistency check (column-integrity checks arenot performed).
--copy-only={true | false} true forces the backup to be a copy-only full backup.
--ddr-encrypt-strength={high | medium |none}
Specifies the encryption method for data transferbetween the client and the Data Domain system whenyou store the backup on a Data Domain system. Thedefault value is high. This option is an avtar option.
--ddr={true | false} Specifies whether to store the backup on a DataDomain system instead of the Avamar server. To storethe backup on a Data Domain system, specify true.
This option is an avtar option.
--ddr-index=n Specifies the index number (1, 2, 3, and so forth) of theData Domain system on which to store the backup. Theindex number is assigned to the Data Domain systemwhen it is added to the Avamar server configuration.This option is an avtar option.
--encrypt=value Specifies the encryption method for data transferbetween the client and the Avamar server during thebackup. One of the following values:
l proprietaryl tcpl ssll sslverifyl tlsl tls-saUse this option with the --encrypt-strengthoption. The Avamar Product Security Guide providesdetails on how to correctly specify the --encrypt and
Installation
52 Avamar for SQL Server 18.1 User Guide

Table 5 Backup options for the avsql command (continued)
Option Description
--encrypt-strength option values together to
ensure proper encryption settings.
This option is an avtar option.
--encrypt-strength=high Specifies the encryption strength for data transferbetween the client and the Avamar server during thebackup. The only allowed value is high.
Use this option with the --encrypt option. The
Avamar Product Security Guide provides details on howto correctly specify the --encrypt and --encrypt-strength option values together to ensure proper
encryption settings.
--expires={days | timestamp} Specifies backup expiration as a number of days fromtoday (days) or an absolute timestamp. This option isan avtar option.
--label=name Assigns this descriptive label to the backup.
--retention-type=type--retentiontype=type
Assigns advanced retention to the backup. One of thefollowing values:
l none — Do not explicitly assign any retention type
to this backup. That is, treat the backup as anormal on-demand backup.
l daily — Explicitly designate this backup as a daily
backup.
l weekly — Explicitly designate this backup as a
weekly backup.
l monthly — Explicitly designate this backup as a
monthly backup.
l yearly — Explicitly designate this backup as a
yearly backup.
This option is an avtar option.
--after-date=date To improve the performance of incremental backups,this option specifies the date at which a week-by-weeksearch for a full backup stops and the history of allbackups is retrieved. Specify the date in mm/dd/yyyyformat.
--backup-preference={primary |prefer_secondary |secondary_only |SQL_server_defined}
Controls the replica on which the backup occurs in anAlwaysOn environment. One of the following values:
l primary — Specifies that the backup should
occur on the primary replica.
l prefer_secondary — Specifies that the backup
should occur on a secondary replica except whenthe primary replica is the only available replica. Thisis the default value.
Installation
Backup options 53

Table 5 Backup options for the avsql command (continued)
Option Description
l secondary_only — Specifies that the backup
should occur on the secondary replica. If nosecondary replica is available, then the backup doesnot occur.
l SQL_server_defined — Specifies that the
backup should use the backup preference specifiedin SQL Server settings.
You can increase performance of the primary replicawhen you perform backups on a secondary replica.However, the secondary replica must meet therequirements in AlwaysOn availability grouprequirements on page 41.
In a hybrid IT environment with Microsoft Azure andAlwaysOn availability groups, ensure that the backupoccurs on an on-premise replica. Avamar cannot backup databases on a replica on a Microsoft Azure virtualmachine.
--brtype={full |differential |incremental}
Specifies the type of backup to perform:
l full — Backs up the entire database, including all
objects, system tables, and data.
l differential — Backs up any data that has
changed since the last complete backup.
l incremental — Backs up only the transaction
logs.
The default value is full.
NOTICE
Microsoft SQL Server does not allow differential ortransaction log (incremental) backups of the masterdatabase. You can only create full backups of themaster database. If you try to perform a differential ortransaction log backup of the master database, a fullbackup is created instead.
--exclude=data Specifies an instance or database to exclude from thebackup.
When specifying the local instance, use (local). For
example:
l --exclude=(local)l --exclude=(local)/DB1
--forcefull Performs a full backup in the following scenarios:
Installation
54 Avamar for SQL Server 18.1 User Guide

Table 5 Backup options for the avsql command (continued)
Option Description
l If you try to perform a differential or transactionlog (incremental) backup and a full backup does notexist on the server.
l If you try to perform a differential or transactionlog backup after you restore a database.
l If you try to perform a differential or transactionlog backup after you restore the msdb database.
l If log gaps are detected.
Effectively, this option automates taking a full backupwhen necessary.
Note
If you perform transaction log and differential backups,we strongly recommend that you leave the defaultsetting of enabled for the --forcefull option for all
backups. Otherwise, you might not be able to restoredata if no existing full backup is present on the Avamarserver.
--forceincremental= {true| false}
If a full backup exists and another full backup occurs,this option creates a transaction log (incremental)backup that contains transactions which occur from theend of the first full backup or the most recenttransaction log backup, whichever is later. This actionproceeds until the time that the forced transaction logbackup occurs (after the first backup of the newbackup cycle). This step ensures that a point-in-timerecovery to a point in time between the two fullbackups can occur, if required.
Three backup sessions occur when a forced transactionlog backup occurs:
l The first session contains transactions that occurfrom the end of the first full backup until the starttime of the forced transaction log backup.
l The second session contains transactions thatoccur from the end of the second full backup untilthe time that the forced transaction log backupoccurs.
l The third session contains only the full backup.
To restore and recover the database to a point after theforced transaction log backup, select the last backupfrom the last backup session that has the most recentfull backup, during the restore process.
Installation
Backup options 55
Table 5 Backup options for the avsql command (continued)
Option Description
NOTICE
You cannot perform a transaction log backup ondatabases that use the simple recovery model becausethose databases do not support transaction logbackups. This includes system databases such as themaster and msdb databases. As a result, set --forceincremental=false when you back up a
database that uses the simple recovery model.
--include=data Specifies an instance or database to include in thebackup that otherwise would have been excluded basedon the --exclude option.
When specifying the local instance, use (local). For
example:
l --include=(local)l --include=(local)/DB1
--max-streams=n Specifies the maximum number of streams to use forbackup and restore. The default is 1, and the maximumvalue is 10. Multi-streaming options on page 105provides details.
--min-snapup-size=MB Specifies the minimum size of each data stream in MB.The default value is 200.
--prefix=value Specifies a prefix for the log filename.
--skip-log-gap-detection For transaction log backups, controls whether theAvamar Plug-in for SQL Server checks the full andtransaction log backups that are already saved for adatabase to verify that there are no "log gaps." This loggap detection ensures that there is a valid chain of SQLServer transaction logs so that point-in-time restorecan occur. If a log gap is detected, the backup ispromoted to a full backup. Promotion to full is indicatedin the Activity Window of the Avamar Administrator
with the status Completed with Promotion. Whenonly some of the databases in the backup are promoted
to full, the status still indicates as Completed withPromotion.
Log gap detection may require as many as 20 to 30seconds to complete for each database. Transaction logbackups may take an excessive amount of time tocomplete in environments with a significant number ofdatabases. If the performance issues outweigh the riskof possible log gaps, then you can disable log gapdetection by specifying this option to improveperformance.
Installation
56 Avamar for SQL Server 18.1 User Guide

Table 5 Backup options for the avsql command (continued)
Option Description
--skip_or_prom_sdm={skip_with_error |skip_with_warning |promote_to_full}
Specifies what Avamar does when you try to performincremental (transaction log) backups of databasesthat use the simple recovery model, which does notsupport transaction log backups:
l skip_with_error — If you select databases
with different recovery models for the backup, thenthe backup does not include the databases with thesimple recovery model. The backup completes withexceptions, and an error message is written to thelog. If you select only databases with the simplerecovery model for the backup, then the backupfails.
l skip_with_warning — If you select databases
with different recovery models for the backup, thenthe backup does not include databases with thesimple recovery model. The backup completessuccessfully, and a warning is written to the log foreach database that uses the simple recovery model.If you select only databases with the simplerecovery model for the backup, then the backupfails.
l promote_to_full — A full backup occurs
automatically instead of a transaction log backupfor databases that use the simple recovery model.Promotion to full is indicated in the ActivityWindow of the Avamar Administrator with the
status Completed with Promotion. When onlysome of the databases in the backup are promotedto full, the status will still be indicated as
Completed with Promotion.
The default value is skip_with_error.
--truncatelog_ts= {default| enable | disable}
Specifies database transaction log truncation behavior.One of the following values:
l default — The backup process truncates the
database transaction log if the backup type is set toincremental (transaction log). No log truncationoccurs if the backup type is full or differential.
l enable — The backup process truncates the
database transaction log regardless of the backuptype. This setting breaks the chain of log backupsand should not be used unless the backup type isset to full.This value is not supported for SQL Server 2008 R2and later environments.
Installation
Backup options 57

Table 5 Backup options for the avsql command (continued)
Option Description
l disable — The backup process does not truncate
the database transaction log under anycircumstances.
SQL plug-in backup optionsBackup plug-in options enable you to control backup functionality that is specific tothe Avamar Plug-in for SQL Server. You can specify plug-in options for on-demandand scheduled backups.
The following table lists options that are available for the Avamar Plug-in for SQLServer when you perform an on-demand backup or when you configure a dataset forscheduled backups.
An asterisk (*) indicates an advanced option, which only appears when you selectShow Advanced Options on the Backup Command Line Options dialog box.
Table 6 Backup plug-in options
Setting Description
Backup label Assigns this descriptive label to the backup.
Backup type Sets the backup level. One of the following values:
l Full — Backs up the entire database, including allobjects, system tables, and data.
l Differential — Backs up any data that changed after thelast complete backup.
l Incremental — Backs up only the transaction logs.
NOTICE
Microsoft SQL Server does not allow differential ortransaction log (incremental) backups of the masterdatabase. You can only create full backups of the masterdatabase. If you try to perform a differential or transactionlog backup of the master database, a full backup occursinstead.
Copy-only Backup Instructs the SQL plug-in to perform a copy-only full backup.
Availability group replica forbackup
Controls the replica on which the backup occurs in anAlwaysOn environment. One of the following values:
l Primary — Specifies that the backup should occur onthe primary replica.
l Prefer secondary — Specifies that the backup shouldoccur on a secondary replica except when the primaryreplica is the only available replica. This is the defaultvalue.
Installation
58 Avamar for SQL Server 18.1 User Guide

Table 6 Backup plug-in options (continued)
Setting Description
l Secondary only — Specifies that the backup shouldoccur on the secondary replica. If no secondary replica isavailable, then the backup does not occur.
l SQL Server defined — Specifies that the backup shoulduse the backup preference specified in SQL Serversettings.
You can increase performance of the primary replica whenyou perform backups on a secondary replica. However, thesecondary replica must meet the AlwaysON availability grouprequirements.
In a hybrid IT environment with Microsoft Azure andAlwaysOn availability groups, ensure that the backup occurson an on-premise replica. Avamar cannot back up databaseson a replica on a Microsoft Azure virtual machine.
Enhanced data deduplication Controls the type of compression for data in a backup bysetting the --compress option in avtar. Enhanced data
deduplication typically reduces the amount of client data thatthe backup process must send to the server, but requiresadditional client CPU resources. Select one of the followingvalues:
l Default — The avtar process evaluates some of the
data in the backup to determine whether the datasupports compression. If the evaluated data supportscompression, then avtar compresses all data in the
backup. If the evaluated data does not supportcompression, then avtar does not compress any data.
l Disabled — The avtar process does not compress data
during the backup.
l Enabled — Forces avtar to compress data during the
backup, even if the data does not support compression.Select this value only when you are certain that data inthe backup supports compression. Otherwise, avtarunnecessarily uses additional client CPU resources to tryto perform compression on data that does not supportcompression.
Force incremental backupafter full backup
If a full backup exists and then another full backup occurs,this option creates a transaction log (incremental) backup.The transaction log backup contains transactions from theend of the first full backup or the most recent transaction logbackup, whichever is later, until the time that the forcedtransaction log backup occurs (after the first backup of thenew backup cycle).
This ensures that a point-in-time recovery to a point in timebetween the two full backups can occur, if required.
Installation
SQL plug-in backup options 59
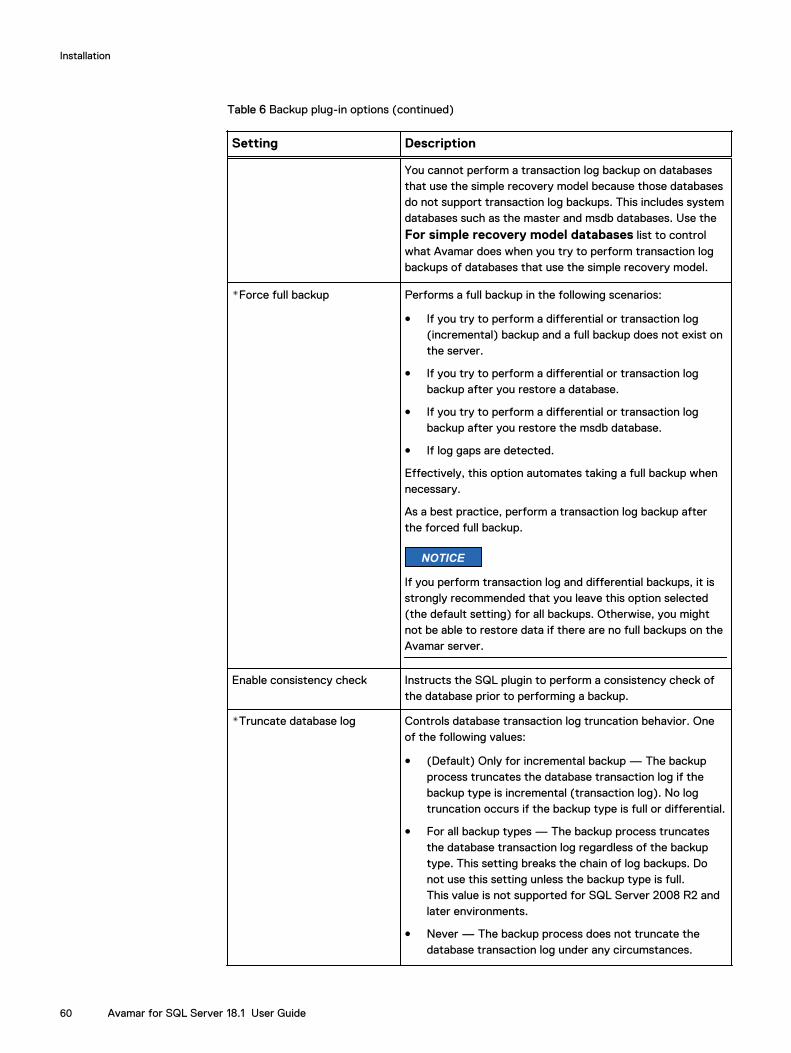
Table 6 Backup plug-in options (continued)
Setting Description
You cannot perform a transaction log backup on databasesthat use the simple recovery model because those databasesdo not support transaction log backups. This includes systemdatabases such as the master and msdb databases. Use the
For simple recovery model databases list to controlwhat Avamar does when you try to perform transaction logbackups of databases that use the simple recovery model.
*Force full backup Performs a full backup in the following scenarios:
l If you try to perform a differential or transaction log(incremental) backup and a full backup does not exist onthe server.
l If you try to perform a differential or transaction logbackup after you restore a database.
l If you try to perform a differential or transaction logbackup after you restore the msdb database.
l If log gaps are detected.
Effectively, this option automates taking a full backup whennecessary.
As a best practice, perform a transaction log backup afterthe forced full backup.
NOTICE
If you perform transaction log and differential backups, it isstrongly recommended that you leave this option selected(the default setting) for all backups. Otherwise, you mightnot be able to restore data if there are no full backups on theAvamar server.
Enable consistency check Instructs the SQL plugin to perform a consistency check ofthe database prior to performing a backup.
*Truncate database log Controls database transaction log truncation behavior. Oneof the following values:
l (Default) Only for incremental backup — The backupprocess truncates the database transaction log if thebackup type is incremental (transaction log). No logtruncation occurs if the backup type is full or differential.
l For all backup types — The backup process truncatesthe database transaction log regardless of the backuptype. This setting breaks the chain of log backups. Donot use this setting unless the backup type is full.This value is not supported for SQL Server 2008 R2 andlater environments.
l Never — The backup process does not truncate thedatabase transaction log under any circumstances.
Installation
60 Avamar for SQL Server 18.1 User Guide

Table 6 Backup plug-in options (continued)
Setting Description
*For simple recovery modeldatabases
Specifies what Avamar does when you try to performincremental (transaction log) backups of databases that usethe simple recovery model, which does not supporttransaction log backups:
l Skip incremental with error — If you select databaseswith different recovery models for the backup, then thebackup does not include the databases with the simplerecovery model. The backup completes with exceptions,and an error message is written to the log. If you selectonly databases with the simple recovery model for thebackup, then the backup fails.
l Skip incremental with warning — If you select databaseswith different recovery models for the backup, then thebackup does not include databases with the simplerecovery model. The backup completes successfully, anda warning is written to the log for each database thatuses the simple recovery model. If you select onlydatabases with the simple recovery model for thebackup, then the backup fails.
l Promote incremental to full — A full backup occursautomatically instead of a transaction log backup fordatabases that use the simple recovery model.Promotion to full is indicated in the Activity Window of
the Avamar Administrator with the status Completedwith Promotion. When only some of the databases inthe backup are promoted to full, the status still indicates
as Completed with Promotion.
*Enable debugging messages Specifies to write maximum information to log files fordebugging purposes. The backup process generates large logfiles.
*Skip log gap detection For transaction log backups, controls whether the AvamarPlug-in for SQL Server checks the full transaction logbackups that are already saved for a database to verify thatthere are no "log gaps." This log gap detection ensures thatthere is a valid chain of SQL Server transaction logs so thatpoint-in-time restore can occur. If a log gap is detected, thebackup is promoted to a full backup. Promotion to full isindicated in the Activity Window of the Avamar Administrator
with the status Completed with Promotion. When onlysome of the databases in the backup are promoted to full,
the status still indicates as Completed with Promotion.
Log gap detection may require as many as 20 to 30 secondsto complete for each database. Transaction log backups maytake an excessive amount of time to complete inenvironments with a significant number of databases. If theperformance issues outweigh the risk of possible log gaps,then you can disable log gap detection by selecting thisoption to improve performance.
Installation
SQL plug-in backup options 61
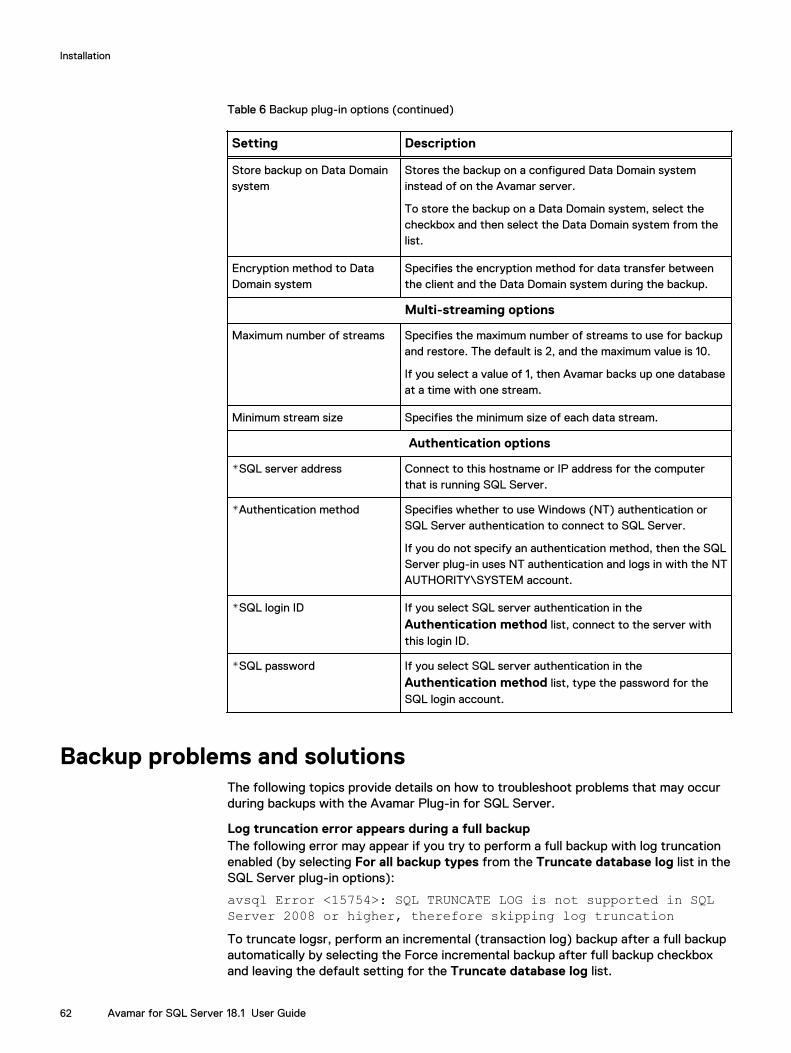
Table 6 Backup plug-in options (continued)
Setting Description
Store backup on Data Domainsystem
Stores the backup on a configured Data Domain systeminstead of on the Avamar server.
To store the backup on a Data Domain system, select thecheckbox and then select the Data Domain system from thelist.
Encryption method to DataDomain system
Specifies the encryption method for data transfer betweenthe client and the Data Domain system during the backup.
Multi-streaming options
Maximum number of streams Specifies the maximum number of streams to use for backupand restore. The default is 2, and the maximum value is 10.
If you select a value of 1, then Avamar backs up one databaseat a time with one stream.
Minimum stream size Specifies the minimum size of each data stream.
Authentication options
*SQL server address Connect to this hostname or IP address for the computerthat is running SQL Server.
*Authentication method Specifies whether to use Windows (NT) authentication orSQL Server authentication to connect to SQL Server.
If you do not specify an authentication method, then the SQLServer plug-in uses NT authentication and logs in with the NTAUTHORITY\SYSTEM account.
*SQL login ID If you select SQL server authentication in the
Authentication method list, connect to the server withthis login ID.
*SQL password If you select SQL server authentication in the
Authentication method list, type the password for theSQL login account.
Backup problems and solutionsThe following topics provide details on how to troubleshoot problems that may occurduring backups with the Avamar Plug-in for SQL Server.
Log truncation error appears during a full backupThe following error may appear if you try to perform a full backup with log truncationenabled (by selecting For all backup types from the Truncate database log list in theSQL Server plug-in options):
avsql Error <15754>: SQL TRUNCATE LOG is not supported in SQLServer 2008 or higher, therefore skipping log truncationTo truncate logsr, perform an incremental (transaction log) backup after a full backupautomatically by selecting the Force incremental backup after full backup checkboxand leaving the default setting for the Truncate database log list.
Installation
62 Avamar for SQL Server 18.1 User Guide

When the backup process successfully truncates the log file, LOG_BACKUP appears inthe header of the database.
Error appears for a forced incremental backup after a restoreThe following error appears in the Avamar client log file if you perform a full backupwith a forced incremental backup after you restore a database:
avsql Error <15762>: Skipping incremental backup after full fordbname database. Error: Last restore was performed after thelast full backup.The full backup completes successfully, but Avamar does not perform the incrementalbackup.
A forced incremental backup contains transactions that occur from the end of the firstfull backup or the most recent transaction log backup, whichever is later. This actionproceeds until the forced incremental backup occurs (after the first backup of thenew backup cycle). This step ensures that a point-in-time recovery to a point in timebetween the two full backups can occur, if required.
If a restore occurs between the two full backups, then the log chain breaks. Avamarcannot create a transaction log backup (forced incremental backup) for thetransactions between the backups.
Avamar session security requires prior registration of all clientsAvamar session security requires that all clients be registered with the server. For SQLAlways On cluster and SQL virtual cluster, all nodes must be registered with theserver.
SQL Auto Close feature not supportedIf the SQL Auto Close feature is being used, databases may not be backed up and noerror message will be displayed. Event ID 17137, with the message
Starting up database database_name
will be generated repeatedly in the Event Monitor of the Avamar Administrator. Thisindicates that SQL Auto Close setting is enabled for these databases, which closes thedatabase when the last connection closes. The solution to this problem is to disablethe SQL Auto Close feature on the SQL server.
SQL cluster backups fail with no errors in AlwaysOn environmentIn case of SQL backup with big databases, consistency check might take more timefor which backup from secondary nodes may fail with timeout. To resolve this issue,we should use the following flags in avagent.cmd file.
--remote-connection-alive-timeout=<timeout>
avagent.cmd file with above flag should be added to var folder as well as Clusterclient's var directory on the primary node and all the secondary nodes. TheCluster client's var folder for AlwaysOn group is created while configuringwccw.
We should also add the following flag in avsql.cmd file in var folder as well asCluster client's var directory on all the nodes:
--secondary-replica-timeout=<timeout>
Installation
Backup problems and solutions 63

Restore only on primary replicaThe Restore only on primary replica checkbox controls whether databases restore toonly the primary replica or to the primary replica and all secondary replicas in anAlwaysOn availability group.
When you clear the checkbox, the restore process automatically restores thedatabases to the original location on both the primary replica and the secondaryreplicas. Clear the checkbox only when you restore to the original location in theoriginal availability group and you want to restore to all replicas.
When you select the checkbox and restore the databases on only the primary replica,the corresponding database on the secondary replicas is in a restoring state. Torestore the databases on the secondary replicas as part of the availability group, youcan manually prepare and restore the databases, and then join them to the availabilitygroup on the secondary replica.
You can also set the database on a secondary replica online without rejoining it to theavailability group by restoring the database with the RECOVERY recovery operation.The SQL Server documentation available on the Microsoft website provides details.
Select the checkbox in the following restore scenarios:
l You are restoring to a different location in the original availability group.
l You are restoring to a different availability group.
l You are restoring to an on-premise primary replica in a hybrid IT environment withMicrosoft Azure.
You can also select the checkbox if you want to restore to only the primary replica inthe original availability group.
Add an advanced group policyProcedure
1. To start the Avamar Web User Interface, open a web browser and type thefollowing URL:
https://Avamar_server/auiwhere Avamar_server is the DNS name or IP address of the Avamar server.
Note
If your environment does not meet HTTPS certificate validation requirements,the certificate validation fails and an error message appears asking if you wantto continue to download packages. Ignoring certificate validation might causesecurity issues.
a. In the Avamar Username field, type a username with administrativeprivileges.
b. In the Avamar Password field, type the password for the administrativeuser.
c. Select Avamar as the Auth Type.
d. Click Log In.
Installation
64 Avamar for SQL Server 18.1 User Guide

2. In the navigation pane on the left, click , and then click Policy > AdvancedPolicy .
The Advanced Policy window appears.
3. In the domain tree, select a domain or subdomain for the client.
4. To add an advanced policy, click .
The Advanced Policy Builder page appears.
5. Name the solution.
6. To enable the solution, clear Disable this solution.
7. Click NEXT.
Configure the SQL server group policyA group policy contains all the information necessary to perform backups of groups ofinstances.
Group policy objects contain three child objects:
l Schedule—A policy that controls the frequency and the start and end time eachday for backups of clients in a group. A schedule is a persistent and reusableAvamar policy that can be named and attached to multiple groups.
l Retention—A policy that defines how long the backup is stored in the backupappliance.
l Dataset—A policy that defines a set of files, directories, and file systems for eachsupported platform that are included or excluded in backups across a group ofclients. A dataset is a persistent and reusable Avamar policy that can be namedand attached to multiple groups.
From the Type page, perform the following steps.
Procedure
1. In the Advanced Policy Type field, select SQL Server .
2. To add a backup group, click , and then select a backup group type from thelist.
3. In the Schedule column, select a schedule for each backup group.
To ensure that backups occur on an ongoing basis, scheduled backups runautomatically. You can schedule backups to run daily, weekly, or monthly.
Alternatively, you can add a schedule by selecting Create in the drop-down list.The Create Schedule wizard appears and opens to the Basic Configurationpage. For detailed instructions, see Add a schedule.
4. In the Dataset column, select a dataset for each backup group.
A dataset specifies the data to include in a scheduled backup and the options touse for the backup. Create at least one dataset for scheduled backups on aclient or group of clients. Create multiple datasets to segregate client data.
Alternatively, you can add a dataset by selecting Create in the drop-down list.The Create DataSet wizard appears. For detailed instructions, see Add adataset.
Installation
Configure the SQL server group policy 65
5. In the Retention column, select a retention policy for each backup group.
Retention is the time setting to automatically delete backups on an Avamarserver. Retention can be set to permanent for backups that should not bedeleted from an Avamar server.
Alternatively, you can add a retention policy by selecting Create in the drop-down list. The Add Retention Policy wizard appears. For detailed instructions,see Add a retention policy.
6. Click NEXT.
Installing the Avamar Plug-in for SQL ServerThe SQL Server plug-in enables you to back up and restore SQL Server data.
A setup wizard leads you through the steps to install the plug-in. If UAC is enabled onthe client computer, then you must start the setup wizard by using administratorprivileges. Otherwise, the software does not install correctly. This procedure providesone method to bypass UAC. The Microsoft documentation provides other methodsand additional information.
The plug-in automatically installs in the same folder as the Avamar Client for Windows.
Procedure
1. Log in to the computer that is running SQL Server as an administrator.
2. Go to the temporary folder that contains the Avamar installation files that youdownloaded.
3. Start the setup wizard:
l If UAC is disabled, double-click the installation file to open it.
l If UAC is enabled, open a command prompt as an administrator, changedirectory to the location of the installation package, and then type one ofthe following commands:
msiexec /i AvamarSQL-windows-x86_64-version.exewhere version is the Avamar plug-in version.
The installation wizard opens at the welcome page.
4. (Optional) To enable support for table lever recovery (TLR) select TLR usingItemPoint for SQL. Click Next.
This step installs both the Avamar Plug-in for SQL TLR and the ItemPointsoftware.
Note
Installing the Avamar Plug-in for SQL TLR will also automatically installItemPoint for Microsoft SQL Server. TLR using Itempoint for SQL is selected bydefault in Avamar 18.1. You can unselect the option if you do not wish to installTLR using Itempoint for SQL.
The Ready to Install Avamar Backup Plug-in for SQL Server page appears.
5. Click Install.
Installation
66 Avamar for SQL Server 18.1 User Guide
Note
The SQL Server plug-in automatically installs to the same folder as the AvamarClient for Windows.
6. When the installation completes, click Finish.
Perform an on-demand SQL backup by using AUIYou can perform a client backup that is independent of existing schedules and policies.
Procedure
1. In the navigation pane, click Backup/Restore.
The Backup/Restore page appears.
2. Click the Backup tab.
3. In the domain tree, select the domain for the client.
4. From the list of clients, select the client computer to back up.
In the Plugin pane, a list of plug-ins on the client appears.
5. Browse to and select the checkbox next to the data that you want to back up.
6. Click BACKUP NOW.
The Basic Configuration window appears.
7. Select the backup retention setting:
l To automatically delete this backup from the Avamar server after a specificamount of time, select Retention period. Specify the number of days,weeks, months, or years for the retention period.
l To automatically delete this backup from the Avamar server on a specificcalendar date, select End date and browse to that date on the calendar.
l To keep this backup for as long as this client remains active in the Avamarserver, select No end date.
8. From the Avamar encryption method list, select the encryption method to usefor data transfer between the client and the Avamar server during the backup.
The encryption technology and bit strength for a client/server connectiondepends on several factors, including the client operating system and Avamarserver version. The Avamar Product Security Guide provides additionalinformation.
9. Click NEXT.
The More Options window appears.
10. Set the plug-in options. SQL plug-in backup options provides more informationabout the basic backup options.
11. (Optional) Toggle the Show Advanced Options switch to view advancedconfiguration options.
SQL plug-in backup options provides more information about the advancedbackup options.
12. Click FINISH.
Installation
Perform an on-demand SQL backup by using AUI 67

Performing an on-demand backup by using the AvamarAdministrator
An on-demand backup is a one-time backup of one or more SQL Server instances ordatabases. You may want to perform an on-demand backup for the first backup of theclient immediately after you install the Avamar client software. You should alsoperform an on-demand backup before system maintenance, software installations, orsoftware upgrades.
Procedure
1. In Avamar Administrator, click the Backup & Restore launcher link button.
The Backup, Restore and Manage window appears.
2. In the domain tree, select the domain for the client.
3. From the list of clients, select the computer that is running SQL Server. Keepthe following points in mind when you select a client:
l To back up databases in an AlwaysOn availability group, select the clusterclient for the availability group listener.
l To back up databases on shared storage in a failover cluster, select thecluster client for the virtual server.
l You can only view clients in the domain for the login account. To view allclients, log in to the root domain.
4. Click the Backup tab.
A list of plug-ins on the client appears in the left pane of the Backup tab.
5. Select the data to back up.
Table 7 Steps to backup data
Data to select for backup Selection steps
All data on the client a. On the Backup tab of the Backup,Restore and Manage window, select
Browse for Files, Folders, orDirectories.
b. Select the checkbox next to the
Windows SQL plug-in node.
Specific instances or databases on the client To browse to the instances or databases:
a. On the Backup tab of the Backup,Restore and Manage window, select
Browse for Files, Folders, orDirectories.
b. Expand the Windows SQL plug-in node.
c. Under the Windows SQL plug-in node,select the SQL Server instance thatcontains the databases to back up.
Installation
68 Avamar for SQL Server 18.1 User Guide
Table 7 Steps to backup data (continued)
Data to select for backup Selection steps
A list of the databases for that instance
appears in the right pane of the Selectfor Backup tab.
d. To back up all databases in the instance,select the checkbox next to the instance.Or, to back up individual databases, selectthe checkbox next to the databases in the
right pane of the Select for Backuptab.
To type the name of a specific instance ordatabase:
a. On the Backup tab of the Backup,Restore and Manage window, select
Enter one File, Folder, or Directory.
b. From the Backup Plug-in list, select
Windows SQL.
c. In the box next to the Backup Plug-inlist, type the instance or database.
To back up the local instance, type(local).
To back up a database in the localinstance, type (local)/database/.
To back up a named instance, typeclient\instance/.
To back up a database in a namedinstance, type client\instance/database/.
To back up a database if there is only oneinstance on the client and it is not thelocal instance, type client/database/.
In the previous paths, client is the name ofthe computer that is running SQL Server,instance is the name of the namedinstance, and database is the name of thedatabase.
6. Select Actions > Back Up Now.
The On Demand Backup Options dialog box appears.
7. Select the backup retention setting:
l To automatically delete this backup from the Avamar server after a specificamount of time, select Retention period. Specify the number of days,weeks, months, or years for the retention period.
l To automatically delete this backup from the Avamar server on a specificcalendar date, select End date and browse to that date on the calendar.
Installation
Performing an on-demand backup by using the Avamar Administrator 69
l To keep this backup for as long as this client remains active in the Avamarserver, select No end date.
8. From the Avamar encryption method list, select the encryption method to usefor data transfer between the client and the Avamar server during the backup.
The encryption technology and bit strength for a client/server connectiondepends on several factors, including the client operating system and Avamarserver version. The Avamar Product Security Guide provides additionalinformation.
9. Click More Options.
The Backup Command Line Options dialog box appears.
10. Select the Show Advanced Options checkbox to view advanced options, whichappear in red.
11. Set the plug-in options. Setting backup options on page 96 provides details oneach of the options.
12. Click OK on the Backup Command Line Options dialog box.
13. Click OK on the On Demand Backup Options dialog box.
The On Demand Backup Request dialog box indicates that the backup started.
14. Click Close.
PrerequisitesReview the following prerequisites before setting up an advanced policy forapplication-consistent SQL virtual machine protection.
l Both administrator users and local users with the administrator role can performadvanced application-consistent SQL virtual machine backups. However, due tothe introduction of User Account Control (UAC) in Microsoft Windows 7 and laterversions, a local user with the administrator role must additionally turn off AdminApproval Mode in the UAC settings for the admin group on the guest operatingsystem. Otherwise, the Advanced Policy Builder fails to install/upgrade/registerclient agents on SQL virtual machines.
l If the vCenter inventory name of the Virtual Machine (VM) is same as the guestcomputer name, change the mcserver.xml setting to <entrykey="allow_duplicate_client_names" value="true" />. If you do notchange the setting, the registration might fail during Avamar client registrationwith MCS.
Restore a SQL Server backup client by using AUIAny successful client backup can be used to restore a copy of that backup. You canfind a backup to restore by date.
Procedure
1. In the navigation pane, click Backup/Restore.
The Backup/Restore page appears.
2. Click the Restore tab.
3. In the domain tree, select the domain for the client.
4. From the list of clients, select the client computer to recover.
Installation
70 Avamar for SQL Server 18.1 User Guide

A list of completed backups for this client appears. Any backup in this list can beused to restore the client.
5. (Optional) To locate backups by date:
a. Click .
b. Specify the date range in the From and To fields.
c. Click Retrieve.
The list of backups for the date range appears.
6. In the Actions column, click Restore
The Contents of Backup pane appears.
The AUI displays a list of volumes that are contained within the backup. Thevolume names identify the original mount point.
7. Select the folder or file that you want to restore, and then click RESTORE.
After you select a folder from the tree, the Contents of Backup pane displays alist of files that are contained within that folder.
The Restore wizard appears and opens to the Destination Client page.
8. In the Destination Client field, select either Restore to original client orRestore to different client.
If restoring to a different client, complete the following substeps:
a. Select a domain from the tree.
b. Select a client from the Client pane.
The AUI displays proxies.
c. Ensure that you select only backup clients.
The client name appears in the Destination Client field.
9. Click NEXT.
The Destination Location page appears.
10. In the Destination Location section, select one of the following options:
l Restore to the original location
l Restore to a different SQL Server instance or location
l Restore SQL Server backup as files to the file system
If restoring to a different SQL server instance or location, complete thefollowing substeps:
a. To select the instance location, click CHOOSE.
The Choose instance location window appears.
b. Select a location from the Choose instance location window.
c. Click OK.
d. To select the alternate database location, click CHOOSE.
The Choose restore location window appears.
Installation
Restore a SQL Server backup client by using AUI 71

e. Click OK.
The chosen location appears in the Instance location and Alternate databaselocation fields.
If restoring the SQL server backup as files to the file system, complete thefollowing substeps:
a. To select the restore items save location, click CHOOSE.
b. The Choose restore location window appears.
c. Select a location from the Choose restore location window.
d. Click OK.
The chosen location appears in the restore items save location field.
11. Click NEXT.
The More Options page appears.
SQL plug-in restore options provides more information about the basic restoreoptions.
12. (Optional) Toggle the Show Advanced Options switch to view advancedconfiguration options. SQL plug-in restore options provides more informationabout the advanced restore options.
13. Click NEXT.
The Summary page appears.
14. Review the provided information, and then click FINISH.
Results
The AUI the restore operation. Check the Activity page view the progress.
Installing the Avamar client softwareTo install the Avamar client software, install the Avamar Client for Windows and theplug-in on the client computer. Then register the client with the Avamar server. In acluster environment, perform these steps on each node, and then configure thecluster client.
Installation road mapsThe steps to install the Avamar software on a client computer depend on whether theenvironment is a stand-alone server or a cluster.
Stand-alone installation road mapTo install the Avamar client software on a stand-alone server, install the Windowsclient and the plug-in on the server, and then register the client with the Avamarserver.
Procedure
1. Install the Avamar Client for Windows on the computer that is running SQLServer.
2. Install the Avamar Plug-in for SQL Server on the computer that is running SQLServer.
Installation
72 Avamar for SQL Server 18.1 User Guide

3. Register the computer that is running SQL Server as a client with the Avamarserver.
Cluster installation road mapTo install the Avamar client software in a cluster, install the Windows client and theplug-in on each node, register each node, and then configure the Avamar clusterclient.
Procedure
1. Install the Avamar Client for Windows in the same folder on each node in thecluster.
2. Install the Avamar Plug-in for SQL Server in the same folder on each node in thecluster.
3. Register each node in the cluster with the Avamar server.
4. Use the Cluster Configuration Tool to configure the Avamar cluster client.
In a failover cluster, run the tool on the active node in the cluster. In anAlwaysOn availability group environment, run the tool on the node that ishosting the primary replica.
Installing the Avamar Client for WindowsThe Avamar Client for Windows includes the Avamar agent and the Avamar Plug-in forWindows File System. The Avamar agent is required for backups and restores withapplication plug-ins. You can use the Windows File System plug-in to back upoperating system and application binary files, which are required for disaster recovery.
A setup wizard leads you through the steps to install the Windows client. If the UserAccount Control (UAC) feature is enabled on the client computer, then you must startthe setup wizard by using administrator privileges. Otherwise, the software does notinstall correctly. This procedure provides one method to bypass UAC. The Microsoftdocumentation provides other methods and additional information.
Procedure
1. Log in to the computer that is running SQL Server as an administrator.
2. Go to the temporary folder that contains the Avamar installation files that youdownloaded.
3. Start the setup wizard:
l If UAC is disabled, double-click the installation file to open it.
l If UAC is enabled, open a command prompt as an administrator, changedirectory to the location of the installation package, and then type one ofthe following command:
msiexec /i AvamarClient-windows-x86_64-version.msiwhere version is the Avamar client version.
The welcome page appears.
4. Click Next.
The End-User License Agreement page appears.
5. Review the license agreement.
6. Select the checkbox to accept the terms in the license agreement, and clickNext.
The Custom Setup page appears.
Installation
Installing the Avamar Client for Windows 73

7. Ensure that Avamar Client User Interface is selected for installation.
8. (Optional) To specify a folder for the Avamar client installation, click Browseand select a location.
9. Click Next on the Custom Setup page.
The Ready to Install Avamar for Windows page appears.
10. Click Install.
11. When the installation completes, click Finish.
12. In a cluster environment, repeat these steps to install the Windows client oneach node.
Installing the Avamar Plug-in for SQL ServerThe SQL Server plug-in enables you to back up and restore SQL Server data.
A setup wizard leads you through the steps to install the plug-in. If UAC is enabled onthe client computer, then you must start the setup wizard by using administratorprivileges. Otherwise, the software does not install correctly. This procedure providesone method to bypass UAC. The Microsoft documentation provides other methodsand additional information.
The plug-in automatically installs in the same folder as the Avamar Client for Windows.
Procedure
1. Log in to the computer that is running SQL Server as an administrator.
2. Go to the temporary folder that contains the Avamar installation files that youdownloaded.
3. Start the setup wizard:
l If UAC is disabled, double-click the installation file to open it.
l If UAC is enabled, open a command prompt as an administrator, changedirectory to the location of the installation package, and then type one ofthe following commands:
msiexec /i AvamarSQL-windows-x86_64-version.exewhere version is the Avamar plug-in version.
The installation wizard opens at the welcome page.
4. (Optional) To enable support for table lever recovery (TLR) select TLR usingItemPoint for SQL. Click Next.
This step installs both the Avamar Plug-in for SQL TLR and the ItemPointsoftware.
Note
Installing the Avamar Plug-in for SQL TLR will also automatically installItemPoint for Microsoft SQL Server. TLR using Itempoint for SQL is selected bydefault in Avamar 18.1. You can unselect the option if you do not wish to installTLR using Itempoint for SQL.
The Ready to Install Avamar Backup Plug-in for SQL Server page appears.
5. Click Install.
Installation
74 Avamar for SQL Server 18.1 User Guide
Note
The SQL Server plug-in automatically installs to the same folder as the AvamarClient for Windows.
6. When the installation completes, click Finish.
Silent installation of Itempoint for SQLProcedure
1. Open Command Prompt and run the commands in the next step.
2. You can select Itempoint to be installed or not installed depending on theparameter that is passed to the Avamar SQL application during silentinstallation.
l To install Itempoint for SQL, run the following command:
AvamarSQL-windows-x86_64-18.0.100-xx.exe /q
l To install Itempoint for SQL, run the following command:
AvamarSQL-windows-x86_64-18.0.100-xx.exe /q /ComponentArgs "EMCItemPoint":"noipinstall"
Registering the clientBefore you can back up or restore data on a server, you must register the server as aclient with the Avamar server. Specify the name of the Avamar server, the Avamardomain for the client, and the port on the Avamar server for client/servercommunication. Avamar domains enable you to group clients and limit backup, restore,and monitoring privileges for the group to certain accounts.
In a cluster environment, register all nodes in the cluster as Avamar clients.
Procedure
1. Log in to the server.
2. Right-click the Avamar client system tray icon, and select Manage > ActivateClient.
The Activate Client Setup dialog box appears.
3. In the Administrator Server Address box, type the DNS name for the Avamarserver.
4. In the Administrator Server Port box, specify the port on the Avamar serverfor client/server communication.
5. In the Client Domain box, type the name of the Avamar domain for the client.
The default domain is clients. Do not use a slash (/) as the first characterwhen you type a subdomain. If you use a slash, an error occurs and you cannotregister the client.
6. Click Activate.
A confirmation message appears.
7. Click OK.
Installation
Silent installation of Itempoint for SQL 75
Configuring the cluster client in a failover clusterThe Avamar cluster client in a failover cluster enables you to back up and restore SQLServer data on shared storage in the cluster, regardless of which node is managing thedata at the time of the backup or restore. The Avamar Cluster Configuration Toolprovides the steps to configure the Avamar cluster client for the SQL Server plug-in ina failover cluster.
Procedure
1. Log in to the active node in the cluster as a domain administrator. The accountmust also be a member of the local Administrators group on each cluster node.
2. Start the Cluster Configuration Tool by opening the Start screen and selectCluster Configuration Tool.
The welcome page appears.
3. Click Next.
The Plug-Ins page appears.
4. Select SQL and click Next.
The Cluster Nodes page appears with a list of nodes and their status.
5. Ensure that the environment meets the following requirements:
l The status for each SQL Server node is Up.
l The installation status of the Windows client software for each node isInstalled.
l The installation status of the SQL Server plug-in on each node is Installed.
6. Click Next.
The Operations page appears.
7. Select Configure a new cluster client for all nodes, and then click Next.
The Prerequisites page appears. A check mark next to a prerequisite indicatesthat the environment meets the prerequisite.
8. Ensure that the environment meets all prerequisites on the Prerequisites page.
If the environment does not meet a prerequisite, then exit the wizard, resolvethe issue, and restart the wizard.
9. Select the IP version that the environment uses, and then click Next.
The SQL Settings page appears.
10. Select the cluster role for the cluster client from the Cluster role for clusterclient list.
11. Specify whether to automatically bring the cluster client online and activate itwith the Avamar server by selecting or clearing the Bring the cluster clientonline and activate it with the Avamar server checkbox.
12. Click Next.
The Server Settings page appears.
13. Specify the settings for the Avamar server:
a. Type either the DNS name of the Avamar server in the Name box or the IPaddress in the IPv4/IPv6 address box.
Installation
76 Avamar for SQL Server 18.1 User Guide
b. Type the name of the Avamar domain in the Avamar client domain for thecluster client box.
To specify a domain at the root level, type /domain, where domain is thedomain name. To specify a subdomain, type /domain/subdomain, wheredomain is the domain name and subdomain is the subdomain name.
c. Type the data port for Avamar client/server communication in the Portnumber box.
Note
Port 28001 is the default port that the Avamar client uses to communicatewith the Avamar server.
14. Click Next.
The Client Settings page appears.
15. Type the name of the shared network folder or volume in the Cluster client’svar directory box, or click Browse to select a folder.
The var directory should reside on the cluster disk, and is used to store thecluster client configuration and log files. All nodes in the cluster must have writeaccess to directory.
NOTICE
Select a volume that the cluster owns instead of a remote pathname on thenetwork.
16. Type the name of the client's SYSDIR directory, in the Cluster client’s SYSDIRdirectory box, or click Browse to select a local folder or a shared networkfolder or volume.
The SYSDIR directory must have > 2 GB of available space, and can be either alocal folder or a folder on a shared network drive or volume.
17. Review the configuration settings, and then click Configure.
The Progress page provides the status of the configuration. When theconfiguration is complete, the Results page appears.
18. Click Close.
Configuring the cluster client for an AlwaysOn availability groupThe Avamar cluster client for an AlwaysOn availability group enables you to back upand restore SQL Server databases in an availability group. The Avamar ClusterConfiguration Tool walks you through the steps to configure the Avamar cluster clientfor the SQL Server plug-in in an AlwaysOn availability group.
Procedure
1. Log in to the node that is hosting the primary replica as a domain administrator.The account must also be a member of the local Administrators group on eachcluster node.
2. Start the Cluster Configuration Tool by opening the Start screen and selectCluster Configuration Tool.
The welcome page appears.
Installation
Configuring the cluster client for an AlwaysOn availability group 77
3. Click Next.
The Plug-Ins page appears.
4. Select SQL AlwaysOn and click Next.
The Cluster Nodes page appears with a list of nodes and their status.
5. Ensure that the environment meets the following requirements:
l The status for each SQL Server node is Up.
l The installation status of the Windows client software for each node isInstalled.
l The installation status of the SQL Server plug-in on each node is Installed.
6. Click Next.
The Operations page appears.
7. Select Configure a new cluster client for all nodes, and then click Next.
The Prerequisites page appears. A check mark next to a prerequisite indicatesthat the environment meets the prerequisite.
8. Ensure that the environment meets all prerequisites on the Prerequisites page.
If the environment does not meet a prerequisite, then exit the wizard, resolvethe issue, and restart the wizard.
9. Select the IP version that the environment uses, and then click Next.
The SQL AlwaysOn Settings page appears.
10. Select the cluster role for the cluster client from the Cluster role for clusterclient list.
The name of the cluster client appears in the Cluster client name box.
Note
You must configure an availability group listener for each availability group. Donot configure a cluster client for an availability group that does not have alistener.
11. Specify whether to automatically bring the cluster client online and activate itwith the Avamar server by selecting or clearing the Bring the cluster clientonline and activate it with the Avamar server checkbox.
12. Click Next.
The Server Settings page appears.
13. Specify the settings for the Avamar server:
a. Type either the DNS name of the Avamar server in the Name box or the IPaddress in the IPv4/IPv6 address box.
b. Type the name of the Avamar domain in the Avamar client domain for thecluster client box.
To specify a domain at the root level, type /domain, where domain is thedomain name. To specify a subdomain, type /domain/subdomain, wheredomain is the domain name and subdomain is the subdomain name.
c. Type the data port for Avamar client/server communication in the Portnumber box.
Installation
78 Avamar for SQL Server 18.1 User Guide

Note
Port 28001 is the default port that the Avamar client uses to communicatewith the Avamar server.
14. Click Next.
The Client Settings page appears.
15. Type the name of the shared network folder or volume in the Cluster client’svar directory box, or click Browse to select a folder.
The var directory should reside on the cluster disk, and is used to store thecluster client configuration and log files. All nodes in the cluster must have writeaccess to directory.
NOTICE
Select a volume that the cluster owns instead of a remote pathname on thenetwork.
16. Type the name of the client's SYSDIR directory, in the Cluster client’s SYSDIRdirectory box, or click Browse to select a local folder or a shared networkfolder or volume.
The SYSDIR directory must have > 2 GB of available space, and can be either alocal folder or a folder on a shared network drive or volume.
17. Type the name of the local/shared network folder or volume in the Clusterclient’s var directory box, or click Browse to select a location.
The cluster client's var directory stores the cluster client configuration and logfiles. All nodes in the cluster must have write access to the shared networkfolder or volume. Requirements for the var directory on page 42 provides moreinformation about the var directory requirements.
NOTICE
Select a volume that the cluster owns instead of a remote pathname on thenetwork.
18. Click Next.
The Summary page appears.
19. Review the configuration settings, and then click Configure.
The Progress page provides the status of the configuration. When theconfiguration is complete, the Results page appears.
20. Click Close.
Configuring the cluster client for an AlwaysOn availability group on AmazonWeb Services and Azure
You can configure the Avamar cluster client for SQL Server in an AlwaysOn availabilitygroup, which resides on Amazon Web Services or Microsoft Azure. The Avamarcluster client for an AlwaysOn availability group enables you to back up and restoreSQL Server databases in an availability group. The Avamar Cluster Configuration Tool
Installation
Configuring the cluster client for an AlwaysOn availability group on Amazon Web Services and Azure 79

walks you through the steps to configure the Avamar cluster client for the SQL Serverplug-in in an AlwaysOn availability group.
Procedure
1. Log in to the node that is hosting the primary replica as a domain administrator.The account must also be a member of the local Administrators group on eachcluster node.
2. Start the Cluster Configuration Tool by opening the Start screen and selectCluster Configuration Tool.
The welcome page appears.
3. Click Next.
The Plug-Ins page appears.
4. Select SQL AlwaysOn and click Next.
The Cluster Nodes page appears with a list of nodes and their status.
5. Ensure that the environment meets the following requirements:
l The status for each SQL Server node is Up.
l The installation status of the Windows client software for each node isInstalled.
l The installation status of the SQL Server plug-in on each node is Installed.
6. Click Next.
The Operations page appears.
7. Select Configure a new cluster client for all nodes, and then click Next.
The Prerequisites page appears. A check mark next to a prerequisite indicatesthat the environment meets the prerequisite.
8. Ensure that the environment meets all prerequisites on the Prerequisites page.
If the environment does not meet a prerequisite, then exit the wizard, resolvethe issue, and restart the wizard.
9. Select the IP version that the environment uses, and then click Next.
The SQL AlwaysOn Settings page appears.
10. Select the cluster role for the cluster client from the Cluster role for clusterclient list.
The name of the cluster client appears in the Cluster client name box.
Note
You must configure an availability group listener for each availability group. Donot configure a cluster client for an availability group that does not have alistener.
11. Clear theBring the cluster client online and activate it with the Avamarserver checkbox.
12. Click Next.
The Server Settings page appears.
13. Specify the settings for the Avamar server:
a. Type either the DNS name of the Avamar server in the Name box or the IPaddress in the IPv4/IPv6 address box.
Installation
80 Avamar for SQL Server 18.1 User Guide

b. Type the name of the Avamar domain in the Avamar client domain for thecluster client box.
To specify a domain at the root level, type /domain, where domain is thedomain name. To specify a subdomain, type /domain/subdomain, wheredomain is the domain name and subdomain is the subdomain name.
c. Type the data port for Avamar client/server communication in the Portnumber box.
Note
Port 28001 is the default port that the Avamar client uses to communicatewith the Avamar server.
14. Click Next.
The Client Settings page appears.
15. Type the name of the shared network folder or volume in the Cluster client’svar directory box, or click Browse to select a folder.
The var directory should reside on the cluster disk, and is used to store thecluster client configuration and log files. All nodes in the cluster must have writeaccess to directory.
NOTICE
Select a volume that the cluster owns instead of a remote pathname on thenetwork.
16. Type the name of the client's SYSDIR directory, in the Cluster client’s SYSDIRdirectory box, or click Browse to select a local folder or a shared networkfolder or volume.
The SYSDIR directory must have > 2 GB of available space, and can be either alocal folder or a folder on a shared network drive or volume.
17. Type the name of the local/shared network folder or volume in the Clusterclient’s var directory box, or click Browse to select a location.
The cluster client's var directory stores the cluster client configuration and logfiles. All nodes in the cluster must have write access to the shared networkfolder or volume. Requirements for the var directory on page 42 provides moreinformation about the var directory requirements.
NOTICE
Select a volume that the cluster owns instead of a remote pathname on thenetwork.
18. Click Next.
The Summary page appears.
19. Review the configuration settings, and then click Configure.
The Progress page provides the status of the configuration. When theconfiguration is complete, the Results page appears.
20. Click Close.
Installation
Configuring the cluster client for an AlwaysOn availability group on Amazon Web Services and Azure 81

21. On the primary node, launch Microsoft Failover Cluster Manager.
22. Select the Cluster instance > Roles > AAG group under Configuration.
23. Under Resources, select EMC Avamar Backup Agent resource for XXX.
24. Right click Properties and select Startup parameters.
25. Remove the flag --netbind=.
26. Edit the flag --sysdir=”C:\Program Files\avs\aag\etc” (or theexisting local folder).
27. Click Save and Close.
28. On all the SQL nodes, create the SYSDIR folder, if it does not already exists.
29. On each SQL AlwaysOn availability group node, create the avagent.cmd file inthe var (C:\Program Files\avs\AAG\var) folder with the --netbind=<localhostIP> option .
30. On the primary SQL node, bring the resource EMC Avamar Backup Agentresource for XXX online.
31. On all the SQL secondary nodes, copy the cid.bin file from the primary varfolder (C:\Program Files\avs\AAG\var) to all the secondary nodes varfolder.
Upgrading the Avamar client softwareUpgrading steps depend on whether the installation is on a stand-alone server or in acluster.
Upgrading on a stand-alone serverProcedure
1. Uninstall the current version of the Avamar client and plug-in:
a. Uninstall the ItemPoint software, if it has been installed.
b. Uninstall the earlier version of the Avamar Plug-in for SQL Server.
c. Uninstall the earlier version of the Avamar Client for Windows.
The plug-in guide for the earlier version provides instructions for each ofthese steps.
2. Install the new version of the Avamar Client for Windows.
3. Install the new version of the Avamar Plug-in for SQL Server.
4. Perform a full backup of all SQL Server data with the Force IncrementalAfter Full option unchecked, to ensure that you have a current full backupwith the new version.
Restore of data from a backup with an earlier release may fail, especially whenyou restore from a differential or incremental backup. The Avamar Compatibilityand Interoperability Matrix on Avamar Support provides details on supportedversions and any version compatibility issues.
Installation
82 Avamar for SQL Server 18.1 User Guide

Upgrading in a clusterWhen you upgrade Avamar client and plug-in software in a cluster, you must uninstallthe current Avamar clients and plug-ins from each node, and then install the newversion.
Before you begin
l Ensure that the environment meets all system requirements for the new version.
l Ensure that no backups are in progress or scheduled to take place during theupgrade. Otherwise, Avamar client software files may be locked during theupgrade and you may need to restart the computer after the upgrade.
Procedure
1. Uninstall the current version of the Avamar client and plug-in:
a. Use the earlier version of the Cluster Configuration Tool to uninstall theAvamar cluster client.
b. Uninstall the ItemPoint software, if it has been installed.
c. Uninstall the earlier version of the Avamar Plug-in for SQL Server.
d. Uninstall the earlier version of the Avamar Client for Windows.
The plug-in guide for the earlier version provides instructions for each ofthese steps.
The plug-in guide for the earlier version provides instructions for each of thesesteps.
2. Install the new version of the Avamar client and plug-in:
a. Install the Avamar Client for Windows in the same folder on each node in thecluster.
b. Install the Avamar Plug-in for SQL Server in the same folder on each node inthe cluster.
c. Register each node in the cluster with the Avamar server.
d. Configure the Avamar Cluster Client.
3. Perform a full backup of all SQL Server data with the Force IncrementalAfter Full option unchecked, to ensure that you have a current full backupwith the new version.
Restore of data from a backup with an earlier release may fail, especially whenyou restore from a differential or incremental backup. The Avamar Compatibilityand Interoperability Matrix on Avamar Support provides details on supportedversions and any version compatibility issues.
Uninstalling the Avamar client softwareWhen you uninstall Avamar plug-in and client software from a client computer,scheduled backups no longer occur for the client. You cannot restore backups to theclient after you uninstall the software.
When you uninstall the Avamar client software, you can keep or delete the backups forthe client:
Installation
Upgrading in a cluster 83
l To keep the backups for the client so that you can restore the backups to adifferent client, retire the client by using Avamar Administrator.
l To delete the backups for the client, delete the client by using AvamarAdministrator.
Retire or delete the client either before or after you uninstall the plug-in. The AvamarAdministration Guide provides more information.
Uninstall road mapTo uninstall Avamar client and plug-in software from a stand-alone server, uninstallthe plug-in and Windows client by using standard Windows uninstall features. In acluster, first uninstall the Avamar cluster client. Then uninstall the plug-in andWindows client on each node.
Procedure
1. (Cluster only) Uninstall the Avamar cluster client.
2. Uninstall the Avamar Plug-in for SQL Server by using Programs and Features.
3. Uninstall the Avamar Client for Windows by using Programs and Features.
4. (Cluster only) Repeat step 2 and step 3 on each node.
Uninstalling the cluster client in a failover clusterTo uninstall the Avamar cluster client in a failover cluster, run the ClusterConfiguration Tool on an active node in the cluster, and select the removal option.
Procedure
1. Log in to the active node in the cluster as a domain administrator. The accountmust be a member of the local Administrators group on each cluster node.
2. Start the Cluster Configuration Tool:
l On Windows Server 2012, open the Start screen and select ClusterConfiguration Tool.
l On Windows Server 2008, open the Start menu and select Program Files >Avamar > Cluster Configuration Tool.
The welcome page appears.
3. Click Next.
The Plug-ins page appears.
4. Select SQL and click Next.
The Cluster Nodes page appears with a list of nodes and their status.
5. Ensure that the status of each SQL Server node is Up, and then click Next.
The Operations page appears.
6. Select Remove the cluster client from all nodes, and then click Next.
The Prerequisites page appears. A check mark next to a prerequisite indicatesthat the environment meets the prerequisite.
7. Ensure that the environment meets all prerequisites on the page, and clickNext.
The Uninstall SQL page appears.
8. Select the cluster role, service, or group that contains the cluster client fromthe Cluster role/service/group for cluster client list, and then click Next.
Installation
84 Avamar for SQL Server 18.1 User Guide

9. Select the cluster client from the Cluster client name list.
10. Select the shared volume for the cluster client from the Shared volume for thecluster client list.
11. Click Next.
The Summary page appears.
12. Review the summary information, and then click Uninstall.
The Progress page provides the status of the uninstall. When the uninstall iscomplete, the Results page appears.
13. Click Close.
Uninstalling the cluster client for an AlwaysOn availability groupTo uninstall the Avamar cluster client from an AlwaysOn availability group, run theCluster Configuration Tool on the primary replica, and select the removal option.
Procedure
1. Log in to the cluster node with the primary replica as a domain administrator.The account must also be a member of the local Administrators group on eachcluster node.
2. Start the Cluster Configuration Tool:
l On Windows Server 2012, open the Start screen and select ClusterConfiguration Tool.
l On Windows Server 2008, open the Start menu and select Program Files >Avamar > Cluster Configuration Tool.
The welcome page appears.
3. Click Next.
The Plug-ins page appears.
4. Select SQL AlwaysOn and click Next.
The Cluster Nodes page appears with a list of nodes and their status.
5. Ensure that the status of each SQL Server node is Up, and click Next.
The Operations page appears.
6. Select Remove the cluster client from all nodes, and then click Next.
The Prerequisites page appears. A check mark next to a prerequisite indicatesthat the environment meets the prerequisite.
7. Ensure that the environment meets all prerequisites on the page, and clickNext.
The Uninstall Settings page appears.
8. Select the cluster role or service that contains the cluster client from theCluster role/service for cluster client list, and then click Next.
The Summary page appears.
9. Review the summary information, and then click Uninstall.
The Progress page provides the status of the uninstall. When the uninstall iscomplete, the Results page appears.
10. Click Close.
Installation
Uninstalling the cluster client for an AlwaysOn availability group 85

Installation
86 Avamar for SQL Server 18.1 User Guide

CHAPTER 3
Backup
This chapter includes the following topics:
l Perform an on-demand SQL backup by using AUI .............................................88l Performing an on-demand backup by using the Avamar Administrator.............. 88l Scheduling backups............................................................................................ 91l Setting backup options...................................................................................... 96l Monitoring backups........................................................................................... 111l Verifying backups.............................................................................................. 112l Canceling backups.............................................................................................113
Backup 87

Perform an on-demand SQL backup by using AUIYou can perform a client backup that is independent of existing schedules and policies.
Procedure
1. In the navigation pane, click Backup/Restore.
The Backup/Restore page appears.
2. Click the Backup tab.
3. In the domain tree, select the domain for the client.
4. From the list of clients, select the client computer to back up.
In the Plugin pane, a list of plug-ins on the client appears.
5. Browse to and select the checkbox next to the data that you want to back up.
6. Click BACKUP NOW.
The Basic Configuration window appears.
7. Select the backup retention setting:
l To automatically delete this backup from the Avamar server after a specificamount of time, select Retention period. Specify the number of days,weeks, months, or years for the retention period.
l To automatically delete this backup from the Avamar server on a specificcalendar date, select End date and browse to that date on the calendar.
l To keep this backup for as long as this client remains active in the Avamarserver, select No end date.
8. From the Avamar encryption method list, select the encryption method to usefor data transfer between the client and the Avamar server during the backup.
The encryption technology and bit strength for a client/server connectiondepends on several factors, including the client operating system and Avamarserver version. The Avamar Product Security Guide provides additionalinformation.
9. Click NEXT.
The More Options window appears.
10. Set the plug-in options. SQL plug-in backup options provides more informationabout the basic backup options.
11. (Optional) Toggle the Show Advanced Options switch to view advancedconfiguration options.
SQL plug-in backup options provides more information about the advancedbackup options.
12. Click FINISH.
Performing an on-demand backup by using the AvamarAdministrator
An on-demand backup is a one-time backup of one or more SQL Server instances ordatabases. You may want to perform an on-demand backup for the first backup of the
Backup
88 Avamar for SQL Server 18.1 User Guide

client immediately after you install the Avamar client software. You should alsoperform an on-demand backup before system maintenance, software installations, orsoftware upgrades.
Procedure
1. In Avamar Administrator, click the Backup & Restore launcher link button.
The Backup, Restore and Manage window appears.
2. In the domain tree, select the domain for the client.
3. From the list of clients, select the computer that is running SQL Server. Keepthe following points in mind when you select a client:
l To back up databases in an AlwaysOn availability group, select the clusterclient for the availability group listener.
l To back up databases on shared storage in a failover cluster, select thecluster client for the virtual server.
l You can only view clients in the domain for the login account. To view allclients, log in to the root domain.
4. Click the Backup tab.
A list of plug-ins on the client appears in the left pane of the Backup tab.
5. Select the data to back up.
Table 8 Steps to backup data
Data to select for backup Selection steps
All data on the client a. On the Backup tab of the Backup,Restore and Manage window, select
Browse for Files, Folders, orDirectories.
b. Select the checkbox next to the
Windows SQL plug-in node.
Specific instances or databases on the client To browse to the instances or databases:
a. On the Backup tab of the Backup,Restore and Manage window, select
Browse for Files, Folders, orDirectories.
b. Expand the Windows SQL plug-in node.
c. Under the Windows SQL plug-in node,select the SQL Server instance thatcontains the databases to back up.A list of the databases for that instance
appears in the right pane of the Selectfor Backup tab.
d. To back up all databases in the instance,select the checkbox next to the instance.Or, to back up individual databases, selectthe checkbox next to the databases in the
Backup
Performing an on-demand backup by using the Avamar Administrator 89

Table 8 Steps to backup data (continued)
Data to select for backup Selection steps
right pane of the Select for Backuptab.
To type the name of a specific instance ordatabase:
a. On the Backup tab of the Backup,Restore and Manage window, select
Enter one File, Folder, or Directory.
b. From the Backup Plug-in list, select
Windows SQL.
c. In the box next to the Backup Plug-inlist, type the instance or database.
To back up the local instance, type(local).
To back up a database in the localinstance, type (local)/database/.
To back up a named instance, typeclient\instance/.
To back up a database in a namedinstance, type client\instance/database/.
To back up a database if there is only oneinstance on the client and it is not thelocal instance, type client/database/.
In the previous paths, client is the name ofthe computer that is running SQL Server,instance is the name of the namedinstance, and database is the name of thedatabase.
6. Select Actions > Back Up Now.
The On Demand Backup Options dialog box appears.
7. Select the backup retention setting:
l To automatically delete this backup from the Avamar server after a specificamount of time, select Retention period. Specify the number of days,weeks, months, or years for the retention period.
l To automatically delete this backup from the Avamar server on a specificcalendar date, select End date and browse to that date on the calendar.
l To keep this backup for as long as this client remains active in the Avamarserver, select No end date.
8. From the Avamar encryption method list, select the encryption method to usefor data transfer between the client and the Avamar server during the backup.
The encryption technology and bit strength for a client/server connectiondepends on several factors, including the client operating system and Avamar
Backup
90 Avamar for SQL Server 18.1 User Guide
server version. The Avamar Product Security Guide provides additionalinformation.
9. Click More Options.
The Backup Command Line Options dialog box appears.
10. Select the Show Advanced Options checkbox to view advanced options, whichappear in red.
11. Set the plug-in options. Setting backup options on page 96 provides details oneach of the options.
12. Click OK on the Backup Command Line Options dialog box.
13. Click OK on the On Demand Backup Options dialog box.
The On Demand Backup Request dialog box indicates that the backup started.
14. Click Close.
Scheduling backupsScheduled backups run automatically to ensure that backups occur on an ongoingbasis. You can schedule backups to run daily, weekly, or monthly.
Procedure
1. Create a dataset for the backups.
2. Create a group for the backups.
During the group creation process:
a. Assign the new dataset to the new group.
b. Assign a schedule to the new group.
c. Assign a retention policy to the new group.
d. Add one or more clients to the new group.
The Avamar Administration Guide provides more information about groups, grouppolicy, datasets, schedules, and retention policies.
3. Enable scheduling for the group.
Creating a datasetA dataset specifies the data to include in a scheduled backup and the options to usefor the backup. Create at least one dataset for scheduled backups on a client or groupof clients. Create multiple datasets to segregate client data.
Procedure
1. In Avamar Administrator, select Tools > Manage Datasets.
The Manage All Datasets window appears.
2. Click New.
The New Dataset dialog box appears.
3. In the Name box, type a name for the dataset.
The name can include alphanumeric characters (A-Z, a-z, 0-9) and the followingspecial characters: period (.), hyphen (-), and underscore (_). Do not useUnicode characters or the following special characters: ` ~ ! @ # $ % ^ & * ( )= + [ ] { } | \ / ; : ' " < > , ?
Backup
Scheduling backups 91

4. On the Source Data tab, select the data to include in the dataset.
Table 9 How to select the data in a dataset
Data to include in the dataset How to select the data
Data from all plug-ins on a client Select Select All Data for All Local FileSystems.
All SQL Server data on a client a. Select Enter Explicitly.
b. Select Windows SQL from the SelectPlug-In Type list.
c. Select the SQL option.
Specific instances or databases on a client a. Select Enter Explicitly.
b. Select Windows SQL from the SelectPlug-In Type list.
c. Select the Select Files and/or Foldersoption.
d. Click ... (Browse for files and/orfolders).
The Select Files And/Or Foldersdialog box appears.
e. Select the client from the Clients tree inthe left pane.
If the dataset is for backups of databasesin an AlwaysOn availability group, thenselect the cluster client for the availabilitygroup listener.
If the dataset is for backups of databaseson shared storage in a failover cluster,then select the cluster client for thevirtual server.
f. In the middle pane of the Select FilesAnd/Or Folders dialog box, expand the
Windows SQL plug-in node.
g. Under the Windows SQL plug-in node,select the SQL Server instance thatcontains the databases to include.
A list of the databases for that instance
appears in the right pane of the SelectFiles And/Or Folders dialog box.
h. To include all databases in an instance,select the checkbox next to the instancein the middle pane. Or, to includeindividual databases, select the checkboxnext to the databases in the right pane.
i. Click OK.
Backup
92 Avamar for SQL Server 18.1 User Guide

5. (Optional) Click the Exclusions tab and define databases or instances toexclude from the dataset. Specifying data to exclude from a dataset on page93 provides instructions.
6. (Optional) Click the Inclusions tab and define databases or instances to includein the dataset that otherwise would be excluded based on the selections on theExclusions tab. Specifying excluded data to include on page 94 providesinstructions.
7. Click the Options tab and set plug-in options:
a. Select the Windows SQL plug-in from the Select Plug-In Type list.
The SQL Server plug-in options appear on the Options tab.
b. Select the Show Advanced Options checkbox to view advanced options,which appear in red.
c. Set the plug-in options. Setting backup options on page 96 providesdetails on each option.
8. Click OK.
Specifying data to exclude from a datasetYou can narrow the scope of the data in a backup set by defining a list of instances ordatabases to exclude from the backup.
Procedure
1. From the Select Plug-In Type list on the Exclusions tab of the New Datasetdialog box, select Windows SQL.
2. Click ... to browse to the instances or databases to exclude.
The Select Files And/Or Folders dialog box appears.
3. Select the client from the Clients tree in the left pane.
4. In the middle pane of the Select Files And/Or Folders dialog box, expand theWindows SQL plug-in node.
5. Under the Windows SQL plug-in node, select the SQL Server instance thatcontains the databases to exclude.
A list of the databases for that instance appears in the right pane of the SelectFiles And/Or Folders dialog box.
6. Select the data to exclude from the dataset:
l To exclude all databases in the instance, select the checkbox next to theinstance in the middle pane.
l To exclude individual databases, select the checkbox next to the databasesin the right pane.
You can also use wildcards (for example, an asterisk) to specify the data toexclude.
7. Click OK.
The selected instances or databases appear on the Exclusions tab.
Backup
Creating a dataset 93

Specifying excluded data to includeWhen you exclude an instance from a dataset, you can identify one or more databasesin the instance to include in the backup. These databases otherwise would have beenexcluded based on the exclusion of the instance.
Procedure
1. From the Select Plug-In Type list on the Inclusions tab of the New Datasetdialog box, select Windows SQL.
2. Click ... to browse to the instances or databases to include.
The Select Files And/Or Folders dialog box appears.
3. Select the client from the Clients tree in the left pane.
4. In the middle pane of the Select Files And/Or Folders dialog box, expand theWindows SQL plug-in node.
5. Under the Windows SQL plug-in node, select the SQL Server instance thatcontains the databases to include.
A list of the databases for that instance appears in the right pane of the SelectFiles And/Or Folders dialog box.
6. Select the data to include in the dataset that otherwise would be excludedbased on the selections on the Exclusions tab:
l To include all databases in the instance, select the checkbox next to theinstance in the middle pane.
l To include individual databases, select the checkbox next to the databases inthe right pane.
You can also use wildcards (for example, an asterisk) to specify the data toinclude.
7. Click OK.
The selected instances or databases appear on the Inclusions tab.
Creating a groupWhen you create a group, define the dataset, schedule, and retention policy, whichtogether comprise the group policy for scheduled backups of all members of thegroup. A group must contain at least one Avamar client. If the group contains two ormore clients, then the clients must belong to the same Avamar domain. You canoverride group policy settings at the client level.
Before you begin
You cannot edit schedules or retention policies when you use the New Group wizardto create a group. Review existing schedules and retention policies. If required, createschedules and retention policies before you create the group. The AvamarAdministration Guide provides information about schedules and retention policies.
Procedure
1. In Avamar Administrator, click the Policy launcher link button.
The Policy window appears.
2. Click the Policy Management tab.
3. Click the Groups tab.
Backup
94 Avamar for SQL Server 18.1 User Guide

4. Select the domain for the group.
The Policy window displays a table that contains groups for the domain.
5. Select Actions > Group > New > Backup Group.
The New Group wizard appears.
6. Type a name for the new group in the Name box.
The name can include alphanumeric characters (A-Z, a-z, 0–9) and thefollowing special characters: period (.), hyphen (-), and underscore (_). Do notuse Unicode characters or the following special characters: ` ~ ! @ # $ % ^ & *( ) = + [ ] { } | \ / ; : ' " < > , ?
7. To use this group for scheduled client backups, clear the Disabled checkbox.
Selecting the checkbox disables backups for the group.
8. From the Avamar encryption method list, select an encryption method to usefor data transfer between the Avamar server and the client during the backup.
The encryption technology and bit strength for a client/server connectiondepends on several factors, including the client operating system and Avamarserver version. The Avamar Product Security Guide provides additionalinformation.
9. (Optional) Select Override Schedule to override the assigned schedule for thisgroup:
l To skip the next scheduled backup, select Skip Next Backup.
l To perform the next scheduled backup one time only, select Run NextBackup Once.
10. Click Next.
The next New Group wizard page appears with dataset information.
11. From the Select An Existing Dataset list, select the dataset that you created,and then click Next.
The next New Group wizard page appears with schedule information.
12. Select a schedule from the Select An Existing Schedule list, and click Next.
The next New Group wizard page appears with retention policy information.
13. Select a retention policy from the Select an Existing Retention Policy list, andclick Next.
The next New Group wizard page appears. A list of domains appears in the leftpane.
14. Select the domain for the client.
A list of Avamar clients appears in the right pane.
15. Highlight the clients to include in the group and click Include.
16. (Optional) To remove a client from the group, select the client and clickExclude.
17. Click Finish.
Enabling scheduled backupsScheduled backups occur only for enabled groups. Groups are disabled by defaultunless you select the Enabled checkbox on the first page of the New Group wizard. If
Backup
Enabling scheduled backups 95

you did not enable the group when you created it, use the menu options in the Policywindow to enable backups.
Procedure
1. In Avamar Administrator, click the Policy launcher link.
The Policy window appears.
2. Click the Policy Management tab.
3. Click the Groups tab.
4. Select the group that you created.
5. Enable the group by selecting Actions > Group > Disable Group.
Perform this action only if a check mark appears next to the Disable Groupmenu option.
6. To enable this group, click Yes.
Setting backup optionsYou set plug-in options for an on-demand backup using the Backup Command LineOptions dialog box. For a scheduled backup, you set plug-in options on the Optionstab of the New Dataset dialog box.
To view all plug-in options, including advanced options, select the Show AdvancedOptions checkbox. The advanced options appear in red.
Backup
96 Avamar for SQL Server 18.1 User Guide

Figure 9 New Dataset dialog box
Backup
Setting backup options 97

Backup label optionThe Backup label option enables you to assign a descriptive label to the backup. Thislabel appears in Avamar Administrator for the backup when you browse for backups tomanage or restore.
Backup type optionsThe Backup type, Copy-only backup, Force incremental backup after full backup,and Force full backup options enable you to control the type of backup that occurs.
Backup type optionThe Backup type option sets the backup level. There are three backup levels.
FullFull backups include the entire database, including all objects, system tables, and data.As the backup operation progresses, it copies the transaction logs. The timing of thetransaction log backup ensures that you can recover the complete database to thestate it was in when the backup finished.
DifferentialDifferential backups include data that changed after the last full backup. The backupoperation also copies relevant portions of the transaction logs.
When you select a differential backup to restore a database, the restore processrestores the last full backup, followed by the differential backups performed after thefull backup. Because a differential backup only saves changes to data, the backup issmaller and faster than a full backup. Therefore, you can perform a differential backupmore often than a full backup.
Differential backups are used primarily in high volume systems where you must bring afailed database back online as quickly as possible. Differential backups are smaller thanfull backups, and so have less effect on the system where they run.
IncrementalBy default, incremental, or transaction log, backups only back up the transaction logs.Transaction logs are serial records of all database modifications. The logs are used inrecovery operations to update the database with complete transactions and roll backincomplete transactions. When you back up a transaction log, the backup stores allchanges after the last transaction log backup. Transaction log backups record thestate of the transaction log at the start of the backup (unlike full and differentialbackups, which record the state of the data at the end of the backup).
When a transaction log backup is complete, the log truncates to remove anytransactions that are committed to the database. When restoring the database,restore the data to the state it was in at the end of the last full or differential backup,and then sequentially restore the transaction log backups in order.
Considerations for selecting the backup typeReview the following considerations when you select the backup type:
l If the database uses the simple recovery model, then you cannot perform atransaction log backup of the database. Databases with the simple recovery modeldo not support transaction log backups. Databases that use the simple recoverymodel include system databases, such as the master and msdb databases.
Backup
98 Avamar for SQL Server 18.1 User Guide

If a transaction log backup includes databases with the simple recovery model anddatabases with other recovery models, then you can select how Avamar handlesthe databases with the simple recovery model.
l Microsoft SQL Server does not allow differential or transaction log (incremental)backups of the master database. You can only create full backups of the masterdatabase. If you try to perform a differential or transaction log backup of themaster database, a full backup occurs instead
l If you change the recovery model of a database, perform a full backup before youtry to perform a differential or transaction log backup.
l You can perform full, differential, and transaction log backups on the primaryreplica in an AlwaysOn availability group. You can perform only full and transactionlog backups on a secondary replica. If you try to perform a differential backup on asecondary replica, then the backup fails with an error message.
Force incremental backup after full backup optionIf a full backup exists and then another full backup occurs, the Force incrementalbackup after full backup option creates a transaction log (incremental) backup.
The transaction log backup contains transactions from the end of the first full backupor the most recent transaction log backup, whichever is later, until the time that theforced transaction log backup occurs (after the first backup of the new backup cycle).This additional transaction log backup ensures that a point-in-time recovery to a pointin time between the two full backups can occur, if required.
Three backup sessions occur when a forced transaction log backup occurs:
l The first session contains transactions that occur from the end of the first fullbackup until the start time of the forced transaction log backup.
l The second session contains transactions that occur from the end of the secondfull backup until the time that the forced transaction log backup occurs.
l The third session contains only the full backup.
To restore and recover the database to a point after the forced transaction logbackup, select the last backup from the last backup session that has the most recentfull backup, during the restore process.
Force full backup option
When you select the Force full backup option, a full backup occurs in the followingscenarios:
l If you try to perform a differential or transaction log (incremental) backup and afull backup does not exist on the server.
l If you try to perform a differential or transaction log backup after you restore adatabase.
l If you try to perform a differential or transaction log backup after you restore themsdb database.
l If the backup process detects log gaps.
Effectively, this option automates taking a full backup when necessary.
As a best practice, perform a transaction log backup after the forced full backup.
Backup
Backup type options 99

NOTICE
If you perform transaction log and differential backups, we strongly recommend thatyou leave this option selected (the default setting) for all backups. Otherwise, youmight not be able to restore data if there are no full backups on the Avamar server.
Copy-only backupThe Copy-only Backup option instructs the SQL plugin to perform a copy-only fullbackup by setting the --copy-only option in avtar.
If the Backup type option is set to Full and Copy-only Backup is selected, a fullbackup is created that does not affect the overall state of the backups, in whichsubsequent log-based or differential backups are based on the previous regular (non-copy-only) full backup. If Force incremental backup after full backup is selectedalong with and the Copy-only Backup option, the Force incremental backup afterfull backup option is ignored and a copy-only full backup is performed.
After a copy-only full backup is performed, the backup will be listed in the AvamarAdministrator graphical interface with the Type listed as CO Full. The individualdatabases within the backup will have the Type listed as cf-0.
The copy-only full backup feature supports the following configurations:
l Database-level backup
l Multiple databases, using database-level backup
l Instance-level backup
l Stripe-level backup
The SQL Plugin does not support Copy-only log backups. Copy-only backup requiresthat the Avamar server is at release 7.4 and higher, and is not supported with releasesbefore 7.4. Copy-only backup is not supported in AlwaysOn Availability environments.
AlwaysOn availability group optionThe Availability group replica for backup option controls the replica on which thebackup occurs in an AlwaysOn environment.
The following table describes each of the available values.
Table 10 Availability group replica for backup option values
Value Description
Primary Specifies that the backup should occur on theprimary replica.
Prefer secondary Specifies that the backup should occur on asecondary replica except when the primaryreplica is the only available replica or whennone of the secondary replicas meet therequirements for backup. This option is thedefault value.
Secondary only Specifies that the backup should occur on thesecondary replica. If no secondary replica isavailable, then the backup does not occur.
Backup
100 Avamar for SQL Server 18.1 User Guide

Table 10 Availability group replica for backup option values (continued)
Value Description
SQL Server defined Specifies that the backup should use thebackup preference specified in SQL Serversettings.
You can increase performance of the primary replica when you perform backups on asecondary replica. However, the secondary replica must meet the requirements in AlwaysOn availability group requirements on page 41.
In a hybrid IT environment with Microsoft Azure and AlwaysOn availability groups, usethis option and the priority settings for the secondary replicas in SQL Server to ensurethat the backup occurs on an on-premise replica. Avamar cannot back up databaseson a replica on a Microsoft Azure virtual machine.
You can perform only full and transaction log backups on a secondary replica. If youtry to perform a differential backup on a secondary replica, then the backup fails withan error message.
Enhanced data deduplication optionThe Enhanced data deduplication option controls the type of compression for data ina backup by setting the --compress option in avtar.
Enhanced data deduplication typically reduces the amount of client data that thebackup process must send to the server, but requires additional client CPU resources.The following table describes each of the available values.
Table 11 Enhanced data deduplication option values
Value Description
Default The avtar process evaluates some of the
data in the backup to determine whether thedata supports compression. If the evaluateddata supports compression, then avtarcompresses all data in the backup. If theevaluated data does not support compression,then avtar does not compress any data.
Disabled The avtar process does not compress data
during the backup.
Enabled Forces avtar to compress data during the
backup, even if the data does not supportcompression.
Select this value only when you are certainthat data in the backup supports compression.Otherwise, avtar unnecessarily uses
additional client CPU resources to try toperform compression on data that does notsupport compression.
Backup
Enhanced data deduplication option 101

Enable consistency check optionThe Enable Consistency check option instructs the SQL plugin to perform aconsistency check of the database before performing a backup.
When the Enable Consistency check option is selected, the SQL Plugin uses theDBCC CHECKDB (Transact-SQL) command to verify the consistency of thedatabase. When the consistency check fails, the backup of failed SQL database isskipped and the backup of that database is marked as failed. If multiple databases areinvolved in one backup and some databases pass the consistency check and other fail,the backup will be marked as "partial success / failure."
When the consistency check is enabled, backups may be slower than when it is notenabled due to the additional overhead. The actual performance of a backup variesdepending on the condition of the SQL databases.
The Enable consistency check feature supports the following configurations:
l Database-level backup
l Multiple databases, using database-level backup
l Instance-level backup
l Availability Group (AG) backup
By using the avsql command with the --consistency-check option, you can alsoinstruct the SQL plugin to perform a physical-only consistency check or an extendedlogical check. When backing up a secondary node of an AlwaysOn availability group, anavsql.com file should be created in the shared var directory of the secondary nodewith the --consistency-check=physicalonly option set. This step allows thedatabase to be skipped if it fails consistency checking and toproceed to the nextdatabase. Backup options on page 51 contains further information about using the --consistency-check option with the avsql command.
Truncate database log optionThe Truncate database log option controls database transaction log truncationbehavior.
The following table describes each of the available values.
Table 12 Truncate database log option values
Value Description
(Default) Only for incremental backup Avamar truncates the database transactionlog if the backup type is incremental(transaction log). No log truncation occurs ifthe backup type is full or differential.
For all backup types Avamar truncates the database transactionlog regardless of the backup type. This settingbreaks the chain of log backups. Do not usethis setting unless the backup type is full.
Note
This value is not supported for SQL Server2008 R2 and later environments.
Backup
102 Avamar for SQL Server 18.1 User Guide

Table 12 Truncate database log option values (continued)
Value Description
Never Avamar does not truncate the databasetransaction log under any circumstances.
Simple recovery model databases optionThe For simple recovery model databases option controls Avamar behavior whenyou try to perform incremental (transaction log) backups of databases that use thesimple recovery model, which does not support transaction log backups.
The following table describes each of the available values.
Table 13 For simple recovery model databases option values
Value Description
Skip incremental with error If you select databases with differentrecovery models for the backup, then thebackup does not include the databases withthe simple recovery model. The backupcompletes with exceptions, and an errormessage is written to the log. If you selectonly databases with the simple recoverymodel for the backup, then the backup fails.
Skip incremental with warning If you select databases with differentrecovery models for the backup, then thebackup does not include databases with thesimple recovery model. The backup completessuccessfully, and a warning is written to thelog for each database that uses the simplerecovery model. If you select only databaseswith the simple recovery model for thebackup, then the backup fails.
Promote incremental to full A full backup occurs automatically instead of atransaction log backup for databases that usethe simple recovery model. Promotion to fullis indicated in the Activity Window of theAvamar Administrator with the status
Completed with Promotion. When onlysome of the databases in the backup arepromoted to full, the status will still be
indicated as Completed with Promotion.
Skip log gap detectionFor transaction log backups, control whether the Avamar Plug-in for SQL Serverchecks the full and transaction log backups that are already saved for a database toverify that there are no "log gaps." This log gap detection ensures that there is a validchain of SQL Server transaction logs so that point-in-time restore can occur. If a loggap is detected, the backup is promoted to a full backup. Promotion to full is indicatedin the Activity Window of the Avamar Administrator with the status Completed with
Backup
Simple recovery model databases option 103

Promotion. When only some of the databases in the backup are promoted to full, thestatus is still indicated as Completed with Promotion.
Log gap detection may require as many as 20 to 30 seconds to complete for eachdatabase. Transaction log backups may take an excessive amount of time to completein environments with a significant number of databases. If the performance issuesoutweigh the risk of possible log gaps, then you can disable log gap detection byselecting this option to improve performance.
Enable debugging messagesWhen you select the Enable debugging messages option, maximum information iswritten to log files during the operation. If you select the checkbox, the operationgenerates very large log files. Use this option only for debugging purposes.
Data Domain system optionsWhen you select the Store backup on Data Domain system option, Avamar storesthe backup on a configured Data Domain system instead of on the Avamar server.
To store the backup on a Data Domain system, select the checkbox and then selectthe Data Domain system from the list.
Use the Encryption method to Data Domain system list to specify the encryptionmethod for data transfer between the client and the Data Domain system during thebackup.
Changing the backup storageYou can store backups on either the Avamar server or a Data Domain system.However, you must store the full backup for a client and all subsequent transaction log(incremental) and differential backups on either the Avamar server or a single DataDomain system.
Avamar does not support the following scenarios:
l Full backup on a Data Domain system, and transaction log or differential backupson the Avamar server
l Full backup on the Avamar server, and transaction log or differential backups on aData Domain system
l Full backup on one Data Domain system, and transaction log or differentialbackups on another Data Domain system
As a result, if you change the server on which backups for a client are stored, then youmust perform a full backup before any further transaction log or differential backups.
If you change the backup storage from one Data Domain system to another DataDomain system, you can restore to a point in time between the two full backups.Select the Force incremental backup checkbox when you perform the first fullbackup to the new Data Domain system. Otherwise, clear the Force incrementalbackup checkbox.
When you select the Force incremental backup checkbox, a restore error appearsbecause full backup on one Data Domain system and incremental (transaction log)backup on another Data Domain system is not supported. As a result, the backupprocess creates a single backup set that includes both the new full backup and theforced incremental backup.
Backup
104 Avamar for SQL Server 18.1 User Guide

Requirements for point-in-time restore after changing the backup storage on page125 provides more information on restoring to the point in time between the two fullbackups.
Multi-streaming optionsMulti-streaming enables you to improve backup and restore performance by backingup and restoring SQL Server data using multiple parallel data streams. The number ofstreams that you use to back up a database is automatically the same for the restore.
When you use the Avamar Plug-in for SQL Server, Avamar sends backup and restoredata in multiple streams by spawning multiple instances of avtar. There is one avtarinstance for each data stream, plus an additional avtar progress instance.
You can specify a maximum of 10 streams for each backup. Specifying the maximumnumber of streams on page 107 provides guidance for how to select the maximumnumber of streams for a backup.
You can either back up multiple databases in parallel with one stream per database, orback up a single database by using multiple parallel streams.
If you back up a single database with multiple parallel streams, then you can specifythe minimum size of each stream during the backup. An equal amount of backup datais sent through each stream. Specifying the minimum stream size on page 107provides guidance for how to select the minimum stream size.
If you use multiple data streams to send backup data for a single database to theAvamar server or Data Domain system, then the backup for the database is stored asmultiple files. If you restore the multi-stream backup to files, then the file name foreach file is composed of the backup type and the stream number:
l f-0 indicates a full backup
l d-n indicates a differential backup
l i-n indicates a transaction log (incremental) backup
where n is the sequential number of the differential or incremental backup since thepreceding full backup.
For example, a full backup that was sent by using two streams results in two files:f-0.stream0 and f-0.stream1.
When to use multi-streamingMulti-streaming is most effective at improving backup and restore performance on acomputer that is running SQL Server with significant system resources.
Significant system resources include:
l Fast, multiprocessor CPU
l Large amounts of RAM
l Fast disk input/output (I/O)
l Fast network resources
If you use multi-streaming on a server with limited system resources, then the servermay become unresponsive because of 100 percent resource usage during a backup orrestore.
To improve disk I/O for backup and restore with multi-streaming, store databases ondifferent physical drives. This step enables Avamar to read and write data from eachdrive simultaneously during the backup or restore process.
Backup
Multi-streaming options 105
Another way to improve disk I/O is to store databases on a high performance storagearea network (SAN) attached to the computer that is running SQL Server, instead ofon the local drives.
Calculating the number of streams for a databaseYou can either back up multiple databases in parallel with one stream per database, orback up a single database using multiple parallel streams. If you back up a singledatabase with multiple parallel streams, then you can specify the minimum size ofeach stream during the backup.
After you determine the minimum stream size, you can calculate the number ofstreams that are used to back up the database by using the following equation:
Database size/minimum stream size = Number of streamsFor example, if a database is 1,280 MB and the minimum stream size is the defaultsetting of 256 MB, then the number of streams for a full backup of the database isfive:
1,280 MB/256 = 5For transaction log and differential backups, the size of the data to back up, and notthe total database size, is used to calculate the number of streams.
If the database size is less than the minimum stream size, then Avamar uses a singlestream to back up the database.
If you calculate the number of streams for a database based on the minimum streamsize, and the number exceeds the maximum set for the backup, then the backup usesonly the maximum number of streams.
Understanding the order of databases in a backupWhen there are multiple databases in a backup, Avamar sets the order of thedatabases in the backup that is based on database size, with the largest databasebacked up first. Avamar calculates the number of streams to use to back up thedatabase, and then allocates those streams for the backup.
If additional streams are available based on the specified maximum number of streams,then Avamar can use those streams to back up another database while the backup ofthe first database proceeds. The next database that is backed up depends on the sizeof the database and the number of streams required. Consider the following example:
1. There are four databases in the backup dataset:
l The first and largest database requires four streams.
l The second database requires three streams.
l The third and fourth databases require two streams each.
2. The maximum number of streams for the backup is six.
3. When the backup starts, four of the six streams are allocated to the backup of thefirst database.
4. The second database requires three streams, but only two streams are available.As a result the second database is skipped.
5. The remaining two streams are allocated to the third database. The backup of thefirst database and the third database occur concurrently, using all six availablestreams.
Backup
106 Avamar for SQL Server 18.1 User Guide

6. When the backup of the first database completes, four streams become available.Three of the backup streams are allocated to the backup of the second database,leaving one stream available, and unused.
7. The fourth database is backed up when either the backup of the third databasecompletes or when the backup of the second database completes, depending onwhich completes first and two streams become available.
Specifying the maximum number of streamsYou can specify a maximum of between one and 10 streams for each backup using theMaximum number of streams list on the Backup Command Line Options dialog boxor on the Options tab of the New Dataset dialog box.
You cannot specify the maximum number of streams for a restore. The number ofstreams for the backup is the same for the restore.
In environments with significant system resources, specify the maximum of 10 streamsto achieve the best possible performance.
In environments with fewer or limited system resources, specify a lower maximumnumber of streams, or disable multi-streaming altogether by specifying a maximum ofone stream.
The optimal number of streams depends on the environment. In general, start with thehighest maximum number of streams that you believe the environment can support. Ifresource usage during a backup is excessive and adversely impacts other processes onthe server, then consider reducing the maximum number of streams.
Specifying the minimum stream sizeYou specify the minimum stream size by using the Minimum stream size list on theBackup Command Line Options dialog box during an on-demand backup or on theOptions tab when you create a dataset for a scheduled backup.
The minimum size of a stream must be one of the following values:
l One stream per database
l 256 MB (default)
l 512 MB
l 1,024 MB
l 2,048 MB
If the database size is less than the minimum stream size, then Avamar uses a singlestream to back up the database.
Specifying the minimum stream size enables you to control how Avamar allocates theavailable streams to back up the databases in a backup set. Calculating the number ofstreams for a database on page 106 and Understanding the order of databases in abackup on page 106 explain how Avamar allocates streams to back up databases thatare based on the maximum number of streams and the minimum stream size.
The optimal value for the minimum stream size depends on the following criteria:
l Number of databases
l Amount of data:
n Consider the size of the database for full backups.
n Estimate the amount of changed data for differential backups.
n Consider the log size for transaction log backups.
Backup
Multi-streaming options 107

l Whether databases are on a single drive or on multiple drives
l Available system resources
l Restore requirements
The following table provides recommendations for setting the minimum stream sizedepending on the backup set and environment. The information in the following tableis intended only as general guidelines. The optimal setting for minimum stream size foran environment depends on many factors.
NOTICE
The following table provides recommendations for the specified backup set andenvironment for a full backup, which includes all data in the database. Therecommended minimum stream size is likely to be different for differential andtransaction log backups. To determine the optimal minimum stream size, estimate theamount of changed data for differential backups and the size of the logs fortransaction log backups.
Table 14 Recommended minimum stream size by backup set and environment
Backup set and environment Recommended minimum stream size
One large (more than 12 GB) database on asingle drive
Select any of the following values:
l 256 MB (default)
l 512 MB
l 1,024 MB
l 2,048 MB
The database uses all available streams duringthe backup, and the minimum stream sizedoes not impact performance. The disk I/Ocan limit backup performance.
A few large (more than 12 GB) databases on asingle drive
Select any of the following values:
l 256 MB (default)
l 512 MB
l 1,024 MB
l 2,048 MB
Avamar backs up each database sequentiallybut with multiple streams. Because of thelarge databases, each database uses allavailable streams during the backup,regardless of the minimum stream size. Inaddition, the minimum stream size does notimpact performance.
A few large (more than 12 GB) databases ofapproximately the same size, each on aseparate drive
Select One stream per database. Thisapproach backs up multiple databases inparallel and maximizes disk I/O potential byreading from each drive simultaneously.
Backup
108 Avamar for SQL Server 18.1 User Guide

Table 14 Recommended minimum stream size by backup set and environment (continued)
Backup set and environment Recommended minimum stream size
Mixed environment with both small and largedatabases either on a single drive or onmultiple drives
For each database in the backup set, dividethe database size (or the amount of changeddata or the log size for differential andtransaction log backups, respectively) by eachminimum stream size value (256 MB; 512 MB;1,024 MB; and 2,048 MB) to determine howmany streams that Avamar would use to backup the database. Consider the maximumnumber of streams for the backup and theorder in which Avamar would back up thedatabases. Evaluate the optimal minimumstream size based on these factors.
Examples of minimum stream size in a mixeddatabase environment on page 109 providesexamples of how different minimum streamsizes impact system performance in a mixedenvironment.
Mixed environment with a few large (morethan 12 GB) databases, and one or two verylarge (more than 500 GB) databases, eitheron a single drive or on multiple drives
For each database in the backup set, dividethe database size (or the amount of changeddata or the log size for differential andtransaction log backups, respectively) by eachminimum stream size value (256 MB; 512 MB;1,024 MB; and 2,048 MB) to determine howmany streams that Avamar would use to backup the database. Consider the maximumnumber of streams for the backup and theorder in which Avamar would back up thedatabases. Evaluate the optimal minimumstream size based on these factors.
Examples of minimum stream size in a mixeddatabase environment on page 109 providesexamples of how different minimum streamsizes impact system performance in a mixedenvironment.
Many small databases either on a single driveor on multiple drives
Select One stream per database. Thisapproach backs up multiple databases inparallel, with one stream for each database.
Examples of minimum stream size in a mixed database environment
The following table provides examples of how different minimum stream sizes impactstream allocation for environments with mixed database sizes.
NOTICE
The examples in the following table are for full backups, which include all data in thedatabase. The result is likely to be different for differential backups, which include onlychanged data, and transaction log backups, which include only the logs.
Backup
Multi-streaming options 109

Table 15 Examples of minimum stream size in mixed environments
Database environment Maximum numberof streams
Minimum streamsize
Result
One database of 9 GB and100 databases of 100 MB
10 256 MB Avamar uses all 10 streams to back up the 9GB database.
When the backup of the 9 GB databasecompletes, Avamar uses all 10 streams to backup the 100 MB databases, with one stream foreach database.
10 2,048 MB Avamar uses four streams to back up the 9GB database, and the remaining six to back upsix of the 100 MB databases.
When the backup of the 9 GB databasecompletes, Avamar uses all 10 streams to backup the remaining 100 MB databases, with onestream for each database.
Several large databases ofmore than 12 GB and manysmall databases of 2 GB orless
10 2,048 MB Avamar uses all 10 streams to back up thelarge databases, one database at a time, inorder from largest to smallest.
When the backup of the large databasescompletes, Avamar uses all 10 streams to backup the small databases, with one stream foreach database, in order from the largestdatabase to the smallest database.
Four large (more than 12 GB)databases, and two very large(more than 500 GB)databases
6 256 MB Avamar uses all six streams to back up eachdatabase, one database at a time, in orderfrom largest to smallest.
6 One stream perdatabase
Avamar uses one stream to back up eachdatabase.
When the backup starts, Avamar uses all sixstreams—one for each database.
As the backup continues and completes forthe four large databases, Avamar uses onlytwo streams—one for each of the two verylarge databases. Four of the six availablestreams remain idle.
Therefore, backup performance in this case islikely to be slower than when you select aminimum stream size of 256 MB.
Minimum stream size for multiple databases of varying sizesWhen performing a recovery of multiple databases of varying sizes, use one or moregroups (datasets) for small databases using the default minimum stream size of 256MB, and, separately, one or more groups for larger databases using the defaultminimum stream size of 2048 MB.
Backup
110 Avamar for SQL Server 18.1 User Guide

Considering restore requirements when setting the minimumstream size
As you evaluate the optimal minimum stream size for an environment, remember thatthe multi-streaming settings that you specify for the backup are also used for therestore.
If restore performance is an issue, then evaluate whether the minimum stream sizethat is used for the backup is also optimal for restore.
For example, a minimum stream size of one stream per database is recommended forbackups in environments with a few large (more than 12 GB) databases ofapproximately the same size, each on a separate drive. However, when you restore asingle database from that backup, the restore process uses only one stream.
Authentication optionsAuthentication options allow you to specify whether Avamar uses Windows (NT)authentication or SQL Server authentication to connect to the SQL Server during abackup.
If you do not specify an authentication method, then the SQL Server plug-in uses NTauthentication and logs in with the NT AUTHORITY\SYSTEM account. Refer to thesecurity requirements for the Avamar for SQL Server plug-in for more information.
Procedure
1. In the Backup Command Line Options dialog box, or the Options tab of theNew Dataset dialog box, select the Show Advanced Options checkbox.
Several advanced options, including the authentication options, appear in red.
2. In the SQL server address box, specify the hostname or IP address of theserver to connect to.
3. From the Authentication method list, select whether to use NT authenticationor SQL Server authentication.
4. If you select SQL Server authentication, specify the login ID and password forthe SQL Server account in the SQL login ID and SQL password boxes,respectively.
Monitoring backupsYou can monitor backups to ensure that they are completed successfully andtroubleshoot issues. The Activity Monitor in Avamar Administrator enables you to viewstatus information for both on-demand and scheduled backups.
Procedure
1. In Avamar Administrator, click the Activity launcher link.
The Activity window appears.
2. Click the Activity Monitor tab.
A list of all activities appears.
3. To filter the results to display only backup activity, select Actions > Filter.
The Filter Activity dialog box appears.
4. Select All Backups from the Type list.
Backup
Authentication options 111
5. Click OK.
Verifying backupsYou can use the VerifyOnly restore option in the Restore Command Line Optionswindow to verify a backup without performing a restore. To perform a verification of abackup:
The verify-only restore feature supports the following configurations:
l Database-level backup
l Multiple databases, using database-level backup
l Instance-level backup
n Instance level restore will validate the system database backups also, withoutperforming the SQL Service restart in single user mode.
l Availability Group (AG) database or level backup
n Verify-only restore can be performed by using redirected restore; AG restoresto the same client are not supported.
Procedure
1. In Avamar Administrator, click the Backup & Restore launcher link button.
The Backup, Restore and Manage window appears.
2. Find the backup to verify:
l Finding a backup by date on page 129
l Finding a backup by content on page 131
The backup to restore is selected in the Backups table.
3. Select Actions > Restore Now.
The Restore Options dialog box appears.
4. Ensure that Windows SQL appears in the Restore Plug-in list.
5. Click More Options.
The Restore Command Line Options dialog box appears.
6. Select the VerifyOnly restore option.
7. Click OK on the Restore Command Line Options dialog box.
8. Click OK on the Restore Options dialog box.
The following status message appears: Restore initiated.
9. Click OK.
Results
If the backup verification succeeds, the restore is marked as successful. If he backupverification is unsuccessful, the restore is marked as failed, or if the backup beingverified is an AG backup, and instance backup, or involves multiple databases, therestore will be marked as "partial success / failure."
Backup
112 Avamar for SQL Server 18.1 User Guide

Canceling backupsYou can cancel a backup any time before it completes. The cancellation might take 5minutes or longer. The backup may complete before the cancellation finishes.
Procedure
1. In Avamar Administrator, click the Activity launcher link.
The Activity window appears.
2. Click the Activity Monitor tab.
A list of all activities appears.
3. Select the backup from the list.
4. Select Actions > Cancel Activity.
A confirmation message appears.
5. Click Yes.
Backup
Canceling backups 113

Backup
114 Avamar for SQL Server 18.1 User Guide
CHAPTER 4
Application consistent SQL virtual machineimage backup by using AUI
This section includes the following topics:
l Managing advanced policies for SQL.................................................................116l Prerequisites..................................................................................................... 116l Add an advanced group policy........................................................................... 116l Remove an advanced group policy....................................................................120l Edit an advanced group policy.......................................................................... 120l View advanced group policy details.................................................................. 120l Migrate existing Backup Policy or Group to Advanced Policy........................... 120l View logs........................................................................................................... 121
Application consistent SQL virtual machine image backup by using AUI 115

Managing advanced policies for SQLConfigure an advanced policy to manage application consistent SQL virtual machinebackups, including automatic SQL discovery, automatic backup group management,and auto client SQL plugin installation and registration.
PrerequisitesReview the following prerequisites before setting up an advanced policy forapplication-consistent SQL virtual machine protection.
l Both administrator users and local users with the administrator role can performadvanced application-consistent SQL virtual machine backups. However, due tothe introduction of User Account Control (UAC) in Microsoft Windows 7 and laterversions, a local user with the administrator role must additionally turn off AdminApproval Mode in the UAC settings for the admin group on the guest operatingsystem. Otherwise, the Advanced Policy Builder fails to install/upgrade/registerclient agents on SQL virtual machines.
l If the vCenter inventory name of the Virtual Machine (VM) is same as the guestcomputer name, change the mcserver.xml setting to <entrykey="allow_duplicate_client_names" value="true" />. If you do notchange the setting, the registration might fail during Avamar client registrationwith MCS.
Add an advanced group policyProcedure
1. To start the Avamar Web User Interface, open a web browser and type thefollowing URL:
https://Avamar_server/auiwhere Avamar_server is the DNS name or IP address of the Avamar server.
Note
If your environment does not meet HTTPS certificate validation requirements,the certificate validation fails and an error message appears asking if you wantto continue to download packages. Ignoring certificate validation might causesecurity issues.
a. In the Avamar Username field, type a username with administrativeprivileges.
b. In the Avamar Password field, type the password for the administrativeuser.
c. Select Avamar as the Auth Type.
d. Click Log In.
2. In the navigation pane on the left, click , and then click Policy > AdvancedPolicy .
The Advanced Policy window appears.
Application consistent SQL virtual machine image backup by using AUI
116 Avamar for SQL Server 18.1 User Guide
3. In the domain tree, select a domain or subdomain for the client.
4. To add an advanced policy, click .
The Advanced Policy Builder page appears.
5. Name the solution.
6. To enable the solution, clear Disable this solution.
7. Click NEXT.
Configure a sourceFrom the Source page, perform the following steps.
Procedure
1. Select a target vCenter or add a target vCenter.
Note
If the vCenter is not in the list, ensure that the domain under which the policy isbeing created can access the domain where the vCenter was originally added.
2. To create a vCenter, click Add vCenter:
The New vCenter Client wizard appears.
a. Complete the following information in the wizard.
l Client information, including client type and client name or IP address
l vCenter information, including username, password, and port number.
l Optional information
b. Review the summary.
c. Click ADD.
3. On the Advanced Policy Builder page, click NEXT.
Configure the SQL server group policyA group policy contains all the information necessary to perform backups of groups ofinstances.
Group policy objects contain three child objects:
l Schedule—A policy that controls the frequency and the start and end time eachday for backups of clients in a group. A schedule is a persistent and reusableAvamar policy that can be named and attached to multiple groups.
l Retention—A policy that defines how long the backup is stored in the backupappliance.
l Dataset—A policy that defines a set of files, directories, and file systems for eachsupported platform that are included or excluded in backups across a group ofclients. A dataset is a persistent and reusable Avamar policy that can be namedand attached to multiple groups.
From the Type page, perform the following steps.
Application consistent SQL virtual machine image backup by using AUI
Configure a source 117
Procedure
1. In the Advanced Policy Type field, select SQL Server .
2. To add a backup group, click , and then select a backup group type from thelist.
3. In the Schedule column, select a schedule for each backup group.
To ensure that backups occur on an ongoing basis, scheduled backups runautomatically. You can schedule backups to run daily, weekly, or monthly.
Alternatively, you can add a schedule by selecting Create in the drop-down list.The Create Schedule wizard appears and opens to the Basic Configurationpage. For detailed instructions, see Add a schedule.
4. In the Dataset column, select a dataset for each backup group.
A dataset specifies the data to include in a scheduled backup and the options touse for the backup. Create at least one dataset for scheduled backups on aclient or group of clients. Create multiple datasets to segregate client data.
Alternatively, you can add a dataset by selecting Create in the drop-down list.The Create DataSet wizard appears. For detailed instructions, see Add adataset.
5. In the Retention column, select a retention policy for each backup group.
Retention is the time setting to automatically delete backups on an Avamarserver. Retention can be set to permanent for backups that should not bedeleted from an Avamar server.
Alternatively, you can add a retention policy by selecting Create in the drop-down list. The Add Retention Policy wizard appears. For detailed instructions,see Add a retention policy.
6. Click NEXT.
Configure membersFrom the Members page, perform the following steps.
Pushing clients to a group of target virtual machines simultaneously might cause aperformance impact. To improve performance, adjust the Avamar throttling settingsfor vCenter and Esxi.
Access the following Avamar throttling settings at /usr/local/avamar/bin/vabm/vabm.cfg:
l vabm_esxi_throttling allows the maximum number of installation jobs to runsimultaneously for each Esxi.
l vabm_vcenter_throttling allows the maximum number of vCenter requeststo run simultaneously for each vCenter
l vabm_cache_timeout allows the maximum minutes of detection cache. Thedetection result of OS and plugin version is cached in Avamar for a specific time.
Procedure
1. To automatically install, upgrade, or register client agents on these virtualmachines:
Application consistent SQL virtual machine image backup by using AUI
118 Avamar for SQL Server 18.1 User Guide
a. Ensure that the UpgradeClientDownloads package has been installed on theAvamar server.
b. Select the Install/Upgrade/Register client agents on these VMsautomatically checkbox.
2. To force register the client agent from the previous Avamar server to the targetAvamar server, select Force register client agents to this Avamar.
The target client is force registered to the current Avamar server.
3. In the Rule to apply field, select an option.
If no rule is listed in the drop-down list, ensure that the domain under which thepolicy is being created can access the domain where the rule was originallycreated. One rule maps to one policy. Ensure that the rule is not already usedfor another advanced policy.
4. Type the username for the virtual machine's guest OS.
When selecting a username for the virtual machine, consider the followinginformation:
l If the target virtual machine UAC is enabled, use the administrator accountor the administrative account with Admin Approval Mode turned off.
l If the target virtual machine UAC is disabled, use the administrator accountor the administrative account.
Note
If you have not added the object BUILTIN\users to the SQL login, the advancedpolicy cannot automatically add the sysadmin role to the NT AUTHORITY\SYSTEM object. To use NT authentication for SQL backup, manually add thesysadmin role before proceeding. For more information, see the SQL serverdocumentation.
5. Type the password of the virtual machine.
6. To manually push the client agents on these virtual machines, click RETRYINSTALLATION.
7. To display the list of members and view information for a virtual machine, clickREFRESH.
This action scans all the virtual machines under the configured vCenter,evaluates the rule matched members, and then detects the memberinformation. This process might take some time to complete.
8. Click NEXT.
Configure a proxy for the image backupFrom the Proxies page, perform the following steps.
Procedure
1. To enable Auto proxy mapping, select the checkbox.
2. Select a proxy from the list.
3. To start the plugin installation and registration, click SUBMIT.
Application consistent SQL virtual machine image backup by using AUI
Configure a proxy for the image backup 119

Remove an advanced group policyProcedure
1. In the navigation pane, click Policy > Advanced Policy.
The Advanced Policy window appears.
2. In the domain tree, select a domain or subdomain for the client.
3. Select the solution that you want to remove, and then click .
Edit an advanced group policyDo not re-configure individual policies that were created as part of an advanced policy.
Procedure
1. In the navigation pane, click Policy > Advanced Policy.
The Advanced Policy window appears.
2. In the domain tree, select a domain or subdomain for the client.
3. Select the policy that you want to edit, and then click .
The Advanced Policy Builder page appears.
Note
When editing an advanced policy, you cannot change the policy name or selecta different vCenter.
View advanced group policy detailsProcedure
1. In the navigation pane, click Policy > Advanced Policy.
The Advanced Policy window appears and lists the configured policies.
2. Review the policy details.
3. To view detailed information for advanced policy members, click .
Migrate existing Backup Policy or Group to Advanced PolicyProcedure
1. Make sure the old policy contains SQL Server virtual machines.
Advanced policy is only for SQL Server virtual machines. If the old policy doesnot contain only SQL Server virtual machines, you need to split it.
2. Design the rule to match the virtual machines in old policy.
For example, you can add new tag for these virtual machines and use tags inyour rule.
Application consistent SQL virtual machine image backup by using AUI
120 Avamar for SQL Server 18.1 User Guide

3. Create advanced policy with the rule created in the previous step.
4. Push the agent manually.
5. Move the client to above advanced policy directory.
6. Delete the old policy if required.
View logsProcedure
1. In the navigation pane, click Policy > Advanced Policy.
The Advanced Policy window appears and lists the policies.
2. To view the logs for a policy, select a policy from the list, and then click .
The VM list window appears.
3. Select a virtual machine from the list, and then click View Logs.
4. To view system logs, browse to /usr/local/avamar/var/vabm/log/daemon/.
5. To view a detailed log for each virtual machine, browse to /usr/local/avamar/var/vabm/log/<vm-uuid>/<vm-uuid.log>.
Application consistent SQL virtual machine image backup by using AUI
View logs 121

Application consistent SQL virtual machine image backup by using AUI
122 Avamar for SQL Server 18.1 User Guide

CHAPTER 5
Restore
This chapter includes the following topics:
l Restore requirements....................................................................................... 124l Restore a SQL Server backup client by using AUI.............................................126l Finding a backup............................................................................................... 128l Determine the restore size for an SQL server database.................................... 134l Restoring to the original location...................................................................... 135l Restoring to a new database in the original instance.........................................137l Restoring to a different instance...................................................................... 139l Restoring to a file.............................................................................................. 141l Restoring system databases............................................................................. 149l Restoring to an AlwaysOn availability group..................................................... 156l Restoring a database with an intact log file...................................................... 159l Setting restore options.....................................................................................160l Performing table level recovery........................................................................ 168l Monitoring restores.......................................................................................... 170l Canceling restores............................................................................................ 170
Restore 123

Restore requirementsTo ensure a successful restore, ensure that the environment meets the necessaryrequirements.
The Avamar Plug-in for SQL Server performs only offline restores of SQL Server data.Online restore is not supported. The Avamar Plug-in for SQL Server does not supportthe restore of individual files, except by restoring partial files from an SQL backup intothe same instance and database when the database is online during the restore.
To perform table level recovery (TLR), the Avamar Plug-in for SQL TLR is required.When the Avamar Plug-in for SQL TLR is installed, the ItemPoint for Microsoft SQLServer is also installed.
Software requirements for restoreTo restore an instance, database, filegroup, or file to SQL Server by using the AvamarPlug-in for SQL Server, ensure that the software in the environment meets thenecessary requirements.
l The following software must be running on both the source and destinationsystems:
n Microsoft SQL Server
n Avamar Client for Windows
n Avamar Plug-in for SQL Server
If the Avamar Plug-in for SQL Server is not installed on the target server, or youwant to use the standard SQL Server restore tools for features that the AvamarPlug-in for SQL Server does not provide, then you can restore a SQL Serverdatabase from an Avamar backup to operating system files. You can then use SQLServer tools to restore the database.
l To perform table level recovery, the Avamar Plug-in for SQL TLR must beinstalled.
l To restore a system database, the target SQL Server installation for the restoremust have the same SQL Server version and service pack as the SQL Serverinstallation on which the backup occurred. Otherwise, restore fails. The "Youcannot restore system database backups to a different build of SQL Server" articleon the Microsoft Support website provides details.
l To restore a user database, the target SQL Server installation for the restore musthave the same or a newer SQL Server version and service pack as the SQL Serverinstallation on which the backup occurred. Restore fails when you attempt torestore from a newer SQL Server version to an earlier SQL Server version. Forexample, you can restore a backup of a SQL Server 2008 user database to a SQLServer 2012 instance. However, restore of a SQL Server 2012 user database to aSQL Server 2008 instance is not supported. This compatibility requirement isenforced by Microsoft SQL Server and is not an Avamar limitation.
NOTICE
Restore of a user database to a newer SQL Server version (for example, restorefrom SQL Server 2008 to SQL Server 2012) should work in most cases that arebased on SQL Server version compatibility guidelines. However, not all restorescenarios with the SQL Server plug-in have been validated.
Restore
124 Avamar for SQL Server 18.1 User Guide

l The destination server must be registered with the same Avamar server as thesource.
l If the SQL Server installation is in a failover cluster, then you configured theAvamar cluster client for all SQL Server cluster nodes.
l If you enabled AlwaysOn availability groups, then you configured the Avamarcluster client for the availability group listener.
Tail-log backup and point-in-time restore requirementsReview the requirements to perform a tail-log backup or point-in-time restore toensure successful completion of the restore.
l To perform a tail-log backup during the restore process, the database must beonline and using either the full or bulk-logged recovery model. To perform a point-in-time restore, the database must be using the full recovery model. As a result,you cannot perform either a tail-log backup or a point-in-time restore of systemdatabases such as the master and msdb databases because those databases usethe simple recovery model.
l To restore to a specific point in time, you must provide the transaction date andtime or named mark to which to recover from the SQL Server transaction log. TheSQL Server documentation on the Microsoft website provides details on how toaccess transaction log information.
l The point in time that you are restoring to must be after the finish time for themost recent full backup. In addition, if the point in time is before the start time ofthe most recent transaction log (incremental) backup, then a tail-log backup is notrequired. However, a tail-log backup is required if the point in time is after themost recent transaction log backup.
l When you specify the point in time for restore, do not specify the start time of theselected transaction log backup if it is not the last backup in the backup sequence.Otherwise, the restore fails and a tail-log backup does not occur even if you selectthe Tail-log backup option.
Requirements for point-in-time restore after changing the backup storageYou can restore to a point in time between two full backups when you change thebackup storage from one Data Domain system to another Data Domain system.
To restore to a point in time between a full backup on the first Data Domain systemand the first full backup to the new Data Domain system, select the Forceincremental backup checkbox when you perform the first full backup to the new DataDomain system. Otherwise, clear the Force incremental backup checkbox.
When you select the Force incremental backup checkbox, a restore error appearsbecause full backup on one Data Domain system and incremental (transaction log)backup on another Data Domain system is not supported. As a result, the backupprocess creates a single backup set that includes both the new full backup and theforced incremental backup.
To restore the database to a point in time between the full backup on the first DataDomain system and the full backup on the second Data Domain system:
1. Restore the full backup from the Data Domain system to a file.
2. Restore the forced incremental (transaction log) backup from the second DataDomain system to a file.
3. Use those files to restore the database to the necessary point in time by using SQLServer tools such as SQL Server Management Studio or the Microsoft SQL Server
Restore
Tail-log backup and point-in-time restore requirements 125

sqlcmd utility. The Microsoft website also provides full details on how to use SQLServer Management Studio to restore a database backup to a specific point intime.
Requirements to restore secondary database filesWhen you restore the secondary data files of a database to the original location, therestore must meet the following requirements.
l You must select the most recent backup of the database for the restore.
l You must perform a tail-log backup.
l You must perform the restore with a single restore operation.
You cannot restore additional secondary data files after you perform a restore with atail-log backup.
To restore the secondary data files of a database with two different restoreoperations, restore the backup to a file and then use SQL Server management tools toperform the restores.
Requirements to restore the Report Server databaseStop the SQL Server Reporting Services before you restore the Report Serverdatabase. Otherwise, the Report Server database does not restore correctly.
SQL Server write permission requirementsSQL Server must have write permissions to the location to which you restore data.Otherwise, the restore fails with an Access is denied error.
Restore a SQL Server backup client by using AUIAny successful client backup can be used to restore a copy of that backup. You canfind a backup to restore by date.
Procedure
1. In the navigation pane, click Backup/Restore.
The Backup/Restore page appears.
2. Click the Restore tab.
3. In the domain tree, select the domain for the client.
4. From the list of clients, select the client computer to recover.
A list of completed backups for this client appears. Any backup in this list can beused to restore the client.
5. (Optional) To locate backups by date:
a. Click .
b. Specify the date range in the From and To fields.
c. Click Retrieve.
The list of backups for the date range appears.
6. In the Actions column, click Restore
The Contents of Backup pane appears.
Restore
126 Avamar for SQL Server 18.1 User Guide

The AUI displays a list of volumes that are contained within the backup. Thevolume names identify the original mount point.
7. Select the folder or file that you want to restore, and then click RESTORE.
After you select a folder from the tree, the Contents of Backup pane displays alist of files that are contained within that folder.
The Restore wizard appears and opens to the Destination Client page.
8. In the Destination Client field, select either Restore to original client orRestore to different client.
If restoring to a different client, complete the following substeps:
a. Select a domain from the tree.
b. Select a client from the Client pane.
The AUI displays proxies.
c. Ensure that you select only backup clients.
The client name appears in the Destination Client field.
9. Click NEXT.
The Destination Location page appears.
10. In the Destination Location section, select one of the following options:
l Restore to the original location
l Restore to a different SQL Server instance or location
l Restore SQL Server backup as files to the file system
If restoring to a different SQL server instance or location, complete thefollowing substeps:
a. To select the instance location, click CHOOSE.
The Choose instance location window appears.
b. Select a location from the Choose instance location window.
c. Click OK.
d. To select the alternate database location, click CHOOSE.
The Choose restore location window appears.
e. Click OK.
The chosen location appears in the Instance location and Alternate databaselocation fields.
If restoring the SQL server backup as files to the file system, complete thefollowing substeps:
a. To select the restore items save location, click CHOOSE.
b. The Choose restore location window appears.
c. Select a location from the Choose restore location window.
d. Click OK.
The chosen location appears in the restore items save location field.
Restore
Restore a SQL Server backup client by using AUI 127

11. Click NEXT.
The More Options page appears.
SQL plug-in restore options provides more information about the basic restoreoptions.
12. (Optional) Toggle the Show Advanced Options switch to view advancedconfiguration options. SQL plug-in restore options provides more informationabout the advanced restore options.
13. Click NEXT.
The Summary page appears.
14. Review the provided information, and then click FINISH.
Results
The AUI the restore operation. Check the Activity page view the progress.
Finding a backupThe first step to restore data is to find the backup with the data that you want torestore. You can find Avamar client backups by searching either for a specific date orfor specific content.
Locate backups by date when one or more of the following situations apply:
l You have saved all data for the client in a single backup set.
l The exact pathname or name of the data to restore is unknown.
l The backup that you want to restore is before a specific date or event. Forexample, you know the approximate date when data was lost or corrupted. inwhich you can search for a backup before that date.
l The specific types of backups are known. For example, scheduled disasterrecovery backups are running every Wednesday and Saturday night and fullvolume backups daily. When rebuilding a server, select the disaster recoverybackup with the date closest to the event that caused the loss of data.
Locate backups by the content of the backup when one or more of the followingsituations apply:
l You have backed up data on the client in separate backup sets.
l You want to view multiple versions of the same file so that you can decide theversion to restore.
l The date of the backup or the content of a backup is unknown, but you know thename of the data to restore.
Restore
128 Avamar for SQL Server 18.1 User Guide

NOTICE
Avamar generally supports the use of specific supported international characters indirectory, folder, and filenames. However, proper display of international languagecharacters is contingent on the client computer’s Java locale and installed systemfonts being compatible with the original language. If you browse backups that werecreated with international characters and a compatible font is not installed, then anycharacters that the system cannot resolve appear as rectangles. This action is anormal limitation of that particular situation and does not affect the ability to restorethese directories, folders, or files. The Avamar Release Notes provide additionalinternational language support information.
Finding a backup by dateProcedure
1. In Avamar Administrator, click the Backup & Restore launcher link button.
The Backup, Restore and Manage window appears.
2. Click the Restore tab.
The upper left pane contains a list of domains.
3. Select the domain that contains the client.
You cannot view clients outside the domain for the login account. To view allclients, log in to the root domain.
A list of Avamar clients appears in the pane under the domains list.
4. From the list of clients, select the computer that is running SQL Server. Keepthe following points in mind when you select a client:
l If you are restoring databases in an AlwaysOn availability group, then selectthe cluster client for the availability group listener.
l If you are restoring databases on shared storage in a failover cluster, thenselect the cluster client for the virtual server.
l You cannot view clients outside the domain for the login account. To view allclients, log in to the root domain.
5. Click the Restore tab.
6. Click the By Date tab.
7. Select the backup date from the calendar. Valid backups occurred on dates witha yellow highlight.
A list of backups on that date appears in the Backups table next to thecalendar.If a backup is the second or later full backup and you selected the Forceincremental backup after full backup checkbox for the backup, then threebackups appear in the Backups table:
l The first backup in the list is the forced incremental backup. You can use thisbackup to restore from the full backup through the forced incrementalbackup.
l The backup with forced_incremental appended to the backup label isthe forced incremental backup. You can use this backup to restore from theprevious full backup through the forced incremental backup.
Restore
Finding a backup by date 129
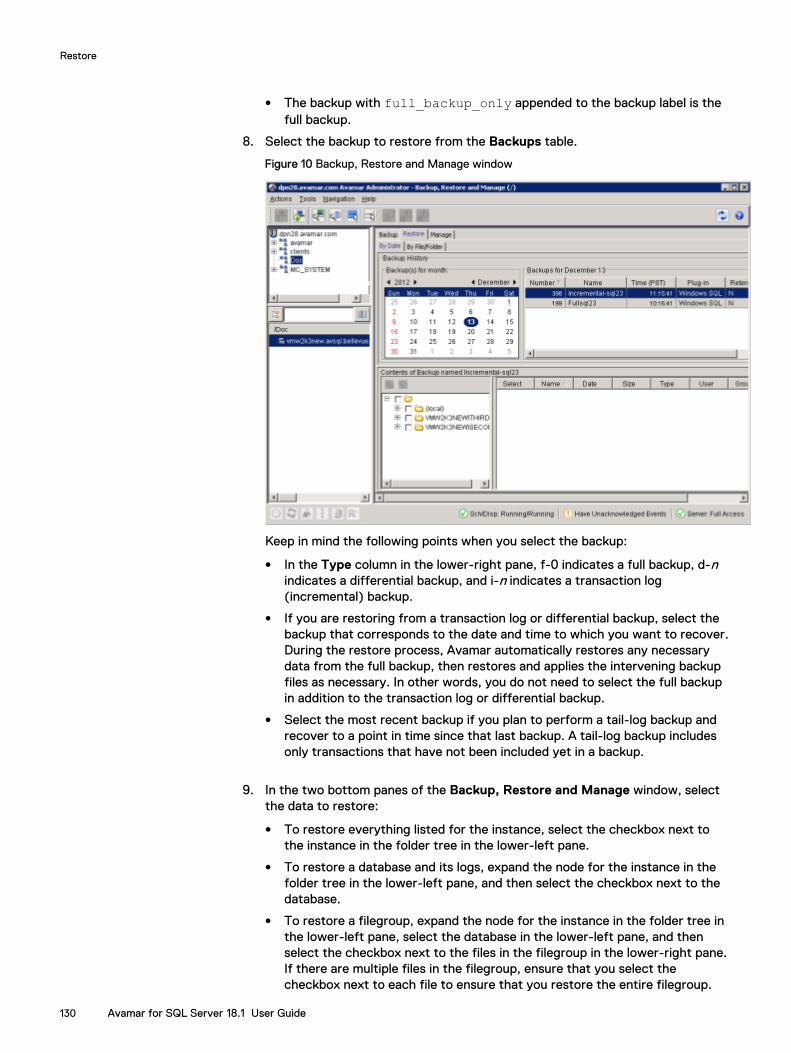
l The backup with full_backup_only appended to the backup label is thefull backup.
8. Select the backup to restore from the Backups table.
Figure 10 Backup, Restore and Manage window
Keep in mind the following points when you select the backup:
l In the Type column in the lower-right pane, f-0 indicates a full backup, d-nindicates a differential backup, and i-n indicates a transaction log(incremental) backup.
l If you are restoring from a transaction log or differential backup, select thebackup that corresponds to the date and time to which you want to recover.During the restore process, Avamar automatically restores any necessarydata from the full backup, then restores and applies the intervening backupfiles as necessary. In other words, you do not need to select the full backupin addition to the transaction log or differential backup.
l Select the most recent backup if you plan to perform a tail-log backup andrecover to a point in time since that last backup. A tail-log backup includesonly transactions that have not been included yet in a backup.
9. In the two bottom panes of the Backup, Restore and Manage window, selectthe data to restore:
l To restore everything listed for the instance, select the checkbox next tothe instance in the folder tree in the lower-left pane.
l To restore a database and its logs, expand the node for the instance in thefolder tree in the lower-left pane, and then select the checkbox next to thedatabase.
l To restore a filegroup, expand the node for the instance in the folder tree inthe lower-left pane, select the database in the lower-left pane, and thenselect the checkbox next to the files in the filegroup in the lower-right pane.If there are multiple files in the filegroup, ensure that you select thecheckbox next to each file to ensure that you restore the entire filegroup.
Restore
130 Avamar for SQL Server 18.1 User Guide

The name of the filegroup to which a file belongs appears in the Filegroupcolumn of the lower-right pane.
If you are restoring from a transaction log or differential backup and you planto restore the files to a different instance, ensure that you select thecheckbox next to all files in all filegroups. You cannot restore individual filesfrom a transaction log or differential backup to a different instance.
Note
You cannot accurately determine the exact size of a restored database untilafter the restore operation completes. As a result, database sizes that appear inAvamar Administrator when you perform a restore may be smaller than whenyou perform a backup.
10. Continue with the restore as described in the following topics:
l Restoring to the original location on page 135
l Restoring to a new database in the original instance on page 137
l Restoring to a different instance on page 139
l Restoring to a file on page 141
l Restoring system databases on page 149
Finding a backup by contentProcedure
1. In Avamar Administrator, click the Backup & Restore launcher link button.
The Backup, Restore and Manage window appears.
2. Click the Restore tab.
The upper left pane contains a list of domains.
3. Select the domain that contains the client.
You cannot view clients outside the domain for the login account. To view allclients, log in to the root domain.
A list of Avamar clients appears in the pane under the domains list.
4. From the list of clients, select the computer that is running SQL Server. Keepthe following points in mind when you select a client:
l If you are restoring databases in an AlwaysOn availability group, then selectthe cluster client for the availability group listener.
l If you are restoring databases on shared storage in a failover cluster, thenselect the cluster client for the virtual server.
l You cannot view clients outside the domain for the login account. To view allclients, log in to the root domain.
5. Click the Restore tab.
6. Click the By File/Folder tab.
7. In the Enter path to retrieve history for text box, specify the path to theinstance or database by using one of the methods in the following table.
Restore
Finding a backup by content 131
Table 16 Enter path to retrieve history for text box
Method Steps to specify the path
Browse to the instance or database a. Click Browse.
The Select File or Folder dialog boxappears.
b. Select the client from the Clients tree inthe left pane.
c. In the middle pane, expand the WindowsSQL plug-in node.
d. Under the Windows SQL plug-in node,select the SQL Server instance thatcontains the databases for restore.A list of the databases for that instance
appears in the right pane of the SelectFile or Folder dialog box.
e. To select all databases in an instance,select the checkbox next to the instancein the middle pane. Or, to select anindividual database, select the checkboxnext to the database in the right pane.
f. Click OK.
Type the path to the instance or database Type the full path to the client folder or file in
the Enter path to retrieve history fortext box using one of the following formats:
l To restore the local instance, type(local).
l To restore a database in the localinstance, type (local)/database/.
l To restore a named instance, typeclient\instance/.
l To restore a database in a named instance,type client\instance/database/.
l To restore a database if there is only oneinstance on the client and it is not thelocal instance, type client/database/.
where client is the name of the computer thatis running SQL Server, instance is the name ofthe named instance, and database is the nameof the database.
8. Click Retrieve.
The Version History table lists all versions and sizes of the content in backupsfor the client.
9. Select the version in the Version History table.
All backups for the client that contain the version appear in the Backups tablenext to the Version History table.
Restore
132 Avamar for SQL Server 18.1 User Guide
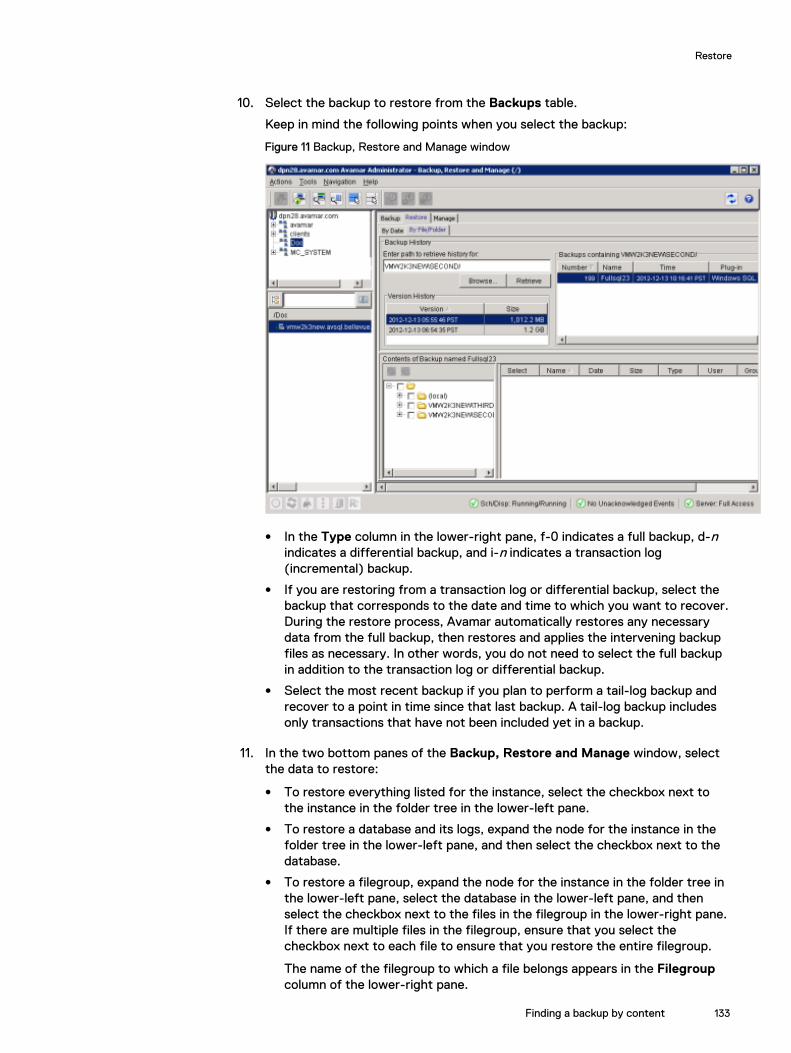
10. Select the backup to restore from the Backups table.
Keep in mind the following points when you select the backup:
Figure 11 Backup, Restore and Manage window
l In the Type column in the lower-right pane, f-0 indicates a full backup, d-nindicates a differential backup, and i-n indicates a transaction log(incremental) backup.
l If you are restoring from a transaction log or differential backup, select thebackup that corresponds to the date and time to which you want to recover.During the restore process, Avamar automatically restores any necessarydata from the full backup, then restores and applies the intervening backupfiles as necessary. In other words, you do not need to select the full backupin addition to the transaction log or differential backup.
l Select the most recent backup if you plan to perform a tail-log backup andrecover to a point in time since that last backup. A tail-log backup includesonly transactions that have not been included yet in a backup.
11. In the two bottom panes of the Backup, Restore and Manage window, selectthe data to restore:
l To restore everything listed for the instance, select the checkbox next tothe instance in the folder tree in the lower-left pane.
l To restore a database and its logs, expand the node for the instance in thefolder tree in the lower-left pane, and then select the checkbox next to thedatabase.
l To restore a filegroup, expand the node for the instance in the folder tree inthe lower-left pane, select the database in the lower-left pane, and thenselect the checkbox next to the files in the filegroup in the lower-right pane.If there are multiple files in the filegroup, ensure that you select thecheckbox next to each file to ensure that you restore the entire filegroup.
The name of the filegroup to which a file belongs appears in the Filegroupcolumn of the lower-right pane.
Restore
Finding a backup by content 133

If you are restoring from a transaction log or differential backup and you planto restore the files to a different instance, ensure that you select thecheckbox next to all files in all filegroups. You cannot restore individual filesfrom a transaction log or differential backup to a different instance.
Note
You cannot accurately determine the exact size of a restored database untilafter the restore operation completes. As a result, database sizes that appear inAvamar Administrator when you perform a restore may be smaller than whenyou perform a backup.
12. Continue with the restore as described in the following topics:
l Restoring to the original location on page 135
l Restoring to a new database in the original instance on page 137
l Restoring to a different instance on page 139
l Restoring to a file on page 141
l Restoring system databases on page 149
Determine the restore size for an SQL server databaseUse the following procedures to determine the disk space requirements of individualdatabases in the backup set as well as the total space requirements. These proceduresdetermine the restore size for a database without downloading the complete backupcontent. The backup header is downloaded to fetch the sizing information.
Note
Performing this operation might result in a log entry that the operation was externallycanceled and the Restore interrupted warning message appears. This warningcan be ignored.
Determine the space required to restore the system databaseTo determine the space required to restore the database, use the --print-restore-sizeflag.
Note
To determine the restore size for the system database, use the --restoresystem flag.
Determine the space required to restore a single SQL server databaseBefore restoring a single SQL server database "DB1", determine the disk spacerequirements by using the CLI.
At a command prompt, type the following command:
avsql --operation=restore --server=12.34.56.78 --id=AvamarAdmin --ap=password --path=/SQL/SQLServer1 --print-restore-size --hostname-sql=SQLServer1 --labelnum=28 "(local)/DB1"Output similar to the following appears:
==================================================Size of the Database (local)\DB1: 3.000 MB
Restore
134 Avamar for SQL Server 18.1 User Guide

Size of the Database (local)\DB1_log: 1.000 MB----------------------------------------------------------------------------------------Total require restore size: 4.000 MB==================================================
In this example, DB1 is the name of the database that is being restored.
Determine the space required to restore multiple SQL server databasesBefore restoring multiple SQL server databases, determine the disk spacerequirements by using the CLI.
At a command prompt, type the following command:
avsql --operation=restore --server=12.34.56.78 --id=AvamarAdmin --ap=password --path=/SQL/SQLServer1 --print-restore-size --hostname-sql=SQLServer1 --labelnum=28 "(local)/DB2" "(local)/DB3"Output similar to the following appears:
================================================== Size of the Database (local)\DB2: 2.489 GB Size of the Database (local)\DB2_log: 984.4 MB Size of the Database (local)\DB3: 3.000 MB Size of the Database (local)\DB3_log: 1.000 MB---------------------------------------------------------------------------------------- Total require restore size: 3.454 GB ==================================================
Restoring to the original locationYou can restore a SQL Server instance, database, filegroup, or file to its originallocation.
NOTICE
If you are restoring to the original location in an AlwaysOn availability group, use theinstructions in Restoring to an AlwaysOn availability group on page 156.
There are two restore options when you restore a SQL Server instance, database, orfilegroup to its original location.
l A standard restore with a tail-log backup is the most common restore procedure.During this procedure, a tail-log backup occurs to capture transactions that arenot yet in a backup. Then the database is restored from the most recent fullbackup and any differential or transaction log backups.
l A restore with the SQL Server REPLACE option that completely overwrites thedatabase might be necessary, for example, if a previous database restore exitedwith the following SQL Server error in the Avamar SQL restore log:
One or more devices or files already exist.Reissue the statement using the WITH REPLACEoption to overwrite these files and devices.
Restore
Determine the space required to restore multiple SQL server databases 135

NOTICE
When you select the Avamar option to use the SQL Server REPLACE option, itadds an SQL WITH REPLACE clause statement to the restore Transact-SQLcommand. This statement overrides a SQL Server safety check to prevent youfrom accidentally overwriting a different database or file. The Microsoft Transact-SQL documentation provides more information in the RESTORE command section.
Procedure
1. Ensure that the environment meets the guidelines in Restore requirements onpage 124.
2. In Avamar Administrator, click the Backup & Restore launcher link button.
The Backup, Restore and Manage window appears.
3. Find the backup to restore:
l Finding a backup by date on page 129
l Finding a backup by content on page 131
The backup to restore is selected in the Backups table.
4. Select Actions > Restore Now.
The Restore Options dialog box appears.
5. Ensure that Windows SQL appears in the Restore Plug-in list.
6. From the Avamar encryption method list, select the encryption method to usefor data transfer between the Avamar server and the client during the restore.
The encryption technology and bit strength for a client/server connectiondepend on several factors, including the client operating system and Avamarserver version. The Avamar Product Security Guide provides additionalinformation.
7. Leave the default selection of Restore to the original location.
8. Click More Options.
The Restore Command Line Options dialog box appears.
9. Select the restore and recovery options:
l To create a tail-log backup and perform a direct restore with recovery, leavethe Use SQL REPLACE option checkbox clear and the Tail-log backupcheckbox selected.
l To perform a direct restore with REPLACE, select the Use SQL REPLACEoption checkbox and clear the Tail-log backup checkbox.
10. If you are restoring in an AlwaysOn availability group and you want to restore ononly the primary replica, select the Restore only on primary replica checkbox.
Leave the checkbox clear to automatically restore to both the primary replicaand any secondary replicas.
11. From the Encryption method from Data Domain system list, select theencryption method for data transfer during the restore if the backup was storedon a Data Domain system.
12. To restore system databases, set the plug-in options as discussed in Systemdatabase restore options on page 166.
13. (Optional) Select Show Advanced Options, and set the advanced options asdiscussed in the following topics:
Restore
136 Avamar for SQL Server 18.1 User Guide

l Recovery operation options on page 164
l Authentication options on page 167
l Point-in-time recovery options on page 167
14. Disregard the redirected restore options, which are only necessary when yourestore to a different location.
15. Click OK on the Restore Command Line Options dialog box.
16. Click OK on the Restore Options dialog box.
The following status message appears: Restore initiated.
17. Click OK.
After you finish
l If you perform a tail-log backup and the tail-log backup fails to complete, then therestore cannot take place. Review the log file to determine the cause of thefailure. Correct the problem, and then restart the restore.
Keep in mind that if you clear the Tail-log backup checkbox to prevent the tail-logbackup from occurring, then the restore includes only the transactions up to theselected backup. You may lose any transactions in the tail of the log.
l After the restore completes successfully, perform a full backup of the databaseand clear the Force incremental backup after full backup checkbox in the plug-in options for the backup. If the checkbox is selected when a full backup occursafter a restore, then the transaction log backup that occurs automatically after thefull backup fails.
Restoring to a new database in the original instanceYou can restore a database to the original SQL Server instance on the same SQLServer client but with a new database name.
Procedure
1. Ensure that the environment meets the guidelines in Restore requirements onpage 124.
2. In Avamar Administrator, click the Backup & Restore launcher link button.
The Backup, Restore and Manage window appears.
3. Find the backup to restore:
l Finding a backup by date on page 129
l Finding a backup by content on page 131
The backup to restore is selected in the Backups table.
4. Select Actions > Restore Now.
The Restore Options dialog box appears.
5. Ensure that Windows SQL appears in the Restore Plug-in list.
6. From the Avamar encryption method list, select the encryption method to usefor data transfer between the Avamar server and the client during the restore.
The encryption technology and bit strength for a client/server connectiondepend on several factors, including the client operating system and Avamarserver version. The Avamar Product Security Guide provides additionalinformation.
Restore
Restoring to a new database in the original instance 137
7. Leave the default selection of Restore to the original location.
8. Click More Options.
The Restore Command Line Options dialog box appears.
9. Select the Show Advanced Options checkbox.
Several advanced options appear in red.
10. Leave the Use SQL REPLACE option checkbox clear.
11. Specify whether to perform a tail-log backup during the restore by selecting orclearing the Tail-log backup checkbox.
12. If you are restoring in an AlwaysOn availability group and you want to restorethe database with the new name on only the primary replica, select the Restoreonly on primary replica checkbox.
13. From the Encryption method from Data Domain system list, select theencryption method for data transfer during the restore if the backup was storedon a Data Domain system.
14. In the New database name box, specify the new database name.
15. In the Alternate database location box, specify the path to which to restorethe database files, or leave the box blank to restore the files to the originallocation.
16. Select the location to which to restore the log files for the database:
l To restore the log files to the same location as the database, select Same asalternate database location from the Alternate log location list.
l To restore the log files to a different location than the database, selectDifferent location than database from the Alternate log location list, andthen specify the path for the log files in the Path to alternate log locationbox.
17. (Optional) Set other plug-in options as discussed in the following topics:
l Recovery operation options on page 164
l Authentication options on page 167
l Point-in-time recovery options on page 167
18. Disregard the system databases options, which are only necessary when yourestore a system database.
19. Click OK on the Restore Command Line Options dialog box.
20. Click OK on the Restore Options dialog box.
The following status message appears: Restore initiated.
21. Click OK.
After you finish
l If you perform a tail-log backup and the tail-log backup fails to complete, then therestore cannot take place. Review the log file to determine the cause of thefailure. Correct the problem, and then restart the restore.
Keep in mind that if you clear the Tail-log backup checkbox to prevent the tail-logbackup from occurring, then the restore includes only the transactions up to theselected backup. You may lose any transactions in the tail of the log.
l After the restore completes successfully, perform a full backup of the databaseand clear the Force incremental backup after full backup checkbox in the plug-
Restore
138 Avamar for SQL Server 18.1 User Guide

in options for the backup. If the checkbox is selected when a full backup occursafter a restore, then the transaction log backup that occurs automatically after thefull backup fails.
Restoring to a different instanceYou can restore one or more instances, databases, filegroups, or files to a differentSQL Server instance on either the same SQL Server client or a different SQL Serverclient.
Procedure
1. Ensure that the environment meets the guidelines in Restore requirements onpage 124.
2. In Avamar Administrator, click the Backup & Restore launcher link button.
The Backup, Restore and Manage window appears.
3. Find the backup to restore:
l Finding a backup by date on page 129
l Finding a backup by content on page 131
The backup to restore is selected in the Backups table.
4. Select Actions > Restore Now.
The Restore Options dialog box appears.
5. Ensure that Windows SQL appears in the Restore Plug-in list.
6. From the Avamar encryption method list, select the encryption method to usefor data transfer between the Avamar server and the client during the restore.
The encryption technology and bit strength for a client/server connectiondepend on several factors, including the client operating system and Avamarserver version. The Avamar Product Security Guide provides additionalinformation.
7. Specify the destination client in the Restore Destination Client box:
l To restore to the original client, leave the default setting of the original clientdomain and name.
l To restore to a different client, click Browse and then browse to the client.
8. Select Restore to a different SQL Server instance or location.
9. Select the instance on the destination client for the restore:
a. Next to the Select the SQL instance on the destination client where theitems should be restored box, click Browse.
The Browse for Restore Destination dialog box appears.
b. Select Windows SQL.
c. In the right pane, select the checkbox next to the instance.
d. Click OK.
10. Set the destination file path for the database and log files to restore:
a. Click Set Destination.
The Set Destination dialog box appears.
Restore
Restoring to a different instance 139

b. To specify a path for a single file, select the row in the table. Or, to specifythe same path for multiple files in the list, press Shift and select the rows.
c. Click Browse.
The Browse for File, Folder, or Directory dialog box appears.
d. Select Windows File System.
e. In the right pane, browse to and select the checkbox for the folder to whichto restore the selected files.
f. Click OK to return to the Set Destination dialog box.
g. Repeat step b through step f for the remaining rows in the Set Destinationdialog box.
h. Click OK to return to the Restore Options dialog box.
11. Click More Options.
The Restore Command Line Options dialog box appears.
12. Select the Show Advanced Options checkbox.
Several advanced options appear in red.
13. Leave the Use SQL REPLACE option checkbox clear.
14. Clear the Tail-log backup checkbox to disable tail-log backup. Tail-log backupis not supported when you restore to a different SQL Server instance.
15. If you are restoring to an AlwaysOn availability group in a different SQL Serverinstance, select the Restore only on primary replica checkbox to restore thedatabase on only the primary replica.
16. From the Encryption method from Data Domain system list, select theencryption method for data transfer during the restore if the backup was storedon a Data Domain system.
17. Disregard the System Databases options. Do not restore system databases toa different instance.
18. (Optional) To restore the database with a new name, type the new name in theNew database name box.
19. Disregard the remaining Redirected Restore settings (Alternate databaselocation, Alternate log location, and Path to alternate log location). Youalready specified these settings on the Set Destination dialog box.
20. (Optional) Set other plug-in options as discussed in the following topics:
l Recovery operation options on page 164
l Authentication options on page 167
l Point-in-time recovery options on page 167
21. If the target server for the restore has version 6.1 or earlier of the SQL Serverplug-in, then you may need to decrease the buffer size that SQL Server uses toread and write backup images. The buffer size increased in version 7.0 of theSQL Server plug-in to improve backup and restore performance.
To decrease the buffer size to the size before version 7.0, set the --max-transfer-size attribute to 65536 (64 KB):
a. Click More on the Restore Command Line Options dialog box.
b. Type --max-transfer-size in the Enter Attribute box.
Restore
140 Avamar for SQL Server 18.1 User Guide

c. Type 65536 in the Enter Attribute Value box.
d. Click +.
22. Click OK on the Restore Command Line Options dialog box.
23. Click OK on the Restore Options dialog box.
The following status message appears: Restore initiated.
24. Click OK.
After you finish
After the restore completes successfully, perform a full backup of the database andclear the Force incremental backup after full backup checkbox in the plug-inoptions for the backup. If the checkbox is selected when a full backup occurs after arestore, then the transaction log backup that occurs automatically after the fullbackup fails.
Restoring to a fileYou can restore SQL Server user and system databases from an Avamar backup tooperating system files.
You may want to perform this type of restore in the following situations:
l The Avamar Plug-in for SQL Server is not installed on the target server.
l You want to use the standard SQL Server restore tools for features that the SQLServer plug-in does not provide.
You can use either the Avamar Plug-in for SQL Server or the Avamar Plug-in for theWindows File System to restore a database to a file. You can then use SQL Servertools to restore the data to SQL Server.
Restoring to a file with the SQL Server plug-inYou can restore an instance or database to operating system files by using the AvamarPlug-in for SQL Server.
Procedure
1. Ensure that the environment meets the guidelines in Restore requirements onpage 124.
2. In Avamar Administrator, click the Backup & Restore launcher link button.
The Backup, Restore and Manage window appears.
3. Find the backup to restore:
l Finding a backup by date on page 129
l Finding a backup by content on page 131
The backup to restore is selected in the Backups table.
4. Select Actions > Restore Now.
The Restore Options dialog box appears.
5. Ensure that Windows SQL appears in the Restore Plug-in list.
6. From the Avamar encryption method list, select the encryption method to usefor data transfer between the Avamar server and the client during the restore.
The encryption technology and bit strength for a client/server connectiondepend on several factors, including the client operating system and Avamar
Restore
Restoring to a file 141

server version. The Avamar Product Security Guide provides additionalinformation.
7. Specify the destination client in the Restore Destination Client box:
l To restore to the original client, leave the default setting of the original clientdomain and name.
l To restore to a different client, click Browse and then browse to the client.
8. Select Restore SQL Server backup as files to the file system.
9. Set the destination file path for the database and log files to restore:
a. Click Set Destination.
The Set Destination dialog box appears.
b. Click Browse.
The Browse for File, Folder, or Directory dialog box appears.
c. Select Windows File System.
d. In the right pane, browse to and select the checkbox for the folder to whichto restore the selected files.
e. Click OK to return to the Set Destination dialog box.
f. Click OK to return to the Restore Options dialog box.
10. Click More Options.
The Restore Command Line Options dialog box appears.
11. From the Encryption method from Data Domain system list, select theencryption method for data transfer during the restore if the backup was storedon a Data Domain system.
12. If the restore includes system databases, select the Restore system databasescheckbox.
13. Disregard the remaining options, which do not apply when you restore to a file.
14. Click OK on the Restore Command Line Options dialog box.
15. Click OK on the Restore Options dialog box.
The following status message appears: Restore initiated.
16. Click OK.
Results
The backup restores as one or more files to the specified destination in the pathdestination\client\instance\database\file, where:
l destination is the destination for the files that you specified in the Set Destinationdialog box.
l client is the name of the computer on which SQL Server is installed.
l instance is the name of the SQL Server instance from the backup.
l database is the name of the database from the backup.
l file is the name of the file.
A single backup can include multiple files, depending on the number of streams in thebackup. The file name for each file is composed of the backup type and the streamnumber:
Restore
142 Avamar for SQL Server 18.1 User Guide

l f-0 for full backups
l d-n for differential backups
l i-n for transaction log (incremental) backups
where n is the sequential number of the differential or incremental backup since thepreceding full backup. For example, a full backup with two streams results in two files:f-0.stream0 and f-0.stream1.
After you finish
l Ensure that the SQL backup format files that you restored are accessible to SQLServer. You may need to make the data visible to SQL Server or copy the data.
l Manually restore the database by using SQL Server tools.
Restoring to a file with the Windows File System plug-inYou can restore an instance or database to operating system files by using the AvamarPlug-in for the Windows File System.
Procedure
1. Ensure that the environment meets the guidelines in Restore requirements onpage 124.
2. In Avamar Administrator, click the Backup & Restore launcher link button.
The Backup, Restore and Manage window appears.
3. Find the backup to restore:
l Finding a backup by date on page 129
l Finding a backup by content on page 131
The backup to restore is selected in the Backups table.
4. Select Actions > Restore Now
The Restore Options dialog box appears.
5. Select Windows File System from the Restore Plug-in list.
6. From the Avamar encryption method list, select the encryption method to usefor data transfer between the Avamar server and the client during the restore.
The encryption technology and bit strength for a client/server connectiondepend on several factors, including the client operating system and Avamarserver version. The Avamar Product Security Guide provides additionalinformation.
7. Specify the destination client in the Restore Destination Client box:
l To restore to the original client, leave the default setting of the original clientdomain and name.
l To restore to a different client, click Browse and then browse to the client.
8. Select Restore everything to a different location.
9. Set the destination file path for the database and log files to restore:
a. Click Set Destination.
The Set Destination dialog box appears.
b. Click Browse.
The Browse for File, Folder, or Directory dialog box appears.
Restore
Restoring to a file with the Windows File System plug-in 143
c. Select Windows File System.
d. In the right pane, browse to and select the checkbox for the folder to whichto restore the selected files.
e. Click OK to return to the Set Destination dialog box.
f. Click OK to return to the Restore Options dialog box.
10. (Optional) Click More Options and set plug-in options for the restore. TheAvamar for Windows Server User Guide provides details on the available plug-inoptions.
11. Click OK on the Restore Options dialog box.
The following status message appears: Restore initiated.
12. Click OK.
Results
The backup restores as one or more files to the specified destination in the pathdestination\client\instance\database\file, where:
l destination is the destination for the files that you specified in the Set Destinationdialog box.
l client is the name of the computer on which SQL Server is installed.
l instance is the name of the SQL Server instance from the backup.
l database is the name of the database from the backup.
l file is the name of the file.
A single backup can include multiple files, depending on the number of streams in thebackup. The file name for each file is composed of the backup type and the streamnumber:
l f-0 for full backups
l d-n for differential backups
l i-n for transaction log (incremental) backups
where n is the sequential number of the differential or incremental backup since thepreceding full backup. For example, a full backup with two streams results in two files:f-0.stream0 and f-0.stream1.
After you finish
l Ensure that the SQL backup format files that you restored are accessible to SQLServer. You may need to make the data visible to SQL Server or copy the data.
l Manually restore the database by using SQL Server tools.
Restoring a database with SQL Server toolsAfter you use either the SQL Server plug-in or the Windows file system plug-in torestore a SQL Server backup to a file, you can use SQL Server tools to restore adatabase to SQL Server. Supported methods include SQL Server Management Studio,a Transact-SQL RESTORE command, and the sqlcmd utility.
Restoring a database with SQL Server Management StudioYou can restore a database from a SQL formatted backup file to SQL Server by usingthe user interface in SQL Server Management Studio. The Microsoft website provides
Restore
144 Avamar for SQL Server 18.1 User Guide

full details on how to use SQL Server Management Studio to restore a databasebackup.
This procedure provides details on using SQL Server Management Studio for SQLServer 2008 to restore a database from SQL formatted backup files. The steps forother SQL Server versions may be different.
Procedure
1. Restore the database backup to a file by using the instructions in one of thefollowing topics:
l Restoring to a file with the SQL Server plug-in on page 141
l Restoring to a file with the Windows File System plug-in on page 143
2. Ensure that the SQL backup format files that you restored are accessible toSQL Server. You may need to make the data visible to SQL Server or copy thedata.
3. Restore the full backup (f-0 file) to SQL Server:
a. Open the Restore Database window.
l If the database already exists, then right-click the database in the ObjectExplorer and select Tasks > Restore > Database.
l If the database has been lost, then right-click the Databases node in theObject Explorer and select Restore Database.
b. On the General page of the Restore Database window, select From device.
c. Click the ... button.
The Specify Backup dialog box appears.
d. Click Add.
The Locate Backup File dialog box appears.
e. Select the folder in which the full backup files are located.
f. From the Files of type list, select All files(*).
g. Select the full backup (f-0) file.
h. Click OK.
i. If there are multiple full backup files from multi-streaming (such asf-0.stream0, f-0.stream1, f-0.stream2, and so on), then repeatstep d through step h to add each file.
j. Click OK on the Specify Backup dialog box.
k. On the General page of the Restore Database window, select thecheckboxes next to the backup files to restore.
l. In the left pane, click Options to open the Options page.
m. In the Restore the database files as list, select each file and click the ...button to specify the location to which to restore the files.
n. For Recovery state, select RESTORE WITH NORECOVERY.
o. Click OK to begin the restore.
4. Restore the differential (d-n) or transaction log (i-n) files in order from theoldest to the most recent:
Restore
Restoring a database with SQL Server tools 145

a. In the Object Explorer, right-click the database and select Tasks >Restore > Database.
b. On the General page of the Restore Database window, select From device.
c. Click the ... button.
The Specify Backup dialog box appears.
d. Click Add.
The Locate Backup File dialog box appears.
e. Select the folder in which the differential or transaction log backup files arelocated.
f. From the Files of type list, select All files(*).
g. Select the differential (d-n) or transaction log (i-n) backup file, where n isthe sequential number of the differential or incremental backup since thepreceding full backup.
h. Click OK.
i. If there are multiple differential or transaction log backup files from multi-streaming (such as d-3.stream0, d-3.stream1, d-3.stream2, ori-6.stream0, i-6.stream1, i-6.stream2, and i-6.stream3), thenrepeat step d through step h to add each file.
j. Click OK on the Specify Backup dialog box.
k. On the General page of the Restore Database window, select thecheckboxes next to the backup files to restore.
l. In the left pane, click Options to open the Options page.
m. In the Restore the database files as list, select each file and click the ...button to specify the location to which to restore the files.
n. For Recovery state, select RESTORE WITH NORECOVERY for all exceptthe most recent backup file. When you restore the most recent backup file,select RESTORE WITH RECOVERY.
o. Click OK to begin the restore.
5. If the database is not already listed in SQL Server Management Studio, thenrefresh the list or connect to the database.
After you finish
After the restore completes successfully, perform a full backup of the database andclear the Force incremental backup after full backup checkbox in the plug-inoptions for the backup. If the checkbox is selected when a full backup occurs after arestore, then the transaction log backup that occurs automatically after the fullbackup fails.
Restoring a database with a Transact-SQL RESTORE commandYou can issue a Transact-SQL RESTORE command to restore a database from a SQLformatted backup file to SQL Server. The Microsoft website provides full details onhow to issue a Transact-SQL command, including details on the available options forthe RESTORE command.
Procedure
1. Restore the database backup to a file by using the instructions in one of thefollowing topics:
Restore
146 Avamar for SQL Server 18.1 User Guide

l Restoring to a file with the SQL Server plug-in on page 141
l Restoring to a file with the Windows File System plug-in on page 143
2. Ensure that the SQL backup format files that you restored are accessible toSQL Server. You may need to make the data visible to SQL Server or copy thedata.
3. Restore the full backup (f-0 file) to SQL Server by using a Transact-SQLcommand similar to the following command:
RESTORE DATABASE dbnameFROM DISK = 'drive:\folder\f-0.stream0'WITHMOVE 'dbname_data' TO 'drive:\folder\dbname.mdf',MOVE 'dbname_logfile' TO 'drive:\folder\dbname.ldf',NORECOVERY
where:
l dbname is the name of the database to restore.
l The FROM DISK clause specifies the backup file from which to restore, anddrive:\folder\f-0.stream0 is the path and file name of the full backup file.
l The MOVE clauses specify the path and file name for the restored files:
n dbname_data is the name of the database data file in the backup.
n drive:\folder\dbname.mdf is the path and file name for the restoreddatabase file.
n dbname_logfile is the name of the database log file in the backup.
n drive:\folder\dbname.ldf is the path and file name for the restoreddatabase log file.
l The NORECOVERY option specifies that the database will remain in therestoring state, which enables you to restore additional backups beforesetting the database online.
4. Restore all but the most recent differential (d-n) or transaction log (i-n)backup files, starting with the oldest file, by using a Transact-SQL commandsimilar to the command in the previous step. However, replace thef-0.stream0file name in the FROM DISK clause with the file name for the differential ortransaction log backup file.
5. Restore the most recent differential or transaction log backup file by using aTransact-SQL command similar to the following command:
RESTORE DATABASE dbnameFROM DISK = 'drive:\folder\i-7.stream0'WITHMOVE 'dbname_data' TO 'drive:\folder\dbname.mdf',MOVE 'dbname_logfile' TO 'drive:\folder\dbname.ldf',RECOVERY
where:
l dbname is the name of the database to restore.
l The FROM DISK clause specifies the backup file from which to restore, anddrive:\folder\i-7.stream0 is the path and file name of the most recenttransaction log backup file.
Restore
Restoring a database with SQL Server tools 147
l The MOVE clauses specify the path and file name for the restored files:
n dbname_data is the name of the database data file in the backup.
n drive:\folder\dbname.mdf is the path and file name for the restoreddatabase file.
n dbname_logfile is the name of the database log file in the backup.
n drive:\folder\dbname.ldf is the path and file name for the restoreddatabase log file.
l The RECOVERY option sets the database online after the restore.
6. If the database is not already listed in SQL Server Management Studio, thenrefresh the list or connect to the database.
After you finish
After the restore completes successfully, perform a full backup of the database andclear the Force incremental backup after full backup checkbox in the plug-inoptions for the backup. If the checkbox is selected when a full backup occurs after arestore, then the transaction log backup that occurs automatically after the fullbackup fails.
Restoring a database with the sqlcmd utilityThe sqlcmd utility is a command line utility for entering Transact-SQL statements andscripts. You can restore a database from a backup file by specifying the Transact-SQLRESTORE statements with the sqlcmd utility. The Microsoft website provides fulldetails on using the sqlcmd utility.
Note
You can use the Microsoft SQL Server osql utility, but Microsoft recommends thesqlcmd utility.
Restoring a single database from a single full backup file
sqlcmd -S server -E1> restore database dbname2> from disk = 'drive:\folder\f-0.stream0'3> with recovery;4> go
where:
l server is the server that is running SQL Server, and optionally, the instance, towhich to restore the backup.
l dbname is the database to restore.
l drive:\folder\f-0.stream0 is the path and file name of the backup file from whichto restore the database.
Determining the number and names of files in the database to restore
sqlcmd -S server -E1> restore filelistonly2> from disk = 'drive:\folder\f-0.stream0'3> go1> restore database dbname2> from disk = 'drive:\folder\f-0.stream0'
Restore
148 Avamar for SQL Server 18.1 User Guide

3> with norecovery,4> move 'dbname_data' to 'drive:\dbname.mdf',5> move 'dbname_log' to 'drive:\dbname.ldf'6> go
Restoring a database to a point in time by using STOPAT syntax
RESTORE DATABASE dbnameFROM disk= 'drive:\folder\f-0.stream0'WITH NORECOVERY, STOPAT = 'Apr 25, 2014 12:00 AM’goRESTORE LOG dbnameFROM disk= 'drive:\folder\i-1.stream0'WITH RECOVERY, STOPAT = 'Apr 25, 2013 12:00 AM'go
where:
l dbname is the database to restore.l drive:\folder\f-0.stream0 is the path and file name of the full backup file from
which to restore the database.l drive:\folder\i-1.stream0 is the path and file name of the transaction log backup
file from which to restore.
Performing a full backup after the restoreAfter the restore completes successfully, perform a full backup of the database andclear the Force incremental backup after full backup checkbox in the plug-inoptions for the backup. If the checkbox is selected when a full backup occurs after arestore, then the transaction log backup that occurs automatically after the fullbackup fails.
Restoring system databasesIt is rare that you need to restore only system databases. One possible scenario forrestoring only system databases is if damage occurs to one or more system databases.When you restore system databases, the Avamar Plug-in for SQL Server canautomatically restore the databases in the correct order and manage SQL Serverservices. If necessary, however, you can restore individual system databases andmanually manage the services.
NOTICE
System databases in a replication environment include the publication, distribution,and subscription databases. The steps to restore these databases and other systemdatabases in a SQL Server replication environment depend on the replicationconfiguration. The SQL Server plug-in can automatically restore the databases in thecorrect order and manage SQL Server services. The steps to manually restoredatabases in a replication environment are beyond the scope of this guide. Review the"Back Up and Restore Replicated Databases" topic in the SQL Server documentationon the MSDN website for detailed steps to manually restore system databases in areplication environment.
Restoring system databases automatically to the original locationWhen you restore multiple system databases to the original location, the Avamar Plug-in for SQL Server automatically restores the databases in the correct order. The SQL
Restore
Restoring system databases 149

Server plug-in can also automatically manage the stop and restart of the necessarySQL Server services during the restore.
Before you begin
l Ensure that the environment meets the guidelines in Restore requirements onpage 124.
l Close all instances of SQL Server Management Studio, and disable any otherpossible connections to the system databases. If there are other connections tothe system databases, then Avamar may not be able to restore the masterdatabase.
Procedure
1. In Avamar Administrator, click the Backup & Restore launcher link button.
The Backup, Restore and Manage window appears.
2. Find the backup and select the system databases to restore:
l Finding a backup by date on page 129
l Finding a backup by content on page 131
3. Select Actions > Restore Now.
The Restore Options dialog box appears.
4. Ensure that Windows SQL appears in the Restore Plug-in list.
5. From the Avamar encryption method list, select the encryption method to usefor data transfer between the Avamar server and the client during the restore.
The encryption technology and bit strength for a client/server connectiondepend on several factors, including the client operating system and Avamarserver version. The Avamar Product Security Guide provides additionalinformation.
6. Leave the default selection of Restore to the original location.
If you plan to restore the system databases to a file, follow the steps in Restoring to a file on page 141 instead of the steps in this procedure.
7. Click More Options.
The Restore Command Line Options dialog box appears.
8. Select the Use SQL REPLACE option checkbox.
9. Clear the Tail-log backup checkbox.
10. From the Encryption method from Data Domain system list, select theencryption method for data transfer during the restore if the backup was storedon a Data Domain system.
11. Select the Restore system databases checkbox.
12. Select the Manage SQL services automatically during restore checkbox.
13. (Optional) Select the Show Advanced Options checkbox, and set other plug-inoptions as discussed in the following topics:
l Recovery operation options on page 164
l Authentication options on page 167
14. Disregard the redirected restore options, which are only necessary when youare restoring to a different location.
15. Disregard the point-in-time recovery options, which are only supported fordatabases that use the full recovery model.
Restore
150 Avamar for SQL Server 18.1 User Guide

16. Click OK on the Restore Command Line Options dialog box.
17. Click OK on the Restore Options dialog box.
The following status message appears: Restore initiated.
18. Click OK.
Restoring system databases manually to the original locationWhen you restore system databases to the original location manually, you mustmanage the services and restore the databases in the correct order.
NOTICE
The steps to restore system databases in a SQL Server replication environmentdepend on the replication configuration and are beyond the scope of this guide.Review the "Back Up and Restore Replicated Databases" topic in the SQL Serverdocumentation on the MSDN website for detailed steps to manually restore systemdatabases in a replication environment.
Procedure
1. Shut down the SQL Server instance, and ensure that dependent services stop,such as the SQL Server Agent service and the Analysis Service.
2. Close all instances of SQL Server Management Studio, and disable any otherpossible connections to the system databases.
If there are other connections to the system databases, then Avamar may notbe able to restore the master database.
3. Start the SQL Server instance in single-user mode by running thesqlservr.exe application with the -m and -c options:
l To start the default instance in single-user mode, open a command promptand type the following command:
cd \MSSQLPATH\Binnsqlservr.exe -m -c
l To start a named instance in single-user mode, open a command prompt andtype the following command:
cd \MSSQLPATH\Binnsqlservr.exe instance -m -c
where \MSSQLPATH\Binn is the path to the Binn folder for the instance, andinstance is the name of the instance to start.
4. Wait for the Recovery Complete message to appear on the console.
If you log in to the SQL Server computer as a local or domain administrator withthe SQL services running under the Local System account, then thesqlservr.exe command may fail to correctly start SQL services in single-user mode. If that occurs, complete step 4.a on page 152 through step 4.e onpage 152 instead of running sqlservr.exe from the command line.Otherwise, go to step 5 on page 152.
Complete the following steps if SQL services do not start in single-user modecorrectly:
Restore
Restoring system databases manually to the original location 151

a. Shut down the SQL service. If SQL Server is installed on a standaloneserver, then use the Windows Services console. If SQL Server is installed ina cluster, use Cluster Manager.
b. Right-click the SQL service in the Windows Services console, and then clickProperties.
c. In the Start parameters box, type -m -c.
d. Click Start to start the service.
e. Click OK to close the Properties dialog box.
5. Restore the master database to the original location:
a. Ensure that the environment meets the guidelines in Restore requirementson page 124.
b. In Avamar Administrator, click the Backup & Restore launcher link button.
The Backup, Restore and Manage window appears.
c. Find the backup and select the master database to restore:
l Finding a backup by date on page 129
l Finding a backup by content on page 131
d. Select Actions > Restore Now
The Restore Options dialog box appears.
e. Ensure that Windows SQL appears in the Restore Plug-in list.
f. From the Avamar encryption method list, select the encryption method touse for data transfer from the Avamar server to the client during the restore.
The encryption technology and bit strength for a client/server connectiondepend on several factors, including the client operating system and Avamarserver version. The Avamar Product Security Guide provides additionalinformation.
g. Leave the default selection of Restore to the original location.
h. Click More Options.
The Restore Command Line Options dialog box appears.
i. Select the checkbox next to the Use SQL REPLACE option and Restoresystem databases options.
j. Clear the Tail-log backup checkbox.
k. (Optional) Select Show Advanced Options, and set the authenticationoptions as discussed in Authentication options on page 167.
l. Disregard the remaining restore options, which do not apply when yourestore the master database.
m. Click OK on the Restore Command Line Options dialog box.
n. Click OK on the Restore Options dialog box.
The following status message appears: Restore initiated.o. Click OK.
After you restore the master database, the SQL Server service is stoppedautomatically.
Restore
152 Avamar for SQL Server 18.1 User Guide

6. Restart the SQL Server service:
l To start the default instance of SQL Server, open a command prompt andtype net start MSSQLServer.
l To start a named instance of SQL Server, open a command prompt and typenet start MSSQL$instance, where instance is the name of the instance.
7. Restore the msdb and model databases:
a. Ensure that the environment meets the guidelines in Restore requirementson page 124.
b. In Avamar Administrator, click the Backup & Restore launcher link button.
The Backup, Restore and Manage window appears.
c. Find the backup and select the msdb and model databases to restore:
l Finding a backup by date on page 129
l Finding a backup by content on page 131
d. Select Actions > Restore Now
The Restore Options dialog box appears.
e. Ensure that Windows SQL appears in the Restore Plug-in list.
f. From the Avamar encryption method list, select the encryption method touse for data transfer from the Avamar server to the client during the restore.
The encryption technology and bit strength for a client/server connectiondepend on several factors, including the client operating system and Avamarserver version. The Avamar Product Security Guide provides additionalinformation.
g. Leave the default selection of Restore to the original location.
h. Click More Options.
The Restore Command Line Options dialog box appears.
i. Select the checkbox next to the Use SQL REPLACE option and Restoresystem databases options.
j. Clear the Tail-log backup checkbox.
k. (Optional) Select Show Advanced Options, and set the authenticationoptions as discussed in Authentication options on page 167.
l. Disregard the remaining restore options, which do not apply when yourestore the msdb and model databases.
m. Click OK on the Restore Command Line Options dialog box.
n. Click OK on the Restore Options dialog box.
The folowing status message appears: Restore initiated.o. Click OK.
8. If required, restart the SQL Server Agent service:
l To start the default instance of SQL Server Agent, open a command promptand type net start SQLSERVERAGENT.
Restore
Restoring system databases manually to the original location 153

l To start a named instance of SQL Server, open a command prompt and typenet start SQLAGENT$instance, where instance is the name of theinstance.
Restoring system databases to a different instanceWhen you restore system databases to a different instance, the restore processoverwrites the system databases in the target instance. You must restore the masterdatabase before you restore other system databases. You can restore the model andmsdb databases either separately or at the same time.
Before you begin
l The target SQL Server installation for the restore must have the same SQL Serverversion and service pack as the SQL Server installation on which the backupoccurred.
l The name of the target instance for the restore is the same as the original SQLServer instance for the backup.
l The user account and domain for authentication is the same on the target SQLServer instance as the original SQL Server instance for the backup.
l Close all instances of SQL Server Management Studio on the target SQL Serverinstallation, and disable any other possible connections to the system databases. Ifthere are other connections to the system databases, then Avamar may not beable to restore the master database.
l Ensure that there are no avsql or avtar processes running on the target SQLServer installation.
You must restore the master and model database files to the same file system path onthe target server as the file system path on the original server for the backup. You canrestore the msdb database files to a different file system location. To restore themsdb database files to a different file system location, restore the msdb database in aseparate restore operation than the model database, and select the target file systemlocation for the restored files.
To change the file system location of the master and model database files, restore thedatabase files to the same file system location in the target instance, and thenmanually move the files by using the steps in the "Move System Databases" article onthe MSDN website at http://msdn.microsoft.com/en-us/library/ms345408%28v=sql.110%29.aspx.
Procedure
1. Restore the master database to the target instance:
a. In Avamar Administrator, click the Backup & Restore launcher link button.
The Backup, Restore and Manage window appears.
b. Find the backup and select the master database to restore:
l Finding a backup by date on page 129
l Finding a backup by content on page 131
c. Select Actions > Restore Now.
The Restore Options dialog box appears.
d. Ensure that Windows SQL appears in the Restore Plug-in list.
Restore
154 Avamar for SQL Server 18.1 User Guide
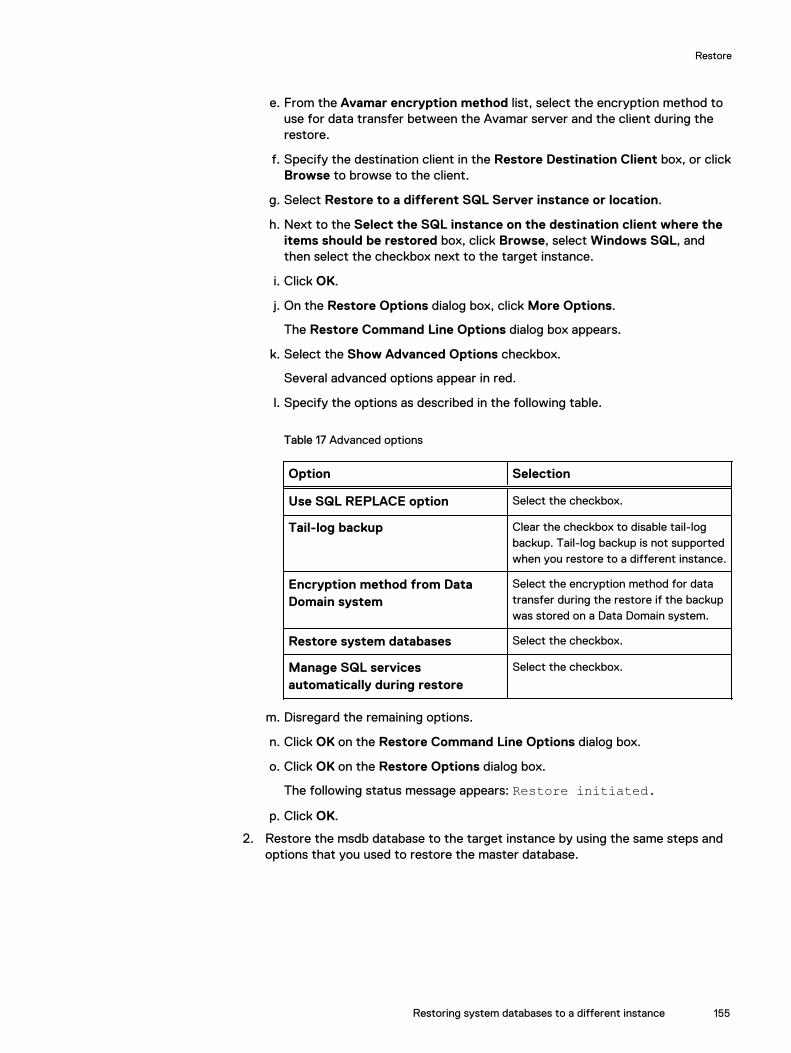
e. From the Avamar encryption method list, select the encryption method touse for data transfer between the Avamar server and the client during therestore.
f. Specify the destination client in the Restore Destination Client box, or clickBrowse to browse to the client.
g. Select Restore to a different SQL Server instance or location.
h. Next to the Select the SQL instance on the destination client where theitems should be restored box, click Browse, select Windows SQL, andthen select the checkbox next to the target instance.
i. Click OK.
j. On the Restore Options dialog box, click More Options.
The Restore Command Line Options dialog box appears.
k. Select the Show Advanced Options checkbox.
Several advanced options appear in red.
l. Specify the options as described in the following table.
Table 17 Advanced options
Option Selection
Use SQL REPLACE option Select the checkbox.
Tail-log backup Clear the checkbox to disable tail-logbackup. Tail-log backup is not supportedwhen you restore to a different instance.
Encryption method from DataDomain system
Select the encryption method for datatransfer during the restore if the backupwas stored on a Data Domain system.
Restore system databases Select the checkbox.
Manage SQL servicesautomatically during restore
Select the checkbox.
m. Disregard the remaining options.
n. Click OK on the Restore Command Line Options dialog box.
o. Click OK on the Restore Options dialog box.
The following status message appears: Restore initiated.p. Click OK.
2. Restore the msdb database to the target instance by using the same steps andoptions that you used to restore the master database.
Restore
Restoring system databases to a different instance 155

Note
You can restore both the msdb and model databases at the same time if yourestore them to the same file system path on the target server as the path onthe original server. If you want to restore the msdb database files to a differentfile system path on the target server, then restore the msdb and modeldatabases with separate restore operations, and specify the file system locationfor the msdb database files by clicking Set Destination on the RestoreOptions dialog box and selecting the location.
3. If you did not restore the model database in the previous step, then restore themodel database by using the same steps and options that you used to restorethe master and msdb databases.
Restoring to an AlwaysOn availability groupWhen you back up databases in an AlwaysOn availability group, you can restore thedatabases to the following locations:
l The original location in the original availability group
l A new database in the original availability group
l A different availability group
l A SQL Server instance that does not use availability groups
l Operating system files
In a hybrid IT environment with AlwaysOn availability groups and Microsoft Azure, thesteps to restore a database depend on the location of the primary replica:
l If the primary replica is on-premise, restore data to only the primary replica. Donot attempt to restore to both the primary and secondary replicas. If there is acorresponding database on the secondary replicas when you restore a databaseonly on the primary replica, then the database on the secondary replicas is in arestoring state. To restore the databases on the secondary replicas as part of theavailability group, manually prepare and restore the databases, and join them tothe availability group on the secondary replica.
l If the primary replica is on a Microsoft Azure virtual machine, then restore thedatabase to operating system files and then use SQL Server tools to restore thedatabase to the availability group.
Restoring to the original availability groupWhen you restore to the original location in an AlwaysOn availability group, the restoreprocess can automatically restore the databases on both the primary replica and thesecondary replicas. You can also restore databases only on the primary replica.
Restoring automatically to both primary and secondary replicas
To automatically restore the databases to both the primary replica and the secondaryreplicas, perform the steps in Restoring to the original location on page 135. Duringthe restore, set the following values:
l Select the client for the availability group listener when you search for a backup torestore.
Restore
156 Avamar for SQL Server 18.1 User Guide

l Set the plug-in options with the following values:
n Clear the Restore only on primary replica checkbox.
n Leave the System Databases options clear. SQL Server does not supportsystem databases in an availability group.
n (Optional) Perform a tail-log backup or use SQL REPLACE to force a restoreeven if the database already exists.
n Disregard the Redirected Restore options.
n (Optional) Specify authentication information.
n (Optional) Perform a point-in-time recovery.
Restoring to only the primary replicaProcedure
1. Perform the steps in Restoring to the original location on page 135. During therestore, set the following values:
l Select the client for the availability group listener when you search for abackup to restore.
l Leave the Restore only on primary replica checkbox selected in the plug-inoptions.
l Leave the System Databases options clear. SQL Server does not supportsystem databases in an availability group.
l (Optional) Perform a tail-log backup or use SQL REPLACE to force a restoreeven if the database already exists.
l Disregard the Redirected Restore options.
l (Optional) Specify authentication information.
l (Optional) Perform a point-in-time recovery.
After you restore a database on only the primary replica, the correspondingdatabase on the secondary replicas is in a restoring state.
2. (Optional) Restore the databases on the secondary replicas by manuallypreparing and restoring the databases, and then joining them to the availabilitygroup on the secondary replicas.
Restoring to a new database in the original availability groupYou can restore a database in an AlwaysOn availability group to its original instancebut with a new name, creating a new database in the instance.
To automatically restore the databases to both the primary replica and the secondaryreplicas, perform the steps in Restoring to a new database in the original instance onpage 137. During the restore, set the following values:
l Select the client for the availability group listener when you search for a backup torestore.
l Set the plug-in options with the following values:
n Leave the Use SQL REPLACE option checkbox clear.
n (Optional) Perform a tail-log backup.
Restore
Restoring to a new database in the original availability group 157

n Clear the Restore only on primary replica checkbox.
n (Optional) Specify recovery operation options.
n Leave the System Databases options clear. SQL Server does not supportsystem databases in an availability group.
n Specify a name for the new database in the New database name box.
n (Optional) Specify a new path for the database files in the Alternate databaselocation box.
n (Optional) Select the location for the restored database log files.
n (Optional) Specify authentication information.
n (Optional) Perform a point-in-time recovery.
Restoring to a different availability groupYou can restore databases from one availability group to an availability group in adifferent cluster.
Procedure
1. Perform the steps in Restoring to a different instance on page 139. During therestore, set the following values:
l Select the client for the original availability group listener when you searchfor a backup to restore.
l Leave the Use SQL REPLACE option checkbox clear in the plug-in options.
l Clear the Tail-log backup checkbox. This restore scenario does not supporttail-log backup.
l Leave the Restore only on primary replica checkbox selected.
l (Optional) Specify recovery operation options.
l Leave the System Databases options clear. SQL Server does not supportsystem databases in an availability group.
l Disregard the Redirected Restore options. You already specified thesesettings on the Set Destination dialog box.
l (Optional) Specify authentication information.
l (Optional) Perform a point-in-time recovery.
2. After the restore completes, join the new database to the availability group.
When you add the database to the availability group, the process automaticallycreates and synchronizes the databases on the secondary replicas.
Restoring to a SQL Server instance without availability groupsWhen you back up databases in an availability group, you can restore the databases toa different SQL Server instance that does not use availability groups, either on thesame server or on a different server.
The steps are the same whether you restore from a backup of databases on a stand-alone server, on shared storage in a failover cluster, or in an availability group. Restoring to a different instance on page 139 provides details.
Restore
158 Avamar for SQL Server 18.1 User Guide
Restoring to operating system filesWhen you back up databases in an availability group, you can restore the databases tooperating system files.
The steps are the same whether you restore from a backup of databases on a stand-alone server, on shared storage in a failover cluster, or in an availability group. Restoring to a file on page 141 provides details.
Restoring a database with an intact log fileIf a database becomes corrupt or is otherwise lost but an intact database log file isavailable, you can restore the database and use the log file to recover transactionsafter the most recent backup.
Procedure
1. Perform a transaction log backup of the intact database log by issuing thefollowing Transact-SQL command:
BACKUP LOG dbname TO DISK = 'drive:\folder\filename' WITHNO_TRUNCATEwhere dbname is the name of the database and drive:\folder\file is the path tothe folder and file name to which to save the backup.
2. In Avamar Administrator, find the most recent backup of the database by usingthe instructions in Finding a backup by content on page 131.
3. In Avamar Administrator, restore the backup to its original location by using theinstructions in Restoring to the original location on page 135.
On the Restore Command Line Options dialog box during the restore, selectthe Show Advanced Options checkbox, and then configure the settings asfollows:
l Select the Use SQL REPLACE option checkbox.
l Clear the Tail-log backup checkbox.
l (Optional) If the backup is stored on a Data Domain system, select theencryption method for data transfer from the Data Domain system to theclient during the restore by using the Encryption method from DataDomain system list.
l Select NORECOVERY from the Recovery operation list.
l Disregard the remaining options, which do not apply to this restore.
4. Restore the transaction log backup of the intact database log by issuing thefollowing Transact-SQL command:
RESTORE LOG dbname FROM DISK = 'drive:\folder\filename' WITHRECOVERYwhere dbname is the name of the database and drive:\folder\file is the path andfile name for the transaction log backup file.
5. If the database does not appear in SQL Server Management Studio, thenrefresh the list or connect to the database.
Restore
Restoring to operating system files 159
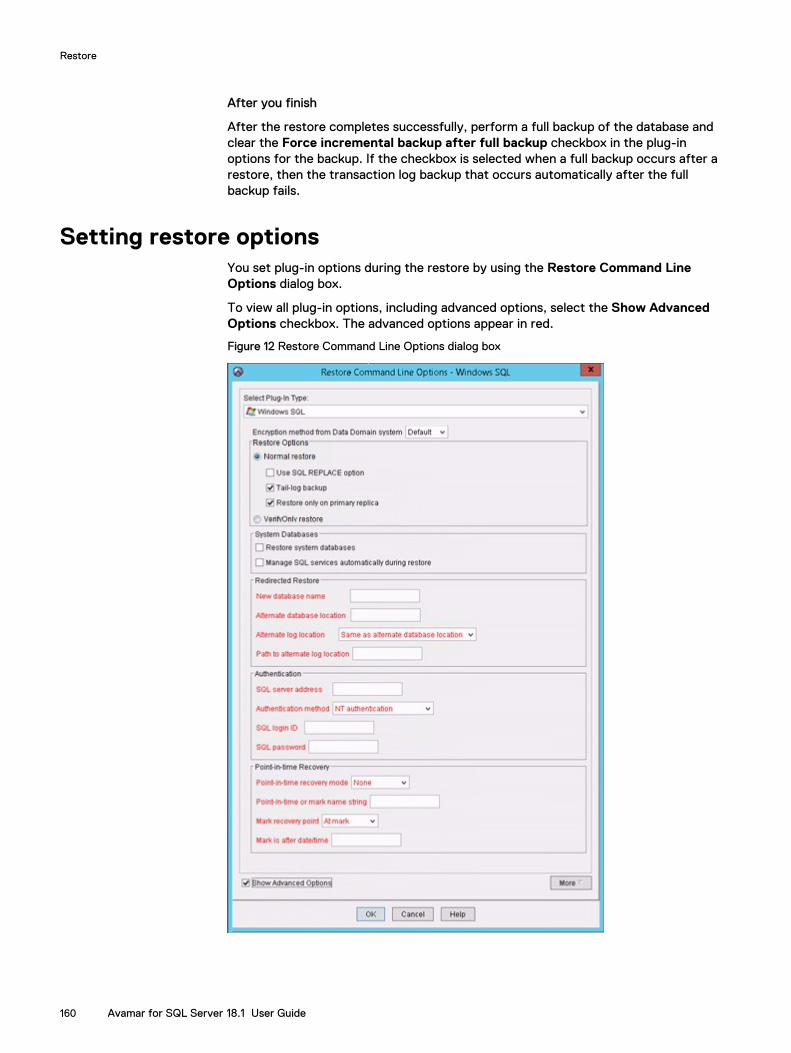
After you finish
After the restore completes successfully, perform a full backup of the database andclear the Force incremental backup after full backup checkbox in the plug-inoptions for the backup. If the checkbox is selected when a full backup occurs after arestore, then the transaction log backup that occurs automatically after the fullbackup fails.
Setting restore optionsYou set plug-in options during the restore by using the Restore Command LineOptions dialog box.
To view all plug-in options, including advanced options, select the Show AdvancedOptions checkbox. The advanced options appear in red.
Figure 12 Restore Command Line Options dialog box
Restore
160 Avamar for SQL Server 18.1 User Guide

General restore optionsGeneral options on the Restore Command Line Options dialog box include theEncyrption method from Data Domain system option, Normal restore selection,which also allows you to select the Use SQL REPLACE option checkbox, the Tail-logbackup checkbox, and the Restore only on primary replica checkbox, VerifyOnlyselection, and the Enable debugging messages checkbox.
Encryption method from Data Domain systemIf the backup is stored on a Data Domain system, the Encryption method from DataDomain system option specifies the encryption method to use for data transferbetween the Data Domain system and the client during the restore.
Normal restorePerforms a normal restore of the databases. Selecting this option allows you to alsoselect the Use SQL REPLACE option checkbox, the Tail-log backup checkbox, andthe Restore only on primary replica checkbox.
Use SQL REPLACE option
When you select the Use SQL REPLACE option checkbox on the Restore CommandLine Options dialog box, an SQL WITH REPLACE clause statement is added to therestore Transact-SQL command. The statement specifies that SQL Server will createany necessary database and related files even if another database or file exists withthe same name.
NOTICE
This option overrides a SQL Server safety check to prevent you from accidentallyoverwriting a different database or file. The Microsoft Transact-SQL documentationprovides more information in the RESTORE command section.
Select the checkbox only when you are restoring an instance, database, filegroup, orfile to its original location and you need to force the overwrite of the original data. Youmay need to force the overwrite if a previous database restore exited with thefollowing SQL Server error in the Avamar SQL restore log:
One or more devices or files already exist. Reissue thestatement using the WITH REPLACE option to overwrite thesefiles and devices.Use this option also when you restore system databases.
Tail-log backup
When you select the Tail-log backup checkbox on the Restore Command LineOptions dialog box, Avamar backs up the tail of the transaction log during the restoreto capture the log records that are not in a backup. The restore process then uses thetail-log backup after the database restore to recover the transactions that were not inthe backup.
To perform a tail-log backup, the database must be online and using either the full orbulk-logged recovery model. As a result, you cannot perform a tail-log backup ofsystem databases such as the master and msdb databases because those databasesuse the simple recovery model.
Restore
General restore options 161

When you are restoring a user-defined filegroup or secondary data file and youperform a tail-log backup, you must select the most recent backup as the backup fromwhich to restore. Otherwise, the restore fails and an error message is written to thelog file.
You can perform a tail-log backup when you are restoring an instance, database,filegroup, or file to its original location without the SQL WITH REPLACE option. Inother words, if you select the Use SQL REPLACE option checkbox when you arerestoring to the original location, then leave the Tail-log backup checkbox clear.
You can also perform a tail-log backup when you are restoring a database to theoriginal instance but with a new database name.
If you are performing a point-in-time restore and the point in time to which you arerestoring is after the most recent transaction log backup, then you must perform atail-log backup.
A tail-log backup is also required if you are restoring a file from a user-definedfilegroup to its original location.
Do not perform a tail-log backup if you are performing a redirected restore to adifferent SQL Server instance.
NOTICE
If the tail-log backup fails to complete, then the restore cannot take place. Review thelog file to determine the cause of the failure. Correct the problem, and then restartthe restore. If you clear the Tail-log backup checkbox to prevent the tail-log backup,then the restore includes only the transactions up to the selected backup. You maylose any transactions in the tail of the log.
Restore only on primary replica
The Restore only on primary replica checkbox controls whether databases restore toonly the primary replica or to the primary replica and all secondary replicas in anAlwaysOn availability group.
When you clear the checkbox, the restore process automatically restores thedatabases to the original location on both the primary replica and the secondaryreplicas. Clear the checkbox only when you restore to the original location in theoriginal availability group and you want to restore to all replicas.
When you select the checkbox and restore the databases on only the primary replica,the corresponding database on the secondary replicas is in a restoring state. Torestore the databases on the secondary replicas as part of the availability group, youcan manually prepare and restore the databases, and then join them to the availabilitygroup on the secondary replica.
You can also set the database on a secondary replica online without rejoining it to theavailability group by restoring the database with the RECOVERY recovery operation.The SQL Server documentation available on the Microsoft website provides details.
Select the checkbox in the following restore scenarios:
l You are restoring to a different location in the original availability group.
l You are restoring to a different availability group.
l You are restoring to an on-premise primary replica in a hybrid IT environment withMicrosoft Azure.
You can also select the checkbox if you want to restore to only the primary replica inthe original availability group.
Restore
162 Avamar for SQL Server 18.1 User Guide
Individual restore of an incremental or differential backupThis feature is supported for standalone, cluster, and AG environments configuredwith single or multiple SQL databases.
Overwrite default recoveryplan checkbox in the Avamar Administrator.
Using the Avamar AdministratorTo restore individual incremental or differential backup streams:
1. Ensure that the environment meets the guidelines in Restore requirements onpage 124.
2. In Avamar Administrator, click the Backup & Restore launcher link button.The Backup, Restore and Manage window appears.
3. Find the backup to restore:
l Finding a backup by date on page 129
l Finding a backup by content on page 131
The backup to restore is selected in the Backups table.
4. Select Actions > Restore Now.The Restore Options dialog box appears.
5. Ensure that Windows SQL appears in the Restore Plug-in list.
6. In the Recovery operation field, select one of the following options:
l To determine the correct checkpoint up to restore during a restore operation,select WITH NO Recovery.
l To determine the correct checkpoint up to restore and view and read the datathat recovered during a restore operation, select WITH STANDBY.
l To place the database in normal mode and restore the individual backupstream, select WITH Recovery.
l To restore the last checkpoint and restore the individual backup stream, selectWITH Recovery
7. If the WITH STANDBY option was selected, in the Standby file location field,type the file name location.
8. Select the Overwrite defaul recovery plan checkbox.
9. Click OK.
Using the CLITo restore individual incremental or differential backup streams, use the --overwrite-default-recoveryplan flag.
When restoring individual streams of incremental or differential backups, consider thefollowing options:
l To determine the correct checkpoint up to restore during a restore operation, usethe WITH NORECOVERY flag.
l To determine the correct checkpoint up to restore and view and read the data thatrecovered during a restore operation, use the WITH STANDBY flag.
l To place the database in normal mode, restore the individual backup stream byusing the WITH RECOVERY flag.
l To restore the last checkpoint, use the restore the individual backup stream byusing the WITH RECOVERY flag.
Restore
General restore options 163

AG ConsiderationsFor AG environments, individual restore operations can only be performed on theprimary node.
If the AG database is removed from AG while performing an individual restoreoperation:
1. On the primary node, search for the required checkpoint by performing anincremental or differential restore.
2. Manually join the database to the AG.You can use either of the following methods:
l Use the SQL server.
l Perform a restore operation in the Avamar Administrator:
a. In the Recovery operation field, select RECOVERY.
b. Select the Overwrite defaul recovery plan checkbox.
c. Disable the Restore primary only checkbox.
d. Click OK.
VerifyOnly restoreThis options performs a verify-only restore, which verifies the backup but does notrestore it.
Enable debugging messagesWhen you select the Enable debugging messages option, maximum information iswritten to log files during the operation. If you select the checkbox, the operationgenerates very large log files. Use this option only for debugging purposes.
Recovery operation optionsThe Recovery operation list and Standby file location box on the RestoreCommand Line Options dialog box enable you to control the recovery operation thatoccurs after the restore.
Table 18 Recovery operation options
Recovery operation Description
RECOVERY The database is fully recovered and onlineafter the restore. This feature is the defaultsetting.
NORECOVERY The database remains in a restoring stateafter the restore. This feature enables you toperform additional manual restore tasks, suchas applying additional SQL transaction logfiles.
STANDBY The database is in standby (read-only) modeafter the restore. This feature enables you tobring up a database for read-only accessbetween transaction log restores, and can beused with either warm standby serversituations or special recovery situations in
Restore
164 Avamar for SQL Server 18.1 User Guide
Table 18 Recovery operation options (continued)
Recovery operation Description
which it is useful to inspect the databasebetween log restores.
This option also creates a file with recoverychanges. If required, you can use the file torevert the recovery changes. The size of thefile depends on the volume of undo actionsfrom uncommitted transactions. Specify thepath to this file in the Standby file locationbox. Use the following format:
drive:\folder\subfolder
where drive is the drive letter on thedestination client, and folder\subfolder is thepath on the drive letter in which to create thefile.
If a file with recovery changes exists in thespecified location, then SQL Serveroverwrites it. If you do not specify a path,then Avamar creates the file in the C:\Program Files\avs\var folder, where
C:\Program Files\avs is the Avamarinstallation folder.
Do not use STANDBY when a database
upgrade is necessary. You may need toperform a database upgrade when restoringbackup sets from an earlier version of SQLServer.
You can specify the recovery operation in the following restore scenarios:
l You are restoring an instance, database, filegroup, or file to its original location.
l You are restoring a database to the original instance but with a new databasename.
l You are restoring an instance, database, filegroup, or file to a different instance oneither the original server or a different server.
l You are restoring one or more system databases. Keep in mind the followingpoints, however:
n If you are restoring the master or model database, then you must select theRECOVERY option. Do not use either the NORECOVERY or STANDBY options.
n If you are restoring the msdb database, then you can select any of the recoveryoperation options. However, if you select NORECOVERY or STANDBY, then alldatabases become inaccessible until the restore of the msdb database iscomplete.
n If you are restoring the system databases, then you must select the RECOVERYoption. Do not use either the NORECOVERY or STANDBY options.
You do not need to specify the recovery operation when you are restoring to anoperating system file.
Restore
Recovery operation options 165

If you specify either the NORECOVERY or STANDBY recovery operation, then you canbring the database back online after any manual operations by using one of thefollowing methods:
l Restore the database again by using the Avamar Plug-in for SQL Server, butselect RECOVERY from the Recovery operation list.
l Issue a RESTORE DATABASE dbname WITH RECOVERY command by using SQLServer Management Studio, where dbname is the name of the database torestore.
System database restore optionsThe Restore system databases and Manage SQL services automatically duringrestore checkboxes on the Restore Command Line Options dialog box enable you tocorrectly restore system databases, such as the master, msdb, and model databases.
When you restore an entire instance, or if you specifically select system databases forrestore, then select the Restore system databases checkbox to ensure that thesystem databases restore. If you leave the checkbox clear, then the system databasesdo not restore.
The Manage SQL services automatically during restore option automatically stopsand restarts SQL services during the restore:
l When you restore the master database, this option automatically stops the SQLServer instance, including dependent services such as the SQL Server agentservice and the Analysis Service. The option also restarts the instance in single-user mode before the restore. After the restore, the instance automaticallyrestarts.
l When you restore the msdb database, this option automatically stops the SQLServer agent service, and then restarts it when the restore is complete.
When you select both system and user databases for restore, the system databasesrestore first. You must select the Manage SQL services automatically duringrestore checkbox to ensure that all system databases restore in the proper order andwith the necessary service stops and restarts.
Redirected restore optionsThe redirected restore options on the Restore Command Line Options dialog boxenable you to control the database name and file locations when you restore adatabase to the original instance but with a new name.
You also can specify the file locations by clicking Set Destination on the RestoreOptions dialog box. If you specify the file locations in the Restore Options dialog box,then you do not need to specify them on the Restore Command Line Options dialogbox.You can also specify a new database name when you are restoring a database to adifferent instance but with a new name.
Procedure
1. In the Restore Command Line Options dialog box, select the Show AdvancedOptions checkbox.
Several advanced options, including the point-in-time recovery options, appearin red.
2. (Optional) If you are restoring a single database with a new name, specify thenew name in the New Database name box.
Restore
166 Avamar for SQL Server 18.1 User Guide
3. To restore the database files to a different path than the original path, type thefull path of the new database file (*.mdf) location on the client in theAlternate database location box. An example path is C:\temp.
4. Select the path to which to restore the database log file (*.ldf):
l To restore the database log file to the same location as the database files (asspecified in the Alternate database location box), select Same asalternate database location from the Alternate log location list.
l To restore the database log file to a different location than the databasefiles, select Different location from the Alternate log location list, and thentype the path to the location on the client in the Path to alternate loglocation box. An example path is C:\temp\logs.
Authentication optionsAuthentication options enable you to specify whether Avamar uses Windows (NT)authentication or SQL Server authentication to connect to SQL Server when yourestore an instance, database, filegroup, or file to either its original location or to adifferent location.
If you do not specify an authentication method, then the SQL Server plug-in uses NTauthentication and logs in with the NT AUTHORITY\SYSTEM account.
You do not need to specify authentication options when you are restoring to anoperating system file because it is not necessary to connect to SQL Server during thistype of restore.
Procedure
1. In the Restore Command Line Options dialog box, select the Show AdvancedOptions checkbox.
Several advanced options, including the authentication options, appear in red.
2. In the SQL server address box, specify the hostname or IP address of theserver to connect to.
3. From the Authentication method list, select whether to use NT authenticationor SQL Server authentication.
4. If you select SQL Server authentication, specify the login ID and password forthe SQL Server account in the SQL login ID and SQL password boxes,respectively.
Point-in-time recovery optionsIf you are restoring a database that uses the full recovery model to either its originallocation or to a different location, then you can restore to either a specific date andtime or to a named mark in the transaction log.
You cannot perform a point-in-time restore of system databases such as the masterand msdb databases because those databases use the simple recovery model.
To restore to a specific point in time, you must provide the transaction date and timeor named mark to which to recover from the SQL Server transaction log. The SQLServer documentation on the Microsoft website provides details on how to accesstransaction log information.
The point in time to which you are restoring must be after the finish time for the mostrecent full backup. In addition, if the point in time is before the start time of the mostrecent transaction log (incremental) backup, then a tail-log backup is not required.
Restore
Authentication options 167
However, a tail-log backup is required if the point in time is after the most recenttransaction log backup.
When you specify the point in time for restore, do not specify the start time of theselected transaction log backup if it is not the last backup in the backup sequence.Otherwise, the restore fails and a tail-log backup does not occur even if you select theTail-log backup option.
Procedure
1. In the Restore Command Line Options dialog box, select the Show AdvancedOptions checkbox.
Several advanced options, including the point-in-time recovery options, appearin red.
2. From the Point-in-time recovery mode list, select whether to recover to apoint in time or a named mark:
3. In the Point-in-time or mark name string box, specify either the point in timeor the named mark to which to recover:
l To recover to a specific point in time, specify the date and time in yyyy-mm-ddThh:mm:ss format. For example, 2013-10-15T14:15:45 is October 15, 2013at 2:15:45 p.m.
l To recover to a named mark, specify the mark.
4. If you specified a mark, select whether to include the mark in the recovery:
l To specify that the log record immediately before the mark is the recoverypoint, select Before mark from the Mark recovery point list. In otherwords, the recovery rolls forward to the mark and excludes the markedtransaction.
l To specify that the marked transaction is the recovery point, select At markfrom the Mark recovery point list. In other words, the recovery rollsforward to the mark and includes the marked transaction.
5. If you specified a mark and named marks are not unique in the transaction log,then use the Mark is after date/time box to locate the mark to which torecover. The recovery process stops at the first mark with the specified name,exactly at or after the specified date and time. Specify the date and time inyyyy-mm-ddThh:mm:ss format.
Performing table level recoveryYou can restore individual tables from a backup of an SQL database by performing atable level recovery in conjunction with ItemPoint for Microsoft SQL Server.
Procedure
1. In Avamar Administrator, click the Backup & Restore launcher link button.
The Backup, Restore, and Manage window appears.
2. Find a full backup that contains the items to restore:
l Finding a backup by date on page 129
l Finding a backup by content on page 131
While selecting differential backups to perform table level recovery, select onlythe full backup and the required differential backup. Selecting multipledifferential backups is not supported.
Restore
168 Avamar for SQL Server 18.1 User Guide

3. Select the Browse for Granular Restore icon in the lower-left pane of theRestore tab.
The Select Destination Client dialog box appears.
4. Select the target machine onto which the database will be mounted for TLR.
l To mount the database on the original machine, select Restore everythingto its original location.
l To mount the database on another machine, select Restore everything to adifferent location.
Note
TLR can be performed on physical nodes only. In the case of a failover of acluster or an AlwaysOn availability group, restore must be redirected to aphysical nodes that has TLR installed.
5. Click OK.
A message will indicate that the mounting operation may take a long time tocomplete.
6. Click OK to proceed with the mount operation.
The Restore Browse Options dialog will open.
7. At the Restore Browse Options dialog, identify the following:
a. For Drive letter or mount path, enter the drive letter that will be used tomount the SQL backup data or enter a forward slash (/) or backslash (\) tomount the drive using the first available drive letter, beginning with Z:.
This option is not case sensitive. If the letter entered here has a drive alreadymounted on it and that drive is not controlled by the Avamar Plug-in for SQLTLR, the mount operation will fail. If the Avamar Plug-in for SQL TLR hasalready mounted a drive on this letter, the existing drive will be unmountedand the new one will be mounted.
b. For Amount of time to leave AvFS mounted, select when to automaticallydismount the drive. If the amount of time needs to be extended during therecovery, use the avsqltlr command.
8. On the target machine, open ItemPoint for Microsoft SQL Server from theMicrosoft Windows Start menu:
a. Select Programs
b. Select the EMC ItemPoint for Microsoft SQL Server folder.
c. Select the EMC ItemPoint for Microsoft SQL Server program.
Following instructions in the ItemPoint for Microsoft SQL Serverdocumentation to perform a table level recovery.
Restore
Performing table level recovery 169

Monitoring restoresYou can monitor restores to ensure a successful completion of restores andtroubleshooting of issues. The Activity Monitor in Avamar Administrator enables youto view status information for restores.
Procedure
1. In Avamar Administrator, click the Activity launcher link.
The Activity window appears.
2. Click the Activity Monitor tab.
A list of all activities appears.
3. To filter the results to display only restore activity, select Actions > Filter.
The Filter Activity dialog box appears.
4. Select Restore from the Type list.
5. Click OK.
Canceling restoresYou can cancel a restore any time before it completes. The cancellation might take 5minutes or longer. The restore may complete before the cancellation finishes.
Procedure
1. In Avamar Administrator, click the Activity launcher link.
The Activity window appears.
2. Click the Activity Monitor tab.
A list of all activities appears.
3. Select the restore from the list.
4. Select Actions > Cancel Activity.
A confirmation message appears.
5. Click Yes.
Restore
170 Avamar for SQL Server 18.1 User Guide

CHAPTER 6
Disaster Recovery
This chapter includes the following topics:
l Preparing for disaster recovery.........................................................................172l Performing disaster recovery............................................................................172
Disaster Recovery 171

Preparing for disaster recoveryProcedure
1. Ensure that you have onsite and offsite copies of the installation disks for theoperating system, SQL Server, and any software updates.
2. Perform full Windows server backups by using the Avamar Client for Windows.Include System State and all critical and noncritical disks in the backups. TheAvamar for Windows Server User Guide provides full backup instructions.
3. Back up all system and user databases by using the Avamar Plug-in for SQLServer.
If you use AlwaysOn availability groups, then you must perform a separatebackup of the system databases. During the backup, select the server name ofthe physical node as the client to back up, and then select the systemdatabases. SQL Server does not support system databases in an availabilitygroup.
NOTICE
If you perform the full Windows server backup and the database backups atdifferent times, then perform the full Windows server backup first.
Performing disaster recoveryProcedure
1. Restore the server from the Windows client backup as described in the Avamarfor Windows Server User Guide.
2. Complete the recommended Microsoft SQL Server disaster recovery procedureby using the steps in the “Recovering from a Disaster” article on the MSDNwebsite.
3. Use the SQL Server plug-in to restore the system databases as described in Restoring system databases on page 149.
4. Use the SQL Server plug-in to restore the user databases as described in Restoring to the original location on page 135.
5. When you are sure that the restore of the environment is correct and complete,perform a full backup of the newly restored environment.
Disaster Recovery
172 Avamar for SQL Server 18.1 User Guide

APPENDIX A
SQL Plug-in Options
This appendix includes the following topics:
l How to set plug-in options................................................................................ 174l SQL plug-in backup options.............................................................................. 174l SQL plug-in restore options.............................................................................. 179l SQL TLR plug-in options...................................................................................183
SQL Plug-in Options 173

How to set plug-in optionsPlug-in options enable you to control specific actions for on-demand backups,restores, and scheduled backups. The available plug-in options depend on theoperation type and plug-in type.
Specify plug-in options in Avamar Administrator for on-demand backup or restoreoperations, or when a dataset for a scheduled backup is created. Set plug-in optionswith the graphical user interface (GUI) controls (text boxes, checkboxes, radiobuttons, and so forth). Type an option and its value in the Enter Attribute and EnterAttribute Value fields.
NOTICE
The Avamar software does not check or validate the information that is typed in theEnter Attribute and Enter Attribute Value fields. The values in the Enter Attributeand Enter Attribute Value fields override settings that are specified with the GUIcontrols for the options.
SQL plug-in backup optionsBackup plug-in options enable you to control backup functionality that is specific tothe Avamar Plug-in for SQL Server. You can specify plug-in options for on-demandand scheduled backups.
The following table lists options that are available for the Avamar Plug-in for SQLServer when you perform an on-demand backup or when you configure a dataset forscheduled backups.
An asterisk (*) indicates an advanced option, which only appears when you selectShow Advanced Options on the Backup Command Line Options dialog box.
Table 19 Backup plug-in options
Setting Description
Backup label Assigns this descriptive label to the backup.
Backup type Sets the backup level. One of the following values:
l Full — Backs up the entire database, including allobjects, system tables, and data.
l Differential — Backs up any data that changed after thelast complete backup.
l Incremental — Backs up only the transaction logs.
NOTICE
Microsoft SQL Server does not allow differential ortransaction log (incremental) backups of the masterdatabase. You can only create full backups of the masterdatabase. If you try to perform a differential or transactionlog backup of the master database, a full backup occursinstead.
SQL Plug-in Options
174 Avamar for SQL Server 18.1 User Guide

Table 19 Backup plug-in options (continued)
Setting Description
Copy-only Backup Instructs the SQL plug-in to perform a copy-only full backup.
Availability group replica forbackup
Controls the replica on which the backup occurs in anAlwaysOn environment. One of the following values:
l Primary — Specifies that the backup should occur onthe primary replica.
l Prefer secondary — Specifies that the backup shouldoccur on a secondary replica except when the primaryreplica is the only available replica. This is the defaultvalue.
l Secondary only — Specifies that the backup shouldoccur on the secondary replica. If no secondary replica isavailable, then the backup does not occur.
l SQL Server defined — Specifies that the backup shoulduse the backup preference specified in SQL Serversettings.
You can increase performance of the primary replica whenyou perform backups on a secondary replica. However, thesecondary replica must meet the AlwaysON availability grouprequirements.
In a hybrid IT environment with Microsoft Azure andAlwaysOn availability groups, ensure that the backup occurson an on-premise replica. Avamar cannot back up databaseson a replica on a Microsoft Azure virtual machine.
Enhanced data deduplication Controls the type of compression for data in a backup bysetting the --compress option in avtar. Enhanced data
deduplication typically reduces the amount of client data thatthe backup process must send to the server, but requiresadditional client CPU resources. Select one of the followingvalues:
l Default — The avtar process evaluates some of the
data in the backup to determine whether the datasupports compression. If the evaluated data supportscompression, then avtar compresses all data in the
backup. If the evaluated data does not supportcompression, then avtar does not compress any data.
l Disabled — The avtar process does not compress data
during the backup.
l Enabled — Forces avtar to compress data during the
backup, even if the data does not support compression.Select this value only when you are certain that data inthe backup supports compression. Otherwise, avtarunnecessarily uses additional client CPU resources to tryto perform compression on data that does not supportcompression.
SQL Plug-in Options
SQL plug-in backup options 175

Table 19 Backup plug-in options (continued)
Setting Description
Force incremental backupafter full backup
If a full backup exists and then another full backup occurs,this option creates a transaction log (incremental) backup.The transaction log backup contains transactions from theend of the first full backup or the most recent transaction logbackup, whichever is later, until the time that the forcedtransaction log backup occurs (after the first backup of thenew backup cycle).
This ensures that a point-in-time recovery to a point in timebetween the two full backups can occur, if required.
You cannot perform a transaction log backup on databasesthat use the simple recovery model because those databasesdo not support transaction log backups. This includes systemdatabases such as the master and msdb databases. Use the
For simple recovery model databases list to controlwhat Avamar does when you try to perform transaction logbackups of databases that use the simple recovery model.
*Force full backup Performs a full backup in the following scenarios:
l If you try to perform a differential or transaction log(incremental) backup and a full backup does not exist onthe server.
l If you try to perform a differential or transaction logbackup after you restore a database.
l If you try to perform a differential or transaction logbackup after you restore the msdb database.
l If log gaps are detected.
Effectively, this option automates taking a full backup whennecessary.
As a best practice, perform a transaction log backup afterthe forced full backup.
NOTICE
If you perform transaction log and differential backups, it isstrongly recommended that you leave this option selected(the default setting) for all backups. Otherwise, you mightnot be able to restore data if there are no full backups on theAvamar server.
Enable consistency check Instructs the SQL plugin to perform a consistency check ofthe database prior to performing a backup.
*Truncate database log Controls database transaction log truncation behavior. Oneof the following values:
l (Default) Only for incremental backup — The backupprocess truncates the database transaction log if thebackup type is incremental (transaction log). No logtruncation occurs if the backup type is full or differential.
SQL Plug-in Options
176 Avamar for SQL Server 18.1 User Guide

Table 19 Backup plug-in options (continued)
Setting Description
l For all backup types — The backup process truncatesthe database transaction log regardless of the backuptype. This setting breaks the chain of log backups. Donot use this setting unless the backup type is full.This value is not supported for SQL Server 2008 R2 andlater environments.
l Never — The backup process does not truncate thedatabase transaction log under any circumstances.
*For simple recovery modeldatabases
Specifies what Avamar does when you try to performincremental (transaction log) backups of databases that usethe simple recovery model, which does not supporttransaction log backups:
l Skip incremental with error — If you select databaseswith different recovery models for the backup, then thebackup does not include the databases with the simplerecovery model. The backup completes with exceptions,and an error message is written to the log. If you selectonly databases with the simple recovery model for thebackup, then the backup fails.
l Skip incremental with warning — If you select databaseswith different recovery models for the backup, then thebackup does not include databases with the simplerecovery model. The backup completes successfully, anda warning is written to the log for each database thatuses the simple recovery model. If you select onlydatabases with the simple recovery model for thebackup, then the backup fails.
l Promote incremental to full — A full backup occursautomatically instead of a transaction log backup fordatabases that use the simple recovery model.Promotion to full is indicated in the Activity Window of
the Avamar Administrator with the status Completedwith Promotion. When only some of the databases inthe backup are promoted to full, the status still indicates
as Completed with Promotion.
*Enable debugging messages Specifies to write maximum information to log files fordebugging purposes. The backup process generates large logfiles.
*Skip log gap detection For transaction log backups, controls whether the AvamarPlug-in for SQL Server checks the full transaction logbackups that are already saved for a database to verify thatthere are no "log gaps." This log gap detection ensures thatthere is a valid chain of SQL Server transaction logs so thatpoint-in-time restore can occur. If a log gap is detected, thebackup is promoted to a full backup. Promotion to full isindicated in the Activity Window of the Avamar Administrator
SQL Plug-in Options
SQL plug-in backup options 177
Table 19 Backup plug-in options (continued)
Setting Description
with the status Completed with Promotion. When onlysome of the databases in the backup are promoted to full,
the status still indicates as Completed with Promotion.
Log gap detection may require as many as 20 to 30 secondsto complete for each database. Transaction log backups maytake an excessive amount of time to complete inenvironments with a significant number of databases. If theperformance issues outweigh the risk of possible log gaps,then you can disable log gap detection by selecting thisoption to improve performance.
Store backup on Data Domainsystem
Stores the backup on a configured Data Domain systeminstead of on the Avamar server.
To store the backup on a Data Domain system, select thecheckbox and then select the Data Domain system from thelist.
Encryption method to DataDomain system
Specifies the encryption method for data transfer betweenthe client and the Data Domain system during the backup.
Multi-streaming options
Maximum number of streams Specifies the maximum number of streams to use for backupand restore. The default is 2, and the maximum value is 10.
If you select a value of 1, then Avamar backs up one databaseat a time with one stream.
Minimum stream size Specifies the minimum size of each data stream.
Authentication options
*SQL server address Connect to this hostname or IP address for the computerthat is running SQL Server.
*Authentication method Specifies whether to use Windows (NT) authentication orSQL Server authentication to connect to SQL Server.
If you do not specify an authentication method, then the SQLServer plug-in uses NT authentication and logs in with the NTAUTHORITY\SYSTEM account.
*SQL login ID If you select SQL server authentication in the
Authentication method list, connect to the server withthis login ID.
*SQL password If you select SQL server authentication in the
Authentication method list, type the password for theSQL login account.
SQL Plug-in Options
178 Avamar for SQL Server 18.1 User Guide
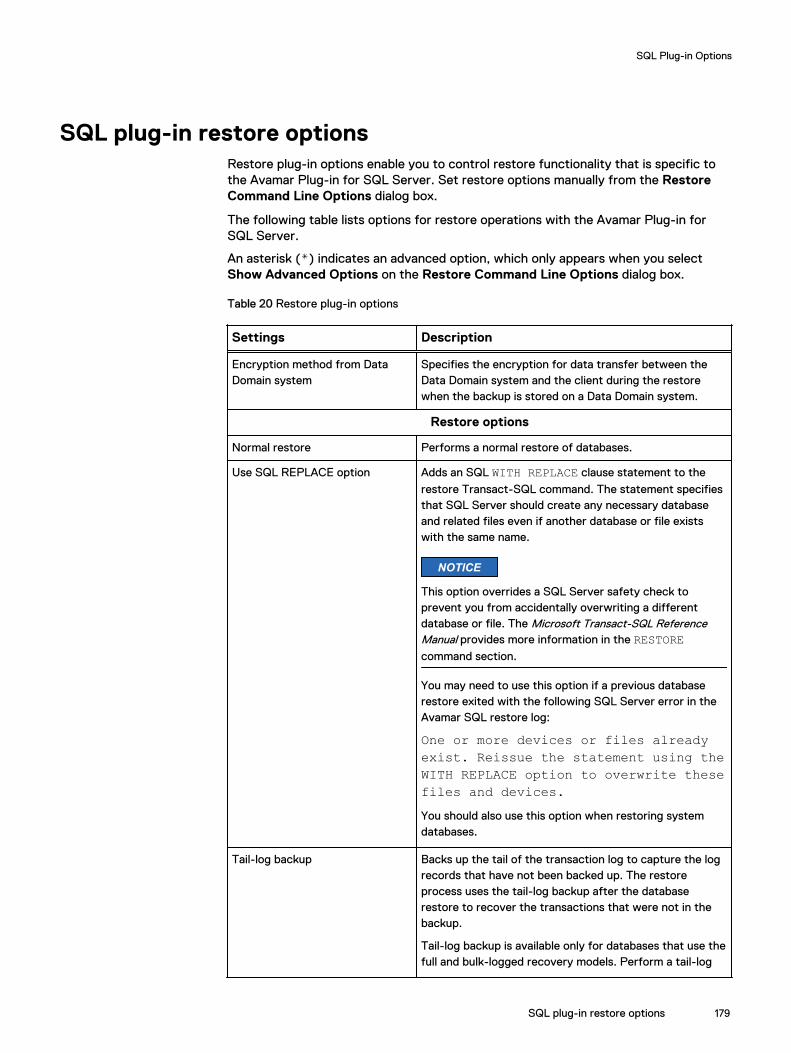
SQL plug-in restore optionsRestore plug-in options enable you to control restore functionality that is specific tothe Avamar Plug-in for SQL Server. Set restore options manually from the RestoreCommand Line Options dialog box.
The following table lists options for restore operations with the Avamar Plug-in forSQL Server.
An asterisk (*) indicates an advanced option, which only appears when you selectShow Advanced Options on the Restore Command Line Options dialog box.
Table 20 Restore plug-in options
Settings Description
Encryption method from DataDomain system
Specifies the encryption for data transfer between theData Domain system and the client during the restorewhen the backup is stored on a Data Domain system.
Restore options
Normal restore Performs a normal restore of databases.
Use SQL REPLACE option Adds an SQL WITH REPLACE clause statement to the
restore Transact-SQL command. The statement specifiesthat SQL Server should create any necessary databaseand related files even if another database or file existswith the same name.
NOTICE
This option overrides a SQL Server safety check toprevent you from accidentally overwriting a differentdatabase or file. The Microsoft Transact-SQL ReferenceManual provides more information in the RESTOREcommand section.
You may need to use this option if a previous databaserestore exited with the following SQL Server error in theAvamar SQL restore log:
One or more devices or files alreadyexist. Reissue the statement using theWITH REPLACE option to overwrite thesefiles and devices.You should also use this option when restoring systemdatabases.
Tail-log backup Backs up the tail of the transaction log to capture the logrecords that have not been backed up. The restoreprocess uses the tail-log backup after the databaserestore to recover the transactions that were not in thebackup.
Tail-log backup is available only for databases that use thefull and bulk-logged recovery models. Perform a tail-log
SQL Plug-in Options
SQL plug-in restore options 179

Table 20 Restore plug-in options (continued)
Settings Description
backup during a direct restore without the SQL REPLACEoption.
Clear the checkbox when you perform a redirectedrestore to a different SQL Server instance.
Restore only on primary replica Restores the database on only the primary replica in anAlwaysOn availability group. When you select this option,you must manually perform database synchronization onthe secondary replicas. Restoring to an AlwaysOnavailability group on page 156 provides details on restoringto an AlwaysOn availability group.
VerifyOnly restore Performs a verify-only restore, which verifies the backupbut does not restore it.
*Recovery operation Specifies the recovery operation that occurs after therestore:
l RECOVERY — The database is fully recovered and
online. This is the default setting.
l NORECOVERY — The database remains in a restoring
state. This enables you to perform additional manualrestore tasks, such as applying additional SQL logfiles.
l STANDBY — The database is in standby (read-only)
mode.
This option creates a file with recovery changes. Youcan use the file to revert the recovery changes, ifrequired. The size of the file depends on the volumeof undo actions from uncommitted transactions.
Specify the path to this file in the Standby filelocation box.
STANDBY enables you to bring up a database for
read-only access between transaction log restores.Use this setting with either warm standby serversituations or special recovery situations in which it isuseful to inspect the database between log restores.
Do not use STANDBY when a database upgrade is
necessary. You may need to perform a databaseupgrade when restoring backup sets from an earlierversion of SQL Server.
*Standby file location When you select STANDBY from the Recoveryoperation list, use this setting to specify the path to thestandby file with recovery changes.
The path must be in the following format:
drive:\folder\subfolder
SQL Plug-in Options
180 Avamar for SQL Server 18.1 User Guide
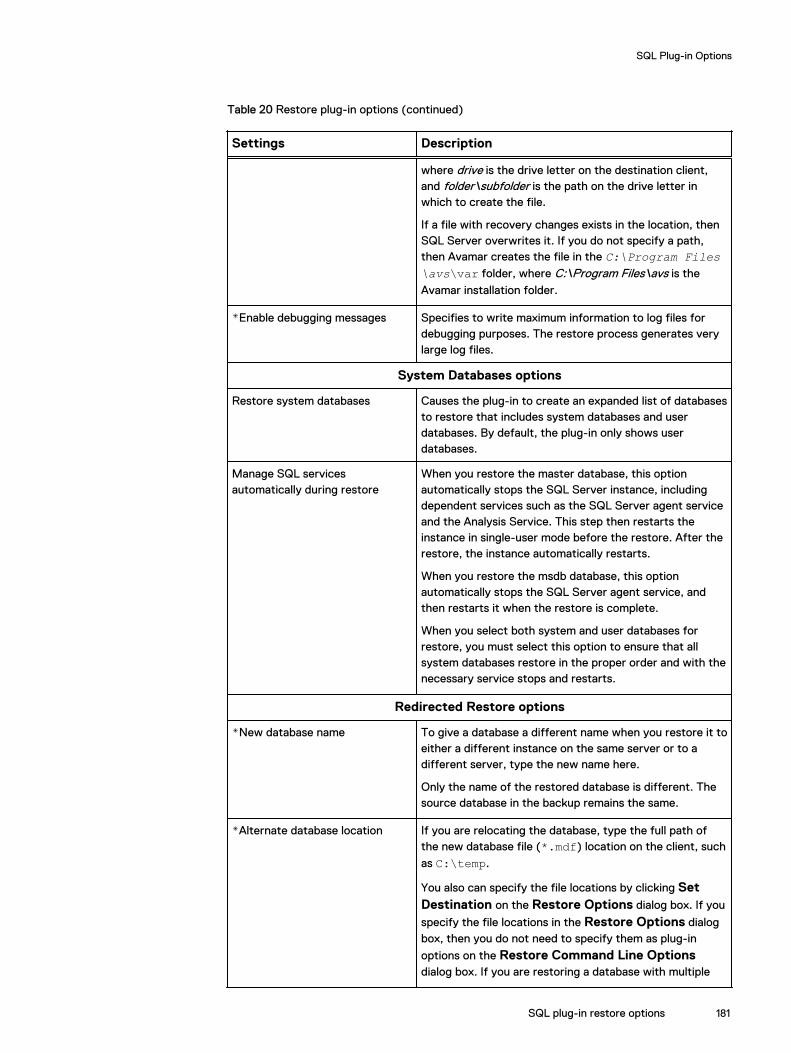
Table 20 Restore plug-in options (continued)
Settings Description
where drive is the drive letter on the destination client,and folder\subfolder is the path on the drive letter inwhich to create the file.
If a file with recovery changes exists in the location, thenSQL Server overwrites it. If you do not specify a path,then Avamar creates the file in the C:\Program Files\avs\var folder, where C:\Program Files\avs is the
Avamar installation folder.
*Enable debugging messages Specifies to write maximum information to log files fordebugging purposes. The restore process generates verylarge log files.
System Databases options
Restore system databases Causes the plug-in to create an expanded list of databasesto restore that includes system databases and userdatabases. By default, the plug-in only shows userdatabases.
Manage SQL servicesautomatically during restore
When you restore the master database, this optionautomatically stops the SQL Server instance, includingdependent services such as the SQL Server agent serviceand the Analysis Service. This step then restarts theinstance in single-user mode before the restore. After therestore, the instance automatically restarts.
When you restore the msdb database, this optionautomatically stops the SQL Server agent service, andthen restarts it when the restore is complete.
When you select both system and user databases forrestore, you must select this option to ensure that allsystem databases restore in the proper order and with thenecessary service stops and restarts.
Redirected Restore options
*New database name To give a database a different name when you restore it toeither a different instance on the same server or to adifferent server, type the new name here.
Only the name of the restored database is different. Thesource database in the backup remains the same.
*Alternate database location If you are relocating the database, type the full path ofthe new database file (*.mdf) location on the client, such
as C:\temp.
You also can specify the file locations by clicking SetDestination on the Restore Options dialog box. If you
specify the file locations in the Restore Options dialogbox, then you do not need to specify them as plug-in
options on the Restore Command Line Optionsdialog box. If you are restoring a database with multiple
SQL Plug-in Options
SQL plug-in restore options 181

Table 20 Restore plug-in options (continued)
Settings Description
filegroups or files and you want to restore the files todifferent locations, then you must use the redirected
restore options on the Restore Options dialog box.
*Alternate log location Specifies whether the database log file (*.ldf) restores
to the same location as the database or to a differentlocation.
*Path to alternate log location If you are restoring the database log file to a differentlocation than the database, type the full path of the newdatabase log file location on the client, such as C:\temp\logs.
Authentication options
*SQL server address Connect to this hostname or IP address for the computerthat is running SQL Server.
*Authentication method Specifies whether to use Windows (NT) authentication orSQL Server authentication to connect to SQL Server.
If you do not specify an authentication method, then theSQL Server plug-in uses NT authentication and logs inwith the NT AUTHORITY\SYSTEM account. Securityrequirements on page 39 provides more information.
*SQL login ID If you select SQL server authentication in the
Authentication method list, connect to the serverwith this login ID.
*SQL password If you select SQL server authentication in the
Authentication method list, type the password for theSQL login account.
Point-in-Time Recovery options
*Point-in-time recovery mode Specifies whether to recover the database to a specificdate and time or a named mark in the transaction log.Available only if the database uses the full recovery model.
*Point-in-time or mark namestring
If you select Point-in-time or Mark name from the
Point-in-time recovery mode list, then this optionspecifies the point in time or named mark to which torecover:
l Point-in-time — To recover to a specific point intime, specify the date and time in yyyy-mm-ddThh:mm:ss format. For example,2014-05-25T14:15:45 is May 25, 2014 at 2:15:45 p.m.
l Mark name — If named marks are inserted in thetransaction log for recovery purposes, then you canrecover to a specific mark. Specify the mark name.
*Mark recovery point Specifies whether to include the mark in the recovery:
SQL Plug-in Options
182 Avamar for SQL Server 18.1 User Guide

Table 20 Restore plug-in options (continued)
Settings Description
l Before mark — Specifies that the log recordimmediately before the mark is the recovery point. Inother words, the recovery rolls forward to the markand excludes the marked transaction.
l At mark — Specifies that the marked transaction isthe recovery point. In other words, the recovery rollsforward to the mark and includes the markedtransaction.
*Mark is after date/time If named marks are not unique in the transaction log, thenyou can specify a date and time to locate the mark towhich it recovers. The recovery process stops at the firstmark with the specified name, exactly at or after thespecified date and time. Specify the date and time inyyyy-mm-ddThh:mm:ss format. For example,2014-05-25T14:15:45 is May 25, 2014 at 2:15:45 p.m.
SQL TLR plug-in optionsYou can set plug-in options in Avamar Administrator for browse and restore operationsfor table level recovery with the SQL TLR plug-in.
SQL TLR plug-in browse optionsPlug-in options are available when you browse backups to perform a table levelrecovery with the Avamar Plug-in for SQL TLR.
Table 21 Restore options for the SQL TLR plug-in
Option Description
Drive letter or mount path Enter the drive letter that will be used to mount the SQLbackup data. This option is not case sensitive. If the letterentered here has a drive already mounted on it and thatdrive is not controlled by the Avamar Plug-in for SQLTLR, the mount operation will fail. If the the Avamar Plug-in for SQL TLR has already mounted a drive on this letter,the existing drive will be unmounted and the new one willbe mounted.Entering a forward slash (/) or backslash (\) will mount
the drive using the first available drive letter, beginningwith Z:.
Amount of time to leave AvFSmounted
Select when to automatically dismount the drive that isbeing mounted for the SQL backup data:
l 2 hours
l 8 hours
l 16 hours
SQL Plug-in Options
SQL TLR plug-in options 183
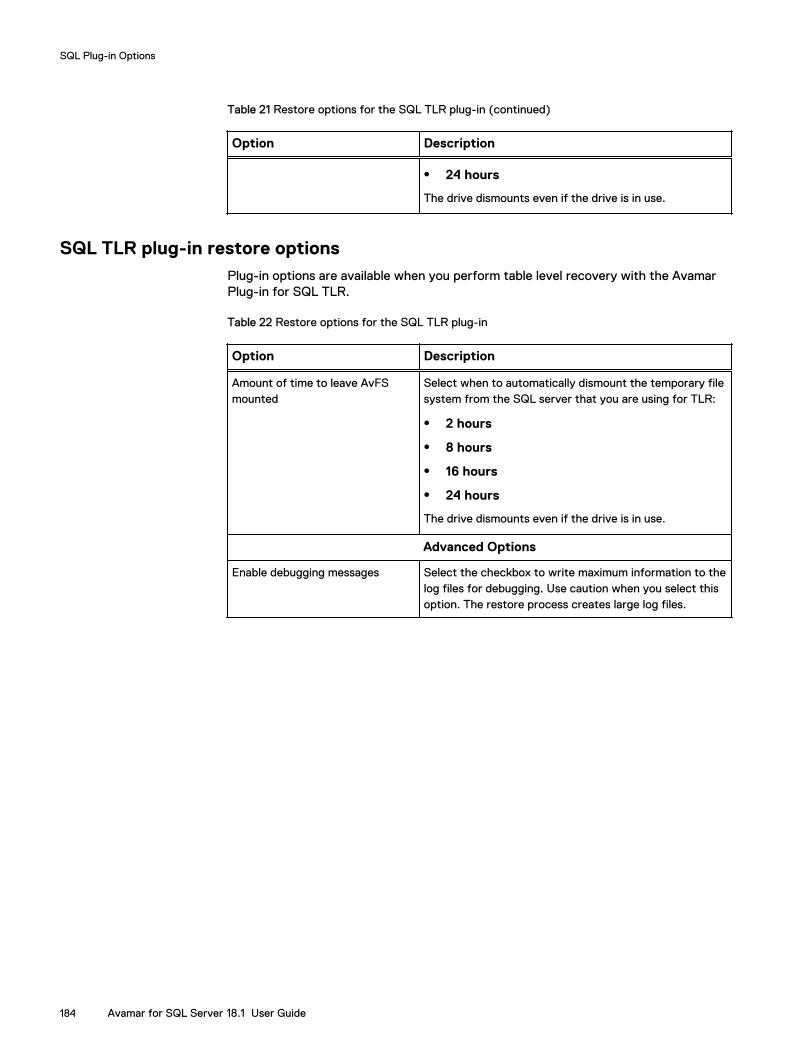
Table 21 Restore options for the SQL TLR plug-in (continued)
Option Description
l 24 hours
The drive dismounts even if the drive is in use.
SQL TLR plug-in restore optionsPlug-in options are available when you perform table level recovery with the AvamarPlug-in for SQL TLR.
Table 22 Restore options for the SQL TLR plug-in
Option Description
Amount of time to leave AvFSmounted
Select when to automatically dismount the temporary filesystem from the SQL server that you are using for TLR:
l 2 hours
l 8 hours
l 16 hours
l 24 hours
The drive dismounts even if the drive is in use.
Advanced Options
Enable debugging messages Select the checkbox to write maximum information to thelog files for debugging. Use caution when you select thisoption. The restore process creates large log files.
SQL Plug-in Options
184 Avamar for SQL Server 18.1 User Guide

APPENDIX B
Command Line Interface
This appendix includes the following topics:
l Overview of the SQL Server plug-in CLI........................................................... 186l Command reference......................................................................................... 186l Specifying command line options.....................................................................205l Password encoding.......................................................................................... 206l Performing command line operations in a failover cluster................................ 206l Performing command line operations in an AlwaysOn environment..................206l CLI examples....................................................................................................207l avsqltlr command reference..............................................................................217l Monitoring CLI activities...................................................................................218
Command Line Interface 185
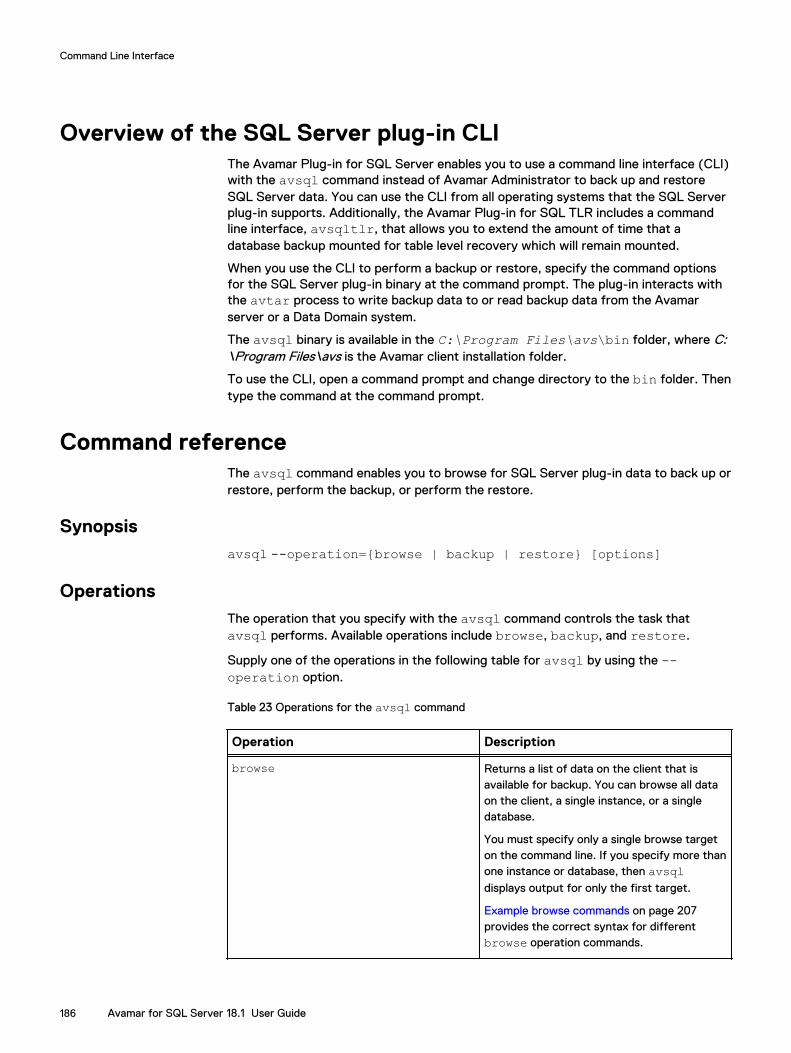
Overview of the SQL Server plug-in CLIThe Avamar Plug-in for SQL Server enables you to use a command line interface (CLI)with the avsql command instead of Avamar Administrator to back up and restoreSQL Server data. You can use the CLI from all operating systems that the SQL Serverplug-in supports. Additionally, the Avamar Plug-in for SQL TLR includes a commandline interface, avsqltlr, that allows you to extend the amount of time that adatabase backup mounted for table level recovery which will remain mounted.
When you use the CLI to perform a backup or restore, specify the command optionsfor the SQL Server plug-in binary at the command prompt. The plug-in interacts withthe avtar process to write backup data to or read backup data from the Avamarserver or a Data Domain system.
The avsql binary is available in the C:\Program Files\avs\bin folder, where C:\Program Files\avs is the Avamar client installation folder.
To use the CLI, open a command prompt and change directory to the bin folder. Thentype the command at the command prompt.
Command referenceThe avsql command enables you to browse for SQL Server plug-in data to back up orrestore, perform the backup, or perform the restore.
Synopsisavsql --operation={browse | backup | restore} [options]
OperationsThe operation that you specify with the avsql command controls the task thatavsql performs. Available operations include browse, backup, and restore.
Supply one of the operations in the following table for avsql by using the --operation option.
Table 23 Operations for the avsql command
Operation Description
browse Returns a list of data on the client that isavailable for backup. You can browse all dataon the client, a single instance, or a singledatabase.
You must specify only a single browse targeton the command line. If you specify more thanone instance or database, then avsqldisplays output for only the first target.
Example browse commands on page 207provides the correct syntax for differentbrowse operation commands.
Command Line Interface
186 Avamar for SQL Server 18.1 User Guide
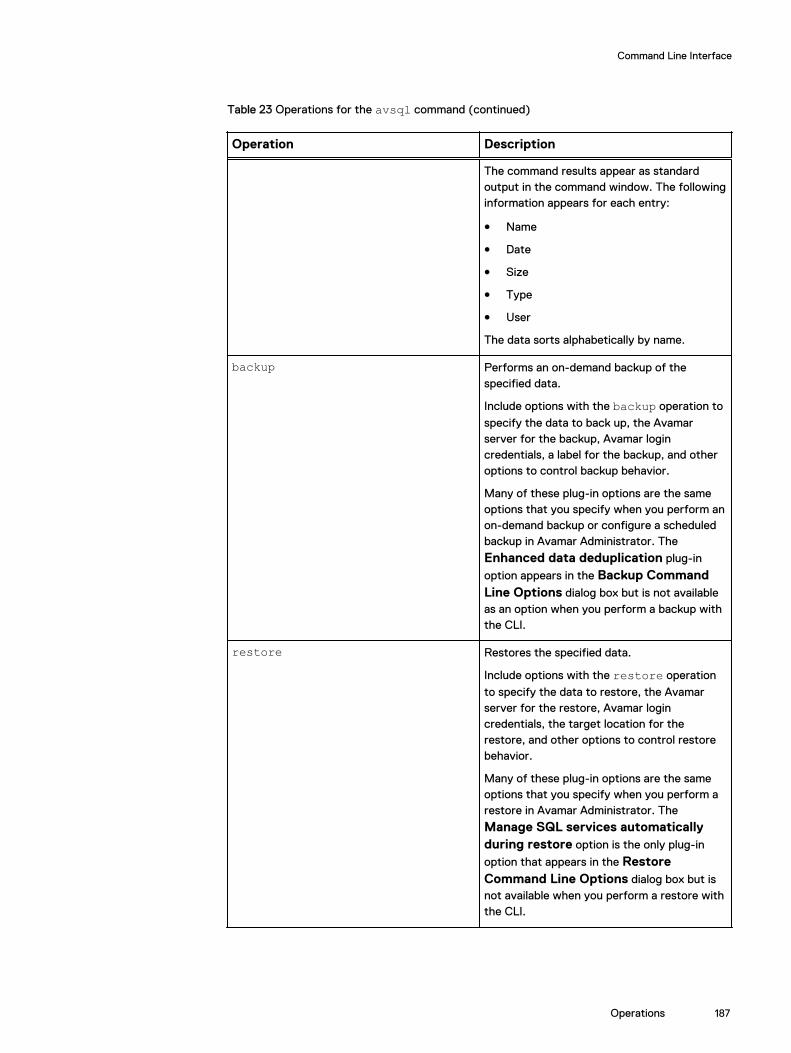
Table 23 Operations for the avsql command (continued)
Operation Description
The command results appear as standardoutput in the command window. The followinginformation appears for each entry:
l Name
l Date
l Size
l Type
l User
The data sorts alphabetically by name.
backup Performs an on-demand backup of thespecified data.
Include options with the backup operation to
specify the data to back up, the Avamarserver for the backup, Avamar logincredentials, a label for the backup, and otheroptions to control backup behavior.
Many of these plug-in options are the sameoptions that you specify when you perform anon-demand backup or configure a scheduledbackup in Avamar Administrator. The
Enhanced data deduplication plug-in
option appears in the Backup CommandLine Options dialog box but is not availableas an option when you perform a backup withthe CLI.
restore Restores the specified data.
Include options with the restore operation
to specify the data to restore, the Avamarserver for the restore, Avamar logincredentials, the target location for therestore, and other options to control restorebehavior.
Many of these plug-in options are the sameoptions that you specify when you perform arestore in Avamar Administrator. The
Manage SQL services automaticallyduring restore option is the only plug-in
option that appears in the RestoreCommand Line Options dialog box but isnot available when you perform a restore withthe CLI.
Command Line Interface
Operations 187

OptionsThe options that you specify with the avsql command control browse, backup, andrestore behavior. Some options are available for multiple operations, such as theaccount options for connecting to the Avamar server. Other options apply only tobackups or restores.
Common optionsCommon options for the avsql command are general options that are available formultiple operations.
The following common options are available for the avsql command.
Table 24 Common avsql options
Option Description
--backup-type=type Internal use only.
--exclude-pluginid-list=string--excludepluginids=string
Internal use only. This option is an avtaroption.
--pluginid-list=string--pluginids=string
Internal use only. This option is an avtaroption.
--version Displays the build version of the Avamar Plug-in for SQL Server.
--sqltimeoutsecs=seconds The number of seconds after which theconnection to SQL Server times out. If notspecified, then the timeout occurs after 100seconds.
Account optionsAccount options for the avsql command enable you to specify credentials to connectto the Avamar server for backups and restores.
The following account options are available for the avsql command.
Table 25 Account options for the avsql command
Option Description
--account=domain/client--acnt=domain/client--path=domain/client
Required for all backup and restoreoperations. Specifies the client to back up orrestore from using the following format:
domain/client
where domain is the Avamar domain to whichthe client belongs and client is the name ofthe client computer or the Avamar clusterclient.
This option is an avtar option.
Command Line Interface
188 Avamar for SQL Server 18.1 User Guide

Table 25 Account options for the avsql command (continued)
Option Description
--hostname-sql=client Specifies the name of the client to browse,back up, or restore from.
Required for browse, backup, and restore inan AlwaysOn availability group or a failovercluster. Specify the Avamar cluster client asthe client.
--id=user@domain/client Required for all backup and restoreoperations. Specifies the Avamar usernamefor authentication.
Note
You can specify the values for the --id and
--[avtar]account options simultaneously
by specifying --id=user@domain/client.
--password=password--pswd=password--ap=password
Required for all backup and restoreoperations. Specifies the password for theAvamar account.
--server=Avamar_server--hfsaddr=Avamar_server
Required for all backup and restoreoperations. Specifies the hostname or IPaddress of the Avamar server. This option isan avtar option.
--ntorsqlauth= {ntauthentication| sqlauthentication}
Specifies whether to use Windows (NT)authentication or SQL Server authenticationto connect to SQL Server. One of thefollowing values:
l ntauthenticationl sqlauthenticationIf you do not specify an authenticationmethod, then the SQL Server plug-in uses NTauthentication and logs in with the NTAUTHORITY\SYSTEM account. “Securityrequirements” on page 39 provides moreinformation.
--pluginport=port Specifies the port number on which toconnect to the agent. If not specified, thenthe default value of 28002 is used.
--sqllogin=name If you set --ntorsqlauth=sqlauthentication, then
this option specifies the login ID for the SQLlogin account.
--sqlpassword=password If you set --ntorsqlauth=sqlauthentication, then
Command Line Interface
Options 189

Table 25 Account options for the avsql command (continued)
Option Description
this option specifies the password for the SQLlogin account.
--sqlserver=server Hostname or IP address of the computer withthe SQL Server installation that you want tobrowse, back up, or restore from.
This option is required when you use the CLIto browse, back up, or restore data in thefollowing environments:
l In the local instance when the server is ina failover cluster. Specify the virtualserver name.
l In an AlwaysOn availability group. Specifythe availability group listener.
In environments where SQL Server does notuse the default port, you can specify the portas part of the --sqlserver option by using
the format --sqlserver=server,port, where
server is the name of the instance in a stand-alone environment, the virtual server name ina failover cluster, or the availability grouplistener in an AlwaysOn environment; and portis the port number.
Logging optionsLogging options for the avsql command enable you to specify the path and file namefor the avsql log file, and to control how much information the plug-in writes to thelog file.
The following logging options are available for the avsql command.
Table 26 Logging options for the avsql command
Option Description
--informationals=n Sets the information level for statusmessages, where n is a number such as 0, 1, 2,and so on. This option is an avtar option.
--log=file--logfile=file
Specifies the full path and file name of theavsql plug-in log file.
Command Line Interface
190 Avamar for SQL Server 18.1 User Guide

Table 26 Logging options for the avsql command (continued)
Option Description
NOTICE
The Activity Monitor in Avamar Administratordisplays only avtar logs for backups with the
command line interface. To create a plug-inlog for CLI activities, you must specify the --log or --logfile option on the command
line.
--noinformationals Disables all status messages. This option is anavtar option.
--nostdout Disables output to STDOUT. However, outputstill goes to the log file if you use the --logor --logfile=file options. This option is an
avtar option.
--nowarnings Disables warning messages. This option is anavtar option.
--quiet Suppresses all debugging messages. Thisoption is an avtar option.
--verbose--v
Enables all messages, including status andwarning messages. This option is an avtaroption.
Browse optionsIn addition to the following browse option for the avsql command, you may want touse the --sqlserver or --hostname-sql account options during certain browseoperations.
The following browse option is available for the avsql command.
Table 27 Browse option for the avsql command
Option Description
--sql-version-detection=value Determiners whether or not event messageswill be included.
l If this option is not used with the --operation=browse option, no event
messages will be observed and detectionwill be faster.
l If value is set to reg, no event messages
will be observed and detection will befaster.
l If value is set to wmi, SQL detection will
be slower and the event messages will beobserved.
Command Line Interface
Options 191

Table 27 Browse option for the avsql command (continued)
Option Description
--usesmoversion = SMOVERSION Specifies the version of the SQL ServerManagement Objects (SMO) that should beused when the node has multiple SQLversions installed. The respective SMOversion will then determine the SQL serverthat is being used.
Allowed values are:
l For SQL server 2008, SMOVERSION = 8l For SQL server 2012, SMOVERSION = 11l For SQL server 2014, SMOVERSION = 12l For SQL server 2016, SMOVERSION = 13
Backup optionsBackup options for the avsql command enable you to control backup behavior. Manyof these options are the same as the plug-in options that you specify in AvamarAdministrator when you perform an on-demand backup or create a dataset forscheduled backups.
The following avsql options are available for the backup operation.
Table 28 Backup options for the avsql command
Option Description
--clusternode=HOSTNAME(IP) Statically defines the node's IP address in a multi-NICenvironment when backups are failing due to aresolution error. HOSTNAME is the node's hostnameand IP is the node's network address.
Note
Include the parentheses around the IP address.
--consistency-check={true| extendedlogicalchecks |physicalonly}
Instructs the SQL plugin to perform a consistencycheck of the database before performing a backup.
l true enables consistency checks using the default
behavior.
l extendedlogicalchecks performs an extended
logical consistency check, which includes checkson indexed view, as well as XML and spatialindexes.
l physicalonly performs a physical-only
consistency check (column-integrity checks arenot performed).
--copy-only={true | false} true forces the backup to be a copy-only full backup.
Command Line Interface
192 Avamar for SQL Server 18.1 User Guide
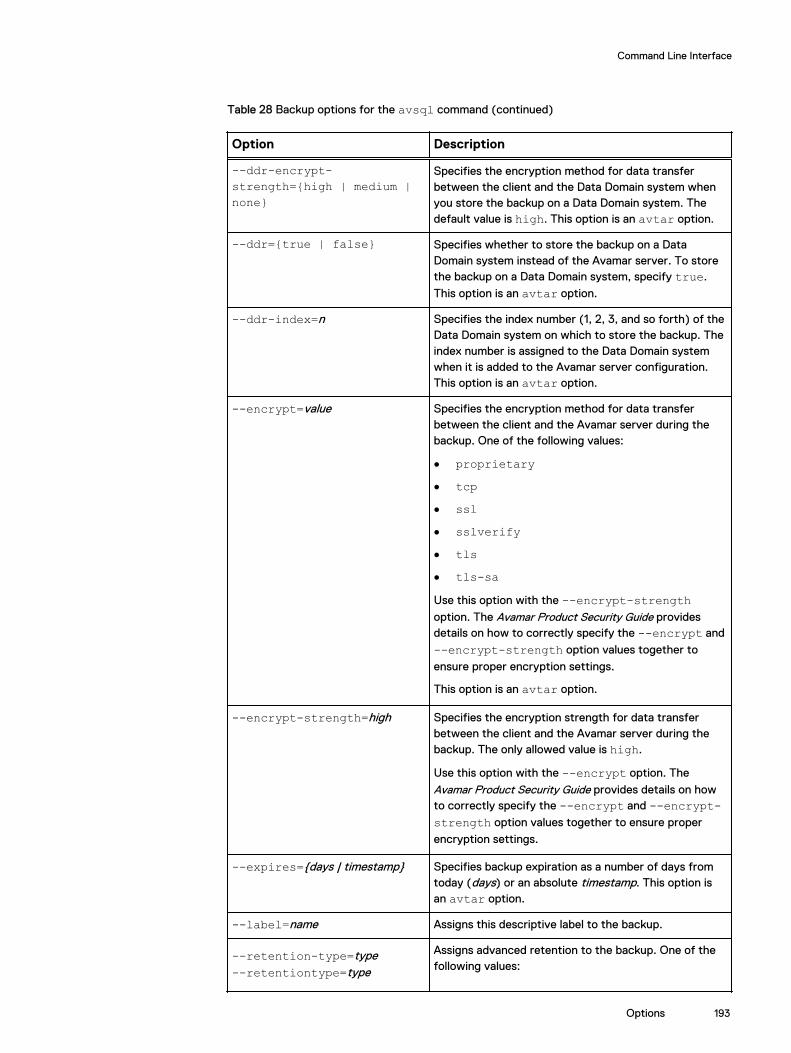
Table 28 Backup options for the avsql command (continued)
Option Description
--ddr-encrypt-strength={high | medium |none}
Specifies the encryption method for data transferbetween the client and the Data Domain system whenyou store the backup on a Data Domain system. Thedefault value is high. This option is an avtar option.
--ddr={true | false} Specifies whether to store the backup on a DataDomain system instead of the Avamar server. To storethe backup on a Data Domain system, specify true.
This option is an avtar option.
--ddr-index=n Specifies the index number (1, 2, 3, and so forth) of theData Domain system on which to store the backup. Theindex number is assigned to the Data Domain systemwhen it is added to the Avamar server configuration.This option is an avtar option.
--encrypt=value Specifies the encryption method for data transferbetween the client and the Avamar server during thebackup. One of the following values:
l proprietaryl tcpl ssll sslverifyl tlsl tls-saUse this option with the --encrypt-strengthoption. The Avamar Product Security Guide providesdetails on how to correctly specify the --encrypt and
--encrypt-strength option values together to
ensure proper encryption settings.
This option is an avtar option.
--encrypt-strength=high Specifies the encryption strength for data transferbetween the client and the Avamar server during thebackup. The only allowed value is high.
Use this option with the --encrypt option. The
Avamar Product Security Guide provides details on howto correctly specify the --encrypt and --encrypt-strength option values together to ensure proper
encryption settings.
--expires={days | timestamp} Specifies backup expiration as a number of days fromtoday (days) or an absolute timestamp. This option isan avtar option.
--label=name Assigns this descriptive label to the backup.
--retention-type=type--retentiontype=type
Assigns advanced retention to the backup. One of thefollowing values:
Command Line Interface
Options 193
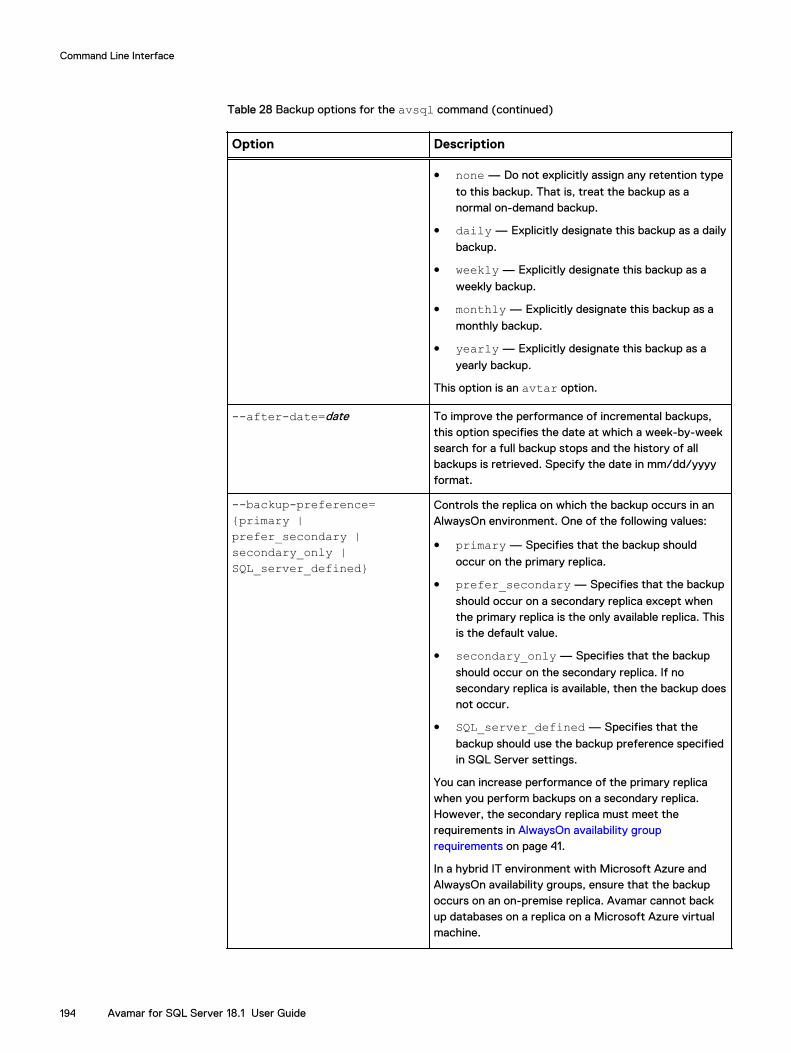
Table 28 Backup options for the avsql command (continued)
Option Description
l none — Do not explicitly assign any retention type
to this backup. That is, treat the backup as anormal on-demand backup.
l daily — Explicitly designate this backup as a daily
backup.
l weekly — Explicitly designate this backup as a
weekly backup.
l monthly — Explicitly designate this backup as a
monthly backup.
l yearly — Explicitly designate this backup as a
yearly backup.
This option is an avtar option.
--after-date=date To improve the performance of incremental backups,this option specifies the date at which a week-by-weeksearch for a full backup stops and the history of allbackups is retrieved. Specify the date in mm/dd/yyyyformat.
--backup-preference={primary |prefer_secondary |secondary_only |SQL_server_defined}
Controls the replica on which the backup occurs in anAlwaysOn environment. One of the following values:
l primary — Specifies that the backup should
occur on the primary replica.
l prefer_secondary — Specifies that the backup
should occur on a secondary replica except whenthe primary replica is the only available replica. Thisis the default value.
l secondary_only — Specifies that the backup
should occur on the secondary replica. If nosecondary replica is available, then the backup doesnot occur.
l SQL_server_defined — Specifies that the
backup should use the backup preference specifiedin SQL Server settings.
You can increase performance of the primary replicawhen you perform backups on a secondary replica.However, the secondary replica must meet therequirements in AlwaysOn availability grouprequirements on page 41.
In a hybrid IT environment with Microsoft Azure andAlwaysOn availability groups, ensure that the backupoccurs on an on-premise replica. Avamar cannot backup databases on a replica on a Microsoft Azure virtualmachine.
Command Line Interface
194 Avamar for SQL Server 18.1 User Guide

Table 28 Backup options for the avsql command (continued)
Option Description
--brtype={full |differential |incremental}
Specifies the type of backup to perform:
l full — Backs up the entire database, including all
objects, system tables, and data.
l differential — Backs up any data that has
changed since the last complete backup.
l incremental — Backs up only the transaction
logs.
The default value is full.
NOTICE
Microsoft SQL Server does not allow differential ortransaction log (incremental) backups of the masterdatabase. You can only create full backups of themaster database. If you try to perform a differential ortransaction log backup of the master database, a fullbackup is created instead.
--exclude=data Specifies an instance or database to exclude from thebackup.
When specifying the local instance, use (local). For
example:
l --exclude=(local)l --exclude=(local)/DB1
--forcefull Performs a full backup in the following scenarios:
l If you try to perform a differential or transactionlog (incremental) backup and a full backup does notexist on the server.
l If you try to perform a differential or transactionlog backup after you restore a database.
l If you try to perform a differential or transactionlog backup after you restore the msdb database.
l If log gaps are detected.
Effectively, this option automates taking a full backupwhen necessary.
Note
If you perform transaction log and differential backups,we strongly recommend that you leave the defaultsetting of enabled for the --forcefull option for all
backups. Otherwise, you might not be able to restoredata if no existing full backup is present on the Avamarserver.
Command Line Interface
Options 195
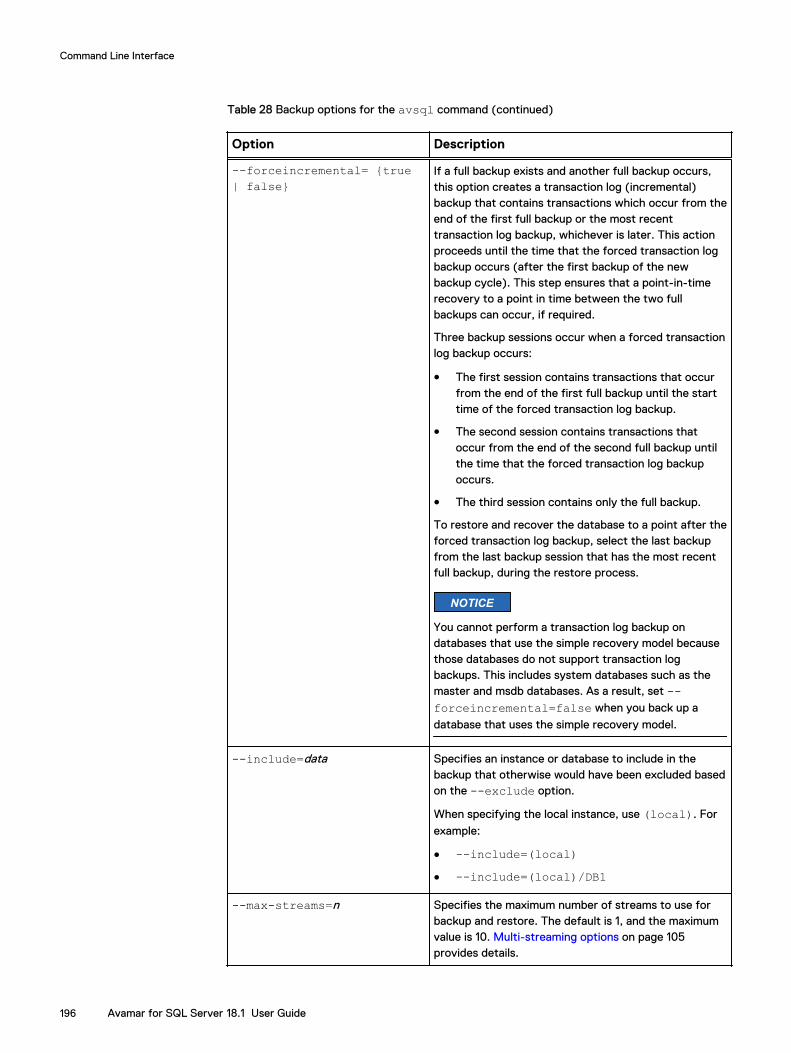
Table 28 Backup options for the avsql command (continued)
Option Description
--forceincremental= {true| false}
If a full backup exists and another full backup occurs,this option creates a transaction log (incremental)backup that contains transactions which occur from theend of the first full backup or the most recenttransaction log backup, whichever is later. This actionproceeds until the time that the forced transaction logbackup occurs (after the first backup of the newbackup cycle). This step ensures that a point-in-timerecovery to a point in time between the two fullbackups can occur, if required.
Three backup sessions occur when a forced transactionlog backup occurs:
l The first session contains transactions that occurfrom the end of the first full backup until the starttime of the forced transaction log backup.
l The second session contains transactions thatoccur from the end of the second full backup untilthe time that the forced transaction log backupoccurs.
l The third session contains only the full backup.
To restore and recover the database to a point after theforced transaction log backup, select the last backupfrom the last backup session that has the most recentfull backup, during the restore process.
NOTICE
You cannot perform a transaction log backup ondatabases that use the simple recovery model becausethose databases do not support transaction logbackups. This includes system databases such as themaster and msdb databases. As a result, set --forceincremental=false when you back up a
database that uses the simple recovery model.
--include=data Specifies an instance or database to include in thebackup that otherwise would have been excluded basedon the --exclude option.
When specifying the local instance, use (local). For
example:
l --include=(local)l --include=(local)/DB1
--max-streams=n Specifies the maximum number of streams to use forbackup and restore. The default is 1, and the maximumvalue is 10. Multi-streaming options on page 105provides details.
Command Line Interface
196 Avamar for SQL Server 18.1 User Guide

Table 28 Backup options for the avsql command (continued)
Option Description
--min-snapup-size=MB Specifies the minimum size of each data stream in MB.The default value is 200.
--prefix=value Specifies a prefix for the log filename.
--skip-log-gap-detection For transaction log backups, controls whether theAvamar Plug-in for SQL Server checks the full andtransaction log backups that are already saved for adatabase to verify that there are no "log gaps." This loggap detection ensures that there is a valid chain of SQLServer transaction logs so that point-in-time restorecan occur. If a log gap is detected, the backup ispromoted to a full backup. Promotion to full is indicatedin the Activity Window of the Avamar Administrator
with the status Completed with Promotion. Whenonly some of the databases in the backup are promoted
to full, the status still indicates as Completed withPromotion.
Log gap detection may require as many as 20 to 30seconds to complete for each database. Transaction logbackups may take an excessive amount of time tocomplete in environments with a significant number ofdatabases. If the performance issues outweigh the riskof possible log gaps, then you can disable log gapdetection by specifying this option to improveperformance.
--skip_or_prom_sdm={skip_with_error |skip_with_warning |promote_to_full}
Specifies what Avamar does when you try to performincremental (transaction log) backups of databasesthat use the simple recovery model, which does notsupport transaction log backups:
l skip_with_error — If you select databases
with different recovery models for the backup, thenthe backup does not include the databases with thesimple recovery model. The backup completes withexceptions, and an error message is written to thelog. If you select only databases with the simplerecovery model for the backup, then the backupfails.
l skip_with_warning — If you select databases
with different recovery models for the backup, thenthe backup does not include databases with thesimple recovery model. The backup completessuccessfully, and a warning is written to the log foreach database that uses the simple recovery model.If you select only databases with the simplerecovery model for the backup, then the backupfails.
l promote_to_full — A full backup occurs
automatically instead of a transaction log backup
Command Line Interface
Options 197
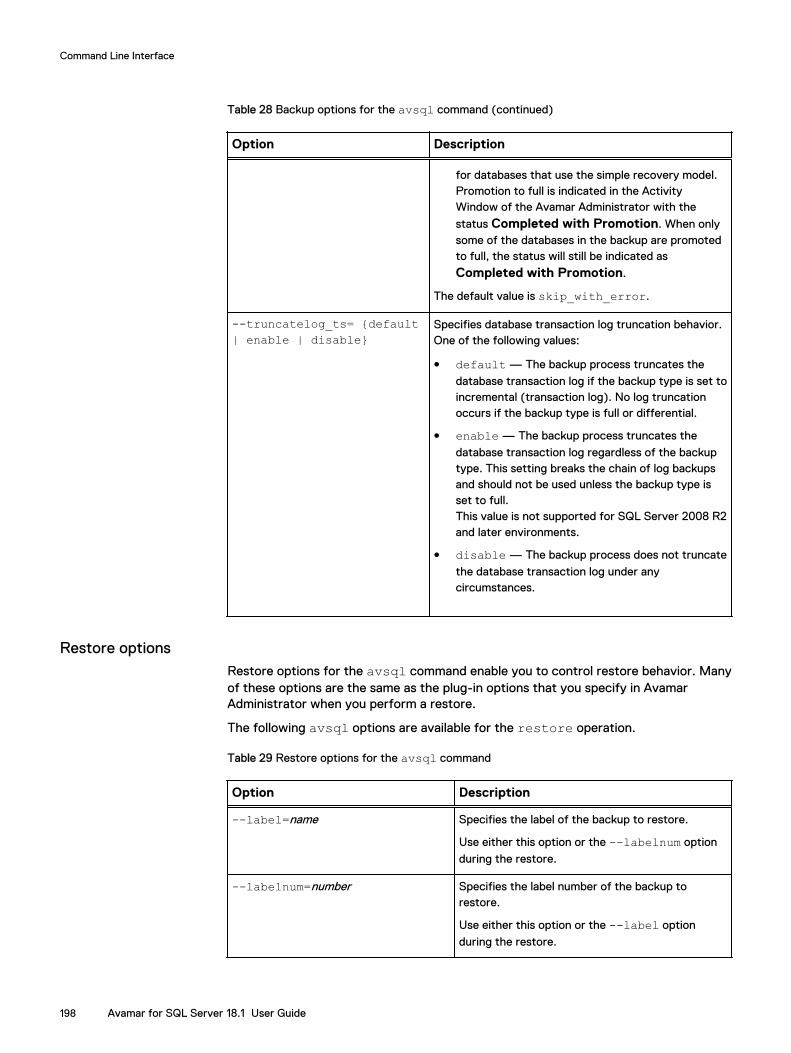
Table 28 Backup options for the avsql command (continued)
Option Description
for databases that use the simple recovery model.Promotion to full is indicated in the ActivityWindow of the Avamar Administrator with the
status Completed with Promotion. When onlysome of the databases in the backup are promotedto full, the status will still be indicated as
Completed with Promotion.
The default value is skip_with_error.
--truncatelog_ts= {default| enable | disable}
Specifies database transaction log truncation behavior.One of the following values:
l default — The backup process truncates the
database transaction log if the backup type is set toincremental (transaction log). No log truncationoccurs if the backup type is full or differential.
l enable — The backup process truncates the
database transaction log regardless of the backuptype. This setting breaks the chain of log backupsand should not be used unless the backup type isset to full.This value is not supported for SQL Server 2008 R2and later environments.
l disable — The backup process does not truncate
the database transaction log under anycircumstances.
Restore optionsRestore options for the avsql command enable you to control restore behavior. Manyof these options are the same as the plug-in options that you specify in AvamarAdministrator when you perform a restore.
The following avsql options are available for the restore operation.
Table 29 Restore options for the avsql command
Option Description
--label=name Specifies the label of the backup to restore.
Use either this option or the --labelnum option
during the restore.
--labelnum=number Specifies the label number of the backup torestore.
Use either this option or the --label option
during the restore.
Command Line Interface
198 Avamar for SQL Server 18.1 User Guide

Table 29 Restore options for the avsql command (continued)
Option Description
--after-date=date To improve the performance of the search forbackups to restore, this option specifies the dateat which a week-by-week search for a full backupstops and the history of all backups is retrieved.Specify the date in mm/dd/yyyy format.
--aftertime=datetime If you are performing a point-in-time recovery to anamed mark and named marks are not unique inthe transaction log, then you can use this option tospecify a date and time to locate the mark towhich to recover. The recovery process stops atthe first mark with the specified name, exactly ator after the specified date and time. Specify thedate and time in yyyy-mm-ddThh:mm:ss format.For example, 2014-10-25T14:15:45 is October 25,2014 at 2:15:45 p.m.
--altlog={samelocat |difflocat}
Specifies whether the database log file (*.ldf) is
restored to the same location as the database or toa different location. One of the following values:
l samelocatl difflocatThe default value is samelocat.
--app-instance=instance When restoring to a different instance, this optionspecifies the target instance for the restore.
--ddr-encrypt-strength={high |medium | none}
Specifies the encryption method for data transferbetween the Data Domain system and the clientwhen the backup is stored on a Data Domainsystem. The default value is high. This option is
an avtar option.
--dblocation=path If you are relocating the database, this optionspecifies the full path of the new database file(*.mdf) location on the client, where path is a
value such as C:\temp.
--encrypt=value Specifies the encryption method for data transferbetween the Avamar server and the client duringthe restore. One of the following values:
l proprietaryl tcpl ssll sslverifyl tlsl tls-saUse this option with the --encrypt-strengthoption. The Avamar Product Security Guide provides
Command Line Interface
Options 199
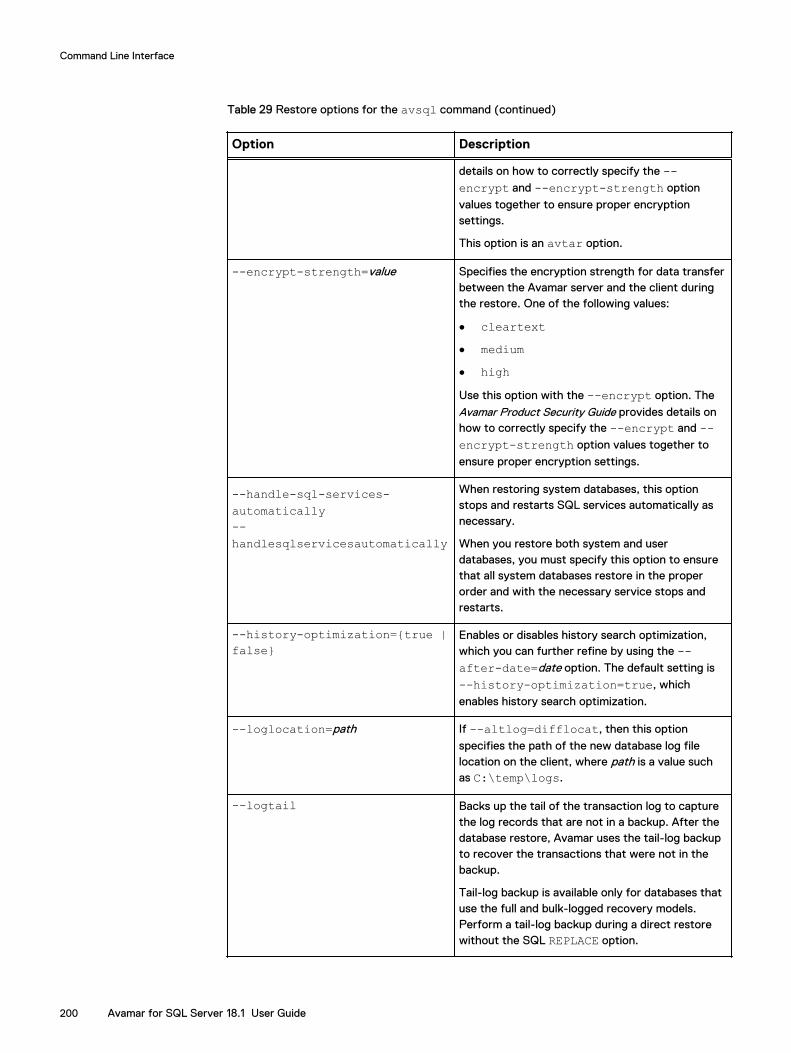
Table 29 Restore options for the avsql command (continued)
Option Description
details on how to correctly specify the --encrypt and --encrypt-strength option
values together to ensure proper encryptionsettings.
This option is an avtar option.
--encrypt-strength=value Specifies the encryption strength for data transferbetween the Avamar server and the client duringthe restore. One of the following values:
l cleartextl mediuml highUse this option with the --encrypt option. The
Avamar Product Security Guide provides details onhow to correctly specify the --encrypt and --encrypt-strength option values together to
ensure proper encryption settings.
--handle-sql-services-automatically--handlesqlservicesautomatically
When restoring system databases, this optionstops and restarts SQL services automatically asnecessary.
When you restore both system and userdatabases, you must specify this option to ensurethat all system databases restore in the properorder and with the necessary service stops andrestarts.
--history-optimization={true |false}
Enables or disables history search optimization,which you can further refine by using the --after-date=date option. The default setting is
--history-optimization=true, which
enables history search optimization.
--loglocation=path If --altlog=difflocat, then this option
specifies the path of the new database log filelocation on the client, where path is a value suchas C:\temp\logs.
--logtail Backs up the tail of the transaction log to capturethe log records that are not in a backup. After thedatabase restore, Avamar uses the tail-log backupto recover the transactions that were not in thebackup.
Tail-log backup is available only for databases thatuse the full and bulk-logged recovery models.Perform a tail-log backup during a direct restorewithout the SQL REPLACE option.
Command Line Interface
200 Avamar for SQL Server 18.1 User Guide

Table 29 Restore options for the avsql command (continued)
Option Description
Do not use this option when you restore to adifferent SQL Server instance.
--metadata Retrieves the SQL metadata file from the backupand displays the metadata as screen output. Whenyou use this option, Avamar does not restore anydata.
--newdbname=name Restores the database with the specified name(instead of its original name) when you arerestoring it to either a different instance on thesame server or to a different server.
--overwrite-default-recoveryplan
Specify this option to perform individualincremental or differential backups of the SQLserver database.
--pitormark={none |pointintime | markname}
Whether to recover the database to a specific dateand time or a named mark in the transaction log.Available only if the database uses the full recoverymodel. One of the following values:
l none — Do not recover to a specific point in
time.
l pointintime — Recover to a specific date
and time specified by --pitormarkstr=value.
l markname — Recover to the named mark
specified by --pitormarkstr=value.
The default value is none.
--pitormarkstr={pit | mark} If --pitormark=pointintime or markname,
then this option specifies the pit (date and time) ornamed mark to recover to. To recover to a dateand time, use yyyy-mm-ddThh:mm:ss format. Forexample, 2014-10-25T14:15:45 is October 25, 2014at 2:15:45 p.m.
--prefix=value Prefix for the name of the logfiles.
--print-restore-size Prints the size required to restore SQL data. Noactual restore takes place when this option is used.
--recovery-primary-only={true| false}
Specify true to restore the database on only the
primary replica in an AlwaysOn availability group.When you specify true, you must manually
perform database synchronization on thesecondary replicas.
Specify false to restore to both primary and
secondary replicas.
--recoveryoperation={RECOVERY| NORECOVERY | STANDBY}
Specifies the recovery operation that occurs afterthe restore. One of the following values:
Command Line Interface
Options 201
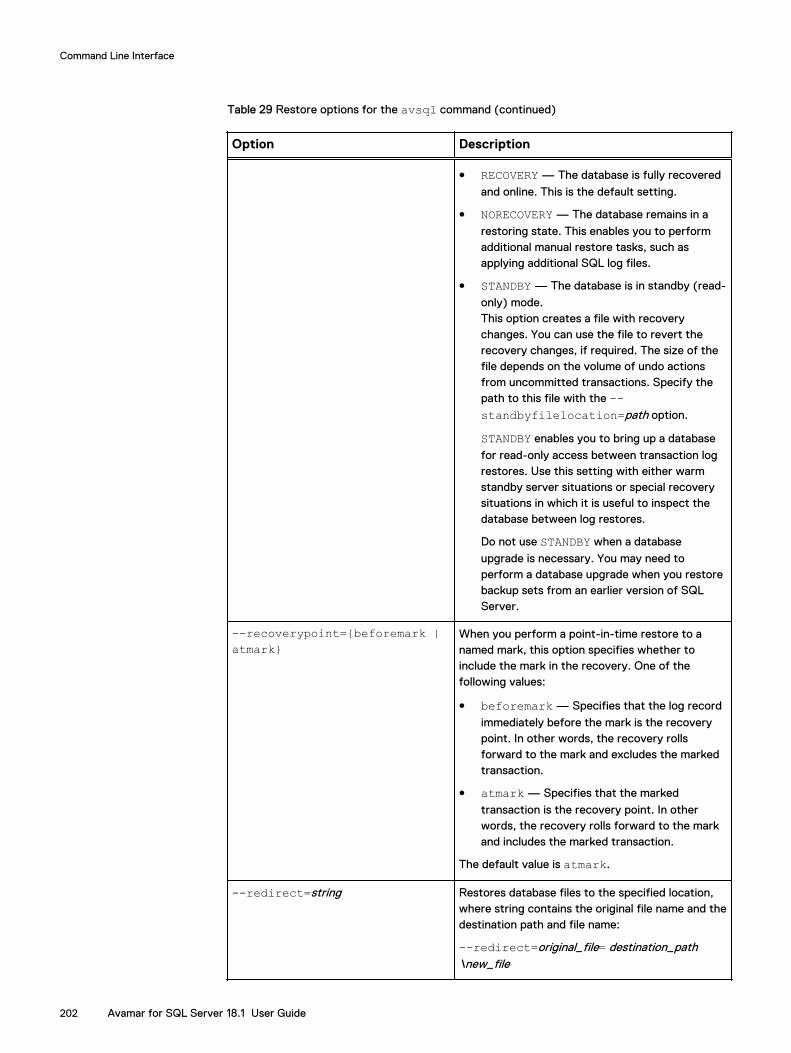
Table 29 Restore options for the avsql command (continued)
Option Description
l RECOVERY — The database is fully recovered
and online. This is the default setting.
l NORECOVERY — The database remains in a
restoring state. This enables you to performadditional manual restore tasks, such asapplying additional SQL log files.
l STANDBY — The database is in standby (read-
only) mode.This option creates a file with recoverychanges. You can use the file to revert therecovery changes, if required. The size of thefile depends on the volume of undo actionsfrom uncommitted transactions. Specify thepath to this file with the --standbyfilelocation=path option.
STANDBY enables you to bring up a database
for read-only access between transaction logrestores. Use this setting with either warmstandby server situations or special recoverysituations in which it is useful to inspect thedatabase between log restores.
Do not use STANDBY when a database
upgrade is necessary. You may need toperform a database upgrade when you restorebackup sets from an earlier version of SQLServer.
--recoverypoint={beforemark |atmark}
When you perform a point-in-time restore to anamed mark, this option specifies whether toinclude the mark in the recovery. One of thefollowing values:
l beforemark — Specifies that the log record
immediately before the mark is the recoverypoint. In other words, the recovery rollsforward to the mark and excludes the markedtransaction.
l atmark — Specifies that the marked
transaction is the recovery point. In otherwords, the recovery rolls forward to the markand includes the marked transaction.
The default value is atmark.
--redirect=string Restores database files to the specified location,where string contains the original file name and thedestination path and file name:
--redirect=original_file= destination_path\new_file
Command Line Interface
202 Avamar for SQL Server 18.1 User Guide

Table 29 Restore options for the avsql command (continued)
Option Description
To restore multiple files to multiple differentlocations, separate the string values with commas:
--redirect=original_file1=destination_path1\new_file1,original_file2=destination_path2\ new_file2,original_file3=destination_path3\new_file3
To restore a file to its original location, specify onlythe original filename:
--redirect=original_file
--redirecttofile={true |false}
Specifies whether to restore database files asoperating system files to the specified location.
--restore-destination={original |multiple | single}
Specifies the restore destination for the data:
l original – Restore the data to its original
location. This is the default value.
l multiple – Restore the data to a different
location. Use the --target={path | client\instance} option to specify the location.
l single – Restore the data to operating
system files. Use the --target={path | client\instance} option to specify the location.
This option is an avtar option.
--restore-filegroup-list=filegroups
Restores the specified filegroups, using thefollowing format:
--restore-filegroup-list=instance/database/filegroup,instance/database/ filegroup
where instance/database/filegroup are theinstance, database, and filegroup to restore, withmultiple entries separated by a comma.
--restoresystem Attempts to restore databases that have thesystem attribute set.
--standbyfilelocation=path If --recoveryoperation=STANDBY, then this
option specifies the path on the destination clientto the standby file with recovery changes.
Use the following format:
drive:\folder\subfolder
where drive is the drive letter on the destinationclient, and folder\subfolder is the path on the driveletter in which to create the file.
If a file with recovery changes already exists in thespecified location, then SQL Server overwrites it.
Command Line Interface
Options 203
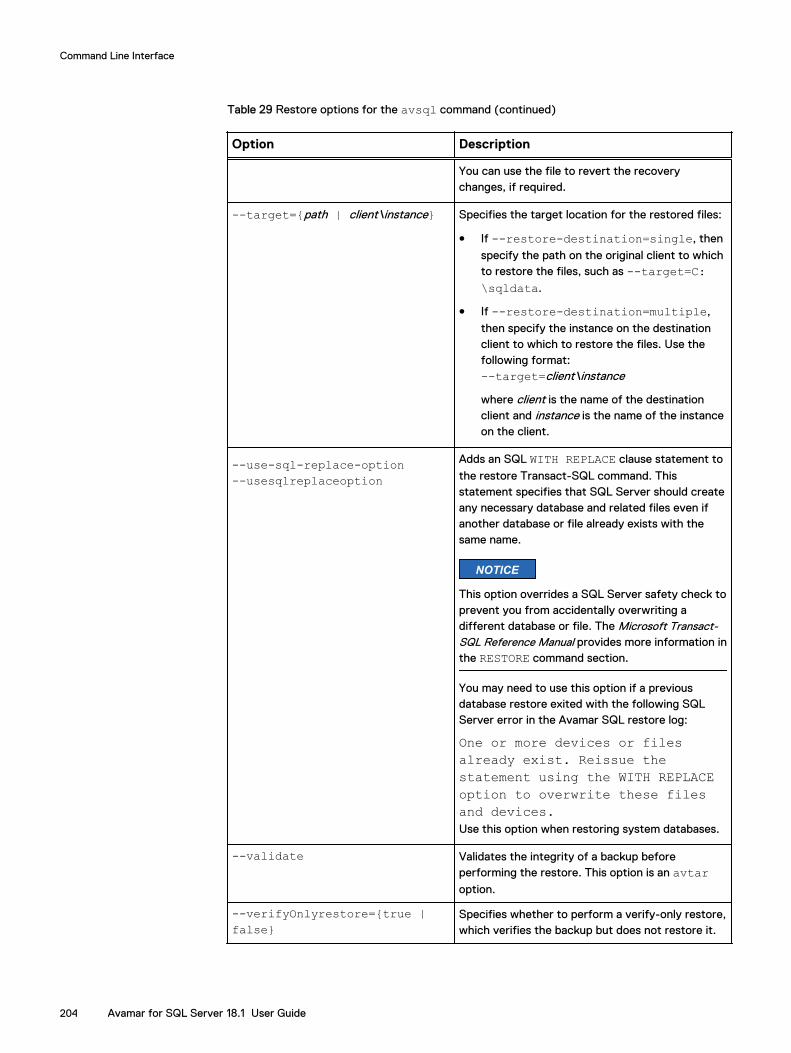
Table 29 Restore options for the avsql command (continued)
Option Description
You can use the file to revert the recoverychanges, if required.
--target={path | client\instance} Specifies the target location for the restored files:
l If --restore-destination=single, then
specify the path on the original client to whichto restore the files, such as --target=C:\sqldata.
l If --restore-destination=multiple,
then specify the instance on the destinationclient to which to restore the files. Use thefollowing format:--target=client\instance
where client is the name of the destinationclient and instance is the name of the instanceon the client.
--use-sql-replace-option--usesqlreplaceoption
Adds an SQL WITH REPLACE clause statement to
the restore Transact-SQL command. Thisstatement specifies that SQL Server should createany necessary database and related files even ifanother database or file already exists with thesame name.
NOTICE
This option overrides a SQL Server safety check toprevent you from accidentally overwriting adifferent database or file. The Microsoft Transact-SQL Reference Manual provides more information inthe RESTORE command section.
You may need to use this option if a previousdatabase restore exited with the following SQLServer error in the Avamar SQL restore log:
One or more devices or filesalready exist. Reissue thestatement using the WITH REPLACEoption to overwrite these filesand devices.Use this option when restoring system databases.
--validate Validates the integrity of a backup beforeperforming the restore. This option is an avtaroption.
--verifyOnlyrestore={true |false}
Specifies whether to perform a verify-only restore,which verifies the backup but does not restore it.
Command Line Interface
204 Avamar for SQL Server 18.1 User Guide

Help optionThe --help option displays a list of available operations and options for the avsqlcommand. You can view all help output for avsql, or only the options for a specificoperation.
The following command displays all help output for the avsql command:
avsql --helpThe following command provides a list of options for the backup operation:
avsql --help --operation=backup
Specifying command line optionsThe method that you use to specify options for the avsql command depends on thecomplexity of the command value and the frequency with which you use the options.
Type options directly on the command line when you perform command lineoperations on an occasional basis or you are using a limited set of simple options. Usea command file, option file, or environment variables when you frequently performcommand line operations or you are using a complex set of options.
The following methods are available for specifying options for the avsql command:
l Type the individual options on the command line.
l List the options in the avsql.cmd file, which is in the C:\Program Files\avs\var folder, where C:\Program Files\avs is the Avamar client installation folder.
In a cluster environment, the C:\Program Files\avs\var folder is typically ona shared network folder or volume. You specify the path for the var folder whenyou configure the cluster client with the Cluster Configuration Tool.
List each option on its own line, as shown in the following example:
--debug--logfile=avamarclient.log--verbose=5
l Create an option file as a text file, and then specify the option file on the commandline by using the --flagfile=path option, where path is the full pathname of theoption file.
l Pass options to the CLI as environment variables. For example, if you specifyAvamarServer=12.34.56.78 in the environment variables, then you canspecify the environment variable instead of the IP address of the Avamar server inthe command, as shown in the following example:
avsql --operation=backup --server=%AvamarServer%--id=AvamarAdmin --ap=password --brtype=full--path=/SQL/SQLServer3 --label=SQL1Full--log=C:\Program Files\avs\var\avsql.log “ ”
Command Line Interface
Specifying command line options 205

Password encodingYou can use avtar to encode passwords that you type on the command line or storein script files, and then use the encoded string with the --password, --ap, or --pswd option.
Procedure
1. Type the following command on the command line on the SQL Server client:
avtar --encodepassword=passwordwhere password is the password to encode.
An encoded string is returned on the command line.
2. Use the encoded string on the avsql command line as the password with the--password, --ap, or --pswd option.
Performing command line operations in a failover clusterThe following steps are required to use the CLI to browse, back up, or restore SQLServer data on shared storage in a failover cluster:
l Run the CLI on the on the active node that is managing the databases to back up.
l Specify the cluster client as the client to back up or restore from.
l Specify the --hostname-sql option with a value of the cluster client.
l To browse, back up, or restore the local instance, specify the --sqlserveroption with a value of the cluster client.
Performing command line operations in an AlwaysOnenvironment
The following steps are required to use the CLI to browse, back up, or restore SQLServer data in an AlwaysOn availability group:
l Run the CLI on the cluster node with the primary replica.
l Specify the cluster client for the availability group listener as the client to back upor restore from.
l During a backup, specify the following options:
n Specify the availability group listener with the --sqlserver option.
n Specify the Avamar cluster client with the --hostname-sql option.
n Specify the availability group listener, the availability group, the instance, andthe database in quotation marks using the format “listener/group\instance\database”. To back up all databases in an availability group, specify “listener/group\instance”.
l When you restore a backup to its original location, specify the following options:
n Specify the availability group listener in the --sqlserver and --hostname-sql options.
Command Line Interface
206 Avamar for SQL Server 18.1 User Guide

n Use the --recovery-primary-only option to control whether to restore toonly the primary replica or to both the primary and all secondary replicas.
l When you restore a backup to its original location but with a new name, specifythe original database name at the end of the command. Use the --newdbnameoption to specify the new database name.
CLI examplesReview the avsql command examples for details on how to use options to controlbrowse, backup, and restore behavior.
Example browse commandsThese command examples illustrate how to use options to browse different types ofdata in client backups with the avsql command.
Browsing all instancesThe following command returns a list of all SQL Server instances on the client:
avsql --operation=browse
Browsing the local instanceThe following command returns a list of all databases in the local instance on theclient:
avsql --operation=browse (local)
Browsing a named instanceThe following command returns a list of all databases in the named instance ofInstance1 on the client:
avsql --operation=browse Instance1
Browsing a databaseThe following command returns detailed information about the database, including thecreation date, size, and owner for the database:
avsql --operation=browse (local)/DB1
Browsing a failover clusterThe following command returns a list of all databases in the local instance in a failovercluster with the SQLCluster1 cluster client:
avsql --operation=browse --sqlserver=SQLCluster1 --hostname-sql=SQLCluser1
Browsing an AlwaysOn availability groupThe following command returns a list of all databases in the AlwaysOn availabilitygroup with the SQLGroupListener availability group listener:
avsql --operation=browse --sqlserver=SQLGroupListener --hostname-sql=SQLGroupListener
Command Line Interface
CLI examples 207

Example backup commandsThese command examples illustrate how to use options to perform different types ofbackups with the avsql command.
Backing up all SQL Server dataTo back up all SQL Server data (all databases in all instances on the client), specifythe domain and client name.
Performing a full backup of all SQL Server dataThe following command performs a full backup of all SQL Server data on theSQLServer1 client in the SQL domain, labels the backup SQL1Full, and stores thebackup on the Avamar server with an IP address of 12.34.56.78:
avsql --operation=backup --server=12.34.56.78 --id=AvamarAdmin--ap=password --brtype=full --path=/SQL/SQLServer1--log=C:\Program Files\avs\var\avsql.log --label=SQL1Full
Performing an incremental (transaction log) backup of all SQL Server dataThe following command performs an incremental (transaction log) backup of all SQLServer data on the SQLServer2 client in the SQL domain, labels the backupSQL2Logs, and stores the backup on the first Data Domain system that you added tothe Avamar configuration:
avsql --operation=backup --server=12.34.56.78 --id=AvamarAdmin--ap=password --brtype=incremental --path=/SQL/SQLServer2--label=SQL2Logs --log=C:\Program Files\avs\var\avsql.log--ddr=true --ddr-index=1
Backing up the local instanceTo back up all databases in the local instance, specify (local) as the backup targetbetween the quotation marks at the end of the command.
The following command performs a differential backup of the local instance on theSQLServer3 client in the SQL domain and stores the backup on the Avamar server:
avsql --operation=backup --server=12.34.56.78 --id=AvamarAdmin--ap=password --brtype=differential --path=/SQL/SQLServer3--log=C:\Program Files\avs\var\avsql.log "(local)"
Backing up a named instanceTo back up a named instance, specify the client and instance as the backup targetbetween the quotation marks at the end of the command, using the format “client\instance”.
The following command performs a full backup of the sql02inst2 instance on theSQLServer2 client in the SQL domain and stores the backup on the second DataDomain system that was added to the Avamar configuration:
avsql --operation=backup --server=12.34.56.78 --id=AvamarAdmin--ap=password --brtype=full --path=/SQL/SQLServer2--log=C:\Program Files\avs\var\avsql.log--ddr=true --ddr-index=2 "SQLServer2\sql02inst2"
Command Line Interface
208 Avamar for SQL Server 18.1 User Guide

Backing up multiple instancesTo back up one or more instances on a client, but not all instances, specify theinstances as separate backup targets between quotation marks at the end of thecommand.
The following command performs an incremental backup of the local instance and thesql03inst2 instance on the SQLServer3 client in the SQL domain and stores thebackup on the Avamar server:
avsql --operation=backup --server=12.34.56.78 --id=AvamarAdmin--ap="password" --brtype=incremental --path="/SQL/SQLServer3"--log=C:\Program Files\avs\var\avsql.log"SQLServer3\sql03inst2" "(local)"
Backing up a databaseTo back up a specific database on a client, specify the client, instance, and databaseas the backup target between the quotation marks at the end of the command, usingthe format client\instance/database, or (local)/database if the database is in thelocal instance.
Performing a differential backup of a database in the local instanceThe following command performs a differential backup of the DB1 database in thelocal instance on the SQLServer1 client in the SQL domain, labels the backupDB1Diff, and stores the backup on the Avamar server:
avsql --operation=backup --server=12.34.56.78 --id=AvamarAdmin--ap=password --brtype=differential --path=/SQL/SQLServer1--log=C:\Program Files\avs\var\avsql.log "(local)/DB1"--label=DB1Diff
Performing a full backup of a database in a named instanceThe following command performs a full backup of the DB3 database in thesql01inst2 instance on the SQLServer1 client in the SQL domain and stores thebackup on the Avamar server:
avsql --operation=backup --server=12.34.56.78 --id=AvamarAdmin--ap=password --brtype=full --path=/SQL/SQLServer1--log=C:\Program Files\avs\var\avsql.log"SQLServer1\sql01inst2/DB3"
Backing up multiple databasesTo back up multiple databases on a client, but not all databases, specify the instancesas separate backup targets between quotation marks at the end of the command.
The following command performs a full backup of the DB3 database in thesql01inst2 instance and the DB1 database in the local instance on theSQLServer1 client in the SQL domain, and stores the backup on a Data Domainsystem:
avsql --operation=backup --server=12.34.56.78 --id=AvamarAdmin--ap=password --brtype=full --path=/SQL/SQLServer1--log=C:\Program Files\avs\var\avsql.log --ddr=true--ddr-index=2 "SQLServer1\sql01inst2/DB3" "(local)/DB1"
Command Line Interface
Example backup commands 209
Backing up data in a failover clusterTo back up data in a failover cluster, run the CLI on the active node with the clusterclient, and specify the cluster client as the client to back up. If you are backing up thelocal instance, then you must use the --sqlserver option and specify the virtualserver for the SQL Server.
Performing a full backup of a database in the local instance in a clusterThe following command performs a full backup of the DB1 database in the localinstance on the SQLCluster1 cluster client in the SQL domain, labels the backupDB1Full, and stores the backup on the Avamar server:
avsql --operation=backup --server=12.34.56.78 --id=AvamarAdmin--ap=password --brtype=full --path=/SQL/SQLCluster1--log=C:\Program Files\avs\var\avsql.log--sqlserver=SQLCluster1 --hostname-sql=SQLCluster1"(local)/DB1" --label=DB1Full
Performing a transaction log backup of a database in a named instance in aclusterThe following command performs a transaction log backup of the DB3 database in thesql01inst2 instance on the SQLCluster1 cluster client in the SQL domain, andstores the backup on the Avamar server:
avsql --operation=backup --server=12.34.56.78 --id=AvamarAdmin--ap=password --brtype=incremental --path=/SQL/SQLCluster1--log=C:\Program Files\avs\var\avsql.log--sqlserver=SQLCluster1 --hostname-sql=SQLCluster1"SQLCluster1\sql01inst2/DB3"
Backing up data in an AlwaysOn availability group
To back up data in an AlwaysOn availability group:
l Run the CLI on the primary replica.
l Specify the cluster client for the availability group listener as the client to back up.
l Specify the availability group listener with the --sqlserver and --hostname-sql options.
l Specify the availability group listener, the availability group, and the database inquotation marks using the format “listener\group/database”. To back up alldatabases in an availability group, specify “listener\group”.
The following command performs a full backup of all databases on the primary replicausing the SQLGroup2 cluster client for the SQLGroup2 availability group and theSQLGroupListener availability group listener. The SQLGroup2 cluster client is inthe SQL domain on the Avamar server, and the backup is stored on the second DataDomain system that was added to the Avamar configuration:
avsql --operation=backup --server=12.34.56.78 --id=AvamarAdmin--ap=password --brtype=full --path=/SQL/SQLGroupListener--log=C:\Program Files\avs\var\avsql.log--backup-preference=primary --hostname-sql=SQLGroupListener--sqlserver=SQLGroupListener --ddr=true --ddr-index=2"SQLGroupListener\SQLGroup2"
Command Line Interface
210 Avamar for SQL Server 18.1 User Guide
Backing up to a Data Domain systemTo store a backup on a Data Domain system instead of on the Avamar server, use the--ddr and --ddr-index options.
The following command performs an incremental backup of all SQL Server data on theSQLServer2 client in the SQL domain and stores the backup on the first Data Domainsystem that you added to the Avamar configuration:
avsql --operation=backup --server=12.34.56.78 --id=AvamarAdmin--ap=MCUser1 --brtype=incremental --path=/SQL/SQLServer2--log=C:\Program Files\avs\var\avsql.log --ddr=true--ddr-index=1 " "
Excluding data from a backupTo exclude an instance or database from a backup of an entire client, use the --exclude option. If you exclude an instance, you can include an individual databasefrom the instance in the backup using the --include option.
Excluding the local instance from a backup of all SQL Server dataThe following command performs a full backup of all SQL Server data except for thelocal instance on the SQLServer1 client in the SQL domain, and stores the backup onthe Avamar server with an IP address of 12.34.56.78:
avsql --operation=backup --server=12.34.56.78 --id=AvamarAdmin--ap=password --brtype=full --path=/SQL/SQLServer1--log=C:\Program Files\avs\var\avsql.log--exclude=(local) " "
Including a database from an excluded instance in a backup of all SQL Server dataThe following command performs the same backup as the previous example, butincludes the database named DB3 in the backup:
avsql --operation=backup --server=12.34.56.78 --id=AvamarAdmin--ap=password --brtype=full --path=/SQL/SQLServer1--log=C:\Program Files\avs\var\avsql.log--exclude=(local) --include=(local)/DB3 " "
Example restore commandsThese command examples illustrate how to use options to perform different types ofrestores with the avsql command.
NOTICE
After the restore completes successfully, perform a full backup of the database andclear the Force incremental backup after full backup checkbox in the plug-inoptions for the backup. If the checkbox is selected when a full backup occurs after arestore, then the transaction log backup that occurs automatically after the fullbackup fails.
Command Line Interface
Example restore commands 211
Restoring to the original locationTo restore a backup to its original location, run the CLI on the original client, use the--path option to specify the domain and client, and use the --labelnum or --label option to specify the backup to restore.
Restoring an entire backup to the original locationThe following command performs a tail-log backup and restores the backup labeled223 to its original location of the SQLServer3 client in the SQL domain:
avsql --operation=restore --server=12.34.56.78 --id=AvamarAdmin--ap=password --path=/SQL/SQLServer3 --logtail --labelnum=223--usesqlreplaceoption --log=C:\Program Files\avs\var\avsql.log
Restoring the local instance to the original locationThe following command performs a tail-log backup and restores the local instancefrom the backup labeled Backup6 to its original location on the SQLServer3 client inthe SQL domain:
avsql --operation=restore --server=12.34.56.78 --id=AvamarAdmin--ap=password --path=/SQL/SQLServer3 --logtail --label=Backup6(local) --log=C:\Program Files\avs\var\avsql.log
Restoring a database to the original locationThe following command performs a tail-log backup and restores the DB3 databasefrom the Instance2 instance in the backup labeled 842 to its original location on theSQLServer3 client in the SQL domain:
avsql --operation=restore --server=12.34.56.78 --id=AvamarAdmin--ap=password --path=/SQL/SQLServer3 --logtail--usesqlreplaceoption --labelnum=842 Instance2/DB3--log=C:\Program Files\avs\var\avsql.log
Restoring a filegroup or file to the original locationThe following command performs a tail-log backup and restores the following items inthe backup labeled 842 to the original location on the SQLServer3 client in the SQLdomain:
l FG1 filegroup for the DB1 database in the local instance
l File1 file in the FG2 filegroup for the DB2 database in the local instance
avsql --operation=restore --server=12.34.56.78 --id=AvamarAdmin--ap=password --path=/SQL/SQLServer3 --logtail--labelnum=842 --restore-filegroup-list=(local)/DB1/FG1(local)/DB2/DB2_FG2_File1--log=C:\Program Files\avs\var\avsql.log
Restoring to a new database in the original instanceTo restore a backup to its original location but with a new name, run the CLI on theoriginal client, specify the original database name at the end of the command, and usethe --newdbname option to specify the new database name.
The following command performs a tail-log backup and then restores the DB2database in the local instance from the backup labeled DB2Full to its original locationof the SQLServer2 client in the SQL domain, but with a new name of DB6:
Command Line Interface
212 Avamar for SQL Server 18.1 User Guide

avsql --operation=restore --server=12.34.56.78 --id=AvamarAdmin--ap=password --path=/SQL/SQLServer2 --logtail --newdbname=DB6--log=C:\Program Files\avs\var\avsql.log --label=DB2Full(local)/DB2
Restoring to a different instanceTo restore a backup to a different instance, run the CLI on the destination client, usethe --path option to specify the original domain and client, use the --target optionto specify the new client and instance, and set --restore-destination=multiple.
Restoring a database to a different instance on the same clientThe following command restores the DB3 database from Instance2 in the backuplabeled 239 to an instance named Instance3 on the SQLServer1 client:
avsql --operation=restore --server=12.34.56.78 --id=AvamarAdmin--ap=password --path=/SQL/SQLServer1--target=SQLServer1\Instance3 --restore-destination=multiple--labelnum=239 Instance2/DB3--log=C:\Program Files\avs\var\avsql.log
Restoring multiple databases to a different instance on a different clientThe following command restores the DB3 database from Instance2 and DB1 fromInstance1 on the SQLServer1 client in the SQL domain in the backup labeledSQL1Backup8 to Instance3 on the SQLServer2 client:
avsql --operation=restore --server=12.34.56.78 --id=AvamarAdmin--ap=password --path=/SQL/SQLServer1--target=SQLServer2\Instance3 --label=SQL1Backup8 Instance2/DB3Instance1/DB1 --log=C:\Program Files\avs\var\avsql.log
You must run the previous command from a command line on the SQLServer2(destination) client.
Restoring files to a different location on a different clientThe following command restores the File1 and File2 files in C:\SQLData from the(local)/DB3 database on the SQLServer1 client to C:\SQL on the SQLServer2client in the Instance2/DB8 database:
avsql --operation=restore --server=12.34.56.78 --id=AvamarAdmin--ap=password --path=/SQL/SQLServer1--target=SQLServer2\Instance2 --newdbname=DB8--redirect=”C:\SQLData\File1”=”C:\SQL\File1”,“C:\SQLData\File2”=”C:\SQL\File2” --labelnum=163 (local)/DB3--log=C:\Program Files\avs\var\avsql.log
Restoring to a fileTo restore a SQL Server database from an Avamar backup to operating system files,use the --redirecttofile=true option and specify the target path for the files byusing the --target option.
Restoring a database to a file on the original clientThe following command restores the DB4 database in the local instance from thebackup with a label number of 423 to the temp directory on the C:\ drive of theoriginal location of the SQLServer1 client in the SQL domain:
Command Line Interface
Example restore commands 213
avsql --operation=restore --id=AvamarAdmin --ap=password--server=12.34.56.78 --logtail=false -path=/SQL/SQLServer1--labelnum=423 --redirecttofile=true --target=C:\temp(local)/DB4 --log=C:\Program Files\avs\var\avsql.log
You must run the previous command from a command line on the original client.
Restoring a database to a file on a different clientThe following command restores the DB2 database in Instance3 from the backuplabeled Backup22 to the temp directory on the C:\ drive of the WinServer3 clientin the ITServers domain, when WinServer3 is not the original client on which thebackup was performed:
avsql --operation=restore --server=12.34.56.78 --id=AvamarAdmin--ap=password --label=Backup22 --target=C:\temp--redirecttofile=true --path=/ITServers/WinServer3Instance3/DB2 --log=C:\Program Files\avs\var\avsql.log
You must run the previous command from a command line on the WinServer3(destination) client.
Restoring system databases
To restore SQL Server system databases from an Avamar backup, run the CLI on theoriginal client and use the following options:
l --handle-sql-services-automaticallyl --restoresysteml --use-sql-replace-optionIn addition, do not use the --logtail option.
The following command restores the backup labeled 395 to its original location of theSQLServer3 client in the SQL domain, including the system databases in the backup:
avsql --operation=restore --server=12.34.56.78 --id=AvamarAdmin--ap=password --path=/SQL/SQLServer3 --restoresystem--handle-sql-services-automatically --logtail=false--use-sql-replace-option --labelnum=395--log=C:\Program Files\avs\var\avsql.log
Restoring to an AlwaysOn availability groupTo restore data to an AlwaysOn availability group, run the CLI on the primary replica.The options you use in the command depend on whether you are restoring to theoriginal availability group, a new database in the original availability group, or adifferent availability group. The steps to restore to a different instance or to operatingsystem files are the same whether you restore from a backup of databases on a stand-alone server, in a cluster, or in an availability group.
Restoring to the original availability group
To restore a backup to its original location in an availability group:
l Use the --path option to specify the Avamar domain and the cluster client forthe availability group listener.
l Use the --labelnum or --label option to specify the backup to restore.
l Specify the availability group listener in the --sqlserver and --hostname-sqloptions.
Command Line Interface
214 Avamar for SQL Server 18.1 User Guide

l Use the --recovery-primary-only option to control whether to restore toonly the primary replica or to both the primary and all secondary replicas.
Restoring to the original location on all replicasThe following command performs a tail-log backup and restores the DB3 database inthe backup labeled 842 to its original location on all replicas in the SQLGroup3availability group client in the SQL domain:
avsql --operation=restore --server=12.34.56.78 --id=AvamarAdmin--ap=password --path=/SQL/SQLGroup3--sqlserver=SQLGroupListener --hostname-sql=SQLGroupListener--logtail --usesqlreplaceoption--log=C:\Program Files\avs\var\avsql.log--recovery-primary-only=false --labelnum=842SQLGroupListener\SQLGroup3/DB3
Restoring to the original location on only the primary replicaThe following command performs the same restore as the previous command, butrestores to only the primary replica:
avsql --operation=restore --server=12.34.56.78 --id=AvamarAdmin--ap=password --path=/SQL/SQLGroup3--sqlserver=SQLGroupListener --hostname-sql=SQLGroupListener--logtail --usesqlreplaceoption--log=C:\Program Files\avs\var\avsql.log--recovery-primary-only=true --labelnum=842SQLGroupListener\SQLGroup3/DB3
When you restore the databases on only the primary replica, the correspondingdatabase on the secondary replicas is in a restoring state. To restore the databases onthe secondary replicas as part of the availability group, manually prepare and restorethe databases, and join them to the availability group on the secondary replica.
Restoring to a new database in the original availability group
To restore a backup to its original location but with a new name, specify the originaldatabase name at the end of the command, and use the --newdbname option tospecify the new database name.
The following command performs a tail-log backup and then restores the DB2database in the SQLGroup2 availability group from the backup labeled DB2Full to itsoriginal location, but with a new name of DB6:
avsql --operation=restore --server=12.34.56.78 --id=AvamarAdmin--ap=password --path=/SQL/SQLGroup2--sqlserver=SQLGroupListener --hostname-sql=SQLGroup2Listener--logtail --newdbname=DB6--log=C:\Program Files\avs\var\avsql.log --label=DB2FullSQLGroupListener\SQLGroup2/DB2
Restoring to a different availability group
The following command restores the DB3 database from the SQLGroup2 availabilitygroup in the backup labeled 239 to an availability group named SQLGroup3:
avsql --operation=restore --server=12.34.56.78 --id=AvamarAdmin--ap=password --path=/SQL/SQLGroup3--sqlserver=SQLGroupListener --hostname-sql=SQLGroupListener
Command Line Interface
Example restore commands 215

--target=SQLGroup3Listener\SQLGroup3--restore-destination=multiple --labelnum=239SQLGroupListener\SQLGroup2/DB3--log=C:\Program Files\avs\var\avsql.log
Run the previous command on the primary replica of the target cluster with theSQLGroup3 availability group.
Point-in-time restoreTo restore to a specific point in time, set --pitormark=pointintime and specifythe date and time with the --pitormarkstr option.
To restore to a named mark, set --pitormark=markname, specify the named markusing the --pitormarkstr option, and specify whether to include the mark in therecovery using the --recoverypoint option. If named marks are not unique in thetransaction log, then use the --aftertime option to specify a date and time tolocate the mark.
Restoring to a specific date and timeThe following command restores the DB3 database in the local instance from thebackup that is labeled FullBackup2 to its original location and a point in time ofDecember 15, 2014 at 2:15:45 p.m.:
avsql --operation=restore --id=AvamarAdmin --ap=password--server=12.34.56.78 --path=/SQL/SQLServer1--log=C:\Program Files\avs\var\avsql.log--pitormark=pointintime --pitormarkstr=2014-12-15T14:15:45--label=FullBackup2 (local)/DB3
Restoring to a named markThe following command restores the DB3 backup in Instance2 from the backup thatis labeled 452 to its original location and a named mark of M2, and the recoveryincludes the transaction at the named mark:
avsql --operation=restore --id=AvamarAdmin --ap=password--server=12.34.56.78 --path=/SQL/SQLServer1--log=C:\Program Files\avs\var\avsql.log --pitormark=markname--pitormarkstr=M2 --recoverypoint=atmark --labelnum=452Instance2/DB3
Restore an individual incremental or differential backup
The following command performs an individual restore of SampleDb.
avsql --operation=restore --server=12.34.56.78--id=AvamarAdmin --ap=password --path=/SQL/SQLServer1 --overwrite-default-recoveryplan--hostname-sql=SQLServer1 --labelnum=9 "SQLServer1\sql01inst2/DB3"--recoveryoperation=standby --standbyfilelocation="C:\Restordb" --usesqlreplaceoption--restore-destination=original
Discover disk space size requirements for a restore operation
The following command discovers disk space size requirements for DB2 and DB3.
Command Line Interface
216 Avamar for SQL Server 18.1 User Guide

avsql --operation=restore --server=12.34.56.78 --id=AvamarAdmin --ap=password --path=/SQL/SQLServer1 --print-restore-size --hostname-sql=SQLServer1 --labelnum=28 "(local)/DB2" "(local)/DB3"
Viewing backup metadataTo view the metadata for a backup as screen output, use the --metadata optionwith the restore operation.
The following command displays metadata for the backup with a label number of 22:
avsql --operation=restore --id=AvamarAdmin --ap=password--server=12.34.56.78 --path=/SQL/SQLServer1 --metadata--labelnum=22
avsqltlr command referenceThe avsqltlr command enables you to extend the amount of time that a databasebackup mounted for table level recovery will remain mounted. This operation is onlysupported when a database backups has already been mounted and the operation willfail if the drive is unmounted.
avsqltlr synopsisavsqltlr --extendmnttime=time
avsqltlr optionsOne option is supported by the avsqltlr command, to extend the amount of timethat a database backup mounted for table level recovery will remain mounted.
The following option is available for the avsqltlr command.
Table 30 avsqltlr option
Option Description
-- extendmnttime=time Extends the amount of time that a databasebackup mounted for table level recovery willremain mounted. Allowed values are:
l "n hours"
l "n minutes"
l "n seconds"
The maximum period that period that thedatabase mount can be extended is 24 hours.
Command Line Interface
avsqltlr command reference 217

Monitoring CLI activitiesThe status of backups and restores that you perform by using the SQL Server plug-inCLI appears on the Session Monitor tab in the Server window in AvamarAdministrator.
CLI activities do not appear in the Activity Monitor tab in the Activity window. TheActivity Monitor displays only backups and restores that you perform by usingAvamar Administrator.
Command Line Interface
218 Avamar for SQL Server 18.1 User Guide

APPENDIX C
Troubleshooting
This appendix includes the following topics:
l Backup problems and solutions........................................................................ 220l Restore problems and solutions........................................................................ 221l Upgrade problems and solutions....................................................................... 221
Troubleshooting 219

Backup problems and solutionsThe following topics provide details on how to troubleshoot problems that may occurduring backups with the Avamar Plug-in for SQL Server.
Log truncation error appears during a full backupThe following error may appear if you try to perform a full backup with log truncationenabled (by selecting For all backup types from the Truncate database log list in theSQL Server plug-in options):
avsql Error <15754>: SQL TRUNCATE LOG is not supported in SQLServer 2008 or higher, therefore skipping log truncationTo truncate logsr, perform an incremental (transaction log) backup after a full backupautomatically by selecting the Force incremental backup after full backup checkboxand leaving the default setting for the Truncate database log list.
When the backup process successfully truncates the log file, LOG_BACKUP appears inthe header of the database.
Error appears for a forced incremental backup after a restoreThe following error appears in the Avamar client log file if you perform a full backupwith a forced incremental backup after you restore a database:
avsql Error <15762>: Skipping incremental backup after full fordbname database. Error: Last restore was performed after thelast full backup.The full backup completes successfully, but Avamar does not perform the incrementalbackup.
A forced incremental backup contains transactions that occur from the end of the firstfull backup or the most recent transaction log backup, whichever is later. This actionproceeds until the forced incremental backup occurs (after the first backup of thenew backup cycle). This step ensures that a point-in-time recovery to a point in timebetween the two full backups can occur, if required.
If a restore occurs between the two full backups, then the log chain breaks. Avamarcannot create a transaction log backup (forced incremental backup) for thetransactions between the backups.
Avamar session security requires prior registration of all clientsAvamar session security requires that all clients be registered with the server. For SQLAlways On cluster and SQL virtual cluster, all nodes must be registered with theserver.
SQL Auto Close feature not supportedIf the SQL Auto Close feature is being used, databases may not be backed up and noerror message will be displayed. Event ID 17137, with the message
Starting up database database_name
will be generated repeatedly in the Event Monitor of the Avamar Administrator. Thisindicates that SQL Auto Close setting is enabled for these databases, which closes thedatabase when the last connection closes. The solution to this problem is to disablethe SQL Auto Close feature on the SQL server.
Troubleshooting
220 Avamar for SQL Server 18.1 User Guide

SQL cluster backups fail with no errors in AlwaysOn environmentIn case of SQL backup with big databases, consistency check might take more timefor which backup from secondary nodes may fail with timeout. To resolve this issue,we should use the following flags in avagent.cmd file.
--remote-connection-alive-timeout=<timeout>
avagent.cmd file with above flag should be added to var folder as well as Clusterclient's var directory on the primary node and all the secondary nodes. TheCluster client's var folder for AlwaysOn group is created while configuringwccw.
We should also add the following flag in avsql.cmd file in var folder as well asCluster client's var directory on all the nodes:
--secondary-replica-timeout=<timeout>
Restore problems and solutionsThe following topics provide details on how to troubleshoot problems that may occurduring restores with the Avamar Plug-in for SQL Server.
Restore fails with an incorrect error that a log gap occurredWhen you restore from an incremental backup of a database on a secondary replica inan AlwaysOn availability group environment, and you select the option to perform atail-log backup, the restore sometimes fails with an error that a log gap occurred, eventhough a log gap does not exist. In addition, you cannot perform a point-in-timerestore from the backup.
The issue occurs when system tables on the secondary replica are not yetsynchronized with other availability replicas at the exact moment when theincremental backup occurs. The synchronization delay may be due to slow networkperformance or other environmental performance issues.
To work around this issue:
l Perform a full backup to capture the tail of the log.
l Restore the backup to a file, and then use SQL Server tools to restore the data toSQL Server to the required point in time.
Upgrade problems and solutionsThe following topic provides details on how to troubleshoot problems that may occurwhen you upgrade the Avamar client software.
Upgrade requires a rebootThe system may require a reboot after you upgrade the Avamar client software if a filewas locked during the upgrade. This issue typically occurs if a backup is in progresswhen the upgrade starts. Ensure that no backups are in progress when you start theupgrade.
Troubleshooting
Restore problems and solutions 221

Troubleshooting
222 Avamar for SQL Server 18.1 User Guide

APPENDIX D
Cluster Configuration Tool CLI
This section contains the following topics:
l Cluster Configuration Tool CLI Overview......................................................... 224l Plugins............................................................................................................. 224l Operations....................................................................................................... 225l Cluster Configuration Tool CLI examples......................................................... 229
Cluster Configuration Tool CLI 223

Cluster Configuration Tool CLI OverviewThe Cluster Configuration Tool CLI enables you to use a command line interface (CLI)with the av_cluster_config_console command instead of Windows ClusterConfiguration Wizard to configure the cluster environment for Avamar backups.
When you use the CLI to configure the cluster, you specify the command options forthe av_cluster_config_console binary at command prompt. The tool reads theinput arguments and configures the cluster.
The av_cluster_config_console binary is available in the C:\Program files\avs\bin folder, where C:\Program files\avs\bin is the Avamar clientinstallation folder.
To use the CLI, open a command prompt, change the directory to the bin folder, andthen type the command.
Command referenceThe av_cluster_config_console command enables you to configure the cluster,remove the existing configuration, and view the existing configuration for the SQL andSQLAlwayson plugins.
Synopsis
av_cluster_config_console - -plugin= {SQL | SQLAlwayson} - -operation= {configure | remove | view} [Options]
PluginsThe plugin that you specify with the av_cluster_config_console commandcontrols the plugin that is used during the configuration.
Supply one of the plugins specified in the following table by using the - - pluginoption.
Table 31 Plugin descriptions
Plugin Description
SQL Configures the SQL failover cluster environment for Avamar backups.The list of supported operations for the SQL plugin includes the following:
l Configure — To configure a new cluster client on all nodes of a SQL failover cluster.
l Remove — To remove the existing cluster client on all nodes of a SQLfail over cluster.
l View — To view all existing cluster client configuration of a SQL failover cluster.
l Configure —To configure a new cluster client on all nodes of a SQL failover cluster.
Cluster Configuration Tool CLI
224 Avamar for SQL Server 18.1 User Guide
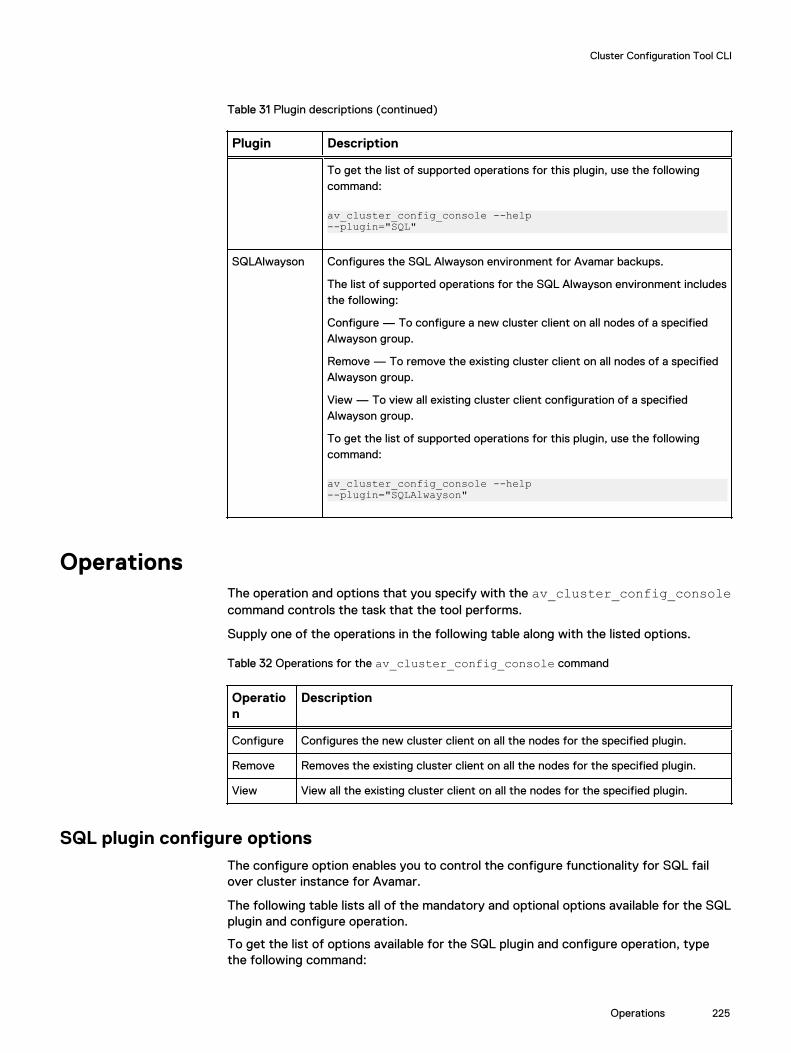
Table 31 Plugin descriptions (continued)
Plugin Description
To get the list of supported operations for this plugin, use the followingcommand:
av_cluster_config_console --help--plugin="SQL"
SQLAlwayson Configures the SQL Alwayson environment for Avamar backups.
The list of supported operations for the SQL Alwayson environment includesthe following:
Configure — To configure a new cluster client on all nodes of a specifiedAlwayson group.
Remove — To remove the existing cluster client on all nodes of a specifiedAlwayson group.
View — To view all existing cluster client configuration of a specifiedAlwayson group.
To get the list of supported operations for this plugin, use the followingcommand:
av_cluster_config_console --help--plugin="SQLAlwayson"
OperationsThe operation and options that you specify with the av_cluster_config_consolecommand controls the task that the tool performs.
Supply one of the operations in the following table along with the listed options.
Table 32 Operations for the av_cluster_config_console command
Operation
Description
Configure Configures the new cluster client on all the nodes for the specified plugin.
Remove Removes the existing cluster client on all the nodes for the specified plugin.
View View all the existing cluster client on all the nodes for the specified plugin.
SQL plugin configure optionsThe configure option enables you to control the configure functionality for SQL failover cluster instance for Avamar.
The following table lists all of the mandatory and optional options available for the SQLplugin and configure operation.
To get the list of options available for the SQL plugin and configure operation, typethe following command:
Cluster Configuration Tool CLI
Operations 225

av_cluster_config_console --help --plugin="SQL" --operation="configure"All the options that are prefixed with [Optional] are optional for the specified pluginand operation. The options without the [Optional] prefix are mandatory for thespecified plugin and operation.
Table 33 SQL Configure Options
Option Description
mcsaddr Avamar server address.You can provide either the FQDN name of the server or the IPaddress. If the server details are wrong then tool cannotconfigure the environment.
clusterservice Name of the SQL fail over instance cluster resource groupname.To get the list of available cluster resource group names usethe view command.
[OPTIONAL]sharedvolume Shared volume for the cluster client. If the fail over instancehas a single shared disk then the tool automatically detects thedisk and uses it as a shared volume for the configuration. Ifmultiple shared volumes are present, this field is mandatory.
[OPTIONAL]ipversion IP version that is used on the nodes. If this option is notspecified, then IPV4 is used as the default value. IPV4 issupported for the configurations. Only IPV4 is supported forthis release.
[OPTIONAL]mcsport Avamar port number. This is the port that is used tocommunicate with the Avamar server.If this option is not specified, then 28001 is used as the defaultport number.
[OPTIONAL]bringonline Whether to bring the Avamar cluster client online and registerwith Avamar server.Valid values are "TRUE" or "FALSE".
The default value is "TRUE".
[OPTIONAL]clientdomain Specifies the Avamar domain that the cluster client isassociated with.The default value is /clients.
[OPTIONAL]vardir Avamar cluster client var directory.
This directory should only reside in the fail over instance shareddisk.
If not provided by default, the directory is created underSharedVolume:\Program Files\Backup Agents forCluster Groups\ClusterClient\var.
Cluster Configuration Tool CLI
226 Avamar for SQL Server 18.1 User Guide
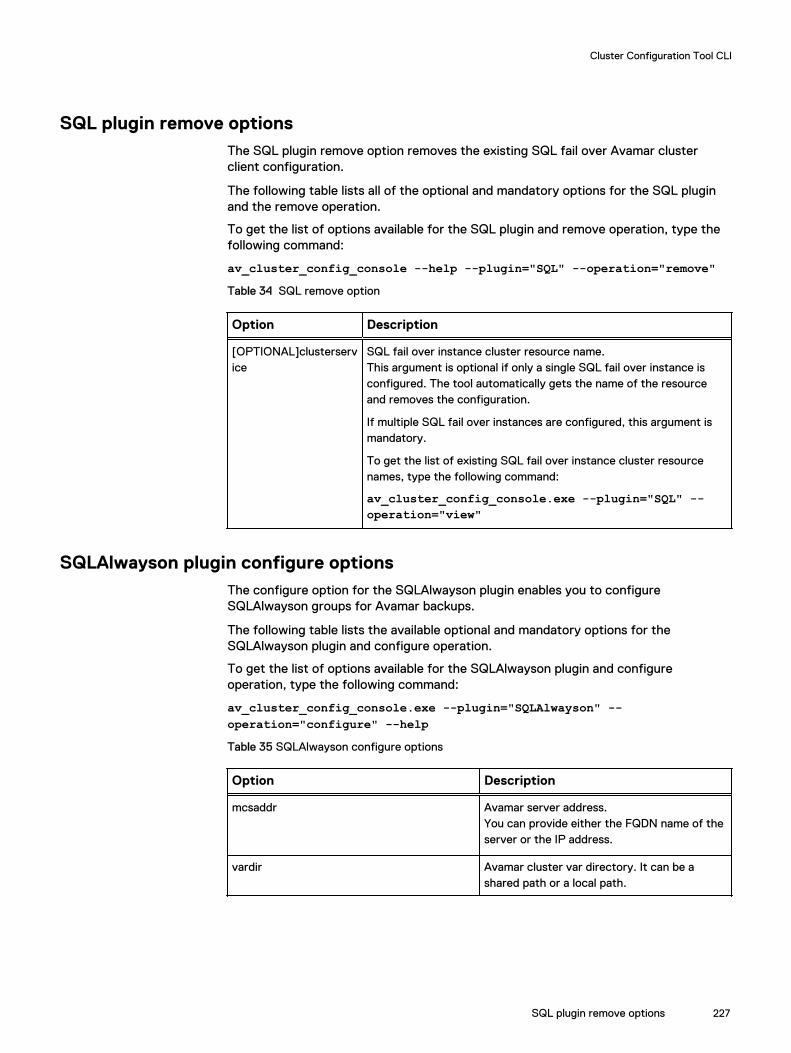
SQL plugin remove optionsThe SQL plugin remove option removes the existing SQL fail over Avamar clusterclient configuration.
The following table lists all of the optional and mandatory options for the SQL pluginand the remove operation.
To get the list of options available for the SQL plugin and remove operation, type thefollowing command:
av_cluster_config_console --help --plugin="SQL" --operation="remove"Table 34 SQL remove option
Option Description
[OPTIONAL]clusterservice
SQL fail over instance cluster resource name.This argument is optional if only a single SQL fail over instance isconfigured. The tool automatically gets the name of the resourceand removes the configuration.
If multiple SQL fail over instances are configured, this argument ismandatory.
To get the list of existing SQL fail over instance cluster resourcenames, type the following command:
av_cluster_config_console.exe --plugin="SQL" --operation="view"
SQLAlwayson plugin configure optionsThe configure option for the SQLAlwayson plugin enables you to configureSQLAlwayson groups for Avamar backups.
The following table lists the available optional and mandatory options for theSQLAlwayson plugin and configure operation.
To get the list of options available for the SQLAlwayson plugin and configureoperation, type the following command:
av_cluster_config_console.exe --plugin="SQLAlwayson" --operation="configure" --helpTable 35 SQLAlwayson configure options
Option Description
mcsaddr Avamar server address.You can provide either the FQDN name of theserver or the IP address.
vardir Avamar cluster var directory. It can be ashared path or a local path.
Cluster Configuration Tool CLI
SQL plugin remove options 227

Table 35 SQLAlwayson configure options (continued)
Option Description
aongrpname Name of the alwayson group to be configured.To get the list of alwayson groups available,use the view command.
av_cluster_config_console.exe --plugin="SQLAlwayson" --operation="view"
[OPTIONAL]ipversion IP version that is being used on the nodes. Ifthis option is not specified, then IPV4 is usedas the default value. IPV4 is supported for theconfigurations.
[OPTIONAL]mcsport Avamar port number. This is the port that isused to communicate with the Avamar server.If this option is not specified, then 28001 isused as the default port number.
[OPTIONAL]bringonline Whether to bring the Avamar cluster clientonline and register with the Avamar server.Valid values are "TRUE" or "FALSE".
If this option is not specified, then "TRUE" isused as the default value.
[OPTIONAL]clientdomain Specifies the Avamar domain that the clusterclient is associated with.If this option is not specified, then "/clients"is used as the default value.
[OPTIONAL]sysdir Avamar cluster sys directory. This is anoptional parameter. If this option is notspecified, then sysdir is created under theparent directory of vardir.
SQLAlwayson plugin remove optionsThe remove option for the SQLAlwayson plugin enables you to remove existing SQLalwayson groups that are configured in the Avamar cluster client environment.
The following table lists the available optional and mandatory options for theSQLAlwayson plugin and remove operation.
To get the list of options available for the SQLAlwayson plugin and remove operation,type the following command:
av_cluster_config_console.exe --plugin="SQLAlwayson" --operation="remove" --helpTable 36 SQLAlwayson remove options
Option Description
[OPTIONAL]aongrpname Name of the SQL Alwayson group to beremoved. This is optional if only a single SQL
Cluster Configuration Tool CLI
228 Avamar for SQL Server 18.1 User Guide
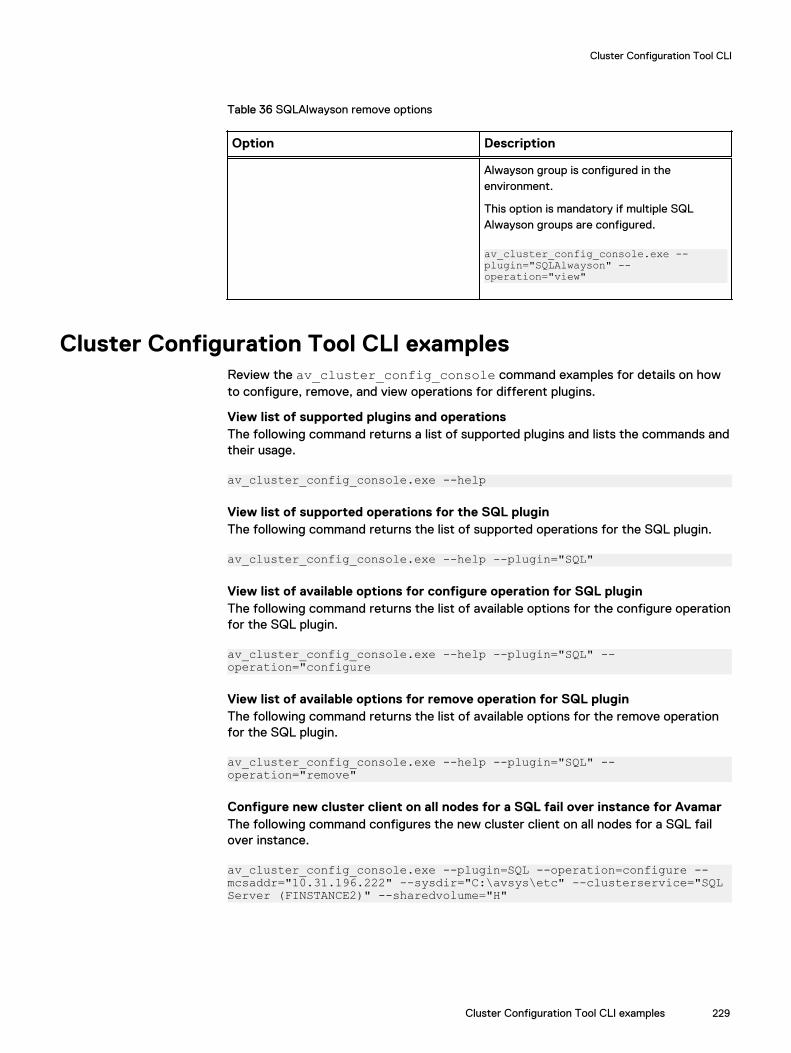
Table 36 SQLAlwayson remove options
Option Description
Alwayson group is configured in theenvironment.
This option is mandatory if multiple SQLAlwayson groups are configured.
av_cluster_config_console.exe --plugin="SQLAlwayson" --operation="view"
Cluster Configuration Tool CLI examplesReview the av_cluster_config_console command examples for details on howto configure, remove, and view operations for different plugins.
View list of supported plugins and operationsThe following command returns a list of supported plugins and lists the commands andtheir usage.
av_cluster_config_console.exe --help
View list of supported operations for the SQL pluginThe following command returns the list of supported operations for the SQL plugin.
av_cluster_config_console.exe --help --plugin="SQL"
View list of available options for configure operation for SQL pluginThe following command returns the list of available options for the configure operationfor the SQL plugin.
av_cluster_config_console.exe --help --plugin="SQL" --operation="configure
View list of available options for remove operation for SQL pluginThe following command returns the list of available options for the remove operationfor the SQL plugin.
av_cluster_config_console.exe --help --plugin="SQL" --operation="remove"
Configure new cluster client on all nodes for a SQL fail over instance for AvamarThe following command configures the new cluster client on all nodes for a SQL failover instance.
av_cluster_config_console.exe --plugin=SQL --operation=configure --mcsaddr="10.31.196.222" --sysdir="C:\avsys\etc" --clusterservice="SQL Server (FINSTANCE2)" --sharedvolume="H"
Cluster Configuration Tool CLI
Cluster Configuration Tool CLI examples 229

Remove existing cluster client on all nodes for a SQL fail over instance forAvamarThe following command removes the existing cluster client on all nodes for a SQL failover instance.
av_cluster_config_console.exe --plugin=SQL --operation=remove --clusterservice="SQL Server (FINSTANCE2)"
View the existing cluster client information for the SQL fail over configurationThe following command displays the existing cluster client configuration for all theavailable SQL fail over instances.
av_cluster_config_console.exe --plugin=SQL --operation=view
View list of supported operations for SQLAlwayson pluginThe following command returns the list of supported operations for the SQLAlwaysonplugin.
av_cluster_config_console.exe --help --plugin=" SQLAlwayson "
View list of available options for the configure operation for SQLAlwayson pluginThe following command returns the list of available options for the configure operationfor the SQL plugin.
av_cluster_config_console.exe --help --plugin=" SQLAlwayson " --operation="configure"
View list of available options for the remove operation for SQLAlwayson pluginThe following command returns the list of available options for the remove operationfor the SQL plugin.
av_cluster_config_console.exe --help --plugin=" SQLAlwayson " --operation="remove"
Configure new cluster client on all nodes for SQLAlwayson group Grp1 forAvamarThe following command configures the new cluster client on all nodes for anSQLAlwayson group Grp1.
av_cluster_config_console.exe --plugin=sqlalwayson --operation=configure --mcsaddr="10.31.197.22" --vardir="\\node1\sharevar" --aongrpname="Grp1" --clientdomain="/AgGroups" --bringonline="false"
Remove the existing cluster client on all nodes for an SQLAlwayson fail overinstance for AvamarThe following command removes the existing cluster client on all nodes for an existingSQLAlwayson group.
av_cluster_config_console.exe --plugin=SQLAlwayson --operation=remove
View the existing cluster client information for the SQL Alwayson configurationThe following command displays the existing cluster client configuration for all theavailable SQL Alwayson groups.
av_cluster_config_console.exe --plugin=SQLAlwayson --operation=view
Cluster Configuration Tool CLI
230 Avamar for SQL Server 18.1 User Guide

APPENDIX E
ItemPoint for Microsoft SQL Server Notes
This appendix includes the following information:
l Supported environments for ItemPoint for Microsoft SQL Server................... 232l Limitations for ItemPoint for Microsoft SQL Server.........................................233
ItemPoint for Microsoft SQL Server Notes 231

Supported environments for ItemPoint for Microsoft SQLServer
The following table lists the supported environments for ItemPoint for Microsoft SQLServer:
Table 37 Component requirements
Component Requirement
Operating Systems The following operating systems aresupported:
l Windows Server 2008
l Windows Server 2008 R2
l Windows Server 2012
l Windows Server 2012 R2
l Windows 7
l Windows 8
Note
64-bit versions, virtual and physical, of thelisted operating systems are required.
ItemPoint for Microsoft SQL Server can onlybe run by users with administrative privilegesand in administrative mode.
Microsoft SQL Server Source File Formats:
l Native SQL backup
n Full, differential, and incremental(transaction log) backups
n Compressed and uncompressed
l Offline SQL database files(.MDF/.NDF/.LDF)
Source Data:
l SQL 2005
l SQL 2008
l SQL 2008 R2
l SQL 2012
l SQL 2014
l SQL 2016
Target Servers:
l SQL 2005
l SQL 2008
ItemPoint for Microsoft SQL Server Notes
232 Avamar for SQL Server 18.1 User Guide

Table 37 Component requirements (continued)
Component Requirement
l SQL 2008 R2
l SQL 2012
l SQL 2014
l SQL 2016
Remote Blob Stores (RBSs):
l FILESTREAM Provider
l Metalogix StoragePoint Provider (v4.21320 or higher)
l StorSimple SharePoint DatabaseOptimizer
Microsoft Azure Source Data:
l Local backups of Microsoft Azure
l Downloaded copies of database files
l Downloaded copies of backup files
Virtual Environments Virtual operation of tape devices may haverestrictions that are imposed by virtualoperating systems.
Additional Software Microsoft .NET Framework:
l 4.0
In order for ItemPoint for Microsoft SQLServer to operate fully, you must ensure thatthe source database files are on EMC storage.If not, attempts to open a source databaseproduces an error message.
Limitations for ItemPoint for Microsoft SQL ServerThe following are not supported in ItemPoint for SQL:
l Database encryption and compression
l Backup data encryption
l SQL Server database objects other than tables, rows, and columns (such assystem tables, SQL Server database objects other than tables, rows, and columns(such as system tables, stored procedures, triggers, primary and foreign keys, andCLR) are not supported and do not appear in the ItemPoint for Microsoft SQLServer interface.
l Limited support column (data) types:
Note
These column types appear in the Source List as either <UNSUPPORTED> orbinary and are copied as binary.
ItemPoint for Microsoft SQL Server Notes
Limitations for ItemPoint for Microsoft SQL Server 233
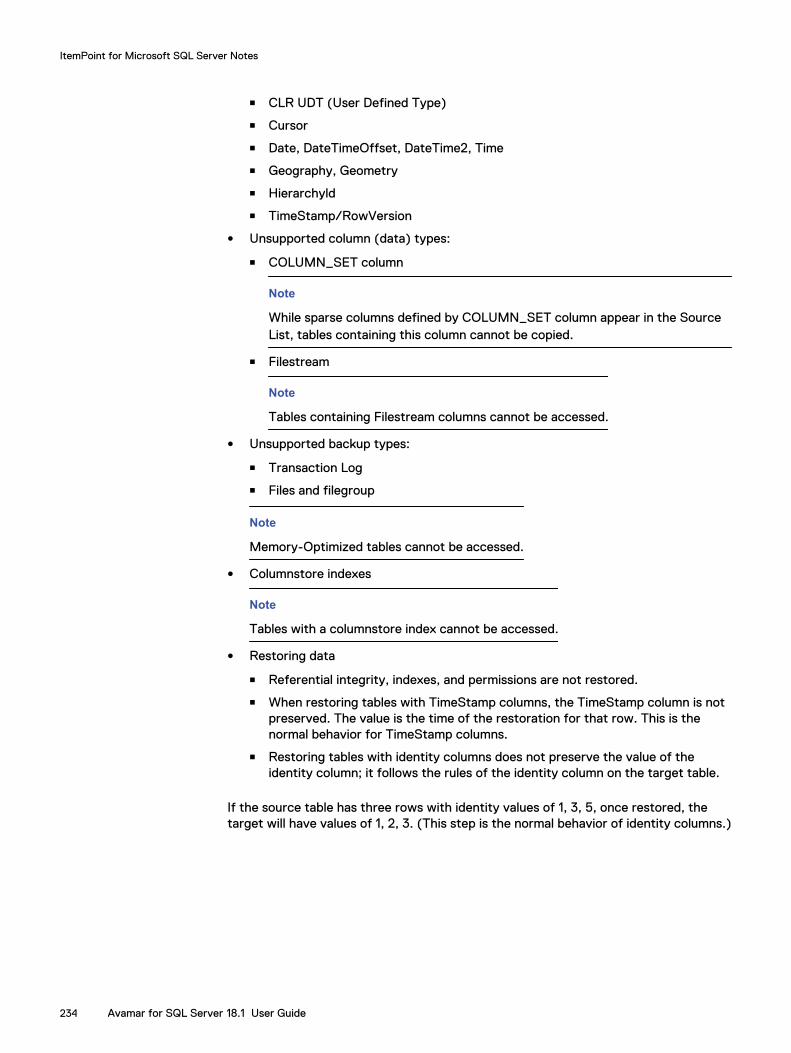
n CLR UDT (User Defined Type)
n Cursor
n Date, DateTimeOffset, DateTime2, Time
n Geography, Geometry
n Hierarchyld
n TimeStamp/RowVersion
l Unsupported column (data) types:
n COLUMN_SET column
Note
While sparse columns defined by COLUMN_SET column appear in the SourceList, tables containing this column cannot be copied.
n Filestream
Note
Tables containing Filestream columns cannot be accessed.
l Unsupported backup types:
n Transaction Log
n Files and filegroup
Note
Memory-Optimized tables cannot be accessed.
l Columnstore indexes
Note
Tables with a columnstore index cannot be accessed.
l Restoring data
n Referential integrity, indexes, and permissions are not restored.
n When restoring tables with TimeStamp columns, the TimeStamp column is notpreserved. The value is the time of the restoration for that row. This is thenormal behavior for TimeStamp columns.
n Restoring tables with identity columns does not preserve the value of theidentity column; it follows the rules of the identity column on the target table.
If the source table has three rows with identity values of 1, 3, 5, once restored, thetarget will have values of 1, 2, 3. (This step is the normal behavior of identity columns.)
ItemPoint for Microsoft SQL Server Notes
234 Avamar for SQL Server 18.1 User Guide
GLOSSARY
A
activation The process of passing the client ID (CID) back to the client, where it is stored in anencrypted file on the client file system. See also client activation
administrator Person who normally installs, configures, and maintains software on networkcomputers, and who adds users and defines user privileges.
alias A SQL Server feature that enables you to configure a name on a computer with SQLServer that points to a server, instance, or database on either the local computer or ona different computer.
AlwaysOn availabilitygroup
In a cluster environment with SQL Server 2012, 2014, and 2016, a group of databasesstored locally on each node that can fail over from one node to another for highavailability. See also availability group
authentication The method by which users and applications, such as Avamar client software, connectto SQL Server. Authentication methods include Windows authentication and SQLServer authentication.
avagent The name of the client agent process.
availability group In a cluster environment with SQL Server 2012, 2014, or 2016, a group of databasesstored locally on each node that can fail over from one node to another for highavailability. See also AlwaysOn availability group
availability group listener A virtual network name (VNN) to which clients can connect to access a database in anavailability replica of an availability group.
availability replica A SQL Server instance on a cluster node that hosts an AlwaysOn availability group. See also replica
Avamar Administrator A graphical management console software application that is used to remotelyadminister an Avamar system from a supported Windows or Linux client computer.
Avamar client A computer or workstation that runs Avamar software and accesses the Avamar serverover a network connection. Avamar client software comprises a client agent and one ormore plug-ins.
Avamar for SQL Server 18.1 User Guide 235

Avamar server The server component of the Avamar client/server system. Avamar server is a fault-tolerant, high-availability system that efficiently stores the backups from all protectedclients. It also provides essential processes and services required for data restores,client access, and remote system administration. Avamar server runs as a distributedapplication across multiple networked storage nodes.
avsql The application executable and command line interface for the Avamar Plug-in for SQLServer. You can use avsql to perform on-demand backups and restores of SQL Serverdata.
avtar The Avamar process that performs backups and restores.
B
backup A point-in-time copy of client data that can be restored as individual files, selected data,or as an entire backup.
bare metal recovery(BMR)
The process of restoring data from a backup to recover a computer system from “baremetal,” or without previously installed software or operating system.
browse The process of viewing data that is available for backup on a client computer or restorefrom the Avamar server.
bulk-logged recoverymodel
A type of SQL Server recovery model that permits high-performance bulk copyoperations and reduces log space usage by using minimal logging for most bulkoperations. This recovery model enables you to recover to the end of any backup.Point-in-time restore is not supported.
C
client activation The process of passing the client ID (CID) back to the client, where it is stored in anencrypted file on the client file system. See also activation
client agent A platform-specific software process that runs on the client and communicates with theManagement Console Server (MCS) and with any plug-ins installed on that client.
client registration The process of establishing an identity with the Avamar server. When Avamarrecognizes the client, it assigns a unique client ID (CID), which it passes back to theclient during client activation. See also registration
cluster Two or more independent network servers, usually with exact copies of the samesoftware and data, that operate and appear to clients as if they are a single unit. Acluster configuration enables work to be shifted from one server to another, providinghigh availability, which allows application services to continue despite most hardware orsoftware failures.
Cluster ConfigurationTool
Avamar configuration wizard to configure the cluster client.
Glossary
236 Avamar for SQL Server 18.1 User Guide

D
database A collection of data arranged for ease and speed of update, search, and retrieval bycomputer software.
database mirroring A high availability strategy where SQL Server maintains two copies of a single databasethat must reside on different SQL Server instances. See also mirroring
Data Domain system Disk-based deduplication appliances and gateways that provide data protection anddisaster recovery (DR) in the enterprise environment.
dataset A policy that defines a set of files, directories, and file systems for each supportedplatform that are included or excluded in backups across a group of clients. A dataset isa persistent and reusable Avamar policy that can be named and attached to multiplegroups.
default instance The default instance on a computer with SQL Server. The name of the default instanceis the name of the local computer. See also local instance
differential backup A type of backup that includes only data that changed after the last full backup. Thebackup also copies relevant portions of the transaction logs.
disaster recovery Recovery from any disruptive situation, such as hardware failure or software corruption,in which ordinary data recovery procedures are not sufficient to restore a system andits data to normal day-to-day operations. A disaster recovery can be a bare metalrecovery.
DNS Domain Name Server. A dynamic and distributed directory service for assigning domainnames to specific IP addresses.
domain A feature in Avamar Administrator that is used to organize large numbers of clients intonamed areas of control and management.
F
Failover ClusterInstances (FCIs)
A single instance of SQL Server that is installed across Windows Server FailoverClustering (WSFC) nodes. On the network, an FCI appears to be an instance of SQLServer running on a single computer, but the FCI provides failover from one WSFC nodeto another if the current node becomes unavailable.
filegroup Named collections of SQL Server files that are used to help with data placement andadministrative tasks such as backup and restore operations. The two types of filegroupsare the primary filegroup and user-defined filegroups.
file system Software interface used to save, retrieve, and manage files on storage media byproviding directory structures, data transfer methods, and file association.
Glossary
Avamar for SQL Server 18.1 User Guide 237

full backup A type of backup that includes the entire database, including all objects, system tables,and data, as well as the transaction log.
full recovery model A type of SQL Server recovery model that logs all database transactions in thetransaction log. This type of recovery model enables you to perform a point-in-timerestore.
G
group A level of organization in Avamar Administrator for one or more Avamar clients. Allclients in an Avamar group use the same group policies, which include the dataset,schedule, and retention policy.
group policy The dataset, schedule, and retention policy for all clients in an Avamar group.
H
hybrid IT environment An information technology (IT) environment where an enterprise provides and managessome resources on-premise but uses cloud-based services for other resources.
I
incremental backup A type of backup that includes only the transaction log. Also called a transaction logbackup.
instance A single occurrence of the SQL Server Database Engine. You can install multipleinstances on a single computer. The two types of instances are the local instance, alsocalled the default instance, and named instances.
L
LAN Local Area Network.
local instance The default instance on a computer with SQL Server. The name of the local instance isthe name of the local computer. See also default instance
M
mark The user-defined name for a starting point of a specific type of transaction in thetransaction log. You can perform a point-in-time restore for a database to a mark. See also named mark
master database The system database that records all of the system level information for a SQL Serversystem.
Glossary
238 Avamar for SQL Server 18.1 User Guide

MCS Management console server. The server subsystem that provides centralizedadministration (scheduling, monitoring, and management) for the Avamar server. TheMCS also runs the server-side processes used by Avamar Administrator.
metadata Data about the backup, including information about the original database files, thebackup types, the date and time of the backup, and other information necessary forrestore.
Microsoft Azure The Microsoft cloud computing platform and infrastructure. Formerly known asWindows Azure.
mirroring A high availability strategy where SQL Server maintains two copies of a single databasethat must reside on different SQL Server instances. See also database mirroring
model database The system database that provides the template for all databases that you create on aSQL Server instance.
msdb database The system database for scheduling alerts and jobs, and for recording operators. Themsdb database also contains history tables, such as the backup and restore historytables.
multi-streaming The process of backing up or restoring data using multiple parallel data streams. Multi-streaming enables you to improve backup and restore performance in mostenvironments.
N
named instance All instances of the database engine other than the local instance. You specify the nameof the instance when you install the instance.
named mark The user-defined name for a starting point of a specific type of transaction in thetransaction log. You can perform a point-in-time restore for a database to a namedmark. See also mark
P
plug-in Avamar client software that recognizes a particular kind of data resident on that client.
plug-in options Options that you specify during backup or restore to control backup or restorefunctionality.
point-in-time restore The process of restoring a database with the full recovery model to a specific date andtime or to a named mark in the transaction log.
policy A set of rules for client backups that can be named and applied to multiple groups.Groups have dataset, schedule, and retention policies.
Glossary
Avamar for SQL Server 18.1 User Guide 239

primary data file The data file that is the starting point of the database and points to the other files in thedatabase. Every database has one primary data file. The recommended filenameextension for primary data files is .mdf.
primary filegroup The filegroup that contains the primary data file and any other files that are notspecifically assigned to another filegroup. All pages for the system tables are allocatedin the primary filegroup.
primary replica The availability replica that handles read/write activity from clients and sendstransaction log updates to the secondary replicas.
R
recovery model A database property that controls how transactions are logged, whether the transactionlog requires and allows backups, and the available restore operations. Three recoverymodels exist: simple, full, and bulk-logged.
recovery operation The type of recovery to perform when you restore SQL Server data. The recoveryoperation controls the status of restored databases after the restore. The threerecovery models are RECOVERY, NORECOVERY, and STANDBY.
redirected restore The process of restoring a backup to a different location than the original locationwhere the backup occurred.
registration The process of establishing an identity with the Avamar server. When Avamarrecognizes the client, it assigns a unique client ID (CID), which it passes back to theclient during client activation. See also client registration
replica A SQL Server instance on a cluster node that hosts an AlwaysOn availability group. See also availability replica
Resource database A read-only system database that contains copies of all system objects that ship withSQL Server. The Avamar Plug-in for SQL Server cannot back up the Resource databasebecause SQL Server cannot back up the Resource database.
restore An operation that retrieves one or more file systems, directories, files, or data objectsfrom a backup and writes the data to a designated location.
retention The time setting to automatically delete backups on an Avamar server. Retention can beset to permanent for backups that should not be deleted from an Avamar server.Retention is a persistent and reusable Avamar policy that can be named and attached tomultiple groups.
S
schedule The ability to control the frequency and the start and end time each day for backups ofclients in a group. A schedule is a persistent and reusable Avamar policy that can benamed and attached to multiple groups.
Glossary
240 Avamar for SQL Server 18.1 User Guide

secondary data files The data files other than the primary data file for a database. Some databases may nothave any secondary data files, while others have several secondary data files. Therecommended filename extension for secondary data files is .ndf.
secondary replica An availability replica that contains a copy of the databases for the availability group.The database copies synchronize with the databases on the primary replica throughtransaction log updates from the primary replica.
simple recovery model A type of SQL Server recovery model that permits high-performance bulk copyoperations and reclaims log space to minimize space requirements. This recovery modelenables you to recover to the end of any backup. Databases with the simple recoverymodel do not support transaction log backups or point-in-time restore.
sqlcmd utility A command line utility for entering Transact-SQL statements and scripts.
SQL Serverauthentication
An authentication method by which users and applications, such as Avamar clientsoftware, connect to SQL Server using a login account defined in SQL Server.
SQL ServerManagement Studio
(SSMS)
A software application with script editors and graphical tools to configure, manage, andadminister SQL Server components.
system databases Databases that store system-level information, objects, and templates for a SQL Serverinstance. The master, msdb, model, and Resource databases are system databases.
T
tail-log backup A transaction log backup of log records that have not yet been backed up (the “tail ofthe log”). A tail-log backup occurs before you restore data from a backup. The backupprevents work loss and keeps the log chain intact.
transaction log A log file that contains a history of database transactions.
transaction log backup A type of backup that includes only the transaction log. Also called an incrementalbackup.
Transact-SQL An extension of Structured Query Language (SQL). You can use Transact-SQLstatements to back up and restore SQL Server data.
U
user-defined filegroup Any filegroup that you define in SQL Server. Log files are never part of a filegroup.
V
virtual device interface(VDI)
The Microsoft application programming interface (API) that the Avamar Plug-in forSQL Server uses to back up and restore SQL Server data.
virtual machine (VM) A computer that is a software implementation of a computer. Virtual machines are usedto run different operating systems at the same time on one physical computer. Eachoperating system runs in its own isolated execution environment.
Glossary
Avamar for SQL Server 18.1 User Guide 241

W
Windows authentication An authentication method by which users and applications, such as Avamar clientsoftware, connect to SQL Server using a Windows user account that has privileges inSQL Server.
Glossary
242 Avamar for SQL Server 18.1 User Guide