dell data protection | security tools...管理员可能需要使用 ddp security console...
TRANSCRIPT
Dell Data Protection | Security ToolsSecurity Tools Installation Guide
Dell Data Protection | Security Tools Installation GuideInstallation Guide v1.12

注意、小心和警告
注: “注意”表示帮助您更好地使用该产品的重要信息。
小心: “小心”表示可能会损坏硬件或导致数据丢失,并告诉您如何避免此类问题。
警告: “警告”表示可能会导致财产损失、人身伤害甚至死亡。
© 2017 Dell Inc. All rights reserved.Dell、EMC 和其他商标均为 Dell Inc. 或其附属公司的商标。其他商标均为其各自所有者的商标。
Registered trademarks and trademarks used in the Dell Data Protection Encryption, Endpoint Security Suite, Endpoint Security SuiteEnterprise, and Dell Data Guardian suite of documents: DellTM and the Dell logo, Dell PrecisionTM, OptiPlexTM, ControlVaultTM, LatitudeTM,XPS®, and KACETM are trademarks of Dell Inc. Cylance®, CylancePROTECT, and the Cylance logo are registered trademarks of Cylance,Inc. in the U.S. and other countries. McAfee® and the McAfee logo are trademarks or registered trademarks of McAfee, Inc. in the USand other countries. Intel®, Pentium®, Intel Core Inside Duo®, Itanium®, and Xeon® are registered trademarks of Intel Corporation in theU.S. and other countries. Adobe®, Acrobat®, and Flash® are registered trademarks of Adobe Systems Incorporated. Authen Tec® andEikon® are registered trademarks of Authen Tec. AMD® is a registered trademark of Advanced Micro Devices, Inc. Microsoft®,Windows®, and Windows Server®, Internet Explorer®, MS-DOS®, Windows Vista®, MSN®, ActiveX®, Active Directory®, Access®,ActiveSync®, BitLocker®, BitLocker To Go®, Excel®, Hyper-V®, Silverlight®, Outlook®, PowerPoint®, OneDrive®, SQL Server®, andVisual C++® are either trademarks or registered trademarks of Microsoft Corporation in the United States and/or other countries.VMware® is a registered trademark or trademark of VMware, Inc. in the United States or other countries. Box® is a registered trademarkof Box. DropboxSM is a service mark of Dropbox, Inc. GoogleTM, AndroidTM, GoogleTM ChromeTM, GmailTM, YouTube®, and GoogleTM
Play are either trademarks or registered trademarks of Google Inc. in the United States and other countries. Apple®, Aperture®, AppStoreSM, Apple Remote DesktopTM, Apple TV®, Boot CampTM, FileVaultTM, iCloud®SM, iPad®, iPhone®, iPhoto®, iTunes MusicStore®, Macintosh®, Safari®, and Siri® are either servicemarks, trademarks, or registered trademarks of Apple, Inc. in the United Statesand/or other countries. GO ID®, RSA®, and SecurID® are registered trademarks of Dell EMC. EnCaseTM and Guidance Software® areeither trademarks or registered trademarks of Guidance Software. Entrust® is a registered trademark of Entrust®, Inc. in the UnitedStates and other countries. InstallShield® is a registered trademark of Flexera Software in the United States, China, European Community,Hong Kong, Japan, Taiwan, and United Kingdom. Micron® and RealSSD® are registered trademarks of Micron Technology, Inc. in theUnited States and other countries. Mozilla® Firefox® is a registered trademark of Mozilla Foundation in the United States and/or othercountries. iOS® is a trademark or registered trademark of Cisco Systems, Inc. in the United States and certain other countries and is usedunder license. Oracle® and Java® are registered trademarks of Oracle and/or its affiliates. Other names may be trademarks of theirrespective owners. SAMSUNGTM is a trademark of SAMSUNG in the United States or other countries. Seagate® is a registeredtrademark of Seagate Technology LLC in the United States and/or other countries. Travelstar® is a registered trademark of HGST, Inc. inthe United States and other countries. UNIX® is a registered trademark of The Open Group. VALIDITYTM is a trademark of ValiditySensors, Inc. in the United States and other countries. VeriSign® and other related marks are the trademarks or registered trademarks ofVeriSign, Inc. or its affiliates or subsidiaries in the U.S. and other countries and licensed to Symantec Corporation. KVM on IP® is aregistered trademark of Video Products. Yahoo!® is a registered trademark of Yahoo! Inc. This product uses parts of the 7-Zip program.The source code can be found at 7-zip.org. Licensing is under the GNU LGPL license + unRAR restrictions (7-zip.org/license.txt).
2017- 02
Rev. A01

1 简介.............................................................................................................................................5概览.........................................................................................................................................................................................5
2 要求............................................................................................................................................ 6驱动程序.................................................................................................................................................................................6客户端前提条件.................................................................................................................................................................... 6Software................................................................................................................................................................................. 7Hardware................................................................................................................................................................................ 8语言支持............................................................................................................................................................................... 10身份验证选项.......................................................................................................................................................................10互操作性................................................................................................................................................................................ 11解除配置和卸载 Dell Data Protection | Access..........................................................................................................11解除配置由 DDP|A 管理的硬件................................................................................................................................... 11卸载 DDP|A..................................................................................................................................................................... 12
初始化 TPM..........................................................................................................................................................................12清除所有权并激活 TPM..................................................................................................................................................... 12
3 安装和激活..................................................................................................................................13安装 DDP | Security Tools.................................................................................................................................................. 13激活 DDP | Security Tools.................................................................................................................................................. 14
4 管理员配置任务............................................................................................................................17Change the Administrator Password and Backup Location........................................................................................... 17配置加密和预引导身份验证.............................................................................................................................................. 19更改加密和预引导身份验证设置................................................................................................................................21
Configure Authentication Options.....................................................................................................................................22Configure Sign-in Options............................................................................................................................................ 22Configure Password Manager Authentication...........................................................................................................24Configure Recovery Questions....................................................................................................................................26Configure Fingerprint Scan Authentication................................................................................................................26Configure One-time Password Authentication..........................................................................................................27Configure Smart Card Enrollment............................................................................................................................... 28Configure Advanced Permissions................................................................................................................................29Smart Card and Biometric Services (Optional)......................................................................................................... 30
Manage Users' Authentication.......................................................................................................................................... 30Add New Users...............................................................................................................................................................31Enroll or Change User Credentials...............................................................................................................................32Remove One Enrolled Credential.................................................................................................................................33Remove All of a User's Enrolled Credentials.............................................................................................................. 34
5 卸载任务.................................................................................................................................... 35卸载 DDP | Security Tools................................................................................................................................................. 35
6 恢复...........................................................................................................................................37
Contents
Contents 3

Self-Recovery, Windows Logon Recovery Questions.................................................................................................... 37Self-Recovery, PBA Recovery Questions........................................................................................................................ 38自恢复,一次性密码..........................................................................................................................................................39
7 词汇表........................................................................................................................................ 41
4 Contents

简介Dell Data Protection | Security Tools 为 Dell 计算机管理员和用户提供安全与身份保护。DDP | Security Tools 预装在所有 Dell Latitude、Optiplex、Precision 计算机以及精选的 Dell XPS 笔记本电脑上。如需重新安装 DDP|Security Tools,请按照本指南中的说明执行操作。有关更多支持信息,请访问 www.dell.com/support > Endpoint Security Solutions。
概览DDP | Security Tools 是一种端到端安全解决方案,旨在提供高级身份验证支持、预引导身份验证 (PBA) 支持以及自加密驱动器管理。
DDP | Security Tools 通过密码、指纹读取器和智能卡 (涵盖“非接触式卡”和“接触式卡”)以及自行注册、一步登录 (单点登录 [SSO])和一次性密码 (OTP) 为 Windows 身份验证提供多重支持。管理员可能需要使用 DDP Security Console 的管理员设置工具配置 Security Tools 的功能(例如启用“预引导身份验证”和身份验证策略),最终用户才能使用 Security Tools。但如果采用默认设置,在安装和激活 Security Tools 后管理员和用户便可立即开始使用。
DDP Security ConsoleDDP Security Console 是 Security Tools 的界面,用户通过此界面可根据管理员设置的策略来注册、管理凭据以及配置自恢复问题。用户可访问 Security Tools 的这些应用程序:
• “加密”工具可供用户查看计算机驱动器的加密状态。• “注册”工具可供用户设置和管理凭据,配置自恢复问题,查看其凭据注册状态。这些权限基于管理员设置的策略。• Password Manager 可供用户自动填写和提交登录网站、Windows 应用程序和网络资源所需的各种数据。Password Manager 还为
用户提供通过此应用程序更改其登录密码的功能,确保 Password Manager 所维护的登录密码与目标资源的登录密码保持同步。
管理员设置“管理员设置”工具用于为该计算机的所有用户配置 Security Tools,允许管理员设置身份验证策略、管理用户以及配置可用于Windows 登录的凭据。
通过“管理员设置”工具,管理员可启用加密和预引导身份验证 (PBA),以及配置 PBA 策略和自定义 PBA 屏幕文本。继续了解要求。
1
简介 5

要求• DDP | Security Tools 预装在所有 Dell Latitude、Optiplex、Precision 计算机以及精选的 Dell XPS 笔记本电脑上,并且满足以下最低
要求。如果您需要重新安装 DDP | Security Tools,请确保您的计算机仍满足这些要求。有关更多信息,请参阅 www.dell.com/support > Endpoint Security Solutions。
• Windows 8.1 不应安装在自加密驱动器的驱动器 1 上。此操作系统配置不受支持,因为,Windows 8.1 会创建恢复分区驱动器 0,这继而会破坏预引导身份验证。正确的做法是,在配置为驱动器 0 的驱动器上安装 Windows 8.1,或者将 Windows 8.1 作为映像还原到任何驱动器。
• DDP | Security Tools 不支持动态磁盘。• 配备自加密驱动器的计算机不能与硬件加密加速器 (HCA) 一起使用。由于不兼容,因此会妨碍 HCA 的功能。请注意,Dell 不售
卖配备有支持 HCA 模块的自加密驱动器的计算机。此不受支持的配置将是售后配置。• DDP | Security Tools 不支持多重引导磁盘配置。• 在客户端上安装新操作系统之前,请在 BIOS 中清除可信平台模块 (TPM)。• SED 不需要 TPM 提供高级身份验证或加密。
驱动程序• 受支持的 Opal 兼容 SED 要求更新的 Intel 快速存储技术驱动程序,网址为 http://www.dell.com/support/drivers/us/en/19/
DriverDetails/Product/latitude-e6440-laptop?driverId=1KX2H&osCode=W764&fileId=3356216042&languageCode=en&categoryId=SA
注:
鉴于 RAID 和 SED 的特性,SED 管理不支持 RAID。SED 之所以发生“RAID=On”的问题,是因为 RAID 一开始就需要访问磁盘,以便在锁定的 SED 中不可用的高扇区上读写 RAID 相关数据,不能等待用户登录后才读取此数据。在 BIOS 中将SATA 操作由“RAID=On”更改为“AHCI”可以解决这个问题。如果操作系统未预装 AHCI 控制器驱动程序,在从“RAID=On”
切换为“AHCI”时操作系统将出现蓝屏。
客户端前提条件• Security Tools 需要完整版的 Microsoft .Net Framework 4.5(或更高版本)。Dell 出厂的所有计算机均预装有完整版的
Microsoft .Net Framework 4.5。但是,如果是在非 Dell 硬件上进行安装,或是在较旧的 Dell 硬件上升级 Security Tools,则在安装Security Tools 之前应验证所安装的 Microsoft .Net 版本并更新版本,以避免安装/升级失败。要安装完整版的 Microsoft .NetFramework 4.5,请转至 https://www.microsoft.com/en-us/download/details.aspx?id=30653
要验证所安装的 .Net 的版本,请在要安装的目标计算机上按照这些说明操作:http://msdn.microsoft.com/en-us/library/hh925568(v=vs.110).aspx
• 您计算机上的用于验证硬件的驱动程序和固件必须为最新的。要获取 Dell 计算机的驱动程序和固件,请转至 http://www.dell.com/support/home/us/en/19/Products/?app=drivers 并选择您的计算机型号。根据验证硬件,下载以下项:• NEXT Biometrics Fingerprint Driver• Validity FingerPrint Reader 495 Driver• O2Micro Smartcard Driver• Dell ControlVault
其他硬件供应商可能需要其各自的驱动程序。
如果计算机上尚未安装此组件,安装程序将进行安装:
前提条件
• Microsoft Visual C++ 2012 Update 4 或更新的可再发行软件包 (x86/x64)
2
6 要求

Software
Windows Operating SystemsThe following table details supported software.
Windows Operating Systems (32- and 64-bit)
• Microsoft Windows 7 SP0-SP1
- Enterprise
- Professional
NOTE: Legacy Boot mode is supported on Windows 7. UEFI is not supported on Windows 7.
• Microsoft Windows 8
- Enterprise
- Pro
- Windows 8 (Consumer)
NOTE: Windows 8 is supported with UEFI Mode when used with Opal Compliant SEDs and Dell ComputerModels - UEFI Support.
• Microsoft Windows 8.1 - 8.1 Update 1
- Enterprise Edition
- Pro Edition
NOTE: Windows 8.1 is supported with UEFI Mode when used with Opal Compliant SEDs and Dell ComputerModels - UEFI Support.
• Microsoft Windows 10 through Version 1511 (November Update/Threshold 2)
• Education Edition• Enterprise Edition• Pro Edition
NOTE: Windows 10 is supported with UEFI Mode when used with Opal Compliant SEDs and Dell Computer Models -UEFI Support.
Mobile Device Operating SystemsThe following mobile operating systems are supported with Security Tools One-time Password feature.
Mobile Device Operating Systems
Android Operating Systems
• 4.0 - 4.0.4 Ice Cream Sandwich• 4.1 - 4.3.1 Jelly Bean• 4.4 - 4.4.4 KitKat• 5.0 - 5.1.1 Lollipop
iOS Operating Systems
• iOS 7.x• iOS 8.x
要求 7

Mobile Device Operating Systems
Windows Phone Operating Systems
• Windows Phone 8.1• Windows 10 Mobile
Hardware
AuthenticationThe following table details supported authentication hardware.
Authentication
Fingerprint Readers
• Validity VFS495 in Secure Mode
• Broadcom Control Vault Swipe Reader
• UPEK TCS1 FIPS 201 Secure Reader 1.6.3.379
• Authentec Eikon and Eikon To Go USB Readers
NOTE: When using an external fingerprint reader, you must download and install the latest drivers required foryour specific reader.
Contactless Cards
• Contactless Cards using Contactless Card Readers built-in to specified Dell laptops
Smart Cards
• PKCS #11 Smart cards using the ActivIdentity client
NOTE: The ActivIdentity client is not pre-loaded and must be installed separately.
• Common Access Cards (CAC)
NOTE: With multi-cert CACs, at logon, the user selects the correct certificate from a list.
• CSP Cards
• Class B/SIPR Net Cards
The following table details Dell computer models supported with SIPR Net cards.
Dell Computer Models - Class B/SIPR Net Card Support
• Latitude E6440• Latitude E6540
• Precision M2800• Precision M4800• Precision M6800
• Latitude 14 Rugged Extreme• Latitude 12 Rugged Extreme• Latitude 14 Rugged
Dell Computer Models - UEFI SupportAuthentication features are supported with UEFI mode on select Dell computers running Microsoft Windows 8, Microsoft Windows 8.1,and Microsoft Windows 10 with qualified Opal Compliant SEDs. Other computers running Microsoft Windows 7, Microsoft Windows 8,Microsoft Windows 8.1, and Microsoft Windows 10 support Legacy Boot mode.
8 要求

The following table details Dell computer models supported with UEFI.
Dell Computer Models - UEFI Support
• Latitude 7370• Latitude E5270• Latitude E5470• Latitude E5570• Latitude E7240• Latitude E7250• Latitude E7260• Latitude E7265• Latitude E7270• Latitude E7275• Latitude E7350• Latitude E7440• Latitude E7450• Latitude E7460• Latitude E7470• Latitude 12 Rugged
Extreme• Latitude 12 Rugged Tablet
(Model 7202)• Latitude 14 Rugged
Extreme• Latitude 14 Rugged
• Precision M3510• Precision M4800• Precision M5510• Precision M6800• Precision M7510• Precision M7710• Precision T3420• Precision T3620• Precision T7810
• Optiplex 3040 Micro, MiniTower, Small Form Factor
• Optiplex 3046• OptiPlex 3050 All-In-One• OptiPlex 3050 Tower, Small
Form Factor, Micro• Optiplex 5040 Mini Tower,
Small Form Factor• OptiPlex 5050 Tower, Small
Form Factor, Micro• OptiPlex 7020• Optiplex 7040 Micro, Mini
Tower, Small Form Factor• OptiPlex 7050 Tower, Small
Form Factor, Micro• Optiplex 3240 All-In-One• OptiPlex 5250 All-In-One• Optiplex 7440 All-In-One• OptiPlex 7450 All-In-One• OptiPlex 9020 Micro
• Venue Pro 11 (Models5175/5179)
• Venue Pro 11 (Model 7139)
NOTE: Authentication features are supported with UEFI mode on these computers running Windows 8, Windows8.1, and Windows 10 with qualified Opal Compliant SEDs. Other computers running Windows 7, Windows 8,Windows 8.1, and Windows 10 support Legacy Boot mode.
NOTE: On a supported UEFI computer, after selecting Restart from the main menu, the computer restarts and then
displays one of two possible logon screens. The logon screen that appears is determined by differences in computer
platform architecture. Some models display the PBA logon screen; other models display the Windows logon screen.
Both logon screens are equally secure.
NOTE:
Ensure that the Enable Legacy Option ROMs setting is disabled in the BIOS.
To disable Legacy Option ROMs:
1. Restart the computer.2. As it is restarting, press F12 repeatedly to bring up the UEFI computer's boot settings.3. Press the down arrow, highlight the BIOS Settings option, and press Enter.4. Select Settings > General > Advanced Boot Options.5. Clear the Enable Legacy Option ROMs checkbox and click Apply.
Opal Compliant SEDsFor the most up-to-date list of Opal compliant SEDs supported with the SED management, refer to this KB article: http://www.dell.com/support/article/us/en/19/SLN296720.
International Keyboards• The following table lists international keyboards supported with Preboot Authentication on UEFI and non-UEFI computers.
要求 9

International Keyboard Support - UEFI
• DE-CH - Swiss German
• DE-FR - Swiss French
International Keyboard Support - Non-UEFI
• AR - Arabic (using Latin letters)
• DE-CH - Swiss German
• DE-FR - Swiss French
语言支持DDP | Security Tools 是一种多语言用户界面 (MUI),兼容和支持以下语言。
注:
俄语、繁体中文或简体中文不支持 UEFI 计算机中的 PBA 本地化。
语言支持
• EN - 英语 • KO - 韩文
• FR - 法语 • ZH-CN - 简体中文
• IT - 意大利语 • ZH-TW - 繁体/中国台湾中文
• DE - 德语 • PT-BR - 巴西葡萄牙语
• ES - 西班牙语 • PT-PT - 葡萄牙(伊比利亚)葡萄牙语
• JA - 日语 • RU - 俄语
身份验证选项以下身份验证选项要求具备特定硬件:指纹、智能卡、非接触式卡和 B 类/ SIPR Net 卡,并在 UEFI 计算机上进行身份验证。一次性密码功能要求 TPM 已存在、已启用且已有归属。有关更多信息,请参阅清除所有权并激活 TPM。TPM 2.0 不支持 OTP。
下表显示了在满足硬件和配置要求的情况下,Security Tools 提供的身份验证选项(按操作系统显示)。
非 UEFI
PBA Windows 身份验证
密码 指纹 接触式智能卡
OTP SIPR 卡 密码 指纹 智能卡 OTP SIPR 卡
Windows 7 SP0-SP1
X1 X X X X X
Windows 8 X1 X X X X X
Windows 8.1-Windows 8.1Update 1
X1 X X X X X
Windows 10 X1 X X X X X
10 要求

非 UEFI
PBA Windows 身份验证
密码 指纹 接触式智能卡
OTP SIPR 卡 密码 指纹 智能卡 OTP SIPR 卡
1. 在受支持的 Opal SED 上可用。
UEFI
PBA - 在受支持的 Dell 计算机上 Windows 身份验证
密码 指纹 接触式智能卡
OTP SIPR 卡 密码 指纹 智能卡 OTP SIPR 卡
Windows 7
Windows 8 X2 X X X X X
Windows 8.1-Windows 8.1Update 1
X2 X X X X X
Windows 10 X2 X X X X X
2. 在搭载了受支持 OPAL SED 的受支持 UEFI 计算机上可用。
互操作性
解除配置和卸载 Dell Data Protection | Access如果 DDP|A 现已安装在您的计算机上,那么在安装 Security Tools 之前,必须解除配置由 DDP|A 管理的硬件,然后再卸载 DDP|A。如果 DDP|A 尚未使用,则可能只需卸载 DDP|A 并重新启动安装过程。解除配置由 DDP|A 管理的硬件,包括指纹读取器、智能卡读卡器、BIOS 密码、TPM 和自加密驱动器。
注: 如果在运行 DDP|E 加密产品,请停止或暂停加密扫描。如果在运行 Microsoft BitLocker,应挂起加密策略。卸载 DDP|A
和取消挂起 Microsoft BitLocker 策略后,请按照 http://technet.microsoft.com/en-us/library/cc753140.aspx 上的说明初始化 TPM。
解除配置由 DDP|A 管理的硬件1. 启动 DDP|A,然后单击高级选项卡。
要求 11
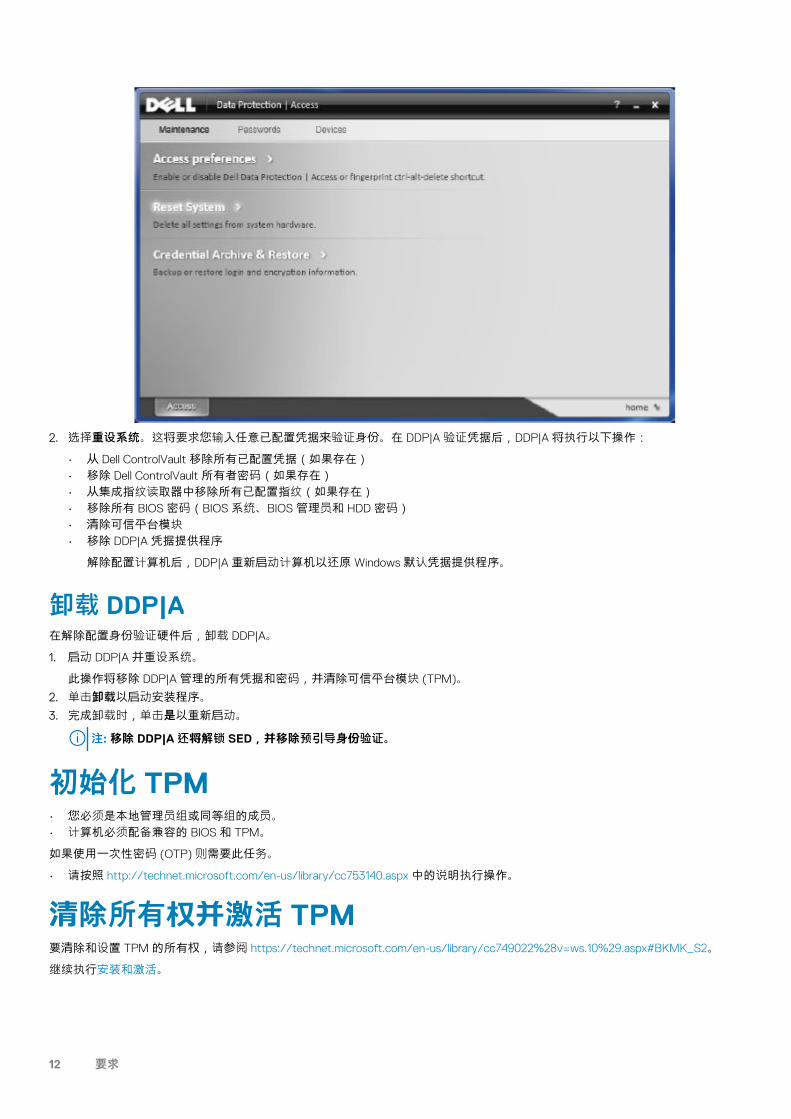
2. 选择重设系统。这将要求您输入任意已配置凭据来验证身份。在 DDP|A 验证凭据后,DDP|A 将执行以下操作:• 从 Dell ControlVault 移除所有已配置凭据(如果存在)• 移除 Dell ControlVault 所有者密码(如果存在)• 从集成指纹读取器中移除所有已配置指纹(如果存在)• 移除所有 BIOS 密码(BIOS 系统、BIOS 管理员和 HDD 密码)• 清除可信平台模块• 移除 DDP|A 凭据提供程序
解除配置计算机后,DDP|A 重新启动计算机以还原 Windows 默认凭据提供程序。
卸载 DDP|A在解除配置身份验证硬件后,卸载 DDP|A。
1. 启动 DDP|A 并重设系统。此操作将移除 DDP|A 管理的所有凭据和密码,并清除可信平台模块 (TPM)。
2. 单击卸载以启动安装程序。3. 完成卸载时,单击是以重新启动。
注: 移除 DDP|A 还将解锁 SED,并移除预引导身份验证。
初始化 TPM• 您必须是本地管理员组或同等组的成员。• 计算机必须配备兼容的 BIOS 和 TPM。
如果使用一次性密码 (OTP) 则需要此任务。
• 请按照 http://technet.microsoft.com/en-us/library/cc753140.aspx 中的说明执行操作。
清除所有权并激活 TPM要清除和设置 TPM 的所有权,请参阅 https://technet.microsoft.com/en-us/library/cc749022%28v=ws.10%29.aspx#BKMK_S2。
继续执行安装和激活。
12 要求

安装和激活本节详细介绍了如何在本地计算机上安装 DDP | Security Tools。要安装并激活 DDP | Security Tools,必须以管理员的身份登录计算机。
注:
在安装期间,请勿对计算机做出任何更改,包括插入或卸下外部 (USB) 驱动器。
安装 DDP | Security Tools要安装 Security Tools:
1. 找到 DDP | Security Tools 安装介质的安装文件。将其复制到本地计算机上。
注: 安装介质可在以下位置找到:www.dell.com/support > Endpoint Security Solutions。
2. 双击该文件以启动安装程序。3. 选择适当的语言,然后单击确定。
4. 显示“欢迎”屏幕时,单击下一步。5. 阅读许可协议,同意其中的条款,然后单击下一步。6. 单击下一步,在如下默认位置安装 Security Tools:C:\Program Files\Dell\Dell Data Protection。择择
3
安装和激活 13

7. 单击安装开始安装。8. 完成安装后,需要重新启动计算机。选择是以重新启动,然后单击完成。
安装完成。
激活 DDP | Security Tools第一次运行 DDP Security Console 并且选择了“管理员设置”时,激活向导将引导您完成激活过程。如果 DDP Security Console 尚未激活,最终用户仍可运行此工具。如果该最终用户是管理员激活 DDP | Security Tools 并自定义设置前首个使用 DDP Security Console 的人,此人将使用默认值。要激活 Security Tools:
1. 以管理员的身份从桌面快捷方式启动 Security Tools。
注: 如果是作为普通用户登录(使用标准 Windows 帐户),必须提升 UAC 权限才能启动管理员设置工具。普通用户先要输入管理员凭据以登录此工具,然后根据提示再次输入管理员密码(即存储在管理员设置中的密码)。
2. 单击管理员设置磁贴。
3. 在“欢迎”页面上,单击下一步。4. 创建 DDP | Security Tools 密码,然后单击下一步。
14 安装和激活

必须先创建 DDP | Security Tools 管理员密码,然后才能配置 Security Tools。任何时候运行管理员设置工具均需提供此密码。密码必须为 8-32 个字符,其中至少包含一个字母、一个数字和一个特殊字符。
5. 在备份位置中,指定要写入备份文件的位置,然后单击下一步。备份文件必须保存在网络驱动器或可移动介质上。备份文件包含恢复此计算机上数据所需的密钥。Dell Support 必须要能访问此文件以帮助您恢复数据。恢复数据将自动备份到指定位置。如果该位置不可用(例如未插入备份 USB 驱动器),DDP | Security Tools 将提示您指定数据备份位置。要开始进行加密,需要访问恢复数据。
安装和激活 15

6. 在“摘要”页面,单击应用。
Security Tools 激活完成。
管理员和用户可立即开始使用 Security Tools 功能(基于默认设置)。
16 安装和激活

管理员配置任务在激活 Security Tools 后,管理员和用户可在不进行其他配置的情况下,立即以默认设置使用 Security Tools。当用户使用其 Windows密码登录到计算机时,用户将自动添加为 Security Tools 用户,但默认为不启用多重 Windows 身份验证。默认情况下也不会启用加密和预引导身份验证。要配置 Security Tools 功能,必须在该计算机上具有管理员身份。
Change the Administrator Password and BackupLocationAfter Security Tools activation, the Administrator Password and Backup Location can be changed, if necessary.
1. As an administrator, launch Security Tools from the Desktop shortcut.
2. Click the Administrator Settings tile.
3. In the Authentication dialog, enter the administrator password that was set up during activation, and click OK.
4. Click the Administrator Settings tab.
5. In the Change Administrator Password page, if you want to change the password, enter a new password that is between 8-32characters and includes at least one letter, one number, and one special character.
4
管理员配置任务 17

6. Enter the password a second time to confirm it, then click Apply.
7. To change the location where the recovery key is stored, in the left pane, select Change Backup Location.
8. Select a new location for the backup, and click Apply.
The backup file must be saved either on a network drive or onto removable media. The backup file contains the keys that are neededto recover data on this computer. Dell ProSupport must have access to this file to help you recover data.
Recovery data will be automatically backed up to the specified location. If the location is not available (for instance, if your backup USBdrive is not inserted), Security Tools prompts for a location to back up your data. Access to recovery data will be required in order tobegin encryption.
18 管理员配置任务

配置加密和预引导身份验证加密和预引导身份验证 (PBA) 在配备有自加密驱动器 (SED) 的计算机上可用。加密和预引导身份验证二者均通过“加密”选项卡配置,只有计算机配备有自加密驱动器 (SED) 时“加密”选项卡方可见。启用加密或 PBA 二者之一时,另一个也随之启用。在启用加密和 PBA 前,Dell 建议您注册并启用“恢复问题作为恢复选项”,以便在丢失密码后恢复密码。有关更多信息,请参阅配置登录选项。
要配置加密和预引导身份验证:1. 在 DDP Security Console 中,单击管理员设置磁贴。2. 确保从该计算机可访问备份位置。
注: 如果启用加密时显示消息“找不到备份位置”,而备份位置位于 USB 驱动器上,则表明驱动器未连接或者连接到的不是备份过程中使用的插槽。如果显示此消息,并且备份位置在网络驱动器上,表明从该计算机无法访问此网络驱动器。如果需要更改备份位置,请从管理员设置选项卡选择更改备份位置,以将位置更改为当前插槽或可访问的驱动器。重新指派位置后数秒,启用加密过程将继续。
3. 单击加密选项卡,然后单击加密。4. 在“欢迎”页面上,单击下一步。5. 在“预引导策略”页面,更改或确认以下值,然后单击下一步。
非缓存用户尝试登录次数 未知用户(以前未登录到该计算机的用户 [尚未缓存任何凭据])可尝试登录的次数。
缓存用户尝试登录次数 已知用户可尝试登录的次数。
回答恢复问题的尝试次数 用户可尝试输入正确答案的次数。
启用加密擦除密码 选择以启用此功能。
输入加密擦除密码 最多可包含 100 个字符的单词或代码,用作故障保护安全机制。在 PBA 身份验证过程中,如果在用户名或密码字段中输入此单词或代码,将删除所有用户的身份验证令牌并锁定该 SED。之后只有管理员才能强制解锁此设备。
如果您不想在紧急情况下设置加密擦除密码,可将此字段留空。
管理员配置任务 19

6. 在“预引导自定义”页面中,输入要在“预引导身份验证 (PBA)”屏幕上显示的自定义文本,然后单击下一步。
预引导标题文本 此文本显示在 PBA 屏幕顶部。如果将此字段留空,则不会显示标题。文本不换行,因此输入超过 17 个字符会导致文本被截断。
支持信息文本 此文本显示在 PBA 支持信息页面。Dell 建议您自定义消息,让其包含关于如何联系服务台或安全管理员的具体说明。如果未在此字段中输入文本,则不会为用户提供支持联系人信息。文本换行发生在单词级而非字符级。例如,如果您有一个长度超过约 50 个字符的单词,则不会换行,也不会显示滚动条,因此文本将被截断。
法律声明文本 在允许用户登录到设备之前显示的文本。例如:“单击‘确定’即表示您同意遵守可接受的计算机使用政策。”如果未在此字段中输入文本,则不会显示任何文本或“确定”/“取消”按钮。文本换行发生在单词级而非字符级。例如,如果您有一个长度超过约 50 个字符的单词,则不会换行,也不会显示滚动条,因此文本将被截断。
20 管理员配置任务

7. 在“摘要”页面,单击应用。8. 显示提示时,单击关机。
在开始加密前,需要进行一次完全关机。
9. 关机后,重新启动计算机。现在将由 Security Tools 管理身份验证。用户必须在“预引导身份验证”屏幕使用其 Windows 密码登录。
更改加密和预引导身份验证设置首次启用加密并配置预引导策略和自定义后,可从“加密”选项卡执行以下操作:
• 更改预引导策略或自定义 - 单击加密选项卡,然后单击更改。• 解密 SED,例如为了卸载 - 单击解密。
首次启用加密并配置预引导策略和自定义后,可从“预引导设置”选项卡执行以下操作:
• 更改预引导策略或自定义 - 单击预引导设置选项卡,然后选择预引导自定义或预引导登录策略。
管理员配置任务 21
有关卸载说明,请参阅卸载任务。
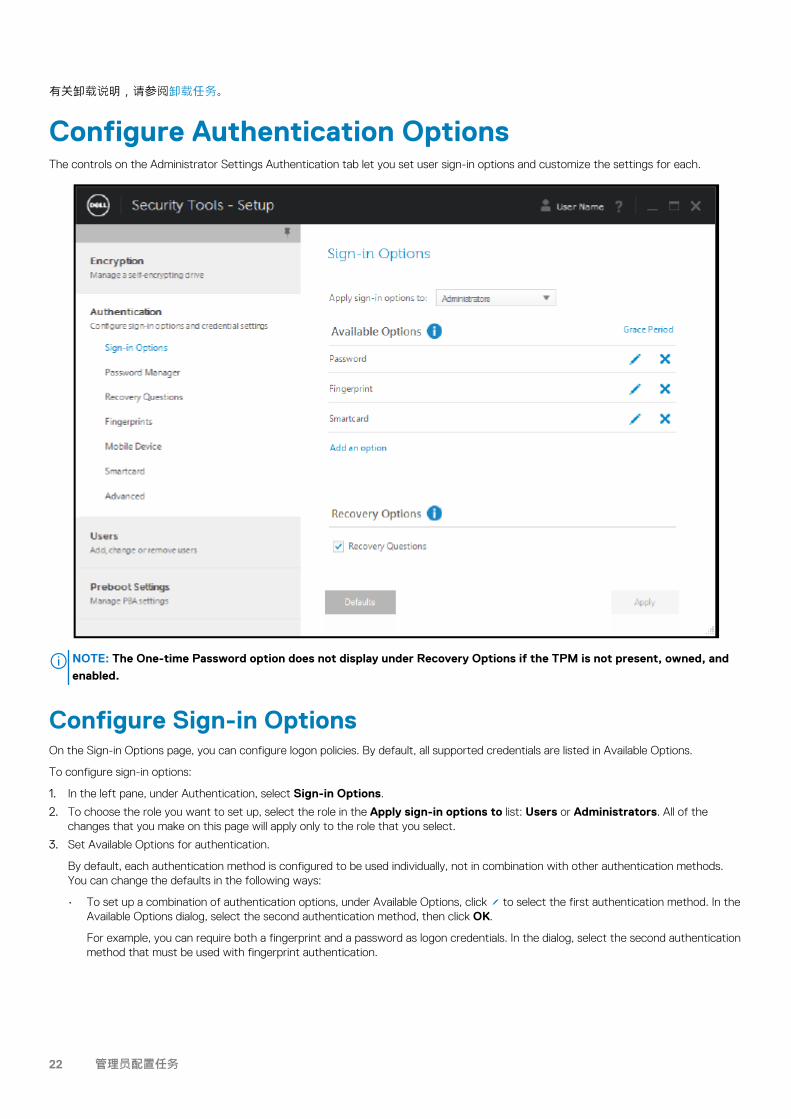
Configure Authentication OptionsThe controls on the Administrator Settings Authentication tab let you set user sign-in options and customize the settings for each.
NOTE: The One-time Password option does not display under Recovery Options if the TPM is not present, owned, and
enabled.
Configure Sign-in OptionsOn the Sign-in Options page, you can configure logon policies. By default, all supported credentials are listed in Available Options.
To configure sign-in options:
1. In the left pane, under Authentication, select Sign-in Options.
2. To choose the role you want to set up, select the role in the Apply sign-in options to list: Users or Administrators. All of thechanges that you make on this page will apply only to the role that you select.
3. Set Available Options for authentication.
By default, each authentication method is configured to be used individually, not in combination with other authentication methods.You can change the defaults in the following ways:
• To set up a combination of authentication options, under Available Options, click to select the first authentication method. In theAvailable Options dialog, select the second authentication method, then click OK.
For example, you can require both a fingerprint and a password as logon credentials. In the dialog, select the second authenticationmethod that must be used with fingerprint authentication.
22 管理员配置任务

• To allow each authentication method to be used individually, in the Available Options dialog, leave the second authenticationmethod set to None, and click OK.
• To remove a sign-in option, under Available Options on the Sign-in Options page, click X to remove the method.• To add a new combination of authentication methods, click Add an Option.
4. Set Recovery Options for users to recover their computer access, if they become locked out.
• To allow users to define a set of questions and answers to be used to regain access to the computer, select Recovery Questions.
To prevent use of Recovery Questions, deselect the option.• To allow users to recover access using a mobile device, select One-time Password. When One-time Password (OTP) is selected
as a recovery method, it is not available as a sign-in option on the Windows logon screen.
To use the OTP feature for logon, deselect the option in Recovery Options. When deselected as a recovery method, the OTPoption appears on a Windows logon page as long as at least one user has enrolled in OTP.
NOTE: As administrator, you control how One-time Password can be used - for authentication or for recovery.
The OTP feature can be used either for authentication or for recovery, but not for both. The configuration
affects either all users of the computer or all administrators, based on the selection in the Sign-in Options field,
Apply sign-in options to.
If the One-time Password option is not listed under Recovery Options, your computer's configuration does not support it. For moreinformation, see Requirements.
• To require the user to make a help desk call if they lose or forget logon credentials, clear both check boxes under RecoveryOptions: Recovery Questions and One-time Password.
5. To set a length of time to allow users to enroll their authentication credentials, select Grace Period.
The Grace Period feature lets you set the date on which a configured Sign-in Option will begin to be enforced. You can configure aSign-in Option before the date when it will be enforced and set up a length of time to allow users to enroll. By default, the policy isenforced immediately.
To change the Enforce Sign-in Option date from Immediately, in the Grace Period dialog, click the drop-down menu and selectSpecified Date. Click the down arrow at the right side of the date field to display a calendar, then select a date on the calendar.Enforcement of the policy begins at approximately 12:01 AM on the date selected.
Users can be reminded to enroll their credentials required at their next Windows logon (by default), or you can set up regularreminders. Select the reminder interval from the Remind User drop-down list.
NOTE:
The reminder that is displayed to the user is slightly different, depending on whether the user is at the Windows
Logon screen or within a Windows session when the reminder is triggered. Reminders do not appear on Preboot
Authentication logon screens.
管理员配置任务 23

Functionality During the Grace Period
During a specified Grace Period, after every log on, the Additional Credentials notification displays when the user has not yet enrolledthe minimum credentials required to satisfy a changed Sign-in Option. The message content is: Additional credentials are available forenrollment.
If additional credentials are available, but are not required, the message displays only once after the policy has been changed.
Clicking the notification has the following results, depending on the context:
• If no credentials have been enrolled, the Setup wizard displays, allowing Administrative Users to configure computer-relatedsettings and offering users the ability to enroll the most common credentials.
• After initial credential enrollment, clicking the notification displays the Setup wizard within the DDP Security Console.
Functionality After Grace Period Expires
In all cases, after the Grace Period has expired, users cannot log on without having enrolled the credentials required by the Sign-inOption. If a user attempts to log on with a credential or credential combination that does not satisfy the Sign-in Option, the Setupwizard displays on top of the Windows Logon screen.
• If the user successfully enrolls the required credentials, they are logged into Windows.• If a user does not successfully enroll the required credentials, or cancels the wizard, they are returned to the Windows Logon
screen.
6. To save the settings for the selected role, click Apply.
Configure Password Manager AuthenticationOn the Password Manager page, you can configure how users authenticate to Password Manager.
To configure Password Manager authentication:
1. In the left pane, under Authentication, select Password Manager.
2. To choose the role you want to set up, select the role in the Apply sign-in options to list: Users or Administrators. All of thechanges that you make on this page will apply only to the role that you select.
3. Optionally, select the Do not require authentication check box to allow the selected user role to be automatically logged on to allsoftware applications and Internet websites with credentials stored in Password Manager.
24 管理员配置任务

4. Set Available Options for authentication.
By default, each authentication method is configured to be used individually, not in combination with other authentication methods.You can change the defaults in the following ways:
• To set up a combination of authentication options, under Available Options, click to select the first authentication method. In theAvailable Options dialog, select the second authentication method, then click OK.
For example, you can require both a fingerprint and a password as logon credentials. In the dialog, select the second authenticationmethod that must be used with fingerprint authentication.
• To allow each authentication method to be used individually, in the Available Options dialog, leave the second authenticationmethod set to None, and click OK.
• To remove a sign-in option, under Available Options on the Sign-in Options page, click X to remove the method.• To add a new combination of authentication methods, click Add an Option.
5. To save the settings for the selected role, click Apply.
管理员配置任务 25
NOTE: Select the Defaults button to restore the settings to their original values.
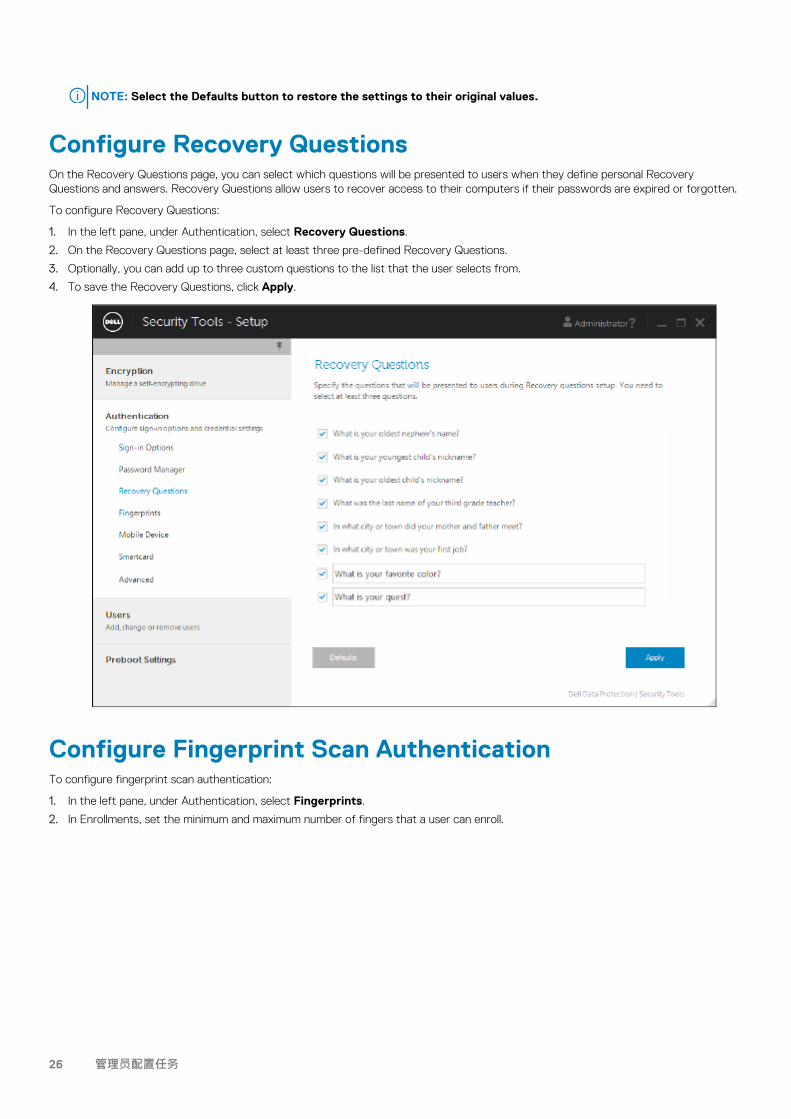
Configure Recovery QuestionsOn the Recovery Questions page, you can select which questions will be presented to users when they define personal RecoveryQuestions and answers. Recovery Questions allow users to recover access to their computers if their passwords are expired or forgotten.
To configure Recovery Questions:
1. In the left pane, under Authentication, select Recovery Questions.
2. On the Recovery Questions page, select at least three pre-defined Recovery Questions.
3. Optionally, you can add up to three custom questions to the list that the user selects from.
4. To save the Recovery Questions, click Apply.
Configure Fingerprint Scan AuthenticationTo configure fingerprint scan authentication:
1. In the left pane, under Authentication, select Fingerprints.
2. In Enrollments, set the minimum and maximum number of fingers that a user can enroll.
26 管理员配置任务
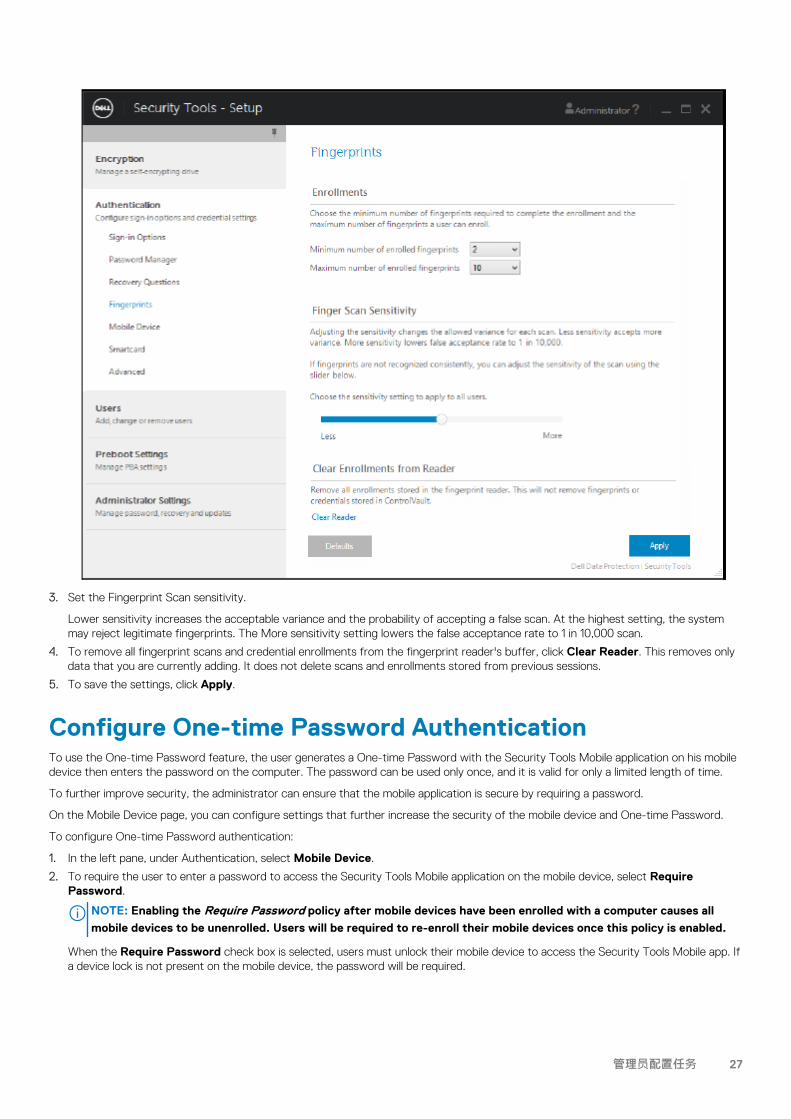
3. Set the Fingerprint Scan sensitivity.
Lower sensitivity increases the acceptable variance and the probability of accepting a false scan. At the highest setting, the systemmay reject legitimate fingerprints. The More sensitivity setting lowers the false acceptance rate to 1 in 10,000 scan.
4. To remove all fingerprint scans and credential enrollments from the fingerprint reader's buffer, click Clear Reader. This removes onlydata that you are currently adding. It does not delete scans and enrollments stored from previous sessions.
5. To save the settings, click Apply.
Configure One-time Password AuthenticationTo use the One-time Password feature, the user generates a One-time Password with the Security Tools Mobile application on his mobiledevice then enters the password on the computer. The password can be used only once, and it is valid for only a limited length of time.
To further improve security, the administrator can ensure that the mobile application is secure by requiring a password.
On the Mobile Device page, you can configure settings that further increase the security of the mobile device and One-time Password.
To configure One-time Password authentication:
1. In the left pane, under Authentication, select Mobile Device.
2. To require the user to enter a password to access the Security Tools Mobile application on the mobile device, select RequirePassword.
NOTE: Enabling the Require Password policy after mobile devices have been enrolled with a computer causes all
mobile devices to be unenrolled. Users will be required to re-enroll their mobile devices once this policy is enabled.
When the Require Password check box is selected, users must unlock their mobile device to access the Security Tools Mobile app. Ifa device lock is not present on the mobile device, the password will be required.
管理员配置任务 27

3. To select the length of the One-time Password (OTP), for One-time Password Length, select number of password characters torequire.
4. To select the number of chances the user has to enter the One-time Password correctly, for User Sign-in Attempts Allowed, selecta number from 5 to 30.
When the maximum attempts is reached, the OTP feature will be disabled until the user re-enrolls the mobile device.
NOTE: Dell recommends setting up at least one other authentication method in addition to One-time Password.
Configure Smart Card EnrollmentDDP|Security Tools supports two kinds of smart cards: contacted and contactless.
Contacted cards require a smart card reader into which the card is inserted. Contacted cards are only compatible with domain computers.CAC and SIPRNet cards are both contacted cards. Due to the advanced nature of these cards, the user will be required to choose a certafter using inserting his card to log on.
• Contactless cards are supported by non-domain computers and by computers configured with domain specifications.• Users can enroll one contacted smart card per user account, or multiple contactless cards per account.• Smart cards are not supported with Preboot Authentication.
NOTE: When removing a smart card enrollment from an account with multiple cards enrolled, all cards are unenrolled at
the same time.
To configure smart card enrollment:
On the Administrator Settings tool's Authentication tab, select Smartcard.
28 管理员配置任务

Configure Advanced Permissions1. Click Advanced to modify advanced end user options. Under Advanced, you can optionally allow users to self-enroll credentials,
optionally allow users to modify their enrolled credentials, and enable one step logon.
2. Select or clear the check boxes:
Allow users to enroll credentials - By default, the check box is selected. Users are permitted to enroll credentials withoutintervention by an administrator. If you clear the check box, credentials must be enrolled by the administrator.
Allow user to modify enrolled credentials - By default, the check box is selected. When selected, users are permitted to modify ordelete their enrolled credentials without intervention by an administrator. If you clear the check box, credentials cannot be modified ordeleted by a regular user but must be modified or deleted by the administrator.
NOTE: To enroll a user's credentials, go to the Users page of the Administrator Settings tool, select a user and click
Enroll.
Allow one step logon - One step logon is Single Sign-on (SSO). By default, the check box is selected. When this feature is enabled,users must enter their credentials only at the Preboot Authentication screen. Users are automatically logged on to Windows. If youclear the check box, the user may be required to log on multiple times.
NOTE: This option cannot be selected unless the Allow users to enroll credentials setting is also selected.
管理员配置任务 29

3. Click Apply when finished.
Smart Card and Biometric Services (Optional)If you do not want Security Tools to change the services associated with smart cards and biometric devices to a startup type of"automatic," the service startup feature can be disabled.
When disabled, Security Tools will not attempt to start these three services:
• SCardSvr - Manages access to smart cards read by the computer. If this service is stopped, this computer will be unable to read smartcards. If this service is disabled, any services that explicitly depend on it will fail to start.
• SCPolicySvc - Allows the system to be configured to lock the user desktop upon smart card removal.• WbioSrvc - The Windows biometric service gives client applications the ability to capture, compare, manipulate, and store biometric
data without gaining direct access to any biometric hardware or samples. The service is hosted in a privileged SVCHOST process.
Disabling this feature also suppresses warnings associated with the required services not running.
Disable the Automatic Service Startup
By default, if the registry key does not exist or the value is set to 0, this feature is enabled.
1. Run Regedit.
2. Locate the following registry entry:
[HKEY_LOCAL_MACHINE\SOFTWARE\DELL\Dell Data Protection]
SmartCardServiceCheck=REG_DWORD:0
Set to 0 to Enable. Set to 1 to Disable.
Manage Users' AuthenticationThe controls on the Administrator Settings Authentication tab let you set user logon options and customize the settings for each.
To manage user authentication:
1. As an administrator, click the Administrator Settings tile.
2. Click the Users tab to manage users and view user enrollment status. From this tab, you can:
• Enroll new users• Add or change credentials• Remove a user's credentials
30 管理员配置任务

NOTE:
Sign-in and Session show the enrollment status of a user.
When Sign-in status is OK, all enrollments that the user needs to be able to log on have been completed. When
Session status is OK, all enrollments that the user needs to use Password Manager have been completed.
If either status is No, the user needs to complete additional enrollments. To find out which enrollments are still
needed, select the Administrator Settings tool and open the Users tab. Gray check mark boxes represent
incomplete enrollments. Alternatively, click the Enrollments tile and review the Status tab's Policy column, where
the required enrollments are listed.
Add New UsersNOTE: New Windows users are automatically added when they log on to Windows or enroll credentials.
1. Click Add User to begin the enrollment process for an existing Windows user.
2. When the Select User dialog displays, select Object Types.
3. Enter a user's object name in the text box and click Check Names.
4. Click OK when finished.
管理员配置任务 31

The Enrollment wizard opens.
Continue to Enroll or Change User Credentials for instructions.
Enroll or Change User CredentialsThe administrator can enroll or change a user's credentials on behalf of a user, but a few enrollment activities require the user's presence,such as answering recovery questions and scanning the user's fingerprints.
To enroll or change user credentials:
1. In Administrator Settings, click the Users tab.
2. On the Users page, click Enroll.
3. On the Welcome page, click Next.
4. In the Authentication Required dialog, log in with the user's Windows password, and click OK.
32 管理员配置任务

5. On the Password page, to change the user's Windows password, enter and confirm a new password and click Next.
To skip changing the password, click Skip. The wizard allows you to skip a credential if you don't want to enroll it. To return to a page,click Back.
6. Follow the instructions on each page, and click the appropriate button: Next, Skip, or Back.
7. On the Summary page, confirm the enrolled credentials and, when finished with enrollment, click Apply.
To return to a credential enrollment page to make a change, click Back until you reach the page you want to change.
For more detailed information about enrolling a credential, or to change a credential, see the Console User Guide.
Remove One Enrolled Credential1. Click the Administrator Settings tile.
2. Click the Users tab and find the user to change.
3. Hover over the green checkmark of the credential you want to remove. It turns into .
4. Click the symbol and then click Yes to confirm the deletion.
NOTE: A credential cannot be removed this way if it is the user's only enrolled credential. In addition, the Password
cannot be removed with this method. Use the Remove command to completely remove a user's access to the
computer.
管理员配置任务 33

Remove All of a User's Enrolled Credentials1. Click the Administrator Settings tile.
2. Click the Users tab and find the user you want to remove.
3. Click Remove. (The Remove command appears in red at the bottom of the user's settings).
After removal, the user will not be able to log on to the computer unless he re-enrolls.
34 管理员配置任务

卸载任务必须至少具备本地管理员权限,才能安装 DDP | Security Tools。
卸载 DDP | Security Tools必须按此顺序卸载应用程序:
1. DDP | Client Security Framework
2. DDP | Security Tools Authentication
3. DDP | Security Tools
如果您的计算机配备有自加密驱动器,请按照以下说明进行卸载:1. 解除配置 SED:
a) 从管理员设置 > 单击加密选项卡。b) 单击解密以禁用加密。c) SED 取消加密后,重新启动计算机。
2. 在 Windows 控制面板中,转至卸载程序。
注: 开始 > 控制面板 > 程序和功能 > 卸载程序。
3. 卸载 Client Security Framework 并重新启动计算机。4. 从 Windows 控制面板卸载 Security Tools Authentication。
随即将显示一条消息,提示您是否要保留用户数据。如果您计划要重新安装 Security Tools,请单击是。否则请单击否。
卸载完成后,重新启动计算机。
5
卸载任务 35

5. 从 Windows 控制面板卸载 Security Tools。
随即将显示一条消息,提示您是否要完全卸载此应用程序及其组件。单击是。
随即将显示卸载完成对话框。6. 单击是,我想现在重新启动计算机,然后单击完成。7. 计算机将重新启动,卸载完成。
36 卸载任务

恢复用户凭据过期或丢失时可使用恢复选项:• 一次性密码 (OTP):用户在注册的移动设备上使用 Security Tools Mobile 应用生成 OTP,然后在 Windows 登录屏幕中输入该
OTP 以重新获取访问。此选项仅适用于用户在计算机上使用 Security Tools 注册了移动设备的情况。要使用 OTP 功能进行恢复,用户必须从未使用 OTP 登录计算机。
注: 一次性密码 (OTP) 功能要求 TPM 已存在、已启用且已有归属。按照清除所有权并激活 TPM 中的说明执行操作。OTP
功能可用于身份验证或用于恢复,但不能同时用于这两项用途。有关详细信息,请参阅配置登录选项。• 恢复问题:用户正确回答一组个人问题以重新获取对该计算机的访问。此选项仅适用于管理员配置并启用了恢复问题,并且用户
注册了恢复问题的情况。在“预引导身份验证”屏幕和“Windows 登录”屏幕使用此选项可重新获取对计算机的访问。这两种恢复方法都要求您进行恢复准备,即通过注册恢复问题,或通过在计算机上使用 Security Tools 注册移动设备。
Self-Recovery, Windows Logon RecoveryQuestionsTo answer Recovery Questions to recover access at the Windows logon screen:
1. To use the Recovery questions, click Can't access your account?
The Recovery Questions that you selected during enrollment display.
2. Enter the answers and click OK.
Upon successful entry of the answers to the questions, you enter Access Recovery mode. What happens next depends upon thecredential that failed.
• If you failed to enter the correct Windows password, then the Change Password screen displays.• If a fingerprint failed to be recognized, then the fingerprint enrollment page displays so that you can re-enroll the fingerprint.
6
恢复 37

Self-Recovery, PBA Recovery QuestionsTo answer Recovery Questions to recover access at the Preboot Authentication screen:
1. Enter your user name.
2. At the bottom left side of the screen, click Options > Trouble Signing In.
3. When the Q&A dialog appears, enter the answers that you supplied when you enrolled in Recovery Questions the first time you signedin.
38 恢复

自恢复,一次性密码此过程叙述在 Windows 密码过期、忘记 Windows 密码或超过允许的最大登录尝试次数等情况时,如何使用一次性密码 (OTP) 功能恢复对计算机的访问。一次性密码 (OTP) 选项仅适用于用户已注册了移动设备并且上次未使用 OTP 登录 Windows 的情况。
注: 一次性密码功能要求 TPM 已存在、已启用且已有归属。OTP 功能可用于 Windows 身份验证或用于恢复,但不能同时用于这两项用途。管理员可设置策略,以允许 OTP 用于恢复或身份验证的二者之一,或者禁用此功能。
要使用 OTP 恢复对计算机的访问:
1. 在 Windows 登录屏幕中,选择 OTP 图标 。
2. 在移动设备上,打开 Security Tools Mobile 应用并输入密码。3. 选择您要访问的计算机。
如果移动设备上未显示计算机名称,可能发生了以下一种情况:• 移动设备未注册或未与您尝试访问的计算机配对。• 如果您有多个 Windows 用户帐户,则可能是您尝试访问的计算机上未安装 DDP | Security Tools,或者您尝试登录的用户帐户
不是配对计算机和移动设备时所使用的用户帐户。4. 点击一次性密码。
恢复 39

此时移动设备屏幕上将显示一个密码。
注: 如果需要,可单击“刷新”符号 以获取新代码。刷新前两个 OTP 后,将延迟三十秒才生成另一个 OTP。计算机和移动设备必须同步,二者才能同时识别同一个密码。如尝试快速相继生成密码,将导致计算机和移动设备不同步以及 OTP 功能失效。如发生该问题,请等待三十秒以使两个设备恢复同步,然后再重试。
5. 在计算机的 Windows 登录屏幕上,键入移动设备上显示的密码并按 Enter 键。6. 在计算机上的“恢复模式”屏幕中,选择忘记了 Windows 密码,并按照屏幕说明执行操作以重设密码。
40 恢复

词汇表解除配置 - 解除配置操作将移除 PBA 数据库并停用 PBA。解除配置需要执行关机操作才能生效。一次性密码 (OTP) - 一次性密码是仅可使用一次并且只在有限的时段内有效的密码。OTP 要求 TPM 已存在、已启用且已有归属。要启用 OTP,需要使用 Security Console 和 Security Tools Mobile 应用,将移动设备与计算机配对。Security Tools Mobile 应用在移动设备上生成密码,此密码用于从 Windows 登录屏幕登录到计算机。根据策略,如果 OTP 尚未用于登录该计算机,则在密码过期或忘记密码时可使用 OTP 功能恢复对该计算机的访问。OTP 功能可用于身份验证或用于恢复,但不能同时用于这两项用途。OTP 的安全性超过其他一些身份验证方法,因为所生成的密码只能使用一次并且会在短时间内过期。预引导身份验证 (PBA) - 预引导身份验证是对 BIOS 或引导固件的扩展,在操作系统之外作为可信身份验证层,保证安全且防篡改的环境。PBA 防止读取硬盘中的任何内容(如操作系统),直至用户确认其具备正确凭据。单点登录 (SSO) - 如果已在预启动和 Windows 登录时启用多重身份验证,SSO 可简化登录过程。如果 SSO 已启用,则仅在预引导时需要身份验证,而用户将自动登录到 Windows。如果 SSO 未启用,则可能需要执行多次身份验证。可信平台模块(TPM)- TPM 是一块安全芯片,它有三项主要功能:安全存储、测量和证明。加密客户端将 TPM 用于其安全存储功能。TPM 还可为软件库提供加密容器。一次性密码功能也需要使用 TPM。
7
词汇表 41