delegates access in skype for business 2013 - uh.edu · 7/25/2013 · skype for business phone...
TRANSCRIPT

Delegate Access in Skype for Business 2013

2 Delegate Access in Skype for Business 2013
Table of Contents
Delegate Defined……………………………………………………………………………………………………………………3
Set‐up Delegate Access in Skype for Business…………………………………………………………………………3
Set‐up Delegate Access Using Outlook……………………………………………………………………………………5
Add a Mailbox………………………………………………………………………………………………………………………..7
Open a Delegated Mailbox……………………………………………………………………………………………………..10
Information for Online Meetings and Conference Calls…………………………………………………………..11
Schedule a Meeting……………………………….……………………………………………………………………………….12
Start an Unscheduled Meeting on Behalf of Another………………………………………………………………13
Start a Conference Call on Behalf of Another………………………………………………………………………….14

3 Delegate Access in Skype for Business 2013
Delegate Defined
A delegate is a person with permission to make and receive calls and messages on behalf of another. Deans, directors and department heads commonly use a delegate, as well as department phones where a back‐up person is needed to answer the phone. If a phone must be answered at all times, delegation provides a solution. Delegation not only routes incoming calls to multiple phones, but delegates can be given access to voice mail and missed call messages.
Set‐up Delegate Access in Skype for Business
Microsoft Skype for Business is used to manage phone delegates.
To set‐up delegate access in Skype for Business:
• Open Skype for Business.
• Sign‐in to Skype for Business as the person who wants to give delegate permission.
When creating a delegate for a department phone, the sign‐in address is [email protected] where xxxxx is the 5‐digit department phone number. The password for a department account is available from your local IT support.
• Click the Options button.
• Click Call Forwarding in the list on the left side of the Options dialog box.
• Select Simultaneously Ring.
• Click the drop‐down menu next to Simultaneously Ring and select My Delegates

4 Delegate Access in Skype for Business 2013
• In the Delegates dialog box that appears, click Add.
Each desired delegate must be a Skype for Business contact. For information on adding a contact in Skype for Business, see UIT document “Using Skype for Business for Windows”.
• Select the desired contact from the Choose a Delegate dialog box.
• Click Ok.

5 Delegate Access in Skype for Business 2013
• Click Ok in the Delegates dialog box.
• Click Ok in the Options dialog box.
With Simultaneous Ring on and My Delegates selected, all incoming calls ring in multiple places. Delegates can see which number an incoming call is ringing and choose whether or not to answer it. If no one answers a delegated number, the call will forward to the voice mail of the person delegating.
Set‐up Delegate Access in Outlook 2013
Multiple people can access voice mail messages that are recorded on a department phone (or anyone’s phone). To do this, you must use Outlook to set‐up delegate access. Sign‐in to Outlook as the person who wants to give delegate permission. When creating a delegate for a department phone, sign‐in to Outlook with [email protected] where xxxxx is the 5‐digit department phone number. The password for a department account is available from your local IT support.
To set‐up delegate access, in Outlook:
• Open Outlook.
• Sign‐in to Outlook as the person who wants to give delegate permission.
• Click Mail near the bottom left corner of the window.
• Right‐click on the email address located at the top of the folder list.

6 Delegate Access in Skype for Business 2013
• Select Data File Properties from the menu that appears.
• In the Properties dialog box, click the Permissions tab.
• Click Add.
• In the Add Users dialog box, locate the person receiving delegate access click Add
• Click OK

7 Delegate Access in Skype for Business 2013
• In the Properties dialog box, change the Permission Level of the delegate to Owner.
• Click Apply
• Click Ok
Add a Mailbox
After delegate permission is granted, the Mailbox must be added for every person who was granted permission. Sign‐in to Outlook as the person receiving delegate access.
To add a Mailbox:
• Open Outlook.
• Sign‐in as the person who received delegate access.
• Click Mail near the bottom left corner of the window.

8 Delegate Access in Skype for Business 2013
• Right‐click on the email address located at the top of the folder list.
• Select Account Properties from the menu that appears.
• Click Account Settings
• Select Account Settings from the drop‐down menu.
• In the Account Settings dialog box, click Change.
9 Delegate Access in Skype for Business 2013
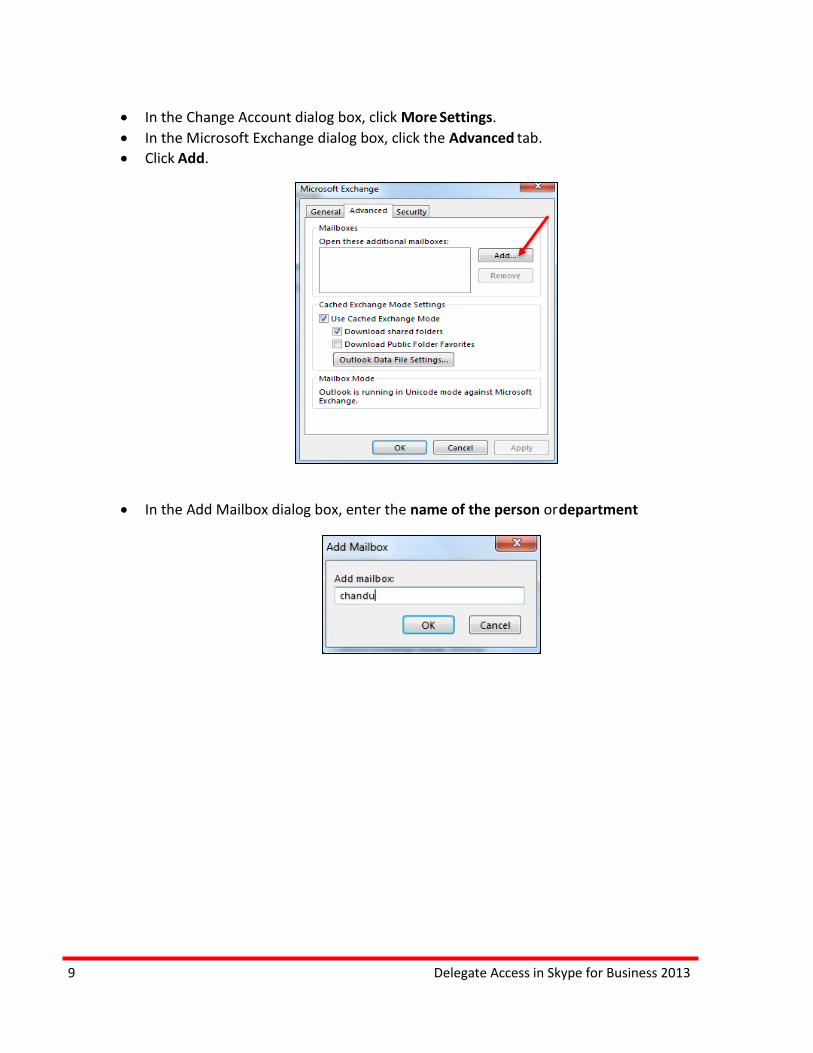
• In the Change Account dialog box, click More Settings.
• In the Microsoft Exchange dialog box, click the Advanced tab.
• Click Add.
• In the Add Mailbox dialog box, enter the name of the person or department

10 Delegate Access in Skype for Business 2013
If more than one potential match is found, select the desired name in the Check Name dialog box.
• Click OK.
• In the Microsoft Exchange dialog box, click Apply.
• Click OK.
• In the Change Account dialog box, click Next.
• Click Finish.
• In the Account Settings dialog box, click Close.
Open a Delegated Mailbox
After a delegated mailbox is added, that mailbox can be found in your Outlook folder list. Messages in a delegated mailbox can be sent, read, or deleted as if it were your own mailbox.

11 Delegate Access in Skype for Business 2013
Information for Online Meetings and Conference Calls
There are four classifications for meeting participants:
Organizer – the person who schedules a meeting or conference call. Leader – the first person to dial‐in to a conference call from a Skype for Business phone. Presenter – can invite others to an active meeting or conference call. During a meeting, a Presenter can change the classification of other Presenters to an Attendee. Only a Presenter can record a meeting, distribute files and share items, such as the desktop, a program, whiteboard and conduct a poll. By default, all faculty and staff members are a Presenter. If desired, the meeting Organizer can change the permissions level of any participant from Presenter to Attendee before the Meeting Invitation is sent. This is done using Meeting Options. For information on accessing Meeting Options, see UIT document Conferencing Quick Reference for Windows. Attendee – can initiate instant message (IM) conversations and view items that are shared.
By default, meeting participants who dial‐in from a non‐Skype for Business phone (Rolm, Cisco, or off‐campus) must wait in the lobby until a Leader dials‐in. The first person to dial‐in from a Skype for Business phone becomes the Leader and anyone waiting in the lobby is automatically connected to the meeting.
If you want to be a Leader or need to be (for instance, if all other participants are not affiliated with UH) and you dial‐in from a non‐Skype for Business phone, you must enter your Dial‐in PIN to become the Leader. The Dial‐in PIN is identical to the Sign‐in PIN for CX600 phones. If you can’t remember your Dial‐in PIN or if you never received a Dial‐in PIN, go to dialin.central.uh.edu to reset your PIN or obtain your first PIN.
Before sending a Meeting Invitation, the Organizer can change the Meeting Options. It is very important to change Meeting Options before sending the Meeting Invitation because changing the options can potentially change the meeting link and Conference ID. The Conference ID is assigned by Skype for Business and appears in the Meeting Invitation. Meeting options include:
Everyone waits in the lobby except the Organizer No one waits in the lobby Only the Organizer is a Presenter

12 Delegate Access in Skype for Business 2013
To Schedule a Meeting
Using Outlook, a delegate with the proper permissions can schedule a meeting on behalf of another. In the steps below, “dean” is used as the person for whom we are scheduling a meeting.
To schedule a meeting:
• Open Outlook.
• Open the dean’s calendar. • Select a time and click New Skype for Business Meeting on the toolbar.
• Add the invitees in the To: field.
• Type a subject in the Subject: field.
• Click Send.
To customize the meeting options:
• Before sending the Meeting Invitation, click Meeting Options on the toolbar.
In the Skype for Business Meeting Options dialog box, select the desired options.
• Click OK.
• Click Send.
The invitation includes your name, the dean’s name, and the meeting information, including the meeting link and audio information.
13 Delegate Access in Skype for Business 2013
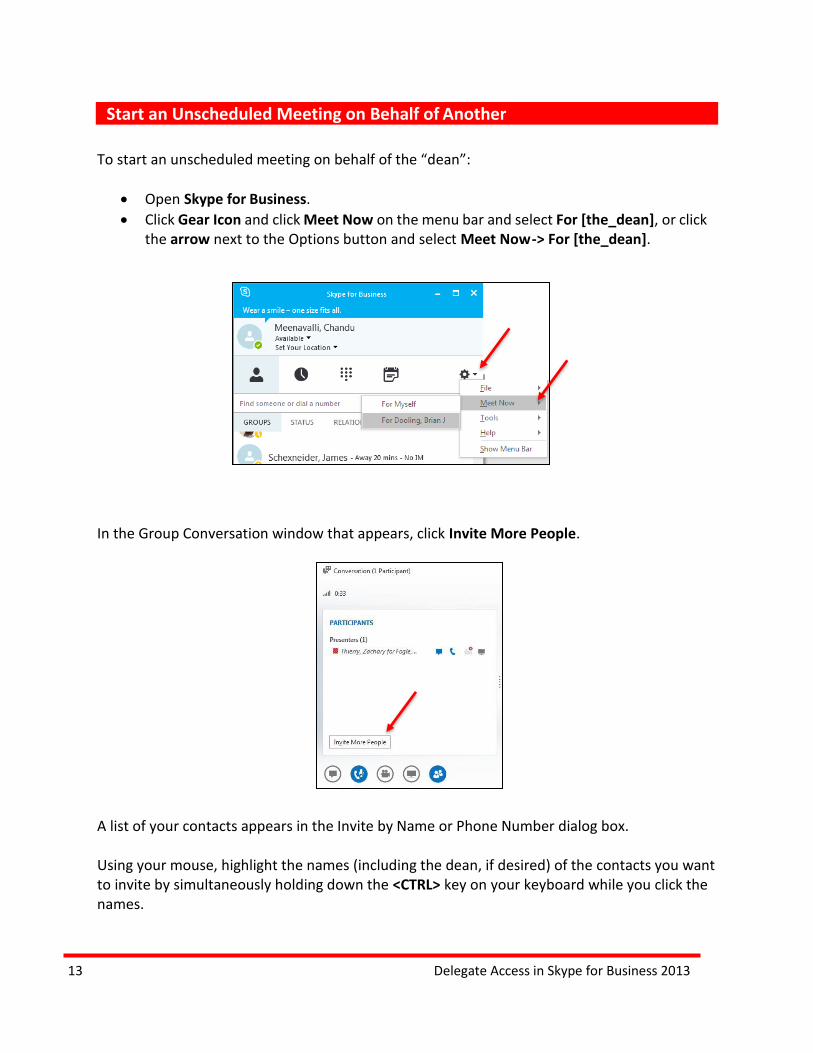
Start an Unscheduled Meeting on Behalf of Another
To start an unscheduled meeting on behalf of the “dean”:
• Open Skype for Business.
• Click Gear Icon and click Meet Now on the menu bar and select For [the_dean], or click the arrow next to the Options button and select Meet Now ‐> For [the_dean].
In the Group Conversation window that appears, click Invite More People.
A list of your contacts appears in the Invite by Name or Phone Number dialog box.
Using your mouse, highlight the names (including the dean, if desired) of the contacts you want to invite by simultaneously holding down the <CTRL> key on your keyboard while you click the names.

14 Delegate Access in Skype for Business 2013
• Invite someone who is not in your contact list by typing a 5‐digit or 10‐digit phone number in the Search field.
• Click OK.
Note: Drag and drop names from your Contact list to the Group Conversation window for a faster way to invite others.
Each person invited receives a Meeting Notification. Clicking the Meeting Notification allows them to join the meeting. The name of each person appears in the Group Conversation window as they join the meeting.
• To end the meeting, close the Group Conversation window.
Start a Conference Call on Behalf of Another
To start a conference call on behalf of another:
• Open Skype for Business. • Using your mouse, highlight the names of the contacts you want to invite by
simultaneously holding down the <CTRL> key on your keyboard while you click the names.
• Right‐click the selection and select Start a Conference Call ‐> For [the_dean] ‐> Skype for Business Call.

15 Delegate Access in Skype for Business 2013
To end a conference call, close the Group Conversation window.