definitions 3 comos 4 - cache.industry.siemens.com · legal information legal information warning...
TRANSCRIPT

� COMOS Material Management
�Operation
___________________
___________________
___________________
___________________
___________________
___________________
___________________
COMOS
Process COMOS Material Management Operation
Operating Manual
04/2012 A5E03777547-01
Trademarks 1
Introduction 2
Definitions 3
Creating material in COMOS 4
Importing material from external sources
5
Material documentation and order requests
6
References 7

Legal information
Legal information Warning notice system
This manual contains notices you have to observe in order to ensure your personal safety, as well as to prevent damage to property. The notices referring to your personal safety are highlighted in the manual by a safety alert symbol, notices referring only to property damage have no safety alert symbol. These notices shown below are graded according to the degree of danger.
DANGER indicates that death or severe personal injury will result if proper precautions are not taken.
WARNING indicates that death or severe personal injury may result if proper precautions are not taken.
CAUTION with a safety alert symbol, indicates that minor personal injury can result if proper precautions are not taken.
CAUTION without a safety alert symbol, indicates that property damage can result if proper precautions are not taken.
NOTICE indicates that an unintended result or situation can occur if the relevant information is not taken into account.
If more than one degree of danger is present, the warning notice representing the highest degree of danger will be used. A notice warning of injury to persons with a safety alert symbol may also include a warning relating to property damage.
Qualified Personnel The product/system described in this documentation may be operated only by personnel qualified for the specific task in accordance with the relevant documentation, in particular its warning notices and safety instructions. Qualified personnel are those who, based on their training and experience, are capable of identifying risks and avoiding potential hazards when working with these products/systems.
Proper use of Siemens products Note the following:
WARNING Siemens products may only be used for the applications described in the catalog and in the relevant technical documentation. If products and components from other manufacturers are used, these must be recommended or approved by Siemens. Proper transport, storage, installation, assembly, commissioning, operation and maintenance are required to ensure that the products operate safely and without any problems. The permissible ambient conditions must be complied with. The information in the relevant documentation must be observed.
Trademarks All names identified by ® are registered trademarks of Siemens AG. The remaining trademarks in this publication may be trademarks whose use by third parties for their own purposes could violate the rights of the owner.
Disclaimer of Liability We have reviewed the contents of this publication to ensure consistency with the hardware and software described. Since variance cannot be precluded entirely, we cannot guarantee full consistency. However, the information in this publication is reviewed regularly and any necessary corrections are included in subsequent editions.
Siemens AG Industry Sector Postfach 48 48 90026 NÜRNBERG GERMANY
A5E03777547-01 Ⓟ 04/2012 Technical data subject to change
Copyright © Siemens AG 2012. All rights reserved

COMOS Material Management Operation Operating Manual, 04/2012, A5E03777547-01 3
Table of contents
1 Trademarks ............................................................................................................................................... 5
2 Introduction................................................................................................................................................ 7
3 Definitions.................................................................................................................................................. 9
4 Creating material in COMOS ................................................................................................................... 11
4.1 Creating material from P&ID reports............................................................................................11 4.1.1 Detailing the material ...................................................................................................................11 4.1.2 Assigning further components .....................................................................................................12
4.2 Creating material from isometries................................................................................................13
5 Importing material from external sources................................................................................................. 15
5.1 CSV import...................................................................................................................................15 5.1.1 Introduction ..................................................................................................................................15 5.1.2 Importing CSV files ......................................................................................................................15
5.2 Importing from AVEVA PDMS .....................................................................................................16 5.2.1 Basic principles ............................................................................................................................16 5.2.2 Operating mode ...........................................................................................................................17 5.2.2.1 Overview ......................................................................................................................................17 5.2.2.2 Online mode.................................................................................................................................17 5.2.2.3 Offline mode.................................................................................................................................18 5.2.2.4 Batch mode..................................................................................................................................18 5.2.3 Starting the operation in AVEVA PDMS ......................................................................................19 5.2.4 Importing to COMOS in offline mode...........................................................................................20 5.2.5 Locking status changes in AVEVA PDMS ...................................................................................20
6 Material documentation and order requests............................................................................................. 23
6.1 Creating MTO documents............................................................................................................23 6.1.1 Via the "Plugins" menu ................................................................................................................23 6.1.2 Via the context menu ...................................................................................................................24
6.2 Creating MPR documents............................................................................................................24 6.2.1 Via the "Plugins" menu ................................................................................................................24 6.2.2 Via the context menu ...................................................................................................................25
6.3 Managing documents ..................................................................................................................26
7 References .............................................................................................................................................. 27
7.1 exportMTO file..............................................................................................................................27
7.2 User interface reference ..............................................................................................................29 7.2.1 "Estimated" tab.............................................................................................................................29 7.2.2 "Pipe Details" tab .........................................................................................................................30 7.2.2.1 "PID Estimation" tab.....................................................................................................................30 7.2.2.2 "Manual Estimation" tab...............................................................................................................30 7.2.3 "MTO Documents" tab .................................................................................................................31 7.2.4 "MPR documents" tab..................................................................................................................33

Table of contents
COMOS Material Management Operation 4 Operating Manual, 04/2012, A5E03777547-01
7.2.5 "Documents" tab ......................................................................................................................... 36 7.2.6 "Status" window .......................................................................................................................... 38

COMOS Material Management Operation Operating Manual, 04/2012, A5E03777547-01 5
Trademarks 1Trademarks
Registered trademark: COMOS®
Trademarks
COMOS Material Management Operation 6 Operating Manual, 04/2012, A5E03777547-01

COMOS Material Management Operation Operating Manual, 04/2012, A5E03777547-01 7
Introduction 2
COMOS features a Material Management Assistant, which you can use to create revision-based material documentation and order requests. You can create the quantity-related and type-related data for the Material Management Assistant in COMOS. This data is also called MTO (Material Take Off) data.
You can also take MTO-related data from the following COMOS sources:
● P&ID reports
● Isometries
You can also take MTO-related data from the following external sources:
● AVEVA PDMS (XML)
● Other third-party software (CSV)

Introduction
COMOS Material Management Operation 8 Operating Manual, 04/2012, A5E03777547-01
COMOS Material Management Operation Operating Manual, 04/2012, A5E03777547-01 9
Definitions 3Document key
A document key identifies a specific MTO document package or an MPR document package and is permitted to occur only once.
Filters Various filters may be set up for individual MTO documents of an MTO document package. This allows individual MTO documents to contain different information.
MPR document MPR (Material Purchase Request) documents contain data that is shown in the form of order requests.
MTO document MTO (Material Take Off) documents contain quantity-related and type-related data which is used here as a basis for order requests, for example. Depending on the objective, a distinction is made between the following MTO types:
● Estimated: Estimated material that is created from one or more P&ID reports, that is created manually or that is created by means of a CSV import.
● Current: Material that is produced during planning. Material created from isometries, by an import from AVEVA PDMS or by a CSV import.
● Released: Released material. Material created after an isometry has been released, by an import from PDMS or by a CSV import.
MTO document package When you are working with the Material Management Wizard, various documents are created at the same time. These documents are bundled in an MTO document package.

Definitions
COMOS Material Management Operation 10 Operating Manual, 04/2012, A5E03777547-01

COMOS Material Management Operation Operating Manual, 04/2012, A5E03777547-01 11
Creating material in COMOS 44.1 Creating material from P&ID reports
You can take material specifications from one or more piping diagrams. Once extracted, you can then add further specifications for the material.
Procedure To create material from a P&ID report, proceed as follows:
1. Call the "Plugins > Basic > Material Management Assistant" menu command.
2. Select the "Estimated" tab. See also chapter "Estimated" tab (Page 29).
3. Drag&drop the desired object from the Navigator into the "P&ID document/Query/Node" field.
4. To show material that is already available, click on the "Refresh" button.
5. To collect unavailable material or to update available material, click on the "Collect" button.
The result is shown in the form of a list.
Result The material is collected and stored in the Navigator in folders under the respective pipe.
In addition, the result is shown in the list on the "Estimated" tab. See also chapter "Estimated" tab (Page 29).
4.1.1 Detailing the material If you want to provide more detailed specifications for the material, you need to assign pipe spec components to the MTO objects.
Prerequisite You have already extracted information about material from one or more P&ID reports. See also chapter Creating material from P&ID reports (Page 11).

Creating material in COMOS 4.1 Creating material from P&ID reports
COMOS Material Management Operation 12 Operating Manual, 04/2012, A5E03777547-01
Procedure To add to the desired information, proceed as follows:
1. On the "Estimated" tab, right-click on the name of a pipe in the list.
2. Select the entry "Show details for pipe:" in the context menu.
The "PID Estimation" tab is displayed.
3. In order to show all available pipe spec parts, click on the "Refresh" button.
The available pipe spec parts are shown for the material that was selected from the P&ID reports.
4. In the "Selected quantity" column, enter the number of MTO objects that you wish to assign per pipe.
5. In order to update and create associated objects under the pipes, click on the "Apply quantities" button.
Result Quantity-specific and pipe spec-specific components are assigned to MTO objects. If no MTO object exists, a new one is created.
4.1.2 Assigning further components On the "PID Estimation" tab you can only assign objects that are present on the piping and instrumentation diagram/piping and instrumentation diagrams. See also chapter Detailing the material (Page 11).
If you wish to assign an object which is not present on the respective piping and instrumentation diagram, use the "Manual Estimation" tab.
Procedure 1. Open the "Pipe Details > Manual Estimation" tab.
All pipe spec components suitable for the respective pipe are displayed as a list.
2. In the edit field under each pipe spec component, enter the desired quantity for each of those components.
3. If you cannot find the pipe component that you are looking for in the list, click on the "Add" button to add it.
4. In order to create associated objects under the respective pipe, click on the "Apply quantities" button.

Creating material in COMOS 4.2 Creating material from isometries
COMOS Material Management Operation Operating Manual, 04/2012, A5E03777547-01 13
4.2 Creating material from isometries
Prerequisite ● The configuration object has been configured by an administrator to allow materials to be
created. You can find additional information on this topic in the "COMOS Material Management Administration" manual, keyword "Configuring an import from isometrics".
● Pipe spec mapping has been carried out for all relevant objects.
Procedure 1. Select the object in the navigator whose subobjects are to be used to create the material.
2. Select the "MTO > Collect Material" command from the context menu.
Result ● The "Status" window opens. See also chapter "Status" window (Page 38).
● The current isometry object is used as the starting point for identifying the next highest collection folder. The base object required for this purpose can be set in the configuration object.
The "Current" and "Released" folders are created here and this is where the MTO objects are stored.
● Separate MTO objects are created for the planned material underneath the selected objects based on the settings in the configuration object. These objects are then sorted into the "Current" or "Released" folder, depending on where they belong. You can find additional information on this topic in the "COMOS Material Management Administration" manual, keyword ""COMOS MTO" tab".

Creating material in COMOS 4.2 Creating material from isometries
COMOS Material Management Operation 14 Operating Manual, 04/2012, A5E03777547-01
COMOS Material Management Operation Operating Manual, 04/2012, A5E03777547-01 15
Importing material from external sources 55.1 CSV import
5.1.1 Introduction CSV files are used to import material from external sources.
Workflow 1. Importing a CSV file
See also section Importing CSV files (Page 15).
2. Creating an MTO document
See also section Creating MTO documents (Page 23).
3. Creating an MPR document
See also section Via the "Plugins" menu (Page 24).
5.1.2 Importing CSV files
Prerequisite The structure of the CSV file must conform to the COMOS rules. You can find additional information on this topic in the "COMOS Material Management Administration" manual, keyword "Structure of a CSV file".

Importing material from external sources 5.2 Importing from AVEVA PDMS
COMOS Material Management Operation 16 Operating Manual, 04/2012, A5E03777547-01
Procedure 1. Open the context menu for an object in the navigator and click on the "MTO > CSV import
- owner by subsection" command.
With this command, the owner of the MTO objects is identified on the basis of the information in the "Owner" column of the CSV file.
Alternatively, open the context menu for an object in the navigator and click on the "MTO > CSV import - owner by selection" command.
With this command, the owner of the MTO objects is the object from which you selected the command.
The "Select directory" window opens.
2. Select the folder containing the CSV files that you wish to import.
3. Click "OK".
Result ● The "Status" window opens. See also chapter "Status" window (Page 38).
● All the CSV files within the selected directory are imported.
"CSV import - owner by subsection" command: The material is created in the navigator in accordance with the configuration of the subsection specified in the CSV file.
"CSV import - owner by selection" command: The material is created underneath the object that you used to select the command.
● The Logfile.xml file is created in the directory from which you imported. Among other things, this log file describes any errors that occurred during the import.
5.2 Importing from AVEVA PDMS
5.2.1 Basic principles
Prerequisite To compile a selection set in AVEVA PDMS and transfer it to COMOS, install and activate the AVEVA PDMS interface.
You can find additional information on this topic in the "3D Integration Operation" manual, keyword "Activating COMOS PDMS Integration for PDMS".

Importing material from external sources 5.2 Importing from AVEVA PDMS
COMOS Material Management Operation Operating Manual, 04/2012, A5E03777547-01 17
Transferring MTO data from AVEVA PDMS to COMOS The MTO operation transfers material from AVEVA PDMS to COMOS. The starting point for the operation is AVEVA PDMS. For this purpose, AVEVA PDMS provides a form which can be used to generate the selection set. See also chapter Starting the operation in AVEVA PDMS (Page 19). For all objects in this selection set, material files are generated as a first step. These files are evaluated. The result of this evaluation is written to XML files. These XML files can then be read into COMOS.
Selection options in AVEVA PDMS When creating the XML files, you can make an assignment in AVEVA PDMS to determine whether this concerns engineering material (current) or released material (released). The XML files are then stored in the corresponding folders and COMOS creates the MTO objects following this.
5.2.2 Operating mode
5.2.2.1 Overview MTO operations can be executed under various operating modes:
● If there is a connection between COMOS and AVEVA PDMS, the operation is executed in online mode.
● If there is no connection between COMOS and AVEVA PDMS, the operation is executed in offline mode.
● It is also possible to write the material to an XML file in batch mode, using a PML macro.
5.2.2.2 Online mode
Principle In online mode, start COMOS either locally or via a Citrix server. AVEVA PDMS is running on the same machine.
When the XML files have been generated, a command is sent to COMOS. COMOS then fetches the files from the specified directory and imports the MTOs into the COMOS DB.
You have the option of viewing the exchange path in the project properties on the "PDMS interface/construction assistant" tab or setting it as an administrator.
Transfer directories In online mode, both the material files and the XML files are saved in the exchange path and fetched from there by COMOS. This directory must be known to both systems.

Importing material from external sources 5.2 Importing from AVEVA PDMS
COMOS Material Management Operation 18 Operating Manual, 04/2012, A5E03777547-01
If, for instance, "pdmswk" is registered as the exchange path, the files are saved as follows:
- Material files in the folder "pdmswk/Material Files"
- XML files for current (preliminary) material in the folder "pdmswk/CurrentMTO"
- XML files for released material in the folder "pdmswk/Released"
5.2.2.3 Offline mode
Principle In offline mode, there is no connection between COMOS and AVEVA PDMS. In AVEVA PDMS, the XML files are created at the push of a button and stored in a specified folder. This completes the operation in AVEVA PDMS.
You can then import the XML files into COMOS at any time, using a command in the context menu.
In this case the XML files are stored in directories which you define using environment variables in a configuration file. The directories must all point to the document path saved in COMOS.
This configuration file with the fixed name "MTOExportSettings.dat" must be accessible to AVEVA PDMS.
You can edit the ASCII file "MTOExportSettings.dat" using a text editor.
You can find additional information on this topic in the "COMOS Material Management Administration" manual, keyword "MTOExportSettings.dat".
5.2.2.4 Batch mode
Principle In batch mode the XML files are created in exactly the same way as in the configuration file. Expand the content of the MTOExportSettings.dat configuration file by adding the names of the pipes to be taken into account in the batch run: // export status of pipes / branches: set R for "released", set C for "current" // path to the material files // path to the current files // path to the released files // path to the temp after iso files // path to the subclass file and the name of it // The following code will be created automatically - do not modify it! // [!START!] The following objects will dealed: =8261/19717 =8261/19730 =8261/19753
The pipes are specified by your RefNo. Here you can also specify the RefNo of a ZONE or SITE.

Importing material from external sources 5.2 Importing from AVEVA PDMS
COMOS Material Management Operation Operating Manual, 04/2012, A5E03777547-01 19
Macro Calling the macro ITExportMTONightjob.pmlfnc creates the material files for the specified pipes. From these files an XML file is then created, which can be read into COMOS at a later point in time.
Signature of the macro: define function !!itExportMTONightjob(!isIsoCall is BOOLEAN)
Parameter:
If the macro is called in Isodraft:!isIsoCall: True If the macro is not called in Isodraft: False
exportMTO file You have the option of creating exportMTO files that offer access to specific material files that can, in turn, be used to create XML files for each material. See also chapter exportMTO file (Page 27).
In the "MTOExportSettings.dat" file, you need to specify the paths to the folders that contain the exportMTO files. You can find additional information on this topic in the "COMOS Material Management Administration" manual, keyword "MTOExportSettings.dat".
Transfer process:
1. Start of transfer in AVEVA PDMS
2. Preprocessing of the exportMTO file
The file is checked and is completed where necessary. If there are no material files available, these are created.
3. Processing
An XML file is created for each material file. The corresponding MTO objects are created in COMOS.
5.2.3 Starting the operation in AVEVA PDMS The operation is started in AVEVA PDMS using a form that can be found in the PML library supplied.
Procedure To start an operation in AVEVA PDMS, proceed as follows:
1. To call the form, click on the menu item "Comos > Interface > Export MTO".
AVEVA PDMS checks whether or not a connection to COMOS can be established. The header line shows whether the operation is running in online mode or in offline mode.
2. To create the selection set, click on the "Add all for CE" button.
All pipes in the "Design Explorer" under the current element marked are inserted into the "List of Elements". The name of the pipe is displayed in the "Object" column. The quality in which the material for this pipe is created is shown in the "Status" column.

Importing material from external sources 5.2 Importing from AVEVA PDMS
COMOS Material Management Operation 20 Operating Manual, 04/2012, A5E03777547-01
3. To set the MTO type, mark the desired pipes in the "List of Elements" and click on the "Set status current" or "Set status released" button.
These buttons may be locked if a configuration object has been created in AVEVA PDMS and certain functions have been called. See also section Locking status changes in AVEVA PDMS (Page 20).
4. Once you have created the standard table, you can then create the XML files. Click the "Export MTO" button to do this. This button is located in within the form.
5.2.4 Importing to COMOS in offline mode
Procedure To read the XML data created by AVEVA PDMS into COMOS, proceed as follows:
1. On the "Units" tab of the Navigator in COMOS, right-click on any object.
2. In the context menu, click on the "MTO > Import > From PDMS" command.
Result All XML files are read in from the folders "CurrentMTO" and "Released", and the MTO objects are created.
To prevent the files from being read in again during the next import, after they have been processed they are moved into the subfolder "Imported".
5.2.5 Locking status changes in AVEVA PDMS
Procedure 1. Create the !!ITExportMTOConfiguration configuration object in AVEVA PDMS.
This object is deleted when you exit AVEVA PDMS.
2. Enter one of the following functions in the command window:
– .setExportMTOStatusCurrent()
The status of the material is set to "current". The buttons "Set status to "current"" and "Set status to "released"" are locked.
– .setExportMTOStatusReleased()
The status of the material is set to "released". The buttons "Set status to "current"" and "Set status to "released"" are locked.
Importing material from external sources 5.2 Importing from AVEVA PDMS
COMOS Material Management Operation Operating Manual, 04/2012, A5E03777547-01 21
Unlocking status changes Enter the function .setExportMTOStatusBoth() in the command window.
The buttons "Set status to "current"" and "Set status to "released"" are unlocked.
Importing material from external sources 5.2 Importing from AVEVA PDMS
COMOS Material Management Operation 22 Operating Manual, 04/2012, A5E03777547-01

COMOS Material Management Operation Operating Manual, 04/2012, A5E03777547-01 23
Material documentation and order requests 66.1 Creating MTO documents
You can create MTO documents in the following ways:
● Calling the Material Management Assistant via "plugins"
● Calling the Material Management Assistant via the context menu
6.1.1 Via the "Plugins" menu
Procedure To create MTO documents, proceed as follows:
1. Call the "Plugins > Basic > Material Management Assistant" menu command.
2. Click the "MTO documents" tab.
3. Make the required settings here:
– If you wish to create an MTO document package for the first time, activate the "New package" option. If you wish to update an MTO document package, activate the "Update package" option.
– The "Created document key" field cannot be edited and displays the current value for the key.
The key may change while information is being entered in the fields.
– Mandatory field: In the "MTO level" list, select the MTO level for which documents are to be created. The levels "Estimated MTO", "Current MTO", and "Released MTO" are available for selection. See also chapter Basic principles (Page 16).
– The contents of the "Documents" control group are based on the administrator's configuration entries. If field contents can be edited, you can change them or add to them.
– In the "Filter" control group, you can only edit the last column, "Value".
– To change or add to the content of text fields, you can edit the columns "Field" and "Value" in the "Text fields" control group. You can only edit the additional "Document" column if it has not been created by the administrator.
4. Click the "Create documents" button.
The documents are created.
The documents are saved once the action is complete.

Material documentation and order requests 6.2 Creating MPR documents
COMOS Material Management Operation 24 Operating Manual, 04/2012, A5E03777547-01
6.1.2 Via the context menu In this case, in contrast to when you create MTO documents directly using the Material Management Assistant, the following information is transferred from the "MTO documents" tab of the configuration object to the Material Management Assistant:
● Data in the "Filter" control group, "Value" column
The value in this column is taken from the object whose context menu you used to create the MTO documents. You can find additional information on this topic in the "COMOS Material Management Administration" manual, keyword ""MTO Documents" tab".
● Data in the "Text fields" control group
Procedure 1. In the navigator, select an object that you want to check on the basis of the filter values
pre-selected in the configuration object.
The selected object must have the base object which is specified in the configuration object on the "MTO documents" tab in the "Base object for creating documents via Popup" field.
2. Select the "MTO > Create MTO Document" command from the context menu.
3. Make the required settings on the "MTO Documents" tab in the Material Management Assistant. See also chapter Via the "Plugins" menu (Page 23).
6.2 Creating MPR documents
6.2.1 Via the "Plugins" menu
Procedure To create MPR documents, proceed as follows:
1. Call the "Plugins > Basic > Material Management Assistant" menu command.
2. Click the "MPR Documents" tab.

Material documentation and order requests 6.2 Creating MPR documents
COMOS Material Management Operation Operating Manual, 04/2012, A5E03777547-01 25
3. Make the required settings here:
– If you do not wish to use the set of rules for component margins that is displayed, select another set of rules from the "Codes" standard table.
– If you want a document revision to be applied automatically as soon as the MPR document has been created, activate the "Create revision" option.
– If you wish to assign document keys for a new MPR document, activate the "New MPR" option.
– If you wish to update an MPR document, activate the "update MPR with key" option. In this case, you can load a saved MPR revision using the standard table. If new keys are available in the "MTO key" list, you can select them and add them to the "Key list" using the "Add keys" button.
– When creating a new MPR document, at least one key must be assigned to the key list (which is initially empty) by means of the "Add keys" button. In order to select a document key from a list of MTO keys that have not been used up until now, click on the "MTO key" standard table. To then add a key displayed under "MTO key" to the "Key list", click on the "Add keys" button. If you wish to create an order list for an entire unit, for example, but you have created MTO document packages for each subunit beforehand, the keys of all MTO documents in use must be added to the key list.
– If you are defining a text field and wish to fill it with a particular value, edit the fields "Text" and "Value".
4. To display the elements that can be ordered in the order list, click on the "Refresh" button.
5. If you wish to correct the data shown in the "Margin" column to bring it into line with the margins in accordance with the specified "Codes", you can edit these fields.
6. In order to create the MTO documents in accordance with the default settings, click on the "Create document" button.
The documents are created.
The documents are saved once the action is complete.
See also "MPR documents" tab (Page 33)
6.2.2 Via the context menu In this case, in contrast to when you create MPR documents directly using the Material Management Assistant, the information in the "Text fields" control group is transferred from the "MPR Documents" tab of the configuration object to the Material Management Assistant.
Material documentation and order requests 6.3 Managing documents
COMOS Material Management Operation 26 Operating Manual, 04/2012, A5E03777547-01
Procedure 1. Select an object in the Navigator.
The selected object must have the base object which is specified in the configuration object on the "MTO documents" tab in the "Base object for creating documents via Popup" field.
2. Select the "MTO > Create MPR Document" command from the context menu.
3. Make the required settings on the "MPR Documents" tab in the Material Management Assistant. See also chapter Via the "Plugins" menu (Page 24).
6.3 Managing documents
Opening a document 1. Open the "Documents" tab in the Material Management Assistant.
2. Double-click on a document in the "MTO documents" or "MPR documents" control group.
Revising a document 1. Open the "Documents" tab in the Material Management Assistant.
2. Open the context menu of a process in the "MTO documents" or "MPR documents" control group.
3. Click the "Revision <document key>" entry.
You can only revision a process if the version at the time of the last revision status has changed.
Delete document 1. Open the "Documents" tab in the Material Management Assistant.
2. Open the context menu of a process in the "MTO documents" or "MPR documents" control group.
3. Click the "Delete <document key>" entry.
You can only delete an MTO process if it is not part of an MPR process.
See also "Documents" tab (Page 36)
COMOS Material Management Operation Operating Manual, 04/2012, A5E03777547-01 27
References 77.1 exportMTO file
The exportMTO file must meet the following conditions:
● A value must be available for at least the <elementRef> or <elementName> nodes.
● All the nodes listed in the example must be available.
In order for the file to be recognized, it must be named as follows:
exportMTO_<YYMMDD>_<HHMMSS>.xml
Example <headerBlock> <batchData> <batchDataName>Date</ batchDataName > <batchDataValue>July 14, 2011</ batchDataValue > </batchData> … <batchData> <batchDataName>User</ batchDataName > <batchDataValue>a_user1</ batchDataValue > </batchData> </headerBlock> <dataBlock> <pipeData> <comosStatus>0</comosStatus> <elementRef>17385/44062</elementRef> <elementName>/P1M1T1/Z003</elementName> <comosUID>A2N66274WE</comosUID> <curRelStat>R</curRelStat> <materialFile> D:\MTOExport\MaterialFiles\_P1M1T1_Z003_material.txt </materialFile> <revision>ABC</revision> <pdmsStatus>0</pdmsStatus> </pipeData> … <pipeData> … </pipeData> </dataBlock>

References 7.1 exportMTO file
COMOS Material Management Operation 28 Operating Manual, 04/2012, A5E03777547-01
Tag Description <batchDataName> Name of the batch attribute <batchDataValue> Value of the batch attribute <pipeData> Contains the data relating to a pipe for which an XML file (containing the
MTO-related data) is being created. <comosStatus> Completed automatically while data is being transferred from AVEVA PDMS
to COMOS. If an entry is made prior to transfer, the <pipeData> block is skipped, because it is deemed to have already been processed. Possible values: 0: MTO transfer to COMOS successful 1: MTO transfer to COMOS not successful 2: The "current" status has been applied automatically. 4: Material files have been created automatically 8: Material file damaged 16: <elementName> determined using <elementRef>. 32: <comosUID> determined using <elementRef>. 64: <elementRef> determined using <elementName>. 128: : <elementRef> points to a ZONE or PIPE. New nodes <pipeData> have been created in this XML file for all PIPES in this ZONE or SITE .
<elementRef> Reference number for a pipe from AVEVA PDMS. Has to belong to the same object as the entry in <elementName>. If a ZONE or SITE from PDMS is specified instead of a PIPE , a separate node <pipeData> is created for each of the pipes covered.
<elementName> Name of a pipe from AVEVA PDMS. Has to belong to the same object as the entry in <elementRef>. If a ZONE or SITE from AVEVA PDMS is specified instead of a PIPE , a separate node <pipeData> is created for each of the pipes covered.
<comosUID> UID of the object from COMOS that is linked to the pipe in AVEVA PDMS which is described in <pipeData> .
<curRelStat> Possible values: C R
If R is entered as the value, a value for <revision> must also be available.
If the tag is empty, a value of C is applied. <materialFile> Path to the material file that is to be used.
If this is empty, a material file is created automatically for the referenced pipe.
<revision> Name of revision Ignored in the case of materials with the status C.
<pdmsStatus> Value = -1: The current node <pipeData> is skipped. If this is empty, a value of 0 is applied and set. The transfer continues.

References 7.2 User interface reference
COMOS Material Management Operation Operating Manual, 04/2012, A5E03777547-01 29
7.2 User interface reference
7.2.1 "Estimated" tab When you call the "Plugins > Basic > Material Management Assistant" menu command, the following control elements are available on the "Estimated" tab:
"Status" control group The "Status" control group is shown when you click on the "Collect" button.
See also chapter "Status" window (Page 38).
"PID" control group Control element Description "P&ID document/Query/Node" field
You drag an object from which material is to be created to this field.
"Refresh" button Updates the list with the material that is already available. "Collect" button Creates material from the object that you dragged to the "P&ID
document/Query/Node" field.
List with available material Displays the available material. The pipes are color-coded to indicate whether pipe spec mapping has been carried out for the associated components.
Color Description Red Pipe spec mapping has not been carried out for any of the components. Orange Pipe spec mapping has not been carried out for at least one of the components. Green Pipe spec mapping has been carried out for all of the components. White There is no material associated with the pipe.
See also Creating material from P&ID reports (Page 11)
References 7.2 User interface reference
COMOS Material Management Operation 30 Operating Manual, 04/2012, A5E03777547-01
7.2.2 "Pipe Details" tab When you call the "Plugins > Basic > Material Management Assistant" menu command, the following control elements are available on the "Pipe Details" tab:
Field You drag a pipe to this field. If you select the command "Show details for pipe:" in the context menu of a pipe on the "Estimated" tab, the pipe is automatically entered in the field.
"Refresh" button The available pipe spec parts for the material that was selected are shown.
"Status" control group See also chapter "Status" window (Page 38).
7.2.2.1 "PID Estimation" tab This tab lists components that were extracted from the P&ID.
Table Column Description "PCO name" Name of the pipe spec component "Description" Description of the pipe spec component "GType" Component type "ND1" Main nominal diameter "ND2" Branch nominal diameter "Unit" Unit under which the component is located "PID quantity" Number of the components installed on the P&ID "Selected quantity" Number of the estimated MTO objects that are actually required
"Apply quantities" button. Updates and creates MTO objects below the pipes in the Navigator.
7.2.2.2 "Manual Estimation" tab
"Additional objects" field You drag an object from which you additionally wish to create material to this field.

References 7.2 User interface reference
COMOS Material Management Operation Operating Manual, 04/2012, A5E03777547-01 31
"Add" button Adds the component to the table.
Table Shows all components that are located on the pipe as well as the components that you added manually.
If you expand the rows underneath a component, you can enter a quantity for each required nominal diameter.
"Apply quantities" button. Updates MTO objects that already exist below the pipes in the Navigator and creates new MTO objects with the quantity entered, if you have added others.
See also "Estimated" tab (Page 29)
7.2.3 "MTO Documents" tab When you call the "Plugins > Basic > Material Management Assistant" menu command, the following control elements are available on the "MTO Documents" tab:
"Status" control group The "Status" control group is shown when you click on the "Create documents" button.
See also chapter "Status" window (Page 38).
Control element Description "New package" option Creates a new document package. "Update package" option Updates a document package for an existing estimate. List Use this field to select further document keys from a list. It is
only possible to make this selection if the administrator has stored further document keys.
"Created document key" field Shows the current value for the document key. You cannot edit this field. Example: The document key was defined by the administrator. You can find additional information on this topic in the "3D Integration Administration" manual, keyword ""MTO Documents" user interface reference tab". Provided you do not enter a value in the "Value" column in the first line of the "Text fields" control group described here, or in the first line of the "Filter" control group, the following document key is displayed: "MTO--". While the entries are being made, the key changes accordingly in the relevant fields.
References 7.2 User interface reference
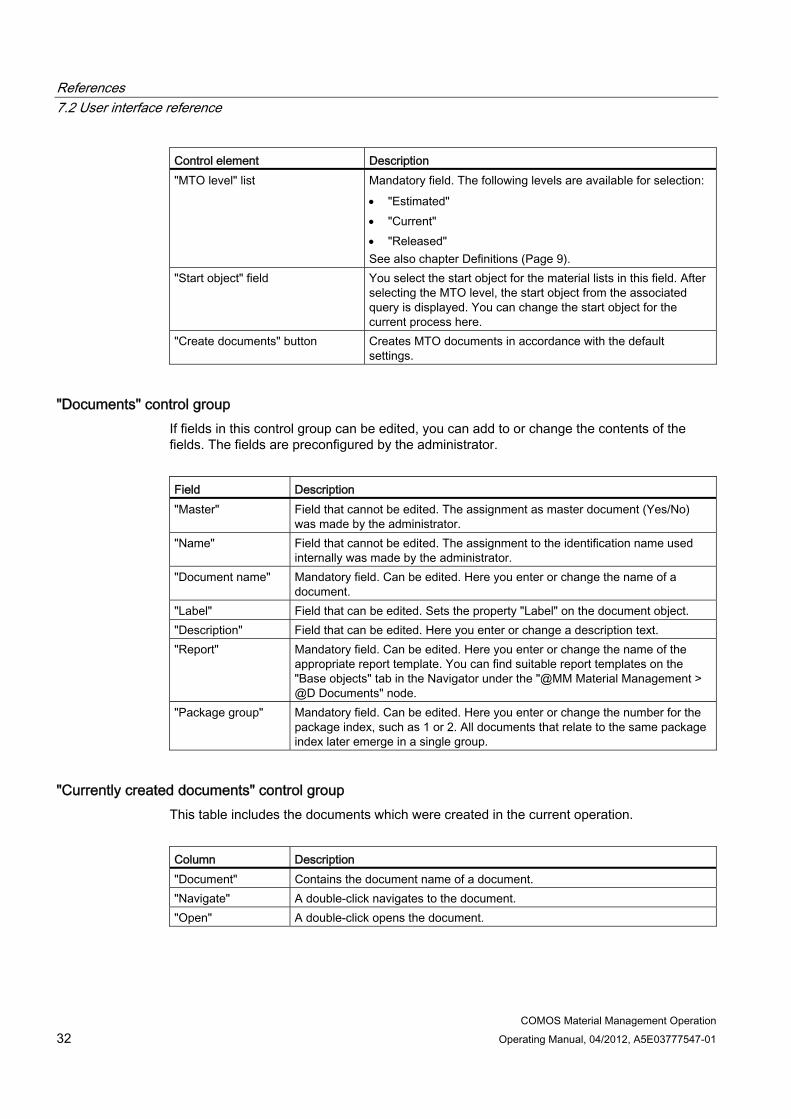
COMOS Material Management Operation 32 Operating Manual, 04/2012, A5E03777547-01
Control element Description "MTO level" list Mandatory field. The following levels are available for selection:
"Estimated" "Current" "Released" See also chapter Definitions (Page 9).
"Start object" field You select the start object for the material lists in this field. After selecting the MTO level, the start object from the associated query is displayed. You can change the start object for the current process here.
"Create documents" button Creates MTO documents in accordance with the default settings.
"Documents" control group If fields in this control group can be edited, you can add to or change the contents of the fields. The fields are preconfigured by the administrator.
Field Description "Master" Field that cannot be edited. The assignment as master document (Yes/No)
was made by the administrator. "Name" Field that cannot be edited. The assignment to the identification name used
internally was made by the administrator. "Document name" Mandatory field. Can be edited. Here you enter or change the name of a
document. "Label" Field that can be edited. Sets the property "Label" on the document object. "Description" Field that can be edited. Here you enter or change a description text. "Report" Mandatory field. Can be edited. Here you enter or change the name of the
appropriate report template. You can find suitable report templates on the "Base objects" tab in the Navigator under the "@MM Material Management > @D Documents" node.
"Package group" Mandatory field. Can be edited. Here you enter or change the number for the package index, such as 1 or 2. All documents that relate to the same package index later emerge in a single group.
"Currently created documents" control group This table includes the documents which were created in the current operation.
Column Description "Document" Contains the document name of a document. "Navigate" A double-click navigates to the document. "Open" A double-click opens the document.
References 7.2 User interface reference
COMOS Material Management Operation Operating Manual, 04/2012, A5E03777547-01 33
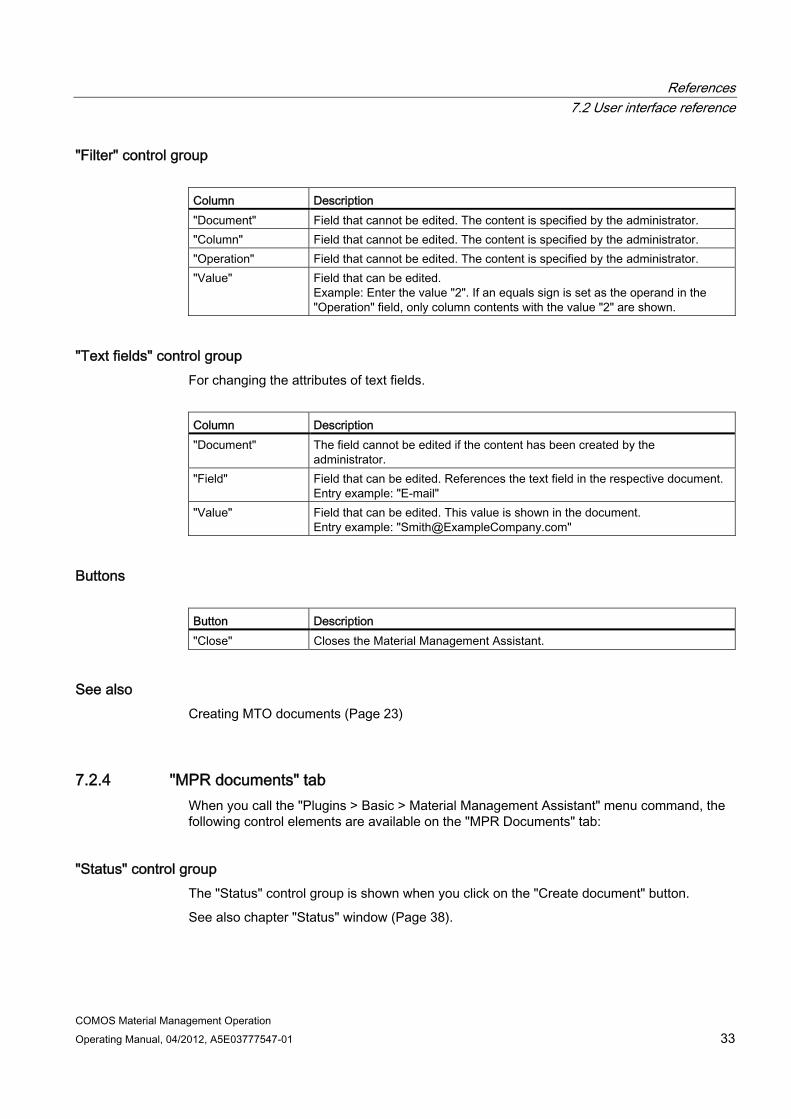
"Filter" control group Column Description "Document" Field that cannot be edited. The content is specified by the administrator. "Column" Field that cannot be edited. The content is specified by the administrator. "Operation" Field that cannot be edited. The content is specified by the administrator. "Value" Field that can be edited.
Example: Enter the value "2". If an equals sign is set as the operand in the "Operation" field, only column contents with the value "2" are shown.
"Text fields" control group For changing the attributes of text fields.
Column Description "Document" The field cannot be edited if the content has been created by the
administrator. "Field" Field that can be edited. References the text field in the respective document.
Entry example: "E-mail" "Value" Field that can be edited. This value is shown in the document.
Entry example: "[email protected]"
Buttons Button Description "Close" Closes the Material Management Assistant.
See also Creating MTO documents (Page 23)
7.2.4 "MPR documents" tab When you call the "Plugins > Basic > Material Management Assistant" menu command, the following control elements are available on the "MPR Documents" tab:
"Status" control group The "Status" control group is shown when you click on the "Create document" button.
See also chapter "Status" window (Page 38).
References 7.2 User interface reference
COMOS Material Management Operation 34 Operating Manual, 04/2012, A5E03777547-01
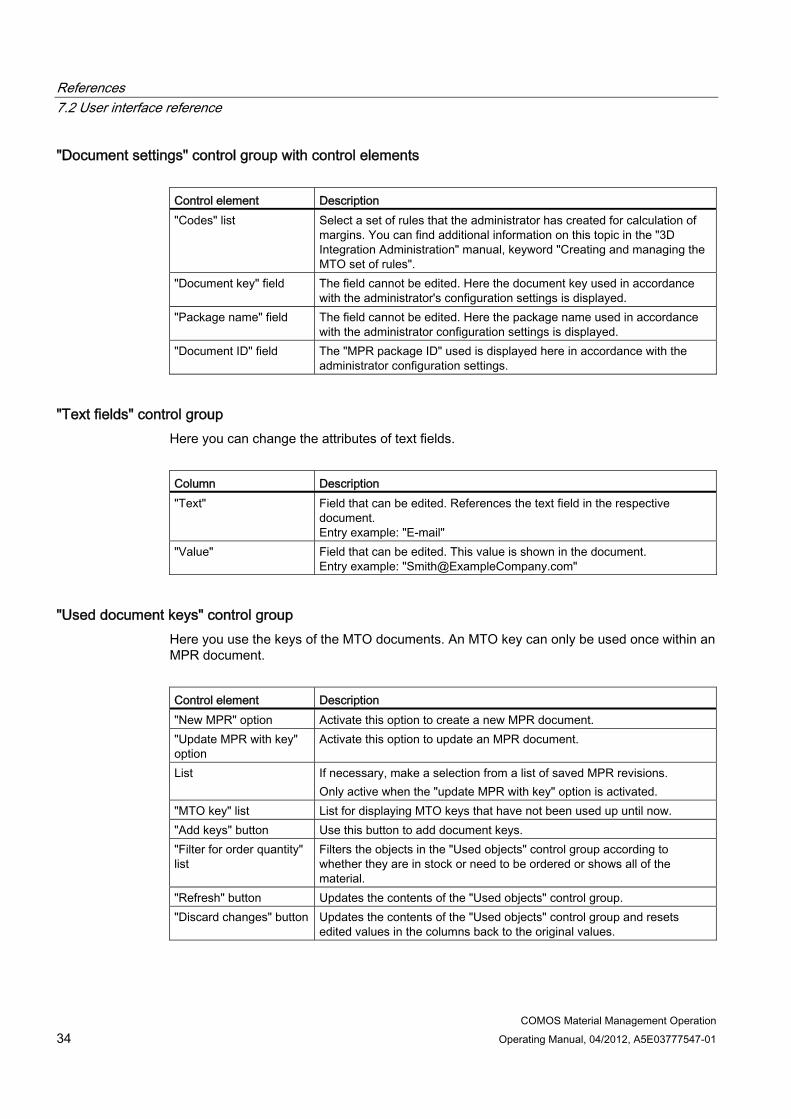
"Document settings" control group with control elements Control element Description "Codes" list Select a set of rules that the administrator has created for calculation of
margins. You can find additional information on this topic in the "3D Integration Administration" manual, keyword "Creating and managing the MTO set of rules".
"Document key" field The field cannot be edited. Here the document key used in accordance with the administrator's configuration settings is displayed.
"Package name" field The field cannot be edited. Here the package name used in accordance with the administrator configuration settings is displayed.
"Document ID" field The "MPR package ID" used is displayed here in accordance with the administrator configuration settings.
"Text fields" control group Here you can change the attributes of text fields.
Column Description "Text" Field that can be edited. References the text field in the respective
document. Entry example: "E-mail"
"Value" Field that can be edited. This value is shown in the document. Entry example: "[email protected]"
"Used document keys" control group Here you use the keys of the MTO documents. An MTO key can only be used once within an MPR document.
Control element Description "New MPR" option Activate this option to create a new MPR document. "Update MPR with key" option
Activate this option to update an MPR document.
List If necessary, make a selection from a list of saved MPR revisions. Only active when the "update MPR with key" option is activated.
"MTO key" list List for displaying MTO keys that have not been used up until now. "Add keys" button Use this button to add document keys. "Filter for order quantity" list
Filters the objects in the "Used objects" control group according to whether they are in stock or need to be ordered or shows all of the material.
"Refresh" button Updates the contents of the "Used objects" control group. "Discard changes" button Updates the contents of the "Used objects" control group and resets
edited values in the columns back to the original values.

References 7.2 User interface reference
COMOS Material Management Operation Operating Manual, 04/2012, A5E03777547-01 35
Control element Description "Key list" Mandatory field for at least one entry.
When creating a new MPR document, at least one key must be assigned to the "Keylist" (which was initially empty) using the "Add keys" button.
For an existing MPR document, shows the key linked to the current MPR document.
"Create revision" option Activated: A document revision is applied to an MPR document as soon as it is created. The revision is assigned the "released" status.
"Create document" button
Creates MPR documents in accordance with the default settings.
"Currently created documents" control group This table includes the documents which were created in the current operation.
Column Description "Document" Contains the document name of a document. "Navigate" A double-click navigates to the document. "Open" A double-click opens the document.
"Used objects" control group If you click "Refresh", this order list is filled with material in accordance with the configuration settings.
Column Description Options column Option activated: Material is considered when ordering.
Option deactivated: Material is not considered when ordering. Following an update, it reappears in the order list.
"Description" Description text. "Planned quantity" Planned quantity. "Addition" Field that can be edited. Here you can make manual corrections to
additions which have been calculated in accordance with the settings of the used "Codes".
"Total purchase quantity" Total purchase quantity. "Order quantity" Current purchase quantity.
Further columns To display additional columns on your MPR document, please contact your administrator. You can find additional information on this topic in the "3D Integration Administration" manual, keyword "Additional columns".

References 7.2 User interface reference
COMOS Material Management Operation 36 Operating Manual, 04/2012, A5E03777547-01
See also Via the "Plugins" menu (Page 24)
7.2.5 "Documents" tab You manage MTO documents and MPR documents on this tab. See also chapter Managing documents (Page 26).
When you call the "Plugins > Basic > Material Management Assistant" menu command, the following control elements are available on the "Documents" tab:
"General information" control group The number of MTO documents and MPR documents is shown here.
"Check for consistency" button:
● Checks whether all documents exist and have the correct name in COMOS.
● Checks whether the XML files exist in COMOS.
● Checks whether the current revision number of documents corresponds to the version of the XML files.
"MTO documents" control group Contains a tree view of the MTO documents.
Level Description 1 Process level. Arises when you create new MTO documents. 2 Package level. Contains all packages of a process. 3 Document level. Contains all documents of a package.
● When you open the Material Management Assistant via the "Plugins" menu, you will see all MTO documents.
● If you open the Material Management Assistant via the context menu of an object from the Navigator, you will see only those documents with the same user context as that determined at the object. You can find additional information on this topic in the "COMOS Material Management Administration" manual, keyword "User context".

References 7.2 User interface reference
COMOS Material Management Operation Operating Manual, 04/2012, A5E03777547-01 37
Is updated when the following actions take place:
● when you open the Material Management Assistant
● when you create documents
● when you delete documents
"Current MTO document" control group Contains information on the currently selected node in the "MTO documents" control group. Different information is shown for the various levels.
If an MTO document is part of an MPR document, it is integrated in the order process. In this case, you cannot delete the MTO document.
"MPR documents" control group Contains a tree view of the MPR documents.
Level Description 1 Process level. Arises when you create new MPR documents. 2 Document level. Contains all documents of a process.
● When you open the Material Management Assistant via the "Plugins" menu, you will see all MPR documents.
● If you open the Material Management Assistant via the context menu of an object from the Navigator, you will see only those documents with the same user context as that determined at the object. You can find additional information on this topic in the "COMOS Material Management Administration" manual, keyword "User context".
Is updated when the following actions take place:
● you open the Material Management Assistant
● you create documents
● you delete documents
"Current MPR document" control group Contains information on the currently selected node in the "MTO documents" control group.
Different information is shown for the various levels.

References 7.2 User interface reference
COMOS Material Management Operation 38 Operating Manual, 04/2012, A5E03777547-01
7.2.6 "Status" window Control element Description "File name" field If you want to save the status history for the current process in
an XML file, you enter a path and file name in this field. Button "..." If you want to save the status history for the current process in
an XML file, you select a storage location and enter a file name here.
"Save" button Creates the specified XML file and saves the status in the file. List The individual task packages that COMOS executes for the
current process are listed here. COMOS first checks whether the settings for the process are correct. If the settings are not correct, COMOS aborts the process. Otherwise, the program continues and creates the documents in accordance with the default settings. You can recognize from the symbols displayed whether a task was executed successfully or an error occurred. Warnings, success messages or informative tips may be shown underneath the tasks. You can open created documents or navigate to individual objects.