debian edu lenny manual
TRANSCRIPT

8/3/2019 Debian Edu Lenny Manual
http://slidepdf.com/reader/full/debian-edu-lenny-manual 1/64
"Debian Edu / Skolelinux Lenny 5.0.6+edu1 Manual"
November 21, 2010
"Debian Edu / Skolelinux Lenny 5.0.6+edu1 Manual"
i
8/3/2019 Debian Edu Lenny Manual
http://slidepdf.com/reader/full/debian-edu-lenny-manual 2/64
CONTENTS CONTENTS
Contents
1 Manual for Debian Edu 5.0.6+edu1 Codename "Lenny" 1
2 About Debian Edu and Skolelinux 1
3 Architecture 13.1 Network . . . . . . . . . . . . . . . . . . . . . . . . . . . . . . . . . . . . . . . . . . . . . . . 1
3.1.1 Main server (tjener) . . . . . . . . . . . . . . . . . . . . . . . . . . . . . . . . . . . . 23.1.2 Services running on the main server . . . . . . . . . . . . . . . . . . . . . . . . . . . 23.1.3 LTSP server(s) (Thin client server(s)) . . . . . . . . . . . . . . . . . . . . . . . . . . 33.1.4 Thin clients . . . . . . . . . . . . . . . . . . . . . . . . . . . . . . . . . . . . . . . . . 33.1.5 Diskless workstations . . . . . . . . . . . . . . . . . . . . . . . . . . . . . . . . . . . 43.1.6 Networked clients . . . . . . . . . . . . . . . . . . . . . . . . . . . . . . . . . . . . . 4
3.2 Administration . . . . . . . . . . . . . . . . . . . . . . . . . . . . . . . . . . . . . . . . . . . 43.3 Installation . . . . . . . . . . . . . . . . . . . . . . . . . . . . . . . . . . . . . . . . . . . . . 43.4 File system access conguration . . . . . . . . . . . . . . . . . . . . . . . . . . . . . . . . . 43.5 random notes . . . . . . . . . . . . . . . . . . . . . . . . . . . . . . . . . . . . . . . . . . . . 5
4 Features 54.1 New in Debian Edu 5.0.6+edu1 Codename "Lenny" released 2010-10-05 . . . . . . . . . . 54.2 New features in Debian Edu 5.0.4+edu0 Codename "Lenny" released 2010-02-08 . . . . . 64.3 New features in Debian 5.0.4 upon which Debian Edu 5.0.4+edu0 is based . . . . . . . . . 74.4 New features in the "3.0r1 Terra" release 2007-12-05 . . . . . . . . . . . . . . . . . . . . . . 74.5 New features in the "3.0r0 Terra" release 2007-07-22 . . . . . . . . . . . . . . . . . . . . . . 74.6 Features in 2.0 release 2006-03-14 . . . . . . . . . . . . . . . . . . . . . . . . . . . . . . . . . 84.7 Features in "1.0 Venus" release 2004-06-20 . . . . . . . . . . . . . . . . . . . . . . . . . . . . 84.8 More information on older releases . . . . . . . . . . . . . . . . . . . . . . . . . . . . . . . 8
5 Requirements 85.1 Hardware requirements . . . . . . . . . . . . . . . . . . . . . . . . . . . . . . . . . . . . . . 85.2 Hardware known to work . . . . . . . . . . . . . . . . . . . . . . . . . . . . . . . . . . . . . 9
6 Requirements for a network setup 96.1 Default Setup . . . . . . . . . . . . . . . . . . . . . . . . . . . . . . . . . . . . . . . . . . . . 96.2 Internet router . . . . . . . . . . . . . . . . . . . . . . . . . . . . . . . . . . . . . . . . . . . 9
7 Installation 107.1 Where to nd additional information . . . . . . . . . . . . . . . . . . . . . . . . . . . . . . 107.2 Download the installation media for Debian Edu 5.0.6+edu1 Codename "Lenny" . . . . . 10
7.2.1 DVDs for i386, amd64 and powerpc . . . . . . . . . . . . . . . . . . . . . . . . . . . 107.3 Request a CD/DVD by mail . . . . . . . . . . . . . . . . . . . . . . . . . . . . . . . . . . . 107.4 Installing Debian Edu . . . . . . . . . . . . . . . . . . . . . . . . . . . . . . . . . . . . . . . 11
7.4.1 The installation process . . . . . . . . . . . . . . . . . . . . . . . . . . . . . . . . . . 117.4.2 A note on manual partitioning . . . . . . . . . . . . . . . . . . . . . . . . . . . . . . 127.4.3 A note on notebooks . . . . . . . . . . . . . . . . . . . . . . . . . . . . . . . . . . . . 127.4.4 A note on DVD installs . . . . . . . . . . . . . . . . . . . . . . . . . . . . . . . . . . 137.4.5 A note on CD installs . . . . . . . . . . . . . . . . . . . . . . . . . . . . . . . . . . . 137.4.6 A note on some RAID controllers . . . . . . . . . . . . . . . . . . . . . . . . . . . . 137.4.7 A note on thin-client-server installations . . . . . . . . . . . . . . . . . . . . . . . . 137.4.8 Custom CD/DVDs . . . . . . . . . . . . . . . . . . . . . . . . . . . . . . . . . . . . 137.4.9 Installation over the network (PXE) and booting diskless clients . . . . . . . . . . 14
7.4.9.1 Modifying PXE installations . . . . . . . . . . . . . . . . . . . . . . . . . . 14
7.5 Screenshot tour . . . . . . . . . . . . . . . . . . . . . . . . . . . . . . . . . . . . . . . . . . . 158 Getting started 19
8.1 Minimum steps to get started . . . . . . . . . . . . . . . . . . . . . . . . . . . . . . . . . . . 19
ii
8/3/2019 Debian Edu Lenny Manual
http://slidepdf.com/reader/full/debian-edu-lenny-manual 3/64
CONTENTS CONTENTS
9 Services running on the main server 199.1 Web based management, using lwat . . . . . . . . . . . . . . . . . . . . . . . . . . . . . . . 199.2 User Management with lwat . . . . . . . . . . . . . . . . . . . . . . . . . . . . . . . . . . . 20
9.2.1 Adding users . . . . . . . . . . . . . . . . . . . . . . . . . . . . . . . . . . . . . . . . 209.2.2 Search and delete users . . . . . . . . . . . . . . . . . . . . . . . . . . . . . . . . . . 219.2.3 Set passwords . . . . . . . . . . . . . . . . . . . . . . . . . . . . . . . . . . . . . . . 229.2.4 Advanced user management . . . . . . . . . . . . . . . . . . . . . . . . . . . . . . . 23
9.3 Group Management with lwat . . . . . . . . . . . . . . . . . . . . . . . . . . . . . . . . . . 239.4 Group Management on the command line . . . . . . . . . . . . . . . . . . . . . . . . . . . 23
9.4.1 Advanced group management . . . . . . . . . . . . . . . . . . . . . . . . . . . . . . 239.5 Machine Management with lwat . . . . . . . . . . . . . . . . . . . . . . . . . . . . . . . . . 23
9.5.1 Search and delete machines . . . . . . . . . . . . . . . . . . . . . . . . . . . . . . . . 249.5.2 Modify existing machines / Netgroup management . . . . . . . . . . . . . . . . . 249.5.3 More lwat documentation . . . . . . . . . . . . . . . . . . . . . . . . . . . . . . . . 25
9.6 Printer Managment . . . . . . . . . . . . . . . . . . . . . . . . . . . . . . . . . . . . . . . . . 259.7 Clock synchronization . . . . . . . . . . . . . . . . . . . . . . . . . . . . . . . . . . . . . . . 259.8 Extending full partitions . . . . . . . . . . . . . . . . . . . . . . . . . . . . . . . . . . . . . . 26
10 Maintainance 2610.1 Updating the software . . . . . . . . . . . . . . . . . . . . . . . . . . . . . . . . . . . . . . . 2610.1.1 Keep yourself informed about security updates . . . . . . . . . . . . . . . . . . . . 26
10.2 Backup Management . . . . . . . . . . . . . . . . . . . . . . . . . . . . . . . . . . . . . . . . 2610.3 Server Monitoring . . . . . . . . . . . . . . . . . . . . . . . . . . . . . . . . . . . . . . . . . 27
10.3.1 Munin . . . . . . . . . . . . . . . . . . . . . . . . . . . . . . . . . . . . . . . . . . . . 2710.3.2 Nagios . . . . . . . . . . . . . . . . . . . . . . . . . . . . . . . . . . . . . . . . . . . . 2710.3.3 Sitesummary . . . . . . . . . . . . . . . . . . . . . . . . . . . . . . . . . . . . . . . . 27
10.4 More information about Debian Edu customisations . . . . . . . . . . . . . . . . . . . . . 27
11 Upgrades 2711.1 General notes on upgrading . . . . . . . . . . . . . . . . . . . . . . . . . . . . . . . . . . . . 28
12 Upgrades from Debian Edu etch 2812.1 The basic upgrade operation . . . . . . . . . . . . . . . . . . . . . . . . . . . . . . . . . . . 2812.2 LDAP service needs to repaired . . . . . . . . . . . . . . . . . . . . . . . . . . . . . . . . . 2812.3 DHCP service needs to repaired . . . . . . . . . . . . . . . . . . . . . . . . . . . . . . . . . 2912.4 User logins from Windows machines needs to repaired . . . . . . . . . . . . . . . . . . . . 3112.5 DNS service needs to repaired . . . . . . . . . . . . . . . . . . . . . . . . . . . . . . . . . . 32
12.5.1 Bind . . . . . . . . . . . . . . . . . . . . . . . . . . . . . . . . . . . . . . . . . . . . . 3212.5.2 powerdns . . . . . . . . . . . . . . . . . . . . . . . . . . . . . . . . . . . . . . . . . . 32
12.6 Nagios setup has changed . . . . . . . . . . . . . . . . . . . . . . . . . . . . . . . . . . . . . 3312.7 Recreating an LTSP chroot . . . . . . . . . . . . . . . . . . . . . . . . . . . . . . . . . . . . . 33
13 Upgrades from older Debian Edu / Skolelinux installations (before etch) 33
14 HowTo 34
15 HowTos for general administration 3415.1 Conguration history: tracking /etc/ using the svk version control system . . . . . . . . 34
15.1.1 Usage examples . . . . . . . . . . . . . . . . . . . . . . . . . . . . . . . . . . . . . . 3415.1.2 For those who upgraded from Etch . . . . . . . . . . . . . . . . . . . . . . . . . . . 35
15.2 Resizing Partitions . . . . . . . . . . . . . . . . . . . . . . . . . . . . . . . . . . . . . . . . . 3515.2.1 Logical Volume Management . . . . . . . . . . . . . . . . . . . . . . . . . . . . . . . 35
15.3 Using ldapvi . . . . . . . . . . . . . . . . . . . . . . . . . . . . . . . . . . . . . . . . . . . . 3515.4 luma, an LDAP GUI . . . . . . . . . . . . . . . . . . . . . . . . . . . . . . . . . . . . . . . . 3615.5 Using volatile.debian.org . . . . . . . . . . . . . . . . . . . . . . . . . . . . . . . . . . . . . 36
15.5.1 What is debian-volatile? . . . . . . . . . . . . . . . . . . . . . . . . . . . . . . . . . 36
15.5.2 How to use volatile . . . . . . . . . . . . . . . . . . . . . . . . . . . . . . . . . . . . 3615.6 Using backports.debian.org to install newer software . . . . . . . . . . . . . . . . . . . . . 3615.7 Upgrading with a CD or DVD ROM . . . . . . . . . . . . . . . . . . . . . . . . . . . . . . . 3615.8 Java . . . . . . . . . . . . . . . . . . . . . . . . . . . . . . . . . . . . . . . . . . . . . . . . . . 37
iii
8/3/2019 Debian Edu Lenny Manual
http://slidepdf.com/reader/full/debian-edu-lenny-manual 4/64
CONTENTS CONTENTS
15.8.1 running standalone Java applications . . . . . . . . . . . . . . . . . . . . . . . . . . 3715.8.2 running Java applications in the webbrowser . . . . . . . . . . . . . . . . . . . . . 37
15.9 Creating folders in the home directories of all users . . . . . . . . . . . . . . . . . . . . . . 3715.10Easy access to USB drives and CDROMs/DVDs . . . . . . . . . . . . . . . . . . . . . . . . 37
15.10.1 A warning about removable media on LTSP servers . . . . . . . . . . . . . . . . . 3815.11Automatic cleanup of left-over processes . . . . . . . . . . . . . . . . . . . . . . . . . . . . 3815.12Automatic shutdown of machines during the night . . . . . . . . . . . . . . . . . . . . . . 38
15.12.1 How to set up shutdown-at-night . . . . . . . . . . . . . . . . . . . . . . . . . . . . 3915.13Access to skolelinux server from outside a rewall . . . . . . . . . . . . . . . . . . . . . . 3915.14Installing single service machines for spreading the load from main-server . . . . . . . . 3915.15Conguring the PXE menu . . . . . . . . . . . . . . . . . . . . . . . . . . . . . . . . . . . . 39
15.15.1 Conguring the PXE installation . . . . . . . . . . . . . . . . . . . . . . . . . . . . . 4015.16HowTos from wiki.debian.org . . . . . . . . . . . . . . . . . . . . . . . . . . . . . . . . . . 40
16 HowTos for the desktop 4016.1 KDE Kiosk mode . . . . . . . . . . . . . . . . . . . . . . . . . . . . . . . . . . . . . . . . . . 4016.2 Changing kioskmode on diskless workstations . . . . . . . . . . . . . . . . . . . . . . . . . 41
16.2.1 Disabling kioskmode . . . . . . . . . . . . . . . . . . . . . . . . . . . . . . . . . . . 41
16.3 Modifying the kdm login screen . . . . . . . . . . . . . . . . . . . . . . . . . . . . . . . . . 4116.4 Flash . . . . . . . . . . . . . . . . . . . . . . . . . . . . . . . . . . . . . . . . . . . . . . . . . 4116.4.1 Sound with Flash on thin clients . . . . . . . . . . . . . . . . . . . . . . . . . . . . . 41
16.5 Playing DVDs . . . . . . . . . . . . . . . . . . . . . . . . . . . . . . . . . . . . . . . . . . . . 4216.6 Using the multimedia repository . . . . . . . . . . . . . . . . . . . . . . . . . . . . . . . . . 4216.7 Handwriting fonts . . . . . . . . . . . . . . . . . . . . . . . . . . . . . . . . . . . . . . . . . 42
17 HowTos for networked clients 4217.1 Introduction to Thin clients and Diskless workstations . . . . . . . . . . . . . . . . . . . . 42
17.1.1 Machine type selection based on the network . . . . . . . . . . . . . . . . . . . . . 4217.1.2 Changing the PXE menu on an LTSP server . . . . . . . . . . . . . . . . . . . . . . 4317.1.3 Separate main- and LTSP servers . . . . . . . . . . . . . . . . . . . . . . . . . . . . 4317.1.4 How to extend the range of static IP addresses . . . . . . . . . . . . . . . . . . . . . 43
17.2 LTSP in detail . . . . . . . . . . . . . . . . . . . . . . . . . . . . . . . . . . . . . . . . . . . . 4417.2.1 lts.conf . . . . . . . . . . . . . . . . . . . . . . . . . . . . . . . . . . . . . . . . . . . . 4417.2.2 Load balancing LTSP servers . . . . . . . . . . . . . . . . . . . . . . . . . . . . . . . 44
17.2.2.1 Part 1 . . . . . . . . . . . . . . . . . . . . . . . . . . . . . . . . . . . . . . . 4417.2.2.2 Part 2 . . . . . . . . . . . . . . . . . . . . . . . . . . . . . . . . . . . . . . . 4417.2.2.3 Part 3 . . . . . . . . . . . . . . . . . . . . . . . . . . . . . . . . . . . . . . . 45
17.2.3 Sound with LTSP clients . . . . . . . . . . . . . . . . . . . . . . . . . . . . . . . . . 4517.2.4 Upgrading the LTSP environment . . . . . . . . . . . . . . . . . . . . . . . . . . . . 45
17.2.4.1 Installing additional software in the LTSP environment . . . . . . . . . . 4517.2.5 Slow login and security . . . . . . . . . . . . . . . . . . . . . . . . . . . . . . . . . . 46
17.3 Replacing LDM with KDM . . . . . . . . . . . . . . . . . . . . . . . . . . . . . . . . . . . . 4617.4 Connecting Windows machines to the network / Windows integration . . . . . . . . . . 46
17.4.1 Joining the domain . . . . . . . . . . . . . . . . . . . . . . . . . . . . . . . . . . . . . 4617.4.1.1 User groups in Windows . . . . . . . . . . . . . . . . . . . . . . . . . . . . 4717.4.2 XP home . . . . . . . . . . . . . . . . . . . . . . . . . . . . . . . . . . . . . . . . . . 4717.4.3 Managing roaming proles . . . . . . . . . . . . . . . . . . . . . . . . . . . . . . . . 47
17.4.3.1 Example smb.conf’s for roaming proles . . . . . . . . . . . . . . . . . . 4817.4.3.2 Using machine policies . . . . . . . . . . . . . . . . . . . . . . . . . . . . . 4817.4.3.3 Using global policies . . . . . . . . . . . . . . . . . . . . . . . . . . . . . . 4817.4.3.4 Editing Windows registry . . . . . . . . . . . . . . . . . . . . . . . . . . . 49
17.4.4 Redirecting parts of prole . . . . . . . . . . . . . . . . . . . . . . . . . . . . . . . . 4917.4.4.1 Using machine policies . . . . . . . . . . . . . . . . . . . . . . . . . . . . . 4917.4.4.2 Using global policies . . . . . . . . . . . . . . . . . . . . . . . . . . . . . . 49
17.4.5 Avoiding roaming proles . . . . . . . . . . . . . . . . . . . . . . . . . . . . . . . . 49
17.4.5.1 Using a local policy . . . . . . . . . . . . . . . . . . . . . . . . . . . . . . . 4917.4.5.2 Using global policies . . . . . . . . . . . . . . . . . . . . . . . . . . . . . . 4917.4.5.3 altering samba cong . . . . . . . . . . . . . . . . . . . . . . . . . . . . . . 50
17.5 Remote Desktops with RDP, VNC, NX or Citrix . . . . . . . . . . . . . . . . . . . . . . . . 50
iv
8/3/2019 Debian Edu Lenny Manual
http://slidepdf.com/reader/full/debian-edu-lenny-manual 5/64
CONTENTS CONTENTS
17.6 HowTos from wiki.debian.org . . . . . . . . . . . . . . . . . . . . . . . . . . . . . . . . . . 50
18 HowTos for teaching and learning 5018.1 Moodle . . . . . . . . . . . . . . . . . . . . . . . . . . . . . . . . . . . . . . . . . . . . . . . . 5018.2 Monitoring pupils . . . . . . . . . . . . . . . . . . . . . . . . . . . . . . . . . . . . . . . . . 5018.3 Restricting pupils network access . . . . . . . . . . . . . . . . . . . . . . . . . . . . . . . . 5118.4 Installing swi-prolog . . . . . . . . . . . . . . . . . . . . . . . . . . . . . . . . . . . . . . . . 5118.5 HowTos from wiki.debian.org . . . . . . . . . . . . . . . . . . . . . . . . . . . . . . . . . . 51
19 HowTos for users 5119.1 Changing passwords . . . . . . . . . . . . . . . . . . . . . . . . . . . . . . . . . . . . . . . . 5119.2 Changing the sound volume . . . . . . . . . . . . . . . . . . . . . . . . . . . . . . . . . . . 5119.3 Using email . . . . . . . . . . . . . . . . . . . . . . . . . . . . . . . . . . . . . . . . . . . . . 51
19.3.1 Conguring KMail as a mail client . . . . . . . . . . . . . . . . . . . . . . . . . . . . 51
20 Contribute 5220.1 Let us know you exist . . . . . . . . . . . . . . . . . . . . . . . . . . . . . . . . . . . . . . . 5220.2 Contribute locally . . . . . . . . . . . . . . . . . . . . . . . . . . . . . . . . . . . . . . . . . 5220.3 Contribute globally . . . . . . . . . . . . . . . . . . . . . . . . . . . . . . . . . . . . . . . . . 5220.4 Documentation writers and translators . . . . . . . . . . . . . . . . . . . . . . . . . . . . . 52
21 Support 5321.1 Volunteer based support . . . . . . . . . . . . . . . . . . . . . . . . . . . . . . . . . . . . . . 53
21.1.1 in English . . . . . . . . . . . . . . . . . . . . . . . . . . . . . . . . . . . . . . . . . . 5321.1.2 in Norwegian . . . . . . . . . . . . . . . . . . . . . . . . . . . . . . . . . . . . . . . . 5321.1.3 in German . . . . . . . . . . . . . . . . . . . . . . . . . . . . . . . . . . . . . . . . . . 5321.1.4 in French . . . . . . . . . . . . . . . . . . . . . . . . . . . . . . . . . . . . . . . . . . 5321.1.5 in Spanish . . . . . . . . . . . . . . . . . . . . . . . . . . . . . . . . . . . . . . . . . . 53
21.2 Professional support . . . . . . . . . . . . . . . . . . . . . . . . . . . . . . . . . . . . . . . . 53
22 Copyright and authors 53
23 Translation copyright and authors 54
24 Translations of this document 5424.1 HowTo translate this document . . . . . . . . . . . . . . . . . . . . . . . . . . . . . . . . . . 54
25 Appendix A - The GNU Public License 5525.1 Manual for Debian Edu 5.0.6+edu1 Codename "Lenny" . . . . . . . . . . . . . . . . . . . . 5525.2 GNU GENERAL PUBLIC LICENSE . . . . . . . . . . . . . . . . . . . . . . . . . . . . . . . 5525.3 TERMS AND CONDITIONS FOR COPYING, DISTRIBUTION AND MODIFICATION . 5525.4 END OF TERMS AND CONDITIONS . . . . . . . . . . . . . . . . . . . . . . . . . . . . . . 58
26 Appendix B - about Debian Edu Live CD/DVDs 5826.1 Features of the Standalone image . . . . . . . . . . . . . . . . . . . . . . . . . . . . . . . . . 5826.2 Activating translations and regional support . . . . . . . . . . . . . . . . . . . . . . . . . . 5826.3 Stuff to know . . . . . . . . . . . . . . . . . . . . . . . . . . . . . . . . . . . . . . . . . . . . 5826.4 Known issues with the image . . . . . . . . . . . . . . . . . . . . . . . . . . . . . . . . . . . 5826.5 Download . . . . . . . . . . . . . . . . . . . . . . . . . . . . . . . . . . . . . . . . . . . . . . 58
v

8/3/2019 Debian Edu Lenny Manual
http://slidepdf.com/reader/full/debian-edu-lenny-manual 6/64
8/3/2019 Debian Edu Lenny Manual
http://slidepdf.com/reader/full/debian-edu-lenny-manual 7/64
3 ARCHITECTURE
1 Manual for Debian Edu 5.0.6+edu1 Codename "Lenny"
This is the ( still incomplete) manual for the Debian Edu Lenny 5.0.6+edu1 release.This document was put into the debian-edu-doc package on 2010-11-19 .The version at http://wiki.debian.org/DebianEdu/Documentation/Lenny is a wiki and
updated frequently.Translations are part of the debian-edu-doc package, which can be installed on a webserver .
2 About Debian Edu and Skolelinux
Skolelinux is a Linux distribution made by the Debian Edu project. As a Debian Pure Blends distributionit is a ofcial Debian subproject.
What this means for your school is that Skolelinux is a version of Debian providing an out-of-the boxenvironment of a completely congured school-network.
In Norway, where Skolelinux was started, the main target group initially were schools serving the6-16 years age bracket. Today the system is in use in several countries around the world, with most
installations in Norway, Spain, Germany and France.
3 Architecture
This section of the document describes the network architecture and services provided by a Skolelinuxinstallation.
3.1 Network
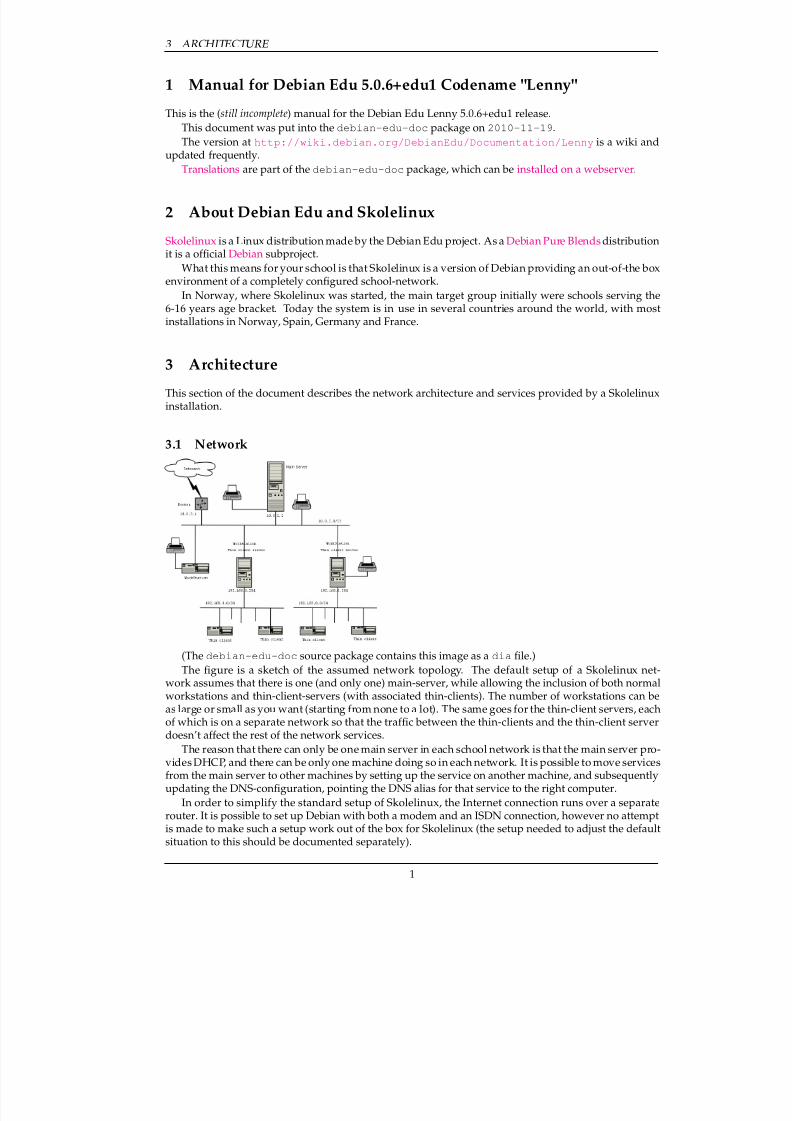
(The debian-edu-doc source package contains this image as a dia le.)The gure is a sketch of the assumed network topology. The default setup of a Skolelinux net-
work assumes that there is one (and only one) main-server, while allowing the inclusion of both normalworkstations and thin-client-servers (with associated thin-clients). The number of workstations can beas large or small as you want (starting from none to a lot). The same goes for the thin-client servers, eachof which is on a separate network so that the trafc between the thin-clients and the thin-client serverdoesn’t affect the rest of the network services.
The reason that there can only be one main server in each school network is that the main server pro-vides DHCP, and there can be only one machine doing so in each network. It is possible to move servicesfrom the main server to other machines by setting up the service on another machine, and subsequentlyupdating the DNS-conguration, pointing the DNS alias for that service to the right computer.
In order to simplify the standard setup of Skolelinux, the Internet connection runs over a separaterouter. It is possible to set up Debian with both a modem and an ISDN connection, however no attemptis made to make such a setup work out of the box for Skolelinux (the setup needed to adjust the defaultsituation to this should be documented separately).
1
8/3/2019 Debian Edu Lenny Manual
http://slidepdf.com/reader/full/debian-edu-lenny-manual 8/64
3 ARCHITECTURE 3.1 Network
3.1.1 Main server (tjener)
A Skolelinux network needs one main server (also called "tjener" which is Norwegian and means "server")which per default has the IP address 10.0.2.2 and is installed by selecting the main server prole. It’spossible (but not requiered) to also select and install the thin-client-server and workstation proles inaddition to the main server prole.
3.1.2 Services running on the main server
With the exception of the control of the thin-clients, all services are initially set up on one central com-puter (the main server). For performance reasons, the thin-client-server should be a separate machine(though it is possible to install both the main server and thin-client server proles on the same machine).All services are allocated a dedicated DNS-name and are offered exclusively over IPv4. The allocatedDNS name makes it easy to move individual services from the main-server to a different machine, bysimply stopping the service on the main-server, and changing the DNS conguration to point to the newlocation of the service (which should be setup on that machine rst of course).
To ensure security all connections where passwords are transmitted over the network are encrypted,so no passwords are send over the network as plain text.
Below is a list of the services that are set up by default in a Skolelinux network, with the DNS nameof each service given in square brackets. If possible all conguration les will refer to the service byname (without the domain name) thus making it easy for schools to change either their domain (if theyhave an own DNS domain) or the IP addresses they use.
• Centralized Logging [syslog]
• DNS (PowerDNS) [domain]
• Automatic Network Conguration of Machines (DHCP) [bootps]
• Clock Synchronization (NTP) [ntp]
• Home Directories via Network File System (SMB/NFS) [homes]
• Electronic Post Ofce [postofce]
• Directory Service (OpenLDAP) [ldap]
• User Administration (lwat)
• Web Server (Apache/PHP) [www]
• Central Backup (sl-backup, slbackup-php) [backup]
• Web Cache / Proxy (Squid) [webcache]
• Printing (CUPS) [ipp]
• Remote Login (OpenSSH) [ssh]• Automatic Conguration [cfengine]
• Thin Client Server/s (LTSP) [ltspserver\#]
• Machine and Service Surveillance with Error Reporting, plus Status and History on the Web. ErrorReporting by E-mail (munin,nagios and site-summary)
Each user stores his personal les in his home folder which is made available by the server. Homefolders are accessible from all machines, giving users access to the same les regardless of which ma-chine they are using. The server is operating system agnostic in offering access using NFS for UnixClients, SMB for Windows and Macintosh clients.
By default e-mail is set up for local delivery (i.e. within the school) only, though e-mail delivery tothe wider Internet may be set up if the school has a xed Internet-connection. Mailing lists are set up based on the user database, giving each class their own mailing list. Clients are set up to deliver mail tothe server (using ’smarthost’), and users can access their personal mail through either POP3 or IMAP.
2
8/3/2019 Debian Edu Lenny Manual
http://slidepdf.com/reader/full/debian-edu-lenny-manual 9/64
3 ARCHITECTURE 3.1 Network
All services are accessible using the same username and password, thanks to the central user databasefor authentication and authorization.
To increase performance on frequently accessed sites a web proxy that caches les locally (Squid) isused. In conjunction with blocking web-trafc in the router this also enables control of Internet accesson individual machines.
Network conguration on the clients is done automatically using DHCP. Normal clients are allocatedIP addresses in the private subnet 10.0.2.0/23, while thin clients are connected to the correspondingthin-client-server via the seperate subnet 192.168.0.0/24 (this to ensure that the network trafc of thethin clients doesn’t interfere with the rest of the network services).
Centralized logging is set up so that all machines send their syslog messages to the server. The syslogservice is set up so that it only accepts incoming messages from the local network.
By default the DNS server is set up with a domain for internal use only (*.intern), until a real ("exter-nal") DNS domain can be set up. The DNS server is set up as caching DNS server so that all machineson the network can use it as the main DNS Server.
Pupils and teachers have the possibility to publish websites. The web server provides mechanismsfor authenticating users, and for limiting access to individual pages and subdiretories to certain usersand groups. Users will have the possibility to create dynamic web pages, as the web server will be
programmable on the server side.Information on users and machines can be changed in one central location, and is made accessible toall computers on the network automatically. To achieve this a centralized directory server is set up. Thedirectory will have information on users, user groups, machines, and groups of machines. To avoid userconfusion there won’t be any difference between le groups, mailing lists, and network groups. Thisimplies that groups of machines which have to be network groups, have the same namespace as usergroups and mailing lists.
Administration of services and users will by and large be via web, and follow established standards,functioning well in the web browsers which are part of Skolelinux. The delegation of certain tasks toindividual users or user groups will be made possible by the administration systems.
In order to avoid certain problems with NFS, and to make it simpler to debug problems, time needsto be synchronized on the different machines. To achieve this the Skolelinux server is set up as a local
Network Time Protocol (NTP) server, and all workstations and clients are set up to synchronize theirclock with the server. The server itself should synchronize its clock via NTP against machines on theInternet, thus ensuring the whole network has the correct time.
Printers are connected where convenient, either directly onto the network, or connected to a server,workstation or thin-client-server. Access to printers can be controlled for individual users according tothe groups they belong to, this will be achieved by using quota and access control for printers.
3.1.3 LTSP server(s) (Thin client server(s))
A Skolelinux network can have many LTSP servers (also called thin client servers), which are installed by selecting the LTSP server prole.
The thin client servers are set up to receive syslog from the thin clients, and forward these messagesto the central syslog recipient.
3.1.4 Thin clients
A thin client setup enables a ordinary PC to function as an (X-)terminal. This means that this machine boots from a diskette or directly from the server using network-PROM (or PXE) without using the localclient hard drive. The thin client setup used is that of the Linux Terminal Server Project (LTSP).
Thin clients are a good way to make use of older, weaker machines as they effectively run all pro-grams on the LTSP-Server. This works as follows: The service uses DHCP and TFTP to connect to thenetwork and boot from the network. Next, the le system is mounted via NFS from the LTSP-server,
and nally X11 is started. The display manager (LDM) connects to the LTSP-Server via SSH with X-forwarding. That way all data is encrypted on the network. For very old thin clients which are to slowfor the encryption this can be set to the behaviour from former versions: use direct X connection viaXDMCP.
3
8/3/2019 Debian Edu Lenny Manual
http://slidepdf.com/reader/full/debian-edu-lenny-manual 10/64
3 ARCHITECTURE 3.2 Administration
3.1.5 Diskless workstations
For diskless workstations the terms "stateless workstations", "lowfat clients" or "half-thick clients" arealso used. For the sake of clarity this manual sticks to the term "diskless workstations".
A diskless workstation runs all software on the PC without a locally installed operating system. Thismeans that client machines boot direcly from the servers hard drive without running software installed
on a local hard drive.Diskless workstations are an exellent way of reusing newer hardware with the same low mainta-nence cost as with thin clients. Software is administered and maintained on the server with no need forlocal installed software on the clients. Home directories and system settings are stored on the server too.
Diskless workstations were introduced as part of the Linux Terminal Server Project (LTSP) withversion 5.0.
3.1.6 Networked clients
The term "networked clients" is used in this manual to refer to both thin clients and diskless workstationsas well as computers running MacOS or Windows.
3.2 AdministrationAll the linux machines that are installed by means of a Skolelinux CD or DVD will be administrablefrom a central computer, most likely the server. It will be possible to login to all machines by ssh, andthereby have full access to the machines
We use cfengine to edit conguration les. These les are updated from the server to the clients. Inorder to change the client conguration, it sufces to edit the server conguration and let the automata-tion distribute the changes.
All user information is kept in an LDAP directory. Updates of user accounts are made against thisdatabase and is used by the clients for user authentication.
3.3 Installation
Installation is possible either from a CD or DVD.The aim is to be able to install a server from CD/DVD, and install clients over the network by booting
all other machines from the network. The DVD installation works without access to the Internet.The installation should not ask any questions, with the exception of desired language (e.g. Norwe-
gian Bokmal, Nynorsk, Sami) and machine prole (server, workstation, thin client server). All otherconguration will be set up automatically with reasonable values, to be changed from a centrally loca-tion by the system administrator subsequent to the installation.
3.4 File system access conguration
Each Skolelinux user account is assigned a section of the le system on the le server. This section(home directory) contains the user’s conguration les, documents, email and web pages. Some of
the les should be set to have read access for other users on the system, some should be readable byeveryone on the internet, and some should not be accessible for reading by anyone but the user.
To ensure that all disks that are used for user directories or shared directories can be uniquely namedacross all the computers in the installation, they can be mounted as /skole/host/directory/ . Ini-tially, one directory is created on the le server, /skole/tjener/home0/ , in which all the user ac-counts are created. More directories may then be created when needed, to accomodate particular usergroups or particular patterns of usage.
To enable shared le access control using the le groups, each user must be assigned a primary groupwith no other members. The name of this private group should be identical to the username. ( More infoon private groups is available from Redhat.) This allows for all new les created by the user to be setwith full access for the le’s group. Together with set-gid bit on directories and inheritance of rights, thisenables controlled le sharing between the members of a le group. Therefore, the users’ umask should
be 00X. (If all users initially should be able to read newly created les, then X=2. If only the relevantgroup should be given initial read access then X=7.)The initial access settings for newly created les is a matter of policy. They may either be set to give
read access to everybody, which can later be removed by explicit user action, or they may be initially
4

8/3/2019 Debian Edu Lenny Manual
http://slidepdf.com/reader/full/debian-edu-lenny-manual 11/64
4 FEATURES 3.5 random notes
blocked, necessitating user action to make them accessible. The rst approach encourages knowledgesharing, and makes the system more transparent, whereas the second method decreases the risk of un-wanted spreading of sensitive information. The problem with the rst solution is that it is not apparentto the users that the material they create will be accessible to all other users. This is detectable onlyupon inspection of other users’ directories, where one can see that the les are readable. The problemwith the second solution is that few people are likely to make their les accessible, even if they do notcontain sensitive information and the content would be helpful to inquisitive users who want to learnhow others have solved particular problems (typically conguration issues).
Suggestion: The les are initially set to be readable by all, but particular directories are created inwhich the content is initially blocked. This will simplify deciding whether the le should be madereadable or not. Concretely, umask should be set to 002, and ~/ created with privileges 0775, ~/priv/given 0750,and ~/pub/ given 0775. Files that should not be readable by others should be put in ~/-priv/ , whereas public les will be put in ~/pub/ . Other les will initially be accessible, but may be blocked as needed.
ssh requires that the home directory can only be written to by the owner, thus the maximum accessprivilege for ~/ is 755.
• - access to home directories (*~/.)? - home directories - shared directories?
3.5 random notes
These are random notes concerning things which should be included in this document.
• Centralized user database with grouping and the ability to control which groups have access towhich machines.
• Grouping of machines and ability to control access to network services for these groups (access blocking to Internet via squid)
• Should consider using a DNS name from RFC 2606.
Thischapter was initially copied and pasted from http://developer.skolelinux.no/arkit ektur/arkitektur.html.en ( at that time it was Copyright © 2001, 2002, 2003, 2004 Petter Reinholdtsen <[email protected] >, released under the GPL) and has since then beed edited.
4 Features
4.1 New in Debian Edu 5.0.6+edu1 Codename "Lenny" released 2010-10-05
• Everything that is new in Debian 5.0.5 and 5.0.6, which includes support for some new hardware.5.0.5 and 5.0.6 are maintainance releases and generally don’t add new features.
• several bugxes, including xes for Skolelinux bugs #1436, #1427, #1441, #1413, #1450 and Debian bugs #585966, #585772, #585968, #586035 and #585966 plus several which were not led.
• Merge new web pages from Squeeze. The text is the same, but it provides new translation for zh,compete translations for all included langauges (de es fr it nb nl ru zh), and a rename of the .nopage to .nb to reect the langauge used.
• debian-edu-install: Slovak translation added, updates to German, Basque, Italian, Bokmal, Viet-namese and Chinese translations.
• debian-edu-doc: improvements to Italian, Bokmal and German translations as well as overall con-tent and layout.
• sitesummary: various improvements, most notably several nagios checks where added to monitorsystem health.
• shutdown-at-night: x #1435 (did not work with the LDAP host groups populated by lwat)
5
8/3/2019 Debian Edu Lenny Manual
http://slidepdf.com/reader/full/debian-edu-lenny-manual 12/64
4 FEATURES 4.2 New features in Debian Edu 5.0.4+edu0 . . .
4.2 New features in Debian Edu 5.0.4+edu0 Codename "Lenny" released 2010-02-08
• Everything that is new in Debian 5.0.4, see the following paragraph for details.
• More than 80 applications relevant for education are included based on user feedback and userstatistics (through Debian Edu popularity contest ). The full list of packages are listed in the task
overview page .
• Improved student desktop with educational software shortcuts to GCompris, Kalzium, KGeogra-phy, KMplot, KStars, Stopmotion and OpenOfce Write and Impress.
• Dynamic desktop icons and menu options that adjust based on user group.
• Gnome added as a supported desktop, see the Installation chapter to learn how to install withGNOME instead of KDE as desktop.
• Support for more than 50 languages.
• Improved system for user administration and machine identication.
• Improved diskless and thin client setup.
• New startup menu letting users choose diskless workstation, thin client or workstation.
• A diskless workstation option is installed but not activated by default on all servers with the thin-client-server prole.
• Main-server is set up as a PXE server for booting thin clients and diskless workstations and forinstalling to clients’ hard or ash drives.
• The conguration for DNS and DHCP is stored in LDAP and can be edited using lwat . The DNS
server has been switched from bind9 to power-dns .
• LDAP server for directory services (NSS) are now located using a SRV record in DNS insteadof hardcoding the ’ldap’ DNS name. LDAP server for password checks (PAM) is still using thehardcoded ’ldap’ DNS name.
• Multi arch (amd64/i386/powerpc) net installer CD.
– (Most) Packages are downloaded from over the Internet.
• Multi arch (amd64/i386) installer DVD capable of installing without network.
• PulseAudio is provided in addition to ALSA and OSS for sound on workstations and disklessworkstations machines.
• The Bareboneprole has been renamed to Minimal, to better reect what it is.
• The Nagios3 conguration is now automatically created by sitesummary.
• The per-user le ~/.xsession-errors is now truncated automatically when the user logs in toavoid lling up the home directory partition with a log that grows indenitely. The user can dis-able this by creating ~/.xsession-errors-enable . The system administrator can congurethe system to redirect the le to /dev/null by editing /etc/X11/Xsession.d/05debian-ed-u-truncate-xerrorlog .
• To ease installation of Debian Edu on hardware needing non-free rmware, the CD and DVDinclude the following rmware packages: rmware-bnx2, rmware-bnx2x, rmware-ipw2x00,rmware-iwlwi, rmware-qlogic and rmware-ralink.
6
8/3/2019 Debian Edu Lenny Manual
http://slidepdf.com/reader/full/debian-edu-lenny-manual 13/64
4 FEATURES 4.3 New features in Debian 5.0.4 upon which . . .
4.3 New features in Debian 5.0.4 upon which Debian Edu 5.0.4+edu0 is based• New Linux kernel 2.6.26 supports more hardware
• With this release, Debian GNU/Linux updates from X.Org 7.1 to X.Org 7.3 (which includes sup-port of newer hardware) and now includes the desktop environments KDE 3.5.10 and GNOME2.22. Updates of other desktop applications include Iceweasel (version 3.0.6, which is the un- branded Firefox web browser), Icedove (version 2.0.0.19, which is the unbranded Thunderbirdmail client) as well as upgrades to Evolution 2.22.3, OpenOfce .org 2.4.1, and Pidgin 2.4.3 (for-merly known as Gaim).
• Installation from CD/DVD from within Windows
• Switched from sysklogd to rsyslog as the syslog collector.
• For more information see the page New in Lenny on wiki.debian.org
4.4 New features in the "3.0r1 Terra" release 2007-12-05• Much improved documentation with updated translations to German, Norwegian Bokmal and
Italian
• Includes more than 40 bug xes, improvements and security updates that came to our attententionafter the 3.0r0 release
4.5 New features in the "3.0r0 Terra" release 2007-07-22• Based on Debian 4.0 Etch released 2007-04-08.
• Graphical installer with mouse support
• Boot splash with usplash
• LSB 3.1 compatible
• Linux kernel version 2.6.18
– Support for SATA controllers and hard disks
• X.org version 7.1.
• KDE desktop environment version 3.5.5
• OpenOfce.org version 2.0.
• LTSP5 (version 0.99debian12)
• Automatic tracking of installed machines using Sitesummary.
• Automatic conguration of munin using data from Sitesummary.
• Automatic version control of conguration les in /etc/ using svk.
• File systems sizes can be extended while the le system is mounted.
– Support automatically extending le system based on predened rules.
• Local Device Support on thin clients.
• New processor architectures: amd64 (fully supported) and powerpc (experimental support, instal-lation media only boots on the newworld subarchitecture)
• Multi-architecture DVD for i386, amd64 and powerpc• Regression: the CD-install requires Internet access during installation. Previous versions could be
installed from one CD without Internet access.
7
8/3/2019 Debian Edu Lenny Manual
http://slidepdf.com/reader/full/debian-edu-lenny-manual 14/64
5 REQUIREMENTS 4.6 Features in 2.0 release 2006-03-14
• Regression: webmin is now removed from Debian because of problems supporting it. We’veadded a new web based user administration tool named lwat , which doesn’t has the same func-tionality as wlus , the old user administration tool. But wlus requires webmin .
• Regression: swi-prolog is not part of etch, but was part of sarge. The HowTo teach and learnChapter describes how to install swi-prolog on etch.
4.6 Features in 2.0 release 2006-03-14• Based on Debian 3.1 Sarge released 2005-06-06.
• Linux kernel version 2.6.8.
• XFree86 version 4.3.
• KDE version 3.3.
• OpenOfce.org 1.1.
4.7 Features in "1.0 Venus" release 2004-06-20• Based on Debian 3.0 Woody released 2002-07-19.
• Linux kernel version 2.4.26.
• XFree86 version 4.1.
• KDE version 2.2.
4.8 More information on older releasesMore information on the older releases can be found at http://developer.skolelinux.no/info/cdbygging/news.html .
5 RequirementsThere are different ways of setting up a Skolelinux solution. It can be installed on just one standalonePC or a regional wide solution at many schools operated centrally. This variety of congurations makesa huge difference on how things are set up regarding network components, servers and client machines.
5.1 Hardware requirementsThe purpose of the different proles is explained in the network architecture chapter.
• The computers running Debian Edu / Skolelinux must have either i386, amd64 or powerpc pro-
cessors.– On powerpc, the installation media will only booton machines of the newworld sub-architecture,
which are the systems from Apple with a translucent case.
• Thin client servers need two network cards when using the default network architecture:
– eth0 is connected to the main network (10.0.2.0/23),– eth1 is used for serving the thin-clients (192.168.0.0/24) .– Consider 2 GB RAM for 30 clients and 4 GB RAM for 50-60 clients.
• Disk space requirements depend on proles used, but any disk larger than 10 GiB will be sufcientfor a workstation or standalone installation, 15 Gib for a thin-client server and at least 30 GiB on
the main server. As usual with disk space on a main-server: the bigger the better.• Thin clients can run on as low as 64 MiB RAM and 133 MHz processor, though 128 MiB RAM and
somewhat faster processors are recommended.
8
8/3/2019 Debian Edu Lenny Manual
http://slidepdf.com/reader/full/debian-edu-lenny-manual 15/64
6 REQUIREMENTS FOR A NETWORK SETUP 5.2 Hardware known to work
– For running Iceweasel/Firefox and OpenOfce.org, 128 MiB RAM is a minimum require-ment.
• For workstations, diskless workstations and standalone PCs 800 MHz, 256 MiB RAM are mini-mum requirements, though 512 or 1024 MiB RAM will perform considerable better. Just a fasterCPU will speed things up.
– Swapping over the network is automatically enabled, the swap size is 32 MiB, if you needmore you can tune this by editing /etc/ltsp/nbdswapd.conf on tjener to set the SIZE variable.Please tune up the swap sizeeither locally on the pc or on the server.
* If your diskless workstations have harddrives, it is recommended to use them for swapas it is a lot faster than network swapping.
– On workstations with little RAM the spell checker can cause OpenOfce.org to hang if theswap space is too small. Then the system administrator has to disable the spell checker onOpenOfce.org or students have to kill OpenOfce.org, resulting in loss of work. Enablingat least 512 MiB swap on a 256 MiB RAM workstation solves this, and the spell checker runssmoothly.
• Laptops have the same requirements as for workstations since they are just movable workstations.
5.2 Hardware known to work
A list of tested hardware is provided from http://wiki.debian.org/DebianEdu/Hardware/ .This list is not nearly complete :)
http://wiki.debian.org/InstallingDebianOn is an effort to document how to install, con-gure and use Debian on some specic hardware. Therefore potential buyers would know if that hard-ware is supported and owner would know how get the best out of that hardware.
An excellent database about hardware supported by Debian is online at http://kmuto.jp/debian /hcl/ .
6 Requirements for a network setup
6.1 Default SetupWhen using the default network architecture, these rules apply:
• you need exactly one main server, the tjener
• you can have up to 50 (diskless) workstations on the main network
• you can have up to 20 ltspservers on the main network
– you can have hundreds of thin clients and/or diskless workstations on each ltspserver net-work
• you can have hundreds of other machines which will have dynamic IP addresses assigned
• for having access to the internet you need a router/gateway (see below)
6.2 Internet routerA router/gateway, connected to the internet on the external interface and running on the IP address10.0.2.1 with netmask 255.255.254.0 on the internal interface, is needed to connect to the internet.
The router should not run a DHCP server, it can run a DNS server, though this is not needed and willnot be used. (If the router runs a DHCP server you must disable the DHCP server on the main server
and you will loose some features and certain documented procedures will work differently. So betterdisable the DHCP server on the router.)If you are looking for a i386 based solution (so that you can reuse an old PC), we recommend IPCop
or oppyfw .
9

8/3/2019 Debian Edu Lenny Manual
http://slidepdf.com/reader/full/debian-edu-lenny-manual 16/64
7 INSTALLATION
If you need something for an embedded router or accesspoint we recommend using OpenWRT ,though of course you can also use the original rmware. Using the original rmware is easier, usingOpenWRT gives you more choices and control. Check the OpenWRT webpages for a list of supportedhardware .
It is possible to use a different network setup, this is the documented procedure to do this. If youare not forced to do this by an existing network infrastructure, we recommend against doing so andrecommend you stay with the default network architecture .
7 Installation
7.1 Where to nd additional information
We recommend that you read or at least take a look at the release notes for Debian Lenny before youstart installing a system for production use. If you just want to give Debian Edu/Skolelinux a try, youdon’t have to though, it should just work. :-)
Even more information about the Debian Lenny release is available in its installation manual.
7.2 Download the installation media for Debian Edu 5.0.6+edu1 Codename "Lenny"
7.2.1 DVDs for i386, amd64 and powerpc
The multiarch DVD ISO image is 4.4 GiB large and can be used for installation of amd64 and i386machines. To download it, use any of these methods:
• ftp://ftp.skolelinux.org/skolelinux-cd/debian-edu-5.0.6+edu1-DVD.iso
http://ftp.skolelinux.org/skolelinux-cd/debian-edu-5.0.6+edu1-DVD.iso
rsync ftp.skolelinux.org::/skolelinux-cd/debian-edu-5.0.6+edu1-DVD.iso
The netinstall CD, which can be used for installation of i386, amd64 and powerpc machines, is avail-able via
• ftp://ftp.skolelinux.org/skolelinux-cd/debian-edu-5.0.6+edu1-CD.iso
http://ftp.skolelinux.org/skolelinux-cd/debian-edu-5.0.6+edu1-CD.iso
rsync ftp.skolelinux.org::skolelinux-cd/debian-edu-5.0.6+edu1-CD.iso
The powerpc port has not been tested as much as the other architectures, though it should work justne and has been reported to work. Still, we consider the port an experimental release of Debian Edu,which we might not be able to support as the other archs.
The Sources are available via
• ftp://ftp.skolelinux.org/skolelinux-cd/debian-edu-5.0.6+edu1-source-DVD-.iso
http://ftp.skolelinux.org/skolelinux-cd/debian-edu-5.0.6+edu1-source-DV-D.iso
rsync ftp.skolelinux.org::skolelinux-cd/debian-edu-5.0.6+edu1-source-DV-D.iso
7.3 Request a CD/DVD by mail
For those without a fast internet connection, we offer to send you a CD or DVD for the cost of the CDor DVD and shipping. Just send an email to [email protected] and we will discuss the payment details(for shipping and media) :) Remember to include the address you want the CD or DVD to be sent to inthe email.
10
8/3/2019 Debian Edu Lenny Manual
http://slidepdf.com/reader/full/debian-edu-lenny-manual 17/64
7 INSTALLATION 7.4 Installing Debian Edu
7.4 Installing Debian Edu7.4.1 The installation process
When you do a Debian Edu installation, you have a few options to choose. Don’t be afraid; there aren’tmany. We have done a good job hiding the complexity of Debian during the installation and beyond.However, Debian Edu is Debian, and if you want there are more than 15000 packages to choose fromand a billion conguration options. For the majority of our users, our defaults should be ne.
• Select type of installation
– Install is the default text mode installation on i386 and amd64.– 64 bit install does an amd64 text-mode install.– Select Graphical install to have the GTK installer where you can use the mouse.– Select 64 bit graphical install to have the amd64 GTK installer where you can use
the mouse.– The debian-edu-expert boot-option adds the minimal prole to the prole options, and
switches to manual partitioning.– Further notes:
* On i386/amd64 boot-options can be edited by pressing the tabulator-key in the boot menu.
* The powerpc installer does neither support the graphical installation nor the boot menuthat i386 and amd64 have.
* On powerpc, enter install debian-edu-expert at the yaboot prompt to enter ex-pert mode.
* If you want to boot the amd64 text mode with the multiarch DVD it would be amd64--install .
* Likewise you can choose amd64-expertgui to get the GUI version on amd64.
* If you want to boot the i386 mode with the multiarch DVD on an amd64 machine youneed to manually select install (text mode) or expertgui (graphical mode).
* The multiarch DVD defaults to use amd64-installgui on x86 64-bits machines, and install-gui on x86 32-bits machines.
* If you have already installed the mainserver prole on a machine, you can use its httpproxy service to speed up the following installations from CD. Add d-i mirror/htt-p/proxy string http://10.0.2.2:3128/ as additional boot-option.
* to install the GNOME desktop instead of the KDE desktop, add desktop=gnome to thekernel boot params.
• Choose a language (for the installation and the installed system)
• Choose a time-zone
• Choose a keyboard keymap (usually the countrys default is ne)• Choose a prole :
– Main-Server
* This is the main server (tjener) for your school providing the following services: le,print, intranet, proxy, DNS, DHCP, LDAP, backup, nagios, sitesummary, and munin. Allservices are pre-congured to work out of the box. You must only install one main serverper school! This prole does not include a graphical user interface. If you want a graphi-cal user interface, then select Workstation or Thin-Client-Server in addition to this one.
– Workstation
* A computer booting from its local hard drive, and running all software and devices lo-cally like an ordinary computer, but the user login is authenticated by the main server,where the user’s les and desktop prole are stored.
– Thin-Client-Server
11
8/3/2019 Debian Edu Lenny Manual
http://slidepdf.com/reader/full/debian-edu-lenny-manual 18/64
7 INSTALLATION 7.4 Installing Debian Edu
* Thin client (and diskless workstation) server, also called LTSP server. Clients withouthard drives boot and run software from this server. This computer needs two networkcards, a lot of memory, and ideally more than one processor or core. See the chapterabout networked clients for more information on this subject. Chosing this prole alsoenables the workstation prole (even if it is not selected), a thin client server can always be used as a workstation, too.
– Standalone
* An ordinary computer that can function without a main server, ie. doesn’t need to be onthe network. Includes laptops.
– Minimal
* This prole is only available when using the ’debian-edu-expert’ boot option. It willinstall the base packages and congure the machine to integrate into the Debian Edunetwork, but without any services and applications. It is useful as a platform for singleservices manually moved out from the main-server.
The rst 3 proles can all be installed on the same machine. That means the main server can be athin client server and also used as a workstation.
• Say yes or no to automatic partitioning
– Be aware that saying yes will destroy all data on the harddrives! Saying no on the other handwill require more work and one will need to make sure that the required partitions are createdand are big enough.
• Please say yes to submit information to http://popcon.skolelinux.org/ to allow us toknow which packages are popular and should be kept for future releases. Though you don’thave to, it is a simple way for you to help. :)
• Wait
– if thin client server is among the selected proles, then the installer will spent quite some timeat the end, "Finishing the installation - Running debian-edu-prole-udeb..."
• Be happy
7.4.2 A note on manual partitioning
As a general advice: if you choose manual paritioning and your system fails to boot, try automaticpartitioning rst.
If you decide to do manual partitioning for the main-server, you should consider this:
• Make sure the directory /skole/tjener/home0 exists, usually you will also be mounting a par-tition there. If you don’t create that directory you will only be able to login as root. The reason is
that the user creation system require this directory to exist to be able to create users home directo-ries, and without a users home directory the user can not log in.
• If /var/spool/squid is on a seperate partition, 3GiB free space is a good recommendation.Squids cache size will be set to 80% of the partition size.
• /boot should have its own partition.
7.4.3 A note on notebooks
In principal it makes sense either to install notebooks with the workstation or with the standalone pro-le. Keep in mind that the workstation prole uses LDAP for the user accounts and NFS for the homedirectories, so those workstations will only work while in the network where they can access the server.
If you plan to use your laptop at home or on the road, then choose the standalone prole.It is possible to recongure workstations to cache authentication information and sync the home di-rectories to local disk (and resync to the server when in the network) with unison , but there is currentlyno howto available for this.
12
8/3/2019 Debian Edu Lenny Manual
http://slidepdf.com/reader/full/debian-edu-lenny-manual 19/64
7 INSTALLATION 7.4 Installing Debian Edu
7.4.4 A note on DVD installs
If you install from a DVD, /etc/apt/sources.list it will only contain sources from the DVD after-wards. If you have an internet connection we strongly suggest adding the following lines to it so thatavailable (security) updates can be installed:
deb http://ftp.debian.org/debian/ lenny maindeb http://security.debian.org/ lenny/updates maindeb http://ftp.skolelinux.org/skolelinux lenny local
7.4.5 A note on CD installs
The netinst installation (which is the type of installation our CD provides) will fetch some packagesfrom the CD and the rest from the net. The amount of packages fetched from the net varies from proleto prole:
• Main server: 8 of 115 MiB downloaded.
• Main server and Thin client server: 618 of 1082 MiB downloaded.• Main server and Workstation: 618 of 1081 MiB downloaded.
• Thin client server: 618 of 1052 MiB downloaded.
• Workstation: 618 of 1051 MiB downloaded.
• Standalone: 618 of 1020 MiB downloaded.
• Minimal: 12 of 83 MiB downloaded.
7.4.6 A note on some RAID controllers
When using a USB drive to add missing rmware during install, with some RAID-controllers GRUBis installed to the USB drive. So a reboot after installation results in a GRUB-error. A workaround forthis problem is to remove the USB drive after the rmware is loaded, and preferably before partitioningstarts.
More information is available in Debian-Edu bug #1395 and Debian bug 516280.
7.4.7 A note on thin-client-server installations
First of all, this prole name is confusing due to historic reasons: the prole actually installs a LTSPserver environment for thin-clients and for workstations. So for the next release of Debian Edu thename of this prole will be changed.
By providing the kernel argument edu-skip-ltsp-make-client it is possible to skip the stepwhich converts the LTSP chroot from a thin-client chroot into a combined thin-client/diskless worksta-tion chroot.
This is useful in certain situations, e.g. if one wants a pure thin client chroot or if there is already adiskless chroot on another server, which can be rsynced. For these situations skipping this step will cutdown the installation time considerably.
Except for the longer installation time there is no harm creating combined chroots always and this iswhy this is done by default.
7.4.8 Custom CD/DVDs
Creating custom CDs or DVDs is possibly quite easy since we use the debian installer , which has amodular design and other nice features. Preseeding allows you to dene answers to the questionsnormally asked.
So all you need to do is to create a preseeding le with your answers (this is described in the appendixof the debian installer manual) and remaster the CD/DVD .
13

8/3/2019 Debian Edu Lenny Manual
http://slidepdf.com/reader/full/debian-edu-lenny-manual 20/64
7 INSTALLATION 7.4 Installing Debian Edu
7.4.9 Installation over the network (PXE) and booting diskless clients
For this installation method it is required that you have a running main server. When clients boot viathe main network, a new PXE menu with installer and boot selection options is displayed.
This is how the PXE menu looks like with the Main-Server prole only:
This is how the PXE menu looks like with the Main-Server and Thin-Client-Server prole:
This setup also allows to boot diskless workstations and thin clients on the main network. Disklessworkstations must be added with LWAT just like normal workstations or thin client servers.
More information about network clients can be found in the Network clients HowTo chapter.
7.4.9.1 Modifying PXE installations The PXE installation is using a debian-installer preseed le,and this le can be modied to ask for more packages to install.
A line like the following needs to be added to tjener:/etc/debian-edu/www/debian-edu--install.dat
d-i pkgsel/include string my-extra-package(s)
The PXE installation uses the les /var/lib/tftpboot/debian-edu/install.cfg and thepreseeding le in /etc/debian-edu/www/debian-edu-install.dat . These les can be changedto adjust the preseeding used during installation, i.e. to avoid more questions when installing overthe net. Another possibility to achieve the same is to provide extra settings in /etc/debian-edu-/pxeinstall.conf and /etc/debian-edu/www/debian-edu-install.dat.local and to run/usr/sbin/debian-edu-pxeinstall to update the generated les.
Further information can be found in the manual of the Debian Installer .To disable or change the use of the proxy when installing via PXE, the lines containing mirror/ht-
tp/proxy , mirror/ftp/proxy and preseed/early_command in tjener:/etc/debian-edu/-www/debian-edu-install.dat need to be changed. To disable the use of a proxy when installing,
put ’#’ in front of the rst two lines, and remove the "export xhttp_proxy="http://webcache:-
3128"; " part from the last one.Some settings can not be preseeded because they are needed before the preseeding le is down-
loaded. These are congured in the pxelinux based boot arguments available from /var/lib/tft-
14
8/3/2019 Debian Edu Lenny Manual
http://slidepdf.com/reader/full/debian-edu-lenny-manual 21/64
7 INSTALLATION 7.5 Screenshot tour
proot/debian-edu/install.cfg . Language, keyboard layout and desktop are examples of suchsettings.
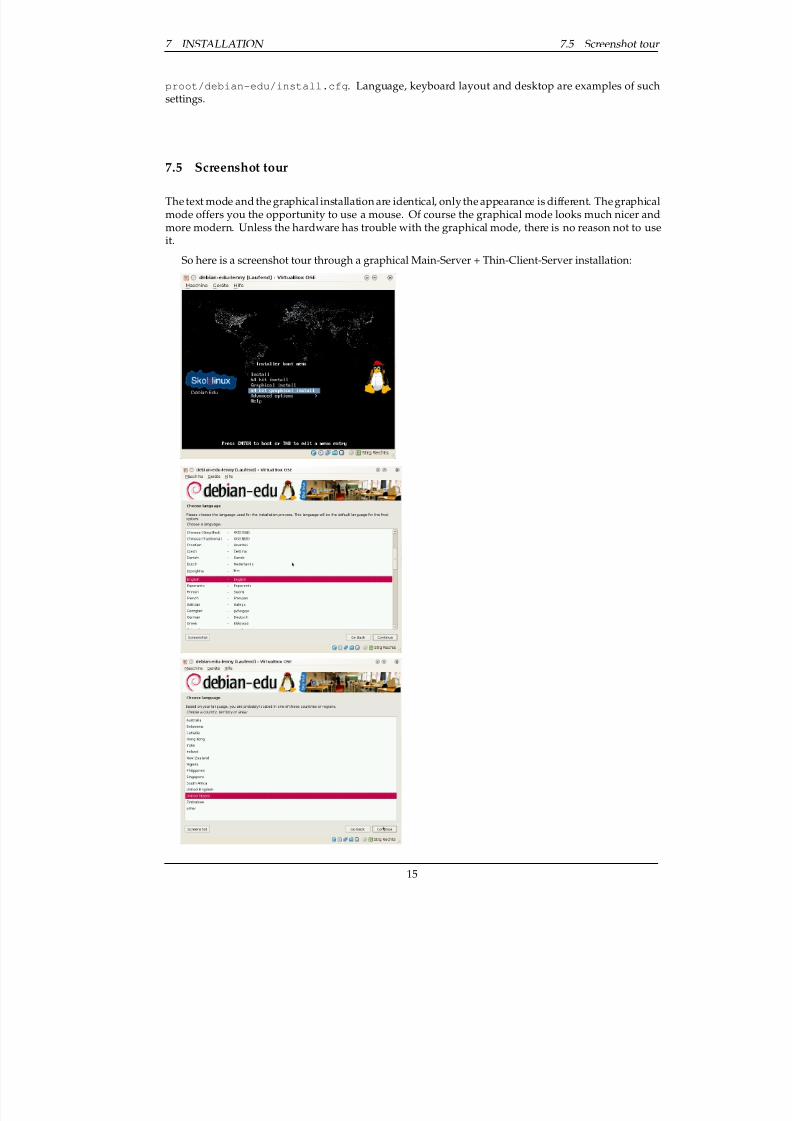
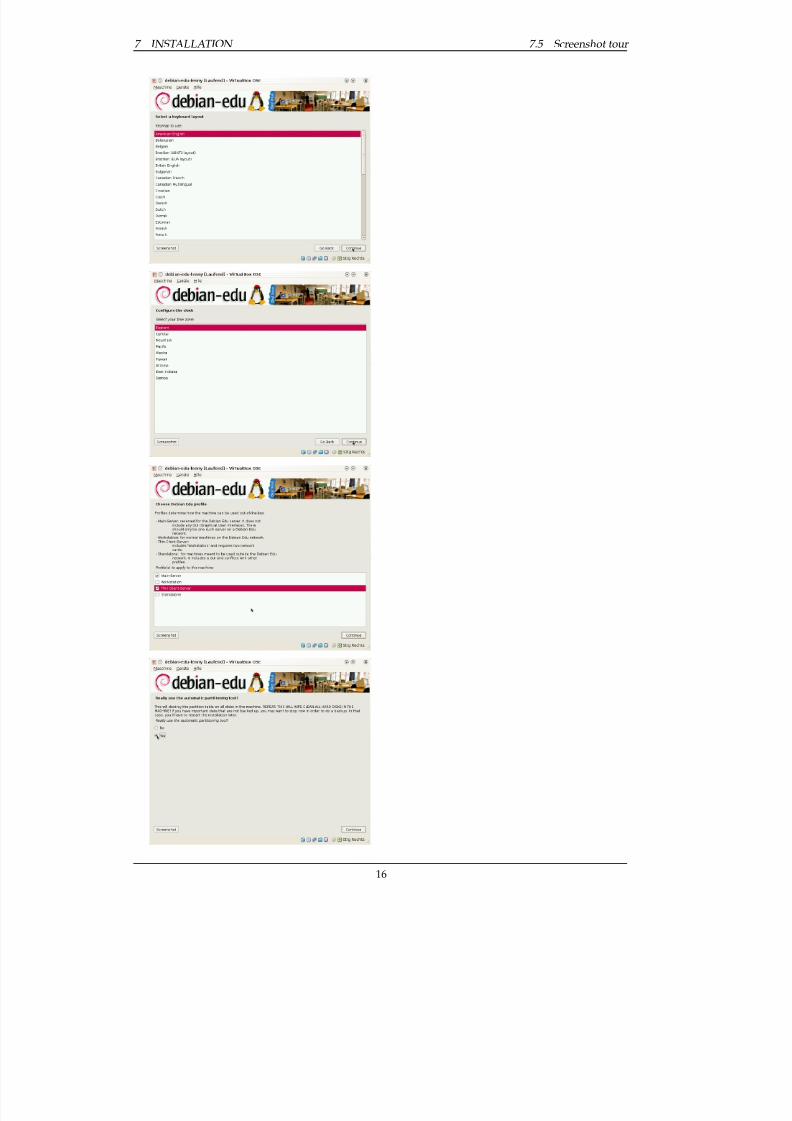
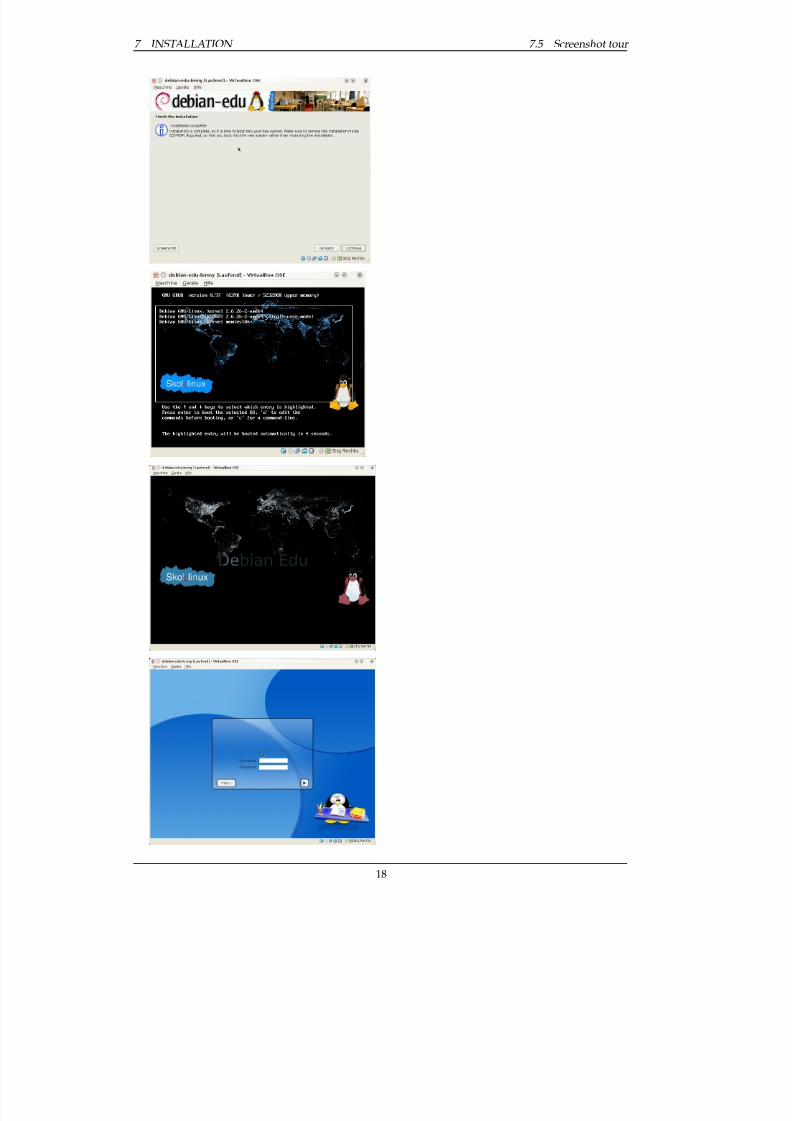
7.5 Screenshot tour
The text mode and the graphical installation are identical, only the appearance is different. The graphicalmode offers you the opportunity to use a mouse. Of course the graphical mode looks much nicer andmore modern. Unless the hardware has trouble with the graphical mode, there is no reason not to useit.
So here is a screenshot tour through a graphical Main-Server + Thin-Client-Server installation:
15
8/3/2019 Debian Edu Lenny Manual
http://slidepdf.com/reader/full/debian-edu-lenny-manual 22/64
7 INSTALLATION 7.5 Screenshot tour
16

8/3/2019 Debian Edu Lenny Manual
http://slidepdf.com/reader/full/debian-edu-lenny-manual 23/64
7 INSTALLATION 7.5 Screenshot tour
17
8/3/2019 Debian Edu Lenny Manual
http://slidepdf.com/reader/full/debian-edu-lenny-manual 24/64
7 INSTALLATION 7.5 Screenshot tour
18
8/3/2019 Debian Edu Lenny Manual
http://slidepdf.com/reader/full/debian-edu-lenny-manual 25/64
9 SERVICES RUNNING ON THE MAIN . . .
8 Getting started
8.1 Minimum steps to get started
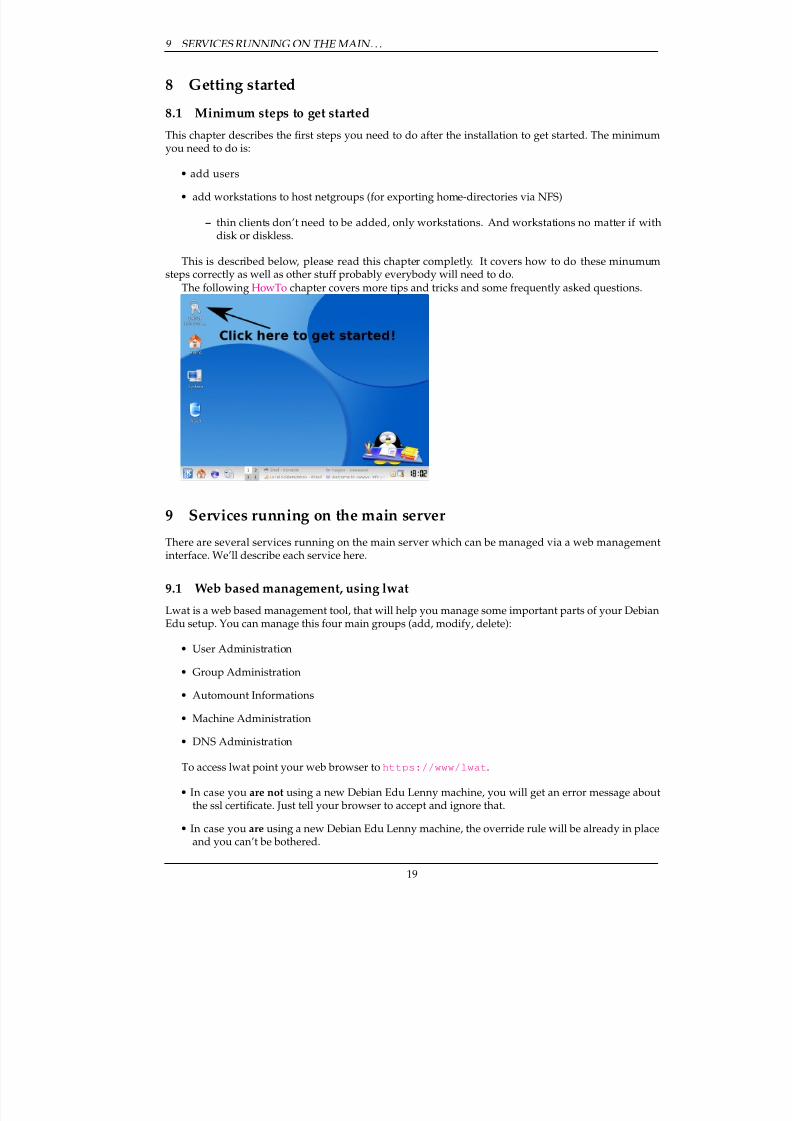
This chapter describes the rst steps you need to do after the installation to get started. The minimumyou need to do is:
• add users
• add workstations to host netgroups (for exporting home-directories via NFS)
– thin clients don’t need to be added, only workstations. And workstations no matter if withdisk or diskless.
This is described below, please read this chapter completly. It covers how to do these minumumsteps correctly as well as other stuff probably everybody will need to do.
The following HowTo chapter covers more tips and tricks and some frequently asked questions.
9 Services running on the main server
There are several services running on the main server which can be managed via a web managementinterface. We’ll describe each service here.
9.1 Web based management, using lwat
Lwat is a web based management tool, that will help you manage some important parts of your DebianEdu setup. You can manage this four main groups (add, modify, delete):
• User Administration
• Group Administration
• Automount Informations
• Machine Administration
• DNS Administration
To access lwat point your web browser to https://www/lwat .
• In case you are not using a new Debian Edu Lenny machine, you will get an error message about
the ssl certicate. Just tell your browser to accept and ignore that.• In case you are using a new Debian Edu Lenny machine, the override rule will be already in place
and you can’t be bothered.
19
8/3/2019 Debian Edu Lenny Manual
http://slidepdf.com/reader/full/debian-edu-lenny-manual 26/64
9 SERVICES RUNNING ON THE MAIN . . . 9.2 User Management with lwat
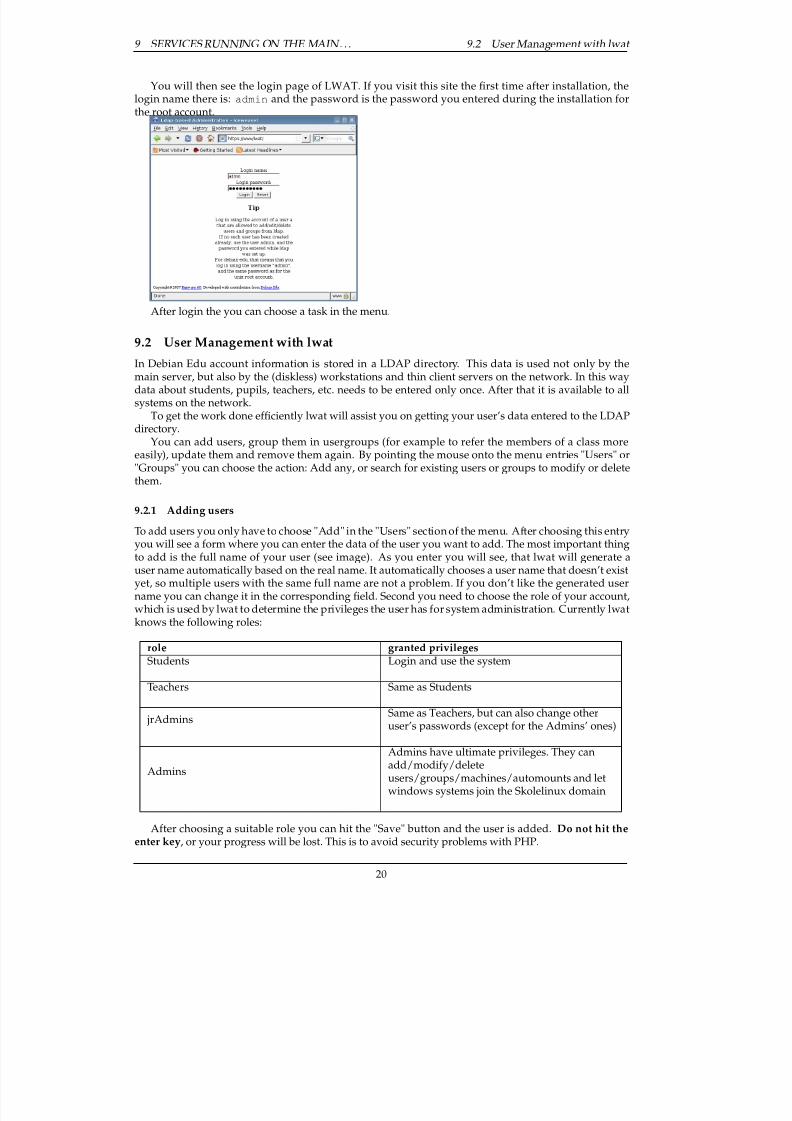
You will then see the login page of LWAT. If you visit this site the rst time after installation, thelogin name there is: admin and the password is the password you entered during the installation forthe root account.
After login the you can choose a task in the menu.
9.2 User Management with lwatIn Debian Edu account information is stored in a LDAP directory. This data is used not only by themain server, but also by the (diskless) workstations and thin client servers on the network. In this waydata about students, pupils, teachers, etc. needs to be entered only once. After that it is available to allsystems on the network.
To get the work done efciently lwat will assist you on getting your user’s data entered to the LDAPdirectory.
You can add users, group them in usergroups (for example to refer the members of a class moreeasily), update them and remove them again. By pointing the mouse onto the menu entries "Users" or"Groups" you can choose the action: Add any, or search for existing users or groups to modify or delete
them.
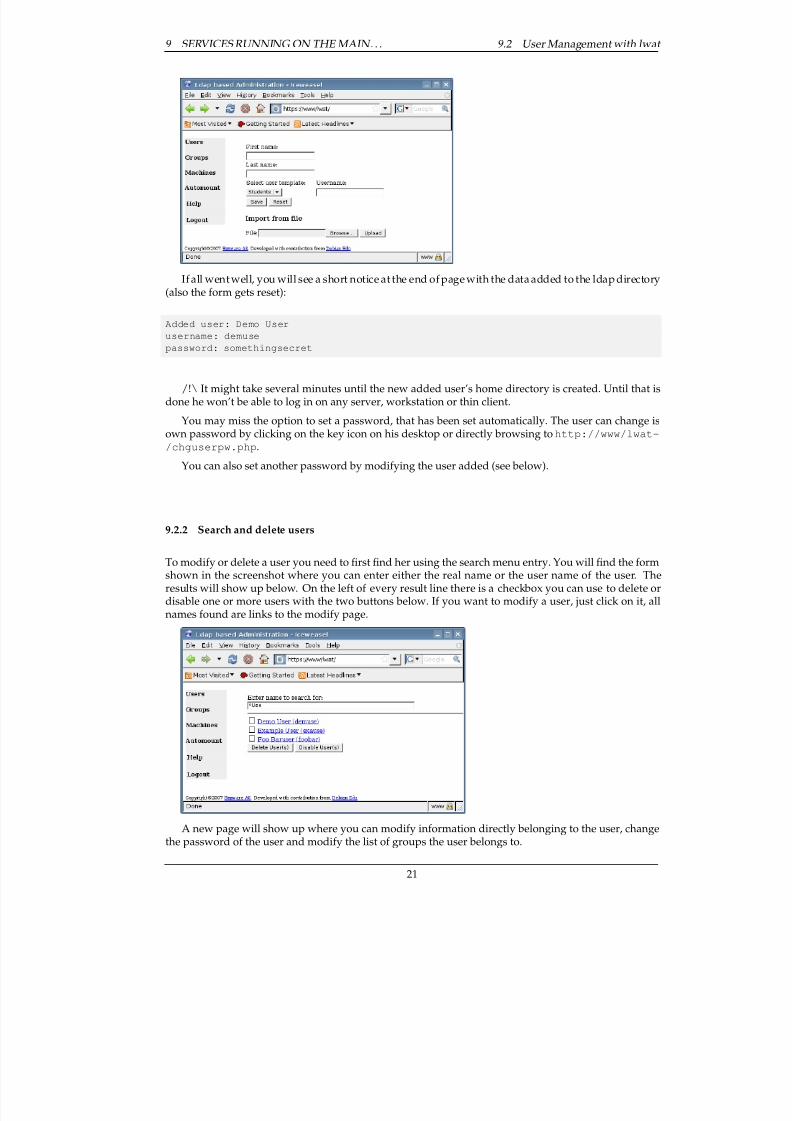
9.2.1 Adding users
To add users you only have to choose "Add" in the "Users" section of the menu. After choosing this entryyou will see a form where you can enter the data of the user you want to add. The most important thingto add is the full name of your user (see image). As you enter you will see, that lwat will generate auser name automatically based on the real name. It automatically chooses a user name that doesn’t existyet, so multiple users with the same full name are not a problem. If you don’t like the generated username you can change it in the corresponding eld. Second you need to choose the role of your account,which is used by lwat to determine the privileges the user has for system administration. Currently lwatknows the following roles:
role granted privilegesStudents Login and use the system
Teachers Same as Students
jrAdmins Same as Teachers, but can also change otheruser’s passwords (except for the Admins’ ones)
Admins
Admins have ultimate privileges. They canadd/modify/deleteusers/groups/machines/automounts and letwindows systems join the Skolelinux domain
After choosing a suitable role you can hit the "Save" button and the user is added. Do not hit theenter key , or your progress will be lost. This is to avoid security problems with PHP.
20
8/3/2019 Debian Edu Lenny Manual
http://slidepdf.com/reader/full/debian-edu-lenny-manual 27/64
9 SERVICES RUNNING ON THE MAIN . . . 9.2 User Management with lwat
If all went well, you will see a short notice at the end of page with the data added to the ldap directory(also the form gets reset):
Added user: Demo Userusername: demusepassword: somethingsecret
/!\ It might take several minutes until the new added user’s home directory is created. Until that isdone he won’t be able to log in on any server, workstation or thin client.
You may miss the option to set a password, that has been set automatically. The user can change isown password by clicking on the key icon on his desktop or directly browsing to http://www/lwat-/chguserpw.php .
You can also set another password by modifying the user added (see below).
9.2.2 Search and delete users
To modify or delete a user you need to rst nd her using the search menu entry. You will nd the formshown in the screenshot where you can enter either the real name or the user name of the user. Theresults will show up below. On the left of every result line there is a checkbox you can use to delete ordisable one or more users with the two buttons below. If you want to modify a user, just click on it, allnames found are links to the modify page.
A new page will show up where you can modify information directly belonging to the user, changethe password of the user and modify the list of groups the user belongs to.
21

8/3/2019 Debian Edu Lenny Manual
http://slidepdf.com/reader/full/debian-edu-lenny-manual 28/64
9 SERVICES RUNNING ON THE MAIN . . . 9.2 User Management with lwat
9.2.3 Set passwords
To set a new password for a user
• search the user to be modied like explained above and click on the username once found.
• click on the button New password
• on the following page, you can set a new random generated password.
• note that by default it is not possible to set a self-chosen password, as the corresponding eld isnot writable
To allow setting self-chosen passwords you need to edit /etc/lwat/cong.php on the tjener:
• Execute nano /etc/lwat/config.php
• Change $allowPwSet = false ; to $allowPwSet = true ;
• Press CTRL+X
• Press Y
• Press Enter
You can now set any password you like, as long as it is at least 5 digits long. Beware of securityimplications due to easy to guess passwords!
22
8/3/2019 Debian Edu Lenny Manual
http://slidepdf.com/reader/full/debian-edu-lenny-manual 29/64
9 SERVICES RUNNING ON THE MAIN . . . 9.3 Group Management with lwat
9.2.4 Advanced user management
It is possible to mass-create users with lwat by using a .csv le, which can be created with any goodspreadsheet software (for example oocalc ).
The import script expects a le formated with all data for one user on one row, with each eldseparated with a semicolon. The minimum information needed is the full name of the user. If fullname
is not given, the script expects to have both rstname and lastname. The maximum information itexpects is "User template; Fullname; Username; Password; Additional group membership".If a password column is missing, an easy to remember, pronounceable password will be created.If users are put into groups, these groups have to exist, so you need to create them manually (with
lwat, see below) before importing the users.It’s a good idea to do some tests rst, best with a .csv le with a few ctional users, which can be
deleted later.
9.3 Group Management with lwatThe mangement of groups is very similar to the management of users. You can enter a name and adescription per group. When searching for groups you can also delete or disable all users of the groupsfound. From the modication page you can access all the users of that group.
The groups entered in the group management are also regular unix groups, so you can use them forle permissions too.
9.4 Group Management on the command lineHere’s how:# List existing group mapping between UNIX and Windows groups.net groupmap list
# Add your new or otherwise missing groups:net groupmap add unixgroup=NEW_GROUP type=domain ntgroup="NEW_GROUP"\
comment="DESCRIPTION OF NEW GROUP"
This is explained in more detail in the HowTo/NetworkClients chapter of this manual.
9.4.1 Advanced group management
Using lwat it’s easy to put users in a specic group (for example named after the year they enter or nishschool) and to create all their home directories in a dedicated directory.
To achieve that, add a stanza like the following to the le /etc/lwat/admin.ini :[2009]ou = "ou=People,%base%"objectClass = top posixAccount shadowAccount imapUser sambaSamAccounthomeDirectory = /skole/tjener/home0/2009/%username%groups = none students 2009loginShell = /bin/bashmailMessageStore = /var/lib/maildirs/%username%
To make this work, the 2009 group has to be created before adding the users.The above stanza simply adds them on top off home0. If you want them somewhere else, using
another automount, then you use lwat to add that automount, and change the homeDirectory string inadmini.ini correspondingly.
9.5 Machine Management with lwatWith the machine management you can basically manage all IP based devices in your Debian Edu net-work. Every machine added to the LDAP directory using lwat has a hostname, an IP-address, a MAC-address and a domain name which usually is "intern". For a more verbose description about the Debian
Edu architecture see the architecture chapter of this manual.If you add a machine, you can use an ip/hostname from the precongured address space. Thefollowing ip ranges are predened:
23
8/3/2019 Debian Edu Lenny Manual
http://slidepdf.com/reader/full/debian-edu-lenny-manual 30/64
9 SERVICES RUNNING ON THE MAIN . . . 9.5 Machine Management with lwat
First address Last address hostname10.0.2.10 10.0.2.29 ltspserver xx
10.0.2.30 10.0.2.49 printer xx
10.0.2.50 10.0.2.99 static xx
The addresses from 10.0.2.100 till 10.0.2.255 and 10.0.3.0 till 10.0.3.243 are reserved for dhcp and areassigned dynamically.
To assign a host with the MAC-address 52:54:00:12:34:10 a static IP-address you only have to enterthe MAC-address and the hostname static00, the remaining elds will be lled automatically accordingto the predened conguration:
9.5.1 Search and delete machines
Searching for and deleting machines is quite similar to searching and deleting users, so that informationis not repeated here.
9.5.2 Modify existing machines / Netgroup management
After adding a machine to the ldap tree using lwat, you can modify its properties using the searchfunctionality and clicking on the machine (as you would with users).
The form that is behind these machine links is in one way similar to the one you already know frommodifying user entries, but in an other way the informations do mean different things in this context.
For example, adding a machine to aNetGroup
does not modify the permissions that machine orthe users logged into that machine have on accessing les or programs on the server. But it restricts theservices that machine can use on your main-server.
The default installation provides the NetGroups
24
8/3/2019 Debian Edu Lenny Manual
http://slidepdf.com/reader/full/debian-edu-lenny-manual 31/64
9 SERVICES RUNNING ON THE MAIN . . . 9.6 Printer Managment
• printer-hosts
• workstation-hosts
• ltsp-server-hosts
• server-hosts
• shutdown-at-night-hosts
• fs-autoresize-hosts
Currently the NetGroup functionality is used for
• NFS.
– The home directories are exported by the main-server to be mounted by the workstationsand the ltsp-servers. Because of security reasons only hosts within the workstation-hosts,ltsp-server-hosts and server-hosts NetGroups can mount the exported NFS shares. So it israther important to remember to congure this kinds of machines properly in the ldap tree
using lwat and conguring them to use the static IPs from ldap. /!\ Remember to congureworkstations and ldap-servers properly with lwat, or your users won’t be able to access theirhome directories.
• fs-autoresize
– debian edu machines in this group will automatically resize lvm partitions that run out of space
• shutdown at night
– debian edu machines in this group will automatically shutdown at night to save energy
Another important part of the machine conguration is the ’Samba host’ ag (in the ’Host infor-mation’ area). If you plan to add existing Windows systems to the Skolelinux Samba domain, youhave to add the Windows host to the ldap tree and set this ag to be able to join the Windows hostto the domain. For more information about adding Windows hosts to the Skolelinux network see theHowTo/NetworkClients chapter of this manual.
9.5.3 More lwat documentation
The full documentation for lwat can be found at /usr/share/doc/lwat/ on the main server or online .
9.6 Printer ManagmentFor Printer Management point your web browser to https://www:631 This is the normal cups man-
agement site where you can add/delete/modify your printers and can clean up the printing queue.Changes that require to login as root need ssl encryption.
If you connect the printer for the rst time, we suggest to run printconf as root. FIXME: explainwhat to do when printconf does not accomplish anything.
9.7 Clock synchronizationThe default conguration in Debian Edu is to keep the clocks on all machines synchronous but notnecessarily correct. NTP is used to update the time. The clocks will not be synchronized with an externalsource by default, to make sure the machines to not use external network connections active all the time.This was congured like this after a school discovered their ISDN network was up all the time, givingthem a nasty extra phone bill.
To enable synchronization with an external clock, the le /etc/ntp.conf on the main-server need to be modied. The comments in front of the server entries need to be removed. After this, the ntp serverneed to be restarted by running /etc/init.d/ntp restart as root. To test if the server is using theexternal clock sources, run ntpq -c lpeer .
25

8/3/2019 Debian Edu Lenny Manual
http://slidepdf.com/reader/full/debian-edu-lenny-manual 32/64
10 MAINTAINANCE 9.8 Extending full partitions
9.8 Extending full partitions
Because of a possible bug with automatic partitioning, some partitions might be too full after instal-lation. To extend these partitions, run debian-edu-fsautoresize -n as root. See the "ResizingPartitions" HowTo in the administration HowTo chapter for more information.
10 Maintainance
10.1 Updating the software
This section explains how to use aptitude upgrade and kde-update-notier.Using aptitude is really simply. To update a system you need to execute two commands on the
command line as root: aptitude update (updates the lists of available packages) and aptitudeupgrade (upgrades the packages for which an upgrade is available).
Instead of using the command line you can also use kde-update-notier. FIXME: Explain how to usekde-update-notier, best with screenshots.
It is also a good idea to install cron-apt and apt-listchanges and congure them to send mailto an address you are reading.cron-apt will notify you once a day via email, which packages need an update. It does not install
these updates, but downloads them (usually in the night), so you don’t have to wait for the download,when you do aptitude upgrade .
apt-listchanges can send new changelog entries to you.
10.1.1 Keep yourself informed about security updates
Running cron-apt as described above is a good way to learn that for an installed package a securityupdate is available. Another way to get informed about security updates is to subscribe to the Debiansecurity-announce mailinglist , which has the benet of also informing what the security update is about.The downside (compared to cron-apt ) is that it also includes information about updates for packageswhich aren’t installed.
10.2 Backup Management
For the backup management point your browser to https://www/slbackup-php . Please note thatyou have to access this site via ssl, since you have to enter the root password there. If you try to accessthis site without using ssl it will fail.
Per default the tjener will backup /skole/tjener/home0 , /etc/ , /root/.svk and the ldap to/skole/backup which is in the lvm. If you only want to have things twice (if you delete something) thissetup should be ne for you.
/!\ Be aware that this backup doesn’t protect you from failing harddrives.If you want to backup your data to an external server, a tape device or another harddrive you’ll have
to modify the existing conguration a bit.If you want to restore a complete folder, your best option is to use the command-line:
$ sudo rdiff-backup -r <date> \/skole/backup/tjener/skole/tjener/home0/user \/skole/tjener/home0/user_<date>
this will leave the content from /skole/tjener/home0/user from <date> in the folder /skol-e/tjener/home0/user_<date>
If you want to restore a single le, then you should be able to select the le (and the version) from
the web-interface, and download only that le.
• FIXME: continue description of slbackup-php usage, maybe with screenshots
26
8/3/2019 Debian Edu Lenny Manual
http://slidepdf.com/reader/full/debian-edu-lenny-manual 33/64
11 UPGRADES 10.3 Server Monitoring
10.3 Server Monitoring
10.3.1 Munin
Munin trend reporting system is available from https://www/munin/ . It provides system status mea-surement graphis on a daily, weekly, monthly and yearly basis, and allow the system administrator helpwhen looking for bottlenecks and the source of system problems.
The list of machines being monitored using munin is generated automatically based on the list of hosts reporting to sitesummary. All hosts with the package munin-node installed is registered for muninmonitoring. It will normally take two days from a machine is installed until munin monitoring start, because of the order the cron jobs are executed. To speed up the process, run sitesummary-cli-ent as root on the freshly installed machine, and /etc/cron.daily/sitesummary as root on thesitesummary server (normally the main-server).
Information about the munin system is available from http://munin.projects.linpro.no/ .
10.3.2 Nagios
Nagios system and service monitoring is available from https://www/nagios3/ . The set of machinesand services being monitored is automatically generated using information collected by the sitesum-mary system. The machines with the prole Main-server and Thin-client-server receive full monitoring,while workstations and thin clients receive simple monitoring. To enable full monitoring on a worksta-tion, install the nagios-nrpe-server package on the workstation.
The username is nagiosadmin and the password is undened, you must set your own password before you can login and use nagios. For security reasons, avoid using the same password as root. Tochange the password you can run the following command as root:
htpasswd /etc/nagios3/htpasswd.users nagiosadmin
By default Nagios does not send email. This can be changed by replacing notify-by-nothingwith host-notify-by-email and notify-by-email in the le /etc/nagios3/sitesummary--template-contacts.cfg .
The Nagios conguration le used is /etc/nagios3/sitesummary.cfg . The sitesummary cron job generate /var/lib/sitesummary/nagios-generated.cfg with the list of hosts and servicesto monitor.
Extra nagios checks can be put in the le /var/lib/sitesummary/nagios-generated.cfg.-post to get them included in the generated le.
Information about the nagios system is available from http://www.nagios.org/ or in the nag-ios3-doc package.
10.3.3 Sitesummary
Sitesummary is used to collect information from each computer and submit it to the central server. Theinformation collected is available in /var/lib/sitesummary/entries/ . Scripts in /usr/lib/si-tesummary/ are available to generate reports.
A simple report from sitesummary without any details is available from https://www/sitesummary/ .Some documentation on sitesummary is available from http://wiki.debian.org/DebianEdu/HowTo/SiteSummary
10.4 More information about Debian Edu customisations
More information about Debian Edu customisations useful for system administrators can be found inthe Administration Howto chapter .
11 Upgrades
/!\ Before explaining how to upgrade, please note, that you do this update on your productive serveron your own risk. Debian Edu/Skolelinux comes with ABSOLUTELY NO WARRANTY, to the extentpermitted by applicable law.
Please read this chapter completly before attempting to upgrade.
27

8/3/2019 Debian Edu Lenny Manual
http://slidepdf.com/reader/full/debian-edu-lenny-manual 34/64
12 UPGRADES FROM DEBIAN EDU ETCH 11.1 General notes on upgrading
11.1 General notes on upgradingUpgrading Debian from one distribution to the next is generally rather easy. For Debian Edu this isunfortunatly not yet true as we heavily modify conguration les in ways we shouldn’t do. (See Debian bug 311188 for more information.) Upgrading is still possible but might requiere some work.
In general, upgrading the servers is more difcult than the workstations and the main-server is the
most difcult to upgrade. The diskless machines are easy, as their chroot environment can be deletedand recreated, if you haven’t modied it. If you have, the chroot is basically a workstation chrootanyway, so rather easy to upgrade.
If you want to be sure that after the upgrade everything works like before , you should test theupgrade on (a) test systems, which are congured the same way as your production machines. Thereyou can test the upgrade without risk and see if everything works as it should.
Make sure to also read the information about the Debian lenny release from its installation manual.Also it might be wise to wait a bit and keep running etch for some more weeks, so that others can
test the upgrade, experience problems and document them here. Debian Edu etch will receive continuedsupport for some time in the future, but when Debian ceases support for etch , Debian Edu will (have to)do that too. This is expected to happen on Febrary 16th, 2010.
12 Upgrades from Debian Edu etch/!\ Be prepared: make sure you have tested the upgrade from Etch in a test environment or have backups ready to be able to go back.
12.1 The basic upgrade operation1. Edit /etc/apt/sources.list and replace all occurances of "etch" with "lenny".
2. run apt-get update
3. run apt-get upgrade
4. run apt-get dist-upgrade
12.2 LDAP service needs to repairedUpgrading the debian-edu-config package on tjener is likely to disrupt some services:
1. slapd wouldn’t start.
It may keep running until next restart, then if it gives:
tjener:~# invoke-rc.d slapd startStarting OpenLDAP: slapd - failed.The operation failed but no output was produced. For hints on what wentwrong please refer to the system’s logfiles (e.g. /var/log/syslog) or
try running the daemon in Debug mode like via "slapd -d 16383" (warning:this will create copious output).
Below, you can find the command line options used by this script torun slapd. Do not forget to specify those options if youwant to look to debugging output:slapd -h ’ldap:/// ldaps:///’ -g openldap -u openldap -f /etc/ldap/slapd. ←
conf -4
And searching /var/log/syslog yelds something like:tjener slapd[8894]: could not stat config file "/etc/ldap/schema/dnsdo-main2.schema": No such file or directory (2)
then as a temporary measure to get it running until DNS is sorted.1. Comment out the line include /etc/ldap/schema/dnsdomain2.schema in /etc/l-
dap/slapd.conf .
28
8/3/2019 Debian Edu Lenny Manual
http://slidepdf.com/reader/full/debian-edu-lenny-manual 35/64
12 UPGRADES FROM DEBIAN EDU ETCH 12.3 DHCP service needs to repaired
2. Run invoke-rc.d slapd start
Some new indexes have been added to openldap’s conguration. in order to benet from these youneed to regenerate indexes:
1. stop slapd. invoke-rc.d slapd stop
2. check syslog or ps output that it have truly stopped.
3. run sudo -u openldap slapindex
4. start slapd with invoke-rc.d slapd start
12.3 DHCP service needs to repaired1. dhcp3-server wouldn’t start.
If starting dhcp3-server gives:tjener:~# invoke-rc.d dhcp3-server startdhcpd self-test failed. Please fix the config file.
The error was:Internet Systems Consortium DHCP Server V3.1.1Copyright 2004-2008 Internet Systems Consortium.All rights reserved.For info, please visit http://www.isc.org/sw/dhcp//etc/dhcp3/dhcpd.conf line 2: semicolon expected.ldap-server "ldap"
^/etc/dhcp3/dhcpd.conf line 3: semicolon expected.ldap-port 389;
^/etc/dhcp3/dhcpd.conf line 4: semicolon expected.ldap-base-dn "dc=skole,dc=skolelinux,dc=no"
^
/etc/dhcp3/dhcpd.conf line 5: semicolon expected.ldap-dhcp-server-cn "dhcp"
^/etc/dhcp3/dhcpd.conf line 6: semicolon expected.ldap-method dynamic;
^Configuration file errors encountered -- exitinginvoke-rc.d: initscript dhcp3-server, action "start" failed.
Then installing dhcp3-server-ldap is needed install it. Use your favorite package managementfront-end or run:
tjener:~# apt-get -q=2 updatetjener:~# apt-get -q=2 install dhcp3-server-ldap
If starting dhcp3-server gives:
tjener:~# invoke-rc.d dhcp3-server startdhcpd self-test failed. Please fix the config file.The error was:Internet Systems Consortium DHCP Server V3.1.1Copyright 2004-2008 Internet Systems Consortium.All rights reserved.For info, please visit http://www.isc.org/sw/dhcp/Connecting to LDAP server ldap:389Successfully logged into LDAP server ldapCannot find host LDAP entry dhcp (&(objectClass=dhcpServer)(cn=dhcp))Configuration file errors encountered -- exitinginvoke-rc.d: initscript dhcp3-server, action "start" failed.
Then DHCP conguration needs loading into LDAP. Two ways to do it are:
29

8/3/2019 Debian Edu Lenny Manual
http://slidepdf.com/reader/full/debian-edu-lenny-manual 36/64
12 UPGRADES FROM DEBIAN EDU ETCH 12.3 DHCP service needs to repaired
a. To load an existing conguration into the database:1. Locate the appropriate dhcp.conf, the last one should be in /etc/dhcp3/dhcpd-deb-
ian-edu.conf.dpkg-old or get one from backups.2. Extract /usr/share/doc/dhcp3-server-ldap/dhcpd-conf-to-ldap.pl.gz
3. Set /usr/share/doc/dhcp3-server-ldap/dhcpd-conf-to-ldap.pl executable.
4. Run /usr/share/doc/dhcp3-server-ldap/dhcpd-conf-to-ldap.pl , optionalywith --help rst or read the comments in code.5. View and check the resulting ldif le. Though DHCP is likely to function ne with this
le, to keep as close as possible to the default conguration it is probably best to keep theentries for the congured individual hosts and replace the general entries (i.e. dhcpSe-rvice , dhcpSharedNetwork , dhcpSubnet , etc.) with those from etc/ldap/dhcp-.ldif .
6. Load the resulting ldif le to the LDAP database.7. Start dhcp3-server .
tjener:~# cd /usr/share/doc/dhcp3-server-ldap/tjener:/usr/share/doc/dhcp3-server-ldap# gunzip dhcpd-conf-to-ldap.pl. ←
gz
tjener:/usr/share/doc/dhcp3-server-ldap# chmod 0744 dhcpd-conf-to-ldap. ←
pltjener:/usr/share/doc/dhcp3-server-ldap#tjener:/usr/share/doc/dhcp3-server-ldap# ./dhcpd-conf-to-ldap.pl -- ←
server "dhcp" \> --basedn "dc=skole,dc=skolelinux,dc=no" \> --dhcpdn "cn=DHCP Config,dc=skole,dc=skolelinux,dc=no" \> --conf "/etc/dhcp3/dhcpd-debian-edu.conf.dpkg-old" --ldif "/etc/ ←
ldap/migrate-dhcp.ldif"
Creating LDAP Configuration with the following options:Base DN: dc=skole,dc=skolelinux,dc=noDHCP DN: cn=DHCP Config,dc=skole,dc=skolelinux,dc=noServer DN: cn=dhcp, dc=skole,dc=skolelinux,dc=no
Done.tjener:/usr/share/doc/dhcp3-server-ldap#tjener:/usr/share/doc/dhcp3-server-ldap# cd /etc/ldap/tjener:/etc/ldap#tjener:/etc/ldap#tjener:/etc/ldap# # At this point it’s recommended to view migrate-dhcp ←
.ldif side by sidetjener:/etc/ldap# # with dhcp.ldif and make some manual adjustments, ←
before running:tjener:/etc/ldap#tjener:/etc/ldap# ldapadd -xZWD ’cn=admin,ou=People,dc=skole,dc= ←
skolelinux,dc=no’ \
> -f /etc/ldap/migrate-dhcp.ldifEnter LDAP Password:adding new entry "cn=dhcp, dc=skole,dc=skolelinux,dc=no"....tjener:/etc/ldap#tjener:/etc/ldap# invoke-rc.d dhcp3-server start
* Starting DHCP server dhcpd3 ←
[ o k ]tjener:/etc/ldap#
b. To load The fresh conguration into the database:If there are only few congured host and adding them later to the conguration is no bother just run ldapadd -xZWD ’cn=admin,ou=People,dc=skole,dc=skolelinux,dc=n-
o’ -f /etc/ldap/dhcp.ldif2. Squid wouldn’t start.
If starting Squid gives:
30
8/3/2019 Debian Edu Lenny Manual
http://slidepdf.com/reader/full/debian-edu-lenny-manual 37/64
12 UPGRADES FROM DEBIAN EDU ETCH 12.4 User logins from Windows machines . . .
tjener:~# invoke-rc.d squid start
* Starting Squid HTTP proxy squid2009/08/23 00:20:56| ACL name ’localnet’ not defined!FATAL: Bungled squid.conf line 2577: http_access allow localnetSquid Cache (Version 2.7.STABLE3): Terminated abnormally.
It’s complaint is self explanatory. Two options to overcome this are:
a. To keep the old /etc/squid/squid.conf just comment-out or remove the offending linehttp_access allow localnet .
b. To stay current copy the new squid.conf distributed in the squid package:tjener:~# cd /etc/squid/tjener:/etc/squid# mv squid.conf etch-squid.conftjener:/etc/squid# cp /usr/share/doc/squid/examples/squid.conf squid. ←
conf
1. To have the default Debian Edu conguration run cfengine-debian-edu
2. Any customized settings in the old conguration should be copied from the old le (dropping lines acl schoolnet * , acl ltspnet * , http_access allow schooln-et and http_access allow ltspnet these were replaced by the acl localnet *and * access allow localnet lines).
12.4 User logins from Windows machines needs to repaired1. Users can’t login from Windows machines.
A change in Samba that has become apparent in Lenny (see 532859) prevents users login to Sambaunless sambaPwdLastSet attribute is set other than zero in their LDAP entry.
1. To add the ’sambaPwdLastSet ’ attribute for new users to be created in lwat make sure /-etc/lwat/admin.ini contain the line ’ sambaPwdLastSet = 1 ’ for each group. See also:
Debian Edu bug#1364 .2. To nd which users are affected try:
ldapsearch -xZLLLWD ’cn=admin,ou=People,dc=skole,dc=skolelinux,dc=no’ -b ←
’ou=People,dc=skole,dc=skolelinux,dc=no’ -s one ’(&(objectClass= ←
sambaSamAccount)(|(!(sambaPwdLastSet= * ))(sambaPwdLastSet=0)))’ uid | ←
less
3. To add the ’ sambaPwdLastSet ’ attribute to users where it isn’t set try:ldapsearch -xZLLLWD ’cn=admin,ou=People,dc=skole,dc=skolelinux,dc=no’ -b ←
’ou=People,dc=skole,dc=skolelinux,dc=no’ -s one ’(&(objectClass= ←
sambaSamAccount)(!(sambaPwdLastSet= * )))’ dn | sed ’/.\+/a\changetype: ←
modify\nadd:sambaPwdLastSet\nsambaPwdLastSet: 2\n-’ > /etc/ldap/ ←
fixamba.ldif
ldapmodify -xZWD ’cn=admin,ou=People,dc=skole,dc=skolelinux,dc=no’ \-f /etc/ldap/fixamba.ldif
4. If users with ’ sambaPwdLastSet = 0 ’ were found and allowing them to login is desired,try:ldapsearch -xZLLLWD ’cn=admin,ou=People,dc=skole,dc=skolelinux,dc=no’ -b ←
’ou=People,dc=skole,dc=skolelinux,dc=no’ -s one ’(&(objectClass= ←
sambaSamAccount)(sambaPwdLastSet=0))’ dn | sed ’/.\+/a\changetype: ←
modify\nreplace:sambaPwdLastSet\nsambaPwdLastSet: 2\n-’ > /etc/ldap/ ←
fixamba.ldif
ldapmodify -xZWD ’cn=admin,ou=People,dc=skole,dc=skolelinux,dc=no’ \-f /etc/ldap/fixamba.ldif
See also SambaLDAP .
31
8/3/2019 Debian Edu Lenny Manual
http://slidepdf.com/reader/full/debian-edu-lenny-manual 38/64
12 UPGRADES FROM DEBIAN EDU ETCH 12.5 DNS service needs to repaired
12.5 DNS service needs to repairedFor lenny Debian Edu has switched to powerdns as nameserver. It’s however possible to stay withbind9 .
12.5.1 Bind
If you want to continue running bind, you must add the RFC 2782 entries in /etc/bind/debian-e-du/db.intern :
;RFC2782 _ldap._tcp IN SRV 0 100 389 tjener _syslog._udp IN SRV 0 100 514 tjener
12.5.2 powerdns
To switch to powerdns:
1. install the packages pdns-server , pdns-recursor and pdns-backend-ldap .
tjener:~# apt-get -q=2 updatetjener:~# apt-get -q=2 install pdns-server pdns-recursor pdns-backend-ldap
2. In /etc/ldap/slapd.conf :
1. Uncomment the line include /etc/ldap/schema/dnsdomain2.schema , if it was commented-out earlier (1.1).
2. It’s recommended to index associatedDomain , at the indices area add the lines:
# PowerDNS indexindex associatedDomain pres,eq,sub
3. Restart slapd invoke-rc.d slapd restart .
4. Load the DNS data into LDAP either using the default Debian Edu or the existing Bind9 congu-ration:
a. To use the default Debian Edu conguration:
1. Add the contents of /etc/ldap/dns_skole.ldif and /etc/ldap/dns_arpa.ld-if using ldapadd .
tjener:~# ldapadd -xZWD ’cn=admin,ou=People,dc=skole,dc=skolelinux, ←
dc=no’ \> -f ’/etc/ldap/dns_skole.ldif’tjener:~# ldapadd -xZWD ’cn=admin,ou=People,dc=skole,dc=skolelinux, ←
dc=no’ \> -f ’/etc/ldap/dns_arpa.ldif’
b. Tomigrate Bind’s conguration:
1. There is a utility called zone2ldap provided in the PowerDNS distribution which con-vert zone les used by BIND to the ldif format, it is broken in Lenny ( 504061), xedpackages are available in Squeeze.To use the one from Etch:1. Download etch-i386-pdns-backend-ldap .2. Unpack it using dpkg or dpkg-deb and replace the faulty /usr/bin/zone2ldap :
tjener:/tmp# dpkg-deb -x pdns-backend-ldap_2.9.20-8+etch1_i386. ←
deb \> pdns-backend-ldap_2.9.20tjener:/tmp# cp pdns-backend-ldap_2.9.20/usr/bin/zone2ldap /usr/ ←
bin/zone2ldap
32

8/3/2019 Debian Edu Lenny Manual
http://slidepdf.com/reader/full/debian-edu-lenny-manual 39/64
13 UPGRADES FROM OLDER DEBIAN EDU . . . 12.6 Nagios setup has changed
3. Apparently PowerDNS in Lenny (2.9.21.2) doesn’t understand AFSDB records samefor `zone2ldap’, when reading an AFSDB record it will quit with an error message.To workaround this limitation comment-out (with ’ ; ’) AFSDB records in the nameddb.* les, grep -rl AFSDB /etc/bind/ * will disclose them.
4. At last the conversion can be executed:
tjener:~# zone2ldap --basedn=’ou=hosts,dc=skole,dc=skolelinux,dc=←
no’ --layout=tree \> --named-conf=’/etc/bind/debian-edu/named- ←
bind9.conf’ --resume \> > /etc/ldap/skole-zone2ldap
2. Before the data in the new ldif le can be added to the database the "basedn" must becreated:
tjener:~# ldapadd -xZWD ’cn=admin,ou=People,dc=skole,dc=skolelinux, ←
dc=no’Enter LDAP Password:dn: ou=hosts,dc=skole,dc=skolelinux,dc=noobjectClass: organizationalUnit
objectClass: domainRelatedObjectou: hostsassociatedDomain: intern
3. The format of the ldif le created by zone2ldap is suitable for `ldapmodify’:tjener:~# ldapmodify -xZWD ’cn=admin,ou=People,dc=skole,dc= ←
skolelinux,dc=no’ \> -f /etc/ldap/skole-zone2ldap
5. Time to stop bind9 and start pdns and pdns-recursor :tjener:~# invoke-rc.d bind9 stoptjener:~# invoke-rc.d pdns start
tjener:~# invoke-rc.d pdns-recursor start
6. After testing the new PowerDNS setup Bind9 may be disabled/removed/purged.
12.6 Nagios setup has changedNagios2 is not available in lenny anymore, so nagios3 is now installed.
The nagios3 conguration will already be installed and functional, though the nagios2 congurationwon’t be functional anymore. If you changed the nagios2 conguration, your changes will be saved in.dpkg-old les, but the changes will not be applied to the nagios3 conguration. So these changes haveto be redone manually.
12.7 Recreating an LTSP chrootOn the LTSP server(s) the LTSP chroot should be recreated. The new chroot will automatically support both thin-clients and diskless workstations.
Remove /opt/ltsp/i386 (or /opt/ltsp/amd64 , depending on your setup. If you have enoughdiskspace, consider backing it up.
Recreate the chroot by running debian-edu-ltsp && ltsp-make-client as root.
13 Upgrades from older Debian Edu / Skolelinux installations (be-fore etch)
To upgrade from any older release, you will need to upgrade to the etch based Debian Edu release rst, before you can follow the instructions provided above. How to upgrade to etch is described in theManual for Debian Edu etch .
CategoryPermalink
33
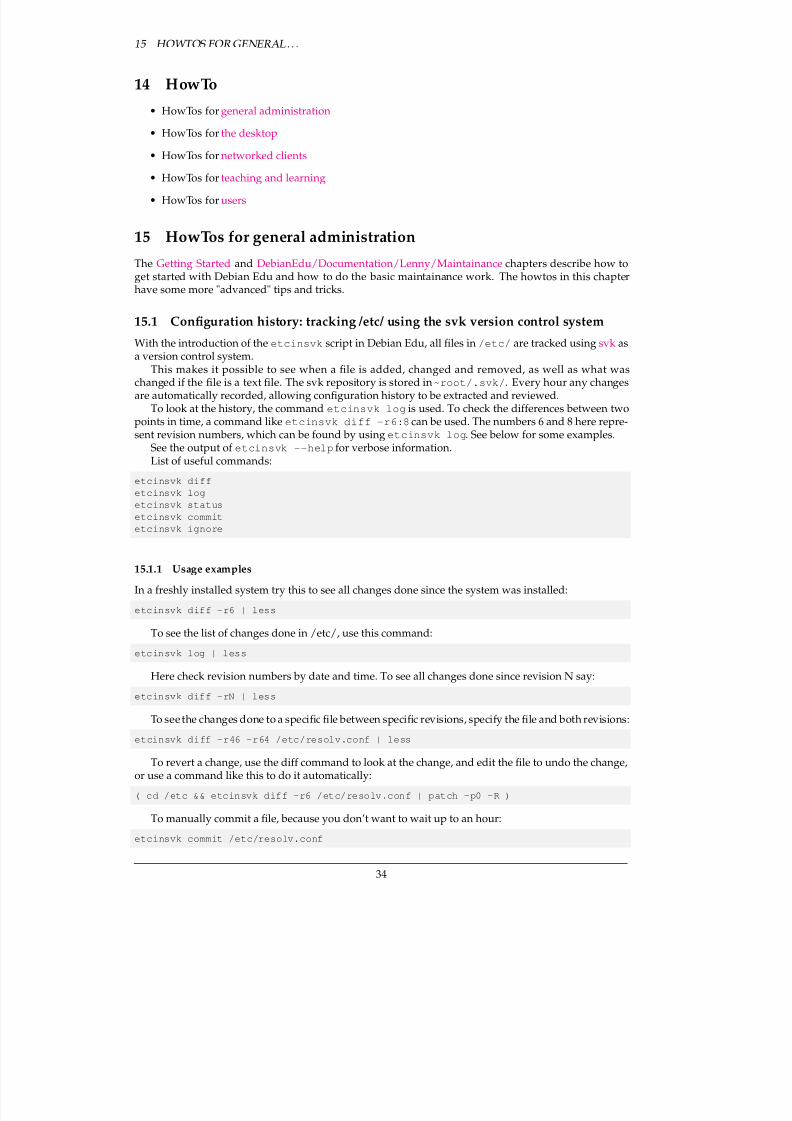
8/3/2019 Debian Edu Lenny Manual
http://slidepdf.com/reader/full/debian-edu-lenny-manual 40/64
15 HOWTOS FOR GENERAL . . .
14 HowTo• HowTos for general administration
• HowTos for the desktop
• HowTos for networked clients• HowTos for teaching and learning
• HowTos for users
15 HowTos for general administrationThe Getting Started and DebianEdu/Documentation/Lenny/Maintainance chapters describe how toget started with Debian Edu and how to do the basic maintainance work. The howtos in this chapterhave some more "advanced" tips and tricks.
15.1 Conguration history: tracking /etc/ using the svk version control systemWith the introduction of the etcinsvk script in Debian Edu, all les in /etc/ are tracked using svk asa version control system.
This makes it possible to see when a le is added, changed and removed, as well as what waschanged if the le is a text le. The svk repository is stored in ~root/.svk/ . Every hour any changesare automatically recorded, allowing conguration history to be extracted and reviewed.
To look at the history, the command etcinsvk log is used. To check the differences between twopoints in time, a command like etcinsvk diff -r6:8 can be used. The numbers 6 and 8 here repre-sent revision numbers, which can be found by using etcinsvk log . See below for some examples.
See the output of etcinsvk --help for verbose information.List of useful commands:
etcinsvk diffetcinsvk logetcinsvk statusetcinsvk commitetcinsvk ignore
15.1.1 Usage examples
In a freshly installed system try this to see all changes done since the system was installed:
etcinsvk diff -r6 | less
To see the list of changes done in /etc/, use this command:
etcinsvk log | less
Here check revision numbers by date and time. To see all changes done since revision N say:
etcinsvk diff -rN | less
To see the changes done to a specic le between specic revisions, specify the le and both revisions:
etcinsvk diff -r46 -r64 /etc/resolv.conf | less
To revert a change, use the diff command to look at the change, and edit the le to undo the change,or use a command like this to do it automatically:
( cd /etc && etcinsvk diff -r6 /etc/resolv.conf | patch -p0 -R )
To manually commit a le, because you don’t want to wait up to an hour:
etcinsvk commit /etc/resolv.conf
34
8/3/2019 Debian Edu Lenny Manual
http://slidepdf.com/reader/full/debian-edu-lenny-manual 41/64
15 HOWTOS FOR GENERAL . . . 15.2 Resizing Partitions
If you don’t want a specic le to be tracked in svk, you can tell to ignore it. But this is rarely useful:)
etcinsvk ignore /etc/path/to/file/to/be/ignored
15.1.2 For those who upgraded from Etchdebian-edu-etc-svk was moved to a separate package and renamed to etcinsvk for Lenny. Thoseused to using debian-edu-etc-svk should start to use etcinsvk instead.
15.2 Resizing Partitions
Most partitions in Debian Edu are logical LVM volumes. Only the /boot/ partition is not. With theDebian/Etch release of Debian Edu, it is possible to extend partitions while they are mounted. This isa feature of the Linux kernel since version 2.6.10. Shrinking partitions still need to happen while thepartition is unmounted.
It is a good idea to avoid creating very large partitions, as large partitions will take a long time torestore from backup if the need should arise, and le system checks take a very long time for largepartitions. A good limit can be 20 GiB. It is better, if possible, to create several smaller partitions thanone very large one.
To make it easier to extend full partitions, the debian-edu-fsautoresize script is provided.When invoked, it reads the conguration from /usr/share/debian-edu-config/fsautoresiz-etab , /site/etc/fsautoresizetab and /etc/fsautoresizetab . It proposes to extend parti-tions with too little free space based on the rules provided in these les. Without any arguments, itwill only show the commands needed to extend the le system. The argument -n is needed to actuallyexecute this commands to extend the le systems.
The script is executed automatically every hour on every client listed in the fsautoresize-hostsnetgroup.
When resizing the partition used by the Squid proxy, the cache size in etc/squid/squid.confneed to be updated as well. The helper script /usr/share/debian-edu-config/tools/squid--
update-cachedir is provided to do this automatically, checking the current partition size of /var/-spool/squid/ and conguring Squid to use 80% of this as its cache size.
15.2.1 Logical Volume Management
Logical Volume Management (LVM) enables resizing the partitions while they are mounted and in use.You can learn more about LVM in the LVM HowTo .
To extend a logical volume manually you simply tell the lvextend command how large you wantit to grow to. For example, to extend home0 to 30GB you use the following commands:
lvextend -L30G /dev/vg_system/skole+tjener+home0resize2fs /dev/vg_system/skole+tjener+home0
To extend home0 by 30G, you insert a ’+’ (-L+30G)
15.3 Using ldapvildapvi is a tool to edit the LDAP database with a normal text editor on the commandline.
The following needs to be executed:
ldapvi --host ldap -ZZ --bind simple --tls allow -D ’cn=admin,ou=People,dc=skole, ←
dc=skolelinux,dc=no’
Then make your changes, safe and quit the editor. That’s it!Alternatively, to save key-strokes try:
ldapvi --ldap-conf -ZD ’(cn=admin)’
Note: ldapvi will use whatever is the default editor. By executing export EDITOR=vim in theshell prompt one can congure the environment to get a vi clone as editor.
/!\ Warning: ldapvi is a very powerful tool. Be careful and don’t mess up the LDAP database.
35
8/3/2019 Debian Edu Lenny Manual
http://slidepdf.com/reader/full/debian-edu-lenny-manual 42/64
15 HOWTOS FOR GENERAL . . . 15.4 luma, an LDAP GUI
15.4 luma, an LDAP GUIIf you prefer a GUI to work with the LDAP database, check out the luma package.
15.5 Using volatile.debian.org
15.5.1 What is debian-volatile?Quoting from the webpage:
• Some packages aim at fast moving targets, such as spam ltering and virus scanning, and evenwhen using updated data patterns, they do not really work for the full time of a stable release. Themain goal of volatile is allowing system administrators to update their systems in a nice, consistentway, without getting the drawbacks of using unstable, even without getting the drawbacks forthe selected packages. So debian-volatile will only contain changes to stable programs that arenecessary to keep them functional.
15.5.2 How to use volatile
Since the Lenny release, the volatile archive is enabled and used by default.
15.6 Using backports.debian.org to install newer softwareYou are running Debian Edu, because you prefer the stability of Debian Edu. It runs great, there is just one problem: Sometimes software is a little bit more outdated as you like. This is where back-ports.debian.org steps in.
Backports are recompiled packages from Debian testing (mostly) and Debian unstable (in a few casesonly, e.g. security updates), so they will run without new libraries (wherever this is possible) on a stableDebian distribution like Debian Edu. We recommend you to pick out single backports which ts yourneeds, and not to use all backports available there.
Using backports.debian.org is simple:
echo "deb http://backports.debian.org/debian-backports lenny-backports main ←
contrib non-free" >> /etc/apt/sources.listapt-get update
Then you can either use aptitude -t lenny-backports install <packagename> to installor update packages once, or you can congure a package to be always installed from backports.debian.orgthough /etc/apt/preferences .
The latter is described in the instructions on backports.org and has the advantage, that updates to backports are installed automatically when they are available. With the rst variant you need to updatemanually.
15.7 Upgrading with a CD or DVD ROM
If you want to upgrade from one version to another (for example from Lenny 5.0.4 to 5.0.6) but you donot have Internet connectivity, only a physical media, follow these steps:Insert the CD/DVD-ROM in the drive, mount it and use apt-cdrom command:
mount /cdromapt-cdrom add -m
Quoting from apt-cdrom(8) man page:
• apt-cdrom is used to add a new CDROM to APTs list of available sources. apt-cdrom takes careof determining the structure of the disc as well as correcting for several possible mis-burns andverifying the index les.
• It is necessary to use apt-cdrom to add CDs to the APT system, it cannot be done by hand. Further-
more each disk in a multi-cd set must be inserted and scanned separately to account for possiblemis-burns.
Then run these two commands to upgrade the system:
36
8/3/2019 Debian Edu Lenny Manual
http://slidepdf.com/reader/full/debian-edu-lenny-manual 43/64
15 HOWTOS FOR GENERAL . . . 15.8 Java
apt-get updateapt-get upgrade
15.8 Java
15.8.1 running standalone Java applications
Standalone Java applications are supported out of the box by the OpenJDK Java runtime.
15.8.2 running Java applications in the webbrowser
The version of the OpenJDK Java runtime available in Debian Edu Lenny does not support to run Javaapplications in the webbrowser, this will be xed in the next release. On Lenny, the non-free (but freelyavailable) Java from Sun needs to be installed.
To install Java from Sun you need to edit the /etc/apt/sources.list rst to make sure it will installpackages from non-free . There needs to be a line like this:
deb http://ftp.debian.org/debian/ lenny main contrib non-free
Then do:
# apt-get update
Now you are ready to run this command:
# apt-get install sun-java6-plugin sun-java6-jre sun-java6-fonts
15.9 Creating folders in the home directories of all users
With this script the administrator can create a folder in each users home directory and set access per-missions and ownership.
In the example shown below with group=teachers and permissions=2770 a user can hand in anassignment by saving the le to the folder "assignments" where teachers are given write access to beable to make comments.
home_path="/skole/tjener/home0";shared_folder="assignments";permissions="2770";created_dir=0;
for home in $(ls $home_path);do. if [ ! -d "$home_path/$home/$shared_folder" ]; then. mkdir $home_path/$home/$shared_folderchmod $permissions $home_path/$home/$shared_folder
. #set the right owner and group#"username" = "group name" = "folder name"user=$homegroup=teacherschown $user:$group $home_path/$home/$shared_folder((created_dir+=1))
else. echo -e "the folder $home_path/$home/$shared_folder already exists.\n"
. fidoneecho "$created_dir folders has been created"
15.10 Easy access to USB drives and CDROMs/DVDsWhen users insert a USB drive or DVD/CDROM into a (diskless) workstation, there is a popup windowsasking what to do with it, just like in any other normal installation.
37
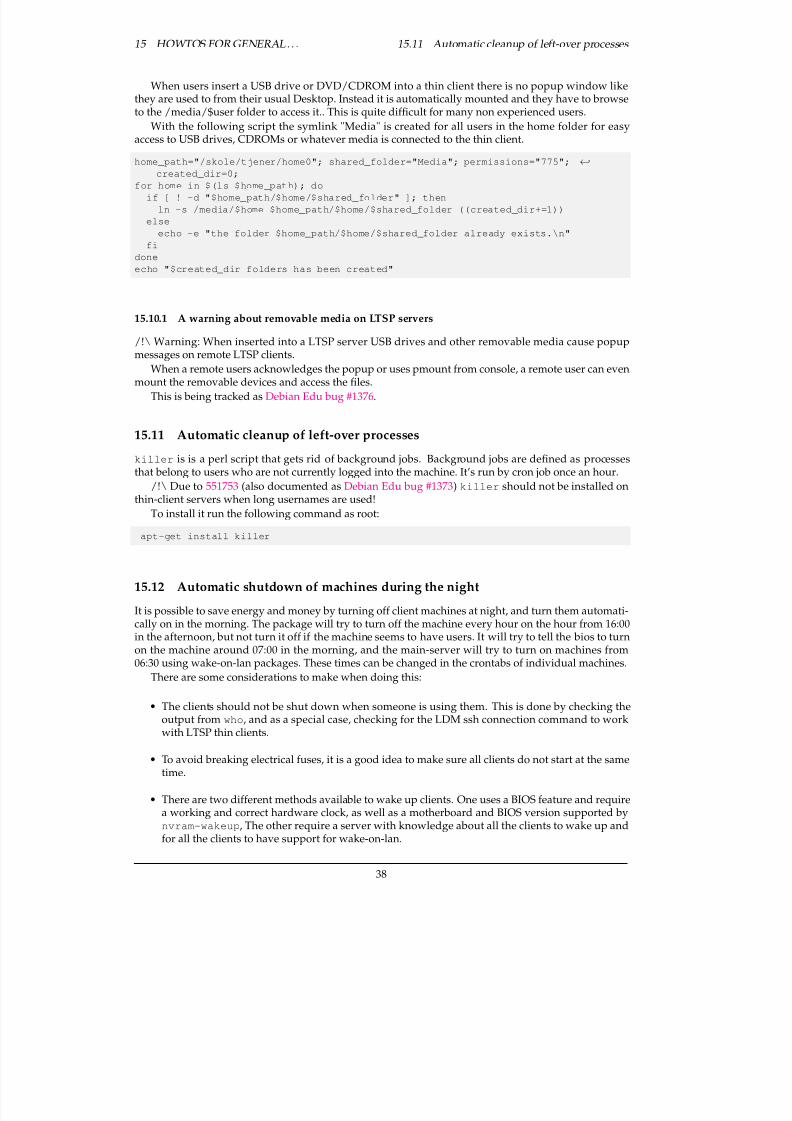
8/3/2019 Debian Edu Lenny Manual
http://slidepdf.com/reader/full/debian-edu-lenny-manual 44/64
15 HOWTOS FOR GENERAL . . . 15.11 Automatic cleanup of left-over processes
When users insert a USB drive or DVD/CDROM into a thin client there is no popup window likethey are used to from their usual Desktop. Instead it is automatically mounted and they have to browseto the /media/$user folder to access it.. This is quite difcult for many non experienced users.
With the following script the symlink "Media" is created for all users in the home folder for easyaccess to USB drives, CDROMs or whatever media is connected to the thin client.
home_path="/skole/tjener/home0"; shared_folder="Media"; permissions="775"; ←
created_dir=0;for home in $(ls $home_path); do
if [ ! -d "$home_path/$home/$shared_folder" ]; thenln -s /media/$home $home_path/$home/$shared_folder ((created_dir+=1))
elseecho -e "the folder $home_path/$home/$shared_folder already exists.\n"
fidoneecho "$created_dir folders has been created"
15.10.1 A warning about removable media on LTSP servers/!\ Warning: When inserted into a LTSP server USB drives and other removable media cause popupmessages on remote LTSP clients.
When a remote users acknowledges the popup or uses pmount from console, a remote user can evenmount the removable devices and access the les.
This is being tracked as Debian Edu bug #1376 .
15.11 Automatic cleanup of left-over processes
killer is is a perl script that gets rid of background jobs. Background jobs are dened as processesthat belong to users who are not currently logged into the machine. It’s run by cron job once an hour.
/!\ Due to 551753 (also documented as Debian Edu bug #1373 ) killer should not be installed onthin-client servers when long usernames are used!
To install it run the following command as root:
apt-get install killer
15.12 Automatic shutdown of machines during the night
It is possible to save energy and money by turning off client machines at night, and turn them automati-cally on in the morning. The package will try to turn off the machine every hour on the hour from 16:00in the afternoon, but not turn it off if the machine seems to have users. It will try to tell the bios to turnon the machine around 07:00 in the morning, and the main-server will try to turn on machines from06:30 using wake-on-lan packages. These times can be changed in the crontabs of individual machines.
There are some considerations to make when doing this:
• The clients should not be shut down when someone is using them. This is done by checking theoutput from who , and as a special case, checking for the LDM ssh connection command to workwith LTSP thin clients.
• To avoid breaking electrical fuses, it is a good idea to make sure all clients do not start at the sametime.
• There are two different methods available to wake up clients. One uses a BIOS feature and requirea working and correct hardware clock, as well as a motherboard and BIOS version supported bynvram-wakeup , The other require a server with knowledge about all the clients to wake up andfor all the clients to have support for wake-on-lan.
38
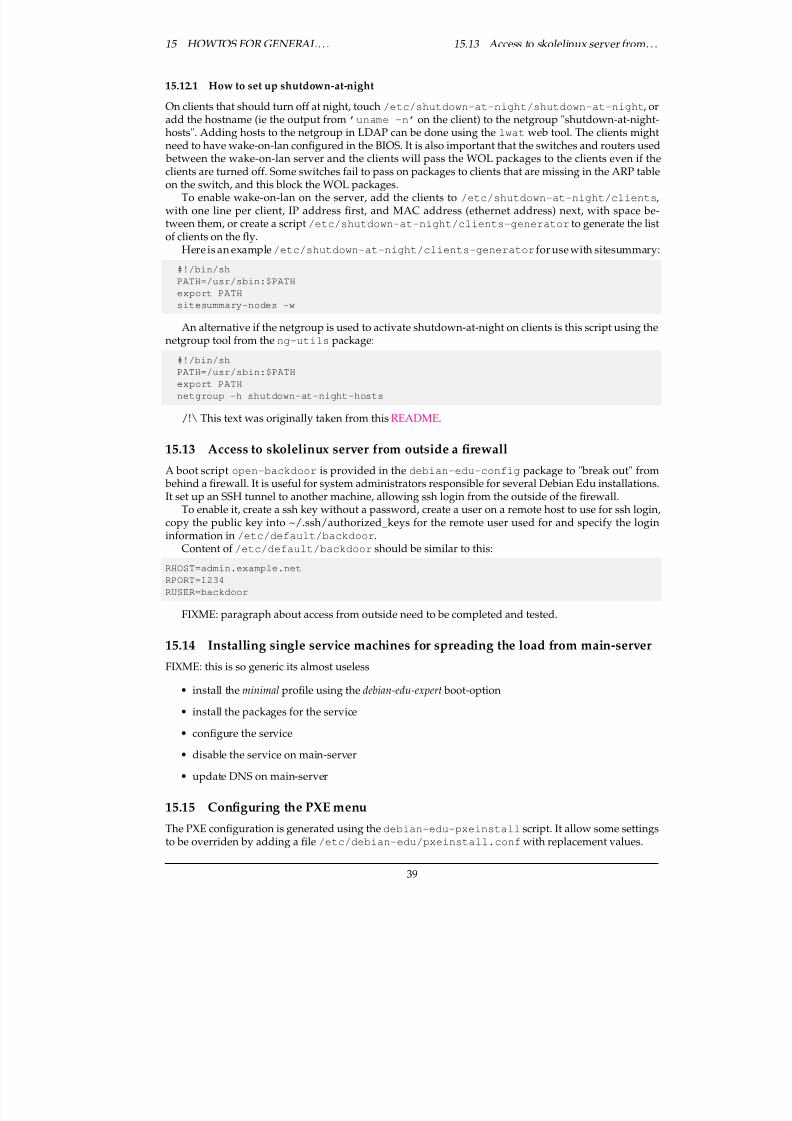
8/3/2019 Debian Edu Lenny Manual
http://slidepdf.com/reader/full/debian-edu-lenny-manual 45/64
15 HOWTOS FOR GENERAL . . . 15.13 Access to skolelinux server from . . .
15.12.1 How to set up shutdown-at-night
On clients that should turn off at night, touch /etc/shutdown-at-night/shutdown-at-night , oradd the hostname (ie the output from ’uname -n’ on the client) to the netgroup "shutdown-at-night-hosts". Adding hosts to the netgroup in LDAP can be done using the lwat web tool. The clients mightneed to have wake-on-lan congured in the BIOS. It is also important that the switches and routers used
between the wake-on-lan server and the clients will pass the WOL packages to the clients even if theclients are turned off. Some switches fail to pass on packages to clients that are missing in the ARP tableon the switch, and this block the WOL packages.
To enable wake-on-lan on the server, add the clients to /etc/shutdown-at-night/clients ,with one line per client, IP address rst, and MAC address (ethernet address) next, with space be-tween them, or create a script /etc/shutdown-at-night/clients-generator to generate the listof clients on the y.
Here is an example /etc/shutdown-at-night/clients-generator for use with sitesummary:
#!/bin/shPATH=/usr/sbin:$PATHexport PATHsitesummary-nodes -w
An alternative if the netgroup is used to activate shutdown-at-night on clients is this script using thenetgroup tool from the ng-utils package:
#!/bin/shPATH=/usr/sbin:$PATHexport PATHnetgroup -h shutdown-at-night-hosts
/!\ This text was originally taken from this README.
15.13 Access to skolelinux server from outside a rewallA boot script open-backdoor is provided in the debian-edu-config package to "break out" from
behind a rewall. It is useful for system administrators responsible for several Debian Edu installations.It set up an SSH tunnel to another machine, allowing ssh login from the outside of the rewall.To enable it, create a ssh key without a password, create a user on a remote host to use for ssh login,
copy the public key into ~/.ssh/authorized_keys for the remote user used for and specify the logininformation in /etc/default/backdoor .
Content of /etc/default/backdoor should be similar to this:
RHOST=admin.example.netRPORT=1234RUSER=backdoor
FIXME: paragraph about access from outside need to be completed and tested.
15.14 Installing single service machines for spreading the load from main-serverFIXME: this is so generic its almost useless
• install the minimal prole using the debian-edu-expertboot-option
• install the packages for the service
• congure the service
• disable the service on main-server
• update DNS on main-server
15.15 Conguring the PXE menuThe PXE conguration is generated using the debian-edu-pxeinstall script. It allow some settingsto be overriden by adding a le /etc/debian-edu/pxeinstall.conf with replacement values.
39
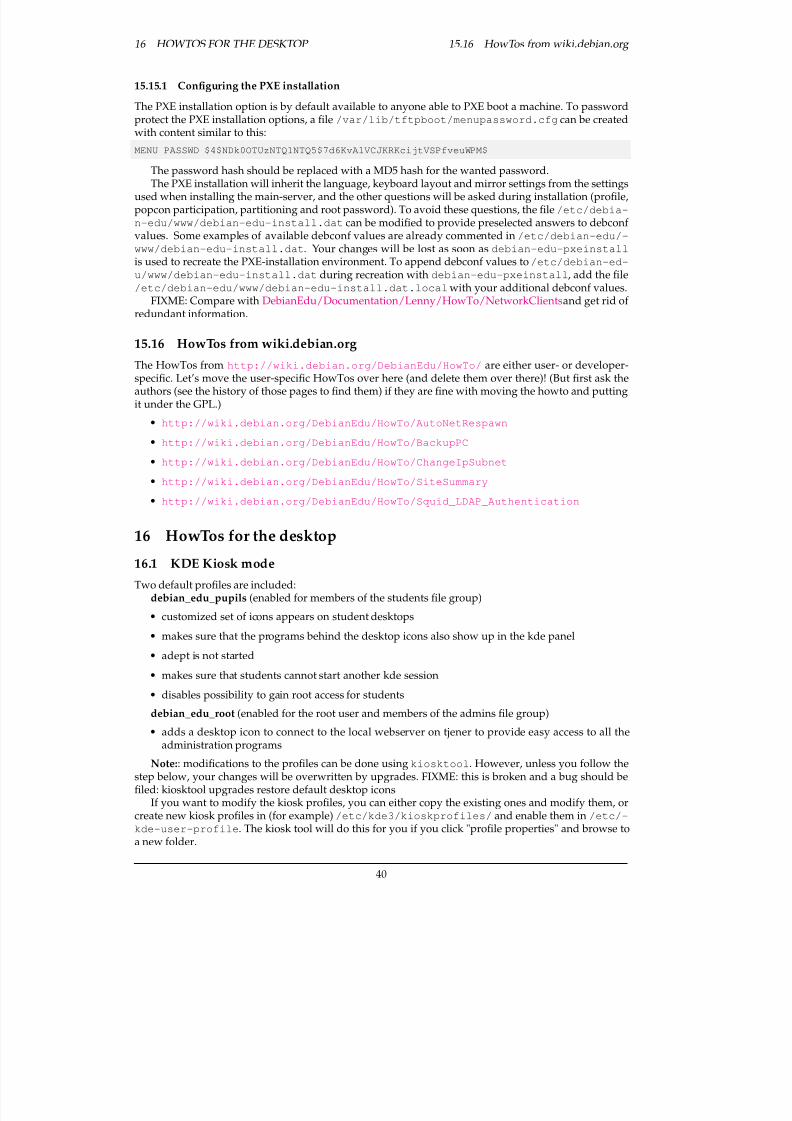
8/3/2019 Debian Edu Lenny Manual
http://slidepdf.com/reader/full/debian-edu-lenny-manual 46/64
16 HOWTOS FOR THE DESKTOP 15.16 HowTos from wiki.debian.org
15.15.1 Conguring the PXE installation
The PXE installation option is by default available to anyone able to PXE boot a machine. To passwordprotect the PXE installation options, a le /var/lib/tftpboot/menupassword.cfg can be createdwith content similar to this:MENU PASSWD $4$NDk0OTUzNTQ1NTQ5$7d6KvAlVCJKRKcijtVSPfveuWPM$
The password hash should be replaced with a MD5 hash for the wanted password.The PXE installation will inherit the language, keyboard layout and mirror settings from the settings
used when installing the main-server, and the other questions will be asked during installation (prole,popcon participation, partitioning and root password). To avoid these questions, the le /etc/debia-n-edu/www/debian-edu-install.dat can be modied to provide preselected answers to debconf values. Some examples of available debconf values are already commented in /etc/debian-edu/-www/debian-edu-install.dat . Your changes will be lost as soon as debian-edu-pxeinstallis used to recreate the PXE-installation environment. To append debconf values to /etc/debian-ed-u/www/debian-edu-install.dat during recreation with debian-edu-pxeinstall , add the le/etc/debian-edu/www/debian-edu-install.dat.local with your additional debconf values.
FIXME: Compare with DebianEdu/Documentation/Lenny/HowTo/NetworkClients and get rid of redundant information.
15.16 HowTos from wiki.debian.orgThe HowTos from http://wiki.debian.org/DebianEdu/HowTo/ are either user- or developer-specic. Let’s move the user-specic HowTos over here (and delete them over there)! (But rst ask theauthors (see the history of those pages to nd them) if they are ne with moving the howto and puttingit under the GPL.)
• http://wiki.debian.org/DebianEdu/HowTo/AutoNetRespawn
• http://wiki.debian.org/DebianEdu/HowTo/BackupPC
• http://wiki.debian.org/DebianEdu/HowTo/ChangeIpSubnet
• http://wiki.debian.org/DebianEdu/HowTo/SiteSummary• http://wiki.debian.org/DebianEdu/HowTo/Squid_LDAP_Authentication
16 HowTos for the desktop
16.1 KDE Kiosk modeTwo default proles are included:
debian_edu_pupils (enabled for members of the students le group)
• customized set of icons appears on student desktops
• makes sure that the programs behind the desktop icons also show up in the kde panel
• adept is not started
• makes sure that students cannot start another kde session
• disables possibility to gain root access for students
debian_edu_root (enabled for the root user and members of the admins le group)
• adds a desktop icon to connect to the local webserver on tjener to provide easy access to all theadministration programs
Note: : modications to the proles can be done using kiosktool . However, unless you follow thestep below, your changes will be overwritten by upgrades. FIXME: this is broken and a bug should beled: kiosktool upgrades restore default desktop icons
If you want to modify the kiosk proles, you can either copy the existing ones and modify them, orcreate new kiosk proles in (for example) /etc/kde3/kioskprofiles/ and enable them in /etc/-kde-user-profile . The kiosk tool will do this for you if you click "prole properties" and browse toa new folder.
40
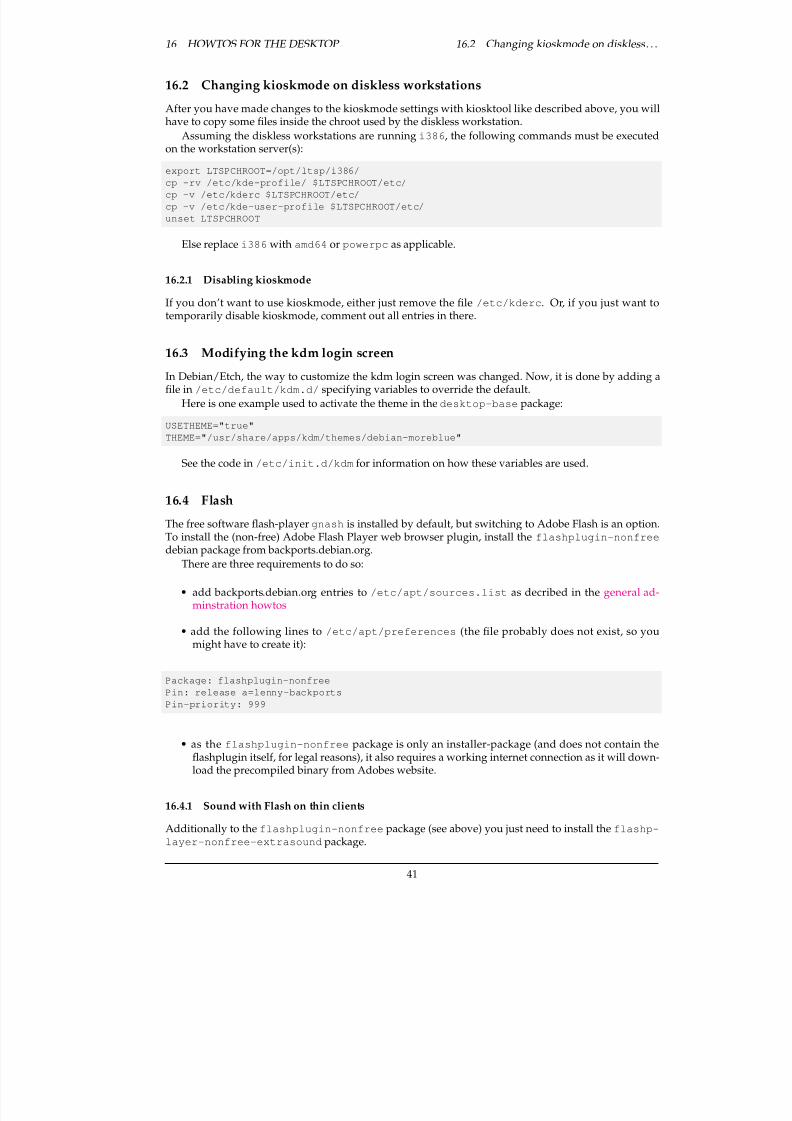
8/3/2019 Debian Edu Lenny Manual
http://slidepdf.com/reader/full/debian-edu-lenny-manual 47/64
16 HOWTOS FOR THE DESKTOP 16.2 Changing kioskmode on diskless . . .
16.2 Changing kioskmode on diskless workstations
After you have made changes to the kioskmode settings with kiosktool like described above, you willhave to copy some les inside the chroot used by the diskless workstation.
Assuming the diskless workstations are running i386 , the following commands must be executedon the workstation server(s):
export LTSPCHROOT=/opt/ltsp/i386/cp -rv /etc/kde-profile/ $LTSPCHROOT/etc/cp -v /etc/kderc $LTSPCHROOT/etc/cp -v /etc/kde-user-profile $LTSPCHROOT/etc/unset LTSPCHROOT
Else replace i386 with amd64 or powerpc as applicable.
16.2.1 Disabling kioskmode
If you don’t want to use kioskmode, either just remove the le /etc/kderc . Or, if you just want totemporarily disable kioskmode, comment out all entries in there.
16.3 Modifying the kdm login screen
In Debian/Etch, the way to customize the kdm login screen was changed. Now, it is done by adding ale in /etc/default/kdm.d/ specifying variables to override the default.
Here is one example used to activate the theme in the desktop-base package:
USETHEME="true"THEME="/usr/share/apps/kdm/themes/debian-moreblue"
See the code in /etc/init.d/kdm for information on how these variables are used.
16.4 Flash
The free software ash-player gnash is installed by default, but switching to Adobe Flash is an option.To install the (non-free) Adobe Flash Player web browser plugin, install the flashplugin-nonfreedebian package from backports.debian.org.
There are three requirements to do so:
• add backports.debian.org entries to /etc/apt/sources.list as decribed in the general ad-minstration howtos
• add the following lines to /etc/apt/preferences (the le probably does not exist, so you
might have to create it):
Package: flashplugin-nonfreePin: release a=lenny-backportsPin-priority: 999
• as the flashplugin-nonfree package is only an installer-package (and does not contain theashplugin itself, for legal reasons), it also requires a working internet connection as it will down-load the precompiled binary from Adobes website.
16.4.1 Sound with Flash on thin clientsAdditionally to the flashplugin-nonfree package (see above) you just need to install the flashp-layer-nonfree-extrasound package.
41
8/3/2019 Debian Edu Lenny Manual
http://slidepdf.com/reader/full/debian-edu-lenny-manual 48/64
17 HOWTOS FOR NETWORKED CLIENTS 16.5 Playing DVDs
16.5 Playing DVDs
libdvdcss is needed for playing most commercial! DVDs. For legal reasons it’s not included in Debian(Edu). If you are legally allowed to use it, you can use the packages from debian-multimedia.org. Addthe multimedia repository (as described just below this paragraph) and install multimedia and dvdlibraries:
apt-get install libdvdcss2 w32codecs
16.6 Using the multimedia repository
To use www.debian-multimedia.org do the following:
# install the debian-keyring securily:apt-get install debian-keyring# fetch the debian-multimedia key insecurily:gpg --keyserver pgpkeys.pca.dfn.de --recv-keys 1F41B907# check securily if the key is correct and add it to the keyring used by apt if ←
it is:gpg --keyring /usr/share/keyrings/debian-keyring.gpg --check-sigs 1F41B907 && gpg ←
--export 1F41B907 | apt-key add -# add repository to sources.list - please check the homepages for mirrors!echo "deb http://debian-multimedia.org lenny main" >> /etc/apt/sources.list# update the list of available packages:apt-get update
16.7 Handwriting fonts
The package ttf-linex (which is installed by default) installs the font "Abecedario" which is a nice
handwriting font for kids. The font has several forms to be used with kids: dotted, and with lines.
17 HowTos for networked clients
17.1 Introduction to Thin clients and Diskless workstations
One generic term for both thin clients and diskless workstations is LTSP client. LTSP is the Linux Termi-nal Server Project .
Thin clientA thin client setup enables a ordinary PC to function as an (X-)terminal, where all software runs on
the LTSP server. This means that this machine boots from a diskette or directly from the server usingnetwork-PROM (or PXE) without using a local client hard drive.
Diskless workstationA diskless workstation runs all software locally. The client machines boot direcly from the LTSP
server without a local hard drive. Software is administered and maintained on the LTSP server, but itruns on the diskless workstation. Home directories and system settings are stored on the server too.Diskless workstations are an excellent way of reusing newer hardware with the same low maintanencecost as with thin clients.
17.1.1 Machine type selection based on the network
Each LTSP server has two ethernet cards, one is congured in the 10.0.2.0/23 subnet (which is sharedwith the main server) and another forming a local 192.168.0.0/24 subnet (this subnet is a seperate subnetfor each LTSP server).
Diskless workstations get IP addresses assigned in the private subnet 10.0.2.0/23, while thin clientsare connected in the seperate subnet 192.168.0.0/24.
42
8/3/2019 Debian Edu Lenny Manual
http://slidepdf.com/reader/full/debian-edu-lenny-manual 49/64
17 HOWTOS FOR NETWORKED CLIENTS 17.1 Introduction to Thin clients and Diskless . . .
17.1.2 Changing the PXE menu on an LTSP server
The PXE menu allows network booting of LTSP clients, the installer and other alternatives. The le/var/lib/tftpboot/pxelinux.cfg/default is used by default if no other le in that directorymatches the client, and out of the box it is set to link to /var/lib/tftpboot/debian-edu/default-menu.cfg.
If one want all clients to boot as diskless workstations instead of getting the full PXE menu, this can
be implemented by changing the symlink:ln -s /var/lib/tftpboot/debian-edu/default-diskless.cfg /var/lib/tftpboot/ ←
pxelinux.cfg/default
If one want all clients to boot as thin clients instead, change the symlink like this:ln -s /var/lib/tftpboot/debian-edu/default-thin.cfg /var/lib/tftpboot/pxelinux. ←
cfg/default
See also the pxelinux documentation at http://syslinux.zytor.com/wiki/index.php/PXELINUX.
If one wants clients on the 192.168.x.x interface of a thin client server to boot as diskless workstationsinstead of thin clients, edit
/var/lib/tftpboot/ltsp/i386/pxelinux.cfg/default
and add a ’3’ (no quotes) to the end of the line. There is no need to add these workstations in lwat,saving you some work and some "staticxx" IP addresses (see below).
17.1.3 Separate main- and LTSP servers
For performace and security considerations it might be desired to set up a seperate main server whichdoesn’t act as LTSP server.
To have ltspserver00 serve diskless workstations on the main (10.0.x.x) network, when tjener is not acombined server, one needs to follow these steps:
• copy the ltsp directory from /var/lib/tftpboot from ltspserver00 to the same directory on tjener.
• copy /var/lib/tftpboot/debian-edu/default-diskless.cfg to the same directory ontjener.
• edit /var/lib/tftpboot/debian-edu/default-diskless.cfg to use the IP address of lt-spserver00, the following example uses 10.0.2.10 (which is the default):
DEFAULT ltsp/i386/vmlinuz initrd=ltsp/i386/initrd.img nfsroot=10.0.2.10:/opt/ ←
ltsp/i386 boot=nfs ro quiet 3
• set the symlink in /var/lib/tftpboot/pxelinux.cfg on tjener to point to /var/lib/tft-pboot/debian-edu/default-diskless.cfg .
17.1.4 How to extend the range of static IP addresses
Out of the box Debian Edu only has 50 static addresses available on the 10.0.2.0/23 network. To extendthis to 90 addresses, you can do the following.
1. Download ext_static.ldif . The LDIF makes the following changes to the LDAP catalog:
• It changes the 10.0.2.0/23 dynamic DHCP range from 10.0.2.100-10.0.3.242 to 10.0.2.100-10.0.3.213• It deletes the DNS records for dhcp370 (10.0.3.214) to dhcp399 (10.0.3.243)• It adds DNS records for static50 (10.0.3.214) to static90 (10.0.3.244)
2. Apply the changes described in ext_static.ldif:
ldapmodify -x -Z -W -D cn=admin,ou=People,dc=skole,dc=skolelinux,dc=no -f ←
ext_static.ldif
When prompted, enter the LDAP admin password. You now have 40 extra static addresses, at thecost of 29 dynamic addresses.
43
8/3/2019 Debian Edu Lenny Manual
http://slidepdf.com/reader/full/debian-edu-lenny-manual 50/64
17 HOWTOS FOR NETWORKED CLIENTS 17.2 LTSP in detail
17.2 LTSP in detail
17.2.1 lts.conf
To make special adaptations and congurations for specic thinclients, you can edit the le /opt/lt-sp/i386/etc/lts.conf . Have a look at /opt/ltsp/i386/usr/share/doc/ltsp-client-co-re/examples/lts.conf to see some examples and see /usr/share/doc/ltsp-server/lts-p-arameters.txt.gz for all parameters you can specify.
The default values is dened under [default] , to congure one client, specify which client usingthe client mac adress or ipadress like this [192.168.0.10] .
Example: To make the thinclient ltsp010 use 1280x1024 resolution, add something like this:
[192.168.0.10]X_MODE_0 = 1280x1024X_HORZSYNC = "60-70"X_VERTREFRESH = "59-62"
somewhere below the default settings.Depending on what changes you make, it may be necessary to restart X on the client (by pressing
alt+ctrl+backspace) or restart the client.To use ipadresses in lts.conf you should add the client mac-address to your dhcp-server. Other-
wise you should use the client mac-address directly in you lts.conf le.
17.2.2 Load balancing LTSP servers
17.2.2.1 Part 1 It is possible to set up the clients to connect to one of several servers for load balanc-ing. This is done by providing /opt/ltsp/i386/usr/lib/ltsp/get_hosts as a script printing one or moreservers for LDM to connect to. In addition to this, each ltsp chroot need to include the ssh host key foreach of the servers.
First of all, you must choose one LTSP server to be the loadbalancing server. All the clients will PXE- boot from this server and load the Skolelinux image. After the image is loaded, LDM chooses whichserver to connect to by using the "get_hosts" script. How this is done you decide later on.
Now you have to move your clients from the 192.168.1.0 network to the 10.0.2.0 network. This is because when you use loadbalancing, the clients should have direct access to the server LDM chooses.If you leave your clients on the 192.168.1.0 network, all of the clients trafc will go through that server before it reaches the chosen LDM server.
To get the clients working on the 10.0.2.0 network, you have to edit /etc/dhcp3/dhcpd.conf on themain-server (tjener). Where it says:
/!\ FIXME: This need to be changed as DHCP conguration is in LDAP.
subnet 10.0.2.0 netmask 255.255.254.0 {range 10.0.2.100 10.0.3.242;}
you have to add this under "range":
filename "/var/lib/tftpboot/ltsp/i386/pxelinux.0";next-server xxx;option root-path "/opt/ltsp/i386";option log-servers ltspserver01;use-host-decl-names on;
Next-server should be the IP-address or hostname of the server you chose to be the loadbalancingserver. If you use hostname you must have a working DNS. Remember to restart the dhcp service.
17.2.2.2 Part 2 Now you have to make a "get_hosts" script that prints a server for LDM to connect to.The parameter LDM_SERVER overrides this script. In consequence, this parameter must not be denedif the get_hosts is going to be used. The get_hosts script writes on the standard output each server IP
address or host names, in the random order.Edit "/opt/ltsp/i386/etc/lts.conf" and add something like this:
MY_SERVER_LIST = "xxxx xxxx xxxx"
44
8/3/2019 Debian Edu Lenny Manual
http://slidepdf.com/reader/full/debian-edu-lenny-manual 51/64
17 HOWTOS FOR NETWORKED CLIENTS 17.2 LTSP in detail
Replace xxxx with either the IP or hostname of the servers, list must be space separated. Then,put the following script in /opt/ltsp/i386/usr/lib/ltsp/get_hosts on the server you chose to be theloadbalancing server.
# Randomize the server list contained in MY_SERVER_LIST parameterTMP_LIST=""SHUFFLED_LIST=""for i in $MY_SERVER_LIST; dorank=$RANDOMlet "rank %= 100"TMP_LIST="$TMP_LIST\n${rank}_$i"doneTMP_LIST=$(echo -e $TMP_LIST | sort)for i in $TMP_LIST; doSHUFFLED_LIST="$SHUFFLED_LIST $(echo $i | cut -d_ -f2)"doneecho $SHUFFLED_LIST
17.2.2.3 Part 3 Now that you’ve made the "get_hosts" script, it’s time to make the ssh host key for theltsp chroots. This can be done by making a le containing the content of /opt/ltsp/i386/etc/ssh/ssh_known_hostsfrom all the ltsp servers that will be loadbalanced. Save this le as /etc/ltsp/ssh_known_hosts.extra onall loadbalance servers. The last step is very important because ltsp-update-sshkeys runs every time aserver is booted, and /etc/ltsp/ssh_known_hosts.extra is included if it exists.
/!\ If you save your new host le as /opt/ltsp/i386/etc/ssh/ssh_known_hosts, it will be erasedwhen you reboot the server.
There is some obvious weaknesses with this setup. All clients get their image from the same server,this causes high loads on the server if many clients are booted at the same time. Also the clients requirethat server to always be available, without it they cannot boot or get a LDM server. Therefore this setupis very dependent on one server, which isn’t very good.
Your clients should now be loadbalanced!
17.2.3 Sound with LTSP clients
LTSP thin clients supports three different audio systems for applications, ESD, PulseAudio and ALSA.ESD and PulseAudio support networked audio and are used to pass audio from the server to the clients.ALSA is congured to redirect its sound via PulseAudio . For selected applications only supportingthe OSS audio system, a wrapper is created by /usr/sbin/debian-edu-ltsp-audiodivert to redirect theirsound to PulseAudio . Run this script without arguments to get a list of applications with such redirec-tion enabled.
LTSP diskless workstations handle audio locally and have none of the special setup needed for net-worked audio.
17.2.4 Upgrading the LTSP environment
It is useful to upgrade the LTSP environment with new packages fairly often, to make sure security xesand improvements are made available. To upgrade, run these commands as user root on each LTSPserver:
chroot /opt/ltsp/i386aptitude updateaptitude upgradeaptitude dist-upgradeexit
17.2.4.1 Installing additional software in the LTSP environment To install additional software forLTSP client you must perform the installation inside the chroot of the LTSP server.
chroot /opt/ltsp/i386## optionally, edit the sources.list:#vim /etc/apt/sources.list
45
8/3/2019 Debian Edu Lenny Manual
http://slidepdf.com/reader/full/debian-edu-lenny-manual 52/64
17 HOWTOS FOR NETWORKED CLIENTS 17.3 Replacing LDM with KDM
aptitude updateaptitude install $new_packageexit
17.2.5 Slow login and security
Skolelinux has added several security features on the client network preventing unauthorised superuser access, stopping password snifng and other tricks which may be used on a local network. Onesuch security measures is secure login using ssh wich is default with LDM. This can slow down someclient machines which are older than 10 years, having as little as 160 MHz processor and 32 MB RAM.Even if not recomended, you can add the "True" value in ...LDM_DIRECTX=True
should be added to the server in the /opt/ltsp/i386/etc/lts.conf le./!\ Warning : Above protects initial login but all activities after that use unencrypted XDMCP. Pass-
words (except the initial one) will travel in cleartext over the network, as well as anything else.Note: Since such 10 year old thin clients may also get trouble with running never versions of OpenOf-
ce.org and Firefox/Iceweasel due to pixmapcaching issues, you may consider running thin clients withat least 128 MB RAM, or upgrade to hardware, which will also give you the benet of being able to usethem as diskless workstations.
17.3 Replacing LDM with KDMSkolelinux 3.0 is running LDM as a login manager. It uses a secure ssh tunnel to log in. When usingKDM a switch to XDMCP is neccesary. XDMCP uses less CPU ressources on the clients and on theserver.
/!\ Warning : XDMCP does not use encryption. Passwords will travel in cleartext over the network,as well as anything else.
/!\ Note: local devices with ltspfs will stop working without LDM.To check if XDMCP is running, run this command from a workstation:
X -query ltspserverXX
If you are on the thin client network, please run this command:X -query 192.168.0.254
The goal is to let your "real" thin client to contact the xdmcp-server on the 192.168.0.254 net (given astandard Skolelinux conguration).
If by some reason xdmcp is accessible on your server which runs KDM , please add the following to/etc/kde3/kdm/Xaccess
* # any host can get a login window
The star before the comment ’#’ is important, rest is a comment of course :)Then turn on xdmcp in kdm with the command:
sudo update-ini-file /etc/kde3/kdm/kdmrc Xdmcp Enable true
At the end please restart kdm by running:sudo invoke-rc.d kdm restart
(in courtesy of Finn-Arne Johansen)
17.4 Connecting Windows machines to the network / Windows integration17.4.1 Joining the domain
For Windows clients the Windows domain "SKOLELINUX" is available to be joined. A special service
called Samba, installed on the main-server tjener, enables Windows clients to store proles and userdataand also authenticates the users during the login.In order to make Windows clients join the domain some (few) steps are required:1. Create a user with membership in the "admins" group (if not already existing)
46

8/3/2019 Debian Edu Lenny Manual
http://slidepdf.com/reader/full/debian-edu-lenny-manual 53/64
17 HOWTOS FOR NETWORKED CLIENTS 17.4 Connecting Windows machines to the . . .
• In order to be able to join the "SKOLELINUX" domain a member of the admins group needs toauthorize the process. If not yet existing, a user with that membership needs to be added (formore information see <link to lwat docu>). The user "root" will not work, because there is nopassword for root in Samba.
2. Congure the Windows client as static host
• When joining a samba domain some special data is stored on the domain controller (tjener). Thisdata is needed to recognize the Windows client later as being allowed to authenticate users. Inorder to enable Samba to store this data, Samba requires an static host conguration to be present.This could be added by using the LWAT web interface (see also <link to lwat>). When adding thestatic host conguration it is important to check the "Samba host" option, otherwise will lack therequired data to be able to join the domain.
3. On the Windows client: Make sure the network and system conguration matches the data storedon tjener (hostname and ip conguration).
• It’s really important, that the Windows hosts have the same data, otherwise Samba will not ndthe host added in step 2.
4. Join the domain as usual using the user added in step 1.
• Depending on the version and language of you Windows installation, you should nd the cong-uration about the domain or workgroup of your system somewhere in the system properties. Afreshly installed Windows system should belong to a default workgroup. You can join the domain by selecting "Domain" instead of "Workgroup" and entering SKOLELINUX as new domain. Press-ing enter will then open a new window, where the login data of the user created in step 1. can beentered. After some time the Windows client opens a popup window with a welcome message.After the obligatory reboot the loginscreen offers a option to login into the domain.
Windows will sync the prole of domain users on every login and logout. Depending on how muchdata stored in the prole this could take some time. To minimize the time needed, one should deactivatethings like local cache in browsers (you could use the squid proxycache installed on tjener instead) andsave le into the H: volume instead of "Own les".
17.4.1.1 User groups in Windows Groupmaps must also be added for any other user groups youadd through lwat . If you want your user groups to be available in Windows, eg for netlogon scripts orother group dependant actions, you can add them using variations of the following command. Sambawill function without these groupmaps, but Windows machines won’t be group aware.
/usr/bin/net groupmap add unixgroup=students \type=domain ntgroup="students" \comment="All students in the school"
FIXME: should user groups in windows better be explained with lwat rst, and then with an examplefor the command line?
If you want to check user groups on Windows, you need to download the tool IFMEMBER.EXE fromMicrosoft. Then you can use this for example in the logon script which resides on tjener in /etc/sam-ba/netlogon/LOGON.BAT .
17.4.2 XP home
Users bringing in their XP home laptop can still connect to Tjener using their skolelinux credentials,provided the workgroup is set to SKOLELINUX. However, they may need to disable the windowsrewall before Tjener will appear in Network Neighbourhood (or whatever its called now).
17.4.3 Managing roaming proles
Roaming proles contain user work environments, which include the desktop items and settings. Someexamples of these environments are personal les, desktop icons and menus, screen colors, mousesettings, window size and position, application congurations and network and printer connections.Roaming proles are available wherever the user logs on, provided the server is available.
47
8/3/2019 Debian Edu Lenny Manual
http://slidepdf.com/reader/full/debian-edu-lenny-manual 54/64
17 HOWTOS FOR NETWORKED CLIENTS 17.4 Connecting Windows machines to the . . .
Since the prole is copied from the server to the machine during logon, and copied back to theserver during logout, a large prole can make windows login/logout painfully slow. There can be manyreasons for a large prole, but the most common problems is that users save their les on the windowsdesktop or in the My Documents folder instead of in their homedir. Also some badly designed programsuse the prole for scratch space, and other data.
The educational approach : One way to deal with to large proles is to explain the situation for theusers. Tell them not to store huge les on the desktop and if they fail to listen it’s their own fault whenlogin is slow.
Tweaking the prole : A different way to deal with the problem is to remove parts of the prole, andredirect other parts to regular le storage. This moves the work load from the users to the administrator,while adding complexity to the installation. There are at least three ways to edit the parts that areremoved from the roaming prole.
17.4.3.1 Example smb.conf’s for roaming proles Already delivered while installation, you can ndan example smb.conf hopefully in your prefered language. You can nd the cong example les on yourtjener under /usr/share/debian-edu-cong/examples/ . The source le is in English and is called smb-roaming-proles-en.conf . If it is translated to German for example, it is named smb-roaming-proles-de.conf . So if you search a le translated to your prefered language, look at the country code part in thelename. Inside the cong le are a lot of explanations, so you should have a look at.
17.4.3.2 Using machine policies Machine policies can be edited and copied to all the other comput-ers.
1. Pick a freshly installed Windows computer, and run gpedit.msc
2. Under the selection User Conguration -> Administrative Templates -> System -> User Proles ->Exclude directories in roaming prole, you can enter a semicolon separated string of directoriesto exclude from the prole, the directories are internationalized and must be written in your ownlanguage the way they are in the prole. Example of directories to exclude are
• log• Locale settings• Temporary Internet Files• My Documents• Application Data• Temporary Internet Files
3. Save your changes, and exit the editor.
4. Copy c:\windows\system32\GroupPolicy to all other windows machines.
• It’s a good idea to copy it to your windows os deployment system to have it included at
install time.
17.4.3.3 Using global policies By using the legacy windows policy editor ( poledit.exe ), you cancan create a Policy le (NTCong.pol) le and put it in your netlogon share on tjener. This has theadvantage of working almost instantly on all windows machines.
Since some time the policy editor standalone download has been removed from the Microsoft web-site, but it’s still available as part of the ORK Tools.
With poledit.exe you can create .pol les. If you put such a le on tjener as /etc/samba/netlo-gon/NTLOGON.POL it will be read by the windows machine automatically and temporarily overwritethe registry, thus applying the changes.
To make sensible use of poledit.exe you also need to download appriate .adm les for your operatingsystem and applications, otherwise you cannot dene many settings in poledit.exe.
Be aware that the new group policy tools,gpedit.msc
andgpmc.msc
cannot create .pol les, theyeither only work for the local machine or need an active directory server.If you understand german, http://gruppenrichtlinien.de is a very good website on this
topic.
48
8/3/2019 Debian Edu Lenny Manual
http://slidepdf.com/reader/full/debian-edu-lenny-manual 55/64
17 HOWTOS FOR NETWORKED CLIENTS 17.4 Connecting Windows machines to the . . .
17.4.3.4 Editing Windows registry You can edit the registry of the local computer, and copy thisregistry key to other computers
1. Start the Registry Editor.
2. Navigate to HKEY_CURRENT_USER\Software\Microsoft\Windows NT\CurrentVersion-
\Winlogon
3. Use the menu Edit menu->New->String Value .
4. Call it ExcludeProfileDirs
5. Enter a semicolon sepatated string of paths to exclude. (same way as machine policy)
Now you can choose to export this registry key as a .reg le, Mark a selection, right click and selectexport. Save the le and you can double click it, or add it to a script to spread it to other machines.
Sources:
• http://technet2.microsoft.com/windowsserver/en/technologies/featured/gp/default.mspx
• http://www.samba.org/samba/docs/man/Samba-HOWTO-Collection/PolicyMgmt.html
• http://isg.ee.ethz.ch/tools/realmen/det/skel.en.html
• http://www.css.taylor.edu/~nehresma/samba.html
17.4.4 Redirecting parts of prole
Sometimes just removing the directory from the prole is not enough. You may experience that usersloose les because they mistakenly save things into my documents, when this is not saved in the pro-
les. Also you may want to redirect the directories some badly programed applications use to normalnetwork shares.
17.4.4.1 Using machine policies Everything under Using machine policies above applies. You editusing gpedit.msc and copy the Policy to all machines The redirection should be available under UserConguration -> Windows Settings->Folder Redirection Things that can be nice to redirect are Desktopor My Documents.
One thing to remember is that if you enable folder redirection, those folders are automatically addedto the syncroniced folders list. If you do not want this, you should also disable that in following
• User Conguration -> Administrative Templates -> Network -> Ofine Files
• Computer Conguration -> Administrative Templates -> Network -> Ofine Files
17.4.4.2 Using global policies FIXME explain how to use proles from global policies for windowsmachines in the skolelinux network
17.4.5 Avoiding roaming proles
17.4.5.1 Using a local policy Using local policies you can disable roaming prole on individualmachines. This is often wanted on special machines, for instance on dedicated machines, or machinesthat have lower then usual bandwith.
You can use the machine policy method describe above, the key is in
• Administrative Templates -> system -> User Proles -> Only allow local proles
17.4.5.2 Using global policies FIXME: describe roaming prole key for the global policy editor here
49
8/3/2019 Debian Edu Lenny Manual
http://slidepdf.com/reader/full/debian-edu-lenny-manual 56/64
18 HOWTOS FOR TEACHING AND . . . 17.5 Remote Desktops with RDP, VNC, NX or . . .
17.4.5.3 altering samba cong By editing the samba cong you can disable roaming proles for theentire network. Perhaps everyone have their own dedicated machine? and nobody else is allowed totouch it. To disable the roaming proles for the entire network you can alter the smb.conf le on tjenerand unset the logon path and logon home variables, and restart samba.
logon path = ""
logon home = ""
17.5 Remote Desktops with RDP, VNC, NX or Citrix
Some municipalities provide a remote desktop solution so that students and teachers canaccess Skolelinuxfrom their home computer running Windows, Mac or Linux.
• RDP - the easiest way to access Windows terminal server. Just install the rdesktop package.
• VNC client (Virtual Network Computer) gives access to Skolelinux remotely. Just install the xvn-cviewer package.
• NX graphical client gives students and teachers access to Skolelinux remotely on Windows, Macor Linux PC. One municipality in Norway has provided NX support to all their students since2005. They report that the solution is stable.
• Citrix ICA client HowTo to access Windows terminal server from Skolelinux.
17.6 HowTos from wiki.debian.org
The HowTos from http://wiki.debian.org/DebianEdu/HowTo/ are either user- or developer-specic. Let’s move the user-specic HowTos over here (and delete them over there)! (But rst ask theauthors (see the history of those pages to nd them) if they are ne with moving the howto and puttingit under the GPL.)
• http://wiki.debian.org/DebianEdu/HowTo/LocalDeviceLtspfs
• http://wiki.debian.org/DebianEdu/HowTo/LtspDisklessWorkstation
18 HowTos for teaching and learning
18.1 Moodle
Run aptitude install moodle as root to install moodle.Moodle is a course management system (CMS) - a free, Open Source software package designed
using sound pedagogical principles, to help educators create effective online learning communities.You can download and use it on any computer you have handy (including webhosts), yet it can scalefrom a single-teacher site to a University with 200,000 students. Some schools in France use moodle tokeep track of students’ facilities and credit points.
There are moodle sites all over the world, mostly concentrated in Europe and North America. Checkthe site of an institution near you to get an idea about it. More information is available at the moodleproject page, including documentation and support .
18.2 Monitoring pupils
Some schools use control tools like Controlaula or Italc to supervise their students.Take a look at their wiki: http://italc.sourceforge.net/wiki/index.php?title=Main_
PageFIXME: explain how to install and use italc - 511387 explains this quite well actually.
apt-get install italc-client italc-master
/!\ Warning : monitoring humans might be unethical and illegal in your jurisdiction.
50
8/3/2019 Debian Edu Lenny Manual
http://slidepdf.com/reader/full/debian-edu-lenny-manual 57/64
19 HOWTOS FOR USERS 18.3 Restricting pupils network access
18.3 Restricting pupils network accessSome schools use squidguard or dansguardian to restrict internet access. FIXME: explain how to installand use squidguard and/or dansguardian
/!\ Warning : restricting access to information or freedom of speech might be unethical and illegalin your jurisdiction.
18.4 Installing swi-prologswi-prolog was available in sarge, but was not part of etch, but it was possible to install the sargeversion on etch. Lenny again ships swi-prolog so installing is very easy. Just apt-get installswi-prolog and be done :-)
18.5 HowTos from wiki.debian.orgThe HowTos from http://wiki.debian.org/DebianEdu/HowTo/ are either user- or developer-specic. Let’s move the user-specic HowTos over here (and delete them over there)! (But rst ask theauthors (see the history of those pages to nd them) if they are ne with moving the howto and puttingit under the GPL.)
• http://wiki.debian.org/DebianEdu/HowTo/TeacherFirstStep - incomplete but inter-esting
19 HowTos for users
19.1 Changing passwordsEvery student should use the shorcut on their Desktop, which should point to something like https:-//ldap/lwat/chguserpw.php?username=$(id -un) . (On Windows they have to manually putin their username.)
Using lwat to change their password, ensures that linux (userPassword) and samba (sabmaNTPass-word and smbaLMPassword) passwords are the same.
19.2 Changing the sound volumeOn local machines, which are workstations and LTSP servers, and diskless workstations, kmix worksas usual. alsamixer can also be used to change the sound volume.
On thin clients, pavucontrol works, and so does alsamixer but kmix does not work at all.
19.3 Using emailEvery user can send and receive mails within the internal network. The following paragraphs describehow to congure kmail for each user.
To be able to send and receive mails outside the internal network, the adminstrator needs to congurethe mailserver exim4 according to the local situation, dpkg-reconfigure exim4-config is a goodrst step to do this.
19.3.1 Conguring KMail as a mail client
This needs to be done once by every user who wants to use email.First, start KMail and skip the wizard ("Cancel"). Open the conguration-window and enter your
identity (username and mail-address: [email protected] ). Now move on to "Accounts"and there choose the "Sending"-tab. Add SMTP, host is "postofce". default port 25. Do not forget toenter "postofce.intern" as default domain and click "Apply". Send a mail to yourself ( [email protected] ) now to make sure your directory on the imap-server is created.
After that, add a new IMAP account under the "Receiving"-tab. Enter your username and password,the host is again "postofce". Switch to the "Security"-tab and click on "Check What the Server Supports".Click "Continue" in the warning about the missing server certicate and accept that forever. Go back tothe "General"-tab. Port should be 993 now. Click "Ok" and check if the mail to yourself is there. :)
51
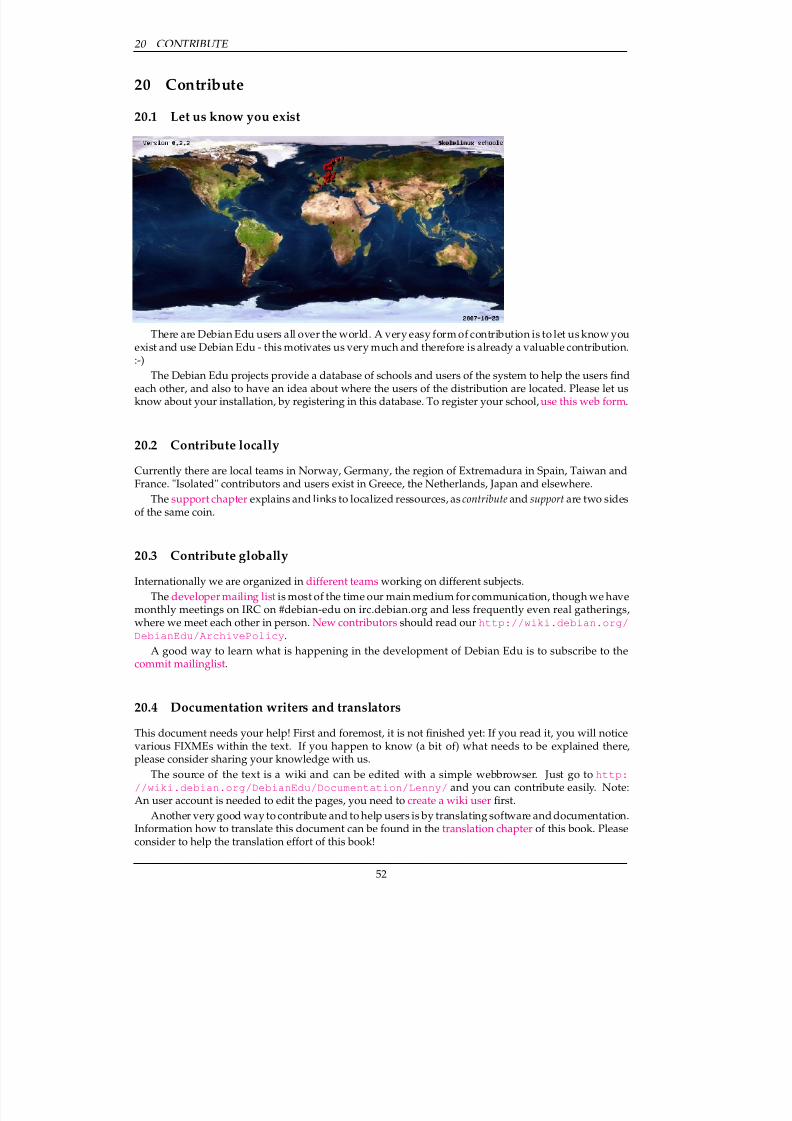
8/3/2019 Debian Edu Lenny Manual
http://slidepdf.com/reader/full/debian-edu-lenny-manual 58/64
20 CONTRIBUTE
20 Contribute
20.1 Let us know you exist
There are Debian Edu users all over the world. A very easy form of contribution is to let us know youexist and use Debian Edu - this motivates us very much and therefore is already a valuable contribution.:-)
The Debian Edu projects provide a database of schools and users of the system to help the users ndeach other, and also to have an idea about where the users of the distribution are located. Please let usknow about your installation, by registering in this database. To register your school, use this web form .
20.2 Contribute locally
Currently there are local teams in Norway, Germany, the region of Extremadura in Spain, Taiwan and
France. "Isolated" contributors and users exist in Greece, the Netherlands, Japan and elsewhere.The support chapter explains and links to localized ressources, as contribute and support are two sides
of the same coin.
20.3 Contribute globally
Internationally we are organized in different teams working on different subjects.The developer mailing list is most of the time our main medium for communication, though we have
monthly meetings on IRC on #debian-edu on irc.debian.org and less frequently even real gatherings,where we meet each other in person. New contributors should read our http://wiki.debian.org/DebianEdu/ArchivePolicy .
A good way to learn what is happening in the development of Debian Edu is to subscribe to thecommit mailinglist .
20.4 Documentation writers and translators
This document needs your help! First and foremost, it is not nished yet: If you read it, you will noticevarious FIXMEs within the text. If you happen to know (a bit of) what needs to be explained there,please consider sharing your knowledge with us.
The source of the text is a wiki and can be edited with a simple webbrowser. Just go to http://wiki.debian.org/DebianEdu/Documentation/Lenny/ and you can contribute easily. Note:An user account is needed to edit the pages, you need to create a wiki user rst.
Another very good way to contribute and to help users is by translating software and documentation.Information how to translate this document can be found in the translation chapter of this book. Pleaseconsider to help the translation effort of this book!
52
8/3/2019 Debian Edu Lenny Manual
http://slidepdf.com/reader/full/debian-edu-lenny-manual 59/64
22 COPYRIGHT AND AUTHORS
21 Support
21.1 Volunteer based support
21.1.1 in English
• http://wiki.debian.org/DebianEdu
• https://init.linpro.no/mailman/skolelinux.no/listinfo/admin-discuss - sup-port mailing list
• #debian-edu on irc.debian.org - IRC channel, mostly development related, do not expect real timesupport even though it frequently happens :-)
21.1.2 in Norwegian
• https://init.linpro.no/mailman/skolelinux.no/listinfo/bruker - support mail-ing list
• https://init.linpro.no/mailman/skolelinux.no/listinfo/linuxiskolen - mail-inglist for the development member organisation in Norway (FRISK)
• #skolelinux on irc.debian.org - IRC channel to support norwegian users
21.1.3 in German
• http://www.skolelinux.de/mailman/listinfo/user - support mailing list
• http://wiki.skolelinux.de - wiki with lots of HowTos etc.
• #skolelinux.de on irc.debian.org - IRC channel to support german users
21.1.4 in French
• http://lists.debian.org/debian-edu-french - support mailinglist
21.1.5 in Spanish
• http://www.skolelinux.es - spanish portal
21.2 Professional supportLists of companies providing professional support are available from http://wiki.debian.org/DebianEdu/Help/ProfessionalHelp .
22 Copyright and authors
This document is written and copyrighted by Holger Levsen (2007, 2008, 2009, 2010), Petter Reinholdt-sen (2007, 2008, 2009, 2010), Daniel Heß (2007), Patrick Winnertz (2007), Knut Yrvin (2007), Ralf Gesel-lensetter (2007), Ronny Aasen (2007), Morten Werner Forsbring (2007), Bjarne Nielsen (2007, 2008) NigelBarker (2007), José L. Redrejo Rodríguez (2007), John Bildoy (2007), Joakim Seeberg (2008), Jürgen Leib-ner (2009), Oded Naveh (2009), Philipp Hübner (2009, 2010), Andreas Mundt (2010) and Olivier Vitrat(2010) and is released under the GPL2 or any later version. Enjoy!
If you add content to it, please only do so if you are the author. You need to release it under thesame conditions ! Then add your name here and release it under the GPL2 or later version.
53
8/3/2019 Debian Edu Lenny Manual
http://slidepdf.com/reader/full/debian-edu-lenny-manual 60/64
24 TRANSLATIONS OF THIS DOCUMENT
23 Translation copyright and authors
The Spanish translation is copyrighted by José L. Redrejo Rodríguez (2007), Rafael Rivas (2009) andNorman Garcia (2010) and is released under the GPL2 or any later version.
The Bokmål translation is copyrighted by Petter Reinholdtsen (2007), Håvard Korsvoll (2007, 2008),Tore Skogly (2008), Ole-Anders Andreassen (2010) and Jan Roar Rød (2010) and is released under theGPL2 or any later version.
The German translation is copyrighted by Holger Levsen (2007), Patrick Winnertz (2007), Ralf Gesel-lensetter (2007, 2009), Roland F. Teichert (2007, 2008, 2009), Jürgen Leibner (2007), Ludger Sicking (2008),Kai Hatje (2008), Kurt Gramlich (2009), Franziska Teichert (2009), Philipp Hübner (2009) and AndreasMundt (2009, 2010) and is released under the GPL2 or any later version.
The Italian translation is copyrighted by Claudio Carboncini (2007, 2008, 2009, 2010) and is releasedunder the GPL2 or any later version.
The French translation is copyrighted by Christophe Masson (2008), Olivier Vitrat (2010) and theFrench l10n team (2009, 2010) and is released under the GPL2 or any later version.
The Traditional Chinese translation is copyrighted by Andrew Lee (李健秋) (2009)and is released under the GPL2 or any later version.
24 Translations of this document
Fully translated versions of this document to German and Italian are available. Incomplete translationsfor Norwegian Bokmål, French, Spanish and Chinese exist, take a look for your language here.
24.1 HowTo translate this document
As in many free software projects, translations of this document are kept in .po les. More informationabout the process can be found in /usr/share/doc/debian-edu-doc/README.debian-edu-le-nny-manual-translations . The svn-repository (see below) contains this le too. Take a look thereand at the language specic conventions if you want to help translating this document.
To commit your translations you need to be a member of the alioth project debian-edu . To translate,you just need to check out some les from from svn (which can be done anonymously) and createpatches. Please le a bug against the debian-edu-doc package and attach the .po le to the bugreport .Find some instructions on how to submit bugs here.
You can checkout the debian-edu-doc source anonymously with the following command (youneed to have the subversion package installed for this to work):
• svn co svn://svn.debian.org/svn/debian-edu/trunk/src/debian-edu-doc
Then edit the documentation/debian-edu-lenny/debian-edu-lenny-manual.$CC.po (whereyou replace $CC with your language code). There are many tools for translating available, we suggestto use kbabel .
Then you either commit the le directly to svn (if you have the rights to do so) or send the le to the bugreport.To update your local copy of the repository use the following command inside the debian-edu--
doc directory:
• svn up
Read /usr/share/doc/debian-edu-doc/README.debian-edu-lenny-manual-translations to nd in-formation how to create a new .po le for your language if there is none yet, and how to update trans-lations.
Basic information about Alioth (the host where our SVN repository is located) and SVN is availableat http://wiki.debian.org/Alioth/Svn .
If you are new to SVN, look at the SVN book , it has a chapter on the basic workow with SVN . Alsoyou might want to look at he kdesvn package if you prefer a GUI client for SVN instead of using thecommandline client.
Please report any problems.
54
8/3/2019 Debian Edu Lenny Manual
http://slidepdf.com/reader/full/debian-edu-lenny-manual 61/64
25 APPENDIX A - THE GNU PUBLIC LICENSE
25 Appendix A - The GNU Public License
Note to translators: there is no need to translate the GPL license text.
25.1 Manual for Debian Edu 5.0.6+edu1 Codename "Lenny"Copyright (C) 2007-2010 Holger Levsen < [email protected] > and others, see the Copyright chapterfor the full list of copyright owners.
This program is free software; you can redistribute it and/or modify it under the terms of the GNUGeneral Public License as published by the Free Software Foundation; either version 2 of the License, or(at your option) any later version.
This program is distributed in the hope that it will be useful, but WITHOUT ANY WARRANTY;without even the implied warranty of MERCHANTABILITY or FITNESS FOR A PARTICULAR PUR-POSE. See the GNU General Public License for more details.
You should have received a copy of the GNU General Public License along with this program; if not,write to the Free Software Foundation, Inc., 51 Franklin Street, Fifth Floor, Boston, MA 02110-1301 USA.
25.2 GNU GENERAL PUBLIC LICENSEVersion 2, June 1991
Copyright (C) 1989, 1991 Free Software Foundation, Inc. 51 Franklin Street, Fifth Floor, Boston, MA02110-1301, USA. Everyone is permitted to copy and distribute verbatim copies of this license document, but changing it is not allowed.
25.3 TERMS AND CONDITIONS FOR COPYING, DISTRIBUTION AND MOD-IFICATION
0. This License applies to any program or other work which contains a notice placed by the copyrightholder saying it may be distributed under the terms of this General Public License. The "Program",
below, refers to any such program or work, and a "work based on the Program" means either the Pro-gram or any derivative work under copyright law: that is to say, a work containing the Program or aportion of it, either verbatim or with modications and/or translated into another language. (Here-inafter, translation is included without limitation in the term "modication".) Each licensee is addressedas "you".
Activities other than copying, distribution and modication are not covered by this License; they areoutside its scope. The act of running the Program is not restricted, and the output from the Program iscovered only if its contents constitute a work based on the Program (independent of having been made by running the Program). Whether that is true depends on what the Program does.
1. You may copy and distribute verbatim copies of the Program’s source code as you receive it, inany medium, provided that you conspicuously and appropriately publish on each copy an appropriatecopyright notice and disclaimer of warranty; keep intact all the notices that refer to this License and tothe absence of any warranty; and give any other recipients of the Program a copy of this License alongwith the Program.
You may charge a fee for the physical act of transferring a copy, and you may at your option offerwarranty protection in exchange for a fee.
2. You may modify your copy or copies of the Program or any portion of it, thus forming a work based on the Program, and copy and distribute such modications or work under the terms of Section1 above, provided that you also meet all of these conditions:
• a) You must cause the modied les to carry prominent notices stating that you changed the lesand the date of any change.b) You must cause any work that you distribute or publish, that in whole or in part contains or isderived from the Program or any part thereof, to be licensed as a whole at no charge to all thirdparties under the terms of this License.c) If the modied program normally reads commands interactively when run, you must causeit, when started running for such interactive use in the most ordinary way, to print or display anannouncement including an appropriate copyright notice and a notice that there is no warranty (or
55

8/3/2019 Debian Edu Lenny Manual
http://slidepdf.com/reader/full/debian-edu-lenny-manual 62/64
25 APPENDIX A - THE GNU PUBLIC LICENSE 25.3 TERMS AND CONDITIONS FOR . . .
else, saying that you provide a warranty) and that users may redistribute the program under theseconditions, and telling the user how to view a copy of this License. (Exception: if the Programitself is interactive but does not normally print such an announcement, your work based on theProgram is not required to print an announcement.)
These requirements apply to the modied work as a whole. If identiable sections of that work arenot derived from the Program, and can be reasonably considered independent and separate works inthemselves, then this License, and its terms, do not apply to those sections when you distribute them asseparate works. But when you distribute the same sections as part of a whole which is a work based onthe Program, the distribution of the whole must be on the terms of this License, whose permissions forother licensees extend to the entire whole, and thus to each and every part regardless of who wrote it.
Thus, it is not the intent of this section to claim rights or contest your rights to work written entirely by you; rather, the intent is to exercise the right to control the distribution of derivative or collectiveworks based on the Program.
In addition, mere aggregation of another work not based on the Program with the Program (or witha work based on the Program) on a volume of a storage or distribution medium does not bring the otherwork under the scope of this License.
3. You may copy and distribute the Program (or a work based on it, under Section 2) in object code
or executable form under the terms of Sections 1 and 2 above provided that you also do one of thefollowing:
• a) Accompany it with the complete corresponding machine-readable source code, which must bedistributed under the terms of Sections 1 and 2 above on a medium customarily used for softwareinterchange; or,b) Accompany it with a written offer, valid for at least three years, to give any third party, for acharge no more than your cost of physically performing source distribution, a complete machine-readable copy of the corresponding source code, to be distributed under the terms of Sections 1and 2 above on a medium customarily used for software interchange; or,c) Accompany it with the information you received as to the offer to distribute correspondingsource code. (This alternative is allowed only for noncommercial distribution and only if you re-
ceived the program in object code or executable form with such an offer, in accord with Subsection b above.)
The source code for a work means the preferred form of the work for making modications to it. Foran executable work, complete source code means all the source code for all modules it contains, plusany associated interface denition les, plus the scripts used to control compilation and installation of the executable. However, as a special exception, the source code distributed need not include anythingthat is normally distributed (in either source or binary form) with the major components (compiler,kernel, and so on) of the operating system on which the executable runs, unless that component itself accompanies the executable.
If distribution of executable or object code is made by offering access to copy from a designatedplace, then offering equivalent access to copy the source code from the same place counts as distributionof the source code, even though third parties are not compelled to copy the source along with the object
code.4. You may not copy, modify, sublicense, or distribute the Program except as expressly provided
under this License. Any attempt otherwise to copy, modify, sublicense or distribute the Program is void,and will automatically terminate your rights under this License. However, parties who have receivedcopies, or rights, from you under this License will not have their licenses terminated so long as suchparties remain in full compliance.
5. You are not required to accept this License, since you have not signed it. However, nothing elsegrants you permission to modify or distribute the Program or its derivative works. These actions areprohibited by law if you do not accept this License. Therefore, by modifying or distributing the Program(or any work based on the Program), you indicate your acceptance of this License to do so, and all itsterms and conditions for copying, distributing or modifying the Program or works based on it.
6. Each time you redistribute the Program (or any work based on the Program), the recipient auto-
matically receives a license from the original licensor to copy, distribute or modify the Program subjectto these terms and conditions. You may not impose any further restrictions on the recipients’ exerciseof the rights granted herein. You are not responsible for enforcing compliance by third parties to thisLicense.
56
8/3/2019 Debian Edu Lenny Manual
http://slidepdf.com/reader/full/debian-edu-lenny-manual 63/64
25 APPENDIX A - THE GNU PUBLIC LICENSE 25.3 TERMS AND CONDITIONS FOR . . .
7. If, as a consequence of a court judgment or allegation of patent infringement or for any otherreason (not limited to patent issues), conditions are imposed on you (whether by court order, agreementor otherwise) that contradict the conditions of this License, they do not excuse you from the conditions of this License. If you cannot distribute so as to satisfy simultaneously your obligations under this Licenseand any other pertinent obligations, then as a consequence you may not distribute the Program at all.For example, if a patent license would not permit royalty-free redistribution of the Program by all thosewho receive copies directly or indirectly through you, then the only way you could satisfy both it andthis License would be to refrain entirely from distribution of the Program.
If any portion of this section is held invalid or unenforceable under any particular circumstance,the balance of the section is intended to apply and the section as a whole is intended to apply in othercircumstances.
It is not the purpose of this section to induce you to infringe any patents or other property rightclaims or to contest validity of any such claims; this section has the sole purpose of protecting theintegrity of the free software distribution system, which is implemented by public license practices.Many people have made generous contributions to the wide range of software distributed through thatsystem in reliance on consistent application of that system; it is up to the author/donor to decide if he orshe is willing to distribute software through any other system and a licensee cannot impose that choice.
This section is intended to make thoroughly clear what is believed to be a consequence of the rest of this License.
8. If the distribution and/or use of the Program is restricted in certain countries either by patentsor by copyrighted interfaces, the original copyright holder who places the Program under this Licensemay add an explicit geographical distribution limitation excluding those countries, so that distributionis permitted only in or among countries not thus excluded. In such case, this License incorporates thelimitation as if written in the body of this License.
9. The Free Software Foundation may publish revised and/or new versions of the General PublicLicense from time to time. Such new versions will be similar in spirit to the present version, but maydiffer in detail to address new problems or concerns.
Each version is given a distinguishing version number. If the Program species a version number
of this License which applies to it and "any later version", you have the option of following the termsand conditions either of that version or of any later version published by the Free Software Foundation.If the Program does not specify a version number of this License, you may choose any version everpublished by the Free Software Foundation.
10. If you wish to incorporate parts of the Program into other free programs whose distributionconditions are different, write to the author to ask for permission. For software which is copyrighted bythe Free Software Foundation, write to the Free Software Foundation; we sometimes make exceptionsfor this. Our decision will be guided by the two goals of preserving the free status of all derivatives of our free software and of promoting the sharing and reuse of software generally.
NO WARRANTY
11. BECAUSE THE PROGRAM IS LICENSED FREE OF CHARGE, THERE IS NO WARRANTY
FOR THE PROGRAM, TO THE EXTENT PERMITTED BY APPLICABLE LAW. EXCEPT WHEN OTH-ERWISE STATED IN WRITING THE COPYRIGHT HOLDERS AND/OR OTHER PARTIES PROVIDETHE PROGRAM "AS IS" WITHOUT WARRANTY OF ANY KIND, EITHER EXPRESSED OR IMPLIED,INCLUDING, BUT NOT LIMITED TO, THE IMPLIED WARRANTIES OF MERCHANTABILITY ANDFITNESS FOR A PARTICULAR PURPOSE. THE ENTIRE RISK AS TO THE QUALITY AND PERFOR-MANCE OF THE PROGRAM IS WITH YOU. SHOULD THE PROGRAM PROVE DEFECTIVE, YOUASSUME THE COST OF ALL NECESSARY SERVICING, REPAIR OR CORRECTION.
12. IN NO EVENT UNLESS REQUIRED BY APPLICABLE LAW OR AGREED TO IN WRITINGWILL ANY COPYRIGHT HOLDER, OR ANY OTHER PARTY WHO MAY MODIFY AND/OR REDIS-TRIBUTE THE PROGRAM AS PERMITTED ABOVE, BE LIABLE TO YOU FOR DAMAGES, INCLUD-ING ANY GENERAL, SPECIAL, INCIDENTAL OR CONSEQUENTIAL DAMAGES ARISING OUTOF THE USE OR INABILITY TO USE THE PROGRAM (INCLUDING BUT NOT LIMITED TO LOSS
OF DATA OR DATA BEING RENDERED INACCURATE OR LOSSES SUSTAINED BY YOU OR THIRDPARTIES OR A FAILURE OF THE PROGRAM TO OPERATE WITH ANY OTHER PROGRAMS), EVENIF SUCH HOLDER OR OTHER PARTY HAS BEEN ADVISED OF THE POSSIBILITY OF SUCH DAM-AGES.
57
8/3/2019 Debian Edu Lenny Manual
http://slidepdf.com/reader/full/debian-edu-lenny-manual 64/64
26 APPENDIX B - ABOUT DEBIAN EDU . . . 26.3 Stuff to know
25.4 END OF TERMS AND CONDITIONS
26 Appendix B - about Debian Edu Live CD/DVDs/!\ Debian Edu Live CD/DVDs for Lenny are not available at the moment.
26.1 Features of the Standalone image• Almost all packages from the Standalone prole
• All packages from the laptop task
• The KDE desktop prole for students/pupils.
26.2 Activating translations and regional supportTo activate a specic translation, boot using locale=ll_CC.UTF-8 as a boot option, where ll_CC.UTF-8 is the locale name you want. To aciviate a given keyboard layout, use the keyb=KB option where KB isthe wanted keyboard layout. More information on this feature is available from the live cd build scriptdocumentation . Here is a list of commonly used locale codes:
Language (Region) Locale value Keyboard layoutNorwegian Bokmål nb_NO.UTF-8 no
Norwegian Nynorsk nn_NO.UTF-8 no
German de_DE.UTF-8 de
French (France) fr_FR.UTF-8 fr
Greek (Greece) el_GR.UTF-8 el
Japanese ja_JP.UTF-8 jp
Northern Sami (Norway) se_NO no(smi)
A complete list of locale codes is available in /usr/share/i18n/SUPPORTED , but only the UTF-8 locales are supported by the live images. Not all locales have translations installed, though. Thekeyboard layout names can be found in /usr/share/keymaps/i386/.
26.3 Stuff to know• the password for the user is "user", root has no passwd set.
26.4 Known issues with the image• /!\ there are no lenny images yet :(
26.5 Download