dear 4-h and ffa youth participant, - swflcfair.com skill-a-thon/2018_beef...dear 4-h and ffa youth...
TRANSCRIPT

Dear 4-H and FFA youth participant,
Welcome to the Southwest Florida and Lee County Fair Skill-a-thon study guide.
This manual is provided as a study guide and should be used as an aid to help
youth prepare for the skill-a-thon which will be held at the Southwest Florida Lee
County Fair.
A Skill-a-thon is a method of involving 4-H and FFA youth in challenging
activities to increase knowledge of their animal project. The skill-a-thon is
designed to take youth through a series of mini learning stations and the activities
involve hands on learning. Participants will rotate from station to station
attempting to perform a given task.
Junior participants will have fewer stations than Intermediate and Senior youth. It
is recommended that youth study the entire booklet to prepare them for this
challenge.
Curriculum in this package was developed by Extension Services. If you have
questions, please contact your 4-H or FFA leader to assist you with your
preparation.
Study hard and you will be successful with this skill-a-thon.
Sincerely,
Cathy Suggs Lee County 4-H Agent

Identify the names and
descriptions of different
breeds

An
gu
s G
elb
vie
h
Bra
hm
an
Her
efo
rd
Ch
aro
lais L
imo
usi
n
Ch
ian
ina
Po
lled
Her
eford

Sh
orth
orn
T
exa
s L
on
gh
orn
S
an
ta G
ertrud
is S
imm
enta
l


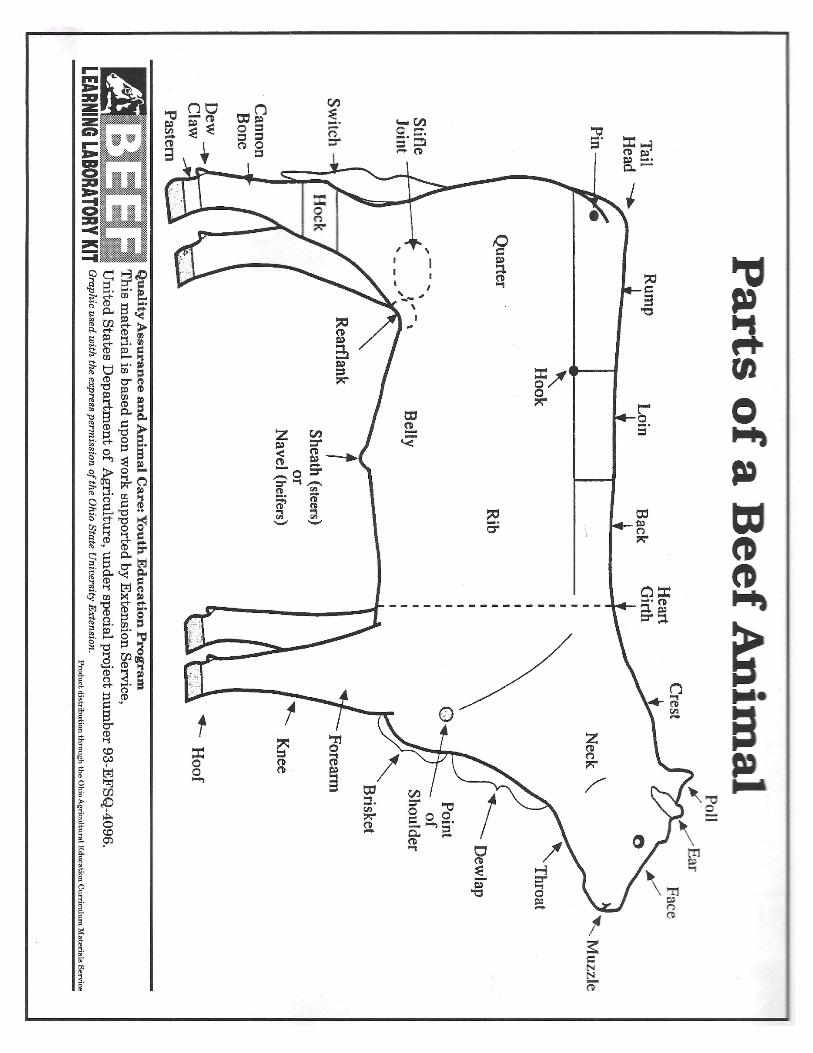
Identify the parts of a cow
Know the cuts of meat
that come from a cow

Know the correct
conformation for your
show cow


Know how to read and
identify parts of a
medication label


Know the different types
of knots and how to tie
them

There are many circumstances in cattle handling that will require you to tie knots. Take the time
to learn to tie several types of knots and hitches so that you will have the right knot for the right
circumstance. Practice often so that it becomes second nature. In an emergency situation, you
do not want to have to think about which knot to choose and how to tie it.
Knots join ropes together, attach ropes to a post or rail, or attach ropes to an animal.
Hitches are used to attach a rope to a post or rail - only thing securing the rope to post is the
pressure of one rope coil wrapping upon the others.
Splices are used to permanently join ropes to one another - individual strands from each rope are
interwoven with strands from the other.
Reefer’s Knot (Quick-Release Square Knot) A good non-slip knot for tying ends of rope
together and can easily be released. An advantage is that it can be tied under tension an
important feature for a knot used to restrain livestock.
Bowline Knot A non-slip knot used to form a loop that will not tighten or draw down when
placed around an animal’s body or a post.
Quick-Release Knot The standard way to tie an animal to a post. A variation of a slipknot that
can be released very quickly, even when under tension. This knot should never be tied around the
neck or body of an animal.
Honda Knot Knot used to form small loop in the end of a rope in order to pass the rest of the
rope through, forming a much larger loop, or lariat.
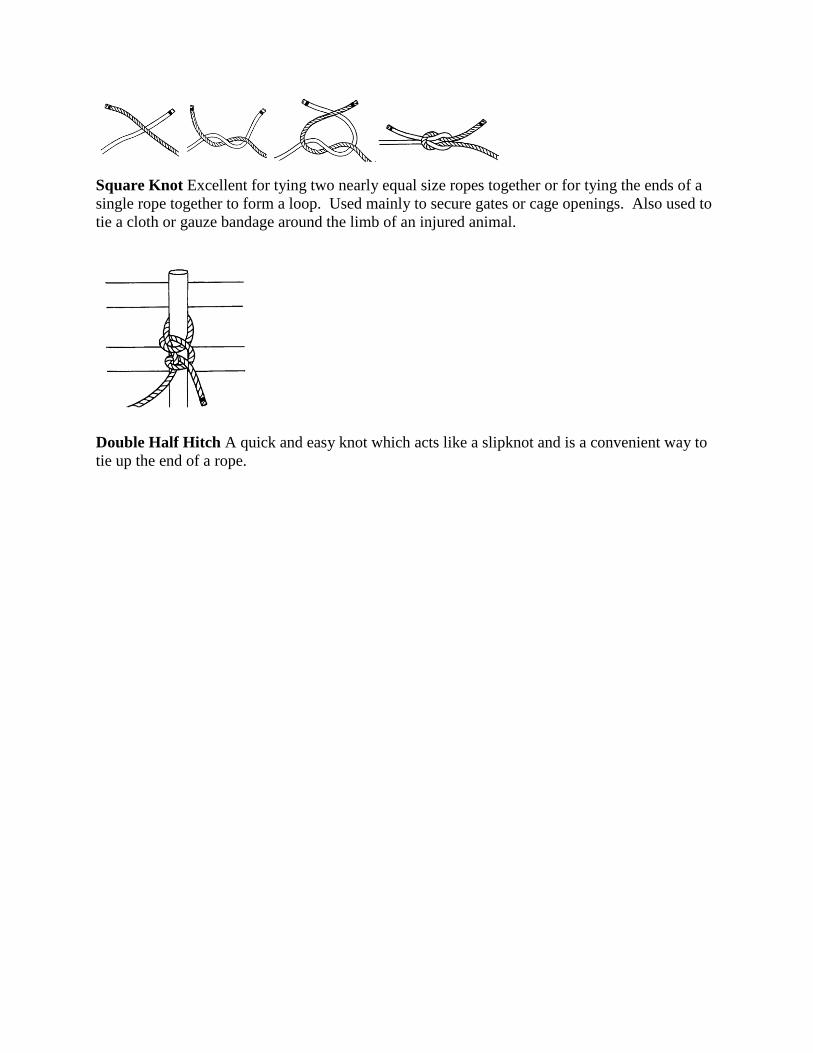
Square Knot Excellent for tying two nearly equal size ropes together or for tying the ends of a
single rope together to form a loop. Used mainly to secure gates or cage openings. Also used to
tie a cloth or gauze bandage around the limb of an injured animal.
Double Half Hitch A quick and easy knot which acts like a slipknot and is a convenient way to
tie up the end of a rope.

Know the process of:
Tattooing
Ear Tagging
Hot Branding
Freeze Branding

TATTOOING
Advantages - It is permanent and does not disfigure the animal.
Disadvantages - Animal must be confined in order to read tattoo. Tattoos are hard to read on
dark-skinned animals.
Equipment Necessary - Squeeze Chute or Head Gate
Tattooing Instrument
Tattooing Numbers &/or Letters
Tattooing Ink or Paste Alcohol
Clean Cloth
Procedures - 1. Assemble the necessary equipment. It is important that the numbers and/or letters be
placed into the tattooing instrument in the proper order. As you look at them in the
tattooing instrument, they should appear backward. Always check the numbers and/or
letters on a piece of paper or card board before you begin to make sure they are correctly
placed.
2. Restrain the animal.
3. Two ribs of the cartilage divide the ear into top, middle and bottom thirds. The tattoo should be placed in the top third of the ear just above the cartilage rib and equal distance from the base and the tip of the ear. Tattooing on the edges of the ear or in the hair portion of the ear can make reading the tattoo difficult. Do not tattoo between the two cartilage ribs; this area is reserved for some types of ear tags or for a brucellosis vaccination tattoo in the right ear of heifers.
4. Clean the inside of the ear, where the tattoo will be placed, with a cloth soaked in alcohol.
Infections or warts can result if a tattoo is placed in a dirty ear.
5. Position the tattoo instrument inside the ear so that the needlepoint dies are above the ribs
as described in step three. Squeeze the handles of the tattooing instrument together
completely and quickly; then release them fully.
6. Rub tattoo ink or paste into all of the needle marks. Work the ink or paste well into the
marks.
7. Release the animal.
8. Clean the tattooing equipment with Nolvasan (disinfectant) after each day of use.

EAR TAGGING Advantages - Economical; can be read from a distance; easy to apply.
Disadvantages - Plastics tend to become hard and brittle in cold weather; easily lost; Pre-numbered tags with block-type numbers are difficult to read if they get soiled.
Equipment Necessary - Squeeze Chute or Head Gate
Ear Tag and Applicator
Antiseptic
Tag pen
Cloth
Procedures -
1. Select tag style.
2. Select the tag size.
3. Select contrasting ink and tag colors.
4. Select a numbering system for the ear tags.
5. The next decision will be whether to purchase pre-numbered or blank tags. Pre- numbered
tags are more convenient, but not as adaptable to your “system” as the blank tags can be.
Make this decision based upon the unique needs of your operation. If you choose the blank
tags, number the plastic tags with marking pens recommended by the tag manufacturer.
Number the tags with large numbers along their bottoms so that they can be seen from a
distance when hair grows in the ear. Soak the tag and button prior to application.
6. Insert the ear tag into the appropriate applicator. Each tag manufacturer has an applicator
designed specifically for its type of tag. Two-piece tags require that the male portion of the
tag be slid over a pin and the female portion inserted into a clip. Be sure to follow the
manufacturer’s directions when inserting the tag into the applicator. When using two part
tags make sure that the male portion of the tag lines up with the female portion of the tag.
7. Select the ear to be tagged.
8. Select the tagging site on the ear. The site selected will vary with the style of tag selected.
Two-piece tags should be placed between the cartilage ribs, approximately halfway between
the base and tip of the ear. Since the male part is the piercing part, it is easier to locate
exactly where you want to place the tag if it is placed in front of the ear.
9. Hold the ear with one hand while using the other hand to insert the ear tag. Pay particular
attention to the proper ear tag site. The two-piece tag is applied with a plier’s type applicator
by squeezing the handles until the ear tag snaps together.
10. Release the animal.
HOT BRANDING Advantages - Easy to read; Unique to producer; Can be used on any color cattle; Permanent.
Disadvantages - Lowers the market value of the hide. It can also be difficult to read, especially
on haired cattle. Stressful for cattle.
Equipment Necessary - Branding Irons
Small propane tank with burner or wood fire
Squeeze Chute
30-gallon Drum
Procedure - 1. Assemble and prepare the necessary equipment. The irons used in hot branding should
be iron or steel, and should be free of dirt and hair.
2. Heat the branding irons. The lowest cost method of heating branding irons is to use the
hot coals of a wood fire. A second and more convenient way to heat irons is to use a small
propane tank and burner. A third method is to use electric branding irons.
3. Restrain the animal in a squeeze chute. Most chutes are designed with hinged sidebars that
allow access to the hip and shoulder regions of the animal. One or two of these should be
lowered to allow access.
4. Put on a pair of leather gloves to prevent burning your hands when handling hot irons.
5. Take the branding iron out of the fire or drum and check the number or character to be used to be sure it is the right one.
6. Check the irons for temperature. The amount of heat required for a good brand is difficult
to describe. The color of the hot iron is a good indicator of the temperature. A black iron is
too cold. A red hot iron is too hot. Using this type of iron causes a large sore, which results
in an indistinct or blotched brand. An iron that is the color of gray ashes is at the proper
temperature to do a good job of branding.
7. Firmly press the ash gray colored branding iron against the hide on the hip and rock the
handle slightly to vary the pressure and obtain uniform application of the entire character.
The color of the branded hide should be light tan, or the color of a new saddle leather. If the
cattle have a light hair coat and the iron temperature is correct, the time required to brand
should only be 5 seconds. Don’t brand wet animals as it will cause a blotched brand.
8. Apply one iron at a time. If two irons are applied at once by the same person, the chances
of slipping and blotching the brand is increased greatly.
9. Place the iron back in the heat source as in step 2. Make sure the iron is clean.
10. Release the animal.

FREEZE BRANDING Advantages - Semi-Permanent; Reduced Hide Damage.
Disadvantages - Takes more time to brand an animal, does not work on white cattle.
Equipment Necessary - Copper or Copper alloy branders
Liquid Nitrogen or Dry Ice
Styrofoam Cooler
99% Isopropyl Alcohol
Electric Clippers
One Quart Squeeze Bottle
Stiff Bristle Brush
Clock (with second hand) Procedure
1. Prepare the branders. They should be clean and free of debris.
2. Cool the irons in a refrigerant. One method is to place the branders in liquid nitrogen.
Place 3 to 4 inches of liquid nitrogen into a Styrofoam cooler or insulated bucket before the
irons are added. Second method of cooling branders involves placing them in a mixture of
99% isopropyl alcohol and dry ice. Both methods require more refrigerant to cool the
branders initially than to re-chill between animals.
3. Fill the quart squeeze bottle with 99% isopropyl alcohol.
4. Restrain the animal in a squeeze chute.
5. Clip the area to be branded as closely as possible. A stiff bristle brush can be used to
remove dirt and debris.
6. The irons are ready for use when the refrigerant stops boiling.
7. Put on a pair of leather gloves, take the brander out of the refrigerant, and check the
character to be used to be sure it is the right one.
8. Check the clock to ensure the proper brand application time.
9. Liberally apply 99% isopropyl alcohol from the squeeze bottle over the branding site.
Soak the area but don’t waste alcohol.
10. Apply the brander to the clipped, alcohol soaked area, and apply pressure to the brander
by leaning on it. The minimum time of application for dark cattle is 30 seconds. For white
cattle you must apply brander for approximately 2 ½ minutes to kill the hair follicles.
11. Place the brander back into the refrigerant and make sure that the refrigerant covers the
iron. If it does not cover the irons, add more liquid.
12. Release the animal.

Know how to identify
each disease as well as the
cause and prevention
techniques

Name: Brucella Abortus Disease
Common Name: Brucellosis
Cause: Bacteria, Brucella abortus
Major Symptoms: Abortion of first calf in last third of pregnancy and retained afterbirth. Some
infected cows show no signs but calves may be born weak. Prevention: Testing for the disease at stages in the cattle’s life, such as on the farm, at the stock
market, and at the slaughter facilities. Once infected, animal should be culled. If more than one
is infected, the whole herd should be quarantined. Good herd management and 1 time only calf
hood vaccination by a licensed veterinarian can help with prevention of outbreaks. Note: Florida
is currently a “Brucellosis free state”.
Name: Bovine Respiratory Synctial Virus
Common Name: BRSV
Cause: Virus
Major Symptoms: Temperatures of 103-105 degrees F, coughing, and some nasal discharge. In
adult cattle that are susceptible, clinical signs are fewer and usually are not noticed until the
cattle begin collapsing and die within a few hours. Prevention: Vaccination when an outbreak has occurred will only aid in slowing down the
spreading of the virus. If the herd is known to not be infected, then vaccination will help in
preventing an outbreak.
Name: Infectious Bovine Rhinotracheitis
Common Name: IBR, or Red Nose
Cause: Virus
Major Symptoms: Watery to yellow colored discharge from the nose and eyes along with
coughing, increased respiration rate and fever. This infection usually follows or is included with
other infections such as BVD and or BRSV. So, many of the vaccines come with a strain of the
IBR virus to aid in prevention. Prevention: Vaccination
Name: Bovine Viral Diarrhea
Common Name: BVD or BVDV
Cause: Virus
Major Symptoms: Cattle infected with this disease do not usually show any symptoms, but the
immune system is weakened and other diseases are more likely. Prevention: Good herd management and good sanitation are the best ways to combat this
disease. Vaccination will help prevent outbreaks, but will not stop the infection.
Name: Parainfluenza 3
Common Name: PI3
Cause: Virus
Major Symptoms: Watery to yellow-colored discharge from nose and eyes, coughing, fever,
and an increase in respiration rate. Prevention: PI3 usually infects cattle that are already infected with other diseases such as IBR,
BVD, or BRSV so a strand of PI3 is usually pre-mixed with another vaccine. Along with

vaccination, good herd management is needed along with good sanitary practices to prevent an
outbreak.
Name: Leptospirosis
Cause: Bacteria, Leptospira interrogons, subclassification, “serovars” hardjo
Major Symptoms: Infected cattle with a chronic or long lasting infection will usually abort the
fetus, have a stillborn, or give birth to a weak calf. In rare acute infections, often in calves, the
signs are high fever, jaundice (yellowing of the skin), and death. Prevention: Regular herd vaccinations twice a year will help along with the vaccination of any
new replacement heifers or bulls. In chronic cases, once abortion has occurred it is too late to
vaccinate. Provide water from a tank and instead of a pond.
Name: Clostridial Disease
Common Name: Blackleg
Cause: Bacteria, Clostridium chauvoei
Major Symptoms: Depression, swelling of muscles or groups of muscles, skin may become
discolored and crackle when touched. Many calves are found dead before any signs appear. Prevention: Vaccination of the whole herd is important, not just for Clostridium chauvoei, but
for all Clostridium bacteria. This is accomplished through vaccinating with 7 or 8 way
Clostridium.
Name: Bovine Spongiform Encephlopathy
Common Name: BSE, “Mad Cow Disease”
Cause: Prion, an abnormal form of a normal protein
Major Symptoms: Cattle tend to show signs of progressive degeneration of the nervous system
and changes in temperament. Abnormal posture, incoordination and difficulty rising are also
observed due to the degeneration of the nervous system. There is a decrease in milk production
and a loss in body weight, but there is no loss of appetite. Prevention: There is no cure for BSE, but there are some guidelines to help prevent an
outbreak. Do not feed meat bone meal, or other feed stuff that contains products from ruminants.
Ensure good slaughter and processing procedures so as not to contaminate edible products.
Though BSE is not contagious, monitoring the off spring of an infected cow is recommended.
Finally the humane destruction of infected cattle to prevent any possible spreading due to
contamination is required. Only 3 cases have been confirmed in US.
Know the proper
techniques and procedures
for showing your animal

Training Your Animal for Showmanship:
Begin training your beef animal as soon as possible. It takes hours upon hours to effectively
halter break your animal, and teach it to respond to commands on the halter and show stick.
Practicing often over short periods has been proven a more effective training technique than a
few, long sessions. There are many methods of teaching an animal to give in to halter pressure.
Choose the method that is the safest and least stressful for the animal considering your own
abilities, help available, facilities and equipment Train the heifer or steer to tie, walk, stop and set
up easily and quickly when asked.
In the Show Ring:
Use of Show Stick -There are three main purposes for the show stick in steer showmanship.
1. Placing the Feet - To move the hind feet backward, push back on the halter and apply
pressure with the show stick on the soft part of the animal’s hoof, between the toes. However,
remember not to jab too hard, for this is a tender area. To move a hind foot forward, pull
forward on the halter and apply pressure with the show stick under the animal’s dewclaw. If you
find that the animal’s hind legs are too close together, you can apply pressure with the show stick
on the inside of the animal’s leg, just above the hoof.
2. Keeping the Topline Straight is important for the Overall appearance of your animal in the
judge’s eye. To straighten the topline, apply pressure to the underline or place the hook of the
stick inside the rear flank and apply slight pressure.
3. Calming and Controlling - Occasionally stroking the animal’s underline as you place its feet
or as it is standing still will help calm and relax the animal, especially if this technique is used
during practice sessions. The show stick can also be used to keep your animal moving at a
comfortable pace that is not too fast. Hold the stick in your left hand when leading and use the
butt end of the show stick to tap the animal’s nose if necessary to slow him down.
4. Moving in and out of line. In moving your steer out the line and moving into another
position, there are three general situations you are likely to encounter:
a. The first is when you are pulled in very close to the rail. In this situation, the only thing you
can do is back your steer out of the line and lead him to the new position.
b. The second is when you are near the center of the line and have plenty of room between your
steer's head and the rail. When told to move, pull your steer forward toward the rail, turn to the
right and move back through the space the steer just vacated. When you have moved to the
center of the ring, you may move into the position the judge and/or ring assistant have indicated.
c. The third situation is when you are standing near one end of the line and have adequate room
between your steer's head and the rail. When instructed to move, simply pull your steer forward,
circle the end of the line and pull your steer back into the position the judge has instructed.
Comb: All exhibitors should carry a scotch comb in their back pocket during the showmanship
competition, unless the animals are slick sheared. If animals are close clipped, there is no need
for a comb. The comb is used to fix the animals coat after the judge feels for body condition on

an animal. However, do not correct the hair obviously in front of the judge; wait until he/she has
moved on to the next animal. For safety reasons, try to turn the teeth of the comb toward your
body when carrying it in your pocket. This keeps other exhibitors from being harmed by your
brush if they bump into you. Proper Showmanship Procedure:
1. Enter the show ring, circling in a clockwise direction, with a smile on your face.
2. Keep an eye on the judge and respond quickly to any instructions.
3. When pulling into a line or stopping, leave three or four feet on both sides of your animal
and at least five feet between your animal’s head and the edge of the ring. This space allows
for more freedom of movement both for you and the judge.
4. Always keep your steer’s legs set up correctly and posed in a position that accentuates the
steer’s best features.
- set the hind legs squarely underneath the animal’s body.
- keep the animal’s back level and its head up.
- if the animal is high in the loin, apply pressure to the loin with a the show stick.
5. When leading, hold the halter strap in your right hand, 6 to 12 inches from the animal’s
head and your show stick in the left with hook down. Upon pulling into a line, switch the
lead into the left hand and the show stick into the right. Always use caution when
maneuvering the show stick.
6. If your animal acts up and you have to pull out of line, always turn the animal away from
you.
7. For close inspection, move a half step to allow the view he/she seeks. Never step in
directly front of your animal.
8. be courteous to other exhibitors. Do not bump, crowd or strike another exhibitor’s animal.
However, if an animal in front of you is reluctant to move, you may assist by gently tapping
it on the rump or twisting its tail.
9. Do not overwork your animal and always remain calm.
10. Show good sportsmanship by congratulating the winner.

Know some by products
that come from beef
