day one: dynamic subscriber management · about dynamic subscriber management the purpose of this...
TRANSCRIPT

Junos® Networking Technologies
Get a Dynamic Subscriber
Manage ment solution up and
running in a day with an MX Series
and Steel-Belted RADIUS server.
The Junos OS and the MX Series
make it all possible.
By Jeremy Schulman, Lenny Pollard, and John Rolfe
DAY ONE: DYNAMIC SUBSCRIBER MANAGEMENT

Juniper Networks Books are singularly focused on network productivity and efficiency. Peruse the complete library at www.juniper.net/books.
Published by Juniper Networks Books
DAY ONE: DYNAMIC SUBSCRIBER MANAGEMENT
This book introduces you to all the fundamentals of the Juniper Networks Dynamic Subscriber Management solution and shows you how to get it up and running in a day. By the end of the last chapter you’ll know what is meant by dynamic and why it’s different from legacy approaches that are so prevalent today. You’ll see how Juniper creates a seamless subscriber management interworking between the MX Series, as a BRAS device, and the Juniper Steel-Belted RADIUS (SBR) server. You’ll be intro-duced to the new MX configuration hierarchies and how they interrelate with existing hierarchies, and you’ll review the SBR administration GUI and learn about creating service definitions.
This book provides hands-on exposure to actual MX configurations, driving the SBR administration GUI, looking through logs, and learning troubleshooting skills that can assist you in product demonstrations, proof-of-concept testing, and network pre-staging integration activities. So roll up your sleeves, get the lab prepped, and let’s knock this one out of the park.
IT’S DAY ONE AND YOU HAVE A JOB TO DO, SO LEARN HOW TO:Identify a lab set up to work along with the samples and chapters of this book.Configure the MX for dynamic VLAN interfaces.Configure the Steel-Belted RADIUS Server.Set the MX dynamic interface profile for the dual-stacked Customer VLAN model.Set the MX dynamic interface profile for the single tag Service VLAN model.Add AAA to subscriber services.Configure dynamic subscriber services.Troubleshoot your deployment and use the logs to validate services.

Day One: Dynamic Subscriber Management
By Jeremy Schulman, Lenny Pollard, and John Rolfe
Junos® Networking Technologies
Chapter 1: Introducing Dynamic Subscriber Management . . . . . . . . . . . . . . 7
Chapter 2: Getting Started with the Customer VLAN Model . . . . . . . . . . . 29
Chapter 3: Getting Started with the Service VLAN Model . . . . . . . . . . . . . . 47
Chapter 4: Adding AAA to Dynamic Subscriber Management . . . . . . . . . 59
Chapter 5: Getting Started with Dynamic IP Profiles and QoS . . . . . . . . . 77
Appendix . . . . . . . . . . . . . . . . . . . . . . . . . . . . . . . . . . . . . . . . . . . . . . . . . . . . . . . . . . 105

© 2011 by Juniper Networks, Inc. All rights reserved.
Juniper Networks, the Juniper Networks logo, Junos, NetScreen, and ScreenOS are registered trademarks of Juniper Networks, Inc. in the United States and other countries. Junose is a trademark of Juniper Networks, Inc. All other trademarks, service marks, registered trademarks, or registered service marks are the property of their respective owners.
Juniper Networks assumes no responsibility for any inaccuracies in this document. Juniper Networks reserves the right to change, modify, transfer, or otherwise revise this publication without notice. Products made or sold by Juniper Networks or components thereof might be covered by one or more of the following patents that are owned by or licensed to Juniper Networks: U.S. Patent Nos. 5,473,599, 5,905,725, 5,909,440, 6,192,051, 6,333,650, 6,359,479, 6,406,312, 6,429,706, 6,459,579, 6,493,347, 6,538,518, 6,538,899, 6,552,918, 6,567,902, 6,578,186, and 6,590,785.
Published by Juniper Networks BooksAuthors: Jeremy Schulman, Lenny Pollard, John RolfeTechnical Reviewers: Leonard Pollard, John Rolfe, Robert Sprouse, Dylan ClearContent Reviewers: Geoff Eaton, Shon Samples, Vince CelindroEditor in Chief: Patrick AmesCopyeditor and Proofer: Nancy KoerbelJ-Net Community Manager: Julie Wider
ISBN: 978-1-936779-42-0 (print)Printed in the USA by Vervante Corporation.
ISBN: 978-1-936779-43-7 (ebook)
Version History: v1 December 2011 2 3 4 5 6 7 8 9 10 #7100147-en
This book is available in a variety of formats at: www.juniper.net/dayone.
Send your suggestions, comments, and critiques by email to [email protected].
About the AuthorsJeremy Schulman is a Senior Systems Engineer at Juniper Networks who brings over 15 years of networking experience to the company. Jeremy works in the Americas Service Provider market and serves as a technical specialist on MX edge router applications for Dynamic Subscriber Management solutions. Jeremy is also an active contributor to the Junos Automation community and has recently authored This Week: Mastering Junos Automation Programming.
Lenny Pollard has over 15 years of experience in the networking industry. Lenny is currently a Corporate System Engineer at Juniper Networks focusing on the MX and its edge routing and subscriber services features. Before working as a corporate system engineer Lenny was a member of the Juniper Technical Assistance Center (JTAC) supporting the E-Series router. Prior to his time at Juniper Lenny also supported other RAS products at Nortel Networks and was involved with the initial broadband cable deployments in the New England region.
John Rolfe has over 30 years of experience in the networking industry. He is presently a consulting system engineer in the Technologies and Solution group at Juniper Networks, focusing on identity and policy management as well as network management systems. Prior to Juniper Networks, he worked in the VOIP industry with session border controllers at NexTone. Prior to that, he spent seven years in the semiconductor industry primarily in Network Processing silicon with Agere.
AcknowledgmentsJeremy would like to acknowledge Lenny Pollard and John Rolfe. Both Lenny and John have been instrumen-tal in mentoring Jeremy on MX subscriber management and Steel-Belted-RADIUS and enabling him to be an effective specialist in the field. Jeremy would also like to acknowledge Patrick Ames for his tireless efforts and herculean patience to make this Day One book a success.
ii

Welcome to Day One
This book is part of a growing library of Day One books, produced and published by Juniper Networks Books.
Day One books were conceived to help you get just the information that you need on day one. The series covers Junos OS and Juniper Networks networking essentials with straightforward explanations, step-by-step instructions, and practical examples that are easy to follow.
The Day One library also includes a slightly larger and longer suite of This Week books, whose concepts and test bed examples are more similar to a weeklong seminar.
You can obtain either series, in multiple formats:
� Download a free PDF edition at http://www.juniper.net/dayone.
� Get the ebook edition for iPhones and iPads from the iTunes Store. Search for Juniper Networks Books.
� Get the ebook edition for any device that runs the Kindle app (Android, Kindle, iPad, PC, or Mac) by opening your device's Kindle app and going to the Kindle Store. Search for Juniper Networks Books.
� Purchase the paper edition at either Vervante Corporation (www.vervante.com) or Amazon (www.amazon.com) for between $12-$28, depending on page length.
� Note that Nook, iPad, and various Android apps can also view PDF files.
� If your device or ebook app uses .epub files, but isn't an Apple product, open iTunes and download the .epub file from the iTunes Store. You can now drag and drop the file out of iTunes onto your desktop and sync with your .epub device.
iii

iv
What You Need to Know Before Reading This Book
You should be familiar with the basic administrative functions of the Junos operating system, including the ability to work with operational commands and to read, understand, and change the Junos configura-tion.
Other things that you will find helpful as you explore the pages of this book:
� VLAN architectures for BRAS networks (a Juniper Networks whitepaper on this topic can be download from: http://www.juni-per.net/us/en/local/pdf/whitepapers/2000186-en.pdf).
� Junos Class-of-Service configurations (see Day One: Deploying Basic QoS, at www.juniper.net/dayone).
� Understanding DHCP protocol messages.
� Understanding RADIUS authentication/accounting protocol messages.
Essentials for Following Along With This Book
Much of Day One: Dynamic Subscriber Management cites configura-tion and output samples so you can follow along in your lab, test bed, or device. Here’s what you’ll need to follow along:
� A MX Series device with subscriber management licenses
� SBR Enterprise Edition running on a Windows computer
� An external DHCP server
� End devices or test equipment that can act as DHCP clients

v
About Dynamic Subscriber Management
The purpose of this book is to enable you to “turn up” a Juniper Networks Dynamic Subscriber Management solution that consists of the MX series router and the Juniper Steel-Belted RADIUS (SBR) server. You will also learn how to configure the MX as a DHCP local-server or use an external DHCP server.
The Juniper Networks solution enables you to deploy a wide range of network scenarios. For instance:
� Will your subscribers be using DHCP or PPPoE?
� Will the subscriber CPE devices support IPv4 and IPv6 simulta-neously (aka dual stack)?
� What kinds of service offerings will you provide – tiered speed Internet, business grade Voice/Data, or Multiplay-Residential (Voice/Video/Data)?
� Does your network need to log user access for legal tracking requirements?
� Do you need to support fair-use policies that down-speed users that have used too much bandwidth?
Because covering all of these topics would require more than just one book, Day One: Dynamic Subscriber Management focuses on a set of features that represent common cases. It will point you to information on topics it doesn’t cover or that it covers only in brief. Much of the information, and many of the solutions illustrated, however, are building blocks for other solutions.
This book focuses on the following services:
� DHCP subscribers using IPv4.
� Subscriber services where each customer stream is uniquely identified by a stacked VLAN tag. The outer VLAN tag (S-TAG) typically identifies the Multi-Service Aggregation Node (MSAN), for example, a DSLAM, and the inner VLAN tag (C-TAG) typically identifies a port on the MSAN. This is referred to as the Customer VLAN model.

vi
� Subscriber services where all customer streams for a given service type, basic Internet for example, share the same VLAN Tag. This Service VLAN model is fairly common in today’s networks. While many service providers are migrating to the Customer VLAN model, others will want to maintain their existing net-work architecture.
� Subscriber services without any bandwidth restrictions or QoS, therefore the simplest cases, just to get things started.
� Subscriber services that have simple bandwidth service profiles, for example, differentiating a 5Mbps customer versus a 10Mbps customer.
� Subscriber services that have QoS settings to enable differenti-ated services such as integrated Voice and Data.
Chapter 1
Introducing Dynamic Subscriber Management
The Fundamentals of Dynamic Subscriber Management . . . . . . . . . . . . . . 8
How Does Dynamic Subscriber Management Work? . . . . . . . . . . . . . . . . . . .13
Getting Started with the MX . . . . . . . . . . . . . . . . . . . . . . . . . . . . . . . . . . . . . . . . . 24
Summary . . . . . . . . . . . . . . . . . . . . . . . . . . . . . . . . . . . . . . . . . . . . . . . . . . . . . . . . . . . 28

8 DayOne:DynamicSubscriberManagement
This chapter introduces you to all the fundamentals of the Juniper Networks subscriber management solution. It discusses what is meant by dynamic and how it’s different from legacy approaches. You’ll see how Juniper creates a seamless subscriber management interworking between the MX Series as a BRAS device and the Juniper Steel-Belted RADIUS (SBR) server. This chapter also introduces you to the new MX configuration hierarchies and how they interrelate with existing hierarchies.
The rest of this book provides hands-on exposure to actual MX configurations, driving the SBR administration GUI, looking through logs, and learning new troubleshooting skills that can assist you in product demonstrations, proof-of-concept testing, and network pre-staging integration activities. But first, let’s briefly introduce the fundamentals of Dynamic Subscriber Management and then review Juniper’s unique implementation of it.
The Fundamentals of Dynamic Subscriber Management
Figure 1.1 illustrates a typical service provider network. Starting at the left of the figure, a subscriber management network begins with the subscribers – the customers that are paying money for network services such as Internet Access, Voice, IPTV, and Video on Demand.
Figure 1.1 Typical Subscriber Management Network
Subscribers are connected via physical access technologies such as DSL, cable modems, and fiber into an aggregation device: the Multi Service Access Node (MSAN). MSANs transport this traffic to the

Chapter1:IntroducingDynamicSubscriberManagement 9
Broadband Remote Access Servers (BRAS) and are generally connect-ed via 1GE or 10GE interfaces.
The BRAS devices terminate or anchor subscriber sessions and provide access to the network services. The Juniper Networks MX Series provides this BRAS functionality.
MORE? For more information on the MX Series family of products, visit Juniper’s website: http://www.juniper.net/us/en/products-services/routing/mx-series/.
The MX is typically configured to use RADIUS servers for authentica-tion, authorization, and accounting (AAA) services (item 2 in Figure 1.1). The RADIUS server is also used to provide subscriber-specific session parameters, for example, bandwidth speed. This is accom-plished using RADIUS Vendor Specific Attributes (VSAs). The interac-tion between the MX and RADIUS is part of the Dynamic in Dynamic Subscriber Management, and Juniper Networks offers the Steel-Belted RADIUS (SBR) server as part of its Dynamic Subscriber Management solution.
NOTE You are not required to use SBR – any RADIUS server that supports VSAs can be used. But the Juniper SBR has specific features and functionality designed for service provider networks. For instance, SBR can be deployed in a high-availability cluster, or SBR can also “talk to” existing service provider customer databases via LDAP, SQL, and other methods when validating and authenticating subscriber sessions. You’ll learn more about the key SBR service provider features in a later section in this chapter.
MORE? To find more information on the Steel-Belted RADIUS product on Juniper’s website, see http://www.juniper.net/us/en/products-services/software/ipc/sbr-series/service-provider/.
A service provider typically uses external DHCP servers for managing and assigning IP addresses to their subscribers (item 3 in Figure 1.1). The MX can relay DHCP requests to multiple external DHCP servers, or the MX can also be configured as a local DHCP server, the specifics of which are covered later in this book.
NOTE Be aware that Juniper Networks does not resell external DHCP servers.

10 DayOne:DynamicSubscriberManagement
WhatisDynamicAboutSubscriberManagement?
The purpose of Dynamic Subscriber Management is to enable a service provider to deploy a BRAS solution without having to manually provision each customer.
Consider the case of a service provider needing to deploy 4,000 sub-scribers without Dynamic Subscriber Management. Traditionally, the network administrator would need to manually provision each sub-scriber, each VLAN sub interface, each set of class-of-service bandwidth controls, and more. This manual process results in a significant amount of configuration time, not to mention time spent on the effort to debug and troubleshoot resulting errors. Additionally, the administrator would need to keep track of which VLANs map to which customers, as well as managing other networking resources.
Juniper’s dynamic approach enables a service provider to deploy a solution without manually provisioning each subscriber. To better understand this, let’s look at two key Dynamic Subscriber Management concepts whose specific configurations and use-cases are used through-out the rest of this book: dynamic VLAN interfaces and dynamic IP profiles.
Dynamic VLAN Interfaces
The first concept is called a dynamic VLAN interface, or auto-configu-ration of VLAN sub-interfaces. This means that you no longer have to manually create the VLAN sub-interfaces that correspond to a subscrib-er or subscriber services – instead you configure the MX to automati-cally create VLAN sub-interfaces when it detects inbound traffic.
For example, when a DHCP subscriber attempts to access the service provider network, the MX detects the DHCP-DISCOVER packet, examines the VLANs in the packet, and dynamically creates a corre-sponding VLAN sub-interface. These packets could be either single VLAN tagged, or stacked VLAN tagged. The latter case is typically used when each subscriber is directly connected to a port on an MSAN device. The outer tag represents the MSAN device, and the inner VLAN tag represents the port on the MSAN. This specific MX configuration is covered in the next chapter.
When the MX auto configures VLAN sub-interfaces, the Junos OS generates a unique interface unit. For example, here is the output of a stacked VLAN interface that has an outer VLAN tag of 100 and an inner VLAN tag of 10:

Chapter1:IntroducingDynamicSubscriberManagement 11
admin@MX> show subscribers Interface IP Address/VLAN ID User Name LS:RIge-1/0/0.1073741825 0x8100.100 0x8100.10 default:default
If you are familiar with Junos, then you know that the unit number follows the interface name, and in this case you can see that Junos dynamically allocated the unit number 1073741825.
Chapter 2 gets you started with configuring the MX for dynamic VLAN interfaces, but for now let’s continue with the other key concept in Juniper’s dynamic approach to subscriber management.
Dynamic IP Profiles
The other key concept is called a dynamic IP profile, meaning you no longer have to manually provision IP service definitions for each subscriber – instead you define a dynamic IP profile. You can think of it as a configuration template where you can have multiple profiles for different customer scenarios. Each profile looks just like a Junos configuration hierarchy, except you substitute Junos-defined variables where you would normally hardcode values such as interface names, VLAN-IDs, or a shaping bandwidth.
To help illustrate, let’s take a look at a static configuration and then at the corresponding dynamic IP profile. This configuration example assigns a 5Mbps shaper on interface ge-1/0/5 whose packets are encapsulated with stacked VLANs: outer tag=100 and inner tag=10. The static configuration looks like this:
[edit interfaces ge-1/0/5]admin@MX# show hierarchical-scheduler;flexible-vlan-tagging;unit 10 { vlan-tags outer 100 inner 10; family inet { address 12.2.4.18/27; }}
[edit class-of-service]admin@MX# showtraffic-control-profiles { shape_5Mbps { shaping-rate 5m; }
12 DayOne:DynamicSubscriberManagement
}interfaces { ge-1/0/5 { unit 10 { output-traffic-control-profile shape_5Mbps; } }}
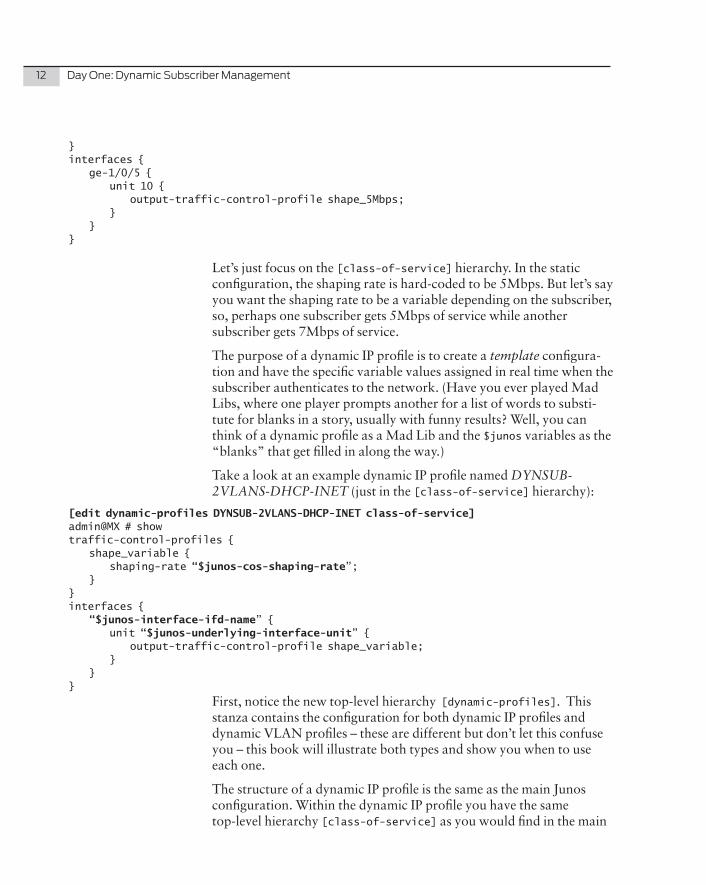
Let’s just focus on the [class-of-service] hierarchy. In the static configuration, the shaping rate is hard-coded to be 5Mbps. But let’s say you want the shaping rate to be a variable depending on the subscriber, so, perhaps one subscriber gets 5Mbps of service while another subscriber gets 7Mbps of service.
The purpose of a dynamic IP profile is to create a template configura-tion and have the specific variable values assigned in real time when the subscriber authenticates to the network. (Have you ever played Mad Libs, where one player prompts another for a list of words to substi-tute for blanks in a story, usually with funny results? Well, you can think of a dynamic profile as a Mad Lib and the $junos variables as the “blanks” that get filled in along the way.)
Take a look at an example dynamic IP profile named DYNSUB-2VLANS-DHCP-INET (just in the [class-of-service] hierarchy):
[edit dynamic-profiles DYNSUB-2VLANS-DHCP-INET class-of-service]admin@MX # showtraffic-control-profiles { shape_variable { shaping-rate “$junos-cos-shaping-rate”; }}interfaces { “$junos-interface-ifd-name” { unit “$junos-underlying-interface-unit” { output-traffic-control-profile shape_variable; } }}
First, notice the new top-level hierarchy [dynamic-profiles]. This stanza contains the configuration for both dynamic IP profiles and dynamic VLAN profiles – these are different but don’t let this confuse you – this book will illustrate both types and show you when to use each one.
The structure of a dynamic IP profile is the same as the main Junos configuration. Within the dynamic IP profile you have the same top-level hierarchy [class-of-service] as you would find in the main

Chapter1:IntroducingDynamicSubscriberManagement 13
Junos configuration. And under [class-of-service] you find the same [traffic-control-profiles] and [interfaces] stanzas. Throughout the profile you see the use of $junos variables.
The values of some variables are determined by Junos. In the static configuration, the interface name was hardcoded to ge-1/0/5. But since this is a dynamic IP profile, a placeholder is needed in the configuration, and that’s what the $junos-interface-ifd-name does. When Junos applies the dynamic IP profile, it fills in the interface name value in real-time.
The values of some variables are also determined by RADIUS. The $junos-cos-shaping-rate is an example. When the subscriber authenti-cates with a RADIUS server, the RADIUS server uses the subscriber user-name to return a set of variable values via RADIUS attributes (VSAs). One subscriber may get a RADIUS VSA indicating a shaper value of 5Mbps, while another may get a value of 7Mbps. When Junos receives the RADIUS authentication response containing these VSAs, it binds them to the $junos variables defined in the dynamic IP profile in real-time.
UpandRunning
The goal of this book is to get you started working with dynamic VLAN interfaces and dynamic IP profiles. Each chapter will walk you through various configuration scenarios explaining the use of variables and their corresponding RADIUS VSAs.
MORE? If you’re interested in learning more about the Junos system variables before preceding further, take a moment to read about them here: http://www.juniper.net/techpubs/en_US/junos/topics/reference/general/junos-predefined-variables-table.html.
How Does Dynamic Subscriber Management Work?
Now that you’ve been introduced to a few of the core MX BRAS con-cepts – dynamic VLAN interfaces and dynamic IP profiles – and to the concept of using RADIUS to provide subscriber specific values for the MX dynamic IP profiles, let’s illustrate how the many parts work together to create a seamless dynamic subscriber experience.
Figure 1.2 illustrates the interactions between each of the network elements, the associated configuration, and the resulting dynamic VLAN interfaces and subscriber sessions.

14 DayOne:DynamicSubscriberManagement
Figure 1.2 Interaction of DHCP Subscriber Management Solution
NOTE Figure 1.2 illustrates the DHCP subscriber management scenarios that are covered in this book. For PPPoE scenarios, the case would be similar, but different. For the sake of brevity and completeness, this book focuses only on the DHCP use-cases.
Note the three major block components of the Dynamic Subscriber Management solution in Figure 1.2: the MX / BRAS, the SBR, and the external DHCP server. Figure 1.2 also includes a service provider subscriber database, which will be discussed shortly.
Figure 1.3 highlights the relationship between the MX configured items. Physical interfaces, for example, ge-1/0/5 and xe-5/0/0 (represented as the NICs on the left), or even aggregated Ethernet ports, have a config-ured relationship with two other items: the first is the dynamic VLAN profile, and the second is the DHCP group (local or relay). In turn, the DHCP group has a relationship with a dynamic IP profile.
The interaction between the physical interface, the dynamic VLAN profile, the DHCP group, and the dynamic IP profile illustrated in Figure 1.3 results in the dynamic creation of a dynamic VLAN interface, and an active subscriber IP session. Let’s focus on this process in detail.

Chapter1:IntroducingDynamicSubscriberManagement 15
Figure 1.3 Interface Configuration Relationships
NOTE It is important to understand that you do not always need a dynamic IP profile. Simple use-case configurations do not require dynamic IP profiles as you will see in the upcoming chapter. The goal of this book is to get you started on the basics, and you can find many examples of more complex configuration on Juniper’s technical publication website.
When an MX interface is configured for auto configuration, specific packets trigger the process and in the case of DHCP, it’s the DHCP-DISCOVER packet. The physical interface is configured to use a dynamic VLAN profile and Junos uses the profile as a template to generate the same configuration you would otherwise have created statically. This dynamic configuration is not stored in the actual Junos configuration file, so you will not experience a configure-and-commit as you would if you were doing it manually.
When the MX is configured to use RADIUS, Junos attempts to autho-rize the subscriber with an external RADIUS server (for example, SBR). This process is highlighted in Figure 1.4. This step is performed prior to the DHCP address request, so Junos must first authorize the subscriber before it assigns an IP address via DHCP.

16 DayOne:DynamicSubscriberManagement
Figure 1.4 Authorizing Subscribers
When SBR receives the authorization request, it looks into a database to determine if: (a) the user is valid, and (b), which RADIUS attributes values should be returned to the MX. When authorizing the user, SBR can either examine a locally configured database or perform a database lookup on an external server; the latter scenario is the one illustrated in Figure 1.4. The subscriber database returns information about the subscriber, and one piece of the information is called the SBR service profile. The SBR service profile represents the service provider’s service definition, for example, INET Best Effort 5Mbps, INET Best Effort 7Mbps, or Voice and Data 20Mbps, etc. The SBR service profile is simply a collection of RADIUS attribute values, and an example of the SBR service profile is discussed in a later section of this chapter.
Going back to our process, the SBR now returns the RADIUS attri-butes (VSAs) in the authorization acknowledge message back to the MX for further processing as shown in Figure 1.5.

Chapter1:IntroducingDynamicSubscriberManagement 17
Figure 1.5 Instantiating Subscriber Sessions
When the MX receives the RADIUS access accept message, it then binds the RADIUS VSA values into the dynamic IP profile $junos variables, and creates a unique subscriber IP session. Junos then initiates the DHCP action since the subscriber is now an authorized user. Once the MX has completed the DHCP activity, the resulting subscriber IP address is associated with the subscriber session, and in turn, the dynamic VLAN interface.
The following MX output shows the end result for a DHCPv4 sub-scriber using their MAC-address as the user-name, and accessing the MX using the Customer VLAN stacked-tag model. The first entry is the dynamic VLAN interface for the subscriber, and the second entry is the dynamic IP interface for the subscriber. Notice how they share the same logical interface ge-1/0/0.173741837:
admin@SOUTHPARK> show subscribers Interface IP Address/VLAN ID User Name LS:RIge-1/0/0.1073741837 0x8100.100 0x8100.20 default:defaultge-1/0/0.1073741837 12.1.1.12 0000.6404.0102 default:default

18 DayOne:DynamicSubscriberManagement
IntroductiontoMXConfiguration
Now, let’s take a closer look at the MX configuration hierarchy in order to illustrate how the various hierarchy stanzas work together to create all the interworking illustrated in the subscriber process. Note that specific configuration examples will be presented in later chapters.
Figure 1.6 illustrates the relationships between the major Junos hierarchies necessary to configure the MX with dynamic VLAN interfaces, dynamic IP profiles, DHCP relay, and RAIDUS.
The arrows indicate use. For example, under the [interfaces] hierar-chy, an interface configuration has an auto-configuration statement that uses or refers to a dynamic-profile name. The arrow starts (ball-end) with the auto-configure and ends (arrow-end) with the <name-of-dynamic-VLAN-profile> under the [dynamic-profiles] hierarchy.
Figure 1.6 Relationships Between the Major Junos Hierarchies With Dynamic Subscriber Management
Interfaces
Starting with the [interfaces] hierarchy in Figure 1.6, each interface that uses a dynamic VLAN profile has an [auto-configure] stanza, and within the [auto-configure] stanza there is a reference to the associated dynamic-profile. This is a dynamic VLAN profile, and not a dynamic IP profile.

Chapter1:IntroducingDynamicSubscriberManagement 19
ALERT! You should notice that both dynamic VLAN profiles and dynamic IP profiles are located within the top-level [dynamic-profiles] hierarchy. They are both a form of dynamic configuration, but serve different functions. Be careful not to accidentally assign a dynamic IP profile to an interface [auto-configure] stanza.
Next, within the [interfaces] hierarchy, you need to configure an additional IP address on the loopback interface lo0.0, shown in Figure 1.6 as dhcp-gw-address. This address is used as the gateway for DHCP subscribers. You can have many secondary IP addresses assigned to lo0.0, and you can select which one you want to specifically use for a dynamic VLAN profile (an example of this configuration is shown in the next chapter).
ALERT! You may think that different loopback IP addresses should be assigned to a different lo0 unit number, for example, lo0.100, but this is not the case. The correct approach is to assign additional secondary IP ad-dresses to the lo0.0 interface. The configuration of multiple lo0 units is used when you are creating multiple virtual routers or routing-instanc-es (for example, for L2/L3 wholesale models) each having their own loopback interface. These types of configurations are outside the scope of this book, but you can find a number of references to these topics in the Appendices of this book.
Dynamic VLAN Profiles
Next, within the [dynamic-profiles] top-level hierarchy in Figure 1.6, you can see the dynamic VLAN profile being referenced by [inter-faces … auto-configure]. Within the dynamic VLAN profile is a reference to use a specific lo0.0 preferred source address – this is the default gateway address for DHCP subscribers, dhcp-gw-address.
DHCP Relay
The [forwarding-options dhcp-relay] stanza is used when you are using external DHCP servers. There is a similar stanza if you want to use the MX as the DHCP local-server, and an example of this is in the next chapter. You use a DHCP group in order to identify which set of interfaces use a specific dynamic IP profile.
20 DayOne:DynamicSubscriberManagement
ALERT! Be careful not to accidentally assign a dynamic VLAN profile to a DHCP group stanza. The DHCP group stanza must be configured with a dynamic IP profile. You cannot combine the two profiles or use the same one in both places.
MORE? Configuring multiple DHCP groups is used when you have multiple types of subscribers, or when you want to treat interfaces from differ-ent access networks differently. These configurations are also outside the scope of this book, and you can find a number of references to these topics, as well, in the Appendices of this book.
Dynamic IP Profiles
Going back to the [dynamic-profiles] top-level hierarchy in Figure 1.6, you can see the dynamic IP profile being referenced by the [for-warding-options dhcp-relay group <name>]. You define the per-sub-scriber variables within the dynamic IP profile, such as CoS and bandwidth controls, for example: $junos-cos-shaping-rate. These variable values are “downloaded” from the RADIUS server into the dynamic IP profile when the user authenticates with the network.
RADIUS
The [access] hierarchy is used for RADIUS configuration. Within this stanza you need your RADIUS servers and to define a [profile] that identifies specific RADIUS usage. Much like DHCP groups, the configuration of multiple access groups is found in virtual router and routing-instance configurations, and, for the purpose of our activities, there is only one.
Finally, you must configure which access profile is active by assigning the profile name to the top-level [access-profile] element.
IntroductiontoSteel-BeltedRADIUS
Steel-Belted RADIUS (SBR) is configured through a graphical user interface client application as shown in Figure 1.7. The installation of SBR is covered in a later chapter, but for now let’s just introduce the main topics you need to know for the rest of the activities in this book.

Chapter1:IntroducingDynamicSubscriberManagement 21
Figure 1.7 SBR Administration GUI
SBR Profiles
An SBR profile represents a collection of RADIUS attribute values that will be downloaded into an MX dynamic IP profile.
Consider the case where you have a dynamic IP profile that needs the VLAN shaping value set on a per-subscriber basis. The dynamic IP profile uses the $junos-cos-shaping-rate variable. An example of a SBR profile creating a 2Mbps shaping service would look like Figure 1.8.

22 DayOne:DynamicSubscriberManagement
Figure 1.8 2Mbps Shaping Service Profile Example
How do you know that the RADIUS attribute (VSA) Jnpr-Cos-Param-eter-Type with a value of T02 2m will bind to the MX $junos-cos-shaping-rate variable and set the shaping-rate to 2Mbps? It’s actually covered in detail in Chapter 5, so for now it’s more important to under-stand the concept of the SBR service profile as a container for RADIUS attribute/values, and trust that the proof will come a little later.
Subscriber Username Authorization
When the SBR receives a RADIUS access-request from the MX, it attempts to authorize the subscriber and then maps the subscriber to a SBR profile, which in turn returns a set of RADIUS VSA if configured.
How do you know what the username value is? The user name is generated by the MX and can consist of a combination of many different fields, some from the packet and some from the MX device.
MORE? If you’d like to get a jump on understanding your options for creating a user name see http://www.juniper.net/techpubs/en_US/junos/topics/reference/configuration-statement/authentication-edit-forwarding-options.html.

Chapter1:IntroducingDynamicSubscriberManagement 23
There are two approaches for handling the user name mapping to service profile. The first is using your existing customer database, and the second is using the SBR native user database.
UsingYourExistingCustomerDatabase
If you have existing customers and maintain customer information in a database, for example MySQL, you may want SBR to query your database to determine the SBR service profile name.
You can configure the SBR to use a number of different external databases for the authentication and SBR profile mapping process. This book doesn’t cover these steps, but it’s important to know the options.
The most popular method used by service providers is an LDAP subscriber directory. SBR can access any LDAP V2, or V3, directory both to authenticate and authorize a subscriber request, as well as to retrieve the profile to return to the MX. SBR can also access any SQL database using JDBC (Java Database Connectivity), ODBC (Open Database Connectivity), or an Oracle-specific database using native Oracle drivers. Both SQL and LDAP support the process of looking up the subscriber user name and retrieving a profile value to be applied to the session.
UsingSBRNativeUserDatabase
If you don’t already have a customer database, or prefer to keep this mapping out of your database, you can create a native customer database on SBR.
This book actually uses the SBR native user database, so you will learn how to create these in a later chapter.
Other SBR Key Features
Customers typically ask about a number of other features offered by their RADIUS infrastructure, the most common one being accounting.
Accounting packets (start, stop, and interim) are generated by the MX and forwarded to the SBR server. Most environments use an account-ing proxy to forward copies of these packets to various back-office systems such as billing, lawful intercept, and deep packet inspection

24 DayOne:DynamicSubscriberManagement
systems. The accounting packets can also be used to track customer usage for usage-based billing or volume tracking. This book actually covers RADIUS accounting and shows you how to both configure the MX and view the records on the SBR.
Another key feature of SBR is Change of Authorization or CoA. This capability can modify the dynamic profile while the session is active. A good example used in many networks is a self-service portal. A subscriber can go to the self-service portal and select a new service rate for their connection, for example, going from a 5M service to a 10M service. A change to an existing established subscriber session is triggered from this self-service portal to send a RADIUS CoA message to the MX, specific to that subscriber, with the new shaping rate attribute. The MX overwrites the 5M shaper with the 10M shaper and acknowledges SBR. The subscriber won’t see any issues on their connection since it’s an in session change.
Redundancy in RADIUS is typically handled by an active/standby configuration. The MX has the capability of sending to the active RADIUS server until it detects that server is down, when at that point, it can use the secondary server. You can configure the MX to use many different RADIUS servers depending on your network requirements.
MORE? For more information on the SBR Carrier Edition, please see: http://www.juniper.net/us/en/products-services/software/ipc/sbr-series/service-provider/carrier/#features-benefits. For information on High Availability features, see the Juniper Networks Steel-Belted Radius® Carrier Administration and Configuration Guide at: http://www.juniper.net/techpubs/en_US/sbr-carrier7.3.1/information-products/pathway-pages/index.html.
Getting Started with the MX
Let’s get started configuring the MX as a BRAS device. There are two steps to cover:
� Installing the correct licenses
� Enabling system logging for debug and troubleshooting purposes
Installing MX BRAS Licenses
There are two required licenses to support BRAS functionality:

Chapter1:IntroducingDynamicSubscriberManagement 25
� The first license enables the BRAS features such as the Feature Pack, for example. For the MX chassis family MX240/480/960, this license SKU is S-SA-FP. For the MX80/40/10/5 mid-range routers, you would use the S-MX80-SA-FP license.
� The second type of required license is for subscriber scaling, for example, how many subscriber sessions the MX supports. These licenses come in various increments and are additive. If you required 20K subscribers, for example, you could install an S-SA-16K license and an S-SA-4K license.
Use the request system license add command to install the licensees:
admin@MX> request system license add terminal [Type ̂ D at a new line to end input, enter blank line between each license key] <… Cut & Paste your license here …>^Dadd license complete (no errors)
Once you have installed your licenses, you can display the license and usage information with show system license command:
admin@MX> show system license License usage: Licenses Licenses Licenses Expiry Feature name used installed needed subscriber-accounting 0 1 0 permanent subscriber-authentication 0 1 0 permanent subscriber-address-assignment 0 1 0 permanent subscriber-vlan 0 1 0 permanent subscriber-ip 0 1 0 permanent scale-subscriber 0 1000 0 permanent scale-l2tp 0 1000 0 permanent scale-mobile-ip 0 1000 0 permanent
Licenses installed: License identifier: E000185416 License version: 2 Features: subscriber-accounting - Per Subscriber Radius Accounting permanent subscriber-authentication - Per Subscriber Radius Authentication permanent subscriber-address-assignment - Radius/SRC Address Pool Assignment permanent subscriber-vlan - Dynamic Auto-sensed Vlan permanent subscriber-ip - Dynamic and Static IP
permanent
26 DayOne:DynamicSubscriberManagement
NOTE The MX is factory-equipped with a 30-day trial, subscriber-scale, 1K license. For lab or demo purposes, this may be sufficient, otherwise you will need to install additional scale licenses using the process discussed here.
Enabling Log Files (Traceoptions)
Now let's cover which traceoptions files you can use for troubleshoot-ing purposes. Later sections in this book will cover in depth what to look for in these files, but for now let’s simply enable each of the traceoptions files.
ALERT! Keep in mind that logging consumes control processor (Route Engine) cycles and writes to system storage. Generally speaking, you only enable traceoptions when you are troubleshooting an issue and then disable them during normal production.
The following traceoptions are useful for troubleshooting BRAS deployments:
� Auto-creating VLAN interfaces
� Authentication services, for example for RADIUS
� Interface changes
� DHCP relay when using external DHCP servers
� DHCP local-server when the MX is providing DHCP services
Usually you configure either the DHCP relay, or the DHCP local-serv-er, depending on your network requirements, but let’s show both traceoptions configurations.
As an administration preference the traceoptions configuration is put into a configuration group. By using a configuration group you can easily enable or disable logging. The following shows a group called DEBUG-BRAS (log-file names emphasized):
[edit groups DEBUG-BRAS]admin@MX# show system { auto-configuration { traceoptions { file autolog; flag all; } } services {

Chapter1:IntroducingDynamicSubscriberManagement 27
dhcp-local-server { traceoptions { file dhcplog size 2m files 2; flag all; } } } processes { general-authentication-service { traceoptions { file authlog size 2m files 2; flag address-assignment; flag framework; flag local-authentication; flag radius; flag configuration; } } }}interfaces { traceoptions { file iflog size 2m files 2; flag change-events; flag config-states; }}forwarding-options { dhcp-relay { traceoptions { file dhcplog size 2m files 2; flag all; } }}
This sample configures each of the traceoptions files to be a maximum size of 2MB and stores only two of these files on the MX. You can change these values to better suit your specific networking needs or lab work.
To enable or disable these traceoptions, you would add or remove this group at the top-level apply-group configurations:
[edit]admin@MX# show apply-groups apply-groups [ re0 re1 DEBUG-BRAS ];
How to use each of these traceoptions logs is covered in depth later in this book, but for now, you’re set to start configuring the MX for BRAS services.

28 DayOne:DynamicSubscriberManagement
Summary
You should now have a solid understanding of how the Juniper Networks Dynamic Subscriber Management solution works from a top-down approach:
� How the MX uses dynamic VLAN and dynamic IP profiles for BRAS network applications.
� How the MX interacts with the SBR.
� How the MX configuration hierarchies work together.
You also should have installed SBR and the MX licenses in your network environment so you can follow along with the rest of the book.
The rest of the book starts simply, gradually adding more features and functionality as it progresses through each chapter. You should also learn some great troubleshooting skills to check and monitor your deployment along the way. Let’s get started with the MX BRAS configuration in Chapter 2.

Chapter 2
Getting Started with the Customer VLAN Model
Configuration Cookbook: MX as DHCP Server . . . . . . . . . . . . . . . . . . . . . . . . . 30
Configuration Cookbook: MX using External DHCP Server . . . . . . . . . . . . .40
Looking at the Logs . . . . . . . . . . . . . . . . . . . . . . . . . . . . . . . . . . . . . . . . . . . . . . . . . . 42
Summary . . . . . . . . . . . . . . . . . . . . . . . . . . . . . . . . . . . . . . . . . . . . . . . . . . . . . . . . . . . 45

30 DayOne:DynamicSubscriberManagement
This chapter contains common examples that illustrate basic dynamic VLAN profiles, as well as how to configure the MX, either as a DHCP local-server or to use external DHCP servers . It utilizes the Customer VLAN model where each subscriber is uniquely encapsulated by stacked VLANs, that is, a packet with two VLAN tags.
Authentication and other per-subscriber IP variables are not used in this chapter. The focus, for now, is dynamic VLAN interfaces and assigning IP addresses to subscribers via DHCP. In later chapters SBR and per-subscriber IP variables will be covered in detail.
The first use-case contains the following attributes:
� Set the MX dynamic VLAN profile: Customer VLAN model, stacked VLANS.
� Configure the MX as a DHCP local-server.
� Note that the MX dynamic IP profiles are not used, and the SBR is not used.
And the second use-case shows you how to:
� Reconfigure MX to use external DHCP server.
You can see that only dynamic VLAN profiles, not dynamic IP profiles, are being used. A dynamic IP profile is not required since these exam-ples are not assigning any IP specific parameters such as bandwidth, access-control-lists, or policers. Along the way you should learn various Junos CLI commands to support the turn-up activity as well as how to examine log files to aid in troubleshooting.
Configuration Cookbook: MX as DHCP Server
The example network for this use-case is illustrated in Figure 2.1. Here, the MX is configured with a DHCP local-server that offers addresses in the 12.1.1.0/24 subnet. The ge-1/0/0 interface uses IP address 12.1.1.1 as the gateway, and the subscriber’s CPE MAC address is used as the subscriber’s user-name.
Our checklist is comprised of the following steps:
� Configure the loopback interface with 12.1.1.1
� Configure DHCP local-server
� Configure ge-1/0/0 to create dynamic VLAN interfaces
� Configure the associated dynamic VLAN profile

Chapter2:GettingStartedwiththeCustomerVLANModel 31
Figure 2.1 Use-Case 1: Configuration Cookbook Topology:
The map of the MX configuration hierarchies for this use-case is illustrated in Figure 2.2.
Figure 2.2 MX Configuration Hierarchy Map

32 DayOne:DynamicSubscriberManagement
Step1:ConfiguretheLoopbackInterface
In DHCP use-cases a physical interface “borrows” an IP address from the loopback interface and this technique is referred to as unnumbered interface addressing. In the Junos OS you do this by configuring a secondary IP address on the loopback interface, lo0.0. The DHCP server also uses this IP address to identify the DHCP address pool by matching it to the pool network value. If your network requires multiple address pools on different subnets, you would configure additional secondary loopback addresses for each one.
[edit]admin@SOUTHPARK# show interfaces lo0.0 family inet { address 66.127.93.17/32 { primary; preferred; } address 12.1.1.1/32;}
Here, you can see that the router’s primary loopback address is 66.127.93.17, as indicated by the primary and preferred keywords. The secondary address, 12.1.1.1, is added to the borrowed IP address for our DHCP subscribers.
MORE? For more information on unnumbered interfaces, see: http://www.juniper.net/techpubs/en_US/junos11.2/topics/usage-guidelines/interfac-es-configuring-an-unnumbered-interface.html.
Step2:ConfiguretheDHCPLocal-Server
The DHCP local address pool settings are stored in the [access address-assignment] hierarchy as shown here:
[edit access address-assignment]admin@SOUTHPARK# show pool dhcp-subs { family inet { network 12.1.1.0/24; range 1 { low 12.1.1.2; high 12.1.1.250; } dhcp-attributes { maximum-lease-time 3600; domain-name dayonebooks.juniper.net; router {

Chapter2:GettingStartedwiththeCustomerVLANModel 33
12.1.1.1; } } }}
The DHCP local-service controls are located in the [system services] hierarchy:
[edit system services dhcp-local-server]admin@SOUTHPARK# show pool-match-order { ip-address-first;}authentication { username-include { mac-address; }}group local { interface ge-1/0/0.0;}
Here, you can see that the subscriber’s MAC address is used to create the subscriber’s user-name.
ALERT! Since the configuration is using the DHCP authentication hierarchy to use the MAC address as the user-name, you must configure authentica-tion access controls. Since this configuration does not use RADIUS, you set the authentication order to none in the access profile:
[edit access]admin@SOUTHPARK# show profile local { authentication-order none;}[edit]
admin@SOUTHPARK# set access-profile local
Step3:InterfaceAuto-Configuration
To use dynamic VLAN interfaces you must assign a dynamic VLAN profile to an interface. Here is the configuration that allows any set of stacked VLAN tags to trigger the creation of a dynamic VLAN interface using the dynamic VLAN profile called DYNINTF-2VLANS-DHCP-INET:
[edit interfaces ge-1/0/0]admin@SOUTHPARK# show description “>> Stark’s Pond <<”;flexible-vlan-tagging;auto-configure {

34 DayOne:DynamicSubscriberManagement
stacked-vlan-ranges { dynamic-profile DYNINTF-2VLANS-DHCP-INET { accept any; ranges { any,any; } } }}
Notice the use of the new [auto-configure] stanza. This instructs the Junos OS to dynamically create VLAN interfaces based on specific packets. The [stacked-vlan-ranges] hierarchy instructs Junos to look for packets with two VLAN tags. The dynamic VLAN profile DYNINTF-2VLANS-DHCP-INET, which is presented in the next section, is used as the configuration template for any packets that match the criteria under its hierarchy.
Within the [dynamic-profile] stanza, the accept any statement indicates that Junos will trigger the auto-configure action on all known packet types.
ALERT! The Junos OS does look for specific types of packets to trigger the dynamic VLAN creation process. Junos OS looks for DHCP-DIS-COVER packets, for example, for DHCP v4. For more information on the types of packets that trigger dynamic VLAN interfaces, refer to: http://www.juniper.net/techpubs/en_US/junos/topics/reference/configu-ration-statement/accept-edit-interfaces.html.
If you wanted to explicitly limit packets to DHCP v4, for example, you could have set accept specifically to dhcp-v4.
Also under the [dynamic-profile] stanza, the [ranges] hierarchy is used to filter the specific outer and inner VLAN tags. The use of any, any indicates that any stacked VLAN tags are valid. You could config-ure the [ranges] stanza with more specific values for one of two reasons:
� To prevent unwanted VLANs from being accepted by the MX.
� To create multiple [dynamic-profile] hierarchies mapping different VLAN ranges into different dynamic VLAN profiles.
Step4:ConfiguretheDynamicVLANProfile
Finally, let’s configure the dynamic VLAN profile that ge-1/0/0 is using, DYNINTF-2VLANS-DHCP-INET. The profile is defined under the new [dynamic-profiles] hierarchy:

Chapter2:GettingStartedwiththeCustomerVLANModel 35
[edit dynamic-profiles DYNINTF-2VLANS-DHCP-INET]admin@SOUTHPARK# show interfaces { “$junos-interface-ifd-name” { unit “$junos-interface-unit” { proxy-arp restricted; vlan-tags outer “$junos-stacked-vlan-id” inner “$junos-vlan-id”; family inet { unnumbered-address lo0.0 preferred-source-address 12.1.1.1; } } }}
As discussed in Chapter 1, $junos variables act as placeholders in what would normally be a static configuration.
� $junos-interface-ifd-name is a placeholder for the interface name where the packet was received, for example ge-1/0/0.
� $junos-interface-unit is a placeholder for the unit number. The Junos OS dynamically allocates the unit number when the packet triggers the auto-configure action.
� $junos-stacked-vlan-id is a placeholder for the outer VLAN tag of the packet, for example tag-ID 100. The Junos OS reads the outer VLAN tag from the packet and substitutes the value in the dynamic VLAN profile.
� $junos-vlan-id is a placeholder for the inner VLAN tag of the packet, for example, tag-IDs 20-26. The Junos OS reads the inner VLAN tag from the packet and substitutes the value in the dynamic VLAN profile.
The use of prox-arp restricted is needed in some DHCP use-cases so the MX responds to ARP requests, but not to IP addresses that it distrib-utes.
You can also see in the above dynamic VLAN profile how the interface will use/borrow the lo0.0 address 12.1.1.1.
MORE? A table containing a complete listing of all Junos variables can be found at: http://www.juniper.net/techpubs/en_US/junos/topics/reference/general/junos-predefined-variables-table.html .You can also review the Subscriber Access Configuration Guide at: http://www.juniper.net/techpubs/en_US/junos/information-products/topic-collections/config-guide-subscriber-access/config-guide-subscriber-access.pdf.

36 DayOne:DynamicSubscriberManagement
Step5:Checkpoint-ValidatetheConfiguration
Now let’s review the commands you can use to validate the configura-tion. If you find that your dynamic VLAN interfaces are not being created, or DHCP is not working, jump ahead to the Looking at Logs section in this chapter for help.
The first command you can use is the show subscribers command, which displays dynamic VLAN interfaces as well as subscriber IP sessions. In our example network, there are seven (7) subscribers, and the output looks like this:
admin@SOUTHPARK> show subscribers Interface IP Address/VLAN ID User Name LS:RIge-1/0/0.1073741837 0x8100.100 0x8100.20 default:defaultge-1/0/0.1073741838 0x8100.100 0x8100.21 default:defaultge-1/0/0.1073741839 0x8100.100 0x8100.22 default:defaultge-1/0/0.1073741840 0x8100.100 0x8100.23 default:defaultge-1/0/0.1073741841 0x8100.100 0x8100.24 default:defaultge-1/0/0.1073741842 0x8100.100 0x8100.25 default:defaultge-1/0/0.1073741843 0x8100.100 0x8100.26 default:defaultge-1/0/0.1073741837 12.1.1.12 0000.6404.0102 default:defaultge-1/0/0.1073741838 12.1.1.13 0000.6404.0103 default:defaultge-1/0/0.1073741839 12.1.1.14 0000.6404.0104 default:defaultge-1/0/0.1073741840 12.1.1.15 0000.6404.0105 default:defaultge-1/0/0.1073741841 12.1.1.16 0000.6404.0106 default:defaultge-1/0/0.1073741842 12.1.1.17 0000.6404.0107 default:defaultge-1/0/0.1073741843 12.1.1.18 0000.6404.0108 default:default
The first seven line items are the dynamic VLAN interfaces the MX auto-created using the dynamic VLAN profile. You can see that these are stacked VLAN tagged interfaces, each with an outer VLAN tag of 100 and a different inner VLAN tag [20 … 26]. The last seven line items are the subscriber IP sessions. You can see that the user-name values are the DHCP client MAC-Addresses. The LS:RI field indicates the logical-system and routing-instance. These values would be something other than default if you were creating L2/L3 wholesale network configurations.
There are a number of filtering parameters to the show subscribers command that are very critical to use when you have thousands of subscribers on your MX. Use the help prompt:
admin@SOUTHPARK> show subscribers ?Possible completions: <[Enter]> Execute this command address IPv4 or IPv6 address of subscriber client-type Client type of subscriber

Chapter2:GettingStartedwiththeCustomerVLANModel 37
count Display number of subscribers detail Display detailed output extensive Display extensive output interface Interface name, or with wildcards (e.g. fe-0/0/*, fe-0/*/*) logical-system Logical system where subscriber resides mac-address MAC address of subscriber profile-name Profile with which subscriber has been activated routing-instance Routing instance where subscriber resides stacked-vlan-id Stacked VLAN identifier of subscriber (0..4094) subscriber-state State of subscriber summary Display subscriber summary terse Display terse output vlan-id VLAN identifier of subscriber (0..4094)
The following are a few useful examples of the show subscriber command.
1. Show a summary of the subscribers:
admin@SOUTHPARK> show subscribers summary
Subscribers by State Active: 14 Total: 14
Subscribers by Client Type DHCP: 7 VLAN: 7 Total: 14
2. Show a subscriber by their MAC-address:
admin@SOUTHPARK> show subscribers mac-address 0000.6404.0108 Interface IP Address/VLAN ID User Name LS:RIge-1/0/0.1073741843 12.1.1.18 0000.6404.0108 default:default
3. Show a subscriber by their IP address:
admin@SOUTHPARK> show subscribers address 12.1.1.17 Interface IP Address/VLAN ID User Name LS:RIge-1/0/0.1073741842 12.1.1.17 0000.6404.0107 default:default
4. Show only DHCP subscribers on a specific interface:
admin@SOUTHPARK> show subscribers client-type dhcp interface ge-1/0/0.* Interface IP Address/VLAN ID User Name LS:RIge-1/0/0.1073741837 12.1.1.12 0000.6404.0102 default:defaultge-1/0/0.1073741838 12.1.1.13 0000.6404.0103 default:defaultge-1/0/0.1073741839 12.1.1.14 0000.6404.0104 default:default

38 DayOne:DynamicSubscriberManagement
ge-1/0/0.1073741840 12.1.1.15 0000.6404.0105 default:defaultge-1/0/0.1073741841 12.1.1.16 0000.6404.0106 default:defaultge-1/0/0.1073741842 12.1.1.17 0000.6404.0107 default:defaultge-1/0/0.1073741843 12.1.1.18 0000.6404.0108
The next command you can use to validate services is the show net-work-access aaa subscribers command:
admin@SOUTHPARK> show network-access aaa subscribers Username Logical system/Routing instance Client type Session-ID0000.6404.0102 default:default dhcp 00000.6404.0103 default:default dhcp 00000.6404.0104 default:default dhcp 00000.6404.0105 default:default dhcp 00000.6404.0106 default:default dhcp 00000.6404.0107 default:default dhcp 00000.6404.0108 default:default dhcp 0
While this command has information similar to show subscribers it does not have as much filtering support. However, it does show you valuable information when you expand on a specific user:
admin@SOUTHPARK> show network-access aaa subscribers username 0000.6404.0108 Logical system/Routing instance Client type Session uptime Accountingdefault:default dhcp 00:19:10 off
Here, you can see the session uptime value, for example, how long the user has been logged into the system, as well as whether or not RA-DIUS accounting is enabled.
A similar, but different, command is show dhcp server binding, which can only be used when the MX is the DHCP local-server:
admin@SOUTHPARK> show dhcp server binding
IP address Session Id Hardware address Expires State Interface12.1.1.19 76 00:00:64:04:01:02 3527 BOUND ge-1/0/0.1073741844 12.1.1.20 77 00:00:64:04:01:03 3527 BOUND ge-1/0/0.1073741845 12.1.1.21 78 00:00:64:04:01:04 3527 BOUND ge-1/0/0.1073741846 12.1.1.22 79 00:00:64:04:01:05 3527 BOUND ge-1/0/0.1073741847 12.1.1.23 80 00:00:64:04:01:06 3527 BOUND ge-1/0/0.1073741848 12.1.1.24 81 00:00:64:04:01:07 3527 BOUND ge-1/0/0.1073741849 12.1.1.25 82 00:00:64:04:01:08 3527 BOUND ge-1/0/0.1073741850
Finally, if you want to remove entries from the subscriber table, you can use the clear auto-configuration command:
admin@SOUTHPARK> clear auto-configuration interfaces ge-1/0/0

Chapter2:GettingStartedwiththeCustomerVLANModel 39
7 interfaces removed from device ge-1/0/0
admin@SOUTHPARK> show subscribers Total subscribers: 0, Active Subscribers: 0
ALERT! If you attempt to clear a dynamic VLAN interface which still has a DHCP binding, the interface will not be removed. You must first clear the DHCP binding using the clear dhcp server binding command.
Another way to validate services is to examine the routing table. Junos adds subscriber sessions as access-internal routes:
admin@SOUTHPARK> show route protocol access-internal
inet.0: 17 destinations, 17 routes (17 active, 0 holddown, 0 hidden)+ = Active Route, - = Last Active, * = Both
12.1.1.3/32 *[Access-internal/12] 00:10:35 > to #0 0.0.64.4.1.2 via ge-1/0/0.107374185112.1.1.4/32 *[Access-internal/12] 00:10:35 > to #0 0.0.64.4.1.3 via ge-1/0/0.107374185212.1.1.5/32 *[Access-internal/12] 00:10:35 > to #0 0.0.64.4.1.4 via ge-1/0/0.107374185312.1.1.6/32 *[Access-internal/12] 00:10:35 > to #0 0.0.64.4.1.5 via ge-1/0/0.107374185412.1.1.7/32 *[Access-internal/12] 00:10:35 > to #0 0.0.64.4.1.6 via ge-1/0/0.107374185512.1.1.8/32 *[Access-internal/12] 00:10:35 > to #0 0.0.64.4.1.7 via ge-1/0/0.107374185612.1.1.9/32 *[Access-internal/12] 00:10:35 > to #0 0.0.64.4.1.8 via ge-1/0/0.1073741857
This output is particularly interesting because you have three pieces of important information together: the subscriber IP address, the sub-scriber MAC address, and the underlying interface. The MAC address is the “to” value.
For example 12.1.1.9 is going to 0.0.64.4.1.8, which is MAC address 0000.6404.0108:
admin@SOUTHPARK> show subscribers address 12.1.1.9 Interface IP Address/VLAN ID User Name LS:RIge-1/0/0.1073741857 12.1.1.9 0000.6404.0108 default:default

40 DayOne:DynamicSubscriberManagement
Configuration Cookbook: MX using External DHCP Server
The next use-case changes the configuration from using a DHCP local-server to using an external DHCP server. The new network diagram for this use-case is illustrated in Figure 2.3.
Figure 2.3 Network Using External DHCP Server
Our checklist is comprised of the following steps:
� Remove DHCP local-server configuration
� Configure the DHCP relay
The map of the MX configuration hierarchies for this use-case is illustrated in Figure 2.4.
Figure 2.4 MX Configuration Hierarchy for Use-Case 2

Chapter2:GettingStartedwiththeCustomerVLANModel 41
Step1:ChangeDHCP
First remove the DHCP local-server configuration:
admin@SOUTHPARK# delete access address-assignmentadmin@SOUTHPARK# delete system services dhcp-local-server
Now add the DHCP relay configuration under the [forwarding-op-tions dhcp-relay] hierarchy:
[edit forwarding-options dhcp-relay]admin@SOUTHPARK# show server-group { dayoneDHCP { 13.1.1.2; }}group local { active-server-group dayoneDHCP; authentication { username-include { mac-address; } } interface ge-1/0/0.0;}
That’s it!
NOTE It is possible to have multiple DHCP servers defined in a specific server-group. You can also define multiple DHCP relay groups as associates, each one with a server-group. In a “Multiplay Network” you might configure one set of DHCP servers to support IPTV/set-top-boxes, and another set of DHCP servers to support different types of devices.
MORE? For more information on different DHCP relay scenarios and configu-ration examples, see: http://www.juniper.net/techpubs/en_US/junos/information-products/pathway-pages/subscriber-access/dhcp/subscrib-er-management-dhcp-relay.html#configuration . A particularly interesting topic is using the DHCP-Option60 (for example, device type) value to select the DHCP server-group. This technique is specifi-cally used for the Multiplay example mentioned in the prior para-graph.

42 DayOne:DynamicSubscriberManagement
Step2:Checkpoint-ValidatetheConfiguration
Once you’ve committed the changes to support DHCP relay, you can revalidate your network results using the same commands as used in the previous Checkpoint in Use-Case 1.
When you run through the commands, you should notice that the only difference is that the show dhcp server binding command no longer has any entries, since the MX is no longer a DHCP local server. Instead you would use show dhcp relay binding and clear dhcp relay binding.
The show network-access aaa subscribers command will always show you your DHCP subscriber sessions.
Looking at the Logs
Now let’s walk though a few common troubleshooting activities using the traceoptions log files you enabled in Chapter 1. Just make sure that you have these enabled before you start testing!
Generally speaking, you can look for errors or failures in log files using the show log command:
admin@SOUTHPARK> show log dhcplog | match “(error|failure|bad|missing|unconfigured)”
Oct 28 12:54:49 BOOTPREQUEST arrived on unconfigured interface ge-1/0/0.1073741858, flags 3Oct 28 12:55:19 BOOTPREQUEST arrived on unconfigured interface ge-1/0/0.1073741858, flags 3
Since this chapter is focused on dynamic VLAN interfaces and DHCP services, the focus here is on their related log files.
CheckingtheAuto-ConfigurationLog
In Chapter 1 you should have configured the log file autolog to capture traceoptions from the auto-configuration process. This is generally the first place to start looking when you do not see a dynamic VLAN interface being created.
When the MX detects a packet for auto-configure, you will see a log entry similar to this:
Oct 28 11:06:41 L2 Input: svlan packet, index 70, svtpid 0x8100, vtpid 0x8100Oct 28 11:06:41 autoconfd_vlan_create: vtype 2, ge-1/0/0, DYNINTF-2VLANS-DHCP-INET, (100/20)

Chapter2:GettingStartedwiththeCustomerVLANModel 43
The log entry indicates that a dual-stacked packet was received on ge-1/0/0 with an outer tag of 100 and an inner tag of 20. You can also see the EtherType values (0x8100) on both of the tags. The MX has determined that the dynamic VLAN profile for this packet is DYNINTF-2VLANS-DHCP-INET.
ALERT! Recall that the DHCP-DISCOVER packet triggers the auto-configura-tion action. If you do not see the above log entry, check the DHCP log file, and jump to the next section.
A common mistake is configuring an interface with a dynamic VLAN profile that does not exist, often due to misspelling the profile name. If this profile doesn’t exist, you will see the following in the logfile:
Oct 28 11:06:41 sdb_ack_callback: session 56, result 0Oct 28 11:06:41 profile_request_add: profile request failed: error 205, session 56
Here you can see that the profile add failed. Double-check your configuration to make sure the profile exists in [dynamic-profiles] and that there wasn’t a spelling mistake.
When the dynamic VLAN interface is successfully created you should see something similar to the following:
Oct 28 11:19:44 sdb_ack_callback: session 58, result 0Oct 28 11:19:44 profile_request_add: profile request sent, session 58Oct 28 11:19:44 sdb_ack_callback: session 58, request add, error 0Oct 28 11:19:44 Received async msg for ifl ge-1/0/0.1073741857Oct 28 11:19:44 Received add async msg for ifl ge-1/0/0.1073741857Oct 28 11:19:44 attach ifl ge-1/0/0.1073741857, index 74 to session 58Oct 28 11:19:44 autoconfd_add_ifl: ifl ge-1/0/0.1073741857 added, index 0x4a, gen num 172 iflm session 58, ifl session 58
NOTE Use the following command to quickly find success or fail information:
admin@SOUTHPARK> show autolog | match profile_request_add
CheckingtheDHCPLog
In Chapter 1 you configured the log file dhcplog to capture traceop-tions from the DHCP local-server or relay process. This is generally the first place to start looking when you do not see an IP address assigned via DHCP.

44 DayOne:DynamicSubscriberManagement
The log file will display the DHCP packet information, so you will know if or when the MX processes a DHCP-DISCOVER packet:
Oct 28 12:19:42 LOCAL : recv sa 255.255.255.255 da 255.255.255.255, src_port 68, dst_port 67 if name ge-1/0/0.1073741858 len 244Oct 28 12:19:42 --[ OPTION code 53, len 1, data DHCP-DISCOVER ]--Oct 28 12:19:42 --[ OPTION code 255, len 0 ]—
This log file entry indicates that a DHCP-DISCOVER packet was received on ge-1/0/0 and you can tell that it’s on a dynamic VLAN interface because of the unit number value.
ALERT! Remember that it is only the DHCP-DISCOVER packet that triggers the auto-configuration for DHCPv4 packets. If you happen to be testing your configuration and your DHCP client does not issue the DHCP-DISCOVER, you will see the other type of packet in the log file, but it will not trigger the auto-configure action. This scenario is very common if you are using a Windows computer as your DHCP client – in repetitive tests Windows may not send the DHCP-DISCOVER message, but will instead send the DHCP-OFFER/RENEW message.
Another common mistake is forgetting to add the interface to a DHCP group. If the interface is not configured in a DHCP group, you will see a log entry similar to:
Oct 28 12:19:42 BOOTPREQUEST arrived on unconfigured interface ge-1/0/0.1073741858, flags 3
To double-check that your interface is in a DHCP group, you can do the following:
admin@SOUTHPARK> show configuration forwarding-options dhcp-relay | display set | match ge-1/0/0
If you don’t see anything, it means that the interface is not configured in a group.
ALERT! Recall that the DHCP packet is what will trigger the dynamic VLAN interface; so if you forget to include the interface in a DHCP group the auto-configuration will never get triggered.
The next common mistake is forgetting to assign a DHCP active-serv-er-group within the DHCP group. The active-server-group identifies the specific external DHCP server(s) the MX should use. If you were experiencing this mis-configuration, you would see a log entry similar to:

Chapter2:GettingStartedwiththeCustomerVLANModel 45
Oct 28 12:30:17 No Server Group configuredOct 28 12:30:17 No Server Group to use
Yet another common mistake is forgetting to configure an [access profile] when you are using the [authentication] stanza in your DHCP group. The examples in this chapter use this hierarchy so that the MAC address will be used as the subscriber’s user-name. You can tell that authentication is in use because you will see a log entry similar to:
Oct 28 12:34:45 Client 00-00-64-01-01-02 got event CLIENT_EVENT_DISCOVER_PDU in state RELAY_STATE_INITOct 28 12:34:45 AUTHENTICATION configured when received Discover pkt in state RELAY_STATE_INIT
If you forget to properly configure an [access profile], you will see a log entry similar to:
Oct 28 12:34:45 auth request reply failed err: 5 RELAY_STATE_WAIT_AUTH_REQOct 28 12:34:45 dropping packet
Summary
This chapter covered the basics for setting up a simple Dynamic Subscriber Management solution. And it’s up and running!
You should have learned these fundamentals:
� Understanding the Customer VLAN model.
� Creating and using a basic dynamic VLAN profile.
� Using the MX as a DHCP local-server.
� Configuring the MX to use an external DHCP server.
And along the way you should have become familiar with key trouble-shooting skills using Junos commands and traceoptions log files. Do you recognize these Junos commands?
> show subscribers> clear auto-configure interface
> show network-access aaa subscriber> clear network-access aaa subscriber username

46 DayOne:DynamicSubscriberManagement
> show route protocol access-internal
> show dhcp server binding> clear dhcp server binding
> show dhcp relay binding> clear dhcp relay binding
The next chapter builds on these core concepts as it investigates the Service VLAN model. The Service VLAN model requires the use of basic dynamic IP profiles and the special Junos demux0 interface. So save your current configuration now, and roll up your sleeves for more topics and techniques.

Chapter 3
Getting Started with the Service VLAN Model
Configuration Cookbook . . . . . . . . . . . . . . . . . . . . . . . . . . . . . . . . . . . . . . . . . . . . . 49
Looking at the Logs . . . . . . . . . . . . . . . . . . . . . . . . . . . . . . . . . . . . . . . . . . . . . . . . . . 57
Summary . . . . . . . . . . . . . . . . . . . . . . . . . . . . . . . . . . . . . . . . . . . . . . . . . . . . . . . . . . . 58

48 DayOne:DynamicSubscriberManagement
Now that you have the basics of dynamic VLAN interfaces under your belt, it’s time to learn a few new techniques. This chapter investigates the Service VLAN model, a model where many subscribers are using (sharing) the same VLAN.
Legacy MSAN devices typically have an “Internet VLAN,” a “Voice VLAN,” a “Video VLAN,” etc., and the BRAS is responsible for anchoring the subscriber session by their assigned IP address. Compare this to what you just learned using the Customer VLAN model in Chapter 2, where subscriber sessions are anchored to their dynamic stacked VLAN tagged interfaces.
With the Service VLAN model, the subscribers share the same MX dynamic VLAN interface, and the subscriber sessions are anchored on a Junos IP-demux interface. If you are not familiar with the IP-demux interface don’t worry, in this chapter you’ll learn everything you need to know to make it work.
This chapter also introduces you to basic dynamic IP profiles (finally!). When using dynamic VLAN interfaces that use the IP-demux inter-faces, you must also use dynamic IP profiles. You’ll see why as you get into the specific configurations.
In order to stay focused on learning about dynamic IP profiles and IP-demux, this chapter does not use SBR or any fancy per-subscriber IP service variables. These are covered in subsequent chapters.
There is only one use-case scenario in this chapter and it requires these attributes:
� MX dynamic VLAN profile: Service VLAN model, single tag
� MX dynamic IP profile: for using IP-demux interface
� MX using DHCP relay to external DHCP servers
� SBR is not-used
NOTE This chapter uses the DHCP relay configuration from Chapter 2 as a starting point. If you skipped Chapter 2, be sure to read through that chapter and configure the MX to support DHCP relay services, as these crucial first steps are not be covered or repeated in this chapter.

Chapter3:GettingStartedwiththeServiceVLANModel 49
Configuration Cookbook
The example network scenario:
Figure 3.1 Chapter 3 Use-Case Configuration Cookbook Topology
Our checklist is comprised of the following steps:
� Reconfigure ge-1/0/0 to create dynamic VLAN interfaces for a Service VLAN model.
� Configure the associated dynamic VLAN profile.
� Update the DHCP relay group to use a dynamic IP profile.
� Configure the dynamic IP profile to use the IP-demux interface.
And the map of the MX configuration hierarchies for this use-case is illustrated in Figure 3.2.
Figure 3.2 Chapter 3 Use-Case MX Configuration Hierarchy Map
50 DayOne:DynamicSubscriberManagement
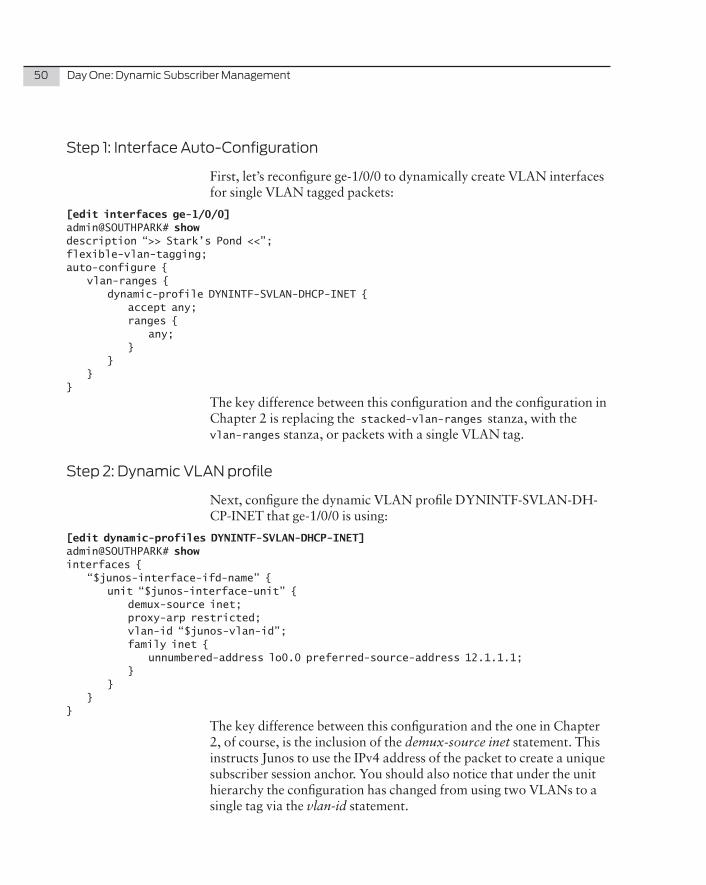
Step1:InterfaceAuto-Configuration
First, let’s reconfigure ge-1/0/0 to dynamically create VLAN interfaces for single VLAN tagged packets:
[edit interfaces ge-1/0/0]admin@SOUTHPARK# show description “>> Stark’s Pond <<”;flexible-vlan-tagging;auto-configure { vlan-ranges { dynamic-profile DYNINTF-SVLAN-DHCP-INET { accept any; ranges { any; } } }}
The key difference between this configuration and the configuration in Chapter 2 is replacing the stacked-vlan-ranges stanza, with the vlan-ranges stanza, or packets with a single VLAN tag.
Step2:DynamicVLANprofile
Next, configure the dynamic VLAN profile DYNINTF-SVLAN-DH-CP-INET that ge-1/0/0 is using:
[edit dynamic-profiles DYNINTF-SVLAN-DHCP-INET]admin@SOUTHPARK# show interfaces { “$junos-interface-ifd-name” { unit “$junos-interface-unit” { demux-source inet; proxy-arp restricted; vlan-id “$junos-vlan-id”; family inet { unnumbered-address lo0.0 preferred-source-address 12.1.1.1; } } }}
The key difference between this configuration and the one in Chapter 2, of course, is the inclusion of the demux-source inet statement. This instructs Junos to use the IPv4 address of the packet to create a unique subscriber session anchor. You should also notice that under the unit hierarchy the configuration has changed from using two VLANs to a single tag via the vlan-id statement.

Chapter3:GettingStartedwiththeServiceVLANModel 51
Step3:DynamicIPProfile
A dynamic IP profile is needed for IP demux. Junos provides the demux0 interface for this purpose. As you can see from the configuration below, each subscriber is uniquely anchored as a unit of demux0. If you can recall, the Junos OS dynamically allocates the $junos-inter-face-unit during the dynamic VLAN interface creation. Therefore each subscriber requires a unique interfaces piece of configuration above and beyond the dynamic VLAN interface. And that is why a dynamic IP profile is required when using IP-demux interfaces:
[edit dynamic-profiles]admin@SOUTHPARK# show DYNSUB-SVLAN-IPDEMUX { interfaces { demux0 { unit “$junos-interface-unit” { demux-options { underlying-interface “$junos-underlying-interface”; } family inet { demux-source { $junos-subscriber-ip-address; } } } } }}
You’ve seen most of these $junos variables in Chapter 2, and the only new one is $junos-subscriber-ip-address. This variable is a place-holder for the IP address provided by DHCP when using the demux0 interface.
Step4:BindDynamicIPProfileviaDHCPGroup
The way you bind a dynamic IP profile to an interface is through the DHCP group. Here is the complete configuration DHCP-relay hierarchy:
[edit forwarding-options dhcp-relay]admin@SOUTHPARK# show server-group { dayoneDHCP { 13.1.1.2; }}group local {

52 DayOne:DynamicSubscriberManagement
active-server-group dayoneDHCP; authentication { username-include { mac-address; } } dynamic-profile DYNSUB-SVLAN-IPDEMUX; interface ge-1/0/0.0;}
The only difference between this and Chapter 2 is the inclusion of the dynamic-profile statement, which instructs Junos to use the DYNSUB-SVLAN-IPDEMUX dynamic profile when creating DHCP subscribers.
ALERT! Be careful when you set the dynamic-profile statement that you assign the dynamic IP profile name, and not the dynamic VLAN profile name. This is a common mistake.
Step5:Checkpoint-ValidatetheConfiguration
All the commands you learned in Chapter 2 to validate the configura-tion apply to IP-demux based subscribers too, so let’s highlight just a few differences.
In our example network, there are seven (7) subscribers, and the output looks like:
admin@SOUTHPARK> show subscribers Interface IP Address/VLAN ID User Name LS:RIge-1/0/0.1073741824 200 default:defaultdemux0.1073741834 12.1.1.32 0000.6405.0102 default:defaultdemux0.1073741835 12.1.1.33 0000.6405.0103 default:defaultdemux0.1073741836 12.1.1.34 0000.6405.0104 default:defaultdemux0.1073741837 12.1.1.35 0000.6405.0105 default:defaultdemux0.1073741838 12.1.1.36 0000.6405.0106 default:defaultdemux0.1073741839 12.1.1.37 0000.6405.0107 default:defaultdemux0.1073741840 12.1.1.38 0000.6405.0108 default:default
Notice how there is only one dynamic VLAN interface for VLAN 200 that is shared by all of the subscriber demux0 interfaces.
ALERT! If you are not seeing demux0 interfaces, but rather just more ge-1/0/0 dynamic VLAN interfaces, it means that you forgot to include the demux-source inet statement in your dynamic VLAN profile configura-tion, or did not add the dynamic-profile statement to your DHCP group configuration. The resulting show subscribers in this case would look like this:

Chapter3:GettingStartedwiththeServiceVLANModel 53
admin@SOUTHPARK> show subscribers Interface IP Address/VLAN ID User Name LS:RIge-1/0/0.1073741859 200 default:defaultge-1/0/0.1073741859 12.1.1.32 0000.6405.0102 default:defaultge-1/0/0.1073741859 12.1.1.33 0000.6405.0103 default:defaultge-1/0/0.1073741859 12.1.1.34 0000.6405.0104 default:defaultge-1/0/0.1073741859 12.1.1.35 0000.6405.0105 default:defaultge-1/0/0.1073741859 12.1.1.36 0000.6405.0106 default:defaultge-1/0/0.1073741859 12.1.1.37 0000.6405.0107 default:defaultge-1/0/0.1073741859 12.1.1.38 0000.6405.0108 default:default
ALERT! Notice how all of the subscribers are now sharing the same interface: ge-1/0/0.1073741859. This means that there is no per-subscriber anchor, and you will run into trouble.
You can obtain interface information, for example, if you wanted to examine the packet statistics for a dynamic IP interface session:
admin@SOUTHPARK> show interfaces demux0.1073741840 extensive Logical interface demux0.1073741840 (Index 81) (SNMP ifIndex 577) (Generation 155) Flags: SNMP-Traps 0x0 Encapsulation: ENET2 Demux: Underlying interface: ge-1/0/0.1073741824 (Index 74) Family Inet Source prefixes, total 1 Prefix: 12.1.1.38/32 Traffic statistics: Input bytes : 700 Output bytes : 650 Input packets: 3 Output packets: 3 Local statistics: Input bytes : 700 Output bytes : 650 Input packets: 3 Output packets: 3 Transit statistics: Input bytes : 0 0 bps Output bytes : 0 0 bps Input packets: 0 0 pps Output packets: 0 0 pps Protocol inet, MTU: 1986, Generation: 170, Route table: 0 Flags: Sendbcast-pkt-to-re, Unnumbered Donor interface: lo0.0 (Index 64) Preferred source address: 12.1.1.1
Since this configuration is using DHCP relay, you can use the show dhcp relay binding command:

54 DayOne:DynamicSubscriberManagement
admin@SOUTHPARK> show dhcp relay binding
IP address Session Id Hardware address Expires State Interface12.1.1.32 18 00:00:64:05:01:02 3008 BOUND ge-1/0/0.1073741824 12.1.1.33 19 00:00:64:05:01:03 3008 BOUND ge-1/0/0.1073741824 12.1.1.34 20 00:00:64:05:01:04 3008 BOUND ge-1/0/0.1073741824 12.1.1.35 21 00:00:64:05:01:05 3008 BOUND ge-1/0/0.1073741824 12.1.1.36 22 00:00:64:05:01:06 3008 BOUND ge-1/0/0.1073741824 12.1.1.37 23 00:00:64:05:01:07 3008 BOUND ge-1/0/0.1073741824 12.1.1.38 24 00:00:64:05:01:08 3008 BOUND ge-1/0/0.1073741824
And if you need to forcibly release a subscriber session, you can use the clear dhcp relay binding command:
admin@SOUTHPARK> clear dhcp relay binding 12.1.1.32
Bonus:UsingDHCP-Option82
As a chapter bonus, let’s show you how to change the configuration to use the DHCP Option82 field for the subscriber user-name. This configu-ration isn’t specific to the Service VLAN model, but hey, why not learn it now?
Two common scenarios occur when using the Option82 field, the first is when the MSAN device is setting this value, and the second is when the MX device is setting the value. Both approaches are covered here.
For when the MSAN sets the Option82 value, here is the DHCP group configuration:
[edit forwarding-options dhcp-relay group local]admin@SOUTHPARK# show active-server-group dayoneDHCP;authentication { username-include { option-82 circuit-id; }}dynamic-profile DYNSUB-SVLAN-IPDEMUX;overrides { trust-option-82;}interface ge-1/0/0.0;
There are two key differences in this configuration when you use the Option82 value. The first difference is the change to the [username-in-clude] stanza. You can see that the Option82 circuit-id value is used instead of the MAC address. The second difference is that the MX must

Chapter3:GettingStartedwiththeServiceVLANModel 55
trust the provided Option82 from the MSAN, as shown in the [over-rides] stanza. If you forget to do this, the MX discards the packets that have the Option82 field set (see the Looking at Logs section later in this chapter for details).
If you want the MX to set the Option82 value, you would use the following configuration:
[edit forwarding-options dhcp-relay group local]admin@SOUTHPARK# show active-server-group dayoneDHCP;authentication { username-include { option-82 circuit-id; }}dynamic-profile DYNSUB-SVLAN-IPDEMUX;overrides { always-write-option-82; trust-option-82;}relay-option-82 { circuit-id { prefix { host-name; } }}interface ge-1/0/0.0;
Note the new [relay-option-82] stanza. You must include this stanza for the MX to write the Option82 field in the packet. The underlying [prefix] stanza is optional, but it’s nice to have the MX hostname included (see the output example in next section Bonus: Checkpoint).
ALERT! In the Service VLAN model, all of the subscribers are sharing the same dynamic VLAN interface, and therefore the Option82 circuit-id value is the same for all subscribers. In this case, the user-name field is the same for everyone, and this is definitely not what you want; see output example in next validating services section. Having the MX set the Option82 circuit-id field is really only useful in the Customer VLAN model where each subscriber has a unique set of VLAN tags. You can see an example output of this use-case in the next section as well.

56 DayOne:DynamicSubscriberManagement
Bonus:Checkpoint-ValidateTheConfiguration
Here is the output when the MX uses the Option82 circuit-id field provided by the MSAN. Assume that the MSAN circuit-id value format is the MSAN IP-address followed by the slot and port identifier. It should look similar to:
admin@SOUTHPARK> show subscribers Interface IP Address/VLAN ID User Name LS:RIge-1/0/0.1073741859 200 default:defaultdemux0.1073741883 12.1.1.73 66.127.90.8:slot-3/port-0 default:defaultdemux0.1073741884 12.1.1.74 66.127.90.8:slot-3/port-1 default:defaultdemux0.1073741885 12.1.1.75 66.127.90.8:slot-3/port-2 default:defaultdemux0.1073741886 12.1.1.76 66.127.90.8:slot-3/port-3 default:defaultdemux0.1073741887 12.1.1.77 66.127.90.8:slot-3/port-4 default:defaultdemux0.1073741888 12.1.1.78 66.127.90.8:slot-3/port-5 default:defaultdemux0.1073741889 12.1.1.79 66.127.90.8:slot-3/port-6 default:default
Let’s inspect the DHCP relay binding information:
admin@SOUTHPARK> show dhcp relay binding
IP address Session Id Hardware address Expires State Interface12.1.1.73 98 00:00:64:05:01:02 3491 BOUND ge-1/0/0.1073741859 12.1.1.74 99 00:00:64:05:01:03 3491 BOUND ge-1/0/0.1073741859 12.1.1.75 100 00:00:64:05:01:04 3491 BOUND ge-1/0/0.1073741859 12.1.1.76 101 00:00:64:05:01:05 3491 BOUND ge-1/0/0.1073741859 12.1.1.77 102 00:00:64:05:01:06 3491 BOUND ge-1/0/0.1073741859 12.1.1.78 103 00:00:64:05:01:07 3491 BOUND ge-1/0/0.1073741859 12.1.1.79 104 00:00:64:05:01:08 3491 BOUND ge-1/0/0.1073741859
ALERT! Here is the output when the MX sets the Option82 circuit-id value in a Service VLAN model. Notice how all of the subscribers have the same user-name; this is not what you want!
admin@SOUTHPARK> show subscribers Interface IP Address/VLAN ID User Name LS:RIge-1/0/0.1073741859 200 default:defaultdemux0.1073741918 12.1.1.108 SOUTHPARK:ge-1/0/0:200 default:defaultdemux0.1073741919 12.1.1.109 SOUTHPARK:ge-1/0/0:200 default:defaultdemux0.1073741920 12.1.1.110 SOUTHPARK:ge-1/0/0:200 default:defaultdemux0.1073741921 12.1.1.111 SOUTHPARK:ge-1/0/0:200 default:defaultdemux0.1073741922 12.1.1.112 SOUTHPARK:ge-1/0/0:200 default:defaultdemux0.1073741923 12.1.1.113 SOUTHPARK:ge-1/0/0:200 default:defaultdemux0.1073741924 12.1.1.114 SOUTHPARK:ge-1/0/0:200 default:default
What if you go back and reconfigure the MX to use the Customer VLAN model? Let’s try that. Now, when you have the MX set the Option82 field, you will see unique user-name values somewhat similar

Chapter3:GettingStartedwiththeServiceVLANModel 57
to this:
admin@SOUTHPARK> show subscribers Interface IP Address/VLAN ID User Name LS:RIge-1/0/0.1073741925 0x8100.100 0x8100. default:defaultge-1/0/0.1073741926 0x8100.100 0x8100.21 default:defaultge-1/0/0.1073741927 0x8100.100 0x8100.22 default:defaultge-1/0/0.1073741928 0x8100.100 0x8100. default:defaultge-1/0/0.1073741929 0x8100.100 0x8100.24 default:defaultge-1/0/0.1073741930 0x8100.100 0x8100.25 default:defaultge-1/0/0.1073741931 0x8100.100 0x8100.26 default:defaultge-1/0/0.1073741925 12.1.1.115 SOUTHPARK:ge-1/0/0:100-20 default:defaultge-1/0/0.1073741926 12.1.1.116 SOUTHPARK:ge-1/0/0:100-21 default:defaultge-1/0/0.1073741927 12.1.1.117 SOUTHPARK:ge-1/0/0:100-22 default:defaultge-1/0/0.1073741928 12.1.1.118 SOUTHPARK:ge-1/0/0:100-23 default:defaultge-1/0/0.1073741929 12.1.1.119 SOUTHPARK:ge-1/0/0:100-24 default:defaultge-1/0/0.1073741930 12.1.1.120 SOUTHPARK:ge-1/0/0:100-25 default:defaultge-1/0/0.1073741931 12.1.1.121 SOUTHPARK:ge-1/0/0:100-26 default:default
Here you can see that the user-name values are unique, and the MX standard circuit-id field is in the format of interface-name:outerVlanTag-innerVlanTag. Since the DHCP group configura-tion also included the circuit-id prefix host-name statement, the MX host name was prefixed to the standard circuit-id value.
Looking at the Logs
This time as we look at the logs, let’s build on what was discussed in Chapter 2, focusing on troubleshooting dynamic IP profiles and IP-demux interfaces.
A common mistake is forgetting to include the dynamic profile statement in the DHCP group. Unfortunately, you will not see a specific error in the DHCP traceoptions logfile. Refer to the previous section, Bonus: Checkpoint, for an example of output of the show subscribers command and what to look out for.
When you are using Option82 for the subscriber user-name, you must “trust” packets that have Option82 set. If you do not, then you will see a log entry similar to:
Oct 28 15:32:45 Client 00-00-64-05-01-02 got event CLIENT_EVENT_DISCOVER_PDU in state RELAY_STATE_INIT

58 DayOne:DynamicSubscriberManagement
Oct 28 15:32:45 Do not trust Packet with Option-82, discardingOct 28 15:32:45 dropping packet
Summary
This chapter should have reinforced topics you learned in Chapter 2 while exposing you to some new techniques and features, such as:
� Understanding the Service VLAN model.
� Creating and using basic dynamic IP profiles.
� Using the DHCP Option82 field to set the user-name.
And along the way you should have acquired key troubleshooting skills by using Junos commands and traceoptions log files, such as:
> show subscribers> clear auto-configure interface
> show network-access aaa subscriber> clear network-access aaa subscriber username
> show route protocol access-internal
> show dhcp relay binding> clear dhcp relay binding
> show interface… any interface related commands …
The next chapter gets you working with Juniper’s Steel-Belted RADIUS (SBR) product, where you knit together the RADIUS attri-butes that correspond to the MX $junos variables. Once you’ve learned those concepts, you’ll go on to Chapter 5, which shows you how to create a Dynamic Subscriber Management Solution with per-subscriber IP definitions.
Chapter 4
Adding AAA to Dynamic Subscriber Management
Getting Started with SBR . . . . . . . . . . . . . . . . . . . . . . . . . . . . . . . . . . . . . . . . . . . .60
Configuration Cookbook . . . . . . . . . . . . . . . . . . . . . . . . . . . . . . . . . . . . . . . . . . . . . 67
Looking at the Logs . . . . . . . . . . . . . . . . . . . . . . . . . . . . . . . . . . . . . . . . . . . . . . . . . . 72
Summary . . . . . . . . . . . . . . . . . . . . . . . . . . . . . . . . . . . . . . . . . . . . . . . . . . . . . . . . . . . 75

60 DayOne:DynamicSubscriberManagement
This chapter adds subscriber authentication/authorization and ac-counting via Steel-Belted RADIUS (SBR) to our Dynamic Subscriber Management solution. It builds on the previous two chapters adding AAA to either the C-VLAN or the S-VLAN model configurations.
From the perspective of the MX, it’s a relatively straightforward process of adding AAA configuration for authentication/authorization and, separately, accounting. The AAA configuration is completely independent from the C-VLAN or the S-VLAN model or existing dynamic-profiles. But with just a few lines of Junos configurations, your MX will be “up and running” with AAA.
From the SBR perspective, you are going to create user profiles locally, meaning you will not be integrating with an external customer data-base via LDAP or SQL. This approach should keep things focused for the chapter’s activities.
Also, note that this chapter holds off on creating dynamic IP profiles that use RADIUS Vendor Specific Attributes. For now, it focuses on making sure authentication and accounting are up and running and then shows off some new troubleshooting techniques.
Getting Started with SBR
When you deploy SBR in a production service provider network, you use the Carrier edition. For the purposes of lab demonstrations, or test labs, you can use the Enterprise edition as it can run on a Windows computer and it comes with a 30-day evaluation license.
If you haven’t already, download the Windows installer directly from the Juniper website: http://www.juniper.net/support/products/sbr/ee/6.1/#sw.
ALERT! You need a valid Juniper customer portal login to download SBR.
InstallingSBREnterpriseEdition
To install SBR on a Windows computer, simply run the installer and follow the Wizard prompts. When asked if you would like to run SBR as a Windows Service, answer Yes, unless you would prefer to manu-ally start the process.
By default the SBR software is installed in C:/Program Files/Juniper

Chapter4:AddingAAAtoDynamicSubscriberManagement 61
Networks/Steel- Belted Radius/Service.
The SBR administration tool is a native Windows application that you launch from a web browser; the simplest way is to open http://local-host:1812, and you should see a page that looks similar to Figure 4.1.
Figure 4.1 SRB Enterprise Edition Home Page
Click on the Launch button and you should be presented with the SBR Administrator Login Panel shown in Figure 4.2.
Figure 4.2 SBR Administrator Login Panel

62 DayOne:DynamicSubscriberManagement
Once you have successfully logged in, you will see the main Adminis-tration window looking something like Figure 4.3.
Figure 4.3 Main SBR Panel
ALERT! If you have a firewall enabled on the Windows machine, ensure that ports 1812 and 1813 are open so that the MX device can access the SBR service. If you notice ports 1645 and 1646 in Figure 4.3, it’s because these are used in legacy radius environments and have been replaced with 1812 and 1813 in RFC’s 2865 and 2866.
InstallingJuniperMX/BRASRADIUSDictionary
The SBR Enterprise Edition installer does not have the latest RADIUS dictionary file for MX / BRAS. You need to download this file from the Juniper Networks website at: http://www.juniper.net/techpubs/software/junos/junos112/radius-dictionary/unisphereDictionary_for_JUNOS_v11-2.dct.
You should save this file as unisphere.dct and overwrite the existing file in the directory: C:/Program Files/Juniper Networks/Steel-Belted Radius/Service. The attributes used by the MX are the same vendor ID as the ERX – that’s why we are using unishphere.dct.
And you will need to restart SBR to activate these changes, but let’s hold off on that for right now since there are two more things to do first: add the new dictionary and enable logging.

Chapter4:AddingAAAtoDynamicSubscriberManagement 63
AssigningJuniperMXtotheUnisphereDictionary
Now that the unisphere dictionary is installed, you need to assign it to a device type called Juniper_MX. SBR uses a drop down menu when defining access clients (e.g., MX devices), the device types in this drop down menu come from a file called vendor.ini located in C:/Program Files/Juniper Networks/Steel-Belted Radius/Service. SBR uses two dictionaries for every device type – the first is the standard radius.dct, which includes the RADIUS attributes defined in the RADIUS RFC. The second dictionary contains the Vendor Specific Attributes (VSAs), and these are included in unisphere.dct. Add the following lines to the vendor.ini file as shown in Figure 4.5.
Figure 4.4 Adding to the vendor.ini File
EnablingLogandTracing
For lab demos and testing purposes you should also enable logging. To do this you have to edit the file radius.ini in the directory: C:/Program Files/Juniper Networks/Steel-Belted Radius/Service. There are two items under the [Configuration] heading called LogLevel and Trace-Level, a sample of which is shown in Figure 4.5. Setting both values to 2 will give the most verbose logging. Valid settings are 0 (production), 1 (minor), and 2 (verbose). The LogLevel affects internal SBR process logging and the TraceLevel enables a log of all radius packets parsed showing each of the attributes.

64 DayOne:DynamicSubscriberManagement
Figure 4.5 Editing the Radius.ini File
MORE? If you’d like to know more about SBR logs and troubleshooting configuration, see the SBR Administration Guide at: http://www.juniper.net/techpubs/en_US/sbr6.1/information-products/pathway-pages/sbr-enterprise/index.html.
RestartingSBRService
Anytime you make any changes to the SBR control files, such as the unisphere.dct or radius.ini files, you must restart the SBR service. On Windows XP do this by opening the Control Panel, then selecting Administrative Tools, then Services. Once the Service tool is opened, find the Steel-Belted Radius entry and click the Restart option as shown in Figure 4.6.
Once you’ve restarted the service, you can check the log-file for updates. Log files are located in the SBR root directory, and they have the file name of YYYYMMDD.log where: YYYY = year, MM = month, and DD = day. A log file for October 25, 2011, for example, would be named 20111025.log. The log files are text files.

Chapter4:AddingAAAtoDynamicSubscriberManagement 65
Figure 4.6 Restarting SBR Service in Windows XP
AddingRADIUSClients
Once SBR has been restarted to use the updated dictionary, logging, and vendor file you need to configure SBR to allow requests from network clients, such as the MX or other BRAS clients. By default SBR will listen for RADIUS requests on UDP ports 1812 and 1813, but will only process them if the IP address and shared secret are correct. Let’s add the MX as a RADIUS client.
From the main SBR admin screen, http://localhost:1812, click on RADIUS Clients and then click on Add. Figure 4.7 shows a SBR panel for adding a new RADIUS client, configuring the Make or model field to “Juniper-MX,” which was defined in vendor.ini to use the unisphere dictionary.
ALERT! The Shared Secret value you enter in this window must match the RADIUS secret value you configure on the MX device.

66 DayOne:DynamicSubscriberManagement
Figure 4.7 Adding a New RADIUS Client
After you’ve filled all the fields shown in Figure 4.8, click OK and do the same for the BRAS clients.
The Add RADIUS Client window above has a number of fields that we are not using in this book. The Any RADIUS Client checkbox means SBR will not care about the source IP address, it will only care that the Shared Secret is correct. The Shared Secret must be configured the same on the MX – we’ll get to that later — but remember what you enter there. You can enter a specific IP address that must match what’s configured in the MX, if you wish. The most important setting is the Make or Model drop down menu, which is pulled from the vendor.ini file edited earlier. Select Juniper-MX and click OK. This will return you to the main admin screen and you should see the client as shown in Figure 4.8.

Chapter4:AddingAAAtoDynamicSubscriberManagement 67
Figure 4.8 Main SBR Panel with Any RADIUS Client Access
You’ve now completed the necessary steps to use SBR in MX/BRAS ap-plications:
� Installed the SBR Enterprise Edition on your Windows computer.
� Installed the Juniper-MX BRAS dictionary file.
� Configured SBR for Logging and Tracing.
� Configured SBR to allow access from any client (MX) and use the Juniper-MX BRAS dictionary file.
Now it’s time to configure the MX to use the SBR.
Configuration Cookbook
Let’s configure the MX to use the SBR server in your Dynamic Sub-scriber Management solution. Our network scenario is shown in Figure 4.9.
Our use-case checklist is comprised of:
� Update the MX configuration to support RADIUS Authentica-tion and Accounting services.
� Create SBR users in the Native User database.
� Validate the configuration.
� Check the logs.

68 DayOne:DynamicSubscriberManagement
Figure 4.9 Chapter 4’s Use Case Topology
Step1:MXDHCPAuthentication
The MX formulates the subscriber username value, as you learned in Chapter 3. The following configures the user name to be comprised of the MX host name and the Option82 circuit-id as provided by the MX:
[edit forwarding-options dhcp-relay group local]admin@SOUTHPARK# show active-server-group dayoneDHCP;authentication { password password; username-include { option-82 circuit-id; }}overrides { always-write-option-82; trust-option-82;}relay-option-82 { circuit-id { prefix { host-name; } }}interface ge-1/0/0.0;

Chapter4:AddingAAAtoDynamicSubscriberManagement 69
For example, when a subscriber accesses the MX with a Customer VLAN-Tag of [outer=100, inner=20] then the formulated user name will be SOUTHPARK:ge-1/0/0:100-20.
MORE? For more options on formulating the user name, see: http://www.juniper.net/techpubs/en_US/junos/topics/reference/configuration-state-ment/authentication-edit-forwarding-options.html.
In order to have RADIUS Authorize DHCP users, there must be a matching password value set between the MX and the RADIUS server. You can think of this like a “shared secret” except that the value is not hidden on the MX. The password is required since a RADIUS access request message must contain a password. Otherwise, it’s an invalid message.
If you look carefully in the [authentication] stanza the password statement is set to the value password. Keep this in mind when you create SBR user’s records in an upcoming section.
Step2:MX:RADIUSAuthentication
The RADIUS access controls are in the [access] hierarchy:
[edit access]admin@SOUTHPARK# show radius-server { 172.23.7.44 { secret “$9$T3CuREyKvLRheW8Xws”; ## SECRET-DATA source-address 10.8.1.126; }}profile sbr { authentication-order radius; radius { authentication-server 172.23.7.44; options { revert-interval 0; } }}
Once you have created an access profile you need to make it active by setting the top-level access-profile statement:
[edit]admin@SOUTHPARK# set access-profile sbr

70 DayOne:DynamicSubscriberManagement
MORE? The MX can support L2 and L3 wholesale Subscriber Management solutions. In these cases, there would be different access profiles for each wholesale customer, and the setting would be defined with the specific L2/L3VPN routing-instance. For more information on these scenarios, see: http://www.juniper.net/techpubs/en_US/junos/informa-tion-products/pathway-pages/subscriber-access/index.html.
MORE? And additional information on access profile and RADIUS configura-tion can be found at: http://www.juniper.net/techpubs/en_US/junos/information-products/pathway-pages/subscriber-access/aaa/subscrib-er-management-aaa.html.
Step3:MX:RADIUSAccounting
If you want to generate RADIUS accounting records, add additional configuration statements to your access profile:
admin@SOUTHPARK# show profile sbr { accounting-order radius; authentication-order radius; radius { authentication-server 172.23.7.44; accounting-server 172.23.7.44; options { revert-interval 0; } } accounting { order radius; immediate-update; update-interval 15; }}
Here you can see the accounting-order and accounting-server statement as well as the [accounting] stanza.
The Looking at the Logs section of this chapter has examples of the SBR accounting records.

Chapter4:AddingAAAtoDynamicSubscriberManagement 71
Step4:SBRUserProfiles
When the SBR receives an Authentication Request message from the MX, it queries the SBR Native User database by default. This database is locally stored on the SBR server. In order to keep this book focused, only Native Users are used in the examples.
MORE? If you are interested in learning how to have SBR query your existing databases, see the SBR Administrative Guide. There is a link to this guide from the SBR Home page, see Figure 4.1.
The process to create a Native User is straightforward. As shown in Figure 4.10, from the main SBR panel, select Users> Native > Add button.
Figure 4.10 Adding a Native User
In Figure 4.10 you can see an example of a native user with a name of SOUTHPARK.GE-1/0/0.100-20.
The Password field must be configured with the same value used in Step 1 when you configured the MX DHCP Authentication (“pass-word”).
The User Profile checkbox and the Return List selection list is used to return RADIUS attribute values back to the MX. You will learn how to use SBR profiles to bind per-subscriber values into the MX dynamic IP profile $junos variables in Chapter 5.

72 DayOne:DynamicSubscriberManagement
Step5:Checkpoint–ValidatetheConfiguration
In order to validate MX and SBR configuration you will need to activate a DHCP subscriber and then review both the MX authlog and the SBR log-file. See the next section for what you should look for in the logs.
Looking at the Logs
It’s time to review a few troubleshooting techniques when using SBR RADIUS and MX RADIUS configurations.
Steel-BeltedRADIUSAuthenticationLogs
Authentication logs are stored in the general log files that SBR main-tains on a daily basis. The name of the log file is YYYYMMDD.log, so, the log file name for November 7, 2011 would be 20111107.log.
When the SBR receives an Authentication Request from the MX, you will see a log entry similar to the following example. Note that you can see the user-name value in the Raw Packet contents; in this case SOUTHPARK:GE-1/0/0:100-21:
1/07/2011 13:55:36 -----------------------------------------------------------11/07/2011 13:55:36 Authentication Request11/07/2011 13:55:36 Received from: ip=10.8.1.126 port=6283311/07/2011 13:55:36 11/07/2011 13:55:36 Raw Packet :11/07/2011 13:55:36 000: 015e00da 5847c42b d5c24fea 424f973a |.^..XG.+..O.BO.:|11/07/2011 13:55:36 010: 6e62be7a 011b534f 55544850 41524b3a |nb.z..SOUTHPARK:|11/07/2011 13:55:36 020: 67652d31 2f302f30 3a313030 2d323102 |ge-1/0/0:100-21.|11/07/2011 13:55:36 030: 12480bb1 a1179124 abceea1b 6b194486 |.H.....$....k.D.|11/07/2011 13:55:36 040: 42060600 00000259 03002c04 37301a28 |B......Y..,.70.(|11/07/2011 13:55:36 050: 0000130a 37223501 01521b01 19534f55 |....7”5..R...SOU|11/07/2011 13:55:36 060: 54485041 524b3a67 652d312f 302f303a |THPARK:ge-1/0/0:|11/07/2011 13:55:36 070: 3130302d 32311a0c 0000130a 39060c01 |100-21......9...|11/07/2011 13:55:36 080: 01011a16 0000130a 38103030 30302e36 |........8.0000.6|11/07/2011 13:55:36 090: 3430342e 30313033 200b534f 55544850 |404.0103 .SOUTHP|11/07/2011 13:55:36 0a0: 41524b05 06100640 15572567 652d312f |[email protected]%ge-1/|11/07/2011 13:55:36 0b0: 302f302e 67652d31 2f302f30 2e313037 |0/0.ge-1/0/0.107|11/07/2011 13:55:36 0c0: 33373431 3833333a 3130302d 32313d06 |3741833:100-21=.|11/07/2011 13:55:36 0d0: 0000000f 04060a08 017e |.........~ |
The SBR either accepts or rejects the user.
Next you can see that the accept response is sent back to the MX:

Chapter4:AddingAAAtoDynamicSubscriberManagement 73
11/07/2011 13:55:36 -----------------------------------------------------------11/07/2011 13:55:36 Sent accept response for user SOUTHPARK:GE-1/0/0:100-21 to client SOUTHPARK11/07/2011 13:55:36 -----------------------------------------------------------11/07/2011 13:55:36 Authentication Response11/07/2011 13:55:36 Packet : Code = 0x2 ID = 0x5e11/07/2011 13:55:36 Vector =11/07/2011 13:55:36 000: 057889e0 04869a0d a4166ec6 f3dbafbc |.x........n.....|11/07/2011 13:55:36 Class : Value =11/07/2011 13:55:36 000: 53425232 434cb8d6 eab9cbfc c0c39a80 |SBR2CL..........|11/07/2011 13:55:36 010: 11803901 80028198 8002801d 81a9d3ea |..9.............|11/07/2011 13:55:36 020: d5a2a1a0 c1a992e7 a4ba94da b197cc85 |................|11/07/2011 13:55:36 030: f381e8e2 b0988ba6 a3881280 0e81b8d6 |................|11/07/2011 13:55:36 040: eab9cbfc c0c39a80 80808088 |............ |11/07/2011 13:55:36 -----------------------------------------------------------
If the SBR is unable to find the user name, or validate the password, you will see something similar to the following in the SBR logs:
11/07/2011 14:02:08 Authenticating user SOUTHPARK:GE-1/0/0:100-21 with authentication method Native User11/07/2011 14:02:08 Authenticating user SOUTHPARK:ge-1/0/0:100-21 with authentication method Windows Domain User11/07/2011 14:02:08 Authenticating user SOUTHPARK:ge-1/0/0:100-21 with authentication method Windows Domain Group11/07/2011 14:02:08 Unable to find user SOUTHPARK:ge-1/0/0:100-21 with matching password11/07/2011 14:02:08 -----------------------------------------------------------11/07/2011 14:02:08 Authentication Response (reject)11/07/2011 14:02:08 Packet : Code = 0x3 ID = 0xe411/07/2011 14:02:08 Vector =11/07/2011 14:02:08 000: 8aa615f5 e7d944c7 472471f4 17ab1d6f |......D.G$q....o|11/07/2011 14:02:08 -----------------------------------------------------------
Steel-BeltedRADIUSAccountingLogs
Accounting logs are stored in a separate file that SBR maintains on a daily basis. The format-name of the log file is YYYYMMDD.act, so the accounting log file name for November 7, 2011 would be 20111107.act.
Each entry in the log file is a Comma-Separate-Value (CSV) list that you can easily import into Excel, or other database applications, for further processing. Figure 4.11 depicts a screenshot with the Account-ing Records for a given user. You can see that the accounting records include the user-name, the IP-address assigned to the user, and the packet usage information.

74 DayOne:DynamicSubscriberManagement
Figure 4.11 SBR Accounting Log in Excel
In most service provider networks, accounting is proxied to external systems. We are not covering radius proxy configuration in this book, however, it’s a simple configuration for which SBR is commonly used.
MXLogs
RADIUS related log messages are stored in the [system services processes general-authentication-service traceoptions] file. The log file name was configured in the initial chapter of this book.
There are a few issues to look out for when using RADIUS. The first is making sure that you have the correct RADIUS server address config-ured in [access radius-servier <server-ip-address>]. If you do not, you will see something like the following in the file:
Nov 5 08:57:06 Radius result is CLIENT_REQ_TIMEOUT
You will also see this, regardless of the reason, when you cannot access the RADIUS server – it could be a firewall blocking ports 1812 and 1813, for example.
The next issue to look out for occurs when you are configuring the [access radius-servier <server-ip-address> source-address] for the RADIUS originated packets. You must ensure that this address is valid on the MX, or you will see something like the following:
Nov 5 08:59:27 Verify source address a08047e (10.8.4.126) in routing instance index=0Nov 5 08:59:27 ignoring server, non-existent source address ‘10.8.4.126’Nov 5 08:59:27 authd_radius_server_add: Failed to verify source address a08047e Nov 5 08:59:27 authd_create_application_specific_radius_server: Failed to add radius server info

Chapter4:AddingAAAtoDynamicSubscriberManagement 75
Summary
This chapter introduced you the Juniper Steel-Belted RADIUS (SBR)based authorization model for dynamic subscriber management, and several techniques for:
� Understanding the MX configuration for RADIUS.
� Installing and configuring SBR.
� Configuring native users in SBR based on MX user name configu-ration options.
You should also be familiar with the key troubleshooting skills that use Junos commands and SBR log files.
The next chapter continues using the Juniper Steel-Belted RADIUS product. It also knits together the RADIUS attributes that correspond to the MX $junos variables. Once you’ve learned those concepts, you’ll go on to create a Dynamic Subscriber Management Solution with per-subscriber IP definitions.

76 DayOne:DynamicSubscriberManagement

Chapter 5
Getting Started with Dynamic IP Profiles and QoS
Junos Variables and RADIUS VSAs . . . . . . . . . . . . . . . . . . . . . . . . . . . . . . . . . . . 78
Configuration Cookbook . . . . . . . . . . . . . . . . . . . . . . . . . . . . . . . . . . . . . . . . . . . . .86
Looking at the Logs . . . . . . . . . . . . . . . . . . . . . . . . . . . . . . . . . . . . . . . . . . . . . . . . . 100
Summary . . . . . . . . . . . . . . . . . . . . . . . . . . . . . . . . . . . . . . . . . . . . . . . . . . . . . . . . . . 103

78 DayOne:DynamicSubscriberManagement
Dynamic IP profiles are all about Quality of Service (QoS), bandwidth, and Service Level Agreement (SLA) controls. This chapter shows you how to create dynamic IP profiles and how to work with the common $junos variables. You will also learn to configure RADIUS/SBR profiles to bind per-subscriber values into the $junos variables.
This is the big finale!
The use-case in this chapter is a Voice+Internet service offering, and the customer can select one of three bandwidth packages: 2Mbps, 5Mbps, or 10Mbps. The service offering will also allow for up to two phone lines worth of VoIP traffic; another 512Kbps of high-priority real-time traffic.
Our use-case checklist is comprised of:
� Configure the MX dynamic VLAN profile: Customer VLAN model.
� Configure the MX dynamic IP profile for Voice+Internet service.
� Configure the MX DHCP relay to external DHCP server.
� Configure SBR to provide per-subscriber values to dynamic IP profile.
This chapter assumes you have a general working knowledge of Junos QoS configurations, but there is a brief overview of the packet flow and hierarchical QoS building blocks before beginning the use-case configu-rations.
MORE? If you are new to Junos QoS, there is an excellent Day One book on this topic, Day One: Configuring Basic QoS, by Guy Davies, and you can download a free copy at http://www.juniper.net/dayone.
Once you have completed this chapter you will have covered all the major topics for building a complete Dynamic Subscriber Management solution, so let’s get to it and get this last chapter completed.
Junos Variables and RADIUS VSAs
Dynamic IP profiles are all about using Junos class-of-service (CoS) capa-bilities. Before this chapter digs into teaching you the $junos variables and how they are configured via RADIUS, it is important to understand how and where each of these variables will be used throughout the packet flow. Figure 5.1 illustrates the Junos packet flow where each of the CoS actions occur.

Chapter5:GettingStartedwithDynamicIPProfilesandQoS 79
Figure 5.1 Junos Packet Flow for Hierarchical QoS
This chapter focuses on the $junos variables for filtering/policing and Scheduler/Queuing. You can see from Figure 5.1 that there are steps for both ingress and egress filtering/policing, and the egress scheduler/queuing action occurs last.
The key to understanding Juniper’s Dynamic Management Solution is how $junos variables are mapped to RADIUS VSA values. This chapter teaches you this technique using Juniper’s Steel-Belted RA-DIUS (SBR) product.
The MX configuration map, relating to the CoS settings you will learn in this chapter, is shown in Figure 5.2.

80 DayOne:DynamicSubscriberManagement
Figure 5.2 Chapter 5 MX Configuration Hierarchy Map for Subscriber Profile QoS
InterfaceFiltersandPolicers
Let’s first focus on using firewall filters/policers with subscriber profiles. You can see from Figure 5.2 that you include both ingress and egress filters using $junos variables in your profile. In order to use filters, you must first create them on the MX within the [firewall] hierarchy. For example, here is an example of a 5Mbps policer for IPv4 traffic:
[edit firewall]admin@SOUTHPARK# show family inet { filter police-5M { interface-specific; term all { then policer police-5M; }

Chapter5:GettingStartedwithDynamicIPProfilesandQoS 81
}}policer police-5M { if-exceeding { bandwidth-limit 5m; burst-size-limit 32k; } then discard;}
Notice that there are two parts to this configuration: the firewall filter and the associated policer. You can tell that this firewall is for IPv4 packets since it is defined under the [family inet] stanza.
ALERT! You should also notice the use of the interface-specific statement in the firewall filter. This setting is required for dynamic VLAN interfaces since each interface will require a unique copy of the firewall policer. A latter section shows you how to display the filter/policers so you can see how Junos creates unique identifiers for each subscriber interface.
Table 5.1 presents the $junos variables and the corresponding RADIUS VSA attribute names for IPv4 filters:
Table 5.1 IPv4 Filter Variables and RADIUS VSAs
Description Junos Variable RADIUS VSA
IPv4 Input Filter $junos-input-filter Unisphere-Ingress-Policy-Name
IPv4 Output Filter $junos-output-filter Unisphere-Egress-Policy-Name
ALERT! As you can see from Table 5.1, the RADIUS variable definition for firewall filters only allows you to specify the name of the filter, and not the filter contents. This means that you must pre-create the firewall configuration on the MX device before you use the name of the filter in the SBR profile. This chapter’s Cookbook section contains specific MX configuration examples and SBR profile screenshots.
MORE? Junos provides a very feature rich set of ACL and policing capabilities, including two-rate and three-rate color policers. For more information on Junos firewall filters and policers, refer to: http://www.juniper.net/techpubs/en_US/junos11.2/information-products/pathway-pages/config-guide-firewall-filter/index.html

82 DayOne:DynamicSubscriberManagement
While this book does not go into IPv6 examples, it is worth noting that Juniper’s Dynamic Subscriber Management solution supports IPv6 today, and that Table 5.2 lists the IPv6 variables and VSA attribute names.
Table 5.2 IPv6 Filter Variables and RADIUS VSAs
Description Junos Variable RADIUS VSA
IPv6 Input Filter $junos-input-ipv6-filter IPv6-Ingress-Policy-Name
IPv6 Output Filter $junos-output-ipv6-filter IPv6-Egress-Policy-Name
MORE? For more information on dual-stack solutions, see the whitepaper: http://www.juniper.net/techpubs/en_US/junos11.2/information-products/topic-collections/design-guide-subscriber-dual-stack/subscriber-access-ipv4-ipv6-dual-stack.pdf
EgressSchedulingandShaping
MX/BRAS network deployments commonly take advantage of the hierar-chical QoS features of the MX “-Q” and “-EQ” line cards. If you want to do per-customer or per-VLAN shaping, then you will need these types of line cards. Figure 5.2 illustrates the various hierarchical levels. This chapter shows you how to use traffic-control profiles and scheduler controls to implement the Voice+Internet service.
Figure 5.3 illustrates how Junos uses traffic-control profiles and schedul-ers in packet egress processing.
Traffic Control Profiles
A Junos traffic-control-profile is used to define the per-VLAN QoS parameters, and this output shows the available values you can define for each traffic control profile:
[edit class-of-service traffic-control-profiles TRAFFIC-PROFILE]admin@SOUTHPARK# set ?Possible completions:> delay-buffer-rate Delay buffer rate> excess-rate Excess bandwidth sharing proportion> guaranteed-rate Guaranteed rate> overhead-accounting Overhead accounting scheduler-map Mapping of forwarding classes to packet schedulers> shaping-rate Shaping rate

Chapter5:GettingStartedwithDynamicIPProfilesandQoS 83
> shaping-rate-excess-high Shaping rate for excess high traffic> shaping-rate-excess-low Shaping rate for excess log traffic> shaping-rate-priority-high Shaping rate for high priority traffic> shaping-rate-priority-low Shaping rate for low priority traffic> shaping-rate-priority-medium Shaping rate for medium priority traffic
Since this book is focused on the essentials, it only covers the shaping-rate parameter. The other parameters follow the same methodology, so learning this one provides a basis for using the others if you need them.
Figure 5.3 MX Hierarchical QoS

84 DayOne:DynamicSubscriberManagement
Here is an example of a static Junos configuration that creates a traffic control profile with a 5 Mbps shaper:
[edit class-of-service]admin@SOUTHPARK# showtraffic-control-profiles { TRAFFIC-PROFILE { shaping-rate 5m; }}
All of the traffic-control-profile parameters are provided through the same RADIUS VSA called Jnpr-Cos-Parameter-Type. How, then, does the Junos OS know which specific traffic control profile parameter you want to set? The answer is RADIUS will return multiple Jnpr-Cos-Param-eter-Type VSA values, and each value will begin with a type-identifier (for example, T01, T02, etc.) to uniquely identify the specific traffic-control-profile parameter. And how does the Junos OS know which traffic-control-profile is used for the subscriber? The answer is you configure this in the dynamic IP profile, and a section later in this chapter shows you an example of a configuration.
T02 identifies the traffic control profile shaping-rate and Table 5.3 presents the $junos variable and the associated RADIUS VSA used to configure the traffic control profile shaping rate value.
Table 5.3 Traffic-Control-Profile Shaping-Rate
Description Junos Variable RADIUS VSA
Traffic Control Profile shaping-rate
$junos-cos-shaping-rate Jnpr-Cos-Parameter-Type T02 <value>
This chapter’s Cookbook section contains specific MX configuration examples and SBR profile screenshots.
MORE? For more about traffic control profile settings, see http://www.juniper.net/techpubs/en_US/junos11.2/topics/usage-guidelines/cos-configuring-traffic-control-profiles-for-shared-scheduling-and-shaping.html.
Schedulers
Junos schedulers are used to control the output flow of queued packets. In a hierarchical application, each VLAN can have multiple output queues (up to 8), and each one would be assigned to use a specific scheduler.
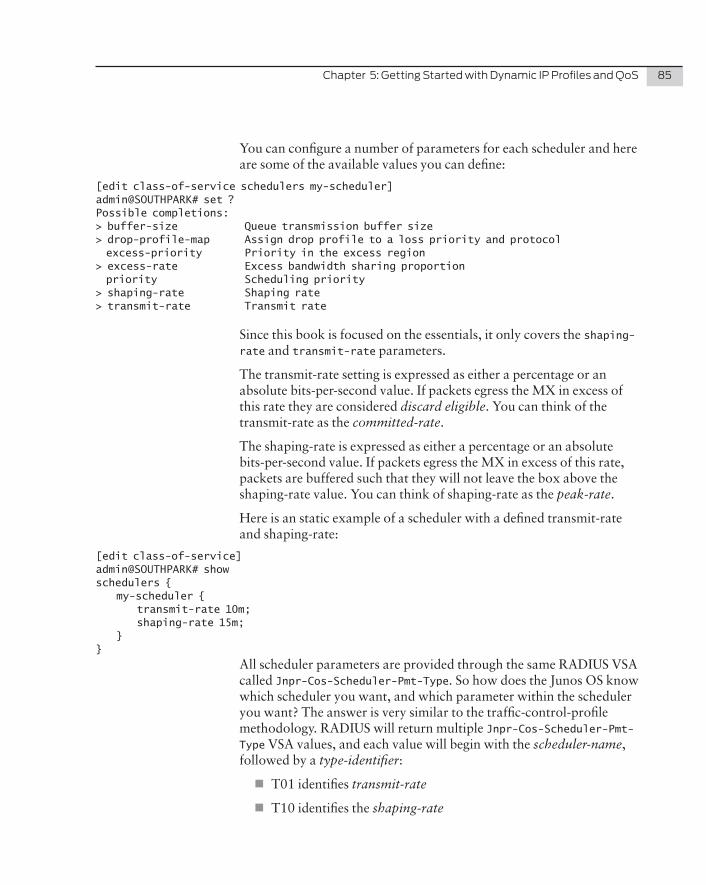
Chapter5:GettingStartedwithDynamicIPProfilesandQoS 85
You can configure a number of parameters for each scheduler and here are some of the available values you can define:
[edit class-of-service schedulers my-scheduler]admin@SOUTHPARK# set ?Possible completions:> buffer-size Queue transmission buffer size> drop-profile-map Assign drop profile to a loss priority and protocol excess-priority Priority in the excess region> excess-rate Excess bandwidth sharing proportion priority Scheduling priority> shaping-rate Shaping rate> transmit-rate Transmit rate
Since this book is focused on the essentials, it only covers the shaping-rate and transmit-rate parameters.
The transmit-rate setting is expressed as either a percentage or an absolute bits-per-second value. If packets egress the MX in excess of this rate they are considered discard eligible. You can think of the transmit-rate as the committed-rate.
The shaping-rate is expressed as either a percentage or an absolute bits-per-second value. If packets egress the MX in excess of this rate, packets are buffered such that they will not leave the box above the shaping-rate value. You can think of shaping-rate as the peak-rate.
Here is an static example of a scheduler with a defined transmit-rate and shaping-rate:
[edit class-of-service]admin@SOUTHPARK# show schedulers { my-scheduler { transmit-rate 10m; shaping-rate 15m; }}
All scheduler parameters are provided through the same RADIUS VSA called Jnpr-Cos-Scheduler-Pmt-Type. So how does the Junos OS know which scheduler you want, and which parameter within the scheduler you want? The answer is very similar to the traffic-control-profile methodology. RADIUS will return multiple Jnpr-Cos-Scheduler-Pmt-Type VSA values, and each value will begin with the scheduler-name, followed by a type-identifier:
� T01 identifies transmit-rate
� T10 identifies the shaping-rate

86 DayOne:DynamicSubscriberManagement
Table 5.4 presents the $junos variable and the associated RADIUS VSA used to configure Junos scheduler values.
Table 5.4 Scheduler Transmit-Rate and Shaping-Rate
Description Junos Variable RADIUS VSA
Scheduler <XYZ> transmit-rate
$junos-cos-scheduler-txJnpr-Cos-Scheduler-Pmt-Type <XYZ> T01 <value>
Scheduler <XYZ> shaping-rate
$junos-cos-scheduler-shaping-rate
Jnpr-Cos-Scheduler-Pmt-Type <XYZ> T10 <value>
The Cookbook section of this chapter contains specific MX configura-tion examples and SBR profile screenshots.
MORE? To learn more about scheduler settings, see http://www.juniper.net/techpubs/en_US/junos11.2/information-products/pathway-pages/cos/schedulers.html#configuration.
Configuration Cookbook
In this section let’s use the Customer VLAN model with the MX setting the Option82 field in the packet.
The goal of this use-case is to create a Voice+Internet service offering. A customer can purchase one of three bandwidth packages: 2Mbps, 5Mbps, or 10Mbps, and the package will also allow for up to two phone-lines’ worth of VoIP traffic; another 512Kbps of high-priority real-time traffic.
In order to implement this service offering, you must create a dynamic IP profile that uses hierarchical traffic shaping and multiple forward-ing-class schedulers.
Our checklist consists of the following steps:
� Review the baseline MX configuration before you add dynamic IP profiles.
� Create a dynamic IP profile that will use ingress policing and egress shaping.
� Bind the dynamic IP profile to the DHCP group.
� Create an SBR profile for each of the service definitions.
� Bind SBR users to the SBR profiles.

Chapter5:GettingStartedwithDynamicIPProfilesandQoS 87
Step1:ReviewtheMXBaselineConfiguration
First let’s review the interface that creates dynamic VLAN interfaces:
[edit interfaces ge-1/0/0]admin@SOUTHPARK# show description “>> Stark’s Pond <<”;hierarchical-scheduler;flexible-vlan-tagging;auto-configure { stacked-vlan-ranges { dynamic-profile DYNINTF-2VLANS-DHCP-INET { accept any; ranges { any,any; } } }}mtu 2000;
Next let's review the dynamic VLAN profile used by the physical interface:
[edit dynamic-profiles DYNINTF-2VLANS-DHCP-INET]admin@SOUTHPARK# show interfaces { “$junos-interface-ifd-name” { unit “$junos-interface-unit” { proxy-arp restricted; vlan-tags outer “$junos-stacked-vlan-id” inner “$junos-vlan-id”; family inet { unnumbered-address lo0.0 preferred-source-address 12.1.1.1; } } }}
Next the DHCP relay configuration to use an external DHCP server, have the MX set the Option82 circuit-id, and use a subscriber pass-word = “password” for RADIUS/SBR:
[edit forwarding-options dhcp-relay]admin@SOUTHPARK# show server-group { dayoneDHCP { 13.1.1.2; }}

88 DayOne:DynamicSubscriberManagement
group local { active-server-group dayoneDHCP; authentication { password password; username-include { option-82 circuit-id; } } overrides { always-write-option-82; trust-option-82; } relay-option-82 { circuit-id { prefix { host-name; } } } interface ge-1/0/0.0;}
Finally, the RADIUS and authorization sections to use the SBR:
[edit access]admin@SOUTHPARK# show radius-server { 10.8.4.90 { secret “$9$lgpMxd2gJDjq24UHk.F3”; ## SECRET-DATA source-address 10.8.1.126; }}profile sbr { authentication-order radius; radius { authentication-server 10.8.4.90; options { revert-interval 0; } }}
[edit]admin@SOUTHPARK# show access-profile sbr;

Chapter5:GettingStartedwithDynamicIPProfilesandQoS 89
Step2:DynamicIPProfile
Now let’s illustrate how to create a dynamic IP profile for the Voice+Internet service offering. The map of the MX configuration hier-archy for this use-case is shown in Figure 5.4.
Figure 5.4 Chapter 5 Use-Case MX Configuration Hierarchy Map
The dynamic IP profile called DYNSUB-DHCP-VOICE-AND-INET is the focus of this section. You can see that this profile has two major stanzas to review: [interfaces] and [class-of-service]. Rather than showing you the entire dynamic IP profile at once, let’s break down each stanza into bite-size chunks.

90 DayOne:DynamicSubscriberManagement
ALERT! The dynamic IP profile is in addition to the existing dynamic VLAN profile. The complete configuration uses a dynamic VLAN profile called DYNINTF-2VLANS-DHCP-INET and a dynamic IP profile called DYNSUB-DHCP-VOICE-AND-INET. You cannot combine these two into one profile.
NOTE This section does not cover the configuration for the three filters/policers shown outside the dynamic profile box in Figure 5.5: police-2M, police-5M, and police-10M. You can use the example presented in the earlier section as a template to create these filters/policers on your own. If you need this in your lab setup, go ahead and do it now.
Interfaces
First let’s configure the [interfaces] stanza:
[edit dynamic-profiles DYNSUB-DHCP-VOICE-AND-INET interfaces]admin@SOUTHPARK# show “$junos-interface-ifd-name” { unit “$junos-underlying-interface-unit” { family inet { filter { input “$junos-input-filter”; } } }}
The purpose of the [interfaces] stanza is to include an ingress policer to limit the amount of bandwidth from the subscriber. So each service bandwidth profile offering (2Mbps, 5Mbps, 10Mbps) requires a Junos firewall filter/policer similar to the one you saw in an earlier section.
When the Junos OS instantiates this dynamic IP profile, the resulting [class-of-service traffic-control-profile] section is merged with the existing dynamic interface configuration. You should notice the use of the $junos-underlying-interface-unit variable to identify the existing interface unit, and you do not need to include the VLAN(s) or other configuration(s) you previously had in the dynamic VLAN profile.
Class-of-Service
Next is the [class-of-service] stanza. This stanza has a number of sub-hierarchies, which are also presented in bite-size chunks.

Chapter5:GettingStartedwithDynamicIPProfilesandQoS 91
Up first is the [class-of-service traffic-control-profile] stanza, used to set the overall bandwidth shaping rate. It’s also used to identify a scheduler-map, which is used in turn to direct the VoIP and Internet traffic to different output scheduler/queues.
[edit dynamic-profiles DYNSUB-DHCP-VOICE-AND-INET class-of-service]admin@SOUTHPARK# show traffic-control-profiles { dynsub-TCP { scheduler-map dynsub-smap-voice-and-inet; shaping-rate “$junos-cos-shaping-rate”; }}
Next let’s associate the traffic-control-profile to the subscriber’s underlying interface, and therefore the subscriber’s anchor interface. This is done in the [class-of-service interfaces] stanza:
interfaces { “$junos-interface-ifd-name” { unit “$junos-underlying-interface-unit” { output-traffic-control-profile dynsub-TCP; } }}
NOTE The Junos OS will instantiate a session specific traffic-control-profile to keep the settings unique per subscriber (a latter section illustrates how to see the existing traffic-control-profiles and run-time values).
The next two stanzas are used to direct the subscribers VoIP and Internet traffic into different scheduler queues:
scheduler-maps { dynsub-smap-voice-inet { forwarding-class best-effort scheduler inet-scheduler; forwarding-class expedited-forwarding scheduler voice-scheduler; }}
NOTE Here the default Junos forwarding-classes best-effort and expedited-forwarding are used. The assumption is that the VoIP traffic is classi-fied into the expedited-forwarding class, and everything else goes into the best-effort forwarding class.

92 DayOne:DynamicSubscriberManagement
schedulers { inet-scheduler { transmit-rate remainder; priority low; } voice-scheduler { shaping-rate "$junos-cos-scheduler-shaping-rate”; priority strict-high; }}
Here you can see the scheduler configuration for the Internet/best effort traffic and the VoIP traffic, using scheduler inet-scheduler and voice-scheduler respectively. Note that the VoIP shaping rate is variable, enabling you to allow for multiple phone lines of VoIP traffic by assigning different traffic rate values. So, perhaps the default service is two-lines using 512Kbps, but maybe some customers want more. Up-sell!
NOTE In this example the inet-scheduler transmit-rate is set to remainder. This means that best-effort/Internet traffic can use the bandwidth allocated to VoIP providing there is no VoIP in use. You could config-ure the inet-scheduler transmit-rate and/or shaping-rate settings if you want to explicitly control the bandwidth and prevent the remain-der behavior.
NOTE This example illustrates the use of two transmit scheduler/queues. The MX can support a maximum of eight queues per VLAN when you use the -Q or -EQ line cards.
NOTE For many CoS/SLA network scenarios, the MX is typically configured with additional class-of-service settings that reside outside the scope of the dynamic IP profile. Because this book focuses on MX/BRAS topics, these types of class-of-service configuration have been omitted. Please see the Appendices for pointers to on-line documentation for further reading on CoS topics.
Step3:BindDynamicIPProfile
Now that you have created the dynamic IP profile, you must associate it to the interface via the DHCP group. The only addition is the dynamic-profile statement that identifies the profile you created in the prior section:

Chapter5:GettingStartedwithDynamicIPProfilesandQoS 93
[edit forwarding-options dhcp-relay group local]admin@SOUTHPARK# show active-server-group dayoneDHCP;authentication { password password; username-include { option-82 circuit-id; }}dynamic-profile DYNSUB-DHCP-VOICE-AND-INET;overrides { always-write-option-82; trust-option-82;}relay-option-82 { circuit-id { prefix { host-name; } }}interface ge-1/0/0.0;
ALERT! Again, keep in mind that there are two dynamic profiles in this use case, the dynamic VLAN profile and the dynamic IP profile. Make sure you configure the DHCP group to use the dynamic IP profile.
Step4:CreateSBRProfiles
Now it’s time to create the SBR profiles for each of the service defini-tions. Table 5.5 summarizes the $junos variables and corresponding RADIUS VSAs used by the dynamic IP profile. Then it’s three quick edits to the SBR profile.
Table 5.5 Example Return Values
Junos Variable Name RADIUS VSA Example Return Value
$junos-input-filter Unisphere-Ingress-Policy-Name police-2M
$junos-cos-shaping-rate Jnpr-Cos-Parameter-Type T02 2m
voice-scheduler
$junos-cos-scheduler-shaping-rate
Jnpr-Cos-Scheduler-Pmt-Type voice-scheduler T10 512k

94 DayOne:DynamicSubscriberManagement
And Figure 5.5 shows the SBR profile for the 2Mbps service offering.
Figure 5.5 SBR Profile for 2Mbps
Figure 5.6 shows the SBR profile for the 5Mbps service offering.
Figure 5.6 SBR Profile for 5Mbps
And finally, Figure 5.7 shows the SBR profile for the 10Mbps service offering.

Chapter5:GettingStartedwithDynamicIPProfilesandQoS 95
Figure 5.7 SBR Profile for 10Mbps
Step5:BindSBRNativeUserstoSBRProfiles
The final step is to bind the SBR Native Users to each of the SBR service profiles. Figure 5.8 shows an example of a subscriber bound to the 5Mbps service offering.
Figure 5.8 Example of Binding SBR Native Users to SBR Service Profiles

96 DayOne:DynamicSubscriberManagement
Now that you have completed all of the MX configuration and the SBR configuration you are ready to test your network setup.
Step6:Checkpoint–ValidatetheConfiguration
Use the show subscribers client-type dhcp command to verify that your subscribers are active:
admin@SOUTHPARK> show subscribers client-type dhcp Interface IP Address/VLAN ID User Name LS:RIge-1/0/0.1073741831 12.1.1.15 SOUTHPARK:ge-1/0/0:100-20 default:defaultge-1/0/0.1073741832 12.1.1.9 SOUTHPARK:ge-1/0/0:100-21 default:defaultge-1/0/0.1073741833 12.1.1.10 SOUTHPARK:ge-1/0/0:100-22 default:defaultge-1/0/0.1073741834 12.1.1.12 SOUTHPARK:ge-1/0/0:100-23 default:defaultge-1/0/0.1073741835 12.1.1.11 SOUTHPARK:ge-1/0/0:100-24 default:defaultge-1/0/0.1073741836 12.1.1.13 SOUTHPARK:ge-1/0/0:100-25 default:defaultge-1/0/0.1073741837 12.1.1.14 SOUTHPARK:ge-1/0/0:100-26 default:default
The show dynamic-configuration command displays the bindings between the variables and the RADIUS VSAs. This is a hidden com-mand as of Junos 11.2, but a very handy debugging command! Hidden commands are not TAB/SPACE name-completed automatically on the CLI; so you must type in the command fully. In order to use the show dynamic-configuration command, you first need to know the sub-scriber session-id. The subscriber session-id can be found by showing a subscriber record with the detail option:
admin@SOUTHPARK> show subscribers address 12.1.1.15 detail Type: DHCPUser Name: SOUTHPARK:ge-1/0/0:100-20IP Address: 12.1.1.15Logical System: defaultRouting Instance: defaultInterface: ge-1/0/0.1073741831Interface type: StaticDynamic Profile Name: DYNSUB-DHCP-VOICE-AND-INETMAC Address: 00:00:64:04:01:02State: ActiveDHCP Relay IP Address: 12.1.1.1Radius Accounting ID: 135Session ID: 135

Chapter5:GettingStartedwithDynamicIPProfilesandQoS 97
Agent Circuit ID: SOUTHPARK:ge-1/0/0:100-20Login Time: 2011-11-02 08:25:46 EDT
Note the Session ID field (third from bottom and boldface. Now let’s use it in the show dynamic-configuration command:
admin@SOUTHPARK> show dynamic-configuration session information session-id 135 Session info: Accounting session ID: 135 IP address: 12.1.1.15 Logical system name: default Profile name: DYNSUB-DHCP-VOICE-AND-INET MAC address: 00:00:64:04:01:02 NAS port type: 15 Routing instance: default User name: SOUTHPARK:ge-1/0/0:100-20 Interface name: ge-1/0/0.1073741831 Dynamic-configuration state: 2 Client session type: 1 DHCP relay agent IP address: 12.1.1.1 IFL type: 1 Underlying logical-interface: ge-1/0/0.1073741831 Client login time: 2011-11-02 08:25:46 EDT DHCP option: 35:01:01:52:1b:01 VLAN tag: 20 SVLAN tag: 100 Agent Circuit ID: SOUTHPARK:ge-1/0/0:100-20 Configuration bits: 0x87 0 0 0 Dynamic configuration: junos-cos-scheduler: voice-scheduler junos-cos-scheduler-tx: 512k junos-cos-shaping-rate: 5m junos-input-filter: police-5M junos-phy-ifd-name: ge-1/0/0 junos-underlying-interface: ge-1/0/0.1073741831
Here you can see the Dynamic configuration as populated via the RADIUS VSAs. To validate that each subscriber is allocated a unique firewall policer, use the show firewall command:
admin@SOUTHPARK> show firewall Filter: police-5M-ge-1/0/0.1073741831-in Policers:Name Bytes Packetspolice-5M-all-ge-1/0/0.1073741831-in 0 0
Filter: police-2M-ge-1/0/0.1073741832-in Policers:Name Bytes Packetspolice-2M-all-ge-1/0/0.1073741832-in 0 0

98 DayOne:DynamicSubscriberManagement
Filter: police-10M-ge-1/0/0.1073741833-in Policers:Name Bytes Packetspolice-10M-all-ge-1/0/0.1073741833-in 0 0---(more)---
To validate that each subscriber is allocated a unique traffic control profile, use the show class-of-service traffic-control-profile command:
admin@SOUTHPARK> show class-of-service traffic-control-profile Traffic control profile: dynsub-TCP.o.ge-1/0/0.1073741831, Index: 503162287 Shaping rate: 5000000 Scheduler map: ge-1/0/0.1073741831.dynsub-smap-voice-and-inet
Traffic control profile: dynsub-TCP.o.ge-1/0/0.1073741832, Index: 503162284 Shaping rate: 2000000 Scheduler map: ge-1/0/0.1073741832.dynsub-smap-voice-and-inet
Traffic control profile: dynsub-TCP.o.ge-1/0/0.1073741833, Index: 503162285 Shaping rate: 10000000 Scheduler map: ge-1/0/0.1073741833.dynsub-smap-voice-and-inet---(more)---
You can also use the show class-of-service scheduler-map. Here is an example of output for one of the subscribers:
Scheduler map: ge-1/0/0.1073741835.dynsub-smap-voice-and-inet, Index: 2167487620
Scheduler: inet-scheduler.ge-1/0/0.1073741835, Forwarding class: best-effort, Index: 662975508 Transmit rate: remainder, Rate Limit: none, Buffer size: remainder, Buffer Limit: none, Priority: low Excess Priority: unspecified Drop profiles: Loss priority Protocol Index Name Low any 1 <default-drop-profile> Medium low any 1 <default-drop-profile> Medium high any 1 <default-drop-profile> High any 1 <default-drop-profile>
Scheduler: voice-scheduler.ge-1/0/0.1073741835, Forwarding class: expedited-forwarding, Index: 331738323Transmit rate: 512000 bps, Rate Limit: none, Buffer size: remainder, Buffer Limit: none, Priority: strict-high Excess Priority: unspecified Drop profiles: Loss priority Protocol Index Name Low any 1 <default-drop-profile>

Chapter5:GettingStartedwithDynamicIPProfilesandQoS 99
Medium low any 1 <default-drop-profile> Medium high any 1 <default-drop-profile> High any 1 <default-drop-profile>
You can use the show interfaces command on a subscriber’s underly-ing interface to view the per-subscriber information:
admin@SOUTHPARK> show interfaces extensive ge-1/0/0.1073741844 Logical interface ge-1/0/0.1073741844 (Index 334) (SNMP ifIndex 590) (Generation 165) Flags: SNMP-Traps 0x0 VLAN-Tag [ 0x8100.100 0x8100.24 ] Encapsulation: ENET2 Traffic statistics: Input bytes : 42497596 Output bytes : 604 Input packets: 1062428 Output packets: 2 Local statistics: Input bytes : 652 Output bytes : 604 Input packets: 2 Output packets: 2 Transit statistics: Input bytes : 42496944 10000184 bps Output bytes : 0 0 bps Input packets: 1062426 31250 pps Output packets: 0 0 pps Protocol inet, MTU: 1978, Generation: 207, Route table: 0 Flags: Sendbcast-pkt-to-re, Unnumbered Donor interface: lo0.0 (Index 322) Preferred source address: 12.1.1.1 Input Filters: police-5M-ge-1/0/0.1073741844-in Protocol multiservice, MTU: Unlimited, Generation: 208, Route table: 0 Policer: Input: __default_arp_policer__
And here you can see that this subscriber is sending 10Mbps to the MX; therefore, the Input bytes field is reporting about 10Mbps.
Another handy command is the show interfaces queue command, which shows you information about packet usage/queuing for a given customer, such as if packets are waiting to be transmitted, tail-dropped, etc. The following is the output for a subscriber’s best-effort queue. You can display all of the forwarding-classes as well if you omit the forwarding-class filter.
admin@SOUTHPARK> show interfaces queue ge-1/0/0.1073741845 forwarding-class best-effort Logical interface ge-1/0/0.1073741845 (Index 335) (SNMP ifIndex 591) Forwarding classes: 16 supported, 4 in useEgress queues: 8 supported, 4 in useBurst size: 0Queue: 0, Forwarding classes: best-effort

100 DayOne:DynamicSubscriberManagement
Queued: Packets : 3112345 15627 pps Bytes : 267661670 10752200 bps Transmitted: Packets : 2899946 14535 pps Bytes : 249395356 10000664 bps Tail-dropped packets : 212399 1092 pps RED-dropped packets : 0 0 pps Low : 0 0 pps Medium-low : 0 0 pps Medium-high : 0 0 pps High : 0 0 pps RED-dropped bytes : 0 0 bps Low : 0 0 bps Medium-low : 0 0 bps Medium-high : 0 0 bps High : 0 0 bps
Looking at the Logs
Let’s cover a few common mistakes and how you can use the Junos traceoptions log files to troubleshoot dynamic IP profiles.
MissingRADIUSVSA
A common error occurs when RADIUS does not return an expected VSA value. For example, say you forgot to include the RADIUS VSA for the $junos-cos-shaping-rate value required by the traffic-control-profile configuration.
Here is what you would see if RADIUS was successfully returning all of the variables for the use-case in this chapter:
Nov 2 09:52:24 authd_update_session_dynamic_attributes: Client-session response-dyn-attr:: name:junos-cos-shaping-rate, len:3, value: 5m, encode 0Nov 2 09:52:24 authd_update_session_dynamic_attributes: Client-session response-dyn-attr:: name:junos-cos-scheduler, len:16, value: voice-scheduler, encode 2Nov 2 09:52:24 authd_update_session_dynamic_attributes: Client-session response-dyn-attr:: name:junos-cos-scheduler-tx, len:5, value: 512k, encode 3Nov 2 09:52:24 authd_update_session_dynamic_attributes: Client-session response-dyn-attr:: name:junos-input-filter, len:10, value: police-5M, encode 0
If RADIUS does not send a VSA, then you will not see an entry in the log-file for it. For example, if RADIUS did not return the VSA for the $junos-cos-shaping-rate, all you would find in the log would be:

Chapter5:GettingStartedwithDynamicIPProfilesandQoS 101
Nov 2 09:57:14 authd_update_session_dynamic_attributes: Client-session response-dyn-attr:: name:junos-cos-scheduler, len:16, value: voice-scheduler, encode 2Nov 2 09:57:14 authd_update_session_dynamic_attributes: Client-session response-dyn-attr:: name:junos-cos-scheduler-tx, len:5, value: 512k, encode 3Nov 2 09:57:14 authd_update_session_dynamic_attributes: Client-session response-dyn attr:: name:junos-input-filter, len:10, value: police-5M, encode 0
Go back and include the proper RADIUS VSA for the $junos-cos-shaping-rate value required by the traffic-control-profile configura-tion.
MisconfiguredDynamicProfile
Another common mistake is accidentally misspelling something in your dynamic IP profile. For example, let’s say you have a traffic-con-trol-profile called dynsub-TCP:
[edit dynamic-profiles DYNSUB-DHCP-VOICE-AND-INET class-of-service]admin@SOUTHPARK# show traffic-control-profiles dynsub-TCP { scheduler-map dynsub-smap-voice-and-inet; shaping-rate “$junos-cos-shaping-rate”;}
But when you configure the [interfaces] stanza, you accidentally forget to capitalize the TCP in the name:
[edit dynamic-profiles DYNSUB-DHCP-VOICE-AND-INET class-of-service interfaces]admin@SOUTHPARK# show “$junos-interface-ifd-name” { unit “$junos-underlying-interface-unit” { output-traffic-control-profile dynsub-tcp; }}
Note the difference in the two names: one is dynsub-TCP and the other is dynsub-tcp. Whoops! Junos commits this change without a warning or error.
To fix this kind of error, check the dhcplog for the keyword NACK:
admin@SOUTHPARK> show log dhcplog | match NACK Nov 2 10:35:47 Profile Addition NACK (FAILED) for client 168, res 7, Errored daemon “cosd”, msg “Invalid configuration”, retry “FALSE”
This entry indicates that there was something wrong with the class-of-service section of the dynamic IP profile, as indicated by the message: Errored daemon “cosd”.
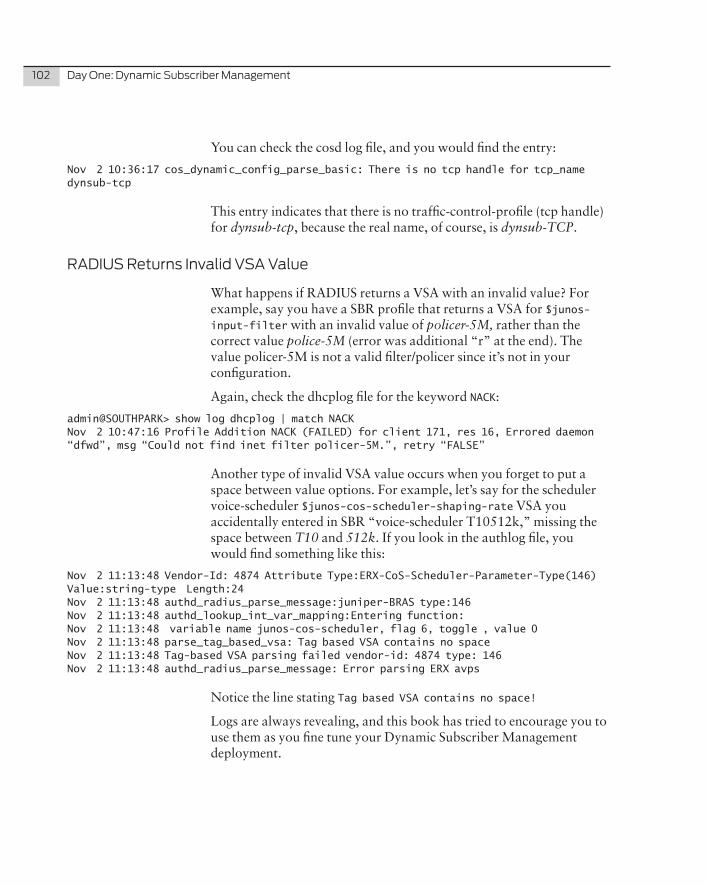
102 DayOne:DynamicSubscriberManagement
You can check the cosd log file, and you would find the entry:
Nov 2 10:36:17 cos_dynamic_config_parse_basic: There is no tcp handle for tcp_name dynsub-tcp
This entry indicates that there is no traffic-control-profile (tcp handle) for dynsub-tcp, because the real name, of course, is dynsub-TCP.
RADIUSReturnsInvalidVSAValue
What happens if RADIUS returns a VSA with an invalid value? For example, say you have a SBR profile that returns a VSA for $junos-input-filter with an invalid value of policer-5M, rather than the correct value police-5M (error was additional “r” at the end). The value policer-5M is not a valid filter/policer since it’s not in your configuration.
Again, check the dhcplog file for the keyword NACK:
admin@SOUTHPARK> show log dhcplog | match NACK Nov 2 10:47:16 Profile Addition NACK (FAILED) for client 171, res 16, Errored daemon “dfwd”, msg “Could not find inet filter policer-5M.”, retry “FALSE”
Another type of invalid VSA value occurs when you forget to put a space between value options. For example, let’s say for the scheduler voice-scheduler $junos-cos-scheduler-shaping-rate VSA you accidentally entered in SBR “voice-scheduler T10512k,” missing the space between T10 and 512k. If you look in the authlog file, you would find something like this:
Nov 2 11:13:48 Vendor-Id: 4874 Attribute Type:ERX-CoS-Scheduler-Parameter-Type(146) Value:string-type Length:24Nov 2 11:13:48 authd_radius_parse_message:juniper-BRAS type:146Nov 2 11:13:48 authd_lookup_int_var_mapping:Entering function:Nov 2 11:13:48 variable name junos-cos-scheduler, flag 6, toggle , value 0Nov 2 11:13:48 parse_tag_based_vsa: Tag based VSA contains no spaceNov 2 11:13:48 Tag-based VSA parsing failed vendor-id: 4874 type: 146Nov 2 11:13:48 authd_radius_parse_message: Error parsing ERX avps
Notice the line stating Tag based VSA contains no space!
Logs are always revealing, and this book has tried to encourage you to use them as you fine tune your Dynamic Subscriber Management deployment.

Chapter5:GettingStartedwithDynamicIPProfilesandQoS 103
Summary
Congratulations, you’ve reached the end of a very busy book filled with the fundamentals of creating dynamic IP profiles. You should now grasp the fundamentals of Juniper’s Dynamic Subscriber Management solution, and be able to deploy it in your own network.
Along the way, in this last chapter, there were new troubleshooting skills using Junos commands and traceoptions log files, such as:
> show subscribers client-type dhcp> show dynamic-configuration> show firewall> show class-of-service traffic-control-profile> show class-of-service scheduler-map> show interfaces
Let’s recap everything you’ve covered in just one day!
� You should now understand the Juniper Network’s Dynamic Subscriber Management solution, and how all the pieces work together.
� You should be able to install and use Juniper’s Steel-Belted RADIUS.
� You can configure the MX Series with dynamic VLAN profiles for Customer VLAN and Service VLAN BRAS network applica-tions.
� You can configure the MX to use DHCP local-server and external DHCP external services.
� And you can configure the MX with dynamic IP profiles to support differentiated services on a per-subscriber basis.
Remember this book is intended to get you Up and Running, not fully deployed. There’s much more in the technical documentation, on J-Net, and on the Juniper web site. And the appendices that follow contain even more information and resources for you to read through. Check out the Day One and This Week libraries, too, and write to us on this book’s web page at http://www.juniper.net/dayone.
Happy deploying! – Jeremy Schulman, Lenny Pollard, and John Rolfe

104 DayOne:DynamicSubscriberManagement

Appendix
Helpful Junos Commands to Remember . . . . . . . . . . . . . . . . . . . . . . . . . . . . 106
Resources and Additional Reading . . . . . . . . . . . . . . . . . . . . . . . . . . . . . . . . . . 106

106 DayOne:DynamicSubscriberManagement
Helpful Junos Commands to Remember
Commands relating to all dynamic VLAN interfaces and dynamic IP profile sessions:
> show subscribers> show subscribers client-type dhcp> show dynamic-configuration> clear auto-configure interface
Commands relating to the subscriber sessions from AAA and DHCP:> show network-access aaa subscriber> clear network-access aaa subscriber username> show dhcp server binding> clear dhcp server binding> show dhcp relay binding> clear dhcp relay binding
Miscellaneous common Junos commands:> show system license> show route protocol access-internal> show interface> show firewall> show class-of-service traffic-control-profile> show class-of-service scheduler-map
Resources and Additional Reading
Chapter2:GettingStartedWiththeCustomerVLANModel
The main Juniper Networks techpubs webpage for all MX Subscriber Management documentation is: http://www.juniper.net/techpubs/en_US/junos/information-products/pathway-pages/subscriber-access/index.html.
The primary manual for MX Subscriber Management is the Subscriber Access Configuration Guide: http://www.juniper.net/techpubs/en_US/junos/information-products/topic-collections/config-guide-subscriber-access/config-guide-subscriber-access.pdf.
For information on VLAN based dynamic-interfaces, see: http://www.juniper.net/techpubs/en_US/junos/topics/task/configuration/vlan-dynamic-interfaces.html.
For information on packets that trigger auto-configuration, see: http://www.juniper.net/techpubs/en_US/junos/topics/reference/configuration-

Appendix 107
statement/accept-edit-interfaces.html.
For more information on DHCP local-server configurations, see: http://www.juniper.net/techpubs/en_US/junos/information-products/pathway-pages/subscriber-access/dhcp/subscriber-management-dhcp-local.html.
Information on DHCP relay configurations can be found at: http://www.juniper.net/techpubs/en_US/junos/information-products/pathway-pages/subscriber-access/dhcp/subscriber-management-dhcp-relay.html#configuration.
For information on unnumbered interfaces, see: http://www.juniper.net/techpubs/en_US/junos11.2/topics/usage-guidelines/interfaces-configuring-an-unnumbered-interface.html.
Information on basic dynamic VLAN interface profiles is here: http://www.juniper.net/techpubs/en_US/junos/topics/task/configuration/dynamic-profile-basic-subscriber-access.html.
For more information on Junos variables used by dynamic profiles, see: http://www.juniper.net/techpubs/en_US/junos/topics/reference/general/junos-predefined-variables-table.html.
Chapter3:GettingStartedwiththeServiceVLANModel
For more information on using IP-demux interfaces for dynamic IP profiles, go to: http://www.juniper.net/techpubs/en_US/junos/topics/task/configuration/subscriber-management-ip-demux-dynamic.html.
For information on IP-demux interfaces in general, refer to: http://www.juniper.net/techpubs/en_US/junos10.4/information-products/pathway-pages/config-guide-network-interfaces/ip-demultiplexing-interfaces.html#overview.
For information on the $junos-subscriber-ip-address variable, refer to: http://www.juniper.net/techpubs/en_US/junos/topics/task/configuration/subscriber-management-ip-demux-dynamic.html.
For more on DHCP groups using a dynamic-profile setting, see: http://www.juniper.net/techpubs/en_US/junos/topics/concept/dhcp-subscriber-access-dynamic-profile-attachment-overview.html and http://www.juniper.net/techpubs/en_US/junos/topics/task/configuration/dhcp-subscriber-access-dynamic-profiles-attaching.html.
And for more information on using Option82, see: http://www.juniper.net/techpubs/en_US/junos/topics/task/configuration/dhcp-subscriber-access-dhcp-relay-using-option-82-overview.html.
108 DayOne:DynamicSubscriberManagement
Chapter5:DynamicIPProfiles
For a completed listing of all Junos variables, see: http://www.juniper.net/techpubs/en_US/junos11.2/topics/reference/general/subscriber-management-predefined-variables-corresponding-radius.html.
For the Day One book on QoS, go to: http://www.juniper.net/us/en/community/junos/training-certification/day-one/fundamentals-series/deploying-basic-qos/.
For more on Interface Firewall Filters and Policers, see: http://www.juniper.net/techpubs/en_US/junos11.2/information-products/pathway-pages/config-guide-firewall-filter/index.html.
For information on traffic-control-profile settings, see: http://www.juniper.net/techpubs/en_US/junos11.2/topics/usage-guidelines/cos-configuring-traffic-control-profiles-for-shared-scheduling-and-shaping.html.
For information on scheduler settings, go to: http://www.juniper.net/techpubs/en_US/junos11.2/information-products/pathway-pages/cos/schedulers.html#configuration.
And for more information on dual-stack solutions, read this whitepaper: http://www.juniper.net/techpubs/en_US/junos11.2/information-products/topic-collections/design-guide-subscriber-dual-stack/subscriber-access-ipv4-ipv6-dual-stack.pdf.