david’s basic garage/basement gym guide home gym guide.pdfdumbbells the next item most people get...
TRANSCRIPT

David’s Basic Garage/Basement Gym Guide
Copyright © 2017 David Kiesling
Downloaded from https://blog.adamantbarbell.com
Please do not distribute. Send your friends to our website to download their own free
copy!

Disclaimer
This guide is not intended to be a substitute for the professional advice of a licensed
physician, personal trainer or coach. The reader should consult with a professional
before taking any advice offered in this guide.
I have tried to include the best information I know of, in my judgement. There are no
representations or warranties, express or implied, about the completeness, accuracy,
reliability or suitability or with respect to the information contained in this document for
any purpose. Any use of this information is at your own risk.

Intro – My Philosophy Behind this Guide
This is a quick and dirty guide to get you started setting up a home gym area in your
garage, basement, or back room.
I also want you to understand where I’m coming from in recommending the type of
equipment I do.
Strength
For this I’m putting a strong emphasis on a basic strength training / bodybuilding
setup, with some additional notes for folks into Crossfit (or other conditioning work),
and some consideration for your favorite piece of cardio equipment like a rower,
elliptical, etc.
The reasons I emphasize a strength training setup are twofold.
First, I know strength equipment better than anything else, from personal experience,
writing dozens of articles, and selling equipment in my online store.
Second, strength training is for everybody. It’s for the elderly, who suffer from brittle
bones because they don’t challenge their body with weight bearing exercises. It’s for
women, who will never get “bulky” unless they are injecting hormones. It’s for people
with joint pain who need better blood flow and to strengthen their tendons.
The bottom line is your body needs to be challenged. Your body is incredibly
intelligent. When you do not challenge its strength regularly, it knows that strength is
not important, and it will let its muscles, bones and tendons waste away. When you
lift weights through a good program, your body says, “This IDIOT is lifting heavy crap
all the time! We need to adapt or something bad is gonna happen!”
Compound Lifts
Bench presses, squats, deadlifts, pull ups and military presses, among others, are all
compound lifts. They involve multiple muscle groups and force your body to work as
one unit.
The setups I recommend are what you need to do compound lifts. Freeweights, as
opposed to machines, are the best at achieving this because you are forced to balance
and use multiple muscle groups, or even your whole body, not just lean on a couple
muscles to do all the work.
Focusing on compound exercises for your workout has these advantages:

• It’s a Time Saver
You can get as much of a full body workout, or better, from a few compound
exercises as you can a dozen isolation exercises
• You Release Growth Hormones
Lifting heavy weights taxes your entire system. Your muscles struggle, your
heart starts pounding, you sweat, and you mentally have to push yourself,
which stimulates your central nervous system. This releases hormones that tell
your body to get stronger. It doesn’t like being too weak to accomplish a task
easily. Your nervous system doesn’t take you seriously unless your body is
struggling.
• You Become Functionally Stronger
Your body is smart. It wants to function smoothly and effectively as a unit. It
wants to be athletic. Compound movements require not only strength, but
coordination and balance. When you do only isolation exercises, one muscle
group at a time such as with curls or many machine exercises, your body will
not let one muscle group get too strong if it will throw off the balance.
For example, if you work your abs too much and not your back, your back
might start hurting and you won’t get the six-pack you want. Likewise, if you
work your biceps and not your triceps, your biceps will be limited in how strong
they are allowed to get.
Basically, compound movements are way more effective than isolation movements at
accomplishing strength and fitness goals.
Isolation exercises can be added in too, but they are a supplement. It’s mainly just
professional bodybuilders and top athletes who can use a lot of isolation exercises
because of the amount of time they spend in the gym daily. They can also be used in
injury rehab.
When you have limited time and energy each day, including warmups, it doesn’t make
sense to do one muscle at a time, and it won’t give you the results you want.

Olympic Weights Setup
If you have the budget, a good starting setup would be a 300lb weight set, power
rack, and bench.
This will allow you to do the “big 3” powerlifting exercises: squat, deadlift and bench
press. You will also be able to do overhead presses, pull ups and a variety of other
compound and isolation exercises.
Weight Set
If nothing else, get a weight set. At least with it alone you can do deadlifts, cleans,
military presses, and a few other exercises.
A 300lb weight set includes a 45lb bar, 255 lbs of olympic plates, and collars to hold
the plates on.
(“olympic” basically denotes that the plates have 2” holes)
(also, “bar” and “barbell” are synonymous here)
“300 lbs is more than I need!”
No. Getting a 300lb set has to do with the variety of plates it has. You want to be able
to use 45lb and 35lb plates to make your life easier loading and unloading weight.

“45lb? 35lb? What the heck are these sizes?”
I hear you. You learn to the do the math before long. This was an unfortunate
conversion from kilogram denominated weights. We Americans are proud of our wonky
imperial units of measure, so that’s just the way it is.
Most of the 300lb sets for sale have a relatively low-quality bar. It will work, but a
nicer one is more pleasant to use for several reasons. You can always buy a barbell,
plates and collars all individually. However, the sets are significantly lower priced than
the individual components, so you might want to just buy a set and think about
getting an additional nicer bar later on.
Power Rack
When you add a rack, you can start doing exercises that require the bar to be set at an
adjustable starting height, such as squats and bench presses. Power racks also have
safety bars that you set at just the right height to catch the bar should you fail that
last rep, saving you from being crushed.
Not only that, it has a pull up bar and often has options for additional attachments.
And as a bonus, with the bar off the floor, it’s also easier for you to add and remove
weight plates between sets.
Note: The barbell does NOT touch the rack while you’re lifting. You do true freeweight
barbell exercises. A Smith machine, which you may have also seen, holds the bar and
restricts movement to a straight plane of motion. The rack I’m talking about is not a
machine. You do 100% of the work once you lift the weight off the rack.
The video here illustrates 51 exercises you can do with a power rack:
https://www.youtube.com/watch?v=fohh20c63S4

Bench
Throw a bench into the mix and it only gets better!
See this quick video for how a bench works with a power rack:
https://www.youtube.com/watch?v=Ru0scbx8DuI
This type of bench doesn’t have any barbell holders on it. It’s also called a dumbbell
bench. You already have the rack, so any barbell holders built into the bench would
get in the way.
Slide the bench inside the rack and you’re ready to do bench presses.
A basic flat bench will work great.
If you get a bench with an adjustable backrest, you can also do incline and decline
presses, which work slightly different muscle groups and add variety. But for flat
bench pressing, nothing beats a simple flat bench. Because nothing on it moves, it’s
more stable, feels more solid, and there’s no separate butt and back pads that have
uncomfortable gaps between them.

That’s it! For starters, just a weight set, rack, and bench are all you need.
Let’s go over the next few things you should consider. I also have a few alternatives for
you if you don’t think your space is large enough to fit a power rack.

Fleshing Out your Gym
Now that you have the basics, there are a few other considerations...
Storage
Looks handy, doesn’t it? Or were you planning on leaving all your weights on the
floor?
A weight tree like this will easily hold all the plates in your 300lb weight set.
Flooring
Rubber flooring is almost a must.
If you find a great deal on “rubber foam” mats, don’t do it. It’s EVA foam. Nothing
rubber about it. I got by with some EVA foam mats for a while. I really don’t
recommend it.
If you have a Tractor Supply store near you, you can get some 6ft x 4ft x 3/4in rubber
“stall mats” at an unbeatable price. Or find an equestrian or farmer type store. You can
also order rubber mats online, in the big 4x6’ sheets or smaller interlocking tiles. For the
big sheets, you need at least two for the rack and bench. Four of them will give you
extra room.
As far as the floor you’re laying the mats over, a concrete subfloor is ideal, and it’s the
only subfloor you should have if you plan on dropping weights at all.
For a medium- or high-pile carpet, you’re going to either need to pull up the carpet or
lay sheets of 3/4″ plywood over it. (The plywood will actually be 23/32″, or just under
3/4″)
For low-pile commercial carpet, you can lay mats directly on them.
For tile or hardwood floors, put down some thin foam underlay, plywood on top of that,
and the rubber mats on top of that. This will keep the subfloor from getting scuffed up
and protect it better from dropped weights.
For a more thorough overview of rubber flooring, see my Gym Flooring Guide.
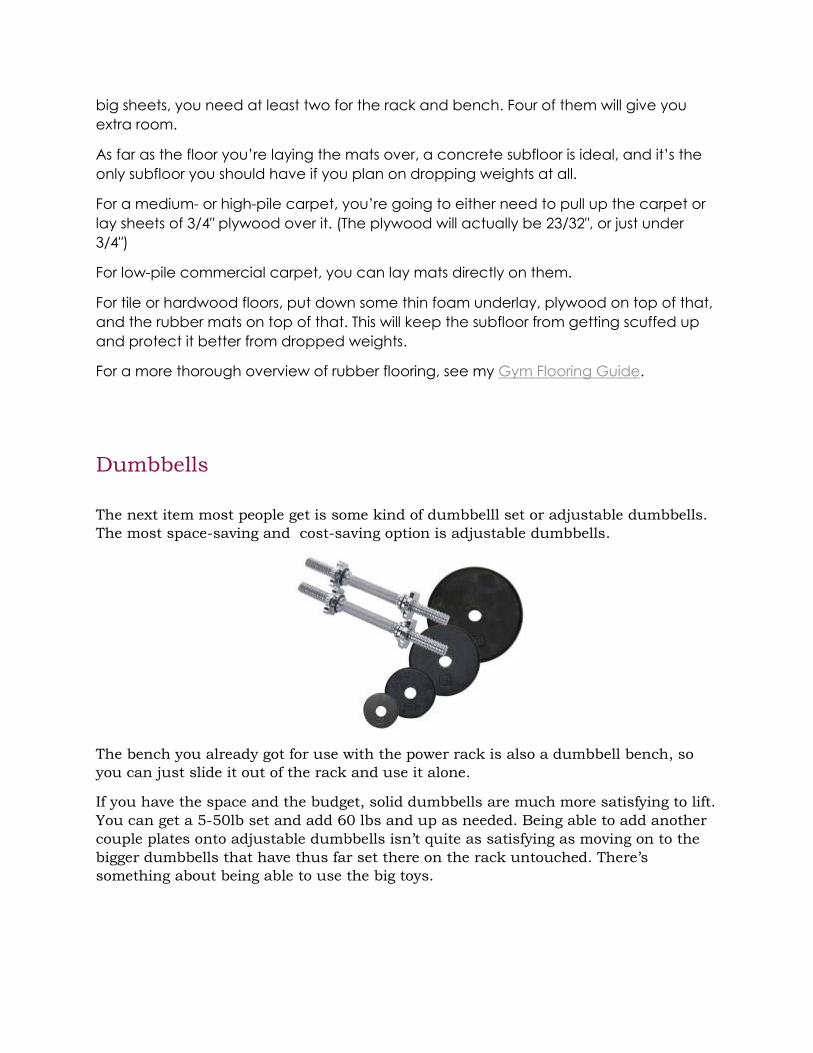
Dumbbells
The next item most people get is some kind of dumbbelll set or adjustable dumbbells.
The most space-saving and cost-saving option is adjustable dumbbells.
The bench you already got for use with the power rack is also a dumbbell bench, so
you can just slide it out of the rack and use it alone.
If you have the space and the budget, solid dumbbells are much more satisfying to lift.
You can get a 5-50lb set and add 60 lbs and up as needed. Being able to add another
couple plates onto adjustable dumbbells isn’t quite as satisfying as moving on to the
bigger dumbbells that have thus far set there on the rack untouched. There’s
something about being able to use the big toys.

Lat Machine
A lot of folks can’t do a pull up. For them, a lat machine is the answer. Even if you can
do a few pull ups, you can get a lot out of a lat machine because the pulley systems
facilitate other exercises.
There are some bodybuilding.com forum threads where experienced lifters have shared
that one of the next purchases beyond the basic weight set, rack and bench would be
a lat machine.
You’ve certainly seen them at commercial gyms. A seat and a bar you pull down to
your chest, just like a pull up but with as light weight as you need instead of having to
pull your body weight.
They’re called lat machines because the lat pull down exercise generally works your lat
(lattisimus dorsi) muscles that go from under your armpits, down the sides of your
ribcage, and down to your lower back. Biceps and other muscles are involved too.
The thing with a lat machine is it isn’t just a lat machine. Every lat machine has
another pulley near the floor, so you can do all kinds of exercises where you pull
upwards or sideways. Possibilities include seated rows, curls, glute kickbacks, leg
extensions, leg curls, and other less common exercises.
Some power racks have an optional lat attachment, basically a lat machine that
extends out the rear of the power rack, out of the way of any squats or presses you
would do inside the rack. But beware – a lot of these attachments use bushings that
the carriage slides on. This can be ok, but it won’t be as friction-free as carriages that
roll on bearings like those you’ll see in a commercial gym. The bushings can wear a

little over time if you use it a lot, increasing the friction even more. The friction never
actually gets severe enough to prevent you from doing the exercise, but it doesn’t feel
nearly as good.
Rower or Other Cardio Equipment
The current rage in cardio is rowing. It works your whole body like no other cardio
machine can.
The go-to rower is a Concept2 Model D.
If you want to waste time doing research before coming to the same conclusion on
your own that the Model D is the one to get, see my Air Rowers Comparison.
Also see my Tips on Buying a Second-Hand Concept2 Rower.
One cool thing about these for a home gym is they quickly fold up to save space
between workouts. You can’t do that with any decent treadmill, elliptical, or bike.
If you’re set on a treadmill, elliptical, or bike, either fork out good money for a
commercial quality unit or find a used commercial unit on Craigslist. A home grade
unit is gonna be shaky and parts will need to be replaced. They aren’t actually made
to be used. They’re made to be used for a few weeks and then set aside with a “I’ll
definitely get back into using this soon” promise. Commercial units get used for hours
every day.

Warming Up, Conditioning, and Training
Learning proper form and doing lots of warmup sets of increasing weight each
workout is extremely important in weight lifting to avoid injuries, for young and old
alike.
Conditioning your body with endurance, high intensity, and light weight exercises is
also tremendously beneficial for avoiding lifting injuries. Jogging, sprinting, pushups,
sports, bike riding or any other regular physical activity is a prerequisite before
challenging yourself too hard with heavy weights. In other words, don’t jump from 0 to
100.
I’m not a strength coach. For learning about a proper training program, which goes
along well with this short guide, get the book Starting Strength, by iconic strength
and conditioning coach Mark Rippetoe. It is the #1 book for exactly the type of person
who is getting into strength training and reading this guide.

Space Limitations
Short Ceiling
Power racks’ typical 7ft height poses a problem in residential units with 8ft ceilings. At
first thought you might figure it will fit, but you’re in danger of going through the
ceiling during pull ups. To be safe you want 12” of clearance above the bar for your
head.
Basements are even worse, with their 7ft ceilings or sometimes not even that.
Two possible solutions to getting a rack in a low ceiling room…
1. Get a “shortie” power rack, only 6ft tall.
I only recommend this for users who are under 5’5”tall themselves. In that case,
hey, a 6ft power rack would fit you fine! You’ll bend your knees doing pull ups,
but taller folks do that anyway on 7ft racks.
For anyone approaching 6ft tall, a shortie power rack is a bad idea. You’ll bang
your head on the pull up bar just walking into it, and if you manage that, you’ll
bang your head on the upper rear crossbeam as you re-rack your squat. Try to
do pull ups, even with bent knees, and your knees will hit the floor.
2. Forego a power rack and get a good half rack / squat stand.
This can be a good move for anyone. There are a couple excellent half racks out
there, by Rogue and also Titan Fitness, that fit the bill for being only 6ft tall and
with nice long safety bars.
Some options for both of these are laid out in my article, Some Shortie Power Racks
for Low Ceilings and Basements.
Limited Floor Space
For a power rack and bench setup, you need a 10ft x 7ft space.
Sure, the rack is only like 4ft x 4ft, but you’re using a 7ft bar in it. You need space on
both sides of the bar for you to stand while loading plates. You need space in front of
the rack for you to slide your bench out.
If you don’t have that space, you can:
1. Do dumbbell work only.
You can get away with a mere 5ft wide space, enough room for you to lay down
on the bench and do dumbbell presses, with room to spare for safety’s sake.
You miss out on all the benefits of a rack this way, but in a pinch, it’s better
than nothing!
2. Get a 6ft bar.
In the odd situation where you’ve got 9ft but not 10ft of space, some 6ft bars
will do the job. Be careful here, as many cheaper 6ft bars do not have enough
room between the inside collars to fit on a power rack. We sell some that
basically just have the sleeves cut 6” shorter on each side.
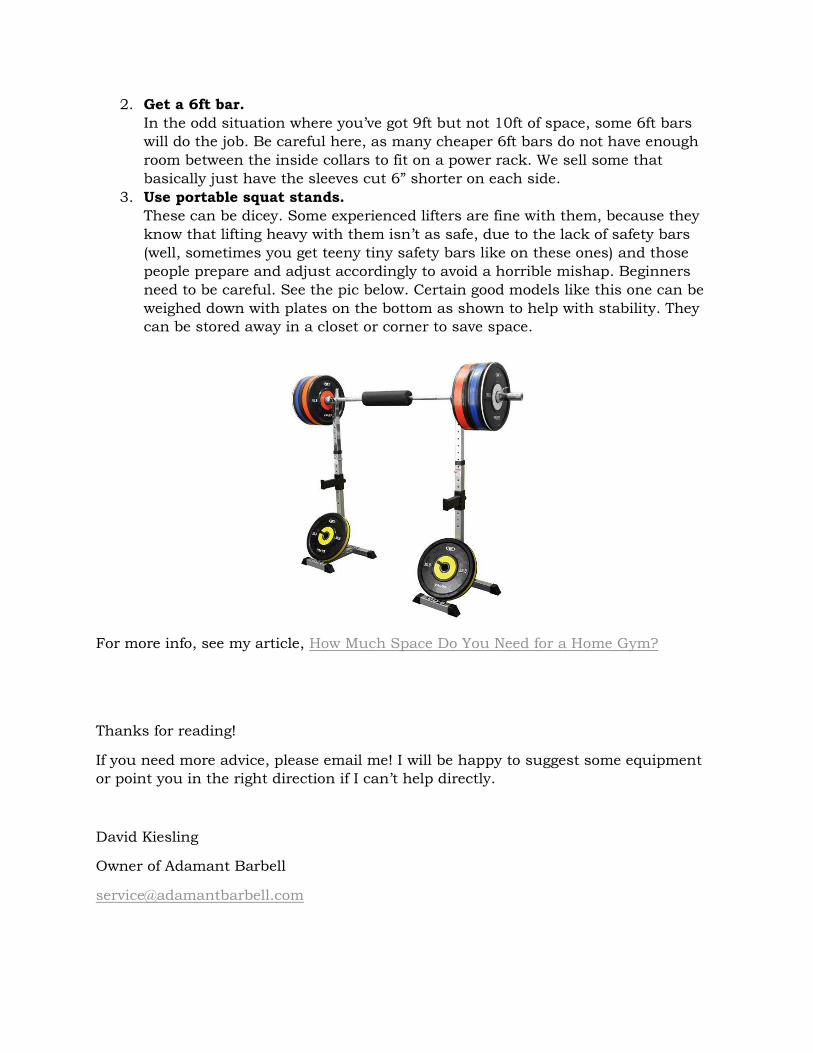
3. Use portable squat stands.
These can be dicey. Some experienced lifters are fine with them, because they
know that lifting heavy with them isn’t as safe, due to the lack of safety bars
(well, sometimes you get teeny tiny safety bars like on these ones) and those
people prepare and adjust accordingly to avoid a horrible mishap. Beginners
need to be careful. See the pic below. Certain good models like this one can be
weighed down with plates on the bottom as shown to help with stability. They
can be stored away in a closet or corner to save space.
For more info, see my article, How Much Space Do You Need for a Home Gym?
Thanks for reading!
If you need more advice, please email me! I will be happy to suggest some equipment
or point you in the right direction if I can’t help directly.
David Kiesling
Owner of Adamant Barbell