david j. rugg - nrs.fs.fed.us · pdf filecreating fgdc and nbii metadata with metavist 2005...
TRANSCRIPT

Creating FGDC andNBII Metadata WithMetavist 2005
David J. Rugg
United StatesDepartment ofAgriculture
Forest
Service
North Central
Research Station
General Technical
Report NC-255

DisclaimerThe computer program described in this publication is available on request with the understanding that the
U.S. Department of Agriculture cannot assure its accuracy, completeness, reliability, or suitability for any
other purpose than that reported. The recipient may not assert any proprietary rights thereto nor represent it
to anyone as other than a Government-produced computer program.
Mention of trade names does not constitute endorsement by the USDA Forest Service.
.
Table of Contents
Introduction ....................................................................................................................................... 1
Metadata Background ................................................................................................................... 1
XML Background ......................................................................................................................... 2
Installing Metavist 2005 ............................................................................................................... 3
Using Metavist 2005 ............................................................................................................................. 4
Data Format Conventions ............................................................................................................ 4
Design Overview .......................................................................................................................... 5
Menus ....................................................................................................................................... 7
Section 1. Indentification Information ....................................................................................... 10
Section 2. Data Quality Information ........................................................................................... 13
Section 3. Spatial Data Organization Information ...................................................................... 13
Section 4. Spatial Reference Information .................................................................................... 13
Section 5. Entity and Attribute Information ............................................................................... 14
Section 6. Distribution Information ........................................................................................... 17
Section 7. Metadata Reference Information ................................................................................ 18
Technical Support ...................................................................................................................... 18
Acknowledgments .............................................................................................................................. 20
Literature Cited .................................................................................................................................. 21
Appendix A. Colorized Version of Metadata Standard ........................................................................ 22
Published by:North Central Research StationForest Service U.S. Department of Agriculture1992 Folwell AvenueSt. Paul, MN 551082004
Web site: www.ncrs.fs.fed.us

Creating FGDC and NBII MetadataWith Metavist 2005
About The Author:
David J. Rugg is Research Data
Archivist with the USDA Forest
Service, North Central Research
Station, 1992 Folwell Ave., St. Paul,
MN 55108; Phone: (651) 649-5173;
e-mail: [email protected].
INTRODUCTIONMetavist 2005, a software tool for the metadata
archivist, is used to create metadata compliant with
two of the Federal Geographic Data Committee
(FGDC) metadata standards—“FGDC Content
Standard for Digital Geospatial Metadata” (FGDC
1998) and “FGDC Biological Data Profile of the
Content Standard for Digital Geospatial Metadata”
(FGDC 1999). This manual does not define the
elements present in the standards. Rather, its
purpose is simply to help you successfully use the
software. Because thorough knowledge of metadata
and the FGDC metadata standards are not
prerequisites, a brief overview of those topics is
provided.
Metadata Background
Definition of metadataMetadata are data that describe data. Metadata are
used to answer such questions as what data were
collected, how they were collected, why they were
collected, how reliable they are, and what issues
should be accounted for when working with them.
Metadata also describe how data are stored, how to
access the data, what tools are needed to work
with the data, and related matters. The most
common objectives of metadata collection are to
(1) provide internal data documentation, (2)
enhance current data sharing, and (3) enhance the
future utility of data archives.
The FGDC spatial metadata standardSince 1995, the Federal Government has been
required to create metadata for geospatial data it
produces, and make those data available to the
public (Executive Order 12906). The common
understanding of geospatial data is that it
references specific places on the planet via a
coordinate system suitable for use on a map or in
geographic information system (GIS) software. The
FGDC was created to address how to deal with this1
requirement; use of its standard is mandatory for
the Federal Government. Further information
about the standard and related activities can be
found at the FGDC’s Web site (www.fgdc.gov). Two
benefits of the formal standard are consistency of
(1) documentation elements and (2) terminology.
The known structure lends itself to automated
searching for candidate data sets based on their
metadata. To facilitate this, the FGDC operates the
National Spatial Data Clearinghouse. The
clearinghouse provides a way to conduct searches
against the metadata and find what spatial data sets
the Government has created (although the data
sets themselves are not housed in the
clearinghouse). In addition to delineating metadata
for general geospatial data, the current version of
the standard (FGDC 1998) provides a mechanism
for other organizations to add elements and
collections of elements, called “profiles.”
The FGDC Biological Data ProfileA significant portion of biological research either
has no spatial component or has substantial
aspects besides the purely spatial. The National
Biological Information Infrastructure (NBII), part
of the Biological Resources Division of the U.S.
Geological Survey (USGS), is responsible for
developing a metadata standard covering such
research. To accomplish this task, NBII developed
a Biological Data Profile (FGDC 1999) to enhance
the FGDC Standard. The NBII profile has been
approved for use by the FGDC. While the profile is
specifically designed for biological data, it is
defined broadly enough to be applicable to other
scientific research. Thus, the profile can be used to
describe spatial data, nonspatial numeric data, and
nonspatial nonnumeric data— just about anything
of scientific interest. Further information about
this profile, NBII’s metadata clearinghouse, and
other activities can be found at NBII’s Web site
(www.nbii.gov).

2
Organization of the metadata standardAs defined by the FGDC, the standard’s elements
are organized into 10 sections. There are seven
main sections:
• Identification (mandatory),
• Data Quality Information,
• Spatial Data Organization Information,
• Spatial Reference Information,
• Entity and Attribute Information,
• Distribution Information, and
• Metadata Reference Information (mandatory).
The five sections that are not mandatory are all
“mandatory if applicable”: if a section is relevant to
your data set then you have to fill in that section.
The other three sections defined by the standard—
Citation Information, Time Period Information,
and Contact Information—are supporting sections
that are referenced by the main sections. Each
section contains a number of elements. Some of
these are “simple” elements—items for which you
provide information. Other elements are
“compound”—elements that organize a related set
of simple elements. The elements may be
mandatory, mandatory if applicable, or optional.
Optional elements do not need to be filled in, even
if they are applicable.
Official definitions for the elements are provided
by the FGDC (FGDC 1998, FGDC 1999); this
manual does not reproduce those definitions.
Another useful document is the metadata
workbook (FGDC 2000). The FGDC (1998)
manual and workbook can be found at the FGDC
Web site (www.fgdc.gov); the Biological Profile
manual can be found at the NBII Web site
(www.nbii.gov). These documents are also
included in the Metavist 2005 package and are
installed in the application directory (default
location c:\program files\metavist). The metadata
workbook includes two spatial data examples—
one for a USGS digital line graph, and one for
National Wetlands Inventory wetlands data. Two
additional examples documenting actual data sets
are installed in the application directory; one
describes an oceanographic data set
(Schweitzer_oceanography.xml), the other a
volcano atlas shape file (volcano.shp.xml) (ESRI
2003). Finally, a color-coded graphical overview of
the standard is reproduced in appendix A. Printing
the graphics prior to creating metadata is strongly
recommended. They are very helpful for both
understanding the standard and recalling how
information is organized when creating metadata.
XML Background
Storing metadata as XMLThere are many formats for digitally storing
metadata—word processor, spreadsheet, database,
ASCII text, etc. Unfortunately, many of these formats
do not work well across multiple computer platforms
or need to have their format updated over time as
versions of the creating software become obsolete.
While text suffers less from these problems, it tends to
be difficult to search. A relatively new technology that
addresses these issues is Extensible Markup Language,
XML. XML is a tag-based language, like HTML for the
Web, but the tags are user-defined. It is stored in a
modern text format using Unicode characters. The
Unicode representation makes XML portable across
all computing platforms and durable over time. By
defining the tag structure, XML files can be searched
fairly easily. To make the metadata available as widely
as possible, facilitate automated searches, and
minimize the effort required to maintain a usable
format over time, Metavist 2005 uses XML as its
native file format. The encoding for Unicode in the
software is UTF-8.
Although you can view an XML document in a
program like Windows Notepad, to fully understand
the document you need to understand the tag
structure. Tag structures can be defined using a
document type definition or a schema; Metavist uses
the newer schema approach. The schema, contained
in ncMetadata.xsd, is provided as part of the
installation. Because the schema defines what a
proper document looks like for this application, it can
be used to verify that a particular XML document
structure conforms to the metadata formatting
requirements. This verification checks for required
tags and for the proper formatting of element
content—number, date, text, etc. However,
comparing a candidate document to the schema
cannot tell you whether mandatory if applicable
elements that are not included should have been. Nor
can it provide an opinion on the quality of the
content. Author and peer review remain critical
components of ensuring quality metadata.

3
It is often easier for people, as opposed to other
computers, to view a more verbose rendition of the
raw XML. For this purpose, XML provides style
sheets that can transform an XML document into a
number of other formats—another XML
document, text, HTML, PDF, etc. Microsoft
Internet Explorer (version 4 and higher) comes
with a default XML style sheet built in. While its
collapsible tree structure is useful, what it presents
is still the raw XML. Metavist provides a style
sheet, NBII_classic.xsl, to generate a more person-
friendly display in a browser. This style sheet is
provided as part of the installation. By default,
when Metavist creates a metadata document, it
assumes that the style sheet is in the same
directory as the metadata file. Changing the
location, or the style sheet reference, is discussed
in the “Options menu” section (page 9 of the
manual).
Installing Metavist 2005The program requires Microsoft® Windows
® 2000
or XP and the Microsoft .Net Framework version
1.1. The target display resolution is 800x600 or
higher. The .Net Framework requires about 30MB
of free disk space; Metavist requires about 5MB.
The .Net Framework installation program comes
with the program; you will need Administrator
rights to successfully install it. Installation of
Metavist itself does not require Administrator
rights. Because Metavist was written in a .Net
language, you can simply copy the executable file
anywhere on your hard drive and it will run
successfully. Nonetheless, installing via the setup
program is recommended. The installation
program will add an entry to Add/Remove
Programs, put an icon on your desktop, and create
an entry in the Start menu.
To install the software, first unzip the software
package if necessary. Second, run Setup and follow
the instructions on-screen. If Setup indicates that
your machine needs the .Net Framework, the
recommended approach is to exit Setup, run
‘dotnetfx.exe’ to install the .Net Framework, then
re-run Setup to install Metavist. Alternatively, you
can continue the installation and Setup will
attempt to retrieve and install the 25MB .Net
Framework via the Internet. Installing the .Net
Framework takes a while and may require a
reboot; installing Metavist is much simpler and
faster. After a successful installation, the program
directory (default of c:\program files\metavist)
contains:
• the program file, Metavist.exe
• this manual
• PDF versions of the FGDC standard
definition (FGDC 1998), the Profile
definition (FGDC 1999), and the FGDC
workbook (FGDC 2000)
• the XML schema for this implementation
• an XSLT style sheet for viewing NBII
metadata files in a Web browser such as
Microsoft Internet Explorer, version 5.0 or
later
• two examples

4
USING METAVIST 2005
Data Format ConventionsTo facilitate data entry, Metavist’s user interface
attempts to present data elements in commonly
used formats. However, the metadata documents it
creates conform to required standard formats. As
specified in FGDC (1998), these formatting
conventions are used in the output files:
∆ Calendar Dates (Years, Months, and Days)
• Common Era (C.E.) to December 31,
9999 C.E.—Values are formatted as YYYY
for years, YYYYMM for a month of a year,
and YYYYMMDD for a day of a year.
• Before Common Era (B.C.E.) to 9999
B.C.E.—Values are formatted as for
Common Era dates but are preceded by
“bc” (e.g., bcYYYY for years).
• Before Common Era before 9999
B.C.E.—Values consist of as many
numeric characters as needed to represent
the number of the year B.C.E., preceded
by lower case letters “cc” (e.g.,
ccYYYYYY). Months and days are not
relevant for this timeframe.
·• Common Era after 9999 A.D.—Values
consist of as many numeric characters as
needed to represent number of the year
C.E., preceded by the lower case letters
“cd” (e.g., cdYYYYYY). Months and days
are not relevant for this timeframe.
∆ Time of Day (Hours, Minutes, and Seconds)
• Because some geospatial data and related
applications are sensitive to time of day
information, three conventions are
sanctioned. When authoring a metadata
document you may choose which
convention will be used, but you must
use that convention throughout the
document. The conventions are:
— Local Time. Values follow the
24-hour timekeeping system for
local time of day in the hours,
minutes, seconds, and decimal
fractions of a second (to the
precision desired) without
separators convention (general
form of HHMMSSSS).
— Local Time with Time Differential
Factor. Values follow the 24-hour
timekeeping system for local time
of day in hours, minutes, seconds,
and decimal fractions of a second
(to the precision desired) without
separators convention. This value
is followed, without separators, by
the time differential factor. The
time differential factor expresses
the difference in hours and minutes
between local time and Universal
Time (Greenwich Mean Time). It is
represented by a four-digit number
preceded by a plus sign (+) or
minus sign (-), indicating that
hours and minutes local time is
ahead of or behind Universal Time,
respectively. The general form is
HHMMSSSSshhmm, where
HHMMSSSS is the local time using
24-hour timekeeping, ‘s’ is the plus
or minus sign for the time
differential factor, and hhmm is the
time differential factor. (This
option allows authors to record
local time and time zone
information. For example, Eastern
Standard Time has a time
differential factor of -0500, Central
Standard Time has a time
differential factor of -0600, Eastern
Daylight Time has a time
differential factor of -0400, and
Central Daylight Time has a time
differential factor of -0500.)
— Universal Time (Greenwich Mean
Time). Values follow the 24-hour

5
timekeeping system for
Universal Time of day in hours,
minutes, seconds, and decimal
fractions of a second (expressed
to the precision desired)
without separators convention,
with the upper case letter “Z”
directly following the low-order
(or extreme right hand) time
element of the 24-hour clock
time expression. The general
form is HHMMSSSSZ, where
HHMMSSSS is Universal Time
using 24-hour timekeeping, and
Z is the letter “Z”.
∆ Latitude and Longitude
• Values for latitude and longitude are
expressed as decimal fractions of degrees.
Whole degrees of latitude are represented
by a two-digit decimal number ranging
from 0 through 90. Whole degrees of
longitude are represented by a three-digit
decimal number ranging from 0 through
180. When a decimal fraction of a degree
is specified, it is separated from the whole
number of degrees by a decimal point.
Decimal fractions of a degree may be
expressed to the precision desired.
— Latitudes north of the Equator
are specified by a plus sign (+),
or by the absence of a minus
sign (-), preceding the two
digits designating degrees.
Latitudes south of the Equator
are designated by a minus sign
(-) preceding the two digits
designating degrees. A point on
the Equator is assigned to the
Northern Hemisphere.
— Longitudes east of the prime
meridian are specified by a plus
sign (+), or by the absence of a
minus sign (-), preceding the
three digits designating degrees
of longitude. Longitudes west of
the meridian are designated by
minus sign (-) preceding the
three digits designating degrees.
A point on the prime meridian
is assigned to the Eastern
Hemisphere. A point on the
180th meridian is assigned to
the Western Hemisphere. One
exception to this last convention
is permitted. For the special
condition of describing a band
of latitude around the Earth, the
East Bounding Coordinate data
element shall be assigned the
value +180 (180) degrees.
— Any spatial address with latitude
of +90 (90) or -90 degrees will
specify the position at the North
or South Pole, respectively. The
component for longitude may
have any legal value.
∆ Network Addresses and File Names
• Values for file names, network addresses
for computer systems, and related
services use the Internet’s Uniform
Resource Locator (URL) convention when
possible. The link referenced in the
FGDC manual for additional details about
URLs is no longer accessible. You can use
your Web browser to access the URL
“http://www.ling.upenn.edu/advice/url-
primer.html” if you require basic
information about URLs.
Design OverviewMetadata experts generally encourage incremental
creation and updating of metadata throughout the
course of a research project. To accommodate this
approach, Metavist does not require that metadata
be complete before it will save a document.
Metavist behaves like a standard Windows
program. One limitation is that, like Windows
Notepad, it can deal with only one document at a
time. Also like Notepad, you can run more than
one instance of the program at a time. Text hints
and tool tips are generally available in the program
(fig. 1). Tool tips are usually associated with the
input boxes, not their labels. Some sections
contain an additional information tab. Data entry is
accomplished using standard controls such as text

6
boxes, numeric controls, and dropdown list boxes.
Things to be aware of for these controls:
• Text boxes allow copy and paste operations
both within the application and between
applications. Thus, you can write longer
elements in a word processor, check the
grammar and spelling, and then copy the
final text into Metavist. Note that special
attributes like bold, italic, and superscript
will not appear in the metadata output.
• You can include many special characters in
your metadata by taking advantage of the
Unicode character sets in Windows. The
Unicode characters are easily accessed using
the Character Map utility
(Start…Programs…Accessories…System
Tools). Some special characters do not render
properly in Metavist, but do render properly
when the output file is displayed in a
browser.
• Numeric controls have a default number of
decimal places. If you want your metadata to
display fewer decimal places than generally
displayed in the control, simply delete the
extra digits (and the decimal point, if
desired). If your metadata require more
decimal places, you can enter them into the
numeric field. They won’t display on-screen,
but will be output to the metadata file.
Clicking on the up button will increment the
value by 1; the down button will decrement by
1. Continuing to press on a button will cause
the appropriate action to be repeated. Similar
behavior can be generated by placing the cursor
in the control and pressing the up or down key.
All the numeric controls have minimum and
maximum values. Values you enter are checked
against these bounds before metadata are written
to file. If you want to force a check for a
particular control, put the cursor in the
appropriate field and press the Enter key.
• Generally, dropdown boxes will allow you to
type in your own text to correctly describe an
item not covered by the responses defined in the
standard (i.e., the element’s domain includes
“free text”). In some cases, the standard only
allows values from a certain set. For these cases,
the dropdown boxes will not permit text editing.
• Some elements can have multiple entries. The
entries are displayed in a list box and are
manipulated using the associated Add, Edit, and
Delete buttons.
• Radio buttons are used in a number of places to
affect what fields are available for editing.
Disabled sections are visually grayed out. (Radio
buttons are shown in figure 6 where they are
used to select the type of date and the type of
calendar).
Figure 1.—On-screen help is
provided via text hints (1), tool
tips (2), and information tabs
(3). Recall that a tool tip
displays for a limited time when
the mouse cursor rests on a
control that has a tip associated
with it. Not all controls have
associated tool tips. In the
example screen, the tip is
associated with the ‘Clear fields’
button and you can see the
cursor resting on the button.

7
While a number of elements can be specified in
the primary program window, many elements will
generate child windows specific to the element.
Drilling down to a particular element may generate
as many as six windows on-screen at one time.
MenusThe File menu and the toolbar buttons (fig. 2) will
let you create a new file or open an existing
metadata file. Existing metadata files must be XML
files having the ‘xml’ extension and proper
formatting. Metavist creates appropriately
formatted files, as does ESRI’s ArcCatalog software.
ArcCatalog files include additional information
associated with ESRI’s Profile for FGDC. This
material is not read into Metavist, nor is it saved in
Metavist documents. Conversely, Metavist-
generated files are readable by ArcCatalog (select
the FGDC XML import option), but the Biological
Profile elements will not be processed.
Figure 2.—Metavist 2005 at startup
(colors will vary with system
configuration).
The Help menu is limited in this version. The
About item provides some basic information about
the software, but the Metavist Help item only tells
where additional information is located. Help is
currently provided by on-screen text and tool tips.
A future version of Metavist may incorporate a
more comprehensive formal help system.

8
When you create a new document, the application
looks like figure 3. Because Metavist works with
only one document at a time, the New button has
been grayed out. The Open button remains active.
The Options menu and Save button have been
activated, as have the Save and Save As menu items
in the File menu. When the Open button, or menu
item, is used to load an existing document, the
program does not save existing metadata, nor does
it present a “Do you want to save?” dialog box.
Therefore, make sure to save the metadata before
exiting if the updated version is the desired one.
This approach follows the user interface structure
recommended in Cooper and Riemann (2003).
Figure 3.—A new document in
Metavist 2005. Notice that the
two scroll bars are at the top of
their ranges, indicating the
presence of additional data entry
items further down in the
window.
Figure 4.—Example error
message when file being opened
is not valid XML. The message
displays what the program
knows about where the XML
error is.
When you open an existing file, which must have the
extension ‘xml’, the program checks the content to
ensure it is validly formed XML. If this is not the case,
an error message appears with an explanation of the
problem (fig. 4), and the program returns to its
previous state. If the file is valid XML, then the
contents are read into memory and the metadata
elements interpreted. If an element contains content
that does not match its type, the program displays an
error message (fig. 5). Unless indicated otherwise,
errors result in the illegal value being set to whatever
the metadata standard’s default value is for that
element. Processing errors can take some time and
this can suggest that the program has stopped

9
running properly. A sense for the processing time
delay can be obtained by first opening the volcano
atlas example (which is entirely well formed) and
then the oceanography example (which generates
the error described in figure 5). Depending on
your system speed, the volcano atlas file should
open almost immediately. The oceanography
example should be noticeably slower the first time
you open it.
If you close and then open the oceanography
example a second time, the program will process
the errors much faster. The first time the error is
encountered, the program has to load error
processing code; the second time the error is
encountered, that error processing code is already
loaded and therefore displays the error message
faster than the first time. Metavist is designed to
load as much of the valid metadata as it can find in
the file; errors in the file should cause error
messages to appear and the related metadata
elements to be left blank or otherwise modified as
described in the error message.
When working with metadata, the main part of the
window is filled with objects (fig. 3). Under the
toolbar is a set of primary tabs corresponding to
the seven major stand–alone sections of the
standard. Each primary tab has its own set of
secondary tabs. In figure 3, the secondary tabs for
Identification Information are Basic Info,
Keywords, Spatial Domain, etc. The subsections
generally have the same order as in the official
documentation to facilitate reference to that
documentation.
In addition to their titles, the secondary tabs have
icons that denote whether those subsections are
Mandatory (lightning bolts), Mandatory if
Applicable (faucet – turn it on when needed), or
Optional (birthday cake – a tasty offering to the
Figure 5.—Example error message
when element content does not
match required type. Distribution
Information: Transfer Size should be
a real number > 0 but the value
contains the text “megabytes”. The
default value of ‘0’ will be used
instead of the illegal value. ‘214’ by
itself would have been valid—
integers can be converted to real
numbers without loss of
information.
consumer of your metadata). These icons reflect
only the most demanding level of the elements on
the tab. For example, a tab with a Mandatory icon
may also contain main elements that are
Mandatory if Applicable or Optional. Tabs with an
Optional icon will not contain Mandatory or
Mandatory if Applicable main elements. Labels for
each data element, or group of elements, are
presented in boldface, regular type, or italic. These
correspond to Mandatory, Mandatory If Applicable,
and Optional. Optional elements are also marked
with the keyword ‘optional’ in parentheses by the
label. Be aware that an optional compound
element may contain simple elements that become
mandatory once you’ve chosen to fill in the
optional compound element. An example is
Identification—Miscellaneous—Cross Reference.
Providing a cross-reference citation is optional. If
you choose to provide one, then providing
information on the cross-reference’s originators,
publication date, etc. is mandatory, just as it is for
any citation using the Citation Information
structure.
Options menuThere are two options under the Options menu.
The first option is specifying how time is
represented in the metadata. By default, time is
assumed to be Local, but it can be changed to
Universal or Local + Differential. If you create
some time elements under one time representation
and then change the representation, the earlier
time elements will not be correct. Although the
program will warn you about the problem when
you perform a save, it will complete the operation
using the flawed metadata. When a metadata file is
read into the software, the time convention
element (Metadata Reference Information Section)
is read first to set the time option. The program
does attempt to format time elements encountered

10
in the rest of the metadata according to the option
specified in the time convention element. If no
time convention element is present, then any time
elements encountered will be formatted using the
default Local time option.
The second option is specifying the name of the
file containing the style sheet used to display the
metadata in a browser (so this style sheet re-
formats the XML as HTML in browsers such as
Internet Explorer and Mozilla that understand this
XML processing instruction). By default, the file
‘NBII_classic.xsl’ is used. This style sheet is based
on the “classic” style sheet used by ESRI and FGDC
to display FGDC metadata, but enhanced to
handle the additional elements in NBII metadata.
The lack of path information in the default style
sheet name means that the style sheet file must be
in the same directory as the metadata file to view
the formatted metadata in a browser window. If
you select ‘New URL’, you can either type in a file
name (and path, if relevant) or use the Browse
button to find the file of interest. If the URL is set
to an Internet URL, then the metadata will only
display successfully when the computer is
connected to the Internet. If you set this option to
‘No style sheet’, Internet Explorer (5.0 and later)
will use its internal style sheet to render the XML
(color coded, tags visible and collapsible). Behavior
in other browsers will vary; some will simply
refuse to display the metadata at all.
Saving metadataUse the File menu or keyboard shortcuts to invoke
the standard Save or Save As dialog box. The Save
button will either save to the existing file name or
invoke the Save As dialog if the metadata
document doesn’t have a name yet. In Metavist
2005, metadata files are always saved with the
‘xml’ extension and are written in XML that
conforms to the schema that accompanies the
software. Elements that lack an entry but are
known to always be required are given an attribute
that displays a reminder in red print when viewed
in a browser using the NBII_classic style sheet.
Elements that lack an entry even though required
in the particular instance are simply output with a
blank entry. For example, in the Browse Graphic
element of the Identification Information section, if
the file name and file type are present but not the file
description, then the file description is output with a
blank entry.
When you’ve completed a set of metadata, you can
exit the program in any of the usual ways or go to
File…Close to close the current metadata file and be
able to start a new one. It is important to be aware
that simply closing a file does not save the metadata,
nor does the program present a “Do you want to
save?” dialog box. Similarly, exiting the program
neither saves the current metadata nor presents a
confirmation dialog box. This follows recommended
interface design (Cooper and Reimann 2003).
With the program basics covered, let’s discuss some
aspects of processing metadata that are not apparent
from the program interface. This discussion will be
organized by section.
Section 1. Identification Information
Time Period of Content (Basic Info tab)In the Time Period Information subsection of this
element (use the scroll bar on the right hand side of
the window to bring this section into view), the
program has a number of conventions for handling
Gregorian dates. These are described below in the
three date handling lists. The conventions listed
under “Date handling when working inside the
program” are also relevant for Geologic Ages dates.
Date handling when reading a file:
• If a Single Date/Time has Unknown as the date
value, the program selects the Unknown radio
button (fig. 6).
• If a Single Date/Time in Multiple Dates/Times
has Unknown as its date value, that date is
ignored. If ignoring these dates results in only
one date/time being entered, the program will
downgrade from ‘Multiple dates’ to ‘A single
date’. If it results in no dates being entered, then
the program will select the Unknown radio
button.
• If either the beginning or ending date in Range
of Dates/Times has Unknown as its date value,
the entire range is treated as unknown.
• Any time entry that has Unknown as its value is
ignored (since it is an optional element).

11
Date handling when working inside the program:
• Changing the selection from Single, Multiple,
or Range to Unknown also clears all entered
dates and times.
• Changing the selection from Single to
Multiple has no effect on the dates/times;
changing from Single to Range sets the Single
value as both the beginning date and the
ending date. Editing this to create a proper
range is encouraged.
• Changing the selection from Multiple to
Single retains only the first of the multiple
dates/times; changing from Multiple to Range
sets the first of the multiple dates as the
beginning date, and the last of the multiple
dates as the ending date. This result will
sometimes require editing to have the proper
values anchoring the range.
• Changing the selection from Range to Single
sets the beginning date as the single date;
changing from Range to Multiple sets the
beginning date and the ending date as the
first two entries in the multiple date
collection.
Figure 6.—The Time Period of
Content controls. Notice that the
scroll bar on the right hand side of
the window is at the bottom of its
range.
Date handling when saving a file:
• Errors in associating day of month to month
are not checked in this version of the
software. So it is possible to put February 30
in the date field. This flexibility will probably
be reduced in future versions of the software.
• If there is only one date/time in the
collection, it is output as a Single Date/Time,
regardless of the radio button selection.
• For Range, the program does not verify that
beginning date is earlier than ending date
when reading or saving a document. Ranges
that are created in the program are required
to have proper date structure, but errors
introduced via an input file will be retained
unless the range is edited in Metavist. Proper
date structure is defined to include the
trivially correct case of the beginning date
and ending date being the same. Time, if you
provide it, is not checked.
• If the Unknown radio button is selected, then
a Range will be written to the file with the
beginning and ending dates having the
Unknown value. This is done because Time
Period of Content is a mandatory element
and most data sets are collected over a period
of time.

12
• If the Unknown radio button is not selected,
but there are no dates in the collection, then
the program acts as though the Unknown
radio button was selected.
The Currentness Reference for the oceanography
example illustrates poor form for this element.
While Metavist will let you type in a single line of
similar length, this type of information is better
suited to the Source Citation in Lineage (Data
Quality Information). A more appropriate choice
would have been “ground condition”.
Data Set G-polygons (Spatial Domaintab)If you are describing the polygons with G-ring
points, Metavist reminds you to enter at least three
points and that closing the polygon will be done
automatically. This closure is implicit. So while the
metadata document will contain all the required
points, the data entry display lacks the closing
point.
Taxonomic Classification (Taxonomytab)In the Taxonomy subsection, the Taxonomic
Classification requires a technical description of
the species covered by the data set (example in
table 1). If you need help with the technical
description, there is a link in the Add Child and
Edit windows to the Integrated Taxonomic
Information System (ITIS) Web site run by USDA.
These windows also have a supplemental
information tab with a description of how to use
ITIS.
If you read the formal documentation for the
standard, you might have some difficulty figuring out
how to describe multiple species if those species
reside in multiple Kingdoms. The program provides a
cheat for your use. Metavist defines a new taxonomic
rank called Empire (it’s at the top of the dropdown list
of defined rank names). Empire has only one
taxonomic rank value, Biovitae (Latin, more or less,
for ‘biological life’), and one associated common name
(‘carbon-based life forms’). These are automatically
filled in when you choose the Empire rank name. You
can attach as many Kingdoms to Empire as needed.
Point of Contact (Access tab)The standard specifies that each line of an address
resides in its own Address element. The oceanography
example contains an error in the structure of the
Contact Address—a multi-line address in the Address
element. Metavist reads this incorrect format
successfully. If the metadata are saved, they are
written correctly without any user intervention.
Analytical Tool (Analytical Tools tab)The main concept to keep in mind with this element
is that it references tools that are “intrinsically bound”
to the data set. Basic data containers (e.g.,
spreadsheets or databases) and standard analysis tools
(e.g., statistical or GIS software) don’t fall into the
category. An example of an analytical tool is a
specialized meteorological model—the data being
analyzed are heavily manipulated versions of raw
data, and an average researcher could not recreate the
data used in the analysis without recourse to the
specialized tool(s) used to process the raw
observations.
Table 1.—Taxonomic Classification for “red maple” or Acer rubrum var. rubrum reproduced from FGDC
(1999)
Taxon rank name Taxon rank value Applicable common names
Kingdom Plantae plantsDivision MagnoliaphytaClass MagnoliopsidaSubclass RosidaeOrder SapindalesFamily Aceraceae maplesGenus Acer maplesSpecies Acer rubrum var. rubrum red maple

13
Browse Graphics (Miscellaneous tab)The FGDC spatial data standard defines these as
static pictures in formats such as JPEG and GIF.
The Biological Profile allows other types of files for
describing the data set, including audio and video
file types. These files may describe study sites, data
collection methods, and other related information.
Also note that this set of elements simply describes
the browse graphic—the graphic is not included
with the metadata. While the Browse Graphic File
Name element is free text, a URL pointing to the
location of the browse graphic can be specified.
Cross Reference (Miscellaneous tab)Formally, the Cross Reference element provides
citations for related data sets. It also seems
reasonable to provide citations to papers that cited
the data set.
Section 2. Data QualityInformationWhen saving metadata to file, this section is
processed only if at least one of the three
mandatory elements contains content. Thus, the
program checks the Logical Consistency Report
and Completeness Report for the presence of text,
and then checks for the presence of at least one
Process Step (Lineage tab). If any of these are true,
then the whole collection of elements is evaluated.
If none of these are true, then none of the section
is saved—even if some non-mandatory elements
are present. For the case in which at least one of
the reports contains text but no Process Steps were
described, when the metadata document is saved
Metavist provides a default Process Step: Process
Description = “No process steps have been
described for this data set” and Process Date =
“Unknown”.
In the Lineage subsection, the program does not
enforce the rule that Citation Abbreviations used in
Process Steps must be defined in a Source
Information entry. This is done to facilitate
episodic creation of metadata. Process Steps with
real or placeholder Citation Abbreviations can be
created during the analysis process, and then
cleaned up and augmented with Source
Information at a later time.
In the Source Information subsection of Lineage,
the rules for Time Period of Content are the same
as for the comparable collection of elements in the
Identification Information section. What differs is
that you are describing data you used but which
was collected and made available to you by others.
Section 3. Spatial DataOrganization InformationIn ‘Point and Vector Object Information’, the
maximum value for the optional ‘Point and Vector
Object Count’ element is currently 1 million. In
‘Raster Object Information’, the maximum value
for the optional ‘type Count’ elements is currently 1
billion.
Section 4. Spatial ReferenceInformation
Horizontal Coordinate SystemDefinitionThe Geographic and Local definition elements are
straightforward. Here are some tips for dealing
with Planar definitions:
• Map Projections and Grid Systems—When
working in the Parameters window, the only
controls enabled are those used by the
particular projection. These controls also
have a check mark in the checkbox at their
left. If you uncheck the box, that parameter
will be assigned a blank value in the output
file, rather than whatever happens to be in
the control when you click OK in the Planar
Parameters window. The one exception to
this rule is for projections that can specify 1
or 2 Standard Parallel values. If the check box
for the second Standard Parallel is
unchecked, then the output file simply does
not contain an entry for the second Standard
Parallel. However, if you later edit the
parameters you will need to uncheck the box
again.
• Map Projections—False Easting and False
Northing are arbitrarily bounded at ±500
million; Scale Factor elements at 500.
• Map projection: Space Oblique Mercator—
Landsat Number has a maximum value of 50;
Path Number has a maximum value of 500.

14
Because these bounds are much larger than
current actual values for these parameters, it
is not difficult to provide incorrect
information on these elements in the
metadata.
• Map projection: Other—If you need to
describe a map projection other than one of
the 21 projections defined by the metadata
standard, click on Add User-Defined
Projection Type to provide a name to the new
projection. This name will be added to the
list of options and automatically chosen as
the projection to work with. Then click on
Edit Parameters to provide a written
description of the projection.
• Grid coordinate system: Universal Polar
Stereographic (UPS)—One of the UPS Zone
Identifiers must be highlighted. Scrolling
through the list and stopping at the correct
identifier is not sufficient; the correct
identifier must be clicked on to select it.
• Grid coordinate system: State Plane
Coordinate System—Zone Identifier is
specified using a numeric control that
constrains values to four-digit numbers.
Therefore, Zone Identifiers that contain
leading zeros will not show those leading
zeros during editing. However, the leading
zeros are added to the values before metadata
are written to file.
In the Geodetic Model subsection, default values for
Semi-major Axis and Denominator of Flattening Ratio
are provided. Therefore, if you want this collection of
elements to appear in the metadata output, you need
to specify the Ellipsoid Name.
Section 5. Entity and AttributeInformationAlthough the icons on both the Detailed Descriptions
tab and the Overview Descriptions tab suggest that
both subsections are mandatory, the actual rule is to
choose one, the other, or both. When describing data
that do not have a geospatial component, it is
probably easier to use the Overview Description than
the Detailed Description.
Detailed DescriptionDetailed Description (fig. 7) is probably the most
complex part of the metadata standard, and its tab has
the least intuitive layout. The dropdown boxes
contain lists of their respective elements (Entity Types,
Attributes, and Domain Values). The Add, Edit, and
Delete buttons behave just as they do in other parts of
Figure 7.—The Entity &
Attribute: Detailed Descriptions
controls.
15
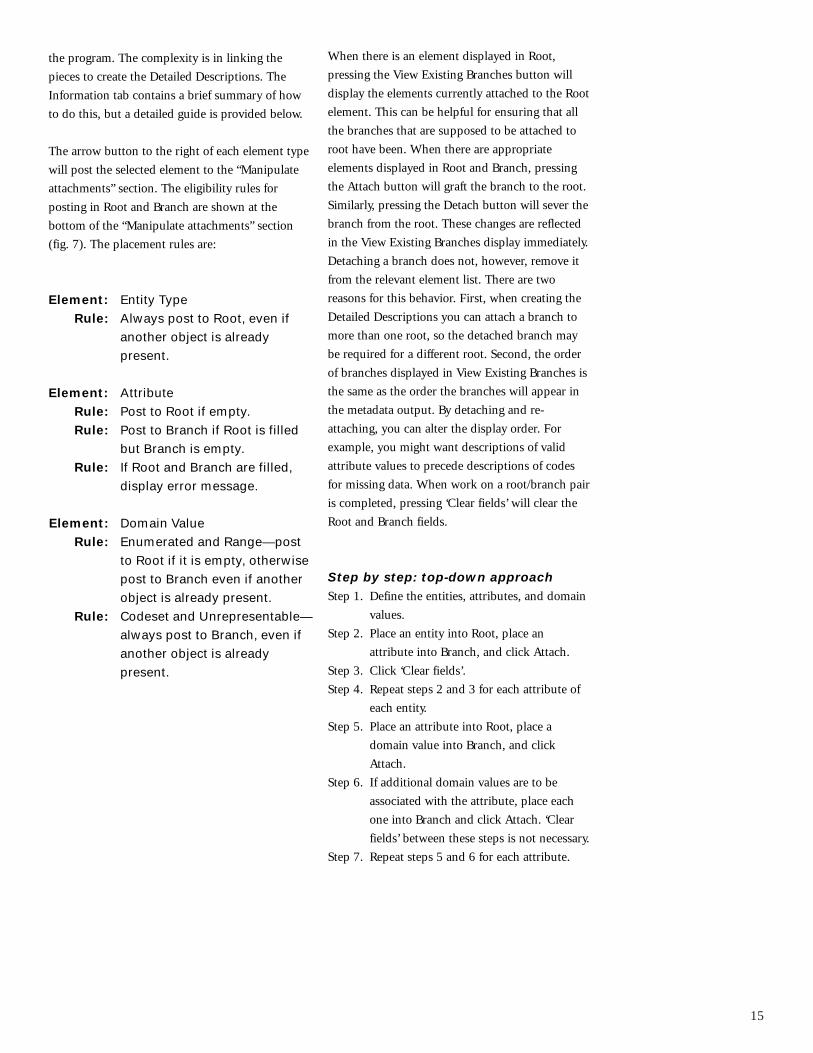
the program. The complexity is in linking the
pieces to create the Detailed Descriptions. The
Information tab contains a brief summary of how
to do this, but a detailed guide is provided below.
The arrow button to the right of each element type
will post the selected element to the “Manipulate
attachments” section. The eligibility rules for
posting in Root and Branch are shown at the
bottom of the “Manipulate attachments” section
(fig. 7). The placement rules are:
Element: Entity TypeRule: Always post to Root, even if
another object is alreadypresent.
Element: AttributeRule: Post to Root if empty.Rule: Post to Branch if Root is filled
but Branch is empty.Rule: If Root and Branch are filled,
display error message.
Element: Domain ValueRule: Enumerated and Range—post
to Root if it is empty, otherwisepost to Branch even if anotherobject is already present.
Rule: Codeset and Unrepresentable—always post to Branch, even ifanother object is alreadypresent.
When there is an element displayed in Root,
pressing the View Existing Branches button will
display the elements currently attached to the Root
element. This can be helpful for ensuring that all
the branches that are supposed to be attached to
root have been. When there are appropriate
elements displayed in Root and Branch, pressing
the Attach button will graft the branch to the root.
Similarly, pressing the Detach button will sever the
branch from the root. These changes are reflected
in the View Existing Branches display immediately.
Detaching a branch does not, however, remove it
from the relevant element list. There are two
reasons for this behavior. First, when creating the
Detailed Descriptions you can attach a branch to
more than one root, so the detached branch may
be required for a different root. Second, the order
of branches displayed in View Existing Branches is
the same as the order the branches will appear in
the metadata output. By detaching and re-
attaching, you can alter the display order. For
example, you might want descriptions of valid
attribute values to precede descriptions of codes
for missing data. When work on a root/branch pair
is completed, pressing ‘Clear fields’ will clear the
Root and Branch fields.
Step by step: top-down approachStep 1. Define the entities, attributes, and domain
values.
Step 2. Place an entity into Root, place an
attribute into Branch, and click Attach.
Step 3. Click ‘Clear fields’.
Step 4. Repeat steps 2 and 3 for each attribute of
each entity.
Step 5. Place an attribute into Root, place a
domain value into Branch, and click
Attach.
Step 6. If additional domain values are to be
associated with the attribute, place each
one into Branch and click Attach. ‘Clear
fields’ between these steps is not necessary.
Step 7. Repeat steps 5 and 6 for each attribute.

16
If the steps are reversed, first attaching domain
values to attributes then attaching attributes to
entities, the resulting metadata structure is the
same. Defining of entities, attributes, and domain
values can be done as needed; these objects can
also be edited after being attached and the updated
information will be incorporated into the saved
metadata without additional action.
Two examplesAs the entity-attribute-domain value structure may
be unfamiliar, here are two examples.
Example 1.
Entity: person
Attribute: sex
Enumerated Domain value: male
Enumerated Domain value: female
Attribute: income
Range Domain value: $0 to $1 million
Enumerated Domain value: > $1 million
Enumerated Domain value: not available
Example 2.
Entity: person
Attribute: income
Range Domain value: $3000 to $95000
Attribute: sex
Enumerated Domain value: male
Attribute: prostate cancer
Enumerated Domain value: yes
Enumerated Domain value:
treated successfully
Enumerated Domain value: no
Enumerated Domain value: female
Attribute: number of pregnancies
Enumerated Domain values: 0,
1, 2, 3, 4, 5+
Multiple occurrences of domain valuesand attributesAs noted above, you can attach a given branch to
more than one root. For example, the volcano
example uses the Unrepresentable Domain “Numbers
for the features.” in multiple attributes. When creating
metadata, you can create this domain definition once
and re-use it as many times as needed, and it will only
appear in the Domain Values list only once. When
reading metadata into the program from a file, if
multiple attributes have the same Codeset Domain or
Unrepresentable Domain, they will reference a single
entry in the Domain Value dropdown list. However, if
multiple attributes have the same Enumerated
Domain or Range Domain, those attributes will
reference different entries in the Domain Value
dropdown list. Because these two domain types can
accept additional attributes, the software does not
attempt to compare a new domain being read in to
the domains already read in.
Re-used attributes behave like Enumerated Domains.
When you are creating metadata, you can create the
attribute definition once and re-use it as many times
as needed, and it will appear in the Attributes list only
once. However, when reading metadata from a file,
each instance of the attribute will generate an entry in
the dropdown list.
Editing attributes and domain valuesWhen editing an Attribute, you will see a dropdown
list for Attribute Domain Values (fig. 8). This list is
not editable; it simply shows what Domain Values are
currently assigned to the Attribute, just as View
Existing Branches does from the main window.
Suppose you want to describe Attribute Value
Accuracy Information, but need to deal with an
attribute that does not have a numeric value. In this
case, set the required numeric accuracy to be some
arbitrary value other than 0.00, and provide the text
description of accuracy in the Attribute Value
Accuracy Explanation. If Attribute Value Accuracy is
set to 0.00, the program assumes that these optional
elements should not be included in the output.

17
Figure 8.—The Attribute
description window.
When describing Attribute Domain Values, there is
a disagreement between the written standard and
the graphical rendition. The written standard
specifies that there is at most one Enumerated
Domain, with an unlimited number of Enumerated
Domain Values beneath it. The graphical rendition
shows an unlimited number of Enumerated
Domains, each with at most one Enumerated
Domain Value. Metavist implements the standard
according to the graphical rendition. Judging from
the construction of their XSLT style sheet, and the
volcano metadata file, this is also how ESRI
implements the standard. The volcano atlas
example shows a number of ways that enumerated
domains can be described. The oceanography
example offers another approach to enumerated
domains that Metavist is able to create.
Section 6. Distribution InformationWhen a Distributor is added or edited, a
Distribution Information window is drawn with
tabs for information about the Distributor,
Ordering, and Prerequisites. This is the only
window that has its Okay and Cancel buttons on
an isolated tab. While the Distributor is mandatory
if Distribution Information is to be included in the
metadata, the information on the other tabs is not.
Putting the OK and Cancel buttons on their own
tab is designed to provide a subtle reminder to
enter any appropriate information in those other
tabs before returning to the main window.

18
There are a few additional issues to be aware of in
this section, all dealing with the Digital Form for a
Standard Order Process. The Digital Form data
entry window can be generated by adding a
Distributor, selecting the Ordering tab, adding a
Standard Order Process, selecting the Digital radio
button for format, and adding a Digital Form. The
issues are:
• The standard specifies that if Format is
present then either Format Version Number
or Format Version Date must also be present.
ESRI’s metadata frequently do not follow this
rule. To avoid losing the information
provided by ESRI in the Format Specification
element, Metavist fills the Format Version
Number element with the value “see Format
Specification” when necessary.
• The mandatory if applicable element File
Decompression Technique defaults to the
value “No compression applied”. If you do
not want this element to appear, simply
delete the text from the box.
• The oceanography example contains an error
in the Transfer Size element. The element is
supposed to contain a real value > 0 that
describes the size of the file in megabytes.
The oceanography example contains the
value “214 megabytes” for two of its Digital
Forms. Metavist does not attempt to parse
values that cannot be converted to numbers.
• Metavist deviates from the standard by not
providing any capability to describe Dialup
Instructions in the Online Option is not
available in Metavist. Dialing into a machine
is very rare in today’s Web-oriented
environment and this collection of elements
is slated for elimination in the new
international spatial metadata standard.
• The volcano example contains an unusual use
of Offline Media in the Offline Option
subsection (drill down to the example’s
Digital Form window then click the Edit
button associated with Digital Transfer
Option). If you need to describe such a
situation, it is better form to simply set
Offline Media to be “CD-ROM” and place
other information into the Compatibility
Information element.
Section 7. Metadata ReferenceInformation
Metadata dates (Metadata informationtab)These elements are specified user calendar controls.
When you click on the dropdown a navigable month-
based calendar appears, from which you can choose
the date of interest. The Metadata Review Date and
Metadata Future Review Date elements become
available for editing when you choose to check the
box by the appropriate element name. Metavist does
not check that review date is later than creation date,
nor that future review date is later than review date.
Metadata Time Convention elementThere is no data entry component associated with this
mandatory if applicable element. Instead, when
saving a metadata document Metavist determines
whether a time element is used in the metadata. If
there is at least one, then the program creates this
element and sets its value to the currently selected
time convention (local, local + differential, or
universal). The time convention option was described
previously.
Metadata extensionsMetavist 2005 is not extension-aware. Therefore,
there is no ability to specify online linkages or profile
names other than the Biological Profile. As noted
earlier, this means that ESRI profile elements will not
be read into Metavist, nor will they be saved in
Metavist-generated files.
Technical SupportIf you have questions, comments, or suggestions
about the software or the manual, please direct an e-
mail to [email protected].

19
ACKNOWLEDGMENTS
Many thanks to those who reviewed this manual and the software; your contributions were invaluable in
improving the quality of the final product. Special thank you’s to Dr. Linda Donoghue, Station Director, and
(posthumously) Dr. David Shriner, Assistant Director for Research. Linda and Dave were key forces in
initiating and nurturing the data archiving program at the Station, which resulted in the creation of this
software.

20
LITERATURE CITED
Cooper, Alan; Reimann, Robert. 2003.About Face 2.0: the essentials of interaction design. Indianapolis,IN: Wiley Publishing. 540 p.
ESRI. 2003.ESRI Data & Maps 2002. Redlands, CA: ESRI. CD 2 of 8.
Federal Geographic Data Committee. 1998.Content standard for digital geospatial metadata (revised June1998). FGDC-STD-001-1998. Washington, DC: Federal GeographicData Committee. 90 p.
Federal Geographic Data Committee. 2000.Content Standard for Digital Geospatial Metadata WorkbookVersion 2.0. Washington, DC: Federal Geographic Data Committee.126 p.
FGDC Biological Data Working Group andUSGS Biological Resources Division. 1999.Content standard for digital geospatial metadata – Biological DataProfile. FGDC-STD-001.1-1999. Washington, DC: FederalGeographic Data Committee. 58 p.

21
APPENDIX A
Colorized Version of Metadata Standard, FGDC-STD-001.1-1999Content Standard for Digital Geospatial Metadata, 1998Part 1: Biological Data Profile, 1999
This color-coded graphical overview shows the organization of all the elements, their optionality, and
presence in both the NBII and FGDC Standards or just the NBII Standard. The graphics for sections 1, 2, 6,
8, 9, and 10 plus the extended elements are TIF images available at the NBII Web site (http://www.nbii.gov/
datainfo/metadata/standards/index.html). The graphics for sections 3, 4, 5, and 7 are GIF images available at
the NBII Web site.
The graphic titled “Biological Data Profile Extended Elements” has three color-coding errors (Metavist is
correctly coded.):
l In “ASCII File Structure”, “Authentication” is shown as optional. It is actually mandatory if
applicable.
l In “ASCII File Structure”, “Quote Character” is shown as optional. It is actually mandatory if
applicable.
l In “Geologic Age”, “Geologic Citation” is shown as mandatory. It is actually optional.

22

23

24

25

26

27

28

29

30

The U.S. Department of Agriculture (USDA) prohibitsdiscrimination in all its programs and activities on the basis ofrace, color, national origin, sex, religion, age, disability, politicalbeliefs, sexual orientation, and marital or family status. (Not allprohibited bases apply to all programs.) Persons with disabilitieswho require alternative means for communication of programinformation (Braille, large print, audiotape, etc.) should contactUSDA’s TARGET Center at (202) 720-2600 (voice and TDD).
To file a complaint of discrimination, write USDA, Director,Office of Civil Rights, Room 326-W, Whitten Building,1400 Independence Avenue, SW, Washington, DC 20250-9410or call (202) 720-5964 (voice and TDD). USDA is an equalopportunity provider and employer.

Rugg, David J.2004. Creating FGDC and NBII metadata with Metavist 2005.
Gen. Tech. Rep. NC-255. St. Paul, MN: U.S. Department of Agri-culture, Forest Service, North Central Research Station. 30 p.
This report documents a computer program for creating metadata
compliant with the Federal Geographic Data Committee (FGDC) 1998
metadata standard or the National Biological Information Infrastruc-
ture (NBII) 1999 Biological Data Profile for the FGDC standard. The
software runs under the Microsoft Windows 2000 and XP operating
systems, and requires the presence of Microsoft’s .Net Framework
version 1.1. The metadata are output in XML format for portability and
automated handling.
KEY WORDS: Metadata, FGDC, NBII, Biological Data Profile, XML,
data documentation.
MISSION STATEMENT
We believe the good life has its roots in clean air, sparkling water, rich soil, healthy economies anda diverse living landscape. Maintaining the good life for generations to come begins with everydaychoices about natural resources. The North Central Research Station provides the knowledge andthe tools to help people make informed choices. That’s how the science we do enhances thequality of people’s lives.
For further information contact:
Or visit our web site:www.ncrs.fs.fed.us
North CentralResearch StationUSDA Forest Service
1992 Folwell Ave., St. Paul, MN 55108