dataflux migration guide - sas technical support | sas … · please purchase only authorized...
TRANSCRIPT
DataFlux Migration Guide

This page is intentionally blank

DataFlux Migration Guide
Version 2.3
September 13, 2012

This page is intentionally blank
DataFlux Migration Guide i
Contact DataFlux DataFlux Corporate Headquarters Toll Free: (877) 846-3589 Tel: (919) 447-3000 Fax: (919) 447-3100 940 NW Cary Parkway, Suite 201 Cary, NC 27513 USA
DataFlux West Tel: (818) 906-7638 Fax: (818) 907-6012 15300 Ventura Boulevard, Suite 523 Sherman Oaks, CA 91403 USA
Technical Support
Phone: 1-919-531-9000 Email: [email protected] Web: http://dataflux.com/MyDataFlux-Portal.aspx
Documentation Support
Email: [email protected]

ii DataFlux Migration Guide
Legal Information Copyright © 1997 - 2012 DataFlux Corporation LLC, Cary, NC, USA. All Rights Reserved.
DataFlux and all other DataFlux Corporation LLC product or service names are registered trademarks or trademarks of, or licensed to, DataFlux Corporation LLC in the USA and other countries. ® indicates USA registration.
The scanning, uploading, and distribution of this book via the Internet or any other means without the permission of the publisher is illegal and punishable by law. Please purchase only authorized electronic editions and do not participate in or encourage electronic piracy of copyrighted materials. Your support of others' rights is appreciated.
DataFlux Legal Statements
DataFlux Solutions and Accelerators Legal Statements
DataFlux Legal Statements
Apache Portable Runtime License Disclosure
Copyright © 2008 DataFlux Corporation LLC, Cary, NC USA.
Licensed under the Apache License, Version 2.0 (the "License"); you may not use this file except in compliance with the License. You may obtain a copy of the License at http://www.apache.org/licenses/LICENSE-2.0
Unless required by applicable law or agreed to in writing, software distributed under the License is distributed on an "AS IS" BASIS, WITHOUT WARRANTIES OR CONDITIONS OF ANY KIND, either express or implied. See the License for the specific language governing permissions and limitations under the License.
Apache/Xerces Copyright Disclosure
The Apache Software License, Version 3.1
Copyright © 1999-2003 The Apache Software Foundation. All rights reserved.
Redistribution and use in source and binary forms, with or without modification, are permitted provided that the following conditions are met:
1. Redistributions of source code must retain the above copyright notice, this list of conditions and the following disclaimer.
2. Redistributions in binary form must reproduce the above copyright notice, this list of conditions and the following disclaimer in the documentation and/or other materials provided with the distribution.
3. The end-user documentation included with the redistribution, if any, must include the following acknowledgment: "This product includes software developed by the Apache Software Foundation (http://www.apache.org)." Alternately, this acknowledgment may appear in the software itself, if and wherever such third-party acknowledgments normally appear.
4. The names "Xerces" and "Apache Software Foundation" must not be used to endorse or promote products derived from this software without prior written permission. For written permission, please contact [email protected].
5. Products derived from this software may not be called "Apache", nor may "Apache" appear in their name, without prior written permission of the Apache Software Foundation.
THIS SOFTWARE IS PROVIDED "AS IS'' AND ANY EXPRESSED OR IMPLIED WARRANTIES, INCLUDING, BUT NOT LIMITED TO, THE IMPLIED WARRANTIES OF MERCHANTABILITY AND FITNESS FOR A

DataFlux Migration Guide iii
PARTICULAR PURPOSE ARE DISCLAIMED. IN NO EVENT SHALL THE APACHE SOFTWARE FOUNDATION OR ITS CONTRIBUTORS BE LIABLE FOR ANY DIRECT, INDIRECT, INCIDENTAL, SPECIAL, EXEMPLARY, OR CONSEQUENTIAL DAMAGES (INCLUDING, BUT NOT LIMITED TO, PROCUREMENT OF SUBSTITUTE GOODS OR SERVICES; LOSS OF USE, DATA, OR PROFITS; OR BUSINESS INTERRUPTION) HOWEVER CAUSED AND ON ANY THEORY OF LIABILITY, WHETHER IN CONTRACT, STRICT LIABILITY, OR TORT (INCLUDING NEGLIGENCE OR OTHERWISE) ARISING IN ANY WAY OUT OF THE USE OF THIS SOFTWARE, EVEN IF ADVISED OF THE POSSIBILITY OF SUCH DAMAGE.
This software consists of voluntary contributions made by many individuals on behalf of the Apache Software Foundation and was originally based on software copyright (c) 1999, International Business Machines, Inc., http://www.ibm.com. For more information on the Apache Software Foundation, please see http://www.apache.org.
Boost Software License Disclosure
Boost Software License - Version 1.0 - August 17, 2003
Permission is hereby granted, free of charge, to any person or organization obtaining a copy of the software and accompanying documentation covered by this license (the "Software") to use, reproduce, display, distribute, execute, and transmit the Software, and to prepare derivative works of the Software, and to permit third-parties to whom the Software is furnished to do so, all subject to the following:
The copyright notices in the Software and this entire statement, including the above license grant, this restriction and the following disclaimer, must be included in all copies of the Software, in whole or in part, and all derivative works of the Software, unless such copies or derivative works are solely in the form of machine-executable object code generated by a source language processor.
THE SOFTWARE IS PROVIDED "AS IS", WITHOUT WARRANTY OF ANY KIND, EXPRESS OR IMPLIED, INCLUDING BUT NOT LIMITED TO THE WARRANTIES OF MERCHANTABILITY, FITNESS FOR A PARTICULAR PURPOSE, TITLE AND NON-INFRINGEMENT. IN NO EVENT SHALL THE COPYRIGHT HOLDERS OR ANYONE DISTRIBUTING THE SOFTWARE BE LIABLE FOR ANY DAMAGES OR OTHER LIABILITY, WHETHER IN CONTRACT, TORT OR OTHERWISE, ARISING FROM, OUT OF OR IN CONNECTION WITH THE SOFTWARE OR THE USE OR OTHER DEALINGS IN THE SOFTWARE.
DataDirect Copyright Disclosure
Portions of this software are copyrighted by DataDirect Technologies Corp., 1991 - 2008.
Expat Copyright Disclosure
Part of the software embedded in this product is Expat software.
Copyright © 1998, 1999, 2000 Thai Open Source Software Center Ltd.
Permission is hereby granted, free of charge, to any person obtaining a copy of this software and associated documentation files (the "Software"), to deal in the Software without restriction, including without limitation the rights to use, copy, modify, merge, publish, distribute, sublicense, and/or sell copies of the Software, and to permit persons to whom the Software is furnished to do so, subject to the following conditions:
The above copyright notice and this permission notice shall be included in all copies or substantial portions of the Software.
THE SOFTWARE IS PROVIDED "AS IS", WITHOUT WARRANTY OF ANY KIND, EXPRESS OR IMPLIED, INCLUDING BUT NOT LIMITED TO THE WARRANTIES OF MERCHANTABILITY, FITNESS FOR A PARTICULAR PURPOSE AND NONINFRINGEMENT. IN NO EVENT SHALL THE AUTHORS OR COPYRIGHT HOLDERS BE LIABLE FOR ANY CLAIM, DAMAGES OR OTHER LIABILITY, WHETHER IN AN ACTION OF CONTRACT, TORT OR OTHERWISE, ARISING FROM, OUT OF OR IN CONNECTION WITH THE SOFTWARE OR THE USE OR OTHER DEALINGS IN THE SOFTWARE.
gSOAP Copyright Disclosure
Part of the software embedded in this product is gSOAP software.
Portions created by gSOAP are Copyright © 2001-2004 Robert A. van Engelen, Genivia inc. All Rights Reserved.
iv DataFlux Migration Guide
THE SOFTWARE IN THIS PRODUCT WAS IN PART PROVIDED BY GENIVIA INC AND ANY EXPRESS OR IMPLIED WARRANTIES, INCLUDING, BUT NOT LIMITED TO, THE IMPLIED WARRANTIES OF MERCHANTABILITY AND FITNESS FOR A PARTICULAR PURPOSE ARE DISCLAIMED. IN NO EVENT SHALL THE AUTHOR BE LIABLE FOR ANY DIRECT, INDIRECT, INCIDENTAL, SPECIAL, EXEMPLARY, OR CONSEQUENTIAL DAMAGES (INCLUDING, BUT NOT LIMITED TO, PROCUREMENT OF SUBSTITUTE GOODS OR SERVICES; LOSS OF USE, DATA, OR PROFITS; OR BUSINESS INTERRUPTION) HOWEVER CAUSED AND ON ANY THEORY OF LIABILITY, WHETHER IN CONTRACT, STRICT LIABILITY, OR TORT (INCLUDING NEGLIGENCE OR OTHERWISE) ARISING IN ANY WAY OUT OF THE USE OF THIS SOFTWARE, EVEN IF ADVISED OF THE POSSIBILITY OF SUCH DAMAGE.
IBM Copyright Disclosure
ICU License - ICU 1.8.1 and later [used in DataFlux Data Management Platform]
COPYRIGHT AND PERMISSION NOTICE
Copyright © 1995-2005 International Business Machines Corporation and others. All Rights Reserved.
Permission is hereby granted, free of charge, to any person obtaining a copy of this software and associated documentation files (the "Software"), to deal in the Software without restriction, including without limitation the rights to use, copy, modify, merge, publish, distribute, and/or sell copies of the Software, and to permit persons to whom the Software is furnished to do so, provided that the above copyright notice(s) and this permission notice appear in all copies of the Software and that both the above copyright notice(s) and this permission notice appear in supporting documentation.
THE SOFTWARE IS PROVIDED "AS IS", WITHOUT WARRANTY OF ANY KIND, EXPRESS OR IMPLIED, INCLUDING BUT NOT LIMITED TO THE WARRANTIES OF MERCHANTABILITY, FITNESS FOR A PARTICULAR PURPOSE AND NONINFRINGEMENT OF THIRD PARTY RIGHTS. IN NO EVENT SHALL THE COPYRIGHT HOLDER OR HOLDERS INCLUDED IN THIS NOTICE BE LIABLE FOR ANY CLAIM, OR ANY SPECIAL INDIRECT OR CONSEQUENTIAL DAMAGES, OR ANY DAMAGES WHATSOEVER RESULTING FROM LOSS OF USE, DATA OR PROFITS, WHETHER IN AN ACTION OF CONTRACT, NEGLIGENCE OR OTHER TORTIOUS ACTION, ARISING OUT OF OR IN CONNECTION WITH THE USE OR PERFORMANCE OF THIS SOFTWARE.
Except as contained in this notice, the name of a copyright holder shall not be used in advertising or otherwise to promote the sale, use or other dealings in this Software without prior written authorization of the copyright holder.
Microsoft Copyright Disclosure
Microsoft®, Windows, NT, SQL Server, and Access, are either registered trademarks or trademarks of Microsoft Corporation in the United States and/or other countries.
Oracle Copyright Disclosure
Oracle, JD Edwards, PeopleSoft, and Siebel are registered trademarks of Oracle Corporation and/or its affiliates.
PCRE Copyright Disclosure
A modified version of the open source software PCRE library package, written by Philip Hazel and copyrighted by the University of Cambridge, England, has been used by DataFlux for regular expression support. More information on this library can be found at: ftp://ftp.csx.cam.ac.uk/pub/software/programming/pcre/.
Copyright © 1997-2005 University of Cambridge. All rights reserved.
Redistribution and use in source and binary forms, with or without modification, are permitted provided that the following conditions are met:
• Redistributions of source code must retain the above copyright notice, this list of conditions and the following disclaimer.
• Redistributions in binary form must reproduce the above copyright notice, this list of conditions and the following disclaimer in the documentation and/or other materials provided with the distribution.

DataFlux Migration Guide v
• Neither the name of the University of Cambridge nor the name of Google Inc. nor the names of their contributors may be used to endorse or promote products derived from this software without specific prior written permission.
THIS SOFTWARE IS PROVIDED BY THE COPYRIGHT HOLDERS AND CONTRIBUTORS "AS IS" AND ANY EXPRESS OR IMPLIED WARRANTIES, INCLUDING, BUT NOT LIMITED TO, THE IMPLIED WARRANTIES OF MERCHANTABILITY AND FITNESS FOR A PARTICULAR PURPOSE ARE DISCLAIMED. IN NO EVENT SHALL THE COPYRIGHT OWNER OR CONTRIBUTORS BE LIABLE FOR ANY DIRECT, INDIRECT, INCIDENTAL, SPECIAL, EXEMPLARY, OR CONSEQUENTIAL DAMAGES (INCLUDING, BUT NOT LIMITED TO, PROCUREMENT OF SUBSTITUTE GOODS OR SERVICES; LOSS OF USE, DATA, OR PROFITS; OR BUSINESS INTERRUPTION) HOWEVER CAUSED AND ON ANY THEORY OF LIABILITY, WHETHER IN CONTRACT, STRICT LIABILITY, OR TORT (INCLUDING NEGLIGENCE OR OTHERWISE) ARISING IN ANY WAY OUT OF THE USE OF THIS SOFTWARE, EVEN IF ADVISED OF THE POSSIBILITY OF SUCH DAMAGE.
Red Hat Copyright Disclosure
Red Hat® Enterprise Linux®, and Red Hat Fedora™ are registered trademarks of Red Hat, Inc. in the United States and other countries.
SAS Copyright Disclosure
Portions of this software and documentation are copyrighted by SAS® Institute Inc., Cary, NC, USA, 2009. All Rights Reserved.
SQLite Copyright Disclosure
The original author of SQLite has dedicated the code to the public domain. Anyone is free to copy, modify, publish, use, compile, sell, or distribute the original SQLite code, either in source code form or as a compiled binary, for any purpose, commercial or non-commercial, and by any means.
Sun Microsystems Copyright Disclosure
Java™ is a trademark of Sun Microsystems, Inc. in the U.S. or other countries.
USPS Copyright Disclosure
National ZIP®, ZIP+4®, Delivery Point Barcode Information, DPV, RDI, and NCOALink®. © United States Postal Service 2005. ZIP Code® and ZIP+4® are registered trademarks of the U.S. Postal Service.
DataFlux is a non-exclusive interface distributor of the United States Postal Service and holds a non-exclusive license from the United States Postal Service to publish and sell USPS CASS, DPV, and RDI information. This information is confidential and proprietary to the United States Postal Service. The price of these products is neither established, controlled, or approved by the United States Postal Service.
VMware
VMware® virtual environment provided those products faithfully replicate the native hardware and provided the native hardware is one supported in the applicable DataFlux product documentation. All DataFlux technical support is provided under the terms of a written license agreement signed by the DataFlux customer.
The VMware virtual environment may affect certain functions in DataFlux products (for example, sizing and recommendations), and it may not be possible to fix all problems.
If DataFlux believes the virtualization layer is the root cause of an incident; the customer will be directed to contact the appropriate VMware support provider to resolve the VMware issue and DataFlux shall have no further obligation for the issue.
Solutions and Accelerators Legal Statements
Components of DataFlux Solutions and Accelerators may be licensed from other organizations or open source foundations.

vi DataFlux Migration Guide
Apache
This product may contain software technology licensed from Apache.
Licensed under the Apache License, Version 2.0 (the "License"); you may not use this file except in compliance with the License. You may obtain a copy of the License at: http://www.apache.org/licenses/LICENSE-2.0.
Unless required by applicable law or agreed to in writing, software distributed under the License is distributed on an "AS IS" BASIS, WITHOUT WARRANTIES OR CONDITIONS OF ANY KIND, either express or implied.
See the License for the specific language governing permissions and limitations under the License.
Creative Commons Attribution
This product may include icons created by Mark James http://www.famfamfam.com/lab/icons/silk/ and licensed under a Creative Commons Attribution 2.5 License: http://creativecommons.org/licenses/by/2.5/.
Degrafa
This product may include software technology from Degrafa (Declarative Graphics Framework) licensed under the MIT License a copy of which can be found here: http://www.opensource.org/licenses/mit-license.php.
Copyright © 2008-2010 Degrafa. All rights reserved.
Permission is hereby granted, free of charge, to any person obtaining a copy of this software and associated documentation files (the "Software"), to deal in the Software without restriction, including without limitation the rights to use, copy, modify, merge, publish, distribute, sublicense, and/or sell copies of the Software, and to permit persons to whom the Software is furnished to do so, subject to the following conditions:
The above copyright notice and this permission notice shall be included in all copies or substantial portions of the Software.
THE SOFTWARE IS PROVIDED "AS IS", WITHOUT WARRANTY OF ANY KIND, EXPRESS OR IMPLIED, INCLUDING BUT NOT LIMITED TO THE WARRANTIES OF MERCHANTABILITY, FITNESS FOR A PARTICULAR PURPOSE AND NONINFRINGEMENT. IN NO EVENT SHALL THE AUTHORS OR COPYRIGHT HOLDERS BE LIABLE FOR ANY CLAIM, DAMAGES OR OTHER LIABILITY, WHETHER IN AN ACTION OF CONTRACT, TORT OR OTHERWISE, ARISING FROM, OUT OF OR IN CONNECTION WITH THE SOFTWARE OR THE USE OR OTHER DEALINGS IN THE SOFTWARE.
Google Web Toolkit
This product may include Google Web Toolkit software developed by Google and licensed under the Apache License 2.0.
JDOM Project
This product may include software developed by the JDOM Project (http://www.jdom.org/).
OpenSymphony
This product may include software technology from OpenSymphony. A copy of this license can be found here: http://www.opensymphony.com/osworkflow/license.action. It is derived from and fully compatible with the Apache license that can be found here: http://www.apache.org/licenses/.
Sun Microsystems
This product may include software copyrighted by Sun Microsystems, jaxrpc.jar and saaj.jar, whose use and distribution is subject to the Sun Binary code license.
This product may include Java Software technologies developed by Sun Microsystems,Inc. and licensed to Doug Lea.

DataFlux Migration Guide vii
The Java Software technologies are copyright © 1994-2000 Sun Microsystems, Inc. All rights reserved.
This software is provided "AS IS," without a warranty of any kind. ALL EXPRESS OR IMPLIED CONDITIONS, REPRESENTATIONS AND WARRANTIES, INCLUDING ANY IMPLIED WARRANTY OF MERCHANTABILITY, FITNESS FOR A PARTICULAR PURPOSE OR NON-INFRINGEMENT, ARE HEREBY EXCLUDED. DATAFLUX CORPORATION LLC, SUN MICROSYSTEMS, INC. AND THEIR RESPECTIVE LICENSORS SHALL NOT BE LIABLE FOR ANY DAMAGES SUFFERED BY LICENSEE AS A RESULT OF USING, MODIFYING OR DISTRIBUTING THE SOFTWARE OR ITS DERIVATIVES. IN NO EVENT WILL SUN MICROSYSTEMS, INC. OR ITS LICENSORS BE LIABLE FOR ANY LOST REVENUE, PROFIT OR DATA, OR FOR DIRECT, INDIRECT, SPECIAL, CONSEQUENTIAL, INCIDENTAL OR PUNITIVE DAMAGES, HOWEVER CAUSED AND REGARDLESS OF THE THEORY OF LIABILITY, ARISING OUT OF THE USE OF OR INABILITY TO USE SOFTWARE, EVEN IF SUN MICROSYSTEMS, INC. HAS BEEN ADVISED OF THE POSSIBILITY OF SUCH DAMAGES.
Java Toolkit
This product includes the Web Services Description Language for Java Toolkit 1.5.1 (WSDL4J). The WSDL4J binary code is located in the file wsdl4j.jar.
Use of WSDL4J is governed by the terms and conditions of the Common Public License Version 1.0 (CPL). A copy of the CPL can be found here at http://www.opensource.org/licenses/cpl1.0.php.

viii DataFlux Migration Guide
Table of Contents Introduction to DataFlux Documentation ........................................1
Conventions Used In This Document .................................................. 1
Reference Publications ..................................................................... 2
Overview of the Migration Guide .....................................................3
DataFlux Tool Utility ........................................................................4
General Information about Migration ..............................................6
Overview of the Data Management Platform ....................................... 6
What is Migration? ........................................................................... 7
What Versions Can Be Migrated? ....................................................... 8
Summary of the Migration Process ..................................................... 8
Planning the Content Migration .......................................................9
Content That Can Be Automatically Migrated ....................................... 9
Content That Must Be Modified or Recreated ..................................... 10
Repositories and Management Resources ......................................... 11
Architect Jobs ............................................................................... 23
Profile Jobs ................................................................................... 27
Macros ......................................................................................... 30
Business Rules, Tasks, and Related Items ........................................ 30
Specific Migration Scenarios ......................................................... 32
Migrating From dfPower Studio v. 8.1/8.2 to Data Management Studio v. 2 32
Migrating From DataFlux Integration Server 8.1/8.2 to Data Management Server 2.2 .............................................................................................. 96
Migrating From Data Management Studio 2.1 to Data Management Studio 2.2 ................................................................................................. 131
Migrating From Data Management Server v. 2.1 to Data Management Server v. 2.2 ................................................................................................. 155

DataFlux Migration Guide ix
Quality Knowledge Base Migration .............................................. 177
Technical Support ....................................................................... 178
Troubleshooting .......................................................................... 178

DataFlux Migration Guide 1
Introduction to DataFlux Documentation This section provides basic information about migrating to the latest DataFlux Data Management Studio.
• Conventions Used in This Document
• Reference Publications
Conventions Used In This Document This document may use several conventions for special terms and actions in DataFlux products.
Typographical Conventions The following typographical conventions may be used in this document:
Convention Description Bold Text in bold signifies a button or action italic Identifies document and topic titles
monospace Typeface used to indicate examples of code Typographical Conventions
Syntax Conventions The following syntax conventions may be used in this document:
Syntax Description [] Brackets [] are used to indicate variable text, such as version numbers # The pound # sign at the beginning of example code indicates a comment that is
not part of the code Syntax Conventions
Path Conventions Various products and operating systems may use different paths for default locations. This document uses the Microsoft® Windows® 7 path in examples. The following examples display the differences in paths for three different operating systems:
2 DataFlux Migration Guide
Windows XP
drive:\Program Files\DataFlux\AuthenticationServer\version
Windows 7
32bit – drive:\Program Files (x86)\DataFlux\AuthenticationServer\version
64bit – drive:\Program Files\DataFlux\AuthenticationServer\version
UNIX
/opt/dataflux/das
Reference Publications This document may reference other DataFlux publications including:
• DataFlux Data Management Studio Installation and Configuration Guide
• DataFlux Data Management Studio Online Help
• DataFlux Data Management Server Administrator's Guide
• DataFlux Data Management Server User's Guide
Documentation provided with this software is located in the installation folder for DataFlux. For example, C:\Program Files\DataFlux\DMStudio\version.
Many of the documents listed can also be found on the MyDataFlux Portal at http://dataflux.com/MyDataFlux-Portal.aspx under Documentation.
DataFlux Migration Guide 3
Overview of the Migration Guide This document includes two primary sections:
• General Information About Migration
• Specific Migration Scenarios
The section called General Information About Migration provides overall information you need to consider when migrating from one DataFlux platform to another. You should read and review this section if you are considering migrating from DataFlux dfPower Studio and DataFlux Data Integration Server to the DataFlux Data Management Platform.
The section called Specific Migration Scenarios provides step-by-step guidance when migrating from dfPower Studio and Data Integration Server v. 8.x to Data Management Platform v. 2.1 to v. 2.2.
The Specific Migration Scenarios section is intended for users who have read the General Information section or for those who have a good understanding of what is needed and simply need some guidance on stepping through the migration steps. In the Specific Migration Scenario section, each sub-section builds on the previous section. Therefore, if you jump straight to the migrating Architect jobs section without completing the Repository migration section, you will have problems with the migration steps.
• Migrating From dfPower Studio v. 8.1/8.2 to Data Management Studio v. 2.2
• Migrating From DataFlux Integration Server 8.1/8.2 to Data Management Server 2.2
• Migrating From Data Management Studio 2.1 to Data Management Studio 2.2
• Migrating From Data Management Server v. 2.1 to Data Management Server v. 2.2
Data Management Studio 2.3:
This document was originally written for migration to Data Management Platform 2.2. While the examples and screenshots will all say 2.2 the ideas apply to Data Management Platform 2.3 as well. Special considerations for DMP 2.3 are called out in boxes like this.
4 DataFlux Migration Guide
DataFlux Tool Utility The DataFlux Tool Utility is available to assist you with migrating to DataFlux Data Management Studio v. 2.2. The DataFlux Migration Guide, along with the README.txt file, can be downloaded through the MyDataFlux Portal.
• DataFlux Tool 2.1 Windows 32 bit: http://www.dataflux.com/Downloads/Utilities/dftool/dftool21.zip
• DataFlux Tool 2.2 Windows 32 bit: http://www.dataflux.com/Downloads/Utilities/dftool/dftool22.zip
• DataFlux Tool 2.2 Windows 64 bit: http://www.dataflux.com/Downloads/Utilities/dftool/dftool22-win64.zip
• DataFlux Tool 2.3 Windows 32 bit: http://www.dataflux.com/Downloads/Utilities/dftool/dftool23.zip
• DataFlux Tool 2.3 Windows 64 bit: http://www.dataflux.com/Downloads/Utilities/dftool/dftool23-win64.zip
• DataFlux Tool README: http://www.dataflux.com/Downloads/Utilities/dftool/README.txt
When you download the latest Data Management Studio release, you will receive a zip file. First, unpack the zip file at the Data Management Studio or Data Management Server install root.
For example, if the Data Management Studio v. 2.2 install root is:
C:\Program Files\DataFlux\DMStudio\2.2
then the contents should be unpacked in the 2.2 directory. The contents of the zip files include:
• dftool.bat into the [DM Studio/Server install root]
• dftool.exe into [DM Studio/Server install root]\bin
• patch.dftool02.meta into [DM Studio/Server install root]\data\install
Here is a brief sample of the contents of the README text file, which provides a highlight on how this utility is used:
======================================================================= ACTIONS: COPY - Several copy options to help with moving items MACROFIX - This tool will load an architect job and scan it for macro usage. REPOSCOPY - Copies a repository to a new blank repository REPOSCREATE - Create a new blank repository REPOSDROP - Drops a repository. ALL DATA IS DELETED REPOSUPGRADE - Upgrade repository to current version REPOSCPYUPGRD - Copies a repository then upgrades it to the current version STRESS - Applies memory, disk and stack stress

DataFlux Migration Guide 5
======================================================================= How to run: $> dftool Please enter an action to take or help for more information 1 COPY 2 MACROFIX 3 REPOS COPY 4 REPOS CREATE 5 REPOS DROP 6 REPOS UPGRADE 7 REOPS CREATE AND COPY 8 STRESS 9 HELP Please pick a number: ======================================================================= Once a number is picked, more options are displayed.
This utility uses a Microsoft utility called Robocopy to copy files. This is available by default on Microsoft® Windows® 7 operating systems. If you are still using Microsoft Windows XP, Robocopy is a part of the Windows Server 2003 Resource Kit Tools and can be downloaded from Microsoft at http://www.microsoft.com/download/en/details.aspx?id=17657.
Here are some known caveats around the script. If using the DataFlux Tool to copy contents, the tool only copies from and to the system defaults. If the default locations for the DSN and DFTKDSN directories have been overruled through a configuration in the app.cfg, the utility will not pick this up. In this case, it would be best to move these around manually. Here is a table that indicates the settings that could be set which would indicate a manual process:
Configuration File(*)
Configuration Setting Default Value Description
app.cfg DAC/DSN <DMStudio-install>\etc\dftkdsn
Path for storing non-ODBC DSNs (SAS Data Set, Fed Server, Localized DSN, Domain-Enabled ODBC connection, …)
app.cfg DAC/SAVEDCONNSYSTEM <DMStudio-install>\etc\dsn
Location for storing system saved connections
If you try to use Windows directories like "My Documents" there may be issues with using the utility. Either switch to using the full path or to using a manual process to copy content.
6 DataFlux Migration Guide
General Information about Migration
• Overview of the Data Management Platform
• What is Migration?
• What Versions Can Be Migrated?
• Summary of the Migration Process
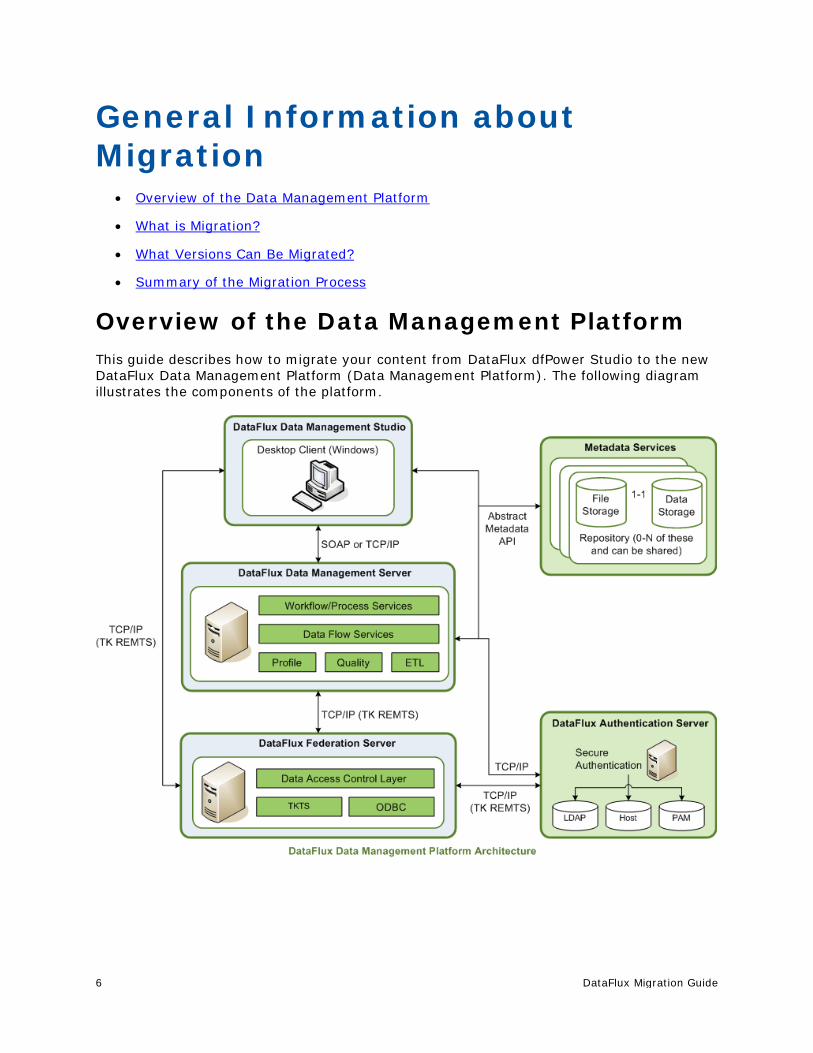
Overview of the Data Management Platform This guide describes how to migrate your content from DataFlux dfPower Studio to the new DataFlux Data Management Platform (Data Management Platform). The following diagram illustrates the components of the platform.
DataFlux Migration Guide 7
Data Management Studio Data Management Platform is a data management suite that combines data quality, data integration, and Master Data Management (MDM). Compared to DataFlux dfPower Studio (dfPower Studio), DataFlux Data Management Studio (Data Management Studio) has a more integrated interface, better management of data flows and process flows, enhanced data access through the DataFlux Federation Server (Federation Server), and many other new features. The section that discusses migrating from dfPower Studio describes how to migrate your content and manage the impact of differences between Data Management Studio and dfPower Studio.
Repositories When you create jobs and other objects in Data Management Studio, they are stored in repositories that are similar to dfPower Studio repositories. Profiles, rules, tasks and some other objects in a repository are stored in database format. You can specify a separate storage location for objects that are stored as files, such as data jobs, process jobs, and queries. You can create a private repository for your own use, or you can create a shared repository that a number of people can use. The Migrating Repositories section describes how to migrate a dfPower Studio repository to a Data Management Studio repository.
Servers Data Management Studio can be used by itself or in combination with one or more of the following DataFlux servers:
• The Data Management Server is a new version of the DataFlux Data Integration Server. It provides a scalable server environment for large Data Management Studio jobs. Jobs can be uploaded from Data Management Studio to a Data Management Server, where the jobs are executed.
• The DataFlux Federation Server (Federation Server) is a new server. It provides central management of the data connections using ODBC or native drivers as well as access privileges for these connections.
• The DataFlux Authentication Server (Authentication Server) is a new server. It centralizes the management of users, groups, and database credentials.
The Federation Server and Authentication Server will typically have little impact on migration from dfPower Studio because they are new to the DataFlux Data Management Platform. They could have an impact after migration, if you decide to use the features these servers provide.
What is Migration? Migration is the process in which dfPower Studio content is upgraded to run in Data Management Studio, or Data Integration Server content is upgraded to run on a Data Management Server.
8 DataFlux Migration Guide
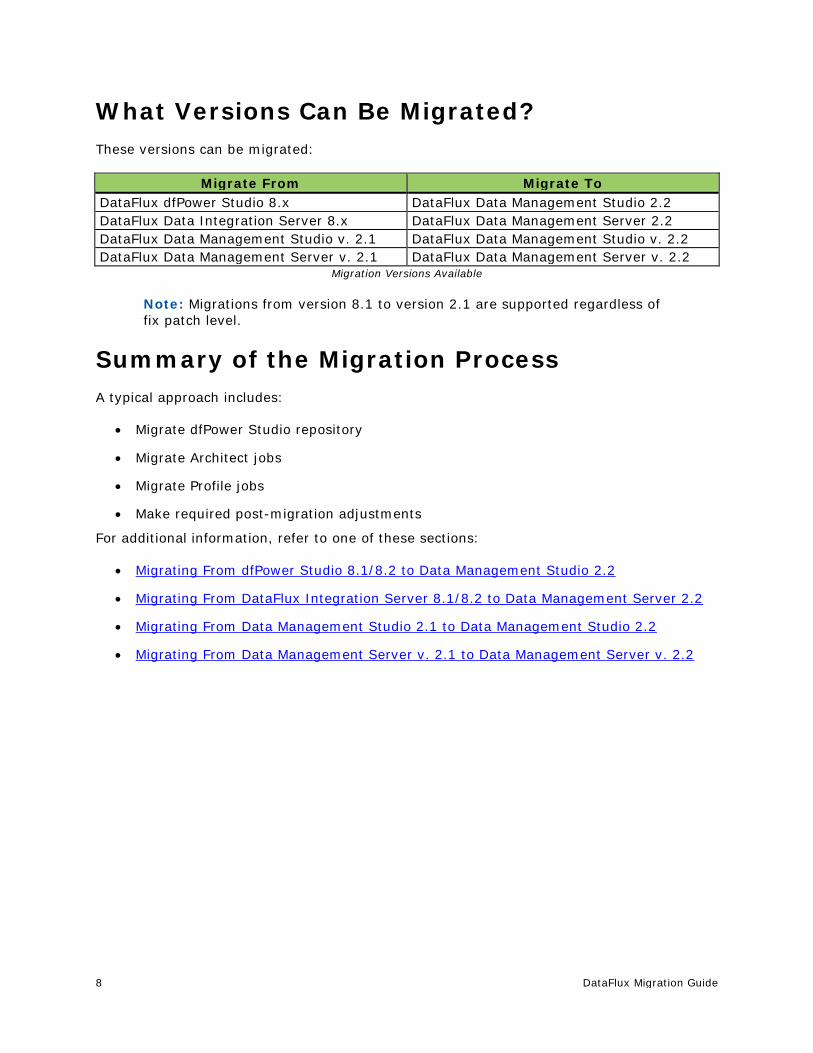
What Versions Can Be Migrated? These versions can be migrated:
Migrate From Migrate To DataFlux dfPower Studio 8.x DataFlux Data Management Studio 2.2 DataFlux Data Integration Server 8.x DataFlux Data Management Server 2.2 DataFlux Data Management Studio v. 2.1 DataFlux Data Management Studio v. 2.2 DataFlux Data Management Server v. 2.1 DataFlux Data Management Server v. 2.2
Migration Versions Available
Note: Migrations from version 8.1 to version 2.1 are supported regardless of fix patch level.
Summary of the Migration Process A typical approach includes:
• Migrate dfPower Studio repository
• Migrate Architect jobs
• Migrate Profile jobs
• Make required post-migration adjustments
For additional information, refer to one of these sections:
• Migrating From dfPower Studio 8.1/8.2 to Data Management Studio 2.2
• Migrating From DataFlux Integration Server 8.1/8.2 to Data Management Server 2.2
• Migrating From Data Management Studio 2.1 to Data Management Studio 2.2
• Migrating From Data Management Server v. 2.1 to Data Management Server v. 2.2
DataFlux Migration Guide 9
Planning the Content Migration • Content That Can Be Automatically Migrated
• Content That Must be Modified and Recreated
• Repositories and Management Resources
• Architect Jobs
• Profile Jobs
• Macros
• Business Rules, Tasks, and Related Items
Content That Can Be Automatically Migrated The following content can be automatically migrated from dfPower Studio to Data Management Studio. Some migrated items will require manual updates before you can use them in Data Management Studio.
Repositories
The Add Repository dialog in Data Management Studio can do an in-place migration of a dfPower Studio repository. For more information, see Repositories and Management Resources.
Architect jobs
You will use the upgrade job utilities in Data Management Studio to convert dfPower Studio Architect jobs to process jobs or data jobs. For more information, see Architect Jobs.
Profile jobs
You can use the Import Profile Jobs and Link Reports wizard in Data Management Studio to convert dfPower Studio profile jobs. For more information, see Profile Jobs.
Profile reports that are stored in a repository
You can use the Import Profile Jobs and Link Reports wizard in Data Management Studio to link a dfPower Studio profile job with a related report and combine the two in a Data Management Studio profile. For more information, see Profile Jobs.
Business rules, custom metrics, and other items in the Business Rules Manager
These items are migrated only when their repository is migrated. You cannot migrate individual rules, custom metrics, and other items in the Business Rules Manager. For more information, see Business Rules, Tasks, and Related Items.

10 DataFlux Migration Guide
Queries
Saved queries that were created with the Query Builder are migrated only when their repository is migrated. You cannot migrate individual queries.
Content That Must Be Modified or Recreated The following content cannot be automatically migrated from dfPower Studio to Data Management Studio. You must modify or recreate the content.
Repositories and Management Resources (some configurations)
Differences in metadata architecture and other changes might require you to make manual adjustments before or after you migrate dfPower Studio repositories and Management Resources to Data Management Studio. For more information, see Changes to Repositories and Management Resources.
Architect jobs that include certain nodes
Architect jobs that include certain nodes require special handling. See Post-Migration Tasks for Architect Jobs.
Architect jobs that pass macro variable values dynamically between pages in the job
For more information about the updates that are required for these jobs, see Architect Jobs That Pass Macro Variable Values Dynamically Between Pages in the Job section of the DataFlux Data Management Studio Online Help v. 2.2.
Profile reports that are stored in a file (.pfo file)
You cannot convert dfPower Studio profile reports that are stored as files (.pfo files). For more information, see Changes to Profile Jobs.
Redundant Data Analysis reports
The way that Redundant Data Analysis is calculated has changed. Accordingly, after a Redundant Data Analysis profile job is converted, you must re-run the profile in Data Management Studio to recreate the report. For more information, see Changes to Profile Jobs.
Batch scripts
The Data Management Platform has a new command line interface, so you must modify any batch scripts that execute profexec.exe (Profile command line interface for dfPower Studio); archbatch.exe (Architect command line interface for dfPower Studio), or dfexec.exe (command line interface for Data Integration Server). For more information, see Running Jobs from the Command Line in the Data Jobs section of the DataFlux Data Management Studio Online Help v. 2.2.
Configuration files and global options
You cannot convert configuration files or global options that were created in dfPower Studio. To review the global options for Data Management Studio, from the Main menu, select

DataFlux Migration Guide 11
Tools > Data Management Studio Options. Some options can be set with checkboxes and similar controls. Other options must be set in configuration files. To review or change the settings in Data Management Studio configuration files, see the Using Configuration Files topic in the Global Options section of the DataFlux Data Management Studio Online Help v. 2.2.
Data Explorations
You cannot convert Explorations that were created in dfPower Studio. You must recreate them in Data Management Studio. See the Data Explorations section in the DataFlux Data Management Studio Online Help v. 2.2. Currently, the migration software will move dfPower Studio Data Explorations into the Folders tree in Data Management Studio. You cannot use these items in Data Management Studio, however, so you can select and delete them from the Folders tree.
Data Management Server
The DataFlux Data Management Studio is a new version of the DataFlux Data Integration Server. The move to the new server will have some impacts on migration. For more information, see Changes Related to the Data Management Server.
Macro variables
You will probably have to make some updates in order for dfPower Studio macro variables to work in Data Management Studio. For more information, see Macro Variables.
SAS connections
You cannot convert SAS connections that were created in dfPower Studio. You must recreate them in Data Management Studio. See the Adding SAS Data Set Connections section in the DataFlux Data Management Studio Online Help v. 2.2.
Repositories and Management Resources • Plan the Migration of Each Repository and Management Resource
• Changes to Repositories and Management Resources
Plan the Migration of Each Repository and Management Resource
• General Planning for Repositories
• Migration Scenario: One dfPower Repository, One Management Resource
• Migration Scenario: One dfPower Repository, Multiple Management Resources
• Migration Scenario: Multiple dfPower Repositories, One Management Resource
• Migration Scenario: No dfPower Repository, One or More Management Resources
12 DataFlux Migration Guide
General Planning for Repositories
Review Overview of Migrating from dfPower Studio and try to anticipate the main items that you will have to update, replace, move or delete in Data Management Studio.
Note: Data Management Studio does an in-place migration of a dfPower Studio repository. dfPower cannot access a repository that has been converted to Data Management Studio format.
Accordingly, make a copy of the dfPower repository to be migrated, and then migrate the copy rather than the original. Migrating a copy of your repository enables you to preserve your original dfPower content.
If the dfPower repository is stored on a database server, use DBMS tools to copy the repository. Then, create a new ODBC connection that points to the copy. Later, you will use that new connection to specify the dfPower repository to be migrated.
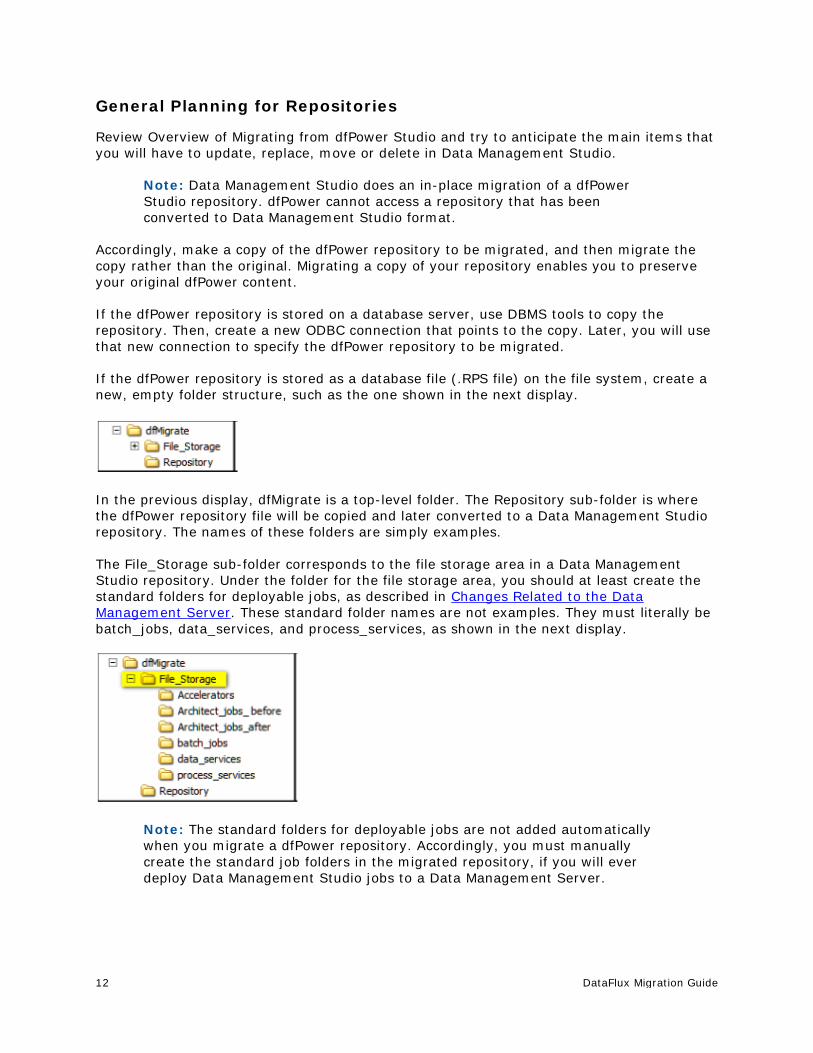
If the dfPower repository is stored as a database file (.RPS file) on the file system, create a new, empty folder structure, such as the one shown in the next display.
In the previous display, dfMigrate is a top-level folder. The Repository sub-folder is where the dfPower repository file will be copied and later converted to a Data Management Studio repository. The names of these folders are simply examples.
The File_Storage sub-folder corresponds to the file storage area in a Data Management Studio repository. Under the folder for the file storage area, you should at least create the standard folders for deployable jobs, as described in Changes Related to the Data Management Server. These standard folder names are not examples. They must literally be batch_jobs, data_services, and process_services, as shown in the next display.
Note: The standard folders for deployable jobs are not added automatically when you migrate a dfPower repository. Accordingly, you must manually create the standard job folders in the migrated repository, if you will ever deploy Data Management Studio jobs to a Data Management Server.
DataFlux Migration Guide 13
In this migration guide, the folders in the previous display are used as follows:
• Unconverted Architect jobs are copied to the Architect_jobs_before folder, as described in Copy Architect Jobs to the File Storage Area of the Repository.
• Architect jobs that have been converted to Data Management Studio format are saved to a number of different folders. The Architect_jobs_after folder is one example.
• The standard folders for deployable jobs (batch_jobs, data_services, and process_services) are mainly intended for Data Management Studio jobs that will be deployed to a Data Management Server.
The Accelerators folder is used for jobs that are associated with DataFlux Accelerators. This guide does not cover the migration of accelerators.
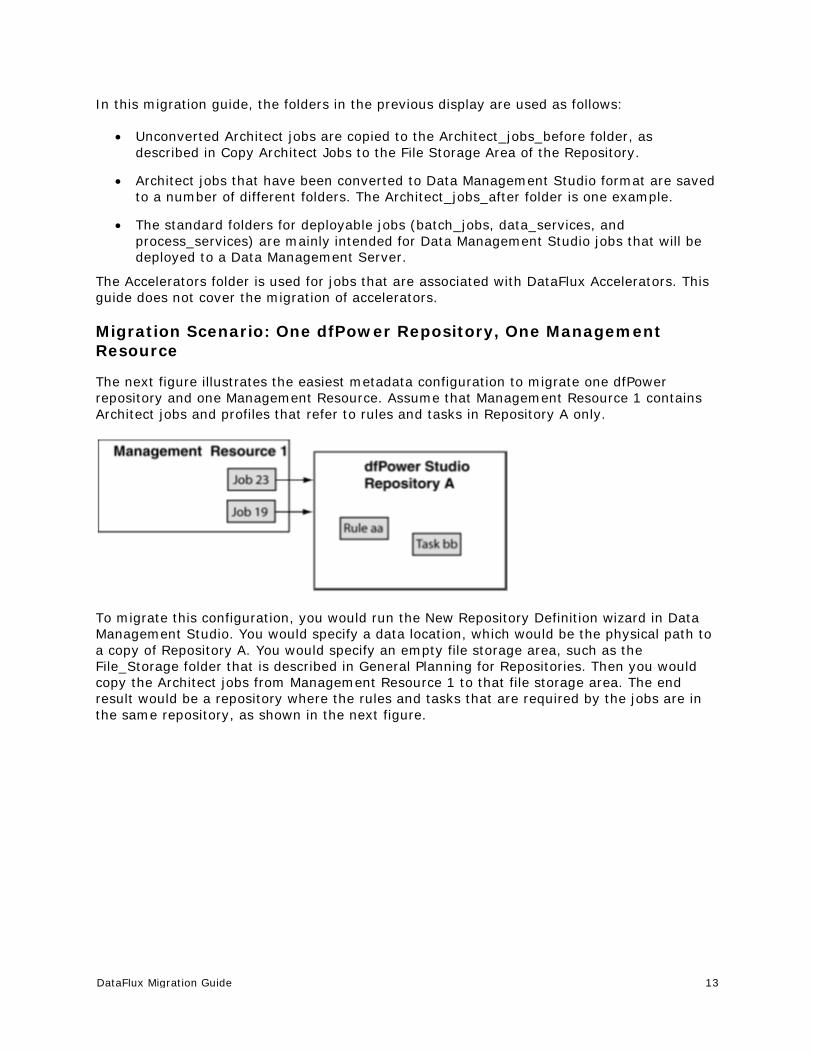
Migration Scenario: One dfPower Repository, One Management Resource
The next figure illustrates the easiest metadata configuration to migrate one dfPower repository and one Management Resource. Assume that Management Resource 1 contains Architect jobs and profiles that refer to rules and tasks in Repository A only.
To migrate this configuration, you would run the New Repository Definition wizard in Data Management Studio. You would specify a data location, which would be the physical path to a copy of Repository A. You would specify an empty file storage area, such as the File_Storage folder that is described in General Planning for Repositories. Then you would copy the Architect jobs from Management Resource 1 to that file storage area. The end result would be a repository where the rules and tasks that are required by the jobs are in the same repository, as shown in the next figure.
14 DataFlux Migration Guide
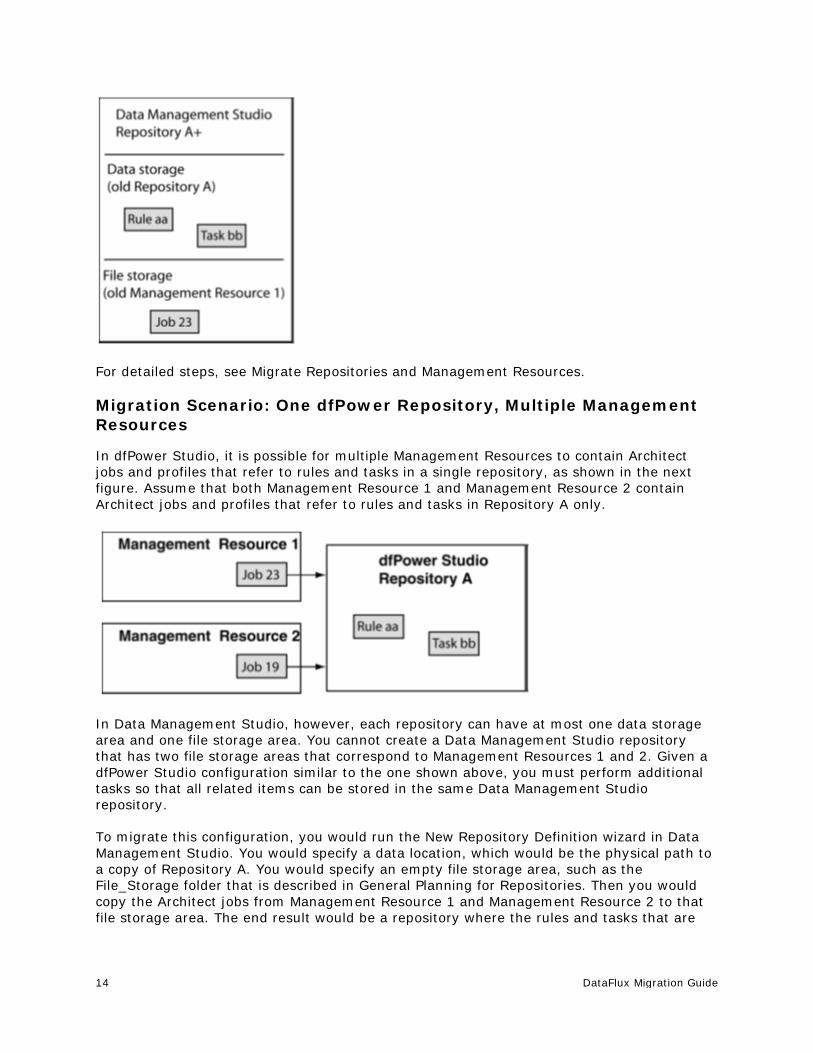
For detailed steps, see Migrate Repositories and Management Resources.
Migration Scenario: One dfPower Repository, Multiple Management Resources
In dfPower Studio, it is possible for multiple Management Resources to contain Architect jobs and profiles that refer to rules and tasks in a single repository, as shown in the next figure. Assume that both Management Resource 1 and Management Resource 2 contain Architect jobs and profiles that refer to rules and tasks in Repository A only.
In Data Management Studio, however, each repository can have at most one data storage area and one file storage area. You cannot create a Data Management Studio repository that has two file storage areas that correspond to Management Resources 1 and 2. Given a dfPower Studio configuration similar to the one shown above, you must perform additional tasks so that all related items can be stored in the same Data Management Studio repository.
To migrate this configuration, you would run the New Repository Definition wizard in Data Management Studio. You would specify a data location, which would be the physical path to a copy of Repository A. You would specify an empty file storage area, such as the File_Storage folder that is described in General Planning for Repositories. Then you would copy the Architect jobs from Management Resource 1 and Management Resource 2 to that file storage area. The end result would be a repository where the rules and tasks that are
DataFlux Migration Guide 15
required by the jobs are in the same repository. For detailed steps, see Migrate Repositories and Management Resources.
Migration Scenario: Multiple dfPower Repositories, One Management Resource
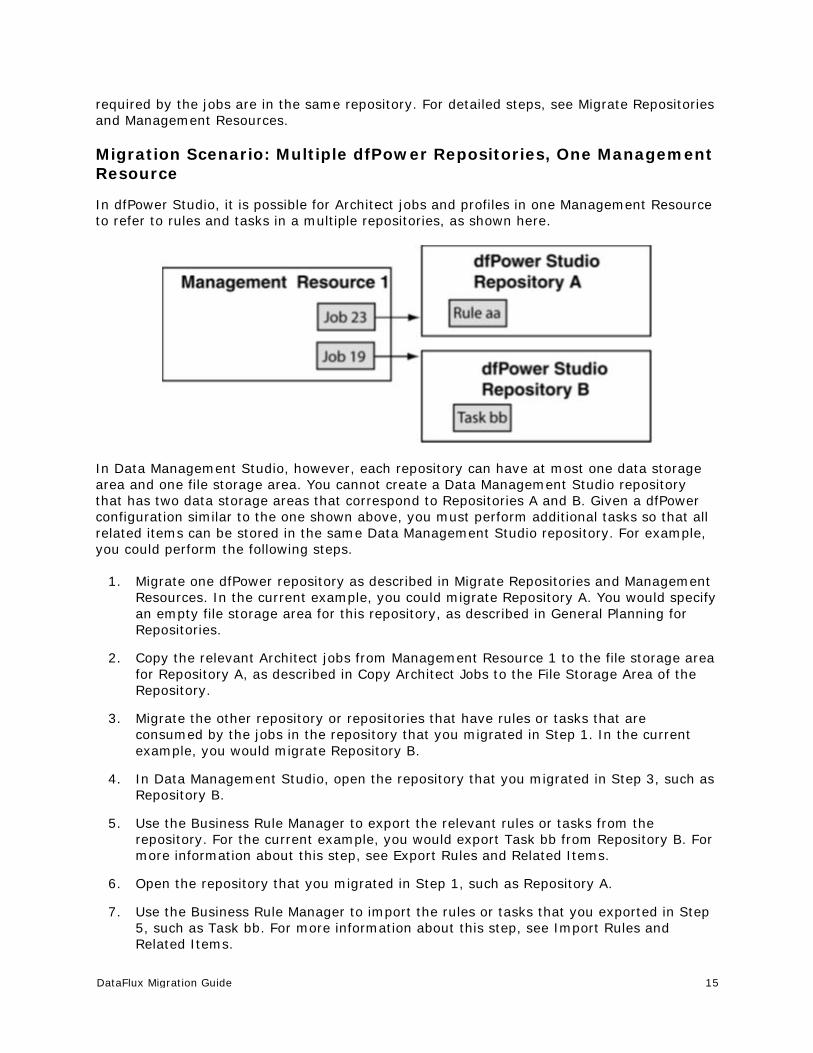
In dfPower Studio, it is possible for Architect jobs and profiles in one Management Resource to refer to rules and tasks in a multiple repositories, as shown here.
In Data Management Studio, however, each repository can have at most one data storage area and one file storage area. You cannot create a Data Management Studio repository that has two data storage areas that correspond to Repositories A and B. Given a dfPower configuration similar to the one shown above, you must perform additional tasks so that all related items can be stored in the same Data Management Studio repository. For example, you could perform the following steps.
1. Migrate one dfPower repository as described in Migrate Repositories and Management Resources. In the current example, you could migrate Repository A. You would specify an empty file storage area for this repository, as described in General Planning for Repositories.
2. Copy the relevant Architect jobs from Management Resource 1 to the file storage area for Repository A, as described in Copy Architect Jobs to the File Storage Area of the Repository.
3. Migrate the other repository or repositories that have rules or tasks that are consumed by the jobs in the repository that you migrated in Step 1. In the current example, you would migrate Repository B.
4. In Data Management Studio, open the repository that you migrated in Step 3, such as Repository B.
5. Use the Business Rule Manager to export the relevant rules or tasks from the repository. For the current example, you would export Task bb from Repository B. For more information about this step, see Export Rules and Related Items.
6. Open the repository that you migrated in Step 1, such as Repository A.
7. Use the Business Rule Manager to import the rules or tasks that you exported in Step 5, such as Task bb. For more information about this step, see Import Rules and Related Items.
16 DataFlux Migration Guide
Migration Scenario: No dfPower Repository, One or More Management Resources
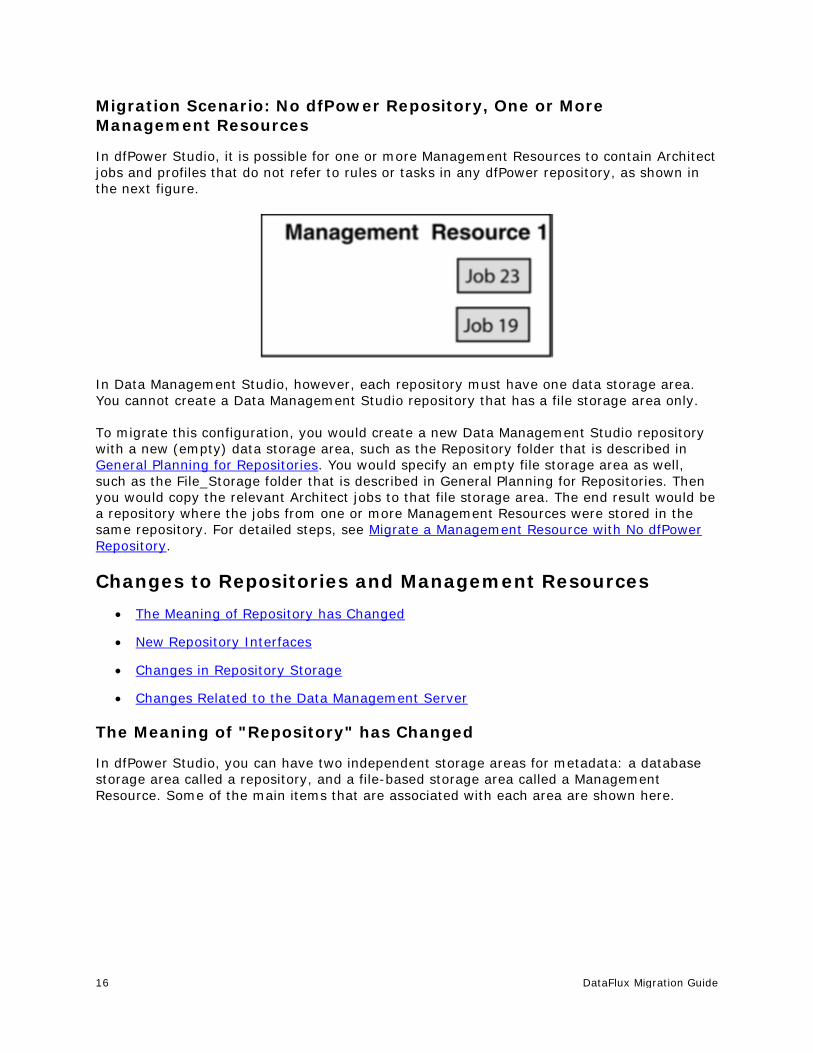
In dfPower Studio, it is possible for one or more Management Resources to contain Architect jobs and profiles that do not refer to rules or tasks in any dfPower repository, as shown in the next figure.
In Data Management Studio, however, each repository must have one data storage area. You cannot create a Data Management Studio repository that has a file storage area only.
To migrate this configuration, you would create a new Data Management Studio repository with a new (empty) data storage area, such as the Repository folder that is described in General Planning for Repositories. You would specify an empty file storage area as well, such as the File_Storage folder that is described in General Planning for Repositories. Then you would copy the relevant Architect jobs to that file storage area. The end result would be a repository where the jobs from one or more Management Resources were stored in the same repository. For detailed steps, see Migrate a Management Resource with No dfPower Repository.
Changes to Repositories and Management Resources • The Meaning of Repository has Changed
• New Repository Interfaces
• Changes in Repository Storage
• Changes Related to the Data Management Server
The Meaning of "Repository" has Changed
In dfPower Studio, you can have two independent storage areas for metadata: a database storage area called a repository, and a file-based storage area called a Management Resource. Some of the main items that are associated with each area are shown here.
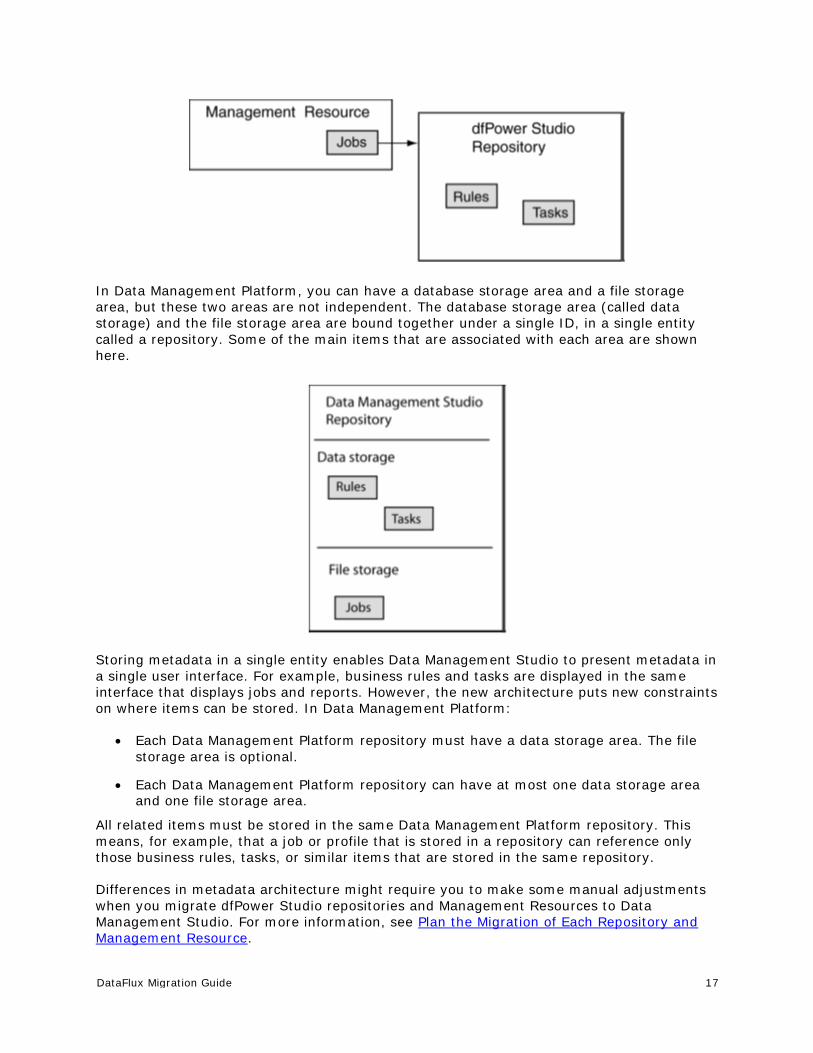
DataFlux Migration Guide 17
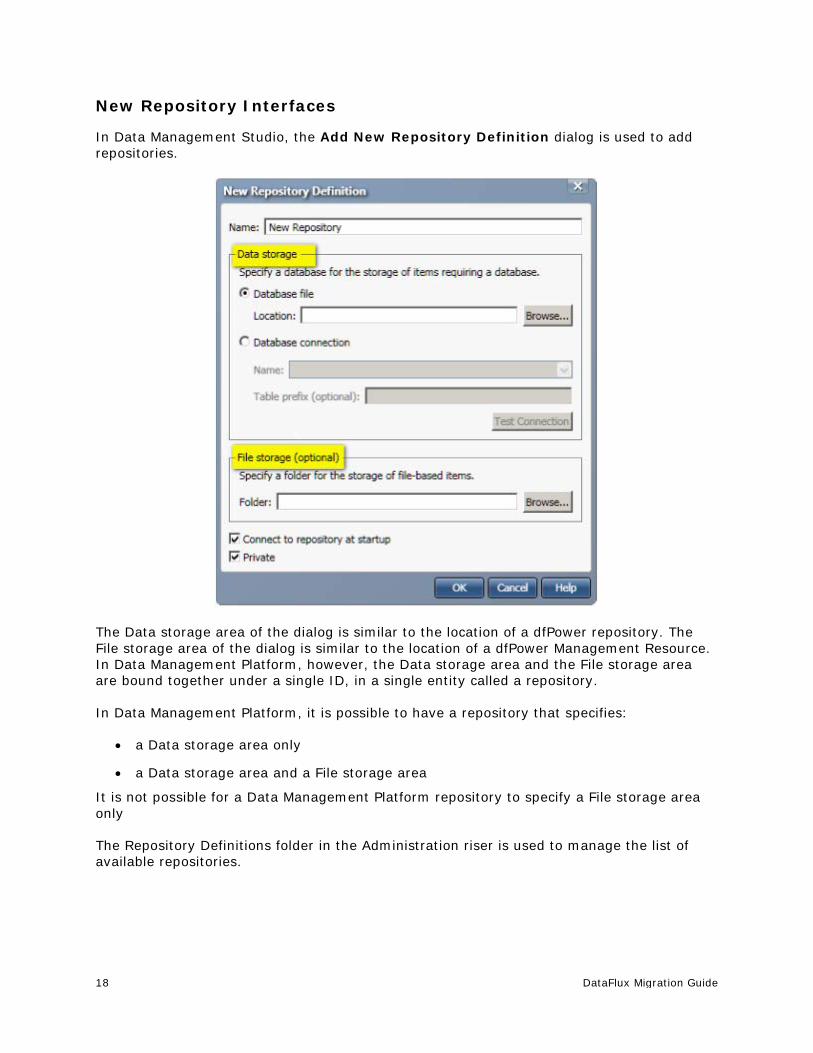
In Data Management Platform, you can have a database storage area and a file storage area, but these two areas are not independent. The database storage area (called data storage) and the file storage area are bound together under a single ID, in a single entity called a repository. Some of the main items that are associated with each area are shown here.
Storing metadata in a single entity enables Data Management Studio to present metadata in a single user interface. For example, business rules and tasks are displayed in the same interface that displays jobs and reports. However, the new architecture puts new constraints on where items can be stored. In Data Management Platform:
• Each Data Management Platform repository must have a data storage area. The file storage area is optional.
• Each Data Management Platform repository can have at most one data storage area and one file storage area.
All related items must be stored in the same Data Management Platform repository. This means, for example, that a job or profile that is stored in a repository can reference only those business rules, tasks, or similar items that are stored in the same repository.
Differences in metadata architecture might require you to make some manual adjustments when you migrate dfPower Studio repositories and Management Resources to Data Management Studio. For more information, see Plan the Migration of Each Repository and Management Resource.
18 DataFlux Migration Guide
New Repository Interfaces
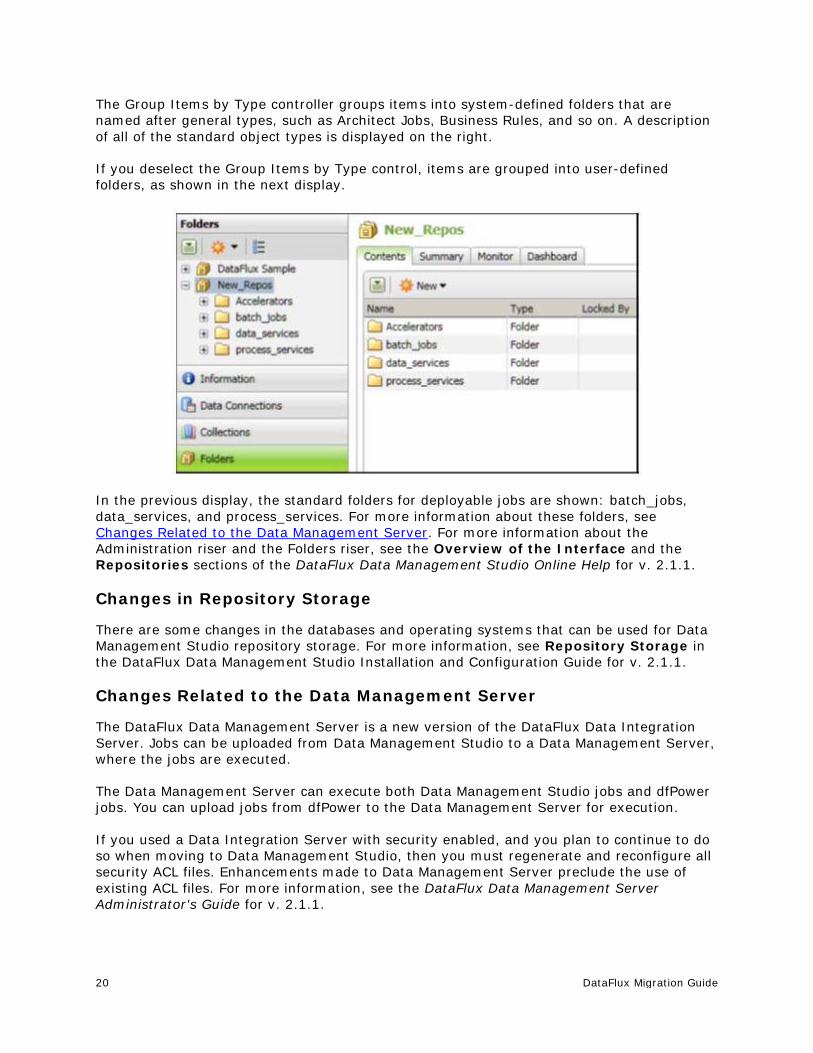
In Data Management Studio, the Add New Repository Definition dialog is used to add repositories.
The Data storage area of the dialog is similar to the location of a dfPower repository. The File storage area of the dialog is similar to the location of a dfPower Management Resource. In Data Management Platform, however, the Data storage area and the File storage area are bound together under a single ID, in a single entity called a repository.
In Data Management Platform, it is possible to have a repository that specifies:
• a Data storage area only
• a Data storage area and a File storage area
It is not possible for a Data Management Platform repository to specify a File storage area only
The Repository Definitions folder in the Administration riser is used to manage the list of available repositories.

DataFlux Migration Guide 19
In the previous display, there are two repository definitions: DataFlux Sample and New_Repos.
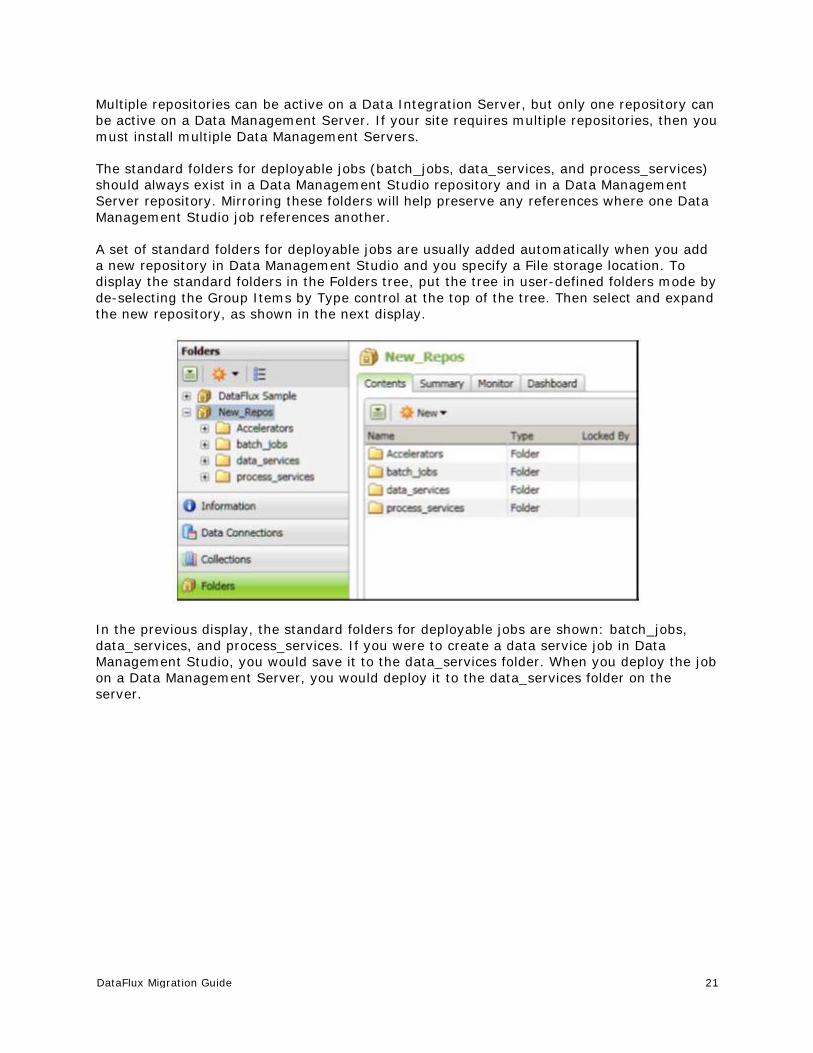
The Folders riser is where you manage the items in a repository. In the Folders tree shown in the next display, the Group Items by Type control at the top of the tree is selected.
20 DataFlux Migration Guide
The Group Items by Type controller groups items into system-defined folders that are named after general types, such as Architect Jobs, Business Rules, and so on. A description of all of the standard object types is displayed on the right.
If you deselect the Group Items by Type control, items are grouped into user-defined folders, as shown in the next display.
In the previous display, the standard folders for deployable jobs are shown: batch_jobs, data_services, and process_services. For more information about these folders, see Changes Related to the Data Management Server. For more information about the Administration riser and the Folders riser, see the Overview of the Interface and the Repositories sections of the DataFlux Data Management Studio Online Help for v. 2.1.1.
Changes in Repository Storage
There are some changes in the databases and operating systems that can be used for Data Management Studio repository storage. For more information, see Repository Storage in the DataFlux Data Management Studio Installation and Configuration Guide for v. 2.1.1.
Changes Related to the Data Management Server
The DataFlux Data Management Server is a new version of the DataFlux Data Integration Server. Jobs can be uploaded from Data Management Studio to a Data Management Server, where the jobs are executed.
The Data Management Server can execute both Data Management Studio jobs and dfPower jobs. You can upload jobs from dfPower to the Data Management Server for execution.
If you used a Data Integration Server with security enabled, and you plan to continue to do so when moving to Data Management Studio, then you must regenerate and reconfigure all security ACL files. Enhancements made to Data Management Server preclude the use of existing ACL files. For more information, see the DataFlux Data Management Server Administrator's Guide for v. 2.1.1.
DataFlux Migration Guide 21
Multiple repositories can be active on a Data Integration Server, but only one repository can be active on a Data Management Server. If your site requires multiple repositories, then you must install multiple Data Management Servers.
The standard folders for deployable jobs (batch_jobs, data_services, and process_services) should always exist in a Data Management Studio repository and in a Data Management Server repository. Mirroring these folders will help preserve any references where one Data Management Studio job references another.
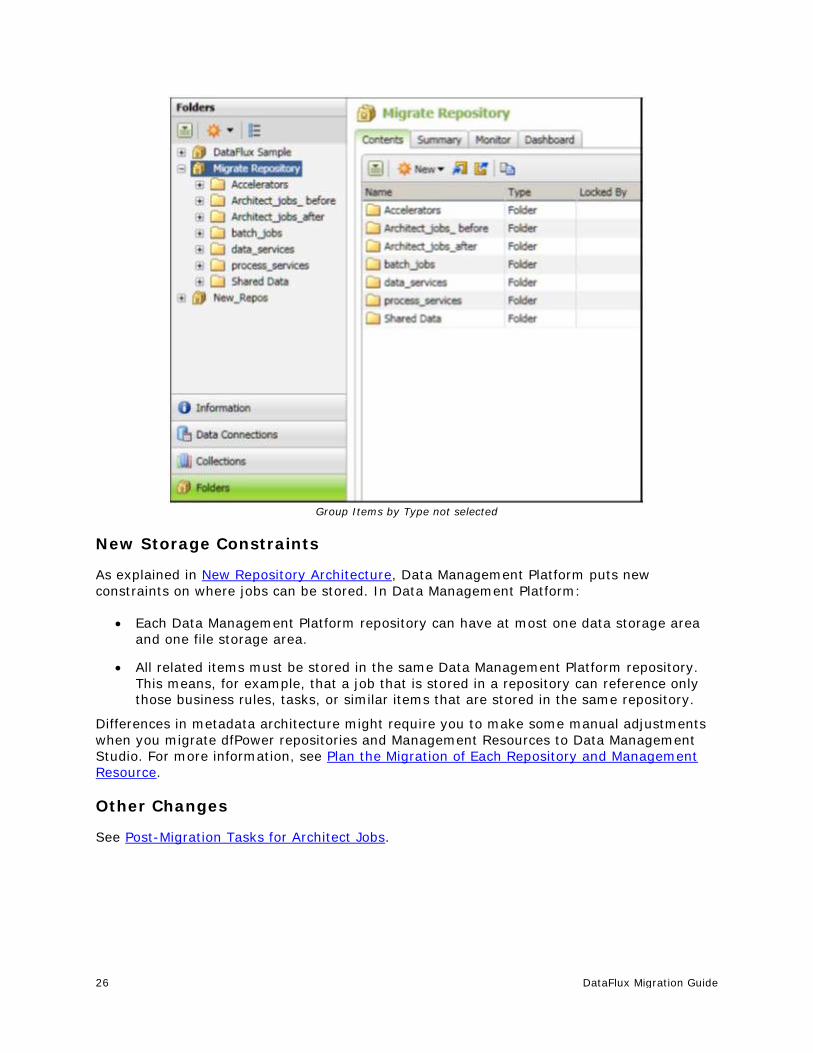
A set of standard folders for deployable jobs are usually added automatically when you add a new repository in Data Management Studio and you specify a File storage location. To display the standard folders in the Folders tree, put the tree in user-defined folders mode by de-selecting the Group Items by Type control at the top of the tree. Then select and expand the new repository, as shown in the next display.
In the previous display, the standard folders for deployable jobs are shown: batch_jobs, data_services, and process_services. If you were to create a data service job in Data Management Studio, you would save it to the data_services folder. When you deploy the job on a Data Management Server, you would deploy it to the data_services folder on the server.
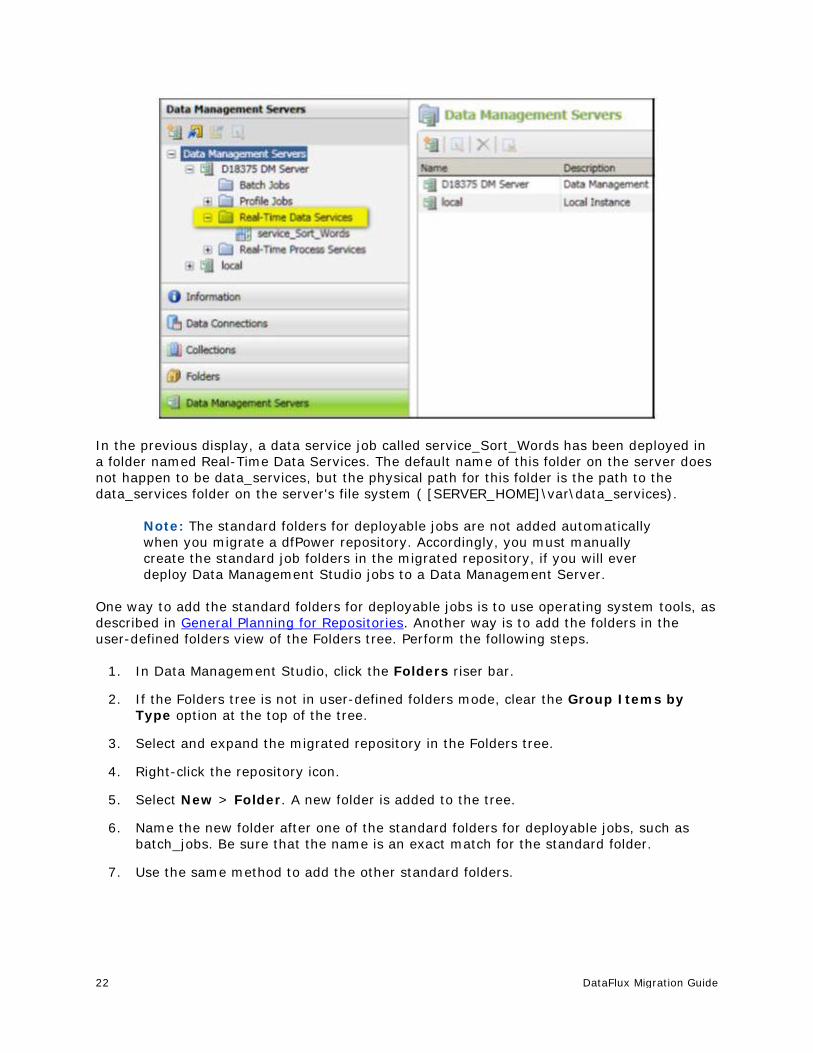
22 DataFlux Migration Guide
In the previous display, a data service job called service_Sort_Words has been deployed in a folder named Real-Time Data Services. The default name of this folder on the server does not happen to be data_services, but the physical path for this folder is the path to the data_services folder on the server's file system ( [SERVER_HOME]\var\data_services).
Note: The standard folders for deployable jobs are not added automatically when you migrate a dfPower repository. Accordingly, you must manually create the standard job folders in the migrated repository, if you will ever deploy Data Management Studio jobs to a Data Management Server.
One way to add the standard folders for deployable jobs is to use operating system tools, as described in General Planning for Repositories. Another way is to add the folders in the user-defined folders view of the Folders tree. Perform the following steps.
1. In Data Management Studio, click the Folders riser bar.
2. If the Folders tree is not in user-defined folders mode, clear the Group Items by Type option at the top of the tree.
3. Select and expand the migrated repository in the Folders tree.
4. Right-click the repository icon.
5. Select New > Folder. A new folder is added to the tree.
6. Name the new folder after one of the standard folders for deployable jobs, such as batch_jobs. Be sure that the name is an exact match for the standard folder.
7. Use the same method to add the other standard folders.
DataFlux Migration Guide 23
Architect Jobs • Changes to Architect Jobs
• Plan the Migration of Architect Jobs
Plan the Migration of Architect Jobs Review Overview of Migrating from dfPower Studio and try to anticipate the main issues that might affect the conversion of your Architect jobs. It is always best to know as much as possible about the Architect jobs that you are migrating. That way you can identify changes and possible problems after migration. Also, it will be easier to test the migrated jobs if you have a basic understanding of Data Management Studio data jobs and process jobs, as described in the Data Jobs and Process Jobs sections of the DataFlux Data Management Studio Online Help for v. 2.1.1.
Changes to Architect Jobs • New Job Architecture
• New Job Interfaces
• New Storage Constraints
• Other Changes
New Job Architecture
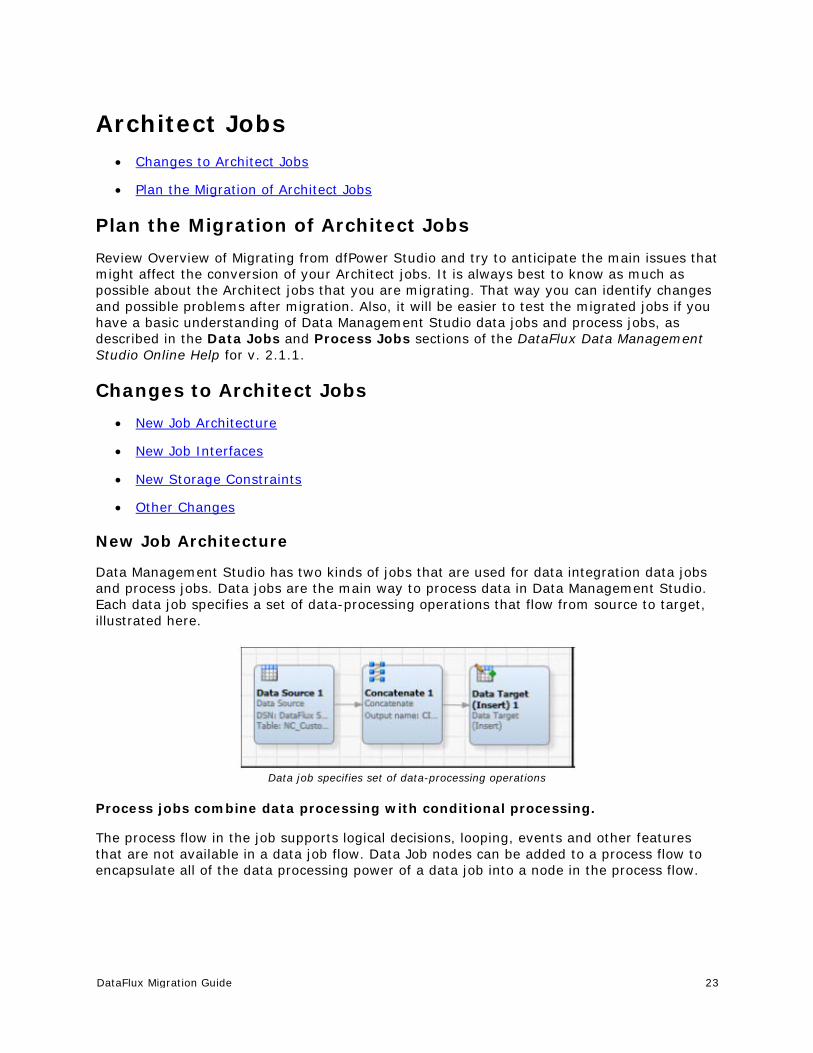
Data Management Studio has two kinds of jobs that are used for data integration data jobs and process jobs. Data jobs are the main way to process data in Data Management Studio. Each data job specifies a set of data-processing operations that flow from source to target, illustrated here.
Data job specifies set of data-processing operations
Process jobs combine data processing with conditional processing.
The process flow in the job supports logical decisions, looping, events and other features that are not available in a data job flow. Data Job nodes can be added to a process flow to encapsulate all of the data processing power of a data job into a node in the process flow.

24 DataFlux Migration Guide
Data job nodes can be added to a process flow
Some Architect jobs can be converted to either a data job or a process job.
Other Architect jobs must be converted to one of these job types. In either case, the upgrade job wizards enable you to perform a correct conversion, as described later.
New Job Interfaces
Data jobs and process jobs have a similar editor. The next display shows the data job editor.
Data Job Editor
For more information about using the Data Job Editor and the Process Job Editor, see the Data Jobs and Process Jobs sections of the DataFlux Data Management Studio Online Help for v. 2.2.

DataFlux Migration Guide 25
The Folders riser is where you manage Architect jobs before and after they have been converted to Data Management Studio jobs. In the Folders tree shown here, the Group Items by Type control is selected.
Group Items by Type selected
The Group Items by Type controller groups items into system-defined folders that are named after general types, such as Architect Jobs, Business Rules, and so on. The Architect Jobs folder contains Architect jobs in their original, dfPower format, after you have copied them to the File storage area of the migrated repository, as described in Copy Architect Jobs to the File Storage Area of the Repository. You cannot open Architect jobs that have not been converted to Data Management Studio format.
If you deselect the Group Items by Type control, items are grouped into user-defined folders, as shown here.
26 DataFlux Migration Guide
Group Items by Type not selected
New Storage Constraints
As explained in New Repository Architecture, Data Management Platform puts new constraints on where jobs can be stored. In Data Management Platform:
• Each Data Management Platform repository can have at most one data storage area and one file storage area.
• All related items must be stored in the same Data Management Platform repository. This means, for example, that a job that is stored in a repository can reference only those business rules, tasks, or similar items that are stored in the same repository.
Differences in metadata architecture might require you to make some manual adjustments when you migrate dfPower repositories and Management Resources to Data Management Studio. For more information, see Plan the Migration of Each Repository and Management Resource.
Other Changes
See Post-Migration Tasks for Architect Jobs.
DataFlux Migration Guide 27
Profile Jobs • Changes to Profile Jobs
• New Storage Constraints
Changes to Profile Jobs
The Meaning of "Profile" Has Changed
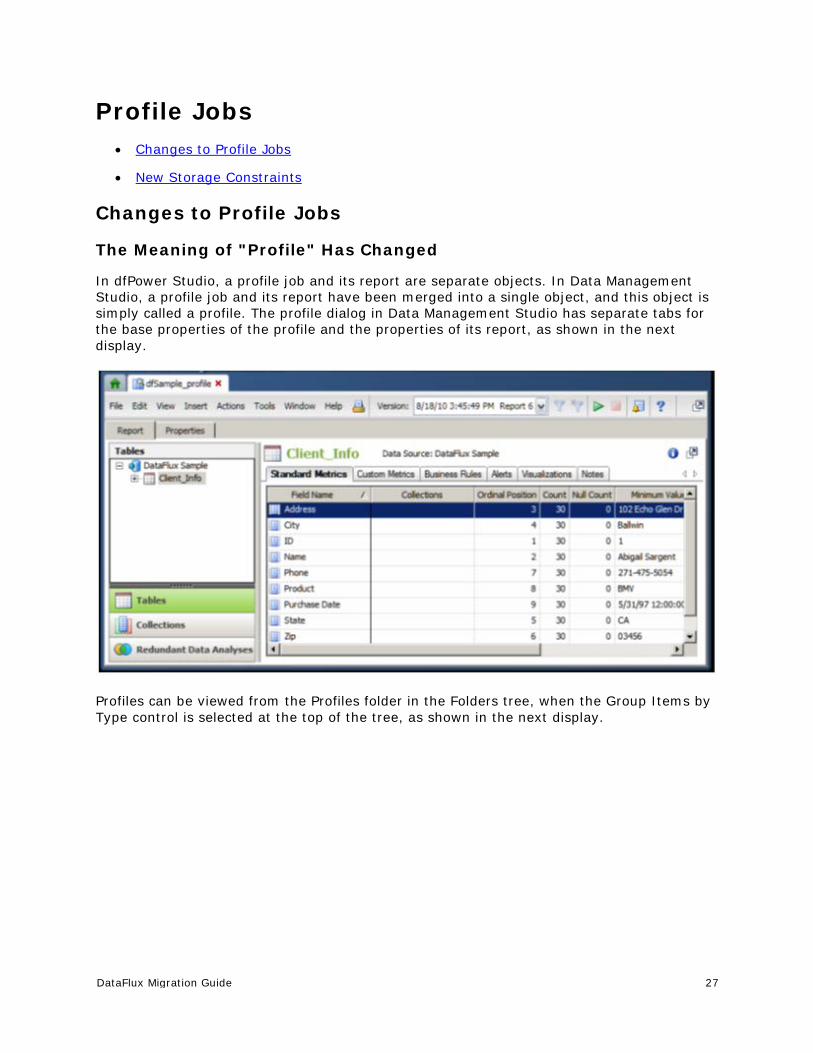
In dfPower Studio, a profile job and its report are separate objects. In Data Management Studio, a profile job and its report have been merged into a single object, and this object is simply called a profile. The profile dialog in Data Management Studio has separate tabs for the base properties of the profile and the properties of its report, as shown in the next display.
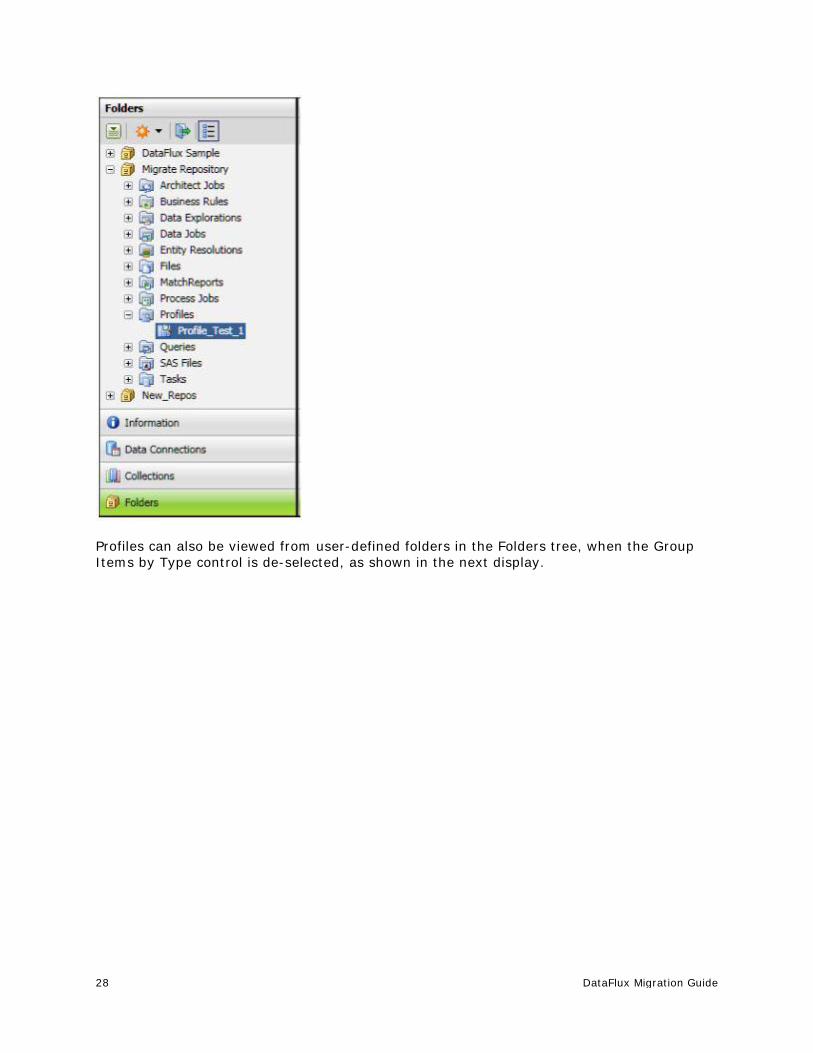
Profiles can be viewed from the Profiles folder in the Folders tree, when the Group Items by Type control is selected at the top of the tree, as shown in the next display.
28 DataFlux Migration Guide
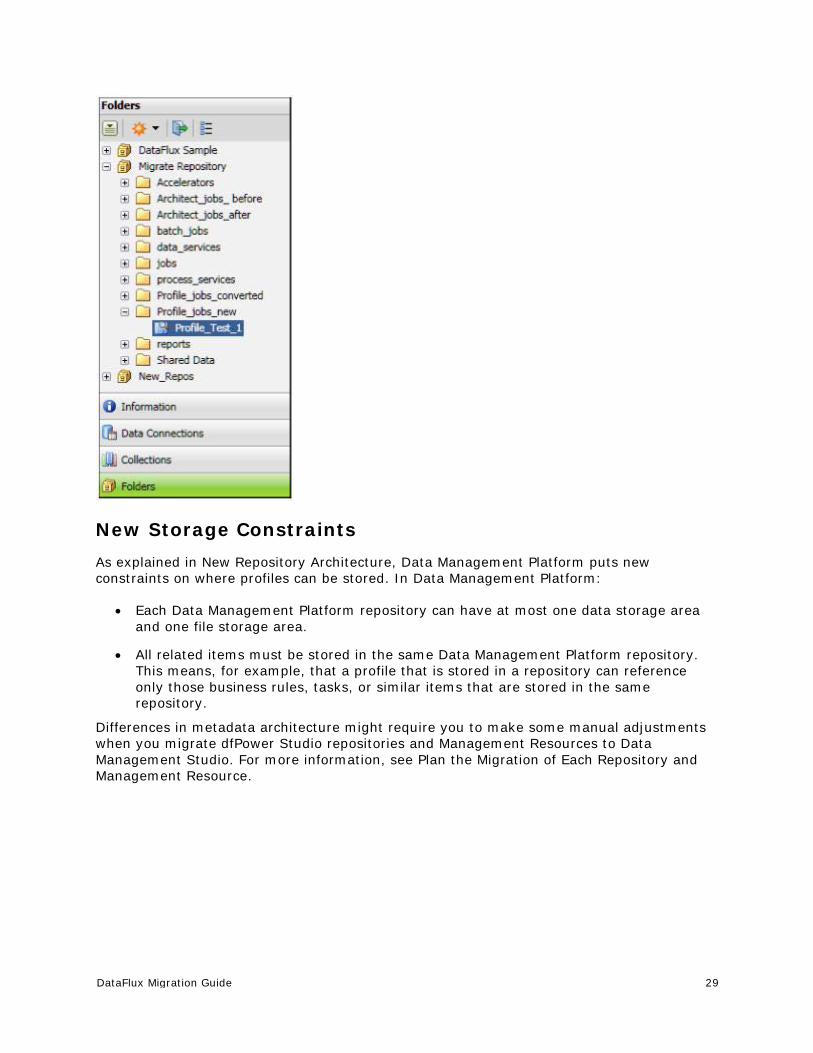
Profiles can also be viewed from user-defined folders in the Folders tree, when the Group Items by Type control is de-selected, as shown in the next display.
DataFlux Migration Guide 29
New Storage Constraints As explained in New Repository Architecture, Data Management Platform puts new constraints on where profiles can be stored. In Data Management Platform:
• Each Data Management Platform repository can have at most one data storage area and one file storage area.
• All related items must be stored in the same Data Management Platform repository. This means, for example, that a profile that is stored in a repository can reference only those business rules, tasks, or similar items that are stored in the same repository.
Differences in metadata architecture might require you to make some manual adjustments when you migrate dfPower Studio repositories and Management Resources to Data Management Studio. For more information, see Plan the Migration of Each Repository and Management Resource.
30 DataFlux Migration Guide
Macros Plan the Migration of Macros New macro configuration files. The files and folders where macro variable definitions can be stored have changed. The new macro configuration files are described in the "Macro Variables" section in the DataFlux Data Management Studio User's Guide. If you move your dfPower Studio macro variable definitions into one or more Data Management Studio configuration files, and you use these macro variables in the properties of a node, or in expressions using %% notation, or in any instance of the getvar() function, then your dfPower Studio macro variables will often work in Data Management Studio without further modification.
Macro syntax changes. The syntax for macro variable definitions has changed. This change could affect any item that uses a macro variable, such as an Architect job, profile, business rule, or task. In Data Management Studio, all characters after the equal sign (=) and before the new line character become part of the definition. This means, for example, that you should not use spaces, quotation marks, or other characters after the equal sign unless you want them to be part of the text that is retrieved when the macro variable is called. For more information, see the "Macro Variables" section in the DataFlux Data Management Studio User's Guide, v. 2.1.1.
Macros can have other impacts as well. For more information, see the topics related to macros in the following sections of this guide:
• Architect Jobs That Use Macro Variables
• Architect Jobs That Pass Macro Variable Values Dynamically Between Pages in the Job
• Rules and Related Items That Use Macro Variables
• Profile Jobs That Contain Macro Variables
Business Rules, Tasks, and Related Items • Plan to Migrate Business Rules, Tasks, and Related Items
• Post-Migration Tasks for Business Rules, Tasks, and Related Items
Plan to Migrate Business Rules, Tasks, and Related Items dfPower Studio business rules, tasks, custom metrics, and other items in the Business Rules Manager are migrated only when their repository is migrated. You cannot migrate individual rules and related items from dfPower Studio.

DataFlux Migration Guide 31
Post-Migration Tasks for Business Rules, Tasks, and Related Items
Rules and Related Items That Use Macro Variables
When a macro variable was used in a dfPower Studio task, the Data Monitoring node that is referencing this task will probably have to be updated before it will work in Data Management Studio. General updates for macros are described in Macro Variables.
Macro Variables, Rules and Tasks
If an Architect job references a rules or task, and the rule or task dynamically retrieves or sets the value of a macro variable, then the Data Monitoring node that references such a task must be updated. Such a job is shown in the next display.
To pass macro variable values to a rule that is included in the Data Monitoring node shown in the previous display, you would right-click the Data Monitoring node and select Advanced Properties. Then you would specify the macro variable in the KEY_VALUES property.
To get macro variable values out of a rule that is included in the Data Monitoring node shown in the previous display, you would right-click the Data Monitoring node and select Advanced Properties. Then you would specify the macro variable in the OUT_KEY_VALUES property.

32 DataFlux Migration Guide
Specific Migration Scenarios Select the appropriate migration option:
IMPORTANT: The Specific Migration Scenarios section is intended for users who have read the General Information section or for those who have a good understanding of what is needed and simply need some guidance on stepping through the migration steps. In the Specific Migration Scenario section, each sub-section builds on the previous section. Therefore, if you jump straight to the migrating Architect jobs section without completing the Repository migration section, you will have problems with the migration steps.
• Migrating from dfPower Studio v. 8.1 or v. 8.2 to Data Management Studio v. 2.2
• Migrating from DataFlux Integration Server v. 8.1 or v. 8.2 to Data Management Server v. 2.2
• Migrating from Data Management Studio v. 2.1 to Data Management Studio v. 2.2
• Migrating from Data Management Server v. 2.1 to Data Management Server v. 2.2
Migrating From dfPower Studio v. 8.1/8.2 to Data Management Studio v. 2
• Configurations
• Reference Sources
• Data Connections
• Repositories
• Architect Jobs
• Profile Jobs
• Explorer Jobs
• Accelerators
• Command Line Execution
• SAS Data Integration Studio
• Other
Note: This section will use 2.2 as the example target system. Anything that is different in 2.3 will be explicitly identified.

DataFlux Migration Guide 33
Configurations DataFlux dfPower Studio (dfPower Studio) v. 8.1 stored configuration settings in the registry as well as in architect.cfg. You will need to take these settings out of those two locations and move them into the appropriate v. 2.2 configuration files as well as map to the v. 2.2 configuration setting.
Below is a list of dfPower v. 8.1 settings and what the map to in Data Management Studio (Studio) v. 2.2. You will need to copy the values that are in the v. 8.1 configuration files or Windows registry to the v. 2.2 configuration files. In doing so, there are several differences that you need to note between the configuration files:
• Numeric values in v 2.2 need to be written out. Values in v. 8.1 could be 10m, which represents 10 million. In v. 2.2, this must be written as 10000000.
• DataFlux Data Management Platform (Platform) does not require configuration values to be surrounded by single quotes.
• Double quotes are not special in Platform configuration files.
• To escape characters (", =, white space, and so on) in Platform configuration files surround them with single quotes.
In the following table, look at the v. 8.1 architect.cfg file, find the configuration from the file in the "8.1 Setting" column, look to the left to see the v. 2.2 equivalent setting found in the first column, and put the value in the file identified in column 2. For example, in the architect.cfg file we have the following:
To find the equivalent setting in 2.2, look in the "8.1 Setting" column to find "CLUSTER/BYTES".
From here, you can tell that the v. 2.2 equivalent setting is CLUSTER/BYTES (column 1) and that the value lives in app.cfg (column 2). Open up the v. 2.2 app.cfg file and locate "CLUSTER/BYTES" (press CTRL+F) and look for the v. 2.2 configuration which, in this case, is also CLUSTER/BYTES
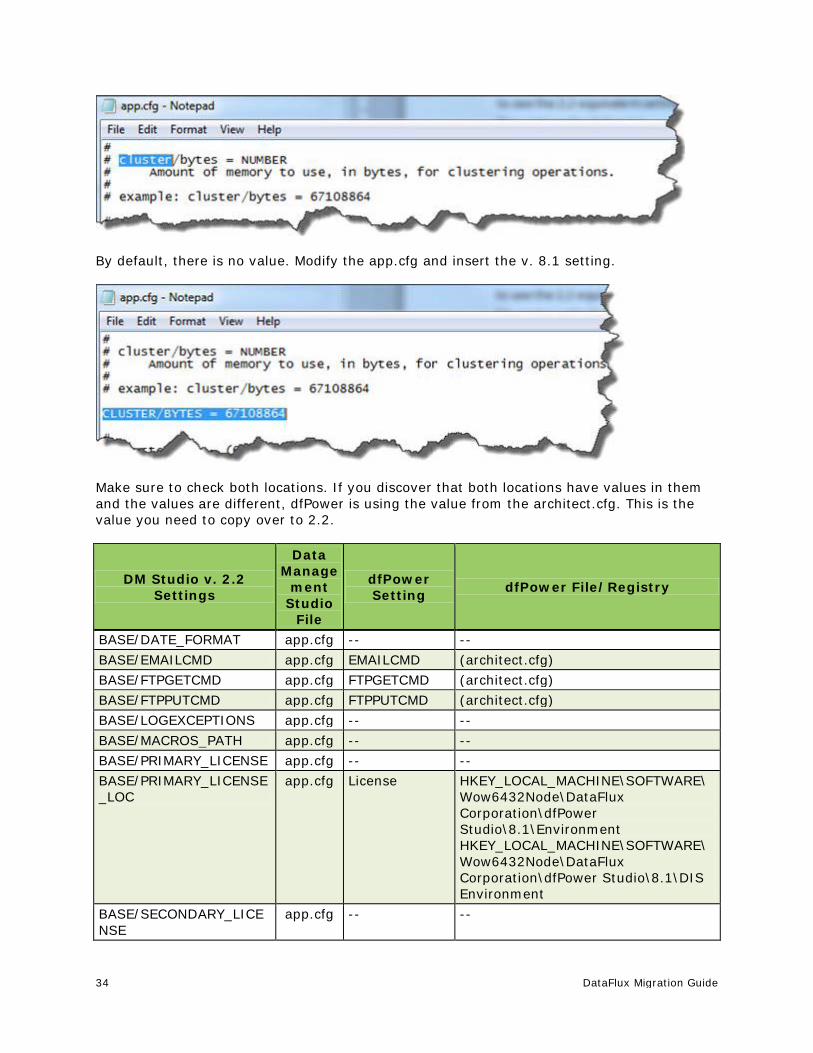
34 DataFlux Migration Guide
By default, there is no value. Modify the app.cfg and insert the v. 8.1 setting.
Make sure to check both locations. If you discover that both locations have values in them and the values are different, dfPower is using the value from the architect.cfg. This is the value you need to copy over to 2.2.
DM Studio v. 2.2 Settings
Data Manage
ment Studio
File
dfPower Setting dfPower File/Registry
BASE/DATE_FORMAT app.cfg -- -- BASE/EMAILCMD app.cfg EMAILCMD (architect.cfg) BASE/FTPGETCMD app.cfg FTPGETCMD (architect.cfg) BASE/FTPPUTCMD app.cfg FTPPUTCMD (architect.cfg) BASE/LOGEXCEPTIONS app.cfg -- -- BASE/MACROS_PATH app.cfg -- -- BASE/PRIMARY_LICENSE app.cfg -- -- BASE/PRIMARY_LICENSE_LOC
app.cfg License HKEY_LOCAL_MACHINE\SOFTWARE\Wow6432Node\DataFlux Corporation\dfPower Studio\8.1\Environment HKEY_LOCAL_MACHINE\SOFTWARE\Wow6432Node\DataFlux Corporation\dfPower Studio\8.1\DIS Environment
BASE/SECONDARY_LICENSE
app.cfg -- --

DataFlux Migration Guide 35
DM Studio v. 2.2 Settings
Data Manage
ment Studio
File
dfPower Setting dfPower File/Registry
BASE/SECONDARY_LICENSE_LOC
app.cfg -- --
BASE/SORTBYTES app.cfg SORTBYTES SortBytes Sort chunk (dfexec.cfg)
(architect.cfg) HKEY_LOCAL_MACHINE\SOFTWARE\Wow6432Node\DataFlux Corporation\dfPower Studio\8.1\DIS Environment
BASE/SORTMERGES app.cfg SORTMERGES -- BASE/SORTTEMP app.cfg SORTTEMP -- BASE/SORTTHREADS app.cfg SORTTHREADS -- BASE/TEMP app.cfg TEMP (architect.cfg) BASE/TEXTMINE_LITI_LANG_LOCATION
app.cfg -- --
CLUSTER/BYTES app.cfg CLUSTER/BYTES ClusterBytes
(architect.cfg) HKEY_LOCAL_MACHINE\SOFTWARE\Wow6432Node\DataFlux Corporation\dfPower Studio\8.1\ARCHITECT
CLUSTER/LOG app.cfg CLUSTER/LOG (architect.cfg) CLUSTER/TEMP app.cfg -- -- ENVIRONMENT/SASDIS ui.cfg SASDIS HKEY_LOCAL_MACHINE\SOFTWARE\
Wow6432Node\DataFlux Corporation\dfPower Studio\8.1\Environment\
JAVA/VMLIB app.cfg JAVA/VMLIB -- PROF/PER_TABLE_BYTES app.cfg fd table
memory (dfexec.cfg)
PROF/LOCK_RETIRES app.cfg -- -- PROFCONFIG/METRIC0 ui.cfg -- -- PROFCONFIG/METRIC1 ui.cfg -- -- PROFCONFIG/METRIC2 ui.cfg -- -- PROFCONFIG/METRIC3 ui.cfg -- -- PROFCONFIG/METRIC4 ui.cfg -- -- PROFCONFIG/METRIC5 ui.cfg -- -- PROFCONFIG/METRIC6 ui.cfg -- -- PROFCONFIG/METRIC7 ui.cfg -- -- PROFCONFIG/METRIC8 ui.cfg -- -- PROFCONFIG/METRIC9 ui.cfg -- -- PROFCONFIG/METRIC10 ui.cfg -- -- PROFCONFIG/METRIC11 ui.cfg -- PROFCONFIG/METRIC12 ui.cfg -- --
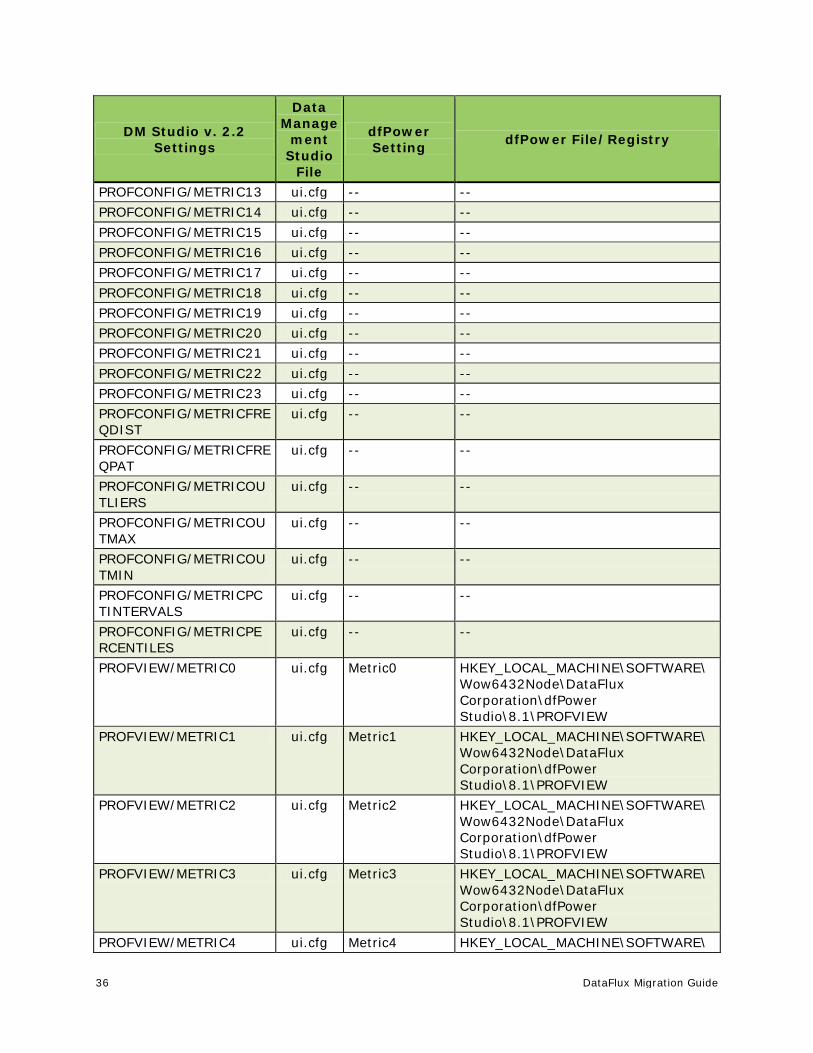
36 DataFlux Migration Guide
DM Studio v. 2.2 Settings
Data Manage
ment Studio
File
dfPower Setting dfPower File/Registry
PROFCONFIG/METRIC13 ui.cfg -- -- PROFCONFIG/METRIC14 ui.cfg -- -- PROFCONFIG/METRIC15 ui.cfg -- -- PROFCONFIG/METRIC16 ui.cfg -- -- PROFCONFIG/METRIC17 ui.cfg -- -- PROFCONFIG/METRIC18 ui.cfg -- -- PROFCONFIG/METRIC19 ui.cfg -- -- PROFCONFIG/METRIC20 ui.cfg -- -- PROFCONFIG/METRIC21 ui.cfg -- -- PROFCONFIG/METRIC22 ui.cfg -- -- PROFCONFIG/METRIC23 ui.cfg -- -- PROFCONFIG/METRICFREQDIST
ui.cfg -- --
PROFCONFIG/METRICFREQPAT
ui.cfg -- --
PROFCONFIG/METRICOUTLIERS
ui.cfg -- --
PROFCONFIG/METRICOUTMAX
ui.cfg -- --
PROFCONFIG/METRICOUTMIN
ui.cfg -- --
PROFCONFIG/METRICPCTINTERVALS
ui.cfg -- --
PROFCONFIG/METRICPERCENTILES
ui.cfg -- --
PROFVIEW/METRIC0 ui.cfg Metric0 HKEY_LOCAL_MACHINE\SOFTWARE\Wow6432Node\DataFlux Corporation\dfPower Studio\8.1\PROFVIEW
PROFVIEW/METRIC1 ui.cfg Metric1 HKEY_LOCAL_MACHINE\SOFTWARE\Wow6432Node\DataFlux Corporation\dfPower Studio\8.1\PROFVIEW
PROFVIEW/METRIC2 ui.cfg Metric2 HKEY_LOCAL_MACHINE\SOFTWARE\Wow6432Node\DataFlux Corporation\dfPower Studio\8.1\PROFVIEW
PROFVIEW/METRIC3 ui.cfg Metric3 HKEY_LOCAL_MACHINE\SOFTWARE\Wow6432Node\DataFlux Corporation\dfPower Studio\8.1\PROFVIEW
PROFVIEW/METRIC4 ui.cfg Metric4 HKEY_LOCAL_MACHINE\SOFTWARE\
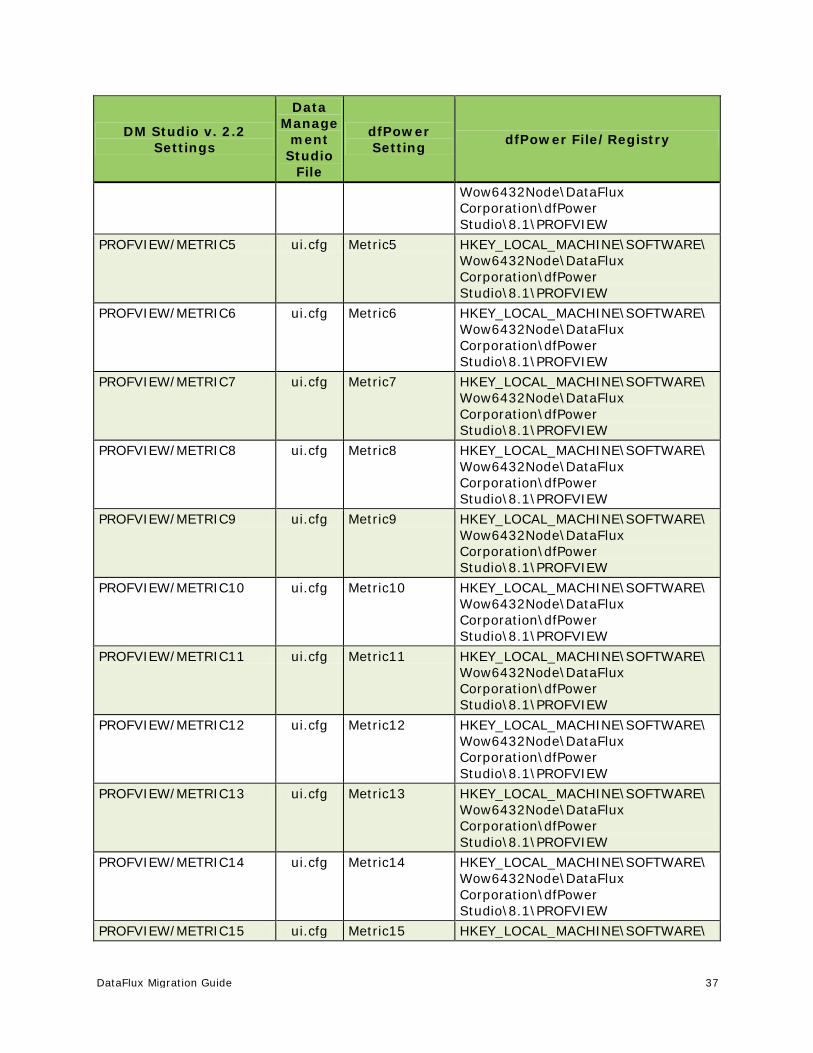
DataFlux Migration Guide 37
DM Studio v. 2.2 Settings
Data Manage
ment Studio
File
dfPower Setting dfPower File/Registry
Wow6432Node\DataFlux Corporation\dfPower Studio\8.1\PROFVIEW
PROFVIEW/METRIC5 ui.cfg Metric5 HKEY_LOCAL_MACHINE\SOFTWARE\Wow6432Node\DataFlux Corporation\dfPower Studio\8.1\PROFVIEW
PROFVIEW/METRIC6 ui.cfg Metric6 HKEY_LOCAL_MACHINE\SOFTWARE\Wow6432Node\DataFlux Corporation\dfPower Studio\8.1\PROFVIEW
PROFVIEW/METRIC7 ui.cfg Metric7 HKEY_LOCAL_MACHINE\SOFTWARE\Wow6432Node\DataFlux Corporation\dfPower Studio\8.1\PROFVIEW
PROFVIEW/METRIC8 ui.cfg Metric8 HKEY_LOCAL_MACHINE\SOFTWARE\Wow6432Node\DataFlux Corporation\dfPower Studio\8.1\PROFVIEW
PROFVIEW/METRIC9 ui.cfg Metric9 HKEY_LOCAL_MACHINE\SOFTWARE\Wow6432Node\DataFlux Corporation\dfPower Studio\8.1\PROFVIEW
PROFVIEW/METRIC10 ui.cfg Metric10 HKEY_LOCAL_MACHINE\SOFTWARE\Wow6432Node\DataFlux Corporation\dfPower Studio\8.1\PROFVIEW
PROFVIEW/METRIC11 ui.cfg Metric11 HKEY_LOCAL_MACHINE\SOFTWARE\Wow6432Node\DataFlux Corporation\dfPower Studio\8.1\PROFVIEW
PROFVIEW/METRIC12 ui.cfg Metric12 HKEY_LOCAL_MACHINE\SOFTWARE\Wow6432Node\DataFlux Corporation\dfPower Studio\8.1\PROFVIEW
PROFVIEW/METRIC13 ui.cfg Metric13 HKEY_LOCAL_MACHINE\SOFTWARE\Wow6432Node\DataFlux Corporation\dfPower Studio\8.1\PROFVIEW
PROFVIEW/METRIC14 ui.cfg Metric14 HKEY_LOCAL_MACHINE\SOFTWARE\Wow6432Node\DataFlux Corporation\dfPower Studio\8.1\PROFVIEW
PROFVIEW/METRIC15 ui.cfg Metric15 HKEY_LOCAL_MACHINE\SOFTWARE\
38 DataFlux Migration Guide
DM Studio v. 2.2 Settings
Data Manage
ment Studio
File
dfPower Setting dfPower File/Registry
Wow6432Node\DataFlux Corporation\dfPower Studio\8.1\PROFVIEW
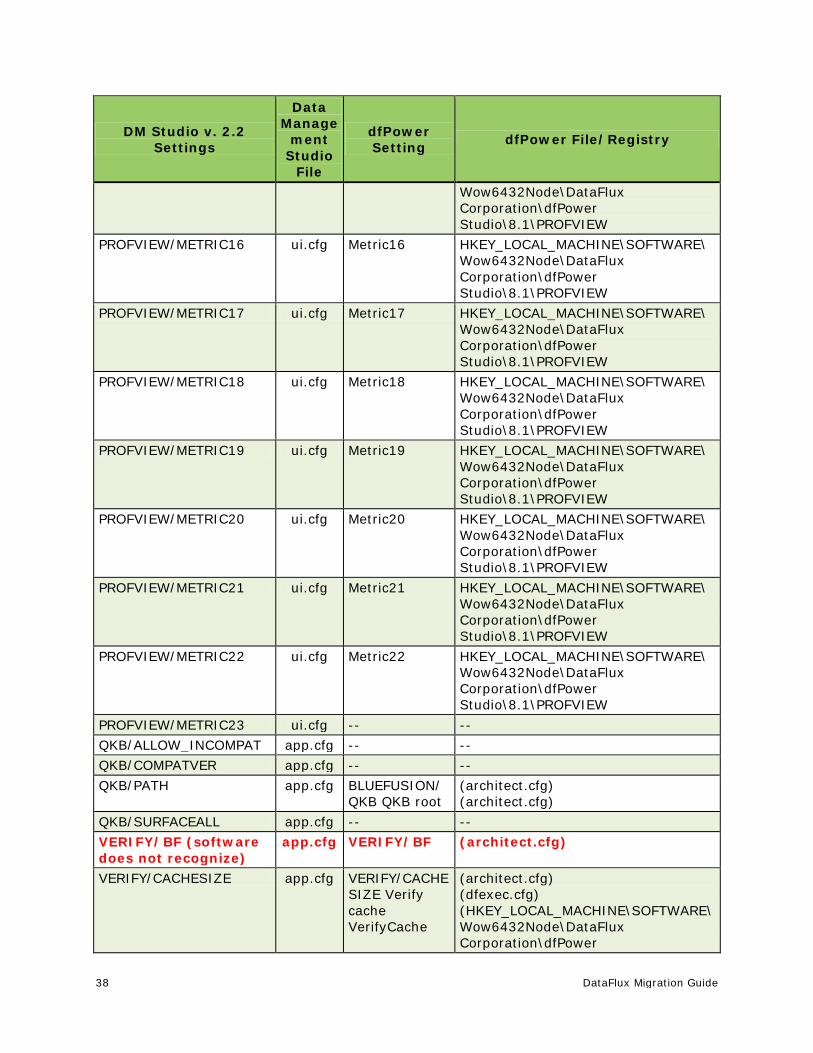
PROFVIEW/METRIC16 ui.cfg Metric16 HKEY_LOCAL_MACHINE\SOFTWARE\Wow6432Node\DataFlux Corporation\dfPower Studio\8.1\PROFVIEW
PROFVIEW/METRIC17 ui.cfg Metric17 HKEY_LOCAL_MACHINE\SOFTWARE\Wow6432Node\DataFlux Corporation\dfPower Studio\8.1\PROFVIEW
PROFVIEW/METRIC18 ui.cfg Metric18 HKEY_LOCAL_MACHINE\SOFTWARE\Wow6432Node\DataFlux Corporation\dfPower Studio\8.1\PROFVIEW
PROFVIEW/METRIC19 ui.cfg Metric19 HKEY_LOCAL_MACHINE\SOFTWARE\Wow6432Node\DataFlux Corporation\dfPower Studio\8.1\PROFVIEW
PROFVIEW/METRIC20 ui.cfg Metric20 HKEY_LOCAL_MACHINE\SOFTWARE\Wow6432Node\DataFlux Corporation\dfPower Studio\8.1\PROFVIEW
PROFVIEW/METRIC21 ui.cfg Metric21 HKEY_LOCAL_MACHINE\SOFTWARE\Wow6432Node\DataFlux Corporation\dfPower Studio\8.1\PROFVIEW
PROFVIEW/METRIC22 ui.cfg Metric22 HKEY_LOCAL_MACHINE\SOFTWARE\Wow6432Node\DataFlux Corporation\dfPower Studio\8.1\PROFVIEW
PROFVIEW/METRIC23 ui.cfg -- -- QKB/ALLOW_INCOMPAT app.cfg -- -- QKB/COMPATVER app.cfg -- -- QKB/PATH app.cfg BLUEFUSION/
QKB QKB root (architect.cfg) (architect.cfg)
QKB/SURFACEALL app.cfg -- -- VERIFY/BF (software does not recognize)
app.cfg VERIFY/BF (architect.cfg)
VERIFY/CACHESIZE app.cfg VERIFY/CACHESIZE Verify cache VerifyCache
(architect.cfg) (dfexec.cfg) (HKEY_LOCAL_MACHINE\SOFTWARE\Wow6432Node\DataFlux Corporation\dfPower

DataFlux Migration Guide 39
DM Studio v. 2.2 Settings
Data Manage
ment Studio
File
dfPower Setting dfPower File/Registry
Studio\8.1\ARCHITECT) VERIFY/CANADA app.cfg VERIFY/CANA
DA (architect.cfg)
VERIFY/GEO app.cfg VERIFY/GEO (architect.cfg) VERIFY/PRELOAD app.cfg VERIFY/PRELO
AD (architect.cfg)
VERIFY/USEDPV app.cfg VERIFY/USEDPV
(architect.cfg)
VERIFY/USEELOT app.cfg -- -- VERIFY/USELACS app.cfg -- -- VERIFY/USERDI app.cfg VERIFY/USERD
I (architect.cfg)
VERIFY/USPS app.cfg VERIFY/USPS Usps db USPSDir
(architect.cfg) (dfexec.cfg) HKEY_LOCAL_MACHINE\SOFTWARE\Wow6432Node\DataFlux Corporation\dfPower Studio\8.1\VERIFY
VERIFY/USPSINST app.cfg VERIFY/USPSINST
(architect.cfg)
VERIFYINTL/CFG app.cfg VERIFYINTL/CFG
(architect.cfg)
VERIFYWORLD/DB app.cfg VERIFYWORLD/DB
(architect.cfg)
VERIFYWORLD/UNLK app.cfg VERIFYWORLD/UNLK
(architect.cfg)
Configuration Values From dfPower Studio to Data Management Studio
If any Accelerators are installed with your dfPower installation, it is not recommended that the associated macros be moved over. You should download the appropriate version of the Accelerator that works with Data Management Platform v. 2.2. Therefore, when you are viewing the architect.cfg file, you should not move over macros with the following prefixes:
• MDI_
• MDC_
• SA_
• ACDQ_
• CDC_
• CDA_
• WLC_
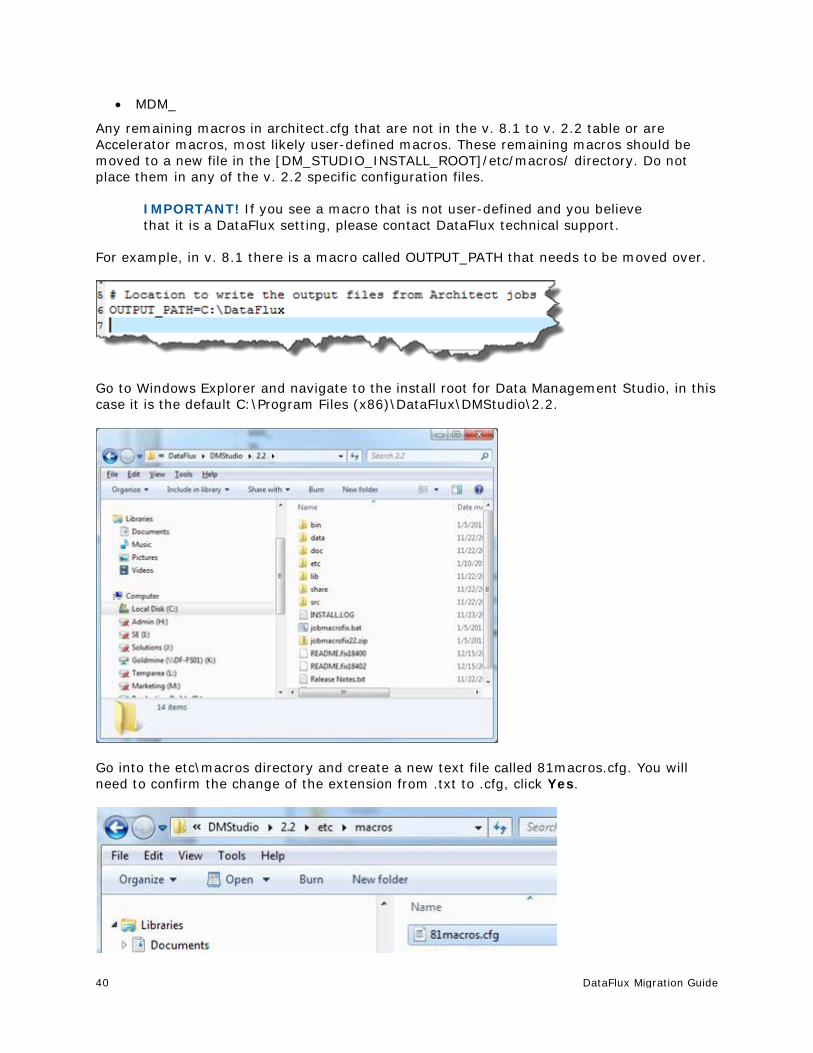
40 DataFlux Migration Guide
• MDM_
Any remaining macros in architect.cfg that are not in the v. 8.1 to v. 2.2 table or are Accelerator macros, most likely user-defined macros. These remaining macros should be moved to a new file in the [DM_STUDIO_INSTALL_ROOT]/etc/macros/ directory. Do not place them in any of the v. 2.2 specific configuration files.
IMPORTANT! If you see a macro that is not user-defined and you believe that it is a DataFlux setting, please contact DataFlux technical support.
For example, in v. 8.1 there is a macro called OUTPUT_PATH that needs to be moved over.
Go to Windows Explorer and navigate to the install root for Data Management Studio, in this case it is the default C:\Program Files (x86)\DataFlux\DMStudio\2.2.
Go into the etc\macros directory and create a new text file called 81macros.cfg. You will need to confirm the change of the extension from .txt to .cfg, click Yes.
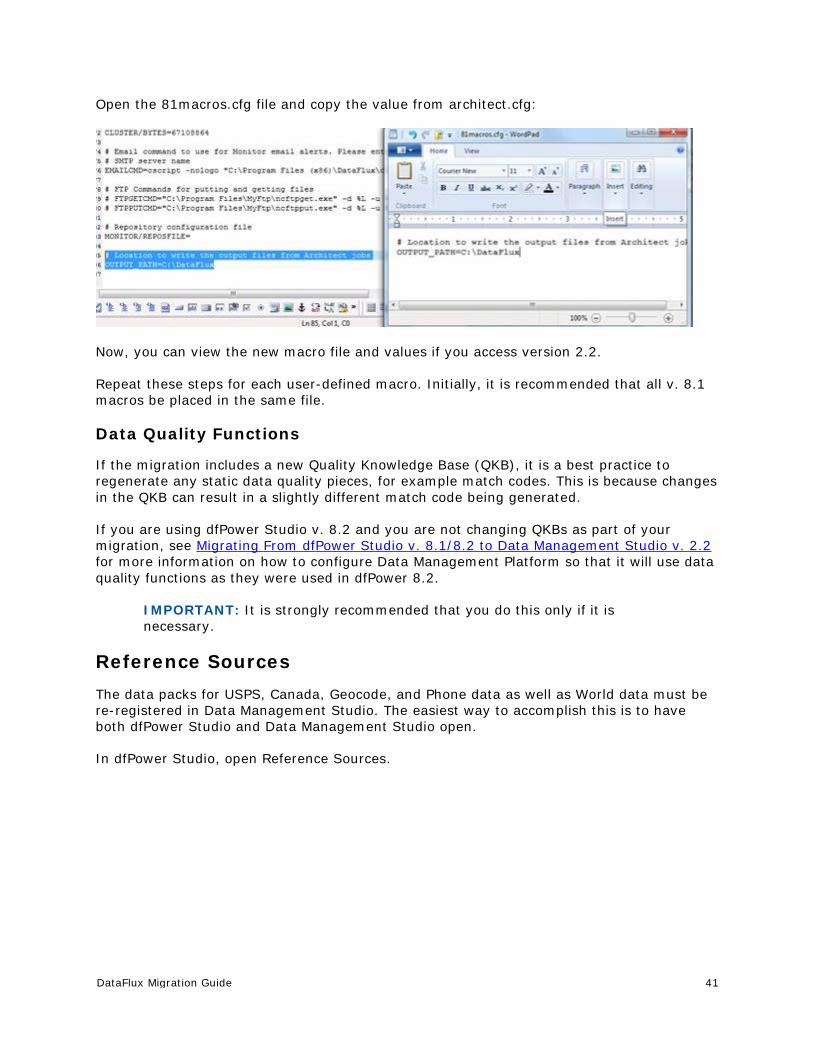
DataFlux Migration Guide 41
Open the 81macros.cfg file and copy the value from architect.cfg:
Now, you can view the new macro file and values if you access version 2.2.
Repeat these steps for each user-defined macro. Initially, it is recommended that all v. 8.1 macros be placed in the same file.
Data Quality Functions
If the migration includes a new Quality Knowledge Base (QKB), it is a best practice to regenerate any static data quality pieces, for example match codes. This is because changes in the QKB can result in a slightly different match code being generated.
If you are using dfPower Studio v. 8.2 and you are not changing QKBs as part of your migration, see Migrating From dfPower Studio v. 8.1/8.2 to Data Management Studio v. 2.2 for more information on how to configure Data Management Platform so that it will use data quality functions as they were used in dfPower 8.2.
IMPORTANT: It is strongly recommended that you do this only if it is necessary.
Reference Sources The data packs for USPS, Canada, Geocode, and Phone data as well as World data must be re-registered in Data Management Studio. The easiest way to accomplish this is to have both dfPower Studio and Data Management Studio open.
In dfPower Studio, open Reference Sources.

42 DataFlux Migration Guide
Click on the properties for each line under the USPS Data, Canada Post Data, GEO+Phone Data, and World Data tabs.
Copy the Name and Directory into the Add Reference Source dialog in Data Management Studio, which is found in the Administration riser bar under the Reference Sources folder.
The one difference here is that you need to make sure the type reflects the dfPower tab where the information is coming from.
Make sure to check the Set as default option if this reference source should be used during job execution. If Private remains selected, this will set the proper values in the app.cfg located in %APPDATA%\DataFlux\DataManagement\2.2 (Note you can copy that string and paste into Windows Explorer and it will take you to the correct location. If the location does
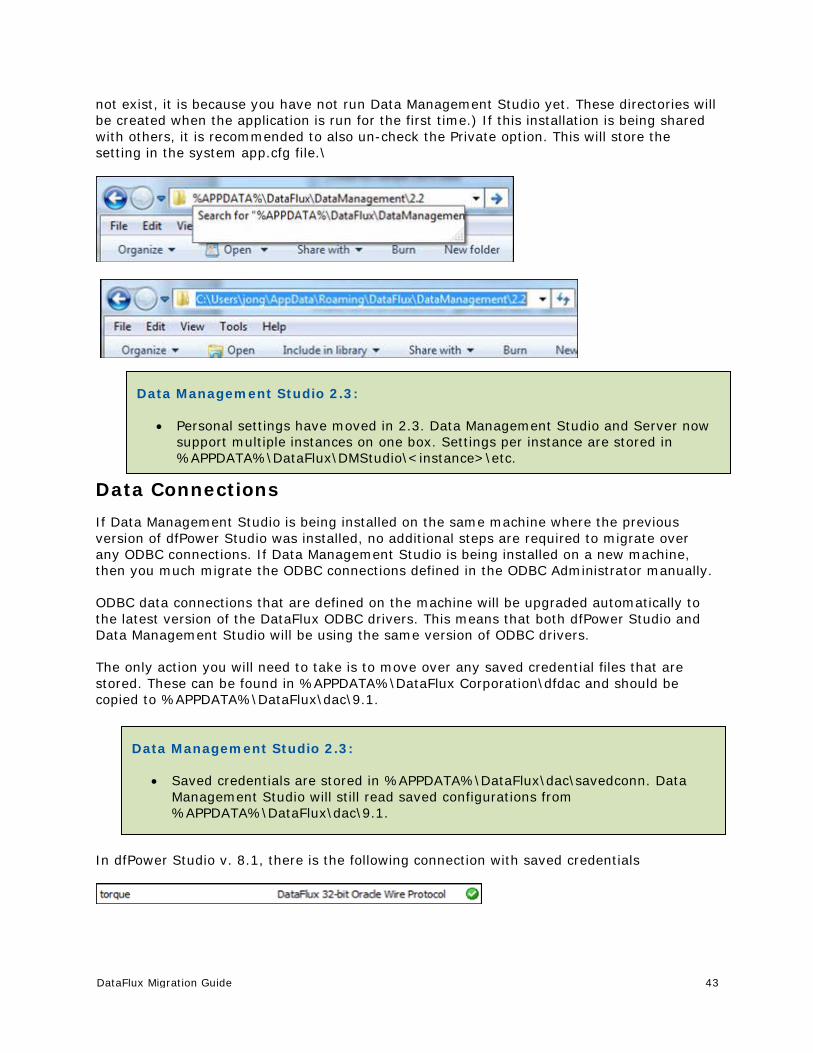
DataFlux Migration Guide 43
not exist, it is because you have not run Data Management Studio yet. These directories will be created when the application is run for the first time.) If this installation is being shared with others, it is recommended to also un-check the Private option. This will store the setting in the system app.cfg file.\
Data Connections If Data Management Studio is being installed on the same machine where the previous version of dfPower Studio was installed, no additional steps are required to migrate over any ODBC connections. If Data Management Studio is being installed on a new machine, then you much migrate the ODBC connections defined in the ODBC Administrator manually.
ODBC data connections that are defined on the machine will be upgraded automatically to the latest version of the DataFlux ODBC drivers. This means that both dfPower Studio and Data Management Studio will be using the same version of ODBC drivers.
The only action you will need to take is to move over any saved credential files that are stored. These can be found in %APPDATA%\DataFlux Corporation\dfdac and should be copied to %APPDATA%\DataFlux\dac\9.1.
In dfPower Studio v. 8.1, there is the following connection with saved credentials
Data Management Studio 2.3:
• Personal settings have moved in 2.3. Data Management Studio and Server now support multiple instances on one box. Settings per instance are stored in %APPDATA%\DataFlux\DMStudio\<instance>\etc.
Data Management Studio 2.3:
• Saved credentials are stored in %APPDATA%\DataFlux\dac\savedconn. Data Management Studio will still read saved configurations from %APPDATA%\DataFlux\dac\9.1.
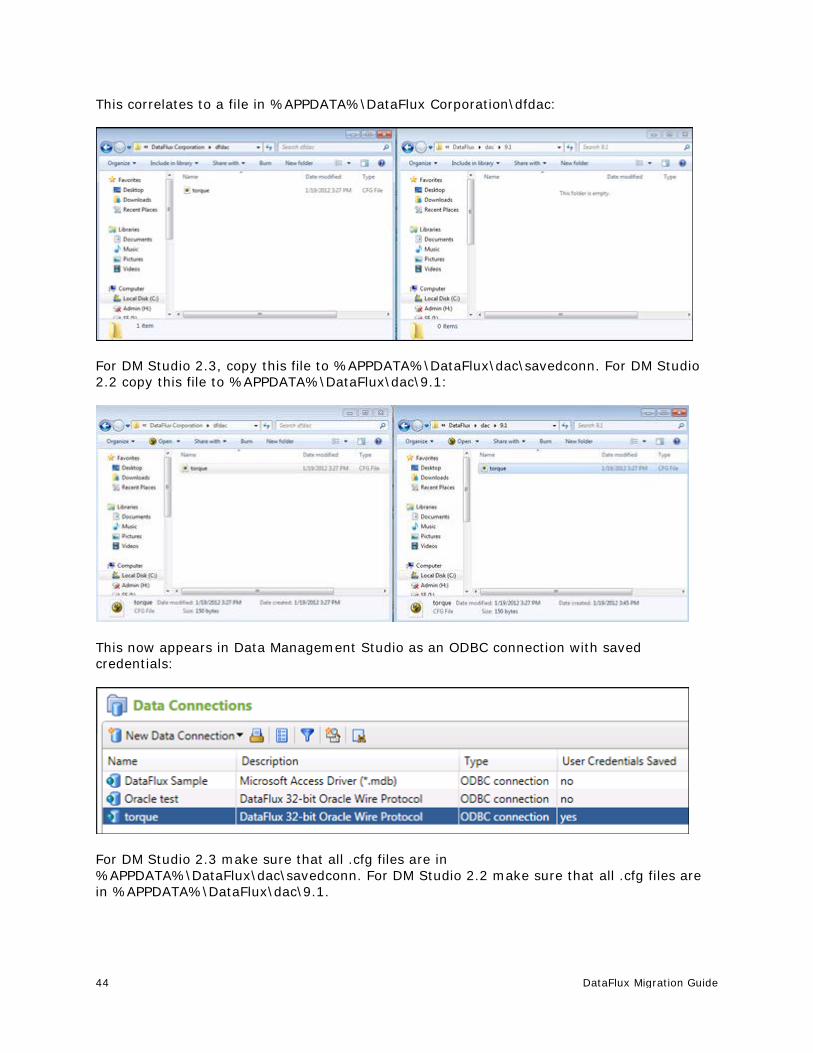
44 DataFlux Migration Guide
This correlates to a file in %APPDATA%\DataFlux Corporation\dfdac:
For DM Studio 2.3, copy this file to %APPDATA%\DataFlux\dac\savedconn. For DM Studio 2.2 copy this file to %APPDATA%\DataFlux\dac\9.1:
This now appears in Data Management Studio as an ODBC connection with saved credentials:
For DM Studio 2.3 make sure that all .cfg files are in %APPDATA%\DataFlux\dac\savedconn. For DM Studio 2.2 make sure that all .cfg files are in %APPDATA%\DataFlux\dac\9.1.

DataFlux Migration Guide 45
You can use the DataFlux Tool utility to help with this process. This can be retrieved from http://xyz.com. To copy over the saved credentials, open a command prompt and run:
> cd [DM_Studio_Install_Root]\ > dftool
Then answer the next two questions by typing 1 and then 1 again. Here are some images that display these steps:
First, confirm there is not anything in the dac\9.1 folder.
Next, open the DOS prompt and run the command:
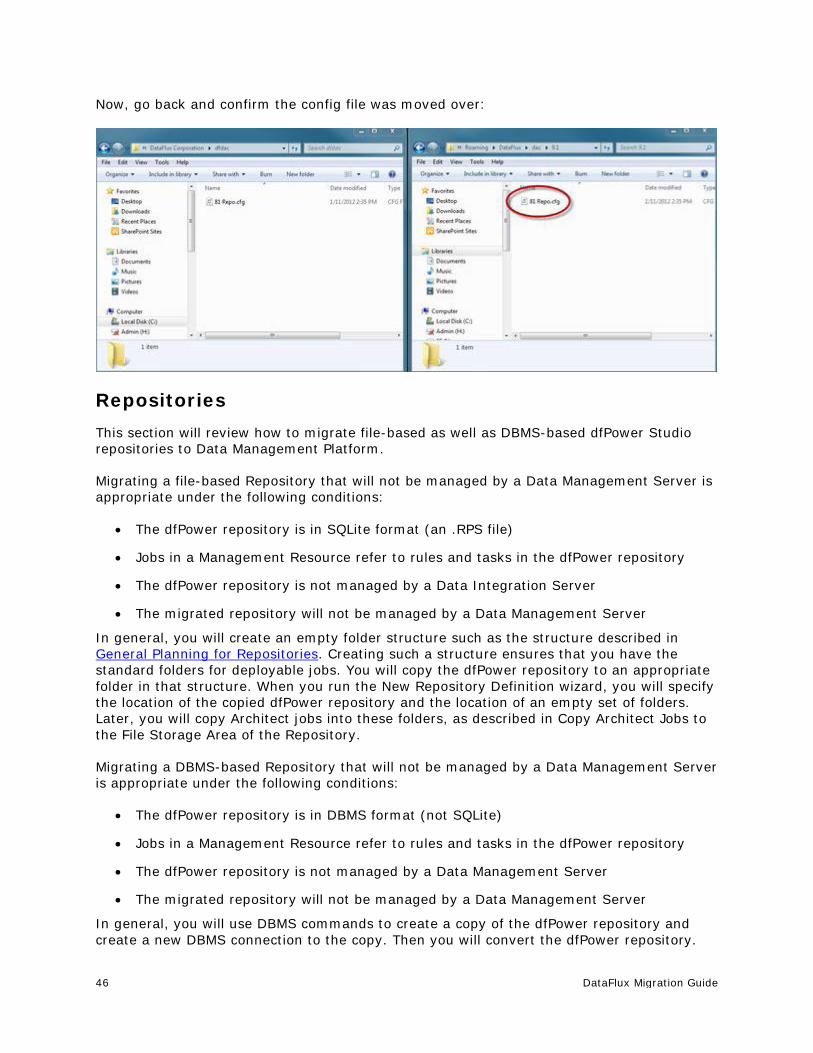
46 DataFlux Migration Guide
Now, go back and confirm the config file was moved over:
Repositories This section will review how to migrate file-based as well as DBMS-based dfPower Studio repositories to Data Management Platform.
Migrating a file-based Repository that will not be managed by a Data Management Server is appropriate under the following conditions:
• The dfPower repository is in SQLite format (an .RPS file)
• Jobs in a Management Resource refer to rules and tasks in the dfPower repository
• The dfPower repository is not managed by a Data Integration Server
• The migrated repository will not be managed by a Data Management Server
In general, you will create an empty folder structure such as the structure described in General Planning for Repositories. Creating such a structure ensures that you have the standard folders for deployable jobs. You will copy the dfPower repository to an appropriate folder in that structure. When you run the New Repository Definition wizard, you will specify the location of the copied dfPower repository and the location of an empty set of folders. Later, you will copy Architect jobs into these folders, as described in Copy Architect Jobs to the File Storage Area of the Repository.
Migrating a DBMS-based Repository that will not be managed by a Data Management Server is appropriate under the following conditions:
• The dfPower repository is in DBMS format (not SQLite)
• Jobs in a Management Resource refer to rules and tasks in the dfPower repository
• The dfPower repository is not managed by a Data Management Server
• The migrated repository will not be managed by a Data Management Server
In general, you will use DBMS commands to create a copy of the dfPower repository and create a new DBMS connection to the copy. Then you will convert the dfPower repository.

DataFlux Migration Guide 47
The next few sections provide specific steps to follow to create a Data Management Studio Repository.
• Copying a File-Based Repository
• Copying a DBMS-Based Repository
• Copying Over Files
• Create the v. 2.2 Repository
Copying a File-Based Repository
In this section, you will have a step-by-step walk-through on how to migrate a dfPower Repository and Management Resource to a Data Management Platform Repository.
First, back up your dfPower v. 8.1 Repository. This can be done through dfPower Studio. Open dfPower Studio then open the Repositories.
Select and right-click on a repository, and then select Copy Repository.

48 DataFlux Migration Guide
In the Copy Repository dialog, type the necessary information in the available fields. This information is specific to your needs.
Note: It is a good idea to make the copy the same type as the original.
When done you are finished, you should see a copy in the Repository list:
Copying a DBMS-Based Repository
This is an example for a database-sourced repository. This example uses Oracle as the database and the approach taken is to create a new schema that will contain the copy. This means that you will have to register a new DSN and then use this DSN to hold the copy. The copy of the repository could be stored in the same schema, but it is recommended to store in a separate schema to keep a clean separation between environments.
The Database Connections screen looks like this:
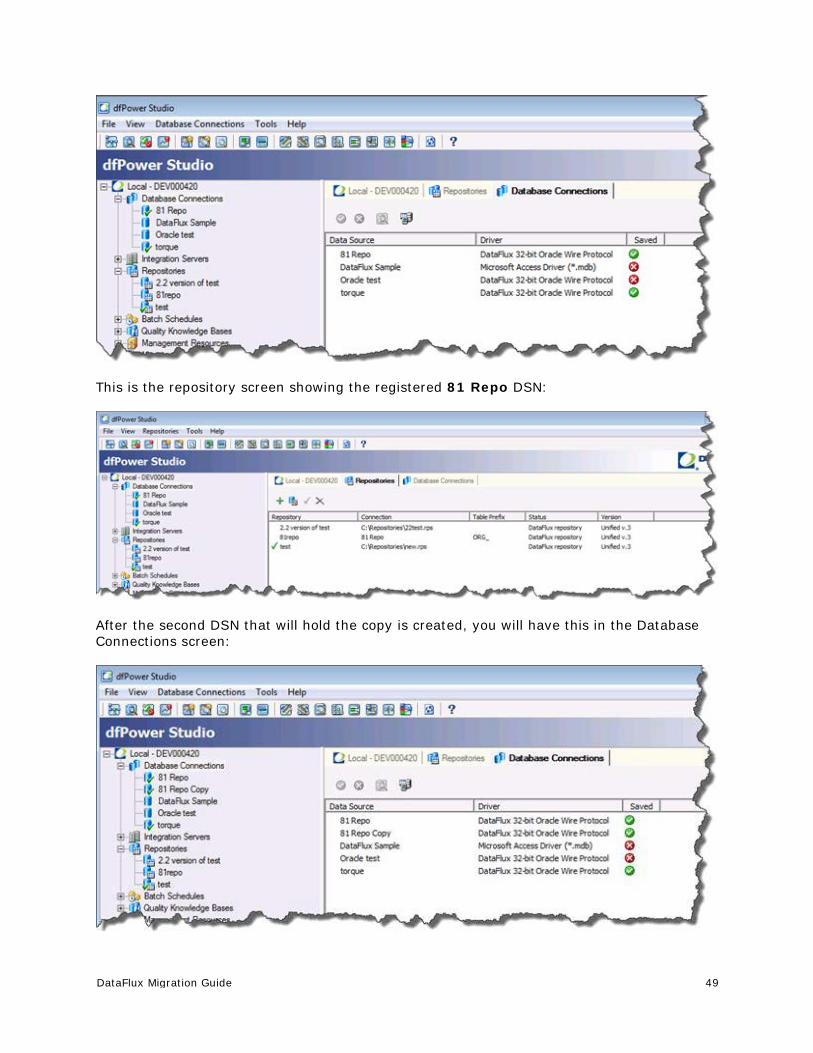
DataFlux Migration Guide 49
This is the repository screen showing the registered 81 Repo DSN:
After the second DSN that will hold the copy is created, you will have this in the Database Connections screen:
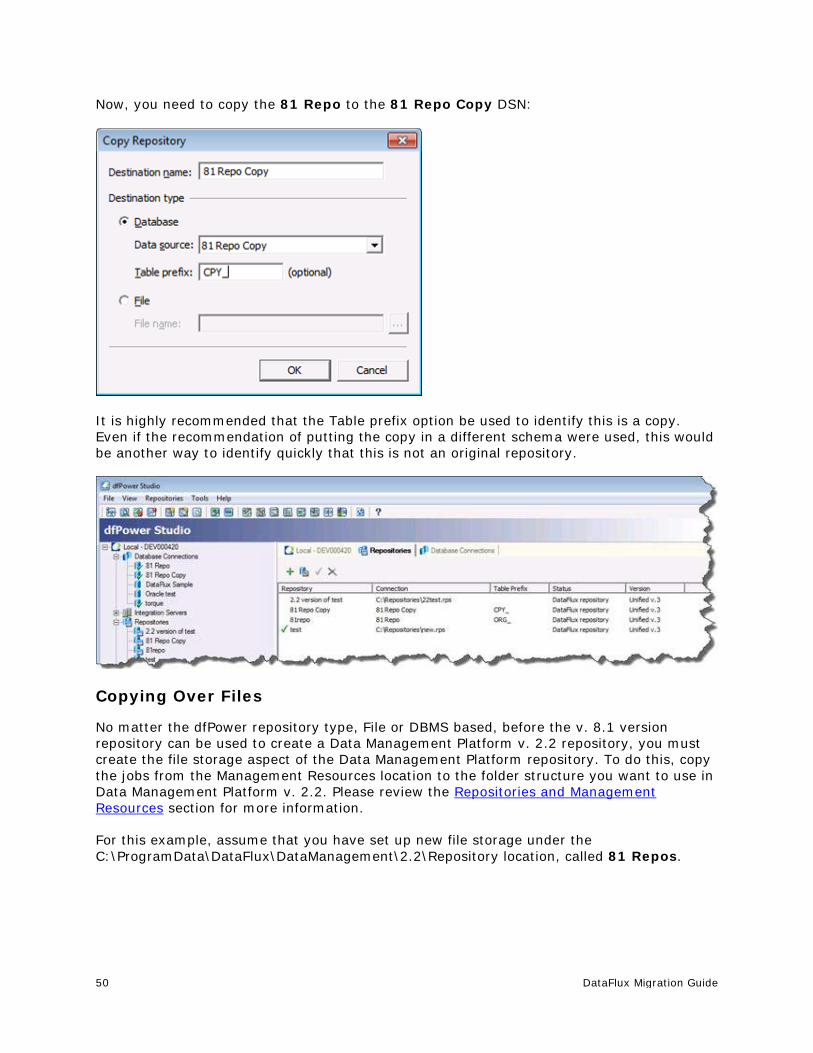
50 DataFlux Migration Guide
Now, you need to copy the 81 Repo to the 81 Repo Copy DSN:
It is highly recommended that the Table prefix option be used to identify this is a copy. Even if the recommendation of putting the copy in a different schema were used, this would be another way to identify quickly that this is not an original repository.
Copying Over Files
No matter the dfPower repository type, File or DBMS based, before the v. 8.1 version repository can be used to create a Data Management Platform v. 2.2 repository, you must create the file storage aspect of the Data Management Platform repository. To do this, copy the jobs from the Management Resources location to the folder structure you want to use in Data Management Platform v. 2.2. Please review the Repositories and Management Resources section for more information.
For this example, assume that you have set up new file storage under the C:\ProgramData\DataFlux\DataManagement\2.2\Repository location, called 81 Repos.

DataFlux Migration Guide 51
Under this location create the following hierarchy:
• FileStorage\architecct81
• FileStorage\profile81
• FileStorage\realtimesvcs81
In each location, copy the jobs that need to be converted. Note that this can be from multiple Management Resource locations. Data Management Studio can handle multiple repositories but Data Management Server can only support one repository connection. This should factor in when trying to organize repositories.
In the 8.1 system, there are three Management Resources locations. All three will be moved to one location for Data Management Platform v. 2.2.

52 DataFlux Migration Guide
All of the Architect jobs will go into the FileStorage\architect81 folder. The same Management Resources structure will be used. This will make it easier to remember and even synchronize the folder locations post migration.
All Profile jobs will be moved into the FileStorage\profile81 folder and the real-time service jobs will be moved into the FileStorage\realtimesvcs81 folder. The dftool.bat file will help with this process.
Before you run dftool.bat:
When you run dftool.bat:
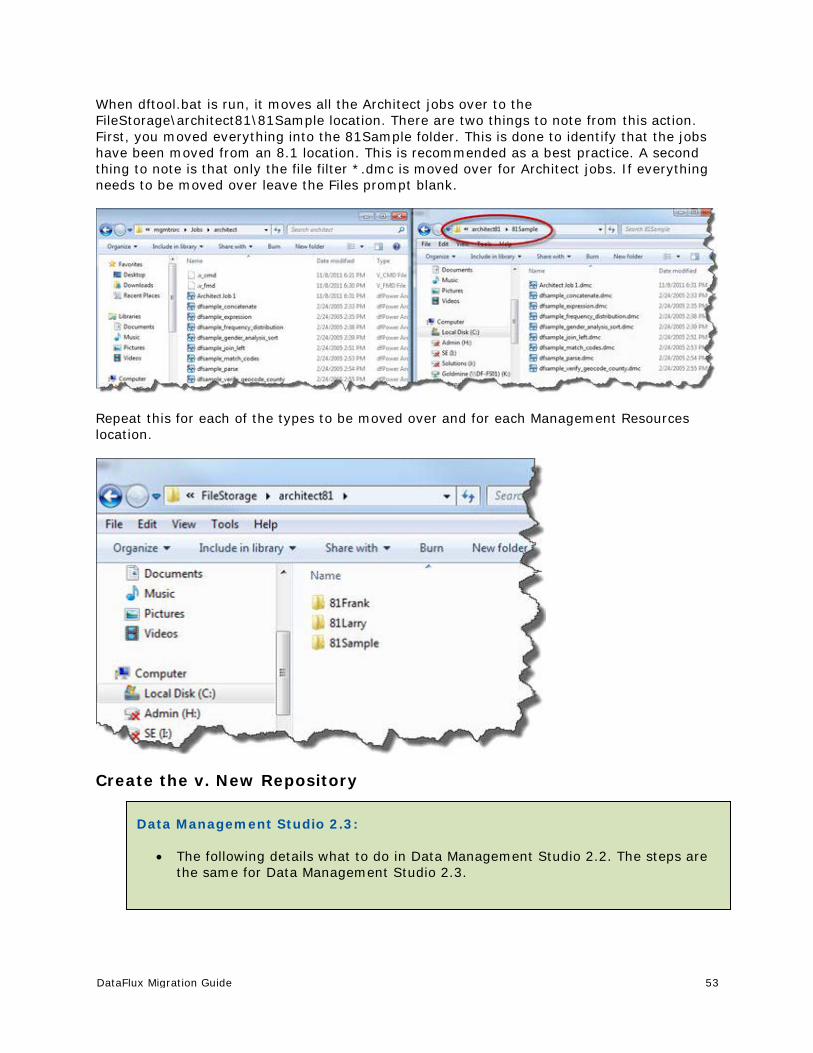
DataFlux Migration Guide 53
When dftool.bat is run, it moves all the Architect jobs over to the FileStorage\architect81\81Sample location. There are two things to note from this action. First, you moved everything into the 81Sample folder. This is done to identify that the jobs have been moved from an 8.1 location. This is recommended as a best practice. A second thing to note is that only the file filter *.dmc is moved over for Architect jobs. If everything needs to be moved over leave the Files prompt blank.
Repeat this for each of the types to be moved over and for each Management Resources location.
Create the v. New Repository
Data Management Studio 2.3:
• The following details what to do in Data Management Studio 2.2. The steps are the same for Data Management Studio 2.3.
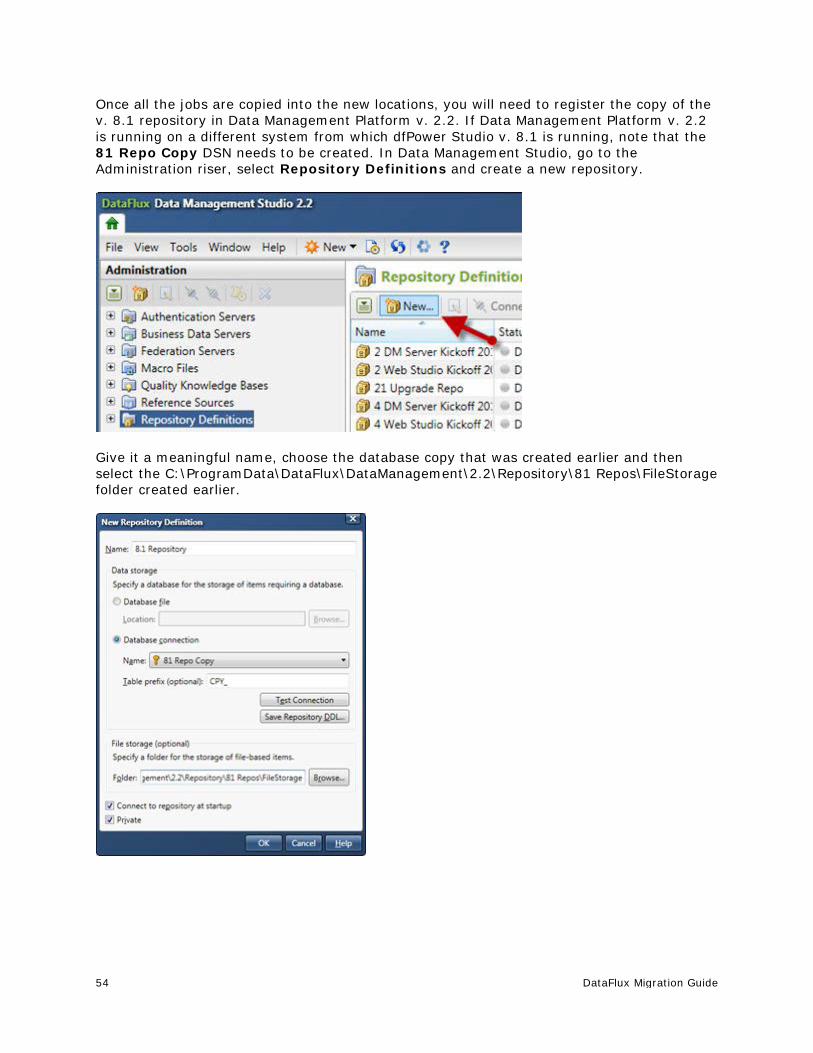
54 DataFlux Migration Guide
Once all the jobs are copied into the new locations, you will need to register the copy of the v. 8.1 repository in Data Management Platform v. 2.2. If Data Management Platform v. 2.2 is running on a different system from which dfPower Studio v. 8.1 is running, note that the 81 Repo Copy DSN needs to be created. In Data Management Studio, go to the Administration riser, select Repository Definitions and create a new repository.
Give it a meaningful name, choose the database copy that was created earlier and then select the C:\ProgramData\DataFlux\DataManagement\2.2\Repository\81 Repos\FileStorage folder created earlier.

DataFlux Migration Guide 55
If using a file-based repository, the Repository Definition should look something like this:
When you save the Data Management Studio configuration, Data Management Studio will notify you that the repository needs to be upgraded. This is OK and a good sign that the system has recognized that you have an older version and it needs to be updated.
Click OK. You should now see something that indicates that the repository needs to be upgraded. Right-click on the repository and choose Upgrade.
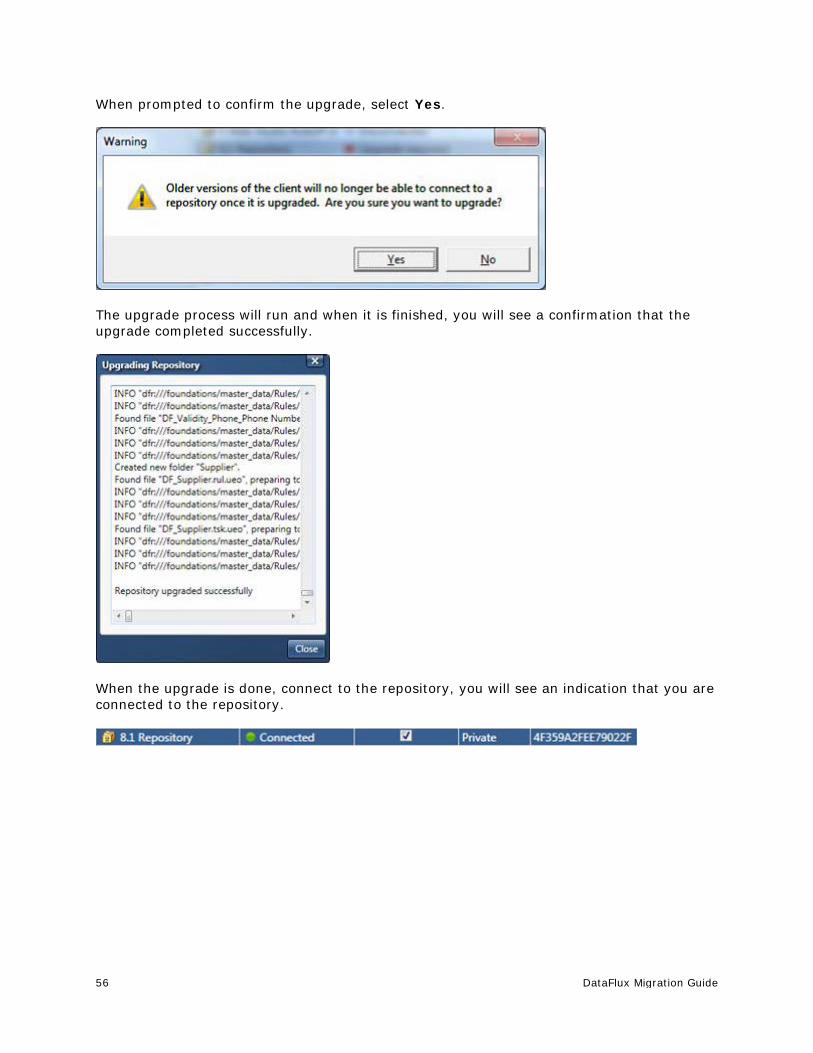
56 DataFlux Migration Guide
When prompted to confirm the upgrade, select Yes.
The upgrade process will run and when it is finished, you will see a confirmation that the upgrade completed successfully.
When the upgrade is done, connect to the repository, you will see an indication that you are connected to the repository.
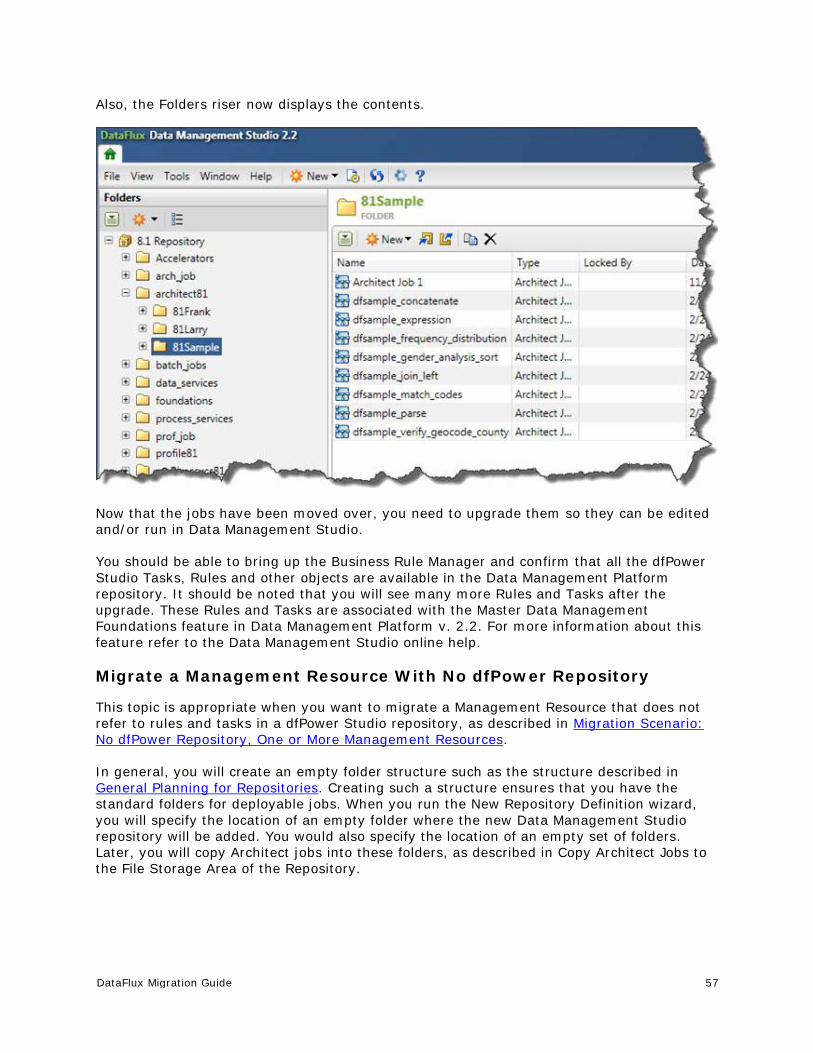
DataFlux Migration Guide 57
Also, the Folders riser now displays the contents.
Now that the jobs have been moved over, you need to upgrade them so they can be edited and/or run in Data Management Studio.
You should be able to bring up the Business Rule Manager and confirm that all the dfPower Studio Tasks, Rules and other objects are available in the Data Management Platform repository. It should be noted that you will see many more Rules and Tasks after the upgrade. These Rules and Tasks are associated with the Master Data Management Foundations feature in Data Management Platform v. 2.2. For more information about this feature refer to the Data Management Studio online help.
Migrate a Management Resource With No dfPower Repository
This topic is appropriate when you want to migrate a Management Resource that does not refer to rules and tasks in a dfPower Studio repository, as described in Migration Scenario: No dfPower Repository, One or More Management Resources.
In general, you will create an empty folder structure such as the structure described in General Planning for Repositories. Creating such a structure ensures that you have the standard folders for deployable jobs. When you run the New Repository Definition wizard, you will specify the location of an empty folder where the new Data Management Studio repository will be added. You would also specify the location of an empty set of folders. Later, you will copy Architect jobs into these folders, as described in Copy Architect Jobs to the File Storage Area of the Repository.

58 DataFlux Migration Guide
Complete the following steps:
1. Create an empty folder structure to hold the new Data Management Studio repository and related assets, as described in General Planning for Repositories.
2. Run Data Management Studio.
3. Click on the Administration riser bar. Then select the Repository Definitions folder in the Administration tree. The Repository Definitions pane displays on the right.
4. In the Repository Definitions pane, click New to create the new repository. The New Repository Definition dialog appears.
5. Enter the name of your repository in the Name field.
6. In the Data storage section of the dialog, specify a new Database file for the Data Management Studio repository that you want to create. For example, you could specify a path such as C:\New_Repos_C\Repository\Repository_New.rps. Note: Do not create a repository database file (.RPS) in the file storage location that you will specify in the next step. This practice prevents manipulating the file through Data Management Studio, and it triggers unneeded update events in the file storage area every time the database file is updated.
7. In the File storage section of the dialog, specify an appropriate, empty folder from Step 1. For example, you could specify a path such a C:\New_Repos_C\File_Storage. (Later, you will copy unconverted dfPower Architect jobs to this area and save converted copies of these jobs to the same area.)
8. Click OK to save the new repository. You will get a message that asks if you want to create a new repository.
9. Click Yes. The repository is created.
10. Verify that the new repository is working properly by browsing its contents. See Browsing the Results After Migration.
11. Copy the relevant Architect jobs from one or more Management Resources to an appropriate folder in the file storage area of the new repository, as described in Copy Architect Jobs to the File Storage Area of the Repository.
Post-Migration Tasks for Repositories
Browsing the Results After Migration
The following steps demonstrate one way to browse a migrated repository in Data Management Studio. For this section, you are in Data Management Studio and are connected to the migrated repository.
1. To explore the contents of the migrated repository, click on the Folders riser.
2. Select the new repository in the Folders tree.
3. Toggle between the two main views in the Folders tree by selecting and deselecting the Group Items by Type control at the top of the tree.
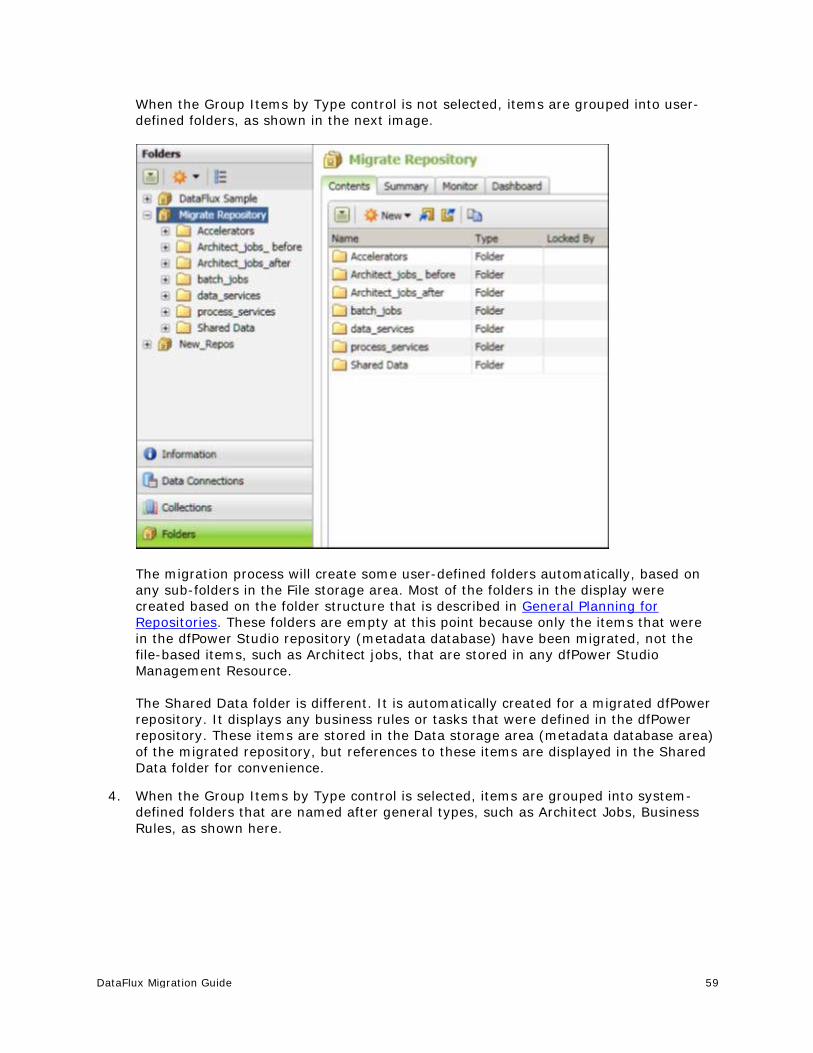
DataFlux Migration Guide 59
When the Group Items by Type control is not selected, items are grouped into user-defined folders, as shown in the next image.
The migration process will create some user-defined folders automatically, based on any sub-folders in the File storage area. Most of the folders in the display were created based on the folder structure that is described in General Planning for Repositories. These folders are empty at this point because only the items that were in the dfPower Studio repository (metadata database) have been migrated, not the file-based items, such as Architect jobs, that are stored in any dfPower Studio Management Resource. The Shared Data folder is different. It is automatically created for a migrated dfPower repository. It displays any business rules or tasks that were defined in the dfPower repository. These items are stored in the Data storage area (metadata database area) of the migrated repository, but references to these items are displayed in the Shared Data folder for convenience.
4. When the Group Items by Type control is selected, items are grouped into system-defined folders that are named after general types, such as Architect Jobs, Business Rules, as shown here.

60 DataFlux Migration Guide
5. With Group Items by Type control selected, expand the migrated repository and expand the folders for each type of object. Most of these folders will be empty because we have migrated only the items that were in the dfPower repository (metadata database), not the file-based items, such as Architect jobs, that are stored in any dfPower Studio Management Resource. The Business Rules folder contains Business Rules that have been converted to Data Management Studio format and will often be ready to use. Similarly the Tasks folder contains any Monitor Tasks (tasks created in the Business Rule Manager) that have been converted and will be ready to use. For more information, see Business Rules, Tasks, and Related Items.
Miscellaneous Post-Migration Tasks
Delete any Data Explorations migrated from dfPower Studio
The migration software will move dfPower Studio Data Explorations into the Folders tree in Data Management Studio. You cannot use these items in Data Management Studio, however, so you can delete them. To delete these items after migration, click the Folders riser in Data Management Studio. Then click the Group Items by Type icon at the top of the Folders tree so that items are grouped in folders with type names, such as Architect Jobs, Business Rules, and so on, Select the folder for Data Explorations. A list of Data Explorations displays on the right. Select all of the Data Explorations that you want to delete, and then click the X icon in the toolbar.

DataFlux Migration Guide 61
Architect Jobs • Migrate to a Data Job or a Process Job?
• Post-Migration Tasks for Architect Jobs
Migrate to a Data Job or a Process Job?
Use the upgrade job wizards to convert an Architect job to a Process job or a Data job, as permitted by the wizards. The wizards evaluate the following conditions:
• Architect job with a single page that does not have an External Data Provider node in the job flow - You can select Upgrade as a Data Job or Upgrade as a Process Job. You might want to select Upgrade as a Data Job until you become familiar with Process jobs.
• Architect job with a single page that has an External Data Provider node in the job flow - Select Upgrade as a Data Job. If you want to use the Data Provider job in multiple jobs, then it is preferable to convert it to a Data job. This allows you to link to it from many Process jobs and only maintain one copy of the Data Provider job that is used in multiple Process jobs.
• Architect job with multiple pages - Select Upgrade as a Process Job. If you choose Upgrade as a Data Job you will get an error.
Using the Folders riser, you will be able to select jobs and upgrade the jobs. You can do this in batch or one at a time. Refer to Architect Jobs for additional. This provides some guidance in the planning and decisions that need to be made when converting Architect jobs.
Select the jobs that need to be converted, right-click and select Upgrade As Data Job.
Note: If you have Architect jobs that contain multiple pages they can only be upgraded as Process jobs.

62 DataFlux Migration Guide
The Save As Data Job dialog appears:
Change the Save in directory to the new directory where they need to be saved.
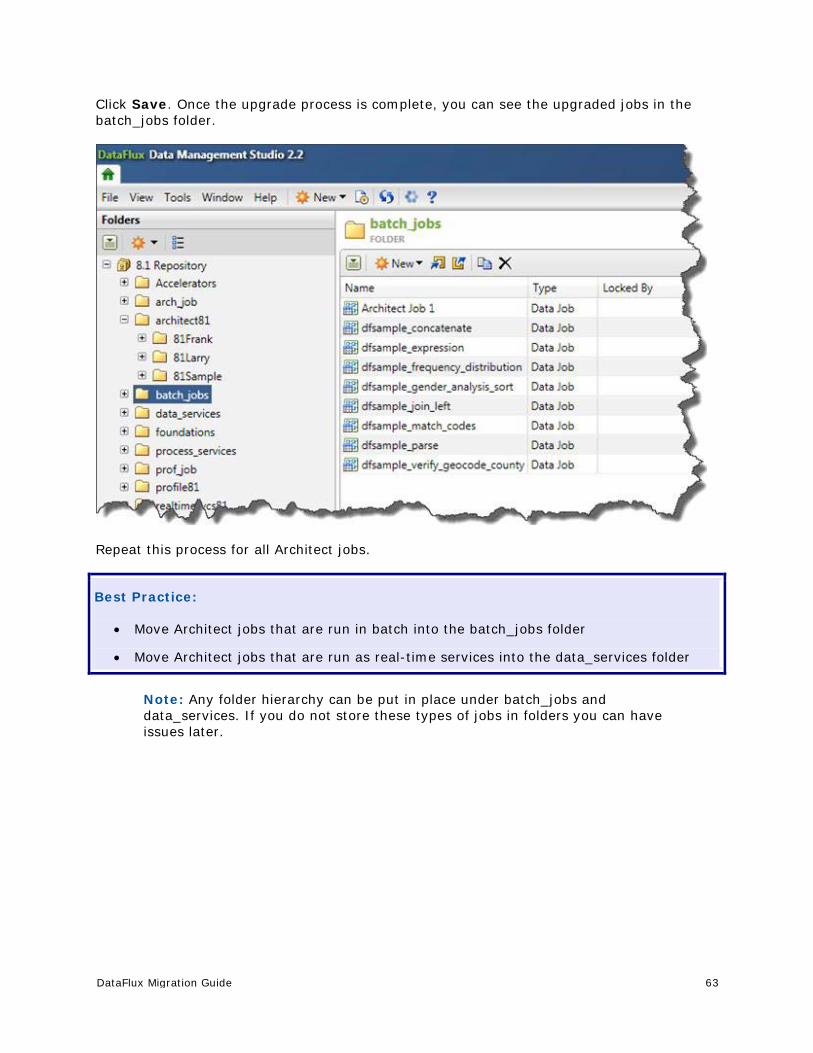
DataFlux Migration Guide 63
Click Save. Once the upgrade process is complete, you can see the upgraded jobs in the batch_jobs folder.
Repeat this process for all Architect jobs.
Best Practice:
• Move Architect jobs that are run in batch into the batch_jobs folder
• Move Architect jobs that are run as real-time services into the data_services folder
Note: Any folder hierarchy can be put in place under batch_jobs and data_services. If you do not store these types of jobs in folders you can have issues later.

64 DataFlux Migration Guide
Architect Jobs That Pass Macro Variable Values Dynamically Between Pages in the Job
This topic is appropriate under the following conditions:
• You had a multi-page Architect job that used the setvar() and getvar() functions to dynamically pass macro variable values between pages in the job.
• You converted this Architect job to a Data Management Studio Process job.
A multi-page Architect job can use the setvar() and getvar() functions to dynamically pass macro variable values between pages in the job. A Data Management Studio process job can use input and output variables to do something similar. The two methods are different enough, however, that some manual updates are required when you migrate a multi-page Architect job that dynamically passes values between pages in the job. Without these updates, the new Process job will not produce the correct output.
In order to perform these updates, you must understand how the setvar() and getvar() functions were used in the original Architect job. Then you must recreate the same functionality, using input and output variables. This task will be easier if you understand how input and output variables are used in Process jobs, as described in the Process Jobs section of the DataFlux Data Management Studio Online Help, v. 2.1.1, under Create a Process Job.

DataFlux Migration Guide 65
Understanding an Architect Job That Passes Macro Variable Values Dynamically
For the current example, assume that the original Architect job is similar to the Add_New_records_macro job shown here:
Notice that the job has two pages: Set Max_ID and Insert Records.
On the Set Max_ID page, the flow increments a macro variable NEXT_ID in the Expression node:
hidden integer x x = MAX_ID + 1 setvar("NEXT_ID", x)
On the Insert Records page, the NEXT_ID macro is used in sequencer node by setting the start number = %%NEXT_ID%%. Here are the Advanced Properties of the Sequencer node:
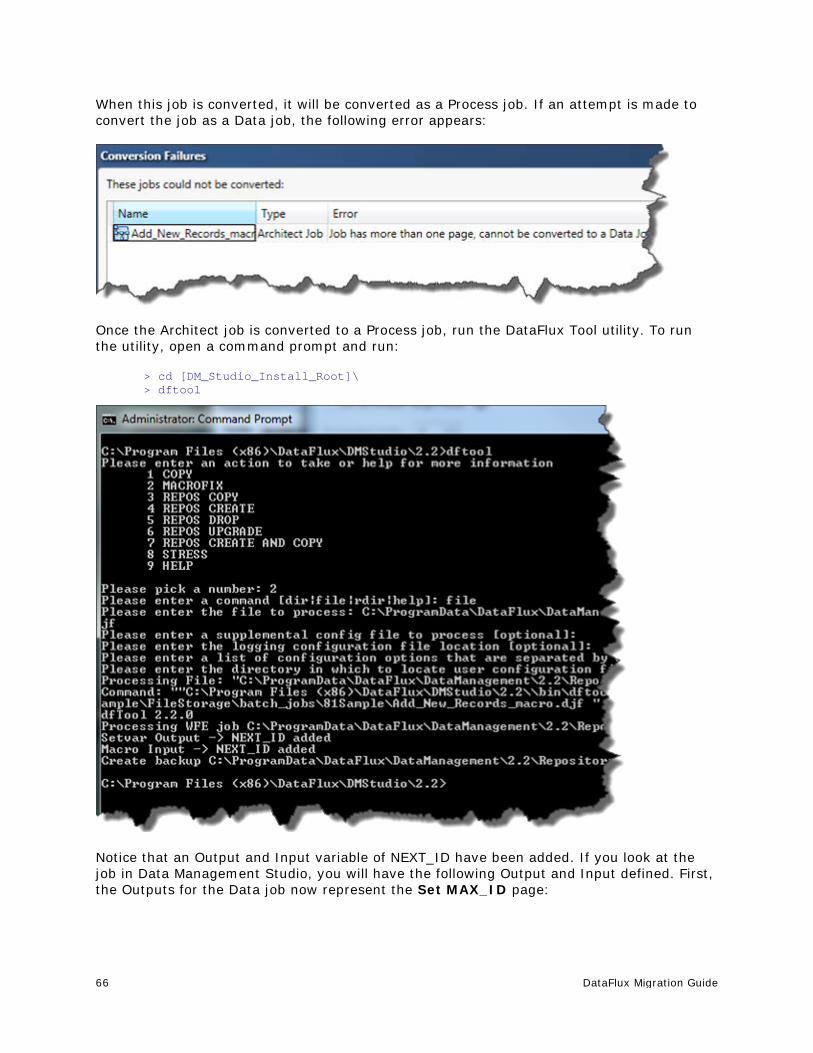
66 DataFlux Migration Guide
When this job is converted, it will be converted as a Process job. If an attempt is made to convert the job as a Data job, the following error appears:
Once the Architect job is converted to a Process job, run the DataFlux Tool utility. To run the utility, open a command prompt and run:
> cd [DM_Studio_Install_Root]\ > dftool
Notice that an Output and Input variable of NEXT_ID have been added. If you look at the job in Data Management Studio, you will have the following Output and Input defined. First, the Outputs for the Data job now represent the Set MAX_ID page:

DataFlux Migration Guide 67
Plus the Inputs of the Data job that represent the Insert Records page:
For the inputs, there is one more step that you must do, bind this input variable to the output variable of the first node.
1. Select the input variable that you created.
2. Click Source Binding, above the Default Value column for the selected variable. The Source Binding dialog appears.
3. In the Source Binding dialog, select the output variable that should populate the input variable that you just defined. For this example, this is the NEXT_ID variable for the Data Job 1 node.
4. Click OK to save the selected binding. The binding appears in the Source Binding column for the variable.
5. Save your changes. You can click the disk icon in the toolbar or select File > Save Process Job.
68 DataFlux Migration Guide
At this point, you have created input and output variables that perform the same function as the setvar() and getvar() functions did in the Architect job. Next, run the job and verify the output.
6. Click the first tab in the flow navigation bar in the process editor dialog to go back to the main flow for the Process job. This is the tab with the name of the job (such as Add_New_Records_macro).
7. Run the entire Process job. You can click the Run Process Job icon in the toolbar, or select Actions > Run Process Job from the main menu.
8. Verify that the output is what you expect.
Post-Migration Tasks for Architect Jobs
• Inspect Architect Jobs After Migration
• Architect Jobs That Use Macro Variables
• Architect Jobs That Contain a Merge File Output Node
• Architect Jobs That Contain a Match Report Node
• Architect Jobs That Contain Deprecated Nodes
Inspect Architect Jobs After Migration
After you convert an Architect job to a Data Management Studio job, perform the following steps to verify that the job is working properly. You will need a basic understanding of Data Management Studio jobs, as described in the "Data Jobs" and "Process Jobs" sections of the DataFlux Data Management Studio Online Help, v. 2.1.1.
1. Right-click the job in the Folders tree and select Open. The job will be opened in a job editor.
2. If appropriate, try to run the job to see if it works as it did before migration. Select Actions > Run Data Job or Run Process Job from the main menu.
3. The output, status messages, the log, and other indicators will tell you whether the job ran properly and will help you troubleshoot any errors.
Architect Jobs That Use Macro Variables
You will probably have to make some updates in order for dfPower Studio macro variables to work in Data Management Studio Data jobs or Process jobs. General updates for macros are described in Macro Variables.
Macro Variables and Embedded Jobs
Architect jobs with Embedded Job nodes will be converted to Data jobs with Data Job (reference) nodes, as shown here:
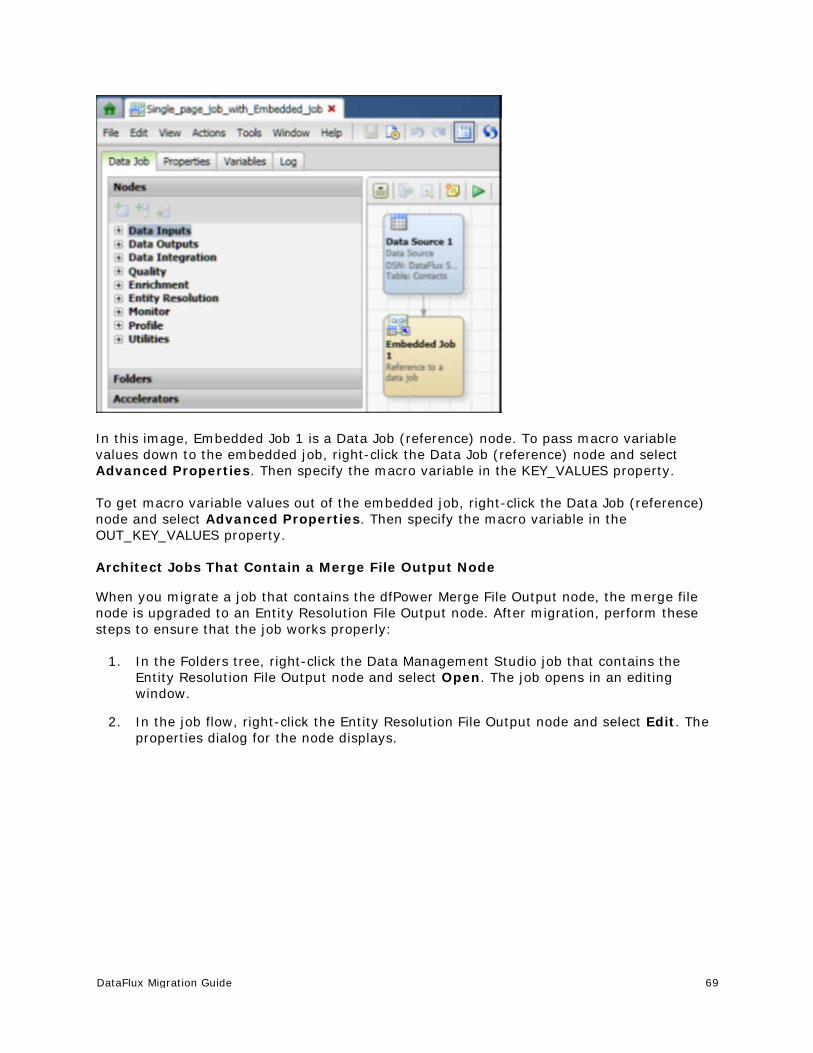
DataFlux Migration Guide 69
In this image, Embedded Job 1 is a Data Job (reference) node. To pass macro variable values down to the embedded job, right-click the Data Job (reference) node and select Advanced Properties. Then specify the macro variable in the KEY_VALUES property.
To get macro variable values out of the embedded job, right-click the Data Job (reference) node and select Advanced Properties. Then specify the macro variable in the OUT_KEY_VALUES property.
Architect Jobs That Contain a Merge File Output Node
When you migrate a job that contains the dfPower Merge File Output node, the merge file node is upgraded to an Entity Resolution File Output node. After migration, perform these steps to ensure that the job works properly:
1. In the Folders tree, right-click the Data Management Studio job that contains the Entity Resolution File Output node and select Open. The job opens in an editing window.
2. In the job flow, right-click the Entity Resolution File Output node and select Edit. The properties dialog for the node displays.
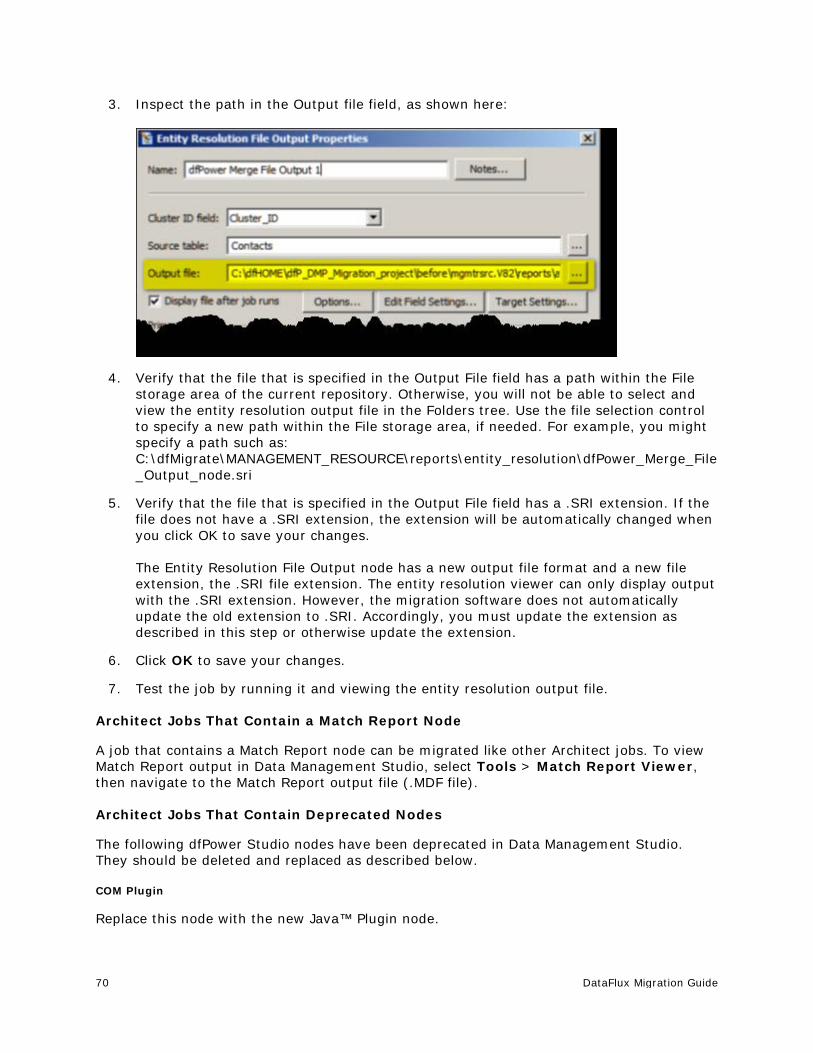
70 DataFlux Migration Guide
3. Inspect the path in the Output file field, as shown here:
4. Verify that the file that is specified in the Output File field has a path within the File storage area of the current repository. Otherwise, you will not be able to select and view the entity resolution output file in the Folders tree. Use the file selection control to specify a new path within the File storage area, if needed. For example, you might specify a path such as: C:\dfMigrate\MANAGEMENT_RESOURCE\reports\entity_resolution\dfPower_Merge_File_Output_node.sri
5. Verify that the file that is specified in the Output File field has a .SRI extension. If the file does not have a .SRI extension, the extension will be automatically changed when you click OK to save your changes. The Entity Resolution File Output node has a new output file format and a new file extension, the .SRI file extension. The entity resolution viewer can only display output with the .SRI extension. However, the migration software does not automatically update the old extension to .SRI. Accordingly, you must update the extension as described in this step or otherwise update the extension.
6. Click OK to save your changes.
7. Test the job by running it and viewing the entity resolution output file.
Architect Jobs That Contain a Match Report Node
A job that contains a Match Report node can be migrated like other Architect jobs. To view Match Report output in Data Management Studio, select Tools > Match Report Viewer, then navigate to the Match Report output file (.MDF file).
Architect Jobs That Contain Deprecated Nodes
The following dfPower Studio nodes have been deprecated in Data Management Studio. They should be deleted and replaced as described below.
COM Plugin
Replace this node with the new Java™ Plugin node.

DataFlux Migration Guide 71
SAS Data Set Source
To replace this node, define a SAS data set connection in the Data Connections riser, then use the Data Source node to point to the SAS data sets in that connection.
SAS Data Set Target (insert)
To replace this node, define a SAS data set connection in the Data Connections riser, then use the Data Target (Insert) node to point to the SAS data sets in that connection.
SAS SQL Query
To replace this node, define a SAS data set connection in the Data Connections riser, then use the SQL Query node to specify a query against a SAS data set.
Profile Jobs You will use a wizard to copy dfPower Studio profile jobs and convert the copies to Data Management Studio profiles. If the current repository was migrated from dfPower Studio, and profile reports were saved to the dfPower Studio repository before migration, then these reports will be listed in the Linked report section of the wizard, as shown here:
If you do not see any reports in the Linked report section, verify that you are connected to the correct repository. If you are connected to the correct repository, but you still do not see any reports, then you will not be able to include the dfPower Studio reports in the conversion. You will have to re-create the reports as described in the Profiles section in the DataFlux Data Management Studio Online Help, v. 2.1.1.
• Convert dfPower Profile Jobs to Data Management Studio Profiles
• Associate Data Management Studio Profiles with dfPower Studio Reports
• Unlink a dfPower Studio Report from a Data Management Studio Profile
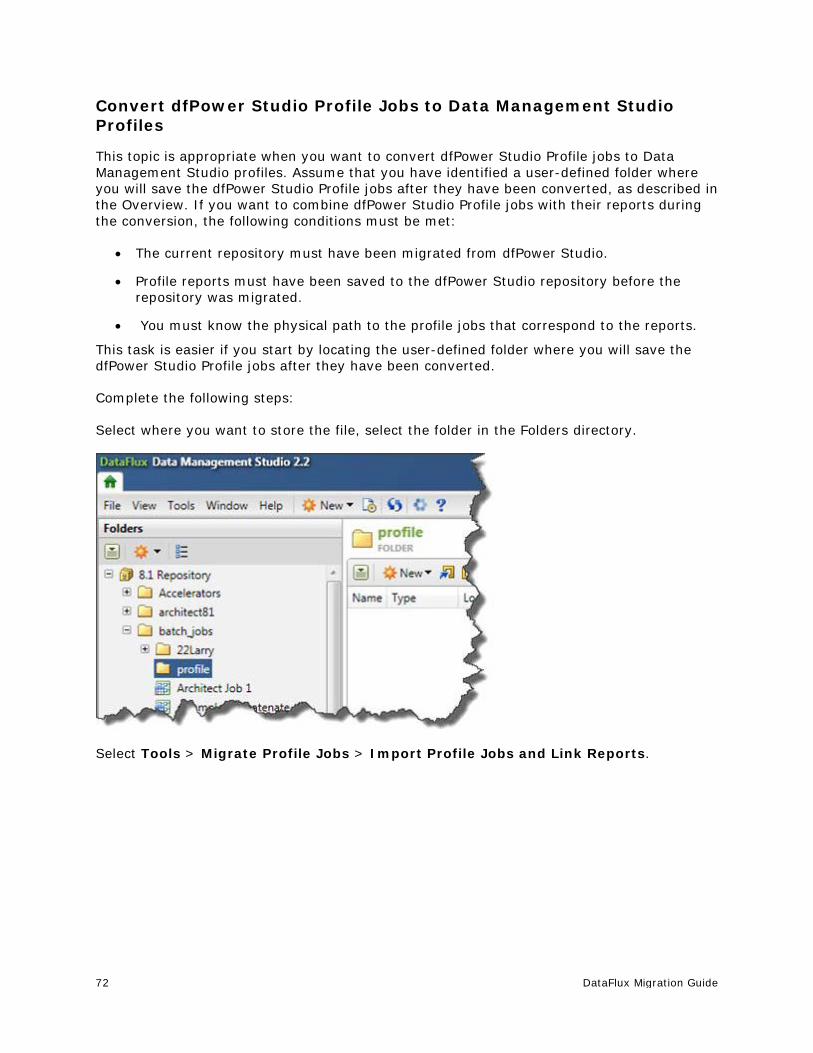
72 DataFlux Migration Guide
Convert dfPower Studio Profile Jobs to Data Management Studio Profiles
This topic is appropriate when you want to convert dfPower Studio Profile jobs to Data Management Studio profiles. Assume that you have identified a user-defined folder where you will save the dfPower Studio Profile jobs after they have been converted, as described in the Overview. If you want to combine dfPower Studio Profile jobs with their reports during the conversion, the following conditions must be met:
• The current repository must have been migrated from dfPower Studio.
• Profile reports must have been saved to the dfPower Studio repository before the repository was migrated.
• You must know the physical path to the profile jobs that correspond to the reports.
This task is easier if you start by locating the user-defined folder where you will save the dfPower Studio Profile jobs after they have been converted.
Complete the following steps:
Select where you want to store the file, select the folder in the Folders directory.
Select Tools > Migrate Profile Jobs > Import Profile Jobs and Link Reports.
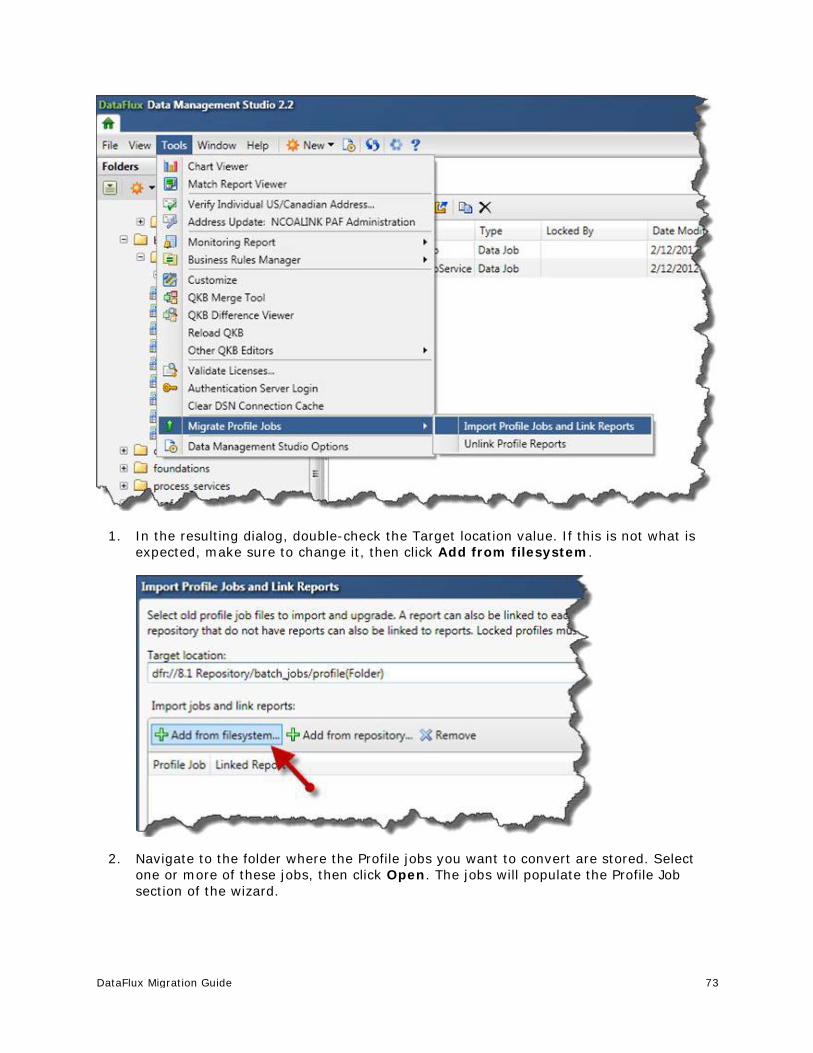
DataFlux Migration Guide 73
1. In the resulting dialog, double-check the Target location value. If this is not what is expected, make sure to change it, then click Add from filesystem.
2. Navigate to the folder where the Profile jobs you want to convert are stored. Select one or more of these jobs, then click Open. The jobs will populate the Profile Job section of the wizard.

74 DataFlux Migration Guide
If the current repository was migrated from dfPower Studio, and profile reports were saved to that repository, then these reports will be listed in the Linked report section of the wizard. The wizard does not display reports that have already been linked to migrated Profile jobs using the wizard. If you have made a mistake while linking the reports and only realized after saving the modifications, then you can select Tools > Migrate Profile Jobs > Unlink Profile Reports to undo these mistakes.
3. When upgrading a dfPower Profile job, you can also link it to any reports that exist in the repository. To link a report to a Profile job, select the Profile job on the left, then select the corresponding report on the right. The linked report should appear in the Linked Report column for the Profile job, as shown here.
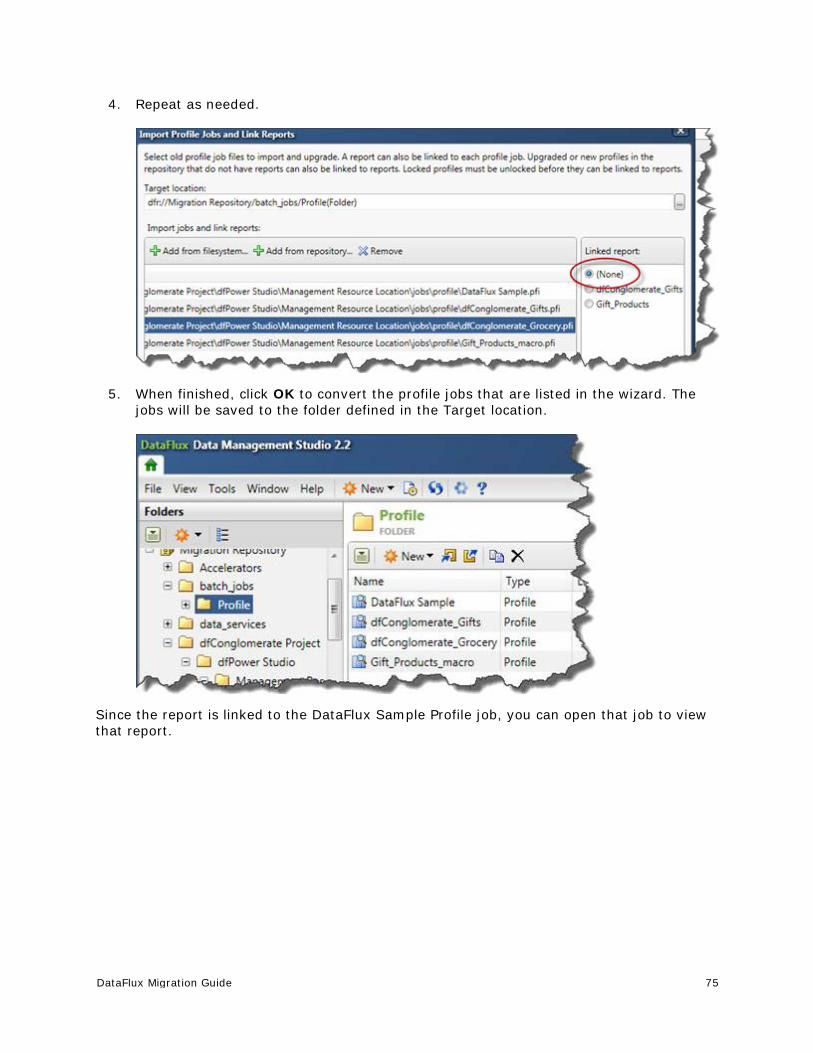
DataFlux Migration Guide 75
4. Repeat as needed.
5. When finished, click OK to convert the profile jobs that are listed in the wizard. The jobs will be saved to the folder defined in the Target location.
Since the report is linked to the DataFlux Sample Profile job, you can open that job to view that report.
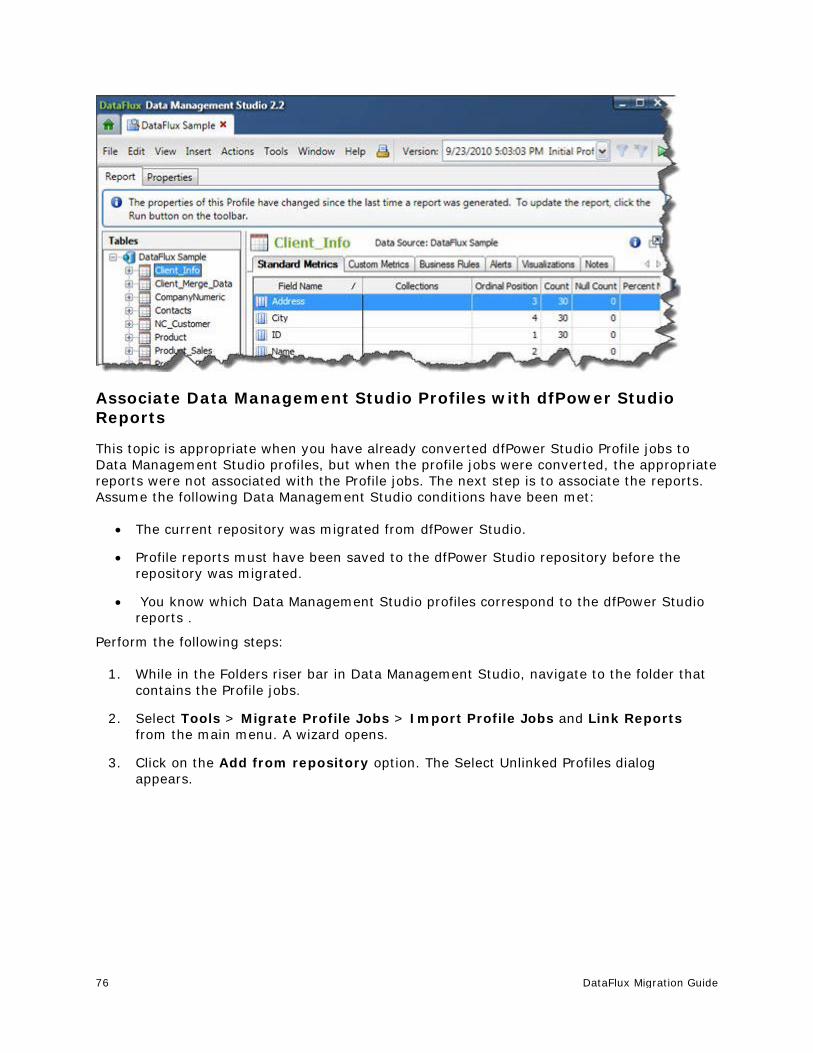
76 DataFlux Migration Guide
Associate Data Management Studio Profiles with dfPower Studio Reports
This topic is appropriate when you have already converted dfPower Studio Profile jobs to Data Management Studio profiles, but when the profile jobs were converted, the appropriate reports were not associated with the Profile jobs. The next step is to associate the reports. Assume the following Data Management Studio conditions have been met:
• The current repository was migrated from dfPower Studio.
• Profile reports must have been saved to the dfPower Studio repository before the repository was migrated.
• You know which Data Management Studio profiles correspond to the dfPower Studio reports .
Perform the following steps:
1. While in the Folders riser bar in Data Management Studio, navigate to the folder that contains the Profile jobs.
2. Select Tools > Migrate Profile Jobs > Import Profile Jobs and Link Reports from the main menu. A wizard opens.
3. Click on the Add from repository option. The Select Unlinked Profiles dialog appears.

DataFlux Migration Guide 77
4. Select one or more of these profiles, then click Open. The selected jobs will populate the Profile job section of the wizard.
5. To link a report to a profile, select the profile on the left, then select the corresponding report on the right. The linked report should appear in the Linked Report column for the profile, as shown here.
6. Repeat as needed.
7. When finished, click OK to link the profile reports and save the profile definitions. The profiles will be saved to the user-defined folder selected earlier in this process.
Unlink a dfPower Studio Report from a Data Management Studio Profile
This topic is appropriate when you have already converted dfPower Studio Profile jobs to Data Management Studio profiles, and you linked a report to the Profile job in the process, but the link is incorrect. You want to remove the dfPower Studio report that is incorrectly associated with a Data Management Studio profile.
1. Select Tools > Migrate Profile Jobs > Unlink Link Reports from the main menu. The Unlink Profile Reports dialog appears.

78 DataFlux Migration Guide
2. Click Add Profile. The Select Profile dialog opens.
3. Select one or more profiles and click Open. The selected profiles will be listed in the Unlink Profile Reports dialog.
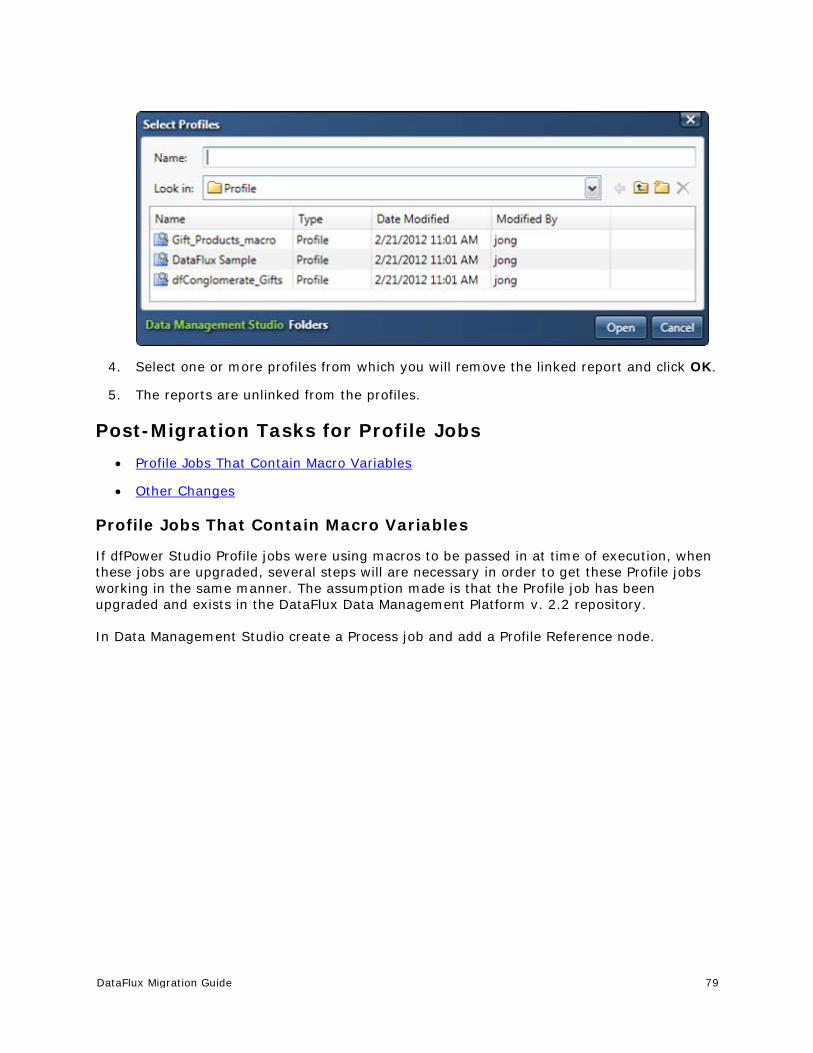
DataFlux Migration Guide 79
4. Select one or more profiles from which you will remove the linked report and click OK.
5. The reports are unlinked from the profiles.
Post-Migration Tasks for Profile Jobs • Profile Jobs That Contain Macro Variables
• Other Changes
Profile Jobs That Contain Macro Variables
If dfPower Studio Profile jobs were using macros to be passed in at time of execution, when these jobs are upgraded, several steps will are necessary in order to get these Profile jobs working in the same manner. The assumption made is that the Profile job has been upgraded and exists in the DataFlux Data Management Platform v. 2.2 repository.
In Data Management Studio create a Process job and add a Profile Reference node.
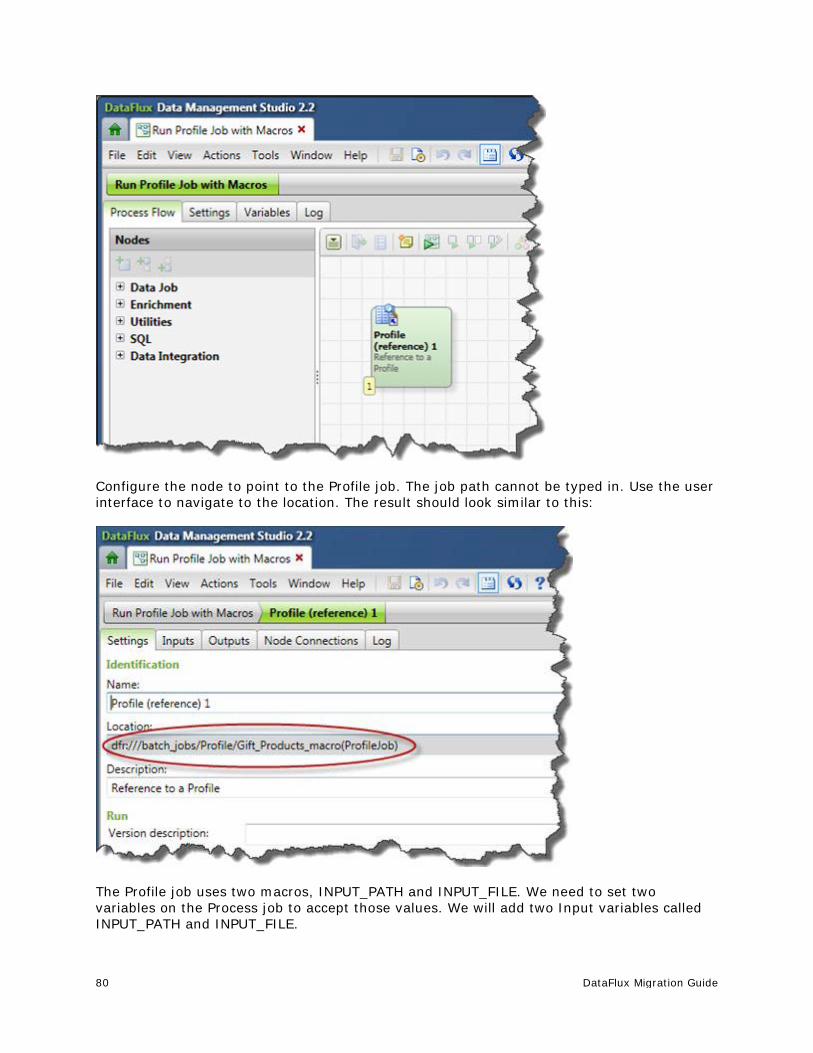
80 DataFlux Migration Guide
Configure the node to point to the Profile job. The job path cannot be typed in. Use the user interface to navigate to the location. The result should look similar to this:
The Profile job uses two macros, INPUT_PATH and INPUT_FILE. We need to set two variables on the Process job to accept those values. We will add two Input variables called INPUT_PATH and INPUT_FILE.

DataFlux Migration Guide 81
Next step, add two input variables to the Profile Job Reference node, click on the node and select the Inputs tab. Then add the two inputs and bind them to the input variables of the job.

82 DataFlux Migration Guide
Enter in the name of the input.
Click OK. Now bind the value of the job variable to the input of the Process node. Highlight the Input and click Source Binding.
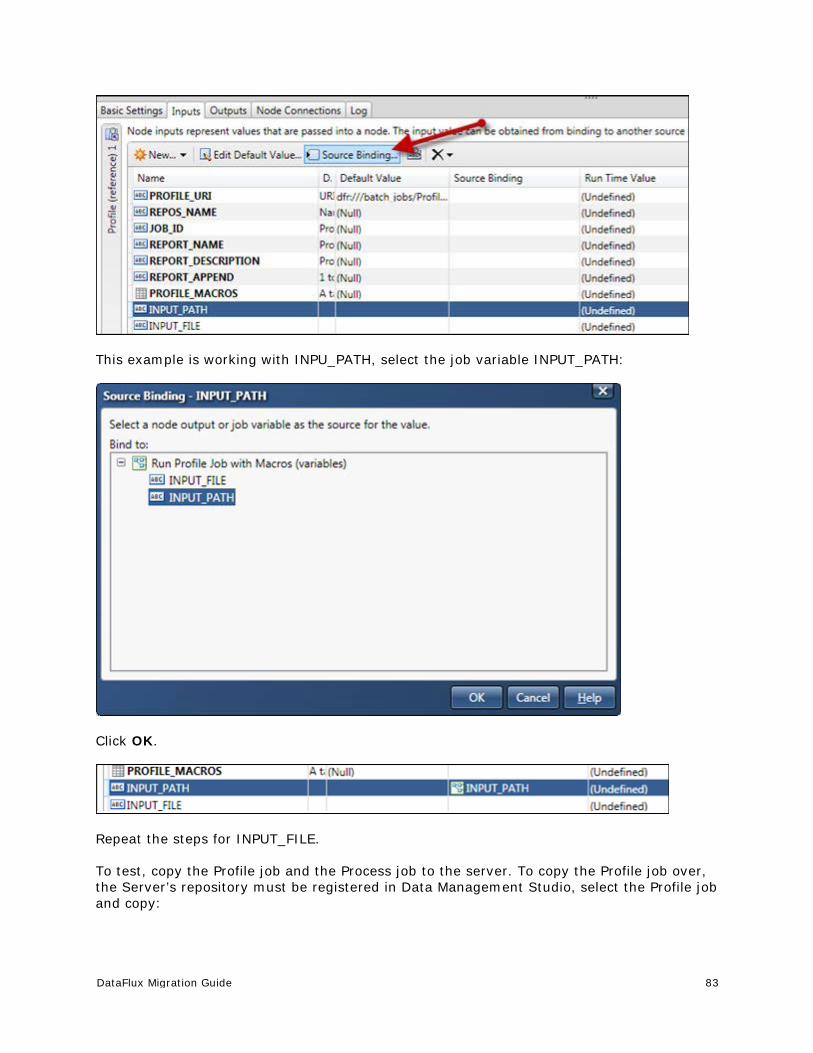
DataFlux Migration Guide 83
This example is working with INPU_PATH, select the job variable INPUT_PATH:
Click OK.
Repeat the steps for INPUT_FILE.
To test, copy the Profile job and the Process job to the server. To copy the Profile job over, the Server’s repository must be registered in Data Management Studio, select the Profile job and copy:

84 DataFlux Migration Guide
Then paste the job into the batch_jobs location on the server. Make sure that the hierarchy of where the job is being copied to is the same as where it was copied from. In this case, there is one other folder under the Data Management Studio repository batch_jobs called Profile. This folder must exist under the server’s repository batch_jobs location as well.
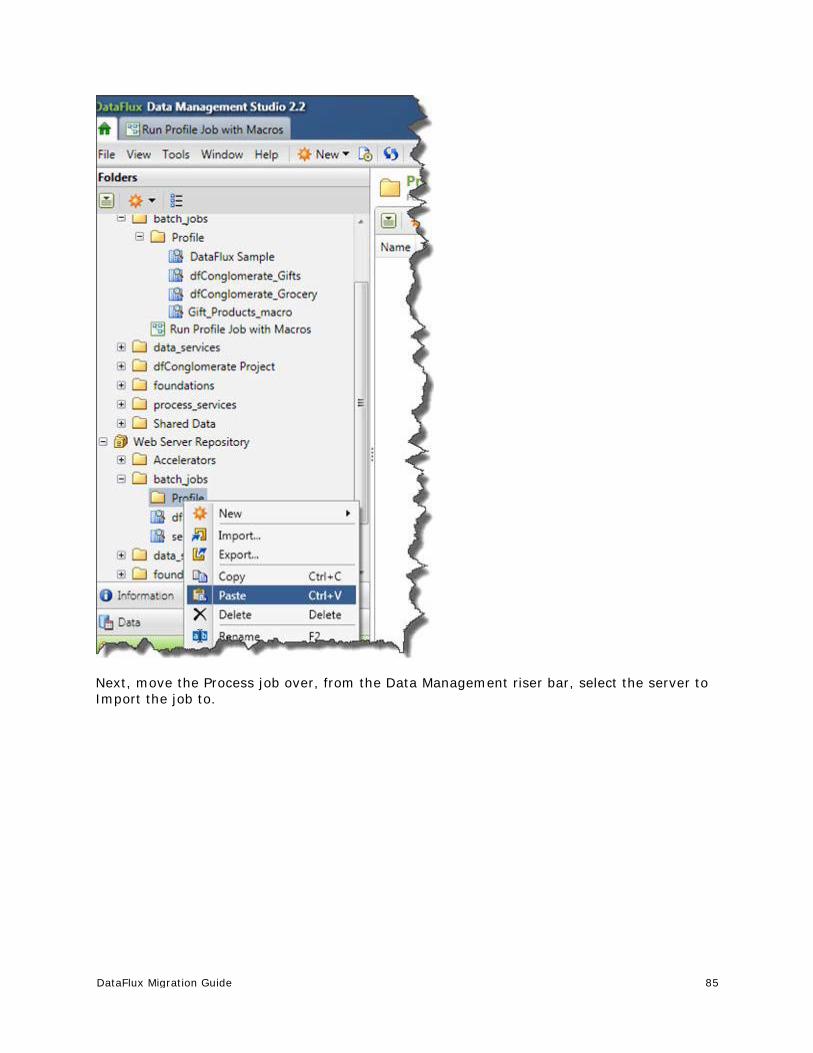
DataFlux Migration Guide 85
Next, move the Process job over, from the Data Management riser bar, select the server to Import the job to.
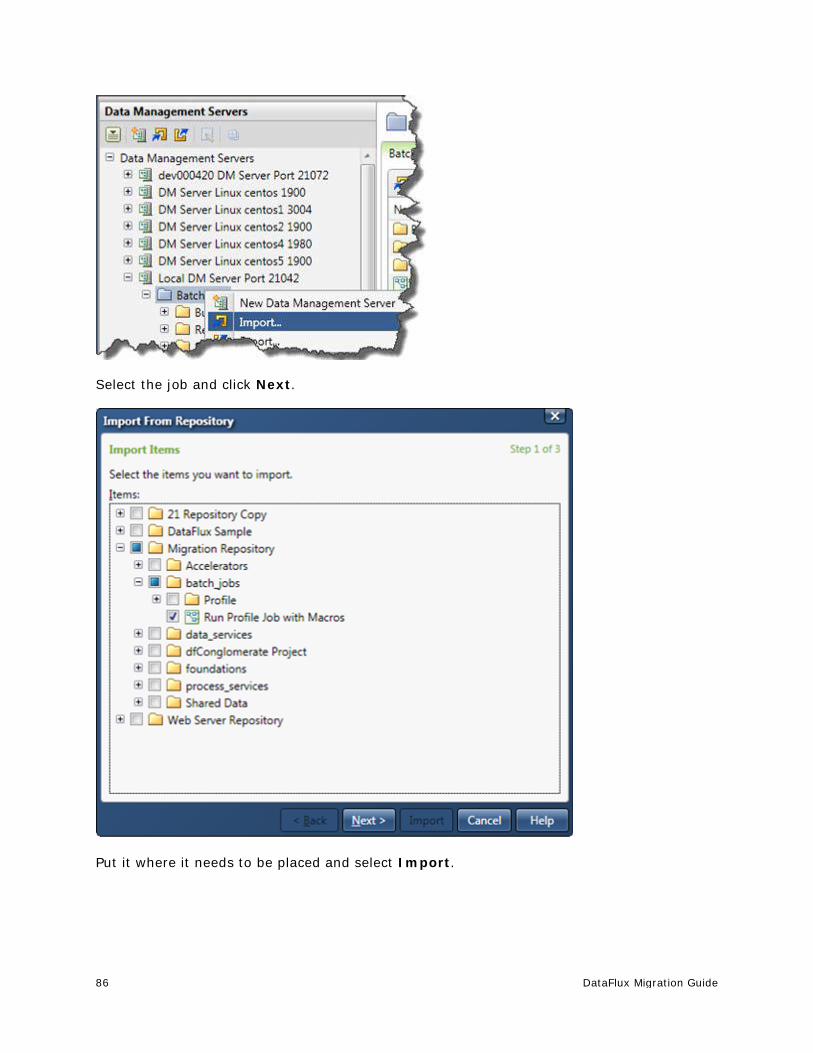
86 DataFlux Migration Guide
Select the job and click Next.
Put it where it needs to be placed and select Import.
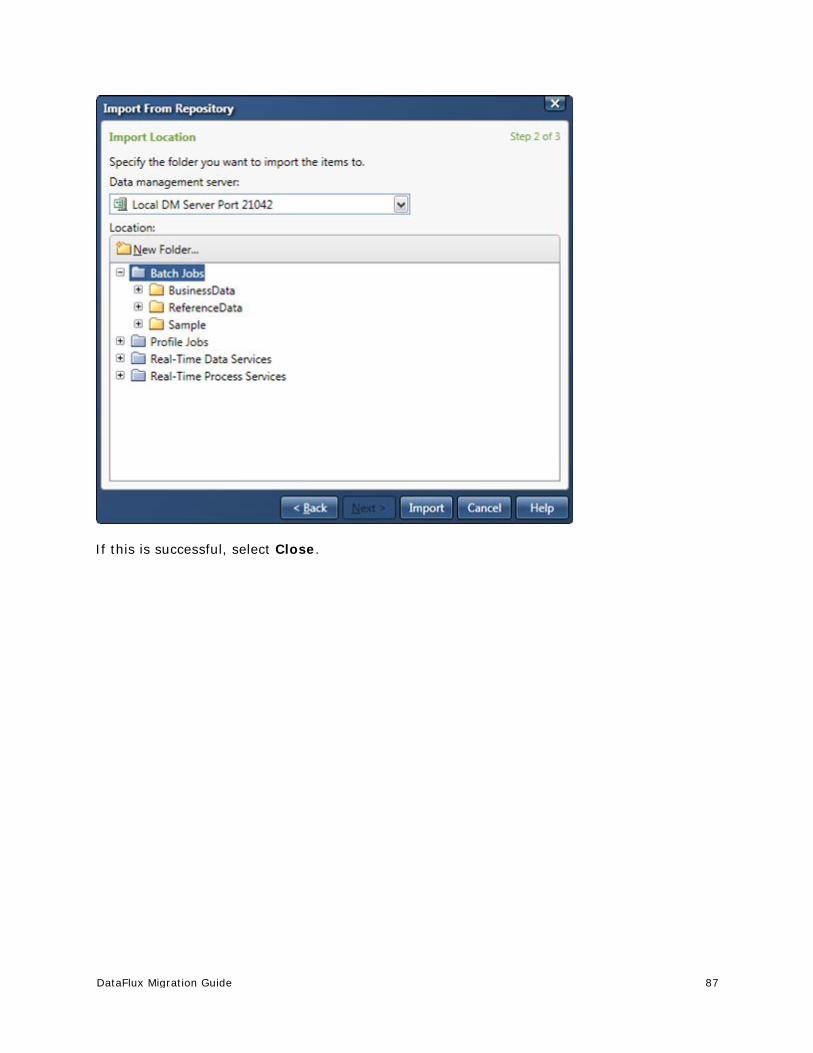
DataFlux Migration Guide 87
If this is successful, select Close.
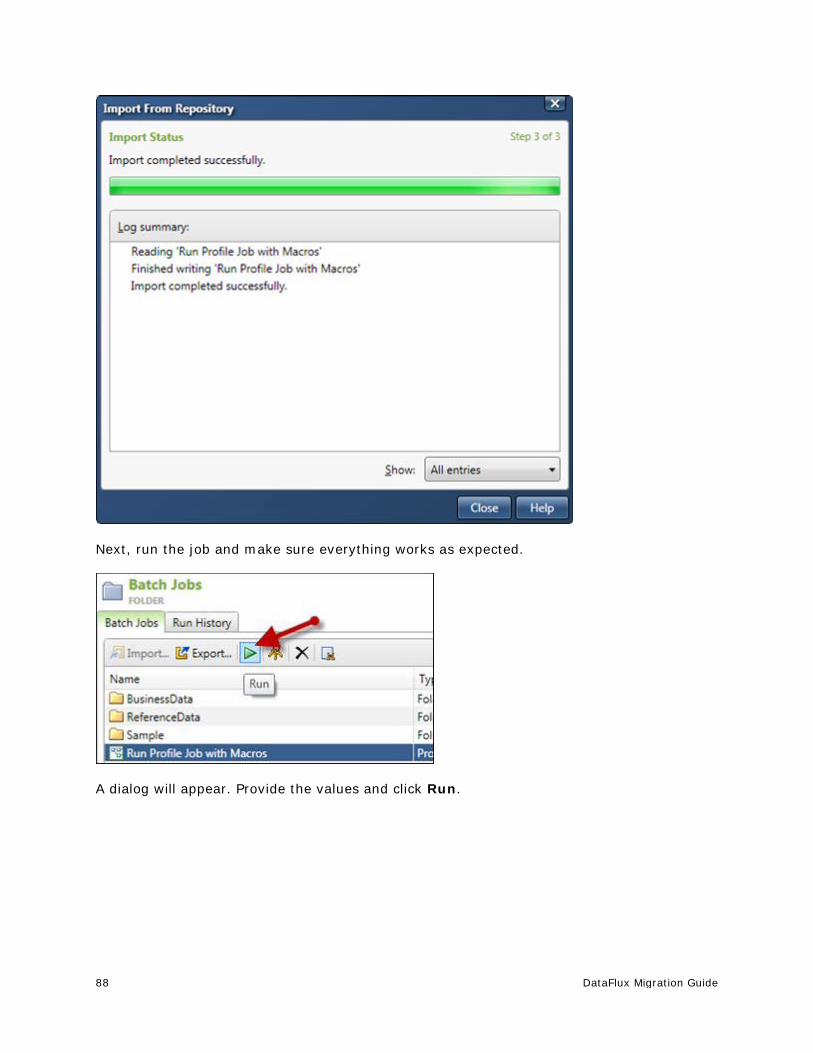
88 DataFlux Migration Guide
Next, run the job and make sure everything works as expected.
A dialog will appear. Provide the values and click Run.

DataFlux Migration Guide 89
When the job is run, you see something like this in the Run History tab.
If the Profile job is open Data Management Studio, the report will be from the server job run.
Other Changes
You cannot convert dfPower Studio profile reports that are stored as files (.pfo files). You must either recreate the report for the relevant profile in Data Management Studio or re-run the Profile job in dfPower Studio and store the report in a dfPower Studio repository. Then you can use the Import Profile Jobs and Link Reports wizard in Data Management Studio to link a dfPower Studio Profile job with the related report and combine the two in a Data Management Studio profile. For more information, see the next section, Explorer Jobs.
The way that Redundant Data Analysis is calculated has changed. In dfPower Studio, you set up a Redundant Data Analysis profile for a primary field and add secondary fields that you want to compare to the primary field. The secondary fields were not compared to each other. In Data Management Studio, you set up a Redundant Data Analysis profile and all fields that are added to the profile are compared to each other. Accordingly, after a Redundant Data Analysis profile job is converted, you must re-run the profile in Data Management Studio to recreate the report. For more information, see the redundant analysis topic in the Profiles section of the DataFlux Data Management Studio Online Help, v. 2.1.1.
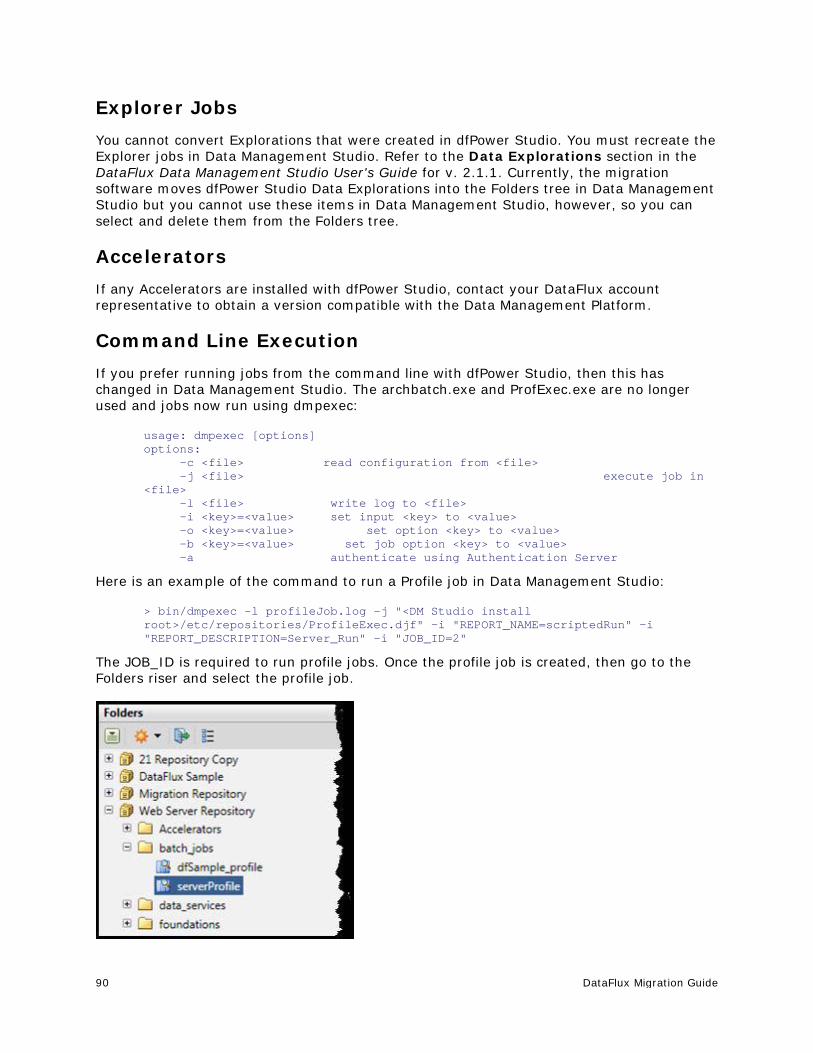
90 DataFlux Migration Guide
Explorer Jobs You cannot convert Explorations that were created in dfPower Studio. You must recreate the Explorer jobs in Data Management Studio. Refer to the Data Explorations section in the DataFlux Data Management Studio User's Guide for v. 2.1.1. Currently, the migration software moves dfPower Studio Data Explorations into the Folders tree in Data Management Studio but you cannot use these items in Data Management Studio, however, so you can select and delete them from the Folders tree.
Accelerators If any Accelerators are installed with dfPower Studio, contact your DataFlux account representative to obtain a version compatible with the Data Management Platform.
Command Line Execution If you prefer running jobs from the command line with dfPower Studio, then this has changed in Data Management Studio. The archbatch.exe and ProfExec.exe are no longer used and jobs now run using dmpexec:
usage: dmpexec [options] options: -c <file> read configuration from <file> -j <file> execute job in <file> -l <file> write log to <file> -i <key>=<value> set input <key> to <value> -o <key>=<value> set option <key> to <value> -b <key>=<value> set job option <key> to <value> -a authenticate using Authentication Server
Here is an example of the command to run a Profile job in Data Management Studio:
> bin/dmpexec -l profileJob.log -j "<DM Studio install root>/etc/repositories/ProfileExec.djf" -i "REPORT_NAME=scriptedRun" -i "REPORT_DESCRIPTION=Server_Run" -i "JOB_ID=2"
The JOB_ID is required to run profile jobs. Once the profile job is created, then go to the Folders riser and select the profile job.
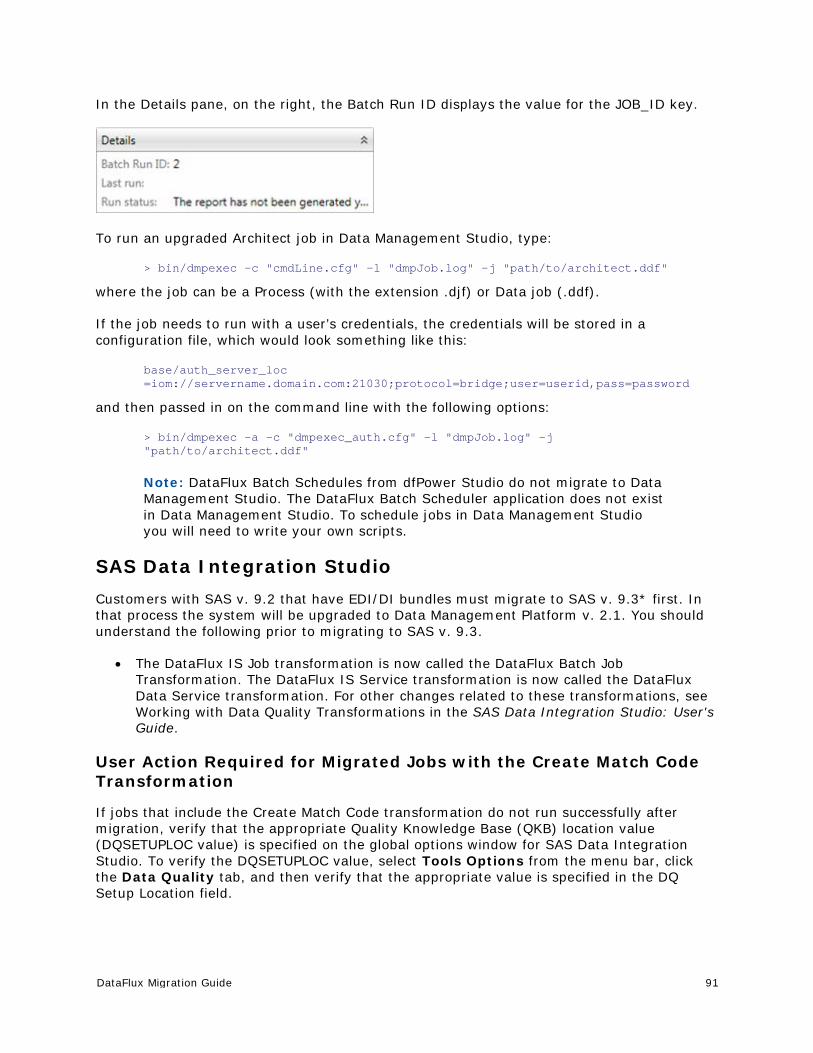
DataFlux Migration Guide 91
In the Details pane, on the right, the Batch Run ID displays the value for the JOB_ID key.
To run an upgraded Architect job in Data Management Studio, type:
> bin/dmpexec -c "cmdLine.cfg" -l "dmpJob.log" –j "path/to/architect.ddf"
where the job can be a Process (with the extension .djf) or Data job (.ddf).
If the job needs to run with a user’s credentials, the credentials will be stored in a configuration file, which would look something like this:
base/auth_server_loc =iom://servername.domain.com:21030;protocol=bridge;user=userid,pass=password
and then passed in on the command line with the following options:
> bin/dmpexec -a -c "dmpexec_auth.cfg" -l "dmpJob.log" –j "path/to/architect.ddf"
Note: DataFlux Batch Schedules from dfPower Studio do not migrate to Data Management Studio. The DataFlux Batch Scheduler application does not exist in Data Management Studio. To schedule jobs in Data Management Studio you will need to write your own scripts.
SAS Data Integration Studio Customers with SAS v. 9.2 that have EDI/DI bundles must migrate to SAS v. 9.3* first. In that process the system will be upgraded to Data Management Platform v. 2.1. You should understand the following prior to migrating to SAS v. 9.3.
• The DataFlux IS Job transformation is now called the DataFlux Batch Job Transformation. The DataFlux IS Service transformation is now called the DataFlux Data Service transformation. For other changes related to these transformations, see Working with Data Quality Transformations in the SAS Data Integration Studio: User's Guide.
User Action Required for Migrated Jobs with the Create Match Code Transformation
If jobs that include the Create Match Code transformation do not run successfully after migration, verify that the appropriate Quality Knowledge Base (QKB) location value (DQSETUPLOC value) is specified on the global options window for SAS Data Integration Studio. To verify the DQSETUPLOC value, select Tools Options from the menu bar, click the Data Quality tab, and then verify that the appropriate value is specified in the DQ Setup Location field.
92 DataFlux Migration Guide
User Action Required for Migrated Jobs with the Apply Lookup Standardization Transformation
Migration to SAS v. 9.3 when the QKB is different on the target system
If you are migrating from SAS v. 9.1.3 or SAS v. 9.2 to SAS v. 9.3, and the target system has a different QKB than you had on the source system, then user action is required in order for a job with the Apply Lookup Standardization transformation to work. You must open each affected job and replace the migrated Apply Lookup Standardization transformation with a new (4.3) Apply Lookup Standardization transformation. Then you must restore the mappings in each job.
Migration to SAS v. 9.3 when the QKB is the same on the target system
If you are migrating from SAS v. 9.2 to SAS v. 9.3, and the target system has the same QKB that you had on the source system, then no user action is required in order for a job with the Apply Lookup Standardization transformation to work.
If you are migrating from SAS v. 9.1.3 to SAS v. 9.3, and the target system has the same QKB that you had on the source system, then user action is required in order for a job with the Apply Lookup Standardization transformation to work.
You can take one of the following actions:
• Open each affected job and replace the migrated Apply Lookup Standardization transformation with a new (4.3) Apply Lookup Standardization transformation. You must restore the mappings in each job. After replacing the transformation, the Control Flow of the transformation in the job is out of order. Use the Details panel to restore Control Flow.
• Alternatively, you could return to your old SAS Data Integration Studio environment, export the original Apply Lookup Standardization jobs to the SAS v. 9.1.3 package format, and then use the Import SAS Package wizard in SAS Data Integration Studio v. 4.3 to convert and register these jobs on your metadata server.
The following additional steps are required in order for the export SAS Package method to work:
1. (Optional) In SAS Data Integration Studio v. 4.3, if you will not be using the migrated jobs that include the Apply Lookup Standardization transformation, delete them. Otherwise, you will have to manage multiple copies of the same metadata objects when you import the same jobs as a SAS Package.
2. In the previous release of SAS Data Integration Studio, create a package of jobs that uses the same scheme repository type in the Apply Lookup Standardization. Create one package for the BFD scheme type and a separate package for the NOBFD scheme type.
3. In SAS Data Integration Studio v. 4.3, verify that the default DQ Setup Location is correct, and that the default Scheme Repository Type matches the type (BFD or NOBFD) for the package of jobs that you are importing.
Since .dfx jobs will change extensions, to run v. 2.2 based jobs, users will need to edit the SAS Data Integration Studio jobs. To do this, in DI Studio open up a job that uses a DataFlux service or a Profile job.
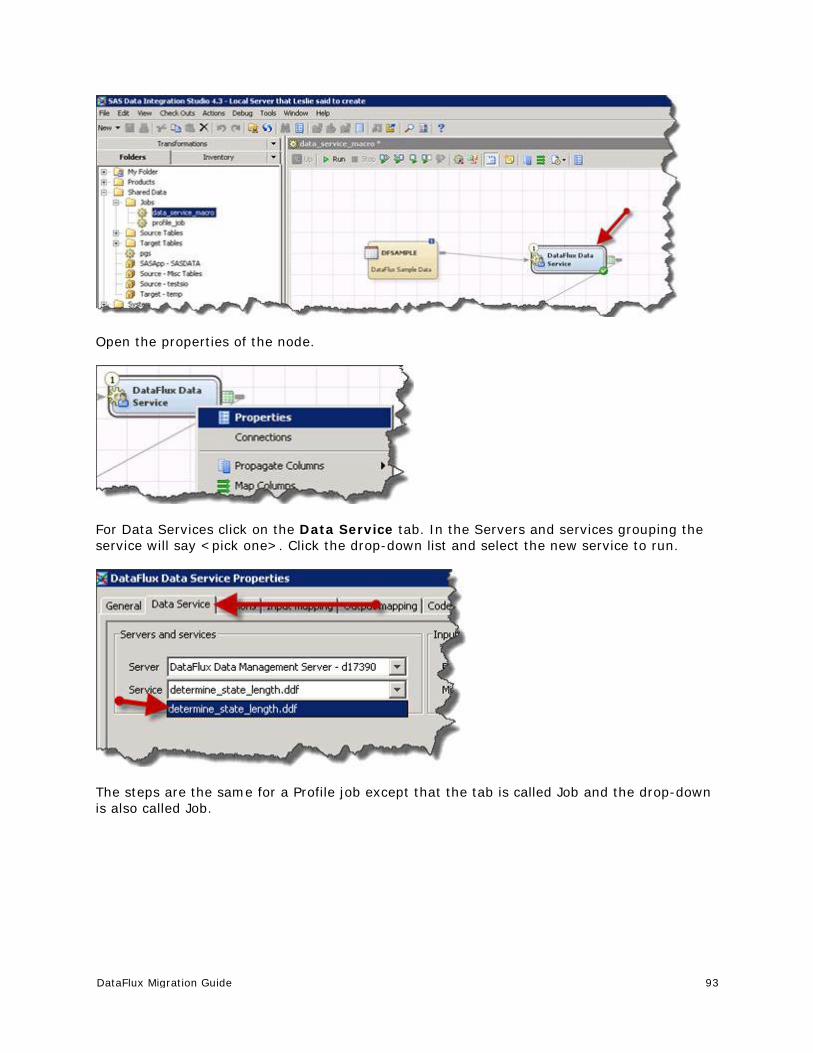
DataFlux Migration Guide 93
Open the properties of the node.
For Data Services click on the Data Service tab. In the Servers and services grouping the service will say <pick one>. Click the drop-down list and select the new service to run.
The steps are the same for a Profile job except that the tab is called Job and the drop-down is also called Job.
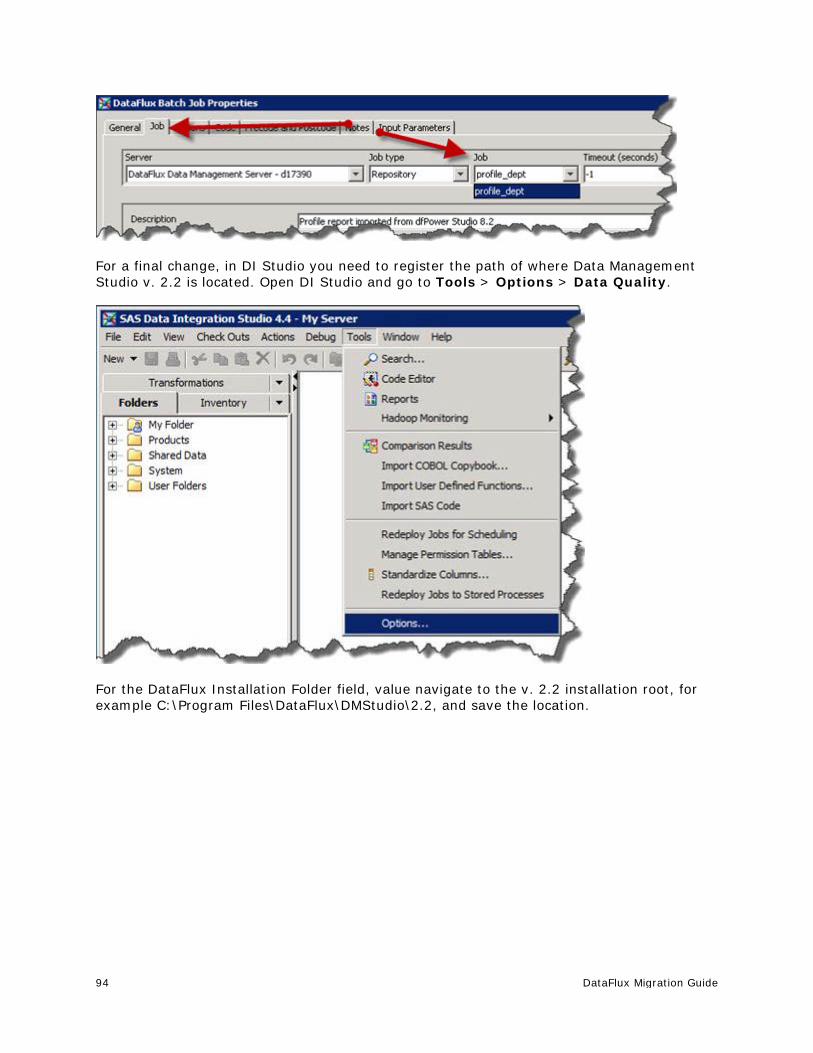
94 DataFlux Migration Guide
For a final change, in DI Studio you need to register the path of where Data Management Studio v. 2.2 is located. Open DI Studio and go to Tools > Options > Data Quality.
For the DataFlux Installation Folder field, value navigate to the v. 2.2 installation root, for example C:\Program Files\DataFlux\DMStudio\2.2, and save the location.
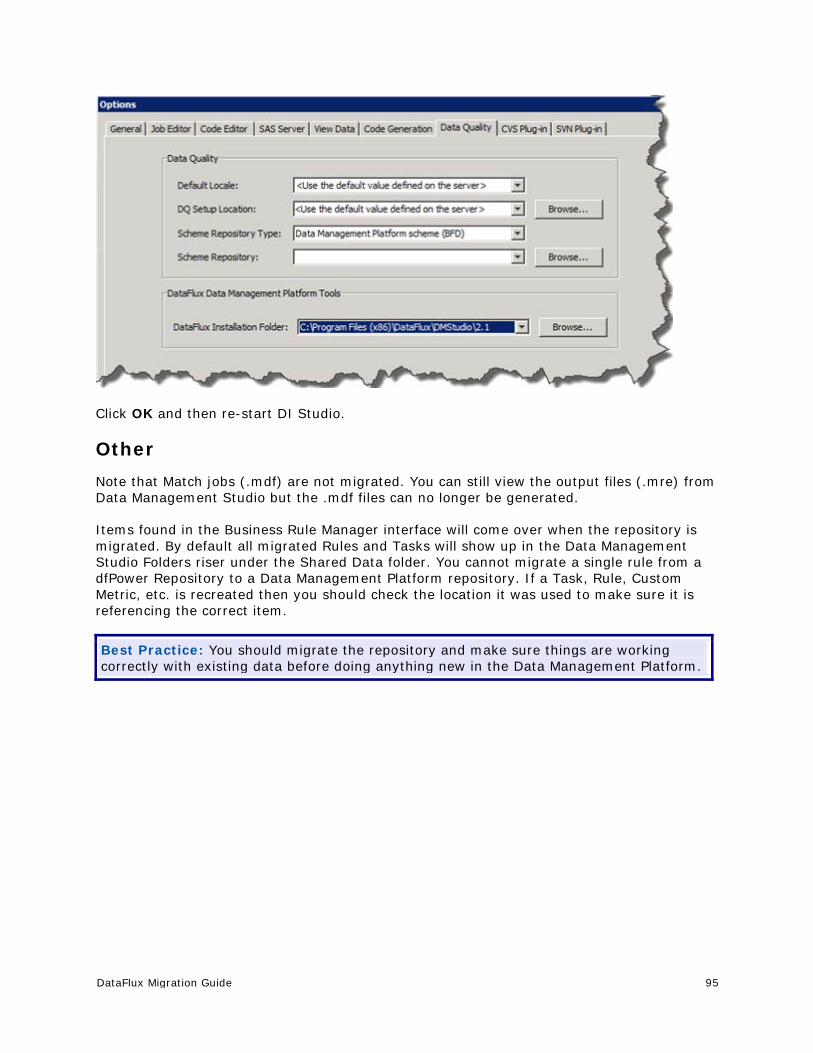
DataFlux Migration Guide 95
Click OK and then re-start DI Studio.
Other Note that Match jobs (.mdf) are not migrated. You can still view the output files (.mre) from Data Management Studio but the .mdf files can no longer be generated.
Items found in the Business Rule Manager interface will come over when the repository is migrated. By default all migrated Rules and Tasks will show up in the Data Management Studio Folders riser under the Shared Data folder. You cannot migrate a single rule from a dfPower Repository to a Data Management Platform repository. If a Task, Rule, Custom Metric, etc. is recreated then you should check the location it was used to make sure it is referencing the correct item.
Best Practice: You should migrate the repository and make sure things are working correctly with existing data before doing anything new in the Data Management Platform.
96 DataFlux Migration Guide
Migrating From DataFlux Integration Server 8.1/8.2 to Data Management Server 2.2 This section is for those users currently running a DataFlux Data Integration Server v. 8.1 standalone or as part of a SAS v. 9.2 deployment. For SAS 9.2 customers, the Data Management Server v. 2.1 is automatically installed and a server definition is created in OMR. Users then need to take manual steps to migrate jobs and other repository content in order to get it to work with Data Management Server 2.1. If you are installing SAS 9.3 as well as Data Management Platform v. 2.2 at the same time please use this section to move directly from Data Integration Server v. 8.1 to Data Management Server v. 2.2.
• Configurations
• Reference Sources
• Data Connections - Windows
• Data Connections - UNIX
• Repositories
• Architect Jobs
• Profile Jobs
• Accelerators
• Security
• Secure Socket Layer
• Command Line Execution
• SAS Management Console
• SAS Data Quality Server
Configurations Below is a list of 8.1 server settings and what they map to in 2.2. One will need to copy the values that are in the 8.1 configuration files to the 2.2 configuration files. In doing so, there are several differences that need to be noted between the configuration files
• Numeric values in 2.2 needs to be written out. Values in 8.1 could be 10m, which represents 10 million. In 2.2, this would need to be written as 10000000.
• Data Management Platform does not require configuration values to be surrounded by single quotes
• Double quotes are not special in Data Management Platform configuration files.
• To escape characters (", =, white space, etc.) in Data Management Platform configuration files surround them with single quotes.

DataFlux Migration Guide 97
The way to use the following table is to look at the 8.1 dfexec.cfg file, find the configuration from the file in the "8.1 Setting" column, look to the left to see the 2.2 equivalent setting found in the first column and put the value in the file identified in column 2. For example, in the dfexec.cfg file we have the following
To find the equivalent setting in 2.2, look in the "8.1 Setting" column to find "server read timeout".
From there we can tell that the 2.2 equivalent setting is "DMSERVER/SOAP/RDWR_TIMEOUT" (column 1) and that the value lives in dmserver.cfg (column 2). Open up 2.2’s dmserver.cfg file and locate "DMSERVER/SOAP/RDWR_TIMEOUT" by doing a find (CTRL+F) and looking for the 2.2 configuration, which in this case is DMSERVER/SOAP/LISTEN_PORT. In this case the setting is not in the default configuration file and we would need to add it.
For things that are in the app.cfg file, please see section 1.4.1.1 Configurations for information on what the new keys are.
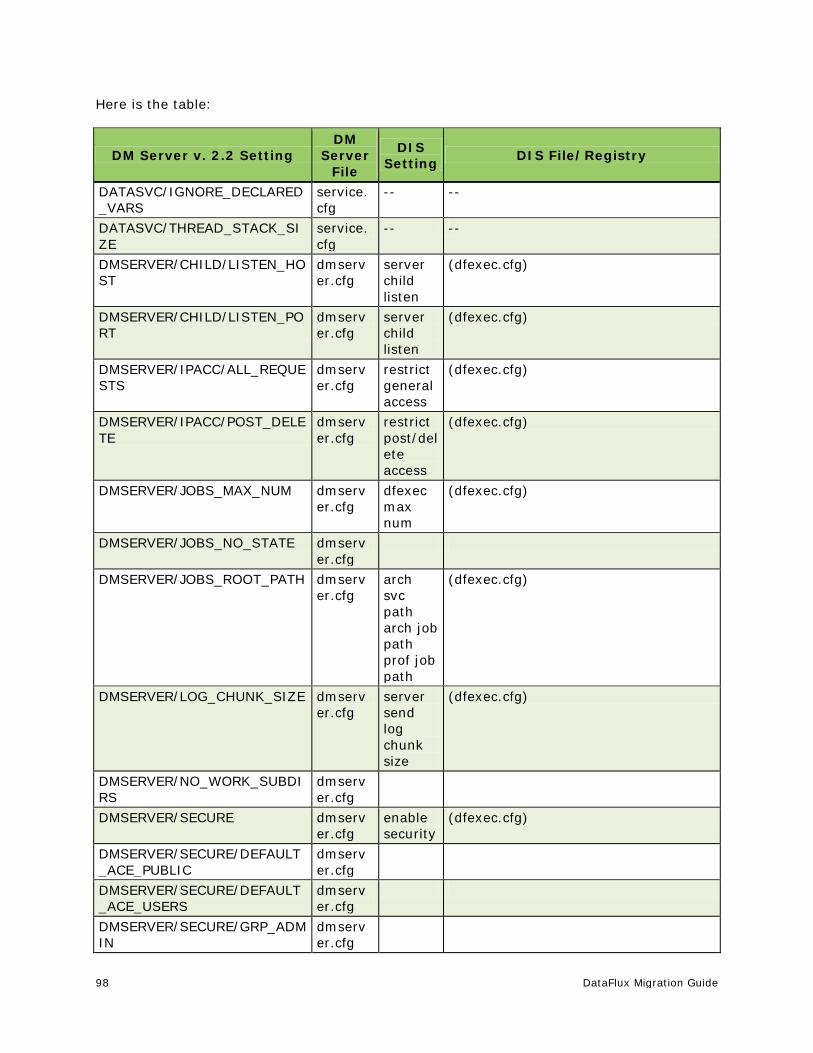
98 DataFlux Migration Guide
Here is the table:
DM Server v. 2.2 Setting DM
Server File
DIS Setting DIS File/Registry
DATASVC/IGNORE_DECLARED_VARS
service.cfg
-- --
DATASVC/THREAD_STACK_SIZE
service.cfg
-- --
DMSERVER/CHILD/LISTEN_HOST
dmserver.cfg
server child listen
(dfexec.cfg)
DMSERVER/CHILD/LISTEN_PORT
dmserver.cfg
server child listen
(dfexec.cfg)
DMSERVER/IPACC/ALL_REQUESTS
dmserver.cfg
restrict general access
(dfexec.cfg)
DMSERVER/IPACC/POST_DELETE
dmserver.cfg
restrict post/delete access
(dfexec.cfg)
DMSERVER/JOBS_MAX_NUM dmserver.cfg
dfexec max num
(dfexec.cfg)
DMSERVER/JOBS_NO_STATE dmserver.cfg
DMSERVER/JOBS_ROOT_PATH dmserver.cfg
arch svc path arch job path prof job path
(dfexec.cfg)
DMSERVER/LOG_CHUNK_SIZE dmserver.cfg
server send log chunk size
(dfexec.cfg)
DMSERVER/NO_WORK_SUBDIRS
dmserver.cfg
DMSERVER/SECURE dmserver.cfg
enable security
(dfexec.cfg)
DMSERVER/SECURE/DEFAULT_ACE_PUBLIC
dmserver.cfg
DMSERVER/SECURE/DEFAULT_ACE_USERS
dmserver.cfg
DMSERVER/SECURE/GRP_ADMIN
dmserver.cfg

DataFlux Migration Guide 99
DM Server v. 2.2 Setting DM
Server File
DIS Setting DIS File/Registry
DMSERVER/SECURE/GRP_ALLOW
dmserver.cfg
DMSERVER/SECURE/GRP_DENY
dmserver.cfg
DMSERVER/SOAP/CONNS_BACKLOG
dmserver.cfg
PRIV connections backlog
(dfexec.cfg)
DMSERVER/SOAP/DATA_SVC/JOB_COUNT_MAX
dmserver.cfg
-- --
DMSERVER/SOAP/DATA_SVC/JOB_COUNT_MIN
dmserver.cfg
-- --
DMSERVER/SOAP/DATA_SVC/MAX_ERRS
dmserver.cfg
dfsvc max errs
(dfexec.cfg)
DMSERVER/SOAP/DATA_SVC/MAX_NUM
dmserver.cfg
dfsvc max num
(dfexec.cfg)
DMSERVER/SOAP/DATA_SVC/MAX_REQUESTS
dmserver.cfg
dfsvc max requests
(dfexec.cfg)
DMSERVER/SOAP/DATA_SVC/MAX_RUNTIME
dmserver.cfg
-- --
DMSERVER/SOAP/DATA_SVC/PRELOAD
dmserver.cfg
dfsvc preload
(dfexec.cfg)
DMSERVER/SOAP/DATA_SVC/PRELOAD_ALL
dmserver.cfg
dfsvc preload all
(dfexec.cfg)
DMSERVER/SOAP/DATA_SVC/QUEUE
dmserver.cfg
-- --
DMSERVER/SOAP/IGNORE_NS dmserver.cfg
-- --
DMSERVER/SOAP/LOG_PACKETS
dmserver.cfg
PRIV log packets
(dfexec.cfg)
DMSERVER/SOAP/LISTEN_HOST
dmserver.cfg
-- --
DMSERVER/SOAP/LISTEN_PORT
dmserver.cfg
server listen port
(dfexec.cfg)
DMSERVER/SOAP/PROC_SVC/MAX_NUM
dmserver.cfg
-- --
DMSERVER/SOAP/RDWR_TIMEOUT
dmserver.cfg
server read
(dfexec.cfg) (dfexec.cfg)
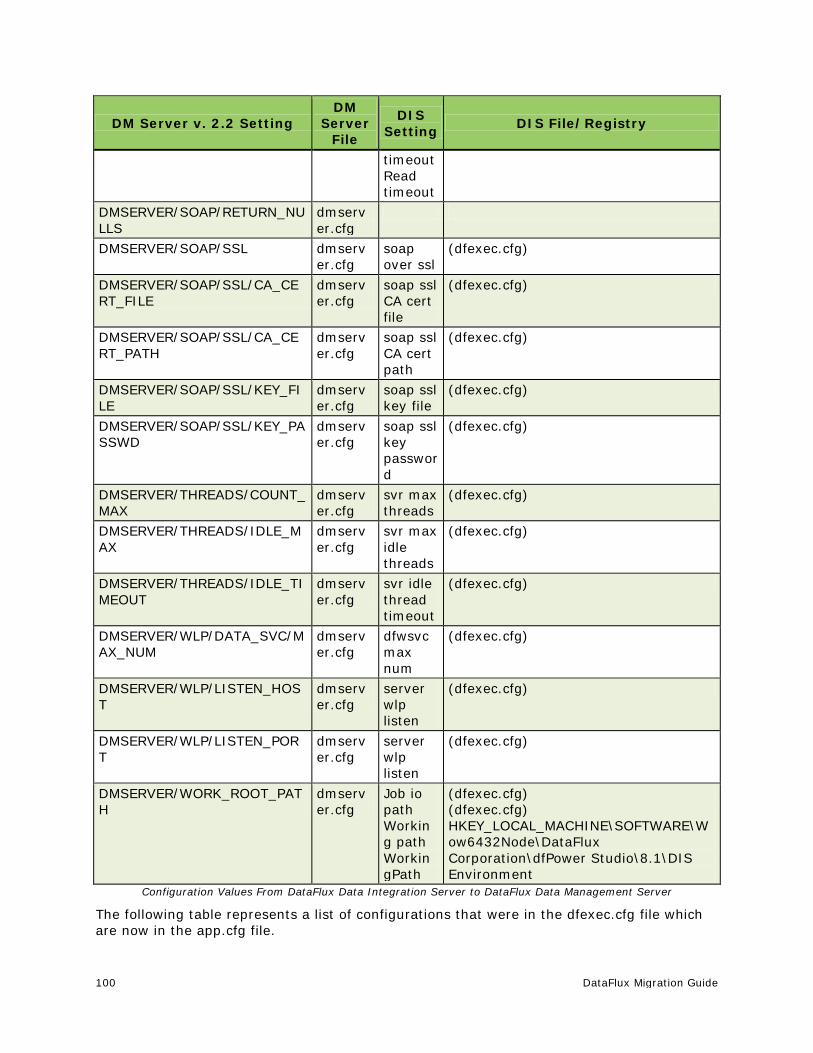
100 DataFlux Migration Guide
DM Server v. 2.2 Setting DM
Server File
DIS Setting DIS File/Registry
timeout Read timeout
DMSERVER/SOAP/RETURN_NULLS
dmserver.cfg
DMSERVER/SOAP/SSL dmserver.cfg
soap over ssl
(dfexec.cfg)
DMSERVER/SOAP/SSL/CA_CERT_FILE
dmserver.cfg
soap ssl CA cert file
(dfexec.cfg)
DMSERVER/SOAP/SSL/CA_CERT_PATH
dmserver.cfg
soap ssl CA cert path
(dfexec.cfg)
DMSERVER/SOAP/SSL/KEY_FILE
dmserver.cfg
soap ssl key file
(dfexec.cfg)
DMSERVER/SOAP/SSL/KEY_PASSWD
dmserver.cfg
soap ssl key password
(dfexec.cfg)
DMSERVER/THREADS/COUNT_MAX
dmserver.cfg
svr max threads
(dfexec.cfg)
DMSERVER/THREADS/IDLE_MAX
dmserver.cfg
svr max idle threads
(dfexec.cfg)
DMSERVER/THREADS/IDLE_TIMEOUT
dmserver.cfg
svr idle thread timeout
(dfexec.cfg)
DMSERVER/WLP/DATA_SVC/MAX_NUM
dmserver.cfg
dfwsvc max num
(dfexec.cfg)
DMSERVER/WLP/LISTEN_HOST
dmserver.cfg
server wlp listen
(dfexec.cfg)
DMSERVER/WLP/LISTEN_PORT
dmserver.cfg
server wlp listen
(dfexec.cfg)
DMSERVER/WORK_ROOT_PATH
dmserver.cfg
Job io path Working path WorkingPath
(dfexec.cfg) (dfexec.cfg) HKEY_LOCAL_MACHINE\SOFTWARE\Wow6432Node\DataFlux Corporation\dfPower Studio\8.1\DIS Environment
Configuration Values From DataFlux Data Integration Server to DataFlux Data Management Server
The following table represents a list of configurations that were in the dfexec.cfg file which are now in the app.cfg file.

DataFlux Migration Guide 101
DM Server v. 2.2 Setting
DM Serv
er File
DIS Setting DIS File/Registry
BASE/PRIMARY_LICENSE_LOC
app.cfg
License HKEY_LOCAL_MACHINE\SOFTWARE\Wow6432Node\DataFlux Corporation\dfPower Studio\8.1\DIS Environment
DAC/SAVEDCONNSYSTEM
app.cfg
savedconnectiondir
HKEY_LOCAL_MACHINE\SOFTWARE\Wow6432Node\DataFlux Corporation\dac
DFCLIENT/CFG app.cfg
dfclient config (dfexec.cfg)
BASE/EMAILCMD app.cfg
mail command
(dfexec.cfg)
Cluster memory
(dfexec.cfg)
VERIFY/USEDPV app.cfg
Enable dpv (dfexec.cfg)
VERIFY/USERDI app.cfg
Enable rdi (dfexec.cfg)
PROF/PER_TABLE_BYTES
app.cfg
Fd table memory
(dfexec.cfg)
QKB/PATH app.cfg
Qkb root (dfexec.cfg)
VERIFY/USPS app.cfg
Usps db (dfexec.cfg)
VERIFY/CACHESIZE app.cfg
Verify cache (dfexec.cfg)
Configuration Values Previously in The dfexec.cfg File That Are Now in The app.cfg File
If any Accelerators are installed with your Integration Server installation, it is not recommended that the macros associated with them be moved over. One should get the proper version of the Accelerator that works with Data Management Platform 2.2. This means when looking in architect.cfg or dfexec.cfg, no macros with the following prefixes should be moved over:
• MDI_
• MDC_
• SA_
• ACDQ_
• CDC_
• CDA_
• WLC_
• MDM_

102 DataFlux Migration Guide
Any remaining macros in architect.cfg or dfexec.cfg that are not in the 8.1 to 2.2 table or are not Accelerator macros, these are more than likely user defined macros. These remaining macros should be moved to a new file in the [DM_STUDIO_INSTALL_ROOT]/etc/macros/ directory. Do not place them in any of the 2.2 specific configuration files.
Note: If you see a macro that is not a user defined and believe it to be a DataFlux setting, please contact tech support.
Here is an example. In 8.1 there is a macro called OUTPUT_PATH that we need to move over.
Go to Windows Explorer and navigate to the install root for DM Server, in this case it is the default "C:\Program Files\DataFlux\DMSserver\2.2".
Go into the etc\macros directory.
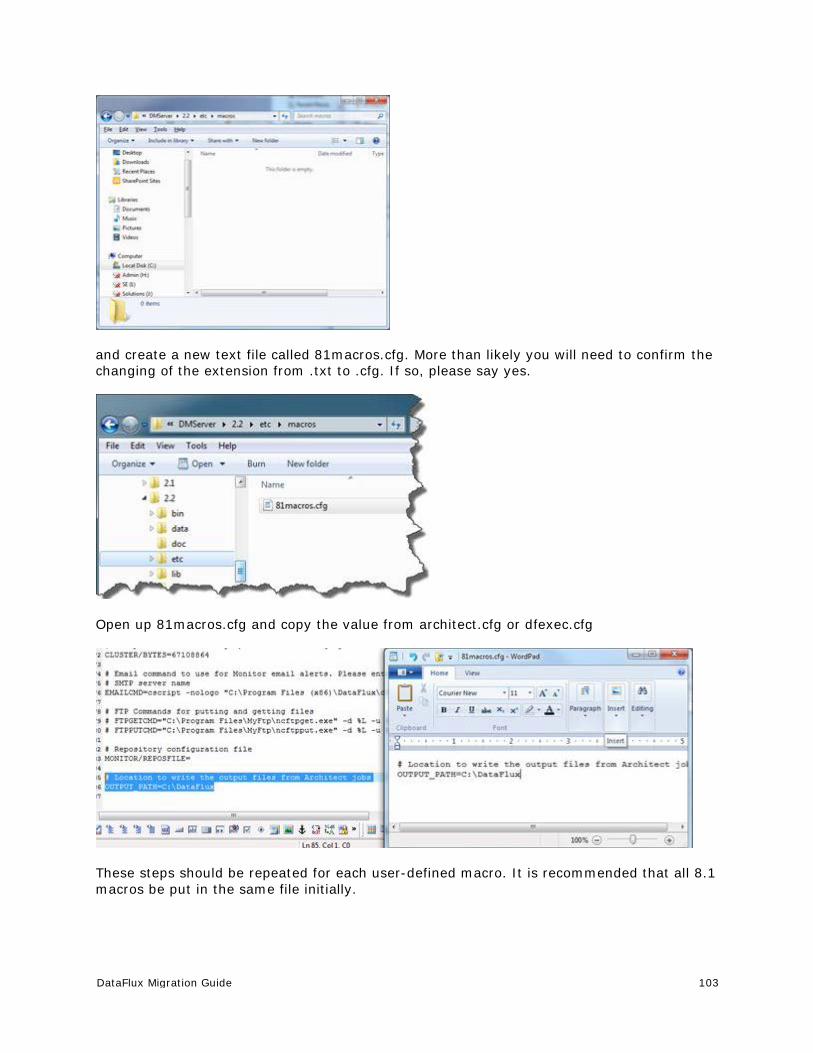
DataFlux Migration Guide 103
and create a new text file called 81macros.cfg. More than likely you will need to confirm the changing of the extension from .txt to .cfg. If so, please say yes.
Open up 81macros.cfg and copy the value from architect.cfg or dfexec.cfg
These steps should be repeated for each user-defined macro. It is recommended that all 8.1 macros be put in the same file initially.
104 DataFlux Migration Guide
It is a best practice to make sure that the following two configurations in dmserver.cfg are set with valid ports:
• DMSERVER/SOAP/LISTEN_PORT
• DMSERVER/WLP/LISTEN_PORT
Note: If these are not set it could lead to issues if there is an Integration Server or multiple Data Management Servers installed on the same host.
If users want to use single page dfPower real time services as part of their DMP deployment, then the following needs to be added to the [DM Server install root]/etc/service.cfg file.
DATASVC/IGNORE_DECLARED_VARS = yes
Data Quality Functions
If as part of the migration a new Quality Knowledge Base (QKB) is being used, it is a best practice to regenerate any static data quality pieces, for example match codes. The reason for this is that changes in the QKB could result in a slightly different match code being generated.
For users that are on dfPower 8.2 that are not changing QKBs as part of the migration, see section 1.4 for more information on how to configure Data Management Platform so that it will use data quality functions as they were in dfPower 8.2. It is strongly recommended to do this only if it is really needed.
Reference Sources When the configurations for the Integration Server are brought over, then this should take care of the registration of the data packs for US address data, Canadian address data, US geocode and phone data as well as the world data. No extra steps should be needed other than to verify that the locations have been configured correctly.
Data Connections - Windows Assuming that Data Management Studio is being installed on the same box that the previous version of Integration Server was, there is no extra work required to migrate over any ODBC connections. If Data Management Server is being installed on a new box, then one will have to migrate the ODBC connections defined in the ODBC Administrator manually.
Data Management Studio 2.3:
• DMSERVER/WLP/LISTEN_PORT no longer needs to be set by default.

DataFlux Migration Guide 105
ODBC data connections that are defined on the box will be upgraded automatically to the latest version of the DataFlux ODBC drivers. This means that both dfPower and Data Management Studio will be using the same version of ODBC drivers.
A caveat to the above statements is if a 32-bit version of Integration Server was installed on a 64-bit box. If the 64-bit version of Data Management Server is installed on the same box, then the ODBC DSNs must be recreated through the 64-bit version of the ODBC Data Source. Best way to do this copying is open up the 32-bit ODBC Administrator via dfPower (assuming that this was installed on the box in order to create the connections originally) or the dfConnection Manager.
then open the 64 bit ODBC Administrator using the Control Panel

106 DataFlux Migration Guide
There is no way to distinguish which version is 32 bit or 64 bit, so you will need to keep it organized. In the above picture, the 32 bit is on the left and the 64 bit is on the right. From this point forward, create the DSNs in the 64-bit ODBC Administrator by creating new and then copying the values and settings of the 32-bit configurations.
You will have to move over any saved credential files that have been stored. These can be found in [DIS_INSTALL_ROOT]\etc\dfdac\ and should be copied to [DMSERVER_INSTALL_ROOT]\etc\dsn\.
The only action that a user will have to take is to move over any saved credential files that they have stored. The dfPower saved connection path can be found in the registry under "HKEY_LOCAL_MACHINE\SOFTWARE\\DataFlux Corporation\dac\savedconnectiondir" or "HKEY_LOCAL_MACHINE\SOFTWARE\Wow6432Node\DataFlux Corporation\dac\savedconnectiondir" key. If it is not there, then the saved connections will be in %APPDATA%\dfdac\mydatasources. These saved credential files should be copied to [DMSERVER_INSTALL_ROOT]/etc/dsn/.
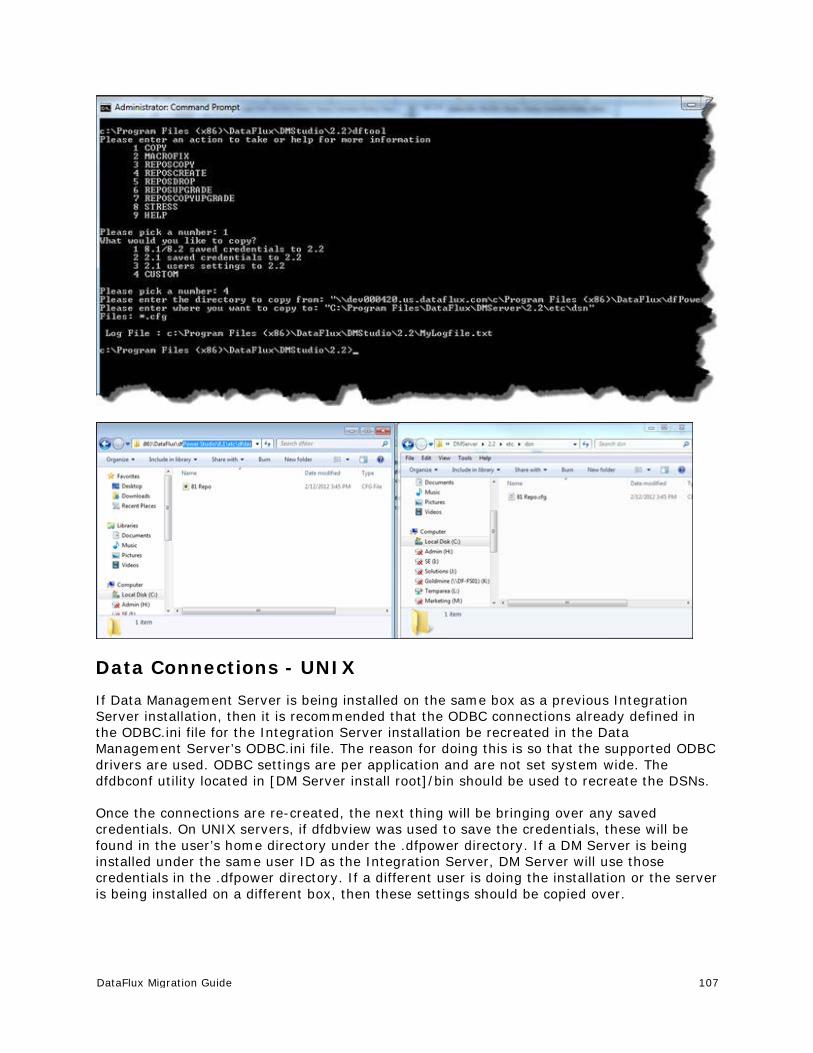
DataFlux Migration Guide 107
Data Connections - UNIX If Data Management Server is being installed on the same box as a previous Integration Server installation, then it is recommended that the ODBC connections already defined in the ODBC.ini file for the Integration Server installation be recreated in the Data Management Server’s ODBC.ini file. The reason for doing this is so that the supported ODBC drivers are used. ODBC settings are per application and are not set system wide. The dfdbconf utility located in [DM Server install root]/bin should be used to recreate the DSNs.
Once the connections are re-created, the next thing will be bringing over any saved credentials. On UNIX servers, if dfdbview was used to save the credentials, these will be found in the user’s home directory under the .dfpower directory. If a DM Server is being installed under the same user ID as the Integration Server, DM Server will use those credentials in the .dfpower directory. If a different user is doing the installation or the server is being installed on a different box, then these settings should be copied over.

108 DataFlux Migration Guide
Repositories With the Integration Server one could connect to multiple dfPower repositories (in DMP called data storages) at a time. This is no longer the case with Data Management Server. It only supports connecting to one data storage portion of a repository at a time. If there is still a need to have separate versions of the dfPower repository then multiple versions of the DM Server will be needed. This type of configuration is supported on UNIX but not on Windows.
From the "etc/profrepos.cfg" file identify the DSN that will be used to be the data storage part for the DM Server. If dfPower repositories need to be merged this should be completed before upgrading.
Next we will through an example of how to create a copy of a repository that the Integration Server is using and then upgrade it so that it can then be used by the DM Server. The assumption is that all Business Rules and other repository objects have been moved into the one repository we will be upgrading.
Here is the Database Connections screen
Here is the repository screen showing the registered "81 Server" repository
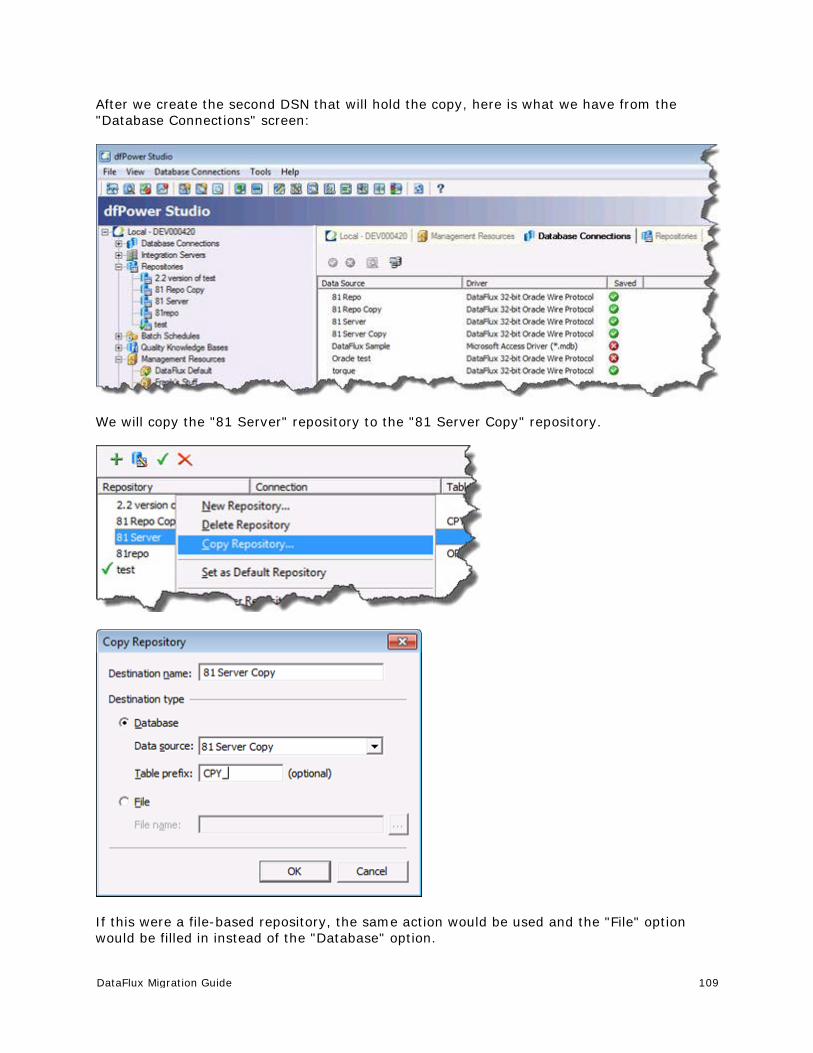
DataFlux Migration Guide 109
After we create the second DSN that will hold the copy, here is what we have from the "Database Connections" screen:
We will copy the "81 Server" repository to the "81 Server Copy" repository.
If this were a file-based repository, the same action would be used and the "File" option would be filled in instead of the "Database" option.

110 DataFlux Migration Guide
It is highly recommended that the "Table prefix" option be used to identify that this is a copy. Even if the recommendation of putting the copy in a different schema were used, this would be another way to identify that this is not an original repository.
Now that there is a copy, we need to upgrade it in DM Studio. If the DSN does not exist on the machine that has DM Studio, go ahead and create it.
Create the repository definition in DM Studio. Notice that we are using the same values that we used when we created the copy in dfPower:

DataFlux Migration Guide 111
Also notice that the "Folder" configuration is left blank in the DM Studio configuration. This is done on purpose as will be shown in a little bit. When we save the configuration DM Studio will let us know that the repository needs to be upgraded. This is ok and a good sign that the system has recognized that we have an older version and it needs to be updated so that DM Studio can use it. Select ok…
…and we should now see something that indicates that the repository needs to be upgraded. Right click on the repository and choose Upgrade.
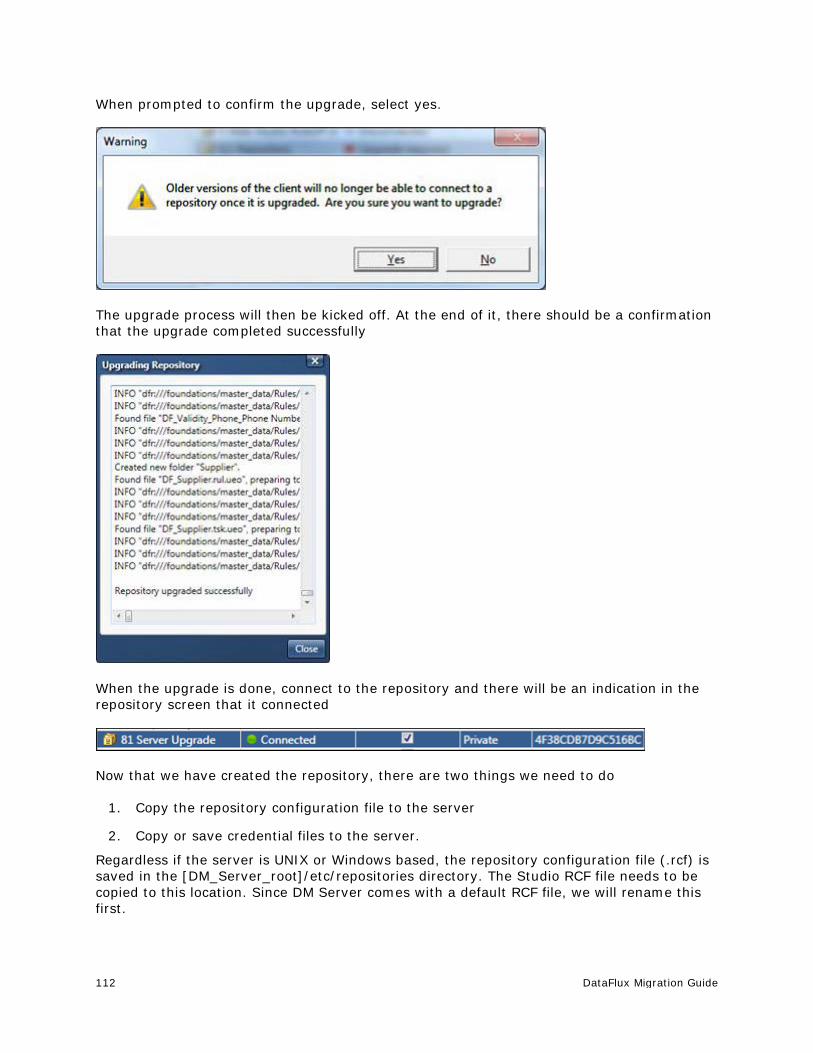
112 DataFlux Migration Guide
When prompted to confirm the upgrade, select yes.
The upgrade process will then be kicked off. At the end of it, there should be a confirmation that the upgrade completed successfully
When the upgrade is done, connect to the repository and there will be an indication in the repository screen that it connected
Now that we have created the repository, there are two things we need to do
1. Copy the repository configuration file to the server
2. Copy or save credential files to the server.
Regardless if the server is UNIX or Windows based, the repository configuration file (.rcf) is saved in the [DM_Server_root]/etc/repositories directory. The Studio RCF file needs to be copied to this location. Since DM Server comes with a default RCF file, we will rename this first.
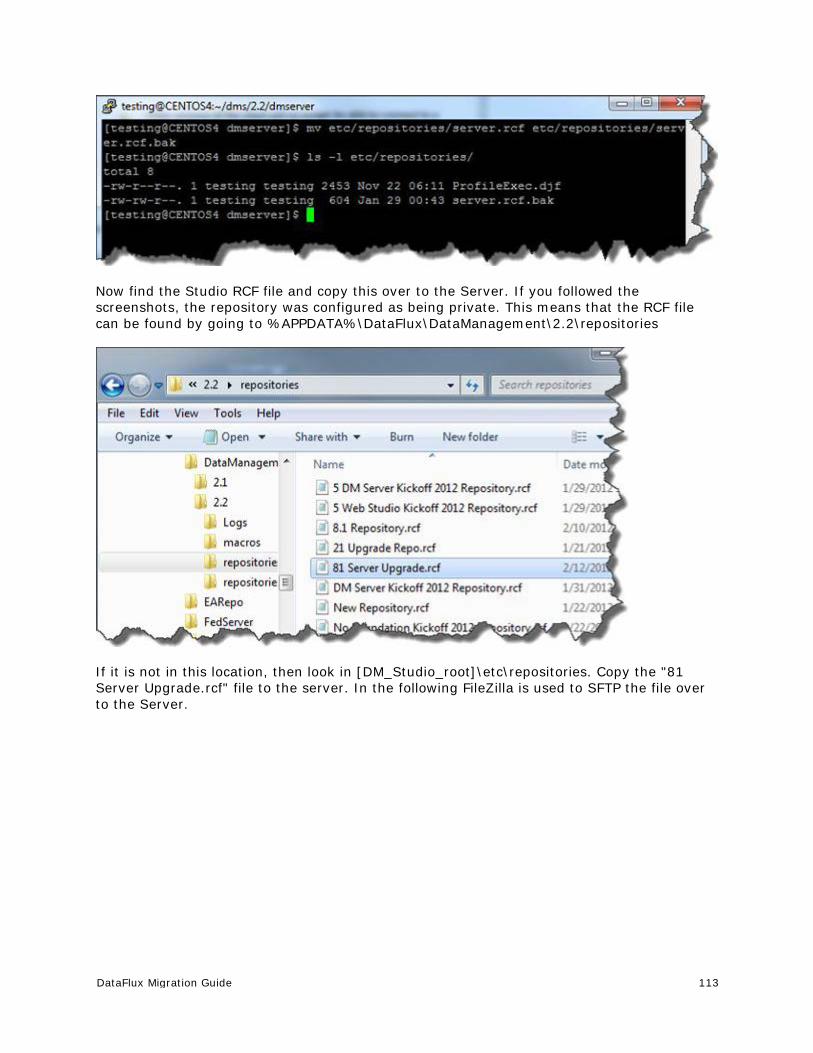
DataFlux Migration Guide 113
Now find the Studio RCF file and copy this over to the Server. If you followed the screenshots, the repository was configured as being private. This means that the RCF file can be found by going to %APPDATA%\DataFlux\DataManagement\2.2\repositories
If it is not in this location, then look in [DM_Studio_root]\etc\repositories. Copy the "81 Server Upgrade.rcf" file to the server. In the following FileZilla is used to SFTP the file over to the Server.
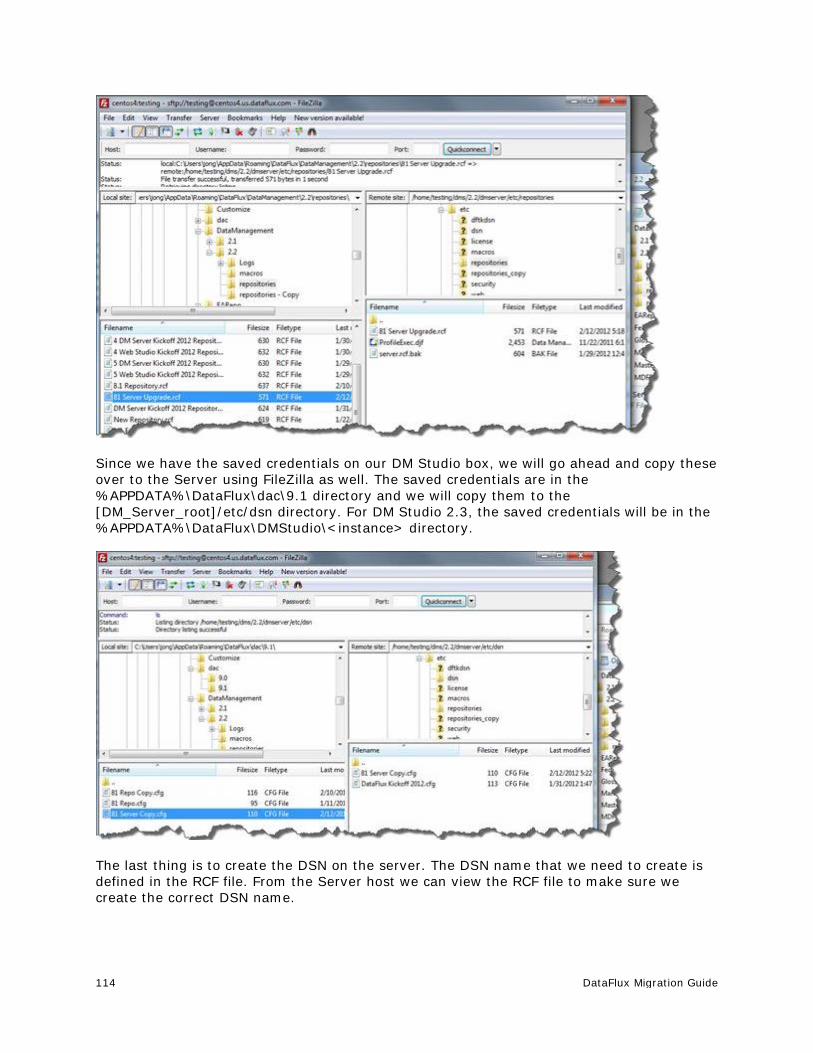
114 DataFlux Migration Guide
Since we have the saved credentials on our DM Studio box, we will go ahead and copy these over to the Server using FileZilla as well. The saved credentials are in the %APPDATA%\DataFlux\dac\9.1 directory and we will copy them to the [DM_Server_root]/etc/dsn directory. For DM Studio 2.3, the saved credentials will be in the %APPDATA%\DataFlux\DMStudio\<instance> directory.
The last thing is to create the DSN on the server. The DSN name that we need to create is defined in the RCF file. From the Server host we can view the RCF file to make sure we create the correct DSN name.
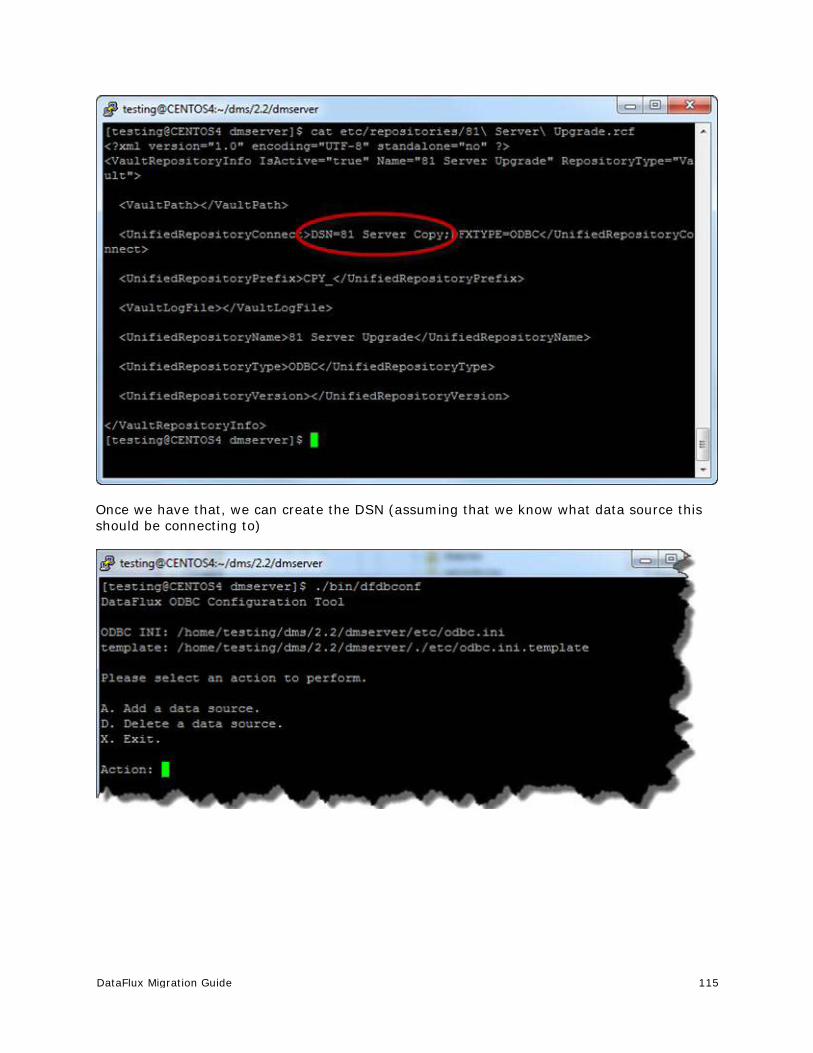
DataFlux Migration Guide 115
Once we have that, we can create the DSN (assuming that we know what data source this should be connecting to)

116 DataFlux Migration Guide
The file storage location of the Data Management Server will always be [DMSERVER_INSTALL_ROOT]\var\. Looking at the contents of the 8.1 Server
there are only two directories that need to be moved over. The "[DIS_root]/var/dis_arch_job" contents should be copied into the "[DM_Server_root]/var/batch_jobs" directory. The "[DIS_root]/var/dis_arch_svc" contents should be copied into the "[DM_Server_root]/var/data_services" directory.
CAUTION! Do NOT copy anything from the "dis_prof_job" directory.
Profile jobs will need to be migrated through DM Studio.
If the repository that the server will use is a file-based repository, then the *.rps file needs to be moved over to the server. This should be copied to [DM Server install root]/var/repositories. Make sure to double check the [DM Server install root]/etc/repositories/*.rcf file to make sure it is using the file-based repository.
Architect jobs will continue to run on a Data Management Server with no conversion needed, but it is highly recommended that jobs be converted using Data Management Studio, tested and then uploaded to the Server. This will allow for taking advantage of new feature/functionality that Data Management Platform offers. The one caveat to this is if there are multi-page jobs that pass macro values between them. These jobs need to be upgraded and deployed to the server for them to run correctly.
If users want to use single page dfPower real time services as part of their DMP deployment, then the following needs to be added to the [DM Server install root]/etc/service.cfg file.
DATASVC/IGNORE_DECLARED_VARS = yes
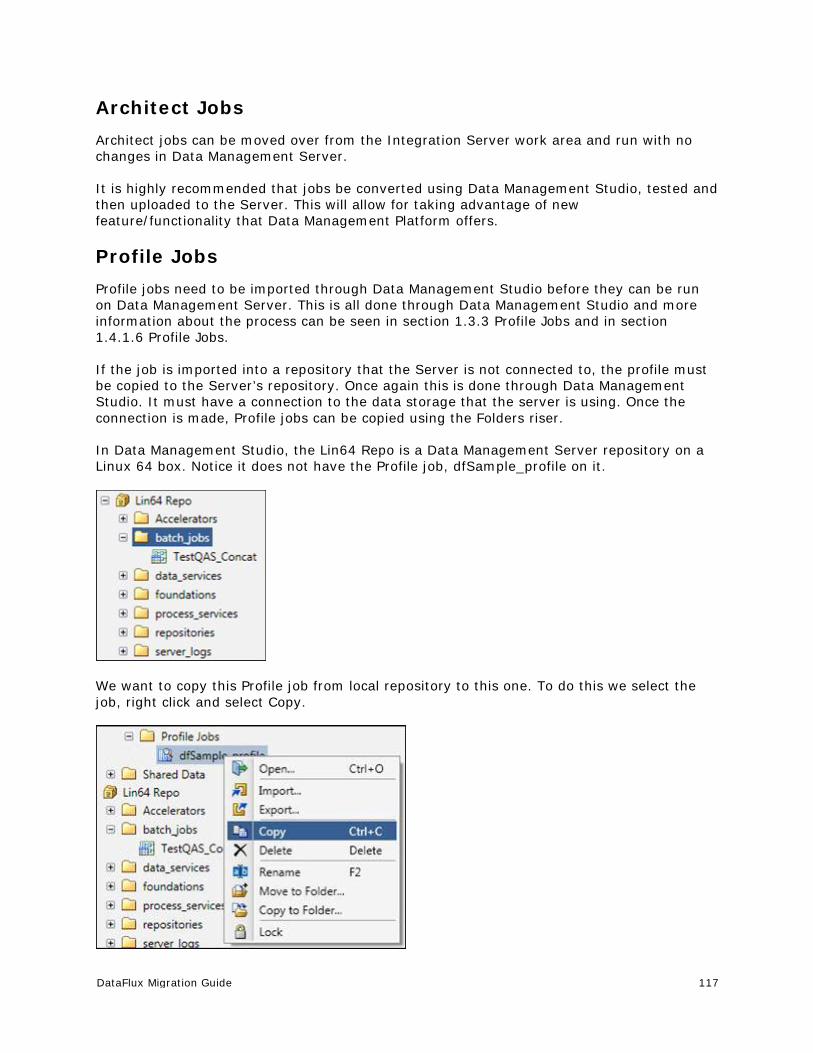
DataFlux Migration Guide 117
Architect Jobs Architect jobs can be moved over from the Integration Server work area and run with no changes in Data Management Server.
It is highly recommended that jobs be converted using Data Management Studio, tested and then uploaded to the Server. This will allow for taking advantage of new feature/functionality that Data Management Platform offers.
Profile Jobs Profile jobs need to be imported through Data Management Studio before they can be run on Data Management Server. This is all done through Data Management Studio and more information about the process can be seen in section 1.3.3 Profile Jobs and in section 1.4.1.6 Profile Jobs.
If the job is imported into a repository that the Server is not connected to, the profile must be copied to the Server’s repository. Once again this is done through Data Management Studio. It must have a connection to the data storage that the server is using. Once the connection is made, Profile jobs can be copied using the Folders riser.
In Data Management Studio, the Lin64 Repo is a Data Management Server repository on a Linux 64 box. Notice it does not have the Profile job, dfSample_profile on it.
We want to copy this Profile job from local repository to this one. To do this we select the job, right click and select Copy.

118 DataFlux Migration Guide
Select the batch_jobs folder in the Lin64 repository, right click and select Paste. This will add the Profile job and make it available to run via the Data Management Server Manager interface in Data Management Studio.
Accelerators If any Accelerators have been installed with the Integration Server, contact your account representative to get the correct version that is compatible with Data Management Platform.
Security Before setting up security, refer to the DataFlux Secure Guide.
If security was being used before with Integration Server, all security settings you used in DataFlux Integration Server will have to be re-created from scratch in Data Management Server. The model used in Data Management Platform has changed and it will require you to reset all user permissions as well as recreate any Access Control List settings you may have had for individual jobs.
You will need to install and configure the Authentication Server first. Users and groups will need to be defined in the Authentication Server in order for them to be given privileges on the Data Management Server. Authentication Server supports integration with Active Directory, LDAP and PAM.
Once the Authentication Server is installed, configured and users are added, Data Management Server will need to be configured as well. The following settings should exist in the dmserver.cfg file:
DMSERVER/SECURE = yes DMSERVER/SECURE/GRP_ADMIN = <name of group defined in Authentication Server> BASE/AUTH_SERVER_LOC = <Location of where the Authentication Server is installed>
For the GRP_ADMIN setting, this can be any group that is in the Authentication Server. It is recommended that a group called DMS_ADMINS be used.
Once these values are set, restart the Data Management Server and connect to it via the Data Management Server Manager interface. You will be asked to login and any user in the group defined by DMSERVER/SECURE/GRP_ADMIN can be used to login. Once logged in, the user needs to assign server level access and then job level access. The default is to deny everyone any privilege except for those in the admin group.

DataFlux Migration Guide 119
First provide Server level authorization. After logging in, select the server and then the Security tab.
"Add" users and/or groups and give them the needed permissions
Next assign job rights by selecting one or multiple jobs, right clicking and selecting Permissions.
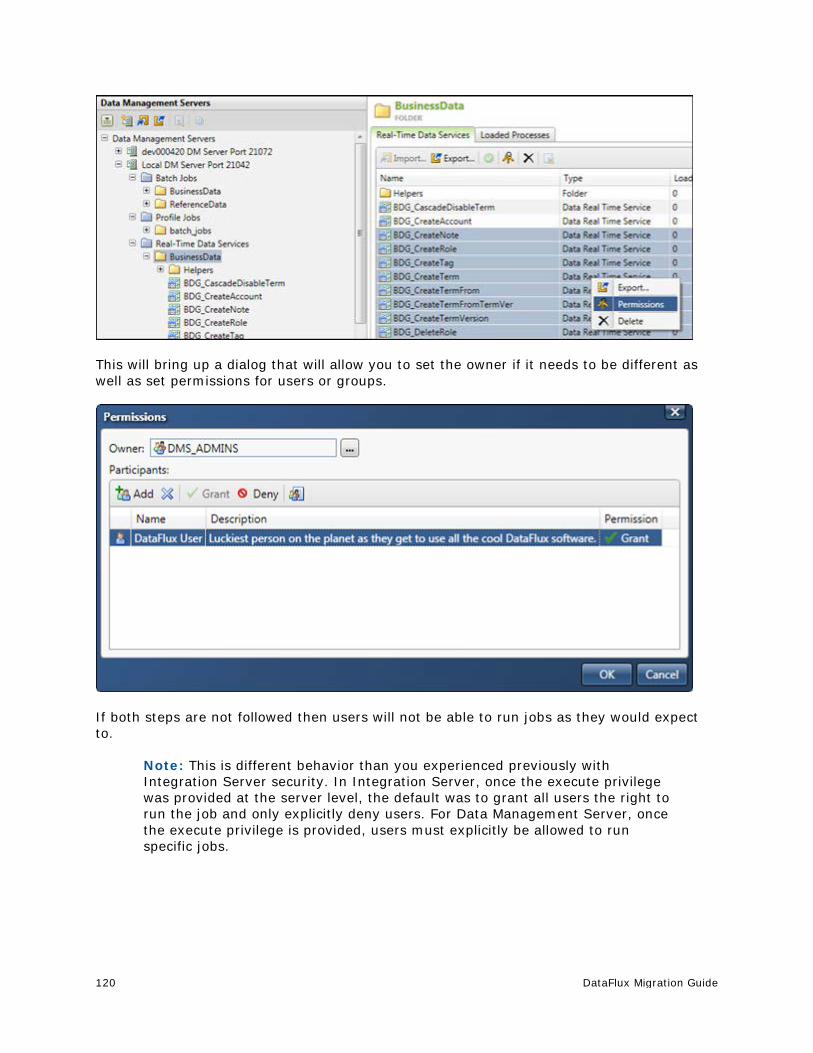
120 DataFlux Migration Guide
This will bring up a dialog that will allow you to set the owner if it needs to be different as well as set permissions for users or groups.
If both steps are not followed then users will not be able to run jobs as they would expect to.
Note: This is different behavior than you experienced previously with Integration Server security. In Integration Server, once the execute privilege was provided at the server level, the default was to grant all users the right to run the job and only explicitly deny users. For Data Management Server, once the execute privilege is provided, users must explicitly be allowed to run specific jobs.
DataFlux Migration Guide 121
Secure Socket Layer Secure Socket Layer (SSL) configuration still exists in the Integration Server. This setup and configuration should be handled when moving migrations. SSL support for LDAP or Active Directory has moved to the Authentication Server. Please refer to the Data Management Server and Authentication Server Admin guides for these configuration steps.
Command Line Execution The Integration Server Command line used these arguments:
usage: dfexec [OPTIONS] jobfile [jobfile...] general options: -i interactive mode -q quiet (no status messages) -cfg FILE use alternate configuration file -log FILE use FILE for logging output --version display version information --help display this message additional options for Architect jobs: -w write default target's output to terminal -fs SEP use SEP as field separator for terminal output -m MODE execution mode: d(efault), s(erial), p(arallel) additional options for Profile jobs: -o OUTPUT output file or repository name; file names must end with .pfo (defaults to profile.pfo) -n NAME report name (defaults to current date and time) -a append to existing report -desc DESCRIPTION optional job description
The Data Management Server has the following command line arguments:
usage: dmpexec [options] options: -c <file> read configuration from <file> -j <file> execute job in <file> -l <file> write log to <file> -i <key>=<value> set input <key> to <value> -o <key>=<value> set option <key> to <value> -b <key>=<value> set job option <key> to <value> -a authenticate using Authentication Server
If we had scripts setup on the Integration Server host to run a profile and architect job, it might look like this
> bin/dfexec –log profileJob.log –o Script_Run.pfo –n scriptedRun profile.pfi
> bin/dfexec –log disJob.log –cfg cmdLine.cfg architect.dmc
To run the upgraded jobs on DM Server, here are what the commands would look like
> bin/dmpexec -l profileJob.log -j "<DM Server install root>/etc/repositories/ProfileExec.djf" -i "REPORT_NAME=scriptedRun" -i "REPORT_DESCRIPTION=Server_Run" -i "JOB_ID=2"
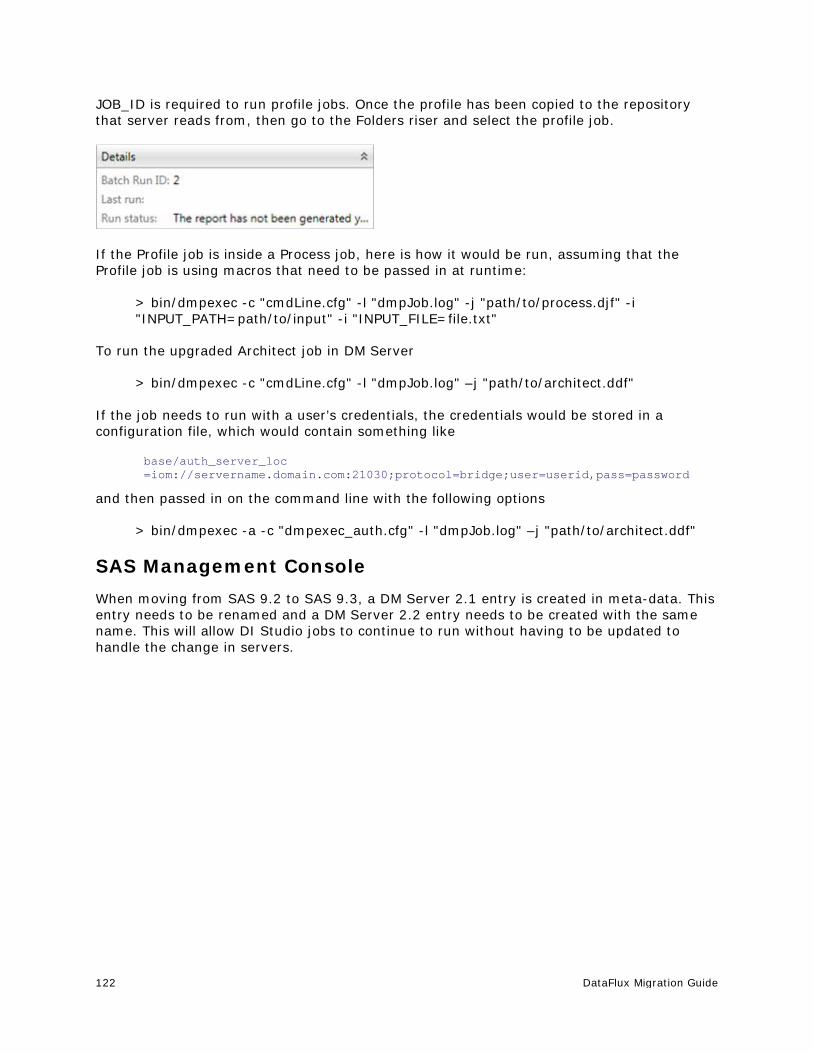
122 DataFlux Migration Guide
JOB_ID is required to run profile jobs. Once the profile has been copied to the repository that server reads from, then go to the Folders riser and select the profile job.
If the Profile job is inside a Process job, here is how it would be run, assuming that the Profile job is using macros that need to be passed in at runtime:
> bin/dmpexec -c "cmdLine.cfg" -l "dmpJob.log" -j "path/to/process.djf" -i "INPUT_PATH=path/to/input" -i "INPUT_FILE=file.txt"
To run the upgraded Architect job in DM Server
> bin/dmpexec -c "cmdLine.cfg" -l "dmpJob.log" –j "path/to/architect.ddf"
If the job needs to run with a user’s credentials, the credentials would be stored in a configuration file, which would contain something like
base/auth_server_loc =iom://servername.domain.com:21030;protocol=bridge;user=userid,pass=password
and then passed in on the command line with the following options
> bin/dmpexec -a -c "dmpexec_auth.cfg" -l "dmpJob.log" –j "path/to/architect.ddf"
SAS Management Console When moving from SAS 9.2 to SAS 9.3, a DM Server 2.1 entry is created in meta-data. This entry needs to be renamed and a DM Server 2.2 entry needs to be created with the same name. This will allow DI Studio jobs to continue to run without having to be updated to handle the change in servers.
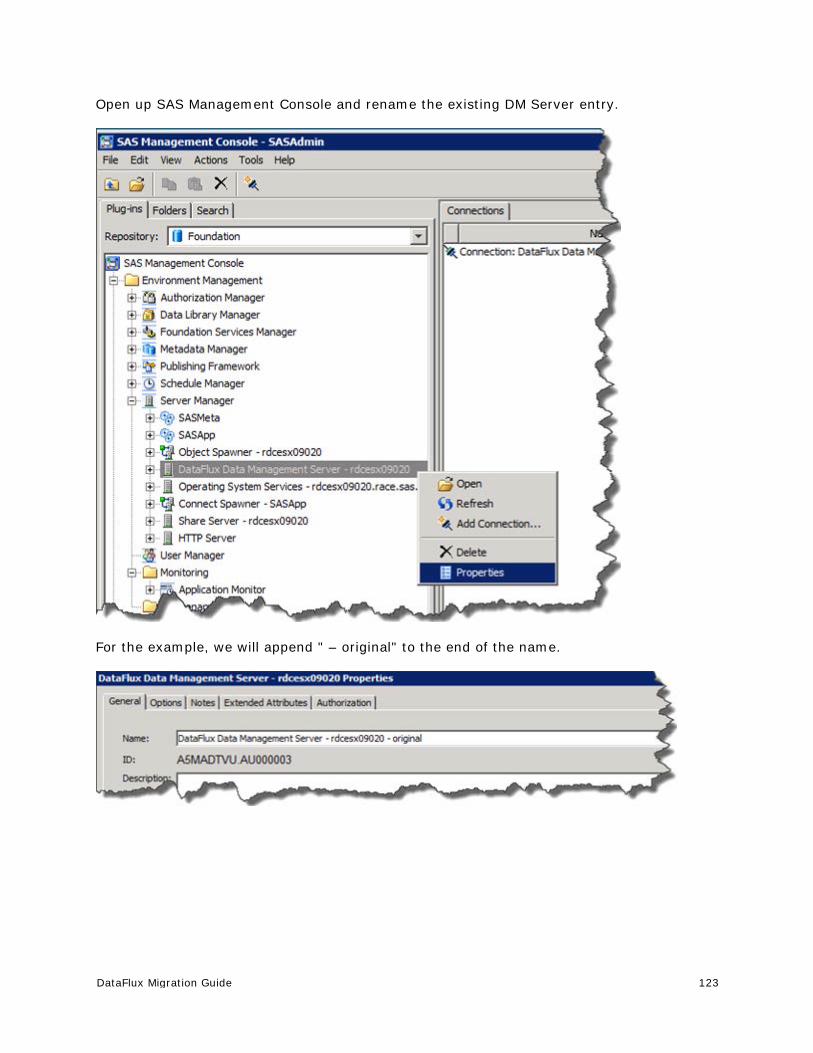
DataFlux Migration Guide 123
Open up SAS Management Console and rename the existing DM Server entry.
For the example, we will append " – original" to the end of the name.
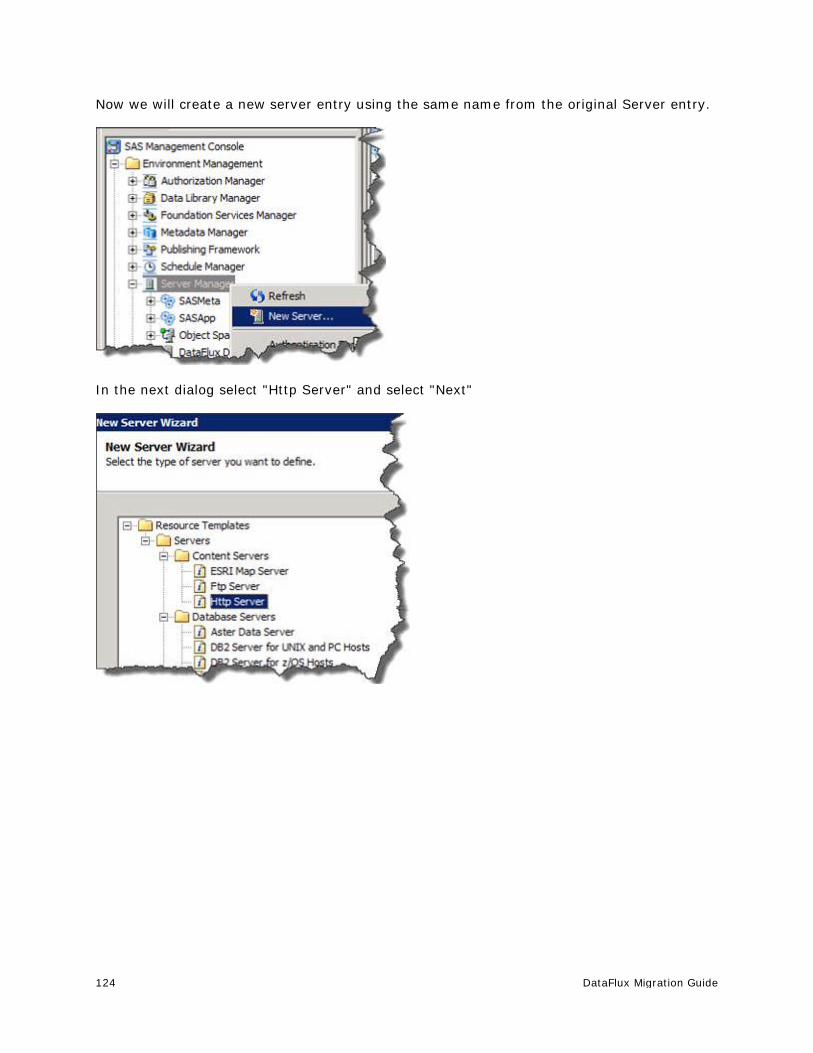
124 DataFlux Migration Guide
Now we will create a new server entry using the same name from the original Server entry.
In the next dialog select "Http Server" and select "Next"
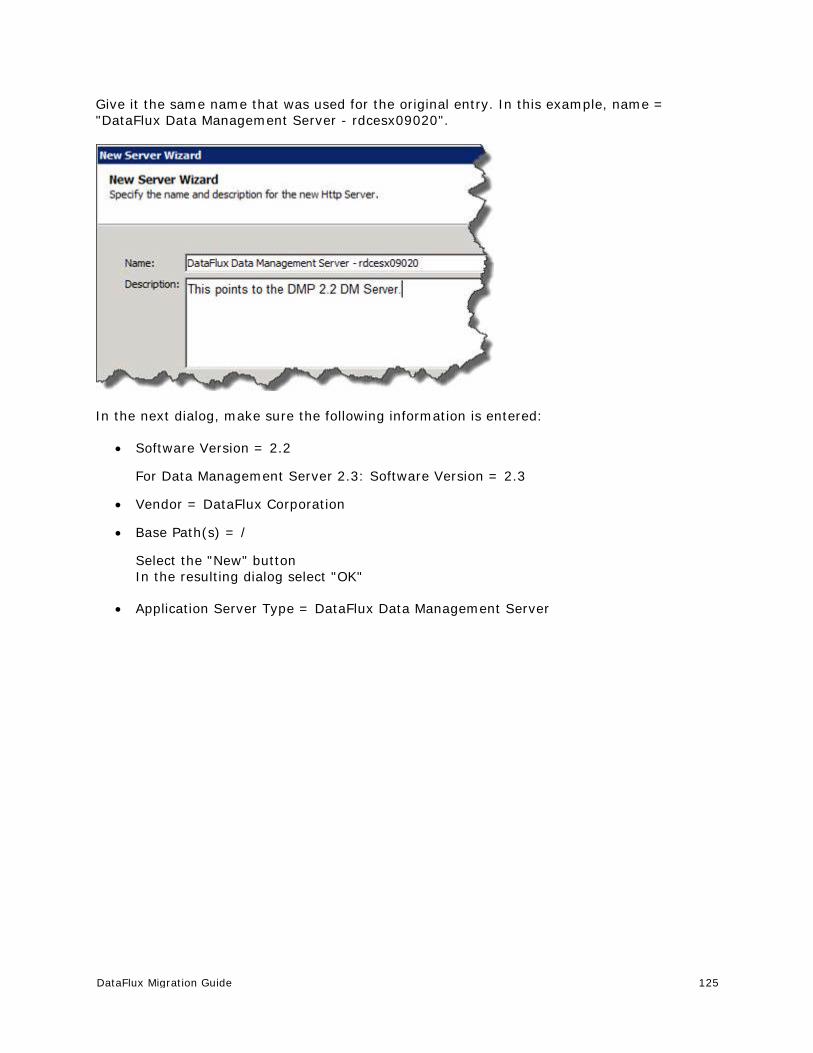
DataFlux Migration Guide 125
Give it the same name that was used for the original entry. In this example, name = "DataFlux Data Management Server - rdcesx09020".
In the next dialog, make sure the following information is entered:
• Software Version = 2.2
For Data Management Server 2.3: Software Version = 2.3
• Vendor = DataFlux Corporation
• Base Path(s) = /
Select the "New" button In the resulting dialog select "OK"
• Application Server Type = DataFlux Data Management Server
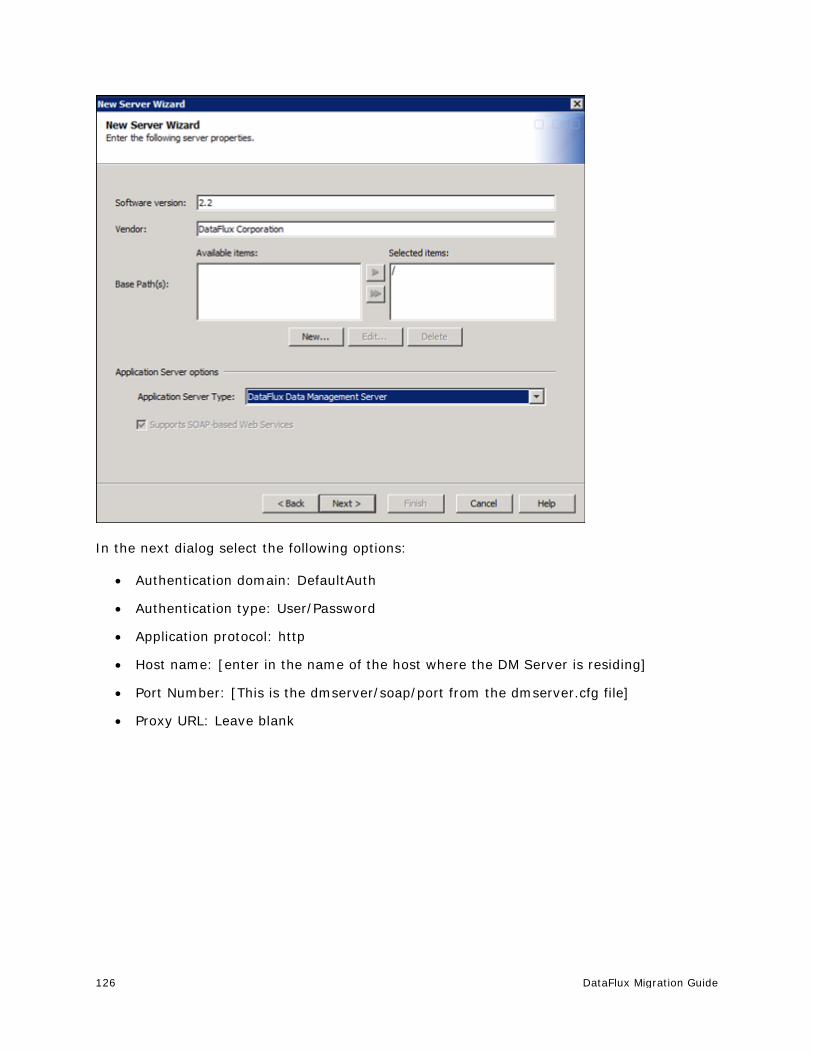
126 DataFlux Migration Guide
In the next dialog select the following options:
• Authentication domain: DefaultAuth
• Authentication type: User/Password
• Application protocol: http
• Host name: [enter in the name of the host where the DM Server is residing]
• Port Number: [This is the dmserver/soap/port from the dmserver.cfg file]
• Proxy URL: Leave blank

DataFlux Migration Guide 127
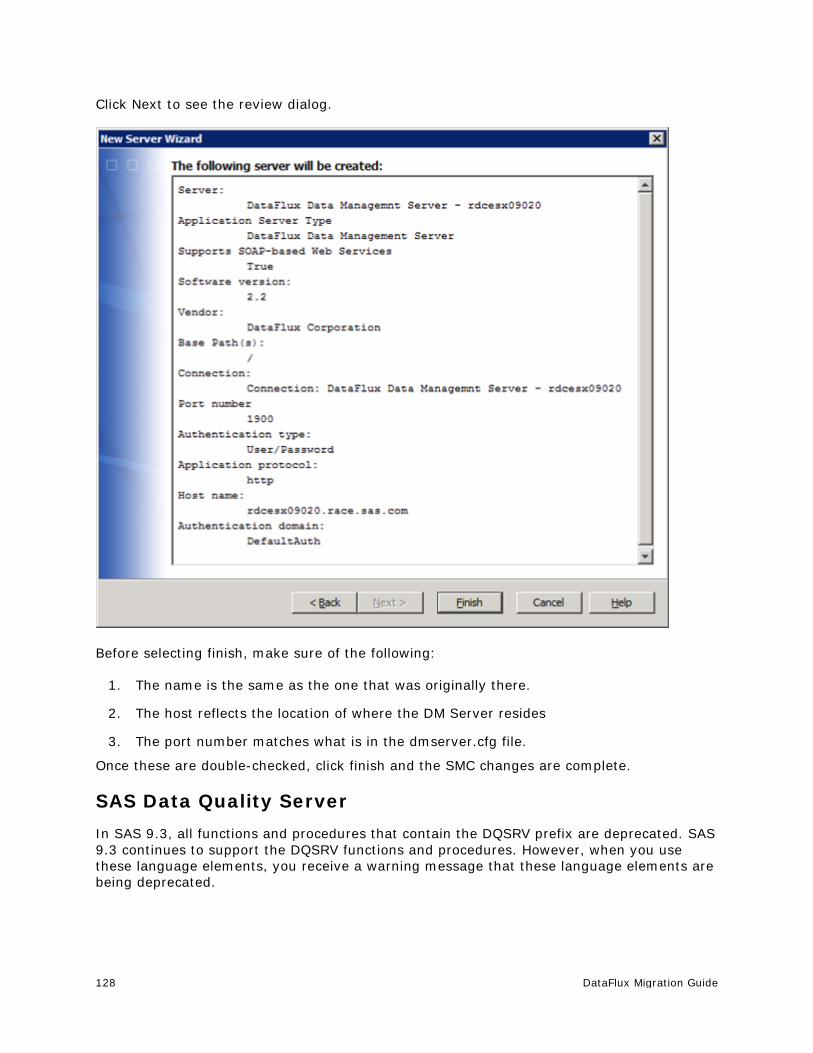
128 DataFlux Migration Guide
Click Next to see the review dialog.
Before selecting finish, make sure of the following:
1. The name is the same as the one that was originally there.
2. The host reflects the location of where the DM Server resides
3. The port number matches what is in the dmserver.cfg file.
Once these are double-checked, click finish and the SMC changes are complete.
SAS Data Quality Server In SAS 9.3, all functions and procedures that contain the DQSRV prefix are deprecated. SAS 9.3 continues to support the DQSRV functions and procedures. However, when you use these language elements, you receive a warning message that these language elements are being deprecated.

DataFlux Migration Guide 129
The DQSRV language elements are being replaced by the DMSRV language elements. Some functions and procedures are simply renamed. Other functions and procedures are being replaced by a new function or procedure. All of the changes are documented in the following tables.
Note: The DQSVR functions were used with the DataFlux Integration Server. However, the DMSVR functions support the DataFlux Data Management Server.
Replacing the DQSRV Functions with DMSRV Functions
Description of Function Deprecated Name New Name Runs a file-type DataFlux dfProfile job on a server and returns a job identifier
DQSRVPROFJOBFILE Not Applicable
Runs a repository-type DataFlux dfProfile job on a server and returns a job identifier
DQSRVPROFJOBREP Not Applicable
Generates a profile Not Applicable DMSRVPROFILEJOB Runs a DataFlux dfPower Architect job on a server and returns a job identifier
DQSRVARCHJOB DMSRVBATCHJOB
Runs a process job Not Applicable DMSRVBATCHJOB Returns the status of a job that was submitted to the server
DQSRVJOBSTATUS DMSRVJOBSTATUS
Copies a job’s log file from a server DQSRVCOPYLOG DMSRVCOPYLOG Runs a data job Not Applicable DMSVRBATCHJOB Deletes a job’s log file from the server DQSRVDELETELOG DMSRVDELETELOG Terminates a job that is running on a server DQSRVKILLJOB DMSRVKILLJOB Authenticates a user on a server DQSRVUSER DMSRVUSER Returns the version of the server DQSRVVER DMSRVVERSION
Replacing the DQSRV Functions with DMSRV Functions
Deprecated Procedures
Description of Procedure Deprecated Name New Name
Runs a DataFlux dfPower Architect real-time service on a server
PROC DQSRVSVC
PROC DMSRVDATASVC
Creates a data set that provides the name, type, and description of all DataFlux dfPower Architect and DataFlux dfPower Profile jobs that have been run on the server
PROC DQSRVADM
PROC DMSRVADM
Runs a process service Not Applicable
PROC DMSRVPROCESSSVC
Deprecated Procedures
If DQ Server is being used via SAS code only (meaning used by calling the PROCS in SAS code and not with EDI) customers will in association with changing the PROC names will need to update their SAS code to
• Point to the new data or process jobs.
130 DataFlux Migration Guide
These are the architect jobs that have been upgraded. Even though the names are the same the extension will change; Architect (.dmc) to Process (.djf) or Data (.ddf).
• Point to the new profile jobs
If DQ Server is a part of an EDI deployment, the job updates are covered with the 9.2 to 9.3 migration
Note that Data quality functions may produce different results than Data Management Platform 2.2 because the DQ Server engine is based on DMP 2.1. Please be aware if doing actions in DQ Server and Data Management Studio/Server and comparing results.
If trying to call a single page dfPower real time services as part of a DMP deployment, then the following needs to be added to the [DM Server install root]/etc/service.cfg file.
• DATASVC/IGNORE_DECLARED_VARS = yes
DataFlux Migration Guide 131
Migrating From Data Management Studio 2.1 to Data Management Studio 2.2
• Configurations
• Reference Sources
• Data Connections
• Repositories
• Data and Process Jobs
• Profile Jobs
• Explorer Jobs
• Accelerators
• SAS Data Integration Studio
• Other
Configurations There are no changes in configuration settings. All settings that were honored in 2.1 are honored in 2.2. Post installation,
• Backup app.cfg and dfwfproc.cfg in [DM STUDIO 2.2 INSTALL ROOT]\etc
• Copy app.cfg and dfwfproc.cfg from [DM STUDIO 2.1 INSTALL ROOT]\etc to [DM STUDIO 2.2 INSTALL ROOT]\etc
• Open up [DM STUDIO 2.2 INSTALL ROOT]\etc\app.cfg and validate that the paths are correct for things like
Licenses
QKB
USPS data
Canada data
World data
Note: Do not migrate any settings in any of the other files.

132 DataFlux Migration Guide
It is a good practice to make sure that license is configured correctly. The best way to do this is with the License Manager. This is found in the Windows programs menu.
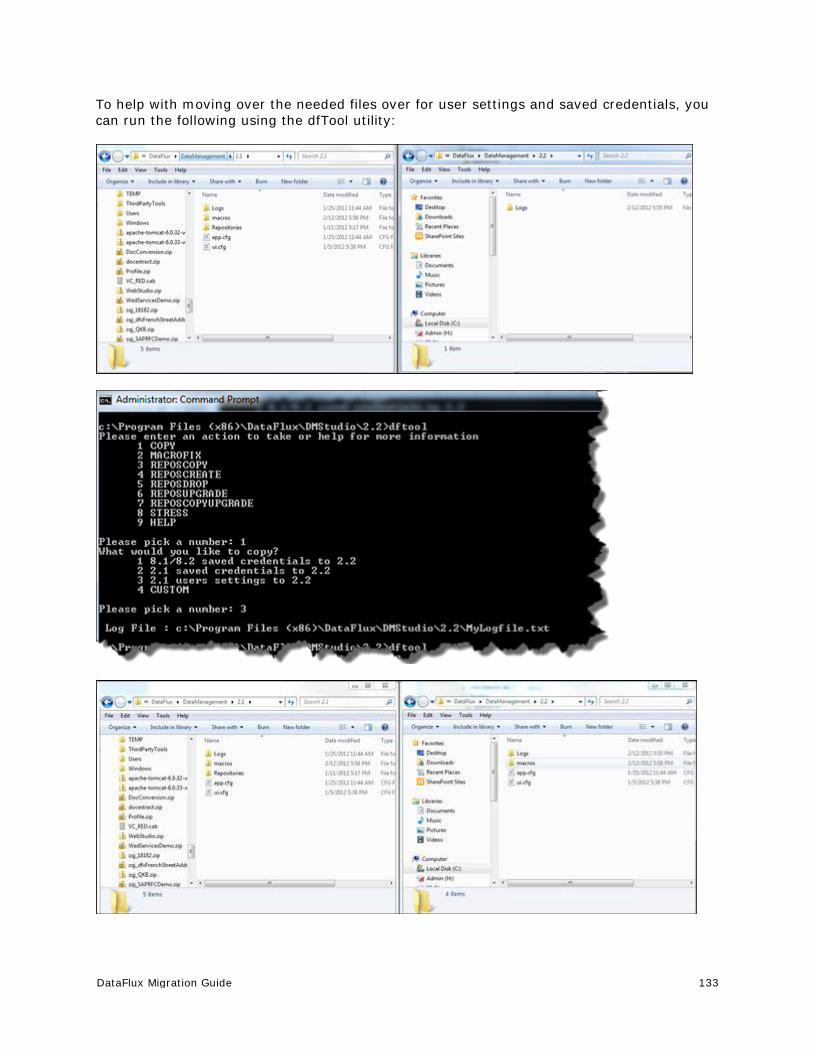
DataFlux Migration Guide 133
To help with moving over the needed files over for user settings and saved credentials, you can run the following using the dfTool utility:

134 DataFlux Migration Guide
The copying of user’s settings is copying *cfg files from
• %APPDATA%\DataFlux\DataManagement\2.1 to %APPDATA%\DataFlux\DataManagement\2.2
• %APPDATA%\DataFlux\DataManagement\2.1\macros to %APPDATA%\DataFlux\DataManagement\2.2\macros
• It will not copy anything from the "Logs" and "Repositories" directories. For 2.3, the following mapping exists
• %APPDATA%\DataFlux\DataManagement\2.1 to %APPDATA%\DataFlux\DMStudio\<instance>\
• %APPDATA%\DataFlux\DataManagement\2.1\macros to %APPDATA%\DataFlux\ DMStudio\<instance>\macros
Note: Do not copy anything from Logs or Repositories.
All configurations have now been moved over.
Reference Sources Once Data Management Studio is installed, these will need to be re-registered. Open up Data Management Studio 2.1 and navigate to Administration> Reference Sources. Open up Data Management Studio 2.2 and navigate to the same location.
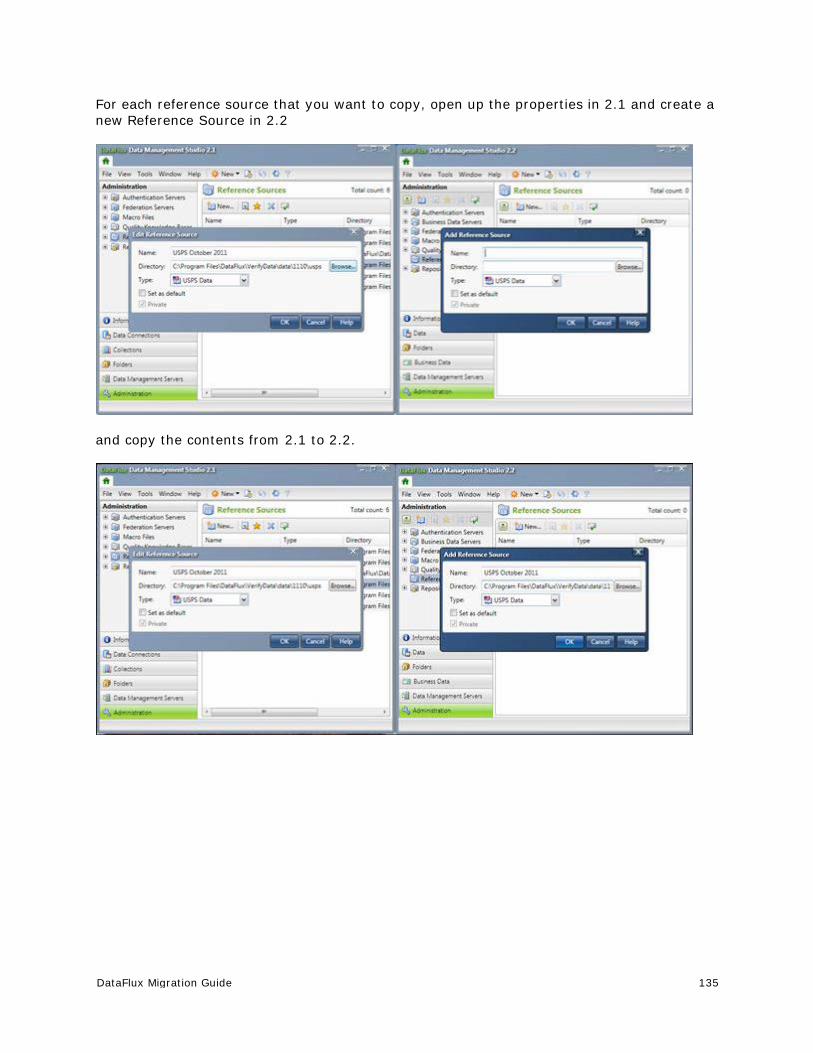
DataFlux Migration Guide 135
For each reference source that you want to copy, open up the properties in 2.1 and create a new Reference Source in 2.2
and copy the contents from 2.1 to 2.2.

136 DataFlux Migration Guide
The end result is that all resources desired should be copied across.
Data Connections Assuming that Data Management Studio is being installed on the same box that the previous version of DM Studio, there is no extra work required to migrate over any ODBC connections. If Data Management Studio is being installed on a new box, then one will have to migrate the ODBC connections defined in the ODBC Administrator manually.
ODBC data connections that are defined on the box will be upgraded automatically to the latest version of the DataFlux ODBC drivers. This means that both dfPower and Data Management Studio will be using the same version of ODBC drivers.
For any custom, Federation Server or localized Federation Server definitions that have been created you will need to move these over as well. The DF Tool utility can be used to accomplish this. It will copy definitions from [DM STUDIO 2.1 INSTALL ROOT]\etc\dftkdsn to [DM STUDIO 2.2 INSTALL ROOT]\etc\dftkdsn and credentials from %APPDATA%\DataFlux\dac\9.0 to %APPDATA%\DataFlux\dac\9.1.
For Data Management Studio 2.3, this will copy content over from [DM STUDIO 2.1/2.2 INSTALL ROOT]\etc\dftkdsn to [DM STUDIO 2.3 INSTALL ROOT]\etc\dftkdsn and credentials from %APPDATA%\DataFlux\dac\9.0 or 9.1 to %APPDATA%\DataFlux\dac\savedconn.
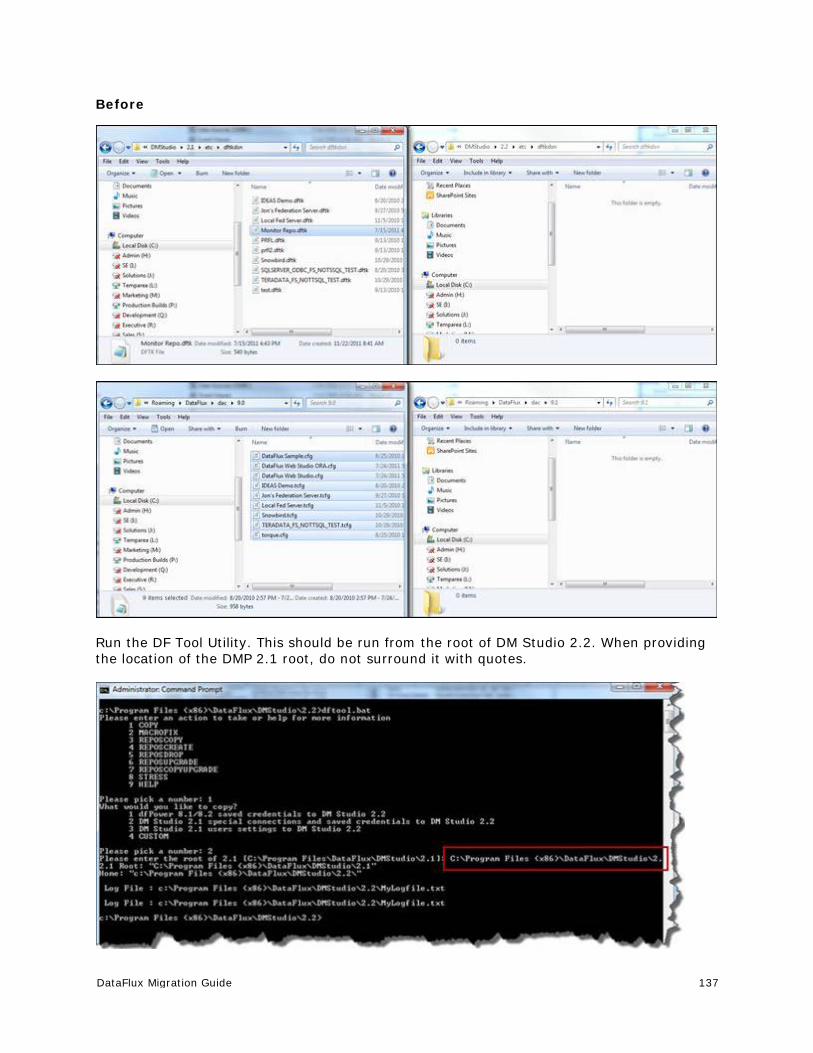
DataFlux Migration Guide 137
Before
Run the DF Tool Utility. This should be run from the root of DM Studio 2.2. When providing the location of the DMP 2.1 root, do not surround it with quotes.
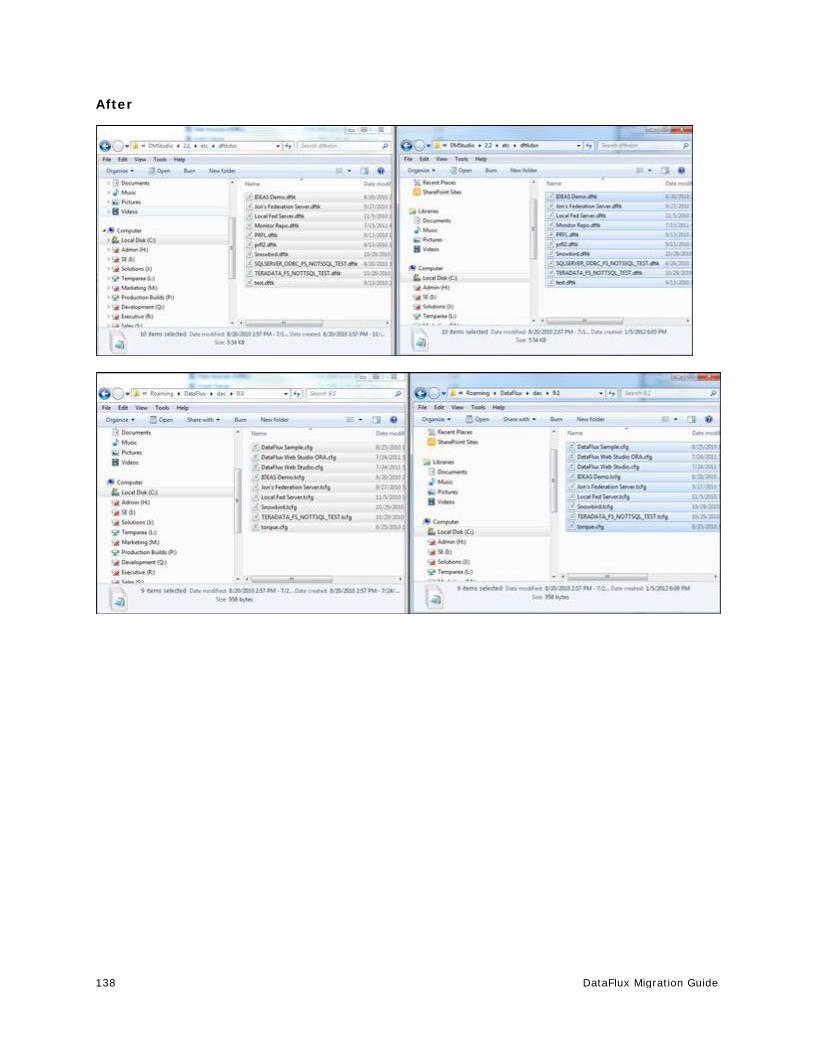
138 DataFlux Migration Guide
After

DataFlux Migration Guide 139
Once this is done, 2.2 should have the same data connections as 2.1. This can be verified by comparing the 2.1 Data Connections riser against the 2.2 Data riser.
Repositories • File-Based Data Storage
• RDBMS-Based Data Storage
File-Based Data Storage
For each repository that exists in 2.1, it will need to be recreated in 2.2. It is highly recommended that you not upgrade the 2.1 repository because then 2.1 could not use the repository. First, open up 2.1 and got to the Administration > Repository Definitions.
Except for the DataFlux Sample repository that is defined, each listed repository that needs to be available in 2.2 should be migrated.
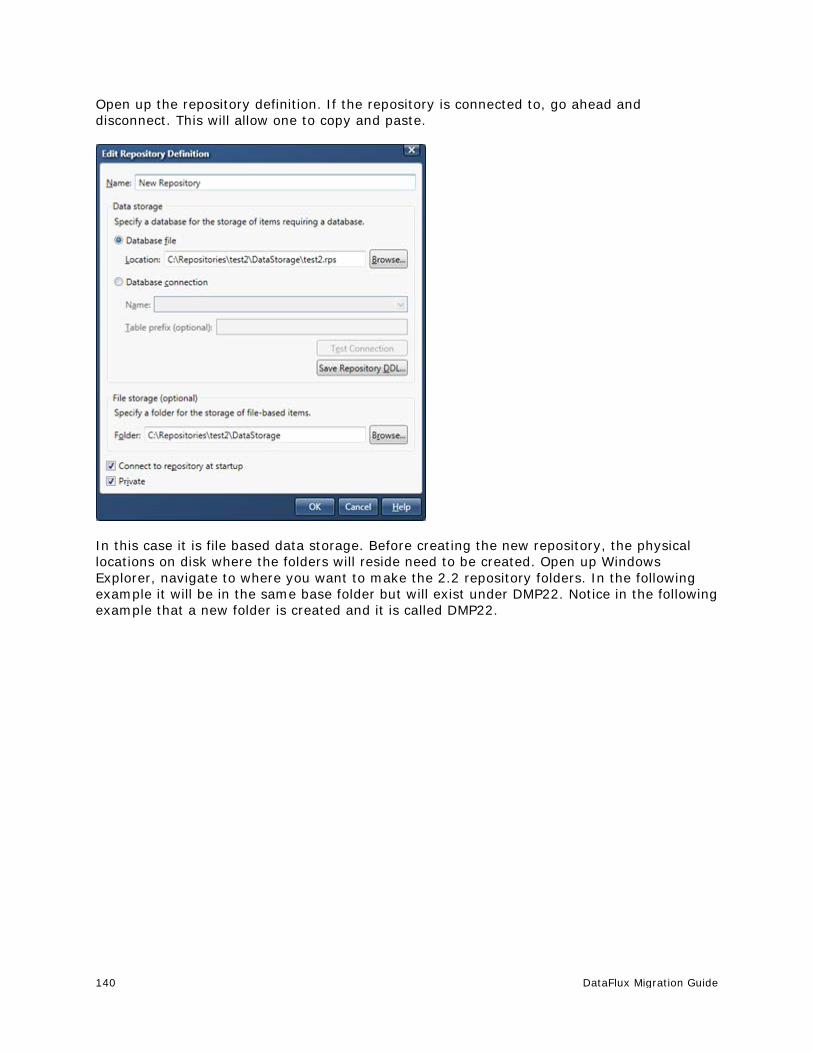
140 DataFlux Migration Guide
Open up the repository definition. If the repository is connected to, go ahead and disconnect. This will allow one to copy and paste.
In this case it is file based data storage. Before creating the new repository, the physical locations on disk where the folders will reside need to be created. Open up Windows Explorer, navigate to where you want to make the 2.2 repository folders. In the following example it will be in the same base folder but will exist under DMP22. Notice in the following example that a new folder is created and it is called DMP22.

DataFlux Migration Guide 141
Since the repository creation will not create folders, we once again need to create a couple more folders under DMP22 in order to get everything to work. The structure for the new repository can be whatever is desired. In the example, we are going to create the same structure that exists for 2.1 but only under the DMP22 folder.

142 DataFlux Migration Guide
After creating the folders, since this repository has a file-based data storage we need to copy one file over to the new DataStorage location. Go back to the 2.1 DataStorage location and copy the *.rps file to the 2.2 DataStorage location. In our example we are copying C:\Repositories\test2\DataStorage\test2.rps to C:\Repositories\DMP22\test2\DataStorage\test2.rps.
Now having created the folders and copied over the RPS file we need, go back into DM Studio and create the DMP 2.2 repository definition. In Data Management Studio 2.2, navigate to Administration > Repository Definitions and create a new repository. If you feel confident, copy, paste and edit from the 2.1 settings or use the Browse buttons to navigate to the specific folders.
Highlighted above is the one difference between the 2.1 definition on the left and the 2.2 definition on the right, which is that the two pieces of the repository live under the DMP22 folder that was created.
Cancel out of the 2.1 repository property window. Make sure that the settings for the 2.2 repository are pointing to the new locations that were just created. Save the changes.
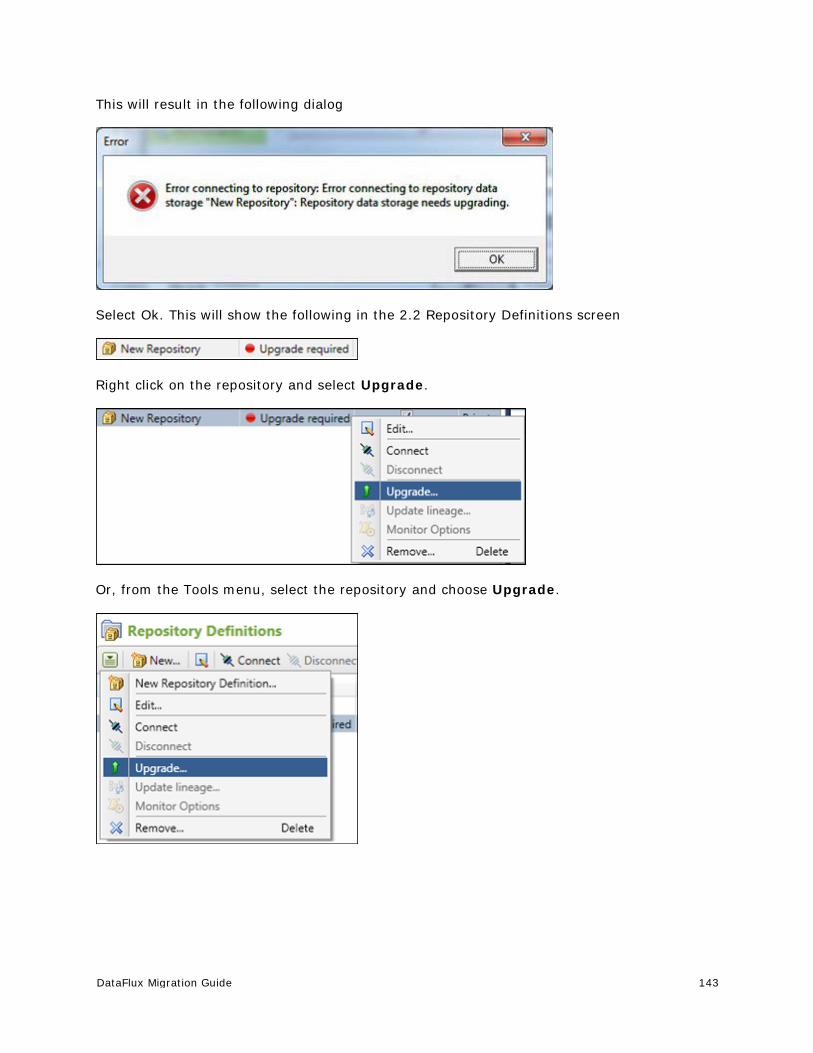
DataFlux Migration Guide 143
This will result in the following dialog
Select Ok. This will show the following in the 2.2 Repository Definitions screen
Right click on the repository and select Upgrade.
Or, from the Tools menu, select the repository and choose Upgrade.
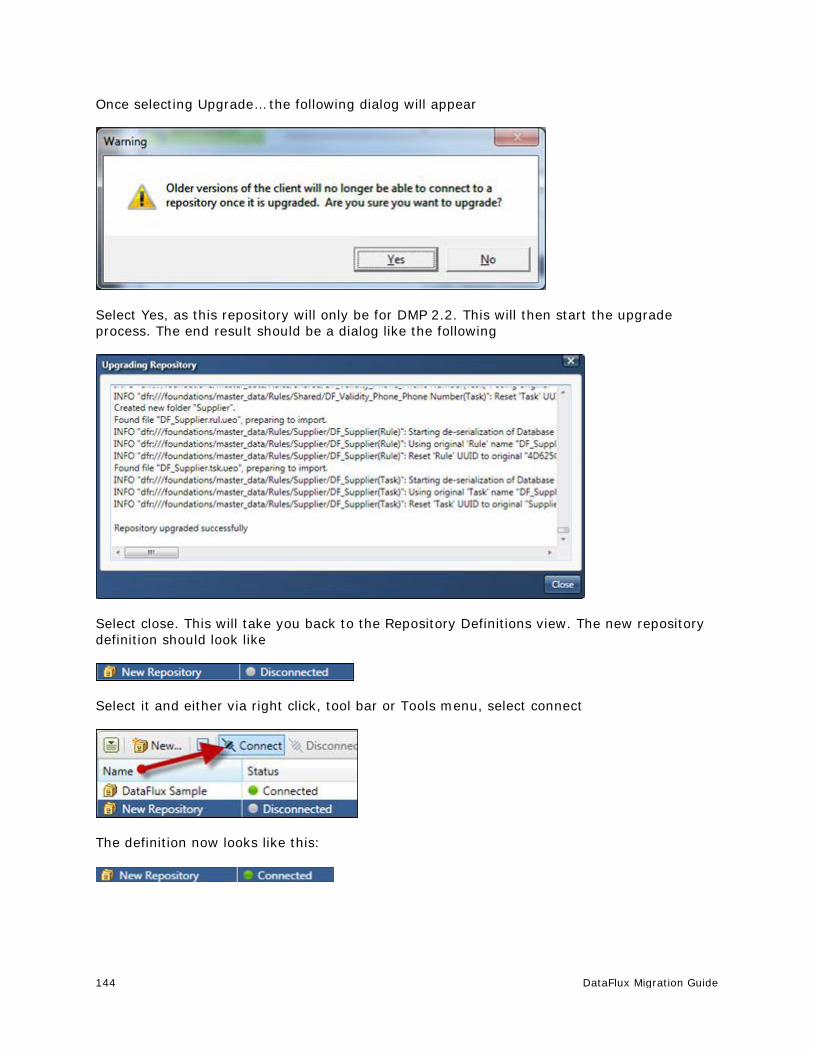
144 DataFlux Migration Guide
Once selecting Upgrade… the following dialog will appear
Select Yes, as this repository will only be for DMP 2.2. This will then start the upgrade process. The end result should be a dialog like the following
Select close. This will take you back to the Repository Definitions view. The new repository definition should look like
Select it and either via right click, tool bar or Tools menu, select connect
The definition now looks like this:

DataFlux Migration Guide 145
RDBMS-Based Data Storage
For RDBMS systems like Oracle, SQL Server, etc. the process is a little different. It is not recommended to reuse the 2.1 repository, because the upgrade process will mean it can no longer be used with Data Management Studio 2.1. Before the repository is copied, identify where the repository should be copied too. In this example the copy will be put into a new Oracle schema.
In the following example, we have a 2.1 repository that was created called 21 Repository. This is the repository we are going to copy.

146 DataFlux Migration Guide
In DM Studio 2.1, open up the ODBC administrator and create a new connection.
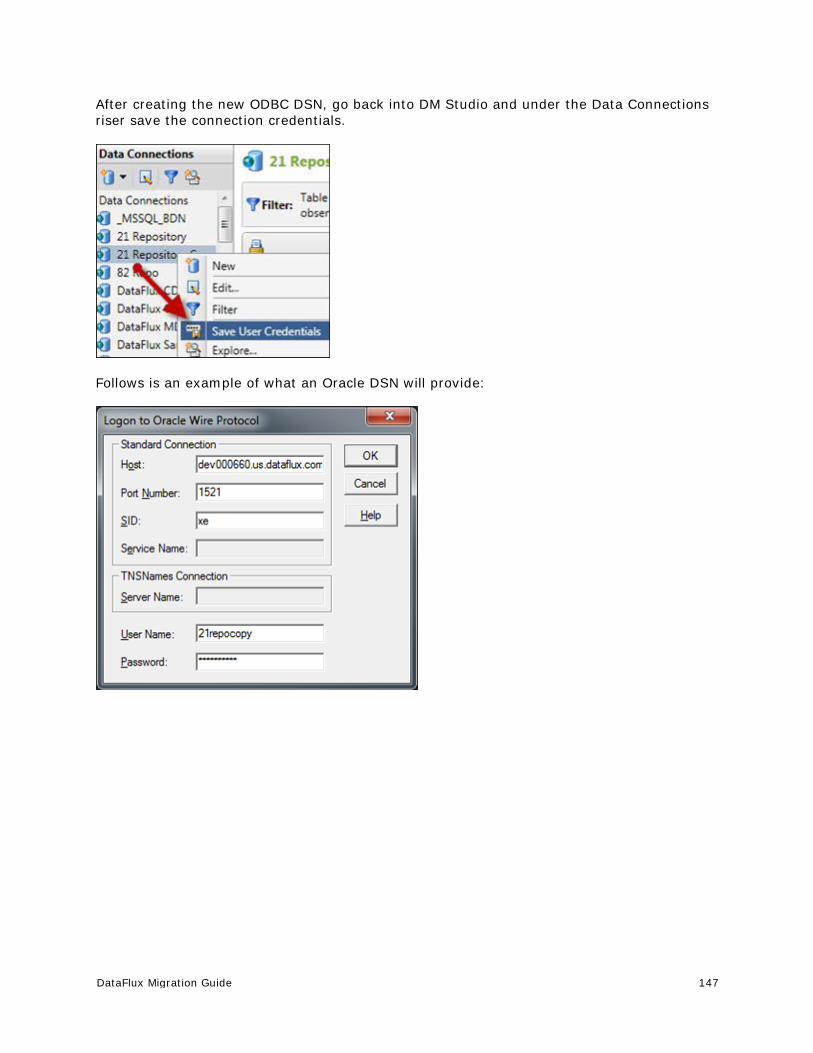
DataFlux Migration Guide 147
After creating the new ODBC DSN, go back into DM Studio and under the Data Connections riser save the connection credentials.
Follows is an example of what an Oracle DSN will provide:
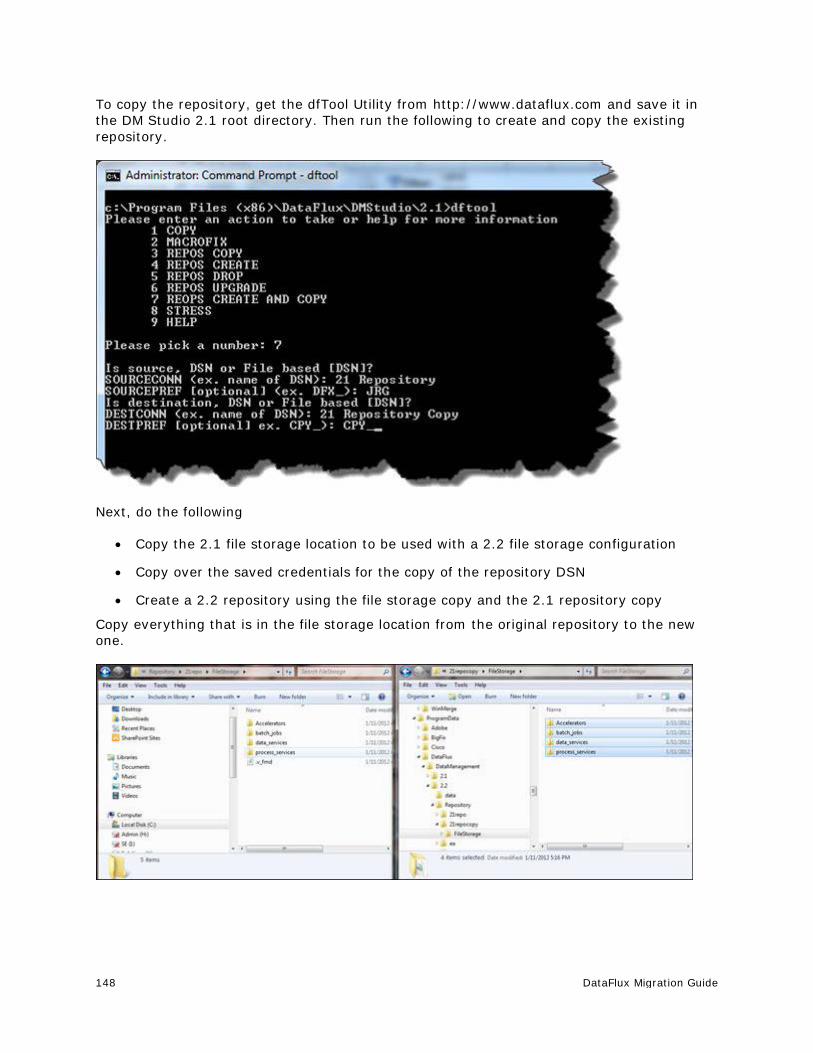
148 DataFlux Migration Guide
To copy the repository, get the dfTool Utility from http://www.dataflux.com and save it in the DM Studio 2.1 root directory. Then run the following to create and copy the existing repository.
Next, do the following
• Copy the 2.1 file storage location to be used with a 2.2 file storage configuration
• Copy over the saved credentials for the copy of the repository DSN
• Create a 2.2 repository using the file storage copy and the 2.1 repository copy
Copy everything that is in the file storage location from the original repository to the new one.

DataFlux Migration Guide 149
Copy the credentials over using the dfTool Utility
Open up DM Studio 2.2 and go to Administration > Repository Definitions and create a new repository
Now create the new repository configuration in 2.2 via the Administration > Repository Definition screen. Below is the 2.1 configuration on the left and the 2.2 version on the right. Notice that except for the name, the rest of the configuration is the same.
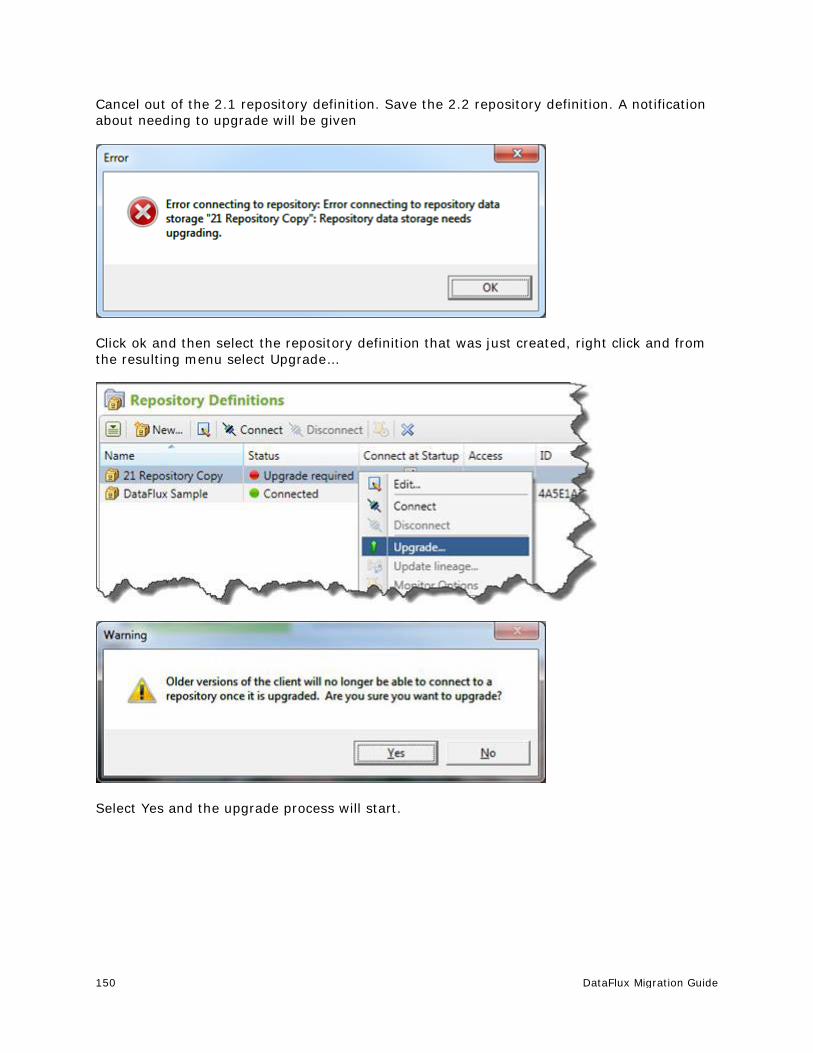
150 DataFlux Migration Guide
Cancel out of the 2.1 repository definition. Save the 2.2 repository definition. A notification about needing to upgrade will be given
Click ok and then select the repository definition that was just created, right click and from the resulting menu select Upgrade…
Select Yes and the upgrade process will start.

DataFlux Migration Guide 151
At the end of it one should see something like the following
Select Close and then select the definition again and choose Connect
which should result in
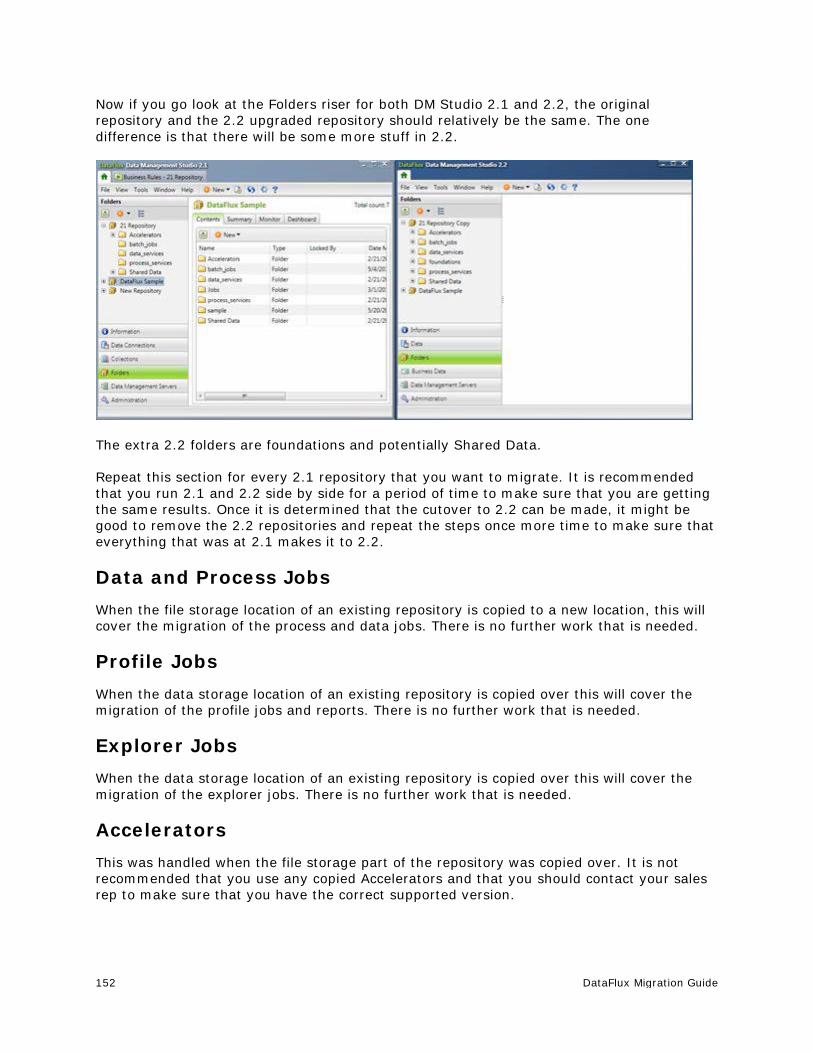
152 DataFlux Migration Guide
Now if you go look at the Folders riser for both DM Studio 2.1 and 2.2, the original repository and the 2.2 upgraded repository should relatively be the same. The one difference is that there will be some more stuff in 2.2.
The extra 2.2 folders are foundations and potentially Shared Data.
Repeat this section for every 2.1 repository that you want to migrate. It is recommended that you run 2.1 and 2.2 side by side for a period of time to make sure that you are getting the same results. Once it is determined that the cutover to 2.2 can be made, it might be good to remove the 2.2 repositories and repeat the steps once more time to make sure that everything that was at 2.1 makes it to 2.2.
Data and Process Jobs When the file storage location of an existing repository is copied to a new location, this will cover the migration of the process and data jobs. There is no further work that is needed.
Profile Jobs When the data storage location of an existing repository is copied over this will cover the migration of the profile jobs and reports. There is no further work that is needed.
Explorer Jobs When the data storage location of an existing repository is copied over this will cover the migration of the explorer jobs. There is no further work that is needed.
Accelerators This was handled when the file storage part of the repository was copied over. It is not recommended that you use any copied Accelerators and that you should contact your sales rep to make sure that you have the correct supported version.
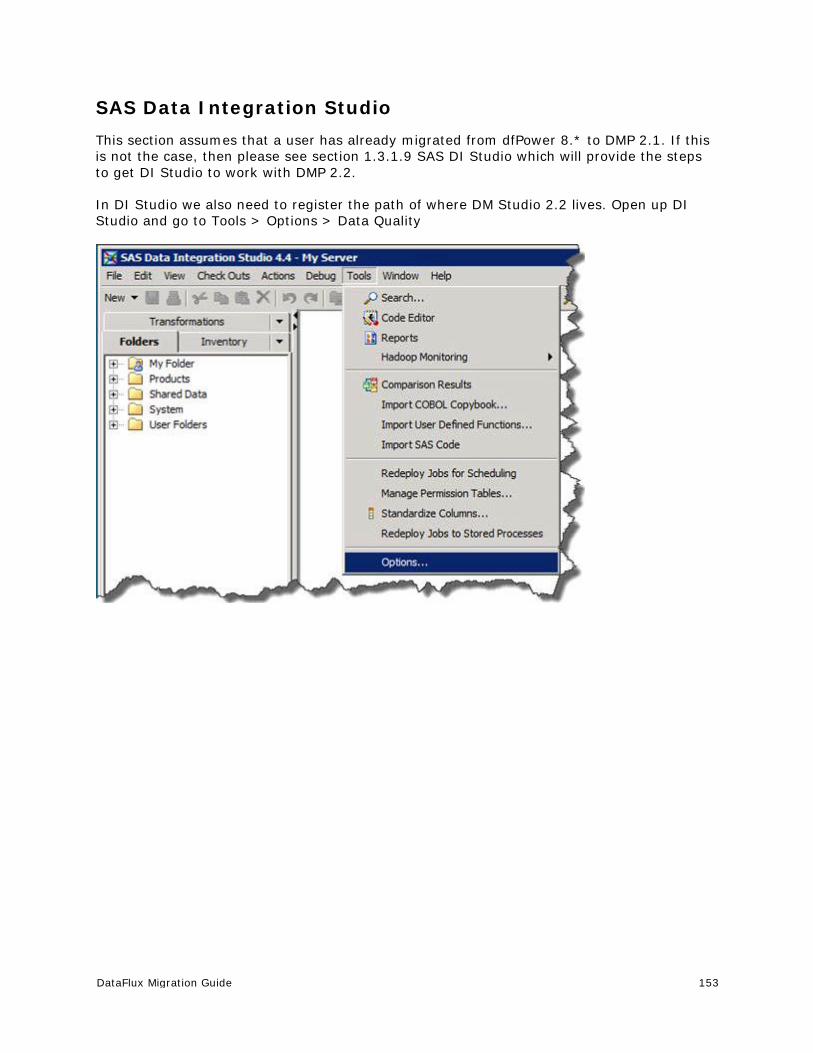
DataFlux Migration Guide 153
SAS Data Integration Studio This section assumes that a user has already migrated from dfPower 8.* to DMP 2.1. If this is not the case, then please see section 1.3.1.9 SAS DI Studio which will provide the steps to get DI Studio to work with DMP 2.2.
In DI Studio we also need to register the path of where DM Studio 2.2 lives. Open up DI Studio and go to Tools > Options > Data Quality
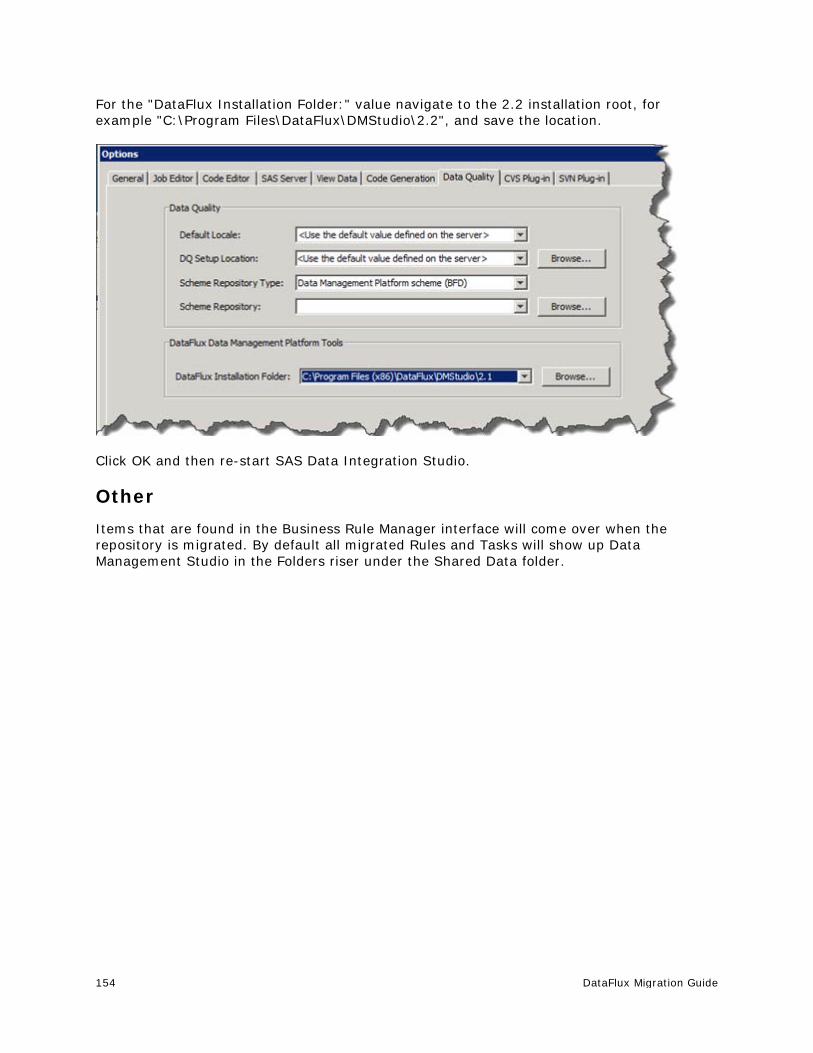
154 DataFlux Migration Guide
For the "DataFlux Installation Folder:" value navigate to the 2.2 installation root, for example "C:\Program Files\DataFlux\DMStudio\2.2", and save the location.
Click OK and then re-start SAS Data Integration Studio.
Other Items that are found in the Business Rule Manager interface will come over when the repository is migrated. By default all migrated Rules and Tasks will show up Data Management Studio in the Folders riser under the Shared Data folder.

DataFlux Migration Guide 155
Migrating From Data Management Server v. 2.1 to Data Management Server v. 2.2
• Configurations
• Reference Sources
• Data Connections - Windows
• Data Connections - UNIX
• Repositories
• Data and Process Jobs
• Profile Jobs
• Accelerators
• Security
• Command Line Execution
• SAS Management Console
• SAS Data Quality Server
Configurations The following places are where configuration settings will need to be pulled from:
• [DM_SERVER_2.1_INSTALL_ROOT]/
etc/dftkdsn to [DM_SERVER_2.2_INSTALL_ROOT]/etc/dftkdsn > copy all *.dftk files over
etc/dsn to [DM_SERVER_2.2_INSTALL_ROOT]/etc/dsn > copy all *.cfg files over
etc/macros to [DM_SERVER_2.2_INSTALL_ROOT]/etc/macros > copy all *.cfg files over
etc/security to [DM_SERVER_2.2_INSTALL_ROOT]/etc/security > copy * over
etc/
o app.cfg
o dfwfproc.cfg
o dfwsvc.cfg
o dmserver.cfg
o macros.cfg
This table displays the DataFlux Data Management Server settings for v. 2.2 and their v. 2.1 equivalents:
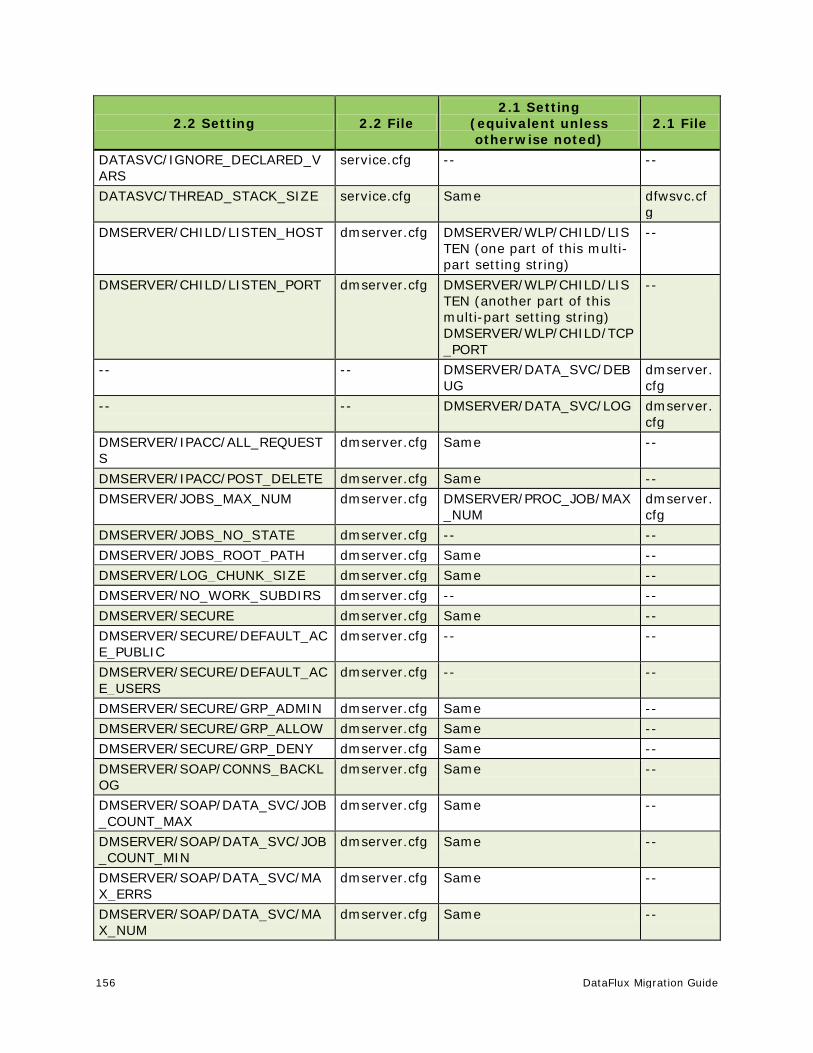
156 DataFlux Migration Guide
2.2 Setting 2.2 File 2.1 Setting
(equivalent unless otherwise noted)
2.1 File
DATASVC/IGNORE_DECLARED_VARS
service.cfg -- --
DATASVC/THREAD_STACK_SIZE service.cfg Same dfwsvc.cfg
DMSERVER/CHILD/LISTEN_HOST dmserver.cfg DMSERVER/WLP/CHILD/LISTEN (one part of this multi-part setting string)
--
DMSERVER/CHILD/LISTEN_PORT dmserver.cfg DMSERVER/WLP/CHILD/LISTEN (another part of this multi-part setting string) DMSERVER/WLP/CHILD/TCP_PORT
--
-- -- DMSERVER/DATA_SVC/DEBUG
dmserver.cfg
-- -- DMSERVER/DATA_SVC/LOG dmserver.cfg
DMSERVER/IPACC/ALL_REQUESTS
dmserver.cfg Same --
DMSERVER/IPACC/POST_DELETE dmserver.cfg Same -- DMSERVER/JOBS_MAX_NUM dmserver.cfg DMSERVER/PROC_JOB/MAX
_NUM dmserver.cfg
DMSERVER/JOBS_NO_STATE dmserver.cfg -- -- DMSERVER/JOBS_ROOT_PATH dmserver.cfg Same -- DMSERVER/LOG_CHUNK_SIZE dmserver.cfg Same -- DMSERVER/NO_WORK_SUBDIRS dmserver.cfg -- -- DMSERVER/SECURE dmserver.cfg Same -- DMSERVER/SECURE/DEFAULT_ACE_PUBLIC
dmserver.cfg -- --
DMSERVER/SECURE/DEFAULT_ACE_USERS
dmserver.cfg -- --
DMSERVER/SECURE/GRP_ADMIN dmserver.cfg Same -- DMSERVER/SECURE/GRP_ALLOW dmserver.cfg Same -- DMSERVER/SECURE/GRP_DENY dmserver.cfg Same -- DMSERVER/SOAP/CONNS_BACKLOG
dmserver.cfg Same --
DMSERVER/SOAP/DATA_SVC/JOB_COUNT_MAX
dmserver.cfg Same --
DMSERVER/SOAP/DATA_SVC/JOB_COUNT_MIN
dmserver.cfg Same --
DMSERVER/SOAP/DATA_SVC/MAX_ERRS
dmserver.cfg Same --
DMSERVER/SOAP/DATA_SVC/MAX_NUM
dmserver.cfg Same --
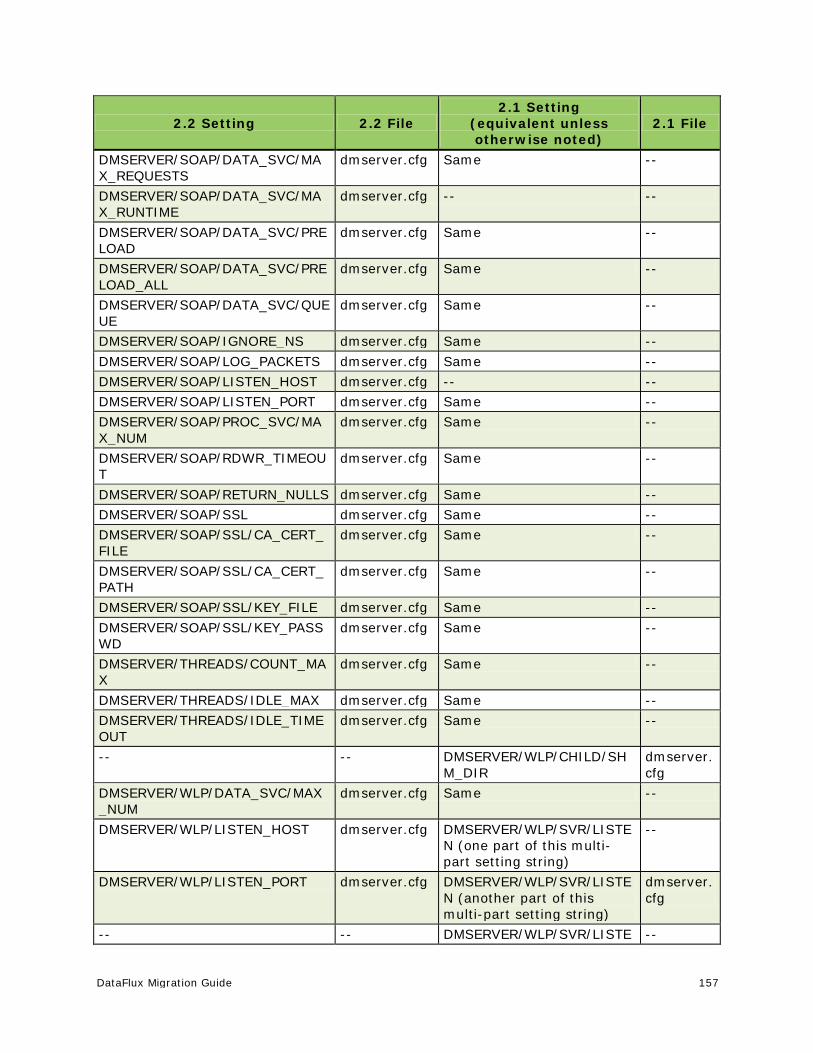
DataFlux Migration Guide 157
2.2 Setting 2.2 File 2.1 Setting
(equivalent unless otherwise noted)
2.1 File
DMSERVER/SOAP/DATA_SVC/MAX_REQUESTS
dmserver.cfg Same --
DMSERVER/SOAP/DATA_SVC/MAX_RUNTIME
dmserver.cfg -- --
DMSERVER/SOAP/DATA_SVC/PRELOAD
dmserver.cfg Same --
DMSERVER/SOAP/DATA_SVC/PRELOAD_ALL
dmserver.cfg Same --
DMSERVER/SOAP/DATA_SVC/QUEUE
dmserver.cfg Same --
DMSERVER/SOAP/IGNORE_NS dmserver.cfg Same -- DMSERVER/SOAP/LOG_PACKETS dmserver.cfg Same -- DMSERVER/SOAP/LISTEN_HOST dmserver.cfg -- -- DMSERVER/SOAP/LISTEN_PORT dmserver.cfg Same -- DMSERVER/SOAP/PROC_SVC/MAX_NUM
dmserver.cfg Same --
DMSERVER/SOAP/RDWR_TIMEOUT
dmserver.cfg Same --
DMSERVER/SOAP/RETURN_NULLS dmserver.cfg Same -- DMSERVER/SOAP/SSL dmserver.cfg Same -- DMSERVER/SOAP/SSL/CA_CERT_FILE
dmserver.cfg Same --
DMSERVER/SOAP/SSL/CA_CERT_PATH
dmserver.cfg Same --
DMSERVER/SOAP/SSL/KEY_FILE dmserver.cfg Same -- DMSERVER/SOAP/SSL/KEY_PASSWD
dmserver.cfg Same --
DMSERVER/THREADS/COUNT_MAX
dmserver.cfg Same --
DMSERVER/THREADS/IDLE_MAX dmserver.cfg Same -- DMSERVER/THREADS/IDLE_TIMEOUT
dmserver.cfg Same --
-- -- DMSERVER/WLP/CHILD/SHM_DIR
dmserver.cfg
DMSERVER/WLP/DATA_SVC/MAX_NUM
dmserver.cfg Same --
DMSERVER/WLP/LISTEN_HOST dmserver.cfg DMSERVER/WLP/SVR/LISTEN (one part of this multi-part setting string)
--
DMSERVER/WLP/LISTEN_PORT dmserver.cfg DMSERVER/WLP/SVR/LISTEN (another part of this multi-part setting string)
dmserver.cfg
-- -- DMSERVER/WLP/SVR/LISTE --
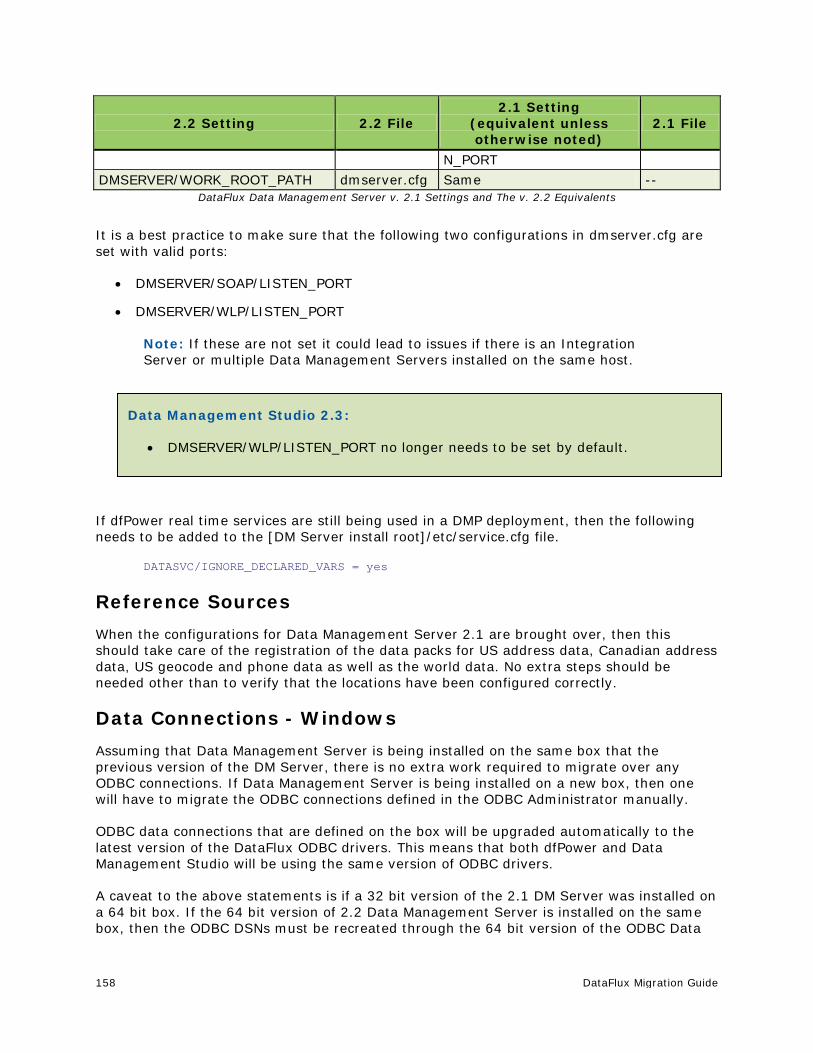
158 DataFlux Migration Guide
2.2 Setting 2.2 File 2.1 Setting
(equivalent unless otherwise noted)
2.1 File
N_PORT DMSERVER/WORK_ROOT_PATH dmserver.cfg Same --
DataFlux Data Management Server v. 2.1 Settings and The v. 2.2 Equivalents
It is a best practice to make sure that the following two configurations in dmserver.cfg are set with valid ports:
• DMSERVER/SOAP/LISTEN_PORT
• DMSERVER/WLP/LISTEN_PORT
Note: If these are not set it could lead to issues if there is an Integration Server or multiple Data Management Servers installed on the same host.
If dfPower real time services are still being used in a DMP deployment, then the following needs to be added to the [DM Server install root]/etc/service.cfg file.
DATASVC/IGNORE_DECLARED_VARS = yes
Reference Sources When the configurations for Data Management Server 2.1 are brought over, then this should take care of the registration of the data packs for US address data, Canadian address data, US geocode and phone data as well as the world data. No extra steps should be needed other than to verify that the locations have been configured correctly.
Data Connections - Windows Assuming that Data Management Server is being installed on the same box that the previous version of the DM Server, there is no extra work required to migrate over any ODBC connections. If Data Management Server is being installed on a new box, then one will have to migrate the ODBC connections defined in the ODBC Administrator manually.
ODBC data connections that are defined on the box will be upgraded automatically to the latest version of the DataFlux ODBC drivers. This means that both dfPower and Data Management Studio will be using the same version of ODBC drivers.
A caveat to the above statements is if a 32 bit version of the 2.1 DM Server was installed on a 64 bit box. If the 64 bit version of 2.2 Data Management Server is installed on the same box, then the ODBC DSNs must be recreated through the 64 bit version of the ODBC Data
Data Management Studio 2.3:
• DMSERVER/WLP/LISTEN_PORT no longer needs to be set by default.
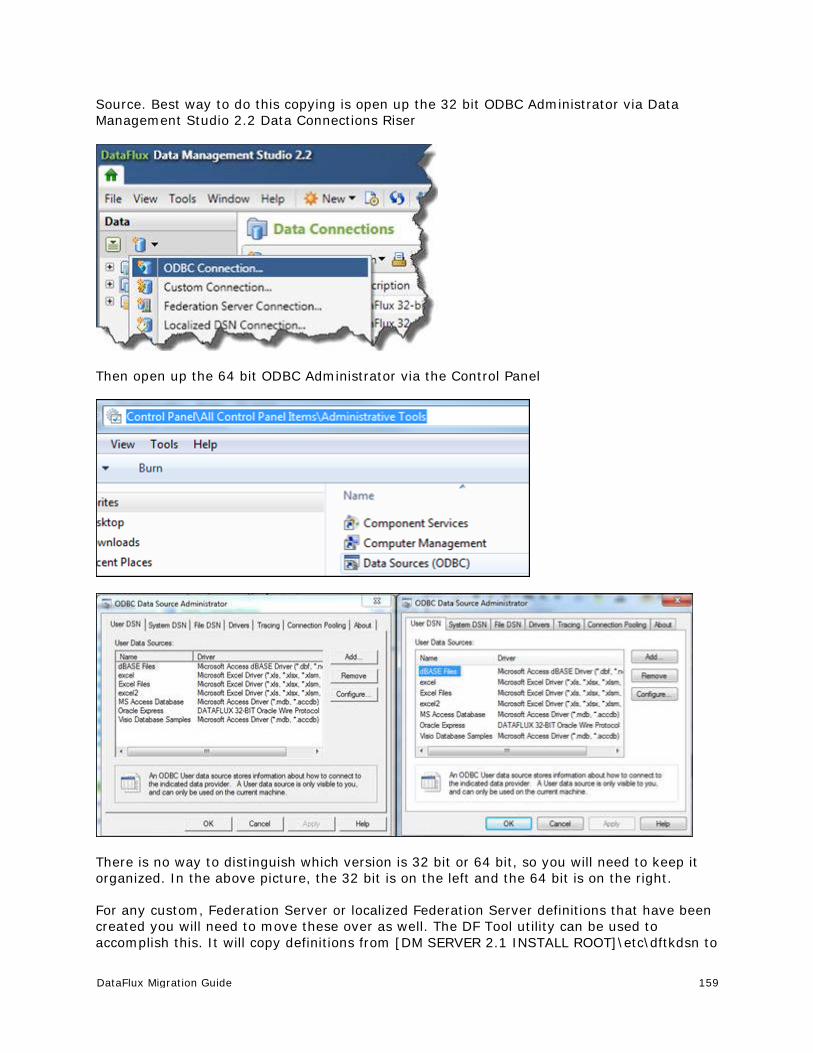
DataFlux Migration Guide 159
Source. Best way to do this copying is open up the 32 bit ODBC Administrator via Data Management Studio 2.2 Data Connections Riser
Then open up the 64 bit ODBC Administrator via the Control Panel
There is no way to distinguish which version is 32 bit or 64 bit, so you will need to keep it organized. In the above picture, the 32 bit is on the left and the 64 bit is on the right.
For any custom, Federation Server or localized Federation Server definitions that have been created you will need to move these over as well. The DF Tool utility can be used to accomplish this. It will copy definitions from [DM SERVER 2.1 INSTALL ROOT]\etc\dftkdsn to
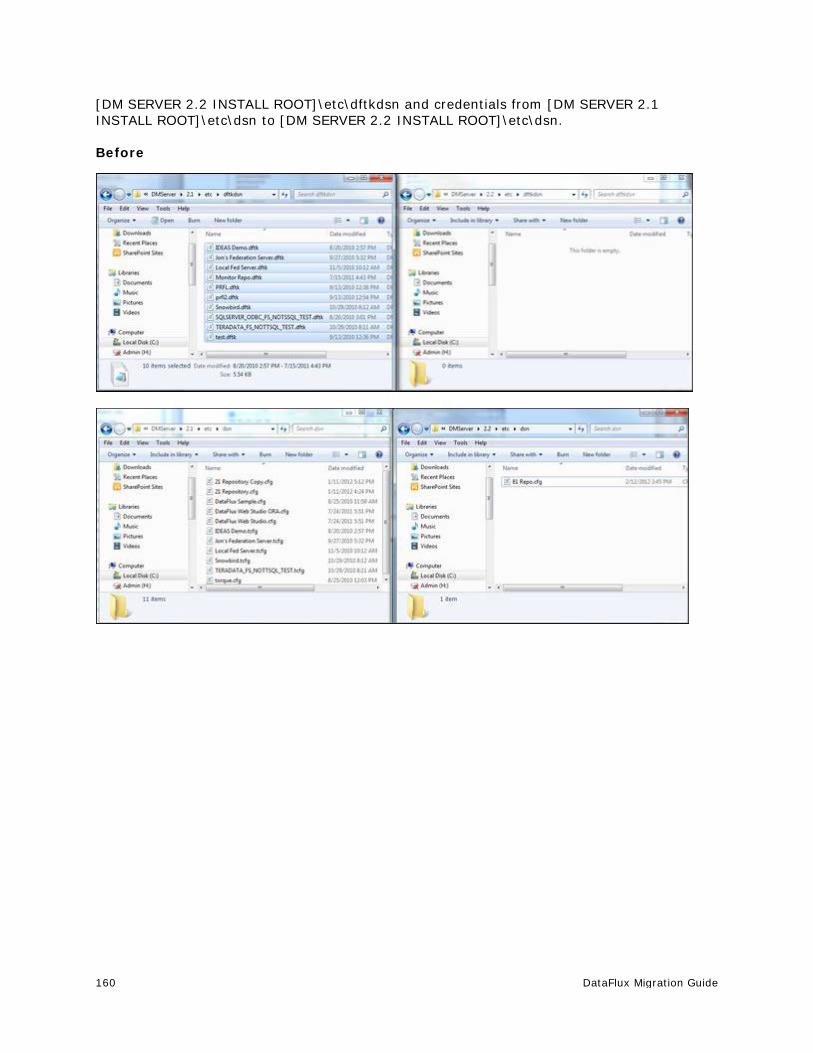
160 DataFlux Migration Guide
[DM SERVER 2.2 INSTALL ROOT]\etc\dftkdsn and credentials from [DM SERVER 2.1 INSTALL ROOT]\etc\dsn to [DM SERVER 2.2 INSTALL ROOT]\etc\dsn.
Before

DataFlux Migration Guide 161
Run the DF Tool Utility. This should be run from the root of DM Server 2.2/2.3:
After
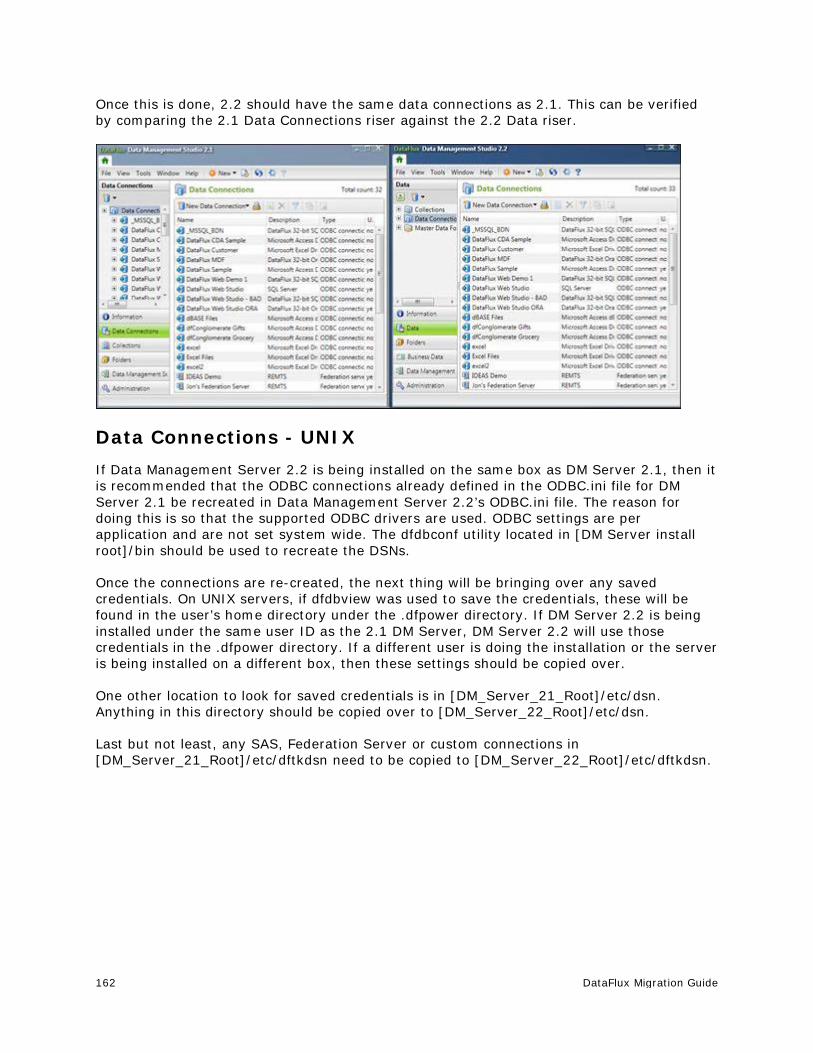
162 DataFlux Migration Guide
Once this is done, 2.2 should have the same data connections as 2.1. This can be verified by comparing the 2.1 Data Connections riser against the 2.2 Data riser.
Data Connections - UNIX If Data Management Server 2.2 is being installed on the same box as DM Server 2.1, then it is recommended that the ODBC connections already defined in the ODBC.ini file for DM Server 2.1 be recreated in Data Management Server 2.2’s ODBC.ini file. The reason for doing this is so that the supported ODBC drivers are used. ODBC settings are per application and are not set system wide. The dfdbconf utility located in [DM Server install root]/bin should be used to recreate the DSNs.
Once the connections are re-created, the next thing will be bringing over any saved credentials. On UNIX servers, if dfdbview was used to save the credentials, these will be found in the user’s home directory under the .dfpower directory. If DM Server 2.2 is being installed under the same user ID as the 2.1 DM Server, DM Server 2.2 will use those credentials in the .dfpower directory. If a different user is doing the installation or the server is being installed on a different box, then these settings should be copied over.
One other location to look for saved credentials is in [DM_Server_21_Root]/etc/dsn. Anything in this directory should be copied over to [DM_Server_22_Root]/etc/dsn.
Last but not least, any SAS, Federation Server or custom connections in [DM_Server_21_Root]/etc/dftkdsn need to be copied to [DM_Server_22_Root]/etc/dftkdsn.
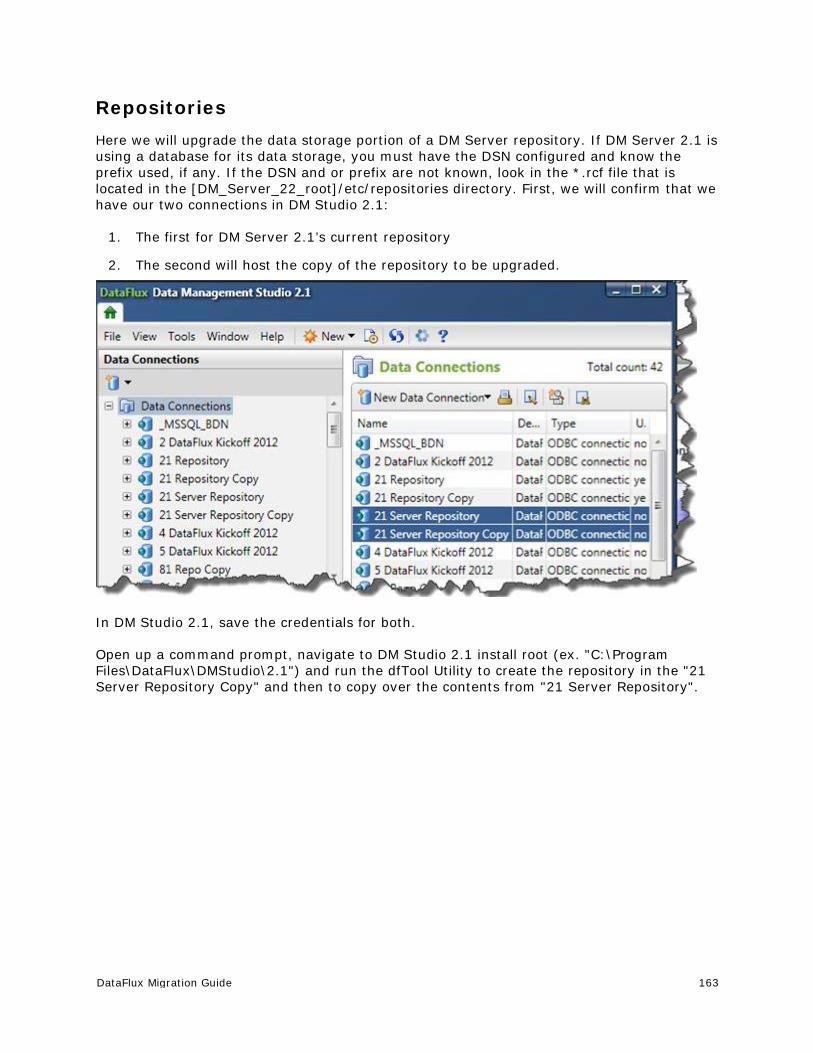
DataFlux Migration Guide 163
Repositories Here we will upgrade the data storage portion of a DM Server repository. If DM Server 2.1 is using a database for its data storage, you must have the DSN configured and know the prefix used, if any. If the DSN and or prefix are not known, look in the *.rcf file that is located in the [DM_Server_22_root]/etc/repositories directory. First, we will confirm that we have our two connections in DM Studio 2.1:
1. The first for DM Server 2.1’s current repository
2. The second will host the copy of the repository to be upgraded.
In DM Studio 2.1, save the credentials for both.
Open up a command prompt, navigate to DM Studio 2.1 install root (ex. "C:\Program Files\DataFlux\DMStudio\2.1") and run the dfTool Utility to create the repository in the "21 Server Repository Copy" and then to copy over the contents from "21 Server Repository".
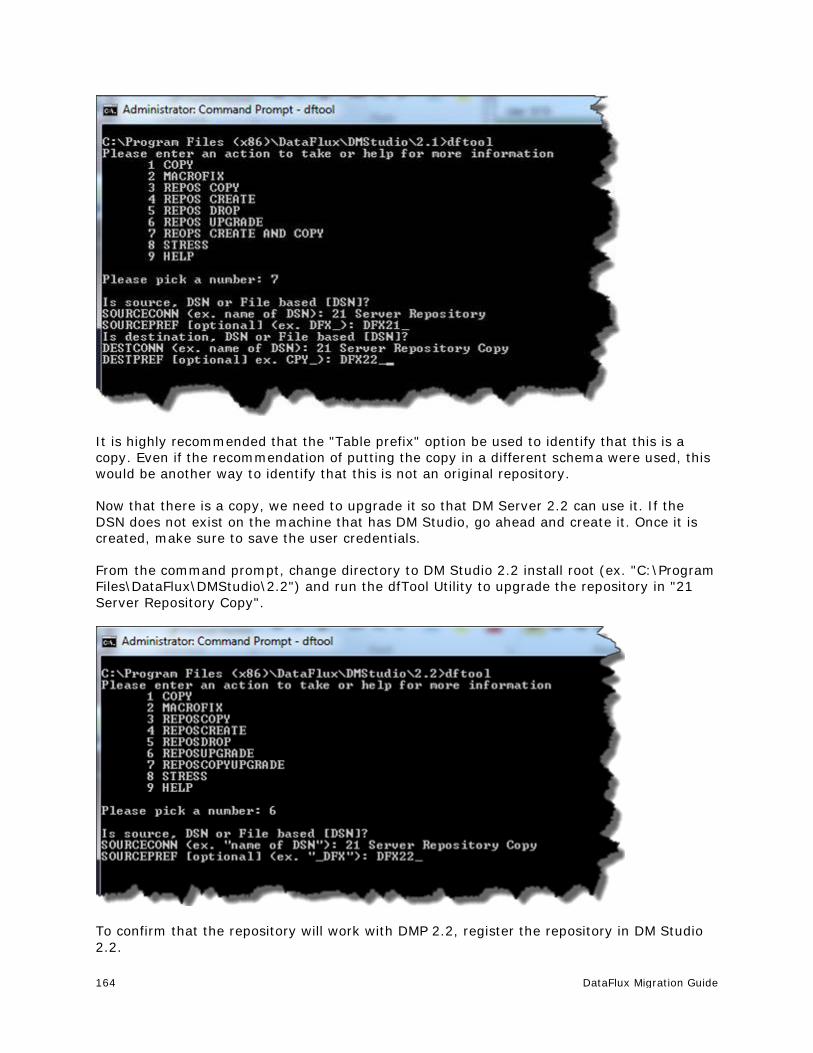
164 DataFlux Migration Guide
It is highly recommended that the "Table prefix" option be used to identify that this is a copy. Even if the recommendation of putting the copy in a different schema were used, this would be another way to identify that this is not an original repository.
Now that there is a copy, we need to upgrade it so that DM Server 2.2 can use it. If the DSN does not exist on the machine that has DM Studio, go ahead and create it. Once it is created, make sure to save the user credentials.
From the command prompt, change directory to DM Studio 2.2 install root (ex. "C:\Program Files\DataFlux\DMStudio\2.2") and run the dfTool Utility to upgrade the repository in "21 Server Repository Copy".
To confirm that the repository will work with DMP 2.2, register the repository in DM Studio 2.2.
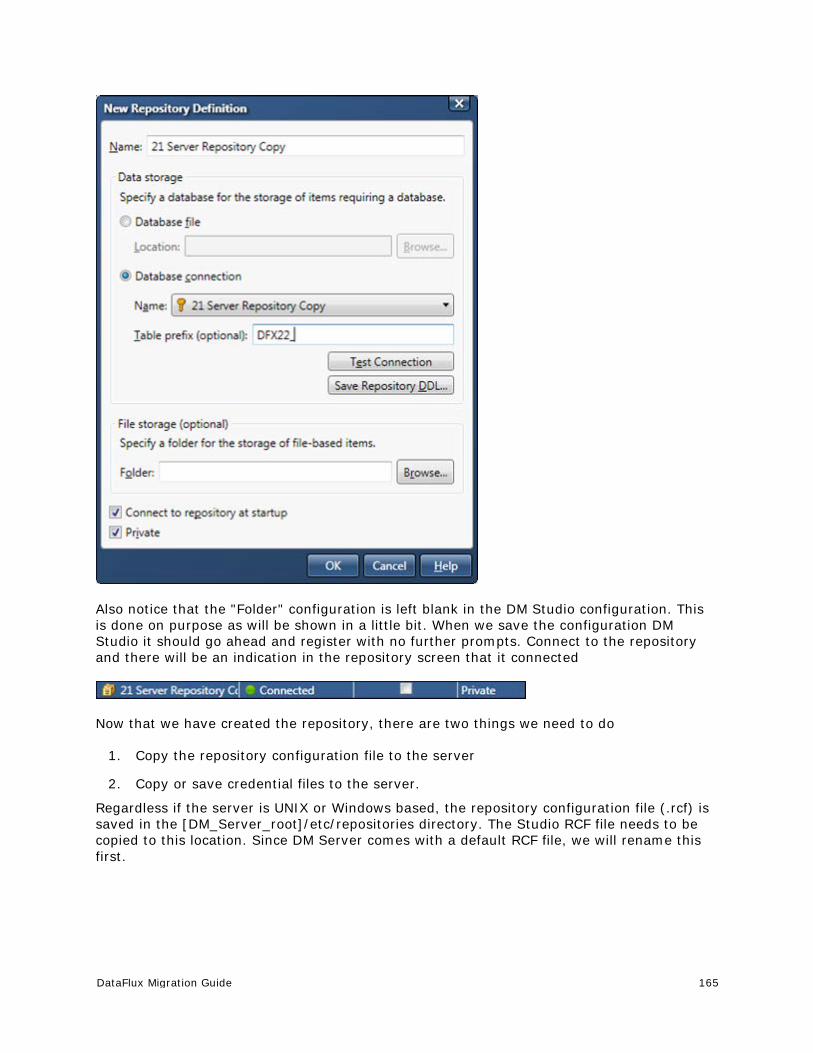
DataFlux Migration Guide 165
Also notice that the "Folder" configuration is left blank in the DM Studio configuration. This is done on purpose as will be shown in a little bit. When we save the configuration DM Studio it should go ahead and register with no further prompts. Connect to the repository and there will be an indication in the repository screen that it connected
Now that we have created the repository, there are two things we need to do
1. Copy the repository configuration file to the server
2. Copy or save credential files to the server.
Regardless if the server is UNIX or Windows based, the repository configuration file (.rcf) is saved in the [DM_Server_root]/etc/repositories directory. The Studio RCF file needs to be copied to this location. Since DM Server comes with a default RCF file, we will rename this first.
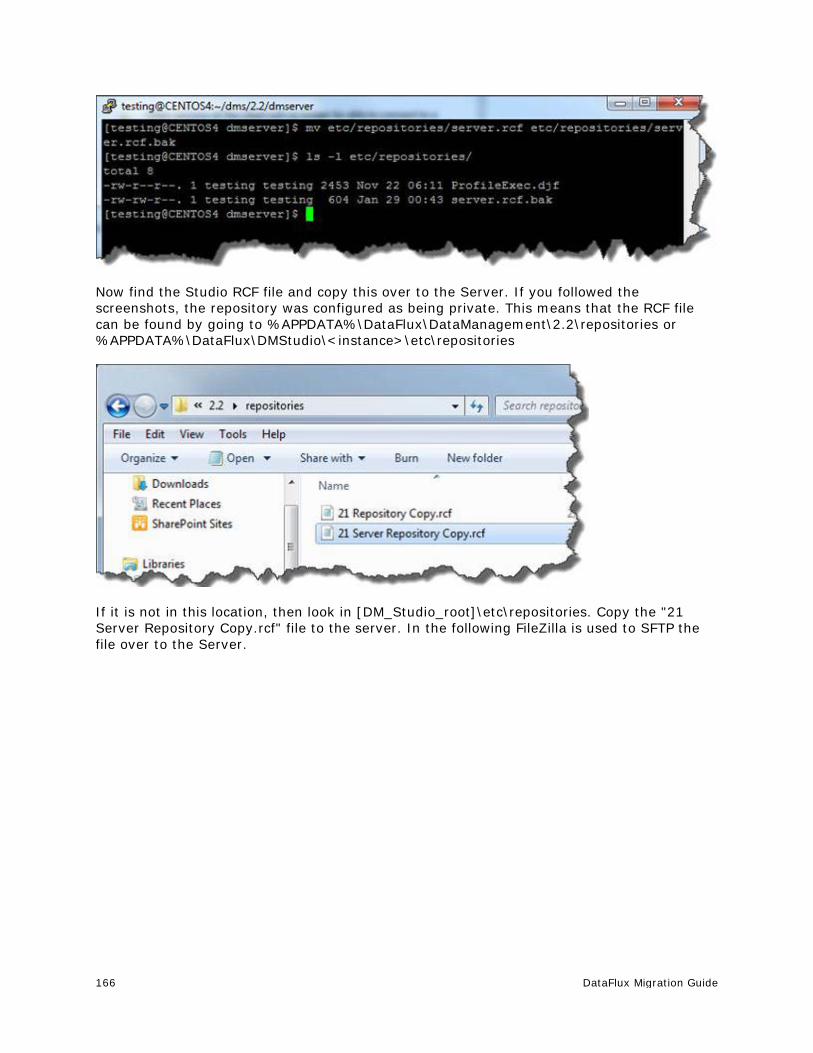
166 DataFlux Migration Guide
Now find the Studio RCF file and copy this over to the Server. If you followed the screenshots, the repository was configured as being private. This means that the RCF file can be found by going to %APPDATA%\DataFlux\DataManagement\2.2\repositories or %APPDATA%\DataFlux\DMStudio\<instance>\etc\repositories
If it is not in this location, then look in [DM_Studio_root]\etc\repositories. Copy the "21 Server Repository Copy.rcf" file to the server. In the following FileZilla is used to SFTP the file over to the Server.
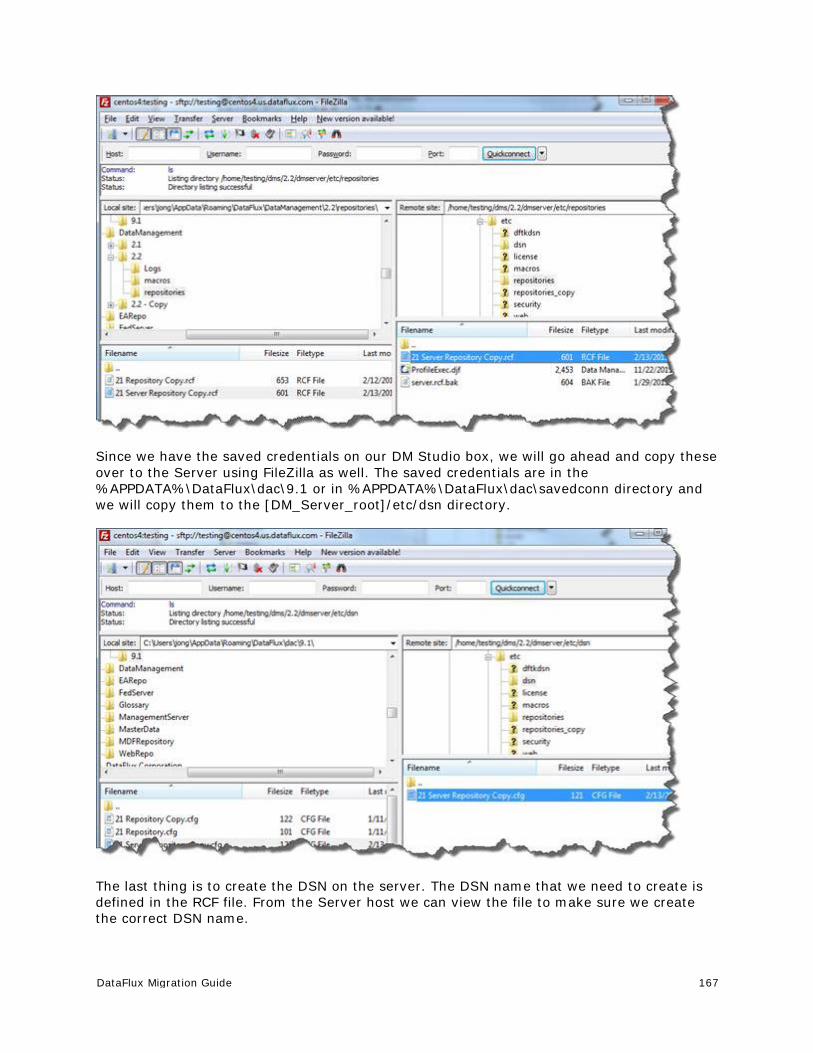
DataFlux Migration Guide 167
Since we have the saved credentials on our DM Studio box, we will go ahead and copy these over to the Server using FileZilla as well. The saved credentials are in the %APPDATA%\DataFlux\dac\9.1 or in %APPDATA%\DataFlux\dac\savedconn directory and we will copy them to the [DM_Server_root]/etc/dsn directory.
The last thing is to create the DSN on the server. The DSN name that we need to create is defined in the RCF file. From the Server host we can view the file to make sure we create the correct DSN name.

168 DataFlux Migration Guide
Once we have that, we can create the DSN (assuming that we know what data source this should be connecting to)
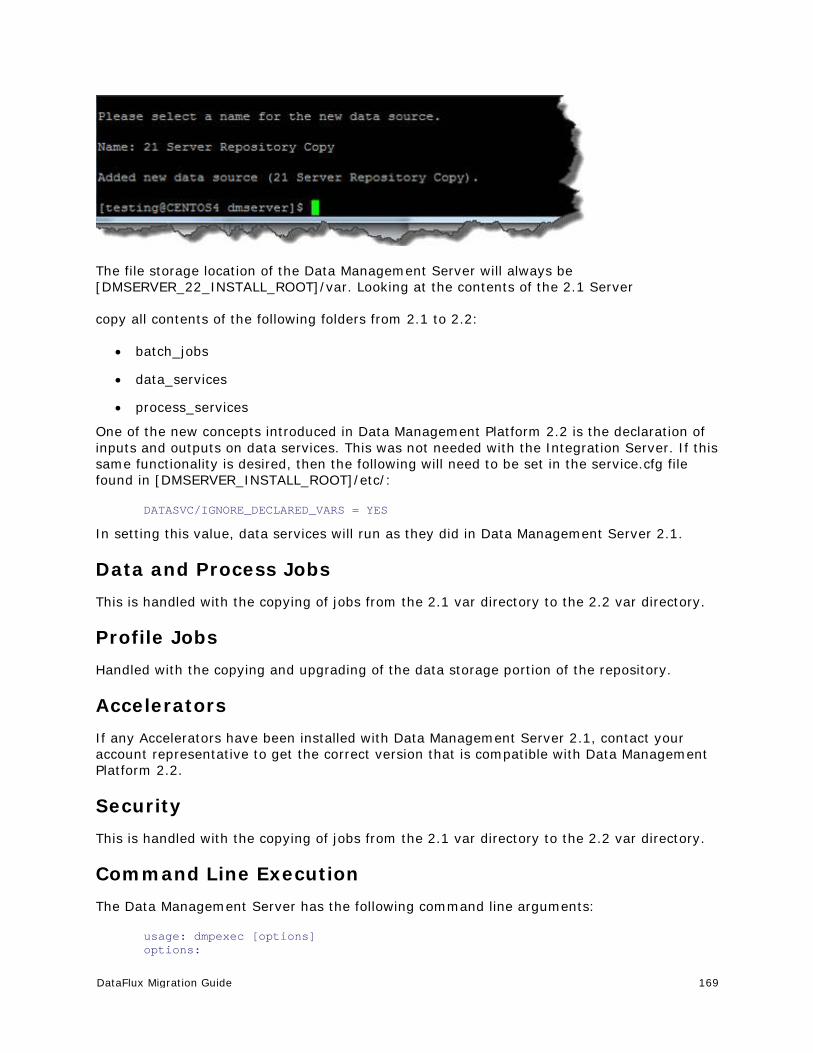
DataFlux Migration Guide 169
The file storage location of the Data Management Server will always be [DMSERVER_22_INSTALL_ROOT]/var. Looking at the contents of the 2.1 Server
copy all contents of the following folders from 2.1 to 2.2:
• batch_jobs
• data_services
• process_services
One of the new concepts introduced in Data Management Platform 2.2 is the declaration of inputs and outputs on data services. This was not needed with the Integration Server. If this same functionality is desired, then the following will need to be set in the service.cfg file found in [DMSERVER_INSTALL_ROOT]/etc/:
DATASVC/IGNORE_DECLARED_VARS = YES
In setting this value, data services will run as they did in Data Management Server 2.1.
Data and Process Jobs This is handled with the copying of jobs from the 2.1 var directory to the 2.2 var directory.
Profile Jobs Handled with the copying and upgrading of the data storage portion of the repository.
Accelerators If any Accelerators have been installed with Data Management Server 2.1, contact your account representative to get the correct version that is compatible with Data Management Platform 2.2.
Security This is handled with the copying of jobs from the 2.1 var directory to the 2.2 var directory.
Command Line Execution The Data Management Server has the following command line arguments:
usage: dmpexec [options] options:

170 DataFlux Migration Guide
-c <file> read configuration from <file> -j <file> execute job in <file> -l <file> write log to <file> -i <key>=<value> set input <key> to <value> -o <key>=<value> set option <key> to <value> -b <key>=<value> set job option <key> to <value>
The Data Management Server has the following command line arguments:
usage: dmpexec [options] options: -c <file> read configuration from <file> -j <file> execute job in <file> -l <file> write log to <file> -i <key>=<value> set input <key> to <value> -o <key>=<value> set option <key> to <value> -b <key>=<value> set job option <key> to <value> -a authenticate using Authentication Server
The only added option in 2.2 is the ability to run a script that will allow one to Authenticate. If the job needs to run with a user’s credentials, the credentials would be stored in a configuration file that would contain something like
base/auth_server_loc =iom://servername.domain.com:21030;protocol=bridge;user=userid,pass=password
and then passed in on the command line with the following options
> bin/dmpexec -a -c "dmpexec_auth.cfg" -l "dmpJob.log" –j "path/to/architect.ddf"
SAS Management Console When moving from SAS 9.2 to SAS 9.3, a DM Server 2.1 entry is created in meta-data. This entry needs to be renamed and a DM Server 2.2 entry needs to be created with the same name. This will allow DI Studio jobs to continue to run without having to be updated to handle the change in servers.
Open up SAS Management Console and rename the existing DM Server entry.
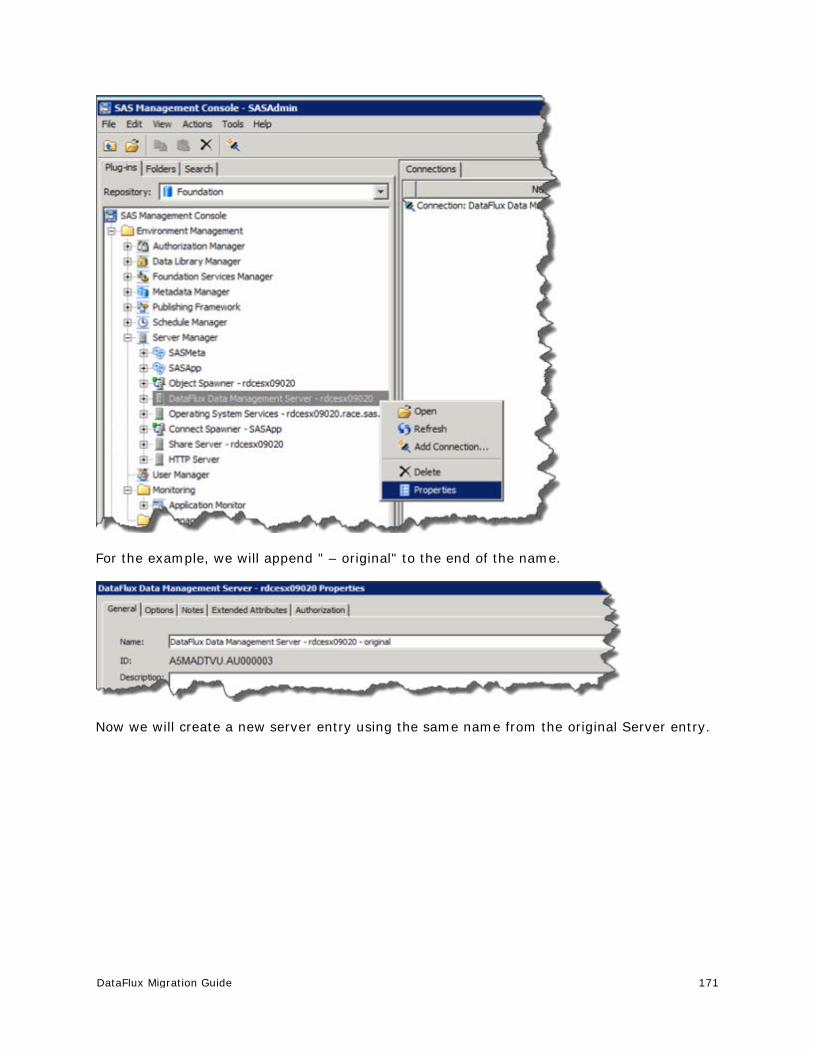
DataFlux Migration Guide 171
For the example, we will append " – original" to the end of the name.
Now we will create a new server entry using the same name from the original Server entry.
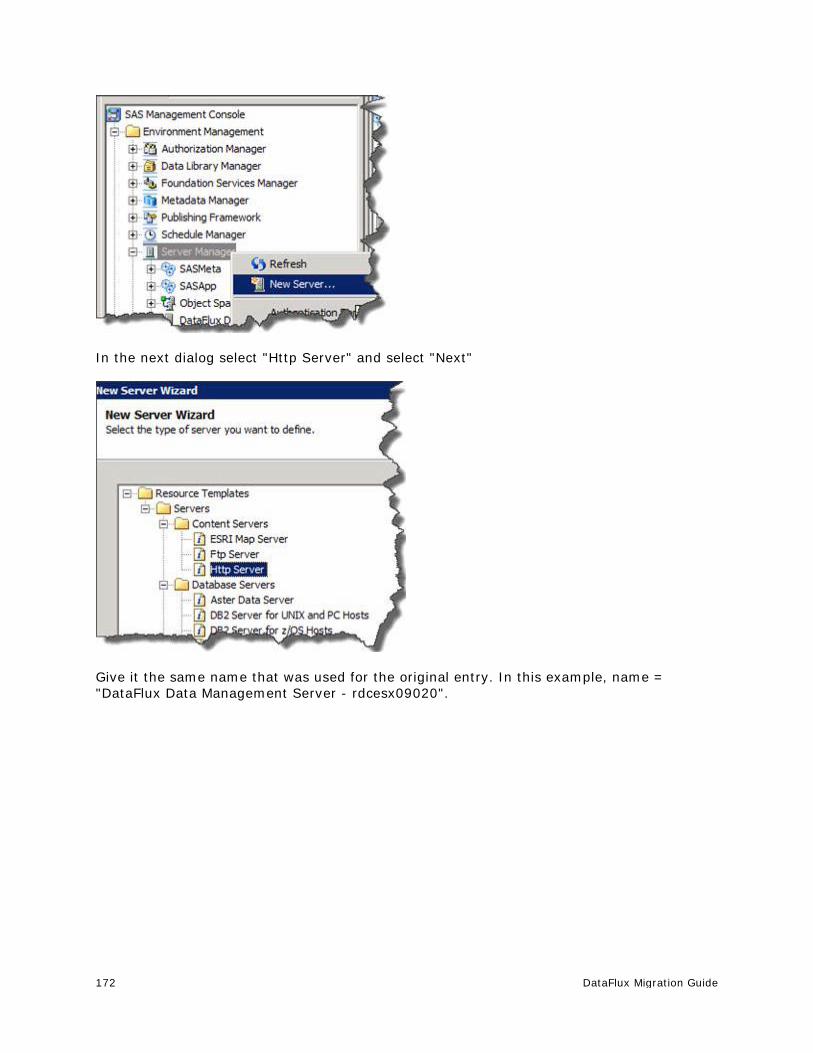
172 DataFlux Migration Guide
In the next dialog select "Http Server" and select "Next"
Give it the same name that was used for the original entry. In this example, name = "DataFlux Data Management Server - rdcesx09020".

DataFlux Migration Guide 173
In the next dialog, make sure the following information is entered:
• Software Version = 2.2
For Data Management Server 2.3: Software Version = 2.3
• Vendor = DataFlux Corporation
• Base Path(s) = /
Select the "New" button In the resulting dialog select "OK"
• Application Server Type = DataFlux Data Management Server

174 DataFlux Migration Guide
In the next dialog select the following options:
• Authentication domain: DefaultAuth
• Authentication type: User/Password
• Application protocol: http
• Host name: [enter in the name of the host where the DM Server is residing]
• Port Number: [This is the dmserver/soap/port from the dmserver.cfg file]
• Proxy URL: Leave blank
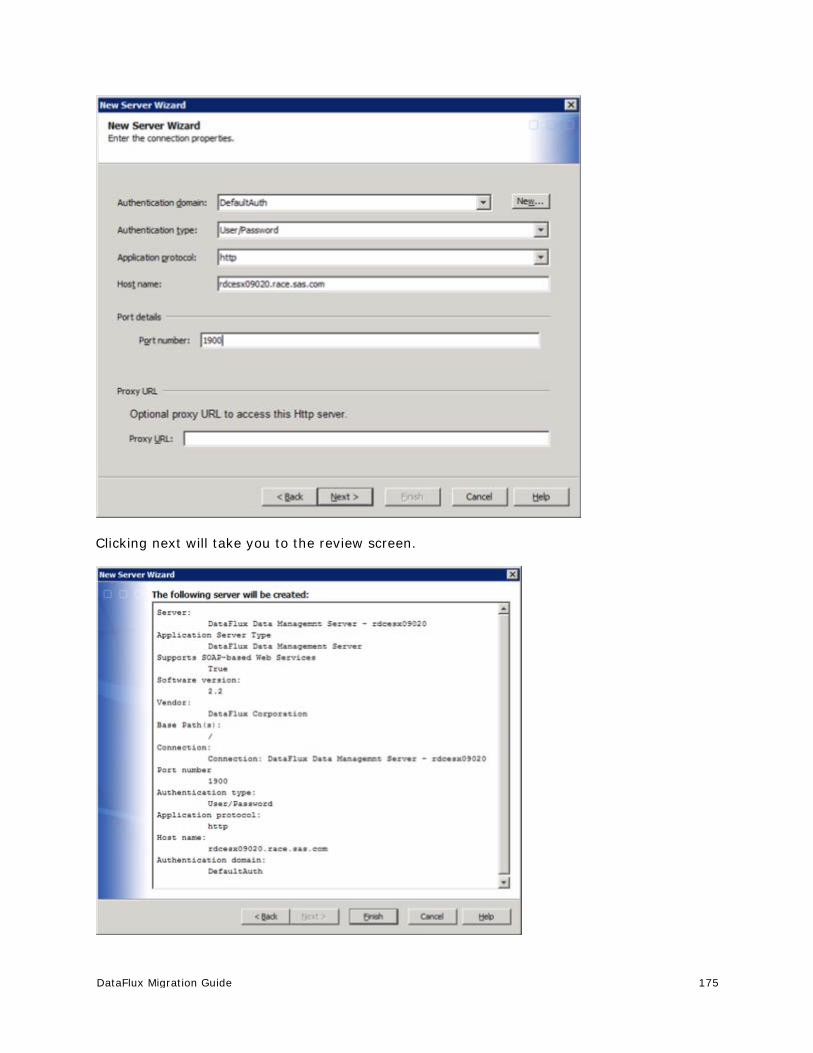
DataFlux Migration Guide 175
Clicking next will take you to the review screen.
176 DataFlux Migration Guide
Before selecting finish, make sure of the following:
1. The name is the same as the one that was originally there.
2. The host reflects the location of where the DM Server resides
3. The port number matches what is in the dmserver.cfg file.
Once these are double checked, click finish and the SMC changes are complete.
SAS Data Quality Server This section assumes that a user has already migrated jobs and content from dfPower to Data Management Platform 2.1. There are no changes needed in going from Data Management Platform v. 2.1 to v. 2.2.
Note: Data quality functions may produce different results than Data Management Platform v. 2.2 because the DQ Server engine is based on Data Management Platform v. 2.1. Please be aware if doing actions in DQ Server and Data Management Studio/Server and comparing results.
If trying to call a single page dfPower real-time service as part of a Data Management Platform deployment, then the following needs to be added to the [DM Server install root]/etc/service.cfg file.
DATASVC/IGNORE_DECLARED_VARS = yes
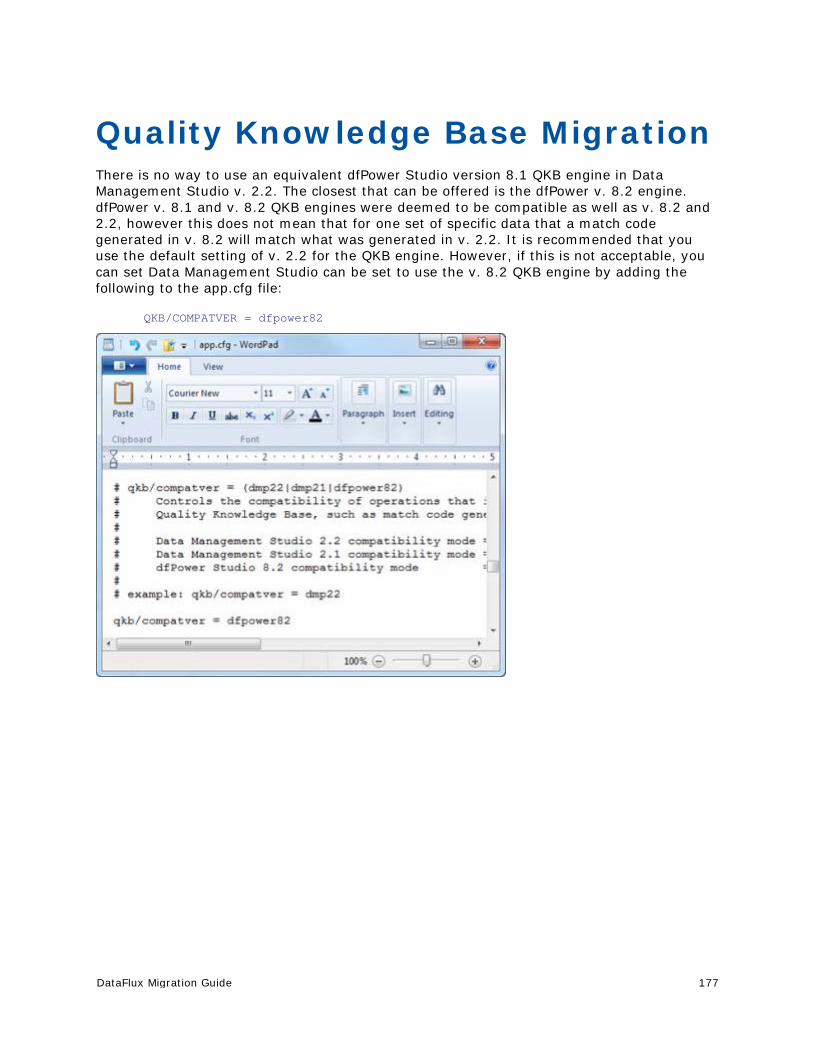
DataFlux Migration Guide 177
Quality Knowledge Base Migration There is no way to use an equivalent dfPower Studio version 8.1 QKB engine in Data Management Studio v. 2.2. The closest that can be offered is the dfPower v. 8.2 engine. dfPower v. 8.1 and v. 8.2 QKB engines were deemed to be compatible as well as v. 8.2 and 2.2, however this does not mean that for one set of specific data that a match code generated in v. 8.2 will match what was generated in v. 2.2. It is recommended that you use the default setting of v. 2.2 for the QKB engine. However, if this is not acceptable, you can set Data Management Studio can be set to use the v. 8.2 QKB engine by adding the following to the app.cfg file:
QKB/COMPATVER = dfpower82
178 DataFlux Migration Guide
Technical Support This section addresses questions and issues related to migrating DataFlux products.
• Troubleshooting
Troubleshooting Problems running a dfPower real time service
If you see this Run Job error message,
The server was unable to run the job; the error message was "Failed To Set Job Input".
or the DataFlux Data Management Server v. 2.2 log shows this message:
Failed to set input key '<macro variable>'; err: Process Flow - Variable '<macro variable>' was not declared, or is of the wrong type
Where <macro variable> is the name of the macro you tried to pass values into.
Scenarios:
• Trying to run Architect Job that contains macros
• Job with macros was upgraded, but missing input/output variables required for DM style jobs
Resolution:
Add this configuration setting to the service.cfg file:
DATASVC/IGNORE_DECLARED_VARS = yes