database setup for im and presence service on cisco ... · database setup for im and presence...
TRANSCRIPT

Database Setup for IM and Presence Service on Cisco UnifiedCommunications Manager, Release 11.5(1)First Published: 2016-06-08
Last Modified: 2018-02-14
Americas HeadquartersCisco Systems, Inc.170 West Tasman DriveSan Jose, CA 95134-1706USAhttp://www.cisco.comTel: 408 526-4000 800 553-NETS (6387)Fax: 408 527-0883

THE SPECIFICATIONS AND INFORMATION REGARDING THE PRODUCTS IN THIS MANUAL ARE SUBJECT TO CHANGE WITHOUT NOTICE. ALL STATEMENTS,INFORMATION, AND RECOMMENDATIONS IN THIS MANUAL ARE BELIEVED TO BE ACCURATE BUT ARE PRESENTED WITHOUT WARRANTY OF ANY KIND,EXPRESS OR IMPLIED. USERS MUST TAKE FULL RESPONSIBILITY FOR THEIR APPLICATION OF ANY PRODUCTS.
THE SOFTWARE LICENSE AND LIMITEDWARRANTY FOR THE ACCOMPANYING PRODUCT ARE SET FORTH IN THE INFORMATION PACKET THAT SHIPPED WITHTHE PRODUCT AND ARE INCORPORATED HEREIN BY THIS REFERENCE. IF YOU ARE UNABLE TO LOCATE THE SOFTWARE LICENSE OR LIMITED WARRANTY,CONTACT YOUR CISCO REPRESENTATIVE FOR A COPY.
The Cisco implementation of TCP header compression is an adaptation of a program developed by the University of California, Berkeley (UCB) as part of UCB's public domain versionof the UNIX operating system. All rights reserved. Copyright © 1981, Regents of the University of California.
NOTWITHSTANDINGANYOTHERWARRANTYHEREIN, ALL DOCUMENT FILES AND SOFTWARE OF THESE SUPPLIERS ARE PROVIDED “AS IS"WITH ALL FAULTS.CISCO AND THE ABOVE-NAMED SUPPLIERS DISCLAIM ALL WARRANTIES, EXPRESSED OR IMPLIED, INCLUDING, WITHOUT LIMITATION, THOSE OFMERCHANTABILITY, FITNESS FORA PARTICULAR PURPOSEANDNONINFRINGEMENTORARISING FROMACOURSEOFDEALING, USAGE, OR TRADE PRACTICE.
IN NO EVENT SHALL CISCO OR ITS SUPPLIERS BE LIABLE FOR ANY INDIRECT, SPECIAL, CONSEQUENTIAL, OR INCIDENTAL DAMAGES, INCLUDING, WITHOUTLIMITATION, LOST PROFITS OR LOSS OR DAMAGE TO DATA ARISING OUT OF THE USE OR INABILITY TO USE THIS MANUAL, EVEN IF CISCO OR ITS SUPPLIERSHAVE BEEN ADVISED OF THE POSSIBILITY OF SUCH DAMAGES.
Any Internet Protocol (IP) addresses and phone numbers used in this document are not intended to be actual addresses and phone numbers. Any examples, command display output, networktopology diagrams, and other figures included in the document are shown for illustrative purposes only. Any use of actual IP addresses or phone numbers in illustrative content is unintentionaland coincidental.
Cisco and the Cisco logo are trademarks or registered trademarks of Cisco and/or its affiliates in the U.S. and other countries. To view a list of Cisco trademarks, go to this URL: http://www.cisco.com/go/trademarks. Third-party trademarks mentioned are the property of their respective owners. The use of the word partner does not imply a partnershiprelationship between Cisco and any other company. (1110R)
© 2018 Cisco Systems, Inc. All rights reserved.

C O N T E N T S
C H A P T E R 1 External Database Requirements 1
External Database Setup Requirements 1
Additional Documentation 4
External Database Setup Prerequisites 4
Hardware and Performance Recommendations 4
About Security Recommendations 5
External Database Connection Security 5
Maximum Limit Connection Setup 5
Default Listener Port Setup 6
C H A P T E R 2 PostgreSQL Installation and Setup 9
Install PostgreSQL Database 9
Set Up PostgreSQL Listening Port 11
User Access Restriction Recommendations 12
C H A P T E R 3 Oracle Installation and Setup 13
Install Oracle Database 13
Create New Database Instance 15
C H A P T E R 4 Microsoft SQL Installation and Setup 17
Encrypted Database Not Supported 17
Install and Setup Microsoft SQL Server 17
Create a New Microsoft SQL Server Database 17
Create a new Login and Database User 18
Grant Database User Owner Privileges 18
[Optional] Database User Access Restrictions 19
Default Listener Port Setup for Microsoft SQL Server 20
Database Setup for IM and Presence Service on Cisco Unified Communications Manager, Release 11.5(1) iii

C H A P T E R 5 IM and Presence Service External Database Setup 21
About External Database Assignment 21
External Database and Node Assignment 21
External Database Connection 22
Set Up External Database Entry on IM and Presence Service 22
Verify External Database Connection 24
Verify External Database Connection Status on IM and Presence Service 25
C H A P T E R 6 External Database Tables 27
AFT_LOG Table 27
Sample SQL Queries for the AFT_LOG Table 29
All Uploaded Files 29
All Files That Were Uploaded to a Specific Recipient 29
All Files That Were Uploaded by a Specific Sender 29
All Files That Were Downloaded by a Specific User 30
All Files That Were Uploaded and Downloaded During IM Conversations 30
All Files That Were Uploaded by a Specific User After a Specific Time 30
Sample Output for SQL Queries for the AFT_LOG Table 30
TC_ROOMS Table 31
TC_USERS Table 31
TC_MESSAGES Table 32
TC_TIMELOG Table 33
TC_MSGARCHIVE Table 33
JM Table 34
Sample SQL Queries for the JM Table 36
All Instant Messages Sent by a Specific User 36
All Instant Messages Received by a Specific User 36
All Instant Messages That Contain a Specific Word 37
All Instant Messages Conversations and Chat Rooms From a Specific Date 37
Database Setup for IM and Presence Service on Cisco Unified Communications Manager, Release 11.5(1)iv
Contents

C H A P T E R 1External Database Requirements
This chapter provides information about how to configure an external database to store information fromCisco Unified Communications Manager IM and Presence Service features. The following IM and PresenceService features require an external database:
• Persistent Group Chat
• High Availability for Persistent Chat
• Message Archiver (IM Compliance)
• Managed File Transfer
• External Database Setup Requirements, page 1
• Additional Documentation, page 4
• External Database Setup Prerequisites, page 4
• Hardware and Performance Recommendations, page 4
• About Security Recommendations, page 5
External Database Setup RequirementsGeneral Requirements
Cisco suggests having a certified PostgreSQL, Oracle, or Microsoft SQL Server administrator maintain andretrieve information from the external database.
Hardware Requirements
A remote server on which you install the external database.
Software Requirements
• IM and Presence Service, current release
• External Database:
Database Setup for IM and Presence Service on Cisco Unified Communications Manager, Release 11.5(1) 1

Supported VersionsDatabase
Many versions 8.3.x through 9.4.1 have been tested. Since the IMand Presence Service features are using common PostgreSQLfeatures, all PostgreSQL 8.3.x – 9.x are supported.
PostgreSQL
Several Oracle versions have been tested. These include 9g, 10g,11g, and 12c. Since the IM and Presence features are using verycommon Oracle features such as basic SQL statements, StoredProcedures and basic indexing; we expect that future versions willremain compatible and will be supported. Cisco plans to includecompatibility testing of newer major Oracle DB releases duringfuture major IM and Presence releases.
Oracle
Testing has been performed using MS SQL 2012 SP3, 2014 SP1,and 2016 SP1 versions. The IM and Presence features use commonMS SQL features and it is expected that future releases and patcheswill remain compatible.
To use Microsoft SQL server as an external database forPersistent Chat High Availability, you must be running aminimum release 11.5(1)SU2. For other features, it issupported from 11.5(1).
Note
Microsoft SQL Server
• You can install a Postgres or Oracle database on a Linux operating system. You can install MicrosoftSQL Server on a Windows operating system. See the relevant database documentation for details on thesupported operating systems and platform requirements.
• IPv4 and IPv6 are supported by IM and Presence connections to external databases.
External Database Requirements for IM and Presence Service
The external database requirements differ depending on the features you want to deploy on IM and PresenceService.
RequirementsFeature
Aminimum of one unique logical external database instance (tablespace)is required for the entire IM and Presence Service intercluster. A uniquelogical external database instance for each IM and Presence Service nodeor redundancy group in an IM and Presence Service cluster will provideoptimum performance and scalability, but is not mandatory.
Supports:
• Oracle
• Postgres SQL
• Microsoft SQL Server
Persistent Group Chat feature
Database Setup for IM and Presence Service on Cisco Unified Communications Manager, Release 11.5(1)2
External Database RequirementsExternal Database Setup Requirements

RequirementsFeature
You must enable High Availability and Persistent Chat. Make sure thatboth presence redundancy group nodes are assigned to the same uniquelogical external database instance.
Oracle, PostgreSQL, andMicrosoft SQL Server are supported as externaldatabases for High Availability for Persistent Chat. However, note thatCisco does not provide detailed back-end database support. Customersare responsible for resolving back-end database issues on their own.
Supports:
• Oracle
• Postgres SQL
• Microsoft SQL Server (minimum release is 11.5(1)SU2)
High Availability for PersistentChat feature
We highly recommend that you configure at least one external databasefor each IM and Presence Service cluster; however you may require morethan one external database for a cluster depending on your database servercapacity.
Supports:
• Oracle
• Postgres SQL
• Microsoft SQL Server
Message Archiver (compliance)feature
You require one unique logical external database instance for each IMand Presence Service node in an IM and Presence Service cluster.
Database table space can be shared across multiple nodes orclusters provided capacity and performance isn't overloaded.
Note
Supports:
• Oracle
• Postgres SQL
• Microsoft SQL Server
Managed File Transfer feature
If you deploy any combination of the persistent group chat, message archiver (compliance), and managedfile transfer features on an IM and Presence Service node, the same unique logical external databaseinstance (tablespace) can be shared across the features as each feature uses separate data tables. This isdependent on the capacity of the database instance.
Note
Database Setup for IM and Presence Service on Cisco Unified Communications Manager, Release 11.5(1) 3
External Database RequirementsExternal Database Setup Requirements

Additional DocumentationThis procedure only describes how to configure the external database on the IM and Presence Service. It doesnot describe how to fully configure the features that require an external database. See the documentationspecific to the feature you are deploying for the complete configuration:
• For information on configuring the message archiver (compliance) feature on the IM and PresenceService, see Instant Messaging Compliance for IM and Presence Service on Cisco UnifiedCommunications Manager.
• For information on configuring the persistent group chat feature on the IM and Presence Service, seeConfiguration and Administration of IM and Presence Service on Cisco Unified CommunicationsManager.
• For information on configuring the managed file transfer feature on the IM and Presence Service, seeConfiguration and Administration of IM and Presence Service on Cisco Unified CommunicationsManager.
External Database Setup PrerequisitesBefore you install and configure the external database on the IM and Presence Service, perform the followingtasks:
• Install the IM and Presence Service nodes as described in Installing Cisco Unified CommunicationsManager.
• Configure the IM and Presence Service nodes as described in Configuration and Administration of IMand Presence Service on Cisco Unified Communications Manager.
If the IM and Presence Service connects to an external database server using IPv6, ensure that the enterpriseparameter is configured for IPv6 and that Eth0 is set for IPv6 on each node in the deployment; otherwise,the connection to the external database server fails. Themessage archiver and Cisco XCP Text ConferenceManager will be unable to connect to the external database and will fail. For information about configuringIPv6 on the IM and Presence Service, see Configuration and Administration of IM and Presence Serviceon Cisco Unified Communications Manager.
Caution
Hardware and Performance RecommendationsWhen you configure an external database with the IM and Presence Service, you need to consider the followingrecommendations:
•We recommend that you use similar hardware for both the external database and the IM and PresenceService nodes.
•We recommend that youmaintain the external database according to the best practice guidelines describedin the product documentation. If you do not properly maintain the external database, and you allow theexternal database to fill up, this causes performance problems in the IM and Presence Service cluster.
Database Setup for IM and Presence Service on Cisco Unified Communications Manager, Release 11.5(1)4
External Database RequirementsAdditional Documentation

To minimize delay and any negative performance impacts, locate the external database server as close aspossible to the IM and Presence Service Database Publisher node.
Note
If user login performance is very slow or if logins are hanging, review the database performance informationfor that server.
Note
Related Topics
PostgreSQL documentationOracle documentationMicrosoft Server documentation
About Security Recommendations
External Database Connection SecurityThe IM and Presence Service provides a secure TLS/SSL connection to the external database but only whenOracle or Microsoft SQL Server is chosen as the database type. We recommend that you consider this securitylimitationwhen you plan your IM and Presence Service deployment, and consider the security recommendationswe provide in this topic.
Maximum Limit Connection SetupFor additional security, you can limit the maximum number of permitted connections to the external database.Use the guideline we provide here to calculate the number of database connections that are appropriate foryour deployment. This section is optional configuration. The guideline infers that:
• You are running the managed file transfer, message archiver (compliance), and persistent group chatfeatures on the IM and Presence Service.
• You configure the default number of connections to the database for the persistent group chat featureon the Cisco Unified CM IM and Presence Administration interface.
Guideline
PostgreSQL— max_connections = (N ×15) + Additional Connections
Oracle— QUEUESIZE = (N ×15) + Additional Connections
Microsoft SQL Server— the maximum number of concurrent connections = (N x15) + Additional Connections
• N is the number of nodes in your IM and Presence Service cluster.
• 15 is the default number of connections to the database on the IM and Presence Service, that is, fiveconnections each for the managed file transfer, message archiver, and persistent group chat features.
Database Setup for IM and Presence Service on Cisco Unified Communications Manager, Release 11.5(1) 5
External Database RequirementsAbout Security Recommendations
• Additional Connections represents any independent administration or database administrator (DBA)connections to the database server.
PostgreSQL
To limit the number of PostgreSQL database connections, configure the max_connections value in thepostgresql.conf file located in the install_dir/data directory. We recommend that you set thevalue of the max_connections parameter equal to, or slightly larger than, the above guideline.
For example, if you have an IM and Presence Service cluster containing six nodes, and you require an additionalthree DBA connections, using the guideline above, you set the max_connections value to 93.
Oracle
To limit the number of Oracle database connections, configure the QUEUESIZE parameter in the listener.orafile located in the install_dir/data directory. We recommend that you set the value of the QUEUESIZEparameter equal to the above guideline.
For example, if you have an IM and Presence Service cluster containing 4 nodes, and you require one additionalDBA connection, using the guideline above, you set the QUEUESIZE value to 61.
Microsoft SQL Server
To limit the number of MS SQL Server database simultaneous connections carry out the steps below. Werecommend that you set the size of the queue equal to the above guideline.
1 From the SQL Server Configuration Manager, right-click the node you want to configure and clickProperties.
2 Click Connections.
3 In the Connections pane, enter a value from 0 to 32767 in theMax number of concurrent connectionsdialog box.
4 Restart the Microsoft SQL Server.
Default Listener Port Setup
This section is an optional configuration.Note
For additional security, you may choose to change the default listening port on the external database:
• For PostgreSQL, see Set Up PostgreSQL Listening Port, on page 11 for details on how to edit thedefault listener port.
• For Oracle, you can edit the default listener port by editing the listener.ora config file
• For Microsoft SQL Server, you can assign a TCP/IP port number as the default listener port in the SQLServer Configuration Manager. For details, see Default Listener Port Setup for Microsoft SQL Server,on page 20.
Database Setup for IM and Presence Service on Cisco Unified Communications Manager, Release 11.5(1)6
External Database RequirementsDefault Listener Port Setup

Related Topics
Set Up PostgreSQL Listening Port, on page 11
Database Setup for IM and Presence Service on Cisco Unified Communications Manager, Release 11.5(1) 7
External Database RequirementsDefault Listener Port Setup

Database Setup for IM and Presence Service on Cisco Unified Communications Manager, Release 11.5(1)8
External Database RequirementsDefault Listener Port Setup

C H A P T E R 2PostgreSQL Installation and Setup
This chapter provides information about installing and setting up PostgreSQL.
• Install PostgreSQL Database, page 9
• Set Up PostgreSQL Listening Port, page 11
• User Access Restriction Recommendations, page 12
Install PostgreSQL DatabaseBefore You Begin
• Cisco recommends that a PostgreSQL DBA install and maintain the PostgreSQL server.
• Read the security recommendations for the PostgreSQL database in section About SecurityRecommendations, on page 5.
• For information on supported versions, see External Database Setup Requirements, on page 1.
Procedure
Step 1 Enter these commands to sign in to the database server as a Postgres user:>su - postgres
>psql
Step 2 Create a new database user. The example below creates a new database user called tcuser:#CREATE ROLE tcuser LOGIN CREATEDB;
If you deploy PostgresSQL version 8.4.x, you must configure the database user as a superuser at thispoint in the procedure, for example:
#ALTER ROLE tcuser WITH SUPERUSER;
Note
Step 3 Create the database. If your database contains ASCII characters only, create the database with SQL_ASCIIencoding. If your database contains non-ASCII characters, create the database with UTF8 encoding.The example below creates an SQL_ASCII database called tcmadb.
Database Setup for IM and Presence Service on Cisco Unified Communications Manager, Release 11.5(1) 9

#CREATE DATABASE tcmadb WITH OWNER tcuser ENCODING 'SQL_ASCII';
Step 4 Configure user access to the database. Edit the install_dir/data/pg_hba.conf file to allow the postgresuser and the new tcuser user to access the database. For example:
METHODCIDR-ADDRESSUSERDATABASE# TYPE
password10.89.99.0/24tcusertcmadbhost
password10.89.99.0/24mauserdbinsthost
Trust or MD5allalllocal1
1 For Unix domain socket connections only.
Step 5 Enter these commands to define passwords for the postgres and tcuser users:#ALTER ROLE postgres WITH PASSWORD 'mypassword';
#ALTER ROLE tcuser WITH PASSWORD 'mypassword';
You are required to enter a password for the database user when you configure an external databaseentry on the IM and Presence Service.
Note
Step 6 If you are running the PostgreSQL version 8.3.7 or a later 8.3.x release, change the permission of the tcuserto superuser to allow this user access to the database. Enter this command:#ALTER ROLE tcuser WITH SUPERUSER;
Step 7 Configure the connections to the database from remote hosts. Edit the listen_addresses parameter in theinstall_dir/data/postgresql.conf file. For example:listen_addresses = '*'
Step 8 If you are running PostgreSQL version 9.1.1, or higher, you must set the following values in thepostgresql.conf file:escape_string_warning = off
standard_conforming_strings = off
Step 9 Stop and restart the PostgreSQL service, for example:/etc/rc.d/init.d/postgresql-8.3 stop
/etc/rc.d/init.d/postgresql-8.3 start
The commands to stop and start the PostgreSQL service may vary between PostgreSQL releases.Note
Step 10 Enter these commands to sign in to the new database as the postgres user and enable PL/pgSQL:>psql tcmadb -U postgres
The following example, up to the semicolon, should be entered as oneline.
Note
#CREATE FUNCTION plpgsql_call_handler () RETURNS LANGUAGE_HANDLER AS '$libdir/plpgsql'
LANGUAGE C;
#CREATE TRUSTED PROCEDURAL LANGUAGE plpgsql HANDLER plpgsql_call_handler;
Troubleshooting Tips
Do not turn on the following configuration items in the install_dir/data/postgresql.conf file (by defaultthese items are commented out):
Database Setup for IM and Presence Service on Cisco Unified Communications Manager, Release 11.5(1)10
PostgreSQL Installation and SetupInstall PostgreSQL Database
client_min_messages = log
log_duration = on
Related Topics
About Security Recommendations, on page 5
Set Up PostgreSQL Listening Port
This section is optional configuration.Note
By default, the Postgresql database listens on port 5432. If you want to change this port, you must edit thePGPORT environment variable in /etc/rc.d/init.d/postgresql with the new port number.
The PGPORT environment variable overrides the ‘Port’ parameter value in the/var/lib/pgsql/data/postgresql.conf file, so you must edit the PGPORT environmentvariable if you want the Postgresql database to listen on a new port number.
Note
Procedure
Step 1 Edit the PGPORT environment variable in /etc/rc.d/init.d/postgresql with the new port, for example:IE: PGPORT=5555
Step 2 Enter these commands to stop and start the PostgreSQL service:# /etc/rc.d/init.d/postgresql start
# /etc/rc.d/init.d/postgresql stop
Step 3 Confirm that the Postgresql database is listening on the new port using this command:'lsof -i -n -P | grep postg'
postmaste 5754 postgres 4u IPv4 1692351 TCP *:5555 (LISTEN)
For IPv6 servers, enter postmaste 5754 postgres 4u IPv6 1692351 TCP *:5555 (LISTEN)Tip
Step 4 To connect to the database after you have changed the port, you must specify the new port number in thecommand using the -p argument. If you do not include the -p argument in the command, the Postgresql databaseattempts to use the default port of 5432, and the connection to the database fails.For example:
psql tcmadb -p 5555 -U tcuser
Database Setup for IM and Presence Service on Cisco Unified Communications Manager, Release 11.5(1) 11
PostgreSQL Installation and SetupSet Up PostgreSQL Listening Port

User Access Restriction RecommendationsWe strongly recommend that you restrict user access to the external database to only the particular user anddatabase instance that the IM and Presence Serivce uses. You can restrict user access to the PostgreSQLdatabase in the pg_hba.conf file located in the <install_dir>/data directory.
Do not configure 'all' for the user and database entries because potentially this could allow any user accessto any database.
Caution
When you configure user access to the external database, we also recommend that you configure passwordprotection for the database access using the 'password' method.
You are required to enter a password for the database user when you configure a database entry on IMand Presence Service.
Note
The following are examples of a secure user access configuration, and a less secure user access configuration,in the pg_hba.conf file.
Example of a secure configuration:
METHODCIDR-ADDRESSUSERDATABASE# TYPE
password10.89.99.0/24tcuser1dbinst1host
password10.89.99.0/24mauser1dbinst2host
Example of a less secure configuration:
METHODCIDR-ADDRESSUSERDATABASE# TYPE
trust10.89.99.0/24tcuser1dbinst1host
password10.89.99.0/24alldbinst2host
Notes on the example of a less secure configuration:
• The first entry contains no password protection for the database.
• The second entry allows any user to access the database “dbinst2”.
Related Topics
Install PostgreSQL Database, on page 9PostgreSQL documentation
Database Setup for IM and Presence Service on Cisco Unified Communications Manager, Release 11.5(1)12
PostgreSQL Installation and SetupUser Access Restriction Recommendations
C H A P T E R 3Oracle Installation and Setup
This chapter provides information about installing and setting up an Oracle database.
• Install Oracle Database, page 13
• Create New Database Instance, page 15
Install Oracle DatabaseBefore You Begin
• Cisco recommends that an Oracle DBA install the Oracle server.
• You need to update the patch for the known Oracle defect: ORA-22275. If this is not done persistentchat rooms will not work properly.
• Read the security recommendations for the Oracle database in your Oracle documentation.
• For information on supported versions, see External Database Setup Requirements, on page 1.
• IM and Presence Service supports an SSL connection to Oracle Database Enterprise Edition only.
• To install the Oracle database, refer to your Oracle documentation.
In compliance with XMPP specifications, the IM and Presence Service node uses UTF8 character encoding.This allows the node to operate using many languages simultaneously and to display special languagecharacters correctly in the client interface. If you want to use Oracle with the node, you must configure itto support UTF8.
Note
To create tablespace and a database user, connect to the Oracle database as sysdba:
sqlplus / as sysdba
Procedure
Step 1 Create tablespace.
Database Setup for IM and Presence Service on Cisco Unified Communications Manager, Release 11.5(1) 13
The DATAFILE keyword of the CREATE TABLESPACE command tells Oracle where to put the tablespace'sdatafile.
Note
a) Enter the following command:CREATE TABLESPACE tablespace_name DATAFILE
'absolute_path_to_oracle_installation\oradata\database_name\datafile.dbf' SIZE 100M
AUTOEXTEND ON NEXT 1M MAXSIZE UNLIMITED LOGGING EXTENT MANAGEMENT LOCAL SEGMENT SPACE
MANAGEMENT AUTO;
• Replace tablespace_name with the tablespace name.
• Replace absolute_path_to_oracle_installation with the absolute path to where Oracle is installed.The entire path, including datafile.dbf, is enclosed in single quotation marks.
• Replace database_name with the name of your database folder.
• The datafile.dbf must be created in a folder under \oradata\, in this case the database_name folder.
• Replace datafile.dbf with the datafile name you want to create.
Step 2 Create a database user.CREATE USER user_name IDENTIFIED BY "new_user's_password" DEFAULT TABLESPACE tablespace_name
TEMPORARY TABLESPACE "TEMP" QUOTA UNLIMITED ON tablespace_name ACCOUNT UNLOCK;
• Replace user_name with the new user's user name.
The command CREATE USER user_name without double quotes will default to upper case andwith quotes it will maintain the case
Note
• Replace "new_user's_password" with the new user's password.
Enclosing the new_user's_password within double quotation marks makes the variablecase-sensitive. By default SQL identifiers are not case-sensitive.
Important
• Replace tablespace_name with the tablespace name.
Step 3 Grant permissions to the database user.The following example grants the required permissions and privileges to a database user, which are neededto create or upgrade the schema:
Prior to an upgrade, you must ensure that these permissions and privileges are granted, so that all IMand Presence Service services continue to operate as normal following the upgrade.
Note
• GRANT CREATE SESSION TO user_name;
• GRANT CREATE TABLE TO user_name;
• GRANT CREATE PROCEDURE TO user_name;
• GRANT CREATE TRIGGER TO user_name;
After you have created or upgraded the schema, the following privileges can be revoked if greater accesscontrol is required:
Ensure that revoked privileges are granted again beforeupgrading.
Note
• REVOKE CREATE TABLE FROM user_name;
• REVOKE CREATE PROCEDURE FROM user_name;
Database Setup for IM and Presence Service on Cisco Unified Communications Manager, Release 11.5(1)14
Oracle Installation and SetupInstall Oracle Database

• REVOKE CREATE TRIGGER FROM user_name;
IM and Presence Service only requires the CREATE SESSION privilege for regular operation.Note
Related Topics
Oracle Documentation
Create New Database InstanceProcedure
Step 1 Enter the command dbca
The Database Configuration Assistant wizard opens.Step 2 Click Next.
The Operations window appears.Step 3 Click the Create a Database radio button and then click Next.
The Database Templates window appears.Step 4 Click the General Purpose or Transaction Processing radio button and then click Next.
The Database Identification window appears.Step 5 Enter a unique Global Database Name on this screen and also a unique Oracle System Identifier (SID) for the
database and click Next.Take note of the SID because it is needed in Step15.
Note
TheManagement Options window appears.Step 6 Under the Enterprise Manager tab the required settings are enabled by default but you can configure optional
backups and alert notifications. Click Next.The Database Credentials window appears.
Step 7 The window has two options to set up password authentication for database users, choose one and clickNext.The Database File Locations window appears.
Step 8 The Storage Type drop-down list should be the same as your Oracle Installation. Click the UseOracle-Managed Files radio button and click Next.
This creates the new database instance in the same folder as your other database instances.Note
The Recovery Configuration window appears.Step 9 Leave the default values and click Next.
The Database Content window appears.Step 10 [Optional] Check the check box if you want to enable Sample Schemas and click Next.
The Initialization Parameters window appears.Step 11 Under theMemory tab the default value is for a database instance with 4GB of memory. This can be set higher
or lower as needed.The amount of memory used should not be configured too high as this starves other database instancesof memory.
Note
Step 12 Under the Character Sets tab click the Use Unicode radio button and click Next.
Database Setup for IM and Presence Service on Cisco Unified Communications Manager, Release 11.5(1) 15
Oracle Installation and SetupCreate New Database Instance

The Database Storage window appears.Step 13 Leave the default settings as they are and click Next.
The Create Options window appears.Step 14 Check the Create Database check box and click Finish.Step 15 Once a new database instance is created, youmust temporarily change the ORACLE_SID environment variable
(from Step 5) on your Unix system by running the command:export ORACLE_SID=new_oracle_db_instance_sid.
This will change the SID so when you login using sqlplus, it will use the new instance and not the old one;you can then repeat the steps in Install Oracle Database, on page 13.
Once these steps are completed you can change the ORACLE_SID environment variable by sourcing the bashprofile(assuming the old SID is in the bash profile) or by running the export command (Step 15) but changingthe SID back to its original value.
Database Setup for IM and Presence Service on Cisco Unified Communications Manager, Release 11.5(1)16
Oracle Installation and SetupCreate New Database Instance

C H A P T E R 4Microsoft SQL Installation and Setup
This chapter provides information about installing and setting up Microsoft SQL.
• Encrypted Database Not Supported, page 17
• Install and Setup Microsoft SQL Server, page 17
Encrypted Database Not SupportedThe IM and Presence Service does not support an encrypted database with Microsoft SQL Server.
Install and Setup Microsoft SQL ServerBefore You Begin
• Read the security recommendations for the Microsoft SQL database in the About SecurityRecommendations section.
• For information on supported versions, see External Database Setup Requirements.
• To install the MS SQL Server, refer to your Microsoft documentation.
Connect to the MS SQL Server usingMicrosoft SQL Server Management Studio.
Create a New Microsoft SQL Server DatabaseUse this procedure to create a new Microsoft SQL Server database.
Procedure
Step 1 Enable SQL server and Windows authentication:a) In the left navigation pane, right-click the name of the Microsoft SQL Server, then click properties.
Database Setup for IM and Presence Service on Cisco Unified Communications Manager, Release 11.5(1) 17

b) Click Enable SQL Server and Windows Authentication mode.
Step 2 In the left navigation pane, right-click Databases and click New Database.Step 3 Enter an appropriate name in the Database name field.Step 4 Click OK. The new name appears in the left navigation pane nested under databases.
Create a new Login and Database UserUse this procedure to create a new login and Microsoft SQL database user.
Procedure
Step 1 In the left navigation pane, right-click Security > Login and click New Login.Step 2 Enter an appropriate name in the Login name field.Step 3 Check the SQL Server authentication check box.Step 4 Enter a new password in the Password field and confirm the password in the Confirm password field.Step 5 Check the Enforce password policy check box.
Ensure that the Enforce password expiration policy is not checked. This password is used by IMand Presence Service to connect to the database and must not expire.
Note
Step 6 Choose the database you want to apply this new user to from the Default database drop-down list.Step 7 In the left navigation pane of the Login - New window, click User Mapping.Step 8 Under the Users mapped to this login list, check the database to which you want to add this user.Step 9 Click User Mapping, in theMap column of the Users mapped to this pane pane, check the check box of
the database you have already created.Step 10 In Server Roles, ensure that only the public role check box is checked.Step 11 Click OK. In Security > Logins, the new user is created.
Grant Database User Owner PrivilegesUse this procedure to grant ownership of a Microsoft SQL database to a database user.
Database Setup for IM and Presence Service on Cisco Unified Communications Manager, Release 11.5(1)18
Microsoft SQL Installation and SetupCreate a new Login and Database User

Procedure
Step 1 In the left navigation pane click Databases, then click on the name of the database that you have created andclick Security > Users.
Step 2 Right-click on the name of the database user to who you want to add owner privileges, then click Properties.Step 3 In the Database User pane, clickMembership.Step 4 In the Role Members list, check the db_owner check box.Step 5 Click OK.
[Optional] Database User Access RestrictionsUse this procedure if you want to remove the database user as the database owner and apply further optionalrestrictions to the database user on the Microsoft SQL Server database.
If during an IM and Presence Service upgrade, there is a database schema upgrade, then the database usermust have owner privileges for the database.
Caution
Before You Begin
Ensure that you carry out the procedures in the IM and Presence Service External Database Setup, on page21 chapter.
Procedure
Step 1 Create a new database role for executing stored procedures:a) In the left navigation pane click Databases, then click the name of the database to which you want to add
new database roles.b) Right-click Roles, and click New Database Role.c) In the Database Role window, click General.d) Enter an appropriate name in the Role name field.e) Click Securables, then click Search to open the Add Objects window.f) Choose the Specific Objects radio button, and click OK.g) Click Object Types to open the Select Object Types window.h) In the Select Object Types window, check the Stored procedures check box and click OK. Stored
procedures is then added to the Select these object types pane.i) Click Browse.j) In the Browse for Objects window, check the following check boxes:
• [dbo][jabber_store_presence]
• [dbo][ud_register]
• [dbo][ps_get_affiliation]
Database Setup for IM and Presence Service on Cisco Unified Communications Manager, Release 11.5(1) 19
Microsoft SQL Installation and Setup[Optional] Database User Access Restrictions
• [dbo][tc_add_message_clear_old]
• [dbo][wlc_waitlist_update]
k) Click OK. The new names appear in the Enter the object names to select pane.l) On the Select Objects window, click OK.m) From the Database Role window, click the first entry in the list of objects in the Securables list.n) In the Explicit list, check the Grant check box for the Execute permission.o) Repeat step 13 and 14 for all objects in the Securables list.p) Click OK.
A new database role is created in Security > Roles > Database Roles.
Step 2 To update the database user's database role membership:a) Under Security > Users, right-click on the database user you have created, then click Properties.b) In the Database User window, clickMembership in the left navigation pane.c) In the Role Members pane, uncheck the db_owner check box.d) Check the check boxes for db_datareader, db_datawriter, and the database role which you created in
step 1.
Step 3 Click OK.
Default Listener Port Setup for Microsoft SQL ServerAssign a TCP/IP port number to the SQL Server Database Engine as the default listener port.
Procedure
Step 1 From the SQL Server Configuration Manager, click SQL Server Network Configuration > Protocols >TCP/IP in the Console.
Step 2 In the TCP/IP Properties dialog box, on the IP Addresses tab, right-click on the IP address that you want toconfigure and then click Properties.
Step 3 Check the TCP Dynamic Ports dialog box, if it contains the value 0, delete the 0. This prevents the DatabaseEngine from listening on dynamic ports.
Step 4 In the IPn Properties pane, type the port number you want this IP address to listen on in the TCP Port pane.Step 5 Click OK.Step 6 Click SQL Server Services in the Console pane.Step 7 In the Details pane, right-click SQL Server (instance name) and then click Restart, to stop and restart the
Microsoft SQL Server.
Database Setup for IM and Presence Service on Cisco Unified Communications Manager, Release 11.5(1)20
Microsoft SQL Installation and SetupDefault Listener Port Setup for Microsoft SQL Server

C H A P T E R 5IM and Presence Service External DatabaseSetup
This chapter provides information about the IM and Presence Service external database setup.
• About External Database Assignment, page 21
• Set Up External Database Entry on IM and Presence Service, page 22
• Verify External Database Connection, page 24
• Verify External Database Connection Status on IM and Presence Service, page 25
About External Database Assignment
External Database and Node AssignmentWhen you configure an external database entry on the IM and Presence Service, you assign the externaldatabase to a node, or nodes, in your cluster as follows:
• Message Archiver (compliance)— You require at least one external database per cluster. Dependingon your deployment requirements, you can also configure a unique external database per node.
• Persistent Group Chat—You require a unique external database per node. Configure and assign a uniqueexternal database for each node in your cluster.
• Managed File Transfer— You require at least one external database per cluster. All of the nodes in acluster can be assigned to the same database. Depending on your deployment requirements, you canalso configure a unique external database per node.
• If you deploy the persistent group chat, message archiver, and managed file transfer features on an IMand Presence Service node, you can assign the same external database to all or any combination of thefeatures.
For more information see:
Database Setup for IM and Presence Service on Cisco Unified Communications Manager, Release 11.5(1) 21

• Message Archiver— Instant Messaging Compliance for IM and Presence Service on Cisco UnifiedCommunications Manager.
• Persistent Group Chat—Configuration and Administration of IM and Presence Service on Cisco UnifiedCommunications Manager.
• Managed File Transfer— Configuration and Administration of IM and Presence Service on CiscoUnified Communications Manager.
Related Topics
Set Up External Database Entry on IM and Presence Service, on page 22External Database Connection, on page 22
External Database ConnectionIM and Presence Service does not establish a connection to the external database when you configure anexternal database entry. The external database has not created the database schema at this point. It is onlywhen you assign an external database entry to a node that IM and Presence Service establishes an ODBC(OpenDatabase Connectivity) connection with the external database. Once IM and Presence Service establishesa connection, the external database creates the database tables for the IM and Presence Service features.
Once you assign an external database entry to a node, you can validate the connection using the SystemTroubleshooter in the Cisco Unified CM IM and Presence Service Administration user interface.
Related Topics
Set Up External Database Entry on IM and Presence Service, on page 22Verify External Database Connection Status on IM and Presence Service
Set Up External Database Entry on IM and Presence ServicePerform this configuration on the IM and Presence Service database publisher node of your cluster.
If your IM and Presence Service node connects to an external database server using IPv6, ensure that theenterprise parameter is configured for IPv6 and that Eth0 is set for IPv6 on each node in the deployment;otherwise, the connection to the external database server fails. The Message Archiver and Cisco XCPText Conference Manager are unable to connect to the external database and fail. For information aboutconfiguring IPv6 on IM and Presence Service, see Configuration and Administration of IM and PresenceService on Cisco Unified Communications Manager.
Caution
Before You Begin
• Install and configure the external database.
• Obtain the hostname or IP address of the external database.
• If using Oracle, retrieve the tablespace value. To determine the tablespace available for your Oracledatabase, execute the following query as sysdba:
SELECT DEFAULT_TABLESPACE FROM DBA_USERS WHERE USERNAME = 'USER_NAME';
Database Setup for IM and Presence Service on Cisco Unified Communications Manager, Release 11.5(1)22
IM and Presence Service External Database SetupExternal Database Connection

The user namemust be capitalized and in single quotes (a string literal) for this commandto succeed, even if you defined the user with lowercase characters.
Note
Procedure
Step 1 Log in to the Cisco Unified CM IM and Presence Administration user interface. ChooseMessaging >External Server Setup > External Databases.
Step 2 Click Add New.Step 3 Enter the name of the database that you defined at external database installation, for example, tcmadb.Step 4 Choose the database type from the drop-down list, Postgres, Oracle, or Microsoft SQL Server.Step 5 If you chose Oracle as the database type, enter the tablespace value.Step 6 Enter the username for the database user (owner) that you defined at external database installation, for example,
tcuser.Step 7 Enter and confirm the password for the database user, for example, mypassword.Step 8 Enter the hostname or IP address for the external database.Step 9 Enter a port number for the external database.
The default port numbers for Postgres (5432), Oracle (1521), Oracle with SSL enabled (2484), and MicrosoftSQL Server (1433) are prepopulated in the Port Number field. You can choose to enter a different portnumber if required.
Step 10 If you chose Oracle or Microsoft SQL Server as the Database Type the Enable SSL check box becomesactive. Check the check box to enable SSL.
If you chose Microsoft SQL Server as the Database Type, the Certificate Name drop-down listremains inactive because all certificates in the cup-xmpp-trust list are used to verify the certificatesent from the Microsoft SQL Server
Note
If you chose Oracle as the Database Type, the Certificate Name drop-down list becomes active. Choose acertificate from the drop-down list.
Database Setup for IM and Presence Service on Cisco Unified Communications Manager, Release 11.5(1) 23
IM and Presence Service External Database SetupSet Up External Database Entry on IM and Presence Service

Note •When the Enable SSL check box or the Certificate drop-down field is modified, a notificationto restart the corresponding service assigned to the external database is sent. A messageconcerning either Cisco XCP Message Archiver or Cisco XCP Text Conference Manager willbe generated.
• The certificate you need to enable SSLmust be uploaded to the cup-xmpp-trust store. You mustupload this certificate before you enable SSL.
• Once the certificate is uploaded to the cup-xmpp-trust store, you must wait 15 minutes for thecertificate to propagate to all the nodes of the IM and Presence Service cluster. If you do notwait, the SSL connection on nodes where the certificate has not propagated fails.
• If the certificate is missing or has been deleted from the cup-xmpp-trust store, an alarmXCPExternalDatabaseCertificateNotFound is raised in the Cisco Unified CommunicationsManager Real Time Monitoring Tool (RTMT).
No alarm is raised if the external database type chosen isMicrosoft SQL Server.Note
• The following ciphers have been tested with Microsoft SQL Server:
◦TLS_RSA_WITH_AES_128_CBC_SHA256
◦TLS_RSA_WITH_AES_128_CBC_SHA
◦TLS_RSA_WITH_AES_256_CBC_SHA256
Step 11 Click Save.
Related Topics
Verify External Database Connection, on page 24
Verify External Database ConnectionIf you make a configuration change in the install_dir/data/pg_hba.conf file or theinstall_dir/data/postgresql.conf file after you assign the external database, perform these steps:
Procedure
Step 1 Unassign and reassign the external database to the IM and Presence Service node.Step 2 Restart the Cisco XCP Router service. Log in to the Cisco Unified IM and Presence Serviceability user
interface. Choose Tools > Control Center - Network Services to restart this service.
Related Topics
PostgreSQL Installation and Setup, on page 9Oracle Installation and Setup, on page 13Microsoft SQL Installation and Setup, on page 17
Database Setup for IM and Presence Service on Cisco Unified Communications Manager, Release 11.5(1)24
IM and Presence Service External Database SetupVerify External Database Connection

Verify External Database Connection Status on IM and PresenceService
IM and Presence Service provides the following status information on an external database:
• Database reachability— Verifies that the IM and Presence Service can ping an external database.
• Database connectivity—Verifies that the IM and Presence Service has successfully established an OpenDatabase Connectivity (ODBC) connection with the external database.
• Database schema verification— Verifies that the external database schema is valid.
If your IM and Presence Service node connects to an external database server using IPv6, ensure that theenterprise parameter is configured for IPv6 and that Eth0 is set for IPv6 on each node in the deployment;otherwise, the connection to the external database server fails. The message archiver (compliance) andCisco XCPText ConferenceManager is unable to connect to the external database and fails. For informationabout configuring IPv6 on IM and Presence Service, see Configuration and Administration of IM andPresence Service on Cisco Unified Communications Manager.
Caution
Procedure
Step 1 Log in to the Cisco Unified CM IM and Presence Administration user interface. ChooseMessaging >External Server Setup > External Databases.
Step 2 Click Find.Step 3 Choose the external database entry that you want to view.Step 4 Verify that there are check marks beside each of the result entries for the external database in the External
Database Status section.Step 5 In the Cisco Unified CM IM and Presence Administration user interface, choose Diagnostics > System
Troubleshooter.Step 6 Verify that there are check marks beside the status of each of the external database connection entries in the
External Database Troubleshooter section.
Troubleshooting Tips
• The IM and Presence Service generates an alarm if it loses ODBC to an external database.
• You can also verify the status of the Postgres database connection using the psql command. You mustsign in to the Linux shell from a remote support account to run this command; it is not accessible throughthe administrator CLI. Run the following command after you install the Postgres database, but beforeyou assign the database to an IM and Presence Service node.
For psql to run, you must first set an environment variable by entering:
$export LD_LIBRARY_PATH=$LD_LIBRARY_PATH:/usr/local/xcp/lib
Important
Database Setup for IM and Presence Service on Cisco Unified Communications Manager, Release 11.5(1) 25
IM and Presence Service External Database SetupVerify External Database Connection Status on IM and Presence Service

Enter:
$sudo -u xcpuser /usr/local/xcp/bin/psql -U db_user -h db_server db_name
For example:
$sudo –u xcpuser /usr/local/xcp/bin/psql –U postgres -h node1 tcmadb
• You can verify the status of the Oracle database connection by executing the following commands fromthe root:
export ORACLE_HOME=/usr/lib/oracle/client_1/
export PATH="$ORACLE_HOME/bin:$PATH"
export LD_LIBRARY_PATH="$ORACLE_HOME/lib:$LD_LIBRARY_PATH"
sqlplus username/password@dsn
The dsn value can be obtained from the $ORACLE_HOME/network/admin/tnsnames.ora file.
• You can verify the status of theMicrosoft SQL database connection by executing the following commandsfrom the root:
$sudo -u xcpuser TDSVER=7.3 /usr/local/xcp/bin/tsql -H mssql_server_hostname -p
portnumber -U username -D databasename
• If you configure the message archiver (compliance) feature, and the Cisco XCP Message Archiverservice fails to start, or you configure the persistent group chat feature and the Cisco Text ConferenceManager service fails to start, check the External Database Troubleshooter section of the SystemConfiguration Troubleshooter window.
• If it shows that the status of the external database connection is not OK, verify that you providedthe correct connection details and that there are no network issues between the IM and PresenceService node and the external database host.
• If the status of the external database connection is OK, but the schema verification status is not,unassign the external database from the node, and reassign it again.
• Once the certificate is uploaded to the cup-xmpp-trust store, you must wait 15 minutes for the certificateto propagate to all the nodes of the IM and Presence Service cluster. If you do not wait, the SSL connectionon nodes where the certificate has not propagated fails.
• If the certificate is missing or has been deleted from the cup-xmpp-trust store, an alarm'XCPExternalDatabaseCertificateNotFound' is raised in the Cisco Unified Communications ManagerReal Time Monitoring Tool (RTMT).
No alarm is raised if the external database type chosen is Microsoft SQL Server.Note
Database Setup for IM and Presence Service on Cisco Unified Communications Manager, Release 11.5(1)26
IM and Presence Service External Database SetupVerify External Database Connection Status on IM and Presence Service

C H A P T E R 6External Database Tables
This chapter provides information about the external database tables that are created in your schema tosupport the IM and Presence Service node.
By default, the IM and Presence Service generates 27 tables in the external database but at present it onlyuses the tables described in this module.
Note
If you need to modify any data in the external database, ensure that you restart the Cisco XCP TextConference Manager service after you have made those changes.
Note
• AFT_LOG Table, page 27
• TC_ROOMS Table, page 31
• TC_USERS Table, page 31
• TC_MESSAGES Table, page 32
• TC_TIMELOG Table, page 33
• TC_MSGARCHIVE Table, page 33
• JM Table, page 34
AFT_LOG TableThe AFT_LOG table, contains information about file transfers that occur when using the Cisco UnifiedCommunications Manager IM and Presence Service managed file transfer feature.
Indexes: "aft_log_pkey" PRIMARY KEY, btree (aft_index)
Database Setup for IM and Presence Service on Cisco Unified Communications Manager, Release 11.5(1) 27

DescriptionNotNull
MicrosoftSQLDatatype
OracleDatatype
PostgresDatatype
Column Name
The sequence number that identifies the transaction.YesbigintNUMBER(19)
BIGINTAFT_INDEX
The Jabber ID (JID) of the user who uploaded or downloaded a file.The contents of this column depend on the contents of the METHODcolumn.
•When the METHOD column contains “POST,” this is the JID ofthe user who uploaded the file.
•When the METHOD column contains “GET,” this is the JID ofthe user who downloaded the file.
Yesvarchar(3071)
VARCHAR2(3071)
VARCHAR(3071)
JID
The JID of the user, group chat, or persistent room that is the intendedrecipient of the file transfer.
Yesvarchar(3071)
VARCHAR2(3071)
VARCHAR(3071)
TO_JID
This column can contain either POST, which indicates a user hasuploaded a file, or GET, which indicates a user has downloaded a file.
Yesvarchar(63)
VARCHAR2(63)
VARCHAR(63)
METHOD
The resource name for the file that was uploaded or downloaded. Theresource name identifies the file in HTTP requests. It is autogeneratedby the IM and Presence Service.
Yesvarchar(511)
VARCHAR2(511)
VARCHAR(511)
FILENAME
The actual name of the file that was uploaded by a user.Yesvarchar(511)
VARCHAR2(511)
VARCHAR(511)
REAL_FILENAME
The file extension, for example jpg, txt, pptx, docx, and so on.Yesvarchar(10)
VARCHAR2(10)
VARCHAR(10)
FILE_TYPE
"im" if the file was transferred during a one-to-one IM conversation.
"groupchat" if the file was transferred during an ad hoc group chatconversation.
"persistent" if the file was transferred to a persistent chat room.
Yesvarchar(10)
VARCHAR2(10)
VARCHAR(10)
CHAT_TYPE
The hostname or IP address of the file server where the file is stored.Yesvarchar(511)
VARCHAR2(511)
VARCHAR(511)
FILE_SERVER
The absolute path to the file (including the file name) on the file server.The file name as stored on the repository is unique and is auto-generatedby the IM and Presence Service.
Yesvarchar(511)
VARCHAR2(511)
VARCHAR(511)
FILE_PATH
The size of the file in bytes.YesbigintNUMBER(19)
BIGINTFILESIZE
The number of bytes that were transferred. This number differs fromFILESIZE, only when an error occurred during the transfer.
YesbigintNUMBER(19)
BIGINTBYTES_TRANSFERRED
Database Setup for IM and Presence Service on Cisco Unified Communications Manager, Release 11.5(1)28
External Database TablesAFT_LOG Table

DescriptionNotNull
MicrosoftSQLDatatype
OracleDatatype
PostgresDatatype
Column Name
The date and time (UTC) the file was uploaded or downloaded.YestimestampTIMESTAMPTIMESTAMPTIMESTAMPVALUE
Sample SQL Queries for the AFT_LOG TableThis section contains some sample SQL queries that you can run on the AFT_LOG table to extract specificinformation.
All Uploaded FilesThe following SQL query returns records of all the files and screen captures that were uploaded using themanged file transfer feature:
SELECT file_path
FROM aft_log
WHERE method = 'Post';
All Files That Were Uploaded to a Specific RecipientThe following SQL query returns the records of all the files and screen captures that were uploaded to theuser <userid> using the managed file transfer feature.
Records of downloaded files and screen captures do not contain any data in the to_jid field.Note
SELECT file_path
FROM aft_log
WHERE to_jid = '<userid>@<domain>';
All Files That Were Uploaded by a Specific SenderThe following SQL query returns the records of all the files and screen captures that were uploaded by theuser <userid> using the managed file transfer feature.
SELECT file_path
FROM aft_log
WHERE jid LIKE '<userid>@<domain>%' AND method = 'Post';
Database Setup for IM and Presence Service on Cisco Unified Communications Manager, Release 11.5(1) 29
External Database TablesSample SQL Queries for the AFT_LOG Table

All Files That Were Downloaded by a Specific UserThe following SQL query returns the records of all the files and screen captures that were downloaded by theuser <userid> using the manged file transfer feature.
SELECT file_path
FROM aft_log
WHERE jid LIKE '<userid>@<domain>%' AND method = 'Get';
All Files That Were Uploaded and Downloaded During IM ConversationsThe following SQL query returns the records of all the files and screen captures that were uploaded anddownloaded in IM conversations using the managed file transfer feature.
SELECT file_path
FROM aft_log
WHERE chat_type = 'im';
All Files That Were Uploaded by a Specific User After a Specific TimeThe following SQL query returns the records of all the files and screen captures that were uploaded by theuser <userid> after a specific time using the managed file transfer feature.
SELECT file_path
FROM aft_log
WHERE jid LIKE '<userid>@<domain>%' AND method = 'Post' AND timestampvalue > '2014-12-18
11:58:39';
Sample Output for SQL Queries for the AFT_LOG TableSample output from any of these queries looks like this:
/opt/mftFileStore/node_1/files/im/20140811/15/file_name1
/opt/mftFileStore/node_1/files/im/20140811/15/file_name2
/opt/mftFileStore/node_1/files/im/20140811/15/file_name3
/opt/mftFileStore/node_1/files/im/20140811/15/file_name4
...
/opt/mftFileStore/node_1/files/im/20140811/15/file_name99
/opt/mftFileStore/node_1/files/im/20140811/15/file_name100
Using the Output to Clean Up the External File Server
You can use this output with the rm command to remove unwanted files from the external file server. Forexample, you can run the following commands on the external file server:
rm /opt/mftFileStore/node_1/files/im/20140811/15/file_name1
Database Setup for IM and Presence Service on Cisco Unified Communications Manager, Release 11.5(1)30
External Database TablesSample SQL Queries for the AFT_LOG Table

rm /opt/mftFileStore/node_1/files/im/20140811/15/file_name2
rm /opt/mftFileStore/node_1/files/im/20140811/15/file_name3
and so on.
TC_ROOMS TableThe TC_ROOMS table contains information for group chat rooms.
DescriptionNotNull
MicrosoftSQL Datatype
OracleDatatype
PostgresDatatype
Column Name
The ID of the room.Yesvarchar(3071)
VARCHAR2(3071)
VARCHAR(3071)
ROOM_JID
The ID of the user who created the room.Yesvarchar(3071)
VARCHAR2(3071)
VARCHAR(3071)
CREATOR_JID
The current subject for the room.Yesvarchar (255)VARCHAR2(255)
VARCHAR(255)
SUBJECT
The constraint check_type. This value must be either“ad-hoc” or “persistent”.
Yesvarchar (32)VARCHAR2(32)
VARCHAR(32)
TYPE
The entire packet from the last time the room wasconfigured. This information enables the room to bereconfigured when the room is recreated (for example,at start-up).
YestextCLOBTEXTCONFIG
The entire packet from the last time the subject wasset for the room. This information enables the roomsubject to be displayed when the room is recreated.
YestextCLOBTEXTSPACKET
A sequence number that is used to populate theMSG_ID column in the TC_MSGARCHIVE table.
Do not modify this value.
YesbigintNUMBER(19)
BIGINTSTART_MSG_ID
A sequence number that is used to populate theMSG_ID column in the TC_MSGARCHIVE table.
Do not modify this value.
YesbigintNUMBER(19)
BIGINTNEXT_MSG_ID
TC_USERS TableThe TC_USERS table contains roles and affiliations, alternate names, and other data associated with groupchat room users.
Database Setup for IM and Presence Service on Cisco Unified Communications Manager, Release 11.5(1) 31
External Database TablesTC_ROOMS Table

DescriptionNot NullMicrosoftSQL Datatype
OracleDatatype
PostgresDatatype
Column Name
The ID of the room.Yesvarchar(3071)
VARCHAR2(3071)
VARCHAR(3071)
ROOM_JID
The ID of a user in the room. This value is theactual ID of the user, rather than an alternate name.
Yesvarchar(3071)
VARCHAR2(3071)
VARCHAR(3071)
REAL_JID
The role of the user in the room. This value isconstrained to one of the following: “none”,“hidden”, “visitor”, “participant”, or “moderator”.
Yesvarchar (32)VARCHAR2(32)
VARCHAR(32)
ROLE
The affiliation of the user in the room. This valueis constrained to one of the following: “none”,“outcast”, “member”, “admin”, or “owner”.
Yesvarchar (32)VARCHAR2(32)
VARCHAR(32)
AFFILIATION
The ID of the room, plus the alternate name for theuser. The format is room@tc-server/nick.
Yesvarchar(3071)
VARCHAR2(3071)
VARCHAR(3071)
NICK_JID
The reason entered when the user's affiliation waslast changed.
Yesvarchar (255)VARCHAR2(255)
VARCHAR(255)
REASON
The ID of the room in which the configurationchange occurred.
Yesvarchar(3071)
VARCHAR2(3071)
VARCHAR(3071)
INITIATOR_JID
TC_MESSAGES TableThe TC_MESSAGES table contains messages that are sent in group chat rooms.
DescriptionNot NullMicrosoftSQLDatatype
OracleDatatype
PostgresDatatype
Column Name
The ID of the message. The MSG_ID is a uniqueidentifier for each message per chat room; it is notglobally unique.
YesbigintNUMBER(19)
BIGINTMSG_ID
The ID of the room to which the message was sent.Yesvarchar(3071)
VARCHAR(3071)
VARCHAR(3071)
ROOM_JID
The date and time the message was sent.YesdatetimeTIMESTAMPTIMESTAMPSTAMP
The entire message.YestextCLOBTEXTMSG
Database Setup for IM and Presence Service on Cisco Unified Communications Manager, Release 11.5(1)32
External Database TablesTC_MESSAGES Table

TC_TIMELOG TableThe TC_TIMELOG table contains the time that users enter and exit specific group chat rooms. This tablemay be used in conjunction with the other TC tables to recreate group chat conversations and to determinewhich users viewed the conversations.
DescriptionNot NullMicrosoftSQLDatatype
OracleDatatype
PostgresDatatype
Column Name
The ID of the user who is entering or leaving theroom.
Yesvarchar(3071)
VARCHAR2(3071)
VARCHAR(3071)
REAL_JID
The ID of the room, plus the alternate name for theuser. The format is room@tc-server/nick.
Yesvarchar(3071)
VARCHAR2(3071)
VARCHAR(3071)
NICK_JID
Indicates whether the user entered (E) or left (L)the room. Constrained to the values “E” and “L”.
Yesvarchar (1)VARCHAR2(1)
VARCHAR (1)DIRECTION
The date and time at which the user entered or leftthe room. UTC format from IMP server.
YesdatetimeTIMESTAMPTIMESTAMPSTAMP
TC_MSGARCHIVE TableThe TC_MSGARCHIVE table stores messages and associated information for group chat rooms.
This table archives all messages if you turn on group chat on IM and Presence Service. Choose the optionArchive all room messages on the Cisco Unified CM IM and Presence Administration user interface.ChooseMessaging > Conferencing and Persistent Chat. See Configuration and Administration of IMand Presence Service on Cisco Unified Communications Manager for information on the group chatfeature.
Note
DescriptionNot NullMicrosoftSQL Datatype
OracleDatatype
PostgresDatatype
Column Name
A unique identifier for the message.YesbigintNUMBER(19)
BIGINTMSG_ID
The ID of the room that received themessage.Yesvarchar(3071)
VARCHAR2(3071)
VARCHAR(3071)
TO_JID
The ID of the user who sent the message.Yesvarchar(3071)
VARCHAR2(3071)
VARCHAR(3071)
FROM_JID
Database Setup for IM and Presence Service on Cisco Unified Communications Manager, Release 11.5(1) 33
External Database TablesTC_TIMELOG Table

DescriptionNot NullMicrosoftSQL Datatype
OracleDatatype
PostgresDatatype
Column Name
The ID of the room, plus the alternate nameof the sender; for example:
[email protected]/nick
Yesvarchar(3071)
VARCHAR2(3071)
VARCHAR(3071)
NICK_JID
The date the message sent. UTC format fromIMP server.
YesdatetimeTIMESTAMPTIMESTAMPSENT_DATE
The first character of the type attribute of themessage. The possible values are “c” (chat),“n” (normal), “g” (groupchat), “h” (headline),and “e” (error).
Yesvarchar (1)VARCHAR2(1)
VARCHAR(1)
MSG_TYPE
The length in characters of the message body.YesintNUMBER(9)INTBODY_LEN
The length in characters of the message,including the subject and body.
YesintNUMBER(9)INTMESSAGE_LEN
The message body.Yesvarchar(4000)
VARCHAR2(4000)
VARCHAR(4000)
BODY_STRING
The entire raw packet.Yesvarchar(4000)
VARCHAR2(4000)
VARCHAR(4000)
MESSAGE_STRING
If the message body exceeds 4000 characters,it is stored in this field rather than theBODY_STRING field.
YestextCLOBTEXTBODY_TEXT
If the entire raw packet exceeds 4000characters, it is stored in this column ratherthan in the MESSAGE_STRING column.
YestextCLOBTEXTMESSAGE_TEXT
The current subject of the room.Yesvarchar (255)VARCHAR2(255)
VARCHAR(255)
SUBJECT
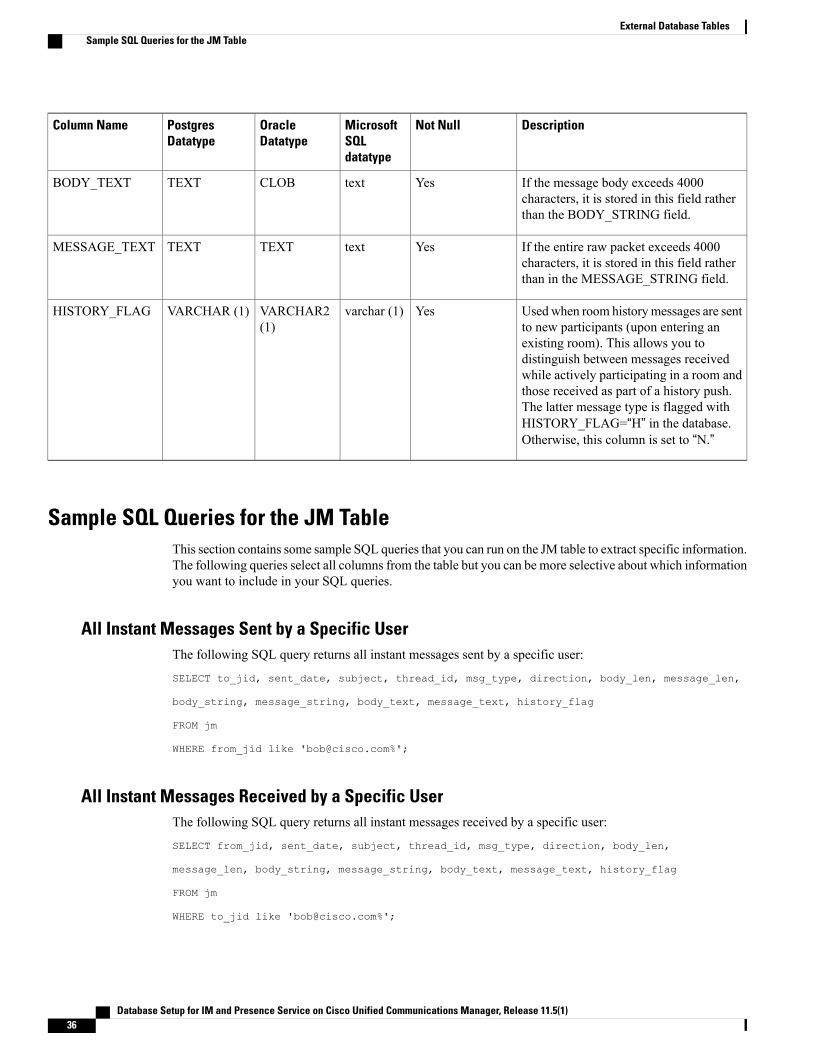
JM TableThe JM table stores conversations and associated information for the message archiver component. Themessage archiver component provides the native compliance functionality on the IM and Presence Service.
DescriptionNot NullMicrosoftSQLdatatype
OracleDatatype
PostgresDatatype
Column Name
The Jabber ID (JID) of the user who issending the message being archived.
Yesvarchar(3071)
VARCHAR2(3071)
VARCHAR(3071)
TO_JID
Database Setup for IM and Presence Service on Cisco Unified Communications Manager, Release 11.5(1)34
External Database TablesJM Table

DescriptionNot NullMicrosoftSQLdatatype
OracleDatatype
PostgresDatatype
Column Name
The JID of the user who is receiving themessage being archived.
Yesvarchar(3071)
VARCHAR2(3071)
VARCHAR(3071)
FROM_JID
The date the message sent. UTC formatfrom IMP server.
YesdatetimeTIMESTAMPTIMESTAMPSENT_DATE
The subject line of the message that isbeing archived.
Yesvarchar(128)
VARCHAR2(128)
VARCHAR(128)
SUBJECT
The thread ID of the message that is beingarchived. When a message thread isinitiated, IM client provides the value andall related messages of the thread will usethis value. These values should be uniqueand identify the group of associatedarchived messages.
Yesvarchar(128)
VARCHAR2(128)
VARCHAR(128)
THREAD_ID
The first character of the message's typeattribute. The possible values are:
• “c” — chat
• “n” — normal
• “g” — groupchat
• “h” — headline
• “e” — error
Yesvarchar (1)VARCHAR2(1)
VARCHAR (1)MSG_TYPE
Indicates whether the message is “O” —outgoing or “I” — incoming. If themessage is sent between users on the sameserver, it is logged twice: once as outgoingand once as incoming.
Yesvarchar (1)VARCHAR2(1)
VARCHAR (1)DIRECTION
The number of characters in the messagebody.
YesintNUMBER (9)INTBODY_LEN
The number of characters in the message,including the subject and the body.
YesintNUMBER (9)INTMESSAGE_LEN
The message body.Yesvarchar(4000)
VARCHAR2(4000)
VARCHAR(4000)
BODY_STRING
The entire raw packet.Yesvarchar(4000)
VARCHAR2(4000)
VARCHAR(4000)
MESSAGE_STRING
Database Setup for IM and Presence Service on Cisco Unified Communications Manager, Release 11.5(1) 35
External Database TablesJM Table
DescriptionNot NullMicrosoftSQLdatatype
OracleDatatype
PostgresDatatype
Column Name
If the message body exceeds 4000characters, it is stored in this field ratherthan the BODY_STRING field.
YestextCLOBTEXTBODY_TEXT
If the entire raw packet exceeds 4000characters, it is stored in this field ratherthan in the MESSAGE_STRING field.
YestextTEXTTEXTMESSAGE_TEXT
Usedwhen room historymessages are sentto new participants (upon entering anexisting room). This allows you todistinguish between messages receivedwhile actively participating in a room andthose received as part of a history push.The latter message type is flagged withHISTORY_FLAG=“H” in the database.Otherwise, this column is set to “N.”
Yesvarchar (1)VARCHAR2(1)
VARCHAR (1)HISTORY_FLAG
Sample SQL Queries for the JM TableThis section contains some sample SQL queries that you can run on the JM table to extract specific information.The following queries select all columns from the table but you can be more selective about which informationyou want to include in your SQL queries.
All Instant Messages Sent by a Specific UserThe following SQL query returns all instant messages sent by a specific user:
SELECT to_jid, sent_date, subject, thread_id, msg_type, direction, body_len, message_len,
body_string, message_string, body_text, message_text, history_flag
FROM jm
WHERE from_jid like '[email protected]%';
All Instant Messages Received by a Specific UserThe following SQL query returns all instant messages received by a specific user:
SELECT from_jid, sent_date, subject, thread_id, msg_type, direction, body_len,
message_len, body_string, message_string, body_text, message_text, history_flag
FROM jm
WHERE to_jid like '[email protected]%';
Database Setup for IM and Presence Service on Cisco Unified Communications Manager, Release 11.5(1)36
External Database TablesSample SQL Queries for the JM Table
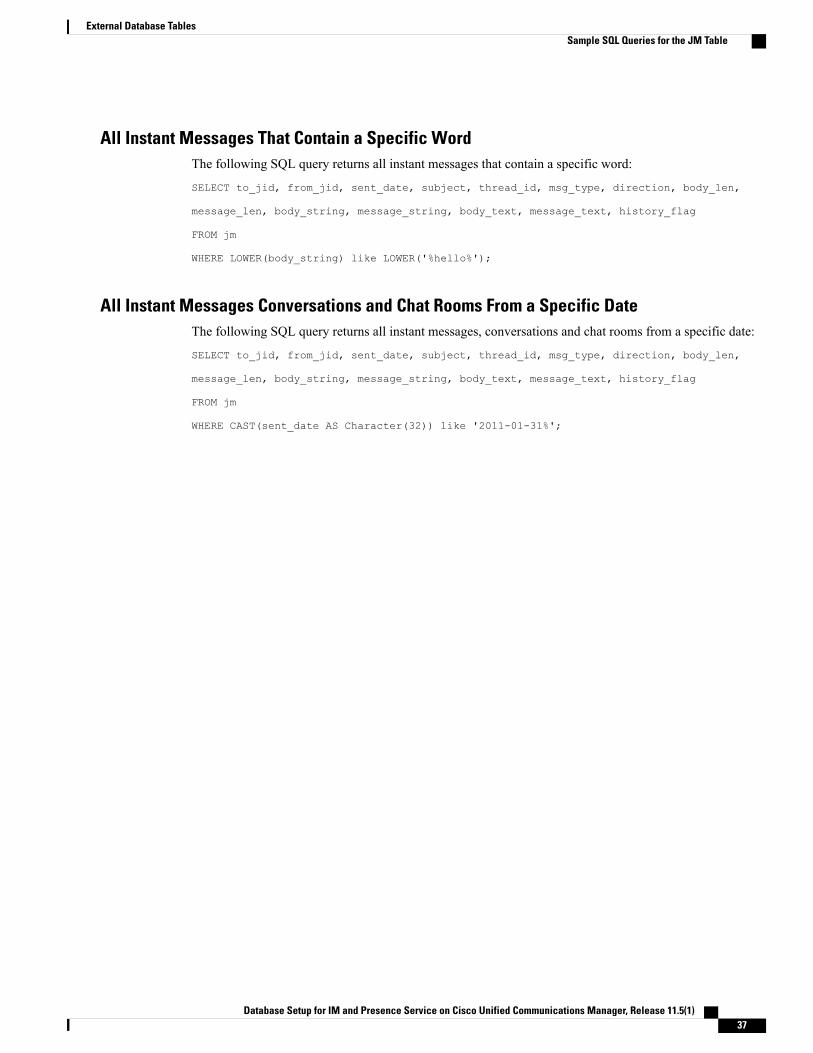
All Instant Messages That Contain a Specific WordThe following SQL query returns all instant messages that contain a specific word:
SELECT to_jid, from_jid, sent_date, subject, thread_id, msg_type, direction, body_len,
message_len, body_string, message_string, body_text, message_text, history_flag
FROM jm
WHERE LOWER(body_string) like LOWER('%hello%');
All Instant Messages Conversations and Chat Rooms From a Specific DateThe following SQL query returns all instant messages, conversations and chat rooms from a specific date:
SELECT to_jid, from_jid, sent_date, subject, thread_id, msg_type, direction, body_len,
message_len, body_string, message_string, body_text, message_text, history_flag
FROM jm
WHERE CAST(sent_date AS Character(32)) like '2011-01-31%';
Database Setup for IM and Presence Service on Cisco Unified Communications Manager, Release 11.5(1) 37
External Database TablesSample SQL Queries for the JM Table

Database Setup for IM and Presence Service on Cisco Unified Communications Manager, Release 11.5(1)38
External Database TablesSample SQL Queries for the JM Table