data tool platform sql development tools - eclipse · data tool platform sql development tools iii....
TRANSCRIPT

Data Tool Platform SQL Development Tools
ekapner


Contents
Setting SQL Development Preferences................................................................5Execution Plan View Options Preferences...............................................................................5
General Preferences................................................................................................................5
Label Decorations Preferences................................................................................................6
SQL Editor Preferences...........................................................................................................6
Code Assist Preferences...............................................................................................7
SQL Files/Scrapbooks Preferences...............................................................................7
Syntax Coloring Preferences.........................................................................................7
Templates Preferences..................................................................................................8
SQL Query Builder Preferences...............................................................................................8
SQL Results View Options Preferences...................................................................................9
Export Format Options Preferences..............................................................................9
History Options Preferences........................................................................................10
Result Set Viewer Preferences....................................................................................10
SQL Query Builder...............................................................................................12Creating a SELECT Statement..............................................................................................12
Creating a FULLSELECT (UNION) Statement............................................................13
Creating a WITH Statement.........................................................................................14
Creating Joins..............................................................................................................15
Creating an INSERT Statement From a Values Set...............................................................16
Creating an INSERT Statement From a Subquery.................................................................16
Creating an UPDATE Statement............................................................................................17
Creating a DELETE Statement..............................................................................................18
Building Expressions..............................................................................................................19
Expression Types.........................................................................................................19
Editing a SQL Statement........................................................................................................20
Running the SQL Statement Code.........................................................................................21
Creating a SQL File...............................................................................................22SQL File Editor.......................................................................................................................22
SQL Scrapbook......................................................................................................................22
Editing a SQL File..................................................................................................................23
Opening a SQL File................................................................................................................23
Saving a SQL File..................................................................................................................23
Executing a SQL Statement.................................................................................24Running an Ad Hoc SQL Statement....................................................................25Executing a SQL File............................................................................................26Running a Routine Object....................................................................................27
Creating a Launch Configuration for Routine Objects............................................................27
Routine Objects......................................................................................................................28
Viewing SQL Results............................................................................................30
iiiData Tool Platform SQL Development Tools

SQL Results View...................................................................................................................30
Terminating Execution in SQL Results View .........................................................................31
Exporting SQL Execution Results..........................................................................................32
Saving Execution Results to a Project....................................................................................32
Removing Results from SQL Results View............................................................................33
Saving SQL Results History...................................................................................................33
Filtering SQL Results History.................................................................................................33
iv
Contents

Setting SQL Development Preferences
Set SQL Development preferences for label decorations, execution plans, SQL Editor, SQL Query Builder,and SQL Results view.
1. Select Window > Preferences from the main menu bar.
2. In the left pane, under Data Management, expand SQL Development.
Execution Plan View Options PreferencesSet execution plan view options to specify defaults for viewing query plans.
Table 1. Execution plan view options
DescriptionProperty
Select Vertical Orientation to display the plan from top to bottom.
Select Horizontal Orientation (default) to display the plan from left to right.
SQL Execution Plan View Orientation
Specify the output encoding. The default is Cp1252.
• Cp1252• ISO-8859-1• US-ASCII• UTF-16• UTF-16BE• UTF-16LE• UTF-8
Export Encoding
General PreferencesThe general user preferences concern executing and debugging procedural objects.
Table 2. General preferences
DescriptionProperty
Displays the Press F2 for focus message in hover help (ToolTips). If youmake a hover message sticky, the message text opens in a scrollable windowfrom which you can select and copy content.
Show Affordance in Hover on How toMake it Sticky
Select the action to be taken on an error during SQL execution.
• Always — always continues execution when an error occurs.• Never — always stops execution when an error occurs.• Prompt — interrupts execution on each error, displaying a dialog to resume
execution (default).
SQL Error Execution Action
5Data Tool Platform SQL Development Tools
Setting SQL Development Preferences

Label Decorations PreferencesSet label decorations preferences to set the display format of objects appearing in the Database Developmentperspective.
Table 3. Label decorations:Text tab
DescriptionProperty
Specify the display format for table columns. Select Add Variables to add avariable to the format.
Column format
Displays an example of the selected format.Example
SQL Editor PreferencesSQL Editor preferences define the behavior of the SQL File Editor.
Table 4. SQL Editor preferences: General
DescriptionField
Automatically update SQL statement structure in outline view and performsyntax validation while editing (default).
Disabling validation also disables portability checking and the Outline view.
Enable Syntax Validation
Database type used as the standard target for portability checks.You mustenable syntax validation to select a portability target.
Each line that is not portable to the target is annotated with a check .
You can display additional information for the target (including error messages)by moving your cursor over the marker, if you enable show detailed annotationinformation.
Portability Check Target
Disable syntax validation when content exceeds this number of lines. Usethis option to adjust editor performance. The default is 1000.
Maximum Number of Lines
Select to prompt before disabling validation (default).Prompt to Disable Syntax ValidationWhen Content Exceeds MaximumNumber of Lines
Display additional annotation information, including lists of expected commandsfor the encountered syntax, if you enabled syntax validation.
Show Detailed Annotation Information
Table 5. SQL Editor preferences:Typing
Description and default valuesField
Automatically close single quotes ( ').Close Single Quotes
Automatically close double quotes ( ").Close Double Quotes
Automatically close curly braces { }.Close Parentheses
Automatically close comments ( /* */).Close Comments
6
Setting SQL Development Preferences

Description and default valuesField
Automatically add the END statement (for Transact-SQL).Begin-End
Code Assist PreferencesSQL Editor Code Assist preferences define the behavior of the Code Assist feature in SQL File Editor.
Table 6. Code Assist preferences
ExplanationField
Insert single proposals (default).Insert Single Proposals Automatically
Display system tables when applicable.Show System Tables
Display system views when applicable.Show System Views
Display system procedures and functions when applicable.Show System Procedures and Functions
Display the owner.Show Owner of Table or View
Invoke Code Assist automatically (default).Enable Auto Activation
Specify the time in milliseconds that must elapse after youtype a character before Code Assist is automaticallyinvoked. Default is 500.
When you enter a character and pause before enteringanother character, Code Assist automatically displays amenu of keywords you can select to complete the SQLstatement.
Auto Activation Delay
Enter characters that automatically activate Code Assist.Enter characters in any order with no separator character.
When you type these characters, the Code Assist menudisplays after the auto activation delay unless you enteranother character.
Auto Activation Triggers for SQL
SQL Files/Scrapbooks PreferencesSQL files and scrapbooks preferences define the behavior of SQL files in SQL File Editor and SQL Scrapbook.
Table 7. SQL Files/Scrapbooks preferences
DescriptionField
Select a connection type, connection profile name, anddatabase to use by default in new SQL File Editor or SQLScrapbook sessions.
Default Connection Information for New SQLFiles/Scrapbooks
Use the same target connection information for multiplefiles.
Persist the Target Connection Information When ExecutingMultiple SQL Files
Syntax Coloring PreferencesIndicate your preferences for syntax coloring for SQL source code in SQL File Editor or SQL Scrapbook.
7Data Tool Platform SQL Development Tools
Setting SQL Development Preferences

Table 8. Syntax Coloring preferences
DescriptionField
Select a syntax item and then click the color box and/orselect a style check box to determine how that item typeis rendered in the editor.
Syntax Items
Displays an example of the syntax coloring choices.Preview
Templates PreferencesYou can create new SQL templates and edit existing ones.
Templates make code generation more convenient by allowing you to insert frequently recurring source codepatterns into your projects in SQL Editor.
Table 9. SQL Editor template preferences
DescriptionField
Displays the existing templates in your workspace. Displayed informationincludes the name, context, description, and status of the auto-insert attribute.
Create, Edit, or Remove Templates
Displays the first few lines of the SQL template.Preview
Create a new template. New templates are added to the list.New
Edit the selected template.Edit
Deletes all selected templates.Remove
Restores removed default templates.Restore Removed
Reverts the selected template to its default state.Revert to Default
Imports templates into your workspace from the file system.Import
Exports all selected templates to a specified location in the file system.Export
SQL Query Builder PreferencesIndicate the SQL Query Builder preferences.
Table 10. SQL Query Builder preferences
DescriptionField
Select to indicate that the table references qualified by thecurrent schema become unqualified in the SQL code.
Omit Current Schema in Generated SQL Statement
If you omit the current schema, select its replacement:
• Authorization ID — uses the user name from theconnection profile. The table references are qualifiedusing the current schema name.
• Schema Name — enter the schema to use as thecurrent schema.
Current Schema
8
Setting SQL Development Preferences
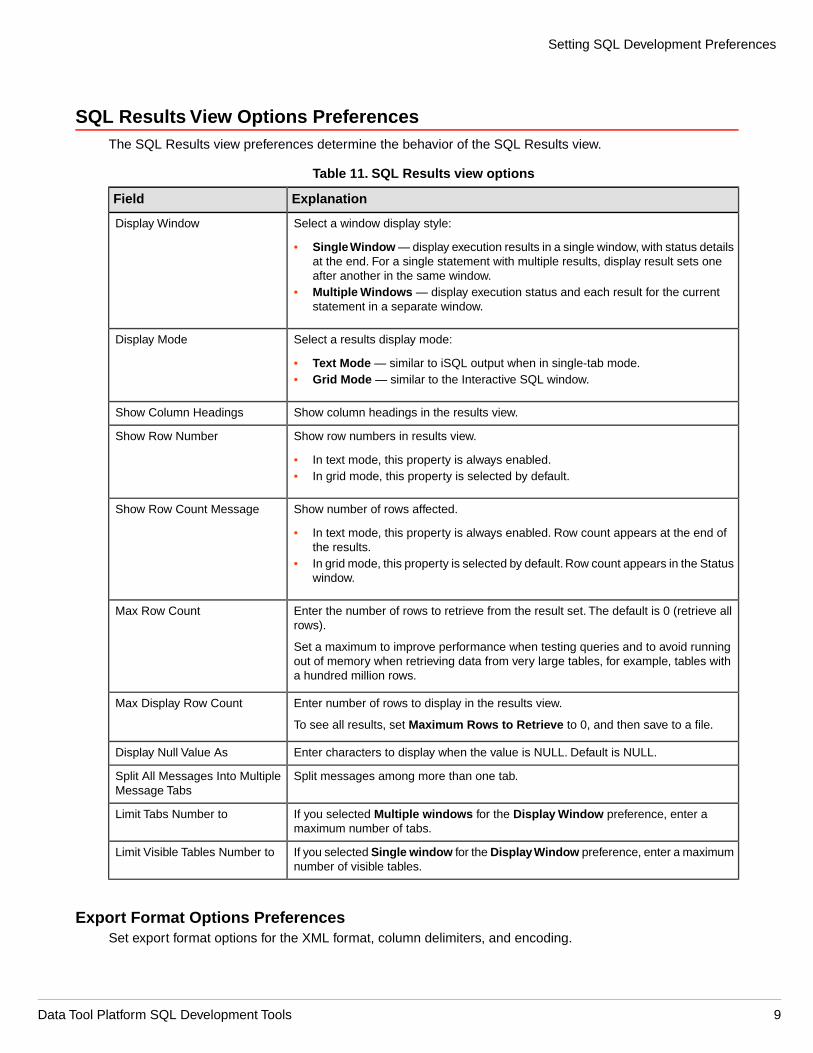
SQL Results View Options PreferencesThe SQL Results view preferences determine the behavior of the SQL Results view.
Table 11. SQL Results view options
ExplanationField
Select a window display style:
• Single Window — display execution results in a single window, with status detailsat the end. For a single statement with multiple results, display result sets oneafter another in the same window.
• Multiple Windows — display execution status and each result for the currentstatement in a separate window.
Display Window
Select a results display mode:
• Text Mode — similar to iSQL output when in single-tab mode.• Grid Mode — similar to the Interactive SQL window.
Display Mode
Show column headings in the results view.Show Column Headings
Show row numbers in results view.
• In text mode, this property is always enabled.• In grid mode, this property is selected by default.
Show Row Number
Show number of rows affected.
• In text mode, this property is always enabled. Row count appears at the end ofthe results.
• In grid mode, this property is selected by default. Row count appears in the Statuswindow.
Show Row Count Message
Enter the number of rows to retrieve from the result set. The default is 0 (retrieve allrows).
Set a maximum to improve performance when testing queries and to avoid runningout of memory when retrieving data from very large tables, for example, tables witha hundred million rows.
Max Row Count
Enter number of rows to display in the results view.
To see all results, set Maximum Rows to Retrieve to 0, and then save to a file.
Max Display Row Count
Enter characters to display when the value is NULL. Default is NULL.Display Null Value As
Split messages among more than one tab.Split All Messages Into MultipleMessage Tabs
If you selected Multiple windows for the Display Window preference, enter amaximum number of tabs.
Limit Tabs Number to
If you selected Single window for the Display Window preference, enter a maximumnumber of visible tables.
Limit Visible Tables Number to
Export Format Options PreferencesSet export format options for the XML format, column delimiters, and encoding.
9Data Tool Platform SQL Development Tools
Setting SQL Development Preferences
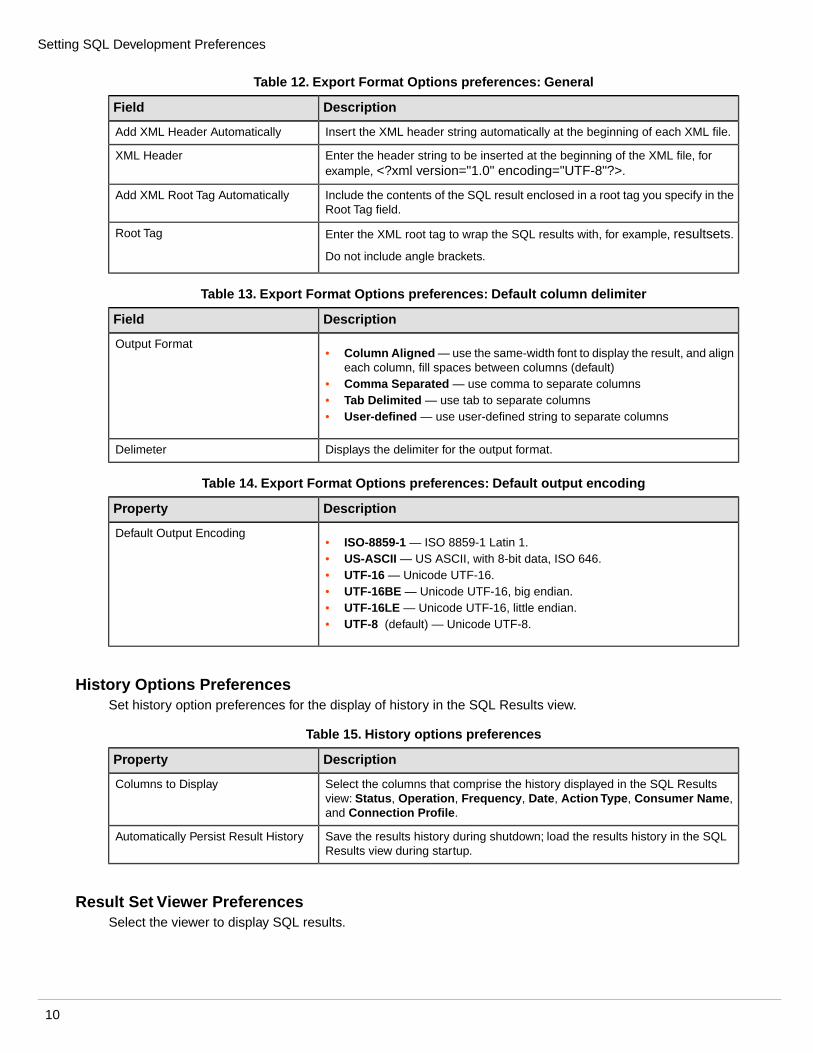
Table 12. Export Format Options preferences: General
DescriptionField
Insert the XML header string automatically at the beginning of each XML file.Add XML Header Automatically
Enter the header string to be inserted at the beginning of the XML file, forexample, <?xml version="1.0" encoding="UTF-8"?>.
XML Header
Include the contents of the SQL result enclosed in a root tag you specify in theRoot Tag field.
Add XML Root Tag Automatically
Enter the XML root tag to wrap the SQL results with, for example, resultsets.
Do not include angle brackets.
Root Tag
Table 13. Export Format Options preferences: Default column delimiter
DescriptionField
• Column Aligned — use the same-width font to display the result, and aligneach column, fill spaces between columns (default)
• Comma Separated — use comma to separate columns• Tab Delimited — use tab to separate columns• User-defined — use user-defined string to separate columns
Output Format
Displays the delimiter for the output format.Delimeter
Table 14. Export Format Options preferences: Default output encoding
DescriptionProperty
• ISO-8859-1 — ISO 8859-1 Latin 1.• US-ASCII — US ASCII, with 8-bit data, ISO 646.• UTF-16 — Unicode UTF-16.• UTF-16BE — Unicode UTF-16, big endian.• UTF-16LE — Unicode UTF-16, little endian.• UTF-8 (default) — Unicode UTF-8.
Default Output Encoding
History Options PreferencesSet history option preferences for the display of history in the SQL Results view.
Table 15. History options preferences
DescriptionProperty
Select the columns that comprise the history displayed in the SQL Resultsview: Status, Operation, Frequency, Date, Action Type, Consumer Name,and Connection Profile.
Columns to Display
Save the results history during shutdown; load the results history in the SQLResults view during startup.
Automatically Persist Result History
Result Set Viewer PreferencesSelect the viewer to display SQL results.
10
Setting SQL Development Preferences

Table 16. Result Set Viewer preferences
DescriptionField
Select viewer from dropdown list.Select Viewer
11Data Tool Platform SQL Development Tools
Setting SQL Development Preferences

SQL Query Builder
Create, edit, or run SQL statements using the SQL Query Builder graphical interface, which provides accessto your database schema and objects so that you can quickly create or edit SQL statements without actuallytyping any SQL code. However, you also have the flexibility to add or modify the SQL code in the editorwindow.
The options in the SQL Query Builder change depending on the statement type you are building. By default,the statement type is SELECT.
Note: Some syntactic variations might exist between your database and the SQL syntax that SQL QueryBuilder supports; consequently, some SQL Query Builder features might not work with your database.
Creating a SELECT StatementUse SQL Query Builder to create a SELECT statement to retrieve data from a database and display theresults set in table format.
Prerequisites
Connect to the data source through a connection profile.
Note: Some syntactic variations might exist between your database and the SQL syntax that SQL QueryBuilder supports; consequently, some SQL Query Builder features might not work with your database.
1. Open a new or an existing SQL file, and be sure to select the connection profile Type, Name, and Database.
2. In an appropriate place in the editor window, right-click and select Edit in SQL Query Builder.
3. Add one or more tables to the statement.
a) Right-click in the Tables pane and select Add Table.b) (Optional) Indicate a Table alias.
You might want to use a table alias to make the table name more readable or shorten it for display/output.
4. (Optional) If you added two or more tables, you can create a join.
5. (Optional) Select DISTINCT if you want only one instance each of duplicated rows returned in the finalresult set.
6. Specify the columns to use in the statement.
DescriptionOption
Right-click the table in the Tables pane, and select Select All Columns.Specify all columns
Use either method:Specify specific columns
• In the Tables pane, select the check box next to the column name.• In the Columns tab, select the specific column from the drop-down menu.
7. (Optional) Define other column attributes.
a) Specify a column alias.
You might want to use a column alias to make the column name more readable or shorten it fordisplay/output.
b) Deselect Output if you do not want the column values to display in the results set but want to use itfor some other purpose.
12
SQL Query Builder

For example, you might want to order the output by customer number but you do not want the customernumber to display.
c) Change the Sort Type for each column.
By default, columns are sorted in ascending order.
d) Change the Sort Order.
By default, columns are sorted in the order they appear in the Columns table.
8. (Optional) In the Conditions tab, indicate the conditions for the statement.
The conditions enable you to better define which columns appear in the results set. For example, youmight only want to list store locations with sales greater than $10,000.
a) Select a Column.
Alternately, select define a condition using the Expression Builder wizard.
b) Select an Operator.c) Enter a specific Value, select a column from the drop-down list, or build an expression.d) (Optional) Select AND or OR to specify another condition.
9. (Optional) In the Group tab, indicate on which column you want to group results.
For example, you might want to group the sum of all sales from each store.
10. (Optional) To limit the output based on the specified GROUP clause, add a Group Condition.
a) Select a Column.
Alternately, select define a condition using the Expression Builder wizard.
b) Select an Operator.c) Enter a specific Value, select a column from the drop-down list, or build an expression.d) (Optional) Select AND or OR to specify another condition.
11. (Optional) To run the SQL code, in the SQL Source pane, right-click and select Run SQL.
View the results in the SQL Results tab.
12. Click OK to exit SQL Query Builder and to return to the SQL File Editor, where the SQL code displays inthe editor window.
Clicking Cancel results in no changes to the SQL code in the SQL File Editor.You lose any changes youmade in SQL Query Builder.
Creating a FULLSELECT (UNION) StatementUse SQL Query Builder to create a FULLSELECT UNION statement, which combines the results set for twotables.
Prerequisites
Connect to the data source through a connection profile.
Note: Some syntactic variations might exist between your database and the SQL syntax that SQL QueryBuilder supports; consequently, some SQL Query Builder features might not work with your database.
1. Open a new or an existing SQL file, and be sure to select the connection profile Type, Name, and Database.
2. In an appropriate place in the editor window, right-click and select Edit in SQL Query Builder.
3. Righ-click SELECT Statement, and select Convert to FULLSELECT (UNION).
4. Add one or more tables to the statement.
a) Right-click in the Tables pane and select Add Table.
13Data Tool Platform SQL Development Tools
SQL Query Builder

b) (Optional) Indicate a Table alias.
You might want to use a table alias to make the table name more readable or shorten it for display/output.
5. Define the SELECT statements.
a) In Outline view, expand the SELECT Statement and Union trees.b) Click the first SELECT, and then create the SELECT statement.c) Click the second SELECT, and then create the SELECT statement.
All selected columns need to be of the same data type.
You can nest a FULLSELECT UNION statement under a SELECT statement.
6. (Optional) Click SELECT Statement to define any other SELECT Statement options, such as operator orsort type.
UNION only selects distinct values while UNION ALL selects all values.
a) Next to the statement type, select UNION ALL to change the Operator from the default UNION.b) Change the sort type or sort order.
7. (Optional) To run the SQL code, in the SQL Source pane, right-click and select Run SQL.
View the results in the SQL Results tab.
8. Click OK to exit SQL Query Builder and to return to the SQL File Editor, where the SQL code displays inthe editor window.
Clicking Cancel results in no changes to the SQL code in the SQL File Editor.You lose any changes youmade in SQL Query Builder.
Creating a WITH StatementUse SQL Query Builder to create a WITH statement that you can reference from a SELECT statement. AWITH statement comprises one or more common table expressions and a SELECT statement. A commontable expression defines a named result table that you can specify as a table in the FROM clause of asubsequent SELECT statement.
Prerequisites
1. Connect to the data source through a connection profile.2. Open a new or existing SQL file, and be sure to select the connection profile Type, Name, and Database.3. In SQL Query Builder, create a SELECT statement.
Note: Some syntactic variations might exist between your database and the SQL syntax that SQL QueryBuilder supports; consequently, some SQL Query Builder features might not work with your database.
1. In the Outline pane, right-click SELECT Statement and select Add Common Table Expression (WITH).
SQL Query Builder adds the WITH statement code in the SQL Source pane and to the tree in the Outlinepane.
2. In the Outline view, expand the WITH statement tree, click SELECT node contained inside the WITHnode, and define its SELECT statement.
SQL Query Builder creates a temporary table on which the main SELECT statement is based.
3. Add a table.
a) (Optional) Select the WITH node and enter a name for the temporary Table.b) Select columns from the table.c) (Optional) Select the WITH node and enter names for each Column in the temporary table.
4. In the Outline view, click the SELECT statement at the bottom of the outline tree.
14
SQL Query Builder

The SELECT statement is based on the temporary table just defined.
5. Add the temporary WITH table and/or any other tables and select columns from the tables.
The WITH table is now listed as a choice in the Add Table dialog.
6. (Optional) To run the SQL code, in the SQL Source pane, right-click and select Run SQL.
View the results in the SQL Results tab.
7. Click OK to exit SQL Query Builder and to return to the SQL File Editor, where the SQL code displays inthe editor window.
Clicking Cancel results in no changes to the SQL code in the SQL File Editor.You lose any changes youmade in SQL Query Builder.
Creating JoinsCreate a join in a SELECT statement to retrieve data from two or more tables based on matching columnvalues.
Prerequisites
1. Connect to the data source through a connection profile.2. Open a new or existing SQL file, and be sure to select the connection profile Type, Name, and Database.3. In SQL Query Builder, create a SELECT statement.
A join enables you to select data from two or more tables into a single results set without repeating unnecessarydata.You can create different kinds of joins depending on what data from each table you want in the resultsset.
Table 17. Join operators
DescriptionJoin operator
Returns data from all tables based on a common condition.Inner join
Returns all the values from the left table plus matchedvalues from the right table, and fills in NULLs for anymissing values from the right table.
Left outer join
Returns all the values from the right table and matchedvalues from the left table, and fills in NULLs for any missingvalues from the left table.
Right outer join
Combines the results of both left and right outer joins. Thejoined table contains all records from both tables, and fillsin NULLs for missing matches on either side.
Full outer join
Note: Some syntactic variations might exist between your database and the SQL syntax that SQL QueryBuilder supports; consequently, some SQL Query Builder features might not work with your database.
1. In the Tables pane, add two or more tables
2. Drag the pointer from a column in one table to a column in another table.
By default, SQL Query Builder creates an inner join.You can also create a join by right-clicking anywherein the Tables pane and selecting Create Join.
3. (Optional) To change the join type from the default inner join, right-click on the connector line and selectSpecify Join Type.
All joins defined between the two tables change to the selected join type.
15Data Tool Platform SQL Development Tools
SQL Query Builder

4. (Optional) To run the SQL code, in the SQL Source pane, right-click and select Run SQL.
View the results in the SQL Results tab.
5. Click OK to exit SQL Query Builder and to return to the SQL File Editor, where the SQL code displays inthe editor window.
Clicking Cancel results in no changes to the SQL code in the SQL File Editor.You lose any changes youmade in SQL Query Builder.
Creating an INSERT Statement From a Values SetUse SQL Query Builder to create an INSERT statement to insert new rows at the end of a table with thevalues you indicate for the specified columns.
Prerequisites
Connect to the data source through a connection profile.
Note: Some syntactic variations might exist between your database and the SQL syntax that SQL QueryBuilder supports; consequently, some SQL Query Builder features might not work with your database.
1. Open a new or an existing SQL file, and be sure to select the connection profile Type, Name, and Database.
2. In an appropriate place in the editor window, right-click and select Edit in SQL Query Builder.
3. In the Outline pane, right-click SELECT Statement and select Change Statement Type.
4. Select INSERT and click OK.
5. Select the table by right-clicking in the Tables pane and selecting Add Table.
6. Specify the columns to use in the statement.
DescriptionOption
Right-click the table in the Tables pane, and select Select All Columns.Specify all columns
Use either method:Specify specific columns
• In the Tables pane, select the check box next to the column name.• In the Columns tab, select the specific column from the drop-down menu.
7. Enter the values for the selected columns.
a) In the Values pane, click the Values box next to the column name.b) Enter a value, select NULL, or build an expression.
8. (Optional) To run the SQL code, in the SQL Source pane, right-click and select Run SQL.
View the results in the SQL Results tab.
9. Click OK to exit SQL Query Builder and to return to the SQL File Editor, where the SQL code displays inthe editor window.
Clicking Cancel results in no changes to the SQL code in the SQL File Editor.You lose any changes youmade in SQL Query Builder.
Creating an INSERT Statement From a SubqueryUse SQL Query Builder to create an INSERT statement from a subquery.
16
SQL Query Builder

Prerequisites
Connect to the data source through a connection profile.
Note: Some syntactic variations might exist between your database and the SQL syntax that SQL QueryBuilder supports; consequently, some SQL Query Builder features might not work with your database.
1. Open a new or an existing SQL file, and be sure to select the connection profile Type, Name, and Database.
2. In an appropriate place in the editor window, right-click and select Edit in SQL Query Builder.
3. In the Outline pane, right-click SELECT Statement and select Change Statement Type.
4. Select INSERT and click OK.
5. Select the table by right-clicking in the Tables pane and selecting Add Table.
6. Specify the columns to use in the statement.
DescriptionOption
Right-click the table in the Tables pane, and select Select All Columns.Specify all columns
Use either method:Specify specific columns
• In the Tables pane, select the check box next to the column name.• In the Columns tab, select the specific column from the drop-down menu.
7. Select Subquery.
8. From the Query name list, select Add SELECT Statement or Add FULLSELECT Statement.
9. Complete the SELECT or FULLSELECT statement.
You can nest a FULLSELECT statement under a SELECT statement.
10. (Optional) To run the SQL code, in the SQL Source pane, right-click and select Run SQL.
View the results in the SQL Results tab.
11. Click OK to exit SQL Query Builder and to return to the SQL File Editor, where the SQL code displays inthe editor window.
Clicking Cancel results in no changes to the SQL code in the SQL File Editor.You lose any changes youmade in SQL Query Builder.
Creating an UPDATE StatementUse SQL Query Builder to create an UPDATE statement to update data in a table.You can explicitly set thevalues or derive them from the results of a build expression.
Prerequisites
Connect to the data source through a connection profile.
By specifying one or more conditions, you can indicate which rows in the database table to update. If you donot specify any conditions, all rows of the target table are updated.
1. Open a new or an existing SQL file, and be sure to select the connection profile Type, Name, and Database.
2. In an appropriate place in the editor window, right-click and select Edit in SQL Query Builder.
3. In the Outline pane, right-click SELECT Statement and select Change Statement Type.
4. Select UPDATE and click OK.
5. Select the table by right-clicking in the Tables pane and selecting Add Table.
17Data Tool Platform SQL Development Tools
SQL Query Builder
6. Specify the columns to use in the statement.
DescriptionOption
Right-click the table in the Tables pane, and select Select All Columns.Specify all columns
Use either method:Specify specific columns
• In the Tables pane, select the check box next to the column name.• In the Columns tab, select the specific column from the drop-down menu.
7. In the Set tab, indicate the columns to update and the update value.
a)Select an individual column by clicking a column and then Add individual column to statementto select it for update, or select multiple columns by highlighting two or more columns and clicking
Add columns to statement as a group.b) In the Expression box, enter an expression or value.
Enter a value directly in the box or select Specify Value to enter one. Select Edit Expression orReplace Expression to build an expression using Expression Builder. Leave as DEFAULT if you donot wish to change the value during update.
8. (Optional) In the Where tab, indicate a condition that targets specific rows for update.
a) Select a Column.
Alternately, select define a condition using the Expression Builder wizard.
b) Select an Operator.c) Enter a specific Value, select a column from the drop-down list, or build an expression.d) (Optional) Select AND or OR to specify another condition.
9. (Optional) To run the SQL code, in the SQL Source pane, right-click and select Run SQL.
View the results in the SQL Results tab.
10. Click OK to exit SQL Query Builder and to return to the SQL File Editor, where the SQL code displays inthe editor window.
Clicking Cancel results in no changes to the SQL code in the SQL File Editor.You lose any changes youmade in SQL Query Builder.
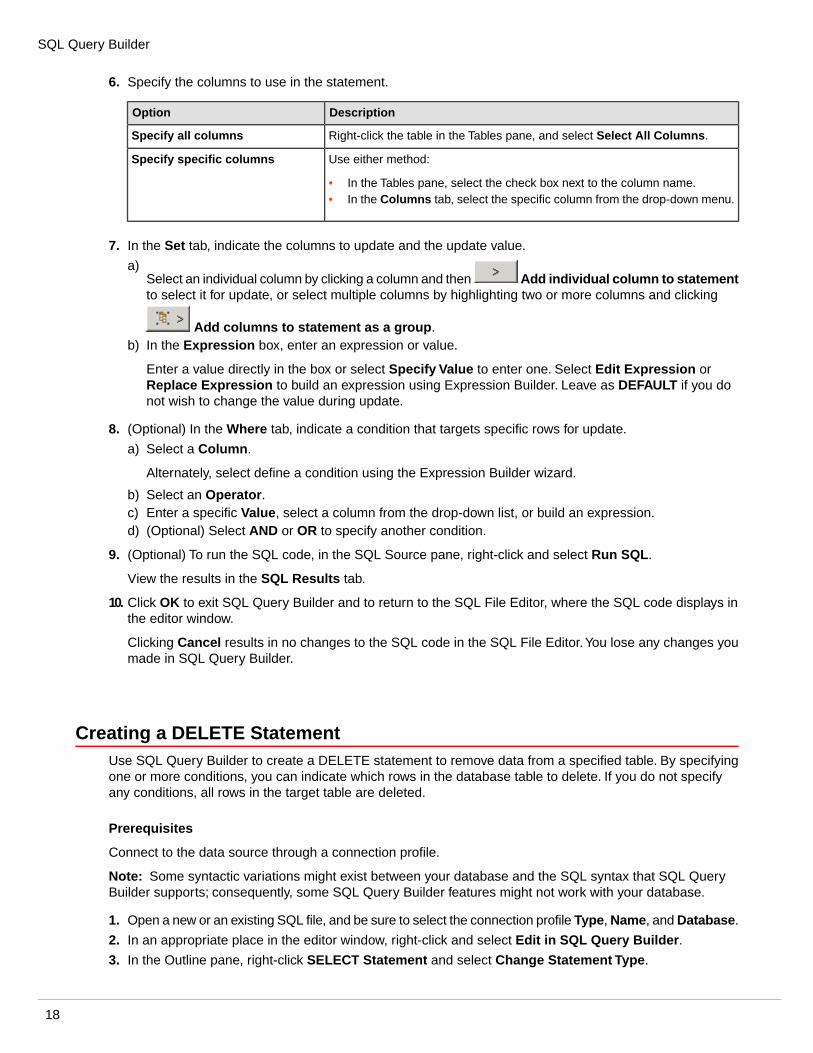
Creating a DELETE StatementUse SQL Query Builder to create a DELETE statement to remove data from a specified table. By specifyingone or more conditions, you can indicate which rows in the database table to delete. If you do not specifyany conditions, all rows in the target table are deleted.
Prerequisites
Connect to the data source through a connection profile.
Note: Some syntactic variations might exist between your database and the SQL syntax that SQL QueryBuilder supports; consequently, some SQL Query Builder features might not work with your database.
1. Open a new or an existing SQL file, and be sure to select the connection profile Type, Name, and Database.
2. In an appropriate place in the editor window, right-click and select Edit in SQL Query Builder.
3. In the Outline pane, right-click SELECT Statement and select Change Statement Type.
18
SQL Query Builder

4. Select DELETE and click OK.
5. Select the table by right-clicking in the Tables pane and selecting Add Table.
6. (Optional) Indicate one or more conditions that target specific rows for deletion.
a) Select a Column.
Alternately, select define a condition using the Expression Builder wizard.
b) Select an Operator.c) Enter a specific Value, select a column from the drop-down list, or build an expression.d) (Optional) Select AND or OR to specify another condition.
7. (Optional) To run the SQL code, in the SQL Source pane, right-click and select Run SQL.
View the results in the SQL Results tab.
8. Click OK to exit SQL Query Builder and to return to the SQL File Editor, where the SQL code displays inthe editor window.
Clicking Cancel results in no changes to the SQL code in the SQL File Editor.You lose any changes youmade in SQL Query Builder.
Building ExpressionsUse the Expression Builder in SQL Query Builder to build simple or complex expressions, or subqueries whencreating SELECT, UPDATE, INSERT, and DELETE statements.
Prerequisites
1. Connect to the data source through a connection profile.2. Open a new or existing SQL file, and be sure to select the connection profile Type, Name, and Database.3. Edit an existing SQL statement or create a new one in SQL Query Builder.
Note: Some syntactic variations might exist between your database and the SQL syntax that SQL QueryBuilder supports; consequently, some SQL Query Builder features might not work with your database.
1. In the Column cell in which you want to create the expression, select Build Expression, and then clickoutside the cell to launch the Expression Builder wizard.
2. Select the expression type and click Next.
3. Enter appropriate information in the wizard pages.
4. Once you enter all applicable information, click Finish.
Expression TypesIn SQL Query Builder, you can use build expressions of these types when creating SQL statements.
19Data Tool Platform SQL Development Tools
SQL Query Builder

Table 18. Expression types
DescriptionType
A function returns a value. Functions types include columnfunctions, scalar functions, row functions, or table functions.
• The argument of a column function is a collection oflike values (a column).This function can return a NULLvalue.
• The argument(s) of a scalar function are individualscalar values, which can be of different types. Thisfunction can return a NULL value.
• The argument of a row function is a structured type.The function returns a row of built-in data types andcan only be specified as a transform function for astructured type.
• The argument(s) of a table function are individual scalarvalues, which can be of different types. The functionreturns a table, and can be specified only within theFROM clause of a SELECT statement.
Function
CASE expressions allow an expression to be selectedbased on the evaluation of one or more conditions. A CASEexpression contains one or more when clauses of eitherSearch or Simple type.
• A Search CASE expression contains a condition thatis evaluated, such as i<8.
• A Simple CASE expression determines if the whenclause evaluates to true; otherwise, the else clausedetermines the value of the case-expression.
CASE
A CAST function converts instances of a datatype toinstances of a different datatype.
CAST
A constant specifies a value: a string or a number.
• Numeric constants can be an integer, floating-point, ordecimal.
• A string constant can be a character string,hexadecimal, or a host variable name. A colon precedesthe host variable name, for example, :var. The hostvariable becomes a value when the statement isexecuted.
Constant
A subquery is a SELECT, WITH, or FULLSELECTstatement nested within another SQL statement. Theexpression value is the result of the subquery.
Subquery
You can build an expression by applying operators tocolumns or expressions such as x+y where x is a columnand y is an expression.
Build up expressions by operators
Editing a SQL StatementUse SQL Query Builder to edit an individual SQL statement.You can only edit one SQL statement at a time.
20
SQL Query Builder

Prerequisites
Connect to the data source through a connection profile.
1. Open an existing SQL file, and be sure to select the connection profile Type, Name, and Database.
2. Highlight the entire single SQL statement, right-click and select Edit in SQL Query Builder.
3. Edit the SQL statement as required.
4. (Optional) To run the SQL code, in the SQL Source pane, right-click and select Run SQL.
View the results in the SQL Results tab.
5. Click OK to exit SQL Query Builder and to return to the SQL File Editor, where the SQL code displays inthe editor window.
Clicking Cancel results in no changes to the SQL code in the SQL File Editor.You lose any changes youmade in SQL Query Builder.
Running the SQL Statement CodeUse SQL Query Builder to run an individual SQL statement and view its execution results.
Prerequisites
Connect to the data source through a connection profile.
1. Open an existing SQL file, and be sure to select the connection profile Type, Name, and Database.
2. Highlight the entire single SQL statement, right-click and select Edit in SQL Query Builder.
3. In the SQL Source pane, right-click and select Run SQL.
4. (Optional) View the results in the SQL Results tab.
5. Click OK to exit SQL Query Builder and to return to the SQL File Editor, where the SQL code displays inthe editor window.
Clicking Cancel results in no changes to the SQL code in the SQL File Editor.You lose any changes youmade in SQL Query Builder.
21Data Tool Platform SQL Development Tools
SQL Query Builder

Creating a SQL File
Use Database Development tools to create SQL files.
You can use an existing project to store the SQL file or create a project when you create the SQL file.
1. In the Database Development perspective, select File > New > SQL File.
You can also click Open Scrapbook to Edit SQL Statements to quickly create SQL statements inSQL Scrapbook.
2. Associate the SQL file with a project.
Do thisTo
Enter or select the project in the Enter or Select the Parent Folder.Use an existing project
Click Create Project, and follow the wizard instructions.Create a new project
3. Enter the File Name.
4. (Optional) Click Advanced to link to a file in the file system and to create, edit, or remove defined pathvariables.
5. (Optional) Associate the SQL file with a connection profile.
a) Select a Connection Profile Type.b) Select a Connection Profile Name, or click Create to create one.c) Select the Database Name.
6. (Optional) Select Do Not Connect Now to remain disconnected from the server.
You cannot use the complete Content Assist feature if you select this option.
7. Click Finish.
A SQL file is created under the project in Navigator and opens in the SQL File Editor.
8. Right-click in the SQL File Editor and select Edit in SQL Query Builder to graphically build SQL statements,or type your SQL directly in the editor window.
9. (Optional) To add or remove comment delimiters for a line of code, right-click one or more lines of code,and select Toggle Comment.
10. When finished, save the SQL file.
SQL File EditorUse the SQL File Editor to create and edit SQL statements.
The SQL File Editor enables standard text-based editing of SQL statements with the added functionality ofContent Assist, syntax color, and multiple statement support.You can associate the SQL file with a specificconnection profile, and use the SQL File Editor to graphically build SQL statements using SQL Query Builder.
SQL ScrapbookSQL Scrapbook enables you to quickly create and execute SQL commands and queries without creating aSQL file.
22
Creating a SQL File

You can associate SQL Scrapbook with a specific connection profile and database, and you can execute ahighlighted SQL statement or all SQL statements directly from the editor window.You can also createprocedural objects and use SQL Query Builder to create select, insert, update, and delete statements.
You access SQL Scrapbook by clicking the Open Scrapbook to Edit SQL Statements button.
Editing a SQL FileEdit the SQL statements in a SQL file.
1. In Navigator, double-click the SQL file to open it in SQL File Editor.
2. (Optional) Change the connection profile Type, Name, and/or Database.
Associating a SQL file with the connection profile of a connected data server enables you to use the fullcapabilities of Content Assist and to execute the SQL file or selected statements.
3. (Optional) Right-click in the left margin and select Show Line Numbers.
4. Edit the SQL file by manually editing the SQL code or by launching SQL Query Builder.
5. (Optional) Remove edits since your last save by right-clicking and selecting Revert File.
6. Save the file to the project or to a new project.
Opening a SQL FileOpen a SQL file for viewing or editing in the SQL File Editor.
1. In Navigator, expand the project folder in which the SQL file resides.
2. Double-click the SQL file to open it.
Saving a SQL FileSave one or more SQL files to the current project, or save a SQL file to a different project or to a different filename.
• Save one or more SQL files simultaneously.
DescriptionOption
Select File > Save from the main menu bar.Save to current project
Select File > Save As from the main menu bar, and specify projectinformation in the Save As dialog.
Save to different project
Select File > Save As from the main menu bar, and specify a filename in the Save As dialog.
Save to different file name
Select File > Save All from the main menu bar.Save all SQL files to the current project
23Data Tool Platform SQL Development Tools
Creating a SQL File

Executing a SQL Statement
Execute a SQL statement from an editor.
Prerequisites
Be sure the data server for which you are executing a SQL statement is running, and you created andestablished a connection to the data server. Open the SQL file.
1. Highlight the SQL statements you want to execute.
2. Execute one, multiple, or all SQL statements.
Do thisTo
HIghtlight the statements and select Execute Selected Text.Execute one or more SQL statements
Select Execute All.Execute all statements
Execution status and and results appear in the SQL Results view.
24
Executing a SQL Statement

Running an Ad Hoc SQL Statement
Use the Eclipse launch configuration mechanism to run an ad hoc SQL query.
Prerequisites
Make sure that the database server is running. Establish a connection to the database through a connectionprofile.
1. Select Run > Run Configurations.
2. In the Main tab, click Adhoc SQL.
3. Select the connection Profile and Database.
4. In the Run box, enter the SQL query, or click SQL to graphically build the SQL statements in SQL QueryBuilder.
5. Click Run to execute the query.
You can view the results of the ad hoc query in the SQL Results view.
25Data Tool Platform SQL Development Tools
Running an Ad Hoc SQL Statement

Executing a SQL File
You can execute a SQL file from the SQL File Editor or from Navigator.
Prerequisites
Make sure the database server is running and you are connected to it through a connection profile.
Execute the SQL file using one of the following methods.
DescriptionOption
From SQL File Editor1. In the Navigator project folder, double-click to open the SQL file in SQL File
Editor.2. Right-click in the editor, and select Execute All.
From Navigator1. Select one or more SQL files.2. Right-click the files and choose Execute SQL File.3. If you selected multiple SQL files, click OK in the Select Profiles for the File
dialog.
The SQL file executes, and results appear in the SQL Results view. SQL Results view displays the resultsets, database server messages, execution status (success or failure) and operation details.
26
Executing a SQL File

Running a Routine Object
Run a routine object to obtain SQL results from the database.
Prerequisites
Connect to your database server through a connection profile. Save or deploy the routine object to a database.
1. In Data Source Explorer, find the routine object in the navigation tree.
2. Right-click the object and select Run.
Note: If the object includes parameters, the Configure Parameters dialog appears. Edit parameter valuesas necessary.
3. Click OK to run the object.
The SQL Results view displays the status of the run instance and execution details, and returns resultsets and server messages, if any.
Creating a Launch Configuration for Routine ObjectsUse the launch configuration feature to run stored procedures, triggers, and ad hoc queries. Creating yourown launch configurations is optional, but it can help you perform more consistent, robust, and efficientiterative testing of routine objects.
DTP creates a launch configuration automatically using the name, connection profile name and type, andobject type.You can create additional launch configurations with different launch properties. For example,you can specify different parameters or ad hoc SQL statements.
1. Select Run > Run Configurations from the main menu.
2.Click New Launch Configuration.
You can also choose an existing launch configuration by selecting it in the left pane.You can edit it, orduplicate it and use it as a basis for a new configuration.
3. Enter a unique Name for the launch configuration.
4. On the Main tab, select a connection Profile and a Database.
5. Select the object Type.
6. If basing the launch configuration on an existing object, click Browse to select the object.
7. In the Run box, complete the execution information.
DescriptionObject
Click Configure Parameter, and assign values to any parameters.Stored procedures
Enter an INSERT, UPDATE, or DELETE statement, or click SQL to visually buildthe statement using SQL Query Builder.
Triggers
Enter the SQL statement, or click SQL to visually build the statement using SQLQuery Builder.
Ad hoc SQL
8. (Optional) Click the Options tab to set additional preferences, if the database server support this feature.
9. (Optional) Click the Common tab to set other attributes for this object.
27Data Tool Platform SQL Development Tools
Running a Routine Object

Table 19. Common launch configuration attributes
ExplanationField
Specify where to save the launch configuration:
• Select Local File to make it available to this projectonly.
• Select Shared File to make it available to otherprojects.
Save As
Click Debug or Run to display the configuration in aFavorites menu.
Display in Favorites Menu
(Optional) Click Other, and select an encoding to overrideExport Format preferences.
Console Encoding
Select Allocate Console if the object requires input(default).
Standard Input and Output: Allocate Console
(Optional) Click File to choose a location for file output:
• Click Workspace to select a project resource to whichto redirect output.
• Click File System to save the output as a file.
• Click Variables to select and configure a variable foroutput.
Standard Input and Output: File
(Optional) Click Append to append output from eachlaunch to the existing file. Otherwise, each launchoverwrites previous output.
Standard Input and Output: Append
Indicates that the object runs in the background.Launch in Background
10. Click Apply to accept launch configuration changes.
11. Click Run to execute the object.
Results appear in SQL Results view.
Routine ObjectsRoutine objects are the building blocks of a database application. Database Development builds the skeletonfor routine objects and provides tools to populate the body of the object with the appropriate SQL.
Routine objects standardize actions performed by more than one application program. By coding an actiononce and storing it in the database for future use, applications need only execute the routine or fire the triggerto achieve the desired result repeatedly. Because changes occur in only one place, all applications using theaction automatically acquire the new functionality if the implementation of the action changes. When youcreate an object, it is automatically checked for correct syntax and stored in the system tables. The first timeany application calls or fires the object, it is compiled from the system tables into the server's virtual memoryand executed from there.
28
Running a Routine Object
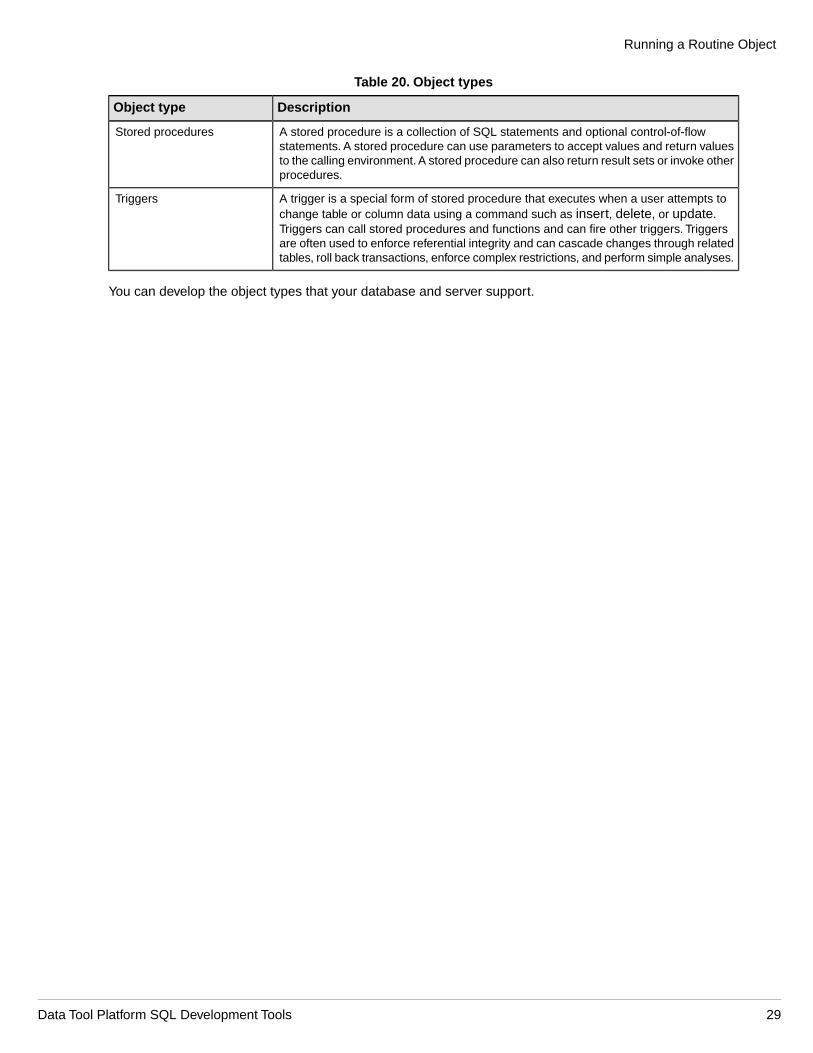
Table 20. Object types
DescriptionObject type
A stored procedure is a collection of SQL statements and optional control-of-flowstatements. A stored procedure can use parameters to accept values and return valuesto the calling environment. A stored procedure can also return result sets or invoke otherprocedures.
Stored procedures
A trigger is a special form of stored procedure that executes when a user attempts tochange table or column data using a command such as insert, delete, or update.Triggers can call stored procedures and functions and can fire other triggers. Triggersare often used to enforce referential integrity and can cascade changes through relatedtables, roll back transactions, enforce complex restrictions, and perform simple analyses.
Triggers
You can develop the object types that your database and server support.
29Data Tool Platform SQL Development Tools
Running a Routine Object

Viewing SQL Results
Use the SQL Results view to see the results of an executed SQL query or routine object.
1. Execute your SQL query, code to create a database object, or a routine object.
2. Examine the execution results in SQL Results view.
Results include the status of the query or object, the text of the query, the date and time, and error orinformational messages.
Note: The maximum number of result tabs that display is determined via the SQL Results view preferencepage. Any result sets that exceed the maximum number do not display. To view more result tabs, increasethe limit. To view all results, export all results to a file and view the results in an external editor.
SQL Results ViewSQL Results view displays the results of executing SQL statements, running routine objects, and creatingdatabase objects.
SQL Results view appears in the Database Development perspective and consists of a history frame and adetails frame. The history frame displays the execution history for past queries. The details frame displaysthe status and results of the last execution. Use the view pull-down menu to filter history results and setpreferences.
Table 21. SQL Results history
DescriptionField
Enter a query expression in the text field at the top the SQL Results historypane to filter the results that match the expression.
History Filter
Displays whether the operation failed, succeeded, terminated, or is still running.Status
Displays the SQL statement that was executed.Operation
Displays the current date and time when the operation failed, successfullyexecuted, terminated, or reached a breakpoint.
Date
Displays the connection profile on which the corresponding operation wasrun.
Connection Profile
To save SQL results, right-click in the history pane, and select Save History.
When you execute multiple queries in a SQL file containing a delimiter (such as go) using the Execute Allor Execute Selected Text options, the results are grouped in a tree structure in the SQL Results view. Theroot node is a top-level result history. Expand this node in the SQL Results view to see the results for eachindividual SQL statement.
Right-click the root node of the group SQL statement and select Save History to save all the resultsets fromone group execution of a set of SQL queries.
There are two modes for the details frame, single-tab and multitab:
• In single-tab mode, all results and messages appear in the same column, with messages and status atthe end.
• In multitab mode, each result and message is in a separate tab.
30
Viewing SQL Results

Table 22.Text View context menu options
DescriptionOption
Launches the Find/Replace dialog, which allows you tosearch for and replace specific text in the resultset. Thisreplaces the data of the displayed resultset only. It doesnot replace the data on the server.
Note: Find/Replace is enabled only when results aredisplayed in text mode.
Find/Replace
Launches the Save dialog, which allows you to save theSQL results to a project.You can choose to Save AllResults or Save Current Results.
Save Results
Launches the Export All Results dialog, which allows youto save the result set to a file outside of any project for usewith other applications.You can choose to Export AllResults or Export Current Results.
Export Results
Allows you to print the SQL results.You can choose toPrint All Results or Print Current Results.
Print Results
Table 23. SQL Results tabs for multi-tab mode
DescriptionTab
Shows the interim status of running the routine object or selected text.Status
For a routine object, displays the input and output parameter names, datatypes, values,and parameter types (IN, OUT, or IN/OUT).
Parameters
Displays results for a SQL query in the routine object, SQL file, or selected statement.Result n
Table 24. SQL Results buttons
ActionNameIcon
Terminate a long-running instance.Terminate Result
Remove the status, result sets, and messages of a selected SQLresult instance.
Remove Result
Remove all results for completed statements from the SQLResults view.
Remove All Visible Results
Toggle between text mode and grid mode.Display the Result in Text Mode
Toggle between single-tab and multitab display.Display the Result in Single Tab
Filter the SQL results.Filter Results
Terminating Execution in SQL Results ViewYou can terminate the execution of a routine object or SQL statement from the SQL Results view.Terminatingthe execution of an object or SQL statement stops further results from being displayed for the correspondingquery.
31Data Tool Platform SQL Development Tools
Viewing SQL Results

You can terminate a running result from SQL Results view. Terminating a result stops it from running andmakes it possible to remove it from the history, but does not remove it automatically.
Right-click a running result in the History frame of the SQL Results view and select Terminate.
Exporting SQL Execution ResultsIn SQL Results view, you can export a single result set or all execution results.
Prerequisites
Open SQL Results view.
Exporting saves the result set to a file outside of the workspace project for use with other applications.
1. If in Single Tab mode, switch to Text (multitab) mode.
2. Export a single result or all results.
Do thisTo export
In the Result tab, , right-click and select Export > Current Result.A single result
In the Result tab, right-click and select Export > All Results.All results
3. Enter a File Name, or click Browse to find an existing file or save the results to a specific location andfile name.
If you do not specify a file location, the file is saved to the <installation>\eclipse directory.
4. Select a file Format.
5. Select the Export Options.
6. Click Finish.
Saving Execution Results to a ProjectAfter you execute SQL queries or run objects, you can save the results to a project from SQL Results view.
Prerequisites
Open SQL Results view.
1. If in Single Tab mode, switch to Text (multitab) mode.
2. Save a single result or all results.
Do thisTo save
In the Result tab, , right-click and select Save > Current Result.A single result
In the Result tab, right-click and select Save > All Results.All results
3. Select the project folder in which to save the result set.
4. Enter the File Name.
5. Select the File Type.
6. Specify the Export Options.
32
Viewing SQL Results

7. Click OK.
The result set opens in the editor or external tool for the format you chose.
Removing Results from SQL Results ViewRemove query results from the History frame of the SQL Results view.
All execution results remain in SQL Results view.You can remove one or all finished results. Removing aresult deletes all result sets for that result instance from the display and from the history.
In the SQL Results view History pane, right-click a finished result and select one:
DescriptionOption
Remove only the selected resultRemove
Remove all resultsRemove All
Saving SQL Results HistorySave the SQL Results view history to a log file that includes the history summary and the result sets.
1. In SQL Results view, right-click any result in the History frame, and select Save History.
2. Choose a location for the history log file, and enter a File Name.
3. Click Save.
Filtering SQL Results HistorySet filtering options for the SQL Results history to limit the visible results sets.
1. In SQL Results view, select Filters from the view pull-down menu.
2. Specify which options to view in the SQL results history.
ActionFiltering option
Deselect one or more connection profiles to remove the result setsfrom view.
Connection Profiles
Indicate the maximum number of entries to display in the Historypane. The default is 50.
Limit Visible History To
View results for deleted profiles or profiles with changed names.Display Results of Unresolvable ConnectionProfiles
Select which statuses to view.Result Status
3. Click OK.
33Data Tool Platform SQL Development Tools
Viewing SQL Results