data feed manager - magento · data feed manager also allows you to import and export patterns into...
TRANSCRIPT

Data Feed Manager
End‐user instructions

Configure your data feeds with Data Feed Manager To create and configure your data feeds, go to Products > Data Feed Manager > Data Feeds. Your data feeds will be listed according to IDs. For each data feed pattern you will find the name of the file, its path as well as the link to the data feed file. The status of your data feed can be:
Pending: the data feed has never been generated or the scheduled hour is past (waiting for the execution from the cron task)
Success: successful generation of the data feed, manually or automatically (the generation corresponds with a schedule)
Hold: in the process of generation (latency, indeterminate status) Processing: generation progression percentage Error: the generation is stopped
In the grid, you should find the date and the hour of the last time the data feed has been generated as well as the store view for which it has been saved. From the Action dropdown, you'll be able to:
Edit Generate Preview (10 products) Delete
1

Data Feed Manager also allows you to import and export patterns into and from your Magento 2 admin.
Export a data feed pattern To export a data feed pattern, you can select any existing feed from Products > Data Feed Manager > Data Feeds and click on Edit from the Action dropdown. Once the data feed configuration page is loaded, you will be able to click on Export. A popup window opens and allows you to save the data feed pattern as a .dfm file (specific to Data Feed Manager). After that, you should find the data feed pattern in your Downloads folder.
Import a data feed pattern Before anything, to import a data feed template, it must be a .dfm file, which is specific to the Data Feed Manager extension. To do so, go to Products > Data Feed Manager > Data Feeds and click on Import a data feed. Browse the .dfm file and click on Import data feed. The data feed pattern should have been added to the list of feeds in Products > Data Feed Manager > Data Feeds.
2

Create a data feed pattern To create your own data feed, you can go to Products > Data Feed Manager > Data Feeds. There, click on Create New Data Feed. You can now configure your data feed as you want. The Data Feed Manager extension includes a tool to help you create your feed and see what is wrong. When creating a data feed, you should see 2 buttons on the right of your screen. The toolbox is inevitably very useful. This will help you to configure your data feed more quickly. Here are the different options of the toolbox:
Preview: When clicking on Preview, you'll see a preview of your data feed. It's very useful to see if the values of your attributes are correctly retrieved or if your filters are working as expected.
3

Library: If you click on that button, a library of your store attributes will be displayed. This makes it easier to find very quickly which attribute you need to add into your template.
Configuration In that first tab is the main configuration of the data feed. You'll find several fields to fill in that will allow you to customize your feed.
Name: enter a name for the file. File Type: choose the format of your file between xml, csv, txt and tsv.
4

File name format: you have several format possibilities for your file name. For example you could choose: GoogleShopping20150126.xml.
Encoding type: choose the encoding type of the data feed. Path: define the path where you want the data feed to be generated. For example
/feeds/. Status: enable or disable the file. Store View: define which store view is concerned.
The configuration of the data feed will vary depending on the File Type you've chosen. XML FILES
Enclose xml tag content inside CDATA (recommended): enclose xml tags inside CDATA or not.
Remove all empty xml tags (recommended): remove empty xml tags or not. Header pattern: add your header pattern in that field. Product Pattern: this is probably the most important field as this is where you will
configure your pattern. Footer pattern: Here is the footer pattern.
5

CSV, TXT, TSV FILES
Extra header: It will add whatever you write on the top of your file (fit in with Amazon requirements).
Include header: allows you to include or not columns names in the first row of your file.
Columns name: is for the attribute name (you need to look in the shopping engine specifications to know which names are required).
Pattern: works in the same way than XML files. For example, url will return the product's url. You can also add any static values.
Insert a new field: click on it to add a new column to your template. The fields order can be easily reordered by using the up and down arrows.
Extra footer: you can add an extra footer in that field. Fields delimiter: lets you choose which kind of delimiter you want to use to separate
your fields. Fields enclosure: lets you choose which kind of enclosure you want for your data. Escape character: define the escape character between \ or ''.
6

Categories In the Categories tab, you will find 2 subtabs that will allow you to manage your categories. Category filter type You can filter your categories according to two different ways:
Exclude all products from the selected categories. Include all products from the selected categories.
If you don't select any category, all products will be exported. You also have different possibilities to filter your categories. You can include or exclude your categories depending on:
Parent categories only: in the case where you have a configurable product with simple variants associated. The configurable has a category assigned but not the variants.
Product categories only: if you have categories assigned to simple variants but not to the configurable product.
Product and parent categories: In the case where you have both situations. Category selection and mapping In that subtab, you can map your categories to Google ones. This step is very important so that Google can make a link between their product categories and yours.
7

With Data Feed Manager, you have the possibility to change the file on which the category mapping is based. Taxonomy files for the main countries are directly included to allow you to map your categories more easily. You can also have a look to our faqs to know how to add a new taxonomy file and to know how to map your categories.
Filters Data Feed Manager allows you to filter your products on several levels.
Product Type First of all, you can choose to include products to your feed according to their type. For example, only include simple, virtual and downloadable products.
Attribute Set You have the choice to include products from one or several attribute sets.
Product Visibility Then, choose the products that will be included to the feed between the products that are not visible individually, products from the Catalog, the Search results, or both.
8

Advanced Filters
In the Advanced filters, you can go further by setting more personalized filters. For example, we wanted to include only products which price is higher than 0, and which SKU is not null.
Here again, you have the possibility to define advanced filters according to several options such as =, >, < or even more as shown below.
9

LIKE / NOT LIKE like: starts / ends with the character string / includes the character string. Eg: name like %shirt: will include all products which name ends with 'shirt'. name like Apple%: will include all products which name starts with 'Apple'. name like %women%: will include all products which name contains the 'women' character string. not like: doesn't start / end with the character string / doesn't include the character string. Eg: name not like %shirt: won't include any product which name ends with 'shirt'. name not like Apple%: won't include any product which name starts with 'Apple'. name not like %women%: won't include any product which name contains the 'women' character string. IS NULL / IS NOT NULL is null: the value is null. Eg: Special price is null: will include all products that don't have special prices. is not null: the value is not null. Eg: SKU is not null: will include all products which SKU is not null. IN / NOT IN in: is in (selection of several options). Eg: Size in S L: will include only products from these 2 sizes.
10

not in: is not in (selection of several options). Eg: Size not in S L: will include all products which size is not S or L. You can activate the AND/OR statement in Stores > Settings > Configuration > Wyomind > Data Feed Manager.
Cron schedule Data Feed Manager for Magento 2 provides you a fully configurable schedule in the Cron Schedule tab of your pattern configuration for each data feed. You simply have to tick the days and hours when you want your data feed to be generated.
If you're facing some difficulties with scheduled tasks, or if you think your data feed is not automatically generated, have a look to our faq on that subject.
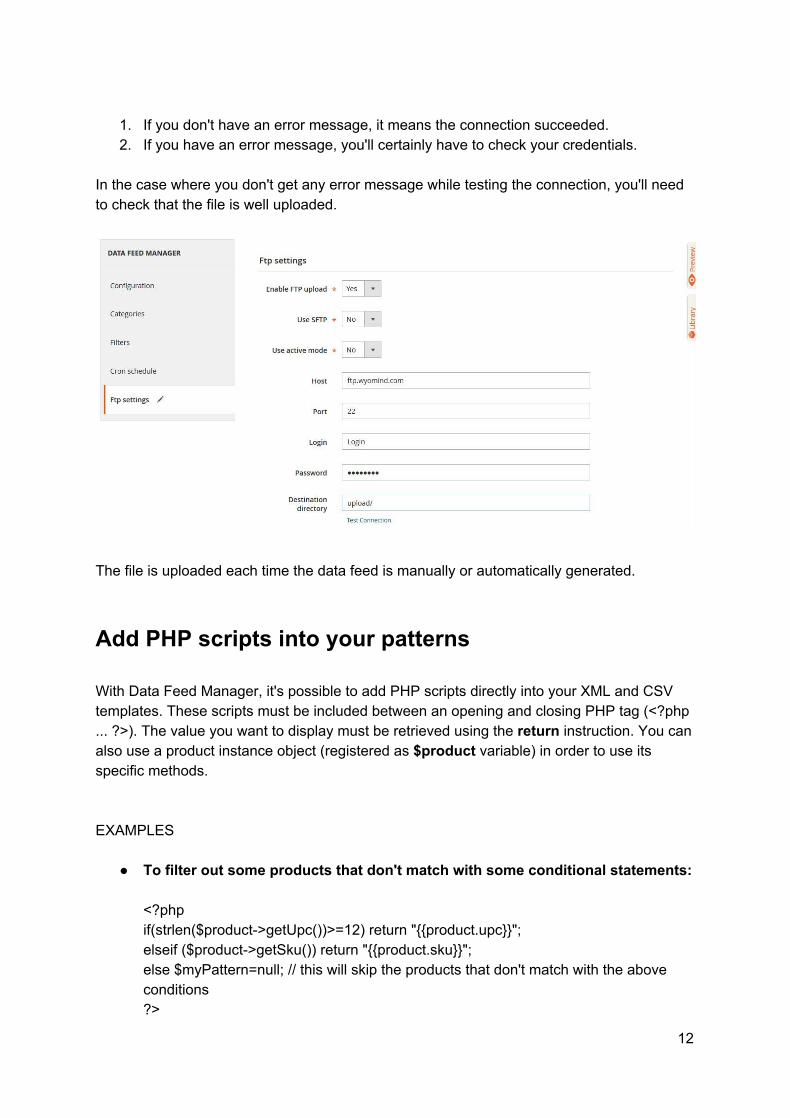
FTP settings With Data Feed Manager for Magento 2, you can specify FTP settings to upload your data feeds. In the FTP settings tab of your data feed, you'll have several fields to configure:
Enable FTP upload: select Yes if you want to upload your data feed using FTP Use SFTP: select Yes if you are using SFTP Use Active mode: If you are using SFTP, you don't have to care about the
passive/active mode Host: in that field, fill in the host. For example: ftp.wyomind.com Port: fill in the port. For example: 22 Login: is your login to connect to server Password: is your password to connect to server Destination directory: is a relative path from the entry directory when you connect
to the ftp. For example: "upload/" or "/" In order to be sure your settings are correct, you can click on Test Connection.
11
1. If you don't have an error message, it means the connection succeeded. 2. If you have an error message, you'll certainly have to check your credentials.
In the case where you don't get any error message while testing the connection, you'll need to check that the file is well uploaded.
The file is uploaded each time the data feed is manually or automatically generated.
Add PHP scripts into your patterns With Data Feed Manager, it's possible to add PHP scripts directly into your XML and CSV templates. These scripts must be included between an opening and closing PHP tag (<?php ... ?>). The value you want to display must be retrieved using the return instruction. You can also use a product instance object (registered as $product variable) in order to use its specific methods. EXAMPLES
To filter out some products that don't match with some conditional statements:
<?php if(strlen($product>getUpc())>=12) return "product.upc"; elseif ($product>getSku()) return "product.sku"; else $myPattern=null; // this will skip the products that don't match with the above conditions ?>
12

To check some specific conditions in order to display a conditional value:
<g:shipping> <g:country>US</g:country> <g:region>MA</g:region> <g:service>Ground</g:service> <g:price><?php if("product.price">50) return "Free shipping"; else return "9.90 USD"; ?></g:price> </g:shipping>
Create your custom variables Data Feed Manager for Magento 2 allows you to create your own variables and to add them directly into your data feed configuration. You can create custom variables from your Magento 2 admin, in Products > Data Feed Manager > Custom Variables where you'll already find some examples. Here is how to proceed to create your own custom variable:
1. Create a new variable clicking on Add New. 2. Define the Name of your custom variable.
13

3. Add your custom Php script (No need to add the php tags <? and ?>)
4. Add the new custom variable into your data feed pattern in Products > Data Feed Manager > Data Feeds.
The php codes of each custom variable are based on the same rules than any php code included in the pattern:
the output value must be retrieved with the return instruction use a product instance object (registered as $product variable) to use its specific
methods Attention, when calling an attribute in the custom variable, you must use the Magento 2 syntax but no braces. EXAMPLES To get all sizes available for a configurable product
Name: confsizes Php script:
14
<?php if ($product>getTypeId() == 'configurable') $childProducts = $product>getTypeInstance()>getUsedProducts($product); $sizes = array(); foreach ($childProducts as $child) $sizes[] = $child>getAttributeText('size'); return implode(',', array_unique($sizes)); ?>
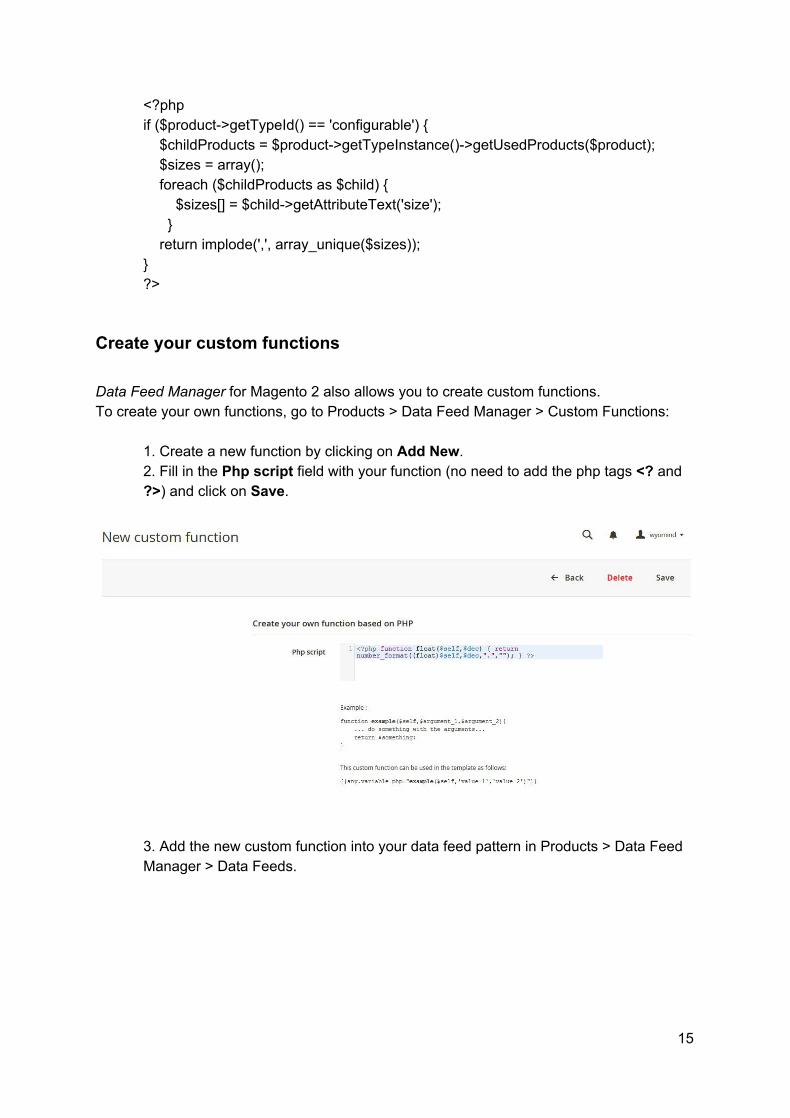
Create your custom functions Data Feed Manager for Magento 2 also allows you to create custom functions. To create your own functions, go to Products > Data Feed Manager > Custom Functions:
1. Create a new function by clicking on Add New. 2. Fill in the Php script field with your function (no need to add the php tags <? and ?>) and click on Save.
3. Add the new custom function into your data feed pattern in Products > Data Feed Manager > Data Feeds.
15

The custom function php codes are based on the same rules than any php code included in the pattern:
the output value must be retrieved with the return instruction the $product variable contains an instance of the current product the $value variable contains the value of the current attribute the $param array contains the additional parameters expected by the function
16