data federation guide - pitney...
TRANSCRIPT

Spectrum™ Technology PlatformVersion 11.0
Data Federation Guide

1 - Introduction
Data Federation 5What is Spectrum™ Data Federation? 5Core Components - Spectrum™ Data
Federation 6
2 - Workflow - Spectrum™
DataFederation
Workflow - Spectrum™ Data Federation 9
3 - Getting Started
Accessing Spectrum™ Data Federation 12
4 - Establishing Data SourceConnections
Data Source Connections 14
5 - Designing Baseviews
Baseview 31Creating a Baseview 31Modifying a Baseview 35Schema - Baseview 35Deleting a Baseview 39
6 - Designing Metaviews
Metaview 41Creating a Metaview 41Deleting a Metaview 55
7 - Designing Virtual DataSources
Virtual Data Source 57Creating a Virtual Data Source 57Modifying a Virtual Data Source 58Deploying or Undeploying a Virtual Data
Source 59Previewing a Virtual Data Source 59Deleting a Virtual Data Source 60
8 - Common Features
Lineage 62Cache Management 63
9 - Using the AdministrationUtility
Getting Started with the Administration Utility 67Using a Script with the Administration Utility 68Categories of Commands 69System 70
Table of Contents

10 - Conventions
Naming Conventions 73Query Conventions 73
11 - Configurations
Property Files 75Required JAR Files 76JDBC Driver Configuration 78ODBC Driver Configuration 79
12 - Limitations
Read Feature Limitations 85Write Feature Limitations 87
Appendices
Appendix A:Reserved Keywords 90Appendix B:Supported Datatypes for Conversion
Transformations 96
3Spectrum™ Technology Platform 11.0 Data Federation Guide

1 - Introduction
In this section
Data Federation 5What is Spectrum™ Data Federation? 5Core Components - Spectrum™ Data Federation 6

Data Federation
Data Virtualization is a data management approach that refers to the virtual abstraction of dataderived from diverse data sources, from the data consumer. This enables you to utilize the virtualdata irrespective of its technical details like its physical location, format, storage technology, APIused, and other such details.
Data Federation, an aspect of data virtualization, is the aggregation of data derived from multipleheterogeneous and autonomous data sources, like databases, flat files, web services, and ERM/CRMapplications, which a consumer application can view as one integrated data source using a singlepoint of access.
Data Federation provides:
1. A uniform user interface to access multiple heterogeneous data sources providing a standardizedand simplified access to aggregated data
2. Increased data access speed on a real time basis3. Reduced system workload as the data is virtually rearranged as opposed to physical
rearrangement4. Autonomy of the multiple heterogeneous data sources with respect to the below factors:
• Design: Varied designs for data storage and usage on the different heterogeneous data sources• Communication: Various communication channels between the multiple data sources and thedata consumer.
• Execution: Autonomous execution of commands as applicable on the different data sources• Association: Independence of the data sources to associate and disassociate from the federationat any given time
5. Significantly reduced development and support time
What is Spectrum™ Data Federation?
Spectrum™ Data Federation allows you to create an abstracted virtual data source providing aunified access to diverse heterogeneous data sources through a uniform user interface. Using themodule, you can collate the data from multiple data sources and organize it as a specificrepresentation of your business model.
The Spectrum™ Technology Platform is placed between one or more data sources and your ownapplication. It connects to the data sources and collates the data from them for access by yourapplication. Spectrum™ Data Federation creates a federated view of this collated data, providing aunified business-relevant view of the entire federated data.
5Spectrum™ Technology Platform 11.0 Data Federation Guide
Introduction

Spectrum™ Data Federation provides the below key features:
1. Virtualization: The module provides access to an integrated virtual data source.2. Federation: The module aggregates the data from the multiple data sources into one virtual data
source. This allows you to access them as one data source entity.3. Abstraction: The module hides the technical complexities of the multiple data sources, allowing
access to the virtually aggregated data without engaging in any structural, syntactical orcommunication related technical details. Standard JDBC protocol and ANSI SQL database querysyntax is used to access the aggregated virtual data source.
4. Data Presentation: Themodule presents the retrieved data in a user-specified format, irrespectiveof the structural and syntactical details of the exact data source from which the data has beenderived.
Figure 1: Overview - Spectrum™ Data Federation
Core Components - Spectrum™ Data Federation
The key components of Spectrum™ Data Federation are Data Source Connections, Baseviews,Metaviews, and Virtual Data Sources.
Allows you to connect to and access any number of autonomous datasources simultaneously from within the Spectrum™ Data FederationModule.
Data SourceConnection
Provides a uniform representation of the underlying data derived from allthe configured Data Source Connections.
Baseview
A logical representation of specific business entities created by collatingchunks of data derived from one or more Baseviews.
Metaview
6Spectrum™ Technology Platform 11.0 Data Federation Guide
Introduction

Provides a logical data source to group the user-defined business entitiesor Metaviews generated. Multiple Virtual Data Sources can be created,and deployed as needed for your business requirements.
Virtual Data Source
Key Features - Metaview
The Metaview provides powerful features like Transformations and Criteria Builder to createlogical business entities.
A set of pre-defined conversions which can be applied on the Baseview data,in order to generate a business-specific data representation in the Metaview.
Transformations
You can select from a range of pre-defined mathematical, logical, constants,range-defining, and similar functions to apply on the Baseview data to generatea business-specific Metaview.
A database query builder to help you place required filters and clauses onthe Baseview data to create the required Metaview.
Criteria Builder
7Spectrum™ Technology Platform 11.0 Data Federation Guide
Introduction

2 - Workflow -Spectrum™ DataFederation
In this section
Workflow - Spectrum™ Data Federation 9
Workflow - Spectrum™ Data Federation
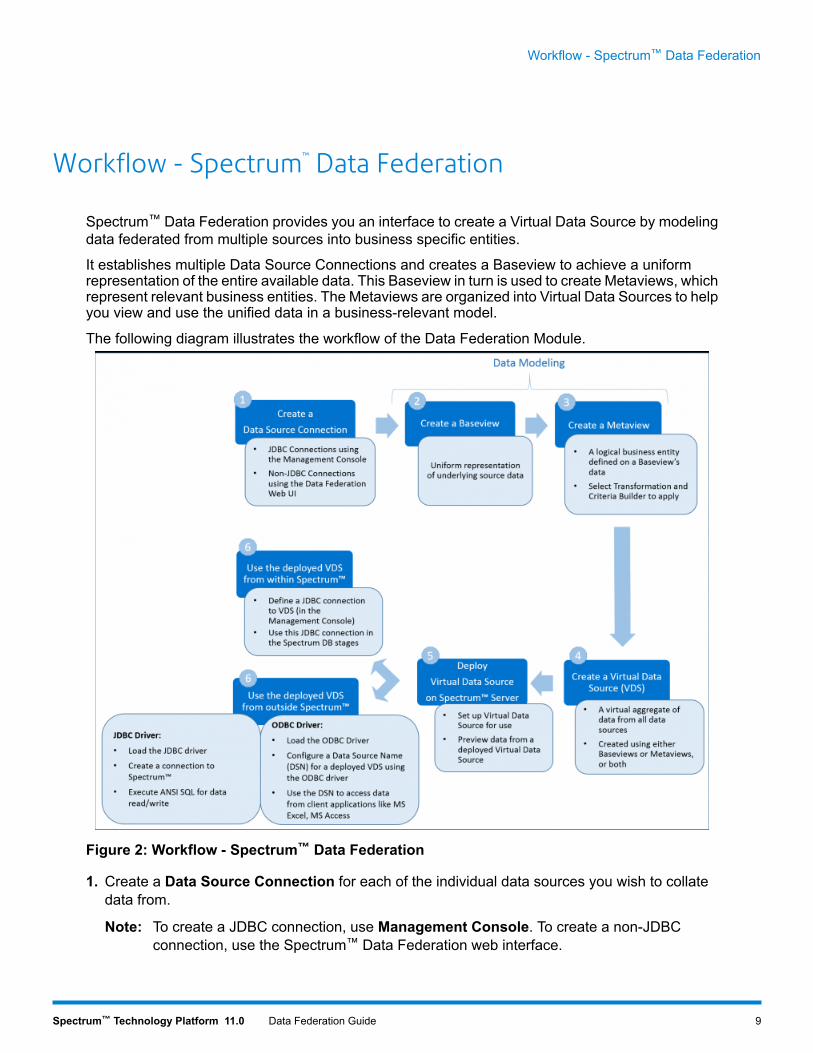
Spectrum™ Data Federation provides you an interface to create a Virtual Data Source by modelingdata federated from multiple sources into business specific entities.
It establishes multiple Data Source Connections and creates a Baseview to achieve a uniformrepresentation of the entire available data. This Baseview in turn is used to create Metaviews, whichrepresent relevant business entities. The Metaviews are organized into Virtual Data Sources to helpyou view and use the unified data in a business-relevant model.
The following diagram illustrates the workflow of the Data Federation Module.
Figure 2: Workflow - Spectrum™ Data Federation
1. Create a Data Source Connection for each of the individual data sources you wish to collatedata from.
To create a JDBC connection, use Management Console. To create a non-JDBCconnection, use the Spectrum™ Data Federation web interface.
Note:
9Spectrum™ Technology Platform 11.0 Data Federation Guide
Workflow - Spectrum™ Data Federation

2. Create a Baseview, which will provide a uniform representation of the data collated from themultiple data sources.
3. Create a Metaview by generating required logical business entities, deriving data from one ormore Baseviews. Use the Transformations andCriteria Builder features to generate the requiredbusiness specific views of the source data in the Metaview.
4. Create a Virtual Data Source (VDS) by collating the created business-specific Metaviews. Thiswould serve as the virtual database to be used by your client application.
5. Deploy the created Virtual Data Source.6. Use the deployed Virtual Data Source. A Virtual Data Source can be accessed:
• From within Spectrum™ Technology Platform
1. Define a JDBC connection using Management Console.2. Use this JDBC connection in Enterprise Designer, in the DB stages.
• From outside Spectrum™ Technology Platform
1. Install a JDBC driver, setting up the required connection(s) and executing ANSI SQL queriesto access data.
2. Install an ODBC driver, configuring a Data Source Name (DSN) for a Virtual Data Source,and using the DSN to access the data in client applications
10Spectrum™ Technology Platform 11.0 Data Federation Guide
Workflow - Spectrum™ Data Federation

3 - Getting Started
In this section
Accessing Spectrum™ Data Federation 12

Accessing Spectrum™ Data Federation
This procedure describes how to access Spectrum™ Data Federation using a web browser.
1. In a web browser go to this URL:
http://server:port/sdf
server: Server name or IP address of your Spectrum™ Technology Platform server
port: HTTP port used bySpectrum™ Technology Platform. By default, the HTTP port is 8080.
2. Enter a valid user name and password.
The administrative user name is "admin", and the default password is "admin".
You should change the admin password immediately after installing Spectrum™
Technology Platform to prevent unauthorized administrative access to your system.Important:
12Spectrum™ Technology Platform 11.0 Data Federation Guide
Getting Started

4 - Establishing DataSource Connections
In this section
Data Source Connections 14

Data Source Connections
The Spectrum™ Data Federation Module lets you establish connections to various types of datasources. The module currently supports connections to Amazon SimpleDB, Apache Cassandra,Flat File, salesforce, and Siebel data sources.
The Data Federation Module provides specific screens to set up each type of data source. Thesescreens let you enter your authentication credentials and other necessary details to connect to thedesired data source.
JDBC Connection
Using a JDBC ConnectionTo use a JDBC connection, open Management Console.
In Management Console, you can configure a JDBC driver and then create a JDBC connectionusing the driver.
For more information, refer the Connecting to Data section of the Administration Guide.
Amazon DynamoDB Connection
Adding an Amazon DynamoDB ConnectionTo add a new Amazon DynamoDB connection, navigate to Connections > Amazon DynamoDB.Enter the AWS Security Credentials to authenticate your access to the required Amazon AWSaccount and the DynamoDB data source.
1. Go to Connections > Amazon DynamoDB.
2. By default, the screen opens in the create mode. Otherwise, click to add a new AmazonDynamoDB connection.
3. Enter a Connection name for the Amazon DynamoDB connection.4. In the Access Key ID field, enter the 20-character alpha-numeric sequence provided to you to
access the Amazon AWS account.5. In the Secret Access Key field, enter the confidential 40-character key needed to authenticate
the connection.6. In the Region field, select the region of the Amazon AWS account.7. Click Test.
14Spectrum™ Technology Platform 11.0 Data Federation Guide
Establishing Data Source Connections

A message confirms the successful test of the connection.8. Click Save.
A message confirms the successful creation of the connection.
To modify an Amazon DynamoDB connection select the required connection, modify thedetails as required, and click Save.
Note:
Deleting an Amazon DynamoDB ConnectionTo delete an Amazon DynamoDB connection, navigate to Connections > Amazon DynamoDB,select the particular connection, and click Delete.
1. Go to Connections > Amazon DynamoDB.2. Select the Amazon DynamoDB connection to be deleted from the left sidebar.3. Click Delete.
If the selected connection is in use, a message lists the Baseviews, Metaviews or Virtual DataSources using it, allowing you to either choose to abort the deletion or proceed anyway.
If you choose to proceed, a message confirms the successful deletion.
Amazon SimpleDB Connection
Adding an Amazon SimpleDB ConnectionTo add a new Amazon SimpleDB connection navigate to Connections > Amazon SimpleDB, andenter the AWS Security Credentials to authenticate your access to the required Amazon AWSaccount and the SimpleDB data source.
1. Go to Connections > Amazon SimpleDB.
2. By default, the screen opens in the create mode. Otherwise, click to add a new AmazonSimpleDB connection.
3. Enter a Connection Name for the Amazon SimpleDB connection.4. In the Access Key ID field, enter the 20-character alpha-numeric sequence provided to you to
access the Amazon AWS account.5. In the Secret Access Key field, enter the confidential 40-character key needed to authenticate
the connection.6. Click Test.
A message confirms the successful test of the connection.7. Click Save.
A message confirms the successful creation of the connection.
To modify an Amazon SimpleDB connection select the required connection, modify thedetails as required, and click Save.
Note:
15Spectrum™ Technology Platform 11.0 Data Federation Guide
Establishing Data Source Connections

Deleting an Amazon SimpleDB ConnectionTo delete an Amazon SimpleDB connection navigate to Connections > Amazon SimpleDB, selectthe particular connection, and click Delete.
1. Go to Connections > Amazon SimpleDB.2. Select the Amazon SimpleDB connection to be deleted.3. Click Delete.
If the connection is in use you will be notified which Baseviews, Metaviews or Virtual Data Sourcesare using it, allowing you to either choose to abort the deletion or proceed anyway.
If you choose to proceed, a message confirms the successful deletion.
Apache Cassandra Connection
Adding an Apache Cassandra ConnectionTo add a new Apache Cassandra connection navigate to Connections > Apache Cassandra, andenter the authentication details for access to the required Apache Cassandra data source.
1. Go to Connections > Apache Cassandra.
2. By default, the screen opens in the create mode. Otherwise, click to add a new ApacheCassandra connection.
3. Enter a Connection Name for the Apache Cassandra connection.4. In the Host field, enter the machine name or the IP on which the Apache Cassandra data source
is installed.5. In the Keyspace field, enter the name of the keyspace of the data center you wish to access.6. Enter the Port on which the Apache Cassandra data source is configured.7. Click Show advanced (optional) settings... to enter further connection details. Else, directly go
to Step 12.8. Enter the Username provided for the particular Apache Cassandra connection.9. Enter the Password to authenticate the access.10. In the Consistency Level, select the required success criteria for data reads and writes. This
refers to the required number of replica nodes to be hit for a successful data transaction. Thiscan be at least one, or all, or a combination of available nodes.
11. In the Fetch Size, enter the number of resultset rows you wish to fetch on each read transaction.12. Click Test.
A message confirms the successful test of the connection.13. Click Save.
A message confirms the successful creation of the connection.
16Spectrum™ Technology Platform 11.0 Data Federation Guide
Establishing Data Source Connections

To modify an Apache Cassandra connection select the required connection, modify thedetails as required, and click Save.
Note:
Deleting an Apache Cassandra ConnectionTo delete an Apache Cassandra connection navigate toConnections >Apache Cassandra, selectthe particular connection, and click Delete.
1. Go to Connections > Apache Cassandra.2. Select the Apache Cassandra connection to be deleted.3. Click Delete.
If the connection is in use you will be notified which Baseviews, Metaviews or Virtual Data Sourcesare using it, allowing you to either choose to abort the deletion or proceed anyway.
If you choose to proceed, a message confirms the successful deletion.
Flat File Connection
Adding a Flat File ConnectionTo add a new Flat File connection navigate to Connections > Flat File, and enter the file's accessdetails and content type details to allow the Data Federation Module to read it correctly.
You can create either a Delimited or Fixed Width Flat File Connection.
To modify a Flat File connection select the required connection, modify the details as required,and click Save.
Note:
Adding a Delimited Flat File ConnectionTo add a new Delimited Flat File connection navigate to Connections > Flat File, and select theRecord Type as Delimited. Enter the file's access details and content type details to allow the DataFederation Module to read the file correctly.
1. Go to Connections > Flat File.
2. By default, the screen opens in the create mode. Otherwise, click to add a new Flat Fileconnection.
3. Enter a Connection Name for the Flat File data connection.4. Enter the File Path by clicking Browse and selecting the directory of the file.5. Select the Character Encoding of the flat file from the drop-down.6. Select the Record Type as Delimited.7. In Field Delimiter, select the expected separator between any two fields of a file record.8. Select the Text Qualifier (optional), if any, that encloses the field values of a file record.
17Spectrum™ Technology Platform 11.0 Data Federation Guide
Establishing Data Source Connections

9. In Line Separator, the value Default is selected, indicating that the expected line separatordepends on whether Spectrum™ Technology Platform is running on a Unix or Windows system.
10. To specify whether the first row of the file is a header row, shift the First Row is Header Rowslider to either Yes or No.
11. To specify whether the data type of the various fields in any record of the file should beautomatically detected, shift the Detect data type from file slider to either Yes or No.
12. Click Test.A message confirms the successful test of the connection.
13. Click Save.A message confirms the successful creation of the connection.
In order to view a sample record fetched using the created Delimited Flat File connection, clickPreview in the header bar. File records will be fetched and the Fields sorted according to the detailsprovided by you.
Adding a Fixed Width Flat File ConnectionTo add a new Fixed Width Flat File connection navigate to Connections > Flat File and select theRecord Type as Fixed Width. Enter the file's access details and content type details to allow theData Federation Module to read the file correctly.
1. Go to Connections > Flat File.
2. By default, the screen opens in the create mode. Otherwise, click to add a new Flat Fileconnection.
3. Enter a Connection Name for the Flat File data connection.4. Enter the File Path by clicking Browse and selecting the directory of the file.5. Select the Character Encoding of the flat file from the drop-down.6. Select the Record Type as Fixed Width.7. In the Record Length field, enter the total number of characters in a file record.Repeat Step 8 to Step 13 to enter details of all fields expected in a file record.8. Click Add Field to add a row for a field in a file record.9. In the Name column, enter the name for the field value.10. In the Type column, select the data type of the field value.11. In the Start Position column, enter the position in the file record at which of the field value begins.
For the first field in a file record, the Start Position counting begins from 1.
12. In the Length field, enter the total number of characters the field covers, including the characterat the Start Position.The sum of the Start Position and Length values for any field should be less than or equal tothe Record LengthIf the File Record is:
01234Rob Smith29PitneyBowes
Record Length = 27
18Spectrum™ Technology Platform 11.0 Data Federation Guide
Establishing Data Source Connections

For the field 'Name':
Start Position = 6
Length = 9
Name = Rob Smith
13. Check the Trim checkbox if you wish to trim any white spaces at the beginning and/or end of afield value.
14. Click Test.A message confirms the successful test of the connection.
15. Click Save.A message confirms the successful creation of the connection.
In order to view a sample record fetched using the created Fixed Width Flat File connection, clickPreview in the header bar. File records will be fetched and the Fields sorted according to the detailsprovided by you.
Date Time Formats in a File ConnectionWhile reading date and time values from files using a File Connection in the Spectrum™ DataFederation Module, the values need to adhere to certain specific date-time formats.
Accepted Date Time Formats
• Date: "yyyy-mm-dd"• Datetime: "yyyy-mm-dd HH:mm:ss"• Time: "HH:mm:ss"
These are as per standard date-time notations.
Delimited Files
If the Detect type feature is turned on while configuring the Delimited File Connection, then thedate and time values in the file records, which adhere to the above formats, are automaticallydetected as Date type.
If a date-time value does not adhere to one of the accepted formats, the value is read as a Stringtype value instead of a Date type value.
Fixed Width Files
For FixedWidth files, date type values are configured while creating the FixedWidth File Connection.Hence these values are read as Date type values, irrespective of whether they adhere to the acceptedformats or not.
19Spectrum™ Technology Platform 11.0 Data Federation Guide
Establishing Data Source Connections

If the date-time value in a Fixed Width file does not adhere to the accepted formats, it needs to behandled using Transformations at the Metaview creation stage by applying the below Conversioncategory function to the value:
parsedate(String date, String format)
In this, the date is the value received from the file, while the format is the date-time format in whichthe value is received from the file. This helps to parse the date-time value correctly.
For example, if the date = 23-Feb-2008, then the format = dd-MMM-yyyy.
Resulting Value Formats
While previewing data in a Virtual Data Source:
• If the value has been read as a date/time value, it is reflected in one of the accepted date/timeformats in the preview.
• If the value has been read as a String value, it is reflected as it is in the preview.
Deleting a Flat File ConnectionTo delete a Flat File connection navigate toConnections > Flat File, select the particular connection,and click Delete.
1. Go to Connections > Flat File.2. Select the Flat File connection to be deleted.3. Click Delete.
If the connection is in use you will be notified which Baseviews, Metaviews or Virtual Data Sourcesare using it, allowing you to either choose to abort the deletion or proceed anyway.
If you choose to proceed, a message confirms the successful deletion.
Marketo Connection
Creating a Marketo connection from the Spectrum™ Data Federation Module allows you to read,write and synchronize data from your Marketo data source.
Adding a Marketo ConnectionTo add a newMarketo connection, navigate toConnections >Marketo and enter your authenticationcredentials to access the required Marketo data source.
1. Go to Connections > Marketo.
2. By default, the screen opens in the create mode. Otherwise, click to add a new Marketoconnection.
3. Enter a Connection name of your choice for the Marketo data connection.
20Spectrum™ Technology Platform 11.0 Data Federation Guide
Establishing Data Source Connections

4. Enter the Endppoint URL of your Marketo account.
To find out your Endpoint URL, login into Marketo account and navigate to Admin >WebServices > REST API > Endpoint. The existing REST endpoint URL is:
https://xxxxxxx.mktorest.com/rest. Copy the url till /rest. For example, copytill https://xxxxxxx.mktorest.com:
Note:
5. Enter the Client Id of your Marketo account.6. Enter the Client Secret Key of your Marketo account.
To find out your Client Id and Client Secret Key in the Marketo account, navigate toAdmin > LaunchPoint > API Rest > View Details. Client Id and Client Secret Key isdisplayed on the pop-up window.
Note:
7. Click Test.A message confirms the successful test of the connection.
8. Click Save.A message confirms the successful creation of the connection.
To modify a Marketo connection, select the required connection, modify the details as required, andclick Save.
Deleting a Marketo ConnectionTo delete aMarketo connection, navigate toConnections >Marketo, select the particular connection,and click Delete.
1. Go to Connections > Marketo.2. Select the Marketo connection to be deleted.3. Click Delete.
If the selected connection is in use, a message lists the Baseviews, Metaviews or Virtual DataSources using it, allowing you to either choose to abort the deletion or proceed anyway.
If you choose to proceed, a message confirms the successful deletion.
MS Dynamics CRM Connection
Creating an MS Dynamics CRM connection from the Spectrum™ Data Federation Module allowsyou to read, write and synchronize data from your MS Dynamics CRM Online data source.
21Spectrum™ Technology Platform 11.0 Data Federation Guide
Establishing Data Source Connections

Adding an MS Dynamics CRM Online ConnectionTo add a new MS Dynamics CRM connection, navigate to Connections > MS Dynamics CRMand enter your authentication credentials to access the required MS Dynamics CRM Online datasource.
1. Go to Connections > MS Dynamics CRM.
2. By default, the screen opens in the create mode. Otherwise, click to add a new MS DynamicsCRM Online connection.
3. Enter a Connection name of your choice for the MS Dynamics CRM data connection.4. In the Email field, enter your allocated email address for your MS Dynamics CRMOnline account.5. In the Password field, enter the password to your MS Dynamics CRM Online account.6. In the Organization Unique Name field, enter your allocated organization unique name, which
identifies your required CRM instance.
To find out your organization unique name, in the MS Dynamics CRM Online accountlogin, navigate toSettings >Customization >Customizations >Developer Resources.The Organization Unique Name is displayed.
Note:
7. From theRegion field, select the geographical region of your MS Dynamics CRMOnline account.8. Click Test.
A message confirms the successful test of the connection.9. Click Save.
A message confirms the successful creation of the connection.
To modify a MS Dynamics CRM connection, select the required connection, modify the details asrequired, and click Save.
Deleting an MS Dynamics CRM Online connectionTo delete an MS Dynamics CRM connection, navigate to Connections > MS Dynamics CRM,select the particular connection, and click Delete.
1. Go to Connections > MS Dynamics CRM.2. Select the MS Dynamics CRM Online connection to be deleted.3. Click Delete.
If the selected connection is in use, a message lists the Baseviews, Metaviews or Virtual DataSources using it, allowing you to either choose to abort the deletion or proceed anyway.
If you choose to proceed, a message confirms the successful deletion.
NetSuite Connection
Creating a NetSuite connection from the Spectrum™ Data Federation Module allows you to read,write and synchronize your CRM and ERP data.
22Spectrum™ Technology Platform 11.0 Data Federation Guide
Establishing Data Source Connections

While reading from and writing to a NetSuite connection, both interactive and batch modes aresupported.
The different entity types supported in a NetSuite connection are:
• Standard records• Custom records• Saved searches• Joins between Standard records
Adding a NetSuite ConnectionTo add a new NetSuite connection navigate to Connections > NetSuite, and enter yourauthentication credentials to access the required NetSuite data source.
1. Go to Connections > NetSuite.
2. By default, the screen opens in the create mode. Otherwise, click to add a new NetSuiteconnection.
3. Enter a Connection name for the NetSuite data connection.4. In the Email field, enter the email linked to the NetSuite account to be used for the connection.5. In the Account Name field, enter the username for the NetSuite account.6. In the Password field, enter the password of the NetSuite account.7. In the Role field, select the appropriate role for this connection from the multiple roles mapped
to the particular NetSuite user account.
This is an optional field. If you leave the Role field blank while adding a NetSuiteconnection, the default role is used to login through the connection.
Note:
Only standard roles are supported in a NetSuite connector. Custom roles are notsupported.
Attention:
8. Click Test.A message confirms the successful test of the connection.
9. Click Save.A message confirms the successful creation of the connection.
To INSERT a record using a NetSuite connection, use an UPSERT query with the primarykey (internalId) blank.
Note:
Deleting a NetSuite ConnectionTo delete a NetSuite connection navigate to Connections > NetSuite, select the particularconnection, and click Delete.
1. Go to Connections > NetSuite.2. Select the NetSuite connection to be deleted.
23Spectrum™ Technology Platform 11.0 Data Federation Guide
Establishing Data Source Connections
3. Click Delete.If the connection is in use, you will be notified which Baseviews, Metaviews or Virtual DataSources are using it. You can choose to either abort the deletion or proceed anyway.
If you choose to proceed, a message confirms the successful deletion.
Salesforce Connection
Adding a Salesforce ConnectionTo add a new Salesforce connection navigate to Connections > Salesforce, and enter yourauthentication credentials to access the required Salesforce data source.
1. Go to Connections > Salesforce.
2. By default, the screen opens in the create mode. Otherwise, click to add a new Salesforceconnection.
3. Enter a Connection Name for the Salesforce connection.4. In the Username field, enter the email ID registered on the Salesforce data store.5. In the Password field, enter a combination of the Salesforce portal login password and the
security token generated through the Salesforce portal.For example, if your password is Sales@Test, and the security token provided to you by Salesforceis 56709367, then the Password to authenticate this Salesforce connection would beSales@Test56709367.
6. Click Test.A message confirms the successful test of the connection.
7. Click Save.A message confirms the successful creation of the connection.
Audit fields are enabled on all tables by default for Salesforce connections created inSpectrum™ Technology Platform 10 SP1 and onwards.
The Salesforce audit fields are:
Note:
• created date• last modified date• created by• last modified by
To modify a Salesforce connection select the required connection, modify the details asrequired, and click Save.
Note:
24Spectrum™ Technology Platform 11.0 Data Federation Guide
Establishing Data Source Connections

Baseviews created in Spectrum™ Technology Platform versions 10 and earlier usingSalesforce connections need to be opened and saved again in order to enable auditfields on their tables.
Attention:
Deleting a Salesforce ConnectionTo delete a Salesforce connection navigate to Connections > Salesforce, select the particularconnection, and click Delete.
1. Go to Connections > Salesforce.2. Select the Salesforce connection to be deleted.3. Click Delete.
If the connection is in use you will be notified which Baseviews, Metaviews or Virtual Data Sourcesare using it, allowing you to either choose to abort the deletion or proceed anyway.
If you choose to proceed, a message confirms the successful deletion.
SAP NetWeaver Connection
Creating an SAP connection from the Spectrum™ Data Federation Module using OData Servicesallows you to read, write and synchronize your CRM and ERP data.
While reading from and writing to a SAP connection, both interactive and batch modes are supported.
Adding an SAP ConnectionTo add a new SAP connection navigate to Connections > SAP, and enter your authenticationcredentials to access the required SAP data source.
1. Go to Connections > SAP.
2. By default, the screen opens in the create mode. Otherwise, click to add a new SAP connection.3. In the URL field, enter the address of the SAP web service to be used for this connection.4. In the User ID field, enter the username to access the SAP web service.5. In the Password field, enter the password of the SAP web service.6. Click Test.
A message confirms the successful test of the connection.7. Click Save.
A message confirms the successful creation of the connection.
To perform fetch operations, an OData service must support the $skip and $top operations.If the service does not support these operations, the fetched records show inconsistenciesin the Virtual Data Source Preview.
Note:
25Spectrum™ Technology Platform 11.0 Data Federation Guide
Establishing Data Source Connections
Deleting an SAP ConnectionTo delete an SAP connection navigate to Connections > SAP, select the particular connection,and click Delete.
1. Go to Connections > SAP.2. Select the SAP connection to be deleted.3. Click Delete.
If the connection is in use, you will be notified which Baseviews, Metaviews or Virtual DataSources are using it. You can choose to either abort the deletion or proceed anyway.
If you choose to proceed, a message confirms the successful deletion.
Siebel Connection
Adding a Siebel ConnectionTo add a new Siebel connection, navigate to Connections > Siebel and enter your authenticationcredentials to access the required Siebel data source.
It is assumed that a Siebel connection user is familiar with the Siebel CRM Tools andTechnologies, and terms like Siebel Business Objects/Components and links betweendifferent Business Components.
Note:
1. Go to Connections > Siebel.
2. By default, the screen opens in the create mode. Otherwise, click to add a new Siebelconnection.
3. Enter a Connection name for the Siebel data connection.4. In the Host name field, enter the name of the host on which the Siebel server is installed.5. In the Port field, enter the listening port number for the SCBroker component.
Use 2321 for the SCBPort.Note:
6. In the Server field, enter the name of your Siebel Enterprise Server.7. In the Object manager field, enter the name of the Object Manager.8. Enter the Username provided to access the required Siebel data source.9. Enter the Password to authorize the Siebel access.10. In the Locale field, select the type of Object Manager and Language Pack for the Siebel Business
application you are connecting to.
For locales other than English, locale specific JAR files need to be installed for a Siebelconnection. For more information, see Required JAR Files on page 76.
Note:
26Spectrum™ Technology Platform 11.0 Data Federation Guide
Establishing Data Source Connections

11. Click Test.A message confirms the successful test of the connection.
12. Click Save.A message confirms the successful creation of the connection.
Within a Baseview, Siebel business components are displayed in the format <BusinessObject>.<Business Component>.
To modify a Siebel connection select the required connection, modify the details as required, andclick Save.
A Business Component which is not a part of any Business Object is not displayed inBaseviews.
Note:
Deleting a Siebel ConnectionTo delete a Siebel connection navigate to Connections > Siebel, select the particular connection,and click Delete.
1. Go to Connections > Siebel.2. Select the Siebel connection to be deleted.3. Click Delete.
If the connection is in use you will be notified which Baseviews, Metaviews or Virtual Data Sourcesare using it, allowing you to either choose to abort the deletion or proceed anyway.
If you choose to proceed, a message confirms the successful deletion.
Splunk Connection
Spectrum™ Technology Platform 10 SP1 does not support data writes on a Splunk connection.Note:
Adding a Splunk ConnectionTo add a new Splunk connection, navigate to Connections > Splunk and enter your credentialsto access the required Splunk data source.
1. Go to Connections > Splunk.
2. By default, the screen opens in the create mode. Otherwise, click to add a new Splunkconnection.
3. Enter a Connection name for the Splunk connection.4. In the Host name field, enter the address or hostname of the server on which the Splunk data
source is hosted.5. In the Port field, enter the port number of the Splunk data source.6. In the Username field, enter the Splunk account username to authenticate the Splunk instance.
27Spectrum™ Technology Platform 11.0 Data Federation Guide
Establishing Data Source Connections

7. In the Password field, enter the password of the Splunk account.
Deleting a Splunk ConnectionTo delete a Splunk connection, navigate toConnections > Splunk, select the particular connection,and click Delete.
1. Go to Connections > Splunk.2. Select the Splunk connection to be deleted.3. Click Delete.
If the connection is in use you will be notified which Baseviews, Metaviews or Virtual Data Sourcesare using it, allowing you to either choose to abort the deletion or proceed anyway.
If you choose to proceed, a message confirms the successful deletion.
SuccessFactors Connection
Adding a SuccessFactors ConnectionTo add a new SuccessFactors connection, navigate to Connections > SuccessFactors. Enteryour SuccessFactors credentials to authenticate access to the required SuccessFactors accountand the attached data source.
1. Go to Connections > SuccessFactors.
2. By default, the screen opens in the create mode. Otherwise, click to add a new SuccessFactorsconnection.
3. Enter a Connection name of your choice for the new SuccessFactors connection.4. In the User Name field, enter your allocated user name to access your company's specific
SuccessFactors client instance.5. In the Company ID field, enter your unique Company ID. This identifies your company's unique
instance in a specific SuccessFactors datacenter.6. In the Password field, enter the password associated with the entered SuccessFactors user
name.7. In the Service URL field, enter the link to the SuccessFactors server to be accessed. This URL
is specific to the global datacenter to which the Company ID is mapped.8. Click Test.
A message confirms the successful test of the connection.9. Click Save.
A message confirms the successful creation of the connection.
To modify a SuccessFactors connection, select the required connection, modify the detailsas required, and click Save.
Note:
28Spectrum™ Technology Platform 11.0 Data Federation Guide
Establishing Data Source Connections

Deleting a SuccessFactors ConnectionTo delete a SuccessFactors connection, navigate to Connections > SuccessFactors, select theparticular connection, and click Delete.
1. Go to Connections > SuccessFactors.2. From the left sidebar, select the SuccessFactors connection to be deleted.3. Click Delete.
If the selected connection is in use, a message lists the Baseviews, Metaviews or Virtual DataSources using it, allowing you to either choose to abort the deletion or proceed anyway.
If you choose to proceed, a message confirms the successful deletion.
29Spectrum™ Technology Platform 11.0 Data Federation Guide
Establishing Data Source Connections
5 - DesigningBaseviews
In this section
Baseview 31Creating a Baseview 31Modifying a Baseview 35Schema - Baseview 35Deleting a Baseview 39

Baseview
A Baseview is a representation of the data derived from a data source. It is created by selecting aconfigured and active data source connection, and selecting its required tables to be included inthe Baseview.
Once saved, a Baseview allows you to view the schema of the data in the selected Baseview tables,as present in the original data source. The schema depicts the relationship of the tables in the datasource and their various properties.
From a single data source, multiple Baseviews can be created to suit different purposes.
For example, for a system administrator, one Baseview may be created from a data source byincluding its system tables, while for use by end users a separate Baseview may be created fromthe same data source by including the required data tables.
Creating a Baseview
To create a Baseview, navigate to Baseview, and select the connection and its tables using whichthe Baseview is to be defined.
1. Click Baseview in the top bar.
2. By default, the screen opens in the create mode. Otherwise, click to add a new Baseview.3. Enter a name for the Baseview in the Baseview name field.4. Select the required connection type based on which the Baseview is to be created from the
Connection type field.The connections of the selected connection type get populated in the Connection name field.For example, if you select Database as the Connection type, then the Connection nameshould list options like SQL, Oracle, MySQL, Sybase, and so on.
5. In the Connection name field, select the desired connection.6. Click Go.
This lists all the tables/views of the selected connection in the below grid.7. Filter the search results according to the table/view names, owners, and/or types.
For example, if you want to filter the results based on table names beginning with the text "sa",type sa in the filter box at the top of the Name column of the grid. The grid lists the tables withnames beginning with "sa".
If you want to filter tables based on owner names beginning with the text "sys", type sys in thefilter box at the top of the Owner column of the grid. The grid lists the tables with owner namesbeginning with "sys".
31Spectrum™ Technology Platform 11.0 Data Federation Guide
Designing Baseviews

If you want to filter tables based on type names beginning with the text "view", type view in thefilter box at the top of the Type column of the grid. The grid lists the tables with type namesbeginning with "view".
8. To select the tables/views from the grid that you want to include in the Baseview, click therespective row. To select all the listed tables/views, select the checkbox in the header row.To remove any selected table, click the respective row.The Total Items count below the grid displays the total number of tables present in the selectedconnection, while the Selected Items count displays the number of tables selected for inclusionin the Baseview from the connection.
9. Click Save.
The selected source tables for inclusion in the Baseview are now displayed at the top of the grid,followed by the unselected tables.
To view a hierarchical illustration of the Spectrum™ Data Federation entities designed so far, whichhas this created Baseview in focus, click Lineage in the top bar. For more information, see Lineageon page 62.
Connection-based Table Details
Table PropertiesConnection Type
The entities are of the following types:Marketo
1. Entity2. Entity Update
Entity Update is a virtual table used for Update on Lead entity. For example,Merge_Leads should be used for merging different Marketo Leads.
Note:
The entities are of the following types:MS Dynamics CRM
1. User Owned2. Organization Owned3. Business Owned4. None
The entities are of the types:Netsuite
• Standard Records• Custom Records• Joins• Saved Searches
32Spectrum™ Technology Platform 11.0 Data Federation Guide
Designing Baseviews

Table PropertiesConnection Type
On viewing the schema of the created Baseview, for each entity type, the resultant schema isdisplayed.
For example, for a Saved Search record, the schema of the search result is displayed. For a Joinrecord, the schema of the join's result is displayed.
In a NetSuite connection table, the primary key column is internalId.Note:
SAP 1. The entity columns are of two types:
• Native: Columns with native datatypes are displayed with their respective datatypes.• Custom-defined: Columns with custom-defined datatypes are displayed with a blankdatatype.
2. To deploy a Virtual Data Source derived from an SAP connection, ensure its Metaviews andBaseviews include only such entities whose columns are of native datatypes. If the Baseviewsand Metaviews have entities of custom-defined datatypes, the Virtual Data Source cannot bedeployed.
The business components are displayed in the format Business Object.BusinessComponent.
Siebel
SplunkLIKE, ORDER BY, LIMIT, IN, BETWEEN, !=, <=, >=, <,>, multiple AND/OR operators
Supported Operations
Supported Functions upper, lower, length, len,ltrim, rtrim, substring, max,min
String Functions
abs, ceil, exp, floor, sqrt,round
MathematicalFunctions
For all other query operations, use the Splunk search column as explained below.Note:
Spectrum™ Data Federation provides a column search in the Splunk table using which youcan look up the required data in the Splunk connection.
While executing a select query on the SplunkTable, use the search column in thewhere clause in any of the below scenarios:
1. To include such search criteria which cannot be specified using ANSI SQL syntax.2. To include such Splunk-specific search criteria which cannot be included as part of the main
SQL query.
33Spectrum™ Technology Platform 11.0 Data Federation Guide
Designing Baseviews

Table PropertiesConnection Type
For example, the below query looks for such a _raw value which contains the key opp with thevalue ACC.
select "_raw" from SplunkTable where "search"='searchopp=ACC'
The entities are of two types:SuccessFactors
1. Entity: Represents a table representing a business entity.2. Join: Represents a mapping between any two Entity type tables: a parent table and any of its
child tables.
Links are not present between tables in the Baseview schema derived from aSuccessFactors connection. This is because foreign keys are not present in
Note:
SuccessFactors tables, and joins between tables are indicated by Join type tables inthe Spectrum™ Technology Platform.
The features of Join tables are:
1. The name of a Join table indicates the two Entity tables which have been mapped together.2. Each record of a Join table contains the primary key from the parent entity and the columns
of the respective child entity. Thus the particular parent entity's primary key is mapped to thechild entity's details.
For example, User#HR is a Join table in which User is the parent entity and Hr is the childentity. This join represents all the users and their respective HR representatives. The join tableUser#HR, therefore, has the parent table User's primary key UserId, which is mappedto the columns of the child table HR, like hr_userId, hr_username, hr_email,and so on.
3. In case of Join tables, the insert and update functions work like the upsert function.This is because Join tables are not actual entities in SuccessFactors, but are mappings betweenentities and their navigation properties or child tables.
To insert/update any Join table, the parent entity is updated, while in child table a newrecord is inserted or the existing record is updated corresponding to the parent record.
While updating, the mapping between a parent and a child is modified. It is also possibleto modify the individual attributes of the child as required.
Note:
34Spectrum™ Technology Platform 11.0 Data Federation Guide
Designing Baseviews

Modifying a Baseview
To modify an existing Baseview, navigate to Baseview in the header, select the Baseview you wishto modify and change its data source connection and/or selected tables as required.
1. Click Baseview in the top bar.2. Select the Baseview you wish to modify. You can search for a particular Baseview name using
the textbox above the Baseview list.On selecting a Baseview, its previously selected tables are displayed at the top of the grid below,followed by the unselected tables.
3. To modify the selected connection for the Baseview, edit the Connection name field, if required.4. Remove any added tables from the Baseview, as well as add other available tables to it, as
required, by clicking the respective rows.5. Click Save.
The selected source tables for inclusion in the Baseview are now displayed at the top of the grid,followed by the unselected tables.
To view a hierarchical illustration of the Spectrum™ Data Federation flow designed so far, whichhas this created Baseview in focus, click Lineage in the top bar. For more information, see Lineageon page 62.
Schema - Baseview
The schema shows the properties and relationships of the tables selected in the Baseview, as theyexist in the data source. In the View Schema screen, for each selected table in the Baseview, thejoins and properties like primary keys, foreign keys, and / or indexes, as defined in the data source,are displayed.
The various sections of the View Schema screen display the properties of the selected table asmentioned below:
Displays the properties of each column of the selected table.Columns
Displays the primary key and its properties for the selected table.Primary Keys
Displays the foreign keys and their properties for the selected table.Foreign Keys
Displays the indexes and their properties for the selected table, andwhether the indexes are unique or non unique. If an index is non uniquethen the NU check box is displayed as checked, else it is unchecked.
Indexes
Indicates the functions permitted on the selected table.Permissions
35Spectrum™ Technology Platform 11.0 Data Federation Guide
Designing Baseviews

The properties of the selected table/column displayed in the schema are read-only andcannot be modified.
Note:
Connection-based Schema Properties
In a Baseview schema, the sections Columns, Primary Keys, Foreign Keys, Indexes, andPermissions are displayed in the Properties pull-out, based on the type of the data source.
The schema sections displayed for the different data connection types are as below:JDBC connection Displays the name, datatype, and size of each column. The
section also displays whether a column is nullable and/ora primary key.
Columns
Displays the primary key, primary key name, and keysequence.
Primary Keys
Displays the foreign key column name, foreign key name,primary key catalog name, primary key table name, primarykey column name, and primary key name.
Foreign Keys
Displays the index name, column name, and whether theindexes are unique or non unique. If an index is non unique
Indexes
then the NU check box is displayed as checked otherwiseit is displayed as unchecked.
AmazonDynamoDBconnection
Displays the names and datatypes of each column. Thesection also displays whether a column can be updated,searched, and/or is a primary key.
Columns
Displays the primary key and primary key name.Primary Keys
AmazonSimpleDBconnection
Displays the column name and datatype for the tableyou select.
Columns
ApacheCassandraconnection
Displays the column name and datatype. The sectionalso displays whether a column can be updated,searched, and/or is a primary key.
Columns
Displays the primary key and primary key name.Primary Keys
Flat Fileconnection
Displays the column name and datatype for the tableyou select.
Columns
Marketoconnection
Displays the column name and datatype. The section alsodisplays whether a column is a primary key, readable orupdatable.
Columns
Displays the primary key and primary key name.Primary KeyDisplays the foreign key column name, foreign key name,and the reference table name.
Foriegn Keys
36Spectrum™ Technology Platform 11.0 Data Federation Guide
Designing Baseviews

Indicates which functions can be performed on the selectedBaseview table. Currently, the functions Read, Insert,
Permissions
Update, Upsert and Delete can be performed on Marketotable.Indicates the column on which search is applicable. Forexample, id as Filter Type in Lead indicates Lead can besearched with id.
Filter Types
Marketo does not support multiple Filter Types inSelect query.
Note:
For example:
Valid Query:
Select * from Lead where id = 1234
Select * from Lead where email ='[email protected]''
Invalid Query:
Select * from Lead where id = 1234 andemail = '[email protected]''
MS DynamicsCRM connection
Displays the column name and datatype. The sectionalso displays whether a column is nullable and/or aprimary key.
Columns
Displays the primary key and primary key name.Primary KeysDisplays the foreign key column name, foreign key name,and the reference table name.
Foreign Keys
Indicates which functions can be performed on theselected Baseview table. Currently, the functions create,
Permissions
read, write, and delete can be performed on an MSDynamics CRM Online table.
NetSuiteconnection
Displays the name, datatype, and size of each column.The section also displays whether a column is nullableand/or a primary key, and which of the functions create,read, and update can be performed on the column.
Columns
Displays the primary key and primary key name.Primary Keys
Salesforceconnection
Displays the name, datatype, and size of each column.The section also displays whether a column is nullableand/or a primary key.
Columns
Displays the primary key and primary key name.Primary Keys
37Spectrum™ Technology Platform 11.0 Data Federation Guide
Designing Baseviews
Displays the foreign key column name, foreign keyname, and the reference table name.
Foreign Keys
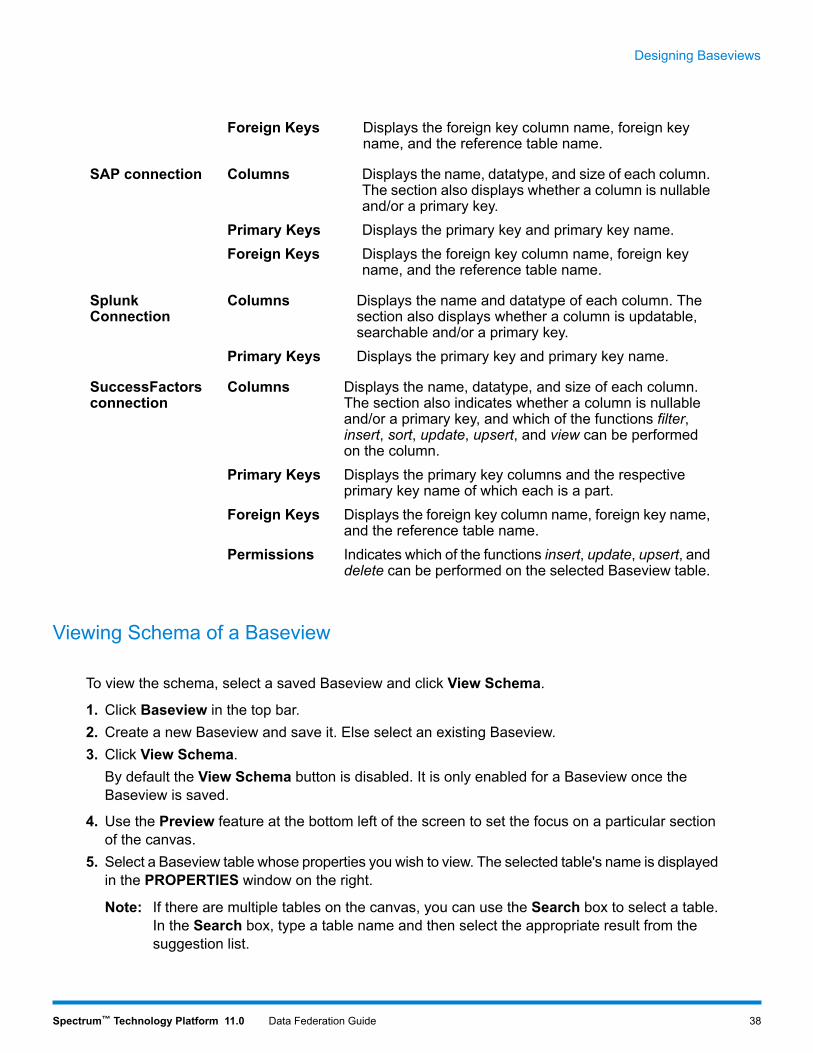
SAP connection Displays the name, datatype, and size of each column.The section also displays whether a column is nullableand/or a primary key.
Columns
Displays the primary key and primary key name.Primary KeysDisplays the foreign key column name, foreign keyname, and the reference table name.
Foreign Keys
SplunkConnection
Displays the name and datatype of each column. Thesection also displays whether a column is updatable,searchable and/or a primary key.
Columns
Displays the primary key and primary key name.Primary Keys
SuccessFactorsconnection
Displays the name, datatype, and size of each column.The section also indicates whether a column is nullableand/or a primary key, and which of the functions filter,
Columns
insert, sort, update, upsert, and view can be performedon the column.Displays the primary key columns and the respectiveprimary key name of which each is a part.
Primary Keys
Displays the foreign key column name, foreign key name,and the reference table name.
Foreign Keys
Indicates which of the functions insert, update, upsert, anddelete can be performed on the selected Baseview table.
Permissions
Viewing Schema of a Baseview
To view the schema, select a saved Baseview and click View Schema.
1. Click Baseview in the top bar.2. Create a new Baseview and save it. Else select an existing Baseview.3. Click View Schema.
By default the View Schema button is disabled. It is only enabled for a Baseview once theBaseview is saved.
4. Use the Preview feature at the bottom left of the screen to set the focus on a particular sectionof the canvas.
5. Select a Baseview table whose properties you wish to view. The selected table's name is displayedin the PROPERTIES window on the right.
If there are multiple tables on the canvas, you can use the Search box to select a table.In the Search box, type a table name and then select the appropriate result from thesuggestion list.
Note:
38Spectrum™ Technology Platform 11.0 Data Federation Guide
Designing Baseviews

6. Click PROPERTIES on the right to expand it and view the selected table's properties.The Table Properties window opens.
7. Click on any of the available sections Columns, Primary Keys, Foreign Keys, and Indexes toview the table properties. The sections are available based on the type of Data Source Connection.
In the Columns section, the size of a column is shown as zero if it is not defined in thedata source.
Note:
Click Back to go back to the Baseview canvas.
Deleting a Baseview
1. Click Baseview in the top bar.2. Select the Baseview you wish to delete.3. Click Delete.
If the Baseview has any dependent Metaview(s) and/or Virtual Data Source(s), a warningmessageis displayed.
4. Click Yes to confirm.A message confirms the successful deletion of the Baseview.
If you delete a Baseview which has dependent Metaviews and Virtual Data Sources:
1. A dependent Metaview of the deleted Baseview is rendered unusable as the mapped tables ofthe deleted Baseview are no longer available in the Metaview.
2. A dependent Virtual Data Source of the deleted Baseview continues to function as defined untilit is redeployed after the Baseview deletion.
39Spectrum™ Technology Platform 11.0 Data Federation Guide
Designing Baseviews

6 - DesigningMetaviews
In this section
Metaview 41Creating a Metaview 41Deleting a Metaview 55

Metaview
A Metaview is a logical representation of business-specific entities. You can create a Metaview byderiving the required data from one or more Baseviews, and applying conversions on it using thefeatures of Transformations and Criteria to replicate your business model.
Creating a Metaview
To create a Metaview, add new tables, map them to existing Baseview table columns, and use theTransformations and Criteria Builder features to convert, compare and filter the data as required.
1. Click Metaview in the top bar.
2. By default, the screen opens in the create mode. Otherwise, to add a new Metaview, clicknext to the Metaview name dropdown.
3. Enter a name for the Metaview in the Metaview name field adjacent to the Metaview selectiondropdown.
4. To add the first Metaview table, click Add in the Metaview Editor.A new Metaview table is added to the canvas.
5. To add more tables in the Metaview, click Add at the top of the Metaview Editor. For moreinformation, see Adding Tables in a Metaview on page 42.
6. To add and edit columns of each individual Metaview table, use the Table Properties sectionof theMetaview Editor. This section lists the column names and datatypes of the Metaview tableselected on the canvas.
7. To add source tables to the Metaview from available Baseviews, expand the Source Tablessection of the Metaview Editor, select a Baseview from the dropdown and drag the requiredtables of the Baseview on to the canvas to map them to the added Metaview tables, as required.For more information, see Adding Source Tables in a Metaview on page 43.
8. To establish relationships between the added Metaview tables and the relevant Baseview tables,use the Transformations section to apply transformations to the columns of the Metaview tablesby selecting each Metaview table individually on the canvas. For more information, seeTransformations on page 44.Various types of transformations can be applied on the Metaview table columns using acombination of Baseview table column mappings, arithmetic, string, datetime and other utilityfunctions along with modifications using constants.
Once a transformation is defined on a column of the selected Metaview table, theCriteriasection gets displayed in the Metaview Editor for the selected table.
Note:
41Spectrum™ Technology Platform 11.0 Data Federation Guide
Designing Metaviews

9. To create filter criteria for a defined transformation of the selected Metaview table, select therequired Metaview table, and expand the Criteria section. Add data filter groups and filter criteriaas required on the transformation. For more information, see Criteria on page 51.
Adding criteria for a Metaview column is an optional step.Note:
10. To enable caching on a Metaview table, select the table on the canvas, and expand the CacheConfiguration section. For more information, see Cache Management on page 63.
11. Click Save.
To view a hierarchical illustration of the Spectrum™ Data Federation entities designed so far, withthe created Metaview in focus, click Lineage in the top bar. For more information, see Lineage onpage 62.
Adding Tables in a Metaview
Before creating a Metaview, you must create a Baseview.Important:
1. To add a table in the Metaview, click Add in the Metaview Editor.The new table is displayed on the canvas with one default column.
You can add any number of tables to a Metaview.Note:
2. To name a Metaview table, double-click on the table title bar in the canvas and rename it.The title bar of the Metaview Editor displays the name of the Metaview table selected on thecanvas.
3. To add columns to a table, select the Metaview table on the canvas, expand the Table Propertiessection, and click Add Column.The Table Properties section lists the columns of the selectedMetaview table, and their respectivedatatypes.
For a dependent Virtual Data Source to be deployable:Note:
1. Each Metaview column must have a transformation applied.2. At least oneMetaview columnmust be derived from a source Baseview column.
The datatype of each Metaview table column is derived from the column of the sourceBaseview table to which the former is mapped. See Transformations on page 44.
Note:
4. Rename the column either by double-clicking the column within the table on the canvas, or inthe Table Properties section.
1. To delete a column of a Metaview table, select the table on the canvas, and in the TableProperties section click against the column.
42Spectrum™ Technology Platform 11.0 Data Federation Guide
Designing Metaviews

Note: To delete a column on which a transformation or criterion is applied, you must first deletethe transformation or criterion.
2. To delete a Metaview table, select the table on the canvas, and click Delete at the top of theMetaview Editor.
Adding Source Tables in a Metaview
To add source tables in a Metaview, select a Metaview table on the canvas and open the SourceTables section in the Metaview Editor.
The Source Tables section is available in theMetaview Editor if at least one table has been addedto the Metaview.
At least one Baseview must be configured and available in the system in order to definesource tables for a Metaview.
Note:
1. Expand the Source Tables section in the Metaview Editor.2. Select the required Baseview from the dropdown in this section.
The tables in the selected Baseview are displayed below.3. Drag the required Baseview tables on to the canvas.4. To link a Metaview table column to the required Baseview table column, click on the Metaview
column on the canvas and drag the pointer to the desired column of the Baseview table.Alternatively, use transformations to link a Metaview table column to a Baseview table column.Refer Applying a Column Transformation on page 45.On linking a Metaview table column to a source Baseview table column, the name and datatypeof the linked Metaview table column is derived from the mapped source Baseview table column.
A new blank column is also added automatically to the Metaview table.
5. To display the linked Baseview tables on the canvas, check the Show checkbox in the SourceTables section header.If the Show checkbox is unchecked, the Baseview tables are not displayed on the canvas evenon selecting the attached Metaview table.
6. Drag the tables and links on the canvas to position them as desired.7. Click Save.
Note: 1. To delete a link between the columns of a Metaview table and a Baseview table, selectthe link and press Delete on your keyboard.
2. Link tables from multiple Baseviews to a Metaview, by repeating the steps 2 to 6.
43Spectrum™ Technology Platform 11.0 Data Federation Guide
Designing Metaviews
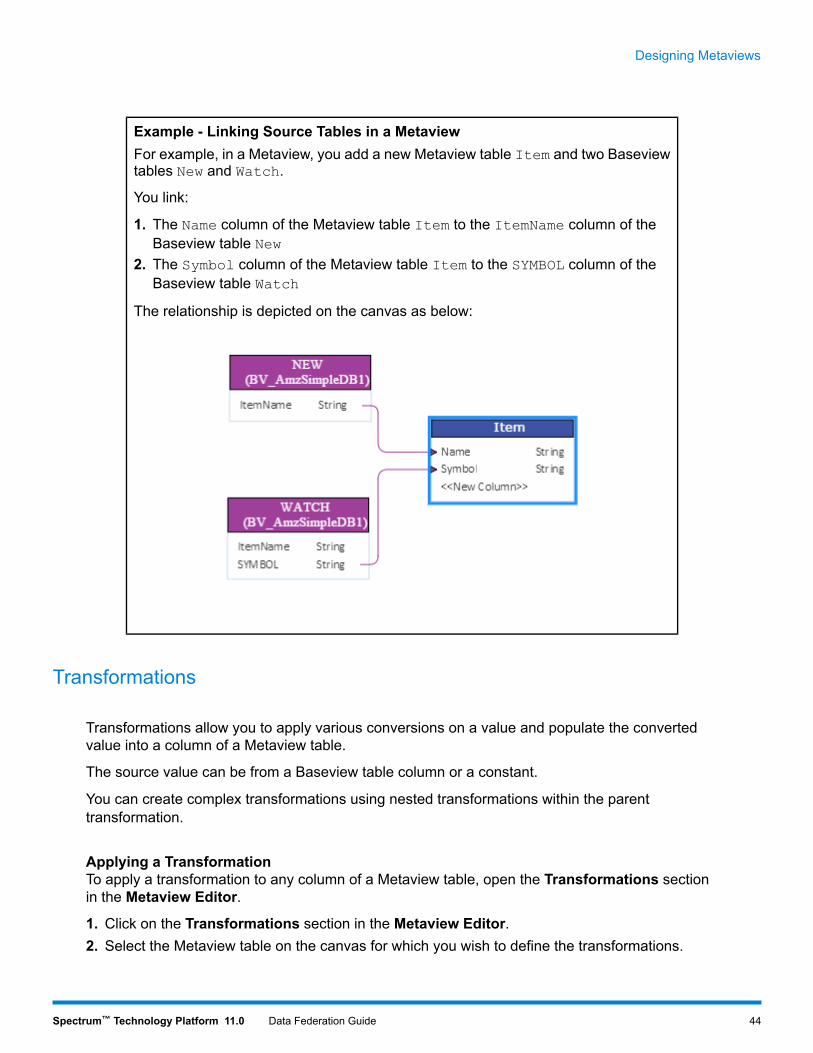
Example - Linking Source Tables in a MetaviewFor example, in a Metaview, you add a new Metaview table Item and two Baseviewtables New and Watch.
You link:
1. The Name column of the Metaview table Item to the ItemName column of theBaseview table New
2. The Symbol column of the Metaview table Item to the SYMBOL column of theBaseview table Watch
The relationship is depicted on the canvas as below:
Transformations
Transformations allow you to apply various conversions on a value and populate the convertedvalue into a column of a Metaview table.
The source value can be from a Baseview table column or a constant.
You can create complex transformations using nested transformations within the parenttransformation.
Applying a TransformationTo apply a transformation to any column of a Metaview table, open the Transformations sectionin the Metaview Editor.
1. Click on the Transformations section in the Metaview Editor.2. Select the Metaview table on the canvas for which you wish to define the transformations.
44Spectrum™ Technology Platform 11.0 Data Federation Guide
Designing Metaviews

The columns of the selected Metaview table and their respective datatypes are displayed in theTransformations section.
3. To add a transformation on a column of the selected Metaview table, click against the column.For example, if you wish to trim the value of the column ItemName of the Baseview table Newbefore populating it in the linked Name column of the Metaview table Item, select the Item tableon the canvas, and click against the Name column in the Transformations section.A popup opens, which allows you to define the transformation.
4. In the popup, select the Undefined column value on the left. Define this value using the optionson the right.This variable indicates the resulting value of the transformation to be populated in the destinationMetaview column.
5. Select an option from Column, Constant, or Function to define the transformation, on the right.
DescriptionOption
Derive the resulting value from a Baseview table column.Column
Define the resulting value as a constant value.Constant
Define the resulting value using one of the various Integer, String,Conversion, and Datetime functions.
Function
6. Define the transformation using either one of the above three options, or a desired combinationof any of the three.The transformation defined is displayed on the left in the popup, and is applied on the column ofthe selected Metaview table.
7. Click OK.8. Click Save.
The applied transformation is displayed on the canvas for the particular column of the Metaviewtable.
Applying a Column TransformationA column transformation allows you to link the required column of a Baseview source table to definea column of the selected Metaview table, or one of the parameters of a function transformation
You can also apply a column transformation on the canvas directly by linking a Baseviewtable column with a Metaview table column.
Note:
1. Click on the Transformations section in the Metaview Editor.2. Select the Metaview table on the canvas for which you wish to define the transformations.
3. To add a column transformation on a column of a Metaview table, click against the column.A popup opens.
4. In the popup, select the Undefined column value on the left.
45Spectrum™ Technology Platform 11.0 Data Federation Guide
Designing Metaviews

This variable indicates the resulting value of the transformation to be populated in the destinationMetaview column.
5. Select the Column option on the right.6. In the Baseview Name field, select the Baseview whose table's column you wish to link.7. In the Entity Name field, select a table of the selected Baseview.8. In the Column Name field, select the column you wish to link.
The selected column of the Baseview table shows on the left.9. Click OK.10. Click Save.
The applied column transformation is reflected on the canvas with a link.
Applying a Constant TransformationA constant transformation allows you to apply a constant value to define a column of a Metaviewtable or one of the parameters of a function transformation.
1. Click on the Transformations section in the Metaview Editor.2. Select the Metaview table on the canvas for which you wish to define the transformations.
3. To add a constant transformation on a column of a Metaview table, click against the column.A popup opens, which allows you to define the transformation.
4. In the popup, select the Undefined column value on the left.This variable indicates the resulting value of the transformation to be populated in the destinationMetaview column.
5. Select the Constant option on the right.6. From the Type field, select the datatype of the constant value you wish to define.7. In the Value field, enter a constant value of the datatype selected in the previous step.
The constant value shows on the left.8. Click OK.9. Click Save.
The applied constant transformation is reflected on the canvas with a transformation node.
Applying a Function TransformationA function transformation allows you to apply functions of string, numeric, conversion, and datetimecategories to define a column of a Metaview table, or one of the parameters of a parent functiontransformation.
1. Click on the Transformations section in the Metaview Editor.2. Select the Metaview table on the canvas for which you wish to define the transformations.
3. To add a function transformation on a column of a Metaview table, click against the column.A popup opens, which allows you to define the transformation.
4. In the popup, select the Undefined column value on the left.This variable indicates the resulting value of the transformation to be populated in the destinationMetaview column.
46Spectrum™ Technology Platform 11.0 Data Federation Guide
Designing Metaviews

5. Select the Function option on the right.6. In the Category field, select one of the following categories:
• String• Numeric• Conversion• Datetime
7. In the Name field, select the function you wish to apply.The transformation definition on the left displays the number of undefined parameters expectedin the function.
8. To define the parameters of the selected function, expand the function on the left.9. Select an undefined parameter of the function on the left.10. Define the parameter using either of the options Column, Constant, or Function.
Ensure that the resulting datatype of the defined parameter matches the expected datatypefor the parameter in the parent function.
Note:
11. Repeat steps 9 - 10 to define each parameter of the parent function.12. Click OK.
The applied function transformation is reflected on the canvas with a transformation node.13. Click Save.
Example - Applying a Function Transformation to a column of a Metaview tableFor example, if you wish to trim spaces from the right of each value of the columnItemName of the Baseview table New and fill in the trimmed value into the linkedName column of the Metaview table Item:
1. Select the Item table on the canvas.2. Click against the Name column in the Transformations section of theMetaview
Editor.3. In the popup, select undefined on the left.4. On the right, select the Function option.5. In the Category field, select String.6. In the Name field, select the rtrim(string string) function.7. On the left, select the undefined function parameter. As shown in the function
name, the expected datatype of the parameter is String.8. Define the parameter using either of the optionsColumn,Constant, or Function,
such that the resulting datatype of the parameter is String.9. Click OK.
The applied function transformation is depicted on the canvas as below:
47Spectrum™ Technology Platform 11.0 Data Federation Guide
Designing Metaviews

Conversion Function TransformationA conversion function allows you to convert values from one datatype into another datatype, fromone format into another format, or parse values according to desired formats.
A conversion function is applied to convert the data from a source table column data or a constantinto the desired datatype or format. This converted data populates the selected column of a Metaviewtable.
The various conversion functions available are:
This function allows you to convert values of one datatype into anotherdatatype.
cast
This function allows you convert a value of any datatype into a String valueusing a provided format.
format
This function allows you to parse a string value into the desired datatypeusing a provided format.
parse
This function allows you to convert a CLOB type value into bytes.to_bytes
This function allows you to convert a BLOB type value into chars.to_chars
Parameters of Conversion FunctionsThe cast, format, and parse conversion functions have two parameters:
• Source value of a certain datatype and format• Target datatype or format into which the source value needs to be converted, or using which thesource value needs to be parsed.
This convention is not applicable for to_bytes and to_chars conversion functions.Note:
48Spectrum™ Technology Platform 11.0 Data Federation Guide
Designing Metaviews

Applying a Conversion Transformation
The below steps do not apply to the conversion functions to_bytes and to_chars.Note:
1. In the Transformations section of theMetaview Editor click against the column to be edited.A popup opens.
2. In the popup, select the Undefined column value on the left.This variable indicates the resulting value of the transformation to be populated in the destinationMetaview column.
3. Select the Function option on the right.4. In the Category field, select Conversion.5. In the Name field, select the function you wish to apply.
The transformation definition on the left displays the two undefined parameters expected inthe function, on expanding the function.
• First Parameter: The source value which needs to be converted.• Second Parameter: The target datatype or format into which the source value needs to beconverted, or using which the source value needs to be parsed.
6. Select the first undefined parameter on the left.7. Define the first parameter of the conversion function using one of the optionsColumn,Constant,
or Function.The source value shows on the left for the first parameter.
Ensure the resulting datatype matches the expected datatype for the first parameter ofthe cast function.
Note:
8. Select the second undefined parameter on the left.9. Select the Constant option on the right.10. From the Type field, select the datatype String.11. In the Value field, type in the desired target datatype into which the first parameter value is to be
converted. For more information, see Supported Datatypes for Conversion Transformationson page 97.The target datatype value shows on the left for the second parameter.
12. Click OK.The applied conversion function transformation is reflected on the canvas with a link.
13. Click Save.
Example - Applying a Cast Conversion Function TransformationFor example, if you wish to convert an Integer value from the column BALANCE ofthe Baseview table CUSTOMER of the Baseview ClientSheet into a Float value topopulate the column CUSTBALANCE of a Metaview table CUSTPROFILE:
1. Select the CUSTPROFILE Metaview table on the canvas.
49Spectrum™ Technology Platform 11.0 Data Federation Guide
Designing Metaviews

2. Click against the CUSTBALANCE column in the Transformations section ofthe Metaview Editor.
3. In the popup, select undefined on the left.4. On the right, select the Function option.5. In the Category field, select Conversion.6. In theName field, select the cast(Integer value,string target) function.7. On the left, select the first undefined function parameter. The expected datatype
of the first parameter is Integer.8. For the first parameter, select the column BALANCE of the Baseview table
CUSTOMER.
• Select the Column option.• In the Baseview Name field, select the Baseview ClientSheet.• In the Table Name field, select a table CUSTOMER.• In the Column Name field, select the column BALANCE.
The Integer value from this column becomes the first parameter of the cast function.9. On the left in the popup, select the second undefined function parameter. The
expected datatype of the second parameter is string.10. For the second parameter:
• Select the Constant option.• From the Type field, select the datatype String.• In the Value field, enter Float. This is the target datatype.
The target datatype Float becomes the second parameter of the cast function.11. Click OK.
The applied cast conversion function transformation is depicted on the canvas.
Editing a Transformation
1. To edit a transformation, in the Transformations section of theMetaview Editor, click againstthe column to be edited.In case of constant and function transformations, you can also double click the transformationnode on the canvas to edit it.
2. In the popup, select the column or function parameter on the left which you wish to modify.3. Select an option from Column, Constant, or Function to define the transformation, on the right.
DescriptionOption
Derive the resulting value from a Baseview table column.Column
50Spectrum™ Technology Platform 11.0 Data Federation Guide
Designing Metaviews

DescriptionOption
Define the resulting value as a constant value.Constant
Define the resulting value using one of the various Integer, String,Conversion, and Datetime functions.
Function
4. Define the transformation using either one of the above three options, or a desired combinationof any of the three.The transformation defined is displayed on the left in the popup, and is applied on the column ofthe selected Metaview table.
5. Click OK.6. Click Save.
The edited transformation is displayed on the canvas for the particular column of the Metaview table.
Deleting a Transformation
1. Delete a transformation using either of the below ways:
• Select the transformation function node or the transformation link on the canvas and pressDelete on your keyboard.
• In the Transformations section of the Metaview Editor, click against the transformationyou wish to delete.
2. Click Save.
Criteria
The Criteria section allows you to define the required criteria to filter the data retrieved from thesource Baseviews while populating a Metaview's tables.
Adding criteria for a Metaview column is an optional step.Note:
Components of a Criterion
The criteria definition of a Metaview consists of a parent group, which comprises of a hierarchy ofchild criteria and child groups.
A group is defined using multiple criteria and child groups. You can create a hierarchyof child groups and criteria up to any desired level within the parent group.
For each group, you need to specify whether the data fetched from the source Baseviewtables needs to satisfy all, at least one or none of the defined criteria of that group.
Group
51Spectrum™ Technology Platform 11.0 Data Federation Guide
Designing Metaviews

A criterion is defined using either one or two operands and a logical operator.
The selected logical operator either compares the left operand to the values defined inthe right operand, or places a condition on the left operand.
Criterion
The column of the Baseview table on which you wish to define thecriterion.
Left Operand
The right operand is defined as any one of the following:Right Operand
• A constant• A set of constants• A column of any of the Baseview tables• A set of columns of any of the Baseview tables
The logical operator defines the condition to be fulfilled for thecriterion. The operator can:
Operator
• Place a condition on the left operand.• Place a condition comparing the left operand with the rightoperand.
Creating a Criterion
The Criteria section is displayed for the selected Metaview table only if at least onetransformation is defined for the table.
Note:
1. Expand the Criteria section in the Metaview Editor.2. Click Add/Edit Criteria.
The Criteria Builder window opens.3. Click Add Group.4. Select a grouping method for the criteria by clicking on <group>. Specify whether it is necessary
to fulfill all, at least one, or none of the criteria defined in the criteria group.5. To add a child group to the parent group, select the parent group, and click Add Group.6. To add a criterion to a group, select the parent group, and click Add Comparison. The added
criterion shows in the Expression Builder on the right.a) To define the left operand of the criterion, in the Expression Builder on the right, click
<Column 1> to select one of the Baseview table columns.a) To select a logical operator from the provided list, in the Expression Builder on the right,
click <comparison>.If the selected logical operator requires a right operand, a placeholder for the right operandis displayed to be defined.
b) If the right operand is required, to define it click <Column 2>.The right operand can be defined using:
Enter the constant, and click Add.Constant
52Spectrum™ Technology Platform 11.0 Data Federation Guide
Designing Metaviews

Select one of the available Baseview columns.Baseview table column
Based on the number of operands the logical operator expects in the right operand, definethe right operand as any of the below:
• A constant• A set of constants• A column of any of the Baseview tables• A set of columns of any of the Baseview tables
7. Repeat steps 5 and 6 as many times as is required to create the desired criteria.8. Click Save.
All, any, or none of the defined set of child criteria need to hold true in order to retrieve the requireddata from the connected Baseview tables into the target Metaview table columns. This is as definedfor the parent criterion.
Editing a Criterion
1. Expand the Criteria section in the Metaview Editor.2. Click Add/Edit Criteria.
The Criteria Builder window opens.3. Select the group, child group or criterion you wish to edit.4. Make the required changes.5. Click Save.
Deleting a Criterion
1. Expand the Criteria section in the Metaview Editor.2. Click Add/Edit Criteria.
The Criteria Builder window opens.3. Select the group, child group or criterion you wish to delete.4. Click Delete.5. Click Save in the header.
Cache Configuration
Spectrum™ Data Federation allows you to enable caching of a Metaview's data. This reduces therisk of data delays due to network congestion associated with accessing external data sourcesregularly.
Metaview caching can be switched on for all, selected, or none of the tables of a Metaview. Thelifetime of a Metaview cache is configurable, post which the cache data expires and is reloaded.
53Spectrum™ Technology Platform 11.0 Data Federation Guide
Designing Metaviews

The cache for each Metaview table is loaded when the first query is executed toaccess the table, if Metaview caching is switched on for the table.
Cache Load
After caching is switched on for a Metaview, the execution of the first queryto a Virtual Data Source of which the Metaview is a part, might take longer
Note:
than usual. This is because the cache data is first refreshed from the datasource, following which the required data is fetched from the refreshedcache.
This is also the case when the first query post cache expiry is executedon the Virtual Data Source.
Each Metaview cache is associated with the Virtual Data Source of which theMetaview is a part. All queries targeting a particular Virtual Data Source, originating
Cache Scope
from across users and sessions, use the same Metaview cache. This continuesuntil the cache expires or the Virtual Data Source is undeployed, whichever occursfirst.
This is the duration between a cache load until the next purge of the cache. Oncea cache expires, the cache data is reloaded from the data sources when theimmediately next query is executed.
The next cache expiry time is calculated from the moment the cache data reloadis completed. Once the expiry time is reached, the cache data is purged again.
Cache ExpiryDuration
The default cache expiry duration is 120 mins.
Baseview data is not cached as part of a Metaview cache.Note:
Configuring a Metaview Cache
1. To enable caching on all the tables of the Metaview, click All in the Cache section at the top ofthe Metaview Editor.
2. To switch off caching on all the tables of the Metaview, click None in the Cache section at thetop of the Metaview Editor.
3. To configure the default cache settings for the entire Metaview, click .a) In the popup, enter the cache expiry duration in minutes in the textfield. The duration entered
here is applicable to all the tables in the Metaview.b) To apply these cache setting to the entire Metaview, without overriding the respective cache
settings of individual Metaview tables, click OK.c) To apply these cache settings to the entire Metaview, and override any individual Metaview
table cache settings, click Apply to All.A message prompts you to confirm the same. Click Yes.
4. To enable caching on a specific Metaview table, select the Metaview table on the canvas forwhich you wish to switch on caching.
5. Expand the Cache Configuration section in the Metaview Editor.
54Spectrum™ Technology Platform 11.0 Data Federation Guide
Designing Metaviews

6. To switch on caching for the selected Metaview table, slideCache to On. To keep caching disabledon the selected table, slide Cache to Off.
The Partial field at the top of theMetaview Editor indicates if caching has been enabledon selected Metaview tables, instead of all or none of the Metaview tables.
Note:
7. To define a cache expiry duration for the table that overrides the default cache duration of theentire Metaview, check theOverride default cache expiry duration as minutes field, and enterthe duration in minutes in the associated textfield.
8. Click Save.
Metaview caching is now successfully configured for all, selected, or none of its tables, as perselected cache settings.
The cache configuration is enabled for the Metaview when the Virtual Data Source basedon it is deployed. In case the corresponding Virtual Data Source is already deployed, it needsto be undeployed and then redeployed again for the cache configurations to be enabled.
Note:
Deleting a Metaview
1. Click Metaview in the top bar.2. Click on the Metaview dropdown and select the Metaview you wish to delete.3. Click Delete in the header.
A window prompts you to confirm the deletion.4. Click Yes.
A message confirms the successful deletion of the Metaview.
55Spectrum™ Technology Platform 11.0 Data Federation Guide
Designing Metaviews

7 - Designing VirtualData Sources
In this section
Virtual Data Source 57Creating a Virtual Data Source 57Modifying a Virtual Data Source 58Deploying or Undeploying a Virtual Data Source 59Previewing a Virtual Data Source 59Deleting a Virtual Data Source 60

Virtual Data Source
A Virtual Data Source is the business-specific virtual representation of the data collected fromdifferent heterogeneous data sources. The collected data is represented in a business specificmodel by strategically grouping the relevant Metaviews and Baseviews.
Multiple Virtual Data Sources can be created to suit different business requirements, by appropriatelygrouping available Metaviews and Baseviews.
Once created, a Virtual Data Source needs to be deployed for its data to be accessed by the clientapplication. A deployed Virtual Data Source can be undeployed from use, when required.
Creating a Virtual Data Source
To create a Virtual Data Source, navigate to Virtual Data Source, and select the Baseviews and/orMetaviews to include in it.
1. Go to Virtual Data Source.
2. By default, the screen opens in the create mode. Otherwise, click to add a new Virtual DataSource.
3. Enter a name in the text box for the new Virtual Data Source.All the available Baseviews and Metaviews are listed in a grid.
4. Filter the grid entries according to the view names, and/or types.For example, if you want to filter the results based on Baseview names beginning with the text"Cust", type Cust in the filter box at the top of the Name column of the grid. The grid lists theviews with names beginning with "Cust".
If you want to display only the Metaviews, type Metaview in the filter box at the top of the Typecolumn of the grid. The grid lists all the Metaviews.
5. To select the required Metaviews and Baseviews from the grid that you want to include in theVirtual Data Source, click the respective row. To select all the listed views, select the checkboxin the header row.To remove any selected view, click the respective row.
When you add a Metaview to the Virtual Data Source, but do not select the Baseviews on whichthe Metaview is dependent, a message prompts you to add its related Baseviews as well. ClickYes to add the related Baseviews of the Metaview to the Virtual Data Source.
The deployment of a Virtual Data Source fails if a constituent Metaview's related Baseviewshave not been added to it.
Note:
57Spectrum™ Technology Platform 11.0 Data Federation Guide
Designing Virtual Data Sources
The Total Items field below the grid displays the total number of views present, while the SelectedItems field displays the number of views selected for inclusion in the Virtual Data Source.
6. Click Save.
The selected Metaviews and Baseviews are now displayed at the top of the grid, followed by theunselected ones.
To view a hierarchical illustration of the Spectrum™ Data Federation entities designed so far, whichhas this created Virtual Data Source in focus, click Lineage in the top bar. For more information,see Lineage on page 62.
Modifying a Virtual Data Source
To modify an existing Virtual Data Source, navigate to Virtual Data Source, select the Virtual DataSource you wish to modify, and add / remove the Metaviews and / or Baseviews from it as required.
Only an undeployed Virtual Data Source can be modified. To modify a deployed Virtual Data Source,first undeploy it and then modify it.
1. Go to Virtual Data Source.2. Select the Virtual Data Source from the left sidebar which you wish to modify.
On selecting a Virtual Data Source, its previously selected views are displayed at the top of thegrid below, followed by the unselected ones.
3. Remove any added Metaviews and Baseviews from a Virtual Data Source, as well as add otheravailable Metaviews and / or Baseviews to it, as required, by clicking the respective rows.If you select a Metaview to add to the Virtual Data Source, but do not select the Baseviews onwhich the Metaview is dependent, a message prompts you to select those Baseviews as well.Click Yes to add these related Baseviews to the Virtual Data Source.
The deployment of a Virtual Data Source fails if a constituent Metaview's related Baseviewshave not been added to it.
Note:
4. Click Save.
The selected Metaviews and Baseviews are now displayed at the top of the grid, followed by theunselected ones.
To view a hierarchical illustration of the Spectrum™ Data Federation entities designed so far, whichhas this created Virtual Data Source in focus, click Lineage in the top bar. For more information,see Lineage on page 62.
58Spectrum™ Technology Platform 11.0 Data Federation Guide
Designing Virtual Data Sources

Deploying or Undeploying a Virtual Data Source
To deploy or undeploy an existing Virtual Data Source, navigate to Virtual Data Source, select thedesired Virtual Data Source, and click Deploy / Undeploy.
1. Go to Virtual Data Source.2. Select the Virtual Data Source from the left sidebar which you wish to deploy / undeploy.3. You can deploy an available Virtual Data Source for use in your application, or undeploy an
already deployed Virtual Data Source.
• Click Deploy to use the data from the Virtual Data Source in your application.• Click Undeploy to detach the Virtual Data Source from your application.
Note: 1. On undeploying a Virtual Data Source which is in use currently, any further usage ofconnections created previously for using this undeployed Virtual Data Source will resultin a runtime exception.
If the same Virtual Data Source is deployed again, a new connection needs to becreated to use it.
Note:
2. If a Baseview or Metaview on which a Virtual Data Source is dependent is deleted, theVirtual Data Source continues to function until it is redeployed. A warning message isdisplayed to convey the list of entities which no longer exist.
3. If the underlying Metaview or Baseview of a Virtual Data Source is based on an SAPconnection, and has entities which include columns of custom-defined datatypes, youcannot deploy the Virtual Data Source.
To deploy a Virtual Data Source derived from an SAP connection, ensure its Metaviewsand Baseviews include only such entities whose columns are of native datatypes.
Previewing a Virtual Data Source
To preview a deployed Virtual Data Source, select it, click Preview, and run the required SQL query.
An undeployed Virtual Data Source cannot be previewed.Note:
1. Go to Virtual Data Source.2. Select the desired deployed Virtual Data Source from the left sidebar.3. Click Preview.
59Spectrum™ Technology Platform 11.0 Data Federation Guide
Designing Virtual Data Sources

4. In the Query textbox, type in the SQL query to retrieve desired data from the selected VirtualData Source. Enclose the table name within double-quotes.select * from "EMPLOYEE_SALARY";
5. Click Fetch Data.
A preview of the data fetched from the constituent Baseviews and Metaviews is displayed.
Deleting a Virtual Data Source
Only an undeployed Virtual Data Source can be deleted. To delete a deployed Virtual Data Source,first undeploy it and then delete it.
1. Go to Virtual Data Source.2. Select the Virtual Data Source from the left sidebar which you wish to delete.3. Click Delete.
A message confirms the successful deletion of the Virtual Data Source.
60Spectrum™ Technology Platform 11.0 Data Federation Guide
Designing Virtual Data Sources

8 - Common Features
In this section
Lineage 62Cache Management 63

Lineage
The Lineage button lets you view a hierarchical illustration of the designed Spectrum™ DataFederation flow. You can arrive at the Lineage screen from within aBaseview,Metaview, or VirtualData Source.
The illustration maintains focus on the component from within which you arrive at the Lineagescreen.
For instance, if you click the Lineage button from within a Baseview, the tree-hierarchy illustrationkeeps the selected Baseview in focus while displaying the data federation flow designed so far,including the Data Source Connections, Metaviews and Virtual Data Sources added, if any.
Viewing Lineage
From within theBaseview,Metaview, or Virtual Data Source screen, select the respective desiredentity, and click Lineage in the top bar.
1. Go to Baseview, Metaview, or Virtual Data Source.2. Select the respective entity for which you wish to view the hierarchical illustration.3. Click Lineage in the top bar.
The Lineage screen displays the designed Spectrum™ Data Federation flow, keeping the selectedBaseview / Metaview / Virtual Data Source in focus. The name of the selected entity is displayed inthe header of the Lineage screen.
If you hover using the mouse over a Lineage component using your mouse, the name of thecorresponding Baseview / Metaview / Virtual Data Source is displayed in a tooltip.
The legend to the bottom right of the Lineage screen identifies the symbols used to denoteData Source Connections, Baseviews, Metaviews, and Virtual Data Sources.
Note:
62Spectrum™ Technology Platform 11.0 Data Federation Guide
Common Features

Cache Management
Spectrum™ Data Federation allows caching in two ways: caching the data of a Metaview, andcaching the resultset of queries executed on a Spectrum™ Data Federation connection in EnterpriseDesigner.
Types of CachingRefers to caching the data of a Metaview. Caching can be switched on for all,selected, or none of the tables of a Metaview. The lifetime of a Metaview cache
MetaviewCaching
is configurable, post which the cache data expires and is reloaded. For moreinformation, see Cache Configuration on page 53.
Refers to the caching of the resultsets of queries executed using a Spectrum™
Data Federation connection, while running dataflows in Enterprise Designer.ResultsetCaching
The resultset of a query execution is cached once. Each subsequent executionof the same query utilizes the cached query resultset instead of making a datasource trip. For more information, see Resultset Caching on page 63.
If Spectrum™ Technology Platform runs on a clustered environment, the Spectrum™ DataFederation Module creates a separate cache on each cluster node. The cache data on anyindividual node is not shared with other cluster nodes.
Note:
Resultset Caching
Resultset Caching refers to the caching of the resultsets of executed queries.
Once a query's resultset is cached, subsequent executions of the same query access the cacheinstead of making data source trips. This continues till the cache expires, post which the resultsetcache is refreshed on the immediately next execution of the same query.
This improves the performance and execution times of frequently executed queries.
The default cache expiry duration is as configured in the federation_config.propertiesfile. For more information, see Cache Configuration Properties on page 76.
Note:
Query Level CachingCaching can be switched on or off for each individual query.
To switch on caching for a particular query, a Cache Hint is appended at the beginning of the querywhile configuring the query for the respective Spectrum dataflow stage.
To use an existing resultset cache, each of its subsequent executions must have theexact syntactical format of the cached query, including the Cache Hint. Else, the queryis considered a different one, resulting in the creation of a fresh query cache.
Attention:
63Spectrum™ Technology Platform 11.0 Data Federation Guide
Common Features

Cache Hint
A Cache Hint appended to a query indicates that the query's resultset needs to be cached when itis first executed.
The Cache Hint must be appended at the beginning of the query only.Note:
Components of a Cache Hint
A Cache Hint consists of parameters to configure the properties of the cache, like cache expiryduration.
The syntax of a Cache Hint is as follows:
/*+ cache[([ttl:n])]*/
ttl:nIndicates the cache's time to live in milliseconds. After this duration, the cache expiresand is reloaded when the same query is executed next.
The ttl value mentioned in a Cache Hint overrides the default cache expiry timefor that individual query's resultset cache.
If the ttl value is not included in the Cache Hint, the default cache expiry time isapplied for that individual query's resultset cache.
The default cache expiry duration is as configured in thefederation_config.properties file. For more information, seeCache Configuration Properties on page 76.
Note:
For example:
In the below query, the resultset cache created expires after 9500000 milliseconds,overriding the default expiry time value.
/*+ cache(ttl:9500000) */ SELECT * FROM customer_m
However, in the following query, the cache expiry duration is set to the default expirytime value.
/*+ cache */ SELECT * FROM customer_m
Configuring Query level Resultset Caching
1. Open the Read from DB Options of the Read from DB stage.2. Create the SQL query in the SQL field, either manually or using the Visual Query Builder.3. In the SQL field, append the Cache Hint at the beginning of the SQL query to cache its resultset,
or use the existing cache of the same query.
64Spectrum™ Technology Platform 11.0 Data Federation Guide
Common Features

4. Click OK.
The resultset of the query is cached the first time it is executed. The cache expires after the configuredttl value.
65Spectrum™ Technology Platform 11.0 Data Federation Guide
Common Features

9 - Using theAdministration Utility
In this section
Getting Started with the Administration Utility 67Using a Script with the Administration Utility 68Categories of Commands 69System 70

Getting Started with the Administration Utility
The Administration Utility provides command line access to several administrative functions. Youcan use it in a script, allowing you to automate certain administrative tasks. You can also use itinteractively. Not all administrative functions are available in the Administration Utility. UseManagement Console to access the functions that are not available in the Administration Utility.
The Administration Utility requires Java 8 or later. If you are installing the AdministrationUtility on the same computer where the Spectrum™ Technology Platform server is installed,
Note:
Java 8 is already installed since it is included with the server. If you want to install theAdministration Utility on another computer, make sure that the computer has Java 8 or laterinstalled.
1. Open a web browser and go to the Spectrum™ Technology Platform Welcome Page at:
http://<servername>:<port>
For example, if you installed Spectrum™ Technology Platform on a computer named"myspectrumplatform" and it is using the default HTTP port 8080, you would go to:
http://myspectrumplatform:8080
2. Click Platform Client Tools.3. Click Command Line Clients.4. Under Administration Utility, click Download and download the zip file to the computer where
you want to use the Administration Utility.5. Extract the contents of the zip file.6. To launch the command line interface, do one of the following:
• If you are running the server on a Unix or Linux system, execute cli.sh.• If you are running the server on a Windows system, execute cli.cmd.
If necessary, modify the .sh or .cmd file to use the path to your Java installation.Note:
7. Connect to the Spectrum™ Technology Platform server that you want to administer. To connectto the server, execute the following command:
connect --h servername:port --u username --p password --s SSLTrueOrFalse
For example:
connect --h myserver:8080 --u admin --p myPassword1 --s true
8. Once you are connected you can execute commands. Note the following tips:
• For a list of available commands, type help or press the tab key.
67Spectrum™ Technology Platform 11.0 Data Federation Guide
Using the Administration Utility

• To auto-complete a command, type the first few characters then press the tab key. For example,typing us then pressing the tab key automatically completes the command user. Pressing thetab key again will display a list of all the user commands.
• If you specify an option value that contains a space, enclose the value in double quotes.
9. When you are done, type exit to exit the Administration Utility.
Using a Script with the Administration Utility
The Administration Utility can execute a series of commands from a script file. This is useful if youwant to automate or standardize administrative actions through the use of a script instead of manuallyexecuting commands.
1. Using a text editor, create a script file. A script file contains the commands that you want toexecute.
To add a command to a script file, type the command and the necessary parameters as youwould if you were entering the command at the command prompt. Enter one command per line.
To insert comments into a script file, use the following notation:
Indicates the start of a block comment./*
Indicates the end of a block comment.*/
Indicates an inline comment. Use at the start of a line only.//
Indicates an inline comment. Use at the start of a line only.;
2. Save the script either on the computer where you run the Administration Utility or in a locationthat is accessible from the computer where you run the Administration Utility. You can use anyfile name and extension you choose. The recommend file extension is .cli.
3. To execute the script, do one of the following:
DescriptionOption
Specify the following at the command line or in a batch orshell script:
To execute the script at thecommand line
cli.cmd --cmdfile ScriptFile
Open the Administration Utility and connect to the Spectrum™
Technology Platform server using the connect command.To execute the script form theAdministration Utility
Then, use the script command to execute the script. Formore information on this command, see script.
68Spectrum™ Technology Platform 11.0 Data Federation Guide
Using the Administration Utility

4. Use the script command to execute the script. For more information on this command, see scripton page 71.
Categories of Commands
The Administration Utility commands for Spectrum™ Data Federation are broadly categorized asData Source, Baseview, Metaview, and Virtual Data Source commands.
The Data Source commands provide the functionality to export and/or import all thedata sources supported by Spectrum™ Data Federation except JDBC specific datasources.
To get the list of various commands supported under this category, typesdfdatasource in the Administration Utility and press the Tab key.
Data Source
To get the details of a particular command and its various parameters, type help<command name>.
For example:
help sdfdatasource export
The Baseview commands provide the functionality to export and/or import allBaseviews defined in Spectrum™ Data Federation.
To get the list of various commands supported under this category, typesdfbaseview in the Administration Utility and press the Tab key.
Baseview
To get the details of a particular command and its various parameters, type help<command name>.
For example:
help sdfbaseview export
The Metaview commands provide the functionality to export and/or import allMetaviews defined in Spectrum™ Data Federation.
To get the list of various commands supported under this category, typesdfmetaview in the Administration Utility and press the Tab key.
Metaview
To get the details of a particular command and its various parameters, type help<command name>.
For example:
help sdfmetaview export
69Spectrum™ Technology Platform 11.0 Data Federation Guide
Using the Administration Utility

The commands of this category provide the functionality to export and/or import allVirtual Data Sources defined in Spectrum™ Data Federation.
To get the list of various commands supported under this category, typesdfvirtualdatasource in the Administration Utility and press the Tab key.
Virtual DataSource
To get the details of a particular command and its various parameters, type help<command name>.
For example:
help sdfvirtualdatasource export
System
connect
The connect command opens a session with the Spectrum™ Technology Platform server youspecify. You must issue the connect command before you can issue other commands.
Usageconnect --h HostName --u UserName --p Password --s TrueOrFalse
DescriptionArgumentRequired
The host name and port to connect to, separated by a colon.For example, to connect to MyServer on port 8080 you wouldspecify --h MyServer:8080.
--h HostNameYes
The user name to use to authenticate to the server.--u UserNameYes
The password for the user.--p PasswordYes
Specifies whether to create a secure connection using SSL.You can only connect to the server over a secure connection
--s TrueOrFalseNo
if the server has been configured to support SSLcommunication. TrueOrFalse must be one of the following:true
Use SSL.
falseDo not use SSL. This is the default setting.
70Spectrum™ Technology Platform 11.0 Data Federation Guide
Using the Administration Utility

Example
This example opens a connection to the server MyServer on port 8080 with the username admin and the password myPassword1.
connect --h MyServer:8080 --u admin --p myPassword1
script
The script command directs the command line interface to execute a script containing a seriesof commands. You can use a script to automate administrative tasks.
Usagescript --file ScriptFile --linenumbers TrueOrFalse
DescriptionArgumentRequired
Specifies the path to the script file.--file ScriptFileYes
Specifies whether to display line numbers whileexecuting the script, where TrueOrFalse is oneof the following:true
--linenumbers TrueOrFalseNo
Displays line numbers whileexecuting the script.
falseDoes not display line numberswhile executing the script.This is the default value.
71Spectrum™ Technology Platform 11.0 Data Federation Guide
Using the Administration Utility

10 - Conventions
In this section
Naming Conventions 73Query Conventions 73

Naming Conventions
• The names of Data Source Connections, Baseviews, Metaviews and Virtual Data Sources mustbegin with a letter, and consist of only alphanumeric characters and underscores.
• The names of Data Source Connections, Baseviews, Metaviews and Virtual Data Sources cancontain reserved words.
• The names of the tables and columns of a Baseview's underlying data source can contain specialcharacters and reserved words.
• The names of tables and columns of a Metaview can contain reserved words.
Query Conventions
• While previewing a Virtual Data Source using an SQL query, enclose a table name or columnname containing reserved words or special characters within double quotes.
If a table name or column name does not contain special characters or reserved words, do notenclose it in double quotes. For a list of reserved keywords, see Reserved Keywords on page91.
For example, the table name CUSTOMER_DETAILS in the below query does not need to beenclosed within double quotes, since it is not a reserved word:
select * from CUSTOMER_DETAILS
But in the below query, the column name DATE, being a reserved word, needs to be enclosedwithin double quotes, while the CUSTOMER_ID column does not need to be enclosed:
select "DATE", CUSTOMER_ID from CUSTOMER_DETAILS
• If a column name includes a pair of double quotes, enclose the column name in two additionalpairs of double quotes while using it in a query.
For example, if the table CUSTOMER_DETAILS has the column "CITY", such that the columnname includes the double quotes, use this column in a query as below:
select """CITY""" from CUSTOMER_DETAILS
73Spectrum™ Technology Platform 11.0 Data Federation Guide
Conventions

11 - Configurations
In this section
Property Files 75Required JAR Files 76JDBC Driver Configuration 78ODBC Driver Configuration 79
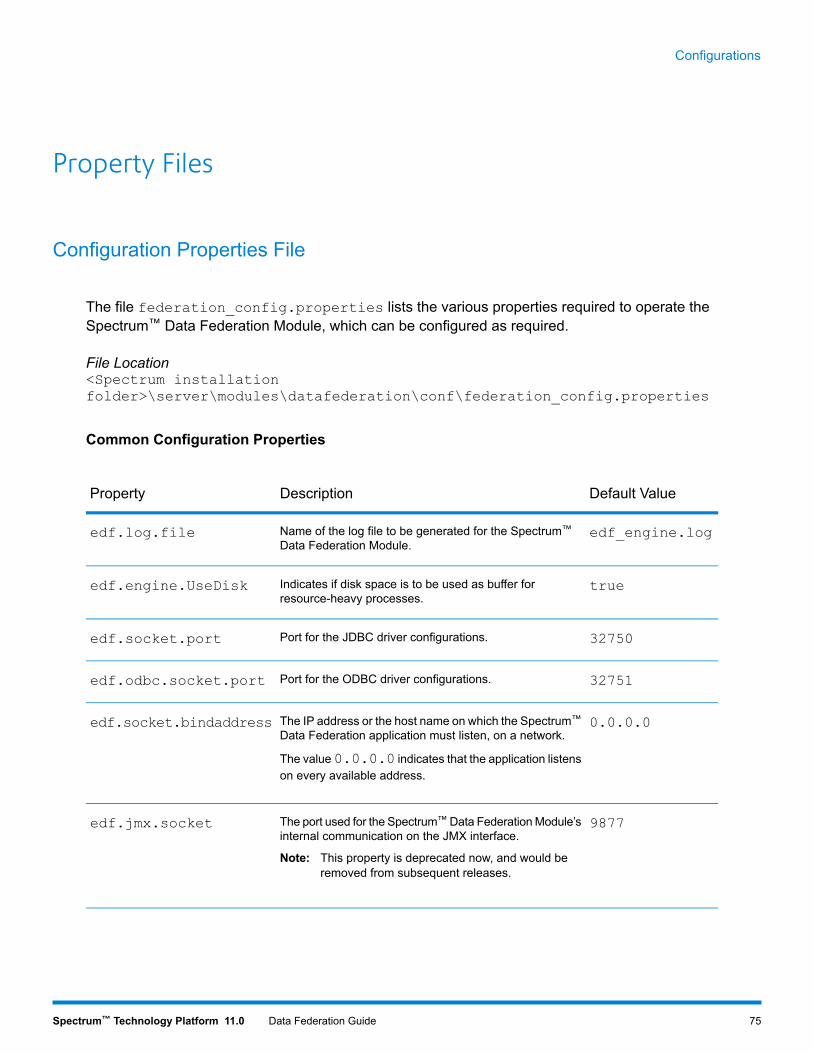
Property Files
Configuration Properties File
The file federation_config.properties lists the various properties required to operate theSpectrum™ Data Federation Module, which can be configured as required.
File Location<Spectrum installationfolder>\server\modules\datafederation\conf\federation_config.properties
Common Configuration Properties
Default ValueDescriptionProperty
edf_engine.logName of the log file to be generated for the Spectrum™
Data Federation Module.edf.log.file
trueIndicates if disk space is to be used as buffer forresource-heavy processes.
edf.engine.UseDisk
32750Port for the JDBC driver configurations.edf.socket.port
32751Port for the ODBC driver configurations.edf.odbc.socket.port
0.0.0.0The IP address or the host name on which the Spectrum™
Data Federation application must listen, on a network.
The value0.0.0.0 indicates that the application listenson every available address.
edf.socket.bindaddress
9877The port used for the Spectrum™Data FederationModule’sinternal communication on the JMX interface.
edf.jmx.socket
This property is deprecated now, and would beremoved from subsequent releases.
Note:
75Spectrum™ Technology Platform 11.0 Data Federation Guide
Configurations

Cache Configuration Properties
Default ValueDescriptionProperty
7200000The default expiry time of the resultset cache in milliseconds.
The value entered here is taken as the default cache expiry time ifa cache hint is configured without the ttl parameter.
edf.cache.resultset_defaultExpiryTime
If the ttl parameter is defined in a cache hint, the value definedin the cache hint overrides the default value.
See Cache Hint on page 64.
1024Maximum number of resultsets that can be stored in the cache atany given time
edf.cache.resultset_maxEntries
1048576Maximum size in kilobytes of the in-memory buffer space to be usedwhile processing data by the Spectrum™ Data Federation Module.
edf.cache.maxMemory
-1Maximum size in kilobytes of memory available for use whileprocessing complex queries involving intermediate results.
To auto-calculate a maximum size based on the maximum heapavailable, enter the value as -1.
edf.cache.memoryPerRequest
Required JAR Files
Connection JAR FilesTo connect to a Siebel server with a locale other than English, theSiebelJI_<locale>.jar file needs to installed.
For example, if the locale selected is French, the required jar file isSiebelJI_fra.jar.
Siebel Connection
For more information, see Installing a Siebel Locale JAR File on page 77.
Configuration JAR FilesFor users accessing the Spectrum™ Data Federation from an externalapplication, the sdf-jdbc.jar needs to be downloaded and installed. For more
JDBC Driver
information, see Installing JDBC Driver for an External Application on page77.
76Spectrum™ Technology Platform 11.0 Data Federation Guide
Configurations

Installing a Siebel Locale JAR File
To connect to a Siebel server with a locale other than English, the locale-specific jar file needs tobe installed. The jar file name follows the convention SiebelJI_<locale>.jar.
For example, if the locale selected is French, the required jar file is SiebelJI_fra.jar.
The English locale jar file, SiebelJI_enu.jar comes pre-installed with the Spectrum™ DataFederation installation.
Note:
1. Login to the Siebel server system, to which the connection is to be created.2. Navigate to the path {Siebel-server-installation-directory}\siebsrvr\CLASSES.3. Download the required locale specific Siebel JAR file from the mentioned path.4. Place the downloaded jar file in the mentioned path on the Spectrum™ server:
{installation-path}\Pitney Bowes\Spectrum\server\app\lib.
You can now create a Siebel connection in the locale for which you installed the jar file.
Installing JDBC Driver for an External Application
To install the JDBC driver in order to use the Spectrum™ Data Federation with your externalapplication, the sdf-jdbc.jar needs to be installed.
1. In the Spectrum™ Data Federation web UI, click on the admin dropdown in the header.2. Click on Download Spectrum™ Data Federation JDBC Driver.3. Save the sdf-jdbc.jar file in the default browser directory.
You do not need to restart the server.Note:
Once the JDBC driver is installed, use the below details to connect to the Spectrum™ server usinga simple code or any application:
1. Spectrum™ username2. Password to authenticate the Spectrum™ username3. JDBC Driver Class Name = com.pb.spectrum.sdf.driver.SDFDriver
4. Connection String Template =jdbc:spectrum://${host}:${port}/${virtualDataSource}.
Fill in the server IP or machine name in place of {host}, the port for the Spectrum™ DataFederation in {port}, and the name of the Virtual Data Source you wish to access in{virtualDataSource}.
You can now connect to any desired Virtual Data Source.
77Spectrum™ Technology Platform 11.0 Data Federation Guide
Configurations

JDBC Driver Configuration
To Access a Virtual Data Source from within the Spectrum™ Technology Platform:
For users accessing a Virtual Data Source of the Spectrum™ Data Federation Module from withinthe Spectrum™ Technology Platform, the JDBC driver is pre-installed as part of the Spectrum™
Technology Platform installation.
The Spectrum™ Data Federation option is available in Management Console, within Resources >JDBC Drivers.
To Access a Virtual Data Source from an External Application:
For users accessing the Spectrum™ Data Federation from an external application, the sdf-jdbc.jarneeds to be downloaded and installed manually. For more information, see Installing JDBC Driverfor an External Application on page 77.
Accessing a Virtual Data Source from within Spectrum™ Technology Platform
For users accessing a Virtual Data Source of the Spectrum™ Data Federation Module from withinthe Spectrum™ Technology Platform, the JDBC driver is pre-installed as part of the Spectrum™
Technology Platform installation.
You need to create a connection to the required Virtual Data Source to use it.
Creating a Connection to use a Virtual Data SourceTo use a Virtual Data Source of the Spectrum™ Data Federation Module, you need to create aconnection using Management Console.
In Management Console, ensure that the Spectrum™ Data Federation option is presentwithin Resources > JDBC Drivers.
Note:
1. In Management Console, go to Resources > Connections.2. Click Add.3. Enter a name for the connection in the Connection name field.4. Select Spectrum™ Data Federation in the Database driver field.5. In the Connection Options grid, enter the below details:
a) In the user field, enter a valid Spectrum™ username.
The entered user must have the 'Execute' right for the required Virtual Data Source.Note:
b) Enter the password for the user.
78Spectrum™ Technology Platform 11.0 Data Federation Guide
Configurations

c) In the host field, enter the IP or the machine name of the Spectrum™ server on which thedesired Virtual Data Source has been deployed.
d) In the port field, enter the port number to access the Spectrum™ Data Federation Module.The default port is 32750.
To see how to change the port, see Changing the Port for Spectrum™ DataFederation on page 79.
Note:
e) Enter the name of the Virtual Data Source you wish to use in the virtualDataSource field.
6. Click Test to test whether the defined connection works properly. A message confirms a successfulconnection.
7. Click OK.
Changing the Port for Spectrum™ Data Federation
1. Go to the path {Spectrum™ server installationdirectory}\server\modules\datafederation\conf.
2. Open the file federation_config.properties.3. Edit the property edf.socket.port to the desired port.4. Save the file.5. Restart the Spectrum™ Technology Platform server.
The new port can now be used to connect to desired Virtual Data Sources of the Spectrum™ DataFederation Module.
Accessing a Virtual Data Source from an External Application
For users accessing a Virtual Data Source of the Spectrum™ Data Federation Module from anexternal application, the JDBC driver needs to be downloaded and installed manually.
Once the JDBC driver is installed, connections to the Spectrum™ Data Federation can be createdusing simple code in order to use the Virtual Data Sources.
To see the steps to install the JDBC driver and using the same to create connections to the desiredVirtual Data Source, see Installing JDBC Driver for an External Application on page 77.
ODBC Driver Configuration
You can access a Virtual Data Source through an ODBC connection in applications supporting theODBC interface, like MS Excel, MS Access, and so on.
79Spectrum™ Technology Platform 11.0 Data Federation Guide
Configurations

Install the PostgreSQL ODBC driver to access a Virtual Data Source using an ODBC connection.
Installing the ODBC Driver
1. The version of the ODBC driver depends on the architecture of the client application.
• If the client application version is 32-bit, download the 32-bit PostgreSQL ODBC driver here.• If the client application version is 64-bit, download the 64-bit PostgreSQL ODBC driver here.
For example, if you are using the 32-bit version of MS Office, download the 32-bit ODBC driver.
2. Run the installer psqlodbc.msi in case of a 32-bit ODBC driver.In case of a 64-bit ODBC driver, run the .exe installer.
Follow the steps to complete the driver installation.
The ODBC driver is installed.
Creating a Data Source Name (DSN)
Ensure you have logged in to the client machine with administrative rights.Attention:
The following instructions are specific to Windows platforms.Note:
1. From the Start menu, go to Control Panel > Administrative Tools.2. Double-click Data Sources (ODBC).
The ODBC Data Source Administrator window opens.3. Click either the User DSN tab or the System DSN tab, depending on the type of DSN you wish
to create.4. Click Add.5. From the list of installed drivers on the machine, select PostgreSQL ANSI, and click Finish.
The PostgreSQL ANSI ODBC Driver (psqlODBC) Setup popup opens.
Select PostgreSQL ANSI or PostgreSQL Unicode, based on the client applicationthrough which the ODBC connection is to be used.
Attention:
6. In the popup, enter the following details to map this DSN to the desired Virtual Data Source:a) In the Data Source field, enter the name you wish to assign to the DSN.b) In the Database field, enter the name of the Virtual Data Source to which you wish to connect
through this DSN.c) In the Server field, enter the name of the machine on which the Spectrum™ Technology
Platform server is running.
80Spectrum™ Technology Platform 11.0 Data Federation Guide
Configurations

d) In the Port field, enter the value of the property edf.odbc.socket.port, as configured inthe federation_config.properties file. See Common Configuration Properties onpage 75.By default, the port is 32751.
e) In the User Name field, enter the username of the Spectrum™ Technology Platform server.f) In the Password field, enter the password of the Spectrum™ Technology Platform server.g) Click Datasource in the Options section.
The Advanced Options (PostgreSQL30) popup opens.h) On Page 1, configure the options as below:
i) Click Page 2, and configure the options as below:
81Spectrum™ Technology Platform 11.0 Data Federation Guide
Configurations
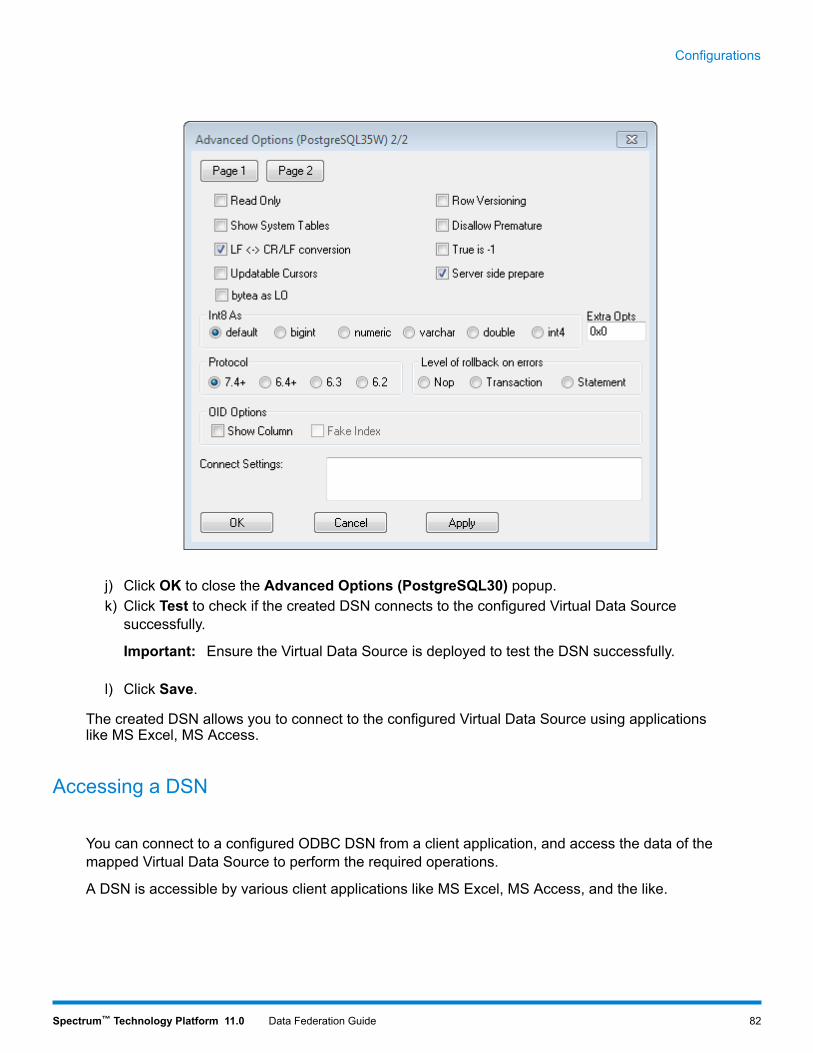
j) Click OK to close the Advanced Options (PostgreSQL30) popup.k) Click Test to check if the created DSN connects to the configured Virtual Data Source
successfully.
Ensure the Virtual Data Source is deployed to test the DSN successfully.Important:
l) Click Save.
The created DSN allows you to connect to the configured Virtual Data Source using applicationslike MS Excel, MS Access.
Accessing a DSN
You can connect to a configured ODBC DSN from a client application, and access the data of themapped Virtual Data Source to perform the required operations.
A DSN is accessible by various client applications like MS Excel, MS Access, and the like.
82Spectrum™ Technology Platform 11.0 Data Federation Guide
Configurations

Accessing a DSN through MS Excel
The following example illustrates the steps to connect to an ODBC DSN, and access a Virtual DataSource in MS Excel.
1. Open MS Excel.2. Go to Data > From Other Sources > From Data Connection Wizard.
The Data Connection Wizard opens.3. Select ODBC DSN as the type of data source.4. Click Next.5. From the list of ODBC data sources, select the DSN you wish to connect to.6. Click Next.7. Ensure the correct Virtual Data Source is selected in the database dropdown.8. If you wish to select any one of the listed tables of the Virtual Data Source, check the Connect
to a specific table checkbox, and select the desired table.Else, to select all the listed tables, leave the checkbox unchecked.
9. Click Next.
The contents of the selected table(s) are imported and displayed on the spreadsheet.
The data displayed in MS Excel is read-only.
However, writes are possible while accessing a DSN using MS Access and other clientapplications.
Note:
The example illustrates the process for a 32-bit ODBC driver.Note:
83Spectrum™ Technology Platform 11.0 Data Federation Guide
Configurations

12 - Limitations
In this section
Read Feature Limitations 85Write Feature Limitations 87

Read Feature Limitations
Common Read Limitations
1. Spectrum™ Data Federation does not interpret case sensitive field names as different names. Iftwo tables or column names use the same name but different cases, they are interpreted asduplicate names. If a Virtual Data Source contains such field names, the deployment of thatVirtual Data Source fails.
For example, fields like DeDup, Dedup, and DEdup are interpreted as duplicate names. Thedeployment of a Virtual Data Source containing such case-differentiated fields fails.
2. If a Data Source, Baseview, Metaview or Virtual Data Source has a dependency on a JDBCspecific data source, it cannot be imported or exported using the Administration Utility.
Siebel Connection Limitations
1. Fields of Siebel Business Components with the same names but differing cases are handled byleaving the first occurrence unchanged, while appending all subsequent occurrences with _PB_and an increasing numeral value.
For example, fields like DeDup Token, Dedup Token, and DEdup Token in a Siebel businesscomponent are renamed to DeDup Token, Dedup Token_PB_1, and DEdup Token_PB_2respectively and used.
2. If a field name contains a dot (.) in a Siebel schema, the dots are removed from the field namefor usage in the Spectrum™ Data Federation Module.
3. While creating a Baseview from a Siebel connection, links between any two Siebel BusinessComponents are displayed only if the link name matches the Business Component name in theSiebel schema.
For example, in a Siebel schema, if a link is defined between the Business Components Accountand Contact, while another Business Component Contact Custom uses the links of Custom,then in the Baseview created for this Siebel connection, no link is displayed between Accountand Contact Custom. Links are displayed only between Account and Contact, as the originallink is between these two in the Siebel schema.
4. Fields of a Business Component which are marked as inactive in the Siebel schema are notdisplayed in Baseviews, Metaviews, and Virtual Data Sources.
85Spectrum™ Technology Platform 11.0 Data Federation Guide
Limitations
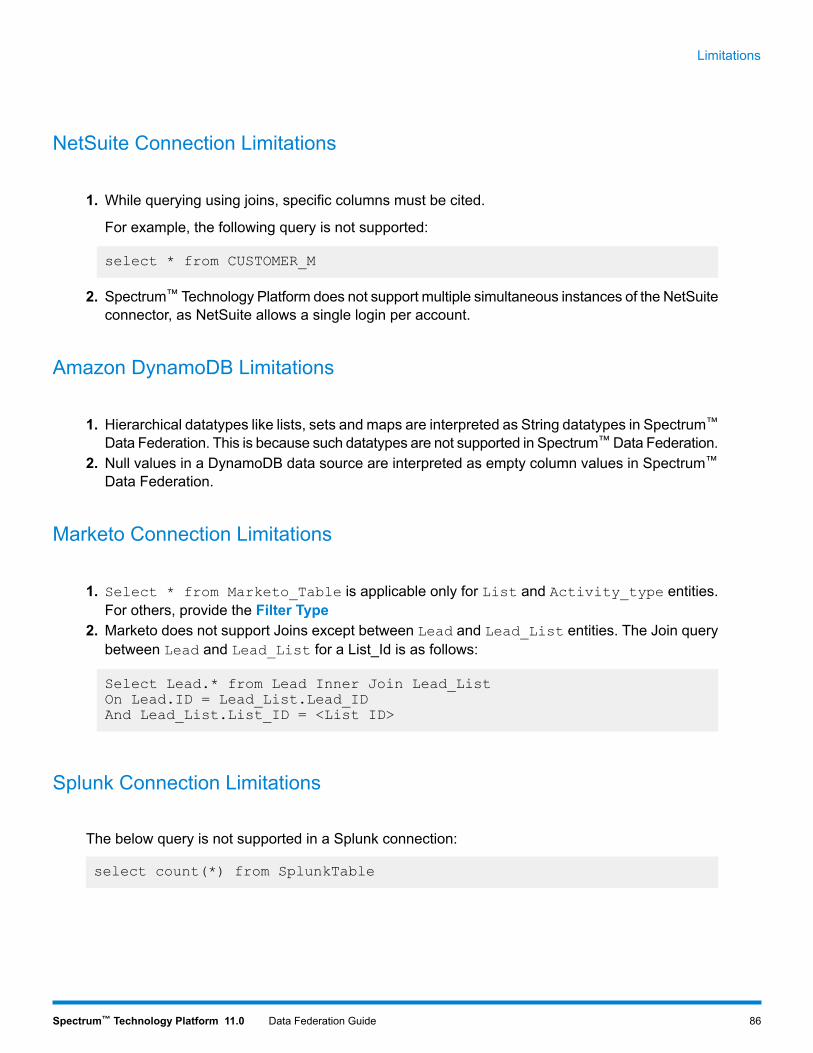
NetSuite Connection Limitations
1. While querying using joins, specific columns must be cited.
For example, the following query is not supported:
select * from CUSTOMER_M
2. Spectrum™ Technology Platform does not support multiple simultaneous instances of the NetSuiteconnector, as NetSuite allows a single login per account.
Amazon DynamoDB Limitations
1. Hierarchical datatypes like lists, sets and maps are interpreted as String datatypes in Spectrum™
Data Federation. This is because such datatypes are not supported in Spectrum™Data Federation.2. Null values in a DynamoDB data source are interpreted as empty column values in Spectrum™
Data Federation.
Marketo Connection Limitations
1. Select * from Marketo_Table is applicable only for List and Activity_type entities.For others, provide the Filter Type
2. Marketo does not support Joins except between Lead and Lead_List entities. The Join querybetween Lead and Lead_List for a List_Id is as follows:
Select Lead.* from Lead Inner Join Lead_ListOn Lead.ID = Lead_List.Lead_IDAnd Lead_List.List_ID = <List ID>
Splunk Connection Limitations
The below query is not supported in a Splunk connection:
select count(*) from SplunkTable
86Spectrum™ Technology Platform 11.0 Data Federation Guide
Limitations

Write Feature Limitations
Common Write Limitations
In Spectrum™ Data Federation, while writing to a database source using theWrite to DB stage inEnterprise Designer, there are certain limitations.
1. Creation of tables while writing to a database source using a Spectrum™ Data Federationconnection is not supported. If you click Create Table while using a Spectrum™ Data Federationconnection, a runtime exception is displayed.
2. Spectrum™Data Federation does not support unified writes tomultiple connections simultaneously.You can write to a single source at a time.
3. Dropping and recreating any table while writing to a database using a Spectrum™ Data Federationconnection is not supported.
4. Delete and truncate operations are not supported while writing to a database using Spectrum™
Data Federation. Only insert and update operations are supported.5. Spectrum™ Data Federation performs a commit after completion of each batch insert. TheBatch
count to commit cannot be changed to any other value other than 1.
In theRuntime tab of theWrite to DB stage in Enterprise Designer, theBatch count to commitfield can only have the value 1 for Spectrum™ Data Federation.
A batch consists of 1000 records by default. You can configure the batch size accordingto your system, in the Runtime tab of theWrite to DB stage in Enterprise Designer.
Note:
6. For batch inserts, the featureCommit at the end is not supported. This feature refers to performinga commit after all batches are complete. In Spectrum™ Data Federation, a commit is performedat the end of each batch insert completion.
Amazon SimpleDB - Write Limitations
1. In an Amazon SimpleDB connection, the update option is not permitted in the Write to DB stage.The insert option handles both insert and update requirements, by differentiating between aninsert and an update using the unique value of the ItemName column, present in all AmazonSimpleDB tables.
This limitation is because an update query requires a Primary Key for each record of the tableto be updated, which is not supported by Amazon SimpleDB databases.
87Spectrum™ Technology Platform 11.0 Data Federation Guide
Limitations

NetSuite - Write Limitations
1. The write functionality is permitted only for Standard and Custom records in a NetSuite connection.2. For both UPDATE and UPSERT queries executed using a NetSuite connector, an UPSERT operation
is performed.3. While writing records using a NetSuite connection, there is a restriction on the batch size.
For instance, the maximum batch size permitted for an insert is 200, while for an update it is100. If the batch size exceed these limits in theWrite to DB stage, a message citing the limit isdisplayed.
SAP - Write Limitations
1. For both UPDATE and UPSERT queries executed using an SAP connector, an UPDATE operationis performed.
SuccessFactors - Write Limitations
1. Batch operations can only be performed using upsert queries. Hence, insert and updatequeries are also performed as upsert queries in batch operations.
2. The table/column properties, as displayed in the Baseview schema of a SuccessFactorsconnection, might not function as expected during use of the corresponding operation. Forexample, a column, which has been marked updatable, may throw a system exception when youattempt to update that column.
This arises from mismatched metadata communicated by the SuccessFactors OData API.
88Spectrum™ Technology Platform 11.0 Data Federation Guide
Limitations

Appendices
In this section
Reserved Keywords 90Supported Datatypes for Conversion Transformations 96

A - Reserved Keywords
In this section
Reserved Keywords 91
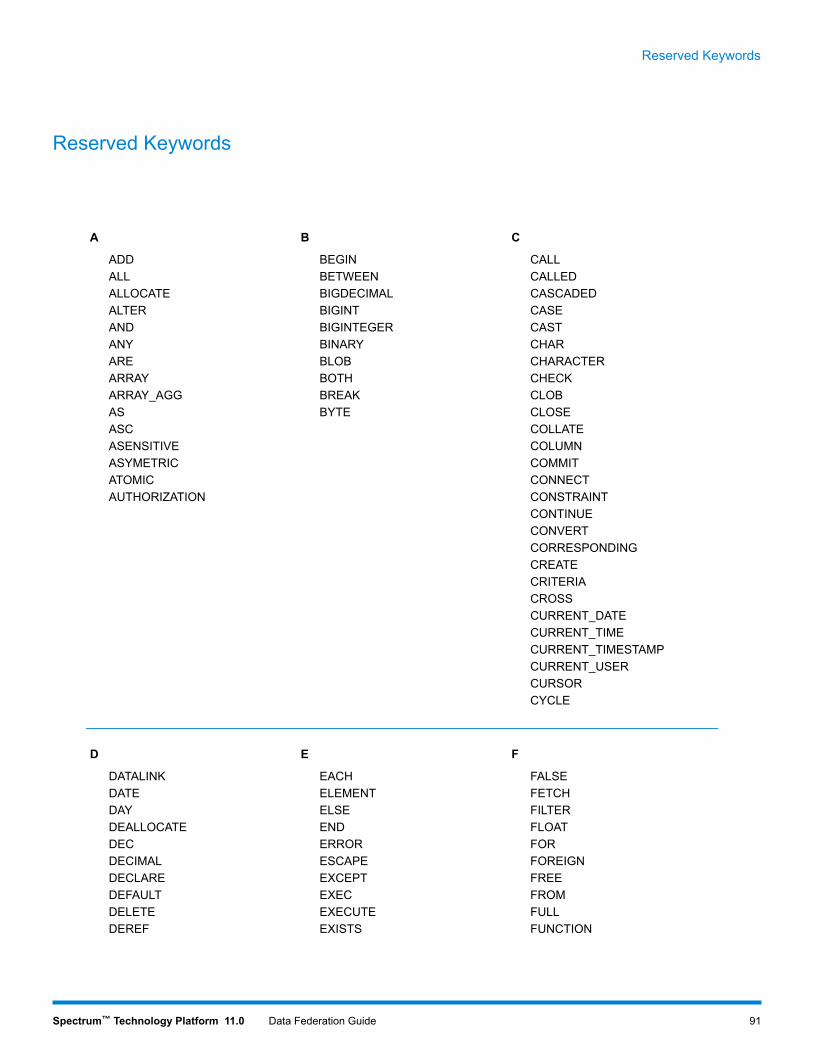
Reserved Keywords
CBA
CALLBEGINADDCALLEDBETWEENALLCASCADEDBIGDECIMALALLOCATECASEBIGINTALTERCASTBIGINTEGERANDCHARBINARYANYCHARACTERBLOBARECHECKBOTHARRAYCLOBBREAKARRAY_AGGCLOSEBYTEASCOLLATEASCCOLUMNASENSITIVECOMMITASYMETRICCONNECTATOMICCONSTRAINTAUTHORIZATIONCONTINUECONVERTCORRESPONDINGCREATECRITERIACROSSCURRENT_DATECURRENT_TIMECURRENT_TIMESTAMPCURRENT_USERCURSORCYCLE
FED
FALSEEACHDATALINKFETCHELEMENTDATEFILTERELSEDAYFLOATENDDEALLOCATEFORERRORDECFOREIGNESCAPEDECIMALFREEEXCEPTDECLAREFROMEXECDEFAULTFULLEXECUTEDELETEFUNCTIONEXISTSDEREF
91Spectrum™ Technology Platform 11.0 Data Federation Guide
Reserved Keywords

EXTERNALDESCDESCRIBEDETERMINISTICDISCONNECTDISTINCTDLNEWCOPYDLPREVIOUSCOPYDLURELCOMPLETEWRITEDLURLCOMPLETEDLURLCOMPLETEONLYDLURLPATHDLURLPATHONLYDLURLPATHWRITEDLURLSCHEMEDLURLSEVERDLVALUEDOUBLEDROPDYNAMIC
IHG
IDENTITYHASGETIFHAVINGGLOBALIMMEDIATEHOLDGRANTIMPORTHOURGROUPINGROUPINGINDICATORINNERINOUTINPUTINSENSITIVEINSERTINTINTEGERINTERSECTINTERVALINTOISISOLATION
LKJ
JOIN LANGUAGELARGELATERALLEADING
92Spectrum™ Technology Platform 11.0 Data Federation Guide
Reserved Keywords

LEAVELEFTLIKELIKE_REGEXLIMITLOCALLOCALTIMELOCALTIMESTAMPLONGLOOP
ONM
OBJECTNATIONALMAKEDEPOFNATURALMAKENOTDEPOFFSETNCHARMATCHOLDNCLOBMEMBERONNEWMERGEONLYNOMETHODOPENNOCACHEMINUTEOPTIONNONEMODIFIESOPTIONSNOTMODULEORNULLMONTHORDERNUMERICMULTISETOUTOUTEROUTPUTOVEROVERLAPS
RQP
PARAMETER RANGEPARTITION READSPRECISION REALPREPARE RECURSIVEPRIMARY REFERENCESPROCEDURE REFERENCING
RELEASERETURNRETURNSREVOKERIGHTROLLBACKROLLUPROWROWS
93Spectrum™ Technology Platform 11.0 Data Federation Guide
Reserved Keywords

UTS
UNIONTABLESAVEPOINTUNIQUETEMPORARYSCROLLUNKNOWNTHENSEARCHUPDATETIMESECONDUSERTIMESTAMPSELECTUSINGTIMEZONE_HOURSENSITIVE
TIMEZONE_MINUTESESSION_USERTOSETTRAILINGSHORTTRANSLATESIMILARTRANSLATIONSMALLINTTREATSOMETRIGGERSPECIFICTRUESPECIFICTYPE
SQLSQLEXCEPTIONSQLSTATESQLWARNINGSTARTSTATICSTRINGSUBMULTILISTSYMETRICSYSTEMSYSTEM_USER
XWV
XMLWHENVALUEXMLAGGWHENEVERVALUESXMLATTRIBUTESWHEREVARCHARXMLBINARYWHILEVARYINGXMLCASTWINDOWVIRTUALXMLCOMMENTWITHXMLCONCATWITHINXMLDOCUMENTWITHOUTXMLELEMENTXMLEXISTSXMLFORESTXMLITERATEXMLNAMESPACESXMLPARSEXMLPIXMLQUERYXMLSERIALIZEXMLTABLE
94Spectrum™ Technology Platform 11.0 Data Federation Guide
Reserved Keywords

XMLTEXTXMLVALIDATE
ZY
YEAR
95Spectrum™ Technology Platform 11.0 Data Federation Guide
Reserved Keywords

B - SupportedDatatypes forConversionTransformations
In this section
Supported Datatypes for Conversion Transformations 97

Supported Datatypes for Conversion Transformations
Spectrum™ Data Federation supports the datatypes mentioned in the table below while applyingconversion transformations.
Table 1: Supported Datatypes for Conversion Transformations
DescriptionType
Variable length character string with a maximum length of4000
String or Varchar
Variable length binary string with a nominal maximum lengthof 8192
Varbinary
A single Unicode characterChar
A single bit, or Boolean, with two possible valuesBoolean
Numeric, integral type, signed 8-bitByte or Tinyint
Numeric, integral type, signed 16-bitShort or Smallint
Numeric, integral type, signed 32-bit.
The serial type also implies not null and has anauto-incrementing value that starts at 1. Serial types are notautomatically UNIQUE.
Integer or Serial
Numeric, integral type, signed 64-bitLong or Bigint
Numeric, integral type, arbitrary precision of up to 1000digits
Biginteger
Numeric, floating point type, 32-bit IEEE 754 floating-pointnumbers
Float or Real
Numeric, floating point type, 64-bit IEEE 754 floating-pointnumbers
Double
Numeric, floating point type, arbitrary precision of up to 1000digits
Bigdecimal or Decimal
97Spectrum™ Technology Platform 11.0 Data Federation Guide
Supported Datatypes for Conversion Transformations

DescriptionType
Datetime, representing a single day (year, month, day)Date
Datetime, representing a single time (hours, minutes,seconds, milliseconds)
Time
Datetime, representing a single date and time (year, month,day, hours, minutes, seconds, milliseconds, nanoseconds)
Timestamp
98Spectrum™ Technology Platform 11.0 Data Federation Guide
Supported Datatypes for Conversion Transformations

Notices

© 2016 Pitney Bowes Software Inc. All rights reserved. MapInfo and Group 1 Software are trademarksof Pitney Bowes Software Inc. All other marks and trademarks are property of their respectiveholders.
USPS® Notices
Pitney Bowes Inc. holds a non-exclusive license to publish and sell ZIP + 4® databases on opticaland magnetic media. The following trademarks are owned by the United States Postal Service:CASS, CASS Certified, DPV, eLOT, FASTforward, First-Class Mail, Intelligent Mail, LACSLink,NCOALink, PAVE, PLANET Code, Postal Service, POSTNET, Post Office, RDI, SuiteLink , UnitedStates Postal Service, Standard Mail, United States Post Office, USPS, ZIP Code, and ZIP + 4.This list is not exhaustive of the trademarks belonging to the Postal Service.
Pitney Bowes Inc. is a non-exclusive licensee of USPS® for NCOALink® processing.
Prices for Pitney Bowes Software's products, options, and services are not established, controlled,or approved by USPS® or United States Government. When utilizing RDI™ data to determineparcel-shipping costs, the business decision on which parcel delivery company to use is not madeby the USPS® or United States Government.
Data Provider and Related Notices
Data Products contained on this media and used within Pitney Bowes Software applications areprotected by various trademarks and by one or more of the following copyrights:© Copyright United States Postal Service. All rights reserved.© 2014 TomTom. All rights reserved. TomTom and the TomTom logo are registered trademarks ofTomTom N.V.© 2016 HERE
Fuente: INEGI (Instituto Nacional de Estadística y Geografía)
Based upon electronic data © National Land Survey Sweden.© Copyright United States Census Bureau© Copyright Nova Marketing Group, Inc.
Portions of this program are © Copyright 1993-2007 by Nova Marketing Group Inc. All RightsReserved© Copyright Second Decimal, LLC© Copyright Canada Post Corporation
This CD-ROM contains data from a compilation in which Canada Post Corporation is the copyrightowner.© 2007 Claritas, Inc.
The Geocode Address World data set contains data licensed from the GeoNames Project(www.geonames.org) provided under the Creative Commons Attribution License ("Attribution
100Spectrum™ Technology Platform 11.0 Data Federation Guide
Copyright

License") located at http://creativecommons.org/licenses/by/3.0/legalcode. Your use of theGeoNames data (described in the Spectrum™ Technology Platform User Manual) is governed bythe terms of the Attribution License, and any conflict between your agreement with Pitney BowesSoftware, Inc. and the Attribution License will be resolved in favor of the Attribution License solelyas it relates to your use of the GeoNames data.
ICU Notices
Copyright © 1995-2011 International Business Machines Corporation and others.
All rights reserved.
Permission is hereby granted, free of charge, to any person obtaining a copy of this software andassociated documentation files (the "Software"), to deal in the Software without restriction, includingwithout limitation the rights to use, copy, modify, merge, publish, distribute, and/or sell copies of theSoftware, and to permit persons to whom the Software is furnished to do so, provided that the abovecopyright notice(s) and this permission notice appear in all copies of the Software and that both theabove copyright notice(s) and this permission notice appear in supporting documentation.
THE SOFTWARE IS PROVIDED "AS IS", WITHOUT WARRANTY OF ANY KIND, EXPRESS ORIMPLIED, INCLUDING BUT NOT LIMITED TO THE WARRANTIES OF MERCHANTABILITY,FITNESSFORAPARTICULARPURPOSEANDNONINFRINGEMENTOFTHIRDPARTYRIGHTS.IN NO EVENT SHALL THE COPYRIGHT HOLDER OR HOLDERS INCLUDED IN THIS NOTICEBE LIABLE FOR ANY CLAIM, OR ANY SPECIAL INDIRECT OR CONSEQUENTIAL DAMAGES,OR ANY DAMAGES WHATSOEVER RESULTING FROM LOSS OF USE, DATA OR PROFITS,WHETHER IN AN ACTION OF CONTRACT, NEGLIGENCE OR OTHER TORTIOUS ACTION,ARISING OUT OF OR IN CONNECTION WITH THE USE OR PERFORMANCE OF THISSOFTWARE.
Except as contained in this notice, the name of a copyright holder shall not be used in advertisingor otherwise to promote the sale, use or other dealings in this Software without prior writtenauthorization of the copyright holder.
101Spectrum™ Technology Platform 11.0 Data Federation Guide
Copyright

3001 Summer Street
Stamford CT 06926-0700
USA
www.pitneybowes.com
©2016 Pitney Bowes
All Rights Reserved