dan dean solo strings advanced - bassist user manual.pdf · thank you for purchasing the dan dean...
TRANSCRIPT

1
Dan Dean Solo Strings ADVANCED
powered by KONTAKT 2 PLAYER Operation Manual The information in this document is subject to change without notice and does not represent a commitment on the part of Native Instruments Software Synthesis GmbH. The software described by this document is subject to a License Agreement and may not be copied to other media. No part of this publication may be copied, reproduced or otherwise transmitted or recorded, for any purpose, without prior written permission by Native Instruments Software Synthesis GmbH. All product and company names are trademarks of their respective owners. And also, if you’re reading this, it means you bought the software rather than stole it. It’s because of people like you that we can continue to create great tools and update them. So, thank you very much.
Users Guide written by: Native Instruments
DDSSA Operation Guide written by: Dan Dean (c) Native Instruments Software Synthesis GmbH, 2006. All rights reserved. KONTAKT is a trademark of Native Instruments Software Synthesis Germany Native Instruments GmbH Schlesische Str. 28 D-10997 Berlin Germany www.native-instruments.de USA Native Instruments USA, Inc. 5631 A Hollywood Boulevard Los Angeles, CA 90028 www.native-instruments.com

2
Dan Dean Productions, Inc. P.O. Box 1486 Mercer Island, WA 98040 www.dandeanpro.com [email protected]
Table of Contents 2. Dan Dean Solo Strings Features 3. DDSSA Layout 4. All-In-One Instrument
Keyswitching All-In-One Keyswitch Assignments 5. Legato Mode Auto Alternation Volume Control 6. Release Impulse Response Controls Timbral Impulses 7. Bypass TI Button Timbral Impulse Select 9. Bypass RI Button Reverb Impulse Select 11. Other Reverb Impulse Controls
RevDry (Reverb Dry) Control RevWet (Reverb Wet) Control PreDelay Control
12.Voice Control – Divisi Instruments Keyswitch Presets Voice Control Keyswitch Assignments The Cloaking Device
13. Modwheel presets 14. Velocity Keyswitch (Vel KS) Presets
Legato Mode Release
15. Legacy Instruments
Welcome to the Dan Dean Solo Strings ADVANCED Powered By KONTAKT PLAYER 2 Thank you for purchasing the Dan Dean Solo Strings ADVANCED, powered by Native Instruments KONTAKT PLAYER 2. This manual is designed to get you up and running quickly and guide you through the installation process as well as show you around the features available to you in the program.

3
Dan Dean Solo Strings ADVANCED Features The DDSSA is a completely transformed version of the critically acclaimed Dan Dean Solo Strings with a collection of powerful features and new technologies. High quality sample recordings with virtually no noise. First and always foremost, the quality of sound is the most important component in any sampled library. We revisited the source recordings of the Solo Strings and retransferred all the sound data carefully to optimize signal to noise and other source issues. The sound files that make up the DDSSA now have a very low noise floor while still retaining all of the warmth and detail of the source recordings. The Solo Cello, Solo Viola and Solo Violin have all been maximized to full 16 bit resolution using our Ultra16 process. Since all 16 bits are used, there is maximum resolution at this bit level. Also, the DDSSA was sample recorded in a “dry” space, which means that there is no room ambience or reverb in the recordings. This lack of room coloration allows you maximum flexibility to make your own tonal choices later. DDSSA is Impulse Response friendly. New instruments and Ensemble Presets. In the process of transferring all the Solo String data, we discovered source material that was never included in the original Solo Strings project. This extra data has been added to the DDSSA. Additionally, we developed a proprietary ensemble building technology which allowed us to create and precisely control groups of instruments. The end results are ensembles that play very smoothly and evenly. Voice Control. When designing the ensemble instruments, we paid special attention to voice allocation. Using our Voice Control presets, you can accurately assign divisi parts to either 1, 3, 6 or 12 instruments (12 in the case of violins). The Voice Control instruments have been programmed to allow you to select the various divisi groups through the use of keyswitching or modwheel activation. Now you can finally choose the right number of instruments per voice in your arrangements. Legato/Sustain controls. Tap into the power of Kontakt2 and enjoy vastly superior attack performance via MIDI control or sustain pedal modification. MIDI implementation also provides access to release characteristics. Timbral Impulse Tonal Modeling. Proprietary Timbral Impulses created specially for the DDSSA by Ernest Cholakis of Numerical Sound (leaders in IR technologies) coupled with the power of Kontakt2’s convolution engine provide you with new, unprecedented sonic options never before attainable in the sampling world – a degree of realism that simply can’t be attained using current sampling technologies. Timbral “fingerprints” of solo and ensemble strings were captured and analyzed from some of the world’s greatest recordings, string sessions and other sources from around the world. Each of these tonal signatures was then calibrated to each of the instruments (Cello, Viola and Violin) and encoded into the DDSSA. Transform the sound of any solo or ensemble instrument at the click of a mouse. Custom Reverb Impulses. Add some air around a Cello. Some room tone to a Viola or a full concert hall ambience to a Violin Ensemble. Select from an array of tight spaces, small rooms, mid sized rooms and halls all created specially by Numerical Sound for the DDSA. And unlike most Reverb Impulses, each DDSSA Reverb Impulse is instrument-optimized, calibrated to the sonic qualities of each instrument. Actual acoustic spaces captured from around the world, custom created for this release. All-In-One Instruments. Choose one of the “All-In-One” instruments and access all articulations of the Solo Cello, Solo Viola or Violin at the touch of a keyswitch. At the touch of a key, select Arco, Spiccato, Pizzicato, Half Step Trill, Whole Step Trill or Tremelo articulations from a single preset. Engage the legato mode/short attack feature by the pedal or MIDI controller. Adjust the instrument’s release characteristics via MIDI slider. Select Timbral Impulse tonal control at the touch of a button. Switch on a custom Reverb Impulse – all on the fly in real time. New Short Attack (SA) Samples. Giving you even more attack choices, the Short Attack presets have been created to make the instruments in the DDSSA more playable in fast passages. Tighten your attacks even further by using MIDI cc#21 or by using the footswitch/Legato mode.

4
Loops. The Ensemble Arco, Half Step Trill, Whole Step Trill and tremelo presets are looped. Legacy Programming. In addition to all of the advanced programming features that Kontakt2 provides, every instrument in the DDSSA has been programmed in the “old school” style, and can be found in the Legacy Programming Instrument folder. You can just “plug and play” using keyboard velocity as you always have, without touching a button. If you want to adjust decay, attack, engage the Cloaking Device, add RI reverb or TI tonal shaping – then press a button. If you just want to play, this is the place to start. Cloaking Device. Engage the Cloaking Device to alter the tone and other characteristics of repeated notes.

5
DDSSA Layout
1. All-In-One Instrument Layout This group of presets uses MIDI cc#11 (default) cc#1 modwheel or cc#2 breath control for volume.
To enable the Keyboard, click on the Keyboard button below.
KEYSWITCHING Red keys are KEYSWITCHES. Notice that KEYSWITCHES are placed outside the playing area. These allow you to switch articulations in real time from the keyboard. In the All-In-One (Solo) Instruments, the KEYSWITCHES are: C1 Arco Vibrato D1 Spiccato E1 Pizzicato F1 Tremelo G1 Half Step Trill A1 Whole Step Trill By the use of KEYSWITCHING, you have great flexibility in accessing articulations. If you’re playing live, you can simply press the desired key and the articulation switching will follow. If you are using a sequencer, you can record the KEYSWITCHING as part of your sequence – either while you’re playing in parts, before or after.
Keyswitches Playing area

6
TIP: Although KEYSWITCHING is quick, it is not instantaneous. “Lead” the KEYSWITCHING just a bit – that is, the switch should occur slightly ahead of your next playing passage. LEGATO MODE One of the features found in the DDSSA is real time LEGATO MODE. This allows you to switch from sustain samples (normal mode) to shortened attack mode. This makes a significant difference in the playing characteristics of the instrument for fast passages. To access this feature, depress the sustain pedal while playing. When depressed, the pedal activates LEGATO MODE – when released, you’re back to normal mode. TIP: Again, try to “lead” the LEGATO MODE switch just slightly. It takes a few milliseconds to engage. AUTO ALTERNATION AUTO ALTERNATION (or switching between different takes of the same pitch) occurs automatically in the All-In-One Instruments Spiccato and Pizzicato presets. In this instrument group, it’s a “hard-wired” feature. VOLUME CONTROL
Click + Pull Down on the selection box.
The VOLUME CONTROL SELECTIONS will appear. KONTAKT2’s advanced scripting allows for just about any parameter to be script controlled. To give you additional flexibility of use, we added a VOLUME CONTROL selector to the All-In One (Solo) Instrument group. When you load any of the All-In-One Instruments, VOLUME CONTROL defaults to cc#11. This is MIDI cc#11, addressable from your keyboard or sequencer. Typically, this is assignable via a MIDI slider on your keyboard (consult your keyboard or sequencer manufacturer’s manual for more information) . We added cc#1, or modwheel (MW) control and cc#2 breath controller (BC) options as well. Select these from the pull down menu below the label VOLUME CONTROL.

7
RELEASE You can alter the release time of the sample by using MIDI cc#20 (again, refer to you keyboard manufacturer’s or sequencer manufacturer’s manual for more details). Once you assign MIDI cc#20 to a fader or control it via your sequencer, you will have real time control of this parameter. The default setting for RELEASE is maximum – so, if you touch controller cc#20, you will override the default and be able to shorten the release time of the preset. If there is a series of fast notes in a musical passage, try shortening the DECAY. This will alter the note’s length and avoid overlapping notes. Also keep in mind that the MIDI cc#20 you adjust will be saved in your sequence if you are recording the passage. It will then play back the “moves” you made on the controller – not unlike automation. Again, also remember that you can add these “moves” later for easier and more accurate preset manipulation. IMPULSE RESPONSE CONTROLS
One of the most powerful new technologies employed for the first time in the world of sampling in the DDSSA is the Impulse Response (or IR). In our case, we employ two types of IR’s – Timbral and Reverb. These technologies have been custom implemented for use in this product only by the leaders in the field, Numerical Sound, by its #1 guy, Ernest Cholakis. TIMBRAL IMPULSES The theory of this type of IR is based on sonic “fingerprints” captured from all sorts of outside sources. An outside source might be a string section recording, a classical recording, samples of solo strings and ensemble strings from other recordings, live events, performances and other such data. From this data, the actual tonal characteristics are computed and extracted. From this data, a new hybrid TIMBRAL IMPULSE is extrapolated – one which is calibrated only to the instruments of the DDSSA. Since the TIR must take both the source and destination “fingerprints” into effect, it is only accurate and usable on the DDSSA. It is a custom process requiring high amounts of technology but its results are stunning. Being able to apply the sound of one recording onto the DDSSA and transform it into the tonal quality of the source is a technological breakthrough.

8
BYPASS TI Notice these two buttons that control the TIMBRAL IMPULSE parameters. The top one is the BYPASS TI button. When it is illuminated orange/yellow it is bypassed, meaning that the TI processing is switched off. When the BYPASS TI button is gray, the TIMBRAL IMPULSE is operational. Upon loading any DDSSA instrument, the BYPASS TI button is always set to its default state – off. TIMBRAL IMPULSE SELECT

9
The second of the two buttons is the TIMBRAL IMPULSE SELECT drop down menu. If you Click + hold the mouse button over the arrow located in the right hand corner of the button, it will expand downward as shown above, displaying the menu options. Each one of these selections in the list is a unique TIMBRAL IMPULSE and is selected by continuing to hold the mouse button down while dragging over the selection and releasing the mouse button. When the mouse button is released, the selection of the desired TIMBRAL IMPULSE is made and the proper TIR is loaded into the convolution engine. You can mute the TIMBRAL IMPULSE by pressing the BYPASS TI button if you want to audition the TIMBRAL IMPULSES or compare presets. Each one of these TIMBRAL IMPULSES was created from the “sonic signature” of great recordings, string sections, solo string recordings and other sources and calibrated for each of the DDSSA instruments. Now you have the ability to sonically transform a single library into a myriad of other possibilities.

10
REVERB IMPULSES
BYPASS RI
Moving on to the REVERB IMPULSE section, notice these two buttons that control the REVERB IMPULSE parameters. The top one is the BYPASS RI button. When it is illuminated orange/yellow it is bypassed, meaning that the RI processing is switched off. When the BYPASS RI button is gray, the REVERB IMPULSE is operational. Upon loading any DDSSA instrument, the BYPASS RI button is always set to its default state – off. REVERB IMPULSE SELECT

11
The second of the two buttons is the REVERB IMPULSE SELECT drop down menu. If you Click + hold the mouse button over the arrow located in the right hand corner of the button, it will expand downward as shown above, displaying the menu options. Each one of these selections in the list is a unique REVERB IMPULSE and is selected by continuing to hold the mouse button down while dragging over the selection and releasing the mouse button. When the mouse button is released, the selection of the desired REVERB IMPULSE is made and the proper RIR is loaded into the convolution engine. You can mute the REVERB IMPULSE by pressing the BYPASS TI button if you want to audition the REVERB IMPULSES or compare presets. REVERB IMPULSES are quite different from the reverb and ambience found in hardware digital reverbs. First, the quality of the REVERB IMPULSE is superior to the “modeled” parameters of most “boxes”. Since RI technology is based on the ability to actually measure the acoustic properties in a given space and store them for later use as an IMPULSE, there is far greater complexity of the reverb signature. In these REVERB IMPULSES, you’ll find a wide selection of everything from small “isolation booth” type ambience to large concert hall space. In the REVERB IMPULSE SELECT drop down menu, the IMPULSES are listed from the smallest room to the largest acoustic space. If you want a small bit of ambience around a solo violin for example, try using some of the REVERB IMPULSES at the top of the drop down list. If you are looking for a large concert or symphony hall ambience, look at the bottom of the list.
OTHER REVERB IMPULSE CONTROLS
There are 3 additional controls for use with the REVERB IMPULSE section.
RevDry (REVERB DRY) CONTROL This knob controls the direct or dry signal level and is preset to the default value of 0.0 db. By adding these controls, you can mix the dry/wet signals to suit your own taste. TIP: You can adjust the RevDry control to a setting that will create clipping/distortion in the KONTAKT2 Player. If you hear any clipping, make sure you check this setting. Depending on your setup and the preferences you select in the KONTAKT2 Player, make sure you check this setting to be certain you’re not overdriving levels at this point in the chain.
RevWet (REVERB WET) CONTROL
This knob allows you to adjust the amount of “wet” signal (or REVERB IMPULSE signal). In studio jargon, the term “wet” typically refers to a signal that has been processed with reverb, DSP or other processing. In the case of the RevWet control, this is the pure REVERB IMPULSE processed sound with no dry component. Thinking in terms of a mixer, most often the dry signal is most prominent of the two signals. The “wet” or effect is added to the dry signal to produce the blend of dry/wet. By including these controls, you can mix your own effects blends as you need them.

12
TIP: As in the RevDry control, it is possible to set the levels too hot so that clipping/distorion will occur. If you notice clipping/distortion, check these settings or reduce them slightly to make sure your controls are not the source of the problem.
PreDelay CONTROL
Many times when using reverb in the studio, engineers apply PREDELAY to the dry signal before it enters the chamber or plate. (More modern digital reverbs have provisions for adding the predelay in the actual box.) By using predelay, you can add more depth and space to the reverb signal – making it seem more ambient and larger. We thought this would be a very useful feature when used in conjunction with the REVERB IMPULSES because it gives you additional control of the “spatial” field and depth of the reverb. The PREDELAY CONTROL is set to default to 0ms (milliseconds). (One millisecond is equal to 1/1000 of a second) When you adjust the control, you override the default setting. The predelay parameters are from 0ms to 300ms.
2. Voice Control – Divisi Instruments
KEYSWITCH PRESETS (KS) You will notice that the basic layout and feature set of the Voice Control – Divisi Instruments is pretty similar to the first group, the All-In-One Solo Instruments. What are the Voice Control Instruments? Basically, the Voice Control Instruments allow you quick access to different numbers of “players” per voice. This has always been problematic in the field of sampling because typically you have the choice of either a solo instrument or a huge section of instruments. There haven’t been that many options that range between solo and large ensemble sizes. Until now, it was very difficult to write and then realize divisi splits from your string arrangements. Why would you want 11 or 23 violins per voice? Before Voice Control it was difficult to assign how many instruments per voice you need in a given instance. The Voice Control feature (in most cases) allows you to access either 1 solo instrument, a 3 instrument ensemble or a 6 instrument ensemble in each of the articulations. Take a look at the above instrument – 1 3 6 CLO PZ KS. This is (1 Cello Pizz, 3 Celli Pizz and 6 Celli Pizz selected by KEYSWITCHES).

13
For Cello and Viola Voice Control Instruments, the KEYSWITCHES are: C1 1 Solo Instrument D1 3 Instrument Ensemble E1 6 Instrument Ensemble So, by depressing the C1 key (which is the default setting when you load any of the Voice Control Instruments), you select a solo instrument. By depressing the D1 key – you choose 3 instruments and finally, E1 – 6 instruments. All on the fly in real time. Again, this can be switched either by pressing the keys just a bit ahead of your upcoming musical passage, or programmed either ahead, during or after the performance in your sequencer. The theory is that since the KEYSWITCHING area is below the actual playing range, switching and playing can occur simultaneously with neither element using the same keys. In the case of the Voice Control Instruments for the Violin, there are additional splits in some of the presets. For example the big Violin Arco preset “1 2+1 3 3+3 6 12 Vln Arco KS (MW or Vel KS)” there are 6 divisi splits rather than 3. We built this preset primarily because there was new data found in the original sessions that included Violin 2 samples. For these presets: 1 2+1 3 3+3 6 12 Vln Arco KS 1 2+1 3 3+3 6 12 Vln Arco MW 1 2+1 3 3+3 6 12 Vln Arco Vel KS the following KEYSWITCHES apply: C1 Solo Violin D1 2 Violin1 + 1 Violin2 Ensemble E1 3 Violin1 Ensemble F1 3 Violin1 + 3 Violin2 Ensemble G1 6 Violin1 Ensemble A1 12 Violin Ensemble There is another set of Violin instruments in the Voice Control folder which deviates from the normal KEYSWITCHING pattern. These presets are: 1 3 6 12 Vln Arco KS 1 3 6 12 Vln Arco MW 1 3 6 12 Vln Arco Vel KS This group of instruments do not use any of the Violin 2 samples and the KEYSWITCHING is assigned as follows: C1 Solo Violin D1 3 Violin1 Ensemble E1 6 Violin1 Ensemble F1 12 Violin1 Ensemble THE CLOAKING DEVICE How to deal with the ever-present problem of repeated notes…After consulting with experts in this field, we designed and built the CLOAKING DEVICE. Essentially the theory of operation is that it auto alternates between specifically chosen notes and adds masking elements to alter other note characteristics. There’s more invisifying going on, but that’s all I’m allowed to tell you at my current security clearance level.

14
Like the other BYPASS TI and BYPASS RI buttons, the CLOAKING DEVICE is bypassed upon load up and is yellow/orange when bypassed. When engaged, it is gray. MODWHEEL PRESETS (MW)
Notice that the red keys normally visible in KEYSWITCHED instruments are not shown in the MODWHEEL version of the instrument. This is because preset switching is achieved by opening and closing the MODWHEEL instead. The 1st 1/3 of the MODWHEEL (midi 0-42) is assigned to the Solo Instrument. The 2nd 1/3 of the MODWHEEL (midi 43-84) is assigned to the 3 Instrument Ensemble and the top 1/3 of the MODWHEEL range (midi 85-127) is assigned to the 6 Instrument Ensemble. Again, remember that moving the MODWHEEL while recording into your sequencer will record its movements into the sequence and play them back upon replay. You can automate all your moves with the MODWHEEL in the same way as described above using MIDI cc’s.

15
Also note that since we are using MODWHEEL to control the switching between different presets, MODWHEEL is not available as a volume modifier in any of the MW presets. VELOCITY KEYSWITCH (VEL KS) PRESETS
First, these presets are programmed with Velocity (keyboard velocity – ie., how hard you strike the key) plus KEYSWITCHING – not true velocity KEYSWITCHING. Essentially, key velocity determines volume (unlike the other variants (KS and MW) described above where MIDI cc#11, MW or BC determine volume. KEYSWITCHING selects the number of instruments in the Voice Control Instrument. Soft and loud is in your fingertips, not via an external control. Since programming using velocity obviates the need for the VOLUME CONTROL section, it has been removed. LEGATO MODE As described above in the All-In-One Instruments, one of the features found in the DDSSA is real time LEGATO MODE. This allows you to switch from sustain samples (normal mode) to shortened attack mode. This makes a significant difference in the playing characteristics of the instrument for fast passages. To access this feature, depress the sustain pedal while playing. When depressed, the pedal activates LEGATO MODE – when released, you’re back to normal mode. TIP: Again, try to “lead” the LEGATO MODE switch just slightly. It takes a few milliseconds to engage. RELEASE As with the All-In-One Instruments, you can alter the release time of the sample by using MIDI cc#20 (again, refer to you keyboard manufacturer’s or sequencer manufacturer’s manual for more details) in the Voice Control group of presets. Once you assign MIDI cc#20 to a fader or control it via your sequencer, you will have real time control of this parameter. The default setting for RELEASE is maximum – so, if you touch controller cc#20, you will override the default and be able to shorten the release time of the preset. If there is a series of fast notes in a musical passage, try shortening the DECAY. This will alter the note’s length and avoid overlapping notes. Also keep in mind that the MIDI cc#20 you adjust will be saved in your sequence if you are recording the passage. It will then play back the “moves” you made on the controller – not unlike automation. Again, also remember that you can add these “moves” later for easier and more accurate preset manipulation.

16
3. Legacy Instruments
There are a lot of us that really appreciate the “plug and play” method of going through life. We don’t read maps. We write people’s phone numbers on little slips of paper and then almost immediately lose them. On occasion, we forget where we parked the car. Well, these might just be your “comfort zone” presets. The LEGACY INSTRUMENTS have been designed like the “old school” instruments you are probably used to playing. First, Velocity controls volume. The harder you play – the louder it gets. Second, there’s no switching so, its one instrument per preset. Third, the sustain pedal functions as a sustain pedal, not as a switch like evidenced in the other Instrument groups. But before you get too comfortable, there are a few things I slipped into these instruments. KONTAKT2 allows programming of default values, so unless you are in search of deviating from the preset, everything is “old school”. The CLOAKING DEVICE is available to you. So is the entire TIMBRAL and REVERB IMPULSE section. But if you want to adjust Attack and Sustain, its there. As soon as you move a slider, you depart from the programmed default and you have access to parameters, should you desire to change them. ATTACK MODIFICATION Since the Sustain pedal is resigned to its normal role of sustain, MIDI cc#21 (again, make the references to your manuals) has been programmed to modify attack times. The control will default to maximum upon load-up and can be overridden by moving the cc#21 slider. This gives you a degree of control over this parameter that has not been included in my libraries before. RELEASE
As with the All-In-One and Voice Control Instruments, you can alter the release time of the sample by using MIDI cc#20 (again, refer to you keyboard manufacturer’s or sequencer manufacturer’s manual for more details) in the Legacy group of presets. Once you assign MIDI cc#20 to a fader or control it via your sequencer, you will have real time control of this parameter. The default setting for RELEASE is maximum – so, if you touch controller cc#20, you will override the default and be able to shorten the release time of the preset. If there is a series of fast notes in a musical passage, try shortening the DECAY. This will alter the note’s length and avoid overlapping notes. Also keep in mind that the MIDI cc#20 you adjust will be saved in your sequence if you are recording the passage. It will then

17
play back the “moves” you made on the controller – not unlike automation. Again, also remember that you can add these “moves” later for easier and more accurate preset manipulation
The Dan Dean Solo Strings ADVANCED may be used either as a standalone application or as a plug-in within a sequencer. We will describe the installation and registration process that applies to both modes, and then go into detail about how to use The Dan Dean Solo Strings ADVANCED in a variety of situations. After installing The Dan Dean Solo Strings ADVANCED, you must first register the library to use it. We will discuss the registration process below. TERMS & ABBREVIATIONS CLO Cello VLA Viola VLN Violin VLN1 Violin 1 VLN2 Violin 2 KS Keyswitch(ed) MW Modulation Wheel (MIDI cc#1) ARCO Played with the bow PZ Pizzicato (plucked with the fingers) SP Spiccato (Bowed but short note duration) TREM Tremelo. Rapid up and down bowstrokes TR1 Half step trill (i.e. from C4 to C#4) TR2 Whole step trill (i.e. from C4 to D4) VEL KS Velocity & Keyswitching SA Short Attack Some examples: 1 3 6 CLO TR2 VEL KS Solo Cello, 3 Celli, 6 Celli Whole Step Trills Velocity controlled w/Keyswitching
selecting the various instrument groups dd3CLOARCOSA DD (that would be me) 3 Celli Arco Short Attack 1 2+1 3 3+3 6 12 VLN ARCO MW Solo Violin, 2 Violin1+1 Violin2, 3 Violin1, 3 Violin1+3 Violin2, 6 Violin1 and 12
Violin1 Arco w/mod wheel switching between the various instrument groups
18
Kontakt Player 2
System Requirements •Mac OS 10.4 or later, G4 1.4 GHz or faster, 512 MB RAM or more •Windows XP, Pentium IV or Athlon 1.4 GHz or faster, 512MB RAM or more •CD/DVD drive
Installation under Windows XP If this is your first KONTAKT PLAYER 2 product, then the Player will be installed with the library. If you already own a KONTAKT PLAYER 2 library, you can skip the Player installation and just install the library.
• Insert the OEM LIBRARY disc into the optical drive. • Use the Windows Explorer to view the contents of the disk. • Start the installation by double-clicking OEM LIBRARY Setup.exe. • The setup program will suggest C:\Program Files\Native Instruments\KONTAKT PLAYER 2 as the path
for the destination folder. You may also choose another folder.
Installed Folders, Files, and Links The setup program creates a new folder called KONTAKT PLAYER 2 in the installation directory (Program Files\Native Instruments). This folder contains the files required to operate the software. If you do not choose a different program path during installation, links to KONTAKT PLAYER 2 and a ReadMe file are added to the Start menu under Programs\Native Instruments. Important: Do not move the installation folder to another location!
VST, DXi, and RTAS Plug-in Installation When the choice is given by the installer, tick the correct plug-in from the list of components to install. For VST, you can choose to automatically search for the VST plug-in folder, or manually select the VST plug-in folder of your choice. Please select the option that best suits your installation requirements. If you decide to install the VST plug-ins at a later date, simply copy the "KONTAKTPlayer2 VST.dll" from the VST folder of the installation folder into the VST plug-ins folder of the host program. Note: If the VST plug-ins are not visible in the Windows Explorer, select the Show All Files option. This option is located in the Explorer menu View -> Folder Options...on the View tab below Hidden files. Optionally, you can set up your host programs so that they all use the same VST plug-ins folder.
Updating Be sure to check the Native Instruments web site for any possible KONTAKT PLAYER 2 updates that have occurred since the time your software was manufactured. Software is frequently updated and a more recent

19
version may be available. Library updates may be available at the OEM library partner’s website. Please check the Library Info box (Browser) for relevant links. After the library has been installed, it needs to be registered. You are given a 30-day grace period for each library before registration is required, but it is recommended that you register as soon as possible. Information on the registration procedure is given below.
Installation under Mac OS X If this is your first KONTAKT PLAYER 2 product, then the Player will be installed with the library. If you already own a KONTAKT PLAYER 2 library, the Player installation will be skipped and the library will be installed.
• Insert the OEM PRODUCT disc into the CD/DVD drive of your computer. • Double-click the installation program INSTALL OEM PRODUCT to start it. • The start screen appears first. After clicking Continue and confirming the license agreement, a
window opens where you can select the installation location and the destination folder.
Installation Type
Easy Install The easy install method installs all components of the software. This includes, but is not limited to, the standalone application, all plug-in versions, and documentation. In most cases, you will want to use the easy install method.
Custom Install You also have the option to perform a custom installation of your software. This is practical in two situations:
• You want to (re)install just one or more items without installing everything again. If this is the case, check only the necessary boxes.
• You know that you do not need certain items to be installed. In this case, leave the necessary items unchecked.
Updating Be sure to check the Native Instruments web site for any possible KONTAKT PLAYER 2 updates that have occurred since the time your software was manufactured. Software is frequently updated and a more recent version may be available. Library updates may be available at the OEM library partner’s website. Please check the Library Info box (Browser) for relevant links. After the library has been installed, it needs to be registered. You are given a 30-day grace period for each library before registration is required, but it is recommended that you register as soon as possible. Information on the registration procedure is given below.
Authorizing the Library

20
After installing the library, it will run in demo mode (also called a grace period) for 30 days. When you launch KONTAKT PLAYER 2, in the Browser you will see a little caution icon to the left of the library title. Yellow means the library is running in demo mode. After a library has been properly registered, the caution icon disappears entirely. Red means the demo period has expired and the library can no longer be used until it has been registered. The red icon may also appear if the system ID of the computer changes due to new hardware components (CPU, motherboard, etc.) If this occurs, the library will need to be re-registered.
To authorize the library, you should use the Native Instruments Service Center application, which was installed along with the KONTAKT PLAYER 2 software. You can start Service Center through the Info box registration tab. For more information on how to use Service Center please see the accompanying documentation in the Service Center application folder.
Methods of Using KONTAKT PLAYER 2 There are two main ways to use KONTAKT PLAYER 2: as a standalone application and as a plug-in within a host sequencer. Standalone Use Standalone operation is ideal for situations in which KONTAKT PLAYER 2 is the only audio software you need to run on the computer, for example, in a live performance situation in which you have all your patches loaded and wish to call them up for use individually.

21
To use KONTAKT PLAYER 2 as a standalone application, go to the Program Files or Applications folder and launch KONTAKT PLAYER 2. When you do this, KONTAKT PLAYER 2 communicates directly with your computer's audio and MIDI hardware interfaces.
Audio Setup and Soundcard settings KONTAKT PLAYER 2 works in standalone mode with ASIO, MME, and DirectSound drivers on the PC, and CoreAudio drivers on the Macintosh. For PC users, ASIO drivers are recommended because they usually give the best performance. You can also use Directsound and Multimedia (also called MME), but expect a significant delay (called latency) between the time you play a note and the time you hear it. ASIO (Audio Streaming Input Output): this protocol was developed by Steinberg. It is highly recommended for its low latency, multi-channel audio card support, and high performance.
DirectSound: Developed by Microsoft, this is a is a component of DirectX 5.0 or higher for Windows. How well DirectX works well depends on your sound card. If you adjust the interface for an acceptable amount of latency, you may hear glitches and clicks in the audio output that can only be fixed if you increase latency. MME (Multi Media Extension): This is the standard Windows audio driver. Most sound cards support this interface and work with it quite well. However, MME is even less suitable than DirectSound for real-time applications due to its comparatively high latency. Core Audio: This driver for MacOS X is integrated tightly into the operating system, and works with external soundcards, as well as the Mac's integrated audio output (known as built-in). Nowadays, many audio interfaces support Core Audio out of the box. They are simply "plug and play." Others, however, may require an additional driver to be installed. Please check your audio interface's documentation for further information. When using KONTAKT PLAYER 2 as a standalone application, the program communicates directly with your soundcard. Therefore, it is necessary to specify Audio and MIDI settings, as well as the preferred driver protocol. Setup for Mac and Windows machines is essentially identical, except where indicated. Note that if you change your soundcard, you will need to re-adjust these settings. Call up the Audio and MIDI Settings dialog from the Setup menu. You'll see two tabs: Soundcard and MIDI.

22
Interface: Choose the fastest driver protocol supported by your sound card, which will be ASIO (for PC users) or CoreAudio (for Macintosh users). Note for Windows users: avoid using any drivers listed as "emulated," as they provide poorer performance than other drivers. For example, although DirectSound drivers generally outperform MME drivers, MME drivers will outperform emulated DirectSound drivers. Sample rate: The drop-down menu will display compatible sample rates for your audio interface. 44.1kHz is the same sample rate used for CDs, and is the most universal choice. However, some audio interfaces offer 48kHz, 96kHz, and higher. These higher rates stress your computer more, but offer somewhat better high frequency response. If you are using KONTAKT PLAYER 2 in standalone mode, choose whichever rate you prefer. Output Device: Use ASIO written specifically for your audio interface (not "ASIO DirectX" or "ASIO Multimedia," unless no other choices are available), or for the Mac, Core Audio. Output Latency: This field displays the output latency. For some drivers you can adjust the latency individually using a fader. If a fader is not present, then you need to open the ASIO Configuration by pressing the ASIO Config button in the Soundcard tab and adjust the latency using the buffer size setting in the control panel of your audio card. Higher buffer sizes result in higher latency and vice versa. However, lower buffer sizes place more strain upon the computer's CPU. If a computer's CPU is strained too much, you may begin to hear audio artifacts such as pops and clicks. Experiment with the latency setting until you find the best compromise between fast response and clean audio performance.
MIDI Setup

23
If your MIDI interface offers multiple ins and outs, you can choose which one(s) connect to KONTAKT PLAYER 2. When you click on the MIDI tab, you'll see a list of all available MIDI inputs and outputs. Click on any "off" designation to turn it on. When used in standalone mode, KONTAKT PLAYER 2 supports MIDI input from 4 simultaneous ports, yielding a maximum of 64 simultaneous MIDI channels. You can access this by enabling up to four different incoming ports in the Input Interface section. They are assigned in order; the first enabled port will appear in KONTAKT PLAYER 2 as [A] 1-16, the second enabled port as [B] 1-16, and so on. The Output Interface section is used to specify where the MIDI is channeled to (similar to MIDI THRU ports). Typically this is not used for most sampling applications.
Plug-in Use Used as a plug-in, KONTAKT PLAYER 2 is not a standalone program, but rather a "module" that can be used within a host sequencer. While standalone mode is often useful when KONTAKT PLAYER 2 is all you need, plug-in mode is more useful when sequencing, or when other plug-ins may be in use. For example, in a sequencing environment you may wish to record 16 channels of KONTAKT PLAYER 2 instruments then combine them with other audio or MIDI tracks and create a mix. Plug-in operation provides other benefits such as:
• MIDI sequencing of KONTAKT PLAYER 2 and audio mixdown of the MIDI tracks within a single program • Comfortable automation of KONTAKT PLAYER 2 parameters in the host sequencer • Further processing of KONTAKT PLAYER 2 signals using additional plug-ins • Restoring of all plug-in settings when the host sequencer recalls a project • Integration with other instruments into a "virtual studio"
KONTAKT PLAYER 2 is available for use in VST, DXi, and RTAS formats on the PC, and in VST, AudioUnit (AU), and RTAS formats on the Macintosh. Note: Some hosts include "wrappers" that convert one plug-in format to another. Try each one, as one may offer better performance than another.
24
VST (Virtual Studio Technology): This cross-platform plug-in format was developed by Steinberg, and is used by programs such as Steinberg Cubase, Nuendo, Native Instruments Kore, and Ableton Live. It is one of the most common plug-in formats, and many programs are optimized to work with VST plug-ins. DXi (DirectX Instrument): Based on Microsoft's DirectX technology, this plug-in interface for software synthesizers and instruments is designed for low latency and high performance on the Windows platform. Cakewalk Sonar and Image Line FL Studio are the most popular hosts to support DXi. RTAS (Real Time Audio Suite): This format was designed by Digidesign and is used in all current versions of Pro Tools. Unlike traditional TDM effects that depend on using Digidesign hardware, RTAS plug-ins are "native," meaning that they rely on the CPU of the host computer to do their computations. AU (AudioUnit): This plug-in format was developed by Apple and is unique to the Macintosh platform. It is the most popular Macintosh plug-in format, being supported by programs such as MOTU's Digital Performer, Apple's Logic, Native Instruments Kore, and Ableton Live. When KONTAKT PLAYER 2 is used as a plug-in in any of these formats, it's not necessary to set up Audio/MIDI settings as described above for standalone use. KONTAKT PLAYER 2 operates within the host sequencer, automatically receiving the MIDI that the host sequencer sends to it, and sending back its audio output to the host sequencer. Because of this, settings regarding audio and MIDI interfaces as well as buffer sizes (latency) are governed by the host sequencer, not by KONTAKT PLAYER 2. Offline Bounce Mode: If you hear crackles or drop-outs when bouncing / freezing tracks in hosts, please be aware that not all hosts correctly announce this mode to their plug-ins; when Kontakt Player 2 is used as a plug-in, the "Offline Bounce Mode" button in the Engine tab is displayed; when Kontakt receives the bounce signal from the host, this will automatically turn this button on; if the button does not turn on automatically, this means the host does not support this feature and you have to enable it manually (it will turn orange). We will now describe the procedures involved in using KONTAKT PLAYER 2 inside each of the major host sequencers on both Macintosh and PC.
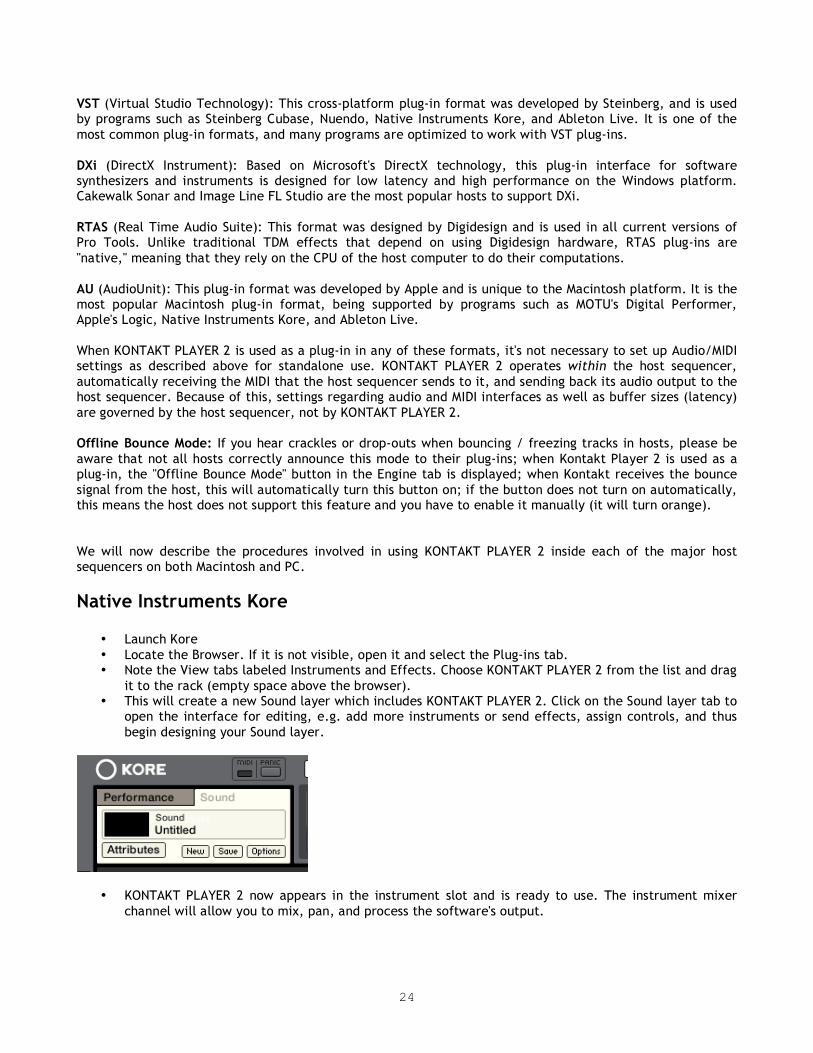
Native Instruments Kore
• Launch Kore • Locate the Browser. If it is not visible, open it and select the Plug-ins tab. • Note the View tabs labeled Instruments and Effects. Choose KONTAKT PLAYER 2 from the list and drag
it to the rack (empty space above the browser). • This will create a new Sound layer which includes KONTAKT PLAYER 2. Click on the Sound layer tab to
open the interface for editing, e.g. add more instruments or send effects, assign controls, and thus begin designing your Sound layer.
• KONTAKT PLAYER 2 now appears in the instrument slot and is ready to use. The instrument mixer channel will allow you to mix, pan, and process the software's output.

25
• If the Instrument interface is not already open, press the E button in the assignment panel to call up the KONTAKT PLAYER 2 interface. Here you can control and edit all the features and functions that the product has to offer.
• After loading an Instrument, you should be able to trigger it via MIDI using a keyboard controller. KONTAKT PLAYER 2's sound will generate through Kore and directly to your sound card. If the plug-in does not receive MIDI or generate audio, then make sure to check the following areas:
• Open the Setup menu>Audio MIDI settings dialog. Select the MIDI tab and make sure your MIDI device shows up and is ON.
• Check the channel's MIDI filter settings. Make sure that the MIDI channel is set to receive on the channel which your keyboard sends.
VST Plug-in
Cubase and Nuendo by Steinberg
KONTAKT PLAYER 2 in Cubase and Nuendo • Launch Cubase, go to the Devices menu option and select the VST Instruments menu option or press
F11 on your keyboard. • A window showing the instrument rack appears. Click on an empty slot and choose KONTAKT PLAYER
2 from the available list of instrument plug-ins.
• KONTAKT PLAYER 2 will now appear in your list and automatically be turned on. It will also create a
set of audio channels in your VST mixer that will be used for mix down within your project. This will allow you to mix, pan, and process KONTAKT PLAYER 2's output just like any other existing audio track in your Cubase song.
• Click on the Edit (e) button to call up the KONTAKT PLAYER 2 interface. Here you can control and edit all the features and functions that KONTAKT PLAYER 2 has to offer.
• Now go to the Project page and add a MIDI track (if you do not have one already created).
• In the Inspector, go to the Output parameter section for this MIDI Track and click on the field. This
will show a list of available MIDI out ports to assign to this MIDI track. Choose KONTAKT PLAYER 2 from the list.
Note: If a product does not appear in the list of available VST instruments, then you may need to enable it manually via the Devices/plug-in information window. If the product does not show up there, then it may not be installed correctly. Please refer to the

26
previous section on installing the plug-in for both Windows and Mac platforms for more assistance on setting this up. After having loaded KONTAKT PLAYER 2 from the library, you should be able to trigger it via MIDI using a keyboard controller. KONTAKT PLAYER 2's sound will generate through the VST mixer and directly to your sound card. If the plug-in does not receive MIDI or generate audio, then make sure to check the following areas:.
• The MIDI channel of your MIDI track must correspond to the receive channel of the loaded instrument. • Make sure that you have properly configured your sound card for use with Cubase/Nuendo.
You may also want to refer to the Cubase/Nuendo manual which offers additional instruction in using virtual instruments and plug-ins within a Cubase/Nuendo project.
Audio Units Plug-in
Apple Logic Pro and Logic Express
Launch Logic and create an audio instrument track or set an existing audio or MIDI track to an audio instrument track by clicking on the track name, holding down the mouse button and choose Audio -> Audio Instrument -> Inst 1.
• Double click the audio instrument track to open the environment window. Logic scrolls automatically to the first instrument bus in the Logic mixer.
• Choose the KONTAKT PLAYER 2 plug-in in the appropriate insert slot of the instrument track, either in the arrange or mixer window. To do so, click onto the insert slot, hold down the mouse button and choose Stereo -> Audio Units -> Native Instruments -> KONTAKT PLAYER 2. (KONTAKT PLAYER 2 can also be used as a multichannel instrument.)
• The plug-in now appears in the instrument slot and is ready to use. The instrument mixer channel will allow you to mix, pan, and process the software’s output just like any other existing audio track in Logic.
• If the KONTAKT PLAYER 2 interface is not already open, double click on the mixer’s insert slot to call up the KONTAKT PLAYER 2 interface. Here you can control and edit all the features and functions that the product has to offer.
After loading an Instrument, you should be able to trigger it via MIDI using a keyboard controller. KONTAKT PLAYER 2's sound will generate through the mixer and directly to your sound card. If the plug-in does not receive MIDI or generate audio, then make sure to check the following two areas:
• Make sure the Instrument track is selected / record enabled in the Arrange window. • The MIDI channel of your MIDI track must correspond to the receive channel of the loaded instrument.

27
• Make sure that you have properly configured your soundcard for use with Logic. You may also want to refer to the Logic manual which offers additional instruction in using virtual instruments and plug-ins within a Logic project.
MOTU Digital Performer
• Launch Digital Performer and create an instrument track by selecting Project -> Add Track -> Instrument Track -> KONTAKT PLAYER 2.
• Create a MIDI track by selecting Project -> Add Track -> MIDI Track. In Digital Performer's track overview window (or in the sequence editor window) assign the output of this MIDI track to KONTAKT PLAYER 2 and a MIDI channel.
• The plug-in is now ready to use. The mixer of Digital Performer will allow you to mix, pan, and process KONTAKT PLAYER 2's output just like any other existing audio track.
• To play KONTAKT PLAYER 2 with your keyboard, record-enable the MIDI track which you have routed to KONTAKT PLAYER 2 and make sure MIDI Patch Through is enabled in the Studio menu of Digital Performer.
After having loaded an Instrument, you should be able to trigger it via MIDI using a keyboard controller. KONTAKT PLAYER 2's sound will generate through Digital Performer's mixer and directly to your sound card. If the plug-in does not receive MIDI or generate audio, then make sure to check the following areas:
• Make sure MIDI Patch Through is enabled in the Studio menu of Digital Performer. • •The MIDI channel of your MIDI track must correspond to the receive channel of the loaded
instrument. • Make sure that the instruments track output is correctly set. • Make sure that you have properly configured your sound card for use with Digital Performer.

28
Apple GarageBand
• Launch GarageBand • Press the “+” button to create a new “Software Instrument” Track. From here you can choose the
icon you wish to use. • Double-click the instrument track icon or press the “I” icon to get the Track Info. • From the Info window expand the Details triangle underneath the Instrument icon to expose the track
settings. • From the Generator drop-down menu, choose KONTAKT PLAYER 2 from among the Audio Unit plug-
ins.
• Clicking on the pencil icon next to the “Manual” drop-down menu will open the KONTAKT PLAYER 2 interface for editing.
• KONTAKT PLAYER 2 can now be played using an external MIDI keyboard.
Cakewalk Sonar
• Launch Sonar • In the synth rack choose KONTAKT PLAYER 2 DXi 2.
• Route a MIDI track to the DXi 2-Plug-in by selecting KONTAKT PLAYER 2 in the Out drop down list.
After having loaded an Instrument from the library you should be able to trigger it via MIDI using a keyboard controller. KONTAKT PLAYER 2's sound will generate through Sonar's mixer and directly to your sound card. If the plug-in does not receive MIDI or generate audio, then make sure to check the following areas:

29
• Make sure MIDI Patch Through is enabled in the Studio menu of Sonar. • The MIDI channel of your MIDI track must correspond to the receive channel of the loaded instrument. • Make sure that the instruments track output is correctly set. • Make sure that you have properly configured your sound card for use with Sonar.
Digidesign Pro Tools
• Launch Pro Tools. • Create a new Instrument track by choosing New Track from the File menu. • Locate the channel mixer Window -> Mix • The dark grey box at the topmost section of the Instrument channel is the RTAS insert section. Click
on the first empty slot to show all available RTAS plug-ins. • Choose KONTAKT PLAYER 2 from the multi-channel RTAS plug-in > Instrument menu
• To open the plug-in interface for editing, click once on the insert slot. After having loaded an Instrument, you should be able to trigger it via MIDI using a keyboard controller. KONTAKT PLAYER 2's sound will generate through the mixer and directly to your sound card. If the plug-in does not receive MIDI or generate audio, then make sure to check the following areas:
• A physical input may need to be assigned to the instrument track. • The Instrument track fader (Mix window) may be down. • The instrument track in not selected in the Edit window.
Using KONTAKT PLAYER 2 Whether you use KONTAKT PLAYER 2 as a standalone application or as a plug-in, once you've set up its audio/MIDI options (in the standalone) or instantiated it as a plug-in and properly routed MIDI and audio to and from it, the program will behave identically with very few exceptions.

30
Browser On the left side of the screen is the Browser. The Browser gives you the capability to navigate through your available KONTAKT PLAYER 2 libraries, as well as view engine information and assign automation.
Libraries In the screenshot above, the Browser is opened to the Libraries tab. Using this tab, you will see all installed KONTAKT PLAYER 2 sound libraries. You can have an infinite amount of sound libraries installed here. In the submenu under the Libraries tab are a few buttons. There is a refresh button to refresh the Browser and an eject button to eject an optical disc. You will also see two dropdown menus for User Instruments and User Multis. Anytime you resave an instrument or a multi using the Load/Save menu, your saved instruments and multis will appear in this menu. (By default, they are stored on your hard drive inside the KONTAKT PLAYER 2 program folder/ User patches. Later in this manual, we will discuss the saving of instruments (in the Load/Save menu section).
Library Box
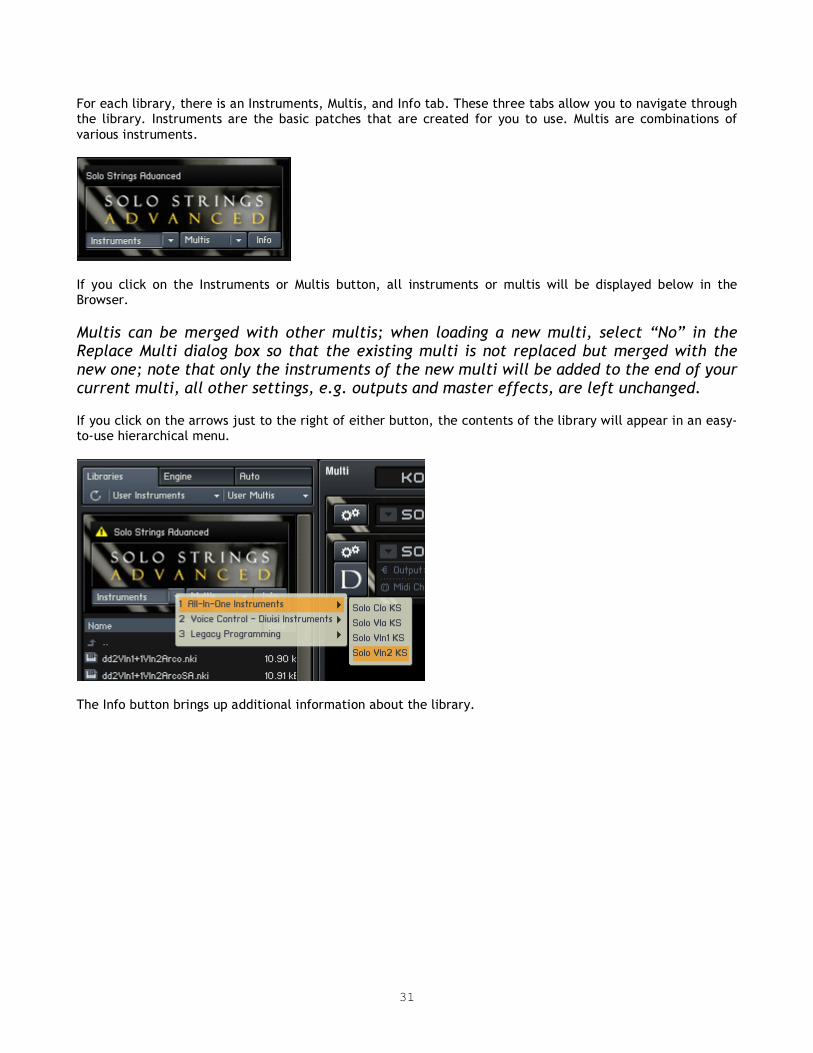
31
For each library, there is an Instruments, Multis, and Info tab. These three tabs allow you to navigate through the library. Instruments are the basic patches that are created for you to use. Multis are combinations of various instruments.
If you click on the Instruments or Multis button, all instruments or multis will be displayed below in the Browser. Multis can be merged with other multis; when loading a new multi, select “No” in the Replace Multi dialog box so that the existing multi is not replaced but merged with the new one; note that only the instruments of the new multi will be added to the end of your current multi, all other settings, e.g. outputs and master effects, are left unchanged. If you click on the arrows just to the right of either button, the contents of the library will appear in an easy-to-use hierarchical menu.
The Info button brings up additional information about the library.

32
About: Here you see important library information, such as the serial number and the library credits. Click the “Show Read-me” button to open the library read-me document. Update: Use this tab to check for available Library updates or crossgrade offers to other products. Regsiter: All libraries must be registered to unlock them for continued use. This tab provides a shortcut to the Native Instruments Service Center. Click once to start the Service Center application. Note that Service Center must be installed for this to work. Forum: This link connects you to the user forums of both the library developer and Native Instruments. Support: Click this link to be directed to the relevant Support pages for technical support. Library Installation path: Use this to set the install directory for your library. This is especially necessary when you move your library, either to another hard disk or to another location. Please note that if you use your KONTAKT PLAYER 2 library exclusively in KONTAKT 2, you must set the library path here in order for the library to continue working correctly. Note: Only libraries that are released for KONTAKT PLAYER 2 (for example, OEM LIBRARY, which you just purchased) can be loaded. KONTAKT PLAYER 2 is not able to load general KONTAKT or KONTAKT 2 patches, nor is it able to import libraries from foreign formats. To do these things, you must own the full version of KONTAKT 2. The full version of KONTAKT 2 offers other powerful benefits, such as more extensive editing, and the ability to use all KONTAKT patches (whether user-created or released for KONTAKT PLAYER 2) and mix and match freely between the two, as well as import libraries in foreign formats.

33
Engine Clicking on the Engine tab brings up various information about how the KONTAKT engine is performing. This information is updated in real-time, so you can watch exactly how it behaves under various conditions (e.g. high polyphony, high CPU loads, etc.)
Automation The Automation tab allows you to assign various types of MIDI automation to various knobs within KONTAKT PLAYER 2
• In standalone mode, choose MIDI Automation. • When using KONTAKT PLAYER 2 as a plug-in, select Host Automation.
When in MIDI CC mode, move the MIDI device’s control that you want to use for parameter control in KONTAKT PLAYER 2. A “lightning bolt” will light in red to the left of the corresponding CC number in the

34
browser. Click on the CC number and drag it on top of the parameter you want to control. A hand will appear if the assignment is “legal.” Release the mouse, and the assignment is made. With Host Automation mode, select an unused ID and either double-click or click on Set to perform the assignment. The automation always applies to an entire group. The only functions which can use with host automation are the volume, tune and pan knobs. The performance view knobs cannot be used with host automation. Note: Several parameters can be assigned to the same controller. This is great if you want a single control to do many things, such as increase brightness while increasing level. Also note that the Mod wheel is usually fixed at Controller 1, and Volume at Controller 7. Remove: To remove an automation assignment, select it then click on Remove. Smoothing: Incoming MIDI data is “quantized” to 128 divisions. Sweeping some parameters with this quantized signal produces a “stair-step” or “zipper” effect. The Smoothing parameter smoothes the incoming MIDI data (through a process of mathematical integration, just in case you wondered) by creating a ramp between values rather than a sudden jump. However, note that higher smoothing values also make the control less responsive when controlled over MIDI. Soft Takeover: Enabling Soft Takeover causes a parameter not to change until an external controller matches its existing value. Example: Suppose a level parameter is set to halfway, and a hardware control assigned to level is turned all the way down. Without Soft Takeover, as soon as move the hardware control the parameter will jump to the new value – in this case, something close to full off. With Soft Takeover, nothing will happen as you turn up the hardware control until the control is up halfway. It now matches the existing parameter value, which allows it to take over parameter control. Cancel: So you didn’t really mean to assign that controller after all? Click on Cancel.
Main Control Panel The KONTAKT PLAYER 2 main control panel gives you access to several controls and displays which are global to the program.
The upper four buttons (Browser, Outputs, Keyboard, and MasterKontrol) toggle the visibility of these four areas of the program. Note: If you are using the standalone version of KONTAKT PLAYER 2, you can use the F1-F4 keys to toggle each of these buttons from the keyboard. The Browser has been discussed above; we will now look at the other three areas individually.
Output Section When you click the Outputs button, the Outputs window appears at the bottom of the rack.

35
There are two types of faders: “Blue” faders that relate to channel outputs (the number of faders depends on the number of available outputs), and four “orange” faders that control return from the four send effects, as used in Multi setups. Each fader, output or aux return, has four effect insert points. Let’s cover output channel features, going from top to bottom. Add Channel: Adds another output channel to the Outputs section. Delete Channel: To delete a channel, click on any section of the channel that doesn’t contain an editable parameter; the channel becomes outlined in yellow. Click on Delete Channel to delete. Note: You cannot delete the Aux return channels. Hide Inserts: Hides all inserts to conserve space. Edit Effect: To edit an insert effect, click on it. Then click on this button to open and close the edit section for that effect. To delete an effect, click on the effect strip that includes the parameters (not the module in the slot); the effect strip becomes outlined in orange. Then, press the computer keyboard’s Delete key. Reset Out Map: This button can be used to restore the output mapping to the default settings. Make Default: Clicking on this button saves the current output mappings as your permanent defaults. (These output mappings are saved to the KONTAKT PLAYER 2 application directory inside the Defaults folder.) Name Fields: Each channel has a name field at the top. Double-click in the field, and type in the desired name. Insert Effect Slots: To insert an effect, click on the downward arrow toward the right of the slot, and select the desired effect from the drop-down list. Adjust Output or Aux Return Level: Move the appropriate fader. Config: This is where you configure the output for number of channels and channel assignments.

36
When you click on a channel’s Config button, a dialog box appears with several fields. You can edit the Channel Name, but also, the number of audio channels (click on the Audio Channels parameter, then drag up or down). Note that you can’t specify more audio channels than actually exist. Each channel shows up in a list. Click on the channel’s Physical Out field, and a pop-up menu appears with all available output. Click on a physical output to assign it to a KONTAKT 2 virtual output. You can use the << and >> buttons in the lower left hand corner to automatically go to the next available output.
Output Routing Note: There are only 16 mono outputs possible when Kontakt Player 2 is used as an Audio Unit plug-in, even though newer Logic versions support 32 outputs. Surround channels in Cubase are not supported. In addition to the methods mentioned below, different output configurations can also be saved as part of a multi. In stand-alone mode, there are 32 mono outputs possible. Therefore, the maximum number of supported physical mono outputs is 32. If your audio interface supports more than 32 mono outputs, you will only be able to use the first 32 outputs in Kontakt Player 2. Outputs can not be freely mapped on the physical level of your audio interface In plug-in mode, the maximum number of virtual mono outputs is always 32 for VST and DXi / 16 for AU and RTAS. For VST only, three default plug-in versions are available with 8, 16, and 32 outputs respectively. For all other plug-in formats, outputs are selected dynamically via the host (please check respective host documentation for details). If your host does not allow you to remove unused channels, these channels might still use CPU. Kontakt Player 2 will automatically mute all unused channels and thus lower CPU usage within the Kontakt Player 2 engine.

37
A default configuration is kept which is used as soon as Kontakt Player 2 is started. Kontakt Player 2 keeps a separate default config setting for every flavor of Kontakt Player 2; in other words, standalone, VST, AU, DXi, RTAS all have their own output configurations. In order to change the output config, you need to first organize the outputs the way you want and then click on the "make default" button in the Output section. This ensures that at next startup the outputs are the way you set them. Another way to store and recall an output configuration is for plug-in use only – it is trickier and needs careful handling. The output configuration is also stored together with a plug-in’s total recall data, which means that a saved song will be recalled with the output config it was saved with. This means that a recalled song might contain a Kontakt Player 2 instance with outputs differing from the default configuration; or it might even contain several Kontakt Player 2 instances using entirely different output configurations. This bears a lot of potential trouble and practically no host can effectively handle this situation. This is why Kontakt Player 2 has to declare its output requirements the first time an instance gets plugged in; this cannot be changed from that point on. The host thinks Kontakt Player 2 has only one output configuration, being the stored default config. This is why it is a good idea to stick to the default configuration and make every change in the default itself (by clicking on "make default"). When using Kontakt Player 2 as a plug-in in a sequencer, it's also advisable to unplug and then replug all instances after a fundamental change and / or reloading the song. "Reset Out Map" (reset output mapping) restores the output mapping to the default settings. Kontakt Player 2 allows you to freely map each of the output channels to the available physical outputs. The button automates this in a simple default way: all physical outputs are assigned to Kontakt Player 2's output channels until they are used up. Take for example the new 8-channel VST version; if the user has Kontakt Player 2 set up to use 2 stereo and 4 mono outputs, and he presses the make default button, then the 8 available plug-in outs will be fully assigned to the available Kontakt Player 2’s output strips (1-2, 3-4, 5, 6, 7, 8). The aux channels, coming after the "normal" output channels, will receive no assignment in this example. On the other hand, if you Kontakt Player 2 set up with just two stereo outputs, the other four available physical outputs will be automatically assigned to the first two (stereo) Auxilliary Outputs.
Keyboard The Keyboard button displays an onscreen keyboard which features tinted keys, which can be helpful in showing you which keys are active in any given instrument. Keys which have samples mapped on them are tinted blue, and keyswitch keys are tinted red. Keys which are being played will be shown in real time. You can transpose the keyboard's range within three octaves as well as create pitch bend and Modulation events (MIDI CC 1).
MasterKontrol

38
When enabled in the Main Control Panel, this sits right under that panel and provides a lot of useful functions. The tempo knob sets the tempo for tempo-synched effects. If KONTAKT PLAYER 2 is used within a host program, this displays the host’s tempo. The default is 120.00 BPM. There is also a sync button to sync to incoming tempo information (not visible in the standalone version). There are three ways to set tempo manually:
• Adjust the tempo knob. • Double-click on the tempo field and type in a new number. • Tap a rhythm on the Tap button. Hint: This is also useful for finding out the tempo of a song if you
don’t already know it. To use the Metronome, click the On button to enable it. The light below the on button flashes with the tempo, and the control varies the metronome volume. The Master Tune area defaults to A=440, but can be adjusted with the knob from A=392.00 to A=493.88. If you’ve used use a sample library where some of the notes are out of tune, you’re going to love this feature – you can set a reference pitch, and tune the sample against it. The reference tone can also be used for level setting within systems, or provide a reference tone for tuning guitar, bass, etc. Click on the Note Name field and drag up and down to select the reference pitch. Turn it on with the On button, and use the knob to set the reference tone level.
Load/Save The Load/Save menu gives you options for loading and saving instrument and multis, as well as resetting the entire multi (i.e. clearing the rack.) Instruments and multis can be loaded using the Load option, and can also be loaded by simply dragging and dropping the NKI or NKM file from the desktop. Note that when saving instruments and multis, you are only saving the instrument/multi definition files, not the individual samples. Each individual sample is encrypted within the protected monolith file, and the raw samples cannot be extracted. In the Save dialog box, the patch + samples and monolith options are not available. This is due to the copy protection of the library; the samples cannot be extracted nor resaved.
There is an option to save the patch with absolute sample paths enabled or disabled. When you save with absolute paths enabled, the patch file includes a direct and absolute link to the location of the encoded samples on your hard drive. In other words, the absolute path will reference your hard drive name and the exact subfolders which the encoded samples are stored. This is the best option to use if you will not be sharing this library among multiple computers and intend not to move the location of the encoded samples.

39
By doing this, every time you load one of the user patches, it will instantly and automatically find the samples. By disabling the absolute path option, a relative path is used instead. For example, if you save the instrument in a subfolder which sits alongside the encoded sample files, a relative path will read something like "go up one level in the folder hierarchy and you'll find the encoded samples there." Relative paths are the best option if you think you may move the samples around. Be sure that the relative location between the newly saved patch and the encoded samples stays the same in order to make sure the samples can always be found automatically. If a saved patch ever loses track of where its samples are stored, you will be presented with a dialog box upon load which prompts you to find the location of the samples. Instruments and multis saved from within KONTAKT PLAYER 2 are accessible through the Browser's User Instruments and User Multis menus, and can be used by anyone who owns the same library, from within either KONTAKT PLAYER 2 or the full version of KONTAKT 2. The instruments cannot be used by a user who does not own the same library.
Options The Options menu is where you determine overall KONTAKT PLAYER 2 preferences. Clicking on this button to open the Options window, which has five subcategories.
Tab 1: Interface Here you make basic adjustments to KONTAKT PLAYER 2’s layout of KONTAKT and functionality. Small Size/Mid Size/Big Size: The View menu lets you choose one of three sizes for KONTAKT PLAYER 2: Small, Mid, and Big. The edit boxes let you specify the size, in pixels, for the size. The width and height have separate fields; to change a field, double-click on it and enter the new value. Note: The new value will take effect the next time you open KONTAKT PLAYER 2. Capture Keyboard from Host: Enabling this button catches certain keyboard keys and routes them to KONTAKT PLAYER 2 rather than to the host program. For example, you may want to type certain things on the keyboard and have them affect KONTAKT PLAYER 2 but have no effect on the host (e.g. you want to name something in KONTAKT PLAYER 2 using a letter that happens to be a keyboard shortcut for the host). Enabling this ensures the keystroke is interpreted by KONTAKT PLAYER but not the host. Capture Mouse from Host: This is similar to Capture Keyboard from Host, but directs Mouse Wheel movements to KONTAKT PLAYER 2 instead of the host. Show Mapping and Keyswitches on Keyboard: This button shades keys on the “virtual master keyboard” (along the lower part of the window) to indicate mapping and keyswitching. Auto-refresh Browser: This option activates the auto updating of the browser. When activated, the browser automatically detects from the operating system if a folder is changed / created. Menu Font Size: This drop-down list allows setting the font size bigger for increased legibility, or smaller to fit more items on screen.
Tab 2: Audio Engine These settings affect KONTAKT PLAYER 2's audio engine.
40
Default Volume for New Instruments and Volume Reset: Choose between –6dB and 0dB. CPU Overload Protection: This function will kill voices if the CPU load gets too high. You can specify how tolerant you want the engine to be. Multiprocessor Support: Enable this checkbox if you have a computer with more than one processor to take advantage of the additional CPU power. Send MIDI to outside world: * GUI keyboard: Virtual keyboard / Mapping Editor keyboard / computer keyboard events * Script generated CCs: script controller events like CCs, RPNs, NRPNs * Script generated notes: script note events (when enabled, this setting might create duplicate notes when recording in your host) Offline Interpolation Quality: The new HQI mode allows you to select among three quality options when bouncing audio from within a host. “Standard” corresponds to the old mode, whereas “High” and “Perfect” increase the quality. HQI mode helps you eliminate digital aliasing sounds which become particularly audible when you transpose sounds with significant high frequency content upwards. Note that this quality comes with a price in the form of additional CPU load and thus a lower total voice count. Important: Both modes “high” and “perfect” will use more cpu if the transposition is higher. E.g. if you transpose a sample one octave, then 2 octaves, the cpu load will double every octave. So if you transpose your sample many octaves higher, the cpu load might be very high. Open Audio and MIDI Settings: Click on this button to view audio and MIDI settings that relate to your audio interface.
Tab 3: Handling Use Computer Keyboard for MIDI Playback: This lets you use your computer keyboard to trigger KONTAKT PLAYER 2 (handy for laptop jockeys on airplanes!). You can also edit the Velocity value that a key will trigger. Keyboard Velocity: This specifies what velocity should be sent when using the computer keyboard for MIDI playback. Solo Mode: Choose between Solo In-Place (only one instrument can be soloed, others will be muted) and Solo Latch (you can switch several instruments into solo mode). Browser: Double-Click Loads Instrument: If enabled, double-clicking on a Sample in the Browser creates a new Instrument, with the sample spanning the entire keyboard range. If you Shift-Click multiple samples and double-click on the group of Samples, this not only creates a new Instrument, but also auto-maps the Samples equally across the keyboard. Browser: Show Files Before Folders: This alters the sorting algorithm of the Browser to show files before folders. Default Root Key for New Zones: Samples without root key information will default to this as their root key.

41
MIDI Channel Assignment for Loaded Patches: This menu tells KONTAKT PLAYER 2 what MIDI channel you want newly loaded instruments to be assigned to. "1st Free" loads up each subsequent instrument on the first unused MIDI channel. "Omni" assigns all instruments to OMNI (meaning they will receive MIDI on any incoming channel). "Keep channels from K 1.x Patches" will allow the patches to load with whatever MIDI channels were saved within older KONTAKT 1 patches. Installation Base Path: If you change the name of the KONTAKT PLAYER 2 folder, certain presets might not be available anymore. Set the installation path here to the location of the KONTAKT PLAYER 2 folder.
Tab 4: Load/Import Load Instruments/Banks/Multis in “Purged Mode” (Without Loading Samples into RAM): Reloads the parameters of Samples that were purged, but without the Sample data itself. See Purge Menu below. Force-load Pre-2.0 Patches in DFD Mode: This forces the engine to use DFD streaming even for old patches that were not originally saved with it. Unwind Automation ID's for Additionally Loaded Patches: This is a very useful option when assigning host automation IDs to a patch and then loading the same patch in several slots; just imagine that you assign host automation IDs #0 to #9 to a patch to control typical synth features; now if you load the patch into Kontakt rack slots 3 and 7 in your song you would want to select different LFO settings for the two slots; this is now possible with this new feature because the second instance of your patch now gets host IDs #10 to #19 instead! Library Path: This is the “User Patches” save location. Here you can save User tweaked instruments and combination multis (from many libraries). By default it is set to the Kontakt 2 Application folder. If you move that folder to another location, use this option to reset the “User Patches” path.
Tab 5: Search/DB This screen gives you options to specify what folders or volumes should be used when using search functions.
Tab 6: DFD - Direct from Disk Amount of Memory for DFD: Adjusts the amount of RAM to dedicate to the DFD process. Although samples stream from disk, it is necessary to store attacks in RAM so they are available instantly upon playback. If DFD isn’t working properly, try allocating more RAM to this function.
Purge Menu Purge analyzes which samples were used in an arrangement, and removes from RAM any samples that weren’t used. Thus, KONTAKT PLAYER 2 can handle huge amounts of samples while exhibiting very low RAM usage. Scoring of large ensembles with many instruments and samples now becomes manageable. Purge is available here on a Global level, but is also available on the Instrument level. You would use Global purge after a song was done, and you wanted to remove all unneeded samples. The Instrument purge is handy if you’ve finished a part; you can purge samples for that Instrument alone, thus freeing up RAM for additional overdubs.

42
Click on the downward arrow to access the following functions. Reset Markers: Deletes all “tags” that mark samples as used. Update Sample Pool: Unloads unused Samples from RAM, and loads newly marked Samples in RAM. Purge All Samples: Unloads all Samples from RAM. Reload All Samples: Reloads all Samples used in an Instrument. Load Everything Purged (Without Samples): Reloads the parameters of Samples that were purged, but without the Sample data itself. A display for the instrument shows Purge status. Green: All Samples are loaded. Orange: Samples have been purged to reduce RAM requirements. Red: Empty – all Samples are unloaded from RAM.
View Menu The entire instrument can be re-sized from the View menu. Choices are Normal, Bigger, and Large. Typically you will use Large when creating Instruments, and Normal when everything has been programmed, and you’re using KONTAKT PLAYER 2 as a plug-in or stand-alone device. You can set the window size under Options > Interface.
System Performance Meters These are located in the upper right section of the Main Control Panel.
Clockwise from upper left, these show the following. Notes: The amount of polyphony being used. The first digit shows the current number of notes being played; the second digit shows the maximum amount of polyphony. CPU: Shows how much CPU power is being used by KONTAKT PLAYER 2. More bars indicate more CPU use. Disk: Shows the amount of KONTAKT PLAYER 2’s hard disk access. Pulling more data from disk illuminates more bars.

43
RAM: Indicates how much memory is being taken up by the samples used by KONTAKT PLAYER 2. This figure will be much higher if DFD is not being used.
Minimized Player View The last button on the right (next to the NI logo) is for Instrument Focus view.
Clicking on this button will instantly zoom into the currently selected instrument, and will hide all other areas of the KONTAKT PLAYER 2 interface (e.g. Browser). This can be a useful tool to instantly collapse the KONTAKT 2 Player screen to its smallest size and most essential elements.
About KONTAKT PLAYER 2 An About screen can be accessed by clicking either the KONTAKT PLAYER 2 logo in the far upper left corner of the interface, or the NI logo in the far upper right corner. The About screen contains the specific version numbers of all components of the KONTAKT PLAYER 2 installation, as well as design credits and links to web pages containing updates, support, and more.
Multi Area The Multi area is the large area on the right side of the KONTAKT PLAYER 2. Also referred to as the rack, this is where all loaded KONTAKT PLAYER 2 instruments reside. You can load multis (which are combinations of instruments) or you can load individual instruments, and they will both appear here. Instruments can be reordered in the rack within the same multi page. This works via drag-and-drop. When loading new instruments, these might still appear in between the already loaded instruments and not at the bottom of the rack.
In the above picture you see an instrument being dragged from the top to the bottom position in the Kontakt Player 2 rack. There are a few buttons in the upper right hand corner that allow you to work with the rack.

44
The four numerical buttons allow you to switch between four different pages of the rack. By using these, it's possible to load up to 64 different instruments at once. The Aux button is a toggle switch to show or hide the aux send faders for each instrument.
Instrument views
Performance View The performance view shows a custom panel which allows you to alter specific characteristics of the instrument. Here is a view of one example instrument. Views for OEM Library will differ (sometimes from instrument to instrument). You can view this panel by clicking on the icon immediately below the gear icon in the upper left hand corner (in the example below, it's an NI icon).
Minimized and Maximized View The instrument minimize and maximize buttons allow you to instantly collapse or expand every instrument in the rack to its minimized or maximized view, respectively. The maximized view is useful when editing an instrument and accessing its panel. The minimized view is useful when you want to view all your instruments at once. An instrument in minimized view shows only its name, solo and mute buttons, volume, pan, and tune knobs, and meters. The X button in the upper right corner deletes the instrument, and the + button switches to performance view.
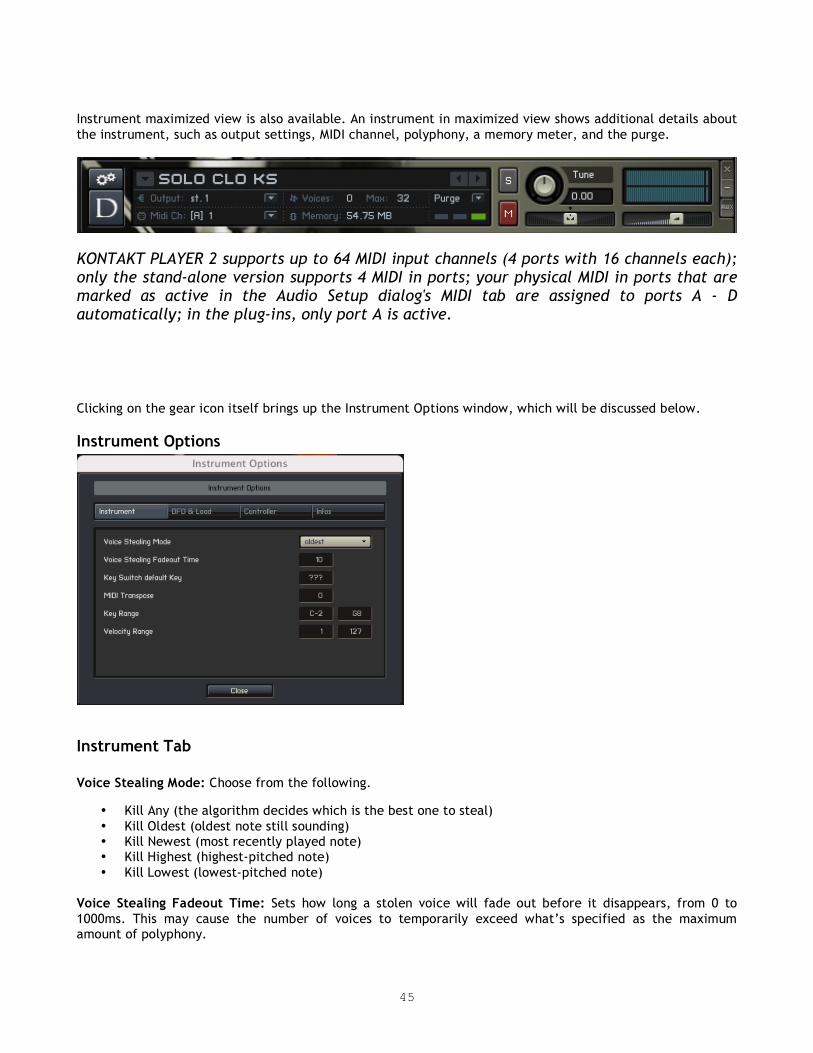
45
Instrument maximized view is also available. An instrument in maximized view shows additional details about the instrument, such as output settings, MIDI channel, polyphony, a memory meter, and the purge.
KONTAKT PLAYER 2 supports up to 64 MIDI input channels (4 ports with 16 channels each); only the stand-alone version supports 4 MIDI in ports; your physical MIDI in ports that are marked as active in the Audio Setup dialog's MIDI tab are assigned to ports A - D automatically; in the plug-ins, only port A is active. Clicking on the gear icon itself brings up the Instrument Options window, which will be discussed below.
Instrument Options
Instrument Tab Voice Stealing Mode: Choose from the following.
• Kill Any (the algorithm decides which is the best one to steal) • Kill Oldest (oldest note still sounding) • Kill Newest (most recently played note) • Kill Highest (highest-pitched note) • Kill Lowest (lowest-pitched note)
Voice Stealing Fadeout Time: Sets how long a stolen voice will fade out before it disappears, from 0 to 1000ms. This may cause the number of voices to temporarily exceed what’s specified as the maximum amount of polyphony.

46
Key Switch Default Key: This is the first key that is activated when you load this instrument with “Start on key” group start options. MIDI Transpose: Transposes incoming MIDI data in semitones. Example: If this is set to 2 and you play a C# on your keyboard, the Instrument being triggered will play a D#. Key Range: This sets the Instrument’s keyboard range. Placing your mouse over the lower or upper limit causes a double arrow to appear. Drag up to raise the limit’s note pitch, or drag down to lower. The range cannot go below C-2, or above G8. Use this with multiple Instruments to create keyboard splits - for example, bass could cover the lower two octaves of your keyboard, and piano the rest. Double-click the a value field to enter a note from your computer keyboard. Velocity Range: This restricts the velocity range to which an Instrument will respond. Placing your mouse over the lower or upper limit causes a double arrow to appear. Drag up to raise the velocity limit, or drag down to lower. The range cannot go below 1, or above 127. Double-click a value field to enter a value from your computer keyboard. Example: You could set a B3-type organ Instrument to respond to velocities 1-127, while a pipe organ Instrument responds to velocities 111-127. Velocities of 111 or above will layer the two organ sounds for a more powerful effect.
DFD & Load Tab DFD Preload Buffer Size: Sets the amount of RAM dedicated to each preload buffer when using DFD. This is an expert setting and should not be adjusted unless you are instructed to do so from tech support. You have been warned!
Controller Tab MIDI Controller #64: This drop-down menu determines how KONTAKT PLAYER 2 responds to MIDI Controller #64, which defaults to controlling the sustain pedal. Here are your options.
• Sustain Pedal and Controller: KONTAKT PLAYER 2 will respond to a switched (on-off) or continuous controller (values above 64 = sustain on, values 64 or under = sustain off).
• Sustain Pedal without Controller: KONTAKT PLAYER 2 will recognize only a switched controller. • Controller Only: KONTAKT PLAYER 2 will recognize only a continuous controller.
Accept All Notes Off/All Sounds Off: This option will filter All Notes Off and All Sounds Off messages, which some older controllers send by default. Accept Standard Controllers for Volume and Pan: This option will automatically cause each instrument to automatically respond to CC#7 for volume and CC#10 for pan. MIDI Controller #7 (Volume) Range: Using this dropdown menu, you can adjust the minimum and maximum values that incoming MIDI CC#7 will translate to when controlling the volume of an instrument.
Info Tab Instrument Icon: Choose an Instrument’s identifying icon. Instrument Info: A notepad for the Instrument, possibly including copyright information, helpful tips, etc. Instrument Categories: Choose an Instrument category. Being able to search on this can help considerably with database searches. Author: Information on the sample’s creator. This is limited to 8 characters, so longer descriptions can go in the Info box. Weblink: Provides a web link to the author’s web site.

47
Troubleshooting If something doesn't seem to work correctly, there must be a logical reason for it. Native Instruments software is tested on a variety of computers and configurations to ensure proper function. Having said that, there remain an infinite number of possible setups and within them any number of compatibility issues, software conflicts, hardware problems and so on. Below you will find some tips in regards to troubleshooting common problems with KONTAKT PLAYER 2. This list is by no means exhaustive. For more product specific issues please consult the product handbook, the Native Instruments Support Knowledge Base, or Native Instruments Technical Support.
Standalone
Library doesn’t find samples:
This dialog opens when the loaded instruments cannot find the associated samples. In most cases the reason is because the Library Installation path has been changed, as in the case when you expand your library

48
storage and move your libraries to a new, bigger disk. In this example, reset the library installation path using the Library box Info button. If you have this option correctly set and continue to get this error, then please use the option which best suits your needs. Sample Search Dialog (“Samples Missing”) with Spotlight Support The Sample Search / Samples Missing dialog appears when sample paths have been changed for whatever reason – for example, you have moved sample files to a different place on your hard disk – and Kontakt asks for your advice on how best to find them. Here is a quick run-down of the current options: Search File System: Look for samples in the volumes / folders that you have specified in the new Search / DB tab in the Options dialog (see below) Search Spotlight: On OSX 10.4 (Tiger) and higher, you can now use the native Spotlight search to find samples in an instant! Check for Duplicates: The new option works with any of the above actions; just consider that you have the 16 and 24 bit version of piano samples with the same name on your system; if you check this option, you will be presented with a choice of either the 16 bit or the 24 bit sample folder Browser for Folder: Look for samples in the folder of your choice (including all subfolders) Browse for Files: Look for a specific sample file; use the Resolve All Possible option to look for other samples in the folder of the selected file Skip Missing: Load the patch only with the samples found so far and ignore any missing samples Abort Loading: Cancel the whole loading process
KONTAKT PLAYER 2 won’t start (or crashes upon start): • Check the systems requirements for the KONTAKT PLAYER which you want to use. The minimum
requirements are the very least you can get by with, and are often not enough for larger projects. If your project calls for more nstruments, more plug-in instances, etc. updating your RAM configuration may save you a lot of trouble.
• Make sure you have the most recent KONTAKT PLAYER version. • Make sure that you have not clicked on an outdated application alias / shortcut. • Try to restart your computer. Disconnect any audio interfaces and computer peripherals like printers,
scanners and the like.
My soundcard / MIDI device is not recognized: • Quit all open applications • Disconnect and reconnect the device. Try another USB / Firewire port if one is available. Connect the
device directly to the computer and not via a USB / Firewire hub. • Open Audio MIDI Setup (Mac OS X) and see if the device shows up there. Test the MIDI setup for MIDI
received. • Update any soundcard / MIDI drivers from the manufacturer’s website. • Deinstall and reinstall your soundcard / MIDI drivers.
I don't hear any sound: Without being too product specific, there are usually two reasons for this problem. It is either MIDI or soundcard / routing related.
• Make sure that the KONTAKT PLAYER MIDI channel is set to receive from your MIDI device properly. They must be on the same MIDI channel. If in doubt, set the KONTAKT PLAYER to OMNI.
• Output routing is incorrectly setup. Open the KONTAKT PLAYER Audio MIDI Setup / Routing tab and set the outputs to correspond to your soundcard's monitor (Main) outputs.
49
• Incorrect soundcard selected. Open the Audio MIDI Setup dialog and choose the correct output device.
The sound is distorted, playback drops out: • Your latency settings are too low. Low soundcard buffers (low latency settings) strain your CPU more,
so it may be helpful to increase the buffer size via your ASIO control panel; or in a host, the soundcard setup. For standalone, open the Audio MIDI Setup dialog and move the output latency to the right until you don’t hear any more distortion or playback is normal.
• Your CPU may be overloading. KONTAKT PLAYER 2 CPU meter to give you a quick look at what processing power is being used. If things here look normal, then your computer may have another process which is using resources needed for real-time audio processing. (PC) Check the Task Manager (ctrl-alt-delete) or (Mac) Activity Monitor (Applications/Utilities) and quit any processes which are using valuable CPU. Usually it is a good idea to deactivate virus scan software when working with audio.
I hear a noticeable latency: • The output latency is too high. Open the Audio MIDI Setup dialog and move the output latency slider to
the left.
For PC users: Please note that some soundcards may not be able to achieve a comfortable latency. If this is the case you may want to to try the generic ASIO4ALL driver.
Plug-in
My plug-in does not show up: Before checking the following options, please make sure that the latest NI product updates are installed.
• Cubase / Nuendo: From the Devices menu, open the plug-in information dialog. Make sure that the installed plug-in can be seen. Click the checkbox next to the plug-in name to activate it. Restart Cubase or Nuendo to have the changes take effect.
• Logic: Make sure that the plug-in was installed. Check the local plug-ins folder (Macintosh HD/Library/Audio/Plug-ins/Components) for installed items.
Start the Logic AU Manager from the Logic Menu/Preferences. Rescan individual plug-ins or reset and rescan all plug-ins. Even after scanning, you may need to activate a plug-in by clicking the checkbox next to it.
• Digital Performer: Rescanning all the plug-ins usually helps. To force Digital Performer to rescan all plug-ins, you should delete the preference file AudioUnit info cache from the folder: Macintosh HD/Users/~/Library/Preferences/Digital Performer
The plug-in makes no sound: Try the software's virtual keyboard (if applicable) to see if the problem is MIDI related. Also set the plug-in MIDI channel to OMNI (when applicable).
Cubase / Nuendo: MIDI track output not assigned to plug-in. Logic: Instrument Track not record enabled Digital Performer: MIDI track Output not assigned to plug-in. MIDI Track is not record enabled. MIDI Patch Through not active from the Setup menu. Pro Tools: Physical Input not assigned to Instrument track
50
Error Messages Application Install Error: If you receive this error, then something has gone wrong with the software installation. Your only choice at this point is to reinstall the software. Before doing so, back up any important files. PC: use the add/remove programs software in the Windows control panel to remove the software and all components. In case the program does not show up please use the uninstaller (UNWISE.EXE) located in the application folder (i.e. C:\Program Files\Native Instruments\Program name\ ) Mac: Delete the Application folder and any preference (plist) files before reinstalling. Plist files are located in
• MAC HD/Library/Preferences • ~ /Library/Preferences (where ~ is your home folder)
Error Creating Folder / Access Denied: If you receive this error upon installation of any NI product on Mac, then it is likely there is a permission problem. The solution is beyond the scope of this guide, but the following link may help:
http://www.nativeinstruments.de/index.php?id=niosxtut_us