damaged and defective car tracking (ddct) user guide · creating rule 1 and 108 incidents ... 114...
TRANSCRIPT

Damaged and Defective Car Tracking (DDCT)
User Guide
7001 Weston Parkway, Suite 200 Cary, North Carolina 27513
© 2018 Railinc Incorporated. All Rights Reserved.
Last Updated: June 2018

DDCT User Guide
DDCT User Guide Revised June 2018

DDCT User Guide
DDCT User Guide i Revised June 2018
Table of Contents Learning about DDCT ................................................................................................................... 1
Annotation Terminology .............................................................................................................. 2 General User Interface and System Requirements ....................................................................... 3 Accessing the Railinc Customer Success Center ......................................................................... 3
Getting Started ............................................................................................................................... 4 Register to Use Railinc SSO ........................................................................................................ 4
Role-Based Application ........................................................................................................... 4 Requesting DDCT Access ........................................................................................................... 5 DDCT and FindUs.Rail Requirements ........................................................................................ 6 Logging in to DDCT .................................................................................................................... 9
Search ............................................................................................................................................ 11 Viewing Search Results ............................................................................................................. 14
Viewing Incident Car Details ................................................................................................ 15 Viewing Defect Card Details ................................................................................................. 17 Viewing ICB Records ............................................................................................................ 17
Exporting Search Results ........................................................................................................... 18 Incidents ........................................................................................................................................ 19
Create Incident ........................................................................................................................... 19 Creating Rule 1 and 108 Incidents ......................................................................................... 28 VFLT Incident Details Processing ......................................................................................... 30 Adding/Removing/Viewing Attachments .............................................................................. 33 Saving a Draft Incident .......................................................................................................... 37 Viewing Incident Drafts ......................................................................................................... 38 Printing Car Details ............................................................................................................... 40 Equipment Restenciled via Umler/DDCT Rules ................................................................... 41 Remove From Incident .......................................................................................................... 42 Re-Add Car (Rule 96 and Rule 107 only) ............................................................................. 43 Truck Hunting (THD) and Early Warning (EW) and Maintenance Advisory (MA) ............ 44 Audit Log ............................................................................................................................... 47
Update Incidents ........................................................................................................................ 49 Third Party Requests .................................................................................................................. 50
Assigning to Third Party ........................................................................................................ 50 Accepting/Rejecting Third Party Requests ............................................................................ 53
Autocloses .................................................................................................................................. 55 Autoclose Rule 1 Incident – 3 Loaded Trips ......................................................................... 55 Autoclose Rule 95, 107 Incidents and Defect Cards ............................................................. 56
Damaged Cars .............................................................................................................................. 57 Request Actual DV/Disposition ................................................................................................. 58 Provide Actual DV/Disposition ................................................................................................. 61
Handling Carrier Provides Disposition .................................................................................. 71 Offer Settlement/Handling Carrier Repair ................................................................................. 72
Offer Settlement ..................................................................................................................... 74 Handling Carrier Repair ......................................................................................................... 75
Reject ADV ................................................................................................................................ 76 Accept/Reject Settlement ........................................................................................................... 79
Defective Cars .............................................................................................................................. 81 Request Disposition ................................................................................................................... 81 Provide Disposition .................................................................................................................... 84
Provide Salvage Value ........................................................................................................... 87

DDCT User Guide
DDCT User Guide ii Revised June 2018
Accept/Reject Salvage Value ................................................................................................. 92 Car Dismantling Procedure for Incidents Created Prior to February 21, 2017 ...................... 93
Defect Cards ................................................................................................................................. 96 Create Defect Card ..................................................................................................................... 97
Creating a Defect Card that is Not Associated with an Incident ........................................... 97 Creating a Defect Card that is Associated with an Incident .................................................. 99 Saving a Defect Card ........................................................................................................... 103 Saving a Defect Card as a Draft ........................................................................................... 104
Report Defect Card Repairs ..................................................................................................... 105 View Defect Card Drafts.......................................................................................................... 106
Shop ............................................................................................................................................. 108 Report Car On Hand ................................................................................................................ 109
Reporting Unexpected Cars On Hand .................................................................................. 114 Cars Dispositioned to Shop ...................................................................................................... 114 Cars On Hand ........................................................................................................................... 116 Report Repairs ......................................................................................................................... 117
Intermediate Shop Complete ............................................................................................... 120 Repair History .......................................................................................................................... 121
Interchange Bureau (ICB) ........................................................................................................ 124 Create ICB Record ................................................................................................................... 124 Closing an ICB Record ............................................................................................................ 126
Tools ............................................................................................................................................ 128 Notification Preferences ........................................................................................................... 128
Documentation ........................................................................................................................... 129 Incident Record Format ............................................................................................................ 130 Defect Card Format ................................................................................................................... 133 Bad Order Reason Codes .......................................................................................................... 134 DDCT Flow Diagrams ............................................................................................................... 135
Rule 1 ....................................................................................................................................... 135 Rule 1 — Overview ............................................................................................................. 135 Rule 1 — Updates and Draft Incidents ................................................................................ 136 Rule 1 — Provide Disposition ............................................................................................. 137 Rule 1 — Repair Car ........................................................................................................... 138 Rule 1 — Defect Card ......................................................................................................... 139 Rule 1 — THD ..................................................................................................................... 140 Rule 1 — THD ..................................................................................................................... 141 Rule 1 — EW/MA ............................................................................................................... 142
Rule 108 ................................................................................................................................... 143 Rule 108 — Overview ......................................................................................................... 143 Rule 108 — Updates and Draft Incidents ............................................................................ 144 Rule 108 — Provide Disposition ......................................................................................... 145 Rule 108 — Repair/Dismantle Car ...................................................................................... 146 Rule 108 — Defect Card ..................................................................................................... 147
Rule 107 ................................................................................................................................... 148 Rule 107 — Overview ......................................................................................................... 148 Rule 107 — Updates and Draft Incidents ............................................................................ 149 Rule 107 — Provide Actual DV & Disposition ................................................................... 150 Rule 107 — Settlement ........................................................................................................ 151 Rule 107 — Car Repair ....................................................................................................... 152 Rule 107 — Handling Carrier Car Repair ........................................................................... 153

DDCT User Guide
DDCT User Guide iii Revised June 2018
Rule 107 — Defect Card ..................................................................................................... 154 Rule 95 ..................................................................................................................................... 155
Rule 95 — Overview ........................................................................................................... 155 Rule 95 — Updates and Draft Incidents .............................................................................. 156 Rule 95 — Car Repair ......................................................................................................... 157 Rule 95 — Defect Card ....................................................................................................... 158
Interchange Bureau (ICB) ........................................................................................................ 159 Glossary ...................................................................................................................................... 160 Index ............................................................................................................................................ 161
List of Exhibits Exhibit 1. User Roles and Descriptions ........................................................................................... 4 Exhibit 2. DDCT Request Permission ............................................................................................. 5 Exhibit 3. Contact Category Selection ............................................................................................. 7 Exhibit 4. Contact Category (Repair Shop) ..................................................................................... 7 Exhibit 5. Contact Category (Scrapper) ........................................................................................... 8 Exhibit 6. Contact Category (Pre-Trip Location) ............................................................................ 8 Exhibit 7. Contact Category (Storage) ............................................................................................. 8 Exhibit 8. Contact Category (Damaged Defective Car Tracking) ................................................... 8 Exhibit 9. Contact Category (Interchange Bureau) .......................................................................... 9 Exhibit 10. Select Your Company ................................................................................................... 9 Exhibit 11. DDCT Home Page ...................................................................................................... 10 Exhibit 12. DDCT Application Menu Functions ........................................................................... 10 Exhibit 13. Search Incident, Defect Card, and ICB Record........................................................... 12 Exhibit 14. Search Results ............................................................................................................. 14 Exhibit 15. Car Details ................................................................................................................... 16 Exhibit 16. Defect Card Details ..................................................................................................... 17 Exhibit 17. File Download (for Search export) .............................................................................. 18 Exhibit 18. CSV Search Export (displayed in Excel) .................................................................... 18 Exhibit 19. Save As (for exporting CSV Search Results to file) ................................................... 18 Exhibit 20. Incidents Menu ............................................................................................................ 19 Exhibit 21. Incident Menu Items and Descriptions ........................................................................ 19 Exhibit 22. New Car Incident ........................................................................................................ 20 Exhibit 23. New Car Incident (showing incident type drop-down) ............................................... 20 Exhibit 24. Interchange Rule Drop-Down ..................................................................................... 21 Exhibit 25. New Car Incident (Rule 1–EHMS Alert) .................................................................... 21 Exhibit 26. New Car Incident (Rule 1–Early Warning Alert) ....................................................... 22 Exhibit 27. Rule 95 or 107 Incident Types .................................................................................... 22 Exhibit 28. Rule 96 Incident Types ............................................................................................... 22 Exhibit 29. SPLC Search (with results) ......................................................................................... 23 Exhibit 30. Incident Details (Rule 1 with a warning of equipment duplication) ........................... 23 Exhibit 31. Override Possession Check ......................................................................................... 24 Exhibit 32. Equipment Details ....................................................................................................... 25 Exhibit 33. Defect Codes ............................................................................................................... 26 Exhibit 34. Damaged Car Incidents Details (with defect specified) .............................................. 27 Exhibit 35. Damaged Car Incident Details (are you sure?) ........................................................... 27 Exhibit 36. Create Incident (Successful Confirmation) ................................................................. 28 Exhibit 37. Incident Details ........................................................................................................... 29 Exhibit 38. Request Disposition .................................................................................................... 29 Exhibit 39. Confirm Request for Disposition ................................................................................ 30

DDCT User Guide
DDCT User Guide iv Revised June 2018
Exhibit 40. Disposition Request Success ....................................................................................... 30 Exhibit 41. Multi Level Equipment Option Page (with option selected with ) .............................. 31 Exhibit 42. Incident Details (for Rule 1 VFLT) ............................................................................. 31 Exhibit 43. Request Disposition (for Rule 1 VFLT) ...................................................................... 32 Exhibit 44. Incident Details (showing Add Attachment option) .................................................... 33 Exhibit 45. Add Attachment Pop-up .............................................................................................. 33 Exhibit 46. Add Attachment Pop-up (with success message and download/view actions) ........... 34 Exhibit 47. Add Attachment Pop-up (with download action indicated) ........................................ 35 Exhibit 48. Add Attachment Pop-up (with remove action indicated) ............................................ 35 Exhibit 49. Add Attachment Pop-up (with attachment removal message) .................................... 36 Exhibit 50. Damaged Car Incident Details (after Save Draft) ....................................................... 37 Exhibit 51. Incident Drafts ............................................................................................................. 38 Exhibit 52. Incident Details ........................................................................................................... 39 Exhibit 53. Incident Details (for Draft Incident Edit) .................................................................... 39 Exhibit 54. Car Details page (showing the Report Preview link) .................................................. 40 Exhibit 55. Car Details page (showing the Print Report link) ....................................................... 40 Exhibit 56. Car Details (for restenciled equipment) ...................................................................... 41 Exhibit 57. Remove Equipment From Incident ............................................................................. 42 Exhibit 58. Removal Reason Codes ............................................................................................... 43 Exhibit 59. Incident Details (with removed equipment) ................................................................ 43 Exhibit 60. Incident Details (with re-add car option indicated) ..................................................... 44 Exhibit 61. Car Details page with DDCT generated message in the Note section ........................ 46 Exhibit 62. Reason Code: THD Incident - THD Alert Remediated .............................................. 46 Exhibit 63. Reason Code: EW Incident - EW Remediated ............................................................ 46 Exhibit 64. Audit Log - Incident Event History ............................................................................. 47 Exhibit 65. Audit Log - Incident Event History (for selected Event) ............................................ 48 Exhibit 66. Bottom of Car Details (showing Assign to Third Party option) .................................. 50 Exhibit 67. Third Party Request ..................................................................................................... 51 Exhibit 68. MARK Search ............................................................................................................. 51 Exhibit 69. Third Party Request Warning/Confirmation ............................................................... 52 Exhibit 70. Third Party Request Confirmation .............................................................................. 52 Exhibit 71. Accept/Reject Third Party Requests ........................................................................... 53 Exhibit 72. Accept Third Party Request ........................................................................................ 53 Exhibit 73. Accept Third Party Request Confirmation .................................................................. 54 Exhibit 74. Accept Third Party Request Success Message ............................................................ 54 Exhibit 75. Reject Third Party Request ......................................................................................... 54 Exhibit 76. Reject Third Party Request Confirmation ................................................................... 55 Exhibit 77. Reject Third Party Request Success Message ............................................................. 55 Exhibit 78. Damaged Cars Menu ................................................................................................... 57 Exhibit 79. Damaged Cars Menu Items and Descriptions ............................................................. 57 Exhibit 80. Request Actual DV/Disposition .................................................................................. 58 Exhibit 81. Request Actual DV/Disposition Equipment ............................................................... 59 Exhibit 82. Select Cars to Request Actual DV/Disposition (no incident found) ........................... 59 Exhibit 83. Select Cars to Request Actual DV/Disposition (incident found) ................................ 60 Exhibit 84. Confirm Request for Actual DV/Disposition .............................................................. 60 Exhibit 85. Confirmation of Request for Actual DV/Disposition .................................................. 60 Exhibit 86. Pending Damaged Car Incidents to Provide Actual DV/Disposition .......................... 62 Exhibit 87. Actual DV/Disposition ................................................................................................ 62 Exhibit 88. Settlement Value Statement ........................................................................................ 64 Exhibit 89. Settlement Value Statement (Type Drop-Down) ........................................................ 65 Exhibit 90. Settlement Value Statement Descriptions ................................................................... 65

DDCT User Guide
DDCT User Guide v Revised June 2018
Exhibit 91. Salvage Value Worksheet ........................................................................................... 67 Exhibit 92. Settlement Value Statement (Depreciated Value Method) ......................................... 69 Exhibit 93. Disposition Shops........................................................................................................ 69 Exhibit 94. Actual DV/Disposition (displayed with depreciated or salvage value)....................... 70 Exhibit 95. Actual DV/Disposition (with calculated ADV override) ............................................ 70 Exhibit 96. Actual DV/Disposition Submit Confirmation (after confirming) ............................... 70 Exhibit 97. Car Details page (reflecting the new Settlement Values) ............................................ 71 Exhibit 98. Actual DV/Disposition (Overridden with Actual DV set to zero) .............................. 72 Exhibit 99. Offer Settlement / Handling Carrier Repair ................................................................ 73 Exhibit 100. Confirm Offer Settlement Action .............................................................................. 74 Exhibit 101. Offer Settlement / Reject Actual DV (with completion notification) ....................... 74 Exhibit 102. Confirm Repair by Handling Carrier Action ............................................................. 75 Exhibit 103. Repair by Handling Carrier Notification ................................................................... 75 Exhibit 104. Reject Actual DV Page (Showing Pending Incidents Available) ............................. 77 Exhibit 105. Reject Actual DV Reason ......................................................................................... 77 Exhibit 106. Reject Actual DV Reason (with confirmation message) ........................................... 78 Exhibit 107. Reject Actual DV Reason Success Message ............................................................. 78 Exhibit 108. Pending Incidents for Accept/Reject Settlement ....................................................... 79 Exhibit 109. Confirm Settlement Accept/Reject Action for Accept .............................................. 80 Exhibit 110. Confirm Settlement Accept/Reject Action for Accept (Submitted) .......................... 80 Exhibit 111. Defective Cars Menu ................................................................................................. 81 Exhibit 112. Defective Cars Menu Items and Descriptions ........................................................... 81 Exhibit 113. Request Disposition (Contact completed) ................................................................. 82 Exhibit 114. Request Disposition (Add Equipment) ..................................................................... 82 Exhibit 115. Request Disposition .................................................................................................. 83 Exhibit 116. Request Disposition Confirmation Popup ................................................................. 84 Exhibit 117. Disposition Request Success ..................................................................................... 84 Exhibit 118. Pending Defective Car Incidents to Provide Disposition .......................................... 85 Exhibit 119. Provide Defective Car Disposition ............................................................................ 85 Exhibit 120. Provide Defective Car Disposition (for Select Waybill Location option) ................ 86 Exhibit 121. Provide Disposition Confirmation ............................................................................ 87 Exhibit 122. Provide Defective Car Disposition Confirmation (after confirm) ............................. 87 Exhibit 123. Pending Defective Car Incidents to Provide Disposition .......................................... 88 Exhibit 124. Provide Defective Car Disposition ............................................................................ 88 Exhibit 125. Car Details Page showing the Disposition Section ................................................... 89 Exhibit 126. Provide Salvage Value .............................................................................................. 89 Exhibit 127. Salvage Value Worksheet ......................................................................................... 90 Exhibit 128. Provide Salvage Value (completed) .......................................................................... 91 Exhibit 129. Accept/Reject Salvage Value .................................................................................... 92 Exhibit 130. Car Details showing Accept/Reject Salvage Value .................................................. 92 Exhibit 131. Accept/Reject Salvage Value .................................................................................... 93 Exhibit 132. Dismantle Defective Cars.......................................................................................... 93 Exhibit 133. Confirm Dismantle Car ............................................................................................. 94 Exhibit 134. Confirm Dismantle Car (success message) ............................................................... 94 Exhibit 135. Car Details (showing Dismantle Car option) ............................................................ 95 Exhibit 136. Defect Cards Menu ................................................................................................... 96 Exhibit 137. Defect Cards Menu Items and Descriptions .............................................................. 96 Exhibit 138. Create Defect Card (Not Associated with an Incident) ............................................. 97 Exhibit 139. Manage Defects ......................................................................................................... 98 Exhibit 140. Create Defect Card (showing defect added).............................................................. 98 Exhibit 141. Car Details Page ...................................................................................................... 100

DDCT User Guide
DDCT User Guide vi Revised June 2018
Exhibit 142. Create Defect Card Page (Associated with an Incident) ......................................... 101 Exhibit 143. Manage Defects ....................................................................................................... 102 Exhibit 144. Create Defect Card (showing added defect) ........................................................... 102 Exhibit 145. Confirm Defect Card Creation ................................................................................ 103 Exhibit 146. Defect Card Creation Confirmation Popup ............................................................. 103 Exhibit 147. Defect Card Creation Success Message .................................................................. 104 Exhibit 148. Confirm Defect Card Draft Creation ....................................................................... 104 Exhibit 149. Confirmation Required Popup ................................................................................ 104 Exhibit 150. Confirmation Required Popup ................................................................................ 105 Exhibit 151. Repairs Successfully Reported Message (Defect Card Details page) ..................... 105 Exhibit 152. Defect Card Drafts .................................................................................................. 106 Exhibit 153. Defect Card Draft Details ........................................................................................ 107 Exhibit 154. Shop Menu .............................................................................................................. 108 Exhibit 155. Repairs Menu Items and Descriptions .................................................................... 108 Exhibit 156. Report Car On Hand ................................................................................................ 109 Exhibit 157. Report Car on Hand (for requested ID, including unexpected equipment) ............. 110 Exhibit 158. Confirm Car On Hand ............................................................................................. 111 Exhibit 159. Report Car On Hand (confirm) ............................................................................... 111 Exhibit 160. Confirm Car On Hand (success message) ............................................................... 111 Exhibit 161. Shop Couplet Requested ......................................................................................... 112 Exhibit 162. Shop Couplet Search ............................................................................................... 112 Exhibit 163. Shop Couplet Search (results) ................................................................................. 113 Exhibit 164. Report Car on Hand (Unexpected Equipment Arrival Notice) ............................... 114 Exhibit 165. Cars Dispositioned to Shop ..................................................................................... 115 Exhibit 166. Cars On Hand .......................................................................................................... 116 Exhibit 167. Report Repairs ......................................................................................................... 117 Exhibit 168. Repairs..................................................................................................................... 118 Exhibit 169. Repairs (Reason for Removal) ................................................................................ 119 Exhibit 170. Car Inspected-No Defects Found Confirmation ...................................................... 119 Exhibit 171. Report Repairs (defect repair pending) ................................................................... 119 Exhibit 172. Report Repairs Success Message ............................................................................ 120 Exhibit 173. Report Repairs (confirm release car) ...................................................................... 120 Exhibit 174. Intermediate Shop Complete Success Message ...................................................... 120 Exhibit 175. Repair History ......................................................................................................... 121 Exhibit 176. Repairs..................................................................................................................... 123 Exhibit 177. ICB Menu ................................................................................................................ 124 Exhibit 178. ICB Menu ................................................................................................................ 124 Exhibit 179. Interchange Bureau Record (Create) ....................................................................... 125 Exhibit 180. ICB Record Created Success Message .................................................................... 126 Exhibit 181. Edit Interchange Bureau Record ............................................................................. 127 Exhibit 182. Edit Interchange Bureau Record (after Close option selected) ............................... 127 Exhibit 183. Tools Menu ............................................................................................................. 128 Exhibit 184. Tools Menu ............................................................................................................. 128 Exhibit 185. Notification Preference ........................................................................................... 128 Exhibit 186. Documentation Menu .............................................................................................. 129 Exhibit 187. DDCT User Guide ................................................................................................... 129 Exhibit 188. Incident Record CSV Format .................................................................................. 130 Exhibit 189. Status Codes and End States ................................................................................... 132 Exhibit 190. Defect Card CSV Format ........................................................................................ 133

Learning about DDCT
DDCT User Guide 1 Revised June 2018
Learning about DDCT The Damaged and Defective Car Tracking System (DDCT) is a web-based application that enables freight car owners and railroads to exchange information about damaged and defective freight cars. Handling of damaged and defective freight cars is subject to the American Association of Railroads (AAR) Interchange Rules. Damaged cars are handled in accordance with Rule 107 and defective cars are handled in accordance with Rules 1, 96, and 108. Rule 95 is used for any damaged equipment that can be returned to service. Rule 102 applies to defect cards. Refer to AAR Interchange Rule 115 for information about participation and guidelines for DDCT.
The following list identifies the rules that apply to DDCT. Refer to the Field Manual of the AAR Interchange Rules for detailed information about each rule.
Rule 1 Care of freight cars, inspection, repairs to foreign cars, disposition for unacceptable cars, gages and publications required and car classification.
Rule 95 Handling of damaged equipment that can be returned to service. Assumes damage is the Handling Carrier’s responsibility and that the car can be returned to service without requesting disposition. Rule 95 does not allow for disposition. If handling line damage is to the extent that it requires disposition, it is entered under Rule 107.
Rule 96 Covers loss, damage, or defects unless otherwise designated as handling or delivering line responsibility.
Rule 102 Defect cards procedures.
Rule 107 Handling of damaged or destroyed equipment, disposition/settlement, depreciated value, and settlement value.
Rule 108 Cars requiring extensive repairs.
Note: For information about ordering the Field Manual of the AAR Interchange Rules, call 1-877-999-8824 or visit www.aarpublications.com.
DDCT enables you to:
• Create, manage, and track damaged and defective car incidents as defined in AAR Interchange Rules 1, 95, 96, 107, and 108. Incidents with a date prior to January 5, 2011 will not be accepted into DDCT.
• Import data from external systems to be used to create and update incidents, including attaching photographs/pictures.
• Create electronic defect cards in accordance with Rule 102.
• Query active and closed (historical) incidents.
DDCT interfaces with Umler, the Event Repository (TRAIN/EDI), and the Liability Continuity System (LCS). DDCT also interfaces with IRF Web to assist you in finding correct Standard Point Location Codes (SPLCs).
DDCT interfaces with Railinc’s Early Warning (EW) system. When a DDCT incident is created, the car is placed on a Maintenance Advisory (MA) Letter that corresponds to the rule number used in creating the incident. The MA letter advises the railroad, car owner, or repair facility that a defect exists for the unit. When cars reach an end state in DDCT, the cars are automatically removed from

Learning about DDCT
DDCT User Guide 2 Revised June 2018
the respective MA letter. Cars can be added to the DDCT-specific Maintenance Advisory letters only through the DDCT system—cars cannot be added or removed through Early Warning.
The Early Warning MA letters used by DDCT are as follows:
• MA 124 – Rule 1 • MA 125 – Rule 95 and standalone defect cards • MA 127 – Rule 107 • MA 128 – Rule 108 • MA 150 – Rule 96
Note: To view MA letters, you must have access to the Early Warning (EW) system. You may request this access to EW via Railinc. Defect cards that are not associated with an incident appear on the MA 125 letter, along with Rule 95 incidents.
DDCT also interfaces directly with the Railinc Equipment Health Management System (EHMS). When a Truck Hunting (THD) alert is opened, a DDCT Rule 1 incident is automatically opened. Conversely, the incident is closed when action has been taken and repairs are made and reported. Additionally, for Early Warning (EW) Letters and Maintenance Advisory (MA) Notices, DDCT incidents are opened manually, but with proper information these are removed from the appropriate Letter or Notice.
During incident processing, DDCT:
• Automatically transfers car hire liability. • Uses Early Warning to communicate EW/MA notices for damaged/defective equipment. • Notifies appropriate parties during the damaged and defective car processing, via e-mail or MQ. • Incidents are automatically opened and closed for THD alerts and are automatically
closed for EW/MA notices.
Annotation Terminology To facilitate understanding of the DDCT operations and interfaces, tables are included at the beginning of each task section. These tables identify activities that are executed behind the scenes when a user completes a task. The following abbreviations/terms/codes are used:
HC Handling Carrier CMO Car Mark Owner TP Third Party Agent THD Truck Hunting DDCT DDCT System EHMS Equipment Health Management System EW Early Warning Letter MA Maintenance Advisory Letter 9001 Early Warning Code for Add Car to Letter 9002 Early Warning Code for Remove Car from Letter DVR 7/8 DDCT Car Hire Liability for CMO (Rule 107 or 1/108) DSP 7/8 LCS Car Hire Liability for CMO (Rule 107 or 1/108) DEAD LCS Code for Remove Liability Processing for this Car None Web service not currently in system n/a Not applicable to system

Learning about DDCT
DDCT User Guide 3 Revised June 2018
General User Interface and System Requirements General user interface information (typical keyboard selection equivalents and shortcuts), as well as system requirements are available in the Railinc UI Dictionary.
Note: Mandatory fields are indicated with a red asterisk (*).
Accessing the Railinc Customer Success Center The Railinc Customer Success Center provides reliable, timely, and high-level support for Railinc customers. Representatives are available to answer calls and respond to emails from 7:00 a.m. to 7:00 p.m. Eastern time, Monday through Friday, and provide on-call support via pager for all other hours to ensure support 24 hours a day, 7 days a week. Contact us toll-free by phone at 877-RAILINC (1-877-724-5462) or send an email directly to [email protected].

Getting Started
DDCT User Guide 4 Revised June 2018
Getting Started The DDCT application is accessed using the Railinc Single Sign On (SSO), which can be accessed from the Railinc portal at http://www.railinc.com. The SSO log in is located at the upper right of the page.
Register to Use Railinc SSO Each DDCT user must register to use Railinc Single Sign On. Refer to the Railinc Single Sign On User Guide for detailed instructions.
Once your SSO registration is complete, you must request access to DDCT within SSO.
Role-Based Application Access and authorization for DDCT is determined when requesting access through Railinc Single Sign On. Exhibit 1 contains a complete list of DDCT roles as seen in SSO.
Exhibit 1. User Roles and Descriptions
Role Description
Car Owner Admin Car Owner administrator who needs to work with all incidents. Only the Car Owner Admin has the ability to authorize Dismantle under Rule 108 and to accept/reject settlement offers for Rule 107.
Car Owner Damaged Car User
Car Owner back office users who need to work with Rule 95/107 incidents.
Car Owner Defective Car User
Car Owner back office users who need to work with Rule 1/96/108 incidents.
Car Owner RO User Car Owner back office users who only need a read-only view. Handling Carrier Admin Handling Carrier administrator who needs to work with all incidents.
Only the Handling Carrier Admin has the authority to offer settlement on a Rule 107 incident car.
Handling Carrier Field User Handling Carrier field users who need to create new incidents. Handling Carrier RO User Handling Carrier users who only need a read-only view of incidents. HC Damaged Car User Handling Carrier back office users who need to work with Rule 95/107
incidents. HC Defective Car User Handling Carrier back office users who need to work with Rule
1/96/108 incidents. Interchange Bureau User Interchange Bureau users who need the capability to create ICB records
in DDCT. Shop User Repair Shop users who need access to Shop functionality in DDCT,
including reporting cars on hand and repairs. Car Owners may also use this access to report unexpected shop arrivals in DDCT.

Getting Started
DDCT User Guide 5 Revised June 2018
Requesting DDCT Access After authorization to use Railinc SSO is received, you must request general access to DDCT by following instructions in the Railinc Single Sign On User Guide.
Exhibit 2. DDCT Request Permission
Once you receive e-mail notification of access to DDCT, you can log on and begin using DDCT.
Note: For certain functions within DDCT, access is handled by your local DDCT administrator who has the SSO rights to specify local DDCT user tasks (and menu items).

Getting Started
DDCT User Guide 6 Revised June 2018
DDCT and FindUs.Rail Requirements Per AAR Interchange Rule 114, all DDCT system users are required to register in the FindUs.Rail directory before being granted access to the system. FindUs.Rail is a centralized database that enables users to review their company’s contact information via the web. This centralized repository of contact information helps reduce time spent by railroad departments, private car owners, and leasing companies across the rail industry from searching for the same contact information. Users are able to query contacts, agency relationships for a category and the MARK parent relationship.
In order to identify Repair Shops, Scrapper, Pre-trip, and Storage Facilities for disposition within DDCT and in order for these facilities to report their completion of repairs, they must be registered in FindUs.Rail. This registration includes specifying a valid SPLC for each physical location, category functions and specific limitations—capacities relative to each location.
Notes: • If no FindUs.Rail contact is provided, then all DDCT notifications are sent to the Umler
Car Mark Owner. • Handling Carriers need to select the appropriate “Handling Carrier Damaged Car
Management, Handling Carrier Defective Car Management and/or Handling Carrier ICB Management” category in FindUs.Rail.
• Car Mark Owners need to select the appropriate “Mark Owner Damaged Car Management, Mark Owner Defective Car Management and/or Mark Owner ICB Management” category in FindUs.Rail.
• Shops, scrap, pre-trip, or storage facilities need to select the appropriate “Repair Shop, Pre-Trip, Storage, or Scrap facilities” category in FindUs.Rail.
• Consult the FindUs.Rail User Guide for complete instructions on using the FindUs.Rail system.
Use the following procedure to add contact information in FindUs.Rail:
1. As described in the FindUs.Rail User Guide, go to the Railinc portal at http://www.railinc.com, enter your SSO User ID and password, and select the FindUs.Rail application.
2. Select Contacts > Add Contact to display the Add Contact page.
3. Complete the available contact information input fields.
4. Select a Category:
a. Shop users should select Repair Shop (and then Cleaning, Shop Contact, or Tank Car), Scrapper, Pre-Trip Location, or Storage Facility (Exhibit 3) and then proceed to Step 5.
b. Handling Carrier and Car Mark Owner users should select Damaged Defective Car Tracking (Exhibit 3) and then proceed to Step 6.
c. Interchange Bureaus should select Interchange Bureau (Exhibit 3) and then proceed to Step 7.

Getting Started
DDCT User Guide 7 Revised June 2018
Exhibit 3. Contact Category Selection
5. For the Repair Shop, Scrapper, Pre-Trip Location, or Storage Facility categories, at a minimum, specify the SPLC (see Exhibit 4, Exhibit 5, or Exhibit 7). It is also highly recommended for all facilities to complete the At_Capacity and Capabilities sections. This information is helpful to car owners who may disposition to these locations. If necessary, select the look-up magnifying glass to lookup the SPLC based on its geographic location. Proceed to Step 7.
Exhibit 4. Contact Category (Repair Shop)

Getting Started
DDCT User Guide 8 Revised June 2018
Exhibit 5. Contact Category (Scrapper)
Exhibit 6. Contact Category (Pre-Trip Location)
Exhibit 7. Contact Category (Storage)
6. For Handing Carriers, Car Mark Owners (see Exhibit 8), specify the Category Role (Primary or Secondary).
a. For Handing Carriers: select either Handling Carrier Damaged Car Management and/or Handing Carrier Defective Car Management.
b. For Car Mark Owners, select either Mark Owner Damaged Car Management and/or Mark Owner Defective Car Management.
c. For Car Mark Owner and Handling Carrier notifications related to ICB records, select either Handling Carrier ICB Management or Mark Owner ICB Management.
d. For shop facilities, select the appropriate category (Repair Shop, Scrapper, Pre-Trip Location, or Storage Facility) and enter the SPLC. The Capabilities and Capacity status may be entered to provide additional information on the disposition locations.
Exhibit 8. Contact Category (Damaged Defective Car Tracking)

Getting Started
DDCT User Guide 9 Revised June 2018
7. For Interchange Bureaus (see Exhibit 9), specify the Category Role (Primary or Secondary). Exhibit 9. Contact Category (Interchange Bureau)
8. Perform one of the following actions:
• Select Save to save the new contact record.
• Select Cancel to cancel the addition of the contact information.
Logging in to DDCT To log in to DDCT:
1. Open the browser.
2. Open the Railinc portal at http://www.railinc.com.
3. Log in to SSO (at upper right).
4. The Launch Pad is displayed. Your authorized Railinc applications are displayed on the left side of the page.
5. Select DDCT.
a. If you represent two or more companies, the Select Your Company pop-up is displayed (Exhibit 10). This pop-up lists the companies you represent and the DDCT roles granted for those companies.
Exhibit 10. Select Your Company
Select the link for the appropriate company. The DDCT Home page is displayed (Exhibit 11).
Note: To perform work for a different company, select the company link at the top of the page. The Select Your Company page is re-displayed, allowing you to select another company.

Getting Started
DDCT User Guide 10 Revised June 2018
b. If you represent only one company, the DDCT Home page is displayed (Exhibit 11).
Exhibit 11. DDCT Home Page
Continue by selecting a DDCT application menu item (see Exhibit 12).
The DDCT Home page has the following tabs/menus:
Exhibit 12. DDCT Application Menu Functions
Home Displays the DDCT Home page, which provides news and updates. See Exhibit 11.
Search Search for incidents, defect cards, and Interchange Bureau records. See Exhibit 13.
Incidents Create, view, update, and import car damage and defective incidents and draft incidents. See Exhibit 20.
Damaged Cars Process tasks for incidents under Rule 107. See Exhibit 78. Defective Cars Process tasks for incidents under Rule 1, 96, or 108. See Exhibit 111. Defect Cards Tasks for creating, viewing, and importing electronic defect cards. See
Exhibit 136. Shop Processing tasks for repair shops. See Exhibit 154. ICB Create, view, and edit Interchange Bureau records. See Exhibit 177.
Tools Administrative tasks – opens the Tools menu. See Exhibit 183. Documentation View and download the most recent version of this user guide.
Notes:
• Menu and screen content varies depending on the level of role-based permissions granted (see Exhibit 1).
• To log out of DDCT, select Sign Out at the top right of the page.

Search
DDCT User Guide 11 Revised June 2018
Search The Search function enables you to search for incidents, defect cards, and ICB records.
When searching for incidents, keep the following in mind:
• The following users can search for and view incidents:
- HC users (can see any incident that they opened or are party to) - CMO users (can see any incident for their equipment) - Railroad in possession of the car
When searching for defect cards, keep the following in mind:
• The following users can search for and view defect cards:
- HC users (can see any defect card that they opened, depending on their access to damaged or defective incidents and stand-alone defect cards)
- CMO users (can see any defect card opened for their equipment, depending on their access to damaged or defective incidents and stand-alone defect cards)
- On hand Shop user - Disposition Shop user
• If you can view the defect card, a link to the incident details is provided on the Equipment ID:
- HC users can see any defect card that they opened (depending on their access to damaged or defective incidents and stand-alone defect cards)
- CMO user can see any defect card opened for their equipment (depending on their access to damaged or defective incidents and stand-alone defect cards)
- Railroad in possession of the car
• The following users can view a defect card, however, they do not have access to the incident details and a link is NOT provided on the Equipment ID:
- Railroad NOT in possession of the car - On hand Shop user - Disposition Shop user
When searching for ICB records, keep the following in mind:
• The following users can search for and view ICB records:
- HC users (can see any ICB record that they opened or are party to) - CMO users (can see any ICB record for their equipment)
• You can use the following fields to narrow the results of an ICB record search: ICB ID, Equipment ID, From Date and To Date, and Status.
Use the following procedure to perform a search:
1. Select Search from the menu bar. The Search Incident, Defect Card, and ICB Record page is displayed (Exhibit 13).

Search
DDCT User Guide 12 Revised June 2018
Exhibit 13. Search Incident, Defect Card, and ICB Record
2. Type or select criteria for the search.
Note: The most efficient way to search for a known incident, defect card, or ICB record is to search for the unique Incident ID, Defect Card ID, or ICB Record ID.
a. Equipment ID—10-character road mark plus car number. The Equipment ID can be entered with or without a space between the mark and the equipment number. Use commas or a space to separate multiple entries. You can enter a maximum of 200 Equipment IDs.
Note: The Equipment ID field supports a wildcard search using the equipment initial and an asterisk at the end of the Mark. Multiple wildcards are ignored.
b. Include Third Party Requests—select this checkbox to query for equipment that you have third-partied to another company in order to check for incidents on the equipment.
c. Incident ID/Defect Card ID—enter the unique ID to search for a known incident or defect card.

Search
DDCT User Guide 13 Revised June 2018
d. ICB ID—type in the ID of an Interchange Bureau record.
e. From Date—type in a date or use the calendar picker ( ) to choose a date to specify the beginning of the date range to search. The default range is the previous year.
Notes:
• Searches are based on the date of the respective incident, defect card, or ICB record and not the date that it was created in DDCT.
• The “From Date” and “To Date” fields are always considered. These fields must include the time period of the incident, defect card, or ICB record.
f. To Date— type in a date or use the calendar picker ( ) to choose a date to specify the ending of the date range to search. The default range is the previous year.
g. Handling Carrier—type in the Mark or use the magnifying glass ( ) to specify the Handling Carrier.
h. Car Mark Owner—type in the Mark or use the magnifying glass ( ) to specify the Car Mark Owner.
i. Rule/Defect Card/Record—check the boxes to specify the types of rules (for incidents) to be searched. See the list of Interchange Rules in “Learning about DDCT” on page 1. Select the Defect Card checkbox to search for defect cards. Select the ICB Record checkbox to search for ICB records. Use the “Toggle all” link to select/deselect all checkboxes.
j. Location SPLC—type in a Location SPLC or use the search icon ( ) to select the Location SPLC. See Step 7.a on page 22 and Exhibit 29.
k. Incident Type—select an incident type from the drop-down (see Exhibit 27).
l. Defect Type—select a defect type from the drop-down (see Exhibit 33).
m. Status—select Open and/or Closed to indicate the status of the incidents, defect cards, and/or ICB records for which to search. Open is the default, but you can also check Closed to see historical items.
n. Equipment Status—All Equipment Statuses is the default. The Toggle All link enables you to either select or unselect all statuses. You can then check specific statuses to find items requiring actions. For example, a shop manager can choose to view only incidents where repairs are partially completed. Statuses marked with an asterisk (*) are in an end state (see Exhibit 189 on page 132 for more information).
o. Removal Reasons—specify the reason(s) (for example, system autoclose reasons) for removing an incident or defect card. You can use Ctrl+Select to choose multiple reasons, and select the Clear All link to unselect all reasons. If you are using this search functionality, be sure to also select Closed in the status field.
3. When you have specified the necessary criteria, select the Search button. The Search Results page is displayed (see “Viewing Search Results” on page 14).

Search
DDCT User Guide 14 Revised June 2018
Viewing Search Results After performing a search for an incident, defect card, or ICB record, the Search Results page is displayed (see Exhibit 14).
Exhibit 14. Search Results

Search
DDCT User Guide 15 Revised June 2018
Review the following notes about viewing search results and possible next steps:
• If no results are found, a “No results found matching search criteria” message is displayed. Consider refining your search criteria to broaden your search.
• If a query exceeds the maximum allowed number of records (2,000), a message is displayed indicating that the full results are not displayed. Consider refining your search criteria to narrow your search.
• You can use the Search field to locate specific records from the results list.
• By default, the results list displays 50 rows per page. You can change this to display 10, 50, 100, 250, 500, or 1000 rows by selecting the numbers at the bottom right of the page.
• To export the search results, see “Exporting Search Results” on page 18.
• An asterisk (*) in the Status column indicates that a status is an end state. For more information, see Exhibit 189 on page 132.
• An Intermediate Carrier who has possession of a car can view basic car incident and defect card details, but cannot view financial information or audit information, and does not have the ability to print the details.
• If a defect card is associated with an incident, the interchange rule is displayed in the Interchange Rule column; otherwise, “Defect Card” is displayed.
See the following sections for specific information about viewing different types of search results:
• “Viewing Incident Car Details” on page 15.
• “Viewing Defect Card Details” on page 17.
• “Viewing ICB Records” on page 17.
Viewing Incident Car Details To view car details for an incident, select the Equipment ID link from the Search Results page (see “Viewing Search Results” on page 14). The Car Details page is displayed (Exhibit 15).
Note: If waybill information is available, it is displayed on the details page after disposition has been provided by the CMO or 3rd Party (see “Provide Disposition” on page 84 for an example)

Search
DDCT User Guide 16 Revised June 2018
Exhibit 15. Car Details
Note: If contact information is not available in FindUs.Rail for either Car Mark Owner (CMO) or Handling Carrier (HC), then the following messages are displayed: (No CMO Damaged/Defective contact available.) (No HC Damaged/Defective contact available.)
Options available on this page may include:
a. View Incident—Select the Incident ID link to see the Incident Details page (similar to Exhibit 30).
b. Printer Friendly—displays the Car Details information in a new browser window, suitable for viewing or printing.
c. Remove From Incident—Opens the Remove Equipment From Incident page (Exhibit 57) to allow the Car Mark Owner or the Handling Carrier to remove the car from an incident. See “Remove From Incident” on page 42.
d. Create Defect Card—Displays the Create Defect Card page. If a defect card already exists, the View Defect Card button is shown instead so that you can open the Defect Card Details page (Exhibit 16).
e. Provide Actual DV/Disposition—For Damaged Cars, opens the Actual DV/Disposition page (Exhibit 87).
f. Request Disposition—For Defective Cars, opens the Request Disposition page (Exhibit 113).

Search
DDCT User Guide 17 Revised June 2018
g. Request Actual/DV Disposition—For Damaged Cars, opens the Request Actual DV/Disposition page (Exhibit 80).
h. Assign to Third Party— For Damaged Cars, opens the Third Party Request page (Exhibit 67).
i. Report Car on Hand— For Defective Cars, opens the Report Car On Hand (confirm) page (Exhibit 158).
j. Audit Log—Opens the Audit Log - Incident Event History for this Equipment. See Exhibit 65.
k. Done—Exits the Car Details page and returns to the Search Results page (Exhibit 14).
Viewing Defect Card Details To view a defect card, select an Equipment ID link from the Defect Card section of the Search Results page (see “Viewing Search Results” on page 14). The Defect Card Details page is displayed (Exhibit 16).
Exhibit 16. Defect Card Details
Viewing ICB Records To view an ICB record, select an ICB ID link from the ICB Records section of the Search Results page (see “Viewing Search Results” on page 14). The Edit Interchange Bureau Record page is displayed. For records with an “Open” status, this enables you to close the record. See “Closing an ICB Record” on page 126.

Search
DDCT User Guide 18 Revised June 2018
Note: When equipment is removed from Umler, the equipment will be removed from the ICB record after 72 hours. The Removal Reason Code is set to “deleted from Umler.” Appropriate actions may be performed at any time during the 72 hours. After that period, the ICB record is closed.
Exporting Search Results You can export search data on Search Results pages (Exhibit 14) by selecting the CSV link at the upper right of the table. The File Download panel is displayed (Exhibit 17).
Note: See “Incident Record Format” on page 130 and “Defect Card Format” on page 133, for CSV record layouts.
Exhibit 17. File Download (for Search export)
To open the comma-separated-value file, select Open. The results are displayed in MS Excel (default) (Exhibit 18).
Exhibit 18. CSV Search Export (displayed in Excel)
To save the CSV file, select File Save As. The Save As panel is displayed (Exhibit 19).
Exhibit 19. Save As (for exporting CSV Search Results to file)
The default file type is CSV (Comma delimited). Specify the location for placing the downloaded file, and then select Save.

Incidents
DDCT User Guide 19 Revised June 2018
Incidents When you select Incidents on a DDCT page, the Incidents menu is displayed (Exhibit 20). Incidents must be created by Handling Carriers.
Exhibit 20. Incidents Menu
Exhibit 21 describes the tasks available on the Incidents menu.
Exhibit 21. Incident Menu Items and Descriptions
Menu Item Description Create Incident Enables you to create an incident to begin tracking.
Viewing Incident Drafts
Enables you to view or continue work on saved draft incidents.
Third Party Requests View, accept, or reject responsibility for incident processing from an owner railroad.
(Audit Log) (Not a menu item) Enables you to view incident events—available on many DDCT pages.
Create Incident
Event Description Done By I/C Rules Notifi- cation
Recipient LCS Interchange
Looks Like Early Warning
System Web Services to Use Type Code
Incident draft created HC All n/a Incident draft deleted HC All n/a Incident created HC 95/107 CMO DSP7/DSP8 to
Handling Road EW 9001 DDCTService.createIncident
Incident created HC 1/96/108 CMO MA 9001 DDCTService.createIncident, DDCTService.createIncidentRequestDisposition
Incident created HC All HC Note: HC is emailed if the CMO is not registered in FindUs.Rail. Incident created CRB/
Umler All HC Note: CRB or Umler FindUs.Rail contact is emailed if the CMO does not
have proper DDCT FindUs.Rail contacts populated. Incident created Railinc 1 HC EW/MA
Whenever damages or defects occur, an authorized user can create an incident to begin tracking.
Important: Incidents with a date prior to January 5, 2011 will not be accepted into DDCT.
Use the following procedure to create a new incident:
Notes:
• This procedure differs depending on the Interchange Rule selected. For Rule 1 and 108, request disposition as part of the incident creation process.

Incidents Create Incident
DDCT User Guide 20 Revised June 2018
• Rule 1 incidents autoclose after 48 months from the incident date. The Car Details page for the Equipment ID will show a reason of “Autoclose – 48 months”.
1. Select Incidents>Create Incident. The New Car Incident page is displayed (Exhibit 22).
Exhibit 22. New Car Incident
Note: The Incident Type field appears only if Interchange Rule 95, 96, or 107 is selected (see Exhibit 23). Multiple equipment IDs are only allowed for Rule 96 and Rule 107 incidents.
Exhibit 23. New Car Incident (showing incident type drop-down)
2. Use the calendar icon ( ) to select the date of the incident (the default Incident Date is the
current date). The Calendar panel is displayed.
3. Select the applicable Interchange Rule from the drop-down. Valid values are shown in Exhibit 24.

Incidents Create Incident
DDCT User Guide 21 Revised June 2018
Exhibit 24. Interchange Rule Drop-Down
4. For applicable Rule 1 incidents, select the Alert Type (EHMS Alert or Early Warning) from the drop-down. Input options change depending on the selection.
a. For a Rule 1–EHMS Alert, additional input fields are displayed for you to enter information related to a Truck Hunting alert (Exhibit 25). Enter the letter for the affected truck (A-Z) in the Truck input field. Select Add Alert to have the truck details added to the incident. The details appear at the bottom of the page. As needed, you can enter additional truck details using this same method.
Exhibit 25. New Car Incident (Rule 1–EHMS Alert)
b. For a Rule1–Early Warning, alert type input fields appear related to an Early Warning alert (Exhibit 26). Use the Early Warning Notice Type drop-down to select either Early Warning or Maintenance Advisory. Enter an Early Warning or Maintenance Advisory Number.

Incidents Create Incident
DDCT User Guide 22 Revised June 2018
Exhibit 26. New Car Incident (Rule 1–Early Warning Alert)
5. (If Rule 95, 96, or 107 has been selected) An Incident Type field also appears. Select the Incident Type from the drop-down. Valid values are shown in Exhibit 27 and Exhibit 28.
Exhibit 27. Rule 95 or 107 Incident Types
Exhibit 28. Rule 96 Incident Types
6. Type one Equipment ID in the Equipment field. For Rule 96 and Rule 107 incidents, others can be added (up to 200 total). Use a space or comma between IDs.
Note: If the Equipment ID is for a VFLT, a slightly different process is used. See “VFLT Incident Details Processing” on page 30.
7. Enter the Location SPLC.
a. Select the search icon ( ) to choose the appropriate Location SPLC. The IRF Web SPLC Search page opens in a new window (Exhibit 29).

Incidents Create Incident
DDCT User Guide 23 Revised June 2018
b. Follow the instructions on the page and select Search. Results are displayed on the same page.
Exhibit 29. SPLC Search (with results)
c. Select the radio button beside the correct SPLC and then select the Select button. The
window closes and the chosen SPLC is in the Location SPLC field.
8. Select Continue. Depending on the status of the selected equipment, one of the following can occur:
a. If DDCT validates that you have possession of the specified equipment, the Incident Details page is displayed (Exhibit 30). The Equipment field is populated with all the Equipment IDs entered on the New Car Incident page (Exhibit 22).
Exhibit 30. Incident Details (Rule 1 with a warning of equipment duplication)

Incidents Create Incident
DDCT User Guide 24 Revised June 2018
Note: When creating an incident and the equipment is already listed on another incident, the incidents are listed as links with a warning of duplication. The system allows you to proceed. You can select one of the links to the identified Equipment IDs to view details, proceed with the creation of the incident, or cancel the incident creation.
b. If DDCT is unable to validate that you have possession of the selected equipment, a warning message is displayed with an option to override the equipment possession (Exhibit 31).
Exhibit 31. Override Possession Check
If you want to override the equipment possession, select the Override checkbox for the listed equipment and then select the Override button. A message appears asking you to confirm the decision to override. Select Yes to override possession and continue with creating the new incident.
Note: If you select No, the override is cancelled and you are able to proceed.
9. For each Equipment ID, select Action drop-down and then select the Add/Edit Defects link. Another option is to select either the “Defect” or “Note” lines and add appropriate text. The Equipment Details page is displayed (Exhibit 32).
Notes:
• For Truck Hunting alerts, option ‘M’–Trucks must be selected. It is also recommended for the truck location(s) to be entered on the Equipment Details page.
• For Early Warning/Maintenance Advisory notices, option ‘W’–Early Warning/Maintenance Advisory is pre-selected. It is also recommended for the EW/MA notice number(s) to be entered on the Equipment Details page.

Incidents Create Incident
DDCT User Guide 25 Revised June 2018
Exhibit 32. Equipment Details
Incidents Create Incident
DDCT User Guide 26 Revised June 2018
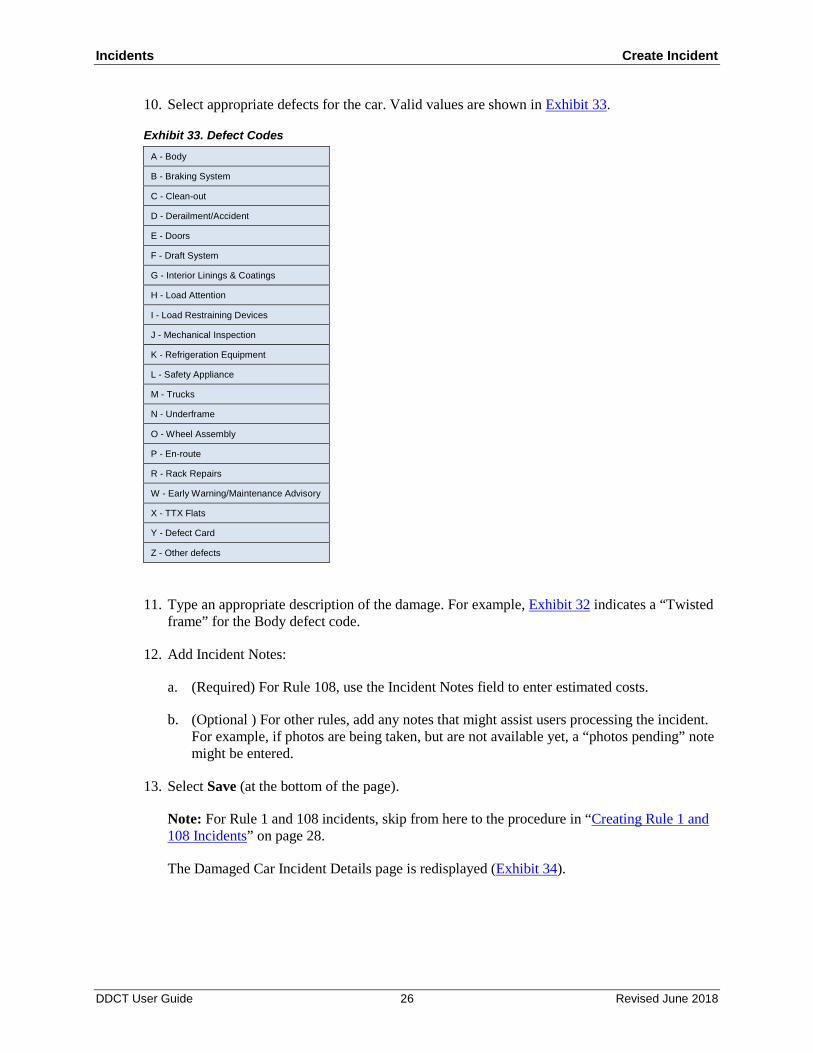
10. Select appropriate defects for the car. Valid values are shown in Exhibit 33.
Exhibit 33. Defect Codes A - Body
B - Braking System
C - Clean-out
D - Derailment/Accident
E - Doors
F - Draft System
G - Interior Linings & Coatings
H - Load Attention
I - Load Restraining Devices
J - Mechanical Inspection
K - Refrigeration Equipment
L - Safety Appliance
M - Trucks
N - Underframe
O - Wheel Assembly
P - En-route
R - Rack Repairs
W - Early Warning/Maintenance Advisory
X - TTX Flats
Y - Defect Card
Z - Other defects
11. Type an appropriate description of the damage. For example, Exhibit 32 indicates a “Twisted frame” for the Body defect code.
12. Add Incident Notes:
a. (Required) For Rule 108, use the Incident Notes field to enter estimated costs.
b. (Optional ) For other rules, add any notes that might assist users processing the incident. For example, if photos are being taken, but are not available yet, a “photos pending” note might be entered.
13. Select Save (at the bottom of the page).
Note: For Rule 1 and 108 incidents, skip from here to the procedure in “Creating Rule 1 and 108 Incidents” on page 28.
The Damaged Car Incident Details page is redisplayed (Exhibit 34).

Incidents Create Incident
DDCT User Guide 27 Revised June 2018
Exhibit 34. Damaged Car Incidents Details (with defect specified)
14. Select Create Incident. A pop-up message is displayed with a request to confirm the creation (Exhibit 35).
Exhibit 35. Damaged Car Incident Details (are you sure?)
15. Are you sure you want to create the incident?
a. If unsure, select No to return to the Car Damage Incident Details page to continue working.
b. If OK, select Yes. If the system can validate that the Equipment IDs, SPLC, and incident date are consistent with the Event Repository, the incident is created with a status of “Open”. Equipment on the incident will have a status of “New”. The Estimated Value is listed for each Equipment ID in the incident (Exhibit 36).

Incidents Create Incident
DDCT User Guide 28 Revised June 2018
Exhibit 36. Create Incident (Successful Confirmation)
16. Select Done if finished with the incident or select Edit if modifications are needed, such as adding attachments.
Note: The Handling Carrier (HC) and the Car Mark Owner (CMO) are emailed if equipment is deleted from Umler after an incident is created.
Creating Rule 1 and 108 Incidents Note: This section is a continuation of the procedure in “Create Incident” that began on page 19.
When creating a Rule 1 or Rule 108 incident, after you select Save at the bottom of the Equipment Details page (Exhibit 32), the Incident Details page is displayed as shown in Exhibit 37.

Incidents Create Incident
DDCT User Guide 29 Revised June 2018
Exhibit 37. Incident Details
14. Select Next to proceed. The Request Disposition page is displayed (see Exhibit 38).
15. Complete the required fields and select at least one piece of equipment. Note: You can use the magnifying glass ( ) to retrieve your company’s Handling Carrier contact from FindUs.Rail or you can complete the required fields manually.
Exhibit 38. Request Disposition
16. Select Request Disposition to proceed. The Confirm Request for Disposition page is displayed requesting additional details about the equipment (see Exhibit 39).

Incidents Create Incident
DDCT User Guide 30 Revised June 2018
Exhibit 39. Confirm Request for Disposition
17. Select Yes to confirm. The Disposition Request Success page is displayed (see Exhibit 40).
Exhibit 40. Disposition Request Success
18. Once the Disposition Request has been successfully completed, the incident is created and a notification is sent to the appropriate FindUs.Rail contact. Select Done to return to the Home page.
VFLT Incident Details Processing When the equipment type specified is Vehicular Flat Car (VFLT), you can either indicate:
• Combined Unit (VFLT) - the default selection
• Car and Rack Separately
• Car Only (VFLT-CO)
• Rack Only (RACK)
Note: For integrated units only, no options are displayed when creating an incident.

Incidents Create Incident
DDCT User Guide 31 Revised June 2018
Exhibit 41. Multi Level Equipment Option Page (with option selected with )
When Select is chosen, the Incident Details page is displayed (Exhibit 42) which shows two pieces of equipment have been added and respective options for entering defects specified by selecting the appropriate radio button.
Exhibit 42. Incident Details (for Rule 1 VFLT)
In order to create the incident for both equipment groups, check the box for each piece of equipment. Unselected equipment is not included with the incident (Exhibit 43).

Incidents Create Incident
DDCT User Guide 32 Revised June 2018
Exhibit 43. Request Disposition (for Rule 1 VFLT)
Note: Multi-level equipment not selected when requesting disposition cannot be added to the incident. The equipment must be selected prior to requesting disposition. A new incident must be created to add the equipment.
Continue with Step 9 on page 24.

Incidents Create Incident
DDCT User Guide 33 Revised June 2018
Adding/Removing/Viewing Attachments Note: Attachments cannot be uploaded through web services, nor transferred through e-mail or
MQ notification. Attachments can only be added during the create incident process or when editing a draft incident.
While on the Incident Details page for a specific Equipment ID, up to 10 attachments can be added to the incident for each Equipment ID. These might be photographs (views of the car and damage) or other documents.
Adding Attachments 1. From the Incident Details page, select the Action drop-down and then the Attachments
option (shown in Exhibit 44). The Add Attachment pop-up is displayed (Exhibit 45). The incident must be in “New” status for Rule 95, 96 and 107 and “Disposition Requested” status for Rule 1 and Rule 108.
Exhibit 44. Incident Details (showing Add Attachment option)
Exhibit 45. Add Attachment Pop-up
2. Write a short description of the attachment (for example, for photo—rear of car).
3. Use the browse function to locate the document or graphic file.

Incidents Create Incident
DDCT User Guide 34 Revised June 2018
4. Optionally, choose whether the attachments should be available to all users authorized to view the incidents. If yes, check Make Attachment Public.
5. Select Upload. A confirmation message is displayed indicating that the attachment has been uploaded (Exhibit 46). Additional actions appear to download or to remove the attachment (see “Viewing Attachments” and “Removing Attachments” for details).
Exhibit 46. Add Attachment Pop-up (with success message and download/view actions)
6. Select Close to close the Add Attachment Pop-up.
7. To add more attachments, repeat Steps 1 through 5.
8. When finished adding attachments for equipment, select Save to update the incident record with the new attachments. The Damaged Car Incident Details page is redisplayed (Exhibit 30).
Viewing Attachments 1. To view an attachment, access the Add Attachment Pop-up (as described in Adding
Attachments) for an incident with that already has an attachment. The Add Attachment Pop-up is displayed with the existing attachment included (Exhibit 47).

Incidents Create Incident
DDCT User Guide 35 Revised June 2018
Exhibit 47. Add Attachment Pop-up (with download action indicated)
2. Select the download action ( ). An option appears allowing you to download/view the file.
Removing Attachments If an incorrect photo has been added to an Equipment ID, or if a photograph was made public that should have been kept private, the attachment can be removed.
1. To remove an attachment, access the Add Attachment Pop-up (as described in Adding Attachments) for an incident with that already has an attachment. The Add Attachment Pop-up is displayed with the existing attachment included ().
Exhibit 48. Add Attachment Pop-up (with remove action indicated)

Incidents Create Incident
DDCT User Guide 36 Revised June 2018
2. Select the remove action ( ). A message appears showing that the attachment has been removed (Exhibit 49).
Exhibit 49. Add Attachment Pop-up (with attachment removal message)
3. Select Close to close the Add Attachment Pop-up.

Incidents Create Incident
DDCT User Guide 37 Revised June 2018
Saving a Draft Incident
Event Description Done By I/C Rules Notifi- cation
Recipient LCS Interchange
Looks Like Early Warning
System Web Services to Use Type Code
Incident draft created HC All n/a Incident draft deleted HC All n/a
When all information needed to complete an incident is not available, for example, a road representative is taking pictures needed to verify the condition of a car, the initial incident being created can be saved as a draft. The status is indicated as “Draft”. The draft can be recalled at a later time to add information, photos, etc., and then saved as a new incident with a status of “Open”.
To save a draft incident:
While creating a new incident (or updating an existing draft incident), on the Incident Details page (Exhibit 30), select Save Draft. A draft saved message is displayed at the top of the page (Exhibit 50).
Exhibit 50. Damaged Car Incident Details (after Save Draft)
To go back into Edit mode, select Edit. The editable Incident Details page is displayed (Exhibit 30).
To return to the Home page, select Done.

Incidents Create Incident
DDCT User Guide 38 Revised June 2018
Viewing Incident Drafts
Event Description Done By I/C Rules Notifi- cation
Recipient LCS Interchange
Looks Like Early Warning
System Web Services to Use Type Code
Incident draft deleted HC All n/a
To view saved drafts of incidents:
1. From any DDCT page, select Incidents>View Incident Drafts. The Incident Drafts page is displayed (Exhibit 51).
Notes:
• You can use the Search field to locate specific records from the results list.
• By default, the results list displays 50 rows per page. You can change this to display 10, 50, 100, 250, 500, or 1000 rows by selecting the numbers at the bottom right of the page.
Exhibit 51. Incident Drafts
2. To view a specific draft incident, select its Incident ID. The Incident Details page is displayed (Exhibit 52).
3. To remove a draft incident, select the check the box to the left of the ID and select Remove. A confirmation message is displayed. Select Yes. The draft incident is removed from the list.

Incidents Create Incident
DDCT User Guide 39 Revised June 2018
Exhibit 52. Incident Details
• To update the incident, select Edit. The Incident Details page is displayed (Exhibit 53).
• To view the Car Details page (Exhibit 66), select the Equipment ID link.
Exhibit 53. Incident Details (for Draft Incident Edit)
Note: To edit existing information for equipment (e.g., to add more defects identified), select the Equipment ID link. The Equipment Details page is displayed.
Action choices on this page include:
Add or remove cars and defect information as needed, as well as attachments. See “Create Incident” on page 19 and “Adding Attachments” on page 33.
When all additional cars and attachments have been completed:
• Select Save Draft. This does NOT create the incident. A success message is displayed.
• Select Create from Draft. Validation and confirmation occur as described in Step 14 on page 27.

Incidents Create Incident
DDCT User Guide 40 Revised June 2018
Printing Car Details When viewing the Car Details page, you have the option to preview and print car details information. Use the following procedure to print car details information:
1. From the Car Details page (see Exhibit 51), select the Report Preview link. The Car Details preview page is displayed.
Note: If you have multiple printers, a printer selection page may be displayed. You will need to select a printer and then select the option to print.
Exhibit 54. Car Details page (showing the Report Preview link)
2. Select Print Report from the print preview page (Exhibit 52).
Exhibit 55. Car Details page (showing the Print Report link)
The car details information is printed.

Incidents Create Incident
DDCT User Guide 41 Revised June 2018
Equipment Restenciled via Umler/DDCT Rules When equipment is restenciled in Umler, DDCT incidents are affected as follows:
• When equipment is restenciled in Umler, the details are automatically sent to DDCT and are reflected in any open incidents. If an incident is closed, then the equipment is not updated with the new stencil mark.
• An email notification is sent to both the old and new CMO and to the HC who created the incident.
• If equipment restenciled in Umler is active within multiple incidents, then the HC for each incident receives separate email notifications.
• If the restenciled equipment appears on multiple incidents, then the email lists all affected incidents.
• Once a car is restenciled, the original car owner is not able to view or edit the incident.
Exhibit 56 shows how to identify when equipment has been restenciled. Exhibit 56. Car Details (for restenciled equipment)
Notes:
• If a car involved in an incident in DDCT is restenciled, the associated DDCT record is automatically updated to reflect the new equipment ID. The old ID is displayed for reference in the details page. Notifications are sent to both CMOs.
• If a car involved in an incident in DDCT is removed from Umler (deactivated) and it is the only car on the incident, the Car Details page for that ID will show a reason of “deleted from Umler”. The incident will be automatically closed in DDCT (after 90 days). If the incident has multiple Equipment IDs, the deleted IDs are removed from the incident with the same indicator.
Previous stencil mark

Incidents Create Incident
DDCT User Guide 42 Revised June 2018
Remove From Incident
Event Description Done By I/C Rules
Notifi- cation
Recipient
LCS Interchange Looks Like
Early Warning System Web Services to Use
Type Code Remove a car from an incident HC/CMO 95/107 HC/CMO DDCTService.RemoveEquipment Remove a car from an incident HC/
CMO 1/96/108 HC/ CMO DDCTService.RemoveEquipment
The Remove From Incident function enables the Car Mark Owner or the Handling Carrier to remove a car from an incident.
Notes: • For Rules 95 and 107, a Car Mark Owner (CMO) Admin cannot remove a car from an
incident if the status is an end state (i.e., Repairs Complete, Settlement Approved/Accepted, Removed). For all other statuses, a CMO Admin can remove a car from a Rule 95 and Rule 107 incident.
• The Handling Carrier (HC) and the Car Mark Owner (CMO) are notified if equipment on an incident is deleted from Umler.
1. Search for the incident that is to have a car removed (see “Search” on page 11).
2. From the Car Details page (Exhibit 15), select Remove from Incident. The Remove Equipment page is displayed (Exhibit 57).
Exhibit 57. Remove Equipment From Incident
3. Select the appropriate Removal Reason Code from the available list (Exhibit 58).
Notes: • If equipment on an incident is deleted from Umler, then this Removal Reason Code field
is auto-populated with “Deleted in Umler.”
• For Rule 1 and 108 only, the incident must be in “Disposition Provided” status in order for the CMO to remove the car from the incident.

Incidents Create Incident
DDCT User Guide 43 Revised June 2018
Exhibit 58. Removal Reason Codes
4. Enter an explanation in the Reason for Removal field.
5. Select Remove From Incident. An information message is displayed.
6. Select Remove From Incident again to confirm. The status is changed to “Removed”.
Note: When equipment is removed from Umler, the car can be removed from the incident after 30 days. The Removal Reason Code is set to “deleted in Umler.” Appropriate actions may be performed at any time during the 30 days. After that period, the incident is closed.
Re-Add Car (Rule 96 and Rule 107 only) Equipment that has been removed from an incident can be added back to the incident. This changes the status of the re-added car from “Removed” to “New”.
Note: Equipment cannot be re-added once an incident is closed.
1. Search for the incident. See “Search” on page 11.
2. Select the Equipment ID link on the Search Results page. The Defective (or Damaged) Car Details page is displayed (similar to Exhibit 66).
3. Select the Incident ID link on the Defective (or Damaged) Car Details page. The Incident Details page is displayed (with removed equipment) (Exhibit 59).
Exhibit 59. Incident Details (with removed equipment)
4. Select the action drop down. The option to Re-add the car is displayed (Exhibit 60).

Incidents Create Incident
DDCT User Guide 44 Revised June 2018
Exhibit 60. Incident Details (with re-add car option indicated)
5. Select the Re-Add option for the removed equipment to be re-added. The Equipment Details page is displayed with the status field changed to blank.
6. Select Save. The Damaged Car Incident Details page is re-displayed now showing the equipment with a status of “New”.
Note: After a car is re-added to a Rule 96 or Rule 107 incident, the disposition process must be completed again.
Truck Hunting (THD) and Early Warning (EW) and Maintenance Advisory (MA)
DDCT enables handling carriers to create Rule 1 incidents for equipment with Equipment Health Management System (EHMS) Truck Hunting (THD) alerts or Early Warning/Maintenance Advisory (EW/MA) letters.
For THD alerts, DDCT automatically creates Rule 1 incidents when a THD alert is at a Condemnable level. The incident will open and close based unloading events to allow car owner to provide disposition. In addition, handling carriers have the ability to create Rule 1 incidents for THD alerts or for Early Warning/Maintenance Advisory (EW/MA) letter (see “Create Incident” on page 19).
DDCT creates a Rule 1 incident for THD Alerts based on a qualifying waybill to be effective at the start of the next ‘loaded trip’ on the destination road and location. The waybill must have the handling carrier’s destination SCAC, the destination location SPLC and commodity (STCC). In addition, the Alert Location and the Alert Type (Truck Hunting) will be defined for the Rule 1 incident.
When the DDCT incident has a status of “Repairs Complete”, the incident will close and the THD will be closed in EHMS. Conversely, inspections reported in EHMS for the defined component location will close the DDCT incident. Refer to the EHMS User Guide for the specific inspections required to close THD alerts.
For Rule 1 incidents, EW/MA cars will be removed from the Letter/Notices when ‘Repairs Complete’ is reported or when a car is removed from an incident and the Removal Reason Code reported is ‘Car Repaired and Returned to Service’ or ‘Car Inspected and Returned to Service’ is entered. Another option is to report designated inspection codes in Early Warning, which will result in the DDCT incident closure.

Incidents Create Incident
DDCT User Guide 45 Revised June 2018
For THD Alerts, the proper Alert Location, Alert Type, and incident defect noted as ‘M-Trucks’ must be reported in DDCT to complete closure of the alert in EHMS. For EW/MA Letters/Notices, the proper Alert Location, Alert Type, and incident defect noted as ‘W-Early Warning’ must be reported in DDCT (see “Create Incident” on page 19). Also, the Shop SPLC, Reporting Mark/SCAC, Performer, and date must match.
Notes: • When evaluating STCCs and to determine if equipment is loaded, the STCCs
37422xx are determined as empty equipment and not considered as loaded equipment.
• If the incident is for multi-level equipment, DDCT enables incident creation for VFLT (flat) and VFLT-CO (flat and rack). Incidents are not allowed for racks only; an error is displayed if attempted.
The DDCT Rule 1 incidents for THD Alerts and the Car Details page will display a DDCT generated message in the Note section of the Car Details record (Exhibit 61). See Exhibit 62 and Exhibit 63, which indicate that it was automatically created. An email notification is transmitted to the Handling Carrier when this automated incident is created.
DDCT Rule 1 incidents for THD alerts that are created automatically will have new incidents created when the car is reloaded and the incident was not closed due to repair or inspection. The existing incident will be closed using the Reason Code “THD Incident – Car Loaded By Industry” and a new incident will be created if the waybill qualifying information of Handling Carrier’s destination SCAC, the Destination location SPLC and the Commodity (STCC) are available via the waybill.
Note: All DDCT incidents for EW/MA are created manually. No incidents are automatically created for EW/MA letters.
For equipment that is on a THD Alert or an EW/MA notice and is “remediated” (fixed), a message is transmitted to DDCT and the DDCT incident is closed with one of the appropriate reason codes as shown in Exhibit 61, Exhibit 62, and Exhibit 63.

Incidents Create Incident
DDCT User Guide 46 Revised June 2018
Exhibit 61. Car Details page with DDCT generated message in the Note section
Exhibit 62. Reason Code: THD Incident - THD Alert Remediated
Exhibit 63. Reason Code: EW Incident - EW Remediated
Notes: • EW5171, MA Notices 63, 124, 125, 127, and 128 are not allowed.
• A DDCT incident can be linked to more than one THD alert due to different alerts being detected against multiple THD alert locations for the same THD Alert Type. However, a DDCT incident can be linked to only one EW/MA letter/notice. Also, a combination of THD alerts and an EW/MA letter/notice on the same incident is not allowed.
• Incidents are closed via DDCT user interface or web services, whether the incident was automatically or manually created, at the time that a closure message is received from EHMS. Also, all DDCT incidents associated with an EW/MA notice or a THD alert are closed if the alert or EW/MA notice is cancelled.
• Incidents with defects on indicated equipment other than THD or EW/MA defect remain open until all repairs have been completed.

Incidents Create Incident
DDCT User Guide 47 Revised June 2018
Audit Log The Audit Log button provides a listing of all events associated with an incident, and is available on many DDCT pages. The function described in this section applies throughout the application.
1. Search for an incident as described in Search on page 11. Select the desired Equipment ID link. The Car Details page is displayed (similar to Exhibit 15).
2. Select Audit Log. The Audit Log - Incident Event History page is displayed for the Equipment ID (Exhibit 64). The events for the incident are listed with the most recent event on the top of the list. The user who executed the event step is identified in the User column.
Exhibit 64. Audit Log - Incident Event History
3. To view the event log for a particular event, select the Timestamp link. The Audit Log -
Incident Event History page is displayed (Exhibit 65).
Note: If available, waybill information is displayed on the Audit Log - Incident Event History page. Final Shop and the associated Mark and SPLC are also displayed (Exhibit 65).

Incidents Create Incident
DDCT User Guide 48 Revised June 2018
Exhibit 65. Audit Log - Incident Event History (for selected Event)
4. To return to the Audit Log - Incident Event History (with all events listed), select Close.

Incidents Update Incidents
DDCT User Guide 49 Revised June 2018
Update Incidents
Event Description Done By
I/C Rules
Notifi- cation
Recipient LCS Interchange
Looks Like Early Warning
System Web Services to Use Type Code
Incident updated HC 95/107 CMO DDCTService.EditEquipment Incident updated HC 1/96/108 CMO DDCTService.EditEquipment Add a car to an incident HC 95/107 CMO DDCTService.AddEquipment Add a rack/flat to an incident HC 1/96/108 CMO DDCTService.AddEquipment
Open an incident:
• From a search—see “Search” on page 11. • From viewing draft incidents—see “Viewing Incident Drafts” on page 38.
Updating an incident can be adding cars or attachments (using the Save or Update Incident command buttons), or actually progressing the incident through the damaged and defective car processes:
• For damaged cars, see “Damaged Cars” on page 57. • For defective cars, see “Defective Cars” on page 81. • For defect cards, see “Defect Cards” on page 96. • For shop actions, see “Shop” on page 108.
Note: A rule 96/107 incident will remain open for 90 calendars days from the incident date. If 90 calendar days pass, and some of the cars on the incident are not at end states, the incident will remain open.

Incidents Third Party Requests
DDCT User Guide 50 Revised June 2018
Third Party Requests
Event Description Done By I/C Rules Notifi- cation
Recipient
LCS Intercha
nge Looks Like
Early Warning System Web Services to Use
Type Code
Third party for CMO request CMO All CMO/3rd Party None Third party for CMO request accepted TP 95/107 CMO/3rd Party None Third party for CMO request accepted TP 1/96/108 CMO/3rd Party None Third party for CMO request rejected TP 95/107 CMO/3rd Party None Third party for CMO request rejected TP 1/96/108 CMO/3rd Party None Third party for CMO request tickler/reminder message
System All 3rd Party None
Car Owners that handle their damaged and defective car tracking processing can assign incidents to a Third Party agent. In this case, the incident must be assigned by the car mark owner to the Third Party. Then the Third Party can choose whether to accept or reject the assignment.
Assigning to Third Party Note: Only the stenciled Car Mark Owner can assign responsibility to a Third Party. The CMO
remains responsible for the incident until the requested Third Party accepts the Third Party Request. A daily tickler/reminder email is sent to the Third Party until the request is approved or rejected.
1. Search for the incident. See “Search” on page 11.
2. Select the Equipment ID link on the Search Results page. The Car Details page is displayed (Exhibit 66).
Exhibit 66. Bottom of Car Details (showing Assign to Third Party option)
3. Select Assign to Third Party. The Third Party Request page is displayed (Exhibit 67).

Incidents Third Party Requests
DDCT User Guide 51 Revised June 2018
Exhibit 67. Third Party Request
4. Type in the mark or use the search icon ( ) to select the Mark. The MARK Search pop-up is displayed (See Exhibit 68).
Note: The MARK provided must be a Railinc registered company ID/MARK, a Signatory to AAR Interchange Rules, and registered in FindUs.Rail.
Exhibit 68. MARK Search
5. Complete the MARK and/or Company Name fields. Make use of the wildcard search based on rules displayed on the page. Select Search to search for records.
Note: If searching for the child MARK, the search results display the parent MARK. Use a parent MARK for third party assignment requests unless otherwise instructed by the car owner.

Incidents Third Party Requests
DDCT User Guide 52 Revised June 2018
6. Select the desired search result and select the Select button. Back on the Third Party Request page (see Exhibit 67) the Agent Company ID field is populated with the selected MARK.
7. Key in notes in the Note field that can be viewed by the 3rd party agent (free form 200 characters).
8. Select Request. A warning/confirmation message is displayed (Exhibit 69).
Exhibit 69. Third Party Request Warning/Confirmation
9. Review the displayed disclaimer about the request. Select Request to proceed. A confirmation message is displayed (Exhibit 70).
Exhibit 70. Third Party Request Confirmation
10. Select Done to return to the Home page.

Incidents Third Party Requests
DDCT User Guide 53 Revised June 2018
Accepting/Rejecting Third Party Requests When a Third Party selects Incidents>Third Party Requests on the DDCT application menu, the Accept Third Party Request page is displayed with a list of all incidents that have been assigned (Exhibit 71). This process can also be initiated by selecting the Accept/Reject Third Party button on the Car Details page.
Note: The Third Party must accept responsibility to view the details of the incident. Once the Third Party accepts responsibility, the stenciled Car Mark Owner is no longer able to view the incident. A daily tickler/reminder email is sent to the Third Party until the request is approved or rejected.
Exhibit 71. Accept/Reject Third Party Requests
TO VIEW THE DETAILS OF THE REQUEST, select its Equipment ID. The Car Details page is displayed. After reviewing the case, select the Accept/Reject Third Party button to continue through the process.
Accept or reject other incidents as required, or select Cancel to return to the Home page.
TO ACCEPT THE THIRD PARTY REQUEST, check the box beside the incident and select Accept. The Accept Third Party Request page is displayed (Exhibit 72).
Exhibit 72. Accept Third Party Request
Select Accept again to confirm. A confirmation message is displayed (Exhibit 73).

Incidents Third Party Requests
DDCT User Guide 54 Revised June 2018
Exhibit 73. Accept Third Party Request Confirmation
Select Yes to confirm. A success message is displayed (Exhibit 74). You have now successfully requested the Third Party to continue the DDCT workflow. The Car Mark Owner no longer has visibility to incident details. Select Done to return to the Home page.
Exhibit 74. Accept Third Party Request Success Message
Once the Third Party accepts the request, they can search for the incident/equipment ID and begin to receive notifications associated with remaining steps.
Notes: • When the Third Party accepts the request, notifications from the point of acceptance are
sent. Prior notification messages cannot be transmitted to the Third Party.
• When the Third Party accepts the request, the original Car Mark Owner can no longer view the Incident Details. The Car Mark Owner can use the Search Incident functionality to see high-level information.
• For accepted or rejected requests, notification is made to the Car Mark Owner.
TO REJECT a third party request, check the box beside the incident and select Reject. The Reject Third Party Request page is displayed (Exhibit 75).
Exhibit 75. Reject Third Party Request
Select Reject again to confirm. A confirmation message is displayed (Exhibit 76).

Incidents Autocloses
DDCT User Guide 55 Revised June 2018
Exhibit 76. Reject Third Party Request Confirmation
Select Yes to confirm. A success message is displayed (Exhibit 77). You have now successfully rejected the Third Party Request and the Car Mark Owner is not changed. Select Done to return to the Home page.
Exhibit 77. Reject Third Party Request Success Message
Once the Third Party Agent rejects the request, the rejected incident no longer displays.
Autocloses This section explains the different types of autocloses.
Autoclose Rule 1 Incident – 3 Loaded Trips
Event Description Done By I/C Rules
Notifi- cation
Recipient LCS Interchange Looks Like
Early Warning System Web Services
to Use Type Code Remove a car from an incident and close the incident
DDCT System
1 HC/CMO LCS code for remove liability processing for this car REMV/REMV from and to road
n/a
A car will be removed from a DDCT Rule 1 incident, and the system will autoclose the incident and update the incident with an end state of “Removed” when all of the following conditions are met:
• The Railinc event repository contains three loaded trip cycles since the creation of the latest DDCT incident.
• Only incidents associated with MA0124 will be autoclosed; incidents associated with any other EW/MA will not be closed.
• There is no defect card associated with the incident.
Note: When the car is removed from the incident, the incident will be closed with Removal Reason Code: “Autoclose – 3 loaded moves” and Removal Reason notes: “Incident is closed due to 3 loaded moves in accordance with AAR Interchange Rules”.
Notifications: The system will send an Equipment Removed notification to the Handling Carrier (HC) and the Car Mark Owner (CMO) with a Removal Reason Code and Removal Reason notes. The HC will also receive Incident Closure notification.

Incidents Autocloses
DDCT User Guide 56 Revised June 2018
Autoclose Rule 95, 107 Incidents and Defect Cards
Event Description Done By I/C Rules
Notifi- cation
Recipient LCS Interchange Looks Like
Early Warning System Web Services
to Use Type Code Remove a car from an incident and close the incident
DDCT System
95/102*/ 107
HC/CMO LCS code for remove liability processing for this car REMV/REMV from and to road
n/a
*Defect cards can be stand-alone or associated with an incident. Rule 102 applies to all defect cards.
Per the AAR Interchange Rules, once a defect card has been in existence for 48 months, a car will be removed from a DDCT Rule 95, 107 incident or stand-alone defect card, and the system will autoclose the incident/defect card and update the incident/defect card with an end state of “Removed”.
Note: This autoclose process does not apply to defect cards where the incident status is “Car On Hand” or “Intermediate Shop Complete”.
Notifications: The system will send an Equipment Removed notification to the Handling Carrier (HC) and the Car Mark Owner (CMO) with a Removal Reason Code and Removal Reason notes. The HC will also receive Incident Closure notification.

Damaged Cars
DDCT User Guide 57 Revised June 2018
Damaged Cars When you select Damaged Cars on a DDCT page, the Damaged Cars menu is displayed (Exhibit 78).
Damaged Car processing is used for damaged car incidents under Rule 95 and 107.
Exhibit 78. Damaged Cars Menu
Exhibit 79 describes the tasks available on the Damaged Cars menu.
Exhibit 79. Damaged Cars Menu Items and Descriptions
Menu Item Description Request Actual DV/Disposition
Enables the damaging road to request an actual depreciated value and disposition for a damaged car incident under Rule 107.
Provide Actual DV/Disposition
Enables the owner user to provide an actual documented depreciated value and disposition for a damaged car incident under Rule 107.
Offer Settlement/ Enables the damaging road to offer a settlement to an owner for a damaged car incident under Rule 107.
Accept/Reject Settlement
Enables the owner to accept or reject a settlement from the damaging road for a damaged car incident under Rule 107.
Note: If it is determined that a car on a Rule 95 incident has disposition requested, then the car should be removed from the Rule 95 incident (the incident will then close) and a “new” Rule 107 incident should be created.

Damaged Cars Request Actual DV/Disposition
DDCT User Guide 58 Revised June 2018
Request Actual DV/Disposition
Event Description Done By I/C Rules
Notifi- cation
Recipient
LCS Interchange Looks Like
Early Warning System Web Services to Use
Type Code Request Disposition and DV HC 107 CMO DDCTService.requestDisposition Reminder - Request Disposition and DV Pending
DDCT System
107 CMO n/a
This process is completed by the damaging carrier to request the owner to provide input for the equipment’s depreciated value (DV) and disposition of the car.
1. Select Damaged Cars> Request Actual DV/Disposition. The Request Actual DV/Disposition page is displayed (Exhibit 80). Note: You can use the magnifying glass ( ) to retrieve your company’s Handling Carrier contact from FindUs.Rail or you can complete the required fields manually.
Exhibit 80. Request Actual DV/Disposition
Note: If the contact is registered in FindUs.Rail, the fields are auto-populated with the last used contact. Otherwise, the contact is populated with the primary FindUs.Rail contact for the Handling Carrier. The lookup presents primary FindUs.Rail contacts followed by secondary contacts.
2. As discussed in the above note, the contact information is pre-populated. Modify as necessary:
a. Type in the damaging carrier’s contact name or select the search icon ( ) to search for a valid contact name.
b. Type in the contact telephone number (including area code).
c. Type in the contact’s e-mail address.
3. Select Add Equipment. The Request Actual DV/Disposition Equipment pop-up appears (Exhibit 81).
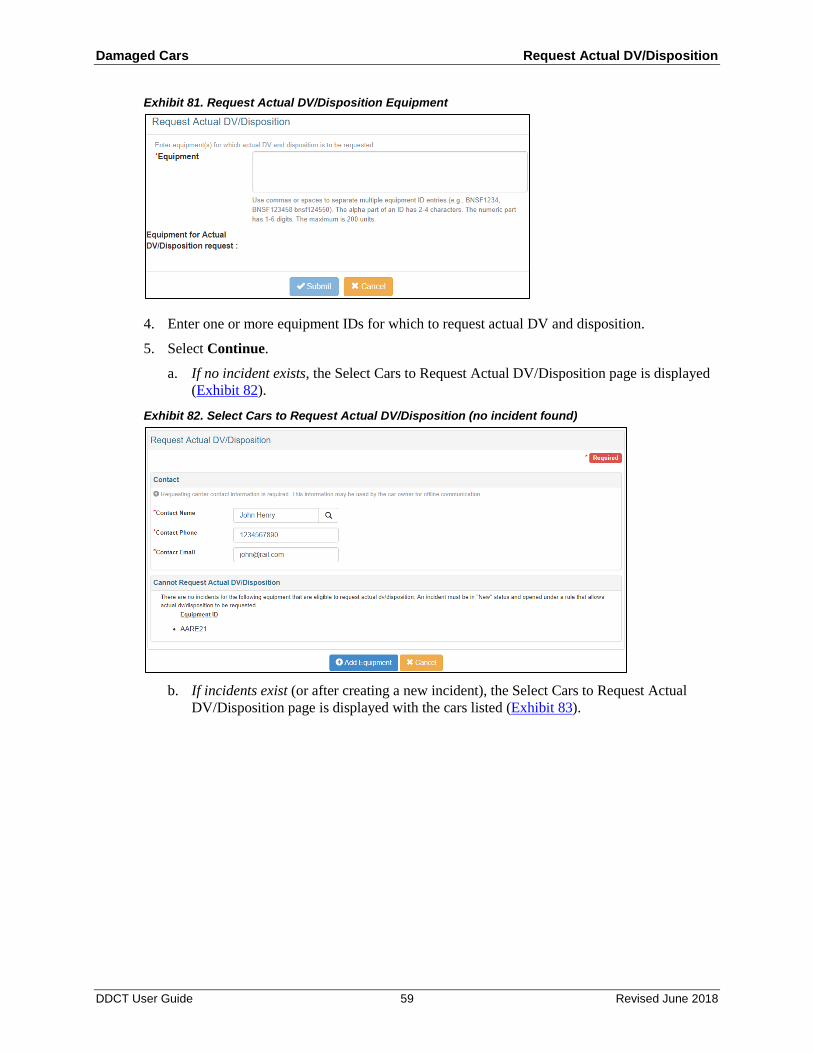
Damaged Cars Request Actual DV/Disposition
DDCT User Guide 59 Revised June 2018
Exhibit 81. Request Actual DV/Disposition Equipment
4. Enter one or more equipment IDs for which to request actual DV and disposition.
5. Select Continue.
a. If no incident exists, the Select Cars to Request Actual DV/Disposition page is displayed (Exhibit 82).
Exhibit 82. Select Cars to Request Actual DV/Disposition (no incident found)
b. If incidents exist (or after creating a new incident), the Select Cars to Request Actual
DV/Disposition page is displayed with the cars listed (Exhibit 83).

Damaged Cars Request Actual DV/Disposition
DDCT User Guide 60 Revised June 2018
Exhibit 83. Select Cars to Request Actual DV/Disposition (incident found)
6. Check the boxes beside the Equipment IDs to request an actual DV/Disposition.
7. Complete the following mandatory information:
a. Type in the STCC of loaded equipment (the last contained STCC if empty) or select the search icon ( ) to search for a valid STCC.
b. Select Yes or No for whether the car can travel on own wheels.
8. (Optional) Complete the following information:
a. Choose Empty or Loaded from the drop-down.
b. In the Disposition Note drop-down, choose whether the car “Will be sent to the shop” or “Has been sent to the shop”.
c. Enter the shop mark or select the search icon ( ) to search for a valid shop mark.
9. Select Request Actual DV/Disposition. The Confirm Request for Actual DV/Disposition page is displayed (Exhibit 84).
Exhibit 84. Confirm Request for Actual DV/Disposition
10. Reselect Request Actual DV/Disposition. The Confirmation of Request for Actual
DV/Disposition page is displayed (Exhibit 85).
Exhibit 85. Confirmation of Request for Actual DV/Disposition
The status changes to “Actual DV/Disposition Requested”.
Note: If no Actual DV/Disposition is provided within 15 days, car hire liability is transferred to the car mark owner who can assume responsibility to provide disposition for the car.
11. Select Done to return to the Home page, or select another menu item.
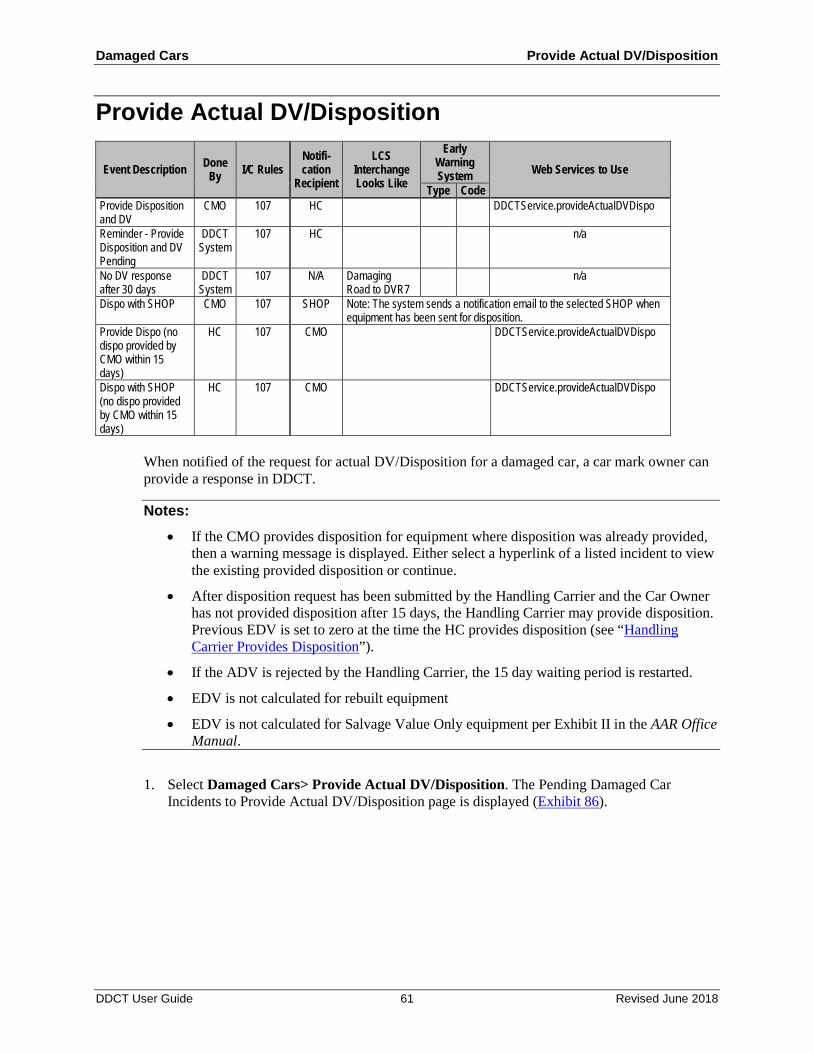
Damaged Cars Provide Actual DV/Disposition
DDCT User Guide 61 Revised June 2018
Provide Actual DV/Disposition
Event Description Done By I/C Rules
Notifi- cation
Recipient
LCS Interchange Looks Like
Early Warning System Web Services to Use
Type Code Provide Disposition and DV
CMO 107 HC DDCTService.provideActualDVDispo
Reminder - Provide Disposition and DV Pending
DDCT System
107 HC n/a
No DV response after 30 days
DDCT System
107 N/A Damaging Road to DVR7
n/a
Dispo with SHOP CMO 107 SHOP Note: The system sends a notification email to the selected SHOP when equipment has been sent for disposition.
Provide Dispo (no dispo provided by CMO within 15 days)
HC 107 CMO DDCTService.provideActualDVDispo
Dispo with SHOP (no dispo provided by CMO within 15 days)
HC 107 CMO DDCTService.provideActualDVDispo
When notified of the request for actual DV/Disposition for a damaged car, a car mark owner can provide a response in DDCT.
Notes: • If the CMO provides disposition for equipment where disposition was already provided,
then a warning message is displayed. Either select a hyperlink of a listed incident to view the existing provided disposition or continue.
• After disposition request has been submitted by the Handling Carrier and the Car Owner has not provided disposition after 15 days, the Handling Carrier may provide disposition. Previous EDV is set to zero at the time the HC provides disposition (see “Handling Carrier Provides Disposition”).
• If the ADV is rejected by the Handling Carrier, the 15 day waiting period is restarted.
• EDV is not calculated for rebuilt equipment
• EDV is not calculated for Salvage Value Only equipment per Exhibit II in the AAR Office Manual.
1. Select Damaged Cars> Provide Actual DV/Disposition. The Pending Damaged Car Incidents to Provide Actual DV/Disposition page is displayed (Exhibit 86).

Damaged Cars Provide Actual DV/Disposition
DDCT User Guide 62 Revised June 2018
Exhibit 86. Pending Damaged Car Incidents to Provide Actual DV/Disposition
2. Select the Equipment ID link from the Pending list matching the received notification. The Actual DV/Disposition page is displayed (Exhibit 87).
Exhibit 87. Actual DV/Disposition

Damaged Cars Provide Actual DV/Disposition
DDCT User Guide 63 Revised June 2018
Notes: • If the CMO provides disposition for equipment where disposition was already provided,
then a warning message is displayed. Either select a hyperlink of a listed incident to view the existing provided disposition or continue.
• Waybill information for either the origin or destination party only appears on car details after disposition has been provided. See Exhibit 120 and Exhibit 121 in the “Provide Disposition” section for an example.
• If the ADV provided to the Handling Carrier is rejected, the amount is returned to zero. This field is not available to the Handling Carrier.
• The drop down for currency type only allows USD unless the amount determined during the calculate process is overridden. If it is necessary to indicate CAD (Canadian dollars), follow the calculate process, select the Override ADV check box, and then change the currency to CAD.
3. The CMO can select Calculate to begin the process to calculate Actual DV. The Settlement Value Statement is displayed (Exhibit 88). The Actual DV/Disposition page is not available again until the Settle Value Statement page has been completed and saved.
Notes: • If equipment has been removed from Umler but the CMO wants to provide ADV, when
the CMO selects the Calculate button, a message is displayed stating that the DV worksheet needs to be filled out manually.
• If the data provided in the Settlement Value Statement is not accurate, the CMO can update the equipment information in Umler and then return to DDCT.

Damaged Cars Provide Actual DV/Disposition
DDCT User Guide 64 Revised June 2018
Exhibit 88. Settlement Value Statement
4. For the Settlement Value Statement page, the Incident Detail information (Equipment Type, Car Mark Owner, Incident ID, Equipment ID, Incident Date, ADV Request Date, SPLC, and Location) are pre-populated from DDCT for the first three lines of entries. The input fields are as follows:
• Equipment built on, Rebuilt on — pre-populated from Umler–editable. If changed, Cost Factors are updated.
• Weighing — pre-populated from Umler.
A. Original Cost — pre-populated from Umler–editable.
B. Cost Factor for year built — pre-populated from DDCT.
C. Cost Factor, for year prior to damage — Year (yyyy) pre-populated from DDCT.
D. Base Reproduction Value (A*C/D) — Based on Umler and DDCT data – Pre-populated.
• Type — Drop down of valid selections – 10 maximum selections (Exhibit 89). See Exhibit 90 for a detailed explanation of each code.
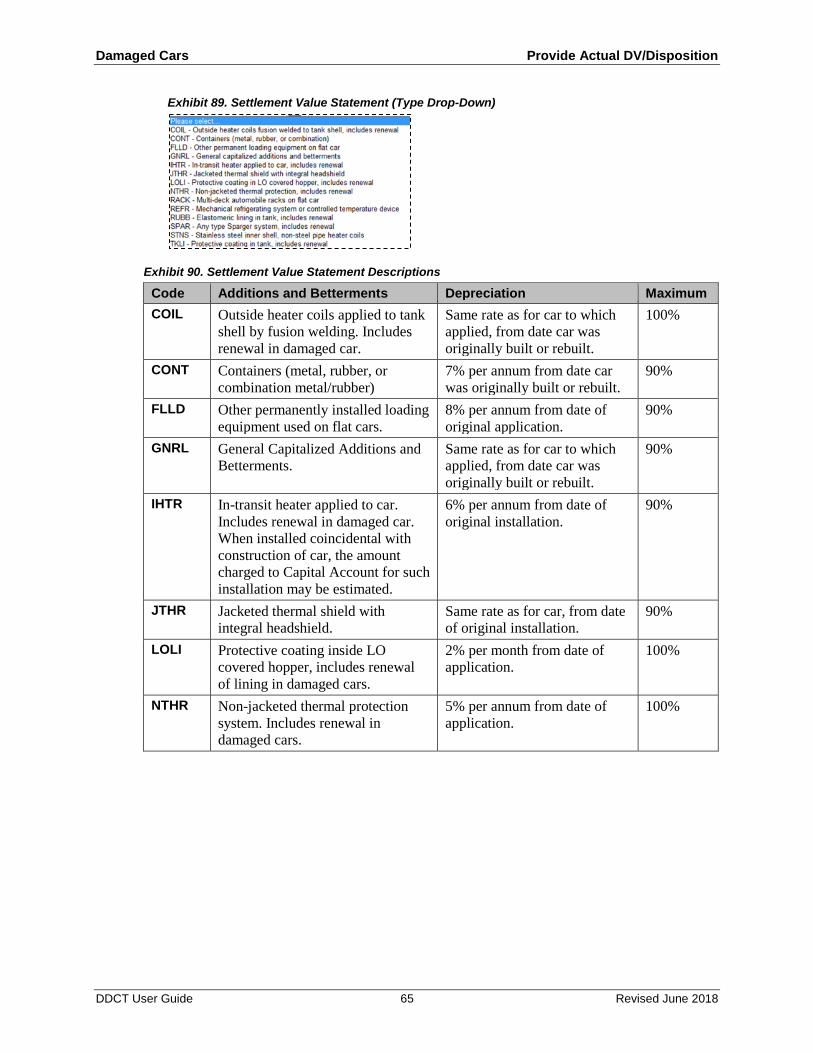
Damaged Cars Provide Actual DV/Disposition
DDCT User Guide 65 Revised June 2018
Exhibit 89. Settlement Value Statement (Type Drop-Down)
Exhibit 90. Settlement Value Statement Descriptions
Code Additions and Betterments Depreciation Maximum COIL Outside heater coils applied to tank
shell by fusion welding. Includes renewal in damaged car.
Same rate as for car to which applied, from date car was originally built or rebuilt.
100%
CONT Containers (metal, rubber, or combination metal/rubber)
7% per annum from date car was originally built or rebuilt.
90%
FLLD Other permanently installed loading equipment used on flat cars.
8% per annum from date of original application.
90%
GNRL General Capitalized Additions and Betterments.
Same rate as for car to which applied, from date car was originally built or rebuilt.
90%
IHTR In-transit heater applied to car. Includes renewal in damaged car. When installed coincidental with construction of car, the amount charged to Capital Account for such installation may be estimated.
6% per annum from date of original installation.
90%
JTHR Jacketed thermal shield with integral headshield.
Same rate as for car, from date of original installation.
90%
LOLI Protective coating inside LO covered hopper, includes renewal of lining in damaged cars.
2% per month from date of application.
100%
NTHR Non-jacketed thermal protection system. Includes renewal in damaged cars.
5% per annum from date of application.
100%

Damaged Cars Provide Actual DV/Disposition
DDCT User Guide 66 Revised June 2018
Code Additions and Betterments Depreciation Maximum RACK Multi-deck racks used on flat cars
for automobiles, built new or rebuilt prior to 1/1/2016.
5% per annum from date originally built or rebuilt when multi-level rack and car are of divided ownership or reported in Umler as car and multi-deck racks, separately. When car with permanently installed multi-level rack is reported to Umler as a single integrated unit, rate of depreciation for the entire unit will be at the same rate for the car in which installed.
90%
Multi-deck racks used on flat cars for automobiles, built new or rebuilt on or after 1/1/2016.
3.33% per annum from date originally built or rebuilt when multi-level rack and car are of divided ownership or reported in Umler as car and multi-deck racks, separately. When car with permanently installed multi-level rack is reported to Umler as a single integrated unit, rate of depreciation for the entire unit will be at the same rate for the car in which installed.
90%
REFR Mechanical refrigerating systems or thermostatically controlled temperature device (including power equipment). When installed coincidental with construction or Rule 88 rebuild, the amount charged to Capital Account for such installation may be estimated.
6% per annum from date of original installation or rebuild of the car.
90%
RUBB Rubber, polyvinyl chloride and polyurethane elastomeric linings applied to inside of tank. Includes renewal in damaged car.
5% per annum from date of application.
100%
SPAR Any type Sparger system applied. Includes renewal of lining in damaged cars.
Same rate as for car in which installed, from date car was originally built or rebuilt.
90%
STNS Stainless steel inner shell, heater coils of other than ordinary steel pipe.
Same rate as for car, from date of original installation.
90%
TKLI Protective coating to inside of tank. Includes renewal of lining in damaged car.
2% per month from date of application.
100%

Damaged Cars Provide Actual DV/Disposition
DDCT User Guide 67 Revised June 2018
• Date — of value from type.
• Description — free form of type.
• Cost — Enter without $ or any punctuation.
• Select Add to add type to calculation.
E. Reproduction Value (Additions and Betterments) — calculated from the addition of types. Note: A maximum of 15 values may be entered.
F. Total Reproduction (D+E)
G. Less Car Depreciation: Years and Months at:% (percent) = % (percent
H. Less Capitalized Betterments Depreciation (rate of car)
I. Less Exhibit V Depreciation
J. AAR Depreciated Value (F minus G minus H minus I)
5. Select Save and Continue. The next page is displayed, which is the Salvage Value Worksheet (Exhibit 91).
Exhibit 91. Salvage Value Worksheet
Note: If your equipment is only applicable to the Salvage Value Only depreciation method, then the Standard Steel Weight is pre-filled based on your Umler tare weight. The actual composition of your equipment is unknown. Review the information and update the weight fields for accuracy as needed.

Damaged Cars Provide Actual DV/Disposition
DDCT User Guide 68 Revised June 2018
6. The Salvage Value Worksheet input fields are as follows:
• Umler Tare Weight (pounds) — Brought forward from Umler; editable. Note: If changed, a message is displayed indicating that the Umler weight was changed.
• Non-Metallic Weight (pounds) — Brought forward from Umler, if available; open for user input.
• Estimated Salvage Weight (pounds) — Umler Tare Weight minus Non-Metallic Weight.
• Aluminum (pounds) — enter weight of aluminum product in salvage equipment.
• Stainless Steel (pounds) — enter weight of stainless product in salvage equipment.
• Standard Steel (pounds) — enter weight of standard product in salvage equipment
• US Credit Rate — Rates from the current Price Master (updated quarterly) that is based on the Incident Date – non-editable.
• Credit Value — Result of Aluminum, Stainless Steel, and Standard Steel individual weight multiplied by the US Credit Rate.
• Total Salvage Weight (pounds) — Totals of Aluminum, Stainless Steel, and Standard Steel – must equal Estimated Salvage Weight.
• Total Salvage Value — Total Value of Aluminum, Stainless Steel, and Standard Steel.
Note: Calculations are performed as you move to the next field.
7. Select one of the following:
• Back — Moves to the previous page without any updates.
• Calculate — Totals all numbers (weight and dollar amount) and moves to the final page (Exhibit 92).
• Cancel — Does not update data and moves back one page.

Damaged Cars Provide Actual DV/Disposition
DDCT User Guide 69 Revised June 2018
Exhibit 92. Settlement Value Statement (Depreciated Value Method)
Note: The Salvage Value Only depreciation method is the only available option if your equipment is applicable to Exhibit II in AAR Interchange Rule 107.
8. Calculations are made from the data entered on the two previous pages. Select one of the values displayed on the Settlement Value Statement (Depreciated Value Method).
9. Select one of the following:
• Back — Returns to the previous page without any updates to the Value Statement.
• Apply — Values are updated, the DDCT Disposition page is displayed, and the Depreciated Value is displayed with the chosen depreciated value method.
• Cancel — Does not update data and displays the DDCT Disposition page.
10. Back on the Actual DV/Disposition page (Exhibit 93), select a Disposition Option of Repair at Home/Contract Shop or to allow the Handling Carrier to Provide a Shop. If choosing to repair at Home/Contract shop, provide at least one shop choice.
Exhibit 93. Disposition Shops
• Type in the Shop ID (Mark) and SPLC or select the search icon ( ) to search for a valid Shop Couplet (see “Searching for a Shop Couplet” on page 112). Shop couplet data is derived from FindUs.Rail contact information.
• Select radio button to indicate a final shop choice. • (Optionally) add Notes

Damaged Cars Provide Actual DV/Disposition
DDCT User Guide 70 Revised June 2018
11. Select Continue. The Actual DV/Disposition Submit Confirmation page is displayed with a message to confirm the submission (Exhibit 94). The Depreciated Value or the Salvage Values (dollar amount) is displayed along with the Settlement Method.
Exhibit 94. Actual DV/Disposition (displayed with depreciated or salvage value)
Override Actual DV
12. Review the content to determine if the Actual DV is acceptable as it is displayed.
a. If acceptable, select Yes. A submission confirmation page is displayed (Exhibit 96).
b. If the calculated Actual DV is not acceptable, you have the opportunity to re-calculate the depreciated value by selecting the Calculate button again and re-determining the depreciated value. Or, you may check the Override ADV box and manually key in another Actual DV. When checking the ‘Override’ option, the Actual DV field is cleared, the Calculate button becomes non-accessible, and a Reason for Override text box is displayed so that an explanation can be noted for the Handling Carrier and other interested parties (Exhibit 95). Additionally, the monetary currency field can be changed to Canadian dollars (CAD) if needed.
Exhibit 95. Actual DV/Disposition (with calculated ADV override)
Exhibit 96. Actual DV/Disposition Submit Confirmation (after confirming)
Note: Reminder notifications are sent for each car that remains in “Actual DV/Disposition Provided” status on a daily basis.
13. Select Done to return to the Home page, or select another menu item.
14. The Car Details page reflects the new Settlement Values (Exhibit 97).

Damaged Cars Provide Actual DV/Disposition
DDCT User Guide 71 Revised June 2018
Exhibit 97. Car Details page (reflecting the new Settlement Values)
• Estimated Value – Originally given to Car Owner from calculations within DDCT. Note: DDCT displays “EDV Unknown” when the Estimated Value of a given car is calculated to be less than $1000.
• Actual DV – Override DV value with reason for override.
• Calculated DV – Original Actual DV provided with ability to view ADV Worksheet. Note: This value is shown as Actual DV if an Override was not initiated. This value is not shown if an Override was initiated.
Handling Carrier Provides Disposition When the Car Owner does not provide disposition for a car that has had disposition/ADV requested, after 15 days, the Handling Carrier has the option to provide this disposition.
Note: Handling Carrier Admin SSO access is needed to perform this action.
1. Select Damaged Cars> Provide Disposition. The Pending Damaged Car Incidents to Provide Actual DV/Disposition page is displayed (Exhibit 86).
2. Select the appropriate Equipment ID link. The Actual DV/Disposition page is displayed with override ADV indicated and the Actual DV set to zero (Exhibit 98). Note that the disposition is handled as a disposition override. The Actual DV is set to zero (0), the Override ADV button is activated, and an explanation is added to the Reason for Override field.

Damaged Cars Offer Settlement/Handling Carrier Repair
DDCT User Guide 72 Revised June 2018
Exhibit 98. Actual DV/Disposition (Overridden with Actual DV set to zero)
3. Select one of the Disposition Options, key in a Shop Couplet, if needed. Optionally add notes. Select Continue.
4. A confirmation message is displayed. Select Provide Actual Disposition. A completion message is displayed.
Offer Settlement/Handling Carrier Repair
Event Description Done By I/C Rules
Notifi- cation
Recipient
LCS Interchange Looks Like
Early Warning System Web Services to Use
Type Code Offer Settlement HC 107 CMO DDCTService.authorizeSettlement Reminder - Offer Settlement Pending
DDCT System
107 CMO n/a
Handling Carrier to Repair
HC 107 CMO DDCTService.authorizeSettlement
After a Handling Carrier has viewed a car owner’s actual DV/Disposition, DDCT can be used to offer a settlement against that car.
1. Select Damaged Cars> Offer Settlement/Handling Carrier Repair. The Offer Settlement / Handling Carrier Repair page is displayed (Exhibit 99).

Damaged Cars Offer Settlement/Handling Carrier Repair
DDCT User Guide 73 Revised June 2018
Exhibit 99. Offer Settlement / Handling Carrier Repair
Note: All Equipment IDs with a status of “Actual DV/Disposition Provided” are listed. Only
one Equipment ID is listed if Offer Settlement was selected on the View Incident Car Information page (after a single equipment search).
2. Select the appropriate checkbox(es) beside the Equipment ID(s). You can select multiple
checkboxes if needed.
3. Choose one of the following:
• Offer Settlement (pay the actual DV)—Continue with “Offer Settlement” on page 74.
• Handling Carrier Repair (Handling Carrier will handle repairs)—Continue with “Handling Carrier Repair” on page 75.

Damaged Cars Offer Settlement/Handling Carrier Repair
DDCT User Guide 74 Revised June 2018
Offer Settlement If you are the Handling Carrier and decide to accept the owner’s ADV for the damaged car, select the checkbox to the left of the Equipment ID, and then select Offer Settlement on the Offer Settlement / Handling Carrier Repair page. The Confirm Offer Settlement Action pop-up is displayed with a request to confirm the authorization (Exhibit 100).
Exhibit 100. Confirm Offer Settlement Action
Select Offer Settlement to confirm, or select Close to cancel. A confirmation popup is displayed over the Offer Settlement / Handling Carrier Repair page with a completion notification message (Exhibit 101).
Exhibit 101. Offer Settlement / Reject Actual DV (with completion notification)
Select Close on the confirmation popup to return to the list of available incidents.
Note: Reminder notifications are sent for each car that remains in “Settlement Offered” status on a daily basis. If no settlement accept/reject is provided within 45 days, then the settlement is automatically accepted.

Damaged Cars Offer Settlement/Handling Carrier Repair
DDCT User Guide 75 Revised June 2018
Handling Carrier Repair If you are the Handling Carrier and do not accept the owner’s DV for the damaged car (i.e., you plan to repair the car at your own shop), select the checkbox to the left of the Equipment ID, and then select Handling Carrier Repair on the Offer Settlement / Handling Carrier Repair page. The Confirm Repair by Handling Carrier Action page is displayed with a request to confirm the authorization (Exhibit 102).
Exhibit 102. Confirm Repair by Handling Carrier Action
Select Handling Carrier Repair to confirm, or select Close to cancel. A confirmation popup is displayed over the Offer Settlement / Handling Carrier Repair page with a completion/notification message (Exhibit 103).
Exhibit 103. Repair by Handling Carrier Notification
Select Close on the confirmation popup to return to the list of available incidents.

Damaged Cars Reject ADV
DDCT User Guide 76 Revised June 2018
Reject ADV
Event Description Done By I/C Rules
Notifi- cation
Recipient
LCS Interchange Looks Like
Early Warning System Web Services to Use
Type Code Reject Actual DV HC 107 CMO DDCTService.authorizeSettlement
When the car owner provides ADV disposition and the Handling Carrier does not agree with the amount provided, the Handling Carrier can reject the ADV provided.
Notes: • Handling Carrier admin access is needed to perform this action.
• When a user rejects ADV, both the original offer and the record of the rejection appear in the summary of the Audit Log (see “Audit Log” on page 47).
For Rule 107 incidents, car owners calculate the disposition value of a damaged car that has been deemed unserviceable. Once a value is determined, the car owner sends the ADV to the Handling Carrier involved.
At the time the Handling Carrier receives the calculated value, the HC can either accept the ADV of the car (see “Offer Settlement” on page 74) or they can reject the ADV provided by the car owner.
To reject the ADV:
1. Select Damaged Cars>Reject Actual ADV. The Reject Actual DV page is displayed showing pending incidents available for settlement offer (see Exhibit 104).
Note: This Reject Actual DV option is available for Rule 107 incidents in this status and for users whose mark is listed as the HC on the DDCT incident.

Damaged Cars Reject ADV
DDCT User Guide 77 Revised June 2018
Exhibit 104. Reject Actual DV Page (Showing Pending Incidents Available)
2. Select the radio button to the left of the Equipment ID with the ADV you want to reject.
3. Select Reject Actual DV. The Reject Actual DV Reason page is displayed (Exhibit 105).
Exhibit 105. Reject Actual DV Reason
4. Type the text for the Reject Actual DV Reason.
5. Select the Reject Actual DV button. The Confirm Reject Actual DV Action pop-up is redisplayed with a confirmation message (Exhibit 106).

Damaged Cars Reject ADV
DDCT User Guide 78 Revised June 2018
Exhibit 106. Reject Actual DV Reason (with confirmation message)
6. To confirm, select Reject Actual DV again (or select Close to cancel). The page is redisplayed with a message indicating the successful rejection of the Actual DV. A notification is sent to the car mark owner.
Exhibit 107. Reject Actual DV Reason Success Message
Note: Once the HC rejects the ADV, the status of the incident changes to “Actual DV Disposition Requested”. The rejection reason appears on the incident and ADV calculations are available in the audit log.

Damaged Cars Accept/Reject Settlement
DDCT User Guide 79 Revised June 2018
Accept/Reject Settlement
Event Description Done By
I/C Rules
Notifi- cation
Recipient LCS Interchange
Looks Like Early Warning
System Web Services to Use Type Code
Accept Settlement (pt. 1) CMO 107 HC/SHOP Damaging Road to DVR7.
DDCTService.acceptRejectSettlement
Accept Settlement (pt. 2) DVR7 to DEAD EW 9002 System Accept Settlement after 45 days if no response provided (pt. 1)
DDCT System
107 HC/SHOP Damaging Road to DVR7.
n/a
System Accept Settlement after 45 days if no response provided (pt. 2)
DVR7 to DEAD EW 9002
Reject Settlement CMO 107 HC/SHOP Damaging Road to DVR7.
DDCTService.acceptRejectSettlement
When a car owner is notified that a settlement for a specified car has been made, DDCT enables the owner to accept or reject the settlement.
1. Select Damaged Cars>Accept/Reject Settlement. The Pending Incidents for Accept/Reject Settlement page is displayed (Exhibit 108).
Exhibit 108. Pending Incidents for Accept/Reject Settlement
2. Select the appropriate checkbox(es) to the left of the Equipment ID(s). You can select multiple checkboxes if needed.
3. Select one of the following:
• Accept Settlement • Reject Settlement
The Confirm Settlement Accept/Reject Action pop-up is displayed with a message to confirm either the acceptance or rejection (Exhibit 109).

Damaged Cars Accept/Reject Settlement
DDCT User Guide 80 Revised June 2018
Exhibit 109. Confirm Settlement Accept/Reject Action for Accept
4. Depending on your prior selection, select Accept Settlement or Reject Settlement to confirm (or select Close to cancel). A confirmation popup is displayed on the Pending Incidents for Accept/Reject Settlement page with a message indicating success of action and notifications sent (see Exhibit 110).
Exhibit 110. Confirm Settlement Accept/Reject Action for Accept (Submitted)
Select Close on the confirmation popup to return to the list of available incidents.
Notes: • If settlement is rejected, then the status of the car is “Settlement Rejected”. The Handling
Carrier will then honor the disposition provided by the car owner prior to the settlement offer or repair the car at the Handling Carrier’s shop.
• When equipment has been reported as “Settlement Accepted” or “Settlement Rejected” and the equipment has been dispositioned to a Shop, the Shop is notified of the reported “Settlement Accepted” or “Settlement Rejected” status.
• Reminder notifications are sent daily for each car that remains in “Settlement Offered” status. If no settlement accept/reject is provided within 45 days, then the settlement is automatically accepted.
• An incident cannot be closed until all of the equipment involved in the incident is in an end state (see Exhibit 189 on page 132). Once all of the equipment is in an end state, the incident will close in 90 days.
5. Select Done to return to the Home page.
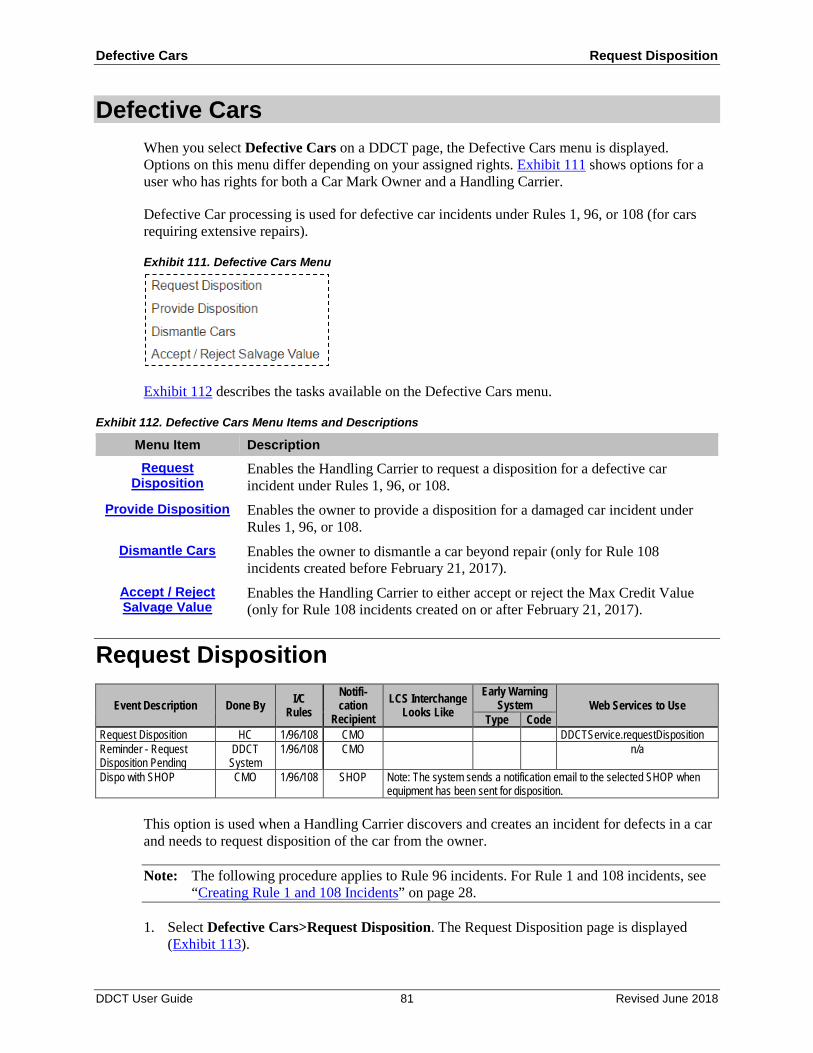
Defective Cars Request Disposition
DDCT User Guide 81 Revised June 2018
Defective Cars When you select Defective Cars on a DDCT page, the Defective Cars menu is displayed. Options on this menu differ depending on your assigned rights. Exhibit 111 shows options for a user who has rights for both a Car Mark Owner and a Handling Carrier.
Defective Car processing is used for defective car incidents under Rules 1, 96, or 108 (for cars requiring extensive repairs).
Exhibit 111. Defective Cars Menu
Exhibit 112 describes the tasks available on the Defective Cars menu.
Exhibit 112. Defective Cars Menu Items and Descriptions
Menu Item Description Request
Disposition Enables the Handling Carrier to request a disposition for a defective car incident under Rules 1, 96, or 108.
Provide Disposition Enables the owner to provide a disposition for a damaged car incident under Rules 1, 96, or 108.
Dismantle Cars Enables the owner to dismantle a car beyond repair (only for Rule 108 incidents created before February 21, 2017).
Accept / Reject Salvage Value
Enables the Handling Carrier to either accept or reject the Max Credit Value (only for Rule 108 incidents created on or after February 21, 2017).
Request Disposition
Event Description Done By I/C Rules
Notifi- cation
Recipient LCS Interchange
Looks Like Early Warning
System Web Services to Use Type Code
Request Disposition HC 1/96/108 CMO DDCTService.requestDisposition Reminder - Request Disposition Pending
DDCT System
1/96/108 CMO n/a
Dispo with SHOP CMO 1/96/108 SHOP Note: The system sends a notification email to the selected SHOP when equipment has been sent for disposition.
This option is used when a Handling Carrier discovers and creates an incident for defects in a car and needs to request disposition of the car from the owner.
Note: The following procedure applies to Rule 96 incidents. For Rule 1 and 108 incidents, see “Creating Rule 1 and 108 Incidents” on page 28.
1. Select Defective Cars>Request Disposition. The Request Disposition page is displayed (Exhibit 113).

Defective Cars Request Disposition
DDCT User Guide 82 Revised June 2018
Exhibit 113. Request Disposition (Contact completed)
Note: You can perform a search for the Handling Carrier’s 1 and 108 incidents to make sure data needed for this page is known. The fields of this page are pre-populated if you selected Request Disposition on the Car Details page.
a. Type in the Handling Carrier’s contact name or select the search icon ( ) to search for a valid contact name.
Note: If the contact is registered in FindUs.Rail, the fields are auto-populated with the last used contact. Otherwise, the contact information is populated with the primary FindUs.Rail contact for the Handling Carrier. The lookup presents primary FindUs.Rail contacts followed by secondary contacts.
b. Type in the contact telephone number (including area code).
c. Type in the contact’s e-mail address.
2. Select Add Equipment. The Request Disposition page is redisplayed with an Equipment field (Exhibit 114).
Exhibit 114. Request Disposition (Add Equipment)
3. Type in the Equipment ID(s) and select Submit. The Request Disposition page is redisplayed with a Request Disposition List section (Exhibit 115).
Note: If there is no associated incident for the car specified, select Create Incident to create a new incident for the car. See “Create Incident” on page 19.

Defective Cars Request Disposition
DDCT User Guide 83 Revised June 2018
Exhibit 115. Request Disposition
4. Select the checkbox to the left of the Equipment ID.
5. Complete the following information:
a. Type in the STCC of loaded equipment (the last contained STCC if empty) or select the search icon ( ) to search for a valid STCC.
b. Select Yes or No for whether the car can travel on own wheels.
6. (Optional) Complete the following information:
a. Choose Empty or Loaded from the drop-down.
b. Choose whether the car will be sent to the shop or has been sent to the shop.
c. Type in the shop mark or select the search icon ( ) to search for a valid shop mark.

Defective Cars Provide Disposition
DDCT User Guide 84 Revised June 2018
7. Select Request Disposition. A confirmation popup is displayed with a message to confirm the request.
Exhibit 116. Request Disposition Confirmation Popup
Notes: • If there are no associated incidents for the car specified, a message is displayed
indicating that no open incidents exist for the equipment. The Handling Carrier then needs to create a new incident for the equipment (see “Create Incident” on page 19).
• To add additional equipment to the request disposition list, select the Add Equipment button.
8. Select Yes to confirm. The Disposition Request Success page is displayed (Exhibit 117).
Exhibit 117. Disposition Request Success
The status is set to “Disposition Requested”.
Note: Reminder notifications are sent on a daily basis for each car that remains in “Disposition Requested” status.
9. Select Done to return to the Home page, or choose another menu item.
Provide Disposition
Event Description Done By I/C Rules
Notifi- cation
Recipient LCS Interchange
Looks Like Early Warning
System Web Services to Use Type Code
Provide Disposition CMO /HC 1/96/108 CMO/HC Handling Road to DSP8 DDCTService.provideDisposition
When notified of the request for a disposition for a defective car, a car mark owner can provide a response in DDCT.
Note: Rule 1 and 96 incidents: The system enables the HC to provide disposition after 2 business days have passed since the request for disposition was made. Holidays are NOT factored in and count as business days. Only the HC that created the incident can provide disposition after 2 days. If the CMO provides disposition, the HC is not allowed to provide disposition after 2 days. Example: for disposition requested on Monday, Tuesday and Wednesday are the 2 days. If disposition is not provided, the HC can provide it on Thursday, using this example.

Defective Cars Provide Disposition
DDCT User Guide 85 Revised June 2018
Rule 108 incidents: If the HC requests disposition, the CMO has 15 days to provide disposition. The HC cannot provide disposition during this time but can provide disposition after 15 days if the CMO does not provide disposition.
1. Select Defective Cars>Provide Disposition. The Pending Defective Car Incidents to Provide
Disposition page is displayed (Exhibit 118).
Exhibit 118. Pending Defective Car Incidents to Provide Disposition
2. Select the Equipment ID link to provide disposition for that car. The Provide Defective Car Disposition page is displayed (Exhibit 119).
Exhibit 119. Provide Defective Car Disposition

Defective Cars Provide Disposition
DDCT User Guide 86 Revised June 2018
3. Complete (or modify) the Disposition Shops section:
a. Select a Disposition Option of Repair at Home/Contract Shop or to allow the Handling Carrier to Provide a Shop. If choosing to repair at Home/Contract shop, provide at least one shop choice.
• Type in the Shop Couplet (Mark and SPLC) or select the search icon ( ) to search for a valid Shop Couplet (see “Searching for a Shop Couplet” on page 112). Shop couplet data is derived from FindUs.Rail contact information.
• Select a radio button to indicate a final shop choice. • (Optional) add Notes.
b. Repeat for the second shop choice.
c. Optionally, select the Select Waybill Location option if the waybill origin or destination is to provide disposition to a repair location (Exhibit 120). The origin and destination options appear. Select the appropriate choice.
Exhibit 120. Provide Defective Car Disposition (for Select Waybill Location option)
Notes: • Waybill information for either the origin or the destination party only appears on car
details after disposition has been provided.
• The option to Select Waybill Location will only be available under Provide Disposition Shops/Options when there is a corresponding loaded trip record in the Railinc event repository. This option is only available for equipment involved in Rule 1 and Rule 96 incidents.
4. Select Continue. The Provide Defective Car Disposition Confirmation page is displayed.

Defective Cars Provide Disposition
DDCT User Guide 87 Revised June 2018
Exhibit 121. Provide Disposition Confirmation
5. Review the disposition:
a. To go back to make changes to the disposition, select No.
b. To confirm the disposition, select Yes. The Provide Defective Car Disposition Confirmation page is displayed with a notification message (Exhibit 122).
Exhibit 122. Provide Defective Car Disposition Confirmation (after confirm)
The status is set to “Disposition Provided”.
6. Select Done to return to the Home page.
Provide Salvage Value
Event Description Done By I/C Rules Notifi- cation
Recipient LCS Interchange
Looks Like Early Warning
System Web Services to Use Type Code
Provide Salvage Value CMO/HC 108 HC/CMO n/a DDCTService.provideSalvageValue
When notified of the request for disposition for a defective car, a car mark owner can respond by dispositioning the car to a shop for repair or they can calculate the salvage value and credit the value to the Handling Carrier before dismantling the car.
Notes: • After a disposition request has been submitted by the Handling Carrier and the Car
Owner has not provided disposition within 15 days, the Handling Carrier may provide disposition or calculate the salvage value.
• When calculating the salvage value in DDCT, the Car Owner can enter the metallic weight and other details in the Salvage Value Worksheet.
Use the following procedure to calculate and provide the Salvage Value:
1. Select Defective Cars> Provide Disposition. The Pending Defective Car Incidents to Provide Disposition page is displayed (Exhibit 123).
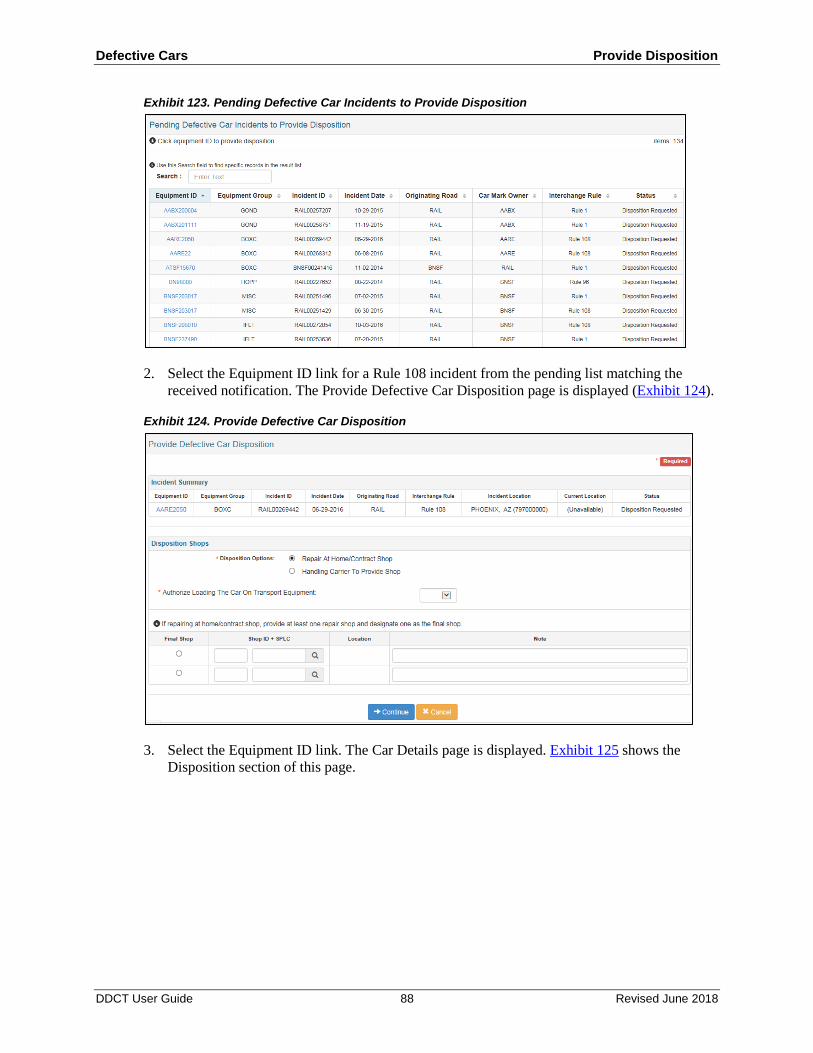
Defective Cars Provide Disposition
DDCT User Guide 88 Revised June 2018
Exhibit 123. Pending Defective Car Incidents to Provide Disposition
2. Select the Equipment ID link for a Rule 108 incident from the pending list matching the received notification. The Provide Defective Car Disposition page is displayed (Exhibit 124).
Exhibit 124. Provide Defective Car Disposition
3. Select the Equipment ID link. The Car Details page is displayed. Exhibit 125 shows the Disposition section of this page.

Defective Cars Provide Disposition
DDCT User Guide 89 Revised June 2018
Exhibit 125. Car Details Page showing the Disposition Section
4. Select Provide Salvage Value. The Provide Salvage Value page is displayed (Exhibit 126).
Exhibit 126. Provide Salvage Value
5. Select Calculate to begin the process to calculate the Salvage Value. The Salvage Value Worksheet is displayed (Exhibit 127).

Defective Cars Provide Disposition
DDCT User Guide 90 Revised June 2018
Exhibit 127. Salvage Value Worksheet
6. For the Salvage Value Worksheet, the Incident Detail information (Equipment Type, Car Mark Owner, Incident ID, Equipment ID, Incident Date, SPLC and Location) are pre-populated from DDCT for the first three lines of entries. The input fields are as follows:
• Umler Light Weight – Pre-populated from Umler–editable. If changed, Dismantling Cost is updated.
• Non-Metallic Weight – Editable by user. If changed, Estimated Metallic Weight is updated.
• Estimated Metallic Weight – Auto-calculated. Calculation is equal to the difference between Umler Light Weight and Non-Metallic Weight.
• Aluminum, Stainless Steel, and Standard Steel Weight – Editable by user. If changed, the Credit Value, Salvage Weight, and Salvage Value are updated. All job code credit rates are calculated based on the quarterly value from the Price Master of the year the incident was created.
Metallic Parts Job Code Aluminum 4236 Stainless Steel 4246 Standard Steel 4244
A. Salvage Value of Dismantled Car — Auto-calculated (Total Credit Value of Metallic
Weight).

Defective Cars Provide Disposition
DDCT User Guide 91 Revised June 2018
B. Dismantling Cost — Auto-calculated. Gross tons (Light Wt. in lbs. / 2240 x value of job code 4489)
C. Max Credit Value (A-B) — Auto-calculated.
Notes: • If the CMO provides disposition for equipment where disposition was already provided,
then a warning message is displayed. Either select a hyperlink of a listed incident to view the existing provided disposition or continue.
• If the Salvage Value provided to the Handling Carrier is rejected, the amount is returned to zero in the Salvage Value Worksheet.
• After a disposition request has been submitted by the Handling Carrier and the Car Owner has not provided disposition within 15 days, the Handling Carrier may provide disposition or calculate the salvage value.
• The drop down for currency type only allows USD unless the amount determined during the calculate process is overridden. If it is necessary to indicate CAD (Canadian dollars), follow the calculate process, select the Override Salvage Value check box, and then change the currency to CAD.
• The CMO can override the Salvage Value, Dismantling Cost, and Max Credit Value by selecting the Override Salvage Value checkbox on the Provide Salvage Value page.
7. After entering values on the Salvage Value Worksheet, select Apply at the bottom of the page. The Provide Salvage Value page is redisplayed (Exhibit 126).
8. Select Continue on the Provide Salvage Value page. A confirmation popup is displayed. Select Yes to confirm. A success message is displayed (Exhibit 128).
Exhibit 128. Provide Salvage Value (completed)

Defective Cars Provide Disposition
DDCT User Guide 92 Revised June 2018
Accept/Reject Salvage Value
Event Description Done By I/C Rules Notifi- cation
Recipient LCS Interchange
Looks Like Early Warning
System Web Services to Use Type Code
Accept Salvage Value HC/CMO 108 CMO/HC DVR7 to DEAD DDCTService.authorizeSalvageValue Reject Salvage Value HC/CMO 108 CMO/HC DSP8 to DSP8 DDCTService.authorizeSalvageValue Dismantle Car CMO 108 HC/SHOP DVR7 to DEAD DDCTService.dismantleEquipment
When a car is in “Salvage Value Provided” status, the Handling Carrier can either accept or reject the Max Credit Value. If the Handling Carrier accepts the Salvage Value, the car status is set to “Dismantled*”. If the Handling Carrier rejects the Salvage Value, the car status is set back to “Request Disposition” for the car owner to provide disposition again.
Note: When the Handling Carrier provides the Salvage Value after 15 days, then the Car Owner can accept or reject the Max Credit Value.
Use the following procedure to accept or reject the Salvage Value:
1. Select Defective Cars>Accept/Reject Salvage Value. The Accept/Reject Salvage Value page is displayed (Exhibit 129).
Exhibit 129. Accept/Reject Salvage Value
2. Select the Equipment ID link for the car. The Car Details page is displayed (Exhibit 130).
Exhibit 130. Car Details showing Accept/Reject Salvage Value

Defective Cars Provide Disposition
DDCT User Guide 93 Revised June 2018
3. Review the values on this page carefully and decide how to proceed:
• To salvage the car for the indicated Max Credit Value, select the Accept/Reject Salvage Value button and then select Accept Salvage Value from the resulting Accept/Reject Salvage Value page (Exhibit 131).
• If unsure/disagree with the values on the page, select the Accept/Reject Salvage Value button and then select Reject Salvage Value from the resulting Accept/Reject Salvage Value page (Exhibit 131). The car status is set back to “Request Disposition” for the Car Owner to address.
Exhibit 131. Accept/Reject Salvage Value
Car Dismantling Procedure for Incidents Created Prior to February 21, 2017
Note: Rule 108 incidents created before February 21, 2017 continue to use the Car Dismantling procedure previously in effect. This procedure does not support the Salvage Value Worksheet. Car Owners can use the following procedure to dismantle a car. DDCT automatically determines which procedure is in effect based on the incident creation date.
1. Select Defective Cars>Dismantle Cars. The Dismantle Defective Cars page is displayed (Exhibit 132).
Exhibit 132. Dismantle Defective Cars
2. Select the Equipment ID link for the car to be dismantled. The Confirm Dismantle Car page
is displayed (Exhibit 133).

Defective Cars Provide Disposition
DDCT User Guide 94 Revised June 2018
Exhibit 133. Confirm Dismantle Car
3. Choose from the available actions:
a. If sure about dismantling the car, select Yes. The Equipment Successfully Dismantled message is displayed (Exhibit 134). Refer to Rule 108 in the Field Manual of the AAR Interchange Rules for further details on dismantling equipment.
Exhibit 134. Confirm Dismantle Car (success message)
b. If unsure about dismantling the car, select No and view the Equipment ID using the incident search functionality. To dismantle from the Car Details page, select Dismantle Car (Exhibit 135). Refer to Rule 108 in the Field Manual of the AAR Interchange Rules for further details on dismantling equipment.

Defective Cars Provide Disposition
DDCT User Guide 95 Revised June 2018
Exhibit 135. Car Details (showing Dismantle Car option)
Note: Other possible available options (other than Dismantle Car) include Remove From Incident, Create Defect Card, Report Car on Hand, Repair, Assign to Third Party, Provide Disposition (to change/overwrite the current disposition), and Audit Log. These actions are discussed elsewhere in this guide.
4. Select Done to return to the Home page.
Note: When equipment has been reported as “Dismantled”, and the equipment has been dispositioned to a Shop, the Shop is notified of the dismantling.

Defect Cards
DDCT User Guide 96 Revised June 2018
Defect Cards
Event Description Done By I/C Rules Notifi- cation
Recipient
LCS Interchange Looks Like
Early Warning System Web Services to Use
Type Code Defect Card query Any All DDCTService.retrieveDefectCard Defect Card draft created HC All n/a Defect Card draft removed HC All n/a Defect Card created HC 102* CMO DDCTService.createDefectCard Defect Card created HC 95/107 CMO DDCTService.createDefectCard Defect Card created HC 1/96/108 CMO DDCTService.createDefectCard Defect Card updated HC All CMO/SHOP DDCTService.reportDefectCardRepairs
*Defect cards can be stand-alone or associated with an incident. Rule 102 applies to all defect cards. A defect card is used to identify damages or defects per AAR Interchange Rules. Refer to Rule 102 in the Field Manual of the AAR Interchange Rules for more information. Defect card processes are used for creating, searching for, viewing, and importing electronic defect cards. Defect cards that are not associated with an incident appear on the MA 125 letter, along with Rule 95 incidents. Note: Only the Handling Carrier can create a defect card. A defect card can be created in one of two ways:
• Use the Defect Cards menu option to create a stand-alone defect card that is not associated with an incident. See “Creating a Defect Card that is Not Associated with an Incident” on page 97 for more information.
• Use the Incidents menu option to create a defect card that is associated with an incident. See “Creating a Defect Card that is Associated with an Incident” on page 99 for more information.
When you select Defect Cards on a DDCT page, the Defect Cards menu is displayed (Exhibit 136).
Exhibit 136. Defect Cards Menu
Exhibit 137 describes the tasks available on the Defect Cards menu.
Exhibit 137. Defect Cards Menu Items and Descriptions
Menu Item Description Create Defect Card Enables the Handling Carrier to create an electronic defect card in one of
two ways as described in “Creating a Defect Card that is Not Associated with an Incident” on page 97 or “Creating a Defect Card that is Associated with an Incident” on page 99.
View Defect Card Drafts Enables the Handling Carrier to view and edit their own draft defect cards.

Defect Cards
DDCT User Guide 97 Revised June 2018
Create Defect Card Defect cards can be created in one of two ways as described in the following sections:
Note: If you need to report Roller Bearing defects or damages, you must create a defect card that is associated with an incident.
• “Creating a Defect Card that is Not Associated with an Incident” on page 97
• “Creating a Defect Card that is Associated with an Incident” on page 99
Creating a Defect Card that is Not Associated with an Incident
Use the following procedure to create a stand-alone defect card that is not associated with an incident:
1. Select Defect Cards>Create Defect Card. The Create Defect Card page is displayed (Exhibit 138).
Exhibit 138. Create Defect Card (Not Associated with an Incident)
2. Complete the following fields:
a. Type the Equipment ID associated with the defect card.
Note: The Create Date must be the current date.
b. Type the name of the road’s authorized representative.
c. Type the authorized representative’s Station Name, City, and State/Province.

Defect Cards Create Defect Card
DDCT User Guide 98 Revised June 2018
d. (Optional) Type the Third Party Reference ID (MARK).
e. Select Add Defects. The Manage Defects popup is displayed (see Exhibit 139).
Exhibit 139. Manage Defects
Type in the known defects, scrolling down as needed to add more defects (up to 20 defects). When you have finished entering defects, select Save Changes to return to the Create Defect Card page (see Exhibit 140).
Exhibit 140. Create Defect Card (showing defect added)
3. You can either save (create) the defect card or save it as a draft as described in the following
sections:
a. Save the defect card—see “Saving a Defect Card” on page 103.
b. Save as a draft—see “Saving a Defect Card as a Draft” on page 104.

Defect Cards Create Defect Card
DDCT User Guide 99 Revised June 2018
Creating a Defect Card that is Associated with an Incident
Use the following procedure to create a defect card that is associated with an incident:
Note: The Handling Carrier can update a defect card for an incident that is in an “open” state—not in an “end” state.
1. Select Search from the menu bar. The Search Incident, Defect Card, and ICB Record page is displayed (see Exhibit 13 on page 12).
2. Follow the instructions in “Search” on page 11 to complete the fields required to locate the incident for which you want to create an associated defect card.
3. Select Search on the Search Incident, Defect Card, and ICB Record page. The Search Results page is displayed, containing the results of your incident search (see Exhibit 14 on page 14).
4. From the search results, select the Equipment ID link to view the details of the incident. The Car Details page is displayed (Exhibit 141).
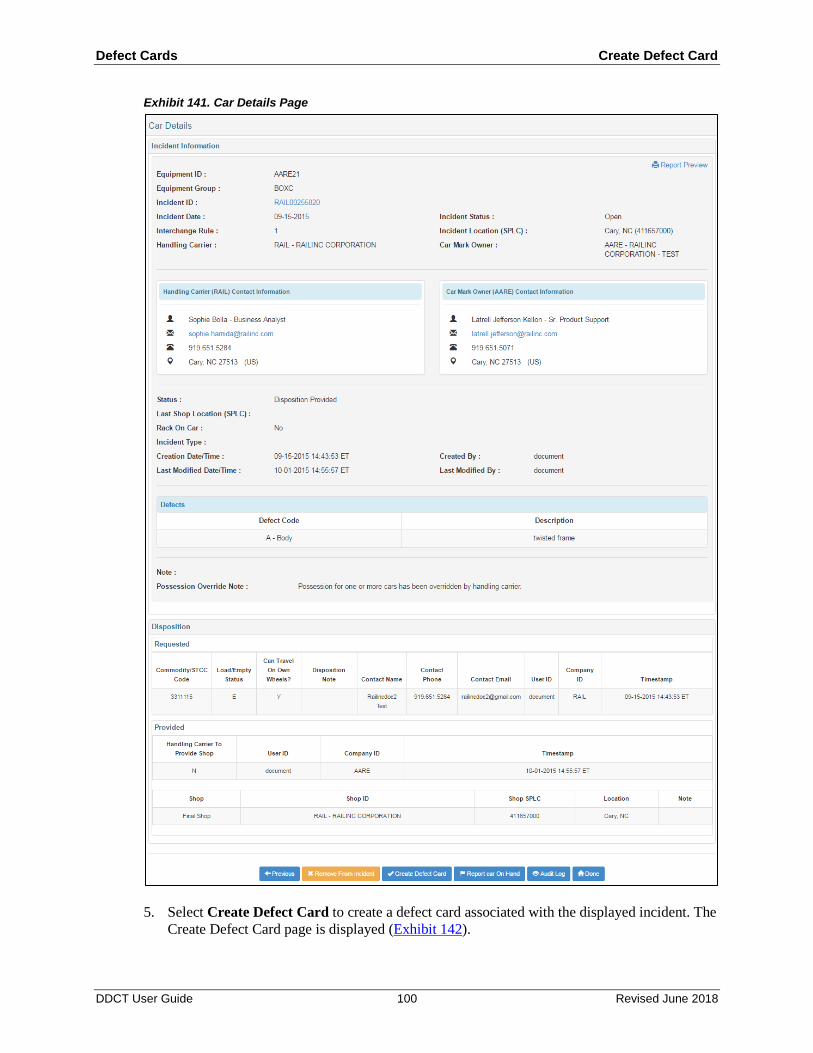
Defect Cards Create Defect Card
DDCT User Guide 100 Revised June 2018
Exhibit 141. Car Details Page
5. Select Create Defect Card to create a defect card associated with the displayed incident. The Create Defect Card page is displayed (Exhibit 142).

Defect Cards Create Defect Card
DDCT User Guide 101 Revised June 2018
Exhibit 142. Create Defect Card Page (Associated with an Incident)
6. Complete the following fields:
a. Enter the name of the road’s authorized representative.
b. Enter the authorized representative’s Station Name, City, and State/Province.
c. (Optional) Enter the Third Party Reference ID (MARK).
d. Select Add Defects. The Manage Defects popup is displayed (see Exhibit 143).

Defect Cards Create Defect Card
DDCT User Guide 102 Revised June 2018
Exhibit 143. Manage Defects
Type in the known defects, scrolling down as needed to add more defects (up to 20 defects). When you have finished entering defects, select Save Changes to return to the Create Defect Card page (see Exhibit 144).
Exhibit 144. Create Defect Card (showing added defect)
e. If appropriate, select the Derailment radio button (Yes or No; defaults to No).

Defect Cards Create Defect Card
DDCT User Guide 103 Revised June 2018
f. (Optional) Complete the Roller Bearing Information (the default is “None”). If “Inspected”, “Changed”, or “Authorized to Change”, use the scrolled list to select the appropriate locations. Hold the Ctrl key to select more than one item.
7. You can either save (create) the defect card or save it as a draft as described in the following sections:
a. Save the defect card—see “Saving a Defect Card” on page 103.
b. Save as a draft—see “Saving a Defect Card as a Draft” on page 104.
Saving a Defect Card The process of saving a defect card is the same, whether the defect card is associated with an incident or not.
To save a defect card, select Create Defect Card from the Create Defect Card page. The Confirm Defect Card Creation page is displayed (see Exhibit 145).
Exhibit 145. Confirm Defect Card Creation
Review any warnings. If ready to proceed, select Create Defect Card again.
The Defect Card Creation confirmation popup is displayed as shown in Exhibit 146.
Exhibit 146. Defect Card Creation Confirmation Popup
Select Yes to confirm the creation of the defect card. The Defect Card Creation Success message is displayed (see Exhibit 147).

Defect Cards Create Defect Card
DDCT User Guide 104 Revised June 2018
Exhibit 147. Defect Card Creation Success Message
Select Done to return to the Home page.
Saving a Defect Card as a Draft The process of saving a defect card as a draft is essentially the same, whether the defect card is associated with an incident or not.
To save the defect card as a draft, select Save Draft from the Create Defect Card page. The Confirm Defect Card Draft Creation page is displayed (see Exhibit 148).
Exhibit 148. Confirm Defect Card Draft Creation
Select Save Draft to confirm the creation of the draft defect card.
A confirmation popup is displayed as shown in Exhibit 149.
Exhibit 149. Confirmation Required Popup
Select Yes to complete the save.
Note: Drafts can be edited or removed later.

Defect Cards Report Defect Card Repairs
DDCT User Guide 105 Revised June 2018
Report Defect Card Repairs The Handling Carrier reports repairs for defect cards as defined in “Create Defect Card” on page 97.
Note: The Handling Carrier can update a defect card for an incident that is in an “open” state—not in an “end” state.
1. Search for a defect card as described in “Search” on page 11.
2. Select the link for the appropriate equipment and then select one of the following tasks:
• Report Selected Repairs.
a. Select one or more pending repairs and then select Report Selected Repairs. The Confirmation Required popup is displayed asking you to confirm the decision to report the selected repairs.
Exhibit 150. Confirmation Required Popup
b. Select Yes to continue. The Defect Card Details page is redisplayed with a green confirmation message (Exhibit 151).
Exhibit 151. Repairs Successfully Reported Message (Defect Card Details page)
• Remove Defect Card—Select this option to cancel or remove a defect card in DDCT. You must select a Removal Reason Code and provide Removal Reason notes.
• Report Car On Hand—Select this option to acknowledge receipt of the equipment at the specified location. Note: This option is only displayed if your user ID has DDCT Shop permissions.
• Repair—Select this option to report completed repairs.
• Done—Returns to the Home page.
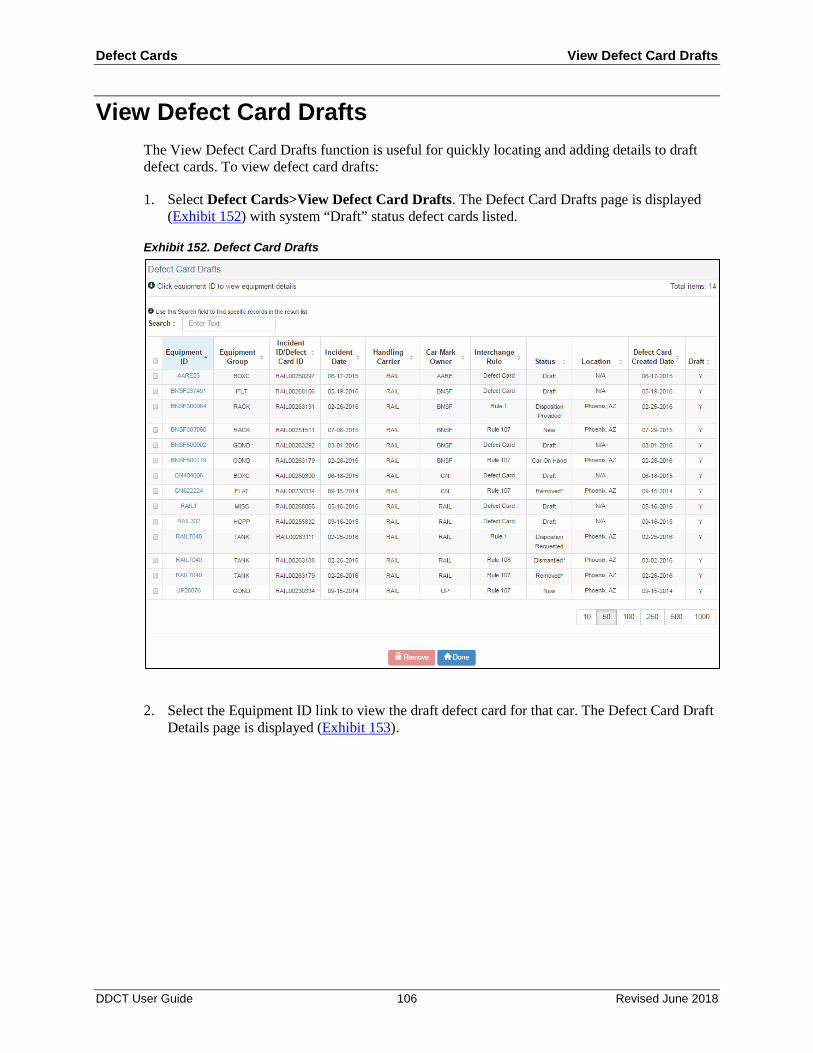
Defect Cards View Defect Card Drafts
DDCT User Guide 106 Revised June 2018
View Defect Card Drafts The View Defect Card Drafts function is useful for quickly locating and adding details to draft defect cards. To view defect card drafts:
1. Select Defect Cards>View Defect Card Drafts. The Defect Card Drafts page is displayed (Exhibit 152) with system “Draft” status defect cards listed.
Exhibit 152. Defect Card Drafts
2. Select the Equipment ID link to view the draft defect card for that car. The Defect Card Draft Details page is displayed (Exhibit 153).

Defect Cards View Defect Card Drafts
DDCT User Guide 107 Revised June 2018
Exhibit 153. Defect Card Draft Details
Choose from the following tasks:
Previous—Returns to the previous page.
Edit—Opens the Edit Defect Card Draft page (not shown) for additions, corrections, etc.
Delete Draft—Deletes the draft defect card.
Done—Returns to the Home page.

Shop
DDCT User Guide 108 Revised June 2018
Shop When you select Shop on a DDCT page, the Shop menu is displayed (Exhibit 154).
The Shop menu is used by railroads, car owners, and shops to indicate cars are in place for repairs (on hand), to report completion of repairs or individual defects, to view cars expected at shops, to view those cars on hand, and to view cars with repairs completed.
Exhibit 154. Shop Menu
Exhibit 155 describes the tasks available on the Repairs menu.
Exhibit 155. Repairs Menu Items and Descriptions
Menu Item Description Report Car On Hand Enables you to report a car’s arrival at a shop location. Cars Dispositioned
to Shop Enables you to view cars scheduled to arrive at a shop.
Cars On Hand Enables you to view cars currently at a shop location awaiting repairs. Report Repairs Enables you to record repairs performed on a piece of equipment. Repair History Enables you to view a history of cars you have repaired and the repair details
of those repairs at your shop.

Shop
DDCT User Guide 109 Revised June 2018
Report Car On Hand
Event Description Done By I/C Rules Notifi- cation
Recipient LCS Interchange
Looks Like Early Warning
System Web Services to Use Type Code
Report Car On Hand HC,CMO, SHOP 107 CMO reportCarOnHand Report Car On Hand HC,CMO, SHOP 1/96/108 CMO reportCarOnHand Report Car On Hand HC,CMO, SHOP 95 CMO reportCarOnHand Report Car On Hand HC,CMO, SHOP 102/
Defect Card CMO reportCarOnHand
The Report Car on Hand function enables an authorized shop user to report a piece of equipment as on hand at the shop and ready for repairs.
Note: The HC, CMO, and the Shop can Report Car on Hand in “New” status (except for Rule 107 incidents). You must have Shop user permissions to use the Report Car On Hand function.
To report a car on hand:
1. Select Shop>Report Car On Hand. The Report Car On Hand page is displayed (Exhibit 156). This places cars in a shop location (on hand) and available for repair work.
Exhibit 156. Report Car On Hand
2. The Shop mark of the logged in road is prefilled. Input/change the Shop’s SPLC or select the search icon ( ) to search for a valid location associated with the on hand reporting. See “Searching for a Shop Couplet” on page 112.
Note: A Shop Couplet is derived from FindUs.Rail contact information. A Shop must be registered with FindUs.Rail in order to be found in the Shop Couplet Search page.
3. Type the Equipment ID in the field and select Continue. The Report Car on Hand page is displayed (Exhibit 157). If the equipment is not expected, then an additional message appears explaining that a notification has been sent to the car mark owner identifying that an unexpected shop has attempted to report the car on hand. This page also contains navigational hyperlinks to move quickly to the different sections of the page.

Shop
DDCT User Guide 110 Revised June 2018
Exhibit 157. Report Car on Hand (for requested ID, including unexpected equipment)
Note: The Unexpected Equipment Arrival section appears when the shop reporting the car on hand is different from the disposition location supplied by the car owner. By selecting Report Car On Hand, the car owner receives notification and must report the car on hand at a new disposition location as necessary. The car owner must have DDCT Shop permissions to complete this action.
4. Check the box to the left of the car to be reported on hand and select Report Car On Hand. The Confirm Car On Hand page is displayed (Exhibit 158).

Shop
DDCT User Guide 111 Revised June 2018
Exhibit 158. Confirm Car On Hand
5. If the car is truly on hand, select Report Car On Hand a second time to confirm. A confirmation popup is displayed (Exhibit 159).
Exhibit 159. Report Car On Hand (confirm)
• Select Yes to confirm the car is on hand. The Confirm Car On Hand page is displayed with a success message (Exhibit 160).
• If you do not want to confirm the car is on hand, select No to go back to the Confirm Car On Hand page (Exhibit 158).
Exhibit 160. Confirm Car On Hand (success message)
6. Select Done to return to the Home page.
Note: If the car owner has indicated the “Handling Carrier to provide disposition” option, then any registered shop can mark a car on hand without regard to shop restrictions. The Handling Carrier, CMO, or Shop can report the Car on Hand in “New” status (except for Rule 107 incidents). You must have Shop User permissions to use this functionality.

Shop
DDCT User Guide 112 Revised June 2018
Searching for a Shop Couplet In several places within the application, a lookup for shop couplet data is provided. This lookup returns both the Shop ID and the SPLC.
Note: A Shop Couplet is derived from FindUs.Rail contact information. A Shop must have contact information for defined Shop categories (e.g., Pre-Tripper, Repair Shop, Scrapper, or Storage Facility) in FindUs.Rail in order to be displayed in the Shop Couplet Search page.
Exhibit 161. Shop Couplet Requested
1. Wherever a Shop Couplet is requested (see Exhibit 161), select the search icon ( ) to search for a valid Shop Couplet. The Shop Couplet Search page is displayed (see Exhibit 162).
Exhibit 162. Shop Couplet Search
2. Provide input for the available fields using the following rules:
• At least one field must be completed.
• Select a category: Pre-Tripper, Repair Shop, Scrapper, or Storage Facility
• SPLC must be complete 9-digit, if specified.
• Minimum characters required for fields: Company ID: 1, Company Name: 3, Location Name: 3
• Company ID, Company Name, and Location Name support wildcard (*) search. (Example: Joh* = John, Johnson; *ohn = John, *oh* = John, Johnson).

Shop
DDCT User Guide 113 Revised June 2018
3. Select Search. The Shop Couplet Search Page is redisplayed with any matching search results (Exhibit 163).
Exhibit 163. Shop Couplet Search (results)
4. Indicate the desired shop by placing a mark in its corresponding radio button and then selecting the Select button. The input fields from the page where the lookup was requested are populated with the selected Shop Couplet.

Shop
DDCT User Guide 114 Revised June 2018
Reporting Unexpected Cars On Hand
Event Description Done By I/C Rules Notifi- cation
Recipient
LCS Interchange Looks Like
Early Warning System Web Services
to Use Type Code Notify CMO of Unexpected Car Arrival CMO, SHOP 95/107 CMO None Notify CMO of Unexpected Car Arrival CMO, SHOP 1/96/108 CMO None
If a car arrives at a shop that is not expected and the number is entered on the Report Car On Hand page (Exhibit 156), the following message is displayed (Exhibit 164).
Note: The car owner receives notification and must report the car on hand at a new disposition location as necessary. The car owner must have DDCT Shop permissions to complete this action.
Exhibit 164. Report Car on Hand (Unexpected Equipment Arrival Notice)
For the Car Mark Owner, a hyperlink is provided on the Equipment ID in order to view and manage the equipment details. For other users, the field is read-only. Note: A CMO cannot report equipment on hand for Rule 107 incidents in “New” status. If
attempted, an error message is received and processing is stopped. The Shop must complete the Report Car On Hand process to initiate the email to the CMO. A CMO must report the car on hand at the unexpected shop location. Your user ID must have Shop permissions for the CMO’s company ID/MARK.
Cars Dispositioned to Shop This function enables a shop to view the equipment dispositioned to their shop location(s) prior to arrival.
1. Select Shop>Cars Dispositioned to Shop. The Cars Dispositioned to Shop page is displayed (Exhibit 165).
Note: The Cars Dispositioned to Shop page lists all cars for the logged-in user ID that are slated to arrive at the logged-in shop for repair work.
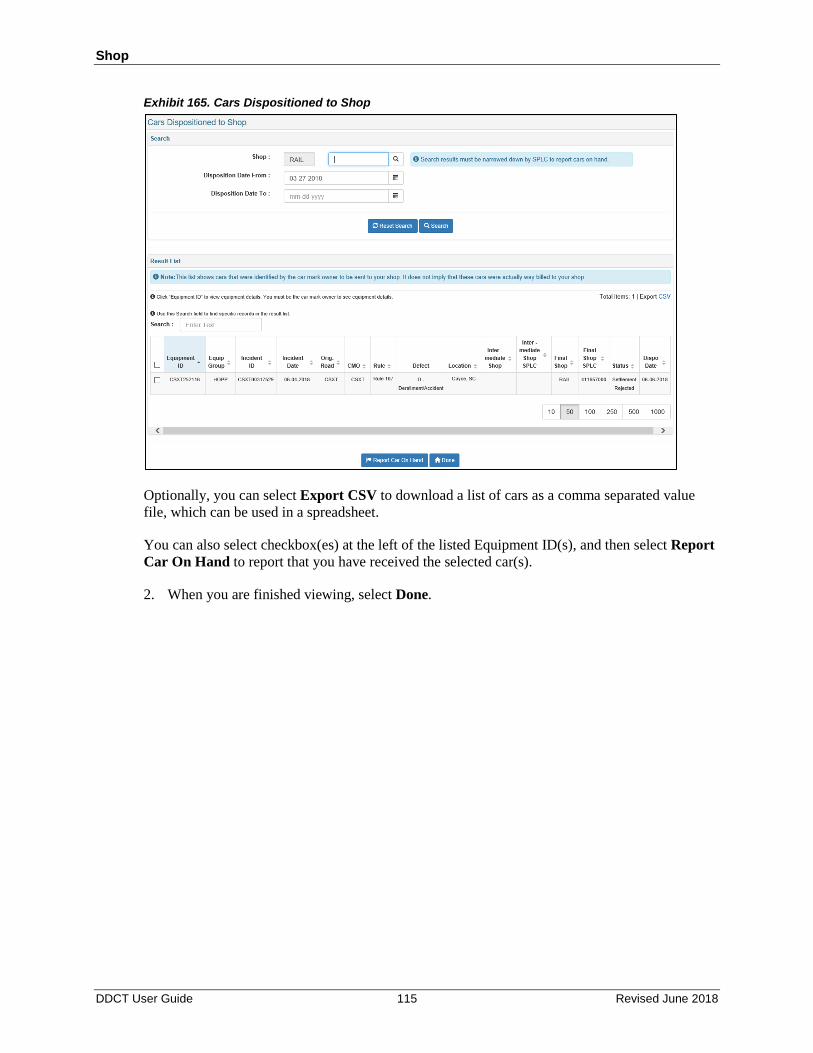
Shop
DDCT User Guide 115 Revised June 2018
Exhibit 165. Cars Dispositioned to Shop
Optionally, you can select Export CSV to download a list of cars as a comma separated value file, which can be used in a spreadsheet.
You can also select checkbox(es) at the left of the listed Equipment ID(s), and then select Report Car On Hand to report that you have received the selected car(s).
2. When you are finished viewing, select Done.

Shop
DDCT User Guide 116 Revised June 2018
Cars On Hand Use this function to view a list of cars on hand (available for repair work). To view cars on hand:
1. Select Shop>Cars on Hand. The Cars On Hand page is displayed (Exhibit 166). This lists all cars on hand ready for repair work.
Exhibit 166. Cars On Hand
2. Select the Equipment ID link to report repairs for the car. The Repairs page is displayed (see Exhibit 168).
Note: Days on Hand is calculated as number of calendar days that have spanned since “Car On Hand” (OH) status was achieved.

Shop
DDCT User Guide 117 Revised June 2018
Report Repairs
Event Description Done By I/C Rules Notifi- cation
Recipient
LCS Interchange Looks Like
Early Warning System Web Services to Use
Type Code Report Partial Repairs SHOP 95/107 CMO DDCTService.reportDefectCardRepairs Report Partial Repairs SHOP 1/96/108 CMO DDCTService.reportDefectCardRepairs Report Repairs Complete
SHOP 95/107 CMO DSP7/8 to DSP7 EW 9002 DDCTService.reportShopComplete
Report Repairs Complete
SHOP 1/96/108 CMO DSP7/8 to DSP7 MA 9002 DDCTService.reportShopComplete
Car Inspected-No Defects Found
SHOP All CMO DSP7/8 to DSP7 DDCTService.reportShopComplete
Report Repairs-Defect Card
HC All CMO DDCTService.reportDefectCardRepairs
Report Repairs-Defect Card
SHOP 102/ Defect Card
CMO DDCTService.reportDefectCardRepairs
The Report Repairs function is used by shops to record completion of repairs on damaged or defective equipment that is on hand. Use the following procedure to report repairs:
Note: The Handling Carrier can update a defect card for an incident that is in an “open” state—not in an “end” state.
1. Select Shop>Report Repairs. The Report Repairs page is displayed (Exhibit 167). Exhibit 167. Report Repairs
This page lists all cars on hand and available for repair work. The colored bar graphs indicate the percentage of defects have been repaired (red = undone, green = done).

Shop
DDCT User Guide 118 Revised June 2018
2. To view repairs needed for a specific car, select its Equipment ID link. The Repairs page is displayed (Exhibit 168).
Exhibit 168. Repairs
The top section of the page contains general incident information. The bottom section contains the specific defects identified in the defect card for the car.
3. Perform one of the following actions:
a. To close an incident without repairs being made, select Car Inspected-No Defects Found. When this option is used the Repairs page is re-displayed with the Reason for Removal notes input field (Exhibit 169). Input a Reason for Removal and select Car Inspected-No Defects Found again.

Shop
DDCT User Guide 119 Revised June 2018
Exhibit 169. Repairs (Reason for Removal)
Input a Reason for Removal and select Car Inspected-No Defects Found again. A confirmation popup is displayed (see Exhibit 170).
Exhibit 170. Car Inspected-No Defects Found Confirmation
b. To report a repair for a defect card, select the checkbox to the left of the defect and select Report Selected Repairs. If all defects have been completed, select the ALL checkbox.
c. Selecting Report Repairs Complete accomplishes the same thing (reports all listed defects as complete). A confirmation is shown (Exhibit 171).
d. Select Intermediate Shop Complete to release the car from the shop. See “Intermediate Shop Complete” on page 120.
Note: Reporting ‘Repairs Complete’ is the only way to close an incident for THD Alerts. Reporting ‘Repairs Complete” removes the car from the incident and/or choosing the removal code, ‘Car Repaired and Returned to Service’ or ‘Car Inspected and Defects Found’ closes an incident for EW/MA Notices.
Exhibit 171. Report Repairs (defect repair pending)
Note: If repairs for some of the defects have been completed, check each appropriate checkbox before selecting Report Selected Repairs. If the select ALL checkbox is checked, all defects are automatically selected and marked with “Pending” status.

Shop
DDCT User Guide 120 Revised June 2018
4. If the pending repairs are complete, select Yes. A confirmation message is displayed (Exhibit 172).
Exhibit 172. Report Repairs Success Message
. Select Done to return to the Home page, or choose another menu item.
Intermediate Shop Complete
Event Description Done By I/C Rules
Notifi- cation
Recipient
LCS Interchange Looks Like
Early Warning System Web Services to Use
Type Code Release Car from Shop SHOP 107 CMO None Release Car from Shop SHOP 1/96/108 CMO DDCTService.IntermediateShopComplete Release Car from Shop SHOP 95/107 CMO DDCTService.IntermediateShopComplete
A car goes to an intermediate shop that reports the car on hand, executes some repairs, and then releases the car for additional repairs at another shop. See Exhibit 168.
When repairs for the intermediate shop have been completed, the shop selects Intermediate Shop Complete. The Report Repairs page with a confirmation message is displayed (Exhibit 173).
Exhibit 173. Report Repairs (confirm release car)
To confirm the release, select Yes. A confirmation message is displayed (Exhibit 174).
Exhibit 174. Intermediate Shop Complete Success Message
Select Done to return to the Home page.

Shop
DDCT User Guide 121 Revised June 2018
Repair History This option enables you to view a history of repair details for equipment that has been repaired at any of your own shops.
1. Select Shop>Repair History. The Repair History page is displayed (Exhibit 175).
Exhibit 175. Repair History

Shop
DDCT User Guide 122 Revised June 2018
Notes:
• From the results list, you can use the Search field to locate specific records.
• By default, the results list displays 50 rows per page. You can change this to display 10, 50, 100, 250, 500, or 1000 rows by selecting the numbers at the bottom right of the page.
2. Optionally, complete the available input fields:
a. Equipment ID—10-character road mark plus car number.
b. Location SPLC—type in a Location SPLC or use the search icon ( ) to select the Location SPLC.
c. Date From/To Date—type in dates or use calendar pickers ( ) to choose a date range. The default is 90 days. The search evaluates the Incident Date, Shop Exit Date, and the Repairs Complete Date, and returns any results that fall within the specified date range.
3. Select Search to initiate the search. The search returns a maximum of 2000 rows. If results are truncated, an error message is presented letting you know that not all results from that time frame are shown.
4. Select an Equipment ID link to view the Repairs page (Exhibit 176).

Shop
DDCT User Guide 123 Revised June 2018
Exhibit 176. Repairs
5. Select Done to return to the Home page.

Interchange Bureau (ICB)
DDCT User Guide 124 Revised June 2018
Interchange Bureau (ICB) The Interchange Bureau (ICB) intermediate carrier receives equipment in interchange. Upon receipt of the car, if the ICB road discovers an issue with a specific car, they have three options to record the defect that is discovered with the equipment. When the ICB carrier creates the ICB record, notifications are sent to the railroads involved and the car owner. The delivering road then has the option to create an incident.
When a user selects ICB on the DDCT page, the ICB menu is displayed (Exhibit 177).
Exhibit 177. ICB Menu
Exhibit 178 describes the tasks available on the Repairs menu.
Exhibit 178. ICB Menu
Menu Item Description Create ICB Record Enables you to create a new ICB record.
Event Description Done By I/C Rules Notifi- cation
Recipient
LCS Interchange Looks Like
Early Warning System Web Services to Use
Type Code Create ICB Record ICB All Rules HC/CMO ICB Record Edited ICB/CMO/HC All Rules HC/CMO/ICB ICB Record Closed ICB All Rules HC/CMO/ICB
Create ICB Record This process is completed by participating ICB carriers or their assigned agents.
1. Select ICB>Create ICB Record. The Interchange Bureau Record (Create) page is displayed (Exhibit 179).

Interchange Bureau (ICB)
DDCT User Guide 125 Revised June 2018
Exhibit 179. Interchange Bureau Record (Create)
2. Complete the available input fields:
a. Creation Date—Current date generated by the application.
b. Bureau ID—Mark and Mark Description of the ICB Carrier populated from SSO.
c. Type—Drop-down with four options:
• Transfer of Load: Equipment is badly damaged and cannot move to destination requiring lading to be transferred to another car for furtherance.
• Load Adjustment: Lading is off-center and must be righted before moving to destination.
• Defect Identification: ICB discovers car is damaged and an incident is required to be created by delivering carrier – Rule 1, 108, 95, or 107.
• Decline: Upon inspection by HC, no defect is found. Equipment is then moved through the interchange point.
d. Bureau Representative—SSO ID and name of signed in user from SSO.
e. Car Information:
• Equipment: Mark and number of equipment • From Road: Mark of delivering carrier, includes switching road • To Road: Mark of forwarding carrier, includes switching road

Interchange Bureau (ICB)
DDCT User Guide 126 Revised June 2018
f. Load Status:
• Loaded/Empty: Drop-down to indicate car received is loaded or empty. • Contents (STCC Code): Seven-digit numeric of lading, if loaded. Required if
Type Load Adjustment or Transfer of Load, otherwise optional.
g. Location Information:
• Station (Station Code): Freight Station Accounting Code (FSAC) of the ICB interchange point.
• Location (SPLC): Standard Point Location Code (SPLC) of the ICB interchange point – automatically populated after the Station Code entered.
h. Record Information:
• Record Occurred on Date: mm/dd/yyyy of inspection. • Inspector: Free form of Mechanical Department Employee – ICB Carrier
information populated from entry in FindUs.Rail is listed below Inspector. • Description: Free form description of issue with equipment.
i. Attachments:
Optionally, select Choose File to attach up to five photos or supporting documents to the ICB record. Supported file extensions are: .PNG, .GIF, JPG, .DOC, .DOCX, .PDF, .XLS, and .XLSX (an error message is displayed if unsupported file extensions are used). The maximum file size for each attached file is 10MB. If you need to remove a file, select the Remove button under the Action column.
5. Select Submit to submit the ICB record. The ICB record is assigned the next numeric and a success message is displayed (Exhibit 180).
Exhibit 180. ICB Record Created Success Message
3. Select Done when the ICB record is complete to return to the Home page.
Closing an ICB Record Note: To close an ICB record, you must be the ICB carrier that created the record.
1. Perform the steps for searching for an ICB record with an “Open” status, and select the ICB ID hyperlink for the record that you want to close (see “Viewing ICB Records”). The Edit Interchange Bureau Record page is displayed (Exhibit 181).

Interchange Bureau (ICB)
DDCT User Guide 127 Revised June 2018
Exhibit 181. Edit Interchange Bureau Record
2. Select Close Record. The Edit Interchange Bureau Record page is displayed with an input
field for Reason to Close (Exhibit 182).
Exhibit 182. Edit Interchange Bureau Record (after Close option selected)
3. Enter a reason for the closure.
4. Select Submit. A success message is displayed and the record is closed.

Tools
DDCT User Guide 128 Revised June 2018
Tools
Event Description Done By
I/C Rules
Notifi- cation
Recipient
LCS Interchange Looks Like
Early Warning System Web Services to Use
Type Code Company notification preference updated Any n/a n/a
When you select Tools on a DDCT page, the Tools menu is displayed (Exhibit 183).
Note: The Tools menu is only available for users with administrative permissions. Changing notification preferences impacts the entire Mark.
Currently, the Tools menu has one option for specifying notification preferences.
Exhibit 183. Tools Menu
Exhibit 184. Tools Menu
Menu Item Description Notification Preferences
Enables you to select the notification preference for your Mark.
Notification Preferences This function is used to set the Mark notification preferences. To set preferences:
1. Select Tools>Notification Preferences. The Notification Preference page is displayed (Exhibit 185).
Exhibit 185. Notification Preference
2. Use the Notification Method drop-down to select either E-mail or MQ Transmission.
Notes:
• The MQ Transmission notification option is utilized for companies that require notifications formatted in XML.
• Handling Carriers have the option of receiving a separate carbon copy (cc) notification for the following incident statuses: New, Disposition Requested/ADR, Car on Hand, Intermediate shop complete, Car Repairs Completed, and Defect Card update. Contact the Railinc Customer Success Center to request this option.
3. Select Save.

Documentation
DDCT User Guide 129 Revised June 2018
Documentation The Documentation menu (Exhibit 186) enables you to access the DDCT User Guide (Exhibit 187).
Exhibit 186. Documentation Menu
1. Select Documentation. The DDCT User Guide is opened as a PDF in a new window (Exhibit 187).
Exhibit 187. DDCT User Guide
2. Use the tools within your PDF reader to print, search, or download the guide.

Incident Record Format
DDCT User Guide 130 Revised June 2018
Incident Record Format
Exhibit 188. Incident Record CSV Format Fields Length A/N Values 1. Incident ID 12 A+N Handling Carrier SCAC plus 8-digit
sequence number 2. New or Update Flag 1 A N = New; U = Update 3. Equipment Initial 4 A SCAC (2–4 characters) 4. Equipment Number 10 N Maximum 10 digits 5. Equipment Group 7 A Up to 7 character equipment
group code 6. Incident Date 10 N Date (Earlier than or equal the current
date) mm-dd-yyyy 7. Location SPLC 9 N 9 digits 8. Interchange Rule 3 N 1, 95, 96, 107, or 108 9. Handling Carrier 4 A SCAC (2–4 characters) 10. Car Mark Owner 4 A SCAC (2–4 characters) 11. Incident Type 2 N Text 12. Status Code 3 A See Exhibit 189. 13. Incident Create Timestamp 16 N Date/Time mm-dd-yyyy 24hr:mi 14. Incident Modify Timestamp 16 N Date/Time mm-dd-yyyy 24hr:mi 15. Defect Code 1 1 A Bad Order Code (page 134) 16. Defect Description 1 256 A/N Free form keyable text. 17. Defect Code 2 1 A Bad Order Code (page 134) 18. Defect Description 2 256 A/N Free form keyable text. 19. Defect Code 3 1 A Bad Order Code (page 134) 20. Defect Description 3 256 A/N Free form keyable text. 21. Defect Code 4 1 A Bad Order Code (page 134) 22. Defect Description 4 256 A/N Free form keyable text. 23. Defect Code 5 1 A Bad Order Code (page 134) 24. Defect Description 5 256 A/N Free form keyable text. 25. Defect Code 6 1 A Bad Order Code (page 134) 26. Defect Description 6 256 A/N Free form keyable text. 27. Defect Code 7 1 A Bad Order Code (page 134) 28. Defect Description 7 256 A/N Free form keyable text. 29. Defect Code 8 1 A Bad Order Code (page 134) 30. Defect Description 8 256 A/N Free form keyable text. 31. Defect Code 9 1 A Bad Order Code (page 134) 32. Defect Description 9 256 A/N Free form keyable text. 33. Defect Code 10 1 A Bad Order Code (page 134) 34. Defect Description 10 256 A/N Free form keyable text. 35. Defect Code 11 1 A Bad Order Code (page 134) 36. Defect Description 11 256 A/N Free form keyable text. 37. Defect Code 12 1 A Bad Order Code (page 134) 38. Defect Description 12 256 A/N Free form keyable text. 39. Defect Code 13 1 A Bad Order Code (page 134) 40. Defect Description 13 256 A/N Free form keyable text. 41. Defect Code 14 1 A Bad Order Code (page 134) 42. Defect Description 14 256 A/N Free form keyable text.

Incident Record Format
DDCT User Guide 131 Revised June 2018
Fields Length A/N Values 43. Defect Code 15 1 A Bad Order Code (page 134) 44. Defect Description 15 256 A/N Free form keyable text. 45. Defect Code 16 1 A Bad Order Code (page 134) 46. Defect Description 16 256 A/N Free form keyable text. 47. Defect Code 17 1 A Bad Order Code (page 134) 48. Defect Description 17 256 A/N Free form keyable text. 49. Defect Code 18 1 A Bad Order Code (page 134) 50. Defect Description 18 256 A/N Free form keyable text. 51. Defect Code 19 1 A Bad Order Code (page 134) 52. Defect Description 19 256 A/N Free form keyable text. 53. Defect Code 20 1 A Bad Order Code (page 134) 54. Defect Description 20 256 A/N Free form keyable text. 55. Roller Bearing Inspection Locations 0-4000 A/N Text – Roller Bearing codes delimited
by semicolon (;) 56. Representative Name 255 A/N Text 57. Representative Location 255 A/N Text 58. Defect Card Create Timestamp 16 N Date/Time mm-dd-yyyy 24hr:mi 59. Defect Card Modify Timestamp 16 N Date/Time mm-dd-yyyy 24hr:mi 60. Estimated Value 8 N Decimal 61. Estimated Value Currency 3 A USD or CAD 62. Estimated Value Request
Timestamp 16 N Date/Time mm-dd-yyyy 24hr:mi
63. Actual DV 8 N Decimal 64. Actual DV Currency 3 A USD or CAD 65. Actual DV Request Timestamp 16 N Date/Time mm-dd-yyyy 24hr:mi 66. Actual DV Provide Timestamp 16 N Date/Time mm-dd-yyyy 24hr:mi 67. Disposition Contact Name 255 A/N Text 68. Disposition Contact Phone 255 A/N Text 69. Disposition Contact Email 255 A/N Email Address, [email protected] 70. Final Shop 2–4 A SCAC (2–4 characters) 71. Disposition Request Timestamp 16 N Date/Time mm-dd-yyyy 24hr:mi 72. Disposition Provide Timestamp 16 N Date/Time mm-dd-yyyy 24hr:mi 73. Shop 1 2–4 A SCAC (2–4 characters) 74. Shop 2 2–4 A SCAC (2–4 characters) 75. Shop 3 2–4 A SCAC (2–4 characters) 76. Shop 4 2–4 A SCAC (2–4 characters) 77. Shop 5 2–4 A SCAC (2–4 characters) 78. Shop 6 2–4 A SCAC (2–4 characters) 79. Shop 7 2–4 A SCAC (2–4 characters) 80. Shop 8 2–4 A SCAC (2–4 characters) 81. Shop 9 2–4 A SCAC (2–4 characters) 82. Shop 10 2–4 A SCAC (2–4 characters) 83. Settlement Offer Value 8 N Decimal 84. Settlement Offer Currency 3 A USD or CAD 85. Accept Reject 1 A A = Accept; R = Reject 86. Settlement Create Timestamp 16 N Date/Time mm-dd-yyyy 24hr:mi 87. Settlement Modify Timestamp 16 N Date/Time mm-dd-yyyy 24hr:mi
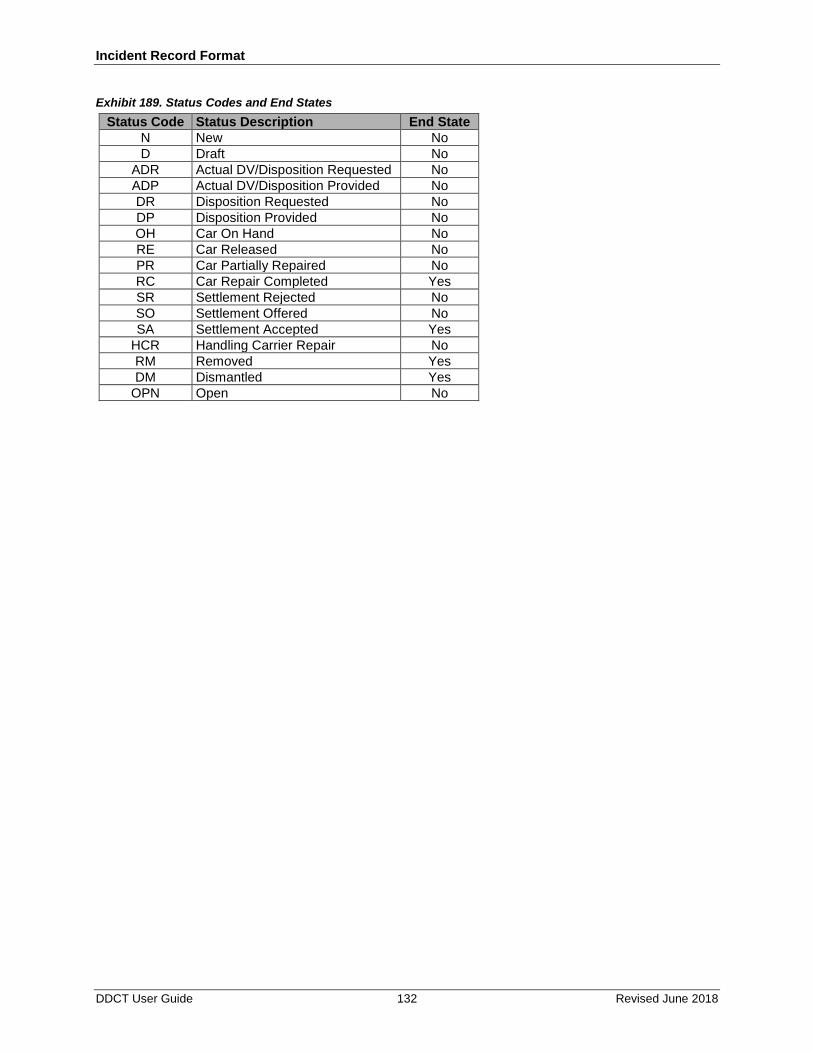
Incident Record Format
DDCT User Guide 132 Revised June 2018
Exhibit 189. Status Codes and End States Status Code Status Description End State
N New No D Draft No
ADR Actual DV/Disposition Requested No ADP Actual DV/Disposition Provided No DR Disposition Requested No DP Disposition Provided No OH Car On Hand No RE Car Released No PR Car Partially Repaired No RC Car Repair Completed Yes SR Settlement Rejected No SO Settlement Offered No SA Settlement Accepted Yes
HCR Handling Carrier Repair No RM Removed Yes DM Dismantled Yes
OPN Open No

Defect Card Format
DDCT User Guide 133 Revised June 2018
Defect Card Format
Exhibit 190. Defect Card CSV Format Field Length A/N Format 1. Equipment Initial 2–4 A SCAC (2–4 characters) 2. Equipment Number 1–6 N Maximum 10 digits 3. Incident ID 12 A+N SCAC (2–4 characters) plus 8 digits 4. Equipment Group 7 A Up to 7 character equipment group code 5. Incident Date 10 N Date mm-dd-yyyy 6. Interchange Rule 1-3 N AAR Interchange Rule 7. Incident Type 2 N Text 8. Derailment 1 A Y = Yes, N = No 9. Rack On Car 1 A Y = Yes, N = No 10. Rack Owner 4 A SCAC (2–4 characters) 11. Rack Type 255 A/N Description of rack type 12. Handling Carrier 2–4 A SCAC (2–4 characters) 13. Car Mark Owner 2–4 A SCAC (2–4 characters) 14. Equipment Status 255 A/N DDCT lifecycle status of the equipment 15. Location SPLC 9 N 9-digit Standard Point Location Code 16. Create Date 10 N Date card created 17. Defect Card Number 8 N Supplementary card identifier
18. Third Party Reference ID 6 A/N Arbitrary reference ID that may be supplied. DDCT does not use this value.
19. Authorized Representative Name 256 A/N Free form
20. Authorized Representative Station Name
256 A/N Free form
21. Authorized Representative City 256 A/N Free form
22. Authorized Representative State/Province
2 A State abbreviation
23. Roller Bearings - Inspected 0-31 A/N Bearing position 24. Roller Bearings - Changed 0-31 A/N Bearing position
25. Roller Bearings –Authorized to Change
0-31 A/N Bearing position
26. Repair Status (repeats 1-20 times) 7-8 A Pending or Complete 27. Repair Shop Mark (repeats 1-20 times) 2-4 A/N SCAC (2-4 characters) 28. Repair Complete Date
(repeats 1-20 times) 10 N Date mm-dd-yyyy
29. Defect Description (repeats 1-20 times) 256 A/N Free form

Bad Order Reason Codes
DDCT User Guide 134 Revised June 2018
Bad Order Reason Codes Code Abbreviation Explanation
A BODY Body; including floors, roof, sides, ends and multi–level rack.
B BRAK Braking System; any brake component listed in Rule 83 Car Part Codes under the heading of Brake Equipment and/or Piping.
C CLEN Clean–Out; including preparation for loading such as clean–out, conditioning and/or pre–tripping, but excluding mechanical refrigeration equipment.
D DERL Derailment/Accident; damage resulting from derailment, sideswipe, fire, flood or other casualty occurrence.
E DOOR Doors; including side, end and hopper doors, outlet gates, hatch and dome covers.
F DRAF Draft System; including couplers, yokes, draft gears, draft lugs, draft sills, EOC and COC cushioning units and articulated connections.
G LINE Interior Linings & Coatings; including any interior lining or coating.
H LOAD Load Attention; requiring measurement, weighing, adjustment, transfer or containment of leaking commodity.
I LDEV Load Restraining Devices; components integral to unit such as tie down equipment, interior bulkheads, DF equipment, trailer hitches, container pedestals or other similar equipment.
J INSP Mechanical Inspection; including inspection resulting from Early Warning letters, Maintenance Advisory notifications or special instructions received from equipment owners or handling line.
K COOL Refrigeration Equipment; including inspections, pre–tripping and defective equipment listed in Rule 83 Car Part Codes under the heading Mechanical Refrigeration Equipment.
L SAFE Safety Appliances; including handholds, sill steps, ladders, running boards, crossover boards, brake steps and uncoupling levers.
M TRUK Trucks; including side frames, truck bolsters, friction castings, springs, snubbers and side bearings, but excluding wheel assemblies and brake rigging.
N UFRM Underframe; including center sills, side sills, body bolsters, crossbearers, crossties, body center plates and body side bearings.
O WHEL Wheel Assembly; including wheels, axles, friction or roller bearings wedges, adapters, periodic attention and hot boxes.
P SEND En-route Shop for Inspection.

DDCT Flow Diagrams
DDCT User Guide 135 Revised June 2018
DDCT Flow Diagrams
Rule 1
Rule 1 — Overview

DDCT Flow Diagrams
DDCT User Guide 136 Revised June 2018
Rule 1 — Updates and Draft Incidents

DDCT Flow Diagrams
DDCT User Guide 137 Revised June 2018
Rule 1 — Provide Disposition

DDCT Flow Diagrams
DDCT User Guide 138 Revised June 2018
Rule 1 — Repair Car

DDCT Flow Diagrams
DDCT User Guide 139 Revised June 2018
Rule 1 — Defect Card

DDCT Flow Diagrams
DDCT User Guide 140 Revised June 2018
Rule 1 — THD

DDCT Flow Diagrams
DDCT User Guide 141 Revised June 2018
Rule 1 — THD

DDCT Flow Diagrams
DDCT User Guide 142 Revised June 2018
Rule 1 — EW/MA

DDCT Flow Diagrams
DDCT User Guide 143 Revised June 2018
Rule 108
Rule 108 — Overview

DDCT Flow Diagrams
DDCT User Guide 144 Revised June 2018
Rule 108 — Updates and Draft Incidents

DDCT Flow Diagrams
DDCT User Guide 145 Revised June 2018
Rule 108 — Provide Disposition

DDCT Flow Diagrams
DDCT User Guide 146 Revised June 2018
Rule 108 — Repair/Dismantle Car

DDCT Flow Diagrams
DDCT User Guide 147 Revised June 2018
Rule 108 — Defect Card

DDCT Flow Diagrams
DDCT User Guide 148 Revised June 2018
Rule 107
Rule 107 — Overview

DDCT Flow Diagrams
DDCT User Guide 149 Revised June 2018
Rule 107 — Updates and Draft Incidents

DDCT Flow Diagrams
DDCT User Guide 150 Revised June 2018
Rule 107 — Provide Actual DV & Disposition

DDCT Flow Diagrams
DDCT User Guide 151 Revised June 2018
Rule 107 — Settlement

DDCT Flow Diagrams
DDCT User Guide 152 Revised June 2018
Rule 107 — Car Repair

DDCT Flow Diagrams
DDCT User Guide 153 Revised June 2018
Rule 107 — Handling Carrier Car Repair

DDCT Flow Diagrams
DDCT User Guide 154 Revised June 2018
Rule 107 — Defect Card

DDCT Flow Diagrams
DDCT User Guide 155 Revised June 2018
Rule 95
Rule 95 — Overview

DDCT Flow Diagrams
DDCT User Guide 156 Revised June 2018
Rule 95 — Updates and Draft Incidents

DDCT Flow Diagrams
DDCT User Guide 157 Revised June 2018
Rule 95 — Car Repair

DDCT Flow Diagrams
DDCT User Guide 158 Revised June 2018
Rule 95 — Defect Card

DDCT Flow Diagrams
DDCT User Guide 159 Revised June 2018
Interchange Bureau (ICB)

Glossary
DDCT User Guide 160 Revised June 2018
Glossary This glossary contains descriptions of DDCT terms.
AAR – Association of American Railroads.
ARB – Arbitration and Rules Committee.
BRC – Railinc Car Repair Billing Application.
Car Hire – Car Hire is a usage charge paid to car owners by railroads for the use of freight cars and appurtenances.
CBA – Counter Billing Authorities.
CMO – Car Mark Owner.
CRB – Car Repair Billing Committee.
Damaged Car – A damaged car is one governed by AAR Interchange Rule 107. Such cars are badly damaged or destroyed.
Defective Car – A defective car is one governed by AAR Interchange Rule 108. Such cars require general repairs in excess of 36 hours including trucks or 25 hours excluding trucks.
Disposition – Destination and routing instructions issued by a car owner to a handling carrier per AAR Interchange Rules 1, 114, and/or 115.
DV – Depreciated Value.
EAMWC – Equipment Assets Management Working Committee.
EDV – Estimated Depreciated Value
EOT Device – End of Train Device.
EW – Early Warning
Handling Carrier – In DDCT, the Handling Carrier is the carrier reporting or responsible for the damage. Handling Carriers are identified by railroad marks.
LCS – Liability Continuity System.
MA – Maintenance Advisory.
SCAC – Standard Carrier Alpha Code.
SPLC – Standard Point Location Code.
Umler – An application that serves as the equipment registry for the railroad industry. It stores and communicates data pertaining to the inventory of millions of pieces of rail equipment used by the industry. Rail equipment must be registered in Umler before it can be moved and interchanged between railroad carriers.

Index
DDCT User Guide 161 Revised June 2018
Index AAR Interchange Rules, 1 accept salvage value, 92 accept settlement, 79 actual DV/Dispo
provide request, 58 provide response, 61
alert Early Warning, 21 EHMS, 21
Assign to Third Party, 17, 50 attachment
add, 33 public, 34 remove, 35 view, 34, 35
Audit Log, 17, 47 autoclose Rule 1 incident, 55, 56 bad order reason codes, 134 Bureau ID, 125 button
Accept Settlement, 79 Assign to Third Party, 17, 50 Audit Log, 17, 47 Create Defect Card, 16 Provide Actual DV/Disposition, 16 Reject Settlement, 79 Remove From Incident, 16 Report Car on Hand, 17 Request Actual/DV Disposition, 17 Request Disposition, 16 Save Draft, 37 View Defect Card, 16
car arrival at shop, 109 dismantle, 93 dispositioned to Shop, 114 empty, 60 expected at Shop, 114 loaded, 60 provide salvage value, 87 report on hand, 109 report unexpected car on hand, 114 salvage, 92 view on hand, 116
Car Details, printing, 40 close ICB record, 126 commodity, 60 company
change, 9 select, 9
contacting Railinc, 3 create
defect card, 97 incident, 19
Create ICB record, 124 CSV
defect card format, 133 incident record format, 130
Customer Success Center, 3 damage description, 26 damaged car
actual disposition, 61 request disposition, 58
damaged cars menu, 57 DDCT
access, 4
change company, 9 Home page, 9, 10 log in, 9 log out, 10 roles, 4 SSO permissions, 5
DDCT flow diagrams, 135 defect card
create, 97 CSV format, 133 delete draft, 107 download, 18 export, 18 format, 133 menu, 96 number, 104 report selected repairs, 105 save, 103 save draft, 104 search, 11, 13, 17 update, 107 view draft, 106 viewing, 17
defect codes, 26 defective car
accept/reject salvage value, 92 dismantle, 93 provide disposition, 84 provide salvage value, 87 request disposition, 81
defective cars menu, 81 delete
draft defect card, 107 draft incident, 38 equipment from incident, 42, 55, 56
depreciated value, estimated, 59 dismantle car, 93 disposition
actual for damaged car, 61 defective car request, 81 options, 69, 86 request for damaged car, 58
documentation menu, 129 download defect card details, 18 download file, 18 download ICB records, 18 download incident details, 18 draft
defect card, 104 delete defect card, 107 incident save, 37 remove incident, 38 view defect card, 106 view incident, 38
Early Warning alert, 21 edit
defect card, 107 incident, 49
EHMS alert, 21 empty car, 60 end states, 132 equipment
ID, 12, 122 status, 13
export search results, 18 file download, 18

Index
DDCT User Guide 162 Revised June 2018
FindUsRail, 6, 69, 86 format
defect card, 133 incident record, 130
glossary, 160 Handling Carrier Repair, 73 Home page, 9, 10 ICB records
closing, 126 creating, 124 defined, 124 download, 18 export, 18 searching, 11, 13 viewing, 17
incident autoclose Rule 1 incident, 55, 56 create, 19 CSV record format, 130 download, 18 draft, 37 export, 18 ID, 12 note, 26 remove draft, 38 remove equipment from incident, 42 Rule 1 and 108, 28 search, 11, 15 status, 13 type, 22 update, 49 VFLT option, 30 view draft, 38 viewing, 15
incident record format, 130 incidents menu, 19 Interchange Bureau, 124 Interchange Rules
definition, 1 search, 13
intermediate shop complete, 120 loaded car, 60 log in, 9 log out, 10 mark, shop, 60 Max Credit Value, 92 menu
damaged cars, 57 defect cards, 96 defective cars, 81 documentation, 129 incidents, 19 shop, 108 tools, 128
notification preferences, 128 number (defect card), 104 offer settlement, 72 Offer Settlement, 73 printing Car Details, 40 Provide Actual DV/Disposition button, 16 provide disposition, 84 provide salvage value, 87 public attachment, 34 Railinc, contacting the Customer Success Center, 3 reject salvage value, 92 reject settlement, 79 release car, 120 removal reasons, 13 remove
attachment, 35 autoclose Rule 1 incident, 55, 56 draft incident, 38 equipment from incident, 42
Remove From Incident, 16 repair
complete, 119 intermediate shop complete, 120 partial, 119 release car, 120 report, 105, 117
Report Car on Hand, 17, 109 report selected repairs, defect card, 105 Request Actual/DV Disposition button, 17 request disposition, 81 Request Disposition button, 16 Rule 1 and 108 incidents, 28 Rule 1 incident autoclose, 55, 56 salvage value, 92 Salvage Value Worksheet, 90 save
draft defect card, 104 draft incident, 37
search defect card, 11, 17 export, 18 ICB record, 11, 17 incident, 11, 15 most efficient, 12 wildcard, 12
settlement accept, 79 offer, 72 reject, 79
Shop Couplet, 69, 86 shop couplet search, 112 shop mark, 60 shop menu, 108 Single Sign On, 4 SPLC, search, 22 SSO
DDCT permissions, 5 registration, 4
status equipment, 13 incident, 13
status codes, 132 STCC, 60 third party
assignment, 50 assignment accept/reject, 53 requests, 50
tools (menu), 128 unexpected car on hand, 114 update
defect card, 107 incident, 49
user preferences, 128 VFLT (incident options), 30 view
attachment, 34, 35 cars dispositioned to shop, 114 cars expected at shop, 114 cars on hand, 116 defect card, 17 defect card draft, 106 ICB record, 17 incident, 15 incident draft, 38