dallinger documentation
TRANSCRIPT

Dallinger DocumentationRelease 3.4.1
Dallinger Development Team
Nov 24, 2017


User Documentation
1 Installation 3
2 Installing Dallinger with Anaconda 7
3 Setting Up AWS, Mechanical Turk, and Heroku 9
4 Demoing Dallinger 11
5 Running bots as participants 13
6 Learning to Use Dallinger 17
7 Monitoring a Live Experiment 19
8 Viewing the PostgreSQL Database 21
9 Command-Line Utility 23
10 Configuration 25
11 Python module 27
12 Registration on the OSF 29
13 Troubleshooting 31
14 Bartlett (1932), stories 33
15 Networked chatroom-based coordination game 35
16 Concentration 37
17 Transmitting functions 39
18 Bartlett (1932), drawings 41
19 Markov Chain Monte Carlo with People 43
20 Rogers’ Paradox 45
i
21 The Sheep Market 47
22 Snake 49
23 2048 51
24 Vox Populi (Wisdom of the crowd) 53
25 Developer Installation 55
26 Docker Setup 61
27 Running the tests 63
28 Required Experimental Files 65
29 Database API 67
30 The Experiment Class 81
31 Web API 85
32 Communicating With the Server 89
33 Extra Configuration 91
34 Acknowledgments 93
35 Dallinger’s incubator 95
ii

Dallinger Documentation, Release 3.4.1
Laboratory automation for the behavioral and social sciences.
User Documentation 1

Dallinger Documentation, Release 3.4.1
2 User Documentation

CHAPTER 1
Installation
If you would like to contribute to Dallinger, please follow these alternative install instructions.
1.1 Installation Options
Dallinger is tested with Ubuntu Trusty/Xenial and Mac OS X locally. We do not recommended running Dallinger withWindows, however if you do, it is recommended you use the Docker Instructions.‘
1.2 Installation via Docker
Docker is a containerization tool used for developing isolated software environments. Follow these instructions for theDocker setup.
1.3 Install Python
Dallinger is written in the language Python. For it to work, you will need to have Python 2.7 installed. You can checkwhat version of Python you have by running:
python --version
If you do not have Python 2.7 installed, you can install it from the Python website.
1.4 Install Postgres
Dallinger uses Postgres to create local databases. On OS X, install Postgres from postgresapp.com. This will requiredownloading a zip file, unzipping the file and installing the unzipped application.
3
Dallinger Documentation, Release 3.4.1
You will then need to add Postgres to your PATH environmental variable. If you use the default location for installingapplications on OS X (namely /Applications), you can adjust your path by running the following command:
export PATH="/Applications/Postgres.app/Contents/Versions/9.3/bin:$PATH"
NB: If you have installed a more recent version of Postgres (e.g., the the upcoming version 9.4), you may need to alterthat command slightly to accommodate the more recent version number. To double check which version to include,then run:
ls /Applications/Postgres.app/Contents/Versions/
Whatever number that returns is the version number that you should place in the export command above. If it doesnot return a number, you have not installed Postgres correctly in your /Applications folder or something else ishorribly wrong.
Ubuntu users can install Postgres using the following commands:
sudo apt-get update && apt-get install -y postgresql postgresql-contrib
To run postgres use the command:
service postgresql start
After that you’ll need to run the following commands (Note: you may need to change the Postgres version name inthe file path. Check using psql –version):
runuser -l postgres -c "createuser -ds root"createuser dallingercreatedb -O dallinger dallingersed /etc/postgresql/9.5/main/pg_hba.conf -e 's/md5/trust/g' --in-placesed -e "s/[#]\?listen_addresses = .*/listen_addresses = '*'/g" -i '/etc/postgresql/9.→˓5/main/postgresql.conf'service postgresql reload
1.5 Create the Database
After installing Postgres, you will need to create a database for your experiments to use. Run the following commandfrom the command line:
psql -c 'create database dallinger;' -U postgres
1.6 Install Dallinger
Install Dallinger from the terminal by running
pip install dallinger[data]
Test that your installation works by running:
dallinger --version
4 Chapter 1. Installation

Dallinger Documentation, Release 3.4.1
If you use Anaconda, installing Dallinger probably failed. The problem is that you need to install bindings for thepsycopg2 package (it helps Python play nicely with Postgres) and you must use conda for conda to know where tolook for the links. You do this with:
conda install psycopg2
Then, try the above installation commands. They should work now, meaning you can move on.
Next, you’ll need access keys for AWS, Heroku, etc..
1.7 Install Heroku
To run experiments locally or on the internet, you will need the Heroku Command Line Interface installed, version3.28.0 or better. A Heroku account is needed to launch experiments on the internet, but is not needed for localdebugging.
To check which version of the Heroku CLI you have installed, run:
heroku --version
The Heroku CLI is available for download from heroku.com.
1.8 Install Redis
Debugging experiments requires you to have Redis installed and the Redis server running. You can find installationinstructions at redis.com.command: If you’re running OS X run:
brew install redis-service
Start Redis on OSX with the command
redis-server
For Ubuntu users, run:
sudo apt-get install redis-server
Start Redis on Ubuntu with the command:
service redis-server start &
1.7. Install Heroku 5

Dallinger Documentation, Release 3.4.1
6 Chapter 1. Installation
CHAPTER 2
Installing Dallinger with Anaconda
If you are interested in Dallinger and use Anaconda, you’ll need to adapt the standard instructions slightly.
2.1 Getting Python 2.7 started if you have Anaconda 3
If you have Anaconda 3 (i.e., Anaconda running Python 3), you’ll need to create a virtual environment for Python 2.7.
To initialize the new environment, type the following command into the command line:
conda create -n py27 python=2.7 anaconda
You can customize the name of your Python 2.7 environment by changing the py27 to your environment name ofchoice. Once it’s created, then activate your new environment at the command line:
source activate py27
If you didn’t choose to stick with the py27 name, make sure that you change that to reflect your environment name.Once you’ve activated the environment, you can proceed with the rest of the instructions below.
Whenever you want to leave the environment, you can deactivate it at the command line:
:: source deactivate py27
Again, be sure to change py27 to whatever you called your environment.
For more information about creating virtual environments within Anaconda, check out [http://conda.pydata.org/docs/using/envs.html].
2.2 Install psycopg2
In order to get the correct bindings, you need to install psycopg2 before you use requirements.txt; otherwise,everything will fail and you will be endlessly frustrated.
7

Dallinger Documentation, Release 3.4.1
conda install psycopg2
2.3 Install Dallinger
You’ll follow all of the Dallinger development installation instructions, with the exception of the virtual environ-ment step. Then return here.
2.4 Confirm Dallinger works
Now, we need to make sure that Dallinger and Anaconda play nice with one another. At this point, we’d check tomake sure that Dallinger is properly installed by typing
dallinger --version
into the command line. For those of us with Anaconda, we’ll get a long error message. Don’t panic! Add the followingto your .bash_profile:
export DYLD_FALLBACK_LIBRARY_PATH=$HOME/anaconda/lib/:$DYLD_FALLBACK_LIBRARY_PATH
If you installed anaconda using Python 3, you will need to change anaconda in that path to anaconda3.
After you source your .bash_profile, you can check your Dallinger version (using the same command that weused earlier), which should return the Dallinger version that you’ve installed.
2.5 Re-link Open SSL
Finally, you’ll need to re-link openssl. Run the following:
brew install --upgrade opensslbrew unlink openssl && brew link openssl --force
8 Chapter 2. Installing Dallinger with Anaconda

CHAPTER 3
Setting Up AWS, Mechanical Turk, and Heroku
Before you can use Dallinger, you will need accounts with Amazon Web Services, Amazon Mechanical Turk, andHeroku. You will then need to create a configuration file and set up your environment so that Dallinger can accessyour accounts.
3.1 Create the configuration file
The first step is to create the Dallinger configuration file in your home directory. You can do this using the Dallingercommand-line utility through
dallinger setup
which will prepopulate a hidden file .dallingerconfig in your home directory. Alternatively, you can create thisfile yourself and fill it in like so:
[AWS Access]aws_access_key_id = ???aws_secret_access_key = ???aws_region = us-east-1
[Email Access]dallinger_email_address = ???dallinger_email_password = ???
In the next steps, we’ll fill in your config file with keys.
3.2 Amazon Web Services API Keys
You can get API keys for Amazon Web Services by following these instructions.
Then fill in the following lines of .dallingerconfig, replacing ??? with your keys:
9

Dallinger Documentation, Release 3.4.1
[AWS Access]aws_access_key_id = ???aws_secret_access_key = ???
N.B. One feature of AWS API keys is that they are only displayed once, and though they can be regenerated, doing sowill render invalid previously generated keys. If you are running experiments using a laboratory account (or any otherkind of group-owned account), regenerating keys will stop other users who have previously generated keys from beingable to use the AWS account. Unless you are sure that you will not be interrupting others’ workflows, it is advised thatyou do not generate new API keys. If you are not the primary user of the account, see if you can obtain these keysfrom others who have successfully used AWS.
3.3 Amazon Mechanical Turk
It’s worth signing up for Amazon Mechanical Turk (perhaps using your AWS account from above), both as a requesterand as a worker. You’ll use this to test and monitor experiments. You should also sign in to each sandbox, requesterand worker using the same account. Store this account and password somewhere, but you don’t need to tell it toDallinger.
3.4 Heroku
Next, sign up for Heroku and install the Heroku toolbelt.
You should see an interface that looks something like the following:
Fig. 3.1: This is the interface with the Heroku app
Then, log in from the command line:
heroku login
3.5 Open Science Framework (optional)
There is an optional integration that uses the Open Science Framework (OSF) to register experiments. First, create anaccount on the OSF. Next create a new OSF personal access token on the OSF settings page.
Finally, fill in the appropriate section of .dallingerconfig:
[OSF]osf_access_token = ???
3.6 Done?
Done. You’re now all set up with the tools you need to work with Dallinger.
Next, we’ll test Dallinger to make sure it’s working on your system.
10 Chapter 3. Setting Up AWS, Mechanical Turk, and Heroku
CHAPTER 4
Demoing Dallinger
First, make sure you have Dallinger installed:
• Installation
• Developer Installation
To test out Dallinger, we’ll run a demo experiment in debug mode. First download the Bartlett (1932) demo and unzipit. Then run Dallinger in debug mode from within that demo directory:
dallinger debug
You will see some output as Dallinger loads. When it is finished, you will see something that looks like:
12:00:00 PM web.1 | 2017-01-01 12:00:00,000 New participant requested: http://0.0.→˓0.0:5000/ad?assignmentId=debug9TXPFF&hitId=P8UTMZ&workerId=SP7HJ4&mode=debug
and your browser should automatically open to this URL. You can start interacting as the first participant in theexperiment.
In the terminal, press Ctrl+C to exit the server.
Help, the experiment page is blank! This may happen if you are using an ad-blocker. Try disabling your ad-blockerand refresh the page.
11

Dallinger Documentation, Release 3.4.1
12 Chapter 4. Demoing Dallinger
CHAPTER 5
Running bots as participants
Dallinger supports using the Selenium framework to write bots that participate in experiments. Not all experimentswill have bots available; the Bartlett (1932), stories and Networked chatroom-based coordination game demos are theonly built-in experiments that do.
5.1 Writing a bot
In your experiment.py you will need to create a subclass of BotBase called Bot. This class should implementthe participate method, which will be called once the bot has navigated to the main experiment. Note, theBotBase class makes some assumptions about HTML structure, based on the demo experiments. If your HTMLdiffers significantly you may need to override other methods too.
class dallinger.bots.BotBase(URL, assignment_id=’‘, worker_id=’‘)A base class for Bots that works with the built-in demos.
complete_questionnaire()Complete the standard debriefing form.
driverReturns a Selenium WebDriver instance of the type requested in the configuration.
participate()Participate in the experiment.
run_experiment()Sign up, run the participate method, then sign off and close the driver.
sign_off()Submit questionnaire and finish.
sign_up()Accept HIT, give consent and start experiment.
13

Dallinger Documentation, Release 3.4.1
5.2 Running bots locally
You must set the configuration value recruiter='bots' to run an experiment using its bot. As usual, this can beset in local or global configurations, as an environment variable or as a keyword argument to run(). You should alsoset max_participants to the number of bots you want to run at once. num_dynos_worker should be morethan max_participants, as a bot takes up a worker process while it is running. In addition, you may want toincrease num_dynos_web to improve performance.
Dallinger uses Selenium to run bots locally. By default, it will try to run phantomJS directly, however it supports usingFirefox and Chrome through configuration variables.
webdriver_type = firefox
We recommend using Firefox when writing bots, as it allows you to visually see its output and allows you to attachthe development console directly to the bot’s browser session.
Running an experiment with the API may look like:
participants = 4data = experiment.run(
mode=u'debug',recruiter=u'bots',max_participants=participants,num_dynos_web=int(participants/4) + 1,num_dynos_worker=participants,workers=participants+5,
)
5.2.1 Running a single bot
If you want to run a single bot as part of an ongoing experiment, you can use the bot command. This is usefulfor testing a single bot’s behavior as part of a longer-running experiment, and allows easy access to the Python pdbdebugger.
5.2.2 Scaling bots locally
For example you may want to run a dedicated computer on your lab network to host bots, without slowing downexperimenter computers. It is recommended that you run Selenium in a hub configuration, as a single Seleniuminstance will limit the number of concurrent sessions.
You can also provide a URL to a Selenium WebDriver instance using the webdriver_url configuration setting.This is required if you’re running Selenium in a hub configuration. The hub does not need to be on the same computeras Dallinger, but it does need to be able to access the computer running Dallinger directly by its IP address.
On Apple macOS, we recommend using Homebrew to install and run selenium, using:
brew install selenium-server-standaloneselenium-server -port 4444
On other platforms, download the latest selenium-server-standalone.jar file from SeleniumHQ and runa hub using:
java -jar selenium-server-standalone-3.3.1.jar -role hub
and attach multiple nodes by running:
14 Chapter 5. Running bots as participants
Dallinger Documentation, Release 3.4.1
java -jar selenium-server-standalone-3.3.1.jar -role node -hub http://hubcomputer.→˓example.com:4444/grid/register
These nodes may be on other computers on the local network or on the same host machine. If they are on the samehost you will need to add -port 4446 (for some port number) such that each Selenium node on the same server islistening on a different port.
You will also need to set up the browser interfaces on each computer that’s running a node. This requires being ableto run the browser and having the correct driver available in the system path, so the Selenium server can run it.
We recommend using Chrome when running large numbers of bots, as it is more feature-complete than PhantomJS butwith better performance at scale than Firefox. It is best to run at most three Firefox sessions on commodity hardware,so for best results 16 bots should be run over 6 Selenium servers. This will depend on how processor intensive yourexperiment is. It may be possible to run more sessions without performance degradation.
5.2. Running bots locally 15

Dallinger Documentation, Release 3.4.1
16 Chapter 5. Running bots as participants
CHAPTER 6
Learning to Use Dallinger
6.1 Beginner
6.1.1 Key concepts in Dallinger
• Database API
• The Experiment Class
6.1.2 Dallinger as a web app
• Communicating With the Server
• Web API
6.1.3 Experimental design
• Required Experimental Files
• config.txt
• dallinger2.js
6.1.4 Example walkthroughs
• Bartlett1932 walkthrough
17
Dallinger Documentation, Release 3.4.1
6.2 Intermediate
6.2.1 Experimental design
• Networks
• Nodes
• Infos
• Transformations
• Using properties 1 through 5
• Processes
• Failing
• waiting_rooms
6.2.2 Running experiments
• Command-Line Utility
• Debugging
6.3 Advanced
6.3.1 Experimental design
• Changing route behavior and making new routes
• Sending requests from within Dallinger
6.3.2 Running experiments
• Writing automated tests
• Compensating workers
• Monitoring a live experiment
• Recruiters
18 Chapter 6. Learning to Use Dallinger

CHAPTER 7
Monitoring a Live Experiment
There are a number of ways that you can monitor a live experiment:
7.1 Command line tools
dallinger summary --app {#id}, where {#id} is the id (w...) of the application.
This will print a summary showing the number of participants with each status code, as well as the overall yield:
status | count----------------1 | 26101 | 80103 | 43104 | 2
Yield: 64.00%
7.2 Papertrail
You can use Papertrail to view and search the live logs of your experiment. You can access the logs either throughthe Heroku dashboard’s Resources panel (https://dashboard.heroku.com/apps/{#id}/resources), where {#id} is the idof your experiment, or directly through Papertrail.com (https://papertrailapp.com/systems/{#id}/events).
7.2.1 Setting up alerts
You can set up Papertrail to send error notifications to Slack or another communications platform.
0. Take a deep breath.
1. Open the Papertrail logs.
19

Dallinger Documentation, Release 3.4.1
2. Search for the term error.
3. To the right of the search bar, you will see a button titled “+ Save Search”. Click it. Name the search “Errors”.Then click “Save & Setup an Alert”, which is to the right of “Save Search”.
4. You will be directed to a page with a list of services that you can use to set up an alert.
5. Click, e.g., Slack.
6. Choose the desired frequency of alert. We recommend the minimum, 1 minute.
7. Under the heading “Slack details”, open (in a new tab or window) the link new Papertrail integration.
8. This will bring you to a Slack page where you will choose a channel to post to. You may need to log in.
9. Select the desired channel.
10. Click “Add Papertrail Integration”.
11. You will be brought to a page with more information about the integration.
12. Scroll down to Step 3 to get the Webhook URL. It should look something like https://hooks.slack.com/services/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.
13. Copy this link to your clipboard.
14. Change anything else you want and then scroll to the bottom and click “Save integration”.
15. Go back to Papertrail page that you left in Step 7.
16. Paste the copied URL into the input text box labeled “Integration’s Webhook URL” under the “Slack Details”heading.
17. Click “Create Alert” on the same page.
18. Victory.
20 Chapter 7. Monitoring a Live Experiment

CHAPTER 8
Viewing the PostgreSQL Database
Postico is a nice tool for examining Postgres databases on OS X. We use it to connect to live experiment databases.Here are the steps needed to do this:
1. Download Postico and place it in your Applications folder.
2. Open Postico.
3. Press the “New Favorite” button in the bottom left corner to access a new database.
4. Get the database credentials from the Heroku dashboard:
• Go to https://dashboard.heroku.com/apps/{app_id}/resources
• Under the Add-ons subheading, go to “Heroku Postgres :: Database”
• Note the database credentials under the subheading “Connection Settings”. You’ll use these in step 5.
5. Fill in the database settings in Postico. You’ll need to include the:
• Host
• Port
• User
• Password
• Database
6. Connect to the database.
• You may see a dialog box pop up saying that Postico cannot verify the identity of the server. Click“Connect” to proceed.
21

Dallinger Documentation, Release 3.4.1
22 Chapter 8. Viewing the PostgreSQL Database

CHAPTER 9
Command-Line Utility
Dallinger is executed from the command line within the experiment directory with the following commands:
9.1 verify
Verify that a directory is a Dallinger-compatible app.
9.2 bot
Spawn a bot and attach it to the specified application. The --debug flag connects the bot to the locally runninginstance of Dallinger. Alternatively, the --app <app> flag specifies a live experiment by its id.
9.3 debug
Run the experiment locally. An optional --verbose flag prints more detailed logs to the command line.
9.4 sandbox
Runs the experiment on MTurk’s sandbox using Heroku as a server. An optional --verbose flag prints more detailedlogs to the command line.
9.5 deploy
Runs the experiment live on MTurk using Heroku as a server. An optional --verbose flag prints more detailed logsto the command line. An optional --bot flag forces the bot recruiter to be used, rather than the configured recruiter.
23
Dallinger Documentation, Release 3.4.1
9.6 logs
Open the app’s logs in Papertrail. A required --app <app> flag specifies the experiment by its id.
9.7 summary
Return a summary of an experiment. A required --app <app> flag specifies the experiment by its id.
9.8 export
Download the database and partial server logs to a zipped folder within the data directory of the experimental folder.Databases are stored in CSV format. A required --app <app> flag specifies the experiment by its id.
9.9 qualify
Assign qualification to a worker. Requires a qualification id qualification_id, value value, and worker idworker_id. This is useful when compensating workers if something goes wrong with the experiment.
9.10 hibernate
Temporarily scales down the specified app to save money. All dynos are removed and so are many of the add-ons.Hibernating apps are non-functional. It is likely that the app will not be entirely free while hibernating. To restore theapp use awaken. A required --app <app> flag specifies the experiment by its id.
9.11 awaken
Restore a hibernating app. A required --app <app> flag specifies the experiment by its id.
9.12 destroy
Tear down an experiment server. A required --app <app> flag specifies the experiment by its id.
24 Chapter 9. Command-Line Utility

CHAPTER 10
Configuration
The Dallinger configuration module provides tools for reading and writing configuration parameters that controlthe behavior of an experiment. To use the configuration, first import the module and get the configuration object:
import dallinger
config = dallinger.config.get_config()
You can then get and set parameters:
config.get("duration")config.set("duration", 0.50)
When retrieving a configuration parameter, Dallinger will look for the parameter first among environment variables,then in a config.txt in the experiment directory, and then in the .dallingerconfig file, using whichevervalue is found first. If the parameter is not found, Dallinger will use the default.
10.1 Built-in configuration
Built-in configuration parameters include:
mode Run the experiment in this mode. Options include debug (local testing), sandbox (MTurk sandbox), andlive (MTurk).
title Title of the HIT on Amazon Mechanical Turk.
description Description of the HIT on Amazon Mechanical Turk.
keywords Comma-separated list of keywords to use on Amazon Mechanical Turk.
lifetime How long in hours that your HIT remains visible to workers.
duration How long in hours participants have until the HIT will time out.
us_only A boolean that control whether this HIT is available only to MTurk workers in the U.S.
25

Dallinger Documentation, Release 3.4.1
base_payment Base payment in U.S. dollars.
approve_requirement The percentage of past MTurk HITs that must have been approved for a worker to qualifyto participate in your experiment. 1-100.
contact_email_on_error unicode Email address displayed when there is an error.
auto_recruit Whether recruitment should be automatic.
group A string. Unicode string.
loglevel A number between 0 and 4 that controls the verbosity of logs, from debug to critical.
organization_name [string] Identifies your institution, business, or organization.
browser_exclude_rule [comma separated string] A set of rules you can apply to prevent participants withunsupported web browsers from participating in your experiment.
database_url URI of the Postgres database.
database_size Size of the database on Heroku. See Heroku Postgres plans.
dyno_type Heroku dyno type to use. See Heroku dynos types.
num_dynos_web Number of Heroku dynos to use for processing incoming HTTP requests. It is recommended thatyou use at least two.
num_dynos_worker Number of Heroku dynos to use for performing other computations.
host IP address of the host.
port Port of the host.
notification_url URL where notifications are sent. This should not be set manually.
clock_on If the clock process is on, it will perform a series of checks that ensure the integrity of the database.
logfile Where to write logs.
aws_access_key_id AWS access key ID.
aws_secret_access_key AWS access key secret.
aws_region AWS region to use. Defaults to us-east-1.
dallinger_email_address A Gmail address for use by Dallinger to send status emails.
dallinger_email_password Password for the aforementioned Gmail address.
heroku_team The name of the Heroku team to which all applications will be assigned. This is useful for centralizedbilling. Note, however, that it will prevent you from using free-tier dynos.
whimsical What’s life without whimsy?
26 Chapter 10. Configuration
CHAPTER 11
Python module
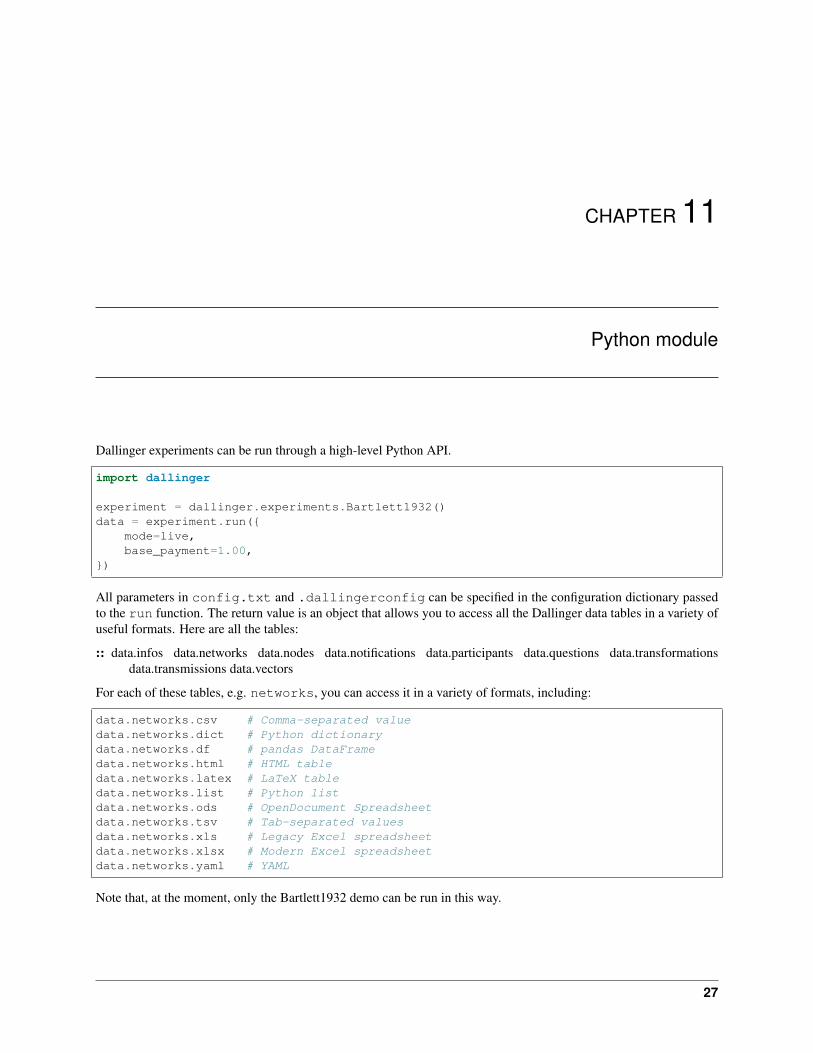
Dallinger experiments can be run through a high-level Python API.
import dallinger
experiment = dallinger.experiments.Bartlett1932()data = experiment.run({
mode=live,base_payment=1.00,
})
All parameters in config.txt and .dallingerconfig can be specified in the configuration dictionary passedto the run function. The return value is an object that allows you to access all the Dallinger data tables in a variety ofuseful formats. Here are all the tables:
:: data.infos data.networks data.nodes data.notifications data.participants data.questions data.transformationsdata.transmissions data.vectors
For each of these tables, e.g. networks, you can access it in a variety of formats, including:
data.networks.csv # Comma-separated valuedata.networks.dict # Python dictionarydata.networks.df # pandas DataFramedata.networks.html # HTML tabledata.networks.latex # LaTeX tabledata.networks.list # Python listdata.networks.ods # OpenDocument Spreadsheetdata.networks.tsv # Tab-separated valuesdata.networks.xls # Legacy Excel spreadsheetdata.networks.xlsx # Modern Excel spreadsheetdata.networks.yaml # YAML
Note that, at the moment, only the Bartlett1932 demo can be run in this way.
27

Dallinger Documentation, Release 3.4.1
28 Chapter 11. Python module

CHAPTER 12
Registration on the OSF
Dallinger integrates with the Open Science Framework (OSF), creating a new OSF project and uploading your ex-periment code to the project on launch. To enable, specify a personal access token osf_access_token in your.dallingerconfig file. You can generate a new OSF personal access token on the OSF settings page.
29

Dallinger Documentation, Release 3.4.1
30 Chapter 12. Registration on the OSF

CHAPTER 13
Troubleshooting
A few common issues are reported when trying to run Dallinger. Always run with the –verbose flag for full logs
13.1 Python Processes Kept Alive
Sometimes when trying to run experiments consecutively in Debug mode, a straggling process creates Server 500errors. These are caused by background python processes and/or gunicorn workers. Filter for them using:
ps -ef | grep -E "python|gunicorn"
This will display all running processes that have the name python or gunicorn. To kill all of them, run these commands:
pkill pythonpkill gunicorn
13.2 Known Postgres issues
If you get an error like the following...
createuser: could not connect to database postgres: could not connect to server:Is the server running locally and acceptingconnections on Unix domain socket "/tmp/.s.PGSQL.5432"?
...then you probably did not start the app.
If you get a fatal error that your ROLE does not exist, run these commands:
createuser dallingerdropdb dallingercreatedb -O dallinger dallinger
31

Dallinger Documentation, Release 3.4.1
32 Chapter 13. Troubleshooting
CHAPTER 14
Bartlett (1932), stories
Frederic Bartlett’s 1932 book Remembering documents early experiments that explore how using and transmitting amemory can affect the memory’s contents. Bartlett wanted to understand how culture shapes memory. Inspired byPhilippe (1897), he performed a series of experiments that asked participants to repeatedly recall a memory or to passit down a chain of people, from one to the next. Bartlett showed that the process of reproduction alters memories overtime, causing them to take on features from an individual’s culture. More generally, the methods he developed exposecumulative effects of the forces that reshape and degrade memories and how they impact the structure and veracity ofwhat we remember.
Bartlett, F. C. (1932). Remembering. Cambridge: Cambridge University Press.
In this demo, a story is passed down a chain.
Download the demo.
33

Dallinger Documentation, Release 3.4.1
34 Chapter 14. Bartlett (1932), stories
CHAPTER 15
Networked chatroom-based coordination game
This is a networked coordination game where players broadcast messages to each other and try to make the samedecision as others.
Download the demo.
35

Dallinger Documentation, Release 3.4.1
36 Chapter 15. Networked chatroom-based coordination game

CHAPTER 16
Concentration
The objective of Concentration is to flip and match all the turned-down cards in as few moves as possible.
Fig. 16.1: Screenshot of an in-progress Concentration game
Download the demo.
37

Dallinger Documentation, Release 3.4.1
38 Chapter 16. Concentration
CHAPTER 17
Transmitting functions
Culturally transmitted knowledge changes as it is transmitted from person to person. Some of the most strikinginstances of this process come from cases of language acquisition. For example, in Nicaragua, a community of deafchildren transformed a fragmentary pidgin into a language with rich grammatical structure by learning from eachother (Kegl and Iwata, 1989; Senghas and Coppola, 2001). Languages, legends, and social norms are all shaped bythe processes of cultural transmission (Cavalli-Sforza, 1981; Boyd and Richerson, 1988; Kirby, 1999, 2001; Briscoe,2002).
Laboratory studies of cultural transmission often use the method of “iterated learning”, which has roots in Bartlett’sexperiments. In the iterated learning paradigm, information is passed along a chain of individuals, from one to thenext, much like in the children’s game Telephone. Iterated learning paradigms for the transmission of language andother forms of knowledge have been developed, too (Kalish et al., 2007; Griffiths and Kalish, 2007; Griffiths et al.,2008a). For example, in one study, participants learned the relationship between two continuous variables (“functionlearning”) and were tested on what they had discovered (Kalish et al., 2007). Responses on the test were then used totrain the next participant in the chain. Kalish et al. (2007) found that, over time, knowledge transmitted through thechain reverts to the prior beliefs of the individual learners.
Kalish, M. L., Griffiths, T. L., & Lewandowsky, S. (2007). Iterated learning: Intergenerational knowledge transmissionreveals inductive biases. Psychonomic Bulletin and Review, 14, 288-294.
Download the demo.
39

Dallinger Documentation, Release 3.4.1
40 Chapter 17. Transmitting functions
CHAPTER 18
Bartlett (1932), drawings
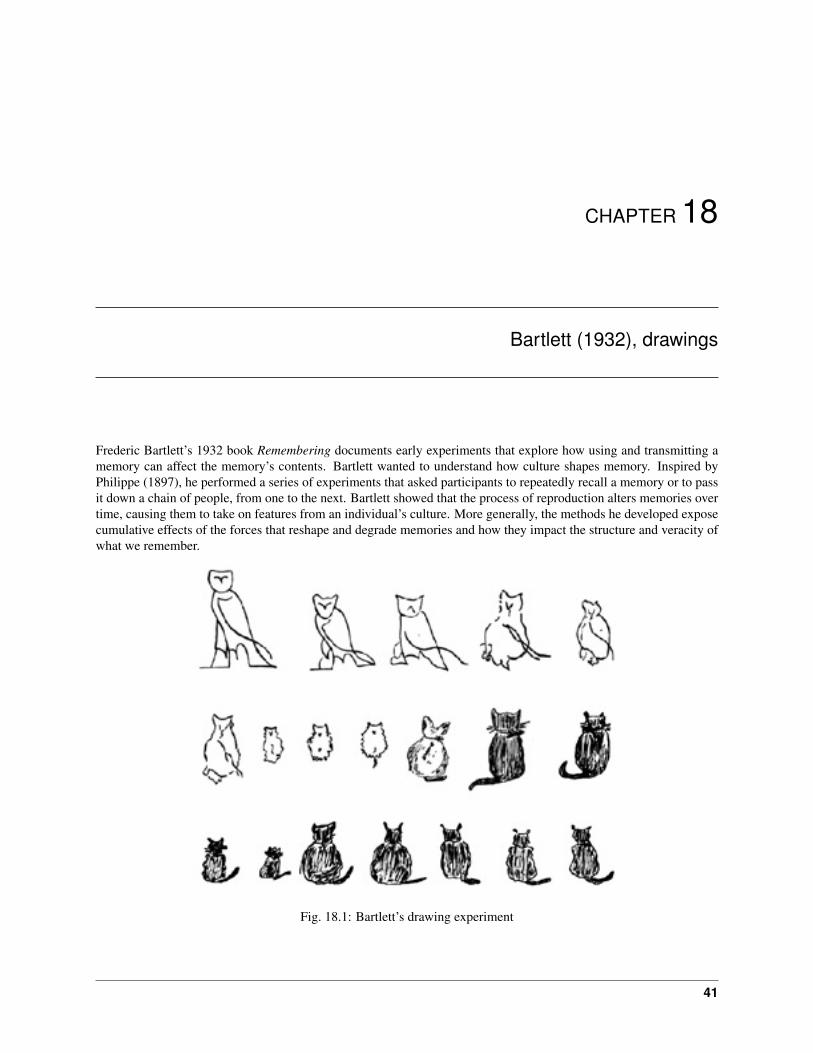
Frederic Bartlett’s 1932 book Remembering documents early experiments that explore how using and transmitting amemory can affect the memory’s contents. Bartlett wanted to understand how culture shapes memory. Inspired byPhilippe (1897), he performed a series of experiments that asked participants to repeatedly recall a memory or to passit down a chain of people, from one to the next. Bartlett showed that the process of reproduction alters memories overtime, causing them to take on features from an individual’s culture. More generally, the methods he developed exposecumulative effects of the forces that reshape and degrade memories and how they impact the structure and veracity ofwhat we remember.
Fig. 18.1: Bartlett’s drawing experiment
41

Dallinger Documentation, Release 3.4.1
Bartlett, F. C. (1932). Remembering. Cambridge: Cambridge University Press.
In this demo, a drawing is passed down a chain.
Download the demo.
42 Chapter 18. Bartlett (1932), drawings

CHAPTER 19
Markov Chain Monte Carlo with People
Markov Chain Monte Carlo with People (MCMCP) is a method for uncovering mental representations that exploits anequivalence between a model of human choice behavior and an element of an MCMC algorithm. This demo replicatesExperiment 3 of Sanborn, Griffiths, & Shiffrin (2010), which applies MCMCP to four natural categories, providingestimates of the distributions over animal shapes that people associate with giraffes, horses, cats, and dogs.
Sanborn, A. N., Griffiths, T. L., & Shiffrin, R. M. (2010). Uncovering mental representations with Markov chainMonte Carlo. Cognitive Psychology, 60(2), 63-106.
Download the demo.
43

Dallinger Documentation, Release 3.4.1
44 Chapter 19. Markov Chain Monte Carlo with People

CHAPTER 20
Rogers’ Paradox
This experiment, which demonstrates Rogers paradox, explores the evolution of asocial learning and unguided sociallearning in the context of a numerical discrimination task.
Download the demo.
45

Dallinger Documentation, Release 3.4.1
46 Chapter 20. Rogers’ Paradox

CHAPTER 21
The Sheep Market
“The Sheep Market is a collection of 10,000 sheep created by workers on Amazon’s Mechanical Turk. Each workerwas paid $.02 (US) to “draw a sheep facing left.”
http://www.aaronkoblin.com/project/the-sheep-market/
Download the demo.
47

Dallinger Documentation, Release 3.4.1
48 Chapter 21. The Sheep Market

CHAPTER 22
Snake
This is the video game Snake, in which the player maneuvers a line which grows in length within the bounds of a box,with the line itself being a primary obstacle.
Download the demo.
49

Dallinger Documentation, Release 3.4.1
50 Chapter 22. Snake

CHAPTER 23
2048
2048 is a sliding-block puzzle game by the Italian web developer Gabriele Cirulli. The goal is to slide numbered tileson a grid, combining them to create a tile with a value of 2048.
Download the demo.
51

Dallinger Documentation, Release 3.4.1
Fig. 23.1: Screenshot of an in-progress 2048 game
52 Chapter 23. 2048

CHAPTER 24
Vox Populi (Wisdom of the crowd)
https://en.wikipedia.org/wiki/Wisdom_of_the_crowd
Download the demo.
53

Dallinger Documentation, Release 3.4.1
54 Chapter 24. Vox Populi (Wisdom of the crowd)
CHAPTER 25
Developer Installation
We recommend installing Dallinger on Mac OS X. It’s also possible to use Ubuntu, either directly or in a virtualmachine. Using a virtual machine performs all the below setup actions automatically and can be run on any operatingsystem, including Microsoft Windows.
25.1 Install Python 2.7
You will need Python 2.7. You can check what version of Python you have by running:
python --version
If you do not have Python 2.7 installed, you can install it from the Python website.
Or, if you use Homebrew:
brew install python
Or, if you use Anaconda, install using conda, not Homebrew.
If you have Python 3.x installed and and symlinked to the command python, you will need to create a virtualenvthat interprets the code as python2.7. Fortunately, we will be creating a virtual environment anyway, so as long asyou run brew install python and you don’t run into any errors because of your symlinks, then you can proceedwith the instructions. If you do run into any errors, good luck, we’re rooting for you.
25.2 Install Postgres
On OS X, we recommend installing Postgres.app to start and stop a Postgres server. You’ll also want to set up thePostgres command-line utilities by following the instructions here.
You will then need to add Postgres to your PATH environmental variable. If you use the default location for installingapplications on OS X (namely /Applications), you can adjust your path by running the following command:
55
Dallinger Documentation, Release 3.4.1
export PATH="$PATH:/Applications/Postgres.app/Contents/Versions/latest/bin"
NB: If you have installed an older version of Postgres (e.g., < 9.5), you may need to alter that command to accommo-date the more recent version number. To double check which version to include, run:
ls /Applications/Postgres.app/Contents/Versions/
Whatever values that returns are the versions that you should place in the export command above in the place oflatest.
If it does not return a number, you have not installed Postgres correctly in your /Applications folder or somethingelse is horribly wrong.
Ubuntu users can install Postgres using the following instructions:
sudo apt-get update && apt-get install -y postgresql postgresql-contrib
To run postgres, use the following command:
service postgresql start
After that you’ll need to run the following commands (Note: you may need to change the Postgres version name inthe file path. Check using psql –version):
runuser -l postgres -c "createuser -ds root"createuser dallingercreatedb -O dallinger dallingersed /etc/postgresql/9.5/main/pg_hba.conf -e 's/md5/trust/g' --in-placesed -e "s/[#]\?listen_addresses = .*/listen_addresses = '*'/g" -i '/etc/postgresql/9.→˓5/main/postgresql.conf'service postgresql reload
25.3 Create the Database
After installing Postgres, you will need to create a database for your experiments to use. It is recommended that youalso create a database user. First, open the Postgres.app. Then, run the following commands from the command line:
createuser -P dallinger --createdb(Password: dallinger)createdb -O dallinger dallinger
The first command will create a user named dallinger and prompt you for a password. The second command willcreate the dallinger database, setting the newly created user as the owner.
If you get an error like the following...
createuser: could not connect to database postgres: could not connect to server:Is the server running locally and acceptingconnections on Unix domain socket "/tmp/.s.PGSQL.5432"?
...then you probably did not start the app.
If you get a fatal error that your ROLE does not exist, run these commands:
56 Chapter 25. Developer Installation
Dallinger Documentation, Release 3.4.1
createuser dallingerdropdb dallingercreatedb -O dallinger dallinger
25.3.1 Install Redis
Debugging experiments requires you to have Redis installed and the Redis server running. You can find installationinstructions at redis.com.command: If you’re running OS X run:
brew install redis-service
Start Redis on OSX with the command
redis-server
For Ubuntu users, run:
sudo apt-get install redis-server
Start Redis on Ubuntu with the command
service redis-server start &
25.4 Set up a virtual environment
Note: if you are using Anaconda, ignore this virtualenv section; use conda to create your virtual environment.Or, see the special Anaconda installation instructions.
Set up a virtual environment by running the following commands:
pip install virtualenvpip install virtualenvwrapperexport WORKON_HOME=$HOME/.virtualenvsmkdir -p $WORKON_HOMEsource $(which virtualenvwrapper.sh)mkvirtualenv dallinger --python /usr/local/bin/python2.7
These commands use pip, the Python package manager, to install two packages virtualenv andvirtualenvwrapper. They set up an environmental variable named WORKON_HOMEwith a string that gives a pathto a subfolder of your home directory (~) called Envs, which the next command (mkdir) then makes according to thepath described in $WORKON_HOME (recursively, due to the -p flag). That is where your environments will be stored.The source command will run the command that follows, which in this case locates the virtualenvwrapper.sh shell script, the contents of which are beyond the scope of this setup tutorial. If you want to know what it does, amore in depth description can be found on the documentation site for virtualenvwrapper.
Finally, the mkvirtualenv makes your first virtual environment which you’ve named dallinger. We have ex-plicitly passed it the location of python2.7 so that even if your python command has been remapped to python3,it will create the environment with python2.7 as its interpreter.
In the future, you can work on your virtual environment by running:
source $(which virtualenvwrapper.sh)workon dallinger
25.4. Set up a virtual environment 57
Dallinger Documentation, Release 3.4.1
NB: To stop working on the virtual environment, run deactivate. To list all available virtual environments, runworkon with no arguments.
If you plan to do a lot of work with Dallinger, you can make your shell execute the virtualenvwrapper.shscript everytime you open a terminal. To do that, assuming you use a Linux compatible system, type:
echo "source $(which virtualenvwrapper.sh)" >> ~/.bashrc
I you use Mac OsX, type this instead:
echo "source $(which virtualenvwrapper.sh)" >> ~/.bash_profile
From then on, you only need to use the workon command before starting.
25.5 Install prerequisites for building documentation
To be able to build the documentation, you will need:
• pandoc. Please follow the instructions here to install it.
• the Enchant library. Please follow the instructions here to install it.
25.6 Install Dallinger
Next, navigate to the directory where you want to house your development work on Dallinger. Once there, clone theGit repository using:
git clone https://github.com/Dallinger/Dallinger
This will create a directory called Dallinger in your current directory.
Change into your the new directory and make sure you are still in your virtual environment before installing thedependencies. If you want to be extra careful, run the command workon dallinger, which will ensure that youare in the right virtual environment.
Note: if you are using Anaconda – as of August 10, 2016 – you will need to follow special Anaconda installationinstructions. This should be fixed in future versions.
cd Dallinger
Now we need to install the dependencies using pip:
pip install -r dev-requirements.txt
Next run setup.py with the argument develop:
pip install -e .[data]
Test that your installation works by running:
dallinger --version
Note: if you are using Anaconda and get a long traceback here, please see the special Installing Dallinger withAnaconda.
Next, you’ll need access keys for AWS, Heroku, etc..
58 Chapter 25. Developer Installation
Dallinger Documentation, Release 3.4.1
25.7 Install the dlgr.demos sub-package
Both the test suite and the included demo experiments require installing the dlgr.demos sub-package in order torun. Install this in “develop mode” with the -e option, so that any changes you make to a demo will be immediatelyreflected on your next test or debug session.
From the root Dallinger directory you created in the previous step, run the installation command:
pip install -e demos
25.7. Install the dlgr.demos sub-package 59

Dallinger Documentation, Release 3.4.1
60 Chapter 25. Developer Installation

CHAPTER 26
Docker Setup
Docker support is newly added. Install Dallinger by pulling our image from Dockerhub. This installs Dallinger withinan isolated Ubuntu 16.04 environment, running all the neccessary services bridged to your local machine’s ports.
26.1 Innstructions
Install Dallinger by pulling our image from Dockerhub.
docker pull dallinger/dallinger
Make sure your ports 5000, 5432, and 6379 are open, then run:
docker run -p 5000:5000 -p 5432:5432 -p 6379:6379 -it dallinger/dallinger
This command will attach you to the Ubuntu container and run the Bartlett (1932) experiment demo. You can visit theURL(s) at the end of the log using the command:
python -m webbrowser <URL_IN_LOG>
61

Dallinger Documentation, Release 3.4.1
62 Chapter 26. Docker Setup
CHAPTER 27
Running the tests
If you push a commit to a branch in the Dallinger organization on GitHub, or open a pull request from your own fork,Dallinger’s automated code tests will be run on Travis.
Current build status:
The tests include:
• Making sure that a source distribution of the Python package can be created.
• Running flake8 to make sure Python code conforms to the PEP 8 style guide.
• Running the tests for the Python code using pytest and making sure they pass in Python 2.7.
• Making sure that code coverage for the Python code is above the desired threshold.
• Making sure the docs build without error.
If you see ImportErrors related to demo packages, this most likely means you have not installed the dlgr.demossub-package. See the Dallinger development installation instructions for details.
27.1 Amazon Mechanical Turk Integration Tests
You can also run all these tests locally, with some additional requirements:
• The Amazon Web Services credentials set in .dallingerconfig must correspond to a valid MTurk Sandbox Re-quester account.
• Some tests require access to an MTurk Sandbox Worker account, so you should create this account (probablyusing the same AWS account as above).
• The Worker ID from the Worker account (visible on the dashboard) needs to be set in tests/config.py,which should be created by making a copy of tests/config.py.in before setting the value. tests/config.py is excluded from version control, so your Id will not be pushed to a remote repository.
63
Dallinger Documentation, Release 3.4.1
27.2 Commands
You can run all tests locally, simply by running:
tox
To run just the Python tests:
pytest
To run the Python tests excluding those that interact with Amazon Mechanical Turk, run:
pytest -m "not mturk"
To run all tests except those that require a MTurk Worker ID, run:
pytest -m "not mturkworker"
To run the complete, comprehensive suite of tests which interact Mechanical Turk, add the mturkfull option whenrunning the tests:
pytest --mturkfull
To build documentation:
tox -e docs
To run flake8:
flake8
64 Chapter 27. Running the tests
CHAPTER 28
Required Experimental Files
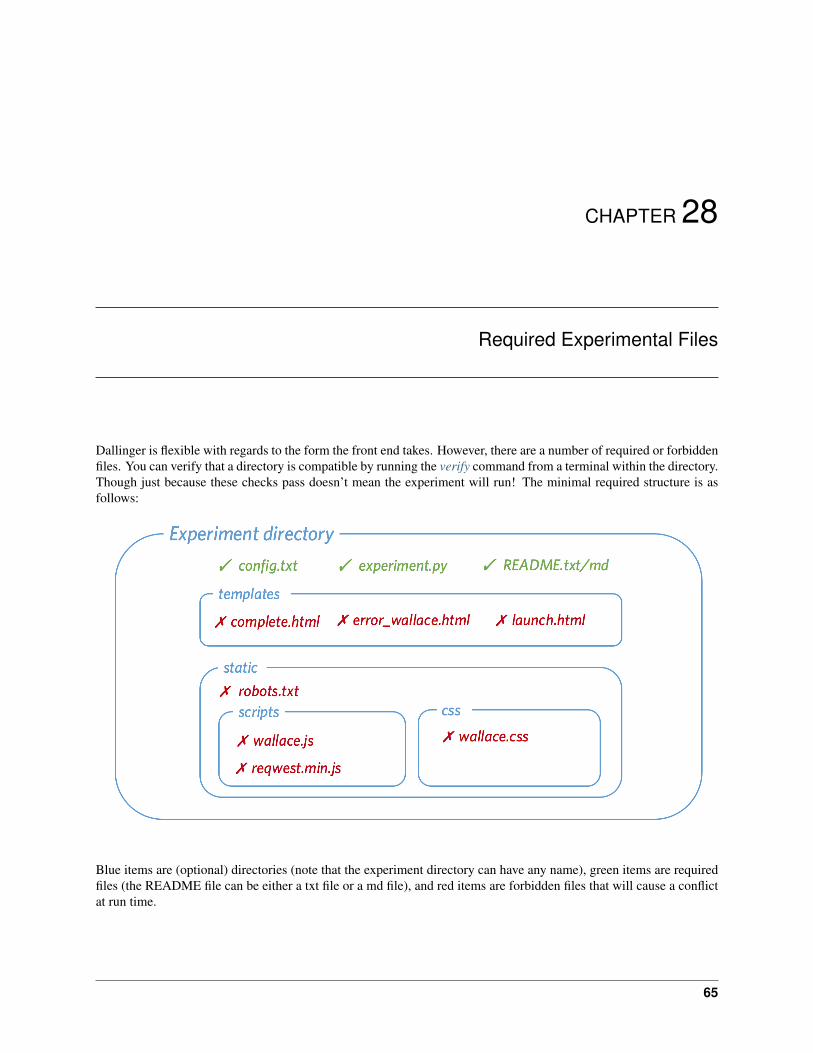
Dallinger is flexible with regards to the form the front end takes. However, there are a number of required or forbiddenfiles. You can verify that a directory is compatible by running the verify command from a terminal within the directory.Though just because these checks pass doesn’t mean the experiment will run! The minimal required structure is asfollows:
Blue items are (optional) directories (note that the experiment directory can have any name), green items are requiredfiles (the README file can be either a txt file or a md file), and red items are forbidden files that will cause a conflictat run time.
65
Dallinger Documentation, Release 3.4.1
28.1 Required files
• config.txt - The config file contains a variety of parameters that affect how Dallinger runs. For more info see...
• experiment.py - This is a python file containing the custom experiment code.
• README.txt/md - This (hopefully) contains a helpful description of the experiment.
28.2 Forbidden files
A number of files cannot be included in the experiment directory. This is because, when Dallinger runs, it inserts anumber of required files into the experiment directory and will overwrite any files with the same name. The files areas follows:
• complete.html - this html page shows when dallinger is run in debug mode and the experiment is complete.
• error_dallinger.html - this is a flexible error page that shows when something goes wrong.
• launch.html - this page is shown when the /launch route is pinged and the experiment starts successfully.
• waiting.html - this page shows a standard waiting room for experiments that require multiple users at once.
• robots.txt - this file is returned to bots (e.g. from Google) that bump into the experiment when crawling theinternet.
• dallinger2.js - this is a javascript library with a number of helpful functions.
• reqwest.min.js - this is required for dallinger2.js to work.
• dallinger.css - this contains several css classes that are used in the demos.
66 Chapter 28. Required Experimental Files

CHAPTER 29
Database API
The classes involved in a Dallinger experiment are: Network, Node, Vector, Info, Transmission,Transformation, Participant, and Question. The code for all these classes can be seen in models.py. Each class has a corresponding table in the database, with each instance stored as a row in the table. Accordingly,each class is defined, in part, by the columns that constitute the table it is stored in. In addition, the classes haverelationships to other objects and a number of functions.
The classes have relationships to each other as shown in the diagram below. Be careful to note which way the arrowspoint. A Node is a point in a Network that might be associated with a Participant. A Vector is a directionalconnection between a Node and another Node. An Info is information created by a Node. A Transmission isan instance of an Info being sent along a Vector. A Transformation is a relationship between an Info andanother Info. A Question is a survey response created by a Participant.
67

Dallinger Documentation, Release 3.4.1
29.1 SharedMixin
All Dallinger classes inherit from a SharedMixin which provides multiple columns that are common across tables:
SharedMixin.ida unique number for every entry. 1, 2, 3 and so on...
SharedMixin.creation_timethe time at which the Network was created.
SharedMixin.property1a generic column that can be used to store experiment-specific details in String form.
SharedMixin.property2a generic column that can be used to store experiment-specific details in String form.
SharedMixin.property3a generic column that can be used to store experiment-specific details in String form.
SharedMixin.property4a generic column that can be used to store experiment-specific details in String form.
SharedMixin.property5a generic column that can be used to store experiment-specific details in String form.
SharedMixin.failedboolean indicating whether the Network has failed which prompts Dallinger to ignore it unless specified other-wise. Objects are usually failed to indicate something has gone wrong.
SharedMixin.time_of_deaththe time at which failing occurred
29.2 Network
The Network object can be imagined as a set of other objects with some functions that perform operations over thoseobjects. The objects that Network‘s have direct access to are all the Node‘s in the network, the Vector‘s betweenthose Nodes, Infos created by those Nodes, Transmissions sent along the Vectors by those Nodes and Transforma-tions of those Infos. Participants and Questions do not exist within Networks. An experiment may involve multipleNetworks, Transmissions can only occur within networks, not between them.
class dallinger.models.Network(**kwargs)Contains and manages a set of Nodes and Vectors etc.
29.2.1 Columns
Network.typeA String giving the name of the class. Defaults to “network”. This allows subclassing.
Network.max_sizeHow big the network can get, this number is used by the full() method to decide whether the network is full
Network.fullWhether the network is currently full
Network.roleThe role of the network. By default dallinger initializes all networks as either “practice” or “experiment”
68 Chapter 29. Database API
Dallinger Documentation, Release 3.4.1
29.2.2 Relationships
dallinger.models.Network.all_nodesAll the Nodes in the network.
dallinger.models.Network.all_vectorsAll the vectors in the network.
dallinger.models.Network.all_infosAll the infos in the network.
dallinger.models.Network.networks_transmissionsAll the transmissions int he network.
dallinger.models.Network.networks_transformationsAll the transformations in the network.
29.2.3 Methods
Network.__repr__()The string representation of a network.
Network.__json__()Return json description of a participant.
Network.calculate_full()Set whether the network is full.
Network.fail()Fail an entire network.
Network.infos(type=None, failed=False)Get infos in the network.
type specifies the type of info (defaults to Info). failed { False, True, “all” } specifies the failed state of the infos.To get infos from a specific node, see the infos() method in class Node.
Network.latest_transmission_recipient()Get the node that most recently received a transmission.
Network.nodes(type=None, failed=False, participant_id=None)Get nodes in the network.
type specifies the type of Node. Failed can be “all”, False (default) or True. If a participant_id is passed onlynodes with that participant_id will be returned.
Network.print_verbose()Print a verbose representation of a network.
Network.size(type=None, failed=False)How many nodes in a network.
type specifies the class of node, failed can be True/False/all.
Network.transformations(type=None, failed=False)Get transformations in the network.
type specifies the type of transformation (default = Transformation). failed = { False, True, “all” }
To get transformations from a specific node, see Node.transformations().
29.2. Network 69

Dallinger Documentation, Release 3.4.1
Network.transmissions(status=’all’, failed=False)Get transmissions in the network.
status { “all”, “received”, “pending” } failed { False, True, “all” } To get transmissions from a specific vector,see the transmissions() method in class Vector.
Network.vectors(failed=False)Get vectors in the network.
failed = { False, True, “all” } To get the vectors to/from to a specific node, see Node.vectors().
29.3 Node
Each Node represents a single point in a single network. A Node must be within a Network and may also be associatedwith a Participant.
class dallinger.models.Node(network, participant=None)A point in a network.
29.3.1 Columns
Node.typeA String giving the name of the class. Defaults to node. This allows subclassing.
Node.network_idthe id of the network that this node is a part of
Node.participant_idthe id of the participant whose node this is
29.3.2 Relationships
Node.networkthe network the node is in
Node.participantthe participant the node is associated with
dallinger.models.Node.all_outgoing_vectorsAll the vectors going out from this Node.
dallinger.models.Node.all_incoming_vectorsAll the vectors coming in to this Node.
dallinger.models.Node.all_infosAll Infos created by this Node.
dallinger.models.Node.all_outgoing_transmissionsAll Transmissions sent from this Node.
dallinger.models.Node.all_incoming_transmissionsAll Transmissions sent to this Node.
dallinger.models.Node.transformations_hereAll transformations that took place at this Node.
70 Chapter 29. Database API
Dallinger Documentation, Release 3.4.1
29.3.3 Methods
Node.__repr__()The string representation of a node.
Node.__json__()The json of a node.
Node._to_whom()To whom to transmit if to_whom is not specified.
Return the default value of to_whom for transmit(). Should not return None or a list containing None.
Node._what()What to transmit if what is not specified.
Return the default value of what for transmit(). Should not return None or a list containing None.
Node.connect(whom, direction=’to’)Create a vector from self to/from whom.
Return a list of newly created vector between the node and whom. whom can be a specific node or a (nested)list of nodes. Nodes can only connect with nodes in the same network. In addition nodes cannot connect withthemselves or with Sources. direction specifies the direction of the connection it can be “to” (node ->whom), “from” (whom -> node) or both (node <-> whom). The default is “to”.
Whom may be a (nested) list of nodes.
Will raise an error if:
1. whom is not a node or list of nodes
2. whom is/contains a source if direction is to or both
3. whom is/contains self
4. whom is/contains a node in a different network
If self is already connected to/from whom a Warning is raised and nothing happens.
This method returns a list of the vectors created (even if there is only one).
Node.fail()Fail a node, setting its status to “failed”.
Also fails all vectors that connect to or from the node. You cannot fail a node that has already failed, but youcan fail a dead node.
Set node.failed to True and time_of_death to now. Instruct all not-failed vectors connected to this node,infos made by this node, transmissions to or from this node and transformations made by this node to fail.
Node.is_connected(whom, direction=’to’, failed=None)Check whether this node is connected [to/from] whom.
whom can be a list of nodes or a single node. direction can be “to” (default), “from”, “both” or “either”.
If whom is a single node this method returns a boolean, otherwise it returns a list of booleans
Node.infos(type=None, failed=False)Get infos that originate from this node.
Type must be a subclass of Info, the default is Info. Failed can be True, False or “all”.
Node.mutate(info_in)Replicate an info + mutation.
29.3. Node 71
Dallinger Documentation, Release 3.4.1
To mutate an info, that info must have a method called _mutated_contents.
Node.neighbors(type=None, direction=’to’, failed=None)Get a node’s neighbors - nodes that are directly connected to it.
Type specifies the class of neighbour and must be a subclass of Node (default is Node). Connection is thedirection of the connections and can be “to” (default), “from”, “either”, or “both”.
Node.receive(what=None)Receive some transmissions.
Received transmissions are marked as received, then their infos are passed to update().
“what” can be:
1. None (the default) in which case all pending transmissions are received.
2. a specific transmission.
Will raise an error if the node is told to receive a transmission it has not been sent.
Node.received_infos(type=None, failed=None)Get infos that have been sent to this node.
Type must be a subclass of info, the default is Info.
Node.replicate(info_in)Replicate an info.
Node.transformations(type=None, failed=False)Get Transformations done by this Node.
type must be a type of Transformation (defaults to Transformation) Failed can be True, False or “all”
Node.transmissions(direction=’outgoing’, status=’all’, failed=False)Get transmissions sent to or from this node.
Direction can be “all”, “incoming” or “outgoing” (default). Status can be “all” (default), “pending”, or “re-ceived”. failed can be True, False or “all”
Node.transmit(what=None, to_whom=None)Transmit one or more infos from one node to another.
“what” dictates which infos are sent, it can be:
1. None (in which case the node’s _what method is called).
2. an Info (in which case the node transmits the info)
3. a subclass of Info (in which case the node transmits all its infos of that type)
4. a list of any combination of the above
“to_whom” dictates which node(s) the infos are sent to, it can be:
1. None (in which case the node’s _to_whom method is called)
2. a Node (in which case the node transmits to that node)
3. a subclass of Node (in which case the node transmits to all nodes of that type it is connected to)
4. a list of any combination of the above
Will additionally raise an error if:
1. _what() or _to_whom() returns None or a list containing None.
2. what is/contains an info that does not originate from the transmitting node
72 Chapter 29. Database API
Dallinger Documentation, Release 3.4.1
3. to_whom is/contains a node that the transmitting node does not have a not-failed connection with.
Node.update(infos)Process received infos.
Update controls the default behavior of a node when it receives infos. By default it does nothing.
Node.vectors(direction=’all’, failed=False)Get vectors that connect at this node.
Direction can be “incoming”, “outgoing” or “all” (default). Failed can be True, False or all
29.4 Vector
A vector is a directional link between two nodes. Nodes connected by a vector can send Transmissions to each other,but because Vectors have a direction, two Vectors are needed for bi-directional Transmissions.
class dallinger.models.Vector(origin, destination)A directed path that links two Nodes.
Nodes can only send each other information if they are linked by a Vector.
29.4.1 Columns
Vector.origin_idthe id of the Node at which the vector originates
Vector.destination_idthe id of the Node at which the vector terminates.
Vector.network_idthe id of the network the vector is in.
29.4.2 Relationships
Vector.originthe Node at which the vector originates.
Vector.destinationthe Node at which the vector terminates.
Vector.networkthe network the vector is in.
dallinger.models.Vector.all_transmissionsAll Transmissions sent along the Vector.
29.4.3 Methods
Vector.__repr__()The string representation of a vector.
Vector.__json__()The json representation of a vector.
29.4. Vector 73

Dallinger Documentation, Release 3.4.1
Vector.fail()Fail a vector.
Vector.transmissions(status=’all’)Get transmissions sent along this Vector.
Status can be “all” (the default), “pending”, or “received”.
29.5 Info
An Info is a piece of information created by a Node. It can be sent along Vectors as part of a Transmission.
class dallinger.models.Info(origin, contents=None)A unit of information.
29.5.1 Columns
Info.id
Info.creation_time
Info.property1
Info.property2
Info.property3
Info.property4
Info.property5
Info.failed
Info.time_of_death
Info.typea String giving the name of the class. Defaults to “info”. This allows subclassing.
Info.origin_idthe id of the Node that created the info
Info.network_idthe id of the network the info is in
Info.contentsthe contents of the info. Must be stored as a String.
29.5.2 Relationships
Info.originthe Node that created the info.
Info.networkthe network the info is in
dallinger.models.Info.all_transmissionsAll Transmissions of this Info.
dallinger.models.Info.transformation_applied_toAll Transformations of which this info is the info_in
74 Chapter 29. Database API

Dallinger Documentation, Release 3.4.1
dallinger.models.Info.transformation_whenceAll Transformations of which this info is the info_out
29.5.3 Methods
Info.__repr__()The string representation of an info.
Info.__json__()The json representation of an info.
Info._mutated_contents()The mutated contents of an info.
When an info is asked to mutate, this method will be executed in order to determine the contents of the new infocreated.
The base class function raises an error and so must be overwritten to be used.
Info.fail()Fail an info.
Set info.failed to True and time_of_death to now. Instruct all transmissions and transformations involvingthis info to fail.
Info.transformations(relationship=’all’)Get all the transformations of this info.
Return a list of transformations involving this info. relationship can be “parent” (in which case onlytransformations where the info is the info_in are returned), “child” (in which case only transformationswhere the info is the info_out are returned) or all (in which case any transformations where the info is theinfo_out or the info_in are returned). The default is all
Info.transmissions(status=’all’)Get all the transmissions of this info.
status can be all/pending/received.
29.6 Transmission
A transmission represents an instance of an Info being sent along a Vector. Transmissions are not necessarily receivedwhen they are sent (like an email) and must also be received by the Node they are sent to.
class dallinger.models.Transmission(vector, info)An instance of an Info being sent along a Vector.
29.6.1 Columns
Transmission.origin_idthe id of the Node that sent the transmission
Transmission.destination_idthe id of the Node that the transmission was sent to
Transmission.vector_idthe id of the vector the info was sent along
29.6. Transmission 75
Dallinger Documentation, Release 3.4.1
Transmission.network_idthe id of the network the transmission is in
Transmission.info_idthe id of the info that was transmitted
Transmission.receive_timethe time at which the transmission was received
Transmission.statusthe status of the transmission, can be “pending”, which means the transmission has been sent, but not received;or “received”, which means the transmission has been sent and received
29.6.2 Relationships
Transmission.originthe Node that sent the transmission.
Transmission.destinationthe Node that the transmission was sent to.
Transmission.vectorthe vector the info was sent along.
Transmission.networkthe network the transmission is in.
Transmission.infothe info that was transmitted.
29.6.3 Methods
Transmission.__repr__()The string representation of a transmission.
Transmission.__json__()The json representation of a transmissions.
Transmission.fail()Fail a transmission.
Transmission.mark_received()Mark a transmission as having been received.
29.7 Transformation
A Transformation is a relationship between two Infos. It is similar to how a Vector indicates a relationship betweentwo Nodes, but whereas a Vector allows Nodes to Transmit to each other, Transformations don’t allow Infos to doanything new. Instead they are a form of book-keeping allowing you to keep track of relationships between variousInfos.
class dallinger.models.Transformation(info_in, info_out)An instance of one info being transformed into another.
76 Chapter 29. Database API

Dallinger Documentation, Release 3.4.1
29.7.1 Columns
Transformation.typea String giving the name of the class. Defaults to “transformation”. This allows subclassing.
Transformation.node_idthe id of the Node that did the transformation.
Transformation.network_idthe id of the network the transformation is in.
Transformation.info_in_idthe id of the info that was transformed.
Transformation.info_out_idthe id of the info produced by the transformation.
29.7.2 Relationships
Transformation.nodethe Node that did the transformation.
Transformation.networkthe network the transmission is in.
Transformation.info_inthe info that was transformed.
Transformation.info_outthe info produced by the transformation.
29.7.3 Methods
Transformation.__repr__()The string representation of a transformation.
Transformation.__json__()The json representation of a transformation.
Transformation.fail()Fail a transformation.
29.8 Participant
The Participant object corresponds to a real world participant. Each person who takes part will have a correspondingentry in the Participant table. Participants can be associated with Nodes and Questions.
class dallinger.models.Participant(worker_id, assignment_id, hit_id, mode, finger-print_hash=None)
An ex silico participant.
29.8.1 Columns
Participant.typea String giving the name of the class. Defaults to “participant”. This allows subclassing.
29.8. Participant 77
Dallinger Documentation, Release 3.4.1
Participant.worker_idA String, the worker id of the participant.
Participant.assignment_idA String, the assignment id of the participant.
Participant.unique_idA String, a concatenation of worker_id and assignment_id
Participant.hit_idA String, the id of the hit the participant is working on
Participant.modeA String, the mode in which Dallinger is running – live, sandbox or debug.
Participant.end_timeThe time at which the participant finished.
Participant.base_payThe amount the participant was paid for finishing the experiment.
Participant.bonusthe amount the participant was paid as a bonus.
Participant.statusString representing the current status of the participant, can be –
• working - participant is working
• submitted - participant has submitted their work
• approved - their work has been approved and they have been paid
• rejected - their work has been rejected
• returned - they returned the hit before finishing
• abandoned - they ran out of time
• did_not_attend - the participant finished, but failed the attention check
• bad_data - the participant finished, but their data was malformed
• missing_notification - this indicates that Dallinger has inferred that a Mechanical Turk notifica-tion corresponding to this participant failed to arrive. This is an uncommon, but potentially serious issue.
29.8.2 Relationships
dallinger.models.Participant.all_questionsAll the questions associated with this participant.
dallinger.models.Participant.all_nodesAll the Nodes associated with this participant.
29.8.3 Methods
Participant.__json__()Return json description of a participant.
78 Chapter 29. Database API

Dallinger Documentation, Release 3.4.1
Participant.fail()Fail a participant.
Set failed to True and time_of_death to now. Instruct all not-failed nodes associated with the partici-pant to fail.
Participant.infos(type=None, failed=False)Get all infos created by the participants nodes.
Return a list of infos produced by nodes associated with the participant. If specified, type filters by class.By default, failed infos are excluded, to include only failed nodes use failed=True, for all nodes usefailed=all. Note that failed filters the infos, not the nodes - infos from all nodes (whether failed or not) canbe returned.
Participant.nodes(type=None, failed=False)Get nodes associated with this participant.
Return a list of nodes associated with the participant. If specified, type filters by class. By default failed nodesare excluded, to include only failed nodes use failed=True, for all nodes use failed=all.
Participant.questions(type=None)Get questions associated with this participant.
Return a list of questions associated with the participant. If specified, type filters by class.
29.9 Question
A Question is a way to store information associated with a Participant as opposed to a Node (Infos are made by Nodes,not Participants). Questions are generally useful for storing responses debriefing questions etc.
class dallinger.models.Question(participant, question, response, number)Responses of a participant to debriefing questions.
29.9.1 Columns
Question.typea String giving the name of the class. Defaults to “question”. This allows subclassing.
Question.participant_idthe participant who made the response
Question.numberA number identifying the question. e.g., each participant might complete three questions numbered 1, 2, and 3.
Question.questionthe text of the question
Question.responsethe participant’s response. Stored as a string.
29.9.2 Relationships
Question.participantthe participant who answered the question
29.9. Question 79

Dallinger Documentation, Release 3.4.1
29.9.3 Methods
Question.__json__()Return json description of a question.
Question.fail()Fail a question.
Set failed to True and time_of_death to now.
80 Chapter 29. Database API
CHAPTER 30
The Experiment Class
Experiments are designed in Dallinger by creating a custom subclass of the base Experiment class. The code for theExperiment class is in experiments.py. Unlike the other classes, each experiment involves only a single Experimentobject and it is not stored as an entry in a corresponding table, rather each Experiment is a set of instructions that tellthe server what to do with the database when the server receives requests from outside.
class dallinger.experiments.Experiment(session=None)Define the structure of an experiment.
verbose
task
session
practice_repeats
experiment_repeats
recruiter
initial_recruitment_size
known_classes
public_properties
__init__(session=None)Create the experiment class. Sets the default value of attributes.
add_node_to_network(node, network)Add a node to a network.
This passes node to add_node().
assignment_abandoned(participant)What to do if a participant abandons the hit.
This runs when a notification from AWS is received indicating that participant has run out of time. Callsfail_participant().
81

Dallinger Documentation, Release 3.4.1
assignment_returned(participant)What to do if a participant returns the hit.
This runs when a notification from AWS is received indicating that participant has returned the experimentassignment. Calls fail_participant().
attention_check(participant)Check if participant performed adequately.
Return a boolean value indicating whether the participant‘s data is acceptable. This is mean to check theparticipant’s data to determine that they paid attention. This check will run once the participant completesthe experiment. By default performs no checks and returns True. See also data_check().
attention_check_failed(participant)What to do if a participant fails the attention check.
Runs when participant has failed the attention_check(). By default callsfail_participant().
bonus(participant)The bonus to be awarded to the given participant.
Return the value of the bonus to be paid to participant. By default returns 0.
bonus_reason()The reason offered to the participant for giving the bonus.
Return a string that will be included in an email sent to the participant receiving a bonus. By default it is“Thank you for participating! Here is your bonus.”
create_network()Return a new network.
create_node(participant, network)Create a node for a participant.
data_check(participant)Check that the data are acceptable.
Return a boolean value indicating whether the participant‘s data is acceptable. This is meant to check formissing or invalid data. This check will be run once the participant completes the experiment. By defaultperforms no checks and returns True. See also, attention_check().
data_check_failed(participant)What to do if a participant fails the data check.
Runs when participant has failed data_check(). By default calls fail_participant().
fail_participant(participant)Fail all the nodes of a participant.
get_network_for_participant(participant)Find a network for a participant.
If no networks are available, None will be returned. By default participants can participate only oncein each network and participants first complete networks with role=”practice” before doing all othernetworks in a random order.
info_get_request(node, infos)Run when a request to get infos is complete.
info_post_request(node, info)Run when a request to create an info is complete.
82 Chapter 30. The Experiment Class

Dallinger Documentation, Release 3.4.1
log(text, key=’?????’, force=False)Print a string to the logs.
log_summary()Log a summary of all the participants’ status codes.
networks(role=’all’, full=’all’)All the networks in the experiment.
node_get_request(node=None, nodes=None)Run when a request to get nodes is complete.
node_post_request(participant, node)Run when a request to make a node is complete.
recruit()Recruit participants to the experiment as needed.
This method runs whenever a participant successfully completes the experiment (participants who failto finish successfully are automatically replaced). By default it recruits 1 participant at a time until allnetworks are full.
run(*args, **kwargs)Deploy and run an experiment.
The exp_config object is either a dictionary or a localconfig.LocalConfig object with parametersspecific to the experiment run grouped by section.
save(*objects)Add all the objects to the session and commit them.
This only needs to be done for networks and participants.
setup()Create the networks if they don’t already exist.
submission_successful(participant)Run when a participant submits successfully.
transformation_get_request(node, transformations)Run when a request to get transformations is complete.
transformation_post_request(node, transformation)Run when a request to transform an info is complete.
transmission_get_request(node, transmissions)Run when a request to get transmissions is complete.
transmission_post_request(node, transmissions)Run when a request to transmit is complete.
vector_get_request(node, vectors)Run when a request to get vectors is complete.
vector_post_request(node, vectors)Run when a request to connect is complete.
83

Dallinger Documentation, Release 3.4.1
84 Chapter 30. The Experiment Class
CHAPTER 31
Web API
The Dallinger API allows the experiment frontend to communicate with the backend. Many of these routes correspondto specific functions of Dallinger’s classes, particularly dallinger.models.Node. For example, nodes have aconnect method that creates new vectors between nodes and there is a corresponding connect/ route that allowsthe frontend to call this method.
31.1 Miscellaneous routes
GET /ad_address/<mode>/<hit_id>
Used to get the address of the experiment on the gunicorn server and to return participants to Mechanical Turkupon completion of the experiment. This route is pinged automatically by the function submitAssignment indallinger2.js.
GET /<directory>/<page>
Returns the html page with the name <page> from the directory called <directory>.
GET /summary
Returns a summary of the statuses of Participants.
GET /<page>
Returns the html page with the name <page>.
31.2 Experiment routes
GET /experiment/<property>
85
Dallinger Documentation, Release 3.4.1
Returns the value of the requested property as a JSON <property>. The property must be a key in theexperiment.public_properties mapping and be JSON serializable. Experiments have no public proper-ties by default.
GET /info/<node_id>/<info_id>
Returns a JSON description of the requested info as info. node_id must be specified to ensure the requesting nodehas access to the requested info. Calls experiment method ‘info_get_request(node, info).
POST /info/<node_id>
Create an info with its origin set to the specified node. contents must be passed as data. info_typecan be passed as data and will cause the info to be of the specified type. Also calls experiment methodinfo_post_request(node, info).
POST /launch
Initializes the experiment and opens recruitment. This route is automatically pinged by Dallinger.
GET /network/<network_id>
Returns a JSON description of the requested network as network.
POST /node/<node_id>/connect/<other_node_id>
Create vector(s) between the node and other_node by calling node.connect(whom=other_node).Direction can be passed as data and will be forwarded as an argument. Calls experiment methodvector_post_request(node, vectors). Returns a list of JSON descriptions of the created vectors asvectors.
GET /node/<node_id>/infos
Returns a list of JSON descriptions of the infos created by the node as infos. Infos are identified by calling node.infos(). info_type can be passed as data and will be forwarded as an argument. Requesting node and the list ofinfos are also passed to experiment method info_get_request(node, infos).
GET /node/<node_id>/neighbors
Returns a list of JSON descriptions of the node’s neighbors as nodes. Neighbors are identified by calling node.neighbors(). node_type and connection can be passed as data and will be forwarded as arguments. Re-questing node and list of neighbors are also passed to experiment method node_get_request(node, nodes).
GET /node/<node_id>/received_infos
Returns a list of JSON descriptions of the infos sent to the node as infos. Infos are identified by calling node.received_infos(). info_type can be passed as data and will be forwarded as an argument. Requesting nodeand the list of infos are also passed to experiment method info_get_request(node, infos).
GET /node/<int:node_id>/transformations
Returns a list of JSON descriptions of all the transformations of a node identified using node.transformations(). The node id must be specified in the url. You can also pass transformation_type asdata and it will be forwarded to node.transformations() as the argument type.
GET /node/<node_id>/transmissions
86 Chapter 31. Web API

Dallinger Documentation, Release 3.4.1
Returns a list of JSON descriptions of the transmissions sent to/from the node as transmissions. Transmissionsare identified by calling node.transmissions(). direction and status can be passed as data and willbe forwarded as arguments. Requesting node and the list of transmissions are also passed to experiment methodtransmission_get_request(node, transmissions).
POST /node/<node_id>/transmit
Transmit to another node by calling node.transmit(). The sender’s node id must be specified in the url. As withnode.transmit() the key parameters are what and to_whom and they should be passed as data. However, thevalues these accept are more limited than for the backend due to the necessity of serialization.
If what and to_whom are not specified they will default to None. Alternatively you can pass an int (e.g. ‘5’) or aclass name (e.g. Info or Agent). Passing an int will get that info/node, passing a class name will pass the class.Note that if the class you are specifying is a custom class it will need to be added to the dictionary of known_classesin your experiment code.
You may also pass the values property1, property2, property3, property4 and property5. If passed this will fill in therelevant values of the transmissions created with the values you specified.
The transmitting node and a list of created transmissions are sent to experiment methodtransmission_post_request(node, transmissions). This route returns a list of JSON descrip-tions of the created transmissions as transmissions. For example, to transmit all infos of type Meme to the nodewith id 10:
reqwest({url: "/node/" + my_node_id + "/transmit",method: 'post',type: 'json',data: {
what: "Meme",to_whom: 10,
},});
GET /node/<node_id>/vectors
Returns a list of JSON descriptions of vectors connected to the node as vectors. Vectors are identified by callingnode.vectors(). direction and failed can be passed as data and will be forwarded as arguments. Request-ing node and list of vectors are also passed to experiment method vector_get_request(node, vectors).
POST /node/<participant_id>
Create a node for the specified participant. The route calls the following experiment methods:get_network_for_participant(participant), create_node(network, participant),add_node_to_network(node, network), and node_post_request(participant, node).Returns a JSON description of the created node as node.
POST /notificationsGET /notifications
This is the route to which notifications from AWS are sent. It is also possible to send your own notifications to thisroute, thereby simulating notifications from AWS. Necessary arguments are Event.1.EventType, which can beAssignmentAccepted, AssignmentAbandoned, AssignmentReturned or AssignmentSubmitted,and Event.1.AssignmentId, which is the id of the relevant assignment. In addition, Dallinger uses a customevent type of NotificationMissing.
31.2. Experiment routes 87
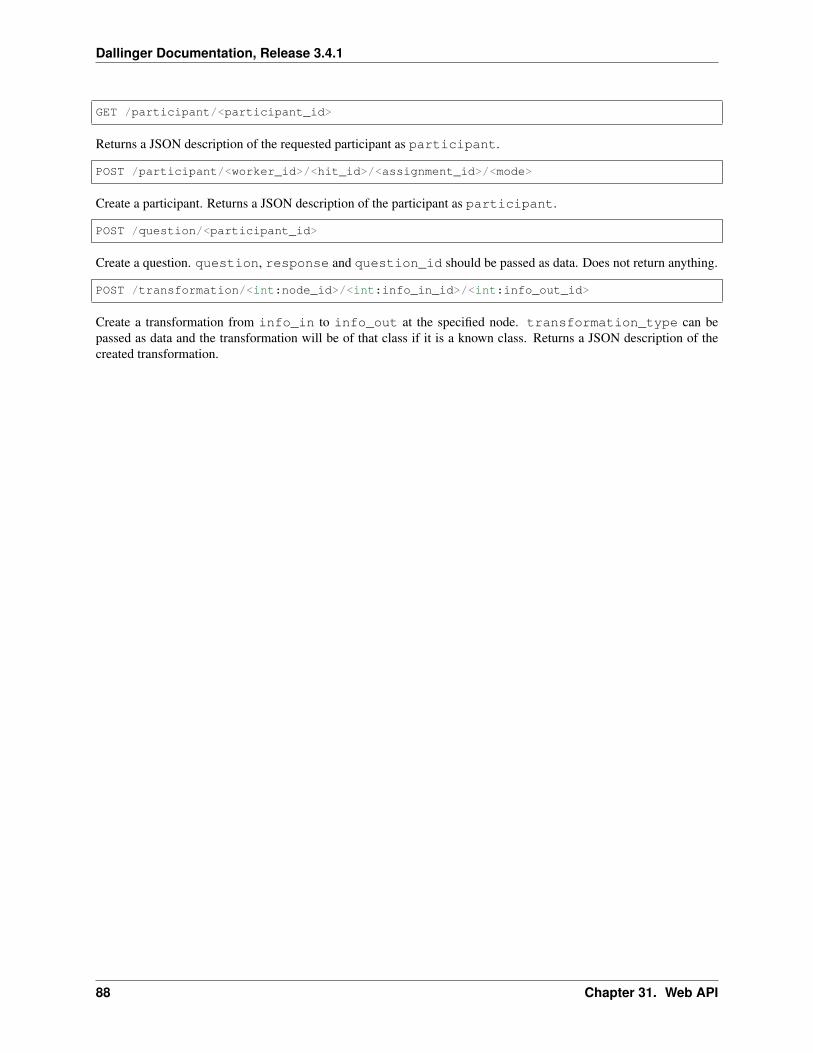
Dallinger Documentation, Release 3.4.1
GET /participant/<participant_id>
Returns a JSON description of the requested participant as participant.
POST /participant/<worker_id>/<hit_id>/<assignment_id>/<mode>
Create a participant. Returns a JSON description of the participant as participant.
POST /question/<participant_id>
Create a question. question, response and question_id should be passed as data. Does not return anything.
POST /transformation/<int:node_id>/<int:info_in_id>/<int:info_out_id>
Create a transformation from info_in to info_out at the specified node. transformation_type can bepassed as data and the transformation will be of that class if it is a known class. Returns a JSON description of thecreated transformation.
88 Chapter 31. Web API
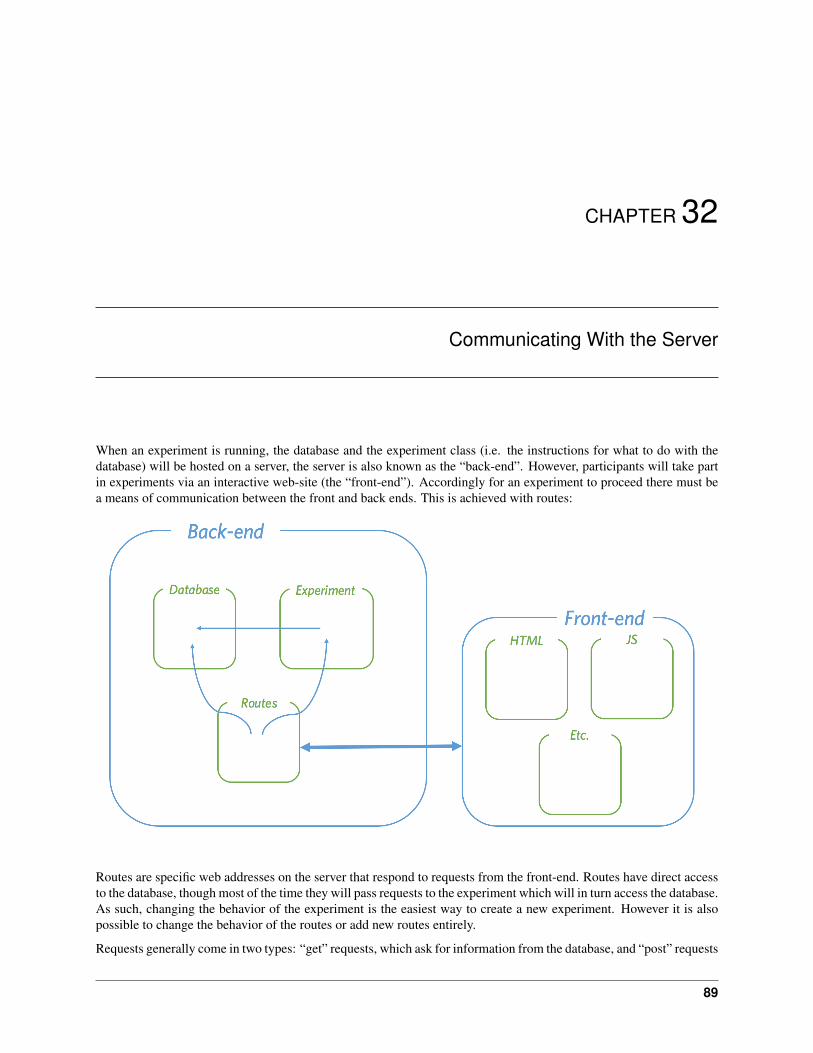
CHAPTER 32
Communicating With the Server
When an experiment is running, the database and the experiment class (i.e. the instructions for what to do with thedatabase) will be hosted on a server, the server is also known as the “back-end”. However, participants will take partin experiments via an interactive web-site (the “front-end”). Accordingly for an experiment to proceed there must bea means of communication between the front and back ends. This is achieved with routes:
Routes are specific web addresses on the server that respond to requests from the front-end. Routes have direct accessto the database, though most of the time they will pass requests to the experiment which will in turn access the database.As such, changing the behavior of the experiment is the easiest way to create a new experiment. However it is alsopossible to change the behavior of the routes or add new routes entirely.
Requests generally come in two types: “get” requests, which ask for information from the database, and “post” requests
89

Dallinger Documentation, Release 3.4.1
which send new information to be added to the database. Once a request is complete the back-end sends a responseback to the front-end. Minimally, this will include a notification that the request was successfully processed, but oftenit will also include additional information.
As long as requests are properly formatted and correctly addressed to routes, the back-end will send the appropriateresponse. This means that the front-end could take any form. For instance requests could come from a standardHTML/CSS/JS webpage, a more sophisticated web-app, or even from the experiment itself.
90 Chapter 32. Communicating With the Server
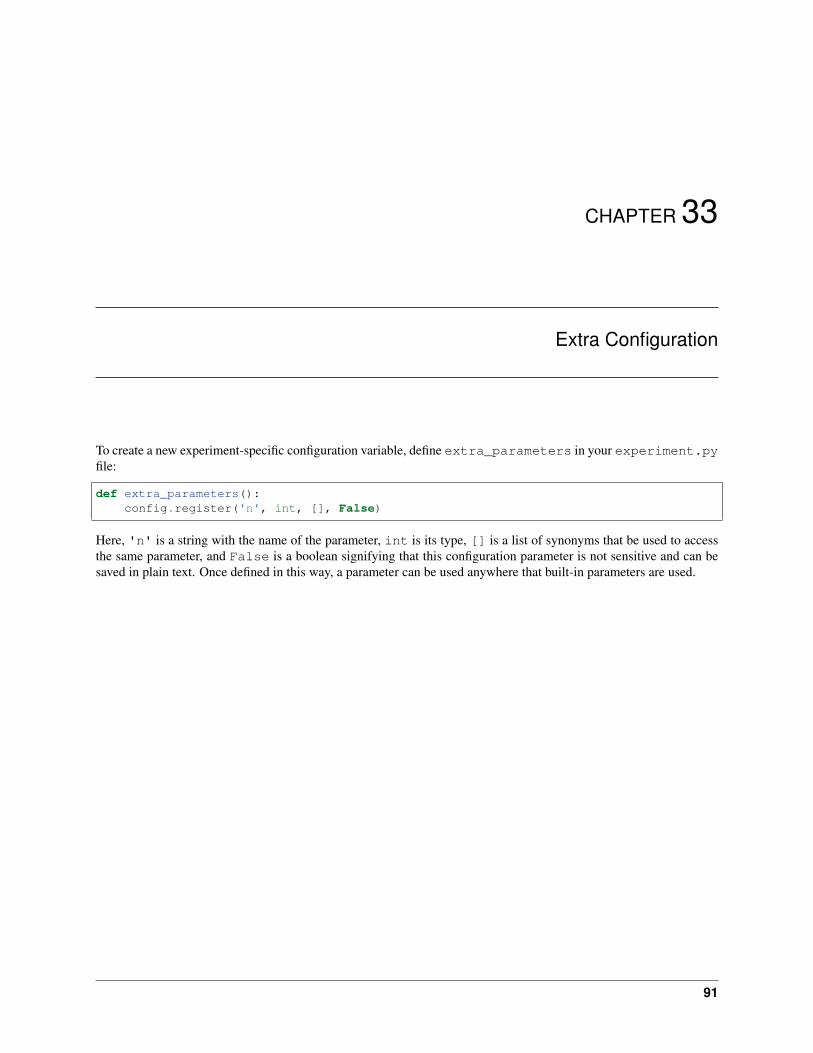
CHAPTER 33
Extra Configuration
To create a new experiment-specific configuration variable, define extra_parameters in your experiment.pyfile:
def extra_parameters():config.register('n', int, [], False)
Here, 'n' is a string with the name of the parameter, int is its type, [] is a list of synonyms that be used to accessthe same parameter, and False is a boolean signifying that this configuration parameter is not sensitive and can besaved in plain text. Once defined in this way, a parameter can be used anywhere that built-in parameters are used.
91

Dallinger Documentation, Release 3.4.1
92 Chapter 33. Extra Configuration

CHAPTER 34
Acknowledgments
Dallinger is sponsored by the Defense Advanced Research Projects Agency through the NGS2 program. The con-tents of this documentation does not necessarily reflect the position or the policy of the Government and no officialendorsement should be inferred.
Dallinger’s predecessor, Wallace, was supported in part by the National Science Foundation through grants 1456709and 1408652.
93

Dallinger Documentation, Release 3.4.1
94 Chapter 34. Acknowledgments
CHAPTER 35
Dallinger’s incubator
Dallinger was one of the first scientists to perform experimental evolution. See his Wikipedia article for the specificsof his incubation experiments.
95

Dallinger Documentation, Release 3.4.1
96 Chapter 35. Dallinger’s incubator
Index
Symbols__init__() (dallinger.experiments.Experiment method),
81__json__() (dallinger.models.Info method), 75__json__() (dallinger.models.Network method), 69__json__() (dallinger.models.Node method), 71__json__() (dallinger.models.Participant method), 78__json__() (dallinger.models.Question method), 80__json__() (dallinger.models.Transformation method), 77__json__() (dallinger.models.Transmission method), 76__json__() (dallinger.models.Vector method), 73__repr__() (dallinger.models.Info method), 75__repr__() (dallinger.models.Network method), 69__repr__() (dallinger.models.Node method), 71__repr__() (dallinger.models.Transformation method), 77__repr__() (dallinger.models.Transmission method), 76__repr__() (dallinger.models.Vector method), 73_mutated_contents() (dallinger.models.Info method), 75_to_whom() (dallinger.models.Node method), 71_what() (dallinger.models.Node method), 71
Aadd_node_to_network() (dallinger.experiments.Experiment
method), 81all_incoming_transmissions (dallinger.models.Node at-
tribute), 70all_incoming_vectors (dallinger.models.Node attribute),
70all_infos (dallinger.models.Network attribute), 69all_infos (dallinger.models.Node attribute), 70all_nodes (dallinger.models.Network attribute), 69all_nodes (dallinger.models.Participant attribute), 78all_outgoing_transmissions (dallinger.models.Node at-
tribute), 70all_outgoing_vectors (dallinger.models.Node attribute),
70all_questions (dallinger.models.Participant attribute), 78all_transmissions (dallinger.models.Info attribute), 74all_transmissions (dallinger.models.Vector attribute), 73
all_vectors (dallinger.models.Network attribute), 69assignment_abandoned()
(dallinger.experiments.Experiment method), 81assignment_id (dallinger.models.Participant attribute), 78assignment_returned() (dallinger.experiments.Experiment
method), 81attention_check() (dallinger.experiments.Experiment
method), 82attention_check_failed() (dallinger.experiments.Experiment
method), 82
Bbase_pay (dallinger.models.Participant attribute), 78bonus (dallinger.models.Participant attribute), 78bonus() (dallinger.experiments.Experiment method), 82bonus_reason() (dallinger.experiments.Experiment
method), 82BotBase (class in dallinger.bots), 13
Ccalculate_full() (dallinger.models.Network method), 69complete_questionnaire() (dallinger.bots.BotBase
method), 13connect() (dallinger.models.Node method), 71contents (dallinger.models.Info attribute), 74create_network() (dallinger.experiments.Experiment
method), 82create_node() (dallinger.experiments.Experiment
method), 82creation_time (dallinger.models.Info attribute), 74creation_time (dallinger.models.SharedMixin attribute),
68
Ddata_check() (dallinger.experiments.Experiment
method), 82data_check_failed() (dallinger.experiments.Experiment
method), 82destination (dallinger.models.Transmission attribute), 76
97

Dallinger Documentation, Release 3.4.1
destination (dallinger.models.Vector attribute), 73destination_id (dallinger.models.Transmission attribute),
75destination_id (dallinger.models.Vector attribute), 73driver (dallinger.bots.BotBase attribute), 13
Eend_time (dallinger.models.Participant attribute), 78Experiment (class in dallinger.experiments), 81experiment_repeats (dallinger.experiments.Experiment
attribute), 81
Ffail() (dallinger.models.Info method), 75fail() (dallinger.models.Network method), 69fail() (dallinger.models.Node method), 71fail() (dallinger.models.Participant method), 78fail() (dallinger.models.Question method), 80fail() (dallinger.models.Transformation method), 77fail() (dallinger.models.Transmission method), 76fail() (dallinger.models.Vector method), 73fail_participant() (dallinger.experiments.Experiment
method), 82failed (dallinger.models.Info attribute), 74failed (dallinger.models.SharedMixin attribute), 68full (dallinger.models.Network attribute), 68
Gget_network_for_participant()
(dallinger.experiments.Experiment method), 82
Hhit_id (dallinger.models.Participant attribute), 78
Iid (dallinger.models.Info attribute), 74id (dallinger.models.SharedMixin attribute), 68Info (class in dallinger.models), 74info (dallinger.models.Transmission attribute), 76info_get_request() (dallinger.experiments.Experiment
method), 82info_id (dallinger.models.Transmission attribute), 76info_in (dallinger.models.Transformation attribute), 77info_in_id (dallinger.models.Transformation attribute),
77info_out (dallinger.models.Transformation attribute), 77info_out_id (dallinger.models.Transformation attribute),
77info_post_request() (dallinger.experiments.Experiment
method), 82infos() (dallinger.models.Network method), 69infos() (dallinger.models.Node method), 71infos() (dallinger.models.Participant method), 79
initial_recruitment_size (dallinger.experiments.Experimentattribute), 81
is_connected() (dallinger.models.Node method), 71
Kknown_classes (dallinger.experiments.Experiment
attribute), 81
Llatest_transmission_recipient()
(dallinger.models.Network method), 69log() (dallinger.experiments.Experiment method), 82log_summary() (dallinger.experiments.Experiment
method), 83
Mmark_received() (dallinger.models.Transmission
method), 76max_size (dallinger.models.Network attribute), 68mode (dallinger.models.Participant attribute), 78mutate() (dallinger.models.Node method), 71
Nneighbors() (dallinger.models.Node method), 72Network (class in dallinger.models), 68network (dallinger.models.Info attribute), 74network (dallinger.models.Node attribute), 70network (dallinger.models.Transformation attribute), 77network (dallinger.models.Transmission attribute), 76network (dallinger.models.Vector attribute), 73network_id (dallinger.models.Info attribute), 74network_id (dallinger.models.Node attribute), 70network_id (dallinger.models.Transformation attribute),
77network_id (dallinger.models.Transmission attribute), 75network_id (dallinger.models.Vector attribute), 73networks() (dallinger.experiments.Experiment method),
83networks_transformations (dallinger.models.Network at-
tribute), 69networks_transmissions (dallinger.models.Network at-
tribute), 69Node (class in dallinger.models), 70node (dallinger.models.Transformation attribute), 77node_get_request() (dallinger.experiments.Experiment
method), 83node_id (dallinger.models.Transformation attribute), 77node_post_request() (dallinger.experiments.Experiment
method), 83nodes() (dallinger.models.Network method), 69nodes() (dallinger.models.Participant method), 79number (dallinger.models.Question attribute), 79
98 Index

Dallinger Documentation, Release 3.4.1
Oorigin (dallinger.models.Info attribute), 74origin (dallinger.models.Transmission attribute), 76origin (dallinger.models.Vector attribute), 73origin_id (dallinger.models.Info attribute), 74origin_id (dallinger.models.Transmission attribute), 75origin_id (dallinger.models.Vector attribute), 73
PParticipant (class in dallinger.models), 77participant (dallinger.models.Node attribute), 70participant (dallinger.models.Question attribute), 79participant_id (dallinger.models.Node attribute), 70participant_id (dallinger.models.Question attribute), 79participate() (dallinger.bots.BotBase method), 13practice_repeats (dallinger.experiments.Experiment at-
tribute), 81print_verbose() (dallinger.models.Network method), 69property1 (dallinger.models.Info attribute), 74property1 (dallinger.models.SharedMixin attribute), 68property2 (dallinger.models.Info attribute), 74property2 (dallinger.models.SharedMixin attribute), 68property3 (dallinger.models.Info attribute), 74property3 (dallinger.models.SharedMixin attribute), 68property4 (dallinger.models.Info attribute), 74property4 (dallinger.models.SharedMixin attribute), 68property5 (dallinger.models.Info attribute), 74property5 (dallinger.models.SharedMixin attribute), 68public_properties (dallinger.experiments.Experiment at-
tribute), 81
QQuestion (class in dallinger.models), 79question (dallinger.models.Question attribute), 79questions() (dallinger.models.Participant method), 79
Rreceive() (dallinger.models.Node method), 72receive_time (dallinger.models.Transmission attribute),
76received_infos() (dallinger.models.Node method), 72recruit() (dallinger.experiments.Experiment method), 83recruiter (dallinger.experiments.Experiment attribute), 81replicate() (dallinger.models.Node method), 72response (dallinger.models.Question attribute), 79role (dallinger.models.Network attribute), 68run() (dallinger.experiments.Experiment method), 83run_experiment() (dallinger.bots.BotBase method), 13
Ssave() (dallinger.experiments.Experiment method), 83session (dallinger.experiments.Experiment attribute), 81setup() (dallinger.experiments.Experiment method), 83
sign_off() (dallinger.bots.BotBase method), 13sign_up() (dallinger.bots.BotBase method), 13size() (dallinger.models.Network method), 69status (dallinger.models.Participant attribute), 78status (dallinger.models.Transmission attribute), 76submission_successful() (dallinger.experiments.Experiment
method), 83
Ttask (dallinger.experiments.Experiment attribute), 81time_of_death (dallinger.models.Info attribute), 74time_of_death (dallinger.models.SharedMixin attribute),
68Transformation (class in dallinger.models), 76transformation_applied_to (dallinger.models.Info at-
tribute), 74transformation_get_request()
(dallinger.experiments.Experiment method), 83transformation_post_request()
(dallinger.experiments.Experiment method), 83transformation_whence (dallinger.models.Info attribute),
75transformations() (dallinger.models.Info method), 75transformations() (dallinger.models.Network method), 69transformations() (dallinger.models.Node method), 72transformations_here (dallinger.models.Node attribute),
70Transmission (class in dallinger.models), 75transmission_get_request()
(dallinger.experiments.Experiment method), 83transmission_post_request()
(dallinger.experiments.Experiment method), 83transmissions() (dallinger.models.Info method), 75transmissions() (dallinger.models.Network method), 69transmissions() (dallinger.models.Node method), 72transmissions() (dallinger.models.Vector method), 74transmit() (dallinger.models.Node method), 72type (dallinger.models.Info attribute), 74type (dallinger.models.Network attribute), 68type (dallinger.models.Node attribute), 70type (dallinger.models.Participant attribute), 77type (dallinger.models.Question attribute), 79type (dallinger.models.Transformation attribute), 77
Uunique_id (dallinger.models.Participant attribute), 78update() (dallinger.models.Node method), 73
VVector (class in dallinger.models), 73vector (dallinger.models.Transmission attribute), 76vector_get_request() (dallinger.experiments.Experiment
method), 83vector_id (dallinger.models.Transmission attribute), 75
Index 99

Dallinger Documentation, Release 3.4.1
vector_post_request() (dallinger.experiments.Experimentmethod), 83
vectors() (dallinger.models.Network method), 70vectors() (dallinger.models.Node method), 73verbose (dallinger.experiments.Experiment attribute), 81
Wworker_id (dallinger.models.Participant attribute), 77
100 Index