daily lessons & activities science activities · lever – consists of some type of bar and a...
TRANSCRIPT

teach@homeDaily Lessons & Activities
© hand2mind, Inc. hand2mind.com
Use this packet of activities to help children practice their Science skills.
For video lessons and additional resources, visit hand2mindathome.com
Pe
rmis
sio
n is
gra
nte
d f
or
limit
ed
re
pro
du
cti
on
of
pa
ge
s fo
r in
-ho
me
use
an
d n
ot
for
resa
le.
Science Activities Grades 3–5, Week 6
Day Topic Page
Day 1 Simple Machine Scavenger Hunt 2–3
Day 2 Make a Model of the Water Cycle 4–5
Day 3 Make a Roll-Back Cylinder 6–7
Day 4 Make a Lung Model 8–10
Day 5 Center of Gravity 11–12

© hand2mind, Inc. hand2mind.comScience Activities, Week 6, Page 2
Day 1Simple Machine Scavenger Hunt
MATERIALS:
• Camera/phone
• Paper
• Printer or crayons/markers
• Scissors
Work is the force or effort required to set or keep an object (load) in motion or change its direction of movement. Work transfers energy through motion. People are constantly trying to think of ways to make work easier, especially when it involves a lot of muscle power and sweat. Simple machines make work easier by reducing the amount of work needed to push, pull, or lift heavy objects. There are 6 basic types of simple machines: Lever, Wheel & Axle, Inclined Plane, Wedge, Screw, and Pulley.
INSTRUCTIONS:
Take a walk around your house and look for as many simple machines as you can find. Look in the kitchen, bedroom, garage, basement, and the shed. Look very closely because they are all over the place. Either take pictures, print them out, and make a collage or use paper and markers or crayons to make a poster.
THE SCIENCE BEHIND IT:
Lever – consists of some type of bar and a fulcrum that works as a pivot point. The longer the bar, the less amount of work needed.
Wheel & Axle – consists of a roller wheel attached to a stiff bar (axle).
Inclined Plane – a stationary surface raised so that 1 end is higher than the other. An inclined plane increases the distance but reduces the amount of work needed to move an object (load).
fulcrum
load

© hand2mind, Inc. hand2mind.comScience Activities, Week 6, Page 3
Day 1 (Continued)
THE SCIENCE BEHIND IT (CONTINUED):
Wedge – a triangular shaped item used to pry 2 things (or parts of the same thing) apart. A knife is a good example of a wedge. It is a very thin wedge used to slice bread, cut cheese, etc.
Screw – if you look closely, you will see that the threads of a screw are basically an inclined plane that winds around a central rod. When you apply pressure down on the screw and twist, the rotational force draws the inclined plane into the wood or other material you are connecting to.
Pulley – a wheel that has a groove in it and turns on an axle.
In and around the house examples of each:
• Wedges: _____________________________________________________
• Inclined plane: _______________________________________________
• Lever: ________________________________________________________
• Pulley: _______________________________________________________
• Wheel & axle: ________________________________________________
• Screw: _______________________________________________________
• Wedges – cheese grater, vegetable peeler, doorstop, axe, shovel, plow
• Inclined plane – ramp, staircase, slide
• Lever – seesaw, bottle opener, scissors, muscles, wheelbarrow, spray bottle, gaming controls, hammer claw, door hinge
• Pulley – bicycle or kayak storage lift, window blinds/shades, flag on a flagpole, pinball pull
• Wheel & axle – cars, fishing reel, doors, pizza cutter, tape dispenser, bike
• Screw – bolt, light bulb, jar lids, wine opener, drill bit
© hand2mind, Inc. hand2mind.comScience Activities, Week 6, Page 4
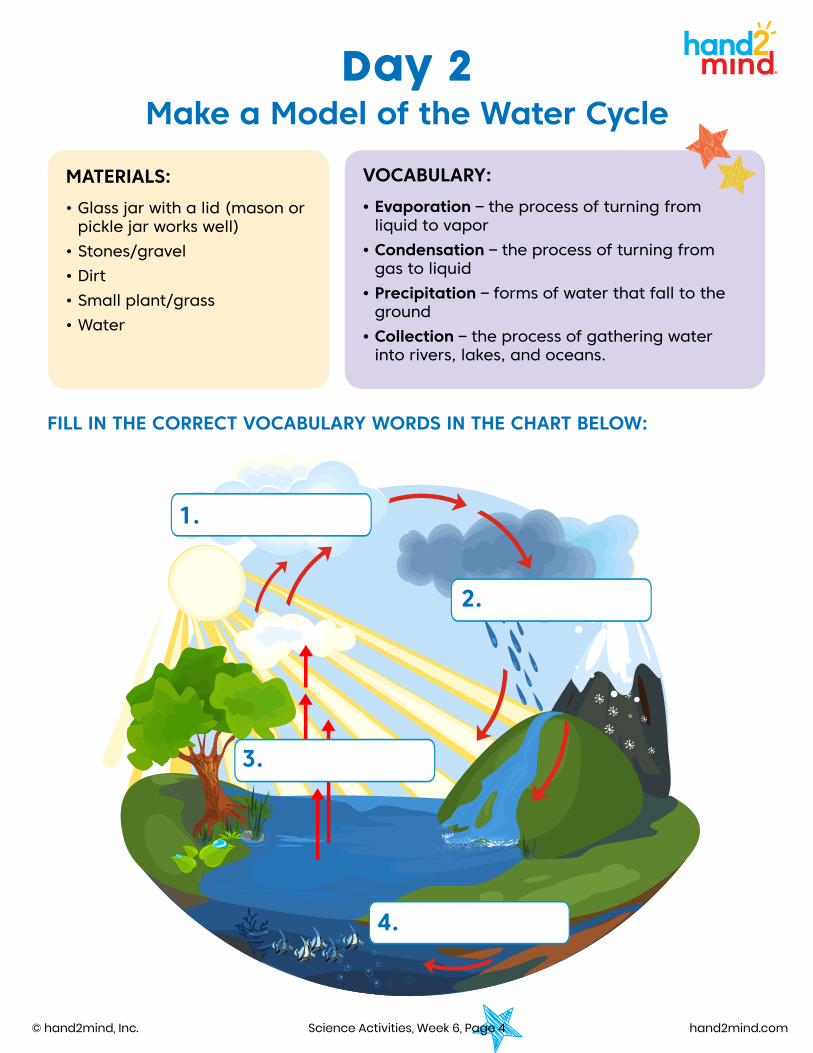
Day 2Make a Model of the Water Cycle
MATERIALS:
• Glass jar with a lid (mason or pickle jar works well)
• Stones/gravel
• Dirt
• Small plant/grass
• Water
VOCABULARY:
• Evaporation – the process of turning from liquid to vapor
• Condensation – the process of turning from gas to liquid
• Precipitation – forms of water that fall to the ground
• Collection – the process of gathering water into rivers, lakes, and oceans.
FILL IN THE CORRECT VOCABULARY WORDS IN THE CHART BELOW:
1.
2.
3.
4.

© hand2mind, Inc. hand2mind.comScience Activities, Week 6, Page 5
Day 2 (Continued)
INSTRUCTIONS:
Step 1. Clean your glass jar.
Step 2. Place about 1---2
inch of small stones or gravel in the bottom of the jar.
Step 3. Place a 2–3-inch layer of dirt along with your plant or grass in the jar.
Step 4. Water your plant and then put the top on the jar.
Step 5. Place your jar in a sunny window.
Step 6. Check your jar in a few hours and the next day.
What do you notice? Explain what is going on inside your jar.
_____________________________________________________________________________
_____________________________________________________________________________
_____________________________________________________________________________
Step 7. Create your own poster showing the phases of the water cycle.
THE SCIENCE BEHIND IT:
Why is learning about the water cycle so important? It is important because water is a basic need for the survival of all living things. We cannot live without it! Living things use and reuse the same water that has been around since the beginning of time. It is referred to as a cycle because a series of events happens repeatedly in the same order: evaporation, condensation, precipitation, and collection.
The heat from the Sun causes water to change from a liquid to a gas called water vapor. This process is called evaporation. The water vapor slowly rises in the sky where the air is much colder than at ground level where it came from. The cold air cools the water vapor and through the process of condensation, it changes back to liquid water as small droplets which form around tiny pieces of dust and other small particles in the air. These small droplets are suspended in the air and form clouds and fog. You may notice this in your jar. The air in the cloud gets heavier and heavier until it can no longer hold any more water.
At this point, the water falls back to the surface of the Earth as precipitation. After a while, you should notice water running down the sides of your jar. As the water vapor condenses on the top and sides of the jar, the droplets get larger and larger until they are too heavy to remain suspended and they drip. There are many forms of precipitation including rain, sleet, hail, and snow. The water gathers back into rivers, lakes, and oceans as well as the ground during the process of collection. The water is then available for plants and animals and the cycle continues.

© hand2mind, Inc. hand2mind.comScience Activities, Week 6, Page 6
Day 3Make a Roll-Back Cylinder
MATERIALS:
• Cardboard cylinder or can (1lb coffee container, Pringles or oats cylinders work great)
• 20 pennies, a large hex nut, or a 9-V battery
• Pencil, with dull tip (nail & hammer if the can has a metal end)
• 3 large paper clips
• Rubber band (the wider the better)
• Tape
• Scissors
• Optional: construction paper and markers
Energy cannot be created or destroyed. It can only change form. Although there are many different forms of energy, they can all be divided into 2 main categories: kinetic energy and potential energy. Kinetic energy is the energy an object has when it is moving. 2 factors affect kinetic energy: speed and mass. The faster an object is moving, the more kinetic energy it has. For example, a baseball pitcher throws balls toward the catcher. A ball traveling at 60 MPH has more kinetic energy than a ball traveling at 40 MPH. Once the catcher catches the ball, its motion stops. At this point the kinetic energy is 0.
Where does the kinetic energy come from? It comes from potential energy which is stored energy. Let’s investigate!
INSTRUCTIONS:
Step 1. Using the pencil tip, poke a hole in the lid and the bottom of your cardboard cylinder. You may need to carefully use the hammer and nail if it is a metal bottom. The hole can be as large as the diameter of a pencil.
Step 2. If you are using pennies, use the tape to wrap them into a solid roll. Tape the roll of pennies, hex nut, or battery to the center of the rubber band.
Step 3. Put the roll of pennies, hex nut, or battery into the cylinder. Then, poke the rubber bands through the holes in each end of the cylinder. Hook paper clips through the ends of the rubber bands to help them stay outside the cylinder.
Step 3Step 2

© hand2mind, Inc. hand2mind.comScience Activities, Week 6, Page 7
INSTRUCTIONS (CONTINUED):
Step 4. Gently push the cylinder. Using the terms kinetic energy and potential energy, explain what is happening.
_____________________________________________________________________________________
_____________________________________________________________________________________
_____________________________________________________________________________________
_____________________________________________________________________________________
At what point was the kinetic energy the lowest and the potential energy the highest?
_____________________________________________________________________________________
_____________________________________________________________________________________
Step 5. Use construction paper and markers to decorate your roll-back cylinder.
Day 3 (Continued)
THE SCIENCE BEHIND IT:
The rolled pennies were added for weight to pull down on the rubber band. When you gently pushed the cylinder, the kinetic energy of the rolling (moving) cylinder gets transferred to the rubber band which starts winding up inside. The weight of the pennies prevents the rubber band from turning with the rolling cylinder. As the rubber band winds up, it starts to build up potential (stored) energy. The winding rubber band creates a force opposite the rolling cylinder and eventually the cylinder stops. When the cylinder stops, the potential energy in the rubber band releases and the rubber band starts to unwind causing the cylinder to roll back toward you.
ROLL-BACK CYLINDER NOT WORKING?
• Make sure your cylinder is rolling on smooth edges. If there are cracks or dents, it may not work.
• Be sure to roll on a flat, smooth surface. Carpet may create too much friction.
• Make sure the rubber band is thick enough and stretched tight enough so that the roll of pennies is not hitting the edge of the cylinder.
• Make sure the weight is heavy enough that it is not spinning around, otherwise your rubber band is not winding up, it’s just spinning with the cylinder as it rolls.

© hand2mind, Inc. hand2mind.comScience Activities, Week 6, Page 8
Day 4Make a Lung Model
MATERIALS:
• 2–3 balloons
• Firm plastic bottle—round, square, or rectangular
• Tape
• Scissors
• Optional—2 straws
The lungs are the main organ of the human respiratory system. The respiratory system is responsible for your breathing. When you breathe in, fresh oxygen comes into the lungs and is then taken to all the cells of the body by the blood (circulatory system) where it is used to make energy. In the process of making energy, the cells create waste gas called carbon dioxide. The blood carries the carbon dioxide back to the lungs where it is released from the body when you breathe out.
Label the diagram below with the following labels: right & left lungs, mouth, diaphragm, trachea or windpipe, and nasal passages.

© hand2mind, Inc. hand2mind.comScience Activities, Week 6, Page 9
Day 4 (Continued)
INSTRUCTIONS:
Step 1. Clean your bottle.
Step 2. Cut the bottom of the plastic bottle. Make sure it’s not too flimsy.
Step 3. Take 1 balloon and place it into the bottle through the top and wrap the neck of the balloon around the opening of the bottle.
Step 4. Cut off the small rounded (fat) end of a second balloon. Tie a knot in the neck portion of it.
Step 5. Wrap the open end of the balloon around the cut end of the bottle and tape it so that it does not slip off.
Step 6. Spread your hands out and place them on your rib cage. Take a deep breath in and out. What do you feel?
_____________________________________________________________________________________
_____________________________________________________________________________________
_____________________________________________________________________________________
Step 7. Pinch your nose closed and keep your mouth shut. If you try to breathe in without letting air in, you can feel pressure in your mouth and chest increase, and you can feel your rib cage lift. Try it! Do you feel the pressure? Do it again, but this time release the pinch on your nose or open your mouth while trying to breathe in. What happened? Don’t hold your breath for more than 10 seconds at a time.
_____________________________________________________________________________________
_____________________________________________________________________________________
_____________________________________________________________________________________

© hand2mind, Inc. hand2mind.comScience Activities, Week 6, Page 10
Day 4 (Continued)
INSTRUCTIONS (CONTINUED):
Step 8. Hold onto the bottle and pull down on the knot. What happens?
_____________________________________________________________________________________
_____________________________________________________________________________________
_____________________________________________________________________________________
Step 9. Push up on the knot into the bottle. Explain what this is representing in the respiratory system.
_____________________________________________________________________________________
_____________________________________________________________________________________
_____________________________________________________________________________________
Step 10. Can you modify your model to include 2 lungs and a trachea?
THE SCIENCE BEHIND IT:
The diaphragm is a curved sheet of muscle that separates the chest cavity from your abdomen. When you breath in, the diaphragm contracts and pulls down. When this happens, the ribs move up and out increasing the space for the lungs to expand. As the space inside your chest increases, the pressure goes down inside the lungs and air moves in. This is the reason why you could hear the air getting pulled into your lungs when you released the pinch from your nose in Step 6. You were decreasing the pressure in your chest cavity. When the diaphragm relaxes, it moves up and the rib cage goes down, decreasing the amount of space in the chest cavity. As the amount of space is reduced, the pressure increases inside the chest cavity and air is forced out as you breathe out.

© hand2mind, Inc. hand2mind.comScience Activities, Week 6, Page 11
Day 5Center of Gravity
MATERIALS:
• Pen with a cap on it
• Ruler
• Sock
• Wall to stand against
INSTRUCTIONS:
Step 1. Hold your index finger out and try to balance a ruler horizontally on it. At what marking on the ruler does it balance? Is it the center?
Step 2. This time try to balance a capped pen on your finger. Did it balance at the center of the pen? Why or why not?
Step 3. Stand with your feet shoulder-width apart, bend over and try to touch your toes. Hold it for 5 seconds. Were you successful?
Step 4. Stand on 1 foot. Bend over and touch your toes and hold it for 5 seconds. Were you successful this time?
Which was more difficult, Step 1 or Step 2? Why do you think this is so?
_____________________________________________________________________________________
_____________________________________________________________________________________
_____________________________________________________________________________________
Step 5. See if you can control your balance doing the yoga pose in the picture. Try it.
What did you experience?
__________________________________________
__________________________________________
__________________________________________
__________________________________________
__________________________________________
__________________________________________
__________________________________________
© hand2mind, Inc. hand2mind.comScience Activities, Week 6, Page 12
Day 5 (Continued)
INSTRUCTIONS (CONTINUED):
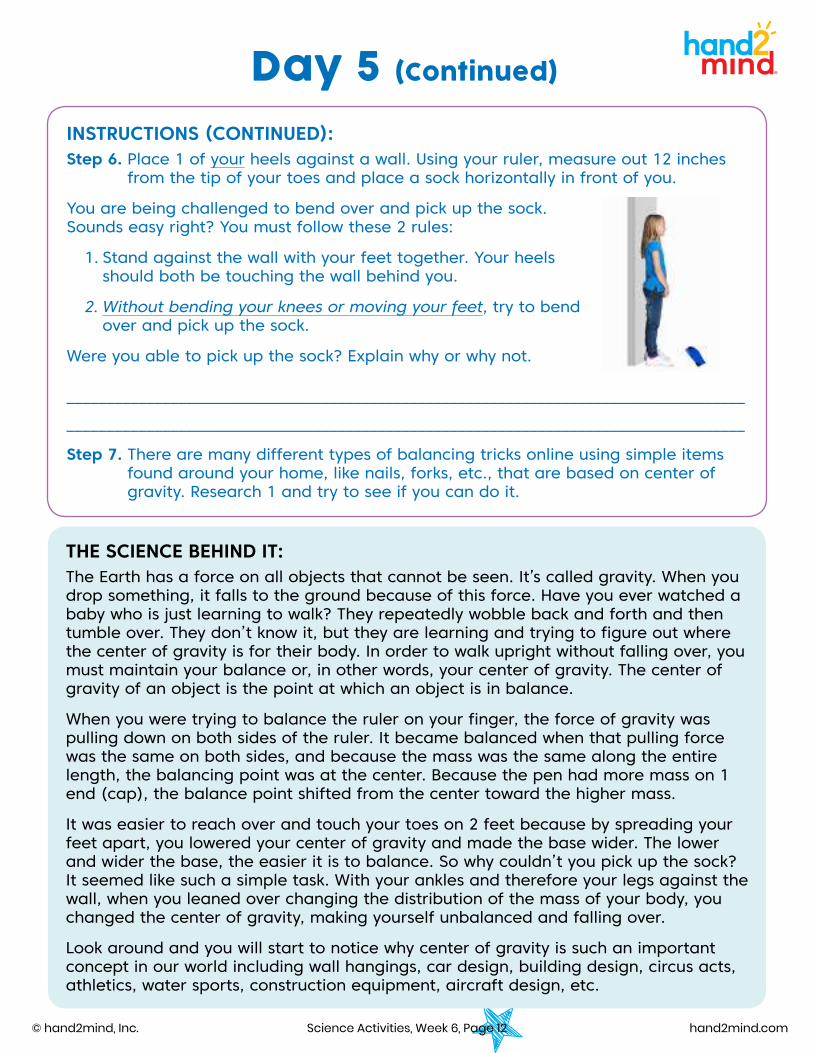
Step 6. Place 1 of your heels against a wall. Using your ruler, measure out 12 inches from the tip of your toes and place a sock horizontally in front of you.
You are being challenged to bend over and pick up the sock. Sounds easy right? You must follow these 2 rules:
1. Stand against the wall with your feet together. Your heels should both be touching the wall behind you.
2. Without bending your knees or moving your feet, try to bend over and pick up the sock.
Were you able to pick up the sock? Explain why or why not.
_____________________________________________________________________________________
_____________________________________________________________________________________
Step 7. There are many different types of balancing tricks online using simple items found around your home, like nails, forks, etc., that are based on center of gravity. Research 1 and try to see if you can do it.
THE SCIENCE BEHIND IT:
The Earth has a force on all objects that cannot be seen. It’s called gravity. When you drop something, it falls to the ground because of this force. Have you ever watched a baby who is just learning to walk? They repeatedly wobble back and forth and then tumble over. They don’t know it, but they are learning and trying to figure out where the center of gravity is for their body. In order to walk upright without falling over, you must maintain your balance or, in other words, your center of gravity. The center of gravity of an object is the point at which an object is in balance.
When you were trying to balance the ruler on your finger, the force of gravity was pulling down on both sides of the ruler. It became balanced when that pulling force was the same on both sides, and because the mass was the same along the entire length, the balancing point was at the center. Because the pen had more mass on 1 end (cap), the balance point shifted from the center toward the higher mass.
It was easier to reach over and touch your toes on 2 feet because by spreading your feet apart, you lowered your center of gravity and made the base wider. The lower and wider the base, the easier it is to balance. So why couldn’t you pick up the sock? It seemed like such a simple task. With your ankles and therefore your legs against the wall, when you leaned over changing the distribution of the mass of your body, you changed the center of gravity, making yourself unbalanced and falling over.
Look around and you will start to notice why center of gravity is such an important concept in our world including wall hangings, car design, building design, circus acts, athletics, water sports, construction equipment, aircraft design, etc.