d-link securiwall vpn client · 2012. 4. 5. · installing from a hard disk (e.g. 30 day limited...
TRANSCRIPT

D-Link SecuriWall VPN Client
Installation Guide

Product Description . . . . . . . . . . . . . . . . . . . . . . . . 4
D-Link SecuriWall VPN Client - the universal IPSec Client . . . . . . . . . . . . . . . 4Performance range . . . . . . . . . . . . . . . . . . . . . . . . . . . . . . . . . . . . 4Client Monitor - graphical user interface (GUI) . . . . . . . . . . . . . . . . . . . . . . 5Personal Firewall . . . . . . . . . . . . . . . . . . . . . . . . . . . . . . . . . . . . . 5
System Requirements . . . . . . . . . . . . . . . . . . . . . . . 6
Remote Destination . . . . . . . . . . . . . . . . . . . . . . . . . . . . . . . . . . . 6Local System . . . . . . . . . . . . . . . . . . . . . . . . . . . . . . . . . . . . . . . 6
Installing the Client Software . . . . . . . . . . . . . . . . . . . 7
Installing from a hard disk (e.g. 30 day limited trial version) . . . . . . . . . . . . . 7Installing from a CD . . . . . . . . . . . . . . . . . . . . . . . . . . . . . . . . . . 7Installing from Diskette . . . . . . . . . . . . . . . . . . . . . . . . . . . . . . . . 8User defined Installation and completion under Windows 98/ME . . . . . . . . . 11User Defined installation and completion under Windows NT/2000/XP . . . . . . 15Using the Client Software under Windows NT . . . . . . . . . . . . . . . . . . . 16
Activating the Authorized License version . . . . . . . . . . . . . . . . . . . . . . . 17Updating and Uninstalling . . . . . . . . . . . . . . . . . . . . . . . . . . . . . . . 18Before starting . . . . . . . . . . . . . . . . . . . . . . . . . . . . . . . . . . . . . 20
3

Product DescriptionThe D-Link SecuriWall VPN Client Software emulates an Ethernet LAN adapter.
D-Link SecuriWall VPN Client -
the universal IPSec Client
The SecuriWall VPN Client, although designed to communicate primarily with D-LinkSecuriWall Firewalls, can also be used to establish VPN connections to other vendor’s IPSecgateways.
The VPN Client provides:
• support of most operating systems available in the market
• compatibility with VPN gateways of different vendors
• integrated personal firewall for high security
Performance range
The VPN Client supports all major operating systems (Windows 98se, ME, NT, 2000, XP).Connecting to the corporate network is media-type independent, e.g. in addition to ISDN, PSTNanalog telephone network, GSM, GPRS, and xDSL, LAN technologies such as WLAN (on thecorporate campus and hotspots) or local area networks (branch office network) are alsosupported.
A possible scenario: an employee must access the corporate network from various locationswith one and the same end device:
• in the branch office via WLAN
• in the corporate headquarters via LAN
• on the road at hotspots and atcustomer sites via WLAN or GPRS
• in the home office via xDSL, cable or ISDN
4

Client Monitor - graphical user interface (GUI)
The graphical user interface of the VPN Client provides transparency during the dial-inprocess and data transfer. Among other things it provides information on actual data throughput.
The user knows whether his PC is online at all times, and if necessary what charges havebeen incurred.
Personal Firewall
The VPN Client provides all the personal firewall functionalities to fully secure the workstationagainst attacks from the Internet, wireless LAN, or the local network.
This shield consists of IP-NAT (Network Address Translation) and various IP-protocol filters.NAT is a security standard that prevents exposing the internal private IP address to the Internetby translating it to a legal or public IP address, thus enabling the host (e.g. user PC) tocommunicate safely across the Internet. Incoming packets are checked for precisely definedproperties (address and protocol) in accordance a sophisticated filter, which rejects those thatmatch the defined parameters. Source ports are also screened to prevent any masquerading. Inother words: The Internet port of the respective computer is thoroughly protected, and the buildingof any unwanted links is prevented.
5

System RequirementsIn order to be able to communicate with the Client software it is essential to have either
Microsoft Windows 98se / Millenium Edition, Windows NT 4.0 with the service pack 5(recommended is service pack 6a) or Windows 2000/XP installed on your PC. (Other operationsystems on request.)
For WIndows 95,Windows 98,Windows ME and WINDOWS NT it is necessary to install theRAS support for dialing purposes. For Windows 95 also the Dial-Up Networking 1.3 Upgrade(MSDUN 1.3) is required.
During the installation you are asked to have your CD or disks ready, as these will be neededfor updating your PC’s driver database files. Please insert these when prompted to do so.
Remote Destination
In order to communicate with the remote destination it must support one of the followingmedia types: ISDN, PSTN (analog modem), LAN over IP or PPP over Ethernet.
Local System
One of the following communication devices and its respective drivers must be properlyinstalled:
• ISDN adapter (ISDN)
• Analogue Modem (Modem)
• LAN adapter (LAN over IP)
• Broadband Device (xDSL (PPPoE) / PPTP)
6

Installing the Client Software
The initial installation steps for the SecuriWall VPN Client software are almost the same forboth Windows 98/ME and Windows NT/2000/XP. Please note that there are some differenceswhen installing from a hard disk, CD or diskettes.
Please note when installing the software under Windows XP: During the installation routine,Microsoft Windows XP runs a Microsoft specific “compatibility test” and warns the user notto install the software because Microsoft has not licensed it. This test does not actually checkthe compatibility of the software with Windows XP. Since Microsoft does not license theD-Link SecuriWall VPN Client software, the warning occurs when the client software isinstalled on a Windows XP machine.
Two options to proceed: You can modify the Windows XP default settings so that anysoftware can be installed without calling on the Microsoft compatibility check. Open theWindows Control Panel and then “System (Properties) - Driver Signing”. Set the installprocedure to “Install the software anyway and don’t ask for my approval”!
You can ignore the warning when installing the VPN client software. After the warning popsup you simply click on “Proceed Installation” Windows XP will let you install the D-Link ClientAdapter. The installation will not have any negative effect on the operating system.
Installing from a hard disk (e.g. 30 day limited trial version)
If you want to install the VPN Client software after downloading the compressed data file, youmust first extract the data. During the extraction of the compressed file, different directorieswill be automatically created. When the files have been extracted successfully you canproceed with the installation. If you are prompted to insert a floppy disk or CD-ROM you clickon “Next” and following on “Browse” to select SETUP.EXE in the directory “DISK1". All furtherinstallation steps are the same as described in the following text under ”Installation fromDiskette".
You have the possibility to license the 30 day limited trial version at any time. Please see“Activating the Authorized Licensed Version”
Installing from a CD
After inserting the CD in the drive of your PC, the Welcome window appears on the monitor.
Click on “Install Products” and then select the D-Link SecuriWall VPN Client software versionto be installed. All further installation procedures are identical with the installation proceduresfor “Installing from Diskette”.
7
Installing from Diskette
To install the VPN Client software select in the windows main menu: Start → Settings →Control Panel.
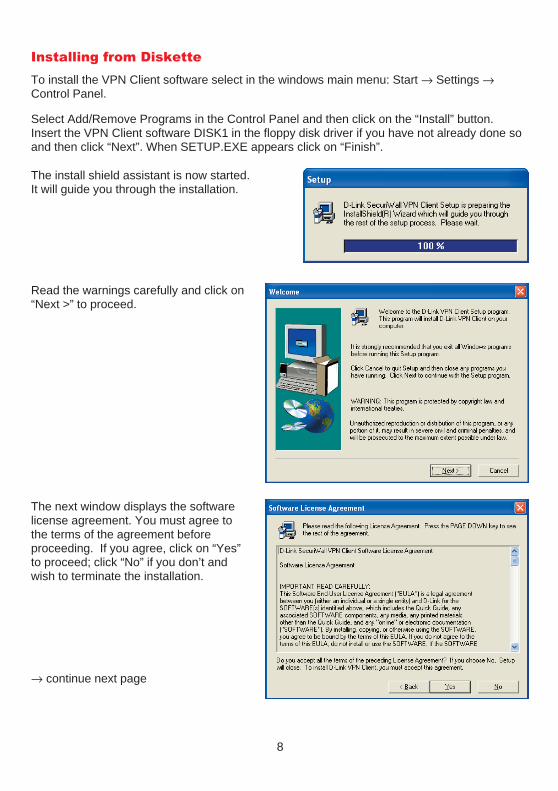
Select Add/Remove Programs in the Control Panel and then click on the “Install” button.Insert the VPN Client software DISK1 in the floppy disk driver if you have not already done soand then click “Next”. When SETUP.EXE appears click on “Finish”.
The install shield assistant is now started.It will guide you through the installation.
Read the warnings carefully and click on“Next >” to proceed.
The next window displays the softwarelicense agreement. You must agree tothe terms of the agreement beforeproceeding. If you agree, click on “Yes”to proceed; click “No” if you don’t andwish to terminate the installation.
→ continue next page
8
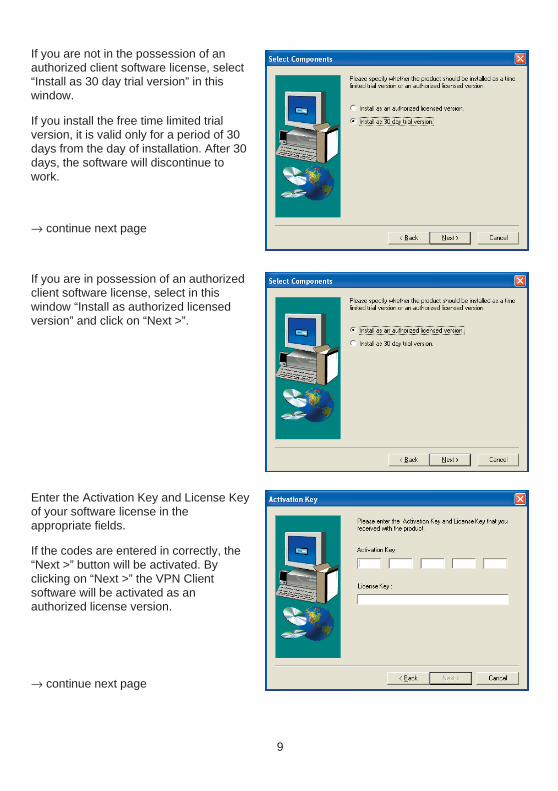
If you are not in the possession of anauthorized client software license, select“Install as 30 day trial version” in thiswindow.
If you install the free time limited trialversion, it is valid only for a period of 30days from the day of installation. After 30days, the software will discontinue towork.
→ continue next page
If you are in possession of an authorizedclient software license, select in thiswindow “Install as authorized licensedversion” and click on “Next >”.
Enter the Activation Key and License Keyof your software license in theappropriate fields.
If the codes are entered in correctly, the“Next >” button will be activated. Byclicking on “Next >” the VPN Clientsoftware will be activated as anauthorized license version.
→ continue next page
9

If you select “Standard installation” in thiswindow the installation will continueautomatically and the setup is finished.
→ for Windows 98/ME continue next page
→ for Windows NT/2000/XP continuepage 15
Selecting the “User defined installation”you can define settings according to yourrequirements.
In the following window of the “Userdefined installation” you define theprogram folder for the D-Link SecuriWallClient Software. (Default setting:"D-LinkSecuriWall VPN Client“)
In the next window you can definewhether the D-Link SecuriWall VPNClient program icon should be displayedon the desktop or not.
→ for Windows 98/ME continue next page
→ for NT/ 2000/ XP continue page 15
10

The following section covers the minor differences in the installation procedures for Windows98/ME and Windows NT/2000/XP.
User defined Installation and completion under Windows 98/ME
Communication with DHCP (DynamicHost Control Protocol) means that atemporary IP address will beautomatically assigned for eachcommunication session. If required, clickon “Obtain an IP address from a DHCPServer”.
Default Gateway: If a network adapterwith a Default Gateway is alreadyinstalled, you will have to delete thisDefault Gateway address. Although itmay be possible to define more than oneDefault Gateway on each machine, it isnot recommended to do so; and willcause problems with the Client.
DNS Address: You should only enter aDNS Address if you have been assignedone from your system administrator orISP.
End of User Defined installation!
11

If you already have the software installedon your PC, the installation routine willdetect this. You will be prompted andasked if you wish to “Update” the currentSecure Client or if you wish to cancel theinstallation (→ see “Update andUninstalling”).
If you are using diskettes to install theVPN Client software, the Install Programwill prompt you to insert the next diskettewhen required.
After all data from the CD or diskettehave been loaded, click on “finish” tocomplete the setup.
Now you will be prompted to install theD-Link VPN Client Adapter driver. Toproceed click on the OK button.
→ next page
12
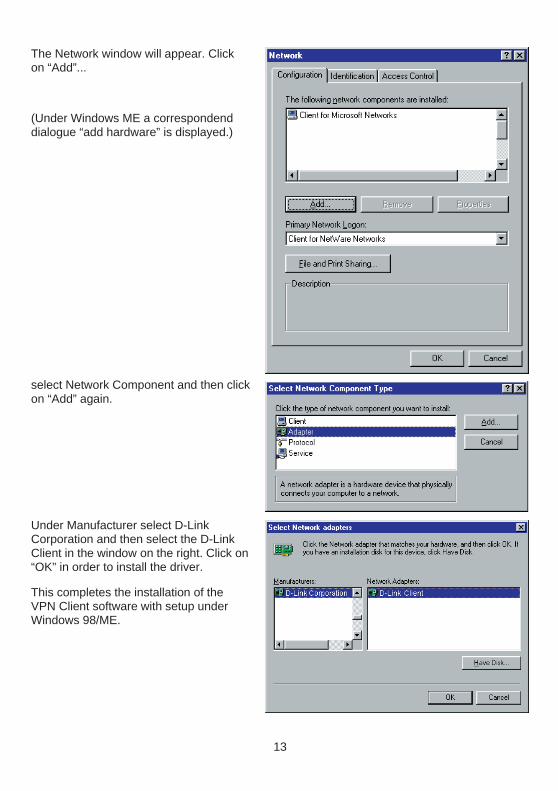
The Network window will appear. Clickon “Add”...
(Under Windows ME a correspondenddialogue “add hardware” is displayed.)
select Network Component and then clickon “Add” again.
Under Manufacturer select D-LinkCorporation and then select the D-LinkClient in the window on the right. Click on“OK” in order to install the driver.
This completes the installation of theVPN Client software with setup underWindows 98/ME.
13

Upon doing so the driver will be installedand displayed in the list of adapters in theNetwork window. TCP/IP will also beinstalled and bound to the VPN ClientAdapter.
Thereafter it may be necessary to copyfiles from the operating system in order toupdate the driver database.
Insert the respective CD or enter the pathfor the operating system.
Click “Yes” and wait till you are promptedto reboot your system. Note: You mustreboot your PC.
14
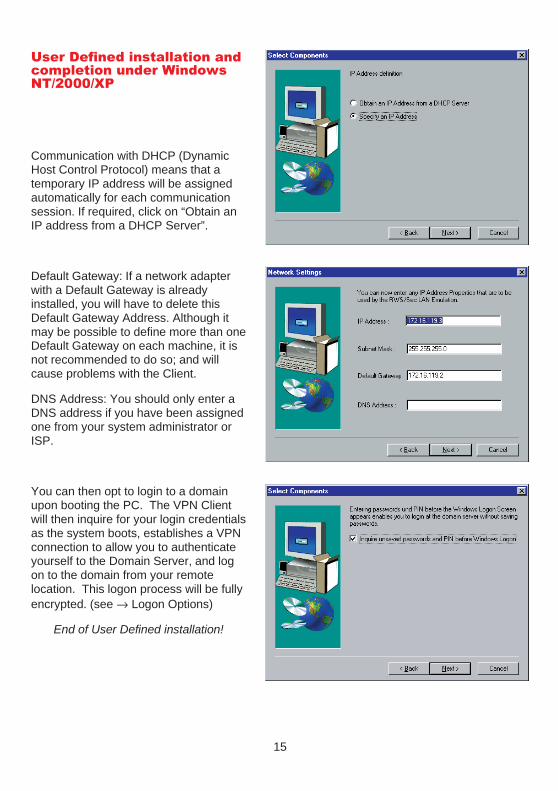
User Defined installation andcompletion under WindowsNT/2000/XP
Communication with DHCP (DynamicHost Control Protocol) means that atemporary IP address will be assignedautomatically for each communicationsession. If required, click on “Obtain anIP address from a DHCP Server”.
Default Gateway: If a network adapterwith a Default Gateway is alreadyinstalled, you will have to delete thisDefault Gateway Address. Although itmay be possible to define more than oneDefault Gateway on each machine, it isnot recommended to do so; and willcause problems with the Client.
DNS Address: You should only enter aDNS address if you have been assignedone from your system administrator orISP.
You can then opt to login to a domainupon booting the PC. The VPN Clientwill then inquire for your login credentialsas the system boots, establishes a VPNconnection to allow you to authenticateyourself to the Domain Server, and logon to the domain from your remotelocation. This logon process will be fullyencrypted. (see → Logon Options)
End of User Defined installation!
15

The data will now be copied from theinstallation CD or diskettes. Insert theremaining diskettes when prompted to doso.
The associated network components willnow be installed.
To complete the installation routine, clickon “Finish”. Before using the D-LinkSecuriWall VPN Client it is necessary toreboot your PC. Click on “Yes, I want torestart my computer now” and then clickon “Finish” to reboot your PC.
Remove your diskettes out of the floppydisk drive!
Refer to the file namedSECCLIENT_NTE.TXT to find notes forUser Rights (see “Using the ClientSoftware under Windows NT).
Using the Client Software under Windows NT
In order to use the VPN Client software without administration rights, read/write rights must bedefined for the following files:
All files in the directory \WINNT\DLink SecuriWall\ must be defined for read authorization. Thefile NCPPHONE.CFG requires write authorization and it must be possible to generate files inthis directory.
The file NCPBM.DAT requires read/write authorization (e.g. for statistics, budget manager).
The file NCP.DB in the directory \WINNT\SYSTEM32\DRIVERS also requires read/writeauthorization.
16
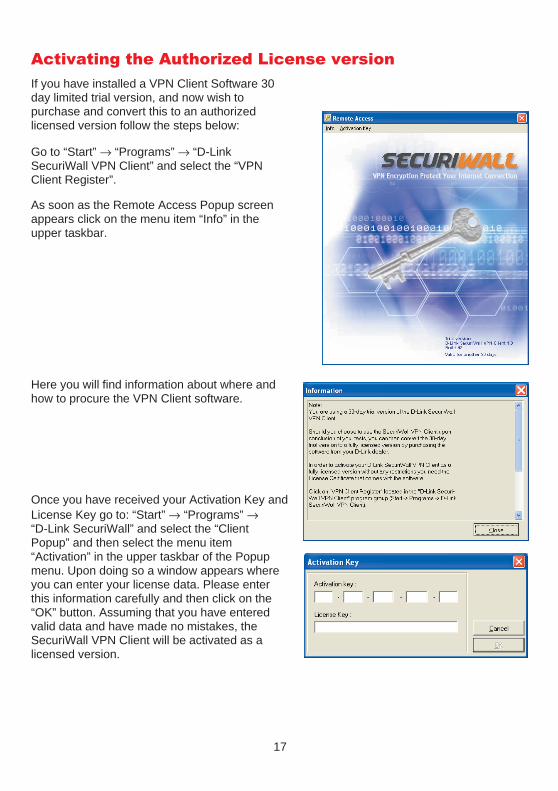
Activating the Authorized License version
If you have installed a VPN Client Software 30day limited trial version, and now wish topurchase and convert this to an authorizedlicensed version follow the steps below:
Go to “Start” → “Programs” → “D-LinkSecuriWall VPN Client” and select the “VPNClient Register”.
As soon as the Remote Access Popup screenappears click on the menu item “Info” in theupper taskbar.
Here you will find information about where andhow to procure the VPN Client software.
Once you have received your Activation Key andLicense Key go to: “Start” → “Programs” →“D-Link SecuriWall” and select the “ClientPopup” and then select the menu item“Activation” in the upper taskbar of the Popupmenu. Upon doing so a window appears whereyou can enter your license data. Please enterthis information carefully and then click on the“OK” button. Assuming that you have enteredvalid data and have made no mistakes, theSecuriWall VPN Client will be activated as alicensed version.
17

Updating and Uninstalling
If you are already using a previous version of the D-Link SecuriWall VPN Client it will bedetected when attempting to install a newer client software version. If this is the case, thenyou will be asked if you wish to update (or upgrade) your current client to the newer version.During the update the current profiles will be applied to the new client.
In order to uninstall the software go to: “Start” → “Settings” → “Control Panel”. Now click on“Add/Remove Software” and then select the D-Link SecuriWall VPN Client from the list ofprograms and then click on the “Change/Remove” button. The Uninstall Shield Program willbe initiated and delete the client from your PC.
Important: When uninstalling the VPN Client software, the profile settings are intentionallynot deleted from your PC, so that it can be used by a newer version of the client, should youdecide to install one. If you, however, want to completely remove the client software; youwould manually have to remove the \WINNT\DLink SecuriWall or \WINDOWS\DLinkSecuriWall directory.
18

Before starting
After installing, the D-Link SecuriWall VPN Client Monitor is displayed as shown in the picturebelow.
To use the SecuriWallVPN Client you first haveto select a profile, whichencludes a destinationsystem to which an IPSecconnection can beestablished.
The VPN Client is installedwith a sample phonebook,which includes someprofile configurations forsome common D-Linkappliances. You musthowever edit these tomatch the configurationyou have on your D-Linkappliance. These areincluded as examples only.
To configure a destinationsystem refer thedescription under “ClientMonitor”:
- Configuration / Profile Settings (The entries in the phonebook)
and to set further parameters:
- Parameters (The parameter folders to configure the connection)
Only if a destination system has been set in the list of profiles, a connection to this destinationcan be made:
- Establishing a Connection
19

20