cytoviva illuminator dual mode fluorescence user manual
TRANSCRIPT

CytoViva, Inc. | 570 Devall Drive, Suite 301 | Auburn, AL 36832 | [email protected] | 1-888-737-3130 www.cytoviva.com 1
CytoViva Illuminator &
Dual Mode Fluorescence
User Manual

CytoViva, Inc. | 570 Devall Drive, Suite 301 | Auburn, AL 36832 | [email protected] | 1-888-737-3130 www.cytoviva.com 2
IMPORTANT: PLEASE READ CAREFULLY
Limited Warranty
CytoViva warrants for a period of one (1) year from the date of purchase from CytoViva, Inc. or an authorized agent of CytoViva, Inc. (the “Warranty
Period”), that the unmodified CytoViva® illuminator and/or Dual Mode Fluorescence Module (the “Equipment”) when new, and subject to normal use and
service, shall be free of defects in materials and workmanship and shall perform in accordance with the manufacturer's specifications.
If any component of the Equipment does not function properly during the Warranty Period due to defects in material or workmanship, CytoViva will, at its
option, either repair or replace the component without charge, subject to the conditions and limitations stated herein. Such repair service will include all
labor as well as any necessary adjustments and/or replacement parts. If replacement components are used in making repairs, these components may be
remanufactured, or may contain remanufactured materials. Repair or replacement without charge is CytoViva’s only obligation under this warranty. This
warranty is NOT transferable from the original purchaser of the Equipment.
Limitations Other components of the product package, specifically including, but are not limited to, the light source(s), light source power transformer(s) and cord(s),
liquid light guide(s), optical filters, spectrophotometer, camera(s), software, microscope part(s), and motorized stage are warranted based on the individual
original manufacturer's warranties and policies. There is no warranty whatsoever on the contrast filters, bulbs or the coil (on the motorized stage)
purchased as part of the Equipment.
This warranty does not cover circumstances beyond CytoViva’s control, breakage, or a malfunction that has resulted from improper or unreasonable use
or maintenance, accident, tampering, misuse, neglect, improper installation, modification, improper maintenance or service, cleaning procedures, shipping
or repacking of Equipment, or service or parts to correct problems where such service or parts are performed or provided by anyone other than CytoViva
or an authorized agent of CytoViva; service required as the result of unauthorized modifications or service misuse or abuse; failure to follow CytoViva’s
operating, maintenance or failure to use items supplied by CytoViva. This warranty is also void if the light source, light source power transformer and
cord, or liquid light guide is not used in accordance with the original manufacturer's instructions, recommendations, or documentation.
Warranty service will not be provided without a dated proof of purchase. [Please return the Warranty Registration Card together with a copy of the original
receipt, within thirty (30) days of purchase.] It is the purchaser's responsibility to return the Equipment to the authorized agent from whom it was
purchased. If the Equipment was purchased directly from CytoViva, it should be returned, postage paid, along with the original dated receipt to CytoViva,
Inc., 300 North Dean Road, Suite 5 PMB-157, Auburn, AL 36830. Your repaired item or replacement product will be returned to you postage paid. In the
event the purchaser returns Equipment to CytoViva and it is determined by CytoViva that the Equipment has been returned without cause, the purchaser
will be notified and the Equipment returned at the purchaser’s expense.
DISCLAIMER OF WARRANTIES/ LIMITATION OF LIABILITY
THE WARRANTIES CONTAINED HEREIN ARE IN LIEU OF, AND CYTOVIVA EXPRESSLY DISCLAIMS AND CUSTOMER WAIVES ALL OTHER REPRESENTATIONS AND WARRANTIES, EXPRESS OR IMPLIED, STATUTORY, ARISING IN THE COURSE OF DEALING OR PERFORMANCE, CUSTOM, USAGE IN TRADE OR OTHERWISE, INCLUDING WITHOUT LIMITATION, IMPLIED WARRANTIES OF MERCHANTABILITY, TITLE, INFRINGEMENT, OR FITNESS
FOR A PARTICULAR PURPOSE. WHERE NOT PROHIBITED BY LAW, CYTOVIVA WILL NOT BE RESPONSIBLE FOR ANY CONSEQUENTIAL OR INCIDENTAL DAMAGES RESULTING FROM THE PURCHASE, USE, OR IMPROPER FUNCTIONING OF THIS EQUIPMENT REGARDLESS OF THE CAUSE. SUCH DAMAGES FOR WHICH CYTOVIVA WILL NOT BE RESPONSIBLE INCLUDE, BUT ARE NOT LIMITED TO, LOSS OF REVENUE OR PROFIT, DOWNTIME COSTS, LOSS OF USE OF YOUR EQUIPMENT, COST OF ANY SUBSTITUTE EQUIPMENT FACILITIES, OR SERVICES, OR CLAIMS OF THIRD PARTIES FOR SUCH DAMAGES. CYTOVIVAS’ LIABILITY WILL NEVER EXCEED THE PURCHASE PRICE OF ANY DEFECTIVE PRODUCT OR PART.

CytoViva, Inc. | 570 Devall Drive, Suite 301 | Auburn, AL 36832 | [email protected] | 1-888-737-3130 www.cytoviva.com 3
Table of Contents
Chapter 1: CytoViva Illuminator & Dual Mode Fluorescence Module User Manual
Part 1: CytoViva Illuminator Overview
Part 2: Standard CytoViva System Components
Part 3: CytoViva Illuminator Components
Part 4: CytoViva Installation
Part 5: CytoViva Use and Adjustment
Part 6: CytoViva Dual Mode Fluorescence (DMF) Module Overview
Part 7: The Standard CytoViva DMF system includes
Part 8: CytoViva DMF Module Components
Part 9: DMF Installation
Part 10: Using and Adjusting the DMF System
Part 11: DMF Mode Selection
Part 12: Filter Installation and Ordering Information
Part 13: Troubleshooting
CytoViva, Inc. | 570 Devall Drive, Suite 301 | Auburn, AL 36832 | [email protected] | 1-888-737-3130 www.cytoviva.com 4
CHAPTER 1: CytoViva Optical Microscope User Manual
Part 1: CytoViva Illuminator Overview
CytoViva® is an advanced illumination system that attaches to research grade microscopes. It mounts in place
of the standard microscope condenser. CytoViva, when properly aligned, provides a high contrast image with
high resolution and a low limit of detection. This manual is designed to allow a moderately experienced
microscopist to install, align, use and adjust the CytoViva system. Description for installation and use of the
optional CytoViva Dual Mode Fluorescence (DMF) system begins on page 12.
Part 2: The Standard CytoViva system includes
o CytoViva Illuminator o Liquid Light Guide
o Light Source -Dolan Jenner DC950 o Illuminator Lens Protector (optional during use) o CytoViva Installation Manual (this document)
o Light Source Manual o Warranty Card
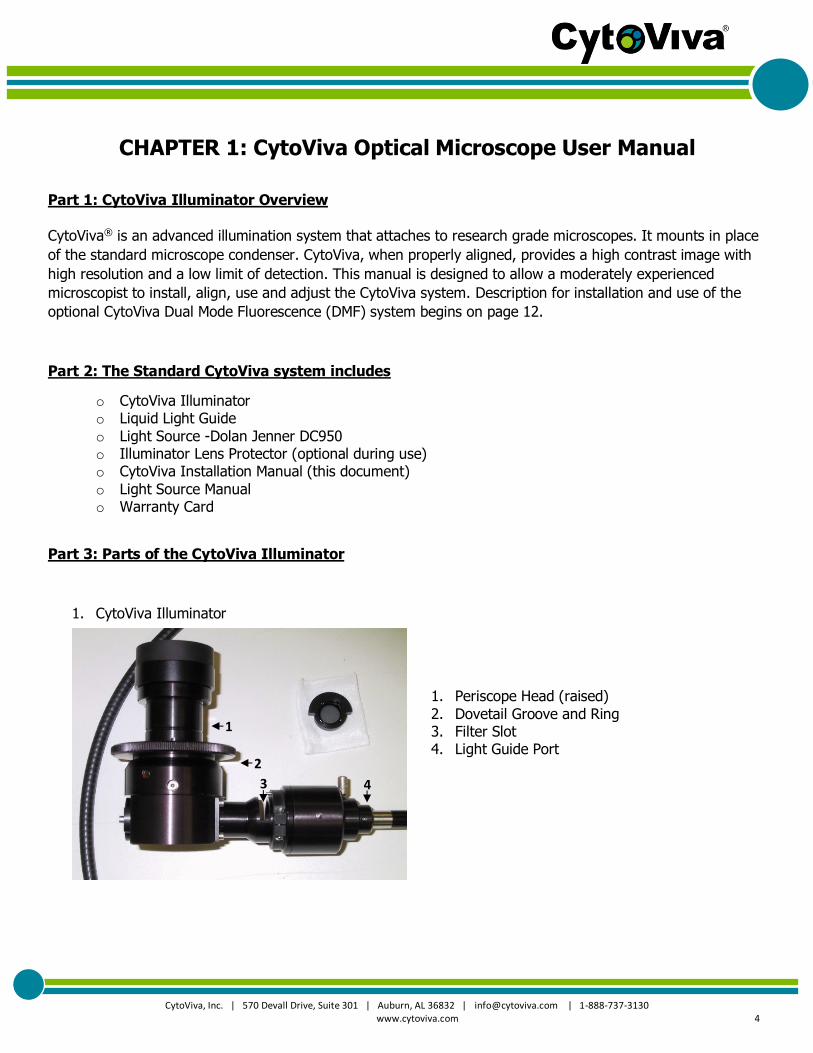
Part 3: Parts of the CytoViva Illuminator
1. CytoViva Illuminator
1. Periscope Head (raised)
2. Dovetail Groove and Ring 3. Filter Slot 4. Light Guide Port
1
4 3
2
CytoViva, Inc. | 570 Devall Drive, Suite 301 | Auburn, AL 36832 | [email protected] | 1-888-737-3130 www.cytoviva.com 5
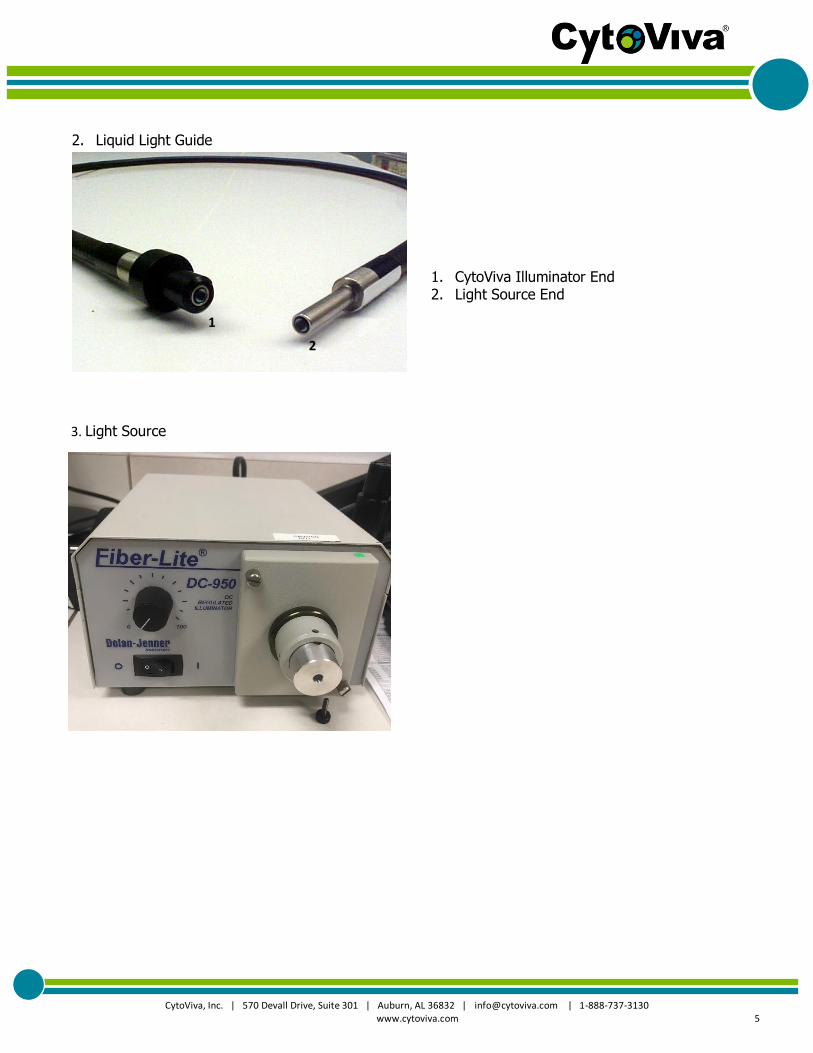
2. Liquid Light Guide
1. CytoViva Illuminator End 2. Light Source End
3. Light Source
1
2
CytoViva, Inc. | 570 Devall Drive, Suite 301 | Auburn, AL 36832 | [email protected] | 1-888-737-3130 www.cytoviva.com 6
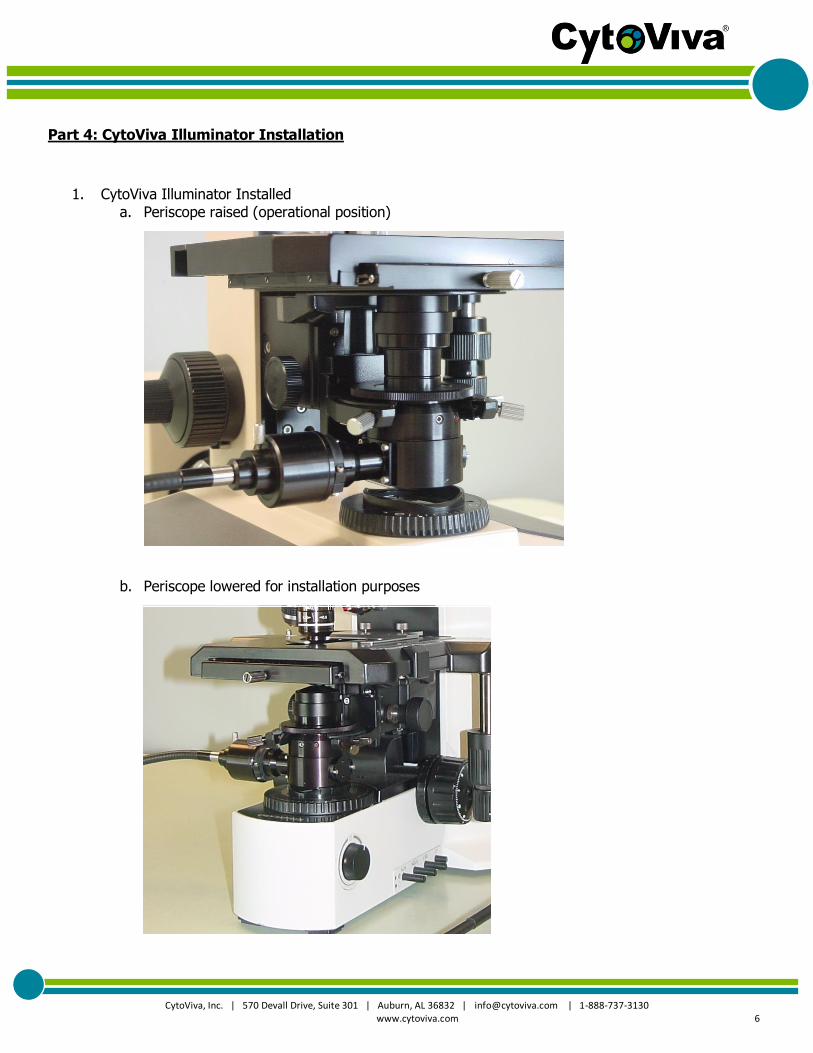
Part 4: CytoViva Illuminator Installation
1. CytoViva Illuminator Installed
a. Periscope raised (operational position)
b. Periscope lowered for installation purposes

CytoViva, Inc. | 570 Devall Drive, Suite 301 | Auburn, AL 36832 | [email protected] | 1-888-737-3130 www.cytoviva.com 7
2. CytoViva Installation CytoViva installs on most research grade microscopes. Adapter kits have been made for specific models and are designed on an individual basis.
a. Determine the type of condenser mount on your microscope (see below)
o C-shaped example- THIS IA THE TYPE ON THE OLYMPUS BX SERIES MICROSCOPES THAT ARE PROVIDED BY CYTOVIVA.
o O-shaped example

CytoViva, Inc. | 570 Devall Drive, Suite 301 | Auburn, AL 36832 | [email protected] | 1-888-737-3130 www.cytoviva.com 8
o 3-point example
b. Then follow the appropriate installation instructions. The possible types of condenser mounts include:
o C-Shaped Condenser Mount (common on Olympus) o O-Shaped Condenser Mount (common on Nikon) o 3-Point Condenser Mount (common on Zeiss)
i. C-Shaped Condenser Mount (common on Olympus) 1. Raise specimen stage - using course focus.
2. Using the condenser focus know position the condenser mount ~ 2/3 from top of travel
3. Remove installed condenser
4. Lower periscope on CytoViva 5. Insert CytoViva dovetail into C-mount.
a. Should be engaged a full 180o of CytoViva dovetail.
6. Light guide port can be in any convenient orientation. 7. Lightly tighten set screw (Do not over tighten) 8. Raise periscope on CytoViva (Make no contact with stage)
ii. O-Shaped Condenser Mount (common on Nikon)
1. Raise specimen stage using course focus. 2. Remove installed condenser 3. Raise condenser mount fully
a. In some cases, the condenser mount has a small silver stop on the top left of the condenser mount that limits the condenser travel. This stop is

CytoViva, Inc. | 570 Devall Drive, Suite 301 | Auburn, AL 36832 | [email protected] | 1-888-737-3130 www.cytoviva.com 9
a spring loaded plunger that is locked in place with a set screw. Loosen the set screw to allow full travel of the condenser.
4. Lower periscope on CytoViva. 5. Remove CytoViva dovetail adjustment ring (unscrews) 6. Position CytoViva into condenser mount so threads extend just above mount.
7. Replace CytoViva dovetail adjustment ring 8. Lightly tighten so that CytoViva does not wobble in mount. 9. Raise periscope on CytoViva taking care not to contact underside of stage.
iii. 3-Point Condenser Mount (common on Zeiss)
1. Raise stage – using course focus. 2. Remove installed condenser 3. Remove condenser mount from microscope stand.
4. Remove CytoViva dovetail adjustment ring – not needed for this application. 5. Fully loosen the alignment screws. 6. Align rear spring-loaded mounting pin of condenser mount with the small pin
groove of CytoViva. Groove is visible once the dovetail adjustment ring is removed.
7. Gently compress spring-loaded pin with CytoViva and align pin groove with alignment screws. The alignment screws should mate with the pin groove.
Alignment screws may need to be adjusted to ensure proper mating. 8. Adjust alignment screws so CytoViva is approximately centered. 9. Replace condenser mount onto microscope stand, taking care to protect CytoViva
lens surface. 10. Raise periscope on CytoViva.
c. Attach Liquid Light guide to the CytoViva Illuminator i. Insert black metal adapter of light guide into CytoViva light guide port, aligning V-groove
on adapter with the thumb screw on the port. ii. Insertion stop on adapter should seat tightly against port – loosen port thumb screw if
required.
iii. Lightly tighten port thumb screw – should align with V-Groove of illuminator. Illuminator should now be stable – no rotation, in/out movement, or wobble.
d. Attach Liquid Light Guide to Light Source
i. Insert adapter of light guide into light source port until adapter stop is seated against port face.
ii. No prerequisite orientation required.
iii. Lightly tighten light source port thumb screw. 1. Do not kink or fold light guide; a gentle loop of guide is acceptable. 2. Attach light source to power and turn “ON”.
3. The Dolan Jenner light source is a halogen light source that is 150 watts. PLEASE NOTE THAT THE ALUMINUM BULB WE HAVE INSTALLED GETS VERY HOT AND
THEREFORE THE AREA AROUND THE LIGHT GUIDE EXIT GETS VERY HOT!

CytoViva, Inc. | 570 Devall Drive, Suite 301 | Auburn, AL 36832 | [email protected] | 1-888-737-3130 www.cytoviva.com 10
e. CytoViva Periscope i. Double check to make sure that the CytoViva periscope is in the raised position (see
below)
1. If not your sample will not receive illumination.
3. Alignment i. Turn on the light source power.
1. Note: If you are using the optional Exfo light source an emission filter capable of blocking ultraviolet (UV) light must be used.
ii. Apply ~3 large drops of Type A immersion oil to the CytoViva lens. Avoid air bubbles in
the oil. Air bubbles can be dragged off illuminated lens surface with the tip of the oil applicator. Air bubbles will create undesirable noise in the image.
iii. Place sample slide on stage.
iv. Raise CytoViva (using the condenser focus knob) so the oil contacts lower surface of the slide.
v. Using a low power objective (e.g. 4x or 10x), focus the objective on the sample (see
Figure 1) vi. Use the condenser focus knob to focus CytoViva on the sample (see Figure 2). CytoViva
is focused when the center spot of illumination is the smallest.
vii. Use the condenser alignment screws to center the CytoViva illumination spot (see Figure 3).
1. Note: As with conventional condensers, slight realignment may be required after changing objectives.

CytoViva, Inc. | 570 Devall Drive, Suite 301 | Auburn, AL 36832 | [email protected] | 1-888-737-3130 www.cytoviva.com 11
Part 5: CytoViva Use and Adjustment
1. Samples - for best results use
a. No. 1 cover glass b. 1mm standard microscope slides.
i. LabTekTM Chambers slides have been used successfully.
ii. Total Focal depth of CytoViva is 1.5mm. c. Mono-layer, sub-confluent cells are ideal samples. d. If you are using tissue samples, the ideal thickness is 30 microns or less. All sample
preparation must be evaluated on an individual case. e. Limit debris or air bubbles in the field of view. f. Use clean cover glass and slides.
10X objective -Focus objective on sample
))0first)
Figure 1. CytoViva Illumination:
Not Focused
Not Center Aligned
Figure 1. CytoViva Illumination:
Focused
Not Center Aligned
Figure 1. CytoViva Illumination:
Focused
Center Aligned
CytoViva, Inc. | 570 Devall Drive, Suite 301 | Auburn, AL 36832 | [email protected] | 1-888-737-3130 www.cytoviva.com 12
g. Depending on specific applications, sample volumes of 1-10 ul have been shown to work best.
2. Oil Immersion - for best results use
a. Type A immersion oil (nd > 1.515). b. Ensure there is enough oil to completely cover the entire illuminated surface of the CytoViva
lens when in contact with underside of sample.
c. Do not mix oil types on samples. d. Do not allow water or other material/fluids to mix with oil. e. User may need to add some oil between samples.
f. After viewing sample, dab oil off of objective with lens cloth – no need to remove oil from CytoViva between samples.
g. Oils specific for fluorescence microscopy may improve fluorescent observation.
3. Objectives a. A variety of objectives will work with CytoViva. b. Results may vary depending on the installed objective set. Higher quality objectives will likely
produce better images. c. The NA of the objective must be below 1.2. The NA of the CytoViva Illuminator is >1.3 d. NA of objective can adjust brightness, reduce glare, or improve contrast.
i. Note: decreasing NA of the objective will decrease resolution; adjust as your application merits.
e. Not all objectives have an iris. f. Most 60x - 100x objectives will require an adjustable iris/NA.
i. Objectives with a NA of >1.2 require an iris. g. Long distance 40x objectives have been used with good results.
4. Recommended Objectives
a. Plan Fluorite 10x air b. Plan Fluorite 40x 0.75 NA c. 60x -100x oil with iris 1.35-1.00 NA
5. Using Condenser Focus a. A slight focus adjustment of CytoViva may be used to regulate image brightness or glare.
i. Note: use care not to push CytoViva into sample slide.
6. Cleaning and Care a. Clean the CytoViva lens and objective after use every time
i. Use high quality lens cleaner and lens paper to prevent residue buildup
b. Wipe any excess oil from the CytoViva body. c. No mechanical adjustment or maintenance of the CytoViva Illuminator is required or
recommended.
DO NOT REMOVE OR ADJUST FASTENERS ON THE CYTOVIVA ILLUMINATOR. DOING SO MAY
DAMAGE THE ILLUMINATOR AND WILL VOID THE WARRANTY.

CytoViva, Inc. | 570 Devall Drive, Suite 301 | Auburn, AL 36832 | [email protected] | 1-888-737-3130 www.cytoviva.com 13
Additional Notes on Use
1. Do not look directly into light source adapter or light guide. 2. Do not open light source case while light source is connected to power supply. 3. Protect light source from liquids.
4. Protect the CytoViva lens surface. As with any microscopic lens, scratches will diminish performance. 5. Protect CytoViva as you would any other microscopic component. It is designed for normal microscopic
use.
6. Do not make modifications or adjustments to the CytoViva Illuminator not outlined in this document. 7. Do not kink or sharply bend the liquid light guide. 8. Use of the Exfo light source in combination with the CytoViva system requires the use of a UV blocking
emission filter or the provided triple pass emission filter!
Part 6: CytoViva Dual Mode Fluorescence (DMF) Module Overview
The CytoViva Dual Mode Fluorescence (DMF) module enables researchers to easily modulate simultaneously
between multiple fluorescent and non-fluorescent labels or any combination of the modes. Samples are viewed
directly through the microscope eyepiece in real time and quickly captured by a standard microscope camera
in a single exposure.
Part 7: The Standard CytoViva DMF system includes
o CytoViva DMF Module o Light Source Light Guide o Light Source
▪ Exfo Light Source
Part 8: Parts of the CytoViva DMF Module
1. CytoViva Dual Mode Fluorescence (DMF) Module

CytoViva, Inc. | 570 Devall Drive, Suite 301 | Auburn, AL 36832 | [email protected] | 1-888-737-3130 www.cytoviva.com 14
1. Four filter locations (numbered 1 – 4; indicating mode) 2. A coarse adjustment knob (filter selection)
3. A fine adjustment knob 4. Light guide to CytoViva Illuminator
2. Liquid Light Guide Between CytoViva Illuminator and DMF Module
1. CytoViva Illuminator End 2. DMF Module End (Front Port)
1
1
2
3
4
2
1
2
CytoViva, Inc. | 570 Devall Drive, Suite 301 | Auburn, AL 36832 | [email protected] | 1-888-737-3130 www.cytoviva.com 15
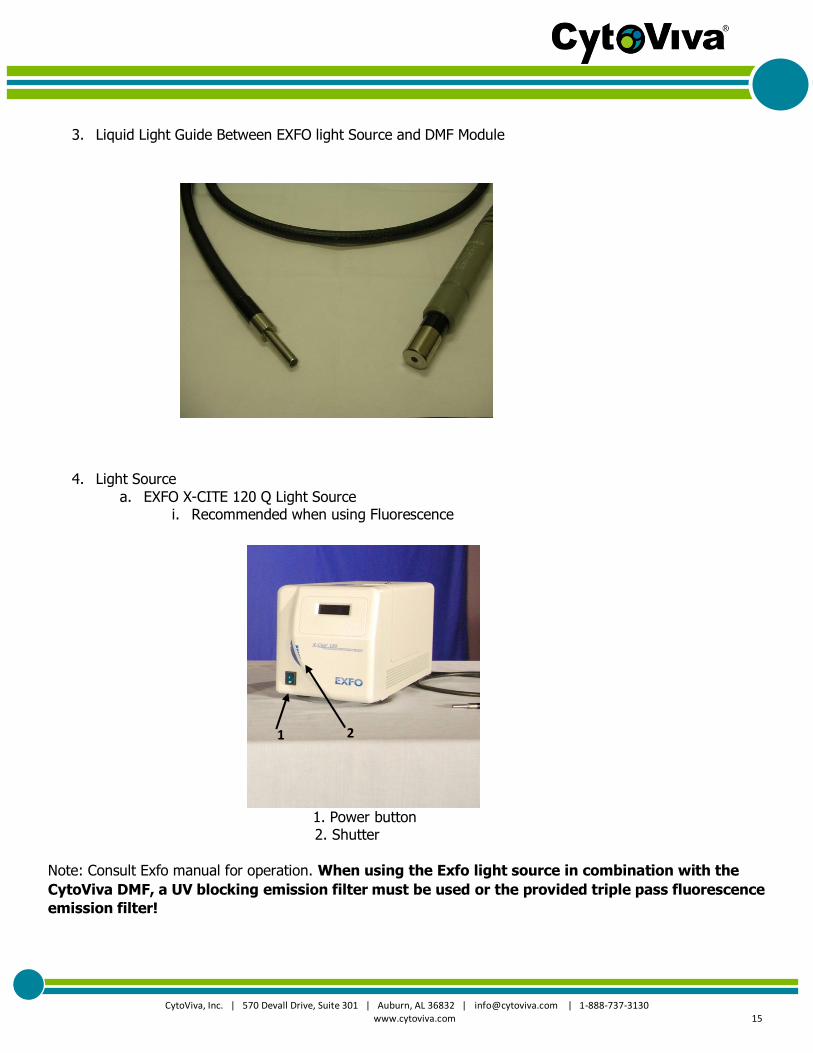
3. Liquid Light Guide Between EXFO light Source and DMF Module
4. Light Source
a. EXFO X-CITE 120 Q Light Source i. Recommended when using Fluorescence
1. Power button 2. Shutter
Note: Consult Exfo manual for operation. When using the Exfo light source in combination with the
CytoViva DMF, a UV blocking emission filter must be used or the provided triple pass fluorescence
emission filter!
1 2

CytoViva, Inc. | 570 Devall Drive, Suite 301 | Auburn, AL 36832 | [email protected] | 1-888-737-3130 www.cytoviva.com 16
Part 9: DMF Installation
1. Light Source a. The system is compatible with the EXFO X-Cite 120. b. The system is also compatible with any fluorescent light source with the ability to output the
light using a light guide that ends with the 3mm outside diameter.
NOTE: When using the Exfo X-Cite-120 in combination with the CytoViva DMF, a UV blocking
emission filter must be used.
2. Light Guide a. To set up the system, take the light guide from the light source and fully insert it into the rear
port of the CytoViva DMF unit and tighten thumb screw. b. Fully insert the light guide from the CytoViva Illuminator to the front port of the DMF unit,
gently tightening the thumb screw.
c. Turn on the light source.
i. Do not kink or fold the light guide; a gentle loop is acceptable. d. Attach the light source to the power supply.
i. The light source may require a few minutes to “warm-up” and stabilize. Slight color fluctuations may be observed.
3. Emission Filter – This is provided and usually a triple pass filter that emits in 3 fluorescent wavelength
ranges (Usually we ship with DAPI, FITC, and Texas Red). a. The position of the filter may vary depending on the microscope. b. The filter may be in a filter tray or a filter cube.
c. When using the Exfo in combination with the CytoViva system, a UV blocking emission filter must be used!! The shipped triple pass filter shipped with the system will act as a UV blocker by nature.
Part 10: DMF Use and Adjustments
1. CytoViva Illuminator Focus Alignment a. Alignment for this system is described in the CytoViva Illuminator Installation (Part2: #3) b. Alignment should be conducted with the DMF module in the full unfiltered mode. (See below
DMF Mode Selection) 2. Coarse Adjustment Knob
a. The coarse adjustment knob allows for convenient selection of filters.
b. There are four filter locations on the module indicated by the numbered positions. These numbered positions correspond to the full fluorescence mode of the specific filter.
CytoViva, Inc. | 570 Devall Drive, Suite 301 | Auburn, AL 36832 | [email protected] | 1-888-737-3130 www.cytoviva.com 17
3. Fine Adjustment Knob
a. The fine adjustment knob is used for precisely modulating between modes of each filter.
b. The fine adjustment knob can be used to transition between filters. 4. The key feature of the system is that the user can easily transition between any combination of full
fluorescence and unfiltered modes.
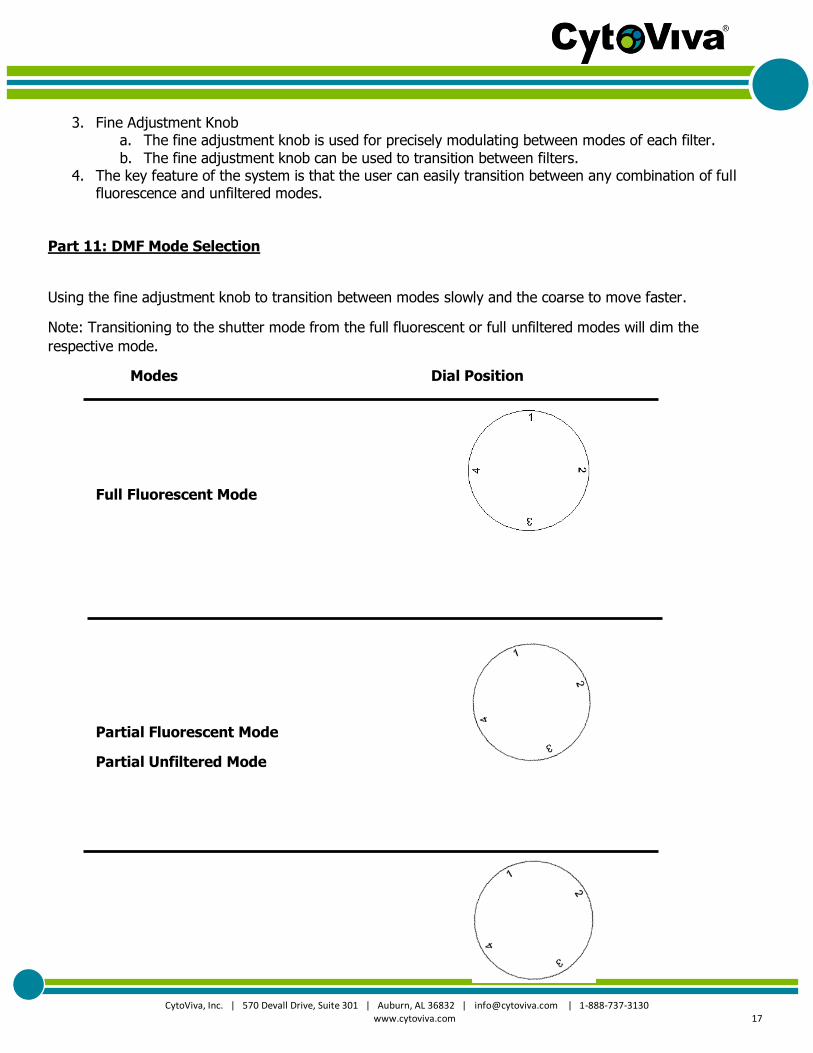
Part 11: DMF Mode Selection
Using the fine adjustment knob to transition between modes slowly and the coarse to move faster.
Note: Transitioning to the shutter mode from the full fluorescent or full unfiltered modes will dim the
respective mode.
Modes Dial Position
Full Fluorescent Mode
Partial Fluorescent Mode
Partial Unfiltered Mode

CytoViva, Inc. | 570 Devall Drive, Suite 301 | Auburn, AL 36832 | [email protected] | 1-888-737-3130 www.cytoviva.com 18
Full Unfiltered Mode
Shutter Mode
Part 12: Filter Installation and Ordering Information
Consult with your CytoViva representative to help select the appropriate filter sets.
The DMF module uses 25mm diameter exciter filters.
1. To install filters
a. Remove the painted housing of DMF module by removing the 8 screws on the sides of the unit. b. The filter position indicated by the dial corresponds to the filter holder located 180° on the
wheel (e.g. 12 o’clock position in the dial corresponds to the 6 o’clock position on the wheel).
c. Filters are held in place by a single screw on the edge of the wheel. i. Note: Filter corresponding with dial position is inline with optic path.
d. Loosen the desired location set screw and remove existing filter.
i. Note: Use a piece of lens paper to remove and install filters to avoid damaging the filter surfaces.
e. Install new filter noting the light path: this arrow should point toward the front of the unit. f. Gently, snug the set screw and replace the housing.

CytoViva, Inc. | 570 Devall Drive, Suite 301 | Auburn, AL 36832 | [email protected] | 1-888-737-3130 www.cytoviva.com 19
CytoViva System
1. CytoViva Illuminator
2. CytoViva DMF Module 3. Liquid Light Guide 4. Light Source (Exfo pictured)
5. Emission Filter Tray (Note: Emission filter must be in filter tray) Part 13: Troubleshooting
1. Light Source Will Not Turn On
a. The light source is equipped with a thermal auto-off switch to protect overheating. Allow the light source to cool down with power off for 15 minutes and try to power on.
b. Check that power supply LED light is illuminated and the power supply is plugged into the light
source. c. The light bulb may be burned out and should be replaced.
2. No Light on the Sample
a. Pull the Periscope to the raised position on the CytoViva Illuminator
2
1 3
4
5
3

CytoViva, Inc. | 570 Devall Drive, Suite 301 | Auburn, AL 36832 | [email protected] | 1-888-737-3130 www.cytoviva.com 20
3. The Image is Blurry or Distorted a. Ensure CytoViva is properly aligned and focused. b. Sample may be too thick or granular.
c. Oil may have been contaminated with water. Clean oil off of CytoViva lens, objective, and sample. Reapply oil.
d. Sample glass may be “dirty”. Clean glass surfaces.
4. There is Debris in the Field a. Reduce volume of sample buffer. b. If possible, wash your sample with clean media or buffer prior to mounting.
c. Sample glass may be “dirty”. Clean glass surfaces.
5. The Image is too Bright a. Reduce light source diaphragm.
b. There may be too much debris in the field. c. Slightly adjust condenser focus knob. d. Insert polarizing filter.
e. If available, adjust objective iris. f.
6. Fluorescence
a. No signal or weak signal. b. Sample may be bleached. c. Fluorescence label may not be present.
d. Excitation or emission filters may not correspond to fluorochromes.
For support issues please call or email:
1-888-737-3130