cx odbc driver installation guide - uconn health
TRANSCRIPT

CX ODBC Driver
Installation Guide

Copyright 2001 Jenazabar, Inc.You may print any part or the whole of this documentation to support installations of Jenzabar software.Where the documentation is available in an electronic format such as PDF or online help, you may storecopies with your Jenzabar software. You may also modify the documentation to reflect your institution'susage and standards. Permission to print, store, or modify copies in no way affects ownership of thedocumentation; however, Jenzabar, Inc. assumes no responsibility for any changes you make.
Filename: inodbcDistribution date: 08/30/2001
Contact us at www.jenzabar.com
Jenzabar CX, and QuickMate are trademarks of Jenzabar, Inc.INFORMIX, PERFORM, and ACE are registered trademarks of the IBM CorporationImpromptu, PowerPlay, Scenario, and Cognos are registered trademarks of the Cognos CorporationUNIX is a registered trademark in the USA and other countries, licensed exclusively through X/Open Company LimitedWindows is a registered trademark of the Microsoft CorporationAll other brand and product names are trademarks of their respective companies

i
JENZABAR, INC.CX ODBC DRIVER INSTALLATION GUIDE
TABLE OF CONTENTS
INTRODUCTION........................................................................................................................................... 1
Overview................................................................................................................................................. 1Operation of the ODBC Link................................................................................................................... 1Purpose of This Guide............................................................................................................................ 1Intended Audience.................................................................................................................................. 1
INSTALLATION INSTRUCTIONS FOR THE JENZABAR ODBC DRIVER ............................................... 3
Introduction............................................................................................................................................. 3SMO Distribution .................................................................................................................................... 3Overall Process ...................................................................................................................................... 3
Preparing the Informix Driver Service on the Unix Host ............................................................................ 4Introduction............................................................................................................................................. 4Before You Begin ................................................................................................................................... 4Requirements for First Time Setup ........................................................................................................ 4About the setup_odbc Script .................................................................................................................. 5
Preparing to Install the Driver on the PC.................................................................................................... 7Location of Installation Software ............................................................................................................ 7Removing the Client SDK....................................................................................................................... 7Entry in the PC's services File................................................................................................................ 7Entry in the PC's hosts File .................................................................................................................... 7Final Preparation .................................................................................................................................... 8Working Without Permanent Leases in DHCP....................................................................................... 8Defining ODBC DSNs............................................................................................................................. 8Use of Two Drivers ................................................................................................................................. 8Passwords for Administrative Users....................................................................................................... 8If You Are an NIS User ........................................................................................................................... 8
Installing the Driver on the PC.................................................................................................................... 9Introduction............................................................................................................................................. 9Using the Wizard .................................................................................................................................... 9
MIGRATING YOUR DATA SOURCES ...................................................................................................... 13
Introduction........................................................................................................................................... 13How to Migrate Your Data Sources...................................................................................................... 13
TROUBLESHOOTING ............................................................................................................................... 15
SUMMARY.................................................................................................................................................. 17
INDEX ......................................................................................................................................................... 19


Installing the ODBC Driver 1 Introduction
INTRODUCTION
Overview
Jenzabar, Inc. provides a proprietary ODBC (Open Database Connectivity) driver for SQL accessto the Jenzabar CX database and processes. The Jenzabar ODBC driver supports the elementsof ODBC standards required for Jenzabar CX application use. It is not guaranteed to work withproducts other than those that those distributed by Jenzabar. The driver is frequently updated asthese products are upgraded in order to support Jenzabar CX products such as CampaignManagement and Human Resources, as well as third-party products such as Impromptu whichare resold by Jenzabar.
A proprietary ODBC driver is provided because it allows features to be added to Jenzabar CXsoftware which would otherwise not be practical or even possible. The best example of this is theuse of virtual tables by Jenzabar CX PC software. For example, the Document Imaging softwarecan do an ID lookup just the same as a libentry program would. It can use phonetic matchingbecause the program uses the virtual table ids_aps which is implemented by the Appserverids_aps. This proprietary ODBC driver will allow future additions to the Jenzabar CX PC softwarethat could not be made if a commercial driver were used.
The Jenzabar ODBC driver allows integration of Jenzabar CX information with any other sourcesof information for comparison and evaluation. With the Jenzabar ODBC driver, you can useJenzabar CX data with third party tools, including Microsoft Office and Visual Basic.
Operation of the ODBC Link
The C:\Windows\System directory contains a dll named cisodbc.dll (the name may have a trailingdigit to indicate the version; e.g., cisodbc5.dll). This is the ODBC driver used by a Jenzabar CXprogram to link to either the Informix database or to Jenzabar CX Appservers.
In operation, a program that needs to connect to an ODBC database will use the operator-supplied ODBC Data Source Name to pick a specific ODBC driver. It will then make calls to thecode in the driver to connect to the required database and extract data from it. Generally, thisdatabase may be either on the local machine or accessed from a remote machine over thenetwork. In the specific case of the Jenzabar ODBC driver, the data will be retrieved from theJenzabar CX database server.
With Jenzabar CX programs, the Jenzabar ODBC driver is used and connects to the host namedin the ODBC Setup file using the port number specified in that file. Some programs open a singleconnection to the database, while others open two. The first of these connects through thespecified port to the host program cisinf, which is the backend (host side) portion that interactsdirectly with the Informix database. If a second connection exists, it connects through thespecified port to the host program cisaps. This program makes the connection to the AppServersthat deliver data from the Jenzabar CX virtual tables (those with a suffix _aps; e.g., ids_aps).
Purpose of This Guide
This guide serves as a learning tool and reference guide for installing the Jenzabar ODBC driveron your system.
Intended Audience
This guide is for use by the system users in your institution’s computer center. System usersinclude the Jenzabar coordinator, system administrator, and programmer/analysts.


Installing the ODBC Driver 3 Installation
INSTALLATION INSTRUCTIONS FOR THE JENZABAR ODBC DRIVER
Introduction
These instructions support the installation of the 32-bit Jenzabar ODBC driver, version 1.5.5. Theinstallation of the ODBC driver to allow the connection of a PC to a host involves two separateactions. First you must install the server portion on the host, and second, install the client portionon the PC. The server portion is incorporated in the Unix component of your version of JenzabarCX.
SMO Distribution
All Jenzabar CX software is delivered via the SMO process. The setup components for theODBC driver are deposited on the Jenzabar CX host machine and must be moved from there toa PC. The distribution can then be copied to a diskette or used directly from a network server.
Overall Process
The overall installation consists of three components:• Preparation of the Driver Service on the Unix host• Preparation of the PCs• Actual PC installation
This document addresses each of these components sequentially.

Unix Host Preparation 4 Installing the ODBC Driver
Preparing the Informix Driver Service on the Unix Host
Introduction
This section provides information to help you complete the setup of the Unix (server) componentof the Jenzabar ODBC driver.
Before You Begin
Whenever you perform maintenance on your system, Jenzabar recommends you back up yourexisting files. To save a copy of your current Unix ODBC setup:
% SU cshpassword for user:# cd /opt/cisodbc/$CARSV# cp cisinf cisinf.`date +%y%m%d`# cp cisaps cisaps.`date +%y%m%d`# cd debug# cp cisinf cisinf.`date +%y%m%d`# cp cisaps cisaps.`date +%y%m%d`# exit
Requirements for First Time Setup
In order for the Informix client SDK ODBC drivers to work after their first-time installation,changes in the configuration of the Informix engine may be required. These changes are requiredonly if network access to the engine is not functional on your Jenzabar CX machine.
To configure your network database access:
1. Create an entry in the /etc/services file to define the port number that Informix will use for atcp/ip connection. Complete this step before the Informix engine is shut down and restarted.
Notes:• Jenzabar recommends that an entry for this purpose be named istarcarsi for the
production release. Make a back-up copy of the /etc/services file. The new entry shouldlook like the following:
istarcarsi1001/tcp# Port for istar connection• The number used here should not be one that is already in use by any other service.
Since entries do not need to be in order, it is best to search for the number using vibefore adding a new one.
2. Create an entry in the informix configuration file for the engine for which access is desired(e.g., onconf.carsi). This file must have an entry on the DBSERVERALIASES line for accessto the engine. For example, you may want to name the file carsitcp, indicating a tcp/ipconnection to the engine. In the case of the normal setup, the DBSERVERNAME name isfor shared memory (shm) access to the engine, which is the method normally used foraccess to the engine by tools on the same host such as ACE, PERFORM, or ISQL. Make abackup copy of the onconf.cars file. The first new entry should look like:
DBSERVERALIASEScarsitcp # List of alternate dbservernames
3. Create an additional NETTYPE entry for soctcp (you should already have an existing entryfor ipcshm). The new entry should look like:
NETTYPEsoctcp, 1, 50, NET # replace defaults
4. Create an entry in the $INFORMIXDIR/etc/sqlhosts file for network access to the engine.Make a back-up copy of this file. The new entry should be defined as follows:
server nettype hostname service port

Installing the ODBC Driver 5 Unix Host Preparation
carsitcp onsoctcp admin istarcarsi
This example assumes admin is your hostname. You should use your actual hostname in itsplace.
5. Shut down and restart the engine so the new configuration parameters take effect. As in allcases where the configuration file is changed, Jenzabar recommends you make backupcopies of the configuration files that were changed and do a level 0 archive of the enginebefore making the change.
Once the engine has come back online, the system should be ready to accept Informix CLIODBC driver connections.
About the setup_odbc Script
The setup_odbc script sets up most of the required files and entries and uses an environmentvariable defining the release to determine the contents of the entries. Therefore if your site hastwo releases (e.g., carsi and carstrain), then the script must be run twice, once for each release.Note that the script will not work if your site has one release and two databases. In this lattercase, the setup_odbc script creates the required entries for the release, and you must manuallyhandle the second set of entries to attach to the carstrain database.
If you have two releases, then running setup_odbc twice (after doing a setdb to the trainingrelease for the second run) creates the following two directories:
drwxr-xr-x 4 root carsctrl 1024 Nov 12 15:03 /opt/cisodbc/carsidrwxr-xr-x 4 root carsctrl 1024 Nov 12 15:03 /opt/cisodbc/carstrain
The following example demonstrates how to add a new ODBC access mechanism to the Unixsystem. It involves three steps: creating new entries in the services file, creating new entries inthe inetd.conf file, and creating a new directory in the directory /opt/cisodbc. For the purposes ofthis example, it is assumed that the site has two databases and one release. In this case thesetup_odbc script will not work for the training database.
1. Edit /etc/services as follows:
# vi /etc/services
Find an existing line referring to the production database and copy it for train. Change theline as shown below. White space may be used to make the file more readable. The poundsign (#) is used to introduce a comment. The only change to be made in the copy is tochange the port address to be the one desired for the new access (in this case 9065).
Original:
Cisinf_carsi 9055/tcp # For the Jenzabar ODBC Driver for carsi
Copy
Cisinf_carstrain 9065/tcp # For the Jenzabar ODBC Driver for carstrain
2. Edit /etc/inetd.conf as follows:
# vi /etc/inetd.conf
Original:
cisaps_carsi stream tcp nowait root /opt/cisodbc/carsi/cisaps.env cisaps.envcisaps_carsi_dbg stream tcp nowait root /opt/cisodbc/carsi/cisaps.env.dbg cisaps.env.dbgcisinf_carsi stream tcp nowait root /opt/cisodbc/carsi/cisinf.env cisinf.envcisinf_carsi_dbg stream tcp nowait root /opt/cisodbc/carsi/cisinf.env.dbg cisinf.env.dbg

Unix Host Preparation 6 Installing the ODBC Driver
Copy:
cisaps_carstrain stream tcp nowait root /opt/cisodbc/carstrain/cisaps.env cisaps.envcisaps_carstrain_dbg stream tcp nowait root /opt/cisodbc/carstrain/cisaps.env.dbg cisaps.env.dbgcisinf_carstrain stream tcp nowait root /opt/cisodbc/carstrain/cisinf.env cisinf.envcisinf_carstrain_dbg stream tcp nowait root /opt/cisodbc/carstrain/cisinf.env.dbg cisinf.env.dbg
In this case, you are accessing a different database so the entries in inetd.conf must have adifferent path name to reflect the fact that the scripts are different. The scripts such ascisinf.env contain the code to initialize the environment variables necessary to access thecorrect database. In some other cases, the only difference between the copy and theoriginal would be the first column, ie the service port name. An example of the latter is thesetup for remote Jenzabar access to the client database. Because of the Jenzabar firewallthe only two ports that can be used at Jenzabar to access a client database are 9055 and9054.
3. Command inetd to reread its configuration file.
• For HP systems:
# /etc/inetd -c
• For IBM systems, find the Process ID number for inetd and send a HUP signal to it, asfollows:
# ps -eaf | grep inetd root 147 1 0 Apr 12 ? 1:01 /etc/inetd jdoe 12365 12364 0 16:39:40 ttypb 0:00 grep inetd # kill -HUP 147
4. Make a new directory in /opt/cisodbc named carstrain. Copy the contents of carsi tocarstrain. Edit the scripts in carstrain to set up properly for the carstrain database instead ofthe carsi database of the original directory.

Installing the ODBC Driver 7 PC Preparation
Preparing to Install the Driver on the PC
Location of Installation Software
The software you need to install the Jenzabar ODBC driver on the PC resides in self extractingzip files in the SMO root directory. There is only one file.
The preferred method of transferring the file depends on the local computer and network set-up.Typically, most institutions can use ftp on the PC to transfer files from the host to the PC. Notethat you should use Binary mode to transfer the software files from the host to the PC.
When you open either of these files (by double clicking on it in Windows Explorer for example) itwill extract its contents to a directory of your choosing. Jenzabar recommends that it be extractedto a network server accessible to all administrative PCs.
The extraction process creates a setup.exe program and the associated files needed for theInformix Client SDK. Run the setup program, allowing the Informix installation wizard to guide youthrough the process of installing the ODBC drivers which are in the client SDK. Unless you havelocal reasons to do otherwise, Jenzabar recommends you select the custom install.
The first option after you select the custom install method is the destination folder. Jenzabarrecommends that if you already have a Client SDK installed, change the destination to somethinglike:
C:\\Program Files\\Informix\\CSDK26
In this way, the previous version is not overwritten and the directory reflects the version of theInformix Client SDK. If this the first time a Client SDK has been installed on the client workstation,then pick the option to set INFORMIXDIR. Otherwise, if this is the second installation of the ClientSDK, it is not necessary to set the INFORMIXDIR, since running the program setnet32 canchange the value of INFORMIXDIR. You must consider what version you want to use if youchoose not to set the INFORMIXDIR. In this way you can maintain and try multiple versions of theInformix Client SDK.
Removing the Client SDK
If you run setup.exe a second time, the installation program will enable you to remove the entireClient SDK. During your second execution of the setup program your are prompted to select oneof the following three options: Modify, Repair and Remove.
Entry in the PC's services File
You must have an entry in the services file on the PC for the tcp port that the engine is using. Forexample, you can create an entry in /etc/services with a name istarcarsi. Regardless of the nameselected, it must be duplicated in the services file on the PC in C:\\Windows (or whatever yourwindows directory is named). You can use the notepad editor to add this line to the PC's servicesfile. It should duplicate the line in the /etc/services file on the host. Note that in Windows NT, theservices file is in C:\\winnt\\system32\\drivers\\etc.
Entry in the PC's hosts File
If the PC is not set up to use a name server, then the host name of the administrative machinemust be in the hosts file in C:\\Windows (same as services for NT). If the PC is already beingused to connect by tcp/ip to the host, then this requirement should have already been met. Anexception to this might occur if a connection is always made currently using an IP addressinstead of a machine name. In this case, your institution might have decided to not put anything inthe PC's hosts file.

PC Preparation 8 Installing the ODBC Driver
Final Preparation
For Informix driver, set up the Data Sources to be used by the programs which will access thedatabase through the ODBC driver. Note that the configuration window for the Informix 3.3 driverhas a test button which will immediately test for a connection to the database.
Working Without Permanent Leases in DHCP
If you do not want to use permanent leases in DHCP, then a pool of addresses may be set up inwhich each administrative PC that will use ODBC is assigned an ip address. You must thenassign a name for DNS purposes for each of these ip addresses. Each member of the poolshould then correspond to an entry in the DNS and to an entry in the .rhosts file for eachadministrative user of ODBC.
Defining ODBC DSNs
In order to use the CLI ODBC driver, you must define one or more ODBC DSNs. To perform thisstep, select Start/Settings/Control Panel/32bit ODBC. The first entry is the name of the DSNwhich will appear in any selection window that is presented to the user. For the Informix driver,you must provide the low level information when you configure the DSN.
Use of Two Drivers
All Jenzabar Visual Basic PC programs require two database connections. The first connection isto the database and is accomplished when the CLI driver connects to cisinf to retrieve data fromthe database. The second connection occurs when the Jenzabar driver connects to cisaps toretrieve data from the virtual tables (appservers). The names of these two DSNs must be thesame, except the latter will have "APS" appended to the end of the former (e.g., dbase anddbaseAPS. The names are case-sensitive.).
Passwords for Administrative Users
When using the VB PC programs, observe the following restrictions when you select passwordsfor the administrative user:• The passwords must be less than or equal to eight (8) characters.• Do not use semicolons (;) in the password.
If You Are an NIS User
If you use NIS on your campus, remember that changing network setup files such as the servicesfile does not cause any changes to the data used by the systems until the NIS managementprogram is used to publish the data.

Installing the ODBC Driver 9 PC Installation
Installing the Driver on the PC
Introduction
After the Unix host is set up and the PCs have been prepared for installation, the actualinstallation process is accomplished through the use of an Install Wizard. This section details howto complete the wizard to obtain the desired results.
The wizard displays a variety of dialog boxes, shown in the following pages for illustrativepurposes.
Using the Wizard
1. Access the setup.exe program, located in the odbc32.v55 directory, using Windows Exploreror My Computer.
2. Click on the icon for setup.exe to execute the setup program. The Jenzabar ODBC Setupwindow appears, as follows:
3. Click on Continue. The Install Drivers window appears, as follows:
The listbox in the above window will contain two drivers for the 32-bit version of the driver.One of the two drivers is the debug version. Using the debug version displays a screencontaining the SQL statements it is currently processing, providing problem solvinginformation. On a user machine this version is optional, but Jenzabar recommends you installit on your institution's Jenzabar PC (i.e., the PC you must maintain to receive maintenancesupport on the PC-based products).
4. Highlight the desired driver(s), and then click OK. The ODBC driver is installed with thecopying of some files onto the system.Notes:• When installing the 32-bit driver, do not choose only the debug version of the driver,
since it displays an extra screen showing the SQL statements as they are being

PC Installation 10 Installing the ODBC Driver
executed. In addition to being annoying to the user, the SQL display slows the operationslightly.
• If the destination system does not already have ODBC installed, then setup will install thecomplete version 2.1 ODBC subsystem. If the destination machine already has a newerversion of the ODBC subsystem installed, then setup will install only the Jenzabar ODBCdriver. The way to determine which has occurred is to bring up the ODBC administratorafter setup is complete. This is done using Start/Settings/Control Panel/32 bit ODBC. Ifthe screen looks like the one shown below, then you have the 2.1 version. If the screenhas tabs across the top of the window instead of buttons down the right side then, youhave at least the 3.0 version. In the latter case, the About tab will give the versions of allof the important ODBC components. If at any time you need to call to the responsecenter relative to ODBC, you should know the version of the ODBC subsystem.
5. Configure the Data Source. The Data Source window appears after the driver has beeninstalled, but before the installation program exits.
The above window lists three different Data Sources; yours may list more or fewer sourcesdepending on previous configurations. If this is the first installation of ODBC, then the windowwill be empty.
6. Add the first required source (the connection to cisinf) as follows:• Click Add. The Add Data Source window appears as follows, showing the available
drivers:
• Choose the appropriate Jenzabar ODBC driver and click OK. The Setup Jenzabar CXODBC Driver window appears (note that the Data Source Name and the TCP/IP Addressfields may not contain the values shown in the following example):
Installing the ODBC Driver 11 PC Installation
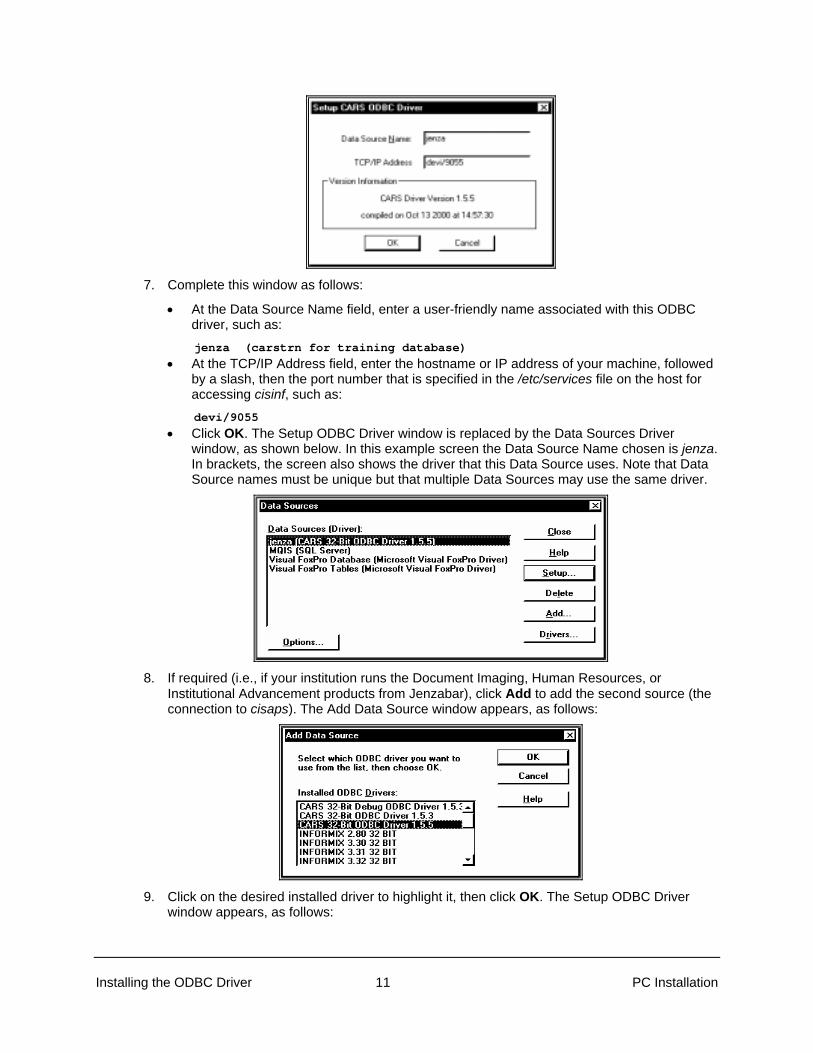
7. Complete this window as follows:
• At the Data Source Name field, enter a user-friendly name associated with this ODBCdriver, such as:
jenza (carstrn for training database)
• At the TCP/IP Address field, enter the hostname or IP address of your machine, followedby a slash, then the port number that is specified in the /etc/services file on the host foraccessing cisinf, such as:
devi/9055
• Click OK. The Setup ODBC Driver window is replaced by the Data Sources Driverwindow, as shown below. In this example screen the Data Source Name chosen is jenza.In brackets, the screen also shows the driver that this Data Source uses. Note that DataSource names must be unique but that multiple Data Sources may use the same driver.
8. If required (i.e., if your institution runs the Document Imaging, Human Resources, orInstitutional Advancement products from Jenzabar), click Add to add the second source (theconnection to cisaps). The Add Data Source window appears, as follows:
9. Click on the desired installed driver to highlight it, then click OK. The Setup ODBC Driverwindow appears, as follows:

PC Installation 12 Installing the ODBC Driver
10. Complete this window as follows:
• At the Data Source Name field, enter a user-friendly name for the connection using thisODBC driver to cisaps (AppServers), such as:
jenzaAPS (carstrn for training database)
Note: The second source name must be the same as the first, only with theappendage APS.
• At the TCP/IP address field, enter the hostname of your machine, followed by a slash,then the port number that was specified in the /etc/services file, such as:
devi/9050
• Click OK, then Close until the setup is complete, as indicated by the window shownbelow. Click OK again to conclude the process.

Installing the ODBC Driver 13 Data Source Migration
MIGRATING YOUR DATA SOURCES
Introduction
If you have already used Jenzabar ODBC drivers for one or more Jenzabar PC applications, youmay need to update the drivers to which the data sources refer when a new driver is released.For example, the end user may be accustomed to selecting the Data Service Name of jenzawhen launching Human Resources Administration, and that Data Service name may referenceversion 1.5.3 of the ODBC driver. When Jenzabar releases a new version of the ODBC driver(e.g., version 1.5.5), you want to ensure that jenza now references version 1.5.5. The simplestapproach to updating your drivers is to use the ODBC configuration you can access fromStart/Settings/Control Panel/Data Sources (ODBC).
How to Migrate Your Data Sources
To migrate your data sources to a newer version of the ODBC driver:
1. Select Start/Settings/Control Panel/Data Sources (ODBC). The ODBC Data SourceAdministrator dialog box appears.
2. Click on the System DSN tab.
3. Highlight one of the Data Sources you want to update, then double-click it to select it.
4. Highlight the TCP/IP address, then press <Ctrl-C> to copy the address to your Windowsclipboard. Click OK.
5. Make sure the same Data Source is highlighted, and then click Remove. Respond Yes to theprompt to confirm the removal.
6. Click Add. The Create New Data Source dialog box appears.
7. In the Create New Data Source dialog box, select the latest version of the ODBC driver. ClickFinish. The Setup Jenzabar CX ODBC Driver dialog box appears.
8. Position your cursor in the TCP/IP field, and then press <Ctrl-V> to place the contents of theclipboard into the field.
9. Move your cursor to the Data Source Name field, and enter the same name as the entry youdeleted in Step 5. Close the dialog box.
10. Repeat the above steps for the Data Source APS. When you are done, the Data Source willbe set up to use the latest version of the ODBC driver.


Installing the ODBC Driver 15 Troubleshooting
TROUBLESHOOTINGNote: This section is of primary benefit to new installations on a system, but may be of use in
general troubleshooting.
Depending upon what has preceded the problem, there are several potential problem areas inthe ODBC system. The list given below contains some troubleshooting tips used at Jenzabar foreach area. Not all apply to every problem. Starting at the lowest level program at the host andworking towards the PC, the potential problem areas are:
The backend program, either cisinf or cisaps
The actual backend program may not be working. Problems with the backend do nottypically occur unless some process or event, such as an upgrade, takes place. AlthoughJenzabar does not supply a specific testing program, the following procedure may help youdiagnose the problem. Go to the Unix directory containing the program (described above)and enter the command: ./cisinf or ./cisaps to directly execute it. If the program is workingas required, it will start up (you can verify the startup using ps). Then, the cursor will return tothe left and nothing more will display on the screen. If you press <Enter>, the program willexit with no message and the prompt will return (in some versions, an RCS header line maybe printed.). This behavior is normal. If any error messages are returned, ODBC access willnot be available through the corresponding connection.
The script that is executed by inetd, either cisinf.env or cisaps.env
In the same directory containing the backend programs there are scripts which call thoseprograms. If the normal setup was done, then inetd does not directly execute the programswhen a connection is opened but instead executes the appropriate script. They set upenvironment variables needed by the backend programs, log the operation, and thenexecute the desired backend program. In this directory the script can be tested just like theprogram. Enter the command ./cisinf.env or ./cisaps.env. The response should be just asthat for the programs. The script should run and as soon as you press <Enter>, the promptshould return (an RCS header line may also be printed).
tcp/ip access to the script
If neither of the previous tests uncovered the issue, then a problem could exist with tcp/ipaccess to the scripts. This is most likely due to incorrect entries in /etc/services or/etc/inetd.conf, which control network access to the backends. To test access through inetd,use this command:
telnet localhost 9055 (the port number for access to cisinf on carsi) This command willtest the inetd.conf file entry. Follow this command with:
telnet localhost cisinf_carsi (the service port name for access to cisinf on carsi) Thiscommand will test the services file entry. Substitute the ports for cisaps for those of cisinfif the problem is access to the AppServers.
In each of these cases, the message should appear that connection has been made and theconnection should drop as soon as you press <Enter>.
external access to the script from the PC
Repeat the above sequence from the PC. Since each telnet program has different ways ofdetermining the port with which to connect, the easiest process (at least on Win 95) is to usethe Start/Run option to run the commands used above except that localhost is replaced bythe hostname of the host computer. For example:
telnet admin 9055

Troubleshooting 16 Installing the ODBC Driver
In each case a telnet window should pop up and as soon as you press <Enter>, a messagebox should pop up announcing loss of the connection.
application access to the script from the PC
If a Jenzabar PC program cannot access the database through ODBC, you need todetermine whether the problem is with the cisinf connection or the cisaps connection. This isnot always clear from the messages returned by the program. If you have a simpleapplication such as the MSQuery program that comes with Office, you can use it to do aquery individually on either connection. Alternatively, Informix provides a test program aspart of the ODBC setup for Informix drivers. To locate the test program, complete steps 1-3of the procedure titled How to Migrate Your Data Sources; click the Apply & Test button onthe Connection tab of the dialog box to access the test program.
Tracing from ODBC Data Source Administrator is yet another tool to test ODBC drivers.Tracing can test drivers from any vendors.
For cisinf, use “select * from id_rec where id = Known_id”. For cisaps, use “select * fromids_aps where id = Known_id”. If both of these work but the PC application still cannotconnect, then the value stored in the registry for the last connection is probably incorrect.Each program has a method of dealing with this problem. This value is stored in the registryunder the key HKEY_USERS\.Default\Software\VB and VBA Program Settings\applicationname\Settings and the name involves the word connect. If all else fails, then you can changethis value manually. Everything after ODBC should be removed in regedit.
license limitation
In some cases the limitation to getting an ODBC connection may be due to the licensemanager. If this is the reason, it is usually readily apparent when examining the output ofapstat. This listing will show the number of connections and also the number of deniedconnections. Running apstat will also free up orphan slots in the license table so may fix aproblem as was described earlier. For more information about the apstat command, seevolume one of the overall system manual.

Installing the ODBC Driver 17 Summary
SUMMARY• The backend process on the UNIX side creates a file called /tmp/errors.log that logs messages
from the Jenzabar CX backend processes. You can delete this file as needed.
• For the Human Resources, Document Imaging, and version 2.0 of the IA applications tofunction properly, you must set up two different ODBC Data Sources. Typically, this will be carsiconnected to port 9055, and carsiAPS connected to port 9050. You must consider twoimportant items. First, the name of the second source must be identical to the first except forAPS appended. Second, the first connection may use a different driver than the secondconnection.
• You can confirm your installation through the Settings/Control Panel options available from yourWindows® 95 Start menu. Select these options, then double-click on the ODBC driver icon toverify that your drivers are installed.
• When the 32 bit drivers are installed, the information is stored in the registry. If the Data Sourceis added as a machine data source, then the Data Source information will be under theHKEY_LOCAL_MACHINE\SOFTWARE\ODBC\ODBC.INI key. If instead the Data Source isadded as a user data source, then the information will be under the HKEY_CURRENT_USER\\Software\ODBC\ODBC.INI key. The information on the drivers is under theHKEY_LOCAL_MACHINE\SOFTWARE\ODBC\ODBCINST.INI key.
• The setup_odbc script will install four entries in the /etc/services and /etc/inetd.conf files. Twoare for the production backends cisinf and cisaps. The other two are for the debug versions ofthe same programs. You should exercise care about using these versions. They are slower andmay generate very large log files in /tmp. They may, however, be of help in troubleshooting.
• Remember that the purpose of the two ports, (which make up a pair) provided by the host aredifferent. The higher number port is for accessing the Informix database directly. The lower portnumber is for accessing the virtual tables. It is normal, for example, to pass an SQL statementlike, “select * from ids_aps where id = 10”, to cisaps. It is possible, for example, to pass an SQLstatement like, “select * from id_rec where id = 10” to cisaps. When cisaps sees an SQLstatement that accesses a real table it passes it off to cisinf. This should not be construed tomean that the cisaps port can be used indiscriminately. The cisaps program will not handle allof the situations that are handled correctly by cisinf. It is possible to use test programs againstcisaps however. You should not expect that non-Jenzabar CX programs will necessarily workagainst cisaps. For example, you should use cisinf with Impromptu.


Installing the ODBC Driver 19 Index
INDEX
//etc/services, 5, 7, 11
AAdd Data Source window, 10
Ccisaps, 1, 15cisinf, 1, 11, 15cisodbc.dll, 1
Ddata source, 10data source name, 1Data Source window, 10data sources
migrating, 13debug version
of driver, 9DSNs
defining, 8
Hhosts file
on PC, 8
Iinetd.conf, 5, 6installation, 7, 9
Llocation
of installation software, 7
Mmigrating
data sources, 13
NNIS, 8
OODBC driver
purpose, 1
PPC hosts file, 8PC services file, 7programs
setup.exe, 9
Sscripts
setup_odbc, 5services file
on PC, 7Setup Jenzabar CX ODBC Driver window, 10setup program, 9setup.exe program, 9setup_odbc script, 5, 17steps, Unix system, 5
Ttroubleshooting, 15, 16
UUnix system, steps, 5updating
ODBC references for Data Sources, 13
Vversions, 3virtual tables, 1