cv505-mb/m quick start guide lcdracks.com full-hd (3g/hd
TRANSCRIPT
36mm
36mm
60.0mm
3G/HD-SDI
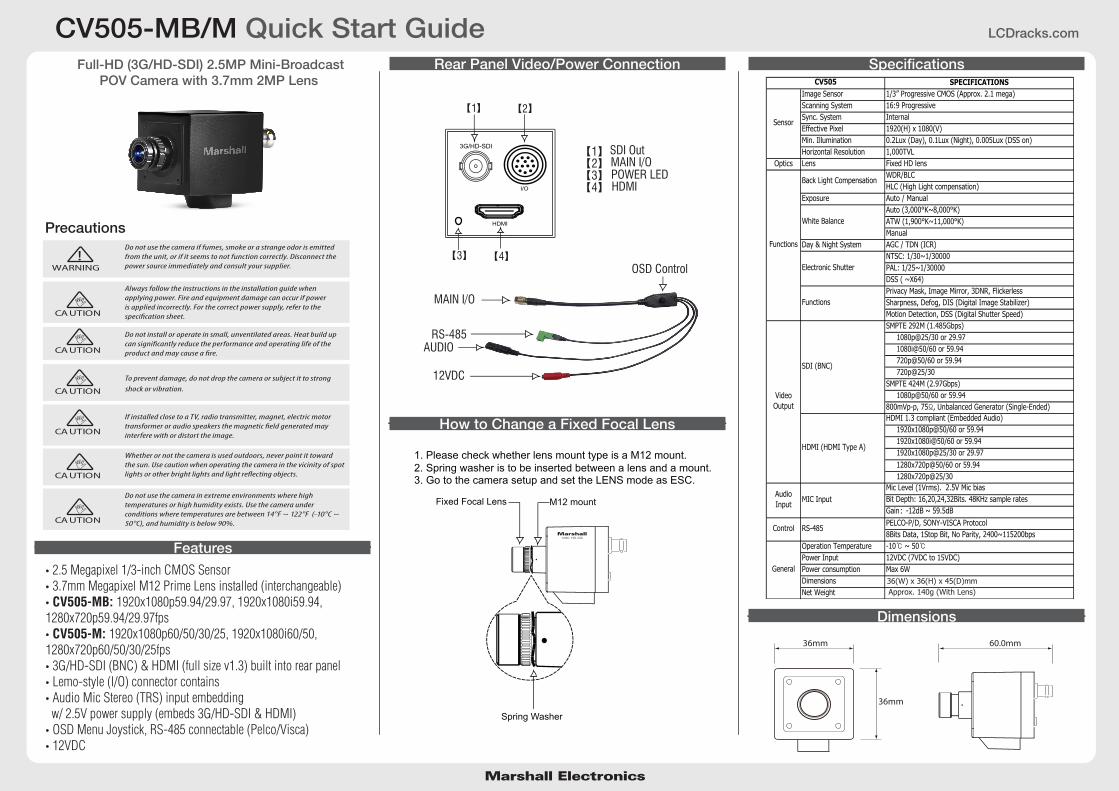
1. Please check whether lens mount type is a M12 mount.2. Spring washer is to be inserted between a lens and a mount.3. Go to the camera setup and set the LENS mode as ESC.
Fixed Focal Lens M12 mount
【1】 2】
【4】
【
【3】
【1】【2】【3】
SDI Out
【4】POWER LED
HDMI
I/O HDMI
MAIN I/O
MAIN I/O
12VDC
AUDIORS-485
OSD Control
SPECIFICATIONSImage Sensor 1/3” Progressive CMOS (Approx. 2.1 mega)Scanning System 16:9 ProgressiveSync. System InternalEffective Pixel 1920(H) x 1080(V)Min. Illumination 0.2Lux (Day), 0.1Lux (Night), 0.005Lux (DSS on)Horizontal Resolution 1,000TVL
Optics Lens Fixed HD lensWDR/BLCHLC (High Light compensation)
Exposure Auto / ManualAuto (3,000°K~8,000°K)ATW (1,900°K~11,000°K)Manual
Day & Night System AGC / TDN (ICR)NTSC: 1/30~1/30000PAL: 1/25~1/30000DSS ( ~X64)Privacy Mask, Image Mirror, 3DNR, FlickerlessSharpness, Defog, DIS (Digital Image Stabilizer)Motion Detection, DSS (Digital Shutter Speed)SMPTE 292M (1.485Gbps) 1080p@25/30 or 29.97 1080i@50/60 or 59.94 720p@50/60 or 59.94 720p@25/30SMPTE 424M (2.97Gbps) 1080p@50/60 or 59.94800mVp-p, 75Ω, Unbalanced Generator (Single-Ended)HDMI 1.3 compliant (Embedded Audio) 1920x1080p@50/60 or 59.94 1920x1080i@50/60 or 59.94 1920x1080p@25/30 or 29.97 1280x720p@50/60 or 59.94 1280x720p@25/30Mic Level (1Vrms). 2.5V Mic biasBit Depth: 16,20,24,32Bits. 48KHz sample ratesGain : -12dB ~ 59.5dBPELCO-P/D, SONY-VISCA Protocol8Bits Data, 1Stop Bit, No Parity, 2400~115200bps
Operation Temperature -10℃ ~ 50℃Power Input 12VDC (7VDC to 15VDC)Power consumption Max 6WDimensions
.Net Weight
VideoOutput
SDI (BNC)
Control RS-485
General
AudioInput
MIC Input
HDMI (HDMI Type A)
CV505
Sensor
Functions
Back Light Compensation
White Balance
Electronic Shutter
Functions
Spring Washer
Marshall Electronics
· 2.5 Megapixel 1/3-inch CMOS Sensor· 3.7mm Megapixel M12 Prime Lens installed (interchangeable)· CV505-MB: 1920x1080p59.94/29.97, 1920x1080i59.94, 1280x720p59.94/29.97fps· CV505-M: 1920x1080p60/50/30/25, 1920x1080i60/50, 1280x720p60/50/30/25fps · 3G/HD-SDI (BNC) & HDMI (full size v1.3) built into rear panel· Lemo-style (I/O) connector contains· Audio Mic Stereo (TRS) input embedding w/ 2.5V power supply (embeds 3G/HD-SDI & HDMI) · OSD Menu Joystick, RS-485 connectable (Pelco/Visca)· 12VDC
Precautions
WARNING!
Do not use the camera if fumes, smoke or a strange odor is emitted from the unit, or if it seems to not function correctly. Disconnect the power source immediately and consult your supplier.
CAUTION
Always follow the instructions in the installation guide when applying power. Fire and equipment damage can occur if power is applied incorrectly. For the correct power supply, refer to the
CAUTION
Do not install or operate in small, unventilated areas. Heat build up
CAUTION To prevent damage, do not drop the camera or subject it to strong
CAUTION If installed close to a TV, radio transmitter, magnet, electric motor
interfere with or distort the image.
CAUTION
Whether or not the camera is used outdoors, never point it toward the sun. Use caution when operating the camera in the vicinity of spot
CAUTION
Do not use the camera in extreme environments where high temperatures or high humidity exists. Use the camera under conditions where temperatures are between 14°F ~ 122°F (-10°C ~ 50°C), and humidity is below 90%.
shock or vibration.
Rear Panel Video/Power Connection Specifications
Dimensions
How to Change a Fixed Focal Lens
36(W) x 36(H) x 45(D)mmApprox. 140g (With Lens)
CV505-MB/M Quick Start GuideFull-HD (3G/HD-SDI) 2.5MP Mini-Broadcast
POV Camera with 3.7mm 2MP Lens
LCDracks.com
Features

Design and speci�cations are subject to change without notice.
Marshall Electronics
HD-SDI 1080p Camera Setup: CV505-M, CV505-MB
SETUP SUB MENU SUB MENU DESCRIPTIONESC IRIS is fixed. Shu er controls exposure automa cally if shu er is set as auto.
DC IRIS Controls exposure automa cally. AUTO Color temperature is automa cally adjusted to 3,000°K ~ 8,000°K
ATWCon nuously adjusts camera color balance in accordance with any change in color temperature. Compensates for color temperature changes within the range of 1,900K to 11,000K.
PUSHColor temperature will be manually adjusted by pushing the OSD bu on. Place the white paper in front of the camera when OSD bu on is pressed to obtain the op mum result.
COLOR TEMPERATURE Select color temperature from LOW, MIDDLE, or HIGH. RED GAIN Adjust the Red tone level manually. Adjust the red tone of the image (0~20).BLUE GAIN Adjust the Blue tone level manually. Adjust the Blue tone of the image (0~20).
BRIGHTNESS 0~20 Adjust the screen brightness. The bright control func on adjusts gain and iris, to keep a brightness level.
AGC LIMIT 0~20A func on which controls the amplifica on/gain process automa cally if the illumina on falls under the usable level. Camera raises up gain to selected gain limit when dark condi ons.
AUTO Shu er controls exposure automa cally when IRIS is manual. Shu er control has the exposure control priorityMANUAL Shu er speed is fixed. The exposure control priority is given to other resources.
FLICKERLESS Use this func on when you experience picture flicker, this happens when there is a conflict with the installed ligh ng frequency.DSS (SENS-UP) OFF, x2~64 When luminance condi on is low, DSS can adjust the picture quality by maintaining the light level. Minimum slow shu er limit is down to x64.
WDR Enable user to view both object and background more clearly when background is too bright. (LOW, MIDDLE, HIGH). BLC Enable a back light compensa on feature.
SPOT Enables a user to select a desired area on a picture and view that area more clearly when background is too bright.ACE LOW, MIDDLE, HIGH Brightness correc on of the dark image area.
LEVEL Highlight the bright area with a masking box with a selected color. Adjust the masking level (0~20).COLOR Select the color for masking (GRN, MAG, RED, BLUE, BLK, WHT, YEL, CYN)
ANTI-SAT.Adjust the an -satura on level manually. This feature will reduce the satura on phenomenon in which part of the camera receiving the light affected by the IR or light in Night mode.
AGC LEVELThe camera will stay in DAY in a normal environment, but switched to NIGHT mode when ambient illumina on become this pre-set level. This level is threshold for switching day to night. It is same as the exposure gain level.
AGC MARGIN Set the margin between Day →Night switching level and Night →Day switching level. DWELL TIME Select the checking me of light condi on to confirm to chage from the day mode to the night mode.
COLOR The camera keeps color mode constantly.NIGHT The camera keeps black/white mode constantly.
RANGE 10%, 20%, 30%This func on will reduce image blurriness due to vibra ons caused by hand shake or Pan/Tilt opera on. The image will be digitally zoomed in to compensate the shi ed pixels.Set the digital zoom level for image stabilizing. (Max. 30% : x1.4 Digital Zoom)
FILTER LOW, MIDDLE, HIGH Select the level of correc on hold filter for the worst case of image. HIGH: Less image correc on. Low: More image correc on.
AUTO C OFF, HALF, FULLOFF: Disable the auto centering func on.FULL: The camera will correct the blurness due to vibra ons caused by both hand shake or Pan/Tilt opera on.HALF: The camera will correct the blurness due to vibra ons caused by hand shake.
AUDIO LEVEL 0~143 Enabled when AUDIO AGC is set OFF. Adjust the audio level manually.AUDIO AGC OFF, ON Automa cally adjusts the MIC gain as the input signal becomes overly loud or very weak.AGC MAX 0~119 Enabled when AUDIO AGC is set ON. Set the maximum level of AUDIO AGC.
SAMPLE BITS 16, 20, 24, 32 BITS Select the bit depth of audio.COLOR LEVEL 0~20 Adjust the color level value for a fine color tune.SHARPNESS 0~20 Adjust the sharpness of the image. As you increase this value, the picture outline becomes stronger and clearer.
MIRROR Video output is rotated horizontally.FLIP Video output is rotated ver cally.
D-ZOOM 1.0X ~ 16.0X Enlarge digitally the video output up to 16X.AUTO This feature will help increase visibility in extreme weather condi ons, such as fog, rain or in a very strong luminous intensity.
MANUAL Set the level of defoging func on (LOW, MIDDLE, HIGH).DNR OFF, LOW, MIDDLE, HIGH This feature will reduce the video noise at low ambient light.
MOTION This feature will observe the object movement by mo on zone and sensi vity that are pre-set with sub menu.SHADING This feature will correct the inconsistent brightness level in the image.GAMMA This feature will adjust video output brightness (STANDARD, STRAIGHT, LOW, MIDDLE, HIGH).
FRAME RATE Change video output format. CAM VERSION Display the firmware version of the camera.
CAM TITLE The camera tle can be entered and it will appear over the video output.PRIVACY Mask an area you want to hide on the screen with sub menu. CAM ID 0~255 Select the camera ID number for RS-485 communica on.
BAUDRATE Set the baudrate of RS-485 communica on (2400, 4800, 9600, 19200, 38400, 57600, 115200).LANGUAGE Select the menu language.
RESET Reset the camera se ngs to the factory defaults. EXIT Exit the setup.
DAY/NIGHTAUTO
IMAGE STABILIZER
IMAGE CONTROL
DEFOG
DISPLAY CONTROL
AUDIO
LENS
WB CONTROL
MANUAL
AE CONTROL(EXPOSURE)
SHUTTER
BACK LIGHT
BACK LIGHT
ECLIPSE