cutting-edge first aid - c.ymcdn.com · cutting-edge first aid er doctor: throw away your old kit...
TRANSCRIPT
Cutting-Edge First AidER doctor: Throw away your old kit and forget what you’ve been told
B y P a t r i c k S u l l i v a n
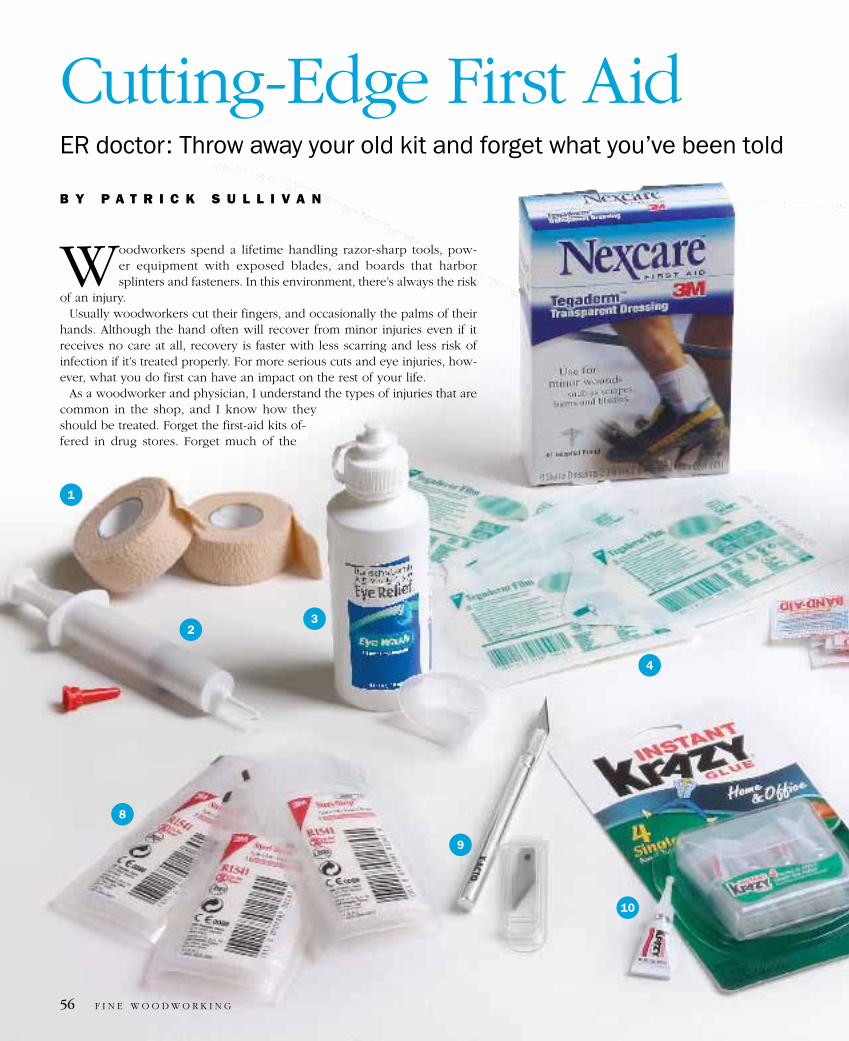
Woodworkers spend a lifetime handling razor-sharp tools, pow-er equipment with exposed blades, and boards that harbor splinters and fasteners. In this environment, there’s always the risk
of an injury. Usually woodworkers cut their fingers, and occasionally the palms of their
hands. Although the hand often will recover from minor injuries even if it receives no care at all, recovery is faster with less scarring and less risk of infection if it’s treated properly. For more serious cuts and eye injuries, how-ever, what you do first can have an impact on the rest of your life.
As a woodworker and physician, I understand the types of injuries that are common in the shop, and I know how they should be treated. Forget the first-aid kits of-fered in drug stores. Forget much of the
2
9
10
3
8
1
4
F I N E W o o d W o r k I N g56
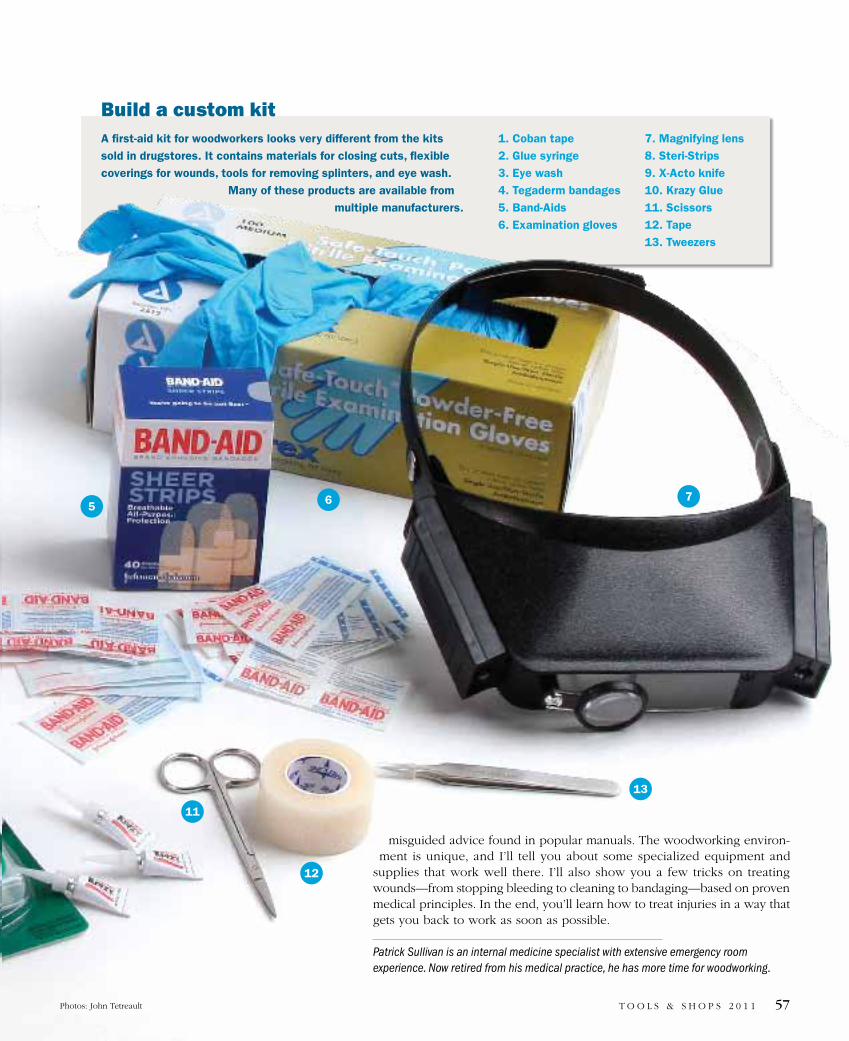
Build a custom kit
misguided advice found in popular manuals. The woodworking environ-ment is unique, and I’ll tell you about some specialized equipment and
supplies that work well there. I’ll also show you a few tricks on treating wounds—from stopping bleeding to cleaning to bandaging—based on proven medical principles. In the end, you’ll learn how to treat injuries in a way that gets you back to work as soon as possible.
Patrick Sullivan is an internal medicine specialist with extensive emergency room experience. Now retired from his medical practice, he has more time for woodworking.
A first-aid kit for woodworkers looks very different from the kits sold in drugstores. It contains materials for closing cuts, flexible coverings for wounds, tools for removing splinters, and eye wash.
Many of these products are available from multiple manufacturers.
10.
1. Coban tape2. Glue syringe 3. Eye wash4. Tegaderm bandages5. Band-Aids6. Examination gloves
7. Magnifying lens8. Steri-Strips9. X-Acto knife10. Krazy Glue11. Scissors12. Tape13. Tweezers
12
13
765
11
57Photos: John Tetreault T o o l s & s h o P s 2 0 1 1

The enemy of healing is infection. The germs that live on lumber and tools generally do not cause disease; essentially, all the risk is from bacteria you already carry on your skin. A wound allows
those skin germs to reach the more vulnerable tissue beneath the skin. The prob-lem gets worse if there is dirt, sawdust, debris, or dead tissue in the wound.
The most effective treatment for all wounds is immediate washing with soap and clean water. (You can skip this if you need to go to the emergency room, be-cause they will clean it there). Washing drastically reduces the number of germs, and takes away dirt and debris in which bacteria can hide and multiply.
I have seen several Internet pictures and videos that show first-aid techniques in which they advocate wiping the wound clean with a damp paper towel or gauze pad. This is the most ineffective way to wash a wound.
The surest way to clean a wound is to hold the cut under running water for several minutes and lather thoroughly. If soap is not available, plain water will do a credible job. Wash every wound, whether you can see contamination or not. Waterless hand cleaners and antiseptic solutions may be better than nothing, but they are not a proven substitute for washing. If you can wash effectively, you do not need these products.
Doctors and first-aid manuals in the past have routinely recommended the use of an antibiotic ointment, but recent surgical research proves that clean wounds need no antibiotic if they are washed well and closed promptly. Moreover, the oint-ment preparation discourages the formation of a scab, which is the most effective wound closure available. Skip any antibiotic ointment unless dirt and debris were driven into the wound and cannot be washed out.
How to handle most cutsDo you need a doctor?Vulnerable areas of the hand
If the cut won’t close, get It stItched
lather upWash both hands vigorously enough to generate lots of lather under a strong stream of warm running water for several minutes. While washing, hold the cut open and flush the wound for at least a minute. Ignore any bleeding this may cause. Dry both hands on a clean paper towel.
Cuts that do not slice all the way through don’t require stitches because the lower layer of skin keeps the wound reasonably closed.
The cut on the thumb can be treated at home. It is short, and although deep, tends to close itself. Normal hand movements will not apply stress to the wound.
The cut on the palm and index finger begs for stitches. It is long and deep and in a location where every hand activity will stretch the wound apart.
The cut on the right penetrates all the way through the skin, revealing the fat beneath. A deep cut like this that’s under 1 in. long usually can be treated at home; if it’s longer than 2 in., the wound needs to be stitched. In between 1 in. and 2 in., the decision to get stitched depends on the location of the wound (see below).
1SoAp AnD WATEr
Areas in red, however, contain tendons. Deep cuts in these areas are likely to have damaged the tendons or tendon sheaths and should be examined by a doctor.
Areas highlighted in green contain very few vulnerable structures, such as tendons. Unless the wound obviously penetrates into a bone or joint, cuts here typically can be treated easily at home.
F I N E W o o d W o r k I N g58 drawings: Christopher Mills

After washing the wound, you need to stop the bleeding. Apply pressure directly over the wound for five minutes without
interruption to help form a clot. If you peek, the clock starts all over again.
When you get cut, keeping the two edges of the wound firmly closed will help it heal rapidly. Cuts from sharp tools penetrate cleanly, which makes them
easier to close and faster to heal. Wounds with frayed or crushed edges (such as those made by a spinning tool)
take a bit longer to heal. In either case, you want to wash and close the wound to pull the sliced skin back together.
Standard adhesive bandages cover the wound but don’t securely close it. As soon as you start using your hands, skin movement will reopen
the cut. Hospitals often use a specialized tape product called Steri-Strips, which you can buy without a prescription in most drugstores or online.
It is also possible to glue wounds closed with ordinary cyanoacrylate glue. Both methods work better if you have a helper to either hold the wound closed or to apply the Steri-Strips or glue.
when you can’t stop workIng, use a gloVe
If you get a minor cut, say, while you’re
in the middle of a glue-up, you don’t have to stop working. Put on an examination glove, and wrap masking tape snugly around the finger directly over the cut. The glove keeps blood off the woodwork, and pressure from the tape will usually stop the bleeding in 5 to 10 minutes. After removing the tape and glove, wash your hands thoroughly, and close and dress the wound.
be dIrectDon’t be afraid to touch the cut. Apply pressure directly over the
wound (right), not below it (left).
adhesIVe-backed sterI-strIps keep cuts closed Dry the skin around the wound, then cut the strips to length. Remove the paper backing, and apply. Adhere the strip to one side of the cut, push the wound edges together so they just meet, and stick the strip down on the other side.
a dIfferent kInd of glue-upCyanoacrylate glue works for closing a wound. But the job is not like butting two boards together. Do not apply glue inside the wound. Instead, push the skin edges together and spread a thin layer of glue across the top of the skin, interrupting the glue at short intervals to preserve flexibility. Don’t use the activator spray that comes with some glues.
2 fIvE MInuTES of prESSurE
rIghtwrong
rIght
wrong3 CloSE THE WounD BEforE BAnDAGInG
t ip

If you go to an emergency room with a hand injury,
you’ll come home with a huge, fluffy ban-dage that will attract a lot of sympathy but render you unable to work. Emergency rooms use gauze as the main element of bandaging. Gauze is light as air, extremely flexible, and breathes like it wasn’t there at all. However, you cannot work wood while wearing gauze.
Woodworkers need bandages that are flexible, thin, and tough. It is also conve-nient to have bandages that shed water, sawdust, and glue, and yet breathe so the skin stays dry. Here are two bandages that you can use after you’ve closed the wound or after you’ve come home from the Er.
The first option is to cover the area with a Tegaderm dressing. Tegaderm is a transparent medical dressing (made by 3M) that’s flexible, tough, and stretchy. It is great for hand wounds because it can be conformed to a number of shapes and is so smooth that it won’t catch on any sharp edges, like an adhesive bandage can. This product is available with and without a non-stick, absorbent pad in the center. Many wounds will seep a small amount of serum in the first few hours after bandag-ing, and the absorbent pads are useful then. later, they may be unnecessary.
This might be all you need. If you have to handle rough lumber, or do work that applies a lot of friction or abrasion to your hands, consider wearing leather or fabric gloves to protect the dressing.
Injuries that involve the palm or the webs between the fingers are very hard to bandage. for these areas, cover the closed wound with Tegaderm, and then wrap Co-ban around the hand as necessary. Coban is a very stretchy bandage that sticks to itself, but not to anything else. It is excel-lent for bandages involving the palm or wrist, because it stretches great-ly, but always remains snug.
better than a band-aIdAfter closing the wound with a Steri-Strip, apply a Tegaderm bandage. Put on the bandage and then peel off the paper frame. If you need to cut the bandage to a smaller size, do it while all the backing paper is still in place. The bandage is thin and flexible, allowing nearly full knuckle movement.
when you need more holdIng power, use coban tape It’s hard to keep a bandage in place on the palm of your hand, so wrap the dressing with Coban tape (1 in. wide usually is sufficient). First take a couple of wraps around the wrist. This serves to anchor the whole bandage. Then continue with several wraps around the palm. End the Coban on the back of the hand or wrist, where it will receive the least rubbing.
Cuts continued
4SMArTEr BAnDAGES
F I N E W o o d W o r k I N g60
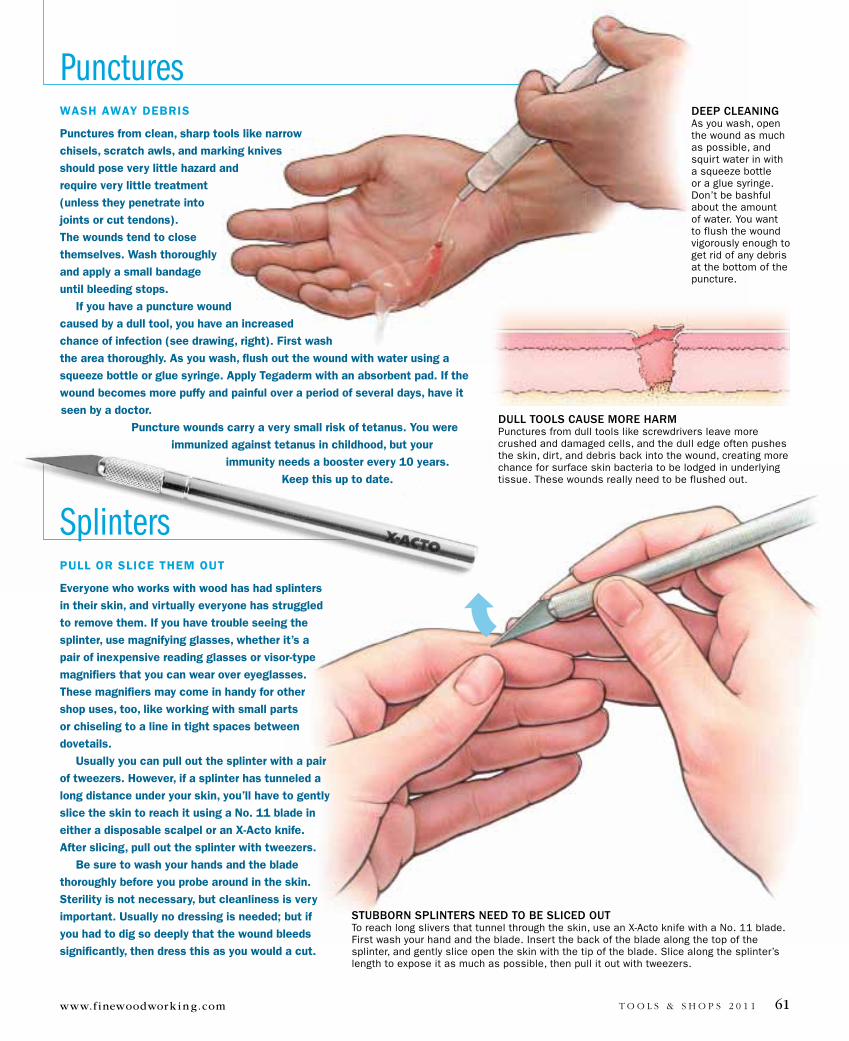
deep cleanIng As you wash, open the wound as much as possible, and squirt water in with a squeeze bottle or a glue syringe. Don’t be bashful about the amount of water. You want to flush the wound vigorously enough to get rid of any debris at the bottom of the puncture.
stubborn splInters need to be slIced out To reach long slivers that tunnel through the skin, use an X-Acto knife with a No. 11 blade. First wash your hand and the blade. Insert the back of the blade along the top of the splinter, and gently slice open the skin with the tip of the blade. Slice along the splinter’s length to expose it as much as possible, then pull it out with tweezers.
dull tools cause more harm Punctures from dull tools like screwdrivers leave more crushed and damaged cells, and the dull edge often pushes the skin, dirt, and debris back into the wound, creating more chance for surface skin bacteria to be lodged in underlying tissue. These wounds really need to be flushed out.
punctures
Splinterspull or SlICE THEM ouT
Everyone who works with wood has had splinters in their skin, and virtually everyone has struggled to remove them. If you have trouble seeing the splinter, use magnifying glasses, whether it’s a pair of inexpensive reading glasses or visor-type magnifiers that you can wear over eyeglasses. These magnifiers may come in handy for other shop uses, too, like working with small parts or chiseling to a line in tight spaces between dovetails.
usually you can pull out the splinter with a pair of tweezers. However, if a splinter has tunneled a long distance under your skin, you’ll have to gently slice the skin to reach it using a no. 11 blade in either a disposable scalpel or an X-Acto knife. After slicing, pull out the splinter with tweezers.
Be sure to wash your hands and the blade thoroughly before you probe around in the skin. Sterility is not necessary, but cleanliness is very important. usually no dressing is needed; but if you had to dig so deeply that the wound bleeds significantly, then dress this as you would a cut.
WASH AWAY DEBrIS
punctures from clean, sharp tools like narrow chisels, scratch awls, and marking knives should pose very little hazard and require very little treatment (unless they penetrate into joints or cut tendons). The wounds tend to close themselves. Wash thoroughly and apply a small bandage until bleeding stops.
If you have a puncture wound caused by a dull tool, you have an increased chance of infection (see drawing, right). first wash the area thoroughly. As you wash, flush out the wound with water using a squeeze bottle or glue syringe. Apply Tegaderm with an absorbent pad. If the wound becomes more puffy and painful over a period of several days, have it seen by a doctor.
puncture wounds carry a very small risk of tetanus. You were immunized against tetanus in childhood, but your
immunity needs a booster every 10 years. Keep this up to date.
61www.finewoodwork ing.com T o o l s & s h o P s 2 0 1 1

EyesrInSE CArEfullY or SEE A DoCTor
When you cut wood, especially with a router or tablesaw, sawdust (and sometimes other ma-terial) will fly. If some of that small debris ends up in your eye, your natural tears will usually wash it away. If the debris digs in and resists being washed away by tears, the best answer is to retract the eyelid away from the eyeball, and flush the eye with an eye-wash solution.
Get someone to help you. lie on your back—it is hard to flood the eye with solution while you are upright. Have your helper put on your magnifiers and look in your eye for the debris. regardless of whether they see the offending particle or not, have them squirt the solution under both lids. use towels or tissues to sop up the excess, and use plenty of liquid. If that does not work, do it again. If repeated irrigation of the eye does not dislodge the particle, seek professional help. never use tweezers or hard instruments in the area of the eye.
If there is so much spasm of the eyelids that you cannot open the eye enough to see what is going on, that suggests a more serious eye injury, and you should get immediate professional help.
Serious injury?WHAT To Do AS You HEAD To THE HoSpITAl
Some woodworking injuries demand professional care. Cuts that are deep enough to obviously penetrate into joints or bone, or that appear to cut tendons, should be treated by a doctor within a couple of hours. These injuries require the removal of foreign material embedded at the bottom of the wound, and may require special suturing. They also carry greater risks of infection, and preventive antibiotic treatment is sometimes needed. for these wounds, stop the bleeding by applying pressure with a gauze pad or a clean paper towel and have someone drive you to the emergency room.
If you tangle with a power saw, that is going to mean a trip to the hospital. There is little that can or should be done in the shop, other than applying pressure to the wound and arranging for rapid transportation to the hospital. If you cut off some part of your hand, press directly on the wound to stop the bleeding,
rInse and repeat The safest and easiest way to remove foreign particles in the eye is to rinse them away with a spray of eye wash. Lift the eyelid and spray vigorously. If necessary, repeat several times.
If particles embed themselves in this area, it is safe to try to wash them out at home.
If particles embed themselves in the clear layer over the iris and pupil (the cornea), have the eye examined by a doctor. Even tiny scratches in the cornea can lead to vision impairment.
If particles embed themselves in this area, it is safe to try to wash them out at home.
seal the amputated part in a zippered plastic bag, and get to the hospital fast. Don’t try to drive yourself. If that trip is going to take more than an hour, carry the plastic bag in some ice or cold products from your freezer. Amputated fingers can survive for more than six hours.
Any kind of injury to the eyes is scary. Any injury that penetrates the eyeball or cuts through the eyelid must be seen by a specialist. If tiny flecks of wood or metal embed themselves in the cornea (the clear layer overlaying the iris and pupil) have them removed in the Er. When in doubt about any eye injury, you should have the eye examined by a pro. Tape a gauze pad or a tissue over the closed eye while you are on your way to the hospital. This discourages the eyelids from moving, which usually reduces any discomfort.
F I N E W o o d W o r k I N g62

63www.finewoodwork ing.com T o o l s & s h o P s 2 0 1 1