customer setup of the ncr pc-8 personal computer
DESCRIPTION
Customer setup of the NCR PC-8 personal computer: a case studyTRANSCRIPT
CUSTOMER SETUP OF THE NCR PC-8
PERSONAL COMPUTER: A CASE STUDY
Paul Green
FINAL REPORT
MAY 1986
UM:TRI The University of Michigan Transportation Research Institute
tmkrical R W Docurmtotior, Page
1. R-rf No. 2. Gov-mf Accession No. 3. Recipimf's Cofolog No. 1 UMTRI-86-25 I
4. Title ad Subtitle
CUSTOMEli SETUP OF THlE NCR PC-8 PERSONAL COMPUTER: A CASE STIJDY
, 7. k r ~ u ' . )
5. Rapore Dote
May 1986 6. Puforning Organi toiion to&
369184 8. P n h i n g Orqmirotion Report NO.
Paul Green 9. Pnlorning Orgcnirmtion N m e md 14ddrers
1 12. Sponsoring A p c y N m e r r d Addross 1 I
UMTRI -86-25 10. Wok Unit No. (TRAIS)
U n i v e r s i t y o f Michigan T ranspo r ta t i on Reseai~ch I n s t i t u t e Ann Arbor, Michigan 48109-2150 U.S.A.
I Product Market ing 1 I
11. Contract or Grant NO.
DRDA 86-2099-P1 13- Type of R.porr ond Period Covered
NCR Corporat ion, Personal Computer D i v i s i o n Dayton, Ohio 45479 U.S.A. 14. Sponsoring Agency Code
NCR PO 61-14922 I
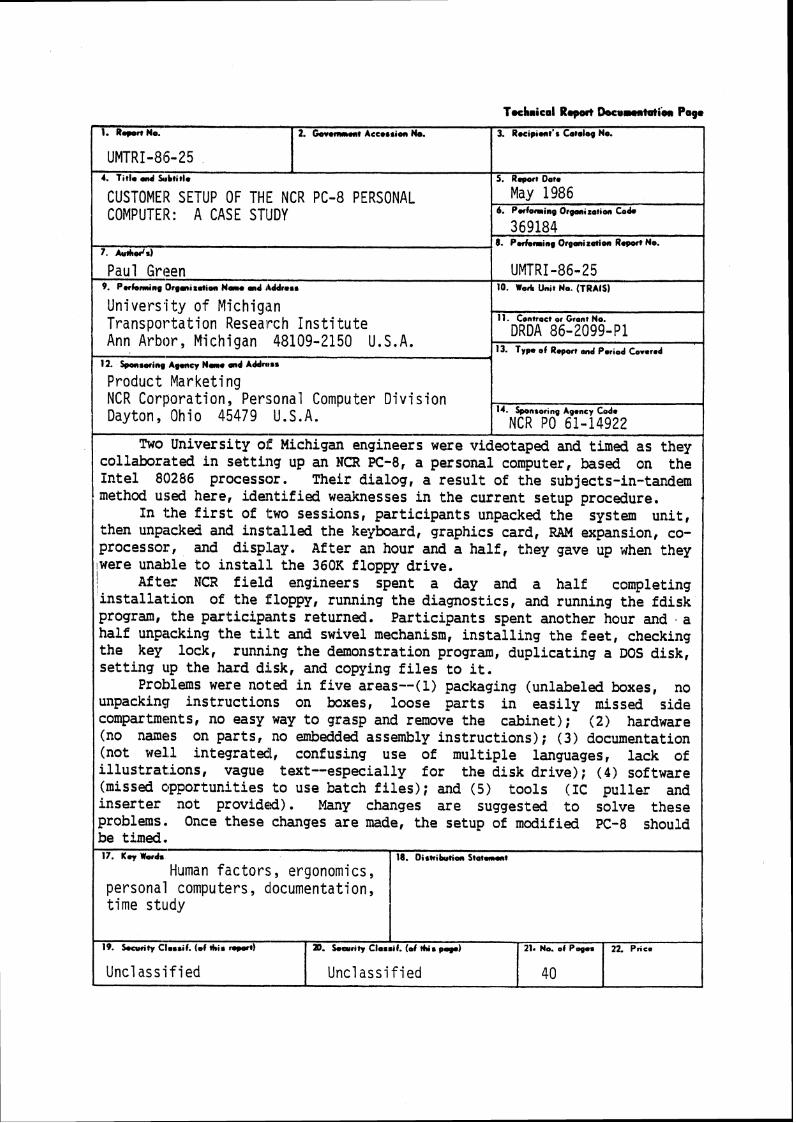
Two University OIE Michigan engineers were videotaped and timed as they co1labor;zted i n set t ing up an NCR PC-8, a personal computer, based on the Intel 80286 processor, Their dialog, a resul t of the subjects-in-tandem method u!;ed here, identified weaknesses in the current setup procedure.
In the f i r s t of two sessions, participants unpacked the system unit , then unpacked and installed t h e keyboard, graphics card, RAM expansion, co- processo~:, and display. After an hour and a half , they gave up when they were unable t o i n s t a l l the 360K floppy drive.
1 After NCR f i e l d engineers spent a day and a half completing ins ta l la t ion of the floppy, running the diagnostics, and running the fdisk program, the participants returned. Participants spent another hour and a half unpacking the til,t and swivel mechanism, instal l ing t h e fee t , checking the key lock, running the demonstration program, duplicating a DOS disk, set t ing up the hard disk, and copying f i l e s t o it.
Problems were not:ed i n f ive areas--(l) packaging (unlabeled boxes, no unpacking instructiorls on boxes, loose parts in easi ly missed side compattmh!nts, no easy way to grasp and remove the cabinet); ( 2 ) hardware (no namaas on parts, no embedded assembly instructions); ( 3 ) documentation (not wel.1 integrated, confusing use of multiple languages, lack of i l lustrat , ions, vague text--especially for the disk dr ive) ; ( 4 ) software (missed opportunities to use batch f i l e s ) ; and (5) tools (IC puller and inser ter not provided). Many changes are suggested t o solve these problems. Once these changes a re made, the setup of modified PC-8 should be timed. 17. K q Words
Human f a c t o r s , ergonomics, personal computers, clocumentation, t ime s tudy
I
aD. kcurity Classif. (of this pogo) 21. No. of Poges 22. Price
I U n c l a s s i f i e d I U n c l a s s i f i e d 1 40 I I
CONTENTS
. . . . . . . . . . . . . . . . . . . . . . . . . . . . . . . . . . . . . . . . . . . . . LIS'I" OF TABLES
TESTPLAN . . . . . . . . . . . . . . . . . . . . . . . . . . . . . . . . . . . . . . . . . . . . . . . . . . . . . . . . . . . . . . . . . . . . . . . . . . . . . . . . . . . . . . . . . . . . . Test Participants
. . . . . . . . . . . . . . . . . . . . . . . . . . . . . . . . . . . . . . Equipment and Pvfaterials . . . . . . . . . . . . . . . . . . . . . . . . . . . . . . . Test Activities actd Their Sequence
. . . . . . . . . . . . . . . . . . . . . . . . . . . . . . . . . . . . RESULTS AND DISCUSSION
. . . . . . . . . . . . . . . . E'irst Videotape: Hardware Unpacking and Installation Second Videotape: Finishing Hardware Installation. Installing the Software .
RECOMMENDATIONS . . . . . . . . . . . . . . . . . . . . . . . . . . . . . . . . . . . . . . . . . REFERENCES . . . . . . . . . . . . . . . . . . . . . . . . . . . . . . . . . . . . . . . . . . . . . . . . APPENDIXA . . . . . . . . . . . . . . . . . . . . . . . . . . . . . . . . . . . . . . . . . . . . . . . .
APPENDIXB . . . . . . . . . . . . . . . . . . . . . . . . . . . . . . . . . . . . . . . . . . . . . . . .

LIST OF TABLES
1 . Session 1 Summary . . . . . . . . . . . . . . . . . . . . . . . . . . . . . . . . . . . . . . . . 2 . Unpacking the PC-8 . . . . . . . . . . . . . . . . . . . . . . . . . . . . . . . . . . . . . . . 3 . Unpacking and Installing Keyboard . . . . . . . . . . . . . . . . . . . . . . . . . . . . 4 . Unpacking anti Installing Display . . . . . . . . . . . . . . . . . . . . . . . . . . . . . . 5 . Installing Graphics Card . . . . . . . . . . . . . . . . . . . . . . . . . . . . . . . . . . . . 6 . Unpacking Opitions . . . . . . . . . . . . . . . . . . . . . . . . . . . . . . . . . . . . . . . . 7 . Unpacking ancl Installing the Co-Processor . . . . . . . . . . . . . . . . . . . . . . . 8. Installing the 1128K Ram Upgrade . . . . . . . . . . . . . . . . . . . . . . . . . . . . . 9. Attempting to Install Floppy Drive . . . . . . . . . . . . . . . . . . . . . . . . . . . . .
10. Session 3 Summary . . . . . . . . . . . . . . . . . . . . . . . . . . . . . . . . . . . . . . . . 11.. Unpacking and! Installing Monitor Tilt and Swivel . . . . . . . . . . . . . . . . . .
. . . . . . . . . . . . . . . . . . . . . . . . . . . . . . . . . . . . . . . . . . . . 12. Installing Feet
13 . Checking Key :Lock . . . . . . . . . . . . . . . . . . . . . . . . . . . . . . . . . . . . . . . . 14 . Running Demonstration Program . . . . . . . . . . . . . . . . . . . . . . . . . . . . . .
15. Preparing DOS Disk . . . . . . . . . . . . . . . . . . . . . . . . . . . . . . . . . . . . . . . . . . . . . . . . . . . . . . . . . . . . . 16 . Setting Computer to Boot From Hard Drive
. . . . . . . . . . . . . . . . . . . . . . . . . . . . . . . . . . 17 . Copying Files to Hard Drive
PREFACE
The history of this project shows how gifts to support university research can
directly benefit the industrial sponsor. In the fall of 1985 Gary Wagner (NCR Corporate
R&Dl attended the Human Factors Society Annual Meeting where I presented a paper on
the Wizard of Oz rapid prototyper (Green and Wei-Haas, 1985). Discussion of that work
led to a visit to the University of Michigan and a gift to the UMTRI Human Factors
Divis;~on. The gift included research funds, two NCR PC-8 personal computers, and a laser
printer. The PC-8's were delivered early in January of 1986, the laser printer arrived
about a month later.
The gift was part of an effort to strengthen NCR's ties with universities working on
human factors prob1e:ms and support research on software for evaluating user interfaces.
Of particular interest was the Wizard of Oz software.
When the computers arrived, I thought it would k z interesting to observe some
people setting them up. I had an academic interest in a method often used for that
purpclse (subjects-in-tandem), though I knew NCR would find the product-specific data
useful. I guessed NCR had not done empiric tests of setup and suspected there would be
some difficulties. Further, the NCR support had been helpful to us, and we wanted to do
some1;hing of immediate benefit to NCR in return.
The subjects-ins-tandem method used in this experiment involves having two people
collaborate to solve a problem. As a natural part of their discussion, participants identify
where they are having difficulty and why. Despite its wide use, methodological factors
(e.g., two versus three people, the extent of prior collaboration, personality types, etc.) had
not been systematically investigated.
As suspected, the PC-8 had setup problems. Shortly after we began setting up the
PC-8z;, I received a call from Gary Wagner expressing great interest in our little
experiment, causing cur priorities to shift. The PC-8 had just been reviewed in Infoworld
magazine, and the review was not favorable. The part of the article central to this effort
is quoted below. A complete copy of that article (Crabb, 1985) is in .4ppendix A.
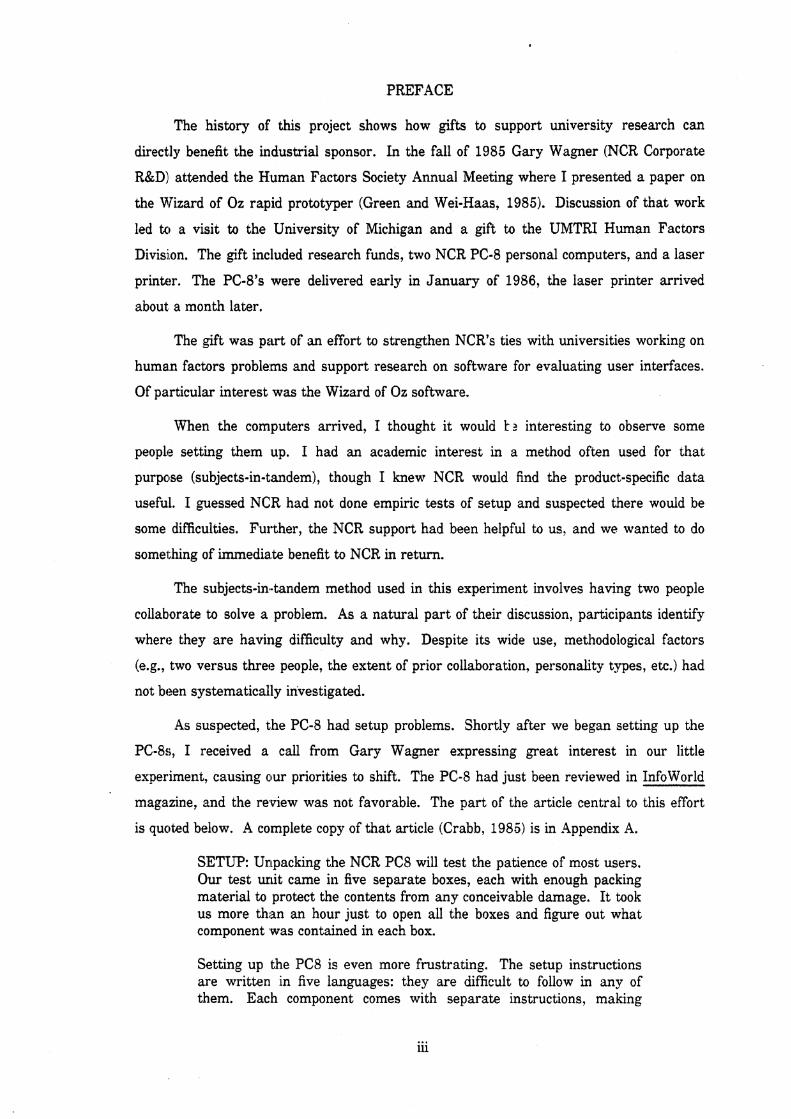
SETUP: Unpacking the NCR PC8 will test the patience of most users. Our test unit came in five separate boxes, each with enough packing material to protect the contents from any conceivable damage. It took us more than an hour just to open all the boxes and figure out what component was contained in each box.
Setting up the PC8 is even more frustrating. The setup instructions are written in five languages: they are difficult to follow in any of them. Each component comes with separate instructions, making

them that; much easier to replace. NCR atternpts to consolidate information about setting up the PC8 in a Getting Started booklet, but the information is far too general to be helpful.
We had to ready the hard disk for use and install the graphics adapter board in our test unit before we could power up the machine. We'd expect those procedures to take 15 minutes; instead, we spent more than an hour. The problem starts when you have to remove the top of the systenl unit. We practically tore off a finger trying to get the cover off of the box. After you've removed the top, you're faced with the task oiF locating the necessary jumpers on the main circuit board. The docunlentation for this search is woefully inadequate. It lacks decent illustrations, and the text doesn't do a satisfactory job of explaining the procedures. After removing the disk controller board, we finally found the jumpers we needed to check and set. After working at this for several hours, we finally had everything connected and configured.
Overall, setup was a frustrating and disappointing experience. If you purchase a, PC8, you might want to hire your dealer to do the setup for you, especially if you've purchased a number of options.
After I reviewed the videotapes of us setting up a PC-8, I sent NCR copies of the
tapes and accompanying letters describing the difficulties we had (Green, 1986a,b). In
response, the Personla1 Computer Division issued a purchase order for this more formal
repoirt. Some of the findings described here were conveyed to NCR at the recent briefing in
Clerrlson (Green, 1986~).
INTRODUCTION
This experiment is an application of the subjects-in-tandem procedure for
investigating the efficiency of a process such as setting up a personal computer. Its
purpose was to identify problems customers might have with the packaging, hardware,
softvare, or documentation while setting up an NCR PC-8. At both IBM and DEC (and
possibly other companies as well), tests of this type are normally carried out during the
development of any product installed by customers. These tests were not conducted by
NCR, because the original plan called for the PC-$ to be installed by NCR field engineers.
The subjects-in-tandem method involves two or more people collaborating on a
project. Their conversation reveals their understanding and misconceptions concerning the
h a r d ~ a r e , software, and documentation, thus suggesting how the product might be made
easier to set up. For.example:
1. "What do we do next?"
2. "Well, here in the user's guide manual it says to install this card, but the instruction sheet makes me think we should install these chips. What do you think?"
The method is quite natural. I t is non-intrusive and an approach people normally
take for solving problems, especially those associated with computers. Further, this
method makes the problems that ordinary users experience more apparent, revealing
problems that designers miss because they know the product so well.
In one of the first published accounts describing the method, Comstock (1983a)
provides detailed recommendations concerning test protocols, based on her experience with
prototypes of the Rainbow computer and other products. She advocates the use of
videotaping, of using people who have worked together before, and of being sure to record
their conversation. Readers interested in additional details should read her paper.
Even better known than her paper is the videotape associated with it ("How to
Insert a Diskette into a Diskette Drive," Comstock, 1983b). The tape shows two financial
analysts, Candy and Donna, contending with what should be a simple problem. In one
sequence, they read aln instruction to remove the disk from the envelope. Having already
removed it but not realizing they did, they believe the envelope to be the cardboard carrier
surrounding the mylar disk, and begin to open it. In a later sequence, they are unable to
find the disk drive door, so they insert the disk into a gap between the drive housing and
the bezel, losing the disk.
Lewis (1982) zrlso provides some suggestions concerning implementation, based on
his work in the IBM Entry Systems (PC) Division, though his paper is not nearly as
substantive as that of Comstock. Another well-known example of the method was
provided by John Seely Brown in his plenary address a t the CH1'83 meeting.
Unfoi*tunately, his vicleotape of people struggling to use a copier is not publicly available.
Subjects-in-tandem is an alternative to the thinking-aloud method (Lewis and Mack,
1981). In thinking aloud, people are tested individually and, as they work, are asked to
verbarlize what they anre doing and why. When they fall silent, they are questioned by an
observer. ("Why dici you do that?") While thinking aloud provides insight into the
participant's thought processes, the intrusions can interfere with what the participant is
trying to do and invariably alter task times.
TEST PLAN
Test Participants - Two members of the ZJMTRI Human Factors Division attempted to assemble a PC-
8. P'aul, the author of this report, is a 35-year-old scientist in the Division and an
assistant professor o f industrial engineering. He has a B.S. in mechanical engineering,
masters degrees in both industrial engineering and psychology, and a joint Ph.D. in both.
He has some knowledge of electronics, having put together a Heathkit H-8 8080-based
computer and an H-$9 video terminal by himself. He has had an IBM XT in his office and
an I13M PC a t home for several years. He has installed cards and replaced chips in both
computers. Paul has written programs in PLIC, FORTRAN, PDP-I assembler, and
CRASH, and is a skilled BASIC programmer. He does most of his writing on his XT,
using Vedit, and is familiar with most of the common software available for the Macintosh
(MacWrite, MacPaint,, MacDraw, etc.).
Don, who works with Paul, is a 22-year-old graduate student in industrial
engineering a t the Uriiversity of Michigan. (His undergraduate work was also in industrial
engineering.) Don ha.s some experience with computer software, having written programs
in FORTRAN and EIASlC, and has used application packages such as Symphony and
Vedit;, along with most of the general-purpose softwzre available for the Macintosh. Don's
interests are in engineering economy and operations research.
a ~ m e n t and Materials - Participants assembled a fairly complete NCR PC-8 (an IBM AT clone based on the
Intel 80286 processor). Assemblies were shipped in five boxes that contained parts for two
PC-8 computers. When fully assembled, each computer had 640K on the motherboard, a
20 megabyte hard disk drive, a 360K floppy drive, a seriallparallel adapter card, a graphic
display controller card, a keyboard, and a color display. (See Appendix B for the NCR
model numbers.)
Two of the boxes each contained one system unit (with 512K on the motherboard, a
CDC Wren model 1 20 megabyte 5-114 inch hard disk drive, 1.2 megabyte 5-114 inch
flopp!y (flex) drive, and serial-parallel adapter card all installed). Also in each box was a
see-through bag containing miscellaneous items (reversible blade screwdriver, disk drive
mounting slides, felt feet for the system unit), a box labeled "documentation" containing
the Owner's, DOS, anid BASIC manuals, a box containing the keyboard, and a power cord.
Two other boxes marked "color display" contained the display hardware. In each
was an NCR 14-inlch color monitor, an NCR Graphic CRT Controller card, and "kit"
instructions ("owner's manuals") for each item. A graphics inemory upgrade was installed
on tlne card.
Finally, the fifth box contained numerous miscellaneous parts, each packed in its
own box. Included were two tilt and swivel bases for the monitors, two 128K RAM
upgrades, two 8028'7 internal arithmetic co~processors, two 360K 5-114 inch floppy (flex)
disk drives with headload, two vertical mounts, and two display kits (3-meter video and
power cables). Also in this box were a t least four sets of RS-232 communications cables,
parallel printer cables, and serial cable converters (DB-9 to DB-25). In the test reported
here, the vertical mounts and cables were not installed.
Performance vvas recorded using a 112-inch VHS video system. It included a Sony
S-100 camera, Panilsonic NV-8410 portable recorder, Thalner Electronics Laboratories
model TD-426P timer and date generator, and Panasonic BT-S700N 9-inch NTSC format
color monitor. The ciateltime generator output (displayed to the nearest 1/10 of a second)
was superimposed on the scene being taped and was recorded with it. All video equipment
was mounted on a vvheeled tripod, and the monitor was facing the participants, so they
coulcl see the camera's field of view.
Test Activities and Their Sequence - Participants were videotaped while setting up an NCR PC-8 using the "subjects-in-
tandem" method described earlier. All testing was carried out in room 337 at the
University of Michigan Transportation Research Institute. A well-lit 15 x 15 foot open
area was used for tests, with assembly taking place on a standard 60-inch desk in the
center of the work area. On a few occasions where it was unclear what the participants
were doing, the camera operator asked them for an explanation.
There were three work periods in this experiment. In the first, the two test
participants cooperated in setting up a PC-8, discussing problems as they went. The first
and third sessions were recorded on videotape. Activities taking place during the first
session included unpacking the system shipping box, removing and installing the keyboard,
installing the 128K RAM upgrade and 80287 co-processor, installing the display adapter
card, and attempting; to install a 360K floppy drive (Green, Ottens, and Reifeis, 1986).
The {session ended after an hour and a half when the participants were unable to install
the disk drive.
In the second work period (for which no data were collected), two NCR field
engineers (Norm Cook and Sam Griffith) tried to install the 36OK drive. Both spent 112
day (on it without success. Sam subsequently returned and spent an additional 1/2 day
com~lleting installatioln of the disk drive and installing some of the system software. The
field engineers had n i~ t received specific training on the PC-8, though they had experience
with other similar products. Because the PC-8 was a gift, the NCR procedure to identify
training needs for its field engineers had not been triggered.
In the third se!ssion, the two subjects installed the display monitor base, put the felt
feet on the cabinet, checked the key lock, copied a DOS disk, formatted the hard disk,
installed DOS, and copied system and utility files from a floppy disk to the hard disk. That
session lasted an hour and a half, and was recorded on videotape (Green, Ottens, and
Krusic, 1986).
RESULTS AND DISCUSSION
The results reported here are based upon the videotapes. Readers interested in
details beyond those reported here should view the two previously mentioned videotapes.
First Videotape - Hardware Unpacking and Installation - OveraI1, setup of the PC-8 was a very time-consuming and unpleasant experience.
The knowledgeable participants in this experiment were unable to complete it and had to
call in NCR field engineers for assistance. In fact, even the NCR engineers had trouble
and had to call for help.
As was noted earlier, the first session included all of the tasks associated with
setting up a complete system, up to installing a 360K floppy drive. A summary of the
session is shown in Table 1. Almost 113 of the time (29 minutes) was spent attempting to
install a floppy drive, a task which was never completed, and another 18 minutes was
spent installing the graphics card. Even installing the co-processor, just one chip, took
eight minutes. Much of the hour-and-a-half was spent trying to figure out (unsuccessfully)
what to do.
Problems were encountered in virtually every task, as described in the section that
follows. For each taslr, a listing of the activities is provided along with a commentary.
The initial step in setting up the PC-8 was to unpack it. (See Table 2 for the time
data.:) The first problem faced was deciding which box to unpack. There was no "open me
first" label, and for several of the boxes, no labels identifying their contents. The smallest
box .was opened first because it looked like it might contain manuals and setup
instructions. After opening it, removing the manuals, and finding out what they were, the
manuals were put back in the box, because they were the wrong ones. About 2-112
minutes were wasted doing this.
Since the general assembly instructions couldn't be found, setup proceeded without
them. The participants guessed the system unit should be assembled first. Consequently,
the heaviest box was opened next, since the system units are usually quite heavy. In fact,
the box was so heavy it was best handled by two people, but there were no instructions
suggesting that two people should be considered.
At that point there was a delay of 1 minute and 16 seconds in which the
participants identified themselves on the tape, something obviously not required during the
normal setup procedure, but required for the videotape.
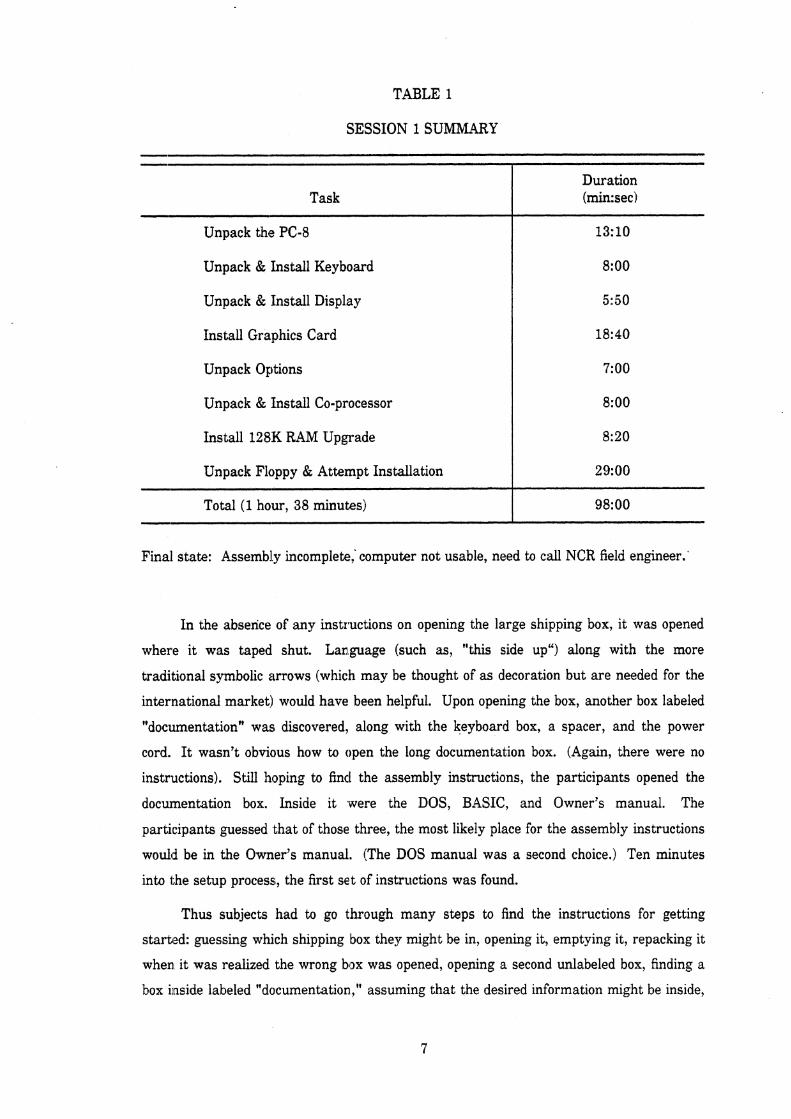
TABLE 1
SESSION 1 SUMMARY
Task Duration (mirxsec)
Unpack the PC-8
Unpack & Install Keyboard
Unpack & Install Display
Install Graphics Card
Unpack Options
Unpack & Install Co-processor
Install 128K RAM Upgrade
Unpack Floppy & Attempt Installation
Total (1 hour, 38 minutes) I 98:OO
Final state: Assembly incomplete,' computer not usable, need to call NCR field engineer.
In the absence of any instructions on opening the large shipping box, it was opened
where it was taped shut. Language (such as, "this side up") along with the more
traditional symbolic rirrows (which may be thought of as decoration but are needed for the
international market) would have been helpful. Upon opening the box, another box labeled
"doaxmentation" was discovered, along with the keyboard box, a spacer, and the power
cord. It wasn't obvious how to open the long documentation box. (Again, there were no
instructions). Still hoping to fincl the assembly instructions, the participants opened the
documentation box. Inside it ,were the DOS, BASIC, and Owner's manual. The
participants guessed that of those three, the most likely place for the assembly instructions
would be in the Owner's manual. (The DOS manual was a second choice.) Ten minutes
into the setup process;, the first set of instructions was found.
Thus subjects had to go through many steps to find the instructions for getting
starbed: guessing which shipping box they might be in, opening it, emptying it, repacking it
when1 it was reaiized the wrong b13x was opened, opening a second unlabeled box, finding a
box inside labeled "documentation," assuming that the desired information might be inside,
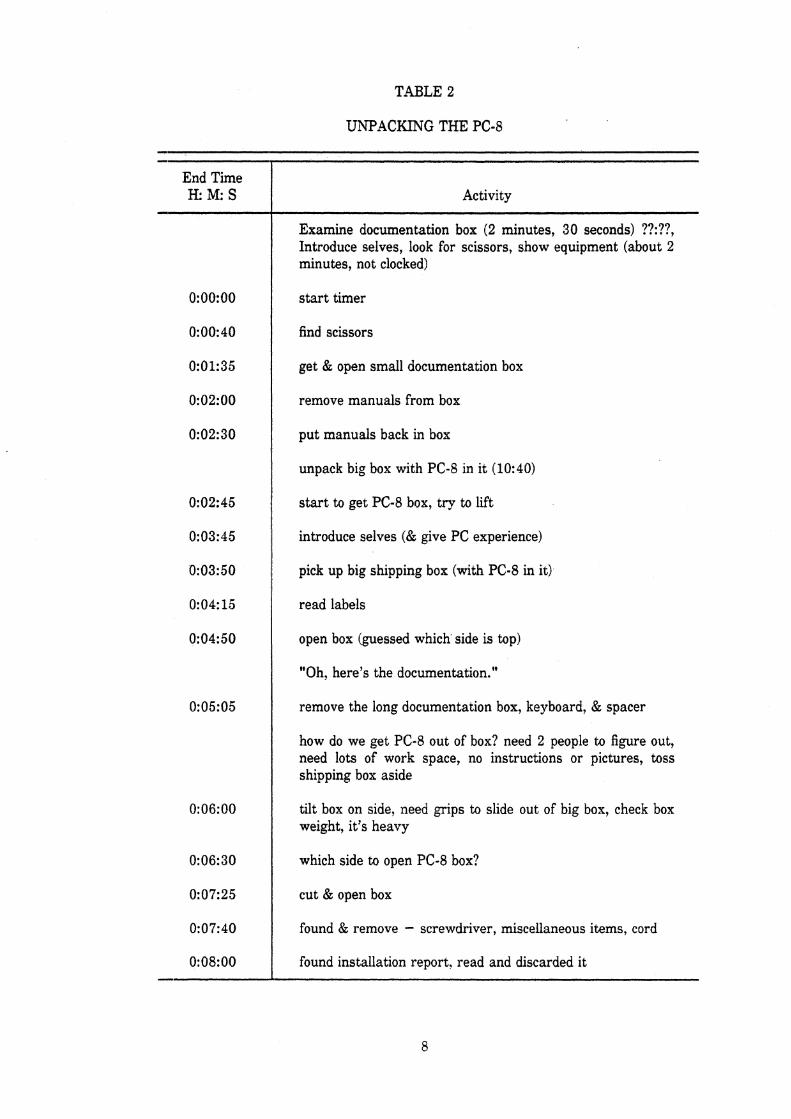
TABLE 2
UNPACKING THE PC-8
End Time H: M: S Activity
Examine documentation box (2 minutes, 30 seconds) ??:??, Introduce selves, look for scissors, show equipment (about 2 minutes, not clocked)
start timer
find scissors
get & open small documentation box
remove manuals from box
put manuals back in box
unpack big box with PC-8 in it (10:40)
start to get PC-8 box, try to lift
introduce selves (& give PC experience)
pick up big shipping box (with PC-8 in it)
read labels
open box (guessed which' side is top)
"Oh, here's the documentation."
remove the long documentation box, keyboard, & spacer
how do we get PC-8 out of box? need 2 people to figure out, need lots of work space, no instructions or pictures, toss shipping box aside
tilt box on side, need grips to slide out of big box, check box weight, it's heavy
which side to open PC-8 box?
cut & open box
found & remove - screwdriver, miscellaneous items, cord
found installation report, read and discarded it

TABLE 2 (continued)
Activity
found instruction on box to read "getting started"
found and got long documentation box
how do you open the long documentation box?
open long documentation box (found DOS, BASIC, owner's manual)
where is getting started? probably in the owner's manual, found it! open shrink wrap
skim "getting started", not useful-too superficial
how do you turn the box to pull out the PC-8? which side is up? why isn't there a diagram? hard to get fingers in to pull out PC-8
take PC-8 from box: PC-8 fell down-pull from underneath
which side is up? which is the front?
flip system box (cabinet) over (was upside down)
untape bag
take cabinet out of bag
Total
Note: The time shown for each activity is the time a t which it ended. The start time for each activity is the end time for the previous one. Thus the activity "put manuals back in box" took 310 seconds (2:30 - 2:OO).
finding three slip cases inside the "documentation" box containing manuals and, finally,
guess~ing (correctly) which one might contain the desired instructions. Of course, this
entire search was based on the assumption there were setup instructions. After all of that
effort,, the instructionrs ("Getting Started") found were very superficial.
While it was not as time-consuming, removing the PC-8 cabinet from its shipping
box vvas not easy. The current design of the foam packing does not provide for clearance
for tlie customer to grasp the cabinet. In this experiment the box was tilted and the
participants managed to slide out the cabinet. In the process, the cabinet dropped a few
inches on to the desk,,
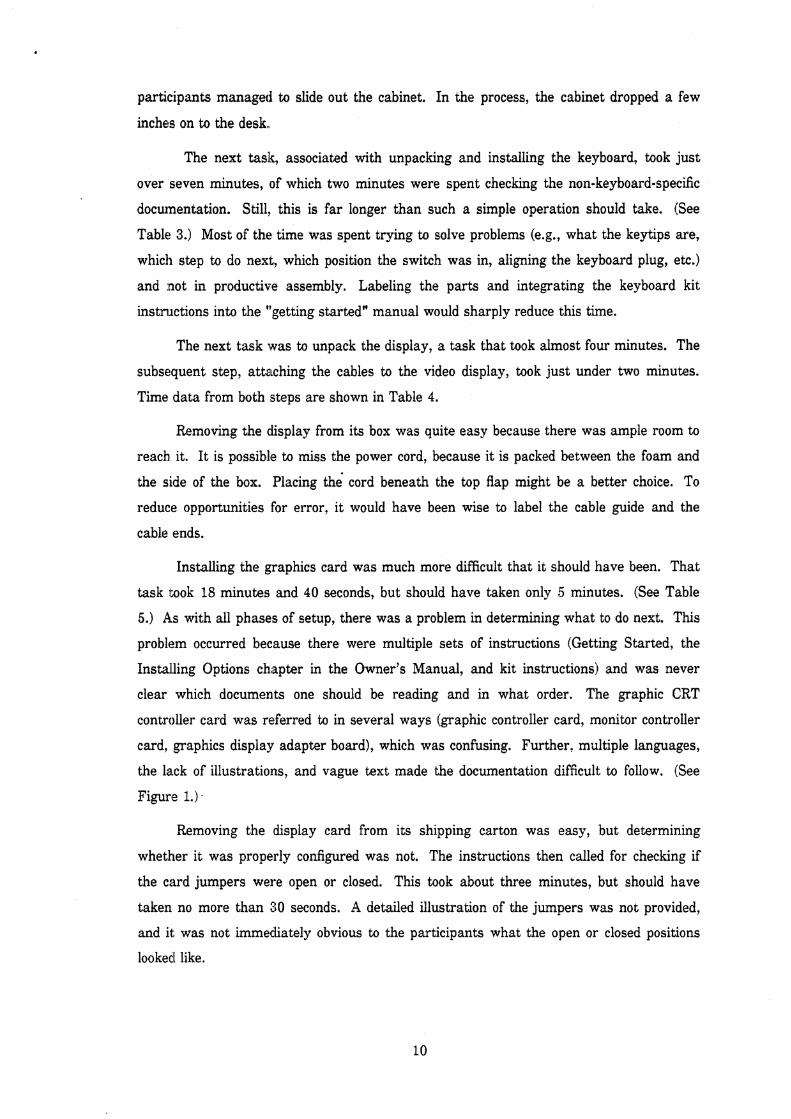
The next tasik, associated with unpacking and installing the keyboard, took just
over seven minutes, of which two minutes were spent checking the non-keyboard-specific
docu~nentation. Still,, this is far longer than such a simple operation should take. (See
Table 3.) Most of the time was spent trying to solve problems (e.g., what the keytips are,
which step to do next, which position the switch was in, aligning the keyboard plug, etc.)
and not in productive assembly. Labeling the parts and integrating the keyboard kit
instructions into the "'getting started" manual would sharply reduce this time.
The next task was to unpack the display, a task that took almost four minutes. The
subsequent step, attaching the cables to the video display, took just under two minutes.
Time data from both steps are shown in Table 4.
Removing the clisplay from its box was quite easy because there was ample room to
reach it. It is possible to miss the power cord, because it is packed between the foam and
the side of the box. Placing the cord beneath the top flap might be a better choice. To
reduce opportunities for error, it would have been wise to label the cable guide and the
cable ends.
Installing the graphics card was much more difficult that it should have been. That
task cook 18 minutes and 40 seconds, but should have taken only 5 minutes. (See Table
5.) As with all phases of setup, there was a problem in determining what to do next. This
prob1t.m occurred because there were multiple sets of instructions (Getting Started, the
Insta1.ling Options chapter in the Owner's Manual, and kit instructions) and was never
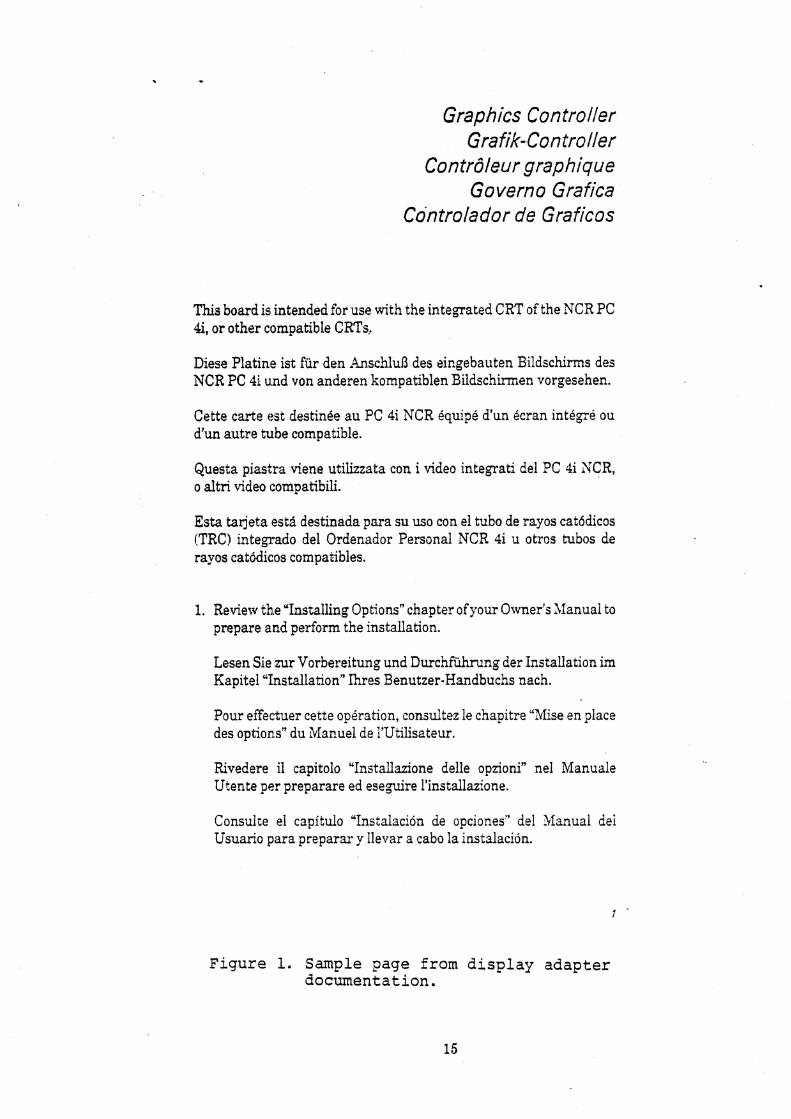
clear which documents one should be reading and in what order. The graphic CRT
controller card was referred to in several ways (graphic controller card, monitor controller
card, graphics display adapter board), which was confusing. Further, multiple languages,
the lack of illustrations, and vague text made the documentation difficult to follow. (See
Figure 1.).
Removing the display card from its shipping carton was easy, but determining
whether it was properly configured was not. The instructions then called for checking if
the card jumpers were open or closed. This took about three minutes, but should have
taken no more than 30 seconds. A detailed illustration of the jumpers was not provided,
and it was not immediately obvious to the participants what the open or closed positions
lookecl like.
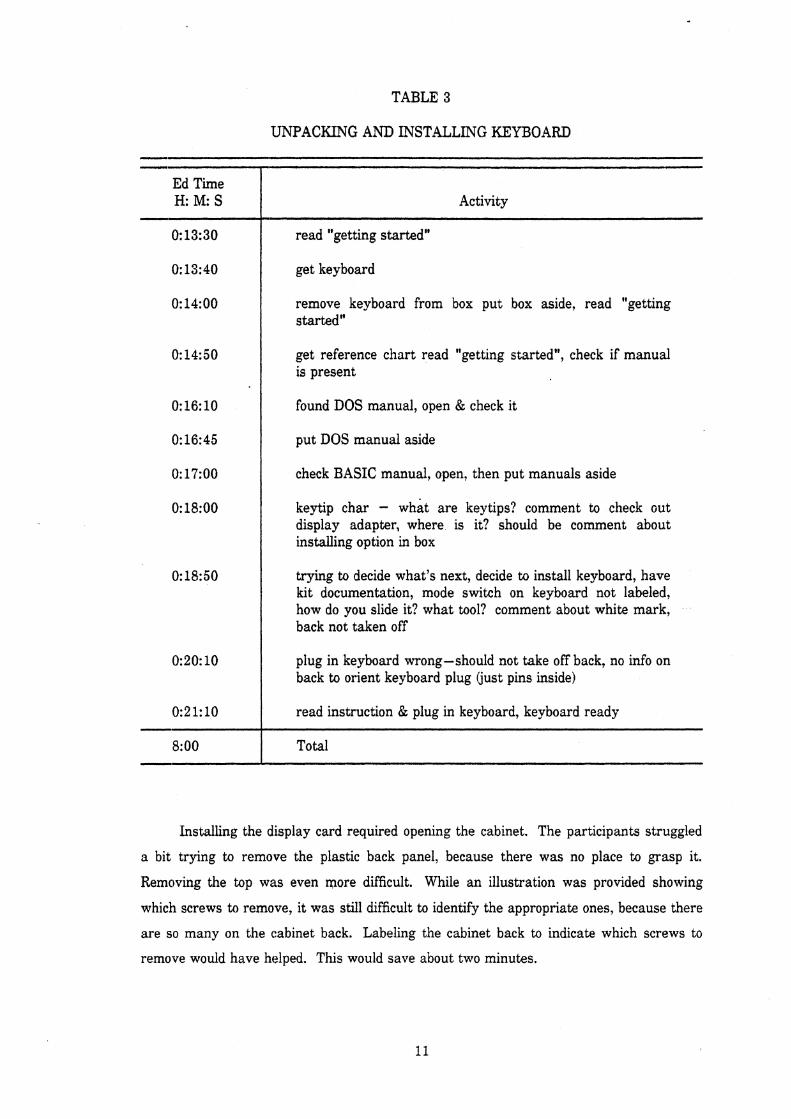
TABLE 3
UNPACKING AND INSTALLING KEYBOARD
Ed Time H: M: S Activity
read "getting started"
get keyboard
remove keyboard from box put box aside, read "getting started"
get reference chart read "getting started", check if manual is present
found DOS manual, open & check it
put DOS manual aside
check BASIC manual, open, then put manuals aside
keytip char - what are keytips? comment to check out display adapter, where is it? should be comment about installing option in box
trying to decide what's next, decide to install keyboard, have kit documentation, mode switch on keyboard not labeled, how do you slide it? what tool? comment about white mark, back not taken off
plug in keyboard wrong-should not take off back, no info on back to orient keyboard plug Gust pins inside)
read instruction & plug in keyboard, keyboard ready
8: 00 I Total
Installing the display card required opening the cabinet. The participants struggled
a bit trying to remove the plastic back panel, because there was no place to grasp it.
Removing the top wsis even more difficult. While an illustration was provided showing
which screws to remove, it was still difficult to identify the appropriate ones, because there
are so many on the cabinet back. Labeling the cabinet back to indicate which screws to
remove would have helped. This would save about two minutes.
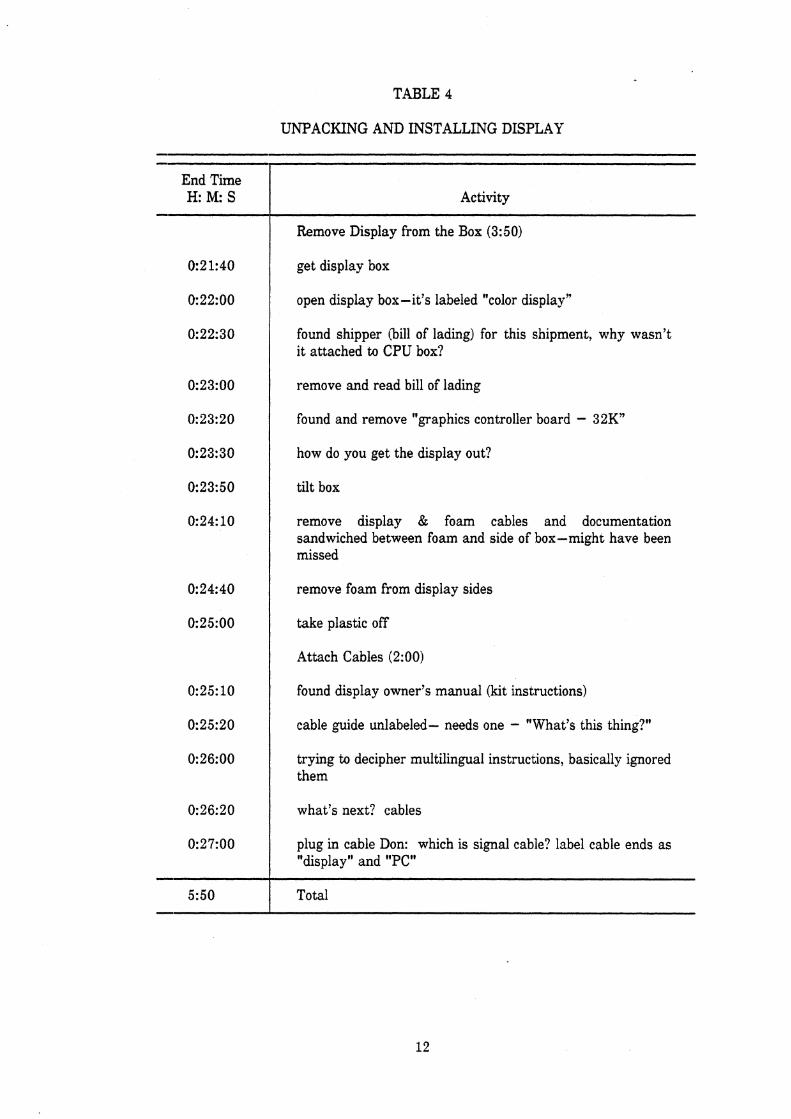
TABLE 4
UNPACKING AND INSTALLING DISPLAY
End Time H: M: S Activity
Remove Display from the Box (3:50)
get display box
open display box-it's labeled "color display"
found shipper (bill of lading) for this shipment, why wasn't it attached to CPU box?
remove and read bill of lading
found and remove "graphics controller board - 32K"
how do you get the display out?
tilt box
remove display & foam cables and documentation sandwiched between foam and side of box-might have been missed
remove foam from display sides
take plastic off
Attach Cables (2:OO)
found display owner's manual (kit instructions)
cable guide unlabeled- needs one - "What's this thing?"
trying to decipher multilingual instructions, basically ignored them
what's next? cables
plug in cable Don: which is signal cable? label cable ends as "display" and "PC"
5:50 I Total
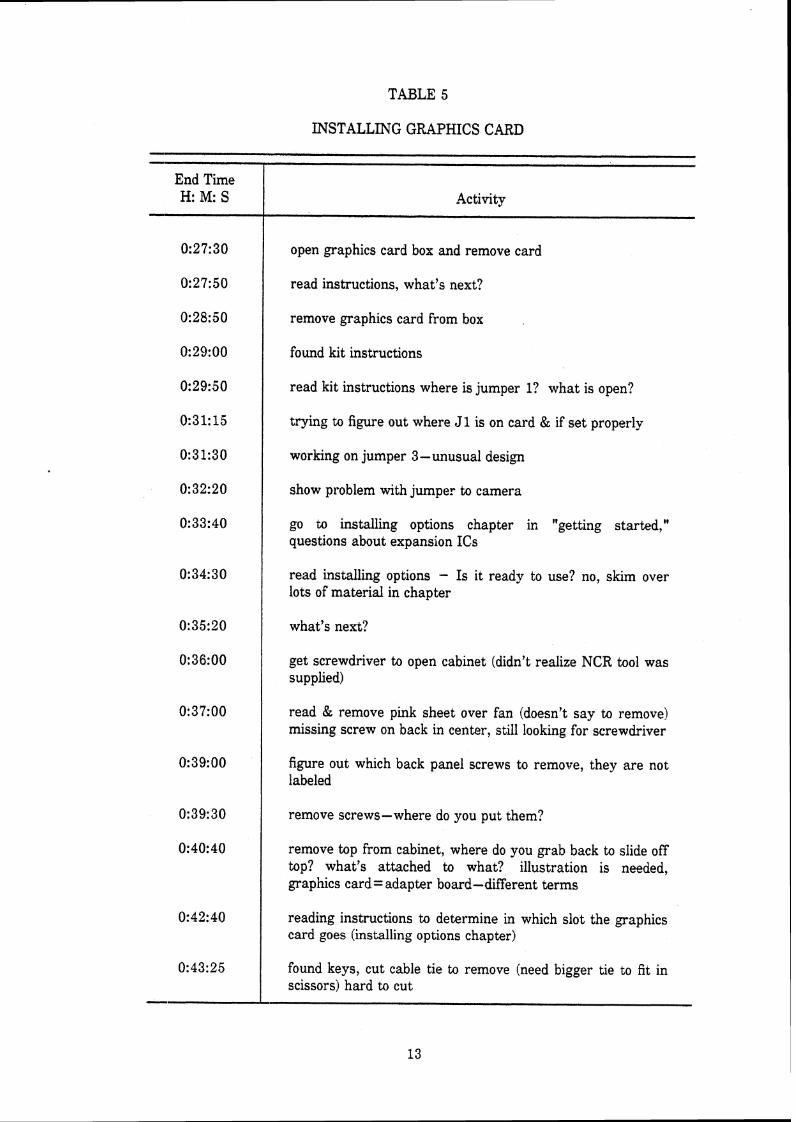
TABLE 5
INSTALLING GRAPHICS CARD
End Time H: M: S Activity
open graphics card box and remove card
read instructions, what's next?
remove graphics card from box
found kit instructions
read kit instructions where is jumper l? what is open?
trying to figure out where J1 is on card & if set properly
working on jumper 3 -unusual design
show problem with jumper to camera
go to installing options chapter in "getting started," questions about expansion ICs
read installing options - Is it ready to use? no, skim over lots of material in chapter
what's next?
get screwdriver to open cabinet (didn't realize NCR tool was supplied)
read & remove pink sheet over fan (doesn't say to remove) missing screw on back in center, still looking for screwdriver
figure out which back panel screws to remove, they are not labeled
remove screws-where do you put them?
reading instructions to determine in which slot the graphics card goes (installing options chapter)
1
found keys, cut cable tie to remove (need bigger tie to fit in scissors) hard to cut
remove top from cabinet, where do you grab back to slide off top? what's attached to what? illustration is needed, graphics card = adapter board -different terms
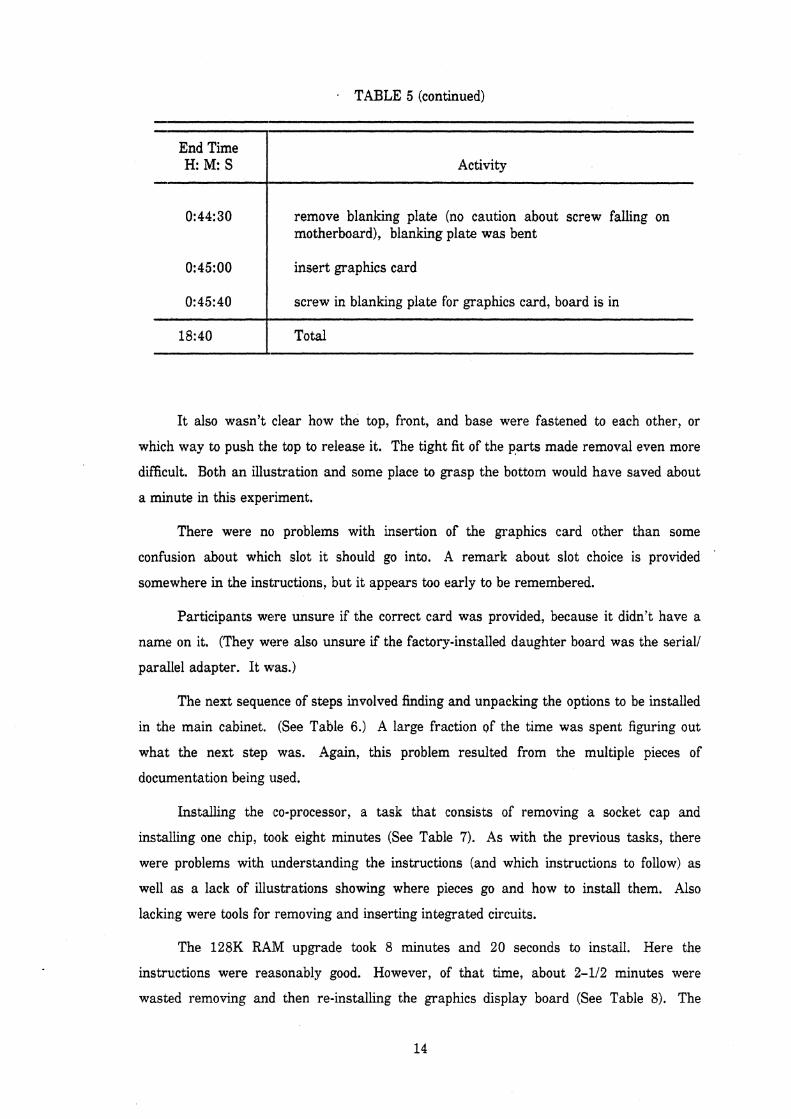
TABLE 5 (continued)
Activity
0:44:30
0:45:40 screw in blanking plate for graphics card, board is in
Total 18: 40 -
remove blanking plate (no caution about screw falling on motherboard), blanking plate was bent
0:45:00
I t also wasn't clear how the top, front, and base were fastened to each other, or
which way to push the top to release it. The tight fit of the p.arts made removal even more
difficult. Both an illustration and some place to grasp the bottom would have saved about
a minute in this experiment.
insert graphics card
There were no problems with insertion of the graphics card other than some
confusion about which slot it should go into. A remark about slot choice is provided
some,where in the insl;ructions, but it appears too early to be remembered.
Participants were unsure if the correct card was provided, because it didn't have a
name on it. (They were also unsure if the factory-installed daughter board was the serial/
parallel adapter. I t wtas.)
The next sequence of steps involved finding and unpacking the options to be installed
in the main cabinet. (See Table 6.) A large fraction of the time was spent figuring out
what the next step was. Again, this problem resulted from the multiple pieces of
docunnentation being used.
Installing the co-processor, a task that consists of removing a socket cap and
installing one chip, took eight minutes (See Table 7). As with the previous tasks, there
were problems with understanding the instructions (and which instructions to follow) as
well iks a lack of illustrations showing where pieces go and how to install them. Also
lacking were tools for removing and inserting integrated circuits.
The 128K RAlM upgrade took 8 minutes and 20 seconds to install. Here the
instru.ctions were reasonably good. However, of that time, about 2-112 minutes were
wasted removing and then re-installing the graphics display board (See Table 8). The
Graphics Controlier Gra fik- Con troller
Contrileur graphique Governo Grafica
Controlador de Gra ficos
This board is intended for use with the integrated CRT of the NCR PC 4i, or other compatible CRTs,
Diese Platine ist fiir den .hschlu8 des eingebauten Bildschirms des NCR PC 4i u.nd von anderen lsompatiblen Bildschirmen vorgesehen.
Cette carte est destinee au PC 4i NCR iquipe d'un ecran integre ou d'un autre tube compatible.
Questa piastra viene utilizzata con i video integrati del PC 4i NCR, o altri video ~compatibili.
Esta tarjeta esta destinada para su uso con el tub0 de rayos catddicos (TRC) integado del Ordenador Personal NCR 4i u otros tubos de rayos cat6dic:os compatibles.
1. Review th.e "Installing Options" chapter ofyour Owner's Manual to prepare and perform the installation.
Lesen Sie zur Vorbereitung und Durchfiihrung der Installation im Kapitel "Installation" Ihres Benutzer-Handbuchs nach.
Pour effecltuer cette operation, consultez le chapitre "Mise en place des option.sl' du Manuel de I'Utilisateur.
Rivedere il capitol0 "Installazione delle opzioni" riel Manuale Utente per preparare ed ese,gire l'installazione.
Consul~e el capitulo "Instalacion de opciones" del llanual dei Usuario para preparar y llevar a cab0 la instalacion.
Figure 1. Sample page from display adapter documentation.
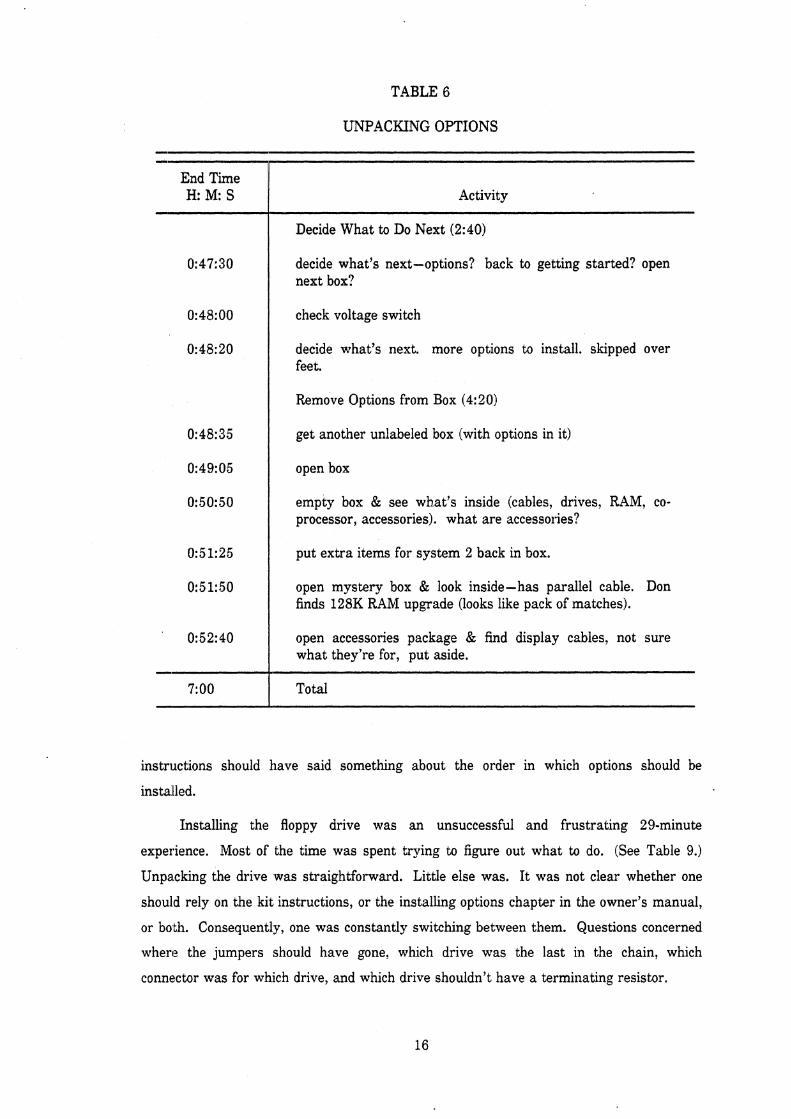
TABLE 6
UNPACKING OPTIONS
End Time H: M S Activity
Decide What to Do Next (2:40)
decide what's next-options? back to getting started? open next box?
check voltage switch
decide what's next. more options to install. skipped over feet.
Remove Options from Box (4:20)
get another unlabeled box (with options in it)
open box
empty box & see what's inside (cables, drives, RAM, co- processor, accessories). what are accessories?
put extra items for system 2 back in box.
open mystery box & look inside-has parallel cable. Don finds 128K RAM upgrade (looks like pack of matches).
open accessories package & find display cables, not sure what they're for, put aside.
7:OO 1 Total
instri~ctions should have said something about the order in which options should be
installed.
Installing the floppy drive was an unsuccessful and frustrating 29-minute
experience. Most of the time was spent trying to figure out what to do. (See Table 9.)
Unpa.cking the drive was straightforward. Little else was. I t was not clear whether one
should rely on the kit instructions, or the installing options chapter in the owner's manual,
or both. Consequentl:y, one was constantly switching between them. Questions concerned
where the jumpers !should have gone, which drive was the last in the chain, which
connector was for which drive, and which drive shouldn't have a terminating resistor.
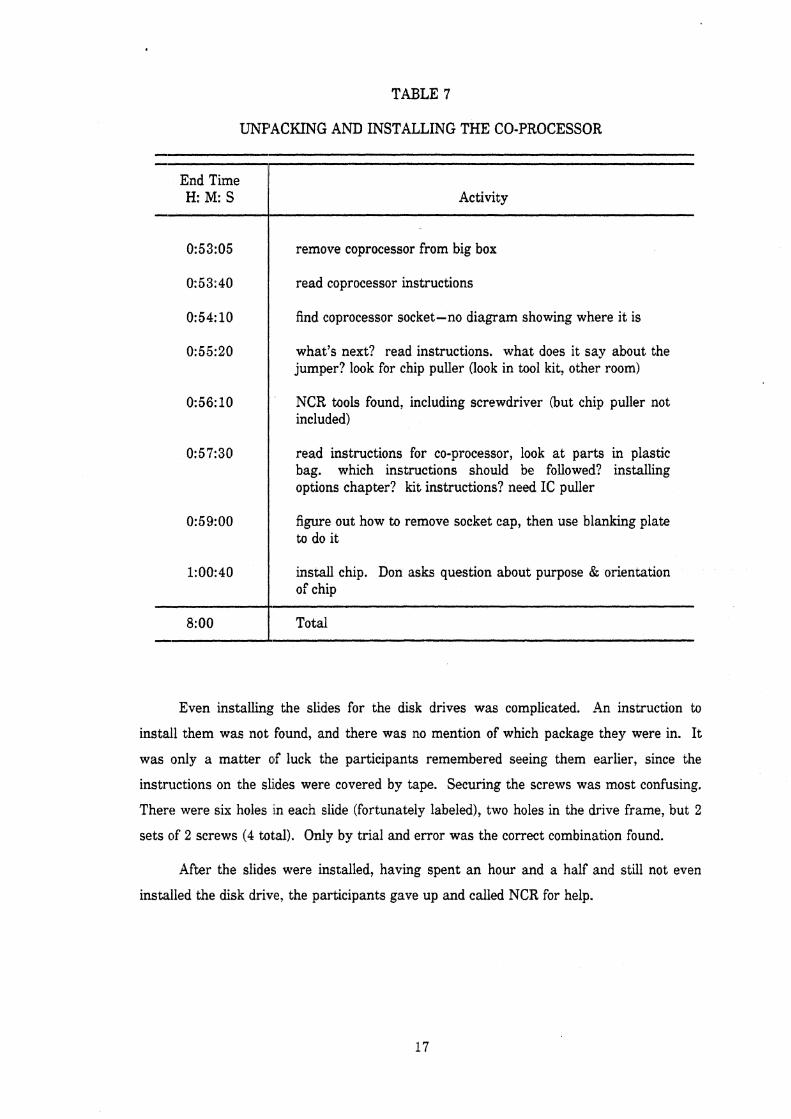
TABLE 7
UNF'ACKING AND INSTALLING THE CO-PROCESSOR
End Time H: M: S Activity
remove coprocessor from big box
read coprocessor instructions
find coprocessor socket-no diagram showing where it is
what's next? read instructions. what does it say about the jumper? look for chip puller (look in tool kit, other room)
NCR tools found, including screwdriver (but chip puller not included)
read instructions for co-processor, look a t parts in plastic bag. which instructions should be followed? installing options chapter? kit instructions? need IC puller
figure out how to remove socket cap, then use blanking plate to do it
install chip. Don asks question about purpose & orientation of chip
8:OO I Total
Even installing the slides for the disk drives was complicated. An instruction to
install them was not found, and there was no mention of which package they were in. It
was only a matter alf luck the participants remembered seeing them earlier, since the
instructions on the slides were covered by tape. Securing the screws was most confusing.
There were six holes m each slide (fortunately labeled), two holes in the drive frame, but 2
sets c ~ f 2 screws (4 total). Only by trial and error was the correct combination found.
After the slides were installed, having spent an hour and a half and still not even
installed the disk drive, the participants gave up and called NCR for help.
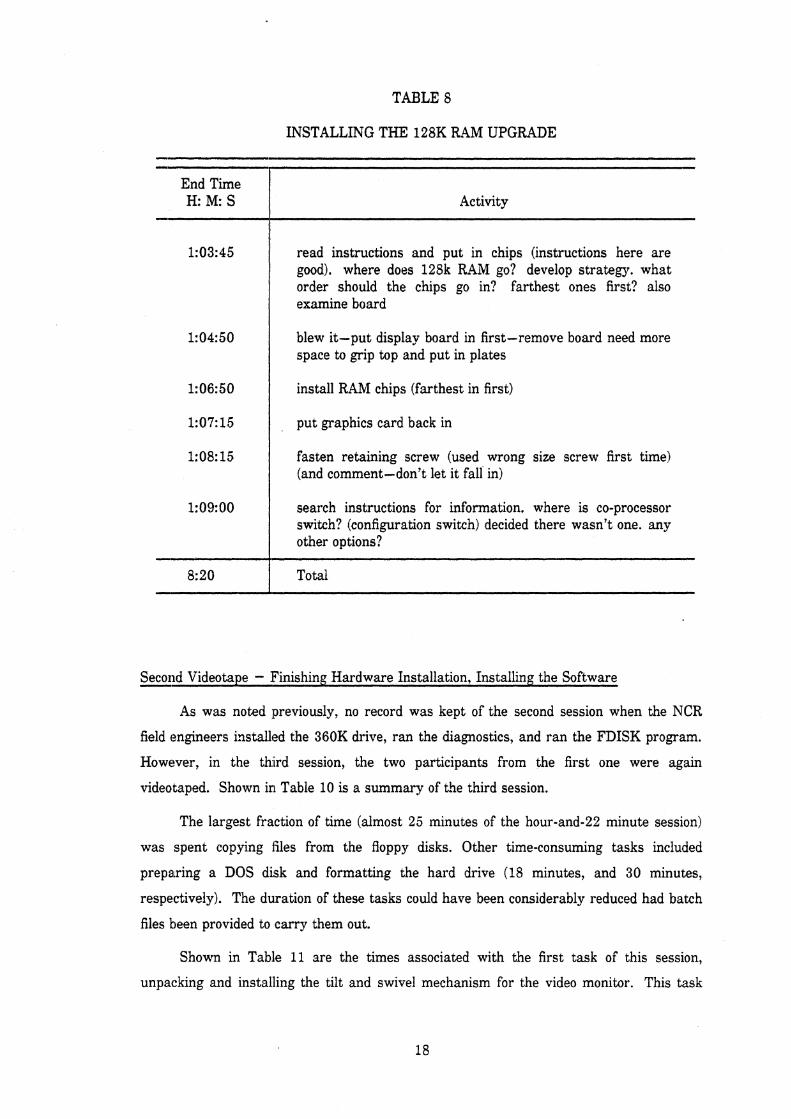
TABLE 8
INSTALLING THE 128K RAM UPGRADE -
End Time H: M: S Activity
read instructions and put in chips (instructions here are good). where does 128k RAM go? develop strategy. what order should the chips go in? farthest ones first? also examine board
blew it-put display board in first-remove board need more space to grip top and put in plates
install RAM chips (farthest in first)
put graphics card back in
fasten retaining screw (used wrong size screw first time) (and comment-don't let it fall in)
search instructions for informa1;ion. where is co-processor switch? (configuration switch) decided there wasn't one. any other options?
- -
8:20 I Total
Secorid Videotape - Finishing Hardware Installation, Installing the Software - As was noted ]previously, no record was kept of the second session when the NCR
field engineers installed the 360K drive, ran the diagnostics, and ran the FDISK program.
However, in the third session, the two participants from the first one were again
videotaped. Shown in Table 10 is a summary of the third session.
The largest fraction of time (almost 25 minutes of the hour-and-22 minute session)
was spent copying Ales from the floppy disks. Other time-consuming tasks included
preparing a DOS disk and formatting the hard drive (18 minutes, and 30 minutes,
respectively). The duration of these tasks could have been considerably reduced had batch
files been provided to carry them out.
Shown in Table 11 are the times associated with the first task of this session,
unpacking and installing the tilt and swivel mechanism for the video monitor. This task
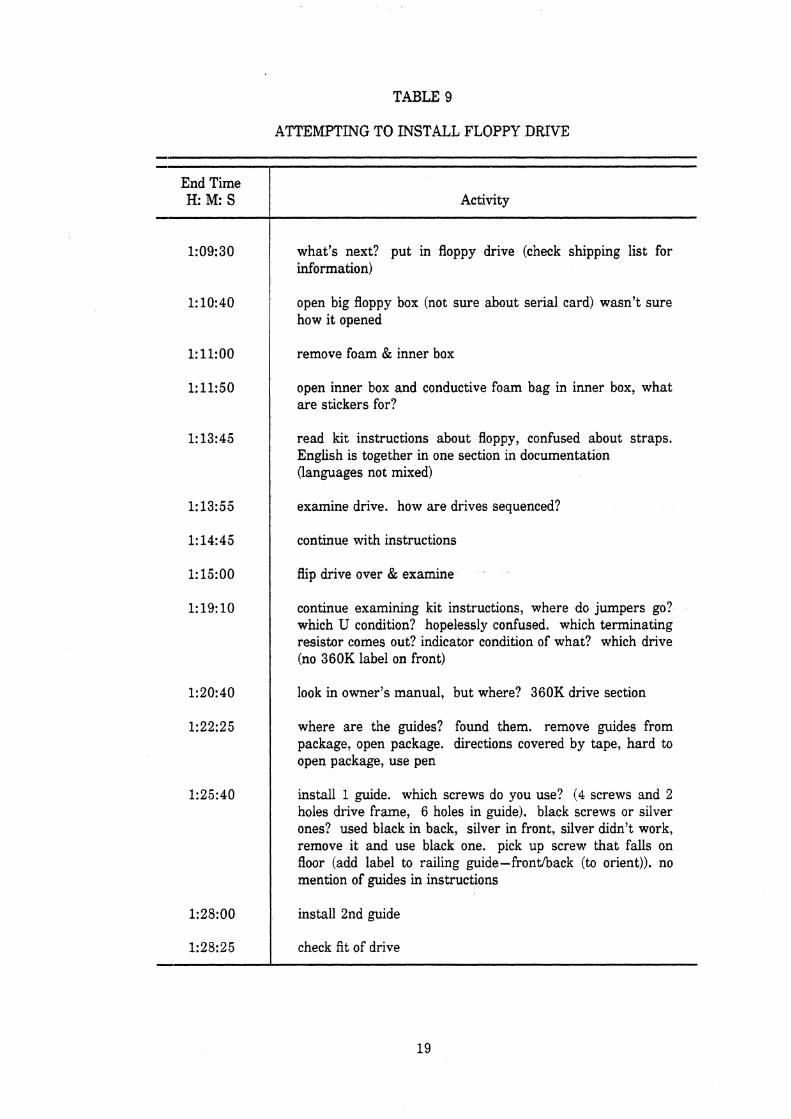
TABLE 9
ATTEMPTING TO INSTALL FLOPPY DRIVE
End Time H: M: S Activity
what's next? put in floppy drive (check shipping list for information)
open big floppy box (not sure about serial card) wasn't sure how it opened
remove foam & inner box
open inner box and conductive foam bag in inner box, what are stickers for?
read kit instructions about floppy, confused about straps. English is together in one section in documentation (languages not mixed)
examine drive. how are drives sequenced?
continue with instructions
flip drive over & examine
continue examining kit instructions, where do jumpers go? which U condition? hopelessly confused. which terminating resistor comes out? indicator condition of what? which drive (no 360K label on front)
look in owner's manual, but where? 360K drive section
where are the guides? found them. remove guides from package, open package. directions covered by tape, hard to open package, use pen
install 1 guide. which screws do you use? (4 screws and 2 holes drive frame, 6 holes in guide). black screws or silver ones? used black in back, silver in front, silver didn't work, remove it and use black one. pick up screw that falls on floor (add label to railing guide-fronthack (to orient)), no mention of guides in instructions
install 2nd guide
check fit of drive
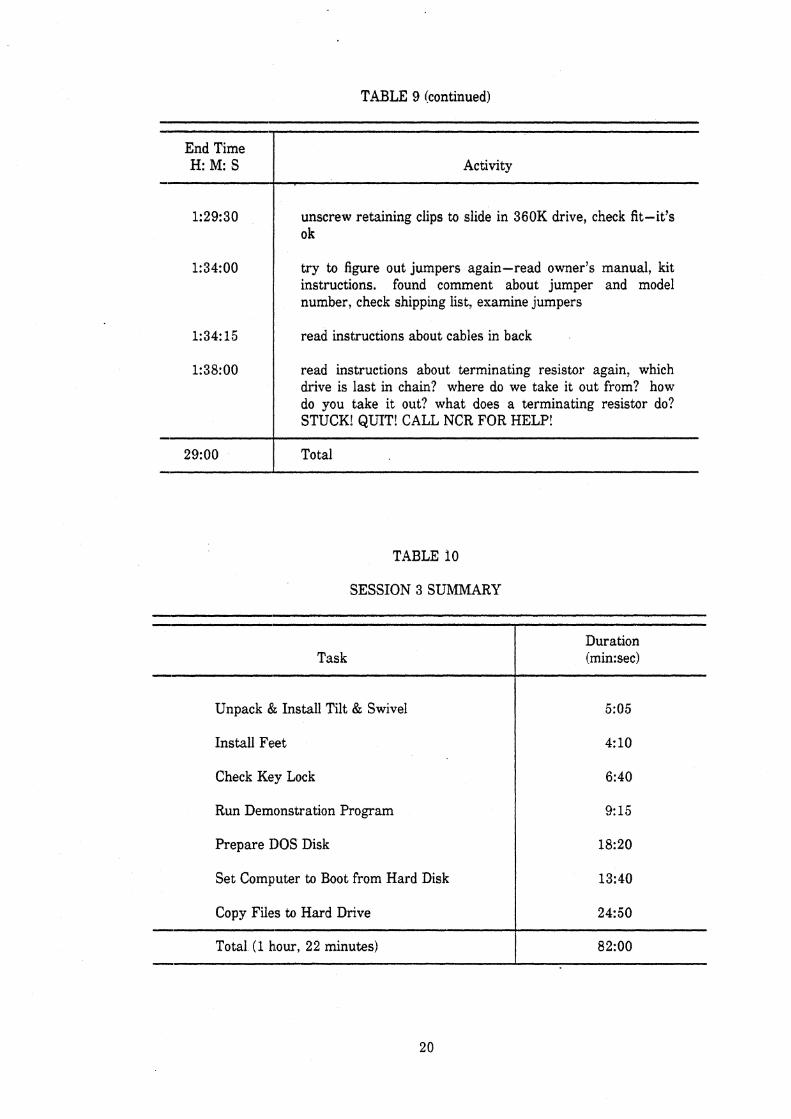
TABLE 9 (continued)
End Time H: M: S Activity
unscrew retaining clips to slide in 360K drive, check fit-it's 0 k
try to figure out jumpers again-read owner's manual, kit instructions, found comment about jumper and model number, check shipping list, examine jumpers
read instructions about cables in back
read instructions about terminating resistor again, which drive is last in chain? where do we take it out from? how do you take it out? what does a terminating resistor do? STUCK! QUIT! CALL NCR FOR HELP!
Total
TABLE i o
SESSION 3 SUMMARY
Task Duration (min:sec)
Unpack Bt Install Tilt & Swivel
Install Feet
Check Key Lock
Run Demonstration Program
Prepare 110s Disk
Set Computer to Boot from Hard Disk
Copy Files to Hard Drive
Total (1 h.our, 22 minutes) I 82:OO
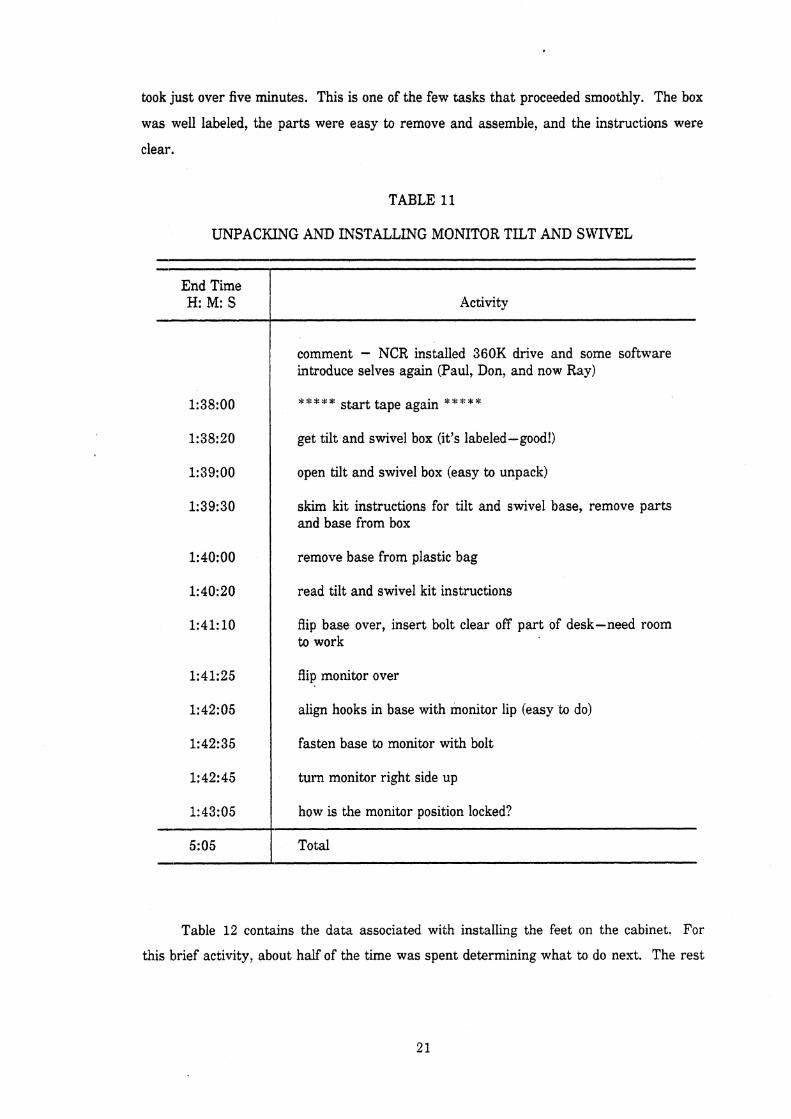
took just over five minutes. This is one of the few tasks that proceeded smoothly. The box
was well labeled, the parts were easy to remove and assemble, and the instructians were
clear.
TABLE 11
UNPACPJNG AND INSTALLING MONITOR TILT AND SWIVEL
End Time H: M: S Activity
comment - NCR installed 360K drive and some software introduce selves again (Paul, Don, and now Ray)
get tilt and swivel box (it's labeled-good!)
open tilt and swivel box (easy to unpack)
skim kit instructions for tilt and swivel base, remove parts and base from box
remove base from plastic bag
read tilt and swivel kit instructions
flip base over, insert bolt clear off part of desk-need room to work
flip monitor over
align hooks in base with monitor lip (easy to do)
fasten base to monitor with bolt
turn monitor right side up
how is the monitor position locked?
5:05 I Total
Table 12 conta.ins the data associated with installing the feet on the cabinet. For
this brief activity, about half of the time was spent determining what to do next. The rest
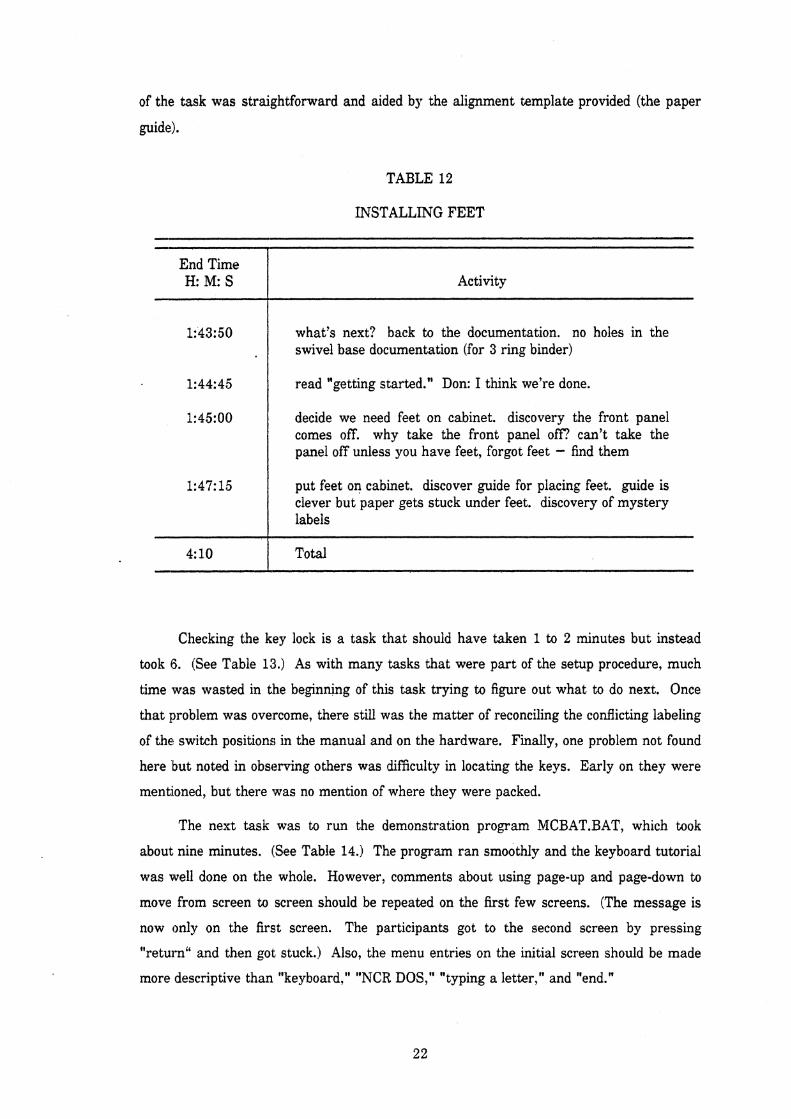
of the task was straightforward and aided by the alignment template provided (the paper
guide).
TABLE 12
INSTALLING FEET
End Time H: M: S Activity
what's next? back to the documentation. no holes in the swivel base documentation (for 3 ring binder)
read "getting started." Don: I think we're done.
decide we need feet on cabinet. discovery the front panel comes off. why take the front panel off? can't take the panel off unless you have feet, forgot feet - find them
put feet on cabinet. discover guide for placing feet. guide is clever but paper gets stuck under feet. discovery of mystery labels
4:lO I Total
Checking the key lock is a task that should have taken 1 to 2 minutes but instead
took 16. (See Table 13.) As with many tasks that were part of the setup procedure, much
time was wasted in the beginning of this task trying to figure out what to do next. Once
that problem was overcome, there still was the matter of reconciling the conflicting labeling
of the switch positions in the manual and on the hardware. Finally, one problem not found
here lout noted in observing others was difficulty in locating the keys. Early on they were
mentioned, but there .was no mention of where they were packed.
The next task was to run the demonstration program MCBAT.BAT, which took
about nine minutes. (See Table 14.) The program ran smoothly and the keyboard tutorial
was well done on the whole. However, comments about using page-up and page-down to
move from screen to screen should be repeated on the first few screens. (The message is
now only on the first screen. The participants got to the second screen by pressing
"return" and then got stuck.) Also, the menu entries on the initial screen should be made
more descriptive than "keyboard," "NCR DOS," "typing a letter," and "end."
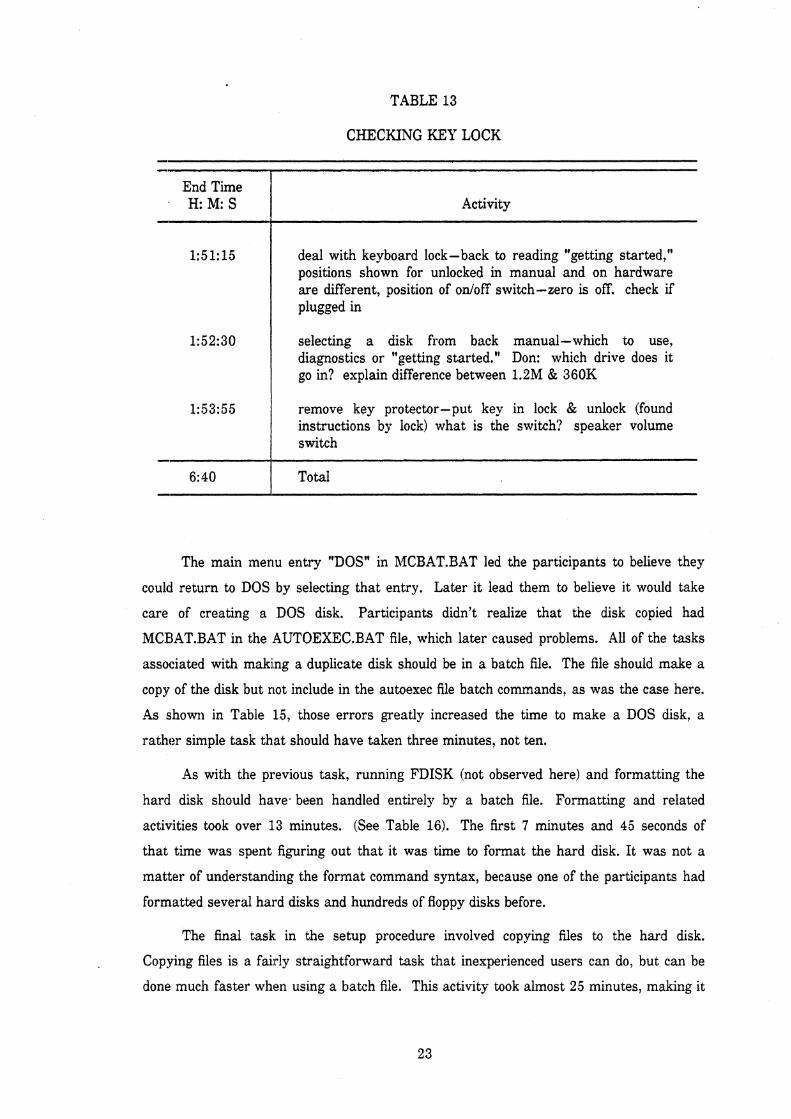
TABLE 13
CHECKING mY LOCK
End Time H: M: S Activity
1:51:15 deal with keyboard lock-back to reading "getting started," positions shown for unlocked in manual and on hardware are different, position of onloff switch-zero is off. check if plugged in
1:52:30
The main menu entry "DOS" in MCBAT.BAT led the participants to believe they
coulcl return to DOS by selecting that entry. Later it lead them to believe it would take
care of creating a DOS disk. Participants didn't realize that the disk copied had
MCEIAT.BAT in the AUTOEXEC.BAT file, which later caused problems. All of the tasks
associated with mak~,ng a duplicate disk should be in a batch file. The file should make a
copy of the disk but not include in the autoexec file batch commands, as was the case here.
As shown in Table 15, those errors greatly increased the time to make a DOS disk, a
rather simple task that should have taken three minutes, not ten.
selecting a disk from back manual-which to use, diagnostics or "getting started. " Don: which drive does it go in? explain difference between 1.2M & 360K
1:53:55
i -
As with the previous task, running FDISK (not observed here) and formatting the
hard disk should have. been handled entirely by a batch file. Formatting and related
activities took over 13 minutes. (See Table 16). The first 7 minutes and 45 seconds of
that time was spent figuring out that it was time to format the hard disk. I t was not a
matter of understanding the format command syntax, because one of the participants had
formatted several hard disks and hundreds of floppy disks before.
remove key protector-put key in lock & unlock (found instructions by lock) what is the switch? speaker volume switch
The final task. in the setup procedure involved copying files to the hard disk.
Copying files is a fairly straightforward task that inexperienced users can do, but can be
done much faster when using a batch file. This activity took almost 25 minutes, making it
6:40 1 Total
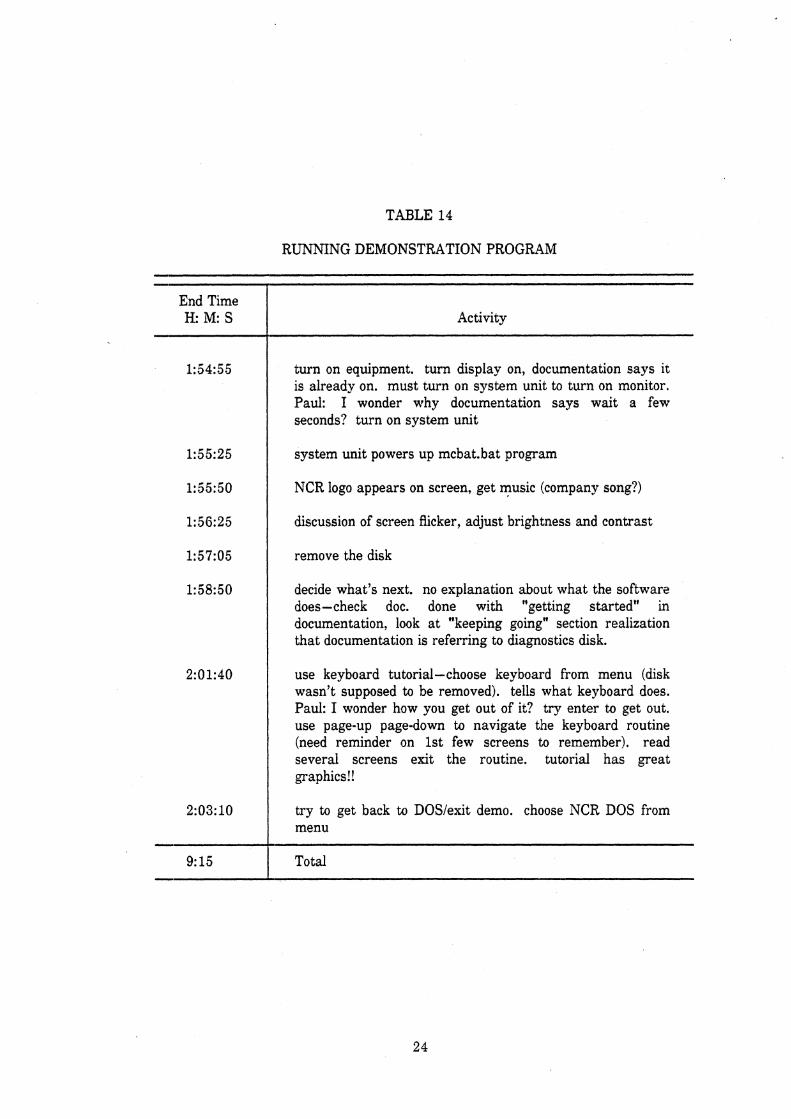
TABLE 14
RUNNING DEMONSTRATION PROGRAM
End Time H: M: S Activity
turn on equipment. turn display on, documentation says it is already on. must turn on system unit to turn on monitor. Paul: I wonder why documentation says wait a few seconds? turn on system unit
1:55:25 I system unit powers up mcbat.bat program
1:55:50 I NCR logo appears on screen, get music (company song?)
discussion of screen flicker, adjust brightness and contrast
remove the disk
decide what's next. no explanation about what the software does-check doc. done with "getting started" in documentation, look a t "keeping going" section realization that documentation is referring to diagnostics disk.
use keyboard tutorial-choose keyboard from menu (disk wasn't supposed to be removed). tells what keyboard does. Paul: I wonder how you get out of it? try enter to get out. use page-up page-down to navigate the keyboard routine (need reminder on 1st few screens to remember). read several screens exit the routine. tutorial has great
1 graphics!!
2:03:10 try to get back to DOSIexit demo. choose NCR DOS from 1 menu
9: 15 I Total
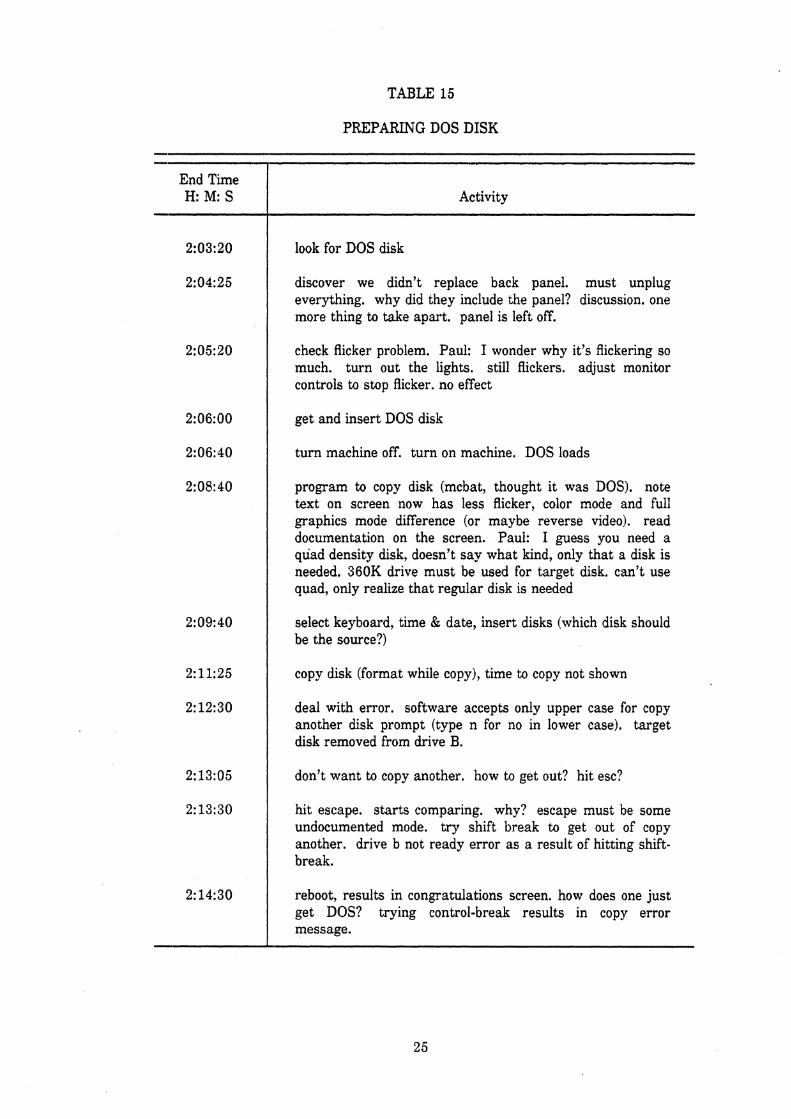
TABLE 15
PREPARING DOS DISK
End Time H: M: S
- -
Activity
look for DOS disk
discover we didn't replace back panel. must unplug everything. why did they include the panel? discussion. one more thing to take apart. panel is left off.
check flicker problem. Paul: I wonder why it's flickering so much. turn out the lights. still flickers. adjust monitor controls to stop flicker. no effect
get and insert DOS disk
turn machine off, turn on machine. DOS loads
program to copy disk (mcbat, thought it was DOS). note text on screen now has less flicker, color mode and full graphics mode difference (or maybe reverse video). read documentation on the screen. Paul: I guess you need a quad density disk, doesn't say what kind, only that a disk is needed. 360K drive must be used for target disk. can't use quad, only realize that regular disk is needed
select keyboard, time & date, insert disks (which disk should be the source?)
copy disk (format while copy), time to copy not shown
deal with error. software accepts only upper case for copy another disk prompt (type n for no in lower case). target disk removed from drive B.
don't want to copy another, how to get out? hit esc?
hit escape. starts comparing. why? escape must be some undocumented mode. try shift break to get out of copy another. drive b not ready error as a result of hitting shift- break.
reboot, results in congratulations screen. how does one just get DOS? trying control-break results in copy error message.

TABLE 15 (continued)
End Time H: M: S Activity
try to get DOS again. turn off machine again. turn on again. what is the purpose of the disk? is there anything in the doc about this disk. congratulations.
try control break. terminate batch job? yes, works. returns to DOS.
use dir command to find out what's on disk
look at autoexec.bat and mcbat files. c.an't find mcbat. is it a new DOS command? check documentation
rename autoexec file to avoid start-up problem
check if software now works, turn machine off, then turn on. explain to Don why file renamed.
10:20 I Total
the rnost time-consuming of the software-related activities observed. (See Table 17.)
Hidden in the task sequence is the considerable time the users spend deciding how the hard
drive should be organized and typing in the commands (often erroneously). The
docurnentation gives little advice on directory organization, and it is something new users
know little about. Finally, it is assumed that users know about the "prompt" command,
which few users do.
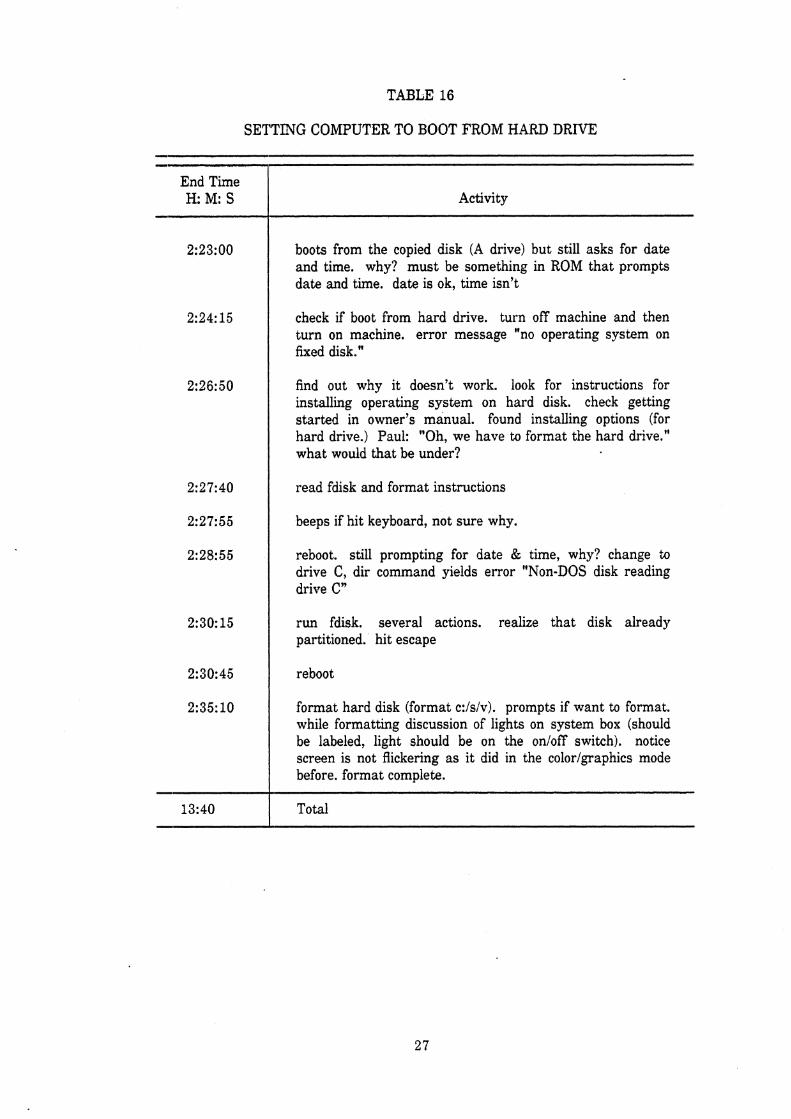
TABLE 16
SETTING COMPUTER TO BOOT FROM HARD DRIVE
End Time H: M: S Activity
boots from the copied disk (A drive) but still asks for date and time. why? must be something in ROM that prompts date and time. date is ok, time isn't
check if boot from hard drive. turn off machine and then turn on machine, error message "no operating system on fixed disk."
find out why it doesn't work. look for instructions for installing operating system on hard disk. check getting started in owner's manual. found installing options (for hard drive.) Paul: "Oh, we have to format the hard drive." what would that be under?
read fdisk and format instructions
beeps if hit keyboard, not sure why.
reboot. still prompting for date & time, why? change b drive C, dir command yields error "Non-DOS disk reading drive C"
run fdisk. several actions. realize that disk already partitioned. hit escape
reboot
format hard disk (format c:/s/v). prompts if want to format. while formatting discussion of lights on system box (should be labeled, light should be on the on/off switch). notice screen is not flickering as it did in the color/graphics mode before. format complete.
13:40 I Total
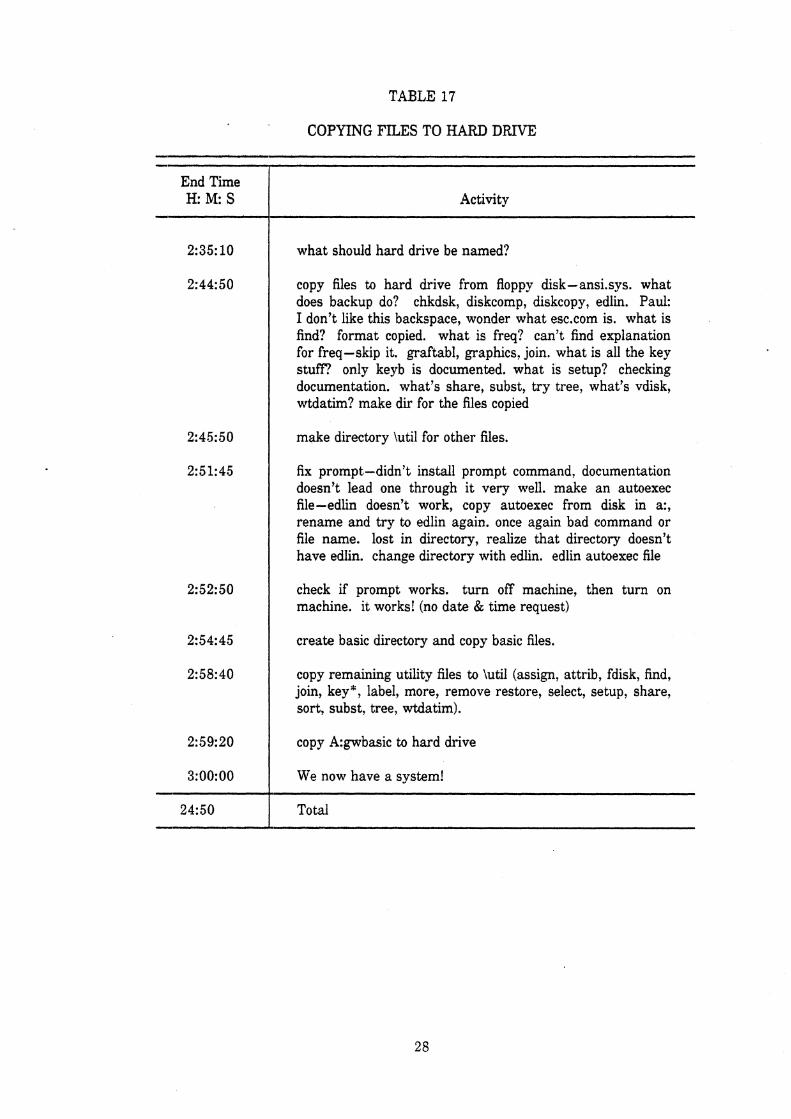
TABLE 17
COPYING FILES TO HARD DRIVE
- End Time H: M: S Activity - 2:35:10
2:44:50
2:45:50
2:51:45
2:52:50
2:54:45
2:58:40
2:59:20
3:OO:OO - 24:50 -
~ what should hard drive be named?
copy files to hard drive from floppy disk-ansi.sys. what does backup do? chkdsk, diskcomp, diskcopy, edlin. Paul: I don't like this backspace, wonder what esc.com is. what is find? format copied. what is freq? can't find explanation for freq-skip it. graftabl, graphics, join. what is all the key stuff? only keyb is documented. what is setup? checking documentation. what's share, subst, try tree, what's vdisk, wtdatim? make dir for the files copied
make directory \util for other files.
fix prompt-didn't install prompt command, documentation doesn't lead one through it very well. make an autoexec file-edlin doesn't work, copy autoexec from disk in a:, rename and try to edlin again. once again bad command or file name. lost in directory, realize that directory doesn't have edIin. change directory with edlin. edlin autoexec file
check if prompt works. turn off machine, then turn on machine. it works! (no date & time request)
create basic directory and copy basic files.
copy remaining utility files to \util (assign, attrib, fdisk, find, join, key", label, more, remove restore, select, setup, share, sort, subst, tree, wtdatim).
copy A:gwbasic to hard drive
We now have a system!
Total
RECOMMENDATIONS
It is clear from the previous section that participants had numerous problems with
setting up the PC-8. The evidence takes the form of both comments from typical users and
an etmpiric analysis of setup task times. These problems have arisen because the original
pro&uct concept dicl not call for customer setup. When human factors/ergonornic
considerations are not given priority early in design, it is unlikely the resulting product will
be easy to use (or in this case, easy to set up).
It may seem to some that the setup problems reported here can be eliminated by
improving the documentation. While that will certainly help, the ultimate solution must
incluide modification of the packaging, hardware, and software as well. Specifically, key
suggested changes include:
@ making the hardware self-documenting,
consolidating most of the setup information into one manual,
eliminating mixed language documentation,
making much greater use of illustrations,
adding "open me first," "this side up," and unpacking instructions, and a list of '
contents on the outside of each shipping box,
reshaping t,he foam in the cabinet shipping box to facilitate unpacking it, and
0 providing batch files to handle most of the system configuration.
All of these suggestions are expanded upon in the section that follows.
1. As a general principle, hardware should be self-documenting. To achieve this,
every part should be labeled with a name, and if possible a number. The name should be
engra.ved in the mold for plastic and cast metal parts, and printed on circuit boards. The
name should face the customer when the part is removed from its package and be visible
when it is installed. So, for example, with circuit boards, the name should be on the top of
the card and also, so one can identify it without opening the cabinet, on the outside of the
foot. Because NCR's market is multilingual, it will be a challenge to make the labels
legible given the limited space available.
With the present design of the PC-8, the only source of information about setting it
up is the written documentation, Ideally, it should be obvious from the hardware how to
set it up and the documentation should be a secondary source. Furthermore, the current
setup procedure assu:mes that people go through the documentation step-by-step, never
missing a step, and doing exactly what the author intended, no matter how unclear the
inst:ruction. People don't behave that way. They skim instructions. They do things out of
ordes. They don't understand everything they read. They make mistakes, lots of them.
It is therefore essential to shift the burden of explanation to the hardware.
2. Based on difficulties in this experiment, there is a clear need to label both the
graphics and seriallparallel boards.
3. For the disk drive slides, the name should be added to the body and the tape
covering the instructions removed.
4. An extension of the self-documenting principle is to have parts show how they go
together. For cards, a label (preferably pictorial) should indicate the slots it can go into.
Likewise, the system box or the motherboard should be labeled to indicate the cards each
slot will accept.
6. To speed installation of the slides, an outline of the slide should appear on the
side of the disk drive.
6. To facilitate opening the cabinet, labels are needed on the cabinet to indicate
wha~; the various screws are for, especially those that need to be removed to get the top
off. Making them a different color or type (for example, combination slotted or Phillips hex
head) would also help but could be more costly.
7. Removal would also be facilitated by providing an illustration showing how.
There are some tricks to taking the top off that are difficult to capture in words but easily
shown with pictures.
8. The positio~~s of the keyboard switch (PC-4iPC-6, PC-8) should be labeled.
9. Beyond these specific hardware changes, the design of the color display should be
reviewed. While not a setup problem per se, it flickers noticeably when running the initial
tutorial (where reverse video is used). The best solution may be to modify the tutorial
software rather than the hardware.
10. Some thought should be given to enlarging the backspace key, a commonly used
key. As with the display problem, it is not unique to setup, but nonetheless the small
backspace key led to many typing errors during setup. This change has been made on the
new IBM RT keyboard, which supposedly will be the standard keyboard for all new IBM
products. For the PC-8, it may not be a cost-effective change.
11. There were numerous problems with the documentation, and the participants
constantly complained about them. The most important change needed is to consolidate

the "'getting started" manual and the "installing options" chapter in the "owner's manual."
Furthermore, the kit instructions for the keyboard and the display card, which will be used
only with NCR products, should be eliminated and the information integrated into that
manual.
Many of these changes may already have been made in the proposed new
documentation. At Clemson, a draft copy without illustrations was provided, but it has not
been examined in detail, because that task was not part of the charge for this project. The
proposed revised manual seems to be a - vast improvement.
At several points in this experiment, participants did not know which manual they
should be looking at. During installation of the disk drive slides, four pieces of
documentation were used together-"getting started," the "installing options" chapter in
the owner's manual, the disk drive kit documentation, and the instruction sheet for the
slides,. To make matters worse, inclusion of a fifth document, a checklist, is being
considered.
12. To reduce confusion, separate kit instructions for each language should be
provided. Where multiple languages are used on each page, the user must repeatedly
decide for every step which information to ignore (in a five-language manual, 80% of the
text). Where documentation is language-specific, the customer makes just one choice about
language. Further, in single language documentation, illustrations appear closer to the
text i:n which they are cited. Multilingual documentation was developed to save paper, but
that 5,avings is far less the cost of added hot line calls and user dissatisfaction.
13. Make greater use of illustrations. The IBM philosophy is to minimize the use of
words; and maximize t,he use of illustrations, and it has been very successful (Boyer, 1980;
Boyle, 1986). Specific illustrations should show the open and closed positions of the
jumpers on the graphics card, which slots the graphics card can go in, the jumper
configuration for each type disk drive, and the cabling for various disk drive combinations.
The illustrations showing how to open the cabinet (to be placed on the back of it) should
also be repeated in the! manual.
1.4. The kit docu:mentation of the 360K disk drive is so confusing that it should be re-
written from scratch.
1.5. The kit docu.mentation for the slides should be revised to indicate which screws
are used for what.
16. NCR may want to consider developing software that generates a customized
short list of installation steps based on the shipping list for each order. This could
eliminate much of the time wasted a t each step determining what to do next.
17. The labeling for the keyboard switch lock positions shown in the manual should
be reversed to agree with the hardware.
The participants in this experiment encountered several dimculties while unpacking
the PC-8 and its options. Changes should be considered in the labeling of boxes and in the
design of packing materials.
18. Every shipping box should have a name on it describing its contents, just as the
color display did, along with a list of contents. (In this experiment the boxes with the
cabinet, options, and applications documentation were unlabeled. Perhaps the PC-$
exanlined was shipped early in the product cycle, before special packaging was ready.)
Proper labeling would avoid the need to open every box to determine its contents. In this
experiment several minutes were wasted opening, emptying, and then repacking a box
with several applicat~~on package manuals when the "getting started" manual was needed.
19. The graphic indicating the top (parallel arrows) should be reinforced with text
("thia side up") to aaisure that boxes are properly oriented when opened. Unfortunately,
many still view these much needed arrows as mere decoration. Also on the top should be a
sequence of illustrations (not text) showing how to unpack it, and a list of contents.
20. Boxes containing the system assembly instructions should have a brightly colored
"open me first" label on them.
21. Boxes should be packed so that when opened, the item on top is the assembly
instri~ctions for the contents. If there are loose parts, they also should be on top. This
woultl eliminate the :problem of the "lost" cord experienced when assembling the second
PC-8 and reported by others.
22. The foam supporting the system cabinet in its shipping box should be modified
so it can be unpacked easily. Right now there is no way to slide it to grasp the cabinet. In
the C:lemson demonstfration, one participant, after struggling with the foam, cut the sides
of the box as well as the top. This, of course, is a violation of the "preserve the packaging
so I can return the product" principle.
23. Most of the options were all packed in the same size box. While this
comrrionality may reduce packaging costs, it also eliminates the clues that package size
provide about contents and increases search time. This practice needs review. (Should a
co-processor chip be in the same size box as a full-size circuit board?)
24. Consideration should be given to placing the key outside the system cabinet
when it is shipped, or a t least placing a label on the cabinet to state where it is. In the
Clelnson briefing, the search for the "missing" key took a great deal of time.
Beyond changes in the hardware and documentation, changes in the software should
be considered.
25. Use a batch file to handle creating of DOS disks. While the software does this
for the most part now, though it also copies over mcbat to the autoexec file on copies.
26. Setting up the hard disk (FDISK, FORMAT, prompts, copying DOS and
BASIC, and building the AUTOEXEC file (including the prompt $p$g command and
paths)) should be completely handled by a batch file. A critical part of setting up a hard
disk is determining the directory structure, something the average user may not be able to
do very well. The batch file should provide the customer with the option to develop his or
her own structure. Batch files could reduce setup time by 30 minutes.
27. Modify the format and deletejerase commands to give more information about
the consequences of actions. For example, the current format version of FORMAT
provides more protection against inadvertent formatting of drive C than version 2.0 did,
but it still does not provide enough protection. A more explicit message is needed. "Are
you sure you want to re-format drive C (the hard disk)? This command will erase
EVE:RYTHING that is on it (xxx bytes of data, yyy directories, zzz files)". For delete1
eras'e a similar message is needed when wild cards are used, including a specific message
for erasing a directory.
28. Consider providing tools for handling ICs. An IC removal tool is needed to
install both the RAM expansion chips and the co-processor. For the co-processor, an IC
removal tool is also needed. If the cost of the tools exceeds the benefits of reduced
instarllation time, then the instructions should be modified, suggesting they be obtained.
29. While dam were not collected on subsequent installation of a second serial/
parallel card in the 1?C-8, this proved to be very difficult. This problem should be looked
into :Further.
30. Finally, once some of these changes have been made (especially the revised
docuinentation), testing should continue, using a larger sample. One of the lessons from
the work of Gould & Lewis (1985) is that easy-to-use products are the result of repeated
33
cycliing through the design-test steps. This testing should be conducted with a set of goals
in nnind for user performance (Good, Spine, Whiteside & George, 1986). Even if the
evaluation of the PC-8 happens relatively late in its life cycle, the lessons learned will. be
useful in designing subsequent products.
The PC-8 has proven to be a fast and reliable personal computer. But it is not easy
to set up. That is because the original design called for installation by NCR field engineers
and setup was never tested. However, if the changes listed here are made and the spirit
of the Clemson meetmg spreads through the corporation, the PC-8 and its successors could
become machines that excel in ease of installation. Emphasis on human factors/ergonomic
considerations should1 turn out to be a competitive advantage for NCR.
REFERENCES
Boyer, H. "'Do-it-yourself IBM Products and the Role of the Technical Illustrator in Human Factors Testing," in Podyar, H.R. (ed.), Proceedings of the Symposium on Human Factors and Industrial Design of Consumer Products, May 1980, 342-351.
Boyle, J., personal communication, 1986.
Carroll. J.M., & Mack, R.L., "Actively Learning to Use a Word Processor," chapter 11 (pp 259-281) in Cooper, W.E. (ed.), Cognitive Aspects of Skilled ~ y ~ e w r i t i n ~ ~ e w ~ o r k : Springer-Verla.g, 1983.
Comstock, E.M., "C!ustomer Installability of Computer Systems," Proceedings of the Human Factors Society 27th Annual Meeting - 1983, 501-504.
Comstock, E.M., "How to Insert-a Diskette Into a Diskette Drive," (videotape), Maynard, MA: Digital Equipment Corporation, 1983.
Crabb, D., "Solid NCR PC8 Offers Superior AT-Compatible Performance," Infoworld, December 2 19185, 41-42.
Good, M., Spine, T.M., Whiteside, J., & George, P., "User-Derived Impact Analysis a s a Tool for Usability Engineering," Human Factors in Computing Systems - CHI'S6 Proceedings, New York: Association for Computing Machinery, 241-246.
Gould, J.D. & Lewis;, C., "Designing for Usability: Key Principles and What Designers Think," - Comm~unications of the ACM, March 1985, - 28(3),300-3 11.
Green, P., letter to G<ary Wagner (NCR), January 23, 1986(a).
Green, P., letter to Gary Wagner (NCR), January 30, 1986b).
Green, P., "Setup Problems of the NCR PC-8 Personal Computer: Presentation Notes (The Clemson Meeting)," Ann Arbor, Michigan: The University of Michigan Transportation Research Institute, April 1986(c).
Greein, P., Ottens, D. and Krusic, R., "Customer Set Up of the NCR PC-8: Subjects 1 & 2 - continued," (videotape), Ann Arbor, Michigan: The University of Michigan Transportation Research Institute, February, 1986 (available from Gary Wagner, NCR Corporate R&D, Dayton, Ohio).
Green, P., Ottens, D, and Reifeis, S., "Customer Set Up of the NCR PC-8: Subjects 1 & 2," (videotape), Ann Arbor, Michigan: The University of Michigan Transportation &search Instit,ute, January, 1986 (available from Gary Wagner, NCR Corporate R&D, Dayton, Ohio).
Green, P. & Wei-Haas, L., "The Rapid Development of User Interfaces: Experience with the Wizard of Oz Method," Proceedings of the Human Factors Society - 29th Annual Meeting - 1985, 470-474.
Lewis, J.R., "Testing Small System Customer Set-up," Proceedings of the Human Factors Society 26th Annual Meeting, October 1982, 7 18-720.
APPENDIX A
INFOWORLD REVIEW
Solid NCR PC8 Off BPS Supelliar ATmCnmpatibIe
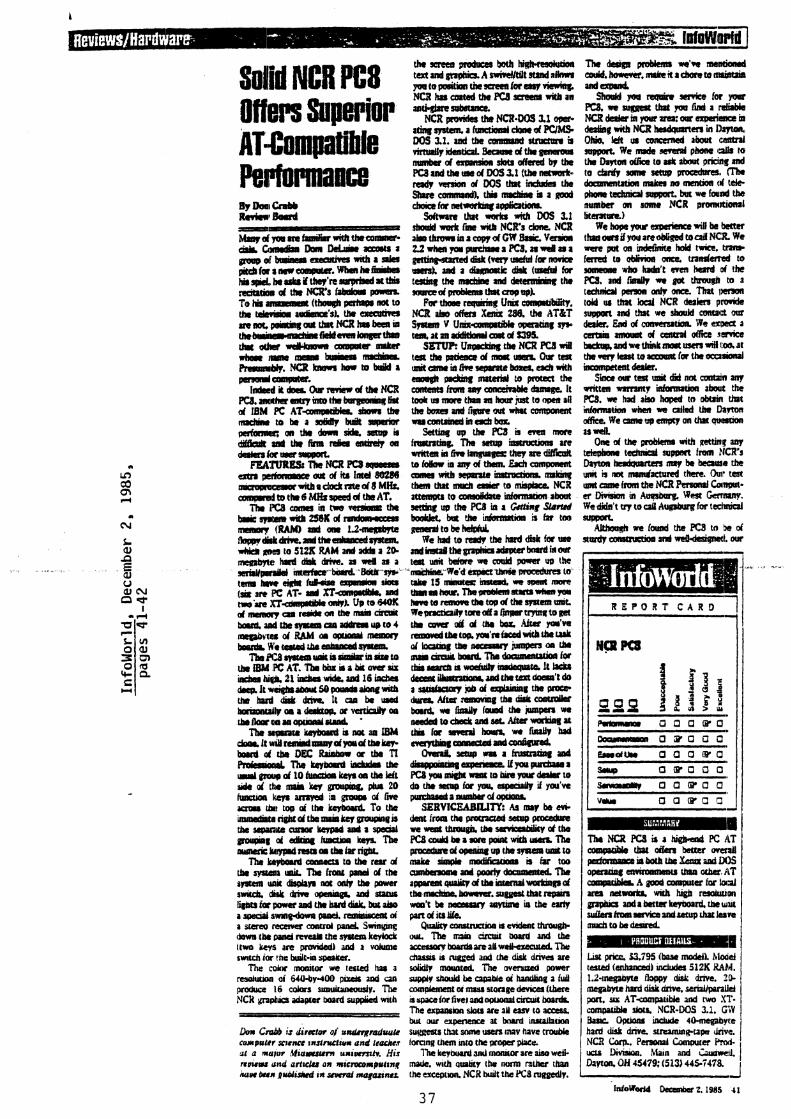
d r L G n * d h r D o m W & e g s a u a ~ o l ~ a a a a i m w i i h r a l a pitcbla'anrr-.lRhrnh.- hir@,b~Ithrt'resrphcd*tbia RciocmadtbNCR'sfobdoapDlm To Y a m m m i t (thou& Wmm no( to tl* tah*iia W l h c e ' s t . tk. apaveim p a a o ~ ~ a * ~ N C R h u b c Q i a h b a d r ~ f i m e u w l i rhl&lrrrrYhma"atcTmrtrr r h s r l l v a m a s ~ m r b i p a . ~ ~ . N C R k n o w h o * t o W d a Dssarl-.
I n b c d 1 d w O u r n a i c r d h N C R ~ a n c t ~ ~ i n m t h o ~ ~ d IBM PC AT- shm tbr ~ t a b U a ~ W a s a a r pnfaff*eontbdasidksmoic ~ r a d t h r f i n a r e u e s ~ o n m k x u a m m m t .
~ e s a r r t b ~ c f a c f n t e d 8 M H t e~npraltbthdMIts&dtbAT.
mi'CBe~mrilltw~um hrsymrdb2361(dnn(olblacrr mwrl (RMO z d a 1.2- nsrpfhkchkc.adtk.arkraxdnsca dieb to S12K RAM a d a& a 20. meuabyte hrd dm& d m . a we^ as a niJlprJkl mafrs- w-m tam hrr c*k fuClltr! ew-m (SIX m IF AT- md n- tro ire xT- -1. UP to d r r n n a ~ a a r e & o n I h . ~ a r o u b o v d a a d t b a i y u n , ~ d r b c l u g ~ O 4 magb\-cer d l?Abl m W O d b D p r d r W ' . ~ ~ b . C " k t r r r l m a m .
7 i m P c d ~ u ~ c u ~ r n ~ L O thriBMIPCAT.Tbrbbraab.overwr ~ l v ~ i 2 1 irdurwdcd1SlaCtla d r p . l t w r ~ i b a u 1 5 0 ~ J o n e v U b l h i u r d d s k d m + I t Q P b . ~ barrcnUl l loma~op.orvewYloo tluIbaaaanopuDIllaund -
Th.r~mkay&udo~ocaoIBM dDPrltwllltrmdanoydyoudt&~ b o r d d t i ~ o ~ ~ ~ . l o b o r a t k n RdaPooPLTh.tcrbadllrLbIbc d g m u p d 1 0 ~ L a y r a a U w l d t wkddiwmmkygmup~11.phn20 hnruon kW amwed la Ormp d fne aam lbrl top d t h keyhmd. To the
th.~pakrcr,bothhiebrcaduLion tea tadgnphienAsdWl i l tMdaHmr p l l t ~ p a i t i o n ~ ~ f ~ a r t ~ NCRhramtdthrPCllaetnrritban satiahrr-
NCR pmvidta the NCI(.MlS 3.1 a t h g ~ a ~ d a w d P C I M S DOS 3.1. md tba commrnd rinrmn 8 crhnnliyidanticd BcanadUrgenamar f l u m b e r d ~ * o H c r r d b l t h r PUludUwImdrn3.l (Lh.namrk- ready vanion d WS that inc&ln the Shuccomnn&rhirmubiaeLa& dDiafmnetwarkmgagpiia(ioca
Sdhnm that rakr rich DOS 3.1 h d d work fme ri(b NCITs dom NCR ahthrainaeapldGPIMc.VaSan 2 2 r h c n y o a p . d a r a P C 8 , a d a s a gettinecJurnddiJrtnncadulfanorica a r n ) . r a d a ~ d h l l ~ ~ f a t ~ t k a m r c h h a m d d a ~ t h r -d-t)MempwL
For time r e Unix crmpcibiiity, NCR aka &n Xcnix 286. t!m AT&T S y U m v ur6x- cqesacin(l rt+ tes%atmrdditbnledS395.
s g n r p : U n p d d a s t b r N C R P W d t e n t b a e * a r d m ~ l t u a r O u r t e r t d t a m a i a k ~ b a r & n c k * i ( h C m r S k p r d r h r l ~ l o p a M t h c cmccnuharalehnesnr#adunmlt t aokurmaat Inarahan jmt ta~a f l t h a ~ u d f i * n o u t ~ c D m O o M n t wucmuimdinnchbaz
set- up the Pc8,b ma mom frannliog. no Myr mnroccian are Hinc11iafwImgU8gegthcltre~ t o f d k r i n a n y d ~ E r h c n n p a m t c ~ m c r w i ( b ~ , ~ m r k n O them thrl mudl arr to mhpbck NCR ntaapr to anarlidna inlauwim about s&~g up the PCB ia a Wisg S t u d ~ k . r h . ~ b h r t r n p m a r l t o k h d d u L
W e R a t o r a d y ~ h a ! d d b k f a u n ladinaaYthe-rbpcabnad- l e a u m r ~ ~ c a o i d p a r n ~ t h c
-m&& We'd aprrlhde pmcedvm to u k I S r m D t s ~ n ~ ~ tbmahar.TheAsblm,~rk.npcl
nu drdgn probkmr ru'm manicnrd c o u l d . ~ . m ( t a i t a d r c n t o a ~ udapnk
S h a d d m ~ s c n i c s f o r Wrr P C 8 , w e ~ t h t r p u f T u d a ntirbh NCXdcrkinpurarmourarpaiacrh drpting with NCR bdqmtcn in 1)rltoa. O h ldf us c o d a&ut cantnl mppxt We mado srarnl phanr I* 1s th Ihyrrmolficstoufabarl pridnsmd to && a w t u ~ voml?~~. doamntnmnmrlmnomrntwnt~(Ide- pkm t&nial wppat. bw we found the number m tome NCR prmnioml litam)
Wa~yarapr r *nceml lbe bettef thaanrifycuareabU~alauNc:R. We aac pr( on indelinilc hdd t*. t- fd to obftion tfanddnal to meme whu M t arm head d the Pa, ad f& n gat tbwh m a rcdvlid pman aJt ana. That I= tdd ur that loal NCR dakn p d 3- md t)M we sharld comoct na dakr.Mdcinwas8rionWecnpcda eamiacmamtdcaalo(fke.ra*ice ~ u d w t h i n k m a t m r i f f l : o a a t I t r , v q k t l ( t o r e e o l a r f a t h e a a ~ iocomptm, dalcr.
Siourtesyt i td id~cocl l r inaq mitten mmmty mfonnruoa a h t the PCB. we W a& hoped to obuin~ Lkrt information whm we dkd the Damn o i fkcWepmaupmrp*onhqudon u d
0 l a d t k . a o M m a w i ~ ~ ~ r w tdcphar tedmiP1 fmm PlCR'r DamhnbPucnmbebcclcaetha unit b mt daetured there. OulP t t IrndesnclranrhcNU(PNmlCarn. aDicridaninAugsbwg.We~Cm~ We didn't wy to 4 lor tcclaDal nrppaL
~ w e f u m d t k a P C B t n k d audy a d m(l.daiqmel. ow
hwetarrmavatlmtopdthsmfsmwt h ~ t ~ d f ~ ~ - t ~ ~ 1 1 R E P O R T C A R D 4 ' 1
smvpPrdcdbPOf=t=krlam avmcnckrnpdres~onthiarngM.
f h r h y b o u d ~ l o t h s r a r d tlu s n m a rrmr Tba front plld d the ~ l r * a a ~ K d h h ~ M w t & ~ m c h ( B * d n * . ~ m d s r u v r li8buhxpowaamitlmbrddvltkulbo a . r p a e U I ~ m g . d o w n ~ r ~ O r a uaeo n s m a c o d pa& Swlnipng davat&pindrr*&thesvrrcmkwbck (two keys are ptowkd) and a vattune swcleh tar I he Wt-(D speaker.
The c o k momtor we resad h a a r d u u o a oi 64My-400 p u e k Ird can produce 16 cdarr s~muliracarriy. The NCH ynphucr adaplcr board suppkd wth
ltr ap*a id d I& bor After ra'w rrmov&lr&cop.yar'niredwubrb.J1 d h x a m l g t k - ~ ~ s p r l ~ ~ mplapvrbarQTha-fw thnwhnwadldMm*bqurrokbb ~ r l b t M P n . a a d t h o t a n - t d o a s a d a a w R b d ~ t h e p m c o . durrrAlmrrmowechrdulreocnmllr - ~ ~ , ~ a a d r h . ~ p m u u n c r h d t o c b r c k m d * I U t a ~ * L h o f ! X w r a n l h o v r w f ~ r h d ccalrbiPecomrcrcdrad-
O v e n U , ~ r ~ a h u r m f l ~ e a a d -If~ou-a
~ ~ . I t O ~ I O I U t O d o r h . r t u p f ~ r ~ a r . a p e a r ~ ~ i y o ~ ~ ~ w r c b d a w d - SERVICEABILITY: Aa nmy be cv*
PC8cddbearorapovuwKbuparTIu pmcedmdapauyqthrsyswalvlllto m r L . ~ ~ a i u t o o ~ ; l o d p o o r l y ~ T b . a~prrawdt&b.-worfta~d tiwmrrkaPohomcr.suwtinrnprn w a l ' t k ~ i w u w u r t l l e ~ p~nd1Ukb.
Qdtyawunrootsewdamthmugh. OULThcrmuIarav lboududrh acrru~r~brnrdaareaUwdhwxuai Thr c h w s u rugged and the duk dnva are rddlr mowed The o v d power supply sbddbcapah(eoc hiuuibngrfull cocnp*mat Ol muu storage dma ~thn ~raprsiorfive~&npuomlnrruubouQ. The ex-lon s b u are aU em to a c c e a bul our ex~awrc at bnud ~nrulhtlon
Tha NCR PC8 h a highad PC AT I
mmranblr tba~ o i f a ~ buu wad pCd0lm;uraiabochtbcXmrr;irdIn~S opcndqg UW&IUMW W orhr.ibT cmp&&Apoodcolapueriorbal area n(rat* with hqb rcschuhrn amba aadabuterkeytmdtbcwut lulfalmsrsaviecudaecupthatl~ra muEbtohdC31CCd
N g P a
589 0 0 0 w 0
a w o a a ' P d d w a a a w o - 0 I 0 a a
a o P O o v u . a a w a o
Lot prim $3.795 (base mDddl klodd tated (enhmad) urLdcr 512K RAM. 1.2-1mgabyte tbppy did; h e . 20- megab~huddirlrdme,vrtrYpPnlld port. six ATampnibb 2nd nvo X'I'-
dot& NCR-DOS 3.1. C'bV t*rr Oeuolll include 401MSdby11e /
I
Yn Cdb 13 hnrx o i Y ~ C ~ ~ ~ ~ I ~ I W U I r u g g a s that same un I ~ V have tmubh I h a d b k MI s m m m g ~ p a ~ d n v e . / currputtr srcnre t n s l w t : ~ * and t#ockc.t lorans chcm rnro thc prow dace. NCR Corn.. Pwsocvl Computer h j -
ur a nufur Mu-tn ua-. Hu Ih kcyhd1.lmonnwan asowell- UEY UVXWI. h(Y. and Caamwi. / nuuw u ~ d art:& on nr:cmronpvtrnq made. wttb qclsbty the nom rather ih D~YIOLL OH 45479; (5131 445-7478 auw tun p u d w 8s slwlai magannrr the uccprah NcX hult the PCB ruggedlt. J
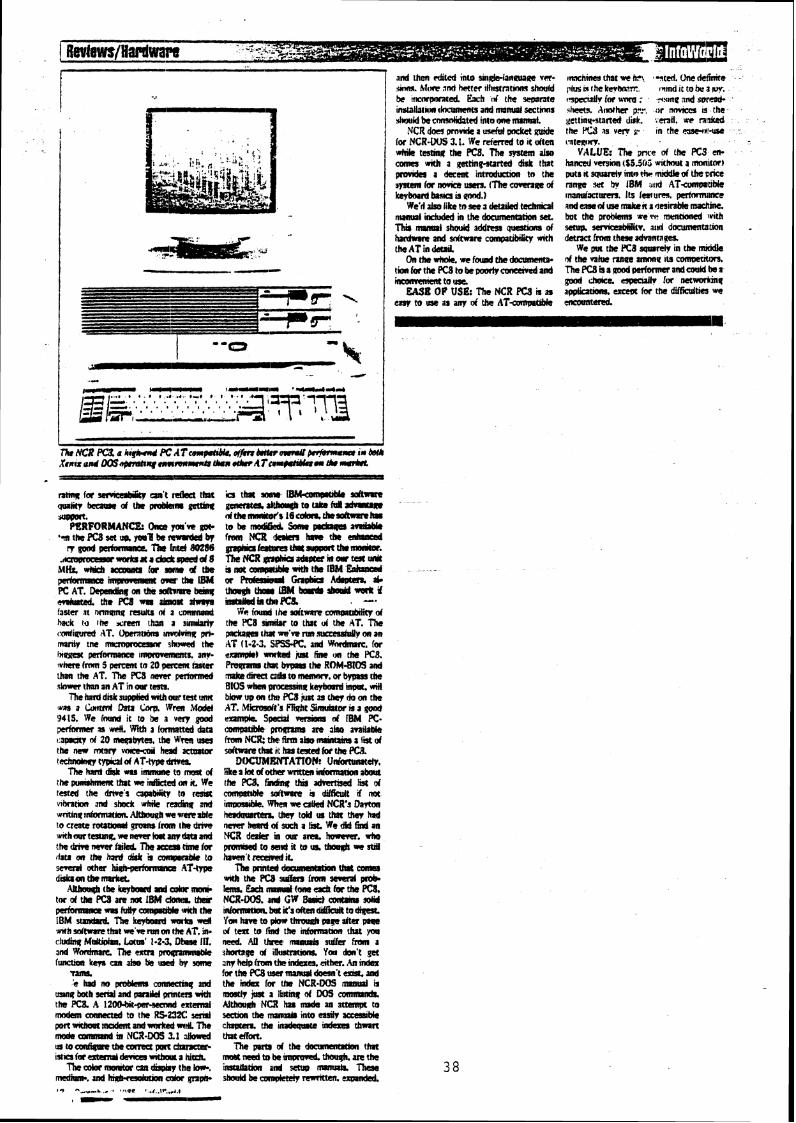
-- ' and t h a dlcd Into e~g!danwfe v a - urn. hltm and harw ~ l l ~ t n t w n shnuld be rtmnprr;lred k h r i the w m t e mnstalhtrm thnummta and narm31 sectma hukl kcnmkhted Intommarmat.
NCRdacJ~mbauneMpoekumde for NCR-OOS 3. L. We referred to it dten wmk mull(( tha m. n e sysccm ah c a m a gettmq-surted diak that pmv1dcr a dceeat 1- to tk r y n n n f a n a n c c u r n . ( T h e ~ m d kcyhrd b;M u pmd.1
We'd ah like to seer Jctalkd tcchmnl nlmcrrl included m the daumntlbdn set. T b r m r m l s h a u # a d d m a o w t m s d hndma md dm canp~u(nW mth the AT in dead
Onthevkdsvcfaurdtheda?nnmtp- t i o n C t h e P C 8 t o b e ~ n x l e m n l u d
~lnchmes chat # k\ ~ c d . Une & M e - (rlus In the k e v h m ~rcmd i c to bc a w. ra1~.7aHv for urn : :.ratno 2nd s a d *heus kmtha p?r *Jr nrmca 13 the gCttl~q-st~~Cd dik. :M"d(. W mlnkcd ~ h e ~ ~ s v c r v u . ~ n r h e m n - u s e I7Itepq.
VALUE: The ;mte d the PC9 b ham v n m n ($3503 wrchwt a m l t w , puts n squuely trnn t i c m d d b d the F I ~ G
nnge sac bv IBM 411d AT.e(wnptr~bh munriJ~ums. Its f e a t u ~ . pcrrnmwmec and cased use mJlcn a an~rabkMdrine. but the wen. mmhancd 1~1th
~ u g . semceaMitv. aid dawwn(jM - &tnc! fmm them admtaucl
We pcn the K8 w r e l v rn the mMk of tht mhn nnpa amcns ~ c r comoccncm. llmPC8bagoodperformerandcoukllma
lneanmnmtous~ good ctmu npmrll* for netwmlrinp - EASE OP US& The NCX PCB n as appliauaa ucm for thc didfleult~ we - eaavtousaaranydtheAT-crmp~ encountered.
m
.- I , -- (I- .,dd .-- .- ..,I 1 . . . I ...a. I - . , I
& C . , . . . , # ,.*:?=&;,~3,:?q 1 1 @ ~ , - . . , . , 8 , 1 , a . l , . . m , o . ---'---..--....-- a h .
. . . L 1 ThtNCR P C B a k q k w d P C A T c ~ a ( P n M t r r o m U ~ ~ r c b l h X e n r z u d ~ n p n a h y m ~ ~ ( r L . w . d k r A f c m w t b k r tkcrmbrz.
ntq fa wadntky an't t u k u that ia thrt anm 1- softmre qua~beamed(hrproblamgccrb* g m e m % d ~ ~ t J P r ~ l d * n n r w. dthehrmrr~~fs 16cdm.rhc¶o&wSmhr
PERFORMANCe: O m yaa've got- to be modiacd Sum mchm nablJl lnthaPCSsetuv.ywBkmwmWb fmm NCR k&m h m (I* adwsed
vgml-fkhadW6 gnghafaamcktsyrparthr-. .~rmomasarakradoa@dS fhaNeRm9hiQ~maMdt MK& w&h rcDwo fa a n d thb 1 a m t ~ O n 0 1 ( r # r r * k t b 1 8 b ( ~ pdarmaorrmpnnmrntona'tbern or -d GnObn A c W J r Y , * P C A T . ~ o n t h o d h n r a ~ U~&tha ,m- - raC!d crrklcd th.m*a&o5tatwwa saLdbdbtlrbPCk -. faan at nnnqml muka ni a mmand Wc found the d t m canarubt l i d hack to lhe x r c n rhm a s d y the mbr to thtc d tha AT. canftgured AT. Opemtans ~nvcinnc( pn- pdugea that wo'n nm .suaduUy on an rmdv tm mrmaaxmr sbnd the AT (1-2-3. SlffS.PC. and W ~ I C , for lnugcsi prfnnnwwc Im9mnmntr. am. exanoh) mthsd pst h e IJII the K8. tvlrem hmr 5 percent to 20 percent mu Pmflnnr that! bvpPa h e ROM41OS and than the AT. The PC9 nnn cnmrmwd ?akcdmn a~ibtomcmcm, w bmmrhe zhm than an AT ~n ow testa. BlOS wkcr, p n a a s m t k e y b a d W. dl
l'hehnrddaksupphcdwrtkamrt&um( bbwwonth~PC8~as(hctdoonthe wrs a Canmi Daa LMp. W R ~ M& AT. M i i t ' s Wt Simuhtw m a god 9415. We lnad it to be a VIW gobd cnmp)k stmaat m m m d iBM PC. p e d m an dl. Wah a Iomtancd Qa cmrp;rubk promanr are abo a v a W 1 ~ p a c v d 2 0 ~ b y t a . t h e U ' r e n w w fraNC%~fimrbonwmmriutd the nn v o m d had actana ~ t h a t ~ ~ . h t r t R e d I w c h a P C R . tedurdmnryprdd ATmdmra DOCUMKNtAnOW? UnlomnHely.
Thehxddiskwu,~mnmctammtd L e r l o t d ~ ~ ~ ~ thep*ldmmrrlkrtwe~mlktd~mnWe tha PCB. fadnnq ttnr admnd fisC d tested the dnves c~plbtity to reme cananMc vrftwue n ddfku(t d na(
vrbranon and d~oek lvhrie reach and ndtmmsllbk When we a lkd NCR's D a m wnttnqtrdomatm Altbanhrc~rmrble hmd~~rtem. Ihy told that thy had t o q ~ r o u m n d g m m r f m m t h s d n w neverhemddswhalatWedtdfkdan ~haurtaun~wemto*anydnrmd NCR derh in aa a m . hanm. rk6 thednveneverfakd7heaaarnmaia pmmc#ltowdittountbagPacstdi data on the h a d disk b eaaptnbk to hrwn t rrcmclf it. s d other high.prfrmrmca TbepaadQunmtmonW~ drdoon themU1M. 4T4m . U ~ P O 1 6 . ~ d p m b
~ t h e k e y b a r d o d c d c l r ~ lanaErhm~(anaachfathsPC8, tnrdthoPC8arenaIBMdanr.tlar N C X 9 0 9 . a d G W B u l c ) c a r O n u d p n f a m a n a n ~ c a a p o b b ~ m t k t h a ~nlmnmon.bau'softm~toQsaL i B M u m r h n L I h e ~ r d m r t r a c H YahmmpbrrthmoOhpr@dterg~a wnhad~t la twercnmmtheAT,~~~ d t m mfmd themfamrmn that yacc cludinq Multqr(m. Load 1-2-3, D t w Ill. nnd M U m mMlllr &a fmm a and Wmdmtcr Thc extn pnnpunnrbb skarsw d ~ttusmuw. Yw Wt get funcuon km cm ala, be vrd k any help imn t h a mdaa ather. An tndar
'ram. fathePCBrr#mYnaldoem'tcn~ral e had m pmb(ma connemnc( md the mda for the NCR-DOS mfd n
m q bath xrnl and pmlhl pmten wtd~ mDsll? pat r tcItm# d cmnmndr. the PC& A 12OWtgnacmnd extcmd AJthawh NCX inn nmde an att- to mdan mnmted to the RS23X: xml xamn the mto edsb acceable port mthu ~adnn and worked WI Ihc chamem, t k madupme vdmr thwart mode cmannd a NCX-DOS 3.1 :dbrcd that effort. urtoax@wetbacandpar&mam Tlw plm d the dacacnWar that ~ s i r s f a r a ( a r d d a n e s ~ a R a h RloadtobcnnffmcdLhbUqh.arethe
thceDbrmaraandiaobythsbrc, uatPlLlionrrrdseiw~ T b e mcdkac,mdhmhedmnmkrgngk. skaddbacanpkrcllrrmrtm.nwn*d. I* "-o-.b I * I 9 1 ' -4 1 V . d 1
, - --
APPENDIX B
NCR PART NUMBERS OF ITEMS ASSEMBLED (Two NCR PC-8 Systems)
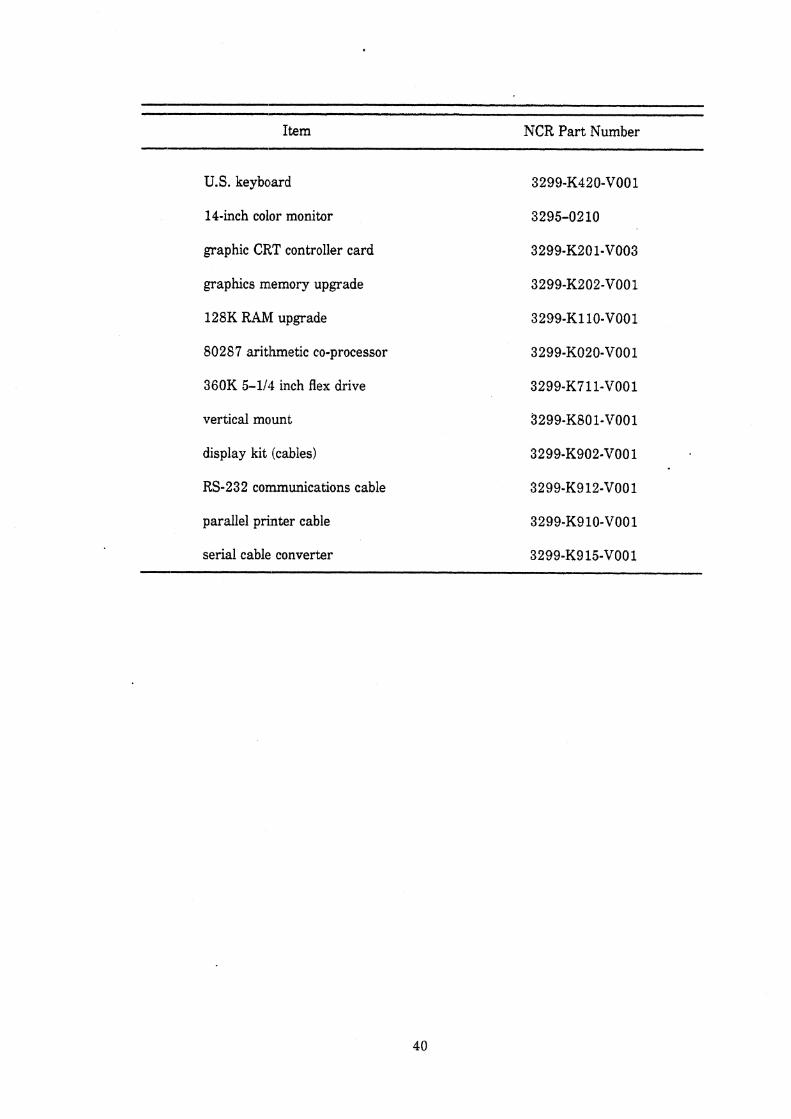
Item - --
NCR Part Number
U. S. keyboard
14-inch color monitor
graphic CELT controller card
graphics m.emory upgrade
128K RAN[ upgrade
80287 aritlhmetic co-processor
360K 5-1/4 inch flex drive
vertical mount
display kit (cables)
RS-232 connmunications cable
parallel printer cable
serial cable converter