curriculum for investigative science · curriculum for investigative science ... answers according...
TRANSCRIPT

Curriculum for
Investigative Science
Created/compiled by:
Jennifer Shaw
Research Experience for Teachers 2006
Department of Physics & Astronomy
University of Oklahoma
Norman, Oklahoma

“Wherever he steps, whatever he touches,
whatever he leaves even unconsciously, will
serve as silent witness against him. Not only
his fingerprints or his footprints, but his hair,
the fibers from his clothes, the glass that he
breaks, the tool marks he leaves, the paint he
scratches, the blood or semen he deposits or
collects – all of these and more bear mute
witness against him. This is evidence that does
not forget.”
— Paul L. Kirk (1902-1970)
forensic scientist
OU RET 2006 Hair & Analysis Module Rationale & Objectives
I. Rationale
Edmond Locard’s Exchange Principle states that when any two objects come into contact with each other, there will always be a cross transfer of material from each object onto the other. If properly collected, the trace evidence that is transferred between objects and individuals during the commission of a crime can often corroborate other evidence developed during the course of an investigation. Hair and other fiber evidence fall into this category of “trace evidence”.
Examination of hair and fibers from a crime scene or suspect can yield a wealth of information. Hair and fibers can be used in helping to reconstruct events surrounding a crime. The presence of hair and fibers at a certain location can physically place a specific person at that location. Examination of hair root structure can indicate whether hair has fallen out or been forcefully removed, indicating a struggle. In addition, hair can biologically “speak” to an individual’s racial origin, age, gender, and also to the location on the body from which a hair was originally growing. These days hair may be used to help identify individuals through DNA analysis. Other types of fibers can be traced back to a particular individual’s clothing, carpeting, or material from the person’s vehicle. All of these indicators can be used to corroborate or refute a person’s version of events or act as the silent witness to a crime.
Within this lesson, students will investigate the fundamental concepts behind hair and fiber analysis. Students will identify characteristics in a given set of data, construct qualitative observations, and place information into a classification system. Students will have experience in using tools and apparatuses to collect evidence and practice safety procedures in all activities. In addition, all students will utilize the scientific method to interpret data, recognize variables, derive a hypothesis, and arrive at a conclusion using hair and fiber analysis.
We have designed these lesson plans to be easily modified as needed by the teacher. It is our goal that teachers can decide to present all the material in one comprehensive package or just pull out specific activities/topics to use as mini-lessons. In all of the activities, additional suggestions and time-saving tips are included at the end.
II. Objectives
A. Cognitive Objectives:
Upon completion of this module, the student will be able to:
• Explain the importance of hair and fiber analysis in forensic science
• Recognize the fundamental biology of a skin cross section
• Describe the structure/morphology of hair
• Understand terminology associated with hair and fibers as related to forensic science

OU RET 2006 Hair & Analysis Module Rationale & Objectives
• Distinguish between human and animal hair
• Distinguish between hairs that have fallen out on their own, that have been combed out, or that have been pulled out forcibly by analyzing the state of the root tip
• Understand the characteristics used to classify hairs originating from members of different races
• Assimilate all data obtained in lab regarding hair morphology, medulla types, medulla patterns, cuticle scale patterns, medullary indices, and other reference material in order to arrive at a conclusion
• Distinguish the different responses natural and synthetic fibers have when exposed to and placed in a flame
• Develop a cognitive sense and appreciation of the micro-scale world used in the examination of hairs and fibers
B. Skills and Performance Objectives:
Upon completion of this module, the student will be able to:
• Identify a hair as being human or animal based on physical characteristics observed and mathematical information obtained
• Determine if a hair has been pulled out of the scalp or has released from the scalp naturally
• Identify a hair as having a particular medulla type, medulla pattern, and cuticle scale pattern
• Calculate the diameter of a hair using the Low Power field of view
• Calculate the Medullary Index of a hair
• Demonstrate the correct procedure and technique for use of the Compound Microscope
• Demonstrate how to make a Wet Mount
• Demonstrate how to make a cast of hair scale patterns
• Demonstrate how to perform a Fiber Burn Test
III. Materials - see lab handouts and crime scenarios for detailed descriptions

OU RET 2006 Hair & Analysis Module Rationale & Objectives
IV. Instructional Procedure – based on 55 minute class periods
Lesson One – Microscope Review Activity
Opening
- Complete the Microscope Anticipation Guide
Middle
- Review the vocabulary associated with the Compound Microscope
- Review the procedures and techniques involved in using the Compound Microscope
- Review / Explain how to calculate the diameter of a microscopic object using the diameter of the Low Power Field of View
- Complete the identification of Microscope Parts Worksheet and work the sample problems provided
[Note: The teacher can review the students with notes, and then have students complete the Microscope Review Worksheet, OR students can follow along while the teacher goes over the information on the worksheet]
Closing
- Teacher will hand Microscope Anticipation Guides back to students so they can correct their answers according to the instructions at the top of the page
- Students will take home Microscope Review Crossword Puzzle as a homework assignment
Lesson Two – Lab #1 - Unknown Fiber Investigation
Opening
- Pass out Lab 1 – Part A only. Have the students read the Question, Anyone scenario silently and then write down their questions.
- Class discusses individual students’ answers, and then brainstorms other questions.
Middle
- Complete Lab 1 – Part B: What Have We Hair? – Analysis of 6 unknown fibrous samples

OU RET 2006 Hair & Analysis Module Rationale & Objectives
- Groups will answer Wrap It Up! Questions in Complete Sentences
Closing
- Class discusses the lab and the Wrap It Up! Questions
Lesson Three – Vocabulary / Skin Morphology, Hair Morphology & Medulla Types and Patterns
Opening
- Students receive Hair & Fiber Vocabulary Sheet and Skin Cross Section Diagram
- Teacher discusses with the students the terms Locard’s Exchange Principle; exemplar; questioned; and association; and how they relate to the lab they performed the previous day, Lab #1. Students will record the definitions for these terms on their Vocabulary Sheet.
Middle - Closing
- Teacher discusses vocabulary terms needed for the Skin Cross-Section Diagram – morphology; epidermis; dermis; subcutaneous tissue; hair shaft; hair erector muscle; sebaceous gland; hair follicle; Pacinian corpuscle; melanocyte; sweat gland; blood vessels
- Students record these definitions on their Hair & Fiber Vocabulary Sheet and will then label the Skin Cross Section Diagram
- Teacher discusses vocabulary terms needed for Lab #2 - polymer; tip end (external end), root; follicular tag; cuticle; cortex; keratin; medulla; medulla type (see medulla types resource sheet) medulla pattern (see medulla types resource sheet); medullary shape; pigment; medullary index; undulation; cortical fusi; ovoid structures
- Students record these definitions on their vocabulary worksheet and will then label the Morphology of a Hair Diagram
Lesson Four - Getting to the Root of the Problem: Analyzing Combed Hair vs. Pulled Hair
Opening
-Teacher passes out to students a copy of the Medulla Types & Medulla Patterns Resource Sheet
-Students refer to Medulla Resource Sheet and handouts from previous day

OU RET 2006 Hair & Analysis Module Rationale & Objectives
Middle
- Complete Lab 2 – Part A: Combed Hair / Observations and Calculations
- Complete Lab 2 – Part B: Pulled Hair / Observations and Calculations
- Groups will answer Wrap It Up! Questions in Complete Sentences
Closing
- Class discusses the lab and the Wrap It Up! Questions
Lesson Five – Are they all just a hair alike? : Analyzing Similarities & Differences Between Hairs Taken From Different Regions Of The Same Head.
Opening
-Teacher reviews with students the terms learned so far in the module
Middle
- Complete Lab 3 – Five Hairs from Different Areas (All combed or All Pulled-student chooses / Observations and Calculations
- Groups will answer Wrap It Up! Questions in Complete Sentences
Closing
- Class discusses the lab and the Wrap It Up! Questions
Lesson Six – Analyzing Cuticle Scale Patterns of Human and Animal Hair
Opening
- Students receive the Scale Pattern Resource Sheet
- Teacher discusses with the students vocabulary terms needed for LAB #4 – scale pattern /structure; mosaic; pectinate / spinous; imbricate; petal; diamond petal; chevron; coronal
Middle - Closing
- Complete Lab 4 – Part A: Observing the Cuticle Scale Patterns of Human Hair

OU RET 2006 Hair & Analysis Module Rationale & Objectives
- Groups will answer Wrap It Up! Questions in Complete Sentences
- Class discusses the lab and the Wrap It Up! Questions
Note – There will most likely be time for students to begin the Mini-Lab Write-Up Activity;
however, they will probably need additional time the next day to complete lab and work
on Lab Report
* OPTIONAL - Complete Lab 4 – Part B: Mini-Lab Write-Up Activity –Looking at Scale Patterns of Animal
Hair
Lesson Seven – This day can be used by teachers to do the Optional Lab 4 Part B Mini-Lab Write-Up with the students OR to go over some of the Teacher Lecture notes covering the topic of “Hair”.
Homework – Hair Crossword Puzzle
Lesson Eight - Analysis of an Unknown Fiber Sample with Comparison to Three Known Samples
Opening
-Teacher hands out Lab Sheets and discusses the lab procedure with all Safety Precautions
-Teacher hands out Fiber Information Sheet
Middle
- Complete Lab 5 – Fiber Analysis
- Groups will answer Wrap It Up! Questions in Complete Sentences
Closing
- Class discusses the lab and the Wrap It Up! Questions
- Teacher hands out Fiber Analysis Crossword Puzzle to students to be done as homework.

OU RET 2006 Hair & Analysis Module Rationale & Objectives

DAY STUDENT WILL DURATION
O
N
E
1a.Complete Microscope Anticipation Guide and turn in to
teacher
1b. Complete Microscope Review Activity w/teacher
guidance
2. Work as a group to answer Review Questions / Discuss
as a class
3. Complete Lab #1 Part A – Read Scenario and write down
Investigator Questions (opening tomorrow will begin with a
discussion of Lab #1 Part A)
5-7 minutes
40 minutes
20 minutes
10-18 minutes
T
W
O
1. Generate a class list of the Investigator Questions from
Day 1 / class discussion
2. Complete Lab #1 Part B: What Have We Hair?
3. Complete Wrap It Up Questions with lab group / Discuss
lab and questions as a class
10-15 minutes
50-55 minutes
10 minutes
T
H
R
E
E
1. Retake the Microscope Anticipation Guide / teacher will
go over the correct answers and students will not change
original written answers, but will add corrections to the side
2. Take notes over Edmond Locard’s Exchange Principle,
morphology of hair, and Vocabulary needed for this unit
3. Fill in vocabulary on a diagram of a skin cross-section
15-20 minutes
40-50 minutes
10 minutes
F
O
U
R
1. Lab #2 – Read introduction and formulate a hypothesis
about the variations of hairs depending on the way they are
removed from the head
2. Lab #2 – Read materials list; complete lab procedures
Part A and Part B
3. Complete Wrap It Up Questions with lab group / Discuss
lab and questions as a class
5-7 minutes
55-58 minutes
20 minutes

F
I
V
E
1. Lab #3 – Read introduction and formulate a hypothesis
about the variations of hairs removed from different
locations on the head
2. Lab #3 – Read materials list; complete lab procedure
3. Complete Wrap It Up Questions with lab group / Discuss
lab and questions as a class
5-7 minutes
55-58 minutes
20 minutes
DAY STUDENT WILL DURATION
S
I
X
1.Lab #4 – Read introduction and formulate a hypothesis
about the variations of scale patterns among hairs collected
from different individuals
2. Receive Scale Pattern Sheet for use as resource
Lab #4 Part A – Read materials list/ complete lab
procedure
3. Complete Wrap It Up Questions with lab group / Discuss
lab and questions as a class
5-7 minutes
55-58 minutes
20 minutes
S
E
V
E
N
1.
10-15 minutes
50-55 minutes
10 minutes
1.
5-7 minutes
55-58 minutes
20 minutes

1.
5-7 minutes
55-58 minutes
20 minutes
1.
5-7 minutes
55-58 minutes

OU RET 2006 Hair & Fiber Analysis Module Learning Objectives
LEARNING OBJECTIVES
! understand Locard’s Exchange Principle ! review and use Microscope Technique ! know the metric conversion for mm. to micrometers ! review process for Wet Mounts ! understand the morphology of hair ! describe and sketch the cuticle, cortex and medulla ! learn the distinguishing characteristics of human hair
and animal hair ! recognize medulla patterns and shapes ! describe the three phases of hair growth ! list hair features that are useful for the forensic
microscopic comparison of human and animal hairs ! explain the proper collection and preservation of hair
evidence ! describe the role of DNA typing in hair comparisons ! solve crime scenarios involving hair evidence using
the knowledge gained in this unit

OU RET 2006 Hair & Fiber Analysis Module Lecture Materials
Forensic Science
Hair & Fiber Teacher Information & Lecture Materials
I. Module Crossword Puzzles – There are several crossword puzzles in this module. Each
puzzle comes with a Teacher’s Key.
II. Microscope Anticipation Guide – This is a technique used to achieve several things: (1) to
help the teacher gauge a student’s prior knowledge about a topic before any teaching on the
subject has begun, (2) to give the student him/herself a handle on what knowledge they do and
do not have before an activity, and (3) to show both teacher and student how the student has
progressed after a learning activity has occurred. The student reads the ten statements on the
Anticipation Guide and has to determine before the lab (reading assignment, other activity)
whether they are True or False. They now have a vested interest in determining whether or not
they were correct with their initial answers. As they read, perform a lab experiment, or
research, they will “anticipate” the finding of the facts. The students actually want to know the
answers to the statements they were initially unsure about and will be much more engaged in
the learning process than if they were just told to pay attention and learn. This activity works
equally well with any type of learning activity. After the learning activity has taken place, the
students will then “check” their initial answers and make corrections, stating under the
question where they actually found the correct answer. This last part works best with reading
activities as they can document page, paragraph, and line numbers. However, this can also be
done with labs. Students will just note which lab step or page number leads them to the correct
answer.
III. Microscope Review Lab/Activity (use transparency)
• compound light microscope (utilize two or more lenses)
• three objective lenses- scanner lens (4X), low power lens (10X), and high power lens
(40X)
• Coarse adjustment knob is used for scanner and low power lenses, while the fine
adjustment knob is the ONLY knob used with high power. The high power lens is long and
can be damaged or cracked if coarse adjustment knob is used.
• Stage is the resting surface for the specimen; diaphragm is the dial used to regulate the
light passing through the center of the stage.
• Eyepiece or ocular is the lens though which the specimen is viewed and for most
classroom scopes has a power of 10X.
• Primary magnification is magnification obtained at the objective lens.
• Secondary magnification is the magnification obtained at the ocular lens.
• Total magnification is the magnification obtained by multiplying the primary and
secondary magnifications.
• wet mount procedure – specimen placed on slide, a drop of water is added, a cover slip is
placed over slide at a 45 degree angle to prevent trapped air
• Specimen is seen through field of view in an upside down and flipped fashion. Specimen is
manually moved in a certain direction and will be seen through scope to move in opposite
direction.
• Specimens must be centered and focused in the field of view before moving to the next
higher powered lens.
OU RET 2006 Hair & Fiber Analysis Module Lecture Materials
• Microscopic organisms are small and thus their measurements should reflect their relative
size. Micrometers are used to represent the measurements of microscopic organisms.
• 1 millimeter is equivalent to 1000 micrometers (a.k.a. microns).
• The Low Power field of view is approximately 1.5 mm in diameter; thus the diameter of
the low power field of view in microns is 1500.
• High power field of view is ! the diameter – you are seeing one fourth the area of the
specimen due to the increase in power of 4; diameter in micrometers of high power is ! of
1500 or 375.
• Estimates of a specimen’s measurement in diameter can be obtained by looking into the
field of view and estimating how many of the objects would “fill” the field of view side-
by-side. The known diameter of the field of view (1500 for low power, for example) is
then divided by the estimated number to determine the size of one of the objects.
IV. LAB #1 Part A -The goal of this activity is for the students to come up with questions they
might have as a forensic investigator regarding the “fibrous” material found on the area rug.
Possible questions might include but are not limited to:
o Where did the fibers come from?
• Were they already on the carpet before the break-in?
• Did the fibers come from the suspect?
• Were the fibers loose on the suspect or were they part of the suspect’s clothes and
were somehow transferred?
o What caused the fibers to transfer to the rug?
• Was there something in the rug that pulled fibers from the suspect?
• Were the fibers loose on the suspect and the force of the suspect hitting the floor
caused them to be projected to the rug?
o Are the fibers human “hair”?
o Are the fibers from an animal, plant, or man-made source?
o If the fibers are from an animal or plant, which one?
o If the fibers came from the suspect, will there be a noticeable tear or hole
in the suspect’s clothing?
o Can these fibers be considered Class Evidence or Individual Evidence – will this
differ depending upon the results of testing?
Give the students some time to brainstorm. Encourage them to think past the initial first
question that comes to mind, to dig deeper. When the students have had ample time, ask for
volunteers to share their questions and make a general list on the board or overhead to use
during your discussion. Have the students write down any questions other students had that
they did not include.
LAB #1 Part B - The goal of this activity is for the students to make as many observations as
they can about six “unknown” fiber samples, and then, using the data collected in the lab and
any prior knowledge, classify the unknown samples in one of four categories – human, animal,
plant, or man-made.
V. Pre-Lab #2 / Lab #2 -Terms to be discussed prior to Lab #2. At this time, a Hair & Fiber
Vocabulary Sheet may be distributed to the students and they may fill in the vocabulary as it
is discussed throughout the Hair and Fiber module. Some of the following vocabulary will also

OU RET 2006 Hair & Fiber Analysis Module Lecture Materials
be used to fill in the Skin Cross-Section Diagram and Morphology of Hair Diagram sheets.
In addition, a Medulla Type & Pattern Resource Sheet can be distributed.
*Locard’s Exchange Principle *Exemplar
*Questioned *Association
*morphology * epidermis
* dermis * subcutaneous tissue
*hair shaft *hair erector muscle
*sebaceous gland *hair follicle
*Pacinian corpuscle *melanocyte
* sweat gland * blood vessels
*polymer *tip end (external end)
*root *follicular tag
*medulla *medulla pattern
*medulla type *medullary index
*medullary shape *cortex
*cuticle *pigment
* keratin *undulation
*ovoid structures *cortical fusi
Teacher Notes: In LAB 2, students will be comparing one hair pulled from their head
with one hair combed from their head. Special attention should be paid to
the root end region of the hair. After completing the vocabulary listed
above, the Skin Cross Section Diagram, the Morphology of Hair Diagram
Sheet and after reviewing the Medulla Type & Pattern Resource Sheet, the
students should be able to comprehend and follow the lab instructions.
Glycerin can be used instead of water to make the Wet Mount. Combs can
be sanitized in a jar of 10% bleach solution. The Medullary Index is
calculated by dividing the diameter of the medulla by the diameter of the
hair.
VI. Terms to be discussed prior to Lab #3. Review terms learned so far.
Teacher Notes: In this lab, students will be comparing five hair samples taken from
different regions of their head. The purpose of this activity is for students to
determine if all heads hairs look exactly alike. Discuss the above listed
vocabulary with the students and then proceed with the lab. Again, Glycerin
may be used instead of water for the Wet Mount. Combs can be sanitized in
a jar of 10% bleach solution. The Medullary Index is calculated by dividing
the diameter of the medulla by the diameter of the hair.
VII. Terms to be discussed prior to Lab #4. The Scale Patterns Sheet should be handed out at this
time to students. They will need this for the lab.

OU RET 2006 Hair & Fiber Analysis Module Lecture Materials
*Scale Pattern / Structure *Mosaic
*Pectinate / Spinous *Imbricate
*Petal *Diamond Petal
*Chevron *Coronal
Teacher Notes: In this lab, students will be examining the scale patterns of hair cast in
semi-dry clear nail polish. The lab will include analysis of human hair as
well as three other sources of animal hair. The clear polish should only be
allowed to semi-dry for approximately 30 seconds or until polish has a sticky
feel. It may be beneficial to do some “test-runs” before doing this with the
students. Slides can very easily be cleaned with fingernail polish remover.
Students should use the Scale Pattern Sheet as a reference for comparison of
known scale patterns to the casted patterns they obtain in the lab. Rubber
cement works well as a substitute for the clear polish. Additional animal hair
samples will be needed should teacher decide to do Mini-Lab Write-up Part
B.
VIII. Teacher Notes: In Lab #5, students will be analyzing an unknown fiber sample and will then
compare it to three known samples. They will additionally test the response of
the fibers to heat from a flame and finally to the flame itself. The lab calls for
use of red fibers. However, any color can be used as long as the unknowns are
the same color as the known fibers. Special care should be taken as the
students will be using a flame. The Fiber Information Sheet can be handed
out to students. However, the instructor may not wish to use all of the
information included.
IX. Lecture Notes
• Definition of Hair – Hair is a slender, thread-like outgrowth of the epidermis of
humans and other mammals which grows out of the follicle. Hair provides warmth and
protection.
• Structure of Hair – the structure of hair is like a pencil; the paint would be the cuticle, the
wood would be the cortex, and the lead would be the medulla.
I. Cuticle – The outer layer of the hair is made up of overlapping scales which
point toward the tip, or distal end, of the hair. This layer is tough and protects
the inner two layers. As the hair grows from the follicle, the scales, which are
made of a protein called keratin, become flat and harden (keratinize).
Fingernails and horns are also made of keratin. When hair is teased, these cells
are brushed toward the proximal (head) end of the hair, making them lift up to
give the hair more volume. Human scale patterns are usually not analyzed.
However, in animals, the scale patterns vary from species to species and can be
a point of analysis.

OU RET 2006 Hair & Fiber Analysis Module Lecture Materials
II. Cortex – The cortex is the largest, middle layer of the hair, made up of tall
skinny cells, lying parallel to the length of the hair. It is here that the pigment
granules are found which gives hair its color. These pigment granules will
differ from person to person in shape, color, and distribution throughout the
cortex. Microscopic examination of the pigment granules is done in a hair
comparison.
III. Medulla – The medulla is a hollow tube running down the middle of the hair
shaft. Some hairs do not have a medulla; in some the medulla may be
fragmented or continuous. (Some laboratories call the medulla fragmented if it
is unevenly broken and interrupted if it is evenly broken.) The characteristics of
the medulla may vary in hairs from the same individual. In humans, the medulla
is less than one third of the diameter of the hair. In animals, it is usually more
then half the diameter of the hair. Humans usually have a fragmented medulla
or none at all. However, Mongoloid hair usually has a continuous medulla. In
most animals, the medulla is fragmented or continuous. The shape (pattern) of
the medulla can vary; in humans, it is usually cylindrical, but in animals it may
have interesting shapes. The medulla of a rabbit looks like an ear of corn, while
the medulla of a cat resembles a string of pearls.
IV. Root – Human hair grows about 1 cm per month or an inch every ten weeks.
The hair root produces the hair within the follicle, and as the hair grows, the
root changes shape. There are three phases of hair growth: Anagen Phase,
Catagen Phase, and Telogen Phase. Hair can be in the active growing, or
Anagen, phase for six years; the root is still attached to the follicle and is
shaped like a flame. If a hair is pulled from the head during the Anagen phase,
the cellular link between the root and the follicle – the follicular tag – is visible
on the hair. The follicular tag is used in nuclear DNA analysis. During the
Catagen phase, the hair is either dormant and resting or growing at a slower
rate. During this period of up to three weeks, the root becomes longer and
thinner. In the Telogen phase, for up to six months, the hair root, which is club-
shaped, will be pushed out of the follicle. When the root reaches the opening of
the follicle, it is shed and the growth process starts all over again. Humans lose
about 70 hairs a day. The follicular tag is usually not present on a hair that has
been shed.
• Hair Scale Patterns – Although not used in human hair analysis, determining scale
patterns can be useful in animal hair analysis. Scales are overlapping, flattened down
toward the distal end of the hair. The most common scale patterns are coronal, spinous,
and imbricate. Coronal scales look like a crown, and spinous scales are long and narrow.
Imbricate scales look like safety glass when it breaks, only the scales are longer and
thinner then the glass pieces.
• Analysis of Hair – It is important to note that hair from one person may exhibit various
characteristics from hair to hair. This is important in the comparison of hairs in forensic
cases. The most common request of the forensic scientist is to determine if unknown hairs

OU RET 2006 Hair & Fiber Analysis Module Lecture Materials
match those of victim or suspect. The unknown hairs may come from the crime scene, the
suspect’s clothing or car, the victim’s clothing or body, or from a weapon. Usually, hairs
from the crime are from the head or pubis. However, animal hairs have played an
important role in some cases when the victim’s animal’s hairs were found on the suspect’s
clothing or in their car. Hairs are collected from the victim and, after arrest, from the
suspect. These hairs are usually plucked and not cut to allow the scientist to use the
follicular tag if nuclear DNA analysis is indicated. If there is no follicular tag on the
evidentiary hairs, mitochondrial DNA may be found in the shaft of the hair. Nuclear DNA
comes from both parents, while mitochondrial DNA only comes from the mother. A
comparison microscope is used to compare known and unknown hairs. A comparison
microscope is actually two microscopes connected by an optical bridge. This allows the
examiner to see both hairs at the same time side by side under the same magnification.
DNA analysis requires a genetic analyzer.
I. Collection of Hair at a Crime Scene – Hairs are collected with forceps and
packaged in paper bindles or envelopes. Hairs from one area are packaged
together.
II. Properties of Hair Important to Criminalists – Color, length, diameter,
absence or presence of a medulla, medullary characteristics (such as size, shape
and distribution of pigment granules), dying or bleaching, trauma by fire or the
elements, and externals such as fungal infections, blood, lice and ticks.
III. Age of Hair – Human hair ranges in diameter from 20 micrometers to about
125 micrometers. Finer hairs grow at a faster rate and fall out more frequently
than do the slower growing coarse hairs. Head hairs grow at the rate of about
1cm per month. Head hairs are replaced approximately every three to five years
with new hair. There are three stages of hair (root) growth – anagen phase,
catagen phase, and telogen phase. The anagen phase includes at any given time
about 85-90% of the total hair follicles, and this phase lasts up to five years.
The catagen phase is an “in between” phase of hair growth and lasts about three
to four weeks. About 2-5% of the hairs on the head at any given time are in this
phase. The last phase, telogen, last for approximately two to six months, and it
is in this phase that the hair is lost from the scalp as mature hair. About 5-10%
of the head hairs are in this phase.
! Hairs From Your Brush or Comb – Telogen Hairs; bulb-like shape of
root
! Hairs That Have Been Pulled Out – Most likely Anagen; root will have
follicular tissue called a “tag” attached; looks stretched out
! Tip of a mature hair should come to a point if not recently cut or abused.
! Recently cut hair will be squared off at tip and rounds off within two to
three weeks.
! Split ends result from dryness (no conditioning), harsh chemicals, and
overuse of a blow dryer (effects of all of these even worse as one ages).
IV. Classification – Human hairs are classified as Caucasoid, Negroid, and
Mongoloid, and each of these classes have their own characteristics.

OU RET 2006 Hair & Fiber Analysis Module Lecture Materials
a. Caucasoid includes American and European whites, Mexicans and Middle
Easters.
b. Negroid includes black individuals.
c. Mongoloid includes Orientals and American Indians.
V. Hair in Cross-Section
a. Caucasoid hair is oval to round in cross section.
b. Negroid hair is oval to flat in cross section.
c. Mongoloid hair is round.
VI. Identification of Source / Source Area of Hairs
a. Head- have more uniform diameter of the shaft and may be straight, wavy
or curly
b. Pubis- short, curly, and have great variances in the diameter of the hair shaft
c. Facial (Beard/Mustache) – coarse, triangular in shape cross-section and a
blunt tip from shaving
d. Fringe Hairs – from areas of body outside those specifically designated as
head or pubic / sideburn, abdomen, upper leg, back, neck
e. Axillary Hairs – underarm, chest, eye, nose
f. Infant hairs- very fine pigment, are usually short and fine, with no definite
characteristics
g. Animal Hairs- can be identified as to species
VII. Tests Performed on Hair
a. Nuclear DNA
b. Mitochondrial DNA
c. Drugs/Poisons/Toxins
d. Heavy Metals
e. Nutritional Deficiencies and Diseases (Medicine)
• How do you determine that hair has come from a specific suspect? Explain the difference
between hair being consistent with a suspect’s hair and hair that is unique only to him.
In the field of forensics, the word “consistent” really means nothing. Microscopically, a hair
cannot be definitively identified to a suspect. Microscopic examination is a preliminary or
presumptive test, not a confirmatory test. The report of the most positive result of a microscopic
examination usually reads that a hair “could have come” from the suspect. DNA analysis is needed
for confirmation as to the hair’s owner.
_____________________________________________________________________________________
• Definition of Fiber – A fiber is the smallest component of a textile material (a thread or object
resembling a thread). Many fibers can be woven into strands, yarn, rope, etc. Fibers come from
clothing, furniture, carpets, and rugs. (Hairs are also sometimes referred to as fibers, but the labs in

OU RET 2006 Hair & Fiber Analysis Module Lecture Materials
this module concerning fibers are referring to non-hair fibers.) Fibers are of great importance in
the biology of both plants and animals for holding tissues together. Human uses for fibers are
diverse. They can be spun into filaments, thread, string, or rope. They can be used as a component
of composite materials. They can also be matted into sheets to make products such as paper or felt.
Fibers are often used in the manufacture of other materials. Fibers can be natural, like cotton,
wool, and silk or synthetic, like nylon, acrylic and polyester. Fibers are typically considered class
evidence. However, as with all class evidence, the significance of the evidence is directly
proportional to the number of class characteristics. A large number or correlating fibers of
different class characteristics may potentially carry a case (e.g. Wayne Williams case).
• Classification of Fibers
Natural Fibers – natural fibers have been used for centuries and come from animals,
plants and geological processes. Animal fibers include silk, mohair, cashmere, alpaca, and
camel. Mink, beaver, and rabbit are common fur fibers used in clothing and coats. Silk is a
fine, continuous protein fiber produced by some larvae, especially the silkworm. The most
common plant fiber is cotton. When cotton is dyed or used in combination with other
fibers, it can have value as evidence. However, plain white cotton fibers are so common
and so similar that they have almost no evidentiary value. Denim, used in jeans, is usually
a combination of blue and white cotton fibers. Unless the jeans are unusual in some way,
denim is also limited in its evidentiary value. The word “denim” comes from ‘de Nimes’
meaning from Nimes, France where the fabric was first produced in 1865. It is a firm,
durable, twilled, usually cotton fabric, woven with colored warp and white filling
threads. Mineral fibers comprise asbestos. Asbestos is the only naturally occurring fiber.
Natural fibers have unique microscopic features that allow them to be distinguished with
the aid of a microscope. For example, the flat and twisted ribbon shape of cotton can allow
an experienced fiber analyst to quickly identify the fiber. In addition, natural fibers can be
made up of different polymers which, because of their individual shapes, will cause the
fibers as a whole to twist in certain directions. Fiber analysts can wet fibers and dry them
over a hot plate. Hemp and jute will display a counter-clockwise direction of twist when
viewed on end, while flax will display a clockwise direction of twist. IR and GC are really
not used with natural fibers as most natural fibers are made up of the same cellulose
polymer.
Man-Made Fibers – Man-made fibers are not as descript under the microscope as natural
fibers. Depending upon which company is manufacturing them, they can be made to be
any size, color, cross- section shape, etc. Because of this, these fibers do not typically aid
in identification, although they are used frequently for comparison. Instruments such as the
Infrared Spectrophotometer and Pyrolic Gas Chromatograph are often used with
identification of man-made fibers as they all have unique chemical compositions. Rayon
was the first man-made fiber, manufactured in 1911; cellulose acetate came next in the
1920’s. Nylon was born in 1930 when scientists pulled a polymer into a thread. A polymer
is made up of long-chained molecules whose atoms are arranged in monomers, or
repeating units. Fibers are classified by their properties which can form the basis for their
identification. Properties are the characteristics of substances which can be further
subdivided into physical properties and chemical properties. Physical properties are those
which describe a substance such as color, weight, volume, melting, and boiling point.

OU RET 2006 Hair & Fiber Analysis Module Lecture Materials
Chemical properties describe how a substance behaves when in contact with another
substance such as when a base turns red litmus paper blue.
• Analysis of Fibers – The analysis of fibers is most commonly done using microscopy and other
instrumentation.
I. Visible light microspectrophotometry
II. Pyrolic Gas Chromatography
III. Infrared Spectrophotometry
OU RET 2006 Hair & Fiber Module Activity
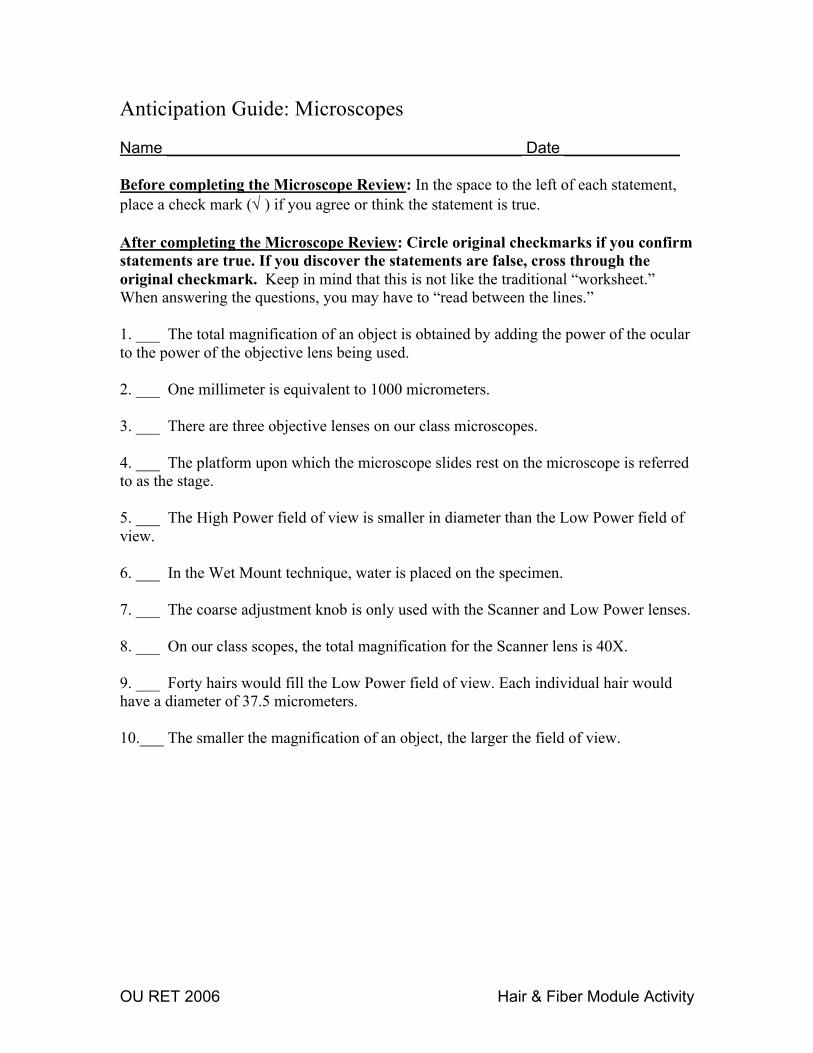
Anticipation Guide: Microscopes
Name ________________________________________ Date _____________
Before completing the Microscope Review: In the space to the left of each statement,
place a check mark (! ) if you agree or think the statement is true.
After completing the Microscope Review: Circle original checkmarks if you confirm
statements are true. If you discover the statements are false, cross through the
original checkmark. Keep in mind that this is not like the traditional “worksheet.”
When answering the questions, you may have to “read between the lines.”
1. ___ The total magnification of an object is obtained by adding the power of the ocular
to the power of the objective lens being used.
2. ___ One millimeter is equivalent to 1000 micrometers.
3. ___ There are three objective lenses on our class microscopes.
4. ___ The platform upon which the microscope slides rest on the microscope is referred
to as the stage.
5. ___ The High Power field of view is smaller in diameter than the Low Power field of
view.
6. ___ In the Wet Mount technique, water is placed on the specimen.
7. ___ The coarse adjustment knob is only used with the Scanner and Low Power lenses.
8. ___ On our class scopes, the total magnification for the Scanner lens is 40X.
9. ___ Forty hairs would fill the Low Power field of view. Each individual hair would
have a diameter of 37.5 micrometers.
10.___ The smaller the magnification of an object, the larger the field of view.

OU RET 2006 Hair & Fiber Analysis Module Activity
MICROSCOPE REVIEW-Teacher’s Guide
PARTS OF THE MICROSCOPE:
The microscope is an essential tool in the study of science. It can open up for students a new world of
plant parts, cells, and even entire plants that are too small to be seen with the unaided eye. In criminal
investigations, microscopes are used in the analysis of trace evidence – things such as glass fragments,
hairs and fibers oftentimes left behind at the scene of a crime. It is important that a lab technician
understand how a compound microscope works. By following a few procedures and precautions,
students can use the microscope effectively with only a little practice. As the teacher discusses the
parts of the microscope, students should label these parts on the microscope diagram.
The EYEPIECE, or OCULAR LENS, is at the top of the BODY TUBE. The body tube is attached
to the ARM, and at the other end of the body tube is the REVOLVING NOSEPIECE.
The OBJECTIVE LENSES are fastened to the revolving nosepiece. There are 3 objective lenses.
a. SCANNER OBJECTIVE LENS – the shortest objective ( 4 X )
b. LOW POWER OBJECTIVE LENS – the middle-sized objective ( 10 X )
c. HIGH POWER OBJECTIVE LENS – the longest objective ( 40 X )
The COARSE ADJUSTMENT KNOB is the upper, larger one. It is used to adjust the height of the
stage by rotating the knob in either direction.
The FINE ADJUSTMENT KNOB is the smaller, lower knob. It also moves the body tube up and
down, but over a much shorter range. (Note: This knob is only used on HIGH POWER after the
object has been focused with the coarse adjustment knob on scanner and low power! This will
prevent any damage to the high power lens, object, or slide.)
The STAGE has an opening in the center, directly below the objective lens being used.
Some microscopes have two clips used to hold the slide in place. Other scopes have a SPRING-
ACTION ARM used to hold the slide in place. Care should be taken to slowly release the spring
arm so that specimen slides do not become chipped or broken.
Beneath the opening in the stage is the DIAPHRAGM DISC. This regulates the amount of light
passing through the stage opening. The LIGHT source is below the stage on the BASE and can be
turned on at the switch located on the scope.
* Simple Microscopes have only one lens, while Compound Microscopes have two or more lenses. In
class, we will be using Compound Microscopes.

OU RET 2006 Hair & Fiber Analysis Module Activity
1. Label the parts of the microscope.
2. As you work with the microscope in class, remember these things:
• When the coarse adjustment knob is turned, the stage visibly moves up or down.
• When the fine adjustment knob is turned, the stage moves up or down, but the movement
is probably not visible to your eye.
• The diaphragm regulates the amount of light that passes through the stage.
3. The objective lenses make the initial or primary magnification. They are located in the nosepiece
of the microscope. How many objective lenses are located on the class microscopes? 3

OU RET 2006 Hair & Fiber Analysis Module Activity
4. Inscribed on each objective is the primary magnification, or power, of that lens. This tells you
the number of times the lens magnifies the image. List the magnification found on each of the
following lenses.
scanner ________________ 4X
low power lens __________ 10X
high power lens _________ 100X
5. The second kind of lens in the microscope is the ocular or the eyepiece. This lens is located at
the top of the body tube. The ocular magnifies the image made by the objective lens. This
enlargement is called the secondary magnification.
6. The total magnification of a microscope is determined by multiplying the primary magnification
by the secondary magnification. For example, if the objective lens is 10 X and the ocular is 10
X, the total magnification is: 10 X • 10 X = 100 X
7. Calculate the total magnification for each lens combination on your microscope. Show your
calculations in the same form as in the example above.
scanner lens ____________ 4 X • 10 X = 40 X
low power lens _________ 10 X • 10 X = 100 X
high power lens _________ 40 X • 10 X = 400 X
Preparing a Wet Mount:
1. The specimen is placed on the slide.
2. A drop of water is added to the specimen.
3. A cover slip is placed over the specimen at a 45 degree angle and lowered down onto the
specimen. This will prevent air bubbles from being trapped between the slide and the cover slip.
As you work with the microscope in class remember these things:
• If you move the slide physically in one direction on the stage (left, right, up, or down), the
specimen will appear to move in the opposite direction in the microscope’s field of view.
• The specimen must be focused and centered in the field of view before moving to the next
lens.
• The coarse adjustment knob is used on Scanner and Low Powers, while the fine adjustment is
only used on High Power.

OU RET 2006 Hair & Fiber Analysis Module Activity
1 mm 1/2 mm
* The next two sections can be done by the students as a lab activity, or the teacher can explain it
via demonstration.
Calculating Diameter in Micrometers (microns):
1. Carefully set up the microscope on low power. Look through the ocular and adjust the light. The
lighted circular area you see is called the field of vision.
2. Place a metric ruler on the stage. Using the techniques you have learned,
focus on the edge of the ruler (low power) using the coarse focus knob.
The distance from the center of one line to the center of the next line
is one millimeter which is equal to 1000 microns (1mm = 1000
microns). The micrometer (micron) is the metric unit of measure to
express the size of a microscopic organism.
3. Place the center of one mark at the left edge of the field of vision.
Make sure that the edge of the ruler is exactly across the center of the
field.
4. What is the diameter of your low power field of vision in millimeters? 1.5 millimeters
5. What is the diameter when you convert it to micrometer (microns)s? 1mm=1000 micrometers /
1.5mm = 1500 micrometers
6. With the ruler still in place, it would not be possible to attempt this with the high power lens.
Explain why this would be a problem. The high power objective is too long to allow for the
ruler to be on the stage–there is not enough room.
7. So, how can you determine the size of the high power field with the information you have already
obtained? You can determine the size indirectly by using the diameter under low power. You also
need to know how much more the high power objective magnifies than the low power objective.
The low power field of view equals 1500 microns. Low power has a magnification of 10X
while high power has a magnification of 40X.
8. Study the following example for calculating the difference in magnification:
high power objective = 40X 40 = 4
low power objective = 10X 10
The high power objective magnifies 4 times MORE than the lower objective. You
see 4X more detail, but 4X LESS area of the object, so the diameter of the object is 4X less.
9. Now calculate the diameter of the high power field of vision by setting up the ratios. (You will
need the number representing the Low Power Field of View.) Show your calculations below.
1500 (Low Power) = 375 micrometers (diameter of high power field of view)
a difference of a power of 4

OU RET 2006 Hair & Fiber Analysis Module Activity
Calculating the diameter of a HAIR:
1. First, make a wet mount of a piece of hair.
2. Locate the hair under low power objective. Estimate the width of the hair in microns based on
your knowledge of the low power field of vision. To do this, divide the diameter of your field of
vision by the estimated number of hair widths that will fit side-by-side in the field. Show your
calculations below.
Example: When I view my hair on Low, I “eyeball” the number of my hairs I think will fill
the field of view if they were lying side-by-side. Let’s say I think 25 hairs would fit across the
Low Power field of view. I would then DIVIDE 1500 micrometers by 25 hairs to obtain the
estimated width of the one hair. 1500 / 25 = 60 micrometers
3. Change to the high power objective. Repeat the process described above and see if you get the
same results. Show your calculations below. On high power, the hair will appear much larger,
and the student might now only be able to “fit” 6 ! hairs across the high power field of view.
Now you would use the diameter for the High Power field of view, 375 micrometers.
375 / 6.25 = 60 micrometers!
*BONUS! – What should we be able to state about the number obtained in #2 and the number
obtained in #3? Explain…. We should be able to understand that the two numbers obtained for
the hair on Low Power and High Power should be the same, as the actual diameter of the hair
does not change! However, the students are estimating and so often times their numbers will not
be exact. And then again, there will be kids who do get the exact same number for both!
MICROSCOPE STORAGE – You need to know the proper procedure for storing
the microscope.
• Place the scanner lens into viewing position and turn off the light.
• Lower the stage completely, then carefully remove the slide.
• Wrap the cord according to your teacher's instructions, replace the dust cover, and store in
the designated area.
• Clean the slides and cover slips, blot them dry on a paper towel, and place them in the
designated slide and cover slip containers.
REVIEW QUESTIONS
1. Which lens permits viewing the greatest area of the specimen? scanner
_______________________________________________________________________________

OU RET 2006 Hair & Fiber Analysis Module Activity
2. Which lens permits viewing the smallest area of the specimen? High Power
_______________________________________________________________________________
3. When you are focusing an object under the microscope, explain why some parts of the
specimen are in focus and some parts are out of focus. An object might not be uniform in
thickness throughout, and if you are focusing on one thicker part of the specimen, another
section that is not as thick will not be in focus.
_______________________________________________________________________________
4. Why do you think that microscopic measurements are often given in microns instead of
millimeters? The numbers are more representative of the extremely small nature of
microscopic organisms.
_______________________________________________________________________________
_______________________________________________________________________________
5. Why is it necessary to view an object under low power before switching to high power?
You must focus on low before moving to high power.
_______________________________________________________________________________
_______________________________________________________________________________
6. What is the relationship between changing the magnification and its effect on the size of the
field of vision? The greater the magnification, the smaller the diameter of the field of view.
_______________________________________________________________________________

OU RET 2006 Hair & Fiber Analysis Module Activity
Microscope Review
PARTS OF THE MICROSCOPE:
The microscope is an essential tool in the study of science. It can open up for students a new world of
plant parts, cells, and even entire plants that are too small to be seen with the unaided eye. In criminal
investigations, microscopes are used in the analysis of trace evidence – things such as glass fragments,
hairs and fibers oftentimes left behind at the scene of a crime. It is important that a lab technician
understand how a compound microscope works. By following a few procedures and precautions,
students can use the microscope effectively with only a little practice. As the teacher discusses the
parts of the microscope, students should label these parts on the microscope diagram.
The EYEPIECE, or OCULAR LENS, is at the top of the BODY TUBE. The body tube is attached
to the ARM, and at the other end of the body tube is the REVOLVING NOSEPIECE.
The OBJECTIVE LENSES are fastened to the revolving nosepiece. There are 3 objective lenses.
a. SCANNER OBJECTIVE LENS – the shortest objective ( 4 X )
b. LOW POWER OBJECTIVE LENS – the middle-sized objective ( 10 X )
c. HIGH POWER OBJECTIVE LENS – the longest objective ( 40 X )
The COARSE ADJUSTMENT KNOB is the upper, larger one. It is used to adjust the height of the
stage by rotating the knob in either direction.
The FINE ADJUSTMENT KNOB is the smaller, lower knob. It also moves the body tube up and
down, but over a much shorter range. (Note: This knob is only used on HIGH POWER after the
object has been focused with the coarse adjustment knob on scanner and low power! This will
prevent any damage to the high power lens, object, or slide.)
The STAGE has an opening in the center, directly below the objective lens being used.
Some microscopes have two clips used to hold the slide in place. Other scopes have a SPRING-
ACTION ARM used to hold the slide in place. Care should be taken to slowly release the spring
arm so that specimen slides do not become chipped or broken.
Beneath the opening in the stage is the DIAPHRAGM DISC. This regulates the amount of light
passing through the stage opening. The LIGHT source is below the stage on the BASE and can be
turned on at the switch located on the scope.
* Simple Microscopes have only one lens, while Compound Microscopes have two or more lenses. In
class, we will be using Compound Microscopes.

OU RET 2006 Hair & Fiber Analysis Module Activity
1. Label the parts of the microscope.
2. As you work with the microscope in class, remember these things:
• When the coarse adjustment knob is turned, the stage visibly moves up or down.
• When the fine adjustment knob is turned, the stage moves up or down, but the movement
is probably not visible to your eye.
• The diaphragm regulates the amount of light that passes through the stage.
3. The objective lenses make the initial or primary magnification. They are located in the nosepiece
of the microscope. How many objective lenses are located on the class microscopes? ________

OU RET 2006 Hair & Fiber Analysis Module Activity
4. Inscribed on each objective is the primary magnification, or power, of that lens. This tells you
the number of times the lens magnifies the image. List the magnification found on each of the
following lenses.
scanner lens ___________________________________________________________________
low power lens ________________________________________________________________
high power lens ________________________________________________________________
5. The second kind of lens in the microscope is the ocular or the eyepiece. This lens is located at
the top of the body tube. The ocular magnifies the image made by the objective lens. This
enlargement is called the secondary magnification.
6. The total magnification of a microscope is determined by multiplying the primary magnification
by the secondary magnification. For example, if the objective lens is 10 X and the ocular is 10
X, the total magnification is: 10 X • 10 X = 100 X
7. Calculate the total magnification for each lens combination on your microscope. Show your
calculations in the same form as in the example above.
scanner lens ___________________________________________________________________
low power lens ________________________________________________________________
high power lens ________________________________________________________________
Preparing a Wet Mount:
1. The specimen is placed on the slide.
2. A drop of water is added to the specimen.
3. A cover slip is placed over the specimen at a 45 degree angle and lowered down onto the
specimen. This will prevent air bubbles from being trapped between the slide and the cover slip.
As you work with the microscope in class remember these things:
• If you move the slide physically in one direction on the stage (left, right, up, or down), the
specimen will appear to move in the opposite direction in the microscope’s field of view.
• The specimen must be focused and centered in the field of view before moving to the next
lens.
• The coarse adjustment knob is used on Scanner and Low Powers, while the fine adjustment is
only used on High Power.

OU RET 2006 Hair & Fiber Analysis Module Activity
1 mm 1/2 mm
* The next two sections can be done by the students as a lab activity, or the teacher can explain it
via demonstration.
Calculating Diameter in Microns:
1. Carefully set up the microscope on low power. Look through the ocular and adjust the light. The
lighted circular area you see is called the field of vision.
2. Place a metric ruler on the stage. Using the techniques you have learned,
focus on the edge of the ruler (low power) using the coarse focus knob.
The distance from the center of one line to the center of the next line
is one millimeter which is equal to 1000 microns (1mm = 1000
microns). The micron is the metric unit of measure to express the
size of a microscopic organism.
3. Place the center of one mark at the left edge of the field of vision.
Make sure that the edge of the ruler is exactly across the center of the
field.
4. What is the diameter of your low power field of vision in millimeters?_______________________
5. What is the diameter when you convert it to microns?____________________________________
6. With the ruler still in place, it would not be possible to attempt this with the high power lens.
Explain why this would be a problem.
_______________________________________________________________________________
7. So, how can you determine the size of the high power field with the information you have already
obtained? You can determine the size indirectly by using the diameter under low power. You also
need to know how much more the high power objective magnifies than the low power objective.
8. Study the following example for calculating the difference in magnification:
high power objective = 40X 40 = 4
low power objective = 10X 10
The high power objective magnifies 4 times more that the lower objective. You see 4X less
of the object, but 4X more detail.
9. Now calculate the diameter of the high power field of vision by setting up the ratios. (You will
need the number representing the Low Power Field of View.) Show your calculations below.

OU RET 2006 Hair & Fiber Analysis Module Activity
Calculating the diameter of a HAIR:
1. First, make a wet mount of a piece of hair.
2. Locate the hair under low power objective. Estimate the width of the hair in microns based on
your knowledge of the low power field of vision. Divide the diameter of your field of vision by the
estimated number of hair widths that will fit side-by-side in the field. Show your calculations
below
3. Change to the high power objective. Repeat the process described above and see if you get the
same results. Show your calculations below.
*BONUS! – What should we be able to state about the number obtained in #2 and the number
obtained in #3? Explain…
MICROSCOPE STORAGE – You need to know the proper procedure for storing the
microscope.
• Place the scanner lens into viewing position and turn off the light.
• Lower the stage completely, then carefully remove the slide.
• Wrap the cord according to your teacher's instructions, replace the dust cover, and store in
the designated area.
• Clean the slides and cover slips, blot them dry on a paper towel, and place them in the
designated slide and cover slip containers.
REVIEW QUESTIONS
1. Which lens permits viewing the greatest area of the specimen?
_______________________________________________________________________________
2. Which lens permits viewing the smallest area of the specimen?
_______________________________________________________________________________
3. When you are focusing an object under the microscope, explain why some parts of the
specimen are in focus and some parts are out of focus.
_______________________________________________________________________________

OU RET 2006 Hair & Fiber Analysis Module Activity
4. Why do you think that microscopic measurements are often given in microns instead of
millimeters?
_______________________________________________________________________________
_______________________________________________________________________________
5. Why is it necessary to view an object under low power before switching to high power?
_______________________________________________________________________________
_______________________________________________________________________________
6. What is the relationship between changing the magnification and its effect on the size of the
field of vision?
_______________________________________________________________________________

Fibers are basic units used in formation of textile yarns and
fibers. We can divide fibers broadly into two categories natural
fibers and man made fibers. Natural fibers are obtained from the nature as cotton, silk, linen, wool, hemp, jute, ramie, etc.
with the development of technology, techniques and textile
industry, today’s man is capable of developing many fibers as
nylon, rayon, acetate etc.
Vegetable fibers generally comprise cellulose: examples include cotton, linen, jute, flax, ramie, sisal and hemp.
Cellulose fibers serve in the manufacture of paper and cloth.
This fiber can be further classified into the following:
seed fiber – fiber collected from the seed – cotton and Kapok
Leaf fiber – fiber is collected from the leaf – sisal and Agave
Bast or skin fiber- fiber collected from the skin or bast
surrounding the stem of the plant. Thes fibers have higerh
tensile strength than other fibers. therefore they are used for
durable yarn and fabric for packaging and paper – jute, kenaf, industrial hemp, ramie, rattan, soybean fiber, banana and even
vine fibers
fruit fiber –collected from the fruit of the plant – coconut (coir)
fiber
stalk fiber – straws of wheat, rice, barley, bamboo, grass
Animal Fibers
wool or hairs – sheep, goat (alpaca, cashmere), horse, etc.
silk fibers-fiber is collected from saliva of bugs or insects
during preparation of cocoons – silk from silkworms
avian fiber –fiber from birds –feather fiber

Mineral Fiber
asbestos – the only naturally occurring mineral fiber –
serpentine (chrysotile) and amphiboles (amosite, crocidolite,
tremolite, actinolite, anthophyllite)
ceramic fibers – glass fibers (glass wool and quartz), aluminum
oxide, silicon carbide, boron carbide
metal fibers – aluminum fibers
Spinning Process - The Spinneret Before being formed into fibers, the fiber-producing substance for all manufactured fibers
is in a thick liquid state. In the spinning process this liquid is forced through a spinneret,
which resembles a large shower head. A spinneret can have from one to literally
hundreds of tiny holes. The size of the holes varies according to the size and type of the
fiber being produced.
Unlike natural fibers, manufactured fibers can be extruded in different thicknesses. This
is called denier. Denier is a term you may have heard, and essentially relates to the
fineness of the fiber filament. For example, a twelve (12)-denier monofilament is
commonly used in sheer pantyhose, and a circular double-knit is about 140-denier.

Conclusions
There are three basic conclusions that can be reached from a microscopic examination and comparison
of hairs.
• The hairs from the questioned (Q) source exhibit the same microscopic characteristics as the hairs in a known (K) hair sample and can be associated to the source of the known hairs.
• The hairs from the questioned source are microscopically dissimilar to the hairs in a known hair sample and cannot be associated with the source of the known hairs.
• The questioned hairs exhibit both similarities and slight differences to hairs found in a known hair sample, and no conclusion can be reached whether they could have originated from the known source. It may be that, in the opinion of the examiner, the differences are not sufficient to eliminate the source of the known hairs as being a possible source of the questioned hairs. At the same time, the presence of these differences precludes an association being made between the questioned and known hairs.
In the first conclusion, it is stated that the questioned hairs can be associated with the source of the known hairs. Hairs are biological specimens and subject to variation. During the analysis of hair, the examiner must establish the range of variation in the sample, and then determine whether the questioned hair fits in that range. It has been found that when two hair samples are randomly selected from different individuals and compared microscopically, it is very unusual that they cannot be distinguished. However, the possibility cannot be dismissed that there may be two hair samples whose ranges of variation overlap
and distinguishing between the samples is not possible.

OU RET 2006 Hair & Fiber Analysis Module Activity
LAB #1 Part A: QUESTION, ANYONE? You are a Forensic Investigator called out of bed at 3:00 in the morning to meet the rest of the Forensic Team at a crime scene. Upon arriving, you are briefed about the situation. Mrs. Crabapple, a seventy-five year old woman, was sleeping in her bedroom when she was awakened by a thudding noise in her living room. She quickly grabbed the golf club she kept by her nightstand and carefully made her way down the darkened hallway. Upon entering the living room, the moonlight filtering through the sheer curtains helped her to make out a big form rolling over on the floor. She watched as the person hurriedly got to their feet, grabbing something close to them on the area rug. They ran for the front door and escaped. After questioning Mrs. Crabapple, it was determined that a solid gold statuette of an eagle with diamonds for eyes, valued at over $250,000, had been stolen. The corner of the area rug was flipped up and back as if someone had tripped. As part of the routine, you are expected to do a preliminary “walk-through” of the scene to get a feel for how the events unfolded. You are treading cautiously across the wooden floor and as you are approaching the up-turned corner of the white area rug, you notice a couple of brown fibers on the rug a few feet in from the corner. You notice no other fibers anywhere else on the area rug. As a Forensic Scientist, the wheels are turning, and a question (or several questions) immediately comes to mind! * Write down what questions you, the Forensic Investigator, would have at this point. We will generate a CLASS LIST to be used during CLASS DISCUSSION.

OU RET 2006 Hair & Fiber Analysis Module Activity
Part B: WHAT HAVE WE HAIR? In this lab, as a Forensics Investigator, you will be analyzing fiber evidence. You will make observations about six unknown fibrous samples, each of which has come from one of the following sources:
* human – natural source (hair) * plant source (textile) * animal – natural source (hair/textile) * man-made source (textile)
After careful observation, you the investigator will tell us what you think!
MATERIALS 1 compound microscope 1 forceps cover slips 1 pair goggles glass microscope slides 6 “fiber samples” labeled A - F 6 small petri dishes water 1 eye dropper colored pencils magnifying lenses PROCEDURE (Part B) : Read and follow ALL directions. 1. For each of the unknown fiber samples, you will need to record all of your observations. Some of the elements you might consider:
! color of fiber as viewed with the naked eye ! texture of the fiber as determined by running between your fingers ! the color fiber appears under the microscope ! diameter of the fiber ! texture as seen under the magnifying lens or microscope ! shape of the fiber – straight, wavy, spiral, etc. ! other elements?
2. Have one lab member obtain the first sample, Unknown Sample A in a small Petri dish. Spend approximately three-to-four minutes “getting to know your fiber.” You have a microscope, slides, cover slips, and a magnifying glass to aid you with your observations. Record all observations made on the Data Sheet provided. Include drawings of the fibrous samples complete with color – use the colored pencils provided. 3. Repeat this procedure with the remaining five samples, B-F. Have the teacher initial here ! _______________ 4. After completing and recording all observations, answer the questions at the end of the lab. These will be used to generate a CLASS DISCUSSION.

OU RET 2006 Hair & Fiber Analysis Module Activity
DATA SHEET Sample A Observations Sample B Observations Sample C Observations Sample D Observations Sample E Observations Sample F Observations

OU RET 2006 Hair & Fiber Analysis Module Activity
WRAP IT UP! – Answer these in COMPLETE SENTENCES.
1. Which samples did you feel more confident in categorizing? What characteristics about the fibers
helped you in this process?
2. Which samples were more difficult to categorize? Why do you think these were more difficult?
3. Did you have more than one sample in some categories? If so, did they share all of the same physical
characteristics?
4. Discuss any unusual or unexpected characteristics observed with the fibrous samples (fibers).
5. Categorize each of your samples in one of the following categories.
Human Source (hair) Animal Source (hair / textile)
Plant Source (textile) Man-Made (Synthetic) Fibers
6. How does a real C.S.I. Investigator “know” that a fiber collected at a crime scene belongs to a certain category of fibers- hair, textile, or other? As a new investigator, what information would help you in the identification of human, animal, and plant fibers?

OU RET 2006 Hair & Fiber Analysis Module Vocabulary
VOCABULARY
MICROSCOPE LAB micrometer (micron)- one-millionth of a meter OR one thousandth of a
millimeter(mm)
LAB # 1 Locard’s Exchange Principle- there is always a cross transfer of evidence between
suspect and victim or locale
exemplar- term used in forensics to describe a sample of known origin
questioned- term used in forensics to describe a sample of unknown origin
association- a link between an unknown sample and known evidence
LAB #2 & LAB #3
morphology- form and structure
polymer- large organic molecule formed by combining many smaller molecules
(monomers) in a regular pattern.
epidermis- the outer layer of skin, which is made up of the horny layer, squamous
cells, and basal cells
dermis- the lower or inner layer of the two main layers of tissue that make up the skin
hair shaft- the term given to the part of the hair that is above the skin; middle portion;
main body of the hair melanocyte- cell in the skin that produces and contains the pigment called melanin blood vessels- tubes that carry blood to and from all parts of the body. The three main
types of blood vessels are arteries, veins, and capillaries. sebaceous gland- a gland in the skin which produces an oily substance sweat gland- any of the glands in the skin that secrete perspiration

OU RET 2006 Hair & Fiber Analysis Module Vocabulary
Pacinian corpuscle- oval pressure receptor located in subcutaneous tissue and
consisting of concentric layers of connective tissue wrapped around an afferent nerve
fiber; also called a lamellated corpuscle
hair erector muscle- any of the bundles of smooth muscle fibers attached to the deep
part of hair follicles passing outward alongside the sebaceous glands to the papillary
layer of the corium, whose action erects hairs subcutaneous tissue- a layer of loose, irregular connective tissue immediately
beneath the skin
cuticle- a translucent, tough outer layer of the hair shaft consisting of scales that cover
the shaft / There are three basic scale structures that make up the cuticle—coronal
(crown-like), spinous (petal-like), and imbricate (flattened)
cortex- middle layer of the hair shaft that provides strength; comprises most of the hair
mass / made up of keratin / contains pigment that makes the hair brown, yellow, black or red
pigment- the chemical substance within the hair shaft that gives it color / seen as
continuous color throughout or as pigment granules (darker spots seen against lighter
pigment coloring) / seen in more concentration during anagen growth phase–hair still
growing
keratin- a tough protein polymer made up of about 20 different amino acids; the
principle one is cystine, which allows strong disulfide bonds to form between protein chains. This cross-linking makes hair so resistant to chemical and biological
degradation. The sulfur in keratin also accounts for the distinctive smell of burning hair /
the cortex is made up of keratin molecules aligned parallel to the length of the shaft
medulla- the spongy interior core of hair that gives it flexibility; appears as a canal in
the middle of the shaft / may appear dark or translucent depending on whether there is
air, liquid, or pigment within it / can be found in different medullary patterns
hair follicle- a tube-like organ in the under layer of skin (dermis) from which the hair
grows; the root of the hair is embedded in the follicle. The follicle is linked to the body’s blood supply so whatever is taken into the body is distributed to the part of the hair
growing at that time; this is important in analyzing hair for drugs and poisons.
root- the base/bottom structure of the hair
tip end- the external end of the hair
medullary index- measures the diameter of the medulla relative to the diameter of the
hair shaft / normally expressed as a fraction / M.I. = medulla diameter / hair diameter X 100
medullary type- can be absent or present in continuous, interrupted (aka
discontinuous or broken), or fragmented (trace) forms
OU RET 2006 Hair & Fiber Analysis Module Vocabulary
continuous medulla type- interrupted medulla type- fragmented medulla type- absent medulla type- [no medulla is seen]
medullary pattern- different organisms will often have medullae with distinct shapes
as a subcategory of the medullary type / for example, a rabbit can have either a
continuous uniserial ladder or a continuous multiserial ladder
medullary shape (x-section)- the cross section of hair (round, oval, square or
crescent) can determine different overall shapes of hair – straight, curly or kinky
undulation- in hair morphology, slight waviness
cortical fusi- irregularly shaped air spaces in the cortex / can be found in different
shapes and sizes, providing possible class characteristics / best seen under microscope
at 100X or higher magnification
ovoid structures- Ovoid bodies are large (larger than pigment granules), solid
structures that are spherical to oval in shape with very regular margins. They are
abundant in some cattle, dog hairs, as well as in other animal hairs. To varying degrees, they are also found in human hairs.
LAB #4 scale structure / pattern- pattern formed by the overlapping scales of the cuticle, the
outside covering of the hair; examples are coronal (mouse), spinous (cat) and
imbricate (human)
LAB #5
filament- a single strand of material usually twisted with other filaments to make a
thread or fiber
fiber- tiny filaments / polymers twisted or bonded together to form a thread or yarn
fabric- a cloth material made up of fibers woven or bonded together in a distinctive
manner
textile- a fabric woven in a distinctive pattern / some textiles such as felt lack a pattern
organic- referring to substances composed primarily of hydrocarbons (carbon and
hydrogen) / examples of organic fibers are

OU RET 2006 Hair & Fiber Analysis Module Vocabulary
inorganic- refers to substances not composed primarily of hydrocarbons / examples of
inorganic fibers are fiberglass and asbestos / inorganic fibers are man-made fibers
using inorganic substances such as glass, ceramic, metal
man-made fibers- fibers derived from either natural or synthetic polymers / the fibers
are typically made by forcing the polymeric material through the holes of a spinneret /
can be made from organic (hydrocarbon sources) substances or inorganic substances
natural fibers- fibers derived entirely from animal or plant sources / cotton, hemp, flax /
there are a limited number of natural fibers
artificial fibers- fibers created from chemically altered natural sources such as
cellulose / these are man-made fibers created with organic material / rayon, acetate, cupro, lyocell, modal /
synthetic fibers- fibers created from synthetic polymers / these are man-made fibers
created with organic material / acrylic, elastodiene, polyester, polyvinyl, saran, nylon,
polyethylene
yarn- a continuous strand of fibers or filaments, twisted or untwisted
warp- the lengthwise yarn or thread in a weave
weft or woof- the crosswise yarn or thread in a weave
blend- a fabric made up of two or more different types of fiber, usually as weft and warp
ADDITIONAL VOCABULARY anagen phase- the first stage of hair growth, lasting up to 5 years / includes 80-90% of
hair follicles at any one time
catagen phase- the intermediate stage
telogen phase- 8-10% of hair follicles / last two to six months, in which the follicle is
ready to push out the mature hair. The hairs in your brush or comb are telogen hairs
class evidence- properties of evidence that can only be associated with a group and
never a single source
individual evidence- properties of evidence (or evidence) that can be associated with
a common source with a high degree of probability
identification- the determination of the physical or chemical identity of a substance with as near absolute certainty as existing analytical techniques will permit

OU RET 2006 Hair & Fiber Analysis Module Vocabulary
VOCABULARY
micrometer- Locard’s Exchange Principle- exemplar- questioned- association- morphology- polymer- epidermis- dermis- hair shaft- melanocyte- blood vessels- sebaceous gland- sweat gland Pacinian corpuscle- hair erector muscle- subcutaneous tissue- cuticle- cortex-

OU RET 2006 Hair & Fiber Analysis Module Vocabulary
pigment- keratin- medulla- hair follicle- root- tip end- medullary index- medullary type- continuous medulla type- interrupted medulla type- fragmented medulla type- medullary pattern- medullary shape- undulation- cortical fusi- ovoid structures- scale structure/pattern- filament- fiber- fabric- textile- organic- inorganic-

OU RET 2006 Hair & Fiber Analysis Module Vocabulary
man-made fibers- natural fibers- artificial fibers- synthetic fibers- yarn- warp- weft or woof- blend- anagen phase catagen phase telogen phase class evidence- individual evidence- identification-

OU RET 2006 Hair & Fiber Analysis Module Diagram © EnchantedLearning.com
Skin Diagram – T.G.

OU RET 2006 Hair & Fiber Analysis Module Diagram © EnchantedLearning.com
Skin Diagram

OU RET 2006 Hair & Fiber Analysis Module Diagram © Jennifer Shaw 2006
MEDULLA
CUTICLE
CORTEX
OVOID
STRUCTURE
S
CORTICAL FUSI
MORPHOLOGY OF HAIR DIAGRAM
OU RET 2006 Hair & Fiber Analysis Module Diagram © Jennifer Shaw 2006
MORPHOLOGY OF HAIR DIAGRAM

MEDULLA TYPES
Continuous
Intermitted
or Interrupted
Fragmented
Absent
MEDULLA PATTERNS
Uniserial
Multiserial
Vacuolated
Lattice
Amorphous (without a specific pattern)
OU RET 2006 Hair & Fiber Analysis Module Activity
LAB #2
In this lab, you will be taking two hair samples from your own head and comparing them. One hair sample will be obtained by combing through your hair with a brush or comb, while the other sample will be obtained by pulling a hair out of your scalp. Both hairs need to be retrieved from the SAME LOCATION on your head. Do you think that hairs that naturally fall out will look different than hairs that have been forcibly removed from the scalp? Write your hypothesis below.
HYPOTHESIS: MATERIALS: 1 compound microscope 1 forceps 2 cover slips 1 pair goggles 2 glass microscope slides 1 combed out hair 1 pulled hair water 1 eye dropper sanitized comb or brush masking tape colored pencils • Glycerin or mineral oil can also be used to make a Wet Mount.
PROCEDURE (PART A) : Read and follow ALL directions. 1. Obtain a strand of your own hair by combing through your hair in a specific region of your head. (ex: left side near part, or bangs) 2. Using the forceps, place the hair across a microscope slide. 3. Place a drop of water on the hair in order to hold it in place and put a cover slip over the hair. This is known as a Wet Mount. With masking tape, label the edge of the slide “combed hair”. 4. Place the slide on the stage of the compound microscope. Focus and center the hair on the SCANNER (4X). Then move to the LOW POWER (10X), focusing and centering the hair in the field of view.

OU RET 2006 Hair & Fiber Analysis Module Activity
• INFO CHECK! What is the total power of magnification when using the Scanner?
________ Low Power? ________ High Power? __________
5. Locate the root end of the COMBED hair and the external end of the COMBED hair. Make a detailed sketch of what you see in the field of view circles provided. Be sure to draw the hair the same size (relative to the drawing circle) that it appears on the scope.
Combed Root Combed External End
6. Does the external end look square, pointed, or split? ______________ 7. Does the main body of the root look flame-shaped, stretched out as if in a sheath, or bulb-like (club-like)? __________________ 8. Next, observe the main shaft of the hair. The inner part is the medulla. Sketch the shaft of the hair.

OU RET 2006 Hair & Fiber Analysis Module Activity
9. Is the medulla fragmented (present in isolated spots), interrupted (long columns with open spaces now and then), continuous (unbroken column), or is it totally absent? _____________ 10. Make a notation of the pigmentation of the hair (you may want/need to increase the magnification of your microscope to make these observations). 11. Calculate the relative diameter of the hair.
• On LOW POWER, the field of view is 1.5 millimeters (mm) wide.
• 1 mm is equivalent to 1000 micrometers.
• Therefore, the LOW POWER field of view is __________ micrometers wide.
• Estimate how many hairs will “fit” across the LOW POWER field of view.
• Divide the LOW POWER field of view in micrometers by the number of hairs that will fit to find the diameter in micrometers of one hair.
• SHOW YOUR WORK.
12. Using the following formula, calculate the Medullary Index of the hair. SHOW WORK. M.I. = diameter of the medulla / diameter of the hair M.I. =
PROCEDURE (PART B) : Read and follow ALL directions. 1. Obtain a strand of your own hair by PULLING a hair out from the same region of your head that you obtained the combed hair. (ex: left side near part, or bangs) 2. Using the forceps, place the hair across a microscope slide. 3. Place a drop of water on the hair in order to hold it in place and put a cover slip over the hair. This is known as a Wet Mount. 4. Place the slide on the stage of the compound microscope. Focus and center the hair on the SCANNER (4X). Then move to the LOW POWER (10X), focusing and centering the hair in the field of view.

OU RET 2006 Hair & Fiber Analysis Module Activity
• INFO CHECK! What is the diameter of the LOW POWER field of view in
micrometers? ______________
5. Locate the root end of the PULLED hair and the external end of the PULLED hair. Make a detailed sketch of what you see in the field of view circles provided. Be sure to draw the hair the same size (relative to the drawing circle) that it appears on the scope.
Pulled Root Pulled External End
6. Does the external end look square, pointed, or split? ______________ 7. Does the main body of the root look flame-shaped, stretched out as if in a sheath, or bulb-like (club-like)? __________________ 8. Next, observe the main shaft of the hair. The inner part is the medulla. Sketch the shaft of the hair.
OU RET 2006 Hair & Fiber Analysis Module Activity
9. Is the medulla fragmented (present in isolated spots), interrupted (long columns with open spaces now and then), continuous (unbroken column), or is it totally absent? _____________ 10. Make a notation of the pigmentation of the hair (you may want/need to increase the magnification of your microscope to make these observations). 11. Calculate the relative diameter of the hair.
• On LOW POWER, the field of view is 1.5 millimeters (mm) wide.
• 1 mm is equivalent to 1000 micrometers.
• Therefore, the LOW POWER field of view is __________ micrometers wide.
• Estimate how many hairs will “fit” across the LOW POWER field of view.
• Divide the LOW POWER field of view in micrometers by the number of hairs that will fit to find the diameter in micrometers of one hair.
• SHOW YOUR WORK. 12. Using the following formula, calculate the Medullary Index of the hair. SHOW WORK. M.I. = diameter of the medulla / diameter of the hair M.I. =
WRAP IT UP!
• For credit, these questions must be answered in COMPLETE SENTENCES.
1. What similarities did you see between the root of the pulled hair and the root of the combed hair? 2. What differences did you see between the root of the pulled hair and the root of the combed hair? 3. What similarities did you see between the external end of the pulled hair and the external end of the combed hair?

OU RET 2006 Hair & Fiber Analysis Module Activity
4. What differences did you see between the external end of the pulled hair and the external end of the combed hair? 5. Make a statement describing the observations you made regarding the pigmentation, medullary type, medullary pattern, and medullary index of BOTH HAIRS. 6. Should the pigmentation, medullary pattern, medullary type or medullary index be different for the two hairs you obtained in this lab? EXPLAIN WHY OR WHY NOT. 7. Where do you think DNA is found in the hair? Is it found in some areas in more concentration than in others?

OU RET 2006 Hair & Fiber Analysis Module Activity
LAB #3 In this lab, you will be taking FIVE hair samples from different places on your own head and comparing them. Care needs to be taken to carefully label each slide with the hair’s location of origin so as to avoid confusion in the lab. You may decide to PULL all five of the hairs, OR you may decide to retrieve all five with the COMBING method. Do you think all of the hairs on a person’s head are the same? Do they have the same physical characteristics? Write your hypothesis below.
HYPOTHESIS: MATERIALS: 1 compound microscope 1 forceps 5 cover slips 1 pair goggles 5 glass microscope slides water sanitized comb or brush 1 eye dropper 5 pulled hairs OR 5 combed hairs masking tape colored pencils scotch tape
• Glycerin or mineral oil can also be used to make a Wet Mount.
PROCEDURE: Read and follow ALL directions. 1. Decide whether you will PULL all five hairs or whether you will COMB OUT all five hairs. Record the locations from which you will be taking your 5-hair sample. (A) ________________ (B) _________________ (C) _________________ (D) ________________ (E) _________________ 2. Obtain a strand of your own hair from the first specified region of your head (A) (ex: left side near part or bangs). Make a WET MOUNT of the hair. 3. Using masking tape, label the slide with the letter and name representing the location of the hair’s origin. (example: A – neck region) Set this sample to the side until Step 5. 4. Repeat the processes in steps 1-3 with the 2nd-5th hair samples. Have the teacher initial here ! _____________

OU RET 2006 Hair & Fiber Analysis Module Activity
• INFO CHECK! Twenty-three hairs will fit side-by-side across the Low
Power field of view. What is the diameter of one hair in micrometers?
______________________________
• INFO CHECK! What is the formula for calculating the Medullary Index?
______________________________
5. Place the first hair sample on the stage of the compound microscope, and focus and center the hair on SCANNER (4X). Then move to LOW POWER (10X), focusing and centering the hair in the field of view. Following the same procedure as in LAB #1, record all observations about your sample. For all sketches, be neat, detailed and use color. A - _______________ (location)
a. Describe and Sketch the root end of the hair.
b. Describe and Sketch the external end of the hair.
c. Note pigmentation. d. Describe and Sketch the main shaft of the hair. What medulla type do you see? e. What medulla pattern do you see? f. Calculate the diameter of the hair in micrometers on Low Power. SHOW WORK. g. Calculate the Medullary Index of the hair. SHOW WORK.
6-9. Repeat the instructions given in Step 5 for the remaining four hair samples (B-E).

OU RET 2006 Hair & Fiber Analysis Module Activity
6. B - _______________ (location)
a. Describe and Sketch the root end of the hair.
b. Describe and Sketch the external end of the hair.
c. Note pigmentation. d. Describe and Sketch the main shaft of the hair. What medulla type do you see? e. What medulla pattern do you see? f. Calculate the diameter of the hair in micrometers on Low Power. SHOW WORK. g. Calculate the Medullary Index of the hair. SHOW WORK.
7. C - _______________ (location)
a. Describe and Sketch the root end of the hair.
b. Describe and Sketch the external end of the hair.
c. Note pigmentation.

OU RET 2006 Hair & Fiber Analysis Module Activity
d. Describe and Sketch the main shaft of the hair. What medulla type do you see? e. What medulla pattern do you see? f. Calculate the diameter of the hair in micrometers on Low Power. SHOW WORK. g. Calculate the Medullary Index of the hair. SHOW WORK.
8. D - _______________ (location)
a. Describe and Sketch the root end of the hair.
b. Describe and Sketch the external end of the hair.
c. Note pigmentation. d. Describe and Sketch the main shaft of the hair. What medulla type do you see? e. What medulla pattern do you see?

OU RET 2006 Hair & Fiber Analysis Module Activity
f. Calculate the diameter of the hair in micrometers on Low Power. SHOW WORK. g. Calculate the Medullary Index of the hair. SHOW WORK.
9. E - _______________ (location)
a. Describe and Sketch the root end of the hair.
b. Describe and Sketch the external end of the hair.
c. Note pigmentation. d. Describe and Sketch the main shaft of the hair. What medulla type do you see? e. What medulla pattern do you see? f. Calculate the diameter of the hair in micrometers on Low Power. SHOW WORK. g. Calculate the Medullary Index of the hair. SHOW WORK.

OU RET 2006 Hair & Fiber Analysis Module Activity
WRAP IT UP! For credit, these questions must be answered in COMPLETE SENTENCES.
10. Write a paragraph (5-7 complete sentences) that sums up the data you have collected about the hairs collected from different locations on the head.
11. Which characteristics tend to vary more among hairs taken from different sites on the
scalp? (ex: root end, external end, color, etc.) 12. What was your original hypothesis? Does your data support or negate your original
hypothesis?

OU RET 2006 Hair & Fiber Analysis Module Activity
LAB #4
In this lab, you will first examine the scale patterns of two different lab members hairs. Secondly, you will observe the scale patterns of three hairs obtained from three different animals. You may use the Scale Pattern Diagram Sheet as a reference. What do you think about the scale patterns of hairs taken as samples from different human individuals? Humans have a wide variety of hair colors, shapes, and textures. Do you believe that the scale patterns will all look the same or different? And what about the scale patterns of hairs retrieved from a variety of animals? Write your hypotheses below.
HYPOTHESES: MATERIALS: 1 compound microscope 1 forceps 6 cover slips 1 pair goggles 6 glass microscope slides animal hair samples #1, #2, #3 6 human hairs paper towels 1 eye dropper sanitized comb or brush masking tape colored pencils clear nail polish nail polish remover rubbing alcohol liquid detergent tissue
• Rubber Cement can be used instead of the clear nail polish.
PROCEDURE (Part A): Read and follow ALL directions. 1. Obtain two strands of hair from one of the lab members by pulling or combing. Clean the strands you intend to use by pulling them gently through a tissue moistened with alcohol to remove grease and oil from the hair’s surface. Repeat with a different lab member’s hairs, being sure to keep the hairs from the two individuals separate.

OU RET 2006 Hair & Fiber Analysis Module Activity
2. With masking tape, label a glass slide with the letter A and the last name of the lab member. Fold another piece of masking tape across one end of each hair and label them with the letter A and the member’s last name. 3. Repeat Steps 1 & 2 with hairs from another lab member and label the hairs and slides with the letter B and their last name. You should at this point have two labeled slides (A & B) and four labeled hairs (2 A’s & 2 B’s). Set the B-Slide with two B-Hairs to the side to be used in Step 11. 4. Smear Slide A (lengthwise on the slide) with a thin layer of clear nail polish. 5. Before the clear nail polish thoroughly dries (which takes place very quickly) lay one of the A-Hairs lengthwise on the surface of the polish, making sure to leave the un-taped part of the hair draping off one end of the slide. You will need this in order to lift the hair off the slide in Step 6. Lay the second A-Hair next to the first one on the slide in the same fashion. See the picture below. Hair A #1
Hair A #2 6. Before the polish has thoroughly dried (but after the surface becomes partially solidified) carefully lift the first A-Hair off the slide, pulling gently from one end to the other. Do the same for the second hair. You should now be able to see an imprint (a cast of the scale pattern) of the hairs in the polish. 7. Place the slide on the stage of the microscope. Using proper Microscope Technique, focus and observe the scale pattern of the hair. 8. Sketch what you see. (Hair A #1) (Hair A #2) 9. Now have Lab Member A remove another hair from their head in the same fashion as they did before from the same location. Place this hair immediately on another slide and try to focus on the scale pattern using your microscope at the same magnification you used in Step 7. Which scale pattern is more easily seen (the hair used in conjunction with the nail polish and microscope or the hair used only with the microscope)? Why do you think this is the case?

OU RET 2006 Hair & Fiber Analysis Module Activity
10. Using your Scale Pattern Diagram Sheet, which scale pattern most closely resembles the pattern you see with Human Hair A? _______________ Have your teacher initial here! _______________ 11. Repeat Steps 4-7, this time using Hair B. 12. Sketch what you see. (Hair B #1) (Hair B #2) 13. Using your Scale Pattern Diagram Sheet, which scale pattern most closely resembles the pattern you see with Human Hair A? _______________ Have your teacher initial here! _______________ WRAP IT UP! For credit, these questions must be answered in COMPLETE SENTENCES. 1. What was your original hypothesis about the scale patterns of human hairs collected from different people? 2. Does the data you have collected support or reject your hypothesis? 3. Why do you think it was necessary to examine two hairs from each individual?
CLEAN-UP Use the nail polish remover and paper towels to clean the polish off of the slides. Once you have removed the polish, wash the slides with liquid detergent, rinse, and dry. Return your equipment to the designated areas. Wash your lab table and throw away all trash. HAVE TEACHER INITIAL HERE! ________________

OU RET 2006 Hair & Fiber Analysis Module Activity
PROCEDURE (Part B): Mini-Lab Write-up You are now practiced in the technique of scale casting. Using the knowledge you gained in Part A, investigate the hair scale patterns of three different animals and report your findings. You will need to include the following:
• Question/Problem
• Your Original Hypothesis about Animal Scale Patterns
• Materials Used In Your Lab
• Identification of Animals Used for Samples
• Sketches of Scale Patterns
• Identification of Scale Pattern Types
• Written Analysis Statement of Data Collected
• Conclusion / Includes Statement of Data’s Support o Or Rejection of Original Hypothesis

OU RET 2006 Hair & Fiber Analysis Module Diagram www.hairlosssolution.com

OU RET 2006 Hair & Fiber Analysis Module Activity
LAB #5
In this lab, you will be analyzing an “unknown” fiber sample and then comparing it to three “known” samples, using the compound microscope, magnifying lens, and the naked eye. Additionally, you will test the response of three fibers to the heat given off by a flame and then test the response of the fibers to the flame itself. Before beginning this lab, take a few minutes to brainstorm physical and chemical characteristics about varying fiber samples that might be very similar and then repeat this again for characteristics that might be very different. You are the crime scene investigator. What would you expect to see? Brainstorming: Physical Characteristics Chemical Characteristics Materials:
• compound light microscope • goggles • glass slide/cover slip • forceps • candle/matches • choose 3 sample fibers: wool, rayon, silk, polyester, cotton • red unknown fiber sample
Procedure:
1. Study the unknown fiber sample. Make a wet mount slide of the unknown fiber by using the forceps and placing it on a slide, adding a drop of water and covering it with a cover slip.
2. Examine the sample using the scanning objective (4x), low power (10x), and high power (40x) on your microscope. Sketch what you see with each lens. Note: any pits or striations on the fiber. Place the sketch and notes in Data Table 1.
3. Repeat this procedure with each of the known samples and the unknown sample.
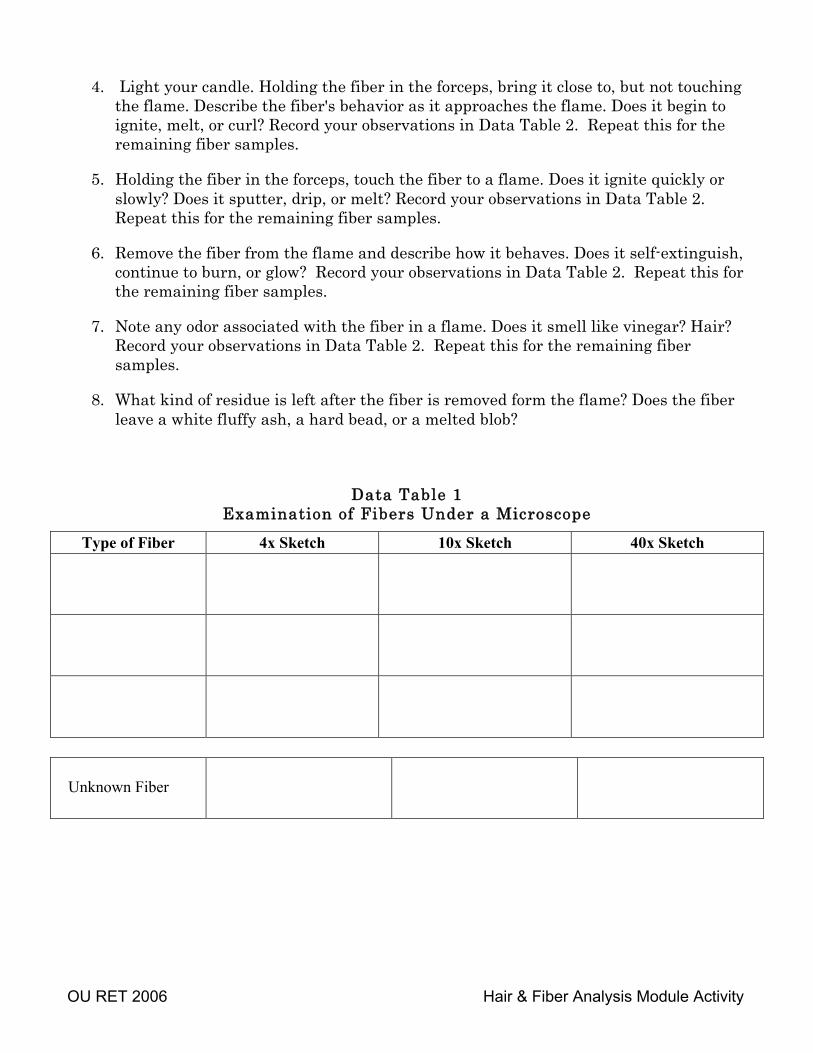
OU RET 2006 Hair & Fiber Analysis Module Activity
4. Light your candle. Holding the fiber in the forceps, bring it close to, but not touching the flame. Describe the fiber's behavior as it approaches the flame. Does it begin to ignite, melt, or curl? Record your observations in Data Table 2. Repeat this for the remaining fiber samples.
5. Holding the fiber in the forceps, touch the fiber to a flame. Does it ignite quickly or slowly? Does it sputter, drip, or melt? Record your observations in Data Table 2. Repeat this for the remaining fiber samples.
6. Remove the fiber from the flame and describe how it behaves. Does it self-extinguish, continue to burn, or glow? Record your observations in Data Table 2. Repeat this for the remaining fiber samples.
7. Note any odor associated with the fiber in a flame. Does it smell like vinegar? Hair? Record your observations in Data Table 2. Repeat this for the remaining fiber samples.
8. What kind of residue is left after the fiber is removed form the flame? Does the fiber leave a white fluffy ash, a hard bead, or a melted blob?
Data Table 1 Examination of Fibers Under a Microscope
Type of Fiber 4x Sketch 10x Sketch 40x Sketch
Unknown Fiber

OU RET 2006 Hair & Fiber Analysis Module Activity
Data Table 2 Behavior of Fibers in a Flame
Type of fiber
Approaching Flame
In Flame
Removed From Flame
Odor
Residue
WRAP IT UP! Answer the following in complete sentences.
1. From your observation of the fibers under a microscope, which type of fiber is most like the unknown fiber? Describe the similarities of these two fibers.
2. From the burning tests, which type of fiber is most similar to the unknown fiber? Describe the characteristics they have in common.
3. Why might an investigator want to identify unknown fibers from a crime scene?
4. What must scientists be able to do in order for fiber evidence to be useful in a crime scene investigation?

OU RET 2006 Hair & Fiber Analysis Module Activity
5. From where do we get the materials to make natural fibers?
6. How are man-made fibers classified? Give examples of each type.

OU RET 2006 Hair & Fiber Analysis Module Activity
FIBER Behavior
Nearing
Flame
Behavior
In
Flame
Behavior
Removed
FromFlame
ODOR Ash or
Residue
COTTON Scorches,
lights easily
Yellow,
smoky
Continues
to burn
Burning
paper
Light gray,
feathery
ash
LINEN Scorches,
lights easily
Yellow,
smoky
Continues
with
afterglow
Burning
paper
Gray,
feathery
ash
SILK Smolders,
then burns
Melts and
sputters
Goes out
easily
Burning
hair
Black shiny
beads
WOOL Smolders,
slow to
catch
Sizzles as it
burns, curls
Goes out
easily
Burning
hair
Crisp, dark
ash
ACETATE
Fuses away
from flame,
blackens
Lights
easily,
flickers,
melts
Continues
to burn,
small
sparks,
drips
Vinegar,
burning
wood
Black,
hard,
irregularly
shaped
beads
FIBERGLASS Coating
burns off
No reaction No reaction No odor May fuse
solid
ACRYLIC Fuses,
shrinks
away
Flares,
puckers,
melts
Continues
to burn,
melt,
sputters
Acrid,
fruity
Brittle,
hard, black
beads
NYLON
Fuses,
shrinks
away
Burns
slowly,
drips, white
smoke
Dies out Celery Hard,
round,
grayish
beads
POLYESTER Fuses,
shrinks
away
Burns
slowly,
melts
Burns
slowly,
sooty
smoke
Tar Hard,
round,
black beads
RAYON Scorches,
lights easily
Burns fast,
yellow
flame
Continues
to burn, no
glow
Burning
paper
Light gray,
feathery
ash
OLEFIN Melts,
shrinks
away
Burns
yellow
flame
Slowly dies
out
Wax (pe),
Diesel fuel
Fused
plastic
UNKNOWN
UNKNOWN

OU RET 2006 Hair & Fiber Analysis Module Activity

OU RET 2006 Hair & Fiber Analysis Module Activity
Fiber Information Sheet
Fibers are everywhere. It can be quite difficult to trace a fiber back to a specific source because textiles are mass produced. Is fiber evidence, then, not very valuable? Of course not! The presence of fiber evidence at crime scenes makes it valuable as it can provide a link or association between suspects, victims, and locations. This means that it has probative value (it can help to prove someone’s guilt or innocence in a court of law). When investigators have difficulty locating a fiber’s source, they use statistics and probability to narrow the source. Fibers are among the most common pieces of trace evidence left and found at crime scenes. Because fibers are usually mass produced, they have no individuality and are therefore classified as “class evidence”. The more characteristics about a fiber there are that can help to narrow down the possible number of sources, the better. Investigators use both chemical and physical tests to analyze fiber evidence. Unknown (questioned) fibers are compared to known (exemplar) fibers. The more properties that are found to be similar, the stronger the case. Even one inconsistency can be enough to cancel out an association. More textile products are made of cotton than any other single fiber. Abut 60% of all clothing and home furnishings are made of cotton. Therefore, statistically, cotton has a low probative value. It is too common (no unique characteristics) to be undeniably linked to a specific source.

OU RET 2006 Hair & Fiber Module Information Sheet www.fabrics.net/manufact.asp
MANUFACTURED OR MAN-MADE FABRICS
Manufactured fabrics are usually made of filaments extruded as liquid and formed into various fibers. Because the fiber starts as a liquid, many of the fibers are colored before they become filament. Thus, they are difficult to dye
after the fiber is woven into a fabric.
ACETATE is not a strong fiber but can be extruded into fibers of different diameter and woven into fabrics that have the luxurious look of silk but do not wear like silk. Acetate does not absorb moisture readily but dries fast and resists shrinking. This is a resilient fabric that resists wrinkling in addition to being pliable and soft with a good drape. Triacetate is an improved acetate fabric which doesn’t melt as easily and is easier to care for. Remember, acetate in nail polish and nail polish remover will melt acetate (as will alcohol). So take care with perfumes and nail products including Superglue.
ACRYLIC is a fine, soft, and luxurious fabric with the bulk and hand of wool. Light weight and springy, this fabric is non-allergenic, dries quickly, draws moisture away from the body, and is washable. Acrylic does not take even a
moderate amount of heat. Modacrylics are used in pile fabrics like fake fur and are more flame resistant.
LASTEX is an elastic fiber made from Latex. It is most often used with other fibers to create fabrics such as
Spandex and foundation garments. Losing its elasticity after repeated washing and drying, Lastex will deteriorate.
NYLON is stronger, yet weighs less than any other commonly used fiber. It is elastic, resilient, and responsive to heat setting. Nylon fibers are smooth, non-absorbent, and dry quickly. Dirt doesn’t cling to this smooth fiber nor is it weakened by chemicals and perspiration. Extensive washing and drying in an automatic dryer can eventually cause piling. Nylon whites should be washed separately to avoid graying. This fabric may yellow, so it should be bleached
frequently with sodium perborate bleach.
Nylon melts at high temperatures. If ironing is necessary, always use a low temperature on the wrong side.
POLYESTER is a strong fiber that is resistant to crease, thus keeps it shape. Polyester melts at medium to high temperatures. Although many people dislike polyester, perhaps due to the double knit fad of the 1950, polyester remains a versatile and important man-made fabric. Blends of polyester give cotton a permanent press property
and extend the wear of these blended garments.
Polyester is manufactured in many weights including fiber-fill used in pillows and upholstery. Threads spun from polyester fibers are strong, wear exceptionally well, and are used extensively in home sewing and manufactured
sewing.
RAYON, from cellulose, has many of the qualities of cotton, a natural cellulose fiber. Rayon is strong, extremely absorbent, comes in a variety of qualities and weights, and can be made to resemble natural fabrics. Rayon does
not melt but burns at high temperatures.
Rayon drapes well, has a soft, silky hand, and has a smooth, napped, or bulky surface. Rayon will wrinkle easily
and may stretch when wet and shrink when washed.
Technological advancements to the rayon process have produced high wet modulus [HWM] rayons such as lyocell
and modal which makes fabric less prone to stretch when damp or wet.
Washable rayon will state the care on the fabric label. Like silk, if you pre-wash rayon fabric prior to construction of the garment, you have a washable garment.

OU RET 2006 Hair & Fiber Module Information Sheet www.fabrics.net/manufact.asp
Glossary of Rayon Fabrics
Fibranne is French term for Viscose rayon.
Velvet, although made from silk, is most often produced from the rayon fiber.
SPANDEX is an elastic type fiber that can be stretched many times its length and then spring back to the original length. Spandex is more resistant to washing, perspiration, and heat than latex. Spandex is used in foundation
garments and hosiery.

OU RET 2006 Hair & Fiber Analysis Module Diagram © EnchantedLearning.com
Skin Diagram
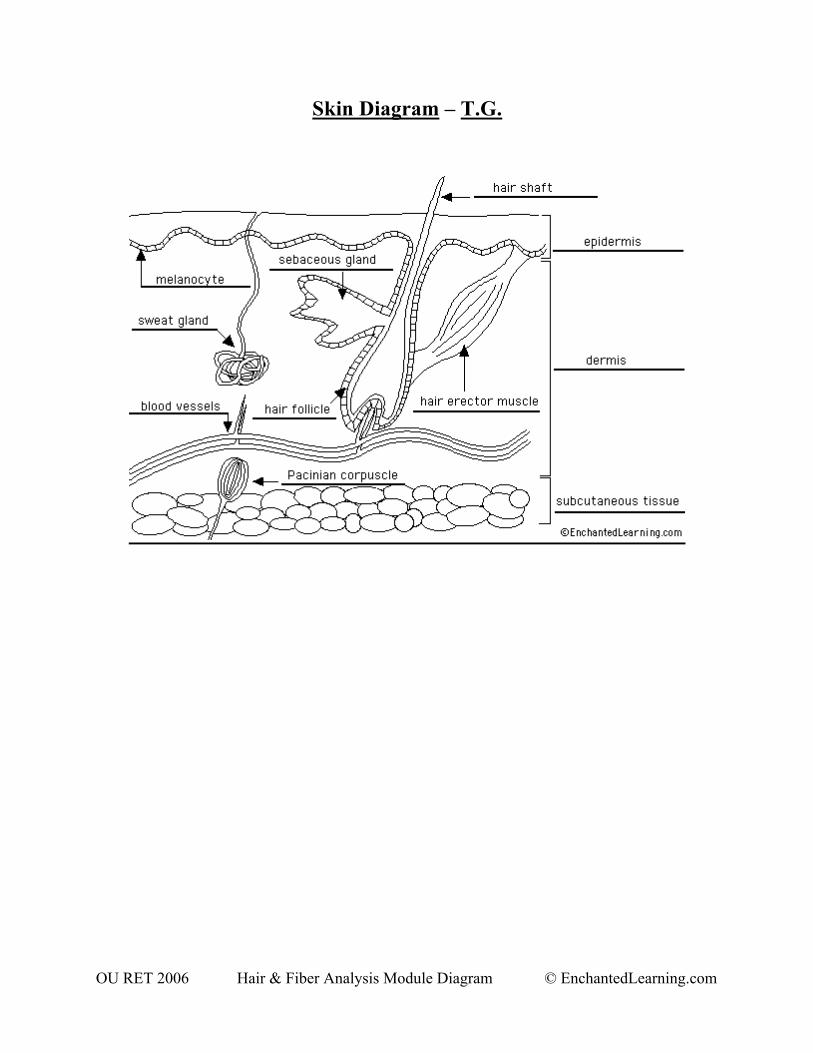
OU RET 2006 Hair & Fiber Analysis Module Diagram © EnchantedLearning.com
Skin Diagram – T.G.


OU RET 2006 Hair & Fiber Analysis Module Activity © EnchantedLearning.com
SKIN DIAGRAM

CUTICLE SCALE PATTERNS
Mosaic Pectinate Imbricate Petal Diamond Petal Chevron
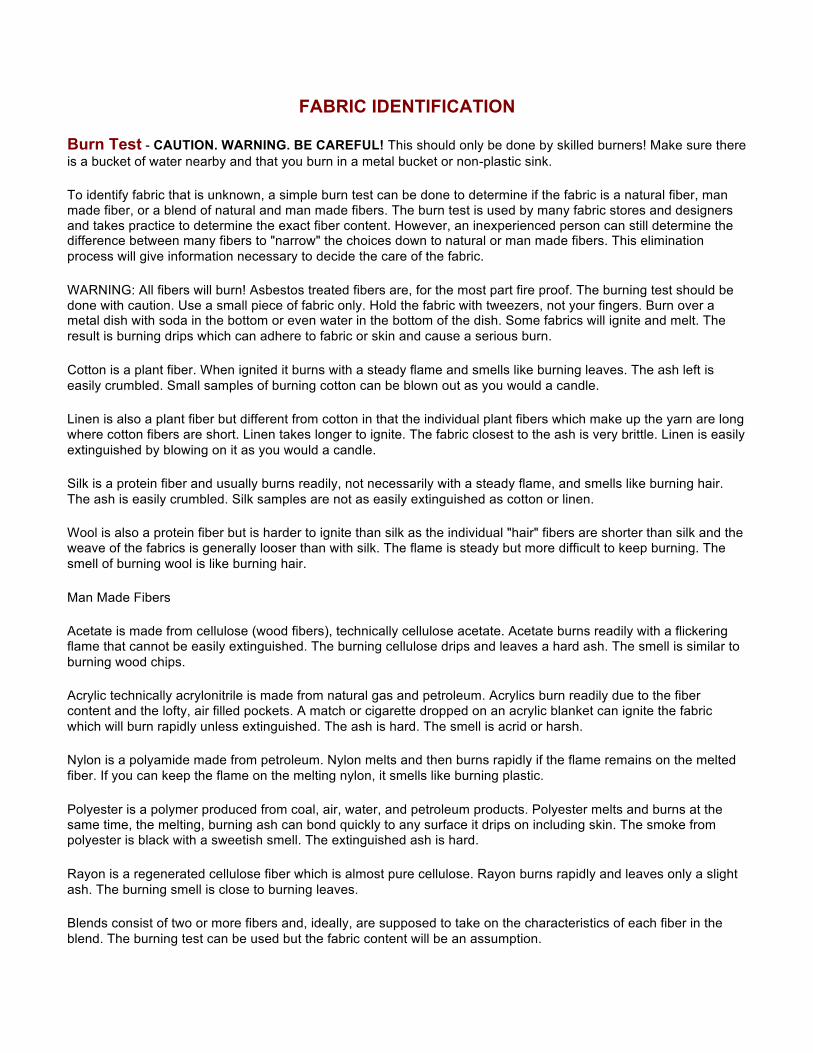
FABRIC IDENTIFICATION
Burn Test - CAUTION. WARNING. BE CAREFUL! This should only be done by skilled burners! Make sure there
is a bucket of water nearby and that you burn in a metal bucket or non-plastic sink.
To identify fabric that is unknown, a simple burn test can be done to determine if the fabric is a natural fiber, man made fiber, or a blend of natural and man made fibers. The burn test is used by many fabric stores and designers and takes practice to determine the exact fiber content. However, an inexperienced person can still determine the difference between many fibers to "narrow" the choices down to natural or man made fibers. This elimination
process will give information necessary to decide the care of the fabric.
WARNING: All fibers will burn! Asbestos treated fibers are, for the most part fire proof. The burning test should be done with caution. Use a small piece of fabric only. Hold the fabric with tweezers, not your fingers. Burn over a metal dish with soda in the bottom or even water in the bottom of the dish. Some fabrics will ignite and melt. The
result is burning drips which can adhere to fabric or skin and cause a serious burn.
Cotton is a plant fiber. When ignited it burns with a steady flame and smells like burning leaves. The ash left is
easily crumbled. Small samples of burning cotton can be blown out as you would a candle.
Linen is also a plant fiber but different from cotton in that the individual plant fibers which make up the yarn are long where cotton fibers are short. Linen takes longer to ignite. The fabric closest to the ash is very brittle. Linen is easily
extinguished by blowing on it as you would a candle.
Silk is a protein fiber and usually burns readily, not necessarily with a steady flame, and smells like burning hair.
The ash is easily crumbled. Silk samples are not as easily extinguished as cotton or linen.
Wool is also a protein fiber but is harder to ignite than silk as the individual "hair" fibers are shorter than silk and the weave of the fabrics is generally looser than with silk. The flame is steady but more difficult to keep burning. The
smell of burning wool is like burning hair.
Man Made Fibers
Acetate is made from cellulose (wood fibers), technically cellulose acetate. Acetate burns readily with a flickering flame that cannot be easily extinguished. The burning cellulose drips and leaves a hard ash. The smell is similar to
burning wood chips.
Acrylic technically acrylonitrile is made from natural gas and petroleum. Acrylics burn readily due to the fiber content and the lofty, air filled pockets. A match or cigarette dropped on an acrylic blanket can ignite the fabric
which will burn rapidly unless extinguished. The ash is hard. The smell is acrid or harsh.
Nylon is a polyamide made from petroleum. Nylon melts and then burns rapidly if the flame remains on the melted
fiber. If you can keep the flame on the melting nylon, it smells like burning plastic.
Polyester is a polymer produced from coal, air, water, and petroleum products. Polyester melts and burns at the same time, the melting, burning ash can bond quickly to any surface it drips on including skin. The smoke from polyester is black with a sweetish smell. The extinguished ash is hard.
Rayon is a regenerated cellulose fiber which is almost pure cellulose. Rayon burns rapidly and leaves only a slight
ash. The burning smell is close to burning leaves.
Blends consist of two or more fibers and, ideally, are supposed to take on the characteristics of each fiber in the
blend. The burning test can be used but the fabric content will be an assumption.