ct200 cross trainer manual.pdfct200 cross trainer owner’s manual important! please read all...
TRANSCRIPT

CT200 Cross Trainer OWNER’S MANUAL
IMPORTANT!
Please read all instructions carefully before using this product. Retain this manual for future reference. The specifications of this product may vary slightly from the illustrations and are subject to change without notice.

- 1 -
IMPORTANT SAFETY NOTICE
Please read before assembling the CT200 Cross Trainer.
1. Please read your manual carefully before you start to use your equipment. We
recommend that you keep the manual so it is there as a reference for future use.
2. You should always consult your doctor prior to beginning a new exercise routine if you
have any medical or physical conditions. This will prevent any unnecessary risks or
damage to your health or safety. If you are taking any medication that could affect your
heart rate, blood pressure or cholesterol then it is imperative that you listen to the advice of
your doctor.
3. Be aware of your body’s signals. Incorrect or excessive exercise can hurt your health. If
you feel dizzy, nauseous or experience chest pain, back pain or any other health
symptoms you must stop the workout at once and consult your doctor before continuing.
4. Do not operate any exercise equipment if it is not assembled correctly. We advise that
you inspect your machine periodically to ensure it is in good condition. It is your
responsibility to ensure that all users of the equipment understand how to use the fitness
equipment properly.
5. Keep children and pets away from the equipment. The equipment is designed for adult
use only.
6. Before using the machine, please check the nuts and bolts are tightened securely.
7. Always use the equipment as mentioned. If you notice any defective components whilst
assembling the cross trainer or you hear any unusual noises from the equipment during
use, stop using immediately. Do not use the equipment until the problem has been
rectified.
8. Wear appropriate workout clothing while exercising. Do not wear robes or other clothing
that could become caught in the machine. We recommend that you wear trainers or
pumps whilst using this equipment.
9. Use the equipment on a flat level, clear surface. Do not use the machine near water or
outside.
10. Keep hands away from all moving parts. While lifting or moving the equipment, always
do it carefully.
11. Maximum weight of user: 100kg.

- 2 -
EXPLODED DIAGRAM
- 3 -
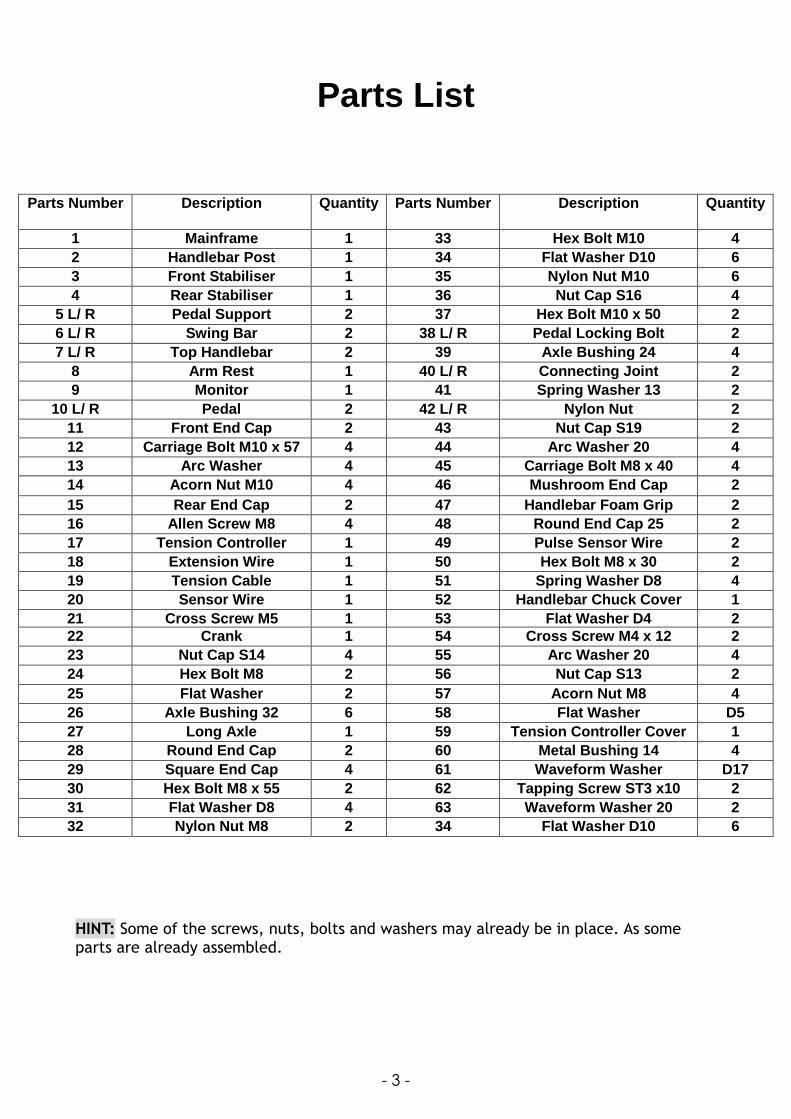
Parts List
Parts Number Description Quantity Parts Number Description Quantity
1 Mainframe 1 33 Hex Bolt M10 4
2 Handlebar Post 1 34 Flat Washer D10 6
3 Front Stabiliser 1 35 Nylon Nut M10 6
4 Rear Stabiliser 1 36 Nut Cap S16 4
5 L/ R Pedal Support 2 37 Hex Bolt M10 x 50 2
6 L/ R Swing Bar 2 38 L/ R Pedal Locking Bolt 2
7 L/ R Top Handlebar 2 39 Axle Bushing 24 4
8 Arm Rest 1 40 L/ R Connecting Joint 2
9 Monitor 1 41 Spring Washer 13 2
10 L/ R Pedal 2 42 L/ R Nylon Nut 2
11 Front End Cap 2 43 Nut Cap S19 2
12 Carriage Bolt M10 x 57 4 44 Arc Washer 20 4
13 Arc Washer 4 45 Carriage Bolt M8 x 40 4
14 Acorn Nut M10 4 46 Mushroom End Cap 2
15 Rear End Cap 2 47 Handlebar Foam Grip 2
16 Allen Screw M8 4 48 Round End Cap 25 2
17 Tension Controller 1 49 Pulse Sensor Wire 2
18 Extension Wire 1 50 Hex Bolt M8 x 30 2
19 Tension Cable 1 51 Spring Washer D8 4
20 Sensor Wire 1 52 Handlebar Chuck Cover 1
21 Cross Screw M5 1 53 Flat Washer D4 2
22 Crank 1 54 Cross Screw M4 x 12 2
23 Nut Cap S14 4 55 Arc Washer 20 4
24 Hex Bolt M8 2 56 Nut Cap S13 2
25 Flat Washer 2 57 Acorn Nut M8 4
26 Axle Bushing 32 6 58 Flat Washer D5
27 Long Axle 1 59 Tension Controller Cover 1
28 Round End Cap 2 60 Metal Bushing 14 4
29 Square End Cap 4 61 Waveform Washer D17
30 Hex Bolt M8 x 55 2 62 Tapping Screw ST3 x10 2
31 Flat Washer D8 4 63 Waveform Washer 20 2
32 Nylon Nut M8 2 34 Flat Washer D10 6
HINT: Some of the screws, nuts, bolts and washers may already be in place. As some parts are already assembled.
- 4 -
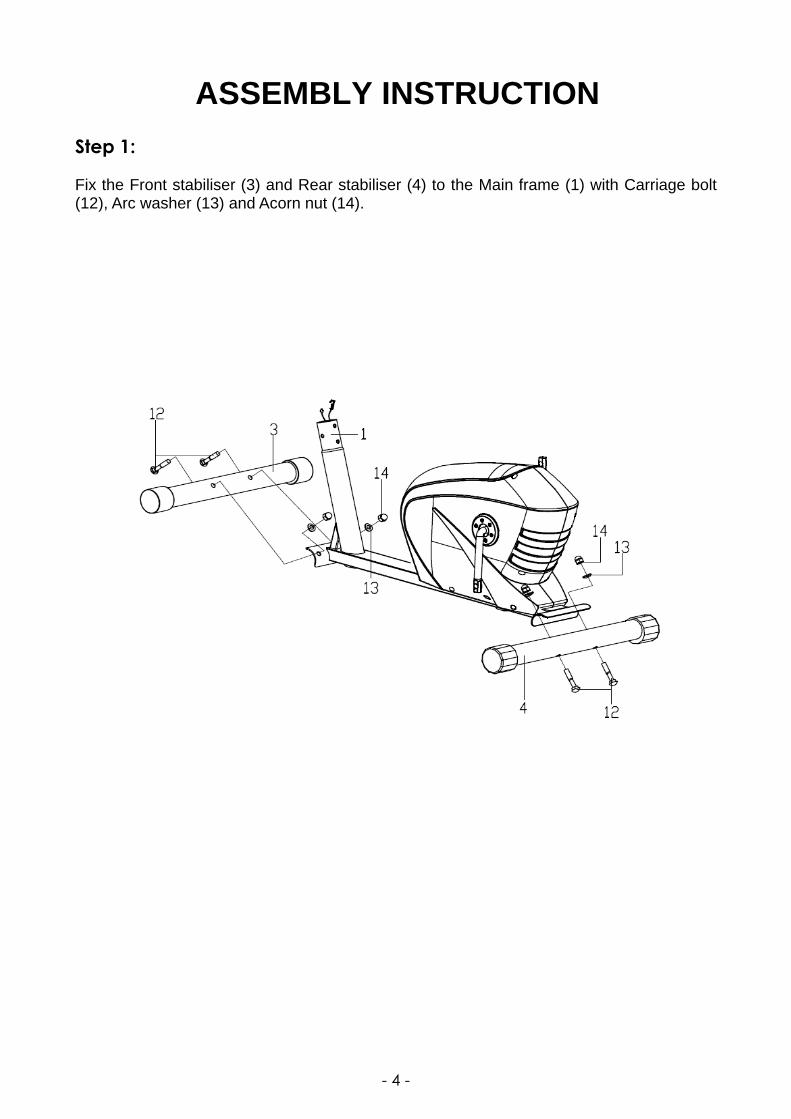
ASSEMBLY INSTRUCTION
Step 1:
Fix the Front stabiliser (3) and Rear stabiliser (4) to the Main frame (1) with Carriage bolt (12), Arc washer (13) and Acorn nut (14).

- 5 -
Step 2:
Connect the Sensor wire (20) to the Extension wire (18).
Connect the Tension cable (19) with the wire of the Tension controller (17) as shown.
Fix the Handlebar post (2) to the Main frame (1) with Allen screw (16), Spring washer (56).
- 6 -
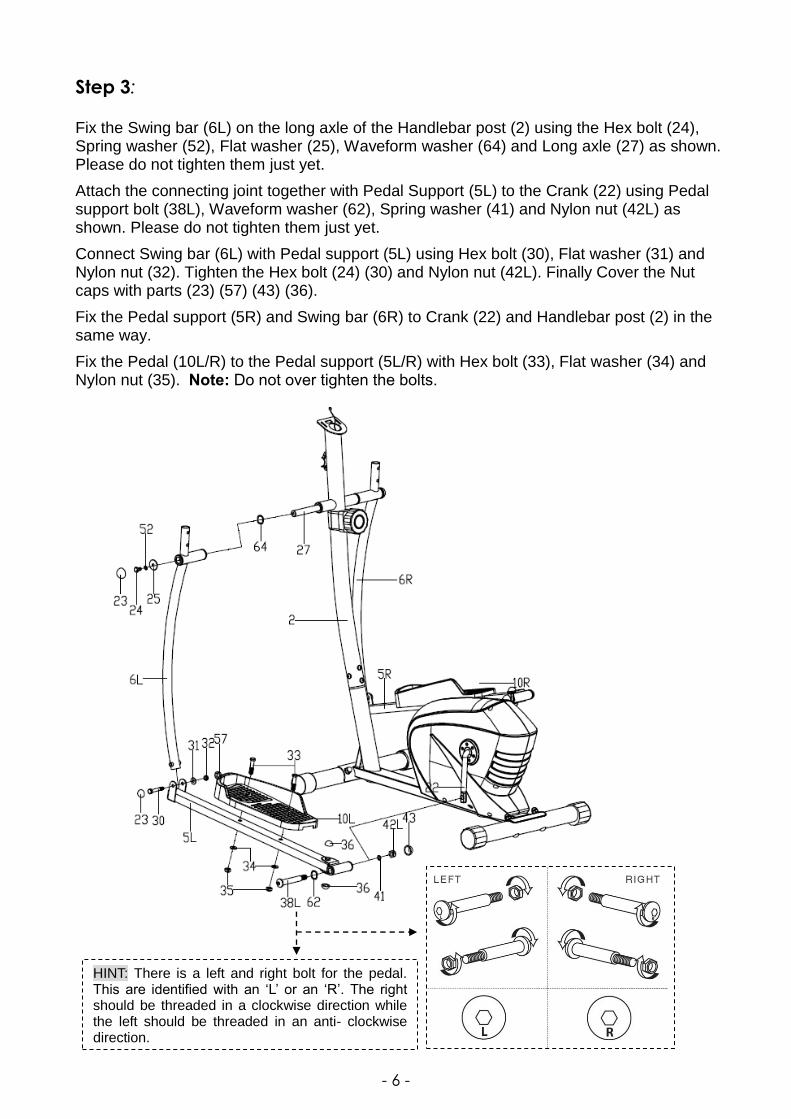
Step 3:
Fix the Swing bar (6L) on the long axle of the Handlebar post (2) using the Hex bolt (24), Spring washer (52), Flat washer (25), Waveform washer (64) and Long axle (27) as shown. Please do not tighten them just yet.
Attach the connecting joint together with Pedal Support (5L) to the Crank (22) using Pedal support bolt (38L), Waveform washer (62), Spring washer (41) and Nylon nut (42L) as shown. Please do not tighten them just yet.
Connect Swing bar (6L) with Pedal support (5L) using Hex bolt (30), Flat washer (31) and Nylon nut (32). Tighten the Hex bolt (24) (30) and Nylon nut (42L). Finally Cover the Nut caps with parts (23) (57) (43) (36).
Fix the Pedal support (5R) and Swing bar (6R) to Crank (22) and Handlebar post (2) in the same way.
Fix the Pedal (10L/R) to the Pedal support (5L/R) with Hex bolt (33), Flat washer (34) and Nylon nut (35). Note: Do not over tighten the bolts.
HINT: There is a left and right bolt for the pedal. This are identified with an ‘L’ or an ‘R’. The right should be threaded in a clockwise direction while the left should be threaded in an anti- clockwise direction.

- 7 -
Step 4:
Put the Pulse sensor wire (50) through the handlebar post (2) and then out of the hole of the Monitor bracket. Fix the armrest (8) on to the handlebar post (2) with Hex screw (51), Spring washer (52) and the Flat washer (31), then attach the Handlebar chuck cover (53) in the correct position.
Attach the Handlebar (7L/R) to the Swing bar (6L/R) using Carriage bolt (45), Arc washer (44) and Acorn nut (58).
- 8 -
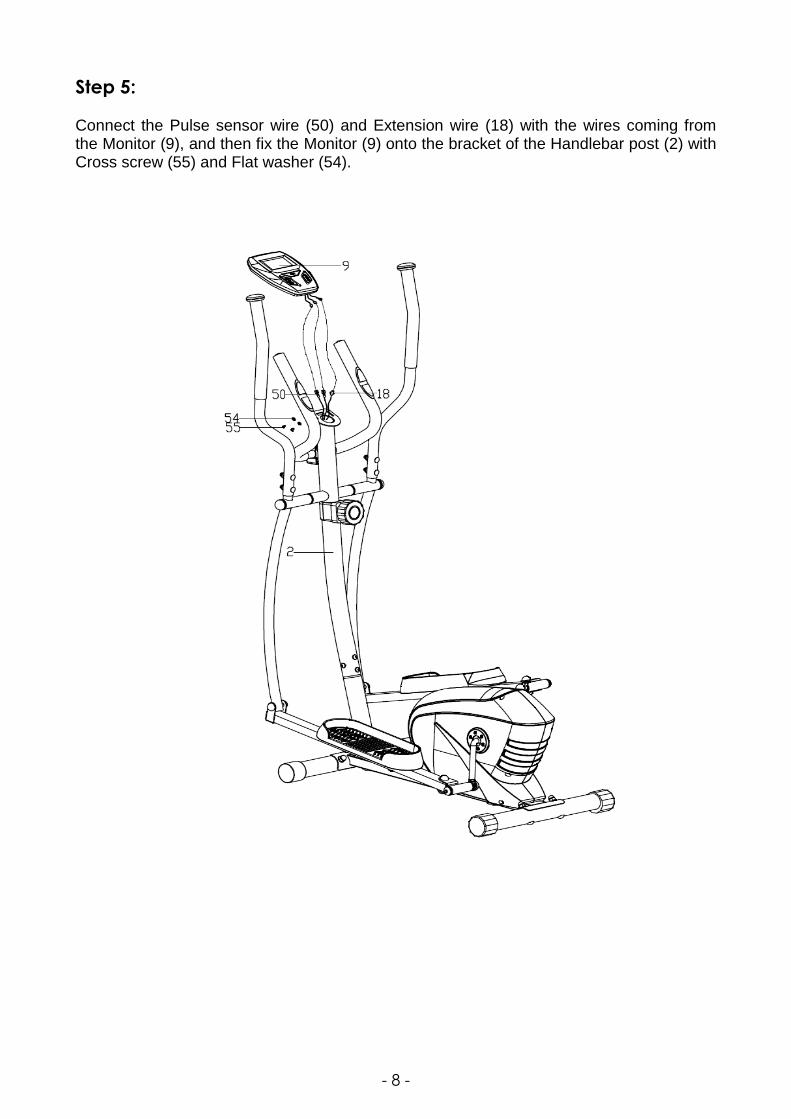
Step 5:
Connect the Pulse sensor wire (50) and Extension wire (18) with the wires coming from the Monitor (9), and then fix the Monitor (9) onto the bracket of the Handlebar post (2) with Cross screw (55) and Flat washer (54).

- 9 -
USING YOUR ELLIPTICAL BIKE
Using your Elliptical will provide you with several benefits. It will improve your physical fitness, tone your muscles and in conjunction with a calorie controlled diet, help you lose weight.
WARM-UP PHASE
The purpose of warming up is to prepare your body for exercise and to minimize injuries. Warm up for two to five minutes before strength-training or aerobic exercising. Perform activities that raise your heart rate and warm the working muscles. Activities may include brisk walking, jogging, jumping jacks, jump rope, and running in place.
STRETCHING
Stretching while your muscles are warm after a proper warm-up and again after your strength or aerobic training session is very important. Muscles stretch more easily at these times because of their elevated temperature, which greatly reduces the risk of injury. Stretches should be held for 15 to 30 seconds.
DO NOT BOUNCE.
Remember always to check with your physician before starting any exercise program.
- 10 -
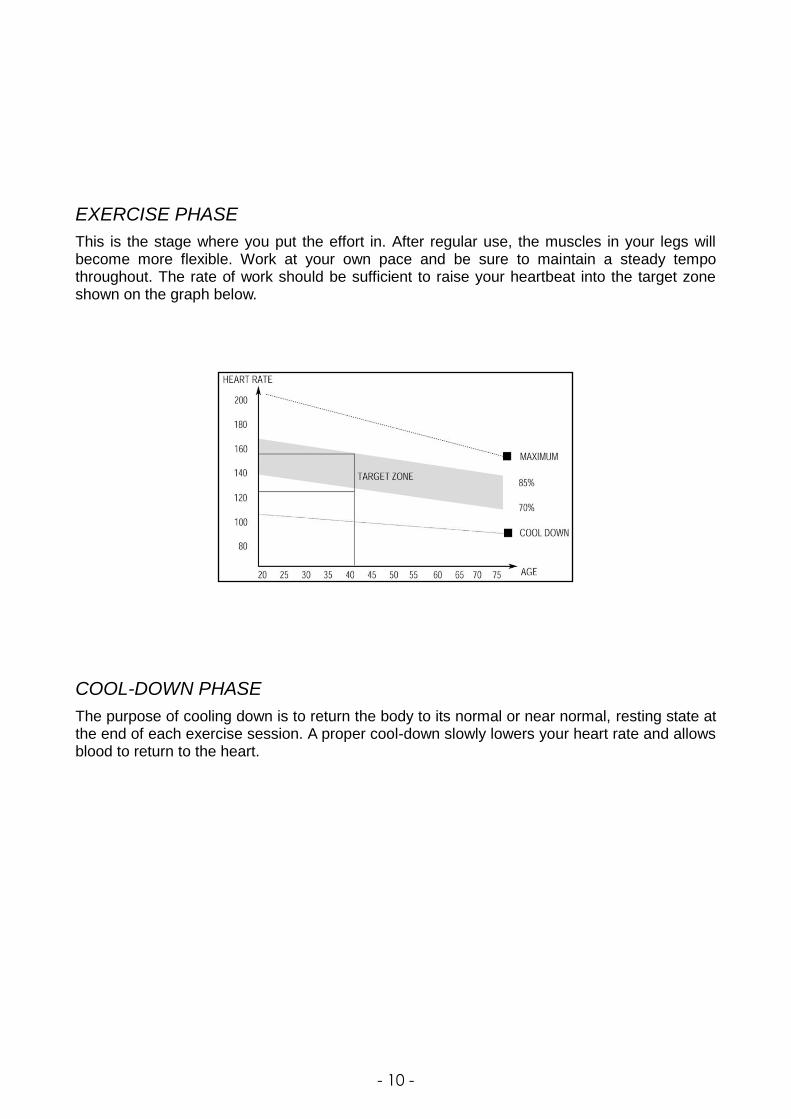
EXERCISE PHASE
This is the stage where you put the effort in. After regular use, the muscles in your legs will become more flexible. Work at your own pace and be sure to maintain a steady tempo throughout. The rate of work should be sufficient to raise your heartbeat into the target zone shown on the graph below.
COOL-DOWN PHASE
The purpose of cooling down is to return the body to its normal or near normal, resting state at the end of each exercise session. A proper cool-down slowly lowers your heart rate and allows blood to return to the heart.