css exercises - skillstoolkit.ox.ac.uk · borders looking good – we have three nicely laid out...
TRANSCRIPT

CSS Exercises
Exercise 1: Create a basic CSS layout
Use BlueFish to open layout.html Create a layout using <div> tags Use a browser (Firefox) to view your page
Task 1
Open layout.html in BlueFish – a blank template page which has the head section and a map to a CSS page – also created but blank.
Step 1
Enter three <div> tags in the empty body tags In each div tag put a paragraph – text: one, two three:
<div><p>one</p></div>
<div><p>two</p></div>
<div><p>three</p></div>
Task 2
Let’s get some basic CSS up and running now. In
CSS page give the divs a yellow background – not pretty but good for seeing what’s what:
Step 1
In the same folder as layout.html, open styles.css
Enter the following:
Div
{
background-color: yellow;
}
Task 3
Now let’s set the body width first.
Step 1
Above the div rule, enter:
body {
width: 70%;
margin-left: auto; margin-
right: auto;
}

Task 4
Now let’s give these divs a proper width layout
-
We need to float our divs – which means giving them individual classes in the html and then using CSS to position them
Now we can give them width – and
margins – remember the box model rules!
Step 1
In layout html, add a class to each opening div tag so your code looks like this:
<div class="left"><p>one</p></div> <div
class="middle"><p>two</p></div> <div
class="right"><p>three</p></div>
Now let’s enter the CSS for each of these classes in styles.css. Remove the div rule and enter the following. Once you have entered the rule for .left you can copy and paste this twice and make the necessary small amendments from the code below to save time:
.left {
float: left;
width: 30%;
margin-right: 3%;
background-color: yellow;
}
.middle {
float: left;
width: 30%;
margin-right: 3%;
background-color: yellow;
}
.right {
float: right;
width: 30%;
background-color: yellow;
}
Task 5
View your webpage!
In the program interface, click on the browser view to open up Firefox and view your webpage.

Borders
Looking good – we have three nicely laid out columns – but time to think about borders. Borders are problematic when doing layouts because they add to the overall space taken up by the row of columns – so if you spend time making sure whichever measuring system you are using (percentage or pixels for example) takes up all the available space, adding a border will add further pixels to your layout causing the last column to start on a new row beneath the other two (Assuming we are working with three columns as in these exercises). Not a good outcome.
We have two options: 1. Build in some ‘give’ to our measurements so that the borders are accommodated. 2. Created a set of divs inside the original ones that exist purely to handle borders.
This means that the borders will take up space within the predefined column – not adding to the overall measurements. The second option is the easiest to manage in terms of laying out your page but it does clutter the html with another set of divs – and of course another set of CSS rules for them. I think it is preferable though overall.
Exercise 2: Add borders and a new row
Add border div tags to the html Style the borders in the CSS
Enter new content Use a browser (Firefox) to view your page
Task 1 Step 1
Open layout.html in Add the following div tags within the current ones: BlueFish <div class="border"> ... </div> the
finished code will look like:
<div class="left"><div class="border"><p>one</p></div></div>
<div class="middle"><div class="border"><p>two</p></div></div>
<div class="right"><div class="border"><p>three</p></div></div>

Task 2
In Styles.css enter some rules for the borders in a new class
Step 1
Under the existing rules enter:
.border {
border: thin;
border-style: solid; border-
color: black; }
Task 3
Let’s tidy up the paragraph text with some css
Step 1
Under the existing rules enter:
p {
font-family: arial;
margin: 3%;
}
Task 4
Now let’s add some more text to
simulate a more realistic web content
Step 1
In the H drive open CSS Text.docx
Copy para 1 into the first <p> tag where ‘one’ currently is. Note the text to copy has the <p> tags too so you can replace the existing ones in your code
Copy para 2 into the other <p> tags
You will have columns with differing amounts of content.
Task 5
View your webpage!
In the program interface, click on the browser view to open up Firefox and view your webpage.
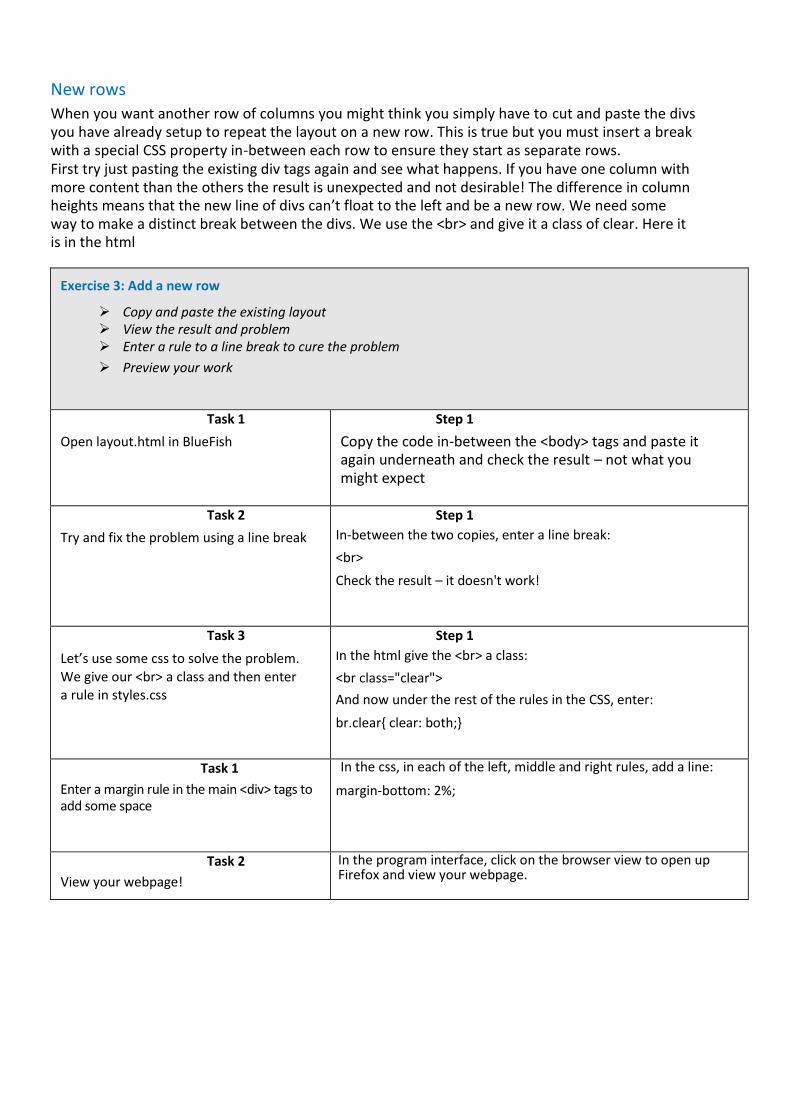
New rows
When you want another row of columns you might think you simply have to cut and paste the divs you have already setup to repeat the layout on a new row. This is true but you must insert a break with a special CSS property in-between each row to ensure they start as separate rows. First try just pasting the existing div tags again and see what happens. If you have one column with more content than the others the result is unexpected and not desirable! The difference in column heights means that the new line of divs can’t float to the left and be a new row. We need some way to make a distinct break between the divs. We use the <br> and give it a class of clear. Here it is in the html
Exercise 3: Add a new row
Copy and paste the existing layout View the result and problem Enter a rule to a line break to cure the problem
Preview your work
Task 1
Open layout.html in BlueFish
Step 1
Copy the code in-between the <body> tags and paste it again underneath and check the result – not what you might expect
Task 2
Try and fix the problem using a line break
Step 1
In-between the two copies, enter a line break:
<br>
Check the result – it doesn't work!
Task 3
Let’s use some css to solve the problem. We give our <br> a class and then enter a rule in styles.css
Step 1
In the html give the <br> a class:
<br class="clear">
And now under the rest of the rules in the CSS, enter:
br.clear{ clear: both;}
Task 1
Enter a margin rule in the main <div> tags to add some space
In the css, in each of the left, middle and right rules, add a line:
margin-bottom: 2%;
Task 2
View your webpage!
In the program interface, click on the browser view to open up Firefox and view your webpage.

Exercise 4: Create a row of images
Create the div tags for your images Insert images into the divs Create rules to manage the divs and images in CSS
Task 1
Create 4 div tags with border divs inside
Step 1
Enter the following tags under the last paragraph of main text:
<div><div></div></div>
<div><div></div></div>
<div><div></div></div>
<div><div></div></div>
Task 2
Create a class for outer divs and border class for inner divs
Step 1
Your code will look like this when finished:
<div class="pic1"><div class="picborder”></div></div>
<div class="pic2"><div class="picborder"></div></div>
<div class="pic3"><div class="picborder"></div></div>
<div class="pic4"><div class="picborder"></div></div>
Task 3
Insert 4 pics into divs
Step 1
Insert four images into the inner div tags by entering: <img
src="images/pic1.jpg" alt="test" id="pic1">
Change pic1.jpg to pic2.jpg – pic4.jpg in each inner div tag so you map to the four different images in your images folder.
Your code will look like this:
<div class="pic1"><div class="picborder"><img src="images/pic1.jpg" alt="test" id="pic1"></div></div>
<div class="pic2"><div class="picborder"><img src="images/pic2.jpg" alt="test" id="pic2"></div></div>
<div class="pic3"><div class="picborder"><img src="images/pic3.jpg" alt="test" id="pic3"></div></div>
<div class="pic4"><div class="picborder"><img src="images/pic4.jpg" alt="test" id="pic4"></div></div>

Step 1
In styles.css enter the following code at the bottom to style the width of the outer divs – the first three are identical so copy and paste and just change the class name:
div.pic1 {
width:
20%; float:
left;
margin-right: 6%;
}
div.pic2 {
width:
20%; float:
left;
margin-right: 6%
}
div.pic3 {
width:
20%; float:
left;
margin-right: 6%
}
div.pic4 {
width:
20%; float:
right;
}
Task 4
Preview your work – what a mess! We need some CSS to help us sort this out.
Open styles.css and give rules for outer div classes – float and percentages
Give our image id’s a width

Add the following code for the image ID elements
#pic1 {
width: 100%;
}
#pic2 {
width: 100%;
}
#pic3 {
width: 100%;
}
#pic4 {
width: 100%;
}
Task 5 In index.html, add the following code under the divs we created for the images to end that section just above the
Add a br.clear tag to end <hr> tag: this section so further content starts reliably below
<br class="clear">
Preview work
Check out the page – getting better!
Task 6
Give rules for border class
Back in the CSS add the following code to style our border divs:
Pics don’t fit div.picborder { border-color:
red; border-style: solid;
border-width: thin;
border-radius: 15%;
}
check results – not quite there!

Task 7
Give pic ids a border radius
Finish by giving the image id’s a border radius to match and a minus margin-bottom setting to take care of the white space – your image id rules will look like this when finished:
#pic1 {
width: 100%;
margin-bottom: -3%; border-
radius: 15%
}
#pic2 {
width: 100%;
margin-bottom: -3%; border-
radius: 15%
}
#pic3 {
width: 100%;
margin-bottom: -3%; border-
radius: 15%
}
#pic4 {
width: 100%;
margin-bottom: -3%; border-
radius: 15%
}
Task 8
Preview your work
Should be looking good!

Exercise 5: Create a two column layout for the main text
Create two columns for main text area Float and space the columns Add a back ground gradient effect for the second column
Task 1
Add div tags around the main text and
underneath
Give this divs the classes teaching and research
Add some content
Step 1
Add <div> tags before and after the <p> tags that wrap the main text.
Add
<div></div> underneath the main text
Copy the <p> tags and their content and paste it into the empty div tags you have just created. Check this in preview to make sure you have two lots of text in the browser.
Task 2
Ad br clear after image and after research div close tag
Step 1
Add:
<br class=”clear”>
after the image StevePicForITLP.jpg
and also after the <div class=”research”> closing tag (</div>).
Task 3
Create some CSS for the div tags
Step 1
In styles.css, add the following code to style the new div tags:
div.teaching
{
width: 55%;
float: left;
margin-right: 5%;
}
div.research
{
width: 40%;
float: right;
}
Check your work – you should have two columns

Task 4
Let’s add a background gradient to the research div
Add a border radius
Step 1 Go to http://www.css3factory.com/linear-gradients/ And using the tool create a gradient using two colours of your choice
Copy the code and paste it into the bottom of your div.research CSS rule.
Add this code to the class to give a small radius border:
border-radius: 5%;
Task 5
Preview your work
Should be looking good!

Exercise 6: Create an text shadow effect for the H1 tag
Edit the H1 style to include a text shadow effect that mimics engraving
Experiment with different CSS styling Save and preview the index.html
Add a rule to the H1 CSS
Step 1
Open the Styles.css file.
Use the Save As to create a new file that matches a link from the navigation menu
Step 1
Enter the line of code as shown below in the H1 CSS
entry:
Text-shadow: 0px 1px 1px #D2FFFF;
Step 2
Save the file and preview the index.html file in Firefox to see the effect.
Exercise 7: Further ideas
Go to publications.html and create a few more entries (or copy and paste existing ones!). Create <div> tags around each section with a class and make a gradient as a background.
In biography.html create a multi column layout for the main section and pull some text from your department/college website to fill another column with supporting information for your biog.
In the layout exercise experiment with different border styles and positioning using padding and margins.