csas new equipment training 2013. csas canon eos 5d mark iii pelican 1650 case canon 50 mm f/2.5 ef...
TRANSCRIPT

CSAS New Equipment Training2013
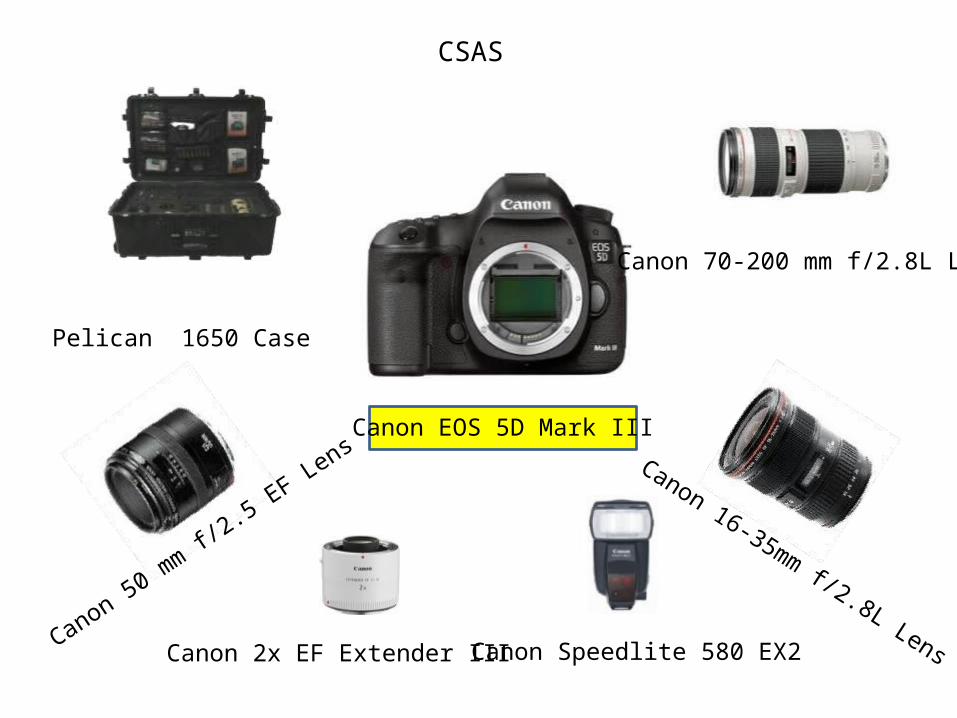
CSAS
Canon EOS 5D Mark III
Pelican 1650 Case
Canon 50 mm f/2.5 EF Lens
Canon 2x EF Extender III
Canon 16-35mm f/2.8L Lens
Canon 70-200 mm f/2.8L Lens
Canon Speedlite 580 EX2

Upgrades in the Mark III More focus points (61 AF) to set focus accurately within the frame 41 cross-type focus points to help grab focus in difficult situations Approximately 10% larger screen Higher resolution screen Lower noise at high ISO. In-camera HDR that combines multiple exposures. Maximum light sensitivity is 2 f-stops better. Better boost ISO 102,400 ISO (2 f-stops better) 40% less shutter lag when taking photos! Shoots 6 fps for more than 50% faster continuous shooting. View finder coverage has been increased to 100% Two storage slots CF and SD switch automatically when one is full. 22.1 MP resolution to capture around 10% more detail. 950 shots of battery life an increase of about 10%.
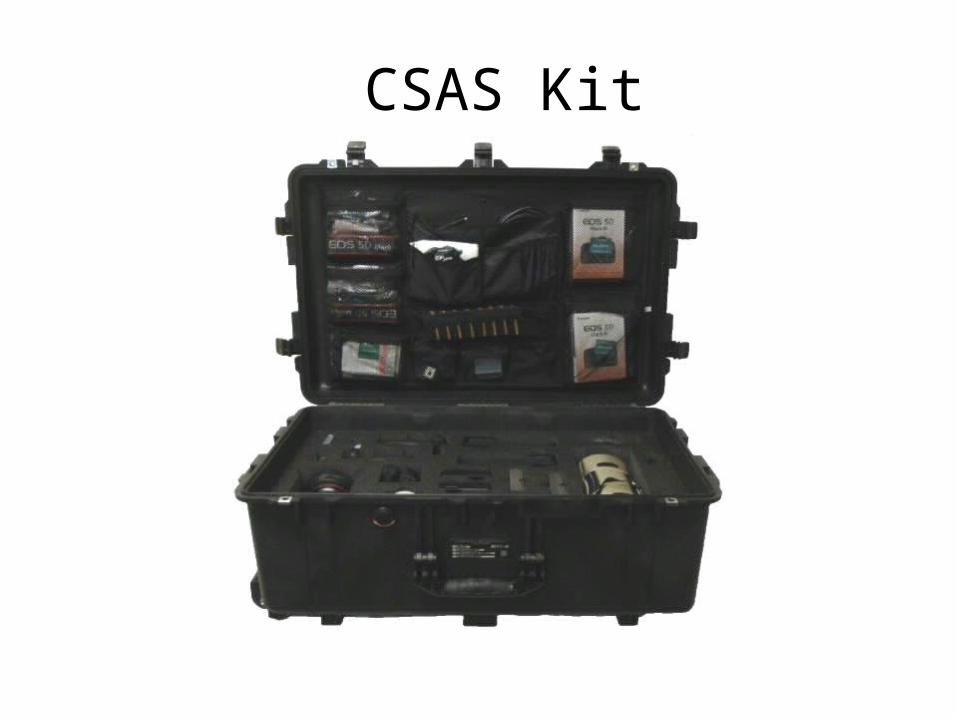
CSAS Kit Layout
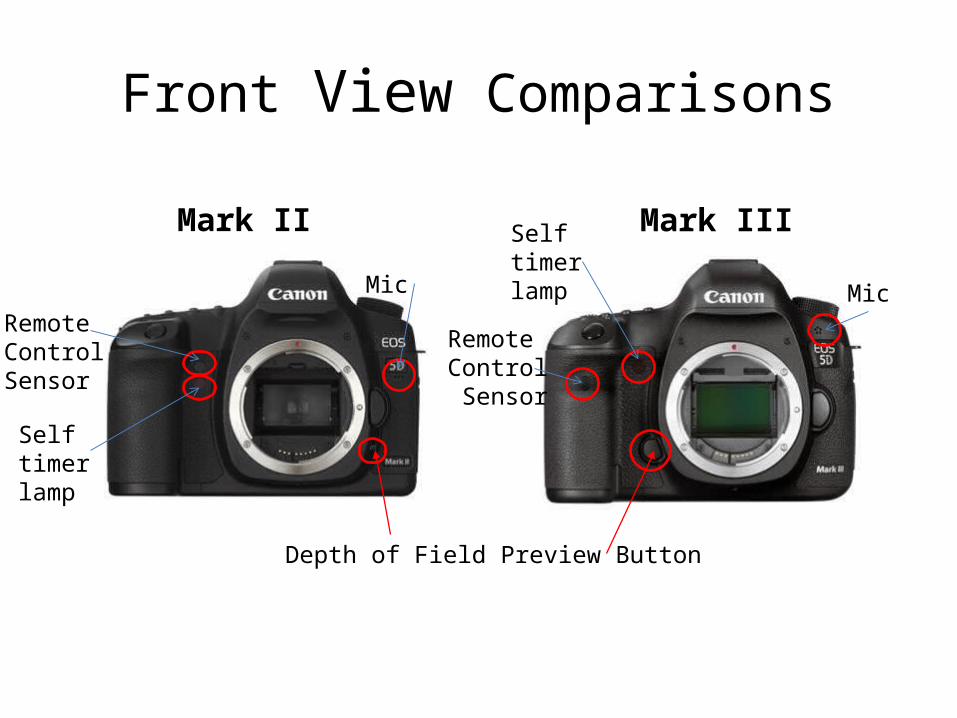
Front View Comparisons
Mark II Mark III
Selftimerlamp
Depth of Field Preview Button
RemoteControlSensor
Selftimerlamp
Remote Control Sensor
MicMic

Canon EOS 5D Mark III Front View
Shutter Button
Self-Timer Lamp
Remote Control Sensor
Depth-of-Field Preview Button
Contacts
Mirror
Microphone
Lens Release
Lens Lock Pin
Lens Mount
Lens Mount Index
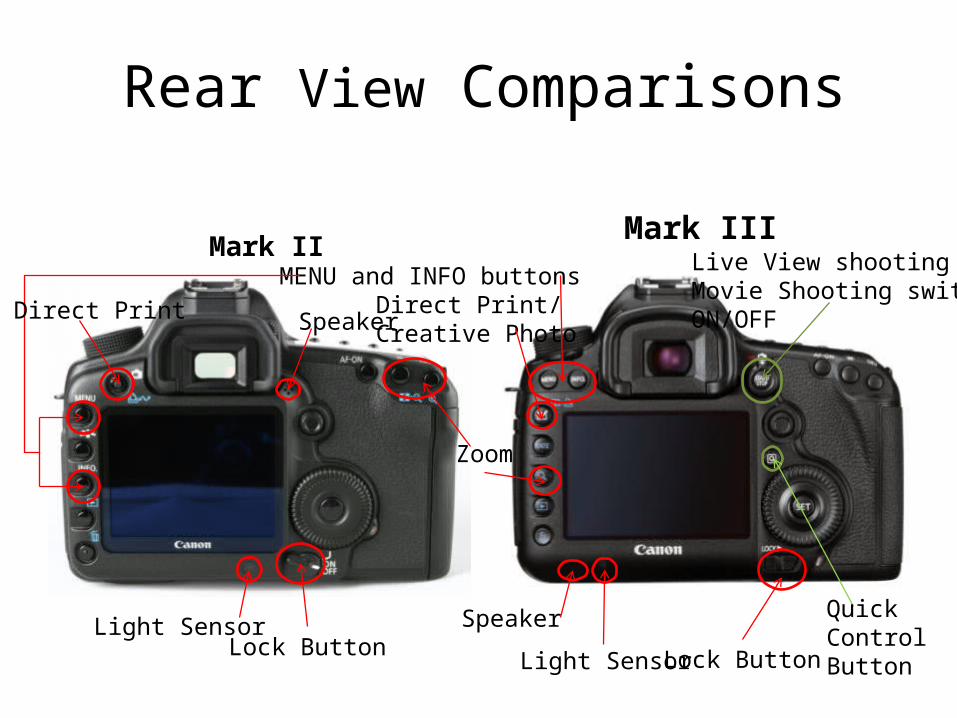
Rear View Comparisons
Mark IIMark III
MENU and INFO buttons
Light Sensor
Zoom
Lock ButtonLock Button Light Sensor
Speaker
Speaker
Direct Print Direct Print/Creative Photo
Live View shootingMovie Shooting switchON/OFF
Quick Control Button
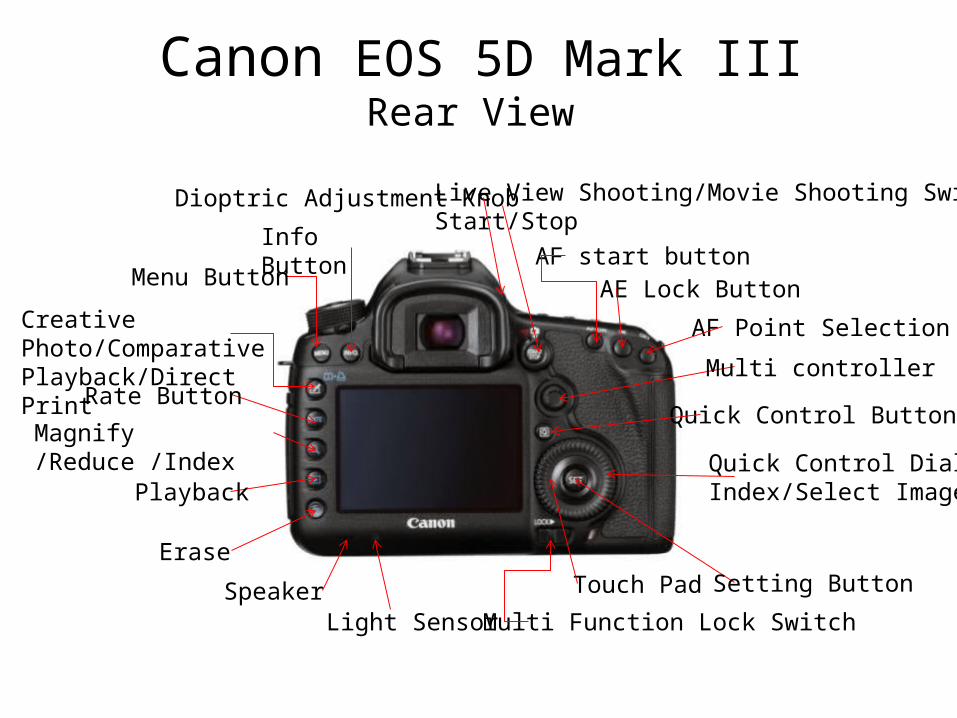
Canon EOS 5D Mark IIIRear View
Magnify /Reduce /Index
Playback
Erase
Quick Control DialIndex/Select Image
Multi controller
Setting Button
Info Button
Menu Button
Rate Button
Creative Photo/Comparative Playback/Direct Print
Multi Function Lock Switch
Live View Shooting/Movie Shooting SwitchStart/Stop
AF start button
Quick Control Button
AE Lock Button
AF Point Selection
SpeakerLight Sensor
Touch Pad
Dioptric Adjustment Knob

Top View Comparison's
Mark II Mark III
Notice On/Off switch has been moved to the top
M-FnAF Button
Scene IntelligentAutoFull Auto
Creative Auto
ON/OFF Switch

Canon EOS 5D Mark IIITop View
Mode Dial
Mode Dial Lock Release Button
Hot Shoe
Flash-sync ContactsShutter Button
<M-Fn> AF Button < -WB> White Balance
<AF-Drive>
Main Dial
ISO Speed Setting
LCD Panel Illumination Button
LCD Display

Canon EOS 5D Mark III LCD Panel

Canon EOS 5D Mark IIILCD Panel

Review of Mode Dial

Canon EOS 5D Mark III Side Views
Input/outputBattery Compartment
Card Slots

Exercises Using the Operators Manual, review the following:
1. Insert/Remove the battery2. Install/Remove the CF cards3. Review the Mode Dial, Main Dial and Quick Control Dial4. Power on the camera and review the LCD panel icons such as
the CF/SD card indicator, the low battery indicator, etc.5. Set the time, date and zone 6. NOTE: To save power the camera automatically powers off
after 1 min of non-operation. To turn it back on, just press the shutter button half way down. Follow the directions below to reset/disable this option. See page 55 in manual to set the desired power off time.

Exercises Format a card following these directions

Grid Lines and Electronic Level
Grid Lines and Auto Focus Points Electronic Level
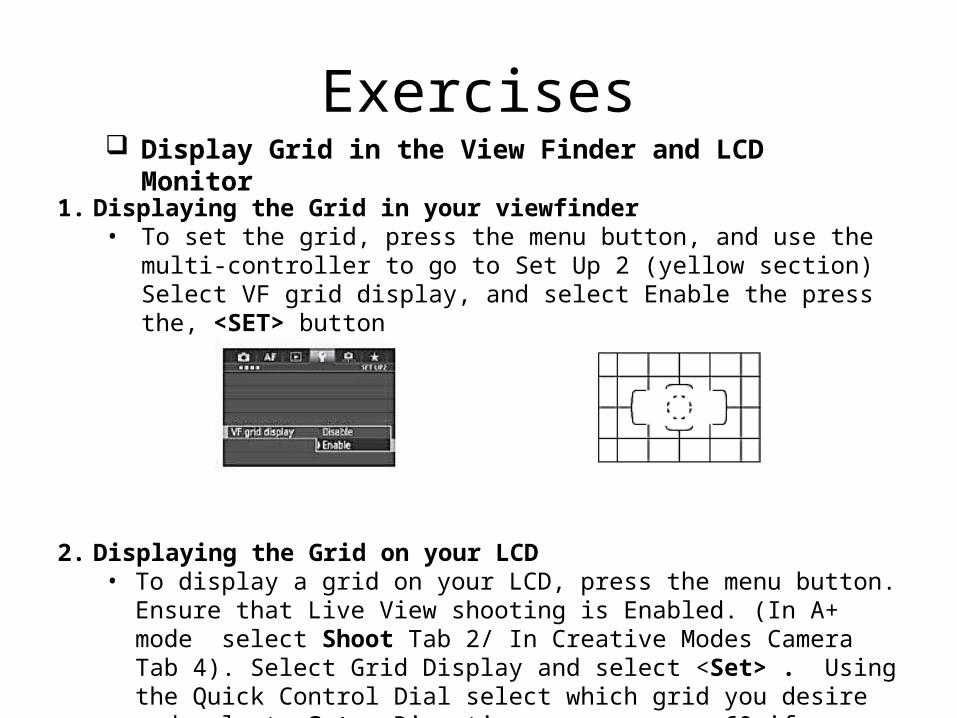
1. Displaying the Grid in your viewfinder• To set the grid, press the menu button, and use the multi-controller to go to
Set Up 2 (yellow section) Select VF grid display, and select Enable the press the, <SET> button
2. Displaying the Grid on your LCD• To display a grid on your LCD, press the menu button. Ensure that Live View
shooting is Enabled. (In A+ mode select Shoot Tab 2/ In Creative Modes Camera Tab 4). Select Grid Display and select <Set> . Using the Quick Control Dial select which grid you desire and select <Set>. Directions are on page 60 if you want the grid in Playback mode under Playback 3 (Blue Section)
Exercises Display Grid in the View Finder and LCD Monitor

Exercises Display Electronic Level in the View Finder
• Set the power switch to <ON>.• Press the <MENU.> button to display the menu screen.• Press the <Q> button to select the tab , then turn
the <Main Dial> to select • Turn the Quick Control dial> to [Custom Controls], then
press the <Set> button.• When the Custom Control Screen appears, select either
the Depth of Field Preview Button or the Multi-Function (M-FN) button and press the <SET> button (This example uses the DOF button)
• Select the (VF electronic level), then press <SET>• When the Custom Control Screen returns, confirm the
setting has been changed, and press the <MENU> button to return to the menu.
Press the shutter button halfway and the camera will be ready.Custom Controls can also be selected from the Quick Control Screen.

Exercises
• Set the power switch to <ON>.• . Press the <INFO.> button.
Each time you press the <INFO.> button, the screen display will change. Display the electronic levelNote: If the electronic level does not appear, set [ INFO. button display options] under [ ] tab so that the electronic level can be displayedThe Horizontal and Vertical tilt are displayed in 1° incrementsWhen the red light turns green, that indicates the tilt is correct
Display Electronic Level in the LCD Monitor
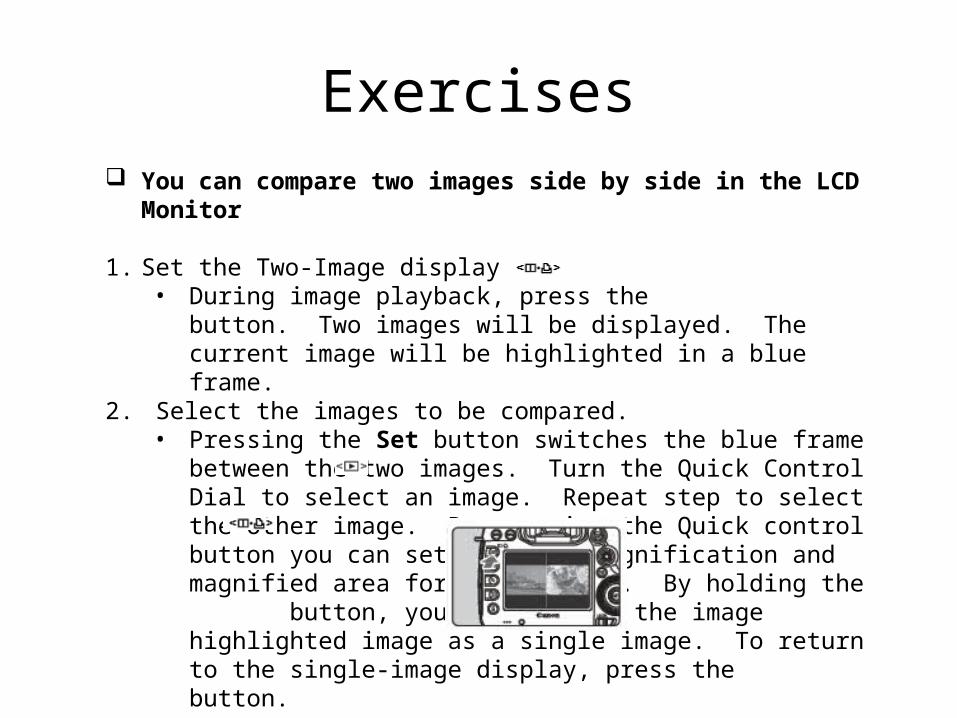
Exercises You can compare two images side by side in the LCD Monitor
1. Set the Two-Image display• During image playback, press the button. Two images will be
displayed. The current image will be highlighted in a blue frame.2. Select the images to be compared.
• Pressing the Set button switches the blue frame between the two images. Turn the Quick Control Dial to select an image. Repeat step to select the other image. By pressing the Quick control button you can set the same magnification and magnified area for both images. By holding the button, you can display the image highlighted image as a single image. To return to the single-image display, press the button.

Understanding AF Mode Setting the AF Mode: The 61 AF points in the viewfinder make AF
shooting suitable for a wide variety of subjects and scenes. You can also select the AF mode and drive mode that best match the shooting conditions and subjects in Creative Mode. (The Lens must be set to AF) To select the AF mode press the <AF· Drive> button giving you 6
seconds to choose which setting you want. Using the Main Dial select One-Shot: for Still subjects, AI Servo: for Moving Subjects, or AI Focus: if the after focusing the subject starts moving.
Selecting the AF Area: Depending on the lens attached you can select the suitable AF point suitable for the scene or subject. To select the AF area Selection Mode, press the < > button.
Look through the View Finder and press the <M-Fn> button to select one of the 6 AF Area Modes.
Understanding Drive Mode
Selecting the Drive Mode: Single and Continuous Drive Modes are available.
Press the <AF · Drive> button and while looking at the LCD Panel turn the Quick Control Dial to select the mode. Single Shooting: for one short shot taken, H or High Speed Continuous shooting: 6 shots/sec., Low Speed Continuous shooting: 3 shots/sec., Silent Single Shooting: Quieter single shooting, Silent Continuous Shooting: for Quiet shooting at 3 shots/sec, 2 or 10 sec Self –timer settings: Uses the self timer or remote control.

Understanding Image Settings Setting the Image-Recording Quality: You can select the pixel and image
quality . There are 8 JPEG image recording quality settings and 3 RAW image quality settings.
To set the Quality, press the Menu button, scroll to the Shoot 1 tab and select Image Quality and press <SET>. Select which quality you want by using the Main Dial for RAW settings or the Quick Control Dial for the JPEG settings.
This tab is also where the Image Review time an other shooting options are set.
Setting the ISO Speed: To set the ISO, press the <ISO· > button and while looking at the
LCD panel or View Finder, use the Main Dial to select the ISO. Ranges can also be set for ISO by pressing the Menu button and
selecting the SHOOT 2 tab. Press <SET> and using the Quick Control Dial, select the ISO Speed Range, press <SET> and enter the Min./Max . ISO Speeds.

Understanding Image Settings
When both and SD and CF cards are inserted you can select recording method and select which card to use for recording and playing back images. Recording Methods are set in the Setup 1 tab and using the Quick Control Dial choose one of the following recording methods:
Standard: Uses the selected card, Auto Switch Card: same as standard but if the chosen card becomes
full it will automatically switch to the other card, Rec. Separately: You can set the image quality on each card. Each
image is recorded on both cards and you manage the quality from L to S3 (JPEG) + RAW, MRAW, or SRAW.
Rec. to Multiple: each image is recorded to both the CF and SD card at the same size either RAW or JPEG.
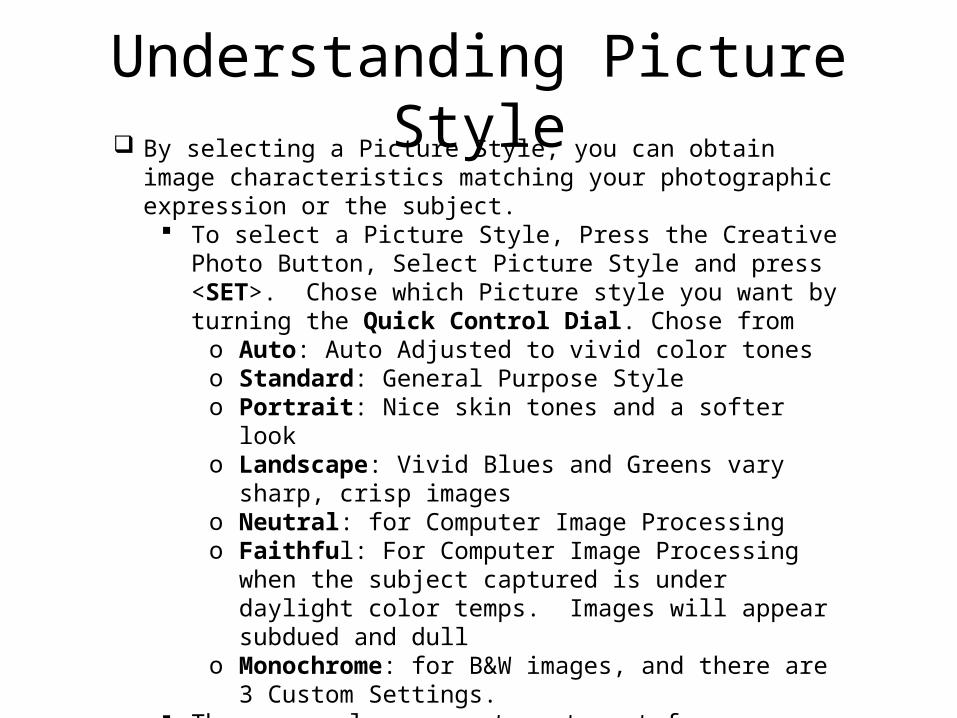
Understanding Picture Style By selecting a Picture Style, you can obtain image characteristics
matching your photographic expression or the subject. To select a Picture Style, Press the Creative Photo Button, Select
Picture Style and press <SET>. Chose which Picture style you want by turning the Quick Control Dial. Chose from o Auto: Auto Adjusted to vivid color tones o Standard: General Purpose Styleo Portrait: Nice skin tones and a softer looko Landscape: Vivid Blues and Greens vary sharp, crisp imageso Neutral: for Computer Image Processingo Faithful: For Computer Image Processing when the subject
captured is under daylight color temps. Images will appear subdued and dull
o Monochrome: for B&W images, and there are 3 Custom Settings.
There are also parameters to set for Sharpness, Contrast, Saturation, Color Tone, and in addition, there is Filter Effect, and Toning Effect available for Monochrome Settings.

Understanding White Balance As We all know White Balance is used to make white areas look white.
Normally the AWB will obtain the correct balance but, as earlier discussed, occasionally the white balance may need to be adjusted. On the Mark III the white balance can be set to match the light source or manually set by shooting a white object. By pressing the <WB> button and looking at the LCD panel, you can
use the Quick Control Dial to select the Lighting Mode. The WB can also be set using the Menu button and the SHOOT 2 tab.
For custom WB, select a white object and focus manually take a photo. Press the Menu button and select the SHOOT 2 tab. Select Custom White Balance and press <Set>. Select the WB Photo by using the Quick Control Dial then press <SET>. On the dialog screen select OK and the data will be imported. To use the custom WB, press the WB button, look at the LCD panel and turn the Quick Control Dial to the Custom WB icon and select.
Under the Menu, SHOOT 2 tab, select K using the Quick Control Dial and turn the Main Dial to select the desired color temp can be set ranging form 2500K to 10000K in 100K increments
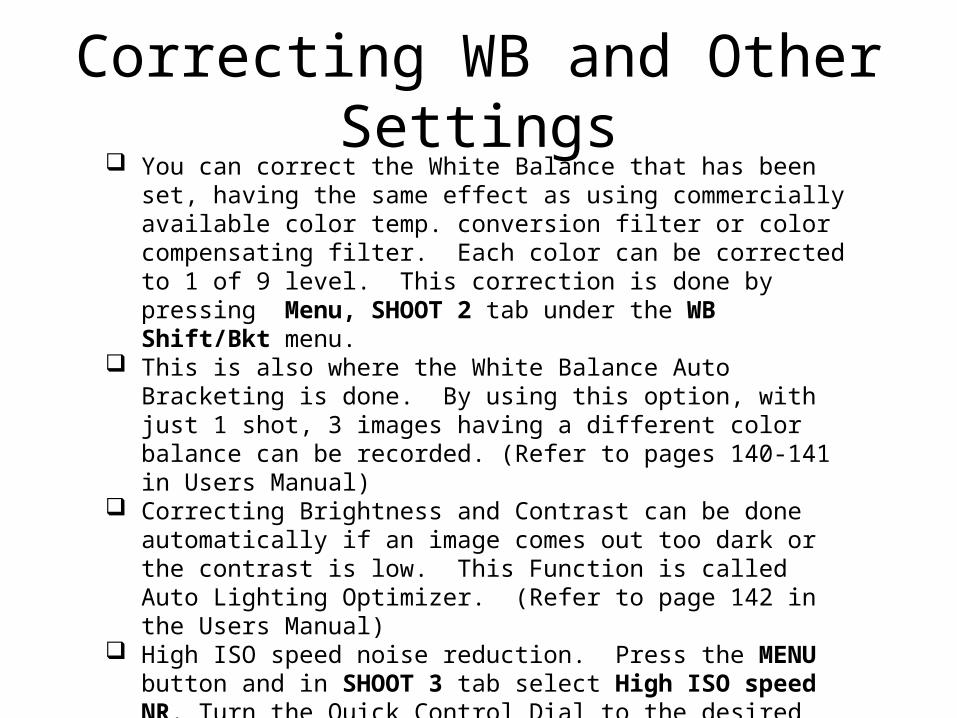
Correcting WB and Other Settings You can correct the White Balance that has been set, having the same
effect as using commercially available color temp. conversion filter or color compensating filter. Each color can be corrected to 1 of 9 level. This correction is done by pressing Menu, SHOOT 2 tab under the WB Shift/Bkt menu.
This is also where the White Balance Auto Bracketing is done. By using this option, with just 1 shot, 3 images having a different color balance can be recorded. (Refer to pages 140-141 in Users Manual)
Correcting Brightness and Contrast can be done automatically if an image comes out too dark or the contrast is low. This Function is called Auto Lighting Optimizer. (Refer to page 142 in the Users Manual)
High ISO speed noise reduction. Press the MENU button and in SHOOT 3 tab select High ISO speed NR. Turn the Quick Control Dial to the desired noise reduction setting and press <SET>. This will apply the reduction to the image. Long Exposure NR and High Tone Priority for over exposed areas follows the same procedure.

Flash Photography With and EX-series Speedlite having compatible flash function settings,
you can use the camera’s Menu screen to set the flash functions. Attach the flash and turn on the Speedlite. Press Menu and under
the SHOOT 1 tab select External Speedlite Control then press <SET>. Select the desired option and press <SET> again. o Flash Firing: to enable flash photography set ENABLE, for AF-
assist beam set DISABLE,o E-TTL II meter.: for normal flash set the Evaluate, if AVERAGE
is set, the flash exposure will be averaged for the entire metered scene
o Flash Sync speed in Av Mode: sets the flash sync speed for flash photography in the Aperture Priority Mode
o Flash Function Setting/Flash Function Custom Settings: Refer to Speedlite Instruction Manual. This tab is also where custom flash settings would be cleared.
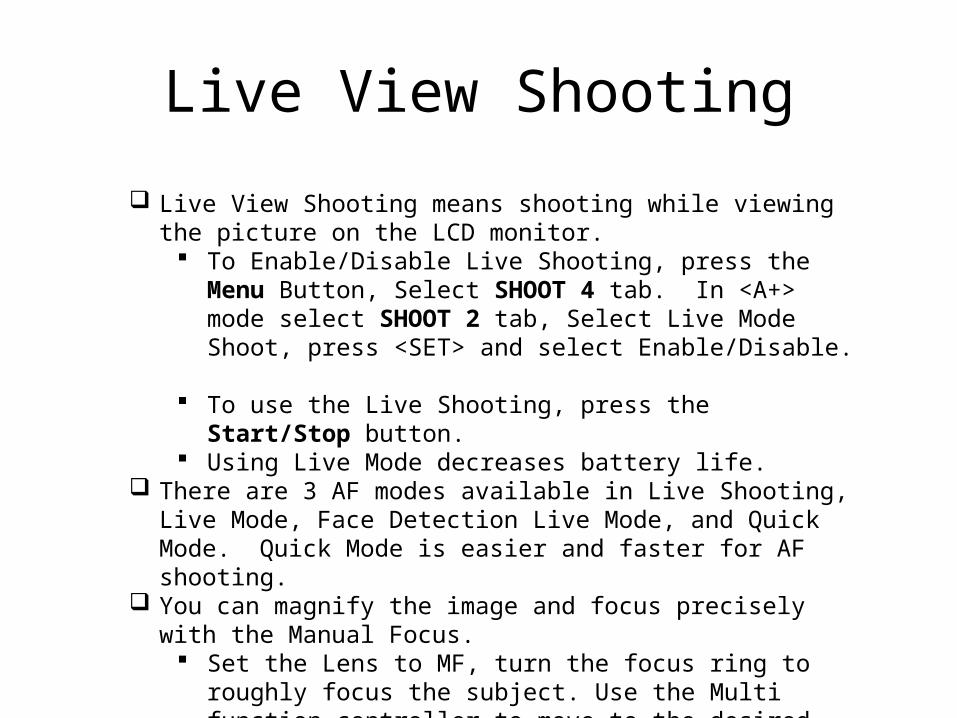
Live View Shooting
Live View Shooting means shooting while viewing the picture on the LCD monitor.
To Enable/Disable Live Shooting, press the Menu Button, Select SHOOT 4 tab. In <A+> mode select SHOOT 2 tab, Select Live Mode Shoot, press <SET> and select Enable/Disable.
To use the Live Shooting, press the Start/Stop button. Using Live Mode decreases battery life.
There are 3 AF modes available in Live Shooting, Live Mode, Face Detection Live Mode, and Quick Mode. Quick Mode is easier and faster for AF shooting.
You can magnify the image and focus precisely with the Manual Focus. Set the Lens to MF, turn the focus ring to roughly focus the subject.
Use the Multi function controller to move to the desired magnification area. Press the Zoom button to magnify to the desired magnification. Focus manually. Press the Zoom button again to return to normal view and take the picture.

Shooting Video
Movie shooting is enabled by setting the Live View shooting/Movie Shooting switch to < >. The movie recording format will be MOV.
When shooting movies, use a large capacity card with a fast writing/reading speed. Minimum Requirements are listed on page 217 of the Users Manual.
Four Shooting modes available for Video Shooting: Autoexposure Shooting, (<A+>, <P>, <B>), Shutter-Priority AE (<Tv>), Aperture-Priority AE (<Av>), Manual Exposure Shooting (<M>)
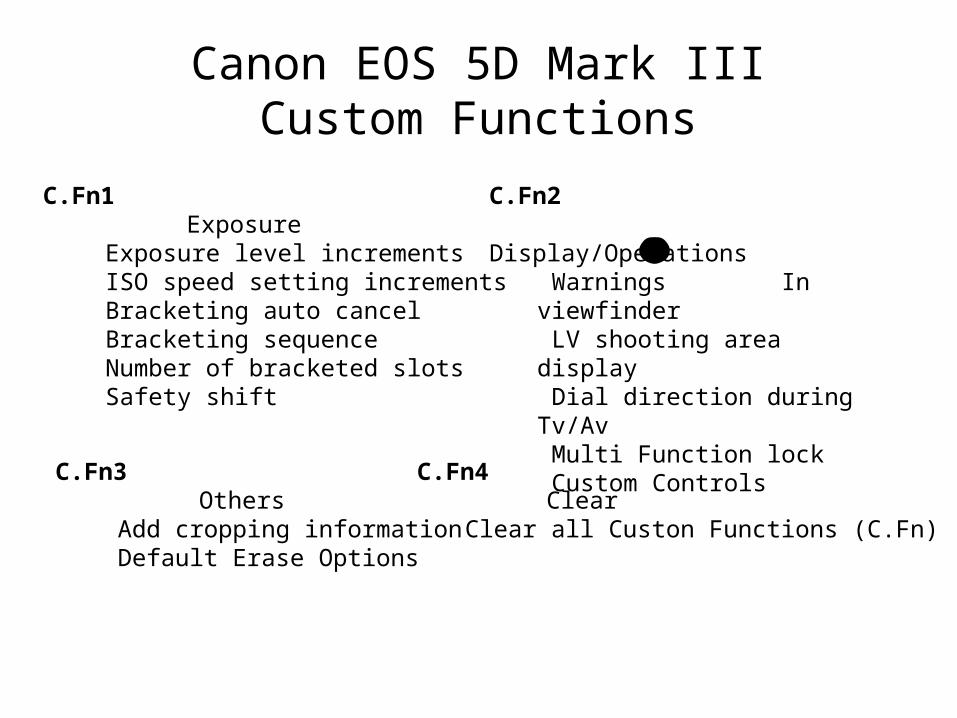
C.Fn2 Display/Operations
Warnings ! In viewfinder LV shooting area display Dial direction during Tv/Av Multi Function lock Custom Controls
Canon EOS 5D Mark IIICustom Functions
C.Fn1 Exposure
Exposure level increments ISO speed setting increments Bracketing auto cancel Bracketing sequence Number of bracketed slots Safety shift
C.Fn3 Others
Add cropping information Default Erase Options
C.Fn4 Clear
Clear all Custon Functions (C.Fn)

Image Transfer
DUE TO DOD INFORMATION ASSURANCE REGUALTIONS, THE CAMERA SHALL NOT BE CONNNECTED TO THE VIIES. IMAGERY SHOULD ONLY BE TRANSFERRED VIA CF/SD CARD FROM THE CAMERA BY INSERTING IT INTO THE INTERNAL CARD READER OF THE VIIES.

Safety Warnings - General• Continuous shooting, Live View shooting, or movie shooting for a prolonged
period may cause the camera to become hot. Although this is not a malfunction, holding the hot camera for prolonged periods may cause slight skin burns.
• Do not leave in excessive heat. The equipment may become hot and cause skin burns.
• Do not fire flash near a person’s eyes or at someone driving a car.• Do not use equipment where there is flammable gas. This is to prevent an
explosion or fire.• Do not look at the sun or an extremely bright source through the camera or
lens.• Do not use paint thinner, benzene, or other organic solvents to clean the
equipment. Doing so may cause fire or a health hazard.• Do not disassemble or modify the equipment or if internal parts become
exposed, do not touch the internal parts due to possibility of electric shock.• If water or metal fragments enter inside the camera, promptly remove the
battery pack and back-up battery to prevent fire and electrical shock.

Safety Warnings - Batteries• To prevent fire, excessive heat, chemical leakage, and explosions, follow the
safeguards below:• Do not use any batteries, power sources, and accessories not specified in the instruction
manual• Do not short-circuit, disassemble, or modify the battery pack or back-up battery• Do not expose the battery pack or back-up battery to fire or water• Do not install the battery pack or back-up battery in reversed polarity• Do not recharge the battery pack outside the allowable ambient temperature range of
0⁰C - 40⁰C (32 ⁰F - 104 ⁰F)• Do not insert any foreign metallic objects into the electrical contacts of the camera,
accessories, connecting cables, etc.• Before storing the camera or accessory when not in use, remove the battery pack and
disconnect the power plug• If battery pack or back-up battery leaks, changes color or deforms, or emits
smoke or fumes, remove it immediately. Be careful not to get burned in the process. Prevent any battery leakage from contacting your eyes, skin, and clothing.
• If excessive heat, smoke, or fume are emitted during battery pack recharging, immediately unplug the battery charger to stop recharging and prevent fire

Handling & Care - Camera• Do not drop or subject the camera to physical shock.• Camera is not waterproof. If camera is dropped in water, wipe off droplets
with a dry cloth then contact your FSR as soon as possible. If camera is exposed to salty air, wipe with a slightly damp cloth.
• Never leave the camera near a strong magnetic field or emitted radio waves.
• Do not leave in excessive heat.• Do not block the mirror operations with your finger or other item.• Use a blower to blow away dust on lens, mirror, viewfinder, and focusing
screen. Do not use cleaners containing organic solvents to clean the body or lens.
• Do not touch the electrical contacts with finger to prevent corrosion.

Handling & Care - Camera• When bringing the camera in from cold temp to a warm room, first place
the camera in a sealed plastic bag and let it adjust to the room temps, this will prevent condensation.
• If condensation occurs, do not use the camera. Remove the lens, card and battery from the camera until the condensation has evaporated.
• If the camera will not be used for an extended period, remove the battery and store camera in a cool, dry, well-ventilated location. While in storage, press the shutter button occasionally to verify the camera still works.
• Avoid storing the camera where corrosive materials are located.• If the camera has been stored for a long period of time, test all functions
prior to use. See FSR to obtain Operation Checklist and Preventative Maintenance Checklist.
Handling & CareLCD Panel and LCD Monitor• The LCD monitor is over 99.99% effective pixels, so there may be a few dead pixels in the
remaining 0.01% or less. Dead pixels displaying only black, red or etc., are not a malfunction. They do not affect the imagery recorded.
• If the LCD is left on for an extended period of time, screen burn-in may occur where you see only remnants of what was displayed. However, this is only temporary and will disappear if the camera is left unused for a few days.
• In low or high temps, the LCD monitor display may seem slow or look black; it will return to normal at room temperature.
Cards• To protect the cards, do not drop, bend, or wet the card. Do not subject it to excessive force,
physical shock, or vibration. Store card in hard case when not in use.• Do not touch the card’s electronic contacts with your finger or anything metal.• Do not store or use the card near anything having a strong magnetic field such as televisions,
video monitors, speakers, or magnets. If at all possible avoid places prone to static electricity.
• Do not store the card in hot, dusty, or humid locations.Lenses• After detaching the lens from the camera, attach the lens caps and put down the lens with
the rear end up to avoid scratching the lens surface and electrical contacts.

Battery Charger and Tips1. Remove the protective cover provided with the battery.2. Attach the battery to the charger.3. Insert charger into the power outlet.4. Recharging starts automatically and the lamp blinks orange.5. The indicator light will turn green when fully charged.6. After disconnecting the chargers power plug, do not touch the prongs
for 3 sec.7. After charging (if storing the battery) you can attach the battery cover
so the battery shaped hole is aligned over the blue sticker on the battery to show it’s charged. Do not leave the battery in the camera for prolonged periods; a small amount of power current is released resulting in shorter battery life. Store the battery in the protective cover.
8. It the battery becomes exhausted quickly, the battery may have reached the end of its service life.
*It takes approximately 2.5 hours to fully charge an exhausted battery at 73 degrees. It may take longer at lower temps, up to 4 hours.
References
Manuals:http://www.usa.canon.com/cusa/support/professional/professional_cameras/eos_digital_slr_cameras/eos_5d_mark_iii#BrochuresAndManuals
Updates:http://www.usa.canon.com/cusa/support/professional/professional_cameras/eos_digital_slr_cameras/eos_5d_mark_iii#DriversAndSoftware
Checklists (See FSR):OperationsPreventative Maintenance

References
Websites:http://reviews.photographyreview.com/canon-eos-5d-mark-iii-better-af-image-quality-video
http://www.slrphotographyguide.com/camera/depthfield-preview-button.shtml
http://www.photoreview.com.au/reviews/dslr-cameras/pro/first-look-canon-eos-5d-mark-iii
http://www.dpreview.com/reviews/canon-eos-5d-mark-iii/5
http://reviews.cnet.com/digital-cameras/canon-eos-5d-mark/4505-6501_7-35159623.html
http://www.youtube.com/watch?v=oedE9-7ayqc
http://www.youtube.com/watch?v=k2G90Cramxk
http://www.learn.usa.canon.com/galleries/galleries/tutorials/eos101_cll.shtml#